

Page 1
Updated for Gpredict 1.2
by Alexandru Csete OZ9AEC
Gpredict User Manual
Page 2

Copyright © 2001-2009 Alexandru Csete and Contributors. All rights reserved.
This document is free; you can redistribute it and/or modify it under the terms of the
GNU General Public License as published by the Free Software Foundation; either
version 2 of the License, or (at your option) any later version.
This document is distributed in the hope that it will be useful, but WITHOUT ANY
WARRANTY; without even the implied warranty of MERCHANTABILITY or FITNESS
FOR A PARTICULAR PURPOSE. See the GNU General Public License for more
details.
You should have received a copy of the GNU General Public License along with this
document; if not, write to the Free Software Foundation, Inc., 675 Mass Ave,
Cambridge, MA 02139, USA.
Revision History
Date Issue Notes
12 Oct 2010 1.2 Updated for Gpredict 1.2
5 Oct 2009 1.1 Updated for Gpredict 1.1
24 May 2009 1.0 First official issue released with Gpredict 1.0
Page 3

Table of Contents
1 Introduction.....................................................................................................7
1.1 What is Gpredict?.............................................................................................................7
1.2 Features of Gpredict......................................................................................................... 8
1.3 About this Document........................................................................................................ 8
1.4 Your Feedback is Appreciated.......................................................................................... 9
2 Getting Started with Gpredict.......................................................................11
2.1 The Basic Idea................................................................................................................ 11
2.2 The Module Pop-Up Menu.............................................................................................. 13
2.3 Configuring the Module..................................................................................................14
2.3.1 Setting Up the Ground Station................................................................................15
2.3.2 Selecting the Satellites............................................................................................ 16
2.3.3 Module Properties................................................................................................... 17
2.4 Creating a New Module.................................................................................................. 19
2.5 Predicting Satellite Passes............................................................................................. 19
2.5.1 Upcoming Passes for a Satellite..............................................................................19
2.5.2 The Sky at a Glance................................................................................................. 20
2.6 Moving On...................................................................................................................... 21
3 Customising Gpredict....................................................................................23
3.1 Overview......................................................................................................................... 23
3.2 Number Formats ........................................................................................................... 25
3.2.1 Show Local Time Instead of UTC............................................................................25
3.2.2 Time Format............................................................................................................ 25
3.2.3 Geographical Coordinates....................................................................................... 28
3.2.4 Measurement Units................................................................................................. 28
3.3 Ground Stations.............................................................................................................. 28
3.4 TLE Update..................................................................................................................... 30
3.5 Message Logs.................................................................................................................30
4 Modules and Views........................................................................................31
4.1 Data Fields...................................................................................................................... 31
4.2 Views.............................................................................................................................. 32
4.2.1 The List View...........................................................................................................32
4.2.2 The Map View.......................................................................................................... 33
4.2.3 The Polar View........................................................................................................36
4.2.4 The Single-Satellite View........................................................................................39
4.2.5 The Upcoming Passes View.....................................................................................40
5 Advanced Pass Predictions............................................................................41
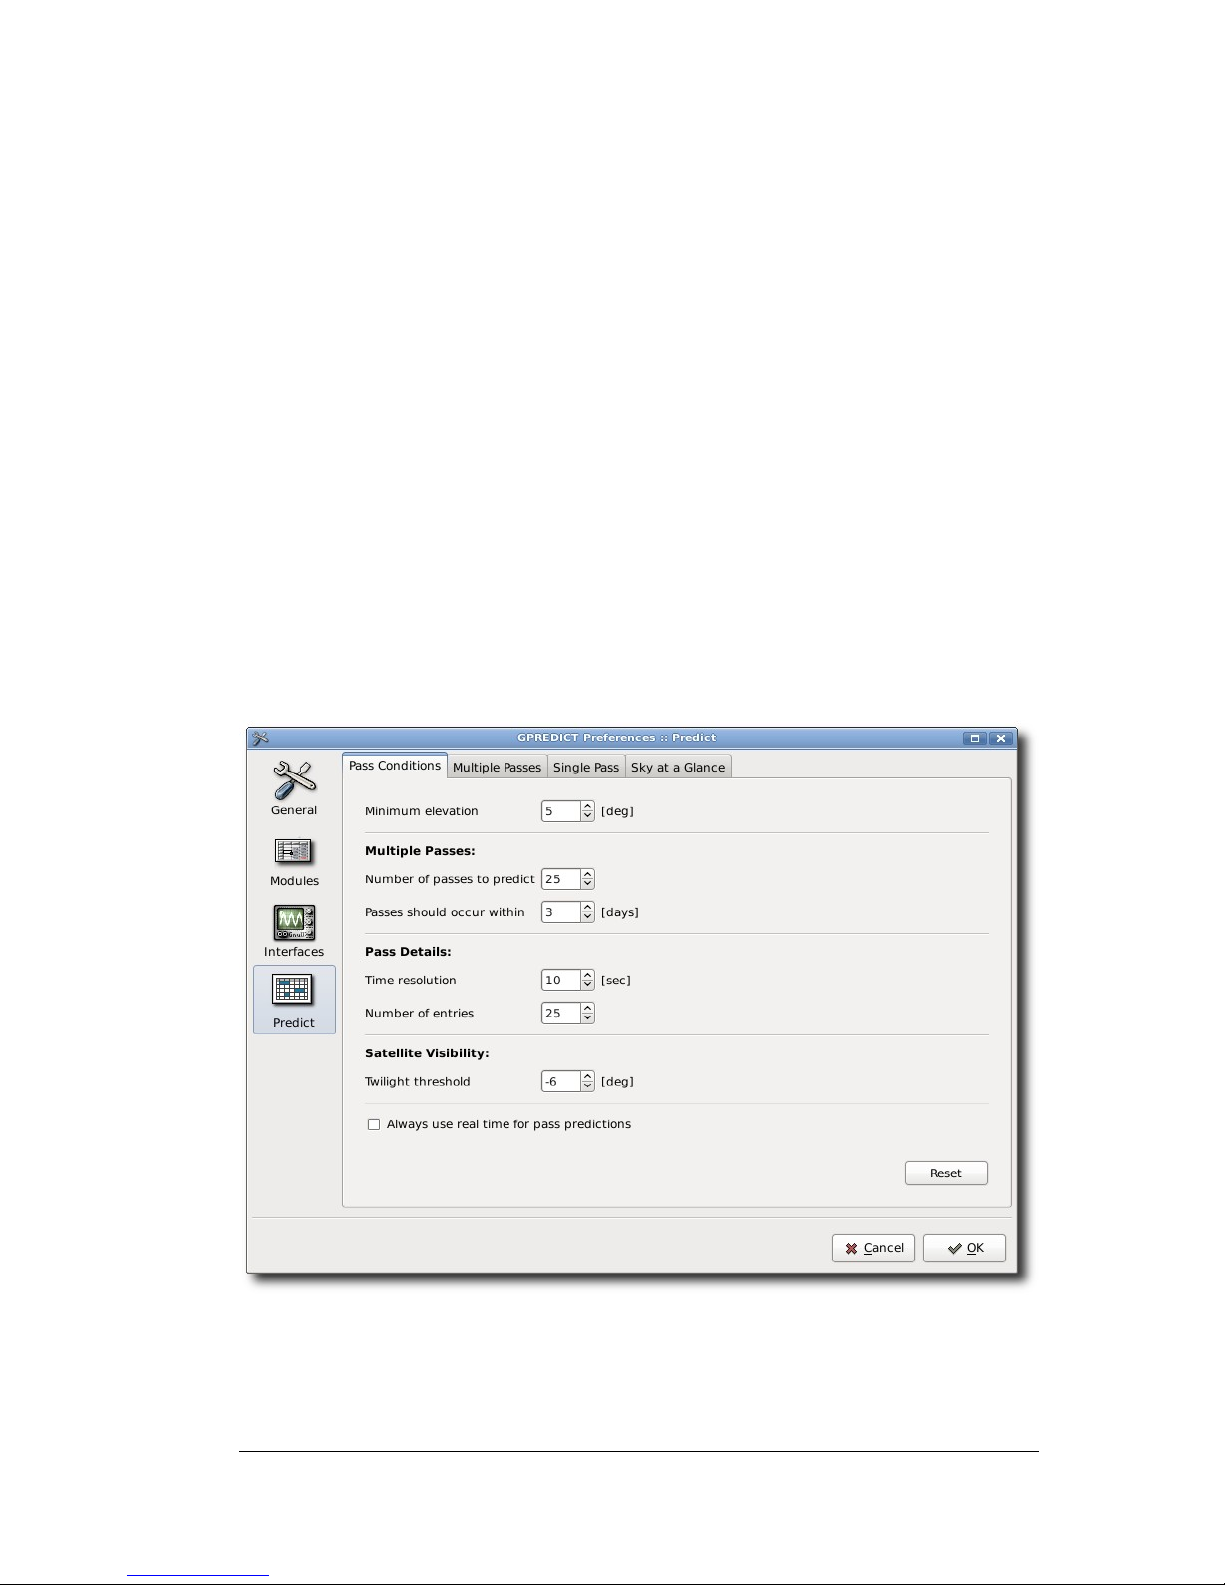
5.1 Customising the Prediction Parameters.........................................................................41
5.1.1 Pass Conditions....................................................................................................... 41
5.1.2 Multiple Passes....................................................................................................... 42
5.1.3 Single Pass.............................................................................................................. 44
5.2 Sky at a Glance............................................................................................................... 44
5.3 Communication Windows...............................................................................................45
5.4 The Advanced Predictor................................................................................................. 45
6 Updating the Orbital Elements.....................................................................47
6.1 Overview......................................................................................................................... 47
6.2 Automatic Update from the Internet.............................................................................. 48
6.2.1 Auto-Update............................................................................................................48
6.2.2 Update from the Internet........................................................................................ 49
6.3 Semi-Automatic Update from Local Files.......................................................................50
6.4 Manual Update............................................................................................................... 50
7 Controlling Radios and Rotators...................................................................51
7.1 Overview......................................................................................................................... 51
7.2 Hamlib Tutorial............................................................................................................... 52
Page 4

7.2.1 Rigctl....................................................................................................................... 53
7.2.2 Rotctl....................................................................................................................... 55
7.2.3 Rigctld and Rotcld................................................................................................... 55
7.3 Configuring your Devices in Gpredict............................................................................56
7.3.1 Radio Configuration................................................................................................57
7.3.2 Antenna Rotator Configuration...............................................................................58
7.4 Controlling your Devices with Gpredict..........................................................................59
7.4.1 The Radio Control Window...................................................................................... 59
7.4.2 The Rotator Control Window................................................................................... 62
8 Creating Custom Layouts..............................................................................67
9 Glossary.........................................................................................................69
List of Tables
Table 3.1: Most common format codes.................................................................................26
Table 3.2: The not so common time format codes................................................................ 27
Table 3.3: Examples of time format strings..........................................................................28
Table 4.1: Data field availability in the different views........................................................32
Table 7.1: Most common rigctl command line options.........................................................55
Table 7.2: Operating modes of the radio controller.............................................................. 62
Table 7.3: Operating modes of the rotator controller...........................................................66
List of Figures
Figure 1.1: Functional overview of a satellite tracking program...........................................7
Figure 2.1: The default main window showing a module with three views. ........................11
Figure 2.2: The four different layouts in gpredict................................................................12
Figure 2.3: The module pop-up............................................................................................. 13
Figure 2.4: The time controller window............................................................................... 13
Figure 2.5: The module configuration window.....................................................................15
Figure 2.6: The ground station editor window.....................................................................16
Figure 2.7: The module properties editor.............................................................................17
Figure 2.8: Satellite popup...................................................................................................19
Figure 2.9: Data presented about the next upcoming pass..................................................20
Figure 2.10: The sky at a glance...........................................................................................21
Figure 3.1: The preferences dialogue................................................................................... 24
Figure 3.2: The table showing the existing ground stations.................................................29
Figure 4.1: The list view illustrating the auto-sort feature...................................................33
Figure 4.2: The map view using the default settings............................................................35
Figure 4.3: The polar view....................................................................................................37
Figure 4.4: Polar View popup............................................................................................... 37
Figure 4.5: The single-satellite view.....................................................................................40
Figure 4.6: The upcoming passes view.................................................................................40
Figure 5.1: Parameters that control pass predictions..........................................................41
Figure 5.2: Configuration options for multiple pass predictions..........................................43
Figure 5.3: Configuration options for single pass predictions.............................................. 44
Figure 5.4: The sky at a glance.............................................................................................44
Figure 5.5: Configuration options for the Sky at a glance function......................................45
Figure 6.1: Configuration options for TLE updates..............................................................48
Figure 6.2: Selecting a directory to update the TLE data from............................................50
Figure 7.1: Radio and rotator settings..................................................................................56
Figure 7.2: Radio setup........................................................................................................ 57
Figure 7.3: Rotator setup..................................................................................................... 58
Figure 7.4: The radio control interface.................................................................................59
Figure 7.5: The rotator control interface..............................................................................62
Figure 8.1: A 3x3 layout grid................................................................................................ 67
Figure 8.2: The layout generated by the sequence 1;0;3;0;2;0;0;2;2;3................................68
Page 5

Page 6
1 Introduction
1.1 What is Gpredict?
Gpredict is a real-time satellite tracking and orbit prediction program. A
satellite tracking program is a computer program that predicts the position
and velocity of a satellite at a given time using a mathematical model of the
orbit. Once the position and velocity of the satellite is known other data can
be calculated, for example bearing, distance, footprint, and visibility just to
mention a few. Figure 1.1 shows a diagram of the core functionality of a
satellite tracking program.
Gpredict, like any other satellite tracking program, takes three kinds of
input:
1. Keplerian Elements describing the satellite orbit, as well as the
position and velocity of the satellite at a given time t0.
2. Position of the ground station on Earth.
3. The date and time at which the satellite position and velocity should
be calculated.
Given the data above, gpredict calculates the position and velocity of any
Earth orbiting satellite using the NORAD SGP4/SDP4 algorithms. These
algorithms solve Kepler's equation of orbital motion and apply various
corrections to compensate for irregular effects like the shape of Earth and
gravitational influence from other celestial bodies.
Gpredict has several ways of presenting the calculated satellite data to the
user. It can show the position, footprint (i.e. coverage area), and ground
track of the satellites on maps, it can show detailed satellite data in tables,
7
Figure 1.1: Functional overview of a satellite tracking program.
Page 7

Gpredict User Manual
and it can also show the satellites within range on a polar plot (radar
screen).
The next section gives an overview of the features and functionality of
gpredict.
1.2 Features of Gpredict
● Fast and accurate real-time satellite tracking using the NORAD
SGP4/SDP4 algorithms.
● No software limit on the number of satellites or ground stations.
● Nice presentation of the satellite data using maps, tables and polar
plots (radar views).
● Allows you to group satellites into modules, each module having its
own visual layout, and being customisable on its own. Of course, you
can use several modules at the same time.
● Efficient and detailed predictions of future satellite passes.
Prediction parameters and conditions can be fine-tuned by the user
to allow both general and very specialised predictions.
● Allows you to track satellites in real time, simulated real time or
manual time control.
● Exhaustive configuration options allowing advanced users to
customise both the functionality and look & feel of the program.
● Automatic updates of the Keplerian elements from the web via HTTP
and FTP, or from local files.
● Support for automated ground station operation providing both
Doppler tuning for radios and antenna rotator control.
● Robust design and multi-platform implementation integrates
gpredict well into modern computer desktop environments, including
Linux, BSD, Windows, and Mac OS X.
● Free software licensed under the terms and conditions of the GNU
General Public License allowing you to freely use it, learn from it,
modify it, and re-distribute it.
1.3 About this Document
This document is intended to give a complete description of all the
functionalities in gpredict as seen from a user's perspective.
● Chapter 2 gives a quick introduction to the core functions and
features in gpredict. It introduces the concept of modules and views,
which are the key objects in gpredict. Reading this chapter should
make users able to perform real-time satellite tracking and some
basic orbit predictions using gpredict.
● Chapter 3 describes the top-level configuration options that allow
8
Page 8

Introduction
users to customise the overall behaviour of gpredict.
● Chapter 4 gives a more in-depth description of the modules and the
views. It also describes how to customise each individual module.
● Chapter 5 describes the pass prediction functions in gpredict
including the pass condition parameters used by the prediction
engine.
● Chapter 6 describes how you can update the Keplerian elements for
the satellites in the gpredict database.
● Chapter 7 describes how to setup and operate gpredict with your
radios and antenna rotators.
1.4 Your Feedback is Appreciated
Both gpredict and this user manual is work in progress. Your comments,
questions and bug reports are highly appreciated. There is a web forum at
http://forum.oz9aec.net/ where you can discuss everything related to
gpredict and ask the community for help.
The gpredict website accessible at http://gpredict.oz9aec.net/ has more
information about other ways you can get support with your problems, or
how you can get in touch with the developers (see under User Support).
9
Page 9
2 Getting Started with Gpredict
2.1 The Basic Idea
The key idea in gpredict is the concept of modules. A module in gpredict is
the same as a document in a word processor application. It is an object,
which has a certain number of satellites and a ground station associated to
it. Based on the geographical location of the ground station and the current
time, the module calculates the positions and other data for the satellites
and displays it using various views organised in a layout.
11
Figure 2.1: The default main window showing a module with three views.
Page 10
Gpredict User Manual
When you start gpredict for the first time it opens a module called
Amateur. This module has a layout with three different views: A map view,
a polar view and a single-sat view see figure 2.1. Currently four different
views are available in gpredict:
● The List View shows the satellite data in a list/table having one
satellite in each row. It is well suited to present detailed information
about many satellites at the same time. The rows in the list view are
sorted automatically at run-time according to the selected sorting
criteria (e.g. elevation, next event, etc.).
● The Map View shows the satellites and their footprints (coverage
area) on a rectangular map. It is intended to give a quick overview of
which satellite is where at a given time. The map view can also show
the ground track of the satellites for several orbits.
● The Polar View, or radar view, shows the satellites within range on
a polar plot. The polar axis corresponds to the azimuth and the radial
axis to the elevation. It can be used to give you an idea of where to
“look” for a satellite.
● The Single-Satellite View can very efficiently show detailed
information about one single satellite. Its advantage over the list
view is that it is much more efficient, since it only shows one single
satellite.
● The Upcoming Passes View shows a list of satellites with a
countdown till next AOS/LOS for each satellite.
The module organises the views using a layout. The layout is based on a
two dimensional grid where data views (map, table, etc.) are placed by
specifying type and coordinates. Figure 2.2 shows the 2x2 grid used in the
default module.
12
Figure 2.2: The four different layouts in gpredict.
Page 11
Getting Started with Gpredict
Section 2.3.3 will give you a more detailed description of data views in
predefined layouts and chapter 8 describes how to create custom layouts.
2.2 The Module Pop-Up Menu
Each module has its own pop-up menu, which can be accessed by clicking
on the V icon in the top right corner of the module. This pop-up menu gives
you quick access to the functions that are relevant for a module. A screen
shot of the pop-up menu is shown on figure 2.3.
The first two items in this pop-up menu are used to
change the display state of the module. A module can
be in three different states:
● Docked: In this default state the module is
docked into the notebook in the main window.
● Window: In this state the module is put in its
own window.
● Full-screen: In this state the module occupies
the whole screen.
You can freely toggle between these three states at
any time. Go ahead and try them if you haven't
already done so.
The next entry in the pop-up menu is Sky at a
glance. This function is intended to give you a quick
overview of which satellites are up now and which
satellites will be up during the next 8 hours. This
function is described in section 2.5.
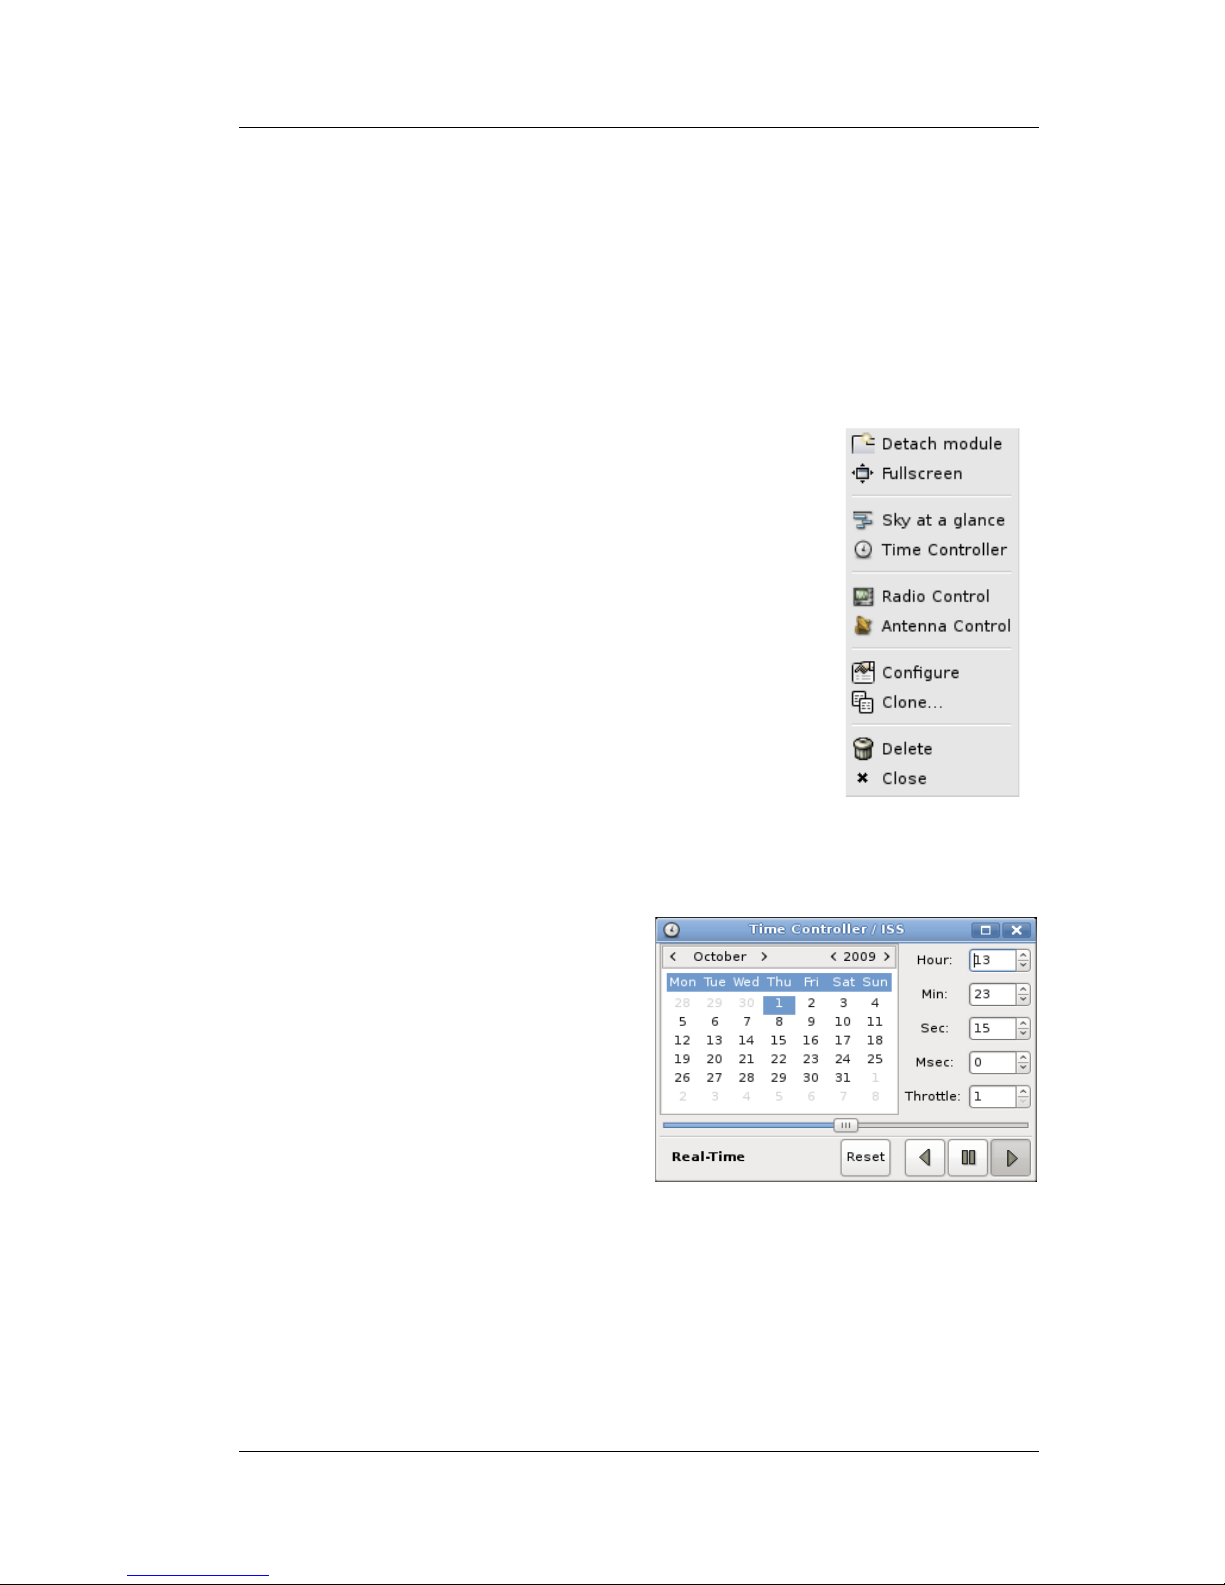
The Time controller menu item
pops up a small window (see figure
2.4) containing widgets for
controlling the time of the module. By
default, the module will run in realtime, but using the Time controller
you have the possibility to tun in
simulated real-time or manual time
control.
The horizontal slider below the
calendar allows you to quickly pan
back and forward in time ± 2.5 hours
from the current time.
The arrow buttons in the time
controller determine in which direction the time should run. The Throttle
value determines the
time compression factor
. A throttle value of 1
corresponds to 1 second / second (real-time), a value of 2 corresponds to 2
seconds / second (simulated real-time), etc. The Pause button between the
two arrow buttons stops automatic increment of time and you can set the
module time using the date and time controls in the window. The Reset
13
Figure 2.4: The time controller
window.
Figure 2.3: The
module pop-up.
Page 12

Gpredict User Manual
button will reset the time to the current time provided by the operating
system.
The Radio Control and Antenna Control menu items bring up the radio
and antenna rotator controller windows. Setting up gpredict to perform
Doppler tuning of radios and antenna rotator tracking is described in
details in chapter 7.
The Configure item allows you to customise the module. This function is
described in the next section.
The Clone... menu item is a convenience function to create an exact copy
of a module. If you select it a small dialogue window pops up asking you to
enter a name for the new module. Enter an appropriate name. Note that
only standard ASCII characters consisting of 0..9, a..z, A..Z, hyphen (-) and
underscore (_) are allowed. This is because the name of the module is also
used for naming the data file in which the configuration will be stored. If
you clear the check box asking whether to open the module, the new
module will be created and that's it. If you leave the check box checked, the
new module will be opened right after it is created. Leave the check box
checked and press OK.
You should see your new module appear in the notebook as a new page. A
key feature in gpredict is that you are allowed to use several modules at
the same time. There is no limit on the number of open modules, except the
processing power and available memory of your computer. It is also up to
you how many modules should be docked in the notebook and how many
should be in their own window. Needless to say, only one module can be in
full-screen state at the same time.
The last two menu items in the pop-up menu, Delete and Close, do exactly
what they promise. If you select Delete the module will be closed
immediately and you will be prompted to confirm the deletion. This is your
last chance before the module is completely removed from the disk.
A module can also be closed by clicking on the X icon in the top right
corner.
2.3 Configuring the Module
If you have followed the cloning instructions in the previous section, you
now have two copies of the same module. Lets modify one of them so that
they are not exactly identical. Gpredict offers you the possibility to
configure each module independently of the others. This is not a
requirement, it is an option. It is up to you whether you want to use the
global defaults or whether you want to customise each module to suit your
needs, and this applies to all parameters.
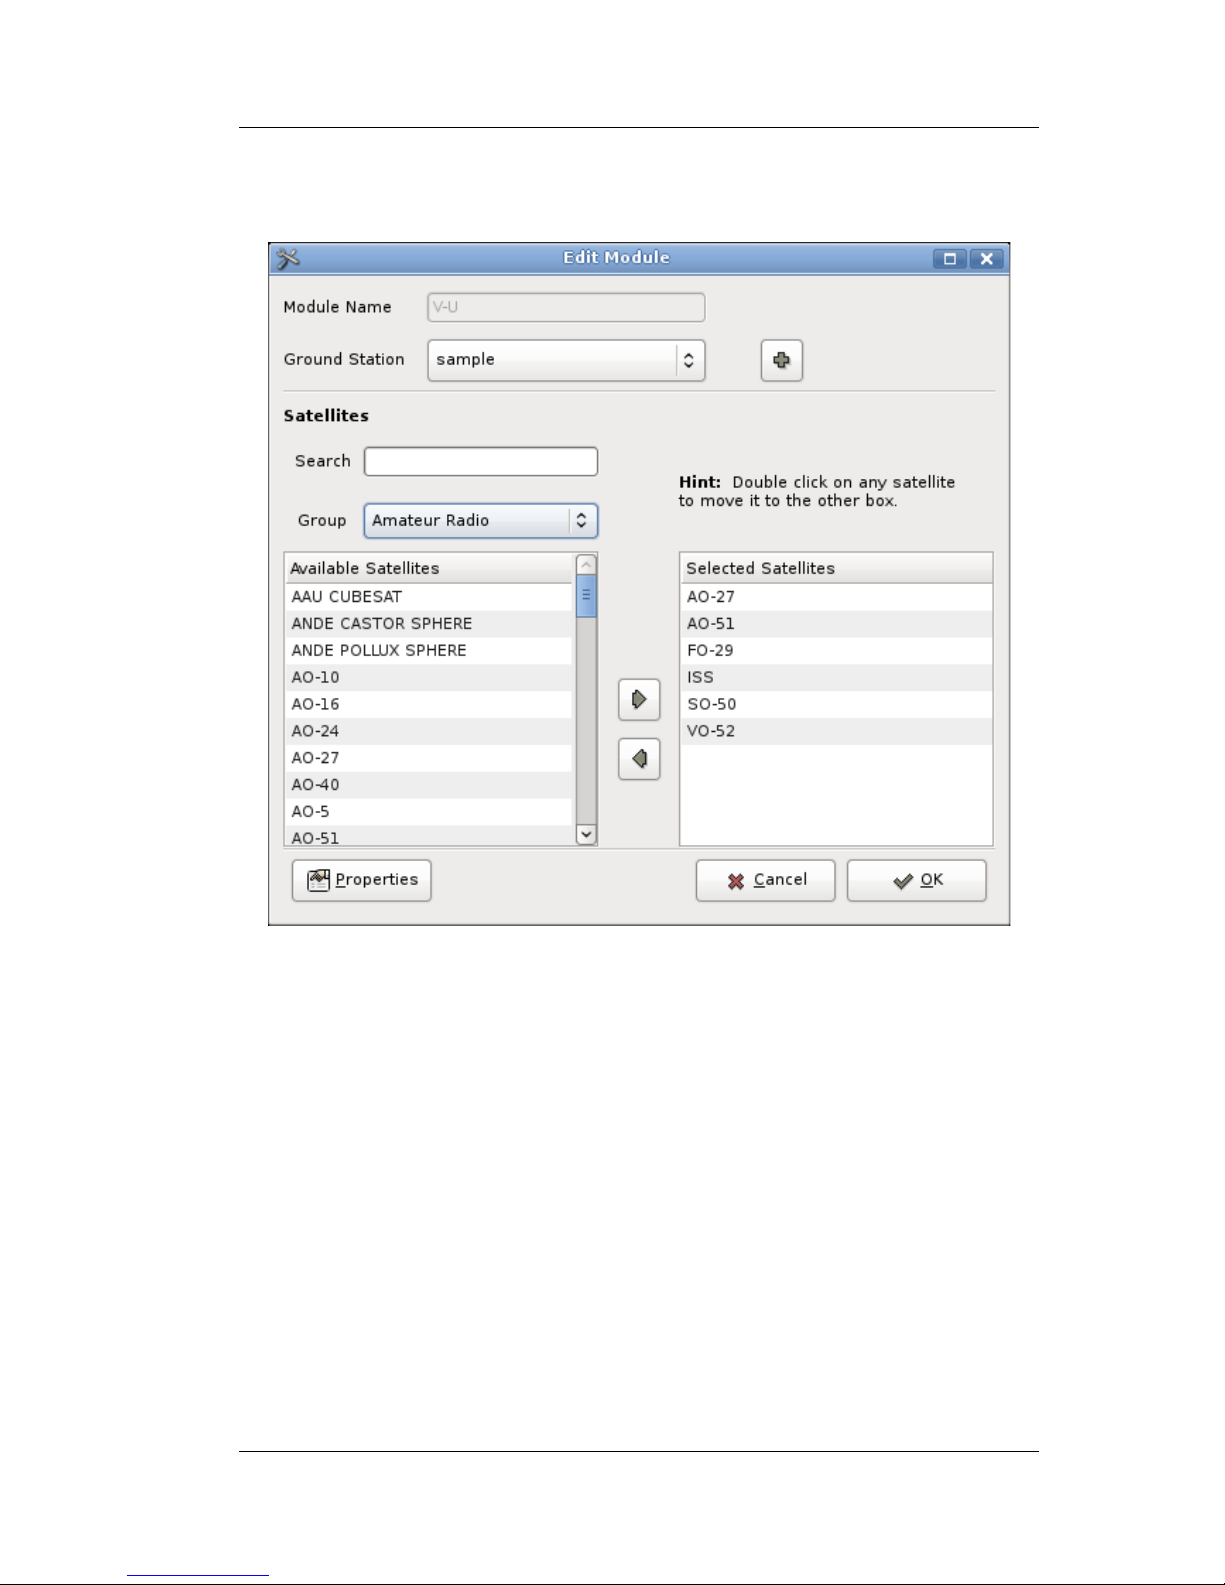
To configure a module select the Configure menu item in the module popup menu. This will bring up a small dialogue window showing the module
name, the name of the ground station, and which satellites are tracked in
this module. Figure 2.5 shows a screen shot of the module configuration
window.
Note that you can not change the name of a module here. If you want to
14
Page 13
Getting Started with Gpredict
rename a module, create a clone and then delete the original.
2.3.1 Setting Up the Ground Station
Below the module name you will find the name of the ground station, i.e.
the geographical location that is used as reference point in the
calculations. It is important to define the position of the ground station
accurately since this it is one of the key input parameters in gpredict. The
sample module uses a ground station called
sample
, which defines a place
in Denmark.
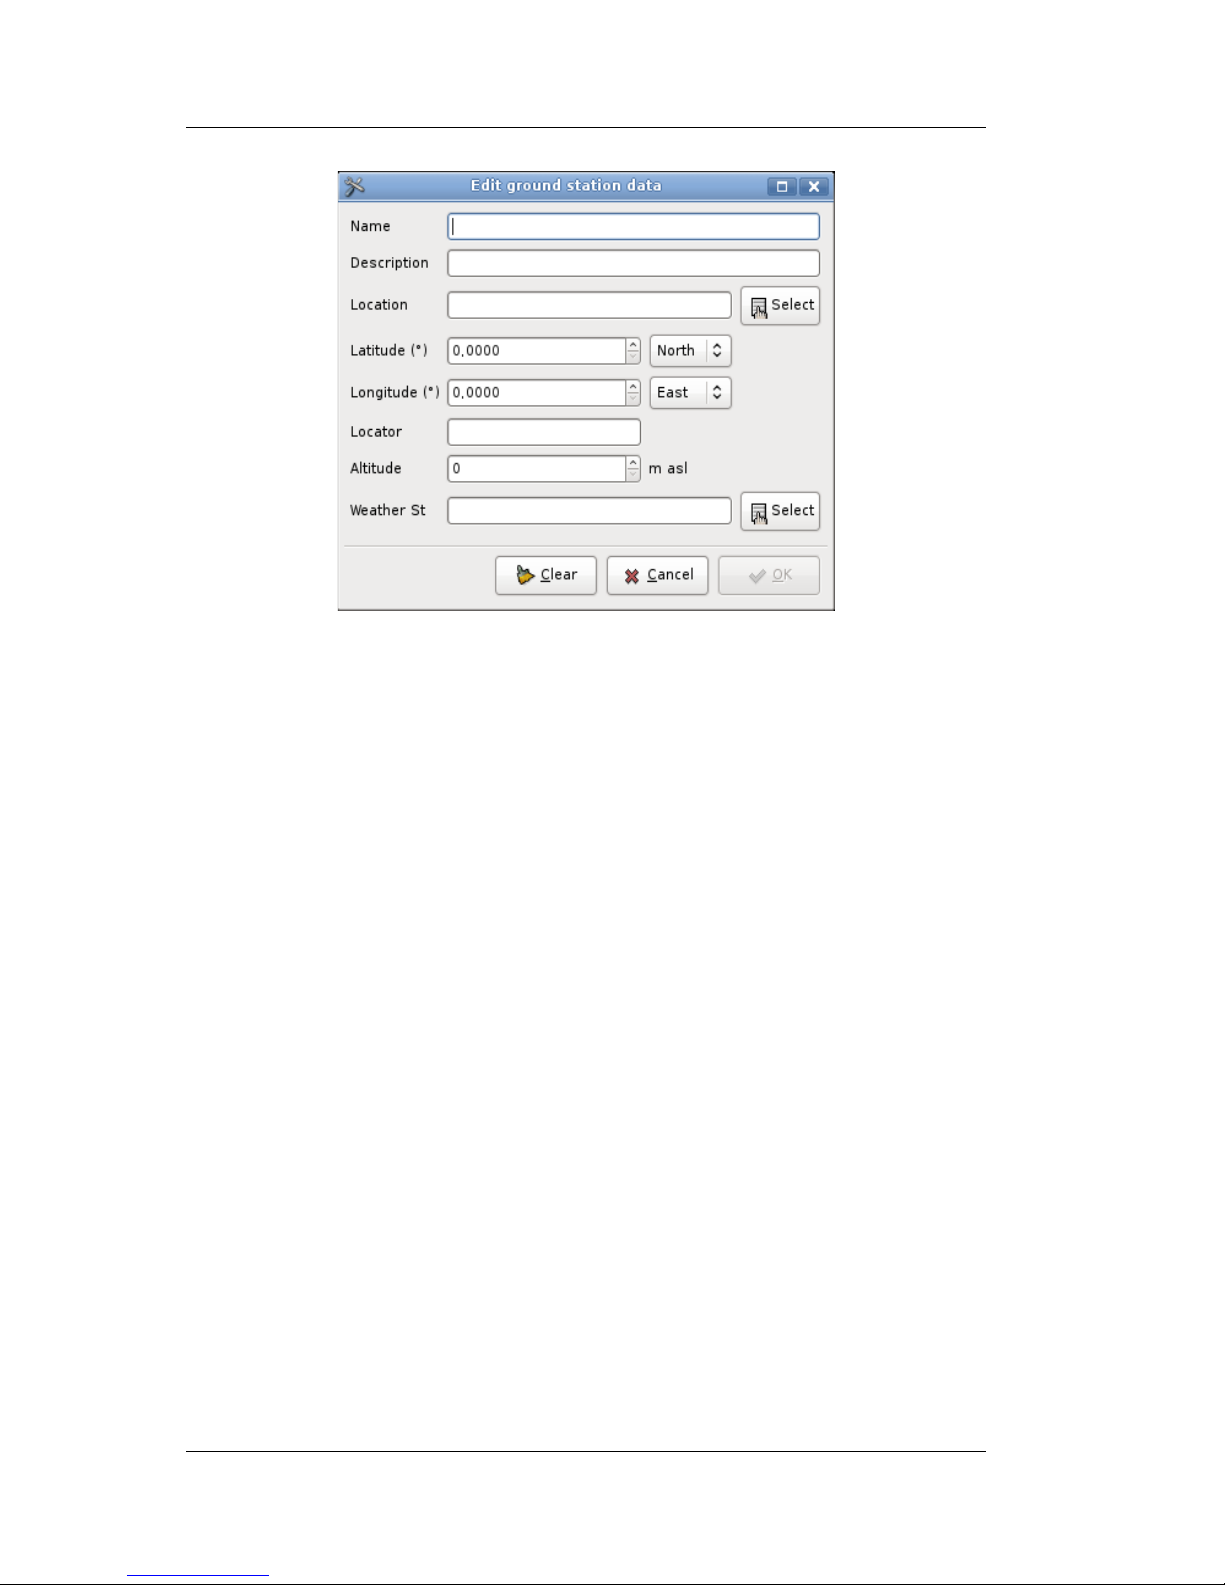
To add your own ground station, click on the + button located right of the
ground station name. This should pop up a small dialogue window as shown
on figure 2.6 where you can enter the data for your ground station. The
only required parameter here is the Name, which you have to enter
according to the same rules as the module name. Optionally, you can also
enter a Description and the Location name, the latter could be a
combination of the city and the country of the location.
15
Figure 2.5: The module configuration window.
Page 14
Gpredict User Manual
For your convenience gpredict offers you the possibility to select a location
from a predefined list. The list can be accessed via the Select button right
next to the Location field. This is useful if you have no idea of the
geographical coordinates of your location. In that case you can simply
select the nearest city from the list.
Instead of entering the latitude and longitude of your location, you can also
enter the Maidenhead locator grid square in the Locator field. Doing so
will automatically update the latitude and longitude fields.
When you are done, click OK to return to the module configuration. Your
newly created ground station should be selected as location for this
module.
2.3.2 Selecting the Satellites
Next step in the module configuration is to select which satellites should be
tracked in this module.
The satellites currently tracked by this module are listed in the right side of
the configuration window while the available satellites that can be tracked
are listed on the left side of the window. You can move a satellite from one
list to the other by double-clicking on it or by clicking on the arrow buttons
between the two lists.
Gpredict has approximately 1200 satellites in its database that you can
choose from. To help you locate a specific satellite, you can use the Search
field as well as the Group filter located above the list of available satellites.
When you start typing a satellite name I the Search field, Gpredict will
search as you type and highlight the satellite that matches your search.
The search is case insensitive.
16
Figure 2.6: The ground station editor window
Page 15
Getting Started with Gpredict
You should be careful not to select too many satellites
for one module, otherwise your module may become
clumsy. Too many satellites may also decrease the
performance in particular if you are using a map view.
Up to 10-15 satellites per module seems to be a good
number, maybe less if you use the map view.
2.3.3 Module Properties
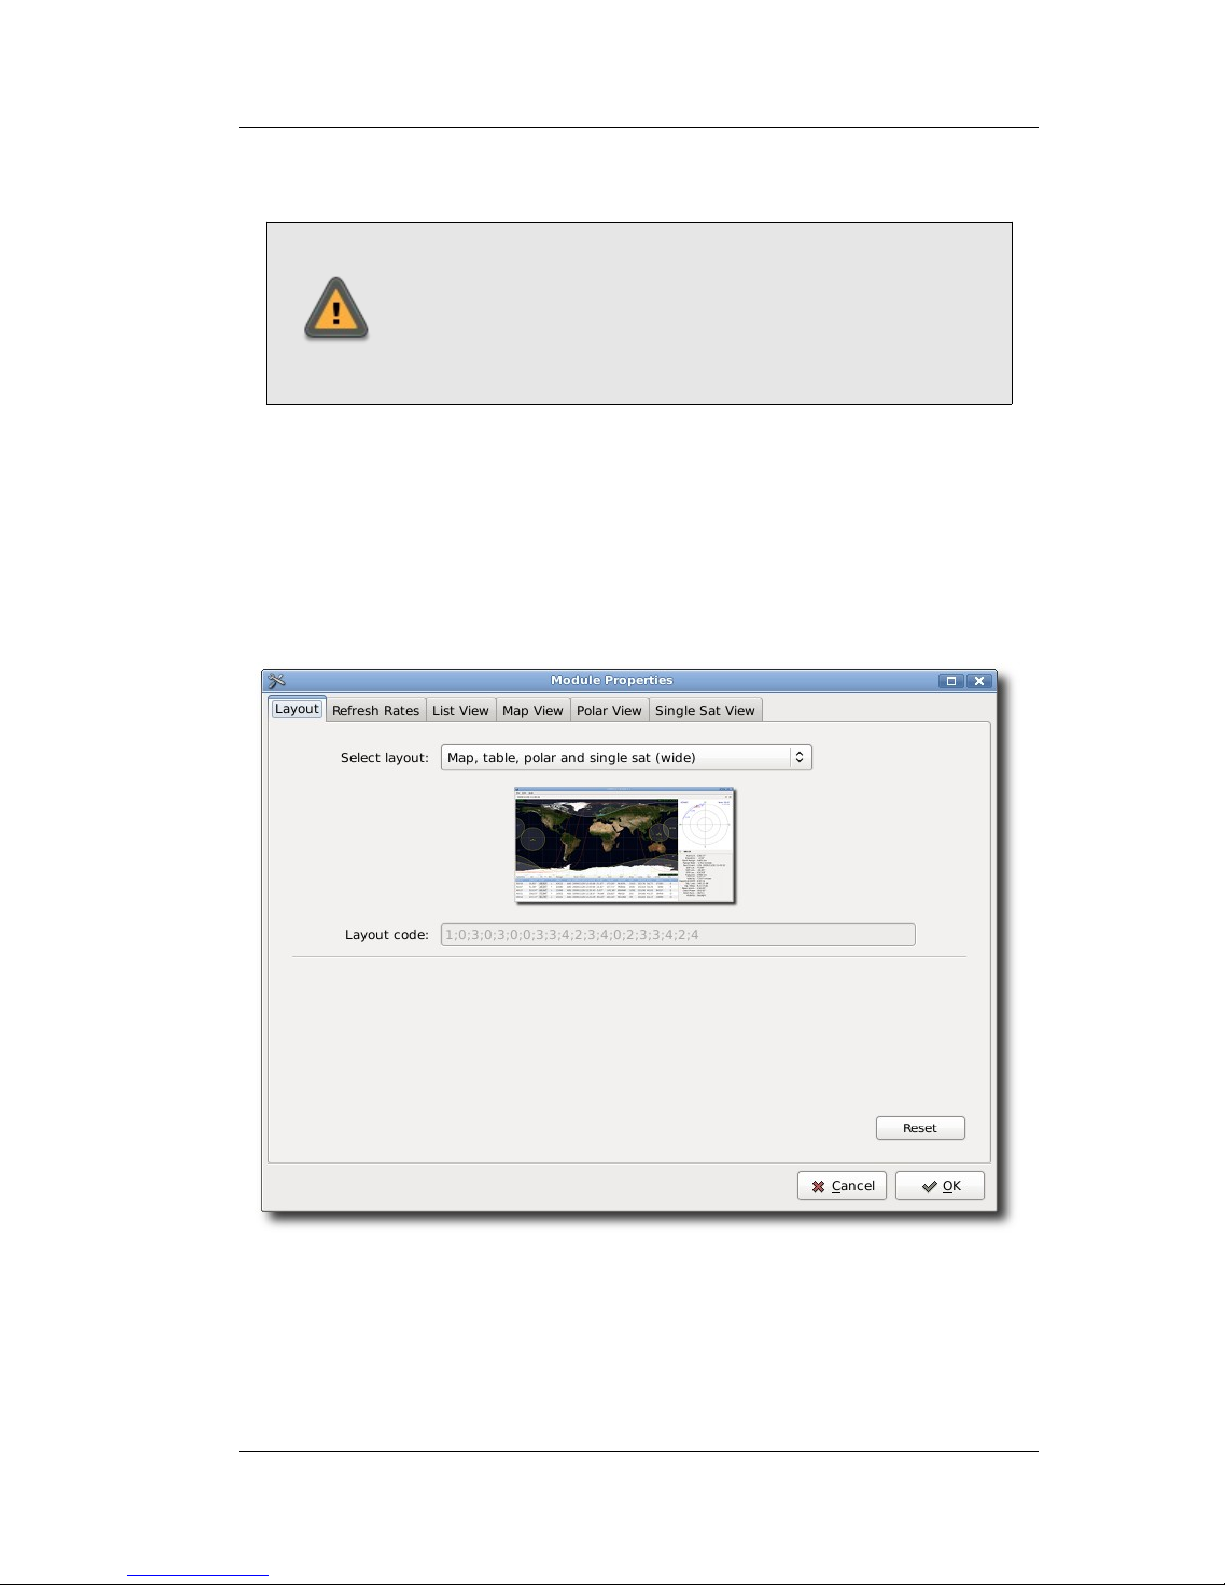
In order to edit the look and feel of the module click on the Properties
button. This will bring up a window showing the module properties
grouped in a notebook. Figure 2.7 below shows a screen capture of the
module properties editor.
The Layout page allows you configure the visual appearance of the
module. You can choose between nine predefined layouts or create your
own custom layout by specifying the layout code. The different views are
explained in greater detail in section 4.2 and a description of how to create
your own layout is in chapter 8.
17
Figure 2.7: The module properties editor.
Page 16

Gpredict User Manual
The Refresh Rates page allows you to tune how often the module should
perform the calculations, as well as how often the views should be updated.
The data refresh rate is specified in milliseconds. This is the time between
two calculation-cycles. Every cycle the module will recalculate the data for
all satellites associated to the module. The refresh rates for the views are
specified in integer cycles of data refresh. If the data refresh rate is 400
msec and the list view refresh rate is 2 cycles, the list view will be
refreshed every 800 msec.
The map and the polar view do not need to be refreshed very often. For
these views visible changes will normally occur over 3-4 seconds. The list
and the single-satellite view, on the other hand, looks pretty cool when they
are refreshed every 100-200 msec, but be careful with the CPU load, in
particular if you have many modules open at the same time.
The rest of the pages in the module property editor define the look and feel
of the views. Most of the parameters are self-explaining and you should not
be afraid of experimenting with the different settings. If you somehow end
up with a useless configuration, you can always reset to the default values
by clicking on the Reset button that is available on all pages.
Chapter 4 describes the modules in more details and also gives a detailed
description of the configuration parameters.
18
Page 17

Getting Started with Gpredict
2.4 Creating a New Module
In order to create a new module, select File → New Module in the menu
bar. This will bring up the same dialogue as you saw while customising an
existing module in the previous section (see figure 2.5), except that here
you have to enter a new name for the module.
Besides the name you will also need to select the observer location and the
satellites you wish to track with the new module. Of course, you can also
customise the new module as described in the previous section.
When you are finished, click OK and the new module will open in the
notebook.
2.5 Predicting Satellite Passes
2.5.1 Upcoming Passes for a Satellite
In order to predict satellite passes occurring in the
near future, you have to right-click on a satellite in
any view. This brings up a pop-up menu for the
selected satellite, and in this pop-up menu you can
select either the Show next pass or the Future
passes menu item. Figure 2.8 shows how the
satellite pop-up menu looks like when you right
click on a satellite in the map view. The satellite
popup for other views look slightly different;
however, there will always be two menu items for
predicting the upcoming passes.
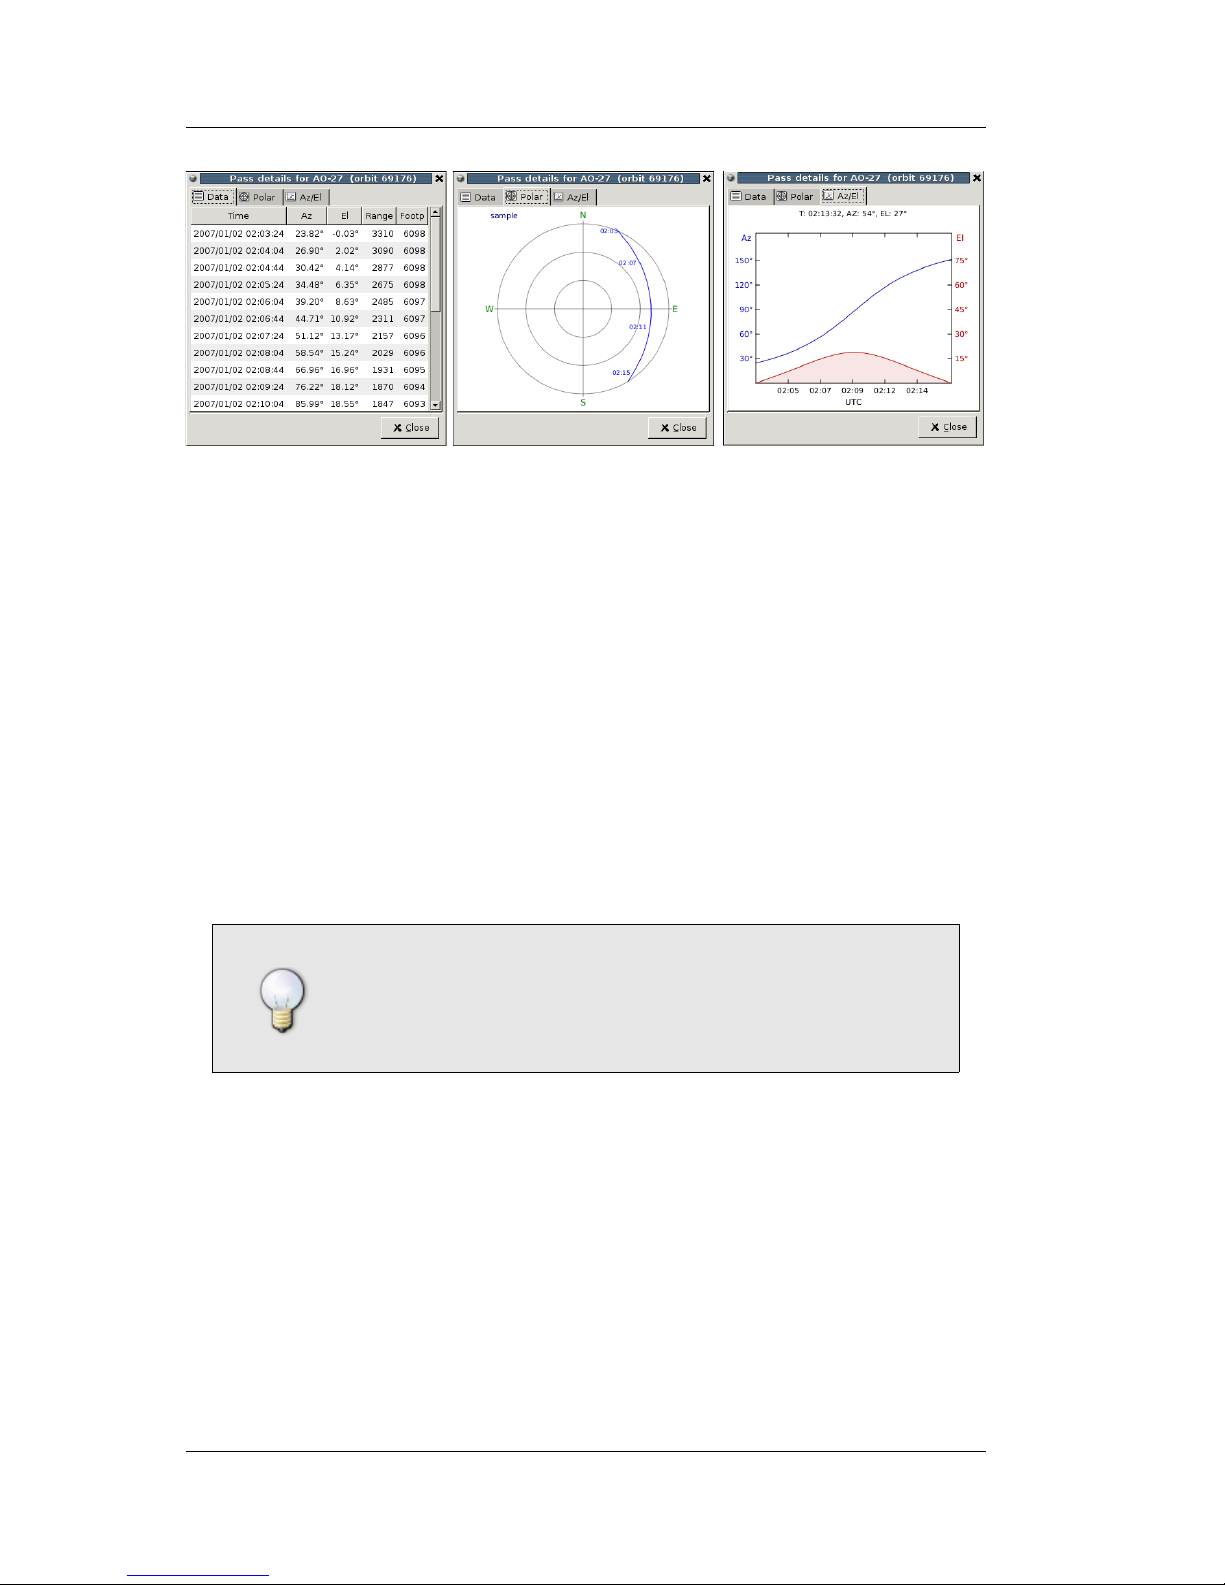
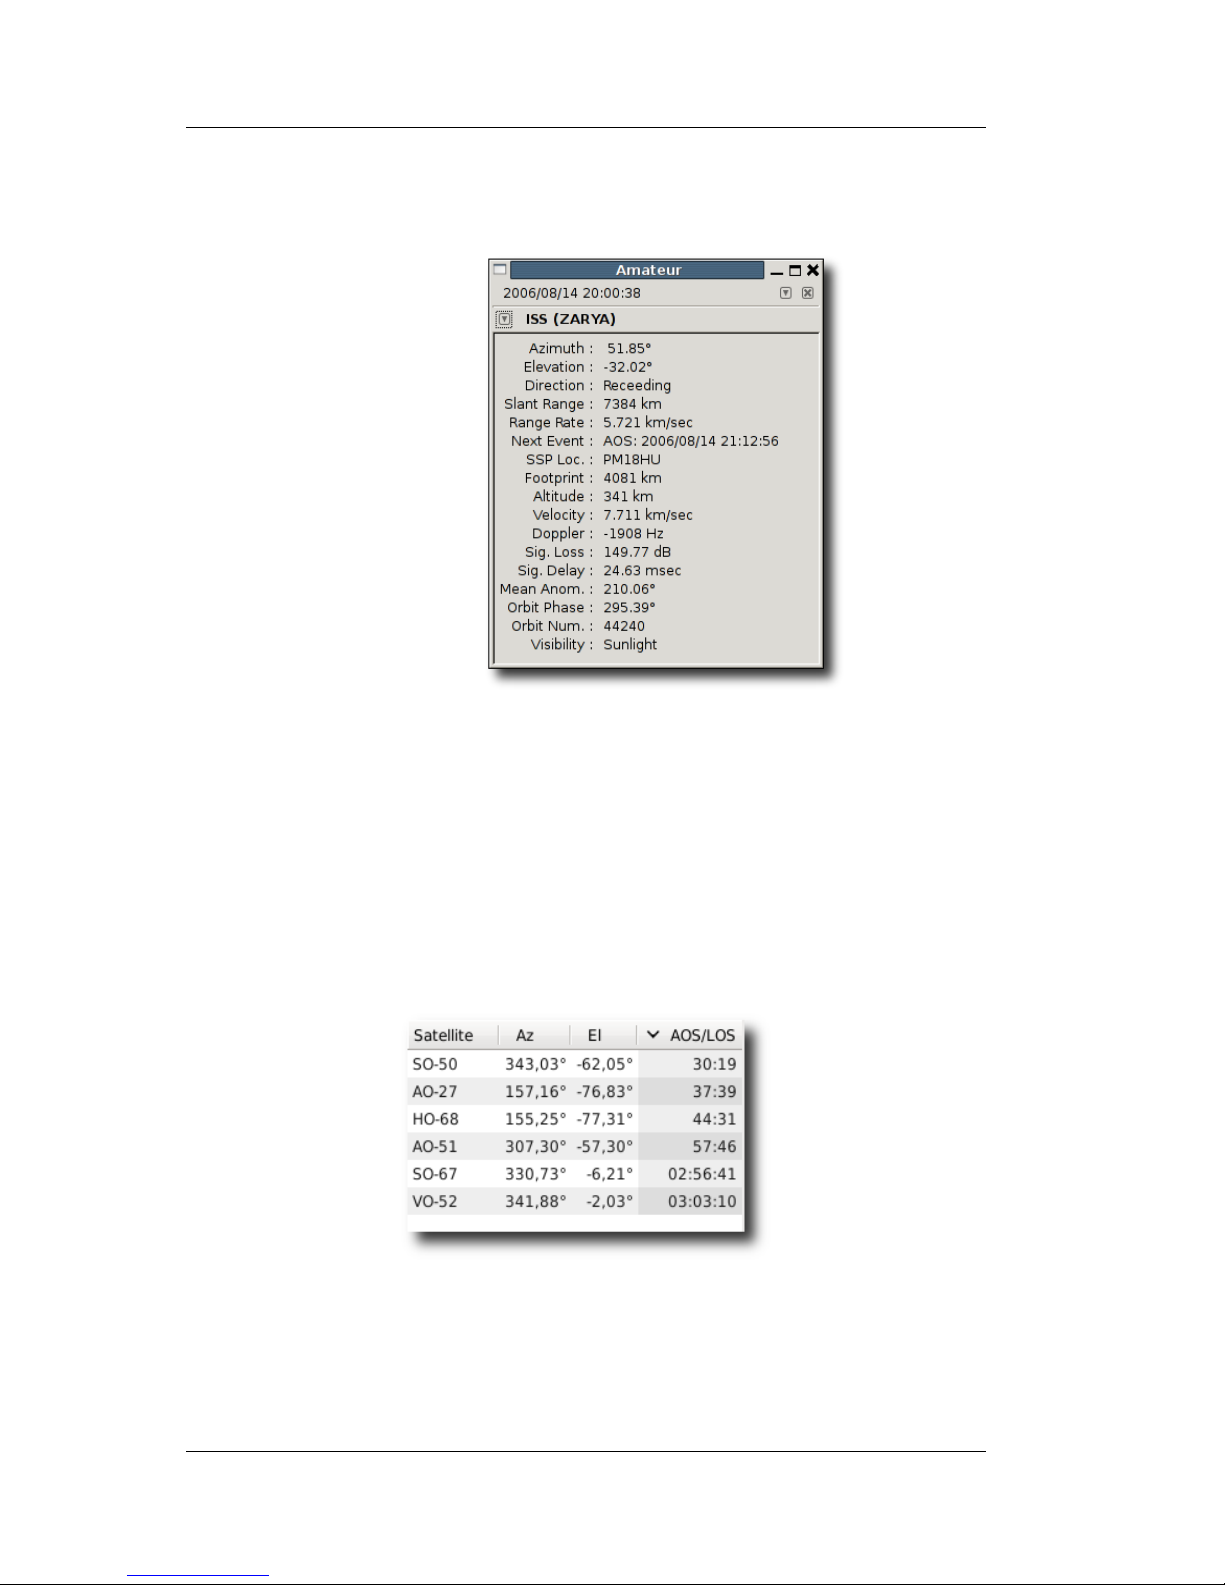
The Show next pass function gives you detailed
information on the first coming pass including the
azimuth, elevation, range and footprint during the
course of the pass. The data is shown in a table as well as on a polar and an
Az/El plot, see figure 2.9. You can configure gpredict to show other data in
this dialogue, select Edit → Preferences and go to the Predict → Single
Pass page. Section 5.1 contains more details on how to customise and finetune the future pass prediction engine.
19
Figure 2.8: Satellite
popup.
Page 18
Gpredict User Manual
The Future passes function gives you an overview of up to the next 10
passes occurring within the next 3 days. The information you are given is
the rise time (AOS), the set time (LOS), the duration, maximum elevation
and the azimuth at AOS and LOS. Again, all parameters including the
number of passes to predict can be customised via the Preferences
dialogue.
If you double-click on a row in the Future passes dialogue, a new window
pops up showing the details for the pass you have clicked on. This is the
same window as you saw when you selected the Show next pass function,
but the pass details are now for the selected pass in the future, which is not
necessarily the first coming pass.
The data displayed in the pass prediction dialogues is static. This means
that the shown data will not be updated automatically if you leave the
dialogues open. You will have to request a new prediction as described
above.
You may have noticed that the above mentioned pop-up
menu does not come up if you right-click in the singlesatellite view. To bring up the pop-up menu in the
single-satellite view you should click on the V icon right
next to the satellite name.
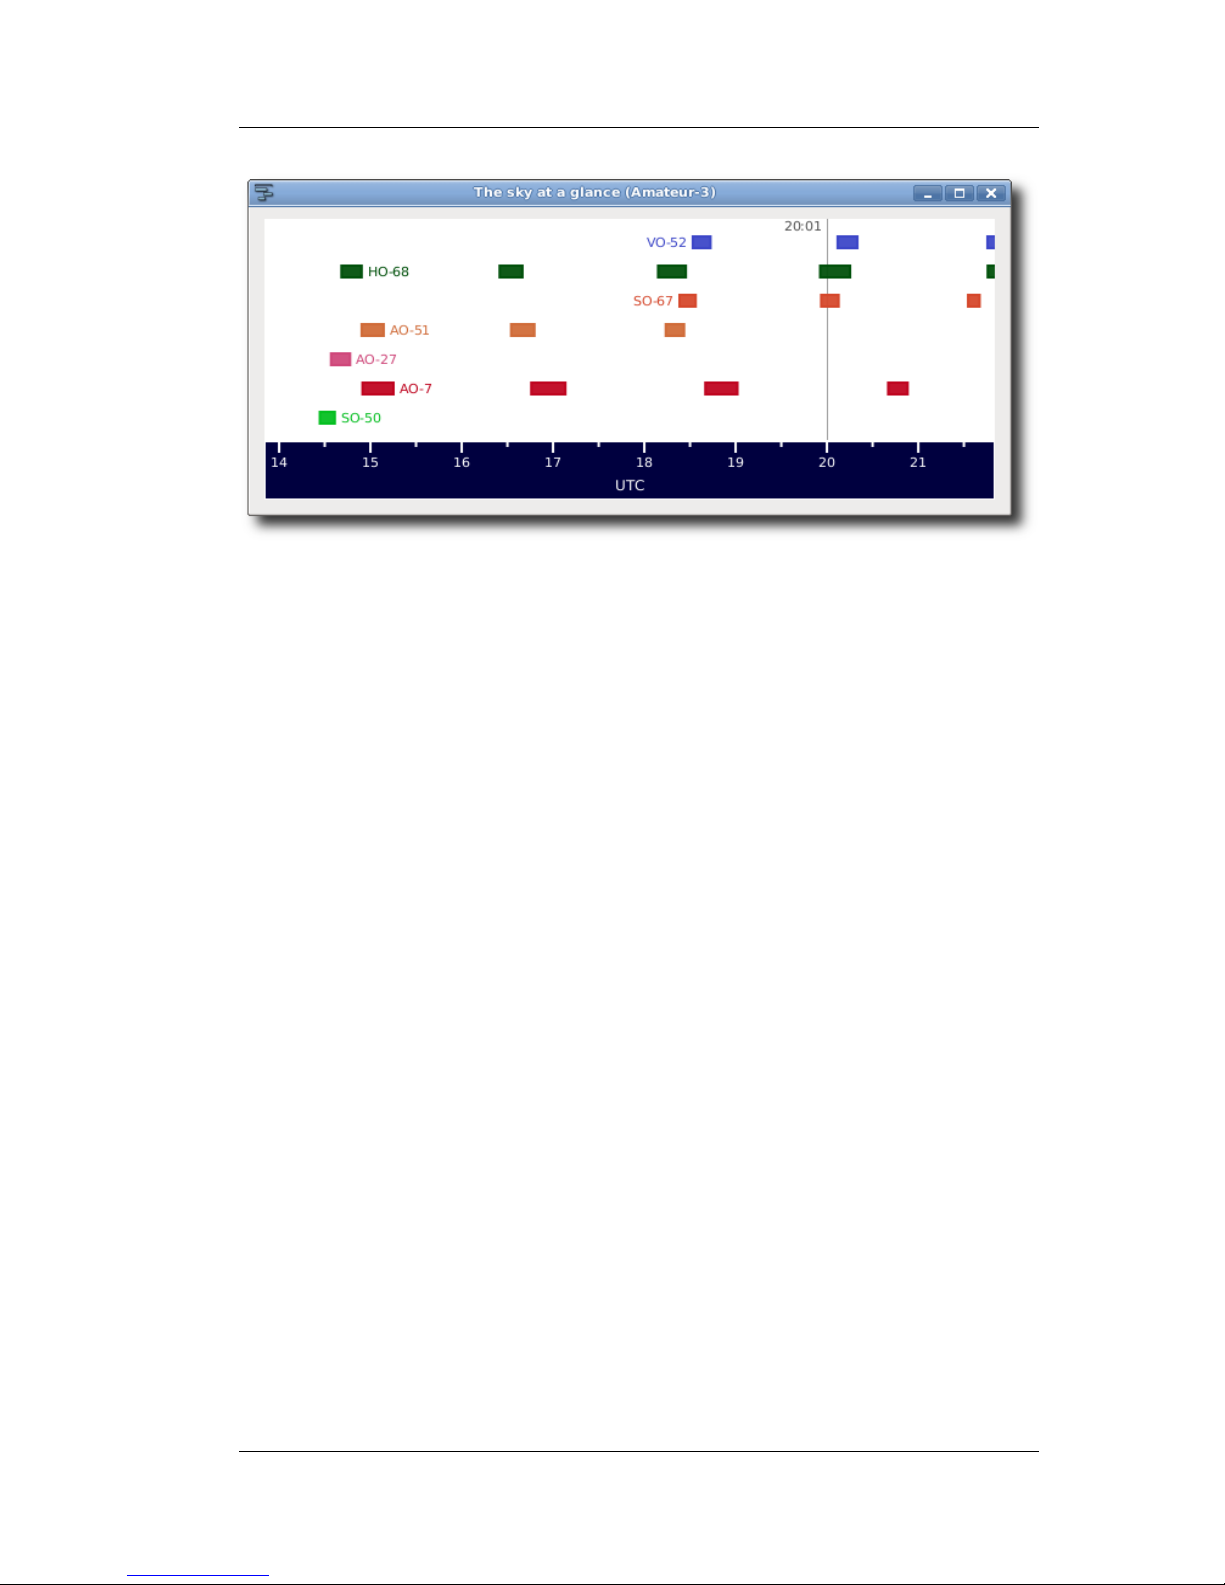
2.5.2 The Sky at a Glance
The sky at a glance is a convenience function in gpredict that can show you
a quick overview of what satellite passes you can expect at your location
between now and the next X hours. An example is shown on Figure 2.10
below. You can activate this function via the module popup menu and there
are more details about configuring this function in chapter 5 – Advanced
Pass Predictions.
20
Figure 2.9: Data presented about the next upcoming pass.
Page 19
Getting Started with Gpredict
2.6 Moving On
If you have read through this section carefully you should have a good
understanding of the basic functions in gpredict as well as some
understanding of how they work. The following chapters of this manual will
continue with more detailed descriptions of all functions in gpredict, some
of which have not been covered in this introductory section. Once you get
used to the basic functionalities in gpredict you should definitely go on and
read the rest of the manual, too. Have fun!
21
Figure 2.10: The sky at a glance.
Page 20

3 Customising Gpredict
3.1 Overview
On one hand, gpredict tries to be very simple and easy to use not requiring
any lengthy configuration and set-up procedures (runs out of the box). On
the other hand, gpredict tries to let the users customise the look and feel of
the application down to the lowest details. Some people would say that
these two requirements contradict one another, nevertheless, they have
been the key drivers during the design and development of gpredict.
Consequently, gpredict has two customisation levels:
1. The Global Settings define the behaviour of gpredict as a whole
and also provide default values for the modules. These settings can
be accessed from the main menu bar via the Edit → Preferences
menu item.
2. Module Level. These settings allow the user to customise each
module independently of the others. They are accessed via the popup menu of each module: Configure → Properties.
The preferences dialogue for editing the global settings is shown on figure
3.1. If you compare it with the module properties editor you saw in the
previous chapter you will notice that the module properties dialogue is
simply a subset of the global preferences dialogue. In other words, the
global configuration dialogue contains the module properties dialogue, and
the settings in the global preferences dialogue provide the default values
for modules, where there are no specific user settings.
23
Page 21

Gpredict User Manual
The global preferences are divided into four major groups:
1. General: This group contains global parameters that influence the
overall behaviour of the application, for example the way numbers
are displayed.
2. Modules: The parameters in this group define the default settings
and properties for the modules. This includes the module layout,
refresh rates, and settings for the available views (map, list, polar,
and single-sat). The parameters are described in details in chapter 4,
where a thorough description of the functionality of the modules is
given.
3. Interfaces: Settings for automating radio and antenna rotator
control. The set-up and use of this feature is described in details in
chapter 7.
4. Predict: Parameters that define the functional and visual behaviour
of the future pass prediction functions. These are described in
chapter 5.
The rest of this chapter describes the parameters in the
General
group,
page by page. You can freely experiment with the configuration parameters
without worrying too much about messing up your settings. Gpredict offers
you a Reset to Default function for most parameters. This function can be
accessed via the Reset button available everywhere in the configuration
24
Figure 3.1: The preferences dialogue.
Page 22

Customising Gpredict
dialogue.
3.2 Number Formats
These settings determine how numbers are displayed in gpredict. They can
be accessed from the menu bar via Edit → Preferences → General →
Number Formats. Figure 3.1 shows how the configuration page looks like
in the dialogue.
3.2.1 Show Local Time Instead of UTC
By default, gpredict shows the time and date in UTC (Universal Time
Coordinates). If you check this box gpredict will show the Local Time
instead of UTC. Please note that Local Time is the time according to the
locale settings in your operating system, which is not necessarily the same
as the local time at the selected ground station.
3.2.2 Time Format
This parameter offers you a very flexible way to define how the date and
time should be displayed throughout the program. The time format is
specified using a format string consisting of any combination of characters
and format codes. The most commonly used format codes are listed in table
3.1, while table 3.2 lists the less common codes. The label next to the
format string entry box shows how the date and time will be displayed
using the soecified format string. This label is updated continuously as you
type into the format string entry box.
Table 3.3 gives a few examples on how the time format codes can be used
to create time format strings. You are highly encouraged to experiment for
yourself, and use the Reset button to reset the format string to the factory
default setting if something goes wrong.
25
Page 23

Gpredict User Manual
Code Description
%a The abbreviated weekday name according to the current locale.
%A The abbreviated month name according to the current locale.
%B The full month name according to the current locale.
%c The preferred calendar time representation for the current locale.
%d The day of the month as a decimal number (range 01 to 31).
%e The day of the month padded with blank (range 1 to 31).
%F The date using the format \%Y-\%m-\%d.
%H The hour as a decimal number (range 00 to 23).
%m The month as a decimal number (range 01 to 12).
%M The minute as a decimal number (range 00 to 59).
%S The seconds as a decimal number (range 00 through 60).
%z Numeric time zone (e.g., -0600 or +0100).
%Z The abbreviated time zone (e.g. CEST or GMT).
Table 3.1: Most common format codes
26
Page 24

Customising Gpredict
Code Description
%C The century of the year.
%D The date using the format %m/%d/%y.
%g
The year corresponding to the ISO week number, but without the century
(range 00 through 99).
%G The year corresponding to the ISO week number. Similar to %Y.
%h The abbreviated month name. The action is the same as for %b.
%I The hour as a decimal number (range 01 to 12).
%j The day of the year (range 001 to 366).
%k
The hour as a decimal number, like %H, but padded with blank (range 0
to 23).
%l
The hour as a decimal number, like %I, but padded with blank (range 1
to 12).
%n A single \n (newline) character. Use with care.
%p
Either AM or PM, according to the given time value (not supported in all
locales).
%P
Either am or pm, according to the given time value (not supported in all
locales).
%r
The complete calendar time using the AM/PM format of the current
locale. This format is equivalent to %I:%M:%S %p.
%R The hour and minute in decimal numbers using the format %H:%M.
%s
The number of seconds since the epoch, i.e., since 1970-01-01 00:00:00
UTC. Leap seconds are not counted unless leap second support is
available.
%t A single \t (tabulator) character.
%T The time of day using decimal numbers using the format %H:%M:%S.
%u
The day of the week as a decimal number (range 1 through 7), Monday
being 1.
%U
The week number of the current year as a decimal number (range 00 to
53), starting with the first Sunday as the first day of the first week.
%V The ISO week number (range 01 to 53). ISO weeks start with Monday.
%w The day of the week (range 0 to 6), Sunday being 0.
%W
The week number of the current year (range 00 to 53), starting with the
first Monday as the first day of the first week.
%x The preferred date representation for the current locale.
%X The preferred time of day representation for the current locale.
%y The year without a century as a decimal number (range 00 through 99).
%Y The year as a decimal number, using the Gregorian calendar.
%% A % sign.
text You can use any free text and characters.
Table 3.2: The not so common time format codes.
27
Page 25

Gpredict User Manual
Format String Resulting Time String
%Y/%m/%d %H:%M:%S 2006/07/23 21:22:00
%Y.%j %H:%M:%S 2006.204 21:22:00
%b %d, %Hh%M Jul 23, 21h26
Table 3.3: Examples of time format strings.
3.2.3 Geographical Coordinates
Geographical coordinates in gpredict (e.g. ground station location and subsatellite points) are specified using decimal degrees North for latitude and
decimal degrees East for longitude. This means that longitudes West of
Greenwich are negative, as are latitudes South of the Equator. To avoid any
endless discussions on whether this is the correct convention or not,
gpredict offers you the possibility to show geographical coordinates using
N, S, E and W suffixes instead of signs. You can enable this by checking the
Use N/S/E/W for geographical coordinates field. Enabling this will show
12.34° East of Greenwich as 12.34°E, while 12.34° West of Greenwich will
be shown as 12.34°W.
3.2.4 Measurement Units
This option allows you to choose imperial units instead of the metric
system, i.e. miles instead of km and feet instead of meters. Internally,
gpredict will always use the metric system and this setting will only affect
how the data is presented.
3.3 Ground Stations
This page allows you to add, edit and delete ground stations. You can
define as many ground stations as you want, but you need at least one. You
can always choose between the pre-defined ground stations when you
create or configure a module. Figure 3.2 shows how the corresponding
configuration page looks like in the preferences dialogue.
The page shows the existing ground stations in a table. For each entry, the
table shows the name, latitude, longitude, altitude, weather station, and
whether the ground station is the default one or not1. The table also shows
a column called QRA. This is the Maidenhead locator square corresponding
to the specified location. Gpredict does not store the Maidenhead locator
info, instead it calculates it automatically from the latitude and longitude.
Below the table there are three buttons, namely Add New, Edit, and
Delete. As their names suggest, these buttons are there for adding, editing
and for deleting entries in the table.
1 Default ground station has no particular meaning in gpredict, except that this
location will be used when no explicit selection is made for a module or
prediction function
28
Page 26

Customising Gpredict
To add a new ground station click on the Add New button. This will bring
up the dialogue shown on figure 2.6 with all fields initially empty. You can
proceed by doing the following:
1. Enter a short name for the ground station using the characters a..z,
A..Z, 0..9, hyphen and underscore. This name will also be used as file
name and it must be unique2.
2. Enter the coordinates by either:
○ Manually entering the latitude and longitude or
○ Entering the Maidenhead locator square or
○ Selecting a location from the built-in list. Click the Select button
right next to the Location field to get a list of major cities around
the World.
1. If you wish, you can fill out the optional fields, too:
○ Description.
○ Location.
○ Altitude.
○ Weather station.
2 If you enter the name of an existing observer the data will be overwritten with
no further warnings.
29
Figure 3.2: The table showing the existing ground stations.
Page 27

Gpredict User Manual
Clicking on the Edit button will bring up the same dialogue as when
clicking on the Add New button, but the fields will be filled out with the
values from the selected ground station. The ground station editor behaves
in exactly the same way as when you add a new location.
If you click on the Delete button, the selected entry will be removed from
the table immediately. The data will still exist on the disk and will only be
erased when you commit your changes, i.e. when you press the OK button.
If you delete an entry by mistake, you can always bail out using the Cancel
button. This, however, will also cancel any other modifications you may
have made during this session.
3.4 TLE Update
In order to make accurate calculations, gpredict needs up to date Keplerian
Elements (TLE data) for the satellites. These data can be updated from the
internet, and gpredict can actually do most of the work for you. The
settings on this configuration page allows you to configure how gpredict
should manage the update of the TLE files. Most of the settings should be
pretty self-explanatory, nevertheless they are described in details in
chapter 6. Until then you can leave the values at their defaults.
3.5 Message Logs
Gpredict logs all run-time messages into log files for later examination in
case of debugging and error tracing. The settings on this page allows you
configure the logging level and whether old log files should be kept or
deleted. For everyday use you should keep the default settings.
In case you want to examine the current log file while gpredict is running
select Log browser in the File menu. Besides showing the current
messages the log browser will show a nice summary of the number of
errors, warnings, info and debug messages.
30
Page 28

4 Modules and Views
4.1 Data Fields
Table 4.1 provides a complete reference for what kind of data fields (i.e.
satellite data) gpredict can calculate, and which views and functions can
show them to the user.
Data Field
Available in
List
View
Map
View
Polar
View
Single
Sat.
Predict
dial.
Satellite Name - √ √ √ √ √
Catalogue Number - √ √
Azimuth [°] √ √ √ √
Elevation [°] √ √ √ √
Direction - √ √ √
Right Ascension [°]
3
√ √ √
Declination [°] √ √ √
Range [km] √ √ √
Range Rate [km/s] √ √ √
SSP Latitude [°] √ √ √ √
SSP Longitude [°] √ √ √ √
SSP Maidenhead Locator - √ √ √ √
Footprint [km] √ √ √ √
Ground Track - √
Sky Track - √
Altitude [km] √ √ √
Velocity [km/s] √ √ √
Doppler Shift (100 MHz) [Hz] √ √ √
Signal Loss [dB] √ √ √
Signal Delay [ms] √ √ √
Mean Anomaly [°] √ √ √
3 The right ascension can also be displayed in hh:mm:ss or hh:mm.mm format.
31
Page 29

Gpredict User Manual
Data Field
Available in
List
View
Map
View
Polar
View
Single
Sat.
Predict
dial.
Orbit Phase [°] √ √ √
Visibility - √ √ √
Ground Station Info - √ √
Cursor Track - √ √
Next Event (AOS or LOS) [hms] √ √ √ √ √
AOS [hms] √ √ √
LOS [hms] √ √ √ √ √
TCA [hms] √
Pass Duration [hms] √
Maximum Elevation [°] √
Azimuth at AOS/LOS [°] √
Table 4.1: Data field availability in the different views.
4.2 Views
4.2.1 The List View
The list view shows the data organised in a list/table. It shows one satellite
per row and it is very efficient to show detailed information for many
satellites at the same time. The list view shows all the satellites that are
associated to its parent module. Figure 4.1 shows a screen capture of a list
view.
By default the list view shows the name, azimuth, elevation, direction,
range, time of next event (either AOS or LOS), altitude, and orbit number
for the satellites. There are many more data columns available, they are
just hidden by default. Table 4.1 on page 32 shows a full list of available
data fields for the list view. To change the global defaults use the
preferences dialogue; Edit → Preferences → Modules → List View, while
the settings for each individual list view in a specific module can be
changed via Module Pop-Up → Configure → Properties → List View.
One of the more interesting features of the list view is its ability to
dynamically sort the rows using any of the visible columns as sorting
criteria, in both ascending and descending order. By default the list view is
sorted in ascending order using the satellite names as criteria, that is the
list is sorted in alphabetical order. To sort the list according to another
column, you can simply click on the column header. You can reverse the
sorting order by clicking on the same column header again. Note that the
column that is used as sorting criteria is shaded differently than the other
columns.
The list view on figure 4.1 is sorted by the elevation of the satellites and
32
Page 30

Modules and Views
the small arrow in the column header pointing up indicates that the list is
sorted in descending order. When the list is sorted in ascending order, the
small arrow points down.
Right clicking on row in the list view brings up the satellite pop-up menu
that gives you access to the following functions:
● <SATELLITE NAME>: Selecting this menu item brings up a small
info window showing some static data about the satellite consisting
of the Keplerian Elements.
● Show Next Pass: This will bring up the dialogue window showing
the details about the next upcoming pass for this satellite.
● Future Passes: This will bring up the dialogue window showing the
summary for the next N passes, N being a user configurable
parameter (see section 5.1).
The list view has rather few configuration options. Besides the data fields
described earlier, there is one more configuration parameter that should be
mentioned, namely the Enable Rules Hint in List Views option. This
option tells the theme engine of the desktop manager that the list view
requires users to read across rows and associate cells with one another. By
default, the theme engine will then render the list with alternating row
colours making it easier to distinguish the rows (see figure 4.1). The exact
behaviour depends on your desktop theme. This setting is only available in
the global configuration dialogue and it applies to all list views in gpredict.
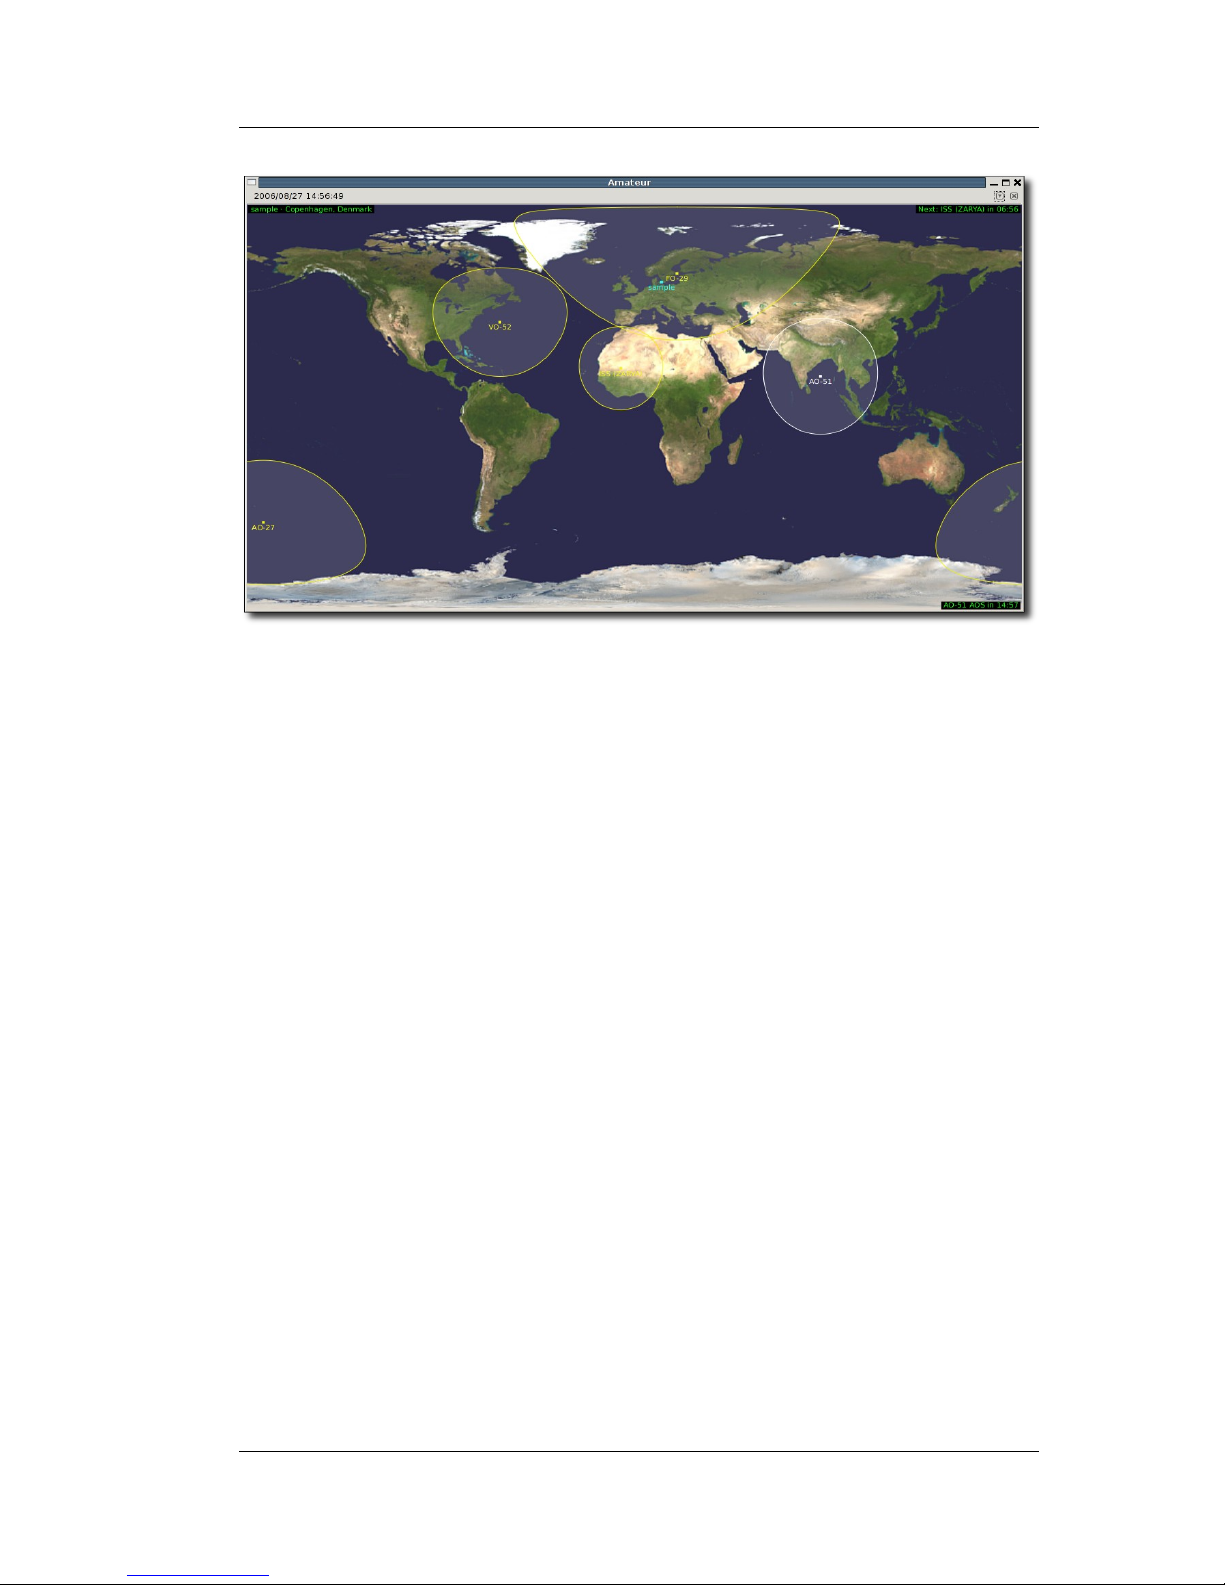
4.2.2 The Map View
The map view is intended to give you a quick overview of which satellite is
33
Figure 4.1: The list view illustrating the auto-sort feature.
Page 31

Gpredict User Manual
where at any given time. The map view shows both the position of the
satellites and their footprints. Moreover, the map view can also show
information about the current ground station, the next event, i.e. which
satellite comes up next, as well as information about the selected satellite.
Figure 4.2 shows how the map view looks like using the default settings. As
you can see, the satellites are shown as small yellow squares with their
name is printed just below the square4. The footprints of the satellites is
drawn using the same colour as the satellite mark and label, and the area
covered by the footprint is highlighted using transparent white colour.
The footprint of a satellite is the area on the surface of the Earth where the
satellite is visible. On a sphere the footprint would be a circle, but since the
map view projects the sphere to a rectangular surface the footprints will
only look like a circle when the satellite is near the Equator.
As you can see on figure 4.2, satellite AO-51 is drawn in white instead of
yellow. This means that AO-51 is selected. You can select a satellite by
simply clicking on it with the left mouse button. You can click anywhere
within its footprint area. The selected satellite will have its next AOS or
LOS time shown in the lower right corner of the map view. Selecting a
satellite will clear any other selection, that is you can have only one
satellite selected at a time. You can also clear your selection by clicking
once more on the selected satellite.
Each satellite has a pop-up menu associated to it. You can activate the popup menu by right clicking on a satellite. The pop-up menu is very similar to
the one you have seen in section 4.2.1 for the list view, except that there
are a few items only applicable for the map view. Following items are
available in the satellite pop-up menu for the map view:
● <SATELLITE NAME>: Selecting this menu item brings up a small
info window showing some static data about the satellite consisting
of the Keplerian Elements.
● Show Next Pass: This will bring up the dialogue window showing
the details about the next upcoming pass for this satellite.
● Future Passes: This will bring up the dialogue window showing the
summary for the next N passes, N being a user configurable
parameter (see section 5.1).
● Highlight Footprint: Selecting this option will highlight the area
covered by the footprint of the satellite.
● Ground Track: Selecting this option will show the ground track of
the satellite on the map. By default the ground track for the current
orbit will be shown. If you select this option again, the ground track
of the satellite will be deleted again. The map view can show the
ground tracks for any number of satellites at the same time and for
more than one orbit. The number of orbits can be configured in the
preferences dialogue or the module settings editor.
4 Satellites that are very close to the bottom or either side of the map have their
names printed above or on the side of the square, as is the case for TBD and
TBD on figure TBD.
34
Page 32
Modules and Views
Gpredict offers you many configuration options to customise the look of the
map view. The global default settings can be modified in the preferences
dialogue, i.e. Edit → Preferences → Modules → Map View, and the
settings for the map view in a specific module can be accessed via Module
Pop-Up → Configure → Properties → Map View. A description of the
configuration options is given below.
● Background Map: This setting determines which map file should be
used as background map. The standard gpredict distribution
includes a few maps but you can also use your own maps. To select a
new map, click on the Select map button. The map file has to be in
a commonly used graphic format, for example Portable Network
Graphics (PNG), and should have Greenwich in the middle, West to
the left and East towards the right. Besides that there are no
restrictions on the map size or the aspect ratio.
● Extra Contents: Using these setting you can determine which extra
content should be displayed on the polar view:
● QTH Info: Checking this box will show the name of the ground
station in the upper left corner of the polar view. The map view on
figure TBD shows
sample
, since this is the name of the default
ground station.
● Next Event: Checking this box will show in the upper right corner
which satellite will come up next as when it will come up. The time is
shown as a countdown to the event. Figure 4.2 shows that the next
satellite will be ISS (ZARYA) and that it will come up in 06m56s.
Please note that the countdown is not necessarily updated in realtime. Actually, it is only updated every time the map view is
refreshed, see description of refresh rates in section 2.3.3 – Module
Properties.
35
Figure 4.2: The map view using the default settings.
Page 33

Gpredict User Manual
● Cursor Position: If this option is set, the latitude and longitude
corresponding to the position of the mouse pointer will be displayed
in real-time in the lower left corner of the map.
● Grid Lines: Enabling this option will draw the grid lines on the map.
The grid lines will be drawn for every 30°.
● Colours: These options allow you to change all colours used in the
map view. You can pick a colour using a colour selector by clicking
on the button showing the coloured rectangle. Note that the colours
are specified using their red, green, and blue components and an
additional alpha channel. The alpha channel determines the
transparency of the colour. Colours which are very transparent may
not be clearly visible on the colour picker button as is the case for
the default Axes/Circles colour. Following colours can be set:
○ Ground Station: This colour is used to draw the small square
and label at the position of the current ground station.
○ Grid: This colour is used to draw grid on the map.
○ Tick Labels: The colour used for the tick labels on the grid.
○ Satellite: The colour of the satellites, their labels, and footprint
circles.
○ Selected Sat.: The colour of the selected satellite, its label, and
its footprint circle.
○ Ground Track: The colour used to draw the ground track of a
satellite.
○ Coverage Area: This colour is used to highlight the area covered
by the footprint of the satellite. It is strongly suggested to make
this colour
very
transparent.
○ Info Text FG: The foreground colour used for the additional
information, e.g. Next Event.
○ Info Text BG: The background colour used for the additional
information.
○ Shadow: Determines how strong the shadow below satellite
markers and labels should be. This shadow is used to enhance the
visibility of the satellites on the map when they are over lightcoloured regions such as the South Pole or a desert area.
● Display ground track for ___ orbit(s): This setting specifies for
how many orbits the ground track of a satellite should be displayed.
The default value is 1 and you can choose any value between 1 and
10.
4.2.3 The Polar View
The polar view (also called radar view) shows the satellites within range on
a polar graph. The polar axis represents the azimuth of the satellites
starting at North and turning towards East, while the radial axis represents
to the elevation of the satellites with 90° at the centre, corresponding to
looking straight up in the sky. Thus, the polar view is a projection of the sky
36
Page 34
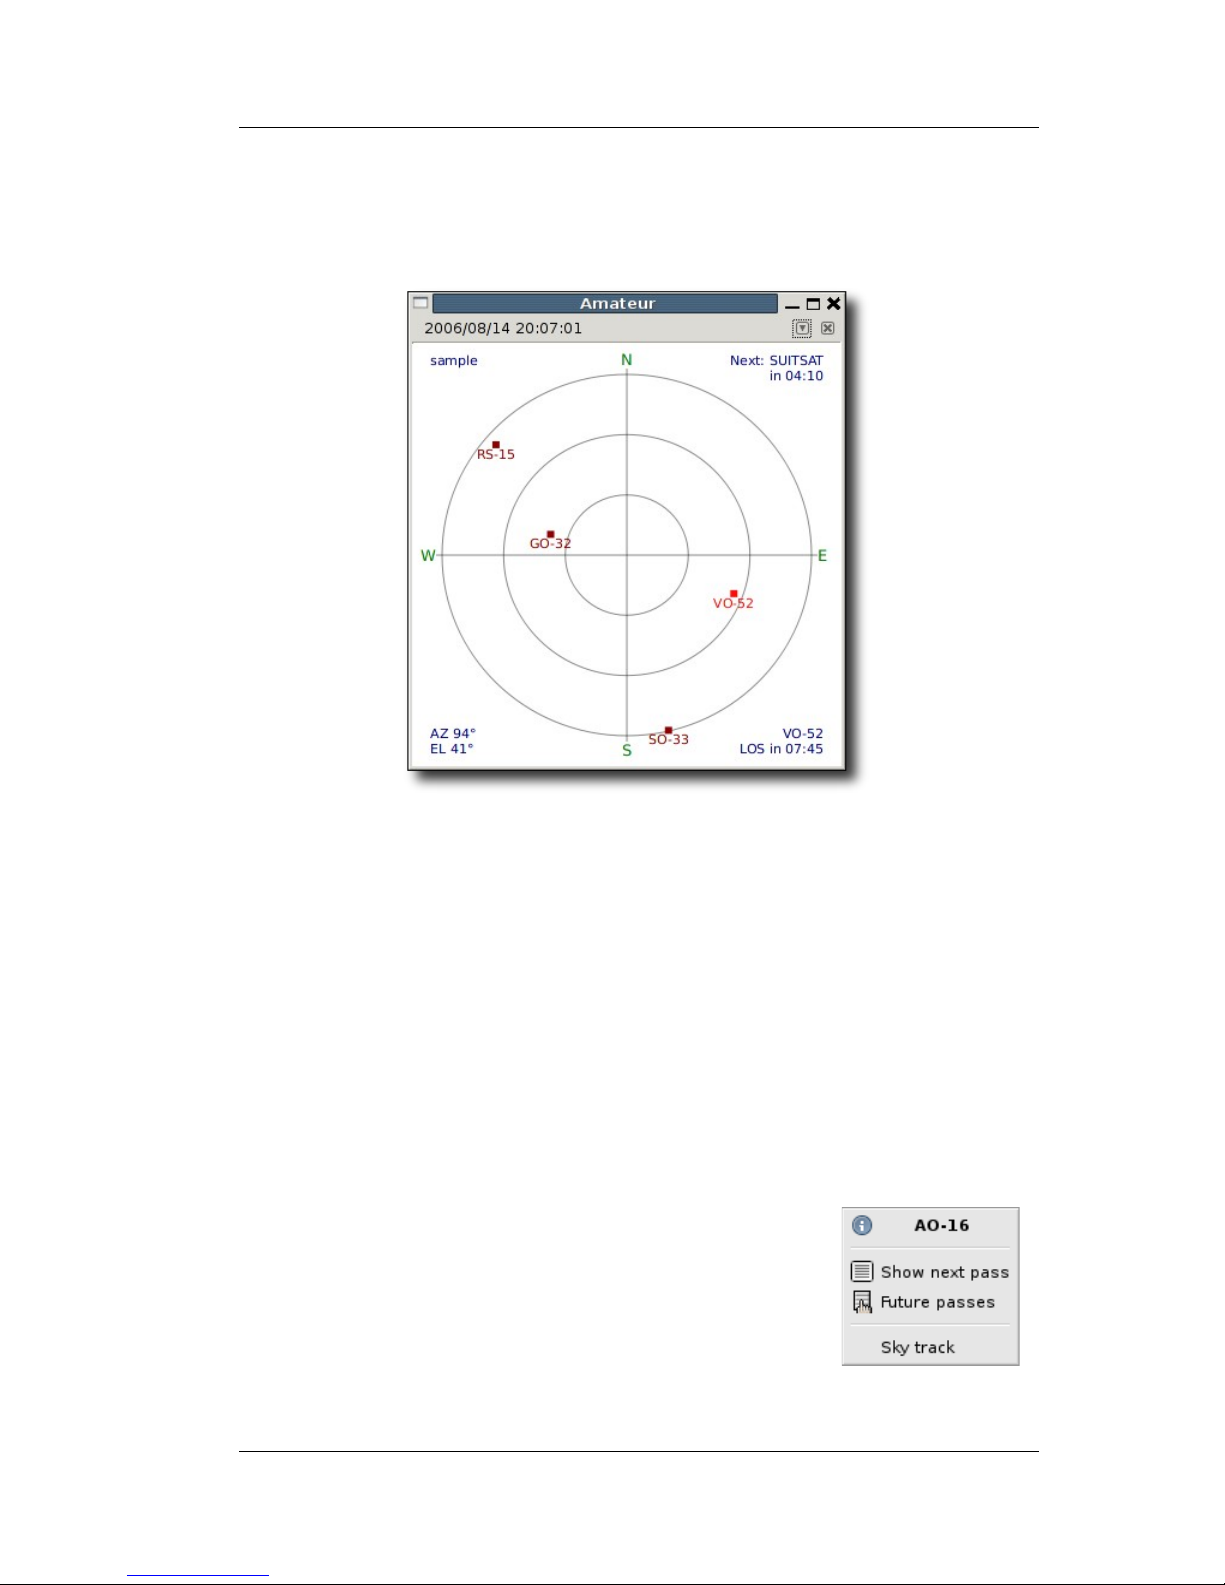
Modules and Views
as seen from the ground station with the centre of the graph corresponding
to looking straight overhead. Figure 4.3 shows a screen capture of the
polar view in gpredict as it looks using the default settings.
The satellites that are plotted on the polar view are selectable. If you left
click on a satellite it becomes selected (changes colour) and the remaining
in-range time for the selected satellite will be displayed in the lower right
corner of the polar view. The selected satellite on figure 4.3 is VO-52 and
it will get out of range (i.e. go below the horizon) in 7 minutes and 45
seconds.
You can only have one satellite selected at a time, thus clicking on an
unselected satellite will clear any previous selection. Clicking on a selected
satellite will deselect it.
You can also right-click on a satellite in order to bring up the satellite popup menu shown on figure 4.4. The satellite pop-up menu in the polar view
gives you quick access to the following functions:
● <SATELLITE NAME>: Selecting this menu
item brings up a small info window showing
some static data about the satellite. Currently,
this data consists of the orbital data
(Keplerian Elements) as well as uplink,
downlink and beacon frequencies for some
satellites.
● Show Next Pass: This will bring up the
dialogue window showing the details about
37
Figure 4.3: The polar view.
Figure 4.4: Polar View
popup.
Page 35

Gpredict User Manual
the next upcoming pass for this satellite.
● Future Passes: This will bring up the dialogue window showing the
summary for the next N passes, N being a user configurable
parameter (see section 5.1).
● Sky Track: Checking this option will show the sky track of the
satellite on the polar graph. If you select this option again, the sky
track of the satellite will be hidden. The polar view can show the sky
tracks for any number of satellites at the same time. When a satellite
goes down, i.e. disappears from the polar view, its sky track will
disappear, too.
● Set Target: Selecting this option will select the satellite as
communication target. This function is currently disabled.
Gpredict offers you many configuration options to customise the look of the
polar view. The global default settings can be modified in the preferences
dialogue, i.e. Edit → Preferences → Modules → Polar View, and the
settings for the polar view in a specific module can be accessed via
Module Pop-Up → Configure → Properties → Polar View. A description
of the configuration options is given below.
● Orientation: This setting determines the orientation and direction
of the polar graph. The first letter defines the cardinal direction that
should be placed at the top of the graph, then it continues clockwise
with the second, third, and fourth letters:
○ N/E/S/W (default): North is at the top, South at the bottom, East
on the right side, and West on the left side.
○ N/W/S/E: Same as the above but East and West swapped, hence
we have West on the right side.
○ S/E/N/W: North and South swapped, as compared to the default
setting.
○ S/W/N/E: Both North/South and East/West swapped as compared
to the default setting.
● Extra Contents: Using these setting you can determine which extra
content should be displayed on the polar view:
○ QTH Info: Checking this box will show the name of the ground
station in the upper left corner of the polar view. The polar view
on figure 4.3 shows
sample
, since this is the name of the default
ground station.
○ Next Event: Checking this box will show in the upper right
corner which satellite will come up next as when it will come up.
The time is shown as a countdown to the event. Figure 4.3 shows
that the next satellite will be SUITSAT and that it will come up in
4 minutes and 10 seconds. Please note that the countdown is not
necessarily updated in real-time. Actually, it is only updated every
time the polar view is refreshed, see description of refresh rates
in section 2.3.3 - Module Properties.
○ Cursor Position: If this option is set, the polar coordinates of the
mouse pointer will be displayed in real-time in the lower left
38
Page 36

Modules and Views
corner of the graph.
○ Extra Az Ticks: Enabling this option will show some extra
Azimuth ticks/axes on the polar graph at 30° intervals.
● Colours: These options allow you to change all colours used in the
polar view. You can pick a colour using a colour selector by clicking
on the button that show the coloured rectangle. Note that the
colours are specified using their red, green, and blue components
and an additional alpha channel. The alpha channel determines the
transparency of the colour. The higher the value the less transparent
is the colour. Colours with an alpha value of 0 will be completely
transparent, that is invisible! Colours which are very transparent
may not be clearly visible on the colour picker button as is the case
for the default Axes/Circles colour. Following colours can be set:
○ Background: The background colour.
○ Axes/Circles: This colour is used to draw the azimuth axes and
the elevation circles.
○ Tick Labels: The colour used for the tick label, e.g. N, W, S, and
E.
○ Satellite: The colour of the satellites and their labels.
○ Selected Sat.: The colour of the selected satellite and its label.
○ Sky Track: The colour used to draw the sky track of a satellite.
○ Info Text: The colour used for the additional information, e.g.
Next Event.
● Miscellaneous:
○ Show the sky tracks automatically: If you enable this check
box the polar view will display the sky tracks for satellites as soon
as they come in range. This means that you don't have to right
click then select sky Track for each satellite. You can still hide the
sky tracks manually.
There is no support to Save/Load colour schemes, nor is there any
possibility to preview you changes. Should you end up with a bad colour
scheme, you can always reset the settings to either the global defaults or
the built-in factory settings. You can do that using the Reset button located
at the bottom of the page.
4.2.4 The Single-Satellite View
The single-satellite view is a simple table showing details of one satellite at
a time. Figure 4.5 shows a screen capture of the single-satellite view. Of
course, you can pick any satellite that is associated to the parent module
via the Select Satellite menu item in the single-satellite pop-up menu. You
can access the pop-up menu by clicking on the small V icon located on the
left side of the satellite name.
The single-satellite view is practically a miniature version of the list view; it
can display the same data as the list view but for only one satellite at a
time. Moreover, the single-satellite view displays the data vertically and is
39
Page 37
Gpredict User Manual
well suited to be placed in the small rectangular container areas of those
layouts, which can contain three views.
4.2.5 The Upcoming Passes View
This view shows a simple list of the satellites in the module together with
their Azimuth, Elevation and a count down clock until the next AOS/LOS.
You can right click on the satellites to get info and predict future passes as
in the other view.
This view has no configuration options.
40
Figure 4.5: The single-satellite view.
Figure 4.6: The upcoming passes view.
Page 38
5 Advanced Pass Predictions
5.1 Customising the Prediction Parameters
The parameters gpredict uses for predicting satellite passes in the future
can be customised to a great extent. To get access to these parameters go
to Edit → Preferences and click on the Predict button. You will be
presented with a notebook containing the prediction parameters organised
in four notebook pages, see figure 5.1.
5.1.1 Pass Conditions
The parameters on this page define how gpredict predicts future passes for
satellites.
Minimum elevation
This parameter define what gpredict should consider as a satellite pass. If
the elevation of the satellite stays below this threshold gpredict will discard
41
Figure 5.1: Parameters that control pass predictions.
Page 39

Gpredict User Manual
the pass and not will include it in the list of passes.
Number of passes to predict
This parameter defines how many passes gpredict should try to find when
looking for future passes.
Passes should occur within
This parameter sets the time limit within which the predicted passes should
occur. When the time variable in the prediction algorithm reaches this time
limit gpredict will stop looking for passes even if it has not found the
number of passes requested in the previous parameter.
These two parameter should therefore be thought of as “either or”, i.e.
gpredict will either stop when it has found X number of passes or when it
reaches the time limit – whichever comes first.
Time resolution
When showing the details of a given pass gpredict will try to reach the time
resolution specified with this parameter. This resolution should be thought
of as a lower limit – the number of entries (next option) in the detailed pass
prediction window will have precedence over this condition.
Number of entries
This parameter defines the number of entries gpredict should display in the
detailed pass prediction window. The exact number might deviate from this
but it will always be around this number.
Twilight threshold
This parameter has influence on when gpredict considers a satellite to be
visible. Theoretically, a satellite can be visible if it is in sunlight but the
ground station is in darkness. The problem is that darkness in this respect
is not an absolute entity and this parameter defines the threshold for the
elevation of the Sun at which the ground station is considered to be in
darkness.
Following definitions exist for twilight:
Civil twilight 0° to -6°
Nautical twilight -6° to -12°
Astronomical twilight -12° to -18°
For most uses the “civil darkness” will be adequate.
Always use real time for pass predictions
If you check this option Gpredict will always use the current system time as
starting point for future pass predictions, even when you are running in
simulation mode. If you leave the box unchecked Gpredict will take the
time from the time controller to predict future passes from.
5.1.2 Multiple Passes
The check-boxes on this page allows you to select what data gpredict
should show when listing multiple passes. You can choose between:
● Acquisition of signal (AOS) – the time when the satellite comes
within range.
● Time of closest approach (TCA) – the time when the elevation of the
42
Page 40

Advanced Pass Predictions
satellite is at maximum during the pass.
● Loss of signal (LOS) – the time when the satellite goes out of range
again.
● Duration of the pass.
● Maximum elevation during the pass.
● The satellite Azimuth when it comes within range.
● The satellite Azimuth at the time of closest approach.
● The azimuth when the satellite goes out of range.
● The orbit during which the pass will occur.
● The visibility of the satellite during the pass. Note that the visibility
can change during the pass. This field will show a combination of
three letters each of them indicating a visibility state (V=visible,
D=daylight, E=eclipsed).
43
Figure 5.2: Configuration options for multiple pass predictions.
Page 41

Gpredict User Manual
5.1.3 Single Pass
The check-boxes on this page allows you to select which data fields
gpredict should include when showing details about a pass. The choices are
pretty much the same as for the list view and the single satellite view.
5.2 Sky at a Glance
44
Figure 5.4: The sky at a glance.
Figure 5.3: Configuration options for single pass predictions.
Page 42

Advanced Pass Predictions
The sky at a glance window gives you a quick overview of upcoming
satellite passes for all satellites of a given module. The only parameter
controlling the behaviour of this function is the length of the time axis, i.e.
the time within which the passes should occur.
Besides that you can customise the colours used for each satellite. The sky
at a glance window will show up to 10 satellites from the given module.
5.3 Communication Windows
This function is currently under development.
5.4 The Advanced Predictor
This function is currently under development.
45
Figure 5.5: Configuration options for the Sky at a glance function.
Page 43

6 Updating the Orbital Elements
6.1 Overview
Gpredict uses the NORAD SDP4/SDP4 algorithms to calculate the position
of Earth orbiting satellites at any given time. These algorithms require
knowledge about the orbit of the satellite as well as the position of the
satellite on the orbit at some time T0 a.k.a Epoch. These data are included
with gpredict in so-called TLE files.
Unfortunately, in the real world the dynamics of an Earth orbiting satellite
can only be approximated (at least within reasonable time limit) and the
SGP4/SDP4 algorithm is no exception to it. As the time difference to Epoch
increases the calculation errors become more and more significant, in
particular for satellites in low Earth orbit (few hundred km). Therefore, the
TLE files containing orbital elements at Epoch must be updated regularly
in order to stay up to date. Depending on the intended use of gpredict, an
update frequency between 1 and 4 weeks is reasonable.
Gpredict offers you three different ways to update the orbital elements at
Epoch (T0):
1. Automatic updates from the web via HTTP or FTP. This is the most
convenient way to update the orbital elements since gpredict will
automatically download the latest data and update the local
database.
2. Automatic updates from local files. This method can be used to
update from files that have been acquired from sources that can not
be accessed with gpredict (e.g. email).
3. Manual update using the built-in orbital elements editor. This is
definitely the least preferred way for updating orbital elements,
nevertheless the method is useful for adding your own satellites to
the gpredict database, and experiment with satellite orbits.
Each of these methods are described in details in the following sections.
Gpredict stores the orbital elements in the NASA/NORAD two-line format5,
and the data you use to update the TLE files need to be in this format.
5 Actually, the NASA two-line format contains three lines for each satellite: One
line for the satellite name and two data lines. There is also the NASA bare twoline format, which contains only two lines per satellite since it omits the line
with the satellite name.
47
Page 44

Gpredict User Manual
6.2 Automatic Update from the Internet
When your computer is connected to the internet, updating the TLE
elements is as easy as selecting Edit → Update TLE → Update from the
internet menu item in the menu bar. When you do that, gpredict will by
default fetch a subset of the TLE files available from http://celestrak.com/,
and update the internal database using the downloaded files. A small
dialogue window showing the progress of the update process will pop up
when you start the update. Please don't interrupt the process by forcing
this dialogue to close. Sometimes, when the network connection to the
remote server is slow or otherwise bad, it may take some time until
gpredict decides to give up and cancel the update process. There is a builtin connection time-out of 10 seconds per data file. If gpredict fails to
retrieve fresh TLE data the process will go through but at the end you will
see that the number of satellites updated is 0.
As mentioned earlier in this chapter, it is rather important to have the TLE
data updated at regular intervals. Gpredict can help you remembering
when it is time to update the TLE data by reminding you once per week
that it is now time to a TLE update. This default behaviour can be changed
in the preferences dialogue, see Edit → Preferences → General → TLE
Update. Figure 6.1 shows how this configuration page looks like.
6.2.1 Auto-Update
These settings define how gpredict should check the age of TLE data and
what it should do when it finds that the TLE data is getting out of date.
First, you can determine how often gpredict should check the age of the
TLE data. Possible choices are: Daily, Weekly, Monthly, and Never. The
48
Figure 6.1: Configuration options for TLE updates.
Page 45

Updating the Orbital Elements
default value is weekly, and it seems to be a good update frequency for
most users.
Second, you can define what gpredict should do when it decides that it is
time to update the TLE data. The default and most obvious action is to send
a notification to the user. This is done by popping up a dialogue box with
the reminder, where after the user can initiate an update as described
earlier in this section. The other possibility is to let gpredict perform a fully
automatic update in the background without any notification to the user –
not even in case of error. If you choose to use this option, you should keep
an eye once in a while on whether the updates are actually performed or
not. You can do that either by checking the satellite info dialogue or by
examining the log messages produced by gpredict.
Please note that both the notification mechanism and the autonomous,
silent update are relatively new functions in gpredict. Consequently they
are far from perfect and are most likely to undergo improvements in future
versions of gpredict. Your comments and suggestions will be highly
appreciated.
6.2.2 Update from the Internet
In order to perform automatic or semi-automatic TLE-updates from the
internet, gpredict needs to know what files to fetch and from where. By
default, gpredict is configured to download all of the “interesting” data
from CelesTrak, but you may want to perform the updates from somewhere
else or using other files. There are three parameters that are relevant here:
1. Remote server: This specifies the complete remote URL consisting
of the network protocol (HTTP, FTP, etc.), the server name, as well
as the directory on the server where the files are located.
2. Proxy server: If you are behind a proxy server, you can enter the
name or address of the server here.
3. Files to fetch: A list of files that should be downloaded from the
remote server. The files should be separated by a ; (semicolon).
Currently, gpredict only supports updates from TLE files that are in the
NASA two-line format (plus a third line for the satellite name), and you
should ensure that the data is in the correct format, wherever you do your
updates from. Wrong format will not crash gpredict but it will not update
anything either.
There is one potentially dangerous shortcoming in the current
implementation of TLE updates from the internet, namely authentication. If
either the remote server or your proxy server requires authentication, the
only way to specify the user name and password is to include them into the
URLs:
protocol://user:password@example.com/path/
Be warned that the URL string and thereby your user name and password
will be stored as clear text in the gpredict configuration file, which may be
readable by anybody who has access to your computer. To help this you
can change the permissions of the gpredict.cfg file so that only you have
read and write permissions on it. At the same time, please submit a feature
49
Page 46

Gpredict User Manual
request at http://sourceforge.net/projects/gpredict asking us to implement
better handling of passwords in gpredict – if enough people complain about
this we will eventually have to do something about it.
6.3 Semi-Automatic Update from Local Files
If you can not update the TLE files using the internet, you still have the
option to perform a semi-automatic update using local files. In order to
update the TLE data from local files, you can do the following:
1. Acquire the fresh TLE files and store them in a directory. The files
must be in the NASA two-line format.
2. Select the Edit → Update TLE → Update from local files menu
entry in the menu bar.
Gpredict will then ask you to specify a directory where the fresh TLE files
are located, see figure 6.2. Click the button, select Other... in the list of
entries, and find the directory where the fresh TLE files are located. Click
OK and you'll see the same progress dialogue as in the case of updating
from the internet.
If you plan to update the TLE from local files often, it is recommended to
use a dedicated directory for that purpose. Gpredict will indeed remember
the last chosen directory till the next time you use this function. Moreover,
if you for some reason are going to use multiple TLE source directories,
you may consider storing these directories as bookmarks in the file selector
dialogue.
6.4 Manual Update
This function has not been implemented yet and is currently disabled.
50
Figure 6.2: Selecting a directory to update the TLE data from.
Page 47

Controlling Radios and Rotators
7 Controlling Radios and Rotators
7.1 Overview
Beginning with version 1.0 gpredict can do Doppler tuning of radios and
tracking of antenna rotators via Hamlib, see http://hamlib.sourceforge.net/.
This is done via hamlib's rigctld and rotctld TCP/IP interface and requires
that hamlib version 1.2.8 or later6 is installed on the computer to which
your radio and/or rotator device is connected.
Since this interface uses an internet protocol, you can either have gpredict
control devices connected to the same computer or you can control devices
connected to a remote computer.
Gpredict is very flexible when it comes to controlling radios. You can use
both receivers, transmitters, and transceivers. You can even use two
separate radios for uplink and downlink.
The rest of this chapter will guide you through setting up gpredict and
hamlib to perform radio and rotator control. You should read this chapter
carefully if you plan to use gpredict for these tasks. If you have difficulties
understanding this section or you miss some information, feel free to seek
support on the gpredict forum at http://forum.oz9aec.net/ .
Before you set up gpredict to control your hardware devices it is very
important to ensure that the hamlib interface works properly with your
devices. Many low-level drivers in hamlib have been written from specs and
might not have been tested with real hardware at all. You could be the first
person to actually test a particular driver with real hardware!
Connecting gpredict to a hardware device without
knowing that the hamlib driver works properly may
cause serious damage to your hardware and for the
surrounding environment.
Regardless of whether your setup works or not, please
provide feedback to the developers via the Gpredict
Froum at http://forum.oz9aec.net/
6 For radio control only you can use hamlib version 1.2.7, but for antenna rotator
you will need version 1.2.8 or later. At the time of writing hamlib 1.2.8 has not
been released yet. However, you can safely use the development version of the
code from http://hamlib.sourceforge.net/bleeding-edge/ - use one from 20 Sep
2008 or later.
51
Page 48

Gpredict User Manual
7.2 Hamlib Tutorial
This section gives you an introduction to hamlib and in particular to the
command line utilities that come with it. It is very important that you know
how to use these tools – otherwise you will not be able to configure
gpredict properly. If you are already familiar with the hamlib command line
utitlities you can skip this section.
Hamlib is a set of libraries that provide low-level radio and antenna rotator
drivers for applications such as gpredict. Besides the libraries hamlib
includes a few command line utilities that allow testing of the drivers.
These are:
● rigctl – allows you to send commands to your radio from the
command line
● rotctl – allows you send commands to your antenna rotator from the
command line
● rigctld – allows you to send commands to your radio via a network
interface using TCP/IP protocol
● rotctld – allows you to send commands to your antenna rotator via a
network interface using TCP/IP protocol
For testing the hamlib driver with your radio and/or rotator you will use
rigctl and rotctl. For setting up gpredict to control your devices you will
use rigctld and rotctld. All of these command line utilities have their own
manual pages that can be accessed by typing
man rigctl
in a terminal.
While this tutorial gives you a brief introduction to hamilb so that you know
just enough to configure gpredict, I strongly encourage you to study these
manual pages for a complete reference about these tools.
Before you can use the hamlib tools you will need to gather some info about
your devices. These are
Model number
This is the Hamlib ID of your particular radio or rotator. The
complete list of supported radios and rotators and their hamlib
ID can be obtained by executing:
rigctl --list
or
rotctl --list
If you are human and cannot read the whole list while it scrolls
by, try using grep or less. For example, to find the ID of the
YAESU FT-847 try:
rigctl --list | grep FT-847
52
Page 49

Controlling Radios and Rotators
101 Yaesu FT-847 0.2 Alpha
This tells you that the FT-847 has model ID 101, the driver has
version number 0.2 and is considered to be in Alpha state
(meaning that it hasn't been tested using a real radio).
Device
This is the Unix file name of the device where your
radio/rotator is connected to. Serial devices are usually
called /dev/ttyS0, /dev/ttyS1 and so on. USB devices including
USB to serial adaptors appear as /dev/ttyUSB0, /dev/ttyUSB1,
etc.
Serial Speed
This is usually set in your radio and although hamlib provides
some default values, it is safest to specify it when you load the
driver
CIV Address
For ICOM radios you will need to know the CIV-address if it
has been changed from the default CIV address. If your ICOM
radio uses the factory default settings you do not need to tell
hamlib what CIV to use.
DTR and CTS
settings
Some special interfaces, e.g. Microham USB I/F, use the DTR
and CTS lines for specific purposes such as PTT and CW
keying. Hamlib sets these lines ON by default and you might
need to disable it explicitly.
Hamlib provides a driver for a fictive radio and rotator
called dummy. This driver has model number 1 and
you can use this driver while you learn to use the
command line utilities. It is also recommended to use
this driver while you get used to the controller user
interface in Gpredict.
7.2.1 Rigctl
Rigctl is an interactive command line tool for sending command to and
reading status from your radio. When you invoke rigctl you need to tell it
which radio you want to control and how to connect to it. For example, the
command line:
rigctl --model=344 --rig-file=/dev/ttyUSB0
will connect to you ICOM IC-910 connected to the first USB port using the
default settings for serial speed, CIV address, etc.
The command line arguments also have a short version consisting of a
single letter. Using the short version the above command would be:
53
Page 50

Gpredict User Manual
rigctl -m 334 -r /dev/ttyUSB0
You can mix the short and long versions as you whish.
By default, hamlib sets the DTR and RTS lines of the RS232 interface high.
If you have an adaptor that uses these lines for special purposes such as
CW and PTT you will need to disable the lines using the --set-conf option:
rigctl –model=334 ... --set-conf=dtr_state=OFF,rts_state=OFF
There are many other configuration options that can be modified using the
--set-conf command line argument. To get a complete list of the
configuration options simply type rigctl -L.
Another very useful option is the -v parameter, which specifies verbosity
level of the debug messages that are printed by rigctl. The more v's you
include the higher the verbosity of the output messages. The highest
number is 5 corresponding to -vvvvv which will print as much as possible –
in most cases even the RS232 traffic. This is very useful for debugging
bogus drivers.
Table 7.1 below lists some of the most common command line options for
rigctl. For a complete reference you should consult the rigctl manual page,
i.e. man rigctl .
Command Description
-m ID --model=ID Specify the model ID of your radio. See rigctl
--list for a complete list of supported radios or
on the web:
http://hamlib.sourceforge.net/support.html
-r dev --rig-file=dev The file name of the device where your radio is
connected. Serial ports usually have file names
/dev/ttyS0, /dev/ttyS1, etc. while USB adapter
including USB-to-RS232 converters usually have
device names /dev/ttyUSB0, /dev/ttyUSB1 and so
on.
-s baud --serial-speed=baud Use baud for serial speed. By default hamlib uses
the highest rate the specified radio is known to
support; however, often this setting will be
specific to what the radio has been configured to
and should therefore always be specified.
-c CIV --civaddr=CIV Sets the CI-V address for ICOM radios. If not
specified hamlib will use the factory default CI-V
address of the specific model. You only need to
use this option if the CI-V address of your ICOM
radio is different from the factory default.
You can specify the address using both decimal
notation and HEX, in the latter case the address
must be prefixed with 0x
54
Page 51

Controlling Radios and Rotators
Command Description
-L --show-conf List all the configuration parameters that are
available for the radio.
-C --set-conf=par=val Set configuration parameters. Use -L to get a list
of configuration parameters). Normally you will
use this if you need to set DTR and RTS OFF and
to configure parameters of the serial
communication (e.g. data bits, stop bits,
handshake, and so on).
-l --list Lists all supported radio with their model
number.
-v Set the verbosity level of output messages. The
highest level is 5 corresponding to -vvvvv and in
this mode hamlib will output all information
available.
Table 7.1: Most common rigctl command line options.
Once you are in rigctl it will prompt you for a command to enter. To get a
list of available commands type a question mark. In order to check the
driver for using it with gpredict you should at least check that the set/get
frequency and get_ptt commands work properly. You can do this with F (set
freq), f (get freq), and t (get ptt) commands.
7.2.2 Rotctl
Rotctl is very similar to rigctl in terms of command line options, the only
significant difference being that you can not specify the CI-V address.
Once you have the rotctl command prompt you can set and get the position
of your rotator using P and p. As with rigctl, you can get the full list of
available commands by typing ? At the rotctl command prompt.
7.2.3 Rigctld and Rotcld
Rigctld and rotctld are similar to rigctl and rotctl except that they act as a
TCP/IP server and do not present you with a command prompt. They take
the same command line arguments for specifying the connection to the
hardware. In addition to that, rigctld and rotctld take an optional
parameter -t 1234 or --port=1234 to allow the user to specify which TCP
port the server should use.
The default port is 4532 for rigctld and 4533 for rotctld and you don't need
to change that unless those ports are already in use (e.g. by another rigctld
or rotctld server).
In order to start a radio or antenna rotator server you simply start rigtctld
or rotctld with the same command line arguments as you used for rigctl
and rotctl.
55
Page 52

Gpredict User Manual
7.3 Configuring your Devices in Gpredict
Now that you have tested hamlib with your radio and antenna rotator we
are ready to move on and configure gpredict.
To enter the radio and antenna rotator settings in gpredict select Edit →
Preferences in the menu bar and click on the Interfaces button in the left
part of the dialogue. You should see something that looks like the dialogue
shown on Figure 7.1 below.
The main view of the dialogue will show the list of already configured
radios, which is initially empty. At the bottom you will find three buttons
for adding, editing, and deleting your radio configurations.
Click this button to add a new radio configuration. You
will get a small dialogue window as shown and
explained in the following section (section 7.3.1).
Click this button to edit an existing configuration. This
brings up the same dialogue as when you add a new
configuration, but now the fields are filled with the
values for the selected configuration.
Click this button to delete an existing configuration. The
configuration will be completely removed.
56
Page 53
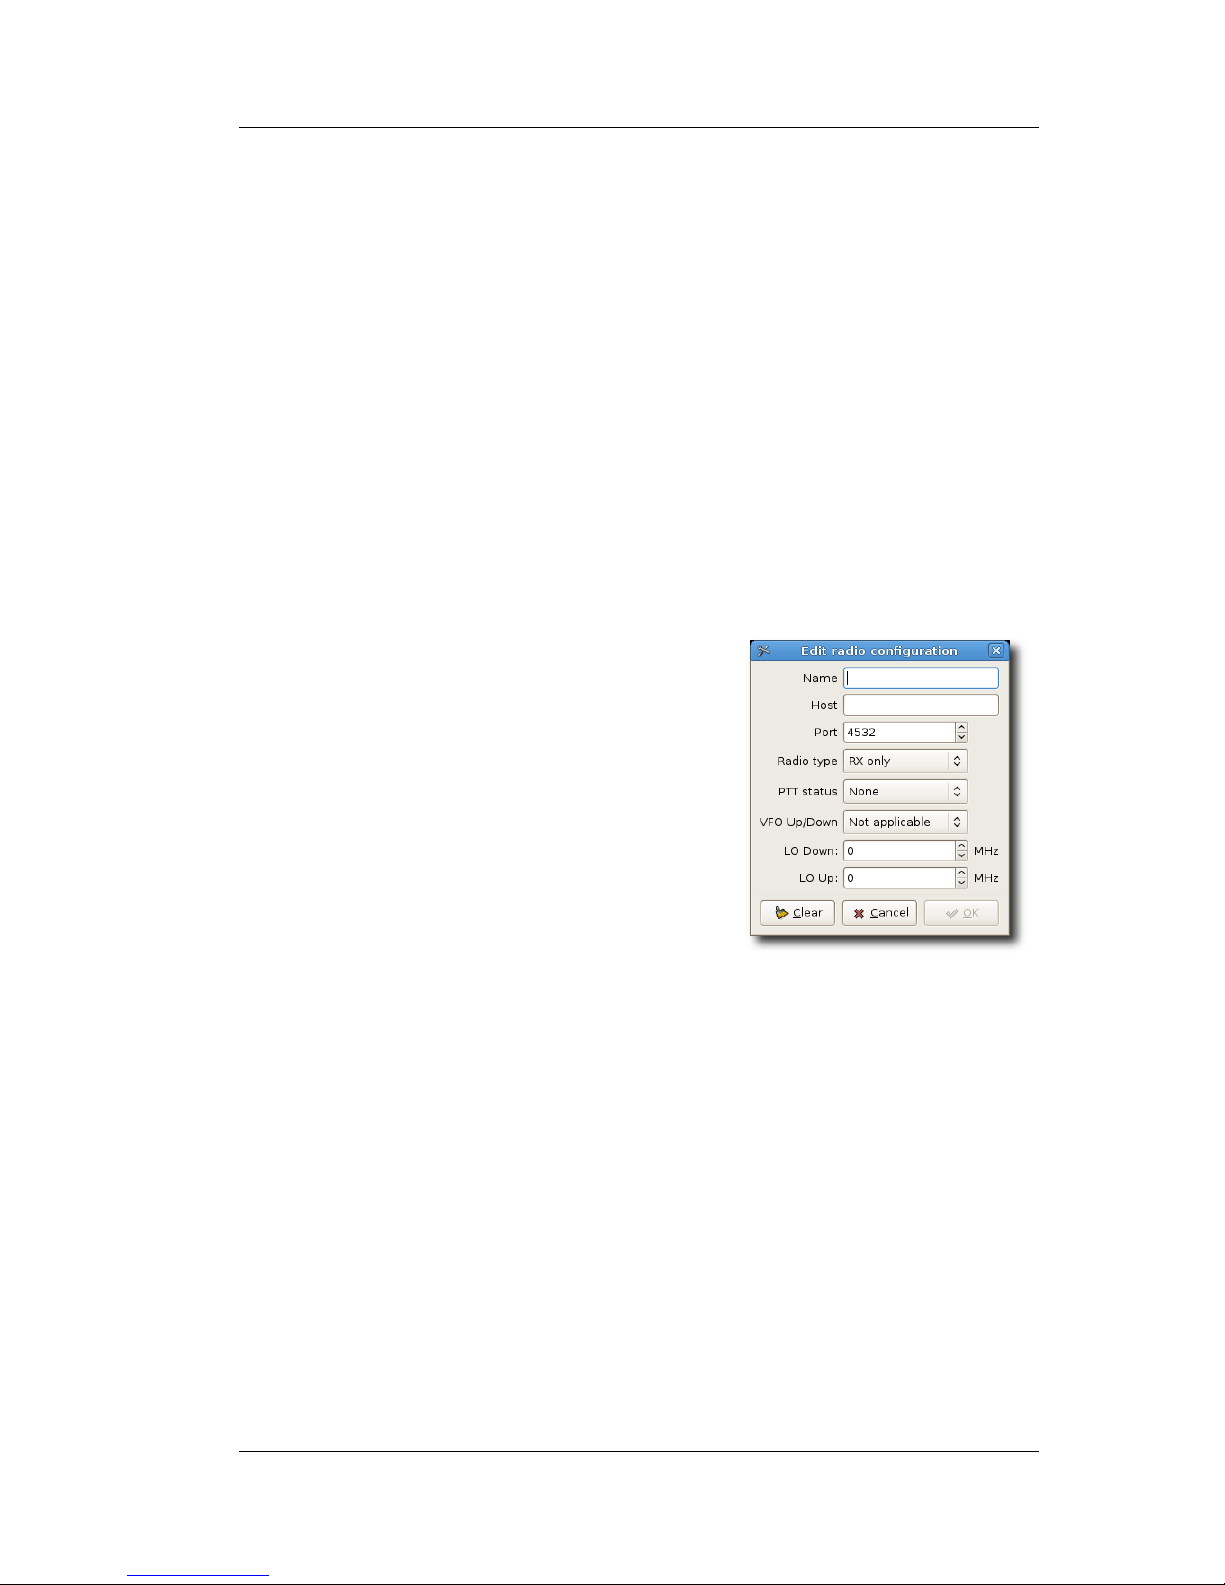
Controlling Radios and Rotators
Note that any changes you make will not take effect until you press the OK
button. In case you Cancel the Preferences dialogue, any changes you may
have made to your radio and rotator settings will be reverted to the state
before you opened the Preference dialogue.
You can configure as many radio and rotator devices as you have or want;
you will always be able to choose one specific device to use in a given
situation during runtime.
7.3.1 Radio Configuration
Configuring a radio device is very simple, see Figure 7.4. The four fields
that are required are explained below.
Name:
A unique name for the configuration. You can use alphanumeric characters
as well as underscore and minus.
Host:
The host name or IP address of the computer
to which your radio is connected to. If this is
the same computer on which gpredict is
running you can enter localhost.
Port:
The port number where rigctld is listening.
By default rigctld uses port 4532.
Radio type:
The type of this radio.
● RX only: The radio should only be used
as receiver. This is useful if you have a radio where the TX frequency
can not be adjusted via the CAT interface (e.g. Yaesu FT-817).
● TX only: The radio should only be used as transmitter. This option is
only useful if you have a radio that is dedicated for uplink.
● Simplex TRX: The radio should be used for both reception and
transmission but only one at a time. This option is useful for
transceivers that can work in split mode and where the frequency
can be adjusted via CAT regardless of whether you are in RX or TX
mode. For this option to work it is a prerequisite that Gpredict can
read the PTT status via CAT.
● Duplex TRX: The radio is a full duplex radio, such as IC-910H, FT-
847 or TS-2000.
● FT817/857/897 (auto): This is a special mode specific for the YAESU
57
Figure 7.2: Radio setup.
Page 54
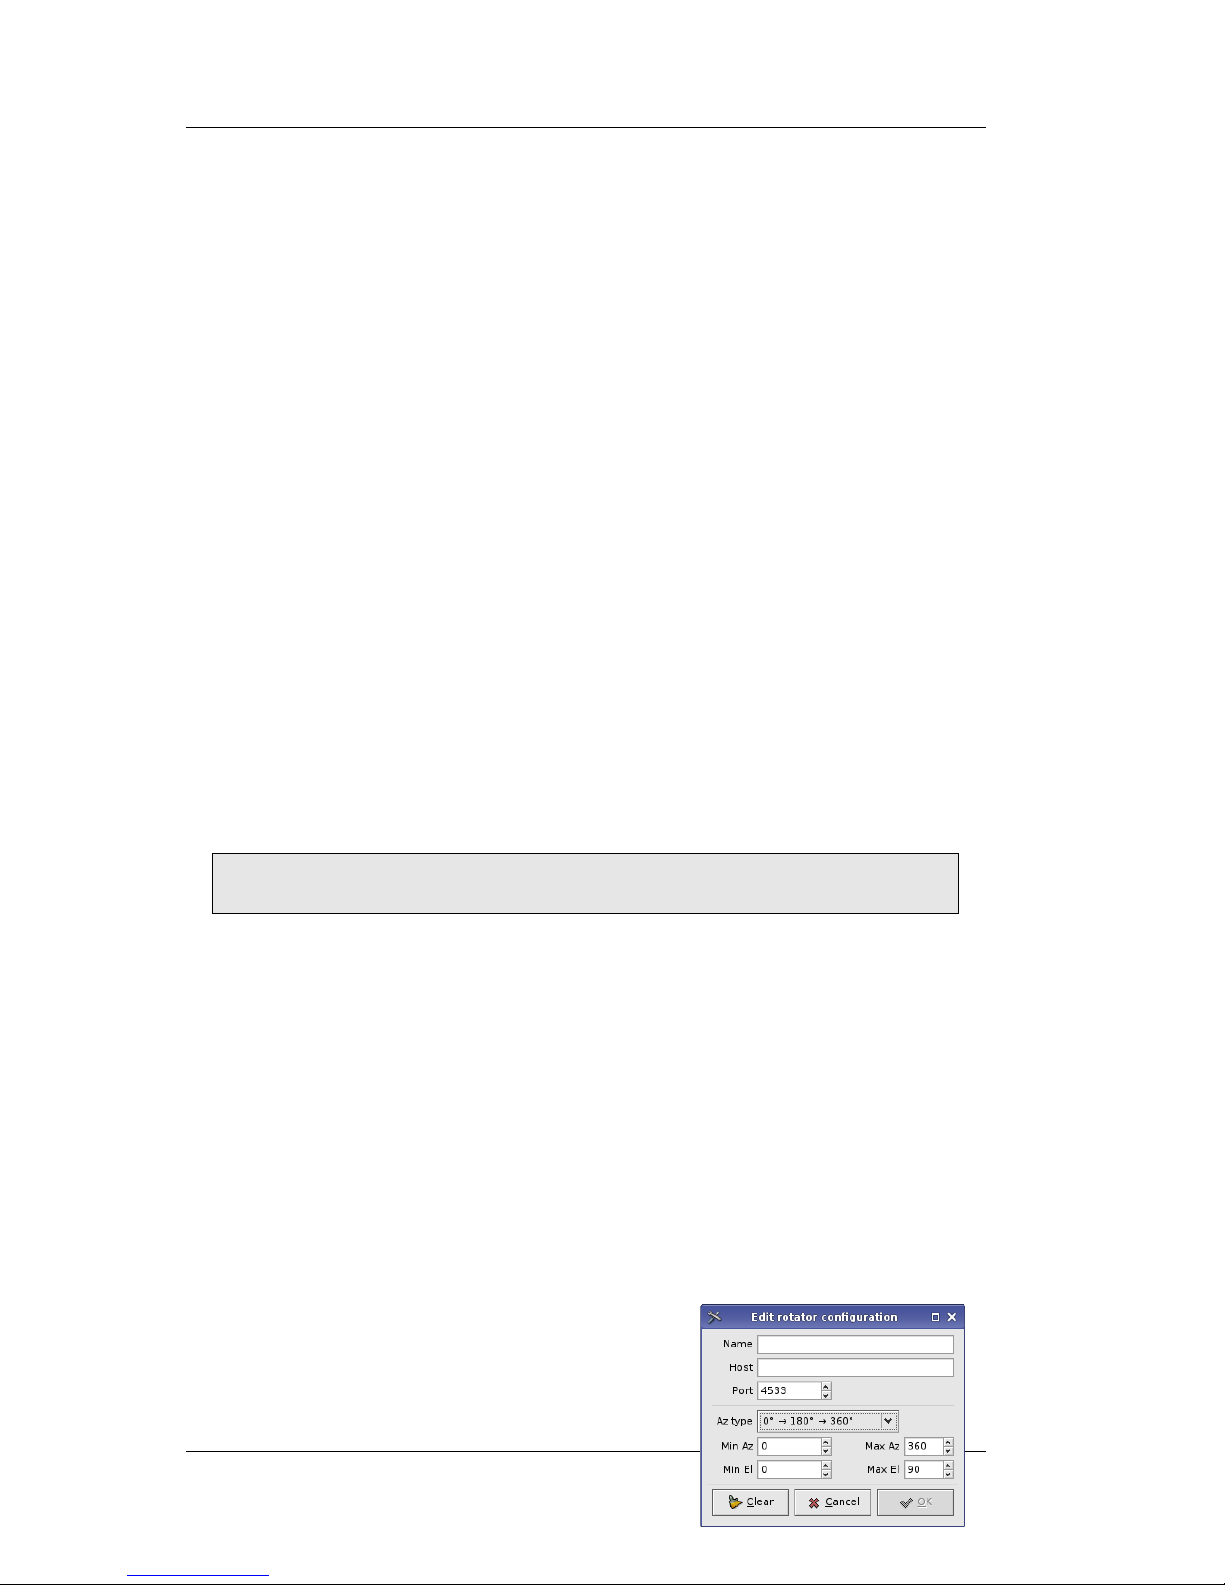
Gpredict User Manual
FT-817, 857 and 897 radios. These radios do not allow the frequency
to be set via CAT while they are in TX mode. When using this mode,
the transmitter frequency will be adjusted while the radio is in RX
mode by toggling the VFO. This way the transmitter frequency will
stay close to the ideal, Doppler corrected frequency.
● FT817/857/897 (manual): This is similar to the previous mode except
that automatic update of the TX frequency is not performed. Instead,
the user can use the SPACEBAR key for PTT. When the SPACEBAR
key is pressed, the controller will update the TX frequency and then
enable PTT. Pressing the SPACEBAR again will disable PTT.
PTT Status:
If you select any other option than None, Gpredict will read the status of
the PTT and act accordingly, meaning that RX tuning will only be done if
PTT is OFF and TX tuning will only be done while PTT is ON. It is a very
important option if you want to use the same radio for both RX and TX
regardless of whether the radio type is RX only, TX only, or Simplex TRX.
If your radio support reading the PTT status via CAT select the Read PTT
option. For FT817/857/897 you should select this option.
If you have a radio that could be used as Simplex TRX but it does not
support reading PTT status via CAT, you might be able to use the Read
DCD option. This requires that your radio outputs some signal that
indicates the PTT status (most transceivers do that) and that you use a
special CAT interface that can route this signal to either CTS or DSR and
configure rigctld to use these signals for DCD:
rigctl –model=334 ... -d /dev/ttyUSB0 --dcd-type=CTS
The PTT Status option has no effect for full duplex radios.
VFO Up/Down
If you are using Gpredict to control a full-duplex capable radio, such as the
IC-910H or FT-847, you need to tell Gpredict which VFO to use for up and
downlink. This setting is different from radio to radio and you should
consult the operation manual of your radio for the correct setting. Also note
that you will have to set your radio into full-duplex mode before letting
Gpredict control it.
This setting is only used for full-duplex radios and has no effect if the radio
is receiver, transmitter or simplex transceiver.
LO Down and Up:
These options allow you specify an offset/local
oscillator frequency if you use a transverter
with your radio. For example, if you are using
a downlink transverter with your HF receiver
58
Figure 7.3: Rotator setup.
Page 55

Controlling Radios and Rotators
in the 28-30 MHz range to track satellites in the 144-146 MHz range, your
LO Down frequency would be 144 – 28 = 116 MHz. Similarly for LO Up,
which is for uplink.
7.3.2 Antenna Rotator Configuration
The antenna rotator setup is similar to the radio setup except a few
parameters that are described below.
Az-type:
By default, gpredict assumes that the azimuth axis of the rotator goes from
0° to 360° with 0° pointing towards North and the center 180° pointing
towards South. There are, however, azimuth rotators that are centered
around 0°, which is North, and go ±180°, i.e. their azimuth range is –180°
to +180°. Select –180° → 0° → +180° if you have one of these rotators and
gpredict will automatically take this into account when tracking satellites
with your rotator.
Min/Max Az/El:
When you select Az-type gpredict will automatically provide the proper
ranges. However, if your rotator has a wider or narrower range for either
Az or El you can specify it here.
7.4 Controlling your Devices with Gpredict
The radio and rotator control interfaces are attached to a specific module.
You can control one radio and one antenna rotator per module at any given
time. If you have more than one module open, you can have one radio and
one rotator interface open for each module. Thus, if your task is to monitor
two different transponders of the same satellite using two different radios,
you simply need two modules having the same satellite.
You can access the radio and antenna rotator control windows via the
module popup menu, see Figure 2.3.
7.4.1 The Radio Control Window
The radio control window shown on Figure 7.4 consists of four areas:
Satellite, Radio, Target, and Device. Each of these are described below.
59
Page 56
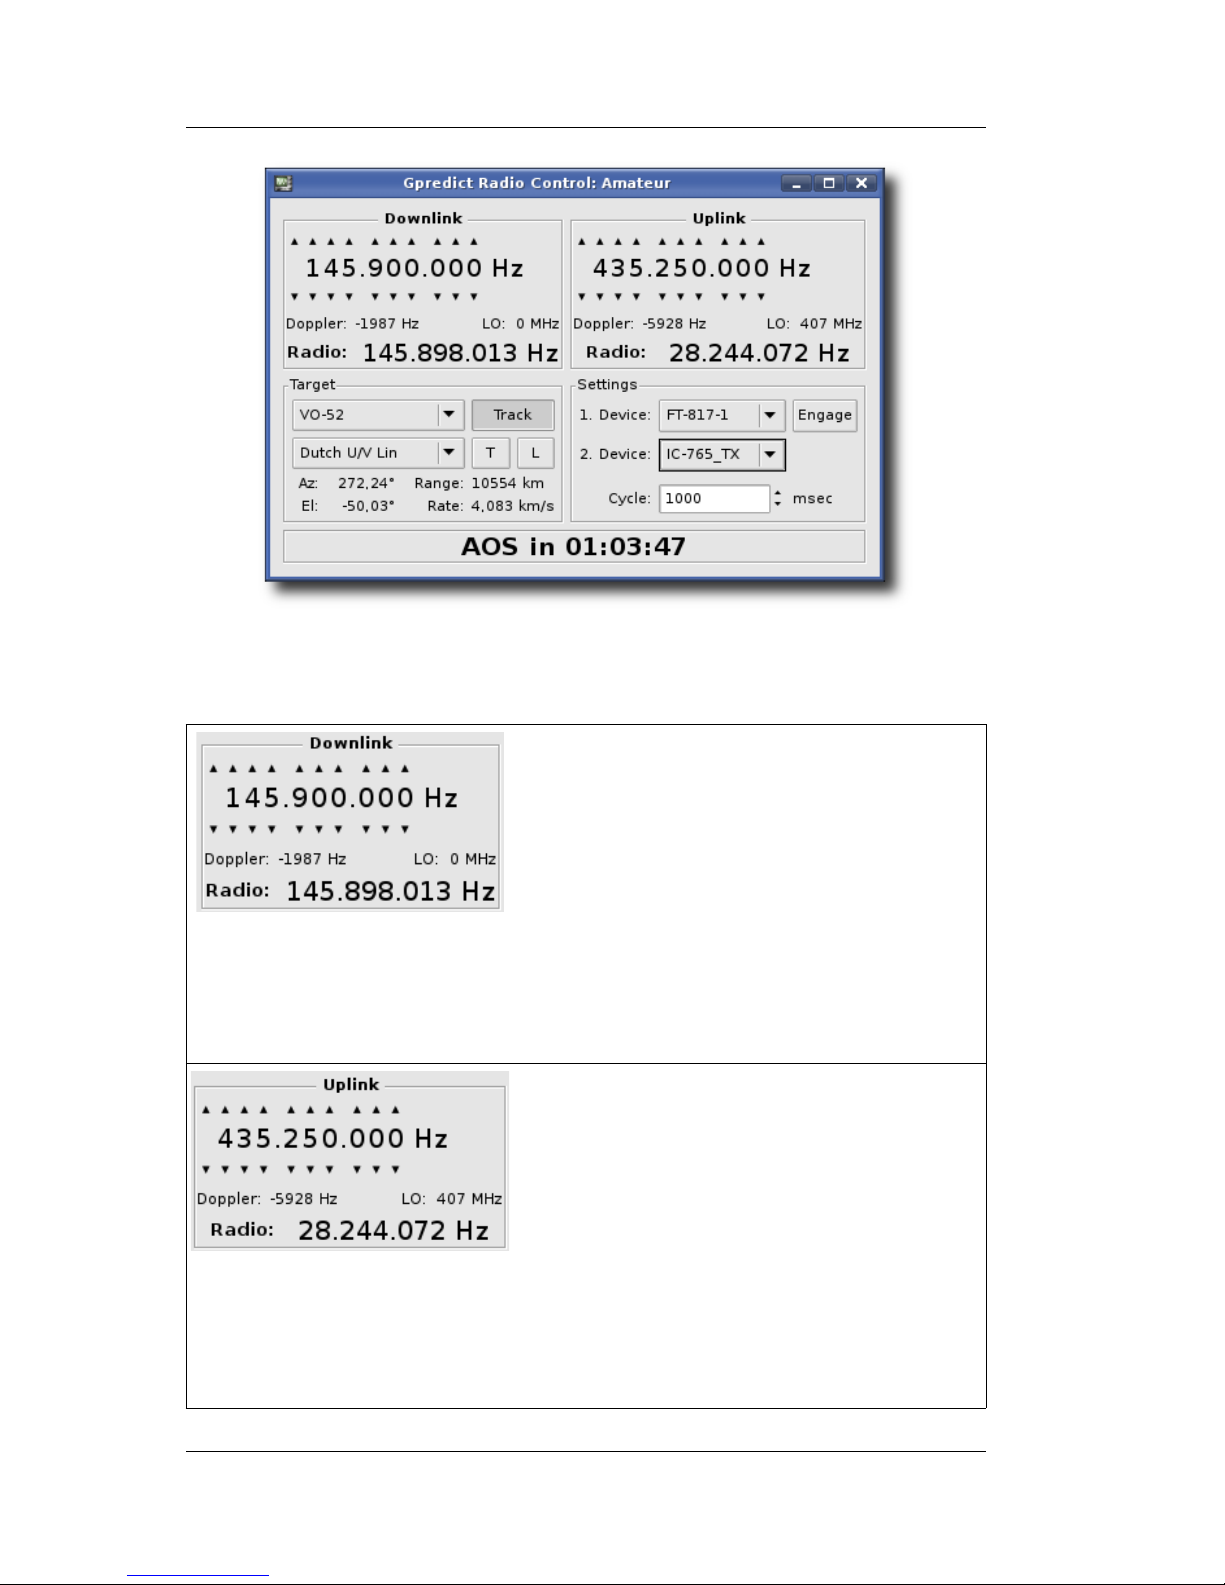
Gpredict User Manual
The Downlink area contains the control and
status widgets for the satellite downlink
frequency. Besides the downlink frequency it
also shows the Doppler shift at the current
downlink frequency, the transverter offset if
any, and the corrected frequency that should
be on your radio, i.e. SAT+Doppler-LO.
Note that Doppler correction is only applied if
Track is enabled (see below). Similarly, LO
correction is applied if the selected device is
Engage'd (see below).
To change the frequency just click on the
proper arrow below or above a digit.
The Uplink area shows the control and status
widgets for the satellite uplink. It has the
same properties as the Downlink area.
Note that the status widgets are updated even
if you are using a receive-only radio. This is
particularly useful if you are using radios
where the frequency can not be set via CAT
while they are in TX mode. This is the case for
the FT-817; if you intend to use an FT-817,
you should configure it as RX only. Gpredict
will then only correct the downlink, but will
still display the corrected uplink so that you
can applyt the correction manually while you
are transmitting.
60
Figure 7.4: The radio control interface.
Page 57
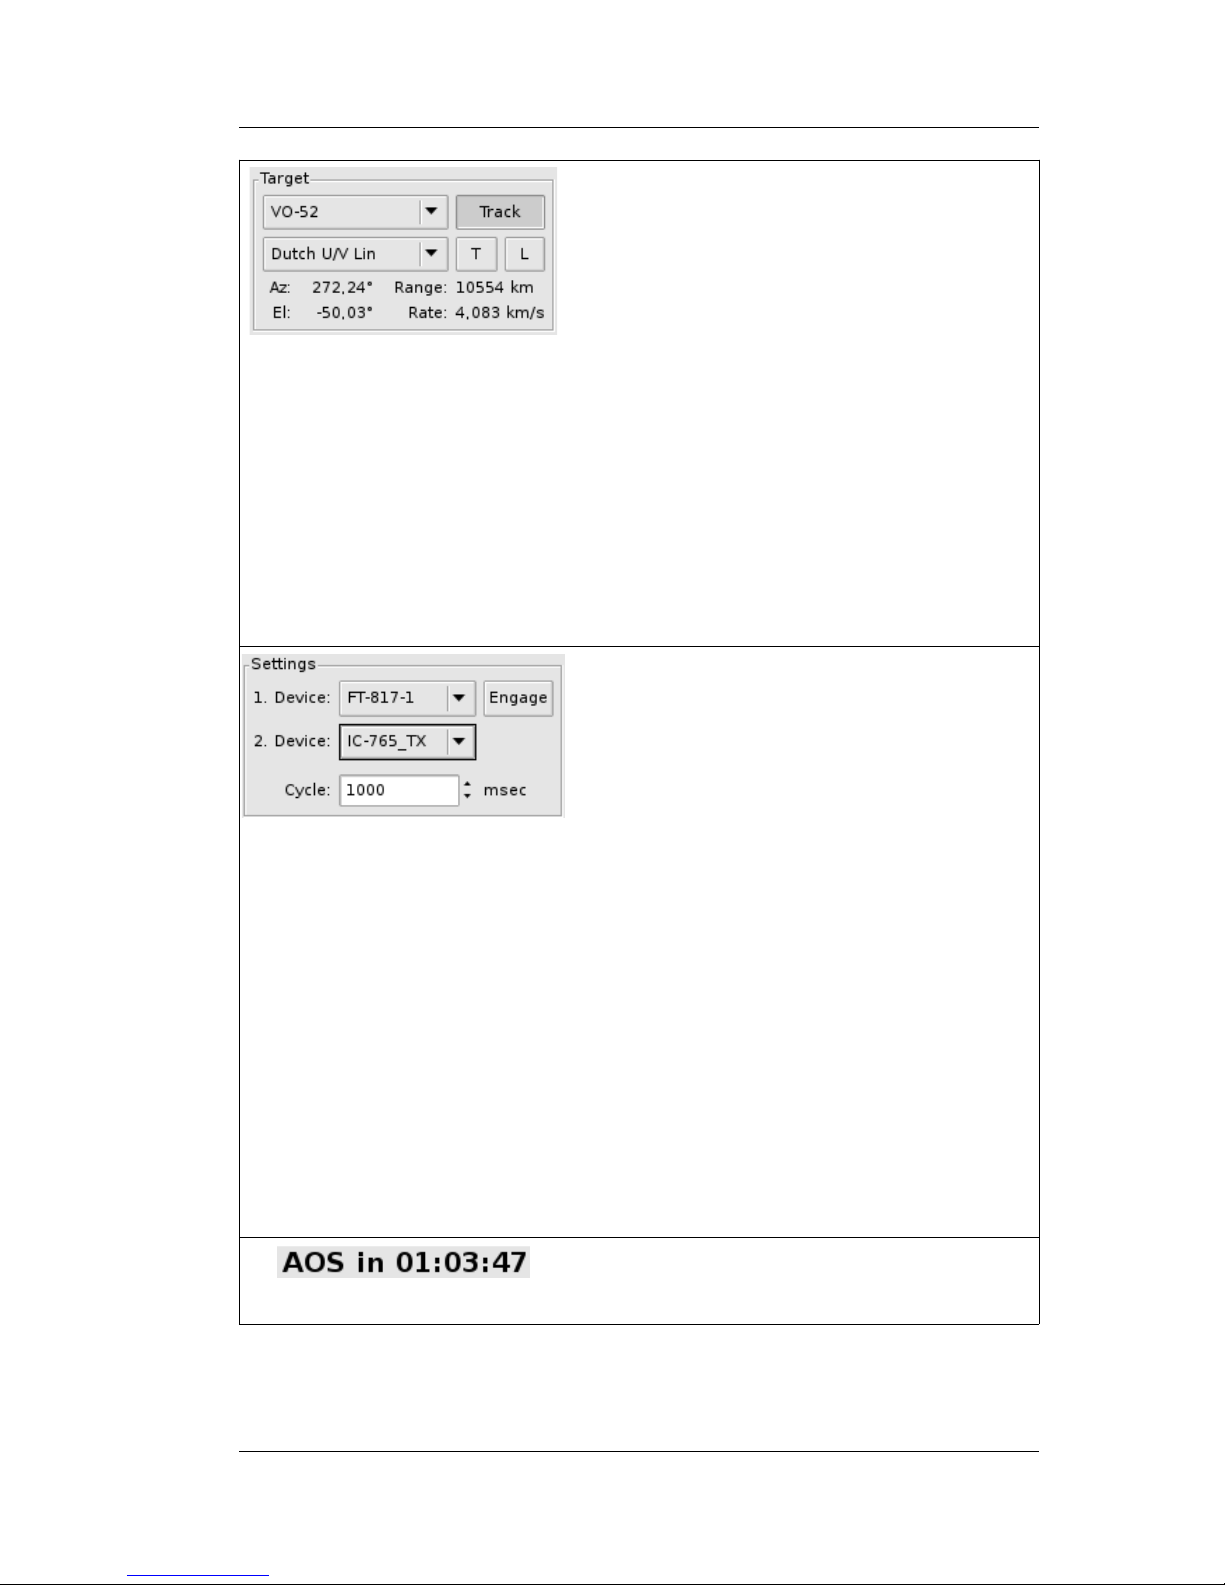
Controlling Radios and Rotators
The Target area contains widgets for
selecting the target object as well as the
transponder for the selected target object.
You can select a new target at any time and
any effects it might have on the radio settings
will be applied instantaneously. Note,
however, that the Doppler shift is only applied
to the operating frequency if you enable the
Track button.
Pressing the Tune button T will cause
Gpredict to tune to the middle of the
passband for the selected transponder.
Pressing the Lock Button L will lock the
uplink and downlink so that any changes to
one of them will update the other – provided
that the selected transponder is a
transponder with a passband, i.e. it doesn't
work for beacons and single channel
transponders.
The Settings area contains widgets for
selecting the radio devices from the ones you
have configured (see section 7.3.1). The
Engage button is used to toggle the
connection between the controller and the
hamlib driver(s). Commands are sent to the
radio device only if the device is engaged.
You can use up to two devices in any
controller. The 1. Device is the primary
device and will be used as downlink and
uplink depending on the device type (and the
selection in the 2. Device). The 2. Device is
the secondary device and is used for uplink
only and therefore it only lists radios that are
not of type RX only.
The code that communicates with hamlib runs
in its own thread and is activated periodically.
the Cycle parameter defines the delay
between two such cycles. A value of 1 second
should be adequate for most uses.
Note that when the controller algorithm
detects 5 subsequent errors in the
communication with hamlib the device will be
automatically disengaged.
In the bottom of the window you will find a
counter counting the time left until next AOS
or LOS event. The format is HH:MM:SS.
Assuming that you have tested and configured your radios properly, all you
need to do to start tracking a satellite with your radio is:
61
Page 58

Gpredict User Manual
1. Select the satellite in the Target box.
2. Select the transponder you want to track.
3. Enable the Track button. You should now see the Radio frequency
being corrected for Doppler shift with respect to the Satellite
frequency.
4. Select the proper radio device(s) in the Settings area.
5. Enable the Engage button.
You can at any time disable the Doppler correction by disabling the Track
button – regardless of whether the radio device is engaged or not.
Similarly, engaging and disengaging the device can be done at any time.
Note that if gpredict detects too many communication errors with hamlib it
will automatically disengage the device(s).
Note that when tracking is enabled Doppler correction will be applied
regardless of whether the satellite is within range or not.
An overview of the operating modes of the radio controller algorithm is
given in Table 7.3 below.
Track Engage Description
OFF OFF No Doppler correction is performed. No commands are
sent to the radio(s). The current frequency of the radio(s)
is not read.
ON OFF Doppler correction is applied, but no commands are sent
to the radio(s) and the current frequency of the radio(s) is
not read back either.
ON ON Doppler correction is applied and the frequency setting
commands are sent to the radio(s). The current frequency
of the radio(s) is read back and is taken into account by
the active feedback algorithm.
OFF ON Doppler correction is not performed but frequency
commands are sent to the radio(s) and the current
frequency is read back from the radio(s). This mode can
be used for manually controlling a remote radio.
Table 7.2: Operating modes of the radio controller.
Further instructions on how to configure specific radios to be used with
Gpredict may be found in the Gpredict forum: http://forum.oz9aec.net .
7.4.2 The Rotator Control Window
The rotator control window shown on Figure 7.5 consists five areas:
Azimuth, Elevation, Target, Settings, and a Polar Plot. Each of these areas
are described below.
62
Page 59

Controlling Radios and Rotators
The Azimuth area allows you to control the
Azimuth of the rotator device. You can change
the value by clicking on the corresponding
arrows; however, if tracking is enabled your
changes will be overridden with the Azimuth of
the target satellite.
The bottom of the area contains a field showing
the current Azimuth as read back from the
rotator device. If the device is not engaged this
field will simply show --- instead of a number. If
there was error in the communication with
hamlib this field will show ERROR.
The Elevation area allows you to control the
Elevation of the rotator device. You can change
the value by clicking on the corresponding
arrows; however, if tracking is enabled your
changes will be overridden with the Elevation of
the target satellite.
The bottom of the area contains a field showing
the current Elevation as read back from the
rotator device. If the device is not engaged this
field will simply show --- instead of a number. If
there was error in the communication with
hamlib this field will show ERROR.
The Target area contains widgets for selecting
the target object. You can select a new target
at any time and any effects it might have on the
rotator settings will be applied instantaneously.
Note, however, that the target position is only
applied if you enable the Track button.
The ΔT field shows the time left until AOS or
LOS in HH:MM:SS format.
63
Page 60

Gpredict User Manual
The Settings area allows you to select one of
your rotator devices that you have configured
(see section 7.3.2).
The Engage button is used to toggle the
connection between the controller and the
hamlib driver. Commands are sent to the rotator
device only if the device is engaged.
The code that communicates with hamlib runs
in its own thread and is activated periodically.
the Cycle parameter defines the delay between
two such cycles. A value between 2-5 seconds
should be adequate for most uses.
The Tolerance parameter can be used to
specify the difference between set and get
positions that you can tolerate. When the
difference between the set and get values
exceeds this parameter a command is sent to
the rotator. The value of this parameter should
be set according to your hardware
characteristics, i.e. no need to set the tolerance
to 0.1° if your rotator precision is ±1° and your
antenna beam width is 25°.
Note that when the controller algorithm
detects 5 subsequent errors in the
communication with hamlib the device will be
automatically disengaged.
The Polar Plot area on the right side of the
window is provided to guide you while you are
tracking a satellite. It shows the next pass of the
currently selected target satellite.
The small rectangle represents the currently
selected target satellite if it is within range. The
circle around the rectangle represents the
current position of the controller while the cross
represents the current position of the rotator
device (if engaged).
If the rectangle, the circle, and the cross are all
aligned you are successfully tracking the target
satellite :-)
When you open the rotator control window tracking will be disabled and
the rotator device disengaged. Select the appropriate device and engage.
You can now control the rotator manually using the Azimuth and Elevation
control widgets. You should be able to see the red circle and the cross
move around the polar plot according to your settings and the current
position of the rotator.
When you want to start tracking a target satellite you simply enable the
Track button.
Note that when tracking is enabled any manual position changes will be
overridden by the position of the currently selected target. Note, however,
that active tracking will be carried out only if the target satellite is within
64
Page 61

Controlling Radios and Rotators
range. If tracking is enabled while the target satellite is out of range, the
rotator controller widgets will be set to the position where the target
satellite is expected to appear at the next AOS.
The Cycle and Tolerance parameters can be changed at any time
regardless of whether the rotator device is engaged or not. Similarly, you
can at any time select a new target even when your rotator device is
engaged.
An overview of the operating modes of the antenna rotator controller
algorithm is given in Table 7.3 below.
Track Engage Description
OFF OFF Controller widgets are not updated with respect to target
position. No commands are sent to the rotator and the
current rotator position is not read back either.
ON OFF Controller widgets are updated with target position but
no commands are sent to the rotator. Current rotator
position is not read back either.
If the target satellite is out of range the controller
widgets will be set to the position where the satellite is
expected to appear at the next AOS.
ON ON Controller widgets are updated with target position and
the position is sent to the rotator. The current position is
read back from the rotator device.
If the target satellite is out of range the controller
widgets will be set to the position where the satellite is
expected to appear at the next AOS.
OFF ON Controller widgets are not updated with target position
but commands are sent to the rotator and current
position is read back. This mode can be used to manually
control your rotator.
Table 7.3: Operating modes of the rotator controller.
65
Page 62

Creating Custom Layouts
8 Creating Custom Layouts
Custom layouts are created by specifying the layout string manually. The
layout string is a sequence of numbers separated with semicolon (;) and
containing five numbers for each view that you want to appear in the
layout.
The first number in each group of five specifies the module type:
• 0 – List view
• 1 – Map view
• 2 – Polar view
• 3 – Single Satellite view
• 4 – Upcoming Passes view
The remaining four numbers in the group
of five specify the coordinates of the view
in an invisible grid. The size of the grid is
dynamic in the sense that it is determined
at runtime according to the coordinates in
the layout string.
The coordinate system in the layout grid
has its origin (0,0) in the upper left
corner, see figure 8.1. The coordinates for
a view are specified using a LEFT,
RIGHT, TOP, BOTTOM sequence.
Thus, if we want to place a map view in
the upper 2/3 part of the grid on figure 8.1 the complete 5-digit sequence
would be:
1;0;3;0;2
This is interpreted as
“Place a map view in the grid with top-left coordinate
at (0,0) and bottom-right coordinate at (3,2)”
.
Similarly, to put list view in the lower 1/3 part of the grid, the sequence
would be:
0;0;2;2;3
The complete sequence would end up being:
67
Page 63

Gpredict User Manual
1;0;3;0;2;0;0;2;2;3
The order in which the views are specified doesn't matter. The complete
sequence above would generate a layout that looks like the one on figure
8.2 below.
This layout is included as one of the predefined layouts and you can use
this and the other predefined layouts as examples.
68
Page 64

Glossary
9 Glossary
Term Meaning
AOS Acquisition of signal – the time when the satellite comes within
range.
Az Azimuth – the angle in the horizontal plane (tangential plane to
the surface of Earth) relative to North with positive direction
towards East.
CAT Computer aided transmission. A term often used when a
computer controls a communication radio device.
El Elevation – the vertical angle between a vector pointing toward
the horizon and a vector pointing towards a satellite. The horizon
is 0° and zenith is 90°.
Full-duplex A communication device/radio where tranmission and reception
can occur at the same time
Hamlib Ham Radio Control Libraries, see http://hamlib.sf.net/
LO Local oscillator. In gpredict it is used to specify the frequency
offset introduced by using a transverter.
LOS Loss of signal – the time when a satellite goes out of range.
PTT Push to talk.
RX Receiver.
TCA Time of closes approach – the time when the distance to a
satellite is shortest.
TLE Term used for the data files that contain Keplerian elements for a
satellite orbit.
TRX Transceiver.
TX Transmitter
69
 Loading...