

Page 1

ENGINE
4M41
CONTENTS
GENERAL INFORMATION 11B-0-3...................................................
1. SPECIFICATIONS 11B-1-1.......................................................
SERVICE SPECIFICATIONS 11B-1-1............................................
TORQUE SPECIFICATIONS 11B-1-4............................................
SEALANT 11B-1-8...........................................................
2. SPECIAL TOOLS 11B-2-1.......................................................
3. GENERATOR ASSEMBLY 11B-3-1...............................................
4. GLOW PLUG 11B-4-1...........................................................
5. COOLING FAN, V-BELT AND WATER PUMP 11B-5-1...............................
6. WATER HOSES AND PIPES 11B-6-1..............................................
7. THERMOSTAT 11B-7-1..........................................................
8. EGR VALVE ASSEMBLY 11B-8-1.................................................
9. INTAKE MANIFOLD 11B-9-1.....................................................
10. TURBOCHARGER ASSEMBLY 11B-10-1.........................................
11. EXHAUST MANIFOLD 11B-11-1..................................................
12. INJECTION PUMP ASSEMBLY 11B-12-1.........................................
13. INJECTION PUMP GEAR 11B-13-1..............................................
14. ROCKER COVER, CAMSHAFT HOLDER ASSEMBLY AND CAMSHAFT 11B-14-1....
15. INJECTION NOZZLE 11B-15-1..................................................
16. CYLINDER HEAD AND VALVE MECHANISM 11B-16-1.............................
17. VACUUM PUMP 11B-17-1......................................................
18. TIMING GEAR CASE 11B-18-1..................................................
19. TIMING GEAR AND BALANCE SHAFT 11B-19-1..................................
20. OIL PUMP 11B-20-1............................................................
21. OIL COOLER AND OIL FILTER 11B-21-1.........................................
22. OIL PAN, OIL STRAINER AND OIL JET 11B-22-1..................................
23. PISTON AND CONNECTING ROD 11B-23-1......................................
24. DRIVE PLATE 11B-24-1........................................................
25. CRANK SHAFT AND CRANK CASE 11B-25-1....................................
26. BALANCE SHAFT BUSH 11B-26-1..............................................
11B-0-1
E
Feb. 2000Mitsubishi Motors Corporation Added
PWEE9409-D
Page 2

11B-0-2
NOTES
E
Feb. 2000Mitsubishi Motors Corporation Added
PWEE9409-D
Page 3

4M41 ENGINE -
General Information
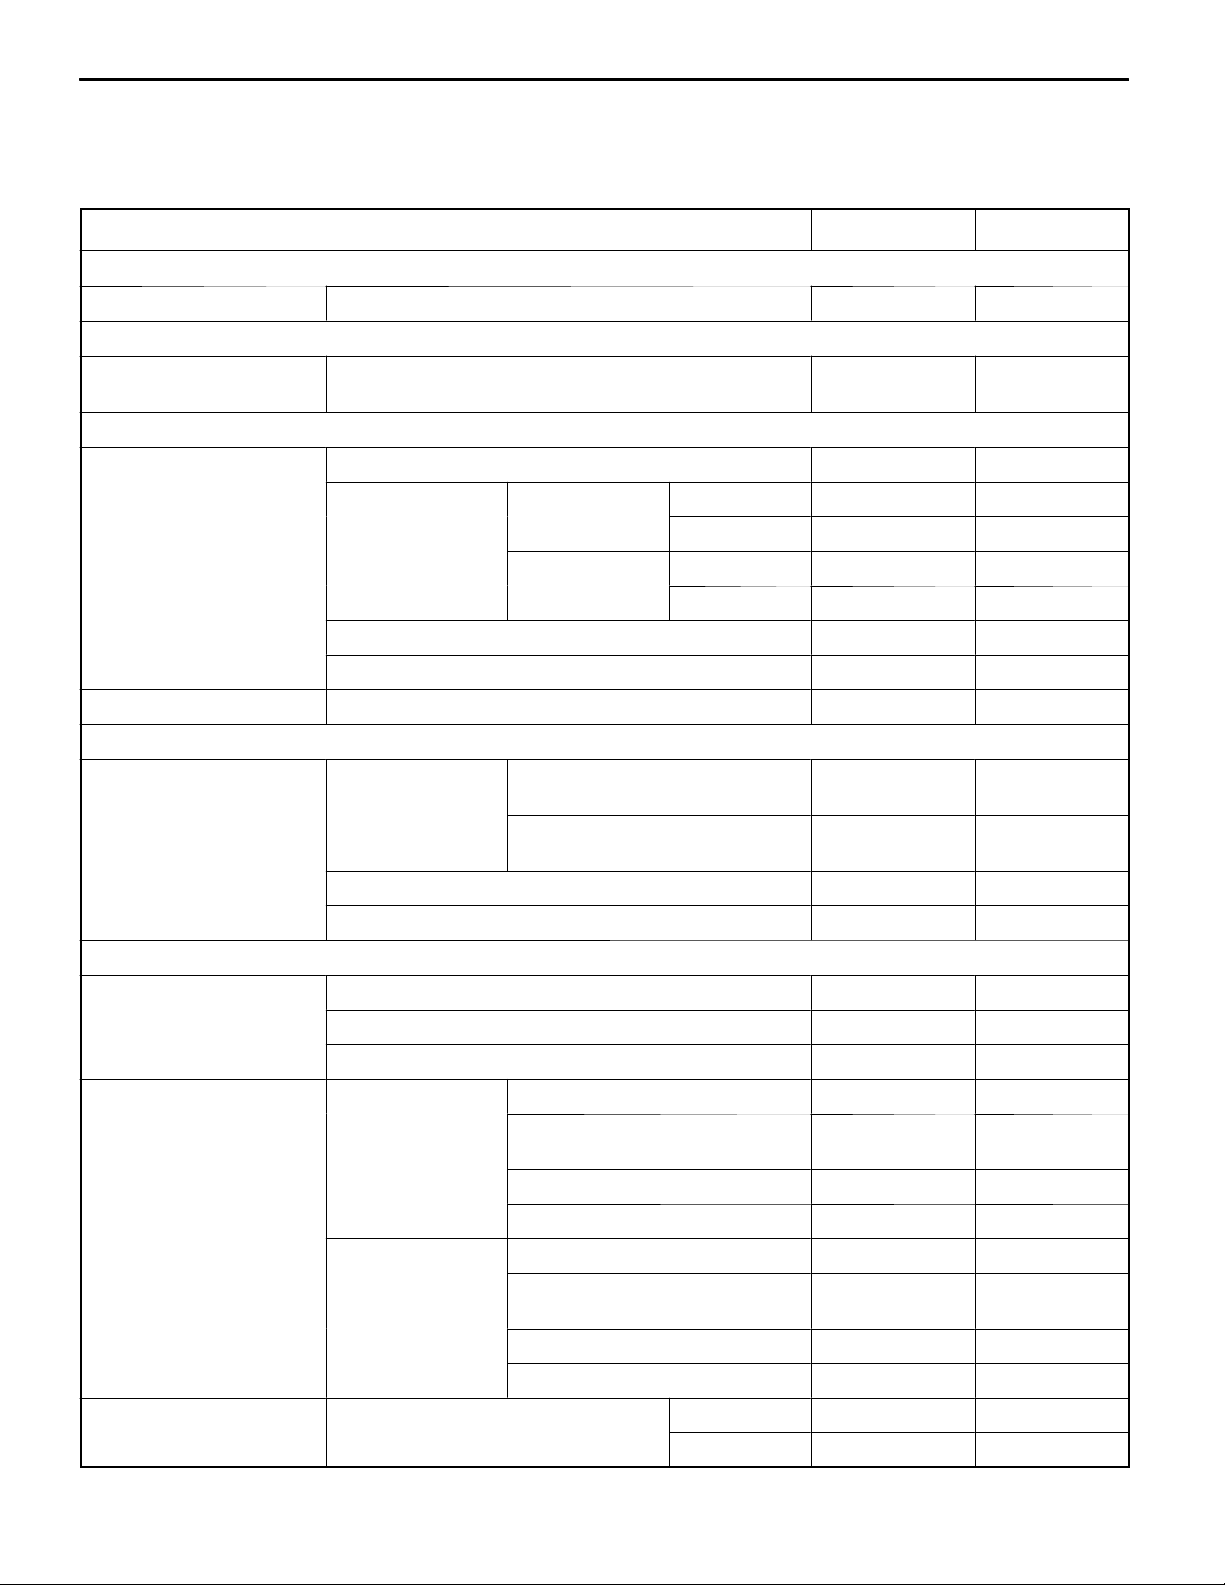
GENERAL INFORMATION
Descriptions Specifications
11B-0-3
Total displacement dm
No. and arrangement of cylinders 4 in-line
Combustion chamber Direct injection
No. of intake/exhaust valves (per cylinder) 2 each
V alve mechanism Double overhead camshaft, 4-valve
Cylinder bore x stroke mm 98.5 x 10⁵
Compression ratio 17
Supercharger Turbo-charging type
Intercooler Air-cooling type
Fuel supply Distributor type electronically controlled fuel injection pump
3
3200
E
Feb. 2000Mitsubishi Motors Corporation Added
PWEE9409-D
Page 4
4M41 ENGINE -
Specifications
1. SPECIFICATIONS
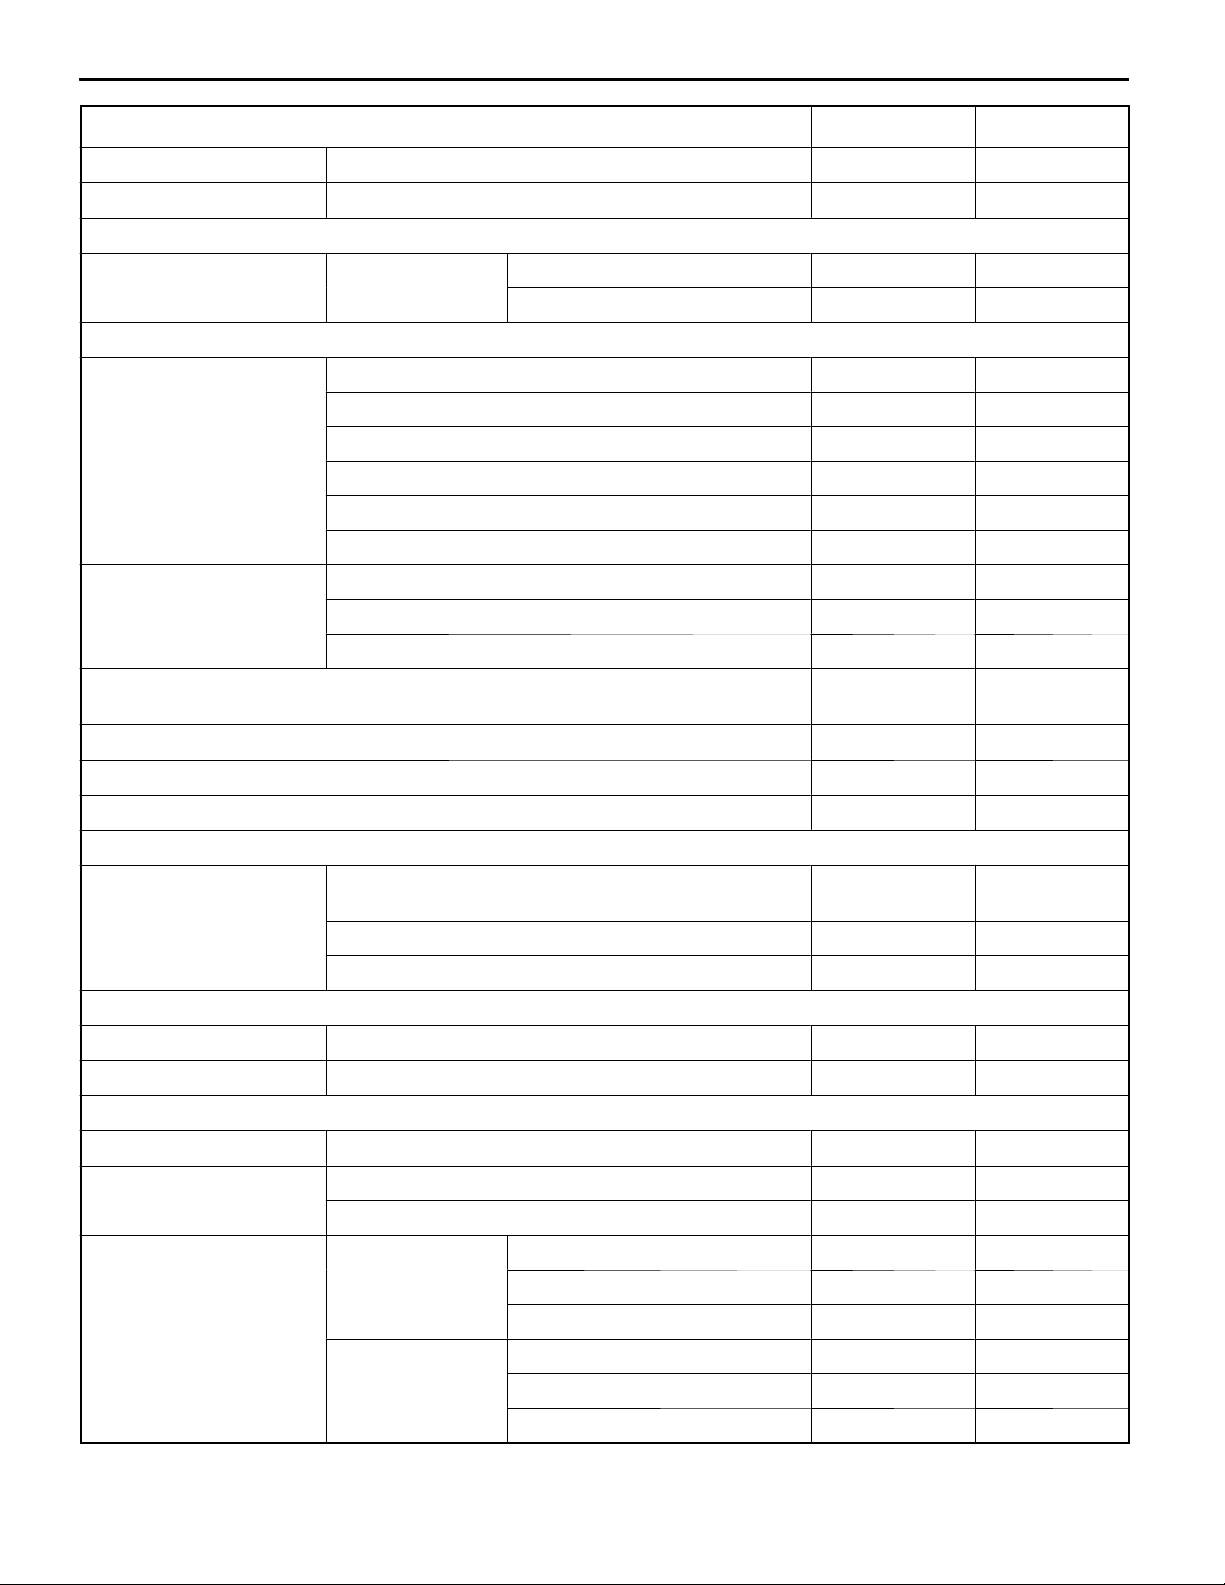
SERVICE SPECIFICATIONS
Descriptions Standard Limit
Glow plug
11B-1-1
Unit: mm
Glow plug Resistance
Turbocharger assembly
Turbocharger Actuator operating pressure
(when operating 1 mm) kPa
Rocker cover, camshaft holder assembly, camshaft assembly
Camshaft
Rocker Rocker roller radial play 0.03 - 0.07 -
Injection nozzle
Injection nozzle Injection pressure
End play 0.10 - 0.18 0.3
Cam lobe lift Intake
Bend Less than 0.015 0.03
Journal oil clearance 0.05 - 0.09 0.15
(valve opening
pressure)
W
Front 6.16 6.11
Rear 6.10 6.05
Exhaust
No. 1 valve opening pressure
No. 2 valve opening pressure
Front 5.91 5.86
Rear 6.16 6.11
MPa
MPa
1.1 -
161 -
17.60 - 18.58 -
22.6 - 23.6 -
Pre-lift 0.05 - 0.07 -
Needle valve lift 0.23 - 0.28 -
Cylinder head and valve mechanism
Valve spring
Valve Intake
Valve guide Stem-to-guide clearance
Free height 51.3 -
Load (installed height: 39.5) N 255 -
Out-of-squareness 2
Stem diameter 6.560 - 6.575 6.45
Sinkage from cylinder head
bottom
Margin 1.0 0.8
V alve seat angle 45
Exhaust
Stem diameter 6.53 - 6.55 6.45
Sinkage from cylinder head
bottom
Margin 1.0 0.8
V alve seat angle 45
_
0.05 - 0.55 0.8
_ ±
15’ -
0.05 - 0.55 0.8
_ ±
15’ -
Intake 0.02 - 0.06 0.10
Exhaust 0.05 - 0.09 0.15
_
4
E
Feb. 2000Mitsubishi Motors Corporation Added
PWEE9409-D
Page 5
11B-1-2
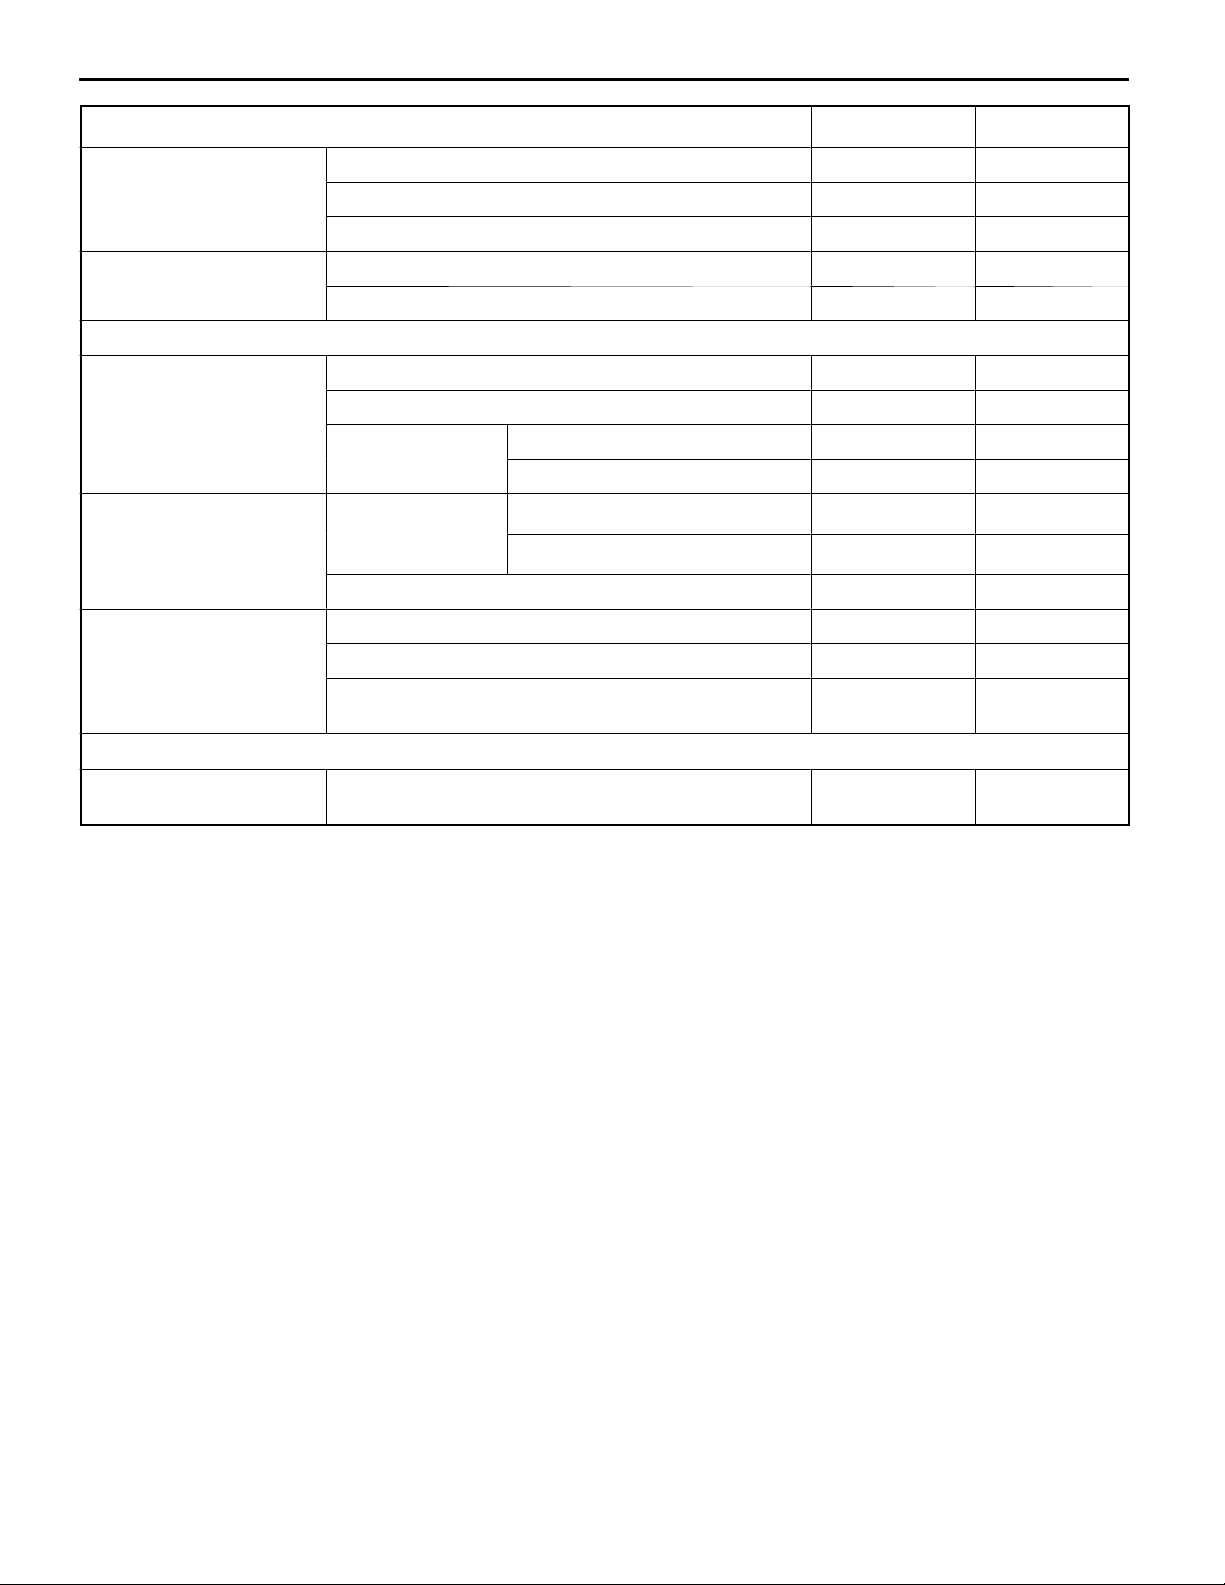
Descriptions LimitStandard
Valve seat Seat width 1.8 - 2.2 2.8
Cylinder head Bottom surface distortion Less than 0.05 0.2
Vacuum pump
4M41 ENGINE -
Specifications
V acuum pump Performance
Timing gears and balance shafts
Backlash between gears
End play
Timing chain elongation (minimum distance between chain spans facing each
other when pressing on tensioner lever)
Tension lever-to-tension lever shaft clearance 0.06 - 0.18 0.3
Idler gear bush LH-to-idler shaft clearance 0.02 - 0.05 0.1
Idler sprocket bush-to-idler shaft clearance 0.02 - 0.06 0.1
Oil pump
Balance shaft gear RH and oil pump gear 0.04 - 0.19 0.3
Oil pump gear and crankshaft gear 0.04 - 0.18 0.3
Crankshaft gear and idler gear 0.04 - 0.18 0.3
Idler gear and idler gear LH 0.04 - 0.19 0.3
Idler gear LH and balance shaft gear LH 0.04 - 0.22 0.4
Idler gear and injection pump gear 0.04 - 0.21 0.4
Balance shaft LH, RH 0.09 - 0.24 0.3
Idler gear/sprocket assembly 0.05 - 0.20 0.3
Idler gear LH assembly 0.05 - 0.20 0.3
Attained degree of vacuum 93 kPa or more -
Pump speed 1500 r/min -
16.5 9
Oil pump
Oil cooler and oil filter
Bypass valve spring Valve opening pressure kPa 490 ± 30 -
Regulator valve spring Valve opening pressure kPa 620 ± 30 -
Piston and connecting rod assembly
Piston Protrusion -0.20 - -0.30 -
Piston pin
Piston ring Ring-to-ring
Driven gear shaft-to-oil pump case and cover
clearance
Side clearance 0.05 - 0.10 0.15
Tip clearance 0.15 - 0.26 0.27
Piston pin-to-connecting rod bush clearance 0.03 - 0.05 0.1
Piston pin-to-piston clearance 0.007 - 0.021 0.05
No.1 compression ring 0.03 - 0.08 0.15
groove clearance
End gap
No.2 compression ring 0.07 - 0.10 0.15
Oil ring 0.03 - 0.06 0.15
No.1 compression ring 0.3 - 0.45 0.8
No.2 compression ring 0.4 - 0.55 0.8
Oil ring 0.3 - 0.5 0.8
0.03 - 0.05 0.15
E
Feb. 2000Mitsubishi Motors Corporation Added
PWEE9409-D
Page 6
4M41 ENGINE -
Descriptions LimitStandard
Specifications
11B-1-3
Connecting rod
Connecting rod bearing
Crankshaft and crankcase
Crankshaft
Main bearing Main bearing-to-
Upper crankcase
End play 0.15 - 0.45 0.6
Bend - 0.05
Twist - 0.1
Oil clearance 0.03 - 0.05 0.1
Free span - 58.8 max.
End play 0.10 - 0.28 0.4
Bend Less than 0.02 0.05
Pin and journal
crankshaft clearance
Free span - 73.16 max.
Upper surface distortion Less than 0.05 0.1
Cylinder I.D. 98.5 - 98.53 98.75
Piston and connecting rod assembly-to-upper
crankcase cylinder clearance
Out-of-roundness Less than 0.01 -
Conicity Less than 0.006 -
No.1, 2, 4 and 5 journal 0.04 - 0.06 0.1
No.3 journal 0.06 - 0.08 0.1
0.04 - 0.05 -
Balance shaft bush
Balance shaft Clearance between balance shaft and balance shaft
bush
0.06 - 0.11 0.16
E
Feb. 2000Mitsubishi Motors Corporation Added
PWEE9409-D
Page 7
11B-1-4
4M41 ENGINE -
Specifications
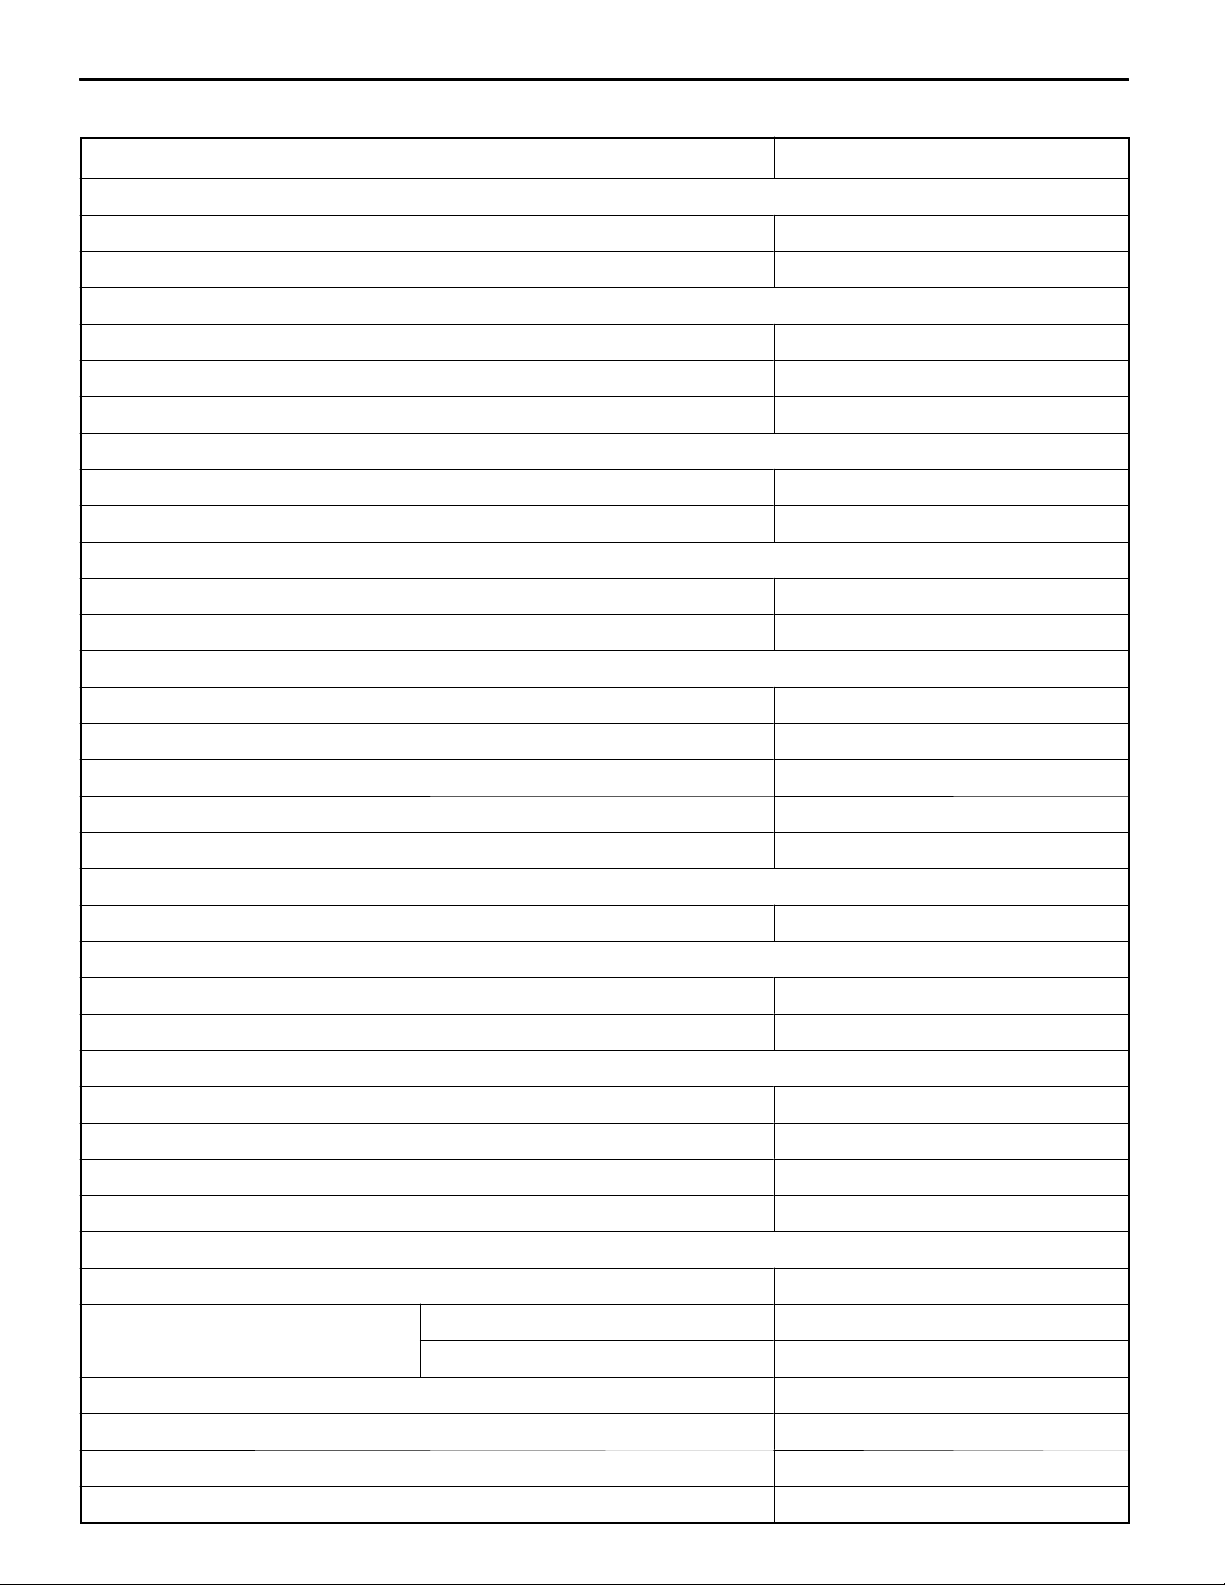
TORQUE SPECIFICATIONS
Items Torque Nm
Glow plug
Connection plate 1.3 ± 1
Glow plug 18 ± 1
Cooling fan V-belt and water pump
Cooling fan bolt 10 ± 1
Auto-cooling fan coupling nut 24 ± 2
Water pump bolt 24 ± 2
Water hoses and pipes
Eyebolt 25 ± 2
Coolant temperature sensor 9 ± 1
Intake manifold
Boost air temperature sensor 15 ± 1
Gas filter assembly 17 ± 1
Turbocharger assembly
Eye bolt (for oil pipe) 20 ± 2
Eye bolt (for water pipe) 25 ± 2
Coupler nut 49 ± 4
Turbocharger nut 49 ± 4
Turbocharger bolt 54 ± 5
Exhaust manifold
Exhaust manifold nut 30 ± 3
Injection pump assembly
Injection pipe 25 ± 2
Pump stay mounting bolt 18 ± 2
Injection pump
Injection pump gear mounting nut 180 ± 10
Sensor plate mounting bolt 5 ± 1
Flange plate mounting nut 38 ± 2
Engine speed sensor mounting bolt 5 ± 1
Rocker cover, camshaft holder assembly, camshaft assembly
Rocker cover mounting bolt 3.0 ± 0.3
Fuel leak-off pipe eyebolt
Cam sprocket mounting bolt 88 ± 10
Camshaft cap mounting bolt 20 ± 1
Adjust screw locknut 9.5 ± 0.5
Pivot bolt 38 ± 8
E
Feb. 2000Mitsubishi Motors Corporation Added
Injection nozzle side 13 ± 2
Cylinder head side 11 ± 1
PWEE9409-D
Page 8
4M41 ENGINE -
Items Torque Nm
Injection nozzle
Injection pipe 33 ± 3
Return pipe eyebolt 11 ± 1
Injection nozzle assembly eyebolt 13 ± 2
Leak-off pipe eye bolt 11 ± 1
Injection nozzle assembly mounting bolt 21 ± 2
Retaining nut 34 ± 5
Cylinder head and valve mechanism
Injection nozzle mounting bolt 21 ± 2
Connecting plate mounting nut 1.3 ± 1.0
Glow plug 18 ± 2
Bolt (M10) 58 ± 6
Cylinder head bolt (M12: long) 49 ± 5+90_ +90_
Cylinder head bolt (M12: short) 49 ± 5+90_ +90_
Specifications
11B-1-5
Water joint 47 ± 5
Vacuum pump
Eyebolt 20 ± 2
Cover and body assembly mounting bolt 5.4 ± 0.5
Timing gear case
Crankshaft pulley mounting bolt 323 ± 32
Cap nut 23 ± 2
Timing gear and balance shaft
Tension lever shaft mounting bolt 40 ± 4
Guide plate mounting bolt 33 ± 3
Balance shaft gear RH mounting bolt 36 ± 4
Thrust plate mounting bolt 12 ± 1
Balance shaft gear LH mounting bolt 36 ± 4
Oil Pump
Balance shaft RH bolt 36 ± 3
Plug 44 ± 4
Oil pump cover screw 10 ± 1
Oil cooler and oil filter
Oil cooler element nut 20 ± 2
Bypass plug 44 ± 4
Regulator plug 44 ± 4
Water drain plug 30 ± 3
E
Feb. 2000Mitsubishi Motors Corporation Added
PWEE9409-D
Page 9
11B-1-6
Items Torque Nm
Oil pan, oil strainer and oil jet
Drain plug 39 ± 3
Oil jet 32 ± 3
Piston and connecting rod
Connecting rod cap mounting nut 29 ± 3+49± 5+45_ +45_
Drive plate
Drive plate assembly and crankshaft mounting bolt 123 ± 12
Crankshaft and crankcase
Dust cover mounting bolt 47 ± 5
Lower crankcase mounting bolt 25 ± 3
Main bearing cap bolt 20 ± 2+90_ +90_
Check valve 32 ± 3
4M41 ENGINE -
Specifications
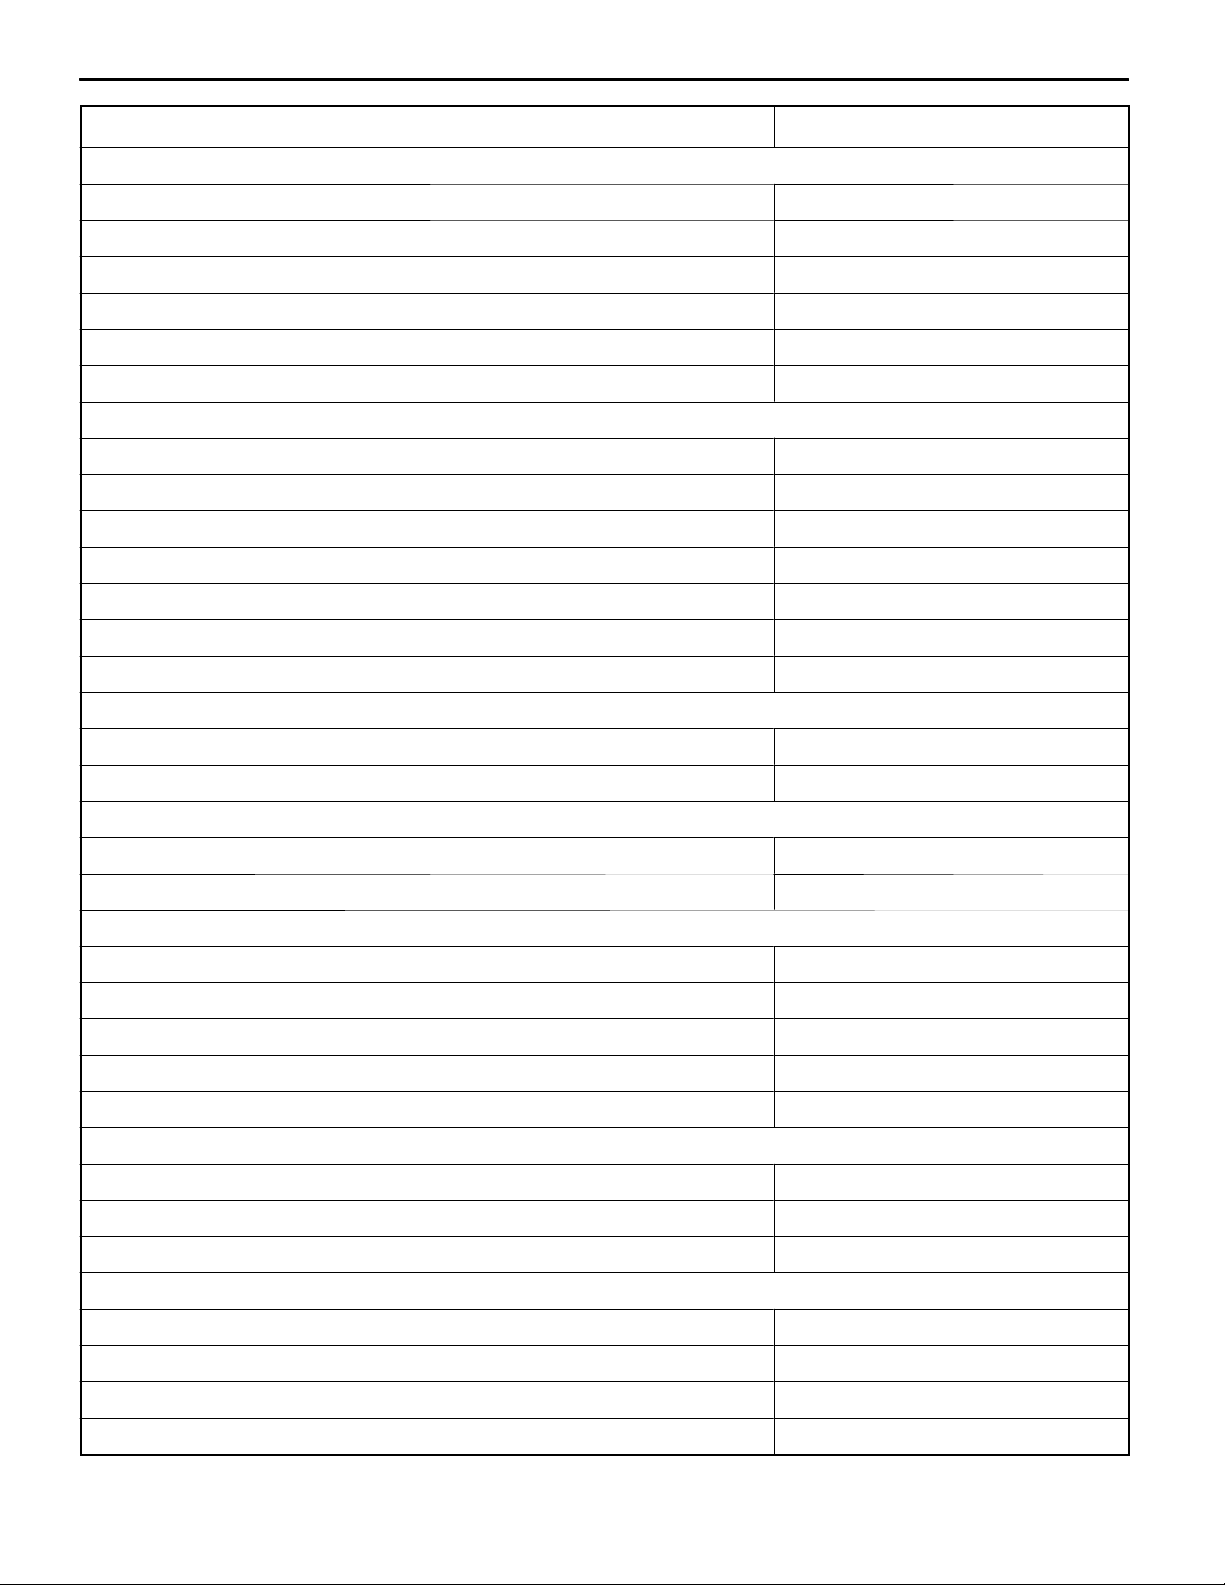
STANDARD BOLT AND NUT TIGHTENING TORQUE TABLE
1. Fasten the parts and equipment of vehicle using the specified standard bolts a n d nuts. Tighten these
bolts and nuts to the torques indicated below, unless otherwise specified.
2. Threads and bearing surfaces must be dry.
3. In case nut and bolt (or stud bolt) differ in strength, tighten them to the torque specified for the
bolt.
Hexagon head bolts and stud bolts
Strength
Code
Head Mark
Nominal
Diameter mm
M5 2.5 ± 0.5 - 5 ± 1 - 6 ± 1 -
M6 5 ± 1 - 9 ± 2 - 10 ± 2 -
M8 11.5 ± 2.5 - 21 ± 4 - 25 ± 4 -
M10 23 ± 4 22 ± 4 44 ± 10 41 ± 8 52 ± 7 55 ± 13
M12 41 ± 8 38 ± 8 81 ± 12 74 ± 9 96 ± 12 86 ± 12
4T 7T 8T
(Stud)
(Stud)
(Stud)
Unit: Nm
E
Feb. 2000Mitsubishi Motors Corporation Added
PWEE9409-D
Page 10
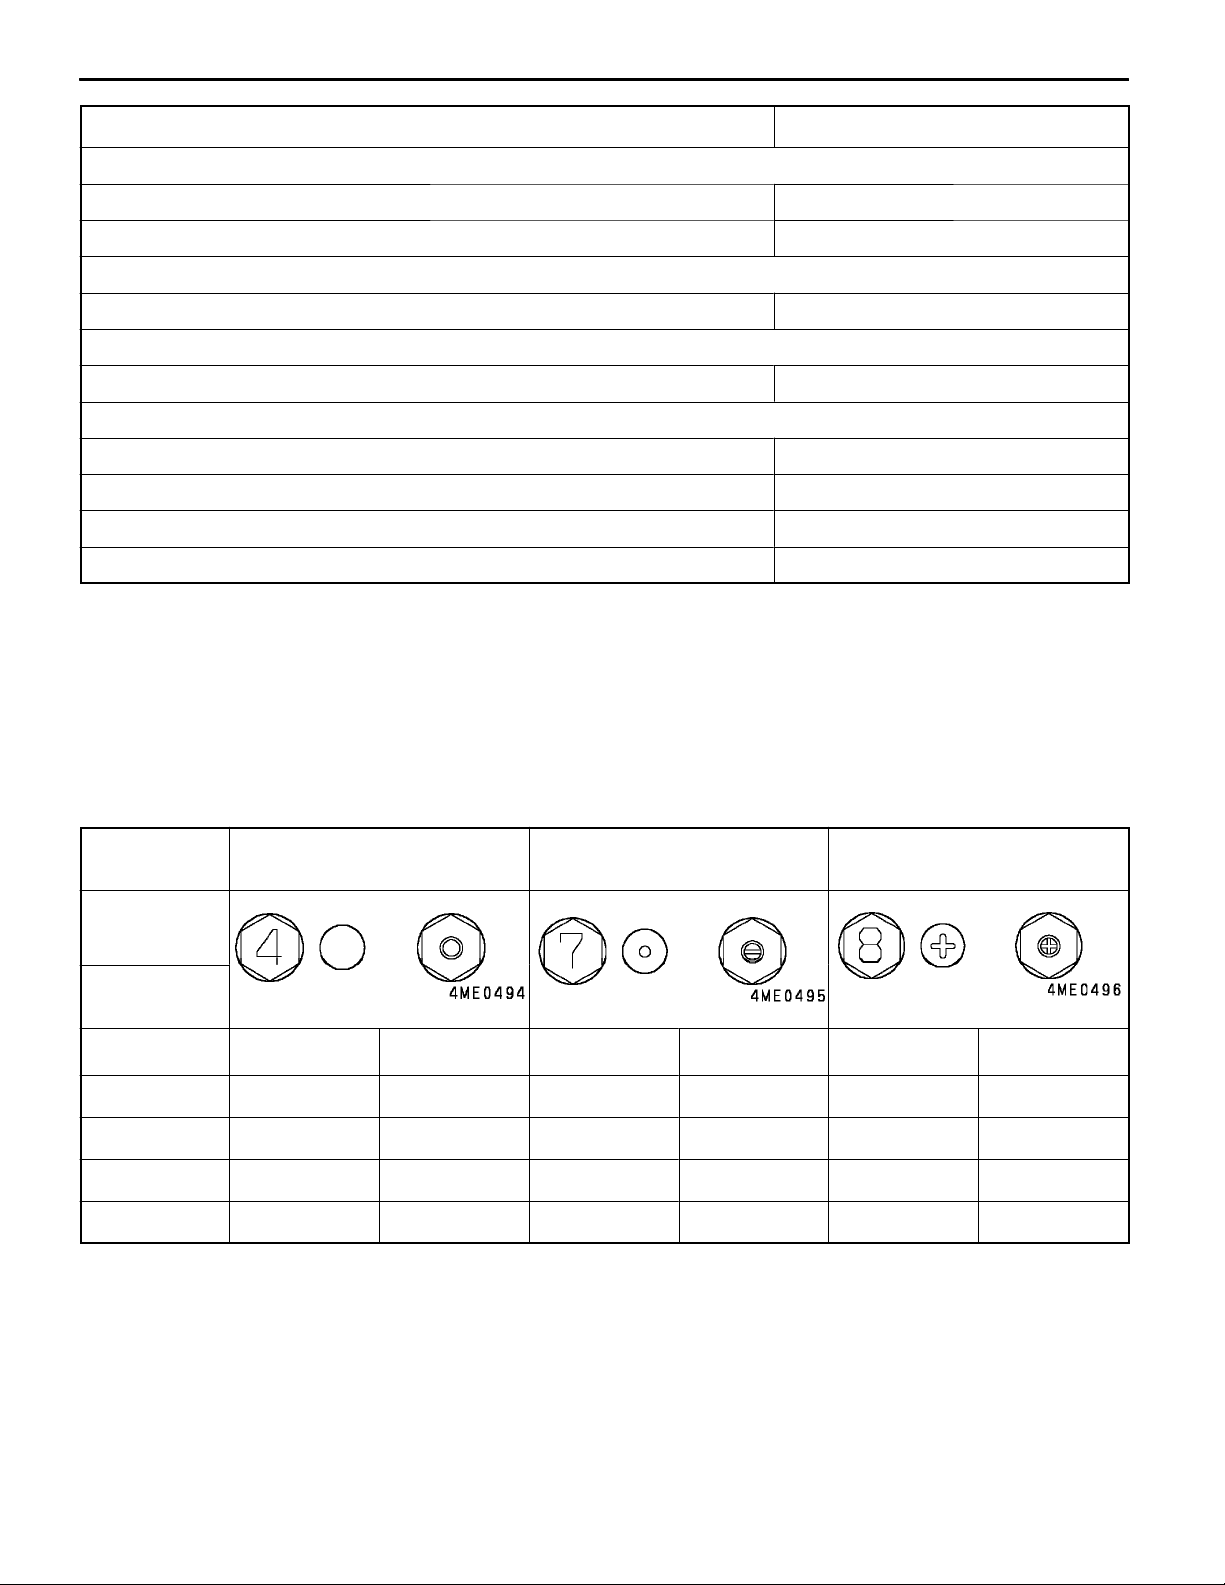
Hexagon flange bolts
4M41 ENGINE -
Specifications
11B-1-7
Unit: Nm
Strength
Code
Head Mark
Nominal
Diameter mm
M6 5 ± 1 - 10 ± 2 - 12 ± 2 -
M8 13 ± 2 - 23 ± 4 - 27 ± 5 -
M10 26 ± 4 22 ± 4 49 ± 10 44 ± 9 57 ± 7 54 ± 10
M12 46 ± 8 42 ± 9 93 ± 15 81 ± 12 103 ± 15 96 ± 12
4T 7T 8T
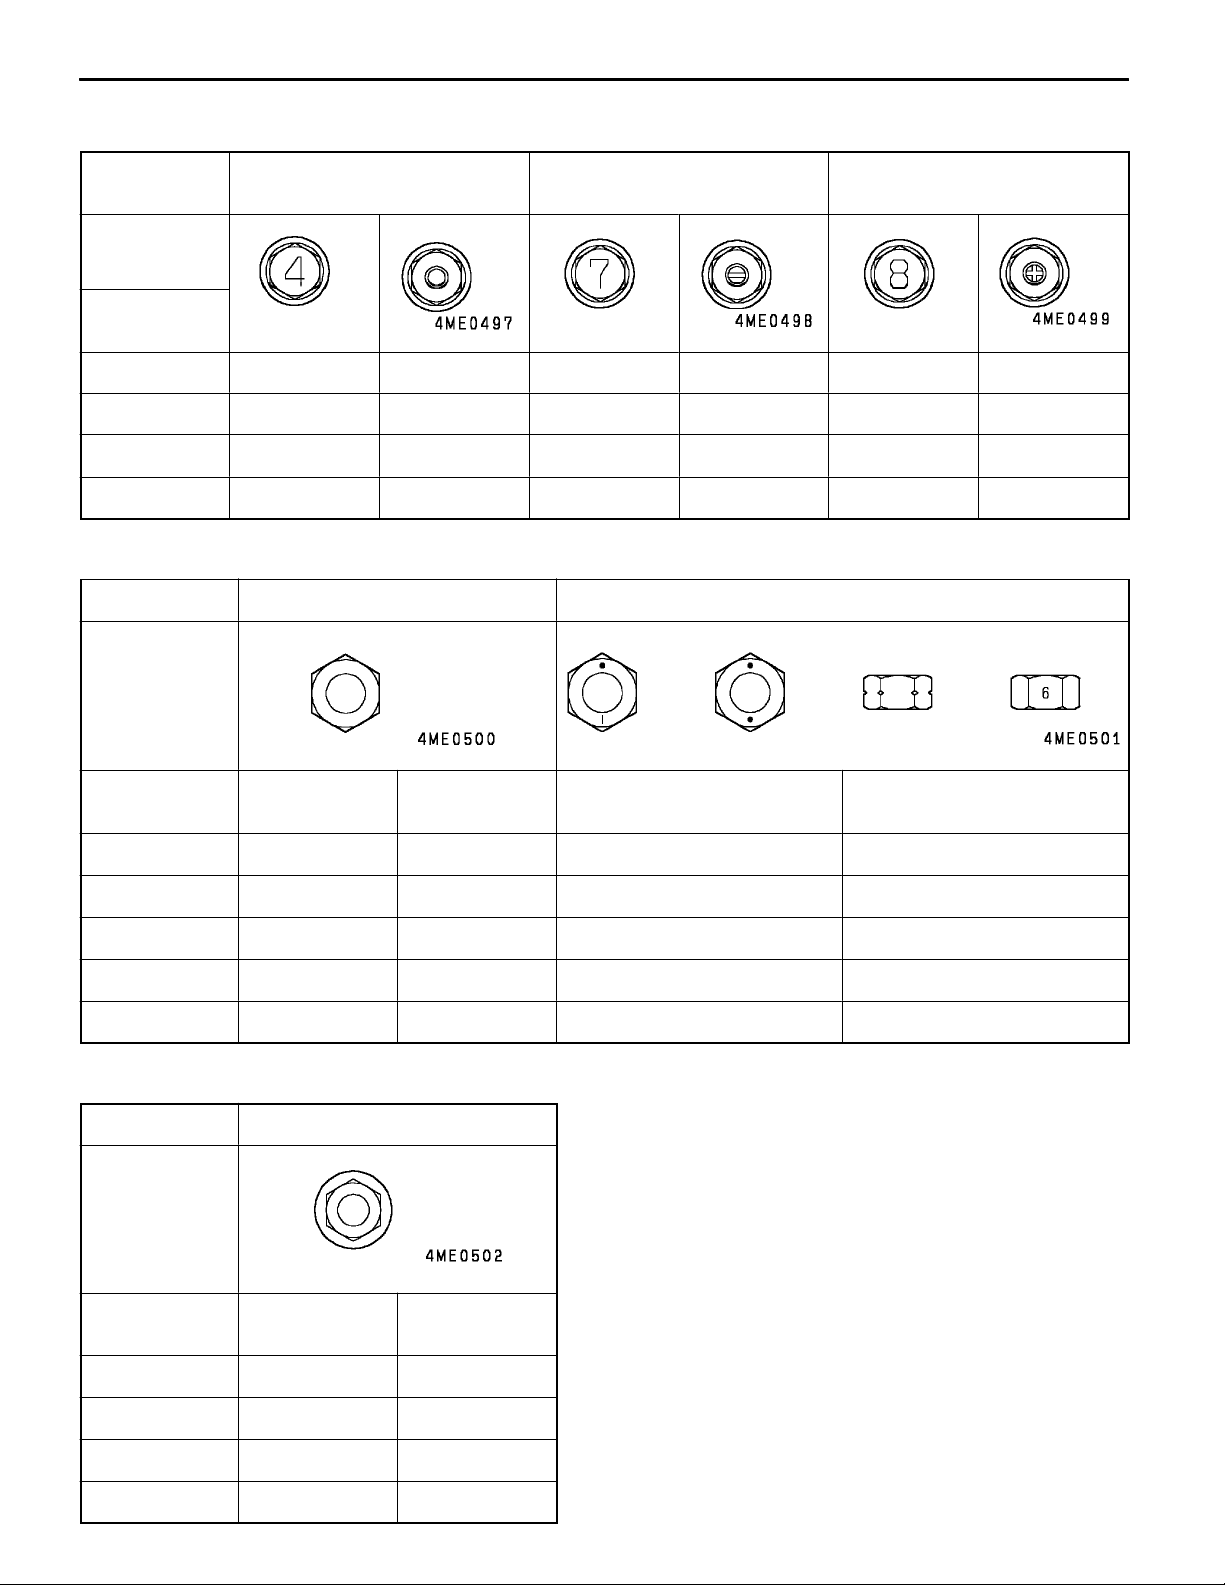
Hexagon nuts
Strength Code
Head Mark
4T 6T
Unit: Nm
Nominal
Diameter mm
M5 2.5 ± 0.5 - 5 ± 1 -
M6 5 ± 1 - 9 ± 2 -
M8 12 ± 2 - 21 ± 4 -
M10 23 ± 4 22 ± 4 44 ± 10 41 ± 8
M12 41 ± 8 38 ± 8 81 ± 12 73 ± 10
Standard
Thread
Coarse Thread Standard Thread Coarse Thread
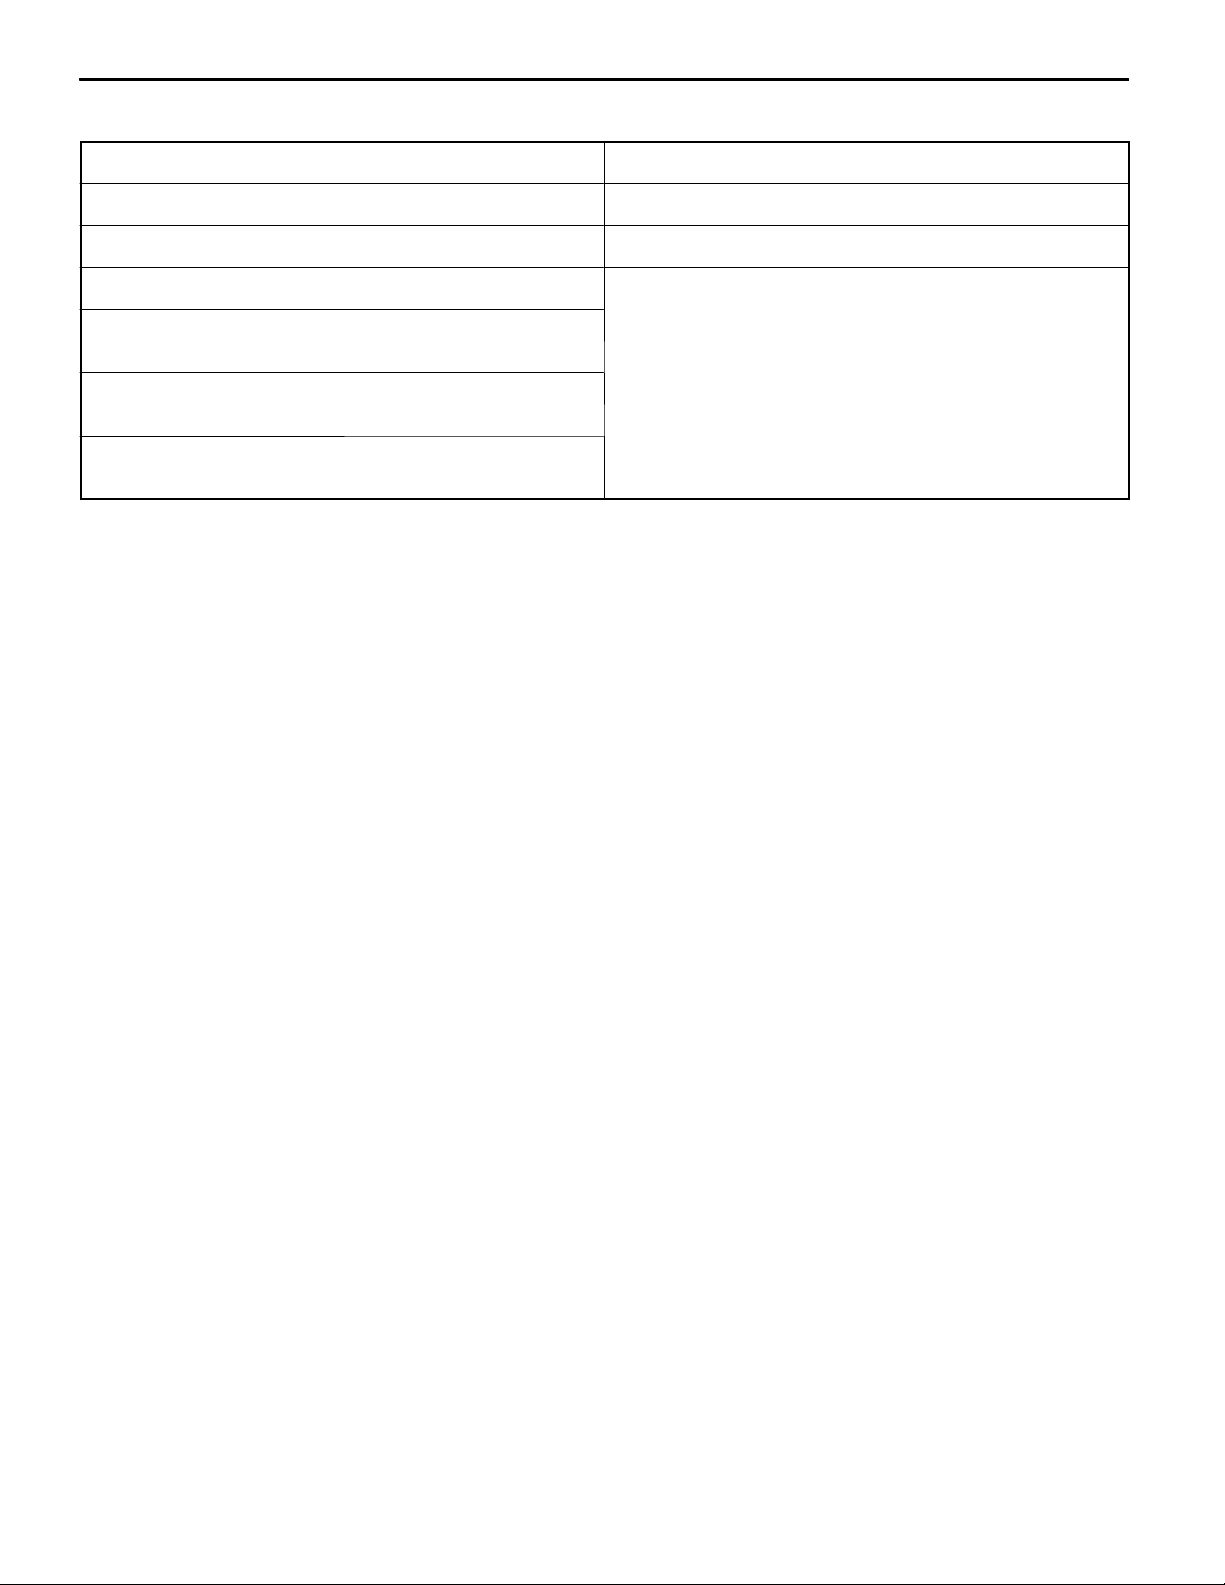
Hexagon flange nuts
Unit: Nm
Strength Code
Head Mark
Nominal
Diameter mm
4T
Standard
Thread
Coarse Thread
M6 5 ± 1 -
M8 13 ± 2 -
M10 26 ± 4 24 ± 4
M12 41 ± 8 42 ± 9
E
Feb. 2000Mitsubishi Motors Corporation Added
PWEE9409-D
Page 11
11B-1-8
4M41 ENGINE -
Specifications
SEALANT
Location Specified sealant
Mating surface of front plate to cylinder head gasket 3M ATD Part No.8660 or equivalent
Inner surface of sealing cap press-fitting hole THREEBOND TB1386, LOCTITE 962T or equivalent
Mating surface of timing gear case to front plate* Mitsubishi Genuine Part No. MD970389 or equivalent
Upper crankcase assembly-to-lower crankcase assembly mounting surface*
Rear oil seal case-to-upper or lower crankcase assembly
mounting surface*
Upper or lower crankcase assembly-to-front plate
mounting surface*
*: FIPG to be applied
FORM-IN-PLACE GASKET
The engine has several areas where the form-in-place gasket (FIPG) is in use. To ensure that the gasket
fully serves its purpose, it is necessary to observe some precautions when applying the gasket. Bead
size, continuity and location are of paramount importance.
Too thin a bead could cause leaks. Too thick a bead, on the other hand, could be squeezed out of
location, causing blocking or narrowing of the fluid feed line. To eliminate the possibility of leaks from
a joint, therefore, it is absolutely necessary to apply the gasket evenly without a break, while observing
the correct bead size.
Since the FIPG used in the engine hardens as it reacts with the moisture in the atmospheric air, it is
normally used in the metallic flange areas.
Disassembly
The parts assembled with the FIPG can be easily disassembled without use of a special method. In
some cases, however, the sealant between the joined surfaces may have to be broken by lightly striking
with a mallet or similar tool. A flat gasket scraper may be lightly hammered in between the joined surfaces.
In this case, however, care must be taken to prevent damage to the joined surfaces.
Surface Preparation
Thoroughly remove all substances deposited on the gasket application surfaces, using a gasket scraper
or wire brush. Check to ensure that the surfaces to which the FIPG is to be applied is flat. Make sure
that there are no oils, greases and foreign substances deposited on the application surfaces. Do not
forget to remove the old sealant remaining in the bolt holes.
Form-In-Place Gasket Application
Applied FIPG bead should be of the specified size and without breaks. Also be sure to encircle the
bolt hole circumference with a completely continuous bead. The FIPG can be wiped away unless it is
hardened. While the FIPG is still moist (in less than 15 minutes), mount the parts in position. When
the parts are mounted, make sure that the gasket is applied to the required area only. In addition, do
not apply any oil or water to the sealing locations or start the engine until a sufficient amount of time
(about one hour) has passed after installation is completed.
The FIPG application procedure may vary on different areas. Observe the procedure described in the
text when applying the FIPG.
E
Feb. 2000Mitsubishi Motors Corporation Added
PWEE9409-D
Page 12
4M41 ENGINE -
Special Tools
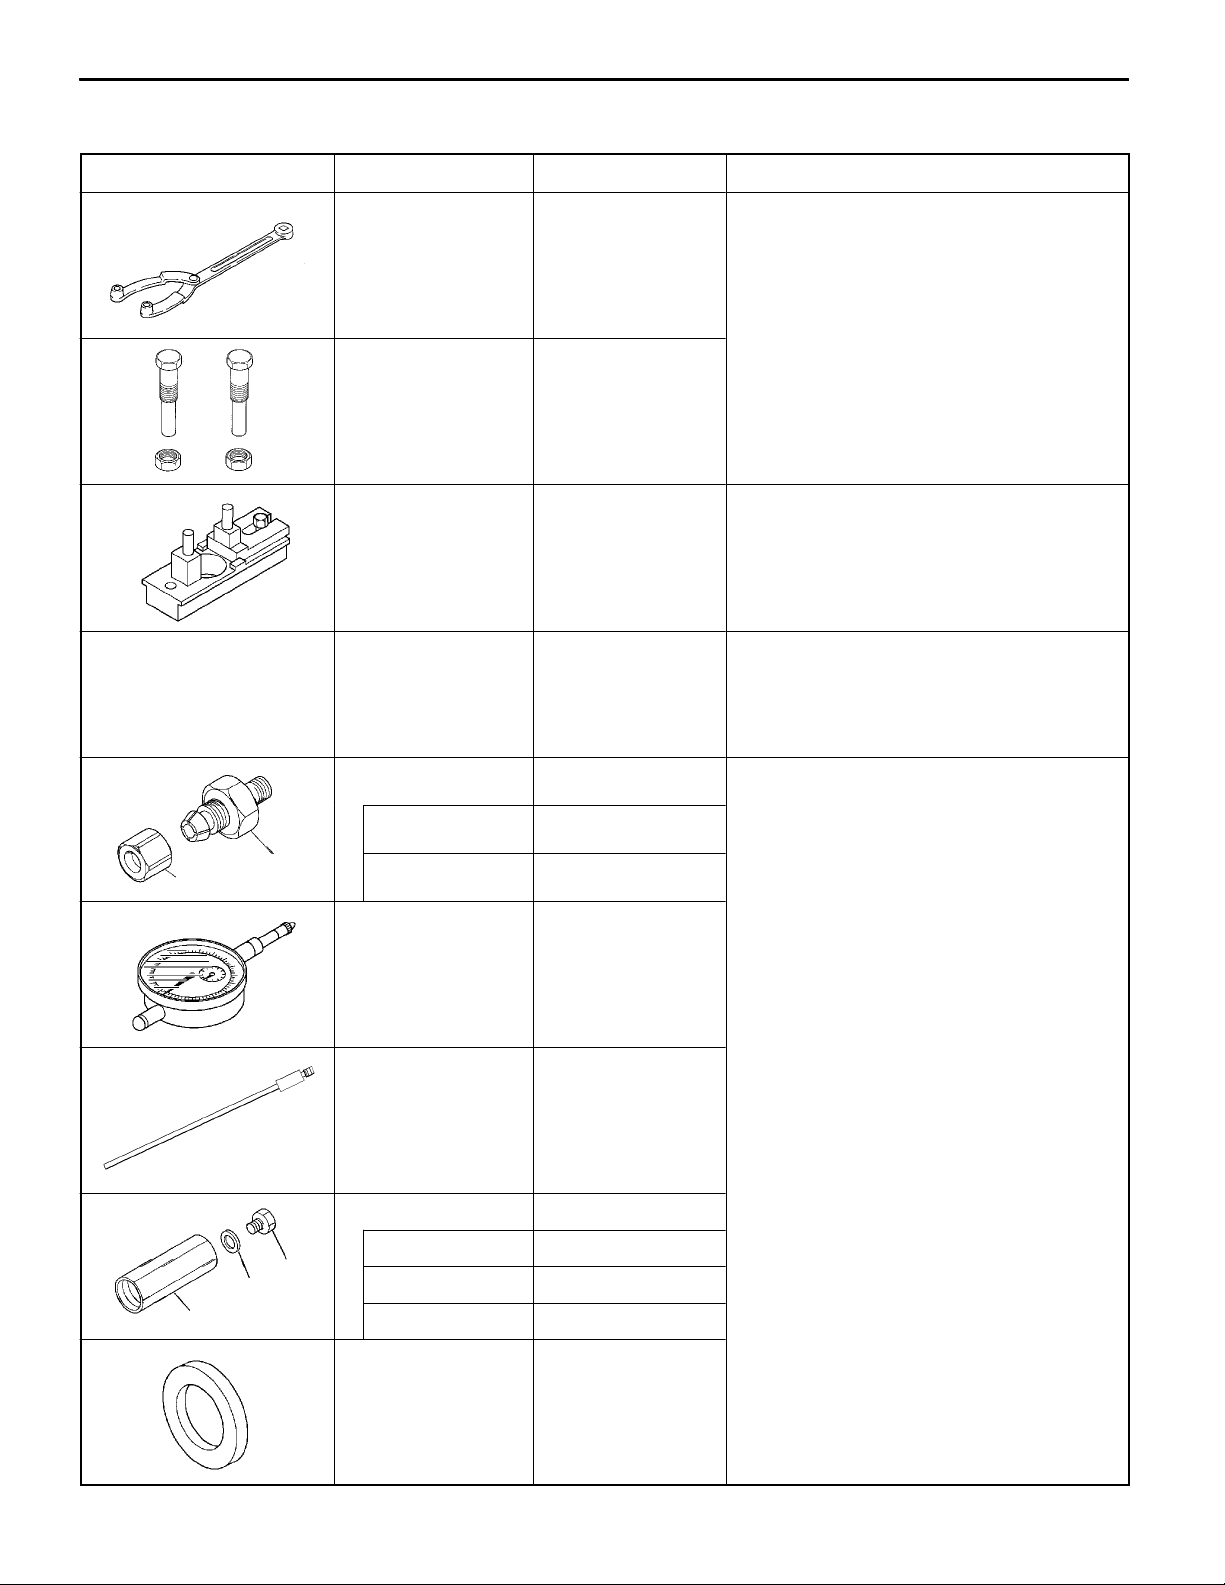
2. SPECIAL TOOLS
Tool Number Name Use
11B-2-1
MB990767 Front hub and
flange yoke holder
MD998754 Crankshaft pulley
holder pin
157944-9520
(Zexel)
105789-0010
(Zexel)
157892-4420 Adjusting device D Adjustment of valve opening pressure
157892-4400: A Holder
Plate Removal and installation of retaining nut
Nozzle cleaning
tool
D Removal of crankshaft puley
D Installation of injection pump assembly
Cleaning of nozzle and needle valve
D Checking needle valve maximum lift
D Checking needle valve maximum lift
D Checking injection nozzle assembly
A
B
C
B
A
157892-1000: B Nut
157954-3801 Dial gauge
157892-7200 Pin
157892-5120 Retaining nut
157892-5100: A Retaining nut
026508-1140: B Gasket
157892-1600: C Plug
157892-3200 Gasket
E
Feb. 2000Mitsubishi Motors Corporation Added
PWEE9409-D
Page 13
11B-2-2
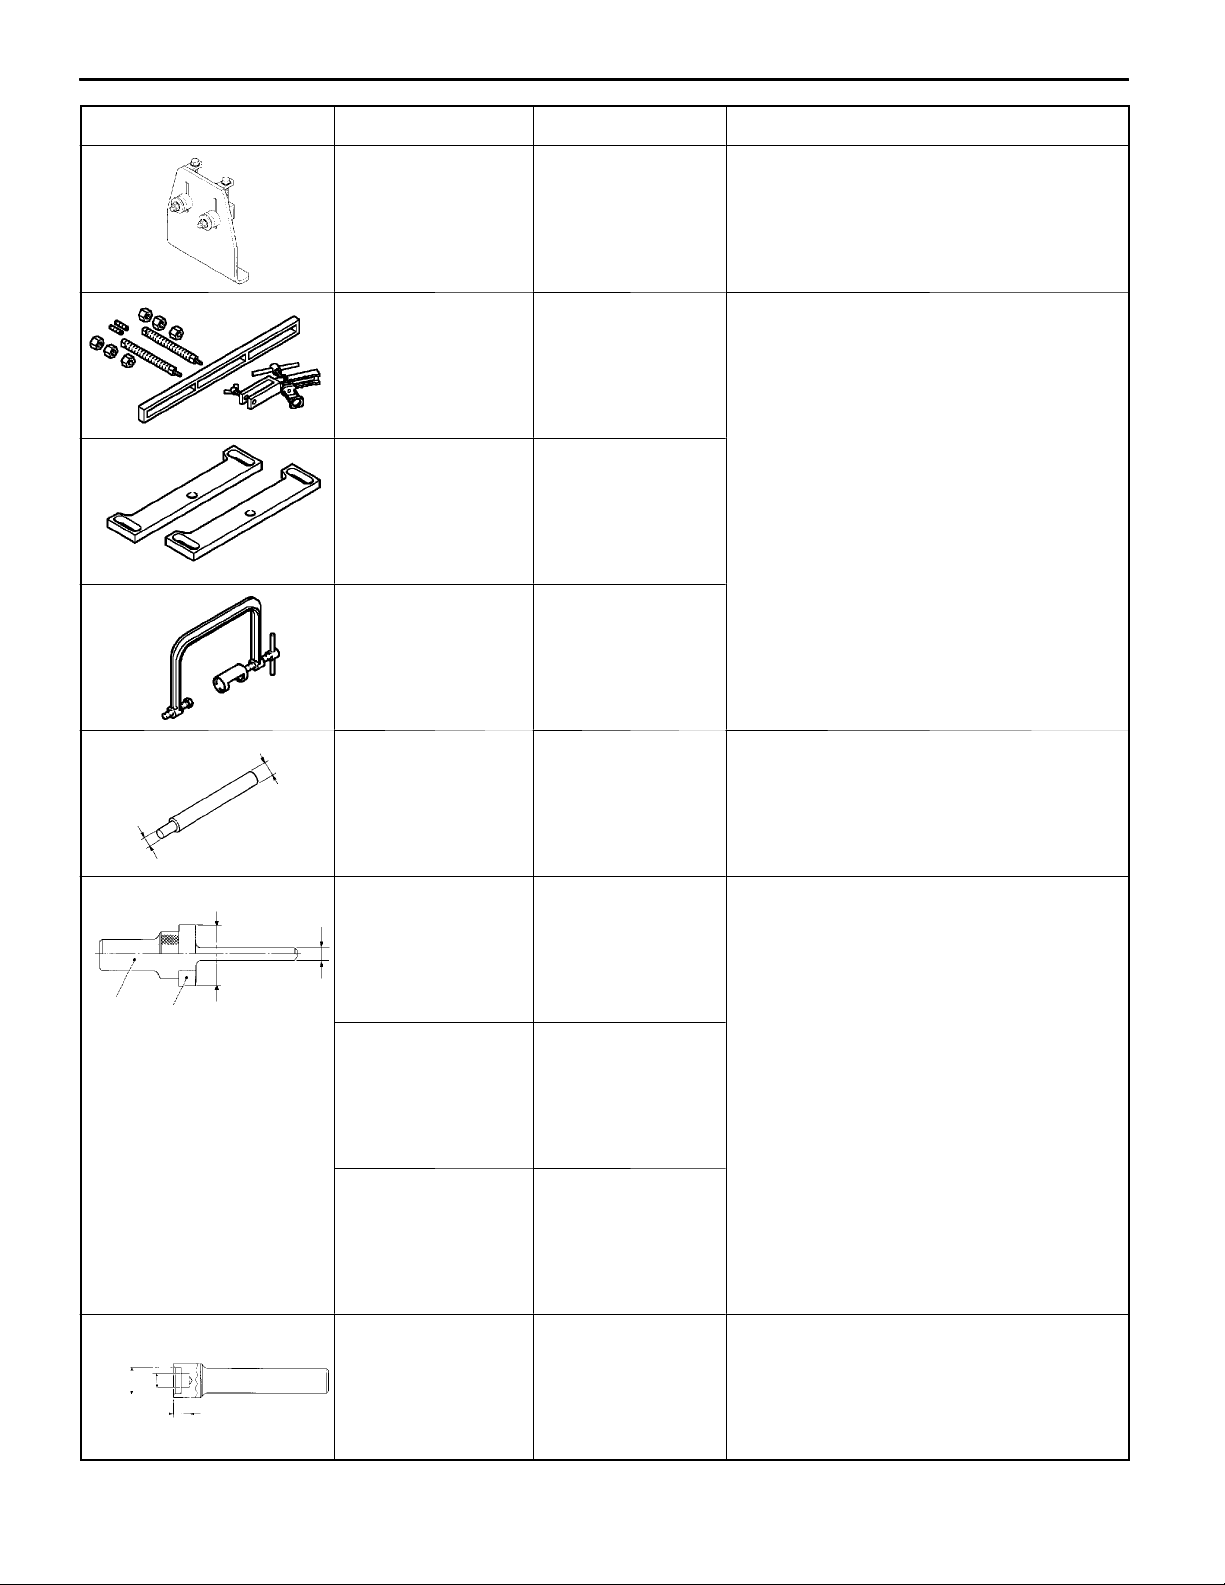
Tool UseNameNumber
4M41 ENGINE -
Special Tools
MH063490 Cam sprocket
holder kit
MD998772 Valve spring com-
pressor
MD998784 Valve spring com-
pressor adaptor
plate
MD999597 Valve spring com-
pressor
Holding cam sprocket
Removal and installation of valve cotter
11.5
f
6.6
f
MD998665 Valve guide remov-erRemoval of valve guide
MH06361 1: A Calking ring inlet Installation of valve seat
8
f
C
A, B
A, B
35: A
f
33: B
f
MH063612: B Calking ring ex-
haust
MH063613: C Calking tool body
12
MH063610 Valve guide install-erInstallation of valve guide
f
21
f
16.5
E
Feb. 2000Mitsubishi Motors Corporation Added
PWEE9409-D
Page 14
4M41 ENGINE -
Special Tools
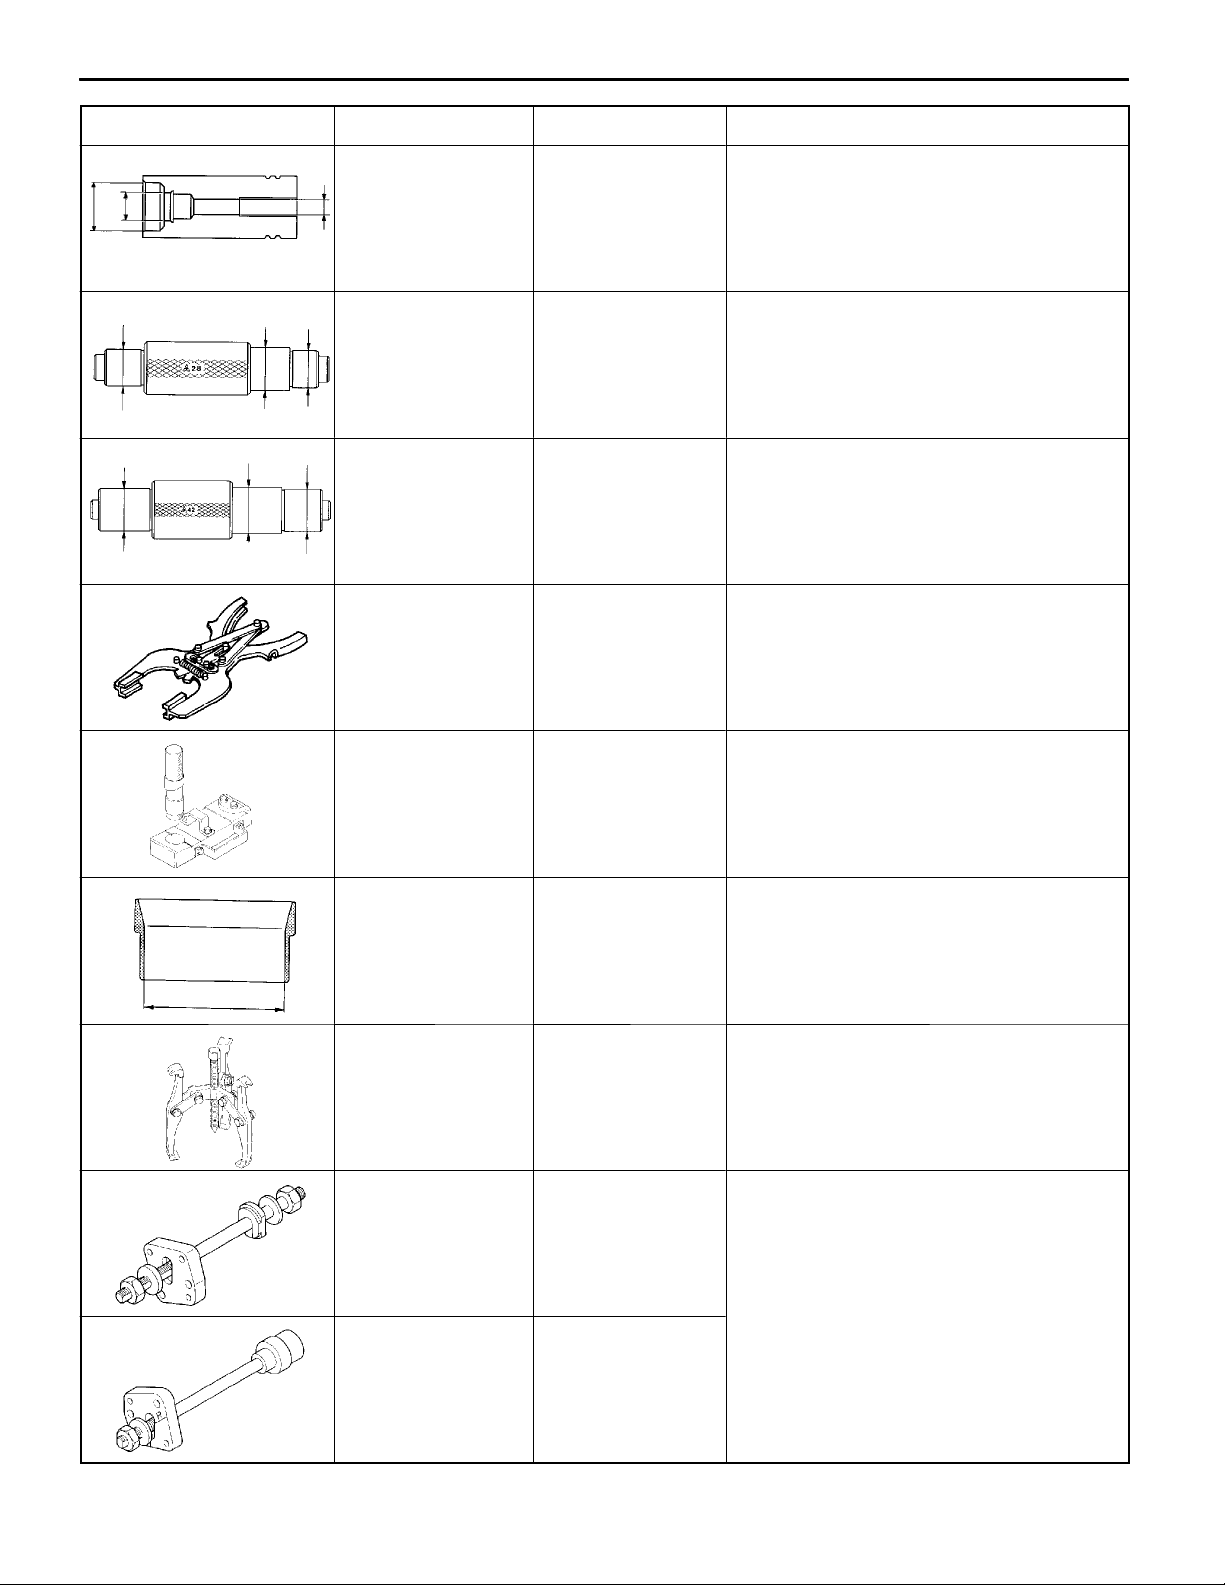
Tool Number Name Use
11B-2-3
18
f
15.4
f
f
27.5
f
41.5
f
60 - 120
MH063609 Valve stem seal
6.6
f
f
32
f
46
f
MH062463 Idler gear bush
f
28
42
MH062462 Idler sprocket bush
installer
puller
puller
Installation of valve stem seal
Removal and installation of idler gear bush
Removal and installation of idler sprocket
bush
MH060014 Piston ring tool Removal and installation of piston rings
f
98.5
MH062574 Connecting rod
Removal of connecting rod bush
bush puller kit
MH063484 Piston guide Installation of piston
MH062469 Gear puller Removal of crankshaft gear
MH062490 Balance shaft bush
Removal of balance shaft bush
remover
MH062717 Balance shaft bush
installer
E
Feb. 2000Mitsubishi Motors Corporation Added
PWEE9409-D
Page 15

11B-2-4
Tool Number Name Use
MH062567 Gear puller Removal of injection pump gear
4M41 ENGINE -
Special Tools
MH063473 Pin wrench arm
assembly
Assembling of injection pump gear
E
Feb. 2000Mitsubishi Motors Corporation Added
PWEE9409-D
Page 16
4M41 ENGINE -
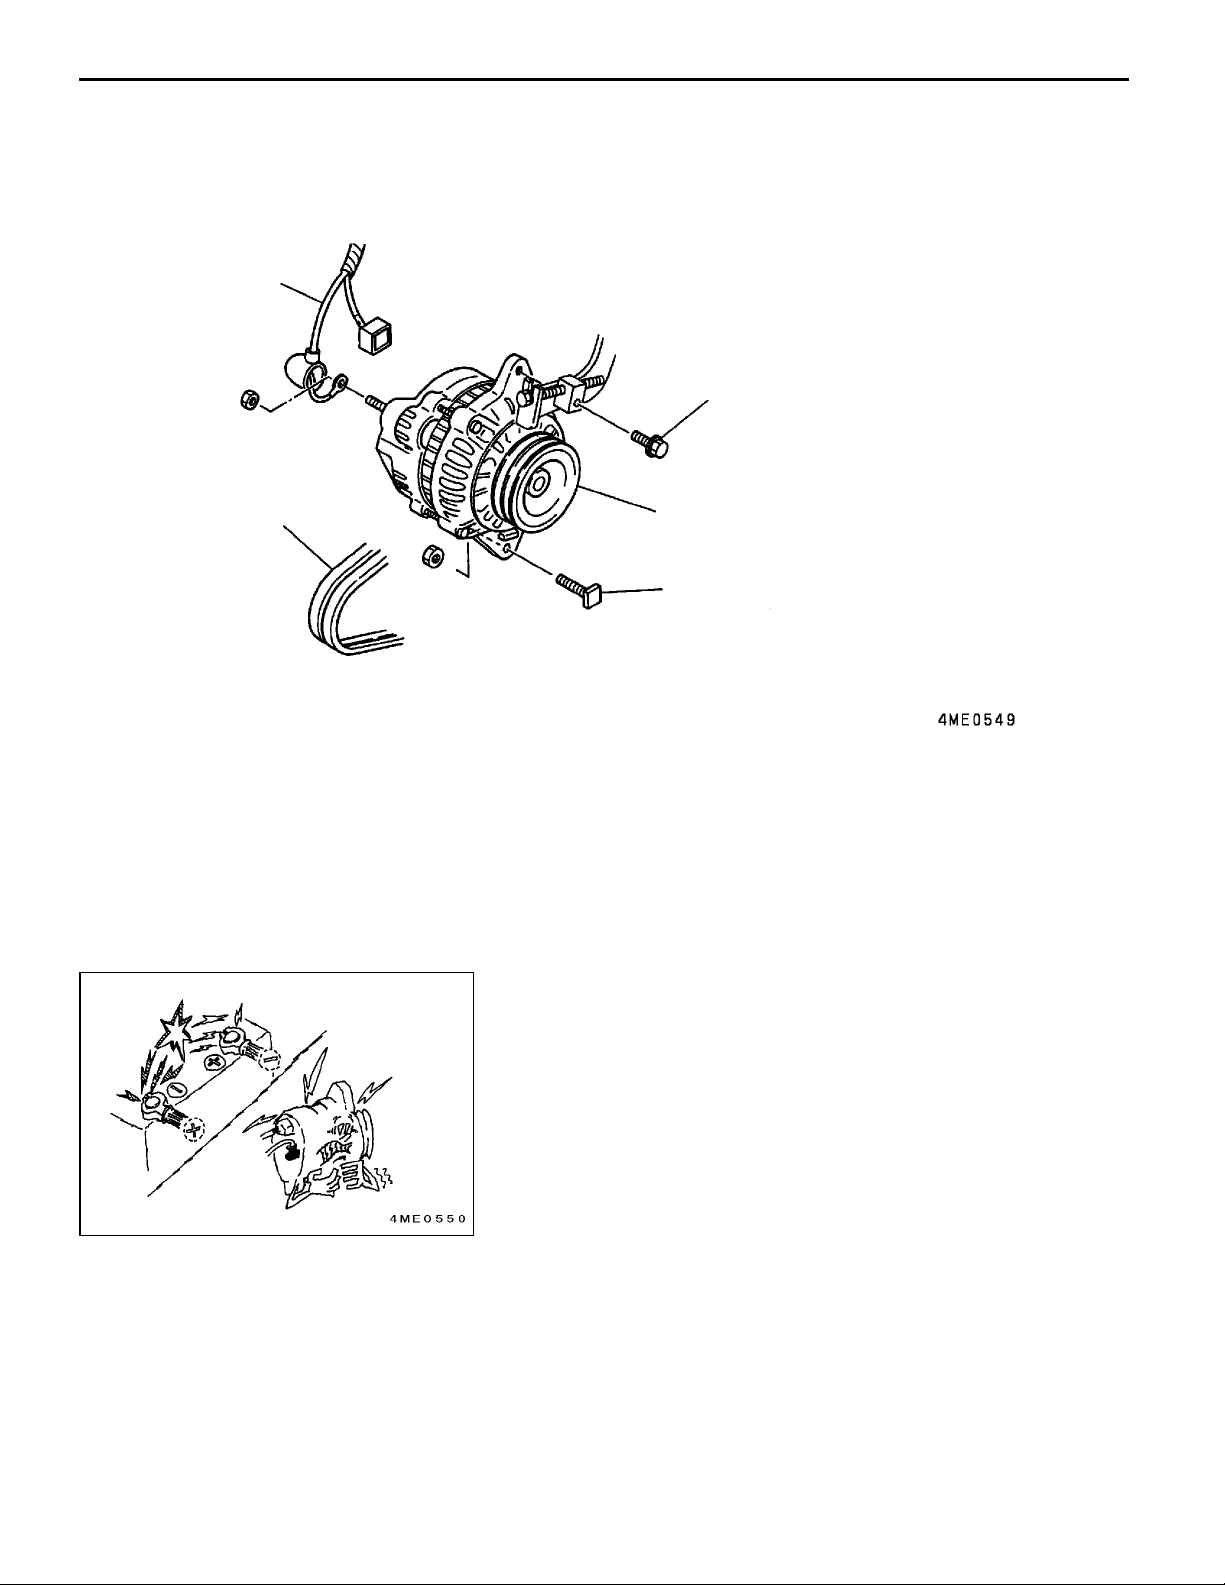
3. GENERATOR ASSEMBLY
REMOVAL AND INSTALLATION
1
Generator Assembly
2
11B-3-1
4
Removal steps
1. Wiring harness
2. Adjusting bolt
3. Bolt
4. V-belt (Refer to page 11B-5-1.)
"AA 5. Generator
5
3
REMOVAL SERVICE POINT
"AA
Caution in Handling Generator
The following caution should be taken when servicing the
generator5.
Be sure to connect the generator5to t he battery correctly.
Reversed polarity causes an excessive current to flow from
the battery to the generator5, damaging the diodes and
voltage regulator.
GENERATOR INSPECTION
E
Feb. 2000Mitsubishi Motors Corporation Added
PWEE9409-D
Page 17
4M41 ENGINE -
4. GLOW PLUG
REMOVAL AND INSTALLATION
Glow Plug
11B-4-1
18±1Nm
5
4
13±1Nm
3
1
7
2
6
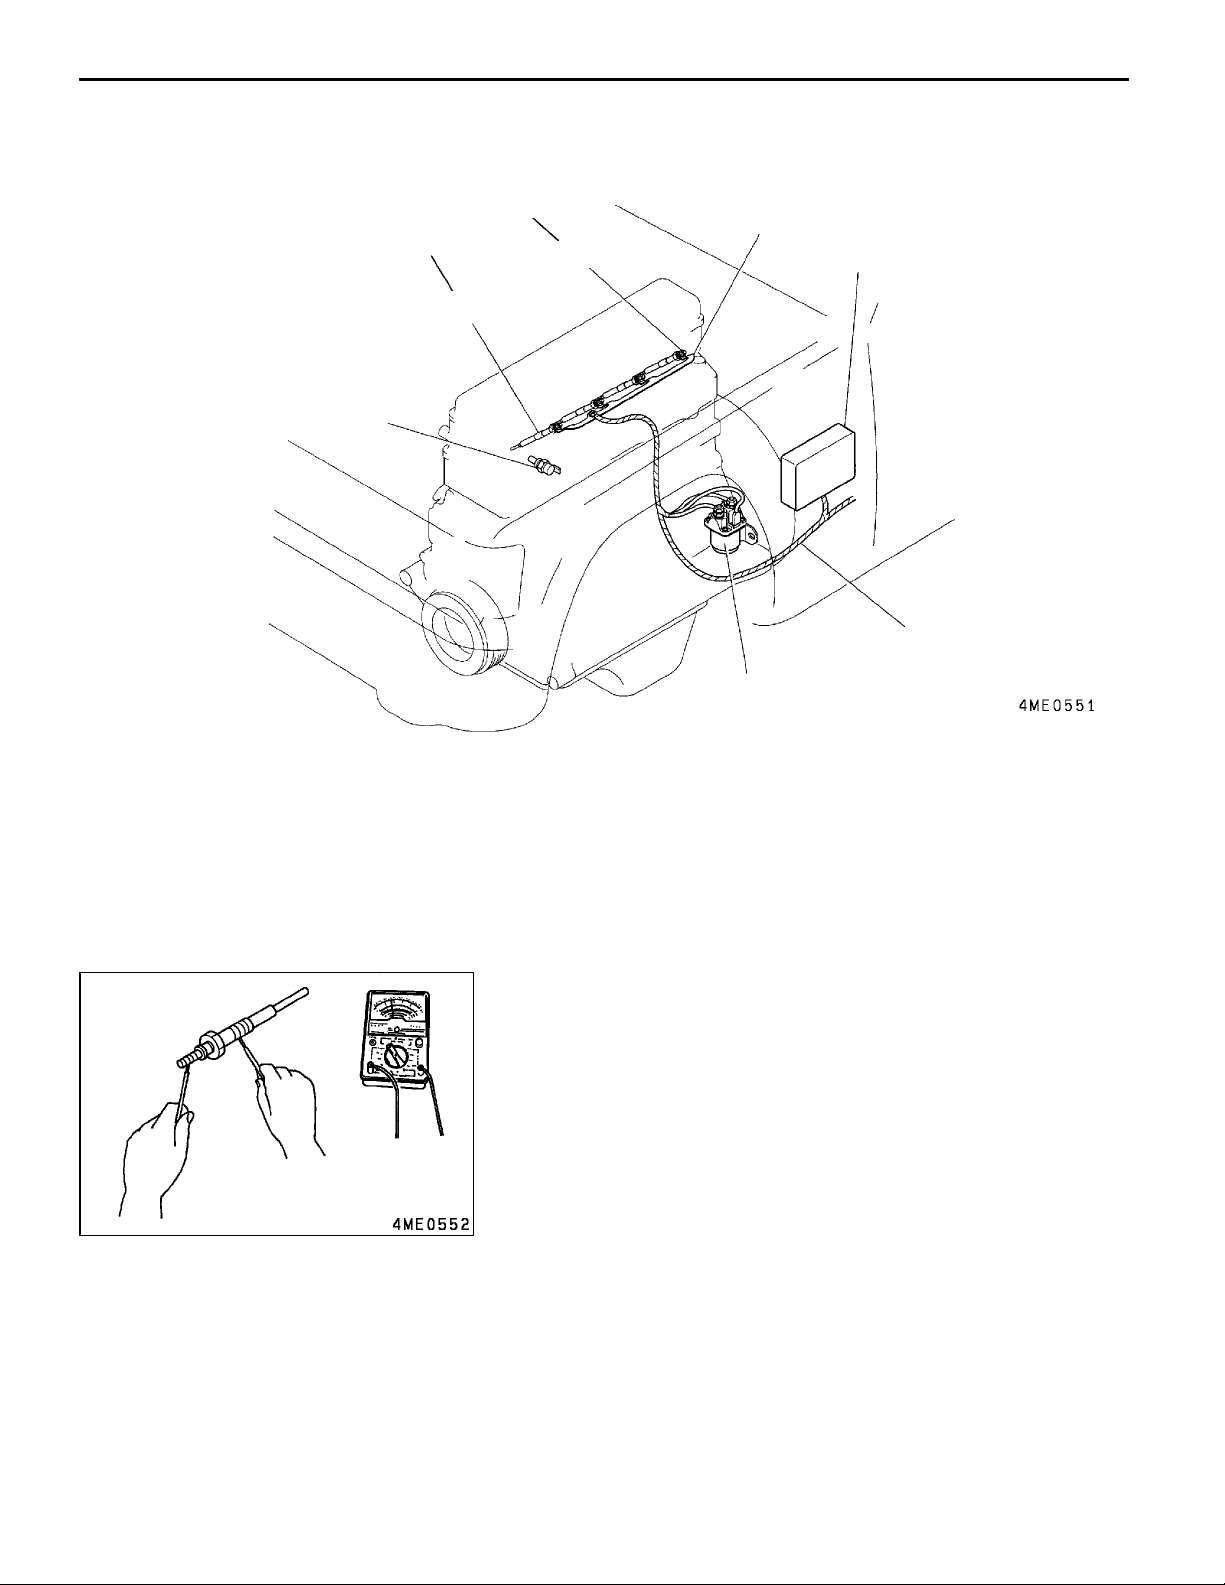
Removal steps
1. Nut
2. Glow plug wiring harness
3. Connection plate
4. Glow plug
5. Coolant temperature sensor
(For engine control)
6. Glow relay
7. Engine ECU
INSPECTION
GLOW PLUG
Measure resistance of the glow plug4. Replace the glow
plug if the reading deviates from the specified standard value.
Standard value: 1.1
W
E
Feb. 2000Mitsubishi Motors Corporation Added
PWEE9409-D
Page 18

4M41 ENGINE -
Cooling Fan, V-belt and Water Pump
5. COOLING FAN, V-BELT AND WATER PUMP
REMOVAL AND INSTALLATION
8
5
11B-5-1
1
10±1Nm
24±2Nm
4
6
2
Removal steps
1. Bolt
2. Cooling fan
3. Nut
4. Auto-cooling fan coupling
5. V-belt
6. Bolt
7. Coupling plate
8. Water pump pulley
9. Water pump assembly
10. O-ring
7
*1
10
9
3
24±2Nm
*1: Timing gear case
E
Feb. 2000Mitsubishi Motors Corporation Added
PWEE9409-D
Page 19
11B-5-2
A
4M41 ENGINE -
Cooling Fan, V-belt and Water Pump
INSPECTION
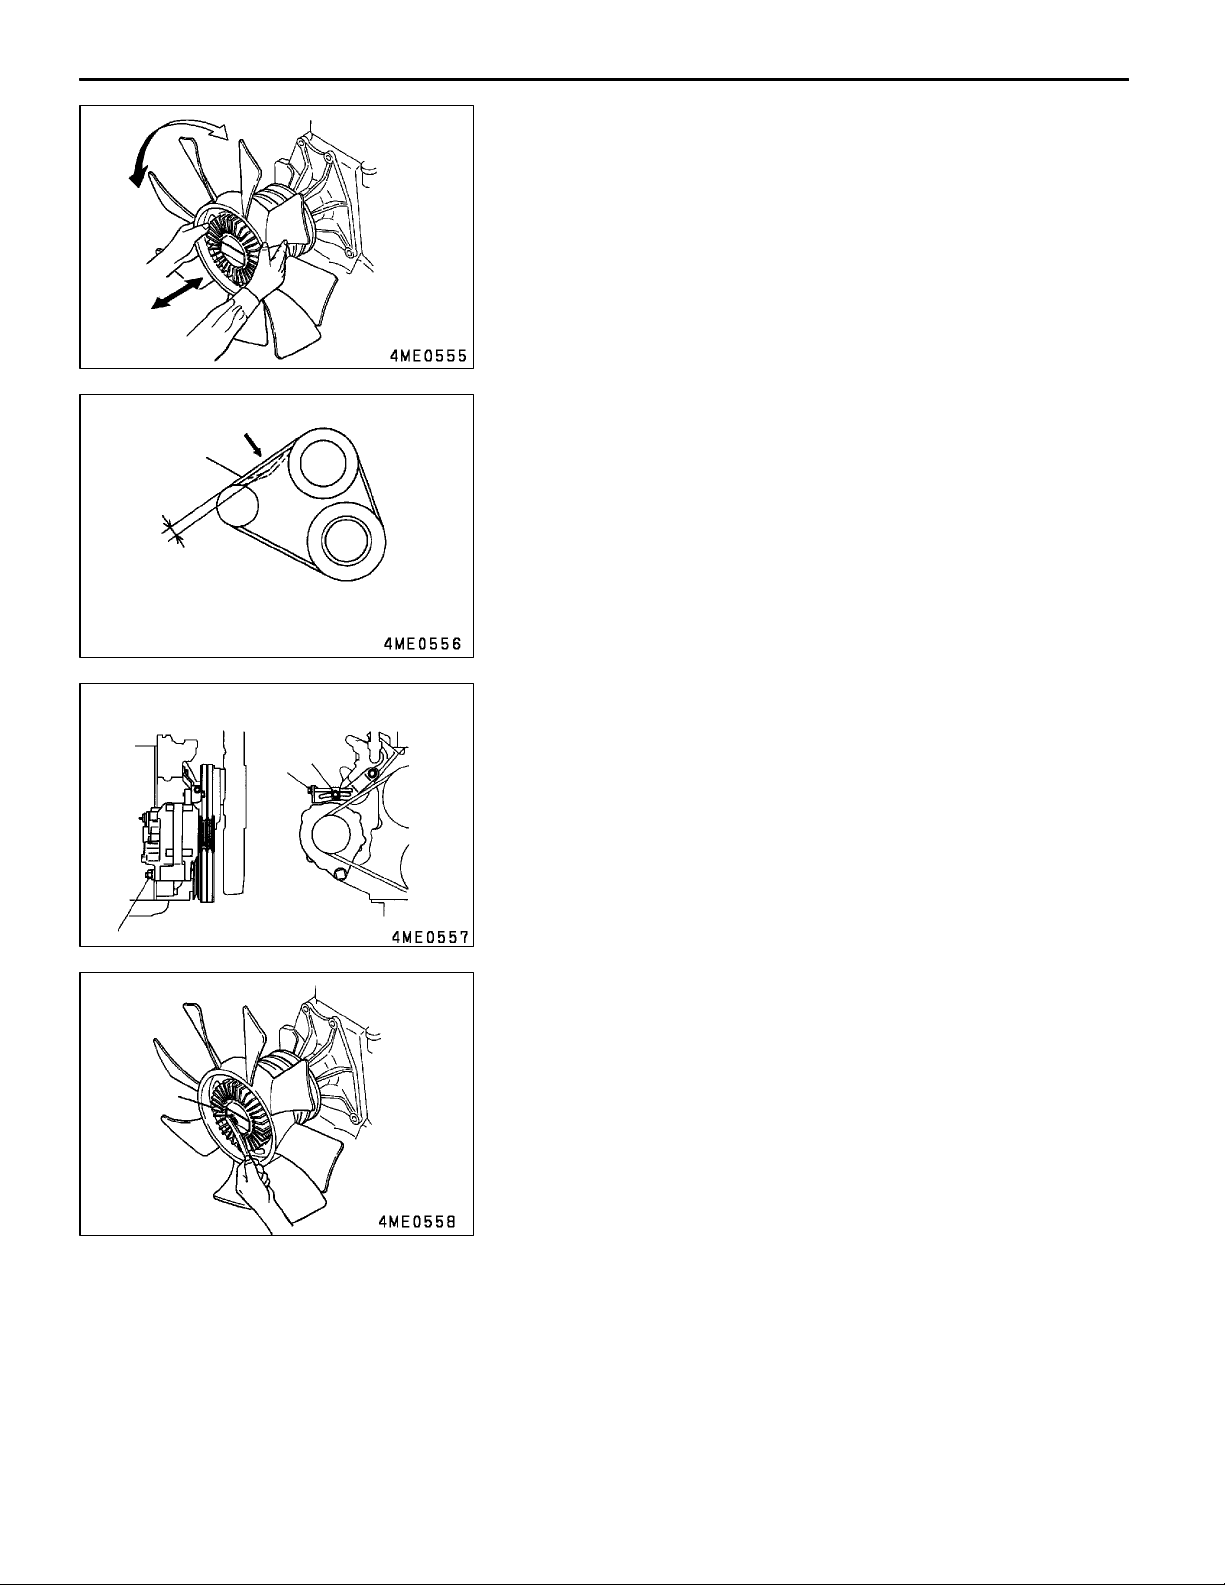
1. AUTO-COOLING FAN COUPLING
Check th e auto-cooling fan coupling4, and replace if
any of the following conditions exists:
(1) Hydraulic fluid is leaking from the hermetically sealed
housing.
(2) The coupling turns irregularly or produces an
abnormal sound when rotated by hand due to
defective inside bearing.
(3) The coupling has an excessive axial play when moved
with the engine in a cold state.
2. V-BELT
5
(1) Push the V-belt
approximately 98 N as shown and read the amount of
deflectionA.
(2) If the reading deviates from the specified standard value,
accomplish the following adjustment.
at its midpoint with a force of
5
(3) Loosen the bolt an d nutBholding the generator, and
adjust the tension of the V-belt5using the adjusting
B
C
B
boltC.
Caution
1. Be sure to retighten the bolt and nut securely
after the adjustment.
2. Excessive tension damages not only the V-belt
5 itself but bearings elsewhere.
3. Be sure to replace the V-belt 5, when necessary,
in pairs and keep it slush-free.
CLEANING
Remove foreign matters, if any, from the bimetalAusing
care not to apply unnecessary force to it.
A
E
Feb. 2000Mitsubishi Motors Corporation Added
PWEE9409-D
Page 20
4M41 ENGINE -
6. WATER HOSES AND PIPES
REMOVAL AND INSTALLATION
3
4
Water Hoses and Pipes
11B-6-1
8
25±2Nm
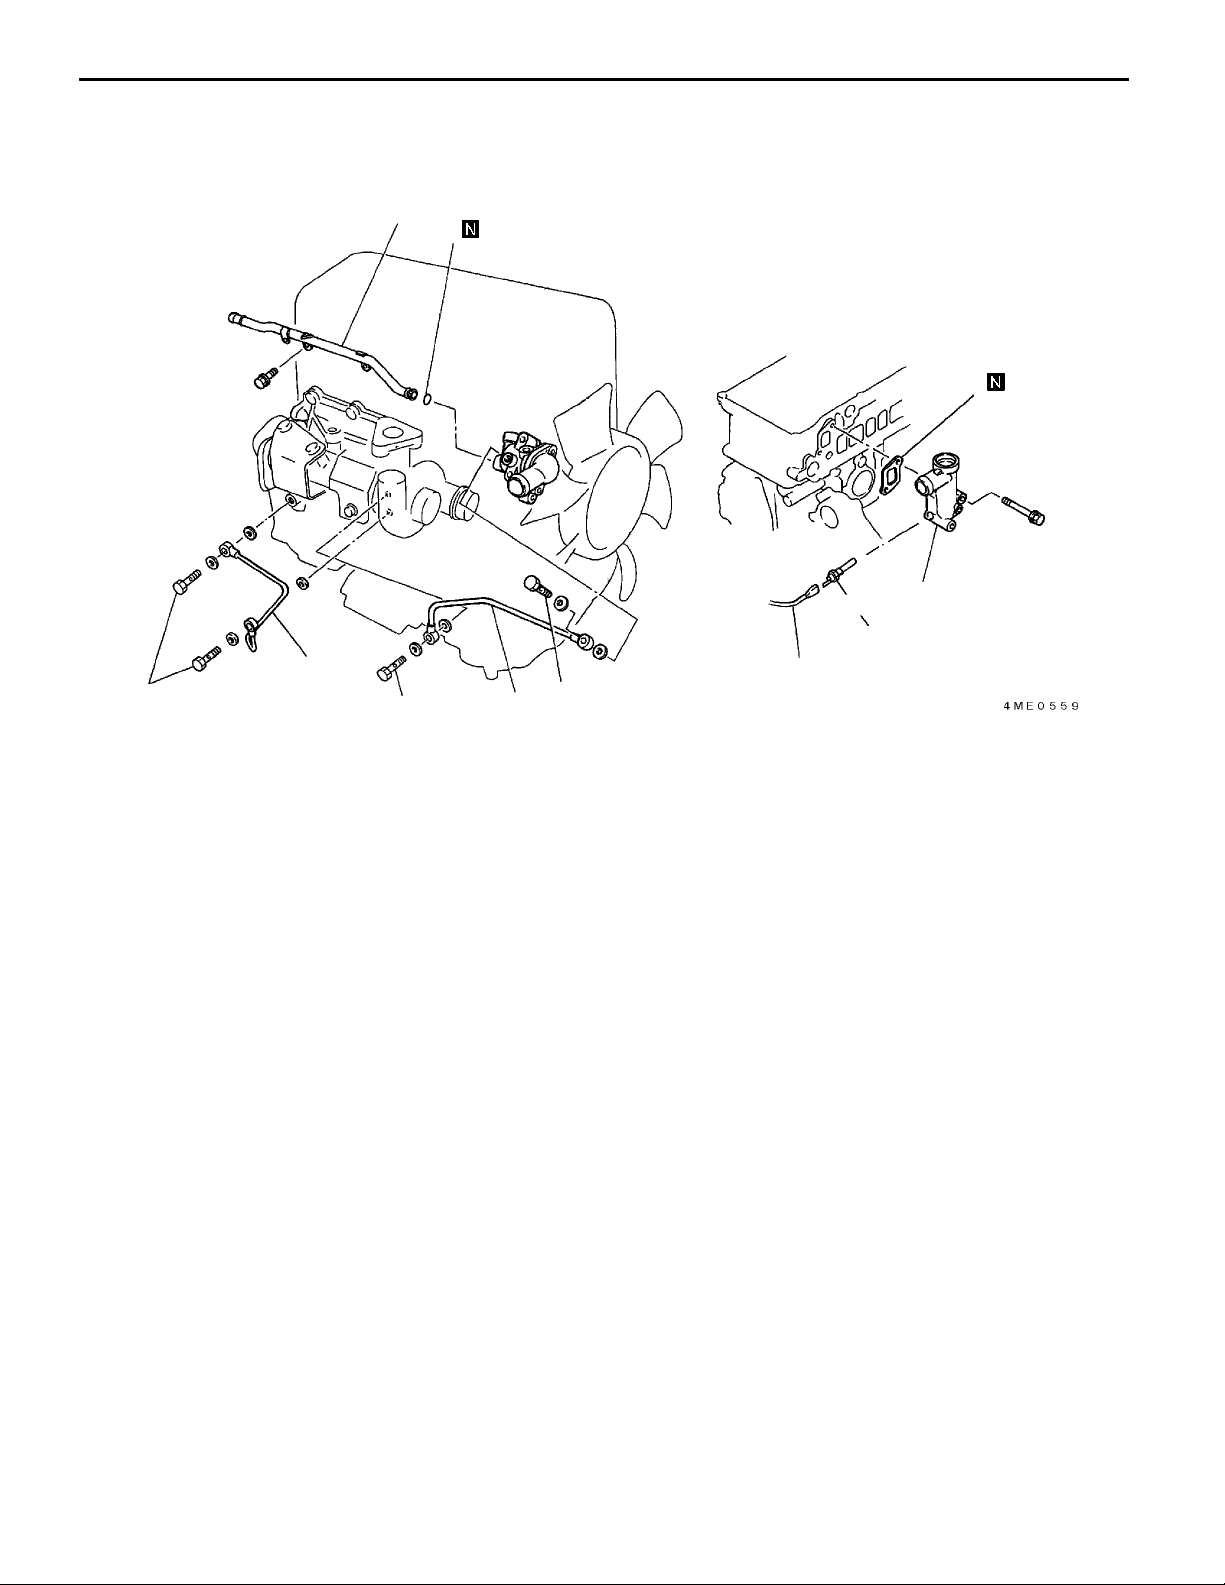
Removal steps
1. Turbocharger water outlet pipe
2. Turbocharger water inlet pipe
3. Heater return pipe
"AA 4. O-ring
5. Harness
6. Coolant temperature sensor
7. Water outlet pipe
8. Gasket
2
25±2Nm
(For water temperature gauge)
1
25±2Nm
6
7
9±1Nm
5
E
Feb. 2000Mitsubishi Motors Corporation Added
PWEE9409-D
Page 21

11B-6-2
4M41 ENGINE -
INSTALLATION SERVICE POINTS
"AA
Caution
Engine oil swells O-rings. When installing the O-rings
4, be sure that they are free of engine oil.
Water Hoses and Pipes
O-RING INSTALLATION
E
Feb. 2000Mitsubishi Motors Corporation Added
PWEE9409-D
Page 22

4M41 ENGINE -
7. THERMOSTAT
REMOVAL AND INSTALLATION
5
2
Thermostat
3
11B-7-1
4
6
1
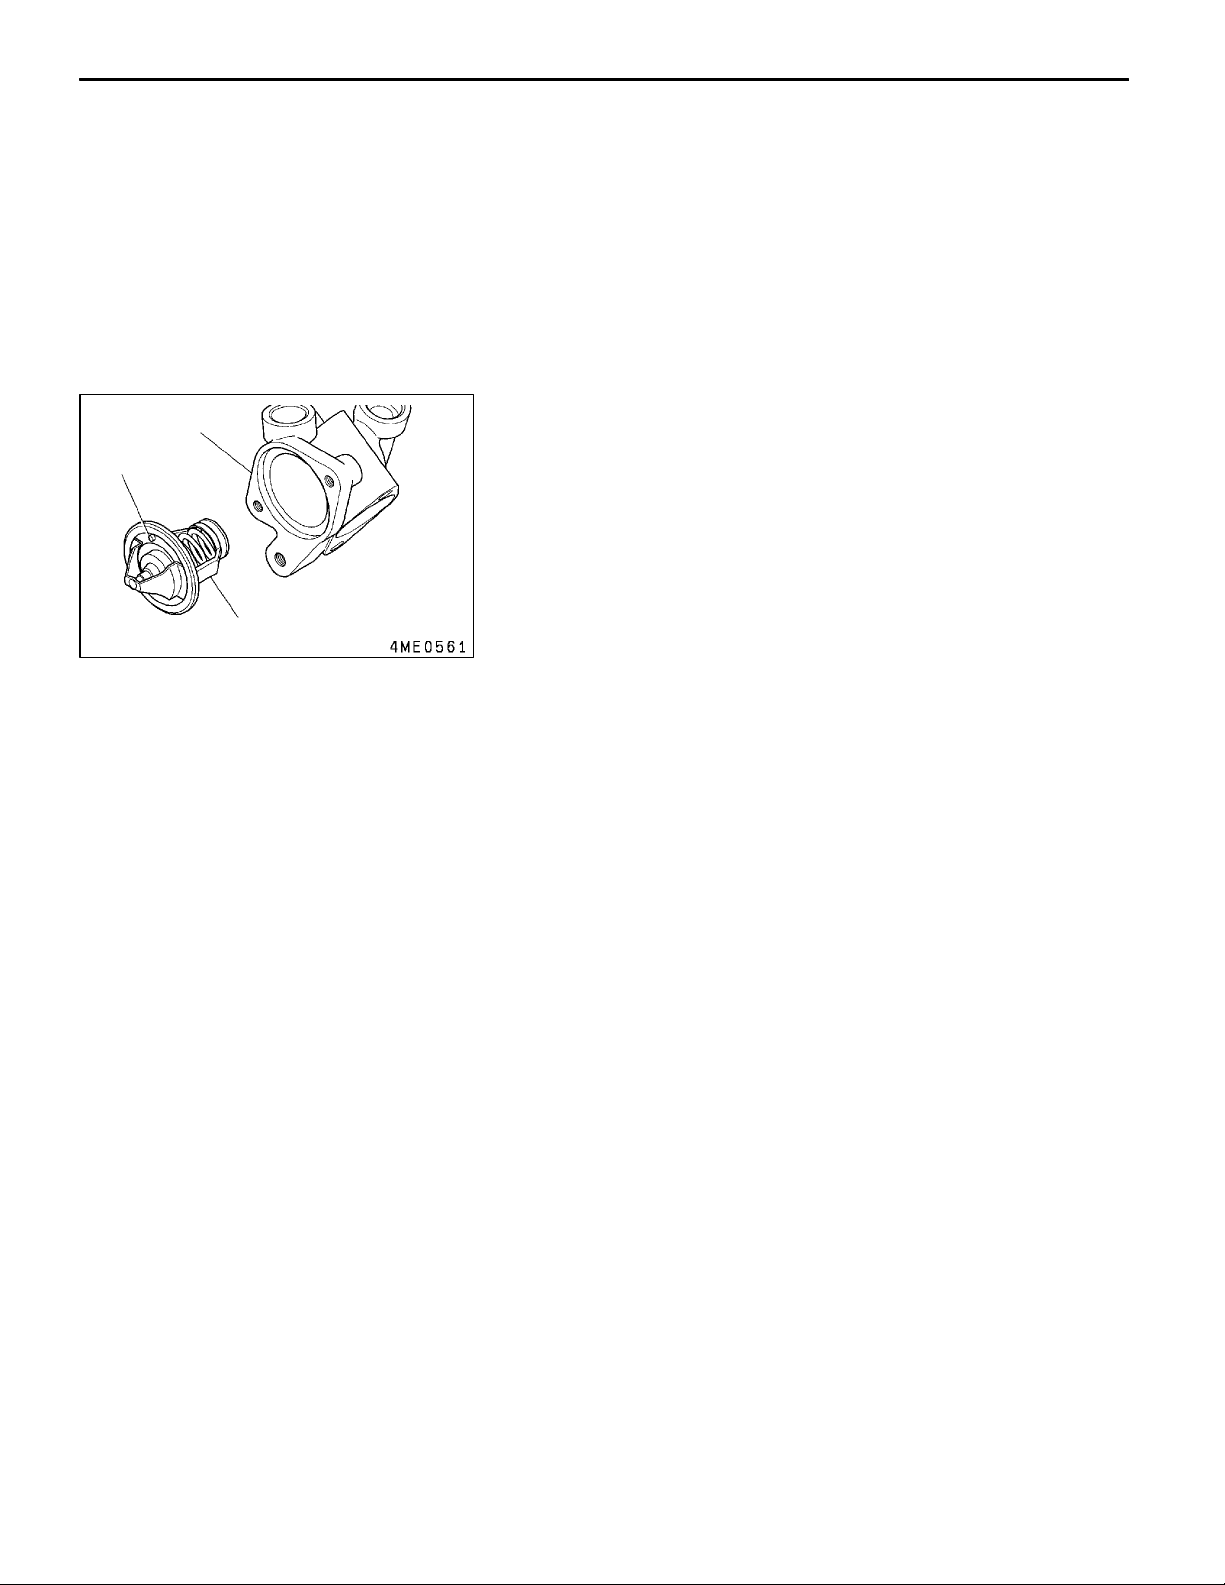
Removal steps
1. Thermostat cover
"BA 2. Thermostat
3. Bypass pipe
"AA 4. O-ring
5. Thermostat case
"AA 6. O-ring
E
Feb. 2000Mitsubishi Motors Corporation Added
PWEE9409-D
Page 23
11B-7-2
4M41 ENGINE -
INSTALLATION SERVICE POINTS
"AA
Caution
Engine oil swells O-rings. When installing the O-rings
4 and 6, be sure that they are free of engine oil.
O-RING INSTALLATION
Thermostat
5
A
Install the thermostat2with its jiggle valveAlocated at the
uppermost position.
"BA
THERMOSTAT INSTALLATION
2
E
Feb. 2000Mitsubishi Motors Corporation Added
PWEE9409-D
Page 24
4M41 ENGINE -
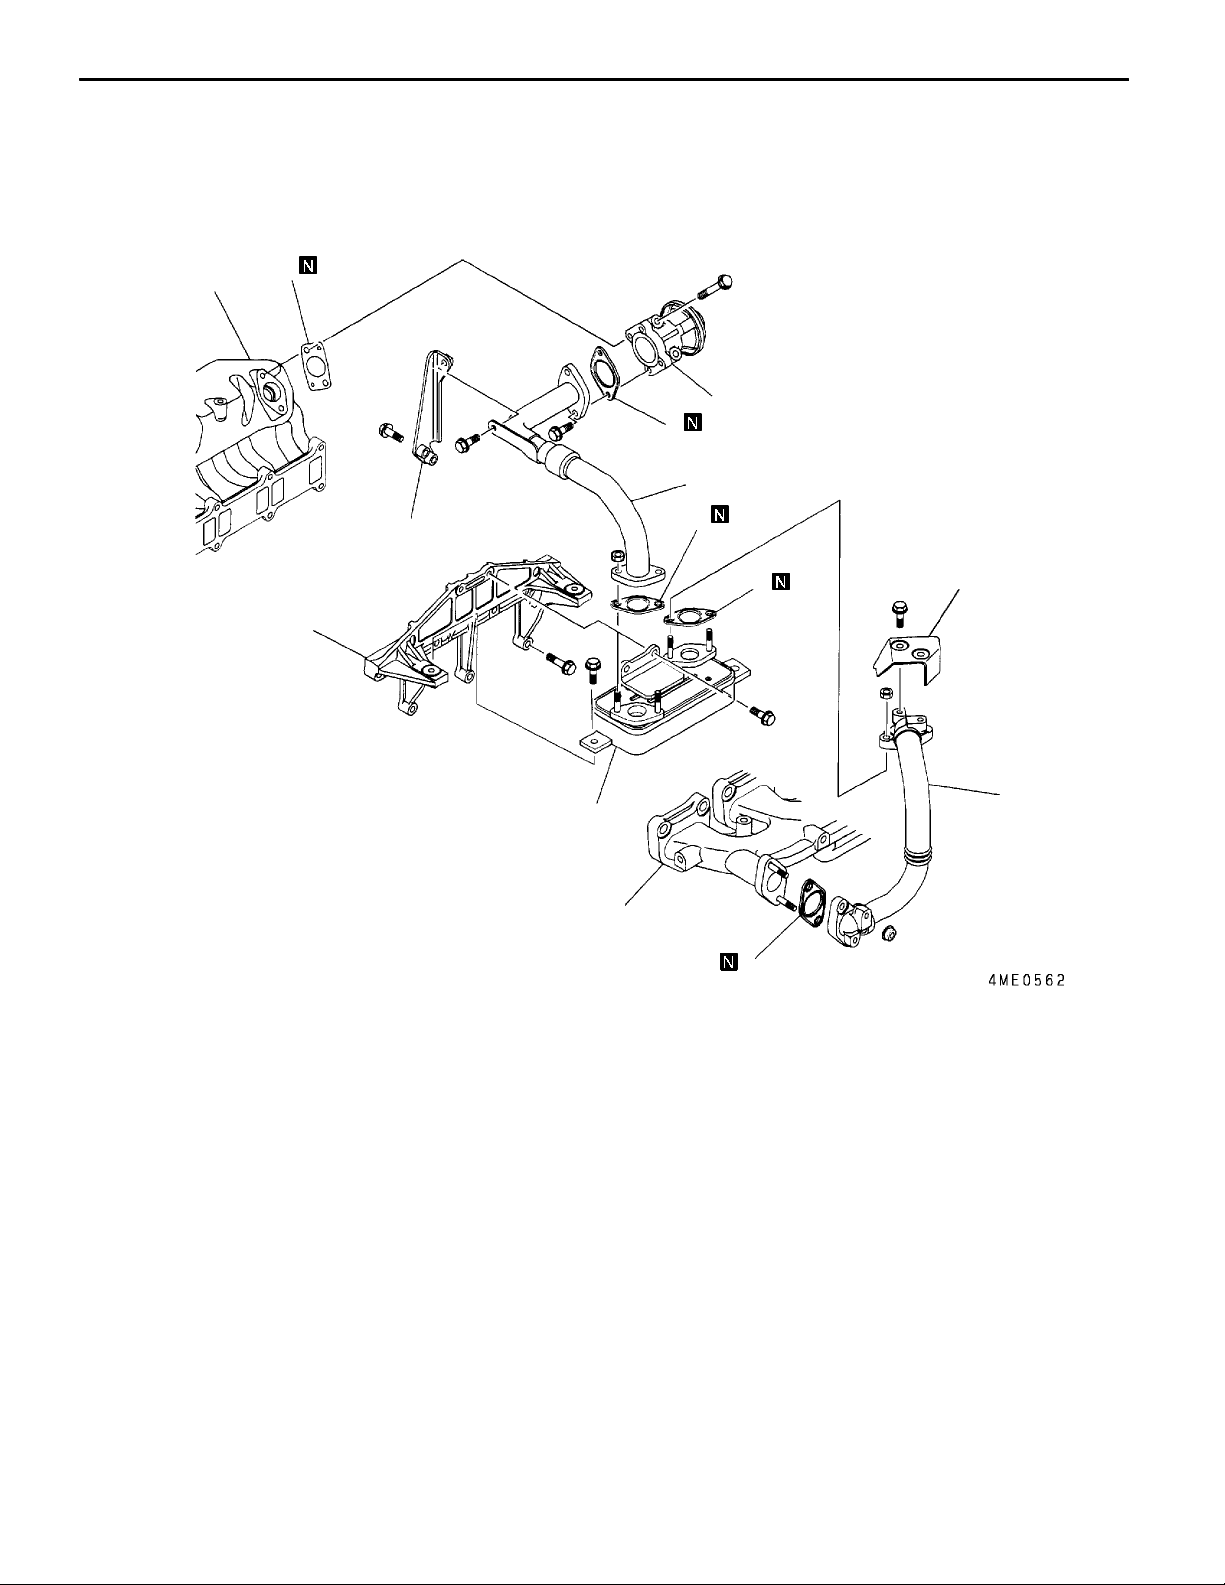
8. EGR VALVE ASSEMBLY
REMOVAL AND INSTALLATION
EGR Valve Assembly
11B-8-1
*a
5
10
4
2
1
3
2
8
6
7
9
Removal steps
1. EGR pipe
2. Gasket
3. EGR pipe stay
4. EGR valve
5. Gasket
6. Insulator
7. EGR pipe
*b
8
8. Gasket
9. EGR box
10. EGR box bracket
*a: Intake manifold
*b: Exhaust manifold
E
Feb. 2000Mitsubishi Motors Corporation Added
PWEE9409-D
Page 25
4M41 ENGINE -
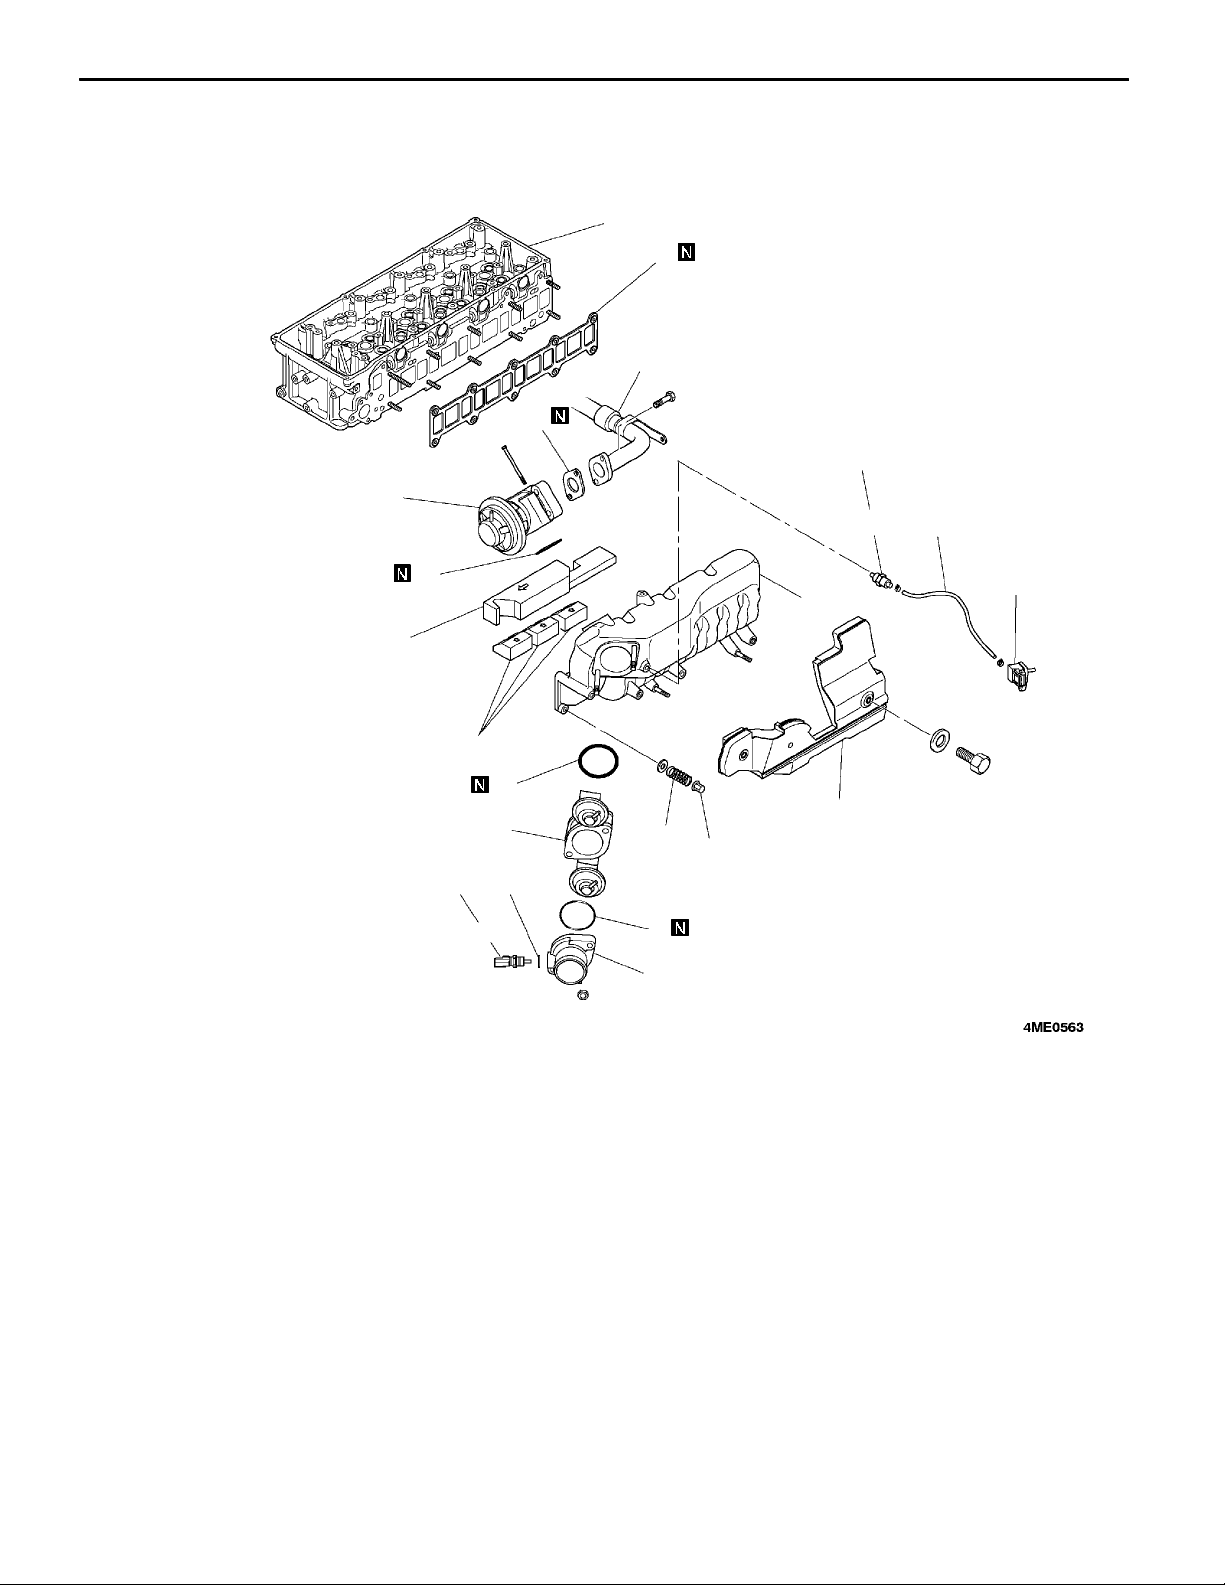
9. INTAKE MANIFOLD
REMOVAL AND INSTALLATION
2
Intake Manifold
11B-9-1
*b
18
*a
3
17±1Nm
12
11
3
13
17
15±1Nm
4
Removal steps
1. Side cover
2. EGR valve
3. Gasket
4. Boost air temperature sensor
5. Gasket
6. Air inlet fitting
7. O-ring
8. Throttle body assembly
9. O-ring
10. Boost pressure sensor
11. Boost hose
10
16
9
8
15
14
1
5
7
6
12. Gas filter assembly
13. Rubber spacer A
14. Nut
15. Spring
16. Intake manifold
17. Rubber spacer B
"AA 18. Gasket
*a. EGR pipe
*b. Cylinder head
E
Feb. 2000Mitsubishi Motors Corporation Added
PWEE9409-D
Page 26
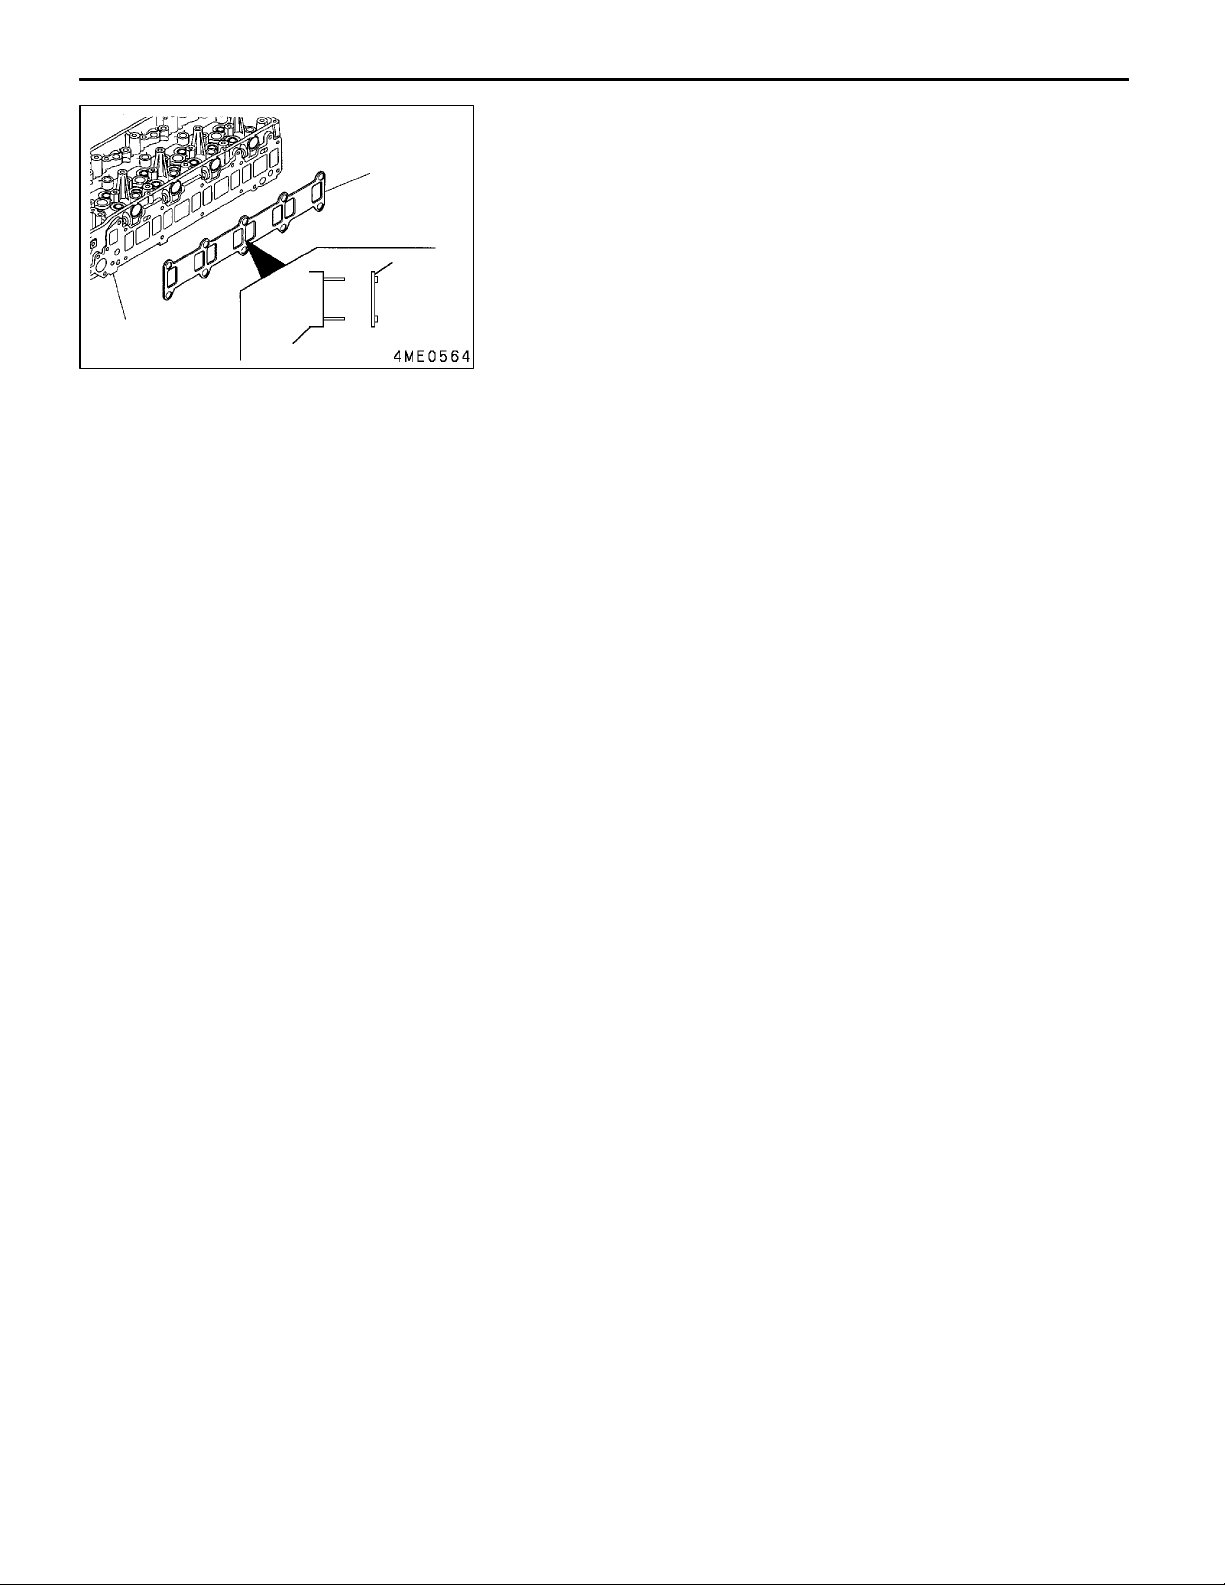
11B-9-2
Cylinder
head
Cylinder head
4M41 ENGINE -
Gasket
Gasket
Intake Manifold
INSTALLATION SERVICE POINT
"AA
Fit the gasket to the cylinder head in the direction shown
in the illustration.
GASKET INSTALLATION
E
Feb. 2000Mitsubishi Motors Corporation Added
PWEE9409-D
Page 27
4M41 ENGINE -
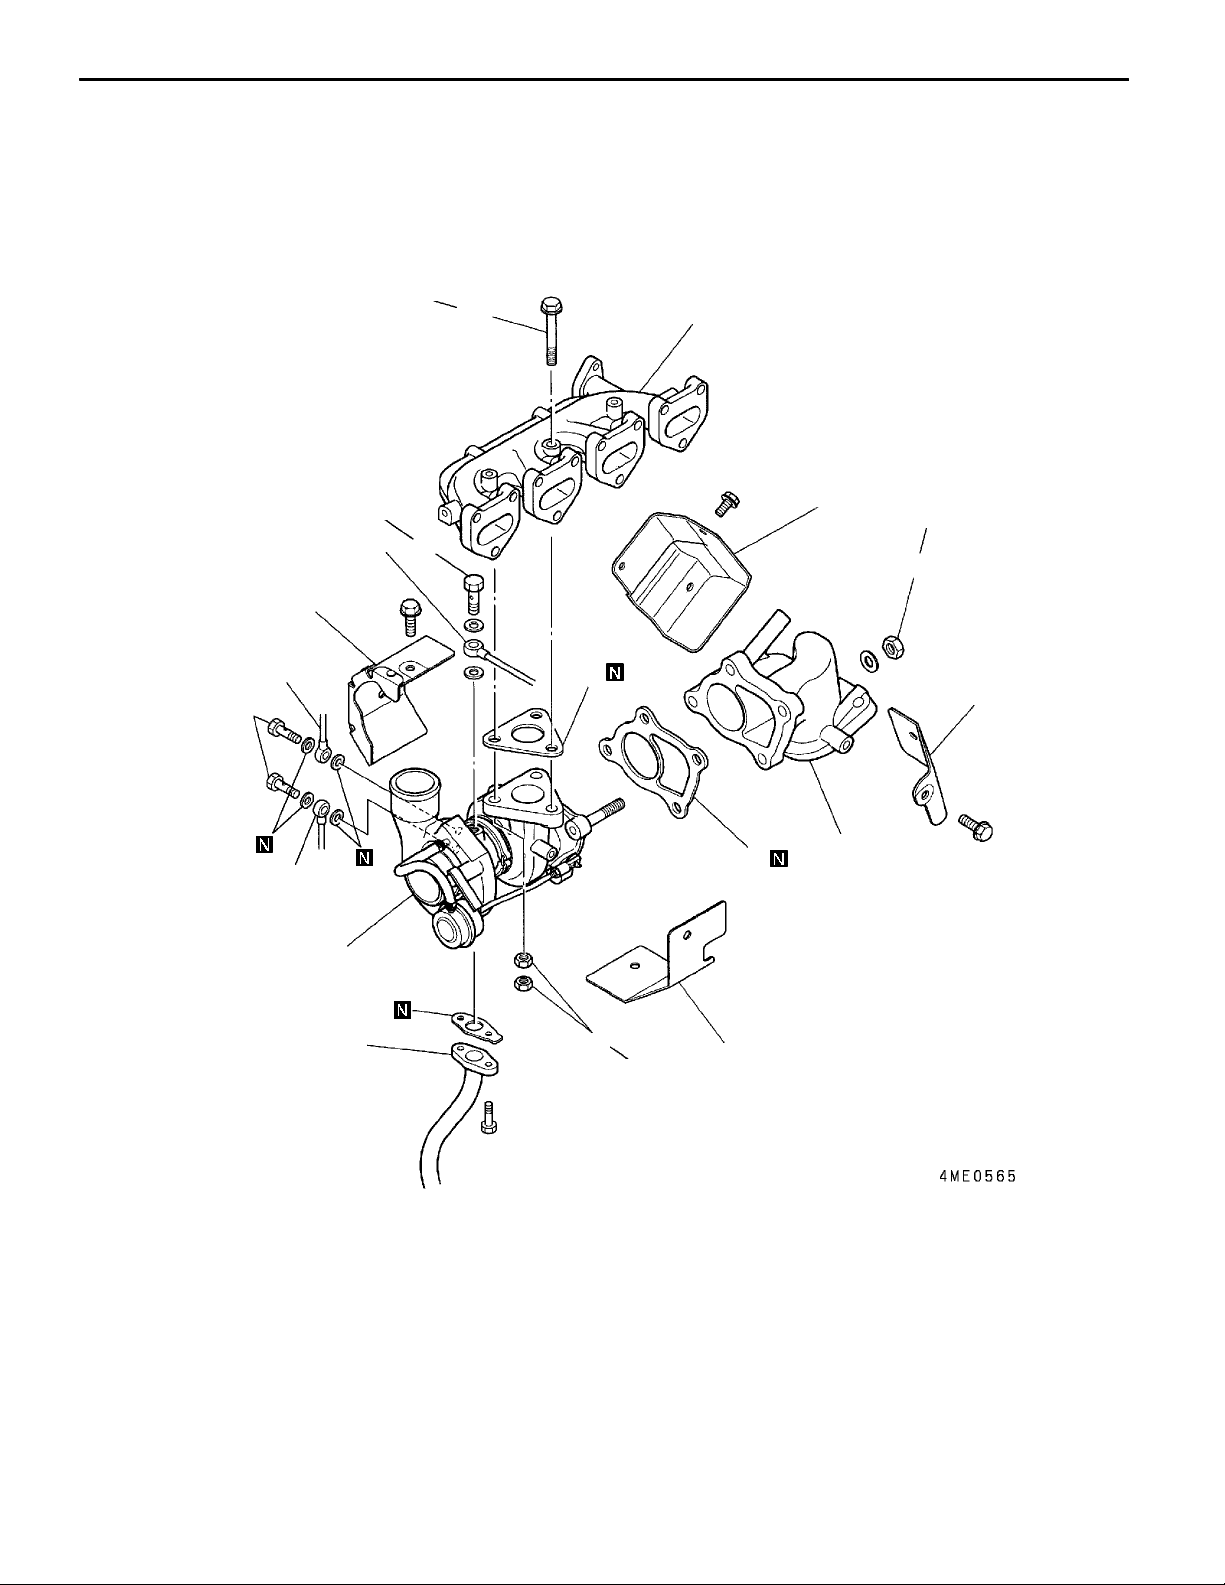
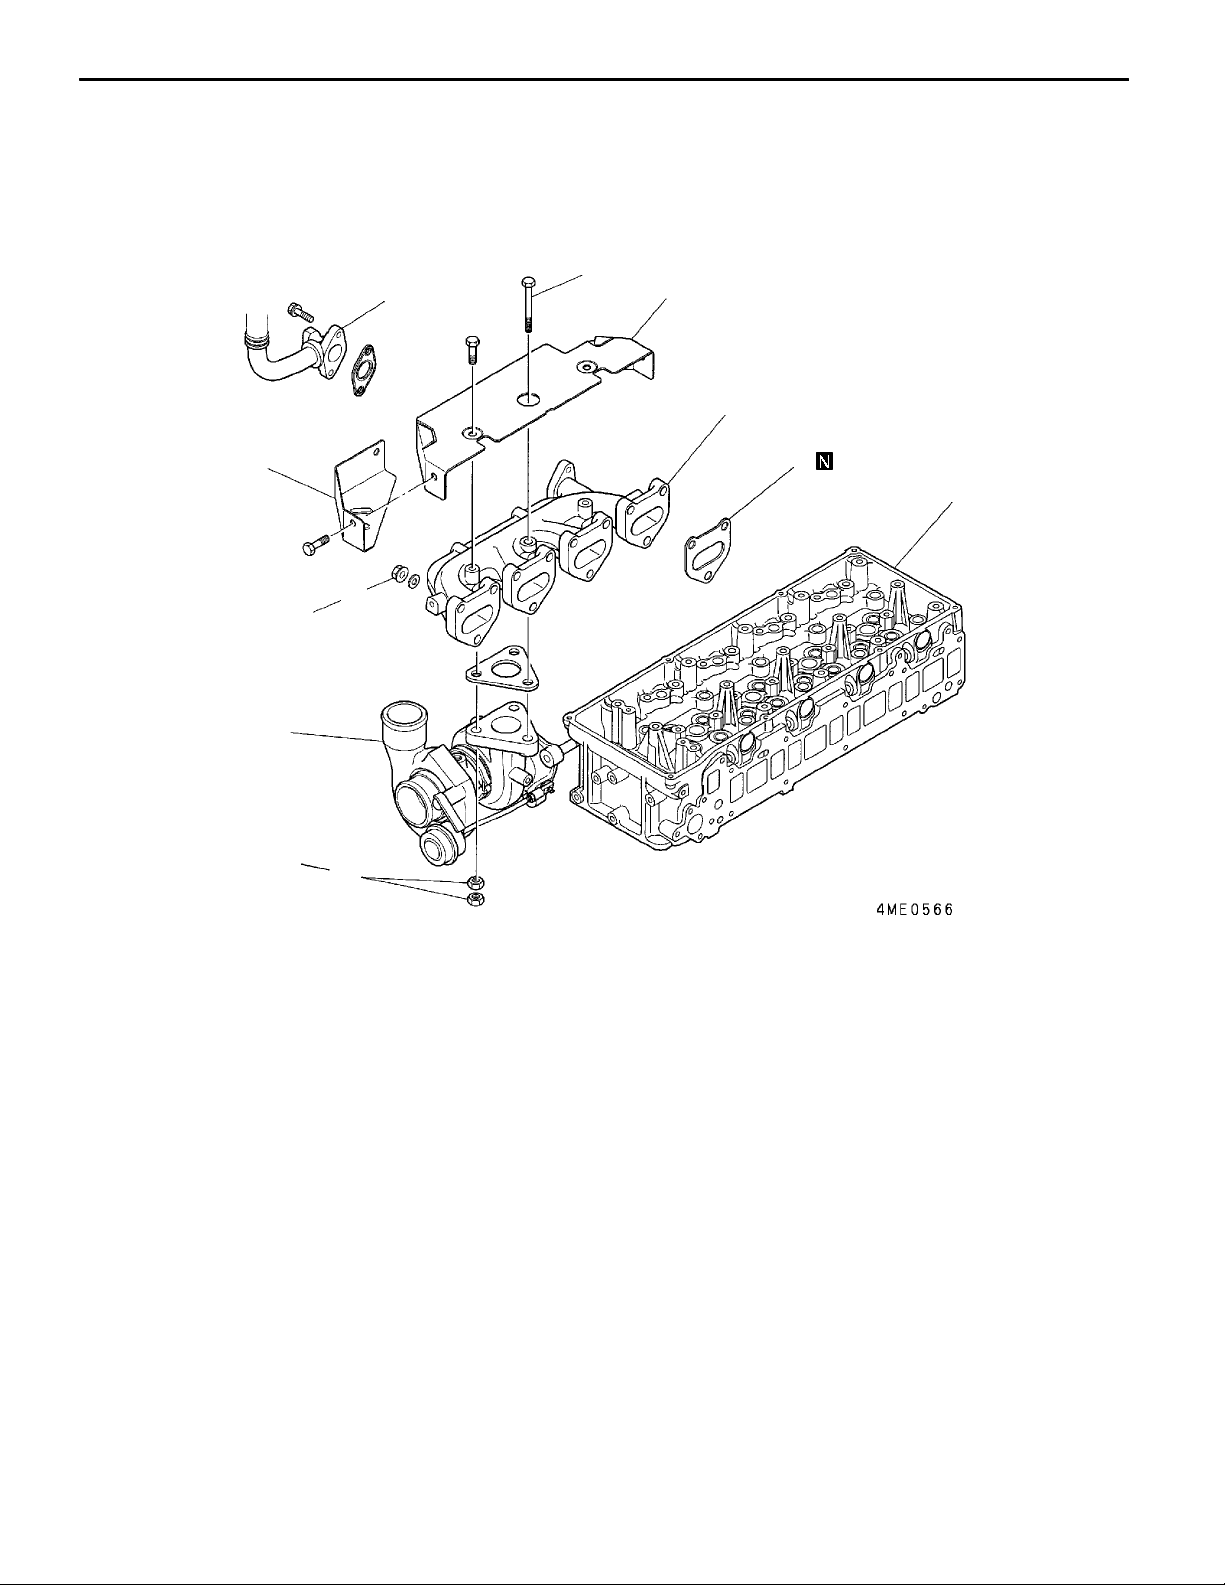
Turbocharger Assembly
10. TURBOCHARGER ASSEMBLY
REMOVAL AND INSTALLATION
54±5Nm
10
11B-10-1
*1
*2
25±2Nm
*3
11
14
20 Nm
2
3
5
49±4Nm
1
4
13
6
8
7
9
49±4Nm
12
Removal steps
1. Eyebolt
2. Oil feed pipe
3. Oil return pipe
4. Nut
5. Coupler insulator
6. Insulator
7. Coupler
8. Gasket
9. Nut
10. Bolt
E
Feb. 2000Mitsubishi Motors Corporation Added
PWEE9409-D
"AA 14. Turbocharger assembly
11. Insulator B
12. Insulator A
13. Gasket
*1: Exhaust manifold
*2: Turbocharger water outlet pipe
(Refer to page 11B-6-1.)
*3: Turbocharger water inlet pipe
(Refer to page 11B-6-1.)
Page 28
11B-10-2
4M41 ENGINE -
Turbocharger Assembly
A
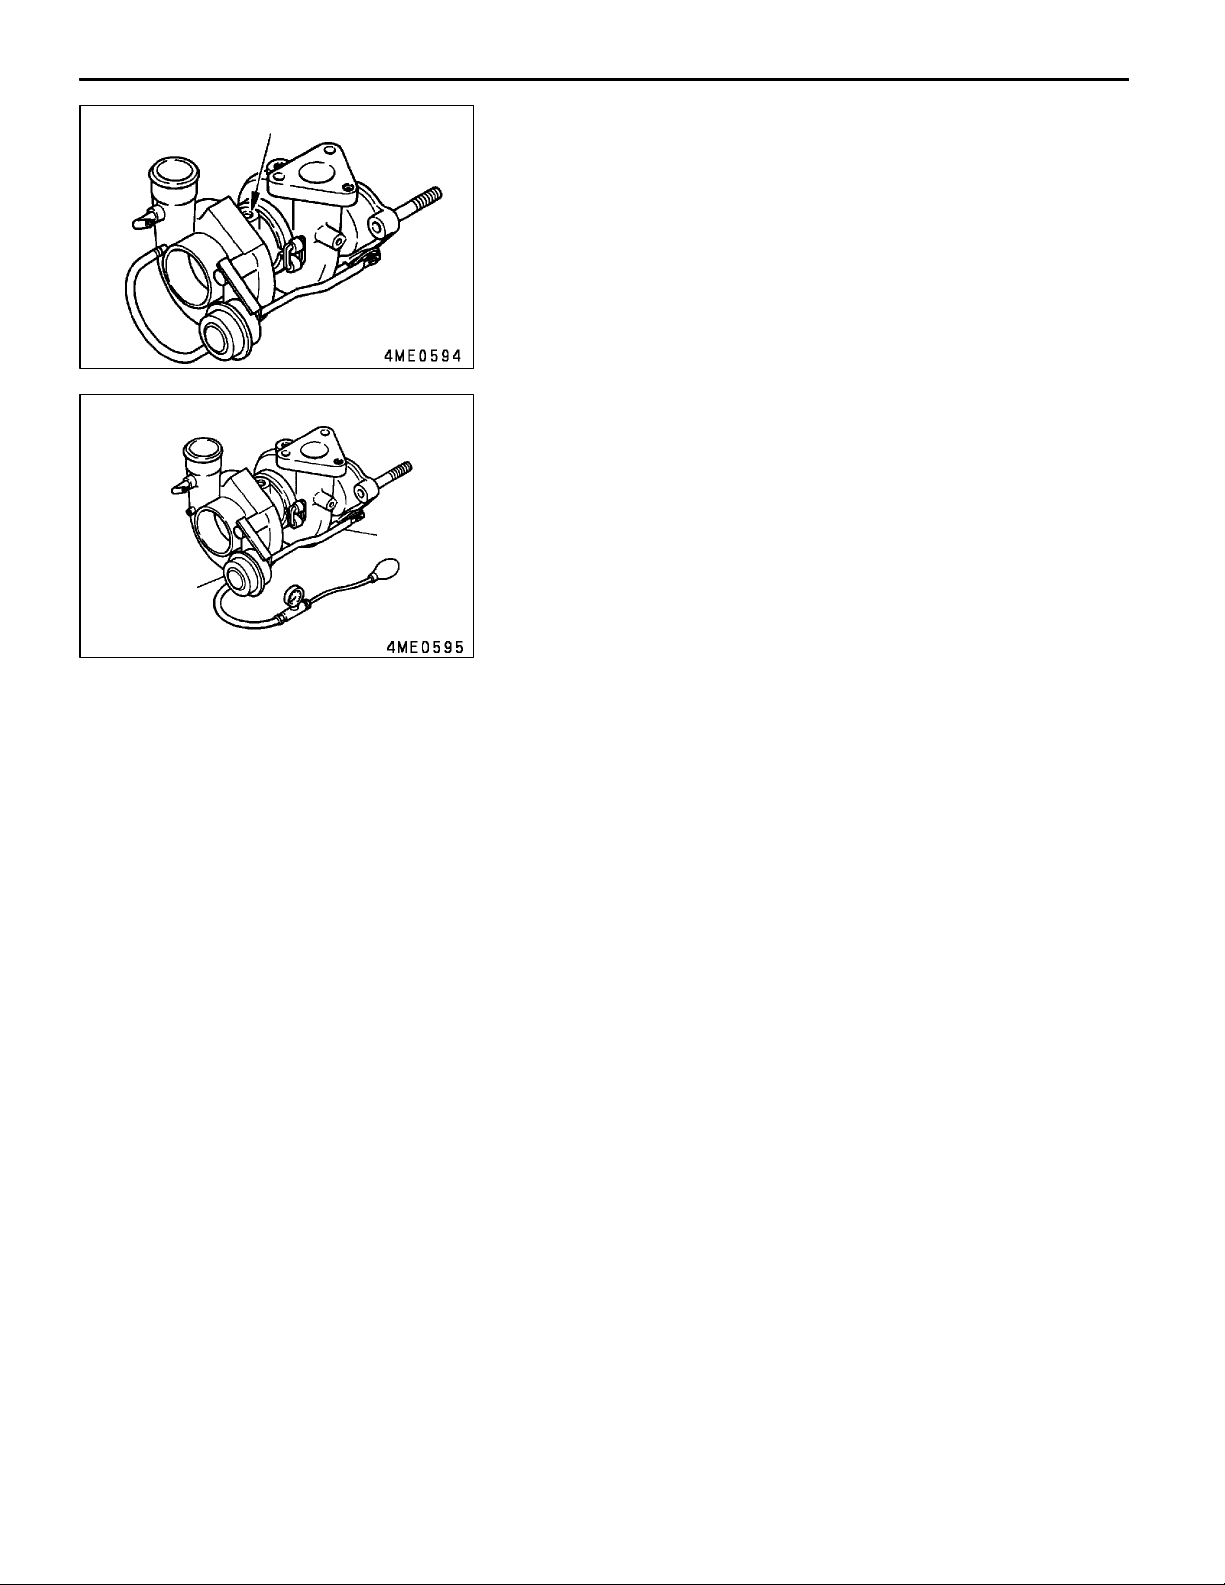
INSTALLATION SERVICE POINT
"AA
TURBOCHARGER ASSEMBLY INSTALLATION
(1) Prior to installing the turbocharger assembly14, pour
engine oil into it through the oil inlet holeAto lubricate
its component parts for smooth movement.
(2) Using a tester, apply pressure to the actuatorBand read
the pressure at which the rod
begins to move
C
(approximately 1 mm).
If the reading deviates from the specified standard value,
replace the actuator.
C
B
Standard value: 161 kPa
Caution
Do not load the actuator B with any more pressure
than 181 kPa nor carry the turbocharger by holding
the rod C, or the diaphragm may be damaged.
E
Feb. 2000Mitsubishi Motors Corporation Added
PWEE9409-D
Page 29
4M41 ENGINE -
11. EXHAUST MANIFOLD
REMOVAL AND INSTALLATION
*1
Exhaust Manifold
3
2
6
11B-11-1
1
30±3Nm
*3
49±4Nm
7
*2
5
4
Removal steps
1. Insulator
2. Insulator
3. Bolt
4. Nut
5. Nut
6. Exhaust manifold
7. Gasket
E
Feb. 2000Mitsubishi Motors Corporation Added
PWEE9409-D
*1: EGR pipe
*2: Cylinder head
*3: Turbocharger
Page 30
4M41 ENGINE -
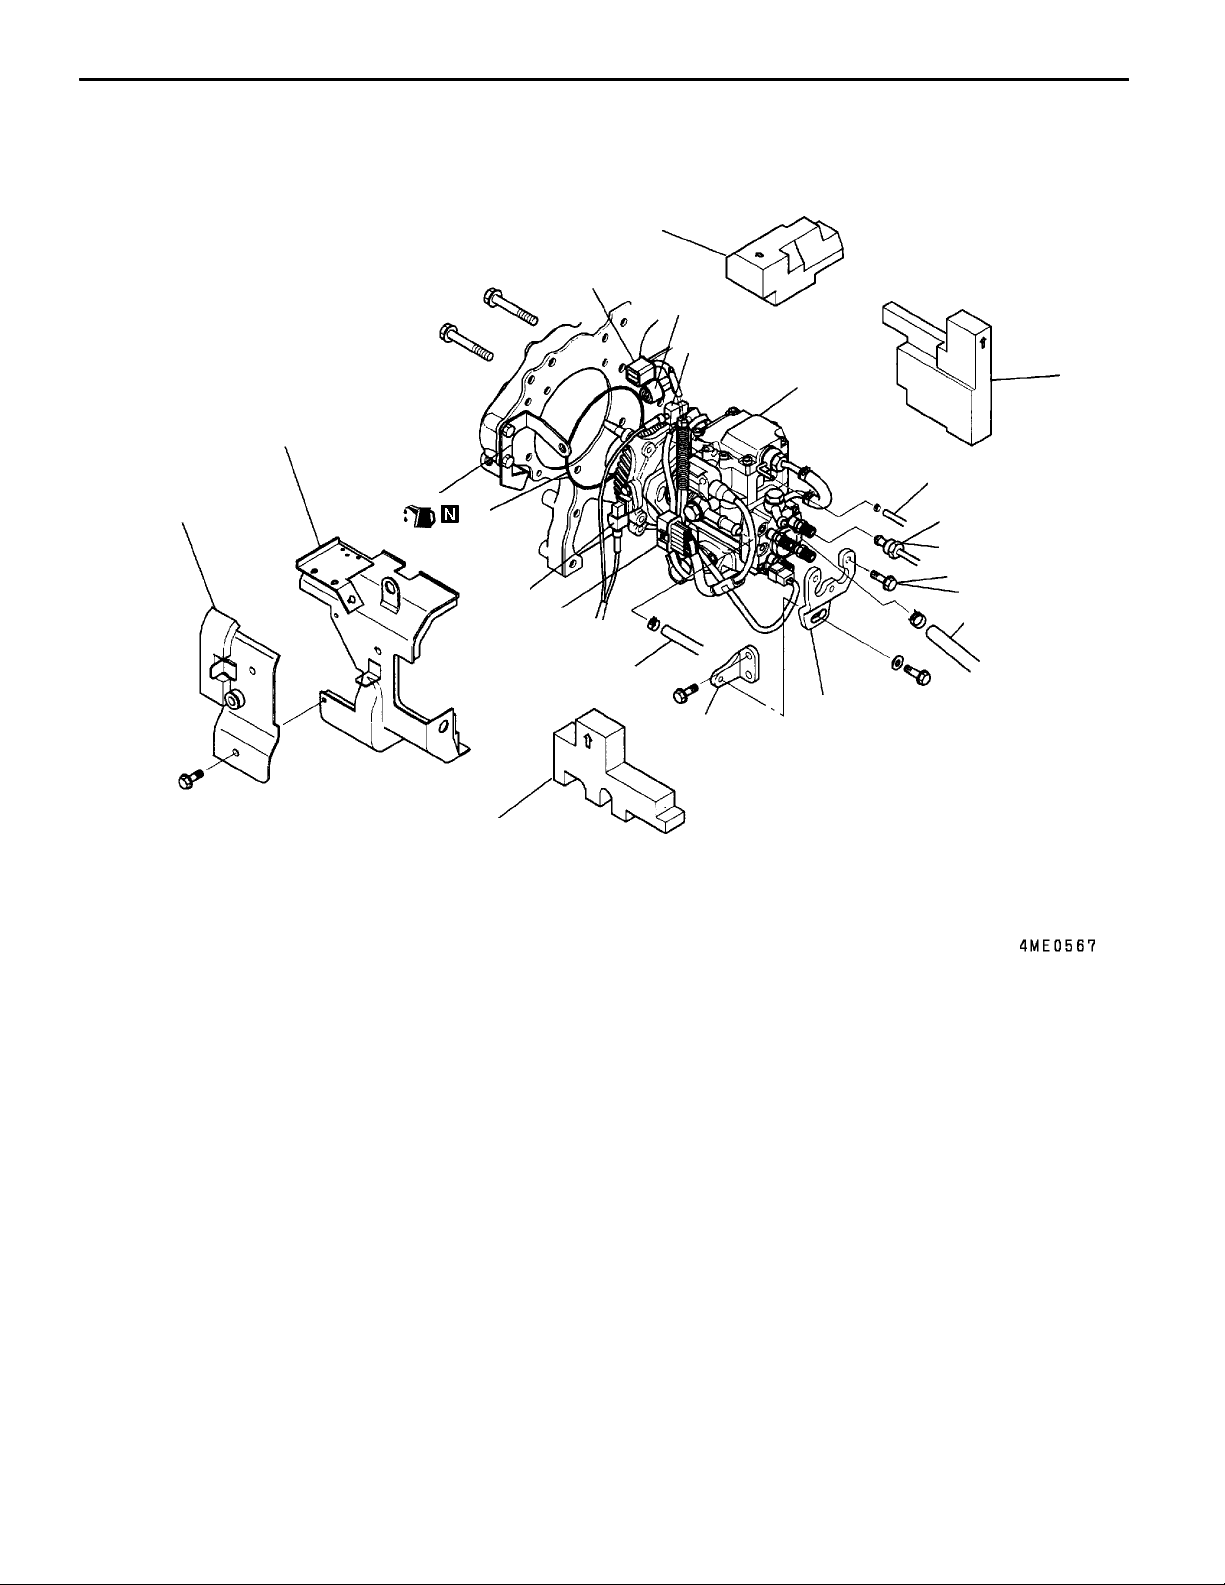
Injection Pump Assembly
12. INJECTION PUMP ASSEMBLY
REMOVAL AND INSTALLATION
6
2
1
20
18
9
8
11B-12-1
4
7
5
17
11
13
25±2Nm
14
18±2Nm
12
19
Removal steps
1. Injection pump cover B
2. Injection pump cover A
3. Rubber spacer
4. Rubber spacer
5. Harness
6. Harness
7. Harness
8. Harness
9. Harness
10. Fuel return hose
10
15
16
3
11. Fuel leak-off hose
12. Fuel suction hose
AA""BA 13. Injection pipe
14. Bolt
15. Pump stay
16. Pump stay
"AA 17. Injection pump assembly
18. O-ring
19. Rubber spacer
20. Stay
Caution
1. Fuel is highly flammable. Keep it away from flames and sources of heat.
2. Be sure to wipe up spilt fuel completely. It could catch fire.
3. Have the injection pump assembly 17 serviced at an appropriate Zexel service station.
4. Dust particles entering the injection pump assembly 17 can seriously affect the engine
performance. To prevent it, fully cover the openings left after the removal of parts such as
pipes and hoses.
5. Before installing the injection pipe 13, check to ensure that the pipe seating surface is free
from any damage and unevenness.
E
Feb. 2000Mitsubishi Motors Corporation Added
PWEE9409-D
Page 31

11B-12-2
“0”
C
MB990767
4M41 ENGINE -
A
B
13
B
A
MD998754
MB990767
A
Injection Pump Assembly
REMOVAL SERVICE POINT
AA"
Loosen the union nutBof the fuel injection pipe
locking the delivery valve holderAto prevent it from rotating
together.
INJECTION PIPE REMOVAL
13
while
INSTALLATION SERVICE POINTS
"AA
(1) Turn the crankshaft pulleyAclockwise with the specified
INJECTION PUMP ASSEMBLY INSTALLATION
special tool to place the No.1 piston at the TDC on the
compression stroke. Align the notchCin the crankshaft
pulley with the timing mark “0” on the timing gear case
.
B
Caution
D
1. If the dent D on the camshaft faces upward, the
No.1 piston is at the TDC on the compression
stroke. If not, rotate the crankshaft pulley A one
more turn in normal direction.
2. Never rotate the crankshaft pulley A in reverse
direction (counterclockwise). It may cause
damage to the timing chain tensioner.
If the crankshaft is accidentally rotated in reverse
direction, remove and reinstall the tensioner
according to the correct installation procedure.
(2) Align the notchFon the injection pump gearEwith the
G
E
F
mating mark “H” on the flange plateG.
H
4ME0542
(3) Align the guide barJof the flange plateGwith the guide
L
holeLof the front plateKand insert t he injection pump
assembly into the front plate just before the injection pump
J
gearEmeshes with the idler gear.
E
G
K
4ME0543
E
Feb. 2000Mitsubishi Motors Corporation Added
PWEE9409-D
Page 32

4M41 ENGINE -
Injection Pump Assembly
11B-12-3
(4) Confirm that the notchFon the injection pump gear
E
F
G
is aligned with the mating mark “H” on the flange plate
. Then push the injection pump assembly further into
G
E
the front plate.
When meshing the gears, the notchFon the gear should
move in the directionM.
H
M
4ME0544
"BA
Tighten the union nutBof the fuel injection pipe
INJECTION PIPE INSTALLATION
13
while
locking the delivery valve holderAto prevent it from rotating
A
together.
B
13
E
Feb. 2000Mitsubishi Motors Corporation Added
PWEE9409-D
Page 33

4M41 ENGINE -
13. INJECTION PUMP GEAR
REMOVAL AND INSTALLATION
Locating pin
6
Injection Pump Gear
20
11B-13-1
3
180±10 Nm
5±1Nm
15
19
16
18
17
7
5
4
11
9
14
10
38±2Nm
13
2
5±1Nm
12
5±1Nm
8
1
2
Locating pin
Removal steps
"AA
11. Flange plate
12. Bolt
13. Engine speed sensorII(Backup)
14. O-ring
15. Bolt
16. Engine speed sensorI(Main)
17. O-ring
18. O-ring
19. Key
20. Injection pump
AA"
"BA
1. Nut
2. Injection pump gear assembly
3. Snap ring
4. Injection pump sub gear
5. Spring
6. Pin
7. Injection pump gear
8. Bolt
9. Sensor plate
10. Nut
Caution
Have the injection pump 20 serviced at an appropriate Zexel service station.
4ME0568
E
Feb. 2000Mitsubishi Motors Corporation Added
PWEE9409-D
Page 34

11B-13-2
MH062567
11
A
20
4M41 ENGINE -
Injection Pump Gear
REMOVAL SERVICE POINT
AA"
Using the special tool, remove the injection pump gear7.
7
INJECTION PUMP GEAR REMOVAL
INSTALLATION SERVICE POINTS
"AA
Install the flange plate
A
FLANGE PLATE INSTALLATION
while aligning the mating marks
11
on the flange plate and the injection pump20.
A
7
Locating pin
B
"BA
INJECTION PUMP GEAR ASSEMBLY
INSTALLATION
(1) Clamp the injection pump gear7in a viceB. Protect
the gear teeth with pieces of waste clothAor the like
as shown.
(2) Remove t he locating pin from the pump gear7.
Caution
1. Check the removed locating pin for deformation
or damage before using it again.
2. Replace the locating pin if deformed or damaged.
4
C
5
7
6
6
5
6
(3) Install the injection pump sub gear4, spring5and pins
onto the injection pump gear7as shown.
6
(4) Hook each pin6on the spring5atC.
E
Feb. 2000Mitsubishi Motors Corporation Added
PWEE9409-D
Page 35

4M41 ENGINE -
Injection Pump Gear
11B-13-3
3
MH063473
(5) Fit the snap ring3onto the injection pump gear.
(6) Fit the special tool in the holeDin the sub gear4. Turning
4
G
D
7
E
H
D
the sub gear with the special tool counter-clockwise, align
the holeEin the sub gear4with the holeFin the pump
gear7, then install the boltG.
(7) In that state, strike the locating pin into the holeHin
the sub gear4, then remove the boltG.
F
Locating
pin
7
E
Feb. 2000Mitsubishi Motors Corporation Added
PWEE9409-D
Page 36

4M41 ENGINE -
Rocker Cover, Camshaft Holder
Assembly and Camshaft
11B-14-1
14. ROCKER COVER, CAMSHAFT HOLDER ASSEMBLY AND CAMSHAFT
REMOVAL AND INSTALLATION
Apply engine oil to all
moving parts before
13±2Nm
6
7
installation.
11±1Nm
8
9
3.0±0.3 Nm
2
3
20±1Nm
10
14
11
12
4
1
17
16
19
18
15
26
21
20
25
24
5
22
31
23
35
38±8Nm
27
28
9.5±0.5 Nm
30
29
32
9.5±0.5 Nm
34
88±10 Nm
33
E
Feb. 2000Mitsubishi Motors Corporation Added
13
PWEE9409-D
Page 37

11B-14-2
Removal steps
1. Oil filler cap
2. Bolt
3. Washer
"BA 4. Rocker cover assembly
"BA 5. Rocker cover gasket
6. Eyebolt
7. Gasket
8. Eyebolt
9. Gasket
10. Fuel leak-off pipe
11. Bolt
12. Upper guide plate
AA""AA 13. Bolt
14. Bolt
15. No.1 camshaft cap
16. No.2 camshaft cap
17. No.3 camshaft cap
18. No.4 camshaft cap
4M41 ENGINE -
Rocker Cover, Camshaft Holder
Assembly and Camshaft
19. No.5 camshaft cap
20. Intake camshaft
21. Exhaust camshaft
22. No.1 camshaft holder
23. No.2 camshaft holder
24. No.3 camshaft holder
25. No.4 camshaft holder
26. No.5 camshaft holder
27. Rocker assembly (short)
28. Lock nut
29. Adjusting screw
30. Rocker (short)
31. Rocker assembly (long)
32. Lock nut
33. Adjustng screw
34. Rocker (long)
35. Pivot bolt
Caution
Since the camshaft caps 15 through 19 and camshaft holders 22 through 26 have been machined
in pairs, replacement of either one of the pair is not allowed. Also, never alter their original
combination.
PRE-REMOVAL INSPECTION
CAMSHAFT END PLAY
Measure the end play, and if th e reading deviates from the
specified value, replace the defective part.
Standard value: 0.10 - 0.18 mm
Limit: 0.3 mm
*b
13
*a
B
REMOVAL SERVICE POINT
AA"
Caution
1. When removing the bolt 13, be sure to lock the
2. The bolt 13 is inversely threaded. The arrow mark
3. The camshaft sprockets *a and timing chain *b must
BOLT REMOVAL
camshaft 20, 21 by holding the hexagonal part A with
a proper wrench. Do not use the timing chain *b for
the locking.
on its head B indicates its turning direction when
tightened. To remove, turn the bolt in the reverse
direction.
be meshed in a fixed position. Do not remove the
timing chain from the camshaft sprockets unless
absolutely necessary.
E
Feb. 2000Mitsubishi Motors Corporation Added
PWEE9409-D
Page 38

4M41 ENGINE -
Rocker Cover, Camshaft Holder
Assembly and Camshaft
11B-14-3
*b
INSTALLATION SERVICE POINTS
"AA
BOLT INSTALLATION
Caution
The bolt 13 is inversely threaded. The arrow mark on
13
its head B indicates its turning direction when tightened.
*a
B
"BA
4
ROCKER COVER GASKET / ROCKET COVER
ASSEMBLY INSTALLATION
Before installing the rocker cover4, remove all deposites,
especially oil in the gasket grooveA.
Caution
A
Install the rocker cover gasket 5 using care so that it
is not distorted.
5
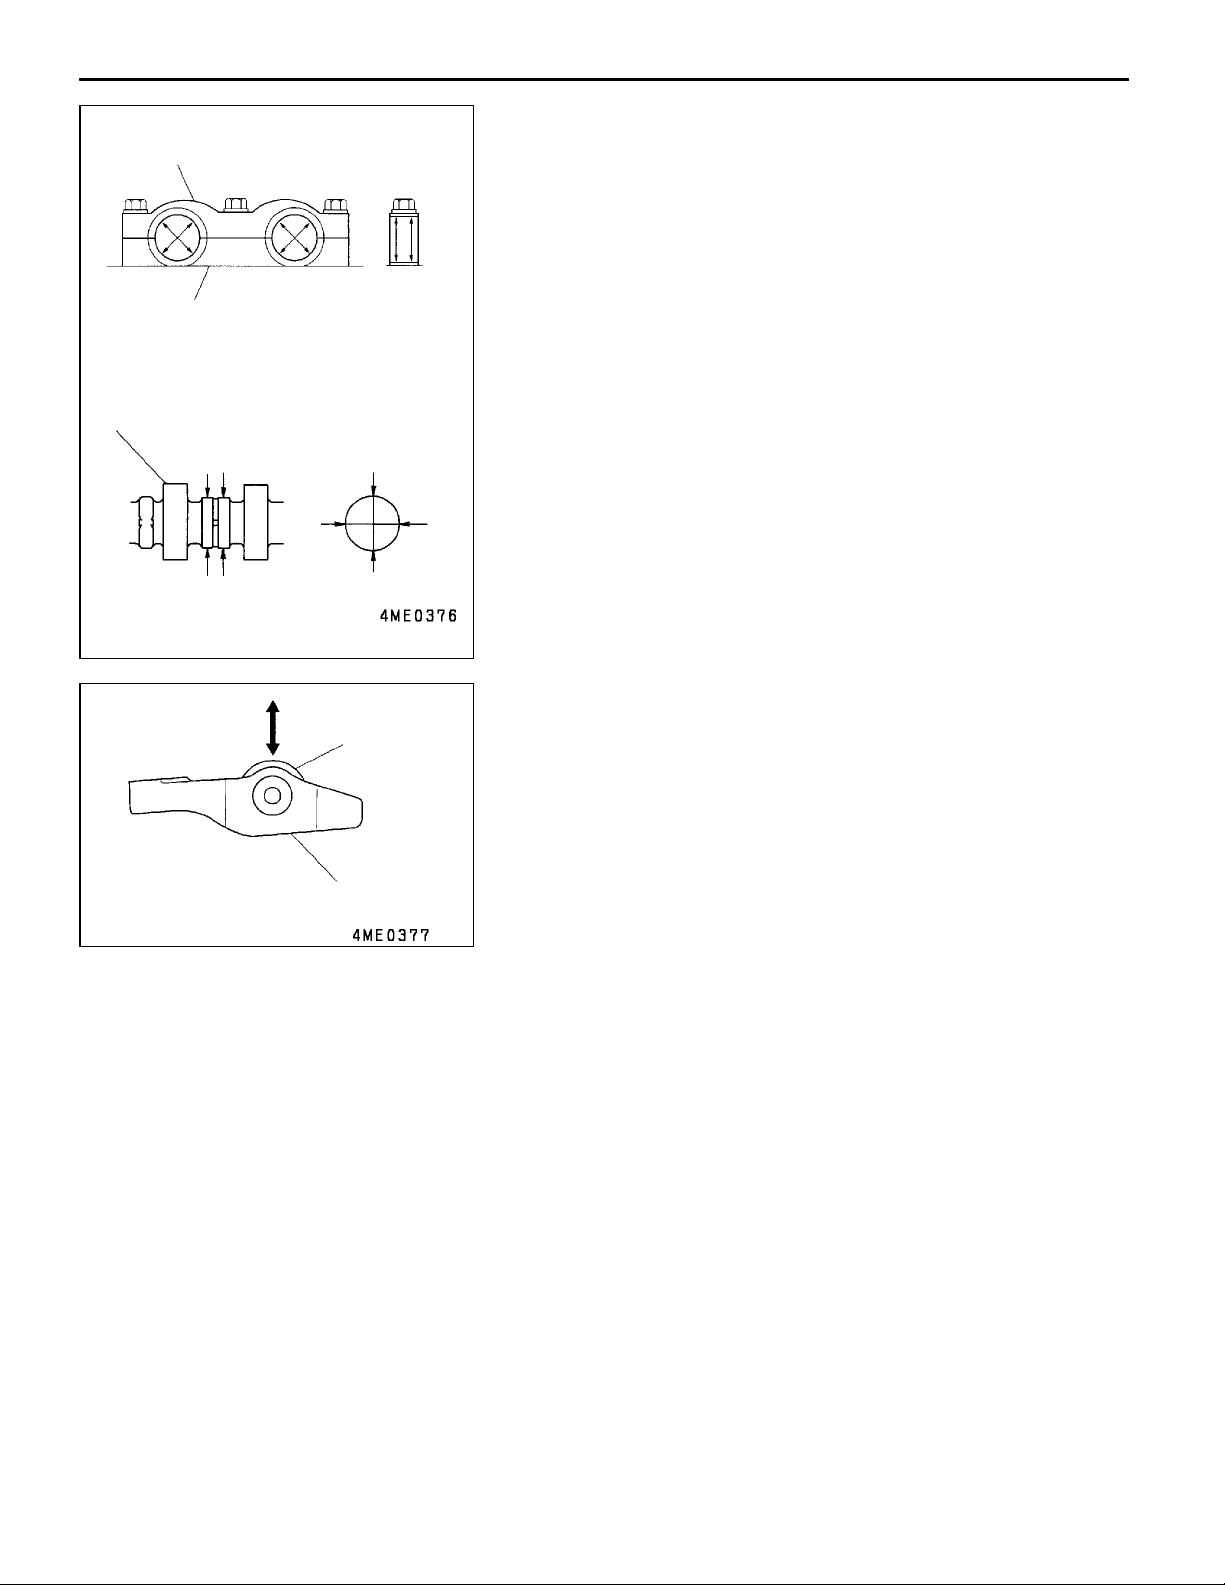
INSPECTION
1. CAMSHAFT
(1) Cam Lobe Lift (Difference between Cam Height and Base
Circle Diameter)
A
If the specified service limit is exceeded, replace the
camshaft20,21.
: Cam height
20, 21
B
A
: Base circle diameter
B
Standard value:
Intake
Front 6.16 mm
Rear 6.10 mm
Exhaust
Front 5.91 mm
Rear 6.16 mm
Limit:
Intake
Front 6.11 mm
Rear 6.05 mm
Exhaust
Front 5.86 mm
Rear 6.11 mm
(2) Bend
With the camshaft
20, 21
supported at No.1 journal
C
and No.5 journalD, measure the bend at No.3 journal
C
D
20, 21
. If the reading exceeds the specified service limit,
E
replace the camshaft
20, 21
.
Standard value: 0.015 mm or less
E
Limit: 0.03 mm
NOTE
The actual shaft bend is a half of what the dial gauge
reads when the camshaft
E
Feb. 2000Mitsubishi Motors Corporation Added
PWEE9409-D
20, 21
is given one turn.
Page 39
11B-14-4
15 - 19
22 - 26
20, 21
4M41 ENGINE -
Rocker Cover, Camshaft Holder
Assembly and Camshaft
(3) Oil Clearance at Journals
Measure the oil clearance at each journal. If the reading
exceeds the specified limit, replace the defective part.
Standard value: 0.05 - 0.09 mm
Limit: 0.15 mm
Caution
Be sure to replace the camshaft 15 through 19 together
with the camshaft holder 22 through 26.
2. ROCKER
B
A
If radial playBat the rollerAof the rocker30,34exceeds
the specified standard value, replace the defective part.
Standard value: 0.03 - 0.07 mm
30, 34
E
Feb. 2000Mitsubishi Motors Corporation Added
PWEE9409-D
Page 40

4M41 ENGINE -
15. INJECTION NOZZLE
REMOVAL AND INSTALLATION
Injection Nozzle
11B-15-1
21±2Nm
Cylinder head
13±2Nm
5
6
8
9
10
26
27
11±1Nm
7
25
23
22
24
20
19
18
17
16
15
13
21
14
12
35±5Nm
4
11
AA""AA
Removal steps
1. Injection pipe
2. Injection pipe seal
3. Eyebolt
4. Return pipe
5. Eyebolt
6. Gasket
7. Eyebolt
8. Leak-off pipe
9. Bolt
10. Injection nozzle assembly
11. Retaining nut
12. Nozzle tip
13. Needle valve
14. Pin
2
11±1Nm
3
1
33±3Nm
4ME0506
15. Spacer
16. Llift piece
17. Spring seat
18. Shim
19. No.2 spring
20. Push rod
21. Collar
22. Spring seat
23. No.1 spring
24. Shim
25. Nozzle holder
26. O-ring
27. Nozzle gasket
E
Feb. 2000Mitsubishi Motors Corporation Added
PWEE9409-D
Page 41

11B-15-2
4M41 ENGINE -
Injection Nozzle
Caution
1. Fuel is highly flammable. Keep it away from flames and sources of heat.
2. Wipe up spilt fuel completely. It could catch fire.
3. Remove all deposited carbon from the injection nozzle assembly 10 before disassembling,
reassembling and adjusting it. Prior to intended disassembly, check the injection nozzle 10
for abnormal injection pressure, abnormal spray pattern and fuel leaks. If it is in order, the
disassembly is not needed.
4. Never change the original combination of needle valve 13 and nozzle tip 12 when reassembling
each injection nozzle assembly 10.
5. Dust particles can seriously affect the engine performance. To prevent the ingress of dust,
fully cover and close up the opening left after removal of each injection nozzle assembly 10.
PRE-REMOVAL INSPECTION
Install the nozzle testerAto the injection nozzle assembly
and perform the following checks:
10
Caution
Prior to proceeding with the checks, bleed air from the
fuel injection nozzle by pumping the nozzle tester lever
two or three times.
10
1. VALVE OPENING PRESSURE CHECK
A
(1) Operate the nozzle testerAlever at 1 to 2 seconds per
stroke. Read the pressure when, after a gradual increase,
the pointer deflects rapidly.
(2) If the reading deviates from the specified standard value,
disassemble the fuel injection nozzle, clean and
reassemble. Then, make necessary pressure adjustment
using adjusting shims
18, 24
.
(3) If the reading still deviates after the adjustment, replace
the fuel injection nozzle assembly10.
2. SPRAY PATTERN CHECK
(1) Inject fuel continuously by pumping the nozzle tester
A
lever quickly (1 to 2 seconds per stroke).
: Even spray from all five injection orifices (Good)
B
: Even and symmetrical spray (Good)
C
: Asymmetrical spray (Bad)
D
: Branched spray (Bad)
E
: Thin spray (Bad)
F
: Irregular spray (Bad)
G
B
C
ED
F
G
(2) Disassemble, clean and recheck t he fuel injection nozzle
assembly
if necessary. If the problem still remains
10
after another check, replace the fuel injection nozzle
assembly.
(3) Check that the fuel injection nozzle does not dribble after
injection.
Caution
Do not touch the spray that comes out of the nozzle.
E
Feb. 2000Mitsubishi Motors Corporation Added
PWEE9409-D
Page 42

4M41 ENGINE -
3. OIL TIGHTNESS CHECK
(1) Slowly increase the nozzle internal pressure and maintain
it at a pressure 1960 kPa lower than the specified 1st
valve opening pressure. In this condition, check that the
fuel injection nozzle does not start dribbling within10
seconds.
(2) If the dribbling begins in less than 10 seconds,
disassemble, clean and recheck the fuel injection nozzle
assembly10. If the problem still remains after another
check, replace the fuel injection nozzle assembly.
Injection Nozzle
11B-15-3
13
10
157944-9520
REMOVAL SERVICE POINTS
AA"
RETAINING NUT REMOVAL
Using the special tool, remove the retaining nut.
4ME0510
Caution
A
1. Be sure not to touch the sliding surface A of the needle
valve 13 with dirty hands.
2. Be sure not to change the original combination of
the needle valve 13 and nozzle tip 12 removed.
4ME0511
10
157944-9520
INSTALLATION SERVICE POINT
"AA
RETAINING NUT INSTALLATION
Using the special tool, install the retaining nut.
4ME0510
Caution
13
A
1. Be sure not to touch the sliding surface A of the needle
valve 13 with dirty hands.
2. Be sure not to change the original combination of
the needle valve 13 and nozzle tip 12 removed.
4ME0511
E
Feb. 2000Mitsubishi Motors Corporation Added
PWEE9409-D
Page 43

11B-15-4
4M41 ENGINE -
Injection Nozzle
13
12
105789-0010
105789-0010
105789-0010
12
NOZZLE TIP, NEEDLE VALVE CLEANING
Wash the needle valve
and nozzle tip
13
removed in
12
clean kerosene (cleaning oil) and remove deposited carbon
from them in the following manners using the specified special
tools.
(1) Remove carbon deposited on the tip of the needle valve
using the special tool Cleaning Bar.
13
Caution
For cleaning, never use a wire brush or any other
hard metal tool.
(2) Remove carbon deposited in the nozzle hole area of
the nozzle tip12by turning the special tool Needle Cleaner
that runs through the nozzle hole.
Cleaning needle diameter: Less thanf0.21 mm
(3) Clean the seat of the nozzle tip
using the special
12
tool Cleaning Scraper.
(4) To remove baked carbon, use the Fuso Carbon
Remover.
NOZZLE TIP, NEEDLE VALVE INSPECTION
(1) Wash the needle valve
and nozzle tip
13
12
clean in
clean kerosene (cleaning oil) prior to reassembly.
(2) Pull out the needle valve
to approximately o ne third
13
of its length, let go of it and see if it slides down by
13
gravity. (Repeat this procedure a few times after turning
the needle valve each time.)
12
4ME0515
(3) If the needle valve
it again and give it another check. Replace the needle
valve
and nozzle tip
13
fails to slide down by itself, wash
13
as a set.
12
Caution
1. If a nozzle tip 12 is to be replaced, use a Nozzle
Service Kit to replace the needle valve 13, pin
14, lift piece 16 and spacer 15 at the same time.
2. After replacing the nozzle tip 12, be sure to readjust
the prelift to bring the valve opening pressure
to the specified standard value.
Standard value: 0.05 - 0.07 mm
E
Feb. 2000Mitsubishi Motors Corporation Added
PWEE9409-D
Page 44

4M41 ENGINE -
INJECTION NOZZLE ASSEMBLY ADJUSTMENT
While reassembling parts, adjust and check the injection
nozzle assembly in the sequence shown below.
Caution
1. Before starting adjustments and checks, wash all
parts clean in clean kerosene (cleaning oil) to ensure
that they are entirely free of dirt and other foreign
matters.
2. Never touch the sliding contact surface of the needle
valve 13.
Injection Nozzle
Adjusting 1st valve opening pressure
Checking full lift of needle valve
Checking prelift
Adjusting 2nd valve opening pressure
11B-15-5
12
13
14
16
16
157892-3200
157892-5100
15
20
19
22
24
12
25
17
18
21
23
25
4ME0516
16
20
4ME0517
Checking nozzle tip and needle valve
ADJUSTING 1ST VALVE OPENING PRESSURE
(1) Fit parts
(2) Fit the lift piece
12
through
16
to the nozzle holder25.
24
in the illustrated direction.
(3) Fit the special tool Gasket onto the nozzle tip12, then
secure the nozzle tip to the nozzle holder
25
with the
special tool Retaining Nut (for adjustment).
Turn the special tool Retaining Nut (for adjustment)
handtight, then tighten it to the specified torque (34
5 Nm).
±
4ME0518
E
Feb. 2000Mitsubishi Motors Corporation Added
PWEE9409-D
Page 45

11B-15-6
4M41 ENGINE -
Injection Nozzle
25
24
25
157892-5100
(4) Attach the nozzle holder
B
(5) Pumping the nozzle testerB, measure the 1st valve
to the nozzle testerA.
25
opening pressure.
Standard value: 17.60 - 18.58 MPa
4ME0519
(6) If the reading deviates from the specified standard value,
disassemble the nozzle holder
adjustment by changing the existing shim
and make pressure
25
for a shim
24
with appropriate thickness.
Thicknesses of available shims (outside diameter:
f
6.2 mm) for 1st valve opening pressure adjustment:
0.40, 0.50, 0.52, 0.54, 0.56, 0.58, 0.60, 0.70 mm
4ME0520
CHECKING FULL LIFT OF NEEDLE VALVE
157892-1600
The full lift check is performed to determine if the seat of
the nozzle tip12is abnormally worn and if the injection nozzle
assembly
is in order as well.
10
(1) Fit the special tool Gasket an d the special tool Plug onto
026508-1140
the special tool Retaining Nut (for adjustment).
157892-4400
25
157892-1000
157892-4400
E
4ME0521
(2) Fit the nozzle holder
to the special tool Plate with
25
its nozzle tip side down.
157944-9520
4ME0522
(3) Fit the special tool Holder to th e nozzle holder25.
(4) Mount the special tool Nut on the special tool Holder.
4ME0523
Feb. 2000Mitsubishi Motors Corporation Added
PWEE9409-D
Page 46

4M41 ENGINE -
Injection Nozzle
11B-15-7
157954-3801
C
25
157892-7200
157954-3801
157892-1000
157892-7200
22
(5) Connect the special tool Pin to the special tool Dial Gauge.
(6) Fit the special tool Dial Gauge onto the nozzle holder
and secure it with the special tool Nut in such a manner
25
that the special tool Pin contacts the upper end of the
spring seat22.
Caution
1. Secure the special tool Dial Gauge so that a stroke
of 2 mm or so can be measured.
2. Do not overtighten the special tool Nut. If it is
too tight, the shaft C of the special tool Dial Gauge
may be stuck.
157954-3801
25
157892-5100
D
Needle
valve
lift
(mm)
0
E
157892-1600
1st valve opening
pressure
Pipe pressure (MPa)
4ME0525
B
zero the special tool Dial Gauge.
(7) Attach the nozzle holder
to the nozzle testerB, then
25
(8) Loosen the special tool Plug, then operate the nozzle
testerBto bleed all air out of the special tool Retaining
Nut (for adjustment). Check for fuel leakage at the same
time.
4ME0526
(9) Using the nozzle tester, increase the pipe pressure up
to somewhere between 34.3 and 44.1 MPa to make the
needle valve13lift to the full level. Record the dial gauge
readingDof full lift.
Standard value: 0.23 - 0.27 mm
Caution
This check is necessary to determine if the seat of
the nozzle tip 12 is abnormally worn.
34.3 - 44.1
Feb. 2000Mitsubishi Motors Corporation Added
PWEE9409-D
Page 47

11B-15-8
D
Needle
E
valve
lift
(mm)
0
1st valve opening
pressure
F
Pipe pressure (MPa)
4M41 ENGINE -
CHECKING PRELIFT
(1) With the needle valve
of the nozzle testerB. This causes the pipe pressure
to decrease with a concomitant drop in dial gauge reading
(needle valve lift).
: Amount of needle valve full lift
D
(2) Read the dial gauge when the 2nd spring19has stopped
acting, or when the needle valve13has stopped lowering
(at prelift levelE), a n d ascertain that the reading is within
the specified limits of standard value.
Standard value: 0.05 - 0.07 mm
(3) Read the dial gauge with the needle valve
prelift measuring pointF(1st valve opening pressure +
approx. 1 MPa). (Observe the dial gauge while lowering
the pressure.)
Injection Nozzle
fully lifted, release the handle
13
13
at the
16
12
157954-3801
14
15
13
G
4ME0529
H
B
4ME0530
(4) If the dial gauge reading deviates from the specified limits
of standard value, replace the pin14, lift piece16, spacer
, nozzle tip
15
and needle valve
12
with a Nozzle
13
Service Kit.
: Capsule (Zexel part No. 105019-1240)
G
Standard value: 0.05 - 0.07 mm
ADJUSTING 2ND VALVE OPENING PRESSURE
(1) After checking the prelift, operate the nozzle tester
and increase the pipe pressure to 34.3 - 44.1 MPa so
that the needle valve lifts fully.
(2) Release the handle of the nozzle testerB. The pipe
pressure will lower with a concomitant drop in dial gauge
reading (needle valve lift).
B
E
Feb. 2000Mitsubishi Motors Corporation Added
PWEE9409-D
Page 48

Needle
valve
lift
(mm)
D
E
0
1st valve opening pressure
E + 0.05
34.3 - 44.1
Pipe pressure (MPa)
E
4M41 ENGINE -
2nd valve opening
pressure
Injection Nozzle
11B-15-9
(3) Note the value indicated by the pressure gaugeHthe
moment the dial gauge indicates the specified amount
of needle valve lift (normally preliftE+ 0.05 mm).
: Needle valve full lift
D
Standard value: 22.6 - 23.6 MPa
157954-3801
18
25
A
H
(4) If the dial gauge reading deviates from the specified limits
of standard value, disassemble the nozzle holder25and
make pressure adjustment by changing the existing shim
for a shim with appropriate thickness.
18
Thicknesses of available 2nd valve opening pressure
adjusting shims (outside diameter:f7.2 mm):
0.10, 0.20, 0.30, 0.40, 0.50, 0.51, 0.52, 0.53, 0.54,
0.55, 0.56, 0.57, 0.58, 0.59 mm
Caution
Adjusting the 1st valve opening pressure changes
the 2nd valve opening pressure. After the lst valve
opening pressure is altered, therefore, be sure to
check and readjust the 2nd valve opening pressure.
CHECKING INJECTION NOZZLE ASSEMBLY
157954-3801
157892-1000
Upon completion of all necessary adjustments, perform a
final check on the injection nozzle assembly by the following
procedure.
157892-4400
(1) Remove the special tools Dial Gauge, Nut and Holder.
157892-3200
E
157892-5120
4ME0533
(2) Remove the special tools Retaining Nut (for adjustment)
and Gasket.
(3) Check that the pin
regular retaining nut
is secured in position. Install the
14
handtight. then tighten it to the
11
specified torque.
(4) Attach the nozzle holder25to the nozzle testerB. Using
the nozzle testerB, check the 1st valve opening pressure,
spray form and seat oiltightness. Check that all parts
are leak-free at the same time.
4ME0534
Feb. 2000Mitsubishi Motors Corporation Added
PWEE9409-D
Page 49

4M41 ENGINE -
Cylinder Head and Valve Mechanism
16. CYLINDER HEAD AND VALVE MECHANISM
REMOVAL AND INSTALLATION
11B-16-1
Apply engine oil to all
moving parts before
installation.
58±6Nm
15
21±2Nm
11
49±5Nm+90_+90
1
2
3
4
_
13
14
49±5Nm+90_+90
_
12
14
7
1.3±1.0 Nm
18±2Nm
5
6
16
8
Removal steps
1. Bolt
2. Injection nozzle
3. O-ring
4. Nozzle gasket
5. Nut
6. Connecting plate
7. Glow plug
8. Timing gear upper cover
"HA
"HA
AA""GA
AA""FA
10
9
9. Tensioner
10. Gasket
11. Bolt (M10)
12. Cylinder head bolt (M12: long)
13. Cylinder head bolt (M12: short)
14. Washer
15. Cylinder head assembly
16. Cylinder head gasket
E
Feb. 2000Mitsubishi Motors Corporation Added
PWEE9409-D
Page 50

11B-16-2
4M41 ENGINE -
Cylinder Head and Valve Mechanism
18
19
20
21
17
22
Apply engine oil to all
moving parts before
installation.
26
25
29
47±5Nm
30
23
24
27
31
28
32
Removal steps
17. Valve cap
AB""EA 18. Valve cotter
19. Valve spring retainer
"DA 20. Valve spring
21. Valve spring seat
"CA 22. Valve stem seal
23. Exhaust valve
24. Intake valve
AC""BA 25. Exhaust valve guide
AC""BA 26. Intake valve guide
AD""AA 27. Exhaust valve seat
AD""AA 28. Intake valve seat
29. Sealing cap (f35 mm)
30. Stud
31. Water joint
32. Cylinder head
Caution
1. The cylinder head bolt 12, 13 is tightened to the plastic area. If the bolt shows the evidence
of having been tightened three times, replace it with a new ones.
2. The timing chain slips out of place if the camshaft sprocket is removed from it. If the chain
comes off, remove the timing gear case assembly and put the chain back in position.
3. Replace the valve stem seal 22 with a new one once the exhaust valve 23 or intake valve
24 is removed.
E
Feb. 2000Mitsubishi Motors Corporation Added
PWEE9409-D
Page 51

4M41 ENGINE -
Cylinder Head and Valve Mechanism
11B-16-3
REMOVAL SERVICE POINTS
AA"
Caution
When removing the cylinder head gasket 16, use care
not to scratch the cylinder head assembly 15, crankcase
assembly and timing gear case assembly.
CYLINDER HEAD ASSEMBLY / CYLINDER HEAD
GASKET REMOVAL
12, 13
15
*b
*a
11
12
10
14
16
17
1318
15
8
4
2
67
5
9
11
1
3
G
G
C
G
F
E
C
(1) Loosen the cylinder head bolts stepwise in the sequence
of the numbers shown, then remove them.
Caution
Provide one punch mark G on the head of the cylinder
head bolt 12, 13 each time the bolt is tightened. Replace
the bolt that already has three punch marks (the evidence
of having been tightened three times).
(2) Lift up the cylinder head assembly straight and remove,
while keeping the camshaft sprockets*ain engagement
with the timing chain*b.
(3) After the cylinder head assembly is removed, hold the
camshaft sprockets*awith the special tool to keep the
timing chain
*b
on it.
Component Parts of the Special Tool MH063490 - Cam
Sprocket Holder Kit
: Nut
A
: Washer
B
: Spacer
C
: Adjusting plate
D
: Nut
E
: Bolt
F
: Bolt
G
D
A
B
E
Feb. 2000Mitsubishi Motors Corporation Added
PWEE9409-D
Page 52

11B-16-4
4M41 ENGINE -
Cylinder Head and Valve Mechanism
MD998772
MD998784
A
MD998784
BC
AB"
VALVE COTTER REMOVAL
<Method 1>
Using the special tools, remove the valve cotters18as follows.
18
Component parts of special tool MD998772 Valve Spring
Compressor
: Wing bolt
A
: Retainer
B
: Handle
D
F
E
G
J
K
L
M
H
N
P
C
: Nut
D
: Bolt
E
: Slotted screw
F
: Stay
G
: Lock nut
H
: Tension spring
J
: Mobile nut
K
: Washer
L
: Snap ring
M
: Retainer holder
N
(1) Install the special tools on the cylinder head32as shown
in the illustration.
MD998784
Q
R
G
D
K
MD998772
B
A
: Bolt (M8 x 12.5 mm)
P
32
(2) Install the special tool MD998772 on the special tools
MD998784.
: Washer
Q
: Nut (M6 x 1 mm)
R
(3) Move the retainerBand mobile nutKinto a position
where the retainer holderNpresses the valve spring
retainer
from right above, then secure them with the
19
wing boltA.
19
Use the nutsDto adjust the vertical position of the stay
.
G
NOTE
N
Set the stayGlevel.
E
Feb. 2000Mitsubishi Motors Corporation Added
PWEE9409-D
Page 53

4M41 ENGINE -
Cylinder Head and Valve Mechanism
11B-16-5
18
C
(4) Turning the handleCclockwise to depress the valve spring
retainer19, remove the valve cotters18.
19
18
<Method 2>
Using the special tool, compress the valve spring20to remove
19
MD999597
the valve cotters18.
: Protector
A
A
AC"
MD998665
Remove the valve guide25,
EXHAUST VALVE GUIDE / INTAKE VALVE
GUIDE REMOVAL
using the special tool.
26
25, 26
AD"
27, 28
The valve seat27,
EXHAUST VALVE SEAT / INTAKE VALVE SEAT
REMOVAL
is shrink-fitted. To remove it, grind
28
its inside surface to reduce its thickness, then pull it out at
room temperature.
: Material to be removed by grinding
F
F
0.5 - 1.0 mm
E
Feb. 2000Mitsubishi Motors Corporation Added
PWEE9409-D
Page 54

11B-16-6
MH063613
MH063611
or
MH063612
27, 28
4M41 ENGINE -
Cylinder Head and Valve Mechanism
INSTALLATION SERVICE POINTS
"AA
(1) Measure a diameter of the valve seat holeJ,Hin the
(2) Rebore the valve seat holeJ,Hto the diameter appropriate
J
H
32
(3) Immerse the valve seat27,
(4) Using the special tools MH063613, MH063611 and
(5) After installing the valve seat27,28, lap it and the valve
A
"BA
(1) Measure a diameter of the valve guide25,
(2) Rebore the valve guide holeAto the diameter appropriate
INTAKE VALVE SEAT / EXHAUST VALVE SEAT
INSTALLATION
cylinder head32and select an oversize valve seat which
can provide proper amount of cylinder head-to-valve seat
interference.
to the selected oversize valve seat.
Unit: mm
Oversize valve seat used
: Intake valve seat hole
J
inside diameter
: Exhaust valve seat hole
H
inside diameter
0.30 0.60
35.3 - 35.325 35.6 - 35.625
33.3 - 33.325 33.6 - 33.625
in liquid nitrogen to cool
28
enough.
MH063612, press the valve seat27,
head
until it bottoms.
32
in the cylinder
28
for proper fit.
INTAKE VALVE GUIDE / EXHAUST VALVE
GUIDE INSTALLATION
hole in
26
the cylinder head32and select an oversize valve guide
which can provide proper amount of cylinder head-to-valve
guide interference.
to the selected oversize valve guide.
32
MH063610
16.5 mm
21
25, 26
Caution
Do not install a valve guide of the same size as
removed.
Oversize valve
guide used
Valve guide hole
inside diameter
(3) Install the valve spring seat
0.05 0.25 0.50
12.05 -
12.068
12.25 -
12.268
in the cylinder head32,
21
12.50 -
12.518
then install the valve guide by striking the special tool
until it comes into full contact with the valve spring seat
.
21
Caution
The installed depth of the valve guide shall be as
specified. Be sure to use the special tool for
installation.
(4) The intake valve guide
is longer than the exhaust
26
valve guide25. Be sure to install right valve guide in
right place.
Unit: mm
E
Feb. 2000Mitsubishi Motors Corporation Added
PWEE9409-D
Page 55

4M41 ENGINE -
Cylinder Head and Valve Mechanism
11B-16-7
23, 24
25, 26
32
A
MD998772
MD998784
MH063609
A
"CA
VALVE STEM SEAL INSTALLATION
(1) Apply a thin coat of engine oil to the lipAof the valve
stem seal22, then press in the valve stem seal
22
by
hand until its lower endBcontacts the top of the valve
guide25,26.
22
(2) Install the valve stem seal
striking the special tool vertically until it comes into full
in position by carefully
22
to fully contact with the valve spring seat surface in the
cylinder head32.
B
"DA
VALVE SPRING INSTALLATION
Install the valve spring20with the blue painted endAupward.
20
"EA
VALVE COTTER INSTALLATION
<Method 1>
Using the special tools, install the valve cotters18as follows.
A
MD998784
BC
18
Component parts of special tool MD998772 Valve Spring
Compressor
: Wing bolt
A
: Retainer
B
: Handle
D
F
E
G
J
K
L
M
H
N
P
C
: Nut
D
: Bolt
E
: Slotted screw
F
: Stay
G
: Lock nut
H
: Tension spring
J
: Mobile nut
K
: Washer
L
: Snap ring
M
: Retainer holder
N
(1) Install the special tools on the cylinder head32as shown
in the illustration.
: Bolt (M8 x 12.5 mm)
P
32
E
Feb. 2000Mitsubishi Motors Corporation Added
PWEE9409-D
Page 56

11B-16-8
4M41 ENGINE -
Cylinder Head and Valve Mechanism
MD998784
Q
R
G
D
K
C
MD998772
B
A
(2) Install the special tool MD998772 on the special tools
MD998784.
: Washer
Q
: Nut (M6 x 1 mm)
R
(3) Move the retainerBand mobile nutKinto a position
where the retainer holderNpresses the valve spring
retainer
from right above, then secure them with the
19
wing boltA.
19
Use the nutsDto adjust the vertical position of the stay
.
G
NOTE
N
Set the stayGlevel.
(4) Turning the handleCclockwise to depress the valve spring
retainer19, install the valve cotters18.
18
19
19
18
MD999597
<Method 2>
Using the special tool, compress the valve spring20to install
the valve cotters18.
: Protector
A
A
E
Feb. 2000Mitsubishi Motors Corporation Added
PWEE9409-D
Page 57

4M41 ENGINE -
Cylinder Head and Valve Mechanism
11B-16-9
ABCD
15
16
“A” - “D”
E
*c
*d
"FA
CYLINDER HEAD GASKET INSTALLATION
The cylinder head gasket16is a part that needs to be selected
for use. Select the appropriate gasket in the following manner.
(1) When replacing the cylinder head gasket alone-Identify;
the crankcase assembly*dby the crankcase identification
mark
“A”,“B”,“C”or“D”
stamped on its top surface
and select a gasket of the size corresponding to the mark.
(2) When replacing the piston and connecting rod as well;
1) Measure the piston protrusion from each cylinder.
2) Select the gasket
corresponding in thickness to
16
the largest of the measured piston protrusions.
NOTE
The gasket varies in type according to the number of
notches in its notched endE.
Unit: mm
Piston projection
Maximum piston projection Crankcase identification
mark
0.03 - 0.11 A A (1 notch) 0.67 - 0.73
- 0.05 - 0.03 B B (2 notches) 0.72 - 0.78
- 0.13 - - 0.05 C C (3 notches) 0.77 - 0.83
- 0.23 - - 0.15 D D (4 notches) 0.82 - 0.88
"GA
12, 13
G
Caution
Cylinder head gasket
Type by size Tightened thickness
CYLINDER HEAD ASSEMBLY INSTALLATION
Before installing the cylinder head bolt 12, 13, check the
number of punch marks D on its head. (The bolt is reusable
if it is two or less.) The number of punch marks
corresponds to that of times the bolt has been tightened
to the plastic area. If the bolt has three punch marks,
replace it.
E
Feb. 2000Mitsubishi Motors Corporation Added
PWEE9409-D
Page 58

11B-16-10
4M41 ENGINE -
Cylinder Head and Valve Mechanism
H
*d
(1) Apply a coat of specified sealant to the upper surface
of the front plate*cthat joins the cylinder head gasket
H
.
16
Specified sealant:
ThreeBond 1211 or equivalent
(2) Within 3 minutes after the sealant application, install the
H
*e
*c
cylinder head assembly
together with the cylinder head gasket16.
*d
to the crankcase assembly
15
Caution
1. Check to ensure that the surface H is clean and
free of oil and other foreign matters before sealant
application.
2. During installation of the cylinder head assembly,
use care that the sealant is kept in place.
3. Do not start the engine for at least 1 hour after
the cylinder head assembly is installed.
4. Whenever the cylinder head bolt 11, 12, 13 is
loosened or removed after the cylinder head
assembly has been installed, always apply a fresh
coat of specified sealant.
(3) Tighten the M12 cylinder head bolts12and13(1 through
15
17
13
11
3
7
5
6
1
2
4
10
14
18
89
16
12
18) at M10 bolts
1) Fit the washer
, with its shear-droop sideJfacing in the direction
13
in the following manner.
11
onto the cylinder head bolt12,
14
shown.
2) Apply a thin coat of engine oil to the threaded part
and seating surface of each cylinder head bolt12,
11
J
12, 13
14
, then tighten the bolts to a torque of 98 ± 10
13
Nm in the sequence of the numbers shown.
3) Loosen the tightened bolts in the reverse order of
the numbers shown and retighten them to a torque
of 49 ± 5 Nm in t h e order of the numbers shown.
4) After tightening, give the bolts an additional 90 degree
turn in the sequence of the numbers shown.
5) Then, give the bolts another 90 degree turn to tighten
them completely.
6) After tightening the cylinder head bolt12,13, tighten
the bolt
to the specified torque.
11
Caution
The cylinder head bolt 12, 13 has been tightened up
to the plastic area by the above procedure. Once
tightened completely, do not attempt to retighten the
bolt.
15
"HA
(1) Fit the gasket
E
10
GASKET / TENSIONER INSTALLATION
to the cylinder head assembly
10
the direction shown in the illustration.
: Sealant coated surface
E
15
in
9
E
Feb. 2000Mitsubishi Motors Corporation Added
PWEE9409-D
Page 59

4M41 ENGINE -
Cylinder Head and Valve Mechanism
11B-16-11
*b
C
B
(2) Turn the camAof the tensioner9to thrust the plunger
in and lock the plunger with the hookC. Then, install
B
the tensioner in that state.
A
(3) Crank the engine in the normal direction (clockwise).
Caution
1. If the tensioner 9 is installed without thrusting
the plunger B in, the timing chain *b may be
9
D
damaged by excessive tension.
2. The tensioner 9 stretches the timing chain *b to
optimum tension by means of the internal ratchet
mechanism. If the engine is cranked counterclockwise (as viewed from the front) after the tensioner 9 is installed, an excessive thrust is exerted
to the plunger B and the cam A may be damaged
as a result. Should the engine be cranked counterclockwise, remove the tensioner and re-install it
in the sequence described above.
NOTE
If the engine is cranked in the normal direction (clockwise)
after the tensioner has been installed, the hookCwill
be released automatically, the timing chain being adjusted
to optimum tension by means of the internal ratchet
mechanism.
23, 24
23, 24
INSPECTION
1. INTAKE AND EXHAUST VALVES
(1) Checking Stem for Wear
Replace the valve23,
specified service limit or uneven wear is recognized.
Standard value:
Intake 6.560 - 6.575 mm
Exhaust 6.53 - 6.55 mm
Limit: 6.45 mm
Caution
If the valve 23, 24 is new, be sure to lap it and the
valve seat 27, 28 for proper seating.
(2) Valve Seat Angle and Valve Margin
Correct or replace the valve23,24if the specified service
limit is exceeded.
Standard value:
Valve seat angle 45
Valve margine 1.0 mm
if the diameter is below the
24
_ ±
15’
Limit:
A
E
B
Feb. 2000Mitsubishi Motors Corporation Added
Valve margine 0.8 mm
: Valve seat angle
A
: Valve margin
B
PWEE9409-D
Page 60

11B-16-12
23, 24
A
23, 24
4M41 ENGINE -
27, 28
27, 28
B
Cylinder Head and Valve Mechanism
2. VALVE SEAT
(1) Valve Seat Width
Replace the valve seat27,
limit is exceeded.
: Valve seat width
A
Standard value: 1.8 - 2.2 mm
Limit: 2.8 mm
Caution
When the valve seat 27, 28 has been corrected or
replaced, lap it and the valve 23, 24 for proper seating.
(2) Valve Sinkage from Cylinder Head Bottom
If the specified service limit is exceeded, correct or replace
the defective part.
: Valve sinkage
B
Standard value: 0.05 - 0.55 mm
Limit: 0.8 mm
if the specified service
28
23, 24
A
B
23, 24
25, 26
3. VALVE AND VALVE GUIDE
If the clearance exceeds the specified service limit, replace
the defective part.
Standard value:
Intake 0.02 - 0.06 mm
Exhaust 0.05 - 0.09 mm
Limit:
Intake 0.10 mm
Exhaust 0.15 mm
4. VALVE AND VALVE SEAT
(1) Apply an even coat of minium to the valve seating surface
of the valve seat27,28.
A
(2) Strike the valve23,
against the valve seat27,
24
28
once while taking care that the valve is not rotated.
: Valve Lapper
B
Caution
Before proceeding with the contact check, examine
the valve 23, 24 and valve guide 27, 28 in detail to
see if they are in normal condition.
(3) Determine the valve seating condition from minium pattern
printed on the valve23,24. If any abnormal contact is
found, take the following corrective action.
Condition Corrective action
Minor defect Lap valve for better seating.
Major defect Correct or replace valve and valve
seat.
E
Feb. 2000Mitsubishi Motors Corporation Added
PWEE9409-D
Page 61

4M41 ENGINE -
Cylinder Head and Valve Mechanism
5. CYLINDER HEAD ASSEMBLY
Measure the distortion of the bottom surface of the cylinder
head31. If the measured value exceeds the limit, replace
the cylinder head.
Standard value: 0.05 mm or less
Limit: 0.2 mm
CORRECTION
1. INTAKE VALVE AND EXHAUST VALVE
Caution
1. The grinding should be minimum.
2. If the valve margin deviates from the specified
service limit after grinding, replace the valve 23,
24.
3. After grinding, lap the valve 23, 24 and valve seat
27, 28 for proper seating.
11B-16-13
E
D
2. VALVE SEAT
(1) Grind the valve seat27,
using a valve seat cutter
28
or a valve seat grinder.
(2) Polish the ground surface lightly using a #400 sandpaper
C
27, 28
23, 24
held between the cutter and valve seat.
(3) Correct the seat widthCof the valve23,24to the specified
value using a 15_ or 75_ cutter.
: Valve seat angle
D
_
±
Standard value: 45
15’
Caution
1. Be sure that the sinkage E of the valve 16, 17
does not exceed the specified service limit as
a result of the correction.
Limit: 0.8 mm
2. After the correction, lap the valve 23, 24 and valve
seat 27, 28 for proper seating.
3. VALVE AND VALVE SEAT
Lap the valve and valve seat as follows:
(1) Apply a thin coat of lapping compound evenly to the
23, 24
valve seating surfaceAof the valve seat27,28.
Caution
C
1. Keep the stem C of the valve 23, 24 free from
the lapping compound.
2. Use an intermediate-mesh compound (120 -
A
150 meshes) first, then a fine-mesh compound
(over 200 meshes).
3. To achieve even application of the lapping
compound, a mix with a small quantity of
engine oil is recommended.
E
Feb. 2000Mitsubishi Motors Corporation Added
PWEE9409-D
Page 62

11B-16-14
4M41 ENGINE -
Cylinder Head and Valve Mechanism
23, 24
(2)Using Valve Lapper, strike the valve23,
the valve seat27,
B
by little.
: Valve Lapper
B
a few times while turning little
28
24
against
(3) Wash off the lapping compound in kerosene.
(4) Apply a thin coat of engine oil to the seating surface
of the valve seat27,
(5) Check the seat contact between the valve23,
and oil lap.
28
24
and valve seat27,28.
(6) Replace the valve seat27,
if necessary.
28
E
Feb. 2000Mitsubishi Motors Corporation Added
PWEE9409-D
Page 63

4M41 ENGINE -
17. VACUUM PUMP
REMOVAL AND INSTALLATION
Vacuum Pump
11B-17-1
<With ABS>
7
6
<Without ABS, LHD>
9
8
10
<Without ABS, RHD>
20±2Nm
11
3
3
4
2
5.4±0.4 Nm
Removal steps
1. Vacuum hose
2. Vacuum pipe
3. Eyebolt
4. Oil pipe
5. Vacuum pump assembly
6. Bolt
1
5
7. Cover
8. O-ring
9. Vane
10. Body assembly
11. O-ring
E
Feb. 2000Mitsubishi Motors Corporation Added
PWEE9409-D
Page 64

11B-17-2
4M41 ENGINE -
Vacuum Pump
B
INSPECTION
VACUUM PUMP ASSEMBLY
(1) Connect a vacuum tank (capacity: 10 liters) to the vacuum
pump assembly5through a vacuum gaugeA.
: Engine oil inlet
C
A
D
5
B
: Engine oil outlet (to oil pan)
C
(2) With the engine running, read the engine speed when
the vacuum builds up to the standard value.
Standard value:
Degree of vacuum: 93 kPa or more
Pump speed: 1500 r/min
(3) If the reading deviates from the specified standard value,
replace the vacuum pump.
E
Feb. 2000Mitsubishi Motors Corporation Added
PWEE9409-D
Page 65

4M41 ENGINE -
18. TIMING GEAR CASE
REMOVAL AND INSTALLATION
Apply engine oil to all
moving parts before
installation.
Timing Gear Case
11B-18-1
323±32 Nm
1
3
2
23±2Nm
4
12
7
13
11
12
23±2Nm
8
14
6
5
10
9
Removal steps
1. Timing gear lower cover
2. Bolt
3. Washer
AA" 4. Crankshaft pulley
5. Power steering pump assembly
6. O-ring
7. Vacuum pump assembly
"BA 11. Front oil seal
"AA 13. Timing gear case
Caution
Do not remove the front oil seal unless absolutely necessary.
E
Feb. 2000Mitsubishi Motors Corporation Added
PWEE9409-D
8. O-ring
9. Bearing block
10. O-ring
12. Cap nut
14. Key
Page 66

11B-18-2
MB990767
11
13
4
MD998754
A
C
4M41 ENGINE -
REMOVAL SERVICE POINT
AA"
Holding the crankshaft pulley4with the special tool, remove
the bolt2.
INSTALLATION SERVICE POINTS
"AA
Apply an even bead of sealant to the entire joint surface
of the timing gear case
13
B
mm.
Specified sealant:
Mitsubishi Genuine Part No. MD970389 or equivalent
Caution
Squeeze out the sealant uniformly without excess and
discontinuity.
"BA
Apply a thin coat of engine oil to the lipC, and install the
front oil seal11in the timing gear case13with the lip directed
as shown until its end surfaceAbecomes flush with the
end surfaceBof the case.
: End surface (front oil seal)
A
: End surface (timing gear case)
B
: Lip
C
Timing Gear Case
CRANKSHAFT PULLY REMOVAL
TIMING GEAR CASE INSTALLATION
as shown. Bead diameter: 3.5
13
FRONT OIL SEAL INSTALLATION
E
Feb. 2000Mitsubishi Motors Corporation Added
PWEE9409-D
Page 67

4M41 ENGINE -
Timing Gear and Balance Shaft
19. TIMING GEAR AND BALANCE SHAFT
REMOVAL AND INSTALLATION
Apply engine oil to all
moving parts before
installation.
18
15
13
14
16
15
36±4Nm
17
19
12
11B-19-1
40
32
24
33±3Nm
8
40±4Nm
10
9
40
43
20
11
1
3
2
21
5
6
7
29
45
4
41
39
42
28
12±1Nm
27
37
24
23
22
38
36±4Nm
44
36
35
34
25
26
30
31
32
33
E
Feb. 2000Mitsubishi Motors Corporation Added
PWEE9409-D
Page 68

11B-19-2
"GA 3. Timing chain
"FA 12. Balance shaft assembly RH
4M41 ENGINE -
Removal steps
1. Upper guide plate
2. Cam sprocket
4. Bolt
5. Tension lever
6. Tension lever shaft
7. Lower guide plate
8. Bolt
9. Guide plate washer
10. Guide plate
11. Bolt
13. Bolt
14. Washer
15. Balance shaft gear RH
16. Thrust spacer
17. Oil pump assembly
18. Key
19. Balance shaft RH
20. O-ring
21. O-ring
22. Bolt
23. Idler washer
Timing Gear and Balance Shaft
"EA 24. Idler gear assembly LH
AA""DA 25. Idler gear bush LH
26. Idler gear LH
27. Idler shaft
28. Bolt
"CA 29. Balance shaft assembly LH
30. Bolt
31. Washer
32. Balance shaft gear LH
33. Thrust spacer
34. Bush
35. Thrust plate
36. O-ring
37. Key
38. Balance shaft LH
39. Oil jet assembly
40. Bolt
41. Idler washer
"BA 42. Idler gear and sprocket assembly
AB""AA 43. Idler sprocket bush
44. Idler gear and sprocket
45. Idler shaft
Caution
After installing the bolt 4, check that the tension lever 5 moves smoothly.
PRE-REMOVAL INSPECTION
1. BACKLASH
Measure backlash between gears, pair by pair, at three
or more points. If the reading exceeds the specified service
limit, replace defective part.
Standard value:
Balance shaft gear RH and oil pump gear
Oil pump gear and crankshaft gear
Crankshaft gear and idler gear 0.04 - 0.18 mm
Idler gear and idler gear LH 0.04 - 0.19 mm
Idler gear LH and balance shaft gear LH
Idler gear and injection pump gear
0.04 - 0.19 mm
0.04 - 0.18 mm
0.04 - 0.22 mm
0.04 - 0.21 mm
Limit:
Balance shaft gear RH and oil pump gear
0.3 mm
Oil pump gear and crankshaft gear 0.3 mm
Crankshaft gear and idler gear 0.3 mm
Idler gear and idler gear LH 0.3 mm
Idler gear LH and balance shaft gear LH
0.4 mm
Idler gear and injection pump gear 0.4 mm
E
Feb. 2000Mitsubishi Motors Corporation Added
PWEE9409-D
Page 69

4M41 ENGINE -
Timing Gear and Balance Shaft
11B-19-3
2. END PLAY
If the reading exceeds the specified service limit, replace
defective part.
Standard value:
Balance shaft LH, RH 0.09 - 0.24 mm
Idler gear and sprocket assembly
0.05 - 0.20 mm
Idler gear LH assembly 0.05 - 0.20 mm
Limit:
Balance shaft LH, RH 0.3 mm
Idler gear and sprocket assembly 0.3 mm
Idler gear LH assembly 0.3 mm
MH062463
MH062462
25
MH062462
43
“0”
REMOVAL SERVICE POINTS
AA"
Using the special tool, remove the idler gear bush25.
AB"
Using the special tool, remove the idler sprocket bush43.
IDLER GEAR BUSH LH REMOVAL
IDLER SPROCKET BUSH REMOVAL
INSTALLATION SERVICE POINTS
"AA
Using the special tool, press-fit the idler sprocket bush
into the idler gear and sprocket
the match mark
IDLER SPROCKET BUSH INSTALLATION
from the side showing
42
.
“0”
43
42
43
E
Feb. 2000Mitsubishi Motors Corporation Added
PWEE9409-D
Page 70

11B-19-4
4M41 ENGINE -
Timing Gear and Balance Shaft
“1”
“0”
32
33
*c
45
35
42
A
38
31
"BA
IDLER GEAR AND SPROCKET ASSEMBLY
INSTALLATION
Install the idler gear and sprocket assembly42onto the idler
shaft45while aligning the mark “1” with that on the crankshaft
gear*c.
"CA
BALANCE SHAFT LH ASSEMBLY INSTALLATION
(1) Assemble the parts shown in the illustration to the balance
shaft LH
Be sure that the washer
38.
and thrust spacer
31
33
face
in correct direction as shown. Install the balance shaft
gear LH
with the side showing the match mark
32
“0”
outward.
: Shear droop side
A
(2) Insert the completed balance shaft LH assembly
the crankcase assembly
and set it in position with
*a
29
into
the dowel pin on the crankcase assembly.
MH062463
“F”
“3”
25
26
24
23
29
27
33
“3”
*a
“0”
42
32
“0”
Caution
1. Do not rotate the balance shaft LH assembly 29
during insertion into the crankcase assembly *a.
This may cause the O-ring 35 to be slipped out
of place.
2. Insert the balance shaft LH assembly 29 using
care not to damage the inner surface of the balance
shaft bush in the crankcase.
"DA
Using the special tool, press-fit the idler gear bush LH
into the idler gear LH
marks “3” and
"EA
IDLER GEAR BUSH LH INSTALLATION
from the side showing the match
26
.
“0”
IDLER GEAR LH ASSEMBLY INSTALLATION
25
(1) Install the idler gear LH assembly24onto the idler shaft
. At this time, be sure to align the match marks “3”
27
and
marks on the idler gear and sprocket assembly
on the idler gear with the corresponding match
“0”
42
and
the balance shaft gear LH32.
(2) Then, install the idler washer
to the idler gear LH
23
assembly with its front mark “F” facing outward.
E
Feb. 2000Mitsubishi Motors Corporation Added
PWEE9409-D
Page 71

4M41 ENGINE -
Timing Gear and Balance Shaft
11B-19-5
14
15
“0”
*d
16
A
"FA
(1) Assemble the parts shown in the illustration to the balance
BALANCE SHAFT RH ASSEMBLY INSTALLATION
shaft RH
Be sure to install the washer
19.
and thrust spacer
14
16
in the direction shown in t he illustration, and install the
balance shaft gear RH15with its mating mark
“0”
aligned
with the mating mark “6” on the oil pump gear*d.
: Shear droop side
A
19
12
*e
“5”
(2) Insert the completed balance shaft RH assembly
the crankcase assembly while aligning the mating marks
“5” on the oil pump gear*dand the crankshaft gear*c,
12
into
and set the shaft assembly in position with the dowel
pin on the crankcase assembly
*a.
Caution
*d
Insert the balance shaft RH assembly using care not
to damage the inner surface of the balance shaft bush
in the crankcase.
*c
*a
(3) After the timing gears are installed in position, check that
all the rotary parts smoothly rotate.
F
D
G
"GA
(1) Hold the camshaft sprocket2using the special tool.
E
2
B
A
C
2
B
A
TIMING CHAIN INSTALLATION
Component Parts of Special Tool MH063490 - Cam
Sprocket Holder Kit
: Nut
A
: Washer
B
: Spacer
C
: Adjusting plate
D
: Nut
E
: Bolt
G
(2) Check that the match mark “1” on the idler gear and
J
J
2
3
sprocket assembly
crankshaft gear*c.
(3) Align the match mark
assembly
with the mark link plateHof the timing
42
is in alignment with that on the
42
on the idler gear and sprocket
“0”
chain3.
“0”
Caution
The timing chain 3 has the match mark provided at
two places: one bright white link plate H at one place
“1”
and a pair of bright white link plates J at the other.
(4) Place the timing chain3around the camshaft sprockets
39
“F”
*c
while aligning th e timing mark
2
sprockets with the mark link plateJon the timing chain.
(5) After installing the timing chain3, attach the idler washer
with the front mark “F” facing outward.
41
on the camshaft
“0”
41
42
“0”
H
E
Feb. 2000Mitsubishi Motors Corporation Added
PWEE9409-D
Page 72

11B-19-6
4M41 ENGINE -
Timing Gear and Balance Shaft
D
E
2
L
INSPECTION
1. TIMING CHAIN
(1) Aligning the stamped linesLon the adjusting plate
3
and nutE, set the camshaft sprocket2in position.
(2) Push the tension lever5by hand to take up the slack
D
of the timing chain3. Measure the minimum clearance
between the chain spans facing each other. If the
K
5
K
reading deviates from the specified limit, replace the timing
chain.
Standard value: 16.5 mm
Limit: 9 mm
A
5
2. TENSION LEVER AND TENSION LEVER SHAFT
(1) Replace the tensioner lever5if it shows any cracks or
flakes on the surfaceAthat makes sliding contact with
the timing chain and the tensioner contact surfaceB.
B
(2) If the tensioner lever5to tension lever shaft6clearance
5
6
exceeds the specified limit, replace the defective part.
Standard value: 0.06 - 0.18 mm
Limit: 0.3 mm
3. GUIDE PLATE
A
10
Replace the guide plate
if it shows any cracks or
10
flakes on the surfaceAthat makes sliding contact with
the timing chain.
E
Feb. 2000Mitsubishi Motors Corporation Added
PWEE9409-D
Page 73

4M41 ENGINE -
Timing Gear and Balance Shaft
11B-19-7
45
27
43
25
4. IDLER GEAR BUSH LH AND IDLER SHAFT
If the idler gear bush25to idler shaft27clearance exceeds
the specified limit, replace the defective part.
Standard value: 0.02 - 0.05 mm
Limit: 0.1 mm
5. IDLER SPROCKET BUSH AND IDLER SHAFT
If the idler sprocket bush
to idler shaft
43
clearance
45
exceeds the specified limit, replace the defective parts.
Standard value: 0.02 - 0.06 mm
Limit: 0.1 mm
E
Feb. 2000Mitsubishi Motors Corporation Added
PWEE9409-D
Page 74

4M41 ENGINE -
20. OIL PUMP
REMOVAL AND INSTALLATION
44±4Nm
14
13
12
Oil Pump
10±1Nm
11B-20-1
15
*3
36±3Nm
9
10
11
7
6
5
3
4
2
8
A
16
17
*1
18
1
Removal steps
1. Balance shaft RH assembly
2. Bolt
3. Washer
4. Balance shaft gear RH
5. Thrust spacer
6. Key
7. Balance shaft RH
8. Oil pump assembly
9. Screw
10. Oil pump cover
11. Driven gear assembly
12. Plug
E
Feb. 2000Mitsubishi Motors Corporation Added
PWEE9409-D
*2
13. Relief valve spring
14. Steel ball
15. Gear and body assembly
16. O-ring
17. O-ring
18. O-ring
*1: Crankcase
(Refer to page 11B-25-1.)
*2: Crankshaft gear
*3: Drive gear
A: Locating pin
Page 75

11B-20-2
10
11
15
11
4M41 ENGINE -
15
*3
Oil Pump
INSPECTION
OIL PUMP
(1) Shaft to Oil Pump Case and Cover Clearances
In either case, if the measurement exceeds the specified
service limit, replace oil pump assembly.
Standard value: 0.03 - 0.05 mm
Limit: 0.15 mm
(2) Difference between Gear Height a nd Oil Pump Case
Depth
If the difference exceeds the specified service limit, replace
defective part.
Standard value: 0.05 - 0.10 mm
Limit: 0.15 mm
11
15
*3
(3) Gear Tooth Crest-to-Oil Case Clearance
If the clearance exceeds the specified service limit, replace
defective part.
Standard value: 0.15 - 0.26 mm
Limit: 0.27 mm
E
Feb. 2000Mitsubishi Motors Corporation Added
PWEE9409-D
Page 76

4M41 ENGINE -
Oil Cooler and Oil Filter
21. OIL COOLER AND OIL FILTER
REMOVAL AND INSTALLATION
16
*
5
11B-21-1
15
14
2
9
44±4Nm
10
11
12
4
8
30±3Nm
13
1
3
20±2Nm
7
6
44±4Nm
Removal steps
"AA 1. Oil filter
2. Oil cooler assembly
3. Nut
4. O-ring
5. Oil cooler element
6. Plug
7. Bypass valve spring
8. Plunger
9. Plug
E
Feb. 2000Mitsubishi Motors Corporation Added
PWEE9409-D
10. Regulator valve spring
11. Plunger
12. Water drain plug
13. Oil cooler body
14. O-ring
15. Gasket
16. Water separate lip
*: Crankcase assembly
Page 77

11B-21-2
A
4M41 ENGINE -
Oil Cooler and Oil Filter
CLEANING
(1) Check the oil cooler element5for deposited carbon and
sludge in oil passage and bypass, and wash it clean
in cleaning oil, if necessary.
(2) Wash the oil cooler element5and the oil cooler body
if they are much contaminated with scale.
13
INSPECTION
OIL COOLER ELEMENT
(1) Immerse the oil cooler element5in a water tank, with
the oil outletAclosed. Connect a hose to the engine
oil inletB.
(2) Apply an air pressure of 1470 kPa into the oil cooler
element5through the connected hose, and check for
air leaks.
B
(3) Replace the oil cooler element5if it leaks.
2
A
1
MH061590
INSTALLATION SERVICE POINT
"AA
(1) Clean the surface of the oil cooler assembly2which
(2) Apply a thin coat of engine oil to the gasketAon the
(3) Holding the gasketAin contact with the oil cooler assembly
OIL FILTER INSTALLATION
contacts the oil filter1.
oil filter1.
, tighten the cover 5/8 turn.
2
E
Feb. 2000Mitsubishi Motors Corporation Added
PWEE9409-D
Page 78

4M41 ENGINE -
Oil Pan, Oil Strainer and Oil Jet
22. OIL PAN, OIL STRAINER AND OIL JET
REMOVAL AND INSTALLATION
9
8
3
7
11B-22-1
*2
*1
11
32±3Nm
10
Removal steps
1. Drain plug
2. Oil pan cover LH
3. Oil pan cover RH
4. Oil pan cover
5. Bolt
"AA 6. Oil pan
7. Oil level sensor
8. Oil strainer
9. O-ring
6
4
1
39±3Nm
5
2
10. Check valve
(Refer to page 11B-25-1.)
11. Oil jet (Refer to page 11B-25-1.)
*1: Lower crankcase
(Refer to page 11B-25-1.)
*2: Upper crankcase
(Refer to page 11B-25-1.)
E
Feb. 2000Mitsubishi Motors Corporation Added
PWEE9409-D
Page 79

11B-22-2
4M41 ENGINE -
Oil Pan, Oil Strainer and Oil Jet
B
C
INSTALLATION SERVICE POINT
"AA
OIL PAN INSTALLATION
(1) Apply sealant at the bottomBof the mating surface of
lower crankcaseCand timing gear caseD.
B
D
(2) Apply even beads of sealant
without skips to the
A
circumferential mating surface of the oil pan6as shown.
Bead diameter:f3.5±1mm
Specified sealant:
A
5
6
A
3.5±1mm
f
(3) Install the oil pan6to the lower crankcase within 15
Mitsubishi Genuine Part No. MD970389 or
equivalent.
minutes after the application of sealantA.
Caution
1. The surface to be coated with sealant A must
be clean and free of slush and other foreign
matters.
2. When installing, take care that sealant A does
not smear other places.
3. After the oil pan 6 is installed, wait for at least
one hour before starting the engine.
4. Remove and reinstall the oil pan 6 with fresh beads
of sealant A whenever the bolts 5 (holding the
oil pan) were loosened or removed after the
installation.
E
Feb. 2000Mitsubishi Motors Corporation Added
PWEE9409-D
Page 80

4M41 ENGINE -
Piston and Connecting Rod
23. PISTON AND CONNECTING ROD
REMOVAL AND INSTALLATION
11B-23-1
5
Apply engine oil to all
moving parts before
installation.
4
2
29±3Nm+49±5Nm+45_+45
_
1
3
4ME0597
E
Feb. 2000Mitsubishi Motors Corporation Added
PWEE9409-D
Page 81

11B-23-2
4M41 ENGINE -
Piston and Connecting Rod
6
Apply engine oil to all
moving parts before
installation.
7
8
10
11
9
15
13
12
Removal steps
AA" 1. Nut
"FA 2. Lower connecting rod bearing
3. Connecting rod cap
"FA 4. Upper connecting rod bearing
"EA 5. Piston and connecting rod assem-
bly
AB""DA 6. 1st compression ring
AB""DA 7. 2nd compression ring
AB""DA 8. Oil ring
9. Snap ring
AC""CA 10. Piston pin
AC""CA 11. Piston
AC""CA 12. Connection rod assembly
AD""BA 13. Connecting rod bush
"AA 14. Connecting rod bolt
15. Connecting rod
14
Caution
1. Do not remove the connecting rod bolt 14 unless absolutely necessary.
2. The nut 1 and connecting rod bolt 14 are tightened to the plastic area. If the nut 1 has three
punch marks indicating that they have been tightened three items, replace both the nut 1 and
the connecting rod bolt 14.
E
Feb. 2000Mitsubishi Motors Corporation Added
PWEE9409-D
Page 82

4M41 ENGINE -
Piston and Connecting Rod
11B-23-3
*b
PRE-REMOVAL INSPECTION
1. PISTON PROTRUSION FROM CRANKCASE TOP
Caution
Do not fail to check piston protrusions. The engine
performance are directly influenced by them.
(1) Position each piston at the TDC.
(2) There are five reference points A on the upper
crankcase*bthat serve as a zero level each. Check
piston protrusions with respect to these reference
points. (Piston protrusion = Measuring point B Reference point A)
(3) Measure piston protrusions at two points per cylinder
(8 in total) using the closest reference point, and
average the readings.
(4) If the average deviates from the specified standard
value, check clearances at necessary points.
Standard value: - 0.20 - -0.30 mm
(5) Select the cylinder head gasket having a thickness
that corresponds with the average of piston
protrusions (measured at 8 points).
2. CONNECTING ROD END PLAY
(1) Measure end play of each connecting rod.
(2) If the measurement exceeds the specified service limit,
replace defective part.
Standard value: 0.15 - 0.45 mm
14
5
1
MH060014
Limit: 0.6 mm
REMOVAL SERVICE POINTS
A
AA"
Caution
Provide one punch mark A on the head of the nut 1 each
time it is used to tighten the connecting rod bolt 14. If
it has three punch marks (the evidence of having been
tightened 3 times), replace both the nut 1 and the
connecting rod bolt 14.
AB"
Using the special tool, remove each piston ring.
NUT REMOVAL
PISTON RING REMOVAL
E
Feb. 2000Mitsubishi Motors Corporation Added
PWEE9409-D
Page 83

11B-23-4
4M41 ENGINE -
Piston and Connecting Rod
9
12
MH062574
AC"
11
D
10
Remove the piston pin
PISTON PIN / PISTON / CONNECTING ROD
ASSEMBLY REMOVAL
using an appropriate push-out
10
barDas shown.
NOTE
To make the piston pin
over an appropriate heater or in hot water if necessary.
11
AD"
CONNECTING ROD BUSH REMOVAL
easy to remove, warm the piston
10
Use the special tool to remove the connecting rod bush13.
Component Parts of Special Tool MH062574 - Connecting
Rod Bush Puller Kit
: Collar
A
: Collar
B
: Puller
C
: Base
D
: Bracket
E
: Plate
F
: Nut
C
H
G
1. Secure the connecting rod
to the baseDwith the
15
bracketEand plateF.
A
13
E
15
F
2. Attach the collarAonto the pullerCas shown, and remove
the connecting rod bush
slowly under a press ram
13
loadHof approximately 49,035 N.
15
D
INSTALLATION SERVICE POINTS
"AA
C
14
B
(1) Check that the bolt holeAin the connecting rod
(2) Apply a thin coat of engine oil to the knurled portion
A
CONNECTING ROD BOLT INSTALLATION
15
free of damage, burrs, etc.
of the connecting bolt14. Then, fit it in the connecting
B
rod with the notchCin the head inward under a press
ram load of less than 4,903 N.
: Notch in bolt head
C
is
E
Feb. 2000Mitsubishi Motors Corporation Added
PWEE9409-D
Page 84

4M41 ENGINE -
Piston and Connecting Rod
11B-23-5
G
C
13
"BA
CONNECTING ROD BUSH INSTALLATION
Use the special tool to install the connecting rod bush13.
H
B
J
15
13
Component Parts of Special Tool MH062574 - Connecting
Rod Bush Puller Kit
: Collar
A
: Collar
B
: Puller
C
: Base
D
: Bracket
E
: Plate
F
: Nut
G
(1) Apply a thin coat of engine oil to the outside surface
of the connecting rod bush
A
in the connecting rod15.
(2) Set the collarB, connecting rod bush
and the bush fitting hole
13
and collar
13
A
on the pullerCas shown and secure them with the nut
.
G
(3) Aligning the oil holesJ, press-fit the connecting rod bush
into the connecting rod
13
slowly under a press ram
15
loadHof approximately 49,035 N.
(4) After press-fitting, ream the connecting rod bush
13
for
the specified push-to-piston pin clearance.
Standard value: 0.03 - 0.05 mm
Limit: 0.1 mm
G
Caution
After reaming, insert the piston pin 10 into the
connecting rod bush 13 to ensure that it smoothly
moves with little play.
H
"CA
(1) Use a piston
PISTON / PISTON PIN / CONNECTING ROD
ASSEMBLY INSTALLATION
having the same size mark
11
or
as that stamped beside each cylinder on the upper
“C”
“A”,“B”
,
crankcase. (The marks are found in the order of the
cylinders No. 1, 2, 3 and 4 starting from the engine front
.)
G
: Location of stamped size mark
H
Caution
A mismatch of size marks can result in the piston
11 being seized while in motion.
E
Feb. 2000Mitsubishi Motors Corporation Added
PWEE9409-D
Page 85

11B-23-6
4M41 ENGINE -
Piston and Connecting Rod
“¬”
9
“1”
B
E
10
11
“¬”
(2) Apply a thin coat of engine oil to the piston pin
10
prior
to insertion. Assemble the connecting rod12and piston
facing in the directions shown.
11
: Connecting rod identification mark
“1”
: Front mark
“¬”
NOTE
To make the piston pin10easy to install, warm the piston
over an appropriate heater or in hot water if necessary.
11
11
Caution
After inserting the piston pin 10, check to ensure
that the piston moves smoothly with little play.
12
"DA
D
(1) Install the oil ring8onto the piston
PISTON RING INSTALLATION
with its end gap
11
positioned atAand the abutting end of the expander
spring atBas shown.
(2) Install the compression rings6,7onto the piston11,
with their manufacturer’s markC(stamped near the end
gap) facing upward and their end gapD,Epositioned
A
6, 7
C
as shown.
: End gap of 1st compression ring
D
: End gap of 2nd compression ring
E
: Front mark
“¬”
"EA
PISTON AND CONNECTING ROD ASSEMBLY
INSTALLATION
5
A
Caution
Before installing the piston and connecting rod assembly
5, check the head of the nut 1 for punch marks. The
14
number of punch marks corresponds to the number of
times the mating connecting rod bolt has been tightened
1
to the plastic area (bolts with two punch marks or less
are reusable). If there are three (the evidence of having
been tightened 3 times), replace both the nut 1 and the
connecting rod bolt B.
D
*b
C
5
(1) Check that the e n d gaps of the piston ringsCare in
position.
(2) Check that the size marksDon the pistons are the same
as the respective marks on the upper crankcase.
(3) Sheathe the connecting rod boltBwith a vinyl hose
so as not to damage the cylinder inside surface of the
E
upper crankcase*band th e pin of the crankshaft assembly
.
*a
B
E
E
*a
Feb. 2000Mitsubishi Motors Corporation Added
PWEE9409-D
Page 86

4M41 ENGINE -
Piston and Connecting Rod
11B-23-7
F
“¬”
(4) Using the special tool, install the piston and connecting
rod assembly in position, with the front mark“¬”on
the piston crown facing toward the engine frontF.
MH063484
(5) Press the piston down. Apply a thin coat of engine oil
1
3
2
H
to the threaded part of the connecting rod bolt, then install
the connecting rod cap3while aligning the lugsHof
the upper connecting rod bearing shell
and lower
4
connecting rod bearing shell2.
(6) Tighten the nuts1alternately in the following manner.
1) Tighten the nut1to a torque of 29 ± 3 Nm.
2) Tighten further to a torque of 49 ± 5 Nm.
3) Give a 45_ ± 5_ turn.
4) Give another 45_ ± 5_ turn to complete the tightening.
4
Caution
The nut is tightened to a point where the bolt is
plastically deformed. Do not tighten it any more than
the final turn.
(7) After the connecting rod cap3is secured, check t he
following.
1) Connecting rod end play
2) Piston protrusion
E
Feb. 2000Mitsubishi Motors Corporation Added
PWEE9409-D
Page 87

11B-23-8
4M41 ENGINE -
Piston and Connecting Rod
"FA
CONNECTING ROD BEARING INSTALLATION
The connecting rod bearing2,4to be used must have an
appropriate thickness that matches the big end I.D. of the
connecting rod and the pin O.D. of the crankshaft assembly.
There are two methods available for selecting an appropriate
bearing.
*a
A
<Selection by measurement>
(1) Measure the big e nd I.D. of the connecting rod (with
connecting rod bearing2,4removed) and the pin O.D.
of the crankshaft assembly.
: Measuring point
A
Connecting rod: 1 point in vertical direction
Crankshaft: 1 point in any direction
A
Caution
Before measuring the big end O.D. of the connecting
B
rod, tighten the nut B to a torque of 49±5 Nm.
(2) Select connecting rod bearing shells2,4having the
C
2
thickness that matches the respective measured values
from the table below. Install the selected connecting rod
bearing shells with their lugCfitted in the mating groove
of the connecting rod.
: Location of connecting rod bearing identification color
D
(side)
C
D
4
E
Caution
The upper connecting rod bearing shell 4 has an oil
hole E, while the lower connecting rod bearing shell
2 has no oil hole. Be careful not to install them in
wrong place.
Crankshaft pin O.D. Connecting rod big end I.D. Compatible connecting rod bearing
identification color (Figures in brackets are sheet thicknesses)
53.980 - 53.988 58.010 - 58.019 mm None (1.992 - 1.996 mm)
58.000 - 58.010 mm Blue (1.988 - 1.992 mm)
53.971 - 53.980 58.010 - 58.019 mm Yellow (1.996 - 2.000 mm)
58.000 - 58.010 mm None (1.992 - 1.996 mm)
E
Feb. 2000Mitsubishi Motors Corporation Added
PWEE9409-D
Page 88

4M41 ENGINE -
Piston and Connecting Rod
11B-23-9
<Selection by identification color>
Select appropriate connecting rod bearings through the
combination of the big end I.D. identification color marked
on each connecting rod and the appropriate pin O.D.
identification color on the crankshaft assembly*aas shown
in the table below.
: Location of identification color
F
F
F
F
Identification color on
crankshaft (Shown in
brackets is identification
mark)
None (1) None Blue
Blue (2) None None
Identification
color on connecting rod
Blue None
Blue Blue
Compatible
connecting rod
bearing identification color
The crankshaft assembly has additional pin O.D. identification
F
marks (
F
apply to No. 1 pin, No. 2 pin and so forth sequentially from
“1”
or
) stamped atGas shown. The 4 marks
“2”
the engine front to rear.
*a
“1” or “2”
G
: Location of crankshaft journal O.D. identification mark
H
H
INSPECTION
1. CONNECTING ROD BEARING
Caution
1. Do not use connecting rod bearings 2, 4 expanded
with force.
2. Replace the connecting rod bearing 2, 4 as a set
of upper and lower shells.
(1) Free Span
If the reading is less than the specified limit, replace the
connecting rod bearing2,4.
Limit: Less than 58.8 mm
2, 4
E
Feb. 2000Mitsubishi Motors Corporation Added
PWEE9409-D
Page 89

11B-23-10
*a
4M41 ENGINE -
5
4
3
2
1
A
Piston and Connecting Rod
(2) Connecting Rod Bearing-to-Crankshaft Clearance
(Oil clearance)
1) Fit the lower connecting rod bearing shell2and upper
connecting rod bearing shell4in the connecting rod
cap3and the piston and connecting rod assembly
, respectively. Tighten the nuts1to a torque of 49
5
± 5 Nm.
2) Measure the I.D. of the connecting rod bearing2,
and the pin O. D. at
4
the readings exceed the specified limit, replace the
defective part(s).
Standard value: 0.03 - 0.05 mm
Limit: 0.1 mm
3) When the connecting rod bearing2,4is replaced
with an undersize bearing, adjust the pin O.D. of
the crankshaft
to the specified undersize
*a
dimension.
of the crankshaft*a.If
A
11
6, 7, 8
F
2. PISTON RING
(1) Piston Ring En d Gap
1) Place the piston ring6,7,8level in the cylinder
F
of the upper crankcase using the crown of the piston
.
11
G
2) Holding the piston ring6,7,8in place, measure
its end gap with a feeler gaugeG. If the reading
exceeds the specified limit, replace the piston ring.
Standard value:
1st compression ring 0.3 - 0.45 mm
2nd compression ring 0.4 - 0.55 mm
Oil ring 0.3 - 0.5 mm
Limit: 0.8 mm
Caution
1. To place the piston ring 6, 7, 8 level in the
cylinder F, be sure to use the piston 11.
2. Place the piston ring 6, 7, 8 at the lower part
of the cylinder F where the cylinder wall wears
less than elsewhere.
3. When it becomes necessary to replace any
of the piston rings 6, 7 and 8, replace all of
them as a set.
E
Feb. 2000Mitsubishi Motors Corporation Added
PWEE9409-D
Page 90

4M41 ENGINE -
Piston and Connecting Rod
11B-23-11
11
6, 7, 8
11
6
11
G
H
4ME0454
(2) Piston Ring-to-Piston Ring Groove Clearance
1) If the measured clearance exceeds the specified limit,
replace the defective part.
Standard value:
1st compression ring 0.03 - 0.08 mm
2nd compression ring 0.07 - 0.10 mm
Oil ring 0.03 - 0.06 mm
Limit: 0.15 mm
NOTE
The 1st compression ring6is of full keystone type.
Measure the clearance with a feeler gauge
G
while
pressing the ring against the piston pin groove bottom
with a straight edgeH.
Caution
1. Clear all carbon deposits from the ring groove
of the piston 11 and measure the clearance all
around the ring groove.
2. When it becomes necessary to replace any of
the rings 6, 7 and 8, replace all of them as a set.
3. PISTON PIN
(1) Measure the clearance between piston pin10and piston
. If the reading exceeds the specified limit, replace
11
the defective part.
Standard value: 0.007 - 0.021 mm
10
10
13
Limit: 0.05 mm
(2) Measure the clearance between piston pin
connecting rod bush13. If the reading exceeds the limit,
replace the defective part.
Standard value: 0.03 - 0.05 mm
Limit: 0.1 mm
10
and
E
Feb. 2000Mitsubishi Motors Corporation Added
PWEE9409-D
Page 91

11B-23-12
4M41 ENGINE -
Piston and Connecting Rod
100 mm
100 mm
A
C
4. CONNECTING ROD
(1) Fit the connecting rod bush
and piston pin
13
10
in the
connecting rod15.
(2) Measure the bendAand twistBof the connecting rod
. If either reading exceeds the specified limit, replace
15
the connecting rod.
10
: Connecting rod aligner (measuring device)
C
Limits:
Bend 0.05 mm
Twist 0 .1 mm
Caution
1. Attach the connecting rod 15 to the connecting
B
rod aligner C with the upper and lower connecting
rod bearing shells installed in place.
2. Tighten the connecting rod cap nut to a torque
of 49±5 Nm.
10
C
E
Feb. 2000Mitsubishi Motors Corporation Added
PWEE9409-D
Page 92

4M41 ENGINE -
24. DRIVE PLATE
REMOVAL AND INSTALLATION
Drive Plate
11B-24-1
6
3
2
1
123±12 Nm
"AA
AA""BA
"AA
Removal steps
1. Bolt
2. Adaptor plate
3. Drive plate assembly
4. Ring gear
5. Drive plate
6. Crankshaft adaptor
4
A
5
4
5
4ME0598
REMOVAL SERVICE POINT
AA"
(1) Heat the ring gear4evenly using an acetylene torch
(2) Remove the ring gear4by tapping it evenly all around.
RING GEAR REMOVAL
or any other suitable heat source.
Caution
Use care not to be burned.
E
Feb. 2000Mitsubishi Motors Corporation Added
PWEE9409-D
Page 93

11B-24-2
4M41 ENGINE -
Drive Plate
2
3
A
*
4
1
A
6
A
5
INSTALLATION SERVICE POINTS
"AA
Attach the adaptor plate2and the crankshaft adaptor6to
the drive plate assembly, facing in the directionsAshown.
A
"BA
(1) Heat the ring gear4with an acetylene torch or any other
(2) Fit the ring gear
CRANKSHAFT ADAPTOR / ADAPTOR PLATE
INSTALLATION
: Drive plate side
RING GEAR INSTALLATION
suitable heat source for 3 minutes. (Approx. 100°C)
Caution
Use care not to be burned.
onto the drive plate
4
non-chamfered teeth side toward the drive plate.
: Chamfered side of ring gear
A
4
5
with the
INSPECTION
RING GEAR
Check the ring gear4for damage and abnormal wear. Replace
the ring gear4if necessary.
E
Feb. 2000Mitsubishi Motors Corporation Added
PWEE9409-D
Page 94

4M41 ENGINE -
Crank Shaft and Crank Case
25. CRANK SHAFT AND CRANK CASE
REMOVAL AND INSTALLATION
29
12
11B-25-1
9
11
28
27
26
32±3Nm
1
Apply engine oil to all
moving parts before
installation.
8
7
25
28
24
10
23
47±5Nm
6
3
18
2
19
15
14
20±2Nm+
90_+90
_
25±3Nm
13
5
4
21
22
16
20
17
4ME0599
E
Feb. 2000Mitsubishi Motors Corporation Added
PWEE9409-D
Page 95

11B-25-2
4M41 ENGINE -
Crank Shaft and Crank Case
Removal steps
1. Bolt
"FA 2. Front plate
3. Stiffener
4. Stiffener RH
5. Stiffener LH
6. Bolt
7. Rubber spacer
8. Dust cover
9. Rear plate
10. Bolt
"EA 11. Rear oil seal
"EA 12. Rear oil seal case
13. Bolt
14. Main cap bolt
AB""CA 20. Crankshaft gear
"AA 16. Lower main bearing
17. Lower crankcase
"BA 18. Lower thrust plate
19. Crankshaft assembly
21. Key
22. Crankshaft
"BA 23. Upper thrust plate
24. Upper crankcase assembly
"AA 25. Upper main bearing
26. Check valve
27. Oil jet
28. O-ring
29. Upper crankcase
AA""DA 15. Lower crankcase assembly
Caution
1. The lower crankcase 17 and upper crankcase 29 have been machined in a pair. Therefore,
replacing either one of the pair is not allowed.
2. The front plate 2 is held in position with the idler shaft, in addition to locating pin.
3. The main cap bolt 14 is tightened to a plastically deformed point. If it shows the evidence
of having been tightened three times, replace it.
4. Do not remove the crankshaft gear 20 unless absolutely necessary.
4
8
12
20
18
2
6
10
MH062469
24
22
14
16
13
15
26
25
A
PRE-REMOVAL INSPECTION
CRANKSHAFT
Before removing the lower crankcase assembly15, measure
the end play of the crankshaft assembly19. If the reading
exceeds the specified limit, replace the thrust plate18,
23
with an oversize one.
Standard value: 0.10 - 0.28 mm
Limit: 0.4 mm
<Available oversize thrust plates>
+0.15 mm, +0.30 mm, +0.45 mm
REMOVAL SERVICE POINTS
9
5
1
21
23
7
11
17
19
3
20
AA"
LOWER CRANKCASE ASSEMBLY CREMOVAL
(1) Gradually loosen the bolts13in the sequence of numbers
1 - 16 shown in the illustration.
(2) Then, gradually loosen the main bearing cap bolts
14
in the sequence of numbers 17 - 26 shown, and remove.
AB"
CRANKSHAFT GEAR REMOVAL
Using the special tool, remove the crankshaft gear20.
Caution
1. Before attaching the special tool, install a protective
bolt A (M16 x 1.5 mm ; 30 mm long) to the crankshaft
end so that the crankshaft will not be damaged by
the special tool.
2. Do not tap on the crankshaft gear 20 to remove it.
E
Feb. 2000Mitsubishi Motors Corporation Added
PWEE9409-D
Page 96

14
F
D
CE
<No.1, 2, 4, 5>
B
<No.3 >
4M41 ENGINE -
Crank Shaft and Crank Case
11B-25-3
INSTALLATION SERVICE POINTS
29
22
A
17
H
L
G
K
H
25
K
16
J
J
<No.1, 2, 4, 5>
<No.3 >
J
J
"AA
The main bearings
MAIN BEARING INSTALLATION
16
and
must have a proper plate
25
thickness that matches the difference between the bearing
mounting hole I.D. of the crankcase assembly
17, 29
and
the journal O.D. of the crankshaft22.
(1) Measure the bearing mounting hole I.D. of the crankcase
assembly
.
22
: Measuring point (One point in vertical direction for
A
17, 29
and the journal O.D. of the crankshaft
crankcase)
Caution
Tighten the main bearing cap bolts 14 by specified
procedure before measuring the bearing mounting
hole I.D. of the crankcase assembly 17, 29.
NOTE
(1) The bearing mounting hole I.D. of the crankcase17,
can be known by the identification markBon
19
the right side of the crankcase rear end.
: No. 1 journal,D: No. 2 journal
C
: No. 3 journal,F: No. 4 journal
E
: No. 5 journal
G
(2) The journal O.D. of the crankshaft22can be identified
by the identification color on the crankshaft.
: Identification color position
H
(2) Select appropriate thickness main bearings
16, 25
from
the following table.
: Identification color position
J
: Lug
K
: Oil hole
L
Caution
The main bearing shells 16 and 25 must be installed
in the specified direction. The main bearing shells
for No. 3 journal are different in thickness from the
others. The upper main bearing shell for No. 3 journal
is different also in shape from the others.
Unit: mm
Crankshaft
Identification
color
None 67.970 - A 72.010 - Black/Black No.1, 2, 4, 5 1.992 - 1.996 0.040 - 0.065
Blue 67.961 - A 72.010 - Yellow/Yel- No.1, 2, 4, 5 1.996 - 2.000 0.040 - 0.066
Journal
O.D.
67.798 72.019
67.970 72.019 low
Crankcase Main bearing
Size
mark
B 72.000 - Blue/Blue No.1, 2, 4, 5 1.988 - 1.992 0.038 - 0.064
Bearing
mounting
hole I.D.
72.010
Identification color
(L/U)
Journal No. Plate
Thickness
No.3 1.982 - 1.986 0.060 - 0.085
No.3 1.978 - 1.982 0.058 - 0.084
No. 3 1.986 - 1.990 0.060 - 0.086
Oil Clearance
B 72.010 - Black/Black No.1, 2, 4, 5 1.992 - 1.996 0.038 - 0.065
72.019
L: Lower main bearing shell U: Upper main bearing shell
E
Feb. 2000Mitsubishi Motors Corporation Added
PWEE9409-D
No.3 1.982 - 1.986 0.058 - 0.085
Page 97

11B-25-4
4M41 ENGINE -
Crank Shaft and Crank Case
20
14
23
A
A
"BA
Install the thrust plates
19
with the oil grooveAoriented outward.
THRUST PLATE INSTALLATION
and23to the crankshaft assembly
18
at No.5 journal only. Install all halves of the thrust plates
Caution
19
A
18
A
21
B
If any oversize thrust plates are to be used, be sure to
use an upper thrust plate 23 and lower thrust plate 18
of the same size at one side. However, using the same
size upper (or lower) thrust bearings on both sides is
not necessary.
"CA
(1) Before installing, heat the crankshaft gear
CRANKSHAFT GEAR INSTALLATION
20
to
approximately 100_C with a piston heater or the like.
Caution
Use care not to be burned.
(2) Align the notchBin the crankshaft gear20with the key
of the crankshaft22, then install the crankshaft gear
21
onto the crankshaft by tapping on the end face lightly
22
A
20
with a plastic hammer.
"DA
LOWER CRANKCASE ASSEMBLY INSTALLATION
Caution
Before installing the lower crankcase assembly 15, check
the head of the main cap bolt 14 for punch marks A.
The number of punch marks corresponds to the number
of times the bolt has been tightened to the plastic area
(bolts with two or less punch marks are reusable). If there
are three, replace the main cap bolt 14.
(1) Apply a 2 mm thick bead of specified sealant to the fitting
24
surface of the upper crankcase assembly
Specified sealant:
as shown.
24
Mitsubishi Genuine Part No. MD970389 or
equivalent
Caution
1. Apply sealant evenly, not broken or oversupplied.
2. Use care not to let the applied sealant slip out
of place during installation.
(2) Apply a thin coat of engine oil to the threaded part and
seating surface of each main cap bolt14, then tighten
the bolts to a torque of 20 ± 2 Nm in the sequence of
the numbers shown (17 - 26).
13
23
25
4
1
9
5
19
21
17
18
12
8
16
22
20
26
24
(3) After tightening, give the bolts an additional 90_ turn.
(4) Then, give the bolts another 90_ turn to tighten them
completely.
(5) Following the main cap bolts14, tighten the bolts
13
to the specified torque in the sequence of the numbers
shown (1 - 16).
(6) After installing the lower crankcase assembly15, check
11
15
E
7
3 6
2
14
10
Feb. 2000Mitsubishi Motors Corporation Added
the following:
1) Smooth rotation of crankshaft assembly
2) E nd play of the crankshaft assembly
PWEE9409-D
19
19
Page 98

4M41 ENGINE -
Crank Shaft and Crank Case
11B-25-5
15
12
11
"EA
REAR OIL SEAL / REAR OIL SEAL CASE
INSTALLATION
B
A
C
(1) Apply a thin coat of engine oil to the lipAof the rear
oil seal11. Press the rear oil seal all the way into the
rear oil seal case
in the direction shown. Be sure
12
that the end faceBof the rear oil seal is flush with the
end faceCof rear oil seal case.
(2) Apply a 3 mm thick bead of the specified sealant to the
fitting surface of the rear oil seal case12.
Specified sealant:
Mitsubishi Genuine Part No. MD970389 or
equivalent
Caution
1. Apply the sealant evenly, not broken or
oversupplied.
2. Use care not to let the applied sealant slip out
of place during installation.
"FA
FRONT PLATE INSTALLATION
Apply a 2 mm thick bead of the specified sealant to the lower
24
crankcase assembly
where indicated in the illustration.
and upper crankcase assembly
15
24
Specified sealant:
Mitsubishi Genuine Part No. MD970389 or
equivalent
Caution
1. Apply the sealant evenly, not broken or
oversupplied.
2. Use care not to let the applied sealant slip out
of place during installation.
3. The bolt 1 that holds the front plate 2 is also used
to secure the timing gear case. Attach the front
plate with a temporary bolt until the timing gear
case is installed.
E
Feb. 2000Mitsubishi Motors Corporation Added
PWEE9409-D
Page 99

11B-25-6
4M41 ENGINE -
16, 25
Crank Shaft and Crank Case
INSPECTION
1. MAIN BEARINGS
Caution
1. Be sure not to use the main bearings 16 and 25
expanded forcedly.
2. When either the main bearing 16 or 25 is defective,
replace them in pairs.
(1) Free Span
If the reading for either main bearing shell16,25exceeds
the specified service limit, replace them in pairs.
Limit: Less than 73.16 mm
14
A
22
22
16
(2) Main Bearing-to-Crankshaft Clearance
25
29
1) Fit the upper main bearing shells
bearing shells
lower crankcase
cap bolts
14
into the upper crankcase
16
respectively, then tighten main
17
to a torque of 20 ± 2 Nm.
2) Measure the I.D. of the main bearings16,
the journal O.D. at
of the crankshaft22. If the
M
and lower main
25
29
25
and
and
measurements exceed the specified limits, replace
the defective part(s).
17
M
Standard value:
No. 1, 2, 4, 5 journal 0.04 - 0.06 mm
No. 3 journal 0.06 - 0.08 mm
Limit: 0.1 mm
B
2. CRANKSHAFT
(1) Out-of-Roundness and Conicity of Crankshaft Journal
and Pin
If the measured value exceeds the limit, replace the
crankshaft22.
: Out-of-Roundness
A
: Conicity
B
Standard value:
Out-of-Roundness 0.01 mm or less
Conicity 0.006 mm or less
E
Feb. 2000Mitsubishi Motors Corporation Added
PWEE9409-D
Page 100

4M41 ENGINE -
Crank Shaft and Crank Case
11B-25-7
22
E
C
D
(2) Bend
1) To measure the bend of the crankshaft22, support
it at No. 1 journalCand No. 5 journalDand read
the runout at No. 3 journalE.
2) If the reading exceeds the specified service limit,
replace the crankshaft22.
Standard value: 0.02 mm or less
Limit: 0.05 mm
NOTE
The bend of the crankshaft22is a half of the dial gauge
reading obtained when the crankshaft is rotated one turn.
A
3. UPPER CRANKCASE
(1) Top Surface Distortion
If the reading exceeds the specified limit, eliminate
distortion using a surface grinder.
: Measuring direction
A
Cylinder
20 mm
80 mm
130 mm
B
A
53.5 mm
C
Standard value: 0.05 mm or less
Limit: 0.1 mm
Caution
The surface grinding of the upper crankcase 29 should
be limited to such an extent that piston protrusions
do not deviate from specified standard value.
(2) Cylinder Inside Diameter
If the cylinder inside diameter exceeds the specified limit,
bore the cylinder to the next oversize.
Standard value: 98.5 - 98.53 mm
Limit: 98.75 mm
: Measuring direction in cylinder
A
(axial direction of crankshaft)
: Measuring direction in cylinder
B
(right angled to crankshaft)
: Measuring direction on piston
C
(right angled to piston pin hole)
Caution
1. If any of the cylinders exceeds the limit, bore all
the cylinders to the next oversize.
2. Irrespective of the cylinder I.D. being within the
specified limit, replace the piston and piston rings
if the cylinder-to-piston clearance deviates from
the standard value.
E
Feb. 2000Mitsubishi Motors Corporation Added
PWEE9409-D
 Loading...