

Page 1
Air-conditioner Control System
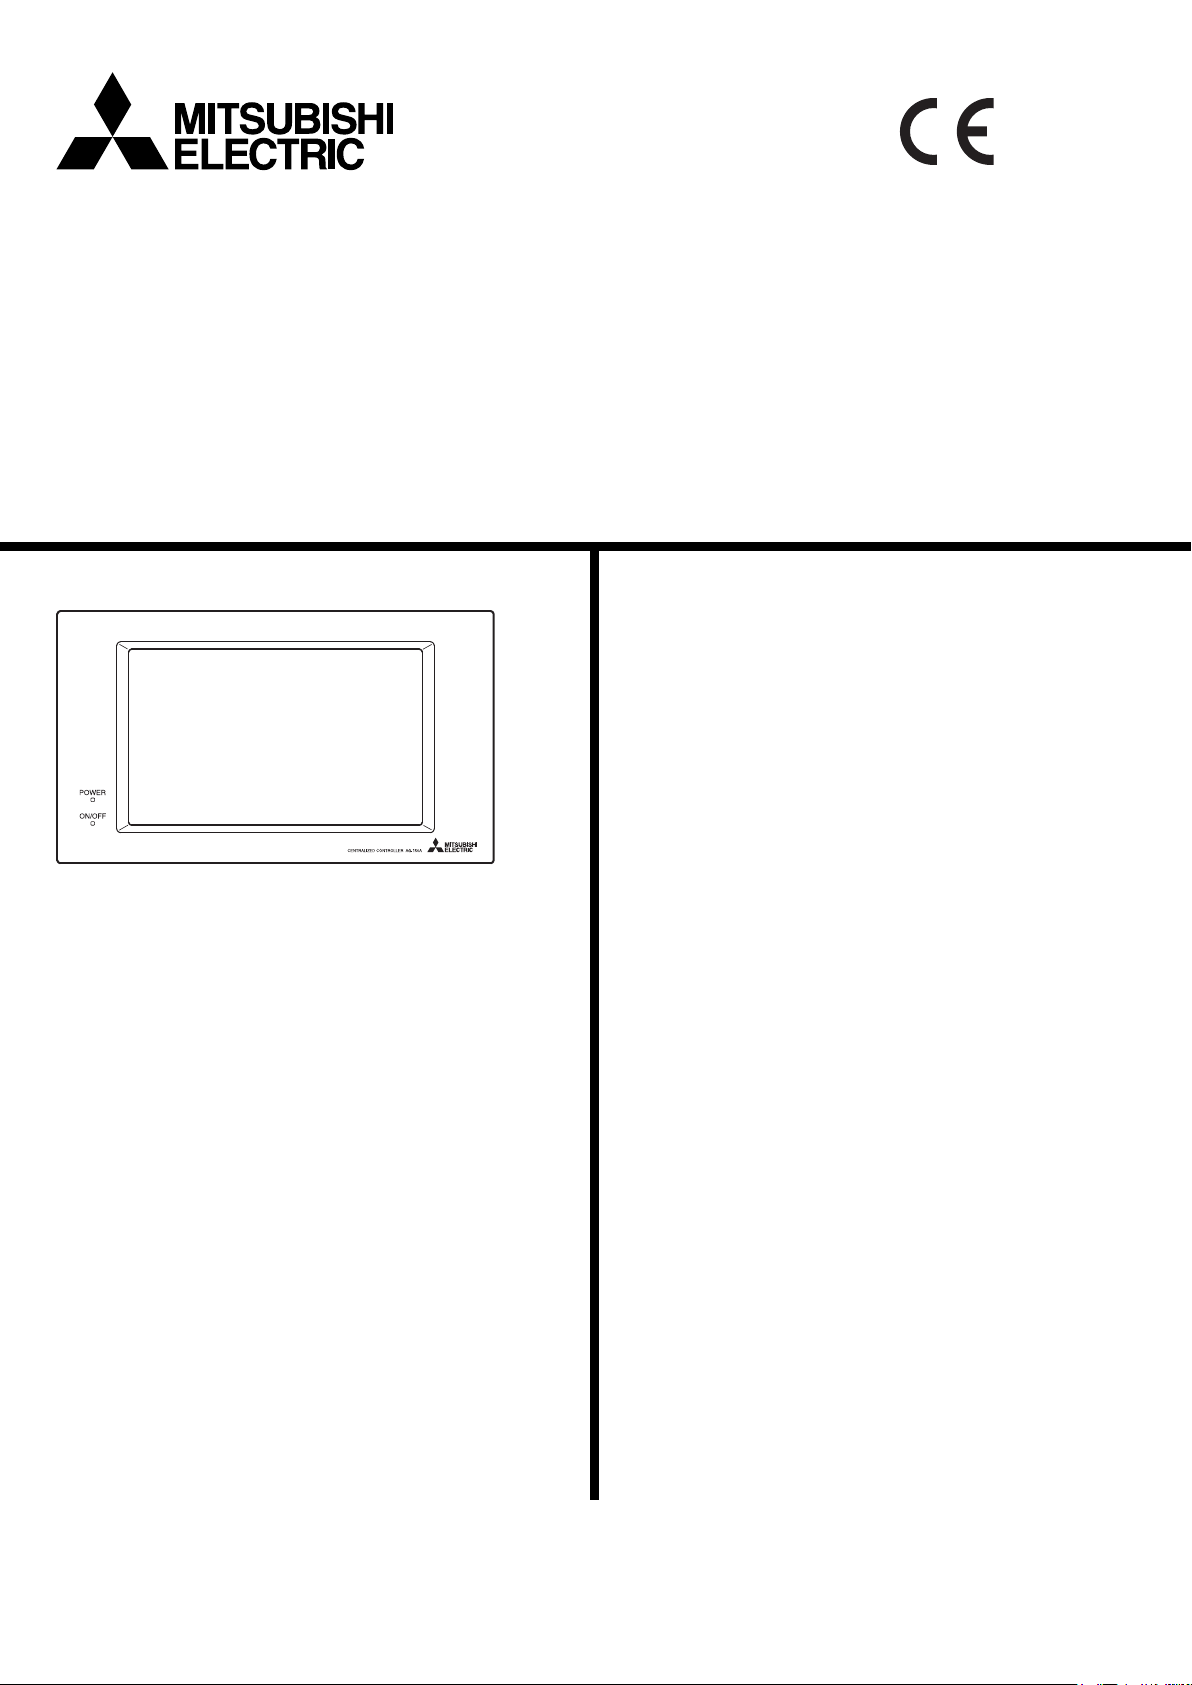
Centralized Controller
Model: AG-150A Installation Manual
Contents
1. Safety Precautions..................................................1
2. Parts List .................................................................2
3. External Dimensions ...............................................3
4. Product Features.....................................................4
1. Specification......................................................4
2. Parts names and functions ...............................4
5. System Diagram......................................................6
1. Standard configuration (using the AG-150A to
control a system with 50 or fewer units of
equipments) ..................................................6
2. System with connection to an expansion
controller (system with 50 or more
units) .............................................................8
6. Installation.............................................................10
1. Field-supplied Parts ........................................10
2. Installation.......................................................10
7. Wiring....................................................................21
1. System without connection to a PAC-YG50ECA
expansion controller....................................21
2. System with connection to a PAC-YG50ECA
expansion controller....................................22
8. Initial Setting..........................................................23
9. Test Run................................................................24
10. System Configuration Example.............................25
1. System with connection to a PAC-YG50ECA
expansion controller....................................25
2. Using multiple system controllers ...................25
3. To control a Mr. slim .......................................25
4. To control a K control model ...........................25
11. External input/output usage ..................................26
1. External signal input function ..........................26
2. External signal output function........................27
3. LAN connection function .................................28
12. Optional Accessories ............................................29
Before installing the controller, please read this Installation Manual carefully to ensure
proper operation. Retain this manual for future reference.
Page 2
This manual describes how to install the centralized controller and wiring. Before installing the controller, read the
1 Safety Precautions section carefully to ensure proper installation.
1 Safety Precautions
Safety symbols used in this manual
The following symbols are used in this manual to indicate the type and severity of potential consequences that may result when
given instructions are not followed exactly as stated.
WARNING
CAUTION
Retain the Installation Manual and the Instruction Book for future reference. Make sure both the Installation Manual and the
Instruction Book are passed to any future air condition system users.
Indicates a risk of death or serious injury.
Indicates a risk of injury or damage to the controller.
WARNING
The controller must be professionalling installed.
Improper installation by an unqualified person may result in
electric shock or fire.
Make sure the controller is securely mounted so that it
will not fall.
Only use specified cables. Securely connect each
cable so that the weight of the cable is not applied to
the connectors.
Loose or improper connections may result in heat
generation or fire.
Do not attempt to modify or repair the controller.
Modification or improper repair may result in electric shock
or fire.
Consult your dealer when repairs are necessary.
Securely install the controller according to the
installation manual.
Improper installation may result in electric shock or fire.
Electric work must be perform by authorized
personnel according to the local regulations and the
instructions detailed in the installation manual.
Inadequate circuit capacity or improper installation may
result in electric shock or fire.
Ask your dealer or an authorized technician to move
the controller.
Improper installation may result in electric shock or fire or
damage to the controller.
CAUTION
Do not install the controller where there is a risk of
flammable gas.
If the leaked gas accumulates around the controller, it may
ignite and cause an explosion.
Do not use the controller in an environment high in oil,
steam, or sulfuric gas.
These substances may have adverse effects on the
performance of the controller or damage its parts.
When installing the controller in a hospital or communication facility, take appropriate measures to reduce
electrical noise interference.
Inverter equipment, generators, high-frequency medical equipment, or radio communication equipment may interfere with
the normal operation of the controller; or the electrical noise from the controller may interfere with the medical practice or
cause image distortion and static.
To prevent over-heating and fire, wire so that the
weight of the cable will not strain the connectors.
Seal the wire lead-in port with putty to prevent the
entry of dew, water, and insects to avoid electric shock
or malfunction of the controller.
Do not wet the controller.
Water may damage the controller and cause an electric
shock.
Do not install this controller where the ambient
temperature exceeds 40°C (104°F) or drops below 0°C
(32°F).
To prevent the controller from being damaged and
malfunctioning, install it out of direct sunlight.
To reduce the risk of electric shock, install and wire the
unit with the power to the PAC-SC51KUA power supply
unit turned off.
Consult an authorized agency for the proper disposal
of the unit.
The unit contains mercury, which is harmful to the environment.
Do not install this controller in a place that has the
potential for steam or dew formation.
Steam or dew formation may cause an electric shock or a
unit malfunction.
Do not install this controller where an acid or alkaline
solution or special chemical spray is used frequently
to avoid electric shock or malfunction.
Use specified wires with the proper current carrying
capacity to prevent current leakage, over-heating, or
fire.
Do not touch the PCB (Printed Circuit Board) with your
hand or a tool.
Keep the PCB dust-free to prevent fire or malfunction.
To avoid the risk of electric shock or damage to the
controller, do not touch the touch panel or USB
storage device connector with wet hands.
To avoid the risk of electric shock or damage to the
controller, do not press the touch panel with sharp
objects.
To avoid causing damage or fire, do not apply an AC
voltage or a voltage higher than 32VDC to the M-NET
or the Power (24VDC) terminal blocks on the
controller.
Use a security device such as a VPN router when
connecting the AG-150A to the Internet to prevent
unauthorized access.
- 1 -
Page 3
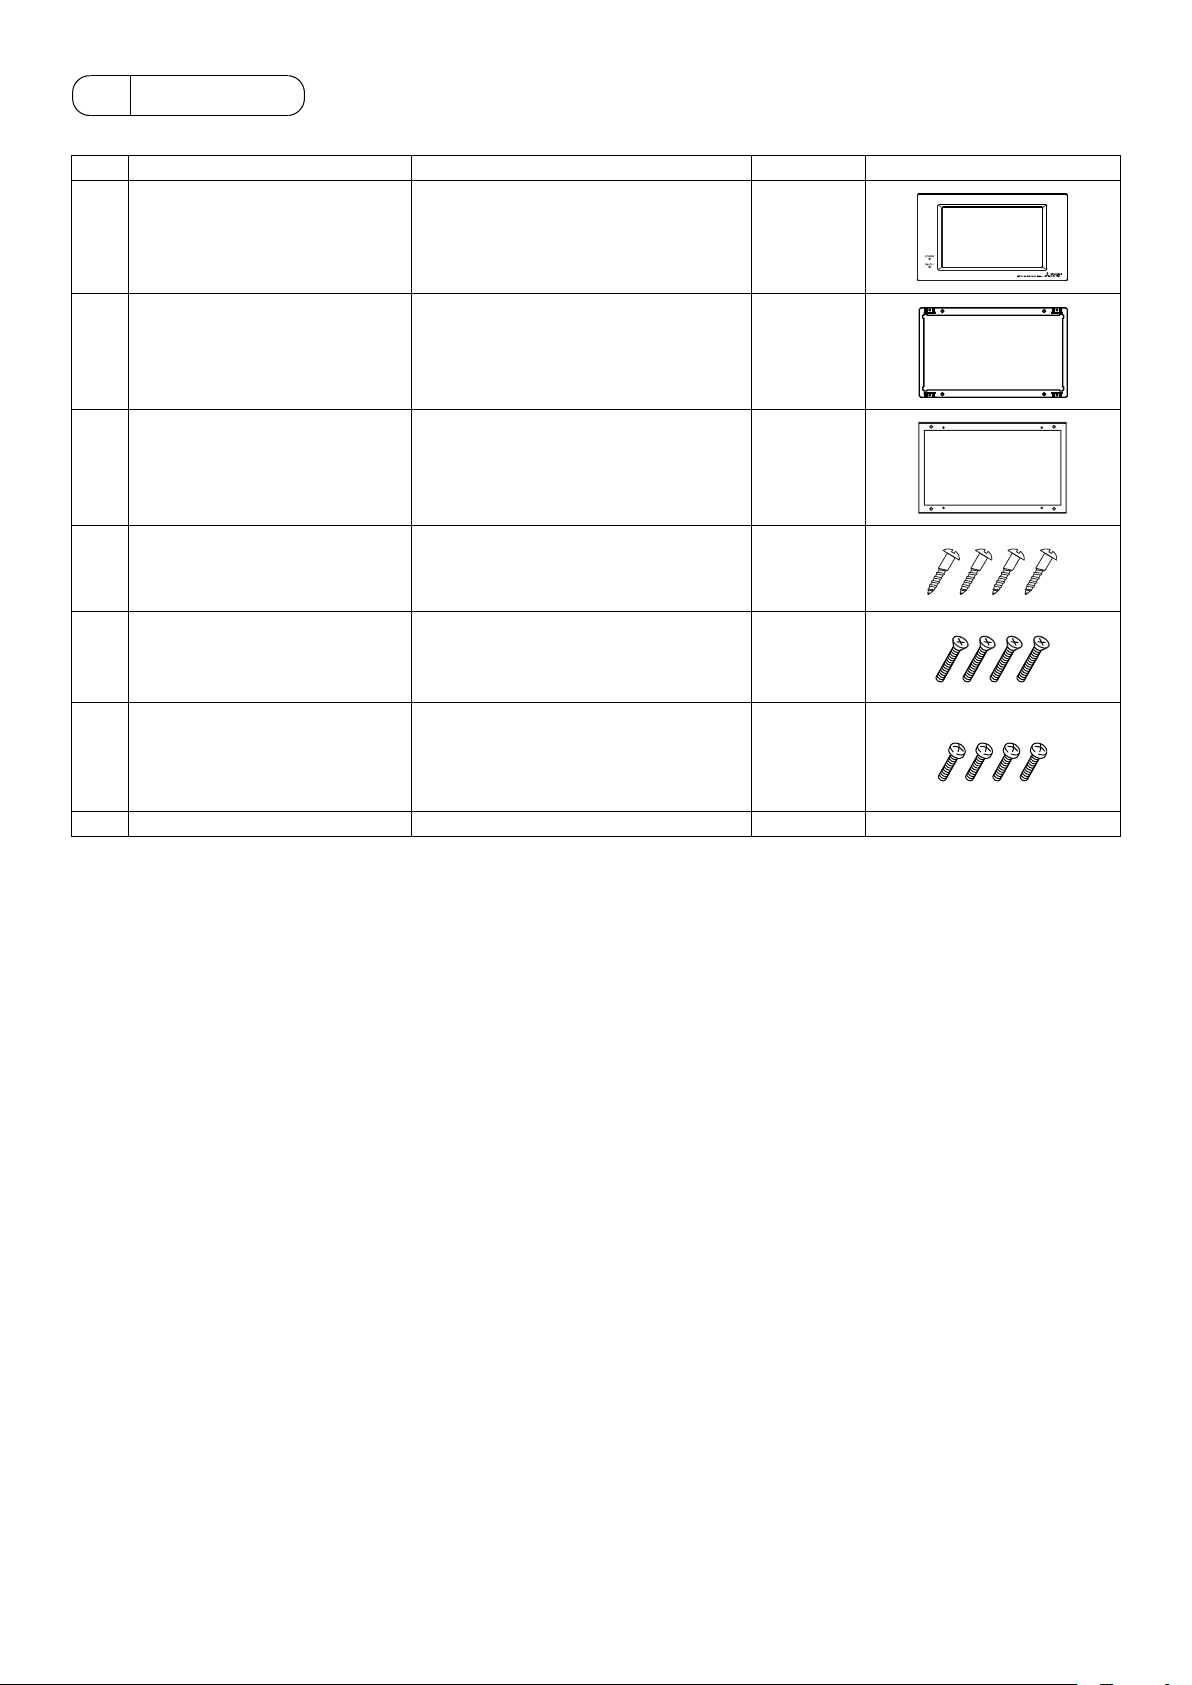
2 Parts List
* The Installation Manual and the parts listed below are included with the unit.
No. Description Usage Qty.
1 AG-150A Centralized controller 1
2 A type Installation plate Use to attach the AG-150A using the B
type installation plate or the Electric box
(PAC-YG83UTB; sold separately) on
the wall or in the control board.
3 B type Installation plate Use to install the AG-150A on the wall
using the A type installation plate.
4 Wood screw (M4.1×25)*
5 M4 flathead screw (M4×40)*
6 M4 roundhead screw (M4×12)*
7 Instruction book 1
*1 ISO metric screw thread
*2 If the enclosed screw for attaching the installation plate cannot be used because the wall is too thick, obtain a longer M4 flathead
screw that matches the wall thickness.
* Besides the above parts, purchase a power supply unit (PAC-SC51KUA) that supplies power to the centralized controller (24VDC)
and the M-NET transmission line.
AG-150A operates by receiving 24VDC power from PAC-SC51KUA.
A PAC-YG50ECA expansion controller (sold separately) is required to control 50 or more units of equipments (e.g., indoor units
and LOSSNAY units).
Up to three expansion controllers can be connected to a system, each of which can control up to 50 units of equipments.
To control 50 or more units of equipments, use AG-150A software version 2.10 or later.
1
For mounting the controller directly on
the wall
1, 2
For attaching the A type installation
plate to either the B type installation
plate or electric box (PAC-YG83UTB;
sold separately)
1
For attaching the AG-150A to the A type
installation plate
1
1
4
4
4
- 2 -
Page 4

3 External Dimensions
25.6
(1
13
300 (11-
/16)
/16)
5
-1/16)
44.7 (1-13/16)
Unit: mm (in)
185 (7-
272 (10-3/4)
Back View
3
272 (10-
/4)
250 (9-7/8)
)
4
)
/
8
3
/
5
146 (5-
167 (6-
A type installation plate B type installation plate
290.8 (11-1/2)
273 (10-3/4)
250 (9-7/8)
7
/8)
200 (7-
/16)
13
147 (5-
/16)
/8)
7
5
167 (6-
163.4 (6-
/16)
15
175.8 (6-
300 (11-13/16)
278 (10-15/16)
250 (9-7/8)
7
/8)
200 (7-
Unit: mm (in)
)
)
16
8
/
/
7
5
152 (6)
167 (6-
163.4 (6-
)
16
/
5
185 (7-
ø6
1
(
/4)ø4(3/16)
- 3 -
6
4
1
3
(
(
/4)
/16)
Page 5
4 Product Features
AG-150A is a centralized controller that features advanced functions such as the Web function.
Air conditioning units connected to this controller can be operated or monitored directly from this controller or over the Web by
purchasing a license, using a browser software on the computer.
Up to 50 indoor units and general equipment can be monitored and operated from an AG-150A unit.
By connecting three PAC-YG50ECA expansion controllers (sold separately), a maximum of 150 units of equipments can be
controlled.
1. Specification
Item Specifications
Power supply
Temperature
Humidity 30~90%RH (No condensation)
Weight 2.1kg [4.6 lbs]
Dimensions (W × H × D)
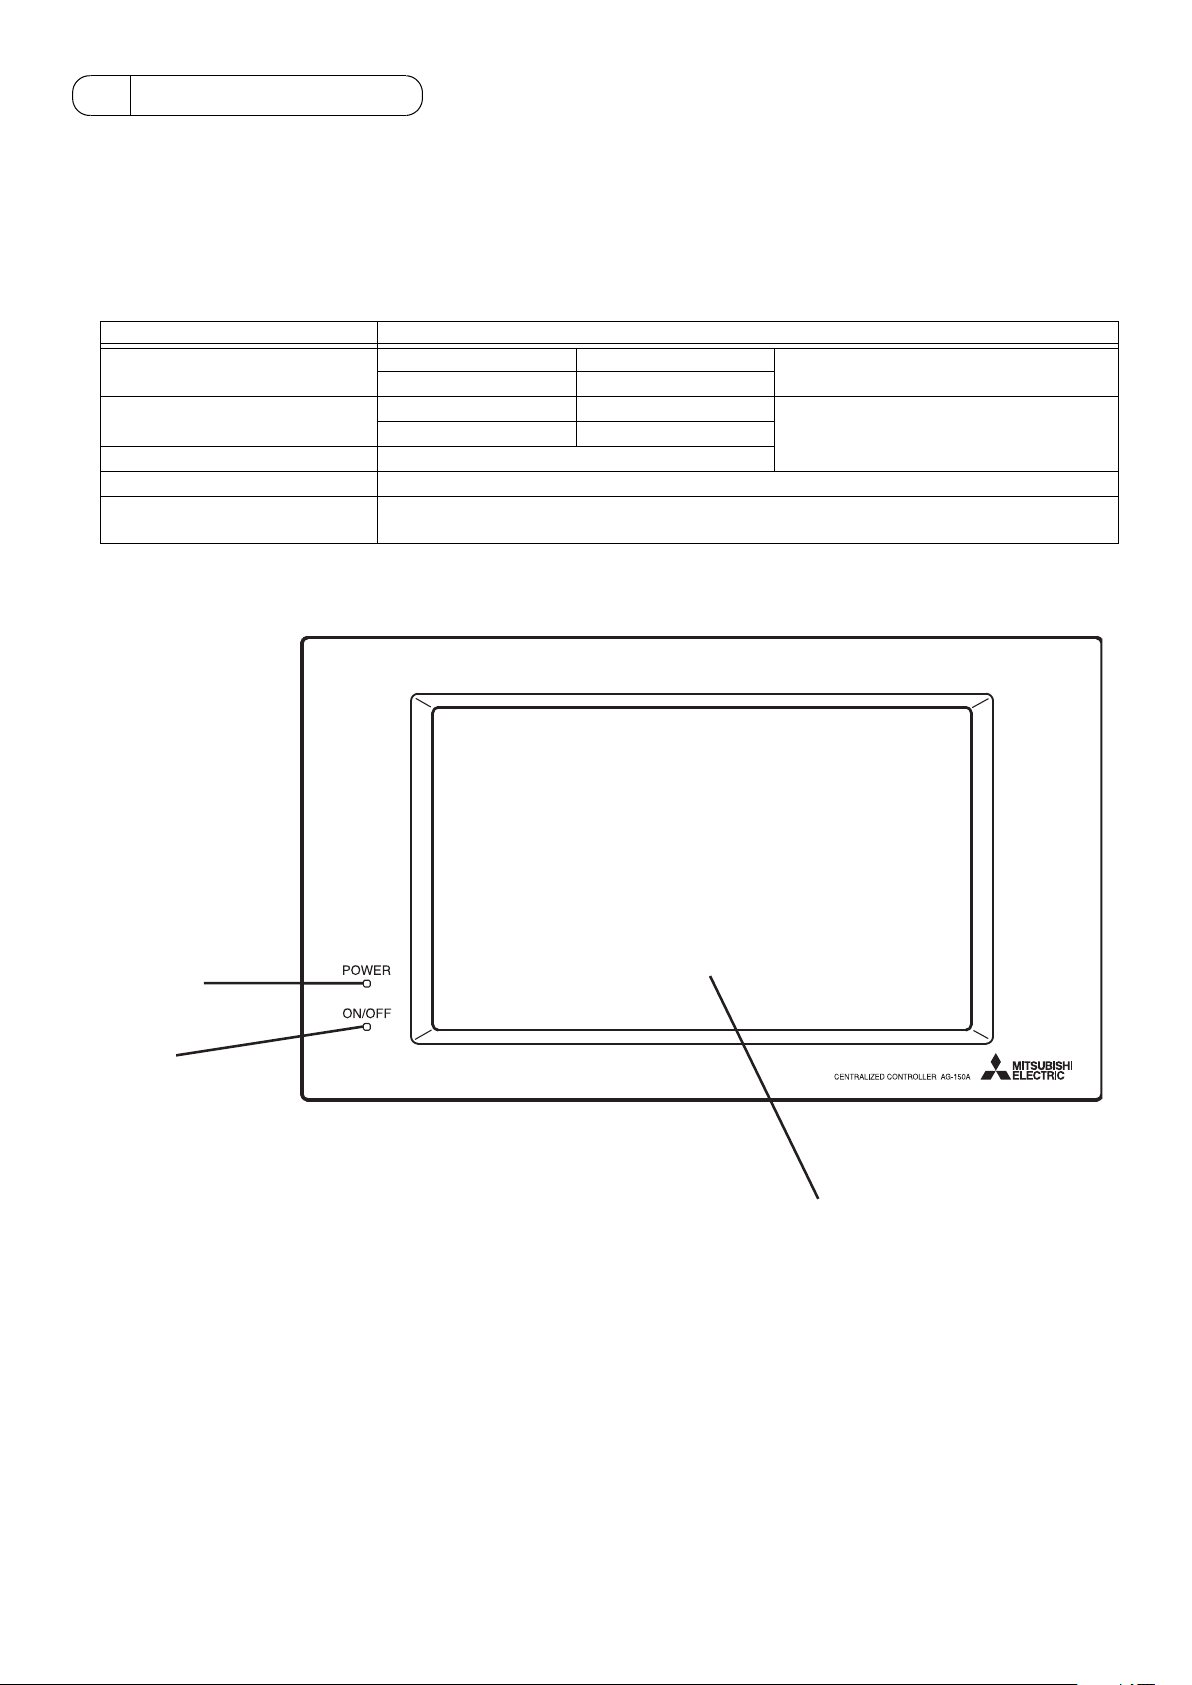
2. Parts names and functions
M-NET Terminal 17VDC~32VDC
Controller drive 24VDC
Operating 0~40°C [32~104°F]
Non operating -20~60°C [-4~140°F]
300 × 185 × 70.3 [25.6] mm 11* [ ]: indicate the thickness from the wall.
13
/16 × 7-5/16 × 2-13/16 [1-1/16] in
Front View
* Power supply: PAC-SC51KUA
For indoor installation only
* To be used in an business office or
similar environment
POWER LED
Lit: Power ON
Unlit: Power OFF
ON/OFF LED
Lit: One or more units are
in operation.
Unlit: All units are stopped.
Blink: One or more errors
have occurred.
Display/Touch panel
- 4 -
Page 6
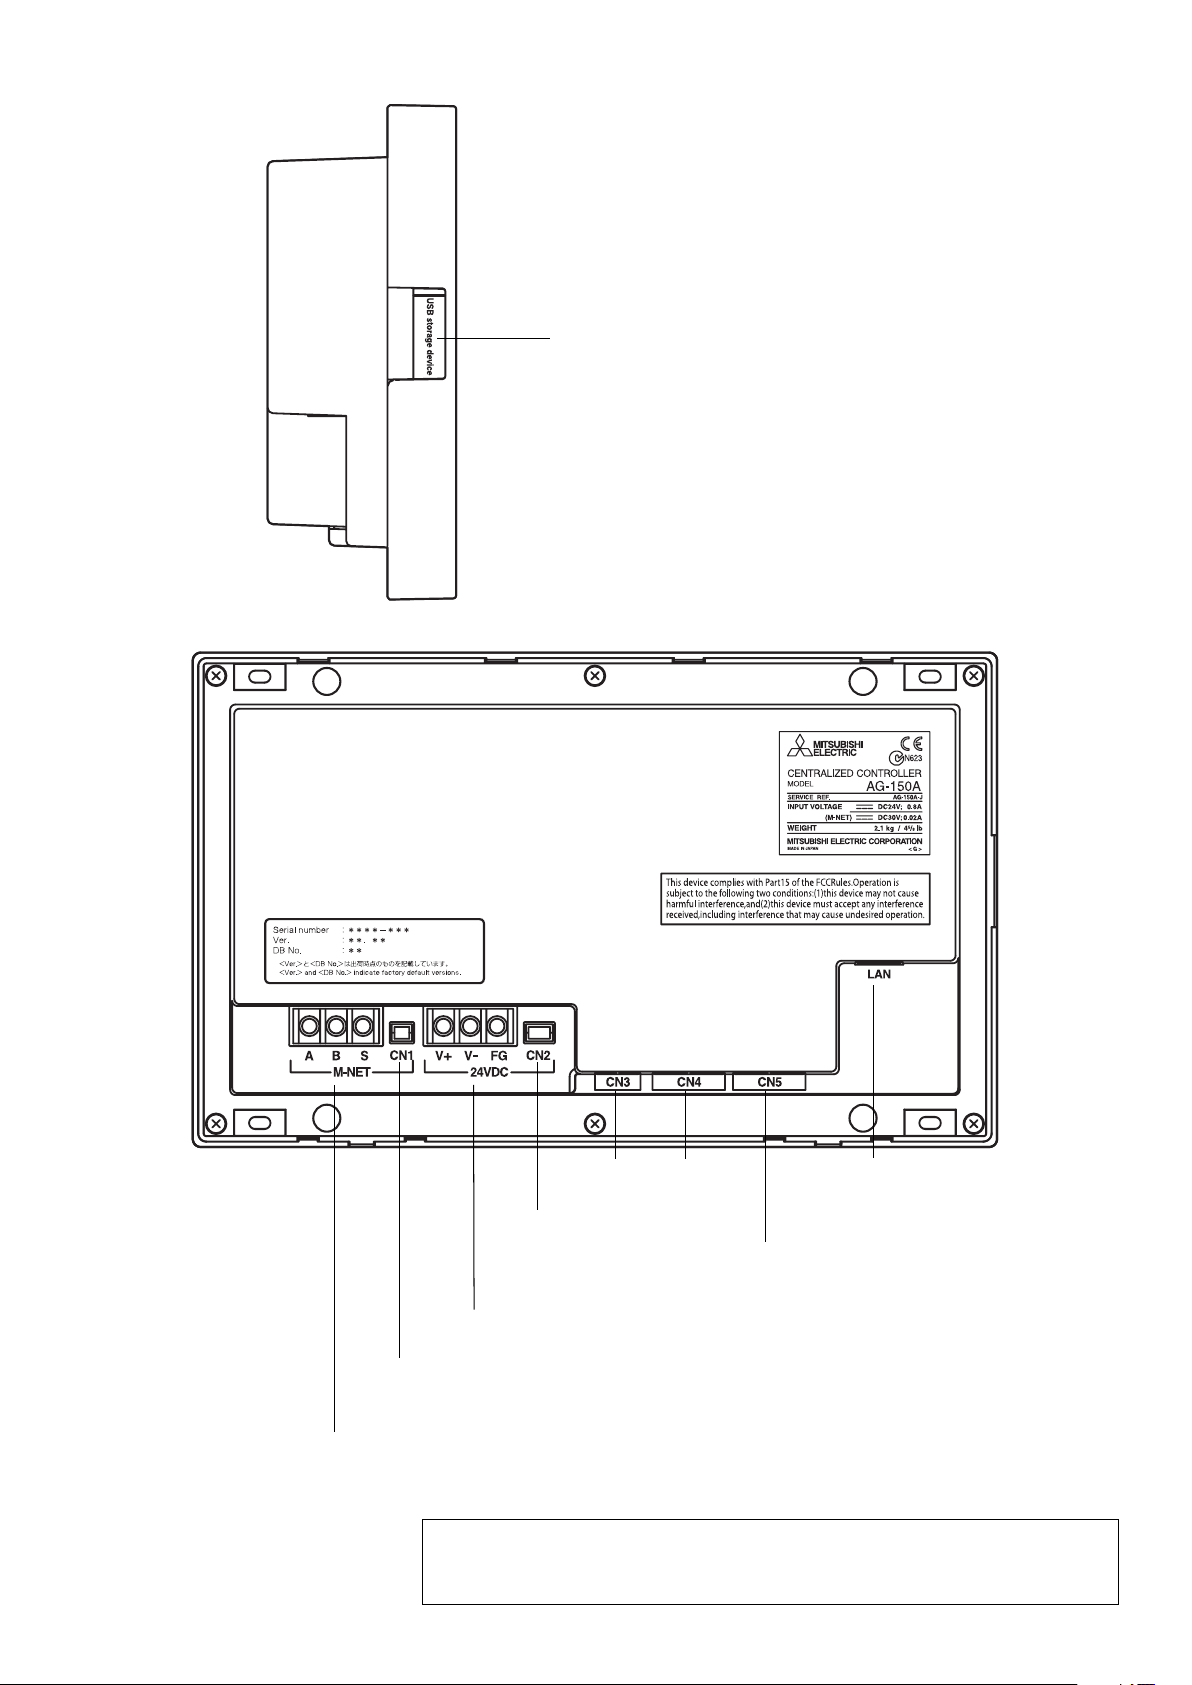
Left view
USB storage device
Connects to a USB storage device
to copy data from the AG-150A
Back View
CN3
Unused
CN2
Connects to the power cable when
the mounting attachment A type
(PAC-YG85KTB; sold separately)
is used to attach the controller.
V+, V-, FG
Connects to power supply unit (PAC-SC51KUA) that supplies 24 VDC power.
CN1
Connects to the M-NET cable when the mounting attachment A type
(PAC-YG85KTB; sold separately) is used to attach the controller.
Do not use this terminal when a PAC-YG50ECA expansion controller is used.
A,B,S
Connects to the M-NET transmission cable from the power supply unit (PAC-SC51KUA).
(A, B: M-NET transmission cable terminal: non-polarized, S: Shield terminal)
Do not use this terminal when a PAC-YG50ECA expansion controller is used.
(V+: +24VDC terminal, V-: 0V terminal, FG: Functional earthing terminal; ground)
CN4
Unused
CN5
Connects to PAC-YG10HA
external input/output adapter
LAN
Connects to other units of
equipments over the LAN via a
HUB.
NOTE
* M-NET terminal (A, B, S) and CN1 cannot be used simultaneously.
* Power supply terminal block (V+, V-, FG) and CN2 cannot be used simultaneously.
- 5 -
Page 7
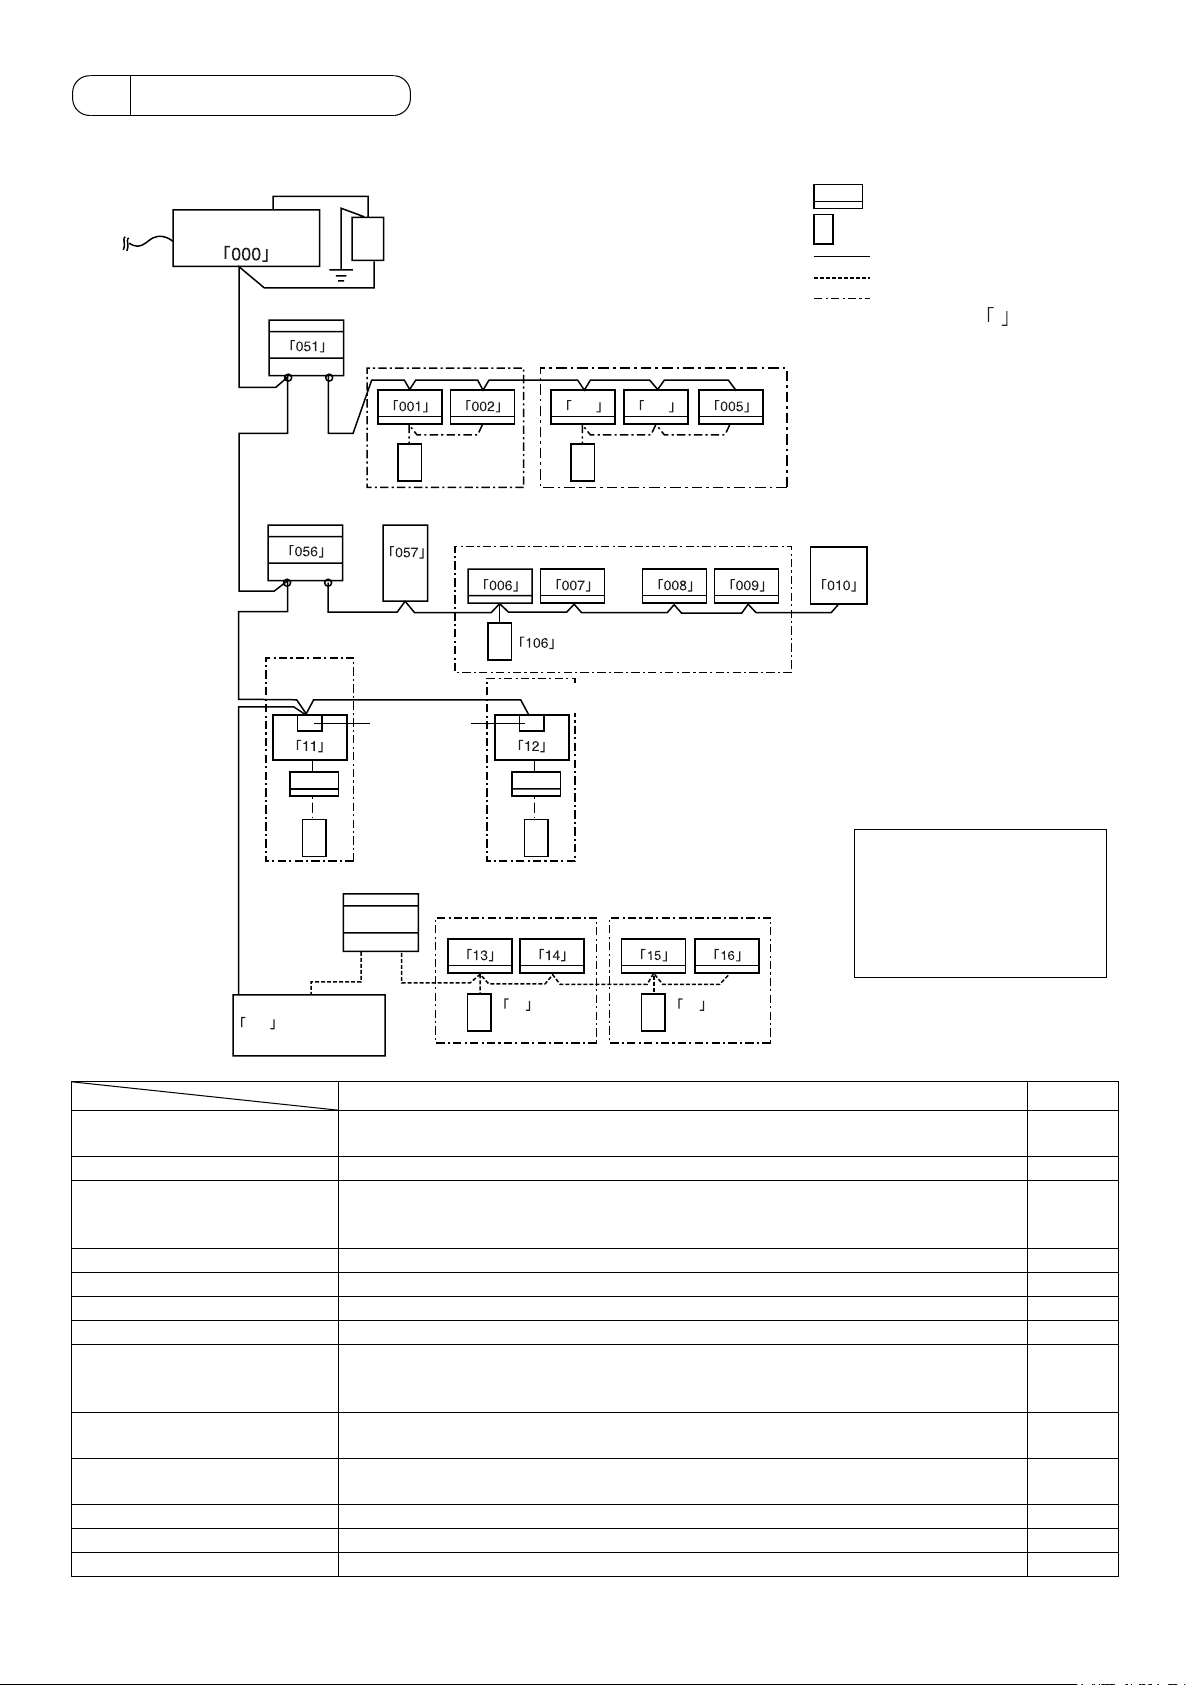
5 System Diagram
1. Standard configuration (using the AG-150A to control a system with 50 or fewer units of equipments)
LAN
POWER (24VDC)
Centralized controller
Model:AG-150A
M-NET
outdoor unit
TB7 TB3
Power supply unit (optional)
Model: PAC-SC51KUA
M-NET
Group 1 Group 2
Indoor unit
Local remote controller
M-NET transmission line
K transmission line
MA remote controller line
The numbers in the
indicate the address No.
M-NET
outdoor unit
TB7 TB3
Mr. Slim
Outdoor unit
MA
R2
M-NET adapter
Group 4
K control
outdoor unit
TB7 TB3
MA MA
BC controller
ME
Mr. Slim
Outdoor unit
MA
Group 13 Group 15
003
Group 5
Group 3
004
LOSSNAY
NOTE
* This diagram does not
show the AC power supply
wiring. Only the
configuration for the
transmission line is shown.
K transmission converter
213
Model:PAC-SC25KAA
13 15
K
K
* Address setting for each M-NET device (Addresses cannot be duplicated).
Address setting method Address
Indoor unit
Set the indoor unit you want to make the main unit in the same group to the minimum
address, then sequentially set the indoor unit addresses in the same group.
1~50
Outdoor unit Minimum indoor unit address in same refrigerant system + No.50 unit. 51~100
Outdoor unit address in same refrigerant system + No.1 unit.
BC controller/OS controller
However, for Sub-BC controller, the minimum indoor unit address that connects the
52~100
local refrigerant piping should be + 50.
K control side remote controller Same address as indoor unit main unit. 1~50
Mr. Slim Outdoor unit
Same address as indoor unit main unit. An M-NET adapter (sold separately) is required.
1~50
M-NET remote controller Set to the minimum indoor unit main address in the same group + 100. 101~200
Sub system controller Assign an address that equals the lowest group number plus 200. 201~250
DIDO controller
(PAC-YG66DCA)
Pl controller (PAC-YG60MCA)
Al controller (PAC-YG63MCA)
Assign an arbitrary but unused address to the PAC-YG66DCA DIDO controller after
assigning an address to all units to be assigned an address between 1 and 50.
The number of controllable units depends on the number of channels used.
Assign an arbitrary but unused address to the PI controller after assigning an address
to all units to be assigned an address between 1 and 50.
Assign an arbitrary but unused address to the AI controller after assigning an address
to all units to be assigned an address between 1 and 50.
1~50
1~50
1~50
MA remote controller Address setting is unnecessary. OA processing unit/LOSSNAY After setting all the indoor units, set an arbitrary but unused address. 1~50
K transmission converter Minimum address of K control indoor unit + 200. 201~250
- 6 -
Page 8
NOTES
* Apply following precautions when using the K transmission converter (model PAC-SC25KAA; discontinued) and controlling the
M-NET model and K control model with the same controller.
Refer to the K transmission converter (PAC-SC25KAA) installation manual for details.
1 Centralized controller address
Always set the controller address to “000”.
2 Centralized controller function selects
Set the “K Converter Address” by using the “M-NET Settings” on the Initial settings screen.
3 Indoor unit address
Set all M-NET model indoor units from the No.1 unit, then set the K control model addresses.
Indoor unit No.1 unit ~M-NET indoor unit max. address> K control indoor unit minimum address ~50
4 K control model group No.
The minimum indoor address No. of that group becomes the group No. (Same for K control side local remote controller.)
5 The remote controller address does not need to be included in the K-control unit group settings.
NOTE
* Some types of units cannot be controlled from the AG-150A controller.
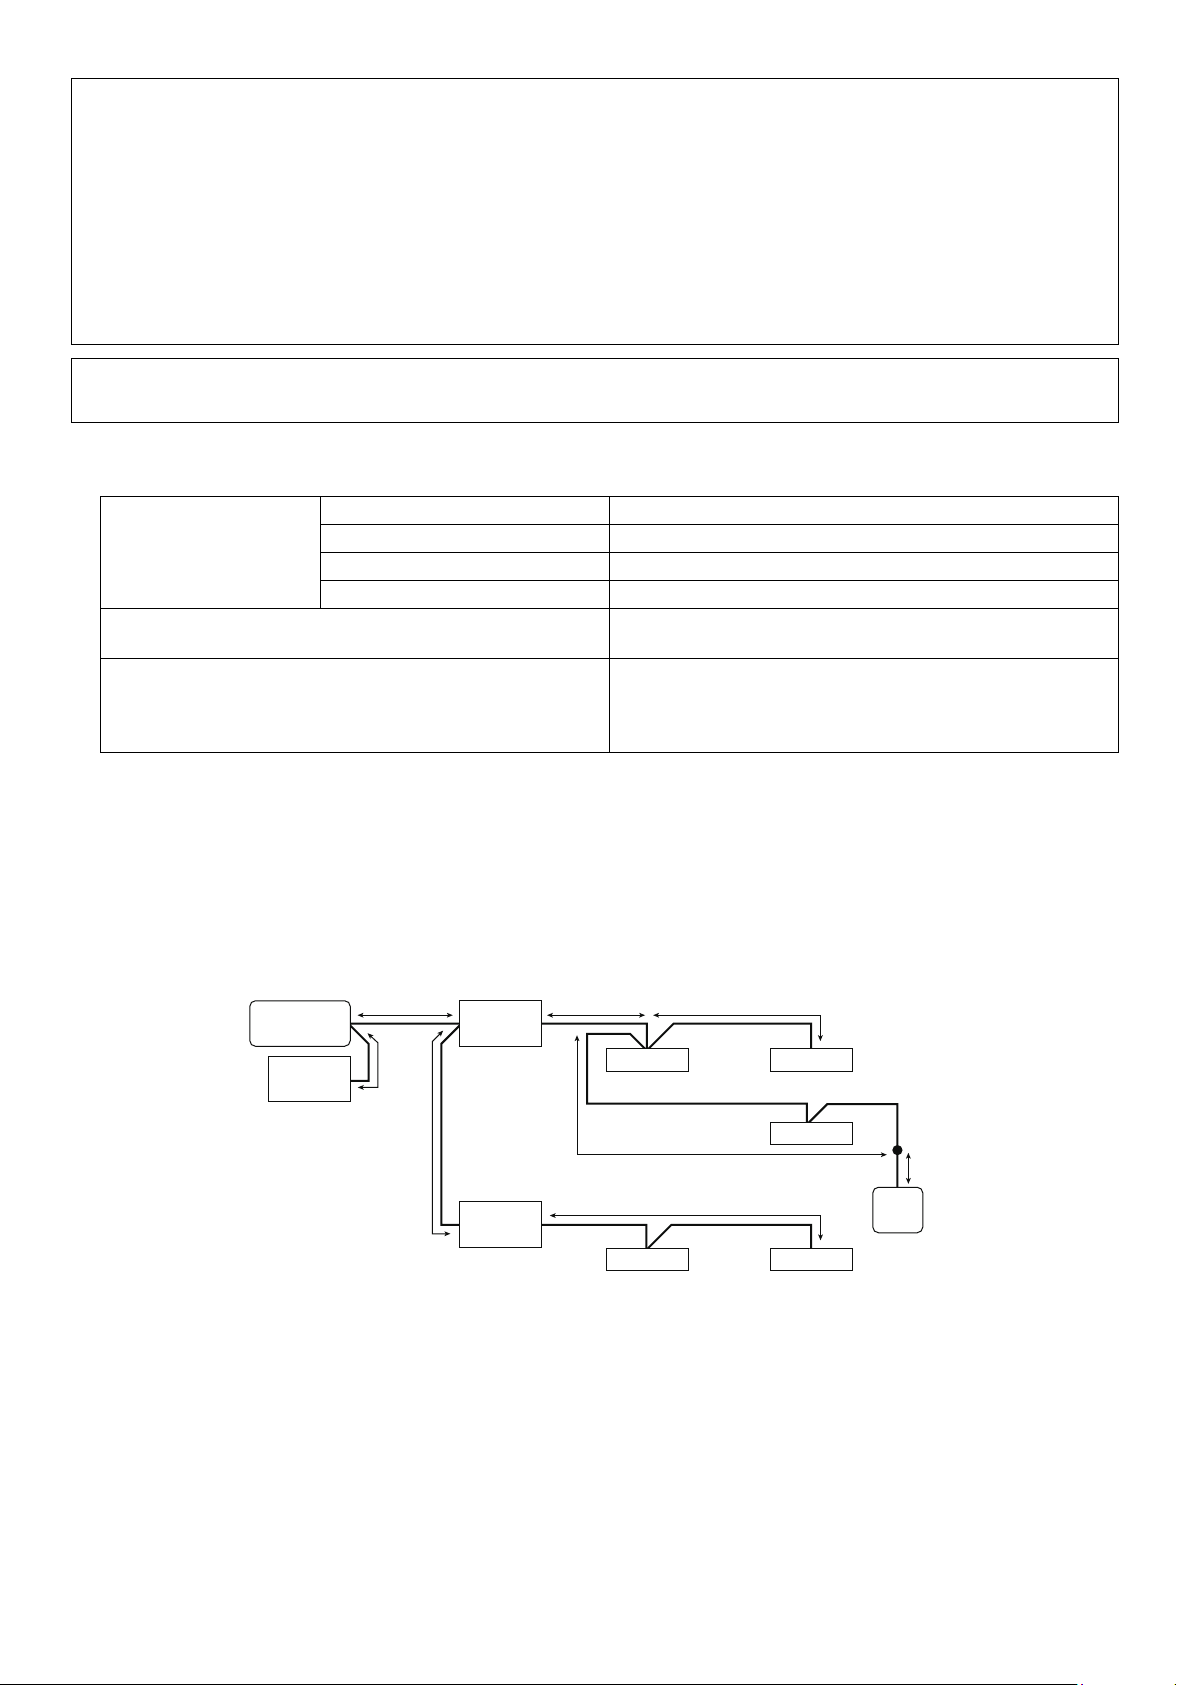
1-1. M-NET wiring configuration
(1) Types and maximum allowable length of M-NET transmission cables
Facility type All facility types
Cable type
Maximum transmission line distance between the outdoor unit
and the farthest indoor unit
Distance of the transmission line for the central control system
and indoor-outdoor transmission line to the farthest indoor unit
(Maximum line distance via outdoor unit)
Type Shielded cable CVVS·CPEVS
No. of cores 2-core cable
Cable size Minimum 1.25 mm
200 m
500 m
* The maximum line distance from the power supply unit on
the transmission line for the central control system to each
outdoor unit or to the system controller is 200 m.
2
The wiring diagram below shows a sample M-NET transmission wiring for a CITY MULTI system.
The maximum total line distance (centralized control and indoor-outdoor transmission lines) for each M-NET system is expressed
in the formula below. Observe the maximum length to ensure proper signal transmission to and from the connected equipments
over the M-NET transmission line.
If the maximum line length is exceeded, the M-NET signals will be attenuated, resulting in communication error and control
failure.
a+b+d+e(f) ≤ 500m a+b+c+g ≤ 500m e(f)+d+c+g ≤ 500m
The local remote controller cable length should be 10 m or shorter. The part that exceeds the 10 m limit should be included in the
maximum total line length of 500 m.
Centralized control transmission line Indoor-outdoor transmission line
System
controller
Power supply
unit for
transmission line
bde
a
Outdoor
unit
Indoor unit Indoor unit
c
Indoor unit
Indoor unitIndoor unit
M-NET
remote
controller
10m
Outdoor
unit
f
g
(A) Centralized control transmission line
The power supply distance for the centralized controller transmission line is expressed in the formula below.
This is the maximum length of the centralized control transmission line to which proper amount of power reaches. If the maximum
line length is exceeded, those equipments at the end of the transmission line may not receive enough power, resulting in
communication error and control failure.
a+b ≤ 200m a+b+c ≤ 200m
(B) Indoor-outdoor transmission line
The power supply distance for the indoor-outdoor transmission line is expressed in the formula below.
This is the maximum length of the indoor-outdoor transmission line to which proper amount of power reaches. If the maximum
line length is exceeded, those equipments at the end of the transmission line may not receive enough power, resulting in
communication error and control failure.
d+e(f) ≤ 200m g ≤ 200m
The length of the local remote controller cable that exceeds the 10 m limit should be included in the maximum total line length of
500 m and in the power supply distance of 200 m.
- 7 -
Page 9
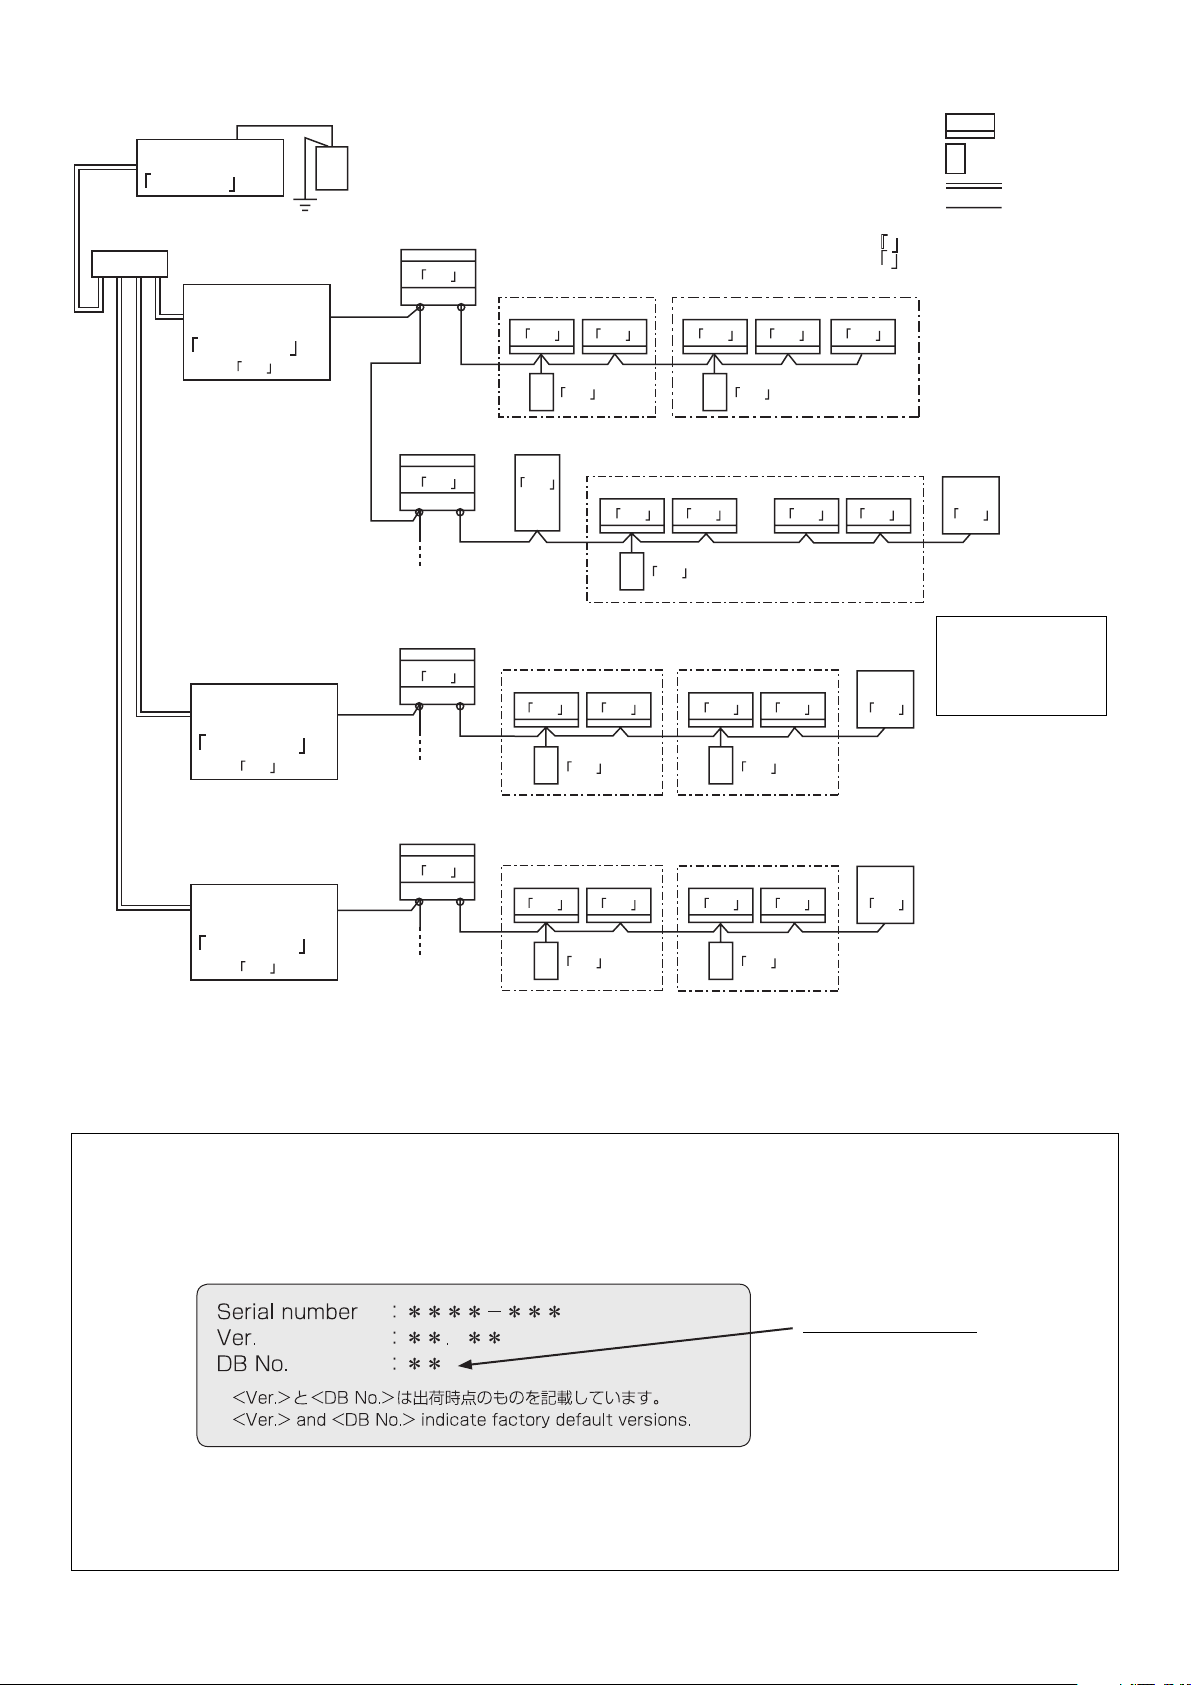
2. System with connection to an expansion controller (system with 50 or more units)
Power supply (DC24V)
LAN
Centralized controller
Model name: AG-150A *
192.168.1.1
HUB
Expansion controller
Model name:
PAC -YG 50E CA
LAN
192.168.1.211
LAN
000
1
Power supply unit (sold separately)
Model name: PAC-SC51KUA *
M-NET
Outdoor unit
051
M-NET
TB7 TB3
M-NET
Outdoor unit
056
TB7 TB3
R2
BC controller
001
ME ME
057
*1: M-NET terminals will not be used.
*2: Terminal block TB2 will not be used.
2
Group 1-1 Group 1-2
002
101 103
006 007 008 009 010
ME
003 004 005
Group 1-3
106
Figures in indicate IP address.
Figures in indicate M-NET address.
Indoor unit
Local remote
controller
LAN
M-NET
transmission line
LOSSNAY
unit
Expansion controller
Model name:
PAC -YG 50 ECA
192.168.1.212
000
Expansion controller
Model name:
PAC -YG 50 ECA
192.168.1.213
000
M-NET
M-NET
M-NET
Outdoor unit
051
TB7 TB3
M-NET
Outdoor unit
051
TB7 TB3
Group 2-1 Group 2-2
001 002 003 004 005
ME ME
101 103
Group 3-1 Group 3-2
001 002 003 004 005
ME ME
101 103
LOSSNAY
unit
LOSSNAY
unit
• This diagram only
shows transmission
line configurations.
Power wires are
omitted.
• Refer to the PAC-YG50ECA expansion controller Installation/Instructions Manual for how to set the IP address.
• The same M-NET address cannot be used twice in the same M-NET system that connects to the same PAC-YG50ECA
expansion controller.
See section 1 “Standard configuration” for how to set the addresses for the equipments that are connected to the expansion
controller within an M-NET system.
NOTES
* The DB No. of PAC-YG50ECA is found on the package box and the controller itself in the [DB No. : **] format.
Only the expansion controllers with the same DB No. as the AG-150A can be connected to the AG-150A. Be sure to check the
DB No. before connecting the expansion controller to the system.
If the DB numbers of the AG-150A and PAC-YG50ECA do not match, the software needs to be updated. Consult your dealer.
Label contents
DB No. appears here.
* Provide “one-point grounding” for the M-NET transmission line (centralized control system) by grounding the shield of the an
expansion controller. (Class-D grounding)
Ground the indoor-outdoor transmission line in each outdoor unit refrigerant system.
* Set the centralized control switch (SW2-1) on the outdoor units on the M-NET line to ON.
(Refer to the outdoor unit Installation Manual for the details of the dipswitch settings.)
- 8 -
Page 10
NOTES
* Up to three PAC-YG50ECA controllers can be connected to each AG-150A unit.
* Main system controllers (e.g., AG-150A) cannot be connected to an M-NET system that is controlled by an expansion controller.
* Main and sub system controllers (M-NET)
AG-150A is for exclusive use as a main SC. AG-150A cannot be used as a sub SC.
• Main system controller (Main SC)
Main SC refers to a controller that controls all other system controllers including the units they control. If a given system has
only one system controller, that controller becomes the main controller. Group settings and interlock settings can only be made
from a main controller.
• Sub system controller (Sub SC)
Sub controller refers to a system controller that is controlled (including the units it controls) by a main system controller.
AG-150A, PAC-YG50ECA etc.
Range of units the main SC
controls (M-NET)
Range of units the
sub SC controls
Group Group
Group
AG-150A is for exclusive use as a main SC. AG-150A cannot be used as a sub
SC or controlled from another main SC.
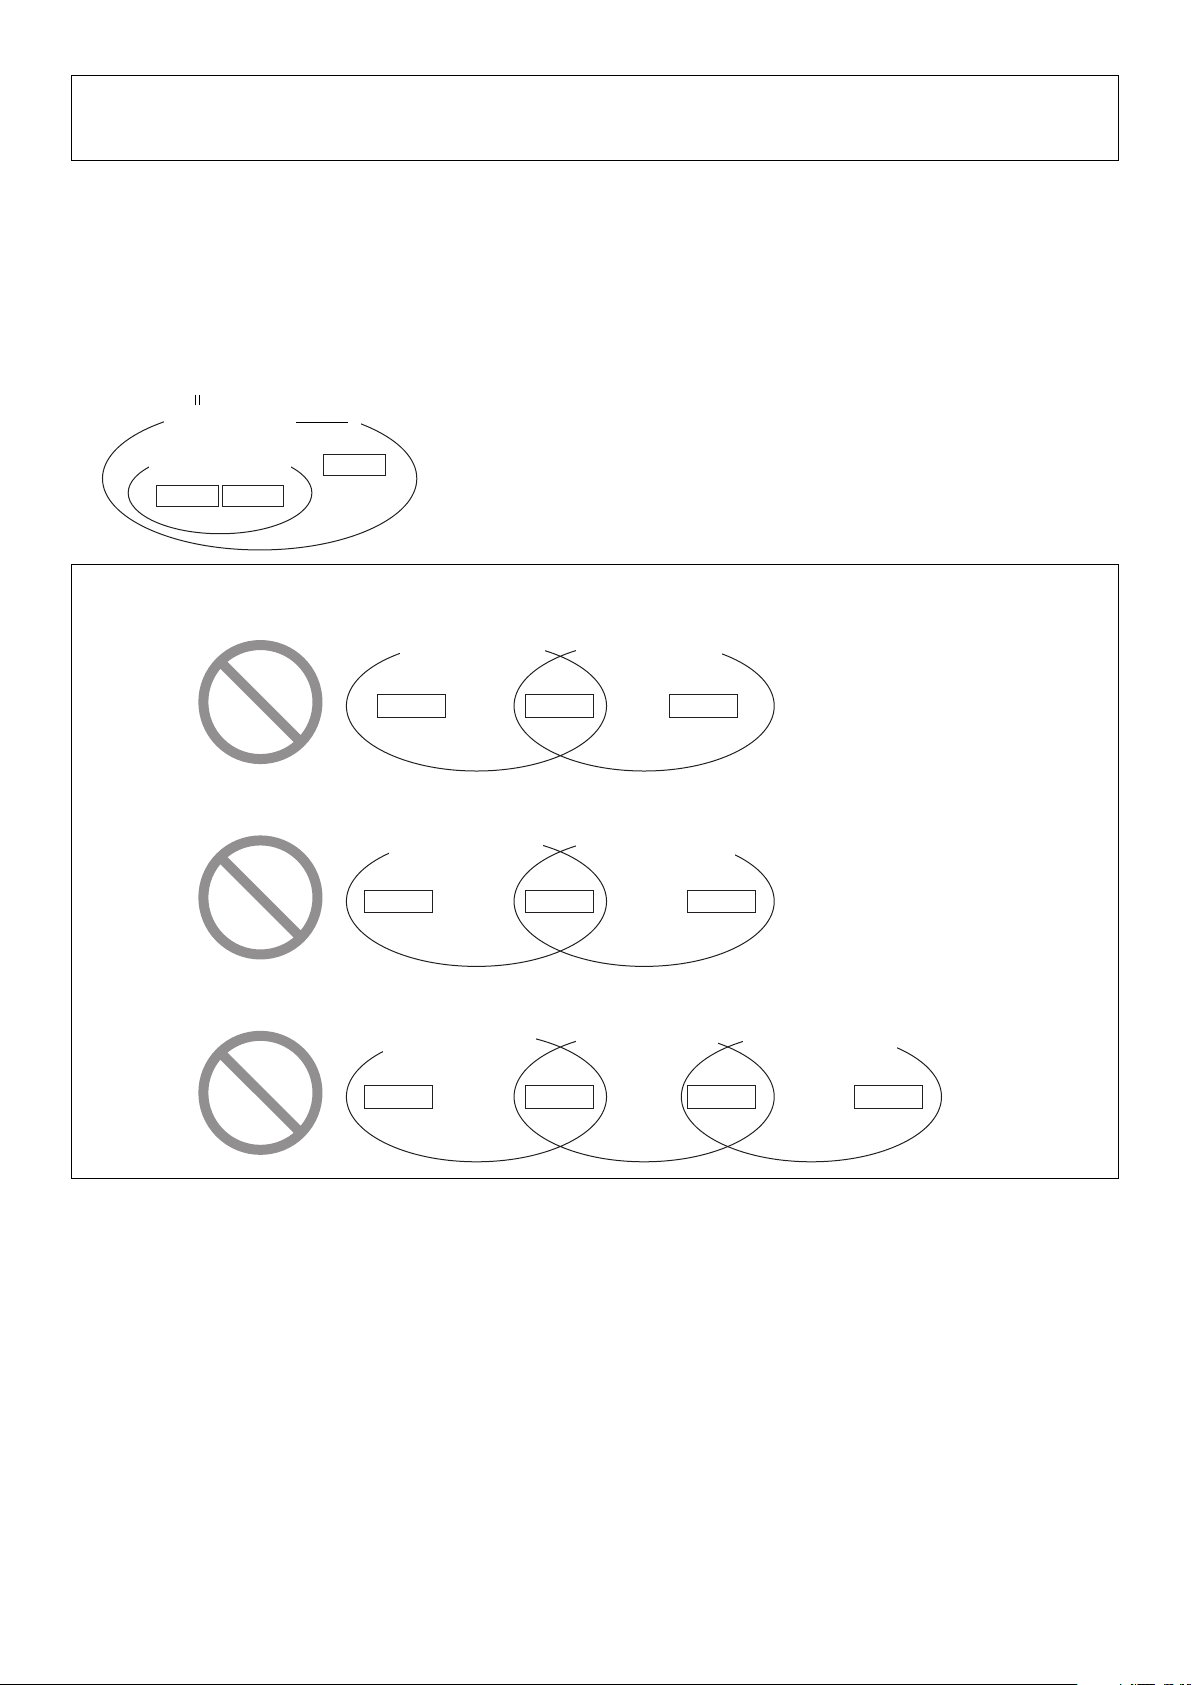
NOTES The following types of configurations are not possible.
• A sub controller can only control the groups that are under the control of its main controller.
Main system
controller
Sub system
controller
Group Group Group
• No groups can be placed under the control of more than one main system controller.
Main system
controller 1
Group Group Group
Main system
controller 2
• No sub system controllers can be placed under the control of more than one main system controller.
Main system
controller 1
Group Group Group Group
Sub system
controller
Main system
controller 2
- 9 -
Page 11

6Installation
CAUTION
* Install and wire the unit with the power to the power supply unit (PAC-SC51KUA) turned off.
* Do not put the signal wire and power wire in the same conduit.
* When routing the cable from the top of the controller, let the cable hang down below the connector before connecting it to the
terminal block or connector as shown in the figure below to prevent water from running down the cable and causing electric
shock or fire.
Terminal block or
connector
Good example
Bad example
1. Field-supplied Parts
1
Electric box: PAC-YG83UTB (sold separately) (When following installation method described in section “2. Installation” item 1.)
2 Mounting attachment B Type: PAC-YG81TB (sold separately) (Required only when following installation method described in
section “2. Installation” item 3.)
3 Mounting attachment A Type: PAC-YG85KTB (sold separately) (Required only when following installation method described
in section “2. Installation” item 4.)
4 Locknuts and bushing for the conduit tube.
5 M-NET transmission cable. (Refer to Page 12.)
6 DC power cable. (Refer to Page 12.)
2. Installation
The controller can be installed by following one of the methods below:
1 By embedding the centralized controller in the wall.
Method of using two plates included with AG-150A.
AG-150A
2 By embedding the centralized controller in the wall and
mounting it to an electric box.
An electric box (PAC-YG83UTB; sold separately) is required.
3 By installing the centralized controller directly on the wall.
Mounting attachment B type (PAC-YG81TB; sold separately) is
required.
AG-150A
AG-150A
Wall
Electric box
(PAC-YG83UTB; sold
separately)
Wall
Wall
PAC-YG81TB (sold
separately) is required
mount installations.
- 10 -
Page 12

4 By installing the centralized controller and a power supply unit
(PAC-SC51KUA; sold separately) inside the mounting
attachment on the wall.
Mounting attachment A type (PAC-YG85KTB; sold separately)
is required.
AG-150A
Wall
PAC-YG85KTB (sold
separately) is required
in wall mount
installation with both
the controller and a
power supply unit.
Power supply unit
(PAC-SC51KUA; sold
separately)
5 Attach the AG-150A to the control board.
AG-150A
Control board
Wall
Power supply unit
(PAC-SC51KUA; sold
separately)
2-1. Embedding the centralized controller in the wall.
1 Ensure there is enough space to install the controller as shown
in the figure at right.
100 (3-15/16)
30 (1-3/16)
)
16
/
5
185 (7-
300 (11-13/16)
)
4
/
3
120 (4-
)
16
/
3
30 (1-
NOTES
* When installing two or more controllers side-by-side and horizontally ensure that there is at least 130 mm (5-
1
between the units.
15
* When installing two or more controllers vertically, ensure that there is at least 150 mm (5-
/16 in) between units; otherwise, it will
be hard to remove the cover.
* The amount of space required on the left of the controller is the amount necessary to connect/disconnect the USB drive. (If the
specified amount of space is not available, use a USB extension cable.)
* The amount of space required under the controller is the amount necessary for the mounting/dismounting of the controller
cover.
Unit: mm (in)
AG-150A
/8 in) or more
2 Cut out an opening in the wall as shown in the shaded area
in the figure at right. (W × H: 278 mm (11 in) × 152 mm (6 in))
Follow the dimensions in the figure exacting. If the opening is
too large, it will be hard to properly install the unit.
Make mounting plate (A type and B type) screw holes on the
hole as shown in the right figure. (Use the supplied M4
screws to mount the plates.)
3 Insert the B type installation plate (supplied) through the hole
in the wall and hold it.
- 11 -
152 (6)
278 (10-15/16)
7
/8)
200 (7-
Unit: mm (in)
)
16
/
7
163.4 (6-
B type installation plate
(supplied)
Page 13

4 Attach the A type installation plate (supplied) to the B type
installation plate (supplied) with the M4 flathead screws
(supplied), sandwiching the wall between the two plates.
Prior to installation, check that the wall is strong enough to
support the weight of the controller to prevent the controller
from falling.
NOTE
* If the screw provided for the installation plate, cannot be
used because of the wall thickness, use an M4 flathead
screw that matches the wall thickness.
5 Remove the AG-150A surface cover.
Insert a flat-tip
screwdriver in the
holes indicated
and move the
handle up to
remove the cover.
Inside the wall
B type Installation plate
(supplied)
M4 flathead screw
(supplied)
A type Installation plate
(supplied)
Wall
6 Push the wire through the wall hole, and connect the M-NET
transmission cable (centralized control cable that is connected to TB2 of
the power supply unit (PAC-SC51KUA)) to M-NET transmission cable
terminal A, B (both non polarity) and S.
Connect the DC power cable from the power supply unit
(PAC-SC51KUA) to the 24VDC power supply terminal block of the
controller. There is V+ and V- polarity.
M-NET transmission cable
DC power cable
NOTE
* When using an LAN and external signal I/O, refer to section
11 External input/output usage .
M-NET transmission
cable
Type of the cable; Shielded cable which comply with the following specifications or equivalent.
• CPEVS φ1.2mm to φ1.6mm
• CVVS 1.25mm² to 2mm² (AWG16 to 14)
*CPEVS; PE insulated PVC jacketed shielded communication cable
*CVVS; PVC insulated PVC jacketed shielded control cable
PE: Polyethylene PVC: Polyvinyl chloride
Back of controller
M-NET
transmission
cable
* When a PAC-YG50ECA expansion controller is used, the
M-NET terminals will not be used.
* When using bridge wiring of the shield,
use the S-terminal as shown below.
A
B
Shield
DC power cable
S
Function earthing
(ground) cable
DC power cable The DC power cable should comply with both local standards as well as the power requirement of the
unit.
Recommended type: 0.75mm² to 2mm² (AWG18 to 14), 3-conductor power cable
Cable length: Within 50m (164 ft)
CAUTION
* Do not connect the AC power cable to the M-NET and POWER (24VDC) terminal blocks of the controller. It may cause a failure.
- 12 -
Page 14

7 Attach the controller to the A type installation plate with the
M4 roundhead screws (supplied).
A type Installation plate
(supplied)
M4 roundhead
screw (supplied)
8 Replace the AG-150A surface cover.
2-2. Wall-Embedded installation with an Electric box (PAC-YG83UTB; sold separately)
1 Ensure there is enough space to install the controller as shown below. Wall space (see diagram below) and 60 mm (2-3/8 in) of
clearance behind the wall are required to mount an Electric box.
Inner wall
Electric box (PAC-YG83UTB; sold separately)
Unit: mm (in)
/16)
3
30 (1-
AG-150A
AG-150A
60 mm
3
/8 in)
(2-
minimum
Building structure
100 (3-15/16)
30 (1-3/16)
/16)
5
185 (7-
300 (11-13/16)
/4)
3
120 (4-
NOTES
1
* When installing two or more controllers side-by-side and horizontally ensure that there is at least 130 mm (5-
/8 in) or more
between the units.
15
* When installing two or more controllers vertically, ensure that there is at least 150 mm (5-
/16 in) between units; otherwise, it will
be hard to remove the cover.
* The amount of space required on the left of the controller is the amount necessary to connect/disconnect the USB drive. (If the
specified amount of space is not available, use a USB extension cable.)
* The amount of space required under the controller is the amount necessary for the mounting/dismounting of the controller
cover.
2 Punch out the appropriate knockout holes on the Electric box depending on how the cable is routed.
Punch out the knockout holes.
(Punch out the appropriate
knockout hole.)
3 Install the Electric box in the wall.
Refer to the Installation Manual that came with the Electric box (PAC-YG83UTB) for details.
- 13 -
Page 15

4 Cut out an opening in the wall as shown in the shaded area in the figure below. (Width × Height: 278 mm (11 in) × 152 mm (6 in))
Follow the dimensions in the figure exactly. If the opening is too large, it will be hard to properly install the unit.
Make A-type mounting plate screw holes on the hole as shown in the right figure. (Use the supplied M4 screws to mount the
plate.)
)
16
/
7
163.4 (6-
Unit: mm (in)
278 (11)
152 (6)
Unit: mm (in)
152 (6)
278 (10-15/16)
7
/8)
200 (7-
5 Securely seal the cable lead-in port with putty to prevent dew, water and
insects, etc. from entering.
* Seal the space between the electric box and conduit with putty.
6 Attach the A type installation plate (supplied) with the M4 flathead screws
(supplied) on the Electric box.
A type Installation plate (supplied)
M4 flathead screw (supplied)
Conduit
Wall
Bushing
Lock nut
Line lead-in port
Seal with putty
M-NET transmission cable
or DC power cable
NOTE
* If the screw provided for the installation
plate, cannot be used because of the
wall thickness, use an M4 flathead screw
that matches the wall thickness.
Electric box
Wall
7 Remove the AG-150A surface cover.
8 Connect the M-NET transmission cable (centralized control cable that is connected to TB2 of the power supply unit
(PAC-SC51KUA)) to M-NET transmission cable terminal A, B (both non polarity) and S.
Connect the DC power cable from the power supply unit (PAC-SC51KUA) to the 24VDC power supply terminal block of the
controller. There is V+ and V- polarity.
NOTE
* When using an LAN and external signal
I/O, refer to section
11 External input/output usage .
M-NET transmission cable
DC power cable
CAUTION
* Do not connect the AC power cable to the M-NET and POWER (24VDC) terminal blocks of the controller. It may cause a failure.
* When leading the cable out from above, seal the port so that water does not enter along the transmission cable and DC power
supply cable.
- 14 -
Page 16

Back of controller
shield
DC power cable
S
DC power cable
M-NET transmission cable
M-NET transmission cable
* When a PAC-YG50ECA expansion controller is used,
the M-NET terminals will not be used.
* When using bridge wiring of the shield,
use the S-terminal as shown below.
A
B
9 Attach the controller to the A type installation plate with the roundhead screws (supplied).
M4 rounded screw
(supplied)
Function earthing
(ground) cable
Wall
0 Replace the AG-150A surface cover.
2-3. Wall-mounting the centralized controller with the mounting attachment B type
(PAC-YG81TB; sold separately)
1 Ensure there is enough space to install the controller as
shown in the figure at right.
30 (1-3/16)
)
16
/
100 (3-
15
/16)
5
185 (7-
NOTES
* When installing two or more controllers side-by-side and horizontally ensure that there is at least 130 mm (5-
between the units.
15
* When installing two or more controllers vertically, ensure that there is at least 150 mm (5-
/16 in) between units; otherwise, it will
be hard to remove the cover.
* The amount of space required on the left of the controller is the amount necessary to connect/disconnect the USB drive. (If the
specified amount of space is not available, use a USB extension cable.)
* The amount of space required under the controller is the amount necessary for the mounting/dismounting of the controller
cover.
Unit: mm (in)
300 (11-13/16)
)
4
/
3
120 (4-
)
16
/
3
30 (1-
Mounting attachment
B type
(PAC-YG81TB; sold
separately)
1
/8 in) or more
- 15 -
Page 17

2 Punch out the appropriate knockout hole, depending on how
Knockout hole
the wiring is routed.
3 Sand the cut surface of the knockout hole smooth.
CAUTION
* Any rough edges that are left may damage the cable and cause electric shock or fire.
4 Push the M-NET transmission cable, DC power cable through the knockout hole.
5 Install the mounting attachment B type (PAC-YG81TB; sold
separately) on the wall with the six screws (field-supplied;
Wall
use screws that are suitable for the type of wall the AG-150A
is installed on).
Prior to installation, check that the wall is strong enough to
support the weight of the controller.
Screws
(Fieldsupplied)
6 Remove the AG-150A surface cover.
7 Connect the M-NET transmission cable (centralized control
cable that is connected to TB2 of the power supply unit
(PAC-SC51KUA)) to M-NET transmission cable terminal A, B
(both non polarity) and S.
Connect the DC power cable from the power supply unit
(PAC-SC51KUA) to the 24VDC power supply terminal block
of the controller. There is V+ and V- polarity.
NOTE
* When using an LAN and external signal
I/O, refer to section
11 External input/output usage .
8 Securely seal the cable lead-in port with putty to prevent
dew, water and insect, etc. from entering.
9 Install the controller on the mounting attachment B type
(PAC-YG81TB) with the four M4 rounded screws (supplied
with the PAC-YG81TB).
Back of controller
M-NET
transmission
cable
* When a PAC-YG50ECA expansion controller is used, the
M-NET terminals will not be used.
* When using bridge wiring of the shield,
use the S-terminal as shown below.
A
B
Seal with putty
Shield
DC power cable
S
Function earthing
(ground) cable
M4 roundhead
screw (supplied
with the PACYG81TB)
0 Replace the AG-150A surface cover.
- 16 -
Page 18

2-4. Installing the centralized controller and a power supply unit (PAC-SC51KUA; sold separately) inside the
mounting attachment A type (PAC-YG85KTB; sold separately) on the wall
1 Ensure there is enough space to install the controller as
shown in the figure at right.
100 (3-15/16)
30 (1-3/16)
300 (11-
)
4
/
3
400 (15-
)
16
/
11
220 (8-
13
/16)
)
16
/
3
30 (1-
NOTES
* When installing two or more controllers side-by-side and horizontally ensure that there is at least 130 mm (5-
between the units.
7
* When installing two or more controllers vertically, ensure that there is at least 250 mm (9-
/8 in) between units; otherwise, it will
be hard to remove the cover.
* The amount of space required on the left of the controller is the amount necessary to connect/disconnect the USB drive. (If the
specified amount of space is not available, use a USB extension cable.)
* The amount of space required under the controller is the amount necessary for the mounting/dismounting of the controller
cover.
2 Install the mounting attachment A type (PAC-YG85KTB; sold
separately) on the wall with the six screws (field-supplied;
use screws that are suitable for the type of wall the AG-150A
is installed on).
Prior to installation, check that the wall is strong enough to
support the weight of the controller.
Knockout hole
Wall
Unit: mm (in)
Mounting attachment
A type (PACYG85KTB; sold
separately)
1
/8 in) or more
Screws (Field-supplied)
3 Punch out the knockout holes on the mounting attachment A
Protective earth
(ground) cable
type (PAC-YG85KTB).
AC power cable
M-NET transmission cable
4 Sand the cut surface of the knockout holes smooth.
CAUTION
* Any rough edges that are left may damage the cable and cause electric shock or fire.
5 Push the AC power cable, protective earth (ground) cable, and M-NET transmission cable through the knockout hole.
6 Install the power supply unit (PAC-SC51KUA; sold
separately) inside the mounting attachment with the four M4
screws (Supplied with PAC-YG85KTB).
7 Connect the cables to the power supply unit
(PAC-SC51KUA).
Refer to the PAC-SC51KUA Installation Manual for details.
Power supply unit
(PAC-SC51KUA;
sold separately)
(weight 1.4kg [4lbs])
8 Securely seal the cable lead-in port with putty to prevent
dew, water and insect, etc. from entering.
9 Remove the AG-150A surface cover.
M4 screws (supplied
with PAC-YG85KTB)
- 17 -
Page 19

0 Connect the wiring from the power supply unit to the
centralized controller.
DC power cable
M-NET transmission cable
(supplied with PAC-YG85KTB)
(supplied with
PAC-YG85KTB)
a Install the controller inside the mounting attachment A type
(PAC-YG85KTB) with the four M4 rounded screws (supplied
with PAC-YG85KTB).
b Replace the AG-150A surface cover.
M-NET
transmission cable
(supplied with
PAC-YG85KTB)
NOTE
* When using an LAN and external signal
I/O, refer to section
11 External input/output usage .
DC power cable
(supplied with PACYG85KTB)
M4 roundhead
screw (supplied
with PACYG85KTB).
c Attach the power supply unit cover with the two screws.
(Supplied with PAC-YG85KTB)
Screws (supplied with
PAC-YG85KTB)
- 18 -
Page 20

2-5. Installing the centralized controller on the control board
1 Make sure that there is an adequate amount of space to
install the controller as shown in the figure on the right.
30 (1-3/16)
)
16
/
15
100 (3-
)
16
/
5
185 (7-
300 (11-13/16)
)
4
/
3
120 (4-
)
16
/
3
30 (1-
NOTES
* When installing two or more controllers side-by-side and horizontally ensure that there is at least 130 mm (5-
between the units.
15
* When installing two or more controllers vertically, ensure that there is at least 150 mm (5-
/16 in) between units; otherwise, it will
be hard to remove the cover.
* The amount of space required on the left of the controller is the amount necessary to connect/disconnect the USB drive. (If the
specified amount of space is not available, use a USB extension cable.)
* The amount of space required under the controller is the amount necessary for the mounting/dismounting of the controller
cover.
Unit: mm (in)
Control board
1
/8 in) or more
2 Install the control board on the wall.
Refer to the Control Board Installation Manual for details.
3 Punch out the appropriate knockout hole on the control
board, and push the AC cable, protective earth (ground)
cable, and M-NET transmission cable through the knockout
hole.
4 Install the power supply unit (PAC-SC51KUA; sold
separately) on the control board.
Control board
M4 screw
(Field-supplied)
Protective earth
(ground) cable
M-NET transmission cable
5 Connect the cable to the power supply unit (PAC-SC51KUA).
Refer to the PAC-SC51KUA Installation Manual for details.
6 Securely seal the cable lead-in port with putty to prevent dew, water and insects, etc. from entering.
* Seal the space between the control board and conduit with putty.
- 19 -
AC power cable
Page 21

7 Screw down the A type installation plate (supplied) on the
control board door with the M4 flathead screws (supplied).
Drill four screw holes and a 278 mm [W] × 152 mm [H] hole
on the control board door ahead of time.
(Cut screw threads in the control board screw holes, or use
nuts to tighten screws.
Use the B type installation plate (supplied) if the above is not
feasible.
Refer to section 2-14.)
152 (6)
A-type installation
plate (supplied)
M4 flathead screw
(supplied)
278 (10-15/16)
7
/8)
200 (7-
φ
4 or above
)
16
/
7
163.4 (6-
Control board
Unit: mm (in)
8 Remove the AG-150A surface cover.
9 Install the AG-150A on the A type installation plate with the
M4 roundhead screws (supplied).
0 Replace the AG-150A surface cover.
a Connect the power supply unit and centralized controller.
NOTE
* When using an LAN and external signal
I/O, refer to section
11 External input/output usage .
M4 roundhead screw
(supplied)
- 20 -
Page 22

7Wiring
1. System without connection to a PAC-YG50ECA expansion controller
Power supply unit (PAC-SC51KUA)
Centralized controller
(AG-150A)
Cable clamp
M-NET transmission line
(Centralized control line)
Outdoor unit
TB7
Back of controller
V+
DC power supply
line (Polarity)
DC power supply line (24VDC)
FG
V-A B S CN1 CN2
24VDCM-NET
Function earthing
(ground) line
*Polarized
M-NET transmission
A, B line (Non-polarity)
Shield
Power supply unit
CN1 CN2
M-NET Output
TB2 TB3
ABS V+V-FG
24VDC
DC power supply line
(Polarity)
to Outdoor unit
50m (164 ft) or less
* Use a ring terminal to connect to the terminal block
NOTES
Connecting the M-NET transmission line to the AG-150A.
* Connect the M-NET transmission to the centralized controller system side, and supply power to the M-NET from PAC-
SC51KUA.
* Leave the power jumper connected to CN41 on all outdoor units.
- 21 -
Page 23

2. System with connection to a PAC-YG50ECA expansion controller
Power supply unit (PAC-SC51KUA)
Centralized Controller
AG-150A
HUB
PAC -YG50 ECA
TB7
Outdoor unit
LAN
M-NET
DC power cable (24VDC)
Back of the centralized controller
V+
DC power
cable
(Polarized)
Cable clamp
* Polarized
FG
V-A B S CN1 CN2
24VDCM-NET
Functional earth
Power supply unit
CN1 CN2
M-NET Output
TB2 TB3
ABS V+V-FG
24VDC
DC power cable
(Polarized)
Maximum 50 m
* Use ring terminals to connect the cables.
NOTES
Connecting the PAC-YG50ECA expansion controller (sold separately)
* Supply 24 VDC power from PAC-SC51KUA to the AG-150A when using PAC-YG50ECA.
* M-NET transmission line does not need to be connected to the AG-150A or PAC-SC51KUA.
Signal communication from the AG-150A is performed entirely over the LAN.
Connect the LAN from the AG-150A to the PAC-YG50ECA via a HUB.
- 22 -
Page 24

8Initial Setting
NOTES
* Choose from two initial setting methods: 1) Making the settings via AG-150A, 2) Making the setting via the LAN using the Initial
Setting Web.
• This manual provides the instructions on making the initial settings from AG-150A.
• Please refer to AG-150A Instruction Book or the Instruction Book that are provided with Initial Setting Web.
• Refer to the PAC-YG50ECA expansion controller Installation/Instructions Manual for how to connect expansion controllers.
System 1: Standard configuration (system with 50 units of equipments or less)
System 2: System with connection to one or more expansion controllers (system with more than 50 units or equipments)
The startup procedures vary with system configuration.
The following table summarizes the initial setting procedures.
Initial setting procedures
1. Startup 1 Check that the version of the AG-150A software is 2.10 or later.
2. Clock setting 1 Touch “Date and time” on the Initial Settings window.
3. Unit information settings 11Touch “Unit Info.” on the Initial Settings window.
4. Network settings 11Touch “Network” on the Initial Settings window.
5. Group settings 11Touch “Groups” on the Initial Settings window.
6. Miscellaneous settings 11After completing the group setting, make the settings for other items as
7. Clock setting 1 Touch “Date and time” on the Initial Settings window.
8. Exiting the Initial Settings
window
System configuration
12
Check that the DB No. of the AG-150A and the PAC-YG50ECA to be
connected match.
2 Set the IP address for the expansion controller with the dipswitch on
PAC-YG50ECA.
13
24The display language selection window will appear. Select the desired
35The Initial Setting screen will appear.
2 Change other settings as necessary by touching the desired items, and
2 Set the Expansion Controller setting to “Do not use”.
2 Set the Expansion Controller setting to “Use”.
33Change other settings as necessary by touching the desired items, and
2 Check that the AG-150A tab is selected.
2 Touch the EC tabs, and make necessary settings for the EC-1 through
33Change other settings as necessary by touching the desired items, and
2 Check that the AG-150A tab is selected.
2 Touch the EC tabs, and make necessary settings for the EC-1 through
33Change other settings as necessary by touching the desired items, and
2 Change other settings as necessary by touching the desired items, and
11When all settings have been completed, touch the icon to return to
Turn on the power supply unit (PAC-SC51KUA) to start up the AG-150A.
language by touching the language.
(Once the initial settings have been made, the monitor screen will
appear when the unit is turned on. Touch the icon at the top right of
the screen to bring up the Initial Settings window if necessary.)
touch “Save Settings” to save the changes.
touch “Save Settings” to save the changes.
EC-3.
touch “Save Settings” to save the changes.
EC-3.
touch “Save Settings” to save the changes.
necessary by touching the item on the menu to be set.
• Interlocked operation setting (interlocked operation between
LOSSNAY and indoor units)
• Refrigerant system monitor setting (monitoring of refrigerant piping
connection between indoor and outdoor units)
• Block settings
• Floor layout settings
•User settings
touch “Save Settings” to save the changes.
the Monitor/Operation window.
- 23 -
Page 25

9Test Run
• Before performing a test run, verify that the group setting has been performed and the startup sequence for the interlocked
operation setting has been completed.
• It may take approximately 5 minutes from power on until the local remote controller becomes operable.
Test run procedure
1 Turn the AG-150A and all air conditioning units on.
2 Set the “Test run” to [In use] on the Unit info on the Initial settings screen. After the setting is completed, the [Test run] button will
appear on the Operation screen.
3 Select the group to be tested on the Monitor/Operation screen and run the test.
4 Check for proper operation of each air conditioning unit during test run (e.g., check to see if cold (or warm) air comes out of the
supply air outlet on each indoor unit)
5 After confirming that all units are operating properly, stop the units either from AG-150A or from the remote controllers.
* Please refer to the Installation Manual that came with the indoor unit for further details on the test run method.
- 24 -
Page 26

10 System Configuration Example
1. System with connection to a PAC-YG50ECA expansion controller
*1
AG-150A
192.168.1.1
24VDC
Power supply unit for transmission line
(Model name: PAC-SC51KUA)
*1 M-NET address settings
are not required.
LAN LAN
HUB
2. Using multiple system controllers
Expansion controller
(PAC-YG50ECA)
192.168.1.211
000
Expansion controller
(PAC-YG50ECA)
192.168.1.212
000
Expansion controller
(PAC-YG50ECA)
192.168.1.213
000
M-NET
M-NET
M-NET
: IP address
: M-NET address
Indoor units: 50 units
ON/OFF remote
controller etc.
201
M-NET adapter
Indoor unit address 01 ~ 20
Indoor unit address 01 ~ 20
Group 1 ~ Group 20
Group 1 ~ Group 20
Mr. Slim outdoor unit (M-NET
adapter)
M-NET adapter: 2 units
M-NET adapter address 21 ~ 22
Group 21, 22
Indoor unit (M-NET): 20 units
Indoor unit address 01 ~ 20
Group 1 ~ Group 20
Indoor unit (K-control): 30 units
Indoor unit address 21 ~50
K transmission converter (Model name: PAC-SC25KAA)
Group 21 ~ Group 50
AG-150A
000
(Main system controller)
ON/OFF remote
controller etc.
201
(Sub system controller)
24VDC
Power supply unit for transmission line (Model name: PAC-SC51KUA)
Indoor units: 50 units
Group 1 ~ Group 20
• Make the initial settings (e.g., group settings and interlock settings) from the AG-150A, which is a main system controller, or
from the Initial Settings Web.
• Designate a single system controller in a given system from which operation prohibition signal can be sent.
3. To control a Mr. slim
M-NET adapter
* An M-NET adapter (sold separately) is required to
connect and control the Mr. Slim model of units to the
M-NET.
(Main system controller)
4. To control a K control model
* Set AG-150A address to “000” when a K transmission converter is
connected. Always set to the main system controller when the
address is “000”.
* Set the address of the K-control indoor units to a larger number
than those of the M-transmission models of indoor units.
* When using a group setting for the K control model, set only the
indoor unit that belongs to that group.
AG-150A
000
Power supply unit for transmission line (Model name: PAC-SC51KUA)
AG-150A
(Main system controller)
24VDC
M-NET
PAC-SC51KUA
Power supply unit
Indoor unit address 01 ~ 20
Group 1 ~ Group 20
Mr. Slim outdoor unit (M-NET
adapter)
M-NET adapter: 2 units
M-NET adapter address 21 ~ 22
Group 21, 22
20 indoor units
Indoor unit address 01~20
Group 1 to Group 20
20 indoor units (for control)
Indoor unit address 21~40
Group 21 to Group 40
PAC-SC25KAA
K transmission converter
* Set the minimum indoor unit address in the group for the K control
model group number.
- 25 -
Page 27

11 External input/output usage
1. External signal input function
* External signal input requires the external I/O adapter (PAC-YG10HA) sold separately.
NOTES
* When using a PAC-YG50ECA expansion controller, connect the external input/output adapter to the external input terminal on
the expansion controller, not to the AG-150A.
* Make necessary settings for each expansion controller from the AG-150A on the Network Settings window (external input
settings).
(1) External input
Emergency stop/normal, run/stop and prohibit/enable operation of local remote controllers can be controlled for all air conditioners by
using a voltage (12VDC or 24VDC) contact signal from an external source. (Select with an initial settings screen.)
No. External signal input function Remarks
Do not use the external input signal
1
(factory setting)
Perform emergency stop/normal with
2
level signal
3 Perform ON/OFF with level signal
Perform ON/OFF, prohibit/enable with
4
pulse signals.
The local remote controller ON/OFF operation, the controller ON/OFF operation,
and prohibit/enable change operation will be prohibited during emergency stop.
Timer operation will also be prohibited.
The local remote controller ON/OFF operation, the controller ON/OFF operation,
and prohibit/enable change operation will be prohibited. Timer operation will also
be prohibited.
Set the pulse width while the contact is ON to 0.5 to 1 second.
-
(2) Level signals and pulse signals (12VDC or 24VDC)
(A) Level signal (B) Pulse signal
Contact ON
Contact OFF
Contact ON
Contact OFF
Stop Run Stop
Emergency
Normal Normal
stop
Example for ON/OFF
Signal 1(run)
Signal 2(stop)
Contact ON
Contact OFF
Contact ON
Contact OFF
0.5 to 1 sec
0.5 to 1 sec
OFFONOFF
* The prohibit/enable input is the same.
(3) External input specifications
CN5 Lead wire Emergency stop/normal level signal ON/OFF, level signal ON/OFF, prohibit/enable pulse signal
No.5 Orange Emergency stop/normal input ON/OFF input ON input
No.6 Yellow Not used Not used OFF input
No.7 Blue Not used Not used Local remote controller operation prohibit input
No.8 Gray Not used Not used Local remote controller operation enable input
No.9 Red External DC source “+ 12VDC” or “+ 24VDC”
(A) For level signal
1 When the emergency stop/normal signal is selected, the status will switch from normal to emergency stop when the
external input signal contact changes from OFF to ON, and will change from emergency stop to normal when the contact
changes from ON to OFF. Air conditioning units that are stopped will remain off after the emergency stop is cancelled.
Start up each indoor unit to manually restore the previous operation.
2 When the ON/OFF signal is selected, the status will change from OFF to ON when the external input signal contact
changes from OFF to ON, and will change from ON to OFF when the contact changes from ON to OFF.
(B) For pulse signal
1 Even if the ON signal is input during ON, the status will remain ON.
2 If local remote controller operation is prohibited, the ON/OFF operation mode, temperature setting operations, and filter
reset from the local remote controller will be prohibited.
3 Set the pulse width (contact ON time) to 0.5 to 1 sec.
- 26 -
Page 28

(4) Recommended circuit
(A) For level signal
CN5
9
8
7
6
5
1
This unit
Red
Orange
Max.10m
(32 ft)
X1
X1
Run/stop or
Emergency stop
Power supply
(12VDC or 24VDC)
Use relays X1, X2, Y1, and Y2 that meet
the following specifications.
Contact rating
Rated voltage >=12VDC
Rated current >= 0.1A
Minimum applicable load =< 1mA at DC
(B) For pulse signal
CN5
9
8
7
6
5
1
This unit
Red
Gray
Blue
Yel lo w
Orange
Max.10m
(32 ft)
Power supply
(12VDC or 24VDC)
Y2
Y1
X2
X1
X1 X2 Y1 Y2
Run Stop
Prohibit
Enable
1 The contact relay, DC power source, extension cable, etc., must be prepared on site.
2
2 The connection cable can be extended up to 10m (32 ft). Use a 0.3mm
(AWG 22) or larger wire.
3 Strip the extra cable near the connector, and insulate the exposed section securely with tape, etc.
2. External signal output function
* External signal output requires the external I/O adapter PAC-YG10HA (sold separately).
NOTE
* When using a PAC-YG50ECA expansion controller, connect the external input/output adapter to the external input terminal on
the expansion controller, not to the AG-150A.
(1) External output
When one or more air conditioners are operating, the “ON” signal will be output, if a malfunction occurs in one or more air
conditioners, the “Malfunction” signal will be output.
(2) External output specifications
CN5 Lead wire Details of each terminal
No.1 Green Common (External ground)
No.2 Black ON/OFF
No.3 Brown Malfunction/normal
(3) Recommended circuit
CN5
9
4
3
2
1
This unit L1: Run display lamp
Brown
Black
Green
Max.10m
(32 ft)
Diode (*2)
(*2)
(*2)
Z1
Power (*1)
Supply
Z2
Z2
L2: Malfunction display lamp
1 Each element will turn on while in ON operation or if a malfunction occurs.
2 The connection cable can be extended up to 10m (32 ft).
3 The relays, lamps, diodes and extension cables, etc, must be prepared separately on site.
1 The “ON” signal is output even while the “Malfunction” signal
is being output.
Use Z1 and Z2 relays that meet the following specifications.
Operation coil
L1Z1
Rated voltage: 12VDC, 24VDC
Power Consumption: 0.9W or less
L2
(*1) Prepare a power supply separately according to the
relay being used (12VDC or 24VDC).
(*2) Always include a diode on both ends of the relay coil.
- 27 -
Page 29

NOTE
• When connecting the external input/output cables to connector
CN5 on the controller, punch out the knockout hole.
3. LAN connection function
When using the LAN connection function, insert the LAN cable to
the LAN connector of the controller.
* Connect the LAN cable from the AG-150A to other equipments via
a HUB.
* The maximum LAN cable distance from the AG-150A is 100 m
(328 ft).
The line can be extended up to 500 m (1640 ft) by connecting the
hubs in cascade.
* When using a PAC-YG50ECA expansion controller, do not
connect more than four devices (gateway, router, layer 3 switch,
HUB, and etc.) in series between AG-150A and PAC-YG50ECA.
(Transmission delay time must not exceed 2 seconds.)
* Procure the LAN cable on site, and use 100 BASE-TX Straight
cable. (Category 5 or later)
* For a description of the IP address setting method, refer to section
8 Initial Setting .
* LAN is 100 BASE-TX specification.
Punch out the knockout hole
LAN
CAUTION
* Perform the LAN wiring before controller installation, and wire up to the body by the same method as wiring the M-NET
transmission cable.
* When a LAN is already connected, choose the IP address after consulting with the system administrator, and connect to the
LAN body after changing the IP address.
* Connect AG-150A to a private network.
Use a security device such as a VPN router when connecting to the Internet.
(Configure the system in the way that does not allow access from the external sites.)
- 28 -
Page 30

12 Optional Accessories
Parts Model Usage Note
Power supply unit PAC-SC51KUA
Expansion controller PAC-YG50ECA
Electric box PAC-YG83UTB Use for wall-embed installations
Mounting attachment A type PAC-YG85KTB
Mounting attachment B type PAC-YG81TB Use for wall-mount installations
External input/output
adapter
Black surface cover PAC-YG71CBL Surface cover
PAC-YG10HA
Supplies power to the controller and M-NET
transmission line.
Enables the connection of up to 150 indoor and
LOSSNAY units to an AG-150A.
Use when both the controller and a power supply
unit (PAC-SC51KUA) for a transmission line are
mounted on a wall.
Enables the use of the external input/output
function
Each expansion controller
can control up to 50 units.
(Up to three expansion
controllers can be connected
to a system.)
Required when using the
external input/output function
NOTE:
This equipment has been tested and found to comply with the limits for a Class B digital device, pursuant to
Part 15 of the FCC Rules. These limits are designed to provide resonable protection against harmful
interference in a residential installation. This equipment generates, uses and can radiate radio frequency
energy and, if not installed and used in accordance with the instructions, may cause harmful interference to
radio communications.
However, there is no guarantee that interference will not occur in a particular installation.
If this equipment does cause harmful interference to radio or television reception, which can be determined
by turning the equipment off and on, the user is encouraged to try to correct the interference by one or more
of the following measures:
- Reorient or relocate the receiving antenna.
- Increase the separation between the equipment and receiver.
- Connect the equipment into an outlet on a circuit different from that to which the receiver is connected.
- Consult the dealer or an experienced radio / TV technician for help.
- 29 -
Page 31

Page 32

This product is designed and intended for use in the residential,
commercial and light-industrial environment.
The product at hand is
based on the following
EU regulations:
• Low Voltage Directive 2006/95/EC
• Electromagnetic Compatibility Directive,
2004/108/EC
Please be sure to put the contact address/telephone number on
this manual before handing it to the customer.
HEAD OFFICE: TOKYO BLDG. , 2-7-3, MARUNOUCHI, CHIYODA-KU, TOKYO 100-8310, JAPAN
Authorized representative in EU: MITSUBISHI ELECTRIC EUROPE B.V.
HARMAN HOUSE, 1 GEORGE STREET, UXBRIDGE, MIDDLESEX UB8 1QQ, U.K.
WT05368X04
Printed in Japan
Recycled Paper
 Loading...