

Page 1

TASKE Administrator TASKE Call Center Management Tools Version 7.0
Table of Contents
TASKE ADMINISTRATOR PROGRAM .............................................................. 3
TASKE ADMINISTRATOR AND DATABASE CONCEPTS................................ 4
Account Codes Definition.................................................................................. 4
Agent Groups Definition.................................................................................... 4
Extension Groups Definition.............................................................................. 4
Extensions Definition......................................................................................... 5
Path Definition................................................................................................... 5
Pilots Definition ................................................................................................. 5
Pilot Groups Definition ...................................................................................... 5
Shadow Definition............................................................................................. 5
TSF Time Definition .......................................................................................... 6
Trunk Groups Definition.................................................................................... 6
Trunk Definition................................................................................................. 6
OVERVIEW OF THE TASKE ADMINISTRATOR INTERFACE .......................... 7
Overview of Database Mode...........................................................................................7
List panel........................................................................................................... 7
Details panel ..................................................................................................... 8
Overview of Configuration Mode.....................................................................................8
File Maintenance............................................................................................... 1
Alarms............................................................................................................... 2
Logs.................................................................................................................. 2
MANIPULATING THE DATABASE ..................................................................... 3
Trunks.............................................................................................................................3
Trunk Groups..................................................................................................................4
Extensions......................................................................................................................5
Extension Groups ...........................................................................................................7
Agents ............................................................................................................................8
Agent Groups................................................................................................................10
Pilots.............................................................................................................................11
Pilot Groups..................................................................................................................13
Account Codes .............................................................................................................14
Spectrums ....................................................................................................................16
Answer Spectrum............................................................................................ 16
Abandon Spectrum.......................................................................................... 17
-1-
Page 2

TASKE Administrator TASKE Call Center Management Tools Version 7.0
Interflow Spectrum .......................................................................................... 17
Options.........................................................................................................................17
Trunk time to answer....................................................................................... 17
Ignore abandon time ....................................................................................... 18
TSF time.......................................................................................................... 18
Short talk time................................................................................................. 18
Week Starts..................................................................................................... 18
Add Auto Attendant TTA................................................................................. 18
PERFORMING CONFIGURATION TASKS....................................................... 20
Examining General Disk Statistics ................................................................................20
Getting detailed statistics on your data files ..................................................................21
Setting Thresholds........................................................................................................22
Archiving old data .........................................................................................................23
Deleting old data...........................................................................................................24
Synchronizing Local Shadow Files................................................................................27
Setting Collector Alarms................................................................................................29
Setting Disk Space Alarms............................................................................................30
Viewing Logs ................................................................................................................31
-2-
Page 3

TASKE Administrator TASKE Call Center Management Tools Version 7.0
TASKE Administrator program
Selecting the Administrator icon accesses the TASKE Administrator
program.
The TASKE Administrator program is used in the process of creating a database
of names, numbers and other characteristics of your Call Center. Creating a
database enables the TASKE system to generate reports for elements of the
telephone system used throughout your company. Changes to the database can
only be made through the TASKE Administrator program.
Configuration activities for the database such as reviewing Error Logs, setting
Alarms and generating Statistics files are also performed through the TASKE
Administrator program. The Administrator is divided into two functional areas:
Database Manipulation and Configuration Tasks.
The major features in Database mode include configuring the number of Trunks,
Extensions, Agents, Pilots and Accounts in use on the telephone system.
The major features in Configuration mode include configuring disk storage
settings, error log tracking and ensuring the security of your stored records by
setting alarms to notify of any abnormalities. The program may be used routinely
for activities such as reading Configuration logs, archiving, deleting and
synchronizing shadow files, as well as performing disk statistics.
-3-
Page 4

TASKE Administrator TASKE Call Center Management Tools Version 7.0
TASKE Administrator and Database Concepts
Account Codes Definition
Account Codes are numbers an Agent enters in the system while engaged
on a Pilot call to flag the call by type so that call statistics can be collected
by the TASKE system for analysis and planning.
The fields that are applicable to Verified Call Activity Account Codes are:
the Call Account Code Number, Name and Nick Name. A Call Account
Code Number must be four (4) digits or less.
Verified Account Codes are constructed as multiple pairs of 2 decimal
digits. The first pair of digits forms a primary pair and is typically displayed
as a row header in the Call Account Reports. Secondary pairs of digits
typically form a column list; in effect a matrix is formed. Combining the
primary pair with multiple secondary pairs results in codes of six digits or
more.
Non-Verified Account Codes are used in an ad-hoc manner and are free
form. They are used as a convenient mechanism to collate statistics on
various types of calls. The TASKE system performs no verification on
them and requires only that they be constructed in pairs of digits. Because
the TASKE system places virtually no restrictions on the format of NonVerified Account Codes, the Account Codes administrator does not apply
to them.
Agent Groups Definition
A group of Agents will be used as the resource to handle incoming
telephone calls depending on the Pilot/Path the caller is on. Agent Groups
are also used for reporting purposes.
Extension Groups Definition
Extensions may be placed in groups to form Extension Hunt Groups or
Station Hunt Groups. These are sometimes referred to simply as
Extension Groups or Hunt Groups. Hunt Groups may be used, for
instance, when Callers wish to reach anyone in the Sales department
rather than a particular individual in Sales. Again, the use of a group
enables calls to be addressed to all Extensions of a Group, rather than
trying one Extension after another to find one free. If any employee in the
Extension Group is free, then they are given the call.
Thus a telephone call arriving at the telephone system is addressed to an
individual Trunk, or to a Trunk Group. After arriving on an incoming Trunk,
the call may be switched by the telephone system to an individual
extension, an Extension Group, to a Voice Mail/Automated Attendant
system, or to some other answering point.
-4-
Page 5

TASKE Administrator TASKE Call Center Management Tools Version 7.0
Extensions Definition
The keyset connected to the phone system is described as an Extension
or Station. In principle, the keyset operates in the same way as the
telephone in your home, and may in fact be the same type of telephone
instrument. The telephones that are used in the business environment,
particularly the telephones that are used in Call Centers may also be more
sophisticated than typical residential telephones.
Path Definition
A Path is a relationship in the telephone system between a number that
can be dialed, and a search order of Agent Groups and Interflow points for
the call to be offered to. A Path encapsulates the routing and timing
options available to a telephone call. Each Path has an Access Code,
which is a reporting mechanism and cannot be dialed. To access a Path it
is given a Pilot Number and a Caller dials the Pilot. When generating
reports in the TASKE system, the Pilot Number is the Access Code
preceded by a P (P001).
Pilots Definition
From a telephone perspective, a Pilot is an access code. From a TASKE
perspective, a Pilot is what shows up in the data records. The TASKE
system employs a Pilot concept, where a pilot is primarily a means of
providing an address mechanism for Extension Groups. The Pilot enables
one dialable number to represent all Extension members of a Group. The
Pilots that are used in the telephone system are dialable address numbers
that correspond to telephone Hunt Groups.
Pilot Groups Definition
Pilots are placed in Pilot Groups, in the same manner that Trunks and
Extensions are grouped. This effectively enables "super-addresses" to be
formed, where one Pilot Group represents multiple answering points for
reporting purposes. This provides powerful and flexible reporting
mechanisms to be developed and used within the TASKE system.
Shadow Definition
The TASKE ToolBox network may run with a shadow disk function, where
each record received from the Telephone System is written both to a
network file server (used to share TASKE data files) and to the shadow
directory (not necessarily "local", it may be located on another hard drive).
This double storage of records provides a duplicate copy of the data
records that are received from the Telephone System.
Typically, the shadow drive would be a local hard drive resident on the
TASKE Network Server, and the primary drive (storing all TASKE data
files) would be a hard drive resident on a separate network file server.
-5-
Page 6

TASKE Administrator TASKE Call Center Management Tools Version 7.0
The shadow drive is used as a backup mechanism and stores data for a
relatively short period of time, such as 30 days. This usually provides a
long enough period to determine if the data on the primary network file
server is accurate.
TSF Time Definition
The Telephone Service Factor (TSF) is the ratio of calls which are either
Answered or Abandoned before a threshold time, to (divided by) the total
number of calls which are offered. You specify the threshold, or TSF Time,
in the TSF Time field for individual Pilots.
Trunk Groups Definition
The Trunks on a telephone system are usually programmed in one or
more groups of Trunks called Trunk Groups. Using a Trunk Group enables
several Trunks to be addressed as a single entity, so the Central Office
does not have to direct a call to a particular Trunk and be concerned with
whether the Trunks are individually busy or free. It merely sends a call to
the telephone system's Trunk Group(s). If any Trunk in the group is free,
then the call gets through to the system. This avoids the Caller having to
try a Trunk and find it busy, and then try another, and so on until a free
Trunk is found.
Trunk Definition
A Trunk is a telephone circuit from the local Central Office to your
telephone system, and is similar to the telephone line from the Central
Office to your house or the telephone line from the telephone system to
your desk. That is, a Trunk is a connection between two telephone
switching systems, while a line is a connection between a telephone
switching system and a telephone instrument.
Outgoing calls from your telephone system to the Public Network are
made over outgoing Trunks, whereas calls to the telephone system from
the Public Network are made over incoming Trunks. In some Call Centers,
Trunks handle both incoming and outgoing calls.
-6-
Page 7
TASKE Administrator TASKE Call Center Management Tools Version 7.0
Overview of the TASKE Administrator Interface
Overview of Database Mode
Database Mode allows you to perform the design, construction and editing of the
Administration database. This Includes configuring the number of Trunks,
Extensions, Agents, Pilots and Accounts in use on your telephone system and
establishing groups for reporting purposes.
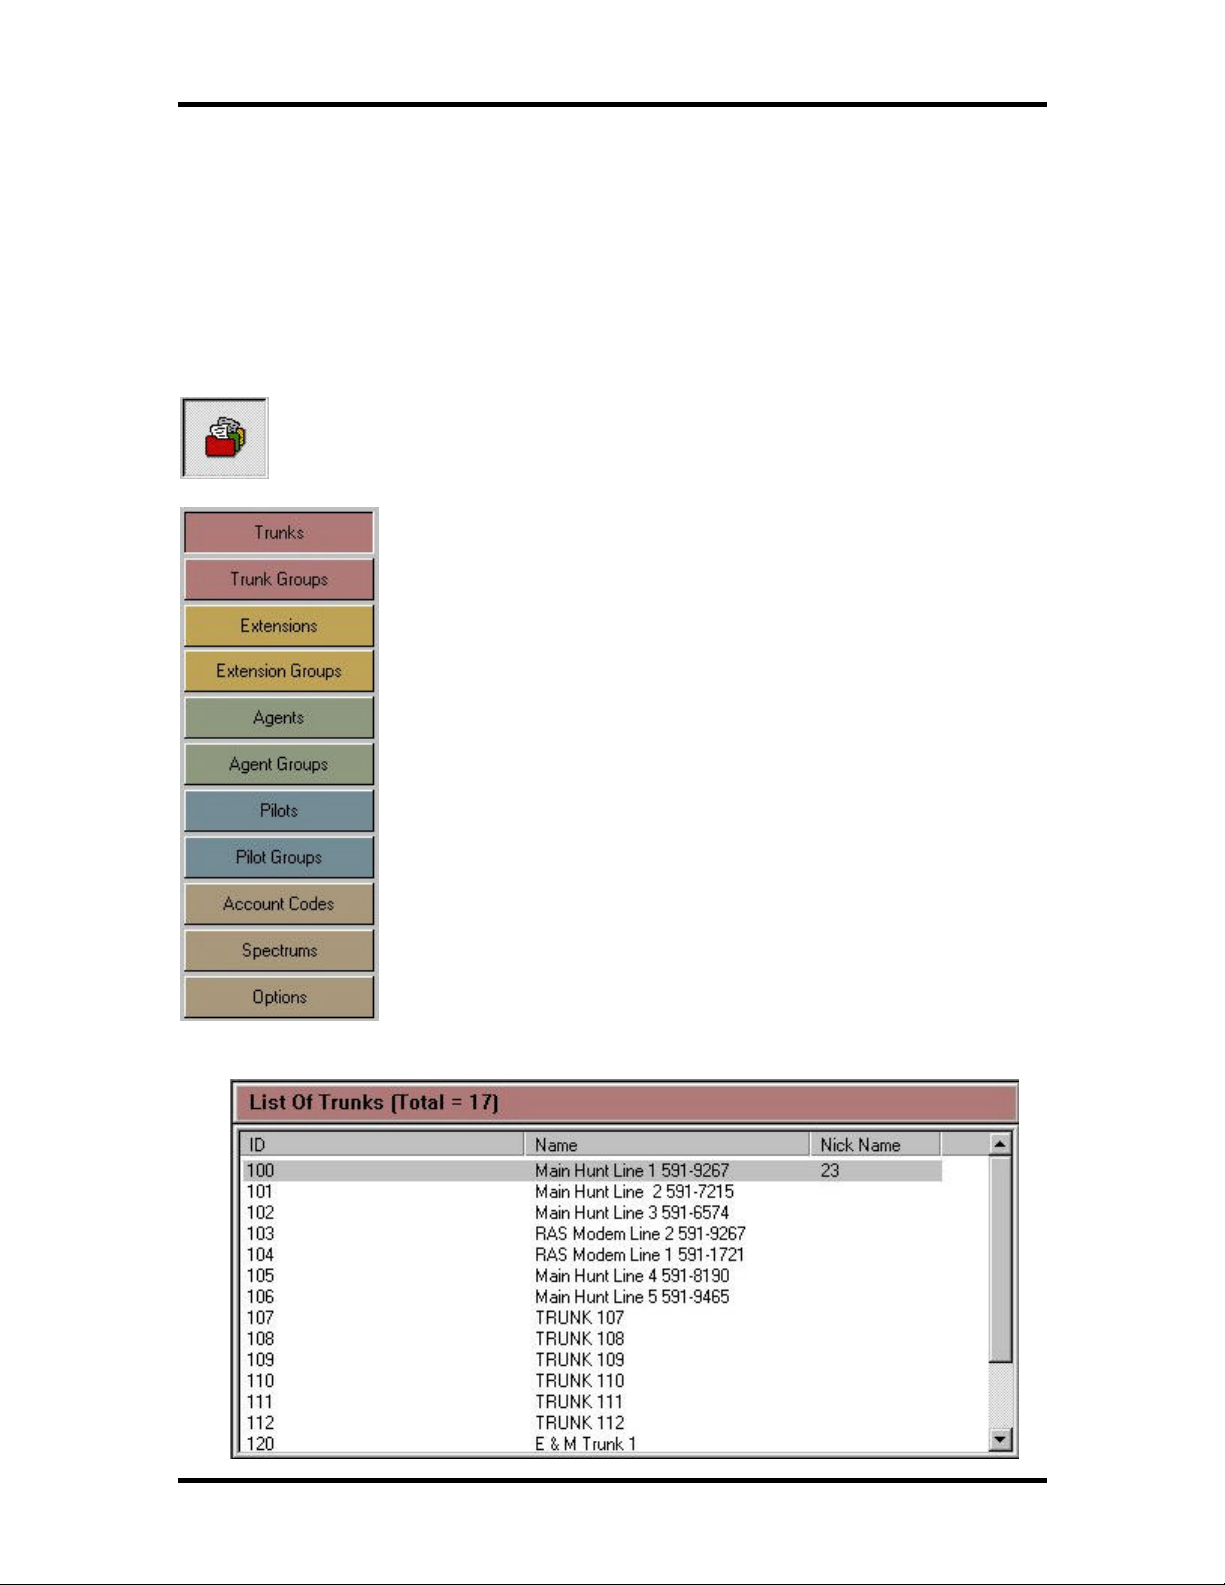
To use the TASKE Administrator in Database Mode, click on the
Database icon in the TASKE Tool section of the TASKE Administrator
(upper left-hand corner).
Once Database mode has been selected, a list of editable
tables is displayed on the left-hand side of the TASKE Main
Control Panel.
These tables include: Trunks and Trunk Groups, Extensions
and Extension Groups, Agents and Agent Groups, Pilots and
Pilot Groups, and Account Codes.
Settings can also be created for Spectrum and Database
options.
List panel
In the List panel (upper right-hand side) the ID
Number, Name and Nick Name of any record in a
chosen table are displayed.
-7-
Page 8
TASKE Administrator TASKE Call Center Management Tools Version 7.0
To choose which table records should be displayed from, you must click
on one of the table buttons on the left-hand side of the screen (these
include Trunks, Trunk Groups, Extensions, Extension Groups, Agents,
Agent Groups, Pilots, Pilot Groups, and Accounts).
Details panel
In the Details panel (lower right-hand side) any detailed information
pertaining to a particular record selected in the List panel is displayed.
As the different tables require different information, the details in the
Details panel change accordingly. Any specific details may be edited,
updated or deleted.
Overview of Configuration Mode
Configuration Mode allows you to perform file maintenance, set alarms and view
logs for the TASKE Administrator Database.
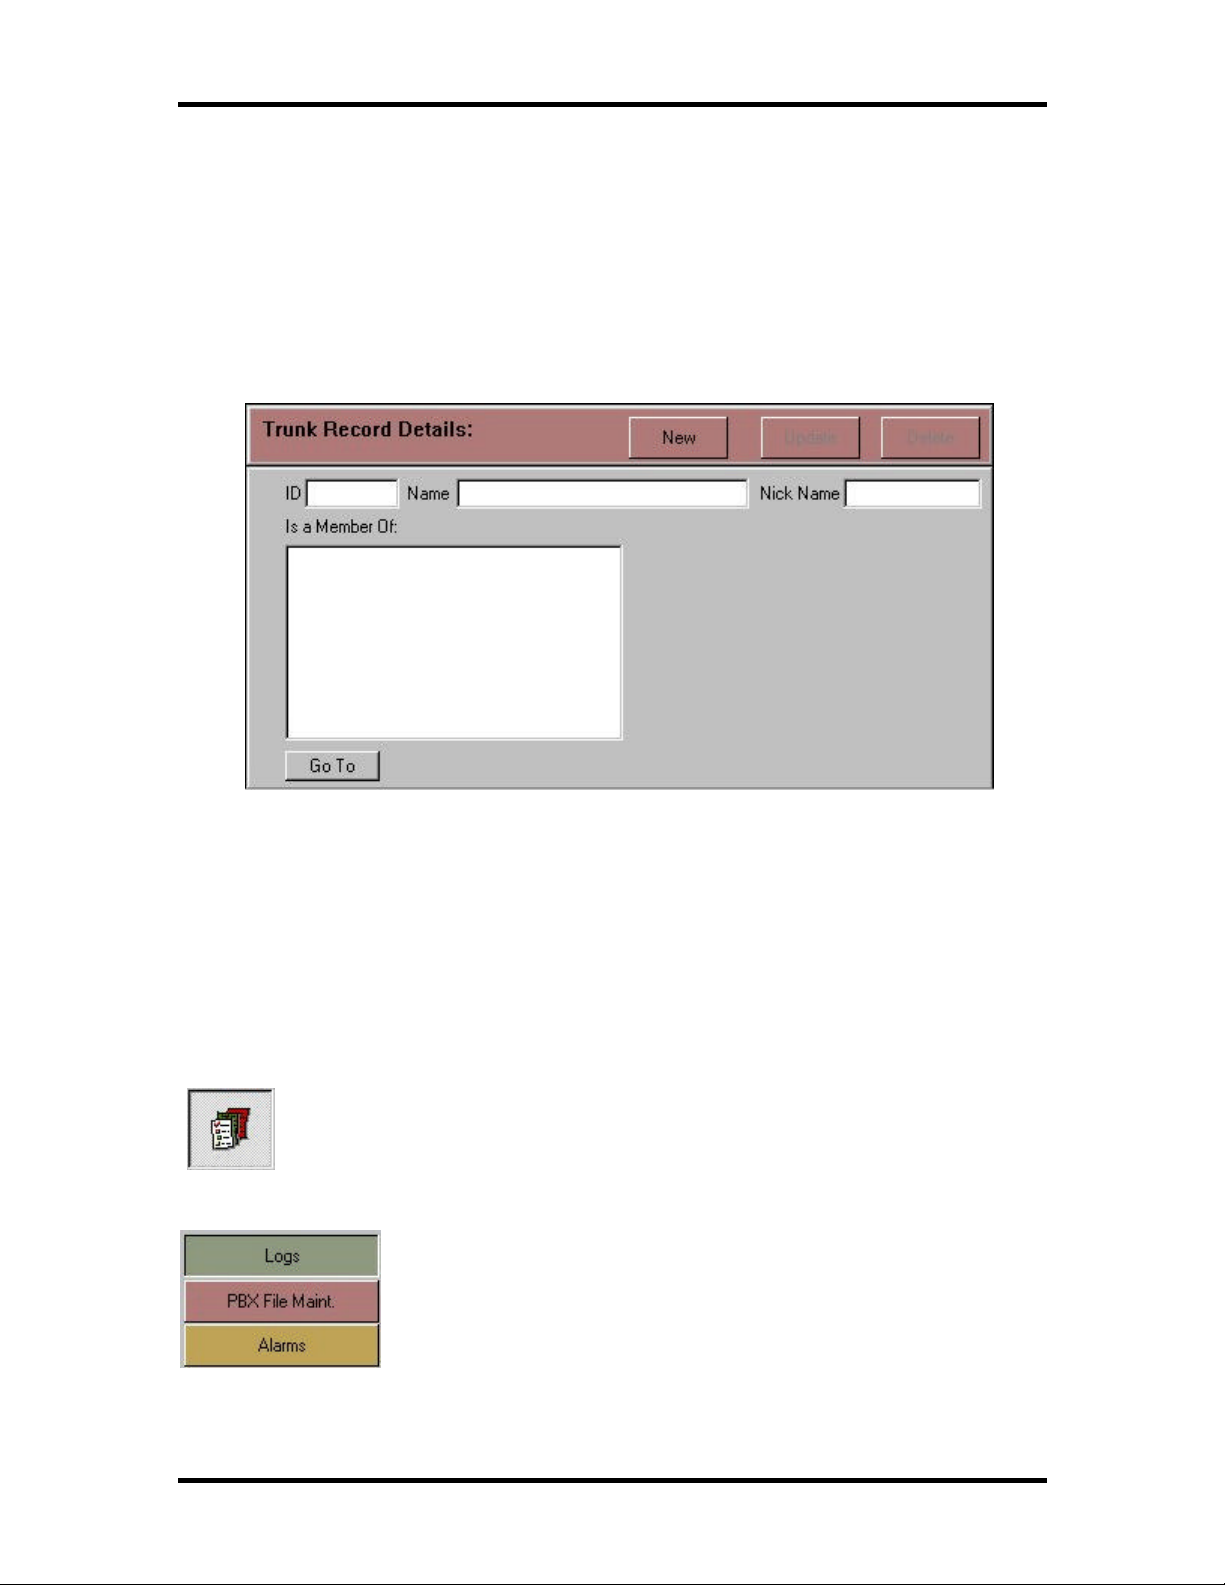
To use the TASKE Administrator in Configuration Mode, click on the
Configuration icon in the TASKE Tool section of the TASKE
Administrator (upper left-hand corner).
Once Configuration mode has been selected, a list of
Configuration tools is displayed below the Database and
Configuration Mode buttons on the left-hand side of the
TASKE Main control panel.
-8-
Page 9
TASKE Administrator TASKE Call Center Management Tools Version 7.0
Note: If the Administrator program is being used on the TASKE Server machine,
the tasks include: File Maintenance, Alarms and Logs. If the TASKE
Administrator is being used on a Supervisor machine, only the Logs option will be
available.
File Maintenance
The File Maintenance tool contains 2 panels. The top panel displays
current statistics on file space and disk space for the TASKE Administrator
machine (the Server in a Client/Server installation).
Different statistics can be displayed by choosing different criteria in the
Display Usage drop down list.
The lower panel displays controls for archiving, deleting and synchronizing
shadow files, as required.
-1-
Page 10
TASKE Administrator TASKE Call Center Management Tools Version 7.0
At the bottom of each panel is a button to perform the tasks immediately.
For example, at the bottom of the Archive Files panel is a Archive Now...
button which performs all archive tasks selected upon being pressed
(when pressed, a dialog box will appear, confirming the actions).
Alarms
The Alarms section allows setting alarms for notification if the Collector
isn't receiving data records, or if the available disk space falls below an
acceptable level.
Logs
The Logs section displays an error log from the TASKE Administrator,
allowing for the tracking and reporting of any errors encountered by the
TASKE system.
The log displayed is a record of Collector events and any errors or alarms
that occur.
-2-
Page 11

TASKE Administrator TASKE Call Center Management Tools Version 7.0
Manipulating the database
Trunks
Selecting the Trunks button within the TASKE Administrator
in Database Mode causes the Trunks section of the database
to be displayed. At the top of the window, in the List panel, is a scrollable list of
all of the Trunks included in the database.
The ID Number Column displays unique ID Numbers for each Trunk defined in
the TASKE Database. The ID Number is the key parameter by which the TASKE
Database indexes and tracks Trunk elements.
The Name Column displays the names for each Trunk defined in the TASKE
Database. The Name is a character string that represents the Trunk's full name
for reference purposes and may appear in Trunk reports.
The Nick Name Column displays nicknames for each Trunk defined in the
TASKE Database. The Nick Name is simply an alternate way of naming Trunk
records and may be used in reports.
In the Details panel Trunks may be added, deleted or modified by using the New,
Update and Delete buttons.
To make a new Trunk entry
1. Click the Database Button on the upper left corner of the TASKE
Administrator program to switch to Database mode.
2. Click the Trunks button.
3. In the Trunk Record Details panel, click the New button.
4. In the Trunk Record Detail panel, enter the ID, Name, and Nick Name
of the new Trunk Record.
5. Select the Trunk Groups that the new Record belongs to from the
Member Of list.
6. Click the Update button.
To modify an existing trunk entry
1. Choose the Trunk entry to be modified from the List panel.
2. In the Trunk Record Detail panel, modify the Trunk Record.
3. In the Trunk Record Details panel, click the Update button.
-3-
Page 12
TASKE Administrator TASKE Call Center Management Tools Version 7.0
To delete a trunk entry
1. Choose the Trunk entry to be deleted from the List panel.
2. In the Trunk Record Details panel, click the Delete button.
3. Click Yes in the confirmation box that displays to continue with the
Delete.
Tip To Examine one of the Trunk Groups listed in the Member Of panel, select
the Trunk Group and click Go To.
Note The Trunk ID Number must be as programmed in your telephone system.
Trunk Groups
Selecting the Trunk Groups button within the TASKE
Administrator in Database Mode causes the Trunk Groups
section of the database to be displayed. In the List panel at the top of the
window, is a scrollable list of all of the Trunk Groups included in the database.
The list contains an ID Number, Name and Nick Name for each Trunk Group.
The ID Number Column displays unique ID Numbers for each Trunk Group
defined in the TASKE Database. The ID Number is the key parameter by which
the TASKE Database indexes and tracks Trunk Group elements.
The Name Column displays the names for each Trunk Group defined in the
TASKE Database. The Name is a character string which represents the Trunk
Group's full name and is for reference purposes and may appear in Trunk Group
reports.
The Nick Name Column displays nicknames for each Trunk Group defined in the
TASKE Database. The Nick Name is simply an alternate way of naming Trunk
Group records and may be used in reports.
In the Details panel Trunk Groups may be added, deleted or modified by using
the New, Update and Delete buttons.
To make a new Trunk Group entry
1. Click the Database Button on the upper left corner of the TASKE
Administrator program to switch to Database mode.
2. Click the Trunk Groups button.
3. In the Trunk Group Record Details panel, click the New button.
-4-
Page 13

TASKE Administrator TASKE Call Center Management Tools Version 7.0
4. In the Trunk Group Record Detail panel, enter the ID, Name, and Nick
Name of the new Trunk Group Record.
5. Select the Trunks that belong to the new Trunk Group from the Trunk
Members list.
6. Click the Update button.
To modify an existing Trunk Group entry
1. Choose the Trunk Group entry to be modified from the List panel.
2. In the Trunk Group Record Detail panel, modify the Trunk Group
Record.
3. In the Trunk Group Record Details panel, click the Update button.
To delete a Trunk Group entry
1. Choose the Trunk Group entry to be deleted from the List panel.
2. In the Trunk Group Record Details panel, click the Delete button.
3. Click Yes in the confirmation box that displays to continue with the
Delete.
Tip To Examine one of the Trunks listed in the Trunk Members panel, select the
Trunk to examine and click Go To.
Note If you intend to implement the TASKE Call Costing program in your Call
Center, it is absolutely necessary to define the lowest Trunk Group Numbers,
such as 1000, 1001, 1002, and 1003 in the TASKE Database as Call Costing
Trunk Groups, and reserve the higher Trunk Group numbers, such as 1010, for
reporting purposes. This is because the Call Costing program searches for
costing information on TASKE Database Trunk Groups with the lowest Trunk
Group number.
Extensions
Selecting the Extensions button within the TASKE
Administrator in Database Mode causes the Extensions
section of the database to be displayed. In the List panel at the top of the
window, is a scrollable list of all of the Extensions included in the database. The
list contains an ID Number, Name and Nick Name for the Extension.
The ID Number Column displays unique ID Numbers for each Extension defined
in the TASKE Database. The ID Number is the key parameter by which the
TASKE Database indexes and tracks Extension elements.
-5-
Page 14

TASKE Administrator TASKE Call Center Management Tools Version 7.0
The Name Column displays the names for each Extension defined in the TASKE
Database. The Name is a character string which represents the Extension's full
name and is for reference purposes and may appear in Extension reports.
The Nick Name Column displays nicknames for each Extension defined in the
TASKE Database. The Nick Name is simply an alternate way of naming
Extension records and may be used in reports.
In the Details panel Extensions may be added, deleted or modified by using the
New, Update and Delete buttons.
To make a new Extension entry
1. Click the Database Button on the upper left corner of the TASKE
Administrator program to switch to Database mode.
2. Click the Extensions button.
3. In the Extension Record Details panel, click the New button.
4. In the Extension Record Detail panel, enter the ID, Name, and Nick
Name of the new Extension Record.
5. Select the Extension Groups that the new Extension belongs to from
the Member Of list.
6. If the Extension is a Voice Mail extension, and should not get counted
in the reports as an extension being answered, abandoned or
interflowed, mark the checkbox for the Voice-Mail flag.
7. If the Extension is an Auto-Attendant, and should not get counted in
the reports as an extension being answered, abandoned or
interflowed, mark the checkbox for the Auto-Attendant flag.
8. Click the Update button.
To modify an existing Extension entry
1. Choose the Extension entry to be modified from the List panel.
2. In the Extension Record Detail panel, modify the Extension Record.
3. In the Extension Record Details panel, click the Update button.
To delete an Extension entry
1. Choose the Extension entry to be deleted from the List panel.
2. In the Extension Record Details panel, click the Delete button.
-6-
Page 15

TASKE Administrator TASKE Call Center Management Tools Version 7.0
3. Click Yes in the confirmation box that displays to continue with the
Delete.
Tip: To Examine one of the Extension Groups listed in the Members Of panel,
select the Extension Group to examine and click Go To.
Note: The Extension Number must be as programmed in the telephone system
as it is the key parameter by which the TASKE Administrator indexes and tracks
Extension elements in the TASKE Administrator Database. An Extension
Number must be seven digits or less, in order to be compatible with PBX data
record entries.
Extension Groups
Selecting the Extension Groups button within the TASKE
Administrator in Database Mode causes the Extension
Groups section of the database to be displayed. In the List panel at the top of the
window, is a scrollable list of all of the Extension Groups included in the
database. The list contains an ID Number, Name and Nick Name for each
Extension Group.
The ID Number Column displays unique ID Numbers for each Extension Group
defined in the TASKE Database. The ID Number is the key parameter by which
the TASKE Database indexes and tracks Extension Group elements.
The Name Column displays the names for each Extension Group defined in the
TASKE Database. The Name is a character string that represents the Extension
Group's full name and is for reference purposes and may appear in Extension
Group reports.
The Nick Name Column displays nicknames for each Extension Group defined in
the TASKE Database. The Nick Name is simply an alternate way of naming
Extension Group records and may be used in reports.
In the Details panel Extension Groups may be added, deleted or modified by
using the New, Update and Delete buttons.
To make a new Extension Group entry
1. Click the Database Button on the upper left corner of the TASKE
Administrator program to switch to Database mode.
2. Click the Extension Groups button.
3. In the Extension Group Record Details panel, click the New button.
-7-
Page 16

TASKE Administrator TASKE Call Center Management Tools Version 7.0
4. In the Extension Group Record Detail panel, enter the ID, Name, and
Nick Name of the new Extension Group Record.
5. Select the Extensions that belong to the new Extension Group from the
Extension Members list.
6. Click the Update button.
To modify an existing Extension Group entry
1. Choose the Extension Group entry to be modified from the List panel.
2. In the Extension Group Record Detail panel, modify the Extension
Group Record.
3. In the Extension Group Record Details panel, click the Update button.
To delete an Extension Group entry
1. Choose the Extension Group entry to be deleted from the List panel.
2. In the Extension Group Record Details panel, click the Delete button.
3. Click Yes in the confirmation box that displays to continue with the
Delete.
Tip To Examine one of the Extensions listed in the Extension Members panel,
select the Extension to examine and click Go To.
Agents
Selecting the Agents button within the TASKE Administrator
in Database Mode causes the Agents section of the database
to be displayed. In the List panel at the top of the window, is a scrollable list of all
of the Agents included in the database. The list contains an ID Number, Name
and Nick Name for each Agent.
The ID Number Column displays unique ID Numbers for each Agent defined in
the TASKE Database. The ID Number is the key parameter by which the TASKE
Database indexes and tracks Agent elements.
The Name Column displays the names for each Agent defined in the TASKE
Database. The Name is a character string which represents the Agent's full name
and is for reference purposes and may appear in Agent reports.
The Nick Name Column displays nicknames for each Agent defined in the
TASKE Database. The Nick Name is simply an alternate way of naming Agent
records and may be used in reports.
-8-
Page 17

TASKE Administrator TASKE Call Center Management Tools Version 7.0
In the Details panel Agents may be added, deleted or modified by using the New,
Update and Delete buttons.
To make a new Agent entry
1. Click the Database Button on the upper left corner of the TASKE
Administrator program to switch to Database mode.
2. Click the Agents button.
3. In the Agent Record Details panel, click the New button.
4. In the Agent Record Detail panel, enter the ID, Name, and Nick Name
of the new Agent Record.
5. Select the Agent Groups that the new Agent belongs to from the
Member Of list.
6. Click the Update button.
To modify an existing Agent entry
1. Choose the Agent entry to be modified from the List panel.
2. In the Agent Record Detail panel, modify the Agent Record.
3. In the Agent Record Details panel, click the Update button.
To delete an Agent entry
1. Choose the Agent entry to be deleted from the List panel.
2. In the Agent Record Details panel, click the Delete button.
3. Click Yes in the confirmation box that displays to continue with the
Delete.
Tip To Examine one of the Agent Groups listed in the Members Of panel, select
the Agent Group to examine and click Go To.
Note The Agent Number must be as programmed in the telephone system as it
is the key parameter by which the TASKE Administrator indexes and tracks
Agent elements in the TASKE Administrator Database. The individual Agents in
this section of the Database form the pool of available Agents which may be
used in defining Agent Groups within the TASKE Database. An Agent ID Number
must be seven digits or less in order to be compatible with the PBX data record
entries.
-9-
Page 18

TASKE Administrator TASKE Call Center Management Tools Version 7.0
Agent Groups
Selecting the Agent Groups button within the TASKE
Administrator in Database Mode causes the Agent Groups
section of the database to be displayed. In the List panel at the top of the
window, is a scrollable list of all of the Agent Groups included in the database.
The list contains an ID Number, Name and Nick Name for each Agent Group.
The ID Number Column displays unique ID Numbers for each Agent Group
defined in the TASKE Database. The ID Number is the key parameter by which
the TASKE Database indexes and tracks Agent Group elements.
The Name Column displays the names for each Agent Group defined in the
TASKE Database. The Name is a character string which represents the Agent
Group's full name and is for reference purposes and may appear in Agent Group
reports.
The Nick Name Column displays nicknames for each Agent Group defined in the
TASKE Database. The Nick Name is simply an alternate way of naming Agent
Group records and may be used in reports.
In the Details panel Agent Groups may be added, deleted or modified by using
the New, Update and Delete buttons.
To make a new Agent Group entry
1. Click the Database Button on the upper left corner of the TASKE
Administrator program to switch to Database mode.
2. Click the Agent Groups button.
3. In the Agent Group Record Details panel, click the New button.
4. In the Agent Group Record Detail panel, enter the ID, Name, and Nick
Name of the new Agent Group Record.
5. Select the Agents that belong to the new Agent Group from the Agent
Members list.
6. Click the Update button.
-10-
Page 19

TASKE Administrator TASKE Call Center Management Tools Version 7.0
To modify an existing Agent Group entry
1. Choose the Agent Group entry to be modified from the List panel.
2. In the Agent Group Record Detail panel, modify the Agent Group
Record.
3. In the Agent Group Record Details panel, click the Update button.
To delete an Agent Group entry
1. Choose the Agent Group entry to be deleted from the List panel.
2. In the Agent Group Record Details panel, click the Delete button.
3. Click Yes in the confirmation box that displays to continue with the
Delete.
Tip To Examine one of the Agents listed in the Agent Members panel, select the
Agent to examine and click Go To.
Note The Agent Group is a reporting concept within the TASKE Database that
identifies a collection of Agents to be reported on as an entity. Unlike individual
Agents, Agent Groups do not have to employ the same Number field entry as in
the telephone system.
Pilots
Selecting the Pilots button within the TASKE Administrator in
Database Mode causes the Pilots section of the database to
be displayed. In the List panel at the top of the window, is a scrollable list of all of
the Pilots included in the database. The list contains an ID Number, Name and
Nick Name for each Pilot.
The ID Number Column displays unique ID Numbers for each Pilot defined in the
TASKE Database. The ID Number is the key parameter by which the TASKE
Database indexes and tracks Pilot elements.
The Name Column displays the names for each Pilot defined in the TASKE
Database. The Name is a character string which represents the Pilot's full name
and is for reference purposes and may appear in Pilot reports.
The Nick Name Column displays nicknames for each Pilot defined in the TASKE
Database. The Nick Name is simply an alternate way of naming Pilot records and
may be used in reports.
In the Details panel Pilots may be added, deleted or modified by using the New,
Update and Delete buttons.
-11-
Page 20

TASKE Administrator TASKE Call Center Management Tools Version 7.0
To make a new Pilot entry
1. Click the Database Button on the upper left corner of the TASKE
Administrator program to switch to Database mode.
2. Click the Pilots button.
3. In the Pilot Record Details panel, click the New button.
4. In the Pilot Record Detail panel, enter the ID, Name, Nick Name and
TSF Time of the new Pilot Record.
5. Select the Pilot Groups that the new Pilot belongs to from the Member
Of list.
6. Select the primary Path for your Pilot (which group of Agents the call
will initially route to) and then up to three additional Overflow Agent
Group ID's. Choosing Path determines the routing of calls between the
Primary and up to three Overflow Groups. Choosing Pilot enables one
dialable number to represent all extensions within an extension group.
7. Click the Update button.
To modify an existing Pilot entry
1. Choose the Pilot entry to be modified from the List panel.
2. In the Pilot Record Detail panel, modify the Pilot Record.
3. In the Pilot Record Details panel, click the Update button.
To delete a Pilot entry
1. Choose the Pilot entry to be deleted from the List panel.
2. In the Pilot Record Details panel, click the Delete button.
3. Click Yes in the confirmation box that displays to continue with the
Delete.
Tip To Examine one of the Pilot Groups listed in the Members Of panel, select
the Pilot Group to examine and click Go To.
Note The TASKE Pilot Number must be a mirror image of the Pilot Number in
the phone system.
-12-
Page 21

TASKE Administrator TASKE Call Center Management Tools Version 7.0
Pilot Groups
Selecting the Pilot Groups button within the TASKE
Administrator in Database Mode causes the Pilots section of
the database to be displayed. In the List panel at the top of the window, is a
scrollable list of all of the Pilot Groups included in the database. The list contains
an ID Number, Name and Nick Name for each Pilot Group.
The ID Number Column displays unique ID Numbers for each Pilot Group
defined in the TASKE Database. The ID Number is the key parameter by which
the TASKE Database indexes and tracks Pilot Group Code elements.
The Name Column displays the names for each Pilot Group defined in the
TASKE Database. The Name is a character string which represents the Pilot
Group's full name and is for reference purposes and may appear in Pilot Group
reports.
The Nick Name Column displays nicknames for each Pilot Group defined in the
TASKE Database. The Nick Name is simply an alternate way of naming Pilot
Group records and may be used in reports.
In the Details panel Pilot Groups may be added, deleted or modified by using the
New, Update and Delete buttons.
To make a new Pilot Group entry
1. Click the Database Button on the upper left corner of the TASKE
Administrator program to switch to Database mode.
2. Click the Pilot Groups button.
3. In the Pilot Group Record Details panel, click the New button.
4. In the Pilot Group Record Detail panel, enter the ID, Name, and Nick
Name of the new Pilot Group Record.
5. Select the Pilots that belong to the new Pilot Group from the Pilot
Members list.
6. Click the Update button.
-13-
Page 22

TASKE Administrator TASKE Call Center Management Tools Version 7.0
To modify an existing Pilot Group entry
1. Choose the Pilot Group entry to be modified from the List panel.
2. In the Pilot Group Record Detail panel, modify the Pilot Group Record.
3. In the Pilot Group Record Details panel, click the Update button.
To delete an Pilot Group entry
1. Choose the Pilot Group entry to be deleted from the list.
2. In the Pilot Group Record Details panel, click the Delete button.
3. Click Yes in the confirmation box that displays to continue with the
Delete.
Tip To Examine one of the Pilots listed in the Pilot Members panel, select the
Pilot to examine and click Go To.
Account Codes
An Account Code is a number used by an Agent for statistics
purposes. When an Agent receives a Pilot call they determine the type of call and
enter an Account Code into the TASKE system so the call is flagged by type in
the TASKE system for analysis and planning. The TASKE Reports program can
then generate reports for calls with specific codes, and provide supervisors with
various statistics for these calls.
There are two types of Call Account Codes: Verified and Non-Verified.
Selecting the Account Codes button within the TASKE Administrator in Database
Mode causes the Account Codes section of the database to be displayed.
In the List panel at the top of the window, is a scrollable list of all of the Accounts
included in the database.
-14-
Page 23

TASKE Administrator TASKE Call Center Management Tools Version 7.0
The ID Number Column displays unique ID Numbers for each Account Code
defined in the TASKE Database. The ID Number is the key parameter by which
the TASKE Database indexes and tracks Account Code elements.
The Name Column displays names for each Account Code defined in the TASKE
Database. The Name is a character string, which represents the Account's full
name and is for reference purposes and may appear in Account reports.
The Nick Name Column displays nicknames for each Account Code defined in
the TASKE Database. The Nick Name is simply an alternate way of naming
Account records and may be used in reports.
In the Details panel Account Codes may be added, deleted or modified by using
the New, Update and Delete buttons.
To make a new Account entry
1. Click the Database Button on the upper left corner of the TASKE
Administrator program to switch to Database mode.
2. Click the Account Codes button.
3. In the Account Record Details panel, click the New button.
4. In the Account Record Detail panel, enter the ID, Name, and Nick
Name of the new Account Code Record.
5. Click the Update button.
-15-
Page 24

TASKE Administrator TASKE Call Center Management Tools Version 7.0
To modify an existing Account entry
1. Choose the Account Code entry to be modified from the List panel.
2. In the Account Record Detail panel, modify the Account Code Record.
3. In the Account Record Details panel, click the Update button.
To delete an Account entry
1. Choose the Account Code entry to be deleted from the list.
2. In the Account Record Details panel, click the Delete button.
3. Click Yes in the confirmation box that displays to continue with the
Delete.
Spectrums
The TASKE ToolBox generates various reports that provide a spectrum or profile
of the timing of calls to the Call Center.
For example, the Reports include a Time To Answer spectrum which indicates
the numbers of calls answered between 10 and 20 seconds, between 20 and 30
seconds, and so on. This enables you to compare the spectrum of call
answering and the time delay, and determine the delays faced by most callers.
Answer Spectrum
The Answer Spectrum edit boxes allow for 10 threshold times for the Time
To Answer spectrum to be set. The Spectrum reports produced indicate
the number of calls Answered within the threshold time for each column.
-16-
Page 25

TASKE Administrator TASKE Call Center Management Tools Version 7.0
Thus, each of the 10 edit boxes is set to an independent threshold time (in
seconds); the edit boxes are set with progressively longer times and a
profile of Time To Answer from 0 to “x” seconds is produced.
Abandon Spectrum
The Abandon Spectrum edit boxes allow for 10 threshold times for the
Time To Abandon spectrum to be set. The Spectrum reports produced
indicate the number of calls Abandoned within the threshold time for each
column.
Interflow Spectrum
The Interflow Spectrum edit boxes allow for 10 threshold times for the
Time To Interflow spectrum to be set. The Spectrum reports produced
indicate the number of calls Interflowed within the threshold time, in each
column.
Thus, each of the 10 edit boxes is set to an independent threshold time (in
seconds); the edit boxes are set with progressively longer times and a
profile of Time To Abandon from 0 to “x” seconds is produced.
To Update Spectrum Settings
1. Click the Database Button on the upper left corner of the TASKE
Administrator program to switch to Database mode.
2. Click the Spectrums button.
3. Enter the number of seconds for each threshold time for Answer,
Abandon and Interflow Spectrums.
4. Click the Update button.
Options
The TASKE ToolBox provides a wide range of reports that provide statistics on
almost all aspects of the operation of a Call Center. The available options are
listed below.
Trunk time to answer
Trunk Reports list the percentage of calls that are actually answered within
“x” seconds. This value is compared with the target service level. The
threshold time is entered in the Trunk time to answer selection box in
seconds, and is reported under the % Ans’d Before xx Secs column
heading in the Reports.
-17-
Page 26

TASKE Administrator TASKE Call Center Management Tools Version 7.0
Ignore abandon time
You can set a threshold time to identify genuine Abandons. These are
calls that Abandon after the threshold time set in the Ignore abandon time
selection box. Genuine Abandons are used in the Service Percentages
for the Pilot.
TSF time
The Telephone Service Factor (TSF) is a measure of the level of service
provided to Callers. It is the percentage of calls Answered and
Abandoned within the defined threshold time compared to the total
number of calls offered. The setting is now used only for extensions.
Short talk time
The TASKE ToolBox allows you to distinguish calls that terminate after a
very short talk time, from other calls. The assumption is that a high
proportion of very short Answered calls indicates a potential fault on one
or more trunks. For example, a faulty Trunk may allow a call to be
Answered, but may not provide a satisfactory audio connection for
conversation to take place.
These calls are reported under the Short Dur’n Calls column heading in
the TASKE Trunk and Trunk Group Reports. The threshold is set in the
Short talk time selection box.
Week Starts
The TASKE ToolBox enables you to produce Daily Reports by Day of
Week. The setting of the Week Starts selection box determines which day
is the start of the work week.
Add Auto Attendant TTA
If your Call Center has implemented an Auto-Attendant function, then a
call may be Answered within a short period of time, such as 6 seconds.
However this is not the time that the Caller perceives as the Time to
Answer, since the Caller may have to wait an additional period of time
after the Auto-Attendant answers before reaching an Agent.
-18-
Page 27

TASKE Administrator TASKE Call Center Management Tools Version 7.0
To obtain a true measure of the time that it takes to reach the Agent, the
TASKE system takes into account both time periods. Enabling the Add
Auto-Attendant TTA check box causes the TASKE ToolBox to add the
Time to Answer for the Auto-Attendant function to the Trunk Time to
Answer.
To Update Option Settings
1. Click the Database Button on the upper left corner of the TASKE
Administrator program to switch to Database mode.
2. Click the Options button.
3. Change the settings to be affected.
4. Click the Update button.
-19-
Page 28

TASKE Administrator TASKE Call Center Management Tools Version 7.0
Performing Configuration Tasks
Examining General Disk Statistics
This option is only available on the TASKE Server or Standalone machine.
Current statistics on file space and disk space for the TASKE Server or
Standalone machine are displayed in the TASKE Administrator in Configuration
Mode under File Maintenance.
The Total Disk Space feature displays the total (used and unused) disk space
available on the local machine.
The Estimated Days Remaining feature displays an estimate of how many days
TASKE will have enough disk space available to continue producing logs and
files at the current rate until more free disk space is required. N/A is displayed on
Client machines.
The Free Disk Space feature displays how much free (available for use) disk
space is currently available on the local machine.
To examine General Statistics
1. Click the Configuration Button on the upper left corner of the TASKE
Administrator program to switch to Configuration mode.
2. Click the PBX File Maint. button.
3. The Statistics are now displayed in the top panel of the Administrator
window in a section called Disk Statistics for...
-20-
Page 29

TASKE Administrator TASKE Call Center Management Tools Version 7.0
Getting detailed statistics on your data files
This option is only available on the TASKE Server or Standalone machine.
Current statistics on file space and disk space for the TASKE Server or
Standalone machine are displayed in the TASKE Administrator in Configuration
Mode under File Maintenance. Statistics can be displayed for the data files on
the local machine by choosing different groups from the Display Usage drop
down list.
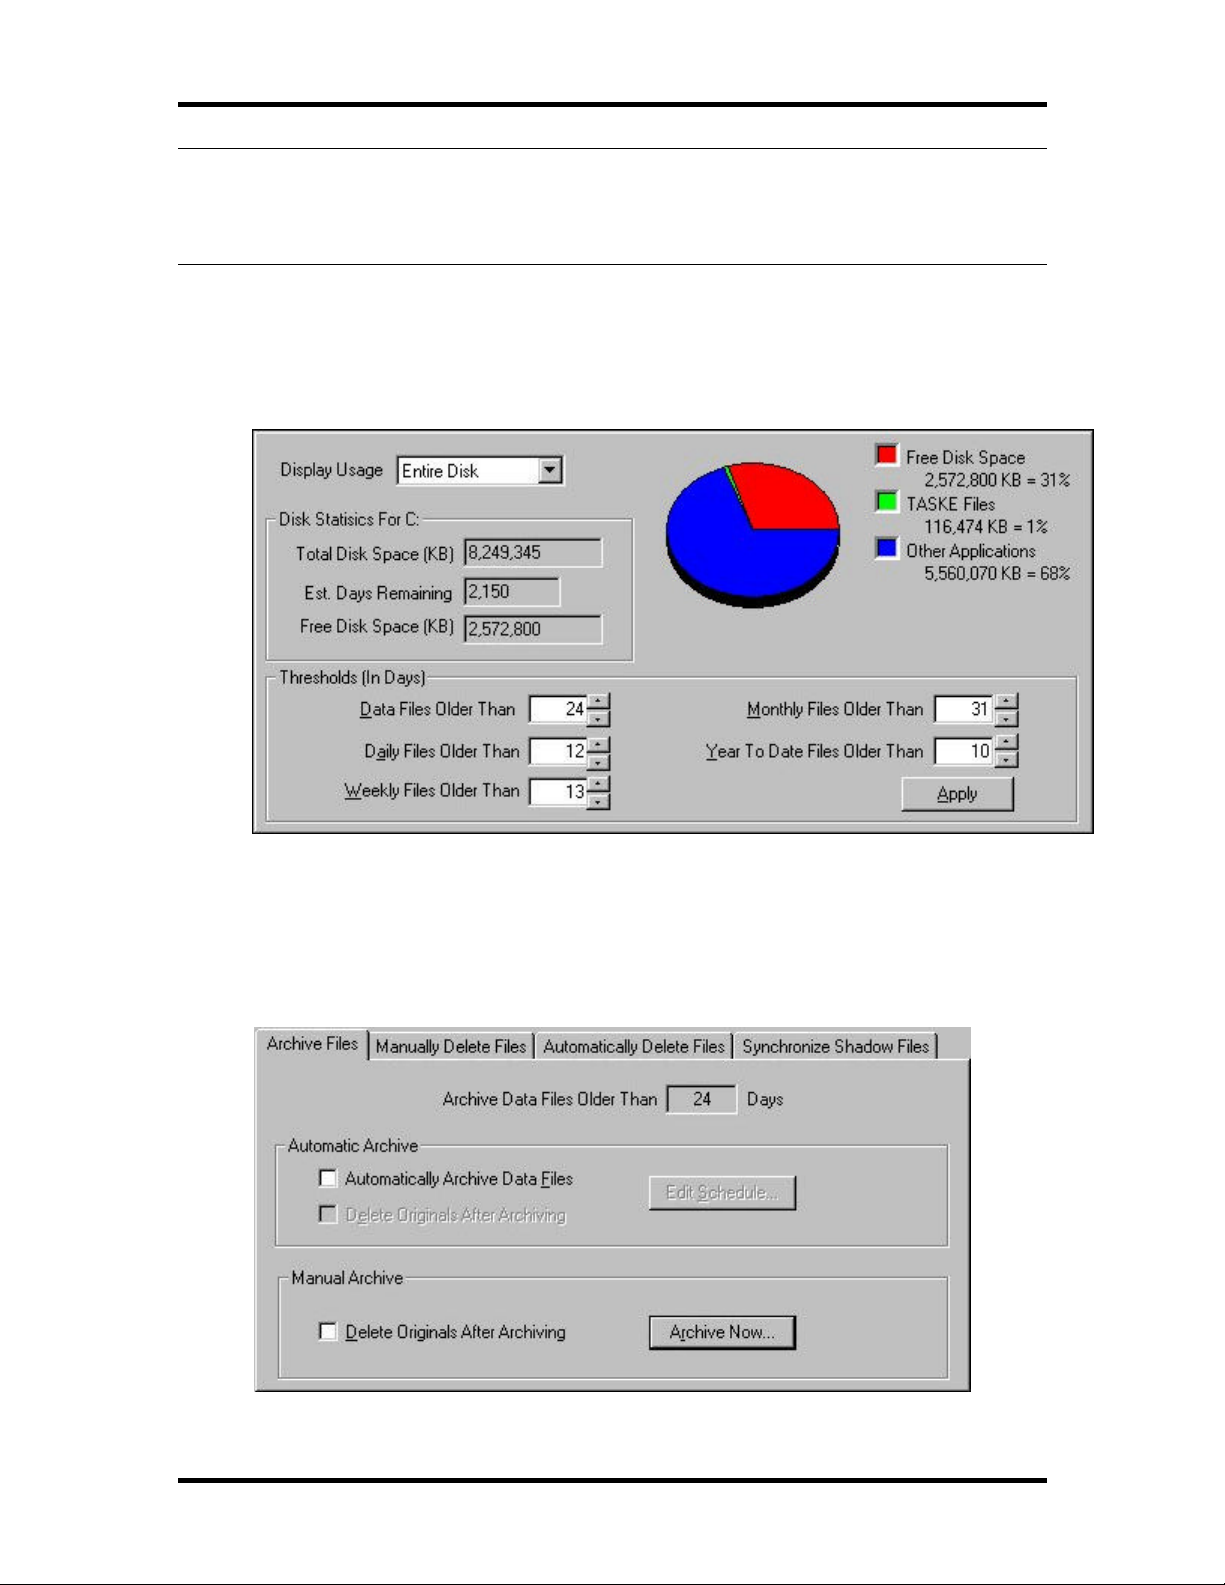
Viewing statistics for the Entire Disk will display the Free Disk Space available on
the local machine, the amount of disk space being occupied by TASKE files and
the amount of disk space being occupied by other - non TASKE files.
Viewing statistics for the TASKE Files will display the space occupied by
Compressed Files, Daily Summaries, Weekly Summaries, Monthly Summaries
and Yearly Summaries.
Viewing statistics for the PBX Data Files will display the space occupied by Data
Files less than 24 days old and those greater than 24 days old.
Viewing statistics for the Daily Files will display the space occupied by Data Files
organizing statistics by day that are less than 12 days old and those greater than
12 days old.
Viewing statistics for the Weekly Files will display the space occupied by Data
Files organizing statistics by week that are less than 13 days old and those
greater than 13 days old.
Viewing statistics for the Monthly Files will display the space occupied by Data
Files organizing statistics by month that are less than 31 days old and those
greater than 31 days old.
Viewing statistics for the Year to Date Files will display the space occupied by
Data Files organizing statistics by year to date that are less than 10 days old and
those greater than 10 days old.
To retrieve File Statistics
1. Click the Configuration Button on the upper left corner of the TASKE
Administrator program to switch to Configuration mode.
2. Click the PBX File Maint. Button.
3. To display the different groups of statistics, choose the group desired
from the Display Usage drop down list.
-21-
Page 30

TASKE Administrator TASKE Call Center Management Tools Version 7.0
Setting Thresholds
This option is only available on the TASKE Server or Standalone machine.
The TASKE File Maintenance tool allows a user to create thresholds (in days) for
data files for the purpose of keeping the files on the TASKE Server current and
using disk space efficiently. Thresholds that are set affect documents being
archived and deleted from the system.
To set thresholds
1. Click the Configuration Button on the upper left corner of the TASKE
Administrator program to switch to Configuration mode.
2. Click the PBX File Maint. Button.
3. In the Thresholds section of the File Maintenance window, set the
number of days for each threshold in each of the threshold fields. For
example, if Data Files older than 21 days are to be archived and
deleted, set the number of days in the Data Files field to 21.
4. Click the Apply button to save the changes.
-22-
Page 31

TASKE Administrator TASKE Call Center Management Tools Version 7.0
Archiving old data
This option is only available on the TASKE Server or Standalone machine.
Archiving old data allows copies of the data to be saved as well as creating more
space for new data files and logs being created. Once files have been archived,
the TASKE Administrator recalculates the current disk usage and displays the
information in the Disk Statistics panel of the TASKE Administrator window.
The archived files are placed under the same directory as the TASKE source file.
Archiving compresses the source files and renames the files with a new
extension (.zip). Zip compression is a standard compression that pkzip or Winzip
tools will decompress. Files can be archived on an automatic, scheduled basis,
or manually.
To archive your data files
1. Click the Configuration Button on the upper left corner of the TASKE
Administrator program to switch to Configuration mode.
2. Click the PBX File Maint. button.
3. Choose the Archive Files tab in the lower panel of the Maintenance
window.
4. Enter the number of days for any files older than to be archived.
5. If the files are to be archived immediately, choose the Delete Originals
after Archiving option to free up space on your hard disk and then
choose the Archive Now… button to start the process immediately.
6. If the files are to be archived automatically on a scheduled basis,
choose the Automatically Archive Data Files checkbox.
-23-
Page 32

TASKE Administrator TASKE Call Center Management Tools Version 7.0
On the Schedule Auto Archive / Delete / Sync dialog box that appears,
choose the day(s) of the week and the time of day for the Automatic
Archiving to occur. When your settings are made, choose the Set
Password… button.
On the Set Password dialog box, enter the network ID and Network
password for the Administrator program to use to access the network
to perform the automatic archiving. When the password is entered,
press the OK, button to return to the Schedule Auto Archive / Delete /
Sync dialog box. Press the OK button to accept the changes and to
return to the Archive Files tab.
Then choose the Delete Originals after Archiving option to free up
space on your hard disk if desired.
Your Auto Archiving settings are now complete.
Note Even though the files are archived they are still going to be used by the
Reports tool since it can understand archived files. Archiving gives the
administrator the opportunity to reduce the size of files so they won't take up too
much space.
Deleting old data
This option is only available on the TASKE Server or Standalone machine.
Deleting Files allows you to purge any old or outdated data files from your
system to create more space for new data files and logs being created. Once
files have been deleted, the Administrator recalculates the current disk usage
and displays the information in the Disk Statistics panel of the Administrator
window. Files can be deleted on an automatic, scheduled basis, or manually.
-24-
Page 33

TASKE Administrator TASKE Call Center Management Tools Version 7.0
Using the Delete Files options will delete any archived files that fit the criteria set
in the delete. For example, if the option “Delete daily files older than 10/23/98” is
selected, and the delete is performed, all data files (archived and not) older that
10/23/98 are deleted.
To delete data files manually
1. Click the Configuration Button on the upper left corner of the TASKE
Administrator program to switch to Configuration mode.
2. Click the PBX File Maint. button.
3. Choose the Manually Delete Files tab in the lower panel of the
Maintenance window.
4. To delete any files exceeding the thresholds set in the PBX File
Maintenance option Thresholds, choose the Delete Selected Files
Exceeding their Threshold option.
Press the Delete Now… button to manually delete all files exceeding
the thresholds.
5. To delete selected files exceeding the thresholds set in the PBX File
Maintenance option Thresholds, choose the Delete All Files Exceeding
their Threshold option.
Select the groups of files you would like deleted by clicking the
checkbox next to them.
Press the Delete Now… button to manually delete all selected files
exceeding the thresholds.
6. Click Yes in the confirmation box that displays to continue with the
Delete.
-25-
Page 34

TASKE Administrator TASKE Call Center Management Tools Version 7.0
To delete data files automatically
1. Click the Configuration Button on the upper left corner of the TASKE
Administrator program to switch to Configuration mode.
2. Click the PBX File Maint. button.
3. Choose the Automatically Delete Files tab in the lower panel of the
Maintenance window.
4. To create scheduled deletion of files, select the Auto Delete TASKE
Files checkbox.
5. Select the groups of files you would like deleted by clicking the
checkbox next to them.
6. Choose the Edit Schedule… button.
On the Schedule Auto Archive / Delete / Sync dialog box that appears,
choose the day(s) of the week and the time of day for the Automatic
Delete to occur. When your settings are made, choose the Set
Password… button.
On the Set Password dialog box, enter the network ID and Network
password for the Administrator program to use to access the network
to perform the automatic archiving. When the password is entered,
press the OK, button to return to the Schedule Auto Archive / Delete /
Sync dialog box. Press the OK button to accept the changes and to
return to the Automatically Delete Files tab.
Your Auto Deleting settings are now complete.
Note Caution is required in using this function since the files, once deleted by
this function, are permanently removed by the system. That is, they are gone
forever! If you wish to archive files as part of your backup procedure, then you
must do this prior to using the Configuration program to purge the files.
-26-
Page 35

TASKE Administrator TASKE Call Center Management Tools Version 7.0
Synchronizing Local Shadow Files
This option is only available on the TASKE Server machine.
The TASKE Administrator allows manual synchronization of Shadow Files as
needed to ensure that the Shadow files saved locally are up to date with the
Shadow files saved on a network.
When the Synchronize Shadow files feature is selected, the shadow disk
compares the file on the local shadow drive with the file stored on the network. If
the file does not exist on the network, it is copied from the shadow drive to the
network. If the files differ in size, the shadow drive file is copied to the network.
This process protects your system from any possible file errors induced by
network problems.
If your network configuration is such that the serverPath directory is somewhere
on the network, and is not on the PC that is running as the TASKE Server, then
enable Shadow Drive functionality in the TASKE ToolBox. An example of such a
configuration is the installation of a TASKE Server onto a Novell LAN, where the
Telephone System data collection is actually stored on the Novell File Server.
The problem that the Shadow Drive attempts to solve is collecting data records
when the connection to the Central File Server is broken. The Telephone System
data files are stored in the Shadow Drive and in the Central File Server
simultaneously, as the records are received from the Telephone System.
If data is lost on the LAN Server end due to a network problem, then the local
Shadow Drive copies of the Telephone System data files can be used to resynchronize the LAN File Server's copies.
-27-
Page 36

TASKE Administrator TASKE Call Center Management Tools Version 7.0
To Synchronize Shadow Files Manually
1. Click the Configuration Button on the upper left corner of the TASKE
Administrator program to switch to Configuration mode.
2. Click the PBX File Maint. button.
3. Choose the Synchronize Shadow Files tab in the lower panel of the
Maintenance window.
4. Choose the Enable Shadowing checkbox to create Shadow Files
settings.
5. Enter the location of your shadow files directory in the Shadow
Directory field.
6. Select the files you would like to synchronize from the Shadow Files
list at the bottom of the tab. Clicking the Add button will select any that
are highlighted in the list, Add All will select all of the files in the list.
Clicking the Remove button will remove any that have been selected
already from the list, and Remove All will remove all files from the
selected list.
7. Click the Synchronize Now button to start the process immediately
once the Synch To Server list contains the files you want to
synchronize.
To Synchronize Shadow Files Automatically
1. Click the Configuration Button on the upper left corner of the TASKE
Administrator program to switch to Configuration mode.
2. Click the PBX File Maint. button.
3. Choose the Synchronize Shadow Files tab in the lower panel of the
Maintenance window.
4. Choose the Enable Shadowing checkbox to create Shadow Files
settings.
5. Enter the location of your shadow files directory in the Shadow
Directory field.
6. Select the Enable checkbox in the Automatic File Synchronization
section.
7. Choose the Edit Schedule… button.
-28-
Page 37

TASKE Administrator TASKE Call Center Management Tools Version 7.0
On the Schedule Auto Archive / Delete / Sync dialog box that appears,
choose the day(s) of the week and the time of day for the Automatic
Shadow File Synchronization to occur. When your settings are made,
choose the Set Password… button.
On the Set Password dialog box, enter the network ID and Network
password for the Administrator program to use to access the network
to perform the automatic archiving. When the password is entered,
press the OK, button to return to the Schedule Auto Archive / Delete /
Sync dialog box. Press the OK button to accept the changes and to
return to the Synchronize Shadow Files tab.
Your Automatic Shadow File Synchronization settings are now
complete.
Setting Collector Alarms
This option is only available on the TASKE Server machine.
The TASKE Collector monitors the com port link connected to the Telephone
System to ensure it remains operational.
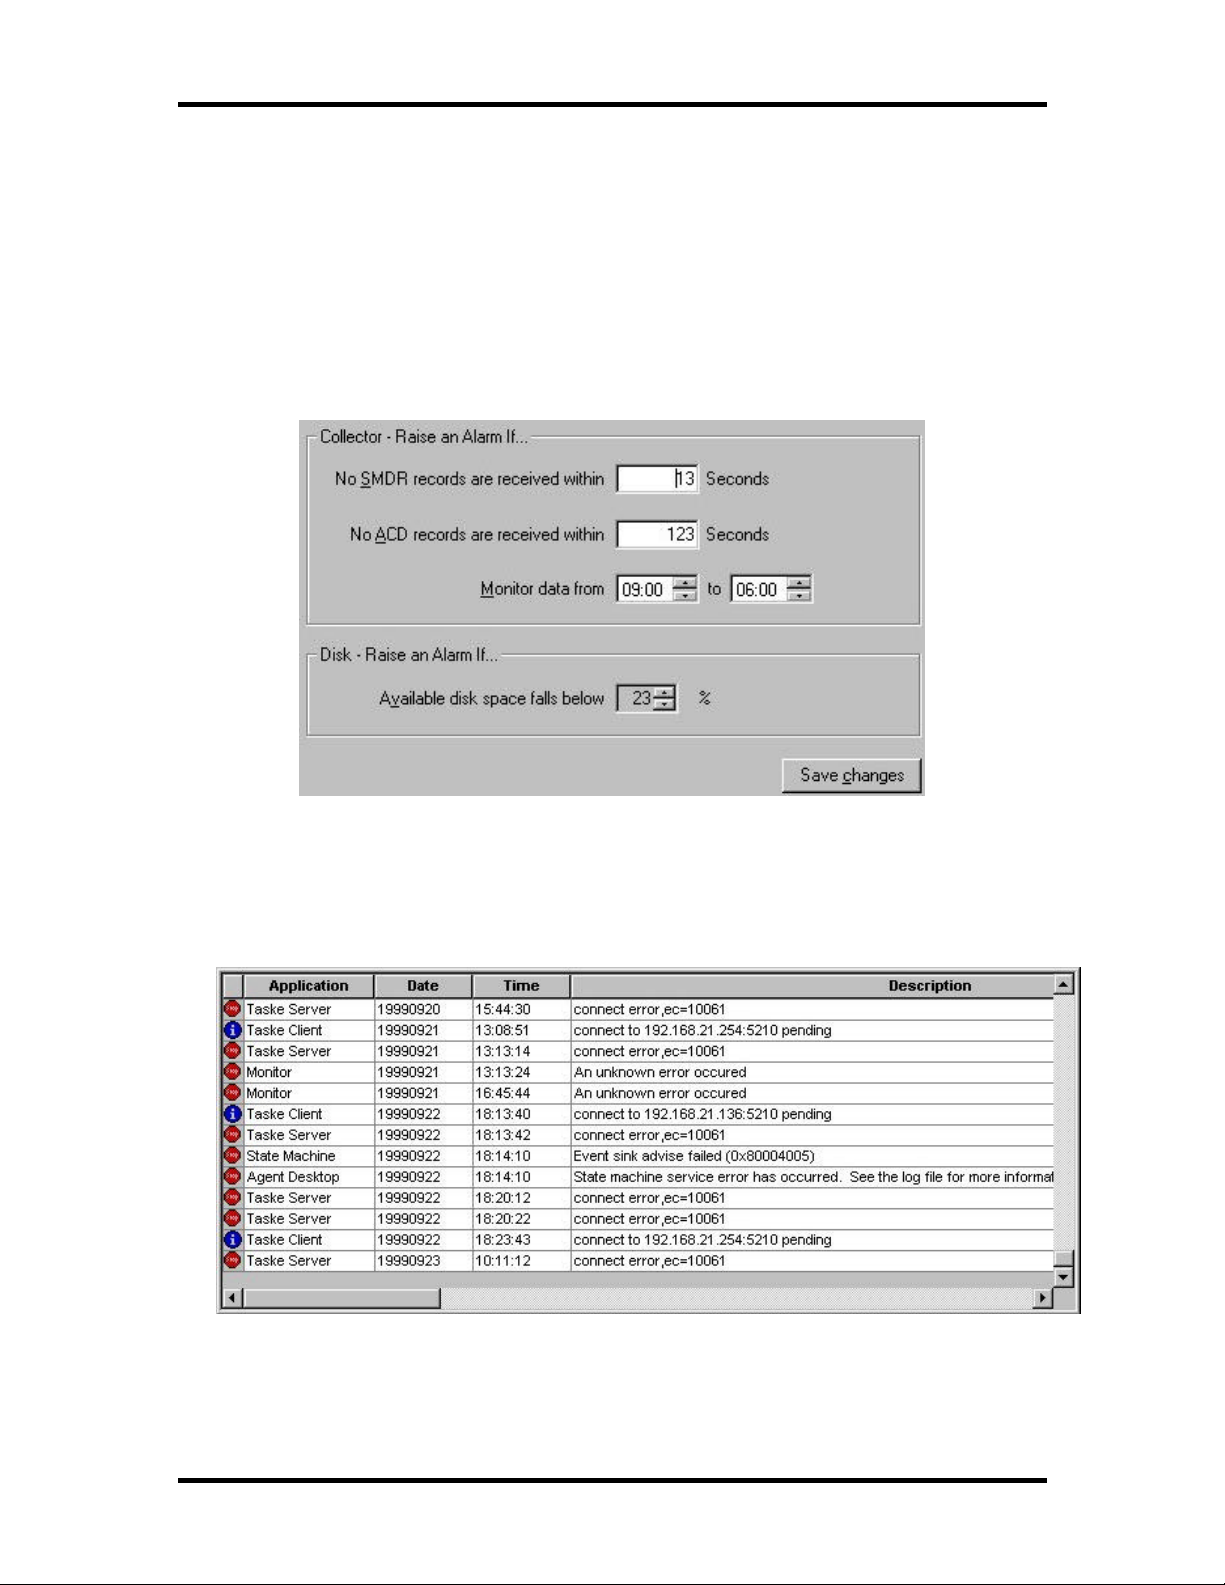
The Collector observes the data stream from the Telephone System and verifies
its integrity by timing the rate of arrival of Data Event records. The Collector
raises an alarm if data is not received from the switch within the period specified.
When the Collector measures a threshold period of seconds without receiving a
Data Event record, then an alarm is raised. The ACD Collector records all
potential data loss alarms but only raises alarm between the Monitor Start Time
and the Monitor End Time.
To avoid raising alarms when there is no one to respond to them, the data
monitoring function is typically applied during normal business hours. The
business hours are entered in the Monitor Start Time and Monitor End Time edit
fields.
-29-
Page 38

TASKE Administrator TASKE Call Center Management Tools Version 7.0
To create an Alarm monitoring data records
1. Click the Configuration Button on the upper left corner of the TASKE
Administrator program to switch to Configuration mode.
2. Click the Alarms button.
3. In the Collector panel at the top of the window enter the number of
seconds to wait for a new data file before raising an alarm.
4. Enter the start and end times for monitoring data.
5. When you exit from the Alarms section of the TASKE Administrator,
save the new Alarm settings by clicking Yes in the confirmation box
that displays to save the new Alarm settings.
Setting Disk Space Alarms
This option is only available on the TASKE Server machine.
The TASKE Administrator monitors the remaining available disk space to ensure
it is sufficient to handle the expected records from the Telephone System.
The TASKE system receives large amounts of records from the Telephone
System. Despite the data compression techniques it uses, there is still a large
disk storage space requirement. TASKE provides a disk audit function that
indicates when the available disk space is running low. If the available disk space
falls below the setting specified an alarm is raised.
The user sets the alarm threshold based on the estimated percentage of disk
space required for new records that arrive from the Telephone System. To
determine what percentage to set for this alarm, look at the general disk statistics
in the PBX File Maintenance section of the TASKE Administrator program.
When an alarm is activated, clear it by freeing up disk space. Free up disk space
by deleting non TASKE programs or data, or by using the TASKE Delete tool in
TASKE's Administrator Configuration.
-30-
Page 39

TASKE Administrator TASKE Call Center Management Tools Version 7.0
To create an Alarm monitoring Disk Space
1. Click the Configuration Button on the upper left corner of the TASKE
Administrator program to switch to Configuration mode.
2. Click the Alarms button.
3. In the Disk - Raise an Alarm If: panel at the bottom of the window enter
the minimum percentage of free disk space.
4. When exiting from the Alarms section of the TASKE Administrator,
save the new Alarm settings. Click Yes in the confirmation box that
displays to save the new Alarm settings.
Viewing Logs
When a running TASKE program encounters an error, or an alert condition, it
writes an entry in the maintenance log. For example, a maintenance log entry
could be an invalid record received by the TASKE Collector from the Telephone
System. The system will record the error, the time it occurred and provide a short
description of the error.
Selecting the Logs button within the TASKE Administrator in Configuration Mode
causes the Logs section of the Database to be displayed. In the List panel in the
window, is a scrollable list of all of the system Logs. The list contains an
Application, Date, Time and Description for each Log. The display of logs is
chronologically ordered, with the latest reported logs appearing first.
The Application Column displays the application in which the error or alert
occurred.
The Date Column displays the date on which the error or alert occurred.
The Time Column displays the time at which the error or alert occurred.
The Description Column displays a description for the type of alert or error that
occurred.
-31-
 Loading...