

Page 1

Search TASKE Call Center Management Tools Version 7.0
Table of Contents
TABLE OF CONTENTS.......................................................................................1
TASKE SEARCH .................................................................................................2
The TASKE Search Interface.......................................................................................... 2
Using the Menu Bar / Toolbar............................................................................2
Using the Status Bar.......................................................................................... 4
Opening SMDR or ACD files........................................................................................... 5
Changing the Font of the Event Records........................................................................ 5
Creating and Modifying Filters ........................................................................................ 6
Renaming Filters............................................................................................................. 6
Deleting a Filter .............................................................................................................. 7
Printing the Search Results ............................................................................................ 7
Copying Records to the Clipboard.................................................................................. 8
Saving the Search Results.............................................................................................. 8
Searching SMDR Call Records.......................................................................................9
Using the Search Options Tab.........................................................................11
Using the Search Events Tab..........................................................................15
Searching ACD Call Records........................................................................................ 18
Time Reports...................................................................................................19
Group Reports.................................................................................................19
Pilot Reports....................................................................................................20
Event Reports..................................................................................................20
Defining ACD Search Parameters ................................................................................ 23
Searching for Call Events by Time...................................................................23
Searching for Call Events by Agent................................................................. 24
Searching for Call Events by Extension........................................................... 24
Searching for Call Events by Pilot ...................................................................25
Searching for Call Events by Group ................................................................26
-1-
Page 2
Search TASKE Call Center Management Tools Version 7.0
TASKE Search
The TASKE Search utility provides a means for call center supervisors to view call
center activity directly from the records produced by the PBX. These records, though
somewhat cryptic, provide comprehensive call center information that is searchable. By
creating search filters, supervisors view only the records that conform to the defined
search criteria.
The TASKE Search utility searches SMDR (Station Message Detail Record) and ACD
(Automatic Call Distribution) call records. A SMDR record is generated at the
completion of a call, summarizing the call activity from beginning to end. ACD records
are real-time event records produced for each event occurring within a call.
The filtering ability of the Search utility is essential for finding specific call records. A
single day in a call center amasses thousands of records that take hours to search
individually. Using the filtering capabilities of the Search utility, a single filter can contain
several subordinate filtering levels, each excluding the records not matching the filter
criteria. Each level of the search can be saved individually as a .txt file for viewing with a
text editor or word processor.
The TASKE Search Interface
Using the Menu Bar / Toolbar
and mouse access to the functions of the TASKE Search utility. The menu bar
contains four menus. The four menus of the menu bar are File, Edit, View, and
Help. The toolbar provides easily accessible buttons for several of the functions
available through the menu bar.
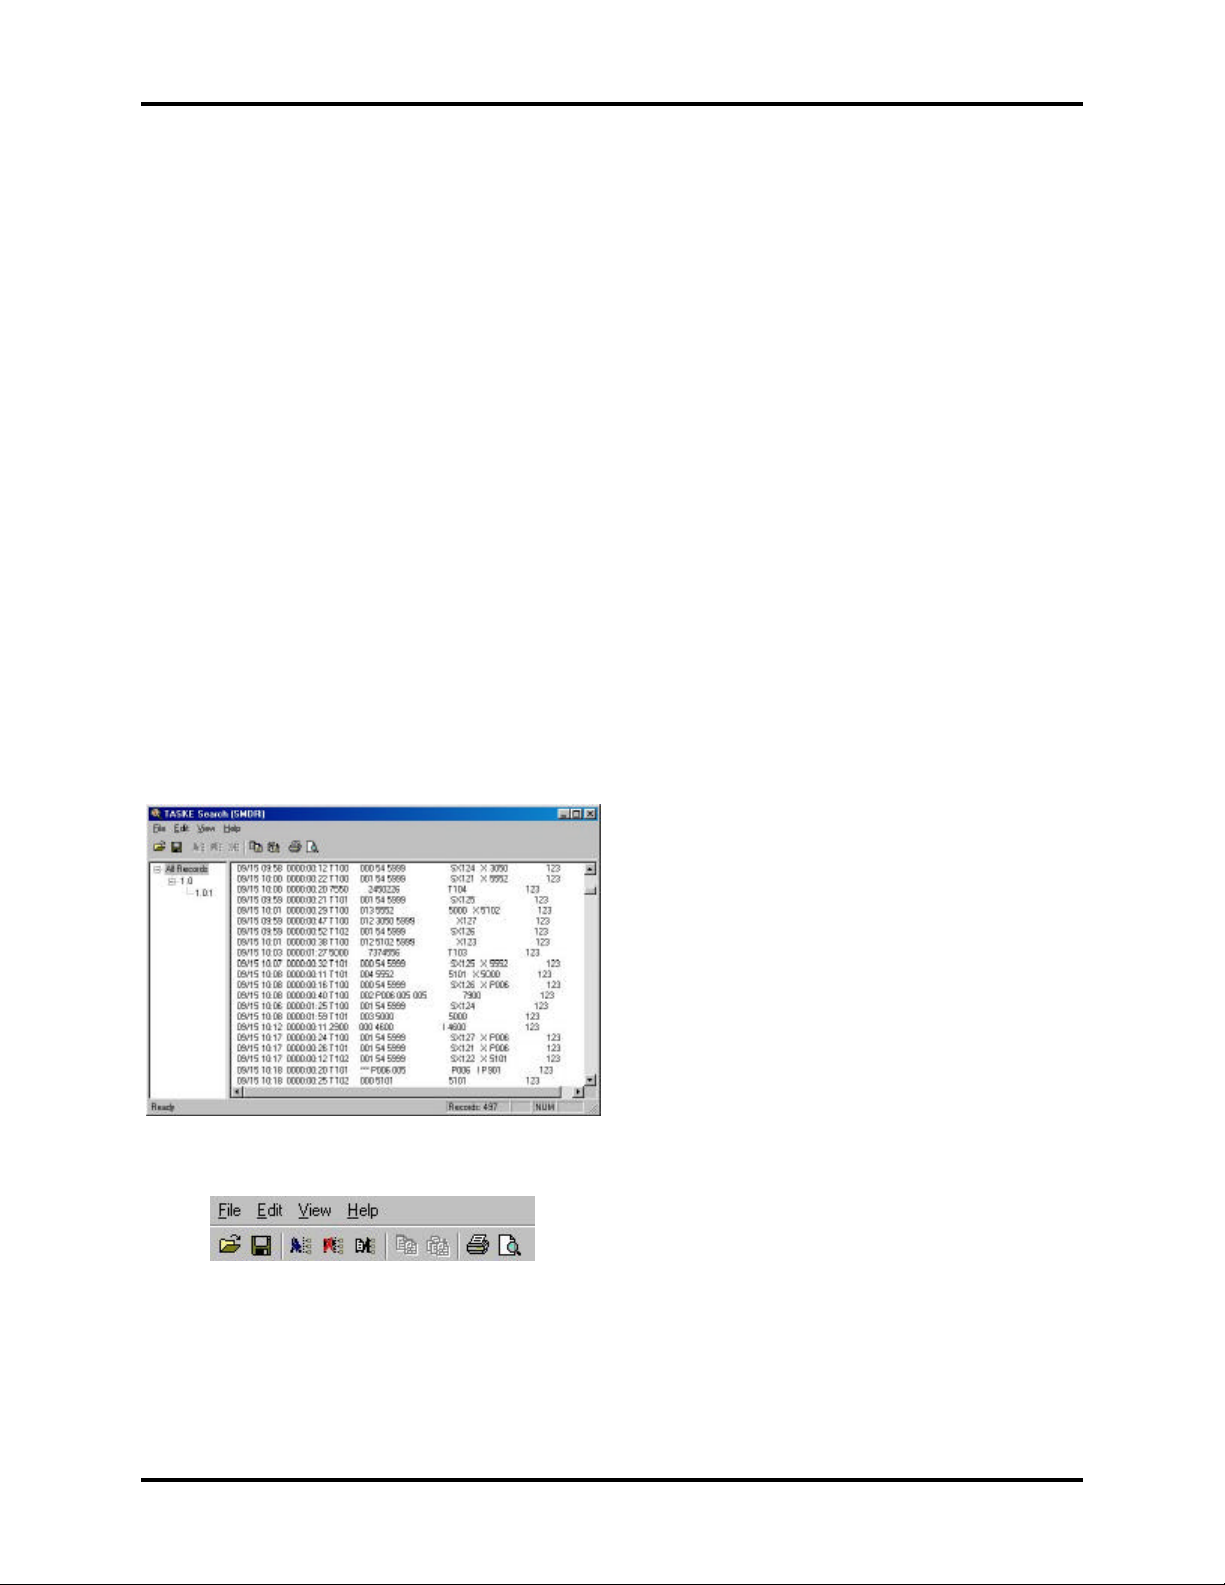
The Search interface is a two-paned
window. The left pane of the window lists
the search filters. The right pane of the
window lists the call records that match
the criteria of the selected search. A
Menu Bar and a Toolbar that provide the
tools for using the Search utility span the
top of the interface. Spanning the bottom
of the interface is a Status Bar that
reports the application status.
The menu bar and the toolbar span the top of
the TASKE Search window. These two sections
of the Search utility window provide keyboard
-2-
Page 3
Search TASKE Call Center Management Tools Version 7.0
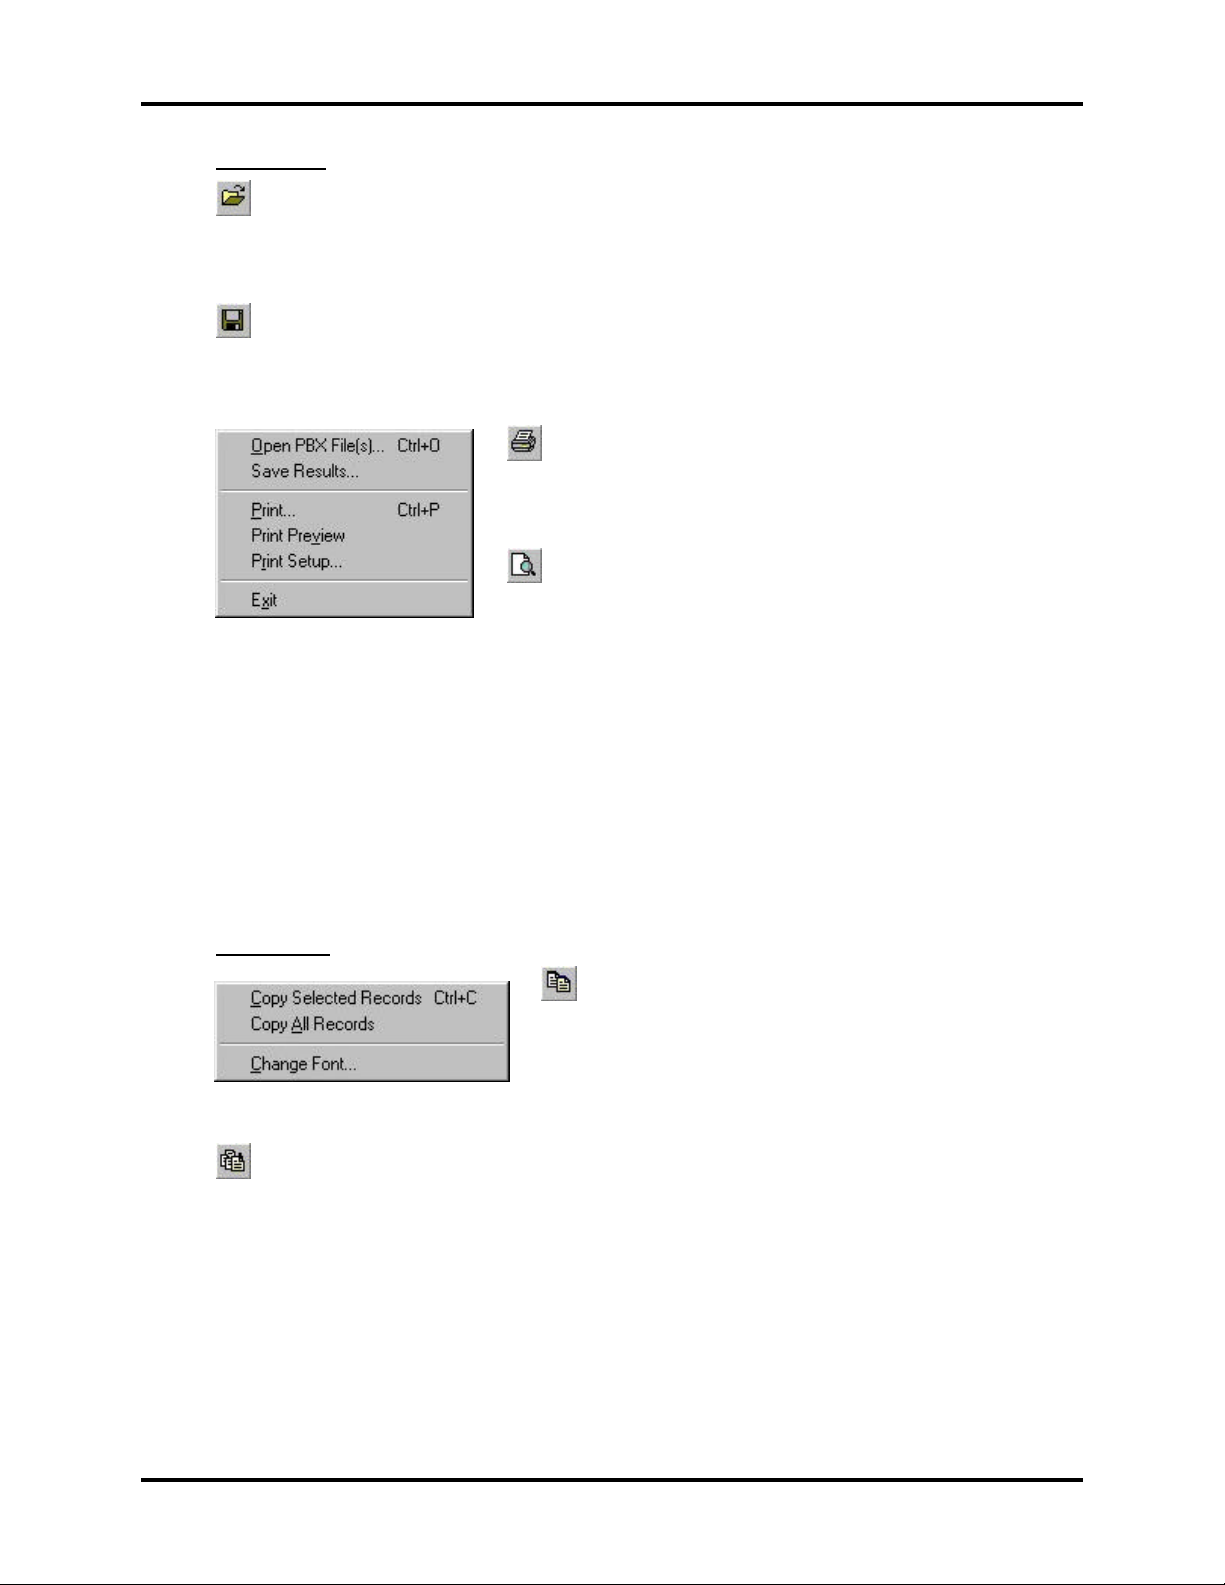
File Menu
Open PBX File(s) - This option opens the Select Date(s) dialog box.
Selection of one or more dates from this dialog box opens the PBX files for those
dates.
Save Results… - This option opens the Save As dialog box. Using this
dialog box, save search results as .txt files for viewing with text editing and word
processing applications.
Print… - This option opens the Print dialog box
where the search results are sent to the printer. This
dialog box also accesses the printer properties.
Print Preview – This option opens the print
preview window, providing a preview of the printed
search results. Use the tools of the print preview
window to maneuver throughout the pages of the preview, view multiple pages,
zoom in or zoom out on the page, and print the search results. Clicking the Close
button closes the print preview and returns to the search results.
Print Setup… – This option opens the Print Setup dialog box where the printer is
setup to print the search results using the desired settings.
Exit – This option closes the TASKE Search utility without saving the search
results.
Edit Menu
Copy Selected Records – This option copies
the selected records (all highlighted records) to
the Windows clipboard. There must be at least
one record selected in the right pane of the
Search window to activate this option.
Copy All Records - This option copies all of the records in the selected
search filter to the Windows clipboard. There must be at least one record
selected in the right pane of the Search window to activate this option.
Change Font… - This option allows users to change the font of the event
records in the left pane of the Search window. Use any font installed on the PC.
-3-
Page 4
Search TASKE Call Center Management Tools Version 7.0
View Menu
Toolbar – Select to enable or disable the view of the Toolbar. When a check
mark is present beside the Toolbar option, the view of the Toolbar is enabled.
When a check mark is not present beside the Toolbar option, the view of the
Toolbar is disabled.
Status Bar - Select to enable or disable the view of the Status Bar. When a
check mark is present beside the Status Bar option, the view of the Status Bar is
enabled. When a check mark is not present beside the Status Bar option, the
view of the Status Bar is disabled.
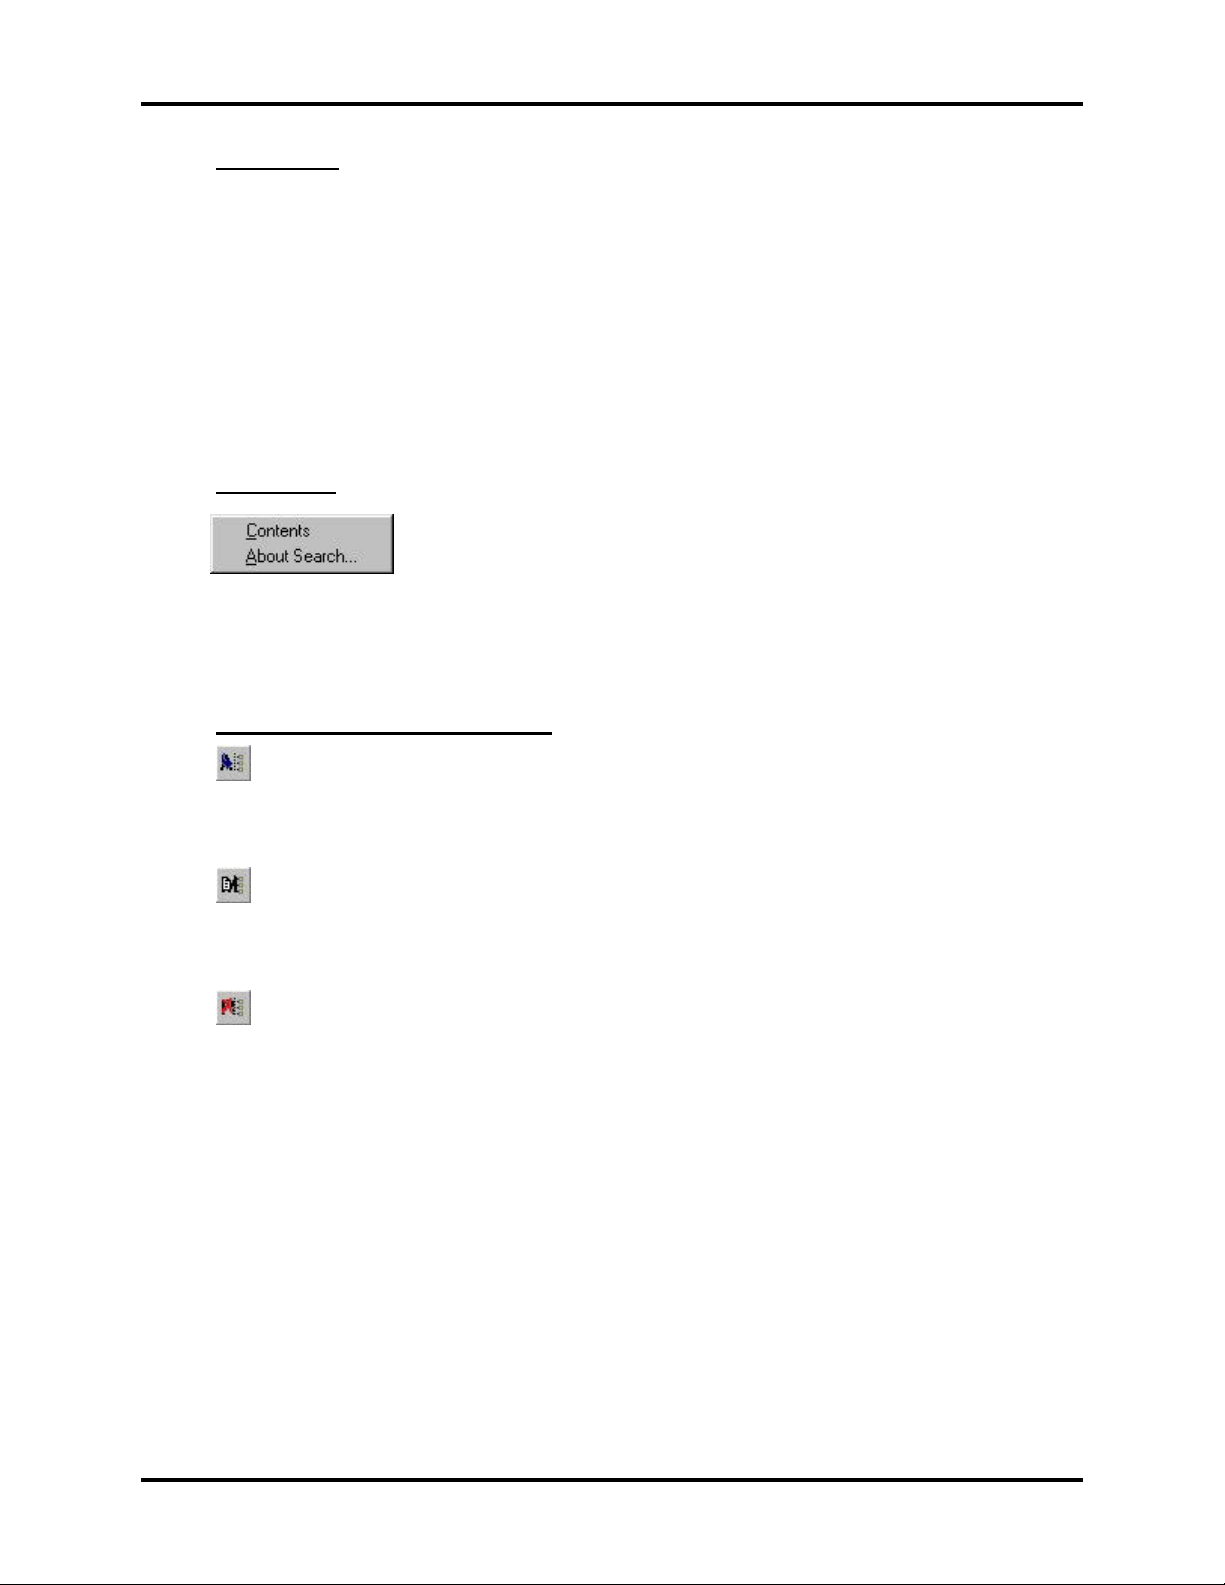
Help Menu
Contents – This option accesses the online help for the
TASKE Search utility.
About Search... - This menu option opens the About TASKE Search dialog box.
This dialog box provides the software release number, the software version
number, and the copyright information. Click OK to exit the dialog box.
Additional ToolBar Functions
- Click to open the Search Parameters dialog box and create a sub-filter for
the selected filter. To activate this option, one of the filters in the left pane of the
Search window must be selected.
- Click to open the Search Parameters dialog box and modify the selected
search filter. To activate this option, one of the filters in the left pane of the
Search window must be selected.
- Click to delete the selected search filter. This action opens the TASKE
Search dialog box where confirmation of the deletion is required by clicking the
Yes button. To activate this option, one of the filters in the left pane of the Search
window must be selected.
Using the Status Bar
Spanning the bottom of the TASKE Search window, the Status Bar is a read-only
display. The Status Bar provides the current status of the Search application, the
number of records that match the selected filter, and the keyboard status of the
Caps Lock, Num Lock, and Scroll Lock keys.
-4-
Page 5
Search TASKE Call Center Management Tools Version 7.0
Opening SMDR or ACD files
Both SMDR and ACD files are based on calendar dates. All records within either type of
PBX file are call records that originated on the same date. For this reason, the date is
the primary search filter for opening PBX files.
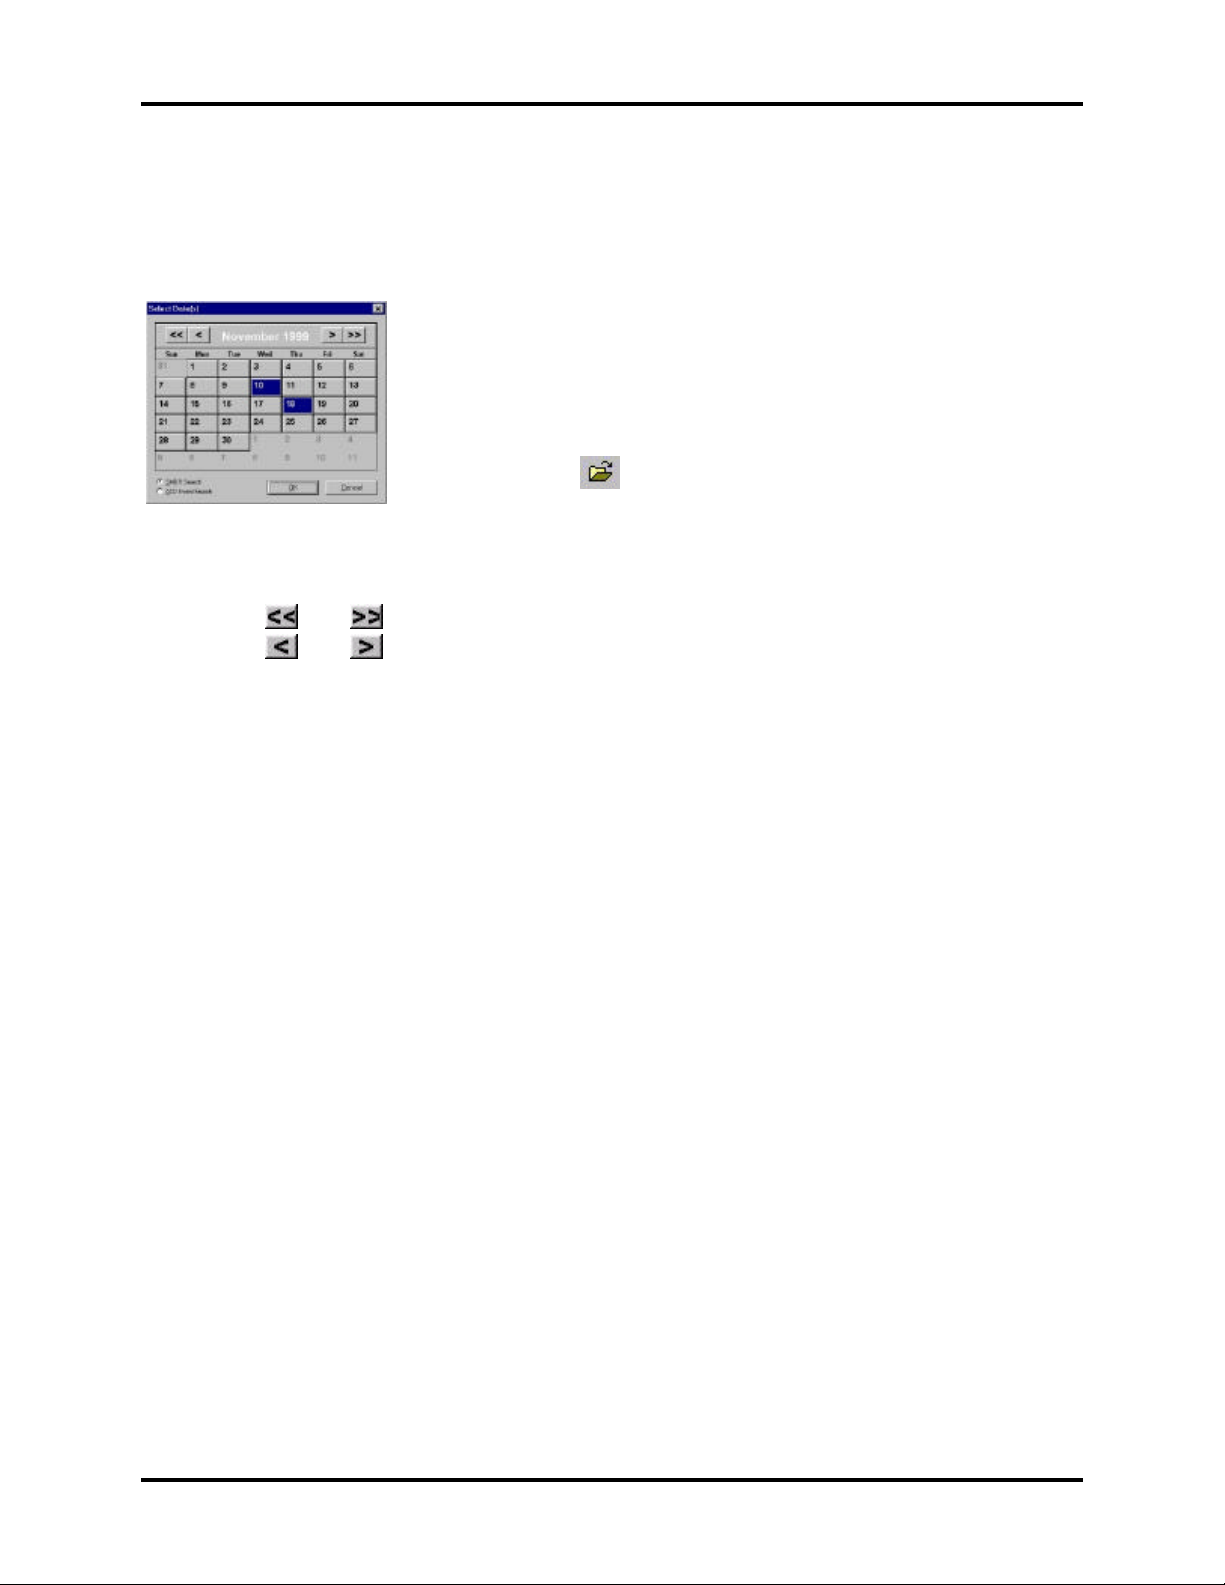
Open PBX files using the Select Date(s) dialog box. This
dialog box is opened using one of the following three
methods:
1. Starting the Search utility.
2. Selecting Open from the File menu.
3. Clicking on the Toolbar.
To open one or more SMDR or ACD file(s):
To open one or more PBX file(s):
1. Access the Select Date(s) dialog box using one of the above methods.
2. Use and to select the desired year.
3. Use and to select the desired month.
4. Click on each of the desired date(s).
5. Enable the SMDR Search radio button to search for SMDR records or enable the
ACD Event Search radio button to search for ACD records.
6. Click OK.
If PBX data is not available for the selected date(s), a warning message is displayed
indicating that the requested file(s) were not found. When a date is selected it is
highlighted in blue. To remove a date selection click on the date a second time.
Changing the Font of the Event Records
The font of the event records, or the text in the left pane of the Search window, is
changeable to accommodate user preferences. Use any font installed on the PC and
set the style and size as desired.
To change the font of the event records:
1. Select Change Font... from the Edit menu to open the Font dialog box.
2. Select a font from the Font list.
3. Select a font style from the Font style list.
4. Select a font size from the Size list or input a value for the font size in the Size
box.
5. Click OK.
The Sample section of the Font dialog box provides an illustration of the selected font
variables.
-5-
Page 6
Search TASKE Call Center Management Tools Version 7.0
Creating and Modifying Filters
Define the parameters for a search in the Search Parameters dialog box. To access the
Search Parameters dialog box, click either or . Clicking creates a sub-filter for
the selected filter, and clicking modifies the selected filter.
The Search Parameters dialog box contains two tabs: Search Options and Search
Events. Using the Search Options tab, define search filter criteria based on call
characteristics. Using the Search Events tab, define search filter criteria based on call
handling. Include both types of search criteria in the same search filter. When all of the
desired options for the search filter have been selected from both tabs, click OK to view
the results.
To create a new filter:
1. Select a filter from the left pane of the TASKE Search window to act as the base
of the new sub-filter .
2. Click on the toolbar or right-click on the selected filter and select Filter Results
from the drop-down menu.
3. The Search Parameters dialog box opens.
4. Choose the desired search parameters.
5. Click OK.
To modify a filter:
1. Select the filter to modify from the left pane of the TASKE Search window.
2. Click on the toolbar or right-click on the selected filter and select Modify Filter
from the drop-down menu.
3. The Search Parameters dialog box opens.
4. Change the search parameters as required.
5. Click OK.
Renaming Filters
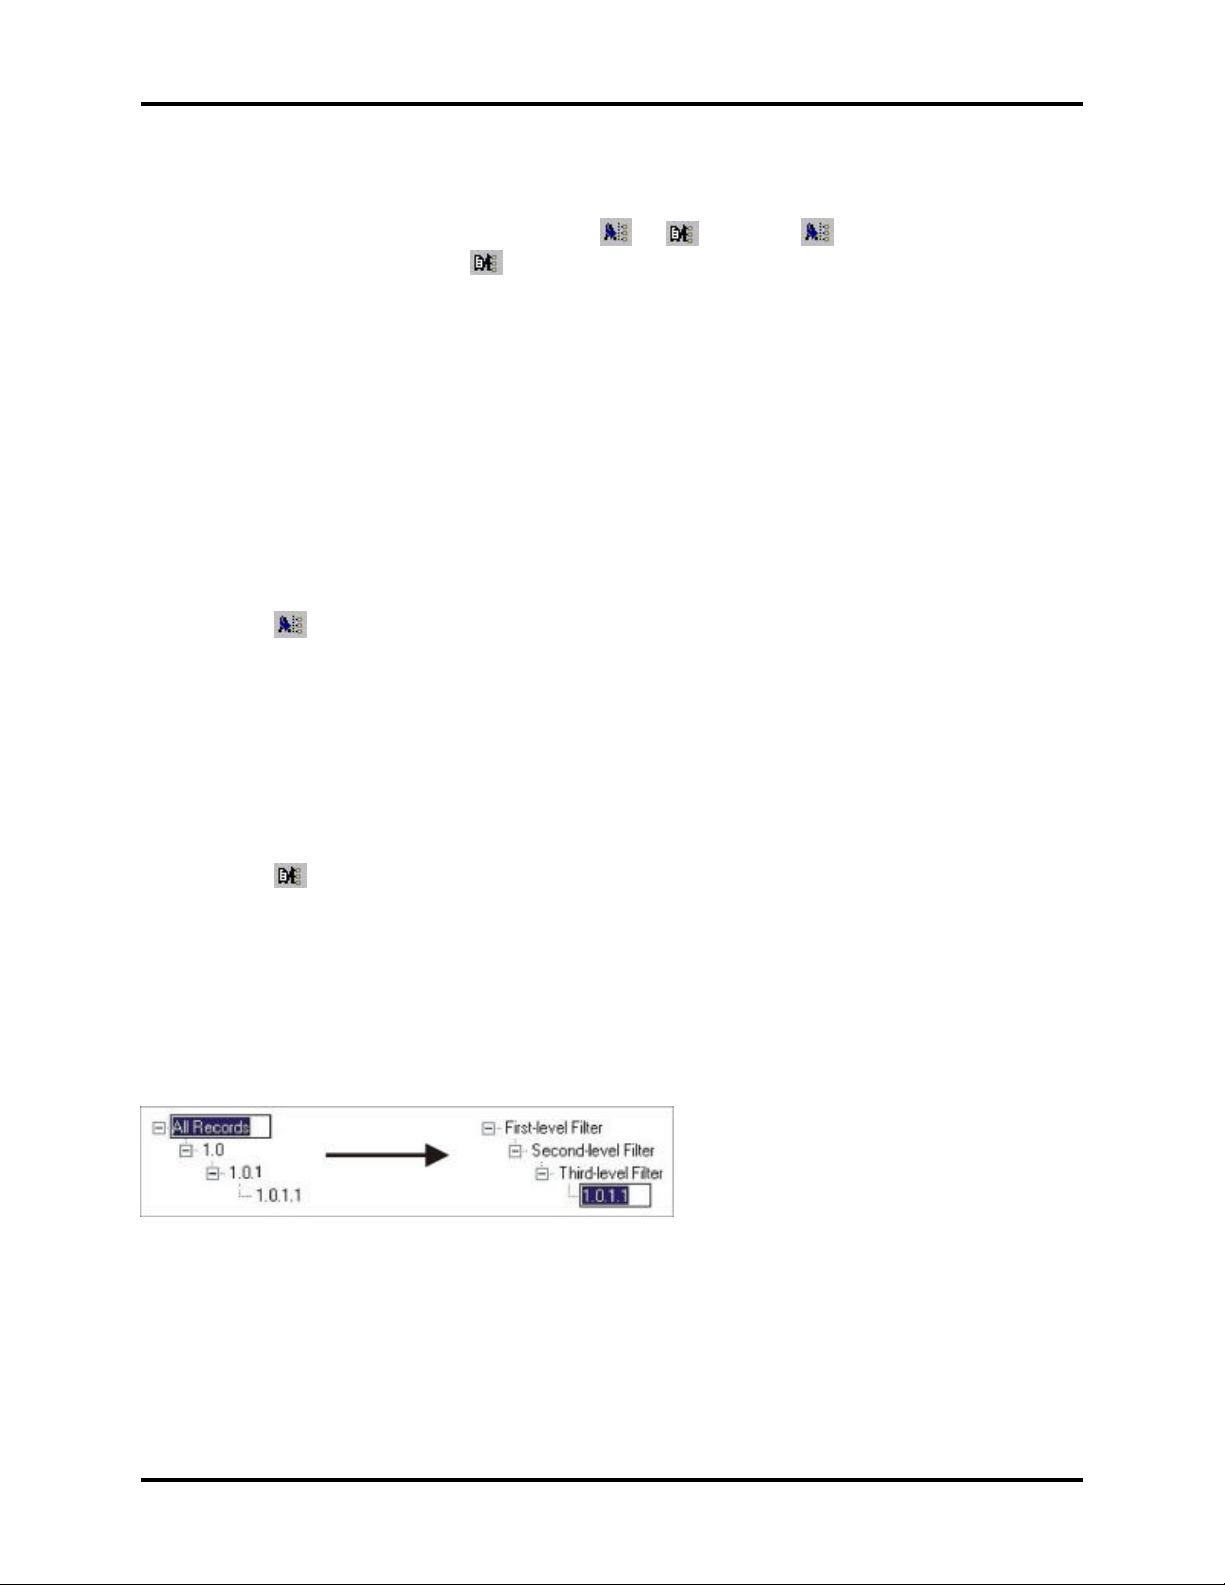
Each new filter is automatically
named using a decimal-based
numbering structure. Second-level
filters, created directly from the
root, are named sequentially in the
format X.0. Third-level filters are named X.0.X. This numbering system continues as
additional filtering levels are created. If desired, rename the filters to anything that is 32
characters or less in length. Use any standard keyboard character in the name,
including spaces.
-6-
Page 7

Search TASKE Call Center Management Tools Version 7.0
To rename a filter:
1. Click the filter to rename in the left-pane of the TASKE Search window.
2. Click the filter a second time to open the edit box.
3. Type the new filter name.
4. Press Enter.
Deleting a Filter
Deleting a filter from the tree structure in the left pane of the TASKE Search window
deletes all of its sub-filters as well. Only the root filter cannot be deleted. For instance,
deleting filter 1.0 also deletes sub-filters 1.0.1 and 1.0.1.1.
To delete a filter:
1. Select any filter, except the root filter, from the left pane of the TASKE Search
window.
2. Click on the toolbar or right-click on the selected filter and select Remove
Filter from the drop-down menu.
3. The TASKE Search dialog box opens asking the user to confirm the filter
deletion.
4. Click Yes to delete the filter and its sub-filters.
Printing the Search Results
Preview and print the search results for each filter individually. The records are printed
as they appear in the Search window. The printed page includes a header, titled TASKE
Search Results, and a footer that includes the page number, date, and time.
To use the print preview to view and print the results of a search filter:
1. Select the search filter to preview from the left pane of the Search window.
2. Click or select Print Preview from the File menu to open the print preview
window.
3. Use the Next Page, Prev Page, One/Two Page, Zoom In, and Zoom Out buttons
to view the search results.
4. If desired, click Print to open the Print dialog box and print the search results.
5. Click Close to exit the print preview window.
To print the results of a search filter:
1. Select the search filter to print from the left pane of the Search window.
2. Click on the Toolbar or select Print from the File menu to open the Print
dialog box.
3. Select the printer, print range, and the number of copies.
-7-
Page 8

Search TASKE Call Center Management Tools Version 7.0
4. Click OK.
To change the print setup:
1. Select Print Setup from the File menu to open the Print Setup dialog box.
2. Make the required changes to the printer, paper, and paper orientation.
3. Click OK.
Copying Records to the Clipboard
Copying the records of a search filter to the Windows Clipboard makes them available
to other applications. This is one method of exporting PBX records.
To copy all records in the filter to the Clipboard:
1. Select the filter containing the desired records from the left pane of the Search
window.
2. Click or select Copy All Records from the Edit menu to copy all records in the
selected filter to the Clipboard.
To copy selected records in the filter to the Clipboard:
1. Select the filter containing the desired records from the left pane of the Search
window.
2. Select the records to be copied from the right pane of the Search window.
3. Click or select Copy Selected Records from the Edit menu to copy the
selected records to the Clipboard.
To select a group of records that are in order for copying:
1. Select the first record.
2. Hold SHIFT and click the last record in the range.
To select a group of records that are not in order for copying:
1. Select the first record.
2. Hold CTRL and click each of the remaining records.
Saving the Search Results
Save the results of a search filter as a text file (.txt) for viewing using text editing or word
processing software applications.
-8-
Page 9

Search TASKE Call Center Management Tools Version 7.0
To save the results of a search filter as a .txt file:
1. Select the filter to save from the left pane of the Search window.
2. Click or select Save Results from the File menu to open the Save As dialog
box.
3. Choose the destination directory and type a name for the file.
4. Click Save.
Searching SMDR Call Records
Displayed in a tree structure in the left pane of the Search interface, filters are created
for the selected PBX files based on specific incidences that occur within calls. Setting
boundaries for these incidences eliminates those records that do not fall within the
specified range. Create several filtering levels for a single search. Sub-filters drill-down
through the records, with each level displaying a more detailed level of search.
The primary filter for any PBX file is the date. When a search is opened, all call records
for the selected dates are included in a root filter that is titled All Records. Any additional
filters created for the search are subordinate to the root filter in the tree structure.
Search filters are created, modified and deleted using the tools provided on the Toolbar.
The button creates a sub-filter for the selected filter. The button is used to modify
the selected filter. The button deletes the selected filter. Clicking either the button
or the button opens the Search Parameters dialog box where the boundaries for a
search filter are defined.
Each new filter is automatically named using a decimal-based numbering structure.
Second-level filters, created directly from the root, are named sequentially in the format
X.0. Third-level filters are named X.0.X. This numbering system continues as additional
filtering levels are created.
Deciphering the information included in a SMDR record is a difficult task for those
viewing the records directly from the PBX. A SMDR record is a call record that
describes call activity. The records are stored in a database and each field in the
database stores a specific section of a call.
-9-
Page 10

Search TASKE Call Center Management Tools Version 7.0
A SMDR record may contain the following information:
MM/DD HH:MM hhhh:mm:ss cccc * TTA ddddddddddddddddddddddddDDDDCSppppX
TTTT aaaaaaaaaaaa sss
where:
MM/DD = Start date of the call
HH:MM = Start time of the call
hhhh:mm:ss = Call duration
cccc = a) Inbound call: the trunk number obtained by the call
b) Outbound call: the identifying number of the calling party
* = a) Displays * if the call was handled by an attendant
b) Blank if not handled by an attendant
TTA = a) Inbound call: displays the time to answer
b) Abandoned call: displays ***
c) Outbound call: displays the trunk access code
dddd... = The digits dialed
DDDD = a) Displays the meter pulses if applicable.
b) Displays a continuation of the digits dialed if meter pulses are not
involved.
c) Blank if meter pulses are not applicable and digits dialed are not
long enough to use the space
C = The call completion status
S = a) The ARS (Automatic Route Selection) speed call flag
b) Blank if call is not speed dialed
pppp = The identifying number of the called party
X = a) Displayed for transferred calls
b) Blank if a transfer did not occur
TTTT = a) The identifying number of the third party
b) Blank if a third party was not involved
aaaa... = a) The account codes for the call
b) Blank if account codes were not applicable
sss = System identifier number, used only when multiple PBX systems
are in use
-10-
Page 11

Search TASKE Call Center Management Tools Version 7.0
Using the Search Options Tab
Using the Search Options tab, define search filter criteria based on call
characteristics. When all of the desired options for the search filter are selected,
click OK to view the results.
Using the Time to Search for Calls
To create a search filter that includes the call records
occurring within a specific time period, define a start time
and an end time in the Include Records Between section
of the Search Options tab. When setting the start time
and the end time, ensure that the start time precedes the
end time, keeping in mind that the 24-hour clock is used.
To set the time range for a search filter:
1. Click the hour field in the Start Time box to select the field.
2. Input a number between 00 and 23.
3. Click the minute field in the Start Time box to select the field.
4. Input a number between 00 and 59.
5. Repeat steps 1 to 4 in the End Time box.
Searching for Calls Using the Time to Answer
The time to answer is the amount of time a caller waits for
an answer from the time a trunk is accessed. To create a
search filter that includes the call records for calls that
were answered within a specified time range, define the
time range for the filter in the Time To Answer section of
the Search Options tab. The time to answer is recorded in
-11-
Page 12

Search TASKE Call Center Management Tools Version 7.0
seconds. Input values ranging from 0 to 999 seconds in the input boxes of this
section.
To define the time to answer range:
1. Click the Greater Than box and input a value between 0 and 999 to
represent the lower limit for the time to answer.
2. Click the But Less Than box and input a value between 0 and 999 to
represent the upper limit for the time to answer.
Searching for Calls by Duration
The call duration is the call length, from the time a
trunk is accessed to the time the call is terminated.
To create a search filter that includes the call records
where the call duration falls within a specified time
range, define the time range for the filter in the Call
Duration section of the Search Options tab. Ensure
that the Greater Than time precedes the But Less Than time, keeping in mind
that the 24-hour clock is used.
To define the time range for the call duration:
1. Click the hour field in the Greater Than box to select the field.
2. Input a value between 00 and 23.
3. Click the minute field in the Greater Than box to select the field.
4. Input a value between 00 and 59.
5. Click the seconds field in the Greater Than box to select the field.
6. Input a value between 00 and 59.
7. Repeat steps 1 to 6 in the But Less Than box.
Including and Excluding Abandoned Calls in a Search Filter
When a caller terminates a call before receiving an
answer, the call is abandoned. To create a search
filter that includes only abandoned calls, enable the
Yes radio button in the Abandoned Calls section of
the Search Options tab. To exclude abandoned calls from the search filter,
enable the No radio button. The Both radio button is the default option. Enabling
the Both radio button includes all calls in the search filter, regardless of the
answer state.
-12-
Page 13

Search TASKE Call Center Management Tools Version 7.0
Searching for Calls by Participant
Use the Party section of the Search Options tab to create
a search filter based on an agent ID or extension number.
Call records can be extracted for an individual based on
calls made, calls received, or calls handled as a third
party. Only one of these items can be included in a single
filter.
A search using the Calling box searches for the calls made by the selected
individual. A search using the Called box searches for the calls received by the
individual. A search using the Third box searches for instances where the
individual was a third party to a call.
To create a search filter for the calls made by an agent or extension:
1. Input the agent ID or extension number in the Calling box.
To create a search filter for the calls received by an agent or extension:
1. Input the agent ID or extension number in the Called box.
To create a search filter for calls where an agent or extension was involved as a
third party:
1. Input the agent ID or extension number in the Third box.
Searching for Calls Using the Digits Dialed
Use the Digits Dialed box in the Search
Options tab to create a search filter based on
the digits dialed in outbound or internal calls.
The digits dialed are the dialable characters that direct the call to its destination.
Use the characters in the table below to create a search based on the digits
dialed.
The allowable characters to use when searching for the digits dialed are:
P Match 'P' as the first character, indicating a Pilot number.
0-9, * # Match a specific digit.
? Match any character, including a blank.
. Match any non-blank character.
Match a blank character.
/ Place at the beginning and end of a string of characters. The character
string is matched anywhere it occurs in the digits dialed of a call record.
-13-
Page 14

Search TASKE Call Center Management Tools Version 7.0
Searching for Call Records Using Automatic Number Identification
Input a number in the ANI box to include a specific ANI number
in the search criteria. ANI is an acronym for Automatic Number
Identification. This is a service provided by a telephone
company that identifies the telephone number of the caller. Not all trunks can
provide this information and it is usually a service that must be purchased from
the local telephone carrier.
The allowable characters to use when searching for an ANI number are:
0-9, * # Match a specific digit.
? Match any character, including a blank.
. Match any non-blank character.
Match a blank character.
/ Place at the beginning and end of a string of characters. This matches
the character string anywhere it occurs within a string of characters.
Searching for Call Records Using Dialed Number Identification Service
Input a number in the DNIS box to create a search filter that
looks for a specific DNIS number. DNIS is an acronym for
Dialed Number Identification Service. This is a service where
the telephone company returns an identification number to the PBX receiving a
call that is usually the last four digits dialed by the caller. The DNIS identification
number reveals the service the caller is requesting from the call center. Not all
trunks can provide this information and it is usually a service that must be
purchased from the local telephone carrier.
The allowable characters to use when searching for a DNIS number are:
0-9, * # Match a specific digit.
? Match any character, including a blank.
. Match any non-blank character.
Match a blank character.
/ Place at the beginning and end of a string of characters. This matches
the character string anywhere it occurs within a string of characters.
Searching for Call Records Using the System ID
Call centers with more than one PBX can create a search filter
based on the system ID of the PBX. The system ID is an address
number used to identify a PBX. To create a search filter based on a specific PBX,
input the system ID number of the PBX in the Sys ID box on the Search Options
tab.
-14-
Page 15

Search TASKE Call Center Management Tools Version 7.0
The allowable characters to use when searching for a system ID are:
0-9, * # Match a specific digit.
? Match any character, including a blank.
. Match any non-blank character.
Match a blank character.
Searching for Call Records Using the Account Code
Account codes are a call classification mechanism
used by some organizations. Call centers using
account codes can create search filters to search
for call records with specific account codes using the Account Codes box on the
Search Options tab. To include a specific account code in a search filter, input
the account code in the Account Code box.
The allowable characters to use when searching for an account code are:
0-9, * # Match a specific digit.
? Match any character, including a blank.
. Match any non-blank character.
Match a blank character.
/ Place at the beginning and end of a string of characters. This matches
the character string anywhere it occurs within a string of characters.
Using the Search Events Tab
Using the Search Events tab, define search filter criteria based on call handling.
When all of the desired options for the search filter are selected, click OK to view
the results.
To enable or disable all of the check boxes
on the Search Events tab, click the Toggle
All button.
Searching by Call Completion Status
To create a search filter based on the
completion results of calls, use the Call
Completion section of the Search Events
tab. Enable the check boxes for the call
completion results to include in the search
filter.
The call completion results to include in a
search are:
-15-
Page 16

Search TASKE Call Center Management Tools Version 7.0
Blank (Nothing) - When the call completion status is blank in a call record, it
means that the call completion result for the call record is unknown.
Answer Supervision - The Answer Supervision call completion status occurs
when the central office provides a signal to the PBX indicating that the outgoing
call received an answer.
Callee is Busy - The Callee is Busy call completion status occurs when the
incoming call is returned to the queue because the intended receiver is busy.
Caller Error - The Caller Error call completion status occurs when the caller dials
an invalid destination and the PBX cannot route the call.
TAFAS Answered - For outgoing calls, the TAFAS
Answered call completion status indicates that the toll
was denied. For incoming calls, this means that the call
was available to all stations or TAFAS (Trunk Answer
From Any Station) answered.
Recall Answered - The Recall Answered call
completion status occurs when a transferred call does
not receive an answer at the intended extension, is
returned to the original extension, and is answered
again by the original receiver.
Recall Not Answered - The Recall Not Answered call completion status occurs
when a transferred call does not receive an answer at the intended extension, is
returned to the original extension, and is not answered because the original
receiver is not available to answer the call.
Internal - The Internal call completion status occurs when a call is internal to the
call center and no trunks are involved.
Searching for Speed Dialed and Forwarded Calls
To create a search filter based on speed dialed or
forwarded calls, use the Speed / Forward section of the
Search Events tab. Enable the check boxes for the
variables to include in the search filter.
The variables to include in the search filter are:
Blank (Nothing) - When the status of calls in relation to speed dialing and
forwarding is unknown, the field in the call record is blank.
-16-
Page 17

Search TASKE Call Center Management Tools Version 7.0
Speed Call - A Speed Call is reported in a call record when a short directory
number, programmed into the PBX, that represents a longer number is dialed.
External Call Forward - External Call Forward occurs in a call record when a
dialed extension has call forwarding enabled and the call is forwarded to an
external number.
Default ARS - ARS is an acronym for Automatic Route Selection. The ARS is a
routing mechanism for routing outbound calls. For instance, dialing 9 before the
telephone number may access an outbound trunk that only allows local calls
whereas, dialing 8 before the telephone number may access an outbound trunk
that permits long distance calls. Default ARS occurs in a call record when the
default ARS number routes outbound calls to the appropriate trunk.
Searching for Calls Handled by an Attendant
Call records for calls handled by attendants can be
included or excluded from a search filter using the
Attendant Handled section of the Search Events tab.
To include call records for calls handled by attendants
in a search filter, enable the Yes radio button. To
exclude these call records, enable the No radio button. To include both types of
calls in the search filter, enable the Both radio button.
Searching for Transferred and Conference Calls
To create a search filter based on
transferring or conferencing, use the
Transfer / Conference section of the
Search Events tab. Enable the check
boxes for the variables to include in the
search filter.
The variables to include in the search filter are:
Blank (Nothing) - When the transferred or conference status of a call is
unknown, the fields in the call record for this information are blank.
Supervised Transfer - A Supervised Transfer occurs in a call record when a call
is transferred to a third party and the transferring party remains on the line to
make sure the call is answered.
Unsupervised Transfer - An Unsupervised Transfer occurs in a call record
when a call is transferred to a third party and the transferring party abandons the
caller before ensuring that the third party answers the call.
-17-
Page 18

Search TASKE Call Center Management Tools Version 7.0
Conference - Conference occurs in a call record when a third party is involved in
the call via a conference.
Requeue - A Requeue occurs in a call record in the event that a call is returned
to the queue when an answer is not received.
Interflow - An Interflow is recorded in a call record if a call is transferred to
another queue after a preset time period has passed without an answer to the
call.
Unavailable - Unavailable is recorded in a call record when a call is not
completed because the pilot is unavailable.
Searching ACD Call Records
Displayed in a tree structure in the left pane of the Search interface, filters are created
for the selected PBX files based on specific incidences that occur within calls. Setting
boundaries for these incidences eliminates those records that do not fall within the
specified range. Create several filtering levels for a single search. Sub-filters drill-down
through the records, with each level displaying a more detailed level of search.
The primary filter for any PBX file is the date. When a search is opened, all call records
for the selected dates are included in a root filter that is titled All Records. Any additional
filters created for the search are subordinate to the root filter in the tree structure.
Search filters are created, modified and deleted using the tools provided on the Toolbar.
The button creates a sub-filter for the selected filter. The button is used to modify
the selected filter. The button deletes the selected filter. Clicking either the button
or the button opens the Search Parameters dialog box where the boundaries for a
search filter are defined.
When defining search parameters for ACD call records, it may be necessary to search
for specific agent, extension, Pilot, or group IDs. Accomplish this by inputting the ID
numbers in the ID boxes on the appropriate tabs of the Search Parameters dialog box.
When the exact ID is not known, mix the wildcards with the known information about the
agent, extension, Pilot, or group to make the search for these entities more general.
The wildcards and an explanation of their use are provided in the table below.
0-9 Match a specific digit
? Match any character, including a blank
. Match any non-blank character
Match a blank character
-18-
Page 19

Search TASKE Call Center Management Tools Version 7.0
Each new filter is automatically named using a decimal-based numbering structure.
Second-level filters, created directly from the root, are named sequentially in the format
X.0. Third-level filters are named X.0.X. This numbering system continues as additional
filtering levels are created.
Deciphering the information included in an ACD record is a difficult task when viewing
the call records directly from the PBX file. An ACD record is a report that provides event
specific information for the system, agents, Pilots, and the ACD queue.
There are four types of ACD report records. These are time reports, group reports, pilot
reports, and event reports. Time reports, group reports, and pilot reports always contain
the same type of information. The content of the event reports depends on the event
being reported.
Time Reports
Generated every 15 seconds, a time report synchronizes the PC clock with the
PBX clock. A time report provides the following information:
##/##/## = Date in DD/MM/YY format
##:##:## = Time in HH:MM:SS format
Time = Report title
Group Reports
Generated every 15 seconds, an agent group report provides the following
information:
##/##/## = Date in DD/MM/YY format
##:##:## = Time in HH:MM:SS format
Group = Report title
### = Group number
CW: # = Number of calls waiting
AA: # = Number of agents available
Longest Wait: ##:## = Amount of time the longest waiting caller has been
waiting
-19-
Page 20

Search TASKE Call Center Management Tools Version 7.0
Pilot Reports
Generated every 15 seconds, a Pilot report provides the following information:
##/##/## = Date in DD/MM/YY format
##:##:## = Time in HH:MM:SS format
Pilot = Report title
P### = Pilot number
CW: # = Number of calls waiting
AA: # = Number of agents available
Longest Wait: ##:## = Amount of time the longest waiting caller has been
waiting
Event Reports
Event reports are generated whenever an event occurs. There are ten types of
event reports. These are Login/Logout, Set/Remove DND, Set/Remove Make
Busy, Answer Personal, Answer ACD, Originate, Idle, Work Timer Start/Expire,
Hold Activate/Retrieve/Abandon, and Remote ACD Answer. The first two fields of
all event reports contain the date, in DD/MM/YY format, and the time in
HH:MM:SS format. The remaining information in the event reports include:
Login / Logout
The Login / Logout reports display the login and logout status of agents in the
queue.
Login or Logout = Report title
#### = Extension number
AGT: #### = Agent ID
Line: # = Line number
Set / Remove DND
The Set / Remove DND reports display the use of the Do Not Disturb feature by
agents.
-20-
Page 21

Search TASKE Call Center Management Tools Version 7.0
Set / Remove Make Busy
The Set / Remove Make Busy reports display the use of Make Busy by agents.
Set Make Busy or Remove Make Busy = Report title
#### = Extension number
AGT: #### = Agent ID
Line: # = Line number
Answer Personal
The Answer Personal report displays agents on non-ACD calls.
Answer Personal = Report title
#### = Extension number
AGT: #### = Agent ID
Line: # = Line number
Answer ACD
The Answer ACD report displays agents on ACD calls.
Answer ACD = Report title
P### = Pilot number
AGT: #### = Agent ID
Line: # = Line number
Originate
The Originate report displays outbound calls originating with an agent.
Originate = Report title
#### = Extension number
AGT: #### = Agent ID
Line: # = Line number
-21-
Page 22

Search TASKE Call Center Management Tools Version 7.0
Idle
The Idle report displays the agent state when idle. This may be Idle, Make Busy,
Do Not Disturb, or Do Not Disturb and Make Busy.
Idle = Report title
#### = Extension number
AGT: #### = Agent ID
Line: # = Line number
State: ??? = Agent state, will be Idle, Make Busy, Do Not Disturb, or Do
Not Disturb and Make Busy
Work Timer Start / Expire
The Work Timer Start / Expire reports display the agent use of Work Timer.
Work Timer Start or Work Timer Expire = Report title
#### = Extension number
AGT: #### = Agent ID
Line: # = Line number
Hold Activate / Retrieve / Abandon
The Hold Activate / Retrieve / Abandon reports display the use of hold by agents.
Hold Retrieve, Hold Activate, or Hold Abandon = Report title
#### = Extension number
AGT: #### = Agent ID
Line: # = Line number
Remote ACD Answer
The Remote ACD Answer report displays calls answered by agents at remote
sites.
-22-
Page 23

Search TASKE Call Center Management Tools Version 7.0
Defining ACD Search Parameters
Define the parameters for an ACD search in
the Search Parameters dialog box. To access
the Search Parameters dialog box for ACD
records, ensure that an ACD search is open
and click either or . Clicking creates
a sub-filter for the selected filter, and clicking
modifies the selected filter.
The Search Parameters dialog box for ACD
records contains five tabs: Time, Agents,
Extensions, Pilots, and Groups. Using these
tabs, include the time of day, an agent ID, an
extension number, a Pilot number, and a
group ID in a search filter. After selecting all
of the desired options for the search filter,
click OK to view the results.
Searching for Call Events by Time
The Time tab defines search filter
criteria based on the time of day that
events occurred. By defining a start
time and an end time, define a time
period as small as one minute or as
large as 23 hours and 59 minutes. The
search filter excludes all records that do
not fall within the specified time period.
To include the Time Reports in the filter,
enable the Time Report check box. To
exclude the Time Reports from the filter
disable the Time Report check box.
To create a time base for a search filter:
1. Click the hour field in the Start Time box to select the field.
2. Input a number between 00 and 23.
3. Click the minute field in the Start Time box to select the field.
4. Input a number between 00 and 59.
5. Repeat steps 1 to 4 in the End Time box.
-23-
Page 24

Search TASKE Call Center Management Tools Version 7.0
Searching for Call Events by Agent
The Agents tab defines search filter
criteria based on line numbers and
events related to a specific Agent ID.
The Line field on the Agents tab defines
a range of line numbers to include in the
search filter. The Agent ID field and the
check boxes below define the agent
events to include for the identified
agent.
When defining the search parameters
on the Agents tab, use the Toggle All
button to switch between enabling and
disabling all of the options.
To create a filter on agent specific information:
1. Click the Greater Than box in the Line section to select the field.
2. Input a value to represent the lower limit for the line number. This must be
a number from 0 to 99.
3. Click the But Less Than box in the Line section to select the field.
4. Input a value to represent the upper limit for the line number. This must be
a number from 0 to 99.
5. Click the Agent ID box and input the ID of the agent to include in the
search filter.
6. Enable the check boxes of the agent events to include in the search filter.
Searching for Call Events by Extension
The Extensions tab defines search filter
criteria based on an extension number.
The Extension field and the check
boxes below define the extension
events to include in the search filter for
the identified extension.
When defining the search parameters
on the Agents tab, use the Toggle All
button to switch between enabling and
disabling all of the options.
-24-
Page 25

Search TASKE Call Center Management Tools Version 7.0
To create a filter on extension specific information:
1. Input the extension number of the extension to include in the search filter.
2. Enable the check boxes of the extension events to include in the search
filter.
Searching for Call Events by Pilot
The Pilots tab defines search filter
criteria based on a particular pilot. The
Pilot to include in the search filter is
identified in the Pilot box and the
remaining sections of the tab define the
search parameters for the Pilot.
To avoid including a number of
unwanted records in the search filter
that are not specific to a Pilot, disable
the Time Reports, agent events,
extension events, and Group Reports on
the other tabs.
To create a search filter for a specific Pilot:
1. Input the Pilot number of the Pilot to include in the search filter.
2. Enable the Pilot Report check box to include Pilot reports in the search
filter.
3. Enable the Answer ACD check box to include Answer ACD reports in the
search filter
4. Enable the Remote ACD Answer check box to include Remote ACD
Answer reports in the search filter.
To include a range for the longest call waiting for the Pilot in the search filter,
input a start time and an end time in the Longest Call Waiting section of the Pilots
tab. The start time and the end time identify the duration of the longest call
waiting. For instance, input 00:10 in the Start box and 01:30 in the End box to
find all of the longest calls waiting for the Pilot that waited anywhere from ten to
ninety minutes. The duration of the longest call waiting can be as short as one
minute or as long as 23 hours and 59 minutes.
To set a range for the longest call waiting in the queue of the selected Pilot:
1. Click the hour field in the Start box to select the field.
2. Input a number from 00 to 23 to define the lower limit for the hour.
3. Click the minute field in the Start box to select the field.
4. Input a number from 00 to 59 to define the lower limit for the minute.
5. Repeat steps 1 to 4 to define the upper range for the duration of the
-25-
Page 26

Search TASKE Call Center Management Tools Version 7.0
longest call waiting in the End box.
To include a range for the number of calls waiting for the Pilot in the search filter,
input a value for the low end of the range and a value for the high end of the
range in the Calls Waiting section of the Pilots tab.
To set a range for the calls waiting:
1. Click the Greater Than box to select the field.
2. Input a number from 0 to 999 to define the lower range for the number of
calls waiting.
3. Click the But Less Than box to select the field.
4. Input a number from 0 to 999 to define the upper range for the number of
calls waiting. Ensure that this number is greater than the number in the
Greater Than box.
To include a range for the number of available agents for the Pilot in the search
filter, input a value for the low end of the range and a value for the high end of
the range in the Available Agents section of the Pilots tab.
To set a range for the available agents:
1. Click the Greater Than box to select the field.
2. Input a number from 0 to 999 to define the lower range for the number of
agents available.
3. Click the But Less Than box to select the field.
4. Input a number from 0 to 999 to define the upper range for the number of
agents available. Ensure that this number is greater than the number in
the Greater Than box.
Searching for Call Events by Group
The Groups tab defines search filter
criteria based on a particular group. The
group to include in the search filter is
identified in the Group ID box and the
remaining sections of the tab define the
search parameters for the group.
To avoid including a number of
unwanted records in the search filter
that are not specific to the group,
disable the Time Reports, agent events,
extension events, Pilot Reports, Answer
ACD reports, and Remote ACD Answer
on the other tabs.
-26-
Page 27

Search TASKE Call Center Management Tools Version 7.0
To create a search filter for a specific group:
1. Input the group number in the Group ID box.
2. Enable the Group Report check box to include group reports for the group.
To include a range for the longest call waiting for the group in the search filter,
input a start time and an end time in the Longest Call Waiting section of the
Groups tab. The start time and the end time identify the duration of the longest
call waiting. For instance, input 00:10 in the Start box and 01:30 in the End box to
find all of the longest calls waiting for the group that waited anywhere from ten to
ninety minutes. The duration of the longest call waiting can be as short as one
minute or as long as 23 hours and 59 minutes.
To set a range for the longest call waiting:
1. Click the hour field in the Start box to select the field.
2. Input a number from 00 to 23 to define the starting hour.
3. Click the minute field in the Start box to select the field.
4. Input a number from 00 to 59 to define the starting minute.
5. Repeat steps 1 to 4 in the End box.
To include a range for the number of calls waiting for the group in the search
filter, input a value for the low end of the range and a value for the high end of
the range in the Calls Waiting section of the Groups tab.
To set a range for the calls waiting:
1. Click the Greater Than box and input a number from 0 to 999 to define the
lower range for the number of calls waiting.
2. Click the But Less Than box and input a number from 0 to 999 to define
the upper range for the number of calls waiting. Ensure that this number is
greater than the number in the Greater Than box.
To include a range for the number of available agents for the group in the search
filter, input a value for the low end of the range and a value for the high end of
the range in the Available Agents section of the Groups tab.
To set a range for the available agents:
1. Click the Greater Than box and input a number from 0 to 999 to define the
lower range for the number of agents available.
2. Click the But Less Than box and input a number from 0 to 999 to define
the upper range for the number of agents available. Ensure that this
number is greater than the number in the Greater Than box.
-27-
 Loading...