

Page 1

INSTALLATION & MAINTENANCE GUIDE
Page 2

NOTICE
The information contained in this document is believed to be accurate in all respects but is not
warranted by Mitel Networks Corporation (MITEL®). The information is subject to change without
notice and should not be construed in any way as a commitment by Mitel or any of its affiliates or
subsidiaries. Mitel and its affiliates and subsidiaries assume no responsibility for any errors or
omissions in this document. Revisions of this document or new editions of it may be issued to
incorporate such changes.
Trademarks
SX-2000 and MiTAI are trademarks of Mitel Networks Corporation.
Windows and TAPI are trademarks of Microsoft Corporation
Other product names mentioned in this document may be trademarks of their respective
companies and are hereby acknowledged.
Copyright
, Trademark of MITEL Networks Corporation
©Copyright 2003, MITEL Networks Corporation
All rights reserved
2
Page 3

Table of Contents
ABOUT THE SX-2000 APSU® ................................................................................. 4
SX-2000 Light CTI Connectivity........................................................................................... 4
INSTALLING THE SX-2000 APSU ........................................................................... 5
Required Components......................................................................................................... 5
Installation Instructions ........................................................................................................5
Installing The MiTAI Client................................................................................................... 7
Configuring The MiTAI Client............................................................................................... 8
Upgrading The SX-2000 ApSU Software............................................................................. 8
About The SX-2000 ApSU Software Load........................................................................... 8
TROUBLESHOOTING ............................................................................................ 11
Check The LED Indicators................................................................................................. 11
FTP Client Cannot Connect To SX-2000 ApSU ................................................................ 11
MiTAI Client Cannot Connect To MiTAI Server On SX-2000 ApSU .................................. 12
Reconfiguring The SX-2000 ApSU Flash Memory ............................................................13
3
Page 4
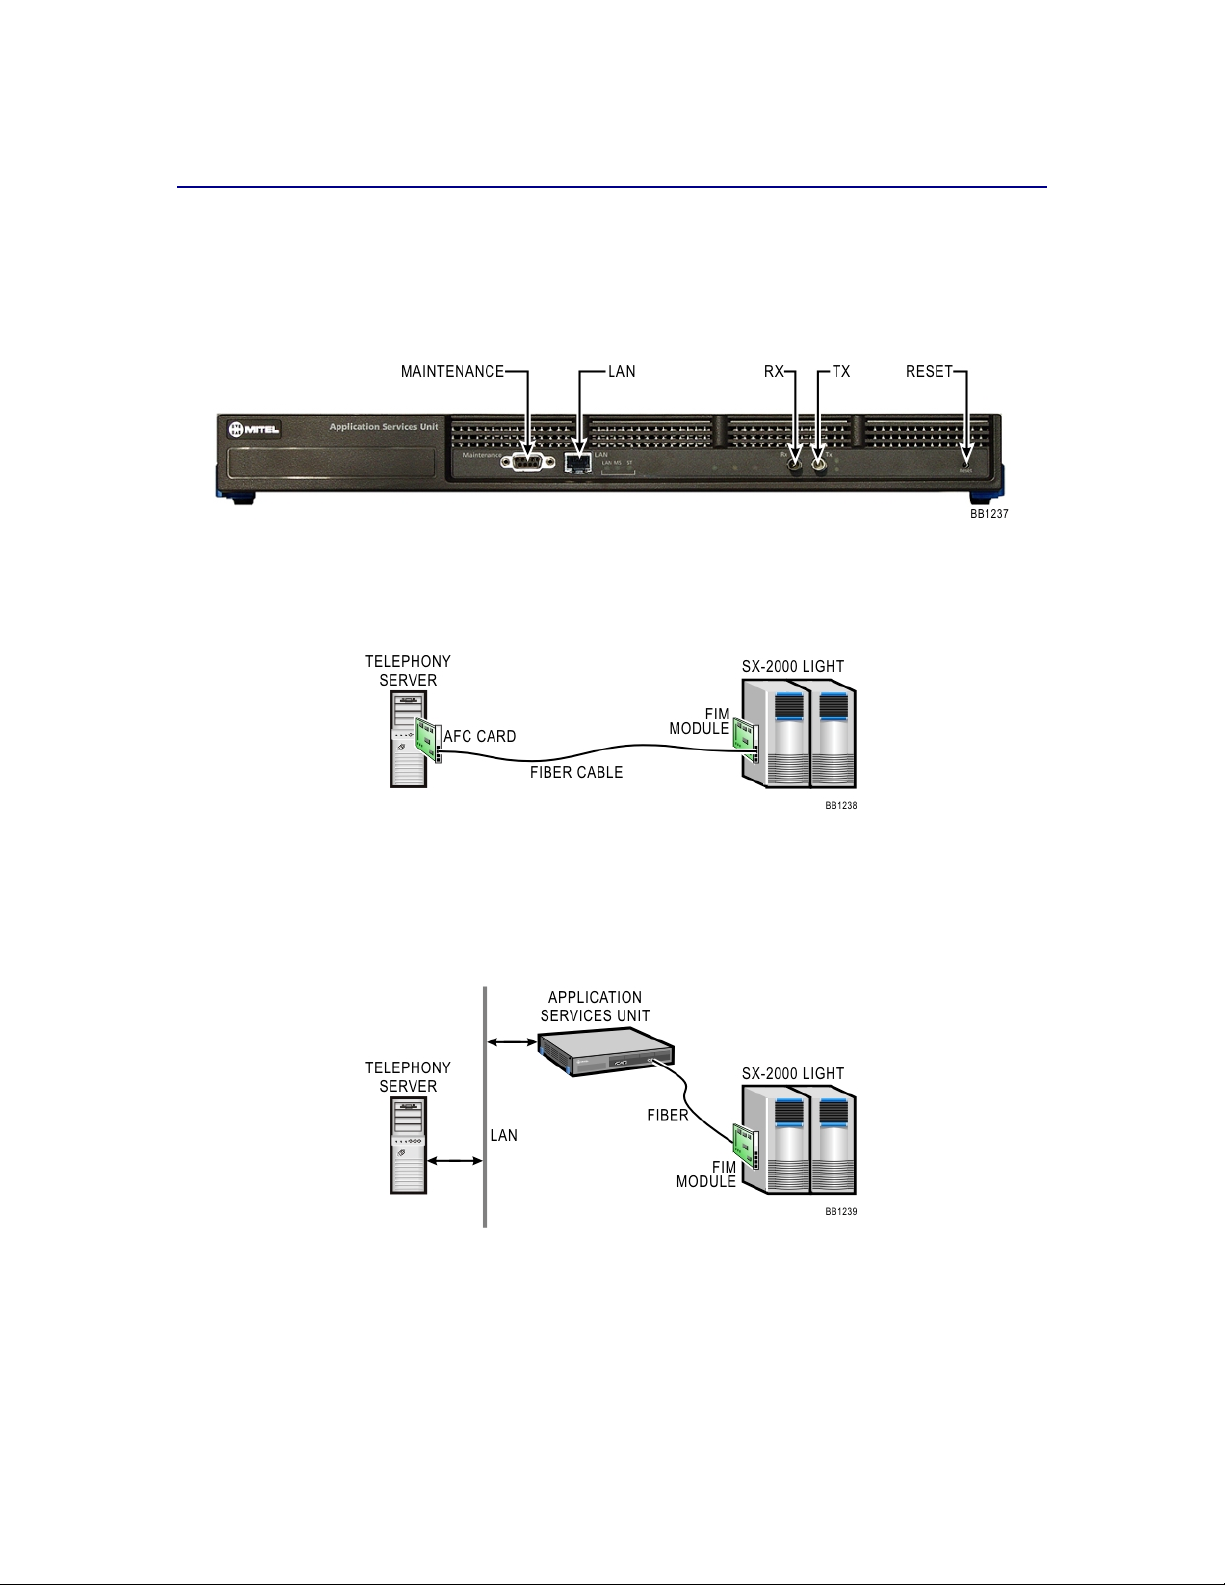
About The SX-2000 ApSU®
The Mitel NetworksTM SX-2000 Application Services Unit (ApSU) is a fiber connected MiTAI
TM
server for the SX-2000 that replaces the Application Fiber Card (AFC). It is a low cost and
maintenance-free unit that supports:
• MiTAI remote clients Version 10 or later,
• Mitel Client/Server TSP 3.0 or later.
SX-2000 Light CTI Connectivity
Currently, the MiTAI server for the SX-2000 resides on a PC and communicates with the SX-2000
PBX via fiber optic cable using the AFC (Application Fiber Card).
SX-2000 CTI Connectivity using the AFC - Application Fiber Card
The AFC is being replaced with the SX-2000 ApSU which provides a MiTAI server that will be
able to service multiple MiTAI and TAPI clients over the network using standard network cards.
The SX-2000 ApSU will reduce the overall cost of hardware and simplify the deployment and
maintenance of telephony applications.
SX-2000 CTI connectivity using the SX-2000 Application Services Unit
4
Page 5

Installing The SX-2000 ApSU
Required Components
To install the SX-2000 Applications Services Unit (SX-2000 ApSU), you require:
• SX-2000 ApSU
• RJ45 Ethernet cable for connecting to the LAN
• fiber-optic cable that is connected to the SX-2000 PBX
• personal computer (PC) with a connection to the same LAN as the SX-2000 ApSU, an
FTP client and Hyperterminal or a similar program for communicating over a serial port
• serial cable to connect the SX-2000 ApSU to the PC’s COM port.
Note: Some Windows operating systems such as XP or 2000 may already have an FTP client
and Hyperterminal included.
Installation Instructions
The following instructions assume that the SX-2000 ApSU has the factory-installed SX-2000
ApSU software already installed.
1. Log into a CDE session on the SX-2000 PBX.
Note: You program the SX-2000 ApSU on the SX-2000 in exactly the same manner as the AFC
card.
2. Program a Fiber Distributed Digital Services Unit (FD DSU) in the Cabinet Assignment form
for the physical location identifier (PLID) of the Fiber Interface Module (FIM) carrier card that
will be used to connect to the SX-2000 ApSU.
3. Program a “Communications Proc” card for the second circuit in the same cabinet in the
System Configuration form. For example, if the cabinet used for the SX-2000 ApSU is #4, the
System Configuration form should display PLID 4 1 1 as “Fiber Interface”. PLID 4 1 2 should
then be programmed as “Communication Proc”. When the SX-2000 ApSU is operational, the
Installed Card Type field should be displayed as “Communication Proc”.
4. Connect the PC to the SX-2000 ApSU using the serial cable.
5. Connect the SX-2000 ApSU to the LAN with the Ethernet cable.
6. Connect the SX-2000 ApSU to the SX-2000 PBX with the fiber cable.
7. Initiate the serial-port communications program (for example, Hyperterminal) on the PC.
Settings should be defined as 38400, 8-N-1 and flow control should be set to ‘None’.
8. Connect the power cable to the SX-2000 ApSU. It should initiate automatically and output
should begin appearing in the Hyperterminal window on the PC screen. If the SX-2000 ApSU
has already been powered up, a soft reset can be performed by using the Reset button
recessed into the front of the SX-2000 ApSU's casing.
Note: As with other fiber connections, the two green LED’s beside the SX-2000 ApSU's fiber
connectors should be lit steady. If not, try switching the connections so that the red
connector is inserted where the blue connector was and the blue connector is inserted
where the red connector was previously.
9. Press any key on the keyboard when prompted by Hyperterminal to stop the auto-boot
process. A prompt should appear reading: [MC269AA Boot]-:
5
Page 6

Note: If the SX-2000 ApSU is left in this mode (displaying the prompt and waiting for input), it
will eventually restart automatically.
10. Enter p at the prompt to display the current boot parameters of the SX-2000 ApSU.
Note: Some fields will not be displayed if they have no value. The c command will allow you to
set or change the values for all the fields.
The output from the p command should resemble the following (values will be different and
additional fields may be displayed):
[MC269AA Boot]-: p
boot device : flash
unit number : 0
processor number : 0
file name : vxworks
inet on ethernet (e) : 10.10.10.2:ffffff00
gateway inet (g) : 10.10.10.1
flags (f) : 0x0
other (o) : flash,c:/,xqt,apsumain.cmd
[MC269AA Boot]-:
11. Enter c at the Hyperterminal prompt to change boot parameters. You will be prompted to
provide values for each parameter:
• Press Enter to cause existing values to be retained
• Type the . (period) key to clear the field
• Type the - (dash) key to go to the previous field
• Press ctrl-D to exit and save the current session.
Note: The p command will not display fields if they have no value; the c command will always
permit all field values to be set or changed.
Boot Parameter Notes/Comments
boot device
Do not change this value. flash indicates
that the vxworks image stored in the SX2000 ApSU’s flash file system will be used.
This is the default setting.
processor number
host name
Do not change this value.
Do not change this value. It is not used
when the boot device is flash.
file name
Should always be vxworks as this is the
name used in the SX-2000 ApSU software.
inet on ethernet (e)
This is the fixed IP address the SX-2000
ApSU will use on the LAN to it is
connected. The subnet mask is appended
to the IP address in hexadecimal format
following a colon. For example, if the SX2000 ApSU is to have the IP address
10.10.10.2 and the subnet mask is to be
255.255.255.0, this field would have the
value 10.10.10.2:ffffff00.
inet on backplane (b)
Leave blank.
6
Page 7

Boot Parameter Notes/Comments
host inet (h)
gateway inet (g)
user (u)
FTP password (pw) (blank = use rsh)
flags (f)
target name (tn)
startup script (s)
other (o)
12. After you review the fields described in the table above, the message Bootline saved in
flash should be displayed in the Hyperterminal window followed by the prompt.
Do not change this value. It is not used
when the boot device is flash.
The IP address of the gateway for the LAN
to which the SX-2000 ApSU is connected.
Do not change this value. It is not used
when boot device is flash.
Do not change this value. Is not used
when boot device is flash.
Leave value as 0x0.
Can leave blank.
Leave blank.
Must have the value:
“flash,c:/,xqt,apsumain.cmd”. This entry
instructs the SX-2000 ApSU software to
mount the flash filesystem as a ‘C:/’ drive,
and to execute the “apsumain.cmd”
command file. The contents of the
“apsumain.cmd” file are what starts up the
SX-2000 ApSU core software, loads the
files into RAM and starts the HCI server
and MiTAI server software running.
13. Enter the p command to verify that all fields have the correct values. If one or more values
are incorrect, use the c command to configure them.
14. After the parameters are correct, enter the @ command to reboot the SX-2000 ApSU. The
SX-2000 ApSU will boot with the new parameters.
CAUTION: In the event that the SX-2000 ApSU does not reset after entering the @
command, press the recessed Reset button on the front of the SX-2000 ApSU's casing to
complete the reset cycle.
15. Configuration is complete and the MiTAI server running in the SX-2000 ApSU is now in
service.
You will need to change the configuration of the MiTAI clients to include the IP address of the
SX-2000 ApSU for their server. You should also verify that MiTAI clients are configured to use
Port Number 8000.
Installing The MiTAI Client
To initiate installation of the MiTAI Client, insert the Local Runtime disc into the CD-ROM drive of
your PC and complete the following procedure:
Note: If the installation procedure does not begin automatically, run the setup.exe executable
program from the root directory of the Local Runtime CD.
1. When the Copyright Information screen appears, click Next.
2. Review the Software Agreement and if you agree to comply by the license, click Yes.
3. A Systems Detection screen will appear displaying attributes of your PC. Click Next.
7
Page 8

In the Settings screen, select whether you wish to use Default settings or settings from a pre-
4.
existing MiTAI.dat file. After making your selection, click Next.
5. The Path screen will display the name of the directory in which the MiTAI Client will be
installed. You may modify this if you wish the software to be installed into a different location
on your PC. Click Next when finished.
6. The Folder screen will prompt you to select where you would like the MiTAI Client software to
appear on your Windows Start menu. Click Next when finished.
7. Review the settings displayed on the Review Settings screen and click Next when finished.
8. The Restart screen will prompt you to restart your PC once the installation is complete. Click
Finish to conclude the installation program.
Note: Once the MiTAI Client has been installed on your PC, it requires further configuration as
described below.
Configuring The MiTAI Client
1. Open the Windows Control Panel by:
- In Windows 2000, click Start, select Settings and then click Control Panel.
- In Windows XP, click Start and then click Control Panel.
2. Double-click on the Mitel Remote Access applet.
3. In the dialog box that appears, enter the Host Name or IP address of the SX-2000 ApSU.
Upgrading The SX-2000 ApSU Software
The following instructions assume that the SX-2000 ApSU has already been installed and
configured correctly.
You can install a new software load on the SX-2000 ApSU into its file system without taking it out
of service or affecting service.
Note: New software loads will only take effect after the SX-2000 ApSU is rebooted/reset.
1. Connect to the SX-2000 ApSU using an FTP client.
2. When prompted for a User ID or password, press Enter.
3. To review files currently on the SX-2000 ApSU, enter the dir command in the FTP client.
4. In the FTP client, set the transfer mode to binary by entering the bin command.
5. Transfer all of the new SX-2000 ApSU files to the SX-2000 ApSU using the put or mput
commands.
6. Use the dir command to verify that all of the new files have been transferred by comparing
file sizes and dates.
7. Exit the FTP client.
The SX-2000 ApSU will continue to operate using the old software until the next time that it is
reboot/reset. To immediately put the new SX-2000 ApSU software into service, reboot/reset the
SX-2000 ApSU by using the Reset button.
About The SX-2000 ApSU Software Load
The following is a complete list of the files that should reside on the SX-2000 ApSU. There is only
one directory in the SX-2000 ApSU file system. The easiest way to view the SX-2000 ApSU file
8
Page 9

system is with an FTP client to connect to the SX-2000 ApSU. This can be done while the
SX-2000 ApSU is running without interfering with its operation.
Here is sample output from an FTP client session:
ftp 10.10.10.2
Connected to 10.10.10.2.
220 VxWorks FTP server (VxWorks 5.4) ready.
User (10.10.10.2:(none)):
331 Password required
Password:
230 User logged in
ftp> dir
200 Port set okay
150 Opening BINARY mode data connection
-rwx---A-- 1 user group 81 Jan 1 1980 DATETAG.TXT
-rwx---A-- 1 user group 406 Jan 1 1980 APSUMAIN.CMD
-rwx---A-- 1 user group 1974134 Jan 1 1980 HCIVXWK.OUT
-rwx---A-- 1 user group 730865 Jan 1 1980 MITAIVXW.OUT
-rwx---A-- 1 user group 2177933 Jan 1 1980 VXWORKS
-rwx---A-- 1 user group 300019 Jan 1 1980 MTC.LOG
-rwx---A-- 1 user group 469265 Jan 1 1980 APSUCORE.O
-rwx---A-- 1 user group 22344 Jan 1 1980 PRI_FPGA.BIN
-rwx---A-- 1 user group 271 Jan 1 1980 APSUAPPS.CMD
226 Transfer complete
ftp: 790 bytes received in 0.11Seconds 7.18Kbytes/sec.
The files include:
Filename Notes
APSUAPPS.CMD Script that launches HCI and MiTAI once the message system between
the ApSU and the SX-2000 PBX is up and running
APSUCORE.O SX-2000 ApSU system software
APSUMAIN.CMD Startup script that launches the system software after a reboot/reset.
DATETAG.TXT Plain text file that identifies the load of software installed on the SX-2000
ApSU.
HCIVXWK.OUT HCI server.
MITAIVXW.OUT MiTAI server.
MTC.LOG
Log file containing the logs generated on this SX-2000 ApSU. This is a
circular file that contains only the most recent logs (guarantees that the
size of the file never grows too large for the available storage space).
PRI_FPGA.BIN Low-level SX-2000 ApSU system software component.
VXWORKS Operating system running the SX-2000 ApSU software
Typically, SX-2000 ApSU software builds are located in a directory named Install. The contents of
the Install directory will be all of the files that need to be copied to the SX-2000 ApSU file system.
Software builds will normally be identified by number such as SX-2000 ApSU build 1.0.0.1.
9
Page 10

The following is an example of the upgrade files stored in an Install directory:
Friday, December 20, 2002 11:52 AM 469271 apsucore.o
Thursday, December 19, 2002 10:46 AM 499 apsumain.cmd
Friday, December 20, 2002 11:51 AM 81 Datetag.txt
Friday, December 20, 2002 11:57 AM 1974152 hcivxwk.out
Friday, December 20, 2002 11:58 AM 731289 mitaivxw.out
Thursday, December 19, 2002 10:45 AM 22344 pri_fpga.bin
Friday, December 20, 2002 11:53 AM 2177279 vxworks
Friday, December 20, 2002 11:56 AM 271 apsuapps.cmd
10
Page 11

Troubleshooting
Use the following procedures to resolve any problems you may encounter with the SX-2000
ApSU.
Check The LED Indicators
Check the LEDs on the front panel of the SX-2000 ApSU.
LED Status Indicates
MS Lit steady
ST Blinking on and off every ½ second The SX-2000 ApSU has not locked up and
FTP Client Cannot Connect To SX-2000 ApSU
1. Verify that the SX-2000 ApSU is operational by checking its LED’s.
2. Verify that the FTP client is connecting to the correct IP address for the SX-2000 ApSU using
the ping command to test the IP address of the SX-2000 ApSU. If no reply is received, there
may be a network problem between the PC and the SX-2000 ApSU or there may be a
problem with the SX-2000 ApSU itself.
Whether or not the message link to the
SX-2000 PBX is functioning. If it is lit, the
message link is up which is the operational
state.
that different tasks are still getting CPU time.
If the ST LED is on all the time or off all the
time, the SX-2000 ApSU has probably locked
up and will require a reboot/reset.
3. If the IP address of the SX-2000 ApSU is not known, the following procedure must be used.
You will need to take the SX-2000 ApSU out of service.
- Connect to the serial port of the SX-2000 ApSU and initiate the Hyperterminal application
on the PC.
- Reboot/reset the SX-2000 ApSU.
- Watch the output from the SX-2000 ApSU carefully as it is displayed. The messages
displayed will include the IP address that the SX-2000 ApSU is configured with on the
line that begins with inet on ethernet. For example:
11
Page 12

VxWorks System Boot
Copyright 1984-1996 Wind River Systems, Inc.
CPU: MC271BA
Version: 5.3.1
BSP version: 1.0.1.14
Creation date: Dec 4 1998, 15:28:28
Press *any* key to stop this auto-boot...
3
2
1
0
auto-booting...
boot device : flash
unit number : 0
processor number : 0
file name : vxworks
inet on ethernet (e) : 10.10.10.2:ffffff00
gateway inet (g) : 10.10.10.1
flags (f) : 0x0
other (o) : flash,c:/,xqt,apsumain.cmd
4. If the steps listed above do not resolve the problem, perform a reboot/reset.
- Connect to the SX-2000 ApSU via the serial connector and start the Hyperterminal
application on the PC.
- Reboot/reset the SX-2000 ApSU.
- Press any key on the keyboard when prompted by Hyperterminal to stop the auto-
boot process. A prompt should appear reading: [MC269AA Boot]-:
- Enter c and change the value of the boot device parameter from flash to qu. The
remaining values can remain unchanged but the boot device must be set to qu for
the Q command to function. If the parameter is not defined properly, entering the Q
command will lock up the SX-2000 ApSU and it will need to be rebooted/reset.
- Enter Q to initiate a quick reboot that will create the flash file system and bring up just
the FTP server. It will not try to start the HCI or MiTAI servers.
Note: When the SX-2000 ApSU is running in this mode, the ST LED will not blink.
MiTAI Client Cannot Connect To MiTAI Server On SX-2000 ApSU
1. Verify that the SX-2000 ApSU is operational by checking its LED’s.
2. Verify that the MiTAI Client is configured with the SX-2000 ApSU’s IP address and the Port
Number is defined as 8000.
3. Verify that the SX-2000 ApSU’s IP address returns data when tested using the ping
command.
4. Connect to the SX-2000 ApSU using FTP and enter the dir command to verify that the
correct files are present.
5. Use FTP to copy the MTC.LOG file from the SX-2000 ApSU onto the PC using the get
command. This is a circular log and so while it may be read using any text editor, the latest
log messages may not be at the bottom of the file. Interpreting the unprocessed log file is
12
Page 13

best left to product support and design personnel. If the logs viewer application is available, it
can be used to copy the logs onto the PC and read the log messages.
Reconfiguring The SX-2000 ApSU Flash Memory
1. Connect a serial cable (34800, straight-through cable) to the maintenance port of the
SX-2000 ApSU.
2. Ensure that you are using a PC connected to the same Network as the SX-2000 ApSU (on
the same subnet or accessible via a router).
3. Copy the following files obtained from Mitel Networks Product Support to a folder on the PC's
hard drive:
- Datetag.txt,
- ApSUmain.cmd,
- ApSUapps.cmd,
- Hcivxwk.out,
- mitaivxw.out,
- vxworks,
- mtc.log,
- apcucore.o,
- pri_fpga.bin
4. Disconnect the fiber-optic cable from the SX-2000 ApSU to prevent it from resetting.
5. Open a terminal emulator program using the serial connection (38400, 8-N-1) to the SX-2000
ApSU.
6. Reset the ApSU.
7. Stop the automatic countdown by pressing any key.
8. At the [MC269AA Boot]-: prompt, enter c to change the boot parameters.
9. Change the boot device parameter from flash to qu.
10. Enter R to reformat the file system on the SX-2000 ApSU.
CAUTION: All files in the SX-2000 ApSU will be deleted! The SX-2000 ApSU will initialize
with just an FTP server operational. This is similar to the Q command but with the addition
of reformatting the file system.
The file system has now been reformatted. Use FTP to transfer a copy of all the SX-2000 ApSU
software files onto the SX-2000 ApSU file system.
The boot parameters will need to be changed back to their original settings. Use the reboot
procedure described above to change the boot parameters back although only the boot device
and other parameters need to be changed back since the other revised parameters will be
ignored when boot device is set to flash. Once the parameters have been changed using the c
command, reboot the SX-2000 ApSU to bring it back into service.
13
Page 14

TM
, ® Trademark of Mitel Networks Corporation.
© Copyright 2003, Mitel Networks Corp or ation .
All rights reserved.
 Loading...