

Page 1

ATTENDANT / UNIFIED MESSAGING USER GUIDE
Page 2

NOTICE
THIS DOCUMENT IS PROVIDED TO YOU FOR INFORMATIONAL PURPOSES ONLY. The
information contained in this document is believed by Mitel Networks to be accurate as of the date
of its publication and is subject to change without notice. M itel Networks assumes no responsibility
for any errors or omissions in this document and shall have no obligation to you as a result of
having m ade this document available to you or as a r es ult of the information it contains.
No part of this document can be reproduced or transmitted in any form or by any means electronic or mechan ical - for an y purpose without written permission from
Mitel Netwo rks Corporation.
The following are trademarks of their respective companies or organization s:
Mitel Networks is a trademark of Mitel Networks Corporation .
Microsoft and Windows are trademarks of Microsoft Corporation.
All other names and products herein are trademarks of their respective companies and are
hereby ack nowledged.
Mitel Networks Speech Server Release 4.5
June 2003
© Co py right 2003, Mitel Networks Corporation.
All Rig hts Reserved
Page 3

Table of Contents
GettingStarted...............................................................1
PurposeofthisGuide ......................................................1
About Mitel Networks™ Speech Server . .......................................1
Benefits of the System . . ....................................................2
ListofFeatures ...........................................................3
Enrolling on the System . ....................................................4
Logging In ...............................................................5
RecordingYourPrimaryGreeting .............................................6
Changing Your Name Recording . .............................................6
SettingYourPersonalPreferences ............................................7
AccessingyourPersonalWebPage ........................................8
Changing Your PIN . . ...................................................10
ProgrammingYourNumbers .............................................10
SettingYourForwardingOptions ..........................................11
SettingyourPersonalOperator ...........................................12
Setting the Prompt Language . ............................................12
SettingtheMessagingOptions............................................13
SettingtheNotificationSettings ...........................................13
Setting Personal Preferences with the Phone ................................14
Creating Your Personal Directory ............................................14
About Your Personal Directory ............................................14
CreatingandModifyingContacts ..........................................15
Managing Y our Contac t List ................................................15
RecordingContactNames ...............................................16
TestingContactNames .................................................17
UsingSpeechCommands.....................................................18
Barge-in ................................................................18
ExpertMode ............................................................18
Speaking Tips . . .........................................................18
UniversalVoiceCommands ................................................19
Navigating through the Applications ..........................................20
Managing Calls . .........................................................20
PlacingaCall .........................................................20
CancelingaCall .......................................................23
TransferringaCall .....................................................23
ForwardingCalls.......................................................23
CheckingaPhoneNumber ..............................................25
CallingtheOperator ....................................................25
Changing the Language .................................................25
ManagingMessages......................................................26
PlayingMessages .....................................................26
ReplyingtoMessages .....................................................28
ForwardingMessages .....................................................29
ForwardingaMessagetoAnotherPerson ...................................29
ForwardingaMessagetoaFaxMachine....................................29
iii
Page 4

Mitel Networks Speech Server
Delivering Messages ......................................................30
MakingandDeliveringaMessage .........................................30
Managing Faxes . . .......................................................31
PlayingaFax .........................................................31
ForwardingaFax ......................................................31
PrintingaFax .........................................................31
Managing Appointments . . . ................................................32
CreatingAppointments..................................................32
Changing Appointments . ................................................33
Deleting Appointments . . ................................................33
Managing Meeting Requests ................................................34
Creating Meeting Requests ..............................................34
Changing the Date/Time . ................................................35
Changing the Attende es . ................................................35
CancelingMeetings ....................................................35
Receiving Meeting Requests . . . ..........................................36
Declining Meeting Requests ..............................................36
Accepting Meeting Requests . . . ..........................................36
Checking Y our Calenda r . . . ................................................37
CheckingEvents.......................................................37
CheckingAvailability....................................................37
Managing Tasks . . .......................................................38
CreatingTasks ........................................................38
CheckingTasks .......................................................38
Changing Tasks .......................................................39
DeletingTasks ........................................................39
UsingTouchtoneCommands..................................................40
PlacingCalls ............................................................40
SwitchingtoTouchtone ....................................................40
PlayingMessages ........................................................41
MakingandSendingMessages..............................................41
SettingAddressOptions ...................................................42
SettingUserOptions ......................................................42
SettingGreetingOptions ...................................................43
Using You r PC for Voice Me ssages . . . ..........................................44
InstallingtheMultimediaOutlookPlug-in.......................................44
Changing Your Voice Message Playback . . . ...................................46
VoiceMessageButtons ....................................................47
PlayingVoiceMessages ...................................................48
Using Your PC Speakers as a Playbac k Device . .............................49
UsingYourTelephoneasaPlaybackDevice.................................50
ReplyingwithVoice .......................................................51
ForwardingwithVoice .....................................................52
Creating Voice Messages . . ................................................52
Using Outlook Web Access....................................................53
iv
Page 5

Getting Started
PurposeofthisGuide
This guide provides procedures f or managing calls, messages, tasks, meetings, and
appointments on the Mitel Networks™ Speech Server system with the Unified Messaging
option.
About Mitel Networks Speech Server
Mitel Networks Speech Server provides auto-attendant functionality with unified mes sa ging.
• The auto-attendant guides you with prompts and res ponds to your spoken commands to
direct your calls.
• The unified messaging stores youre- mai ls, voice mails, and faxes in one location, and lets
you use the auto-attendant to acc ess and manage your messages with any phone, anywhere at anytime. Other features also let you use a phone t o manage your appointments,
meeting requests, and tasks. All of this is possible because the Speech Server system
interacts wi th Microsoft Exchange (Inbox, Contacts, Calendar,and Tasks)allowing you t o
to use voice commands that interact with Microsoft Outlook.
In order to communicate, the system uses speech recognition and Text-to-Speech (TTS)
technologies.
Speech recognition
• Storesyour voice print when you enroll and us es your voice print to identify you every time
you log in
• Recognizes your natu ra l voice commands and performs yourreques ted task, forexample ,
"Find mes s ages"
• Recognizes names in your personal contact list and includes that contact within the task,
for example, "Call Doctor Fisher."
Text-to-Speech
• Reads names that are not personally recorded
• Reads y our text messages (e-mails and certain text attachments) over the phone
• Readsthe sender and subject text of all of y our messages(e-mails, faxes, and voice mails)
that are in your Micros oft® Outlook Inbox
• Available in French, Un ited Kingdom (U.K.) English, and North American (N. A.) English.
Note: The system supports Spanish auto-attendant prompts but does not support the
playback of e-mails in Spanish.
1
Page 6

Mitel Netw orks Speech Server
Benefits of the System
You can
• Placecallstoanynumber in the CompanyDirectorywithaname, ex tension,ordepartment
name, 24 hours a day from any phone.
• Place calls by name to your frequently-called numbers in your Personal Directory.
• Access the system from your hom e or cellular phone and use voice commands to place
calls to numbers that are programmed in your Personal or Company Directory.
• With the Mobility/Forwarding option, forward y our incoming calls to anot her number, for
example, your home number, or cellular phone number.
• Listen to all of your messages from one inbox (Micros oft Exchange).
• Useyour phone to listen to your e-mails.The Unified Messaging softwareis synchronized
with the contact list in Microsoft E x c hange an d uses Text-to-Speech (TTS) to play your
e-mail messages over the phone. Youcan reply with a voice mes sa ge that will be sent as
ane-mailattachment, or you caninstruct the system tocallthe sende r.Thee-mail address
ofthe sender is not required in the Personal or Company Directory,but t he pho ne number
must be listed in on e of the directories.
• Use your phone to check for messages from a particular person. Youcan then reply to or
forwardthemessage toaname listed in y our PersonalDirectory or theCompanyDirectory.
• Use you r pager or e-mail enabled device to be notified when a message arrives.
• Use the traditional touchtone phone commands to manage and access your messages.
• Useyour Personal Web Page to setyour messaging preferences and not if icat ion settings.
Optional features let you
• Send out meeting requests. Simply give the auto-attendan t the list of names, the dat e, the
start and end time, and record a m essage that will be e-m ailed to your attendees.
• Create and manage your appointments in Cale ndar (Microsoft Exchange).
• Create and manage your tasks in Tasks (Microsoft Exchange).
• Search for and find f ax es in your Inbox.
• Forward an e-mail or a fax to a fax machine f or printing.
• Play customized VoiceXML scr ipts with the Enterprise Voice Portal opt ion. These scripts
are developed through Mitel Professional Services o r through qualified dealers.
2
Page 7

List of Features
The Speech Server - Unified Messaging system can provide the following feat ures:
• Call by name
• Call by department
• Call by number
• Multi-level menuing
• Barge-in
• Check a number
• Call the operator
• Demo mode
•Expertmode
• Touchto ne dialing
• Change language
Mitel Networks Speech Server
• Mobility(ReachMe, Forwarding)
• Voice Portal
• One inb ox for messages
• Notification
• Fax Integration
• Calendar m anagement with your phone
• Task management with your phone
• Voice m ail manage ment with your PC
• Playback of voice messages through a phone as directed from Microsoft Out look.
3
Page 8

Mitel Netw orks Speech Server
Enrolling on the System
The first time that you log in, t he system will guide you th r ough enrollment. After you have
enrolled, you can begin using your Personal Directory.
Beforeyoustart,ensure thatyour system administratorhasgivenyouthefollowinginformation:
• Speech Server extension ________________ (2 to 7-digit number)
• YourLogin ID ___________________(10-digit number in NorthAmerica; 11-digitnumber
in the UK)
• Your PIN ______________________ (4 to 7-digit number)
• Yourextension: programmed for
• The URL of the login page for your Personal Web Page ______________________
Logging into the Personal Web Page uses the same Login ID and PIN.
Tip: T he URL has the se rver name between the slashes, for example,
http://computername/login.html
Tip: You should change the PIN that was given to you. The PIN secures acce ss to your
Personal Directory. See Changing Your PIN, on page 10.
To enroll
1. Dial the Speech Server extension number. If your extension is programmed for a manual
login, say "Login".
2. Say your PIN, say your login ID, and repeat your login ID to provide a voiceprint.
3. Record your name. Callers will hear this recording when they ask for your name.
4. Listen t o the tutorial. At the end of the tutorial you will hear a tone or "Who would you like
to call?".
5. You can now say the name of the person to whom you wan t to speak to.
¨
Automatic Login (Partial or Full) OR¨ManualLogin.
4
Page 9

Logging In
To log in from an extension with automatic login
• Dialthe Speech Server extension number.You receive immediateaccess tothe Company
Directory and to y our Personal Directory. You can say "Messenger," "Calendar," "Tas k
Manager," or "User Options" to access the o ther system features.
Twotypes of automatic logins ex ist so you can choose the level of security that you w ant. You
may want a security c hec k bef ore accessing your messages.
• Full Login gives immediate access to y our messages after you say "M es senger." There
is no verification.
• Partial Login gives you ac c es s to your messages after you say "Messenger" and enter
your PIN.
Your system administrator usually programs the automatic login into your business extension
number;however,youcanprogram the t ypeofautomatic loginyouwant for yo ur cellularphone,
pager, fax, and home phone numbers. If you want, you c an change the login type for your
business ex tension as well. See Programming Your Numbers, on page 10.
Mitel Networks Speech Server
To log in from an extension or external number with manua l login
Tip: T his procedure could apply to a company phone programmed with m anual login,
your home phone programmed with manual login, or a pay phone that you manually
login with.
1. Dial the SpeechServer extensionnumber.Youreceiveimmediate accessto the Company
Directory.
2. Say "Login."
3. Say your 10-digi t (for N.A. usage) or 11-digit (for U.K. usage) login ID so the system can
verify your voice with the voiceprint registered during your enrollment. After the system
verifies your voice, you have access to your P erso nal Directory, and you can say
"Messenger", "Calendar", "Task Manager", or "User Options" t o access other system
features.
Note: You can log into M es s aging directly with to uchtone commands. If you are calling
from another phone (that is not assigned to you, has partial login, and is on the s ame
system), dial the Speech Server extension number, and press *M [*6] on the phone.
When the Attendant asks for a PIN,press *, andthen dial your login ID and PIN to access
your mess ages .
5
Page 10

Mitel Netw orks Speech Server
Recording Your Primary Greeting
To re cord your primary greeting
1. Dial the Speech Server extension n umber. Login if necessary.
2. Say “User Options” and then “Record my primary greeting.”
3. When prompted, say your greeting, and then press the # key after c ompleting the
recording.
4. After hearing the recorded greeting, say “Yes” or “No” to accept or reject the greeting. If
necessary, re- record your greeting until y ou are satisfied.
Note: You can also reco rd your prim ary greeting after say ing “Messenger” or “Desktop.”
Simply follow the above procedure, but say “Messenger” or “Des k to p" in stead of “User
Options.”
Note:Greeting Op tions withintheUserOptions menu also letsyourecordyourprimary
greeting, record an alternative greeting, an d listen to your programm ed greetings. See
Setting User Options, on page 42.
Tip: To listen to your programmed primary greeting, you can say “User options,”
“Greeting op tions ,” and then “Listen to primary greeting.”
Changing YourName Recording
The system records your name during your enrollment. If you wi sh to change your name
recording at a later date , you can eas ily do so with the Attendant.
To change the recording of your name
1. Dial the Speech Server extension n umber. Login if necessary.
2. Say "Record my name." The system asks you if you want to record your name or hear
your name.
3. Say "Record name."
4. Say your first and last name.
5. Say "Yes" to keep the recording.
6
Page 11
SettingYour Personal Preferences
Program your personal preferences with your Personal Web Page.
Mitel Networks Speech Server
Your personal Profile S ettings sho w your personal directory and l et you
• Program your phone numbers (cellular phone, home, fax, pager nu mber, or voice mail)
Note: The programming of a voice m ail number in the Personal Web Page is for a user
thatdoes nothave access t o unified messaging. Users with unified messaging have their
voice mai l number programmed in another server.
• Set your forwarding options (des tination and expiration time)
• Set the prompt language (the language of the auto-attendant voic e prompts, bilingual
systems only)
• Set your messagin g options
• Set your notification settings
• Change your PIN.
7
Page 12
Mitel Netw orks Speech Server
Accessing your Personal Web Page
To access your Personal Web Page
1. Open the browser window (Mi crosoft™ Internet Explorer 5.5 or greater) on your PC.
2. Enter the URL of the login page for y our Pers onal Web Page. Get this URL from your
administrator.
3. Enter your login ID and login PIN.
4. Ifthe User Interface Language option is available (on bilingual systems only), select the
language for your Personal Web Page from the drop-down menu.
5. Click Login,orpresstheEnter key.
YourPersonal Web Page is display ed. If your login ID or PIN was incorrect you will receive the
message "A ccess Deni ed" . Enter your login ID an d PIN correctly.
Tip: Book mark the Speech Server login page in your browser.
Tip: If you cannot access your Personal Web page, contact your system a dministrator.
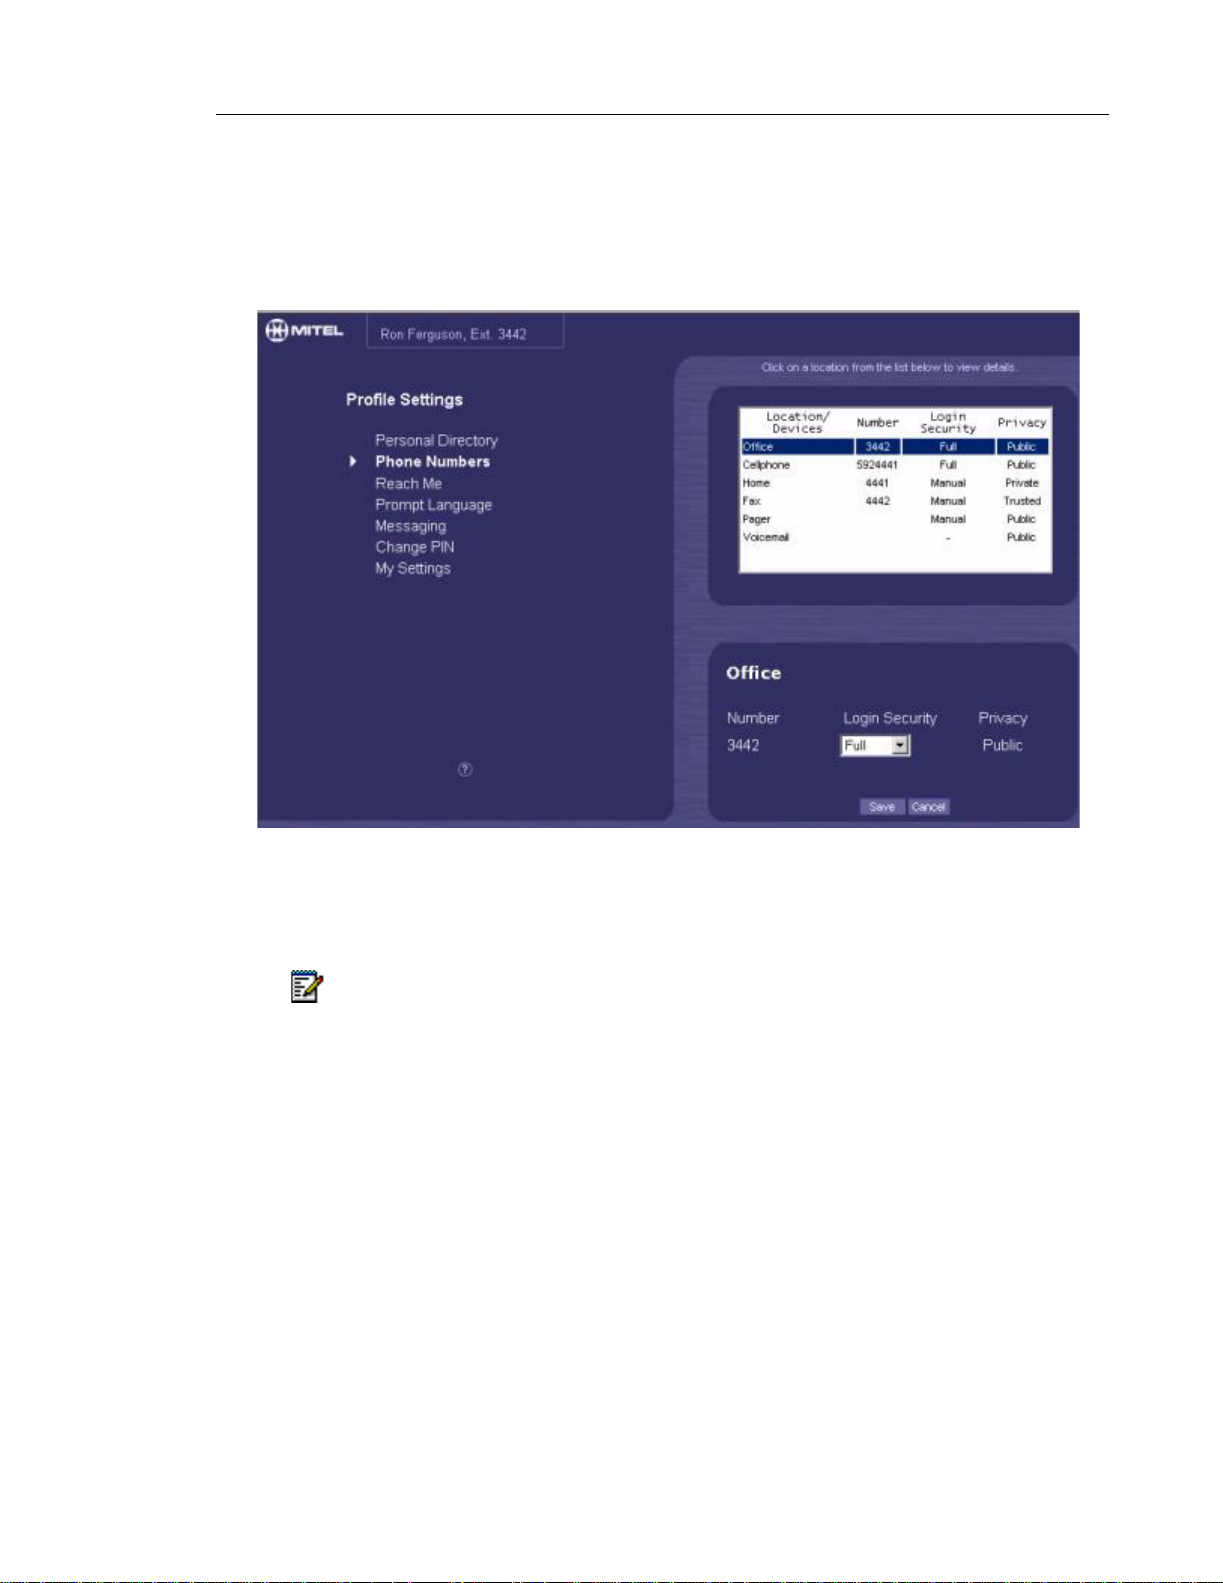
To view your profile settings
• In your Personal Web Page, clic k My Settings.
Thesettings that arein your Personal Web Pagearedependenton the licensethatyour system
has.You can only view these settings. Contact your system administrator if you want tochan ge
these settings.
Personal Data
First Name Your first name as programmed in the system
Last Name Your last name as programmed in the system
Nickname Your nickname as programmed in the system
Department The d epartment that you belong to
Location Your location
Login ID Your 10-digit (for N. A.) or 11-digit (for U.K.) l ogin ID
Language Language setting
Features
Expert Voice
Interface
"enabled" or "disabled"
In Expert Voice Interface mode, the Speech Server onl y provides a
tone when you call into the system. If you make an error, the Speech
Server p r ov ides prompts and instructions.
8
Page 13

Features (continued)
Mitel Networks Speech Server
Mobility
(Reach Me )
"enabled" or "disabled"
Allows you to redirect y our calls to your home, cell ular
phone, pager, fax number, voice mail, or temporary number.
Messaging "enabled" or "disabled"
Messaging allows all messages (e-mail, voice m ail, and faxes) to be
deposited in one location for the Unified Messa ging user. The user can
then us e voice commands to identify the messages, to listen to e-mails
or voice mails, to forward e-mails or faxes to a fax machine of his/her
choice, and to respond to m essages.
Note that forwarding e-mails and faxes to a fax machine requires the
Fax Inte gration option.
Notification "enabled" or "disabled"
Notification allows Unified-messaging users to use their numeric pager
or e-ma il-enabl ed device to notify them when a pre-selected type of
messages arrives.
Status
Account C ode "enabled" or "disabled’
Allows the system to dial the appropriate accoun t code when making an
outgoing call.
Call Restrictions
From Internal Displays the restriction that is applied to calls that you make from an
internal e x tension.Your internally generated calls can be restricted to
• Internal calls only
• Internal and Local calls
• Internal, Local, and Toll calls; or
• Internal, Local, Toll, and International calls.
From External Displays the call r es triction that is applied when you call into the
Speech Server extension from an external number.
Your externally generated calls can be restricted to
• Internal calls only
• Internal and Local calls
• Internal, Local, and Toll calls; or
• Internal, Local, Toll, and International calls.
Mobility
(Reach Me)
Displays the call forwarding settings. Call forwarding can be restricted
to
• Internal calls only
• Internal and Local calls
• Internal, Local, and Toll calls; or
• Internal, Local, Toll, and International calls
Note: Controllingmobility v ia the phone is only available in English and French.
9
Page 14

Mitel Netw orks Speech Server
To exit your Personal Web Page
• In the top r ight-hand corner of the b rows er window, click .
Changing Your PIN
To chang e your PIN
1. In your Personal Web Page, click Change PIN.
2. Enter your current PIN.
3. Enter your new PIN (4- to 7-di git number).
4. Re-enter your PIN as a confirmation.
5. Click Change.
6. Click OK.
The next time you want to log into your Personal Web Page you must enter your logi n ID and
new PIN.
Programming Your Numbers
To prog ram you r cellular phone, home, fax, voice m ail and/or pager n um ber
1. In your Personal Web Page, click Phone Numbers.
2. Select the Loc ation/Device that you want to program. Note that you ca nnot change your
office number. Only the administrator can set your office number.
3. In the Numberfield, enterthe digitsthat you would dial from your phone. See your system
administrator for information about your dialing pl an. If you are able to program your v oice
mail num ber, ent er the voice mail number that the administrator will give you.
Note: The programming of a voice m ail number in the Personal Web Page is for a user
that does not have access to unified messaging. The voice mail number does n ot have
a login security setting, and is av ail able to the public. Users with unified messaging have
their voice mail number programmed by default.
4. Select the Login Security levelsfor your Cellular phone,Home, Fax , and Pager numbers.
Full Login
- Provides immediate access to your messages after you say "Messenger."
- Use full login ifyou do notwant a sec urity check before ac cessing your messages. Full
login does not requ ire you t o enter your PIN. Note that anyone using your phone can
then access your messages. You may want to program your personal cellula r phone
with full login.
10
Partial Login
- Provides access to your messages after you say " Messenger" and dial your PIN. The
PIN should be kept confidential. S ee Changing Your PIN, on page 10.
Page 15

Mitel Networks Speech Server
- Use partial loginif you want immediate accessto names inthe CompanyDirectory and
in your Personal Di rectory. Also use partial login if you wan t the system to perform a
security check before providing access to your messages. The security c hec k is the
entering of your PIN number with your telephone keypad before accessing your mes sages. You may w ant to program your des k phone with partial login.
Manual Login
- Provides access to your messages after you s ay “Login,” your login ID, and then
"Messenger."
- Use m anual login if s ec urity is important. With manual login, you have im mediate
access to the names listed in the Company Directory. Acc es s to other functionality
(Personal Direc to ry,User Options, Messenger,Calendar,and Task Manager) requires
your voiceprint identification with your spoken login ID. You may want t o program a
phone that serves many users ( a lobby or a de partment phone) with manual login.
5. Set thecall restrictionsfor yourcellular phone, home,fax, orpager number.Inthe Pr ivacy
drop-down m enu, select Public, Trusted Users or Private. "Public" lets everyone call
you, "Trusted Users" lets callers logged into the Speech Server system call you, and
"Private" restricts everyone from c alli ng you at that num ber. For example, if the cell ular
phone bel onging to Dave Black is set to "Public" on his Personal Web Pag e, an outside
caller can call Speech Server and say "Dav e Black on his cell phone," and be able to call
Dave Black on his cellular phone if Dave Blac k is listed in the Company Direct ory.
6. Click Save.
Setting Your Forwarding Options
You may want y our calls forwarded to your voice mail if you don’t want to be interrupted, or
you may want to have y our calls forwarded to y our cellular phone, or to a location (other than
your office) that you frequen tly work in.
Note: The call forwarding f eature is dependent on the Mobilit y option being enable d and
the forwarding to a fax machine fe ature is dependent on the F ax Integration option being
enabled.
To set your call forwarding
1. In your Personal Web Page, click Reach Me.
2. Inthe Reach Me field, select thedevice or location where you want to be reached, or enter
atemporary numberthat you wantyour c allsforwarded to. Theofficenumber isthedefault
settingfortheReachMefield.
3. Click Indefinitelyif you want the system to direct your calls to the Reach me number until
thenexttimeyouresettheReach Me field
or
Click Until and then select the date and time at which y ou want th e forwarding to ex pire.
4. In the Forward My Faxes Tofield, enter the number for the fax machine that y ou want to
directyour messages to. The systemuses thisfax number as a defaul t setting in response
11
Page 16

Mitel Netw orks Speech Server
tothevoice command, "FaxForward." Userssay"FaxForward" after t hey heara message
(email, voice mail, or fax ) that requires printing on a fax mac hine.
5. Click Save. While Mobility is enabled, all calls to your name are directed to the Reac h Me
number. Note that if a user specifically requests one of your numbers, for example "John
Smith on his cell phone," the call would be routed to the cellular phone.
Note: You can als o set your c all forwarding with speech com mands. See Fo rwa rding
Calls, on page 23.
Setting your Personal Operator
If you have the Unified Messaging option, you can enable a personal operator.
To assig n a person to accept your calls when the caller presses 0 on his/her phone
during the greeting
1. In your Personal Web Page, click Reach Me.
2. Select the Enable Personal Operator check box
3. Enter the number for y our Perso nal Operator.
Tip: M any people enter their cellular phone number as their Personal Operator. They
then instruct callers with a voice mail greeting to press 0 to reach t hem on their cell ular
phone.
4. Click Save.
Setting the Prompt Language
To set the language of the attendant promp ts and the playback of the e-mails
1. In your Personal Web Page, click Prompt Language.
2. In t he Play prompts in f ield, select the language of the Attendant prompts for your login.
3. In the Email Playback Language menu bar, select the language for the Text-To-Speech
playback of your e-mails.
4. Click Save.
Speech Server provides y our prompts and responds to your commands in the selected
language.
Note:ThesystemsupportsSpanisha ttendant promptsbutdoesnotsupporttheplayback
of e-mails in Spanish.
12
Tip: Th is option is only available on bilingual systems. Bilingual systems are available
with the following languages: English/French and E nglish/Spanish.
Page 17

Mitel Networks Speech Server
Setting the Messaging Options
If you have the Unified Me ssaging option, y ou can set your mes s aging v oice interface options:
To set the order of your messages and to select the recorded greeting
1. Click Messaging.
2. If you want your urgent messages to take priority, select the check box for step A in your
Personal Web Page.
3. Select the order of message types with the pull down menus in step B in your Personal
Web Page. The message summary and message playback use this message order.
4. Select the chronological order in step C in your Personal Web Page: Last Received or
First Received.
5. Select the recorded greeting that will be played to your callers: Primary Greeting or
Alternate Gre eting.
6. Click Save.
Setting the Notification Settings
The Notification service is an added feat ure to Unif ied Messaging. Youcan be notified on your
e-mail activated device or numeric pager of received messages or meeting reminders.
Notification of fax messages and meeting reminders are dependent on theirrespective system
option: Fax Int egrat ion or Calendar and Task Manage ment. Only one device can be
programmed f or notification.
To set the device an d the type of messages
1. Click Notification.
2. Select the Notification Ena bled check box.
3. Inthe Mobile De vice drop-downmenu , select the type of mobiledevice that will notifyyou.
- If you select an e-mail-enabled cellular phone or pager, enter the e-mail address for
the mobile device and select the format for the e-mail (the part of the e-mail that you
will hear: subject only, body only)
- If you select a numeric pager, enter the phone number of the pager (for example,
6135924444), t he number of pauses required f or answer (pauses are entered with
commas,one comma is onepause,two paus es may be required)and th en thenumeric
message or sequence for the pager (for example, 23452345).
4. Select the t y pe of messages of which you want to be not ified. You may want to program
"Urgent" e-m ails, "All" voice mails, "No" faxes, and " N o" meeting reminders.
"All" faxes ref er to all the reports that will be generated by the fax server and includes all
incoming fax messages to the fax server. The word "New" refers only t o the incoming fax
messages.
5. Click Save.
13
Page 18

Mitel Netw orks Speech Server
Setting Personal Preferences with the Phone
You can use voice comm ands to set and/or modify vario us user options.
To access user options
• Dial the Speech Server extension number and say "User Options." You can now choose
from the following options:
Say To
"Greeting options" Select which greeting is played to callers, change your
"Name recording" Review and record your name
"Change PIN" Change your personal identification number
"Call forwarding" Change your call forwarding options
"Change fax forward number" Change your fax number for forwarding.
Tip: The first three options can be set using either voice commands or the touchtone
buttons on you r phone. In addition, you can choose y our greeting, change your PIN, or
change your fax forward number,by modifying the settings on your Personal Web Pa ge.
primary greeting, or change your alternate greeting
Creating Your Personal Directory
About Your Personal Directory
Your Personal Directory is a list of nam es and phone numbers for your personal use. The
Personal Directory allows you to use voice commands to direct calls or mess ages to people
not listed in the Company Directory.
ManageyourPersonal Directory i n theContactsfolderinMicrosoftOutlook.TheSpeech Serv er
supports up to five numbers (business, home, fax, cellular, and pager) per contact. With voice
commands, you c an place a calltoany ofthesefive numbersor place acallbackto thebusiness
number of the contact after listening to their voice mail or e-mail mes s age.
Tip: Contact yoursystem administratorto enable the Personal Directory featureto allow
you to place calls to your Personal Directory contacts.
Note: Unified Messaging users and au to-attendant-only users on a Speech Server Unified Mes sa ging system use Microsoft Outlook to create and modify t heir Personal
Directories.
Tip: For instructions on how to us e Microsoft Outlook, refer t o the Help file within
Microsoft Ou tlo ok .
14
Page 19

Mitel Networks Speech Server
Creating and Modifying Contacts
Unified-messagingusersandAttendant -only users onaSpeech ServersystemwiththeUnified
Messaging option, create and modify their Pers onal Direc tory via Microsoft Outlook. Speech
Server supports up to six distinct phone numbers f or each contact: business, home, pager,
mobile, fax, and voice mail (if the user does no t have unified messaging).
To create and modify a con tact for y our Personal Directory
1. In the File menu in Microsoft Outlook, point to New, and then click Contact.
2. In the Full Name box, type the first and last na me for the contact.
3. Enter the information that you want to include for the contact. I nc lude their multiple phone
numbers and e-mai l address so you can call them and send them messages . Speech
Server supports up to six numbers for the contact name: Business, Home, Business Fax,
Mobile, Voice m ail, and Pager. The administrator programs the voice mail number.
4. For instructions on how to modify a contact, and for more instructions, ref er to Help in
Microsoft Outlook.
Tip: To check if you can call your contacts, use the demo mode. Saying “Enable
Demonstration mode” turns on the feature; “Disable the Demonstration mode” turns the
feature off.
Note: You can record the names of your contacts in your Personal Web Page so the
systemconfirms the nameswitha humanvoicerather than withanautomated one(TTS).
Click on the contactname in your Personal Directory,click Record Name, and f ollow the
instructions.
For more detailed information, click on the Contactsfolder in Microsoft Outlook, and then click
on Help in t he menu bar to access Microsoft Outlook's online Help.
Note: The number of entries that you can ent er into your personal c ontact list is se t by
your system administrator. Contact your administrator if you require additional entries in
your contact list.
Managing Your Contact List
A software license determines the maximum number o f contacts that you can have in your
PersonalWeb P age. If you have morecontacts in Microsoft Outlook than whatyou arelicensed
for, the system chooses the c ontacts for your Personal Web Page by order of entry. The
maximum number that the system accepts is 505 contacts.
The following procedure lets you select which contacts you want to voice-enable. This
procedure involves putting the contacts t hat you want for your Personal Web Page into a Voice
Contact category. Then only those contacts will appear in your personal list.
15
Page 20

Mitel Netw orks Speech Server
Tip: If you have a large number of contacts in Microsoft Outlook, you can use the Voice
Contact catego ry to select the contacts that you want to us e as voice contacts.
To make a Voice Contact category
1. In Microsoft Outlook, open your Contacts folder.
2. Right-click a c ontact name.
3. Select Categories from the pop-up menu .
4. Click the Master Category List button.
5. In the New category text box , type Voice Contact, click Add and th en OK.
6. In the Categories window, click OK.
To enter your existing contacts in the Voice Contact category
1. Right-click the contact nam e or hold down the Ctrlkey,select multiple contacts, and then
right click on the last contact name.
2. Select Categories from the pop-up menu .
3. Select the check box for Voice Contact.
4. Click OK.
To enter a new con tact in the Voice Contact category
1. In th e Untitled Contact window,click Categories after adding the informa tio n for the new
contact.
2. Select the check box for Voice Contact.
3. Click OK.
Tip: You can quickly view which contacts belong to the Voice Contact category by
clicking the View menu, selecting Current View, and then By Category.Microsoft
Outlook will display your contact list, sorted by category.
Recording Contact Names
When you request a contact on your Personal Directory list, the Attendant plays bac k the
requested name to confirm the destination bef ore it routes the call. By default, the Atten dant
plays a computer-generated name (TTS); however, you can record the name yourself and the
system will use your rec orded name to confirm calls.
Use your Personal Web Page and your phone to record the names.
16
To re cord the contact in your Pers onal Directory
1. Log in to your Personal Web Page.
2. Click the c ontact name that you want to record in your Personal Directory.
3. Click Record Name.
Page 21

Mitel Networks Speech Server
4. Dial the Speech Server extension n umber. Login if necessary.
5. Say "Start recording session."
6. After the system prompts you to connect, c lick Connect.
7. Click Record. A t the tone, record the person's name.
8. Click Play to listen to your recording. To record over the name, click Record again.
9. When you are satisfied with your recording, c lick Save.
10.If desired, cli ck on another name and record it.
11. After you hav e finished recording names, click Disco nn ect to return to the main menu.
12.Hang up.
Testing Contact Names
The system has a demonstration mode that allows you to try features such as Call by Nam e,
without actually placing the call. Instead of routing the call to the requ es ted party, t he system
returns you to the main menu.
To test your personal contact entries
1. Dial the Speech Server extension n umber. Logi n if necessary.
2. Say “Enable Demonstration mode.”
3. State the name that you want to test.
4. The attendant either confirms your request and returns you to the main menu or indicates
thatitcannotrecognizeyourrequest.InDemoMode,thesystemwillnotcompleteyourcall.
5. State “Disable Demonstration Mode” to re turn to normal operation.
17
Page 22

Mitel Netw orks Speech Server
Using Speech Commands
The Speech Server system responds to your speech commands. When you become more
comfortable with the prompts, you can use the Barge-in feature and the Expert Mode feature.
Barge-in
Barge-in allows you to interrupt a system p rompt with a request. The system will stop playing
the prompt and respond t o your request.
Barge-in allows experienced users to ob tain faster service from the Attendant. Inex perienced
users can still listen to the full prompts.
Your administrator can enable or disable this feature for you.
Expert Mode
InExpert Mode, the Speech Server provides a short tone instead of prompts when you call into
the system. I f the syst em encounters an error, for example if it can’t recognize the requested
name, it provides prompts and inst ruc tio ns.
Your administrator can enable Expert Mode on your account.
Speaking Tips
When you are speaking to the At tendant
• Speak clearly, but don't shout.
• Speak at a normal pace -- not too slowly, particularly when you state your login ID.
• In noisy environments, do not us e speaker phones.
• Remember that you can interrupt t he prompts if Barge-in is enabled.
• If you are prompted to confirm a name, ans wer only "Yes" or "No." If y ou answer "No,"
wait for the prompt be fore you state the name again.
• Ifthe system do es not recognize a name , it may be because the na me is not programmed
into the system or becau se your pronunciation of the name is not in the system. Contact
yoursystem a dministrator tohave thename added orto havethe pronunciation corrected.
18
Page 23

When calling a name in your Personal Directory
• Say the name as it is entered in your Personal Directory. For example, say the first and
last name of the person.
• Innoisy environments, press *T (*8) to switch from Speech-command Mode to Touchto ne
Mode and then dial the phone number.
•Press9 t o return to Desktop (the top level for voice commands ). You can use D es ktop to
access the functionality under A uto Attendant, Mess enger, Calendar, Task Manager,and
User Options.
• If you frequently access Speech Server from a noisy environme nt, have your system
administrator disable Barge-in in y our user options.
• When entering names into your personal contact list, enter the fir st name followed by the
last name.
Universal Voice Commands
Mitel Networks Speech Server
The following voice commands are available from anywhere within Speech Server:
Say... To
"Cancel" or "Stop" Terminate the current operation
"Operator" Transfer to the operator
"Repeat" Replay the most recent prompt
"Help" Get Help (list of current valid commands)
"Tutorial" Access a tutorial for the current application
"Auto attendant" Transfer to the Attendant for Speech Server
"User Options" Access User Options menu
"Desktop" Transfer to Desktop and access all user functionality.
19
Page 24

Mitel Netw orks Speech Server
Navigating through the Applications
Managing Calls
Placing a Call
Youcan place callsbysaying acontact name,adepartment name,or t he numbers of thephone
number.
The system can call contact names in the Company Directory or in your Personal Directory.
When using the Company Directory, yo u can request t he department name or say the name
of the person and the system (by default) transfers the cal l to the business number. To place
a call to a cell ular phone, pager, fax, voice ma il number, or home number of the person in the
company directory, y ou must reques t it specifically. For example, you could say "Bill Smith on
his hom e number." Note that to rec eive the call, Bill would not have his home phone number
set to "Private". If t he phone num ber is set to "Trusted Users" , then you would have to login to
the Speech Server system and then request the call.
WhenusingthePersonal Directory,youhavetheoption of c alling any ofthefivephone numbers
(business, home, pager,cellular phone, or fax) that belong to your personal contact as long as
theywereprogrammedinMicrosoftOutlook.Whenplacing thecall,you must askforthenumber
specifically. For example, you could say "Bob Black on his home number." The home phone
number for Bob Black would be program med in your contact list in Microsoft Outlook.
20
Page 25

Mitel Networks Speech Server
Conditions:
• The departmen t name must be programmed in the Company Directory.
• Thenameofthepersonmustbeprogrammediny our PersonalDirectoryorintheCompany
Directory.
• If your administrator creates a multi-level menu with Cal l Transfer,Transfer to Voicemail,
Audio Message, and VoiceXML nodes, you can call into the system and answer prompts
within a series of menu s to: speak or leave a message with a specific person, obtain
information from a recorded s cript, or interac t with a VoiceXML script.
- When you initial ly make a c all into the system, the multi-level menu lets you p lace a
call to the company directory while you are at the main menu, but doe s not let you
direct calls to the company directory when y ou are within the sub-levels of t he main
menu.
- When youare in thesub-lev els of the main menu, you c an press the * key on the phone
to get back to the previous level.
• You can place a call to a voice mailbox, ("<first name> < last name> on their voice mail")
if the r ec ipient name is a Unified Messagi ng user,or is in the Company Directory and has
a voice mail nu mbe r programmed in the Speech Server system.
- If the administrator enables Automatic Route Selection (ARS), the system will directly
route your call to a voice m ail box. I f ARS is not enabled, y ou will have to enter a voice
mailbox number after the request, "< first name> < last nam e> on their voice m ail".
• Users are able to restr ict callers from calling them on their personal numbers with privacy
settings (Public, Trusted Users, or Private). "Public" provides no call restriction, "Trusted
Users" allows callers that are logged into the same Speech Server system t o call, and
"Private" restrictscalls.
• If the number you are calling is not programmed, or is marked " Private," or marked for
"Trusted Users" and you are not logged into the Speech Server system, the Attendant
responds with "Sorry, that phone number is not available."
21
Page 26

Mitel Netw orks Speech Server
To place a call
Tip: To get a list of the departments that you c an call, ask the Attendant, "W hat are the
departments?".
1. Dial the Speech Server extension n umber. Login if necessary.
2. When the Attendant answers, say
- the f irst and last name of the person that you want to c all, or the first and last name
and then direct the call, or
- a department name, or
- a phone number (one digit at a time).
For example,
To call John Smith's Say
Extension "John Smith"
Cellular Phone Numb er "John Sm ith on his cell phone"
Pager "John Smith on his pager"
Facsimile "John Smith on his fax"
Home Number "John Sm ith at home"
Voice Mail "John Smith on his voice mail"
The busin es s number (extension) and voice mail number for John Smith is public (this
settingis fixed and c annot be changed). Therefore, everyone can leave a message on his
voice mai l, or can call John Sm it h by saying his name, or by saying "John Smith at his
office."
Tip: Speech Server is very user friendly,and responds to a variety of voice co mm ands ,
forexample, "John Smith- office n umber,""John Smith- cell," and"JohnSmit h - cellular."
JohnSmith can c hoos e theprivacy settings(Public,TrustedUsers,or Private)forhisother
numbers (cell ular phone, pager, fax, or hom e numbers) in his Personal Web Page and
therefore can restrict c all ers from calling him at those numbers. " Private" restricts all
callers. "Pub lic" prov ides no restrictions and "TrustedUsers" lets other people logged into
the Speech Server system call him. These settings can also be s et by the adm inistrator.
22
Note: If you s pec ifically place a call t o an extension number, for ex ample, " John Smith
at his office number" when call forwarding is set to their cellular phone, the system will
honor your request and transfer the call to the office extension number.
Page 27

Mitel Networks Speech Server
3. The system confirms the requested name. I f the confirmation is correct, remain silent or
say "Yes," and th e Attendant will route your call. If the confirmed name is inco rrect, say
"No" or “Cancel,” and the Attendant will allow you to request the name again.
If,after several attempts,the Attendant cannot recognize the name of the person who you
are trying to call, you will be routed to the operator. If an operator i s not available, the
system provides a message explaining that there is a problem and w ill then hang up.
Ifthelineis bus y and if t he personyou are callinghas their voice mail n umberprogrammed
with the Speech Server system, the Attendant will tell you that you can leave a message
on their voice mail if you say " <First name and last nam e> on their v oice mail".
Tip: To improve recognition success, minimi ze background noise.
Canceling a Call
To cancel a call
• Say "Cancel" or "No" before the Attendant says "Dialing...."
If you press 0, you will c ancel the t rans fer, and the system will automatically route your call to
the operator.
Transferring a Call
To transfer a call using Speech Serve r
1. Press the Transfer k ey on the phone.
2. Press the Speak@Ease key (Speech Recognition key on the 5240 IP Appliance),or dial
the Speech S erver extension number.
3. Say the name of the person/department.
4. After the Attendant conf irms the name, hang up the handset.
Forwarding Calls
You can forward your calls to one of your programmed numbers (cellular phone, pager, fax,
home number,or voice mail), or a temporary number.If you enable c all forwarding, callers who
request y ou by name are forwarded to your c all-forwarding nu mber.Your redirection privileges
determine if you can redirect your calls to internal, local, toll, or international numbers.
Youcan enable, disable, or query the c all forwa rding with the Attendant . Youcan also program
the call forwarding in the “Reach Me” section of your Personal Web Page.
For exam ple, if Bill Jones is working f rom home, he can set "Reach me" to his hom e phon e
number.Then,ifsomeonecalls him by reques tinghis name,the s ystemautomatica lly redirects
the call to Bill’s home phone number; however, if a caller specifically requests a number, for
example, "B ill Jones on his cell phone," the call is directed to his c ellular phone.
23
Page 28

Mitel Netw orks Speech Server
Youcanalsosetthetimeatwhichyouwantthecallforwarding toexpire. Afterthecall forwarding
expires, the system directs c alls that are made to your name back t o your office number.
Note: If your phone is on a P BX other than the 3300 ICP, the calls that are redirected
are only the calls that go through the Speech Server.People c alling your phone number
directly will not be rerouted. If your phone is on a 3300 ICP system integrated with the
SpeechServersystem,the adm inistrator canconfigure your phone to have all of the calls
to your number be redirected to your Reach Me (call forwarding) number.
Note: The ability to progra m call forward ing over the phone is available in French, U.K.
English, and N.A.English.
To forward calls to your home, cellular phone, fax machine, pager, voice mail, or to a
temporary number
1. Dial the Speech Server extension n umber. Logi n if necessary.
2. Say "Call f orwarding".
3. Say "Forward Calls".
4. Say "Home," Cell," "Pager," " Fax," "Voice Mail", or say the phone number, one digit at a
time(includethe internationa l or areacode if required ). T he personalized numbers (except
thevoicemai l numberforUnifiedMessaging users)mustbe programmedinyourPersonal
Directory in order for the system to respond to your request.
Tip:IfSpeechServer recognizesthe phone numberthatyouarecallingfrom,thesystem
will provide you wi th the c hoice of saying "Use this number."
5. When the Attendant asks you if you want to s et an expiration date, say "Yes" or "No." If
you said "Yes," say the date and time when prompted, for example, "March 10t h," and
"10:30 a.m." Midnight is recognized as "zero hours", that is, "0:00. " If you said "No" to the
expirationdate, expect thesystem to forwardall of yourcallsto yourrequested destination.
6. After the Attendant conf irms the date and t ime, say "Yes" to return to the main menu.
To disabl e call forwarding
1. Dial the Speech Server extension n umber.Login if necessary.
2. Say "Call f orwarding." The Attendant states your current call forwarding settings.
3. Say "Disable c all forwarding."
To query your call forwarding setting
1. Dial the Speech Server extension n umber. Login if necessary.
2. Say "Call forwarding." The Attendant states y our current call forwarding number and the
expiration time .
24
Page 29

Mitel Networks Speech Server
Tip: Call forwarding is an optional feature that your system administrator can enable on
a per-user basis. To obtain access to this feature, contact your system administrator.
Your ability to redirect calls to internal, local, long distance, or international toll numbers
is also controlled by your system administrator.Contact your system administrator to
obtain the required redirection privileges.
Checking a Phone Number
To check a phone number in the Company Directory or in your Personal Directory
1. Dial the Speech Server extension n umber.Login if necessary.
- For a business number in the Company Directory, say "Check the number for first
name, last name."
- For a department numbe r, say "Check the number for department name."
- For a name in your Personal Directory,say "Check the number for the name listed in
your Personal Directory."
- Foracellularphonenumber,say"Checkthenumber forfirstname, lastname onher/his
cell phone ."
- For a home number, say "Check the number for first name, last name’s home phon e."
- For a fax number, say "Check the number for first name, last na me’s fax number."
Tip: For the above examples, you can also say "What is the number for ............."
2. The system plays the number for the name that you request ed. If the nu mber is not
available, the system responds with "Sorry, that number is not available."
Note: You cannot query a home phone number, fax number, pager n umber, or cellular
phone num ber that is not program med or is marked "Private."
Calling the Operator
To call the operator
• Say "Operator, " or say "Zero," or dial 0 at any time.
Changing the Language
On bilingual systems, you can c hange the language of the auto-a ttendant prompts. After you
statethe desired language, the Attendant w il l provide prompts in that language for the duration
ofthecalloruntilyousay"English".Bilingualsystemsareavailablewiththefollowinglanguages:
• English and French
• English and Spanish
25
Page 30

Mitel Netw orks Speech Server
To set the language of the auto-attendant prompts for the call
1. Dial the Speech Server extension n umber.
2. Request the secondary language. For example, if the Attendant greeting is in English, say
- "Français"; or
- "Español."
3. The Attendant provides prompts and responds to your c ommands in the requested language for the duration of your call or until you say "English".
Tip: You can specify the auto -attendant promp t language for your user account from
your Personal Web Page. Then, every time you log into the system, the system will
respond in the specified language. See Setting th e Prompt Language , on page 12.
Managing Messages
PlayingMessages
From the Unified Messaging main menu, you can request a summary of your Inbox contents.
The system responds by telling you how many unread e-mail and/or vo ice mail messages you
have in your Inbox. The format of this s ummary is dependent on your Personal Profile settings
in your Personal Web Pa ge.
Note: If the Fax Integration s ystem opt ion is enabled, the summary will also tell you how
many unread faxes you have.
From the main menu, you can play all voice mail a nd e-mail messages in your Inbox. If the
e-mail has a playable attachment, you can play that too.
Ifthe Fax Integration system option is enabled, you can play your fax to receive the fax header
information.
If the Calendar and TaskManagem ent system option is enabled, the system will also identify
MeetingRequests,MeetingUpdate s, Me eti ng Cancellations,MeetingAcceptances,orMeeting
Declines that you have.
Note: The system supports the playing of e-mail attachments in certain file formats (rich
text files, text files, or HTML f iles less than 20 K in size). When these are present, the
voice interface will as k you if you want to hear t he attachment.
Tip: Sometimes whe n you are in a noisy environment, you may want to use the phone
pad (DTM F dialing) to provide your messaging commands, instead of using voice
commands. Press *T (*8) to switch to Touchtone M ode. S ee Using Touchtone
Commands, on page 40.
26
Page 31

Mitel Networks Speech Server
To listen to your message summary
1. Dial the Speech Server extension n umber.Login if necessary.
2. Say "Messenger." The Attendant provides a m es sage summary.
After playback of the mess age summary, you can
- Play your e-m ail or voice mail mess ages
- Send a ne w message
- Find an e-mail, voice mail, or fax message matching your specified criteria. You can
play messages sent from someone in t he Company Directory, as well as query the
system for messages of a specific type or from a spec if ic person in y our Personal
Directory
Note: Rece iving faxes and forwarding messages to a fax mach ine is d ependent on the
Fax Integration system option being ena bled.
To listen to your e-mai l and voice messages
1. Dial the Speech Server extension n umber. Login if necessary.
2. Say "Messenger." The Attendant provides a m es sage summary.
3. You can say
- “Play”
- “Play new voice mails”
- “Play ne w e-mails”
- “Play ol d messages”
- “Play old e-mails”
- “Play old voice mails”
- “Find a message”.
The system plays back the message(s) matching your specified criteria.
- Say "Play" to hear the message.
4. During playback of the message(s), you can:
Say To
"Cancel" or "Stop" Stop m essage playback
"Delete" Delete the current message and play t he next message
"Forward " Forward the message to someone on your Personal Contact list or
Company Directory.After you say "Forward," the system will ask
you for a name.
"Fax forward " Print your e-mail or fax message on a fax machine
"Mark as unread" Keepthe message and mark as "unread’"
"Reply to sender" Reply t o the sender of the current message
27
Page 32

Mitel Netw orks Speech Server
Say To
"Reply to all" Reply t o sender and all other recipients
"Call him / her back" Call the m essage sender
"Repeat" or "Play again" Repeat the current message
"Skip" Skip the current message and leave it marked as "read"/"unread"
"Next" Mark the current message as "read" and play t he next message
"Previous" Play the previous message.
5. Say "Messenger" to return to the main m enu.
Examples:
To listen to old voice mails from a certain time period, say "Play old voice mails sent since
the last four days." You must give a number of minutes, hours, or days; do not give the
date. The number can not be greater than 10.
To listen toanold message (e-m ail,voicemailorfax)fromPersonA(listedinyourPersonal
Directory), received sometime in the last 7 days, say “Play old e-mail fromPersonA,
received since the last 7 days.”
To listen to messages from Person X, say "Find messages," and then when prompted,
say " Person X."
Replying to Messages
Afterlisteningtoa message,youcanreply either tothemessage senderonly,or tothemessage
sender and all other rec ipients. The system can deliver a reply to any e- mai ls received. The
system can also deliver a reply to a voice mail message if the s ender's e-mail address is listed
in either the C ompany Directory or th e Personal Directory.
To re ply to a message
1. After hearing t he message, say "Reply" or "Reply to all."
2. At the prompt, record your message.
When you have finished recording your message, you can
- Review the message
- Modify the recipient list
- Deliver the message.
28
Page 33

Forwarding Messages
You can use voice commands to forward v oice mails, faxes, and e-mail mes sa ges to another
person in your Personal or Company D irectory. The system can forward a message providing
the directory has the e-mail address for the person to whom you are forwarding the m es sage.
Voice commands can also forward faxes and e-ma ils to a fax machine if the Fax Integration
system option is enabled. This o ption lets y ou forward faxes to a default fax machine or to
another fax machine. This option is conveni ent when you are traveling and you w ant to print
e-mails and faxes from a fax machine at your hotel.
Whenyouareforwardingmessagestoanotherperson,themessagesareforwardedase-mails.
Forwarding a Message to Another Person
To forward an e-mail, voice mai l , or fax to a contact name
1. After identifying th e e-mail, voice mail, or fax that you want to forward, say " F orward."
2. Wait for the prompt asking f or a name and then say the name of the person listed in your
Personal Directory or your Company Directory.
Mitel Networks Speech Server
Forwarding a Message to a Fax Machine
To forward an e-mail or fax to a fax mach ine
1. After identifying th e e-mail, voice mail, or fax that you want to forward to a fax machine,
say " Fax forward."
2. When prompted, say "Yes" if you want t o use the default fax num ber or say "No" if you
want to send the e-mail to another fax num ber, f or example, a fax machine at a hotel.
3. If you s aid "No," say or key the new fax num ber when prompted. If saying the number,
say the individual digits. The system then asks you to verify the number.
29
Page 34

Mitel Netw orks Speech Server
Delivering Messages
Makingand Delivering a Message
To deliver a message to someone in the Company Directory or Personal Directory
1. Dial the Speech Server extension n umber. Login if necessary.
2. Say "Messenger."
3. Say "Make a message."
4. When prompted, say the f irst and last nam e of the recipient(s) listed in your Company
Directory or your Pers onal Directory, and then say "List c omplete."
5. At the prompt, record your message.
6. When you have finished recording, you can
Say To
"Deliver" Send the message immediately
"Modify message"
"Review message"
"Append message"
"Record message"
"Cancel" Leave without sending a message
"Mark as urgent" Mark the message "urgent"
"Modify recipients" Edit the recipient list ( add, delete, copy recipients).
Change the message
Listen to the message
Add to t he message
Delete the message and add a new message
To m odify the recipient list before delivering a message
1. When you have finished recording your message, say "Modify recipients."
2. Refer to the following prompts to review the list of recipients, clear t he list of recipients,
add or delete a recipient from the list, o r copy the message to someone in the Company
Directory or in you r Personal Directory.
Say To
"List recipients" Playback and review the list of current m essage recipients
"Clear all recipients" Delete the entire list of recipients
"Add recipient" Add a recipient from the Company DirectoryorPersonalDirectory.The
system will prompt you for recipient name.
"Delete name" Remove this recipient from the list of r ecipients
"Copy recipient" Send a copy (cc) t o someone on the Company Directory or Personal
Directory. The system will prompt you for t he recipient name.
30
Page 35

Managing Faxes
Playinga Fax
To listen to an unread fax
1. Dial the Speech Server extension n umber. Login if necessary.
2. Say "Messenger." The Attendant provides a m es sage summary.
3. Say "Play fax." I f you have an unrea d fax, the system will play the name of the sender,
the date and time of the fax, and the subj ect heading of the fax .
4. During the playback, you can
Say To
"Cancel" or "Stop" Stop message playback
"Delete" Delete the current message and play the next message
"Forward " Forward the message to someone on your personal contact list or
"Fax forward " Print your e-mail or fax message on a fax machine
"Mark as unread" Keep the message and mark as "unread"
"Repeat" or "Play again" Repeat the current message
"Skip" Skip the current message and leave it marked as "read"/"unread"
"Next" Mark the message as "read" and play the next message
"Previous" Play the previous message.
Mitel Networks Speech Server
Company Directory. Af ter saying "Forward" the system will ask you
for a name.
5. Say "Messenger" to return to the main m enu.
Forwarding a Fax
To forward a fax to a person
1. After identifying th e fax that you wan t to forward, say " Forward."
2. Wait for the prompt asking f or a name and then say the name of the person listed in your
Personal Directory or i n your Company Directory.
Printing a Fax
To print or forward a fax to a fax machine
1. Dial the Speech Server extension number. Login if required.
2. Say "Messenger." The Attendant provides a m es sage summary.
3. Say "Play fax." The system provides the name of the sender,the date and time of the f ax,
and the subject of the fax.
31
Page 36

Mitel Netw orks Speech Server
4. After identifying the fax message that you want to forward to a fax machine, say "Fax
forward."
5. When prompted, say "Yes" if you want t o use the default fax numb er, or say "No" if you
want to send the fax to another fax number, for example, a fax machine in a hotel room.
6. If you s ay "No," say or enter the new fax number when prompted. If saying the number,
say the individual digits. The system then asks you to verify the number.
To change your default fax machine setting
1. Dial the Speech Server extension n umber. Login if necessary.
2. Say "User Options."
3. Say "Change fax forward number."
4. When prompted, say or ent er the desired fax number. I f saying the number, say the
individual digits. The system asks y ou to confirm the number.
Managing Appointments
Appointments do not involve another person in the way a meeting does. An appointment only
requires a time and an attached voice message.
Managing appointments with your voice commands depends upon the Calendar and Task
Management system option. The appointments are man aged with Outlook Calendar in
Microsoft Exchan ge, and any changes that you make with your voice commands will appear
on your PC in Outlook Calendar. For further information on the functionality of Out look
Calendar, refer to the Help files in Microsoft Outlook.
Note: Calendar functionali ty is only supported in English. I f using French, you must say
"English" to switch to English befo re saying "Calendar".
Creating Appointments
To create an appointment
1. Dial the Speech Server extension n umber. Login if necessary.
2. Say "Calendar." The Attendant provides a summ ary.
3. Say "Create appointment."
4. When prompted, say the dat e, for example, "Today," "Tomorrow," "Friday," or
"September 6." Say "Yes" when the Attendant asks you to confirm the date.
5. When prompted, say the s tart time, for exam ple, "9 a.m.," and t he end time.
32
6. When prompted, say a description of the appointment. The syst em records this voice
message. Reminders will be sent t o your desktop if you have the Reminder setting programmed in Outlook Calendar.
Page 37

Mitel Networks Speech Server
The system willsave your appointment unless you say "Make changes." If you say "Make
changes" you can then have a choi ce of the following comm ands :
Say... To
"Change date" Request a different date
"Change start time" Request a different start time
"Change end time" Request a different end time
"Edit message" Re-record the description of the appointment
"Cancel " Stop the creation of the appointment.
Tip: Recurrences of the appointment can be set using Microsoft Outlook .
Changing Appointments
To chang e an appointment
1. Dial the Speech Server extension n umber.Login if necessary.
2. Say "Calendar." The Attendant provides a summ ary.
3. Say "Play", or say "Check Calendar" to give a specific date and then say "Pla y."
4. Say "Next" or "Previous" unt il you receive the appointment you want to change.
5. Say "Make changes."
6. Say theparameterthat you wanttochange, f or example, "Starttime,""Endtime,"or "Date."
7. Respond to the prompts to change the parameter.
Deleting Appointments
To delete an appointment
1. Dial the Speech Server extension n umber. Login if necessary.
2. Say "Calendar."
3. Say "Play", or say "Check Calendar" to give a specific date and then say "Play."
4. Say "Next" or "Previous" unt il you hear t he appoi ntment that you want to delete.
5. Say "Delete."
Note: Saying "Cancel" will cancel the current operation, not delete the appointme nt.
33
Page 38

Mitel Netw orks Speech Server
Managing Meeting Requests
Meeting requests involve co-ordinating your s chedule with the schedules of other people.
Setting up a meeting request involves sending out a meeting r equest as an e-mail to all the
participants. The meeting requests are then acc ept ed or declined.
Managing meeting reques ts with your voice commands depends u pon the Calendar and Task
Management syste m option. The meeting re quests are managed with Outlook Calendar in
Microsoft Exchan ge, and any changes that you make with your voice commands will appear
onyourPCinOutlookCalendar.ForfurtherinformationonthefunctionalityofOutlookCalendar,
refer to the Help files in Microsoft Outlook.
Note: Calendar functionali ty is only supported in English. I f using French, you must say
"English" to switch to English befo re saying "Calendar".
Creating MeetingRequests
To create a meeting request
1. Dial the Speech Server extension n umber. Login if necessary.
2. Say "Calendar."
3. Say "Create meeting request."
4. When prompted, say the date, for example "Today," "Tomorrow," "Tuesday," or
"September 15."
5. When prompted, say your s tart time and e nd time, for example, "9 a.m." or "10:30 p.m."
6. When prompted, say the f irst and last nam e of the first attendee. Say the names of the
other attendees if required.
7. Say "List Complete."
8. When prompted to record a voice message, say a description of the meeting. You will
receive a reminder 15 minutes (the default setting) prior to the meeting time.
The system will save your meet ing request unless you say "Make Changes." If you say
"Make Changes," yo u can then have a choice of the following commands :
Say... To
"Change attendees" Change the names of the attendees
"Change date" Request a different date
"Change start time" Request a different start time
34
"Change end time" Requesta different end time
"Edit message" Change the description of the meeting
"Cancel " Stop the creation of the meeting.
Page 39

Mitel Networks Speech Server
Changing the Date/Time
To chang e the date or time of your meeting request
1. Dial the Speech Server extension n umber. Login if necessary.
2. Say "Calendar."
3. Say "Play" or "Check Calendar" and then say "Play."
4. Say "Next" or "Prev ious" until you hear t he meeting request that you want to modify.
5. Say "Make changes."
6. Say the parameter that you want to change: "Change start time," "Change end time," or
"Change date," and answer the prompts in order to get the required date and time. For
example, if you say "Change date," the system will say "Please say the new date," and
after you respond with the new date, the system will take your changes and confirm the
meeting request setting s with you.
Tip: After you make a date or time change to a meeting request, an e-mail wil l be sent
out to the attendees to in form them of the change.
Changing the Attendees
To chang e the attendees for your m eeting request
1. Dial the Speech Server extension n umber. Login if necessary.
2. Say "Calendar."
3. Say "Play", or say "Check Calendar" to give a specific date and then say "Play."
4. Say "Next" or "Previous" unt il you receive the meeting request that you want to modify.
5. Say "Make changes."
6. Say "Change attendees."
7. Say "Add attendee" or "De lete attendee." After adding or deleting, say "List Complete" .
8. When you are completely finished making the changes, say "List compl ete."
Canceling Meetings
To cancel your meeting request
1. Dial the Speech Server extension n umber. Login if necessary.
2. Say "Calendar."
3. Say "Play", or say "Check Calendar" to give a specific date and then say "Play."
4. Say "Next" or "Previous" unt il you receive the meeting request that you want to delete.
5. Say "Delete."
Because you initially created the meeting request, the system provides prompts for you to
record a message and send the cancell ation message to the attendees.
35
Page 40

Mitel Netw orks Speech Server
Receiving Meeting Requests
Meeting Requests are received with your voice mail messages, your e-mail messages, and
your f ax m es sages in M icr os oft Outlook . After playing a Meeting Requ est, you hav e the opt ion
of accepting or declining and sending a response. Handling meeting requests with voice
commands is dependent on the Calendar and Task Manage ment system option. When this
system option is not enabled, the meeting request will be handled a s an e-mail.
Declining Meeting Requests
To declin e a meeting request
1. Dial the Speech Server extension n umber. Login if necessary.
2. Say "Messenger."
3. Say "Play" to hear the messages .
4. After listening to the meeting request, say “Declin e,” and when asked if you want t o respond,say “Yes."You are thengiven theoption of creating a voice message for the sender
of the meeting request.
Accepting Meeting Requests
To accept a meeting request
1. Dial the Speech Server extension n umber. Login if necessary.
2. Say "Messenger."
3. Say "Play" to hear the messages .
4. Afterlisteningtothemeetingrequest,say“Accept,”andwhenaskedifyouwanttorespond,
say “Yes.” You are then given the option of creating a voice message for the sender of
the meeting request.
36
Page 41

Checking Your Calendar
Appointments a nd Meeting Requests are managed with your voice commands using the
Outlook Calendar i n Micros oft Outlook. Using voice commands with Calendar is dependent on
the Calendarand TaskManagement system option. For furtherinformation on the f unctionality
of Outloo k Calendar, refer to the Help files in Microsoft Outlook.
Note: Calendar functionali ty is only supported in English. I f using French, you must say
"English" to switch to English befo re saying "Calendar".
Checking Events
To check for scheduled events
1. Dial the Speech Server extension n umber.Login if necessary.
2. Say "Calendar,"The system provides you with a summary of the events scheduled for the
remainder of the day.
3. Ifyouwanttocheck theeventsforanotherday,say "CheckCalendar,"and whenprompted,
say the date, for ex ample, " Wednesday" or "October 5."
Mitel Networks Speech Server
4. Say "Play."When playing the events scheduled you can say,"Next," "Previous," "Delete,"
"Make Changes," or "Play again."
5. You can say the following options:
Say... To
"Check Calendar" Hear the summary of events for another day
"Create appointment" Create an appointment in Calendar
"Create meeting request" Create a meeting i n Calendar
"Check availability" Find out if a specific time of day is free
"Summary" Repeat the current summary
"Desktop" Return to the Desktop.
Checking Availability
To check if you are available for a specific time in your calendar
1. Dial the Speech Server extension n umber. Login if necessary.
2. Say "Calendar."
3. Say "Check Availability."
4. When prompted say the date, for example, "Tomorrow," "Friday," or "September 6."
5. When prompted, say the time, for example, "9 a.m" or "1300 hours.".
6. If the time is available, you can say " Create an appointment," "Create meeting request,"
"Back to Calendar," or "Desktop." If the time is not available, the Attendant will tell you
what is scheduled, and you are returned to Calendar so you can check for another time.
37
Page 42

Mitel Netw orks Speech Server
Managing Tasks
A task outlines an activity that is due at a c ertain date/time, with a particular priority, status
(state of completion), and a message attached (text or voi ce ). A task can also be used to leave
yourself a memo, in which the content of the mes s age is the main co mponent of interest.
Managingtaskswith yourvoice commandsdepends upontheCalendar andTaskManagement
system option. The tasks are managed wi th Outlook Tasks in Microsoft Outlook, and any
changes that you make with your voice commands will appear on your PC in Outlook Ta sks.
Note: TaskManager functionality is only supported in English. If using French, you must
say "English" to switch t o English before saying " Task Manager".
Creating Tasks
To create a task
1. Dial the Speech Server extension n umber.Login if necessary.
2. Say "Task Manager."
3. Say "Create task."Respondtothepromptstomake a rec ording,forexample, "DraftAdue."
4. When prompted, say the due date, for example, "Friday," or "Septe mber 6."
5. Thesystemwillsaveyour taskunlessyousay"Makechanges."Ifyousay"Makechanges,"
you can then have a choice of the following commands:
Say... To
"Change due date" Request a different due date
"Change start date" Request a different start date
"Change reminder" Modify the reminder
"Edit message" Change the attached message
"Cancel " Stop the creations of the task
Checking Tasks
To check your tasks
1. Dial the Speech Server extension n umber. Login if necessary.
2. Say "Task Manager".
3. Say "Play." The system plays the first task. You can say "Next," "Previous," "Delete," or
"Play again." If you want to check off a task as being completed, say " Mark as comple ted."
4. Say "Desktop" to ret urn to the Desktop.
38
Tip:Desktop gives you anoverview of thesystemandlets you choosevariousfunctions,
for example: Auto attendant, Messenger, Calen dar, Task Manager, and Us er Options.
Page 43

Mitel Networks Speech Server
Changing Tasks
To chang e the date or description of a task
1. Dial the Speech Server extension n umber.Login if necessary.
2. Say "Task Manager."
3. Say "Review." You c an also say "Next," "Prev ious, " "Delete," or "Play again."
4. When you get to the task that you want to modify, say "Make changes."
Say... To
"Change due date" Request a di fferent due date
"Change start date" Request a different start date
"Change reminder" M odify the reminder
"Changes complete" Save your changes and r eturn to Task Manager.
Deleting Tasks
To chang e the date or description of a task
1. Dial the Speech Server extension n umber. Login if necessary.
2. Say "Task Manager."
3. Say "Review." You c an also say "Next," "Prev ious, " or "Play again."
4. When you get t o the task that you want to delete, say "Delete."
39
Page 44

Mitel Netw orks Speech Server
Using Touchtone Commands
Placing Calls
To place a call wit h touchtone dialing
1. Dial the Speech Server extension n umber.
2. After the Attendant answers, dial the number. The Attendant pl ac es the call.
Switching to Touchtone
Sometimes, when you are in a noisy environment, you may want to use the phone pad (DTMF
dialing) to provide your messaging commands instead of using voice command s.
To give messaging commands with touchtone dialing
•Press*M (*6) to access "Messenger" while you are in the Attendant mode.
•Press*T (*8) to switch to Touchtone Mode if you are in the " Messenger" m ode.
The Unified Messaging system uses the following phone keys for DTMF comm ands:
Press this Phone Key To
P ( key 7) Play a message
D (key 3) Deleteamessage
K (key 5) Keepthe message. Marks t he message as "read" and moves to the
next message
A (key 2) Answer a message
G (key 4) Give (forward)a message
M (key 6) M ake a new message
# Skip to the next message, leaving the message as "read"/"unread"
* Go to the previous message
1 Listen to your "read" messages
U (key 8) Change your user options (PIN, greetings, name recording)
0 Transfer to the Operator
40
X (key 9) Exit to the main menu (Desktop)
Page 45

Playing Messages
To play your messages
1. Dial the Speech Server extension n umber. Login if necessary.
2. Say "Messenger."
3. Press P [7] t o play your new messages.
4. Press 1 to play your "read" messages.
During message playback, you can
Press To
A [2] Answer (reply to) the message
D [3] Delete the message
G [4] Give (forward) message to someone else
K [5] Keep the message and skip to the next message
M [6] Make a new message
P [7] Play the message again
* Play the previous message
Mitel Networks Speech Server
# Play the next message, leaving the message as "read"/"unread"
X [9] Exit to the Desktop
Making and Sending Messages
To make and send a message
1. Dial the Speech Server extension n umber. Login if necessary.
2. Say "Messenger."
3. Press M [6] to make a message.
4. Dial the number for the recipient in the Company Directory.
or
Dial the number for the recipient(s) in the Company Directory or the Personal Directory.
Press the # key to terminate the recipient list.
5. At the prompt, record your message. When you have finishe d recording your message,
you can hang up to se nd the message immediately, or y ou can
Press To
A [2] Append to the recorded message
D [3] Discard and re-record the message
O [6] Setmessage address options
R [7] Review the recorded message
U [8] Mark/Remove "urgent" flag
L [5] Leave without sending the message
X [9] Send the message and exit to the main menu
zero [0] Not send the message and transfer to the operator
41
Page 46

Mitel Netw orks Speech Server
Setting Address Options
Before sendi ng a message, you have the option of modifying the list of message rec ipients.
• When you have finished recording your message, press O [6] to access the Addressing
Options menu.
If you wish, you can now choose to review t he list of recipients, add or delete a recipient, or
add a "cc" recipient to the list.
Press To
A [2] Add a recipient t o the l ist
D [3] Delete a recipient from the list
G [4] Add a 'cc' recipient to the list
R [7] Review the list of recipients
X [9] Return to the previous menu or exit from Add Recipient mode
Tip: When adding recipients, enter the extension number for the recipients in the
Company Directory
Setting User Options
To program user options
1. Dial the Speech Server extension n umber. Login if necessary.
2. Say "Messenger."
3. Press U [8] to change user options. Choose from the options provided:
Press To
G [4] Change your recorded greeting(s)
N [6] Change your recorded name
P [7] Change your PIN
X [9] Exit to main menu
Tip: All User Options (greetings, call forwarding, recording names, changing PIN,
changing fax forwa r d number) can be programmed using voice commands on your
phone. In addition, you can program call forwarding (Mobility), fax forward number, and
the three options listed in the table, us ing the Personal Directory Web Page.
42
Page 47

Setting Greeting Options
To program greeting options
1. Dial the Speech Server extension n umber.Login if necessary.
2. Say "Messenger."
3. Press U [8] to enter the user opt ions.
4. Press G [4] to enter the greeting options. Choose from the options provided:
Press To
G [4] Switch to t he other greeting
P [7] Change your primary greeting
A [2] Change your alternate greeting
L [5] Listen t o your primary greeting
M [6] Listen to your alternate greeting
X [9] Exit to main menu
Mitel Networks Speech Server
43
Page 48

Mitel Netw orks Speech Server
Using Your PC for Voice Messages
If you install the Mitel Networks™ Speech Server Multimedia Outlook Plug-in, you will be able
to use Microsoft Outlook to manage your voice mails. You can use your PC speak ers or a
phone to listen to your voice messages and use Microsoft Outlook to reply and forward your
messages with a personal voice message.
Note:To createvoice mails in MicrosoftOutlook, you musthave a microphoneconn ec ted
to your PC.
Installing the Multimedia Outlook Plug-in
Your administrator will e-mail you
• The location of the setup.exe file
• The Speech Server platform name or address
To install the Multimedia Outlook Plug-in, you must h av e local administrator rights on the PC.
Note: The Multimedia Outlook Plug-in requires Micr os oft Outlook 2000 or Micr os oft®
OutlookXPandamicrophoneforcreatingvoicemails.The plug-i nworksintheMicrosoft®
Windows 98, Microsoft® Windows 2000, Microsoft® W indows NT, or Windows XP
operating system s . For Windows NT, us ers must have NT4 S P4, or greater. PC Sound
cards and PC speakers are optional.
To install the M ult imedia Outlook Plug-in
1. Close MicrosoftOutlook if you have it open. I f you have the Multimedia Outlook Plug-in
previously installed, remove t he application with Add/Rem ov e Programs in Control Panel.
2. Double-click on the setup.exe file for the Mul timedi a Outlook Plug-in. The welcome window, Multimedia Outlook Plug-in Setup, opens. Click OK ifyouareaskedtoremove
the existing application.
3. Click Next.The Select Ins tallation Language window opens.
4. Select the language, English or French for the installation instructions and for the Multimedia Outlook Plug-in .
5. Click Next.The User Settings window opens.
6. Enter the Speech Server platform name or address, and cl ick Next. The Choose
Destination Loc ation window opens .
44
7. Click Next to accept the default setting for the location or click Browse to place the files
in another location.
Page 49

Mitel Networks Speech Server
8. Click Yes when the system asks y ou if it should create a folder. The Start Copying Files
window op ens .
9. Click Next. Th e software installs, and then the User Profiles Information window opens.
10.Select the Logon User Names for the people that are using your PC that require the
customizedOutlook security settingsfortheMultimedia OutlookPlug-in. Enabling theuser
name will prevent the appearance of se cu rity warnings for that user when the Outlook
Plug-in is opened.
11. Click Enable, and then Close. The InstallShield Wizard C omplete window opens.
12.Click Finish.
13.Open Microsoft Outlook and click Close and Reboot when prompted.
14.After the computer reboots, o pen Microsoft Outlook, and click Tools, Options, and then
the Unified Messaging tab.
15.Select the type of automatic play for the voice message s.These settings are optional.
- If you want to automatically hear the voice messag e when the voice message file is
opened (that is, after double-clicking t he voice m es s age in the I nbox ), click Auto-play
when opening.
- If you want to automatically hear the voice message when the voice message is high-
lighted (that is, previe wing the voice message in the Inbox), click Auto-p lay when
previewing.
16. Select the default playback device for your voi ce message.
- If you want to hear the voice message from a phone, select Telephone from the
drop-down m enu.
- If you want to hear t he voice message from your PC speakers, select PC Speakers
from the drop-down menu.
17.If you selected "Telephone" in the previous step, enter the number of the phone in the
Phone Number or Extension box.
18.Click Messaging Profile to enter the VUID (your login ID) and PIN . These numbers let
youaccessyourPersonalWebPagefromthe Profilebutton on thetoolbarand also provide
identification fo r the playback of y our voice messages.
19.Click OK.
20.Click OK.
Tip: T he Reset Controls button resets the default positions for the Unified Messaging
menus and too lbar, thereby deleting your customized settings for Multimedia Outlook
Plug-in.
Note: The Multimedia Outlook Plug-in is not supported if you launch your unified
messaging through Outlook Web Access (OWA). Theref ore, we suggest that you install
the Microsoft® Outlook Multimedia Extension so you have the ability to listen to your
voice messages using the playbar. The instructions and the extensions are located at
http://<your Exchange 2000 server name>/Exc hweb/ Bi n/e msetup.asp.
45
Page 50

Mitel Netw orks Speech Server
Note: The Mi tel Network s ™ Quick Play toolbar is available so you can stop, play,pause,
fast forw ard, or review your voice mes s ages . Youcan toggle t he Playback Device button
to on or off and change your auto-play options with the "A uto-play when previewing"
check box. If you need to launch the Mitel N etwo rks QuickPlay toolbar, click on the
QuickPlay button on the Microsoft Outlook toolbar. The QuickPlay button will appear
depressed w hen the Mitel Networks QuickPlay toolbar is open.
Note: If y ou have Microsoft Outlook open on a PC and then y ou open Microsoft Outlook
using the same account on another PC, you will have to r es tart Microsoft Outlook on the
original PC in order to receive full functionality of the Multimedia Outlook Plug-in.
Changing Your Voice Message Playback
To chang e the auto-play settings for your v oi ce messages and your playback device
1. Open Microsoft Outlook, and c lick Tools, Options,andthentheUnified Messaging tab.
2. Select the type of automatic play for t he voice messages.
- If you want to automatically hear the voice messag e when the voice message file is
opened (that is, after double-clicking t he voice m es s age in the I nbox ), click Auto-play
when opening.
- If you want to automatically hear the voice message when the voice message is high-
lighted (that is, by a single click on the voice m es s age in the I nbox ), click Auto-play
when previewing.
Note: The Mitel Netw ork s QuickPlay toolbar provides an Auto-play when previewing
check box so you can c hange your auto-play preference there as well. This setting will
also change your auto-play setting in Tools/Options.
3. Select the default playback device f or your voice message. If the system detects that your
PC does not have audio capabilities, you will only get "Telephone" as a choice.
- If you want to hear the voice message from your phone, select Telephone from the
drop-down m enu.
- If you want to hear t he voice message from your PC speakers, select PC Speakers
from the drop-down menu.
Note: The Mitel Net w orks QuickPlay toolbar provides a Playback Device button
that tempo ra rily turns the telephone playback on or off.
46
4. If you s elected "Telephone" in the previous step, enter the n umber of your phone in the
Phone Number or Extension box.
5. Click OK.
Page 51

Voice Message Buttons
The Multime dia Outlook Plug-in provides the following buttons so you can manage your voice
messages:
Function Button
Play
Stop
Pause
Mitel Networks Speech Server
Forward/Review
Adjust volume
Adjust recording level
Playback device
New voice message
Reply with voice message
Reply to All with voice message
Forward with voice message
47
Page 52

Mitel Netw orks Speech Server
Previous voice message
Next voice message
Show/hide QuickPlay toolbar
Function Button
Record
Open Personal Web Page
TheMitelNetworksQuickPl ay toolbarhassome of the s amebuttons.Youc an play,stop,pause,
review, adjust the volume, or playback your message over the telephone while you are
previewing your messages.
Playing Voice Messages
With the Multimedia Outlook Plug-in, you hav e the choice of one of the f ollowing playback
devices that can play your voice messages:
48
• PC Speakers
• Telepho ne
You alsohavethechoiceofsettingthesystemtoplayyour voice messages automaticallywhen
you preview your inbox or when you open the voice message. See C hanging Your Voice
Message P layback, o n page 46.
Page 53

Mitel Networks Speech Server
Refer to one of the following procedures that des c r ibes your playback preferences.
Tip: If you w ant to reply to the voice message, you can respond with your voice or with
text (e-mail), using t he Reply buttons in Microsoft Outlook. Toinclude a voice message,
see Replying with Voice, on page 51.
Tip: If you want to forward the voi ce message, you can do so with the Forward buttons
in Micros oft Outlook. You can add text or add a voice recording. Toinclude a voice
message, s ee Forwa rding with Voice, on page 52.
Tip: If you have your def ault playback device set to "Speakers" and you want some
privacy, switch to your phone with a click on the Playback Device button.
Using Your PC Speakers as a Playback Device
Note: The following two proc edures ass ume that you selected PC Speakers as your
playback device and that you have selected the auto-play setting variable under
Tools/Opt ions. For more information, see Changing Your Voice Message Playback, on
page 46.
To play a voice m essage wi th Auto-play When Previewing
1. Select thevoice message i n theOutlook Inbox. T he system automatically plays your voice
message over the speakers.
2. Click QuickPlay and use the toolbar tostop, play,pause, fast forward, or review the voice
message.
3. If you decide that you want to hear a specific voice message over the phone, click the
Playback Device button on the Mitel Ne tworks QuickPlay toolbar, select the voice mail
message, and answer your phone to hear th at message. The Playback Device button
toggles on and off: on for the phone and off f or the speakers.
To play a voice message wi th Auto-play When Opening
1. Double-click thevoicemess age inthe Outlook Inbox.The system automatically plays your
voice message over the speakers.
2. Use the buttons under the subject header to stop, play,pause, fast forward, or review the
voice message. If you want to hear the previous or next voice message, click Previous
or Next on the toolbar.
Note:Thefollowingprocedure assumesthatyou selected P C Speakersasyourplayback
device and that you have NOT selected the auto-play setting variables under
Tools/Opt ions. For more information, see Changing Your Voice Message Playback, on
page 46.
49
Page 54

Mitel Netw orks Speech Server
To play a voice message without A uto-play
1. Select the voice message in the inbox.
2. Click QuickPlay to open the Mitel Networks QuickPlay toolbar.
3. On the Mitel Net works QuickPlay toolbar,click the Play button to hear the vo ice mes s age
with your speakers.
or
1. Double-click the voice message in the Outlook inbox.
2. Click the Play button under the subject header. U se the buttons under the subject header
to stop, play, pause, fast forward, or review the voice message. I f you want to hear the
previous or next voice message, click Previous or Next on the toolbar.
Using Your Telephone as a Playback Device
Note:Thefollowingtwoproceduresassume that your phoneisidle,thatyouprogrammed
Telepho ne as your playback device, and that you have selected the auto-play setting
variable under Tools/Options. For more information, see Changing Your Voice Messa ge
Playback, on page 46.
Note: The voice mails must be in the Inbox of the Exchange Server for you to be able to
use the telephone as a playback dev ice.
To play a voice m essage wi th Auto-play When Previewing
1. Click QuickPlay.
2. Select the voice message in the Outlook Inbox.
3. Answ er the phone to hear your voice message.
4. Use the Mitel Ne tworks QuickPlay toolbar to stop or play the voice messag e.
5. If you wa nt to listen to some othe r voice messages, you can select the other voice mails
before you hang up.
To play a voice message wi th Auto-play When Opening
1. Double-click the voice message in the Outlook Inbox.
2. Answ er the phone to hear your voice message.
3. Use the buttons under the subject header to stop or play the voic e message. If you want
to hear the previous or next voice message, click Previous or Next on the toolbar before
you hang up.
50
Note: The following procedure assumes that your phone is idle, that you programmed
Telepho ne as your playback device, and that you did NOT selec t the auto-play setting
variables u nder Tools/Options. For moreinformation, see ChangingYourVoiceMessage
Playback, on page 46.
Page 55

Mitel Networks Speech Server
To play a voice message without A uto-play
1. Click QuickPlay to open the Mitel Networks QuickPlay toolbar.
2. Select the voice message in the Outlook Inbox.
3. On the Mitel Networks QuickPlay t oolbar, click the Play button.
4. Answer the phone to hear your voice mes s age.
5. Use t he Mitel Networks QuickPlay t oolbar to stop or play the voice mes s age.
6. If you want to listen to some other voice messages, you can select the other voice mails,
and then click the Play button before you hang up .
or
1. Double-click the voice message in the Outlook inbox.
2. Click the Play button unde r the subject header.
3. Answ er the phone to hear your voice message.
4. Use the buttons under the subject header to stop or play the voic e message. If you want
to hear the previous or next voice message, click Previous or Next on the toolbar, and
then click the Play button before you hang up.
Replying with Voice
Note: Recording a voice message requires a microphone attached to your PC. You
cannot reply with the tele phone, therefore the playback dev ice button must be t urned off.
To reply to a voi ce message or e-mail message with a vo ice message
1. Click the e-mail or voice message that y ou want to reply to.
2. Click o r Click .
3. Click the Record button .
4. Say your voice message .
5. Click on the Stop butt on .
6. If you want to listen to your recording, click the Pla y button or click on the voice
messagepart.Ifyou want t o re-rec ord y our voicemessage, c lick t he Recordbutton,repeat
your voice message, and click the Play button to listen to your modified voice message.
7. If you w ant to attach a file, on the main menu bar, click Insert, File, and then browse fo r
the file and attach it.
8. Click Send.
51
Page 56

Mitel Netw orks Speech Server
Forwarding with Voice
Note: Recording a voice message requires a microphone attached to your PC.
To forward voice messag es and e-mail messages with a voice message
1. Click the e-mail or voice message that you want to forward.
2. Click
3. Enter the e-mail address(es) for the recipients.
4. Click the Record button .
5. Say your voice message.
6. Click the Stop button .
7. If you want to listen to your recording, click the Play button or click on the v oice
messagepart.Ifyouwanttore-recordyourvoicemessage,clicktheRecord button, repea t
your voice message, and c lick the Play button to listen to your modified voice m es sage.
8. Click Send.
Creating Voice Messages
To create a voice m essage
1. Click .
2. Enter the e-mail address(es) for the recipients.
3. Click the Record button .
4. Say your voice message.
5. Click the Stop button .
6. If you want to listen to your recording, click the Play button or click on the v oice
messagepart.Ifyouwanttore-recordyourvoicemessage,clicktheRecord button, repea t
your voice message, and c lick the Play button to listen to your modified voice m es sage.
7. If you w ant to attach a file, on the m ain menu bar click Insert, File, and then browse for
the file and attach it.
8. Click Send.
Tip: Create a voice message and s av e it as a draft. At your convenience, you can
continue or mo dify the message and then send it.
52
Page 57

Using Outlook Web Access
You can use any computer with web access to access your messages.
Note: The Multimedia Outlook Plug-in is not supported when you lau nch your Unified
Messaging through Outlook Web Access (OWA). We suggest that you install the
Microsoft Exchange Multimedia Messaging Component so you have the abil ity to listen
to your voice messages with a playbar or use Windows Media Player to play the
attachment.TheinstructionsandtheextensionstodownloadtheOutlook2000extensions
required for multimedia messaging are located at
http://<your Exchange 2000 server name>/Exc hweb/ Bi n/e msetup.asp
Tip: Eac h multimedia recording is inserted into the message body as a n attachment .
When you receive a multimedia message, you must cli ck the attachment to start the
playback of the audio message.
Online Help is providedto assist you in the use of the MicrosoftExchange Multimedia tool. This
help is accessed when composing or r ec eiving a message.
Mitel Networks Speech Server
• When composing a message, click the Record button, click Start and the Multimedi a
Control bar opens. Click on the drop-down menu on the right-hand side of the Multimedia
Control window and then select Help.
• To access this help during message playback, expand the drop-down menu on the
right-hand side of the Multimedia Control window that appears during message playback,
and then select Help.
For more information on multimedia messaging, contact your system administrator.
53
Page 58

Mitel Netw orks Speech Server
NOTES
54
 Loading...