

Page 1

USER GUIDE
Page 2

Notice to Canadian Customers
Notice to Customers in EU Countries
This Class B digital apparatus complies with Canadian standard
ICES-003.
Notice to U.S. Customers
This equipment has been tested and found to comply with the
limits for a Class B digital device, pursuant to Part 15 of the FCC
Rules. These limits are designed to provide reasonable protection
against harmful interference in a residential installation. This
equipment generates, uses, and can radiate radio frequency
energy and, if not installed and used in accordance with the
instructions, may cause harmful interference to radio
communications. However, there is no guarantee that
interference will not occur in a particular installation. If this
equipment does cause harmful interference to radio or television
reception, which can be determined by turning the equipment off
and on, the user is encouraged to try to correct the interference
by one or more of the following measures:
• Reorient or relocate the receiving antenna.
• Increase the separation between the equipment and receiver.
• Connect the equipment into an outlet on a circuit different
from that to which the receiver is connected.
• Consult the dealer or an experienced radio/TV technician for
help.
Note: Changes or modifications not expressly approved by Mitel
Networks Corporation may void the user’s right to operate the
equipment.
We, Mitel Networks Ltd.
Of, Mitel Business Park
Portskewett
Caldicott
NP26 5YR
UK
Declare that for the hereinafter mentioned product the
presumption of conformity with the applicable essential
requirements
of
DIRECTIVE 1999/5/EC OF THE EUROPEAN PARLIAMENT
(RTTE DIRECTIVE) AND OF THE COUNCIL
is given.
Mitel Networks / 5550 IP Console
Any unauthorized modification of the product voids this
Declaration.
For a copy of the original signed Declaration of Conformity (in full
conformance with EN45014), please contact the Regulatory
Approvals Manager at the above address.
Complies with EN55022, EN55024, EN60950.
Note: This is a Class B product.
Page 3

Notices
Symbols
These notices appear on the product and in the technical
documentation:
WARNING
Warning indicates a potentially hazardous situation
which, if not avoided, could result in death or
serious injury.
CAUTION Caution indicates a potentially hazardous situation
which, if not avoided, may result in minor or
moderate injury and/or damage to the equipment
or property.
These symbo ls app ear on the prod uct :
The exclamation point within an equilateral
triangle indicates that important operating and
maintenance (servicing) instructions are included
in the literature accompanying the product.
® Trademark of Mitel Networks Corporation
© Copyright 2002, Mitel Networks Corporation
All Rights Reserved. Printed in Canada
Page 4

Page 5

Contents
Getting Started................................................................................ 3
Introduction ........................................................................................................4
Console Components ...........................................................................................4
Console Screen....................................................................................................5
Console Keypad...................................................................................................6
Softkeys (F1 – F12) ..............................................................................................7
Handset and Cradle.............................................................................................7
Starting and Closing the Mitel Networks 5550 IP Console.....................................8
Adjusting the Console..........................................................................................9
Call Handling Basics..................................................................... 13
Answering Calls................................................................................................. 14
Dialing Telephone Numbers............................................................................... 16
Extending (Transferring) Calls............................................................................18
Holding and Retrieving Calls.............................................................................. 20
Conference Calls................................................................................................21
Answering Recalls.............................................................................................. 22
Recovering the Last Released Call...................................................................... 22
Advanced Features....................................................................... 25
Account Codes...................................................................................................27
Bulletin Board................................................................................................... 27
Call Answering Priority.......................................................................................28
Call Park ........................................................................................................... 29
Call Waiting Threshold.......................................................................................30
Cancel Call Forwarding...................................................................................... 30
Contents ♦ i
Page 6

Clear All Features.............................................................................................. 30
Data Calls......................................................................................................... 31
Day and Night Service ....................................................................................... 32
Do Not Disturb (Extensions) .............................................................................. 33
Emergency Calls................................................................................................ 34
Feature Access Codes........................................................................................ 35
Firmkey Programming....................................................................................... 35
Message Waiting................................................................................................ 36
Operator Absent/Present Status........................................................................ 37
Override............................................................................................................ 37
Paging............................................................................................................... 38
Phone Book....................................................................................................... 39
Scratch Pad....................................................................................................... 40
Serial Call ......................................................................................................... 40
Trunk Group Status Display.............................................................................. 41
System Speed Call............................................................................................. 42
Tone Signaling................................................................................................... 42
Hotel/Motel Fe a tur e s......................................................................45
Displaying and Changing Room Information...................................................... 46
Searching for Rooms.......................................................................................... 47
Changing Room Occupancy and Condition Status ............................................. 48
Checking-In/Checking-Out ............................................................................... 48
Setting and Clearing Wake-up Calls................................................................... 48
Setting Call Restrictions.................................................................................... 49
Blocking Room-to-Room Calls............................................................................ 50
Monitoring Guest Rooms................................................................................... 50
Clearing the Message Register............................................................................ 51
Printing Reports................................................................................................ 51
ii ♦ Contents
Page 7

Reference....................................................................................... 55
Alarms...............................................................................................................56
Alarm types .......................................................................................................56
Greetings...........................................................................................................56
Rerouted Calls...................................................................................................57
Class of Restriction............................................................................................58
Class of Service..................................................................................................58
Feature Access Codes ........................................................................................59
Glossary............................................................................................................ 60
Hunt Groups .....................................................................................................62
Paging Zones .....................................................................................................62
System Speed Call List.......................................................................................63
System Messages............................................................................................... 64
Telephone Directory...........................................................................................70
Trunk Numbers................................................................................................. 70
Index............................................................................................... 71
Contents ♦ iii
Page 8

Page 9

Getting Started
Page 10

Page 11

Getting Started
Contents
Introduction......................................................................................................................4
Console Components.........................................................................................................4
Starting and Closing the Mitel Networks 5550 IP Console ..................................................8
Adjusting the Console .......................................................................................................9
Getting Started ♦ 3
Page 12
Introduction
The Mitel Networks 5550 IP Console is an attendant console and
administration application for the Mitel Networks
Communications Platform (ICP). It features a specialized keypad and
an intuitive user interface for smooth, efficient call handling.
A note about featur e availability
The features available on your telephone system (i.e. Mitel
Networks 3300 Integrated Communications Platform) are
automatically turned on.
Before you begin using the console
Take a few minutes to explore this guide — it contains all the
information you need to operate the Mitel Networks 5550 IP
Console.
The first section introduces you to the console. You will learn
about the console keypad and what the Function keys on the
computer keyboard do. You will also learn about the console
screen and how to interpret the information it displays.
If any problems occur while you are using the console, contact
your communications department for assistance.
3300 Integrated
Console Components
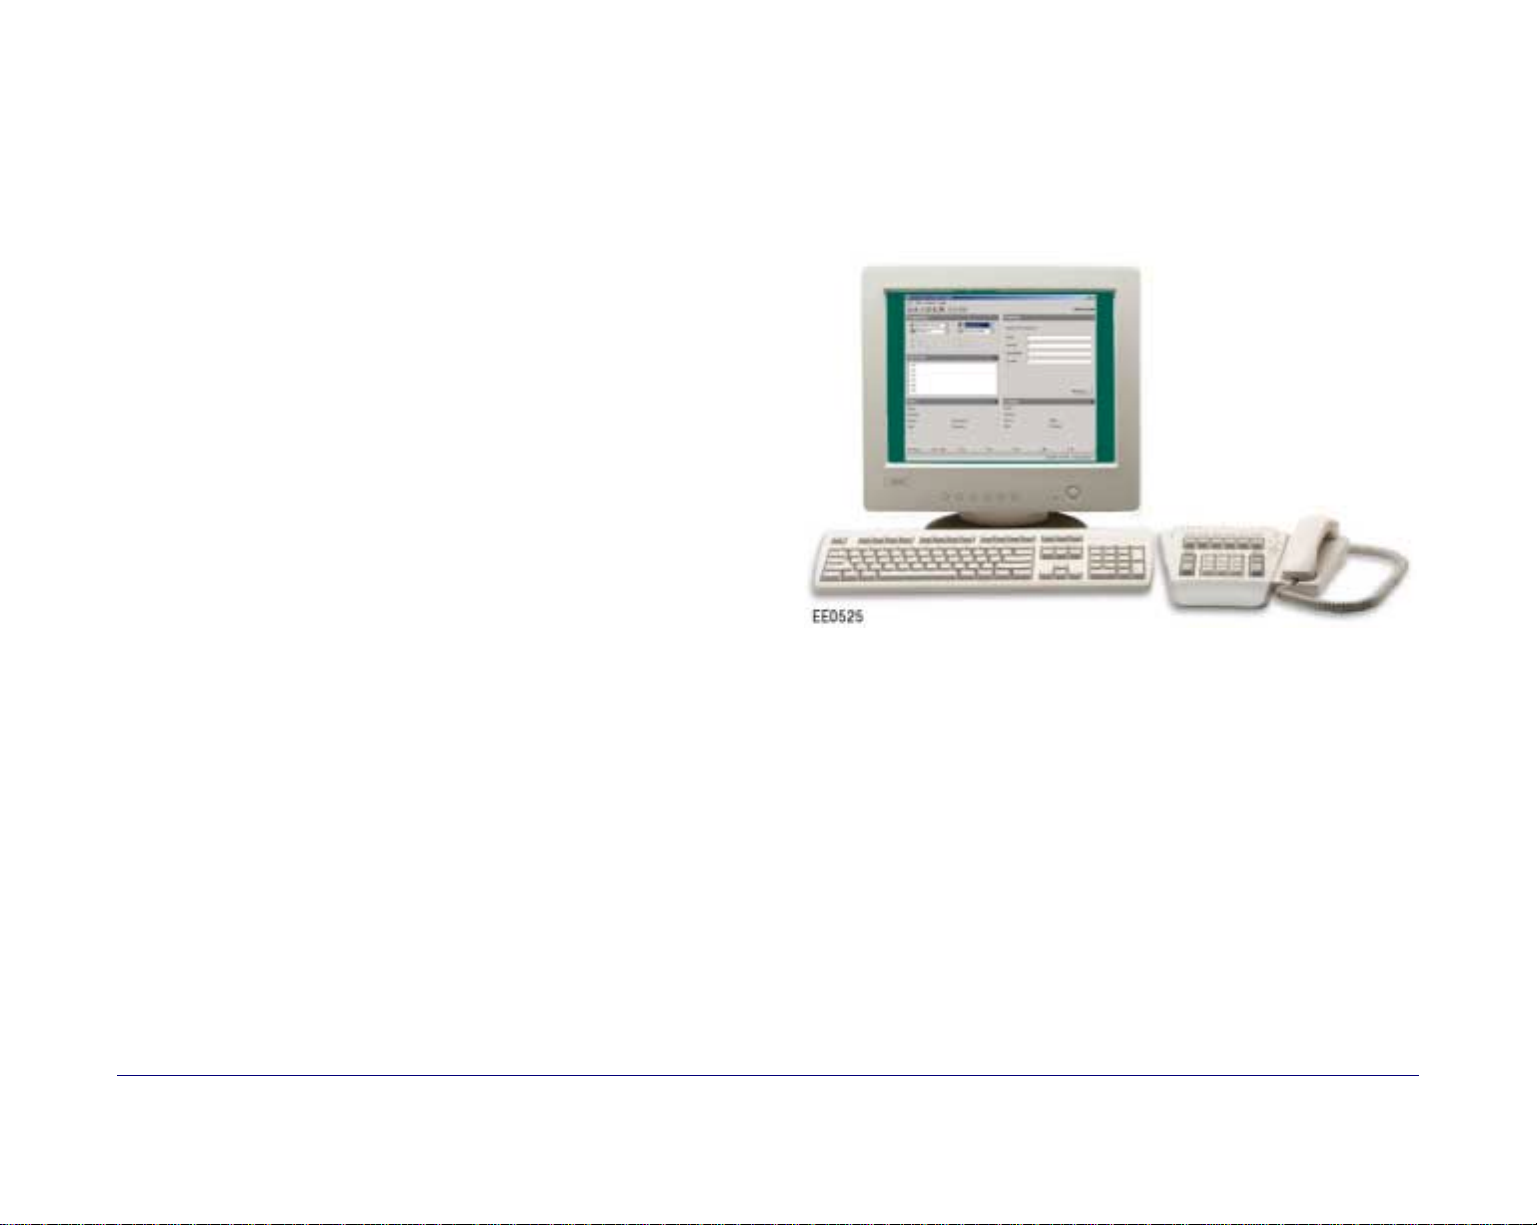
Your 5550 IP Console consists of a personal computer (PC) with
monitor, a standard computer keyboard, a keypad, a mouse and
a handset with cradle.
Conventions used in this guide
Throughout this guide, the fixed-function keys and firmkeys
(both key types are explained later in this section) are in bold
type—for exampl e, Answer or Release.
Softkey commands that appear on your screen and correspond to
the Function keys (F1, F2, F3, etc.) at the top of your keyboard
are shown in brackets— for example, [Source] or [Destination].
See page 7 for more information about softkeys.
4 ♦ Getting Started
The monitor displays call-handling prompts and call status
information. Use the keypad for all call-handling funct ion s,
including dialing. The handset (or optional headset) is for talking
with callers.
You use the computer keyboard to find entries in the Phone Book
or to type in the Scratch Pad or Bulletin Board. The Function
keys (F1, F2, F3, etc.) at the top of the keyboard execute the
softkey commands that appear on the screen.
Page 13
Console Screen
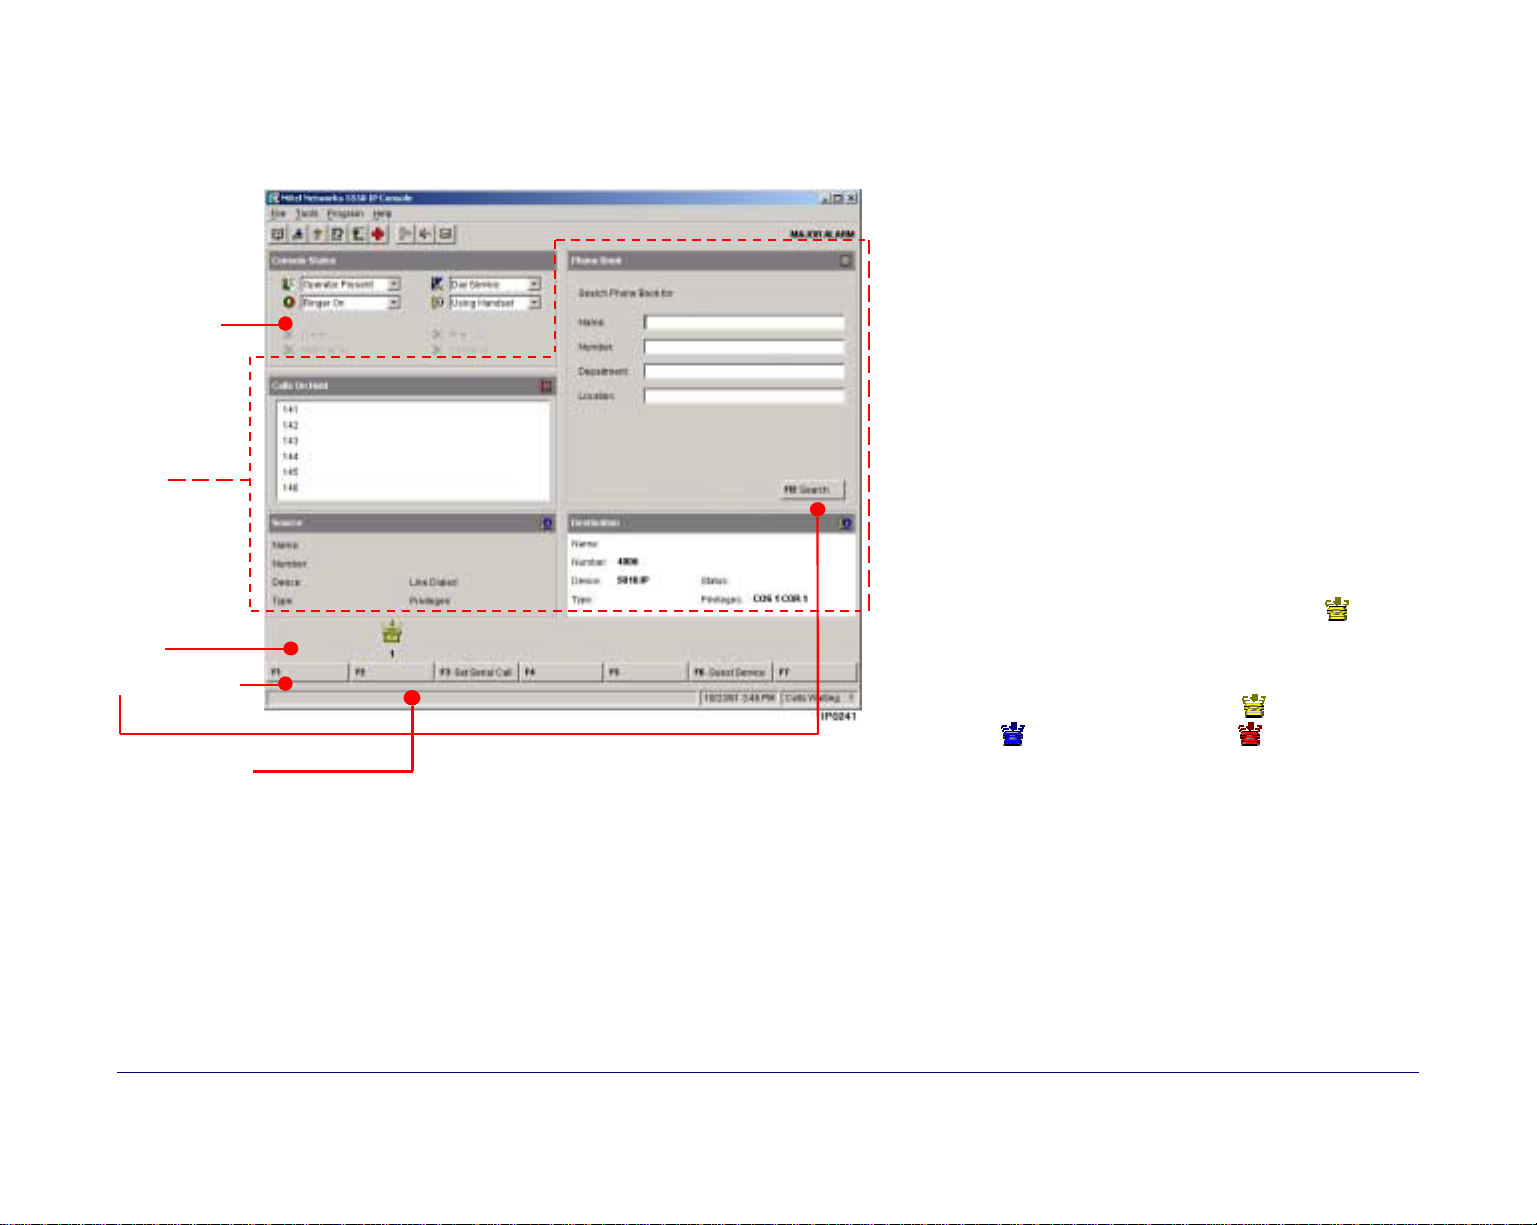
The 5550 IP Console screen is divided into five areas:
Console
Status Area
Application
Area
• The Console Status area shows you at a glance what
state the console an d the system ar e in —for example
whether the con sole ringer is on or off and whet her the
system is in Day or Ni ght Service.
• The Application area is divided into four
sections: The top left section displays information
about calls on hold; the top right, a Phone Book
for finding users on the system and other tools
such as an electro n ic scratch pad for tak ing
notes. The bottom two areas display information
on the Source (calling party) and Destination
(called party ) of all calls handled by th e console.
The Source area also shows the line on which you
answered the call. The Destination area also
shows call forwarding information.
The information displayed includes the name of
the party, extension or trunk number or trunk
label, type of extension, status of call (e.g.,
ringing), privileges assigned to the trunk or
extension, and the type of call (e.g., Conference,
Recall, Serial).
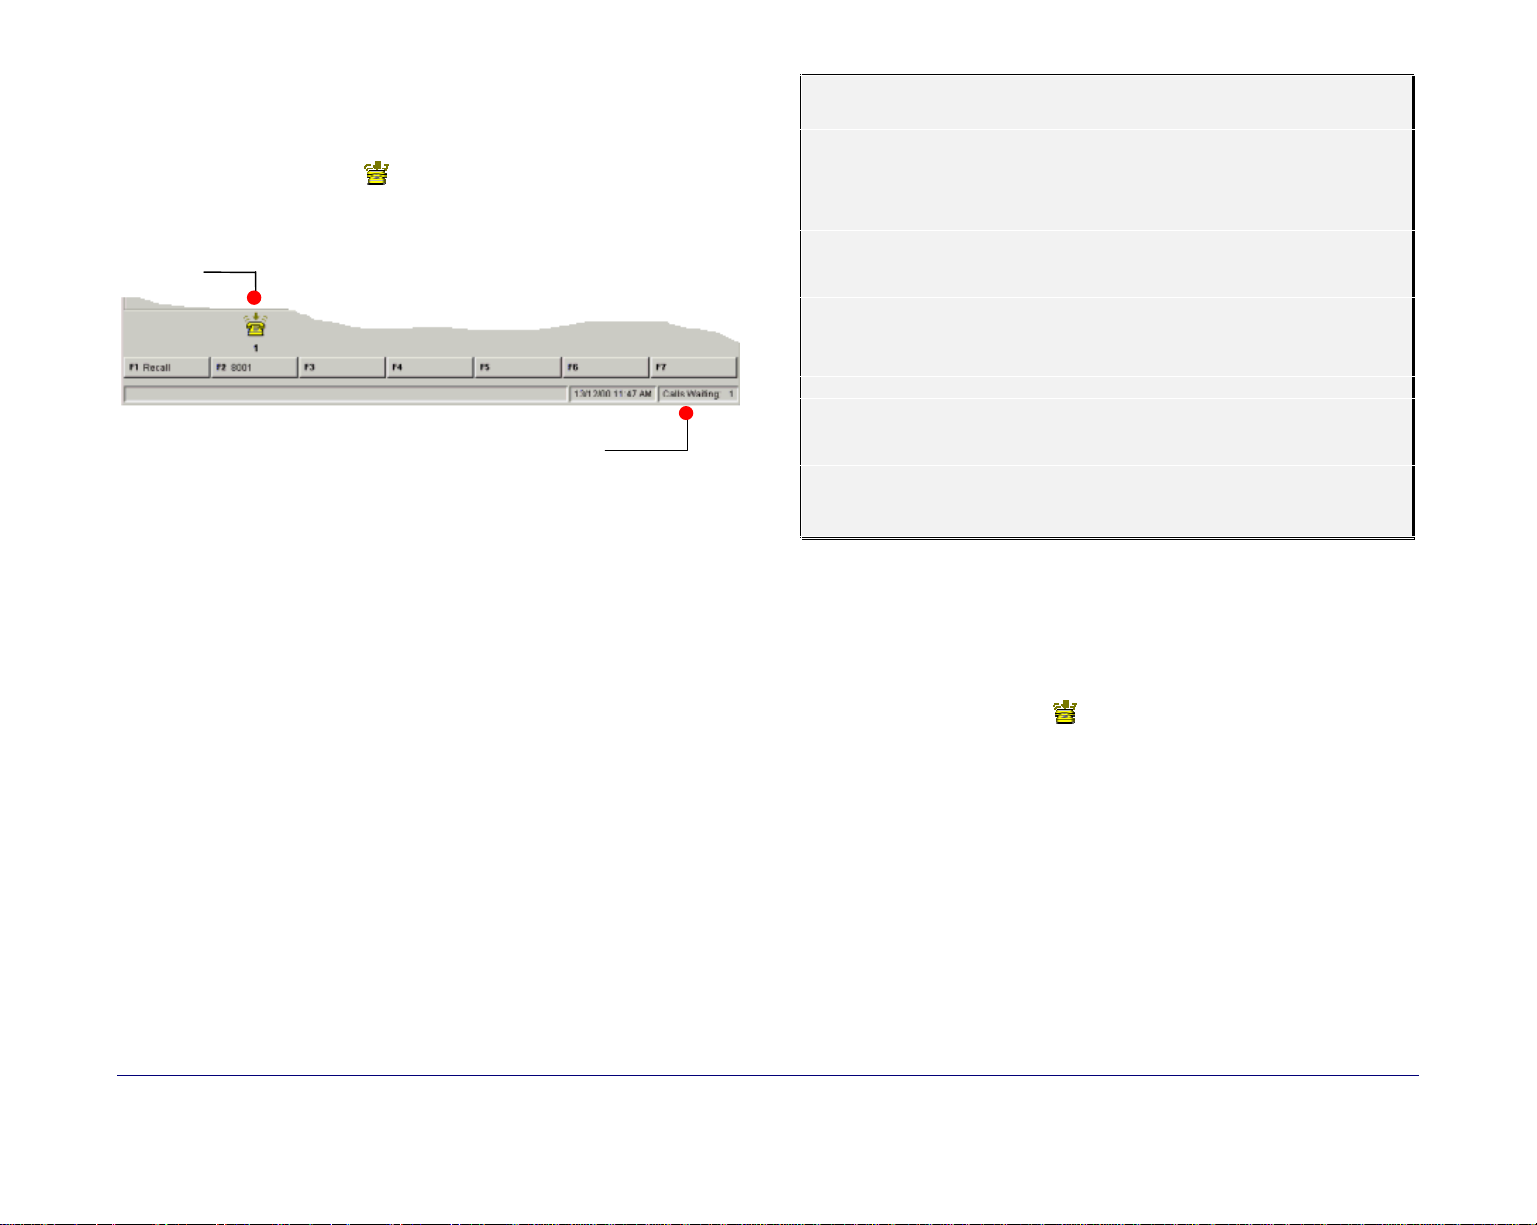
Call Waiting
Area
Softkey Area
Response Area
• The Call Waiting area displays an icon ( ) as a
visual indication of incoming calls. The icon
appears above the softkey that is used to answer
the call. You can tell how many calls are waiting
by the color of the icon: yellow (
blue (
more calls.
• The Softkey areas at the bottom of the screen and
above th e Dest i nati on area (i.e. in th e Phone Book)
displa y th e S of tke y co m mand s. The co mman ds
corres pond t o the Fu nct ion ke ys on th e comp uter
keyboard. S ee th e ne xt se ction f or more in forma tion
on the Softkeys.
• The Response area at the bottom of the screen
displays the date and time, the number of calls
waiting to be answered, and messages received
from the system.
) for two calls and red ( ) for three or
) for one call;
Getting Started ♦ 5
Page 14
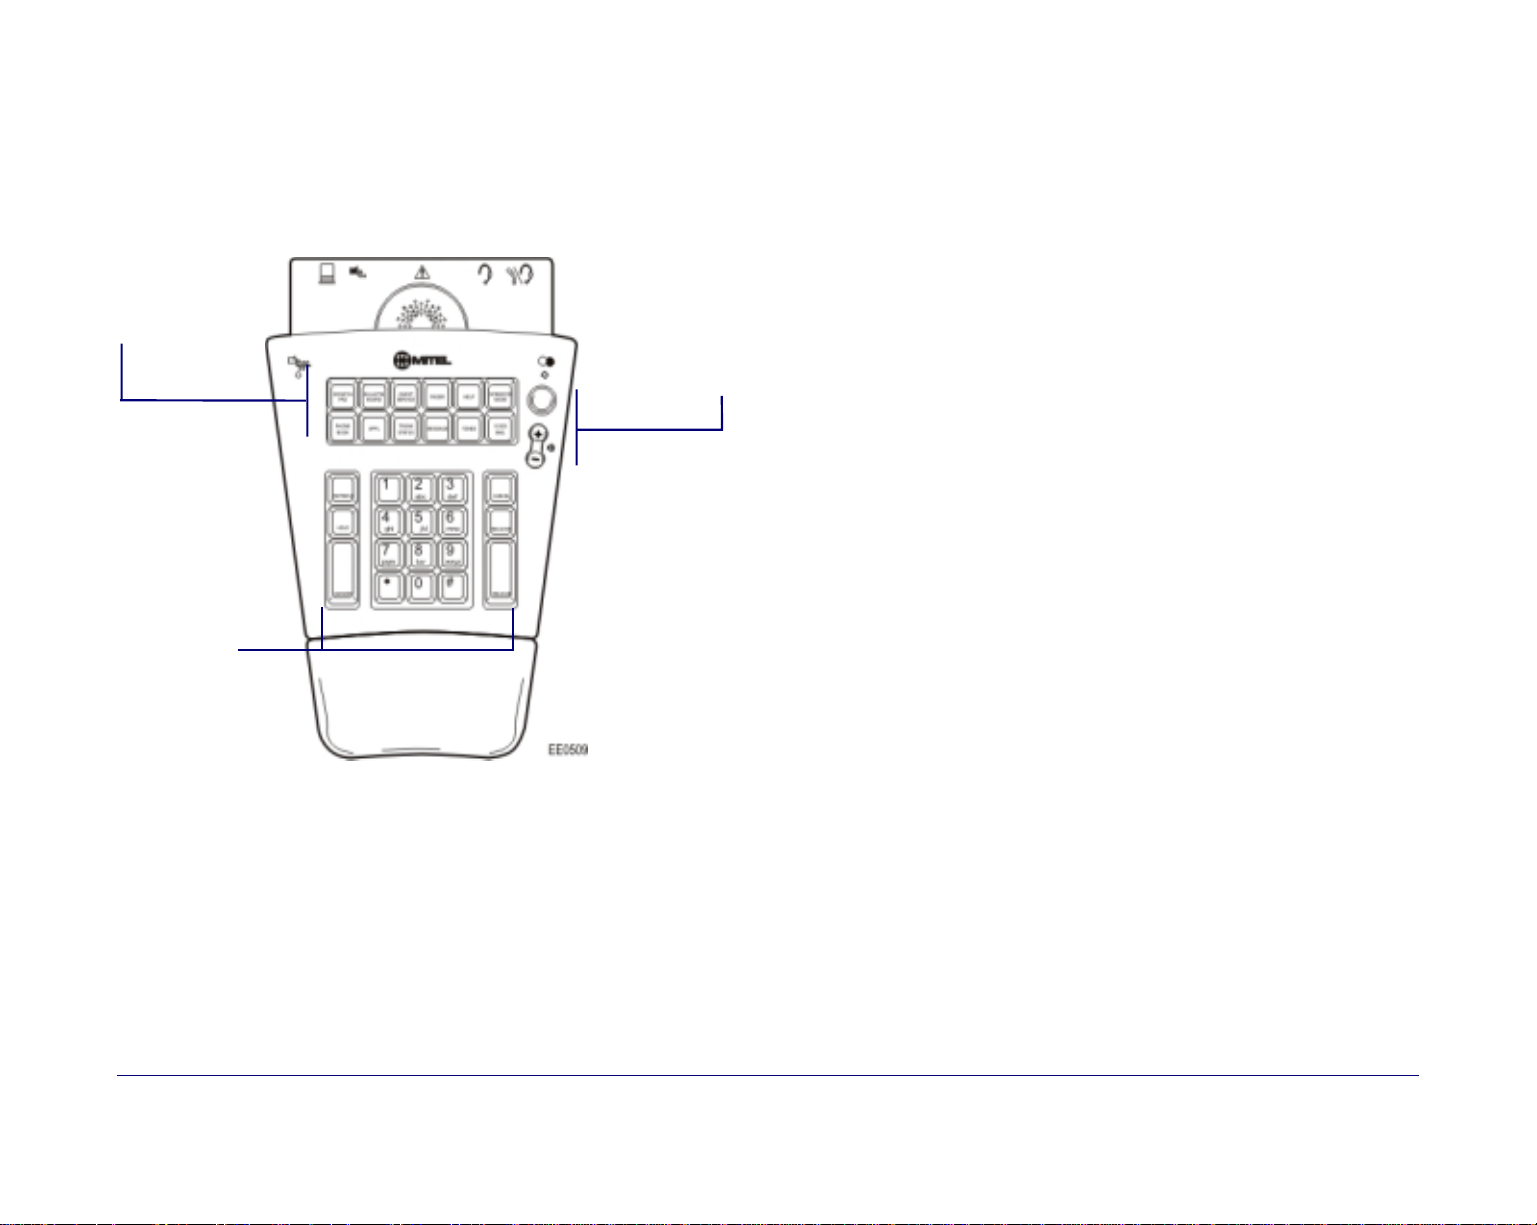
Console Keypad
The console keypad is used for dialing, call processin g and accessing
3300 ICP features. You can adjust the slope of the keypad and detach
(or attach) it from the handset cradle.
The keys on the keypad are arranged in thre e groups:
Firmkeys
Volume and
Mute Keys
Callprocessing
Keys
Volume and Mute Keys – used to increase (+) or decrease (-) the
ringer volume and the volume of the earpiece in the handset or
headset. The Mute key turns the microphone in the headset or
handset on or off.
Call-processing Keys – fixed-function keys that are used to
answer and manage calls. They include Retrieve, Hold, Answer
Cancel, Recover and Release.
Firmkeys -- contains programmable keys that provide access to
the followin g console features and syste m ser vi c es:
SCRATCH
PAD
Displays an electr onic notepad w here you can type
messages from callers, remin ders, questions, or
anything else you wou ld write on notep aper. You can
also use the Scratch Pad to store telephon e numbers
for speed dialing.
BULLETIN
BOARD
Displays an area where you can type messages
that can be viewed from all other 5550 IP Consoles
on the system.
GUEST
SERVICE
Displays room status information and softkeys for
managing guest services in a Hotel/Motel
installation.
PAGER
Accesses paging equipment for making
announcements.
EMERGENCY
CALLS
Raises an alarm at the console when an extension
user places an emergency call, and identifies the
extension that placed the call.
HELP
Opens Help, which provides information to help
you accompli sh you r ta sk s.
OPERATOR
MODE
PHONE BOOK
Re-displays the main console screen.
Allows you to find and call an extension by typing
the user’s name, extension number or other
information.
APPL
Starts another application that extends the capabilities
of the 5550 IP Console. Your communications
department selects t he applicat ion.
TRUNK
STATUS
MESSAGE
Displays information about trunk (outside line)
usage.
Displays softkeys for setting or clearing the
Message Waiting indicator on the dialed extension.
TONES
Sends subsequently dialed digits as tones (used
when dialing into voicemail systems.)
VOICE MAIL
Transfers a r ecall to an extension user’s voicemail bo x.
Note: Some of the features shown are optio n al and ma y not appear
on your console keypad. For keypad programming information, see
Firmkey Programming on page 35.
6 ♦ Getting Started
Page 15

Softkeys (F1 – F12)
The softkeys are the F1 to F12 keys on your computer keyboard.
You use them to enter commands shown in the softkey area on
the screen. The commands are not fixed to a specific softkey;
instead, they change depending on the state of the call you are
handling or the feature you are using. For example, when you
call a busy extension, the F4 key might be used to request a
Callback. At another time, the same key, F4, could be used to set
up a conference call.
Handset and Cradle
The 5550 IP Console is equipped with a handset and cradle. You
can adjust the slope of the cradle and detach (or attach) it from
the console keypad.
Mitel Net works-approved h e ad set s ar e als o a vailabl e f or u s e w it h t h e
consol e.
See page 9 for more information about using the handset or a
headset.
Getting Started ♦ 7
Page 16

Starting and Closing the Mitel
Networks 5550 IP Console
The 5550 IP Console starts with the operator status set to
“Operator Absent.” To begin receiving calls, you must change the
status to “Operator Present.” For more information, see page 37.
To start the 5550 IP Console
• Start Windows.
• Type your user name and password.
• Click on your Windows desktop.
To close the 5550 IP Console
• On the File menu, click Exit.
Accessing tools for system programmi ng and
maintenance
The 5550 IP Console provides access to tools used to program
and maintain the 3300 ICP. Access requires authorization (i.e., a
user name and password) and is usually restricted to trained
technicians.
To access tools for system programming and maintenance
• On the File menu, click Connect to ESM or Connect to OPS
Manager.
Note: OPS Manager is supported by Windows 98 and Window s
2000 operating systems only.
Questions about Starting and Closing the
5550 IP Console
What happens to incoming calls when I clos e the 5550
IP Console application?
If yours is the only console on the system, the system
automatically switches to Night Service 1. Calls then ring
night bells or another designated answering point. If there are
other consoles, yours will switch to Operator Absent status
when you close the application. Other answering points will
receive the calls that would otherwise go to your console. For
more informati on , see Day and Night Service on page 32 and
Operator Status on page 37.
What happens to calls if my computer stops working?
Usually, a nearby extension will serve as a backup answering
position in the event of a power failure or other problem that
causes your computer to stop working. Calls that normally
ring the console would then ring the backup extension.
Can I use other applications while the 5550 IP Console is
running?
Yes, but keep in mind that having multiple applications open
at the same time as the 5550 IP Console can adversely affect
its performance. If possible, try to limit your use of other
applications to periods when call traffic is low.
My screen goes blank som eti me s—wh y?
A power- sa vi n g f e at ur e bu il t i n to t h e c o mpu t er aut o matically
reduces the screen intensit y w h en t here ha s b e en no ke yboard
or mouse activity for approxima tely tw o minut es. After
approxim ate ly fi ve minu tes, the scr e en goe s blan k. Whe n you
press the spac eb ar o n t h e keyboar d , t h e c o n s ol e screen wi l l
reappear.
8 ♦ Getting Started
Page 17
Adjusting the Console
The console is designed with your comfort in mind. You can
make adjustments to the ringer, the language of text on the
screen, the angle of the keypad, whether you want to handle calls
using a handset or headset and more.
Console Ringer
To turn the console ringer on or off
• Select Ringer On or Ringer Off from the list in the
Console Status area.
To detach the clamp from
the keypad
• Grasp the keypad as shown.
• Place your thumbs along
the edge of the clamp, and
then press down and away
from the keypad.
When the ringer is off, the call waiting icon (
indication that you have calls waiting.
To adjust the ringer volume
• While the console is ringing, press the key on the console
keypad to set the volume to the level you want.
You can also use the Options command on the Tools menu to
adjust the ringer volume.
) is the only
Console Keypad and Handset Cradle
You can adjust the slope of the keypad and detach (or attach) it
from the handset cradle. The angle of the cradle also adjusts via
the hinged attachment fitted to the back foot of cradle.
To attach the handset cradle
to the console keypad
• Align the tabs on the
clamp with the slots on the
bottom of the keypad.
• Press to seat the tabs in
the slots.
To detach the clamp from
the cradle
• Using your finger or a tool
such as a screwdriver, push
against either of the tabs as
shown.
• While pushing on the tab,
use the other hand to twist
the U-clamp upward.
WARNING: Bending your
wrist while using the keypad
for prolonged periods can
cause physical injury. To
minimize the risk of injury,
adjust the slope of the
keypad so that your wrist is
straight.
Getting Started ♦ 9
Page 18

Handset/Headset
The console keypad provides jacks for connecting a handset and
a headset. One jack is labeled for headset use only, the other for
either handset or headset use. Both jacks can be in use at the
same time but when they are, the dual-use jack is used for
listening only. (Typically, a supervisor uses the dual-use jack to
monitor a new attendant during training.)
Connect Mitel Net works-appr oved headsets on ly to the keypad. F or a list
of approved headsets, see the 5550 IP Console Installation Guide.
The dual-use jack provi des differ ent audio levels for h eadsets and
handsets. Use th e
handset— is connected t o the jack.
To set the dual-use jack for handset or headset operation
1. Plug the handset or headset into the dual-use jack (
back of the console keypad.
2. Select Handset or Headset from the
Status area.
To adjust the handset (or headset ) volume during a call
• Press the key on the console keypad to set the volume to
the level you want.
You can also use the Options command on the Tools menu to
adjust the volume. After selecting the command (either during a
call or while the console is idle) click Audio, and then drag the
slider to set the volume to the level you want.
list to indicate which one—headset or
) on the
list in the Console
Unplugging the Handset or Headset
Console Language
Text on the console screen can appear in English (the default),
French, Spanish, Dutch, Italian, or German. You can choose the
desired language during inst allati on.
To change the console language
1. Choose Options on the Tools menu.
2. Select Language.
3. Select the language you want.
4. Click Apply or OK.
The change takes effect when you restart the console.
Console Time
You can use either the 3300 ICP clock or the clock in your PC as
the time source for the console. Using the 3300 ICP clock is
recommend ed sin ce it ’s the time source for extensions in the
system.
You should also use th e 3300 ICP clock if you set wake-up calls for
guests. (Setting wak e-up call appli es to hotel/motel syst ems only.)
To set the console time
1. Choose Options on the Tools menu.
2. Select Time.
3. Select the option you want.
4. Click Apply or OK.
Unplugging the handset or headset from the console keypad
automatically enables the other if it is plugged in. If neither is
plugged in, the console changes to Operator Absent status.
Or, if you are the last active attendant, the system goes into
Night Service 1 mode.
Note that plugging the handset/headset back in does not
change the Operator status back to Present.
10 ♦ Getting Started
Page 19

Call Handling Basics
Page 20

Page 21

Call Handling Basics
Contents
Answering Calls ..............................................................................................................14
Dialing Telephone Numbers.............................................................................................16
Extending (Transferring) Calls.........................................................................................18
Holding and Retrieving Calls............................................................................................20
Conference Calls .............................................................................................................21
Answering Recalls...........................................................................................................22
Recovering the Last Released Call....................................................................................22
Call Handling Basics ♦ 13
Page 22
Answering Calls
When a new call arrives at the console the bell rings (if it is turned
on) and a c all w ait ing i con (
with the call.
Call Waiting
indicator
You can answer calls on a “first-come, fir st -s er v ed b a sis, ” using
the Answer key or use the softkeys for “selective answer.” If yo u
wish to answer the Recall first, then press the Answer key.
Note: You cannot answer a new call until the one you are
engaged in is transferred, disconnected, or put on hold.
Answering calls on a first-come, first-served basis,
With both the Source and Destination areas clear,
• Press Answer
to greet the caller who was waiting the longest. Information
about the call, such as the trunk name and number for an
external call or the caller’s name and extension number for
an internal call, is displayed in the Source area.
Note: The Answer key has a hierarchy; recalls are answered first,
then any other call in order of arrival, regardless of whether it is
an internal or external call. You can assign answering priorities
to calls based on the telephone number that callers dial to reach
the console. For more information, see page 28.
) appear s a b ove t h e softkey associat ed
Total Calls Waiting
About the Call Answering Softkeys
The call answering softkeys are assigned by your
communications department to suit the types of calls your
company receives.
The leftmost softkey is reserved for recalls (see Answering
Recalls on page 22), but the other softkeys may be
programmed in a variety of ways. For example, you might
have Dial “0” and “External” to indicate whether a call is
from outside the system or inside; or WATS or TIE to tell you
the type of trunk the call arrived on; or you might see the
department name assigned to the trunk.
You can use the softkeys to guide you when answering a call.
For instance, when you see that a call is from outside the
system, your company might want you to answer with a
different greeting than you use for internal calls or recalls.
Use the form provided on page 53 to record your company’s
preferred greetings.
Selectively answering c alls
You can select the call you want to answer by pressing a softkey
[Recall], [Di al 0 ], [External], [WATS], etc.) instead of t he Answer
key. If you ha ve m ore tha n one c all wait ing at a part icu lar softkey,
then they will be a nsw ere d on a “first-come, fir st-ser ved” basis.
Use the call waiting icons (
you decide which type of calls to answer first. The icon appears
above the softkey associated with the various call types (external,
recalls, etc.). The number below the icon shows you how many
calls of a particular type are waiting. The color of the icon also
indicates the number of calls waiting: yellow for one call, blue for
two calls, and red for three or more calls.
) in the Call Waiting area to help
14 ♦ Call Handling Basics
Page 23
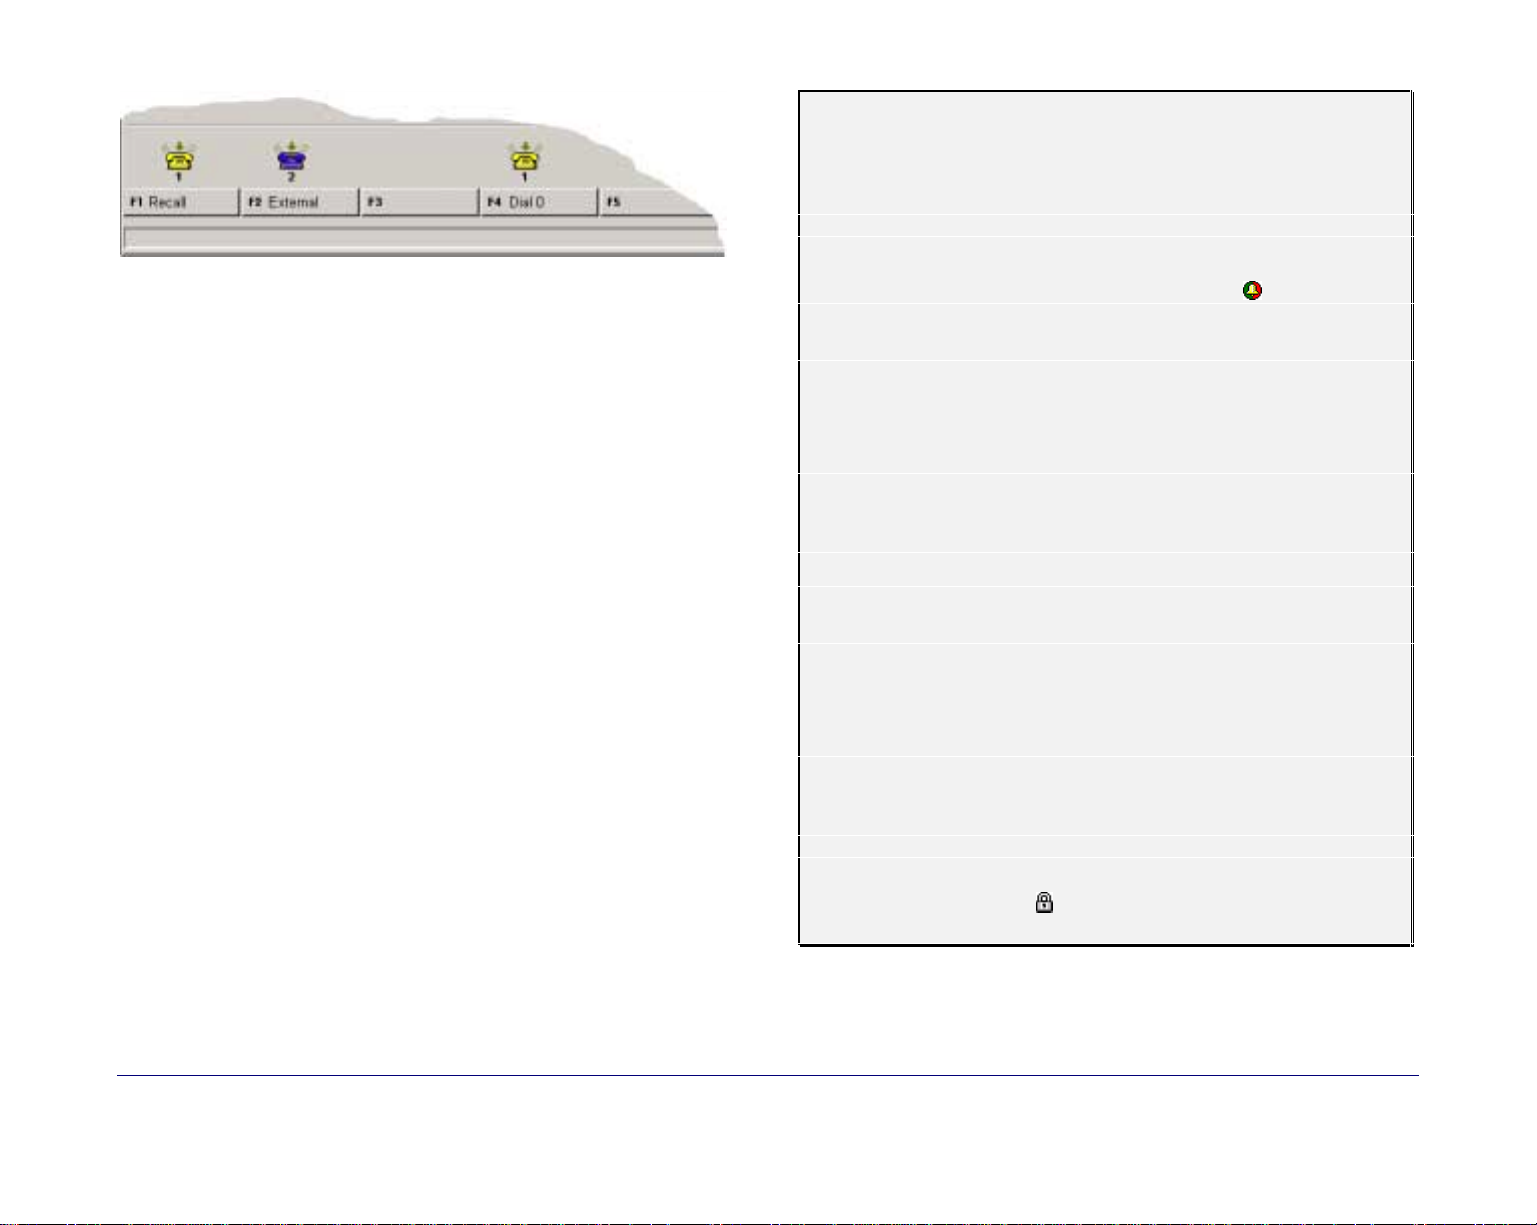
In the example above, note that one internal [Dial 0] cal l is
waiting and two external calls are waiting. If you:
Questions about Answering Calls
Why do I sometimes hear a short burst of ringing
while I’m handling calls?
Either a new call has arrived or a call on hold has recalled. As
you are already handling a call, the console only rings once.
You may turn down your volume control if you wish. You can
also turn off the bell completely by using the list in the
Console Status area. (WARNING: This also turns off all other
bell indications, including the Critical Alarm bell.)
• press Answer, you will be connected to whichever of the three
calls arrived at the console first;
• press [Dial 0], you will answer the internal call; or
• press [External], you will answer the outside call which
arrived at the console first.
Your communications department can give you instructions on
which types of calls it prefers you to answer first.
What does the caller hear while I’m dialing the
extension number?
Once you start to dial, the caller is on Consultation Hold until
you have completed dialing, establ ish ed communi cat ion with
the called party, and released the caller to the called party. If
music on hold is provided on your system, the caller will hear
music; otherwise silence.
Can I answer another call while still connected
to the first?
No. Before you can answer a new call, you must transfer the
current call to another destination (see page 18), put it on
hold (see page 20), or disconnect it from the console by
pressing Release.
Why do extension numbers appearing in the Source and
Destination area sometimes have a ‘p’ n front of them?
When it appears next to an extension, it means that the
extension is designated as private. Attendants see the
number of the extension on their screens; other extension
users see only the user’s name (if available) on their display.
In the Phone Book, the icon indicates a private extension.
Call Handling Basics ♦ 15
Page 24

Dialing Telephone Numbers
You can dial an internal extension number or the number of a
telephone outside the system. Either the Source or Destination
areas must be clear.
To call an extension
1. Dial the extension number from the console keypad.
Information about the ext en sion app ear s in the Destination
area. If information about an answered call is currently in the
Destination area, that information moves to the Source area
as soon as you start dialing.
2. Press Release
to release the call. If the extension is busy, the transferred
call will automatically camp on to the line to wait until it
becomes free. You can also handle the call in one of the
following ways:
To call an outside number
1. Dial the External Line Access Code ( ______ )
2. Dial the telephone number.
Information about the outside call appears in the
Destination area.
*.
Leaving a Callback
You can request a Callback after reaching a busy line (extension
or trunk). The system monitors the line and rings the console
when the line becomes free. Note that Callbacks on outside lines
are used when all system trunks are busy, not when the called
party is busy.
To leave a Callback after reaching a busy line
• Press [Callback].
If the extension is busy
• Press [Source]
and ask what the Source party would like to do. This leaves
the Destination information displayed so that you can easily
take a message and s et Mes sa ge Wait i n g on th e dest in at io n
extension, if required. (See Message Waiting on page 36.)
Or
• Press Cancel
to cancel the call. The caller remains in the Source area, but
the information in the Destination area is lost, which makes
setting Message Waiting more difficult.
Or
• Press [Override]
to intrude into the Destination party’s call if permitted by
your and the extension’s Class of Service (see Override on
page 37).
16 ♦ Call Handling Basics
Placing an outside call for an extension
Extensi on users can usua ll y p l a ce t h ei r own cal ls . However, they
could ask you to place a call for them. Bef ore dialin g, you ma y want
to note the extension’s COR nu mber (se e C l a s s o f Restriction on
page 60). Check with your communications department for specific
instructions on how to handle such requests.
To place an outside call for an extension
1. Answer the call fr om th e ext en si on.
2. Dial the External Line Access Code ( ______ )
3. Dial the telephone number.
4. Press Release
to release the call fr om th e con sol e an d connect the ext en sion
to the outside line.
*.
* Use this space to record the digits you dial to access
an outside line.
Page 25

Options
Questions about Dialing Telephone Numbers
Other ways of dialing
You can use the following alternate ways of dialing a telephone
number:
Last Number Redial – instead of redialing the number of the last
outside call you placed, let the system do it for you by dialing the
Last Number Redial code ( ______ ).
System Speed Call – allows you to dial a telephone number by
entering a short access code. See System Speed Call on page 42.
Dial from Phone Book – useful when you don’t know the full
name of the person you are asked to find or you only know the
person’s location or department. See Phone Book on page 39.
Dial from the Scratch Pad – allows you to dial a telephone number
you typed on an electronic notepad. See Scratch Pad on page 40.
*
* Use this space to record the code you dial to use the Last Number
Redial feature.
Can I access a specific trunk?
Yes, you can select a specific trunk to dial out on.
• Dial the Individual Trunk Access Code ( ______ ).*
• Dial the trunk number. Trunk numbers can be 1 to 4
digits long.
• When you hear dial tone, continue dialing the
telephone number.
If you hear busy tone, the trunk is in use. You can,
• press [Override] to interrupt the call in an emergency
Or
• press Release or Cancel to release the console from
the trunk.
What do I do if I make a mistake while dialing?
If you notice the mistake before you complete dialing, press
Cancel, and then re-enter the number.
If you realize you transferred a call to the wrong extension,
press Recover to cancel the transfer and reconnect the
caller. You can only recover a call while it is still ringing at
the extension to which it was originally transferred.
* Use this space to record the digits you dial to access a specific
trunk.
Call Handling Basics ♦ 17
Page 26

Extending (Transferring) Calls
You can transfer a call to an extension or an outside number.
To transfer a call
1. Dial the destin ati on nu mb er .
The caller is automatically placed on Consultation Hold while
you complete the transfer.
2. Press Release to connect the caller to the ringing phone.
If the called part y fails to answer wit hin a time- o u t peri od,
the transferred call (if it is an outside line) returns to the
console as a Recall.
Reaching a Busy Number or an Extension
with Do Not Disturb Activated
If the dialed number is busy or the extension has Do Not Disturb
activated, do one of the following:
• Press [Source]
to talk with the caller in Source without losing the Destination
information. Tell the caller the requested number is busy and
ask if the caller wants to try again later or leave a voice mail
message for the busy party (see Options on the right). You
can also take a messa ge and se nd th e bu sy par ty a mes sa ge
waiting indication (see Message Waiting on page 36).
Or
• Press [Override]
to intrude into the extension user’s call (if permitted by
your and the extension’s Class of Service. See Override on
page 37.)
Or
• Press Release
to camp the caller on to the busy extension. (Camp-on is not
allowed if the extension has Do Not Disturb activated.) The
extension user hears two beeps to indicate a call is waiting.
When the user hangs up, the extension rings and the waiting
call is automati cally connect ed.
Notes: If there is no answer after a time-out period, the
transferred call (if it is an outside line) returns to the console
as a Recall.
Introducing the caller before completing the transfer
After your call is answered and you’ve had the chance to speak
with the person privately,
1. Press Release to complete the transfer.
Or
2. Press [Source]
to speak privately to the party in Source; the party in
Destination is on Consultation Hold. To speak privately to the
party in Destination again, press [Destination].
• Press Cancel and then dial a different number
if you think you can locate the requested party elsewhere.
Or
• Press [Source], and then [Redial Dest]
to redial the same destination number
Or
18 ♦ Call Handling Basics
Transferring a call to a voicemail box
The Voicemail key on the console keypad allows you to transfer
calls directly to an extension user’s mailbox. You can use the key
for transferring recalls only—that is, calls returned to the console
because the extension went unanswered.
Note: This feature requires an access code, which must be
entered into the console using the Options command on the
Tools menu. For more information, see page 35.
Page 27

Transferring a call to an outside number
You can request a meter pulse count for the call from the
telephone company operator. Upon completion of the call, the
console will ring. When you answer, the meter pulse count will
display on the console screen . A sk your commu n ic at ion s
department for further information about this feature.
Questions about Transferring Calls
What do I do if the destination to which I am
transferring a call is not answering?
• Press [Source] to reconnect the Source call and retain
the Destination information. This gives you more options
to handle the call because softkeys, such as [Redial
Dest], remain on screen.
Or
• Dial a different number if you think you can locate the
requested party elsewhere.
Or
• Press Cancel to reconnect to the Source call but clear
the Destination information.
Do I need to press Release when answering several
calls in a row?
No. If you use the Answer key to answer calls, pressing the
key will transfer the current call to the dialed destination
and connect you to the next call waiting. This only works if
you have calls in both the Source and Destination areas.
What should I do if a caller wants to speak
to one person, and then another?
If an outside party wants to speak with several people in a
row, use the Serial Call feature (see page 40). When the
outside party completes the first call, you receive a Recall
and can then dial the next person’s number.
Can I transfer a call to another console?
Yes, by dialing t he extension number of the other co n s ole.
You can transfer calls to other consoles but you cannot put
another attendant on hold.
Call Handling Basics ♦ 19
Page 28

Holding and Retrieving Calls
You can place up to six callers on hold while you check for
information or page the person that the caller is requesting.
To place a call on hold
• Press Hold.
Information about the call appears in the Calls On Hold area.
To retrieve a call on hold
You can retrieve a call on hold only when the Source and/or
Destination area on the screen is clear.
• Press Retrieve, and then dial the position number of the call
(1-6) you want to retrieve.
Or
• Press Retrieve and then the star key (
retrieve the longest-held call.
Hold Recall
If a call is left on hold longer than the time-out period, it recalls
the console. The console beeps (or rings if you are not engaged in
a call) and a Call Waiting icon (
) appears in the Calls On Hold
) on the keypad to
*
area next to the call that is recalling. Answer the recall using the
procedure for retrieving a call on hold.
Options
To connect a call on hold to the Source or Destination party
1. Press Retrieve.
2. Dial the position number of the call (1-6) you want to retrieve.
3. Press [Source] or [Destination] if you want to speak privately
to either party.
4. Press Release to connect the parties and release the console
from the call.
To connect two calls on hold
Be sure the Source and Destination areas are both clear.
1. Press Retrieve, and then dial the position number of the first
call on hold.
Information about the call appears in the Source area.
2. Press Retrieve and dial the position number of the second
call on hold.
Information about th e second call appe ars in the D estinati on area .
3. Press Release to connect the parties and release the console
from the call.
Questions about Hold and Retrieve
Can I place a conference on hold?
Yes. If you can’t find a person needed for the conference,
you can place the conference on hold until you locate the
person. For more information, see page 21.
What does in the Calls On Hold area signify?
It signifies that the call was the last one placed on Hold.
20 ♦ Call Handling Basics
Page 29

Conference Calls
Up to eight parties (including yourself) may be connected to form
a conference call.
To set up a conference call
Options
Placing a Conference on Hold
If you c an’t find someone n eeded for the con ference, you can place the
conference on hold until you are able to locate th e person.
• With the two parties connected to the console—one in the
Source area and the other i n the Destination area—press
[Conference].
To split a conference to speak privately to either caller
• Press either [Source] or [Destination].
To add more parties to a conference
1. Dial the number of the next party.
The word “Conference” and a Conference number now appear
in the Source area, and the number of the dialed party
appears in the Destination area.
2. Press [Conference].
The new party is added to the confer ence. The parties alr eady in
the conference hear a bri ef tone each time a party i s added.
If the line is busy or unanswered or the person is
unavailable,
• Press Cancel.
to reconnect to the conference. You may continue dialing to
add more parties to the conference.
To place a conference on hold
• Press Hold.
The conference is on hold. The parties in the conference can
speak to each other—only you are removed from the call.
Check on the conference periodically, because the parties in
the conference cannot get in tou ch wi th you .
To retrieve a held conference
You can retrieve a conference only when the Source and/or
Destination area on your screen is clear.
1. Press Retrieve.
2. Dial the hold number of the held conference.
To release the console from the conference
• Press Release.
Once you release the conference, you cannot re-enter it.
Call Handling Basics ♦ 21
Page 30

Answering Recalls
If an external call transferred from the console to an extension is
not answered within a certain time, the call returns to the
console as a recall. The call waiting icon (
[Recall] softkey. Because Recalls are given priority, they will be
answered first when you press Answer. You can also use the
[Recall] softkey to answer recalls.
To answer a Recall
The Source and Destination areas must both be clear.
1. Press [Recall].
Or
2. Press Answer.
You are now connected and may ask if the caller wants to
continue waiting or wants you to ring another extension.
3. Depending on what the caller wants, you have several options
at this point:
• Press [Redial Dest] if the caller wants to continue
waiting.
• Dial another extension.
• Press Release to disconnect the call.
) appears above the
Recovering the Last Released Call
Use the Recover key on the console keypad to retrieve a call that
you transferred to the wrong extension. To successfully recover
the call, you must press Recover while the extension is still
ringing. Also, you cannot have started another action, such as
dialing or answering a call, following the transfer.
To retrieve the last call transferred from the console
• Press Recover.
Note: This feature requires an access code, which must be
entered into the console using the Options command on the
Tools menu. For more information, see page 35.
• Press Voicemail to transfer the caller to the extension’s
voicemai l box.
Note: Serial calls will also recall the console. See Serial Call on
page 40.
22 ♦ Call Handling Basics
Page 31

Advanced Features
Page 32

Page 33

Advanced Features
Contents
Account Codes................................................................................................................27
Bulletin Board.................................................................................................................27
Call Answer Priority.........................................................................................................28
Call Park.........................................................................................................................29
Call Waiting Threshold....................................................................................................30
Cancel Call Forwarding...................................................................................................30
Clear All Features............................................................................................................30
Data Calls.......................................................................................................................31
Day and Night Service.....................................................................................................32
Do Not Disturb (Extensions)............................................................................................33
Emergency Calls .............................................................................................................34
Feature Access Codes (Programming)...............................................................................35
Firmkey Programming.....................................................................................................35
Message Waiting .............................................................................................................36
Override..........................................................................................................................37
Operator Absent/Present Status......................................................................................38
Paging .............................................................................................................................38
Phone Book.....................................................................................................................39
Scratch Pad.....................................................................................................................40
Serial Call.......................................................................................................................40
Trunk Group Status Display............................................................................................41
System Speed Call...........................................................................................................42
Tone Signaling ................................................................................................................42
Advanced Features ♦ 25
Page 34

26
Page 35

Account Codes
An Account Code is a type of password for the system. You may
need to enter an account code to access certain features or to
record a call on the SMDR log for billing or accounting purposes.
To enter an Account Code
1. Dial the Verified or Non-Verified Account Access Code.
A Verified code provides access to features; a Non-Verified
Code records calls on the SMDR log.
2. Dial the Account Code, ending in #.
If you make a mistake, p res s Cancel and try again.
3. Continue dialing.
For more information about Account Codes, contact your
communications department.
Bulletin Board
The Bulletin Board is shared by all 5550 IP Consoles on the
system. Use it to post information that you want other attendants
to see and to store speed dial numbers that all attendants can
access.
To post information on the Bulletin Board
1. Press Bulletin Board.
2. Press [Edit].
Only one person at a time can edit the Bulletin Board; if
someone else is editing it, the Bulletin Board background will
remain gray after you press [Edit].
3. Type the information you want to post.
4. Press [Save].
To view the most recent changes to the Bulletin Board, press
[Refresh].
To dial a telephone number posted on the Bulletin Board
1. Select the telephone number using the mouse or the
computer keyboard.
2. Press [Call] or double-click the selected number.
Note: Information posted on the Bulletin Board is stored in a file
on your network. The actual location of the file is determined
during installation of the console. If the file is moved, enter the
new location, using the Options command on the Tools menu
.
Advanced Features ♦ 27
Page 36

Call Answering Priority
The con so le is usually s et up to answ er inc o mi n g cal l s on a ‘first-
come, fir st - served’ basis. When you pr e s s t h e An swer key with
multiple calls wait in g, th e call t hat ha s bee n w aiti ng lo nge st wil l b e
answer ed f i rst. Alter nativel y , y ou can as si gn pr i or it i es t o c all s b a se d
on their d estinatio n . F or ex am p l e, you might g iv e h i g her pr i or it y to
calls to you r compan y’s main li sted dir ectory nu mber (LD N) t h an t o
“Dial 0” calls (i.e., internal ca lls to th e console). You r
communi cat ions depar t me n t w il l t ell y ou w h ic h type of call it pre f er s
you to an swer fir st.
Note: The Answer key has a hierarchy when the console is set up
to answer calls on a first-come, first-served basis: recalls are
answered fir st, foll owed by other cal ls in ord er of arr iva l. If more
than one call is waiting at a particular softkey, they will be
answered on a “first-come, first-served” basis.
To specify which call s ar e ans we r ed fir st
1. Choose Options on the Tools menu.
2. Click Answer Priority.
3. Do one of the following:
• To answer calls on a first-come, first-served basis, select
First-Come, First-Served.
• To prioritize calls by line, select Assigned line priorities
and then enter a number from 1 to 7 for each line. The
lower the number the higher the priority.
4. Click Apply or OK.
28 ♦ Advanced Features
Page 37

Call Park
Provided the appropriate access code is programmed into the
system, this feature allows an extension user to retrieve a call
that you put on hold, by dialing the Call Park - Remote Retrieve
access code, followed by the console identity number and the
hold position number displayed on your screen.
When the called party retrieves the call, the call is removed
from the hold position on your screen.
Up to six calls can be parked at the conso le at an y one ti me.
Questions about Call Park
To park a call for retrieval by an extension user
1. Put a call on hold (see Holding and Retrieving Calls
on page 20).
The screen displays the call in the first available Hold
position—for example,
2. Page the requested party, informing him or her of the hold
position number.
In the example above, assuming that the caller on Trunk 25
(hold position 2) wants to talk to Mr. Smith, and that the Call
Park - Remote Retrieve Code is 69, you could page Mr. Smith
in the following manner: “Mr. Smith, please dial 69 152.”
The called party can then retrieve the call by dialing the Call
Park - Remote Retrieve access code (69 in the example),
followed by the two-digit console identity number (15 in the
example), and the hold position number (2 in the example).
What happens if the called party does not retrieve
the call?
After a predetermined period of time, the call will
automatically recall your console.
What happens if I change the status of the console to
“Operator Absent” while I have parked calls?
The parked call will remain in the attendant hold position for
the same predetermined period of time. This allows system
users to retrieve calls parked at a console whose attendant
just left. After the predetermined period of time, all parked
calls (external and internal) are automatically routed to a
programmed answering point.
Advanced Features ♦ 29
Page 38

Call Waiting Threshold
To reduce call-waiting times, your system may be programmed to
present incoming calls to other consoles or answering positions.
If your system is programmed this way, you can specify the
number of calls that must be waiting before the system presents
them to your console.
Clear A ll Features
From your console you can disable features activated on any
extension in the system.
These are the feat ur e s you can cl ear :
• All Call Forwarding
To set the call waiting threshold
1. Choose Options on the Tools menu.
2. Click Miscellaneous.
3. Enter a number in the Call Waiting Threshold box.
Cancel Call Forwarding
Call Forwarding lets an extension user route some or all calls to
other extensions. You can cancel Call Forwarding on behalf of
individual extension users, or for all extensions in the system.
To cancel all types of Call Forwarding for a single extension
1. Select Cancel All CFWD on the Program menu.
2. Enter the extension number using the computer keyboard.
3. Click Yes.
To cancel Call Forward - Follow Me for a single extension
You can cancel Call Forwar d - Follow Me on an e xtensio n and leave
the other types of C al l Forwar d (B u s y a n d No Answ er ) alone.
1. Select Cancel Station CFF M on the Program menu.
2. Enter the extension number using the computer keyboard.
3. Click Yes.
• Do Not Disturb
• Callbacks to other users
• Advisory Messages
• Auto-answer
• Timed Reminder
To cancel all features on an extension
1. Select Cancel Station Fe atur es on the Program menu.
2. Enter the extension number using the computer keyboard.
3. Click Yes.
Questions about Clear All Features
Will using Clear All Features on an extension have any
effect on Messages or Callbacks set on that extension by
other users?
No, it only affects features activated by the extension user.
Any Message notifications or Callbacks set on the extension
by others will still be in place. Similarly, Clear All Features
will have no effect on the station user’s Account Codes or
Class of Service.
To cancel all Call Forwarding for all extension users
1. Select Cancel All CFWD on the Program menu.
2. Click Yes.
3. Click Yes again to confirm the cancellation.
30 ♦ Advanced Features
Page 39

Data Calls
You may be asked to connect an outside caller to a data
connection for data communications.
To set up an Associated Data Line Call to a remote facility
1. Dial the Data Access Code.
If you hear silen ce, con tin u e.
To connect a caller to a modem
1. Advise caller to switch local modem to “Data” when they hear
the high-pitched modem tone.
2. Dial the modem number.
‘Modem Call’ appears in status area.
3. Dial the destination data terminal number.
‘Ringing’, and then ‘Connected’ appear in the Destination area
to confirm that you are connected.
4. Listen for the high-pitched modem tone.
5. Press Release
to connect the caller to the modem.
If the number is busy or there is no answer, press Cancel to
return to the caller in the Source area.
To set up a local Associated Data Linecall
1. Dial the Associated Data Line code.
If you hear silen ce, con tin u e.
If you hear busy tone, the Associated Data Line is in use, or
is not ready.
2. Dial the destination data terminal number.
2. Dial the modem hunt group number.
‘Modem Call’ appears in status area.
3. Dial the remote data facility number.
‘Seized’, and then ‘Connected’ appear in Destination.
4. Listen for Connect Tone.
5. Press Release.
Note: For faster dialing using Phone Book, ask your
communications department to add frequently dialed data
numbers to the system directory.
‘Ringing’, then ‘Connected’ appear in Destination. Listen for
Connect Tone.
3. Press Release.
Your data line is connected.
Advanced Features ♦ 31
Page 40

Day and Night Service
Office telephone systems are typically placed in Night Service
after regular hours, or whenever the last available console is left
unattended.
Calls then ring al ter n at e answering points—either designated
extensions, or a night bell.
Extension users can dial the Trunk Answer From Any Station
(TAFAS) Code to answer incoming calls ringing the night bell.
If the last available attendant console has not processed a ca ll
after a programmable time-out period, the system is
automatically placed in Night Service 1.
To change the service mode
Questions about Day and Night Service
What services are affected by Day or Night Service?
The change from Day to Night service may effect some users
depending on their COS and COR. For example, a user might
have a COR that allows external calls when the system is in
Day service but not when in it is in Night service.
• Select the appropriate mode from the
Console Status area.
Note: Contact your communications department for information
about where the answer points are and when you should select
the different services.
list in the
32 ♦ Advanced Features
Page 41

Do Not Disturb (Extensions)
Extension users usually set and cancel Do Not Disturb (DND) on
their own phones but you may be asked to do it for them. When
set, DND prevents calls from ringing the extension.
To set up Do Not Disturb on behalf of an extension user
1. Select Set Station DND on the Program menu.
2. Enter the extension number using the computer keyboard.
3. Click Yes.
To cancel Do Not Disturb on behalf of an extension user
1. Select Cancel Station DND on the Program menu.
2. Enter the extension number using the computer keyboard.
3. Click Yes.
To cancel Do Not Disturb for all extensions
1. Select Cancel All DND on the Program menu.
2. Click Yes.
3. Click Yes again to confirm the cancellation.
Questions about Do Not Disturb
Why would an extension user want to use
Do Not Disturb?
Do Not Disturb prevents most calls from ringing the
extension. Only recalls, overrides, and special trunks dialing
in directly to the extension will ring it. If extension users
want protection from tone intrusion (for instance, during a
data call) they should use Call Privacy instead.
What kind of tones does another extension user or
attendant get when calling an extension that has
Do Not Disturb set?
They hear slow busy signal. Anyone who is permitted to
override the ot her ext en s ion ma y the n do so .
Advanced Features ♦ 33
Page 42

Emergency Calls
This feature raises an alarm at the console when an extension
user places an emergency call and identifies the extension that
placed the call. With this information, you can direct emergency
services (for example, police or ambulance personnel) to the
location from which the call was placed.
When an emerge nc y call alar m is ra is ed, the console rings an d
displays EMERGENCY CALL. The emer gen c y cal l go es d ir e ctly to
emergency services; therefore, the attendant does not have an
opportunity to verbal ly communicate with the person who
initiated the emergency call.
To read an Emergency Call
2. Click Clear to ac kn owledge the call . EMERGENCY CALL
disappears when the last outstanding emergency call has
been cleared.
Note: Only one person can view the emergency call at a time.
To delete an Emergency Call
1. In the Emergency Call Log, select the cleared emergency call
you wish to delete.
2. Click Delete.
Note: Only cleared logs can be deleted. The 3300 ICP will retain
all Emergency Call Logs.
1. Click
- orClick Tools, and then click Emergency Call Log.
The Emergency Call Log window displays:
If emergency calls were previously cleared, they will appear in the
Emergency Call Log, with t he most recent cal l listed fir st.
on the toolbar.
To close the Emergency Cal l Log
• Click Quit.
Note: Once you exit the 5550 IP Console, all logs are discarded
from the Emergency Call Log; however, the logs can be retrieved
through the 3300 ICP.
34 ♦ Advanced Features
Page 43

Questions about Emergency Calls
What does the icon on the toolbar mean?
It is the Emergency Call Log icon. To view the calls listed in
the Emergency Call Log, click the icon once.
What does the icon in the Emergency Call Log mean?
Emergency cal l s app ear in th e Emergency Call Log, with the
most recent call listed first. A current emergency call is
marked with the icon, while previous emergency calls are
not marked with the icon; therefore, only emergency calls
marked with the icon can be cleared.
Sometimes I cannot view the current emergency call
details — why?
Only one pers on can vi ew t he cu r ren t em er g en c y call d et ai l s
at a time. Other attendants receive "Emergency Call
Displayed by <extension>" in the response area at the bottom
of their application. If another attendant is viewing the
current emergency call details, you can still access locally
cleared emergency call information, but you cannot access or
clear the curr en t ca l l.
Sometimes the Emergency Call Log disappears — why?
If you do not click Clear approximately 60 se con ds aft er
receiving the emergency call, the log reverts to Phone Book
so another attendant can view the current emergency call
details.
If another attendant doesn’t ack now l edg e th e emergency cal l,
click the icon again to open the Emergency Call Log.
Feature A ccess Codes
To use the Recover and Voicemail keys on the console keypad,
your console must be programmed with the correct access codes.
To program the Recover and Voicemail access codes
1. Choose Options on the Tools menu.
2. Click Miscellaneous.
3. Type the access codes in the appropriate boxes.
4. Click Apply or OK.
Firmkey Programming
You can reprogram the top two rows of keys on the console
keypad with other features or remove a feature from a key if the
feature is unavailable.
To program features to keys
1. Choose Options on the Tools menu.
2. Click Keypad.
3. Using the right mouse button, click on the key that you want
to program.
A list of features appears.
4. Select the feature you want to assign to the key.
5. Repeat steps 3 and 4 to program other keys.
6. Click Apply or OK.
To restore the original key programming
• Click Restore Defaults.
Advanced Features ♦ 35
Page 44

Message Waiting
You can set (activate) a message waiting indicator on an
extension, to notify the user that you have a message for him or
her. You can also check whether an extension has a message
waiting and clear the message waiting indication.
If a dialed extension is busy, unanswered or has
activated Do Not Disturb
1. Press [Source] and take the message.
2. Press Message.
To check whether an extension has a message waiting
1. Press Message.
2. Press [Ch eck MSG Waiting].
3. Dial extension number.
The words ‘MSG Waiting ON’ appear in the Destination area if
the extension has a message waiting.
3. Press [Set MSG Waiting].
4. You can then,
• press Cancel to return to the call in Source (if necessary),
and then
• press Release to release the call in Source.
To set message waiting if you are not currently connected
or trying to connect with an extension
1. Press Message.
2. Press [Set MSG Waiting].
3. Dial extension number.
To cancel a Message W aiting indication
You can cancel a message waiting indication whether you are
connected to the extension or not.
1. Press Message.
2. Press [Clear MSG Waiting].
3. Dial the extension number (if not connected to the extension).
Questions About Message Waiting
How do extension users know there is a message
waiting for them?
The indication depends on the type of telephone. A user with
a standard telephone hears Message Waiting Tone upon
lifting the handset. (If the user’s phone has a message lamp,
the light flashes). The LCD dis play on phones so equipped,
shows a message waiting indication in addition to the tone.
When should I cancel Message Waiting notifications?
You can do it whenever it is convenient for you; however, it
saves time and effort to do so at the same time as you deliver
the message to the extension user.
While you are delivering the message to the extension,
1. Press Message.
2. Press [Clear MSG Waiting].
3. Press Release when you finish the call.
36 ♦ Advanced Features
Page 45

Operator Absent/Pres ent St atus
You can change the Operator status to Absent when you plan to
be away from your desk and do not want calls sent to your
console. All new and waiting calls will ring another destination
determined by system programming.
Override
You can interrupt a busy extension or intrude on a busy
outside line.
To intrude on a busy extension
To change the Operator Present/Absent status
• Select the state you want from the list in the Console
Status area.
If you are the only Attendant on the system and you attempt to
change the console status to Absent, a warning message will
appear on your screen: ‘Absent Feature Disallowed for Last
Attendant. Select Night Service.’ For more information about
Night Servi ce, s ee pag e 32 .
Note: Unplugging the handset or headset will automatically
change the Attendant Status to Absent. See Unplugging Handset
or Headset on page 10 for more information.
Questions about Operator Absent/Present Status
What happens to my calls when I activate
Operator Absent?
All new and waiting calls to your console are automatically
rerouted to programmed destinations. Calls that you may
have put on hold will time-out and either be given reorder
tone or redirected to the programmed destination. However,
you can still ori ginate calls.
Note: If a console has not processed a call after a programmable time-out period, the console status automatically
changes to Operator Absent.
1. Press [Override].
All parties in the conversation hear Override Tone (a brief
tone every six seconds) for as long as you are connected to
the call.
Everything you say is overheard by all connected parties.
The message ‘Feature not allowed’ appears if your Class of
Service do es not allow you to ov er r ide th e extension.
2. After the override, you may,
• press Release to disconnect the console from the call.
Or
• press Cancel to reconnect to the call in Source and
disconnect from the call in Destination.
To intrude on a busy trunk (outside line)
1. Dial Individual Trunk Access Code.
2. Dial trunk number.
For a list of trunk numbers, use the Trunk Group Status
Display feature described on page 41.
3. Press [Override].
The callers hear Override Tone as long as you are connected
to the call. When they hang up, the line is available for
your use.
Advanced Features ♦ 37
Page 46

Paging
If your system has paging equipment, you can use it to make
announcements to one or more areas or “zones.”
Use the Paging Zones table in the Reference section to record the
location of the paging zones.
To make a page
The Source and Destination areas of your screen must be clear.
1. Press Pager.
If you have only one paging zone, you will be immediately
connected to the pager.
2. Make your announcement.
If you have more than one paging zone
• After pressing Pager, dial the 2-digit Paging Zone Code—(01-
15) or 00 for all zones.
Listen for a long beep. Once you are connected to the paging
circuit, one of these messages appears on your screen:
‘Page Zone Busy’ — someone else is accessing the paging
equipment. Try again later, or press [Override] (if this is
allowed in either your or the paging unit’s Class of Service) to
interrupt the page in progress.
‘Page Zone Unassigned’ — you do not have access to that
paging zone.
‘Connected to Pager’ — you are conne cted an d can mak e your
announcement.
To end a page
• Press Cancel or Release.
You are disconnected from the paging equipment.
38 ♦ Advanced Features
Page 47

Phone Book
Use the Phone Book to search your system’s telephone directory
for people and extensions. You can search by entering a person’s
name, an extension number, a department, or a location.
Searching by department is useful when a caller requests to
speak to “someone in Sales” rather than a specific person. A
location could be a conference room, the lobby of your building,
or other place that has a phone. You can also make a call from
the Phone Book.
To access your system directory
You can access the directory at any time.
1. Press Phone Book.
3. Press [Search] or ENTER.
Entries that match what you typed appear in the
Phone Book area.
4. Use the mouse or the arrow keys or the PageUp/PageDown
keys on the keyboard to scroll through the list until you find
the desired entry.
5. Press [Call] or ENTER to call the selected entry. You can also
double-cl ick the entry to call it .
2. Type the person’s name or other information in the
appropriate boxes. (Use the mouse or the Tab key to move
between boxes.)
Press Backspace to era se i nc or r ect k e ystrokes.
6. To begin a new search, press [N ew Sear c h].
Questions about Phone Book
What does the icon mean?
When it appears next to an extension, it means that the
extension is designated as private. Attendants see the
number of the extension on their screens; other extension
users see only the user’s name (if available) on their display.
In the Sourc e and Desti nation areas, a pr ivate extension app ears
with a ‘p’ before the extension number—for example, p203 0.
Advanced Features ♦ 39
Page 48

Scratch Pad
The Scratch Pad is your own personal phone directory and Speed
Dial list. Use it to save telephone numbers for faster dialing or to
store the names and numbers of callers for future reference.
To delete information in the Scratch Pad
• Select the information using the mouse or the arrow keys,
and then press Delete.
To dial a telephone number in the Scratch Pad
• Select the number you want to dial, and then press [Call].
Serial Call
If a caller wants to talk to several people in a row, use the Serial
Call feature. When the first call ends, the caller returns to the
console instead of being disconnected. You can then dial the next
call. The serial call keeps returning to the console until all the
intended calls have been made.
To set up a serial call for a caller in the Source or
Destination area:
1. Tell the caller to remain on the line after completing each call.
2. Press [Set Serial Call].
3. Dial an extension number.
4. Press Release.
To enter information into the Scratch Pad
You can use the Scratch Pad while connected to a caller.
1. Press Scratch Pad.
2. Type a name, a telephone or extension number, and any
other information you want to save.
Include the Outside Line Access Code for external phone
numbers and omit spaces between digits.
3. Press [Save] to save the information.
40 ♦ Advanced Features
The console is released from the call. When the extension you
dialed hangs up, the Serial Call returns to the console as a
Recall (see Recall on page 22).
To cancel a Serial Call
• When the caller has finished the series of calls, press
[Cancel Serial].
If the serial call recalls and no one is there, it means the
caller has hung up.
Page 49

Trunk Group Status Display
Trunk Group Status Display is an optional feature that lets you
monitor traffic on the system. During peak traffic periods, some
users could experience problems making external calls and may
contact you to find out why. The Trunk Group Status Display
feature enables you to confirm excessive traffic as the most likely
cause. You can then tell users that the situation is temporary
and suggest that they try making their calls later.
You can display traf fic informat ion by specifyi ng trunk gr oup numbers or
the digits dialed t o access them—for example, the digit 9.
To display only the information on the trunks that are
accessed by dialing a given leading digit string
1. Press Trunk Status.
2. Select Search by dialed digit s.
3. Enter the leading digit string—for example, area code “416.”
4. Press [Search].
Options
The use of this feature does not disrupt call processing.
To display traffic information by trunk group number
1. Press Trunk Stat us.
2. Select Search by group number.
3. Enter the starting trunk group number, and then
press [Search].
The displays shows a list of the trunk groups, the number of
trunks in each group, and the number of those trunks
currently in use—for example,
After displaying traffic information you can...
• Click [Print] to print status information for the displayed
trunk groups only.
• Click [Print All] to print status information for all trunks
groups, including those not displayed.
The Timestamp shows the time of your last search.
Advanced Features ♦ 41
Page 50

System Speed Call
Frequently dialed telephone numbers may be saved for you and
other extension users for speed dialing. Use the table provided in
the Reference section to record the System Speed Call numbers
you will most likely need.
• Dial the System Speed Call Number
The stored telephone number is dialed automatically.
Notes:
• If you find that you are fre qu e nt ly dialing the same nu mb er s,
add them to your personal Speed Call list in the Scratch Pad.
For more information, see page 40. You can also use the
Bulletin Board to store speed call numbers for use by all
attendants. For more information, see page 27.
• Programmin g sy st em spe ed call nu mb ers i s don e by you r
communications department and cannot be done from the
console.
Tone Signaling
You may have noticed that when you dial a number at your
console, you don’t hear any of the tones or pulses normally
associated with telephones. This is because your console
‘communicates’ with the rest of your telephone system with
different types of signals. However, there are times when you
need to send tones in order to complete your call. Typically,
special services such as voicemail require passwords or other
information in the form of tones before allowing access.
To generate tones
Once the connection is made and you are prompted to enter
digits:
1. Press Tones.
The Tones indicator in the Console St atus area appears
dimmed when tone signaling is turned off.
2. Dial the code.
To turn off tone signaling
• Press Release
to disconnect your console from the call. Tone signaling stops
automatically.
42 ♦ Advanced Features
Or
• Press Tones ag ain
to turn off the tones.
Page 51

Hotel/Motel Features
Page 52

Page 53

Hotel/Motel Features
Contents
Displaying and Changing Room Information....................................................................46
Searching for Rooms .......................................................................................................47
Changing Room Occupancy and Condition Status...........................................................48
Checking-In/Checking-Out.............................................................................................48
Setting/Canceling Wake-up Calls....................................................................................48
Setting Room Call Restrictions.........................................................................................49
Blocking Room-to-Room Calls .........................................................................................50
Monitoring Guest Rooms.................................................................................................50
Displaying/Clearing a Message Register ..........................................................................51
Printing Reports..............................................................................................................51
Hotel/Motel Features ♦ 45
Page 54

Displaying and Changing Room
Information
Room information includes guest name, room occupancy and
condition status (Vacant, Clean, Out of Service, etc.), outgoing
call charges and restrictions, and the status of message waiting,
wake-up call, and other guest services.
message waiting and a wake-up call for 7:30 AM. The room is
occupied and clean and is unaffected by Call Blocking.
NOTE: The information displayed is different depending on
whether the console is connected to a room or a suite — see,
About Suite Services below for details.
3. Make the required changes (if any), and then press [Save] to
save them.
To display, enter, or change room information
You can display, change, or enter new room information while
the console is idle, or when you are on a call to the room.
1. Press Guest Service, or if you are already on a call to the
room, press th e [Guest Service] softkey.
2. Enter the room extension using the computer keyboard (not
necessary if you are alre ady on a call to the room ). Th e
display shows, for example:
About Suite Services
Suite Services provides optional Shared Telephone Service
(STS) to all phones in interconnected hotel/motel rooms or
suites. When ST S is oper at in g for a particular suit e, call s to
the suite ring all phones. Wake-up calls, Message Waiting, Do
Not Disturb and Call Blocking also apply the same to all
phones. When operating without STS, each phone acts
independently allowing, for example, guests in a two-bedroom
suite to set sep ar at e wake-up call s.
How can you tell whether the console is connected to a room
or a suite and whether STS is operating?
When connected to a suite with STS operating, the Telephone
section of the Guest Services screen will show the number
and name of the calling or answering extension as follows:
The upper part of the Guest Services screen will show the
primary suit e nu mber —that is, the number used to call the
suite and for che ck- in and check-out.
If STS is not operating, the Number box in the Telephone
section is activated, allowing you to select a phone and set up
a wake-up call for it.
In this example, John Smith from Mitel Corp is checked into
room 1026, allowed to make long distance calls, has a
46 ♦ Hotel/Motel Features
Page 55

Options
After displaying the room information, you can...
• Enter or change the name of the guest and the company or
group he or she is affiliated with. The guest’s name can h av e
a maximum of 20 characters.
Searching for Rooms
You can search for a room using the occupancy and condition
states as search parameters. This enables you to find, for
example, all rooms that are vacant and clean or that have maids
in them. You can also search using a guest’s last name to
determine which room they are in.
• Check the guest in or out (see page 48).
• Change the room’s occupancy or condition status (see
page 48).
• Enter, change, or clear the wake-up call time (see page 48).
• Set or change outgoing call restrictions (see page 49).
• Allow or block room-to-room calling (see page 50).
• Clear the Message Cost and information for calls placed from
the room (see page 51).
Note: Guest Services shows only whether Do No t Disturb (DND)
or Message Waiting (MW) are on or off. For information on
changing the status of these features, see pages 33 and 36.
To search for rooms
1. Press Guest Service.
2. Do one of the following:
• To display information for a specific room, use the
computer keyboard to type the room number in the Room
Number box.
• To find rooms by occupancy and condition status, click
Room Status, and then select states from the Occupancy
and Condition lists.
To begin searching from a particular room, type the
number of the room in the Starting at room box.
• To find a guest’s room, click Last Name of Guest, and
then type the guest’s last name.
3. Press [Search].
The screen shows, for example,
Hotel/Motel Features ♦ 47
Page 56

4. To view information for a room in the list, click to select it
and then press [Select]. Use the arrow keys or the Page Up
and Page Down keys to scroll through the rooms.
If a printer is attached to the console, you can print the
occupancy and condition status for all rooms in the hotel or
motel. For more information, see Printing Reports on page 51.
Checking-In/Checking-Out
Checking in a guest changes the status of a room to Occupied;
checking out changes the room to Vacant. Both check-in and
check-out clear the guest name, affiliation and wake-up time (if
set). The Call Block and Call Restriction settings for the room are
also reset to values specified by system programming.
Changing Room Occupancy and
Condition Status
The room occup anc y and cond i tion stat e s are as foll ow s:
Occupancy Condition
Vacant
Occupied
Reserved
Note: The Maid status can also be changed
from the room by dialing a code.
To change a room’s occupancy and condition status
1. Press Guest Service, or if you are already on a call to the
room, press th e [Guest Service] softkey.
2. Enter the room extension using the computer keyboard (not
necessary if you are alre ady on a call to the room ).
3. Press [Search].
Clean
Not Clean
Maid Present (s ee n ote)
To Be Inspected
Out of Service
To check in or check out a guest
1. Press Guest Service, or if you are already on a call to the
room, press th e [Guest Service] softkey.
2. Enter the room extension using the computer keyboard (not
necessary if you are alre ady on a call to the room ).
3. Press [Check-In] or [Check-Out].
4. Press [Save] to save the changes.
To cancel changes you made and return to the previous
screen, pre ss [Previous].
Setting and Clearing Wake-up Calls
Both you and the guest can set, change, and cancel wake-up
calls for a guestroom. The system does not distinguish whether a
wake-up call is set, changed, or canceled from the console or
guestroom telephone. So, for example, a guest can cancel a wakeup call that you set and vice-versa.
Wake-up calls can be set to occur up to three times a day with or
without daily repetition. For each wake-up, you can specify
whether the call is made by the system (an Automatic wake-up) or
the attendant or other hotel employee (a Personal wake-up).
4. Select the desired states f rom the Occupancy and Condition lists.
5. Press [Save] to save the changes.
Note: Depending on sy st e m pro gra m min g , all ‘occupied and
clean’ rooms may automatically change to ‘occupied and not
clean’ at a specified time each day.
48 ♦ Hotel/Motel Features
Page 57

To set, change, or cancel a wake-u p time while viewing the
guestroom’s information
1. For each wake-up call that you want to set up, specify the
frequency (once or daily) and method (automatically by the
system or personally by a hotel employee) of delivery.
2. Click in the Wake-up box, and then type the hour and
minutes in 24-hour format. You must enter four digits—for
example 0630 for 6:30 AM (or 1830 for 6:30 PM)
To cancel a wake-up call, delete the time from the Wake-up
box.
3. Press [Save] to save the changes.
To set, change, or cancel a wake-up time when NOT viewing
the guest room’s information
1. Press Guest Service.
2. Enter the room number using the computer keyboard.
3. Follow steps 1 and 2 from the previous procedure.
Notes:
• If the guest fails to answer the wake-up call, the system will
ring the room up to four more times at intervals of two to
seven minutes. If the guest still does not answer, the wakeup call could be routed to the console.
• Some display phones can set their own timed reminder. The
above procedures will also clear or change a reminder already
set by the user.
Setting Call Restrictions
You can control the type of telephone calls that guests can place
from the phones in their rooms. There are three levels of call
restriction: Internal, Local, and Long Distance.
The system provides three more levels (labeled Option 1, 2, and
3) that can be used to impose special call restrictions. Ask your
communications department for instructions about the use of
these restrictions.
To set or remove call restrictions for a room
1. Press Guest Service, or if you are already on a call to the
room, press th e [Guest Service] softkey.
2. Enter the room extension using the computer keyboard (not
necessary if you are alre ady on a call to the room ).
3. Press [Search].
4. In the Call Restriction list, select one of the following:
• Internal to allow internal calls only.
• Local to allow internal and local calls.
• Long Distance to allow internal, local, and long distance
calls.
• Option 1, Option 2, Option 3 to impose special call
restrictions determined by system programming.
Your system may be programmed to automatically change
Note:
call restrictions for rooms at check-in and check-out time.
• If a printer is attached to the console, a report may print each
time you set, chang e, or canc el a wak e- up call .
Hotel/Motel Features ♦ 49
Page 58

Blocking Room-to-Room Calls
Call Blocking stops guests from placing calls to other rooms. You
can control when Clock Blocking takes effect and the rooms
affected by it.
To control whether Call Blocking affects a room
1. Press Guest Service, or if you are already on a call to the
room, press th e [Guest Service] softkey.
2. Enter the room extension using the computer keyboard (not
necessary if you are alre ady on a call to the room ).
3. Press [Search].
Monitoring Guest Rooms
Guests can use their room phone as a listening device to monitor
their room from a remote station. The remote station can be an
attendant console, an extension, or an outside phone calling into
the system on a special line (i.e., a DISA trunk).
To use the console to listen in on a room that has room
monitoring activated
You can only monitor a room from an idle console.
1. Select Guest Services on the Tools menu.
2. Select Room Monitor.
4. In the Call Block list, select the option you want.
5. Press [Save].
To turn Call Blocking on or off for the entire system
1. Select Guest Services on the Tools menu.
2. Select Toggle Call Block.
The Call Block indicator in the Console Status area appears
dimmed when Call Blocking is turned off.
Note: Your system may be programmed to turn Call Blocking on
and off for all affected rooms at certain times of the day and for
individual rooms at check-in/check-out time.
3. Dial the room number using the console keypad.
4. Listen for three short beeps followed by audio from the room.
If room monitoring is not activated on the room phone, you
will hear reorder tone or a beep.
If you see ‘Monitor Busy,’ then another extension is already
monitoring the room.
If you see ‘Class Restricted’ or ‘Access Disallowed,’ then the
room cannot be monitored because of restrictions on the
console or the room phone.
To disconnect the console from the room
• Press Cancel or Release.
50 ♦ Hotel/Motel Features
Page 59

Clearing the Message Register
The message register is a record of the number and cost of all
external calls placed from a guest room telephone. The system
uses meter pulses received from the local telephone company to
calculate costs. If pulses are not received, then only the number
of external calls are counted.
A guest’s message register is automatically cleared when the guest
is checked out. If a guest prefers to pay for calls on a daily basis,
you can manually clear the register after each payment is made.
To display or clear a room’s message register
1. Press Guest Service, or if you are already on a call to the
room, press th e [Guest Service] softkey.
2. Use the computer keyboard to type the room number in the
Room Number box (not necessary if you are already on a call
to the room).
The Message Cost and Calls fields show the total cost and
number of all external calls placed from the room.
3. Click Clear to er a se th e Message Cost and Calls totals.
If a printer is attached to the console, a report may print showing
the contents of the register before it was cleared.
Printing Reports
If a printer is connected to the console, you can request printed
reports of mess ag e re gist er s, roo m st atu s and au to mat i c wak e- up
calls. Some reports print automatically. For example, whenever a
wake-up call is set, changed, or canceled, a record of the event is
printed.
To print a report
• On the Tools menu, select Guest Services followed by th e
command that corresponds to the report that you want to print.
Hotel/Motel Features ♦ 51
Page 60

Page 61

Reference
Page 62

Page 63

Reference
Contents
Alarms............................................................................................................................56
Greetings ........................................................................................................................56
Rerouted Calls ................................................................................................................57
Class of Restriction .........................................................................................................58
Class of Service...............................................................................................................58
Feature Access Codes......................................................................................................59
Glossary..........................................................................................................................60
Hunt Groups...................................................................................................................62
Paging Zones...................................................................................................................62
System Speed Call List....................................................................................................63
System Messages ............................................................................................................64
Telephone Directory ........................................................................................................70
Trunk Numbers...............................................................................................................70
Reference ♦ 55
Page 64

Alarms
Your telephone system uses automatic monitoring and fault
diagnosis to check the system for faults.
An alarm st at u s appearin g in the up p er - ri g ht co rner of the scre en
notifie s yo u w h en a f au lt occur s . When th er e ar e no faults, thi s area
is blank. If a critical alarm occurs, you’ll hear a recurring beep.
The alarm display is cleared automatically when the fault is
corrected.
Alarm types
There are three classes of alarms: Minor, Major and Critical.
Greetings
Record your company’s preferred greetings for each of the
following situations.
Calls on
Outside
Lines
Calls On
Inside Lines
MINOR
There is a minor alarm within the telephone system, which
probably does not affect the telephone users.
MAJOR
An alarm affect ing service has oc cur r e d, but calls can still be
made. Contact your commun ic ati on s dep art ment.
CRITICAL
The telephon e sy st e m is not pr ov id in g nor m al service and shou l d
automatically switch itself to System Fail Transfer Mode (if this is
available on your system). You MUST contact your
communications department.
Recalls
Calls
Camped on
to a Line
Taking
Messages
56 ♦ Reference
Page 65

Rerouted Calls
Some users may decide to reroute their calls to your console, or
the system may be programmed to reroute certain types of calls
or all calls made at given times to your console.
The calls that are rerouted to your console may be one of
four types:
• Calls a user has forwarded (Follow Me, Busy or No Answer).
• Calls to a given number rerouted by system programming.
• Calls on certain trunks if incoming calls on certain trunks
are always “transferred” to your conso le.
• If the user dials a number that is rejected by the system for
any reason, Intercept Handling may be programmed to
reroute the call to your consol e.
Call Forwarding
When a user has forwarded his or her calls to your console,
incoming calls to that extension will ring your console. When you
answer, the called party information will appear in the
Destination area.
Note that the Destination area displays the name of the called
party, the called party’s number, and the type of Call Forwarding
that the called party programmed and that caused the call to be
rerouted to your console (Follow Me, Busy or No Answer).
Also, two softkeys are always available in this situation:
[Set Serial Call] and [Redial Dest]. Pressing [Redial Dest] will
automatically redial the called party, overriding the Call
Forwarding to your console.
System Rerouting
When the system is programmed to redirect calls to an extension
to your console at all times, the message “Call Forward - Always
Reroute” appears in the Destination area, below the user’s name
and extension number.
Transferred Calls
If you transfer an incom i ng cal l to an ext e nsi on , and th e
extension user transfers the call back to your console, the
message ‘‘Transferred’’ appears in the Destination area.
Intercept Handling
When a user dials a number that the system rejects, the call is
rerouted to your con sole. When you ans wer , th e app rop r i ate
Intercept Handling message displays in the Destination area. See
System Messages on page 64 for information about the messages
that may display in that situation.
Reference ♦ 57
Page 66

Class of Restriction
Each extension and trunk in the system is assigned a Class of
Restriction. As its name implies, a Class of Restriction (COR) may
restrict an extension (or a trunk) from accessing an external
route at a given time.
The extension’s COR is displayed in the Source or Destination
area of the console screen, along with its Class of Service and the
other information on the caller.
Here are a few examples on how the Class of Restriction can
affect users:
Class of Service
Not all the features described in this Guide are available on your
console or on other ext ens ions.
An extension’s Class of Service (COS) appears, with the
information about that extension, in the Source or Destination
area of the console screen.
Each COS defines which features an extension or console can
activate. The message “Feature not allowed” appears on the
console screen when you try to access a feature not allowed in
your or the extension’s COS.
• The extensions with a given COR may not dial outside the
system at all, having to ask the assistance of the attendant
to do so.
• Extensions with another COR may have to go through the
attendant in order to dial long distance.
• Extensions with yet another COR may only dial certain long-
distance numbers and at given times of the day.
• Extensions with the least restrictions programmed could dial
anywhere at any time.
• The extension’s COR may change with Day, Night 1 and
Night 2 services.
• Routing may change according to the time of the day and the
day of the week, indicating different outside dialing privileges
according to the time of dialing.
Here are some examples of how a COS could affect users:
• COS could change depending on whether the system is in
Day, Night 1, or Night 2 Service.
• Extensions without an appropriate COS could be denied
access to certain features, such as Call Override, Paging
Access or Setting Message Waiting Notification.
• You and other extension users may be required to enter an
Account Code for additional system access or when you want
to use your COS at a different extension.
• Some extension users cannot be overridden.
58 ♦ Reference
Page 67

Feature A ccess Codes
FEATURE CODE
Account Code Access
- Verifiable ____________________________
- Non-Verifiable ____________________________
Associated Dataline Access ____________________________
Loopback ____________________________
Call Hold
- Retrieve ____________________________
- Remote - Retrieve ____________________________
Callback ____________________________
- Cancel ____________________________
Call Forward
- Busy (External) ____________________________
- Busy (Internal) ____________________________
- Follow Me ____________________________
- Follow Me Enchaining ____________________________
- I Am Here ____________________________
FEATURE CODE
Clear All Features
- Remote ____________________________
Conference ____________________________
Do Not Dis turb ____________________________
- Remote
- Cancel Remote
External Line Access ____________________________
Forced Release ____________________________
Last Number Redial ____________________________
Individual Trunk Access ____________________________
Message Waiting Inquire ____________________________
Message Notification ____________________________
- Cancel _____________________________
Override
Paging ____________________________
____________________________
____________________________
____________________________
- No Answer (External) ____________________________
- No Answer (Internal) ____________________________
Call Park Remote Retrie ve ____________________________
Call Priv acy ____________________________
Camp-on ____________________________
- Retrieve ____________________________
Personal Speed Call
- Invoke ____________________________
- Store ____________________________
Pickup
- Dialed Call ____________________________
- Directed Call ____________________________
TAFAS -Remote Retrieve ____________________________
Reference ♦ 59
Page 68

Glossary
Account Code
A code you dial to access certain system features; to apply your
Class of Servic e (CO S) at a diff er ent ext e ns i on; or to associate a
caller with an SMDR record for accounting purposes.
ARS - Automatic Route Sel ection
This is an application that handles long distance call routing
automatically.
Broadcast Group
When a line has an appearance on another telephone, it is said to
be in a broadcast group. This means that all extensions with that
line appearance have access to and may use that line.
Call Privacy (D ata Line Security)
A COS feature which prevents an extension from receiving Campon Tone -- which could interfere with data transmission.
Camp-on
A feature allowing the system to queue calls directed to a busy
extension, then automatically connects the waiting party to the
extension when it becomes free. The busy extension user hears
Camp-on Tone indicating a call is camped-on. The waiting caller
is put on hold and hears music or silence.
Class of Restriction (COR)
Control of a station or trunk’s access to trunk circuits. A station
may have up to three different CORs specified for Day, Night 1 or
Night 2 Service.
Class of Service (COS)
A level of service defined by a specific set of features that controls
an extension’s access to these features. A station may ha ve up to
three different COSs specified for Day, Night 1 or Night 2 Service.
Consultation Hold
A temporary hold applied to a call while an extension or console
user activat es a f eatur e or make s a cal l.
Customer Data Entry (CDE)
The entry of programmed data, specific to the customer’s
requiremen t s. Customer da ta i ncludes such it e ms as dir e ct or y
information, COS and COR allocations, and trunk data.
Direct Inward Dialing (DID)
This feature allows outside trunks to reach pre-programmed
extensions directly, without going through the Attendant console.
Direct Inward System Access (DISA)
A feature which allows callers to dial directly into the telephone
system and activate features and facilities.
External Line Access Code
A code which precedes a dialed number to indicate to the
telephone system that the telephone number is outside the
system.
Firmkeys
Keys on the console keypad that can be programmed to access
console featu r es an d sy st e m services.
Hunt Group
Extensions linked together in a group with a common (pilot)
telephone number as well as their own personal extension
numbers. Two types of hunting are available with your telephone
system: Circular Hunting and Terminal Hunting.
Circular Hunting: A new call to the Hunt Group is directed to the
first idle extension found after the extension, which received the
last call. This provides equitable call distribution to all the
extensions.
Terminal Hunting: Hunting takes place in the order in which the
extensions were programmed into the hunt group. It always
starts with the first extension in the list and the hunting ends
with the first idle extension found.
60 ♦ Reference
Page 69

Line
A telephone communications channel between switching centers
or the Central Office and the 3300 ICP.
Night Answer Point(s)
An extension user can answer incoming calls ringing the Night
Answer Point by dialing the TAFAS code.
Night Service
A system mode of operation that routes incoming calls to the
Night Answer Point(s) when the system is in Night Service and
the Attendant consoles are in Absent mode.
Pickup Group
Extensions located in one area, or with similar departmental
functions, are often placed in the same answer group.
Recall
A call returns to the console for further handling by the
attendant.
SMDR - Station M essage Detail Recording
This is an application that automatically logs call information
such as “length of call” and “caller extension number”, among
other things.
Switchhook Flash
Used by extension users to signal the telephone system that they
want to activate a feature.
TAFAS Code
(Trunk Answer From Any Station) A code used to answer calls
ringing the Night Answer Point(s).
Trunk
An outside line which links two switching systems. This link can
be between one or more private telephone systems and/or
between your private system and the public telephone system
(Central Office).
Reference ♦ 61
Page 70

Hunt Groups
Dialing a Hunt Group Pilot Number either from the keypad or
through the Phone Book feature, connects you to the first
available extens ion in that are a. Cont act your co mmun i cat ion s
department for more information
Paging Zones
Use this table to record the paging zones your system uses.
Contact your communications department for more information.
Pilot
Number
Hunt Group
Name
Extensions
Location Zone Code
All Zones 00
01
02
03
04
05
06
07
08
09
10
11
62 ♦ Reference
12
13
14
15
Page 71

System Speed Call List
Name Number
Reference ♦ 63
Page 72

System Messages
These messag es appear in the vari ou s are as of you r screen.
Call Forward - Follow Me
This extension user has all calls forwarded to you (Call Forward Follow Me).
Absent Feature Disal lowed for Last Attendant.
Select Night Service
As the last or only attendant in the group, you cannot place your
console into absent mode.
Access Disallowed
The feature access code you’ve dialed is not available to an
Attendant.
Attendant Gr(oup)
Displayed when one attendant calls another number belonging to
one or more attendants.
Broadcast Gr(oup)
Group of extensions sharing the same line. Actually, every line in
the system is part of a broadcast group, even if it appears on only
one extension (private lines, for example).
Busy
The number you just dialed is busy.
Callback - Recall
The busy extension or trunk you requested the system to monitor
is now available.
Callback Queue Full
Your request for a Callback has been denied because of
insuffici en t system resou rc e s.
Call Forward - No Answer
This extensio n us er is not ava il ab le, and h a s forw arded calls (Call
Forward - No Answer) to you.
Cancel All Featur es for Station # :
Enter the number of the extension for which you wish to cancel
all features.
Cancel CFFM for Station # :
Enter the number of the extension for which you wish to cancel
Call Forward- Follow Me.
Cancel Do Not Disturb for All Stations ... Completed
Confirms that the requested action has been taken.
Cancel DND for Station # :
Enter the number of the extension for which you wish to cancel
Do Not Disturb.
Cancel Forwarding for All Stations ... Completed
Confirms that the requested action has been taken.
Cancel All CFWD for St ation # :
Enter the number of the extension for which you wish to cancel
all types of Call Forwarding.
Call Forward - Always Reroute
This extension user has all calls rerouted to you.
Call Forward - Busy
This extension user is busy and has forwarded calls (Call
Forward - Call Fwd Busy) to you.
64 ♦ Reference
Page 73

Canceling Do Not Disturb for All Stati ons
Your request is in progress.
Canceling Forwarding for All St ations
Your request is in progress.
Cannot Activate Feat ure if a Party in DESTINATION
Release party in DEST and try again.
Cannot Put Connected Par ty On Consultation Hol d
You already have a party on Consultation Hold, and you cannot
perform certain functions - for example, activating message
waiting for an extension until you clear the destination field.
COR
Indicates the Class of Restriction applicable to that station or
trunk.
COS
Indicates the Class of Service applicable to that station or trunk.
COS Violation
The caller tried to access an unavailable feature. Intercept
handling has rerouted the call to your console.
Data Line
Equipment name displayed when a data line is called.
Check MSG Waiting for Station # :
Enter the number of the station for which you want to check the
message waiting notification(s).
Completed
Confirmation message when the number you’ve entered is valid
and the action requested has been taken.
Class Restrict ed
Your Class of Service does not allow this feature.
Conference
Indication that a conference has been set up or is on hold.
Connected
Confirmation message when your call is connected to a data call.
Connected to Pager
Confirmation message that you have accessed the paging zone
and can make your announcement.
Data Group
Equipment name when a data group is called.
Directory Number Out of Service
The caller has dialed a directory number that does not exist. The
call has been rerouted to your console.
Do Not Disturb
The extension user you dialed has activated Do Not Disturb. You
cannot call this extension unless you use the override feature.
External
Indicates a call from outside your system (a trunk call).
Feature Activat ed
A feature such as Do Not Disturb is activated.
Feature Cancell ed
A feature such as Do Not Disturb is cancelled.
Feature Not Allowed
There is a restriction preventing you from using this feature, or
performing this action.
Reference ♦ 65
Page 74

Guest Service
Part of the Hotel/Motel Feature package. This prompt appears in
several attendant mode operations. Pressing it places the console
in Guest Service mode immediately.
Headset or handset r equired for attendant operation
Plug in your headset or handset.
Language selection option not installed
The language you requested is not installed on your telephone
system.
Locked out
Indicates a station which is out of service and cannot be accessed
or make a call.
Holding Party Locked Out
You have left the caller on Key hold for too long, and the call is
returning to your console.
Hunt Group
Indicates that a station or trunk is a member of a hunt group.
Interconnect Failure
There are local interconnect restrictions which do not allow you
to connect the requested devices.
Interconnect Rest riction
The caller’s ext ension is pr ogrammed with Inter connect Restr iction.
Intercept Handl ing has rerouted the call to your consol e.
Internal
Indicates a call from inside your system.
Invalid Account Code
Verify your Account Code and try again.
Invalid Dialing
Verify what you dialed and try again.
Invalid Number
You attempted to dial an incorrect number. Verify your number
and try again.
Modem
You are connected to a modem.
Modem Busy
The modem dialed is already busy.
Modem Call
Confirmation message when you dial a modem.
Modem Group
Indicates that the modem you are conne ct e d to is in a group of
modems.
Modem Out of Service
The modem di aled is out of s ervi ce and cann ot be us ed at thi s tim e.
Monitor Busy
The extension y ou are trying to m onit or is alr ead y be ing m onit or ed
from anoth er stati on .
MSG Waiting
After pressing the [Check MSG Waiting] softkey, this indicates
that the extension has message(s) waiting.
MSG Waiting OFF
Confirmation that you turned off an extension’s message waiting
indicator by pressing the [Clear MSG Waiting] sof tkey.
Invalid Trunk Number
You attempted to select an incorrect or out-of-service trunk.
66 ♦ Reference
MSG Waiting ON
Confirmation that you turned on an extension’s message wait ing
indicator by pressing the [Set MSG Waiting] softkey.
Page 75

Must CANCEL before dialing
Press Cancel on the console keypad, and the try dialing again.
Press “Yes” to Confirm Request or “No” to Quit
Press the appropriate softkey.
Must Press Retrieve Key then 1 - 6 or * to Retrieve
Held Call. Request Ignored.
Try again, but dial the position number of held call (1-6), or dial *
(to retrieve the longest held call).
Network
Shows if you have dialed over a MSDN/DPNSS (Digital Private
Network Signaling System) line, which connects 3300 ICPs in a
private network.
No Answer
There was no answer at the extension called.
No One on Hold at Specified Hold Position
Verify your position number and try again.
Not Ready
The data call cannot be completed at this time. Try again later.
Operator Absent
If you have chang ed th e st atu s of your console to Operator
Absent, this message is displayed in the DEST area of the console
of another attendant who calls you.
Out of Service
The device you dialed is not in service.
Overriding
Confirmation message when you override a busy party.
Recall
A previously extended call has returned to your console after a
time-out period.
Recall – Busy
A previously extended call has returned to your console because
the extension is busy.
Recall - Busy, Camp-on Not Allowed
There is a restriction preventing you from camping a call on to
the requested destination.
Recall – No Answ er
A previously extended call has returned to your console because
the extension did not answer.
Remove MSG Waiting f or Station # :
Enter the number of the extension from which you wish to
remove a Message Waiting notification.
Request Denied
Verify what you’ve just done, and try agai n.
Ringing
The number you dialed is ringing.
Route
You are calling a route.
Page Zone Busy
The zone number you dialed is busy; dial another zone code, or
try again later.
Page Zone Unassigned
Verify the number you dialed. If it still doesn’t work, contact your
communications department.
Reference ♦ 67
Page 76

Seized
Confirmation message when you access a trunk.
SUPERSET x...x
The station in question is a SUPERSET telephone.
Select Paging Zone
Enter the number of the zone which you wish to access by
the Pager.
Selected Operation Not Being Acknowledged.
Request is Abandoned
The telephone system is not processing your request. Try again
later or verify you r op er at ion .
Selected Trunk
Indicates that a particular trunk has been selected for use.
Serial
Indicates a caller who wants to talk to several people in
succession.
Serial - Busy
The Serial call has returned to your console because the
destination is busy.
Serial - No Answer
The Serial call has returned to your console because the
destination did not answer before a predetermined period of time.
Serial - Recall
The Serial call you made was successful.
Set MSG waiting f or Station # :
Enter the number of the extension on which you wish to set a
Message Waiting notification.
5550 IP Console
You are connected to another 5550 IP Console.
System is in Night Service 1
The call has been rerouted because the system is in
Night Service 1.
System is in Night Service 2
The call has been rerouted because the system is in
Night Service 2.
System Unable to Complete Selected Operation.
Please Try Again
The telephone system is not processing your request. Try again
later.
Toll Denial - Illegal Dialing
The caller dialed a toll number wrong, and the call has been
rerouted to your console.
Toll Denial - Route Restriction
The caller tried to dial a toll number not allowed in his/her Class
of Restriction and the call has been rerouted to your console.
Tone Timer Expired
You’ve been listening to busy or ringing tone for too long and the
system has disconnected your call. Cancel the call and try again.
Transferred
The call has been transferred from an internal extension.
Setup DND for Station # :
Enter the number of the extension for which you wish to set up
Do Not Disturb.
68 ♦ Reference
Trunk Access Denied
You are not allowed access to the trunk because of your or the
trunk’s Class of Restriction.
Page 77

Unable to Setup or Add to Conference
Either:
• there is a restriction in your COS/COR preventing you from
setting up a conference;
• you have reached the maximum number of trunks allowed in
a conference;
• you have reached the maximum number of conferees allowed
in a conference; or
• you cannot have two attendants in a conference.
Unassigned Direct ory Number
The number you dialed is not recognized by the telephone
system. Verify your number and try again.
Wake-up Call Not Acknowledged
Part of the Hotel/Motel Feature package. The guest has not
answered the automatic wake-up. (Note: The Hotel/Motel
package is an optional feature.)
Wake-up Call - System Error
Part of the Hotel/Motel Feature package. The Wake-up function
is not operating properly. Contact your communications
department.
You are already using t he selected language. Language not
changed.
You made a mistake in selecting the language. Repeat the
procedure.
Reference ♦ 69
Page 78

Telephone Directory
Name Number
Trunk Numbers
Use this table to record the trunk numbers your system uses.
Contact your communications department for more information
about the trunk numbers.
Trunk Number Use
70 ♦ Reference
Page 79

A
Absent, Operator status, 38
Access Codes, programming, 35
Account Codes, 27
Answer call s, 14
Answer key, 14
Answering priority, changing, 28
Application area, 5
Associated data line, 31
B
Bulletin Board, 27
Busy number, transfer to, 18
Index
Close console. See
Conferenc e cal l s, 21
Console
Adjustments, 9
components, 4
Keypad, 6
Keys, 6
Language, 10
Ringer, 9
Screen, 5
Starting and closing, 8
Time, 10
COR (Class or Restriction), 58
COS (Class of Service, 58
D
C
Call Answer Priority, 28
Call Block, 50
Call Forwarding, canceling on
extensions, 30
Call Park, 29
Call restrictions, setting for guest
rooms, 49
Callback, 16
Cancel
All features on extensions, 30
Call Forwarding on extensions, 30
Do Not Disturb on extensi ons, 33
Message Waiting on extensions, 36
Check-in/Check-out. See Guest Rooms
Class of Restriction, 58
Class of Service (COS), 58
Clear All Features, 30
Data Calls, 31
Day and Night Service, 32
Dialing telephone numbers, 16
DND, 33
Do Not Disturb, 33
E
Emergen cy call s, 34
Errors
Correcting, 17
Extend calls. See Transfer calls
F
Feature Access Codes, 35
Features, clear all, 30
Firmkeys, programming, 35
Index ♦ 71
Page 80

G
Guest room
Find rooms, 47
Guest Room
Condition status, change, 48
Display/change room information, 46
Occupany stat u s, cha n g e, 48
Guest Rooms
Call Blocking, 50
Call Restrictions for, 49
Check-in/Check-out, 48
Message Register, clear, 51
Monitoring, 50
Reports, printing, 51
Wake-up call s, 48
H
Handset, 7
Enabling, 10
Volume, adjusting, 10
Headset
Enabling, 10
Volume, adjusting, 10
Hold, place call on, 20
Hunt Groups, 62
K
Keypad, conso l e, 6
L
Monitoring
Guest Rooms, 50
N
Night and Day Service, 32
Non-verified Account Code, 27
O
Operator Present/Absent status, 38
Override, 37
P
Paging, 38
Paging Zones, 62
Park, Call, 29
Phone Book, 39
Present, Operator status, 38
Programming Firmkeys, 35
R
Recalls, 20, 22
Recover, last call released, 22
Rerouted Calls, 57
Retrieve
Calls on hold, 20
Ringer
Mute, 9
Volume, adjusting, 9
Room-to-room calls, blocking, 50
Language, changing on console, 10
M
Message Register, clear i ng for gu e st
rooms, 51
Message Waiting, 36
Mistakes, cor re ct in g, 17
72 ♦ Index
S
Scratch Pad, 40
Selective call answer, 1 4
Serial Call, 40
Sofkeys, 7
Softkeys, 4, 5, 14
Speed Call, System, 42
Page 81

Start console, 8
Status area, 5
Status Display, Trunk Group, 41
System Messag es , 64
System Speed Call, 42
System Speed Call List, 63
T
Telephone Directory, 70
Telephone numbers, dialing, 16
Time, setting, 10
Tone Signaling, 42
Traffic Monitoring. See Trunk Group
Status Display
Transfer calls, 18
Trunk Numbers, 70
Trunks
Direct access, 17
V
Verified Account Code, 27
Volume
Headset/H and set , ad ju st in g, 10
Ringer, 9
W
Wake-up call s. See Guest Rooms
Index ♦ 73
 Loading...