

Page 1
Issue 1 Release 2.0 January 1996
Voice
Processina Solutjons I
FaxMemo
I
Manual
TM,
@ -Trademark of Mite1 Corporation
0 Copyright 1996, Mite1 Corporation
All rights reserved.
Printed in Canada.
Page 2

Table of
Contents
About This Manual
Who Should Read This Manual ......................................................................
How to Use This Manual
Reference Chapters
Task Lists
Procedures
Menu Maps and Other Navigation Aids
Worksheets
Conventions Used in This Manual ..................................................................
Reader Advisories ..............................................................................................
Before You Start
Console Tips and Techniques
Preparing for a Configuration Session
1 FaxMemo Features
FaxMemo Applications .................................................................................
Fax Mail
Fax Broadcast
Guaranteed Fax
Fax Publishing
Walkaway Fax
FaxMemo Flexible Configuration
Class of Service Options .............................................................................
Cover Page Options ...................................................................................
Billing and Statistics
FaxMemo Hardware
Equipment Supplied With FaxMemo
Series 6 Server Requirements
vii
...............................................................................
...................................................................................... vii
.................................................................................................... vii
.................................................................................................. vlll
.....................................................
................................................................................................... ix
...............................................................................................
......................................................................
........................................................
and
Functions
*,
vii
...
...
Ml1
ix
X
xi
xi
...
xl11
l-2
.....................................................................................................
.............................................................................................
l-2
l-3
.......................................................................................... l-3
............................................................................................ l-3
............................................................................................
.................................................................
1-3
14
14
l-5
................................................................................... l-6
.....................................................................................
...........................................................
.........................................................................
1-6
l-7
l-7
. . .
111
Page 3
Table of Contents
2 Planning Outside Caller Access
DID Fax Call Routing
Switch Integration Fax Call Routing
Switch TIE Trunk
General Access Fax Call Routing.. ................................................................. 2-6
3
Hardware Installation Planning
How Fax Cards
FaxMemo Application Port Requirements ....................................................
Fax Port Planning for Fax Mail ..................................................................
Fax Port Planning for Fax Broadcast
Fax Port Planning for Guaranteed
Fax Port Planning for Fax Publishing
Fax Port Planning for Walkaway Fax
FaxMemo Hardware Configuration Rules .....................................................
FaxMemo Card Planning Worksheet
Task List and Procedures
and Line Cards
..................................................................................
Integration
Fax Call Routing .......................................... 2-5
4 Software Configuration Planning
2-2
.............................................................
Communicate.. ........................................... 3-l
2-2
3-2
3-2
..............................
........................................................
Fax
.........................................................
..........................................................
. ............
................ .3-2
3-2
3-3
3-3
3-3
............................................................
3-5
Planning Your FaxMemo Configuration .......................................................
Offline Configuration ...................................................................................
FaxMemo Classes of Service (COSs) .............................................................
Fax Features ...............................................................................................
Fax Limits
Fax Networking Features ............................................................................
FaxMemo and RCOS
Adding FaxMemo Options to COSs.. ........................................................... 4-P
FaxMemo Mailboxes
Fax Mail Mailbox Configuration ..............................................................
Fax Broadcast Mailbox Configuration .....................................................
Guaranteed Fax Mailbox Configuration
Fax Publishing Mailbox Configuration
Company Fax Cover Page
Task List and Procedures
.................................................................................................
.................................................................................
...................................................................................
...................................................
.....................................................
........................................................................... 4-17
4-l
4-1
4-l
4-2
.4-7
4-P
4-P
4-12
4-12
-4-l
414
415
3
iv
Page 4
5 FaxMemo Billing and Statistics
Billing Parameters . . . . . . . . . . . . . . . . . . . . . . . . . . . . . . . . . . . . . . . . . . . . . . . . . . . . . . . . . . . . . . . . . . . . . . . . . . . . . . . . . . . . . . . . .
Messages Received
Disk Usage
Fax Statistics .................................................................................................
Mailbox Statistics .......................................................................................
System Statistics . . . . . . . . . . . . . . . . . . . . . . . . . . . . . . . . . . . . . . . . . . . . . . . . . . . . . . . . . . . . . . . . . . . . . . . . . . . . . . . . . . . ..-... 54
Fax Group Usage
Task List and Procedures
.................................................................................................
......................................................................................
Report . . . . . . . . . . . ..~.................................-....................-...--..-.-
6 FaxMemo Troubleshooting
Table of Contents
5-
1
5-l
5-3
54
54
5-5
Configuration
Hardware Problems . . . . . . . . . . . . . . . . . . . . . . . . ._............_........... . . . . .._..............................
Problems . . . . . . .._...................-............................. ‘: . .._.................
Worksheets
List of Centigram Procedures
Index
Menu Maps
6-l
6- 1
Page 5

Page 6
About This Manual
This manual describes how to configure the FaxMemo software in any of the
Centigram Series 6 Communications Servers:
l
Model 640
0
Model 120
l
Model 70
Who
Should
This manual is intended for technicians and administrators who are responsible for
configuring the FaxMemo application on the Centigram Series 6 server.
Read This Manual
How to Use This Manual
This manual contains detailed reference information, a list of tasks that you can
perform, a collection of procedures for performing the tasks, and reader aids such as
menu maps.
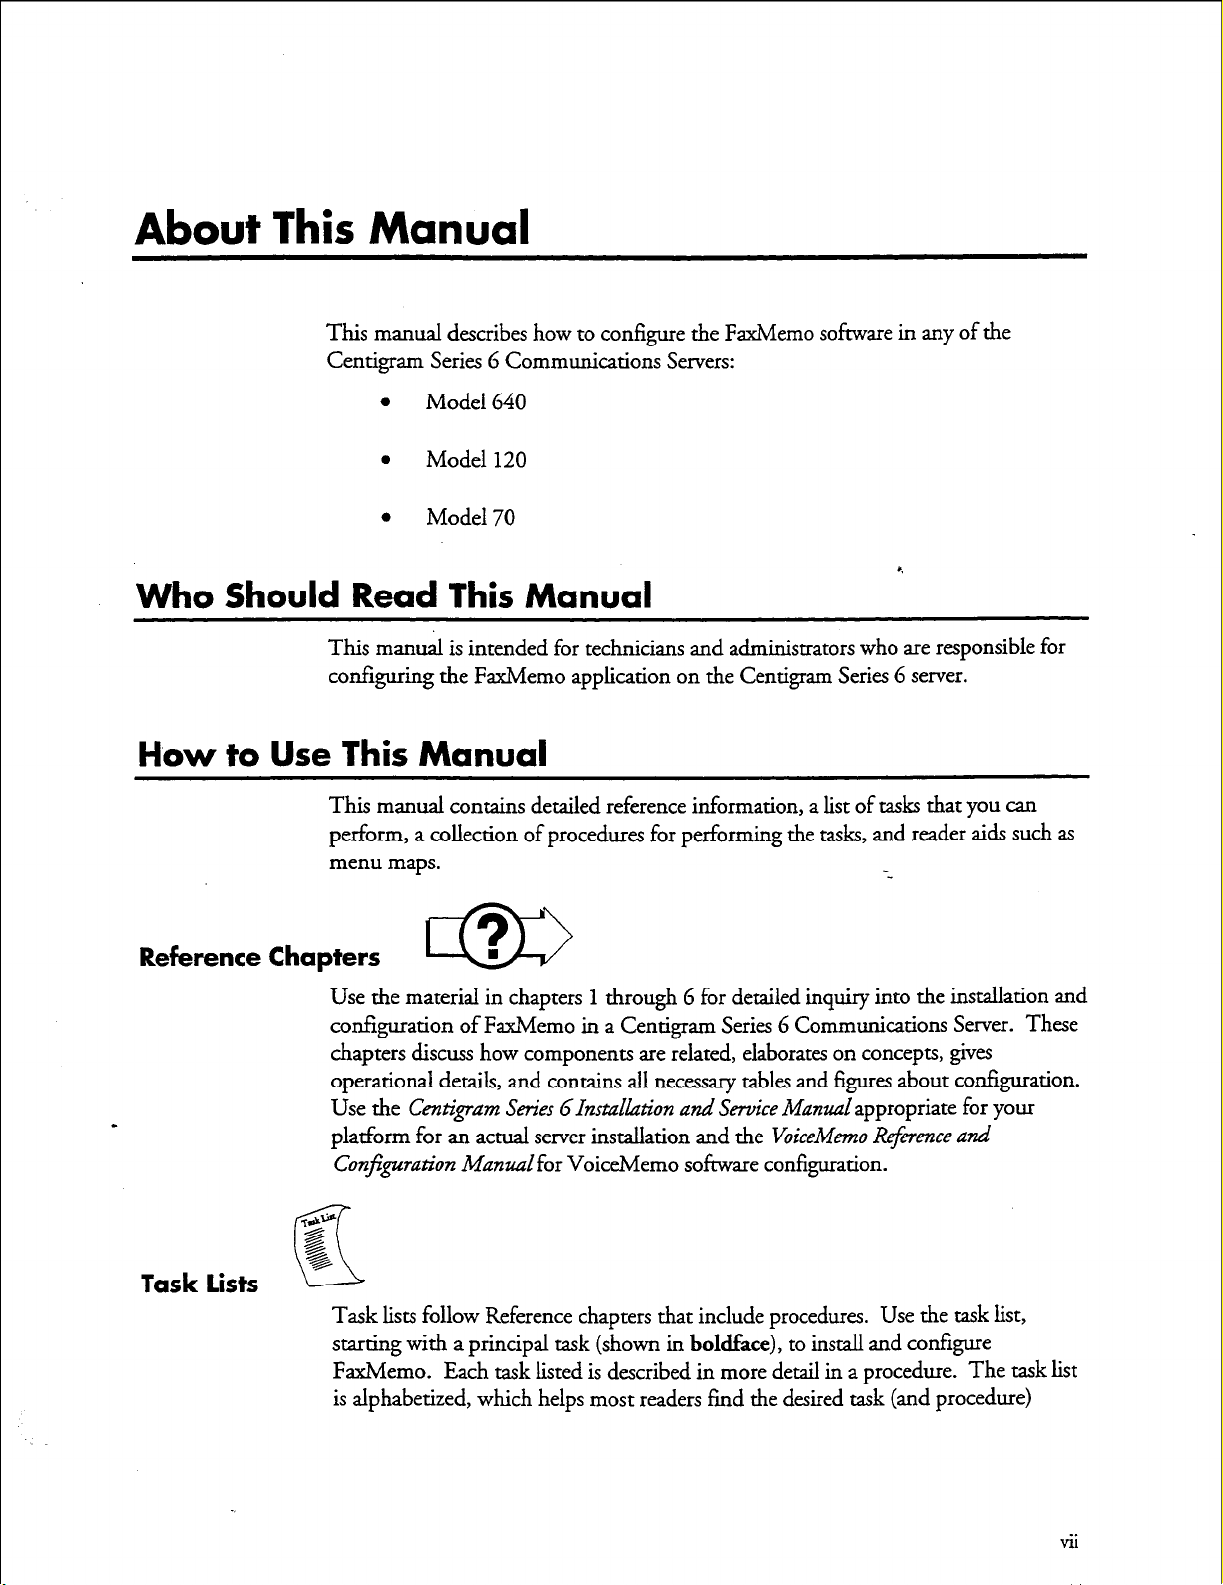
Reference Chapters
Use the material in chapters 1 through 6 for detailed inquiry into the installation and
configuration of FaxMemo in a Centigram Series 6 Communications Server. These
chapters discuss how components are related, elaborates on concepts, gives
operational details, and contains all necessary tables and figures about configuration.
Use the Cent&am Series Glnstalkztion and Service Man&appropriate for your
platform for an actual server installation and the VoiceMemo Reference and
Configzcration Manualfor VoiceMemo software configuration.
m
--
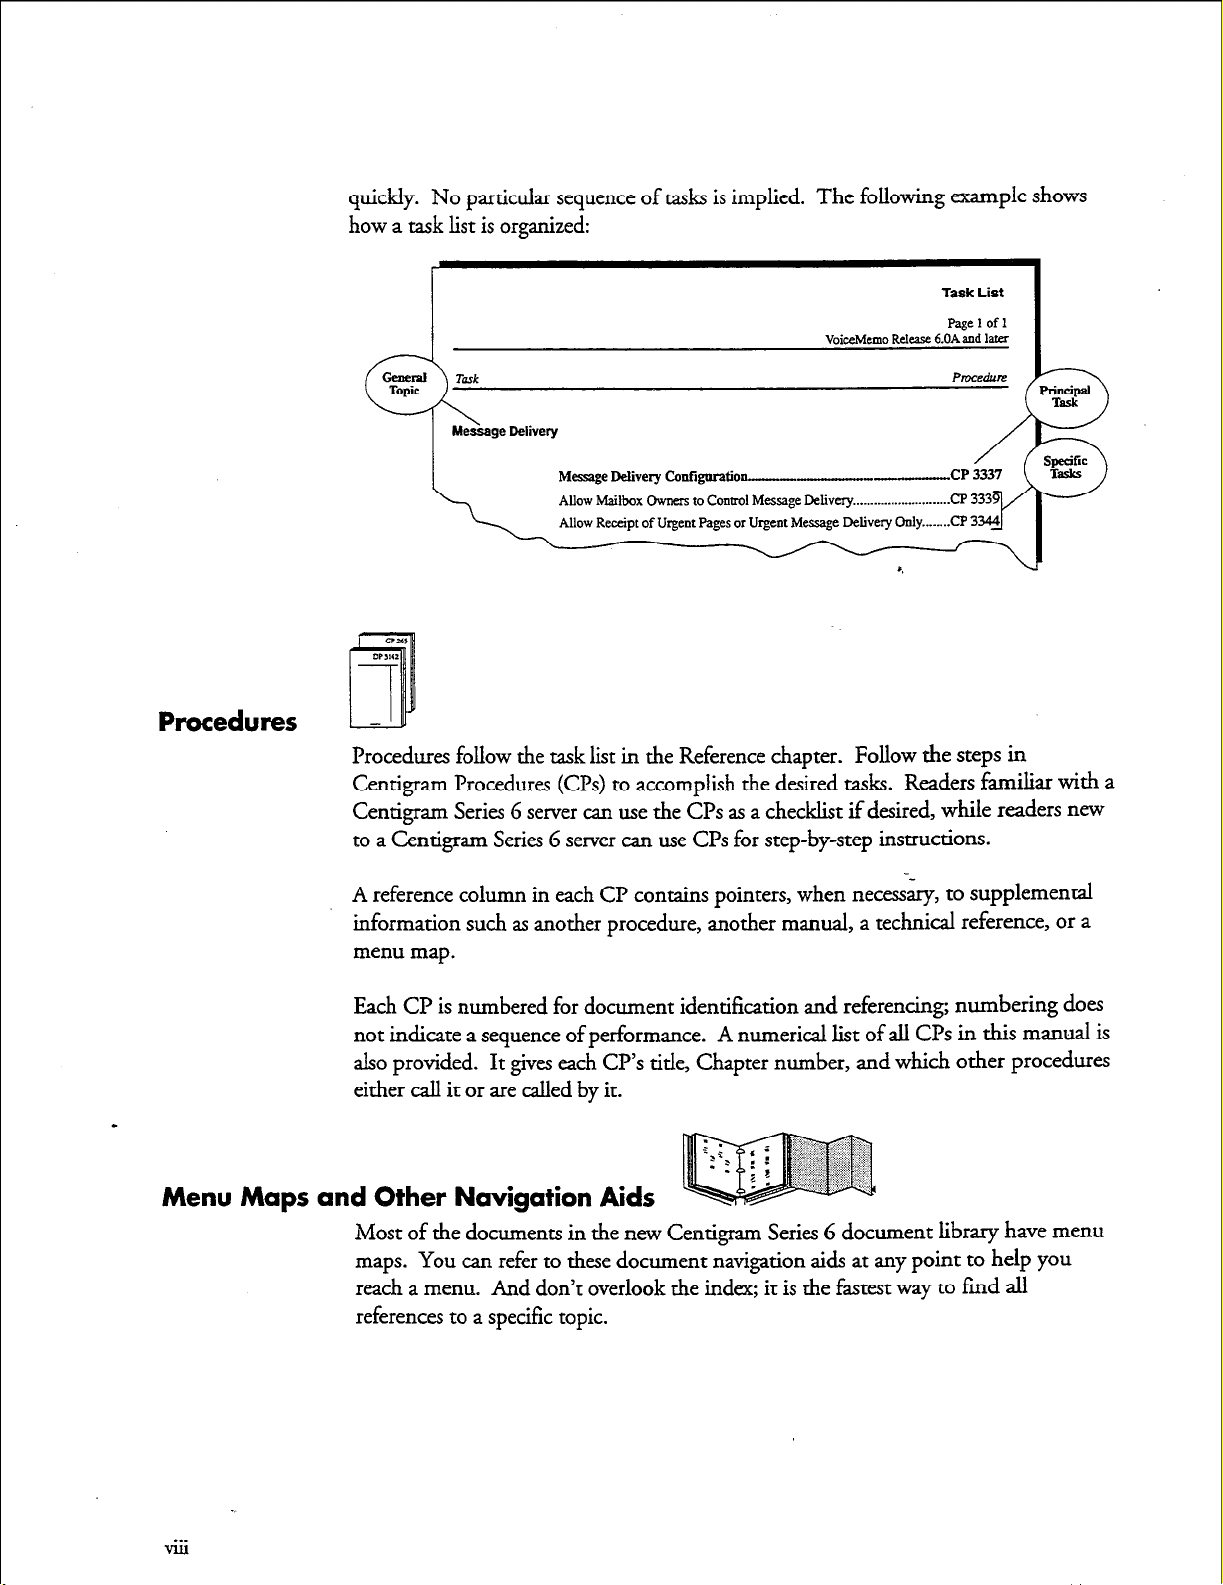
Task lists
Task lists follow Reference chapters that include procedures. Use the task list,
starting with a principal task (shown
FaxMemo. Each task listed is described in more detail in a procedure. The task list
is alphabetized, which helps most readers find the desired task (and procedure)
in boldface),
to install and configure
vii
Page 7
Procedures
quickly. No particular sequence of tasks is implied. The following example shows
how a task list is organized:
Task List
VoiceMemo Release &On&d later
Message Delivery Catiguration-
Procedures follow the task list in the Reference chapter. Follow the steps in
Centigram Procedures (G’s) to accomplish the desired tasks. Readers familiar with a
Centigram Series G server can use the CPs as a checklist if desired, while readers new
to a Centigram Series 6 server can use CPs for step-by-step instructions.
A reference column in each CP contains pointers, when necessary, to supplemental
information such as another procedure, another manual, a technical reference, or a
menu map.
Each CP is numbered for document identification and referencing; numbering does
not indicate a sequence of performance.
also provided. It gives each CP’s title, Chapter number, and which other procedures
either call it or are called by it.
Menu Maps and Other Navigation Aids
Most of the documents in the new Centigram Series 6 document library have menu
maps. You can refer to these document navigation aids at any point to help you
reach a menu. And don’t overlook the index; it is the fastest way to fmd all
references to a specific topic.
A numerical list of all Cl?s in this manual is
Page 8
Worksheets -
ET
You will find blank worksheets in the back of this manual.
completing the worksheets are in the Reference chapters.
you have completed the appropriate worksheet.
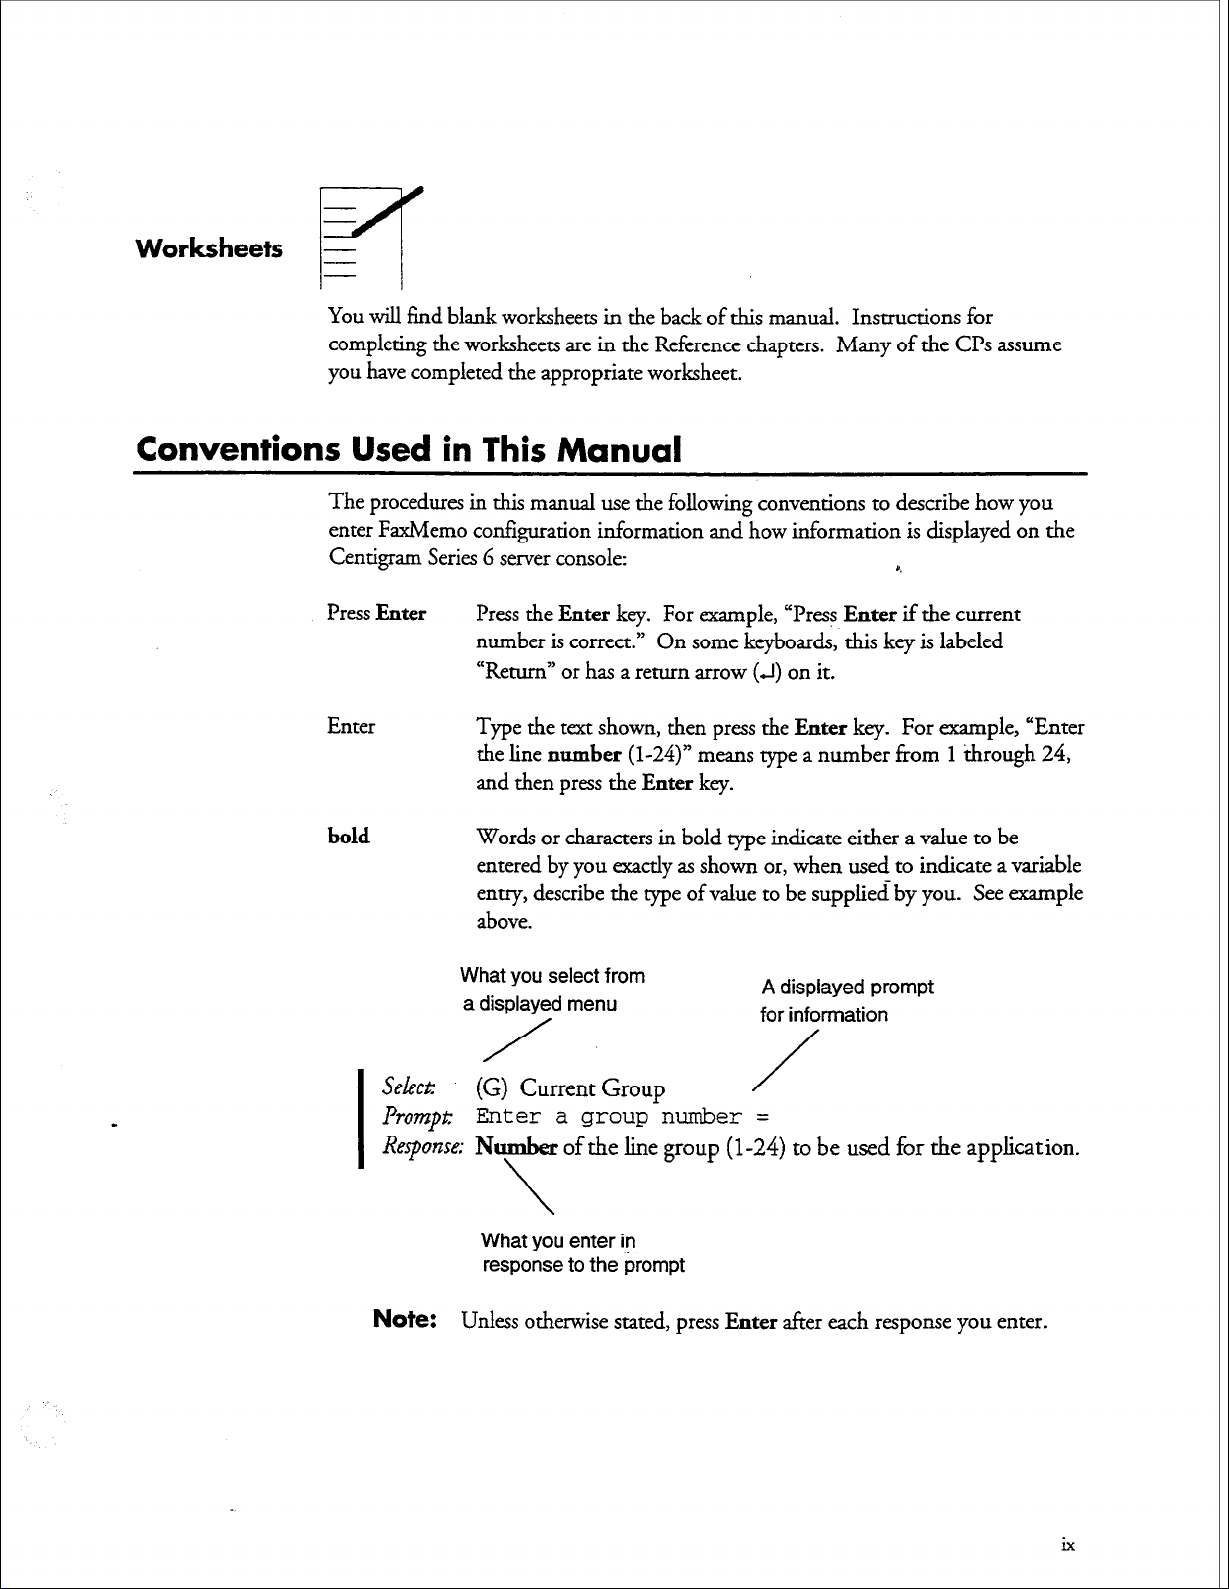
Conventions Used in This Manual
The procedures in this manual use the following conventions to describe how you
enter FaxMemo configuration information and how information is displayed on the
Centigram Series G server console:
Press
Enter
Press
the Enter
number is correct.” On some keyboards, this key is labeled
“Return” or has a return arrow
key. For example, “Press
(J)
Instructions for
Many of the CPs assume
a.
Enter
if the current
on it.
Enter
bold
Select:
I
Prompt:
Response; Number of the line group
I
Type
the
text shown, then press
the line
and then press
Words or characters in bold rype indicate either a value to be
entered by you exactly as shown or, when used to indicate a variable
entry, describe the type of value to be supplied by you.
above.
What you select from
a displayed menu
/
(G) Current Group
number (l-24)”
Enter a group number =
\
What you enter iv
response to the prompt
the Enter
the Enter
means type a number from 1 through 24,
key.
A displayed prompt
for information
/
/
(l-24)
to be used for the application.
key. For example, “Enter
See example
Note:
Unless otherwise stated, press Enter after each response you enter.
ix
Page 9
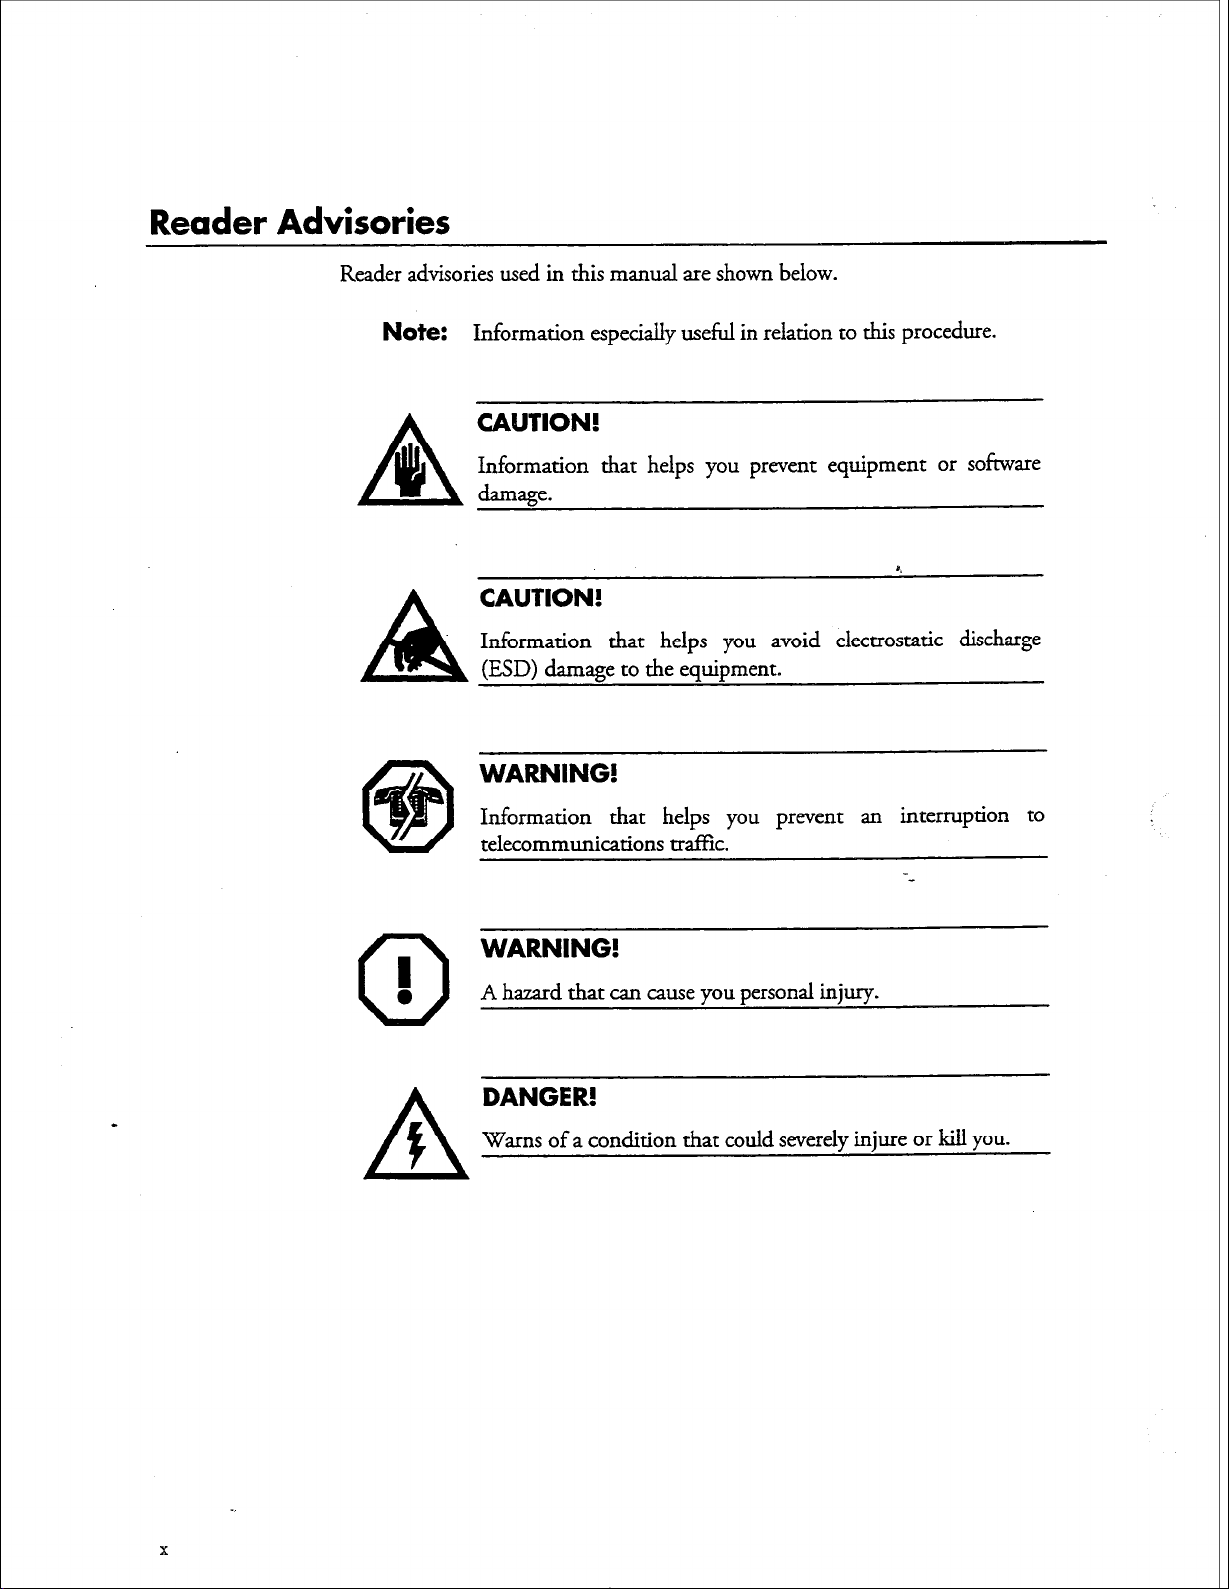
Reader Advisories
Reader advisories used in this manual are shown below.
Note:
A
lb
Information especially useful in relation to this procedure.
CAUTION!
Information that helps you prevent equipment or sofiware
damage.
8
CAUTION!
Information that helps you avoid electrostatic discharge
(ESD) damage to the equipment.
WARNING!
Information that helps you prevent an interruption to
telecommunications traffic.
I
0
0
WARNING!
A hazard that can cause you personal injuxy.
DANGER!
Warns of a condition that could severely injure or kill
you.
Page 10
Before
You Start
This manual assumes that you are familiar with using a console and keyboard. This
section describes how to use the Centigram Series G server effectively.
Console lips and Techniques
The tips and techniques offered in the following paragraphs can make configuration
entry sessions at the Centigram Series 6 server maintenance console more productive.
Mewing Menus
l
When you finish entering a value for a parameter, the server displays an
abbreviated form of the current menu, called the “short menu.” To view
the complete current menu when a short menu is displayed, just press
Enter.
l To
return to the Main Menu from any VoiceMemo application
configuration menu, press X (Exit), until the Main Menu appears.
Accepting Defaults
l
To accept a default displayed in a
l
To accept a default displayed in a menu, no action is necessary.
prompt;
just press
Enter.
=
Avoiding Automatic Exit
CAUTION!
The Centigram Series 6 server “times out” after
This means that if you do not enter anything at the console for
15 minutes, the server automatically exits from the current
program. When this happens, all work that has not been saved
on the disk is lost.
To avoid being timed out and losing your work, follow these steps:
1. When you need time to think, write down the name of the current menu.
15
minutes.
2. Exit to the (server) Main Menu.
3. When you want to continue your work, enter the appropriate menu
options to regain your place.
xi
Page 11
If you find that the Centigram Series 6 server has timed out, follow the steps below.
If your screen is blank, press any key to reactivate the screen and then continue with
these steps.
1.
Press any key to start the login sequence.
2. Enter your user ID and password (if requested).
3. Starting from the Main Menu, enter menu options to proceed to the menu
from which the server timed out.
4. Reenter data as needed to regain lost work.
Quitting an Entry Session
At any point during entry of offline or online parameters, you&n quit. Quitting
discards all parameter entries you have made and leaves the VoiceMemo application
configuration the way it was before you started entering parameters.
To quit from the VoiceMemo Configuration Oflline or Online Menu:
Select:
Prompt
Response: Y to return to the VoiceMemo Configuration Main Menu.
0
Q+-
Quit and forget changes? (y/n) =
Forget Changes
Shortcut Commands
You can use the Ctrl (Control) key or the / (slash) key while simu.lmneously pressing
another key to execute shortcut commands at an Centigram Se&s 6 server
maintenance console.
GCOS menus, return to the VoiceMemo
Configuration Menu and save any entries.
From the oflline or online menus, or FCOS, LCOS,
GCOS menus, return to the VoiceMemo
Configuration Menu without saving any entries.
Stop scrolling a displayed report.
Resume scrolling a displayed report.
xii
Page 12
Preparing
for
a Configuration Session
Before you begin a configuration session, you need the following:
l
The
VoiceMemo R&wnce and ConJ;guation Manual
l
A
Centigram Series G server maintenance console (video monitor and
keyboard) and VoiceMemo module, with power on
l
At least two telephones for configuration testing
l
A blank 3.5-inch diskette on which you can copy your configuration
l
Completed worksheets (an initial supply of blank worksheets is included in
the VoiceMemo ltejmence and Configuration Manmzl)
.~
”
. . .
Xl11
Page 13

Page 14
1 FaxMemo Features and Functions
FaxMemo is an optional feature that allows VoiceMemo users and outside callers to
exchange faxes through user mailboxes and special mailboxes. It consists of one or
more FaxMemo cards and software integral to the Centigram Series 6
Communication Server, and provides a set of fax-related features and limits that you
can assign to VoiceMemo mailboxes.
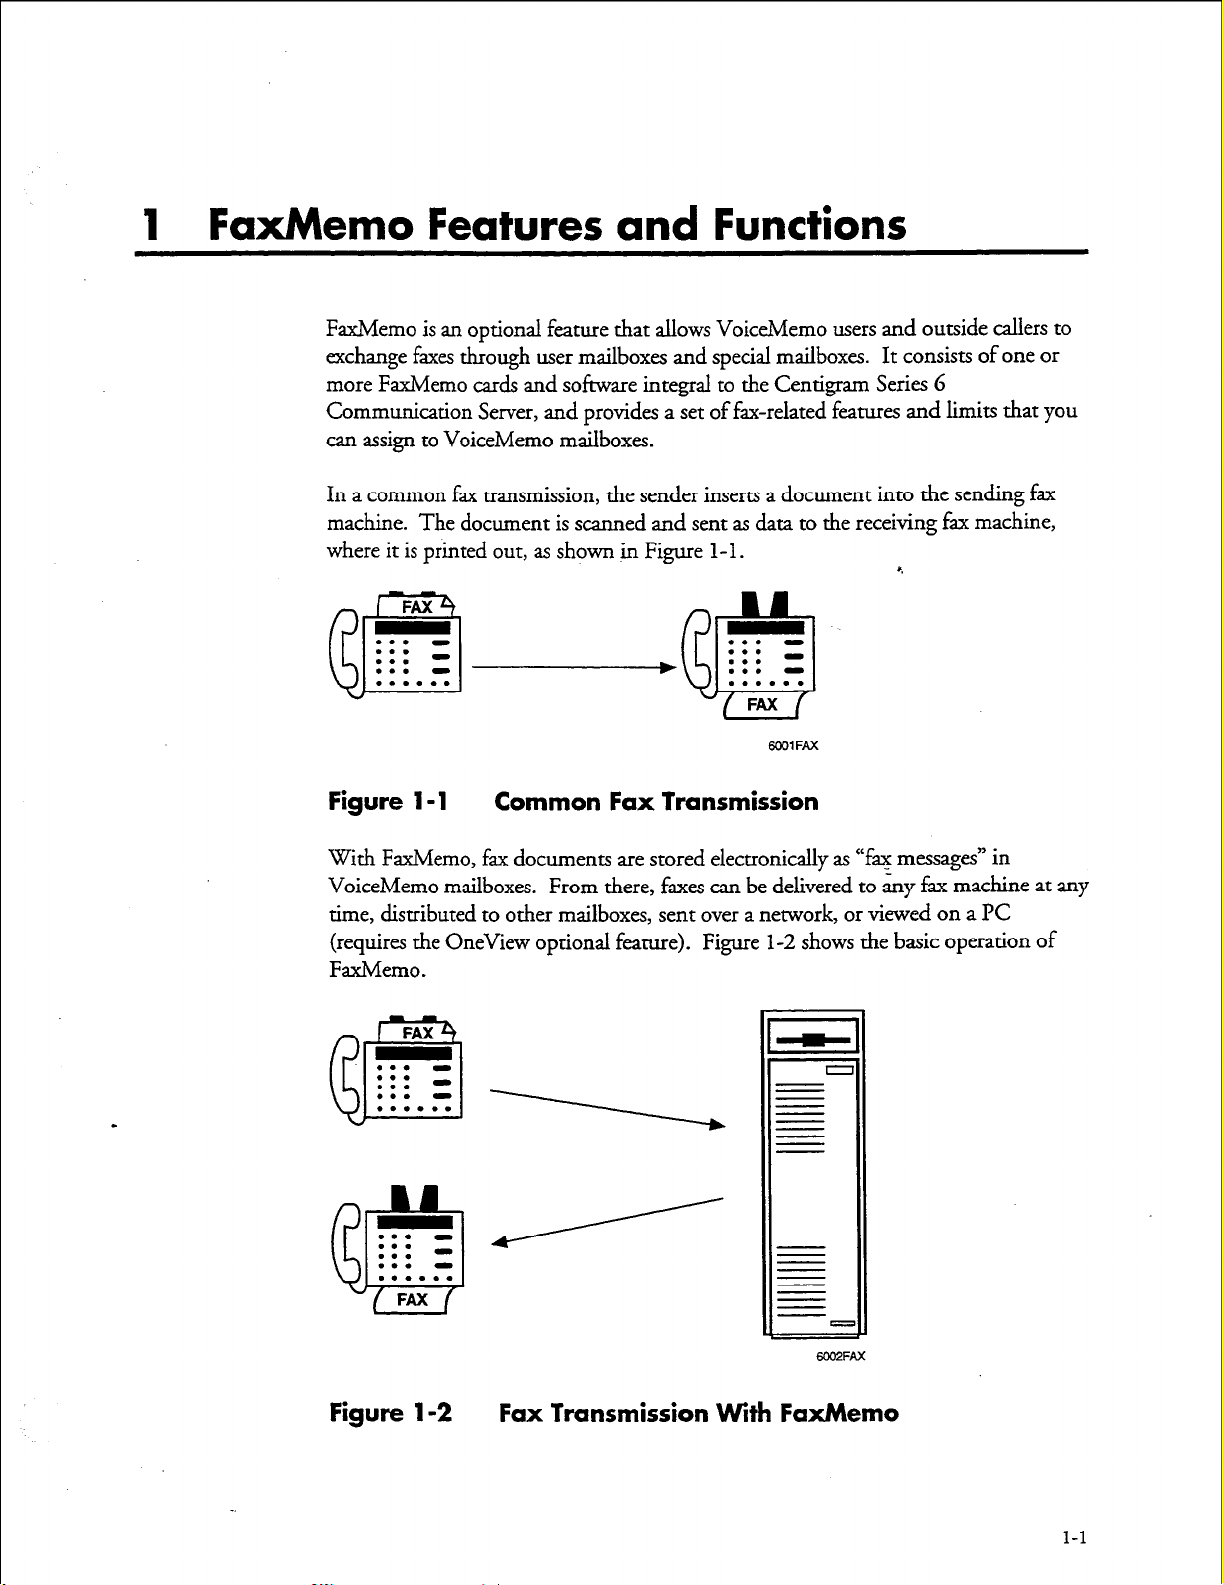
In a common fax transmission, the sender inserts a document into the sending fax
machine. The document is scanned and sent as data to the receiving fax machine,
where it is printed out, as shown in Figure l-l.
FAX
. . . . . .
. . . . . . -
. . . . . .
a
Figure l-1 Common Fax Transmission
eJ
. . . . . . . . .
. . . a
. . . . . .
FAX
WOlFAX
8.
With FaxMemo, fax documents are stored electronically as “fax messages” in
VoiceMemo mailboxes. From there, faxes can be delivered to any fax machine at any
time, distributed to other mailboxes, sent over a network, or viewed on a PC
(requires the OneView optional feature). Figure l-2 shows the basic operation of
FaxMemo.
FAX
. . . . . . . . .
. . . -
. . . . . . 1
fB
. . . -
?A
. . . . . . -
. . . . . .
f&3
Figure 1-2
FAX
Fax Transmission
With
6002FAX
FaxMemo
1-l
Page 15
FaxMemo Features and Functions
FaxMemo overcomes many of the problems inherent in typical fax communication:
0
0
0
0
Callers sending a fax do not have to wait due to the receiving fax
machine being busy with another transmission.
Faxes are stored in password-protected user mailboxes. Faxes do not sit
at the fax machine for anyone to read.
Recipients receive notification when a new fax arrives. Incoming faxes
do not sit for days because recipients do not know they are there.
Faxes can be annotated with voice messages (also called voice
coversheets), relieving the sender of typing out explanatory notes.
0
The recipient decides when and where a fax is printed out.
a FaxMemo user away from the office could call his VoiceMemo mailbox
and direct a fax, deposited there by someone else, to be delivered to his
hotel, the airport, or wherever there is a convenient fax machine. After
reading the fax, he could call back into his mailbox and send the fax to
another party, perhaps a prospect waiting for a quotation.
For a description of end-user features and functions, see the User Gaidefor
VoiceMemo and Fdmo.
FaxMemo Applications
FaxMemo applications include Fax Mail, Fax Broadcast, Guaranteed Fax, Fax
Publishing, and Walkaway Fax. You can use one or more of these applications, in
any combination. For more information about planning and configuring these
applications, see the “Sofiware Configuration Planning” chapter.
Fax Mail
Fax Mail is the most general and widely used application of FaxMemo. With Fax
Mail, incoming faxes are stored electronically as “fax messages” in a user’s mailboxthe same mailbox that stores voice messages. Users are then notified of their new fax
messages in the same manner as with voice messages (for example, message waiting
light, pager, stutter dial tone).
For example,
--
l-2
By calling into their mailboxes, users can retrieve their fax messages at any time by
sending them to any fax machine. In addition, users can call into their mailboxes
from fax phones and retrieve their fax messages “online” at that fax machine. Users
of Fax Mail have the same options that are available to them through voice mail: fax
messages can be played, answered,
or
given to another mailbox, distribution list, or
off-system telephone (fax> number.
Page 16
Fax Broadcast
Guaranteed Fax
FaxMemo Feanues and Functions
Fax Broadcast allows a user to make and send a fax message simultaneously to
multiple destinations using a distribution list. The destinations can include any
other users’ mailboxes, users on another VoiceMemo system connected with
Centigram’s MESA-Net digital network, or outside telephone numbers. For
example, a product manager could disseminate price changes to the sales force with a
copy of the new price list and an attached voice message explaining the changes. Fax
Broadcast messages can be scheduled for future delivery (when rates are lower), and
the Series 6 server can automatically retry calls to numbers that are busy or do not
answer.
with FaxMemo, delivery of incoming faxes can be guaranteed even when the
company or department fax machine is busy, runs out of paper, or is otherwise
disabled. One or more Guaranteed Fax mailboxes are assigned to a hunt group with
the fax machine. When the machine is busy, the incoming faxes are routed to and
stored in the mailboxes; the caller never realizes that the fax did not go directly to a
fax machine. The mailboxes then automatically and continually try to deliver the
stored faxes to the same or another f$x machine.
Fax Publishing
Walkaway Fax
You can configure a FaxMemo mailbox to deliver a voice message and a fax to any
caller on reaching the mailbox. This provides a convenient way to publish frequently
requested information to employee users, customers, or any outside callers.
The caller can reach the mailbox containing the appropriate information directly or
be led by voice prompts through a mailbox tree or chain structure. The mailbox
containing the fax can do either of the following:
a
Play a voice coversheet or a menu or both, giving the caller the choice to
either receive the fax online or enter a telephone number for delivery of
the fax.
l
Immediately begin transmitting the fax.
Walkaway Fax appears to the sender exactly like a regular fax machine. With this
feature, callers dial a telephone number (from a fax machine or a PC running fax
software) and immediately send a fax, without a voice coversheet, directly into a
user’s mailbox. Callers do not have to respond to prompts or monitor the call. The
walkaway Fax Mailbox listens for fax tone while playing a greeting, and if detected,
receives the incoming fax. If none is detected, normal message recording ensues.
1-3
Page 17
FaxMemo Features and Functions
FaxMemo Flexible Configuration
The FaxMemo configuration software includes menu selections so the system
administrator can assign FaxMemo resources to line groups and add the fax options
to existing FCOSs (Features Classes of Service), LCOSs (Limits Classes of Service),
and NCOSs (Network Classes of Service) e
settings can also be used to control fax delivery destinations.
Class of Service Options
RCOS (Restriction Class of Service)
Following are lists of FaxMemo feature, limit, and network options.
Each of these
options is described in detail in chapter 4, Software Configuration Planning.
FCOS Fax Options
4
Receive fax messages
Make fax messages
Give fax messages
Deliver fax to default fax phone number
Deliver fax online
Deliver fax to designated telephone number
User changeable default fax phone number for fax delivery
Fax on demand
Receive fax messages only
Automatic receipt for fax message sent
Fax cover page
Walkaway Fax
Discard fax messages after delivery
Fax verify
Deny user change of fax cover page
Display a FROM field on fax cover pages
Display a promotional message on fax cover pages
Automatic fax retrieval
End of session delivery
Retrieve all unplayed faxes
Receive fax on record timeout
Play fixed initial prompt for walkaway fax
1-4
LCOS Fax Options
l
Maximum number of digits allowed for the fax delivery phone number
l
Number of fax messages per mailbox
e
CNG tone detection length
l
Fax delivery retry frequency
Page 18

Cover Page Options
FaxMemo provides three cover page options for faxes sent out from the server:
FaxMemo Features and Functions
l
Fax delivery retry interval
l
Retention time for played, unplayed, and urgent fax messages
l
Retention time for fax receipts
NCOS Fax Options
l
Make fax message to the network
l
Give fax message to the network
l
Answer fax message to the network
1.
Each mailbox owner can have a personal fax cover page. This option
allows a mailbox owner to fax their own cover. page into their mailbox
(via the User Options Menu). The system sends the personal cover page
with any fax sent from the mailbox to a telephone number. Faxes
retrieved online do not include a cover page.
2.
The system can send a company cover page. If a cover page is put in the
administrator’s mailbox, it becomes the cover page for all faxes sent from
that line group for all mailboxes that do not have a personal cover page.
You can assign separate administrator’s mailboxes, each with a different
cover page, to each outbound line group with fax capability.
3. The system generates a default cover page for any mailboxes that do not
have a personal or company cover page. The default cover page contains
the following information:
l
A “To” field showing the name of the sending mailbox
l
A “From” field, indicating the system or service that the fax was
sent from (optional)
l
The number of pages in the fax
l
A time field, showing the time that the fax was sent, including a
time zone designator
l
The date that the fax was sent from the mailbox (not the date the
fax was sent to the mailbox)
e
A promotional or greeting message of up to 60 characters
(optional)
Note:
If feature bit 200 is not enabled for a mailbox, the system does not
send any cover page.
l-5
Page 19
FaxMemo Features and Functions
Billing and Statistics
The Series 6 server keeps records of fax traffic, both at the system and mailbox level.
Mailbox owners can be billed for faxes sent and.received, either in terms of the
number of faxes, or in terms of the total number of pages
Series 6 servers offer two other methods of billing mailbox owners for fax usage.
transactions are recorded in Call
to a computerized billing system for interpretation and billing. Or the server can
place fax calls using mailbox owners’ long distance carriers and calling card numbers.
This can eliminate the need for any further billing, because there is no toll incurred
by the server.
Fax
statistics
storage.
See the
topics.
FaxMemo
FaxMemo Hardware
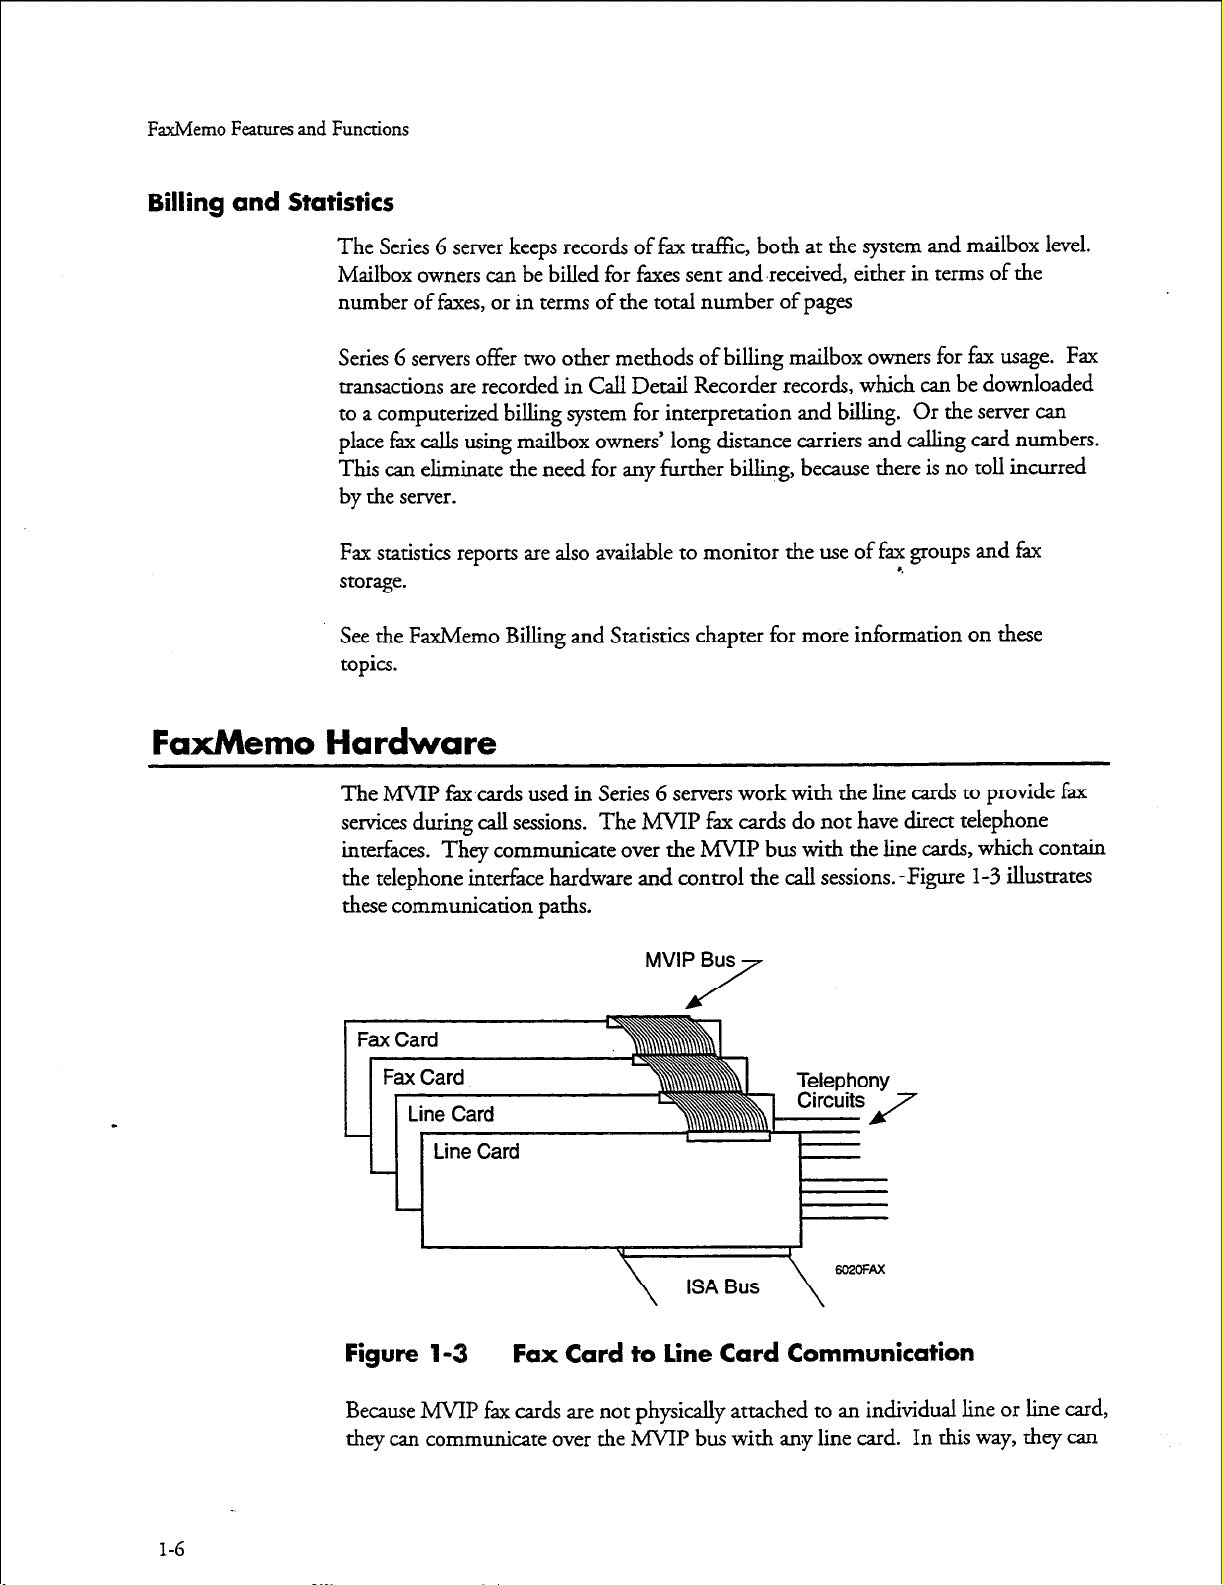
The MVIP faxcards used in Series 6 servers work with the line cards to provide fax
services during call sessions.
interfaces. They communicate over the MWP bus with the line cards, which contain
the telephone interface hardware and control the call sessions. -Figure
these communication paths.
Detail
reports are also available to monitor the use of fax
Billing and Statistics chapter for more information on these
The MVIP fax cards do not have direct telephone
Recorder records, which can be downloaded
groups
4
and fax
l-3
illustrates
Fax
MVIP Bus
/
7
Figure 1-3 Fax Card to Line Card Communication
Because MVIP fax cards are not physically attached to an individual line or line card,
they can communicate over the MVIP bus with any line card.
In this way, they can
1-6
Page 20
serve as a fax resource to any line card. MVIP fax cards can be a dynamicallyallocated resource pool for several line card groups, or they can be assigned to a single
line group. When a fax group is assigned to a line group and the number of fax
channels is the same as the number of line ports, the fax group is
dedicated fax group, there is always a fax resource available for every line port.
See the Hardware Installation l%nnin g chapter for a further explanation of
FaxMemo hardware.
Equipment Supplied With FaxMemo
Each FaxMemo package includes the following items:
l
Two 3.5-&h FaxMemo Optional Feature software ‘diskettes
l
One or more MVIP Faxh4erno cards with two, four, or eight-port
capacities
l
One V&Nemo F’cMemo Manual (this document)
l
The number of user guides ordered
FaxMemo Features and Functions
a’tdicated.
With a
If any of these items are missing, contact your Centigram distributor.
Series 6 Server Requirements
FaxMemo can be installed and enabled in any Series 6 server with VoiceMemo
Release 5.02 Revision A software or later. Your system must have Release 6.0 or later
to use MSQP FaxMemo cards that work with line cards on the MVIP bus.
Your system must have one empty card slot for each FaxMemo card to be installed.
You must take the sewer out of service for about I5 to 30 minutes for FaxMemo
card installation. The total time required depends on the number of FaxMemo cards
that you will iustall. tier you install the hardware and configure the software, you
must activate the new corr&uration, resulting in a momentary loss of call processing
capabilities.
Note:
If your Series G server was ordered as a new system with the
FaxMemo optional feature, the FaxMemo cards and software were
installed at the factory.
1-7
Page 21

Page 22
2 Planning Outside Caller Access
With the FaxMemo optional feature, outside callers can leave fax messages for
mailbox owners just as if they were sending a fax to a fax machine.
instances, callers believe they are dialing directly to a fax machine, and are not
prepared to perform any special functions to deliver a fax. Therefore, for the fax
mail application to be effective, the system must allow the callers to deposit faxes into
the appropriate mailboxes without any unexpected requirements.
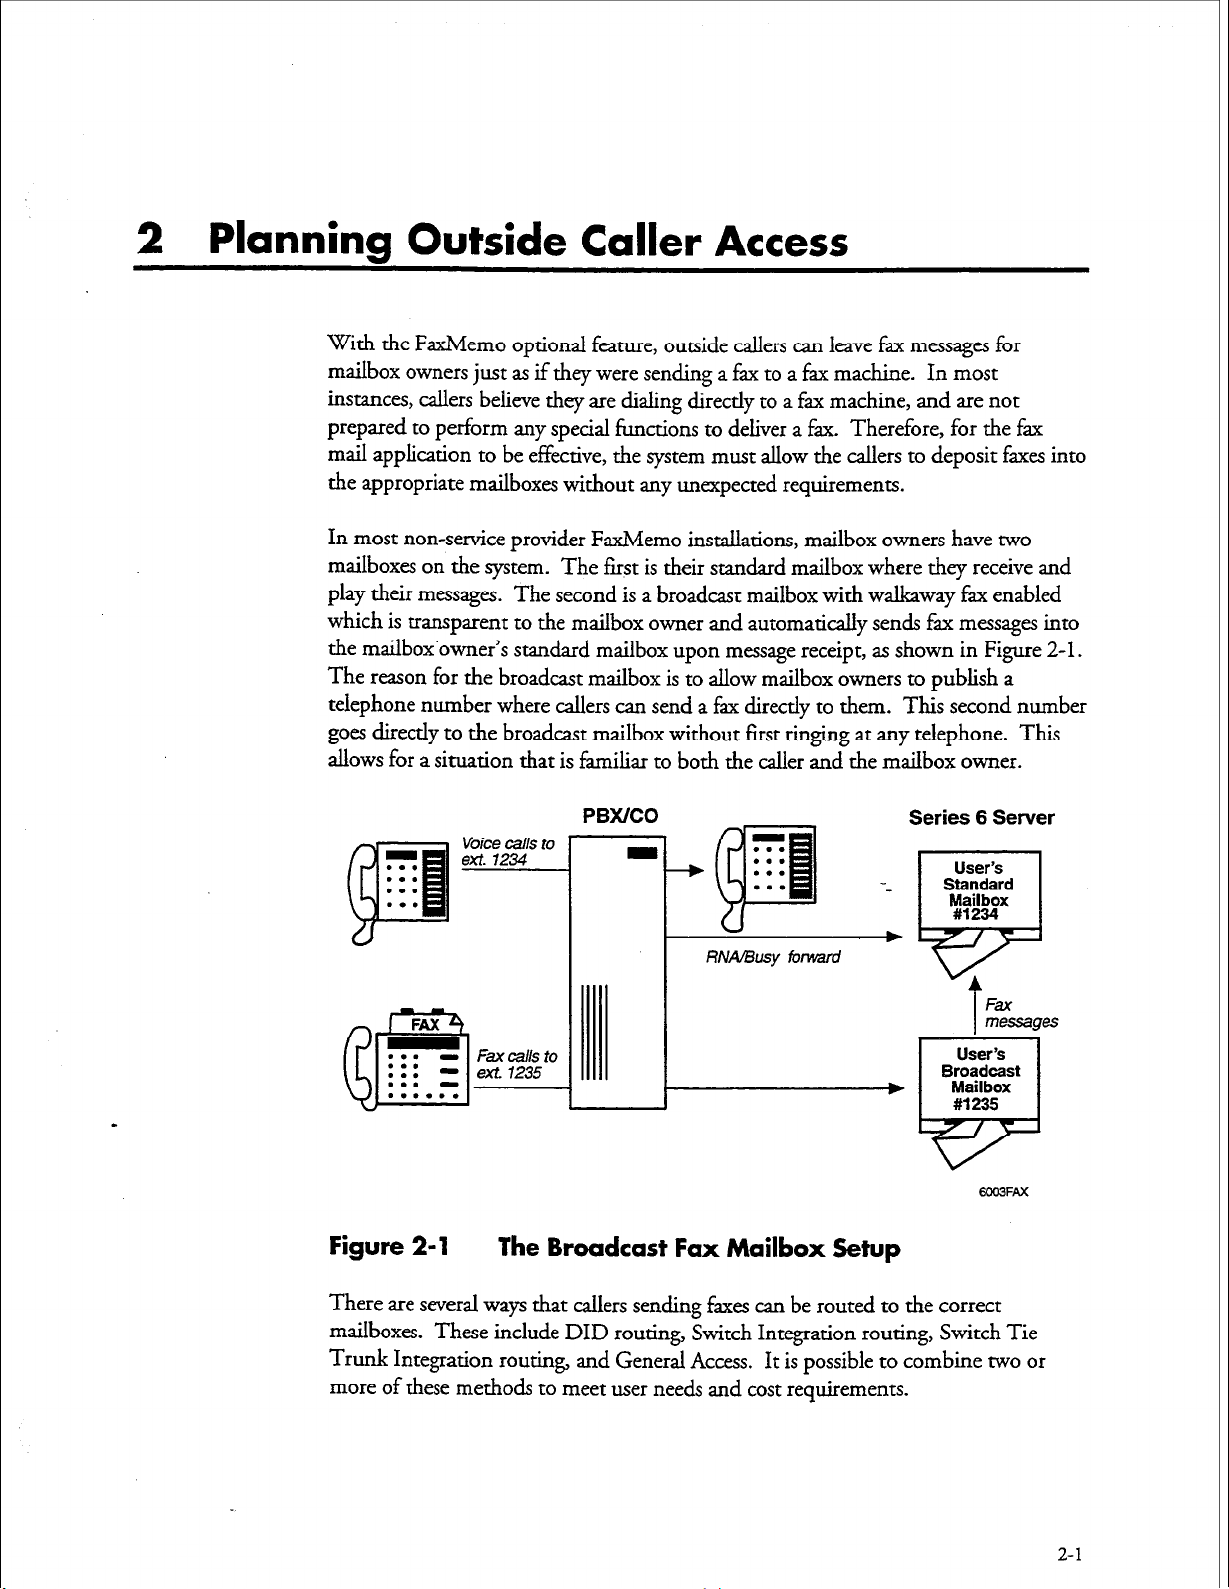
In most non-service provider FaxMemo installations, mailbox owners have two
mailboxes on the system. The first is their standard mailbox where they receive and
play their messages. The second is a broadcast mailbox with walkway fk enabled
which is transparent to the mailbox owner and automatically sends fax messages into
the mailbox’owner’s standard mailbox upon message receipt, as shown in Figure 2-1.
The reason for the broadcast mailbox is to allow mailbox owners to publish a
telephone number where callers can send a fax directly to them. This second number
goes directly to the broadcast mailbox without first ringing at any telephone. This
allows for a situation that is familiar to both the caller and the mailbox owner.
PBX/CO
Voice calls to
ext. 1234
~
. . .
. . .
. . .
. . .
In most
RNA/Busy forward
Fax cells to
ext 1235
Figure 2-l The Broadcast Fax Mailbox Setup
There are several ways that callers sending faxes can be routed to the correct
mailboxes. These include DID routing, Switch Integration routing, Switch Tie
Trunk Integration routing, and General Access. It is possible to combine two or
more of these methods to meet user needs and cost requirements.
2-1
Page 23
Planning Outside Caller Access
Note:
DID Fax Call Routing
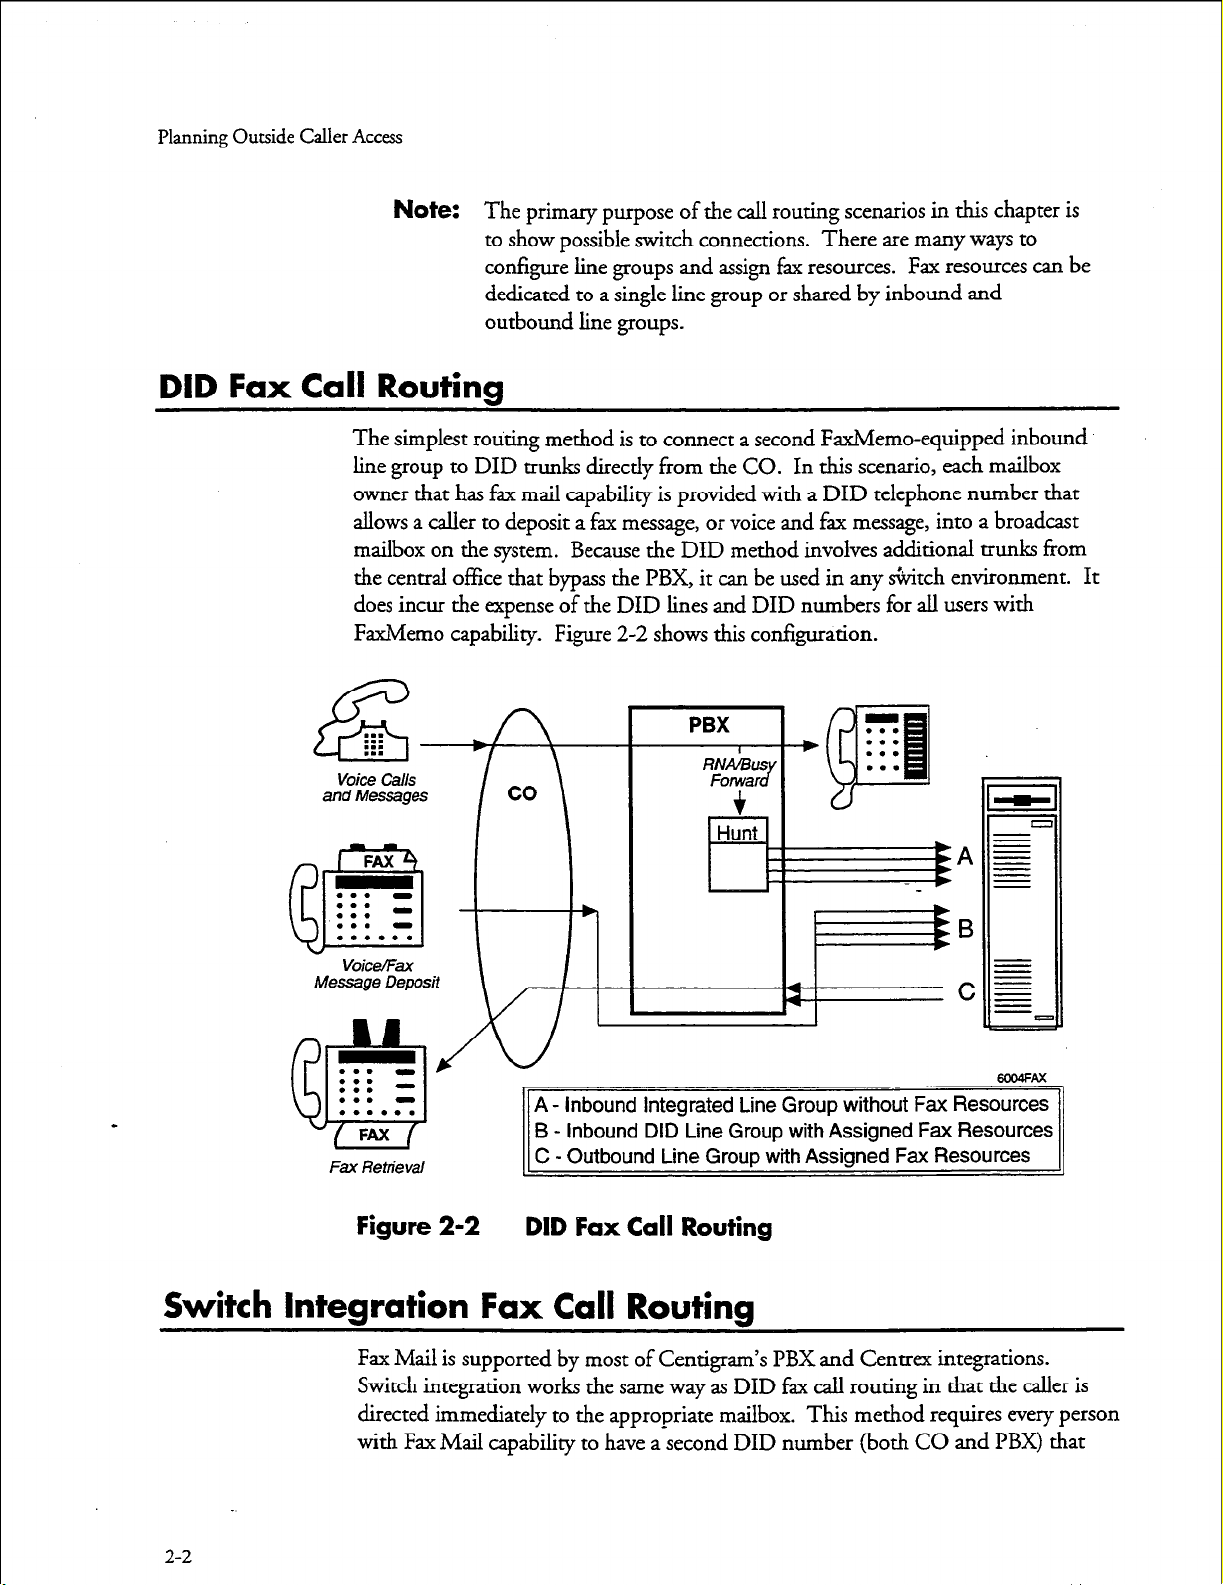
The simplest routing method is to connect a second FaxMemo-equipped inbound
line group to DID trunks directly from the CO. In this scenario, each mailbox
owner that has fax mail capability is provided with a DID telephone number that
allows a caller to deposit a fax message, or voice and fax message, into a broadcast
mailbox on the system. Because the DID method involves additional trunks from
the central office that bypass the PBX, it can be used in any &itch environment. It
does incur the expense of the DID lines and DID numbers for all users with
FaxMemo capability. Figure 2-2 shows this configuration.
and Messages
The primary purpose of the call routing scenarios in this chapter is
to show possible switch connections. There are many ways to
configure line groups and assign fax resources. Fax resources can be
dedicated to a single lime group or shared by inbound and
outbound line groups.
A - Inbound Integrated Line Group without Fax Resources
B - inbound DID Line Group with Assigned Fax Resources
Fax Retrieval
Figure 2-2
C - Outbound Line Group with Assigned Fax Resources
DID Fax Call Routing
Switch Integration Fax Call Routing
Fax Mail is supported by most of Centigram’s PBX and Centrex integrations.
Switch integration works the same way as DID fax call routing in that the caller is
directed immediately to the appropriate mailbox. This method requires every person
with Fax Mail capability to have a-second DID number (both CO and PBX) that
2-2
Page 24
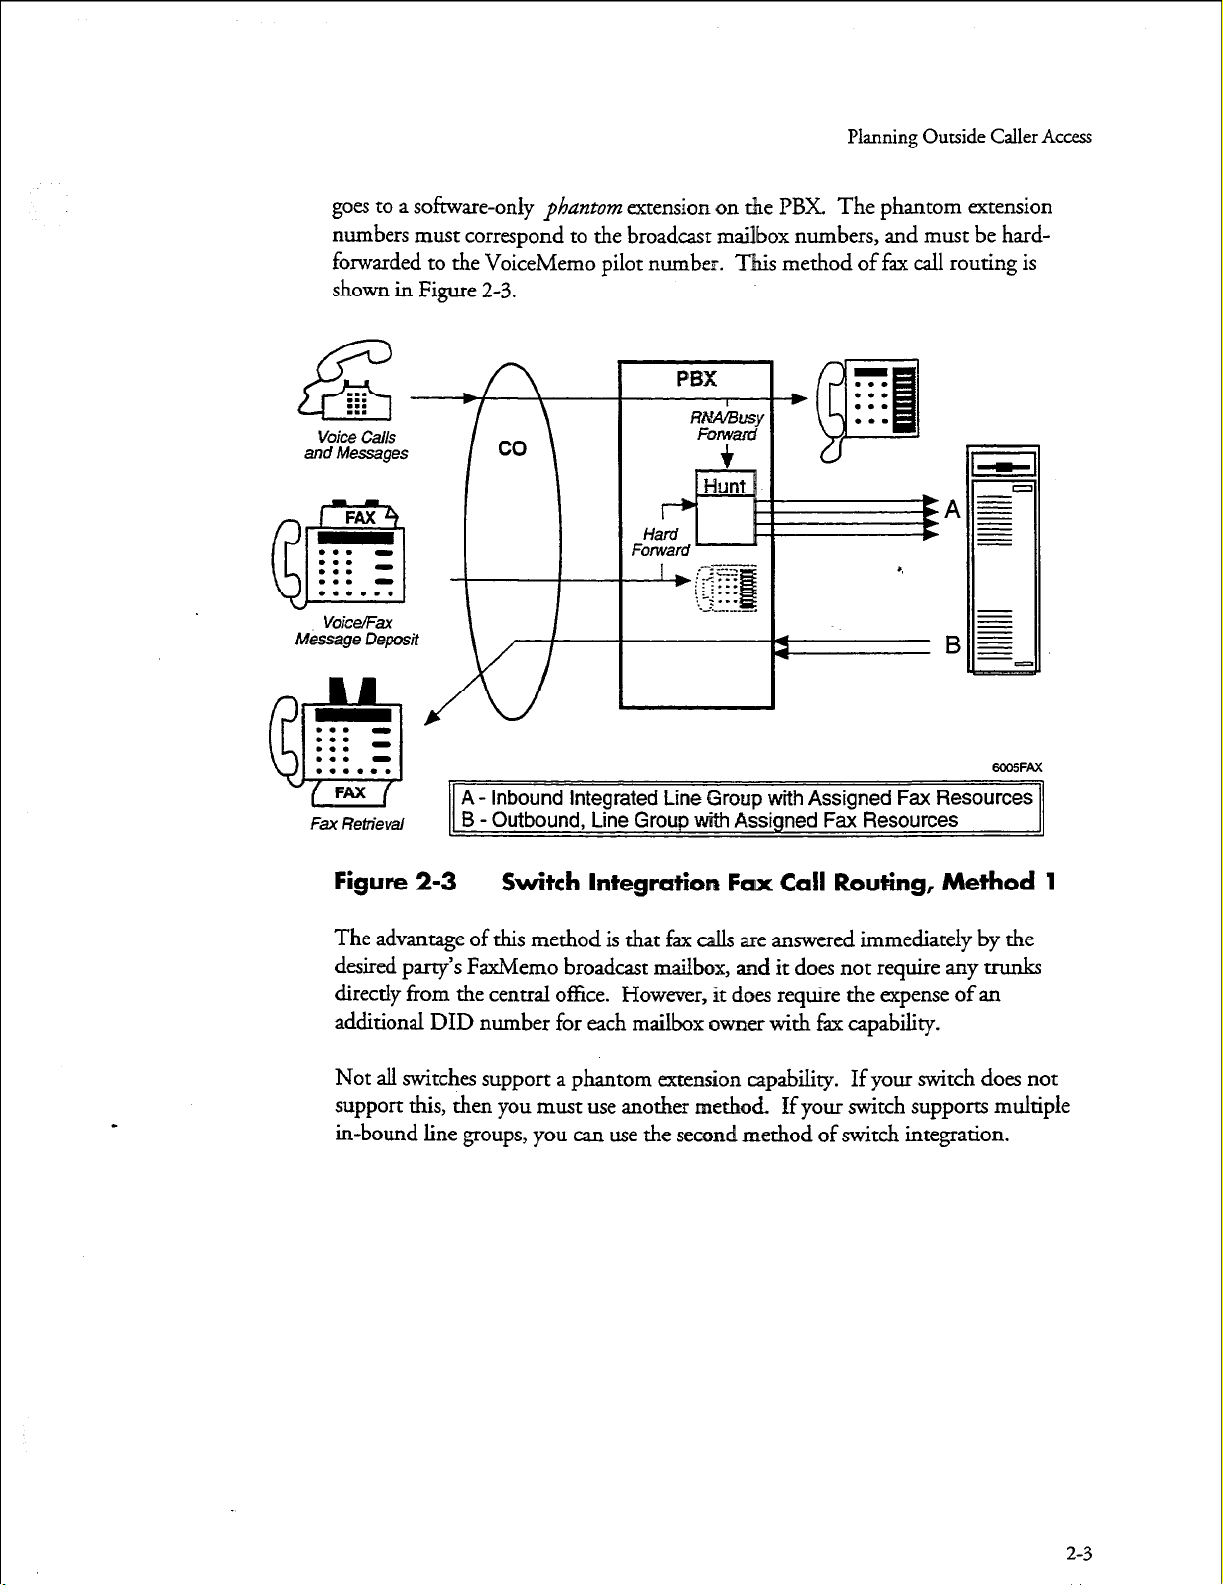
goes to a software-only phantom extension on the PBX. The phantom extension
numbers must correspond to the broadcast mailbox numbers, and must be hardforwarded to the VoiceMemo pilot number. This method of fax call routing is
shown in Figure 2-3.
voice Calls
and Messages
FAX
. . . -
. . .
. . . -
. . . -
m-9
Planning Outside Caller Access
A - inbound Integrated Line Group with Assigned Fax Resources
Fax Retrieval
Figure 2-3
The advantage of this method is that fax calls are answered immediately by the
desired party’s FaxMemo broadcast mailbox, and it does not require any trunks
directly from the central office. However, it does require the expense of an
additional DID number for each mailbox owner with fax capability.
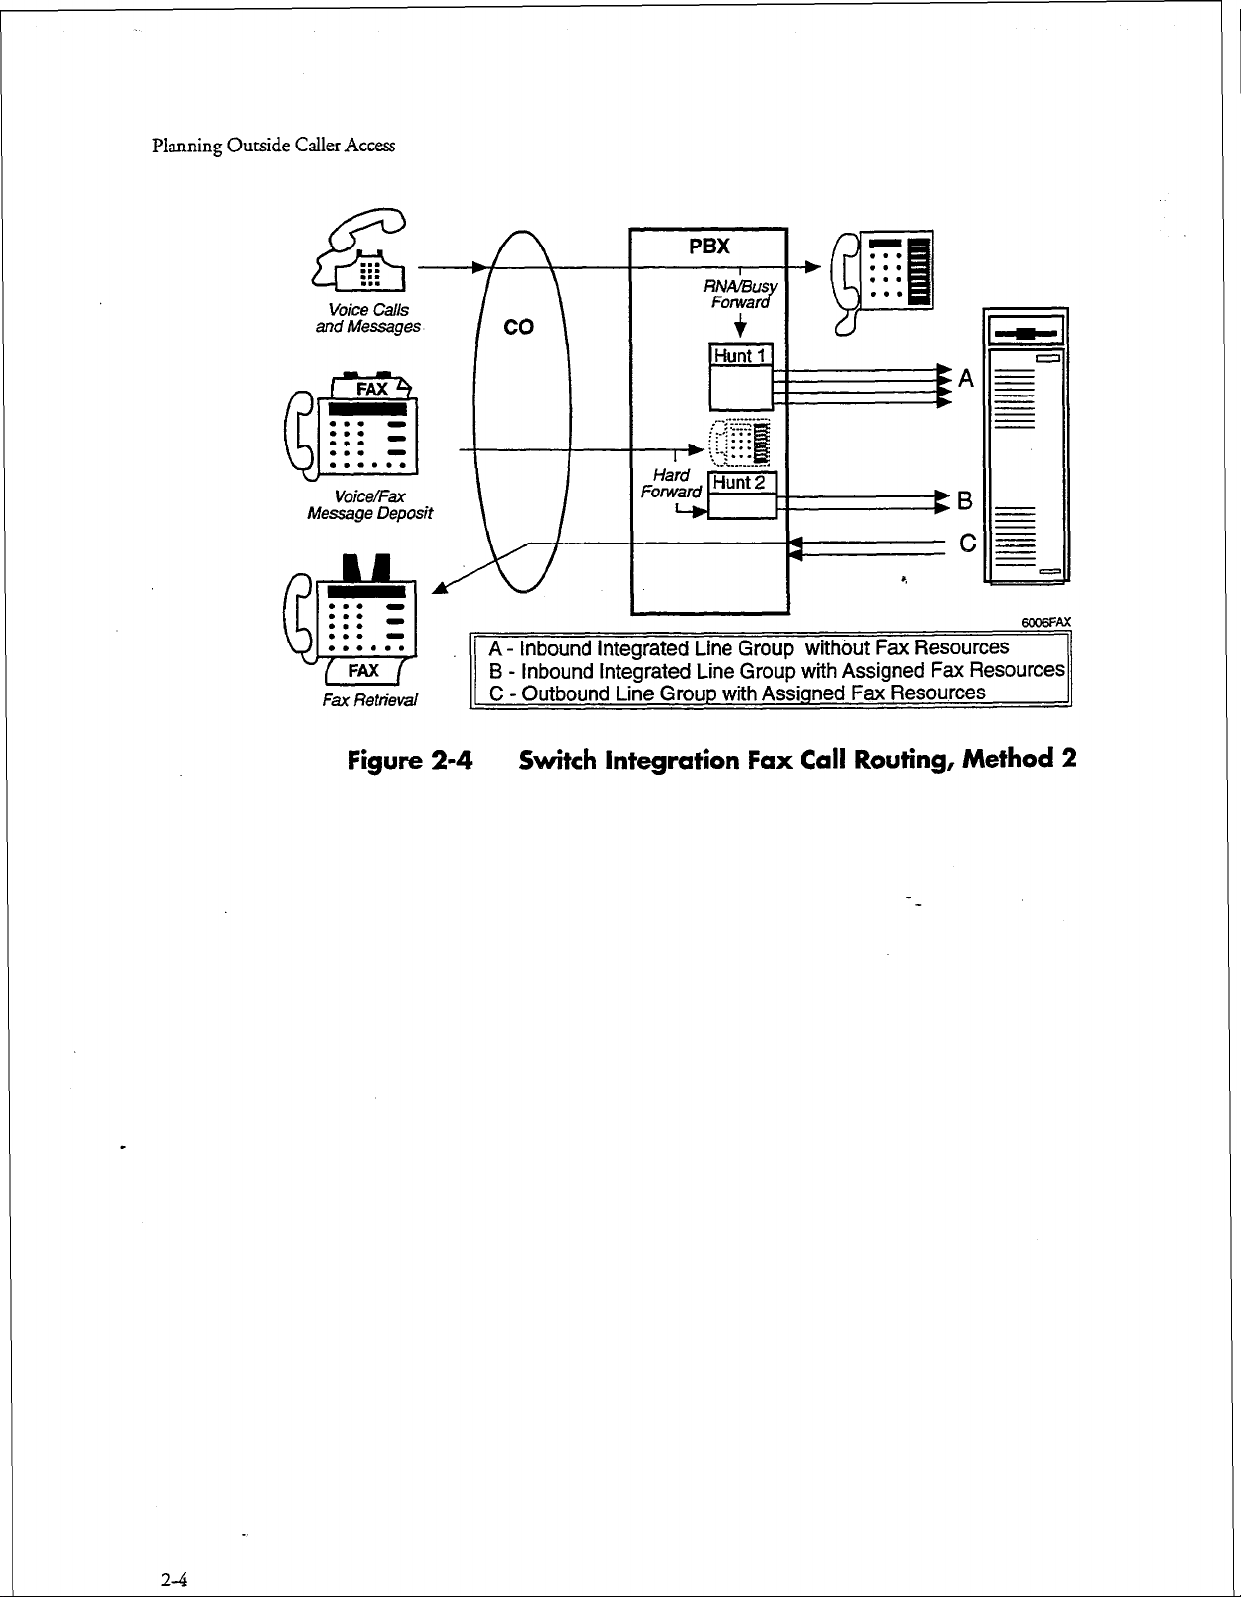
Not all switches support a phantom extension capability. If your switch does not
support this, then you must use another method If your switch supports multiple
in-bound line groups, you can use the second method of switch integration.
B - Outbound, Line Group with Assigned Fax Resources
Switch Integration Fax Call Routing, Method 1
2-3
Page 25
Planning Outside Caller Access
Voice Calls
and Messages
FAX
. . . -
. . . -
. . .
. . . -
. . . . . .
@3
VoiceEax
Message Deposit
PBX
RI&BUS
Fonvar
J
+
Hunt 1
El
.._..__.-..
-gzB
t
..A..........
d&l
. . . a
. . . -
. . .
. . . a
. . . . . .
w -
FAX
Fax Retrieval
Figure 2-4
A+-
A - Inbound Integrated Line Group without Fax Resources
B - Inbound Integrated Line Group with Assigned Fax Resources
C - Outbound Line Group with Assigned Fax Resources
L
Switch Integration Fax Call Routing, Method 2
a
ema=Ax
2-4
Page 26
Planning Outside Caller Access
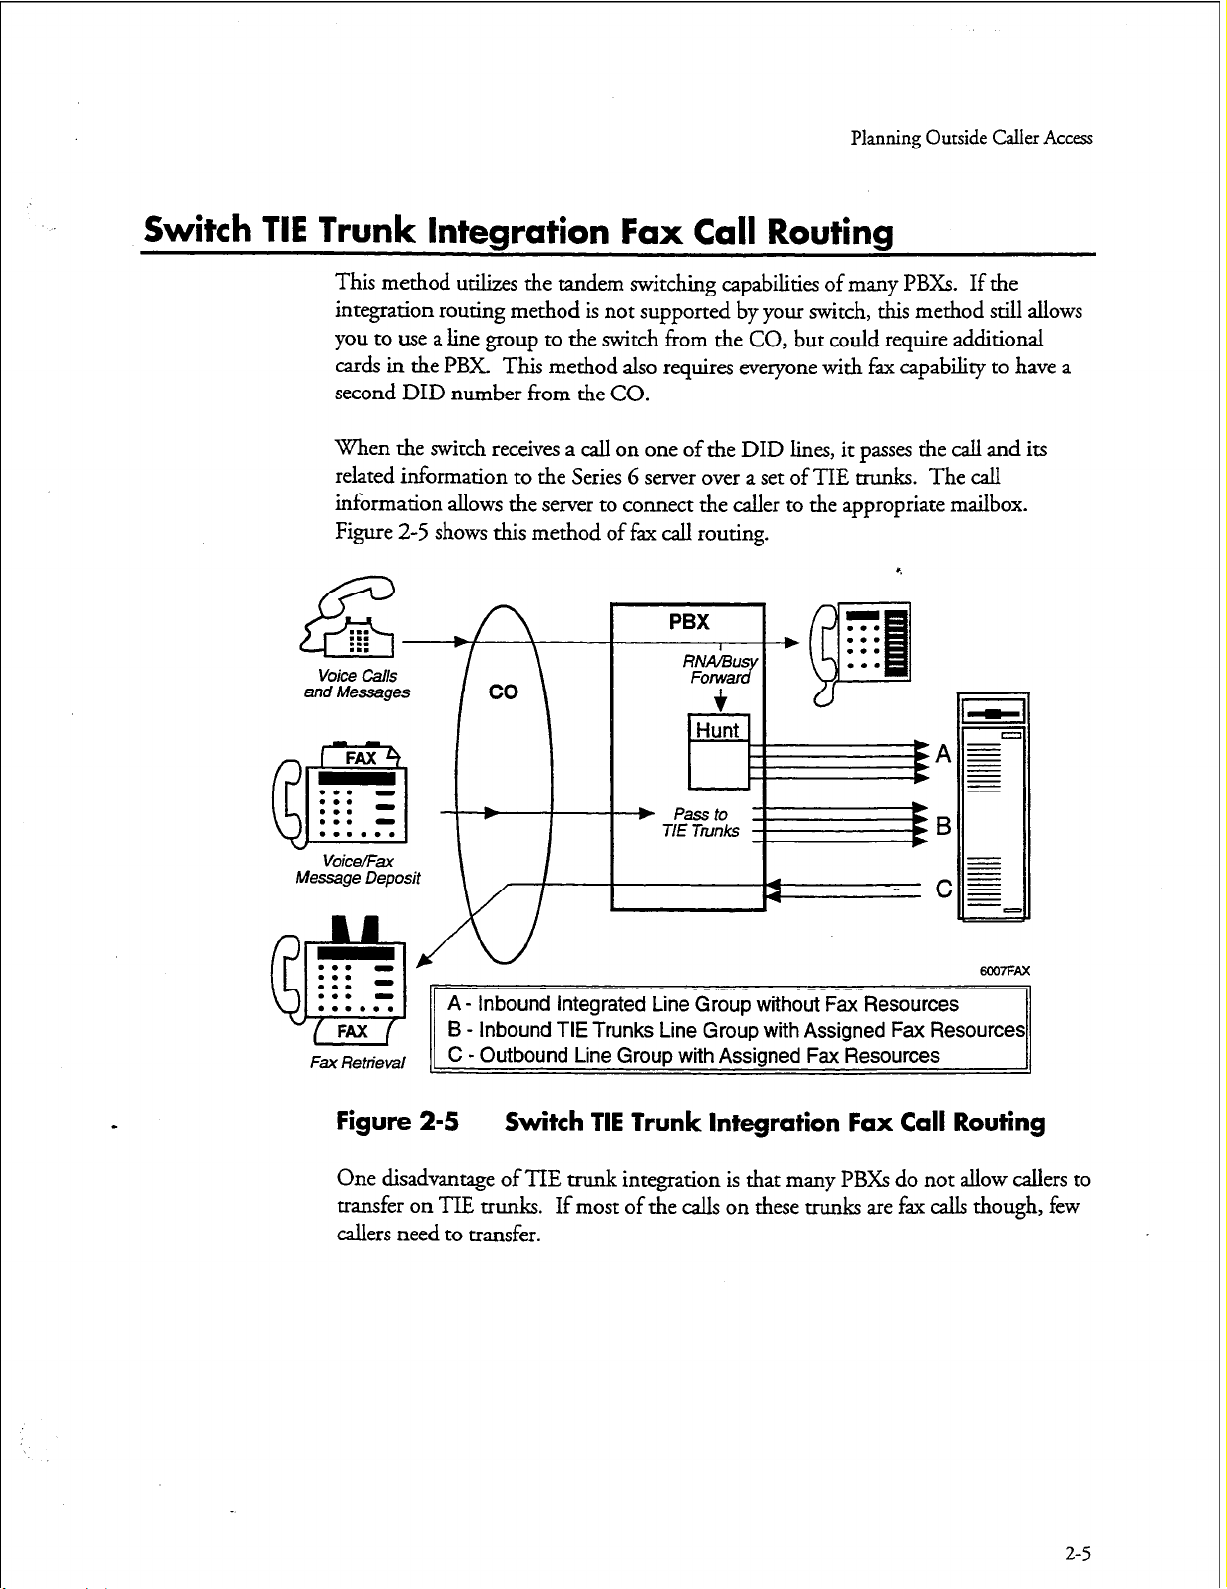
Switch TIE Trunk Integration Fax Call Routing
This method utilixes the tandem switching capabilities of many PBXs. If the
integration routing method is not supported by your switch, this method still allows
you to use a line group to the switch from the CO, but could require additional
cards in the PBX This method also requires everyone with fax capabiliry to have a
second DID number from the CO.
When the switch receives a call on one of the DID lines, it passes the call and its
related information to the Series 6 server over a set of TIE trunks. The call
information allows the server to connect the caller to the appropriate mailbox.
Figure 2-5 shows this method of fax call routing.
. . .
. . .
:::
E
voice call.5
and Messages
vok9/mt
Message Deposit
m7FAx
A - Inbound Integrated Line Group without Fax Resources
B - Inbound TIE Trunks Line Group with Assigned Fax Resources
Fax Retrieval _
C - Outbound Line Group with Assigned Fax Resources
Figure 2-5 Switch TIE Trunk Integration Fax Call Routing
One disadvantage of TIE trunk integration is that many PBXs do not allow callers to
transfer on TIE trunks. If most of the calls on these trunks are fax calls though, few
callers need to transfer.
2-5
Page 27
Planning Outside Caller Access
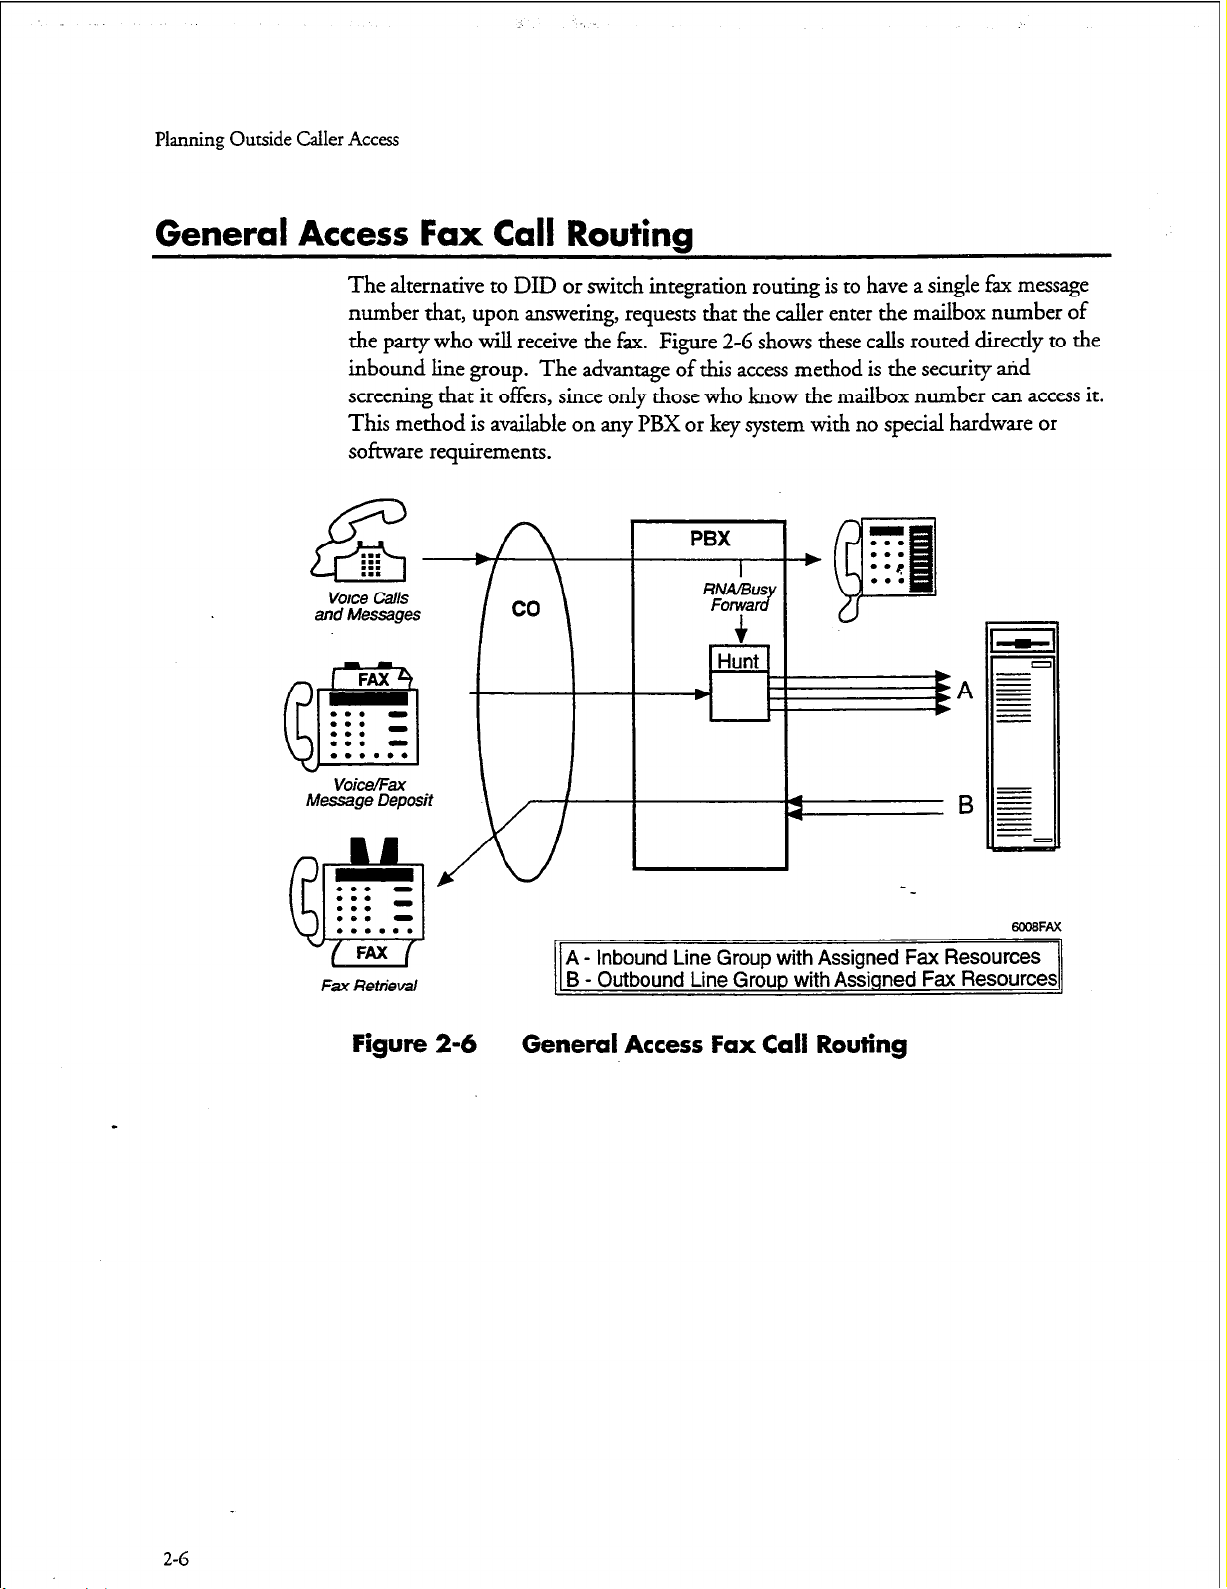
General Access Fax Call Routing
The alternative to DID or switch integration routing is to have a single fax message
number that, upon answering, requests that the caller enter the mailbox number of
the party who will receive the fax.
inbound line group. The advantage of this access method is the security arid
screening that it offers, since only those who know the mailbox number can access it.
This method is available on any PBX or key system with no special hardware or
software requirements.
Voice calls
and Messages
co
Figure 2-6 shows these calls routed directly to the
PBX
I
RNA/BUS
Forwe JJ
I \
Hunt
-43
a
A - Inbound Line Group with Assigned Fax Resources
Fax Retrieval
Figure 2-6 General Access Fax Call Routing
B - Outbound Line Group with Assigned Fax Resources
2-G
Page 28

3 Hardware Installation Warming
Planning the hardware to support FaxMemo involves:
l
Knowing how you will route fax calls to the Series G server (Chapter 2)
a
Understanding the relationship of fax cards to line cards
l
Understanding the requirements of the FaxMemo application(s) that you
will use on your system
l
Knowing the expected volume of fax call traffic for your system
0
Following the five hardware configuration rules
You need all of this information to fill out the FaxMemo Card Worksheets.
*,
How Fax
Cards and
Fax cards and line cards work together to provide fax services on a Series 6 server.
The line card handles all line signaling, supetision, and voice/f+ transmissions.
The fax cards have no direct connection to telephone services, but communicate with
the line cards over the MVIP bus, as shown in Figure 3-l.
line Cards Communicate
MVIP Buss
Figure 3-l Fax Card to line Card Communication
A voice port requests a fax resource over the ANIP bus when it detects an incoming
fax tone during a walkaway fax call session or when a user pushes a key to leave a fax.
3-1
Page 29
Hardware Installation Planning
Once an association with a fax channel is made, the voice port passes all fax-related
data to the fax channel, which converts it into a format suitable for storage on the
system hard disks. When the fax transmission/reception is complete, the voice port
releases the fax channel and continues with the call session. The fax channel is
immediately available to service other voice ports.
FaxMemo Application Port Requirements
Each FaxMemo application has unique requirements for fax-equipped ports on a
Series 6 server. You can combine any or all FaxMemo applications on the same line
groups, provided you allow enough FaxMemo cards to carry the call traf&.
Fax Port Planning for Fax Mail
For general purpose Fax Mail between outside callers and mailbox owners, and
between mailbox owners, you need fax groups connected with both inbound and
outbound line groups. The requirements parallel those for voice message handling.
Inbound line groups with fax are required for outside callers or users depositing faxes
in mailboxes and for users retrieving faxes online. Outbound line groups with fz are
required for users to deliver their faxes to a fax machine, or to send a fax to an offsystem number. (The “give fax message” option is handled by software and does not
use a fax port.)
Fax Port Planning for Fax Broadcast
Fax Broadcast is like Fax Mail, but with many recipients for each fax message.
Broadcast allows a user to send a fax message to a number of people by using the
VoiceMemo distribution list features. The sender uses an inbound fax-equipped
port to send the fax to a personal distribution list or to a master broadcast mailbox.
The server distributes the fax directly to on-system users (no fax port is needed for
distribution). Fax groups connected with inbound and outbound line groups are
required for users to retrieve their faxes as described in Fax Mail.
If users broadcast often to off-system numbers, you must size the system with the
appropriate number of outdialing ports that can use fax resources.
Fax Port Planning for Guaranteed Fax
In Guaranteed Fax, you include FaxMemo mailboxes in a hunt group with company
or department fax machines to handle the overflow when the machines are busy or
out of service. Guaranteed Fax requires an inbound line group with fax for the
mailboxes on the hunt group. Faxes outbound from these mailboxes to fax machines
need outbound fax port capability.
port capability to Fax Mail or Fax Broadcast outbound ports.
Fax
If traffic allows, you can assign the outbound
3-2
Page 30
Fax Port Planning for Fax Publishing
A Fax Publishing application usually has some number of documents stored in
special fau mailboxes on the Series G server. Callers that reach the system use their
push-button phones to request that certain documents be faxed to them. Fax
Publishing requires a minimum number of fax channels connected with inbound
line groups to place the documents in the system for retrieval.
If you allow callers to receive the fax documents online (that is, while calling from a
fax machine), you need fax groups connected with an inbound line group. If you
require callers to input the phone number of their fax machine for delivery, you only
need fax groups connected with an outbound line group. If you offer callers their
choice of methods, you need fax groups for both inbound and outbound line
groups. You might require dedicated fax groups, depending on the number of calls
expected and the number of faxes published sirnultaneonsly.
Fax Port Planning for Walkaway Fax
Walkaway Fax is a special feature that you can activate for Fax Mail, Fax Broadcast,
and Guaranteed Fax applications. When Walkaway Fax is activated, callers can send
from a normal fax machine (or PC with a fax card) to the Series G server just as if
they were sending to another fax machine - they do not need to listen or respond to
any voice prompts before sending a fax.
Hardware Installation Planning
Walkaway Fax by itself only requires fax groups connected with inbound line groups
to deposit faxes. Depending on which other FaxMemo applications you are using
with Walkaway Fax, mailbox owners may be able to use the same inbound line
group to retrieve the faxes on line, or you may need fax groups on an outbound line
group so that users can deliver their faxes to fax machines.
FaxMemo Hardware Configuration Rules
a
Rule #l: Every voice port that either sends or rece’nres a fax must have
It is easier to plan fax cards if you familiarize yourself with these five hardware
configuration rules.
access to a fax channel.
Any call that either deposits a fax or retrieves a fax message on line (caller is calling
from a fax phone) must be answered by a voice port with access to a fax channel.
Likewise, any outbound call that delivers a fax must be made from a voice port with
access to a fax channel. Voice ports in line groups that are not assigned to a fax
group cannot send or receive faxes.
Fax channels do not have to be assigned in a one-to-one relationship with voice
ports. Because the FaxMemo cards use the h4VIP bus to communicate with the line
3-3
Page 31

Hardware Installation Planning
cards and do not have direct connections to specific phone lines, any channel on a
FaxMemo card
addition, fax channels are allocated dynamically - once a channel completes a
session, it is available to service another session on another port.
See rule #2 and rule #3 for more information on assigning fax channels to voice
ports.
can service any port on any line
card in the same module. In
Rule #2: A fax group can be shared by more than one line group.
A fax group (a defined set of fax channels) can be assigned to more than one line
group, and its channels are then shared by the voice ports in those line groups. Fax
groups can be shared by both inbound and outbound line groups. Figure 3-2 shows
a shared fax group.
There can be more voice ports than fax channels - the fax channels are allocated as
they are needed for the different call sessions. If all of the fax channels in the fax
group are in use by call sessions and another call session requests a fax resource, the
system informs the caller that the fax cannot be sent/received.
8.
Rule #3: A fax group must be dedicated to a line group to guarantee
availability of a fax resource.
When there is a one-to-one relationship between the number of voice ports in a line
group and the number of channels in its associated fax group, the fax group is
considered
line groups that carry a lot of fax tra%c will never be unable to get a fix resource.
A Series 6
‘--- _____--____-------------- --/
---w-_-c
dedicated
server
*-
to the line
can have dedicated and shared fax groups, as show in Figure 3-2.
group.
This configuration ensures that voice ports in
Fax Group 2 shared
y Line Groups 2 and 3
\
1
I
I
I
I
/
6027FAx
34
Figure 3-2
Fax Group to line Group Relationships
Page 32

Hardware
Installation
Planning
Rule #4:
Rule #5:
Line groups connected to fax groups can still perForm all other
VoiceMemo functions.
Ports that are equipped for FaxMemo can per&m any VoiceMemo function. For
example, the same outbound line group that delivers faxes can also make message
delivery and paging calls. L&wise, the same line group that performs telephone
answering functions can also receive inbound faxes. There is no need to dedicate line
groups to perform FaxMemo functions.
It may be a better use of system resources to have a separate
line group for some fax applications.
In most FaxMemo installations, every line group in the system does not need a
dedicated fax group. The only time a fax channel is absolutely required on an
inbound call is when a caller sends a fax. The only time a fax channel is required on
an outbound call is when the system needs to deliver a fax.
For some fax applications, such as Fax Mail, a fairly low percentage of calls involve
fax transactions. The fax traffic for these applications probably can be carried by a
single fax group that is shared by incoming and outgoing line groups.
of fax channels in the fax group should be large enough to provide an acceptable
grade of service to fax callers.
The number
For other fax applications, such as Fax Publishing, it is likely that every call involves a
fax transaction. You may want to have a separate line group for these applications
and dedicate a fax group to the line group so that there is always a fax channel for
every voice port. The line group may be incoming or outgoing, depending on
whether callers must call in from a fax machine and receive faxes online (incoming),
or whether they can enter a phone number for the fax to be delivered (outgoing).
By configuring some fax groups as shared and others as dedicated, you can utilize
your fax resources to provide an appropriate grade of service for each fax application.
Note:
If a caller on an inbound line group tries to send a fax when there
are no resources available, the system plays a prompt telling the
caller that it cannot process the request at that time.
fax resources available for an outgoing fax call, the server retries the
call (according to LCOS settings) until one is available.
FaxMemo Card Planning Worksheet
With the information that you have gathered from chapters 2 and 3, you should be
able to fill in the FaxMemo Card Planning Worksheets. A sample worksheet
follows. Blank worksheets for photocopying are in the worksheets section at the end
of this manual. Make a copy for each server module in which you are installing
FaxMemo cards.
If there are no
3-5
Page 33

Hardware Installation Planning
For each fax card in each module, enter the Faxhkmo card serial number, the system
slot number, the number of channels on the fax card, and the base I/O address (see
Technical Reference 1904). Identify the fax group that each fax channel belongs to,
and the line group(s) that it is connected with, and whether the fax group is
dedicated to one line group or shared.
Page 34

FaxMemo Card Planning Worksheet
Hardware
Hardware Installation Planning
Backplane
Module No.
1
2
I 2 I 14
Confiauration
Fax Group #: 1
Connect with line Group(s): I Dedicated El Shared 0
(module:slot:channel)
I
I
Slot No. Serial No. Channels
15
I
14 I
I 15 I
Module #: 1 Total Number of Channels: 16
Triplet
1:15:0
1:15:1
FaxMemo
I
I
I
Card
413 0 100
Number of Base I/O
/ Address 1
0 I 128 I
6
512
Triplet
(module:slot:channel)
1:14:0
1:14:1
I 100 I
Prepared By:
Installed By:
I
I
I
1:15:2
1:15:3
1:15:5
1:15:6
1:15:7
I
I
I
1:14:2
1:14:3
1:14:4
1:14:5
1:14:6
1:14:7
Date:
Date:
3-7
Page 35

Page 36

Hardware Change Task list
Pagelofl
VoiceMemo Release G.OA and later
Task
FaxMemo Hardware Changes
Replace an MVIP Fax Card
Install an MVII? Fax Card ........................................................................ CP 7510
Remove an MVIP Fax Card
Procedure
.................................................................
..................................................................... CP 7511
CP 2146
Page 37

Page 38

Replace an MVIP Fax Card
This procedure describes how to replace an MVIP fax card in a Series 6 server.
DANGER!
cd146
Page 1 of2
VoiceMemo Release G.OA and later
Disconnect the system from its power source before connecting cables,
components, or both.
A
f
CAUTION!
Protect your system from ESD damage during handling of all
components.
WARNING!
This process requires the module to be shut down, resulting in loss of
call processing capabilities. Centigram recommends that you perform
thi s procedure during periods of low call traffic.
Note:
@2l Observe Precautions
You can find ‘IRS referenced in this procedure in the Ce&gnzm Series G :
lZej4ffence Mand.
8.
Te
1. Put on a grounded wrist strap, attaching the other end to the Series 6 server. Doing
so protects the component from electrostatic discharge.
2. Shut down the system, press the reset button, and turn off the power.
CAUTION!
Removing a component while the power is on can severely
ai
A
3. Wait one minute after you turn off the power before you remove any components.
The hard disk should stop spinning and be quiet.
4. When removing a component, place it on a non-conductive surface, such as an anti-
static bag. Make sure you have the anti-static bags required before you begin.
damage both the component you are working on and others.
@IQ Before You Begin
5. Configure the fax card.
cl? 5700
TR 1904
D0CRcv.A
Page 39

GP 2146
Page 2 of 2 Release G.OA and later
SFP
@D Remove the Fax Card
6. Remove the cover on the system. On a Model 640, remove the front panel of the
CPU assembly.
7. Identify the fax card to remove.
8. Using the plastic loops, remove the MVIP cable. You only need to remove the cable
from enough cards so that you can access the fax card.
9. Use a screwdriver to unfasten the bracket screw that holds the fax card to the yd cage.
10. Grasp the fax card firmly, and pull it straight out.
11. Place the fax card on a static bag.
CD Install the New Fax Card
12. Pick up the new fax card. Hold it with the backplane connector facing away from
you.
13. Insert the fax card into the alignment grooves of the card cage.
Rei%m2ce
.l4. Slide the fax card along the grooves until the fax card backplane connector is
touching the corresponding connector on the backplane.
15. Be sure that the two connectors are properly aligned, then press firmly on the edge
of the fax card until the connectors are fully seated.
16. Tighten the bracket screw that holds the fax card in the card cage.
17. Reconnect the MVIp cable to all appropriate cards.
18. Replace the cover on the system.
19. Restore power to the server.
-
20. If you installed the new card in a different slot, or if the replacement card is not
identical to the card that you removed (same number of channels, same base I/O
address), delete the old card and add the new card to the Resource Manager.
Page 40

Install an MYIP Fax Card
This procedure describes how to install an MVIP fax card in a Series 6 server.
DANGER!
Disconnect the server from irs power source before connecting cables,
components, or both.
CAUTION!
07510
Page 1 of 2
VoiceMemo Release 6.OA and later
Protect your server
components.
from ESD damage during handling of all
WARNING!
This process requires the module to be shut down, resulting in loss of
call processing capabilities. Centigram recommends that you perform
this procedure during periods of low call traffic.
Note:
Step
You can find TRs referenced in this procedure in the Centigram Series G
Reference
Manual.
@II Observe Precautions
1. Put on a grounded wrist strap, attaching the other end to the Series 6 server. Doing
so protects the component from electrostatic discharge.
2. Shut down the server, press the reset button, and turn off the power.
Technical
Reference
CAUTION!
Removing a component while the power is on can severely
a
A
3. Wait one minute after you turn off the power before you remove any components.
The hard disk should stop spinning and be quiet.
4. When removing a component, place it on a non-conductive surface, such as an antistatic bag. Make sure you have the anti-static bags required before you begin.
damage both the component you are working on and others.
@I9 Install the Fax Card
5. Set switches on the MVIP fax card.
6. Remove the cover on the server. On a Model 640, remove the front panel of the
CPU assembly.
TR 1904
Dot Rev. A
Page 41

r
cl? 7510
Page 2 of 2
VoiceMemo Release 6.OA and later
Step
7. Using the plastic loops, remove the MVIP cable. You only need to remove it from
enough cards so that you can install the fax card.
8. Pick up the fax card. Hold it with the backplane connector facing away from you.
9. Insert the fax card into the alignment grooves of the card cage.
10. Slide the fax card along the grooves until the fax card backplane connector is
touching the corresponding connector on the backplane.
11.
Be sure that the two connectors are properly aligned, then press firmly on the edge
of the fax card until the connectors are fully seated.
12. Tighten the bracket screw that holds the fax card in the card cage.
13.
Reconnect the hNIP cable to all appropriate cards.
14. Replace the cover on the server.
15. Restore power to the server.
r.
erence
w
Dar RN. A
Page 42

Remove an MMP Fax
This procedure describes how to remove an MVIP fax card from a Series 6 server.
DANGER!
Disconnect the server from its power source before connecting cables,
components, or both.
CAUTION!
Card
cl?7511
Page 1 of 2
VoiceMemo Release 6.OA and later
Protect
components.
your server from ESD damage during handling of all
WARNING!
This process requires the module to be shut down, resulting in loss of call
processing capabilities. Centigram recommends that you perform this
procedure during periods of low call traffic.
Step
@D Observe Precautions
1. Put on a grounded wrist strap attaching, the other end to the Series 6 server. Doing
so protects the component from electrostatic discharge.
2. Shut down the server, press the reset button, then turn off the server power.
CAUTION!
Removing a component while the power is on can severely
damage both the component you are working on and others.
*,
Reference
2 5700,
Ch. 4
- 3. Wait one minute after you turn off the power before you remove any components.
The hard disk should stop spinning and be quiet.
4. When removing a component, place it on a non-conductive surface, such as an antistatic bag. Make sure you have the anti-static bags required before you begin.
@B Remove the Fax Card
5. Remove the cover on the server. On a Model 640, remove the front panel of the
CPU assembly.
6. Identify the fax card to remove.
7. Using the plastic loops, remove the MVIP cable. You only need to ‘remove the cable
from enough cards so that you can access the fax card.
8. Use a-screwdriver to unfasten the bracket screw that holds the fax card to the card cage.
Dot Rev. A
Page 43

cl? 7511
Page 2 of 2
Vo&eMemo Release G.OA and later
SteD
9. Grasp the fax card firmly, and pull it straight out.
10. Place the fax card on a static bag.
11. Reconnect the MVIP cable to all appropriate cards.
12. Replace the cover on the server.
13. Restore power to the server.
Reference
Doe Rcy. A
Page 44

Configuration Task list
Page 1 of 1
VoiceMemo Release 6.OA and later
Task
FaxMemo Configuration
Add FaxMemo to a Series 6 Server
Con.@ure for Fax Broadcast
Codgure for Fax Mail
Canfigure for Fax Publishing
Coufigure for Guaran teed Fax
Setup a Company Fax Cover Page
Activate the Inactive Configuration ..........................................................
Add or Delete Feature Bits .......................................................................
Configure a Mailbox for FaxMemo
Configure Time Zones for FaxMemo
Customize a Default FCOS
Customize an FCOS Copy
Define a Fax Group
Install an Optional Feature
Set Limits for FaxMemo
Shut Down the System
Verify Configuration Parameters
Procedure
......................................................
...............................................................
.......................................................................
..............................................................
............................................................
...................................... . ................
cl? 6449
Cl’ 6453
CP 6450
CP 6451
CP 6452
CP 6454
Cl? 7002
cl? 5011
..........................................................
....................................................... a? 7509
......................................................................
....................................................................... CP 5007
.................................................................................. Cl’7512
.......................................................................
...........................................................................
............................................................................. CP 5700
..............................................................
cl? 7506
Cl’ 5008
Cl? 5402
Cl? 7508
Cl? 5015
Dar Rev. A
Page 45

Page 46

Customize an FCOS Copy
cl?
VoiceMemo Release G.OA and later
5007
Page 1 of 2
This procedure describes how to customize an FCOS by modifying a
FCOS.
step
1.
Choose the existing FCOS you wish to use as a basis for your customized FCOS.
2. Complete an FCOS Worksheet. Blank worksheets are near the back of this manual.
3. Reach the System Configuration Menu, then go to the Feature Class of Service
Menu. Enter the requested information, as described in the following steps, from
your completed FCOS Worksheet.
Note:
select: (Q) Quit - Forget Changes
Ihmpt:
Response: Y
You can quit at any point in the following steps before you exit the
Feature Class of Service Menu. Quitting discards all entries you have 8.
made and leaves the FCOS settings the way they were before you reached
the Feature Class of Service Menu.
To quit:
Make sure the Feature Class of Service Menu is displayed (short form or
long form).
Quit and forget changes? (y/n) =
for yes.
copy
. _ _.
of an existing
Reference
vienu Map
11
4. Number and name the customized FCOS.
Select: (C) Current FCOS
Prompt:
Response: A number
select: (N) Name FCOS
Prompt:
Response:
-
5.
Make a copy of the existing FCOS.
Select:
Prcmzpt:
Response:
FCOS to modify =
from
18
through 20 or 25 throuPh 640.
Enter FCOS name (0 - 15 chars) =
Enter a descriptive name to accompany the customized FCOS.
(K) Copy FCOS
FCOS to copy (? for help) =
The
number
customized FCOS. A copy of this FCOS is created and given the
number and name you assigned above.
of the existing FCOS chosen to be the basis for your
Dot. RN. A
Page 47

CP 5007
Page 2 of 2
VoiceMemo Release G.OA and later
Step
6. Add feature bits to the FCOS copy, as desired.
Sekct: (A) Add Features
prompt.- Features to add (? for help) =
Response: The
l
Feature bits can be entered in any of the formats shown below:
A single bit, for example 208
A range of bits, for example 202-208
A series of bits, for example, 39,40,207,208
l
You can mix types of entries, so you can specify all the bits necessary in bne
attempt. For example, this entry is valid:
208,1-7,50,53,55,6
e
Do not
7. Delete feature bits from the FCOS copy, as desired.
Select:
1 to
S-digit
enter
spaces after commas, and do not end the entry with a comma.
numbers
(D) Delete Features
of the feature bits to be added.
Prompt: Features to delete (? for help) =
Response:
The 1 eo 3-digit
numbers
of the feature bits to be deleted. The same
rules apply to deleting bits as explained for adding bits.
Reference
._
8. Verify that the information you have entered so far matches your worksheet.
Select:
Prompt:
Response:
(S) Show FCOS
FCOS to show (? for help) =
The number of the FCOS copy that you specified in step 4.
9. If the information matches your worksheet, customization is completed and you can
save it. If the information does not match your worksheet, make the necessary
corrections.
10. After verifying that your entries are correct, save the customized FCOS by exiting
from the Feature Class of Service Menu.
Dar Fkv. A
Page 48

Modify or Renumber a Default FCOS
This procedure describes how to customize an FCOS by modifying one of the default
FCOSs supplied by Centigram or by renumbering one of these default FCOSs.
Page 1 of 3
VoiceMemo Release 6.OA and later
step
CD Modifying the Default Itself
1. Choose the default FCOS you wish to modify.
2. Complete an FCOS Worksheet.
3. Reach the System Configuration Menu, then go to the Feature Class of Service
Menu. Enter the requested information, as described in the following steps, from
your completed FCOS Worksheet.
Note:
To quit:
Make sure the Feature Class of Service Menu is displayed (short form or long f&m).
You can quit at any point in the following steps before you exit the
Feature Class of Service Menu. Quitting discards all entries you
have made and leaves the FCOS settings the way they were before
you reached the Feature Class of Service Menu.
Reference
VoiceMemo
Tgerence and
=bnj&ration
2lanzlaL
vienu Map 11
Select:
Prompt:
Response: Y
(Ql
Quit and forget changes? (y/n) =
Quit--
for yes
Forget Changes
4. Specify the default FCOS to modify.
Select:
prompt:
Response:
(C) Current FCOS
FCOS to modify =
The
number (1-
17,2
l-24)
of the default FCOS.
-
5. Change the name if desired.
Sekct:
f’rompt:
Response:
(N) Name FCOS
Enter FCOS name (0 - 15 chars) =
Enter a descriptive name to accompany the modified default FCOS.
6. Add feature bits to the default FCOS, as desired.
Select:
Prompt:
Response:
l
Bits can be entered in any of the formats shown below:
(A) Add Features
Features to add (? for help) =
The
1 to
S-digit numbers of the feature bits to be added.
Doe RN. A
Page 49

CP 5008
Page 2 of 3
VoiceMemo Release G.OA and later
SFP
A single bit, for example 208
A range of bits, for example 202-208
A series of bits, for example, 39,40,207,208
l
You can mix types of entries, so you can specify all the bits necessary in one
attempt. For example, this entry is valid:
208,1-7,50,53,55,6
l
Do not enter spaces after commas, and do not end the entry with a comma.
7. Delete feature bits from the default FCOS, as desired.
Select:
prompt: Features to delete (? for help) =
Response: The 1 to 3-d@ numbers of the feature bits to be deleted. The same
8. Verify that the information you have entered so far matches your worksheet.
Selem (S) Show FCOS
prompt:
Response:
(D) Delete Features
rules apply to deleting bits as explained for adding bits.
FCOS to show (? for help) =
The number of the default FCOS you have been working with.
Reference
a.
9. If the information matches your worksheet, customization is completed and you can
save it. If the information does not match your worksheet, make the necessary
corrections.
10. After verifying that your entries are correct, save the modified default FCOS by
exiting from the Feature Class of Service Menu.
a38 Renumbering a Default FCOS
1. - Choose the default FCOS you wish to renumber. (Renumbering a default FCOS
does not destroy the original default FCOS; the original default FCOS can be
restored through the Use Template FCOS option in the Feature Class of Service
Menu.)
2. Complete an FCOS Worksheet.
VbiceMemo
Rqhence and
Configzrration
Manual
Dar Rm. A
Page 50

CP 5008
Page3of3
VoiceMemo Release 6.OA and later
step
3. Reach the System Configuration Menu, then go to the Feature Class of Service
Menu. Enter the requested information, as described in the following steps, from
your completed FCOS Worksheet.
Note:
To quit:
Make sure the Feature Class of Service Menu is displayed (short form or long focm).
Select:
(Q
prompt: Quit and forget changes? (y/n) =
Response: Y
4. Specify the new number for the FCOS.
Select:
(C) Current FCOS
prompt: FCOS to modify =
Response:
The new FCOS
You can quit at any point in the following steps before you exit
the Feature Class of Service Menu. Quitting discards all entries
you have made and leaves the FCOS settings the way they were
before you reached the Feature Class of Service Menu.
- Forget Changes
Quit
for yes.
number (18-20
or 25-64OJ.
Reference
tienu Map
11
5. Assign the chosen default FCOS to this number.
Select:
Pmmpt:
Response: Y
The system displays a list of the default (template) FCOSs.
Prompt:
Response:
The system displays a confirmation that the default (template) FCOS just
specified has been renumbered. The default FCOS is now customized.
6. Save the customized FCOS by exiting to the System Configuration Menu.
(U) Use Template FCOS
Overwrite current FCOS with a template (y/n) =
for yes.
Choose a number (1-17, 21-24) from the menu:
The
number
want to be assigned to the current FCOS number.
of the default (template) FCOS
(1
- 17
or 2
l-24)
that you
Dot. &. A
Page 51

Page 52

Add or Delete Feature Bits
This procedure describes how to add or delete feature bits in an FCOS.
CP 5011
Pagelofl
VoiceMemo Release 6.OA and later
step
1. Reach the System Configuration Menu, then go to the Feature Class of Service Menu.
2. Identify the FCOS you want to add bits to or delete bits from.
Select:
Prompt:
Response: Number
(C) Current FCOS
FCOS to modify =
of the FCOS (l-64OJ you want to add a bit to or delete a
feature bit from, or just press
Enter
if the displayed FCOS is the one
you want.
3. Add the desired bits.
Sekct:
Prompt:
Response:
l
(A) Add Features
Features to add (? for help) =
The 1 to 3digit
numbers
of the feature bits to be added.
Bits can be entered in any of the formats shown below:
A single bit, for example 208
A range of bits, for example 202-208
A series of bits, for example, 39,40,207,208
l
You can mix types of entries, so you can specify all the bits necessary in one
attempt. For example, this entry is valid:
Refmence
vlenu Map 11
208,1-7,50,53,55,6
l
Do not enter spaces after commas, and do not end the entry with a comma.
4. Delete the desired feature bits.
Select:
Prompt:
Response:
(D) Delete Features
Features to delete (? for help) =
The 1-to-3-digit
numbers
of the feature bits to be deleted. The same
rules apply to deleting bits as explained for adding bits.
5. Confirm the additions and/or deletions to this FCOS.
Select: (S)
Prompt:
Response:
Show FCOS
FCOS to show (? for help) =
The
number
of the FCOS you just added bits to or deleted bits from. If
necessary, repeat the appropriate preceding step(s) to make corrections.
6. After confirming that additions and/or deletions are correct, exit from the Feature
Class of Service Menu to save additions and deletions.
Doe P.m. A
Page 53

Page 54

Verify Configuration Parameters
This procedure describes how to verify the configuration parameters that have been
entered. This procedure can be used for any of these applications:
l
VoiceMemo
l
DID VoiceMemo
l
Paging
l
Message delivery
CP 5015
VoiceMemo Release 6.OA and later
l
RS-232 Message Waiting Lights
l
DTMF-to-PBX Message Waiting Lights
l
Integrations and other optional features
Page 1 of 2
SteD
@D All Applications Except Paging
1.
Reach the Main Menu, then go to the Reports Menu.
2. Request a configuration report.
Select:
Prompt:
(C) Configuration
REPORT OUTPUT ROUTING
(C) Console (screen)
(P) Console
(1) Printer A
with pause
(F) File...
(A) Append to file...
(X) Exit (no report)
If you need help later, type ?.
COMMAND (C/P/l/F/A/X):
C to send th Reqonse: e report to the console without pausing
P to send the report to the console, pausing as the screen fills,
1 to send the report to printer A*,
F to send the report to a file on the Series 6 server,
A to append the report to an existing file on the Series 6 server, or
X to exit report output options (no report).
and
Message Delivery ’
Reference
tienu Map 9
* You can have one or more serial ports on your server with different
devices, depending on the configuration of your server.
DOG Rev. A
Page 55

CP 5015
Page 2 of 2
VoiceMemo Release G.OA and later
Step
Prompt: Biter group nmibr to display (l-24) or <CR> for all :
Response:
The number of the line group to which the application is assigned.
Examples of valid formats for this response are:
l
1 to report the configuration of line group 1
l
14 to report the configuration of line groups 1 through 4
l
1,2,4-7 to report the configuration of line groups 1,2, and 4
through 7
l
Press Enter to get the configuration of all line groups
The server shows the name of the application assigned to each group
specified and displays the parameter settings for that application.
3. To make corrections, go to the appropriate application menu and enter the correct
value.
4. Save the corrections by exiting from the appropriate application menu.
@D Paging and Message Delivery
Reference
tienu Maps
l
If you are currently modifying the Pager or Message Delivery application, go to the
Pagers Menu.
1 a View the configuration.
Select: (S) Show Pagers
Response:
The server displays the pager system number (index number), pager
name, access code, and hold time for each pager.
2. Check the displayed configuration for each pager system against your Pager and
Message Delivery Worksheet to verify that it is correct.
3. To make corrections, return to the Pager Systems Supported option, the Define
Pagers option, or the Other Features option then enter the correct values.
4. When your entries are correct, save the parameter settings.
l
If you are not currently modifying the Pager or Message Delivery application, proceed
as for all applications described above.
tienu Map 7
Dot. RN. A
Page 56

Install Optional Feature With System Online
The procedure describes how to install an optional feature with the system online. Be
sure the Optional Feature Diskette(s) and the Module Enable Diskette contain the serial
number(s) for all disk(s) in the system.
cp
5402
Pagelof2
VoiceMemo Release 6.OA and later
Note:
The serial number on the OneView Optional Feature diskette must match the
serial number of the hard disk on which OneView is being installed.
receive an error message about an incorrect serial number, contact your
support organization.
CAUTION!
If you are loading a revision support disk (RSD), do it after
completion of this procedure. Loading the RSD first, could create an
incorrect con&uration.
1.
Reach the System Maintenance Menu, then go to the System Maintenance
Additional Options Menu.
2. Select the Add Optional Feature(s) program.
Select:
(A) Add Optional Feature(s)
l+ompt: Enter 'Y' to add optional features, 'N' to stop:-
Response: Y
for Yes.
If you
Reference
Menu Map 12
,
3. Install the optional feature.
Prompe
Insert Optional Feature
floppy disk in the floppy
drive.
Enter any key when ready:
Response:
4. After you have installed the Optional Feature software, the system asks if you want
to install another optional feature.
Insert the Optional Feature diskette, then press Enter.
Prompt.- Do you want to install another optional feature?
Response:
The system automatically edits and saves the configuration files, then returns to the
Additional Options Menu.
5. Exit the VoiceMemo Configuration Offline Menu. You see the following prompt:
Prornptz
Response: N
Y to install another optional feature and continue from step 3,
N if you are done installing optional features.
Wait for message waiting queues to be empty?
to continue.
Dot. RN. A
Page 57

CP 5402
Page 2 of 2
VoiceMemo Release G.OA and later
step
6. The following prompt appears:
Prompt:
Response: N
7. Exit to the VoiceMemo Configuration - Main Menu, then go to the VoiceMemo
Configuration - Offline Menu.
8. Duplicate the active configuration.
Select:
9. Exit to the VoiceMemo Configuration - Main Menu and activate the configurkon.
Select:
Wait for paging queues to be empty?
to continue.
(B) Duplicate Active Configuration
(A) Activate Configuration
Reference
Menu Map 2
Dw. Rev. A
Page 58

Shut Down a System
This procedure describes how to shut down a module or an entire Series 6 server. You
should use this procedure before turning off the power to a module, as the shutdown
command halts call processing in a clean and orderly fashion.
WARNING!
You should follow the policies of the site to warn users prior to the system
shutdown. This process removes the system from call processing. Centigram
recommends that you perform this procedure only during periods of low call
traffic.
cl?
VoiceMemo Release 6.OA and later
5700
Page 1 of 2
Step
1.
Reach the System Maintenance Menu.
2. Execute a shutdown command.
Select: (S) System Shutdown
l
The system displays the status of each line and the lengths of the message
indicator request queues.
prompt:
Response:
3. If you have a multi-module system, specify which modules to shut down.
WARNING! ! This will terminate call processing.
Type
shutdown
"shutdown"
if you really want to do this.
J'rompc modules to shutdown:
Response: a for all modules, or the number of a specific module
You can select multiple modules by entering the IDS separated by
commas (3,4), or a range by using a hyphen (2-4).
l
The system displays the status of each line of the specified modules as “idle,”
“active,” or “stopped,” and updates the status every minute until all lines are
-
4. If you are executing a qftern shutdown, wait for the message waiting queue to clear.
stopped. The system stops any calls still in progress after five minutes.
If you are executing a mod&e shutdown on a multi-module system, do not wait for
the message waiting queue to clear.
(1,
2, 3,
or
Reference
4
Menu Map 1
4).
Prompt:
Response: Y to wait for the queue to clear,
5. When the system has taken all lines of the specified modules off-hook, it continues
by asking if a verify is to be executed.
Prompt:
Response: Y to execute the verify,
Wait for
N to continue immediately with the shutdown.
Perform Offline
N to skip verify and continue with the shutdown.
message
waiting queues to be empty?
System
Verification? (Y/N):
Dac. RN. A
Page 59

a? 5700
Page 2 of 2
VoiceMemo Release 6.OA and later
step
6. Specify if changes to the status of each module are to be made.
Prompt: Enable or Disable Modules?
Response:
Y to change the status of modules,
N to keep the module status the same and continue at step 11
7. Ifyou answered yes in step 6, achartwith~e~ofeachmoduleisdisplayedand~~ehe
Module Maintenance Menu is displayed.
8. Enable a module, if necessary:
Select:
(E) ENABLE a module
Prompt: Which Module?
Response: The
number
of the module.
9. Disable a module, if necessary:
Select:
(D) DISABLE a module
&-ompt: Which Module?
Response: The
number
of the module. If you are disabling multiple modules,
disable the module attached to the console last.
Reference
J'rompt: type "disable"
Response: disable
to confirm your request:
If you are disabling multiple modules, repeat step 9.
If the status of the module attached to the console was changed to disabled, the
balance of this procedure is not seen, due to the module resetting. The console then
resets to the Maintenance From Hard Disk Menu.
10. When you are done configuring the modules, exit the menu.
11. The system completes the shutdown.
J'rompt: ****SHUTDOWN COMPLETE****
The System Maintenance Menu is displayed. You can now either reboot the
module(s) or remove power to the module(s).
0cc.RN.A
Page 60

Add FaxMemo to a Series 6 Server
This procedure describes how to add FaxMemo capabilities to a Series 6 server. After
completing this procedure, you must configure one or more of the FaxMemo
applications.
cp
6449
Page lof 1
VoiceMemo Release 6.OA and later
Note:
F
/I
3
Note:
Step
@D Before You Begin
1. Complete a FaxMemo Card Planning Worksheet for each module and fax group in
the system. Blank worksheets are located in Appendix A of this manual.
2. Configure fax card jumpers. Pay special attention to the base I/O address.
If your Series 6 server was configured with FaxMemo at the factory, the
fax cards and fax software have already been installed.
WARNING!
This process requires the system to be shut down, resulting in loss of call
processing capabilities. Centigram recommends that you perform this
procedure durine neriods of low call trafIic.
You can find TRs referenced in this procedure in the Centigam &:eries G Technical
Reference Manual.
-
erence
&f-
I'R1904
@D Install the Fax Cards
3. Perform a system shut down.
4. Turn off the power to the system.
5. Install the fax cards.
6. Turn on the system power. Allow the system to boot from the hard disk.
@D Install the FaxMemo Software
7. Load the FaxMemo Optional Feature software.
8. Add the MVIP fax cards to the Resource Manager configuration.
CP5700
CP7510
CP5402
TR 1935
Dot &. A
Page 61

Page 62

Configure for Fax Mail
This procedure summarizes the steps necessary to configure for Fax Mail in Series 6
server. It assumes that the appropriate server hardware and software have been installed.
Page 1 of 3
VoiceMemo Release 6.OA and later
Step
I. Complete the following worksheets. Blank worksheets are near the back of this
manual.
l
FaxMemo Card Planning Worksheet
l
FaxMemo COS Planning Worksheet
l
Fax Mail Mailbox Worksheet(s)
2. Create fax groups and assign them to the line groups that will be used for the fax+
application.
Note:
You should define the fax groups on the currently inactive
configuration.
If the line groups for the fax application do not already exist,
refer to the VoiceMemo Reference and Conjguration Manual
for procedures to define inbound and outbound line groups.
3. Based on your completed FaxMemo COS Planning Worksheet, customize an FCOS
(by either copying an existing FCOS and adding bits, or by modifying a current
FCOS) to include bits listed below.
Reference
3? 7512
Note:
If you are providing users with broadcast mailboxes for fax
reception, you must customize one FCOS for fax users and
another FCOS for the broadcast mailboxes. If you offer
different levels of service to users, you might have to
customize more than one FCOS.
l
To modify a current FCOS:
l
To copy a current FCOS and add additional bits:
- 190 (receive fax messages)
- 191 (make fax messages)
- 192 (give fax messages)
- 193 (deliver fax to default fax phone number)
- 194 (deliver fax online)
- 195 (deliver fax to designated telephone number)
- 196 (user changeable default fax phone number for fax delivery)
- 198 (receive fax messages only)
- 199 (automatic receipt for fax message sent)
33 5011
ZP 5007
Dot RN. A
Page 63

CP 6450
Page2of3
ViceMemo Release G.OA and later
step
- 200 (fax cover page)
- 203 (walkaway fax)
- 230 (deny change capabilities to cover page)
- 235 (add “from” field to the default cover page)
- 236 (add promotional message field to the default cover page)
- 237 (automatic fax retrieval)
- 238 (end of session delivery)
- 239 (retrieve all unplayed faxes)
- 240 (receive fax on record time-out)
- 256 (enable fxed greeting for walkaway fax)
4. Based on your completed FaxMemo COS Planning Worksheet, customize an LCOS
with these limits parameters:
- Maximum number of digits allowable for fax phone number for fax delivery
- Maximum number of fax messages per mailbox
Reference
2 7508
- CNG tone detection length (recommended value of zero)
- Fax delivery retry frequency
- Fax delivery retry interval
- Played fax message retention
- Unplayed fax message retention
- Urgent fax message retention
- Fax receipt retention
-
5. If you have MESA-Net installed on your server, reach the Network Class of Service
Menu from the System Configuration Menu. If you do not have MESA-Net, go to
step 7.
6. Based on your completed FaxMemo COS Planning Worksheet, customize an
NCOS with these limits parameters:
- 10 (Make Fax Message to Network)
- 11 ( Give Fax Message to Network)
- 12 ( Answer Fax Message to Network)
7. Based on your completed Fax Mail Mailbox Worksheets, configure user mailboxes
for Fax Mail.
Menu Map 13
CP 7506
Dar Rev. A
Page 64

Cl?6450
Page 3 of 3
VoiceMemo Release 6.OA and later
Reference
8. If some mailboxes use the default fax cover page and mailbox owners live in different
time zones, configure time zones for FaxMemo.
3. If desired, set billing rates for FaxMemo.
l
Set the rates for disk usage for fax messages.
l
Set the rates for messages received.
10.
Verify that the configuration is correct.
11.
Activate the configuradon.
c
cl?7509
CP4358, Ch5
04360, Ch5
a5015
CP7002
Dockv.A
Page 65

Page 66

Configure for Fax Publishing
This procedure summarizes the steps necessary to configure for Fax Publishing in a
Series 6 server. It assumes that the appropriate server hardware and software have been
installed.
step
1. Complete the following worksheets. Blank worksheets are near the back of this
manual.
l
FaxMemo Card Planning Worksheet
l
FaxMemo COS Planning Worksheet
l
Fax Publishing Mailbox Worksheet(s)
2. Create fax groups and assign them to the line groups that will be used for the fax
application. You can probably use a shared fax group on an inbound line group to
deposit faxes into the fax publishing system. You probably need a dedicated fax
group for callers to retrieve faxes, either online or by entering a fax machine phone
number.
VoiceMemo Release G.OA and later
cp
645
*.
1
Pagelof2
3’7512
Note:
3. Based on your completed FaxMemo COS Planning Worksheet, customize an FCOS
(by either copying an existing FCOS and adding bits, or by modifying a current
FCOS) to include bits listed below.
l
To modify a current FCOS:
l
To copy a current FCOS and add additional bits:
-
4. Based on your completed FaxMemo COS Planning Worksheet, customize an LCOS
- 194 (deliver fax online)
- 195 (deliver fax to designated telephone number)
- 197 (fax on demand)
- 238 (end of session delivery)
with these limits parameters:
- Maximum number of digits allowable for fax phone number for fax delivery
You should define the fax groups on the currently inactive
configuration.
If the line groups for the fax application do not already exist,
refer to the
for procedures to define inbound and outbound line groups.
VoiceMemo R&erence and
Configuration
Mand -
Z-P 5011
a? 5007
Cl? 7508
- Maximum number of fax messages per mailbox
- CNG tone detection length (recommended value of zero)
- Fax delivery retry frequency
Dot Rev. A
Page 67

Cl?645 1
Page 2 of 2
VoiceMemo Release G.OA and later
step
- Fax delivery retry interval
- Played fax message retention
- Unplayed fax message retention
- Urgent fax message retention
- Fax receipt retention
5. Based on your completed Fax Publishing Mailbox Worksheets, configure mailboxes
for Fax Publishing.
The kinds of mailboxes that can be used for Fax Publishing are:
0 Tree
. Chain
l
Greeting Only
Information for creating these special mailboxes can be found in the VoiceMemo
Reference and Configtlration Manual.
6. If some mailboxes use the default fax cover page and mailbox owners live in different
time zones, configure time zones for FaxMemo.
Reference
Cl?7506
CP7509
7. If desired, set billing rates for FaxMemo.
l
Set the rates for disk usage for fax messages.
l
Set the rates for messages received.
8. Verify that the configuration is correct.
9. Activate the configuration.
10. To deposit the faxes into the Fax Publishing mailboxes, you must call the server
from a fax machine. Log into each Fax Publishing mailbox as the mailbox owner
(by pressing * before the mailbox number) and select y for user options,
fax options, and then press Q ? to leave a fax. When prompted, send the appropriate
pages into the mailbox.
When a caller reaches one of the mailboxes, the server plays any recorded greeting in
the mailbox and then tells the caller to get ready to receive the fax online or input a
fax number to have the fax delivered.
Q Q
Repeat for each mailbox in your Fax Publishing system.
“F for
Q
CP4358,
CP4360,
CT5015
Cl?7002
Ch5
Ch5
Dot Rev. A
Page 68

Configure for Guaranteed Fax
This procedure summarizes the steps necessary to configure for Guaranteed Fax in a
Series 6 server. It assumes that the appropriate server hardware and software have been
installed, and the hardware has been configured in the Resource Manager.
cp
6452
Page 1 of 2
VoiceMemo Release 6.OA and later
SEF
1. Complete the following worksheets. Blank worksheets are near the back of this
manual.
l
FaxMemo Card Planning Worksheet
l
FaxMemo COS Planning Worksheet
l
Guaranteed Fax Mailbox Worksheet(s)
2. Create fax groups and assign them to the line groups that will be used for the fax
application. You probably need a fax group dedicated to an inbound line group to
provide guaranteed fax services.
Note:
3. Based on your completed FaxMemo COS Planning Worksheet, customize an FCOS
(by either copying an existing FCOS and adding bits, or by modifying a current
FCOS) to include bits listed below.
You should define the fax groups on the currently inactive
configuration.
If the line groups for the fax application do not already exist, refer to
the VoiceMemo Re$rence and CorySguration Manual
define inbound and outbound line groups.
for procedures to
*.
Reference
:I? 7512
l
Modify an existing FCOS
or
l
Copy a current FCOS and add additional bits:
*
4. Based on your completed FaxMemo COS Planning Worksheet, customize an LCOS
- 198 (receive fax messages only)
- 206 (fax delete)
- 207 (fax verify)
with these limits parameters:
- Maximum number of fax messages per mailbox
- CNG tone detection length (recommended value of zero)
- Unplayed fax message retention
- Urgent fax message retention
:I? 5011
3? 5007
3’ 7508
Dar RN. A
Page 69

Cl’ G4.52
Page 2 of 2
VoiceMemo Release 6.OA and later
step
5. Based on your completed Guaranteed Fax Mailbox Worksheets, configure mailboxes
for Guaranteed Fax.
l
Enable message delivery.
6. If some mailboxes use the default fax cover page and mailbox owners live in different
time zones, configure time zones for FaxMemo.
7. If desired, set billing rates for FaxMemo.
l
Set the rates for disk usage for fax messages.
l
Set the rates for messages received.
8. Verify, that the configuration is correct.
9. Activate the configuration.
8,
Refwence
cl? 7506
cl? 7509
Cl? 4358, Ch 5
CP 4360, Ch 5
CP 5015
Cl? 7002
Page 70

Configure for Fax Broadcast
This procedure summarizes the steps necessary to configure for Fax Broadcast in a Series
6 server. It assumes that the appropriate server hardware and software have been
installed and the hardware has been added to the Resource Manager Configuration.
cp 6453
Page 1 of 2
VoiceMemo Release 6.OA and later
Step
1. Complete the following worksheets. Blank worksheets are near the back of this
manual.
l
FaxMemo Card Planning Worksheet
l
FaxMemo COS Planning Worksheet
l
Fax Broadcast Mailbox Worksheet(s)
2. Create fax groups and assign them to the line groups that will be used for the fax
application. You probably need at least one inbound and one outbound line group
with fax resources.
Note:
3. Based on your completed FaxMemo COS Planning Worksheet, customize an FCOS
(by either copying an existing FCOS and adding bits, or by modifying a current
FCOS) to include bits listed below.
You should define the fax groups on the currently inactive
configuration.
If the line groups for the fax application do not already exist, refer to
the VoiceMemo Reference and Confguran’on Manuulfor procedures to
define inbound and outbound line groups.
r.
Reference
3? 7512
l
To modify an existing FCOS
or
l
To copy a current FCOS and add additional bits:
-
122
(define broadcast mailbox)
- 190
(receive fax messages)
- 198
(receive fax messages only)
- 203 (walkaway fax)
4. Based on your completed FaxMemo COS Planning Worksheet, customize an LCOS
with these limits parameters:
- Maximum number of digits allowable for fax phone number for fax delivery
- Maximum number of fax messages per mailbox
- CNG tone detection length (recommended value of zero)
- Fax delivery retry frequency
- Fax delivery retry interval
3 5011
cl? 5007
Cl? 7508
Dar RN. A
Page 71

Cl'6453
Page 2 of 2
VoiceMemo Release 6.OA and later
Step
- Played fax message retention
- Unplayed fax message retention
- Urgent fax message retention
- Fax receipt retention
5. Based on your completed Fax Broadcast Mailbox Worksheets, configure mailboxes
for Fax Broadcast.
6. If some mailboxes use the default fax cover page and mailbox owners live in different
time zones, configure time zones for FaxMemo.
7. If desired, set billing rates for FaxMemo.
l
Set the rates for disk usage for fax messages.
l
Set the rates for messages received.
8. Verify that the configuration is correct.
9. Activate the configuration.
10.
For each Fax Broadcast mailbox create distribution list 1 containing the recipients
for faxes sent to that mailbox. Recipients can include local mailboxes, remote
mailboxes on other Series 6 servers connected by a MESA-Net network, or outdial
telephone numbers.
8.
Reference
Cl?7506
CP7509
CP4358,
CP4360,
cl?5015
Cl?7002
Ch5
Ch 5
Dot RN. A
Page 72

Set Up a Company Fax Cover Page
This procedure summarizes the steps necessary to set up a company fax cover page. It
assumes that the appropriate server hardware and software have been installed. You can
have a different fax cover page for each line group by assigning a unique administrator’s
mailbox to each line group and storing a different cover page in each administrator’s
mailbox.
cp
6454
Page 1 of 1
VoiceMemo Release b.OA and later
Note:
1. Plan the layout of the cover page on an 8.5 by
Be sure to include:
l
Company name
l
Address
l
Telephone number
l
Fax number.
2. Make sure that the administrator’s mailbox has an FCOS with the bit 200 (fax cover
page) enabled.
3. Dial into the system administrator’s mailbox from a fax phone and reach the User
Options Menu. Press a
When prompted, fax the cover page into the mailbox.
If you enter a company fax cover page, it takes precedence over
the default cover page and does not include the dynamic
information provided on the default cover page.
1 I -inch page.
3
for Fax Delivery Options, then ‘? for Fax Cover Page.
Q
Dot RN. A
Page 73

Page 74

Activate the Inactive Configuration
This procedure describes how to activate a configuration.
WARNING!
This procedure causes the server to restart all tasks resulting in an
interruption to call processing. Centigram recommends that you perform
this procedure during periods of low call traffic.
CP
7002
Page 1 of 1
VoiceMemo Release 6.OA and later
step
1. Reach the VoiceMemo Configuration Main Menu, then go to the VoiceMemo
Active Configuration Menu.
2. Activate the inactive configuration.
Select:
pr0mpt: Activate the inactive configuration, <configuration nar(le>:
Response: Y
pr0m.t: Wait for message waiting queues to be empty?
Response: Y to warn system users of the impending shutdown, or
l
(A) Activate Configuration
to activate the configuration, or
N to cancel the process.
N to skip the warning.
The server automatically shuts down and resets the software to the new
configuration, then returns to the VoiceMemo Active Configuration
Menu.
If the server experiences problems with the new configuration, you can return
to the old configuration by repeating the preceding steps.
Reference
Menu Map 2
5
Dot. Rzv. A
Page 75

Page 76

Configure a Mailbox for FaxMemo
This procedure describes how to configure those parameters in a mailbox setup that
affect FaxMemo.
1.
Reach the Mailbox Maintenance Menu. Enter the requested information, as
described in the following steps, from your completed FaxMemo Mailbox
Worksheet(s).
2. Identify the mailbox to be created or modified.
VoiceMemo Release 6.OA and later
Page 1 of 4
Select:
prompt: Mailbox to create:
Response: Number of the
Select: (M) Modify Mailboxes
(C) Create New Mailboxes
new
mailbox you want to configure for paging. *
Prompp Mailbox to modify:
Response:
3. Press Enter until the Features Class of Service prompt appears.
4. Assign an FCOS customized for the FaxMemo applications that the mailbox uses.
Prompt: Features class of
Response:
5. Assign the appropriately customized LCOS to the mailbox.
prompt:
Response:
Number of the existing mailbox you want to reconfigure for paging.
Note:
The prompts are almost the same for creating a new mailbox and
modifying an existing one, except that “New” precedes each
prompt when you select Modify Mailboxes.
service:
The number of the FCOS (l-640) that includes the applicable bits.
Limits class of service:
The number of the LCOS (l-640) that includes the applicable limits.
6. Assign the appropriately customized RCOS to the mailbox.
prompt:
Response:
7. If you have MESA-Net, assign the appropriately customized NCOS to the mailbox.
prompt:
Response:
8. For Guaranteed Fax, set up message delivery to the target fax machine. If this
mailbox is not used for Guaranteed Fax, skip to step I I.
f’rompt:
Response: 5
Restriction class of service:
The number of the RCOS (l-64) that includes the applicable limits.
Network class of service:
The number of the NCOS (l-64) that includes the applicable limits.
Message Waiting Type #l:
or
Message Waiting Type #2:
Doe RN. A
Page 77

page 2 of4
VoiceMemo Release 6.OA and later
Reference
Prompt:
Response:
Prompt:
Response:
prompt:
Response:
9. For Guaranteed Fax, activate message delivery.
prompt:
Response: Y
Pager access type:
The
letter
of the index to be used for delivery to a fax machine. The
valid choices are:
I Internal outcall index
B Billed outcall index
U Non-billed outcall index
N Undefined index
Pager number:
The
phone number
of the target fax machine.
Post-pager number:
Leave blank if desired, or enter any overflow from the pager number that
did not fit in the page number field.
Note:
There is no need to set the pager frequency or pager interval for
Guaranteed Fax; those functions are controlled by LCOS settings.
Message delivery:
a.
10.
For Guaranteed Fax, schedule fax delivery.
prompt:
Response:
prompt:
Response: The time at which fax delivery is to stop. Enter the time in hours and
11.
Specify the fax retrieval access type.
Pager start time
The time at which fax delivery is to start. Enter the time in hours and
minutes followed by “am” or “pm, n for example 6:OOpm. To have fax
delivery enabled for all times, set both Pager start time and Pager stop
time to the same value, such as 12:OOam.
Pager stop
minutes followed by “am” or “pm, ” for example 6:OOpm. To have fax
delivery enabled for all times, set both Pager start time and Pager stop
time to the same value, such as 12:OOam.
time
f'rompc Fax retrieval pager access type:
Response:
The
letter
of the index to be used for fax retrieval. The valid choices are:
I Internal outcall index
B Billed outcall index
U Non-billed outcall index
N Undefined index
Page 78

VoiceMemo Release 6.OA and later
12. Specify the default fax phone number. This number is not used by Guaranteed Fax.
cl? 7506
Page3of4
Reference
prompt:
Response:
Default telephone number for fax retrieval:
The default
number
(1-l G characters) of the fax phone the fax message is
to be delivered to. This field can contain any additional characters
necessary for outdialing, from Table 1 at the end of this procedure.
13. Specify the time zone offset for the mailbox.
prompt:
Response:
Time zone offset:
The
number
of hours difference bemeen the time zone of the mailbox
owner and the local time zone of the Series 6 server. Valid values are *
from -23 to +23. This number must match the offset of one of the time
zones set in the Time Zone Configuration Menu.
14. Press
Enter
to skip through each of the remaining mailbox configuration prompts.
After the last prompt, the system displays the mailbox configuration, then prompts
for the next mailbox number.
At this point, the parameter settings are saved and you can continue with mailbox
configuration or exit.
Dee Rx. A
Page 79

Cl’ 7506
Page 4 of 4
VoiceMemo Release 6.OA and later
Step
Table 1 Dial String Characters
Character Explanation
3-9, *, #
(
>
+ Pause for one second
A-D Fourth column DTMF keys
E Go off-hook, wait for dial tone or other steady tone (pager go-ahead
F Switchhook flash and wait for dial tone
G Greet - Wait for a voice or computer tone answer
Keys on a standard pushbutton telephone
The following digits should be dial pulsed
Stop pulsing; resume sending DTMF tones
or confirmation tone, for example), then do next item in string
(10 PI’S)
Reference
r.
H Hang up (go on-hook)
L Wait for an answer supervision signal that indicates the receiving
phone has gone off-hook, then dial remaining characters after
receiving the signal. Valid only with four-wire connections, not
with loop start or ground start phone lines.
N
0 Ring once
P Go off-hook, do not wait for dial tone
S Switchhook flash, no wait required
T Go off-hook, wait for dial tone
V
Start a new activity; do not go off-hook
Play three seconds of the message for voice pager
L
Doe RN. A
Page 80

Set Limits for FaxMemo
This procedure describes how to set the limits that govern FaxMemo.
CP7508
Page 1 of 2
VoiceMemo Release 6.OA and later
Step
1. Reach the System Configuration Menu, then go to the Limits Class of Service Menu.
2. Identify the LCOS you want to modify.
Select: (C) Choose Limits COS to Modify
I%mpt
Response:
Select:
Prompt:
Response:
Enter
Number of the LCOS you want to modify limits in, or just press Enter
if the displayed LCOS is the one you want.
(N) Name Selected LCOS
Enter name for selected limits COS
A descriptive name for the LCOS, from 1 through 15 characters; or just
press Enter if the displayed LCOS name is the one you want.
limits
COS to modify
8.
@B Set CNG Tone Detection Length (Walkaway Fax only)
3. Go to the FaxMemo Limits Menu.
4. Set the length of time that the Series 6 server waits for CNG tone.
Select: (C) CNG Tone Detection Length
Pmnpt:
Response:
Enter CNG tone detection length in seconds
The number of seconds (4-60) the server must detect the CNG tone.
For all sites except those with extremely noisy phone circuits, set this to
zero to disable forced detection and enable automatic detection.
Reference
vienu Map 1
tienu Map
11
@B Set Fax Delivery limits
5. Go to the FaxMemo Limits Menu.
6. Set the maximum phone number length for deilvering fax messages.
Select: (A) Maximum Number of Digits for Telephone Number
-
Prompt.- Enter maximum
Response:
7. Set the number of times the server attempts to deliver a fax.
Select:
Prompt:
Response:
8. Set the number of minutes between fax delivery retries.
Sekxt:
Prompt:
The maximum number of digits (l-24) allowed in the fax phone
number for fax delivery.
(D) Fax Delivery Retry Frequency
Enter number of retries for fax delivery
The number of retry attempts (O-255) the server makes to deliver a fax.
(E) Fax Delivery Retry Interval
Enter number of minutes between fax deliver-y
retries
Response:
The number of minutes (O-255) the server waits between between fax
delivery retires.
phone number length for fax delivery
Menu Map 1 I
Dac. RN. A
Page 81

(37508
Page 2 of 2
VoiceMemo Release 6.OA and later
QED Set Fax Storage limits
Reference
9. Go to the FaxMemo Limits Menu.
10.
Set the maximum number of faxes allowed to be stored in a mailbox.
Select:
prompt:
Response: The maximum number of faxes (O-73) allowed
11.
Go to the Message Retention Limits Menu.
12. Set the number of hours the server retains played fax messages.
Select:
prompt:
Response:
13. Set the number of hours the server retains unplayed fax messages.
Select:
prompt:
Response:
(B) FaxMemo Message Count
Enter maximum number
or
0 (zero) or a period (.) to allow an unlimited number of faxes to be
stored.
(A) Played Fax Message Retention
Enter hours to keep played fax
The number of
deleted by the user.
(B) Unplayed Fax Message Retention
hours
(o-8760) a played fax message is kept, if not
of fax messages allowed
messages
Enter hours to keep unplayed fax messages
The number of hours (o-8760) a unplayed fax message is kept.
vlenu Map
denu Map
11
11
14. Set the number of hours the server retains urgent fax messages.
Select:
Prompt:
Response:
15.
Set the number of hours the server retains fax receipts.
Select:
prompt:
Response:
16.
Save the modified limits by exiting to the System Configuration Menu.
Dot RN. A
(C) Urgent Fax Message Retention
Enter hours to keep urgent fax
The number of hours (o-8760) a urgent fax message is kept.
(D) Fax Receipt Retention
messages
ELnter hours to keep receipts
The number of hours (o-8760)
user.
a ax receipt is kept, if not deleted by the f
Page 82

Configure Time Zones fo,r FaxMemo
This procedure describes how to configure time zones so that the correct time stamp
appears on the default cover page of outgoing faxes.
Note: The server does not put a time stamp on company cover pages or personal cover
pages.
not need to configure time zones.
Step
If your FaxMemo applications do not use default cover pages, you do
CP7509
Page 1 of 2
VoiceMemo Release 6.OA and later
1. Reach the Time Zone Configuration Menu from the System Maintenance Additional Options Menu.
2. Identify the time zone that you want to configure.
Select:
(A) Current time zone
prompt: Enter timezone number to modify:
Response:
3. Set the number of hours difference (offset) from the local time zone of the Series 6
server.
Note:
Select:
The number (l-26) of the time zone that you want to configure.
Note:
Each mailbox also has a Time Zone Offset
a fax from a mailbox that uses a default cover page, the server looks
for a time zone configured here that matches the offset in the
mailbox. The server prints the name of the matching time zone on
the default cover page.
(B) Set current time
Time zone 1 is automatically used as the local time zone for
the Series 6 server.
zone 1, but do not configure an offset.
Be sure to configure a name for time
parameter. When
zone offset
Prompt: Enter time zone offset (3 char):
Response:
-
The number of hours difference between the time zone of the Series 6
server and the time zone of the mailbox owner. Valid values are -23 to
+23.
vienu Map 12
8.
sending
4. Enter a name for the time zone.
Select:
(C) Name time zone
Prompt: Enter time zone name:
Response:
5. Repeat steps 2 through 4 until you have set values for all time zones used by
mailbox owners.
A name (up to 35 characters) that identifies the time zone. You can use
the full time zone
abbreviation, such as PST.
name,
such as Pacific Standard Time, or an
Dot RN. A
Page 83

cl? 7509
Page 2 of 2
VoiceMemo Release G.OA and later
Step
6. Verify the settings that you have made.
Select (D) Display
&-~mpt:
Display Time
-----------------
zone name
Zone
(A) Show a time zone
(B) Show all time zones
(X) Exit
Response: B to see a table of all 26 time zones, or
A to see the configuration of one specific time zone.
7.
When you are satisfied with the time zone settings, exit to the System MainteQance
Menu.
Reference
Dot. RN. A
Page 84

Define a Fax Group
Page 1 of 2
VoiceMemo Release 6.OA and later
This procedure describes how to define a fax group and connect it with line groups.
assumes that you have already added the line cards and fax cards to the Resource
Manager configuration.
Step
1. Reach the VoiceMemo Configuration Offline Menu, then go to the Fax Group
Menu.
Enter the requested information, as described in the following steps, from your
completed FaxMemo Card Planning Worksheet.
2. If desired, use the menu options to show all defined fax groups and/or show
unassigned fax channels.
3. Specify the fax group number that you want to define.
Select: (G) Current Fax Group
f’rompt:
Response: Number
4. Identify the module for the fax group.
Select: (M) Module of Current Fax Group
prompt:
Response:
Enter a group number =
of the fax group (l-42) to that you are defining.
Enter module number =
Number
included in the fax group.
of the module
(l-4)
that contains the fax cards that you want
It
Re$rence
rlenu Map 13
5. Add the desired fax channels.
Select: (B) Add Channels to Current Fax Group
prompt:
Respanse:
Enter fax channels to add =
The fax
want to add to the fax group. Separate the two numbers with a colon (:>.
Any of the formats shown in the following examples are valid:
Depending on the Series 6 server model that you have, your server may
have fewer than 15 slots and fewer the 8 channels on a fax card.
card slot number
Ekdmp Le Specif;es
*
10:*
8-10 All channels on fax cards 8 through 10
V:O-10:2 All channels on the card in slot 9 through channel 2 on the
7:0,8:1,9:* Slot 7 channel 0, slot 8 channel 1, and all channels on the
All channels in the given module
All channels on the fax card in slot 10
card in slot 10
fax card in slot 9
(O-l 5) and
channel number (O-8)
that you
D0CRN.A
Page 85

Cl? 7512
Page 2 of 2
VoiceMemo Release 6.OA and later’
step
6. Drop any desired fax channels.
Select:
Prompt: Enter fax channels
Response:
7. Repeat steps 2 through 6 for each fax group that you want to define. Note that if
you have lime groups that have cards in more than one module and you want to give
those line groups fax capability, you must define a fax group for each module.
8. Exit from the Fax Group Menu back to the Lime Groups Menu.
9. Select a line group that you want to associate (connect) with one or more fax
groups.
Select:
prompt: Enter a group number =
Response:
10. Identify the fax group(s) to associate with the line group.
(D) Drop Channels from Current Fax Group
to
drop =
Channels(s) to remove from the current fax group; values and formats
are the same as described above for adding channels.
(G) Current Group
Number of the line group
groups.
(142)
to that you want to connect with fax
Rejbence
8.
Select:
prompt:
Response: Number of the fax group (142) to that you want to connect with the
The system requests a fax group number for every module that has voice ports in the
line group.
-
11.
Repeat steps 9 through 10 for each line group that you want to associate with fax
groups.
12. Exit to the VoiceMemo Configuration Offline Menu, saving the changes.
(C) Fax group connections for current line group
Line group x, Module y:
(where x is the line group that you selected in step 9, and y is the first
number of the first module that has voice ports in line group x.)
line group. You can connect a fax group with more than one line group.
Dar Rev. A
Page 86

4 Software Configuration Planning
This chapter is designed to help you plan the changes that you must make to your
software configuration when you add FaxMemo applications to your Series 6 server.
It describes all of the software options for FaxMemo, and explains how they are used
in the various applications.
Planning Your FaxMemo Configuration
Before you can configure any FaxMemo applications, you must first assign fax
groups to any line groups that will carry fax traffic. You can then plan and configure
the applications you choose to enable, including any of the following tasks:
l
Assign fax options to existing classes of service (COSs)
0
Update current mailboxes and create fax broadcast mailboxes (if
required) for each new FaxMemo user
0
Create Fax Publishing mailbox trees and/or chains
l
Create and configure Guaranteed Fax mailboxes
0
Create master fax distribution (broadcast) lists
0
Create and store a company fax cover page
Each of these tasks is covered in detail under the application name.
Off line Configuration
a
After you install the FaxMemo cards but before you assign fax features to COSs, you
must create fax groups and then associate (connect) the fax groups with line groups.
The FaxMemo Card Planning Worksheet from the previous chapter has spaces for
the information that you need. Use the most recent Configuration Report to
determine which line groups to connect with fax groups.
FaxMemo Classes of Service (COSs)
The system administration menus contain FaxMemo configuration parameters for
feature, limit, and network classes of service (FCOS, LCOS, and NCOS). All of
4-1
Page 87

Sofmwe Configuration Planning
these options are described below. Read through their descriptions before
completing the remaining worksheets. Some of the options are similar to those for
voice messaging, but some are unique to fax handling. When you assign a FaxMemo
feature to a mailbox, the appropriate user and outside caller prompts are enabled
automatically. The voice prompts are described in the User Guidefor VoiceMemo
and FaxMemo.
Fax Features
The feature bits described below are included with FaxMemo.
190 Receive fax messages
This feature allows a mailbox to receive fax messages. When callers reach the
mailbox, they are first prompted to leave a voice message, then prompted to press L
to leave a fax with the voice message. Callers can ignore the message prompt and
press L to leave a fax without a voice coversheet. When the user accesses the
mailbox, the user is informed that there is a message with a fax there and given
options to retrieve the fax online or direct the fax to a fax machine after hearing the
voice message.
Note:
The mailboxes must also include one or more of the fax delivery
features
stored in the mailboxes.
If feature bit 240 is enabled, callers do not needto press L to begin
sending a fax; the system will detect an incoming fax when it does
not hear speech.
(193,
191 Make fax messages
When this feature is assigned to a mailbox, the mailbox owner can make a voice
message, and then press L to leave a fax with the message. The fax is then delivered
to the addressed party or parties with the voice message.
(master feature)
194,195, 237) to permit the users to retrieve faxes
4-2
192 Give fax messages
This FaxMemo feature allows users who are able to receive faxes in their mailboxes to
forward the faxes along with voice comments directly to other users or to outside
lines. They cannot include another fax as a comment.
Note:
This feature requires feature bit 190.
Page 88

193 Deliver fax to default fax phone number
This feature allows a user to have faxes delivered to a personal (default) fax telephone
number after listening to the voice annotation. This number can be a department or
company fax machine and is entered by the system administrator during
configuration. When the user selects this option, another menu is played giving
further options to schedule delivery, cancel delivery, or deliver the fax now.
Software Configuration Planning
Note:
This feature requires bit
connected to an outbound line group to deliver faxes to phone
numbers.
190.
The system must have a fax group
194 Deliver fax online
This feature permits users accessing their mailboxes from a fax phone to receive
stored faxes online.
Note:
This feature requires feature bit
group connected to an inbound line group to deliver faxes online.
190.
The system must have a fax
195 Deliver fax to designated telephone number
When this feature is included in a mailbox and the user wishes to retrieve a fax or
deliver it to someone else after listening to the voice annotation, the prompt
Press
I to input a number for this fm
is included in the fax transmittal options menu. After the user selects I and inputs
the number, another menu is played giving the choices of scheduling the delivery,
canceling it, or having the fax delivered now.
Note:
This feature requires bit
schedule fax delivery. The system must have a fax group connected
to an outbound line group to deliver faxes to phone numbers.
Additionally, a “fax pager index” must be set in the user’s mailbox.
190
for fax functionality and bit 95 to
196 User changeable default fax phone number for fax del’kery
This feature allows users to change their personal (default) fax delivery numbers
through the user options menu in their mailboxes.
Note:
This feature requires bit 1%.
Page 89

Sohare Configuration Planning
197 Fax on demand
This feature is for Fax Publishing. When
the caller is greeted and given a prompt to get ready to receive the fax deposited in
the mailbox, either online or at another number. The mailbox LCOS and RCOS
control the delivery features.
Note:
This feature requires feature bit 194 and/or 195.
198 Receive fax messages only
This feature prevents a mailbox from receiving voice messages and allows it to receive
only fax messages. It is used for both Guaranteed Fax and broadcast mailboxes in
Fax Mail. No greeting or prompts are played to the calling pyty and only faxes are
recorded. A fax session starts immediately when the server arkvers the call.
A Guaranteed Fax mailbox must have both this bit and message delivery enabled.
199
Note:
Automatic receipt for fax message sent
When this feature is included in a mailbox and the user schedules a fax delivery, a
receipt with a time stamp is automatically placed in the sending user’s mailbox.
This feature requires feature bit 190.
it is
assigned to a greeting only mailbox,
200
Fax cover page
This feature causes the system to send a cover page with outgoing faxes. The cover
page identifies the user as the fax recipient at the company or department fax
machine. Mailbox owners can fax a personal cover page into their mailboxes which
th e system sends each time they retrieve faxes. When a cover page is deposited in the
system administrator’s mailbox, it becomes the company fax cover page and it is
delivered with faxes retrieved by users who do not have a personal cover page. If
neither a personal cover page nor a company cover page is available, the system
generates a default cover page.
If this bit is not enabled in an FCOS, the system does not send any cover sheet with
outgoing faxes.
Note:
Feature bit
so that mailbox owners cannot override the company or default
cover page.
230
disables the mailbox personal fax cover page option
4-4
Page 90

203 Walkaway fax
A mailbox with this feature is set to expect calls from fax machines rather than from
live callers. When a call is routed to a mailbox with this feature, CNG detection is
enabled while the mailbox greeting is playing. If the system detects fax tone, it
processes the incoming fax. If it does not detect fax tone, it plays the recorded
mailbox greeting and prompts. This permits callers
immediately send a fax without a voice coversheet, and without having to respond to
prompts or monitor the call.
Feature bit 256 causes the system to play a brief introductory prompt for walkaway
fax mailboxes.
Software Configuration Planning
to
dial
into a
user’s mailbox and
Note:
206 Fax delete
This feature automatically deletes a fax from a mailbox after it has been delivered. It
is used in Guaranteed Fax to prevent resending the same message to the fax machine.
Note:
207
Fax verify
When feature bit 203 is active, the system listens@ fax tone
(CNG) in order to act like a receiving fax machine when the call is
initiated by a sending fax machine.
When feature bit 240 is active, the system always defaults to
accepting a fax when it does not detect voice. This is similar to the
function of bit 203. However, callers will hear fax signals if their
voice recording times out.
This feature requires feature bit
Feature bit 237 (Automatically deliver fax to default number)
overrides this feature. 237 is for user mailboxes, not guaranteed fax
mailboxes. Do not use both bits in the same FCOS.
190.
This feature is assigned to Guaranteed Fax mailboxes which are on the same hunt
group as the fax machines. It checks incoming faxes with those already stored in the
mailbox to prevent the same fax from rotating through the hunt group and getting
stored in the mailbox again when the fax machine is down or busy.
230 Deny change to fax cover page
This feature disables a mailbox owner’s ability to create a personal fax cover page. If
feature bit 200 is enabled, the system will send either a company cover page (if one
has been placed in the administrator’s mailbox) or the system default cover page.
This feature has no effect if bit 200 is not enabled.
4-5
Page 91

Software Configuration Planning
235
Display from
This feature adds the “From” field to the default fax cover page. The field identifies
the system that the fax came from, such as, “ABC Communications Fax Service.” It
does not identifjr the mailbox owner. The text of the “From” field is set in the Fax
Service and Promotional Message Menu.
field
on fax cover page
236 Display promotional field on fax cover page
This feature adds a promotional message field to the default fax cover page. The text
of the promotional message field is set in the Fax Service and Promotional Message
Menu.
237 Automatic fax retrieval
This feature allows the mailbox owner to have faxes downloaded automatically to a
preconfigured default fax number when faxes arrive in the mailbox. The fax or
voice/fax message is automatically moved to the saved queue and the message waiting
indicator is not triggered. This feature is intended to make it easier for mailbox
owners who regularly use the same fax machine to retrieve their faxes. The mailbox
owner can also enable or disable this feature from the user options menu.
r.
Note:
When this feature is active, the mailbox owner should check the
target fax machine frequently, since fax messages will not activate a
message waiting indicator.
This feature overrides feature bit 206 (Discard fax message after
delivery). 206 is for guaranteed fax mailboxes only. Do not
include both bits in the same FCOS.
238 End of session delivery
This feature is invisible to users. However, it allows the system administrator to save
on outbound fax calls. Instead of making an outbound call for each fax, this feature
enables the system to make only one outbound call for all faxes sent to the same
number during a mailbox session.
Note:
This feature requires feature bit 193 and /or 195.
4-G
Page 92

Sohare Configuration Planning
239
Retrieve all unplayed faxes
This feature makes it easier for mailbox owners to get their faxes.
automatic fax delivery enabled, they have the option to have all faxes concatenated
and sent at once. The user selects the “retrieve all faxes” option from the user
options menu and all the faxes are automatically sent to the user’s default fax
number.
Note:
This feature requires one or more of feature bit 193, 194, or 195.
240 Receive fax on record time-out
This feature makes it easier for callers to send fax-only messages and voice/fax
messages.
start, and walk away.
press L to send the fax.
In the case of fax-only messages, a caller can dial into ,a mailbox, press
In the case of the voice/fax message, the caller does not need to
Note:
When feature bit 203 is active, the system listens for fax tone
(CNG) in order to act like a receiving fax machine when the call is
initiated by a sending fax machine. Without bit 203, callers to a
mailbox must press L to indicate that they want to leave a fax.
If they do not have
-
Fax limits
256
When feature bit 240 is active, the system always defaults to
accepting a fax when it does not detect voice. This is similar to the
function of bit 203, except that the user does not have to press L
to leave a fax. However, callers will hear fax signals if their voice
recording times out.
This feature requires feature bit 190.
Enable fixed greeting for walkaway fax
The feature bit causes walkaway fax mailboxes to play the prompt, “Press 1 or
wait...” before playing the mailbox greeting.
The following fax limits can be included in limits classes of service (LCOS).
Number of digits for fax phone number for fax delivery
This limit restricts the user to the set number of dialing digits when retrieving or
redirecting a fax to a designated number.
allow faxes to be redirected to an internal extension, but
send faxes long distance. If no digits are specified, then the number of digits defaults
to that entered for the outside caller dialing plan at the Online Configuration Menu.
For example, 3 or 4 digits would only
11
digits would let the user
4-7
Page 93

Sofkwxe Configuration Planning
Note:
This limit works in conjunction with RCOS Nl?A/NXX screening.
Number of fax messages per mailbox
This limit is the maximum number of faxes that can be stored in a mailbox at any
one time.
CNG tone detection length
This limit is
tone from a calling fax machine when walkaway fax is enabled (feature bit 203).
This limit should be set to zero except for sites with very noisy phone circuits.
Fax delivery retry frequency
This limit is the number of times the server attempts to send a fax message until it is
successfully sent. The system retries fax delivery when it encounters ring no answer,
busy, or no available fax resource.
the number
of seconds that the Series 6 server waits to detect the CNG
r.
Fax delivery retry interval
This limit is the number of minutes the system waits between retries on delivering a
fax message.
Played fax message retention
This limit is the maximum number of hours that played faxes can be stored in a
mailbox.
Unplayed fax message retention
This limit is the maximum number of hours that unplayed faxes can be stored in a
mailbox.
Urgent fax message retention
This limit is the maximum number of hours that urgent faxes can be stored in a
mailbox.
Fax receipt retention
This limit is the maximum number of hours that fax receipts can be stored in a
mailbox.
4-8
Page 94

Fax Networking Features
The following options determine a user’s fax capability over a MESA-Net network to
other Series 6 servers.
(NCOS).
10 Make fax messages to the network
This feature allows a user to make a fax message and send it over the network.
11 Give fax messages to the network
This feature permits users to forward fax messages deposited in their mailboxes to
users on another system over the network. It does not allow users to make a fax
message to the network.
12 Answer fax messages to the network
A user with this feature can reply to a fax message that was sent from another system
over the network. If feature bit 38 is activated, the original message, voice and fax,
will be sent with the reply back across the network.
Sofiswre Configuration Planning
These are entered as part of the network class of service
r.
FaxMemo and RCOS
Like all other types of outbound calls, outbound FaxMemo calls are controlled by
the Restriction Class of Service of the sending mailbox. A mailbox owner cannot
have a fax delivered to a phone number that is blocked in their RCOS.
Adding FaxMemo Options to COSs
Add FaxMemo options to mailboxes exactly as you would voice message options.
You can include them in existing or new FCOSs, LCOSs, and NCOSs. You must
generate new COSs for applications peculiar to FaxMemo, such as guaranteed fax
and fax publishing.
These are some fax mail FCOS options:
0
VII’ FCOS + 190-196 and 200
User can receive and send fax messages and include a cover sheet.
must use the phone keypad to send a fax.
e
VII’ FCOS + 190-196,200, and 203
Same as above, but callers can also send walkaway fax messages.
Callers
0
VII’ FCOS + 198 and 200
4-9
Page 95

Software Configuration Planning
A sample FaxMemo COS Planning Worksheet follows this section. Blank
worksheets are in Appendix A for photocopying. The Fax FCOS and NCOS bits
and names are included at the top of the worksheet for your reference.
If you add fax features to an existing COS without renumbering the COS, the
existing mailboxes with that COS assigned take on the added fax features. If you
create a new COS by copying an existing one and modifying it, you must assign the
new COS to mailboxes (see “FaxMemo Mailboxes”).
Note that there are entries for users’ standard mailboxes and users’ broadcast fax
mailboxes. If a user is likely to receive many fax calls, he or she should probably have
a separate extension for faxes that has an associated broadcast mailbox. The
broadcast mailbox contains a distribution list consisting of only the user’s standard
VoiceMemo mailbox. Messages or faxes left in the broadcast mailbox are
immediately transferred to the user’s standard mailbox, as shown in Figure 4-1.
Fax only mailbox. This receives fax messages with no voice annotation
and supports a cover page. Use bits 193-195 to retrieve messages.
Figure 4-1
PBWCO
Voice calls to
ext. 1234
RNA/Busy forward
Fax calls to
ext. 1235
Broadcast Mailbox Fax Mail Application
Series 6 Server
User’s
Standard
M#s!8tx
F&f
messages
T
User’s
Broadcast
Mailbox
#1235
6’203FAx
4-10
Page 96

Sofisvare Configuration Planning
FaxMemo COS Planning Worksheet
Fax Feature Bits Fax Feature Bits (continued)
Fax NCOS Bits
Number
10
11
12
Make Fax Message to Network
1 Give Fax Message to*Network
1 Answer Fax Message to Network
Description
CO% for User’s Normal Mailbox
FCOS #to
Modify Number New FCOS Name FAX Feature Bits to Add
10
I
NCOS #
to Modify Number New NCOS Name FAX NCOS Bits to Add
1 1
-
New FCOS
22
I I
New
NCOS
VIP Fax
I I I I I I
Network
Fax 10, 11, 12
190,196,200,203
I
I
FCOS #to
Modify
New FCOS
Number New FCOS Name FAX Feature Bits to Add
Prepared By:
Configured By:
FCOS for User’s Fax Broadcast Mailbox
Date:
Date:
4-11
Page 97

Softwue Configuration Planning
FaxMemo Mailboxes
The planning and configuration for mailboxes for each FaxMemo application is
slightly different. This section contains information about mailboxes for each
application, and sample worksheets to help in planning.
Note:
You can add Walkaway Fax to any of the other FaxMemo
applications by enabling the appropriate feature bits in an FCOS.
Fax Mail Mailbox Configuration
The Fax Mail Mailbox Worksheet associates mailboxes with COSs. A sample
worksheet for this purpose is shown below. The worksheet section at the end of this
manual contains worksheets for photocopying. List all the mailbox owners and their
current mailbox numbers on the sheet. Add the new COS numbers for the current
mailboxes. If you are going to use broadcast mailboxes, add those mailbox numbers
and the COSs to be assigned to them. Remember that the broadcast mailboxes must
be new boxes. If possible, use a numbering scheme for the broadcast mailboxes that
is easy for the users to remember when they need to give their fax numbers out to
callers.
Fax Mail Mailbox Worksheet
Default Telephone
Number for Fax
4-12
Prepared By:
Configured By:
Date:
Date:
Page 98

Fax Broadcast Mailbox Configuration
If you
set
up special distribution list mailboxes for fax broadcasting, use the Fax
Broadcast Mailbox Worksheet at the end of this manual. A sample worksheet is
shown below. Use one worksheet for each distribution list mailbox. Enter the
mailbox number to create or modify and the COSs to assign to it, then list the
mailboxes and owners’ names for the distribution (broadcast) list.
Fax Broadcast Mailbox Worksheet
Sofisvare Configuration Planning
Mailbox No: 6777 Name:
FCOS No: 20
LCOS No: 5 NCOS No: -
5ales Fax Broadcast
Distribution (Broadcast) list
Mailbox # Owner’s Name Mailbox #
4212 Douglass
4256
4235 Johnson
4354 5ojourner
4222 Budris
4343 Dayharsh
4274 Vilahu
Garcia
r.
Owner’s Name
Prepared By: Date:
Configured By:
Date:
-
4-13
Page 99

Sofmate Configuration Planning
Guaranteed Fax Mailbox Configuration
For Guaranteed Fax, use the VII? FCOS with bits 198,206, and 207 and enable
message delivery. This mailbox delivers one copy of each fax message it receives to
your fax machine and deletes each fax after it is successfully sent to the machine.
A sample Guaranteed Fax Mailbox Worksheet is shown below. Blank worksheets for
photocopying are at the end of this manual. Fill in the telephone numbers in the
hunt group. For example, if your fax machine is on 555-3200, assign mailboxes to
555-3201,555-3202, and so on. Enter the COSs for the mailboxes and the fax
number you want them to deliver faxes to.
Guaranteed Fax Mailbox Worksheet
Fax Machine NoJName:
I
I I
555-3200
5ales Order Enttv
I
r.
I
Prepared By: Date:
Configured By: Date:
8
4-14
Page 100

Fax Publishing Mailbox Configuration
For fax publishing, you can use any of these types of mailboxes:
Tree
A tree mailbox routes callers to other mailboxes when they press one of
the keypad numbers. You must assign
(refer to the
distribution list
input order, and record a message in the mailbox directing the caller to
press specific keypad numbers for different information. The “go to”
mailboxes can also be tree mailboxes, branching the caller further for
more specific information.
VoiceMemo Reference
01
Software Configuration Planning
the proper
and Conj&ration
features to the mailbox
Man&k
create
in the mailbox with the “go to” mailboxes in keypad
0
Chain
4
A chain mailbox accepts other mailbox numbers from the caller and
branches to them. Refer to the
VCceMemo Reference
and Configuration
Manualfor chain mailbox features.
l
Greeting with fax
This mailbox plays your recorded greeting and directs the caller to
receive the associated fax.
0
Greeting only
This type of mailbox can be used within a fax publishing and audiotext
application to give a voice only information message, such as the initial
welcome greeting to callers.
l
Fax on demand
Use a greeting only mailbox with bits 194, 195, and 197 to permit callers
to receive a prestored fax online or at a caller-designated number.
l
Fax only
A fax only mailbox plays any greeting and immediately prepares to
a
receive a fax. This can be used in larger fax publishing or audiotext
applications to allow the caller to input a fax message.
A sample Fax Publishing Mailbox Worksheet is shown on the next page. Blank
worksheets for photocopying are at the back of this manual. For tree and chain
publishing, you need a separate worksheet for each mailbox. Number the worksheets
and fill the sheet numbers in the “Continue on Sheet” or “Go to Sheet” columns, so
you can follow the progression through the tree or chain.
Write out the greeting, if any, that you want recorded in the mailbox. Enter a
description or title of the fax document you want stored in the fax transmittal
mailbox or attach it to the worksheet.
4-15
 Loading...