


Call Costing TASKE Call Center Management Tools Version 7.0
Table of Contents
TASKE CALL COSTING PROGRAM.................................................................. 2
Call Costing Concepts.................................................................................................... 2
Public Network Numbering Plans...................................................................... 2
Telecom Carrier Services.................................................................................. 3
Account Codes.................................................................................................. 3
Rate Tables....................................................................................................... 4
How Costs are Apportioned............................................................................... 4
OVERVIEW OF THE CALL COSTING INTERFACE...........................................5
Menu Bar........................................................................................................................5
Tool Bar.......................................................................................................................... 5
Main Window.................................................................................................................. 5
Status Bar....................................................................................................................... 6
USING THE CALL COSTING PROGRAM........................................................... 7
Step 1. Allocate Trunks to Trunk Groups....................................................................... 7
Step 2. Define Cost Intervals......................................................................................... 8
Step 3. Setting up Rate Tables.................................................................................... 10
Step 4. Generate Call Costing Reports........................................................................ 13
-1-
Call Costing TASKE Call Center Management Tools Version 7.0
TASKE Call Costing Program
The TASKE Call Costing program is an accounting system that enables you to
apportion telecom costs among departments, projects and/or employees. This program
does not provide a precise breakdown of spending, but provides a percentage dispersal
to allocate telecom usage among departments. The Call Costing program assists in
identifying the efficient usage of outgoing calls.
The Call Costing program enables you to:
Ÿ produce reports for any range of dates,
Ÿ specify 3 billing rates for each service a carrier provides,
Ÿ organize data into pre-defined reports,
Ÿ consolidate your accounts into meaningful groups—service, department, region,
or project, and
Ÿ store report templates to be used at a later date.
Call Costing Concepts
The following is a brief summary of basic call costing concepts and terminology.
Public Network Numbering Plans
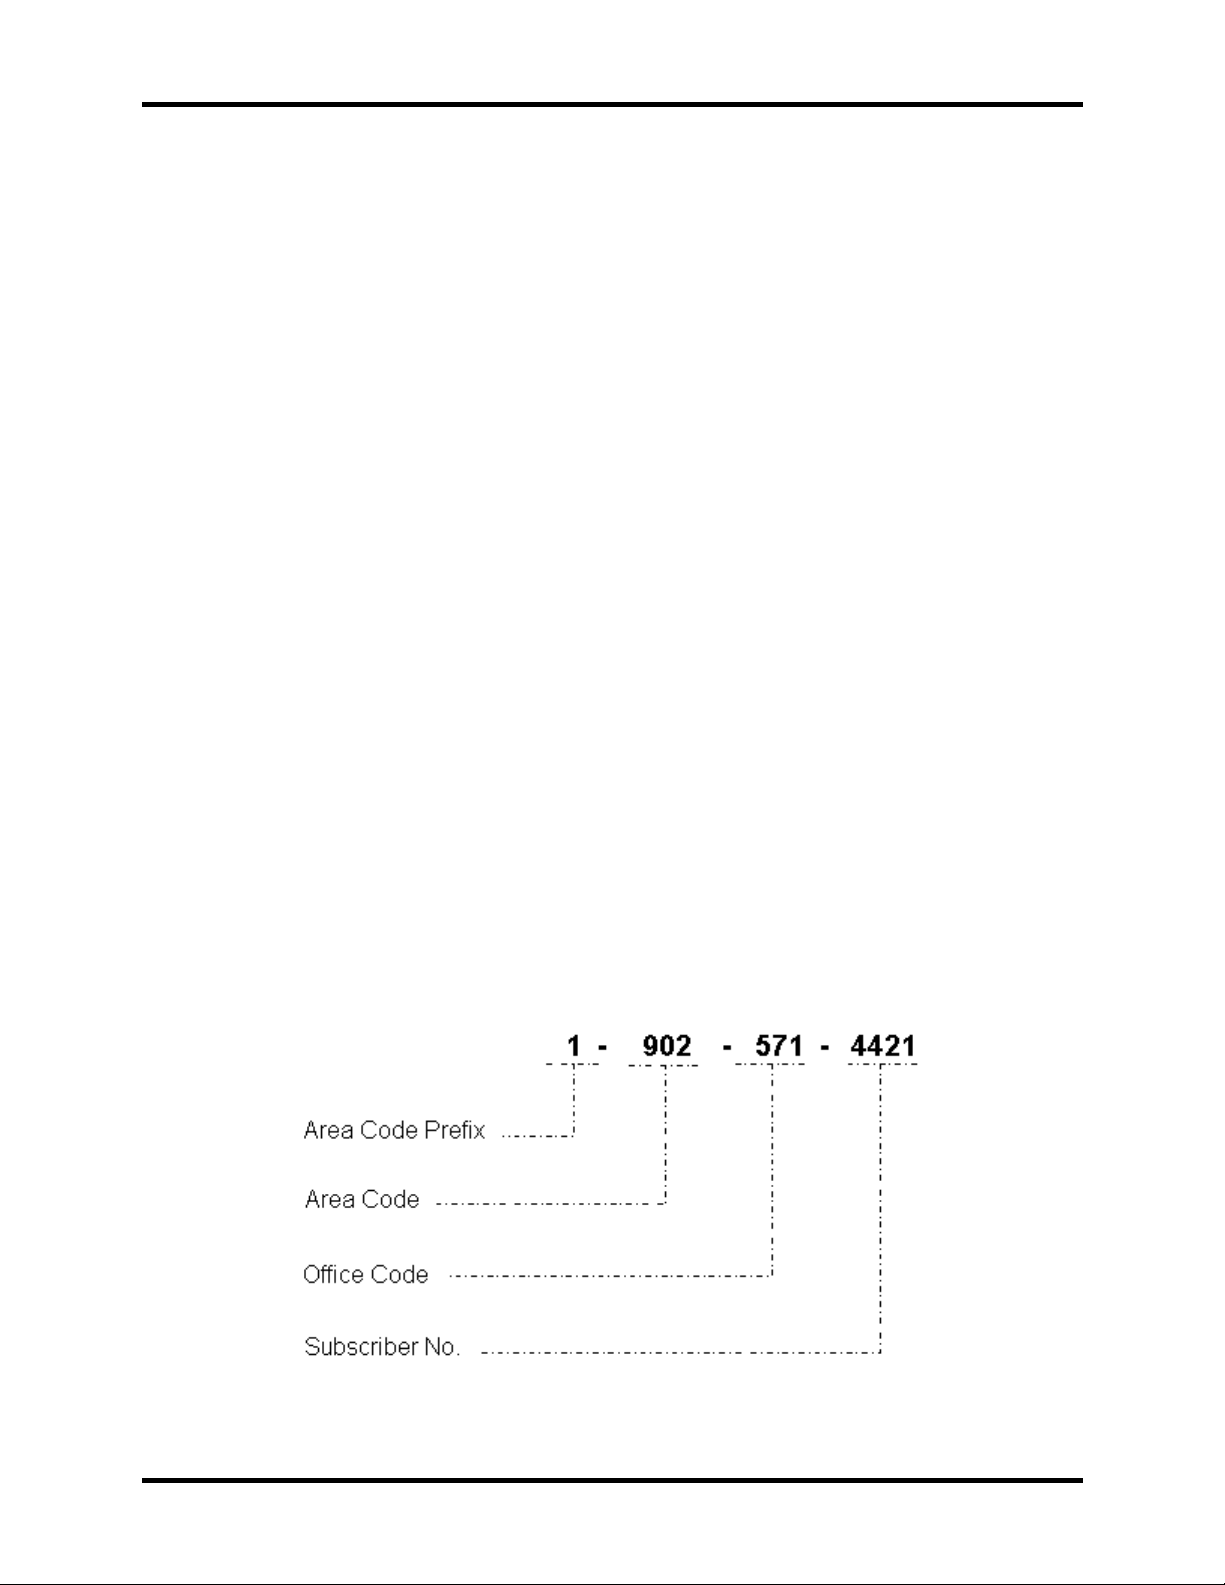
Public network numbering plans enable the users of a network to dial anywhere
in the world. In the North American Numbering Plan, subscribers are assigned a
unique number string of up to 10 digits, such as:
The area code defines a geographic telephone region, and provides the basis for
-2-

Call Costing TASKE Call Center Management Tools Version 7.0
billing customers. The office code identifies a central office (CO) within the
region, and the subscriber number identifies the user of the CO. The area code
prefix is used when calling (voice/data) subscribers outside of the geographic
telephone region.
Telecom Carrier Services
Long distance carriers provide telecom service between major locations at a
reduced rate. The rates vary depending on the geographic telephone region
being dialed and the time of day. Some carriers provide flat rates, usage discount
rates, and discounts for the most frequently dialed number. In addition, carriers
offer various methods of routing calls over the public network, each of which has
a different cost format.
The incoming and outgoing trunks of a business are allocated for telecom
services including: incoming and outgoing telephone calls (voice), fax machines,
ISDN lines, and modems (data). Customers generally select the carrier who
offers the best rate for a given telecom service; a customer may use one carrier
for calls to the Eastern United States, a second carrier for calls to the Western
United States, and a third carrier for calls to Europe. The switch is programmed
to select the trunk that offers the best rate for the long distance number being
dialed, and can be programmed to notify the caller if the trunk is currently in use.
Account Codes
In a business, one or more Account Codes may be assigned to:
• departments,
• projects,
• devices (Extensions and Trunks),
• telecom services (voice/data communication),
• and/or employees.
If an Account Code is included in the database record when a long distance
number is dialed, the call is therefore tagged. Call records tagged with the
Account Code are stored by the TASKE Toolbox . The Call Costing software
sorts the call data, stores it, and retrieves it when producing user-defined reports.
Reports can be generated that include all call records tagged with the Account
Code number.
Account Code numbers can be assigned to any of a number of people or
services. For example, lawyers typically assign Account Codes to each client.
Long distance calls and faxes made on behalf of a client are tagged with the
Account Code. This enables lawyers to allocate long distance charges among
clients, and bill back clients accordingly.
-3-
Call Costing TASKE Call Center Management Tools Version 7.0
Rate Tables
Rate Tables are defined in the Trunk Group Cost Information dialog box. Each
Call Costing Trunk Group has a Rate Table that lists long distance rates for userspecified area codes. The carrier sets the rates. The rates typically vary across
time intervals of the day, such as Day, Night1, and Night2.
If an area code prefix (1), and/or a Trunk access number (generally 8 or 9)
appear in the Leading Digits field, you can specify that they be suppressed. This
ensures that the search for call records is conducted on the area code only,
when the Call Costing program runs reports.
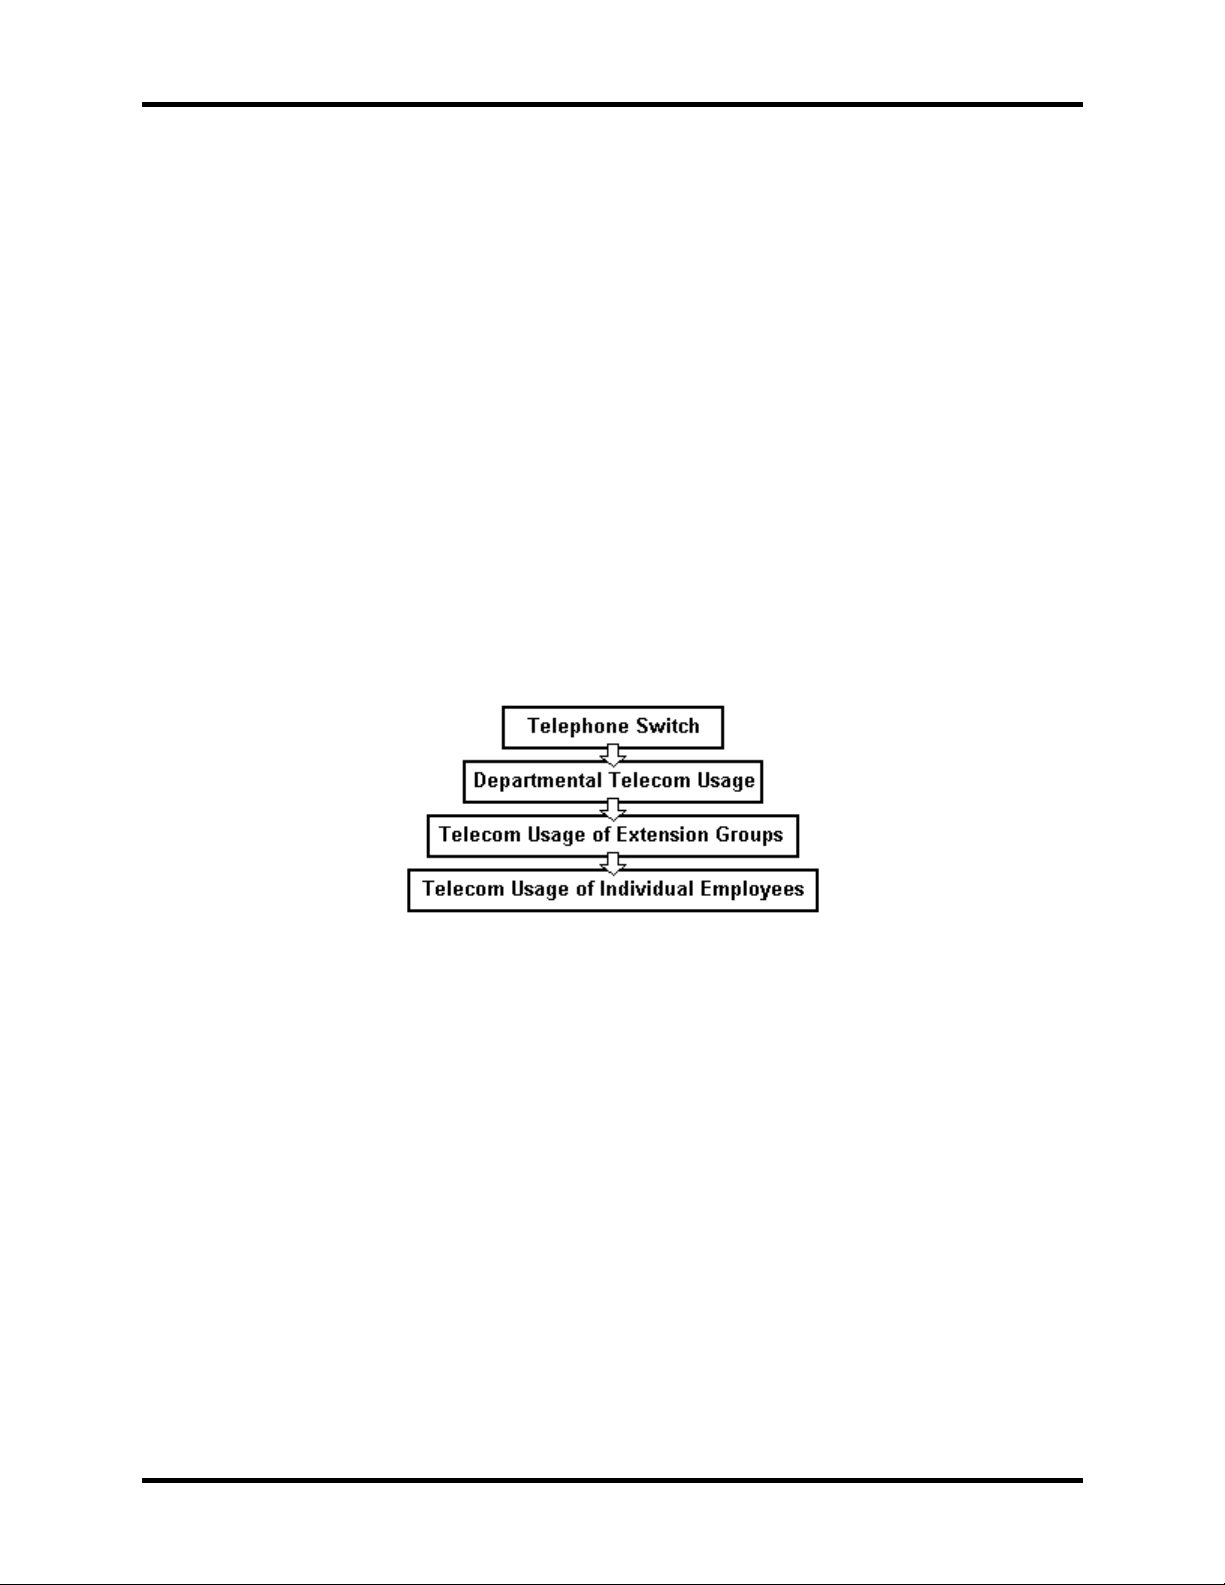
How Costs are Apportioned
The bills received by a subscriber of the network are based on telephone switch
activity. The telephone switch activity is based on a department/project’s call
activity, which is based on the call activity of Extension Groups in the
department/project, and the call activity of individual employees. The TASKE Call
Costing program provides a breakdown of call expenses at the following levels.
-4-
Call Costing TASKE Call Center Management Tools Version 7.0
Overview of the Call Costing Interface
To use the TASKE Call Costing program, click on the Call Costing icon in the TASKE
ToolBox. The TASKE Call Costing program reads the TASKE Main Database and lists
the current Trunks and Trunk Groups defined in the Call Costing window when the Call
Costing program is opened. The features available in the Call Costing program window
are described below.
Menu Bar
In the Menu Bar (top of window) of the TASKE Call Costing program, a set of dropdown menus is displayed.
The five menus include File, Edit, Costing, View and Help, and are for creating and
editing Call Costing criteria, saving settings, changing the display or view of the report,
and accessing the online help.
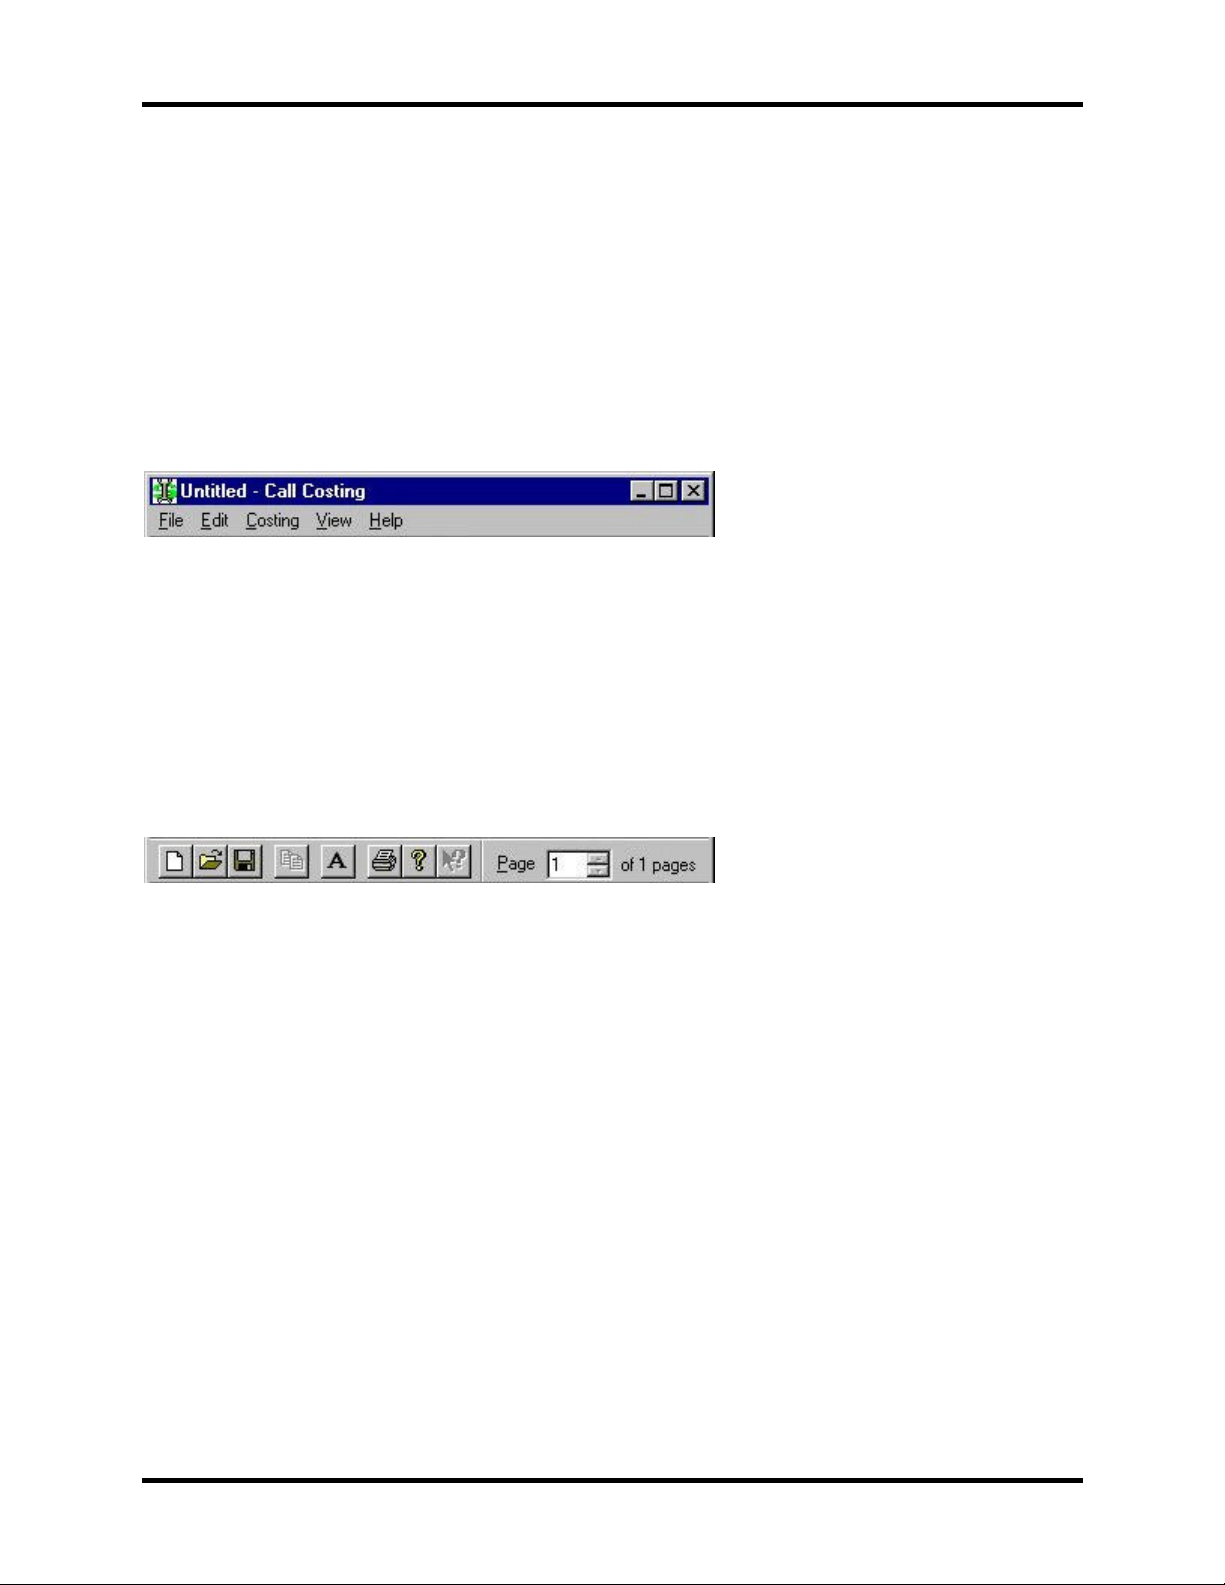
Tool Bar
In the Tool Bar (top of window, below Menu Bar) of the TASKE Call Costing program, a
set of tool buttons is displayed. The buttons include New, Open, Save, Copy, Font,
Print, About and Help. These tools are to help create and edit Call Costing criteria, save
settings, print Call Costing Reports, change the display or view of the report, and
access the online help. Also located on the Tool Bar is the Page selector, which is used
to choose a page to look at in the generated Call Costing report.
Main Window
In the Call Costing program Main window, the Trunks and Trunk Groups are listed. If a
Trunk belongs to more than one Trunk Group in the TASKE Database, the Trunk
Groups are listed numerically. The TASKE Call Costing program assumes the first
Trunk Group listed is the one from which the rate information is extracted. For example,
if a Trunk is listed as being in Trunk Groups 1 and 10, the TASKE Call Costing program
will extract costing information from Trunk Group 1.
-5-
Call Costing TASKE Call Center Management Tools Version 7.0
Any reports generated are displayed in this window.
Status Bar
The Status Bar (bottom of window) of the TASKE Call Costing program displays
statistics about the status of the report being displayed or generated. The Status Bar
displays the current page number being displayed, and the current date and time.
-6-

Call Costing TASKE Call Center Management Tools Version 7.0
Using the Call Costing program
The Call Costing program reads the current Trunk Group information in the TASKE
Database and creates rate tables for each Trunk Group. In order to generate reports,
the TASKE Call Costing program requires rate information on your various Trunk
Groups. Upon starting the Call Costing program, you may either make selections to
produce reports from the existing logistical configuration or first revise the existing
logistics. The following steps are performed when creating or revising call costing
reports settings.
Step 1. Allocate Trunks to Trunk Groups
In the TASKE Administrator, Trunks can be assigned to multiple Trunk Groups. In the
TASKE Call Costing program, Trunks that belong to one or more Groups have their rate
information taken from their first Trunk Group. Before creating a call costing report,
make sure you have assigned Trunks to Trunk Groups within the TASKE Administrator
program. If they are not grouped together in the Administrator, you may find it useful to
create an organization table as described below, and then enter them into the TASKE
Administrator before continuing.
To create an Organization table:
1. Make a list of your Trunks on paper.
2. Group together the Trunks that have the same costing information (rate of
billing/carrier).
3. Number these Trunk Groups starting with the "lowest" Trunk Group number:
Trunk Group #1, Trunk Group #2, and so on. This is necessary as the TASKE
Call Costing program assumes the first Trunk Groups listed are the ones from
which rate information is extracted.
4. Define additional Trunk Groups for reporting purposes as required.
In the TASKE Database, Trunk Groups are defined by allocating Trunks to Trunk
Groups. You will notice that the Trunk Groups programmed in the TASKE Administrator
(used to create the database) are represented in the Trunk Group Cost Information
dialog box of the TASKE Call Costing program as Rate Tables. The TASKE Call
Costing program creates Rate Tables based on existing Trunk Groups.
An Account Code may be assigned to a project department, or individual to track call
costs.
Note In the TASKE Database, The Trunk Groups defined for Reporting Purposes are
not costed by the Call Costing program.
-7-
Call Costing TASKE Call Center Management Tools Version 7.0
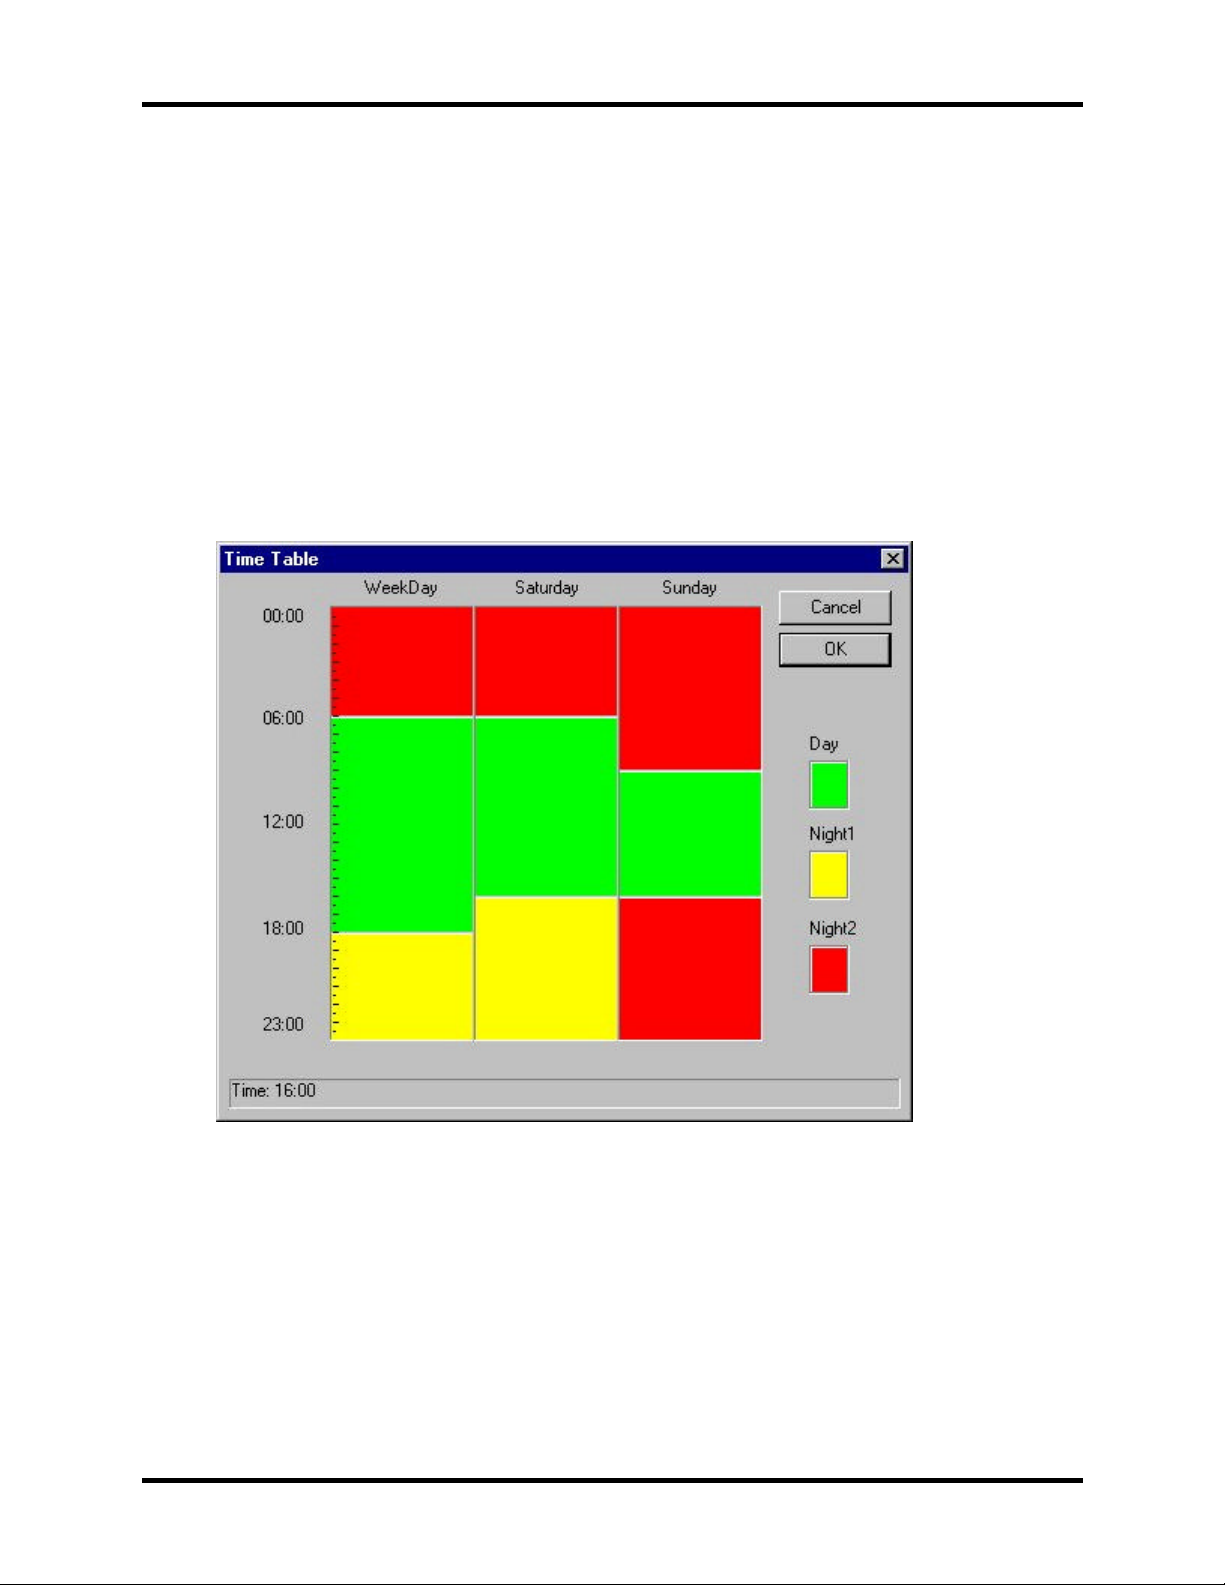
Step 2. Define Cost Intervals
In the TASKE Call Costing program, intervals are defined for periods of the day which
have a unique billing rate. For example, a long distance carrier may offer one third off
the regular rate for calls made between 6:00 p.m. and 11:00 p.m., two thirds off the
regular rate for calls made between 11:00 p.m. and 8:00 a.m., and an un-discounted
rate for calls made between 8:00 a.m. and 6:00 p.m. In this situation, three intervals are
defined for the rate schedule.
To define a Cost Interval, complete the following steps.
1. Select the Costing: Intervals menu item. The Time Table window appears.
2. Click the right mouse button. The available menu options are shown.
3. Select the Insert Interval option to insert one or more intervals.
4. Select the horizontal bar dividing two intervals and drag the bar to the desired
time slot (the time slot the bar is intersecting is displayed in the Status Bar at the
bottom of the Time Table window). Repeat this step until the start and end times
of all your intervals are established.
-8-

Call Costing TASKE Call Center Management Tools Version 7.0
5. Click the right mouse button in an Interval and select the Day, Night1 or Night2
option to associate a rate schedule name to the time interval you have defined.
6. Select OK to save and exit the Time Table window.
Note The time Intervals you define in the Time Table window are globally applied to all
Call Costing Trunk Groups. However, the actual long distance rates entered in the Rate
Table intervals can vary across Trunk Groups.
-9-
Call Costing TASKE Call Center Management Tools Version 7.0
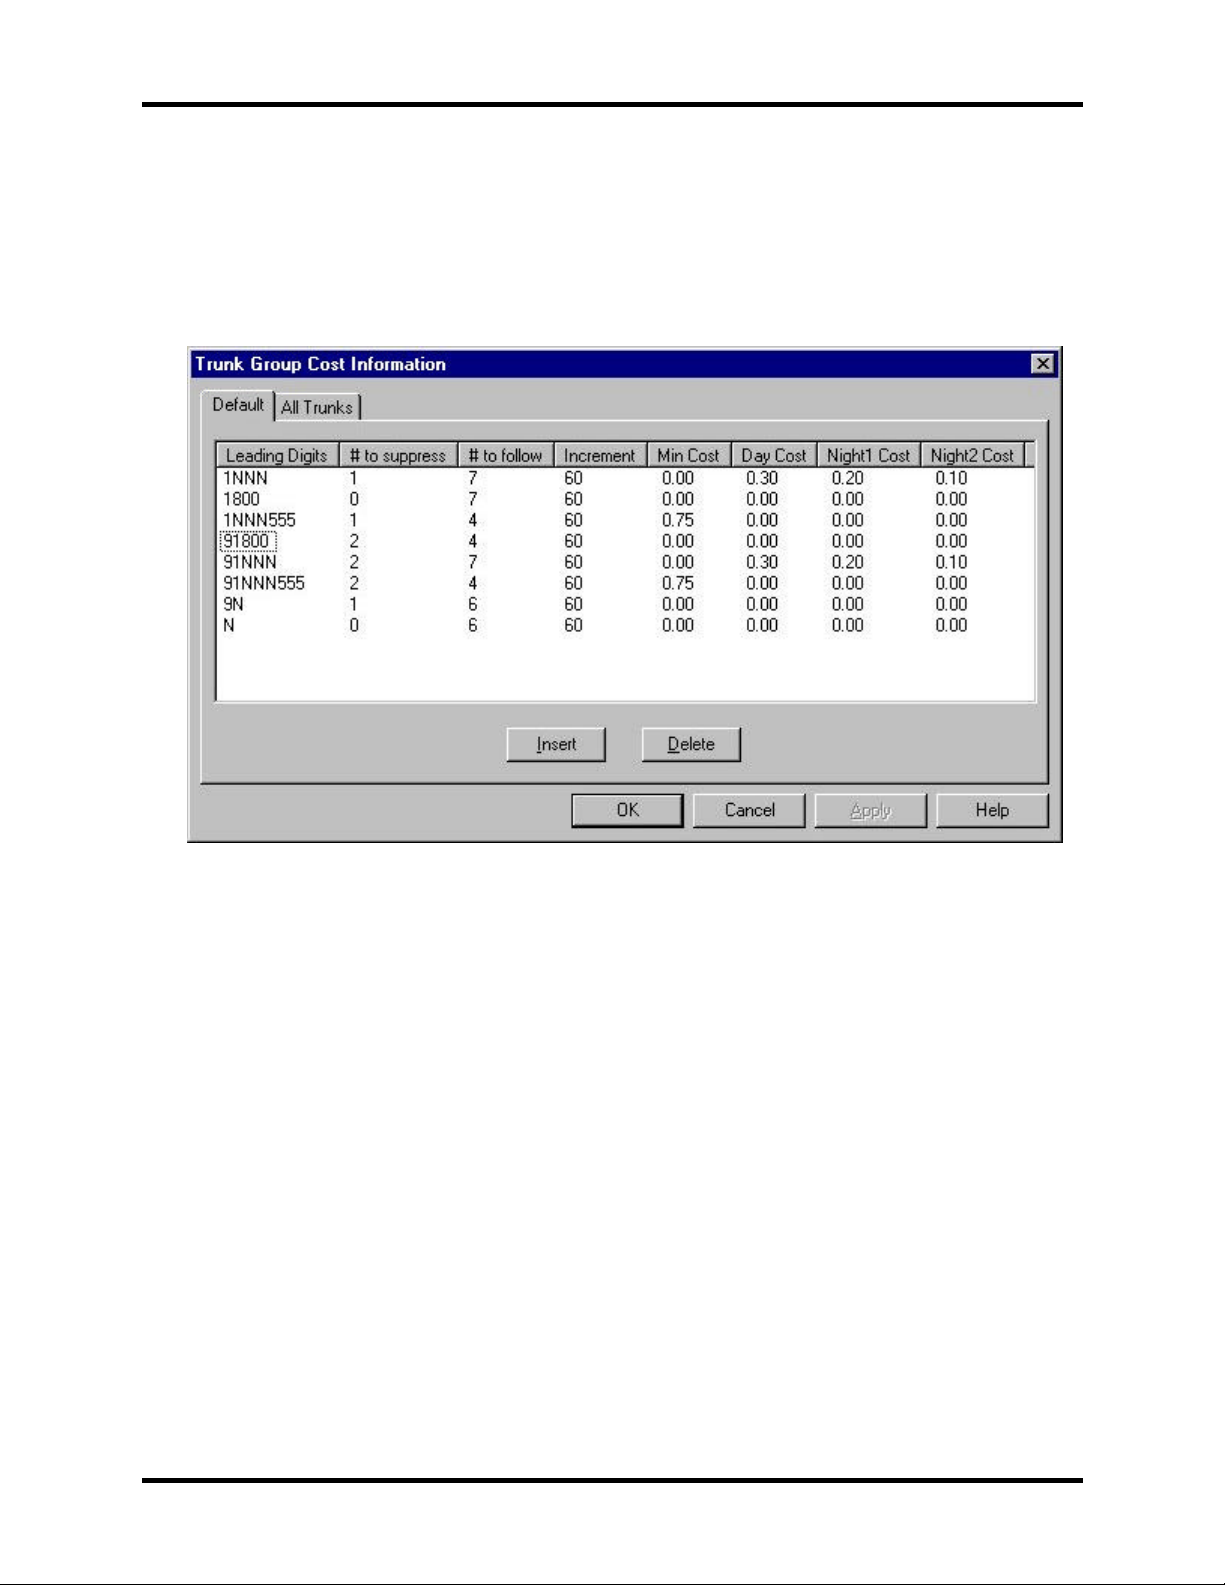
Step 3. Setting up Rate Tables
Rate Tables are defined in the Trunk Group Cost Information dialog box. Each Call
Costing Trunk Group has a Rate Table that lists long distance rates for user-specified
area codes. The rates are set by the carrier. The rates typically vary across time
intervals of the day, such as Day, Night1, and Night2.
1. Select the Costing: Trunk Info menu item.
2. Select the Default or All Trunks tab (call records for Trunks not allocated to Trunk
Groups use the costing defined in the Default tab).
3. Select the Insert button and enter the generic area code for long distance calls in
the Leading Digits Field. If an access code (usually 8 or 9) is needed, do not
forget to use it.
Leading Digits field: Generic area codes are defined in the Leading Digits
field to simplify the programming. In the Leading Digits field, the letter "N"
may be used to represent any number. For example, listing 1NNN area
code in the rate table tells the Call Costing program to search for all call
records to any area code "any number-any number-any number", followed
by 7 digits.
4. Double click on the # to suppress field and type in the number of digits to be
suppressed. For example if only the first digit ("1" for long distance calls) needs
to be suppressed so the switch knows to search for all long distance calls of any
area code, enter 1.
-10-

Call Costing TASKE Call Center Management Tools Version 7.0
# to suppress field: Trunk Access numbers (usually 8 or 9) and Area Code
Prefixes (1) are suppressed in order for the Call Costing program to
properly read rate tables. This ensures that the search for call records is
conducted on the area code only, when the Call Costing program runs
reports.
5. Double click on the # to follow field and type in the number of digits to follow the
suppressed digits. For example, if you were suppressing the area code in the #
to suppress field, you would enter "7" in the # to follow field, as there are
normally 7 digits following an area code in a telephone number.
# to follow field: specifies the number of digits the Call Costing program
reads after the Leading Digits. The number entered in the # to follow field
tells the switch to search for all call records for the area code that are
followed by that number of digits. For example, a 4 in the "# to follow"
field, tells the switch to search for all call records for the area code that are
followed by 4 digits.
6. Double click on the Increment field and enter the number of seconds the rate
applies to (for example: if your increment value is set at 60, every 60 seconds of
a call multiplied by the cost associated).
Increment field: allows you to specify the cost of a call per "X" number of
seconds of calling time.
7. Double click on the Min Cost field and enter the minimum long distance rates per
increment (for example: If your increment value is set at 60, enter the minimum
long distance rate per minute for the specified area code).
Min Cost field: The minimum long distance rates for each code are
entered in the Min Cost field. For example, if you had set the Leading
Digits field to search for all long distance "information" calls for any area
code (by entering "1NNN555" in the Leading Digits field) the Min Cost field
would contain 0.75 as all information calls cost 75 cents.
8. Double click on the Day Cost field and enter the daytime (according to the
interval set in the Time Table) long distance rates per increment (for example: If
your increment value is set at 60, enter the long distance rate per minute for the
specified area code).
Day Cost field: The long distance rates for the Day Interval (as set in the
Time Table) for each code are entered in the Day Cost field.
9. Double click on the Night1 Cost field and enter the nighttime (according to the
interval set in the Time Table) long distance rates per increment (for example: If
-11-

Call Costing TASKE Call Center Management Tools Version 7.0
your increment value is set at 60, enter the long distance rate per minute for the
specified area code).
Night1 Cost field: The long distance rates for the Night1 Interval (as set in
the Time Table) for each code are entered in the Night1 Cost field.
10. Double click on the Night2 Cost field and enter the daytime (according to the
interval set in the Time Table) long distance rates per increment (for example: If
your increment value is set at 60, enter the long distance rate per minute for the
specified area code).
Night2 Cost field: The long distance rates for the Night2 Interval (as set in
the Time Table) for each code are entered in the Night2 Cost field.
11. Click the OK button to save and exit the Rate Table.
Note Selecting a field heading such as # to suppress automatically sorts all of the field
values.
-12-
Call Costing TASKE Call Center Management Tools Version 7.0
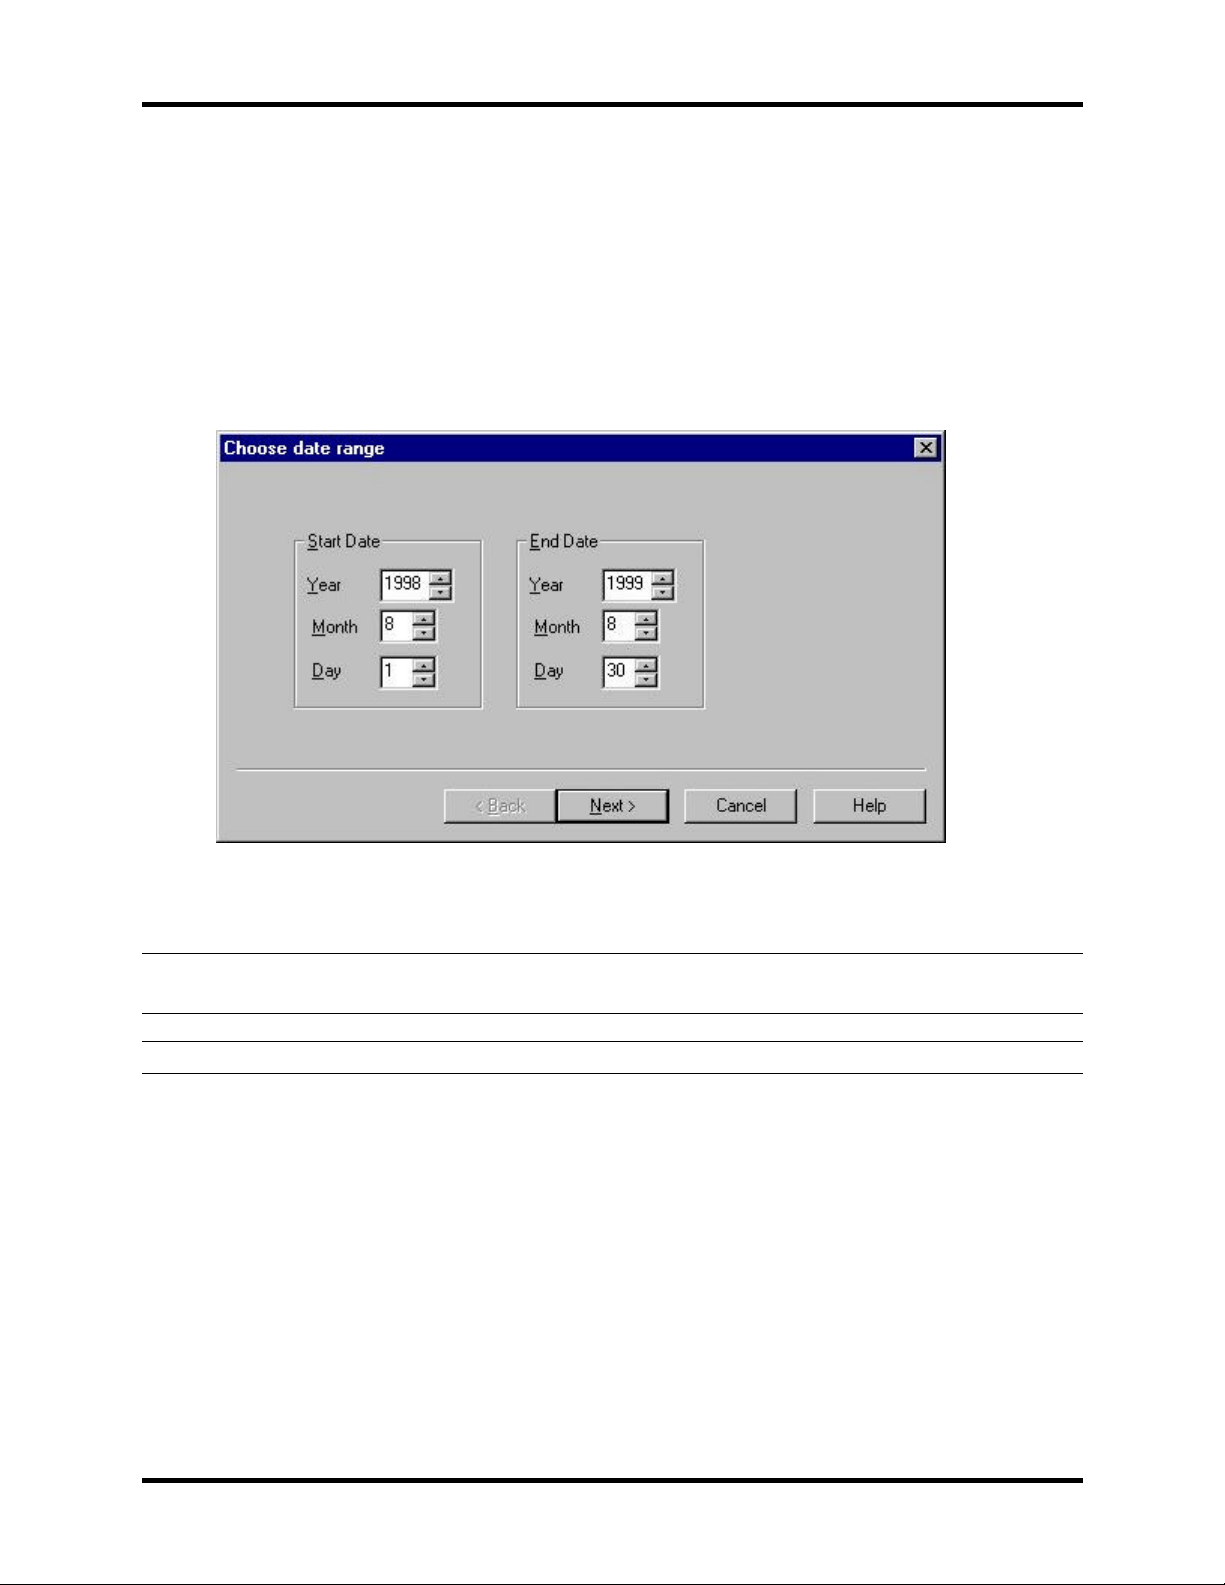
Step 4. Generate Call Costing Reports
The reports produced by the TASKE Call Costing program represent individual
elements (Agents, Extensions, Trunks) or groups of elements. The Report Wizard
allows you to create reports for each element or group.
To specify which reports are run, the Report Wizard is configured as follows.
1. Select the File: New menu item. The Date Range dialog box appears.
2. Select a date or range of dates for the report, and then click the Next... button.
Note: The available range of dates for call costing reports is from January 01, 1990 to
December 31, 2030.
Note: If a report is desired for a single day, set the start date equal to the end date.
-13-
Call Costing TASKE Call Center Management Tools Version 7.0
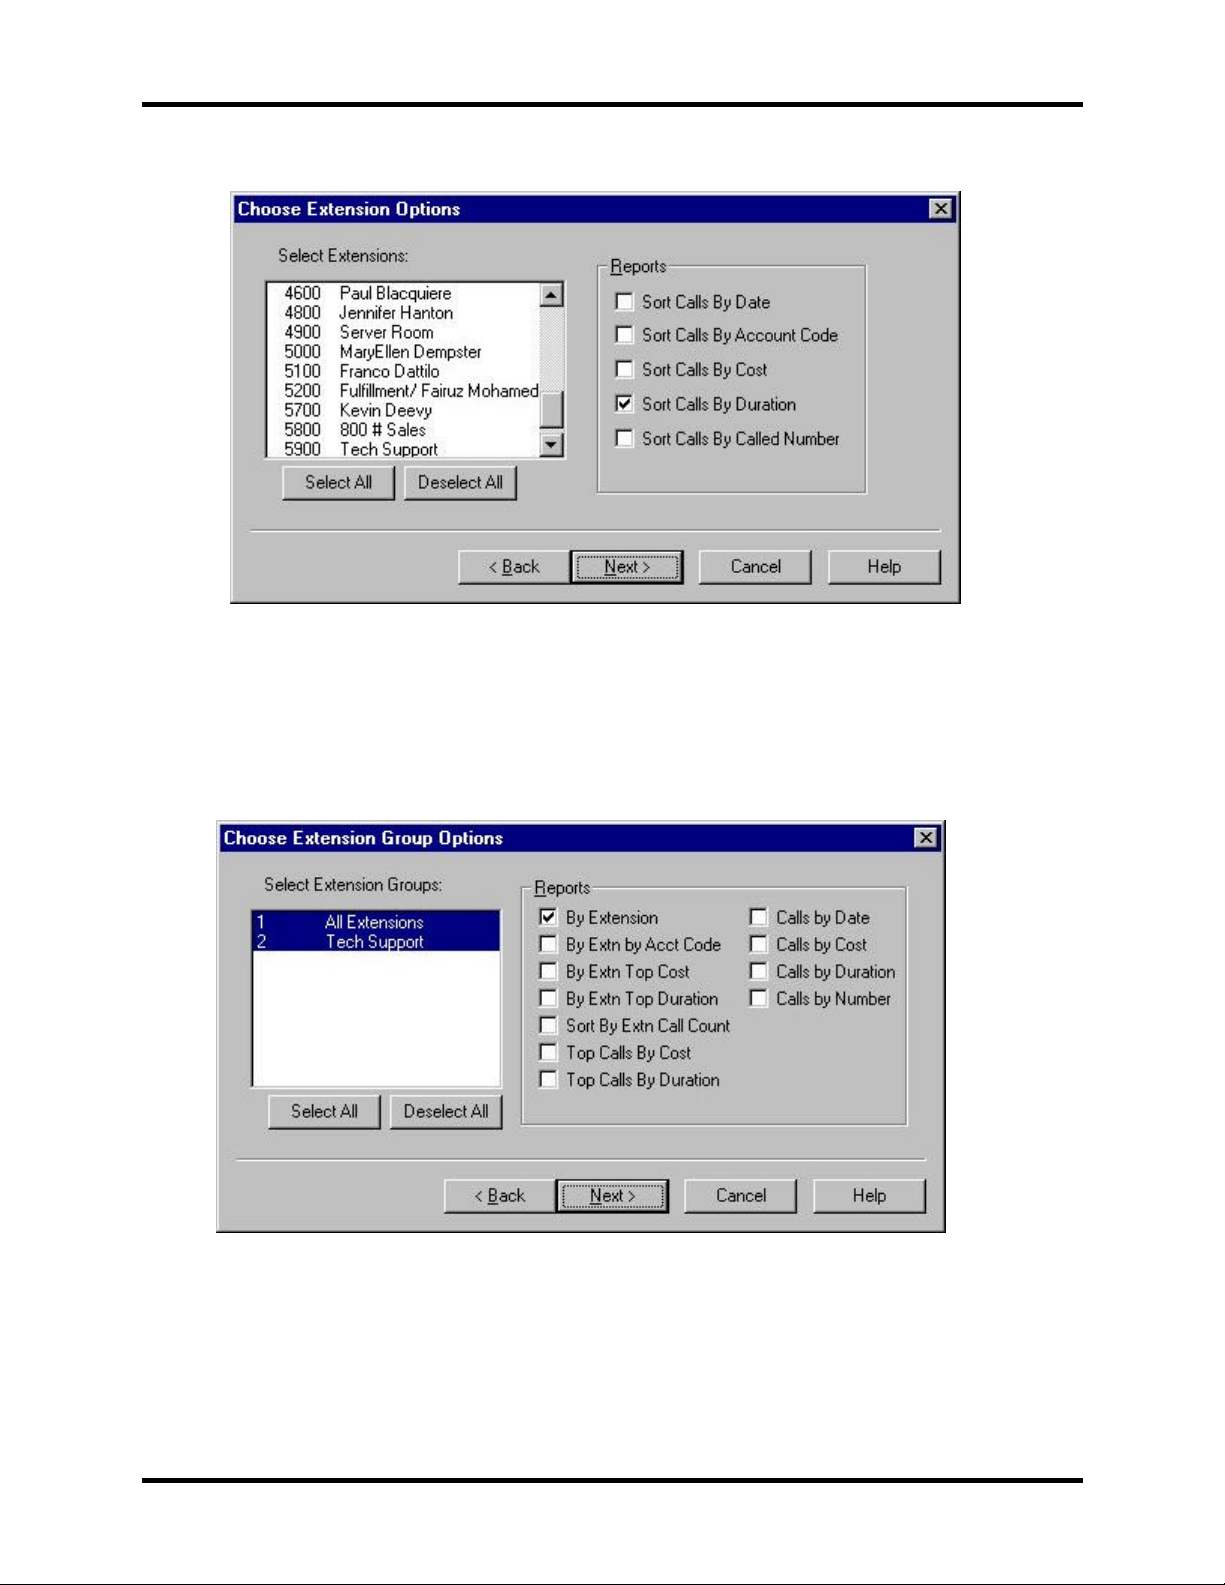
3. The Choose Extension Options dialog box appears.
Select the Extensions for which you are creating reports. Enable the check boxes
of the reports you want produced. (For example, if you enable one Extension and
one report check box, when the reports are run, a report is produced for the
single Extension sorted by the report option chosen.) Select the Next... button.
4. The Extension Group Options dialog box appears.
Select the Extension Groups for which you are creating reports. Enable the
checkboxes of the reports you want produced. Select the Next... button.
-14-
Call Costing TASKE Call Center Management Tools Version 7.0
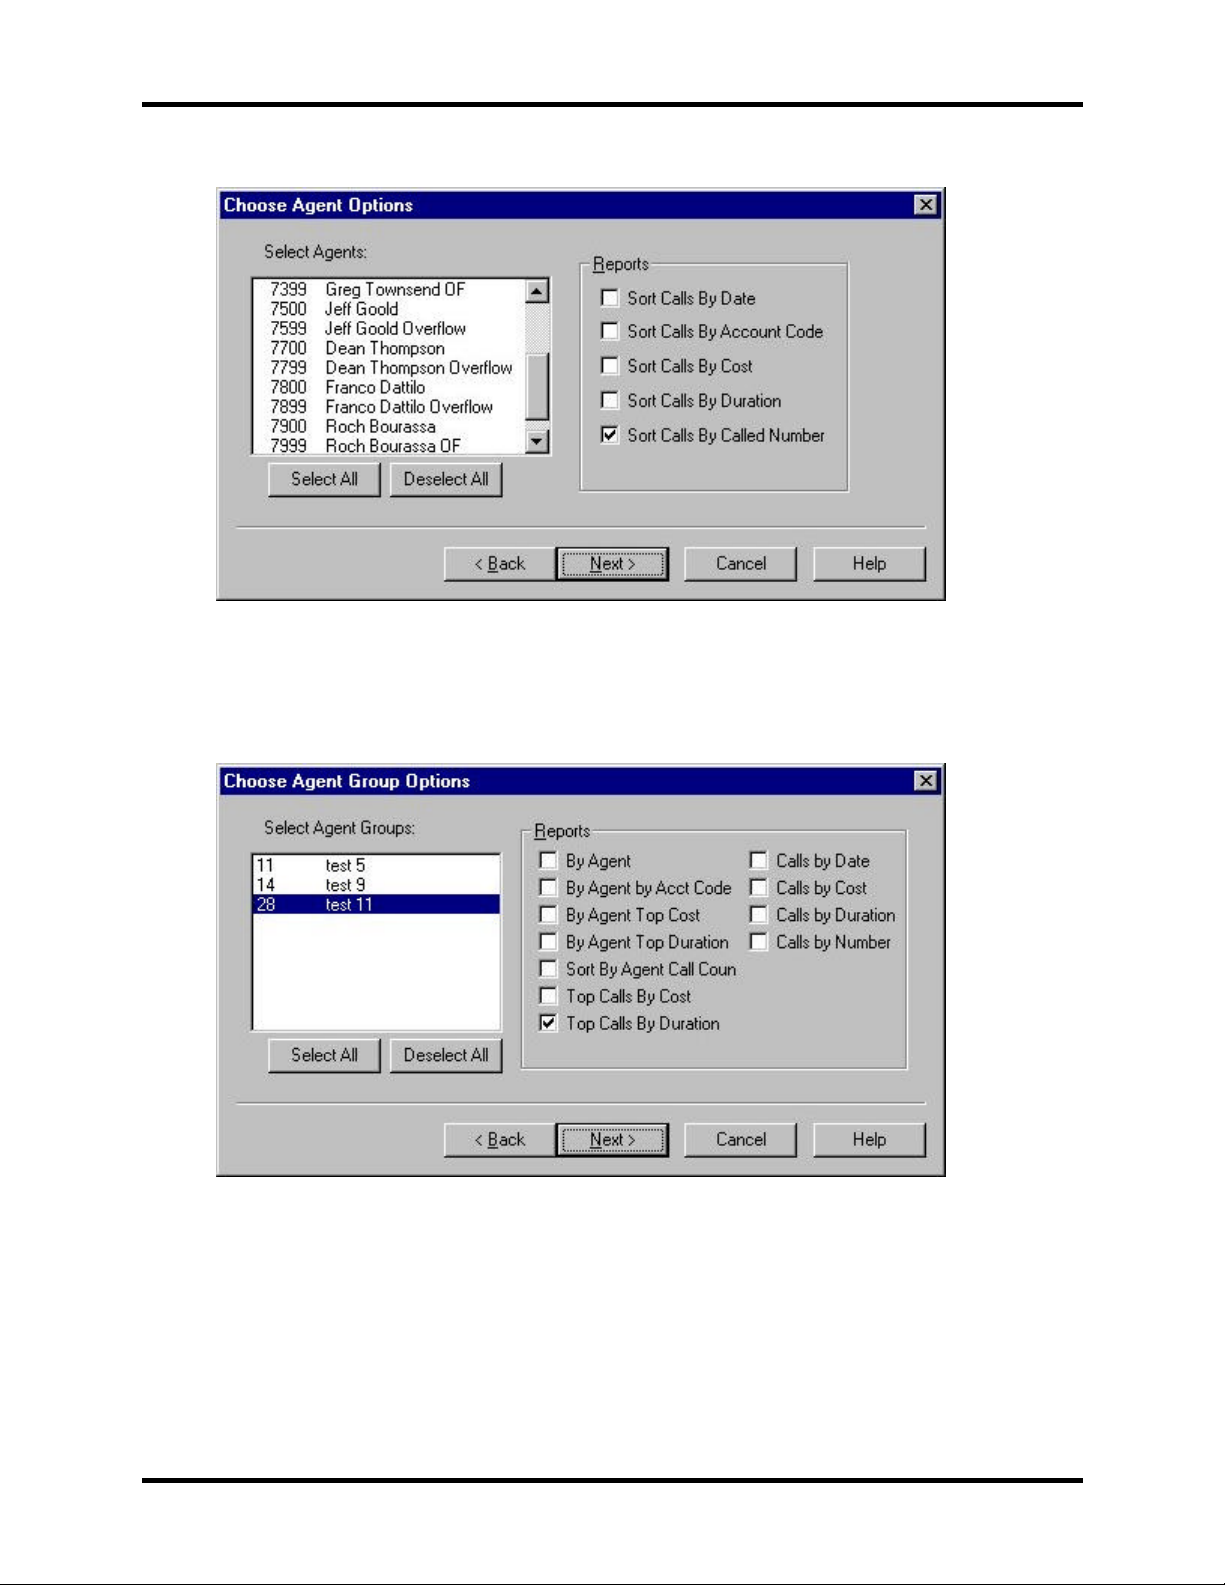
5. The Agent Options dialog box appears.
Select the Agents for which you are creating reports. Enable the checkboxes of
the reports you want produced. Select the Next... button.
6. The Agent Group Options dialog box appears.
Select the Agent Groups for which you are creating reports. Enable the
checkboxes of the reports you want produced. Select the Next... button.
-15-
Call Costing TASKE Call Center Management Tools Version 7.0
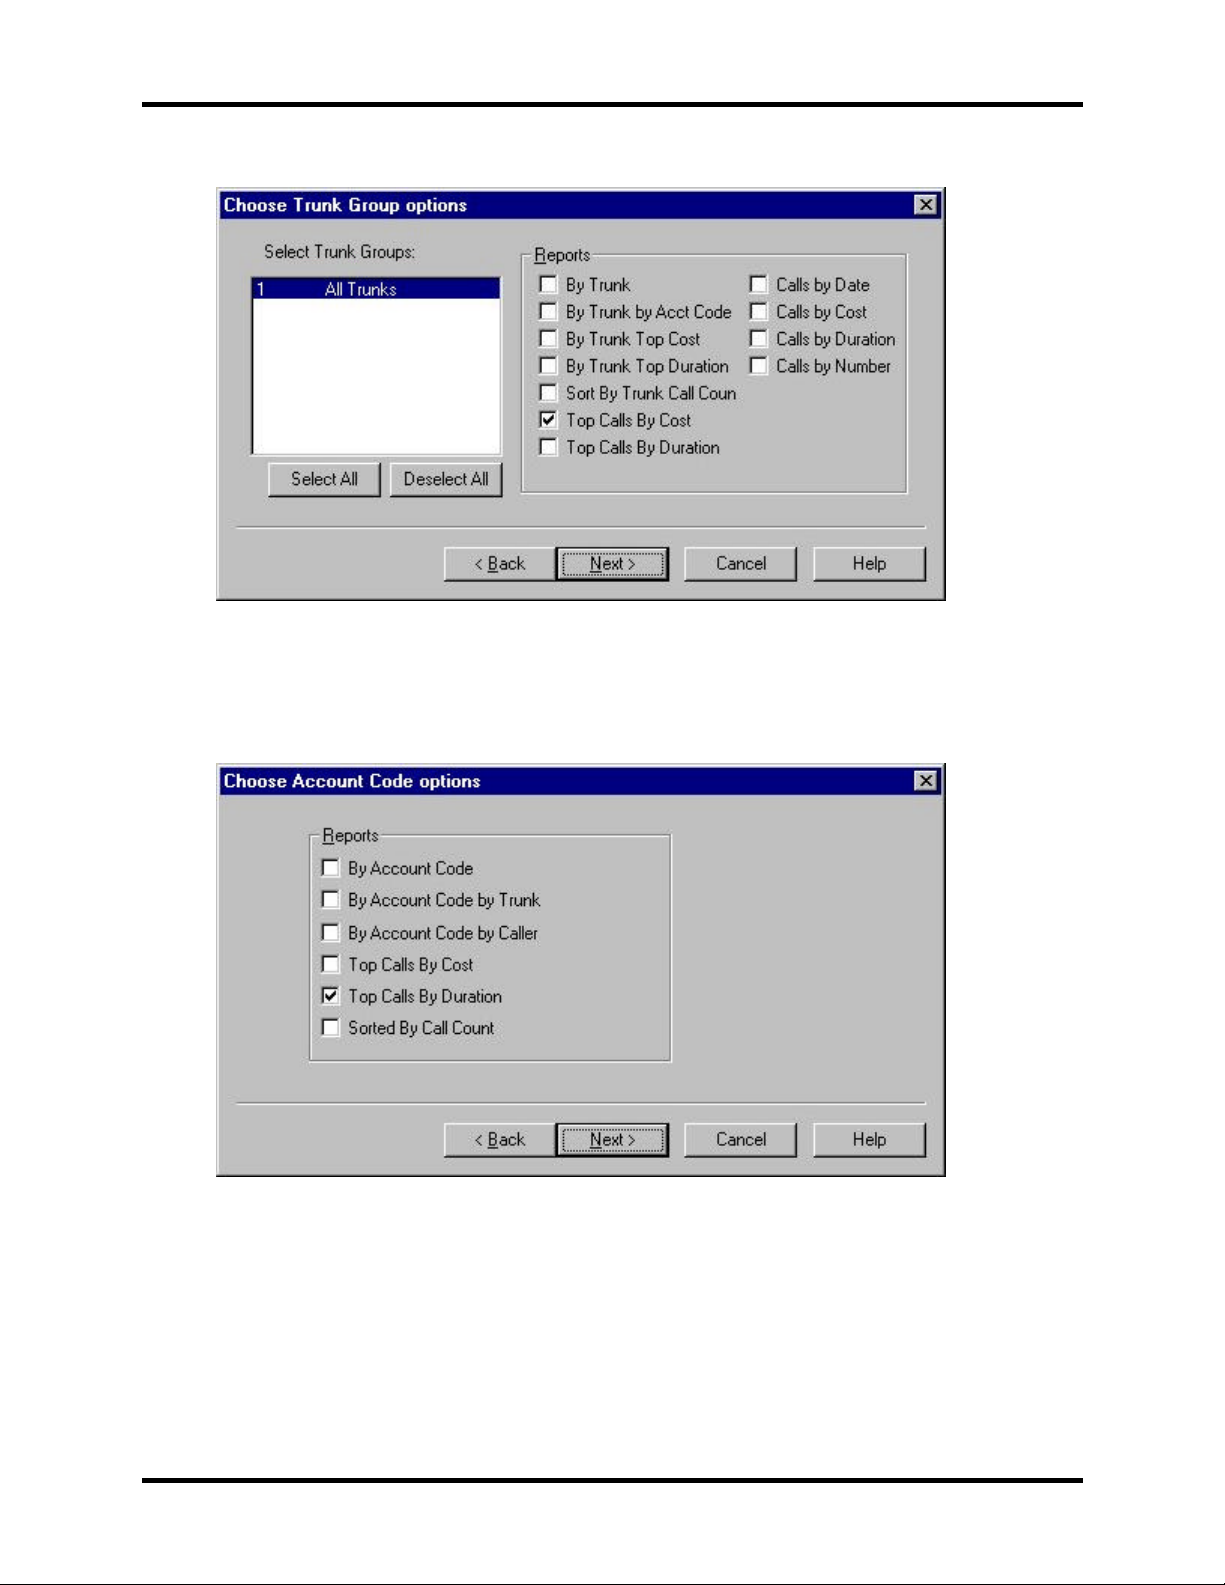
7. The Trunk Group Options dialog appears.
Select the Trunk Groups for which you are creating reports. Enable the
checkboxes of the reports you want produced. Select the Next... button.
8. The Account Code Options dialog box appears.
Choose the Reports to create for costs associated with Account Codes. Select
the Next... button.
-16-
Call Costing TASKE Call Center Management Tools Version 7.0
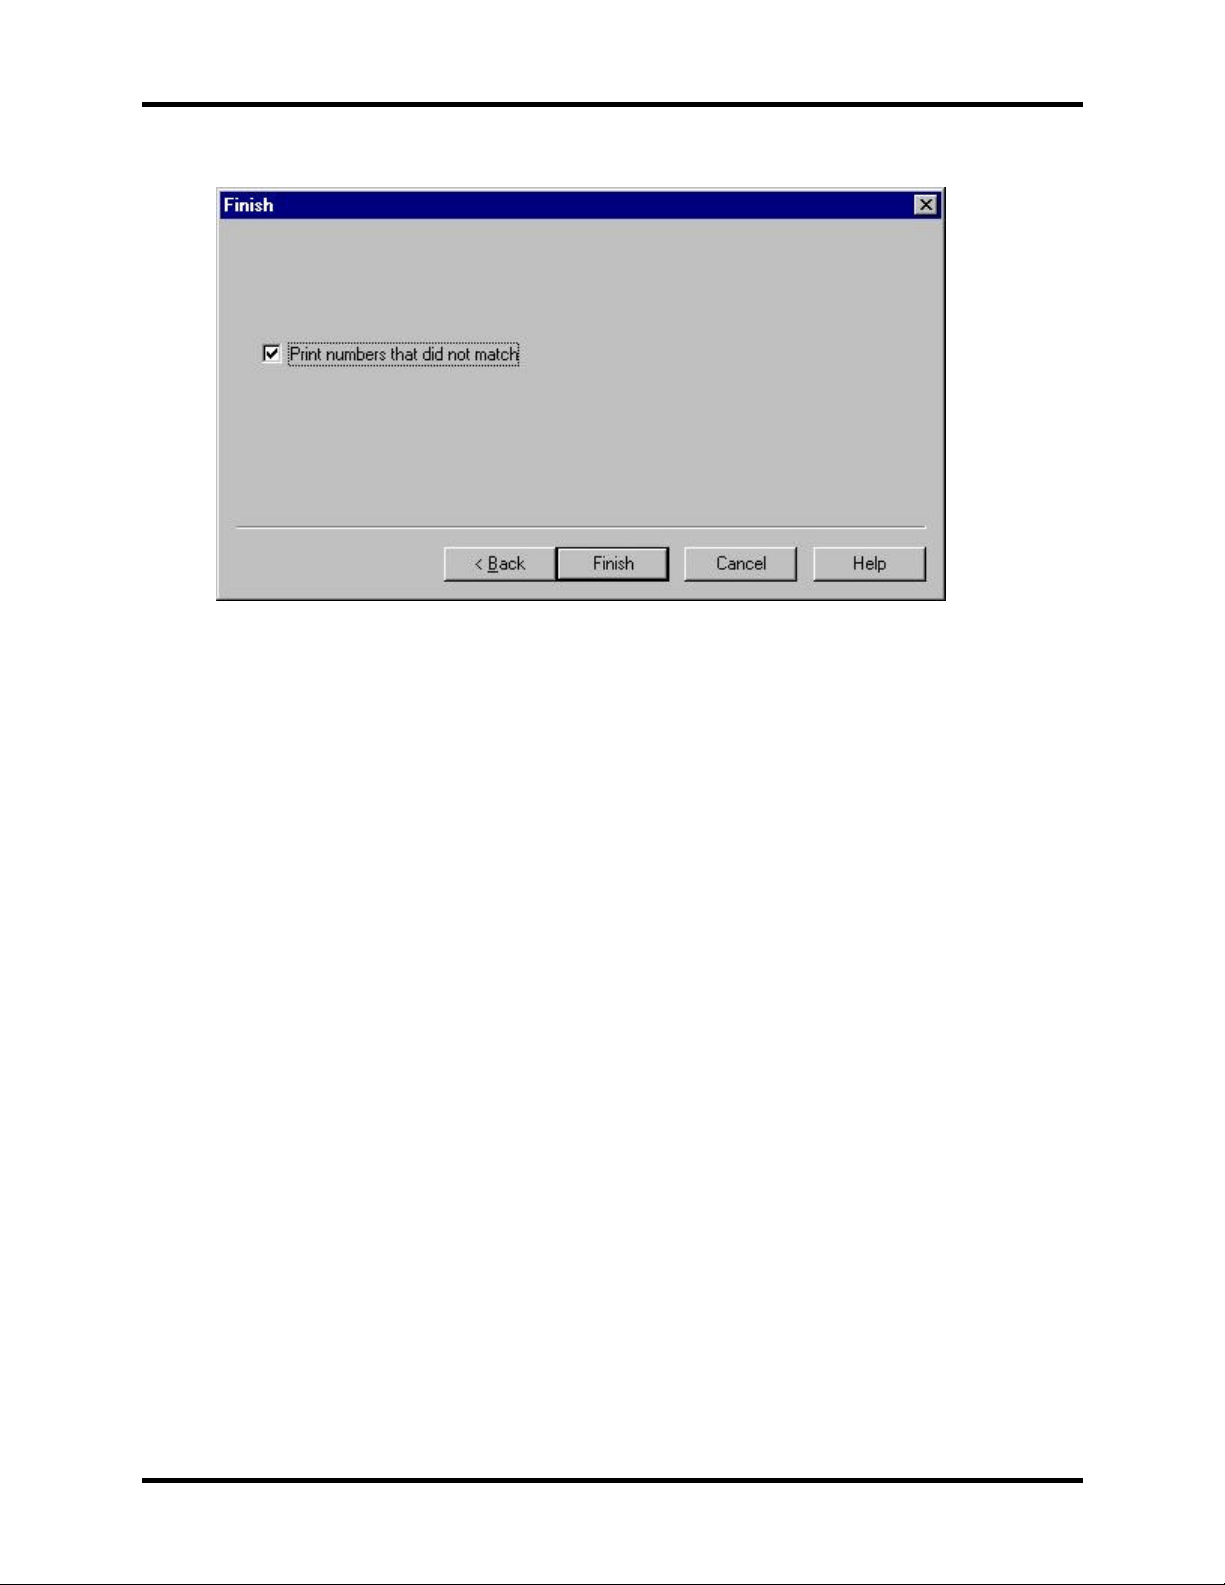
9. The Finish Option dialog box appears.
Enabling the Print numbers that did not match check box produces a report
listing all area codes not represented in the rate tables (and therefore not
costed). Select the Finish button to run the reports you have specified.
The reports will appear in the TASKE Call Costing window. To browse through the
reports, select the page numbers in the Tool Bar.
-17-
 Loading...