

Page 1
Daily Maintenance & Causions /日常の手入れと注意事項について
● If the bottom plate becomes wet, wipe away excess
moisture quickly and allow to dry in your house and slowly.
Do not use outside sources of heat such as heaters or hair
dryers.
● The rack body is UV protected but prolonged exposure to
the sun will cause the nish to look powdery. Keep rack out
of the sun when possible.
● The rack is made of steel tuning and damage to the surface
could invite rust to form. Take care to remove rust if it
appears to prolong the life of the rack.
● When placing heavy items in the rack will change the way
your bike handles. The heavier the load the more time you
will need to change course, brake, turn, etc. Be aware of the
load on your bike at all times.
●水に濡らしてしまった場合は、速やかにタオルなどで水分
を拭き取り、室内保管にてゆっくりと乾燥させていってく
ださい。
急激に乾燥させると底板が割れてしまう恐れがあります。
●本キャリアは耐候性のあるタイプの塗料で塗装してありま
すが、 屋外に放置するなど紫外線に当てっぱなしにする
と、表面が白く煤けるように変色してくることがあります。
これは塗装の特性上避けられません。できる限り室内保管
してください。
●本キャリアは鉄でできていますので、傷を付けて塗膜を剥
がしてしまい下地が見えてしまっている状態だと、そこか
ら錆びが進行し、キャリア自体の寿命を縮めかねません。
傷や塗装の剥がれを見つけた場合は速やかに補修を行なっ
てください。
●本キャリアに重い荷物を搭載した状態でハンドルを大きく
切ると、荷物の重みでさらにハンドルが切れ込み、不安定
になったり最悪の場合転倒してしまう恐れがあります。
またその状態で前ブレーキだけを強くかけると、前転して
しまう恐れもあります。
注意して取り扱いや走行を行なってください。
KingCarrier キングキャリア
KCL-3F
instructions manual
IMPORTANT NOTES /重要な注意事項
!
● By using this product you acknowledge you've read and accepted these cautions.
●
Standard package ts a bike with the eyelet for mounting rack on the bottom of the front fork, or equiped with a standard
9mm quick release type wheel hub. Optional special tting bracket set is required for the bike witout eyelet and equiped
with a nut type hub. Thru type hub is not compatible with KingCarrier.
● 6mm diameter hole must be required on the canti-brake type front fork for installing the rack. Caliper brake type front fork
can be used by installing the mount stay through the brake axle.
● The maximum load of this rack is
● Ask to professional mechanic or bike shop for installing KingCarrier to your bike. Minoura is not responsible to any result caused by your
own installation.
● Check the following points every time before using this rack; 1) All bolts and nuts are rmly tightened, 2) No damage on the welded points,
3) No damage on the Mount Stay, especially at the connecting area to the front fork. If you nd out any problem, do not use this rack.
●本注意事項を承認した場合のみ当商品を使用することができます。また当商品の使用開始をもって本注意事項を承認したものとみなします。
●前フォーク先端部にキャリア取付用ダボがある自転車、あるいは
ト式の自転車に装着するには別売の「ハブナット用取付金具セット」 が必要です。スルーアクスル式の自転車は対象外です。
●Vブレーキを含むカンチブレーキ式前フォークの場合はクラウン部(三つ又部)に 6mm 径の孔があいていなければ装着はできません。
キャリパーブレーキ式前フォークの場合はブレーキの軸に共締めする方式で装着できますがブレーキの分解が必要となります。
●本キャリアの最大許容荷重は
●取り付けは自転車整備の有資格者もしくは販売店にて行なってください。ユーザ個人による取り付けに起因するトラブルについては弊社は
その責任を負いかねます。
●走行前には必ず、すべてのボルトやナットが正しく締まっているか、溶接箇所に破損がないか、取り付けステーに異常はないか(特に前フォー
クに接続されている部分)を確認してください。もし異常を発見した場合には本キャリアは使用しないでください。
10 kg
10 kgs
です。
.
一般的な 9mm クイック式自転車に適合します。ダボがなくハブナッ
組立・取扱説明書
GAMOH
1197-1 Godo, Anpachi, Gifu 503-2305 Japan 〒 503-2305 岐阜県安八郡神戸町神戸 1197-1
Phone: +81-584-27-3131 / Fax: +81-584-27-7505 Phone: (0584) 27-3131 / Fax: (0584) 27-7505
Email: info@gamoh-jp.com Email: info@gamoh-jp.com
(a division of MINOURA)
GAMOH(
Made in Japan
株式会社
箕浦 内)
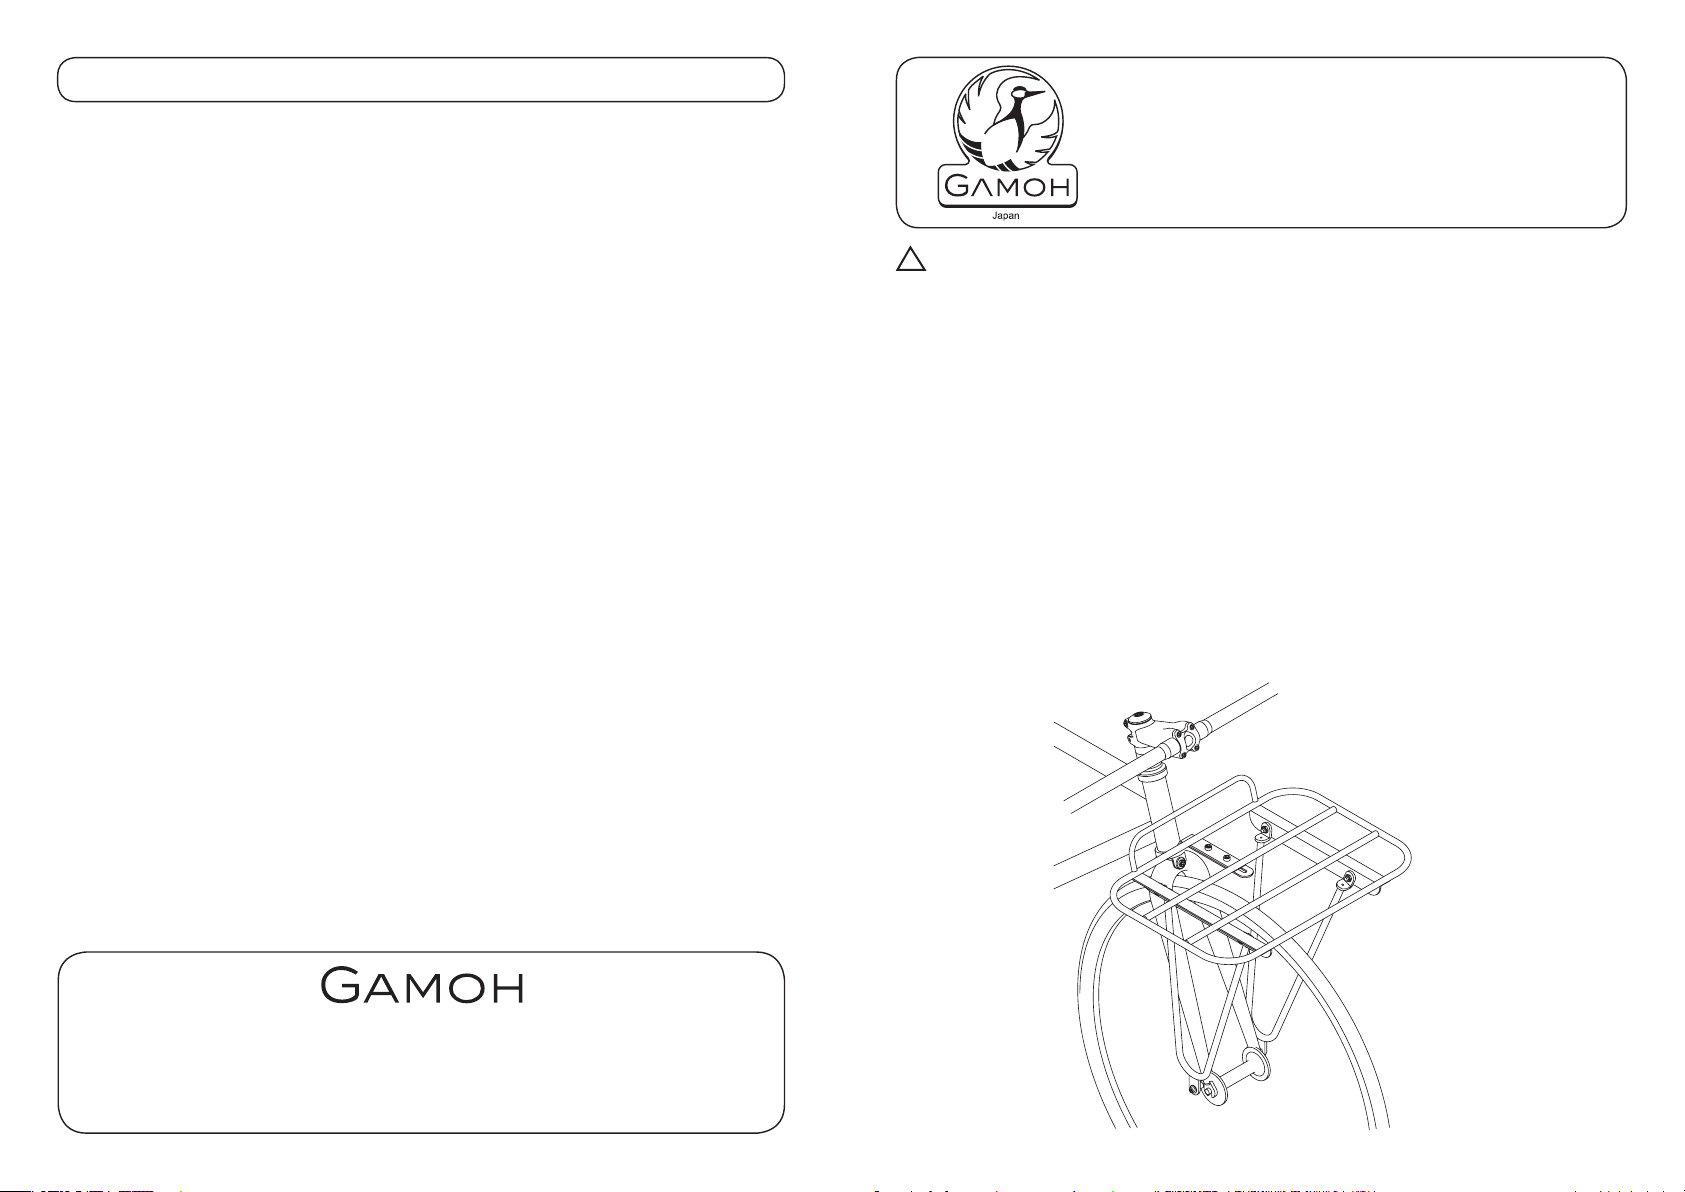
Installation Example
KCL-3F 装着例
Page 2

How To Assemble KingCarrier /キャリアの取り付け方
Before Assembling
/
組み立ての前に
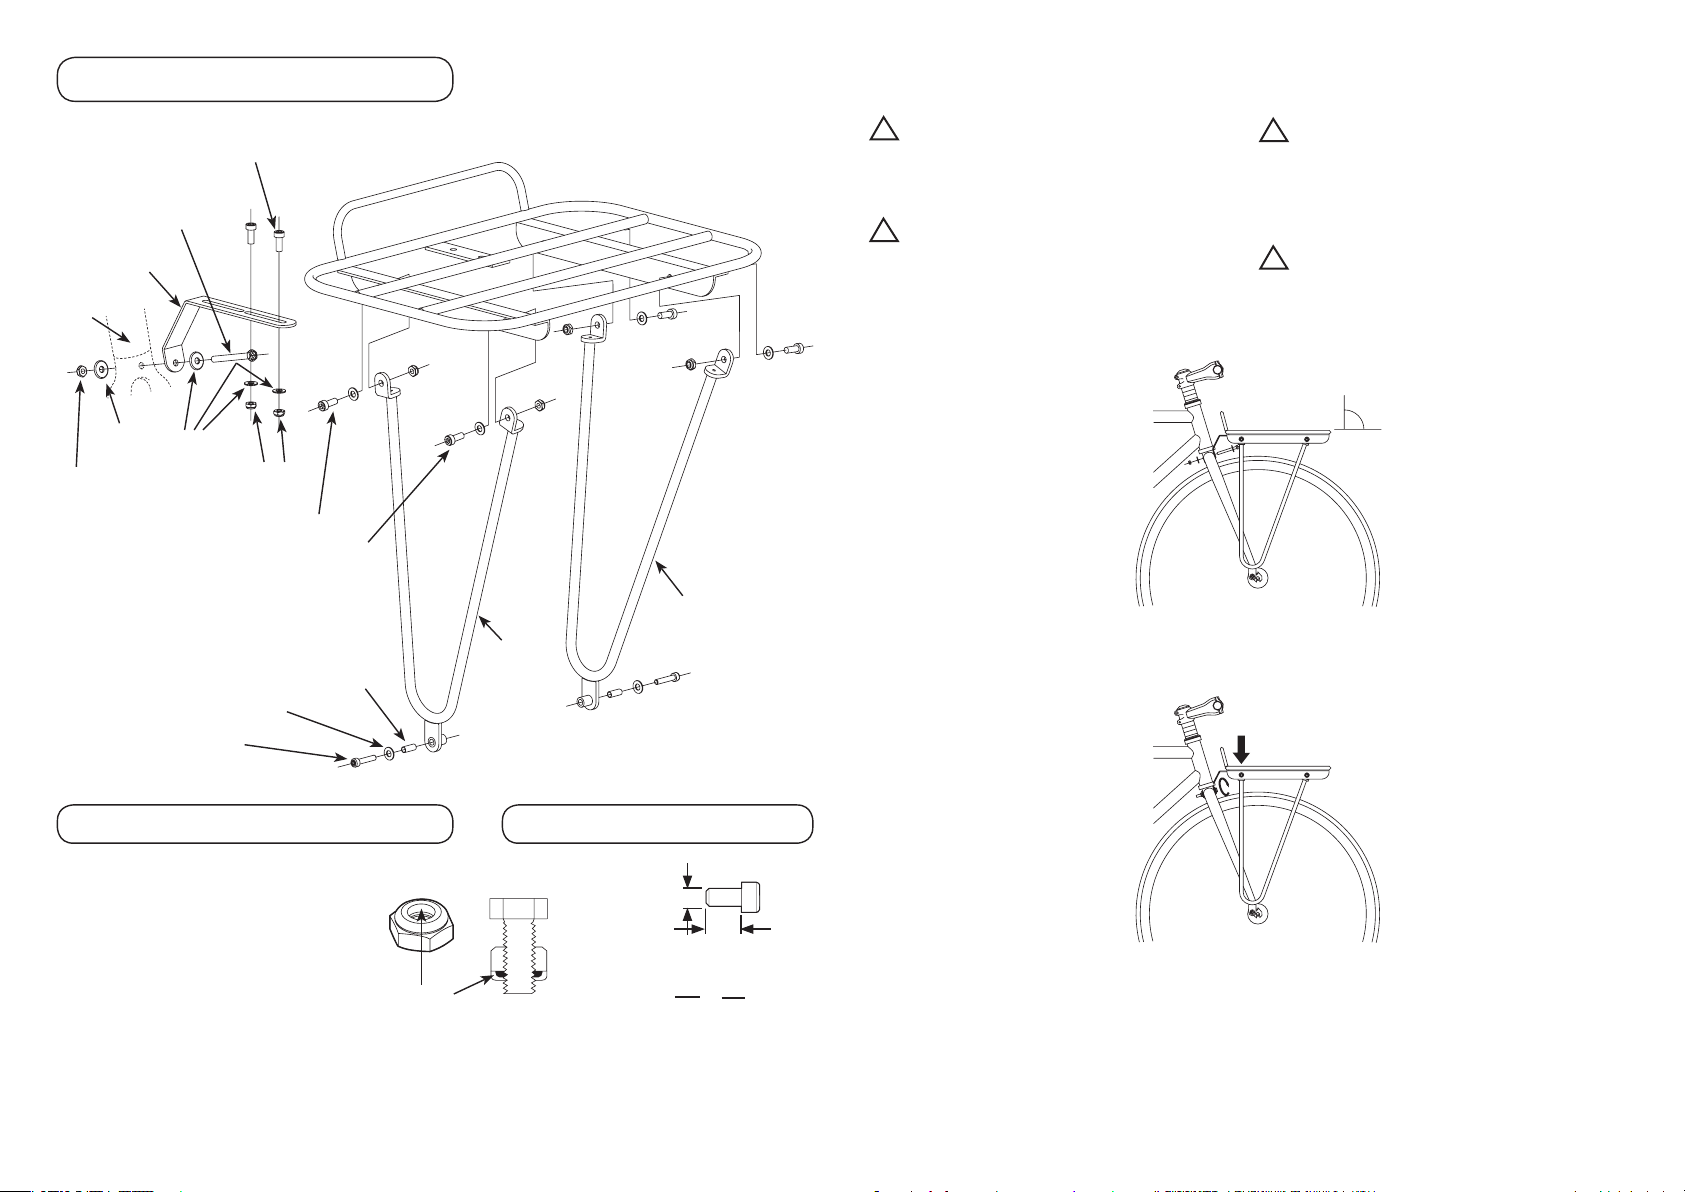
1.
Assemble the Legs to the inside of the under frame. (Fig. A)
Note: The legs are not symmetric. The bracket on the
!
bottom is opposite of the center.
(Fig. B)
< Backside /後ろ側>
(Fig. A /図 A)
2.
The kit comes with two dierent sized Mount Stays. Choose the
appropriate one to your bike's wheel size.
Attach the Mount Stay underneath the rack frame with M6x15
cap screws, M6 washers (large) and M6 nuts. Tighten temporally.
(Fig. C)
1.
左右の脚をキャリア本体下枠の内側に取り付けます。(図 A)
!
Backside
/後ろ側
< Foreside /前側>
2.
キングキャリアには2つの異なったサイズの取り付けステーが
付属しています。装着する自転車に合わせて適する方を選んで
ください。
ステーをキャリア下部に M6x15 キャップボルト・M6 平ワッシャ
(大)・M6 ナットとで仮止めします。(図 C)
脚は左右対称ではありません。V字型をした脚はわずかに
傾いた形をしています。V脚下部の取付金具部分が後ろ寄
りになる方向で取り付けてください。(図 B)
Foreside
/前側
(Fig. B /図 B)
Required Tools
必要な工具
Parts List
部品明細
Mount Stay Dierence
取り付けステーの違い
1 x M5 Hex Wrench 1 x M5 六角レンチ
1 x M6 Hex Wrench 1 x M6 六角レンチ
2 x 10mm Spanner 2 x 10mm スパナ
1 x Rack Body 1 xキャリア本体
1 x Right Side Leg 1 x右脚
1 x Left Side Leg 1 x左脚
1 x Mount Stay (for 700c) 1 x取り付けステー(700c 用)
1 x Mount Stay (for 650c/26") 1 x取り付けステー(650c/26" 用)
2 x Axle Mount Bracket 2 xアクスル取り付け用金具
1 x Hex Bolt M6x35 1 x六角ボルト M6x35
1 x Hex Bolt M6x55 1 x六角ボルト M6x55
6 x Cap Screw M6x15 6 xキャップボルト M6x15
2 x Cap Screw M5x25 2 xキャップボルト M5x25
5 x M6 Washer (Large) 5 x M6 平ワッシャ(大)
4 x M6 Washer (Small) 4 x M6 平ワッシャ(小)
2 x M5 Washer 2 x M5 平ワッシャ
7 x M6 Nut 7 x M6 ナット
2 x M5 Nut 2 x M5 ナット
2 x Copper Sleeve 2 x銅パイプカラー
For 700c Road & CrossBike
700c ロード・クロスバイク用
For MTB, 650c Road
MTB・650c ロード用
Check to make sure there
are no missing parts before
assembling.
組み立て前にすべての部品が
揃っているかどうかをお確かめ
ください。
Cap Screw means the bolt
with cylindrical head with hex
shaped hole on top.
キャップボルトとは、円筒形の
頭に六角形の穴があけられてい
るもののことです。
Choose appropriate one to your
bike wheel size.
お使いの自転車のホイールサイ
ズに合わせて、適合する方を使
用します。
(Fig. C /図 C)
3.
Install the Legs to the threaded hole on the front fork.
Insert the copper sleeve into the tube on the bracket, then screw
the M5x25 cap screw to the hole through the copper sleeve.
(Fig. D)
[Tightening Toruque : 3 N.m]
If there is no threaded hole on the front fork, use the supplied
Axle Mount Bracket to mount the rack on the front wheel quick
skewer axle.
The bracket has two holes. The rear hole is in case you want
!
to use a mudguard. The front hole is for installing the rack.
The included copper sleeve is only for use if you use the
!
included M5 bolt. An M6 bolt can be used without the
copper sleeve.
M6 bolt (suitable size is M6x25) is not included.
(Fig. D /図 D)
3.
脚を前フォーク上にあるダボ孔に取り付けます。
脚先のパイプに銅パイプを挿入してから M5x25 キャップボルト
を差し込み、そしてダボ孔にねじ込みます。(図 D)
(締付けトルク:3 N.m)
もし前フォークにダボ孔がない場合は、添付のクイック共締め
金具を使用して前輪クイックレリーズのシャフトに取り付け場
所を作ってそこにねじ込み、反対側からナットで止めます
クイック共締め金具には2つの孔があります。
!
通常は後ろ側になる方の孔は泥よけなどを取り付けるための
もので、キャリアは前側の方の孔に装着します。
もし前フォークのダボ孔のネジサイズが M5 ではなく M6
!
だった場合には、先端のパイプには銅パイプは使用しません。
使用するのは M5 の場合のみです。
また M6 だった場合の取り付けボルト (M6x25) は添付され
ておりません。ご自身でご用意ください。
。
Q/R Mount Bracket
クイック取付金具
Axle Mount Bracket
(Option)
ハブナット取付金具
(別売)
Q/R Mount Bracket /クイック取付金具
Quick Release Skewer
クイックレリーズ
M5 Nut / M5 ナット
Axle Mount Bracket /ハブナット取付金具
Nut Type Hub
ナット固定式ハブ
- 3 -- 4 -
Use this bracket (incuded) for
mounting the rack if your front
fork doesn't have the braze-on
on its end and features quick
release skewer.
先端にキャリア取り付け用のダ
ボ孔がない前フォークでクイッ
ク式の場合には、この金具を前
輪クイックに共締めしてキャリ
アを取り付けます。
Use this optional bracket for
mounting the rack if your front
fork doesn't have the braze-on
on its end and features xing
nut type hub.
先端にキャリア取り付け用のダ
ボ孔がない前フォークでハブ
ナット式の場合に、この金具を
前輪車軸に通してキャリアを取
り付けます。
Page 3
Parts Names /各部の名称
Cap Screw M6x15
キャップボルト M6x15
Hex Bolt
M6x35 or M6x55
六角ボルト
M6x35 または M6x55
< Torque:5 N.m >
Mount Stay
取り付けステー
Front Fork
前フォーク
M6 Washer (Large)
M6 平ワッシャ ( 大 )
M6 Nut
M6 ナット
Cap Screw M5x25
キャップボルト M5x25
< Torque:3 N.m >
< Torque:5 N.m >
M6 Nut
M6 ナット
Cap Screw M6x15
M6 Washer (Small)
M6 Nut
キャップボルト M6x15
M6 平ワッシャ(小)
M6 ナット
< Torque:5 N.m >
M5 Washer
M5 平ワッシャ
Copper Sleeve
銅パイプ
Left Side Leg
左脚
Right Side Leg
右脚
4.
Temporally install the Mount Stay to the hole on the fork crown
(the shoulder part of the front fork). (Fig. E)
You may have to disassemble the front brake (caliper
!
brake) to set the stay to the brake pivot bolt if your fork
doesn't have the hole.
Ask a certied professional to help if needed. Minoura is not
responsible for any result caused by improper installation.
Put two M6 washers in front and behind the front fork.
!
Do not miss the washer between the bolt and the Mount
Stay.
5.
Adjust the length and bent angle of the Mount Stay to make the
rack level, then tighten the M6x15 cap screws rmly. (Fig. E)
[Tighetining Torque : 5 N.m]
6.
Tighten the hex head bolt and nut on the fork crown mrly while
pushing the rack downward to make the gap zero between the
Mount Stay and the hex bolt. It will increase the rack stability at
maximum level. (Fig. F)
[Tighetining Torque : 5 N.m]
4.
ステーを前フォークのクラウン部(三つ又の付け根部)にある
孔に仮止めします。(図 E)
もしお使いになる自転車の前フォークに取り付け用の孔がな
!
い場合は、前ブレーキ(キャリパーブレーキ)をいったん分
解して、その軸に共締めすることになります。
ただし重要保安部品であるブレーキの分解はとても繊細です
ので、必ず整備士資格のあるショップにお任せください。
もし個人で取り付けた場合、そのことによる一切の不具合に
ついて弊社ではその責任を負いかねます。
前フォークは前後を M6 平ワッシャで挟みます。
!
またボルトとステーとの間にも平ワッシャを挟むのを忘れな
いでください。
5.
キャリアが水平になるようにステーの突き出し長さと曲げ角度
を調節してから、キャリア本体側の M6x15 キャップボルトを
しっかりと締め付けて固定します。(図 E)
(締付けトルク:5 N.m)
90°
(Fig. E /図 E)
6.
キャリアを下向きに押し付けて取り付けステー上の孔とボルト
とのがたを取り去った状態で、フォーク取り付けの六角ボルト
とナットとをしっかりと締め付けて固定します。(図 F)
(締付けトルク:5 N.m)
Nylon nuts are used and have a soft plastic ring that keeps
them from loosening.
It's normal to feel some resistance when tightening. Make
sure to tighten all the way.
Nylon nut is not designed to repeat loosening &
tightening so often.
ナットにはナイロンナットといって内側に樹脂製の
リングを持つ緩み止め機能のあるものを採用しています。
ボルトのネジ山が樹脂リングを圧縮する摩擦抵抗が
緩み止め効果になります。
途中で締め込みが固くなるのは異常ではありません。
それを越えて最後まで締めてください。
締め付けにはスパナが必要です。
ナイロンナットは何度も繰り返して締め直すことには
向いていません。
Plastic Ring
樹脂リング
Bolt Size Spec /ボルトサイズ表記About Nylon Nut /ナイロンナットについて
Diameter 径
Length 長さ
Ex. 例)
M6 x 35
Diameter 径 Length 長さ
7.
Finally, check all bolts and nuts are mrly tightened.
7.
最後に、すべてのボルトががたつきなく取り付けられているか
どうかを確認してください。
- 5 -- 2 -
(Fig. F /図 F)
 Loading...