

Page 1

Bike Storage Stand
Warranty Period : 1 year
DS-4100
instructions manual
(ver.1.0 2014/10)
For more details, please refer the attached
"Minoura Warranty Policy" card.
For the latest info, please check out our web site;
www.minoura.jp.
IMPORTANT NOTES
●For normal 2-wheel sport bicycle with standard
26-inch or 700c size wheel. Not suitable for any
tandem, long tail or small wheel bicycles.
●The wheel cradle height is adjustable in 3 levels
by changing the side frame installation point.
However, every cradle's height must be in same
level. You cannot change it independently.
The shorter the wheelbase size is, the steeper
the angle will be. It means you should not
store different size bikes such as road bike and
BMX in one stand. The rear tire must touch the
ground.
●The cradle's inner width is 66mm. Any tire wider
than this size cannot be used in DS-4100.
In the case of much narrower road bike tire,
please be sure the wheel will be supported at
3 points on the tire, not by the cradle frame, so
the wheel won't sit an an angle in the cradle.
●The cradle must hold the front wheel. If you set
the bicycle upside down, the bicycle will have to
come off due to the steering mechanism.
●A bicycle with a front mud guard may not t in
the cradle properly.
●The long, straight tube keeps the rear wheel
from falling through. This bar is not locked and
inserts into the hole, xing the pillar direction
with the hole facing inside.
●Do not setup on any slanted location. The
stand will not be stable. Adjust all foot adjusters
correctly to be stable.
●You can add 2 more cradles on the other side
as option.
Contact
If you have questions or need help, rst contact the shop you purchased the product from,
or the distributor in your country. If you still can't nd a solution, contact Minoura directly at:
MINOURA JAPAN
1197-1 Godo, Anpachi, Gifu 503-2305 Japan
Phone : +81-584-27-3131 / Fax : +81-584-27-7505
Email : minoura@minoura.jp
www.minoura.jp
(for ALL customers)
Made in Japan
Page 2
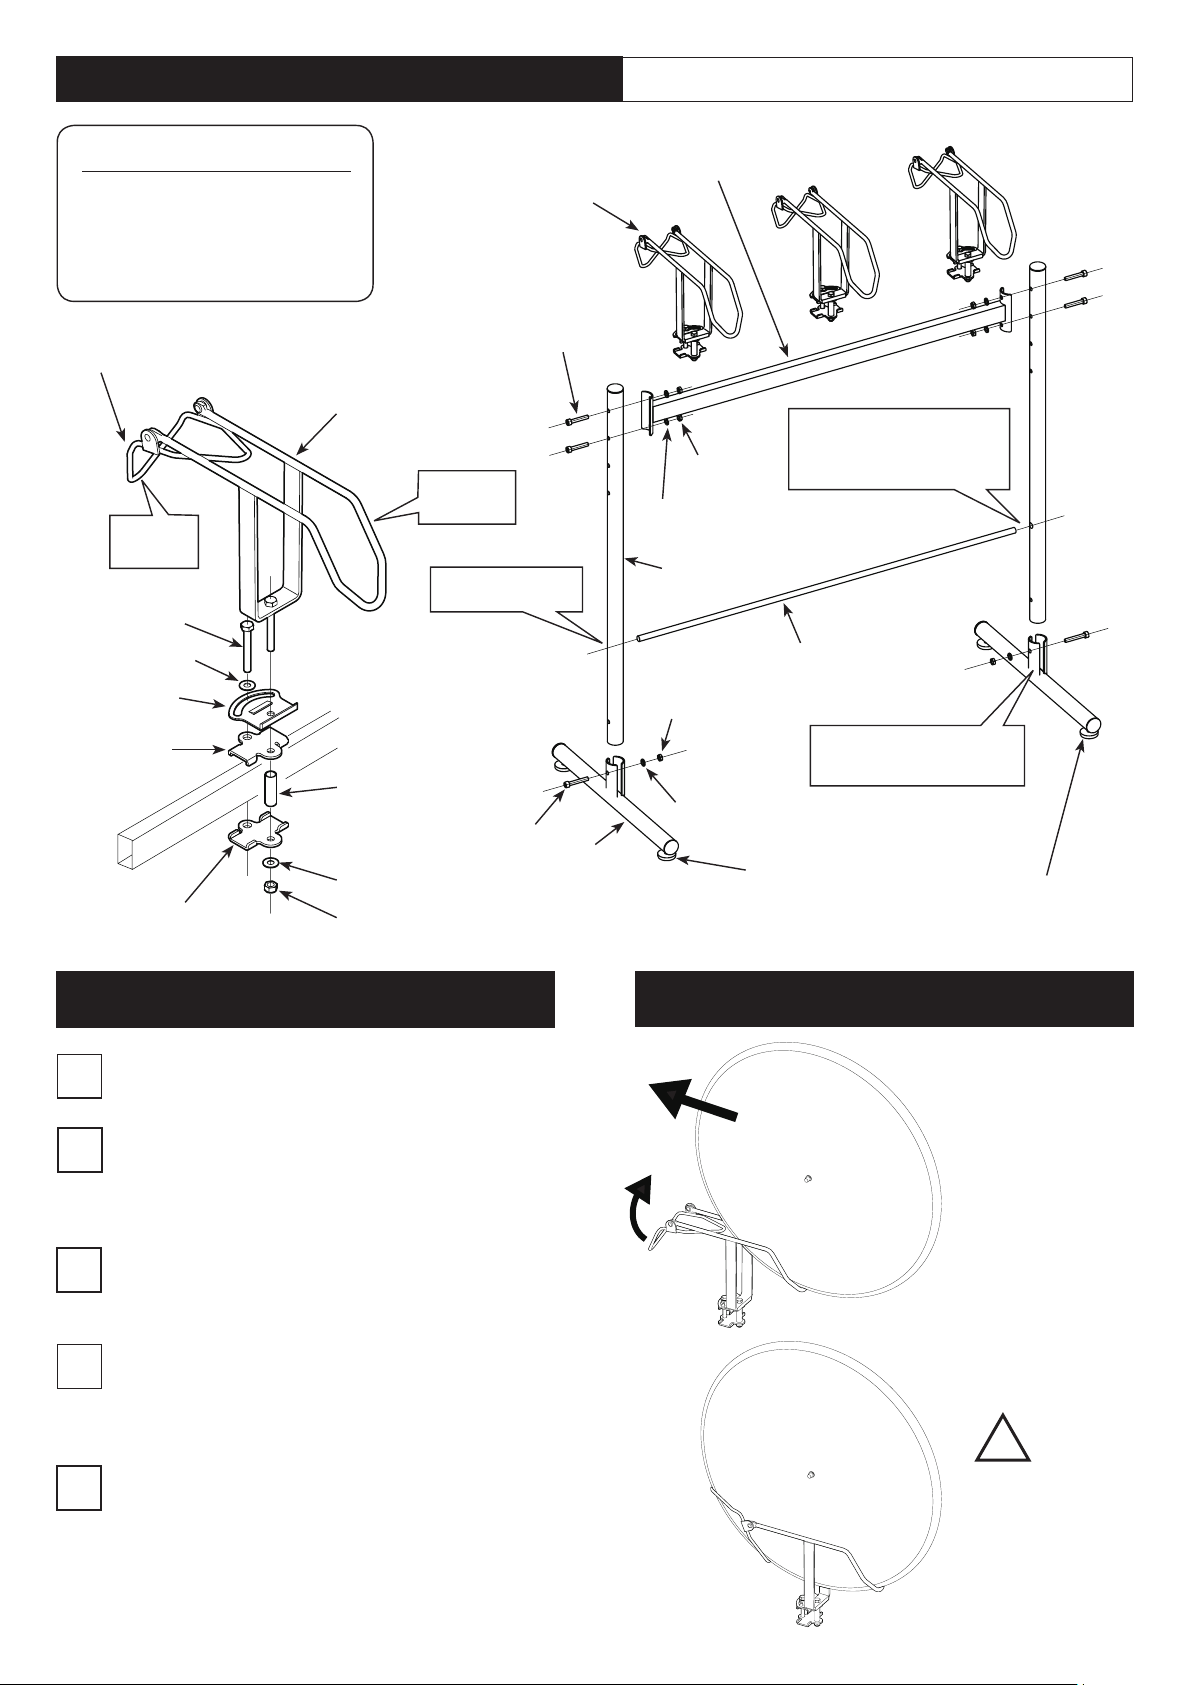
Parts Name & Assembling Your DS-4100
Required Tools : M5 Hex Wrench, 13mm Spanner
Supplied Parts
Cap Bolt M8x45 ... 4
Cap Bolt M8x50 ... 2
M8 Nut ... 6
M8 Spring Washer ... 6
Tire Holder
Foreside
M8x60 Bolt
M8 Flat Washer
Angle Adjust
Plate
Upper Plate
Lower Plate
Cradle
Front Side
Collar
M8 Flat Washer
M8 Nut
Wheel Cradle
M8x45 Bolt
No hole on outside
M8x50 Bolt
Leg
Side Frame
M8 Nut
M8 Spring Washer
Pillar
M8 Nut
M8 Spring Washer
Foot Adjuster
Bar is just inserted into the
hole. Not xed.
Set the hole inward.
Rear Tire Guard Bar
Set the side with shorter
welding inward.
Adjust the length correctly. Turn to adjust the
length, then tighten the nut toward the Leg to fix.
How To Install Wheel Cradle
Wheel Cradle is pre-assembled. Disassemble it.
1
Sandwich the Side Frame with both Upper and
2
Lower Plates. Place the Angle Adjust Plate on
it. Put the M8x60 Bolt with M8 Flat Washer and
tighten to the Lower Plate temporalily.
Put the welded bolt on the Cradle to the Upper
3
Plate, Collar, Lower Plate, Flat and Washer then
tighten to the M8 Nut.
Make sure both Upper and Lower Plates are
4
parallel and tightly touch the Side Frame, and also
the Cradle fits the Upper Plate without any gap,
then tighten M8x60 Bolt firmly.
The Cradles is angle adjustable in order to save the
5
total storage space.
Change the angle then tighten the bolt and nut
equally.
To change the angle again, loosen the nut. Do not
force to turn.
How To Use Wheel Cradle
First, place the
front tire on the
front side of the
Cradle, then push
the wheel forward
to place the wheel
between the
frames.
The Tire Holder
will raise up
automatically, and
then support the
wheel stable with
3 points.
!
The cradle's inner
width is 66mm.
It's not expandable.
 Loading...