

Page 1
CRADELE 3
4 9449244221724 944924422172
Extra Bike Cradle 3
– instructions manual
<Applicable Tube Diameter: 38 – 45mm>
40mm = for BikeTower / BikePit upper pillar
45mm = for BikeTower / BikePit lower pillar, P-500 / 600 / 700 pillar
(ver.1.1 2014/8)
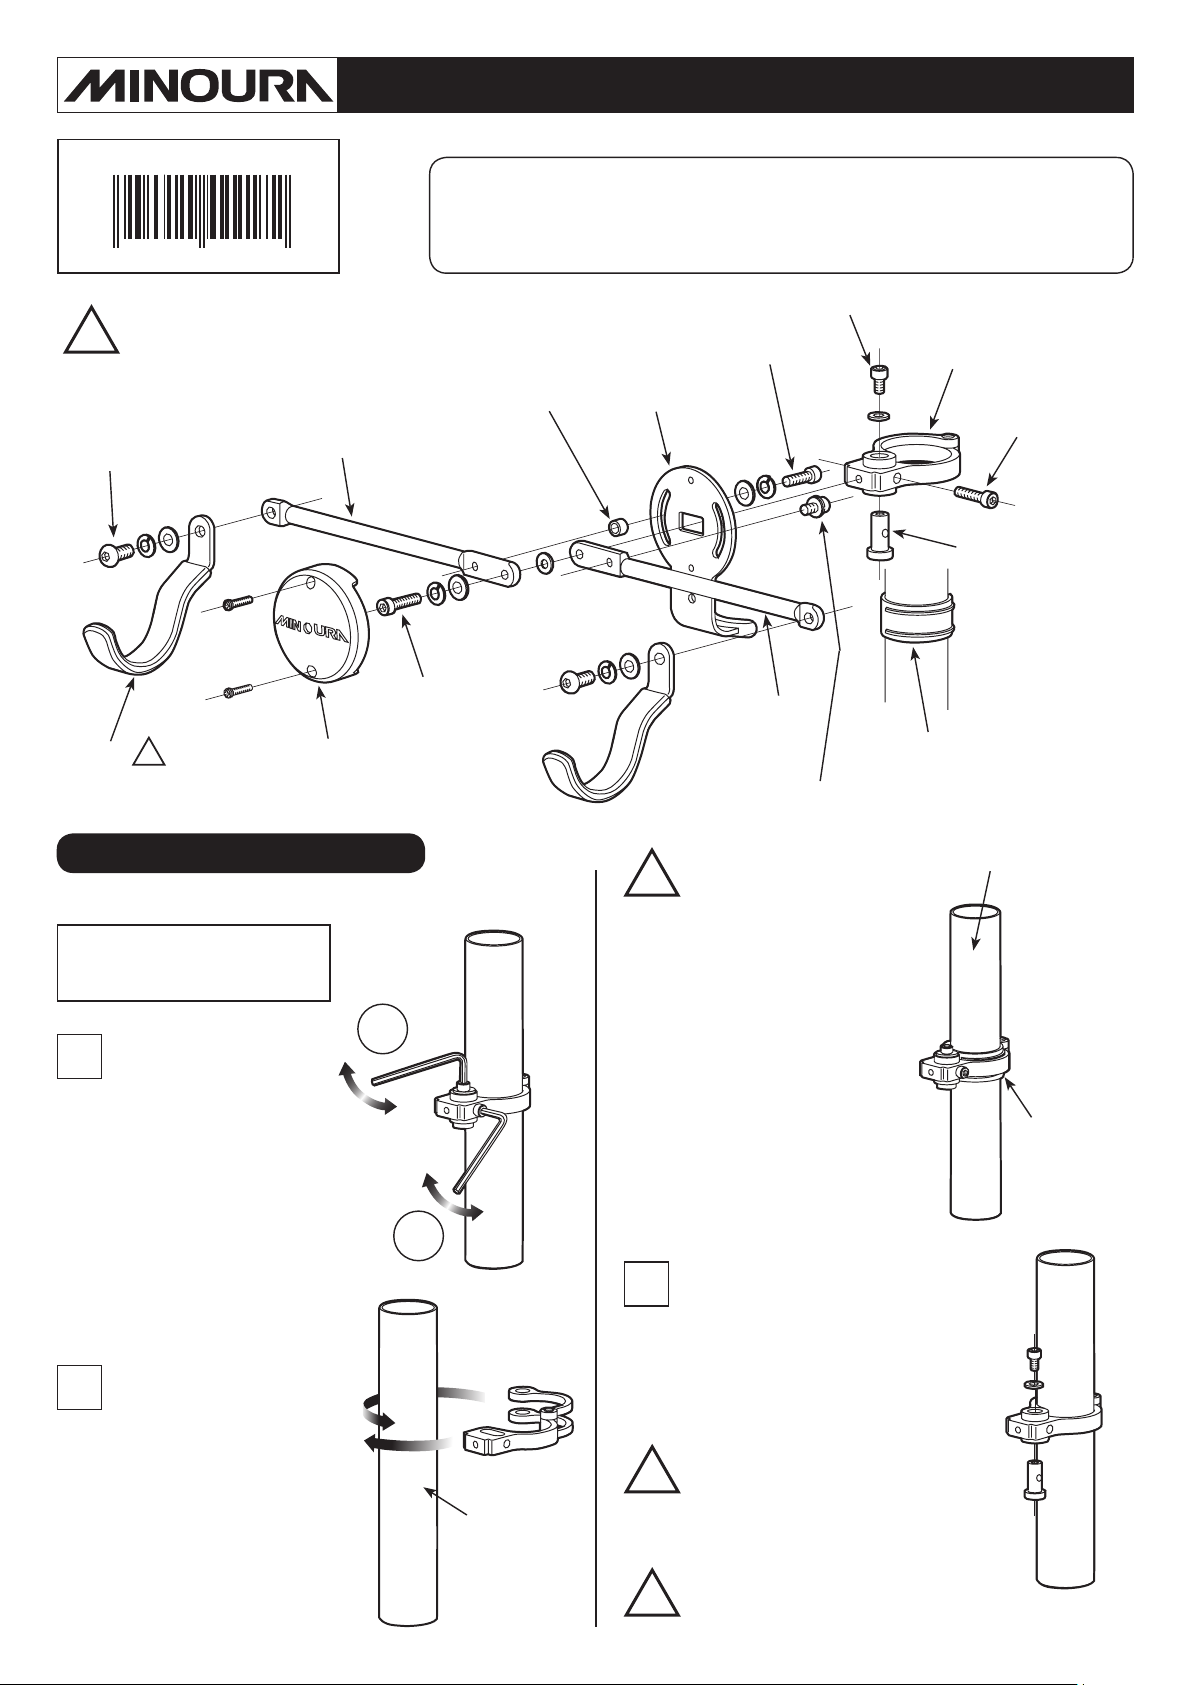
We suggest wrapping
the hook with bar tape to
!
minimize discoloring of
lighter colored frames.
Hook Fixing Bolt
!
Left side Arm (foreside)
Arm Connecting
Bolt
Cradle CapHook
Metal Collar
(Left side only)
How To Install the Cradle
(Cradle is not shown here for describing about the clamp band)
Required Tool:
1 x 5mm Hex Wrench
2
1
First, disassemble the
Clamp Band and open it so
the pillar can be installed.
Then remove the Clamp
Tightening Bolt, then the
Pivot-Pin Fixing Bolt using
an M5 hex wrench.
(see Fig. A)
1
(Fig. A)
2
Open the Clamp Band and
wind around the pillar (see
Fig. B).
Align all 3 holes on the arms
after closing.
BikeTower
lower pillar
(45mm
diameter)
(Fig. B) (Fig. D)
Pivot-Pin Fixing Bolt
Left Arm Angle Fixing Bolt
Base Plate
Right side Arm
(backside)
Right Arm Angle Fixing Bolt
!
In case of installing on
43mm or narrower diameter
pillar such as the upper
pillar of BikeTower or
BikePit, add the Plastic Shim
under the Clamp Band.
The shim is not necessary
when installing on the fatter
45mm diameter pillar.
Make sure the single side
arm sits between the double
rails on the shim.
3
Put the Pivot-Pin through all 3 holes
from the bottom side, and screw the
Pivot-Pin Fixing Bolt with a washer
into the Pivot-Pin (see Fig. D).
If you try to install the Pivot Pin
!
from the bottom, you won't be
able to tighten the bolt correctly.
Follow the instructions precisely.
Do not tighten the bolt rmly
!
yet at this moment.
Clamp Band
Clamp Tightening
Bolt
Pivot-Pin
Plastic Shim
(use on 43mm or smaller
diameter)
BikeTower upper pillar
(40mm diameter)
Install Shim
(Fig. C)
Page 2
4
Rotate the Pivot-Pin to align the thread
hole in the body to the hole on the right
side of the clamp.
Screw the Clamp Tightening Bolt to the
Pivot-Pin (see Fig. E).
To x the Clamp Band,
!
tighten the Clamp Tightening
Bolt rst, then tighten
the Pivot-Pin Fixing Bolt.
Failure to do so will cause
the clamp to be in the
incorrect position.
Arm Angle Adjustment
(Fig. E)
It's not recommended that both arms
!
are set above horizontal level for safety
reason.
You should set the arm which supports
the load mainly at lower than horizontal.
Do not put the bike on the cradle while
!
the arms are not securely xed yet.
The arms will come closer due to the
bike weight and may fall off the bike.
Tighten the bolts rmly.
(Fig. H)
(Fig. F)
Each arm is angle adjustable in +/- 35 degrees in order
to fit various types of bike frames as perfectly as possible
(see Fig. F).
To change the arm angle, loosen the center Arm
Connecting Bolt first (see Fig. G), loosen the backside
screw behind each arm (see Fig. H), then change the
angle by hand.
After fixing the arm angle,
tighten those bolts securely.
Warranty
It's your duty to check the following points regularly to
avoid any possible accidents and troubles.
• Check if every part doesn't have any damage or crack
• Check if all screws are tightened securely
• Check if the hook surface is not damaged
Minoura is not responsible to any trouble or accidents
caused by the lack of above checking, the user's
misuse, unauthorized modification, or natural wear.
Warranty Period = 1 year
Contact
If you have any question or request, please contact the
shop where you originally purchased this product first
or the distributor in your country. The distributor name
can be found on our web site.
Only when you cannot get enough service from them,
you can contact us;
MINOURA North America
(for U.S. residents only)
Hayward, California, U.S.A.
Phone 1-510-538-8599 / Fax 1-510-538-5899
support@minourausa.com
(Fig. G)
MINOURA Jaapn Headquarters
(for ALL customers)
1197-1 Godo, Anpachi, Gifu 503-2305 Japan
Phone +81-584-27-3131 / Fax +81-584-27-7505
minoura@minoura.jp
www.minoura.jp
Made in Japan
 Loading...