

Page 1
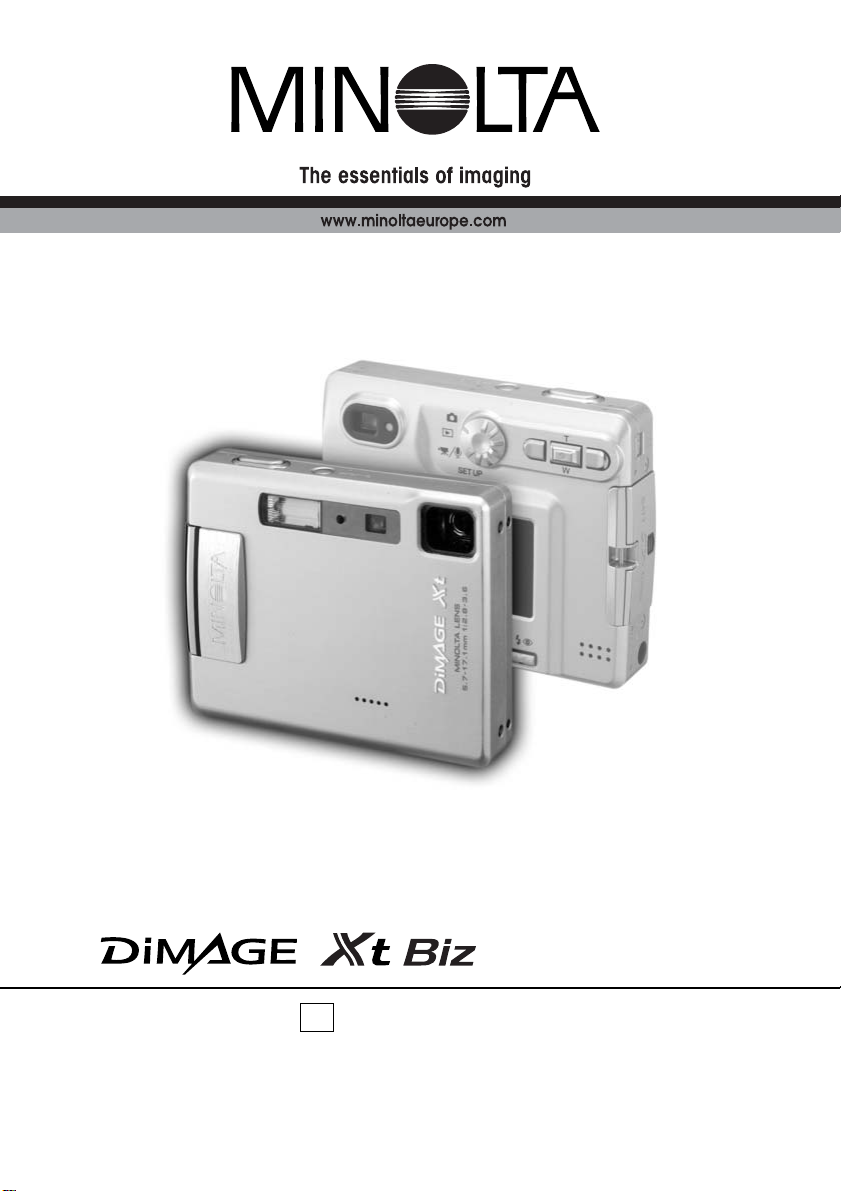
INSTRUCTION MANUAL
E
Quick Guide
9222-2721-11 SY-A308/ME-0308
Page 2

2 BEFORE YOU BEGIN / TABLE OF CONTENTS
BEFORE Y OU BEGIN
Thank you for purchasing the DiMAGE Xt Biz digital camera. The Xt Biz provides great features of
the DiMAGE Xt, renowned for its non-extending zoom and slim design, and new recording functions
for image and audio annotation, and text image processing with the DiMAGE Biz Software.Please
take the time to read through this instruction manual so you can enjoy all the features of your new
digital camera.
This document explains unique Xt Biz functions, and the basic procedures from downloading images
from the camera through mailing annotation files. For detailed instructions on DiMAGE Xt camera
and Biz Software operations not included in this manual, read the corresponding instruction manual.
Reference page numbers to the camera and software manuals are given at the bottom of a page or
the end of a section.
This instruction manual does not provide instruction in the basic operation of personal computers, or
the basic operation of Windows operating systems;refer to the manuals supplied with the computer.
Check the packing list before using this product.This packing list replaces the one in the DiMAGE Xt
camera manual. If any items are missing, immediately contact your camera dealer.
•DiMAGE Biz Software CD-ROM
•DiMAGE Viewer CD-ROM
•DiMAGE Instruction Manuals CD-ROM
• Quick Reference Guide
•Minolta International Warranty Certificate
•Minolta DiMAGE Xt Biz digital camera
•Lithium-ion battery NP-200
•Lithium-ion battery charger BC-300
• Hand strap HS-DG100
• SD Memory Card
•AV cable AVC-200
• USB cable USB-500
Because of the new functions contained in the DiMAGE Xt Biz, Spot AF (Xt manual ref. page - 54) is
not available.The LCD-brightness adjustment screen cannot be activated with the display button (Xt
manual ref.page - 30).The auto reset is initially on and is tur ned off with reset-default option in the
setup menu.When auto reset is active, the custom recording modes are reset to standard recording
each time the camera is turned off.
Amendments to the DiMAGE Xt manual
Page 3

3
TABLE OF CONTENTS
Minolta, The essentials of imaging, and DiMAGE are trademarks or registered trademarks of Minolta
Co., Ltd.Microsoft and Windows are registered trademarks of Microsoft Corporation in the United
States and other countries.The official name of Windows is Microsoft Windows Operating System.All
other brand and product names are trademarks or registered trademarks of their respective owners.
Names of parts .......................................................................................................................................4
Getting up and running...........................................................................................................................5
Camera setup............................................................................................................................5
Using the custom recording menu.............................................................................................7
From annotation to mailing ..................................................................................................... ................8
Recording main images for annotation .....................................................................................8
Image annotation .......................................................................................................................9
Audio annotation......................................................................................................................11
Creating .mdm files from camera images ...............................................................................14
Opening the annotation window..............................................................................................16
Adding text comments.............................................................................................................17
Saving .mdm files....................................................................................................................18
Printing .mdm files...................................................................................................................19
Sending .mdm files by e-mail..................................................................................................20
Text recording and processing.................................................................................................. ...........22
Text recording..........................................................................................................................22
Processing text images ...........................................................................................................23
Printing text images.................................................................................................................26
Validation .........................................................................................................................................27
Page 4
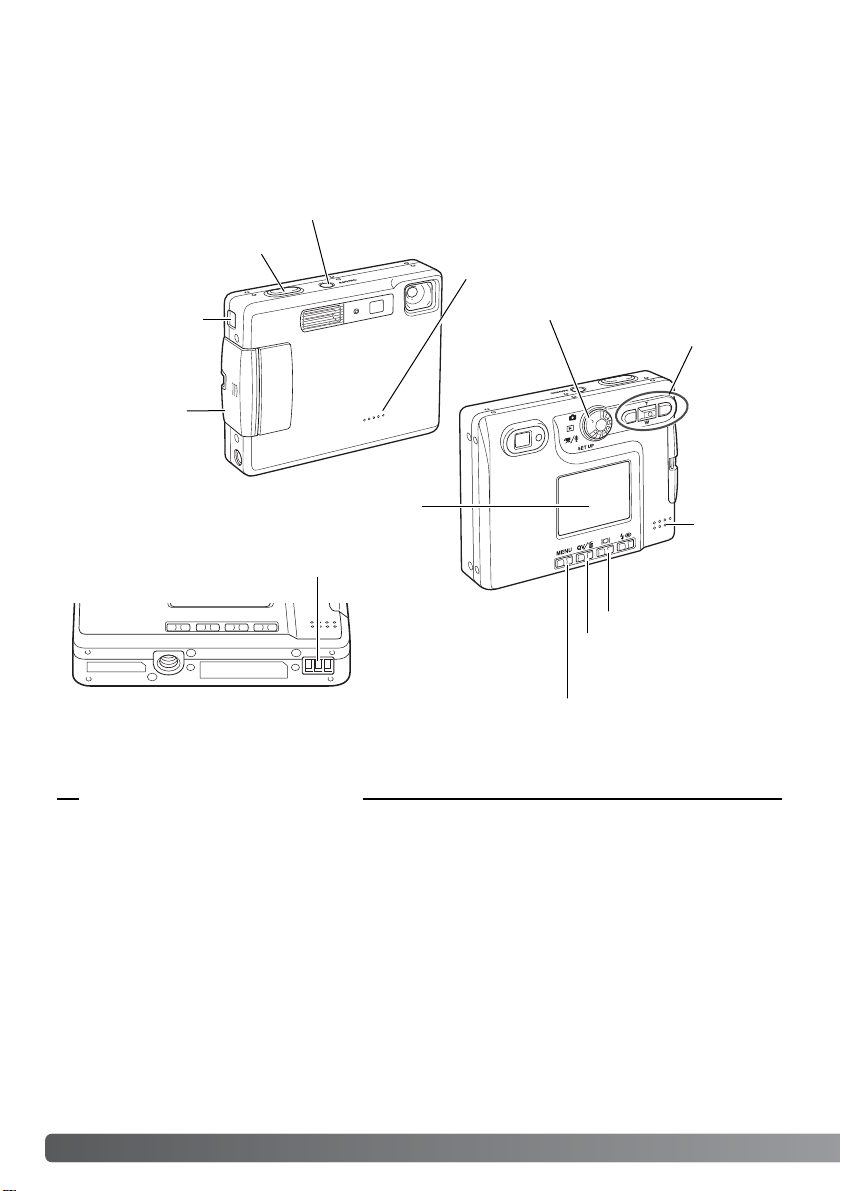
DiMAGE Xt - Names of parts, 12-13
Mode dial (p.7, 8)
Controller
LCD monitor*
Display button (p. 13)
Quick View /
Delete button (p.13)
Menu button (p.13)
Speaker
4 NAMES OFPARTS / GETTING UP AND RUNNING
NAMES OF PARTS
* This camera is a sophisticated optical instrument.Care should be taken to keep these surfaces
clean.
Main switch (p.7)
Microphone (p.12)
AV-out-terminal/
USB-port (p. 14)
Battery/Card
chamber door (p.
5)
Shutter-release button
Charger contacts*
Manual reference page
Page 5

1. Charge the lithium-ion battery.The battery can be charged when
installed in the camera or by itself.
2. Open the battery-chamber door as shown.
3. Insert the batter y into the batter y chamber. Read the safety warnings in page 3 in the Xt manual.
4. Insert a memor y card into the card slot. Read the information about
handling the card in the Xt manual.
5. Turn on the camera.
6. Turn the mode dial to the setup mode to set the date and time using
the menu.
5
GETTING UP AND RUNNING
Camera setup
DiMAGE Xt - Inserting the lithium-ion battery, 14-15.Installing and removing a memory card, p.18,
About memory cards, 19. Setting the date and time, 20-21.
Manual reference page
1
2
3 4 5 6
Page 6
6 GETTING UP AND RUNNING
Annotation: To link images, audio, or text to a specific image as comments.
Comments: Images, audio tracks, or text in an .mdm file used in reference to a main image.
Image and audio comments are created automatically from the linked image and audio
tracks when camera annotation files are opened in the DiMAGE Biz Software (p. 15).
Linked image, Linked audio track: Images or audio tracks linked to a main image as comments in the camera. Linked images can be recorded in the camera’s image annotation
mode (p.9), and linked audio in the audio annotation mode (p.11).
Main image: An image with linked text, audio, or image comments. A recorded image in the
camera can have image and audio files linked to it.Additionally, text comments can be
added with the DiMAGE Biz Software.
.mdm file: An annotation file created from a main image with linked images, audio tracks, or
text (p.14). An .mdm file is created directly with the DiMAGE Biz Software or when camera
annotation files are opened in the application. An .mdm file can be viewed, edited, printed,
and e-mailed using software.
Text recording: To record images of text, graphics, line art or photographs on a white background with the camera’s text-recording mode (p. 22) to be processed with the DiMAGE Biz
Software.
Glossary
Images captured by a camera other than the DiMAGE Xt Biz may be incorrectly marked with
the main-image and text-recording indicators on the camera.JPEG and TIFF images must
have 4:3 proportions to be used. Non-camera images can be converted for camera use with
the DiMAGE Biz Software.
Camera Notes
Page 7
7
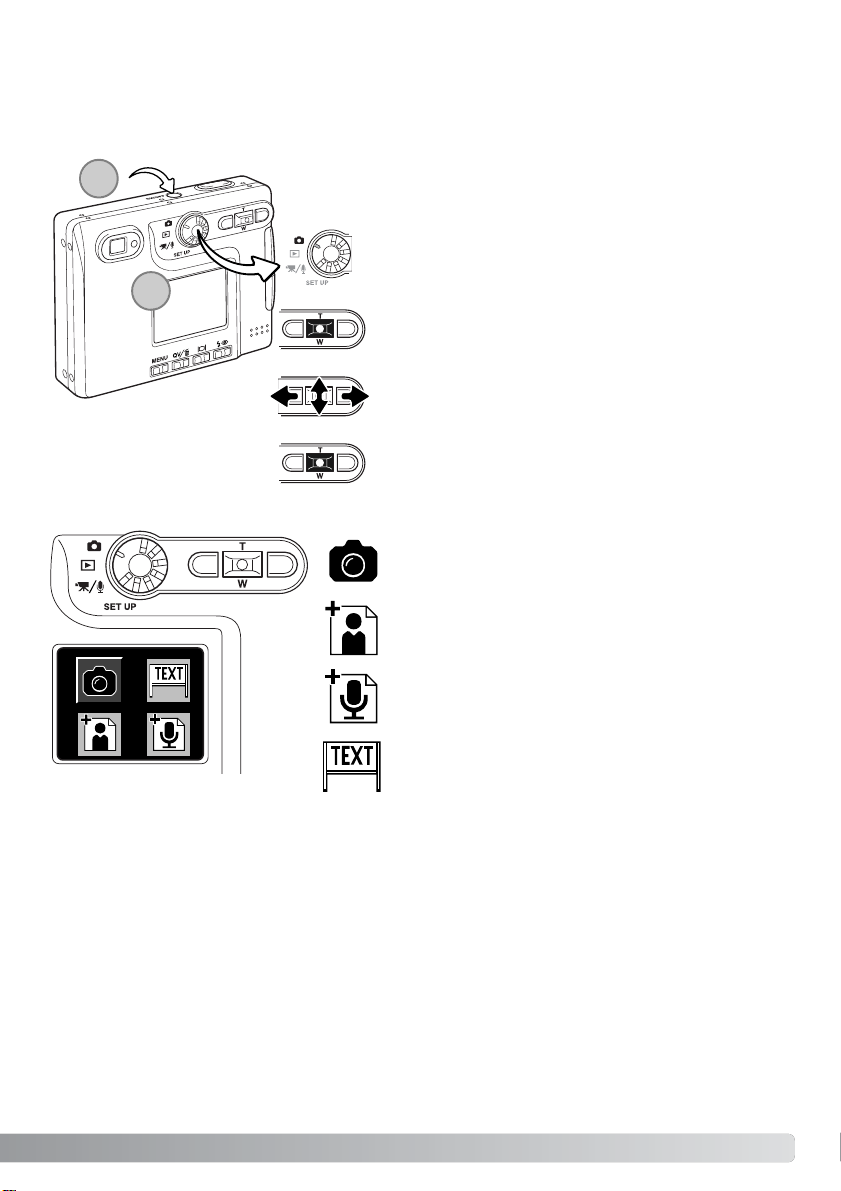
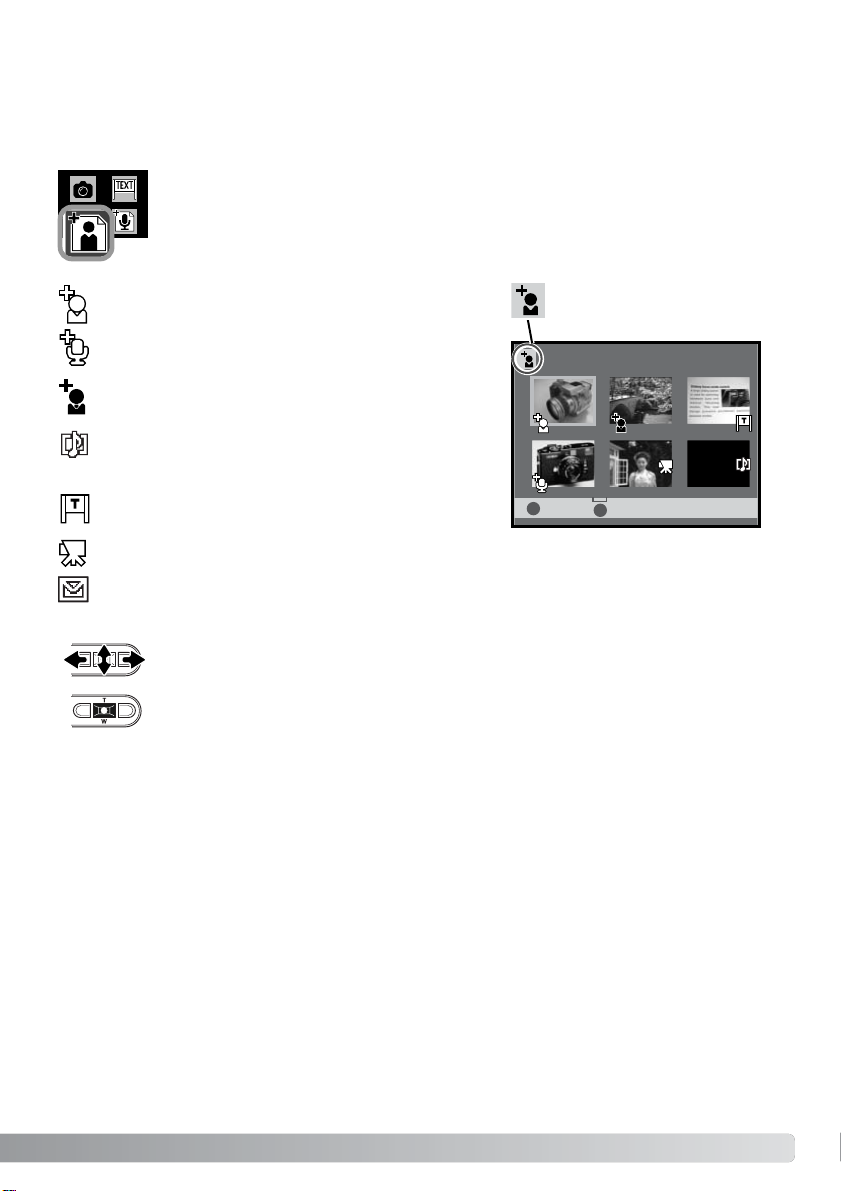
Using the custom recording menu
The custom recording menu is the gateway to annotation and text recording. This menu accesses
three custom recording modes: image annotation, audio annotation, and text recording.
Turn the camera on by pressing the main switch near
the shutter-release button (1).
Turn the mode dial to the recording position (2).The
camera is set to the standard recording mode as
described in the Xt camera manual.
Press and hold the center button of the controller for one
second to open the custom recording menu.
Use the left/right and up/down keys to highlight the
appropriate recording mode.
Press the center button of the controller to select the
mode.
Custom recording menu
Standard recording mode: Used to for general pho-
tography and to record the main image used for annotation (p.8).
Image-annotation mode: To record and link images to
a main image (p.9).
Audio-annotation mode: To record and link audio to a
main image (p.11).
Text-recording mode: To record images of text,
graphics, and line art (p. 22).
1
2
Page 8
Still images and audio tracks can be linked by the camera.This section explains the procedure, and
introduces how to make an .mdm file and send it with the DiMAGE Biz Software.
8 F
ROM ANNOTATION TO MAILING
FROM ANNOTATION TO MAILING
Record main image (p.8)
Link images or audio in camera
(p.8-13)
Select main image (p.9, 11)
Select area on main image (p.10, 12)
Capture images (p.11) or
audio (p.12) annotations
Camera operation
Main images are recorded in the standard recording mode before being annotated. Images with voice
memo or audio captions cannot be used.
Recording main images for annotation
A live image is displayed on the monitor.
Compose the image and press the shutterrelease button to take the picture.For information on recording images see the
DiMAGE Xt manual.
DiMAGE Xt - Recording mode - basic operation, 22-30.Recording - advanced operation, 36-53.
Software processing
Manual reference page
Standard-recording mode indicator
Connect camera to computer
(p.14)
Create .mdm file from camera
images (p. 15)
Add comments to .mdm file
(p.16-17)
Save / Print .mdm file (p.18, 19)
Send .mdm file by e-mail (p.20)
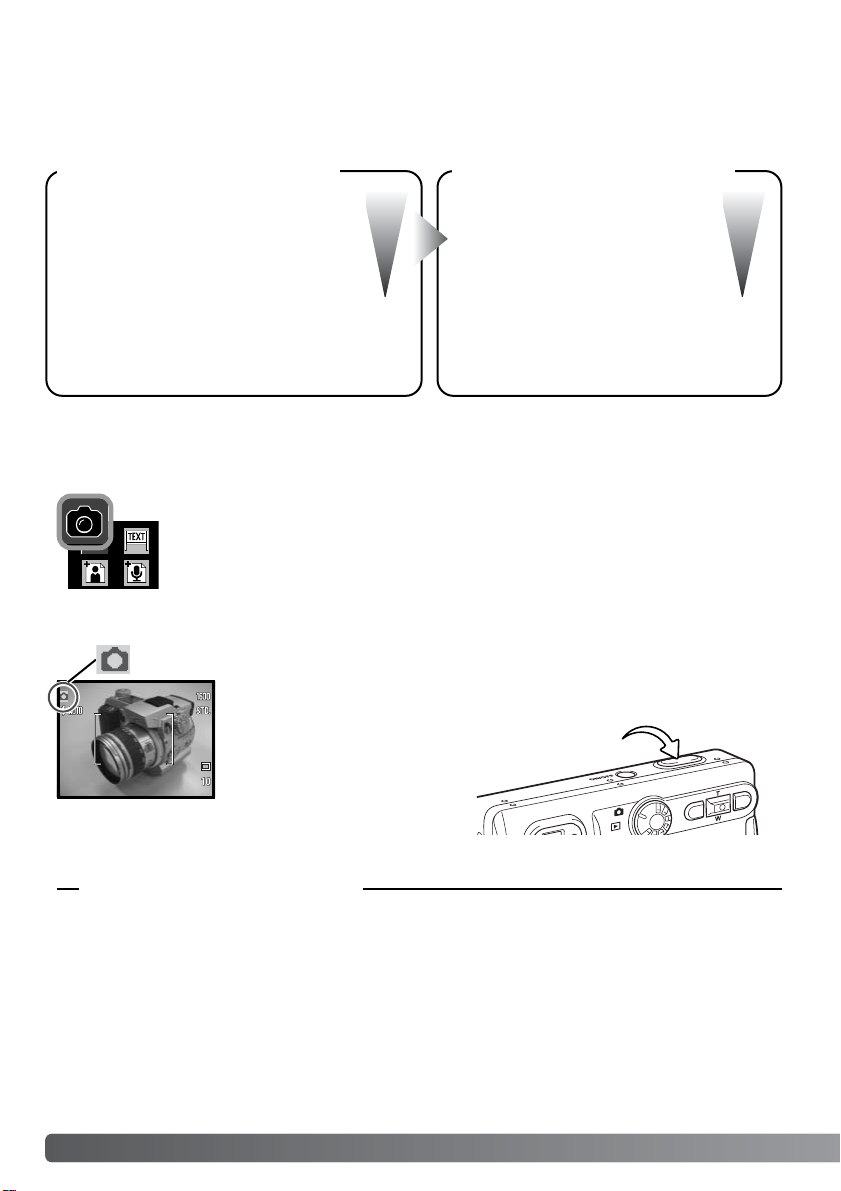
Select the standard-recording mode from the custom recording menu (p.7).
Page 9
: enter : custom
Main-image indicator - audio annotations are linked to
this image.
9
Images are linked to a main image in the image-annotation mode.Up to ten images can be attached.
The main image must be recorded before being annotated.Continuous advance or voice memo cannot be used in the image-annotation mode.
Image annotation
Main-image selection screen
Linked-image indicator - the image is linked to a main
image.
Main-image indicator - image annotations are linked to
this image.
Text-mode indicator - the image was captured in the
text-recording mode.
Audio indicator - the image has a voice memo or audio
caption, or it is an audio file.
Movie indicator - the file is a movie file.
To return to the custom recording menu, press and hold the center of the controller for one second.
E-mail Copy indicator - the image was created with the E-mail Copy function.
Use the left/right and up/down keys of the controller to highlight the main image with the
yellow border.
Press the center of the controller to select the highlighted image.
Image-annotation mode
indicator
Select the image-annotation mode from the custom recording menu (p.7).The mainimage selection screen appears.
Page 10

:enter:size
A linked image can be selected as a main image for an annotation series; the linked-image
indicator changes to a main-image indicator.The link to the first annotation series is not lost.
The image will be used as a linked image in the first annotation series and the main image
for the second series.When the files are downloaded to the DiMAGE Biz Software, two annotation files are created.
Notes on annotation
10 FROM ANNOTATION TO MAILING
DiMAGE Xt - Recording mode - basic operation, 22-30.Recording - advanced operation, 36-53.
Movie clips
The following files cannot be used as main images.
Images with voice memos or audio captions
E-mail Copy files
Main images with ten linked images or audio tracks
Audio tracks
The annotation screen with the selected main image is displayed with a red area marquee.The subsequent picture is
linked to the area in the marquee.
Press the center of the controller to select the area.The live
image is displayed.
Pressing the display button switches the marquee between
the entire and local image areas.
Compose the image to be linked. Press the shutter-release button to take the
annotation image.
Annotation screen
:enter:size
Manual reference page
Use the left/right and up/down keys of the controller to move the marquee.
Page 11

:enter
The main image is displayed again.The yellow marquee indicates the previous marquee position.The red marquee is for the next linked image. Repeat
the procedure to capture subsequent images.
See page 9 for an explanation of thumbnail indicators.See page 10 for notes on annotation.
11
Audio annotation
Audio is linked to a main image in the audio-annotation mode.Up to ten audio tracks can be linked.
Up to ten minutes of audio can be recorded at one time.The main image must be captured before
being annotated.
Use the left/right and up/down keys of the controller to highlight the main image with the yellow
border.
Press the center of the controller to select the
highlighted image.
To return to the custom recording menu, press and
hold the center of the controller for one second.
To exit the image-annotation mode, press the center of the controller for one second. To return to the
main-image selection screen, press the menu button.
:size
Select the audio-annotation mode from the custom recording menu (p.7).The mainimage selection screen appears.
Main-image selection screen
: enter : custom
Audio-annotation mode
indicator
Page 12

:enter:size
12 FROM ANNOTATION TO MAILING
Press the center of the controller to select the area.The audio stand-by screen is
displayed.
In the stand-by screen, press the shutter-release button to begin recording.
The frame counter displays the elapsed time; during the last ten seconds,
the counter will turn red and count down the time.The recording stops
when the shutter-release button is pressed again or the remaining time has
elapsed.
The annotation screen with the selected main image is displayed with a red area marquee.The subsequent audio track
is linked to the area in the marquee.
Pressing the display button switches the marquee between
the entire and local image areas.
Annotation screen
When making audio recordings, be careful not to touch or cover
the microphone. For best results, hold the camera approximately
20cm (8in) from your mouth.
Use the left/right and up/down keys of the controller to move the area marquee.
To exit the audio-annotation mode, press the center of the controller for one second. To return to the
main-image selection screen, press the menu button.
Press shutter button to
record.
:enter:size
The main image is displayed again.The yellow marquee indicates the previous marquee position.The red marquee is for the next linked audio track.
Repeat the procedure to record subsequent tracks.The audio files are
stored in WAV format on the memory card, but they do not appear in the
main-image selection screen.
Recording audio.
Press shutter button to stop.
:enter:size
Page 13

13
Annotation controls
Only linked audio tracks can be played back in Quick View
from the audio-annotation screen. Press the center of the
controller to begin the playback.To pause, press the controller again. A linked audio track cannot be deleted.
DiMAGE Xt - Viewing images, Deleting single images, 33. Playing back movies and audio
recordings, 61.
Display button
Quick View,Delete button
Menu button
Recorded images and audio tracks can be played back and deleted with the
Quick View/Delete button from the main-image selection screen and annotation screen.
For more about Quick View, see the Xt manual.
The display button changes the display format. Each
time the button is pressed the display format cycles
through the following formats.
Main-image selection screen (p.9, 11)
Single-frame playback (full-display)
Single-frame playback (image only)
Main-image selection screen
Annotation screen (p.10, 12)
To exit Quick View, press the menu button. The menu-button indicator at the bottom right of the monitor indicates
the current screen can be closed by pressing the menu
button.
Menu-button indicator
Play
Fwd
Vol
Pause
Rew
Manual reference page
Entire image-area marquee
Local area marquee
Page 14

Connect the camera to the computer.Inser t the small plug of
the USB cable into the camera, and attach the other end of
the USB cable to the computer’s USBport. Make sure the
plugs are firmly attached. If “initializing USB connection” message does not disappear from the LCD monitor, the cable may have not been attached properly.
Start up the computer.
Insert the memory card containing the files into the camera (p.
5).
14 FROM ANNOTATION TO MAILING
Creating .mdm files from camera images
An annotation series captured by the camera can be converted automatically by the DiMAGE Biz
Software to an .mdm annotation file. See the DiMAGE Biz Software manual for installation instructions.
DiMAGE Biz Software - System Requirements, 5.Before installing the software, 5.
Installation, 6-8. Starting up, 9.
DiMAGE Xt - Connecting the camera to a computer, 84-85. Disconnecting the camera from a
computer, 92-93.
Select the DiMAGE Biz Software from the
DiMAGE Biz Software folder in the programs option of the start menu to star t the
application and open the main window.If
the software was
installed in a different location,
open it from
there.
Manual reference page
Main window
Page 15
15
Select My computer > Removable Disk > DCIM > 10xMLT18 main window folder tree.The name of the folder containing the image varies with
camera settings.The images in the selected folder on the camera’s
memory card are displayed.
A message asking if you wish to
create an .mdm file appears. Click
OK to create the .mdm file. If the
message does not appear, an
annotated file was not created on
the camera or the .mdm files have
already been created.
Using the folder tree, select the folder
where the .mdm files are stored. If the
folder is not found, select the update
option from the view menu to update the
tree.The thumbnails of the .mdm files
are displayed in the file display area.
Folder tree
Select a folder in the computer to store the .mdm files.An
.mdm file for each annotation series is created. Click the
save button.
DiMAGE Biz Software - Showing thumbnail images - Opening camera images, 10-14.
Manual reference page
Page 16

16 FROM ANNOTATION TO MAILING
Menu bar
Comment check box
Title text box
Comment display area
Text comment
Comment text box
Main image
Tool bar
To open the annotation window, select an image in
the main window and click the annotation button or
select the view-comment option from the file menu.
Double-clicking on an .mdm thumbnail or dragging
and dropping the image onto the annotation button
also opens the annotation window.
File display area
DiMAGE Biz Software - Annotation window, 28-30.
Annotation button
Annotation window
Opening the annotation window
Manual reference page
Page 17

17
Adding text comments
Text comments can be added to the main image in the annotation window.
Click and drag the mouse to place a red marquee over
the area to be described with a comment (2).
Click the text tab. Click on the comment text box to
place the cursor and enter a comment (3). Up to 512
characters can be used for each comment.
The text comments can be edited. Image and audio comments can be added as well as text comments. Refer to the DiMAGE Biz Software instruction manual.
Click the desired area marquee from the tool bar (1),
or select the area-marquee option in the view menu.
To change the defined area, click and drag the mouse
again; the previous marquee is canceled.
DiMAGE Biz Software - Adding text comments, 34-35. Adding audio comments, 36-37. Adding
image comments, 37. Adding nested comments, 38. Editing .mdm files, 41-43.
The clear button deletes all text in the comment text
box and the red marquee in the image.
Click the add button to add the comment to the comment display area (4).
Repeat steps one through four to add additional comments.Up to 256 comments can be added to an
image.
Area marquees
Manual reference page
1
2
3
4
Page 18

18 FROM ANNOTATION TO MAILING
After adding or editing comments, save the .mdm file.
Saving .mdm files
DiMAGE Biz Software - Saving .mdm files, 44-45.
Save
To save the .mdm file overwriting the
original data, click the save button or
select the save option from the file
menu.When the save command is
used with an existing .mdm file, a
warning to replace the file will appear.
Click the OK button to save changes to
the file.
Save as
To save the .mdm file under a different
name or in a different folder, select the
save-as option from the file menu.
In the save-as window, specify the
location to save the file and enter the
file name. Click the save button to
complete the operation.
Manual reference page
Page 19

DiMAGE Biz Software - Printing, 46-48.
19
Printing .mdm files
The print routine automatically lays out the
images and text. In the annotation window, click
the print button or select the print option from the
file menu.
The print-preview window opens.Select the appropriate parameters and settings in the dialog window.Click the print button to open the print dialog box.
Main image
Page number /
Total number of pages
Title
Comments
Print button
Footer
Header
Date of printing
Print-preview window
Image details
Printer settings can be changed.
The font can be specified.
Color-coded area marquees
Manual reference page
Page 20

20 FROM ANNOTATION TO MAILING
DiMAGE Biz Software - Sending by e-mail, 49-50.
Set print options, and click the OK button to
start printing.
Sending .mdm files by e-mail
.mdm files can be sent by e-mail. Only MAPI compatible e-mail applications can be used and must
be installed on your computer.This allows mail to be sent from other applications. Microsoft Outlook
Express can be used.
With the file to be sent open in the annotation
window, click the mail button, or select the mail
option from the file menu.
Manual reference page
Page 21

When this is checked, the main image is resized to 1024 x 768 (XGA), and image comments are
resized to 640 x 480 (VGA).
Click the OK button.
21
The MAPI-compatible e-mail application will start up.The .mdm file is
attached automatically.
Enter the address, subject, main text
etc. and send the e-mail. Do not quit
the DiMAGE Biz Software before
sending the mail; it may cause an
error.Refer to the e-mail application’s instruction manual for details
on operation.
When the recipient does not have DiMAGE Biz Software,
check this box;DiMAGE Messenger Reader is attached to
the mail. DiMAGE Messenger Reader allows the recipient to
view files, copy the main image, play back audio, and print
the file. However, new comments cannot be added.
The mail dialog box appears.
Page 22

22 TEXT RECORDING AND PROCESSING
Frame the subject. The picture should be taken within 45º
degrees from perpendicular for the software’s perspective control function to be effective.Press the shutter-release button to
take the picture.
If the vertical and horizontal axes of the subject are not clear,
include the edges of the artwork or place guides to help to
define the perspectives with the software.Uneven illumination,
reflections, or overexposure with flash or other light sources
may also prevent the software from being effective.
Text recording
TEXT RECORDING AND PROCESSING
Images of text, line art, or photographs on white backgrounds are low in contrast making the background gray and muddy and the black letters and lines smokey. The camera’s text-recording mode
allows the images to be processed on the DiMAGE Biz Software to improve the appearance and legibility of images of two-dimensional art.
Text-recording mode indicator
Select the text-recording mode from the custom recording menu (p.7). The live
image appears.
Page 23

23
Processing text images
The text image files can be processed to improve the appearance and legibility of images of twodimensional in the DiMAGE Biz Software.
Connect the camera to the computer and start up the DiMAGE Biz Software (p.14).
Select the folder containing the text image
from the folder tree in the main window. The
images in the folder are displayed.
To open the text window, select the image in
the main window and click the text button or
select the text image-processing option from
the file menu. Double-clicking on an image with
the text-mode indicator also opens the text
window.The window can also be opened by
dragging and dropping the image onto the text
button.
DiMAGE Biz Software - Text window, 65-71.
Manual reference page
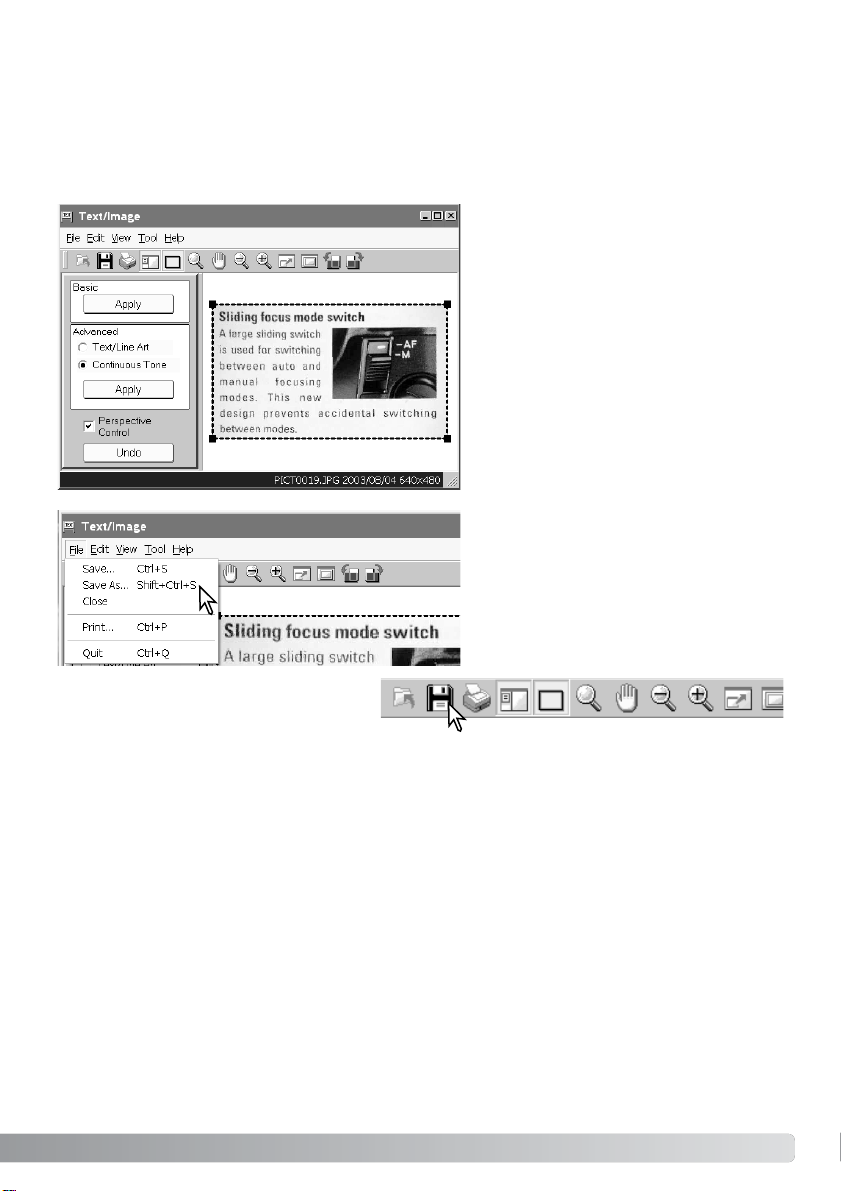
Page 24

Perspective is adjusted with the
rubber band (2).The rubber
band should line up with the horizontal and vertical image elements in the image. Click and
drag on the black squares at the
corner of the rubber band to
adjust the shape.The area outside the rubber band will be
deleted when processing is
applied.
24 TEXT RECORDING AND PROCESSING
Text window
Undo button
Basic apply button
Advanced apply button
Perspective-control
check box
Menu bar
Tool bar
Rubber
band
Display area
Perspective control straightens
images of two-dimensional artwork taken at an angle. Click the
perspective-control check box to
activate the function, uncheck
the box to disable it (1).
Select the appropriate processing mode and click the corresponding apply button. See the next page
(3).
1
2
3
Page 25
25
The result of the processing is applied
immediately. The illustration on the left
shows the results of perspective control.If
the result is not satisfactory, click the undo
button or select the undo option from the
edit menu.
Processing is additive.Each time an apply
button is clicked, processing is applied to
the current image.The more the processing is applied, the stronger the results will
be.The undo button can only cancel the
last processing operation.
To save the image file with a different
name or in a different folder, select the
save-as option from the file menu.In the
save-as window, specify the location to
save the file, enter the file name, and
select the file type, then click the save button.
To overwrite the current file, click the save
button on the tool bar, or select the save
option from the file menu.The image will
be saved in its original location.
Basic: For images of black text on a white background.This is not appropriate for images with small
characters, fine detail, photographs, or continuous-tone illustrations.
Advanced, text/line art: For images of black text and line art on a white background.This is not
appropriate for images with photographs or continuous-tone illustrations.
Advanced, continuous tone: For images of photographs or continuous-tone illustrations on a white
background.
Page 26

26 TEXT RECORDING AND PROCESSING / VALIDATION
Printing text images
In the text window, click the print button on
the tool bar, or select the print option from
the file menu.
Set the print size. Choose either radio button:
Resolution: Enter one of the three values; the
other two values change automatically.
Size to page: The image is resized to fit to the
paper size automatically.
Image information can be shown or hidden
using the display-image-information radio button.
The font can be changed when the font button is
clicked.Printer settings can be changed when
the printer-setup button is clicked.
Click the print button.The print dialog box appears.
Set the print options, and click the OK button.
Page 27

27
VALIDATION
JPEG images taken by a DiMAGE Xt Biz digital camera can be checked to see if they have been
revised or modified.
Select the files to be validated. Single or multiple files
can be selected.
Click on the validation button or select the data-validation option from the validation menu.
To delete the validation tag, select the clear-tag
option from the validation menu.
DiMAGE Biz Software - Validation, 19.
Manual reference page
One of the following tags appears by the image:
Data has not been modified.
Data has been modified.
Cannot confirm if data has been modified or
not.
Page 28

©2003 Minolta Co., Ltd.under the Berne Convention and the Universal Copyright Convention.
1AG6P1P1720--
9222-2721-11 SY-A308/ME-0308
Printed in Germany0-43325-53247-4
 Loading...