

Page 1
Operating instructions
Washer-dryer
WT 946 i
To avoid the risk of accidents
or damage to the machine
it is essential to read these
instructions before it is
installed or used for the first time.
M.-Nr.
G
05 182 311
Page 2

Contents
Caring for the environment . . . . . . . . . . . . . . . . . . . . . . . . . . . . . . . . . . . . . . . . . . 5
Disposal of the packing material . . . . . . . . . . . . . . . . . . . . . . . . . . . . . . . . . . . . . . . 5
Disposal of your old appliance . . . . . . . . . . . . . . . . . . . . . . . . . . . . . . . . . . . . . . . . 5
Warning and Safety instructions . . . . . . . . . . . . . . . . . . . . . . . . . . . . . . . . . . . . . 6
Description of the appliance. . . . . . . . . . . . . . . . . . . . . . . . . . . . . . . . . . . . . . . . . 9
Features . . . . . . . . . . . . . . . . . . . . . . . . . . . . . . . . . . . . . . . . . . . . . . . . . . . . . . . . . . 9
Special programmes . . . . . . . . . . . . . . . . . . . . . . . . . . . . . . . . . . . . . . . . . . . . . 9
Delay start. . . . . . . . . . . . . . . . . . . . . . . . . . . . . . . . . . . . . . . . . . . . . . . . . . . . . . 9
Programme lock . . . . . . . . . . . . . . . . . . . . . . . . . . . . . . . . . . . . . . . . . . . . . . . . . 9
Programmable functions. . . . . . . . . . . . . . . . . . . . . . . . . . . . . . . . . . . . . . . . . . . 9
Future updates (PC) . . . . . . . . . . . . . . . . . . . . . . . . . . . . . . . . . . . . . . . . . . . . . . 9
Control panel . . . . . . . . . . . . . . . . . . . . . . . . . . . . . . . . . . . . . . . . . . . . . . . . . . . . . 10
Important control panel features . . . . . . . . . . . . . . . . . . . . . . . . . . . . . . . . . . . . . . 11
Programme selector . . . . . . . . . . . . . . . . . . . . . . . . . . . . . . . . . . . . . . . . . . . . . 11
Additional option buttons . . . . . . . . . . . . . . . . . . . . . . . . . . . . . . . . . . . . . . . . . 11
"Spin" button with indicator lamps . . . . . . . . . . . . . . . . . . . . . . . . . . . . . . . . . . 11
Washing and drying environmentally . . . . . . . . . . . . . . . . . . . . . . . . . . . . . . . . 12
Before using for the first time. . . . . . . . . . . . . . . . . . . . . . . . . . . . . . . . . . . . . . . 13
WASHING . . . . . . . . . . . . . . . . . . . . . . . . . . . . . . . . . . . . . . . . . . . . . . . . . . . . . . . 14
Programme overview . . . . . . . . . . . . . . . . . . . . . . . . . . . . . . . . . . . . . . . . . . . . . . . 14
How to wash correctly. . . . . . . . . . . . . . . . . . . . . . . . . . . . . . . . . . . . . . . . . . . . . 17
Care symbols - washing . . . . . . . . . . . . . . . . . . . . . . . . . . . . . . . . . . . . . . . . . . 17
Separate washing . . . . . . . . . . . . . . . . . . . . . . . . . . . . . . . . . . . . . . . . . . . . . . . . . 19
Before washing . . . . . . . . . . . . . . . . . . . . . . . . . . . . . . . . . . . . . . . . . . . . . . . . . . . 19
Select a programme . . . . . . . . . . . . . . . . . . . . . . . . . . . . . . . . . . . . . . . . . . . . . . . 20
Selecting additional options for the wash programme. . . . . . . . . . . . . . . . . . . 21
Delay start. . . . . . . . . . . . . . . . . . . . . . . . . . . . . . . . . . . . . . . . . . . . . . . . . . . . . 23
At the end of a programme . . . . . . . . . . . . . . . . . . . . . . . . . . . . . . . . . . . . . . . . . . 23
Adding and removing laundry . . . . . . . . . . . . . . . . . . . . . . . . . . . . . . . . . . . . . . . 24
Programme cycle. . . . . . . . . . . . . . . . . . . . . . . . . . . . . . . . . . . . . . . . . . . . . . . . . . 25
2
Page 3

Contents
Adding detergent . . . . . . . . . . . . . . . . . . . . . . . . . . . . . . . . . . . . . . . . . . . . . . . . . 27
Water softener . . . . . . . . . . . . . . . . . . . . . . . . . . . . . . . . . . . . . . . . . . . . . . . . . . . . 27
Washing with several components . . . . . . . . . . . . . . . . . . . . . . . . . . . . . . . . . . . . 27
Fabric conditioners / starch formulations . . . . . . . . . . . . . . . . . . . . . . . . . . . . . 28
Fabric conditioners, texturisers and starch . . . . . . . . . . . . . . . . . . . . . . . . . . . . . . 28
Automatic dispensing of fabric conditioners, texturisers or liquid starch to
laundry at the end of a programme . . . . . . . . . . . . . . . . . . . . . . . . . . . . . . . . . 28
Adding fabric conditioner or liquid starch separately . . . . . . . . . . . . . . . . . . . 28
Separate starching . . . . . . . . . . . . . . . . . . . . . . . . . . . . . . . . . . . . . . . . . . . . . . 28
DRYING . . . . . . . . . . . . . . . . . . . . . . . . . . . . . . . . . . . . . . . . . . . . . . . . . . . . . . . . . 29
Tips on drying . . . . . . . . . . . . . . . . . . . . . . . . . . . . . . . . . . . . . . . . . . . . . . . . . . . . 29
Programme overview . . . . . . . . . . . . . . . . . . . . . . . . . . . . . . . . . . . . . . . . . . . . . . . 30
Separate drying . . . . . . . . . . . . . . . . . . . . . . . . . . . . . . . . . . . . . . . . . . . . . . . . . . . 32
Before drying . . . . . . . . . . . . . . . . . . . . . . . . . . . . . . . . . . . . . . . . . . . . . . . . . . . . . 32
Programme selection. . . . . . . . . . . . . . . . . . . . . . . . . . . . . . . . . . . . . . . . . . . . . . . 33
Additional options for the drying programmes. . . . . . . . . . . . . . . . . . . . . . . . . 33
Delay start. . . . . . . . . . . . . . . . . . . . . . . . . . . . . . . . . . . . . . . . . . . . . . . . . . . . . 34
At the end of a programme . . . . . . . . . . . . . . . . . . . . . . . . . . . . . . . . . . . . . . . . . . 34
WASHING AND DRYING . . . . . . . . . . . . . . . . . . . . . . . . . . . . . . . . . . . . . . . . . . . 35
Washing and drying in a continuous sequence . . . . . . . . . . . . . . . . . . . . . . . . . . 35
After each washing or drying programme. . . . . . . . . . . . . . . . . . . . . . . . . . . . . 36
Changing a programme sequence . . . . . . . . . . . . . . . . . . . . . . . . . . . . . . . . . . . 38
Safety lock . . . . . . . . . . . . . . . . . . . . . . . . . . . . . . . . . . . . . . . . . . . . . . . . . . . . . . 39
Cleaning and care . . . . . . . . . . . . . . . . . . . . . . . . . . . . . . . . . . . . . . . . . . . . . . . . 40
Cleaning the machine . . . . . . . . . . . . . . . . . . . . . . . . . . . . . . . . . . . . . . . . . . . . . . . 40
Cleaning the fluff filter and pump . . . . . . . . . . . . . . . . . . . . . . . . . . . . . . . . . . . . . 42
Cleaning the filter in the water inlet . . . . . . . . . . . . . . . . . . . . . . . . . . . . . . . . . . . . 44
Problem solving guide. . . . . . . . . . . . . . . . . . . . . . . . . . . . . . . . . . . . . . . . . . . . . 45
What to do if ... ? . . . . . . . . . . . . . . . . . . . . . . . . . . . . . . . . . . . . . . . . . . . . . . . . . . 45
The programme does not start. . . . . . . . . . . . . . . . . . . . . . . . . . . . . . . . . . . . . . . . 46
3
Page 4

Contents
The wash programme stops and a fault indicator light comes on. . . . . . . . . . . . . 47
A fault indicator lamp comes on but the wash programme continues as normal. 48
General problems or an unsatisfactory wash or drying result. . . . . . . . . . . . . . . . 49
Opening the drum door in the event of a power failure. . . . . . . . . . . . . . . . . . . . . 55
After sales service . . . . . . . . . . . . . . . . . . . . . . . . . . . . . . . . . . . . . . . . . . . . . . . . . 57
Appliance guarantee . . . . . . . . . . . . . . . . . . . . . . . . . . . . . . . . . . . . . . . . . . . . 57
Installation and connection . . . . . . . . . . . . . . . . . . . . . . . . . . . . . . . . . . . . . . . . 58
Front view. . . . . . . . . . . . . . . . . . . . . . . . . . . . . . . . . . . . . . . . . . . . . . . . . . . . . . . . 58
Installation surface. . . . . . . . . . . . . . . . . . . . . . . . . . . . . . . . . . . . . . . . . . . . . . . . . 59
Installation . . . . . . . . . . . . . . . . . . . . . . . . . . . . . . . . . . . . . . . . . . . . . . . . . . . . . . . 59
Removing the transit fitting . . . . . . . . . . . . . . . . . . . . . . . . . . . . . . . . . . . . . . . . . . 60
Levelling the machine . . . . . . . . . . . . . . . . . . . . . . . . . . . . . . . . . . . . . . . . . . . . . . 61
Screwing out and adjusting the feet. . . . . . . . . . . . . . . . . . . . . . . . . . . . . . . . . 61
Building under: . . . . . . . . . . . . . . . . . . . . . . . . . . . . . . . . . . . . . . . . . . . . . . . . . . . 62
Matching the facia panel to the height of adjacent drawer fronts . . . . . . . . . . 63
Fitting the front panel . . . . . . . . . . . . . . . . . . . . . . . . . . . . . . . . . . . . . . . . . . . . 63
Fixing the panel in position. . . . . . . . . . . . . . . . . . . . . . . . . . . . . . . . . . . . . . . . 64
Aligning the door . . . . . . . . . . . . . . . . . . . . . . . . . . . . . . . . . . . . . . . . . . . . . . . 65
Fitting a plinth facing. . . . . . . . . . . . . . . . . . . . . . . . . . . . . . . . . . . . . . . . . . . . . 66
Connection to the water supply . . . . . . . . . . . . . . . . . . . . . . . . . . . . . . . . . . . . . . . 67
Connection to the drainage system. . . . . . . . . . . . . . . . . . . . . . . . . . . . . . . . . . . . 70
Electrical connection U.K. . . . . . . . . . . . . . . . . . . . . . . . . . . . . . . . . . . . . . . . . . . . 71
Consumption data . . . . . . . . . . . . . . . . . . . . . . . . . . . . . . . . . . . . . . . . . . . . . . . . 73
Technical data . . . . . . . . . . . . . . . . . . . . . . . . . . . . . . . . . . . . . . . . . . . . . . . . . . . 74
Programmable functions. . . . . . . . . . . . . . . . . . . . . . . . . . . . . . . . . . . . . . . . . . . 76
High water level . . . . . . . . . . . . . . . . . . . . . . . . . . . . . . . . . . . . . . . . . . . . . . . . . . . 76
Additional rinse for the COTTONS programme . . . . . . . . . . . . . . . . . . . . . . . . . . . 77
Buzzer . . . . . . . . . . . . . . . . . . . . . . . . . . . . . . . . . . . . . . . . . . . . . . . . . . . . . . . . . . 78
Opening the door at high temperatures . . . . . . . . . . . . . . . . . . . . . . . . . . . . . . . . 79
Final residual moisture after drying . . . . . . . . . . . . . . . . . . . . . . . . . . . . . . . . . . . . 80
4
Page 5

Caring for the environment
Disposal of the packing
material
The transport and protective packing
has been selected from materials which
are environmentally friendly for disposal
and can normally be recycled.
Ensure that any plastic wrappings,
bags etc. are disposed safely and kept
out of the reach of babies and young
children. Danger of suffocation!
Rather than just throwing these materi
als away, please ensure they are of
fered for recycling.
-
-
Disposal of your old appliance
Old appliances may contain materials
which can be reclaimed or recycled.
Please contact your dealer, your local
waste collection centre or scrap mer
chant about potential recycling
schemes.
Ensure that the machine presents no
danger to children while being stored
for disposal. See the appropriate sec
tion in the Warning and safety instruc
tions.
-
-
-
5
Page 6

Warning and Safety instructions
Read the operating instructions be
fore using this machine for the first
time. They contain important infor
mation about the safety, installation,
use and maintenance of the ma
chine. This way you will avoid the
risk of accidents and damage to the
machine.
Keep these operating instructions in
a safe place and ensure that new
users are familiar with the content.
Pass them on to any future owner of
the machine.
-
-
-
Correct usage
This washer-dryer must only be
used:
– to wash textiles which are declared
by the manufacturer on the care label to be machine washable, as well
as hand washable woollens.
– to dry textiles which have been
washed in a water solution, marked on
the manufacturer’s wash care label as
being suitable for tumble drying.
Any other applications may be danger
ous. The manufacturer cannot be held re
sponsible for damage caused by im
proper or incorrect use of the appliance.
Do not let small children play with
the machine and its controls or op
erate it. Supervise its use by the elderly
or infirm.
-
Technical safety
Before setting up the machine,
check it for any externally visible
damage.
Do not install or use a damaged ma
chine.
Before connecting the machine,
ensure that the connection data on
the data plate (fusing, voltage and fre
quency) matches the mains electricity
supply. If in any doubt, consult a quali
fied electrician.
The electrical safety of this machine
can only be guaranteed when conti
nuity is complete between the machine
and an effective earthing system which
complies with local and national safety
regulations.
It is most important that this basic safety
requirement is regularly tested by a qualified electrician.
The manufacturer cannot be held responsible for the consequences of an
inadequate earthing system.
Do not connect the appliance to
the mains electricity supply by an
extension lead. Extension leads do not
guarantee the required safety of the appliance (e.g. danger of overheating).
The machine is built in accordance
-
-
-
with current safety requirements.
Unauthorised repairs could result in un
foreseen dangers for the user, for which
the manufacturer cannot accept respon
sibility. Repairs should only be under
taken by a Miele approved technician.
The machine is only completely iso
lated from the electricity supply when:
–
it is switched off at the wall socket
and the plug is withdrawn, or
–
it is switched off at the mains, or
–
the mains fuse is withdrawn, or
–
the screw-out fuse is removed in
countries where this is applicable.
-
-
-
-
-
-
-
-
6
Page 7

Warning and Safety instructions
The Miele "Waterproof system" pro
tects from water damage provided
the following conditions have been met:
the machine is correctly plumbed in
–
and connected to the electricity sup
ply.
if a fault has been identified, the ma
–
chine must be examined by a com
petent person before further use,
and repaired if necessary.
Faulty components must only be
exchanged for Miele original spare
parts. Only when these parts are fitted
can the safety standards of the ma
chine be guaranteed.
If the connection cable is damaged
it must be replaced by a special
Miele cable only.
In countries where there are areas
which may be subject to infestation
by cockroaches or other vermin, pay
particular attention to keeping the appliance and its surroundings in a clean
condition at all times. Any damage
which may be caused by cockroaches
or other vermin will not be covered by
the appliance guarantee.
-
-
Use
This equipment is not designed for
maritime use or for use in mobile
installations such as caravans, aircraft
etc. However it may be suitable for
such usage subject to a risk assess
ment of the installation being carried
out by a suitably qualified engineer.
Take care, the metal cap is hot
after drying.
Open the door wide after the drying cy
-
cle. Do not touch the metal cap located
on the inside of the door glass. It will
still be hot and could cause a burn.
Do not install your machine in
-
-
-
rooms where temperatures below
freezing may occur. Frozen hoses may
burst under pressure.The reliability of
the electronic control unit may be im
paired at temperatures below freezing
point.
Before using the machine for the
first time, check that the transit fit
ting at the rear of the machine has been
removed (see section on "Installation").
During spinning, a transit fitting which is
still in place may result in damage to
both the machine and adjacent furniture or appliances.
Turn off the stopcock if the ma-
chine is to be left for any length of
time (e.g. holiday), especially if there is
no floor drain (gully) in the immediate
vicinity.
Flooding danger.
If hooking the drain hose into a
wash basin, check that the water can
drain off quickly enough to prevent the
sink from overflowing. Make sure the
drain hose is secure, so that the force
of the water flowing out of the hose
does not dislodge it.
Take care to ensure that foreign ob
jects (e.g. nails, pins, coins, paper
clips) do not find their way into the ma
chine with the laundry. These may dam
age components of the machine (e.g.
suds container, drum), which in turn
can result in damage to the laundry.
-
-
-
-
-
7
Page 8

Warning and Safety instructions
If the correct amount of detergent
is dispensed, the machine should
not need to be descaled. If, however,
you do wish to descale the machine
only use proprietary non-corrosive
descaling agents and strictly observe
the instructions on the packaging. If in
doubt, contact the Miele Customer Ser
vice Dept. or your Miele Dealer.
Never use solvent based cleaning
agents in this machine, as this may
result in damage to component parts
and create toxic fumes. Such deter
gents also pose a fire and explosion
hazard.
Textiles which have been
pre-treated in solvent based cleaning agents must be thoroughly rinsed in
clean water before being washed in the
machine.
Only use dyes specified by the
manufacturer as being suitable for
use in a domestic washing machine. Always observe the manufacturer's instructions carefully.
Colour run and dye removers con
tain sulphur compounds which can
cause damage such as corrosion. Do
not use these products in this machine.
Always make sure the drum is sta
tionary before reaching in to re
move laundry. Reaching into a moving
drum is extremely dangerous.
-
-
-
-
There is a danger of fire during
drying with fabrics which:
contain rubber, foam rubber or rub
–
ber like materials
have been treated with inflammable
–
cleaning agents
have been splashed with hair lac
–
quer, hair spray, nail varnish remover
or similar substances
which contain padding or fillings
–
(e.g. pillows, jackets). If these were
damaged, the filling could get out
with the risk of igniting in the dryer.
Make sure that any dispensing
balls etc. are removed from laundry
before the drying programme. These
dispensers can melt during the drying
programme and cause damage to the
machine and the laundry. Do not use
liquid dispenser balls or similar if you
are planning to wash and then dry in
one continuous sequence.
Using accessories
Accessory parts may only be fitted
when expressly approved by Miele.
If other parts are used, guarantee, per
formance and product liability claims
will be invalidated.
Disposal of your old machine
Disconnect and remove the mains plug
from the socket. Render the plug use
less. Cut off the cable directly behind
the appliance to prevent misuse. This
should be done by a competent per
son.
-
-
-
-
-
8
Page 9

Description of the appliance
This washer-dryer can be used:
to wash separately
–
with a max. load (depending on
programme) of 5 kg;
to dry separately
–
with a max. load (depending on
programme) of 2.5 kg;
or
to wash and dry in a continuous
–
sequence
with a max. load (depending on
programme) of 2.5 kg;
Features
Special programmes
– Programme for hand-washable fab-
rics (WOOLLENS / )
Hand-washable or machine-washable wool or wool blend fabrics can
be washed in the WOOLLENS /
programme.
–
Programme for small loads (Quick
wash)
This is a Cottons programme for very
lightly soiled fabrics.
–
Rinse programme (Separate rinse)
Delay start
Delay start allows you to delay the start
of a programme from 1 hour up to a
maximum of 9 hours.
Programme lock
Electronic programme locking prevents
the door from being opened or the
programme cancelled during a wash
programme. The electronic programme
locking is automatically cancelled at the
end of the programme.
Programmable functions
The programmable functions can be
used to tailor washing programmes to
suit your individual requirements. The
selected function is displayed when in
programming mode.
Future updates (PC)
The indicator or check lamp marked PC
allows a service engineer to update
your machine in future years.
When, for example, new programmes
are developed or new fabrics are intro
duced, a service engineer will be able
to modify existing programme cycles
accordingly.
-
Articles are only rinsed and spun in
the machine.
9
Page 10
Description of the appliance
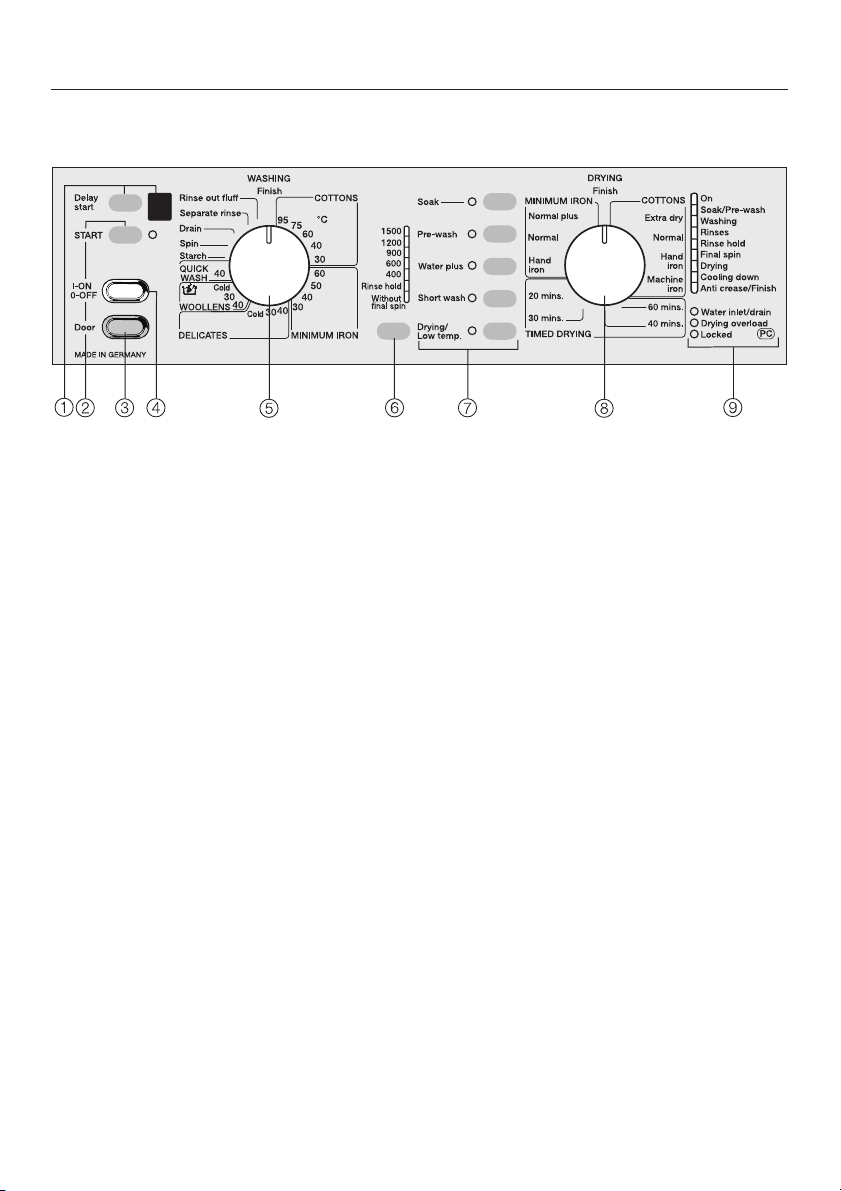
Control panel
a Delay start button and display
This is used to delay the start of a
programme.
The delay time will appear in the display.
b "START" button
Press the Start button to start a
programme.
The Start indicator lamp will flash as
soon as a programme can be
started.
c Door button
Opens the drum door.
d I-ON / 0-OFF button
to switch the machine on and off and
to interrupt a programme that is cur
rently running.
e WASHING programme selector
for selecting a basic wash
programme and temperature.
The programme selector can be
turned clockwise or anti-clockwise.
f "Spin" button
for changing a spin speed or
selecting
– Rinse hold or
– Without final spin.
g Additional option buttons
for selecting additional functions.
When an additional option is selected
the relevant indicator lamp will come
on.
h DRYING programme selector
for selecting the drying programme
and the drying level required. The
programme selector can be turned
clockwise or anti-clockwise.
i Programme sequence
Programme sequence indicator
lamps show which section of the
programme has been reached
and fault / check indicator lamps.
10
Page 11

Description of the appliance
Important control panel
features
Programme selector
The programme selector is used to set
the
basic wash programmes and tem
–
peratures
and
the drying programmes and temper
–
atures.
Additional option buttons
Additional options can be added to the
basic programme. Pressing the relevant
button selects or de-selects the particular option. An additional option is selected if its indicator lamp is on.
If the lamp does not come on, the function is not compatible with the
programme you are trying to use it with.
The indicator lamp will go out when the
option button is released.
"Spin" button with indicator lamps
To change the spin speed press the
"Spin" button.
It is not possible to select a spin speed
higher than the permitted maximum
spin for the basic wash programme.
The indicator lamps show the setting
selected.
-
Spinning at 400 - 1500 rpm
The spin can be set within this range for
the
final spin during a wash programme
–
or
for "Thermospin" during drying (see
–
"DRYING - Programme selection" for
information on the "Thermospin").
The final spin in a wash programme
can also be deactivated:
Press the "Spin" button until you
^
reach
"Rinse hold"
The laundry is not spun and remains
suspended in the final rinse water. This
reduces creasing if the laundry is not
going to be removed from the drum immediately after the end of the
programme.
To continue the programme
– with a final spin
press the "Spin" button until you
reach the spin speed you want.
–
without a final spin
Press the "Spin" button repeatedly
until the
lamp lights up.
Without final spin
The laundry is not spun after the final
rinse but the water is drained away and
the machine goes straight into the
anti-crease stage.
Without final spin
indicator
:
11
Page 12

Washing and drying environmentally
Ideally load the maximum amount
–
specified for the programme you are
using.
This way energy and water con
sumption will be kept to a minimum.
Use the QUICK WASH programme
–
for small loads.
Use the
–
soiled laundry.
A main wash (programme without
–
pre-wash) is sufficient for cleaning
normally soiled laundry.
Use the
–
soiled laundry. The wash temperature can be reduced for the main
wash when using the additonal soak
option.
– Use the additional option
stead of
laundry. If Soak is followed immediately by a main wash the same suds
are used.
Short wash
Soak
option for heavily
Pre-wash
option for lightly
Soak
with heavily soiled
-
in-
Do not exceed the amounts of deter
–
gent which may be recommended by
the manufacturer on the packaging.
Reduce the amount of detergent with
–
smaller loads (approx. 1/3 less than
the amount recommended can be
used when washing a half load).
Load recognition can cause the du
–
ration of a programme to vary
greatly. The main wash may be short
ened and a rinse cycle omitted de
pending on the amount of laundry.
Select a high spin speed for the
–
wash programme, as well as for the
Thermospin, if tumble drying the
laundry afterwards. This saves time
and energy.
-
-
-
-
12
Page 13
Before using for the first time
Before using the machine for the first
time ensure that it is correctly in
stalled and connected. See the rele
vant section under "Installation".
-
Flushing out the drum
Turn on the stopcock.
^
Turn both programme selectors to the
^
Finish
position.
Switch the machine on with the
^
0-OFF
Do not load any laundry
^ Add max. 1/4
gent recommended for a full load into
Compartment j of the detergent dis-
penser.
^ Turn the WASHING programme se-
lector to the "COTTONS 60°C" position.
Important
to prepare the machine for operation.
button.
.
of the amount of deter-
! This programme is required
I-ON /
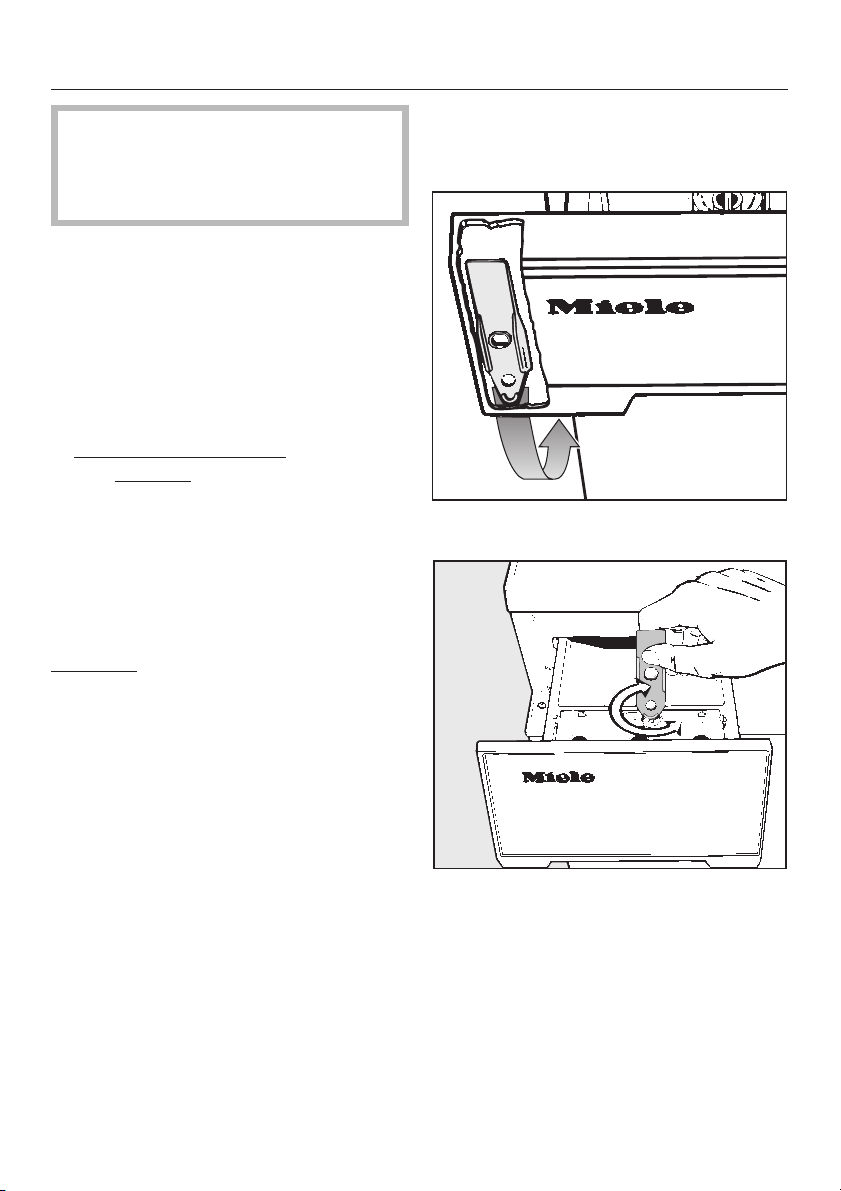
There is a yellow lever behind the de
tergent drawer facia panel.
-
^ Remove the lever.
-
^
Press the
^
Press the "Spin" button repeatedly un
til the
lamp comes on.
^
Press the START button.
This will flush out any residues in the
machine by the end of the programme.
Water hardness reminder
The amount of detergent required will
depend on various factors, including
water hardness. The dial in the deter
gent dispenser can be set as a water
hardness reminder.
Water plus
button.
Without final spin
indicator
-
-
^
Use it to turn the dial to the position
which represents your water hard
ness level.
Your local water authority can advise on
water hardness in your area.
-
13
Page 14
WASHING
Programme overview
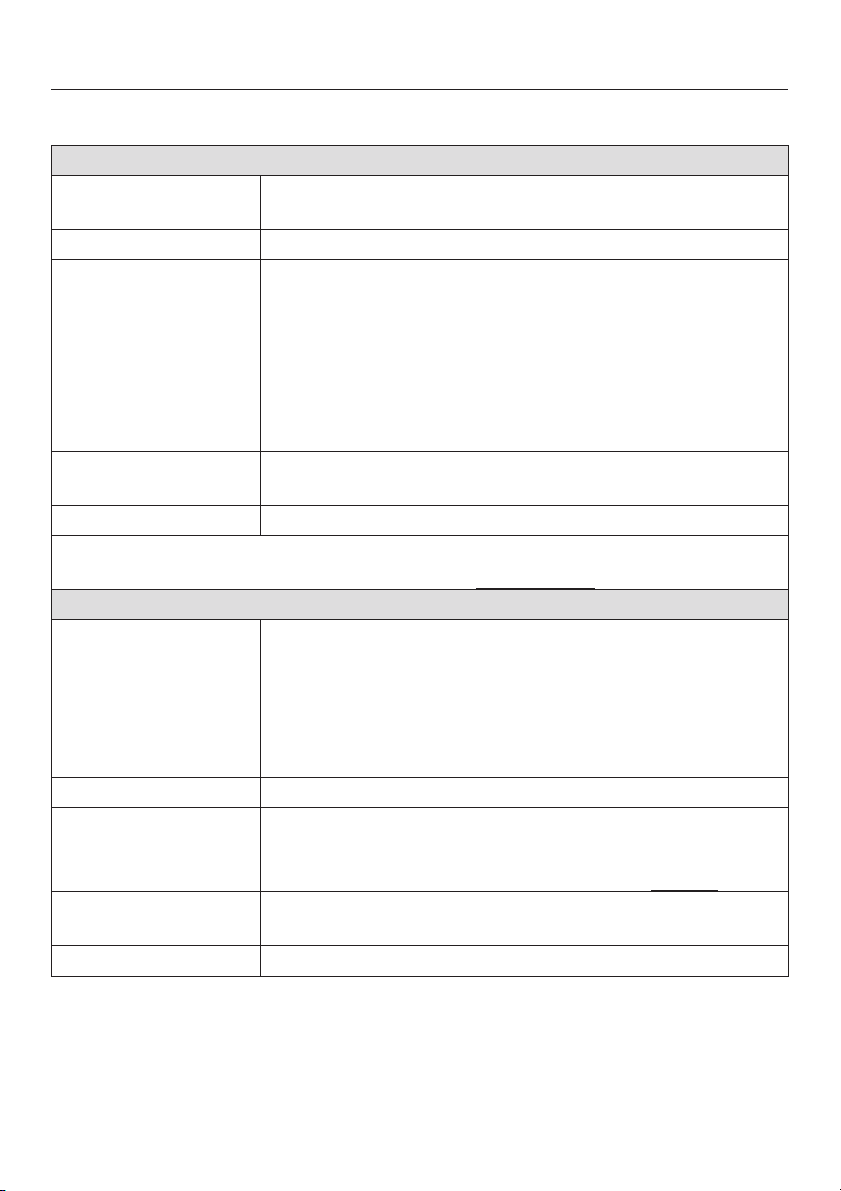
COTTONS e
Fabric type Cottons and linen fabrics, e.g. bed linen, table linen, tow
elling, jeans, underwear, T-shirts, nappies.
Additional options Soak, Pre-wash, Water plus, Short.
Notes
Detergent Powder detergent, detergent for coloured fabrics, liquid
Max. load 5 kg
Note for test institutes:
Programme setting for the EN 50229 Standard Cottons 60°C
MINIMUM IRON ef
Fabric type White nylon (60°C), white polyester fabrics (50°C),
Additional options Soak, Pre-wash, Water plus, Short.
Notes
Detergent Powder detergent, detergent for coloured fabrics, liquid
Max. load 2 kg
Only use the COTTONS 95°C programme for heavily
–
soiled and incontinent laundry.
For heavily soiled laundry select the
–
additional option.
For lightly soiled laundry select the
–
For dark coloured fabrics use a detergent for coloured
–
fabrics, or liquid detergent.
detergent.
coloured nylon, polyester, cotton and viscose fabrics with
special finishes, acrylic, cotton fabrics, coloured polyes-
ter / cotton fabrics,
(40°/30°C) minimun iron fabrics not washable at higher
temperatures.
–
For heavily soiled laundry select the
additional option.
–
For lightly soiled laundry select the
detergent, detergent for delicates.
SoakorPre-wash
Short
option.
SoakorPre-wash
Short
option.
-
14
Page 15
WASHING
Programme overview
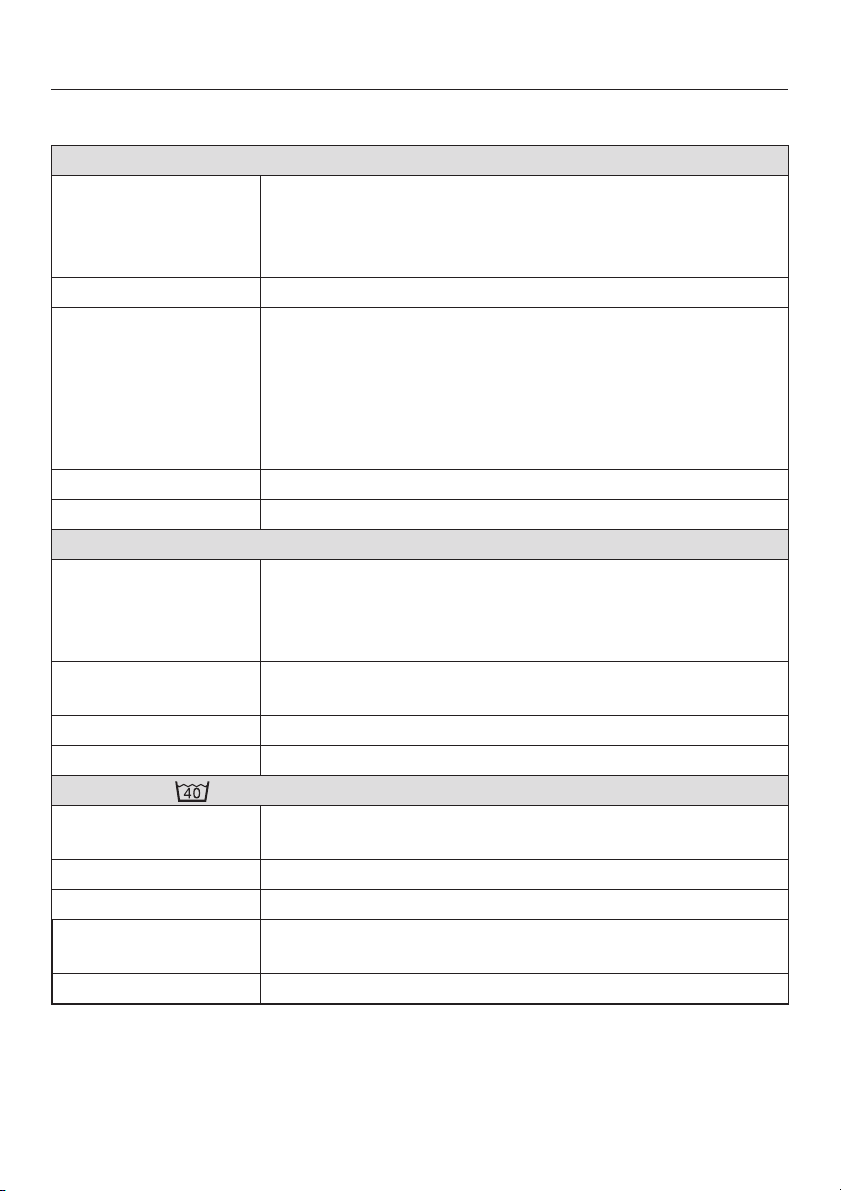
DELICATESf
Fabric type Acrylics, acetate and triacetate, 100% cotton easy care
shirts and blouses.
Curtains, specified machine-washable by the manufac
turer.
Additional options Soak, Pre-wash, Short
Notes
Detergent Detergent for delicates
Max. load 1 kg
WOOLLENS g
Fabric type Machine-washable or hand-washable wool or wool blend
Notes – For hand-washable garments made from delicate fab-
Detergent Liquid detergent for machine washable woollens
Max. load 1 kg
Quick wash
Fabric type Very lightly soiled fabrics, which can be washed in the
Additional option Water plus
Notes
Detergent Powder detergent, detergent for coloured fabrics, liquid
Max. load 2.5 kg
Laundry remains relatively crease-free for easier iron
–
ing.
Dust in curtains usually makes using a programme with
–
Pre-wash advisable
For curtains made from delicate fabrics reduce the
–
spin speed or select Without final spin.
fabrics. Please note that hand-washable wool or wool
blend fabrics will not shrink, stretch, matt or felt beyond
the accepted tolerance of the item.
rics reduce the spin speed or select Without final spin.
Cottons programme.
–
Use less detergent (as for a half load).
detergent.
.
-
-
15
Page 16
WASHING
Programme overview
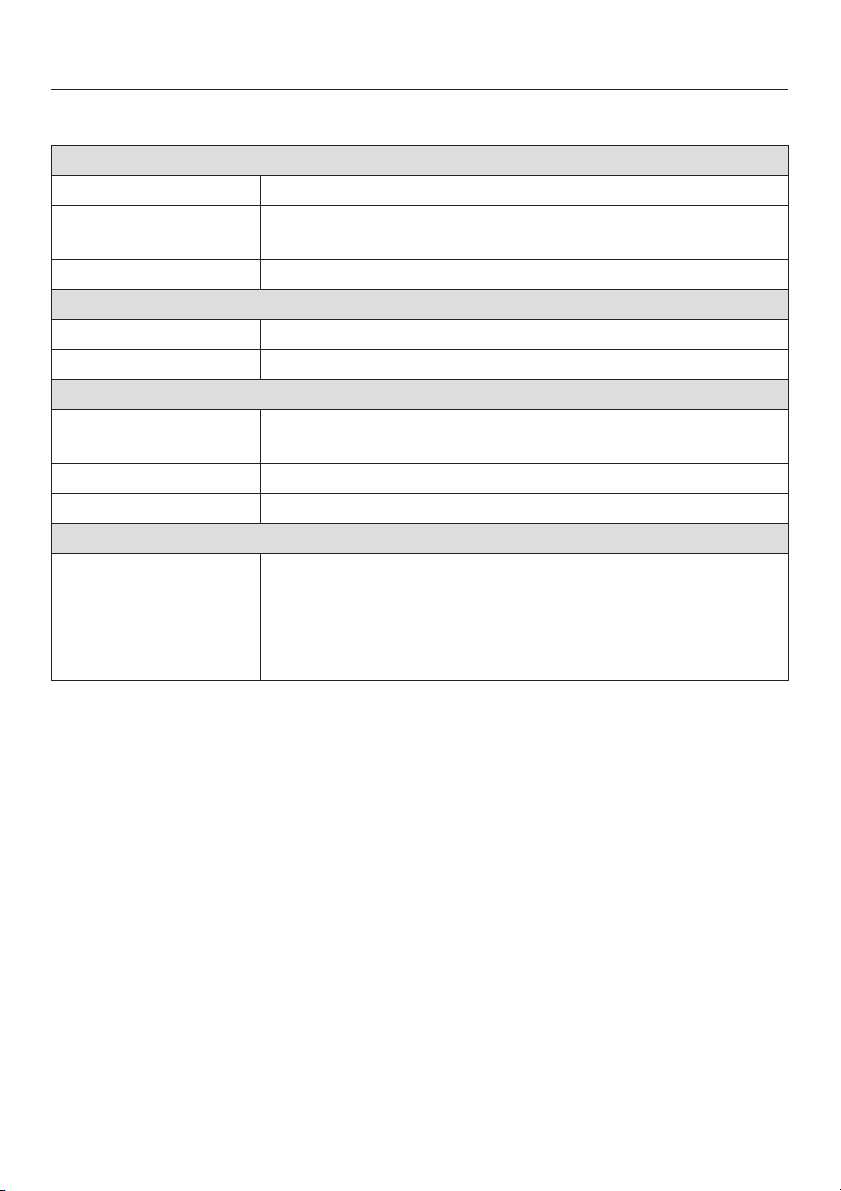
Starch
Fabric type Table cloths, napkins, overalls, aprons.
Notes
Max. load 5 kg
Drain / Spin
Notes
Max. load 5 kg
Separate rinse
Fabric type Articles which have been washed by hand and only need
Notes – Do not use for woollens.
Max. load 5 kg
Flushing out the drum
Notes – Fluff residues left in the drum after a Drying
The laundry should be washed but not treated with
–
fabric conditioner.
Drain only: Select
–
to be rinsed and spun in the machine.
programme can be rinsed out.
Important: there must be no items of laundry left in
the drum! Always check that it is empty before selecting this option.
Without final spin
.
If "cold" is selected, the water is warmed to 24°C. This is to even out any fluctua
tions in the incoming water and helps the detergent to dissolve properly.
16
-
Page 17

Care symbols - washing
How to wash correctly
Care
symbols
e
no bar
f
single bar
g
broken
bar
Fabric
types
Cottons Normal (maxi
Synthetics Reduced (me
Woollens Much reduced
Description of
process
mum) machine
action and nor
mal spinning
dium) machine
action and re
duced spinning
(minimum) machine action but
with normal
spinning
Programme:
(select the appropriate temperature ac
cording to the temperature on the care
label symbol)
Cottons, Minimum iron, Quick wash
-
-
Delicates
-
-
Hand Wash Woollens programmes.
-
17
Page 18
How to wash correctly
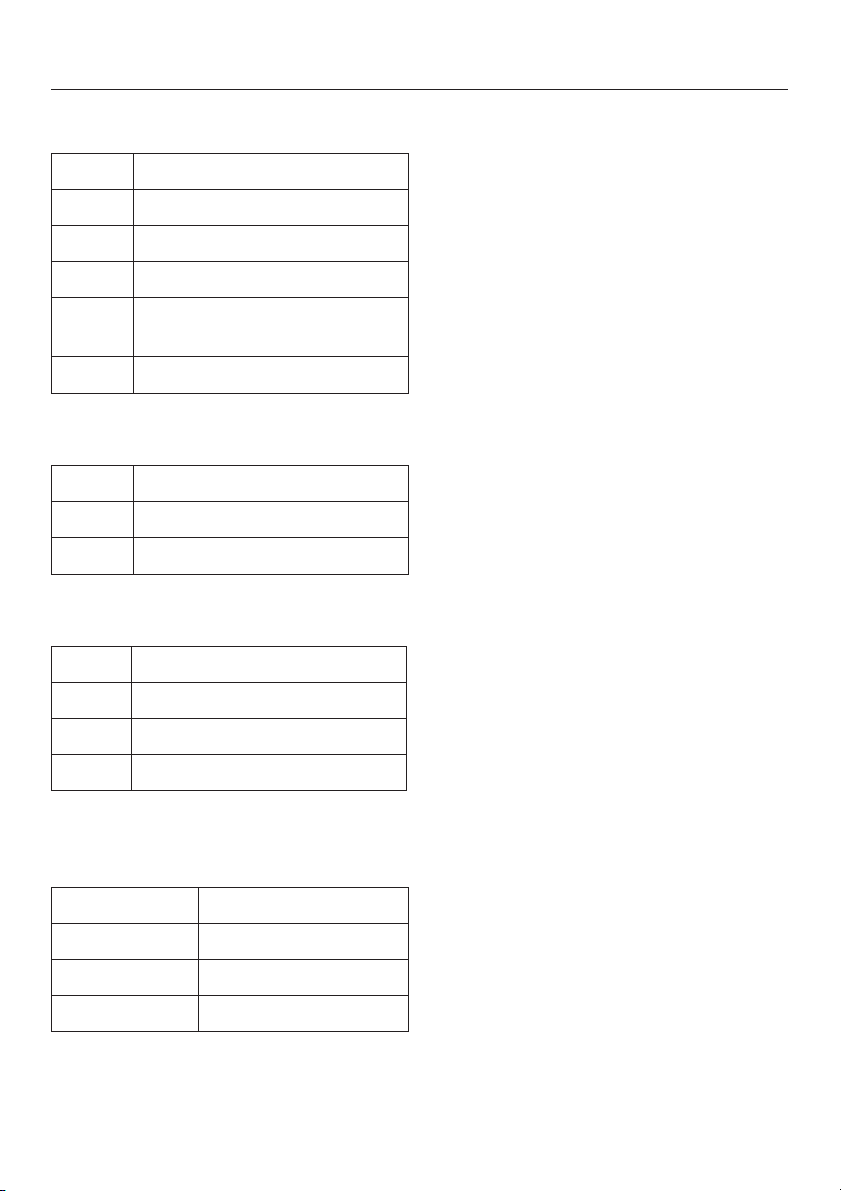
Important - other care symbols
/ Hand wash
h Do not wash
apf Dry clean
D Do not dry clean
y Suitable for chlorine bleach
ing
z Do not use chlorine bleach
Tumble dry
q At normal temperature
r At low temperature
s Do not tumble dry
Ironing
I Hot iron
H Medium hot iron
G Cool iron
J Do not iron
N.B. If you have any textiles with the older wash care labels, select a programme
according to the label below:
-
[:\] Cottons
?;\ Minimum iron
={ Delicates
# Woollens
18
Page 19
Separate washing
Make sure that the DRYING
programme selector is at the
position. Otherwise the drying
programme set will follow on from
the washing programme.
Finish
Before washing
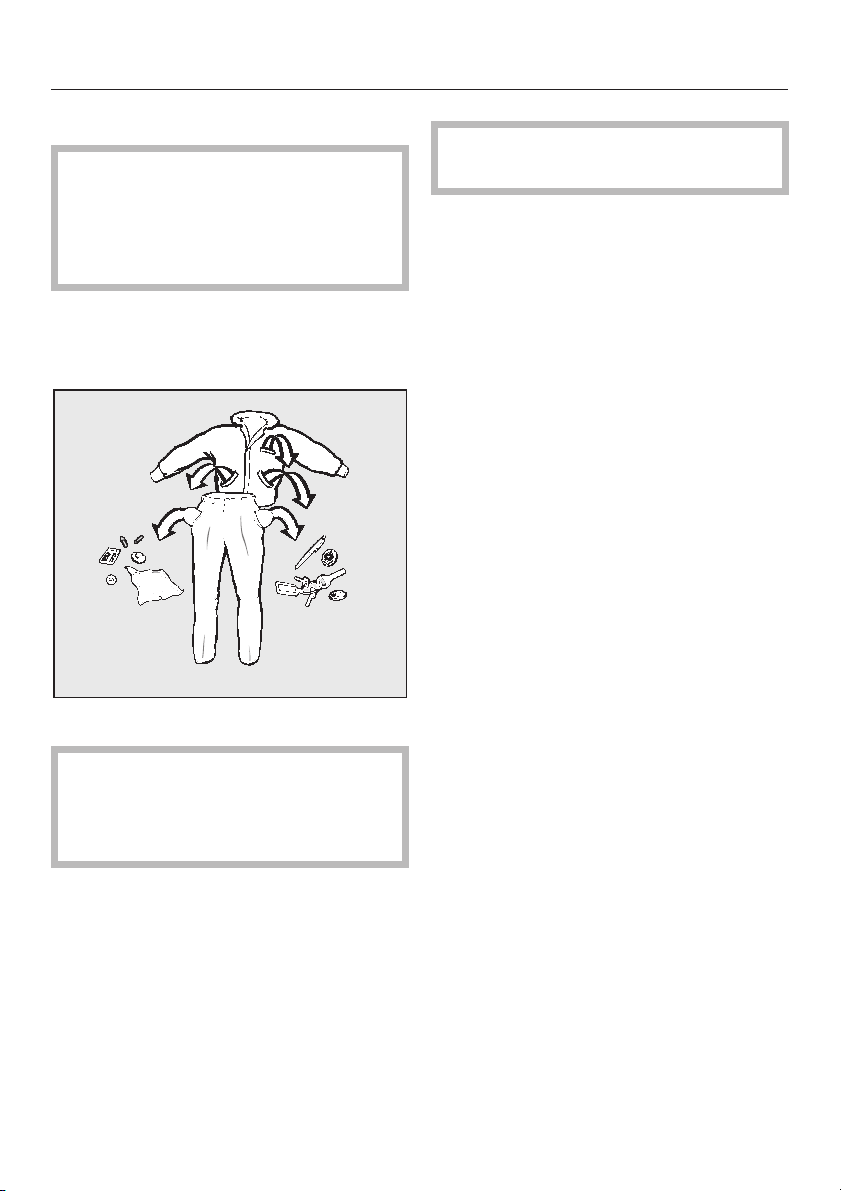
A Sort the laundry
^
Empty all pockets.
,
Foreign objects (e.g. nails,
coins, paper clips, etc.) can cause
damage to garments and compo
nents in the machine.
^
Stains etc. should be removed as
soon as possible whilst still fresh.
Spillages should be carefully dabbed
off using a soft, colourfast cloth. Do
not rub!
How to wash correctly
Do not use solvent-based clean
,
ing agents in this machine.
Sort the laundry by colour and by
^
care label symbol. Most garments
have a textile care label in the collar
or side seam. See the "Programme
overview chart" for information on
which programmes to use for differ
ent fabric types.
Dark textiles often contain excess dye
and should be washed separately sev
eral times before being included in a
mixed load.
– Curtains: Remove lead weights and
strips or place in a laundry bag.
– Bras: Ensure any underwiring is se-
curely sewn in. If not, remove it.
– Knitted garments, trousers and
jeans, T-shirts and sweat shirts: Turn
inside out, if recommended by the
manufacturer.
– Close any zips, fasten hooks and
eyes etc before washing.
–
Fasten duvet covers etc. to prevent
small items from being rolled up in
side them.
-
Do not wash any items in this machine
which are specified by the manufac
turer as non-machine washable on the
care label (h symbol).
-
-
-
-
-
Badly soiled areas can be pre-treated
with liquid detergent, stain removers
etc. first, following the manufacturer’s
instructions. With particularly stubborn
stains ask your dry cleaner for advice.
19
Page 20
How to wash correctly
B Switch the machine on
Press in the
^
C Open the drum door
Press the
^
drum door.
D Load the drum
Unfold the laundry and load loosely
^
in the drum. To achieve best results
make up mixed loads consisting of
both large and small items.
Do not exceed the maximum load for
the programme selected. This uses the
energy and water to the best advantage. Exceeding the maximum load will
result in poorer wash results and an increased level of creasing.
E Close the drum door
Make sure that no garments are caught
between the drum door and seal.
F Open the stopcock
I-ON/0-OFF button.
Door button
and open the
Select a programme
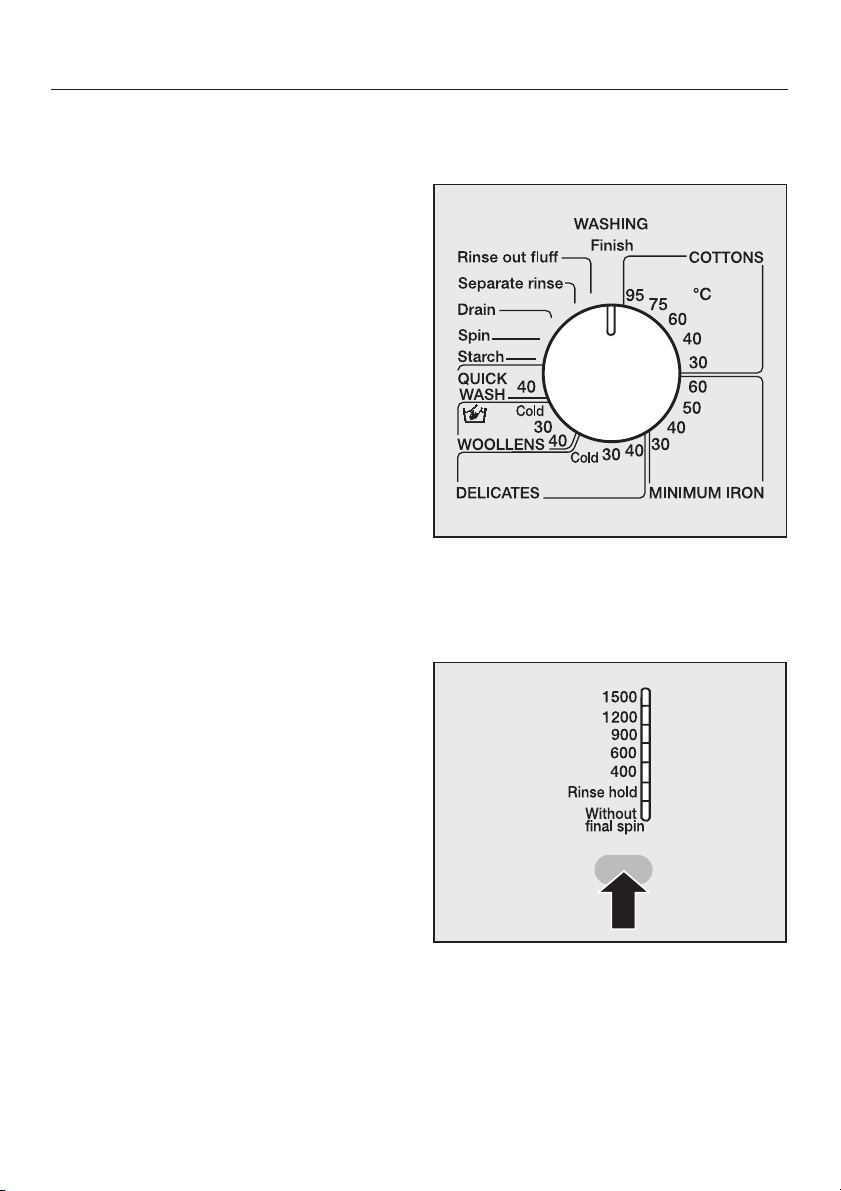
G Select the wash programme.
^ Turn the programme selector to the
required programme.
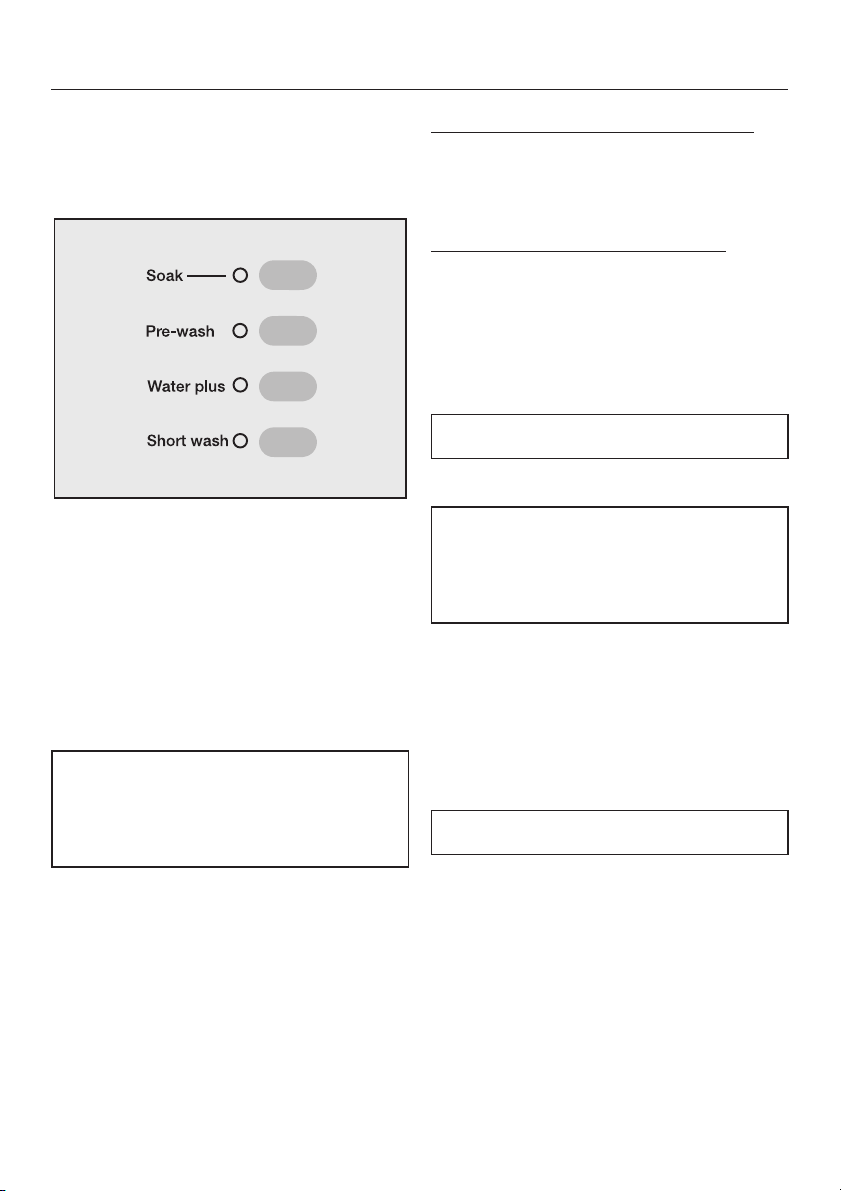
H Select a spin speed.
20
^
Press the "Spin" button repeatedly un
til the indicator lamp for the spin
speed you want comes on.
In some programmes, the maximum
spin speed is limited. The machine will
not allow a higher spin speed to be se
lected.
-
-
Page 21
How to wash correctly
Selecting additional options for the
wash programme
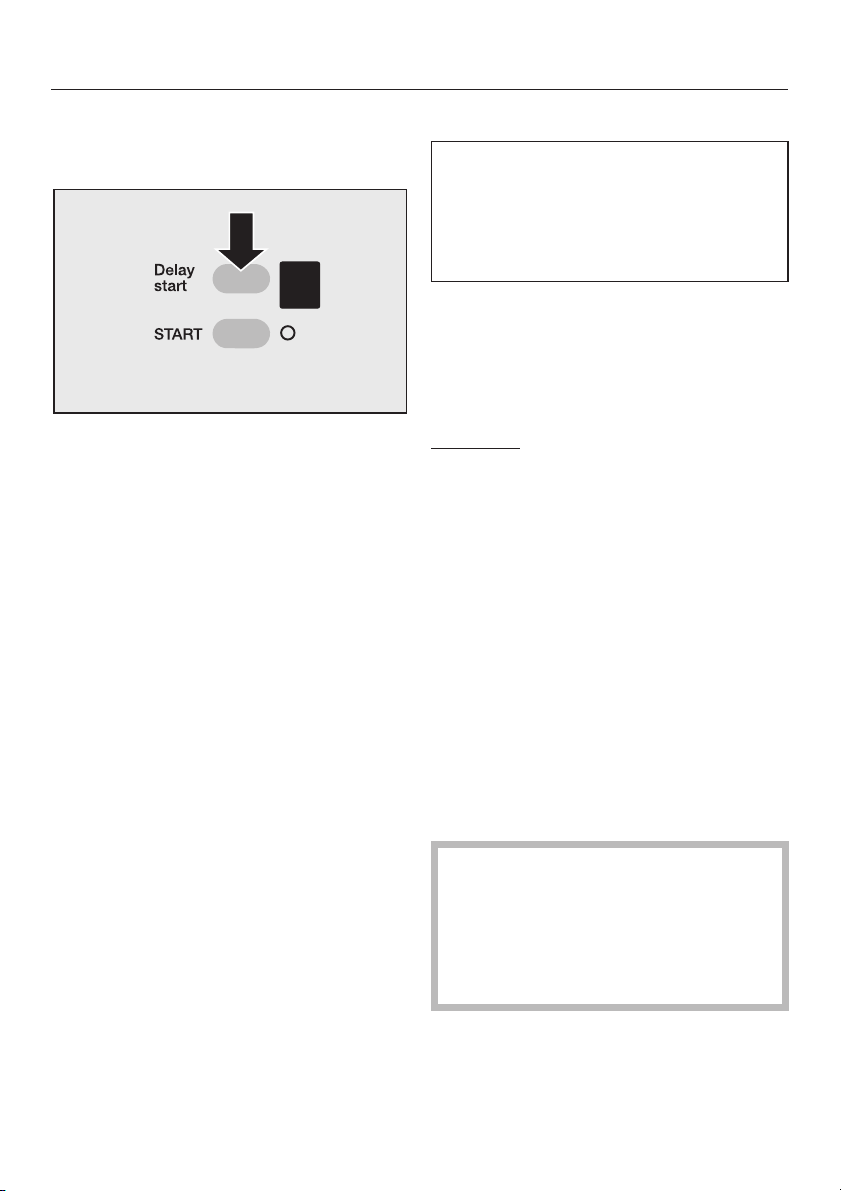
I Select additional option(s)
^ Press the required addtional option
button(s).
Additional options which are not compatible with the basic programme cannot be selected. The indicator lamp will
go out when the option button is released.
Soak
For heavily soiled and stained items
with dried-on stains, or ones which
can be bleached out, (e.g. blood,
fats and oils, cocoa).
Duration of soak:
2 hours.
Detergent dispensing when selecting
the soak option:
For programmes without a pre-wash
Add the total amount to compartment
–
j or directly into the drum on top of
the laundry.
For programmes with a pre-wash
Add 1/4 of the detergent for the soak
–
and pre-wash into compartment i,
and 3/4 into compartment j for the
main wash.
Pre-wash
For heavily soiled and stained items.
Water plus
The water level increases in all sections of the COTTONS / MINIMUM
IRON and QUICK WASH 40°C
programmes.
– for particularly delicate fabrics.
– if more water is required for dispens-
ing the detergent.
–
where a higher quality rinse is re
quired.
Short
For lightly soiled items.
This shortens the programme running
time. In the COTTONS and MINIMUM
IRON programmes only two rinses are
carried out with a higher water level.
:
:
-
The amount to dispense will depend on
which programme is to follow on from
the soak process.
21
Page 22

How to wash correctly
J Adding detergent
It is important to dispense the correct
amount, because... . .
. . . too little detergent results in
Laundry not being cleaned properly
–
and with time it may become grey
and hard to the touch.
Greasy particles clinging to the laun
–
dry.
Limescale deposits on the heater el
–
ements.
. . . too much detergent results in
– Excessive foam, which causes a low
level of agitation and poor wash,
rinse and spin results.
– Higher water consumption because
an extra rinse is automatically acti-
vated.
– A burden to the environment.
Add detergent for the pre-wash to com-
partment i and to compartment j
for the main wash. If the capacity of
compartment j is not sufficient (e.g.
in water hardness area III), some of the
main wash detergent can be added to
compartment i.
:
:
-
-
Pull out the detergent drawer and
^
place detergent in the compartments
as follows:
i = Pre-wash
(if selected, 1/4 of the total
amount recommended for the
programme)
j = Main wash
including the Soak period
if selected
p = Fabric conditioner or
liquid starch.
See "Detergent" section for further infor
mation.
-
22
Page 23
How to wash correctly
Delay start
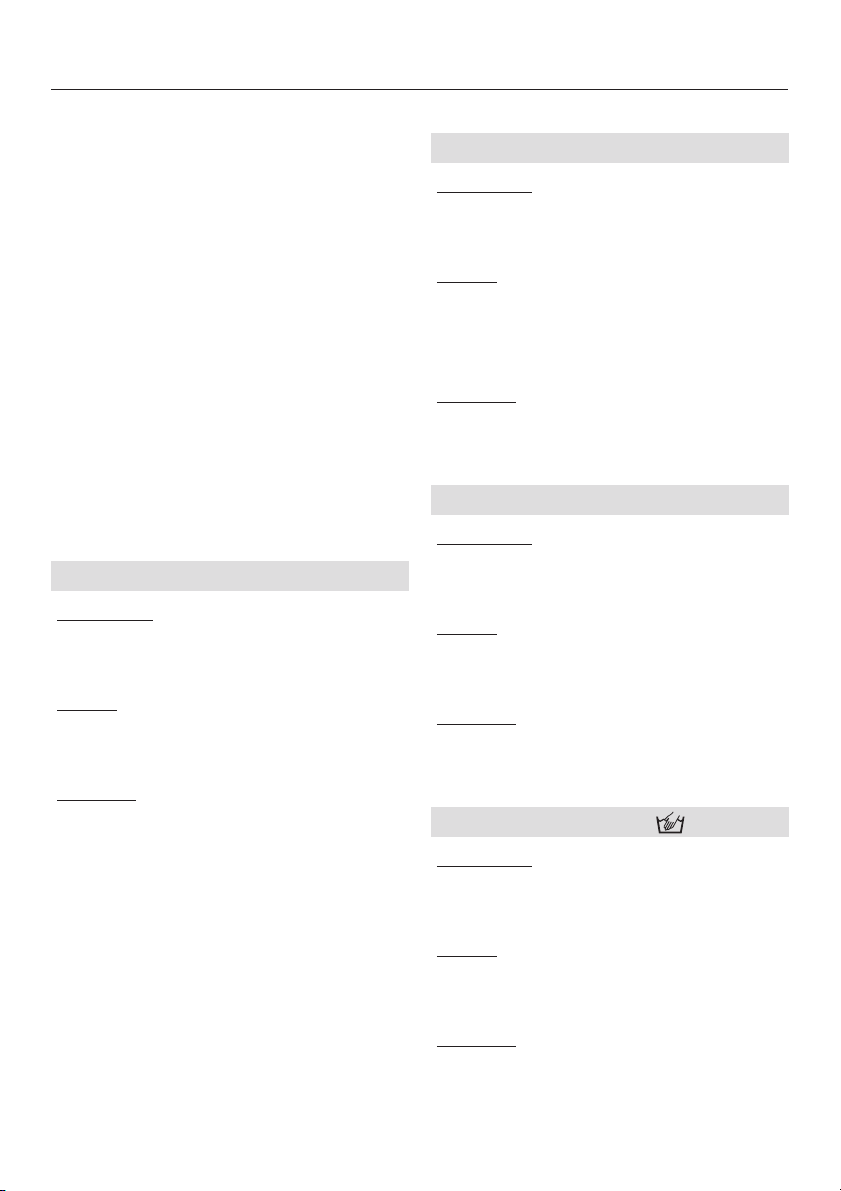
K Select Delay start
Press the
^
edly until the required delay start period shows up in the display (from i to
9 hours).
Press the "START" button. The chosen
time will start to count down hour by
hour. The programme will then start automatically.
To cancel "Delay start":
^ Press the Delay start button once
when 9 is showing in the display, or
^
Switch the machine off with the
0-OFF
Delay start
button.
button repeat
I-ON /
-
Memory function
If an additional option(s) is selected
for a programme, and / or the spin
speed is altered, the machine stores
these changes in memory at the start
of a programme.
When that particular programme is cho
sen again, the display will show the ad
ditional option(s) and / or spin speed
which have been stored for that
programme in the memory.
Exception
L Start the programme
The START indicator lamp will flash as
soon as a programme can be started.
^ Press the START button.
After the programme has started the
START indicator lamp will light up
constantly.
: Delay start
At the end of a programme
A buzzer will sound (see "Programma
ble functions") and the anti-crease / Fin
ish light will come on.
-
-
-
-
After washing a full load
If you have washed a full load of
laundry and you wish to dry the
laundry in the dryer afterwards you
will have to remove half the load.
Carry out the drying procedure in
two batches.
For further information on drying see
section "After each washing or drying
programme".
23
Page 24

How to wash correctly
Adding and removing laundry
Laundry can be added or removed af
ter the start of one of the following
programmes:
COTTONS
–
MINIMUM IRON
–
QUICK WASH 40°C
–
Door
Press the
^
until the door springs open.
Add or remove items.
^
Close the door.
^
The programme will continue automatically.
button in and hold it
The door cannot be opened, if:
-
the suds temperature is above 70°C
–
(except when the programmable
function "Opening the door at high
temperatures" has been activated.
Warning: The water in the machine
will be very hot and could cause
burning or scalding.
the additional function
–
has been selected (because the wa
ter level will be too high).
the safety lock has been activated.
–
the programme has reached the
–
Final spin
The
locked
if the Door button is pressed when the
above conditions are present.
stage.
indicator lamp will come on
Water plus
-
24
Page 25
Programme cycle
This washing machine has fully elec
tronic controls with automatic load rec
ognition. This machine takes in the right
amount of water required for the
programme, depending on the amount
of laundry and its absorbancy rate. This
means that programme cycles and du
rations can vary.
The programme sequences outlined
below are based on the basic
programme with a full load. Additional
options which can be selected, have
not been taken into account.
-
How to wash correctly
MINIMUM IRON
Main wash
Water level: low
Wash rhythm: normal
Rinses
Water level: medium
No of rinses: 3
Graduated rinsing
Spinning
Rinse and interim spin2): yes
Final spin: yes
3)
: above 40°C
The programme sequence indicator
lamps show the stage the programme
has reached.
COTTONS
Main wash
Water level: low
Wash rhythm: normal
Rinses
Water level: low
No of rinses: 3 or 4
1)
Spinning
Rinse and interim spin2): yes
Final spin: yes
DELICATES
Main wash
Water level: high
Wash rhythm: Gentle action
Rinses
Water level: high
No of rinses: 3
Spinning
Rinse and interim spin2): no
Final spin: yes
WOOLLENS
Main wash
Water level: low
Wash rhythm: Woollens
Rinses
Water level: low
No of rinses: 2
Spinning
Rinse and interim spin2): yes
Final spin: yes
25
Page 26

How to wash correctly
QUICK WASH
Main wash
Water level: low
Wash rhythm: normal
Rinses
Water level: medium
No of rinses: 2
Spinning
Rinse and interim spin2): yes
Final spin: yes
Starch
Water level: low
Wash rhythm: normal
Final spin: yes
Special features in the programme
sequences:
Anti-crease
:
At the end of every programme, with
the exception of the WOOLLENS
programme, the anti-crease action
switches on for a maximum of 30 min
utes.
1)
A fourth rinse takes place automati
cally when:
there is too much foam in the drum
–
if a spin speed of lower than 700 rpm
–
has been selected.
Without final spin
–if
has been se-
lected
2)
Rinse and interim spin:
-
-
Separate rinse
Water level: high
No of rinses: 2
Final spin: yes
26
There is a spin between the rinses.
3)
Graduated rinsing:
The suds are cooled at the end of the
main wash cycle by water flowing in
and being pumped away at intervals.
This also helps minimise creasing.
Page 27

Adding detergent
Detergent
All modern detergents produced for
automatic washing machines are suit
able, including liquid, compact (con
centrated), tablets and special applica
tion detergents.
Woollens and knitwear containing wool
mixtures and hand-washable garments
should be washed using a detergent
specifically designed for washing
woollens.
Instructions for use and recommended
amounts for a full load are given on the
detergent packaging.
The right amount to dispense will depend on the following:
– The soiling level of the laundry.
Lightly soiled
No visible dirt or stains. Possibly
slight body odour.
Normally soiled
Visibly dirty and/or just a few slight
stains.
Heavily soiled
Stains and soiling clearly visible.
–
The quantity of laundry
–
The water hardness level in the area
If you do not know the hardness level
contact your local water authority
who will be able to advise you.
-
-
Water hardness
mmol/l German
above 2.5 above 14
-
Hardness
range
I soft 0 - 1.3 0 - 7
II medium 1.3 - 2.5 7 - 14
III hard to
Water
hardness
level
very hard
Water softener
A water softener can be used to cut
down on the use of detergents in water
hardness ranges II - III. Dispense ac
cording to the amount specified on the
packaging. First add detergent and
then the water softener.
Use a quantity of detergent as for soft
water.
Washing with several
components
If you wash using several components
(e.g. special application detergents),
we recommend always dispensing the
agents into compartment j in the fol
lowing order:
1. Detergent
2. Water softener
3. Stain remover, e.g. Biotex
This way the agents are distributed
more evenly.
scale
°d
-
-
27
Page 28
Fabric conditioners / starch formulations
Fabric conditioners, texturisers
and starch
Fabric conditioners make garments soft
and fluffy to handle and help prevent
static cling when tumble drying.
Texturisers are synthetic starch formula
tions, which stiffen items of laundry, e.g.
shirts, tablecloths and bed linen.
Starch stiffens and gives body to items
of laundry, e.g. shirts, tablecloths and
bed linen.
Dispense according to the amount
^
specified on the packaging.
Automatic dispensing of fabric
conditioners, texturisers or liquid
starch to laundry at the end of a
programme
The conditioner or liquid starch is auto
matically dispensed in the last rinse. At
the end of the programme a small
amount of water remains in compart
ment p.
If starching frequently, clean the dis
penser compartment and especially
the siphon tube and conditioner
channel. See "Cleaning the deter
gent dispenser drawer".
Adding fabric conditioner or liquid
starch separately
^ Add fabric conditioner or starch to
compartment p.
^ Turn the WASHING programme se-
lector to
^ Select a spin speed.
^ Press the START button.
Separate starching
Starch.
-
-
-
-
^
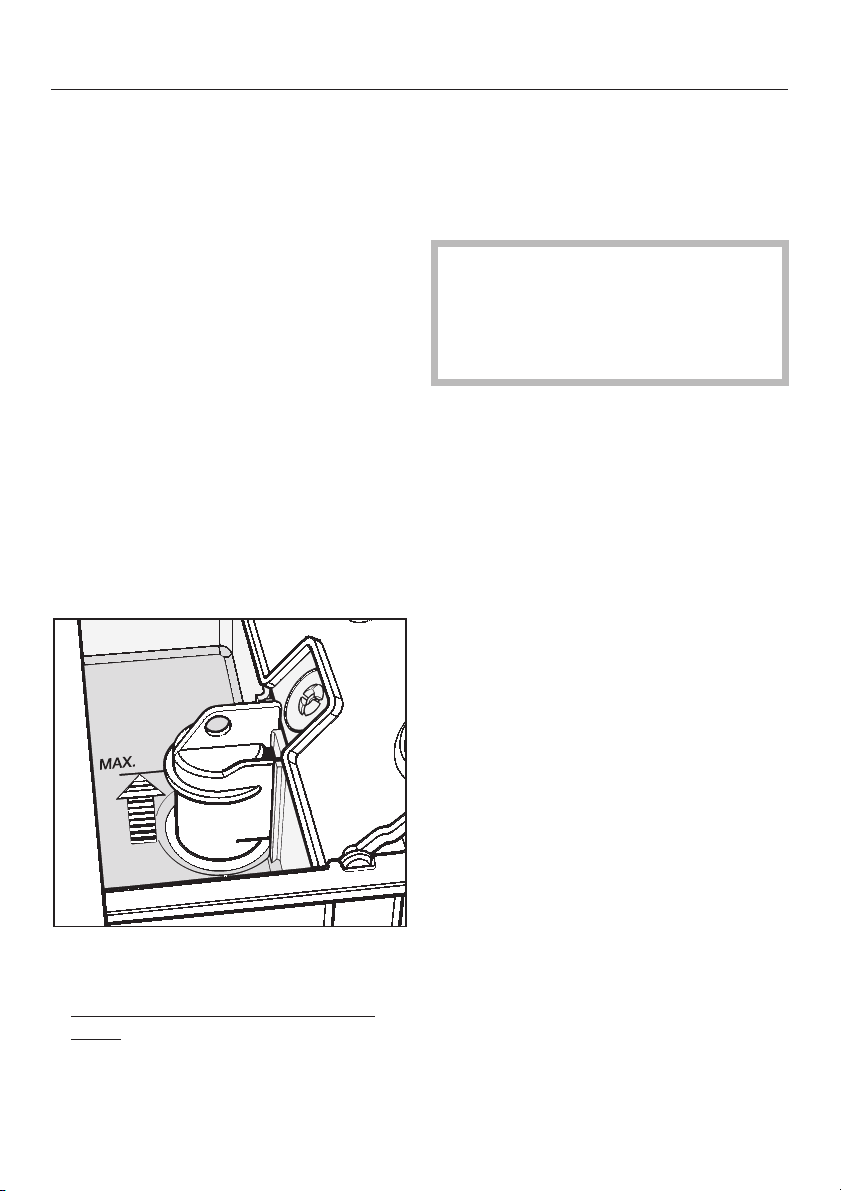
Open the lid to compartment p and
add conditioner, texturiser or starch.
Do not exceed the maximum level
mark.
^
Close the lid and push the dispenser
drawer back in.
28
^ Prepare the starch solution in accor-
dance with manufacturer’s instruc
tions on the packaging.
^
Add the starch formulation to com
partment i.
^
Turn the WASHING programme se
lector to
^
Select a spin speed.
^
Press the START button.
Starch.
-
-
-
Page 29

DRYING
Tips on drying
Before drying check the drying sym
^
bol on the wash care label.
q Dry at normal temperature
r Dry at low temperature
(select the
additional option)
s Do not tumble dry
If there is no symbol, dry at your own
risk applying the following principles:
Cottons and minimum iron items
–
should be dried using the appropri
ate programme.
– Delicate fabrics, e.g. acrylics, should
be dried at a low temperature (select
the
Drying/low temp
tion).
The following fabrics should not be
tumble dried:
– Woollens and wool blends
these fabrics tend to become matted
and shrink.
–
Items filled with down
the fine fabric interior tends to shrink,
depending on the quality involved.
Drying/low temp
-
additional op-
Woven and loopknit materials
T-Shirts, knitted garments) tend to
shrink to varying extents depending on
their quality. Therefore: to prevent fur
ther shrinkage do not over-dry these
textiles. When purchasing these gar
ments it is advisable to take their
shrinkage properties into account.
Starched laundry
tumble dryer. To achieve the usual fin
ish, double the amount of starch should
be used.
Fabrics which crease easily
be given a short period in the dryer.
Minimum iron shirts in 100% cotton
crease during tumble drying depending
on the quality of the weave. Use a short
programme with a low setting. In extreme cases do not tumble dry these
garments, but dry them on a hanger.
Minimum iron fabrics tend to crease
more, the greater the load. This is
particulary the case with delicate fabrics. Reduce the load.
New dark coloured garments
be dried separately from light coloured
garments to avoid the danger of
colours running.
can be dried in the
should only
(e.g.
-
-
-
may
should
–
Pure linen
should only be machine dried if
specified as suitable by the manu
facturer on the wash care label, as
the surface of the fabric may other
wise tend to roughen.
-
-
29
Page 30
DRYING
Programme overview
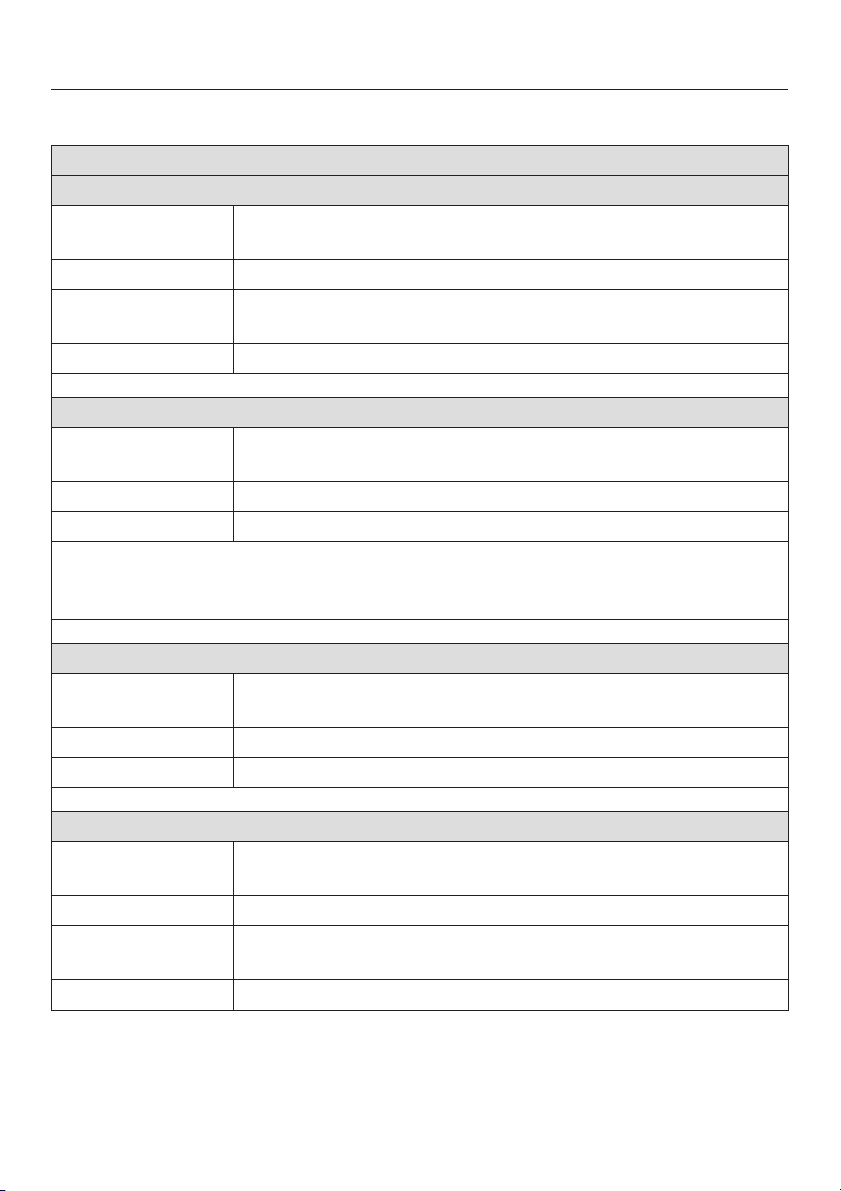
COTTONS
Extra dry
Fabric type Multi-layered fabrics, which are thoroughly dried in the
mal
programme.
Additional options Thermospin max. 1500 rpm, Drying / Low temp.
Note
Max. load 2.5 kg
Normal
Fabric type Single and multi-layered fabrics, e.g. mixed load of cotton
Additional options Thermospin max. 1500 rpm, Drying / Low temp.
Max. load 2.5 kg
Note for test institutes:
Programme setting for the EN 50229 Standard:
COTTONS Normal
Do not dry jerseywear in the
–
dency to shrink)
fabrics (e.g. towelling, jerseywear).
Extra dry
programme (ten
Nor
-
-
Hand iron
Fabric type Cotton or linen fabrics (e.g. table linen, bed linen, starched
laundry etc.).
Additional options Thermospin max. 1500 rpm, Drying / Low temp.
Max. load 2.5 kg
Machine iron
Fabric type Cotton or linen fabrics, including starched laundry for ma
chine ironing.
Additional options Thermospin max. 1500 rpm, Drying / Low temp.
Note
Max. load 2.5 kg
30
–
The laundry should be rolled up before ironing to prevent
it from drying out.
-
Page 31
DRYING
Programme overview
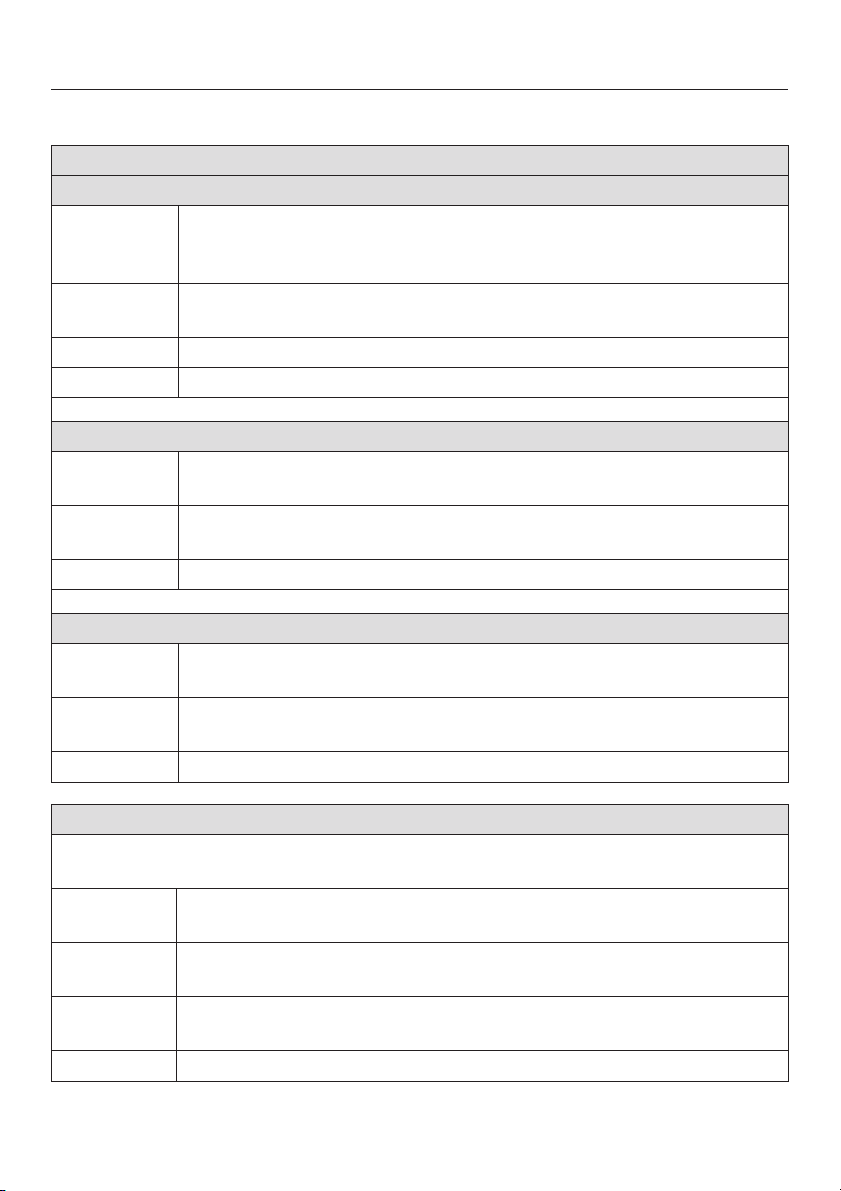
MINIMUM IRON
Normal plus
Fabric type Minimum iron items which are made of synthetic or blended fab
rics (e.g. pullovers,, dresses, trousers) which are not dried ade
quately in the
Additional
options
Note
Max. load 1 kg
Normal
Fabric type Minimum iron shirts, table cloths etc. made of mixed fibres, e.g.
Additional
options
Max. load 1 kg
Hand iron
Fabric type Minimum iron shirts, table cloths etc. made of mixed fibres, e.g.
Additional
options
Max. load 1 kg
Thermospin max. 900 rpm, Drying / Low temp.
Spin fabrics for approx. 30 seconds before drying.
–
cottons / synthetics.
Thermospin max. 900 rpm, Drying / Low temp.
cottons / synthetics, which are still to be hand ironed.
Thermospin max. 900 rpm, Drying / Low temp.
Normal programme.
-
-
TIMED DRYING 20 min / 30 min / 40 min / 60 min
Do not select the longest drying time to start with. Check by experimenting, how
long it takes to reach the level of drying you require.
Fabric type Multi-layered or padded items, which because of their composition
will take varying times to dry. Items which need extra drying.
Additional
options
Note
Max. load 1 - 2.5 kg (depending on type of fabric)
Drying / Low temp.
–
When drying minimum iron fabrics:
always select the Drying / Low temp. option.
31
Page 32

DRYING
Separate drying
The separate drying programme
must be used if the load in the wash
programme is greater than the maxi
mum load permitted for drying, or if
you only want to dry part of the load
that was washed.
Make sure that the WASHING
programme selector is at the
position. Otherwise the washing
programme will begin before the
drying programme.
Finish
Before drying
A Preparing the laundry
^ Sort the laundry according to type of
fibre / weave and the residual moisture content. This will help towards
achieving an even drying result.
B Switch the machine on
^
Press in the
C Open the drum door
^
Press the
drum door.
I-ON/0-OFF button.
Door button
and open the
D Load the drum
Unfold the laundry and load loosely
^
in the drum.
-
Maximum load
Cottons . . . . . . . . . . . . . . . . . . . . 2.5 kg
Minimum iron . . . . . . . . . . . . . . . . 1.0 kg
Timed drying . . . . . . . . . . . . . . . . 2.5 kg
Make sure you have removed any
detergent dispensing aids, e.g.
plastic dispenser balls, before dry
ing. These dispensers can melt dur
ing the drying programme and
cause damage to the machine and
the laundry.
Do not overload the drum. Overloading can cause unnecessary
wear and tear to the laundry and
give a disappointing drying result.
E Close the drum door
Make sure that no garments are caught
between the drum door and seal.
F Open the stopcock
:
-
-
32
Page 33
DRYING
Programme selection
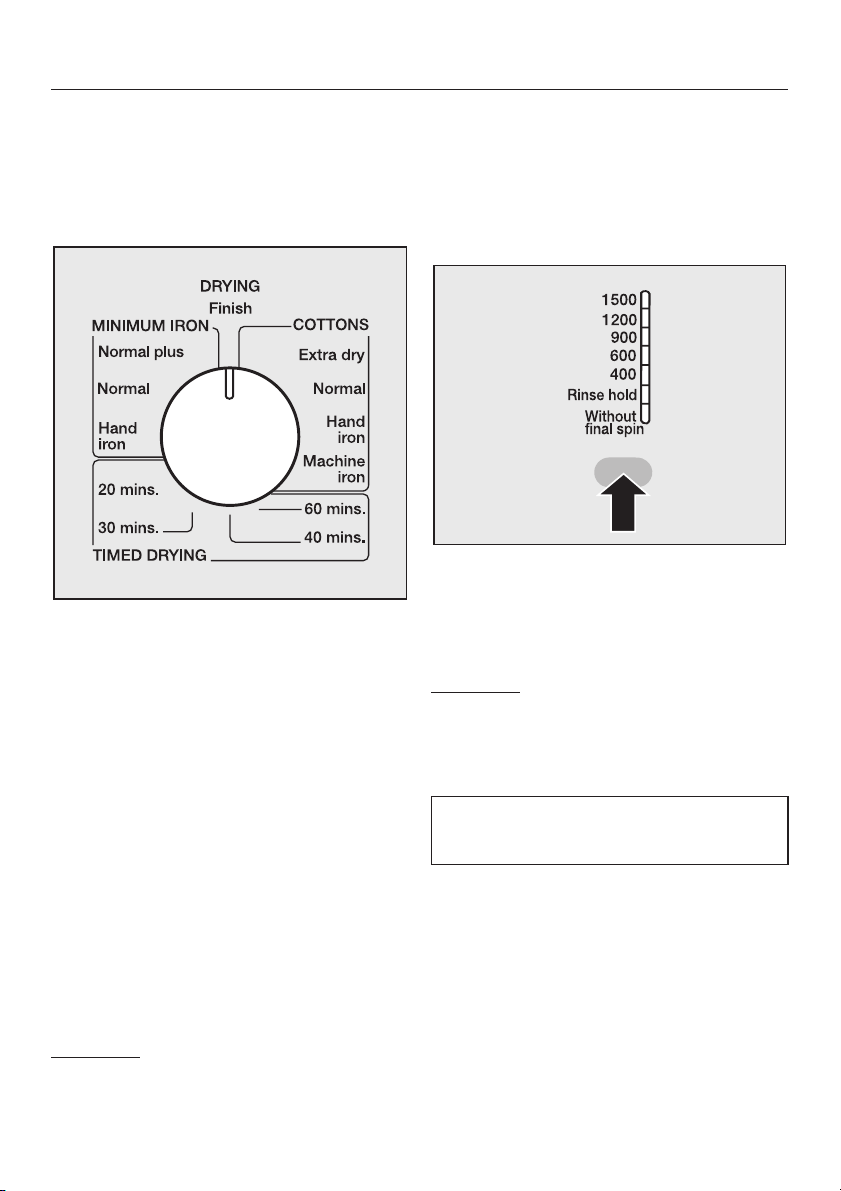
G Select a drying programme
The programmes are described in the
"Drying programme charts".
^ Turn the programme selector to the
required drying programme.
^ For minimum iron fabrics which are
being dried in the TIMED DRYING
programme, you should always se
lect the
option.
Drying/ Low temp.
additional
Additional options for the drying
programmes
H Select an additional option
"Thermospin"
^ Press the "Spin" button repeatedly un-
til the indicator lamp for the spin
speed you want for the thermospin
comes on.
Exception
carried out if
selected.
-
Drying / Low temp.
: The thermospin will not be
TIMED DRYING
has been
The sensor drying programmes for
COTTONS and MINIMUM IRON include
a thermospin process. This process
uses heat during a pre-tumbling spin to
break the bond between the water and
the clothes being dried. This reduces
drying times and the amount of energy
required for drying (one of the spin
speed indicator lamps will light up).
Exception
carried out if the additional function
Drying/Low temp.
: The thermospin will not be
has been selected.
The temperature is reduced during
the drying programme.
–
This is suitable for particularly sensi
tive fabrics (care symbol r) e.g.
acrylics.
The additional option
can be selected for any programme
where it is required.
The thermospin will not take place.
Drying/Low temp.
-
33
Page 34
DRYING
Delay start
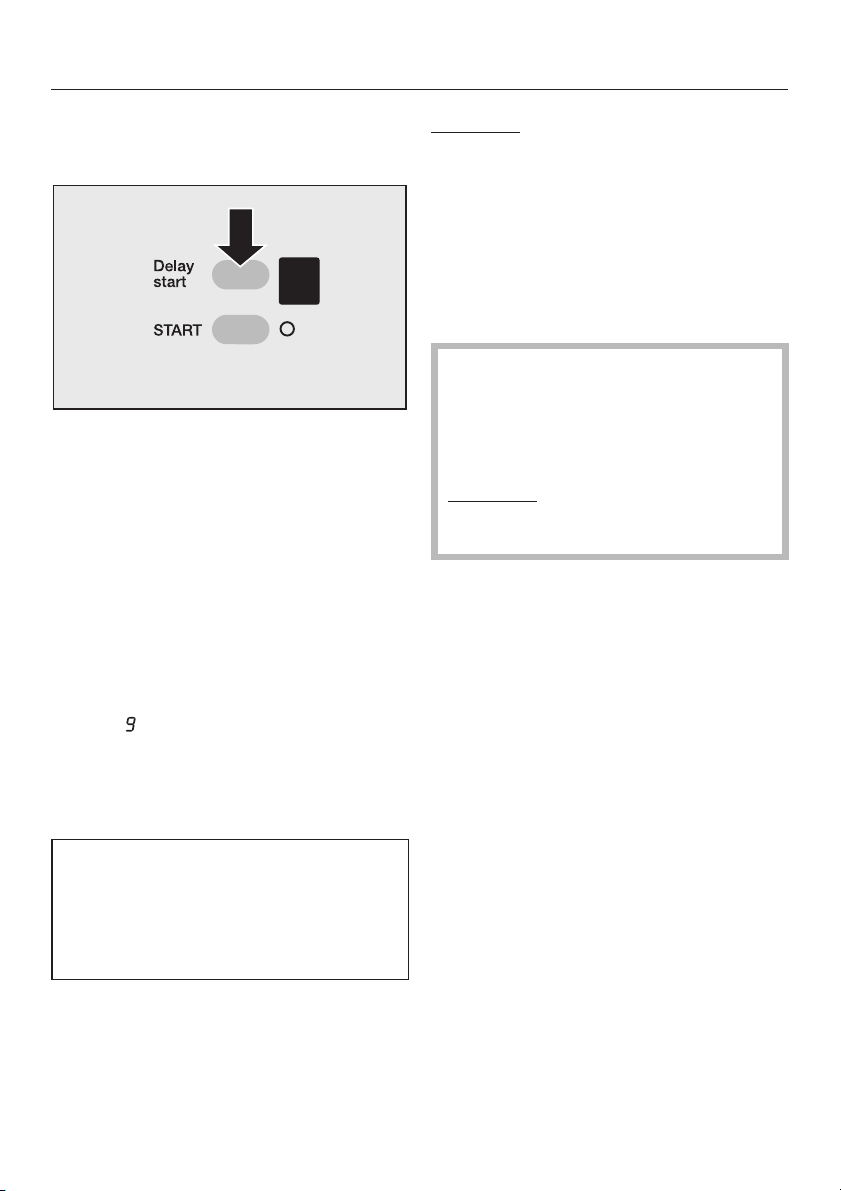
I Select Delay start
Press the
^
edly until the required delay start pe
riod shows up in the display (from i to
9 hours).
Press the"START" button. The chosen
time will start to count down hour by
hour. The programme will then start automatically.
To cancel "Delay start":
^ Press the
when
^
Switch the appliance off using the
I-ON/0-OFF
Memory function
If an additional option(s) is selected
for a programme, and / or the spin
speed is altered, the machine stores
these changes in memory at the start
of a programme.
Delay start
button repeat
Delay start button once
is showing in the display, or
button.
-
Exception
J Start the programme
The START indicator lamp will flash as
soon as a programme can be started.
Press the START button.
^
After the programme has started the
START indicator lamp will light up
constantly.
The door cannot be opened if the
temperature is higher than 70°C. If
this is the case the
light will flash when the
-
is pressed.
Exception
function "Opening the door at high
temperatures" has been activated.
: Delay start
locked
indicator
Door
: when the programmable
At the end of a programme
When the drying programme has finished the buzzer will sound (see "Programmable functions") and the
Anti-crease / finish sequence indicator
lamp will come on.
^
Remove the laundry.
If you want to dry a further load:
^
First switch the machine off and then
on again with the
^
Proceed as described before in this
section.
I-ON/0-OFF
After drying
button
button.
When that particular programme is cho
sen again, the display will show the ad
ditional option(s) and / or spin speed
which have been stored for that
programme in the memory.
34
For further information on drying see
section "After each washing or drying
programme".
Page 35

WASHING AND DRYING
Washing and drying in a
continuous sequence
Where the amount of laundry to be
washed and dried in one programme
does not exceed the maximum
weight permitted for the drying
programme, washing and drying in
one continuous sequence is recom
mended.
It is essential to read both sections
"Separate washing" and "Separate
drying" first.
A Sort the laundry
B Switch the machine on
C Open the drum door
D Load the drum
Maximum loads
Cottons . . . . . . . . . . . . . . . . . . . . 2.5 kg
Minimum iron . . . . . . . . . . . . . . . . 1.0 kg
Quick wash . . . . . . . . . . . . . . . . . 1.0 kg
Spin . . . . . . . . . . . . . . . . . . . . . . . 2.5 kg
Do not use detergent dispensing
aids, e.g. plastic dispenser balls, for
washing followed immediately by the
drying programme. These dispens
ers can melt during the drying
programme and cause damage to
the machine and the laundry.
E Close the drum door
F Open the stopcock
:
-
-
G Add detergent
Use approximately 1/3 less detergent
than is recommended by the manu
facturer on the packaging.
H Select the programme.
Turn the WASHING programme se
^
lector to the required programme.
Press the "Spin" button repeatedly un
^
til the indicator lamp for the spin
speed you want comes on.
Select any additional options that you
^
require for the washing programme.
I Select a drying programme
^ Turn the DRYING programme selec-
tor to the required drying programme.
The Thermospin will automatically be
carried out using the same spin speed
as used in the wash programme.
The Thermospin will not be carried out
if:
–
you have selected a TIMED DRYING
programme;
–
the additional option
temp
has been selected.
^
If required, select the additional op
tion
Drying/Low temp.
J If required, select a "Delay start"
period.
K Start the programme
^
Press the START button.
Drying/Low
-
-
-
-
35
Page 36
After each washing or drying programme
At the end of a programme
A buzzer will sound (see "Program
^
mable functions") and the Anti crease
/ Finish light will come on. Press the
Door button
wide.
Take care, the metal cap is hot
,
after drying. Do not touch the
metal cap located on the inside of
the door glass. Danger of burning!
and open the drum door
Close the door.
^
-
Otherwise there is the danger of ob
jects being placed inadvertently in
the drum. If these remained unno
ticed and were washed in the next
load, they could damage the laundry.
Press in the
^
switch the machine off.
I-ON/0-OFF
button to
-
-
^
Remove the laundry.
^
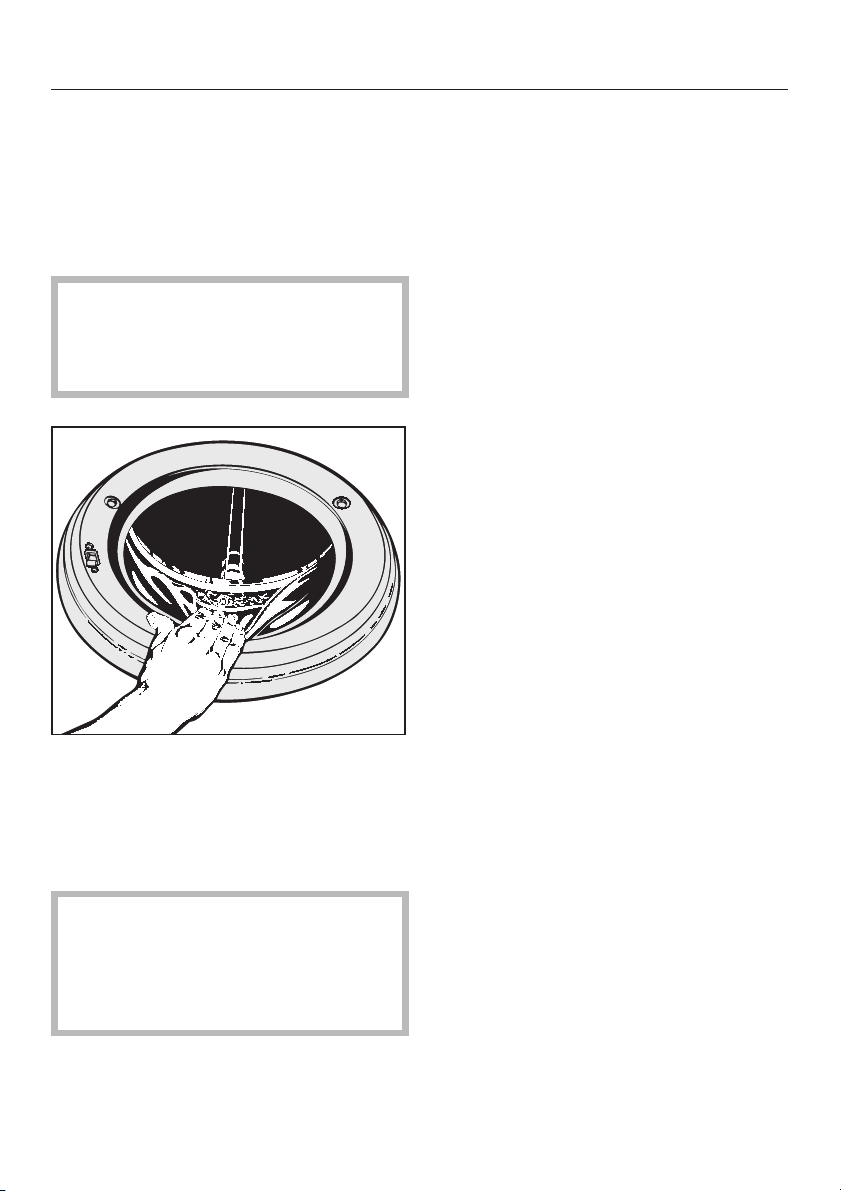
Check the folds in the door seal for
any small articles, e.g. buttons. Re
move any fluff from drying from
around the door seal.
Check that all items have been re
moved from the drum. Items left be
hind could colour run, shrink or be
damaged in the next washing or dry
ing programme.
36
-
-
-
-
Page 37

After each washing or drying programme
After drying
"Rinse out fluff" programme
The fluff which occurs during drying
can collect in the drum and also in
the suds container. It is best to rinse
out this fluff before the machine is
used again, so that it cannot be de
posited on the next load of laundry.
The
Rinse out fluff
not
be used for rinsing items of laun
dry. Make sure that there are no
items of laundry in the drum before
starting this programme.
^ Switch the machine on.
^ Turn the DRYING programme selec-
tor to the
Finish
programme must
position.
-
-
^ Turn the WASHING programme se-
lector to the
programme.
^
Press the START button.
The fluff will rinsed out in a few minutes.
^
Remove any fluff remaining from
around the door seal.
^
Switch the machine off.
Rinse out fluff
37
Page 38

Changing a programme sequence
To change a programme which
Programme sequences can be
changed after the START button has
been pressed. It is also possible to
select a follow-on drying programme
any time up to the end of a washing
programme.
To cancel a programme
Turn both programme selectors to the
^
Finish
position.
The programme sequence indicators
will flash one after the other in the
programme sequence display. The
programme has been successfully cancelled when only the
is on.
On
indicator lamp
To cancel an incorrectly selected programme
^ Turn both programme selectors to the
Finish
position.
has been locked
See section "Safety lock".
When only the
^
Turn the programme selector to the
required programme.
^
Switch additional options on or off as
required.
^
Press the START button.
38
On
indicator lamp is on:
Page 39

Safety lock
Safety lock
Electronic programme locking (the
Locked
vents the door from being opened or
the programme cancelled during a
programme.
The
–
to show that an attempt has been
made to alter a programme. This has
no effect on the programme se
quence.
The locking function is switched off
–
at the end of the programme, during
"Rinse hold" and after the appliance
has been switched off.
Engaging the safety lock
^ Select a programme.
^ Press the START button until the
Locked
– The safety lock has been activated.
indicator lamp is on) pre
Anti-crease/Finish
indicator lamp comes on.
lamp flashes
-
-
To de-activate the safety lock
Press the START button until the
^
Locked
Or, if the
flashing:
Select the programme originally se
^
lected, and press the START button
until the
out.
indicator lamp goes out.
Anti-crease / Finish
Locked
indicator lamp goes
indicator is
-
–
The machine will not accept any
changes to the programme and the
programme will proceed to the end.
39
Page 40
Cleaning and care
Disconnect the machine from the
,
electricity supply by switching off at
the wall socket and withdrawing the
plug before any cleaning and main
tenance work.
Cleaning the machine
Clean the casing with a mild
^
non-abrasive cleaning agent or with
soap and water. Wipe dry with a soft
cloth.
Clean the drum with a suitable propri
^
etary cleaner for stainless steel.
E-Cloth
A microfibre "E-Cloth" is available from
the Miele UK Spare Parts Department,
Part Number 98013530, which is suitable for cleaning surfaces such as
stainless steel, glass, plastic and
chrome without the use of chemicals.
,
Do not use solvents, abrasive
cleaners, glass cleaners or all-pur
pose cleaners. These could damage
plastic surfaces and other parts. Do
not use a hose to wash the machine
down.
-
Cleaning the detergent dispenser
-
-
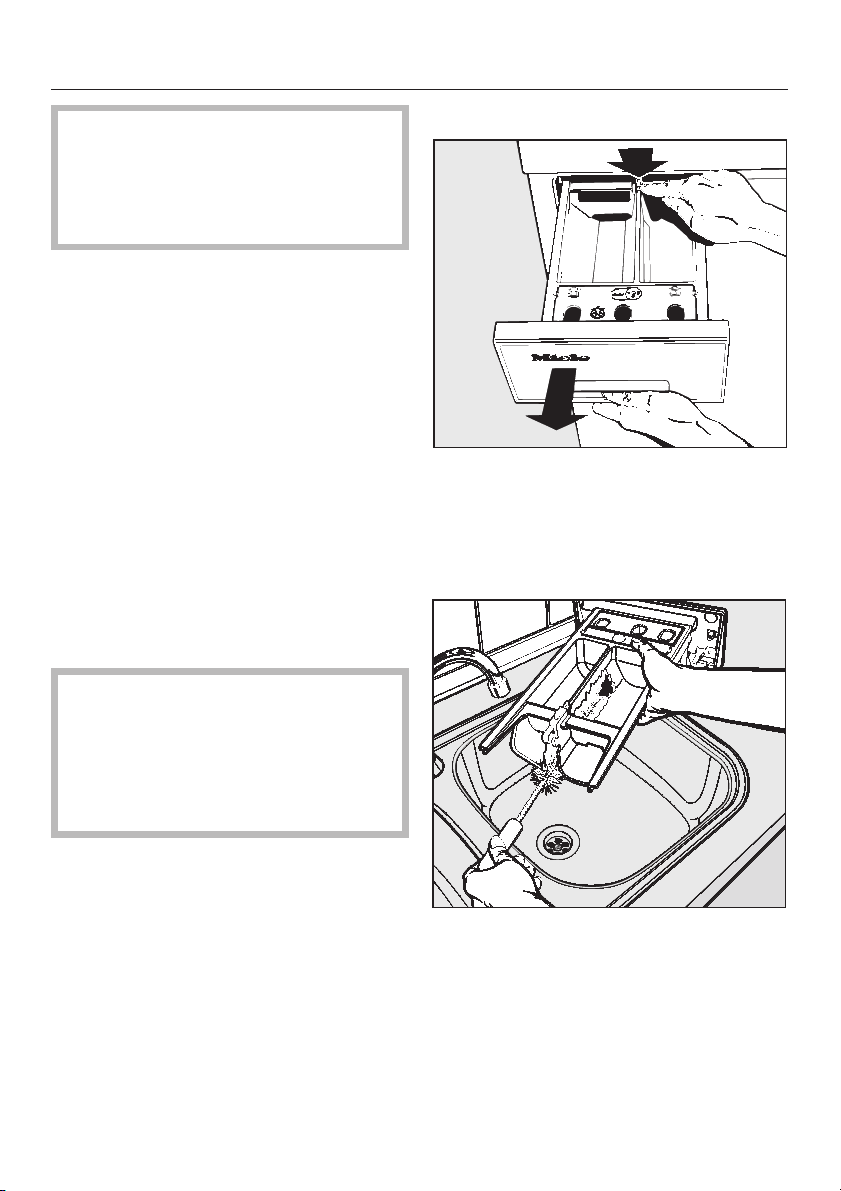
^ Pull out the detergent dispenser
drawer until a resistance is felt. Press
down the red release catch and at
the same time pull the drawer right
out of the machine.
40
^
Clean the detergent dispenser com
partments and the fabric conditioner
compartment with warm water.
-
Page 41
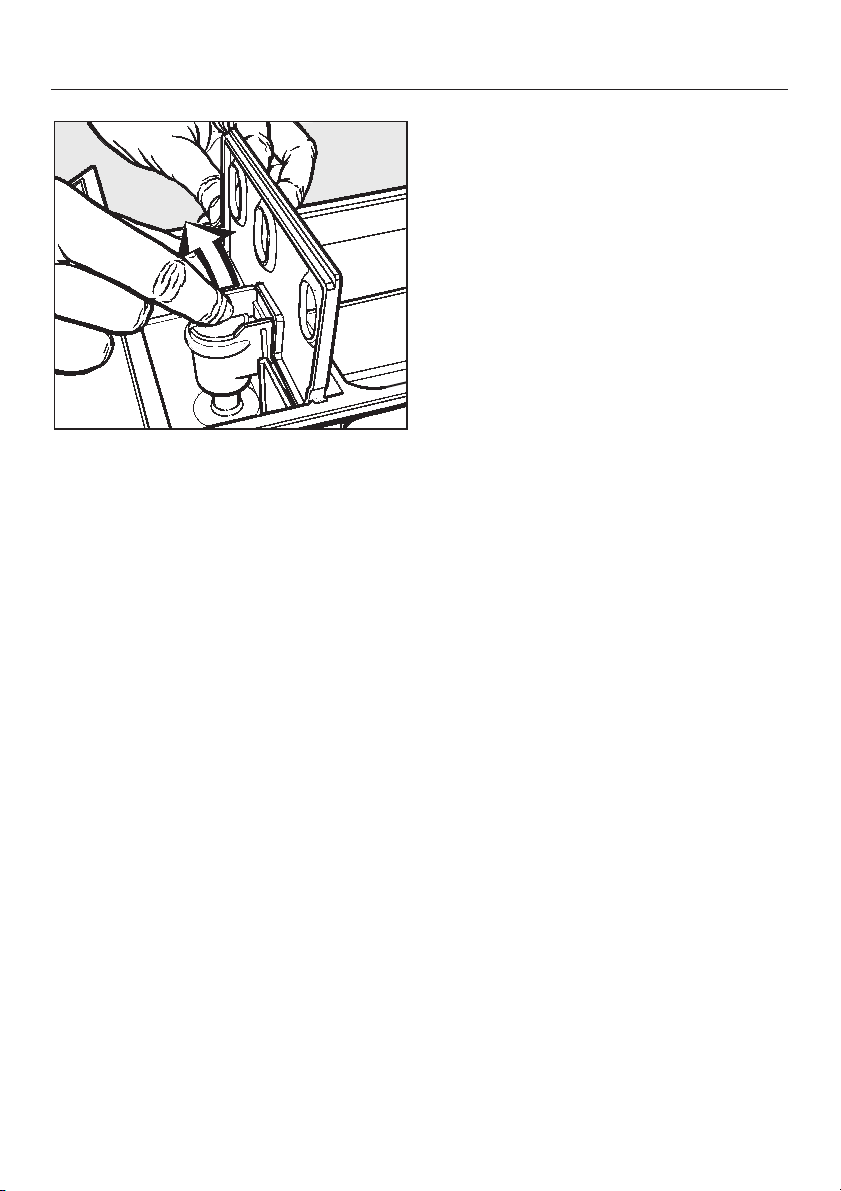
Clean the siphon tube.
^
1. Remove the siphon from compartment p and rinse under warm running water. The channel in compartment p should also be cleaned.
2. Replace the siphon securely.
Over time, detergent residue can build
up in the water jets in the top of the detergent drawer housing.
Cleaning and care
^
Before replacing the detergent
drawer, use a bottle brush or similar
to clean them out.
41
Page 42
Cleaning and care
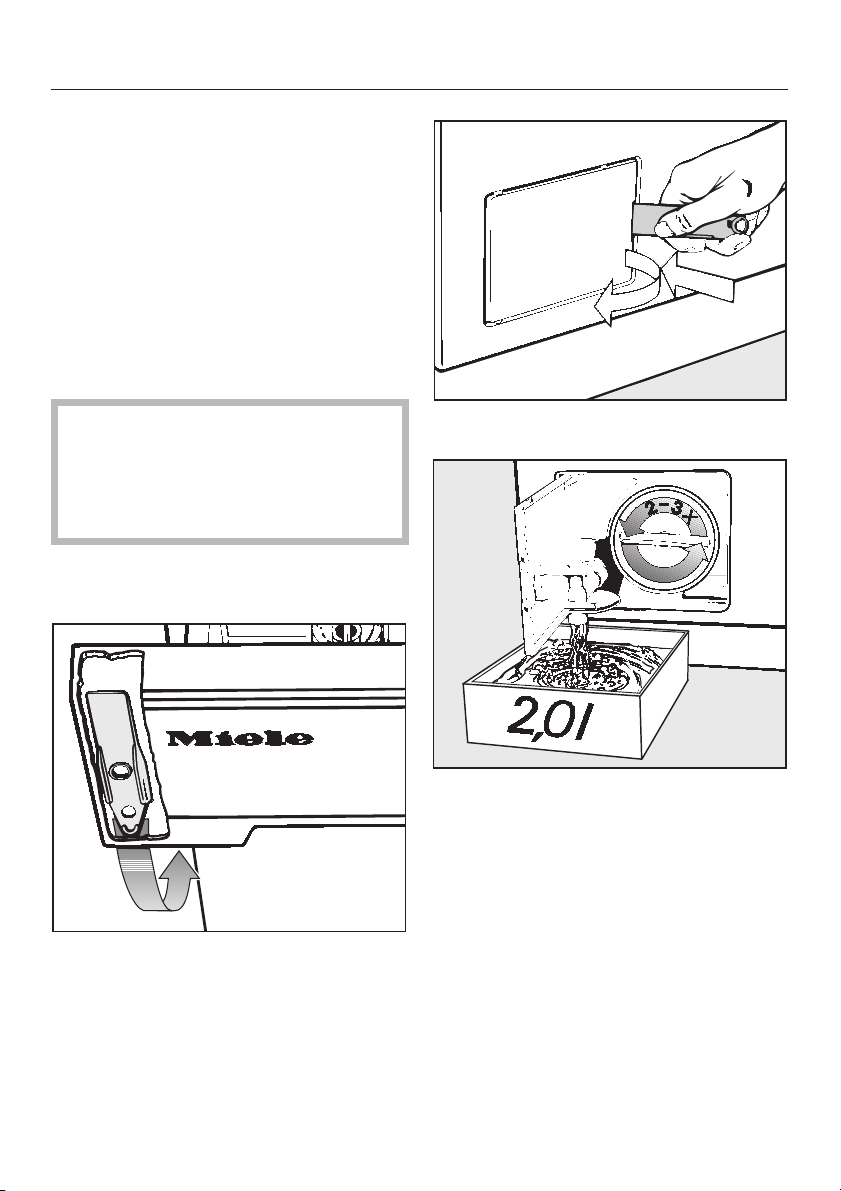
Cleaning the fluff filter and
pump
Check the fluff filter: initially after 3 -4
washes to ascertain how often it is likely
to require cleaning.
With normal cleaning, approx. 2 litres of
water run out.
However, if the drain outlet is blocked,
more water will be retained in the ma
chine (max. 25 l litres).
Caution: If laundry has been
,
washed at a high temperature, water
draining out of the machine will still
be hot. Danger of scalding or burning!
There is a yellow filter flap opener behind the detergent drawer facia panel.
-
Use it to open the access flap.
^
^
Remove the opener.
^
Open the door.
42
^
Place a suitable container (2 litres)
underneath the drain fixture.
^
Turn the fluff filter lid round 2-3 times.
Do not take it right out. Approx. 2
litres of water will drain out.
To interrupt the procedure:
Tighten the fluff filter back up again.
With large volumes of water the dish will
need to be emptied several times.
Page 43
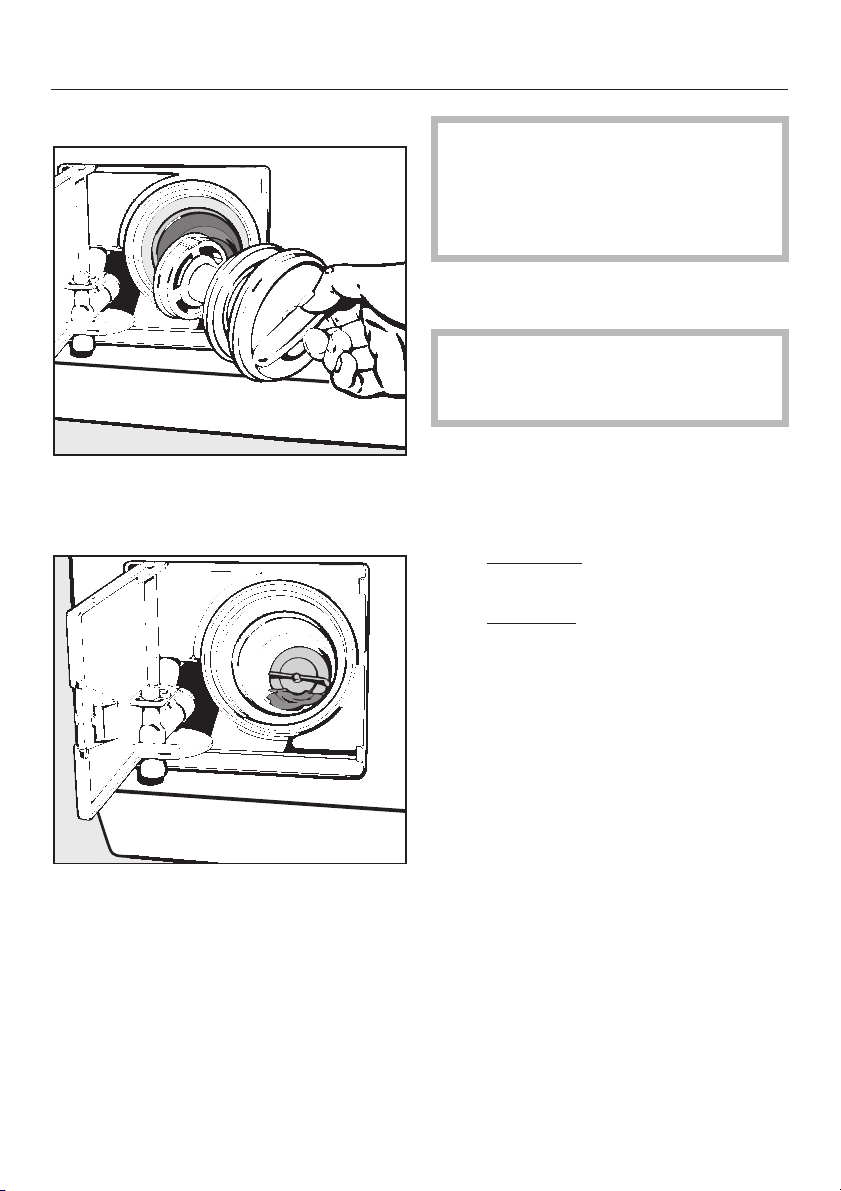
Once the flow of water ceases:
^ Remove the fluff filter completely.
^ Clean the fluff filter thoroughly.
Cleaning and care
Remove any deposits of limescale
and detergent or foreign objects
from the thread of the filter housing
and filter unit (as these can cause a
leakage of water).
Put the fluff filter back in place and
^
secure.
Make sure the fluff filter is se
,
curely tightened. Otherwise there is
a risk of water leakage during use.
Clean the porthole glass.
^ From time to time you should also
clean ...
– the door glass
mild detergent or soap and water.
on the inside using a
-
^
Check the impeller by hand to make
sure it rotates correctly. Remove any
foreign objects (e.g. buttons, coins,
etc) causing an obstruction and
clean the inside of the filter housing.
^
Clean the threaded union in the hous
ing and on the filter itself.
– the metal cap
with a suitable proprietary stainless
steel cleaning agent.
^ Wipe dry using a soft cloth.
-
inside the door glass
43
Page 44
Cleaning and care
Cleaning the filter in the water
inlet
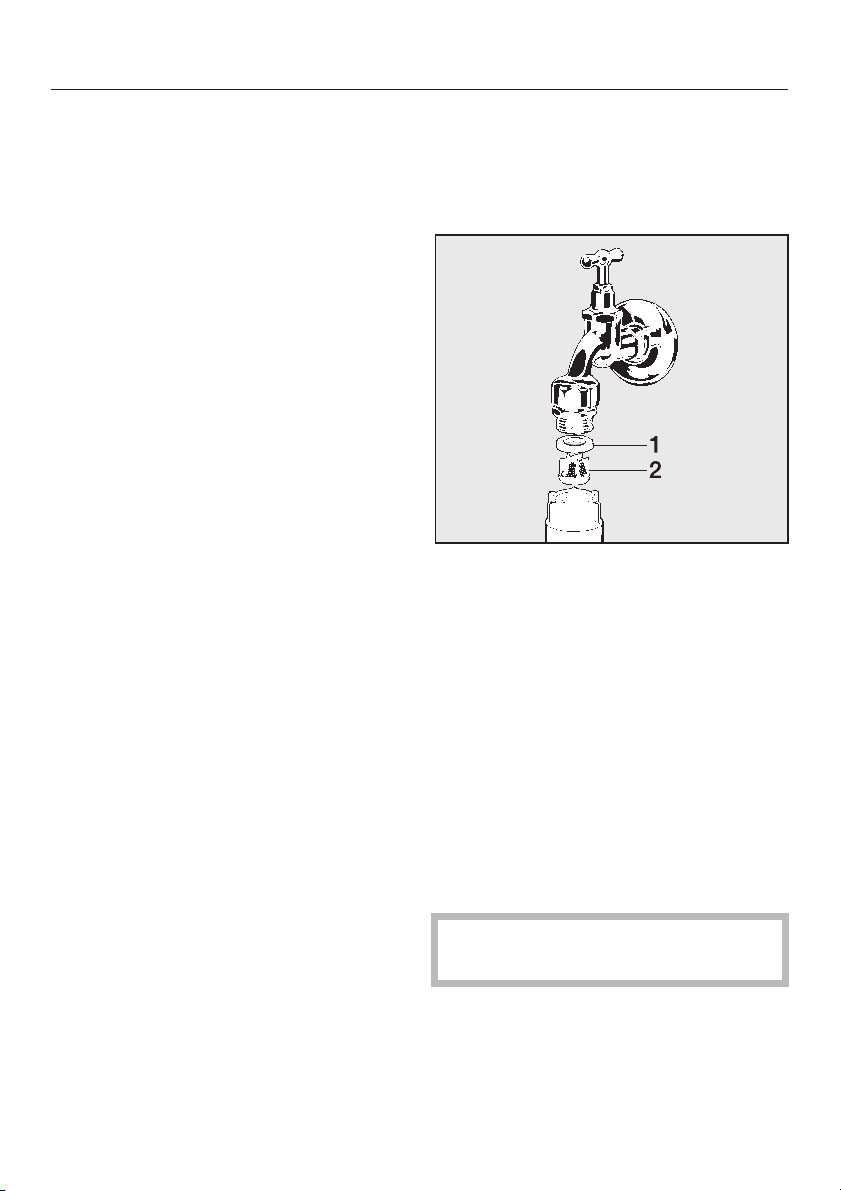
The machine has a filter to protect the
water inlet valve.
The filter in the open end of the inlet
hose should be checked and cleaned
approx. every 6 months. It should also
be checked after an interruption to the
external water supply.
First turn off the stopcock.
^
Unscrew the threaded union connect
^
ing the free end of the inlet hose to
the stopcock.
^ Remove the rubber seal from the re-
cess.
^ Using pointed pliers, take hold of the
plastic filter bar and remove.
^ Clean the plastic filter.
-
44
Put the filter and seal back in the re
verse order and reconnect the hose.
^
Make sure it goes on correctly and is
not cross-threaded.
^
Turn on the stopcock and check that
the connection is watertight. If water
drips out, tighten the connection.
Never forget to put the filter back in
place after cleaning.
-
Page 45

What to do if ... ?
Problem solving guide
With the aid of the following guide, minor problems can be easily corrected with
out calling in a Miele service technician, saving you both time and money.
The following charts are designed to help you establish the cause of a fault or
problem, and rectify it. Please note the following:
Repair work to electrical appliances should only be carried out by a suit
,
ably qualified person in accordance with local and national safety regulations.
Repairs and other work by unqualified persons could be dangerous. The man
ufacturer cannot be held responsible for unauthorised work.
The chart is divided into the following sections to help you:
The programme does not start.
The programme stops and a fault indicator lamp comes on.
A fault indicator lamp comes on but the wash programme continues as
normal.
General problems or an unsatisfactory wash or drying result.
-
-
-
45
Page 46
Problem solving guide
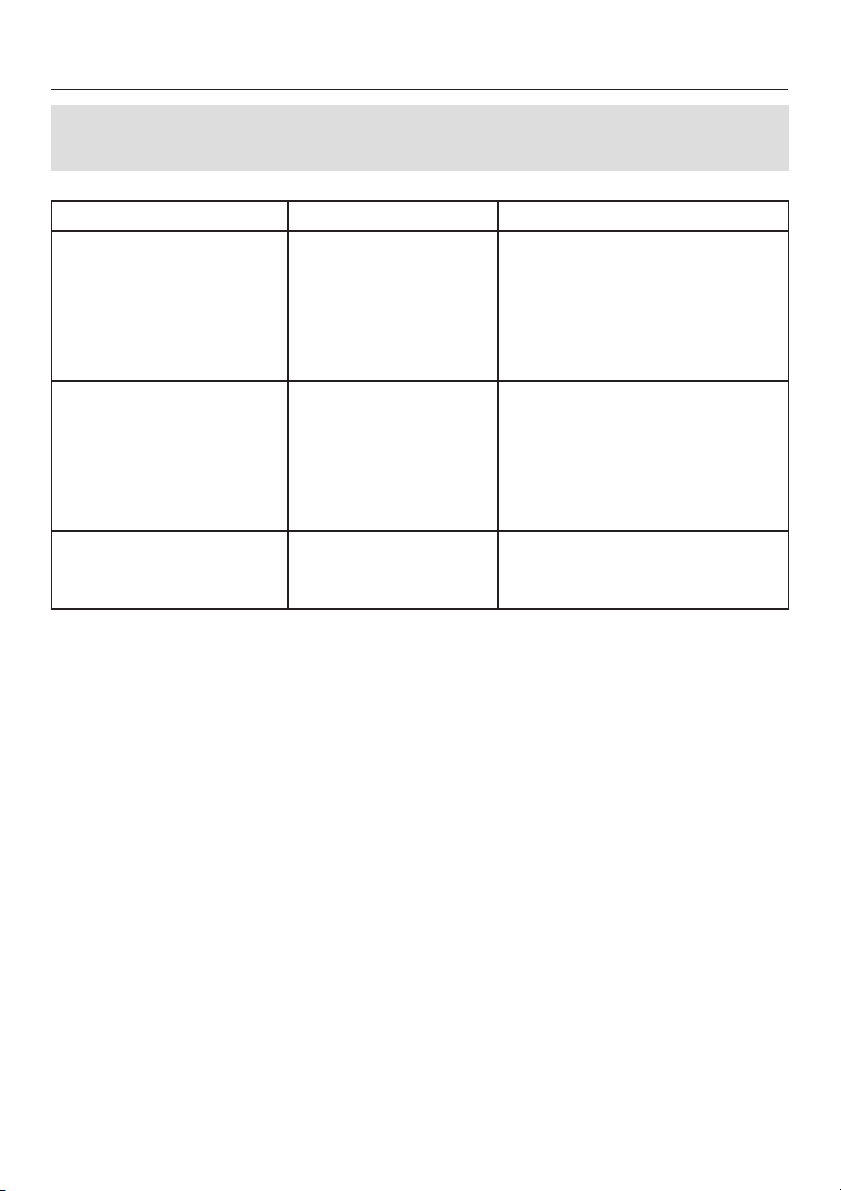
The programme does not start.
Problem Possible cause Remedy
The On indicator lamp
does not light up in the
programme sequence
display or the START
button indicator lamp
does not flash.
If one of the following
indicator lamps is
flashing
- Soak/Pre-wash
- Washing
- Rinses
The "Locked" indicator
lamp is on.
There is no power to
the machine.
There is a fault. Start the programme again.
The safety lock is activated.
Check whether
the door is properly closed.
–
the mains plug is plugged
–
in.
the mains fuse has blown.
–
If the indicator light flashes
again, call the Miele Service
Dept.
De-activate the safety lock as
described in the section
"Safety lock".
46
Page 47
Problem solving guide
The wash programme stops and a fault indicator light comes
on.
Problem Possible cause Remedy
The Water inlet/drain in
dicator lamp is flashing
and the load in the ma
chine has not been
washed.
The Water inlet/drain in
dicator lamp is flashing.
The Final spin indicator
lamp is flashing in the
programme sequence
display.
-
The water inlet system
-
is blocked.
There is a blockage in
-
the water outlet.
The Waterproof system
has reacted.
The final spin has not
taken place. The machine detected an imbalance.
Turn the programme se
–
lectors to
Open the stopcock.
–
Select and start the
–
programme again.
Clean the fluff filter and
–
the drain pump.
– Has the drain hose been
fitted too high? Maximum
delivery head1 m.
– Call the Miele Service
department.
– Loosen the laundry.
– Turn the WASHING
programme selector to
Spin
–
Make sure you select an
appropriate spin speed
for the type of load.
Finish
.
.
-
47
Page 48
Problem solving guide
A fault indicator lamp comes on but the wash programme
continues as normal.
Problem Possible cause Remedy
The Water inlet/drain
indicator lamp
flashes during a
programme, but the
wash programme
has run normally.
The Water inlet/drain
indicator lamp is
flashing.
The Drying overload
indicator lamp is
flashing towards the
end of a drying
programme.
The Anti crease/Fin
ish indicator lamp is
flashing and the
locked indicator
lamp is on.
There is a blockage in
the water inlet.
The water pressure is
too low.
The filter in the water in
let hose is dirty.
There is a blockage in
the water outlet.
The load was too large. – In future do not exceed the
-
The selected
programme was altered
with the safety lock acti
vated.
Check whether:
the stopcock is opened
–
wide enough.
the inlet hose is kinked.
–
In this case, call the Miele
–
Service Dept.
Clean the filter as described
-
–
in "Cleaning and care".
– Clean the fluff filter and the
drain pump.
– Has the drain hose been fit-
ted too high? Max. delivery
head, 1.00 m
maximum load. This way
you will avoid:
a) Creasing of
delicate textiles
b) Uneven drying
results / damp laundry
Complete the drying process
using a TIMED DRYING
programme.
See section "Safety Lock".
-
48
Page 49
Problem solving guide
General problems or an unsatisfactory wash or drying result.
Problem Possible cause Remedy
The door cannot be
opened.
The door cannot be
opened and when the
Door button is pressed
the locked indicator
lamp flashes.
The machine is not con
nected to the electricity
supply.
Power cut. Open the door as de
The door was not cor
rectly closed.
There is still water in the
drum.
This is not a fault. The
temperature "locking"
function is activated.
Insert the plug in the
socket.
scribed at the end of this
section.
Press hard against the left
hand side of the door and
press the
– Turn the WASHING
programme selector to
Drain
drained away.
– Open the door.
For safety reasons the door
cannot be opened when the
internal temperature is
above 70°C.
Door
. The water will be
button.
-
49
Page 50
Problem solving guide
Problem Possible cause Remedy
The door cannot be
opened during or after
drying.
For safety reasons the
door cannot be
opened when the inter
nal temperature is
above 70°C.
Option 1
Wait until the temperature has
dropped below 70°C and then
open the door.
Option 2
Select the cooling down
phase*:
Turn the DRYING
–
programme selector to the
Finish position
Turn the DRYING
–
programme selector imme
diately to a programme:
the
Cooling down
lamp will light up and the
cooling down phase has
been selected.
– At the end of the cooling
down phase (the
crease/ Finish
on), you can open the door.
.
indicator
Anti
light comes
-
50
* If the drying programme has
already finished, first start a
new drying programme for a
few minutes.
Option 3
Activate the programmable
function "Opening the door at
high temperatures".
Page 51
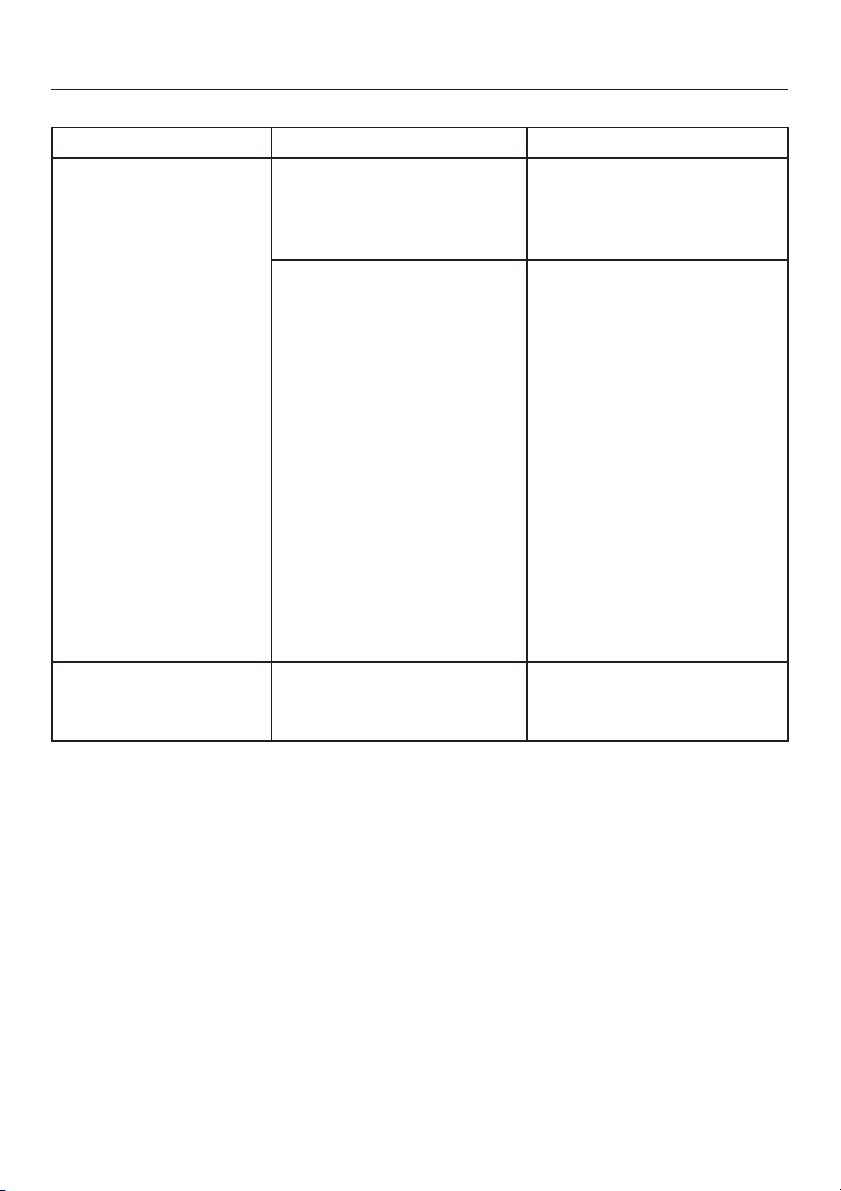
Problem Possible cause Remedy
The laundry is still
damp after a drying
cycle.
There is still water in
the drum after drying.
Problem solving guide
The load weighed less
than 1 kg. The moisture
sensing system cannot op
erate with too small a load.
When washing and dry
ing in one continuous se
quence:
during the spin the laundry
formed a ring in the drum
because the laundry was
distributed unevenly.
When drying separately:
during the Thermospin the
laundry formed a ring in
the drum because the
laundry was too damp or
because the spin was set
too high.
There is a blockage in the
water outlet.
-
In future dry small loads in
a TIMED DRYING
programme.
-
Turn the WASHING and
–
DRYING programme se
-
lectors to the
tion.
Open the door and
–
loosen the laundry.
Select a lower spin
–
speed.
– Start the drying
programme again.
Clean the fluff filter and the
drain pump as described in
"Cleaning and care".
Finish
posi
-
-
51
Page 52
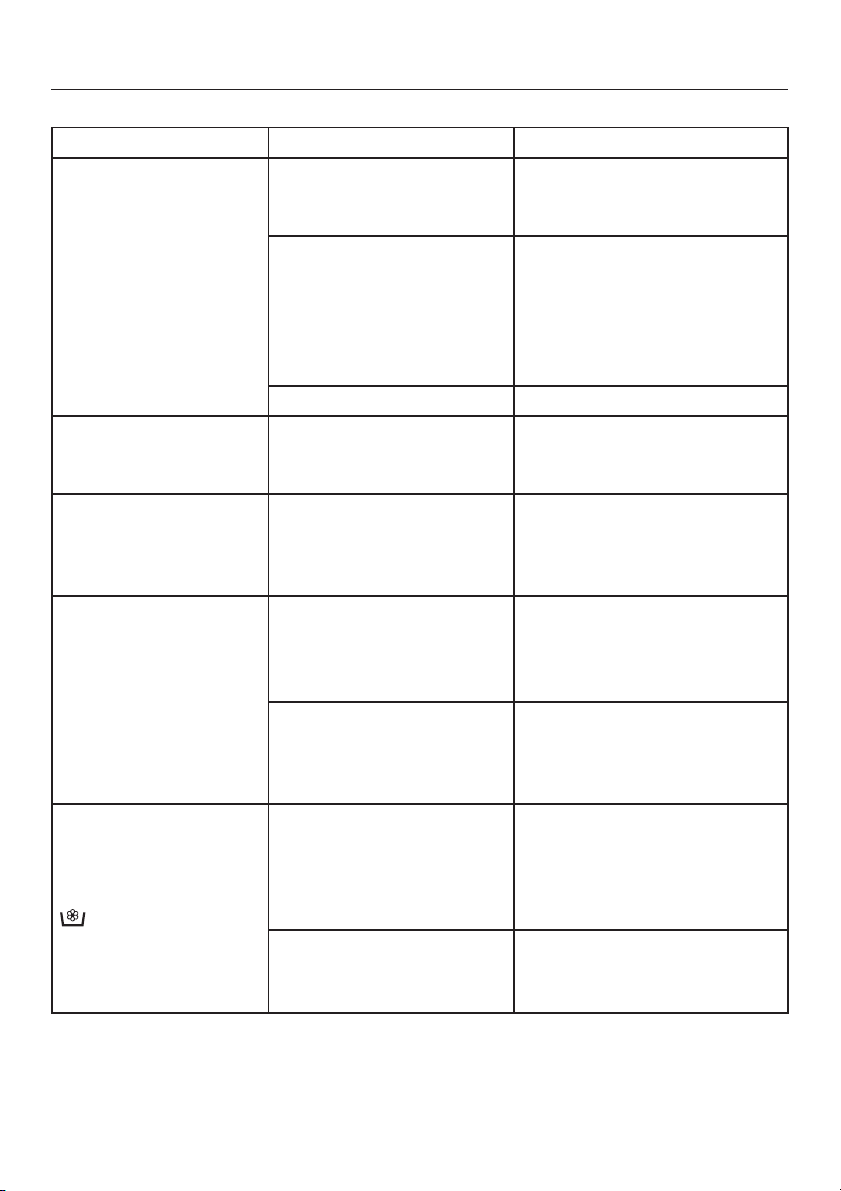
Problem solving guide
Problem Possible cause Remedy
The laundry is not
spun satisfactorily.
The machine is not
steady during a spin
cycle.
In spite of adequate
water pressure, the
water flows into the
machine too slowly.
Large amounts of detergent residue remain in the detergent
dispenser drawer.
Fabric conditioner is
not completely dis
pensed or too much
water remains in the
compartment.
The spin speed selected
was too low.
The machine was not
able to distribute the laun
dry load evenly. Laundry
was spun at a reduced
spin speed to protect the
machine.
The fluff filter is clogged. Clean the fluff filter.
The machine feet are not
level.
The filter in the water inlet
hose is dirty
The water pressure is too
low.
Powder detergent used in
conjunction with water
softeners tends to be
come sticky.
The detergent dispenser
-
drawer was opened or
was not pushed right in
whilst conditioner was be
ing flushed in.
The siphon tube is not
correctly positioned, or is
clogged up.
Select a higher spin speed
for the next wash
programme.
Always mix large and small
items in a load to avoid im
balance.
Level the machine (see "In
stallation").
Clean the filter.
– Clean the filter in the water
inlet.
– Press the
ton.
In future, add washing pow
der into the dispenser first,
-
and then add the water soft
ener.
-
–
Clean the siphon tube.
–
Also clean the channel in
compartment p.
Water plus
-
-
but-
-
-
52
Page 53
Problem Possible cause Remedy
There is an excessive
build-up of foam.
White residues which
look like powder de
tergent are seen on
dark textiles after
washing.
Grey, greasy particles
cling to washed laundry.
-
Too much detergent
was used.
The detergent con
tained compounds
(zeolites) to aid water
softening where are not
soluble in water. They
have ended up on the
textiles.
Insufficient amounts of
detergent have been
used to break down the
particles of grease in
heavily soiled laundry.
-
Problem solving guide
Follow the manufacturer’s
–
instructions on dosage
given on the packaging.
Take the water hardness
–
level into account.
Use less detergent for
–
lightly soiled or small loads.
Try and brush out the resi
–
dues after drying using a
soft brush.
Wash dark textiles using a
–
detergent which contains
no zeolites. Liquid detergents usually contain no
zeolites.
– Use more detergent.
– Before washing the next
load run a COTTONS 95°C
programme with powder
detergent but without a
load.
-
53
Page 54

Problem solving guide
Problem Possible cause Remedy
Liquid detergent does
not give the required
result.
Limescale deposits appear on the drum surface.
The pump makes
strange noises.
Liquid detergents usually
contain no bleaching
agents. They do not re
move fruit, coffee and tea
stains.
Not enough detergent
was used.
This is not a fault! These
noises occur at the end
of a pump sequence as
a normal part of the op
eration.
Use a general purpose
–
detergent containing a
-
bleaching agent.
Pour stain removers into
–
compartment j and
liquid detergent into a
dispensing ball
(Remember to remove
the dispensing ball be
fore drying!).
Never put stain remov
–
ers and liquid detergent
together in the dispenser drawer.
– Use a descaling agent,
suitable for use in washing machines, to remove
the limescale deposits.
– Use the correct amount
of detergent for the water hardness level.
-
-
-
54
Page 55
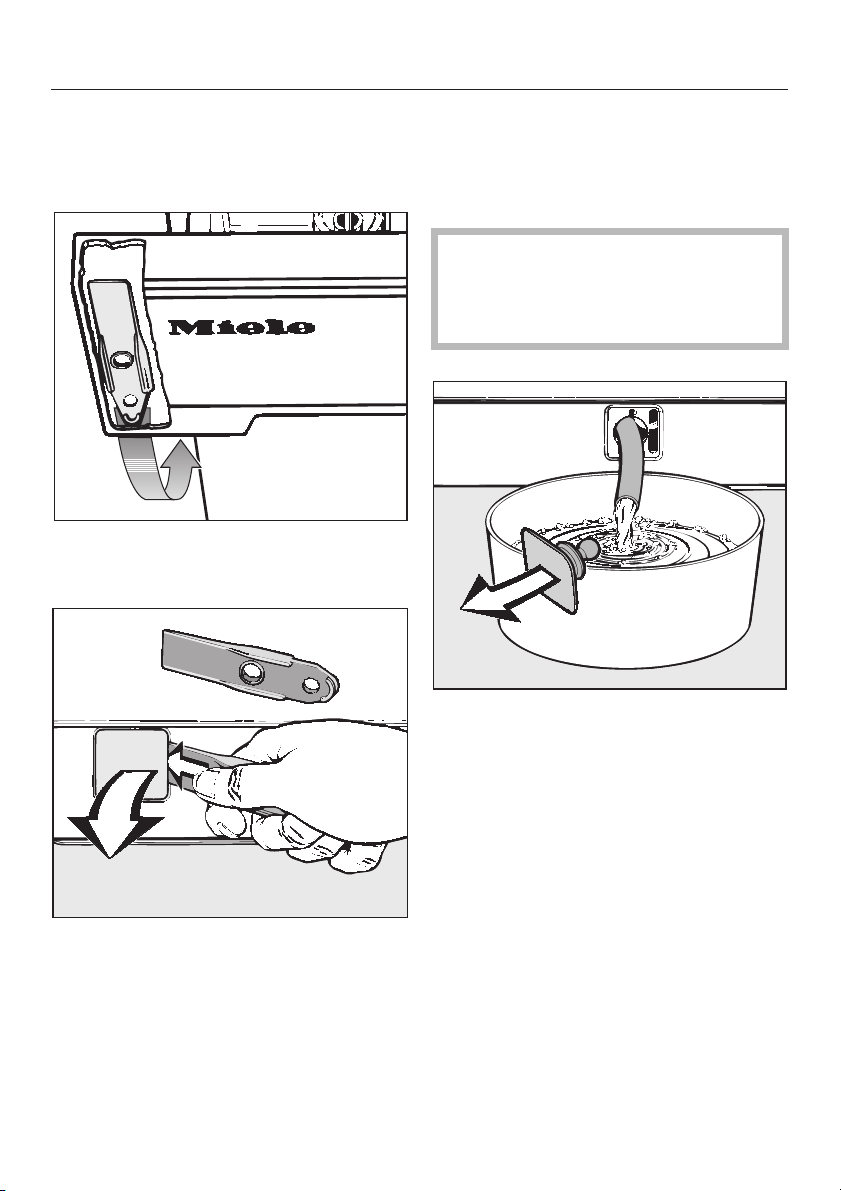
Problem solving guide
Opening the drum door in the
event of a power failure
Switch the machine off.
^
^ Remove the yellow lever from behind
the detergent drawer facia panel.
Place a suitable dish or bowl under
^
the spout.
Point the drain hose into the con
^
tainer.
Caution: if laundry has been
,
washed at a high temperature, water
draining out of the machine will be
hot.
-
^
Open the emergency drainage and
door release flap in the machine
plinth.
^
Remove the stopper from the drain
age pipe.
The container may need to be emp
tied several times depending on how
much water is in the machine. Re
place the stopper while you empty
the container.
^
Repeat the process until no more wa
ter drains out, then replace the stop
per.
-
-
-
-
-
55
Page 56
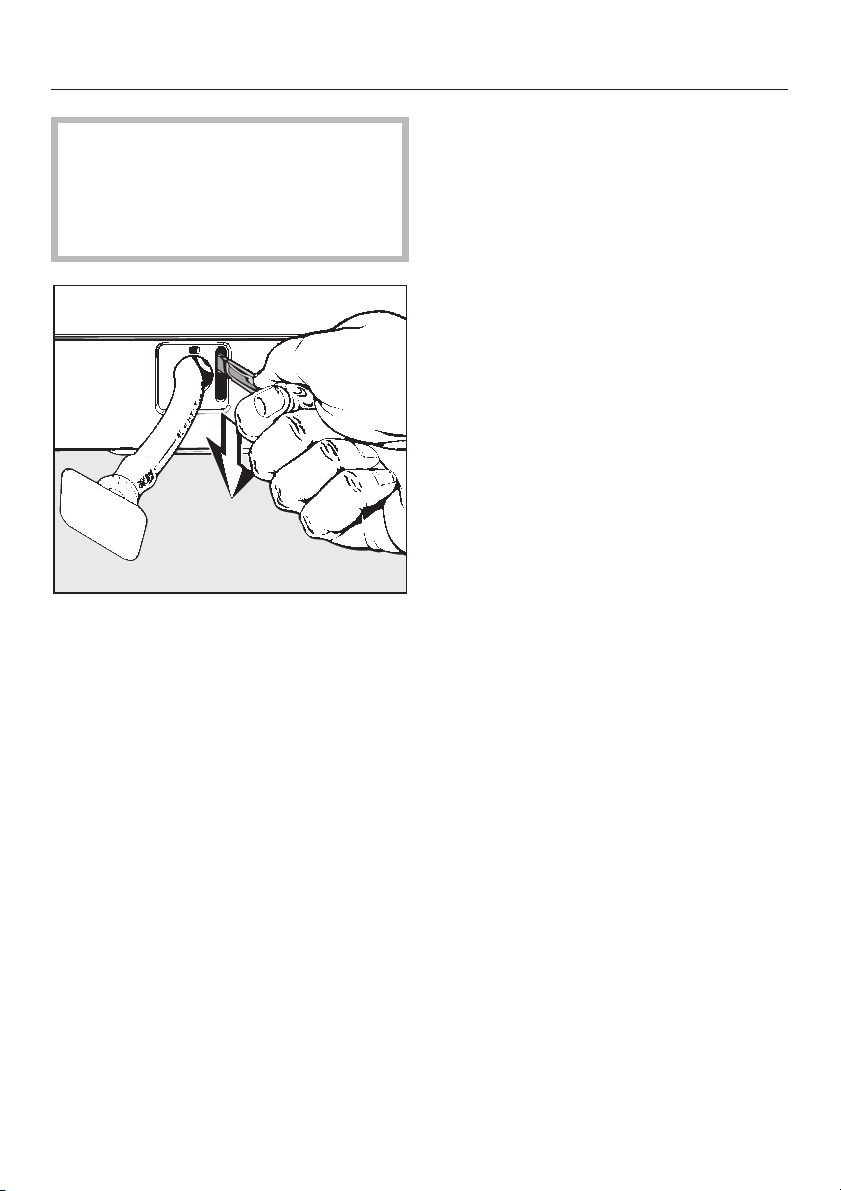
Problem solving guide
Always make sure that the drum
,
is stationary before reaching into the
machine to remove laundry.
Reaching into a moving drum is ex
tremely dangerous.
^ Pull the emergency door latch down-
wards using a spoon handle.
The door will open.
-
^ Push the hose with the stopper refit-
ted, back into the plinth again.
56
Page 57
Problem solving guide
After sales service
In the event of any faults which you
cannot remedy yourself, please contact
Your Miele Dealer or
–
The Miele Service Department (see
–
address on back cover).
When contacting the Service Depart
ment, please quote the model and se
rial number of your appliance, both of
which are shown on the data plate.
-
-
Appliance guarantee
The appliance is guaranteed for a pe
riod of 1 year.
See the guarantee card supplied with
the appliance for further details.
Please note that telephone calls
,
may be monitored and recorded to
improve our service.
-
57
Page 58
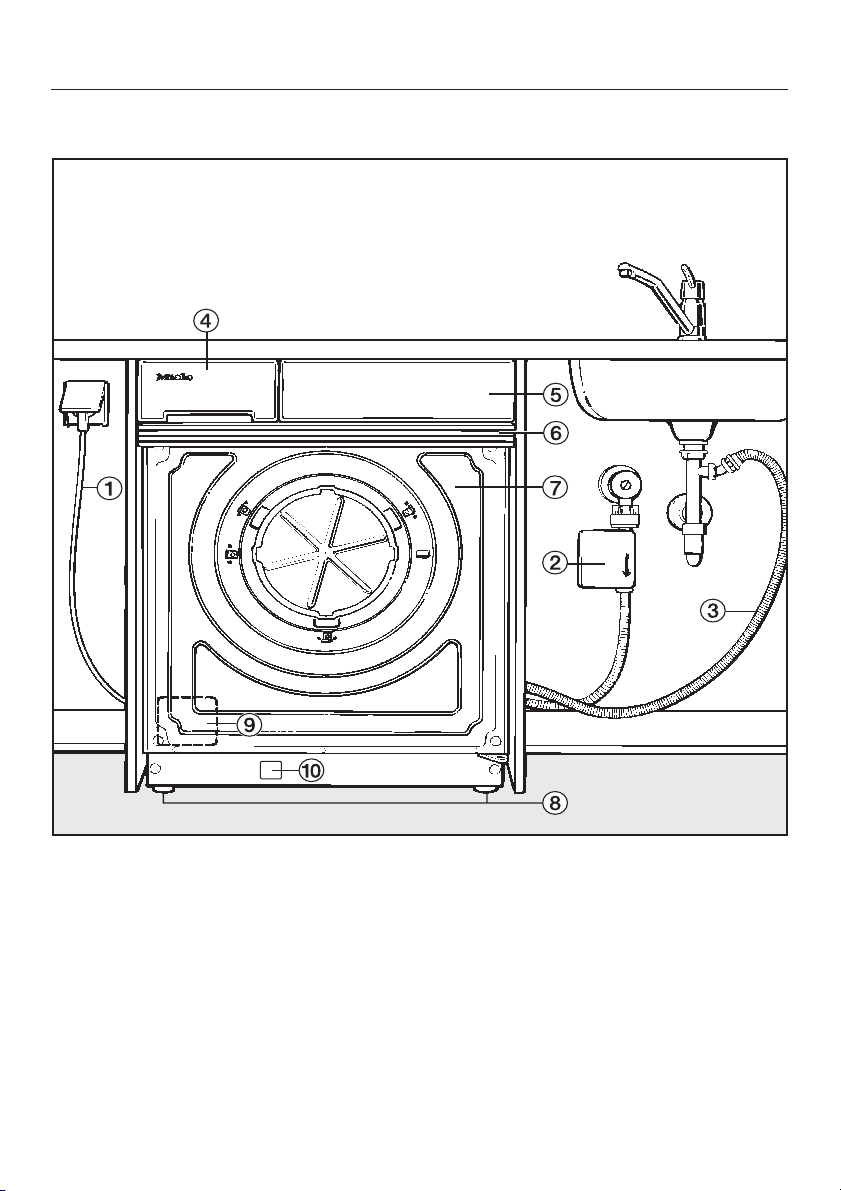
Installation and connection
Front view
a Electrical connection
b The Waterproof system
c Drain hose with flexible / detachable
swivel elbow
d Detergent dispenser
e Control panel
58
f Adapter strips
g Door interior plate with fixing
points for a front panel
h Four height adjustable screw feet
i Access panel to the fluff filter and the
drain pump
j Access panel to the emergency door
release and drainage
Page 59

Installation and connection
Installation surface
A concrete floor is the most suitable in
stallation surface. It is far less prone to
vibration during the spin cycle than
wooden floorboards or a carpeted sur
face.
Please note the following:
The machine must be level and se
^
curely positioned.
To avoid vibrations during spinning
^
the machine should not be installed
on soft floor coverings.
If installing on a wooden joist floor:
^ We recommend the use of a plywood
base at least 59x52x3 cm. The base
should span several joists and be
bolted to the joists and not only to the
floorboards. Check for pipes and ca-
bles beforehand!
The most stable part of the floor is usu-
ally in the corner.
-
Installation
Lift the machine from its packaging
base and move it to its site. Please note
the following:
Do not lift the machine by the drum
^
door.
Ensure that the machine feet and
,
the floor area are dry to prevent the
machine from slipping during the
spin cycle.
,
If the machine is installed on a
raised plinth, it has to be secured
against slippage during spin using
retaining clips (available from the
Miele Spare Parts Dept). Otherwise
there is the danger of the machine
moving about.
59
Page 60
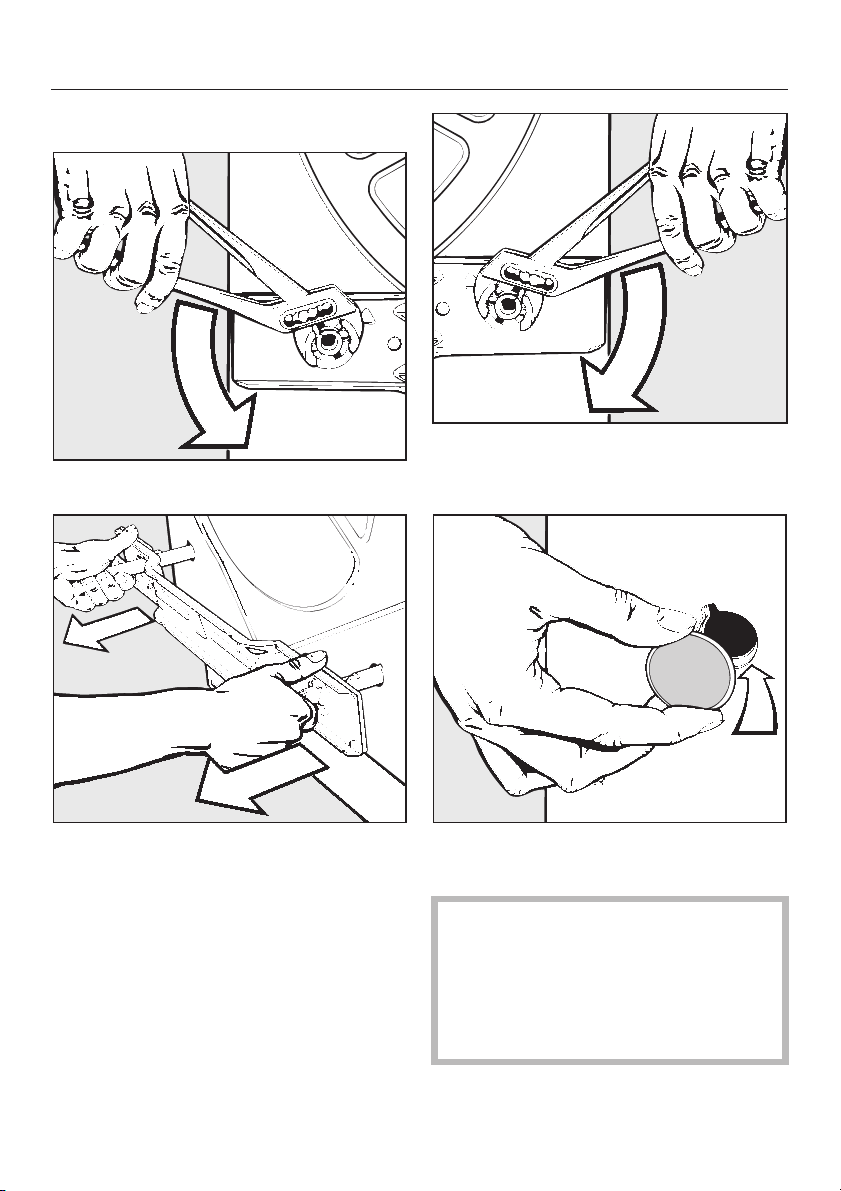
Installation and connection
Removing the transit fitting
A Turn the left-hand transit bar 90°.
C Withdraw the two bars together with
the support plate.
B Turn the right-hand transit bar 90°.
60
D Plug the holes with the plastic caps
supplied.
The machine must not be moved
without the transit fitting in place.
Store the transit fitting in a safe
place for future use. It must be re-fit
ted if the machine is to be moved
again (e.g. when moving house).
Re-fitting is carried out by reversing the
procedure.
-
Page 61
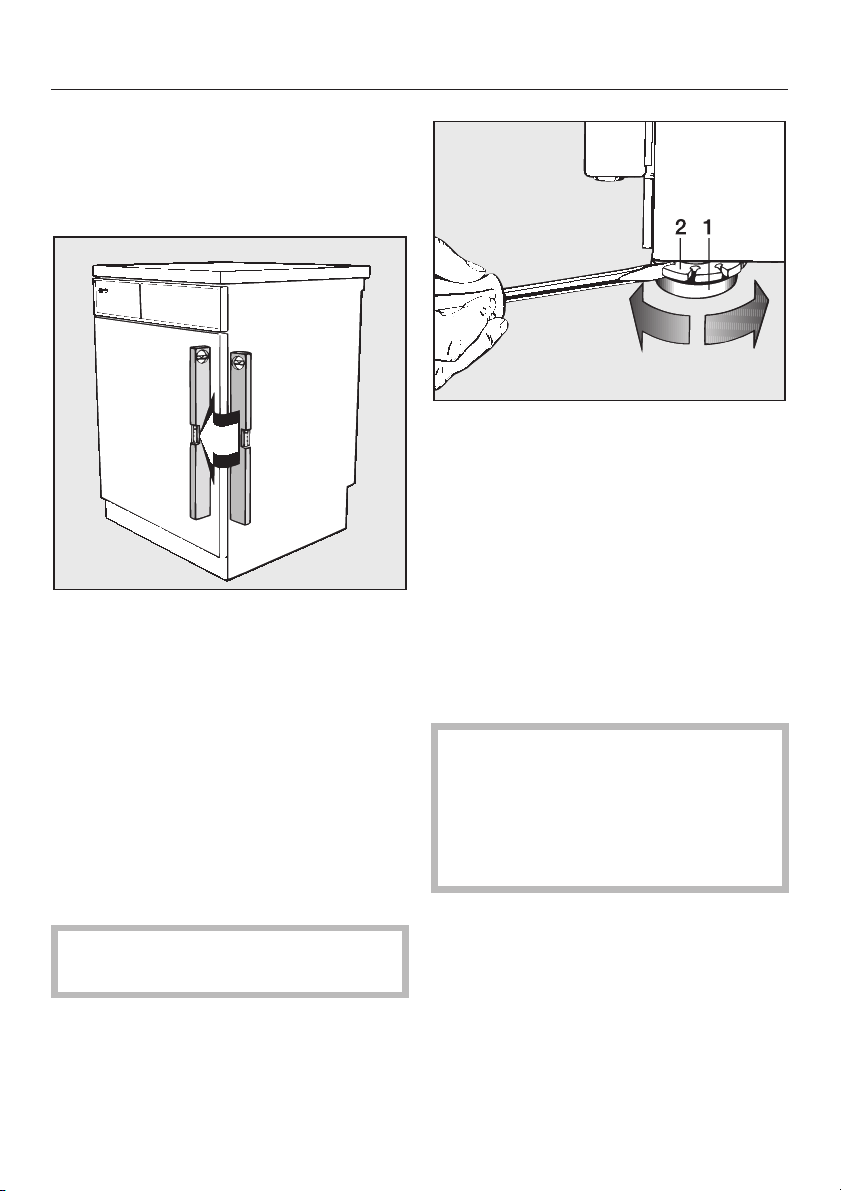
Levelling the machine
The machine must stand perfectly level
on all four feet to ensure safe and
proper operation.
Incorrect installation may increase electricity and water consumption and may
cause the machine to move about.
The four adjustable feet are used to
level the machine. All four feet are
screwed in when the machine is deliv
ered.
Screwing out and adjusting the feet
^
Gently tip the machine and prop it up
using a solid wooden wedge for ex
ample, to ensure stability.
-
-
Installation and connection
Loosen counternut 2 with a screw
^
driver by turning it anti-clockwise,
then unscrew foot 1 together with the
counternut.
^ Put the machine back on all four feet.
^ Use a spirit level to check the ma-
chine is standing level.
^ Hold the foot 1 firm using a pipe
wrench and using a screwdriver turn
the counternut 2 to the right firmly up
against the housing.
,
All four counternuts must be
firmly up against the housing. Please
also check this for the feet which did
not need adjustment. Otherwise
there is the danger of the machine
moving about.
-
,
Make sure the machine does not
slip as this could cause injury.
61
Page 62
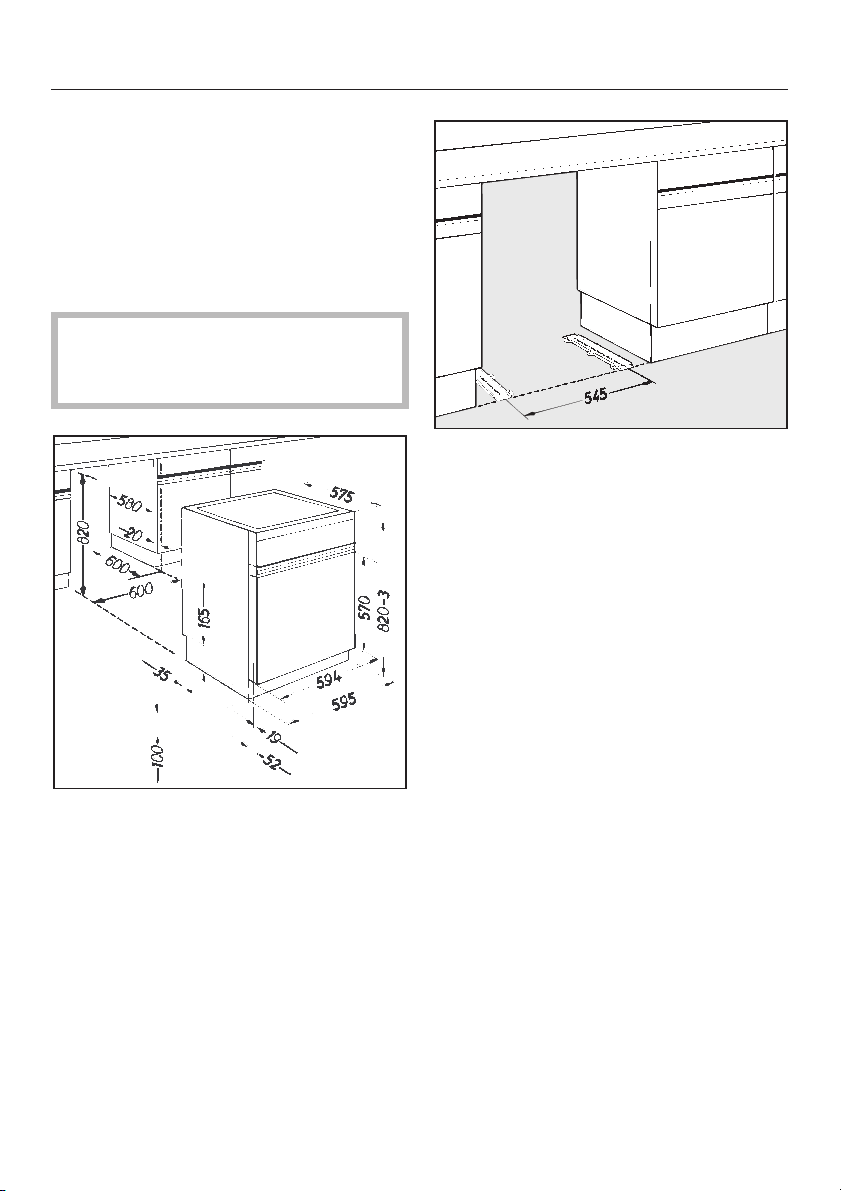
Installation and connection
Building under:
This machine is specially designed for
installation under a continuous worktop
run in a fitted kitchen.
It is supplied with a cover plate which
must be used in place of the machine’s
own lid.
To ensure electrical safety the
,
cover plate must be fitted and must
not be removed!
The slides supplied should be used
–
to protect the floor from damage
when the machine is pushed into position or taken out for servicing.
– For building under a worktop where
the niche height is 870 mm a raising
kit, height 40 mm, should be used.
For niche heights in excess of 920
mm a second raising kit will be required.
Please note:
–
The machine must not be used with
out the front panel in place.
–
Connections for electricity, water and
drainage should be installed in such
a way that they remain accessible
when the machine is in place.
62
The raising kits (incl. Fitting instruc
tions) are available from the Miele
Spare Parts Dept.
-
-
Page 63
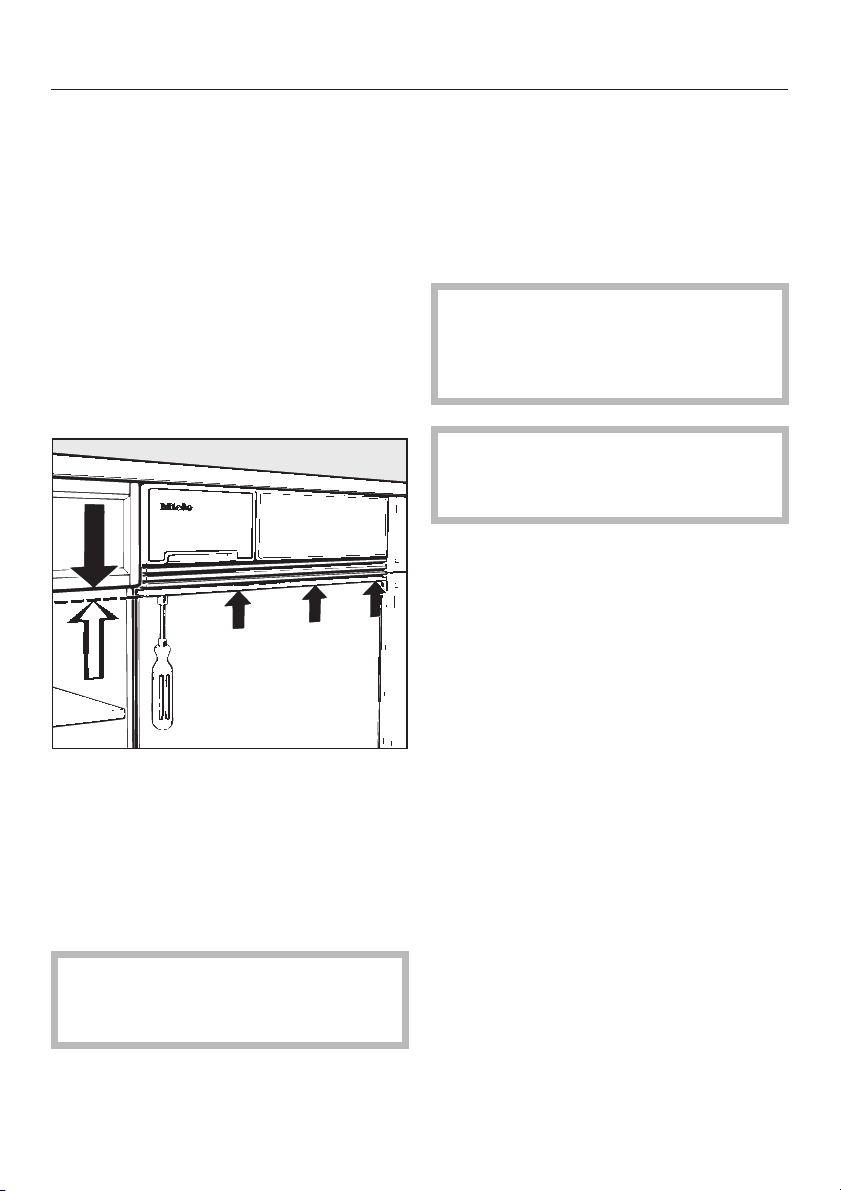
Installation and connection
Matching the facia panel to the
height of adjacent drawer fronts
The adapter can be height adjusted to
match the height of adjacent drawer
fronts by:
adjusting the nuts
–
or
removing one or more of the adapter
–
strips.
Adapter strip adjustment range:
Fitting the front panel
The machine front can be fitted with a
decor panel to match kitchen units.
If fitted in a MIELE kitchen, a front panel
can be ordered pre-drilled with the nec
essary fixing holes.
If fitted in a non-Miele kitchen, a suit
able panel will have to be drilled to
suit by a qualified kitchen fitter in ac
cordance with Miele specifications.
The rear side of the panel must be
completely flat (without profile). Any
unevenness must be levelled out.
Front panel dimensions:
Height: . . . . . . . . 570 mm (+10/- 25mm)
Width: . . . . . . . . . . . . . . . 588 - 596 mm
Thickness: . max. 19 mm (at the edges)
Use the template supplied to locate
and drill the fixing holes in non-Miele
kitchens.
-
-
-
–
max. 10 mm upwards (see arrows in
the illustration),
–
max. 25 mm downwards (this re
quires additional adapter strip(s) and
longer screws, available from your
Miele Dealer or the Spare Parts
Dept.).
After adjustments have been made,
cut or pinch off any excess length
from the screws.
-
63
Page 64
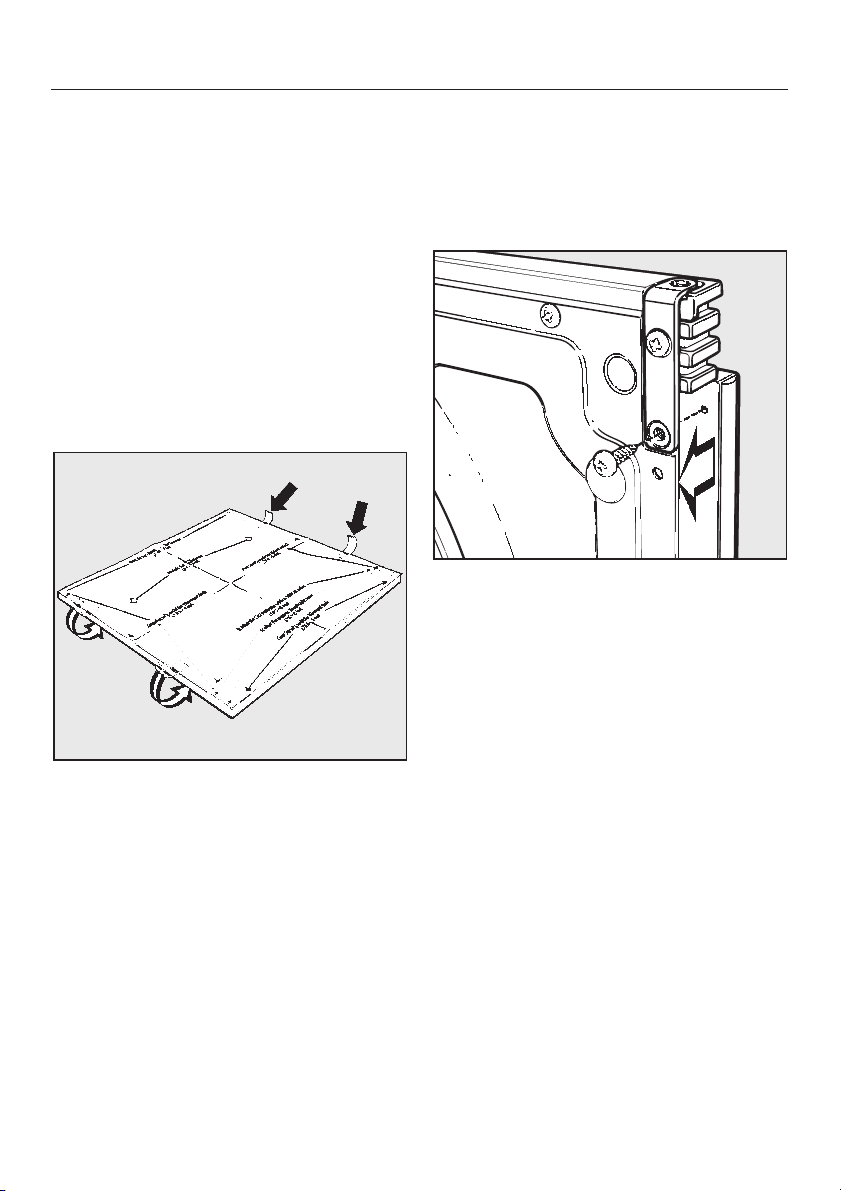
Installation and connection
Drilling template
Place the template on the lower edge
^
of the rear of the door panel.
There are four short parallel marks in all
four corners of the template.
Align the template using these marks
^
as your guide.
Example:
On a 594 mm wide panel the 2nd mark
ing from the centre must line up with
the left and right hand outer edge of the
door panel.
^
Fix the template in position using ad
hesive tape.
Fixing the panel in position
The appliance door is right hand
hinged and is not convertible. The
holes marked 1,2,4,5,6,7,8 and 9 on the
template are required for fixing the
panel in position.
Drill fixing holes for the inner door
^
panel to the specified depth.
On chipboard fronts: inject silicone
sealant (supplied) into the (=Ø10 mm)
free holes.
-
^ Unscrew the lower screw on the up-
per hinge on both the left and right
hand sides of the door (see illustration).
^ Using the screws provided, screw the
front panel through drill holes 1 and 2
on the inner door panel (see tem
plate) - do not overtighten!
-
^
Align the front panel.
Tighten the screws.
Drill any further required holes through
the holes in the inner door panel.
Secure the front panel with the remain
ing screws and hinge screws provided.
-
-
64
Page 65
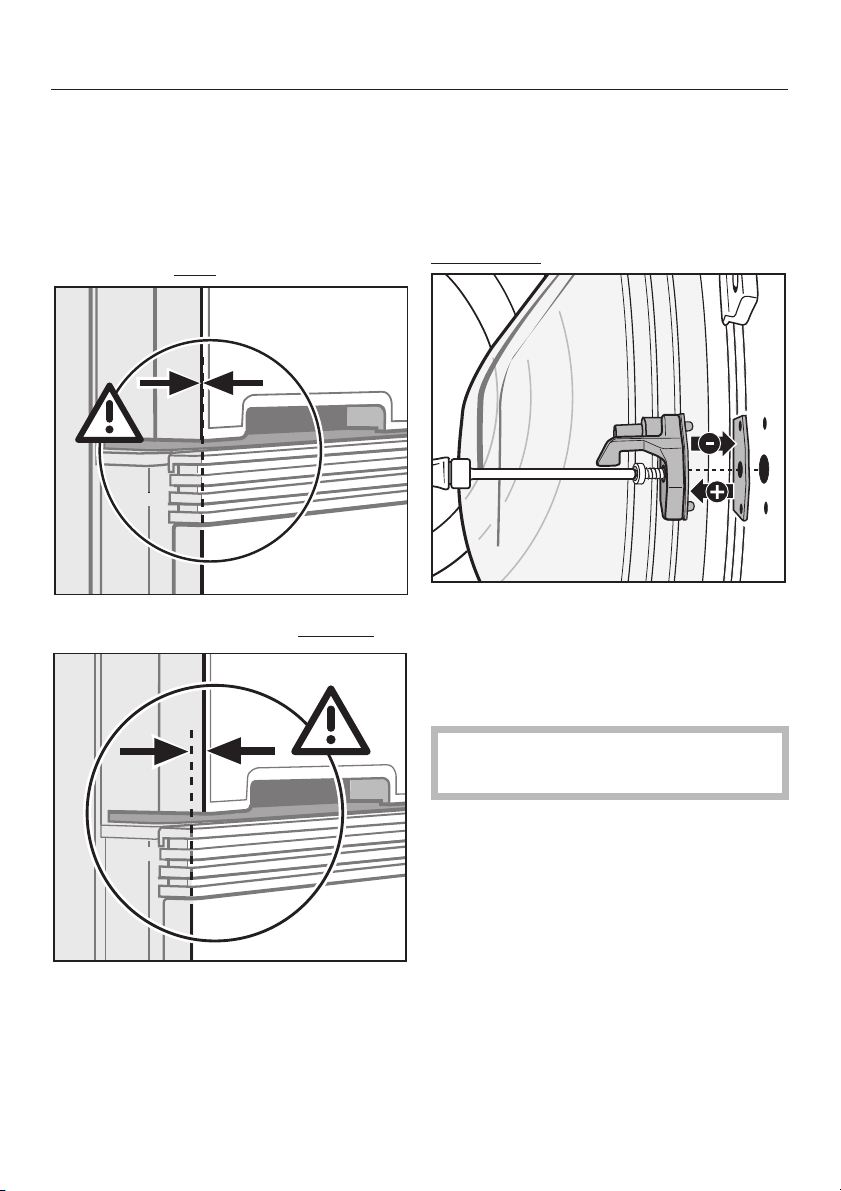
Installation and connection
Aligning the door
The door must align so that it is flush
with the control panel. If the door is not
flush with the control panel it will not
shut properly.
Example of a flush
Example of a door which is not flush
door:
:
To align the door add or remove the
spacers located underneath the door
latch.
Additional spacers are supplied in the
accessory pack.
Please note:
If you use too many spacers the door
will not provide a sufficient seal when
shut.
If this is the case remove one or more
spacers until the door shuts correctly.
After aligning the door test it to make
sure that the seal is adequate.
65
Page 66
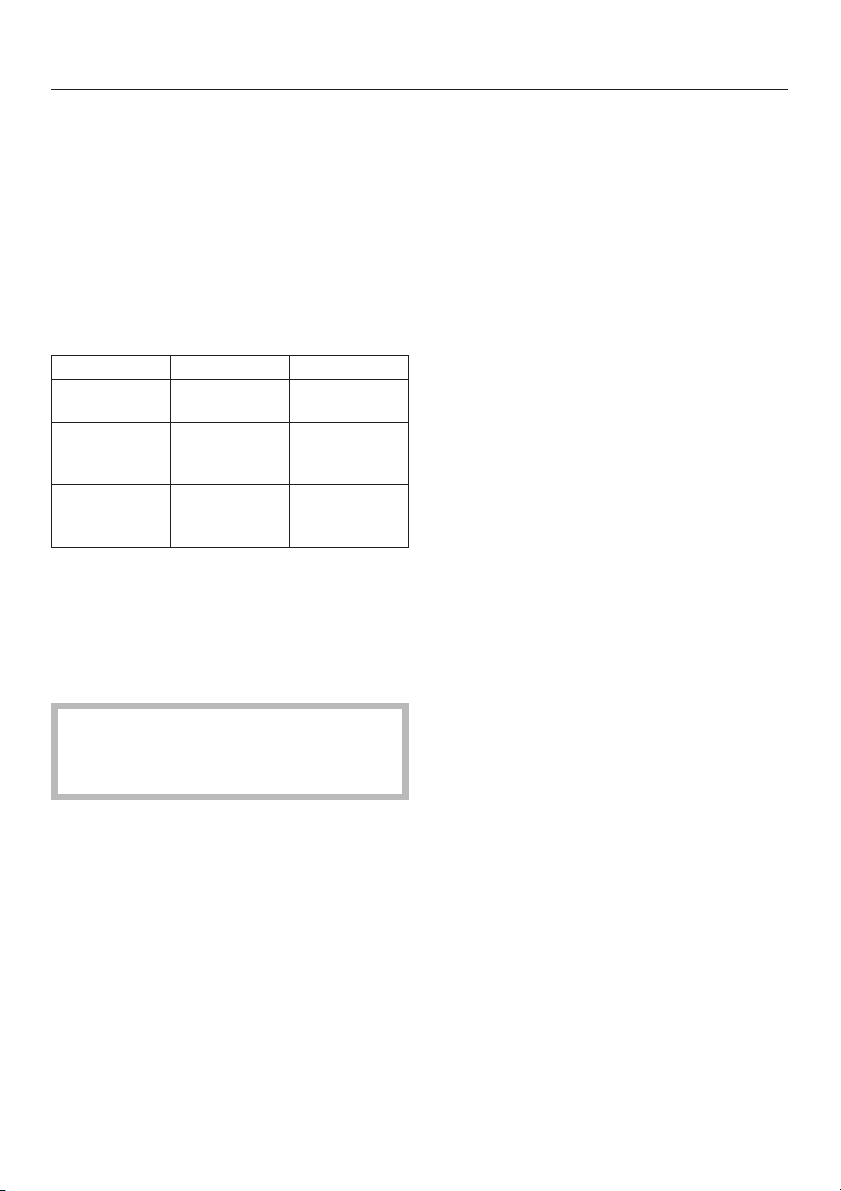
Installation and connection
Fitting a plinth facing.
The appliance plinth below the door
can be fitted with a plinth facing to
match your kitchen.
The height and return of the appliance
plinth cannot be altered.
A higher plinth facia can only be fitted if
the overall niche height is higher.
Plinth height Niche height
100 mm
(standard)
150 mm 870 mm one spacer
200 mm 920 mm two spacer
820 mm -
frame is re
quired
frames are re-
quired
-
Plinth facing (60 cm long) can be ordered from your Kitchen Dealer or manufacturer.
Before fitting the plinth facing please
note:
Fitting the plinth facing:
Stick the velcro strip provided to the
^
appliance plinth.
For this the following procedure is rec
-
ommended:
Match up the hooked side and the
^
looped side of the velcro strip length
wise.
Cut it into 2 or 3 sections.
^
Peel the protective backing off one
^
side of the lengths of velcro.
Position the velcro strips along the
^
appliance plinth, at the left and right
hand sides and in the middle and
then press firmly into place.
^ Carefully remove the remaining pro-
tective foil from the velcro.
^ Press the plinth facing onto the adhe-
sive surface of the velcro strips and
press firmly into position.
-
Under no circumstances must any
thing be stuck over the flap(s) in the
appliance plinth.
66
-
Page 67
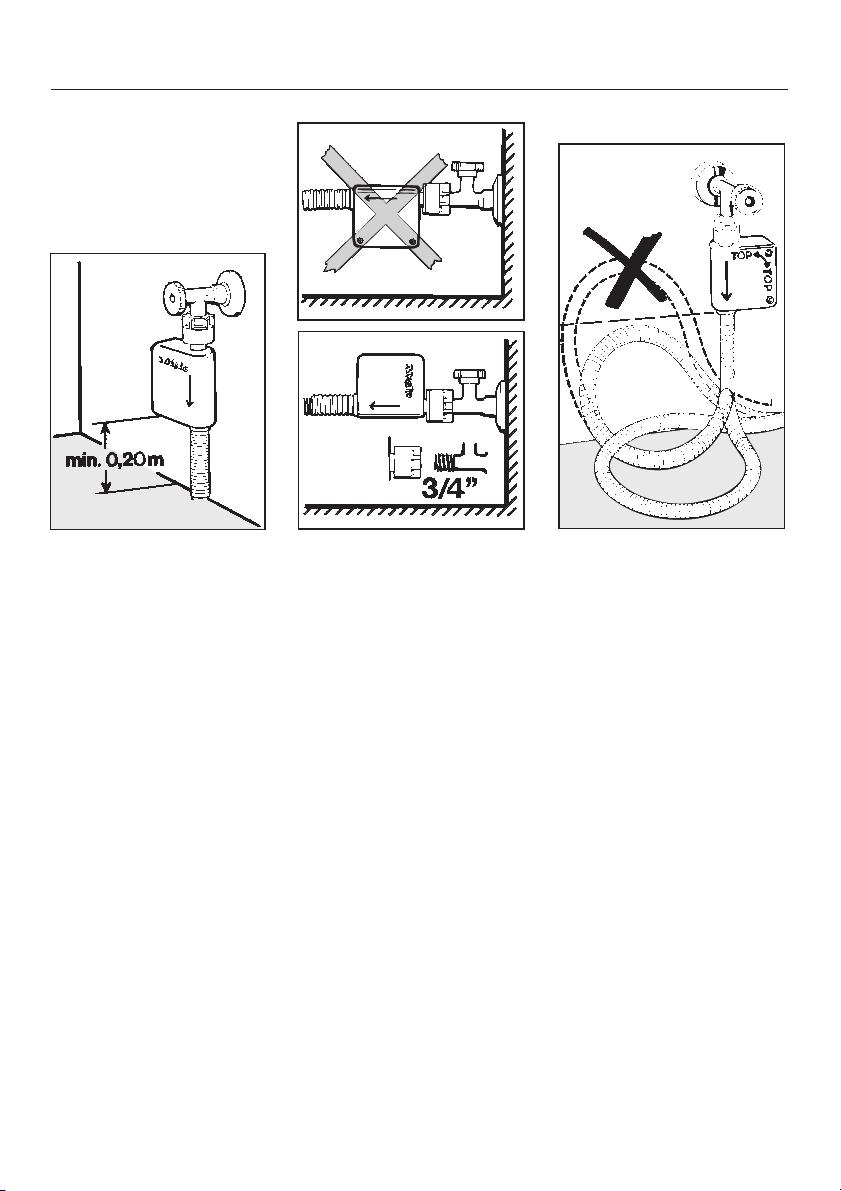
Installation and connection
Connection to the water supply
Fitting
The machine should be connected to a
mains water supply in accordance with
standard regulations. The German authorities do not require it to have a
non-return valve as the machine has
been designed to comply with the rele
vant valid standard (DIN Norm).
The machine is designed to operate
with a minimum flow pressure of 1 bar.
There is a minimum flow pressure of 1
bar if 5 litres of water flow into a suit
able container in 15 seconds.
-
-
The static water pressure must not exceed 10 bar. If it is higher than 10 bar it
is essential to fit a reducer valve.
The Miele Waterproof system connected between the stopcock and the
machine offers the safest protection
against water leaks.
For the Miele Waterproof system to
function correctly, it may only be fitted
in the position shown in the illustrations
above.
Connection to the mains water supply
should incorporate a mains stopcock
with 3/4" thread. The stopcock should
be fitted by a qualified plumber.
67
Page 68
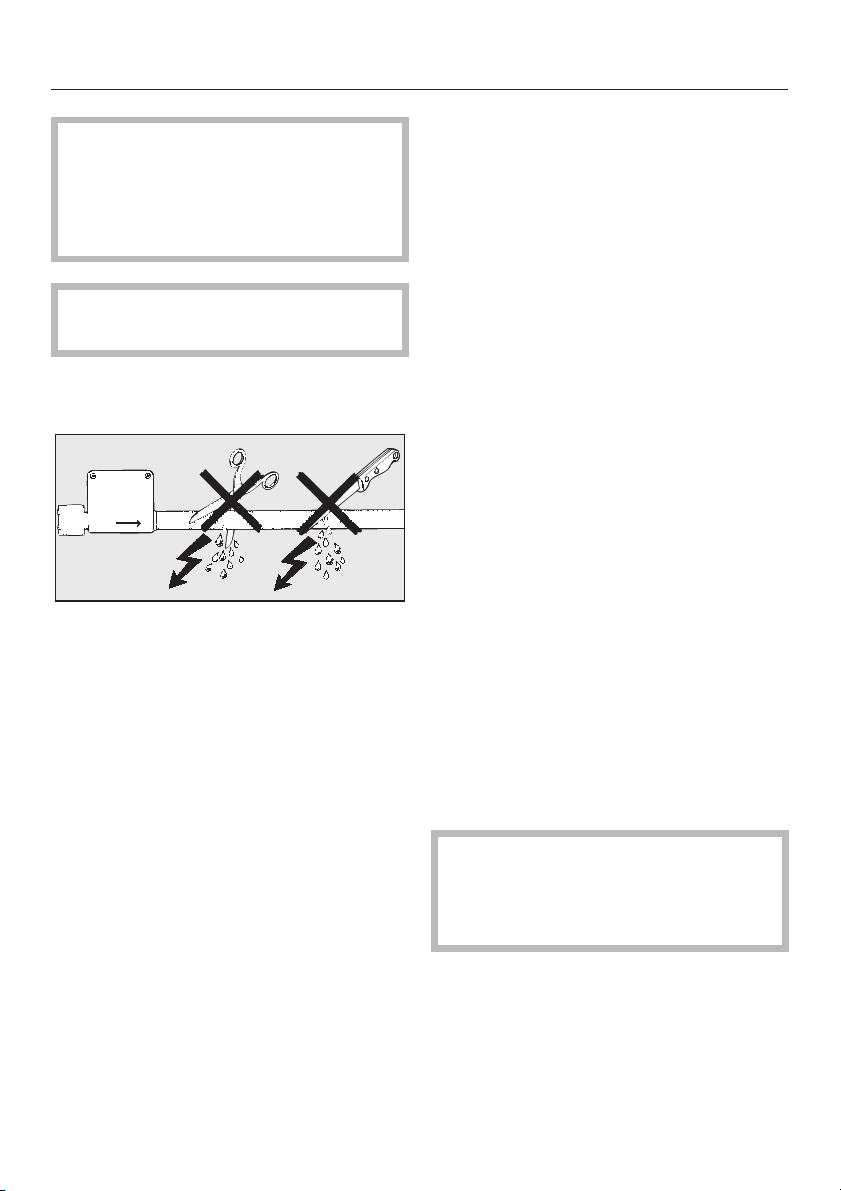
Installation and connection
The connection point is subject to
mains water pressure. Turn on the
stopcock slowly and check for leaks.
Correct the position of the washer
and union if appropriate.
This appliance is not suitable for
connection to hot water.
The protective sleeve of the hose must
not be damaged.
The Miele Waterproof system is available with a hose length of approx. 4.5
m as an optional extra.
Function
The core feature of the Waterproof sys
tem is an electrical safety valve. It
works like an automatic stopcock.
-
The Miele Waterproof system protects
from water damage in the following
cases:
Protection in the event of a leaking
–
appliance.
Any leaking water is collected in a
sump in the base of the appliance.
The float switch switches off the wa
ter supply. This prevents any more
water getting into the machine.
Protection in the event of a leaking
–
water inlet hose.
Leaking water is fed into the sump
through the protective covering which
surrounds the inlet hose as a "second
skin". The float switch switches off the
water supply.
Maintenance
If you intend to unscrew the Miele Wa-
terproof system from the stopcock it is
essential to disconnect the machine
from the electricity supply first.
Only use a Miele Waterproof system
should you ever need a replacement or
extension. These are tested to with
stand pressure of at least 70 bar.
-
-
68
In order to protect the water inlet
valves the dirt filter in the solenoid
safety valve connection must not be
removed.
Page 69
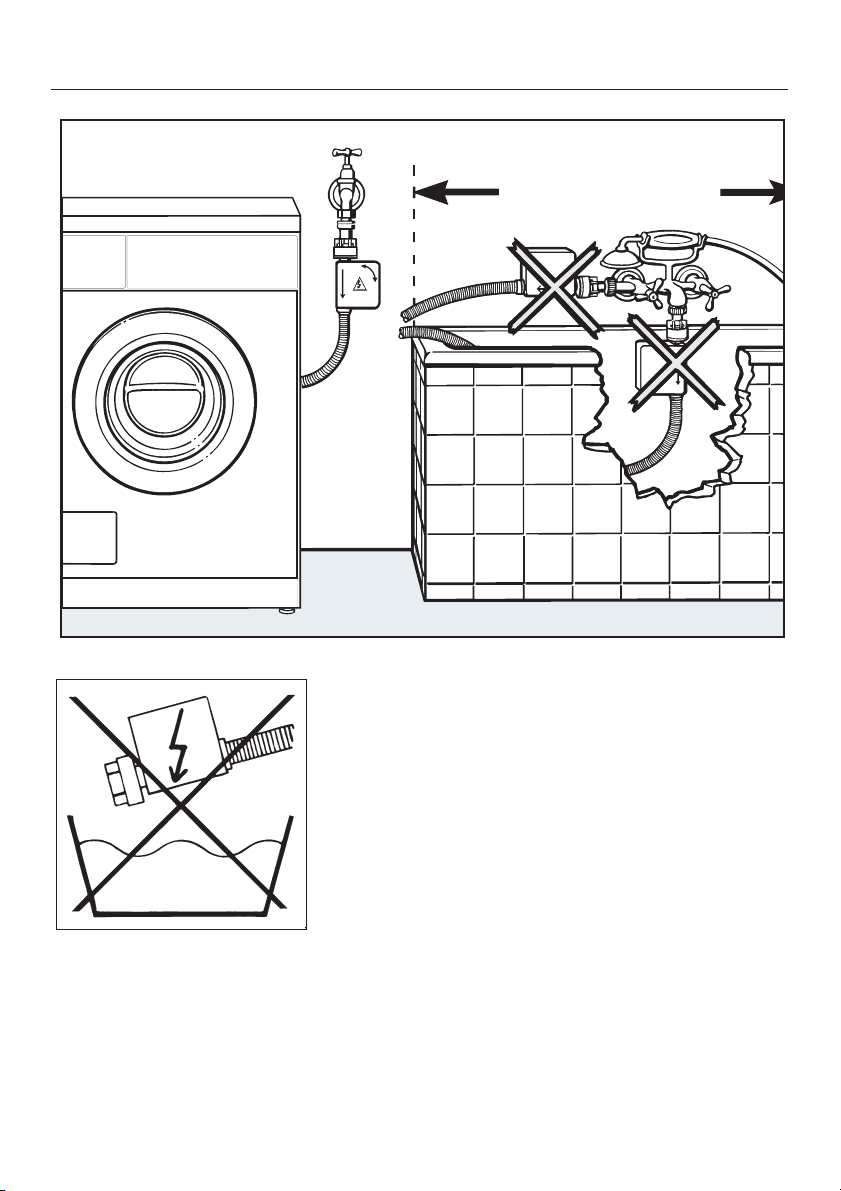
Installation and connection
Warning:
The plastic housing of the water con
nection contains an electrical compo
nent.
Do not dip into any liquid.
-
-
69
Page 70

Installation and connection
Connection to the drainage
system
The machine drains via a drain pump
with a delivery head of 1 metre.
The drain hose is 1.5 m long. It must
not be kinked as this restricts drainage.
The swivel elbow at the end of the hose
can be turned in either direction, or can
be detached if required, with a sharp
twist and pull.
Drain hose connection:
1. Direct into a sink.
Please note the following
Hook the hose over the edge and se
–
cure.
Make sure that the water can drain
–
away freely without hindrance. Other
wise there is a risk of water overflow
ing or of some of the drained water
being sucked back into the machine.
2. Connected securely to a plastic drain
pipe with a rubber nipple. There is no
need to use a non-return valve.
3. Connected securely to a standpipe.
4. Connected securely to a floor gully.
If required the drain hose can be extended to a length of 5 metres. The accessories required can be purchased
from the Miele Spare Parts Dept.
For draining the water away with a delivery head over 1 metre (and up to a
max. of 1.8 metres) a 2nd "Duo-drain
pump" is available together with the
corresponding kit from your Miele
Dealer or the Miele Spare Parts Dept.
-
-
-
70
Page 71

Installation and connection
Electrical connection U.K.
All electrical work should be carried out
only by a suitably qualified and compe
tent person, in strict accordance with
national and local safety regulations.
Ensure power is not supplied to the ap
pliance while installation work is being
carried out.
The appliance is supplied with a mains
cable with moulded plug for connection
to a 230-240V mains supply. The volt
age, rated load and fuse rating are
given on the data plate. Please ensure
these match the household mains supply.
Connection should be made via a fused
plug and suitable switched socket
which is easily accessible after installation.
For extra safety it is advisable to install
a residual current device (RCD), with a
trip current of 30 mA (in accordance
with DIN VDE 0664, VDE 0100, section
739).
Do not connect via an extension lead.
Important
The wires in the mains lead are col
oured in accordance with the following
code:
-
-
Electrical connection U.K.
Non-rewireable plugs BS 1363
-
If this machine is fitted with a
non-rewireable plug and the socket out
lets are not suitable for the plug sup
plied or if the existing plug needs to be
replaced by a new one, the old plug will
need to be cut off and an appropriate
plug fitted. The fuse carrier and the
fuse should be removed from the old
plug and disposed of.
The plug cut from the cable should then
be disposed of and on no account be
inserted into any socket elsewhere in
the house (electric shock hazard).
The fuse cover must be refitted when
changing the fuse, and if the fuse cover
is lost, the plug must not be used until a
suitable replacement is obtained. The
colour of the correct replacement cover
is that of the coloured insert in the base
of the plug, or the colour that is embossed in words on the base of the
plug (as applicable to the design of
plug fitted).
Replacement fuses should be ASTA ap
proved to BS 1362 and have the cor
rect rating. Replacement fuse covers
may be purchased from your local elec
trical supplier or Service agent.
-
-
-
-
-
Green/yellow = earth
Blue = neutral
Brown = live
71
Page 72

Installation and connection
If the colours of the wires in the mains
lead of this appliance do not corre
spond with the coloured markings iden
tifying the terminals of your plug, pro
ceed as follows:
The wire which is coloured green and
^
yellow must be connected to the ter
minal in the plug which is marked
with the letter E or by the earth sym
bol z or coloured green, or green
and yellow.
The wire which is coloured blue must
^
be connected to the terminal in the
plug which is marked with the letter N
or coloured black.
^ The wire which is coloured brown
must be connected to the terminal in
the plug which is marked with the letter L or coloured red.
WARNING: THIS APPLIANCE
MUST BE EARTHED
-
-
-
-
-
72
Page 73
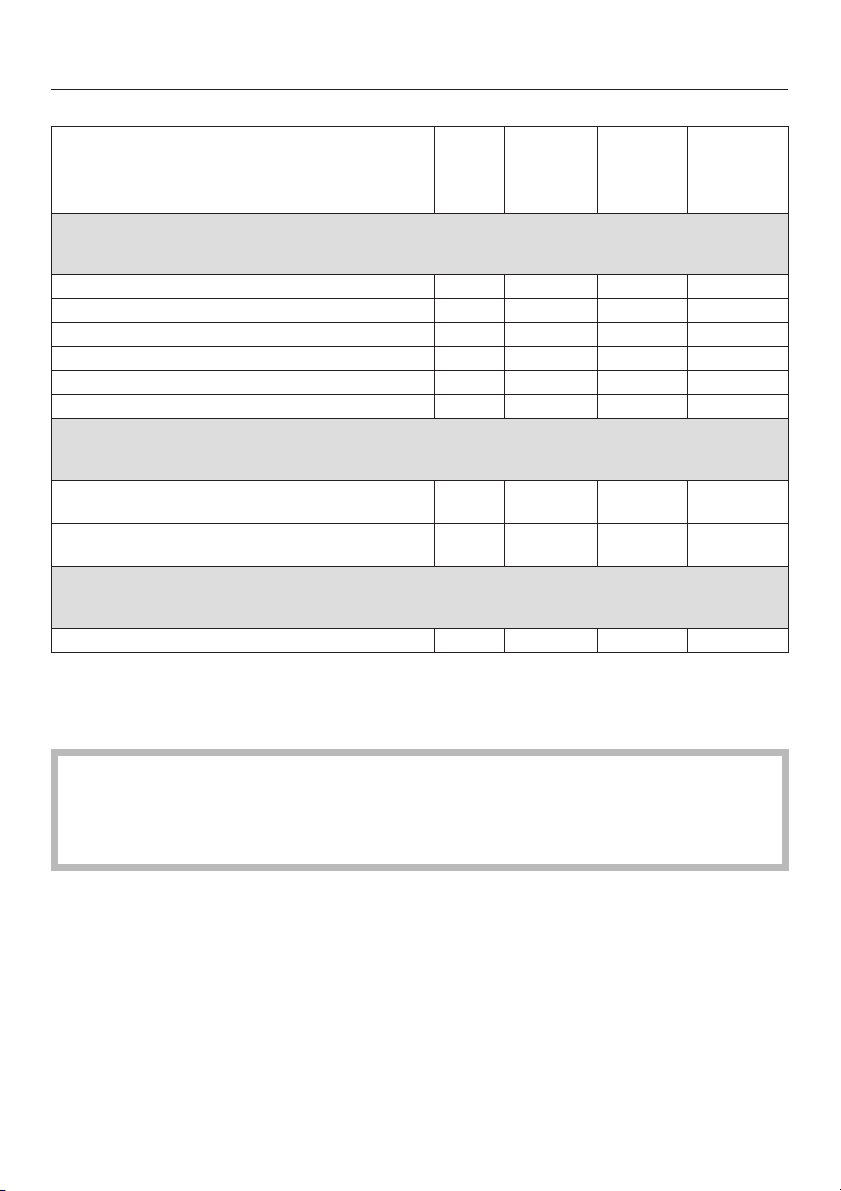
Consumption data
Programme
duration
-
Programmes
Full
load
kg kWh l h min
Energy
consump
tion
consump
-
Water
tion
WASHING
COTTONS 95°C 5.0 1.70 59 1 53
COTTONS 60°C
COTTONS 40°C 5.0 0.50 56 1 56
MINIMUM IRON 40°C 2.0 0.45 57 1 20
DELICATES 30°C 1.0 0.40 75 1 00
WOOLLENS 30°C 1.0 0.15 25 0 38
(1)
5.0 0.95 56 1 56
WASHING and DRYING
COTTONS 60°C and
COTTONS Normal
COTTONS 60°C and
COTTONS Normal
(2)
5.0 3.85 78 4 10
2.5 2.40 47 2 40
DRYING
COTTONS Normal
1)
EN 60456 test programme
2)
EN 50229 test programme
3)
EN 61121 test programme
(3)
2.5 1.45 9 1 03
Consumption data can vary from the nominal values given depending on water
pressure, water hardness, water inlet temperature, room temperature, type and
volume of load, fluctuations in the electricity supply and any additional options
selected.
73
Page 74

Technical data
Height 82.0 cm
Width 59.5 cm
Depth 57.5 cm
Weight, empty 102 kg
Max. floor load 1600 Newton (approx. 160 kg)
Capacity - Washing
Capacity - Drying
Voltage see data plate
Rated load see data plate
Fuse rating see data plate
Consumption data see "Consumption data" section
Minimum water flow pressure 1 bar (100 kPa)
Maximum water flow pressure 10 bar (1000 kPa)
Maximum drain pump head 1.00 m
Maximum drain pump length 5.00 m
Test marks Radio / tv suppression, VDE
max. 5.0 kg dry laundry
max. 2.5 kg Cottons
74
Page 75

Programmable functions
for changing
standard settings
Page 76

Programmable functions
The programmable functions can be
used to tailor programmes to suit
your individual requirements. Once
activated the programmable func
tions remain in memory until they are
deactivated.
-
A Press the additional option buttons
Soak
and Pre-wash at the same time,
hold pressed in and . .
B . . . switch the machine on with the
I-ON / 0-OFF
C Then release these buttons.
button.
High water level
This is useful where a higher quality
rinse is required.
It is available for the rinses in the follow
ing wash programmes:
– COTTONS
– MINIMUM IRON
– QUICK WASH 40°C
Follow steps A to G to programme and
store in memory.
The programmable functions are acti-
vated with the help of the additional option buttons and the WASHING
programme selector.
Before you begin, first ensure that
–
the machine is switched off.
–
the drum door is closed.
–
the WASHING and DRYING
programme selectors are at the
Finish
position.
:
Soak/Pre-wash
The
–
quence indicator lamps will flash.
A P will appear in the left of the dis
–
play.
D Turn the WASHING programme se
lector to the
E The following will appear in the dis-
play:
0 = Programmable function off
(de-activated)
or
i = Programmable function on
(active)
Press the START button to switch between
0 to i activated or from
i to 0 deactivated.
F Switch the machine off with the
/ 0-OFF
The setting you have selected is now
stored in memory.
G Turn the WASHING programme se
lector to the
Rinse out fluff
button.
Finish
and
Washing
position.
position.
I-ON
se
-
-
-
-
76
Page 77

Programmable functions
Additional rinse for the
COTTONS programme
Suitable for areas with soft water
(hardness range I).
If a particularly good rinsing effect is re
quired in an area with soft water, then
the high water level can be activated in
addition to the additional rinse.
Follow steps A to G to programme and
store in memory.
The programmable functions are acti
vated with the help of the additional op
tion buttons and the WASHING
programme selector.
Before you begin, first ensure that
– the machine is switched off.
– the drum door is closed.
– the WASHING and DRYING
programme selectors are at the
Finish
position.
-
:
A Press the additional option buttons
Soak
and Pre-wash at the same time,
hold pressed in and . .
B . . . switch the machine on with the
I-ON / 0-OFF
-
C Then release these buttons.
Soak/Pre-wash
The
–
quence indicator lamps will flash.
A P will appear in the left of the dis
–
play.
D Turn the WASHING programme se
lector to the
E The following will appear in the dis-
play:
0 = Programmable function off
(de-activated)
or
i = Programmable function on
(active)
Press the START button to switch between
button.
and
Washing
Separate rinse
se
-
position.
-
-
0 to i activated or from
i to 0 deactivated.
F Switch the machine off with the
/ 0-OFF
The setting you have selected is now
stored in memory.
G Turn the WASHING programme se
lector to the
button.
Finish
position.
I-ON
-
77
Page 78

Programmable functions
Buzzer
An audible tone will sound at the end
of a washing / drying programme.
The machine is delivered with this pro
grammable function activated.
Follow steps A to G to programme and
store in memory.
The programmable functions are acti
vated with the help of the additional op
tion buttons and the WASHING
programme selector.
Before you begin, first ensure that
– the machine is switched off.
– the drum door is closed.
– the WASHING and DRYING
programme selectors are at the
Finish
position.
-
-
:
A Press the additional option buttons
Soak
and Pre-wash at the same time,
hold pressed in and . .
B . . . switch the machine on with the
I-ON / 0-OFF
C Then release these buttons.
Soak/Pre-wash
The
–
quence indicator lamps will flash.
A P will appear in the left of the dis
–
-
play.
D Turn the WASHING programme se
lector to the "COTTONS 40°C" posi
tion.
E The following will appear in the dis-
play:
0 = Programmable function off
(de-activated)
or
i = Programmable function on
(active)
button.
and
Washing
se
-
-
-
-
78
Press the START button to switch be
tween
0 to i activated or from
i to 0 deactivated.
F Switch the machine off with the
/ 0-OFF
The setting you have selected is now
stored in memory.
G Turn the WASHING programme se
lector to the
button.
Finish
position.
I-ON
-
-
Page 79

Programmable functions
Opening the door at high
temperatures
It is possible to open the door during
a washing or drying programme,
even if the temperature is above
70°C.
Warning: The water in the ma
,
chine will be very hot and could
cause burning or scalding.
The machine is delivered with the pro
grammable function switched off.
Follow steps A to G to programme and
store in memory.
The programmable functions are activated with the help of the additional option buttons and the WASHING
programme selector.
Before you begin, first ensure that
– the machine is switched off.
–
the drum door is closed.
-
-
:
A Press the additional option buttons
Soak
and Pre-wash at the same time,
hold pressed in and . .
B . . . switch the machine on with the
I-ON / 0-OFF
C Then release these buttons.
Soak/Pre-wash
The
–
quence indicator lamps will flash.
A P will appear in the left of the dis
–
play.
D Turn the WASHING programme se
lector to the "DELICATES Cold" posi
tion.
E The following will appear in the dis-
play:
0 = Programmable function off
(de-activated)
or
i = Programmable function on
(active)
Press the START button to switch be
tween
button.
and
Washing
se
-
-
-
-
-
–
the WASHING and DRYING
programme selectors are at the
Finish
position.
0 to i activated or from
i to 0 deactivated.
F Switch the machine off with the
/ 0-OFF
The setting you have selected is now
stored in memory.
G Turn the WASHING programme se
lector to the
button.
Finish
position.
I-ON
-
79
Page 80

Programmable functions
Final residual moisture after
drying
The machine is set to give the best
drying results. You do, however, have
the option of shortening or lengthen
ing the drying time if you prefer.
Shortening the drying time:
by
:
1 minute
2 minutes
3 minutes
4 minutes
Lengthening the drying time:
by
:
1 minute
2 minutes
3 minutes
4 minutes
the display will
show:
I
2
3
4
the display will
show:
5
6
7
8
the WASHING and DRYING
–
programme selectors are at the
Finish
position.
A Press the additional option buttons
Soak
-
B . . . switch the machine on with the
C Then release these buttons.
–
–
D Turn the WASHING programme se-
E A number between 0 and 8 will ap-
By pressing the START button repeatedly you can:
– shorten
and Pre-wash at the same time,
hold pressed in and . .
I-ON / 0-OFF
The
Soak/Pre-wash
quence indicator lamps will flash.
A P will appear in the left of the dis
play.
lector to MINIMUM IRON 30°C .
pear in the display.
the drying time in 1 minute steps:
I, 2, 3 or 4 will appear in the display;
button.
and
Washing
se
-
-
Factory setting:
Follow steps A to G to programme and
store in memory.
The programmable functions are acti
vated with the help of the additional op
tion buttons and the WASHING
programme selector.
Before you begin, first ensure that
–
the machine is switched off.
–
the drum door is closed.
808182
0
-
:
–
increase
the drying time in 1 minute steps, 5,
6, 7 or 8 will appear in the display;
–
or accept the factory setting
(0 will appear in the display).
F Switch the machine off with the
-
/ 0-OFF
The setting you have selected is now
stored in memory.
G Turn the WASHING programme se
lector to the
button.
Finish
position.
I-ON
-
Page 81

Page 82

Page 83

83
Page 84
Alteration rights reserved / 3702
This paper consists of cellulose which has been bleached without the use of chlorine.
M.-Nr. 05 182 311 / V
04
 Loading...