

Page 1

Operating Instructions and Level 1 Maintenance
Tumble Dryers
T 6251 / T 6751 Container
To avoid the risk of
accidents or damage to the
machine it is essential to read these
operating instructions before it is
installed, commissioned or used
for the first time.
G
M.-Nr. 06 411 821
Page 2

2 «M.-Nr. 06 411 821 - GB - »
Page 3

Contents
Warning and Safety instructions . . . . . . . . . . . . . . . . . . . . . . . . . . . . . . . . 4
Description of the machine . . . . . . . . . . . . . . . . . . . . . . . . . . . . . . . . . . . 6
- Machine / control panel . . . . . . . . . . . . . . . . . . . . . . . . . . . . . . . . . . . . . 6
- Pushbutton switches / programme selector . . . . . . . . . . . . . . . . . . . . . . . . . . . 7
- Display with selector button and indicator lights . . . . . . . . . . . . . . . . . . . . . . . . . 8
- Programme sequence and check lights / fault indicators . . . . . . . . . . . . . . . . . . . . 9
- Emergency Stop switch . . . . . . . . . . . . . . . . . . . . . . . . . . . . . . . . . . . . . 9
Before using for the first time . . . . . . . . . . . . . . . . . . . . . . . . . . . . . . . . . . 10
– Preparing the laundry . . . . . . . . . . . . . . . . . . . . . . . . . . . . . . . . . . . . . . 10
– Load capacity . . . . . . . . . . . . . . . . . . . . . . . . . . . . . . . . . . . . . . . . . . 10
Programme selection . . . . . . . . . . . . . . . . . . . . . . . . . . . . . . . . . . . . . . 11
Notes . . . . . . . . . . . . . . . . . . . . . . . . . . . . . . . . . . . . . . . . . . . . . . . 13
- Anti-crease . . . . . . . . . . . . . . . . . . . . . . . . . . . . . . . . . . . . . . . . . . . 13
- Interrupting a programme . . . . . . . . . . . . . . . . . . . . . . . . . . . . . . . . . . . . 13
Cleaning and care . . . . . . . . . . . . . . . . . . . . . . . . . . . . . . . . . . . . . . . . 14
Guide to the data plate . . . . . . . . . . . . . . . . . . . . . . . . . . . . . . . . . . . . . . 15
Explanation of symbols on the data plate . . . . . . . . . . . . . . . . . . . . . . . . . . . 16
Appendix 1 . . . . . . . . . . . . . . . . . . . . . . . . . . . . . . . . . . . . . . . . . . . . 17
Level 1 Maintenance . . . . . . . . . . . . . . . . . . . . . . . . . . . . . . . . . . . . . . . . 17
Page
Appendix 2 . . . . . . . . . . . . . . . . . . . . . . . . . . . . . . . . . . . . . . . . . . . . 18
Programme chart . . . . . . . . . . . . . . . . . . . . . . . . . . . . . . . . . . . . . . . . . 18
3 «M.-Nr. 06 411 821 - GB - »
Page 4

Warning and
Safety instructions
Read the operating instructions through before using this machine for the first time. This
way you will avoid the risk of accidents and
damage to the machine.
The tumble dryer is only intended for
drying fabrics, which have been washed in
a water solution, marked on the manufacturer’s wash care label as being suitable for
tumble drying.
There is a danger of fire with the
following, and on no account should
they be dried in this machine:
– Articles containing foam rubber, rubber or
rubber like materials.
– Articles which have been treated with
inflammable cleaning agents.
– Kitchen overalls which may be greasy,
fatty or impregnated with other residues.
Do not dry mops, floor cloths etc in this
machine if they contain substances such
as wax or chemical cleaning agents.
Damaged padded or filled fabrics (eg.
jackets or cushions) should not be dried. If
the filling comes out it could cause a fire.
Some textiles get very hot during drying
and there may be a risk of high
temperatures causing them to ignite in
exceptional circumstances. They should therefore be taken out of the machine as soon as
the programme has finished and as soon as
possible if there has been a power cut. Keep a
fire extinguisher near the machine.
The laundry must not be taken out of the
dryer before the drying programme has
finished, ie, the cooling down phase must
be completed.
If hot laundry items are stacked or packed
they could self-ignite.
Always make sure the drum is stationary
before reaching in to remove laundry.
Reaching into a moving drum is extremely
dangerous.
Repairs to the machine must only be
carried out by fully trained and qualified
service engineers. Unauthorised repairs could
be dangerous.
The electrical safety of this machine can
only be guaranteed when continuity is
complete between it and an effective earthing
system which complies with local and national
regulations.
It is most important that this basic safety
requirement is regularly tested, and where
there is any doubt the on-site wiring should be
inspected by a qualified electrician.
The manufacturer cannot be held liable for the
consequences of an inadequate earthing
system.
The machine is only completely isolated
from the electricity supply when it is
switched off at the wall isolator, or the distribution board circuit breaker.
Do not damage, remove or bypass the
safety features and controls on the
machine.
Where there is any damage to the controls
or to the cable insulation the machine
must not be used until it has been repaired.
Faulty components must only be
exchanged for original Miele spare parts.
Only when these parts are fitted can the
safety standards of the machine be guaranteed.
Do not touch the connecting pipework and
components. There is a danger of being
burnt.
Only use the machine if all of the
removable outer housing parts are in
place. This way any moving parts or electrical
components cannot be accessed.
Fire and Explosion risk
Never use or store benzine, petrol or petroleum based substances or any easily inflammable substances near the machine.
Peripel should not be stored near the machine.
Fire risk
Do not use the machine without the built-in
fluff filter in place. If the fluff filter is damaged it
must be replaced immediately.
A build-up of fluff could block the air flow
heating and ventilation, and impair the
efficiency of the machine.
4 «M.-Nr. 06 411 821 - GB - »
Page 5

Warning and
Safety instructions
Disinfecting and cleaning agents often
have compounds containing chlorides in
them. If these agents dry onto the steel surfaces, the residual chlorides will attack the
steel and can cause rusting.
If you accidentally spill an agent containing
chloride on the machine it should be rinsed off
with water and dried with a soft cloth.
To protect your machine from rust damage we
recommend only using chloride free
disinfecting and cleaning agents. If you are not
sure about a particular agent contact the
manufacturer for advice.
Do not use a high pressure cleaner or
water jet to clean the machine.
Caution If the tumble dryer switches off
prematurely during the drying cycle,
without the fault indicator light showing, this
could be due to high temperatures in the area
around the motor.
Heater limiters stop the tumble dryer.
In this case please check the seals and locks
on the machine door and the fluff filter.
Check the condition of the air inlet and air
outlet vents. If no damage is evident to any of
the parts checked, the dryer can be re-started.
If the fault occurs again, call G3 Systems.
All personnel working with this machine must
be fully trained in all aspects of its use and
safety.
Keep these operating instructions in a safe
place.
5 «M.-Nr. 06 411 821 - GB - »
Page 6
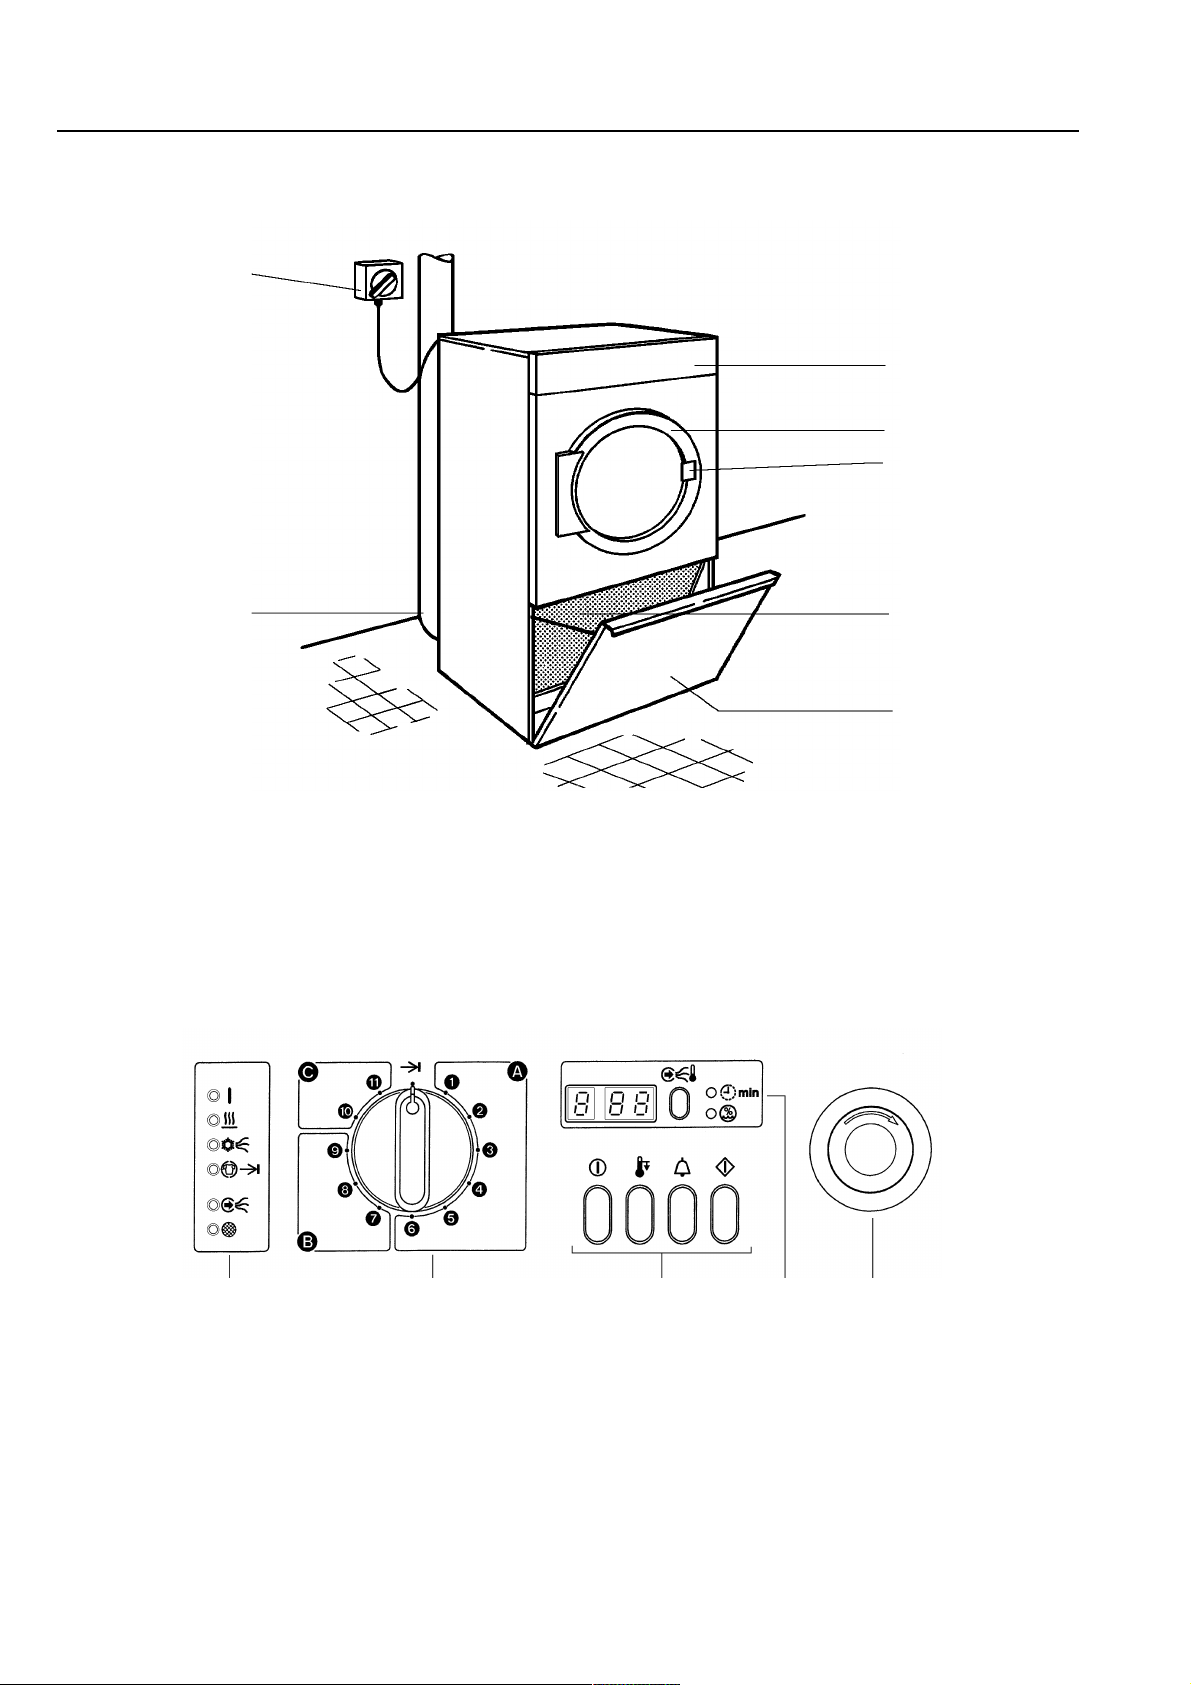
Description of the machine
Tumble dryer (T6251 / T6751)
1
75
2
3
4
1 Mains isolator switch 5 Fluff filter
2 Control panel 6 Fluff compartment flap
3 Drum door 7 Air outlet ducting
4 Door handle
Control panel
6
8 9 10 11 12
8 Programme sequence and check 10 Push button switches
lights 11 Display with selector button
9 Programme selector 12 "Emergency Stop" switch
6 «M.-Nr. 06 411 821 - GB - »
Page 7
Description of the machine
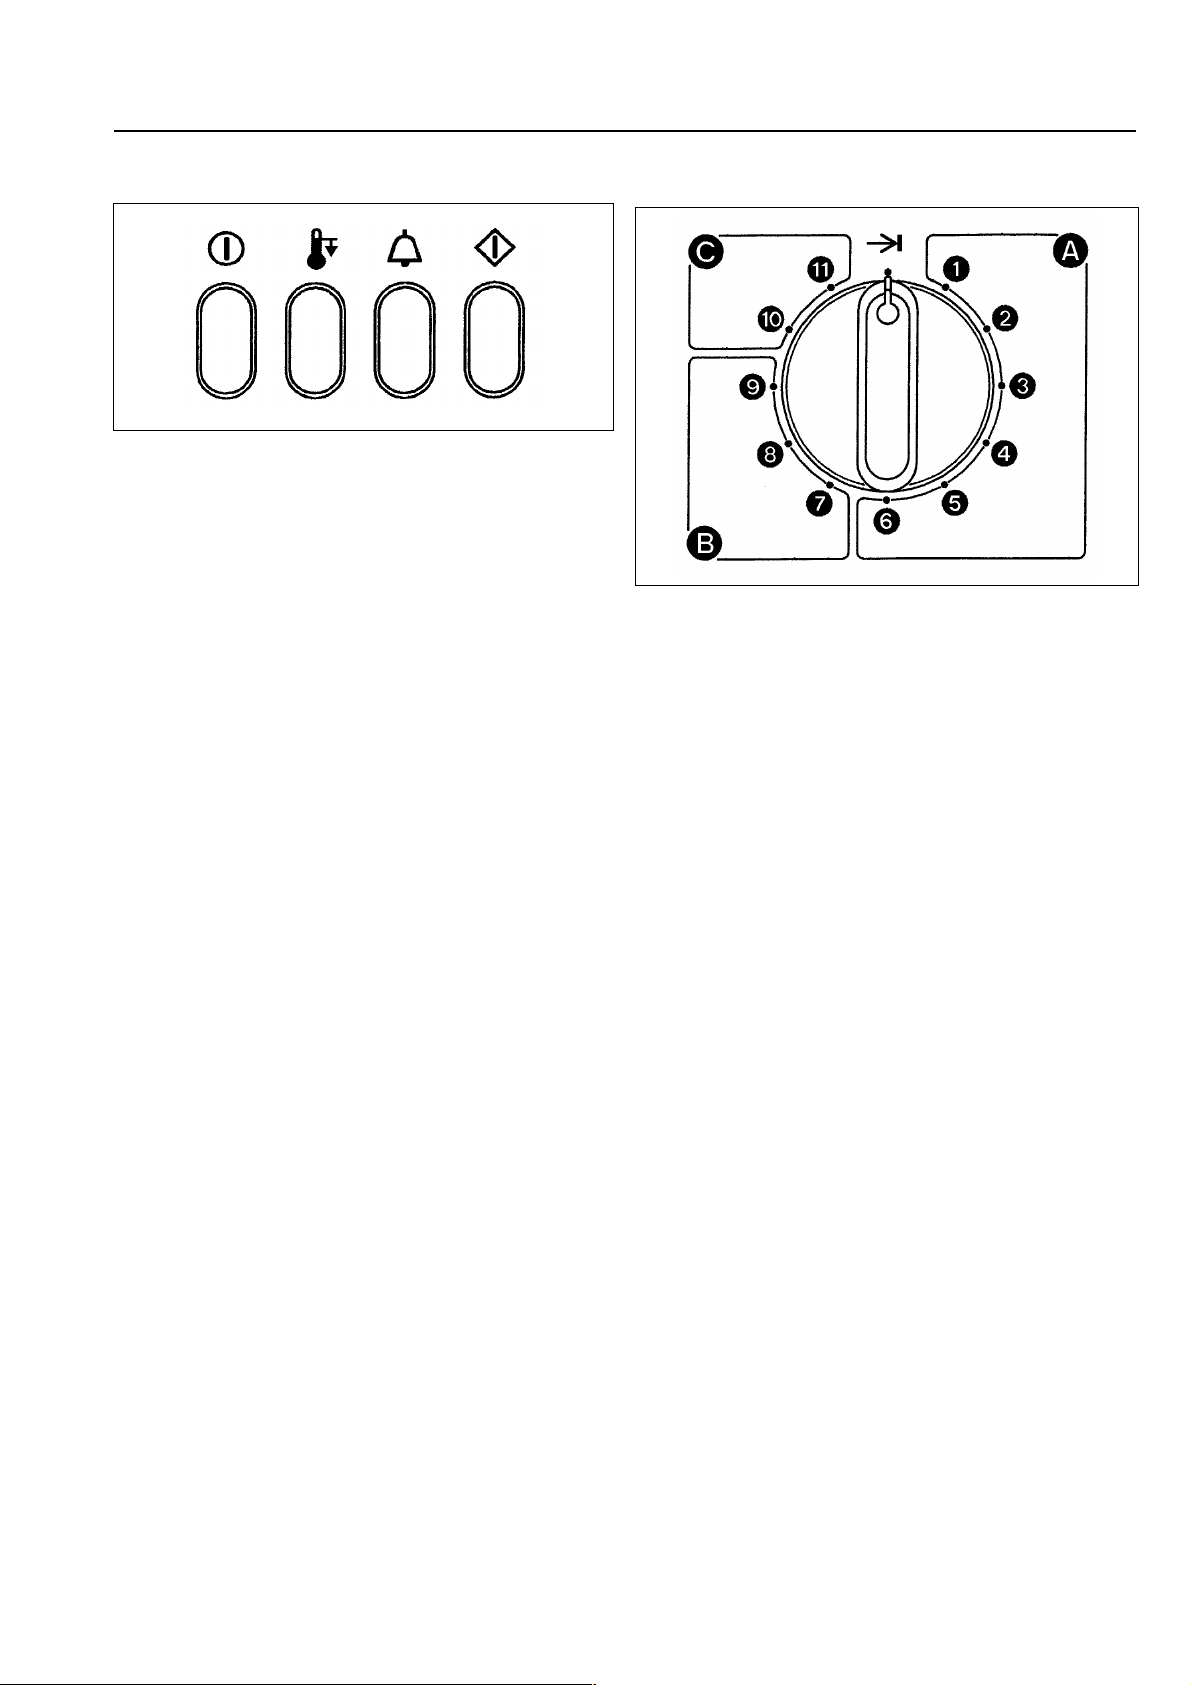
Push button switches
On-Off s switch
L
Low temperature switch
Lowers the drying temperature for delicate
fabrics (e.g. acrylics).
Press the button in to select this function.
Using this button for bagged laundry may
affect the drying times.
l
Buzzer switch
The end of a programme can be indicated by
a buzzer.
Press the button in to select this function.
h
Start button
Press the button in to start the programme.
Programme selector
The programme selector switch is used to
select the programme required.
Predominantly positions 3 and ! will be
used. For a description of these programmes
refer to Appendix 2.
SENSED DRYING
A
For drying cotton / linen textiles
Residual moisture value T6251 T6751
Extra dry -4% -4%
1
Normal + -2% -2%
2
Unbagged 3% 3%
3
Machine iron
4
Machine iron
5
Machine iron
6
r
rr
rrr
13% 16%
20% 22%
26% 30%
MINIMUM IRON
B
For drying polyester / cotton mixtures,
delicates and synthetics
Normal + -2% -2%
7
Normal 2% 2%
8
Machine iron
9
TIMED DRYING
C
without heating 15 min 15 min
0
For airing laundry
Bagged 55 min 55 min
!
For drying bagged loads or to finish off drying
individual items
End
r
7 «M.-Nr. 06 411 821 - GB - »
r
8% 8%
Page 8
Description of the machine
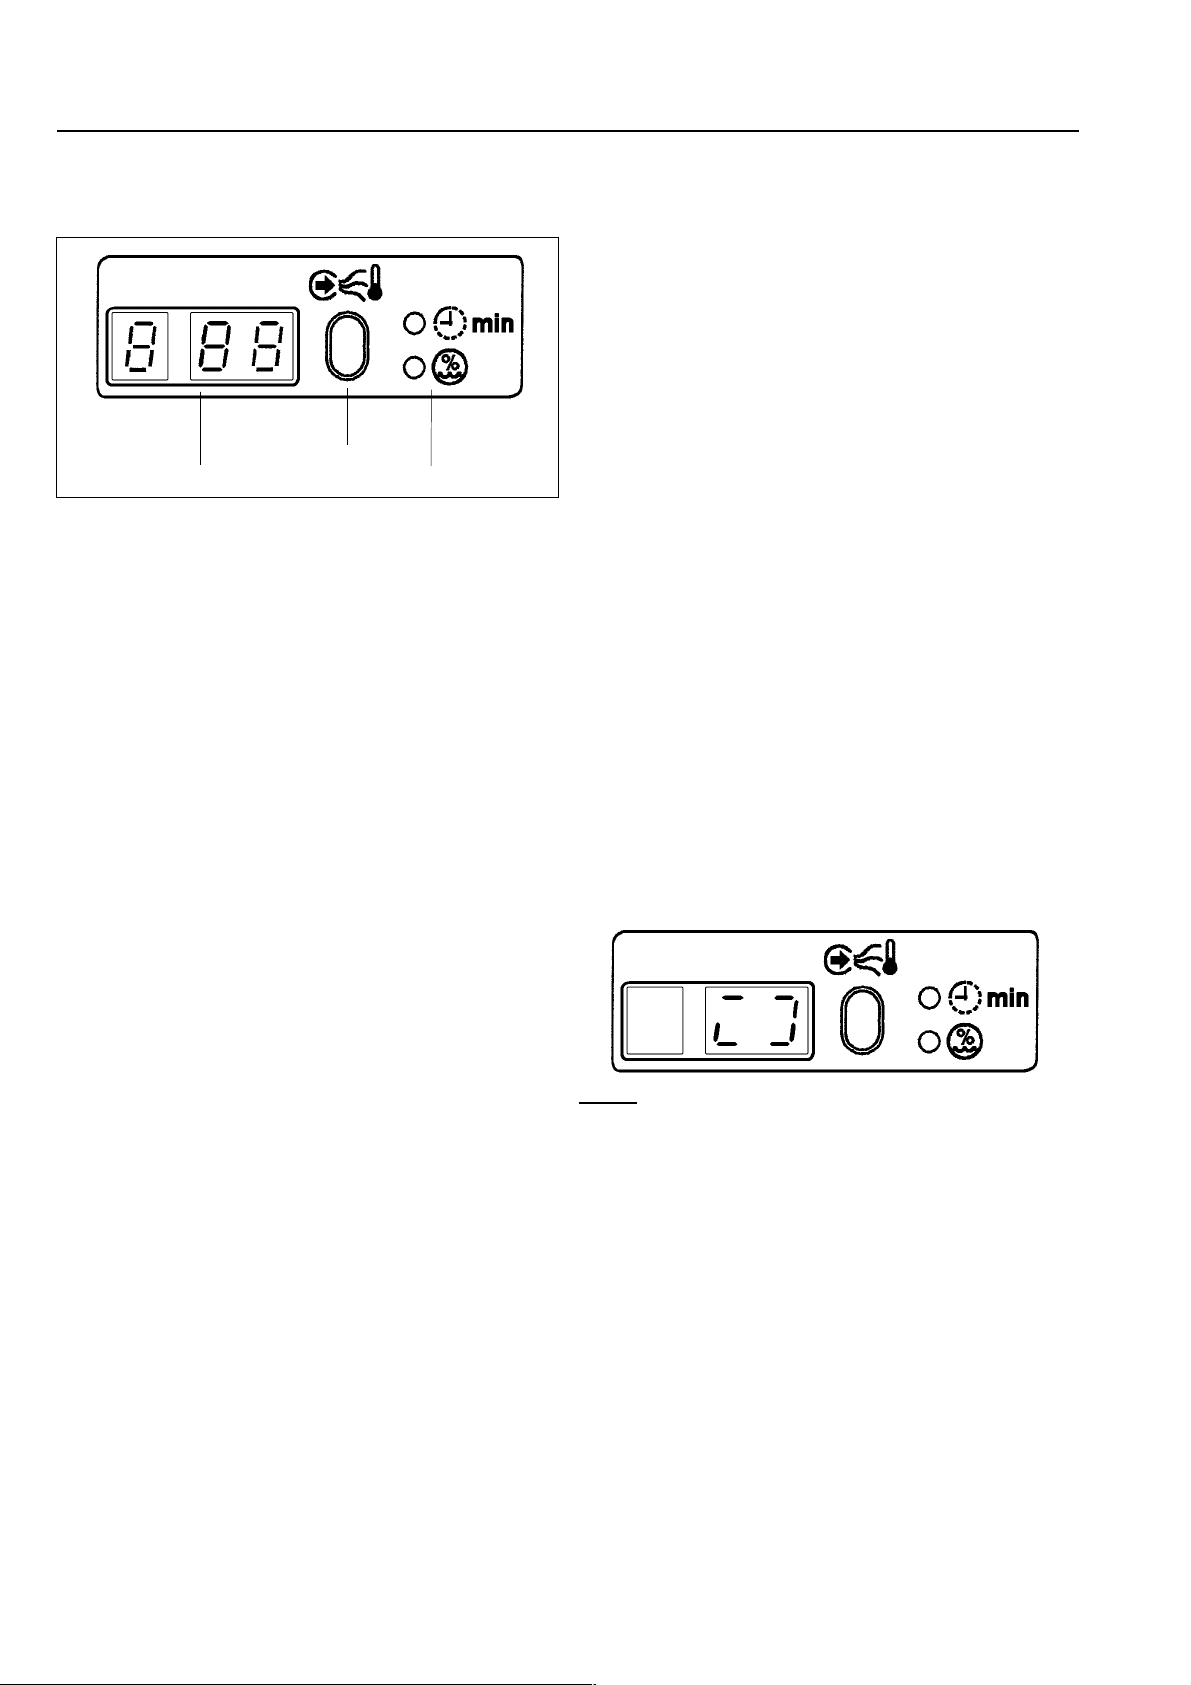
Display with selector button and indicator
lights
Selector button
Display Indicator lights
Selector button shows: Residual moisture /
Time / Vented air temperature
Pressing the selector button will toggle
between Residual moisture / Vented air
temperature (if running a "SENSED DRYING"
programme) and Time / Vented air temperature (if running a "TIMED DRYING"
programme).
Residual moisture <
This button is used to alter the programmed
residual moisture values in programmes
to 9.
1
Display shows: Residual moisture / Time /
Vented air temperature
Residual moisture <
Display of the residual moisture set for
programmes 1 to 9.
A few minutes after the programme has
started the residual moisture in the laundry is
recorded and displayed.
The current residual moisture values are
shown continuously during the programme.
Time m
Display of the time set for programmes
and !.
The hours are shown in the left-hand side of
the display and the minutes in the right-hand
side of the display.
After the programme has started the
remaining time left to run is displayed.
Vented air temperature 0%
The current vented air temperature is
displayed after pressing and releasing the
selector button for approx. 5 seconds while a
programme is running.
0
Time m
This button is used to change the programme
duration in programme
to 1.00 hour, and in programme
minutes to 3.00 hours.
This is done by pressing the button until the
desired time is achieved.
Changes to the residual moisture level and
time can only be carried out before the start of
the programme. Changes are only valid each
time for one selected programme. At the end
of the programme the values set revert to the
standard values.
Temperature of vented air 0%
If the button is pressed in while a programme
is running and released immediately, the
current vented air temperature will show in the
display for approx. 5 seconds.
from 003 minutes
0
from 003
!
Note:
After the start button has been pressed a
turning circle is shown for a short time in the
display (to represent the drum rotating).
8 «M.-Nr. 06 411 821 - GB - »
Page 9
Description of the machine
Indicator lights for: Residual moisture /
Time left
Residual moisture (%)
Lights up when the machine is switched on
and a programme between 1 and 9 has
been chosen.
It goes out at the end of the programme.
Time left (h/mins)
Lights up when the machine is switched on
and programme
It goes out at the end of the programme.
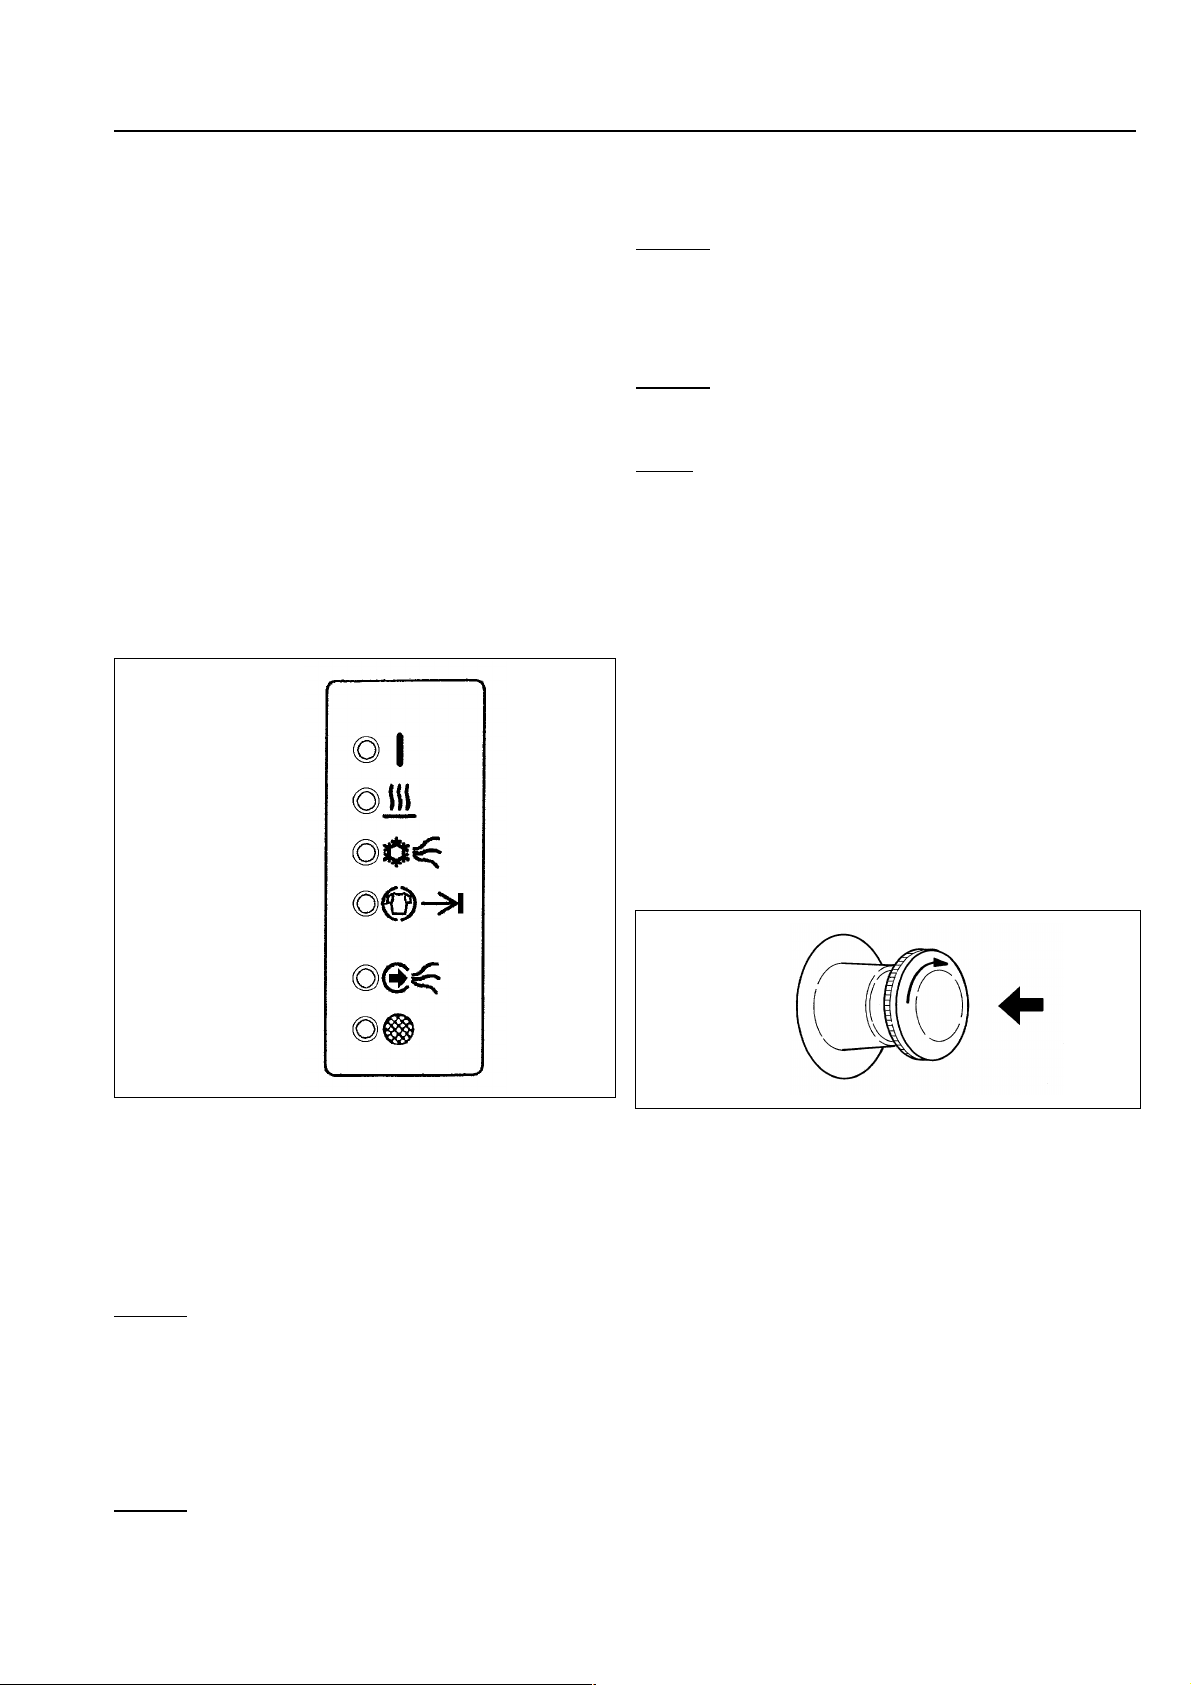
Programme sequence, Check lights and
Fault indicators
or ! has been chosen.
0
On
Check venting
The venting duct is blocked or badly restricted.
Action: Check the vent ducting and if
necessary clean it.
Check fluff filter
The fluff filter is clogged.
Action: Clean the fluff filter at the end of the
programme (I.A.W. Cat 601).
Note:
The "Drying", "Cool air" and "Anti-crease/End"
indicator lights flash if there is a power cut or if
a programme has been interrupted (e.g. when
a door has been opened and shut). They are
not indicative of a fault. The lights will stop
flashing when the "Start" button is pressed
again.
Drying
Cool air
Anti-crease/End
Check venting
Check fluff filter
Fault indicators
Faults or interruptions are indicated by the
sequence lights or the check lights flashing.
Drying light
Fault in the heating system.
Action: Please contact G3 Systems.
Cool air light
The maximum running time of the drying
programme was exceeded because the
residual moisture at the start of the
programme was too high.
Action: Start the drying programme again.
If the fault message occurs again please call
G3 Systems.
Emergency Stop switch
Only use this switch in an emergency.
Do not use it in normal operation to switch the
machine off.
To reset the Emergency stop switch after it
has been used, turn the ribbed disk clockwise.
9 «M.-Nr. 06 411 821 - GB - »
Page 10

Before using for the first time
Preparing the laundry
Before using for the first time
Wipe the inside of the drum with a soft dry
cloth before loading the drum with laundry.
Preparing the laundry
Sort the laundry according to fabric type and
weave in order to achieve an even drying
result.
Not all textiles are suitable for drying in a
tumble dryer. Please pay special attention to
the manufacturer’s instructions on the wash
care label.
Significance of symbols:
= Dry at normal temperature
q
= Dry at low temperature
r
= Do not tumble dry
s
Articles made from pure wool and wool
mixtures tend to become matted and shrink.
They should not be dried in a tumble dryer.
For greater economy dry a full load.
Underloading is uneconomical. Do not
overload as this will impair the drying result
and the laundry finish.
Load capacity (Dry weight)
T 6251 T 6751
Drum volume
250 Litres 750 Litres
Cottons
max.
10 kg
Minimum Iron and Delicates
max.
3.5 kg
max.
30 kg
max.
10 kg
The surface of pure linen is liable to be
roughened by tumble drying. Consult the
manufacturer’s instructions.
Important: Any laundry items with large metal
buckles, hooks, eyes, zip tags etc. should be
put into the dryer in a cloth bag (eg. pillowcase) to protect the drum from scratches and
dents.
Closed metal zips in garments may bridge the
sensor electrodes in the drum ribs causing the
drying process not to end or to end too late.
These items should be dried with the zips undone.
Damaged padded or filled fabrics (eg. jackets
or cushions) should not be dried. If the filling
comes out it could cause a fire
Some woven and loopknit materials tend to
shrink to varying extents depending on their
quality. This tendency is exaggerated by overdrying. Avoid the Extra dry programme for
such fabrics.
Sort the laundry according to the level of
dryness required. It is not necessary to sort
according to size.
10 «M.-Nr. 06 411 821 - GB - »
Page 11

Selecting a programme
Load the drum.
Close the drum door.
Turn on the power supply in accordance
with AESP Cat 201, Chapter 2.
Press in the s On/Off switch.
Select a programme:
Predominantly use Programme 3 for unbagged laundry and Programme ! for
bagged laundry.
The dryer has an electronic sensor system
which monitors the residual moisture in the
laundry.
Note: The drying programmes are not only
monitored electronically but are also timed
for extra safety. The heating time is limited
as standard to 60 minutes.
Once the required level of dryness has
been reached the laundry is cooled down
and the drying programme finishes
automatically.
The programme selector can be turned in
a clockwise or anti-clockwise direction.
Different drying programmes can be
selected with the programme selector
depending on the dryness level required
for further handling:
MINIMUM IRON
B
For drying polyester cotton
mixtures, delicates and synthetics
Residual moisture T6251 T6751
Normal + -2% -2%
7
Normal 2% 2%
8
Hand Iron
9
TIMED DRYING
C
Airing and timed drying
without heating (15 mins)
0
For airing laundry
Bagged (55 mins)
!
To dry bagged loads or to finish off
drying individual items.
If required an additional feature during
drying is the L Low temperature and/or
l Buzzer function.
Press the button for the additional feature
before commencing a drying cycle.
Then press in the h Start button.
r
8% 8%
SENSED DRYING
A
For drying cotton/linen textiles
Residual moisture T6251 T6751
Extra dry -4% -4%
1
Normal + -2% -2%
2
Unbagged 3% 3%
3
Machine Iron
4
Machine Iron
5
Machine Iron
6
r
rr
rrr
13% 16%
20% 22%
26% 30%
The drying programme selected now starts.
Note:
The l Check fluff filter light comes on if the
fluff filter needs to be cleaned. Clean the filter
as soon as the programme has finished.
The laundry must not be taken from the dryer
before the drying programme has
finished, ie, the cooling down phase must
be completed.
If hot laundry items are stacked or packed
they could self-ignite.
11 «M.-Nr. 06 411 821 - GB - »
Page 12

Selecting a programme
The end of the drying programme is
indicated by the ~ r Anti-crease / End
light lighting up and the buzzer sounding if
selected.
Turn the programme selector to r End.
Open the drum door.
Remove the laundry.
If the dryer is not going to be used again in
the near future:
Press the s On/Off button to switch off the
machine.
Turn off the power supply in accordance
with Cat 201, Chapter 2.
Carry out the after use maintenance
required in Cat 601.
12 «M.-Nr. 06 411 821 - GB - »
Page 13
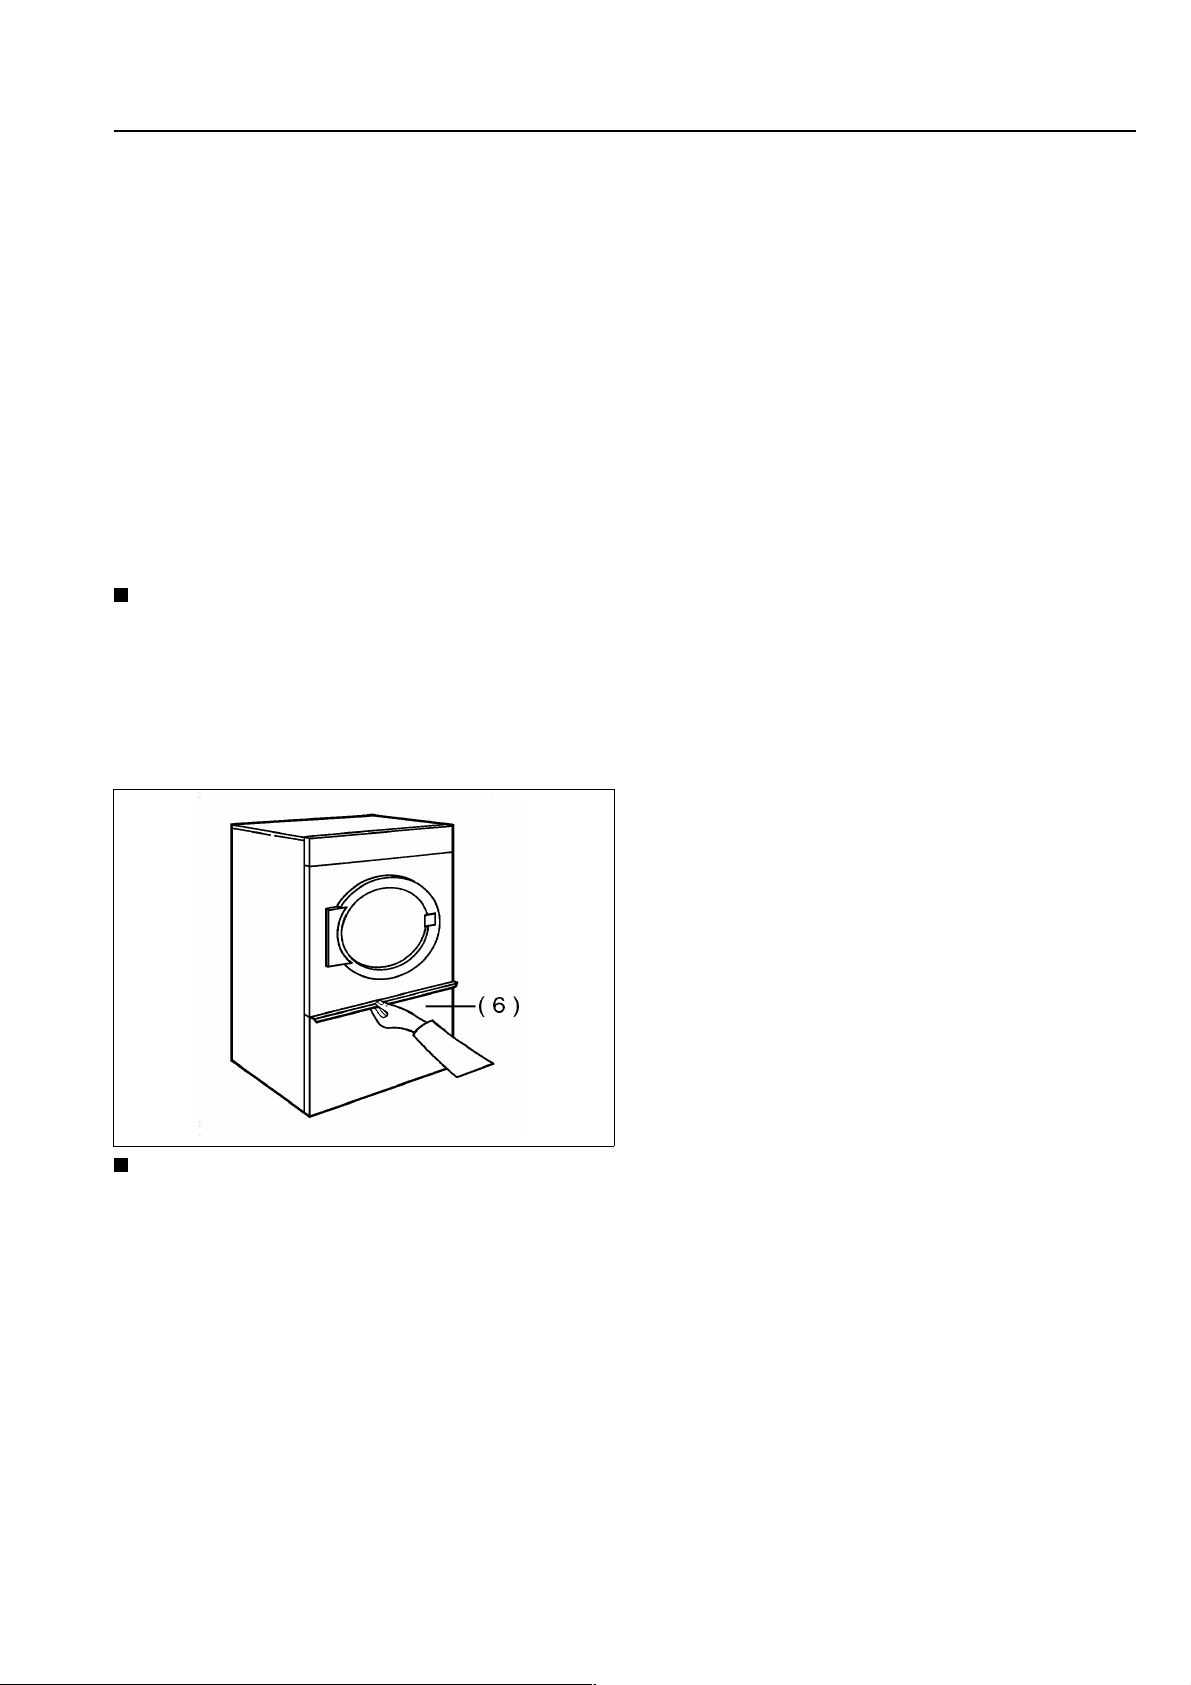
Notes
Anti-crease
If the laundry is not removed from the machine
at the end of the programme an anti-crease
phase switches in automatically. There is
drum movement at intervals to minimise
creasing in the laundry.
The anti-crease phase lasts about 59 minutes.
Interrupting the programme
The door can be opened during operation to
add articles of laundry. Do not reach into a
moving drum.
To continue the drying process:
Close the drum door.
The fan automatically switches on as a
safety measure if the temperature in the interior of the dryer is too high.
The programme sequence lights for drying,
cool air, anti-crease/end and the data in
the display flash.
The On indicator light flashes if the
programme selector is turned to a different
position after the start of a programme. It
stops flashing when the programme selector is
turned back to the programme originally
selected or is turned to the r End position to
finish the programme.
Press the h Start button.
If the drying programme has been interrupted,
either by opening the door, opening the fluff filter panel (6), or operating the Emergency stop
switch, the Start button has to be pressed to
start the programme again.
If a different programme is required, first turn
the programme selector to the r End posi-
tion and then to the desired programme. Press
the Start button to start the new programme.
13 «M.-Nr. 06 411 821 - GB - »
Page 14
Cleaning and care
Before cleaning disconnect the machine from
the power supply by switching off at the isolator or circuit breaker.
Disinfecting and cleaning agents often have
compounds containing chlorides in them. If
these agents dry onto the steel surfaces, the
residual chlorides will attack the steel and can
cause rusting. If you accidentally spill an
agent containing chloride on the machine it
should be rinsed off with water and dried with
a soft cloth.To protect your machine from rust
damage we recommend only using chloride
free disinfecting and cleaning agents. If you
are not sure about a particular agent contact
the manufacturer for advice.
Do not use a high pressure cleaner or
water jet to clean the machine.
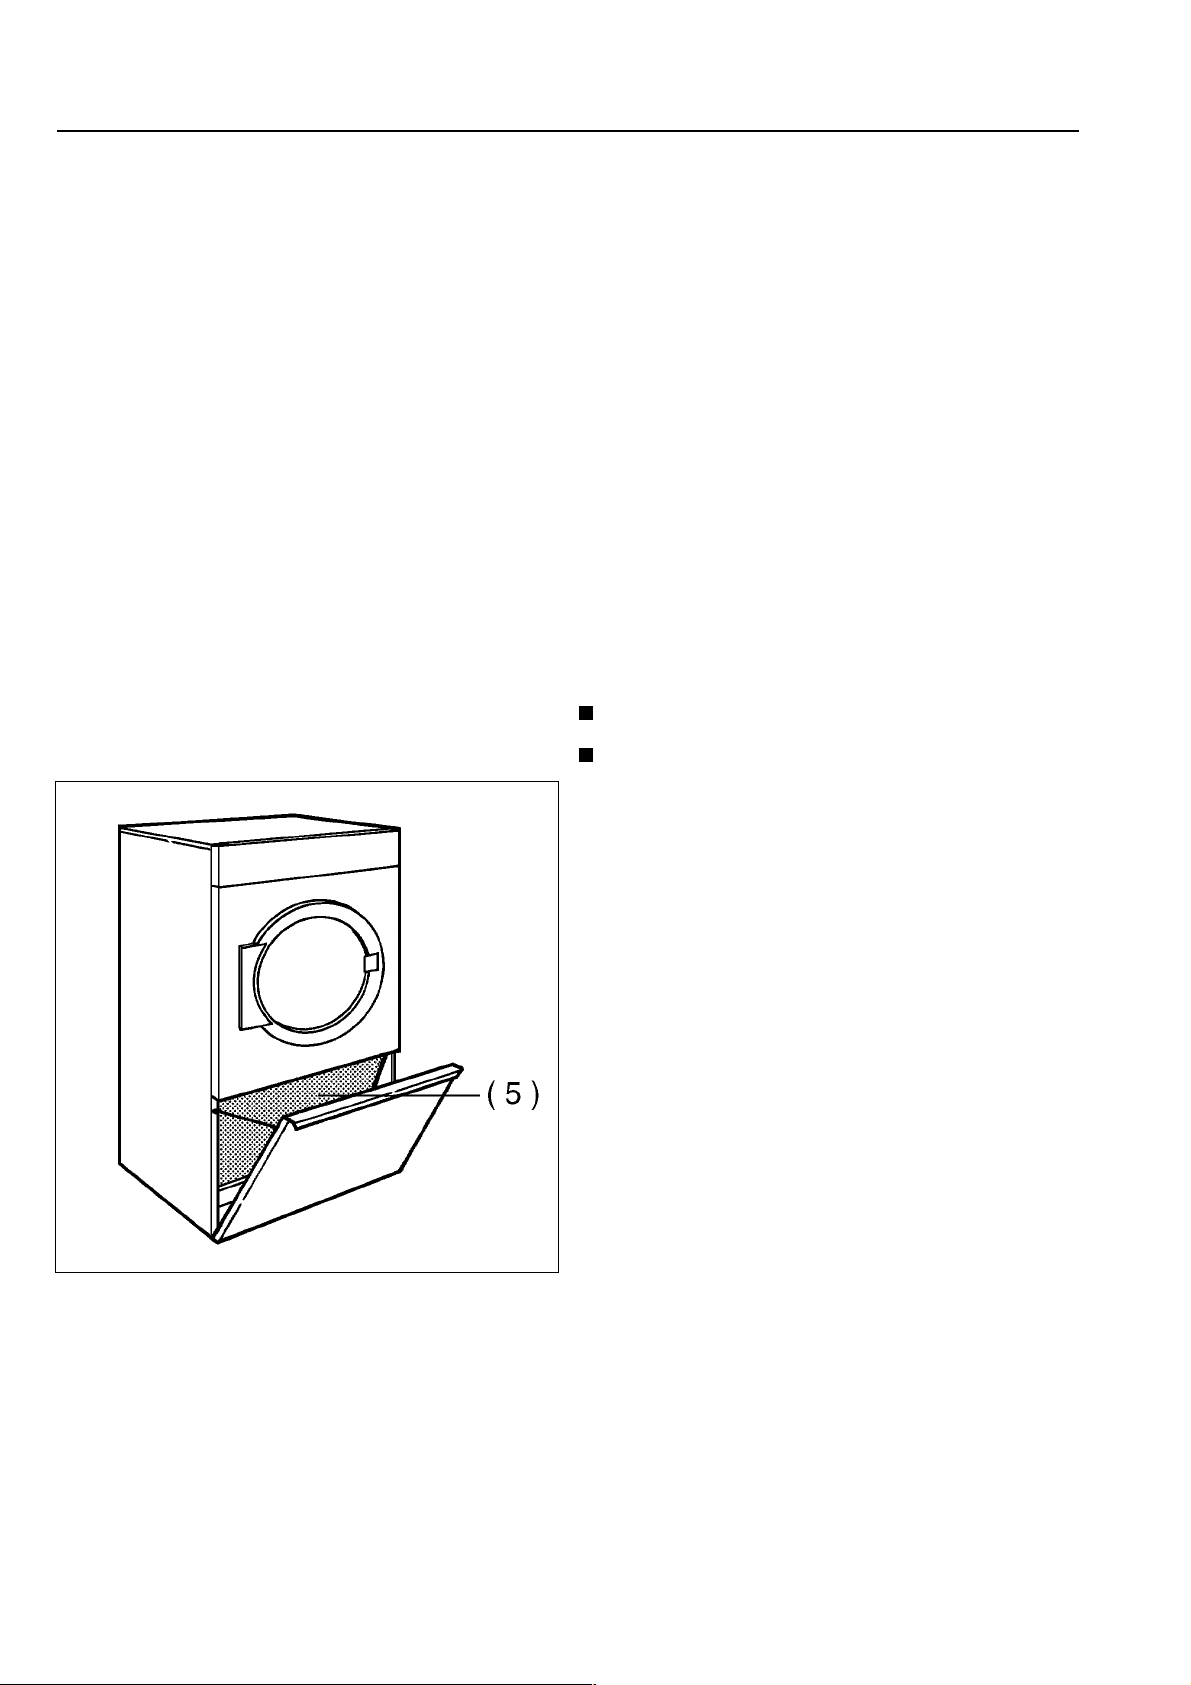
Cleaning the fluff filter
The housing, control panel and any plastic
parts must only be cleaned using a mild cleaning agent or with a soft, damp cloth and then
dried.
Stainless steel housing should be cleaned
with a proprietary stainless steel cleaning
agent following the manufacturer’s instructions
on the packaging.
Never use abrasive cleaning agents to
clean the machine.
If you are unsure about a particular product or
need further advice please contact
G3 Systems. See back page for address.
The following should be checked and if necessary cleaned once a year by G3 Systems:
The whole interior of the tumble dryer
The fins on the ventilation fan
Clean the fluff filter (5) at least once a day, depending on the amount of fluff that has
collected and when the Clean fluff filter indicator light comes on. Do not remove the fluff
filter and be very careful not to damage it.
If appropriate maintenance is not carried out
regularly the efficient running of the machine
may be impaired and operational faults representing a fire hazard can occur.
14 «M.-Nr. 06 411 821 - GB - »
Page 15
Guide to the data plate
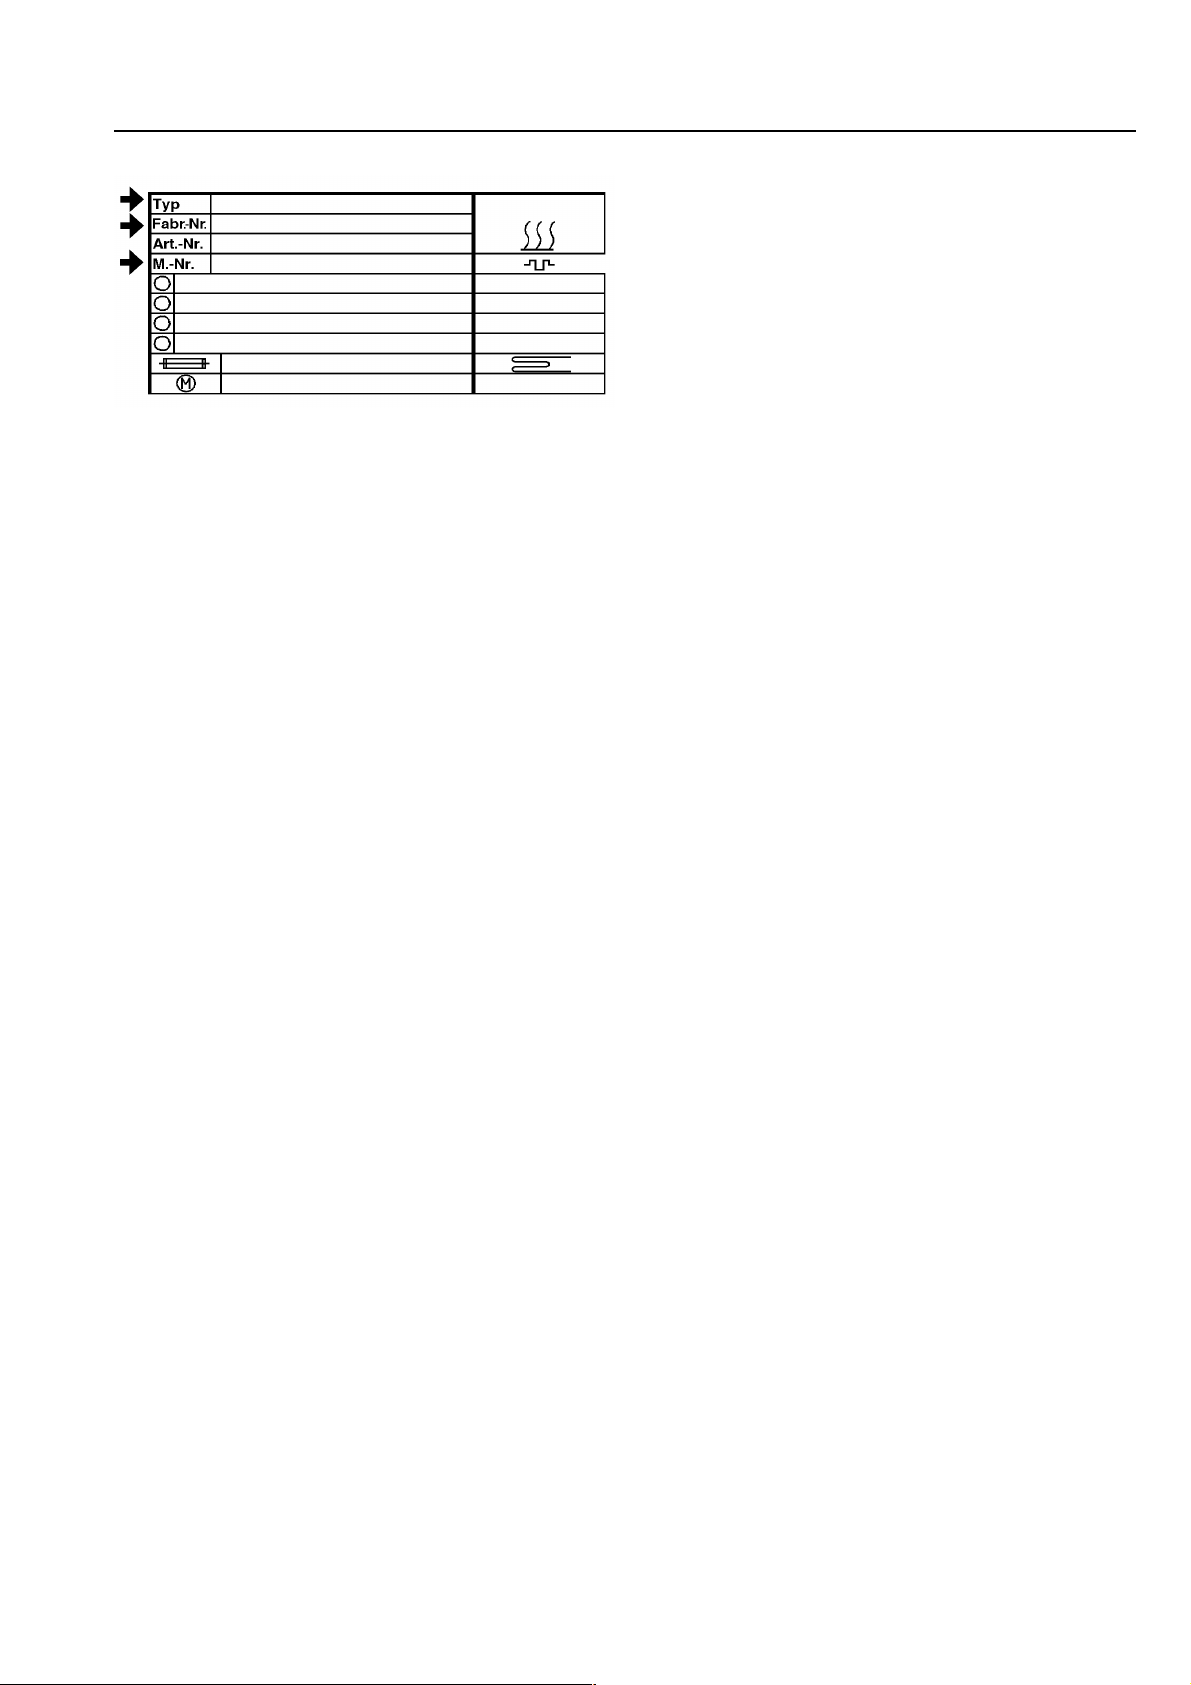
The data plate is located at the rear of the
machine next to the exhaust connection.
Typ Model type
Fabr.-Nr. Serial number
Art.-Nr. Article number
M.-Nr. Part number
IBN Commissioning date
15 «M.-Nr. 06 411 821 - GB - »
Page 16
Explanation of symbols
on the data plate
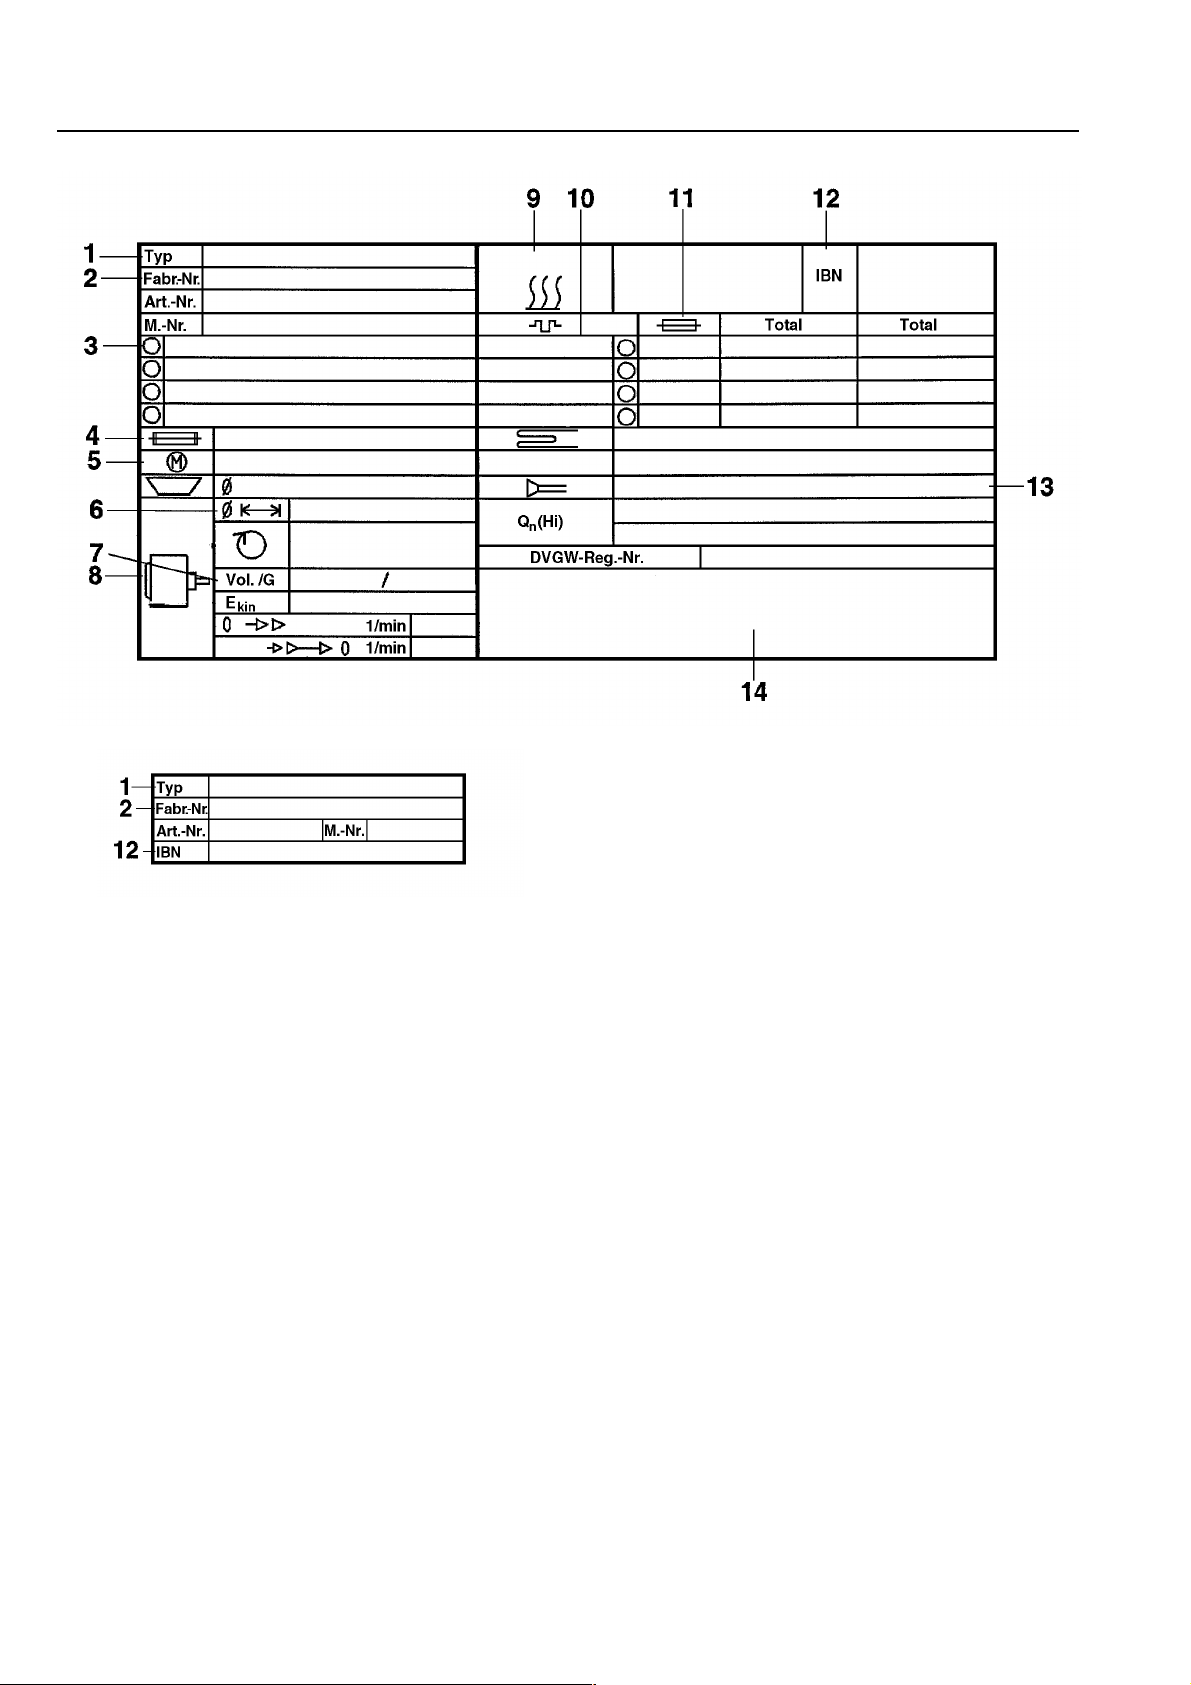
1 Machine type
2 Serial number of the machine
3 Voltage/Frequency
4 Mains fusing
5 Drive motor
6 Drum diameter
7 Drum volume/Laundry dry weight
8 Drum data
9Heating
10 Electric heating (T 6251)
11 Fusing (on site)
12 Commissioning date
13 Steam heating direct (T 6751)
14 Space for test certificate /
e.g. CE - 0085 (Gas)
or country certificate
Noise emission
Registered on the A scale.
T 6251 67.7 dB
T 6751 75.1 dB
measured in Germany in accordance with
DIN (IEC) 45 635, machine noise regulations
3. GSGV p 1 1.a
16 «M.-Nr. 06 411 821 - GB - »
Page 17

Appendix 1
Level 1 Maintenance
Daily before use:
Carry out the before use maintenance
required in Cat 601.
Prepare the laundry for drying. Ensure that
the load is suitable for the drying
programme selected.
Daily after use:
Carry out the after use maintenance
required in Cat 601.
Annually:
Carry out the annual maintenance required
in Cat 601.
17 «M.-Nr. 06 411 821 - GB - »
Page 18

Appendix 2
Programme chart
General: Dryer attributes
The suite of drying programmes installed on
the T 6751 and T 6251 dryers have been
optimised to the field laundry application as
follows:
Simple selection from a suite of
programmes tailored to the types of fabrics
and materials to be laundered.
Provision to process bagged or unbagged
laundry.
Timed drying process – to be used for
BAGGED laundry. The default drying time
is set to 55 minutes although this can be
increased or decreased by the operator to
account for the field laundry conditions.
Sensed drying process – to be used for
UNBAGGED laundry. The default residual
moisture setting is 3% although increased
or decreased dryness settings may be
selected by the operator to account for
the field laundry conditions.
Mass of dry laundry per bag is typically
2.5 kg. This must not exceed 3 kg. Tightly
rolled or twisted clothing may exhibit
localised damp patches.
Capable of drying the laundry loads from
both washer-extractors, split proportionally
between the large and small dryers.
18 «M.-Nr. 06 411 821 - GB - »
Page 19

Appendix 2
Programme chart
Dryer Prog.No. Programme Laundry /
fabric type
T 6751
C!
BAGGED Bagged - mixed
fabrics
UNBAGGED Any unbagged Sensed drying Significantly reduced drying times
A3
T 6251
C!
BAGGED Bagged - mixed
fabrics
UNBAGGED Any unbagged Sensed drying Significantly reduced drying times
A3
Drying
process
Timed drying Default 55 minutes
Timed drying Default 55 minutes
Duration (minutes)
Selectable from 1 to 180 minutes
compared to bagged laundry
Selectable from 1 to 180 minutes
compared to bagged laundry
19 «M.-Nr. 06 411 821 - GB - »
Page 20

Notes:
20 «M.-Nr. 06 411 821 - GB - »
Page 21

21 «M.-Nr. 06 411 821 - GB - »
Page 22

Alteration rights reserved 50.04
This paper is made from 100% chlorine free bleached cellulose.
 Loading...