

Page 1

Operating instructions
Deep fat fryer
KM 402
It is essential to read these
operating instructions before
installing or using the machine,
to avoid the risk of accident
or damage to the machine. M.-Nr. 04 930 491
GiZH
Page 2

Contents
Description of the appliance. . . . . . . . . . . . . . . . . . . . . . . . . . . . . . . . . . . . . . . . . 3
Warning and Safety instructions . . . . . . . . . . . . . . . . . . . . . . . . . . . . . . . . . . . . . 4
Before using for the first time. . . . . . . . . . . . . . . . . . . . . . . . . . . . . . . . . . . . . . . 10
General notes . . . . . . . . . . . . . . . . . . . . . . . . . . . . . . . . . . . . . . . . . . . . . . . . . . . . 10
Disposal of the packing
material . . . . . . . . . . . . . . . . . . . . . . . . . . . . . . . . . . . . . . . . . . . . . . . . . . . . . . . . . 11
Disposal of your old appliance . . . . . . . . . . . . . . . . . . . . . . . . . . . . . . . . . . . . . . . 11
Cleaning and heating up for the first time . . . . . . . . . . . . . . . . . . . . . . . . . . . . . . . 12
Using the fryer . . . . . . . . . . . . . . . . . . . . . . . . . . . . . . . . . . . . . . . . . . . . . . . . . . . 13
Switching on and off . . . . . . . . . . . . . . . . . . . . . . . . . . . . . . . . . . . . . . . . . . . . . . . 13
Before frying . . . . . . . . . . . . . . . . . . . . . . . . . . . . . . . . . . . . . . . . . . . . . . . . . . . . . 13
Frying . . . . . . . . . . . . . . . . . . . . . . . . . . . . . . . . . . . . . . . . . . . . . . . . . . . . . . . . . . . 14
Blanching. . . . . . . . . . . . . . . . . . . . . . . . . . . . . . . . . . . . . . . . . . . . . . . . . . . . . . . . 14
Frying tips . . . . . . . . . . . . . . . . . . . . . . . . . . . . . . . . . . . . . . . . . . . . . . . . . . . . . . . 17
After frying . . . . . . . . . . . . . . . . . . . . . . . . . . . . . . . . . . . . . . . . . . . . . . . . . . . . . . 18
Safety cut-out switch . . . . . . . . . . . . . . . . . . . . . . . . . . . . . . . . . . . . . . . . . . . . . . . 19
Cleaning and care . . . . . . . . . . . . . . . . . . . . . . . . . . . . . . . . . . . . . . . . . . . . . . . . 20
Lid, ceramic surround . . . . . . . . . . . . . . . . . . . . . . . . . . . . . . . . . . . . . . . . . . . . . . 20
Frying reservoir . . . . . . . . . . . . . . . . . . . . . . . . . . . . . . . . . . . . . . . . . . . . . . . . . . . 21
Frying basket . . . . . . . . . . . . . . . . . . . . . . . . . . . . . . . . . . . . . . . . . . . . . . . . . . . . . 21
Problem solving guide. . . . . . . . . . . . . . . . . . . . . . . . . . . . . . . . . . . . . . . . . . . . . 22
Electrical connection. . . . . . . . . . . . . . . . . . . . . . . . . . . . . . . . . . . . . . . . . . . . . . 23
After sales service . . . . . . . . . . . . . . . . . . . . . . . . . . . . . . . . . . . . . . . . . . . . . . . . 25
Data plate . . . . . . . . . . . . . . . . . . . . . . . . . . . . . . . . . . . . . . . . . . . . . . . . . . . . . . . 25
2
Page 3
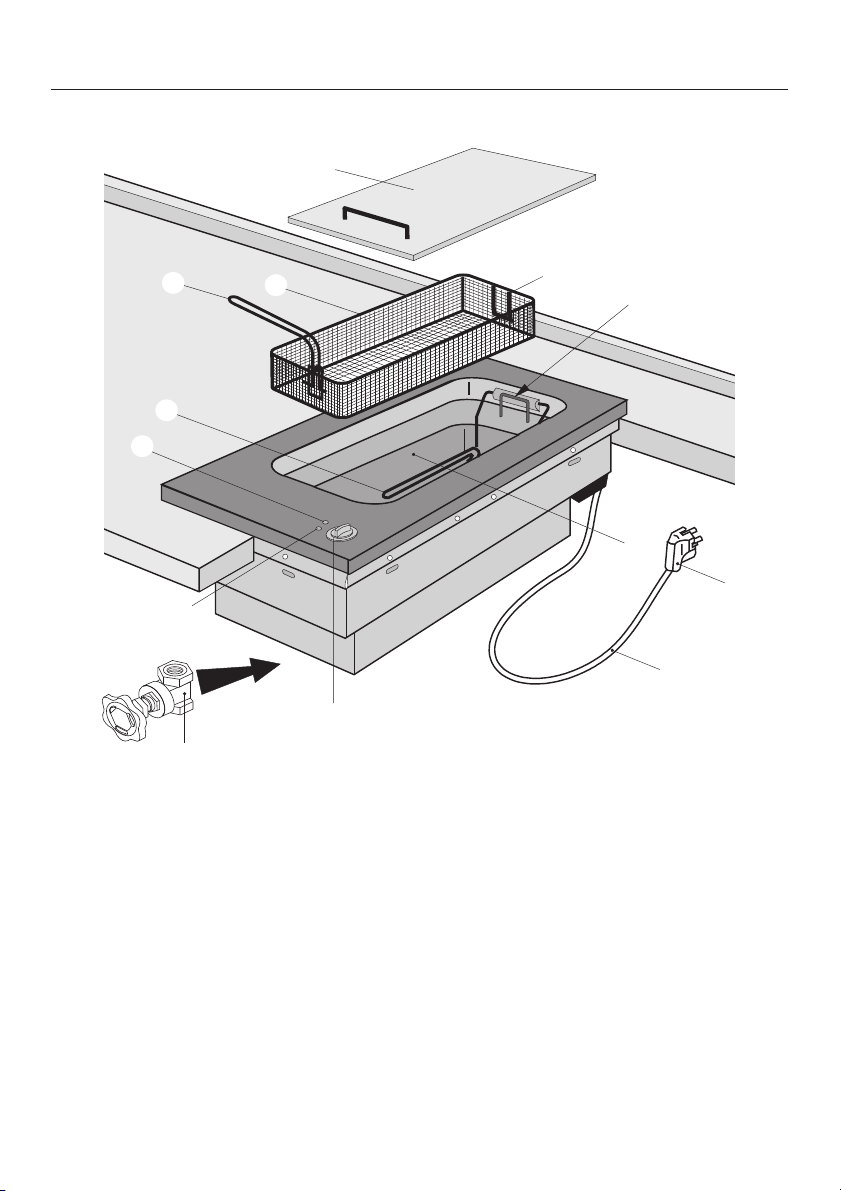
b
Description of the appliance
d
c
g
h
i
k
j
a Lid
b Frying basket with:
c Handle (fold-away, removable)
d Hanging facility
e Basket hanging support
f Heating element (can be raised up;
rating - 2700 kW)
g Temperature indicator light
h Operating indicator light
e
f
l
n
m
i Drain tap
j Control knob
k Frying basket
(capacity: min. 3.0 litres, max. 4.0
litres)
l Mains connection cable
m Plug
Depending on country of destination,
the appliance may be supplied with
3
Page 4

Description of the appliance
or without a plug. The plug shown is
for illustration only.
4
Page 5

Warning and Safety instructions
This appliance complies with all rele
vant legal safety requirements. Im
proper use of the appliance can,
however, present a risk of both per
sonal injury and material damage.
Before installing and using the appli
ance for the first time, read the oper
ating and installation instructions
carefully. They give information on
safety, on the operation and care of
the appliance. This way you will
avoid the risk of accident and dam
age to the appliance.
Do not let children access the appliance or its controls. Supervise its
use by the elderly or infirm.
Keep these instructions in a safe
place for reference and pass them
on to any future user.
-
Building in and connection
-
-
-
-
-
If the appliance is supplied without
a plug, or if the plug is removed,
the appliance must be installed and
connected by a suitably qualified and
competent person in strict accordance
with national and local safety
regula-tions. The manufacturer cannot
be held responsible for damage
caused by incorrect installation or con
nection.
The electrical safety of this appli
ance can only be guaranteed when
continuity is complete between the ap
pliance and an effective earthing system which complies with local and national safety regulations. It is most
important that this basic safety requirement is tested by a qualified electrician.
The manufacturer cannot be held responsible for the consequences of an
inadequate earthing system such as an
electric shock.
-
-
-
Do not connect the appliance to
the mains electricity supply by an
extension lead. Extension leads do not
guarantee the required safety of the ap
pliance (e.g. danger of overheating).
This equipment is not designed for
maritime use or for use in mobile
installations such as caravans, aircraft
etc. However it may be suitable for
such usage subject to a risk assess
ment of the installation being carried
out by a suitably qualified engineer.
-
-
5
Page 6

Warning and Safety instructions
Correct usage
For safety reasons the appliance
must only be operated after it has
been built in. This is necessary to en
sure that all electrical components are
shielded.
This appliance is for domestic use
only and is not intended for com
mercial use.
Use this appliance for the prepara
tion of food only. Any other use is at
the owner’s risk and could be danger
ous. The manufacturer cannot be held
responsible for damage caused by improper use or misuse of the appliance.
-
-
Do not use the appliance to heat
up the room and never switch it on
when the heating element is in the
raised-up position. The high tempera
ture could cause inflammable objects
nearby to catch fire.
This appliance must not be set up
or operated in the open air.
The fryer should only be switched
-
-
on when the lid has been taken off
and it has been filled with oil.
-
6
Page 7

Warning and Safety instructions
Protecting the appliance from
damage
Do not drop anything on the ce
ramic surface. Even a light object
such as a salt cellar, could cause dam
age in certain circumstances.
Under no circumstances use a
steam cleaning appliance to clean
this appliance. Pressurised steam
could cause permanent damage to the
surface and to components, for which
the manufacturer cannot accept re
sponsibility.
-
-
In countries where there are areas
which may be subject to infestation
by cockroaches or other vermin, pay
particular attention to keeping the appli
ance and its surroundings in a clean
-
condition at all times. Any damage
which may be caused by cockroaches
or other vermin will not be covered by
the appliance guarantee.
-
7
Page 8

Warning and Safety instructions
Protection from burning
Never leave the appliance unat
tended when it is switched on and
when frying is taking place. Overheated
oil can catch fire and could even set
the cooker hood on fire. On no account
should there be an open flame in the vi
cinity.
If frying oil does catch fire despite
this do not attempt to put out the
flames with water. Stifle the fire with a
suitable fire blanket or by covering with
the lid.
Avoid touching the appliance and
the frying oil when they are hot.
Both will remain hot for quite a while after the appliance has been switched
off. Only the handle of the frying basket
can be touched safely. Keep children at
a distance.
Do not store anything which might
arouse a child’s interest in storage
areas above or next to the appliance.
Otherwise they could be tempted into
climbing onto the appliance with the
risk of burning themselves.
-
You may prefer to use heat-resis
tant pot holders or gloves when us
ing the appliance.
Take care not to let pot holders or
gloves get damp or wet, as this causes
heat to transfer through the material
quicker with the risk of burning yourself.
Clean or change dirty oil or fat in
good time. Oil or fat containing im
purities is liable to catch fire.
Do not empty hot fat or oil into a
plastic container. The high temper
ature could cause this to melt.
Ensure that children are kept away
from the fryer and cannot get near
to the drain tap of the fryer where oil
which is still hot could be drained out.
-
-
-
-
8
Page 9

Warning and Safety instructions
With a damaged appliance
It is important that the appliance is
not used if there are any signs of
damage, breakages, cracks or dents
on the ceramic surface.
In the event of any damage to the
appliance it must be switched off
immediately and disconnected from the
electricity supply. Contact the Service
Department. Do not use the appliance
until it has been repaired. Continued
use would be dangerous as liquids,
etc, boiling over could penetrate to the
electrical components through any
crack.
Ensure power is not supplied to the
appliance while installation or repair work is being carried out.
Any repairs may only be carried
out by suitably qualified and com
petent persons to ensure safety. Re
pairs and other work by unqualified
persons could be dangerous.
While the appliance is under guar
antee repairs should only be un
dertaken by a service engineer author
ised by the manufacturer. Otherwise the
guarantee is invalidated.
-
-
-
-
-
9
Page 10

Warning and Safety instructions
Further safety notes
When using an electric socket near
the appliance, care should be
taken that the cable of the electrical ap
pliance does not come into contact with
the hot fryer. The insulation on the cable
could become damaged, giving rise to
an electric shock hazard.
Always ensure that food is suffi
ciently cooked or reheated. Many
factors will affect the overall cooking
time, including the size and amount of
food, its temperature, changes to the
recipe and the shape and size of cook
ing container. Some foods may contain
micro organisms which are only destroyed by thorough cooking at high
temperatures. Therefore when cooking
or reheating food, e.g. poultry, it is particularly important that food is fully
cooked through. If in doubt select a longer cooking or reheating time. It is important that the heat is allowed to
spread evenly throughout the food being cooked.
-
To protect the environment used
frying oils and fats should be dis
posed of with the household waste after
they have cooled down. Do not dispose
of used oils and fats down the sink. The
water pipes could become blocked or
damaged.
Before disposing of an old appli
ance, switch off and disconnect it
from the power supply. Cut off and ren
der any plug useless. Cut off the cable
directly behind the appliance to prevent
misuse. This should be done by a com
petent person.
Ensure that the appliance presents
no danger to children while being
stored for disposal.
-
-
-
-
Ensure that children are kept away
from the appliance when it is
switched on.
10
Page 11

Caring for the environment
Disposal of the packing
material
The transport and protective packing
has been selected from materials which
are environmentally friendly for disposal
and can normally be recycled.
Ensure that any plastic wrappings,
bags etc. are disposed of safely and
kept out of the reach of babies and
young children. Danger of suffocation!
Rather than just throwing these materi
als away, please ensure that they are
offered for recycling.
-
Disposal of an old appliance
Old appliances contain materials which
can be reclaimed or recycled. Please
contact your dealer, your local waste
collection centre or scrap merchant
about potential recycling schemes.
Before disposing of an old appli
ance, switch off at the mains elec
tricity supply. Cut off and render any
plug useless. Cut off the cable di
rectly behind the appliance to pre
vent misuse. This should be done by
a competent person. Ensure that the
appliance presents no danger to
children while being stored for disposal.
-
-
-
-
11
Page 12

Before using for the first time
General notes
A data plate for your appliance is sup
plied with this documentation. It should
be stuck into the space provided at the
end of the instruction book. The ad
dress of the nearest Service Depart
ment is given on the back page.
-
-
-
12
Page 13

Before using for the first time
Cleaning and heating up for
the first time
Before using the fryer for the first time,
clean it as follows:
Fill the oil reservoir with approx. 4
^
litres of water and add a little wash
ing up liquid. Ensure that the water
level is not higher than the maximum
level indicator which is marked on the
rear of the reservoir.
Turn the control in a clockwise direc
^
tion to 130 °C and bring the water to
the boil.
^ When the water has started to boil,
switch off the fryer by turning the
control back anti-clockwise to "0".
Empty the water through the drain
tap into a heat resistant container.
(see section on "After frying").
^ Rinse the oil reservoir out with hot
water.
^ Close the drain tap, raise the heating
element and dry the reservoir with a
clean cloth.
-
Metal components have a protective
coating which may give off a slight
smell when the appliance is heated up
for the first time. The smell and any va
pours will dissipate after a short time
and do not indicate a faulty connection
or appliance.
-
-
^
Clean all other appliance surfaces
with a damp cloth only, and then wipe
dry.
13
Page 14

Using the fryer
Switching on and off
To switch the fryer on, turn the control
in a clockwise direction a. To switch
off, turn the control in an anti-clock
wise direction b to "0".
You cannot turn the control to "0" by
turning it past 200 °C.
-
Before frying
Before frying make sure that the oil res
ervoir has been filled with enough frying
oil (min. 3 litres / 3 kg, max. 4 litres / 4
kg).
Only use oil or fat specified for frying
either in liqiud or solid form.
Only use oil / fat which which can be
heated to a high temperature and
never mix different types together.
Correct procedure:
^ Fill tthe oil reservoir with oil / fat. Solid
fat should be cut up into small pieces
first.
When re-using fat which has solidified in the reservoir, make a hole in
the fat as far as the element. This allows any water which has gathered
under the fat to evaporate.
^ Turn the control to 100 °C and wait
until the fat has melted.
-
When the appliance is switched on, the
temperature indicator light g and the
oprating indicator light h come on. The
temperature indicator light tacts on and
off in conjunction with the heating ele
ment.
Only operate the fryer without the lid.
Never switch it on when it is empty
or when the heating element is
raised up.
14
-
When all the fat has melted check the
level in the reservoir. This needs to be
between the minimum and maxiumum
level indicators which are marked on
the narrow rear side of the reservoir.
Page 15

Using the fryer
Frying
Correct procedure:
Set the frying temperature required
^
(see chart) and wait until the temper
ature indicator light goes out for the
first time. The oil has now reached
the set temperature.
Place the frying basket containing the
^
food to be fried into the hot oil.
If the oil froths a lot, remove the bas
ket briefly from the reservoir and then
slowly immerse it into the hot oil
again.
^ When the food is ready, remove the
basket from the hot oil, shake it a little
to remove excess oil and then hang
the basket on the hanging support.
Do not leave the food suspended over
the reservoir for too long as the steam
from the oil can cause the food to lose
its crispness. Finally, place the food on
some paper towel to blot up any excess
-
oil.
Ensure that you do not touch the hot
oil / fat. Protect your hands in partic
ular by wearing oven gloves.
-
Blanching
It is also possible to use this appliance
for blanching vegetables by using water instead of oil or fat.
-
15
Page 16

Using the fryer
Food (fresh) Quantity Temperature
in °C
Breaded chicken
portions
Unbreaded turkey
steaks
Cumberland
sausages
Camembert 4 pieces 180 2-3
Raw battered
vegetables
Raw battered
mushrooms
Saute potatoes 500 g 180 2-3
Croquette potatoes 500 g pre-frying 170
Fried bread 500 g 200 30 secs - 1 min
Chips 500 g pre-frying 170
2 x 250 g pieces 180 8-10
2 x 250 g pieces 180 3-5
4 180 7-8
500 g 180 8-10
500 g 180 2-3
frying 180
frying 180
Frying time
in minutes
2-4
3-5
4-6
2-4
Crisps 500 g 180 3-5
Jam doughnuts 5 pieces 170 6-8
Pineapple fritters 2 pieces 180 2-3
Banana fritters 2 pieces 180 3-4
Please note:
The times given are only a guide. The actual cooking times will depend on the size
and quantity of food cooked.
16
Page 17

Using the fryer
Food (frozen) Quantity Temperature
in °C
Fish fingers 300 g 180 4-6
Beef burgers 220 g 180 5-6
Potato croquettes 500 g 170 pre-frying 1-2
Chips 500 g
1000 g
Spring rolls 2 x 60 g 180 8-10
Scampi 250 g 180 4-5
unbreaded
Plaice fillets
Squid rings 250 g 180 2-3
Please note:
The times given are only a guide. The actual cooking times will depend on the size
and quantity of food cooked.
300 g 170 3-5
180
180
Frying time
in minutes
frying 3-4
4-6
8-10
17
Page 18

Using the fryer
Frying tips
The oil or fat must be hot enough to
^
seal the food quickly. If the tempera
ture is too low the food will absorb
too much fat which will make it diffi
cult to digest.
For this reason, wait until the temper
ature indicator goes out (which
means the set temperature has been
reached), before you place more
food in the fryer.
Do not fry too much food all at once
^
as this cools the oil too quickly.
^ Heat the oil only for as long as neces-
sary. This will keep it in good condition for longer.
^ Food should be as dry as possible as
moisture can cause frothing. Dab
food which is damp dry with kitchen
paper towel. Remove traces of ice
from deep frozen food.
-
-
Lower the frying basket slowly so that
^
the oil does not froth over.
Rinsing freshly cut potatoes under
^
running water and then drying them
thoroughly with kitchen paper towel
will prevent them sticking together.
Place baking made with yeast dough
^
in the basket with the risen side fac
ing downwards and then turn
half-way through the cooking time.
Never season food before frying.
^
Salt, seasoning or icing sugar can be
added to the fried food once any ex
cess oil / fat has been removed.
Never add salt to fried food in the
frying basket while the basket is
over the hot oil. This can cause the
oil to froth over.
-
-
18
Page 19

Using the fryer
After frying
Switch the fryer off. We recommend
that you filter the frying oil. This not only
removes impurities which can affect the
taste of the food but will help the oil last
longer.
How to proceed:
Allow the oil to cool down but not to
^
solidify.
If it has already solidified then melt it
again by switching the fryer to 100 °C.
Place a heat resistant container of a
^
suitable size, a metal pot for example, under the drain tap located underneath the fryer.
^ Ensure the oil is not too hot. Open the
drain tap by turning the hand-wheel
on the tap anti-clockwise a.
c
b
Once the oil has drained out, close
^
the tap again by turning the
hand-wheel clockwise b as far as it
will go. Check that you cannot turn it
any further.
Filter the frying oil by pouring it
^
through kitchen paper or a metal
sieve lined with kitchen or filter paper.
Finally pour the filtered oil back into
^
the oil reservoir to be used again.
Take care that the underside of the
fryer is always easily accessible for
draining oil.
Ensure that the oil is not too hot before it is drained. Otherwise there
could be a danger of being burnt.
Only use a container which is able to
withstand heat to collect the drained
oil.
Do not replace the lid on the fryer
until the oil or fat has cooled down.
Change the oil when it
–
is very dark and does not pour easily.
–
smells unpleasant and froths.
–
begins to smoke at a temperature of
170 °C or less.
19
Page 20

Using the fryer
Safety cut-out switch
Your fryer is fitted with a safety cut-out
which automatically switches it off if:
the oil reservoir is not filled to at least
–
the lower level indicator.
the fryer is switched on when empty.
–
the fryer is switched on when the
–
heating element has been raised
(e.g. for cleaning).
The fryer has cut out automatically
when neither the temperature indicator
light nor the operating indicator light is
on and the oil is no longer being
heated.
Turn the control to "0" and wait until
^
the heating element has cooled
down.
Rectify whatever has caused the
^
automatic cut-out.
Press the pin (see arrow) which is on
^
the left rear underside of the fryer in
firmly. The fryer can now be used
again.
20
Page 21

Never use a steam cleaner to clean
this appliance. Pressurised steam
could cause permanent damage to
the surface and to components for
which the manufacturer cannot ac
cept responsibility.
Never use scouring agents, pads,
abrasive cleaning agents, or strong
cleaners e.g. oven sprays, stain or
rust removers, as these could dam
age the surface of the appliance.
Do not use any sharp pointed ob
jects which could damage the seal
between the ceramic surface and
the surrounding frame and between
the frame and the worktop.
-
Cleaning and care
Lid, ceramic surround
Clean the lid with hot water and a little
washing up liquid and then wipe dry
with a soft cloth. Please take care as
the lid scratches easily.
Do not use washing up liquid on the
ceramic surround as it can leave a blue
sheen on the surface which may be dif
ficult to remove. The ceramic surround
can be cleaned using a damp cloth
and a proprietary cleaning agent for ce
ramic surfaces. Follow the manufac
turer’s instructions on the packaging.
Ensure that every trace of cleaner has
been removed from the surface by wiping carefully with a damp cloth.
After cleaning, thoroughly dry the ceramic surface with a soft cloth to prevent a build up of limescale deposits.
-
-
-
21
Page 22

Cleaning and care
Frying reservoir
Drain the oil out of the reservoir be
^
fore cleaning (see "After frying").
Then raise the heating element.
^ Use kitchen paper towel to remove
any large particles.
^ Fill the reservoir to the maximum
mark with a solution of hot water and
washing up liquid and wash out thoroughly.
Frying basket
Clean the frying basket after each use,
either in the dishwasher or with hot wa
ter and a little washing up liquid. Dry it
thoroughly. It is best to soak stubborn
soiling before cleaning. The handle can
be removed for cleaning.
-
^
Drain out the washing up liquid solu
tion into a suitable container and then
rinse with hot water. Dry the oil reser
voir with a clean cloth.
22
-
-
Page 23

Repairs to electrical appliances
must only be carried out by a suit
ably qualified and competent person
in accordance with local and na
tional safety regulations. Unauthor
ised repairs could be dangerous.
-
-
-
Problem solving guide
... the oil has an unpleasant odour.
Check whether the oil
is suitable for frying.
–
needs changing.
–
... the food is not crisp and brown.
Some minor problems, however, can be
dealt with as follows:
What to do if ...
... after switching on, the appliance
does not heat up.
Check whether
– the safety cut-out has been activated
(see "Safety cut-out").
– the appliance has been switched on
at the mains and that the mains fuse
is in order. If the fuse has blown, contact an electrician or the Service department.
Ensure that the oil is hot enough and
that the frying basket is not overloaded.
Fry for longer if necessary.
23
Page 24

Electrical connection
This appliance should be installed with
plenty of space on either side. See In
stallation Instruction Booklet before
making electrical connection.
All electrical work should be carried
out by a suitably qualified and com
petent person in strict accordance
with national and local safety regula
tions.
Installation, repairs and other work
by unqualified persons could be
dangerous. The manufacturer can
not be held responsible for un
authorised work.
Ensure power is not supplied to the
appliance while installation or repair
work is being carried out.
The appliance must only be operated when built-in. This is to ensure
that all electrical parts are shielded.
Live parts must not be exposed.
Do not connect the appliance to the
mains electricity supply by an exten
sion lead. These do not guarantee
the required safety of the appliance.
-
-
-
Connection of this appliance should be
made via a suitable isolator or a double
pole fused spur connection unit or
fused plug and switched socket which
complies with national and local safety
regulations and the on/off switch should
be easily accessible after the appliance
has been built in.
If the socket is not accessible after in
stallation (depending on country) an
additional means of disconnection must
be provided for all poles.
For extra safety it is advisable to install
a residual current device with a trip cur
rent of 30 mA (in accordance with DIN
VDE 0664, VDE 0100 Section 739).
When switched off there must be an
all-pole contact gap of 3 mm in the isolator switch (including switch, fuses and
relays according to EN 60 335).
Important U.K./ Z.A.
This appliance is supplied for connection to a single phase 230-240 V 50 Hz
supply with a 3-core cable.
-
The wires in the mains lead are col
oured in accordance with the following
code:
-
-
-
The voltage, rated load and fusing are
given on the data plate. Ensure that
these match the household mains sup
ply.
24
Green/yellow = earth
Blue = neutral
Brown = live
WARNING
THIS APPLIANCE MUST BE
EARTHED
Page 25

Electrical connection
If the appliance is connected via a
fused plug and switched socket the
colours of the wires in the mains lead of
this appliance may not correspond with
the coloured markings identifying the
terminals in your plug. If this is the
case, proceed as follows:
The wire which is coloured green and
yellow must be connected to the termi
nal in the plug which is marked with the
letter E or by the earth symbol z or
coloured green or green and yellow.
The wire which is coloured blue must
be connected to the terminal which is
marked with the letter N or coloured
black.
The wire which is coloured brown must
be connected to the terminal which is
marked with the letter L (GB /IRL/ZA) or
A (AUS / NZ) or coloured red.
In other countries check these details
with your supplier.
Non-rewireable plugs (BS 1363)
If this appliance is fitted with a nonrewireable plug, the following informa
tion applies:
If the socket outlets are not suitable for
the plug supplied with this product, it
must be cut off and an appropriate plug
fitted.
The fuse carrier and the fuse should be
removed from the old plug and dis
posed of. The plug cut from the flexible
cord should then be disposed of and
on no account be inserted into any
socket elsewhere in the house (electric
shock hazard).
-
-
-
The fuse cover must be re-fitted when
changing the fuse, and if the fuse cover
is lost, the plug must not be used until a
suitable replacement is obtained. The
colour of the correct replacement cover
is that of the coloured insert in the base
of the plug, or the colour that is em
bossed in words in the base of the plug
(as applicable to the design of the plug
fitted).
The correct fuse rating of the replace
ment fuses that are ASTA approved to
BS 1362 should be fitted. Replacement
fuse covers may be purchased from
your local electrical supplier, or Miele
Service agent.
Important
The electrical safety of this appliance
can only be guaranteed when continuity is complete between the appliance
and an effective earthing system, which
complies with local and national regulations. It is most important that this basic
safety requirement is tested by a quali
fied electrican. The manufacturer can
not be held responsible for the conse
quences of an inadequate earthing
system such as an electric shock.
The manufacturer can assume no re
sponsibility for damage which is the
direct or indirect result of incorrect
installation or connection.
-
-
-
-
-
-
25
Page 26

After sales service
The address of the nearest Service Department is given on the back page.
The voltage and rated load are given on the data plate. Please quote these data,
together with the model description and serial number when contacting the Ser
vice Department.
Please note that telephone calls may be monitored and recorded to improve
our service.
Data plate
Space in which to stick the extra data plate supplied with the appliance. Ensure
that the model number is the same as the one on the front of these operating instructions
-
26
Page 27

27
Page 28

Alteration rights reserved 03/3602
This paper consists of cellulose which has been bleached without the use of chlorine.
 Loading...