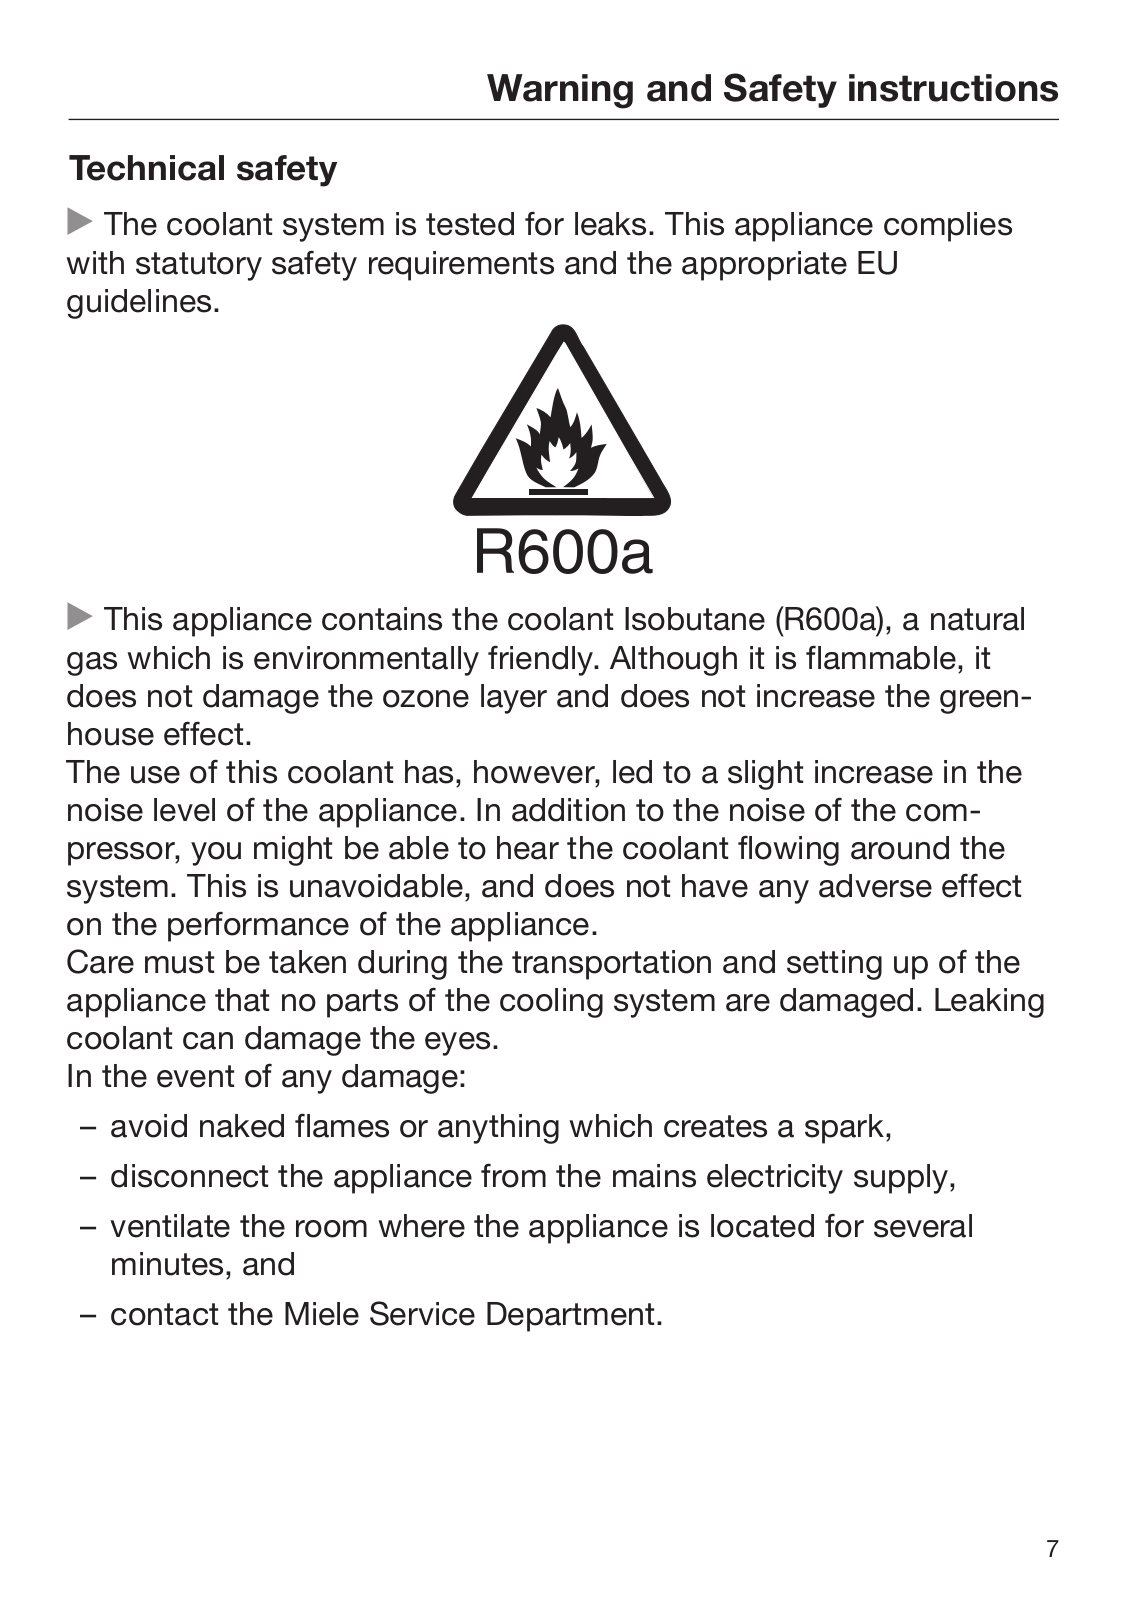
Operating and installation instructions
Fridge-freezer
To avoid the risk of accidents or damage to the appliance it is essential to read these instructions before it is installed and used for the first time.
en-GB |
M.-Nr. 11 000 000 |
Contents |
|
Warning and Safety instructions.......................................................................... |
5 |
Caring for the environment ................................................................................ |
14 |
How to save energy............................................................................................. |
15 |
Guide to the appliance........................................................................................ |
17 |
Ice cube maker with integrated ice cube tray ....................................................... |
18 |
Accessories ......................................................................................................... |
20 |
Accessories supplied ............................................................................................ |
20 |
Optional accessories............................................................................................. |
21 |
Before using for the first time ............................................................................ |
23 |
Before using for the first time ................................................................................ |
23 |
Water container ..................................................................................................... |
23 |
Connecting the appliance ..................................................................................... |
24 |
Switching on and off ........................................................................................... |
25 |
Touch display ........................................................................................................ |
25 |
Switching on.......................................................................................................... |
25 |
Start screen ........................................................................................................... |
25 |
Switching off.......................................................................................................... |
26 |
Switching off for longer periods of time ................................................................ |
28 |
The correct temperature..................................................................................... |
29 |
. . . in the refrigerator section ................................................................................ |
29 |
. . . in the freezer section ....................................................................................... |
29 |
Temperature display .............................................................................................. |
30 |
Setting the temperature......................................................................................... |
30 |
Temperature range ........................................................................................... |
31 |
Using Super cool and Super freeze ................................................................... |
32 |
Super cool function ........................................................................................... |
32 |
Super freeze function ....................................................................................... |
32 |
Switching a function on or off ............................................................................... |
33 |
Displaying a selected function ......................................................................... |
33 |
Temperature and door alarm.............................................................................. |
34 |
Temperature alarm................................................................................................. |
34 |
Door alarm............................................................................................................. |
35 |
Selecting further settings ................................................................................... |
36 |
Settings overview .................................................................................................. |
36 |
2
|
Contents |
Explanation of the different Settings ..................................................................... |
39 |
Switching Party mode on or off .................................................................... |
39 |
Switching Holiday mode on / off ................................................................ |
40 |
Using the minute minder (QuickCool timer) ................................................ |
40 |
Switching the ice cube maker on and off.................................................... |
41 |
Activating or deactivating the safety lock .............................................. |
42 |
Switching the appliance off ......................................................................... |
43 |
Switching Sabbath mode on and off ............................................................ |
43 |
Setting the duration before the door alarm sounds ..................................... |
45 |
Miele@home system settings ...................................................................... |
45 |
Switching the sensor tone on / off ......................................................... |
47 |
Setting the volume / Switching off alarms and audible tones ..................... |
47 |
Setting the display brightness ..................................................................... |
48 |
Setting the temperature unit °C/°F ................................................................... |
48 |
Switching off Demo mode ............................................................................. |
48 |
Resetting to the factory default settings .................................................... |
48 |
Accessing Information ................................................................................... |
48 |
Replace charcoal filter reminder.................................................................. |
49 |
Clean ventilation grille reminder .................................................................. |
49 |
Storing food in the refrigerator section............................................................. |
50 |
Different storage zones ......................................................................................... |
50 |
Food which is not suitable for storage in the refrigerator section ......................... |
51 |
When shopping for food........................................................................................ |
51 |
Storing food correctly............................................................................................ |
52 |
Storing food in the DailyFresh drawer............................................................... |
53 |
Regulating the humidity level in the DailyFresh drawer......................................... |
53 |
Adjusting the interior fittings (refrigerator section) ......................................... |
55 |
Adjusting the door shelf / bottle shelf ................................................................... |
55 |
Moving the adjustable shelves / adjustable shelves with lighting......................... |
55 |
Adjusting the bottle rack ....................................................................................... |
55 |
Removing the DailyFresh drawer and rollers......................................................... |
56 |
Moving the storage drawer (CompactCase).......................................................... |
56 |
Moving and fitting the bottle holder ...................................................................... |
57 |
Moving the charcoal filters .................................................................................... |
57 |
Freezing and storing food................................................................................... |
58 |
Maximum freezing capacity .................................................................................. |
58 |
Freezing fresh food................................................................................................ |
58 |
Storing frozen food................................................................................................ |
58 |
Home freezing ....................................................................................................... |
59 |
3
Contents |
|
Making ice cubes .................................................................................................. |
61 |
Switching the ice cube maker on and off......................................................... |
61 |
Adjusting the interior fittings.................................................................................. |
62 |
Using accessories ................................................................................................. |
62 |
Defrosting............................................................................................................. |
63 |
Cleaning and care ............................................................................................... |
64 |
Cleaning agents..................................................................................................... |
64 |
Cleaning the ice cube tray..................................................................................... |
65 |
Preparing the appliance for cleaning..................................................................... |
66 |
Cleaning the interior and accessories ................................................................... |
69 |
Cleaning the front of the appliance and the side panels....................................... |
70 |
Cleaning the ventilation grille ................................................................................ |
71 |
Cleaning the door seals......................................................................................... |
71 |
Replacing the charcoal filters ................................................................................ |
72 |
After cleaning ........................................................................................................ |
73 |
Problem solving guide ........................................................................................ |
74 |
Noises................................................................................................................... |
88 |
Service.................................................................................................................. |
89 |
Contact in case of malfunction ............................................................................. |
89 |
Warranty ................................................................................................................ |
89 |
Electrical connection .......................................................................................... |
90 |
Connecting the appliance ..................................................................................... |
91 |
Installation............................................................................................................ |
92 |
Location................................................................................................................. |
92 |
Climate range ........................................................................................................ |
93 |
Ventilation.............................................................................................................. |
93 |
Fitting wall spacers supplied................................................................................. |
93 |
Limiting the opening angle of the door ................................................................. |
94 |
To fit the door opening angle limiter................................................................. |
94 |
Installation ............................................................................................................. |
96 |
Building the appliance into a kitchen run .............................................................. |
98 |
Appliance dimensions ........................................................................................... |
99 |
Changing the door hinging............................................................................... |
100 |
Aligning the appliance doors............................................................................ |
113 |
4
This appliance complies with all statutory safety requirements. Please note that inappropriate use can lead to personal injury and damage to property.
To avoid the risk of accidents and damage to the appliance, please read these instructions carefully before using it for the first time. They contain important notes on installation, safety, use and maintenance.
Miele cannot be held liable for non-compliance with these instructions.
Keep these instructions in a safe place and ensure that new users are familiar with the contents. Pass them on to any future owner.
This refrigeration appliance is intended for use in the home and in similar environments, for example
– in shops, offices and similar work settings
– by the guests in hotels, motels, bed & breakfasts and other typical home settings.
This refrigeration appliance is not intended for outdoor use.
This appliance is intended for domestic use only for cooling and storing food and drink as well as for storing deep frozen food, freezing fresh food and for making ice.
Any other usage is not supported by the manufacturer and could be dangerous.
This appliance is not suitable for storing and keeping cool medicines, blood plasma, laboratory preparations or other such materials or products. Incorrect use of the appliance for such purposes can cause deterioration of the items stored. The appliance is not suitable for use in areas where there is a risk of explosion.
Miele cannot be held liable for damage resulting from improper or incorrect use of the appliance.
5
Warning and Safety instructions
The appliance can only be used by people with reduced physical, sensory or mental capabilities, or lack of experience and knowledge, if they are supervised whilst using it, or have been shown how to use it in a safe way and recognise and understand the consequences of incorrect operation.
Children under 8 years of age must be kept away from the appliance unless they are constantly supervised.
Children 8 years and older may only use the appliance unsupervised if they have been shown how to use it in a safe way and recognise and understand the consequences of incorrect operation.
Children must not be allowed to clean or maintain the appliance unsupervised.
Please supervise children in the vicinity of the appliance and do not let them play with it.
Danger of suffocation! Whilst playing, children could become entangled in packaging (such as plastic wrapping) or pull it over their head and suffocate. Keep packaging material away from children.
6
Warning and Safety instructions
The coolant system is tested for leaks. This appliance complies with statutory safety requirements and the appropriate EU guidelines.
This appliance contains the coolant Isobutane (R600a), a natural gas which is environmentally friendly. Although it is flammable, it does not damage the ozone layer and does not increase the greenhouse effect.
The use of this coolant has, however, led to a slight increase in the noise level of the appliance. In addition to the noise of the compressor, you might be able to hear the coolant flowing around the system. This is unavoidable, and does not have any adverse effect on the performance of the appliance.
Care must be taken during the transportation and setting up of the appliance that no parts of the cooling system are damaged. Leaking coolant can damage the eyes.
In the event of any damage:
–avoid naked flames or anything which creates a spark,
–disconnect the appliance from the mains electricity supply,
–ventilate the room where the appliance is located for several minutes, and
–contact the Miele Service Department.
7
Warning and Safety instructions
The more coolant there is in a refrigeration appliance, the larger the room it should be installed in. In the event of a leakage, if the appliance is in a small room, there is the danger of combustible gases building up. For every 11 g of coolant at least 1 m3 of room space is required. The amount of coolant in the appliance is stated on the data plate inside the appliance.
To avoid the risk of damage to the appliance, make sure that the connection data (fuse rating, frequency and voltage) on the data plate corresponds to the household supply.
Check that this is the case before connecting the appliance. Consult a qualified electrician if in any doubt.
The electrical safety of this appliance can only be guaranteed when correctly earthed. It is essential that this standard safety requirement is met. If in any doubt please have the electrical installation tested by a qualified electrician.
Reliable and safe operation of this appliance can only be assured if it has been connected to the mains electricity supply.
If the electrical connection cable is faulty it must only be replaced by a Miele authorised service technician to protect the user from danger.
Do not connect the appliance to the mains electrical supply by a multi-socket adapter or extension lead. These are a fire hazard and do not guarantee the required safety of the appliance.
If moisture gets into electrical components or into the mains connection cable, it could cause a short circuit. Therefore, do not operate this refrigeration appliance in areas which are exposed to moisture (e.g in a garage or utility room).
This appliance must not be used in a non-stationary location (e.g. on a ship).
Do not use a damaged appliance. It could be dangerous. Check the appliance for visible signs of damage.
8
Warning and Safety instructions
The appliance must be isolated from the electricity supply during installation, maintenance and repair work.
Unauthorised installation, maintenance and repairs can cause considerable danger for the user.
Installation, maintenance and repairs must only be carried out by a Miele authorised technician.
The ice-cube maker must only be connected to a cold water supply.
While the appliance is under warranty, repairs should only be undertaken by a Miele authorised service technician. Otherwise the warranty is invalidated.
Please note the following advice for ice cube production:
–Only use cold, fresh tap water to fill the water container. Hot water and other liquids could damage the water container or the ice cube maker.
–To produce fresh ice cubes, the water should be changed on a regular basis, and always before switching on the ice cube maker. This will prevent the build-up of mould in the water container.
–Do not use water from a reverse osmosis unit in this appliance. This would damage it.
Miele can only guarantee the safety of the appliance when genuine original Miele replacement parts are used. Faulty components must only be replaced by Miele spare parts.
9
Warning and Safety instructions
The appliance is designed for use within a certain climate range (ambient temperatures), and should not be used outside this range. The climate range for your appliance is stated on the data plate inside the appliance. Installing it in a room with too low an ambient temperature, e.g. a garage, will lead to the appliance switching off for longer periods so that it cannot maintain the required temperature.
Do not cover or block the air vents as this could impair the efficiency of the appliance, increase the electricity consumption and could cause damage to the components.
If storing food which contains a lot of fat or oil in the appliance or the door, make sure that it does not come into contact with plastic components as this could cause stress cracks or break the plastic.
Do not store explosive materials in the appliance or any products containing propellants (e.g. spray cans). Electrical components could cause flammable vapours to ignite. Danger of fire and explosion.
Do not operate any electrical equipment (e.g. an electric ice cream maker) inside the appliance. Danger of sparking and explosion.
Do not store cans or bottles containing carbonated drinks or liquids which could freeze in the freezer. The cans or bottles could explode. Danger of injury and damage to the appliance.
When cooling drinks quickly in the freezer, make sure bottles are not left in for more than one hour; otherwise they could burst, causing injury or damage.
Never handle frozen food or the metal parts of the appliance with wet hands. Your hands may freeze to the frozen food or to the metal. Danger of frost burn.
10
Warning and Safety instructions
Do not take ice cubes out with your bare hands and never place ice cubes or ice lollies in your mouth straight from the freezer. The very low temperature of the frozen ice or lollies can cause frost burn to the lips and tongue.
Do not refreeze partially or fully defrosted food. Consume defrosted food as soon as possible, as it will lose its nutritional value and spoil if left for too long. Defrosted food may only be re-frozen after it has been cooked.
Observe the manufacturer's “use-by” dates and storage instructions given on food to avoid the risk of food poisoning. Storage times will depend on several factors, including the freshness and quality of the food, as well as the temperature at which it is stored.
Only use genuine original Miele accessories and spare parts with this appliance. Using accessories or spare parts from other manufacturers will invalidate the warranty, and Miele cannot accept liability.
Adhesives will damage the stainless steel surface and cause it to lose its dirt-repellent protective coating. Do not use sticky notes, transparent adhesive tape, masking tape or other types of adhesive on the stainless steel surface.
The surface is susceptible to scratching. Even magnets can cause scratching.
11
Warning and Safety instructions
Do not use any oils or grease on the door seals, as these will cause the seals to deteriorate and become porous with time.
Do not use a steam cleaning appliance to clean or defrost this appliance.
Steam could reach electrical components and cause a short circuit.
Sharp edged or pointed objects will damage the evaporator, causing irreversible damage to the appliance. Do not use sharp edged or pointed objects to
–remove frost and ice,
–separate frozen foods or remove ice trays.
Do not place electric heaters or candles in the appliance to defrost it. These can damage the plastic parts.
Do not use defrosting sprays or de-icers, as they could contain substances which could damage the plastic parts or which might cause the build-up of gases and pose a danger to health.
Always transport the appliance in an upright position and in its original transport packaging to avoid damage in transit.
Danger of injury and damage. The appliance is very heavy and must be transported by two people.
12
Warning and Safety instructions
Before disposing of an old appliance, first make the door latch or lock unusable.
This way you will prevent children from accidentally locking themselves in and endangering their lives.
Splashes of coolant can damage the eyes. Be careful not to damage any part of the pipework whilst awaiting disposal, e.g. by
–puncturing the coolant channels in the condenser,
–bending any pipework, or
–scratching the surface coating.
13
Disposal of the packing mater-
ial
The packaging is designed to protect the appliance from damage during transportation. The packaging materials used are selected from materials which are environmentally friendly for disposal and should be recycled.
Recycling the packaging reduces the use of raw materials in the manufacturing process and also reduces the amount of waste in landfill sites.
Electrical and electronic appliances often contain valuable materials. They also contain specific materials, compounds and components, which were essential for their correct function and safety. These could be hazardous to human health and to the environment if disposed of with your domestic waste or if handled incorrectly. Please do not, therefore, dispose of your old appliance with your household waste.
Please dispose of it at your local community waste collection / recycling centre for electrical and electronic appliances, or contact your dealer or Miele for advice. You are also responsible (by law, depending on country) for deleting any personal data that may be stored on the appliance being disposed of.
Take care not to damage the pipework at the back of it before or during transportation to an authorised collection depot.
In this way, refrigerant in the pipework and oil in the compressor will be contained, and will not leak into the environment.
Please ensure that your old appliance presents no danger to children while being stored awaiting disposal. See “Warning and Safety instructions” for more information.
14
|
|
|
How to save energy |
|
|
Normal energy consump- |
|
Increased energy con- |
|
|
|
|||
|
tion |
|
sumption |
|
|
|
|
|
|
Installation / |
In a ventilated room. |
|
In an enclosed, unventilated |
|
Maintenance |
|
|
room. |
|
|
|
|
|
|
|
Protected from direct sun- |
|
In direct sunlight. |
|
|
light. |
|
|
|
|
|
|
|
|
|
Not near to a heat source |
|
Near to a heat source (radi- |
|
|
(radiator, oven). |
|
ator, oven). |
|
|
|
|
|
|
|
Where the ideal ambient |
|
Where the ambient room |
|
|
room temperature is approx. |
|
temperature is above 25 °C. |
|
|
20 °C. |
|
|
|
|
|
|
|
|
|
Ventilation gaps uncovered |
|
Ventilation gaps covered or |
|
|
and dusted regularly. |
|
dusty. |
|
|
|
|
|
|
Temperature |
Refrigerator section 4 to |
|
The lower the temperature, |
|
setting |
5 °C |
|
the higher the energy con- |
|
|
|
|
sumption. |
|
|
|
|
|
|
|
PerfectFresh Pro zone just |
|
|
|
|
above 0 °C |
|
|
|
|
|
|
|
|
|
Freezer section -18 °C |
|
|
|
|
|
|
|
|
15
How to save energy
|
Normal energy consump- |
Increased energy con- |
|
tion |
sumption |
|
|
|
Use |
Drawers and shelves ar- |
|
|
ranged as they were when |
|
|
the appliance was delivered. |
|
|
|
|
|
Only open the door when |
Frequent opening of the |
|
necessary and for as short a |
door for long periods will |
|
time as possible. Store food |
cause a loss of coldness. |
|
in an organised way. |
The appliance will cool down |
|
|
and the compressor will run |
|
|
for longer periods. |
|
|
|
|
Take an insulated cool bag |
Hot food or food at room |
|
when shopping and load |
temperature raises the tem- |
|
food in the appliance as |
perature inside the appli- |
|
soon as possible. |
ance. The appliance will cool |
|
Replace any food removed |
down and the compressor |
|
as quickly as possible, be- |
will run for longer periods. |
|
fore it begins to thaw. |
|
|
Allow hot food and drinks to |
|
|
cool down before placing |
|
|
them in the appliance. |
|
|
|
|
|
Store food covered or pack- |
The evaporation or condens- |
|
aged. |
ation of liquids will cause a |
|
|
loss of coldness. |
|
|
|
|
Place frozen food in the refri- |
|
|
gerator to defrost. |
|
|
|
|
|
Do not over-fill the appliance |
Poor air circulation will |
|
to allow air to circulate. |
cause a loss of coldness. |
|
|
|
16
a Control panel with display
b Interior lighting
c Fan
d Door shelf / Egg tray
e Adjustable shelf with lighting (FlexiLight)
f Storage drawer (CompactCase)
g Bottle rack
h Holder with active charcoal filter (Active AirClean)
i Water container
j Bottle shelf with bottle holder
k Regulator for setting the humidity level in the DailyFresh drawer
l Condensate channel and drain hole
m DailyFresh drawer (on rollers)
n Recessed handle with door opening aid (Click2open)
o Ice cube drawer with automatic ice cube maker
p Freezer drawers
q Ventilation grille
This drawing is for illustration purposes only.
For easier installation there are transport handles on the back at the top and transport wheels underneath the appliance.
17
Guide to the appliance
Ice cube maker with integrated
ice cube tray
In the ice cube drawer there is an automatic ice cube maker .
An ice cube tray , in which the ice cubes are produced, is integrated in the ice cube maker . This ice cube tray cannot be removed.
The ice cube tray automatically empties into the drawer as soon as ice cubes are produced.
The ice cube maker can be turned off independently of the freezer if you do not want to make any ice cubes.
The ice cube maker is switched on via Settings mode (see "Selecting further settings", - "Switching the ice maker on and off").
18
|
|
|
Guide to the appliance |
|
Symbols on the display |
|
|
||
Controls |
|
|
|
|
|
|
|
||
Symbol |
|
Function |
||
|
|
|
||
|
Standby |
For switching on the whole appliance; |
||
|
|
|
For switching on the refrigerator section |
|
|
|
|
separately |
|
|
|
|
||
|
Settings mode |
For selecting settings (see "Selecting further |
||
|
|
|
settings") |
|
|
|
|
||
/ |
Minus / Plus |
For altering a setting (e.g. temperature) |
||
|
|
|
||
OK |
|
For confirming a setting |
||
|
|
|
||
/ |
Navigation arrow |
For scrolling in Settings mode to select a |
||
|
|
Left / right |
setting |
|
|
|
|
||
|
Back |
For exiting a menu |
||
|
|
|
|
|
Information |
|
|
||
|
|
|
||
Symbol |
|
Meaning |
||
|
|
|
||
|
Standby |
The appliance is connected to the electrical |
||
|
|
|
supply but is not switched on. |
|
|
|
|
The refrigerator section is switched off sep- |
|
|
|
|
arately. |
|
|
|
|
||
|
Freezer section |
Identifies the freezer section temperature |
||
|
|
|
display. |
|
|
|
|
||
|
Super cool (refrigerator |
Function can be selected depending on sec- |
||
|
|
section) / Super freeze |
tion (see “Using Super cool and Super |
|
|
|
(freezer section) |
freeze”). |
|
|
|
|
||
|
Temperature alarm |
Warning (see “Problem solving guide - Dis- |
||
|
|
|
play warnings”). |
|
|
|
|
||
|
Door alarm |
Warning (see “Problem solving guide - Dis- |
||
|
|
|
play warnings”). |
|
|
|
|
|
|
|
|
Power failure |
Warning (see “Problem solving guide - Dis- |
|
|
||||
|
|
|
play warnings”). |
|
|
|
|
|
|
19
Accessories supplied |
Egg tray |
The flexible ribs grip the bottles securely when the door is opened and closed.
Bottles can be stored horizontally using the bottle rack to save space.
The bottle rack can be placed at different positions in the appliance.
The charcoal filters neutralise unpleasant odours in the refrigerator section for improved air quality.
20
Accessories
The cool pack prevents the temperature in the freezer rising too quickly in the event of an interruption to the power supply. This can help prolong the storage time.
The cool pack will be at its most effective after it has been in the freezer for approx. 24 hours.
The door hinges are set ex works to enable the door to be opened up to 115°. If the appliance door hits an adjacent wall when opened, for example, the opening angle can be limited to approx. 90°.
A range of useful Miele accessories and care products are available for your appliance.
Accessories are available to order via the Miele Webshop, from Miele directly (see back cover for contact details) or from your Miele dealer.
The stainless steel cleaning cloth is impregnated with stainless steel conditioner for optimum cleaning and protection.
Each application of the stainless steel conditioner (supplied in a bottle) forms a water and dirt repellent protective coating. It gently removes water marks, fingerprints and other dirt for a uniformly shiny surface.
The appliance is supplied with a bottle rack for the refrigerator section. Additional bottle racks can be fitted if required.
The appliance is supplied with a charcoal filter holder. Additional holders can be fitted in the refrigerator section, if required.
KKF-RF
Active AirClean replacement filters
Replacement filters to the fit the Active AirClean holder are available. We recommend replacing the charcoal filters every 6 months.
21
Accessories
The microfibre cloth is suitable for removing fingerprints and light soiling from surfaces such as stainless steel, glass, plastic and chrome without the use of chemicals.
The MicroCloth Kit contains a universal cloth, a glass cloth and a polishing cloth.
These cloths are extremely rip-proof and hard-wearing. Thanks to very fine microfibres these cloths achieve excellent cleaning results.
22
Remove all packaging material from the inside of the appliance.
The stainless steel trim to the interior shelves and the door shelves has a layer of protective foil to prevent damage during transportation. The stainless steel doors, and side panels where applicable, have a layer of protective foil too.
Do not remove the foil until the appliance has been positioned in its final location.
Please refer to the relevant instructions in "Cleaning and care".
Clean the inside of the appliance and the accessories.
Clean the ice cube maker.
The water quality must conform to the requirements for drinking water in the country in which the appliance is being installed (e.g. 98/83/ EU).
Do not fill the water container with hot or boiling water.
The water container could be damaged.
Use only suitable, cold drinking water to fill the water container.
Liquids containing sugar, such as soft drinks, fruit juice, syrup or concentrate diluted with water, will clog the pump and cause the pump to malfunction and damage the ice cube maker.
Do not fill with liquids containing sugar.
Danger of build-up of bacteria! Do not leave water in the water container for several days.
Change the water in the water container regularly and always empty and refill it before switching on the ice maker to ensure that the ice cubes are made with fresh water. The first three batches of ice cubes made after the ice cube maker is started up must not be consumed, as the water will have been used for the initial rinsing of the water supply line.
This applies to the initial commissioning as well as when using the appliance again after it has been turned off for a long time.
Clean the water container regularly and dry it carefully.
The automatic ice cube maker in the freezer section is supplied with water from the water container in the refrigerator section.
However, you can also use the cooled water in the water container at any time.
The water container holds approx. 1 litre of water.
23
Before using for the first time
Switch the appliance on. |
Pull the water container forwards to remove it.
Clean it thoroughly with water to remove any dust etc.
Fill the container up to the marker with fresh, cold drinking water.
Place the filled water container back into its holder and push it all the way in.
Make sure that the water container has locked into position and is sitting correctly in its niche.
Connect the appliance to the electricity supply as described in “Electrical connection”.
Standby
will appear in the display.
24
The touch display can be scratched by pointed or sharp objects, e.g. pens.
Only touch the touch display with your fingertips.
It is possible for the touch display to not react to finger contact if your fingers are cold.
To enable the temperature to get sufficiently cold inside the appliance, allow the appliance to run for approx.
2 hours before placing food in it.
Do not place food in the freezer section until the temperature is at least -18 °C.
Standby
Touch briefly.
The welcome message
Miele - Willkommen will appear in the display for approx. 3 seconds.
If this does not happen and appears in the display, the safety lock is still activated (see “Selecting further settings - Activating or deactivating the safety lock - Deactivating the safety lock temporarily”).
5°C
-18°C
The display changes to the start screen.
The interior lighting will come on and become brighter until the maximum brightness is reached. The appliance is switched on and begins to cool down to the following pre-set temperatures:
–Temperature in the refrigerator section = 5 °C
–Temperature in the freezer section = -18 °C
Start screen
5°C
-18°C
The start screen is the screen from which all settings can be selected.
25
Switching on and off
The display is divided into several fields for this purpose:
The temperature display for the refrigerator section is in the upper field.
Touch the temperature display to access the refrigerator section display. Here you can set or change the temperature (see "The correct temperature" - "Setting the temperature") as well as select the Super cool function (see "Using Super cool and Super freeze").
The temperature display for the freezer section is in the lower field.
This is also identified by .
Touch the temperature display to access the freezer section display. Here you can set or change the temperature as well as select the Super freeze function (see "Using Super cool and Super freeze").
Settings mode is on the righthand side.
Touch the symbol to access Settings mode. Here further settings can be selected (see "Selecting further settings").
You can switch the appliance off in Settings mode (see "Selecting further settings").
5°C
-18°C
Start screen
Touch .
Settings mode
Use the or arrow sensors until
is displayed.
Switching off
Touch .
The temperature display goes out and
lights up.
The refrigerator section interior lighting will go out and the cooling process will be switched off.
will go out after approx. 10 minutes. The display goes dark and switches to energy-saving mode.
26
Switching on and off
The refrigerator section can be switched off without having to switch off the freezer section.
Tip: We recommend using the Holiday mode function if you are away on holiday (see "Selecting further settings" - "Switching Holiday mode on/off"), so that the appliance operates at lower power rather than being switched off completely.
If the Party mode or Super cool functions have been previously selected, these will be switched off automatically.
5°C
-18°C
Standby
Touch the temperature display in the field for the refrigerator section.
5°C
OK
Refrigerator section display
Touch or until is displayed.
Touch .
Touch OK to confirm your entry.
-18°C
Start screen - refrigerator section switched
off
The temperature display for the refrigerator section goes out and lights up.
The refrigerator section is switched off. The temperature in the freezer section will still be shown in the display. The refrigerator section interior lighting will go out.
-18°C
Start screen - refrigerator section switched
off
Touch in the field for the refrigerator section.
4°C
OK
Refrigerator section display
Touch or until 4 °C is displayed.
Touch OK to confirm your entry.
27
Switching on and off
The refrigerator section will be switched on and the interior lighting will come on. It will start to cool and gradually reach the set temperature.
If, during a long absence, the appliance is switched off but not cleaned and the door(s) left shut, there is a danger of mould building up inside the appliance.
It is essential to clean the appliance.
If the appliance is not going to be used for a longer period of time, e.g. whilst on holiday:
switch the appliance off,
disconnect it from the mains,
empty the ice cube drawer,
take the water container out of the appliance, empty it, then clean and dry it,
clean the appliance and
leave the door(s) ajar to air the appliance and avoid odours building up inside the appliance.
It is also advisable to carry out the last two instructions if you are switching the refrigerator section off for a longer period of time.
28
It is very important to set the correct temperature for storing food in the appliance. Micro-organisms will cause food which is not stored at the correct temperature to deteriorate rapidly. Temperature influences the growth rate of these micro-organisms. Reducing the temperature reduces their growth rate.
The temperature in the appliance will rise:
–the more often the door is opened and the longer it is kept open,
–the more food that is stored in it,
–the warmer the food is which is being put into it,
–the higher the ambient temperature surrounding the appliance. The appliance is designed for use within specific ambient temperatures (climate range). Do not use in ambient temperatures for which it is not designed.
We recommend a temperature of 4 °C in the refrigerator section.
To freeze fresh food and to store frozen food for a long time, a temperature of
-18 °C is required. At this temperature the growth of micro-organisms is generally halted. As soon as the temperature rises above -10 °C, the micro-organ- isms become active in the food again so that it cannot be kept as long. For this reason, partially defrosted or fully defrosted food must not be re-frozen. Food may be re-frozen once it has been cooked, as the high temperatures achieved when cooking destroy most micro-organisms.
29
The correct temperature
5°C
-18°C
Start screen
In normal operation the upper temperature display shows the average, current temperature in the refrigerator section and the lower temperature display the lowest temperature in the freezer section.
Depending on the ambient temperature and the temperature setting, it can take the appliance a few hours to reach the temperature required and for this temperature to then be shown as a constant temperature in the display.
If the temperature in the freezer remains above -18 °C for a long time, check that the frozen food has not started to defrost.
If it has, check that the food is safe to use and if it is, then use it as soon as possible or cook it before freezing it again.
The temperatures for the refrigerator and freezer sections can be set independently of one another.
Touch the temperature display for the section you want to change.
The previously set temperature will appear.
4°C
OK
Refrigerator section display
-18°C
OK
Freezer section display
Use and to set the temperature higher or lower.
30