


Operating instructions
Rotary Ironer
Instrucciones de manejo
Planchadora
Instruções de utilização
Calandras
Bruksanvisning
Varmrulle HM 38-175
It is essential to read these
operating instructions before
installing or using the machine,
to avoid the risk of accident
or damage to the machine.
HM 38-205
QUVX
M.-Nr. 05 803 030

M.-Nr. 05803030 2

Contents
Page
Warning and safety instructions . . . . . . . . . . . . . . . . . . . . . . . . . . . . . . . 4
Gas safety . . . . . . . . . . . . . . . . . . . . . . . . . . . . . . . . . . . . . . . . . . . . 6
Caring for the environment . . . . . . . . . . . . . . . . . . . . . . . . . . . . . . . . . . . 6
Guide to the machine . . . . . . . . . . . . . . . . . . . . . . . . . . . . . . . . . . . . . 7
The controls . . . . . . . . . . . . . . . . . . . . . . . . . . . . . . . . . . . . . . . . . . . 8
Safety features . . . . . . . . . . . . . . . . . . . . . . . . . . . . . . . . . . . . . . . . . 10
Operation . . . . . . . . . . . . . . . . . . . . . . . . . . . . . . . . . . . . . . . . . . . 11
Type of fabric and preparation . . . . . . . . . . . . . . . . . . . . . . . . . . . . . . . . . 11
Ironing . . . . . . . . . . . . . . . . . . . . . . . . . . . . . . . . . . . . . . . . . . . . . 12
Pressing . . . . . . . . . . . . . . . . . . . . . . . . . . . . . . . . . . . . . . . . . . . . 13
Safety features . . . . . . . . . . . . . . . . . . . . . . . . . . . . . . . . . . . . . . . . 14
Motor protection . . . . . . . . . . . . . . . . . . . . . . . . . . . . . . . . . . . . . . . . 14
Insufficient air supply . . . . . . . . . . . . . . . . . . . . . . . . . . . . . . . . . . . . . 14
Insufficient gas supply . . . . . . . . . . . . . . . . . . . . . . . . . . . . . . . . . . . . . 14
Emergency release during a power cut . . . . . . . . . . . . . . . . . . . . . . . . . . . . 14
Variations in equipment . . . . . . . . . . . . . . . . . . . . . . . . . . . . . . . . . . . 15
Laundry return feed . . . . . . . . . . . . . . . . . . . . . . . . . . . . . . . . . . . . . . 15
Belt feed-in . . . . . . . . . . . . . . . . . . . . . . . . . . . . . . . . . . . . . . . . . . . 15
Cleaning and care . . . . . . . . . . . . . . . . . . . . . . . . . . . . . . . . . . . . . . 16
Waxing the heater plate . . . . . . . . . . . . . . . . . . . . . . . . . . . . . . . . . . . . 17
Aluminium heater plate . . . . . . . . . . . . . . . . . . . . . . . . . . . . . . . . . . . . 17
Pick-off attachment . . . . . . . . . . . . . . . . . . . . . . . . . . . . . . . . . . . . . . 17
Ball bearings and gear box . . . . . . . . . . . . . . . . . . . . . . . . . . . . . . . . . . 17
Roller padding (steel wool) . . . . . . . . . . . . . . . . . . . . . . . . . . . . . . . . . . 18
Roller cloth cover, removing, replacing and washing . . . . . . . . . . . . . . . . . . . . . 18
Leaf-type roller padding . . . . . . . . . . . . . . . . . . . . . . . . . . . . . . . . . . . . 19
Symbols on the data plate . . . . . . . . . . . . . . . . . . . . . . . . . . . . . . . . . . 21
Installation . . . . . . . . . . . . . . . . . . . . . . . . . . . . . . . . . . . . . . . . . . 22
Removing the transit fitting . . . . . . . . . . . . . . . . . . . . . . . . . . . . . . . . . . 22
Electrical connection . . . . . . . . . . . . . . . . . . . . . . . . . . . . . . . . . . . . . . 22
Gas connection . . . . . . . . . . . . . . . . . . . . . . . . . . . . . . . . . . . . . . . . 24
Exhaust ducting . . . . . . . . . . . . . . . . . . . . . . . . . . . . . . . . . . . . . . . . 24
The rotary iron must be installed by an
approved Service Technician or authorised
Service Dealer in accordance with local and
national safety regulations.
Página / Side
U Indice . . . . . . . . . . . . . . . . . . . . . . . . . . . . . . . . . . . . . . . . . . 27
V Índice . . . . . . . . . . . . . . . . . . . . . . . . . . . . . . . . . . . . . . . . . . 51
X Innhold . . . . . . . . . . . . . . . . . . . . . . . . . . . . . . . . . . . . . . . . . 75
3 M.-Nr. 05803030
Warning and safety instructions
Read the operating instructions before
using this machine for the first time. This
way you will avoid the risk of accidents and
damage to the machine.
Only iron materials with this ironer which
are suitable for machine ironing and
which were washed in water.
This machine must not be operated in the
same room as dry cleaning machines
which use solvents containing PERs or CFCs.
The ironer should only be used in a room
with a low relative humidity level.
Any removable outer panels must be back
in place, and all moving or electrical parts
shielded before the machine is switched on.
Do not damage, remove or bypass the
safety features, fixtures and control ele-
ments of the machine.
Do not use a machine with damaged controls or with damaged cables. These must
be repaired before it is used again.
Repairs to the machine should only be
undertaken by a suitably qualified trained
service engineer to ensure safety. Unauthorised repairs could be dangerous.
Never allow children to play on or near
the rotary ironer, or to operate it them-
selves.
When the ironer is heated up with the
heater plate in position, there is an acute
danger of burning, if the edge of the heater
plate is touched on the feed-out side.
When ironing double layered items do not
reach in between the layers to straighten
out the fabric. This is extremely dangerous as
you may not be able to extract your hands on
time. The same applies when ironing garments with pockets.
Ironers with belt-feed in:
Warning! Do not iron articles with
fringes/tassles, thin straps, ties etc. They
could cause the belt feed-in mechanism to fail
Always keep a fire extinguisher accessi-
ble in the rare event of textiles igniting.
Accessories
Accessory parts may only be fitted when
expressly approved by Miele. If other
parts are used, guarantee, performance and
product liability claims may be invalidated.
Faulty components must only be exchan-
ged for Miele original spare parts. Only
when these parts are fitted can the safety
standards of the machine be guaranteed.
The electrical safety of this appliance can
only be guaranteed when continuity is
complete between the appliance and an effective earthing system which complies with
local and national regulations. It is most important that this basic safety requirement is regularly tested by a qualified electrician.
The manufacturer can not be held respon-
sible for the consequences of an inadequate earthing system.
The machine is only completely isolated
from the electricity supply either when it is
switched off at the wall isolator or when the
mains fuse is withdrawn from the distribution
board.
M.-Nr. 05803030 4

Warning and safety instructions
Notes on the use of this machine
This ironer must be operated at all times
in accordance with the legal requirements
of the Health and Safety Acts.
Please allow only trained persons,
thoroughly familiar with the ironer, to work
at the feed-in. Always conform to local and
national regulations on minimum age requirements of operators.
Persons with especially slim fingers
should only work at the receiving side and
not at the feed-in.
When working with the ironer, always
wear close fitting clothes. Wide sleeves,
apron bands, ties or scarves could be taken
in by the roller. Also remove rings or bracelets
before starting to work.
Smooth out folds as far away as possible
from the feed-in on the feed-in table. Feed
pillow cases and duvet covers into the ironer
with the open part first. Do not take hold of
the corners from the inside. Do not take hold
of undershirt and apron straps from the inside.
Always check the proper setting of safety
devices. This way you will avoid the
danger of burns, squashed fingers and even
loss of hands.
Check daily whether the safety devices
function properly.
Make sure that the safety bars cannot be
bridged.
Before switching to reverse make sure
that nobody is endangered.
When using a gas heated system, make
sure that the ventilation of the work room
is sufficient.
Lubricate machine parts only when the
machine is shut off.
It is imperative that all local and national
safety regulations concerning the use of
this machine are observed.
5 M.-Nr. 05803030
Gas safety Caring for the environment
Safety precautions to take if you smell gas
(gas-heated ironers only).
(Natural gas usually has no smell of its own.
In the U.K. a smell is added by British Gas for
safety reasons).
If you smell gas you must act immediately.
Extinguish any flames.
Do not create any electrical sparks: e.g. do
not insert or withdraw any electrical plugs
or operate electrical switches such as
lights and door bells.
Do not enter a room with an open light
where there is the smell of gas.
Do not light cigarette lighters or matches.
Do not smoke.
Open all windows and doors.
Close any shut off valves at the gas con-
nection or mains supply immediately.
Shut off the gas-valve next to the machine.
Disposal of the packing material
The transport and protective packing has
been selected from materials which are environmentally friendly for disposal and can
normally be recycled.
Rather than just throwing these materials
away, please ensure they are offered for
recycling.
Disposal of your old machine
Old machines may contain material which can
be reclaimed or recycled. Please contact your
dealer, your local waste collection centre or
scrap merchant about potential recycling
schemes.
Ensure that the machine presents no danger
to children while being stored for disposal.
See the appropriate section in the Warning
and Safety instructions.
If all gas valves are closed but there is still
the smell of gas in the room you should call
your local gas supplier immediately.
Important: Before signing off any commissioning, maintenance, conversion or repair
work as finished, all gas pipework from the
manual isolating valve to the burner nozzles
must be checked for gas soundness.
Pay special attention to the test points on the
multifunction control, the connection pressure
monitor and the burner setting pressure.
The tests must be carried out with the burner
switched on and switched off.
All personnel working with this machine must
be fully trained in all aspects of its use and
safety.
Keep these instructions in a safe and
accessible place.
M.-Nr. 05803030 6
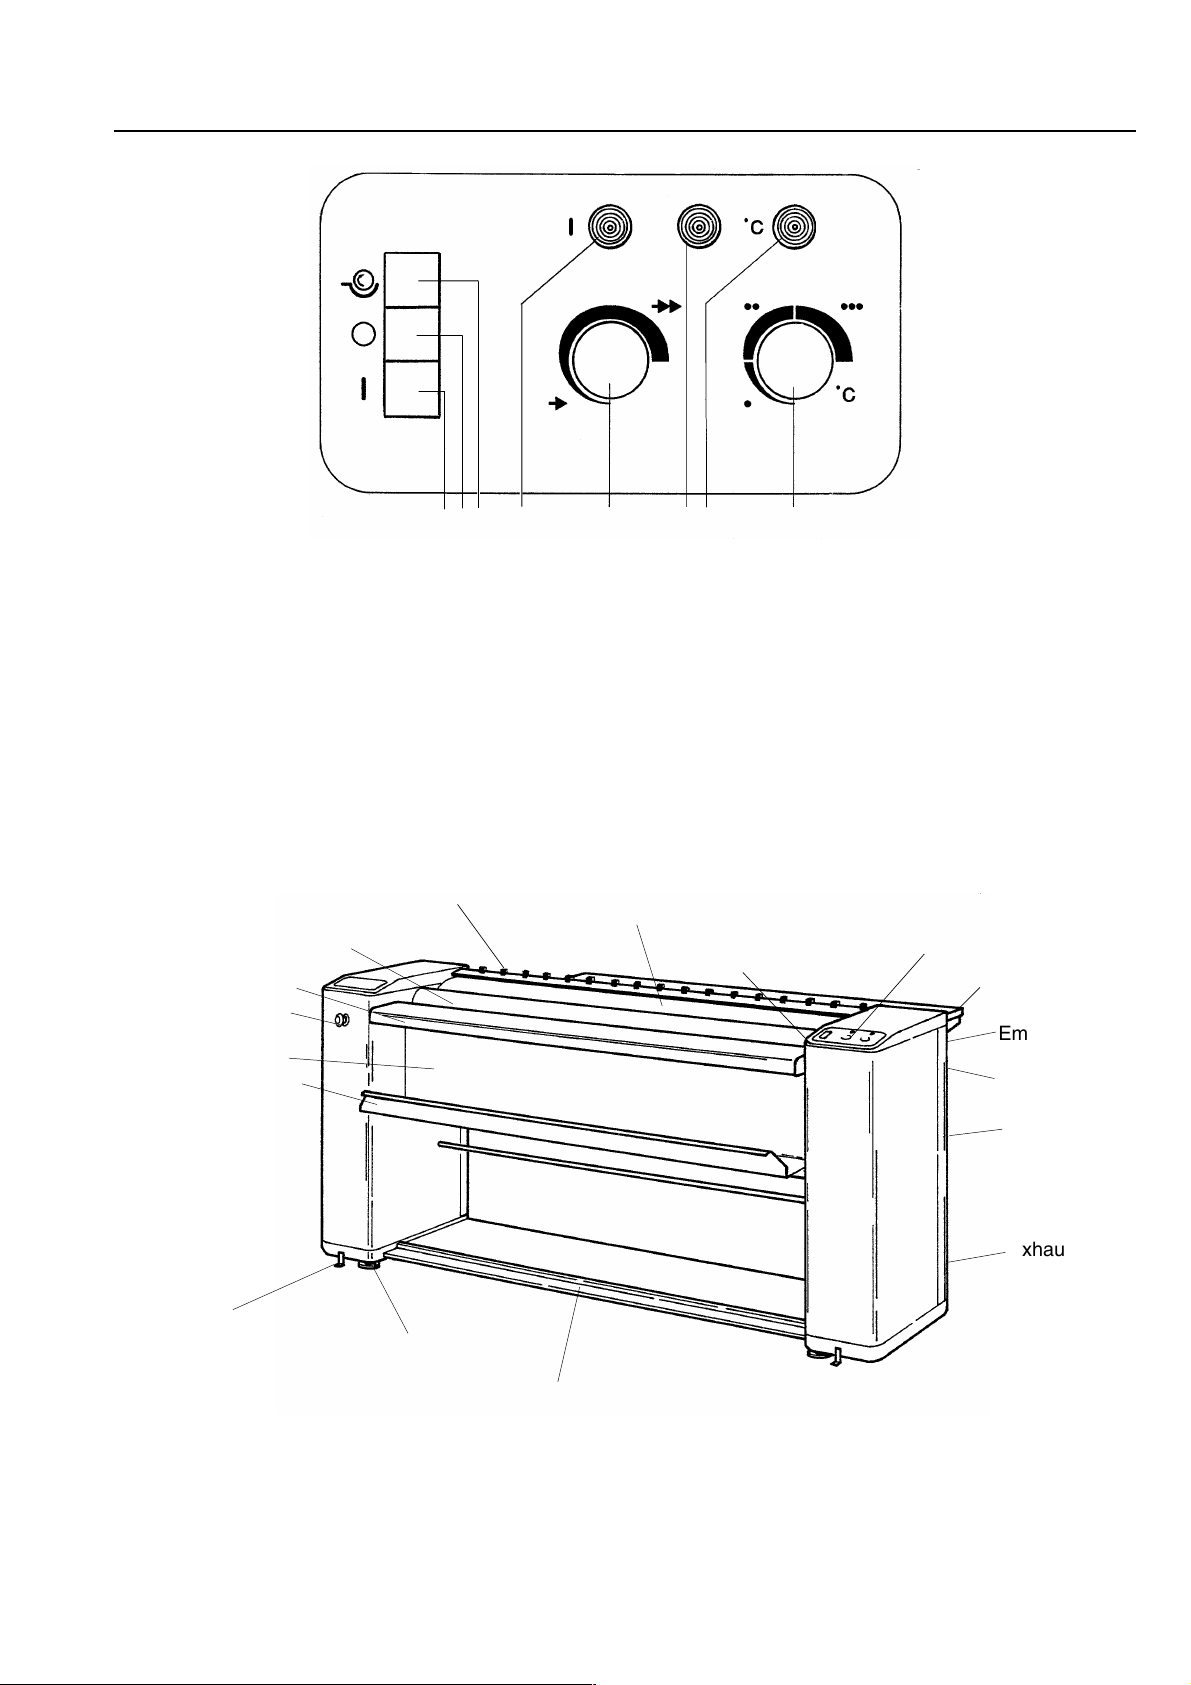
Guide to the machine
yx
1 2 3 4 5 6 7 8
The controls
1 Button "I" On 5 Speed selector
2 Button "O" Off 6 Ignition fault indicator light yx*
3 Button "Ö Reverse run" 7 Temperature indicator light °C
4 In operation indicator light 8 Temperature selector
Pick-off band
Roller
Finger guard Control panel
Reset button*
Feed-in table Out tabling
Emergency stop
switch
Protective panel* switch
Laundry collector box Exhaust extraction
Fixing brackets (4)
Adjustable feet (4)
Foot control bar
*) only with gas heated rotary ironers
Emergency stop
Hand wheel
Exhaust pipe*
HM 38-175
7 M.-Nr. 05803030

Guide to the machine
The indicator lights
Pushbutton controls
Button "I" On
After pressing in button "I" the in-operation indicator light "I" and the temperature indicator
light "°C" come on.
- The heater plate heats up Once the required temperature is reached the
temperature indicator light "°C" goes out.
When the "I" button is pressed again the
heater plate will move into position and the
roller starts.
Button "O" Off
This button is used to switch the machine off
and withdraw the heater plate.
In operation indicator light "I"
The in operation indicator light "I" comes on
when the "I" button is pressed in.
Temperature indicator light "°C"
The temperature indicator light comes on
while the machine is heating up, and it goes
out once the required temperature has been
reached.
Gas heated rotary ironers
Indicator light "yx" ignition fault
(and faults in the exhaust ducting)
This lights up if there is an ignition fault, or if
there is insufficient under-pressure in the exhaust system (exhaust ducting blocked).
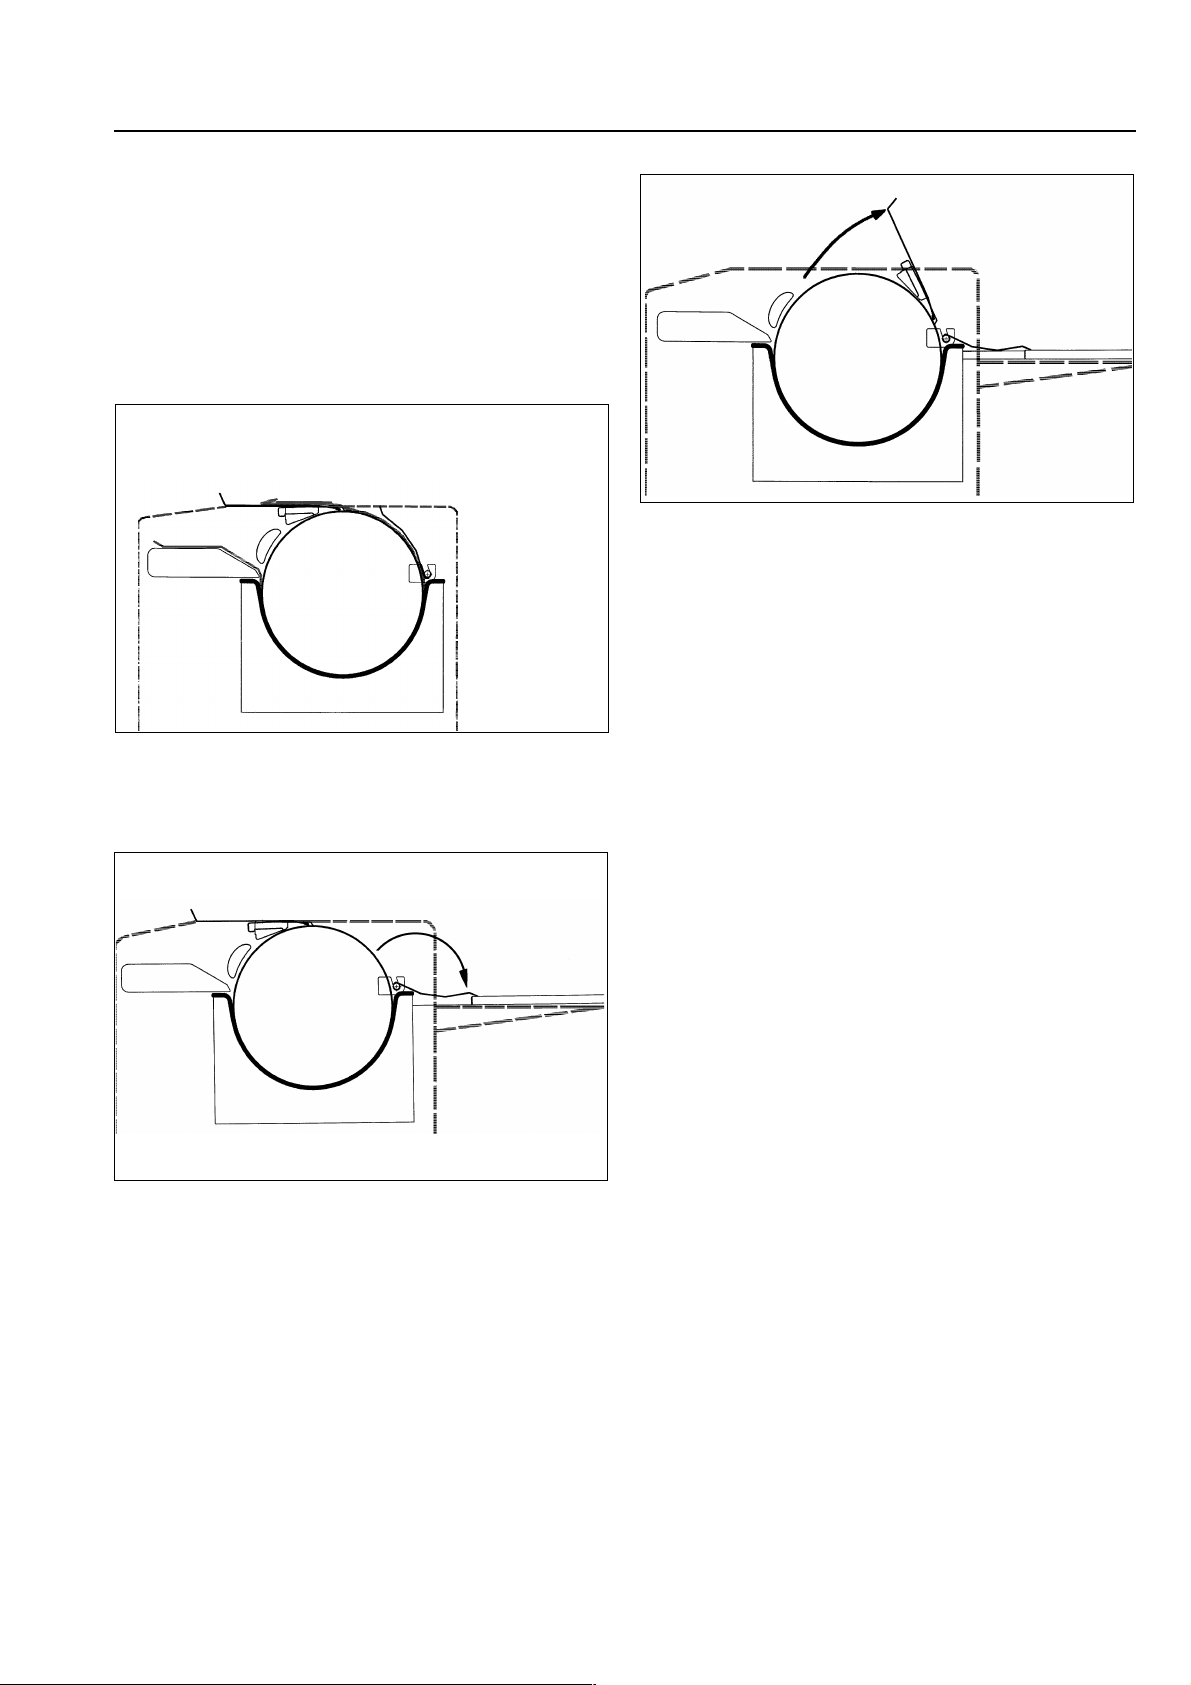
Button "Ö " Reverse run
Reversing is only used to change the roller
covering or replace the padding. First switch
off the machine, the heater plate will then withdraw. Now press the "Ö " Reverse run button
- the roller will only run in reverse as long as
this button is pushed in.
M.-Nr. 05803030 8
Re-set switch "yx"(on the inside of the right
hand column, below the feed-in table)
When an ignition fault occurs, the re-set
switch can be activated after waiting for at
least one minute. If an ignition fault occurs
frequently call the Service department.
Guide to the machine
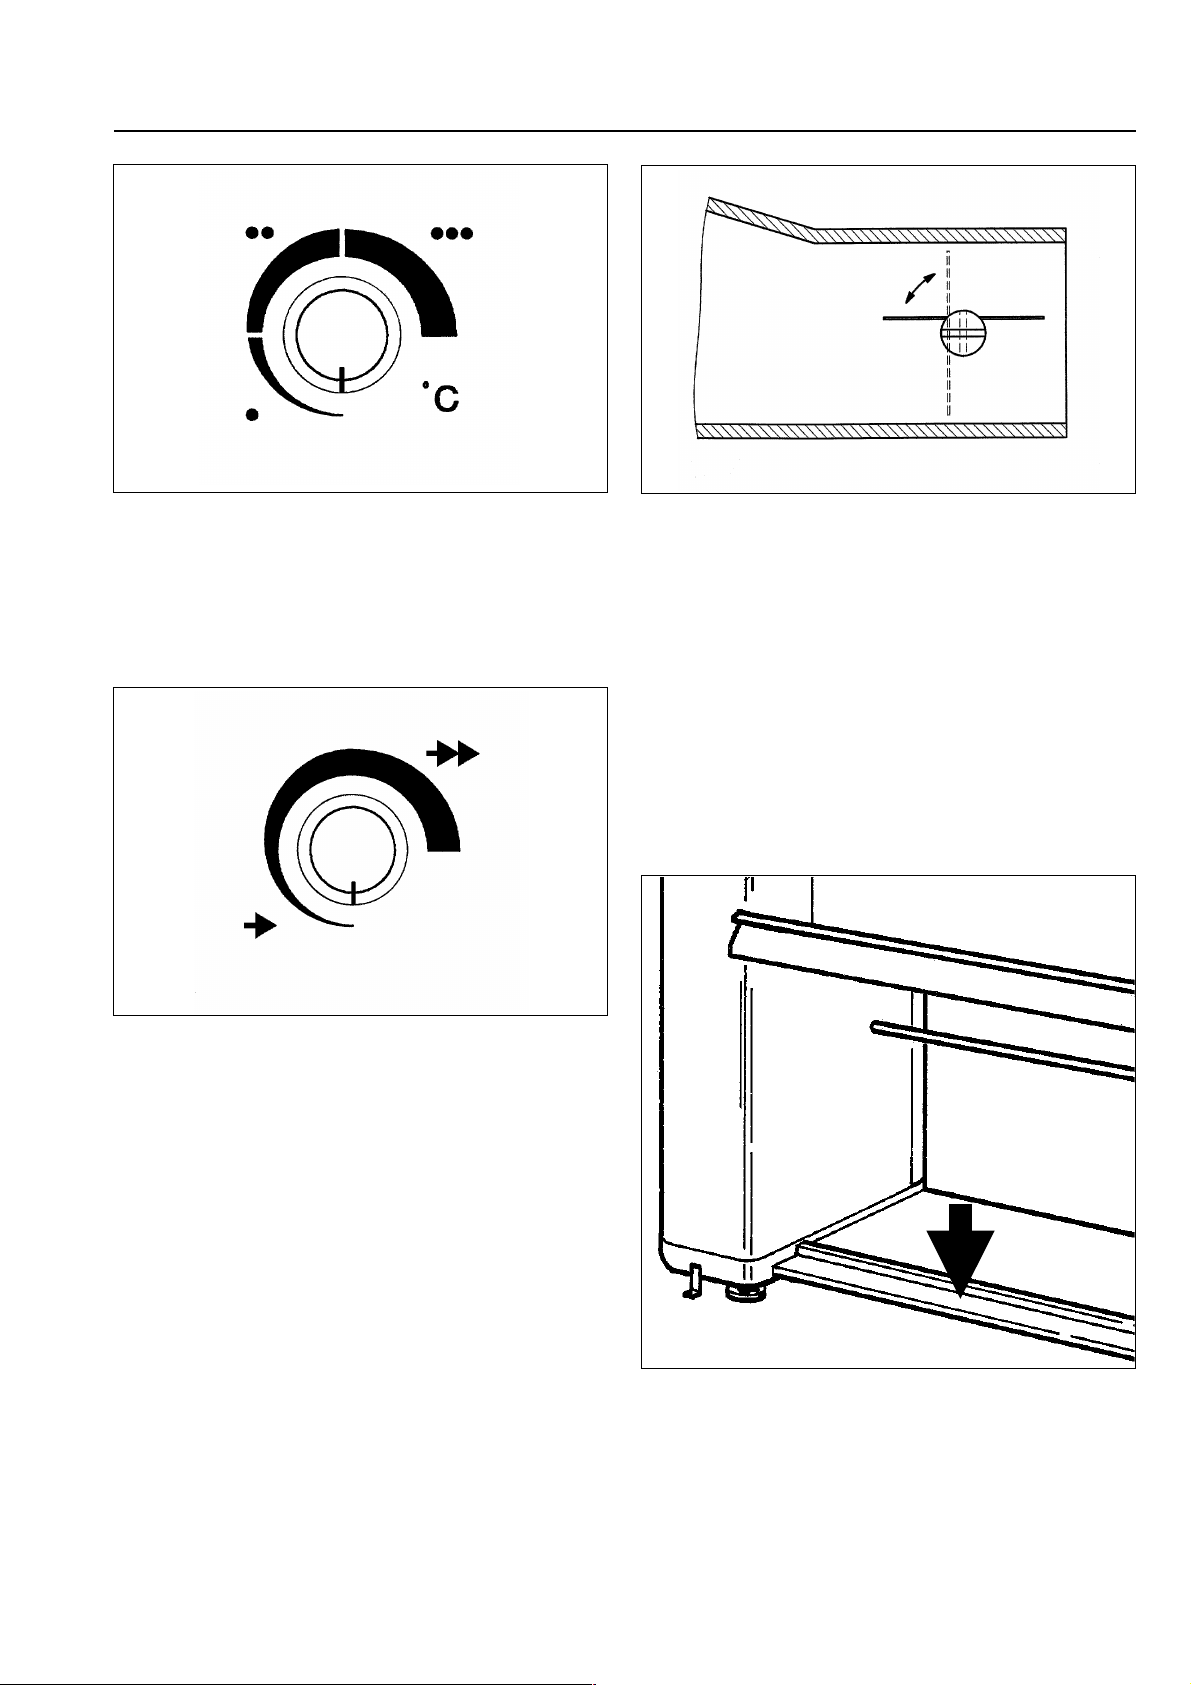
Temperature selector
ß = low temperature
ßß = medium temperature
ßßß = high temperature
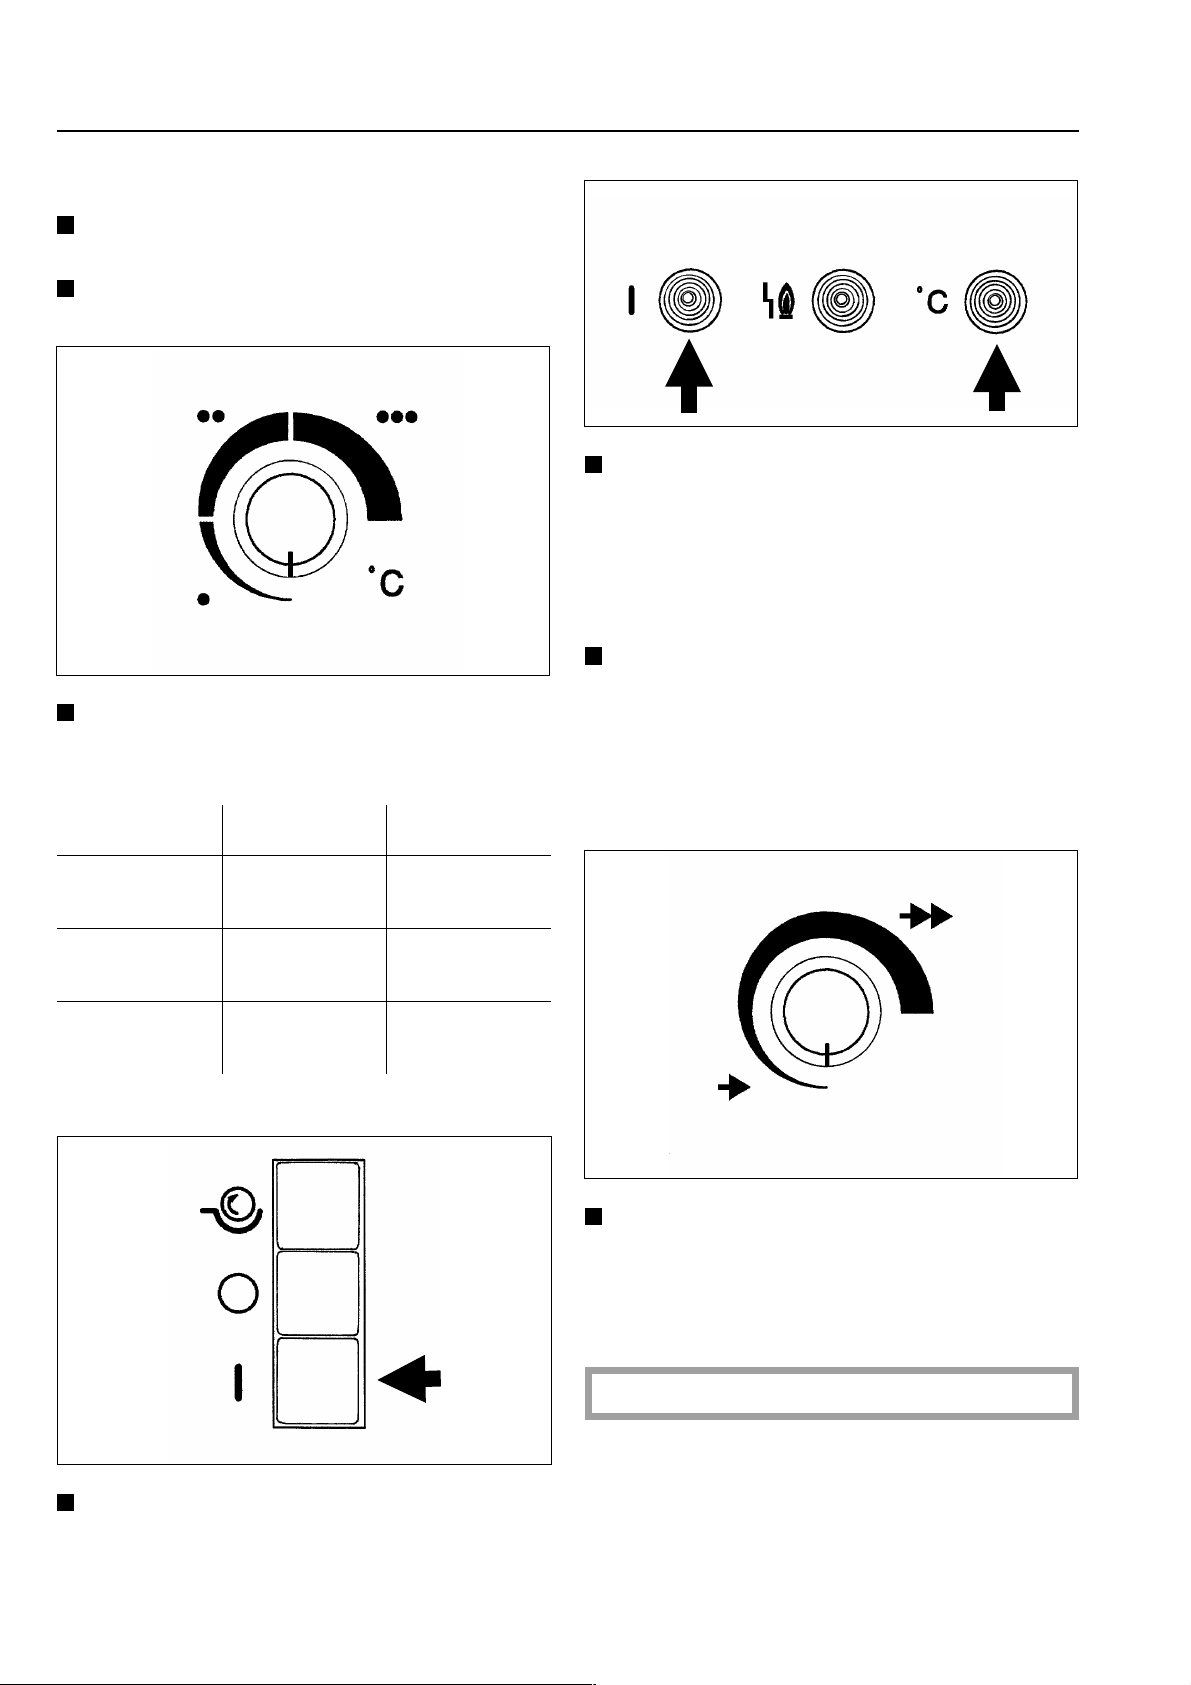
Speed selector
The air volume is highest at the initial position
of the adjusting screw (see drawing), and can
be reduced by turning it through 90°.
The ideal throttle setting is when the roller
dries adequately with the lowest air flow volume, and no water spots appear on the roller
covering or on the items being ironed.
If the air throughput at the vapour exhaust is
too high, the roller will cool down too quickly,
resulting in a less efficient ironing process.
The roller speed is increased by turning the
speed selector clockwise and reduced by
turning it anti-clockwise.
Throttle valve - vapour exhaust
(only with electric heated rotary ironers)
A throttle valve has been installed in the va-
pour exhaust, whereby the air volume flowing
through the roller covering can be reduced.
Foot control bar
Functions:
not activated - ironing setting
activated - pressing setting
9 M.-Nr. 05803030
Guide to the machine
Safety features
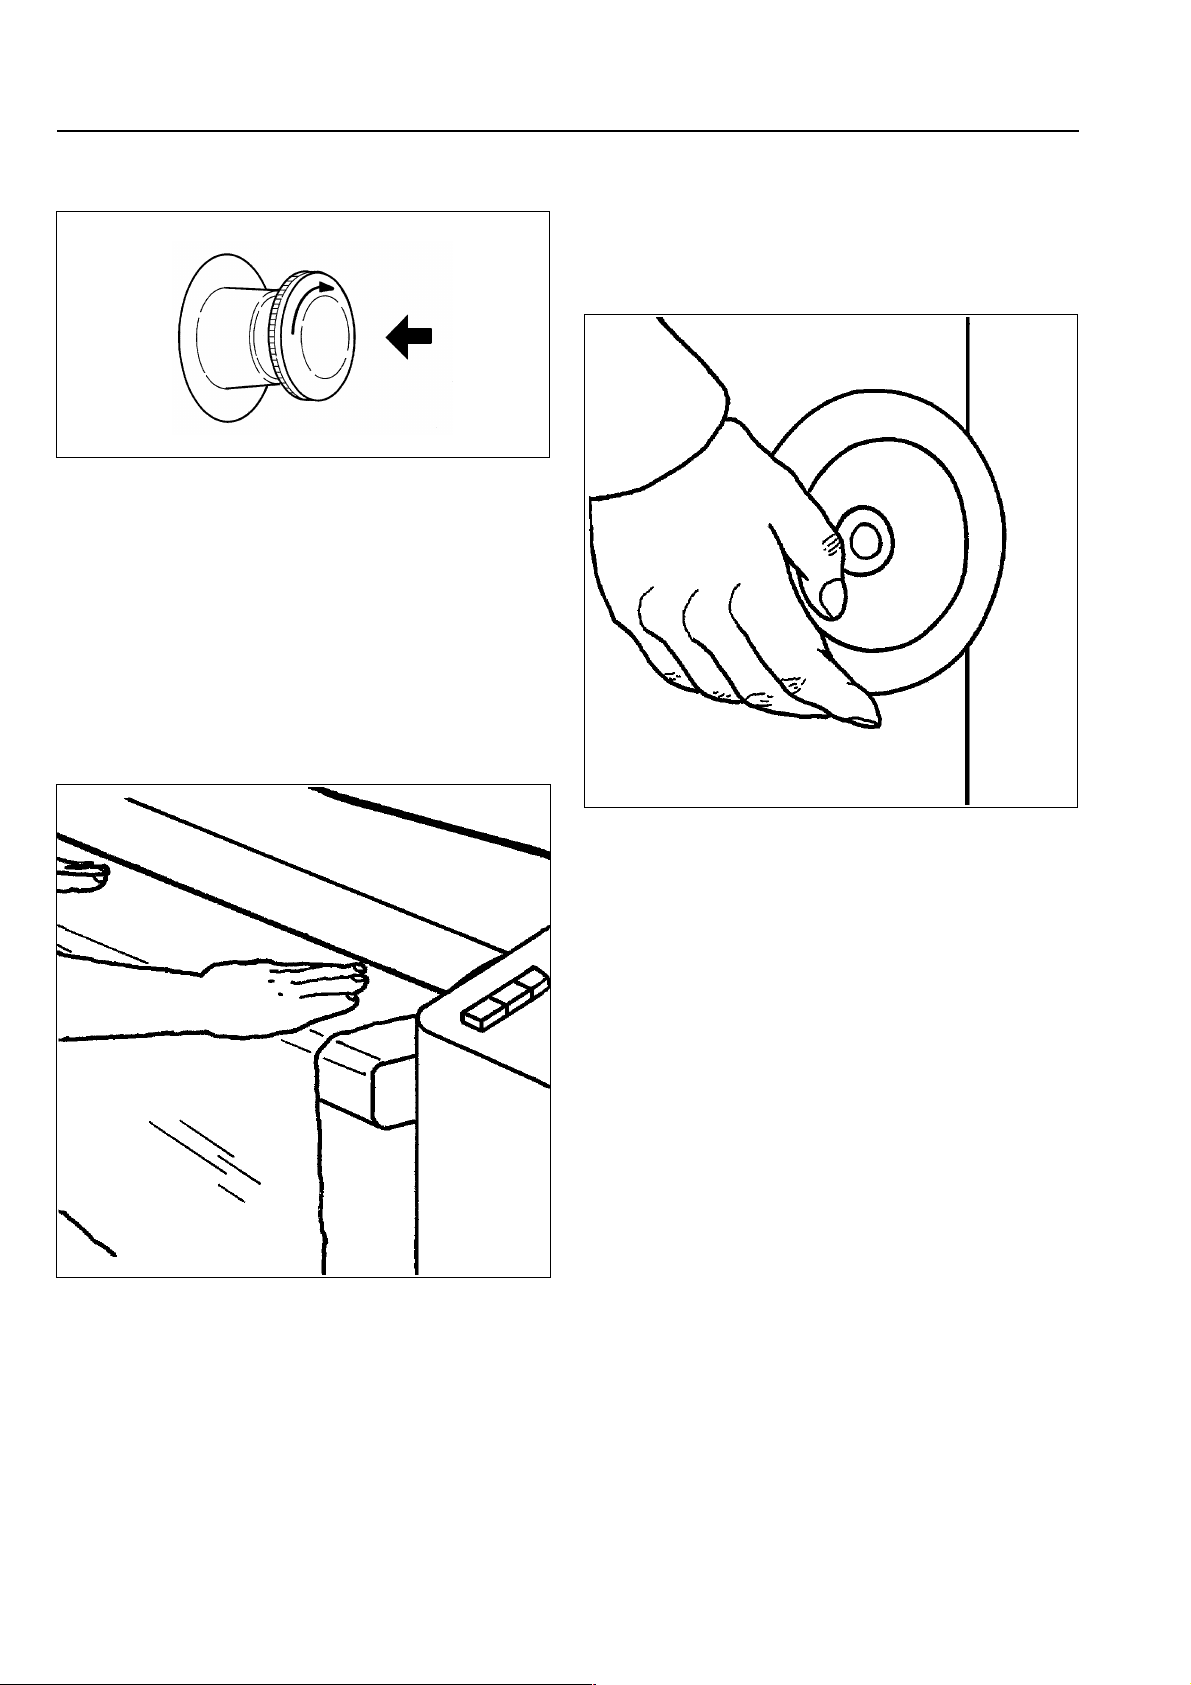
Emergency stop switch
(at the front of the left hand column and at the
rear of the right hand column)
Immediately the emergency stop switch is
pushed in the roller stops and the heater plate
is withdrawn downwards.
To reset the emergency stop switch after it
has been used, turn the ribbed disc clockwise.
The finger guard is a safety feature which
must be checked daily for proper functioning before the machine is used.
Finger guard
If the fingers slip between the laundry feed in
table and the finger guard the roller will stop
immediately and the heater plate is withdrawn
downwards. The finger guard does not work if
the roller is running in reverse.
If the finger guard has been activated, the machine can only be restarted by pushing in
button "I".
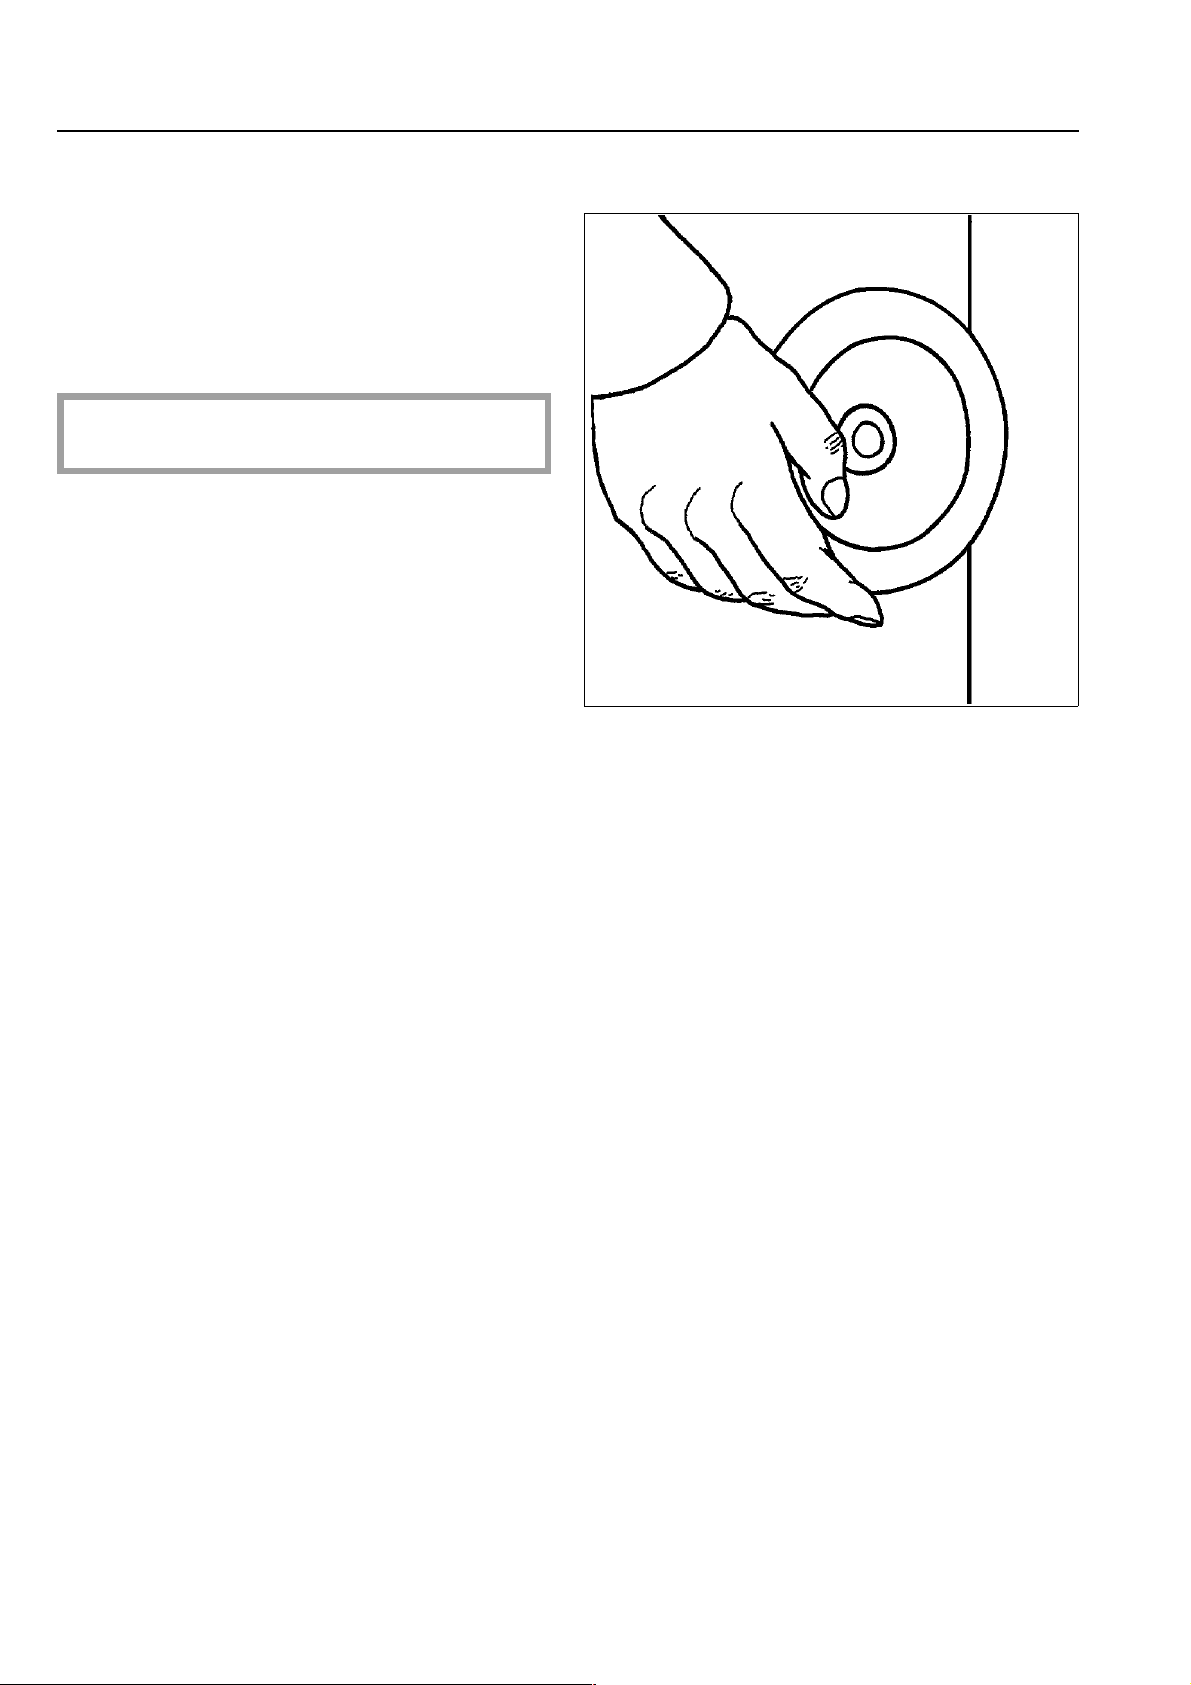
Hand wheel (at the rear of the right hand
column)
The hand wheel is used to release the heater
plate from the stationary roller in the event of
a power cut. Turn the handwheel anti-clockwise to lower the heater plate from the roller
and clockwise to raise it to the roller.
The machine must be disconnected from
the mains supply. (Switch off at the isolator or mains fuse box).
M.-Nr. 05803030 10

Operation
Condition of linen
For a good finish the ideal residual moisture
level lies between 25% - 40%.
If the laundry is rinsed with hot water in the
final rinse, the residual heat in the laundry,
together with the reduced residual moisture
content, will lead to shorter processing times
and save energy.
Laundry with a synthetic fibre content
greater than 50% (e.g. Dralon) must not be
ironed as the high temperatures would
melt the fibres.
Laundry with a lower synthetic content can
be ironed at a low temperature.
Preparing the flatwork
A cloth should be placed over zips, metal buttons and hooks to protect the heater plate
during ironing.
Metal and plastic buckles and very bulky
buttons should not be passed through the
ironer.
Note!
Clean the flatwork ironer before using for
the first time by passing through a cloth
along the entire length of the trough.
Before starting to iron laundry should be
sorted according to size and type of fabric.
First iron articles made from:
perlon, nylon etc.
(
ß - low temperature)
then iron:
woollens and silks
ßß - medium temperature)
(
then iron:
cottons and linen fabrics
(ßßß - high temperature)
To switch back to ironing at a lower temperature reduce the temperature setting and then
wait for it to cool down sufficiently, i.e. when
the temperature indicator light "°C" comes on
again.
Starched laundry should be ironed last to prevent any starch residues on the heater plate
from affecting other items of laundry.
Check the function of the Finger Guard
The finger guard is a safety feature which
must be checked daily for proper functioning before the machine is used.
If fingers slip between the laundry feed in
table and the finger guard the roller must stop
immediately and the heater plate withdraw
from the roller.
The finger guard does not work if the roller is
running in reverse.
If the finger guard has been activated, the
machine can only be restarted by pushing
in button "I".
Items with buttons should be passed through
the ironer with the buttons facing into the roller padding. If they face upwards there is a
danger of them being damaged or torn off
when the item is passed through the ironer.
11 M.-Nr. 05803030
Operation
Ironing
Switch on the electricity supply to the
machine (on site)
Open the gas stopcock (on site)
Select the temperature according to the
type of fabric
The in operation "I" indicator light and the
temperature indicator light "°C" come on,
and the heater plate starts to heat up.
As soon as the desired temperature has
been achieved, the temperature indicator
light "°C" goes out.
Press button "I" once more.
The heater plate moves up to the roller and
the roller rotates. Allow the roller to rotate
for approx. 5 minutes, so that the temperature of the heater plate and of the roller
equalize.
Fibres Symbol Temperature
Perlon /
artificial silk
Silk/wool ● ● medium
Cottons/linen ● ● ● high
● low
temperature
temperature
temperature
Set the required roller speed.
Check the function of the Finger Guard
Switch the machine on by pressing
button "I".
M.-Nr. 05803030 12
Operation
Pressing is stopped by raising your foot off
the foot control bar.
Freshly ironed laundry can be very hot
when it comes off the ironer. Wear gloves
to protect your hands.
In pauses between ironing, withdraw the
heater plate and reduce the temperature.
Pick-off attachment
The pick-off attachment is used for picking
laundry off the roller. Laundry no longer
needs to be removed manually from the roller.
Start ironing by feeding laundry pieces in
by the feed-in table.
Smooth items from the middle outwards towards the edges.
Do not restrict ironing of smaller articles to
any one part of the roller. Make use of the
whole roller width.
If one of the pick-off spring lifters is dislocated
by a piece of laundry it should be manually
pushed back into position.
After ironing
After ironing use the residual heat on the heater plate to iron out the remaining moisture in
the roller covering (approx. 5 mins).
Press the "O" button to switch the machine
off.
Close the gas stopcock (on site).
Switch the machine off at the mains
isolator.
Allow freshly ironed laundry to cool down
before packing it or stacking it to prevent
the risk of very hot laundry igniting and
causing a fire.
Press the foot control bar down for pressing.
The roller does not rotate during pressing.
13 M.-Nr. 05803030
Safety features
Motor protection
If the winding is heated excessively due to
overload the motor is switched off automatically by a winding thermostat. The heater
plate is lowered. Switch the ironer on again
only after it has had time to cool down by
pressing button "I".
Avoid unnecessarily running the ironer
without passing laundry through it.
Do not restrict ironing of smaller articles to
any one part of the roller. Make use of the
whole roller width.
This way an equal amount of heat is obtained
from the heater plate and energy is saved.
The roller is also protected from uneven use.
Safety feature for insufficient air supply*
When there is insufficent air supply to the
machine the heating is automatically switched
off, and the "Ignition fault" indicator light
comes on.
It is only possible to iron cold after a few
minutes.
Emergency release during a power cut
There is a handwheel at the rear of the right
hand column which can be operated manually
to release the roller from the hot heater plate
in the event of a power cut. Isolate the machine from the electricity supply. Turn the
handwheel anti-clockwise to lower the heater
plate from the roller. During normal operation
the wheel turns as the heater plate is brought
into position or withdrawn.
Check whether the exhaust system is clear.
If there is nothing wrong with the exhaust sy-
stem call the Service department.
Safety feature for insufficient gas supply*
When the gas stopcock is turned off or the
gas supply pressure is low, the rotary iron can
not be switched on. If the gas supply pressure
is reduced during operation, the machine switches off automatically and the heater plate is
withdrawn.
When the gas supply pressure has been reestablished, the machine can be switched on
again by pressing the "I" button.
If this fault recurs the on-site gas supply
system must be checked by an accredited
gas engineer, (Corgi registered in the UK).
*) only with gas heated rotary ironers
M.-Nr. 05803030 14
Variations in equipment
Laundry return feed
Laundry return feed enables ironed laundry to
be taken off the machine at the feed-in. No
extra personnel are required for taking
laundry off the machine. For this mode of
operation only the ironer can be positioned
close to a wall, (allow space for servicing).
Then position the laundry return feed to direct
laundry to the rear. Laundry is guided to the
ironer table.
If the ironing cloth cover is to be changed or
the roller needs more padding the lifter
springs need to be individually taken off the
pick-off strip.
The laundry return feed directs laundry back
to the front of the machine on to an ironing
shelf located above the finger guard.
If laundry is to be fed to the ironing table at
the rear allow adequate space for installation.
Fold the laundry guide back on to the laundry
table before starting.
15 M.-Nr. 05803030
Variations in equipment
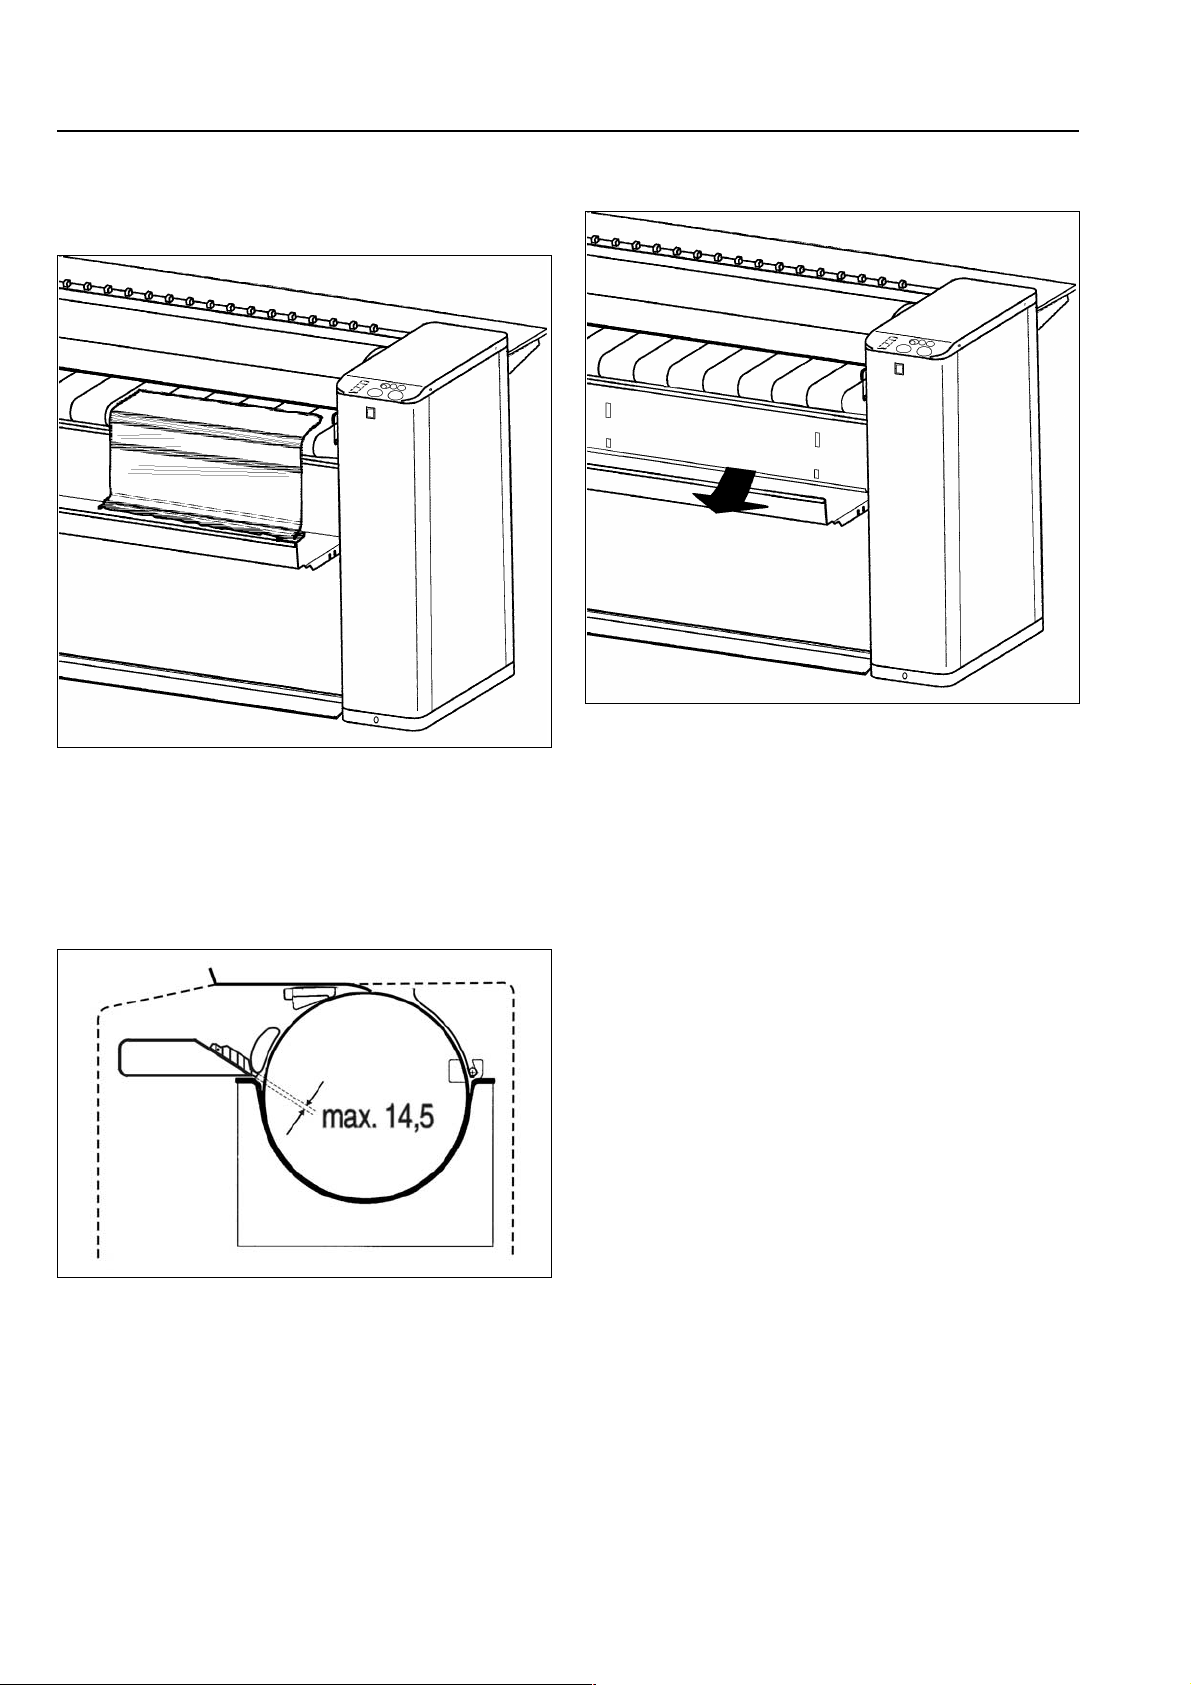
Belt feed-in
This makes feeding in of laundry easier.
Items of laundry are placed parallel to the roller at the front of the feed-in table on the belt,
smoothed out and fed into the roller.
Feed-in table adjustment range
Protective panel
If laundry is fed incorrectly through the belt
feed-in it can be extracted by pulling the protective panel forwards.
The laundry can then be pulled out of the gap
between the laundry collector box and the protective panel using a suitable non-metallic
tool.
The feed-in table has a max. adjustment
range of 14.5 mm.
M.-Nr. 05803030 16
Cleaning and care
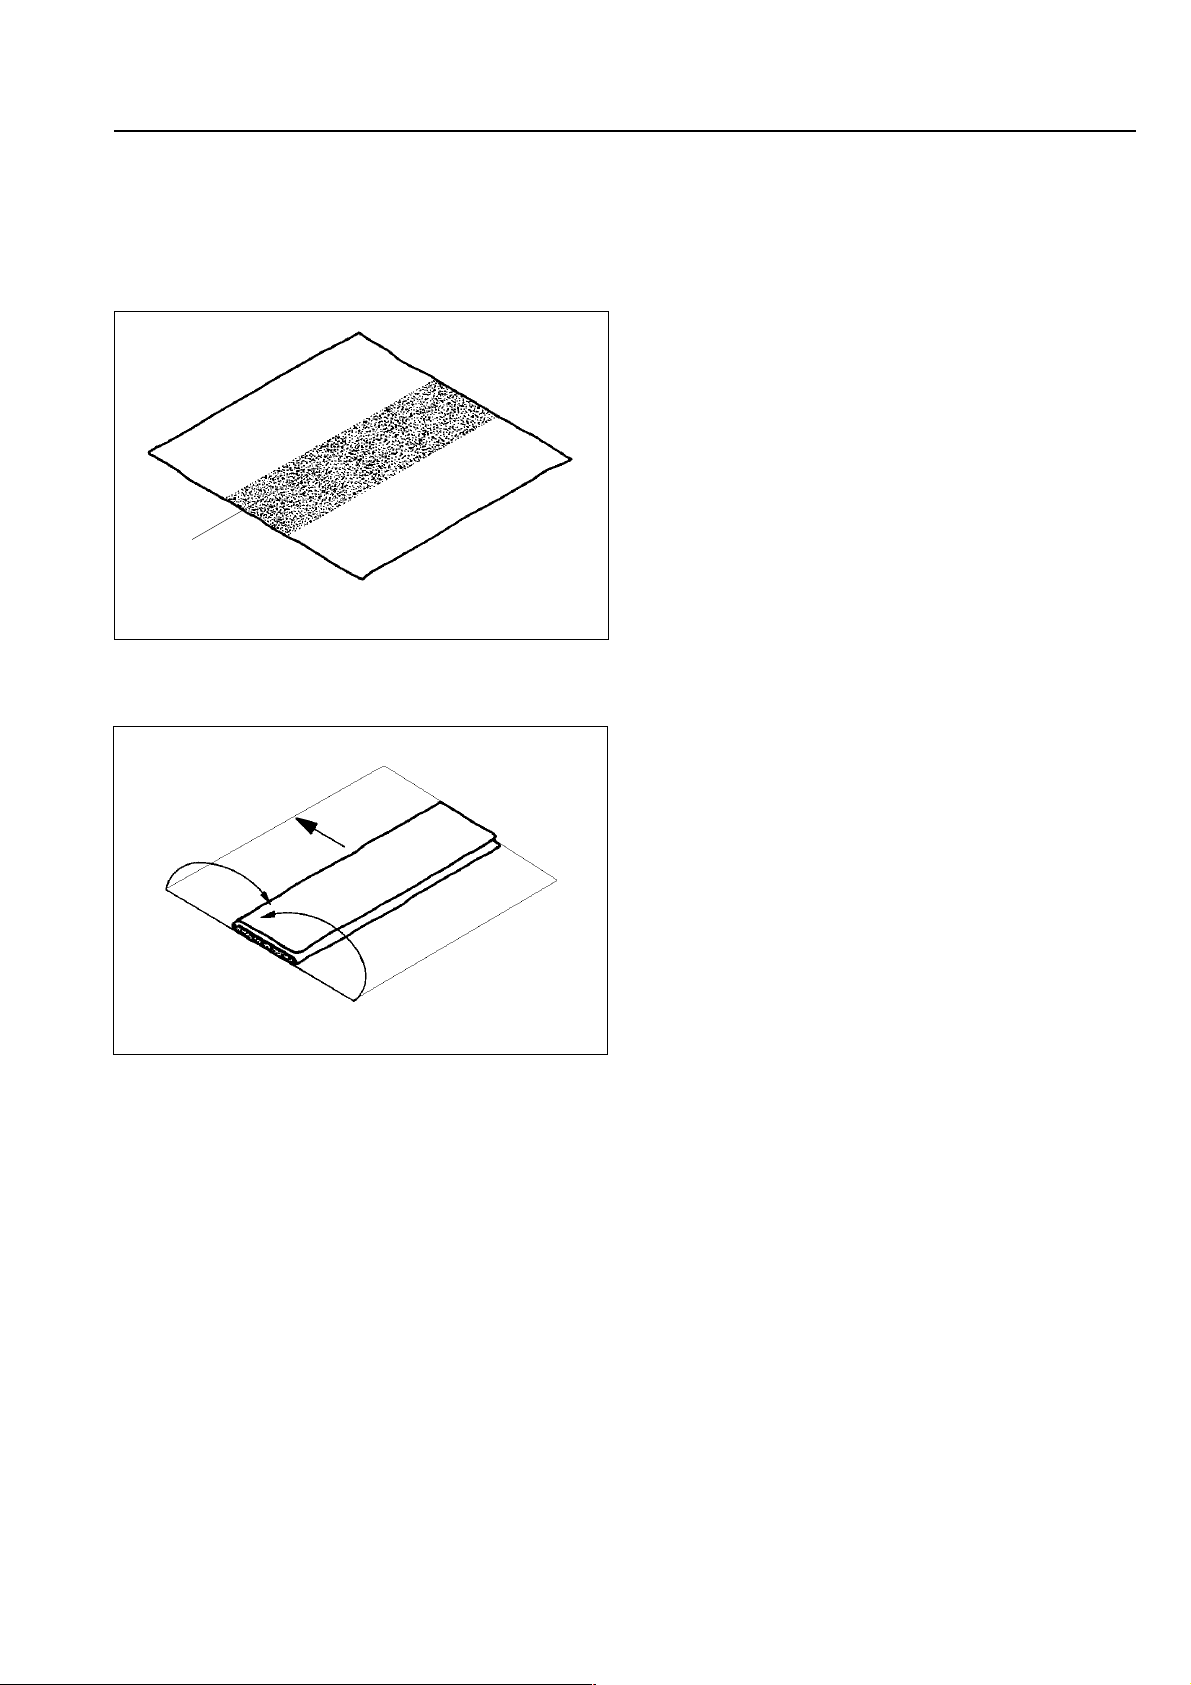
Waxing the heater plate
To maintain the smooth surface of the heater
plate it should be waxed on a regular basis
with an ironer waxing cloth.
Wax
Sprinkle the special wax into the centre of a
thin piece of cloth.
Aluminium heater plate
Limescale deposits and starch residues can
be removed from the heater plate using a suitable proprietary cleaning agent. Do not use
abrasive cleaning agents or abrasive cleaning
cloths.
Pick-off attachment
If you want to clean the lifter springs or the roller covering, re-cover the roller or to iron for a
short period without using the pick-off
attachment, this attachment can be raised
upright.
The tips of the pick-off lifter springs need to
be cleaned occasionally to remove the buildup of residues such as starch. Regular cleaning ensures smooth operation.
Direction of feed
Fold over the ends, then run through the
ironer as if it were a piece of washing. Keep
the folded ends of the cloth towards the roller.
Feed the cloth into the machine repeatedly,
moving along the whole width of the roller
from left to right.
For waxing or cleaning the heater plate select
the ● ● ● temperature setting and the slowest
roller speed.
Ball bearings and gear box
Ball bearings and gear box are greased for
many years of use.
The machine must be switched off for lubrication.
Disconnect the machine from the mains
before lubricating.
There is a danger of burning when removable
outer panels are not in place.
After maintenance work any removable outer
panels must be back in place, and all moving
or electrical parts shielded before the
machine is switched on.
A special cloth for cleaning and special wax
can also be ordered from the Miele Spare
Parts Department.
17 M.-Nr. 05803030

Cleaning and care
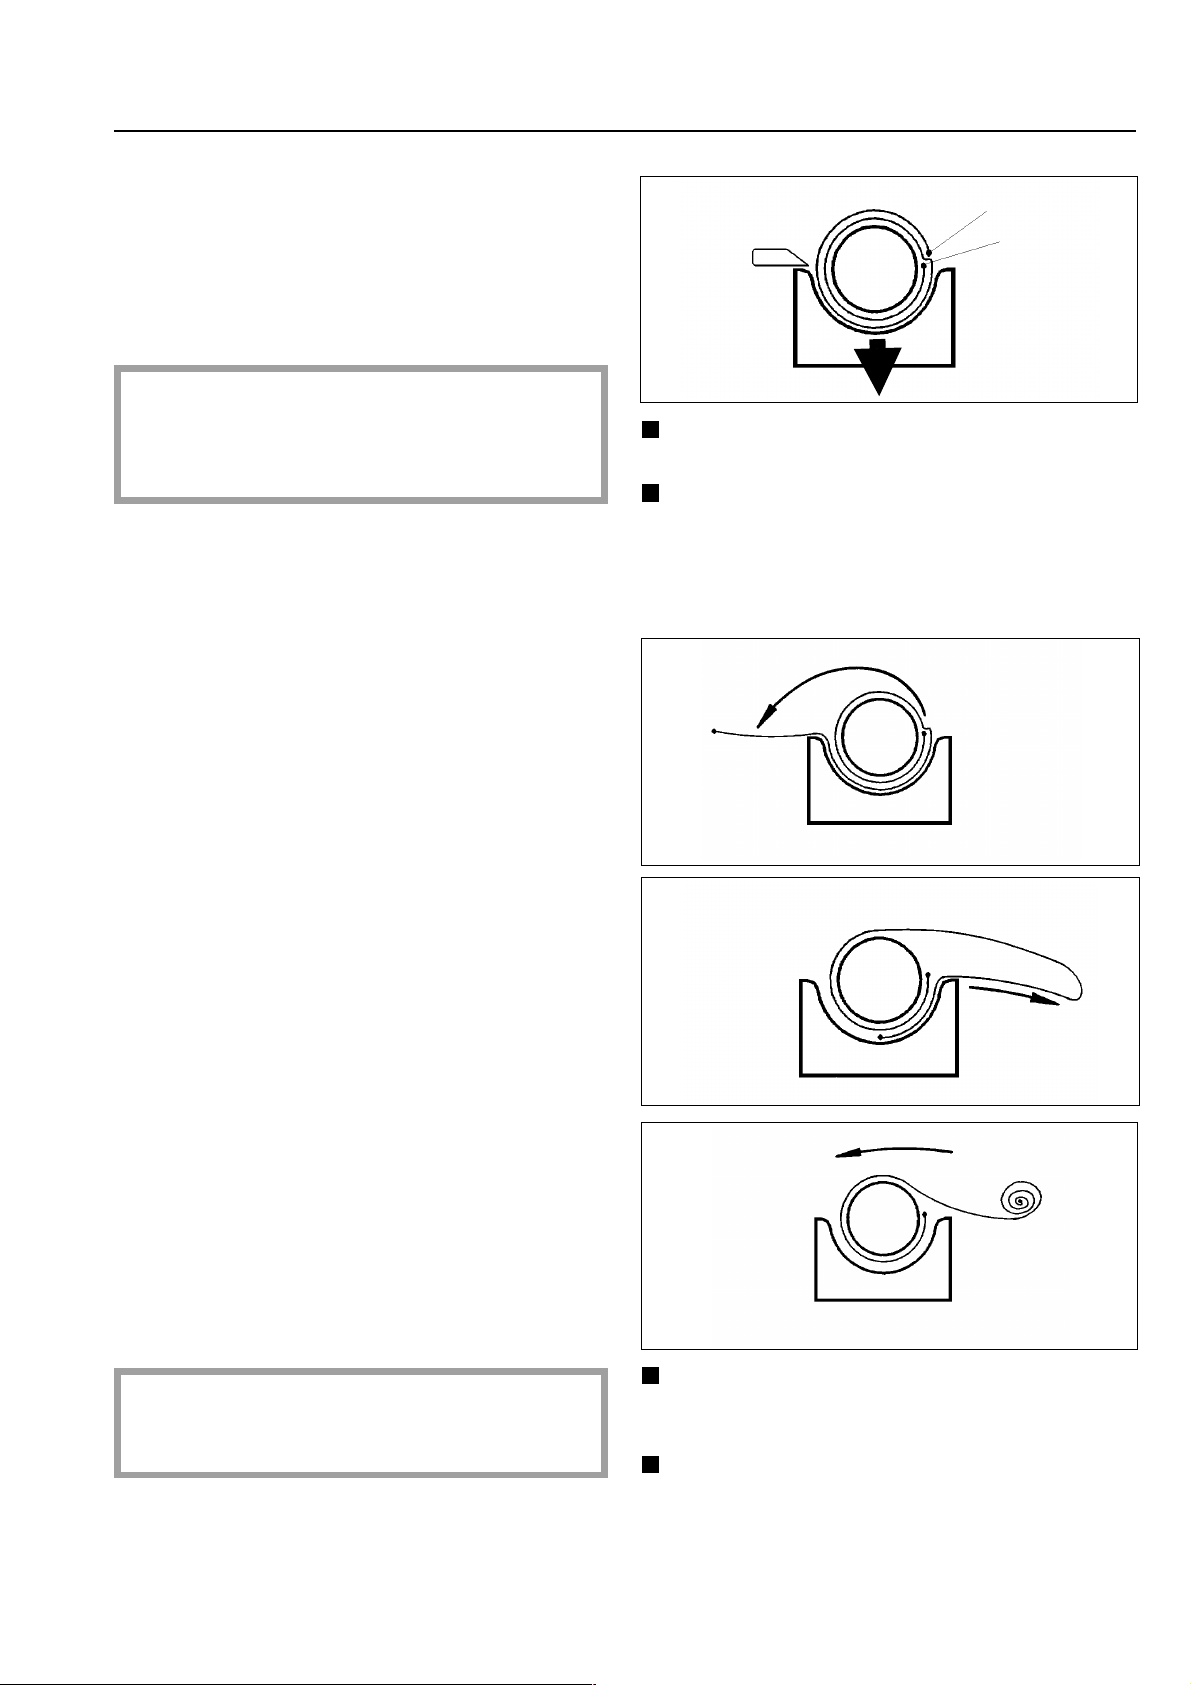
Removing the ironing cloth roller cover
Before removing the ironing cover (for cleaning or renewal) let the heater plate cool
down.
The end of the ironing cover must be visible
at the top of the roller.
Switch the machine off at the mains and raise
the pick-off attachment.
Loosen the side ties and lay the end of the
ironing cover over the feed in table or to the
back of the ironer.
Press the "Reverse run" Ö button and carefully remove the ironing cover.
Roller padding (steel wool)
Renewal or rewinding of the steel wool roller
padding should only be carried out by a Miele
authorised service engineer.
To avoid the danger of injury protective
gloves should be worn whilst renewing the
roller padding.
Replacing the ironing cloth roller cover
Do not wash the new cloth roller cover
before use.
Heat the roller up and in the pressed on position lay the new cloth on to the roller following
the direction of the arrow on the steel wool
covering. The front edge of the cloth should
be brushed out with a steel brush and fed in.
Let the roller run for approx. 5-10 mins, then
trim off any overlapping strands and comb
them out as done at the front edge of the
cloth.
HM 38-175/205 max. 1158 mm circumference
(with cloth)
Washing an ironing cloth
Ironing cloths which have slight discolouration
should, if possible, not be washed (yellowing
is normal). Heavily soiled cloths should be
washed in a Cottons 95 °C programme, spun
and put back on while still damp.
The following steel wool covering dimensions
should be maintained:
HM 38-175/205 max. 1138 mm circumference
(without cloth)
Remove any particles of steel wool that may
have fallen on the heater plate.
M.-Nr. 05803030 18
Cleaning and care
Leaf-type roller padding
To ensure smooth functioning of the ironer
and high capacity ironing, low servicing and
long life the laminated leaf-type padding
should have the specially made ironer roller
cloth cover fitted.
Note: Only iron articles up to max. 3 mm
thick. Thick knobbly fabrics, high buttons,
curtain weights etc. could damage the leaftype padding.
After commissioning
It is advisable approx. 40 operating hours
after commissioning to cut back the overlap of
the ironing cover which has occured through
stretching to about 20 mm overlap and then
to brush out about 15 mm of this using a wire
brush. This is to avoid damp streaks and
shadowing. The roller covering must be the
same thickness along the whole length of the
roller and fit firmly up to the heater plate.
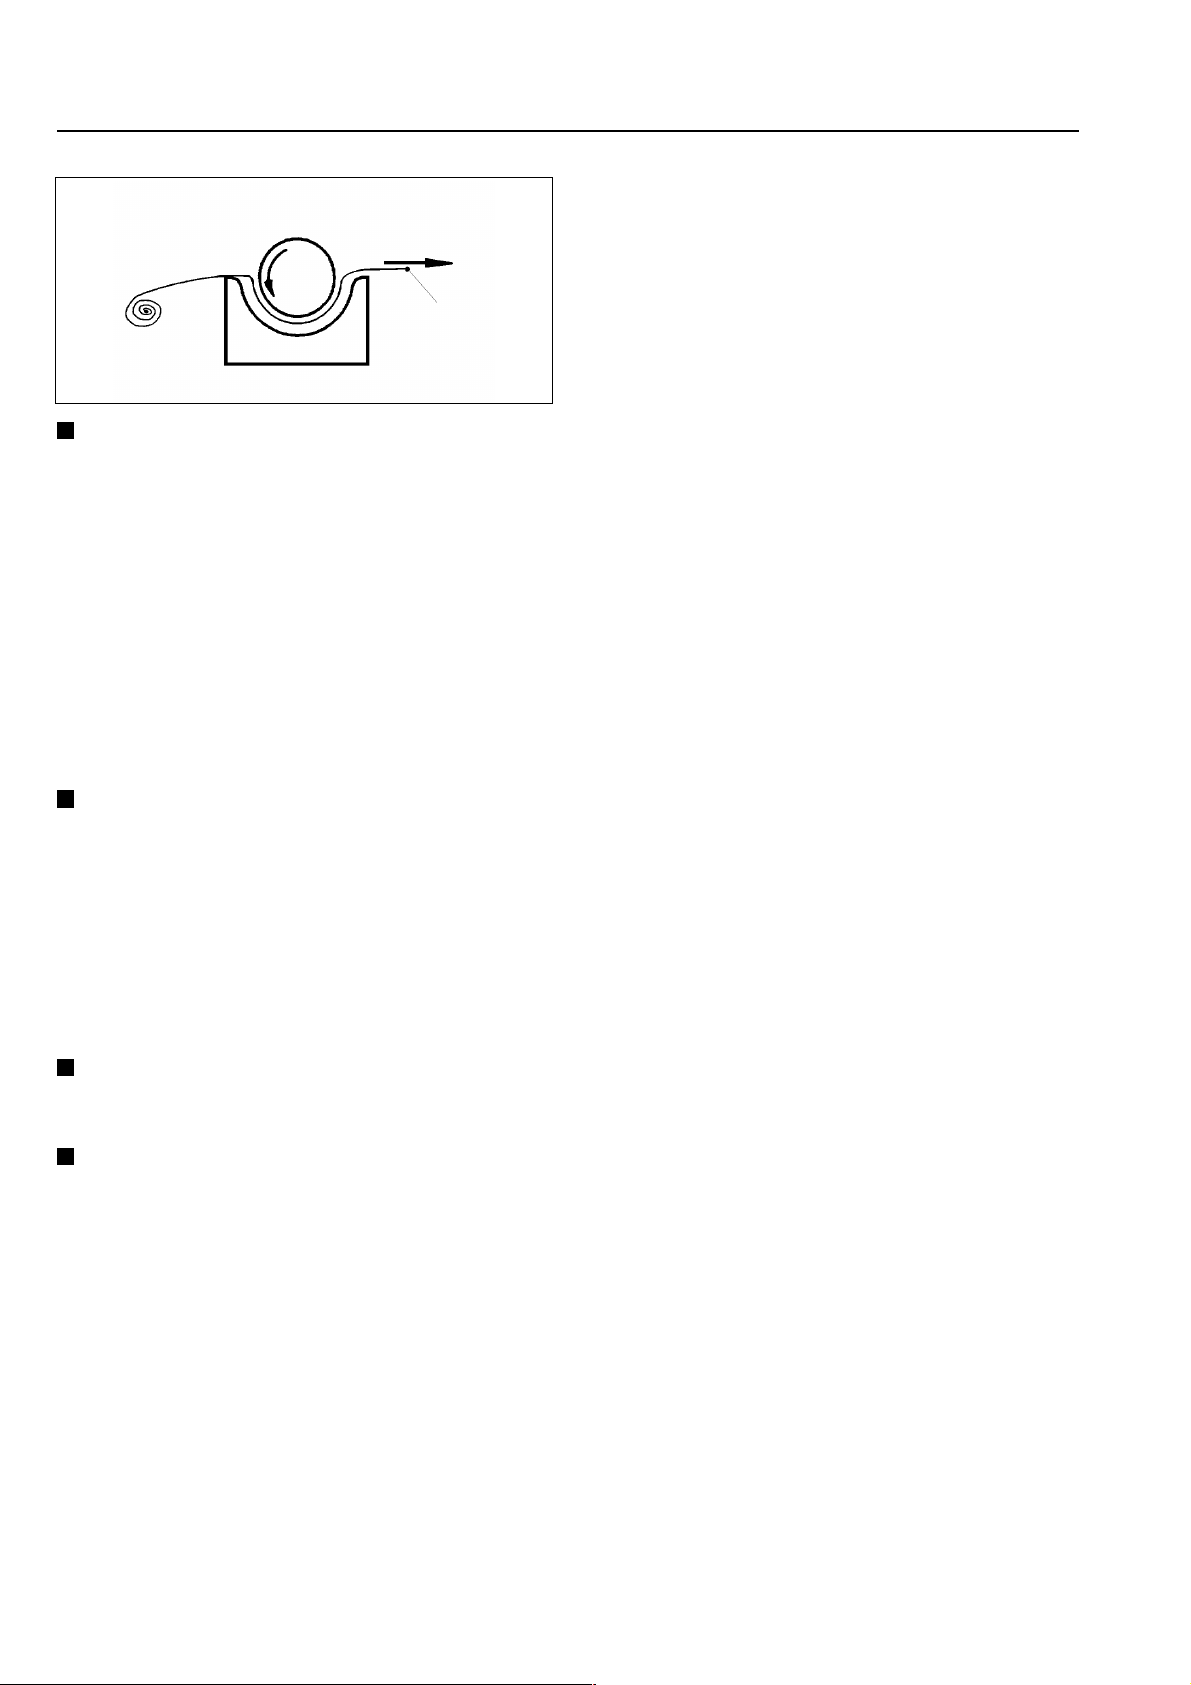
Cloth end
Laundry
feed-in
Switch the machine off, the heater plate
withdraws.
When removing and replacing the ironing
cloth cover the hand wheel should be
turned in an anti-clockwise direction as far
as it will go, so that the heater plate drops
right down and cannot rise up again.
Cloth leading edge
Phase 1
Washing the ironing roller cloth cover
Washing will restore the ironing cover to a softer and more elastic condition, which
absorbs moisture better, and clear the wax
deposits. It should, however, be washed as
infrequently as possible in a Cottons 95 °C
programme. The cover should be completely
alkali free after the last rinse. Do not treat with
solvent or spin too strongly, to avoid the danger of creasing.
Removing the ironing cover on rollers with
leaf-type padding
If a new ironing cover is being fitted it
should first be washed in a Cottons 95 °C
programme.
Phase 2
Phase 3
Phase 4
Raise the laundry pick-off attachment.
Remove the cloth cover as shown in
phases 2 to 4.
When removing pull slowly and carefully
away from the grippers on the leaf-type
padding.
19 M.-Nr. 05803030
Cleaning and care
Discoloration of the ironer cloth
Some discoloration of the ironer cloth from
light to dark brown is normal.
Cloth leading
edge
Phase 5
Switch the machine on, set to the slowest
speed and let the ironing cloth cover run
through as shown in phase 5.
Fitting the ironing cloth cover on a roller
with leaf-type padding
The ironing cover should be wound back on
when still damp.
A double layer is wound on to the roller in one
operation. Do not tuck in the cloth at the ends
of the roller.
Place the cloth in position. Ensure that the
hand wheel is turned as far as it will go in
an anti-clockwise direction, so that the
heater plate is lowered and cannot rise up
again. Switch the machine on and feed it in
following the laundry feed direction using a
low roller speed setting until it lies smooth
and flat. This is to ensure that the heater
plate does not get damaged by the grippers on the leaf-type padding.
To avoid the cloth turning black:
- always use the complete width of the roller.
- space out smaller items and do not always
place them in the same place.
- in pauses between ironing, withdraw the
heater plate or trough and reduce the
temperature.
Switch the machine off and turn the hand
wheel in a clockwise direction about 4
times to raise the heater plate.
Switch the machine on and the heater
plate will raise up completely. Let the roller
rotate slowly. The ironing cloth cover must
have no creases in it. Let the roller rotate
for about 5 minutes.
M.-Nr. 05803030 20
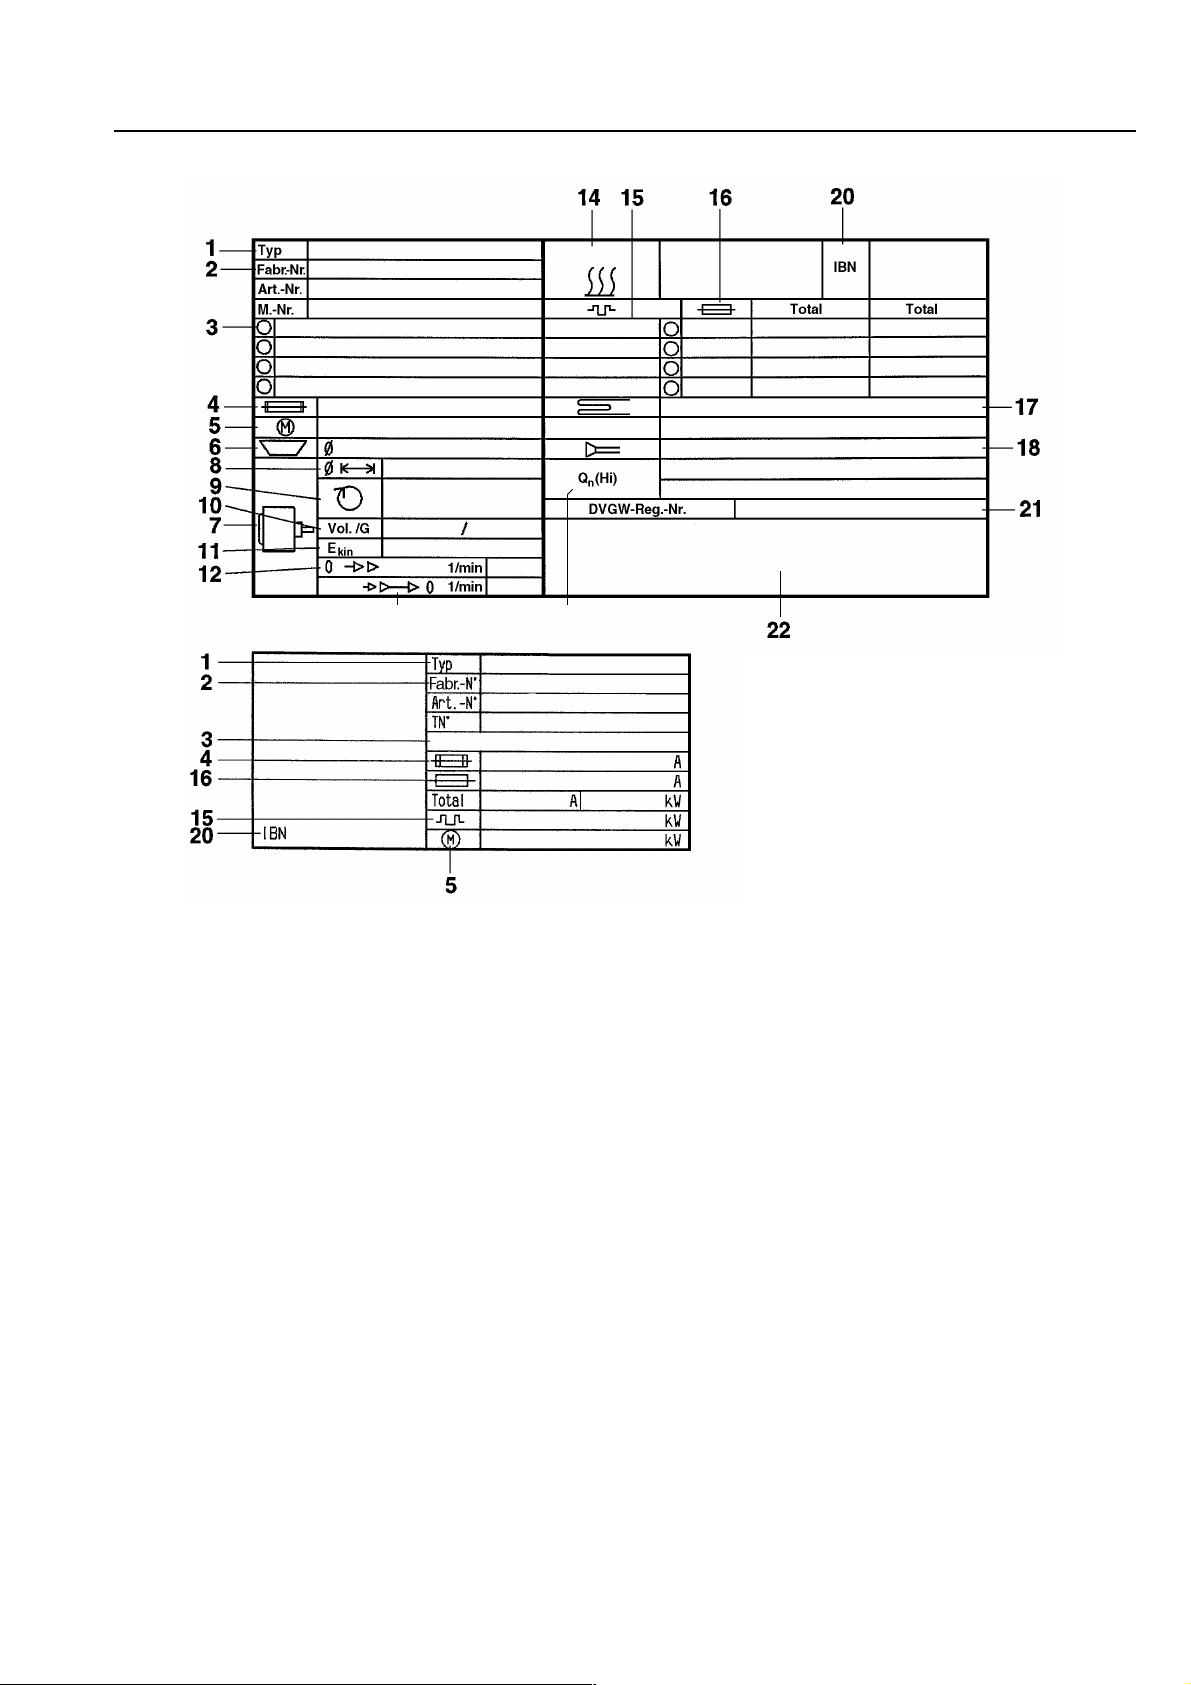
Symbols on the data plate
1 Machine type
2 Machine number/ (year of manufacture)*
3 Voltage/frequency
4 Control fusing
5 Drive motor
6 Plate diameter/Plate qty.*
7 Drum data*
8 Drum diameter/Drum depth*
9 Spin speeds*
10 Drum volume/Laundry dry weight*
11 Kinetic Energy*
12 Top running time*
13 Braking time*
14 Heating
15 Electric heating
16 Fusing (to be installed on site)
17 Steam heating indirect*
18 Steam heating direct*
19 Gas heating
20 Commissioning date
21 Water registrationDVGW- test cert (Water)*
22 Field for CE test symbol...(Product ID-No./
Gas)
*)does not apply to this machine
In the event of any faults please contact your
Miele authorised Service Dealer or the nearest Miele Service Department.
When contacting the Service Department,
please quote the Model and Serial number
(Fabr.-N°) of your machine, both of which are
shown on the data plate.
When ordering spare parts from the Spare
Parts Department please quote the Model
and Serial number (Fabr.-N°) of your machine.
Only use Spare Parts approved by the
manufacturer.
Noise emission
HM 38-205 gas 74.1 dB
registered on the "A" scale.
(measured in Germany in accordance with
DIN (IEC) 45 635, machine noise regulations
3.GSGV p 1.1a).
21 M.-Nr. 05803030
Installation
The rotary ironer may only be commissioned by the Miele Service Department or
a Miele authorised Dealer.
This machine must not be installed in the
same room as dry cleaning machines using
perchlorethylene (PER) or Chlorofluorocarbons (CFCs). On combustion, the escaping
vapours are decomposed to form hydrochloric
acid which can result in dangerous consequences.
Transportation to installation site
The machine should be transported on its
wooden base to the site where it will be installed. Only then should it be taken off the
wooden base.
Lifting points for lifting gear such as straps
and hooks are located underneath the side
base frames of the machine stands near the
feet.
When setting up the machine leave at least
400 mm space each side of the machine so
that the side panels are accessible.
Removing the transit fitting.
Remove the transit fitting at the rear of the machine. This is not applicable to gas-heated rotary ironers.
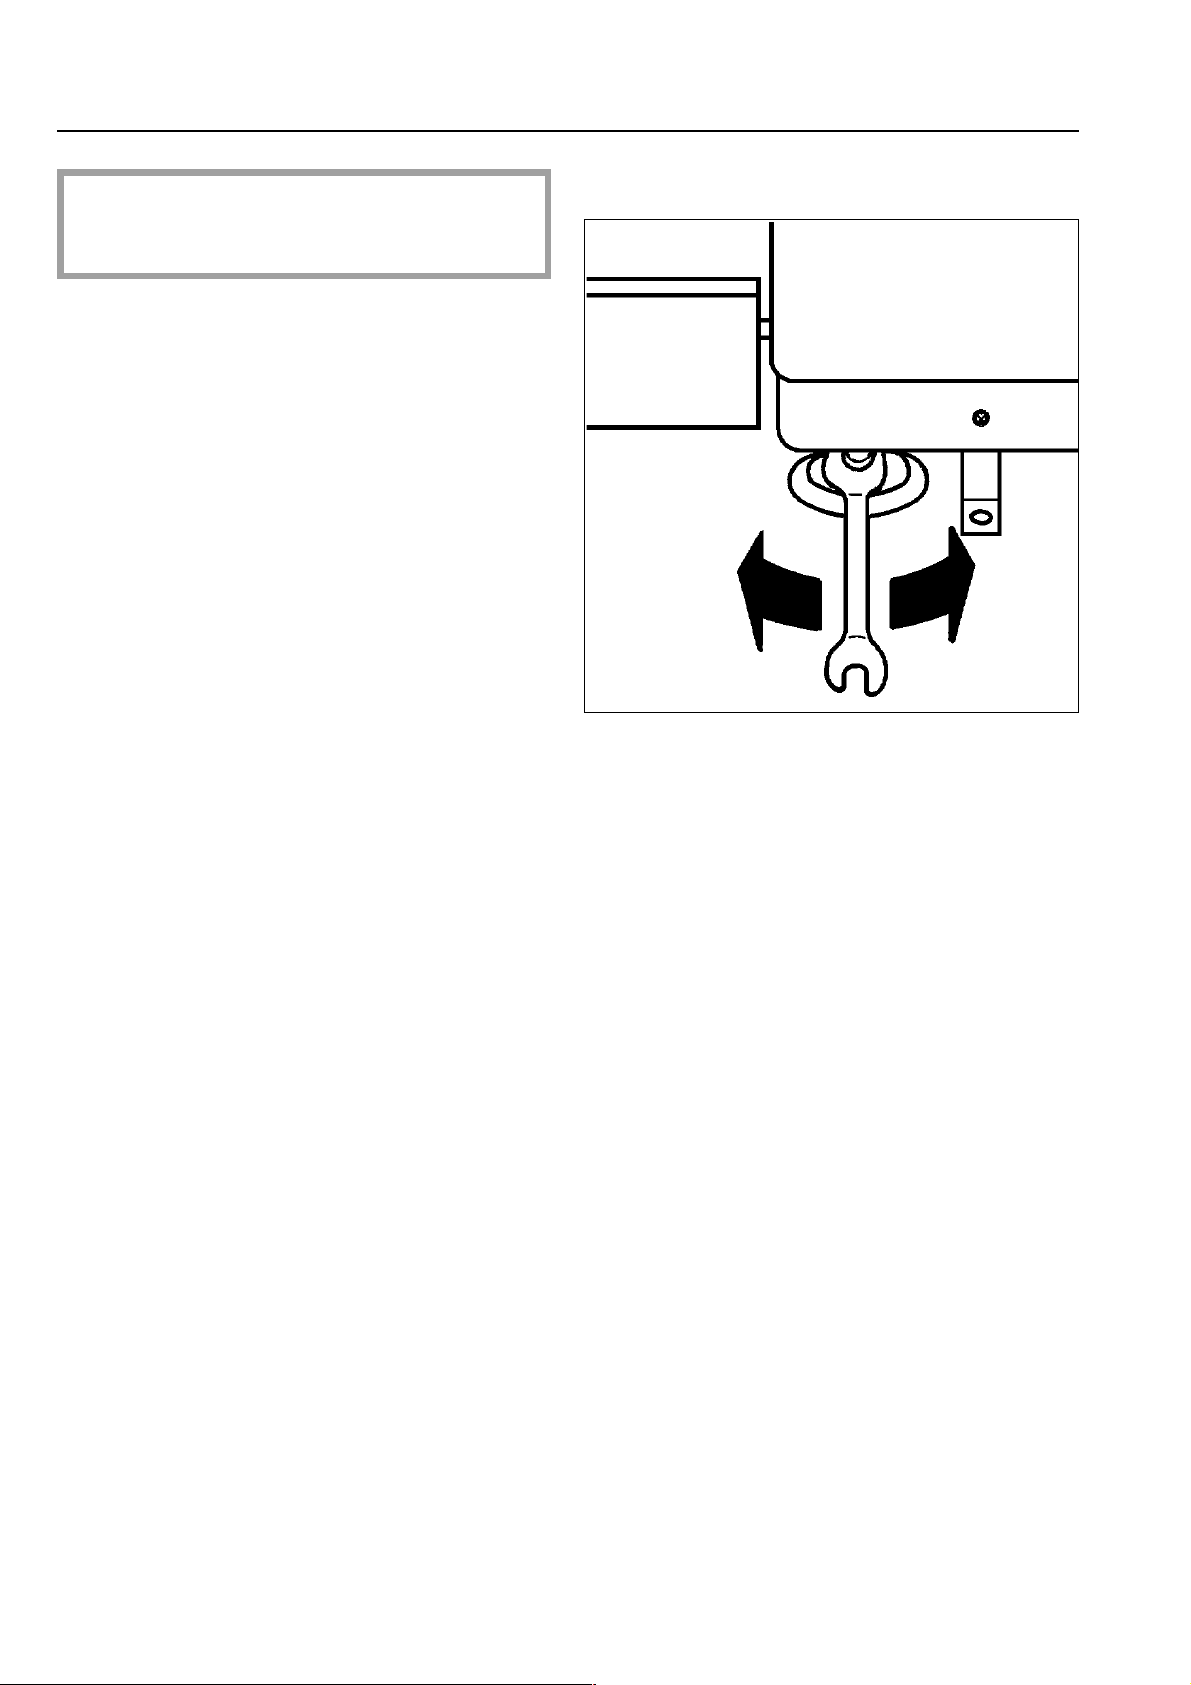
Levelling and securing the ironer
The machine must be level both lengthwise
and widthwise. Use a spirit level and adjust
the feet if necessary (use a SW = 19 mm
spanner).
When adjusting the feet loosen the locking
nuts on the fixing bracket, make the adjustment then tighten the locking nuts back
against the casing.
The ironer should be secured to the floor
using the screws and dowels supplied with
the machine. The holes for the dowels should
be drilled through the holes in the
fixing bracket, (see installation diagram). After
tightening the floor fixing bolts tighten the nuts
which fix the bracket to the machine base.
Attaching the out-tabling
The two support brackets for the out-tabling
on the inside of the end stands should be secured with the M 8 screws supplied.
The separately provided out-tabling is placed
on top of the brackets, levelled so that the
gap between the feed out edge of the roller
and the out-tabling is as small as possible,
and secured with the wood screws provided.
M.-Nr. 05803030 22
Electrical connection
The electrical connection may only be carried
out by a fully competent person in accordance with local and national safety regulations.
The machine is supplied ex works for AC 3N
50 Hz. See the data plate for details.
Connection to the electrical supply must be
carried out in accordance with the data
plate, wiring diagram and installation diagram.
The machine must be connected to a suitable
permanent on-site electricity supply.
WARNING
THIS APPLIANCE MUST BE EARTHED
The wiring diagram and control box are situated underneath the cover on the left hand
stand. The mains connection points are located in the control box.
Before connecting to the mains supply, use
the handwheel to lower the heater plate completely, and then raise it by 12 turns.
Connect the machine to the mains supply and
switch on the on-site mains switch.
If the phase connection is correct, the heater
plate will withdraw.
If the phase connection is incorrect the heater
plate moves into position and two phases
must be changed. Turn the handwheel 12
times to lower the heater plate and switch on
the on-site mains switch.
Once the basic temperature has been
reached raise the heater plate by pressing
button "I".
Exhaust ducting
Refer to calculation of air outlet, air inlet and
ventilation cross sections
The exhaust ducting to be installed on site,
must not be piped into any chimney which is
used by gas, solid fuel or oil fired boilers. It
must also be kept separate from any exhaust
system leading from a tumble dryer.
The warm, moist exhaust air should be discharged into the outside air by the shortest
possible route.
To ensure optimum flow, the ducting should
be laid with as few bends as practicable, and
airtight connections.
The connection point for the exhaust ducting
is situated at the rear of the right hand stand.
To prevent condensation from collecting in
ducting which slopes upwards, provide a condensate trap (3-5 mm diameter) at the lowest
point.
The exhaust ducting must have an internal
diameter of 60/70 mm.
Ensure that there is sufficient ventilation in
the room where the ironer is installed.
If the exhaust is piped into the outside air, the
end of the duct should be protected against
bad weather conditions.
An exhaust duct vented to the outside should
terminate in a freely exposed position and
must be so situated as to prevent the exhaust
from causing a nuisance.
After connecting the machine to the
electricity supply any removable outer panels must be back in place, and all moving
or electrical parts shielded before the
machine is switched on.
23 M.-Nr. 05803030

Gas connection
The gas connection may only be carried out
by a suitably qualified engineer (eg. Corgi in
the UK) in accordance with local and national
safety regulations.
The enclosed installation diagram and the
installation instructions for gas must be followed to ensure correct gas connection.
Check the adhesive label at the rear of the
machine for the gas type to which the
machine has been set at the factory.
When converting to liquid gas or another gas
type, a conversion kit is required, available
from the Miele Spare Parts Department, (give
the model and serial number of the machine
as well as the local gas connection pressure).
The installation instructions for gas heated
machines must be followed. Conversion may
only be carried out by suitably competent persons. Contact your nearest Miele Service Department or your Miele authorised Service
Dealer.
Do not attempt to undertake any repairs to
gas appliances yourself. Repairs must only
be carried out by suitably competent persons
to ensure safety, e. g. gas engineers must be
registered. Please consult the Miele Service
Department or a Miele authorised Service
Dealer.
Exhaust ducting
Please refer to the Installation drawing and instructions supplied.
The connection point for the exhaust ducting
is situated at the rear of the right hand stand.
On first commissioning there can be air in the
inlet pipe, with no ignition taking place in the
first safety period. In this case the ignition
fault light comes on, and the "Reset" button
must be pressed in.
This renewed start procedure can be repeated several times, until the air has been bled
and the burner flame burns.
Note:
If no flame signal appears during the safety
period, the valve shuts and the ignition is switched off, (malfunction cut-out with locking).
The "Ignition fault" indicator light comes on.
To unlock, press the Reset button.
After connecting the machine to the gas
supply any removable outer panels must
be back in place, and all moving or electrical parts shielded before the machine is
switched on.
M.-Nr. 05803030 24

25 M.-Nr. 05803030

M.-Nr. 05803030 26
Indice
Página
Advertencias concernientes a la seguridad . . . . . . . . . . . . . . . . . . . . . . . . 28
Su contribución a la protección del Medio Ambiente . . . . . . . . . . . . . . . . . . . 30
Descripción del aparato . . . . . . . . . . . . . . . . . . . . . . . . . . . . . . . . . . . 31
– Elementos de mando . . . . . . . . . . . . . . . . . . . . . . . . . . . . . . . . . . . . 32
– Dispositivos de seguridad . . . . . . . . . . . . . . . . . . . . . . . . . . . . . . . . . . 34
Manejo . . . . . . . . . . . . . . . . . . . . . . . . . . . . . . . . . . . . . . . . . . . . . 35
– Características y preparación de la ropa . . . . . . . . . . . . . . . . . . . . . . . . . . 35
– Planchado . . . . . . . . . . . . . . . . . . . . . . . . . . . . . . . . . . . . . . . . . . 36
– Planchado a vapor . . . . . . . . . . . . . . . . . . . . . . . . . . . . . . . . . . . . . . 37
– Después del planchado . . . . . . . . . . . . . . . . . . . . . . . . . . . . . . . . . . . 37
Generalidades . . . . . . . . . . . . . . . . . . . . . . . . . . . . . . . . . . . . . . . . 38
– Corte de corriente durante el planchado . . . . . . . . . . . . . . . . . . . . . . . . . . . 38
Dotación especial (bajo pedido)/ Módulo-guía de retorno . . . . . . . . . . . . . . . . . 39
Dotación especial (bajo pedido)/ Cintas introductoras . . . . . . . . . . . . . . . . . . 40
Limpieza y mantenimiento . . . . . . . . . . . . . . . . . . . . . . . . . . . . . . . . . . 41
– Aplicación de cera a la teja . . . . . . . . . . . . . . . . . . . . . . . . . . . . . . . . . 41
– Instrucciones para el rebobinado con lana de acero . . . . . . . . . . . . . . . . . . . . 42
– Bobinado elástico laminar . . . . . . . . . . . . . . . . . . . . . . . . . . . . . . . . . . 43
Símbolos de la placa de características . . . . . . . . . . . . . . . . . . . . . . . . . . 45
Para el técnico . . . . . . . . . . . . . . . . . . . . . . . . . . . . . . . . . . . . . . . . 46
– Emplazamiento de la máquina . . . . . . . . . . . . . . . . . . . . . . . . . . . . . . . . 46
– Retirar el seguro de transporte . . . . . . . . . . . . . . . . . . . . . . . . . . . . . . . 46
– Montaje de la mesa . . . . . . . . . . . . . . . . . . . . . . . . . . . . . . . . . . . . . 46
– Conexión eléctrica . . . . . . . . . . . . . . . . . . . . . . . . . . . . . . . . . . . . . . 47
– Conexión a gas . . . . . . . . . . . . . . . . . . . . . . . . . . . . . . . . . . . . . . . 48
– Conducción de salida de vaho . . . . . . . . . . . . . . . . . . . . . . . . . . . . . . . . 48
¡La planchadora se instalará exclusivamente
por un técnico autorizado!
27 M.-Nr. 05803030
Advertencias concernientes a la seguridad
Lea atentamente las "Instrucciones de manejo" antes de poner la planchadora en
servicio, para protegerse y evitar el deterioro de la máquina debido a un manejo
incorrecto.
Uso adecuado de la planchadora
Esta planchadora deberá utilizarse exclusivamente para tejidos lavados con agua y
aptos para el planchado mecánico.
Seguridad técnica
No se permite el emplazamiento de la
planchadora en una misma estancia con
máquinas de limpieza química que utilizan disolventes con percloroetileno o CFC.
La planchadora sólo deberá utilizarse en
estancias secas.
Utilizar la planchadora sólo con todos los
revestimientos montados y, por consiguiente, no existe riesgo alguno de poder llegar al
contacto con los elementos eléctricos o piezas
giratorias de la máquina.
No dañar, eliminar o descartar los disposi-
tivos de seguridad y elementos de mando
de la planchadora.
La planchadora sólo quedará desconectada
de la red eléctrica, cuando se haya extraído
la clavija de la base de enchufe o desactivado
el fusible de la instalación central del lugar de
emplazamiento.
Utilización
Nunca deberá permitirse que los niños
jueguen encima o cerca de la máquina o
que la manejen.
Con la planchadora caliente existe el ries-
go de quemarse, cuando se llegue al contacto con el borde de la teja en la salida de la
ropa.
Al planchar y alisar la ropa de varias capas,
no deberán introducirse las manos entre
las mismas. Existe el grave riesgo de no poder
apartar a tiempo las manos de la teja caliente.
Lo mismo rige para bolsillos que miran con la
parte abierta hacia la teja.
Sólo con entrada de correa:
No planche piezas de ropa con flecos, cintas finas o hilos. Existe el peligro de que
estos tejidos provoquen un fallo en el funcionamiento de la entrada de correa.
Tenga preparado un extintor para el caso
de que una prenda se pudiera inflamar.
Una planchadora con elementos de mando o conducciones eléctricas deterioradas
no deberá utilizarse antes de ser reparada.
Cualquier reparación de aparatos eléctricos
deberá llevarse a cabo exclusivamente por
personal autorizado. De lo contrario podrían
surgir riesgos considerables para el usuario.
Los componentes defectuosos únicamen-
te deben cambiarse por piezas de recambio originales Miele. Sólo en estas piezas
garantizamos que cumplen en todo su alcance las exigencias de seguridad que planteamos a todas nuestras máquinas.
La seguridad eléctrica del aparato tan
sólo está garantizada por una toma de tierra debidamente instalada. La comprobación
de este detalle por un técnico autorizado es
de suma importancia. Al fabricante no podrán
reclamarse daños y perjuicios, que sean consecuencia de la falta de una toma de tierra o
de su estado defectuoso.
¡Además ha de tenerse en cuenta cualquier
normativa de seguridad complementaria y
vigente al respecto!
Utilización de accesorios
El montaje exterior o interior de accesorios
que puedan afectar el funcionamiento de
la maquina, tan sólo está permitido con la
expresa aprobación por parte de Miele. El
montaje o la incorporación de elementos de
procedencia ajena conllevaría la pérdida de
garantía y/o responsabilidad de producto por
parte del fabricante.
M.-Nr. 05803030 28
Advertencias concernientes a la seguridad
Normas para trabajar en planchadoras
En el lado de la introducción de ropa sólo
deberán emplearse operarios mayores de
17 años, que estén totalmente familiarizados
con el manejo de la planchadora.
El personal con dedos largos y finos debe-
rá operar en la salida de ropa, no en el
lado de la introducción de ropa.
Los operarios de la planchadora deberán
vestir prendas ceñidas. Las mangas anchas,
cintas de delantales y puntas de pañuelos podrían ser pilladas por el rodillo.
Antes de empezar a trabajar, quitarse sor-
tijas, brazaletes y similares.
No doblar la ropa inmediatamente delante
de la boca de admisión, sino a una distancia prudente en la tabla auxiliar. Cualquier tipo
de fundas (almohadas) deberá introducirse
comenzando con la parte abierta. No sujetar
las esquinas desde el interior. No enganchar
las manos en los tirantes de delantales o
prendas similares.
Medidas de seguridad en caso de olor
a gas (Exclusivamente para planchadoras
con calefacción a gas)
¡Apagar las llamas inmediatamente!
¡Abrir ventanas y puertas!
¡Seguidamente, cerrar el paso de gas al
contador o la llave de paso principal!
¡No entrar con llama viva en una habitación
donde huela a gas!
¡No encender cerillas/mecheros!
¡No fumar!
¡No producir chispas eléctricas (p. ej., sa-
cando enchufes eléctricos o accionando
interruptores / timbres)!
¡Cerrar la llave de paso de la toma de gas
de la planchadora (instalación en el lugar
de emplazamiento)!
En el caso de no dar con la causa del olor
a gas a pesar de hallarse cerrados todos
los pasos de gas de la instalación: avisar a
la compañía de abastecimiento de gas.
Siempre se ha de prestar atención al debi-
do funcionamiento de los dispositivos de
protección. Tan sólo así podrán prevenirse
lesiones graves, como contusiones, quemaduras o hasta la pérdida de manos.
¡Comprobar a diario la eficacia de los
dispositivos de protección!
Hay que procurar que sea prácticamente
imposible poder sobrepasar los listones
protectores.
Antes de conmutar al funcionamiento de
’marcha atrás’ hay que cerciorarse que
nadie corra peligro.
En caso de calefacción a gas ha de procu-
rarse la buena ventilación del lugar de trabajo.
¡Lubricar la máquina sólo cuando esté
parada!
¡Importante!
Al terminar los trabajos de puesta en servicio/
mantenimiento/modificación/reparación, siempre ha de comprobarse la estanqueidad de
todos los elementos conductores de gas (desde las llaves de paso hasta los quemadores),
¡prestando especial atención al manguito de
medición en la válvula de gas y en el quemador!
La comprobación ha de realizarse con el quemador encendido y apagado.
Las advertencias anteriores han de ponerse
en conocimiento de todo personal que trabaje
en la planchadora/calandra.
¡Conservar las presentes ’Instrucciones
de manejo!
29 M.-Nr. 05803030

Contribución a la protección medioambiental
Desestimación del embalaje/aparato inservible
El embalaje protege al aparato de daños durante el transporte. Los materiales de embalaje
se han seleccionado con criterios ecológicos
y en función de su posterior tratamiento en
plantas de reciclaje.
La devolución del embalaje al ciclo de reciclado
contribuye al ahorro de materias primas y reduce el aumento de residuos. Por tanto, dichos
materiales no deberán tirarse a la basura, sino
entregarse en un punto de recogida específica
¡Infórmese al respecto en su Ayuntamiento!
Desestimación de un aparato inservible
Cualquier aparato inservible lleva componentes
aprovechables que no tienen desperdicio y de
ningún modo deberán parar en el vertedero.
Infórmese en su Ayuntamiento y en un establecimiento de desguace de vehículos acerca
de las posibilidades de reciclaje.
Hasta el transporte al desguace ¡guarde la
máquina inservible fuera del alcance de los
niños!
M.-Nr. 05803030 30

Descripción del aparato
yx
12 3 4 5 6 7 8
1 Tecla “I" - conexión 5 Regulador de la velocidad del rodillo
2 Tecla “O" - desconexión 6 Piloto de control de anomalías "yx encendido"*
3 Tecla “Ö Marcha atrás” 7 Piloto de control de temperatura "°C"
4 Piloto de control de funcionamiento "I" 8 Selector de temperatura
Desprendedor de ropa
Rodillo
Listón protector de dedos Panel de mandos
Tecla de anulación*
Mesa entrada de ropa Tabla auxiliar
Parada de
emergencia Parada de
Chapa protectora* emergencia
Cajón recogida de ropa
Manivela
Volante
Tubo de salida
de gases
de combustión*
Sujeción/anclaje al suelo (4 )
Patas regulables (4)
Pedal de funcionamiento
*) Sólo planchadoras con calefacción a gas
HM 38-175
31 M.-Nr. 05803030

Descripción del aparato
Pilotos de control
Piloto de control de funcionamiento "I"
Elementos de mando
Tecla "I"
Al pulsar la tecla I se encienden los pilotos co-
rrespondientes a "Funcionamiento" I y "Tem-
peratura" °C.
–La teja se calienta.–
Al haber alcanzado la temperatura seleccionada, el piloto de control °C se apaga.
Pulsando la tecla I de nuevo, la teja se junta
con el rodillo que empieza a girar.
Tecla "O"
Pulsar la tecla para desconectar la planchado-
ra. La teja se separa del rodillo.
Tecla "Ö Marcha atrás"
La marcha atrás se selecciona tan sólo para
sustituir el paño de planchado o renovar el bobinado del rodillo.
Desconectar la máquina –la teja se separa–.
Pulsar "Ö Marcha atrás". El rodillo sólo gira
en marcha atrás, mientras que se mantenga
la tecla pulsada.
Se enciende después de pulsar la tecla I .
Piloto de control de temperatura "°C"
Se enciende durante el calentamiento y se
apaga, cuando se haya alcanzado la tempera-
tura seleccionada.
Planchadoras con calefacción a gas:
Piloto de control "y x Fallo de encendido"
Se enciende en caso de anomalía en el en-
cendido de la calefacción o en caso de una
depresión insuficiente en la conducción de sa-
lida de aire (obstrucción).
Tecla "y x Anulación" (en la columna dere-
cha, en la parte interior, debajo del tablero
de introducción)
La anomalía en el encendido se puede elimi-
nar como muy pronto transcurrido 1 minuto,
pulsando la tecla "Anulación". En caso de
producirse estas anomalías en el encendido
a menudo, se debe informar al Servicio Post-
venta.
M.-Nr. 05803030 32

Descripción del aparato
Selector de temperatura
Zona ● = temperatura baja
Zona ● ● = temperatura media
Zona ● ● ● = temperatura alta
Regulador de la velocidad del rodillo
Girando el mando hacia la derecha: mayor
velocidad,
girando hacia la izquierda: menor velocidad.
El máximo caudal de aire se da en la posición
inicial del tornillo de ajuste (véase fig.) y se irá
reduciendo a medida que se vaya girando hacia la posición de 90°.
La posición óptima de la trampilla se habrá
conseguido, cuando el rodillo se seque con
un caudal mínimo, no quedando manchas de
agua, ni en el revestimiento, ni en la ropa
planchada.
En el caso de una absorción excesiva, el rodillo se enfriaría demasiado, perjudicando el
efecto de planchado.
Trampilla reguladora de absorción de vaho
(sólo planchadoras con calefacción a
eléctrica)
El sistema de absorción de vaho lleva incorporada una trampilla reguladora que permite
reducir el caudal de aire que pasa por el revestimiento del rodillo.
33 M.-Nr. 05803030
Pedal de accionamiento
Funciones:
Pedal sin pisar Planchado
Pedal pisado Planchado a vapor

Descripción del aparato
Dispositivos de seguridad
Interruptor de emergencia (en la parte delantera de la columna izquierda y en la parte posterior de la columna derecha)
Al pulsar este interruptor, el rodillo se para
inmediatamente, separándose la teja. Un interruptor de emergencia activado se le restituye
en su función, girando el disco moleteado hacia la derecha.
El listón-protector de dedos es un disposi-
tivo de seguridad, cuya eficacia ha de com-
probarse a diario y con anterioridad a cada
uso de la planchadora.
Listón-protector de dedos
Si las puntas de los dedos fuesen a parar entre
la tabla auxiliar de introducción de la ropa y el
dispositivo protector de dedos, el rodillo pararía
inmediatamente, separándose la teja hacia
abajo. Cuando el rodillo gira al contrario del
planchado, el listón-protector no tiene función.
Tras el accionamiento del protector de dedos,
la máquina sólo podrá ponerse en marcha
pulsando la tecla I de nuevo.
Volante (en el lado posterior de la
columna derecha)
Sirve para separar manualmente la teja caliente
del rodillo parado en caso de un corte de co-
rriente. Girando en contra del sentido de las
agujas del reloj, la teja se separa bajando y,
girando en el sentido de las agujas del reloj,
a teja se junta con el rodillo.
¡La máquina siempre tiene que estar des-
conectada de la red eléctrica (desconectar
el interruptor principal de la instalación
del cliente)!
M.-Nr. 05803030 34

Manejo
Características y preparación de la ropa
Condición para un buen acabado de la ropa
es una humedad residual adecuada (entre un
25 y 40%).
Si se aclara la ropa en la lavadora utilizando
agua caliente en el último ciclo, se obtiene debido a la reducción de la humedad residual y
al calor de la ropa un tiempo más corto de
procesamiento y con ello, un ahorro de energía.
Los tejidos de mezcla, cuyo contenido en
fibras sintéticas supere el 50% (p. ej.,
dralón) no deberán plancharse, ya que la
materia sintética sometida a altas temperaturas se funde.
Los tejidos con una parte menor en fibras
sintéticas podrán plancharse a temperaturas bajas.
Preparación de la ropa
La preparación adecuada de la ropa es importante para un buen resultado de planchado y
la máxima rentabilidad. Conviene clasificarla
según tamaño y características.
Las cremalleras y botones/ganchos metálicos
deberán cubrirse con un paño, a fin de proteger la teja.
Los suplementos no termorresistentes y extremadamente sobresalientes (botones-perlas)
no deberán plancharse.
¡Comprobar la eficacia del dispositivo protector de dedos!
El listón protector de dedos es un dispositivo
de seguridad, cuya eficacia ha de comprobarse a diario y con anterioridad a cada
uso de la planchadora.
Al activar el dispositivo protector de dedos, el
rodillo tiene que pararse y la teja separarse
del mismo.
Cuando el rodillo gira al contrario del planchado, el listón-protector no tiene functión.
La restitución de la disposición de servicio se
consigue pulsando la tecla "I".
Proceder al planchado según la resistencia
térmica de la ropa:
perlón, nylón y similares (Zona ●)
Lana, Seda (Zona ●●)
Algodón, Lino (Zona ●●●)
Si fuera necesario bajar a un nivel de temperatura inferior, tendrá que esperarse a que se
encienda el piloto "Temperatura C°.
La ropa almidonada se planchará al final, para
evitar que las partículas de almidón adheridas
en la teja no perjudiquen las demás prendas.
Las piezas con botones se colocan con el
botón mirando hacia el rodillo. De lo contrario
correrían el riesgo de ser arrancados o destruidos al entrar en contacto con la teja.
35 M.-Nr. 05803030

Manejo
Planchado
Conectar el interruptor principal (del lugar
de emplazamiento).
Abrir la llave de paso de gas (del lugar de
emplazamiento).
Los pilotos de control para funcionamiento I
y temperatura °C se encienden y la teja se
calienta. Al apagarse el piloto °C se ha alcanzado el nivel de temperatura seleccionado.
Pulsar la tecla I de nuevo.
La teja se junta con el rodillo que gira. Dejar girar el rodillo durante aprox. 5 min.
para conseguir el reparto homogéneo de la
temperatura en teja y rodillo.
Seleccionar el nivel de temperatura de
acuerdo con las características de la ropa.
Tipo de tejido Símbolo Posición de
temperatura
Perlón/
Seda artificial
Seda/
Lana
Algodón/
Lino
●
● ●
● ● ●
baja
media
alta
Ajustar la velocidad de planchado deseada
mediante el correspondiente regulador.
¡Comprobar la eficacia del dispositivo protector de dedos!
Conectar la máquina, pulsando la tecla "I".
M.-Nr. 05803030 36

Manejo
Introducir la ropa preparada por encima de
la tabla auxiliar.
Al planchar, alisar la ropa desde el centro
hacia los extremos.
El planchado a vapor se termina, retirando
el pie del pedal.
La ropa planchada puede estar muy caliente cuando sale de la planchadora. Si es
preciso lleve guantes para proteger sus
manos.
En los descansos levantar la teja y reducir la
temperatura de la misma.
Desprendedor de ropa
Cuando la ropa sale expulsada del planchado,
el desprendedor se encarga de separarla del
rodillo. No es necesario hacerlo a mano.
Si alguna prenda provocara que se suelte un
resorte del desprendedor, se le devolverá a
su posición correcta, presionando con la
mano.
Las prendas pequeñas no deberán plancharse solamente en un punto del rodillo, sino
que conviene hacer uso de toda la anchura
del mismo, alternando.
Para planchar a vapor, pisar el pedal de
accionamiento.
- El rodillo se para.
Después del planchado
Una vez terminado el planchado y con
objeto de eliminar la humedad del revestimiento del rodillo, deberá seguirse planchando unos minutos con la calefacción
desconectada, aprovechando el calor
residual de la teja.
Desconectar la planchadora, pulsando la
tecla "O".
Cerrar la llave de paso del gas (instalación
del lugar de emplazamiento).
Desactivar el interruptor principal (instalación
del lugar de emplazamiento).
Antes de embalar o apilar la ropa planchada,
ésta se debe enfriar lo suficientemente.
La ropa caliente podría autoinflamarse y
provocar un incendio.
37 M.-Nr. 05803030

Generalidades
Guardamotor
En caso de un calentamiento excesivo del bobinado del motor debido a la sobrecarga del
mismo, un termostato se encarga de desconectarlo automáticamente. La teja se separa
del rodillo. Tras el enfriamiento suficiente, la
planchadora tendrá que conectarse de nuevo,
pulsando la tecla I.
¡En todo caso deberá evitarse el funcionamiento innecesario de la planchadora sin
ropa!
No planchar las prendas pequeñas solamente
en un punto del rodillo, sino que conviene hacer
uso de toda la anchura del mismo, alternando.
Así se evita también un desgaste irregular del
bobinado.
Protección contra la falta de aire*
En caso de falta de aire la calefacción se desconecta automáticamente y se ilumina el piloto "Anomalía en el encendido". Después de
pocos minutos se puede planchar sólo en frío.
Se ha de comprobar si la conducción de salida
de gases de combustión está obstruida.
Si no se puede detectar ninguna anomalía en
la conducción de salida de gases de combustión, se debe informar al Servicio Post-venta.
Corte de corriente durante el planchado
En la parte posterior del montante derecho
se halla un volante que gira, cuando la teja se
junta con el rodillo. En caso de un corte de
corriente sirve también para poder separar la
teja del rodillo manualmente, girándolo en
sentido contrario de las agujas de reloj.
Protección contra la falta de gas*
En caso de que la llave de gas esté cerrada o
la presión de la red de gas sea excesivamente
baja, no se puede conectar la planchadora.
Si durante el funcionamiento la presión de la
red de gas bajase a unos valores inadmisibles,
la planchadora se desconecta automáticamente
y la teja baja. Pulsando la tecla "I" se puede
conectar la planchadora sólo, si se dispone
de la presión de gas necesaria.
En caso de que esta anomalía se produjese a
menudo, ha de avisarse a un técnico autorizado para que compruebe el sistema de conducción de gas del lugar de emplazamiento.
*) Sólo planchadoras con calefacción a gas
M.-Nr. 05803030 38

Dotación especial (bajo pedido)
Módulo-guía de retorno
Módulo-guía de retorno
El módulo-guía de retorno permite la instalación
de la máquina junto a la pared y el manejo por
una sola persona, que introduce y recoge la
ropa en el lado frontal.
El módulo-guía de retorno conduce la ropa
planchada hacia delante a una bandeja recogedora, que se encuentra encima del listón
protector de dedos.
Seguidamente se dobla el módulo-guía hacia
atrás. La ropa planchada será llevada a la tabla
receptora.
Para cambiar el paño de planchado o rebobinar
el rodillo se deben extraer las láminas elásticas
del desprendor de ropa una por una.
Si se desea que la ropa sea llevada a la tabla
receptora de la parte posterior, se coloca la
chapa-guía rebatible hacia atrás, mirando a la
tabla receptora.
39 M.-Nr. 05803030

Dotación especial (bajo pedido)
Cintas introductoras
Cintas introductoras
Las cintas introductoras facilitan la introducción de las prendas.
Colocar las prendas sobre las cintas al principio de la mesa, en paralelo al rodillo, alisarlas
y dejar que entren en la planchadora.
Ajuste de la mesa auxiliar
Chapa protectora
Es posible extraer la ropa que pudiera haber-
se introducido incorrectamente, mediante la
correa, desplazando hacia delante la chapa
protectora.
Empleando un dispositivo auxiliara decuado,
no metálico, extraer la prenda de ropa a tra-
vés de la ranura situada entre el cajón para
ropa y la chapa protectora.
La medida de ajuste de la mesa auxiliar es de
máx. 14,5 mm.
M.-Nr. 05803030 40

Limpieza y mantenimiento
Aplicación de cera a la teja
Con objeto de mantener la propiedad del fácil
deslizamiento, repasar la teja periódicamente
con un paño de cera especial para planchadoras.
Cera granulada
Impregnar de cera la tira central de un paño
fino.
Mantenimiento de la teja de aluminio
Cuando la teja presente residuos de cal o
almidón, podrán eliminarse con productos
limpiadores comunes. ¡No utilizar productos
abrasivos o paños especiales con papel de
lija incorporado!
Desprendedor de ropa
Siempre que se proceda a la limpieza de las
chapas elásticas de los desprendedores o del
paño de planchado, al rebobinado del rodillo
o se quiera prescindir del servicio de los desprendedores durante un tiempo breve, se los
colocará en posición vertical.
Tras el uso prolongado de la planchadora tendrá que procederse a la limpieza de las puntas de las chapas elásticas (deposiciones de
almidón, polvo y similares). Tan sólo así quedará garantizado su debido funcionamiento.
Sentido de introducción
Dóblense sus dos extremos e introdúzcase en
la planchadora como si se tratara de un prenda cualquiera. Ha de tenerse en cuenta, sin
embargo, que los extremos plegados han de
estar dirigidos hacia el rodillo.
El paño puede introducirse tanto por la derecha
como por la izquierda, pasando, en los espacios precisos, por todo el ancho del rodillo
dejando.
Tanto el encerado como la limpieza de la teja
deberán hacerse ajustando la temperatura a
● ● ● y reducir la velocidad a la mínima.
Cojinetes y engranaje
Tanto los cojinetes como el engranaje están
provistos del lubricante suficiente para un servicio de varios años.
¡Engrasar la máquina sólo, cuando esté parada y desconectada eléctricamente!
¡Con los revestimientos de la máquina quitados existe el riesgo de quemarse!
¡Una vez terminados los trabajos de mantenimiento han de volver a montarse los revestimientos de la máquina!
El paño y la cera se podrán adquirir a través
del Servicio Post-venta Miele o su distribuidor
Miele.
41 M.-Nr. 05803030

Limpieza y mantenimiento
Advertencias para el rebobinado del rodillo
con lana de acero
Quitar el paño de planchado
Antes de quitar el paño de planchado (en caso
de limpieza o sustitución), dejar enfriar la teja.
El borde final del paño tiene que quedar en la
parte superior del rodillo.
Desconectar la máquina y colocar el desprendedor de ropa en posición vertical.
En caso necesario, desatar las cintas a ambos
extremos y colocar el final del paño en la tabla
auxiliar o ponerlo hacia atrás.
Desconectar la máquina y colocar el desprendedor de ropa en posición vertical.
Pulsar la tecla "Ö Marcha atrás" y retirar
con cuidado el paño de planchado.
Bobinado
El rebobinado o la sustitución completa del
bobinado del rodillo con lana de acero deberá
realizarse exclusivamente por el personal autorizado del Servicio Post-venta.
Colocación del paño de planchado
No lavar un paño de planchado a estre-
nar.
Colocar el paño –con la máquina caliente y la
teja juntada al rodillo– en el sentido de la flecha
(flechas en el bobinado de lana de acero).
Peinar el canto del comienzo del paño con un
cepillo de alambre e ir enrollando el paño en
el rodillo.
Dejar girar el rodillo de 5 a 10 min., cortar la
tira sobrante y peinar el canto final del paño.
HM 38-175/205 Perímetro máx. 1158 mm
(con paño)
Lavado del paño
Cuando el paño muestra pequeños cambios
de color, a ser posible no lavarlo (el ponerse
amarillento es un fenómeno normal). Un paño
muy sucio se lavará apropiadamente en el
programa de ropa blanca a 95 °C, se centrifuga
y se vuelve a colocar húmedo.
Para este trabajo conviene ponerse guantes
protectores. ¡Riesgo de lesionarse!
Para el bobinado con lana de acero ha de
atenerse a la medida correspondiente:
HM 38-175/205 Perímetro máx.1138 mm
(sin paño)
Quitar los restos de lana de acero, que hayan
caído en la teja.
M.-Nr. 05803030 42

Limpieza y mantenimiento
Advertencias para el rodillo con bobinado
elástico laminar
Una de las condiciones más importantes para
el perfecto funcionamiento de la planchadora,
el rendimiento máximo y la larga duración del
bobinado sin necesidad de mantenimiento es
la utilización del paño de planchado, de fabricación especial para el bobinado elástico laminar, que mantiene su grosor.
Atención: Con este tipo de bobinado sólo
deberá plancharse ropa hasta 3 mm de
grosor. Las piezas más gruesas con elementos sobresalientes (botones altos, rodillos
de cortinas o similares) podrían causar
deterioros en el laminado elástico.
Tras la puesta en servicio
A las aprox. 40 horas de utilización de la máquina conviene recortar el sobrante del paño
de planchado (estirado debido al efecto del
planchado) a aprox. 20 mm. y peinar los últimos 15 mm. con un cepillo de alambre. Con
ello se impide la formación de franjas húmedas
y sombras de presión. El bobinado tiene que
presentar un grosor homogéneo a lo largo del
rodillo y adaptarse perfectamente a la teja.
Introducción
de ropa
Desconectar la máquina. La teja se separa
del rodillo.
Al quitar y poner el paño de planchado,
girar el volante en sentido contrario de las
agujas de reloj hasta el tope, a fin de que
la teja permanezca separada del rodillo.
Principio del paño
Final de
paño
Fase 1
Fase 2
Lavado del paño de planchado
Con el proceso de lavado se elimina la cera
que se ha quedado en el paño de planchado
y se devuelve a éste su característica elasticidad y capacidad hidroabsorbente. No obstante,
lavarlo con un programa de ropa blanca a 95°C
o darle la vuelta lo menos posible.
Después del último aclarado tienen que haberse
eliminado todos los residuos alcalinos.
¡No aclarar con aditivos! No centrifugarlo mucho, para evitar la formación de arrugas.
Quitar el paño de planchado del rodillo con
bobinado elástico laminar
Cuando se estrena un paño de planchado:
lavarlo antes con un programa de ropa
blanca a 95 °C.
Fase 3
Fase 4
Colocar los desprendedores de ropa en
posición vertical.
Quitar el paño, procediendo según las
figuras correspondientes a las fases 2 a 4.
Al quitar el paño, desprenderlo despacio y
cuidadosamente de las púas de sujeción
del bobinado elástico laminar.
43 M.-Nr. 05803030

Limpieza y mantenimiento
Principio del paño
Fase 5
Conectar la máquina con la menor velocidad
de giro y pasar el paño (véase la figura de
la fase 5).
Colocar el paño de planchado del rodillo
con bobinado elástico laminar
El paño deberá colocarse húmedo en el rodillo.
El paño se enrolla dos veces en el cilindro, no
debiendo remeterlo en los extremos del rodillo.
Decoloración del paño de planchado
Una coloración marrón del paño, incluso fuerte,
es normal.
La posibilidad de que el paño se ponga negro
se puede reducir de la forma siguiente:
- Aprovechar siempre toda la longitud del
rodillo.
- En caso de planchar prendas pequeñas,
utilizar la longitud del rodillo uniformemente y
no plancharlas siempre por el mismo sitio.
- En los descansos levantar la teja y reducir la
temperatura de la misma.
Colocar el paño. Comprobar que el volante
esté girado hasta el tope –en sentido contrario de las agujas de reloj– para que la
teja permanezca separada del rodillo.
Conectar la máquina con la menor velocidad
de giro y pasar el paño en el sentido del
planchado de ropa, hasta que una capa
quede sin pliegues y totalmente lisa. De
este modo las púas de sujeción del bobinado elástico laminar no deterioran la teja.
Desconectar la máquina y juntar la teja con
el rodillo, realizando con el volante 4 giros
completos en sentido de las agujas de reloj.
Conectar la máquina. La teja termina de
juntarse totalmente con el rodillo. Dejar
girar el rodillo despacio. El paño tiene que
quedar bien ajustado, sin formar pliegues.
A continuación, dejar girar el rodillo durante unos 5 minutos.
M.-Nr. 05803030 44

Símbolos en la placa de características
1 Modelo
2 Nº de máquina / Año de fabricación*
3 Tensión / Frecuencia
4 Fusible de maniobra
5 Motor de accionamiento
6 Diámetro de plato / Cantidad de platos*
7 Datos del tambor*
8 Diámetro de tambor / Profundidad de tambor*
9 Revoluciones de centrifugado*
10 Volumen de tambor / Peso de ropa seca*
11 Energía cinética*
12 Tiempo de arranque*
13 Tiempo de frenado*
14 Calefacción
15 Calefacción eléctrica
16 Fusible (instalación en el lugar de emplazamiento)
17 Calefacción a vapor indirecto*
18 Calefacción a vapor directo*
19 Calefacción a gas
20 Fecha de puesta en servicio
21 Homologaciones DVGW (agua)*
22 Espacio para homologaciones/CE-....
(Nº de identificación de producto/Gas)
*) no procede en caso de este modelo de planchadora
En caso de anomalía en el funcionamiento de
la máquina deberá dirigirse al Servicio Postventa de Miele.
El Servicio Post-venta precisa la indicación del
modelo y nº de máquina [Fabr.-Nº]. Ambos
datos se encuentran en la placa de características.
En caso de sustituciones deberán utilizarse exclusivamente repuestos de origen.
(también en este supuesto, el Servicio Postventa necesita saber el modelo y nº de máquina [Fabr.-Nº]).
Emisión de ruido
Nivel acústico según escala A:
HM 38-205 gas 74,1 dB
medido según DIN (IEC) 45 635
45 M.-Nr. 05803030

Para el técnico
La planchadora deberá ponerse en servicio
exclusivamente por personal autorizado del
Servicio Post-venta.
No se permite el emplazamiento de la máquina
en una misma estancia con máquinas de limpieza química que utilizan disolventes con
percloroetileno o CFC.
Los vapores liberados pueden transformarse
–debido a la formación de chispas en el electromotor de colector y consiguiente combustión–
en ácido clorhídrico, provocando deterioros en
la ropa y la máquina.
Emplazamiento de la máquina
Transportar la máquina con el palé de madera
al lugar de emplazamiento. Allí, levantarla del
mismo.
Los puntos de apoyo para aparatos elevadores
se encuentran en la parte inferior lateral de
las bases de ambos montantes, cerca de las
patas.
Hay que tener en cuenta que, para poder acceder a los revestimientos laterales, es preciso
mantener un espacio libre de 400 mm. junto
a los costados exteriores de los montantes.
Retirar el seguro de transporte
Retirar los elementos del seguro de transporte de la parte posterior de la máquina.
Nivelación y sujeción de la planchadora
Nivelar la maquina frontal y lateralmente con
un nivel de burbuja (llave SW 19).
Para el ajuste es preciso aflojar los tornillos de
las escuadras de sujeción. Una vez realizado
el ajuste, fijar los tornillos reguladores de las
patas mediante contratuercas.
Anclar la máquina al suelo con los tacos y tornillos, que forman parte del suministro.
Los taladros para los tacos podrán realizarse
a través de las escuadras de sujeción (véase
plano de instalación). Después de apretar a
fondo los tornillos de sujeción se apretarán
los tornillos de sujeción de las escuadras en
el zócalo.
Montaje de la tabla auxiliar
Las consolas, que tendrán que montarse a
ambos costados interiores de los montantes,
se sujetarán respectivamente con 2 tornillos
M8 (que forman parte del suministro).
La tabla auxiliar se coloca en las consolas, de
modo que la rendija entre el canto de la teja y
la tabla auxiliar sea lo más pequeña posible.
Para la sujeción se utilizan los tornillos para
madera, que forman parte del suministro.
M.-Nr. 05803030 46

Para el técnico
Obsérvense el plano de conexiones, el
plano de instalación y las instrucciones de
instalación adjuntos a la máquina. Estos
documentos son importantes para la conexión eléctrica de la máquina.
Conexión eléctrica
La conexión eléctrica será realizada exclusivamente por un técnico autorizado, ateniéndose estrictamente a las normas de seguridad
vigentes.
El equipamiento eléctrico de la máquina
corresponde a la normativa IEC 335-1 e
IEC 335-2-44
La máquina viene preparada de fábrica para
AC 3N 50 Hz. El voltaje está indicado en la
placa de características.
Siempre han de tenerse en cuenta la placa de
características, el plano de conexiones y el
plano de instalación.
El usuario tiene que hacerse cargo de la conexión eléctrica fija (NYM-J) de la máquina
en el lugar de emplazamiento.
La caja de conexiones con el plano se hallan
en la columna izquierda. La regleta de bornes
está dentro de la caja de conexiones.
Antes de la conexión eléctrica bajar del todo
la teja por medio del volante y luego subirla
12 vueltas.
Conectar la máquina a la red y conectar el interruptor principal (de la casa).
Si se conectaron correctamente las fases, la
teja se levanta.
Si las fases se conectaron de forma equivocada, la teja baja, debiéndose cambiar las fases.
Bajar la teja 12 vueltas por medio del volante
y conectar el interruptor principal (de la casa).
Conducción de salida de aire
–Véanse diámetros para conducciones de salida de aire y sistemas de ventilación–
La conducción de salida de aire (instalación
en el lugar de emplazamiento) no deberá llevarse a una chimenea para fogones de gas,
fuil-oil o combustibles sólidos. Además tendrá
que llevarse separadamente a la conducción
respectiva de una secadora.
El aire cálido-húmedo deberá llevarse al exterior por el recorrido más corto.
La instalación de la conducción deberá colocarse de modo que favorezca al máximo la rápida salida del aire (pocos codos, puntos de
conexión con la menor resistencia posible
etc.).
El manguito de conexión a la conducción del
vaho absorbido se encuentra en la parte posterior del montante derecho.
En caso de conducciones ascendentes es imprescindible prever, en el punto más bajo, un
taladro (de 3 a 5 mm ø) para la evacuación
del agua condensada.
El diámetro interior de la conducción de salida
de vaho tiene que ser de 60/70 mm.
Prever una ventilación suficiente en el lugar
de emplazamiento.
El extremo de una conducción, que queda en
el exterior expuesto a las inclemencias atmosféricas, tendrá que protegerse correspondientemente.
La conducción del aire al exterier no debe
causar molestias inadmisibles.
Después de alcanzar la temperatura básica,
juntar la teja con el rodillo, pulsando la tecla
"I".
Después de emplazar y conectar la máquina,
volver a montar ineludiblemente todas las
piezas del revestimiento exterior.
47 M.-Nr. 05803030

Para el técnico
Conexión a gas
La conexión a gas se realizará exclusivamente
por un técnico autorizado, ateniéndose estrictamente a las normas de seguridad vigentes.
Obsérvense plano e instrucciones de instalación que forman parte del suministro y que
son muy importantes para la conexión a gas.
De Fábrica la calefacción a gas está ajustada
según indican los detalles técnicos en el adhesivo en la parte posterior de la máquina.
En caso de cambiar a otra familia de gas
(sólo por un técnico autorizado) se necesita el
correspondiente juego de cambio que podrá
adquirirse a través de Servicio Post-venta (indicar modelo y nº de máquina así como la la
familia de gas, el grupo de gas y la presión
de gas del lugar de emplazamiento).
Seguir las instrucciones de instalación para
aparatos con calefacción a gas.
Conducción de salida de gases de combustión
–Véanse plano de instalación y las instrucciones correspondientes.–
La boca de conexión a la conducción de salida
de gases de combustión Ø 120 mm se encuentra en la parte posterior de la columna
derecha.
Puede surgir el caso que en la primera puesta
en servicio se halle aire en la conducción y el
encendido no se produzca durante el tiempo
de seguridad. En tal supuesto se encenderá
el piloto "y x Anomalía". Pulsar la tecla "y x
Anulación". Esta maniobra podrá repetirse varias veces, hasta que se haya eliminado el
aire y se encienda la llama del quemador.
Si durante el tiempo de seguridad no apareciera el símbolo de llama, la válvula se cerraría, desactivando el encendido (anomalía con
bloqueo). El piloto "y x Anulación" se enciende.
El desbloqueo se llevará a cabo pulsando la
tecla "y x Anulación".
Una vez hecha la conexión de gas, es
imprescindible volver a montar todos los
elementos del revestimiento exterior de
la máquina.
¡Cualquier reparación o eliminación de anomalías en aparatos a gas tiene que llevarse a
cabo por personal autorizado!
Recurrir al Servicio Post-venta Miele.
M.-Nr. 05803030 48

49 M.-Nr. 05803030

M.-Nr. 05803030 50

Índice
Página
Medidas de segurança e precauções . . . . . . . . . . . . . . . . . . . . . . . . . . . . . 52
O seu contributo para o meio ambiente . . . . . . . . . . . . . . . . . . . . . . . . . . 54
Descrição do aparelho . . . . . . . . . . . . . . . . . . . . . . . . . . . . . . . . . . . . 55
- Elementos de comando . . . . . . . . . . . . . . . . . . . . . . . . . . . . . . . . . . . 56
- Dispositivos de segurança . . . . . . . . . . . . . . . . . . . . . . . . . . . . . . . . . . 58
Utilização . . . . . . . . . . . . . . . . . . . . . . . . . . . . . . . . . . . . . . . . . . . 59
- Qualidade e preparação da roupa . . . . . . . . . . . . . . . . . . . . . . . . . . . . . . 59
- Passar . . . . . . . . . . . . . . . . . . . . . . . . . . . . . . . . . . . . . . . . . . . . 60
- Vapor . . . . . . . . . . . . . . . . . . . . . . . . . . . . . . . . . . . . . . . . . . . . . 61
- Após terminar . . . . . . . . . . . . . . . . . . . . . . . . . . . . . . . . . . . . . . . . 61
Indicação . . . . . . . . . . . . . . . . . . . . . . . . . . . . . . . . . . . . . . . . . . . 62
- Falta de energia eléctrica durante o funcionamento . . . . . . . . . . . . . . . . . . . . . 62
Equipamento e variantes . . . . . . . . . . . . . . . . . . . . . . . . . . . . . . . . . . 63
- Retorno da roupa . . . . . . . . . . . . . . . . . . . . . . . . . . . . . . . . . . . . . . . 63
- Cintas condutoras . . . . . . . . . . . . . . . . . . . . . . . . . . . . . . . . . . . . . . 64
Limpeza e manutenção . . . . . . . . . . . . . . . . . . . . . . . . . . . . . . . . . . . 65
- Encerar o berço . . . . . . . . . . . . . . . . . . . . . . . . . . . . . . . . . . . . . . . 65
- Enrolamento do rolo com molas palha-de-aço . . . . . . . . . . . . . . . . . . . . . . . . 66
- Enrolamento do rolo com molas em lamelas . . . . . . . . . . . . . . . . . . . . . . . . . 67
Significado dos símbolos na placa de características . . . . . . . . . . . . . . . . . . . 69
Nota para o instalador . . . . . . . . . . . . . . . . . . . . . . . . . . . . . . . . . . . . 70
- Instalação da calandra . . . . . . . . . . . . . . . . . . . . . . . . . . . . . . . . . . . . 70
- Retirar a segurança de transporte . . . . . . . . . . . . . . . . . . . . . . . . . . . . . . 70
- Montagem da mesa . . . . . . . . . . . . . . . . . . . . . . . . . . . . . . . . . . . . . 70
- Ligação eléctrica . . . . . . . . . . . . . . . . . . . . . . . . . . . . . . . . . . . . . . . 71
- Ligação ao gás . . . . . . . . . . . . . . . . . . . . . . . . . . . . . . . . . . . . . . . . 72
- Tubos de evacuação . . . . . . . . . . . . . . . . . . . . . . . . . . . . . . . . . . . . . 72
A máquina só deve ser instalada por um
técnico Miele.
51 M.-Nr. 05803030

Medidas de segurança e precauções
Antes de iniciar o funcionamento com a calandra deve ler as instruções de utilização
atentamente. Assim não só se protege
como evita avarias na calandra.
Utilização adequada
Esta calandra serve exclusivamente para
passar tecidos que suportem a passagem
pela calandra e que foram lavados com água.
Segurança técnica
Esta calandra não deve ser instalada na
mesma divisão onde existam máquinas
que funcionem com produtos solventes que
contenham PER ou CFC.
A calandra só pode ser instalada numa di-
visão sem humidades.
Utilize a calandra somente se todas as pe-
ças do revestimento exterior estiverem
montadas ficando assim impossibilitado o
acesso a peças condutoras eléctricas ou em
rotação e ainda a peças que devido ao funcionamento estejam quentes.
Não danifique nem elimine dispositivos de
segurança e elementos de comando da
calandra.
Máquinas com elementos de comando ou
peças de isolamento danificadas não devem ser postas a funcionar sem serem reparadas.
Reparações em aparelhos eléctricos só
devem ser feitas por técnicos. Reparações feitas indevidamente podem trazer graves
consequências para o utilizador.
Peças avariadas só devem ser substituí-
das por peças originais Miele. Só assim
garantimos que estas peças satisfazem as
exigências de segurança que colocamos às
nossas máquinas.
O fabricante não pode ser responsabilizado
por danos provenientes da falta ou interrupção do fio de terra.
A calandra só está desligada da corrente
se o interruptor principal estiver desligado
ou se os fusíveis/disjuntores do quadro estiverem desactivados.
Utilização da calandra
Não permita que crianças brinquem perto
da calandra ou até a utilizem.
Se a calandra estiver quente e o berço
apoiado, existe perigo de se queimar ao
tocar no canto do berço do lado que sai a roupa.
Ao passar roupa com pano duplo, por ex.
capas de edredões, não deve meter as
mãos entre os panos para alisar a roupa porque existe o perigo de não retirar as mãos a
tempo e entrar em contacto com o rolo quente.
Entrada de roupa por cintas:
Não passe nesta máquina peças de roupa com franjas, fitas estreitas ou linhas e
fios.Este tipo de material pode provocar erro
de funcionamento na máquina.
Perto da calandra deverá existir um extin-
tor instalado para que possa ser utilizado
no caso da roupa se incendiar.
Além disso as medidas de segurança e
normas existentes no País onde a calandra está instalada devem ser respeitadas.
Utilização de acessórios
Só é permitido instalar acessórios se isso
for indicado pela Miele. Se montar outras
peças os direitos à garantia ficam excluídos.
A segurança eléctrica deste aparelho só
está garantida se estiver ligado a uma tomada com protecção à terra. É muito importante que estas regras base de segurança
sejam analisadas e no caso de dúvida deverá
mandar rever a instalação por um técnico.
M.-Nr. 05803030 52

Medidas de segurança e precauções
Regulamentos para trabalhar com a calandra
Com a calandra só devem trabalhar pes-
soas de confiança e maiores de 17 anos
que estejam familiarizadas com a utilização
da máquina.
Pessoas com dedos muito finos só de-
vem trabalhar no lado de recolha da roupa e nunca no lado da entrada da roupa.
O vestuário que o utilizador da máquina
veste, deve ser justo ao corpo. Mangas
largas, cintos de aventais e lenços podem ser
apanhados pelo rolo.
Antes de iniciar o trabalho com a calandra
devem tirar-se anéis e pulseiras.
As pregas não devem ser alisadas à en-
trada do rolo mas longe deste, sobre a
mesa.
Fronhas e capas de edredões devem en-
trar no rolo pela parte da abertura. Não
meter as mãos nos cantos. Não tocar nas alças de aventais.
Preste sempre atenção se a protecção de
dedos está bem regulada. Assim evita
queimaduras ou entalar as mãos.
Controlar diariamente a eficácia dos dis-
positivos de protecção
Verifique se está impedida a entrada para
além do dispositivo de segurança.
Precauções no caso de fugas de gás
-válido só para calandras com aquecimen-
to a gás.-
Apagar de imediato todas as chamas!
Abrir imediatamente portas e janelas!
Fechar as torneiras de segurança existen-
tes junto ao contador do gás ou à torneira
principal.
Em divisões onde existam fugas de gás
não deve acender a luz.
Não acender fósforos ou isqueiros!
Não fumar!
Não provocar faíscas:
por ex. desligando fichas das tomadas ou
accionando interruptores ou campainhas.
Fechar a torneira de segurança instalada
para a calandra.
Se não conseguir determinar a causa da
fuga embora as torneiras estejam fechadas, então deve contactar a companhia
distribuidora de gás.
Atenção! Antes de terminar os trabalhos de
arranque, manutenção, alterações e reparações deve verificar todas as peças condutoras
de gás desde a torneira até aos injectores.
Preste especial atenção ao canhão de medição da válvula do gás, do pressostato de ligação e do queimador
O teste deve ser feito com o queimador ligado e desligado.
Antes de comutar para a fase de desenro-
lar verifique se alguém está em contacto
com a calandra.
No caso de aquecimento a gás, o local
onde a máquina está instalada deve ser
bem arejado.
A máquina só deve ser lubrificada quando
estiver parada por completo.
Estas instruções de utilização devem ser facultadas a todas as pessoas que trabalham
com a calandra.
Guarde o livro de instruções!
53 M.-Nr. 05803030

Protecção do meio ambiente
Embalagem
A embalagem de protecção do aparelho durante o transporte é feita a partir de materiais
seleccionados do ponto de vista ecológico e
por isso reciclável.
Aparelhos
Aparelhos que por motivos de avaria ou substituição deixam de ser utilizados não devem
ser deixados junto do contentor do lixo. Informe-se junto da sua Câmara Municipal sobre
as possibilidades de recolha e reciclagem. Assim contribui para despoluição do meio Ambiente.
M.-Nr. 05803030 54

Descrição do aparelho
yx
1 2 3 4 5 6 7 8
1 Tecla “I Ligar" 5 Selector de rotações
2 Tecla “O Desligar" 6 Lâmpadas indicadoras "yx Avaria na ignição"*
3 Tecla “Ö Desenrolar” 7 Lâmpada indicadora "°C Temperatura"
4 Lâmpada indicadora "I Ligado" 8 Selector de temperatura
Pás de alisamento
Rolo
Protecção de dedos Comandos
Tecla Eliminar avarias*
Mesa Mesa
Botão de
emergência Botão de
Chapa de protecção* emergência
Caixa para roupa Sáida de vapores
Manivela
Sáida de
vapores*
Ângulo de fixação (4)
Pés (4)
Pedal de accionamento
*) só em máquinas por aquecimento a gás
HM 38-175
55 M.-Nr. 05803030

Descrição do aparelho
Lâmpadas de controle de funcionamento
I Lâmpada de controle acesa
Teclas
ILigado
Após accionar a tecla "I" acendem as lâmpa-
das de controle de funcionamento "I" e a lâm-
pada de controle de temperatura "°C".
- O berço aquece Logo que a temperatura seleccionada seja alcançada, a lâmpada de controle da temperatura apaga-se "°C".
Voltando a carregar na tecla "I" o berço ajusta-se e o rolo entra em funcionamento.
O Desligado
Ao accionar a tecla desliga a máquina e o berço separa-se.
Ö Desenrolar
Após accionar a tecla "I" a lâmpada de contro-
le "I" acende.
°C Lâmpada de controle da temperatura
Na fase de aquecimento acende a lâmpada
de controle da temperatura; logo que a tempe-
ratura seja alcançada a lâmpada apaga-se.
Máquinas por aquecimento a gás:
y xLâmpada indicadora avaria na ignição
Acende havendo avaria na ignição do aqueci-
mento ou no caso de pressão baixa nas con-
dutas de saída de ar (obstrução).
Só deve escolher esta posição quando pretender retirar o pano do rolo ou substituir o revestimento do rolo.
Desligar a calandra - o berço levanta -, Carregar na tecla “Ö Desenrolar”. O rolo roda
enquanto a tecla estiver a ser pressionada.
M.-Nr. 05803030 56
y x Tecla Eliminar avarias (no lateral direi-
to, interior por cima da mesa)
Esta avaria deve ser eliminada após 1 minuto
carregando na tecla “yx Eliminar avarias”. Se
esta avaria se repetir várias vezes então de-
verá consultar o serviço de assistência técni-
ca.

Descrição do aparelho
Selector de temperatura
l - Zona = Temperatura baixa
ll - Zona = Temperatura média
lll - Zona = Temperatura elevada
Selector de rotações
As rotações do rolo aumenta ao rodar o botão para a direita e diminuem ao rodar o botão para a esquerda.
A carga de ar formada é maior se o parafuso
regulador estiver na posição original (ver croquis) e vai reduzindo se rodar o parafuso até
90°.
A posição mais favorável é alcançada quando com pouca carga de ar formada, o rolo
seca o suficiente e não se formam manchas
de água no revestimento ou na roupa já passada.
No caso de carga de ar elevada devido à sucção de vapores, o rolo arrefece bastante e a
capacidade de passagem é afectada.
Válvula de estrangulação - Sucção de vapores (só em máquinas por aquecimento a eléctrico)
Na sucção de vapores está montada uma válvula de estrangulação que permite alterar a
quantidade de ar que passa pelo revestimento do rolo.
57 M.-Nr. 05803030
Pedal de accionamento
Funções:
Não carregando no ponto
de ligação Passagem
Carregando no ponto de ligação Vapor

Descrição do aparelho
Dispositivos de segurança
Botão de emergência (na parte da frente
do lateral esquerdo e na parte de trás do
lateral direito)
Carregando neste botão o rolo pára imediatamente e o berço baixa. Rodando o botão
para a direita desbloqueia o botão.
Protecção de dedos
Se a ponta dos dedos ficar entre a mesa e a
protecção de dedos o rolo pára de imediato e
o berço desce. A protecção de dedos não
tem qualquer função quando o rolo roda ao
contrário.
Para voltar a ligar a máquina basta carregar
na tecla "I".
Manivela (nas costas do lateral direito)
Esta manivela permite separar o berço quen-
te do rolo quando faltar a energia eléctrica.
Rodando no sentido inverso aos ponteiros do
relógio o berço baixa e rodando no sentido
dos ponteiros do relógio o berço ajusta-se ao
rolo.
A máquina tem de estar desligada da cor-
rente! (Desligue o interruptor principal).
A protecção de dedos é um dispositivo de
segurança que deve ser testado antes do
arranque da máquina.
M.-Nr. 05803030 58

Utilização
Qualidade da roupa
A humidade ideal para um bom resultado
deve situar-se ente os 25-40%.
Se a última enxaguagem da roupa, na máquina de lavar, for efectuada com água quente
obterá tempos de preparação mais curtos e
com isso economia de energia devido ao baixo teor de humidade residual na roupa.
Roupa com mais de 50% de fibras sintéticas (por ex. Dralon) não pode ser passada
na calandra porque o sintético não suporta
temperaturas elevadas. Roupa com menor
quantidade de sintético pode ser passada
na calandra mas com temperatura baixa.
Preparar a roupa
Antes de passar a roupa deve de a separar
por qualidade de tecido o que contribui para
economia de tempo.
Peças com botões devem ser colocados na
máquina com os botões voltados para o rolo.
Se os botões ficarem voltados para cima existe perigo de ficarem danificados ou até serem
arrancados.
Coloque um pano sobre fechos de correr e
botões metálicos para proteger o berço.
Fivelas em metal ou plástico assim como botões muito altos (por ex. em forma de bola)
não devem ser passados.
Atenção
Antes de iniciar o funcionamento com a calandra deve limpar o berço utilizando um
um pano que deve ser passado ao longo
do rolo, em funcionamento.
Comece por passar com temperatura baixa:
Perlon, Nylon etc. (
depois
Lã, Seda (ll - zona)
e depois
Algodão, Linho (lll - zona)
Se pretender seleccionar de seguida uma
temperatura mais baixa preste atenção à lâmpada de controle da temperatura "°C".; Só
quando a lâmpada de controle correspondente ao grau de temperatura seleccionado acender é que essa temperatura está alcançada.
Roupa que foi tratada com goma deve ser
passada em último lugar para que eventuais
restos de goma, que se agarrem ao berço,
não vão influenciar a passagem de outras peças de roupa.
l - zona)
Verificar a eficácia da protecção de dedos
A régua de protecção de dedos é um dispositivo de segurança que deve ser verificado todos os dias, antes de iniciar o funcionamento com a calandra.
Ao tocar na régua de protecção de dedos o
rolo tem de parar e o berço deve separar-se
do rolo.
Para voltar a ligar a calandra basta tocar na
tecla "I".
59 M.-Nr. 05803030

Utilização
Passar a roupa
Ligar o comutador principal (instalado).
Abrir a torneira de segurança do gás
(instalada).
A lâmpada de controle de funcionamento
"I" e a lâmpada de controle da temperatura
"°C" acendem.
Quando a lâmpada de controle da temperatura se apagar "°C", significa que a temperatura seleccionada foi alcançada.
Carregue de novo na tecla "I".
Rodar o botão selector de temperatura
para a temperatura desejada.
Qualidade de
tecido
Perlon/
Sede artificial
Seda/
Lãs
Lãs/
Linho
Símbolos Grau de
temperatura
l temperatura
baixa
ll temperatura
média
lll temperatura
elevada
O berço ajusta-se ao rolo e o rolo começa a
rodar. Deixe rodar durante 5 minutos para
que a temperatura seja uniforme entre o rolo
e o berço.
Regular as rotações do rolo rodando o botão regulador.
Ligar a calandra carregando na tecla "I".
M.-Nr. 05803030 60
Verificar a eficácia da protecção de dedos!

Utilização
Colocar a roupa sobre a mesa e leva-la até
ao rolo.
A posição de vapor fica accionada enquanto mantiver o pé sobre o pedal.
A roupa que sai do rolo poderá estar muito
quente. Utilize luvas de protecção.
Nos intervalos de passagem levantar o berço
e reduzir a temperatura do rolo.
Pás de alisamento
As pás de alisamento separam a roupa do
rolo. Assim não é necessário retirar a roupa
junto ao rolo.
Se alguma mola de alisamento sair da sua posição é facílimo voltar a coloca-la no respectivo lugar.
Alisar a roupa do meio para as pontas.
Não passar peças pequenas só de um
lado do rolo, mas utilizar toda a largura disponível.
No final de passar a roupa
Desligar o aquecimento e deixar o rolo rodar durante alguns minutos com o berço
ajustado para que o revestimento seque.
Desligar a calandra carregando na tecla
"O"
Fechar a torneira de segurança do gás.
Desligar o comutador principal.
Antes de guardar a roupa acabada de passar a ferro deixe-a arrefecer o tempo suficiente. Roupa muito quente pode incendiar-se.
Se pretender utilizar o vapor deve pressionar o pedal.
O rolo pára
61 M.-Nr. 05803030

Indicação
Protecção do motor
No caso de aquecimento excessivo do motor
devido a sobrecarga, o motor desliga automaticamente e o berço separa-se do rolo. Após
o arrefecimento é necessário voltar a ligar a
calandra, carregando na tecla "I".
Evite que o rolo esteja a rodar sem passar
peças de roupa !
Peças de roupa pequenas não devem ser
passadas só de um lado do rolo.
Se for utilizado sempre o mesmo lado do rolo
o enrolamento dessa parte sofre um desgasta maior devido ao calor.
Segurança falta de arejamento*
No caso de falta de arejamento na calandra o
aquecimento desliga automaticamente e a
lâmpada de controle avaria na ignição
"yx acende. Após pouco minutos a passagem
é feita só a frio. Verifique se os tubos de evacuação de gás de combustão estão obstruídos. Se não encontrar qualquer avaria contacte o serviço de assistência técnica.
Protecção de falta de gás*
Falta de energia eléctrica durante o funcio-
namento
Para que ao faltar a energia eléctrica seja
possível separar o berço quente do rolo para-
do, existe no lateral direito, uma manivela
que pode ser rodada manualmente quando
faltar a corrente. Rodando no sentido contrá-
rio aos ponteiros do relógio separa o berço
do rolo.
No caso da torneira de segurança estar fechada ou existir baixa pressão de ligação a calandra não liga.
Se a pressão baixar durante o funcionamento
para valores inadmissíveis a calandra desliga
automaticamente e o berço baixa. Carregando na tecla “I” a calandra volta a ligar se a
pressão da rede voltar a ser suficiente.
Se esta avaria se repetir várias vezes deverá
mandar rever a instalação a gás por um técnico competente.
*) só em máquinas por aquecimento a gás
M.-Nr. 05803030 62

Variante de equipamento
Retorno da roupa
O retorno da roupa permite recolher a roupa
já passada pelo lado por onde entrou. Assim
não é necessário haver pessoal adicional. A
calandra pode ser instalada encostada a uma
parede.
Depois abra o retorno da roupa para que a
roupa caia sobre a mesa.
Se pretender substituir o pano ou o revestimento do rolo deve retirar as molas das pás
de alisamento uma a uma.
O dispositivo de retorno da roupa conduz a
roupa para a frente depositando-a na tábua situada por cima da protecção de dedos.
Se pretender que a roupa caia sobre uma
mesa deve deixar descair a chapa condutora
da roupa, para trás, sobre a mesa.
63 M.-Nr. 05803030

Variante de equipamento
Cintas condutoras
As cintas condutoras facilitam a introdução
da roupa na máquina.
Coloque a peça de roupa sobre as cintas, paralela ao rolo, alise e passe.
Regulação da mesa de apoio
Chapa de protecção
Se alguma peça de roupa for mal conduzida
ao entrar na máquina poderá ser retirada pu-
xando a chapa de protecção.
Utilizando um objecto adequado mas não me-
tálico, conduza a peça de roupa através da ra-
nhura entre a caixa da roupa e a chapa de
protecção.
A mesa de apoio pode ser regulada no máximo até 14,5 mm.
M.-Nr. 05803030 64

Limpeza e manutenção
Encerar/lubrificar o berço
Para que o rolo deslize sem atrito, aconselhamos encerar/lubrificar o berço regularmente
com um pano utilizando o produto adequado.
cera
Proceda tal como se vê na figura polvilhando
o centro de um pano com o produto especial/cera.
Limpeza do berço em alumínio
Se resíduos de calcário ou restos de goma ficarem agarrados ao berço, utilize um detergente de limpeza normal para os eliminar.
Pás de alisamento
Se pretender limpar as molas ou o pano, revestir o rolo ou passar roupa durante um curto espaço de tempo sem as pás de alisamento então pode levantar as pás de alisamento.
Após algum tempo de funcionamento da calandra deverá efectuar uma limpeza às pontas das pás de alisamento, libertando-as de
sujidade que fique agarrada como por ex.
goma. Só assim está garantido o perfeito funcionamento das pás de alisamento.
Apoios e engrenagem
Sentido de
dobragem
Dobre as duas pontas do pano e coloque-o
na máquina, procedendo tal qual como se fosse passar. Preste atenção para que as pontas dobradas fiquem voltadas para o rolo.
Passe todo o rolo com o pano introduzindo-o
as vezes que forem necessárias, desde o
lado direito até ao esquerdo, mantendo sempre a distância em relação à parte por onde
já passou antes.
A calandra é fornecida de fábrica com lubrificação adequada e suficiente para vários
anos de funcionamento.
A calandra só deverá ser lubrificada quando
estiver desligada da corrente!
Se o revestimento da calandra estiver desmontado existe perigo de queimaduras!.
Após efectuar trabalhos de manutenção ou
reparação deve montar todas as peças de revestimento!
Para encerar/lubrificar assim como limpar o
berço seleccione a posição correspondente à
temperatura lll e a velocidade mais baixa.
Nos serviços Miele pode obter o pano e cera
especial para calandras.
65 M.-Nr. 05803030

Limpeza e manutenção
Indicações para rolos com palha-de-aço
Retirar o pano do rolo
Antes de retirar o pano do rolo, (para lavar ou
substituir) deve deixar arrefecer a calandra.
A ponta final do pano deve ficar visível na parte superior do rolo.
Desligar a máquina e levantar as pás de alisamento.
Se necessário solte as cintas laterais e coloque a ponta final do pano sobre a mesa de
entrada da roupa ou voltado para trás.
Carregar na tecla “Ö Retorno” e retirar o
pano cuidadosamente.
Indicações para enrolar a palha de aço
Somente o serviço de assistência técnica é
que deve proceder à substituição e montagem da palha de aço.
Devem ser utilizadas luvas de protecção para
enrolar a palha de aço.
HM 38-175/205 Perímetro máx. 1138 mm
(sem pano)
Revestir o rolo com o pano
O pano não deve ser lavado antes de ser
utilizado.
Colocar o pano sobre o rolo quente e com o
berço ajustado, no sentido da seta (Setas na
palha de aço)
Escovar a ponta do pano com uma escova de
arame e deixar o pano enrolar no rolo.
Deixar o rolo rodar aprox. 5-10 min, depois
corte a parte do pano sobreposta e penteie-a
com uma escova de arame, tal como fez na
parte da frente do pano.
HM 38-175/205 Perímetro max. 1158 mm
(com pano)
Lavagem do pano
Se o pano ficar amarelado não deverá ser la-
vado, só por isso. Lave o pano só quando es-
tiver bastante sujo, a 95 °C no programa
"Roupa branca/cor". Após a centrifugação,
volte a enrolar o pano ainda húmido no rolo
na posição em que estava.
No final limpe o berço eliminando restos de
palha de aço que eventualmente tenha caído.
M.-Nr. 05803030 66

Limpeza e manutenção
Indicações para rolos com lamelas
A condição prévia para que o funcionamento
da calandra seja isento de avarias, tenha rendimento elevado e a longa duração do revestimento, só existe se for utilizado o pano adequado para lamelas.
Atenção: Só se deve passar roupa até 3
mm de espessura, roupa mais grossa e
com botões altos, ganchos de cortinados e
idênticos podem danificar as lamelas.
Após o arranque
Terá vantagem se após 40 horas de funcionamento cortar até 20 mm do pano sobreposto
e com uma escova de arame escovar aprox.
15 mm até que fique com franjas.
Desta forma evita zonas com humidade e
sombras de pressão.
O revestimento do rolo deve ser uniforme e ficar bem ajustado ao berço.
Entrada
da roupa
Desligando a máquina, o berço separa-se
do rolo.
Ao retirar e enrolar o pano, rode a manivela manualmente no sentido contrário aos
ponteiros do relógio até ao batente para
que o berço fique em baixo e não volte a
ajustar-se ao rolo
Fim do pano
Principio do
pano
Fase 1
Fase 2
Lavagem do pano
Após a lavagem, o pano fica macio, com elasticidade, isento de cera e é um bom absorvente de humidade. A lavagem é feita a 95 °C no
programa "Roupa branca/cor" e não deve ser
feita com frequência. Após a última enxaguagem o pano deve estar totalmente isento de
calcário.
Não deve ser centrifugado com rotações elevadas para evitar rugas e vincos.
Retirar o pano
Se for colocado um pano novo deverá ser
lavado primeiro no programa de roupa
branca/cor a 95 °C.
Fase 3
Fase 4
Levantar as pás de alisamento.
Retirar o pano, tal como se vê na gravura,
fases 2 a 4.
Retire o pano com cuidado, separando-o
das molas das lamelas.
67 M.-Nr. 05803030

Limpeza e manutenção
Inicio do
pano
Fase 5
Ligar a máquina seleccionando as rotações mais baixas deixando o pano desenrolar tal como se vê na fase 5.
Enrolar o pano no caso de rolos com lamelas.
O pano dever ser enrolado ainda húmido no
rolo
Escurecimento do pano de passar a ferro
É normal o pano ficar mais escuro com o de-
correr dos tempos.
Pode no entanto evitar que fique escuro se:
- utilizar todo o rolo para passar a ferro.
- evitar passar peças pequenas sempre no
mesmo lugar; mas utilizar toda a largura do
rolo.
- nos intervalos de passagem levantar o
berço e reduzir a temperatura do rolo.
O pano dobrado é enrolado ao rolo. Não dobre as pontas do pano.
Colocar o pano em cima. Verificar se a manivela rodou no sentido contrário aos ponteiros do relógio até ao batente para que o
berço esteja separado do rolo e não se
ajuste. Ligar a calandra e deixar o pano entrar a pequenas rotações até que uma parte do pano esteja colocado sem dobras.
Assim evita que o berço fique danificado
pelos fixadores das lamelas.
Desligar a calandra e rodar a manivela 4
vezes no sentido dos ponteiros do relógio
para ajustar o berço.
Ligar a calandra para que o berço se ajuste totalmente. Deixar o rolo rodar lentamente. O pano deve estar sem dobras. No final
deixar o rolo rodar durante 5 minutos.
M.-Nr. 05803030 68

Significado dos símbolos na placa de características
1 Modelo de máquina
2 Número de máquina e ano de fabrico*
3 Tensão/frequência
4 Fusíveis
5 Motor
6 Diâmetro dos pratos e quantidade*
7 Dados sobre o tambor*
8 Diâmetro e profundidade do tambor*
9 Rotações*
10 Volume do tambor e peso da roupa*
11 Energia cinética*
12 Tempos*
13 tempo de travagem*
14 Aquecimento
15 Aquecimento eléctrico
16 Fusíveis (pelo utilizador)
17 Aquecimento a vapor indirecto*
18 Aquecimento a vapor directo*
19 Aquecimento a gás
20 Data do arranque
21 Certificados atribuídos (Água)*
22 Campo para certificados atribuídos/CE ...
*)Não tem validade para este tipo de calandra
Em caso de avaria contacte o serviço de assistência técnica, indicando o modelo, no de
fabrico da calandra [Fabr.-No]. e o tipo de avaria.
No caso de substituição de peças, só devem ser utilizadas peças originais Miele
Emissão de ruídos
A-Valores obtidos
HM 38-205 gás 74,1 dB
Averiguado de acordo com a norma DIN
(IEC) 45 635
69 M.-Nr. 05803030

Indicação de montagem
O arranque da calandra só pode ser feito
pelo serviço de assistência técnica Miele.
A calandra não deve ser instalada na mesma
divisão onde existam máquinas a funcionar
com produtos solventes PER ou CFC.
Instalação da calandra
A calandra deve ser transportada sobre o estrado de madeira até ao local onde vai ser instalada. No local da instalação deve ser retirado do estrado.
Os pontos de fixação para levantar a calandra encontram-se em baixo dos dois laterais
no zona dos pés.
Ao instalar a calandra é necessário um espaço livre ao lado dos laterais com pelo menos
400 mm para garantir livre acesso à chapa de
cobertura.
Retirar a segurança de transporte
A segurança de transporte situada no lateral
da calandra deve ser retirada. No caso de máquinas que funcionem a gás não existe.
Nivelar e fixar
Instalar a calandra nivelada utilizando para
isso um nível de água; os pés podem ser
ajustados com uma chave de 19 mm.
Ao nivelar os pés os parafusos dos ângulos
de fixação têm de estar desaparafusados. Depois da calandra estar nivelada deve fixar os
pés da máquina.
A calandra tem de ser fixa ao solo com os parafusos e buchas fornecidas junto.
Após aparafusar os parafusos de fixação ao
solo deve aparafusar os parafusos dos ângulos à base.
Montagem da mesa
As duas consolas são fixas aos laterais com
2 parafusos cada, fornecidos junto.
A mesa é colocada sobre as consolas e nivelada de forma que a ranhura entre a calandra
e a mesa seja a mais pequena possível. No final fixe a mesa com os parafusos de fixação.
M.-Nr. 05803030 70

Indicação para o instalador
Ligação eléctrica
A ligação só deve ser feita por um técnico autorizado que conheça os regulamentos em vigor.
A máquina é fornecida de fábrica para ser ligada a AC 3N 50 Hz. Consulte a placa de características da máquina e o respectivo plano
de instalação e ligação.
A máquina deve ser equipada com um cabo
de ligação (NYM-J)
Caixa de ligações e plano encontram-se no lateral esquerdo. O terminal de bornes encontra-se na caixa de ligações.
Antes de ligar a máquina à corrente deve
rodar a manivela para que o berço baixe totalmente e depois rodar 12 vezes para que o
berço suba. Ligar à corrente e ligar o interruptor principal.
Se as fases estiverem correctas o berço separa-se.
Se as fases estiverem incorrectas o berço
ajusta-se e deve substituir duas fases.
Rodar a manivela 12 vezes para que o berço
baixe e ligar o comutador principal.
Evacuação do ar
- Consulte também o calculação do diâmetro
para os tubos de saída/admissão de ar e sistema de ventilação -
Os tubos de evacuação do ar não podem ser
conduzidos para a mesma chaminé por onde
sejam evacuados gases, fumos, etc. Se existir um secador, o tubo de evacuação de ar
deve ser montado em separado. O ar quente
húmido deve ser conduzido para o exterior
através de uma conduta não muito longa.
O tubo de evacuação do ar deve ser montado
com o mínimo de curvas.
A ligação à sucção de vapores encontra-se
na parte de trás do lateral direito.
Para que a água condensada em condutas
instaladas com inclinação possa sair, deve
ser feito na parte mais baixa um orifício
(3-5 mm ø).
O tubo de evacuação do ar deve ter um diâmetro interior de 60/70 mm.
O local onde o aparelho está instalado deve
ser bem arejado.
Logo que a temperatura seja alcançada carregue na tecla "I" para que o berço se ajuste.
Após instalar e ligar a calandra deverá
montar todas as peças do revestimento
desmontadas.
Se a parte final do tubo ficar saliente no exterior deve ser protegida.
Instale o tubo de forma que o ar que sai para
o exterior não cause incómodos.
71 M.-Nr. 05803030

Indicação para o instalador
Ligação ao gás
A ligação ao gás só deve ser feita por um técnico que conheça os regulamentos da companhia distribuidora de gás:
Consulte o plano de instalação e montagem
fornecidos juntamente com a máquina.
O aquecimento a gás vem regulado de fábrica de acordo com as indicações técnicas na
máquina (consulte o autocolante situado nas
costas da máquina).
Se alterar a máquina para que funcione com
outro tipo de gás deve consultar o serviço de
assistência técnica Miele.
Será necessário pedir um conjunto de adaptação e fornecer dados sobre o modelo e número de máquina assim como grupo de gás e
pressão de ligação.
Preste atenção às instruções de instalação
para aparelhos com aquecimento a gás. Qualquer alteração só deve ser feita por um técnico.
Condutas de gás de combustão
Consulte o plano de instalação e as instruções de montagem fornecido junto.
O canhão de ligação 120 mm da conduta
do gás de combustão, encontra-se nas costas da máquina ao lado do lateral direito.
Ao dar início ao arranque da calandra poderá
haver ar nas condutas e por isso a ignição durante o tempo de segurança não se efectua.
Neste caso a lâmpada avisadora “"yx Avaria”
acende, devendo carregar na tecla “yx Eliminar avarias”. O Start pode ser repetido várias
vezes até que o ar saia e a chama acenda.
Se durante o tempo de segurança não houver sinal de chama, a válvula fecha e a ignição desliga. (Avaria com bloqueio). A lâmpada avisadora “yx Avaria” acende. O bloqueio é
levantado carregando na tecla "yx Eliminar
avarias”.
Depois de instalar e ligar a máquina deverá voltar a montar todas as peças do revestimento desmontadas.
Não proceda a reparações em aparelhos a
gás. Avarias só devem ser reparadas por técnicos.
Consulte de imediato o serviço de assistência
técnica Miele.
M.-Nr. 05803030 72

73 M.-Nr. 05803030

M.-Nr. 05803030 74

Innhold
Side
Sikkerhetsregler og advarsler . . . . . . . . . . . . . . . . . . . . . . . . . . . . . . . . 76
Maskinbeskrivelse . . . . . . . . . . . . . . . . . . . . . . . . . . . . . . . . . . . . . . 78
-Betjeningselementer . . . . . . . . . . . . . . . . . . . . . . . . . . . . . . . . . . . . . 79
-Sikkerhetsinnretninger . . . . . . . . . . . . . . . . . . . . . . . . . . . . . . . . . . . . 81
Bruk . . . . . . . . . . . . . . . . . . . . . . . . . . . . . . . . . . . . . . . . . . . . . . 82
-Klargjøring av tøyet . . . . . . . . . . . . . . . . . . . . . . . . . . . . . . . . . . . . . . 82
-Rulling . . . . . . . . . . . . . . . . . . . . . . . . . . . . . . . . . . . . . . . . . . . . . 83
-Pressing . . . . . . . . . . . . . . . . . . . . . . . . . . . . . . . . . . . . . . . . . . . . 84
Råd . . . . . . . . . . . . . . . . . . . . . . . . . . . . . . . . . . . . . . . . . . . . . . 85
-Motorsikring . . . . . . . . . . . . . . . . . . . . . . . . . . . . . . . . . . . . . . . . . . 85
-Strømbrudd i løpet av rullingen . . . . . . . . . . . . . . . . . . . . . . . . . . . . . . . . 85
Utstyrsvarianter Tilbakeføring . . . . . . . . . . . . . . . . . . . . . . . . . . . . . . . 86
Utstyrsvarianter Innføringsbånd . . . . . . . . . . . . . . . . . . . . . . . . . . . . . . 87
Rengjøring og stell . . . . . . . . . . . . . . . . . . . . . . . . . . . . . . . . . . . . . . 88
-Voksing av strykesålen . . . . . . . . . . . . . . . . . . . . . . . . . . . . . . . . . . . . 88
-Valsen med stålullbeviklingen . . . . . . . . . . . . . . . . . . . . . . . . . . . . . . . . . 89
-Elastopress-bevikling . . . . . . . . . . . . . . . . . . . . . . . . . . . . . . . . . . . . . 90
Symbolene på typeskiltet . . . . . . . . . . . . . . . . . . . . . . . . . . . . . . . . . . 92
Montering . . . . . . . . . . . . . . . . . . . . . . . . . . . . . . . . . . . . . . . . . . . 93
-Transportsikring . . . . . . . . . . . . . . . . . . . . . . . . . . . . . . . . . . . . . . . . 93
-Elektrotilkobling . . . . . . . . . . . . . . . . . . . . . . . . . . . . . . . . . . . . . . . . 94
-Ventilasjonskanal . . . . . . . . . . . . . . . . . . . . . . . . . . . . . . . . . . . . . . . 94
Bare Mieles servicetekniker eller fagfolk
godkjent av Miele skal installere denne
varmrulle.
75 M.-Nr. 05803030

Sikkerhetsregler og advarsler
Les bruksanvisningen før De tar rullen i
bruk. På den måten kan De beskytte Dem
og unngå skader på rullen.
Denne rullen skal bare brukes til tekstiler
som er egnet for rulling, og som er vasket
i vann.
Maskinen skal ikke oppstilles i rom hvor
det befinner seg rengjøringsmaskiner som
benytter PER- eller KFK-holdige løsningsmidler.
Rullen må bare benyttes i tørre rom.
Bruk rullen bare når alle de avtagbare ka-
binettdelene er påmontert, slik at det ikke
er mulig å berøre strømførende, bevegelige
eller varme maskindeler.
Sikkerhetsinnretningene og betjeningsele-
mentene må ikke skades eller fjernes.
Sørg for at de blir brukt!
Maskiner som har ødelagte betjeningsele-
menter eller skadet ledningsisolasjon, må
ikke brukes før skadene er utbedret.
Når De ruller tekstiler som består av flere
lag; stikk ikke fingrene inn mellom lagene
for å strekke ut tøyet. Det er fare for at De
ikke får trukket hendene bort fra den varme
strykesålen i rett tid. Dette gjelder også for
lommer; stikk ikke fingrene inn i dem.
Hold brannslukker klar i tilfelle tekstiler an-
tennes.
Forøvrig må man ta hensyn til de spesielle
sikkerhetsforskrifter og normer som til enhver tid gjelder for hvert enkelt land!
Bruk av tilbehør
Bare tilbehørsdeler som er godkjent av
Miele må innmonteres. Hvis annet tilbehør
monteres inn i eller inntil maskinen, tapes
eventuelle garantikrav.
Reparasjoner på elektromaskiner skal
bare utføres av fagfolk. Ved ufagmessig
utførte reparasjoner kan brukeren utsettes for
alvorlig fare.
Defekte deler må bare skiftes ut mot Miele
originaldeler. Bare for disse delene kan vi
garantere at de sikkerhetskravene vi stiller til
våre maskiner blir oppfylt.
Den elektriske sikkerheten kan bare ga-
ranteres når maskinen er tilkoblet forskriftsmessig installert jordingssystem. Det er
meget viktig at jordingsforholdene er
kontrollert og funnet i orden; sørg eventuelt
for at hele det elektriske anlegget blir sjekket.
Maskinprodusenten kan ikke gjøres ansvarlig
for skader som skyldes manglende eller brutt
jordforbindelse.
Rullen er skilt fra det elektriske anlegget
bare når hovedbryteren eller sikringen (på
stedet) er utkoblet.
Tillat ikke barn å leke på eller nær rullen;
heller ikke å betjene den.
Når rullen er oppvarmet, og når den er i
bruk, er det fare for forbrenning hvis De
berører kantene på uttakssiden.
M.-Nr. 05803030 76

Sikkerhetsregler og advarsler
Regler for rullearbeid
På innleggssiden må bare personer over
17 år arbeide. De må opplæres før de set-
tes til å betjene rullen.
Personer med spesielt lange, tynne fingre
skal bare arbeide på uttakssiden; ikke på
ileggssiden.
Bruk tettsittende klær! Løse ermer, snorer, bånd og halstørklær kan bli trukket inn
i rullen.
Ta av ringer og armbånd før rullearbeidet
starter.
Brett ikke tøyet nær tøyinntaket; gjør det
på innføringsbordet. Pute- og dynetrekk
føres inn med den åpne siden først. Hold
ikke i innvendige hjørner eller i hempen på et
plagg.
Sørg for at beskyttelsesinnretningene er
riktig innstilt. Bare da kan skader, forbrenninger og tap av hender unngås!
Hver dag skal beskyttelsesinnret-
ningene kontrolleres
Sørg for at det ikke er mulig å gripe over
beskyttelseslisten.
Før rullen stilles i revers; pass på at ingen
kan utsettes for fare.
Emballasjen
Emballasjen beskytter maskinen mot transportskader. Emballasjematerialet er valgt
med henblikk på miljøvern og avfallsbehandling og kan derfor gjenvinnes.
-Bølgepappen består for det meste av
resirkulert papir.
-Trerammene er lagd av restmaterialer og er
ubehandlet.
-Polyetylen-folien består delvis av
sekundærråstoff.
Tilbakeføringen av emballasjen til materialkretsløpet sparer råstoff og bidrar til å begrense avfallsmengden.
Maskinforhandleren tar vanligvis emballasjen
i retur. Hvis De selv sørger for transporten;
lever emballasjen på en kommunal avfallsstasjon.
Kassering av gamle maskiner
Gamle maskiner inneholder ofte verdifulle
materialer. Lever Deres gamle maskin for
gjenvinning - enten gjennom forhandieren
eller direkte til offentlig miljøstasjon/avfallsanlegg. Sørg for at maskinen oppbevares barnesikkert til den kjøres bort.
Se "Sikkerhetsregler" i bruksanvisningen.
Rullen smøres når den står stille.
Oppbevar bruksanvisningen på et lett tilgjengelig sted!
77 M.-Nr. 05803030

Maskinbeskrivelse
y x
1 2 3 4 5 6 7 8
1 Tast "I" - PÅ 5 Hastighetsvelger
2 Tast "O" - AV 6 Varsellampe "Feil"*
3 Tast "Revers" 7 Temperaturkontrollampe
4 Driftskontrollampe 8 Temperaturvelger
Fingerbeskyttelse
Innføringsbord Mottaksbordet
Nødbryter Nødbryter
Beskyttelsesplate*
Tøykasse Dampavtrekk
Festevinkel (4 stk.)
Reguleringsfot (4 stk.)
*) bare for gassoppvarmede ruller
Tøyavtagere
Valse
Betjeningselementer
Håndratt
Fotlist
HM 38-175
M.-Nr. 05803030 78

Maskinbeskrivelse
Betjeningselementer
Tast “O”
Når denne tasten betjenes, kobles rullen ut,
og strykesålen skilles fra valsen.
Tast “I”
Når denne tasten betjenes, lyser
kontrollampene "I" og "°C" opp.
- Strykesålen varmes opp Når den valgte temperaturen er oppnådd,
slokner temperaturlampen "°C".
Når tasten "I" betjenes igjen, legges strykesålen an mot valsen som starter.
Driftskontrollampe "I"
Etter at tasten "I" er trykket inn, lyser
kontrollampen "I" opp.
Temperaturkontrollampe "°C"
I oppvarmingsfasen lyser temperaturkontrolllampen; den slokner når temperaturen er oppnådd.
Varsellampe "y x"
(gjelder gassoppvarming)
Tast "Ö ”
Revers velges bare når De skal ta av rullekledet, eller når beviklingen skal skiftes ut.
Koble ut maskinen - strykesålen skilles fra valsen. Trykk på "Ö Revers"-tasten. Valsen
reverserer så lenge tasten “Revers” holdes
inne.
79 M.-Nr. 05803030

Maskinbeskrivelse
Temperaturvelger
l - område = lav temperatur
ll - område = middels temperatur
lll - område = høy temperatur
Hastighetsvelger
Med hastighetsvelgeren kan valsehastigheten
reguleres; mot høyre: hurtigere, mot venstre:
langsommere.
Luftgjennomgangen er størst når innstillingsskruen står i grunnstilling (se skissen); den
kan reduseres til 90°.
Den gunstigste innstillingen er oppnådd når
valsen tørker ved laveste luftgjennomgang,
og det ikke dannes vannflekker på beviklingen eller på tøyet.
Ved for stor luftgjennomgang i damputtaket
blir valsen for sterkt avkjølt, og rulleeffekten
blir redusert.
Drosselspjeld - dampavtrekk
(bare for elektrooppvarmede ruller)
I dampavtrekket er det innmontert et drossel-
spjeld, som gjør at luftmengden som strømmer gjennom valsebeviklingen, kan reguleres.
M.-Nr. 05803030 80
Fotlist
Funksjoner:
Koblingspunkt ubetjent Rulling
Koblingspunkt betjent Pressing

Maskinbeskrivelse
Sikkerhetsinnretninger
Nødbryter
Når denne bryteren trykkes inn, stopper valsen straks, og strykesålen skilles fra valsen.
Fingerbeskyttelse
Hvis fingertuppene kommer mellom innføringsbordet og fingerbeskyttelsen, stopper valsen straks, og strykesålen frigjøres fra valsen.
Ved reverseringen har fingerbeskyttelsen ingen funksjon.
Rullen startes om igjen ved at tasten "I" trykkes inn.
Håndratt
For å skille den varme strykesålen fra den stillestående valsen ved strømbrudd benyttes
håndrattet.
Mot urviserretningen: strykesålen skilles fra
valsen.
I urviserretningen: strykesålen heves.
NB! Sørg for at rullen er koblet fra det
elektriske anlegget.
Fingerbeskyttelsen er en sikkerhetsinnretning som skal kontrolleres hver dag
før rullearbeidet begynner.
81 M.-Nr. 05803030

Bruk
Tøyets beskaffenhet
Den ideelle restfuktigheten for et godt rulleresultat er fra 25 til 40%.
Hvis tøyet skylles i vaskemaskinen med
varmtvann i siste skylling, blir behandlingstiden kortere på grunn av restvarme og lavere
restfuktighet i tøyet, og dermed spares energi.
Tøy som inneholder mer enn 50 % kunststoff (f.eks. dralon), skal ikke kjøres i varmrulle, da kunststoffet smelter ved høy temperatur. Tøy med lavere andel av
kunststoff kan rulles ved lav temperatur.
Klargjøring av tøyet
Tøyet bør sorteres etter type og tekstil før rullingen starter.
Spenner av metall- og kunststoff samt ekstremt tykke knapper, f.eks. kuleknapper, bør
fjernes før rulling.
Viktig!
Rengjør strykesålen før du setter rullen i
gang, ved å la et klede gå gjennom over
hele valsebredden.
Kontroller at fingerbeskyttelsen virker!
Rull de forskjellige tekstilene i denne rekkefølgen:
1)
Perlon, nylon o.l. (l - område)
2)
Ull, silke (ll - område)
3)
Bomull, lin (lll - område)
Hvis det er nødvendig å stille inn på lavere
temperatur, vil kontrollampen "°C" lyse opp
når temperaturen er sunket til ønsket verdi.
Stivetøy skal rulles til slutt for at eventuelle
stivelsesrester på strykesålen ikke skal påvirke rullingen av det andre tøyet.
Rulletøy med knapper skal føres inn slik at
knappene peker mot valsen. Hvis ikke er det
fare for at knappene blir ødelagt eller revet av.
Sikkerhetsinnretningen som skal beskytte
hendene til brukeren, skal kontrolleres
hver dag før arbeidet startes.
Når fingerbeskyttelsen betjenes, skal valsen
bli stående stille, og strykesålen frigjøres fra
valsen.
Ved reverseringen har fingerbeskyttelsen ingen funksjon.
Rullen startes igjen ved at tasten "I" trykkes
inn.
Legg et klede over glidelåser, metallknapper
og metallkroker for å beskytte strykesålen.
M.-Nr. 05803030 82

Bruk
Rulling
Koble inn hovedbryteren for det elektriske
anlegget.
Kontrollampen for drift "I" og for temperatur
"°C" lyser opp.
Når lampen for temperatur "°C" er sloknet,
er den valgte temperaturen oppnådd.
Trykk inn tast "I" på nytt.
Still temperaturvelgeren i det riktige temperaturområdet.
Fibertype Punkt-
symboler
Perlon/
kunstsilke
Silke/
ull
Bomull/
lin
l lav
ll middels
● ● ● høy
Temperatur-
trinn
temperatur
temperatur
temperatur
Strykesålen legges an mot valsen, og valsen roterer. La den rotere ca 5 min, slik at
temperaturen i strykesålen og i valsen kan
bli mest mulig den samme.
Still inn på ønsket valsehastighet.
Koble inn rullen ved å trykke på tast "I".
Kontroller at fingerbeskyttelsen virker!
83 M.-Nr. 05803030

Bruk
Legg inn klargjort rulletøy via innføringsbordet.
Pressingen opphører når foten fjernes fra
fotbryteren.
Det rullete tøyet kan være meget varmt når
det kommer ut av rullen.
Bruk eventuelt vernehansker for å beskytte
hendene.
Skille strykesålen fra valsen i rullepausene og
redusere temperaturen på strykesålen.
Tøyavtagere
Tøyet skilles fra strykevalsen ved hjelp av tøyavtagerne; det skal ikke fjernes fra valsen
med hendene.
Hvis en fjær skulle løsne, er det bare å trykke
den på plass igjen for hånd.
Glatt ut tøyet fra midten mot sidene under
rullingen.
Bruk hele valsebredden i rullearbeidet.
Små plagg og tøystykker skal ikke stikkes
inn på det samme stedet hver gang.
Når rullingen er avsluttet:
For at beviklingen skal få tørke er det viktig
at valsen får gå et par minutter etter at varmen er utkoblet og rullingen avsluttet.
Koble ut rullen med tast "O".
Koble ut hovedbryteren til det elektriske anlegget.
Rullet tøy skal avkjøles tilstrekkelig før det
pakkes eller stables.
Varmt tøy kan selvantennes og føre til
brann.
Når tøy skal presses, trykkes fotbryteren
ned.
Valsen blir da stående stille.
M.-Nr. 05803030 84

Råd
Motorsikring
Hvis motorviklingen er blitt for varm på grunn
av overbelastning, kobles valsemotoren automatisk ut ved hjelp av en termostat, og strykesålen frigjøres. Etter avkjøling må rullen startes på nytt med tasten "I".
Unngå at rullen kjøres uten tøy!
Husk å bruke hele valsebredden; små plagg
og tøystykker stikkes inn på forskjellige steder.
Ensidig belastning på valse og strykesåle
medfører også ensidig varmebelastning, og
beviklingen får ujevn slitasje.
Strømbrudd i løpet av rullingen
Med håndrattet på baksiden av den høyre
stolpen skilles den varme strykesålen fra den
stillestående valsen ved strømbrudd. Rattet
følger strykesålen under rullingen og kan betjenes hvis strømmen blir borte. Rattet dreies
mot urviseren når strykesålen skal skilles fra
valsen.
85 M.-Nr. 05803030

Utstyrsvarianter
Tilbakeføring
Tilbakeføring
Tilbakeføring av tøyet gjør det mulig å ta ut
rulletøyet på forsiden. Det er ikke nødvendig
med eget personale som tar imot tøyet på
baksiden av rullen. Dessuten kan rullen stilles mot veggen.
Til slutt legges tilbakeføringen bakover; nå ledes tøyet til mottaksbordet.
Når rullekledet skal skiftes eller valsen omvikles, trekkes tøyavtagerfjærene ganske enkelt
ut.
Ved tilbakeføringen ledes tøyet frem på et
oppsamlingsbord over fingerbeskyttelseslisten.
Hvis tøyet skal ledes til mottaksbordet, løftes
først tøyplaten bakover på mottaksbordet.
M.-Nr. 05803030 86

Utstyrsvarianter
Innføringsbånd
Innføringsbånd
Innføringsbåndet letter tøyinnleggingen.
Legg tøyet på innføringsbåndet parallelt med
valsen foran på innføringsbordet; trekk det
glatt og la det gå inn i rullen.
Innstilling innføringsbord
Beskyttelsesplate
Tøy som eventuelt er styrt feil av innføringsbåndet, kan hentes ut ved at beskyttelsesplaten trekkes frem.
Bruk et egnet, ikke-metallisk hjelpemiddel og
før plagget ut gjennom spalten mellom tøykassen og beskyttelsesplaten.
Innstillingsmålet for innføringsbordet er maks.
14,5 mm.
87 M.-Nr. 05803030

Rengjøring og stell
Voksing av strykesålen
For å opprettholde strykesålens
glideevne, anbefales å vokse sålen med
jevne mellomrom med et voksrulleklede.
Strøvoks
Strø rullevoks på midten av et tynt klede.
Innføringsretning
Stell av aluminiumssålen
Hvis det er kalkavleiringer eller stivelsesrester
på strykesålen, fjernes disse med et vanlig
oppvask- eller pussemiddel. Bruk ikke grovkornet skuremiddel eller rengjøringskluter
som har innsatt slipepapir!
Tøyavtagere
Hvis man ønsker å rengjøre fjærene eller rullekledet, å vikle om strykevalsen eller rulle
uten tøyavtagere, skal tøyavtagerne løftes
slik at de står opp fra strykevalsen.
Når rullen har vært i bruk en tid, må spissene
på tøyavtagerne renses for avleiringer (stivelse, smuss osv), slik at de kan fungere tilfredsstillende.
Lager og gir
Lagersteder og gir skal smøres godt med
smøremiddel.
Rullen skal smøres når den er utkoblet!
Sørg for at den er spenningsfri!
Når maskinkabinettet er demontert, er det
fare for forbrenning!
Etter at servicearbeider er utført, skal alle kabinettdelene påmonteres igjen!
Brett inn begge endene og før kledet inn som
et plagg. Pass på at de innbrettede endene
ligger mot valsen.
Før kledet inn i maskinen fra venstre eller
høyre flere ganger, slik at strykesålen blir vokset i hele bredden.
Både voksing og rengjøring av strykesålen
skal skje med temperaturinnstilling ● ● ● og
laveste rullehastighet.
Original-rengjøringskleder og rullevoks kan
kjøpes i Mieles serviceavdeling.
M.-Nr. 05803030 88

Rengjøring og stell
Valsen med stålullbeviklingen
Avtaging av rullekledet
Før rullekledet tas av (ved rengjøring og utskifting), må strykesålen avkjøles.
Enden på rullekledet må være synlig oppe på
valsen.
Koble ut maskinen og løft tøyavtagerne.
Løsne også båndene på sidene, og legg en-
den på rullekledet over innføringsbordet,
eventuelt bakover.
Trykk på tast “Ö Revers” og ta rullekledet
forsiktig av.
Vikling
Omvikling eller utskifting av stålullen skal
bare utføres av Mieles servicefolk.
Bruk vernehansker under arbeidet med stålullen!
Påsetting av rullekledet
Det nye rullekledet skal ikke vaskes før
bruk.
Rullekledet legges på i pilens retning når
maskinen er oppvarmet og strykesålen er
presset mot valsen. Se pilene på stålullbeviklingen. Kjem forkanten av kledet med
en stålbørste og før det inn.
La rullen gå 5 - 10 min; deretter kuttes overlappende deler av, og enden på kledet kjemmes med stålbørste, som ved innføringen.
HM 38-175/205 Omfang maks. 1158 mm
(med klede)
Rullekledet skal helst ikke vaskes. Det kan
bli misfarget, men det er helt normalt. Hvis
det er blitt skittent, kan det vaskes ved 95 °C
(i et kokevaskprogram), sentrifugeres og
legges på plass mens det er fuktig.
Sørg for at stålullviklingen blir korrekt iht følgende mål:
HM 38-175/205 Omfang maks. 1138 mm
(uten klede)
Fjern stålullrester på strykesålen.
89 M.-Nr. 05803030

Rengjøring og stell
Elastopress-bevikling
For at rullen skal fungere feilfritt, og man skal
oppnå maksimal rulleeffekt, er det viktig at
man benytter Elastopress-rulleklede. Det gjør
at rullen blir vedlikeholdsfri og får lang levetid.
NB! Tøy som er tykkere enn 3 mm, eller
tykke og ujevnt tykke tøystykker skal ikke
rulles. Heller ikke plagg med tykke knapper, ikke gardiner med ringer og lignende.
Slikt kan ødelegge beviklingen.
Når rullen er tatt i bruk
Det er fordelaktig å kutte av det overflødige
rullekledet inntil 20 mm etter ca 40 driftstimer.
Lag ca 15 mm lange frynser og kjem dem
med en stålbørste. På den måten unngås striper som skyldes fuktighet, samt pressmerker
på tøyet. Den beviklede valsen må være nøyaktig like tykk over hele og må ligge tett inntil
strykesålen hele veien.
Avtaging av Elastopress-kledet
Ved utskifting av kledet; vask først det nye
kledet i et kokevaskprogram ved 95 °C.
Tøyinnføring
Koble ut rullen slik at strykesålen skilles fra
valsen.
Når rullekledet tas av og settes på; bruk
håndrattet og drei mot urviserretningen til
anslag, slik at strykesålen blir skilt fra valsen og ikke blir lagt an igjen.
Klede-ende
Klede-start
Fase 1
Vasking av Elastopress-kledet
Rullekledet blir igjen mykt, elastisk og voksfritt
og tar godt opp fuktighet etter at det er vasket. Vask det i et kokevaskprogram ved
95 °C - ikke for ofte. Etter siste skylling skal
duken være fullstendig alkaliefri.
Bruk ikke syre! Sentrifuger ikke kledet for lenge, det skal ikke bli krøllet.
Fase 2
Fase 3
Fase 4
Løft tøyavtagerne. Ta av kledet slik som
vist på tegningene fase 2 - 4.
M.-Nr. 05803030 90
Når kledet tas av; trekk det langsomt og forsiktig ut av holderne.

Rengjøring og stell
Koble inn rullen ved laveste hastighet og la
kledet rulle med - som vist i fase 5.
Klede-start
Fase 5
Påsetting av Elastopress-kledet
Rullekledet skal legges på mens det er fuktig.
Rullekledet legges på dobbelt. La det ikke
komme under valsekanten!
Legg kledet på. Sørg for at rattet dreies
mot urviserretningen til det stopper, slik at
strykesålen frigjøres. Koble inn rullen og la
den trekke inn ved lav hastighet, inntil ett
lag ligger glatt og uten bretter. Dermed blir
strykesålen ikke skadet av lamellholderne.
Mørkfarging av rullekledet
En lett til sterk brunfarging av rullekledet er
normalt.
Sortfarging kan reduseres ved å:
- utnytte hele valsebredden
- utnytte valsebredden jevnt ved rulling av
mindre plagg, og ikke alltid rulle på samme
sted.
- skille strykesålen fra valsen i rullepausene
og redusere temperaturen på strykesålen.
Koble ut rullen og vri rattet 4 omdreininger i
urviserretningen.
Koble inn rullen igjen slik at valsen går
langsomt rundt. Rullekledet skal ligge glatt
uten bretter. La valsen gå i 5 minutter.
91 M.-Nr. 05803030

Symbolene på typeskiltet
1 Maskintype
2 Maskinnummer/byggeår*
3 Spenning/frekvens
4 Styresikring
5 Drivmotor
6 Tallerkendiameter/hastighet*
7 Trommeldata*
8 Trommeldiameter/dybde*
9 Sentrifugehastighet*
10 Trommelinnhold/vekt tørt tøy*
11 Kinetisk energi*
12 Akselerasjonstid*
13 Bremsetid*
14 Oppvarming
15 Elektrooppvarming
16 Sikring (på stedet)
17 Dampoppvarming indirekte*
18 Dampoppvarming direkte*
19 Gassoppvarming (gjelder ikke Norge)
20 Startdato
21 Vannregistrering (DVGW)*
22 Felt for godkjenninger/CE-.....(Produkt-ID-
nummer/gass)
Ved feil kontakt Mieles serviceavdeling.
Vennligst oppgi type og maskinnummer
o
[Fabr.-N
]. Disse opplysningene finnes på
typeskiltet.
Ved utskifting skal det bare brukes originale reservedeler (Type og maskinnummer
[Fabr.-No] må oppgis).
Støyforhold
A-vurdert lydnivå iht DIN (IEC) 45635 og tysk
lovbestemmelse for maskinstøy 3. GSGV § 1
1.a:
HM 38-205 74,1 dB
*)gjelder ikke denne rulletypen
M.-Nr. 05803030 92

Montering
Varmrullen må bare settes i drift av Mieles
servicerepresentant.
Rullen må ikke plasseres i samme rom som
rengjøringsmaskiner som benytter kjemiske
rensemidler for industribruk. Gnister i kommutatormotoren kan forårsake en kjemisk reaksjon som avgir saltsyre. Dette kan føre til alvorlige skader. Selv når slike maskiner
plasseres i adskilte rom, må det ikke være luftsirkulasjon mellom rommene.
Oppstilling
Varmrullen med trerammen transporteres til
oppstillingsstedet. Her løftes rullen opp fra
trerammen.
Under rammen for de to maskinstolpene - ved
siden av reguleringsføttene - er festepunktene for løfteanretninger (f.eks. remmer og haker.
Pass på at det frie rommet ved siden av maskinstolpene er minst 400 mm, slik at det er
mulig å komme til kabinettplatene fra siden.
Fjerning av transportsikringen
Transportsikringen på baksiden skal fjernes.
Justering og feste av rullen
Ved hjelp av et vater og reguleringsføttene
stilles maskinen slik at den står vannrett.
Bruk en 19 mm nøkkel på reguleringsføttene.
Før justeringen må skruene for festevinkelen
løsnes. Etter justeringen sikres skruene for
reguleringsføttene med kontramutteren.
Maskinen festes til underlaget med pluggene
og skruene som ligger vedlagt. Boringene for
pluggene kan utføres gjennom hullene for festevinklene (se monteringsskjemaet). Etter at
skruene for gulvfestet er trukket til; trekk til
skruene for festevinkelen ved sokkelen.
Montering av mottaksbordet
Hver av de to konsollene som skal settes på
innsiden av stolpene, festes med to vedlagte
M 8-skruer.
Mottaksbordet legges på konsollene og justeres slik at spalten mellom strykesålens uttaksside og mottaksbordet er så liten som mulig.
Fest mottaksbordet med de vedlagte treskruene.
93 M.-Nr. 05803030

Montering
Elektrotilkobling
Alle arbeider i forbindelse med elektrotilkoblingen utføres av Mieles installatører eller annen
godkjent elektroinstallatør.
Det elektriske utstyret i maskinen tilsvarer
IEC 335-1 og IEC 335-2-44.
Maskinen er ved leveringen koblet for tilkobling til AC 3N 50 Hz
nes på typeskiltet.
Ta hensyn til opplysningene på typeskiltet,
i koblingsskjemaet og monteringsskjemaet.
Maskinen tilkobles fast installert elektroledning.
Koblingsboks og koblingsskjema befinner seg
i den venstre sidestolpen. Tilkoblingsklemmen er i koblingsboksen.
Før rullen kobles til strømnettet, drei strykesålen helt ned med håndrattet og drei den så 12
omdreininger opp.
Koble rullen til strømnettet og skru på hovedbryteren (på oppstillingsstedet).
Ved riktig faserekkefølge heves strykesålen.
Ved uriktig faserekkefølge senkes strykesålen, og to faser må byttes om.
Drei strykesålen 12 omdreininger ned med
håndrattet og skru på hovedbryteren (på stedet).
Spenningsangivelsen fin-
.
Ventilasjonskanal
- Se beregning av utluftnings- og luftinntaksrør samt ventilasjonstverrsnitt -
Ventilasjonskanalen på stedet må ikke være
forbundet med et ventilasjonssystem som står
i forbindelse med ildsted for gass, kull eller
olje; heller ikke med ventilasjonssystemet for
tørketrommel. Den fuktige varmluften føres
korteste vei til friluft.
Ventilasjonskanalen legges gunstigst mulig
med tanke på luftgjennomstrømmingen (få bøyer, gode koblinger og overganger).
Tilkoblingsstussen for damputsugningen befinner seg på baksiden av den høyre stolpen.
På det laveste punktet på ventilasjonskanalen
skal det lages et avløpshull (3-5 mm ø).
Ventilasjonskanalen må ha en innvendig diameter på 60/70 mm.
Pass på at det er tilstrekkelig ventilasjon av
oppstillingsrommet.
Rørenden for ventilasjonsanlegg som går ut i
friluft, må være beskyttet.
En ventilasjonskanal som er ført ut i friluft, må
ikke være til uakseptabel sjenanse.
Når grunntemperaturen er oppnådd, startes
strykesålen med tasten "I".
Etter oppstilling og tilkobling av maskinen;
monter alle demonterte utvendige plater.
M.-Nr. 05803030 94

Dette papiret består av 100 % klorfritt bleket cellestoff og er derfor miljøvennlig.
95 M.-Nr. 05803030

Norge:
Miele AS
Løxaveien 13, Postboks 183, N-1351 RUD
Telefon 67 17 31 00, Telefax 67 17 31 10
Internet: http://www.miele.de/D/VG_N.html
Portugal:
Miele Portuguesa, Lda.
Av. do Forte, 5, 2795-504 Carnaxide
Tel. (01) 4248 100, Fax (01) 4248 109
España:
Miele S.A.
28108 Alcobendas (Madrid)
Carretera de Fuencarral, 20
Tfno. 91 623 20 00 - Telefax 91 6 62 02 66
internet: http://www.miele.es
United Kingdom:
Miele Co. Ltd.
Fairacres, Marcham Road, Abingdon Oxon OX14 1TW
Tel: Abingdon (01235) 554455 - Telefax: (01235) 554477
Service Office Abingdon (01235) 554466
Telephone calls may be monitored and recorded to improve our service.
Rett til endringer forbeholdes 22.02
Salvo modificações
Salvo modificaciones
Alteration rights reserved
 Loading...