

Miele G6905SCIXXL User Manual

Operating instructions
for dishwashers
To avoid the risk of accidents or damage to the appliance, it is essential
o read these instructions as well as the installation plan before it is in‐
t
stalled and used for the first time.
en-AU, NZ M.-Nr. 09 867 880HG05

2

Contents
Guide to the appliance........................................................................................... 6
Guide to the appliance............................................................................................. 6
Control panel............................................................................................................ 7
Display ..................................................................................................................... 8
Warning and Safety instructions ..........................................................................
Caring for the environment.................................................................................
9
18
Disposal of the packing material............................................................................ 18
Disposing of your old appliance ............................................................................ 18
Energy-saving dishwashing ................................................................................... 19
EcoFeedback consumption indicator.................................................................... 20
Before using for the first time.............................................................................
21
Opening the door................................................................................................... 21
Closing the door .................................................................................................... 22
Safety lock ............................................................................................................. 22
Basic settings......................................................................................................... 23
Before using the appliance for the first time, you require:..................................... 25
Dishwasher salt...................................................................................................... 25
Filling the salt reservoir..................................................................................... 26
Add salt reminder.............................................................................................. 27
Rinse aid ................................................................................................................ 28
Adding rinse aid................................................................................................ 28
Add rinse aid reminder...................................................................................... 29
Loading the dishwasher ......................................................................................
30
Notes...................................................................................................................... 30
Upper basket ......................................................................................................... 32
Adjusting the upper basket............................................................................... 34
Lower basket ......................................................................................................... 35
Cutlery.................................................................................................................... 38
3D cutlery tray (depending on model)............................................................... 38
Loading examples.................................................................................................. 39
Dishwashers with cutlery tray........................................................................... 39
Comparison tests.................................................................................................
41
Standard height with cutlery tray........................................................................... 41
XXL height with cutlery tray ................................................................................... 44
Operation ..............................................................................................................
47
Detergent ............................................................................................................... 47
Adding detergent .............................................................................................. 49
Switching on .......................................................................................................... 50
3

Contents
Selecting a programme.......................................................................................... 50
Starting the programme......................................................................................... 51
Display ................................................................................................................... 51
Energy management.............................................................................................. 52
At the end of the programme................................................................................. 52
Switching off .......................................................................................................... 53
Unloading the dishwasher ..................................................................................... 53
Interrupting a programme...................................................................................... 54
Changing a programme ......................................................................................... 54
Programme options.............................................................................................
Extras..................................................................................................................... 55
DetergentAgent...................................................................................................... 56
Delay start with EcoStart ....................................................................................... 57
Programme chart.................................................................................................
Further programmes ............................................................................................. 64
Cleaning and care................................................................................................
Cleaning the wash cabinet..................................................................................... 65
Cleaning the door and the door seal ..................................................................... 65
Cleaning the door front.......................................................................................... 66
Checking the filters in the wash cabinet................................................................ 67
Cleaning the filters ................................................................................................. 67
Cleaning the spray arms ........................................................................................ 69
Problem solving guide.........................................................................................
Technical problems................................................................................................ 70
Water inlet fault...................................................................................................... 72
Water drainage fault............................................................................................... 73
General problems................................................................................................... 74
Noises .................................................................................................................... 76
Unsatisfactory washing result................................................................................ 77
Maintenance.........................................................................................................
Cleaning the water inlet filter ................................................................................. 80
Cleaning the drain pump and non-return valve ..................................................... 81
55
60
65
70
80
After sales service ...............................................................................................
Repairs................................................................................................................... 82
Warranty................................................................................................................. 82
Optional accessories...........................................................................................
Electrical connection...........................................................................................
4
82
83
85

Contents
Water connection.................................................................................................
The Miele Waterproof system................................................................................ 86
Connection to the water supply............................................................................. 86
Drainage................................................................................................................. 88
Technical data ......................................................................................................
Settings menu ......................................................................................................
Opening the Settings menu ................................................................................... 90
Language ............................................................................................................
Time of day ............................................................................................................ 91
Date........................................................................................................................ 91
Water hardness...................................................................................................... 92
Rinse aid ................................................................................................................ 93
Consumption (EcoFeedback)................................................................................. 93
Sensor wash .......................................................................................................... 94
AutoOpen............................................................................................................... 94
BrilliantLight ........................................................................................................... 94
Check filters ........................................................................................................... 95
Change main menu................................................................................................ 95
Save extras ............................................................................................................ 95
System lock ........................................................................................................... 96
Temperature........................................................................................................... 96
Brightness.............................................................................................................. 96
Volume ................................................................................................................... 97
Memory.................................................................................................................. 98
Version info ............................................................................................................ 98
EcoStart ................................................................................................................. 99
Showroom programme........................................................................................ 101
Factory default settings........................................................................................ 101
Closing the Settings menu................................................................................... 101
86
89
90
90
5
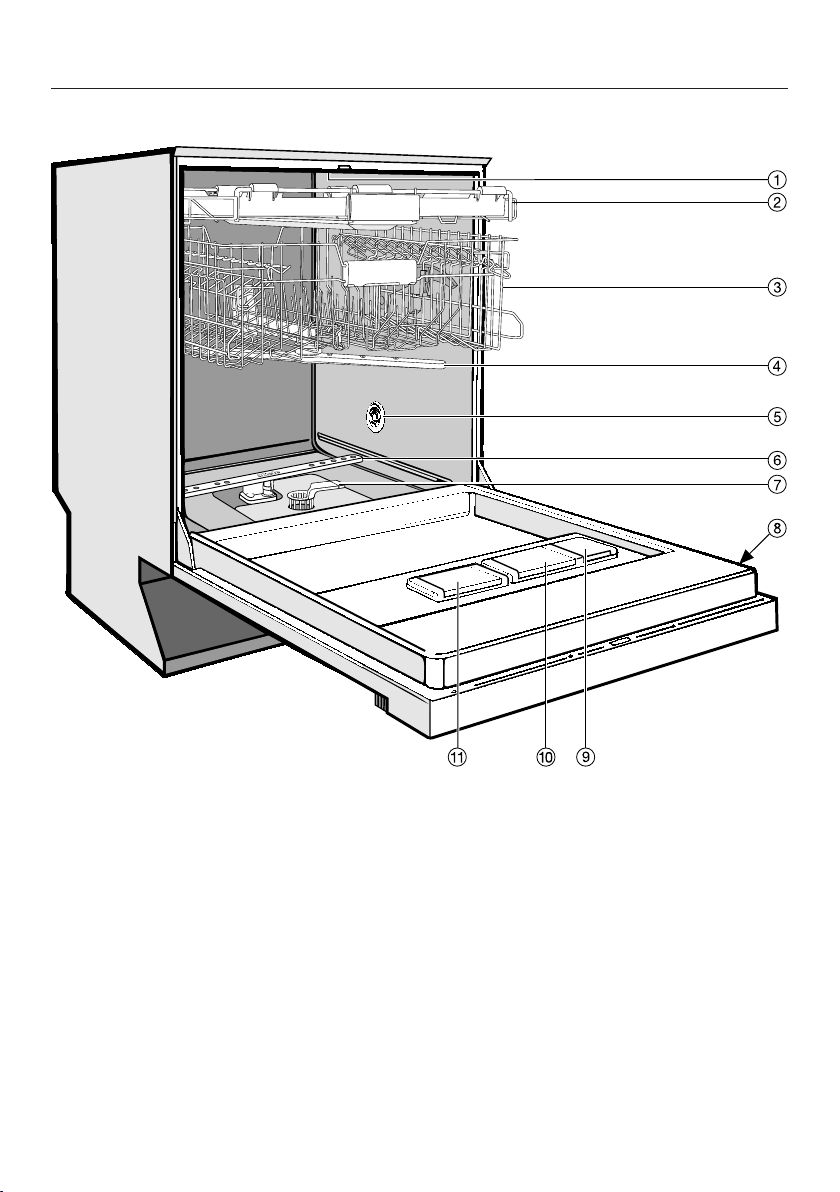
Guide to the appliance
Guide to the appliance
a
Upper spray arm (not visible)
b
Cutlery tray (depending on model)
c
Upper basket
d
Middle spray arm
e
Air inlet for drying (depending on
model)
f
Lower spray arm
6
g
Filter combination
h
Data plate
i
Rinse aid reservoir
j
Dual compartment detergent dis‐
penser
k
Salt reservoir

Control panel
Guide to the appliance
a
On/Off sensor
For switching the dishwasher on and
off.
b
Information sensor
For displaying additional information
about the option in the
c
Sensor controls
For selecting the option marked with
a dash list
For altering values displayed.
For navigating to other menu
screens.
The sensor controls light up when
active.
These operating instructions apply to several different dishwasher models with
ent heights.
differ
The specific dishwasher models are referred to as follows:
Standard = 80.5 cm high dishwashers (integrated)
and 84.5 cm high dishwashers (freestanding)
XXL = 84.5 cm high dishwashers (integrated)
ed next to the sensor.
display.
d
Display
See "Display" for further information.
e
Back sensor
For navigating back to the previous
menu or deleting values which have
been set pr
f
Start sensor
For starting the selected programme.
eviously.
7

Guide to the appliance
Display
General
The display is used to select or set the
following:
– the programme
– any Extras
– the Delay start function
– the Settings
– information
The display can show the following:
– the programme name
– the stage the programme is at
– the current time of day and the date
– the estimated time left for the pro‐
gr
amme to run
– the energy and water consumption
(EcoF
– any relevant fault messages and in‐
formation
To save energy, the dishwasher
switches off aft
do not press any sensors during this
time.
To switch the dishwasher back on
again, press the sensor.
menu
eedback)
er a few minutes if you
A dash
in the display next to a sensor
indicates that a function can be selec‐
ted with that sensor. The relevant sen‐
sor lights up.
The scroll bar on the right of the dis‐
play indicat
es that more options or
more text are available which can be
displayed by touching the relevant illu‐
minated sensor.
A dotted line will appear under the last
option available.
Touch the sensor next to OK t
o confirm
a message or setting and also to move
to the next menu or another menu level.
A tick will appear beside the option
which is currently selected.
To exit a sub-menu, touch the sen‐
.
sor
If you do not press any of the sensors
for several seconds, the display will re‐
turn to the previous menu level. You
may need to enter your settings again.
The Settings
menu is used to alter
the dishwasher's electronics to suit
different requirements (see "Settings
menu").
8

Warning and Safety instructions
This dishwasher complies with current safety requirements. Inap‐
opriate use can, however, lead to personal injury and damage to
pr
property.
To avoid the risk of accidents and damage to the dishwasher,
please
carefully before it is installed and used for the first time. They con‐
tain important information on its installation, safety, use and main‐
tenance.
Keep the installation plan and the operating instructions in a safe
place and pass them on to any future owner.
Miele cannot be held liable for damage caused by non-compli‐
ance with this information.
read the installation plan and the operating instructions
9

Warning and Safety instructions
Correct application
This appliance is designed for domestic use and for use in similar
envir
onments by guests in hotel or motel rooms, bed & breakfasts
and other typical living quarters. This does not include common/
shared facilities or commercial facilities within hotels, motels or bed
& breakfasts.
This dishwasher is not suitable for outdoor use.
It
must only be used as specified in these operating instructions
for cleaning domestic crockery and cutlery. Any other usage is not
supported by the manufacturer and could be dangerous.
This applianc
dren) with reduced physical, sensory or mental capabilities, or lack
of experience and knowledge, unless they have been given supervi‐
sion or instruction concerning its use by a person responsible for
their safety, and are able to recognise the dangers of misuse.
e is not intended for use by persons (including chil‐
10

Warning and Safety instructions
Safety with children
Y
oung children must not be allowed to use this appliance.
Older childr
been clearly explained to them and they are able to use it safely, rec‐
ognising the dangers of misuse.
Clean
supervision of an adult.
Chil
with the appliance. Keep small children away from the appliance at
all times to avoid the risk of injury. There is the risk that children may
lock themselves in the dishwasher.
If
is active, keep young children away from the area in which the door
opens. Danger of injury in the unlikely event of a fault with the open‐
ing mechanism.
ing work may only be carried out by older children under the
dren should be supervised to ensure that they do not play
the automatic door opening mechanism (depending on model)
Dange
in packing material or pull it over their heads with the risk of suffoca‐
tion. Keep children away from any packing material.
eep detergent and other household agents out of the reach of
K
children at all times. Some dishwasher detergents are strongly alka‐
line and contain irritants and corrosive ingredients. They can be ex‐
tremely dangerous if swallowed, and can cause burning in the
mouth, nose and throat, or inhibit breathing. Avoid contact with the
skin and eyes. Keep children away from the dishwasher when the
door is open. There could still be detergent residues in the cabinet
or dispenser. Seek medical advice immediately if your child has
swallowed or inhaled detergent, e.g. Poisons Information Centre
(Australia) or National Poisons Centre (NZ).
en may only use the appliance when its operation has
r of suffocation! Children may be able to wrap themselves
11

Warning and Safety instructions
Technical safety
Repairs and other work by unqualified persons could be danger‐
ous. Installati
ces must only be carried out by a Miele approved service technician.
on, maintenance work and repairs to electrical applian‐
Befor
age. Under no circumstances should you use a damaged dishwash‐
er. A damaged dishwasher could be dangerous.
The ele
when continuity is complete between it and an effective earthing
system. It is most important that this basic safety requirement is
present and regularly tested and, where there is any doubt, the elec‐
trical system in the house should be checked by a qualified electri‐
cian.
Miele cannot be held liable for the consequences of an inadequate
earthing system (e.g. electric shock).
Reliable
ed if it has been connected to the mains electricity supply.
The dishwasher must on
via a suitable switched socket. The electrical socket must be easily
accessible after the dishwasher is installed so that it can be discon‐
nected from the electricity supply at any time.
Ther
ger of overheating and fire risk if the dishwasher were to be pushed
up against a plug.
e installation, check the dishwasher for visible signs of dam‐
ctrical safety of this appliance can only be guaranteed
and safe operation of this dishwasher can only be assur‐
ly be plugged into the electricity supply
e must be no electrical sockets behind the dishwasher. Dan‐
The dishwasher must no
radiant temperatures which are sometimes generated by a cooktop
could damage the dishwasher. For the same reason, it should not be
installed next to open fires or other appliances which give off heat,
such as heaters etc.
12
t be installed under a cooktop. The high

Warning and Safety instructions
o avoid the risk of damage to the dishwasher, make sure that the
T
connection data on the data plate (fuse rating, voltage and frequen‐
cy) matches the mains electricity supply before connecting the dish‐
washer to the mains. Consult a qualified electrician if in any doubt.
Do not con
been fully installed and any adjustment has been made to the door
springs.
The dishwasher may on
nism is working correctly. Otherwise there could be a risk of injury
whilst the automatic door opening mechanism (depending on model)
is active.
To check that the door opening mechanism is working correctly:
– the door springs must be adjusted equally on both sides. They
ar
e correctly adjusted when the door remains stationary when left
half open (approx. 45° opening angle). It is also important that the
door cannot fall open.
– the door locking pins automatically retract when the door opens
at the end of the dr
nect the dishwasher to the mains supply until it has
ly be operated if the door opening mecha‐
ying phase.
Do not connect the appliance to the mains electricity supply by a
multi-socket adapter or an extension lead. These do not guarantee
the required safety of the appliance (e.g. danger of overheating).
This applianc
stallations (e.g. on a ship).
e must not be installed and operated in mobile in‐
Do not insta
frost. Frozen hoses may burst or split. The reliability of the electronic
control unit may be impaired at temperatures below freezing point.
T
o avoid any damage to the appliance, the dishwasher must only
be operated when it is connected to a fully vented plumbing system.
The plastic ho
valve. The housing must not be dipped in water.
ll the dishwasher in a room where there is a risk of
using of the water connection contains an electrical
13

Warning and Safety instructions
Ther
water inlet hose, even if it is too long.
The int
damage, provided the following conditions are met:
– The dishwasher is correctly installed and plumbed in.
– The dishwasher is properly maintained and parts are replaced
– The tap has been turned off when the appliance is not used for a
The Waterproof system will work even if the appliance is switched
off. However
supply.
The wat
be between 30 and 1000 kPa (0.3 and 10 bar).
A d
damaged, switch it off at the mains and call Miele.
The manu
not repaired by a Miele approved service technician.
e are electrical wires in the water inlet hose. Do not cut the
egrated Waterproof system offers protection from water
wher
e it can be seen that this is necessary.
longer period of time (e.g. during holidays).
, the appliance must remain connected to the electricity
er pressure (flow pressure at the connection point) must
amaged appliance could be dangerous. If the dishwasher gets
facturer's warranty will be invalidated if the appliance is
aulty components must only be replaced by genuine Miele spare
F
parts. The manufacturer can only guarantee the safety of the appli‐
ance when Miele replacement parts are used.
During
must be disconnected from the mains electricity supply.
If
special cable of the same type (available from Miele) by a Miele au‐
thorised service technician only in order to avoid a hazard.
14
installation, maintenance and repair work, the appliance
the connection cable is damaged, it must be replaced with a

Warning and Safety instructions
In ar
other vermin, pay particular attention to keeping the appliance and
its surroundings in a clean condition at all times. Any damage which
may be caused by cockroaches or other vermin will not be covered
by the warranty.
eas which may be subject to infestation by cockroaches or
Correct installation
The dishwasher must be install
with the installation instructions.
Be car
gloves to avoid injury on any sharp metal components.
eful when installing the dishwasher. Wear protective
The dishwasher must be corr
operation.
In or
ers must only be installed under a continuous worktop which is se‐
cured to adjacent cabinetry.
If
der ("U") model, you will need to order the appropriate conversion
kit. If you remove the existing plinth, you must replace it with a Umodel plinth. This is necessary to avoid the risk of injury caused by
protruding metal parts.
der to ensure stability, built-under and integrated dishwash‐
you want to convert your freestanding dishwasher to a built-un‐
ed and connected in compliance
ectly aligned to ensure problem-free
The door spring
are correctly adjusted if the half-opened door (approx. 45° door
opening angle) remains in this position when it is released. The door
must not fall down under its own weight.
The appliance may only be used with correctly adjusted door
springs.
s on either side need to be evenly adjusted. They
15

Warning and Safety instructions
Correct use
Do not use sol
Do not inh
detergents are strongly alkaline and contain irritants or corrosive in‐
gredients. They can be extremely dangerous if swallowed, and can
cause burning in the nose, mouth and throat, or inhibit breathing.
Avoid contact with the skin and eyes. Seek medical advice immedi‐
ately if detergent has been swallowed or inhaled, e.g. Poisons Infor‐
mation Centre (Australia) or National Poisons Centre (NZ).
A
void leaving the door open unnecessarily as someone could trip
over it and be injured by it.
Do not sit or lea
washer to tip and be damaged, and you could get injured.
Dishes can
cool until they are comfortable enough to handle before unloading.
Only use det
washers. Do not use washing-up liquid.
Do not use co
cause damage, and there is a risk of a severe explosive chemical re‐
action (such as an explosive oxyhydrogen gas reaction).
vents in the dishwasher. Danger of explosion!
ale or ingest dishwasher detergent. Some dishwasher
n on the opened door. This could cause the dish‐
be very hot at the end of a programme. Allow them to
ergent and rinse aid formulated for domestic dish‐
mmercial or industrial detergents as these may
Do not fill
This will cause serious damage to the reservoir.
Inadver
washer detergent will damage the water softener. Make sure you
have picked up the correct packet of dishwasher salt before filling
the salt reservoir!
the rinse aid reservoir with powder or liquid detergent.
tently filling the salt reservoir with powder or liquid dish‐
Only use special coarse grained dishwasher salt for reactivation.
Do not use other salts such as cooking salt, agricultural grade or
gritting salt. These may contain insoluble additives which can impair
the functioning of the water softener.
16

Warning and Safety instructions
In an app
lery is cleaned and dried more efficiently if placed in the basket with
the handles downwards. However, to avoid the risk of injury, place
knives and forks etc. with the handles upwards.
Plastic it
such as disposable plastic containers, or plastic cutlery and crock‐
ery should not be cleaned in the dishwasher. The high temperatures
in the dishwasher may cause them to melt or lose shape.
you use the "FlexiTimer/Delay start" option (depending on mod‐
If
el), make sure that the dispenser is dry before adding detergent.
Wipe dry if necessary. Detergent will clog if poured into a damp dis‐
penser and may not be thoroughly dispersed.
liance with a cutlery basket (depending on model) cut‐
ems which cannot withstand being washed in hot water,
Please observe the information given in "Technical data" regard‐
ing the capacity of the dishwasher.
Accessories
Use only ge
cessories from other manufacturers are used, the warranty will be in‐
validated, and Miele cannot accept liability.
nuine original Miele spare parts. If spare parts or ac‐
Disposal of your old dishwasher
Mak
tally shut themselves in. Remove or destroy the locking bracket of
the door lock, and make appropriate arrangements for the disposal
of the appliance.
e the door lock inoperative so that children cannot acciden‐
17
Caring for the environment
Disposal of the packing mate‐
rial
The packaging is designed to protect
the appliance fr
transportation. The packaging materials
used are selected from materials which
are environmentally friendly for disposal
and should be recycled.
The packaging consists of the following
erials:
mat
Outer packaging:
– Corrugated cardboard made from up
o 100% recyclable material:
t
or: Polyethylene (PE) shrink wrap
– Polyproplylene (PP) strapping
Inner packaging:
– Chlorine and fluorine free expanded
polystyr
– Base, lid frame and support battens
made fr
from renewable forests
– Polyethylene (PE) protective wrap
om damage during
ene (EPS)
om untreated natural wood
Disposing of your old appli‐
ance
Electrical and electronic appliances of‐
en contain materials which, if handled
t
or disposed of incorrectly, could be po‐
tentially hazardous to human health and
to the environment. They are, however,
essential for the correct functioning of
your appliance. Therefore, please do
not dispose of your old appliance with
your household waste.
Please dispose of it at your local com‐
ty waste collection / recycling cen‐
muni
tre.
Ensure that your old appliance presents
no dange
ed for disposal.
r to children while being stor‐
Recycling the packaging reduces the
use of r
ing process and also reduces the
amount of waste in landfill sites. Rather
than just throwing these materials
away, please ensure they are recycled.
18
aw materials in the manufactur‐
E
nsure that any plastic wrap‐
pings, bags, etc. are disposed of
safely and kept out of the reach of
babies and young children. Danger
of suffocation.
To enable sorting by type of plastic for
r
ecycling, all plastic parts of the appli‐
ance are labelled with international
standard symbols.

Energy-saving dishwashing
This dishwasher is exceptionally eco‐
cal in its use of water and electrici‐
nomi
ty.
You can make the most of your appli‐
ance by following these tips:
– For most economical dishwashing,
e full use of the baskets without
mak
overloading the dishwasher.
– Choose the programme to suit the
type of cr
the degree of soiling.
ockery being washed and
Caring for the environment
– Select the ECO pr
gy-saving dishwashing. This pro‐
gramme is the most efficient in terms
of its combined energy and water
consumption at cleaning normally
soiled crockery.
– If your dishwasher is connected to a
hot water supply, select the SolarSave
programme for washing a lightly to
moderately soiled load. Because the
water is not heated in this pro‐
gramme, crockery may still be slightly
damper at the end of this programme
than it would be with other pro‐
grammes.
– Follow the detergent manufacturer's
r
ecommendations on detergent dos‐
age.
– When using powder or liquid deter‐
gent you can use 1/3 less det
baskets are only half full.
You can find further tips on energysaving dishwashing in "Miele's guide
t
o dishwashing".
ogramme for ener‐
ergent if
19

Caring for the environment
EcoFeedback consumption in‐
dicat
or
The Consumption function is used for
ing up information about the energy
call
and water consumption of your dish‐
washer (see "Settings menu - Con‐
sumption").
Three different types of information can
be displayed:
– an estimate of the consumption be‐
for
e the programme begins
– the actual consumption at the end of
ogramme
the pr
– the total consumption of the dish‐
washer
1. Consumption estimate:
The estimated energy and water con‐
sumption for a pr
shown in the display.
Selec
Select the Estimated consumption op‐
t the programme you want.
tion.
ogramme can be
2. Actual consumption
At the end of the programme you can
c
all up the actual amount of energy and
water used by the programme which
has just been run.
o do this you first have to activate
T
the Display consumption option in the
"Settings - Consumption" menu.
t the end of the programme select
A
the Consumption option and confirm
your choice with OK.
Switching the dishwasher off at the
end of the programme will delete the
actual consumption values for the
programme which has just been run.
3. "Consumption" setting
The Total consumption
tal of the energy and water which has
been used in all previous dishwasher
programmes (see "Settings menu Consumption").
setting gives a to‐
The estimated energy and water con‐
sumption will appear in the display.
The estimated consumption levels will
isplayed as a bar chart. The more
be d
bars ( ) in the display, the more ener‐
gy or water will be used.
The values are influenced by the pro‐
gr
amme selected and any programme
options selected.
The consumption indicator is switched
on as standar
switch the indicator off (see "Settings
menu - Consumption").
20
d. However, you can also
Before using for the first time
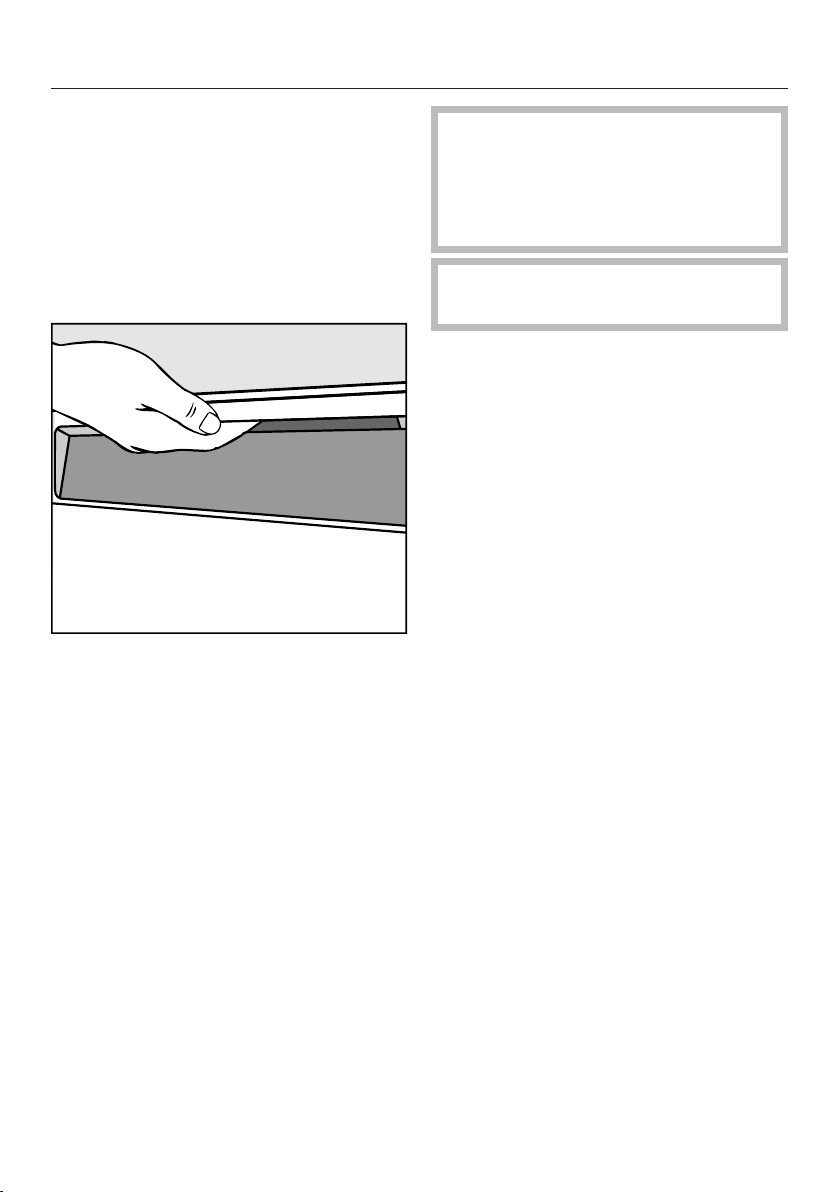
Opening the door
At the end of programmes with a drying
se (see "Programme chart"), the
pha
door will open automatically a little in
order to help the drying process.
This function can be deactivated if pre‐
ferred (see "Settings menu AutoOpen").
T
o open the door, reach under the
door grip and pull.
W
ater in the dishwasher may be
hot. Danger of scalding!
Only open the door during operation
if absolutely necessary and exercise
extreme caution when doing so.
K
eep the area around the door
free of obstructions.
Open the door fully t
locking mechanism.
The door locking pin then retracts.
If the door is opened during operation,
all functions are automatically interrup‐
ted.
o disengage the
21
Before using for the first time
Closing the door
ush the baskets right in.
P
T
hen raise the door upwards until the
catch engages.
The door will then close automatically.
Danger of inj
Do not put your hand inside the door
as it is closing.
ury!
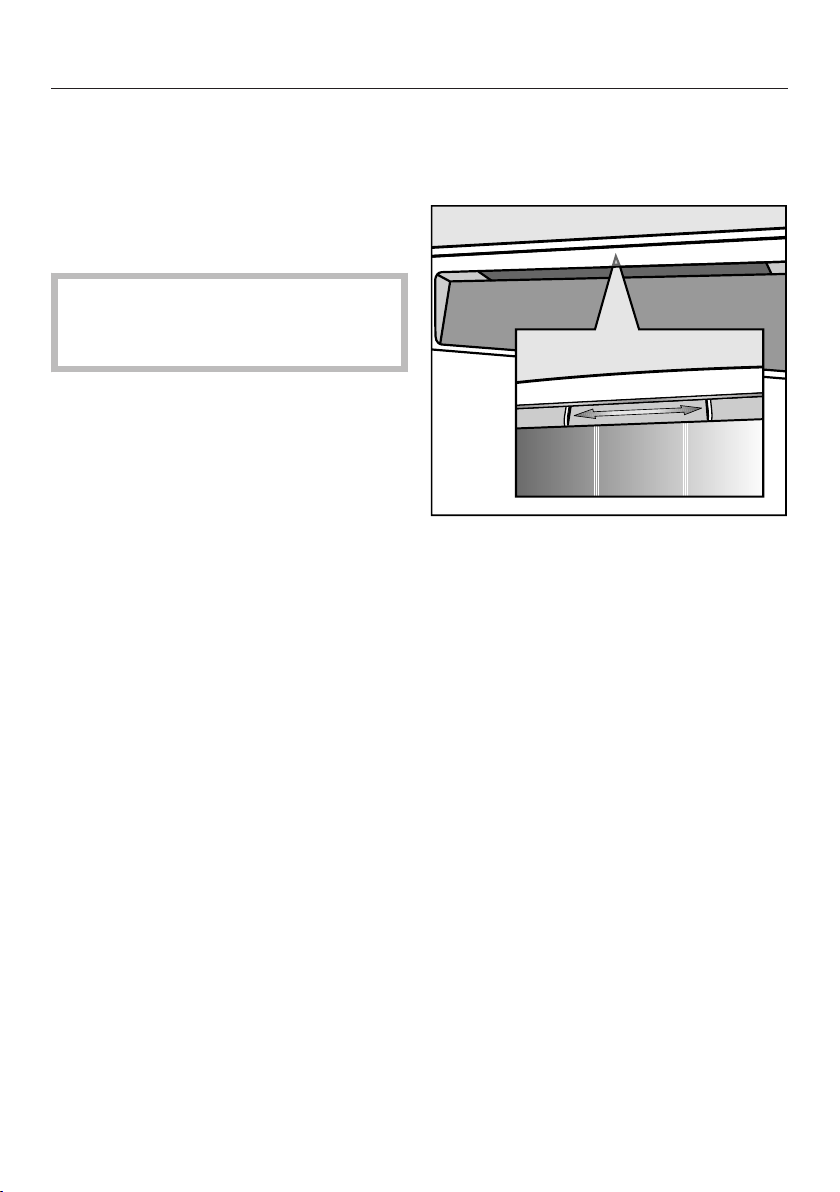
Safety lock
Use the safety lock to prevent children
pening the dishwasher door.
o
T
o lock the door, push the slide un‐
derneath the door grip to the right.
T
o unlock the door, push the slide to
the left.
22

Before using for the first time
Basic settings
Switch the dishwasher on using the
sensor
The welcome screen will appear when
the dishwasher is switched on for the
first time.
Language
The display will change automatically to
the scr
Select the language you want as well
as the cou
confirm with OK.
To learn about the display, read the
section with the same name.
A tick will appear ne
guage that has been set.
Date
The display will change to the screen
for setting the
.
een for setting the language.
ntry, if appropriate, and
xt to the lan‐
date.
Time of day
The display will then change to the
scr
een for setting the time.
The time of day needs to be set before
the Delay start pr
be used.
You can also show the current time of
day in the display.
Use +/- t
with OK.
n set the minutes and confirm
The
with OK.
Time of day display
The display will then change to the
een for setting the display for the
scr
time of day.
Selec
Co
t the display you require for the
time of day, and confirm this with OK.
nfirm the message about energy
consumption with OK.
ogramme option can
o set the hour and confirm
You can show the actual date and time
in the display
Set the year using +/- and confirm
with OK.
Then set the month and the day and
confirm them with OK.
Keeping your finger on the relevant
sensor will
time automatically.
.
increase or decrease the
23

Before using for the first time
Water hardness
The display will change to the screen
for setting the
water hardness.
– The dishwasher must be program‐
med for the wat
er hardness in your
area.
– Your local water authority will be able
t
o advise you of the water hardness
level in your area.
– Where the water hardness fluctuates
e.g. between 1.8 and 2.7 mmol/l (10 15 °d - German scale) always pr
o‐
gramme the dishwasher to the higher
value (2.7 mmol/l or 15 °d in this ex‐
ample).
In the event of a fault, it will help the
vice technician if you know the hard‐
ser
ness of your local water supply.
Enter the water hardness below:
____________°d
The dishwasher is programmed at the
fact
ory for a water hardness level of 2.7
mmol/l (15 °d - German scale).
The message Set up successfully comple-
ted will then appear in the display
.
After confirming this with OK, the
ompts Insufficient salt and Insuffi-
pr
cient rinse aid may appear.
Add salt and rinse aid if necessary
(see "Before using for the first time Dishwasher salt" and "Rinse aid").
Confirm the messages with OK.
The display will change to show the
main menu.
The prompt to set the dishwasher up
for first use will not appear agai
n after
you have run the first complete pro‐
gramme.
Selec
t the water hardness level for
your water supply and confirm with
OK.
See "Settings menu - Water hardness"
for mor
24
e information.

Before using for the first time
Before using the appliance for
the first tim
– approx. 1 kg dishwasher salt,
– domestic dishwasher detergent,
– rinse aid formulated for domestic
dishwashers.
Every dishwasher is tested at the fac‐
ory. There will be residual water in the
t
appliance from this test. It is not an in‐
dication that it has been used previ‐
ously.
e, you require:
Dishwasher salt
In order to achieve good cleaning re‐
sults, the d
with soft water. Hard water results in a
build-up of calcium deposits on crock‐
ery and in the dishwasher.
Mains water with a hardness level high‐
er than 0.7 mmol/l (4 °d - German
scale) needs to be softened. This takes
place automatically in the integrated
water softener. The water softener in
the dishwasher is suitable for a water
hardness level of up to 12.6 mmol/l
(70 °d - German scale).
ishwasher needs to operate
If the water hardness in your area is
constantly lower than 0.9 mmol/l
(5 °d), you do not need t
washer salt. The prompt to add dish‐
washer salt will be switched off auto‐
matically. The water softener must,
however, still be programmed to cor‐
respond to the water hardness level in
your area.
Dishwasher det
age the water softener.
Do not fill the salt reservoir with
powder or liquid det
nly use special coarse grained
O
dishwasher salt for reactivation,
as other salts (e.g. cooking salt, agri‐
tural grade or gritting salt) may
cul
contain insoluble additives which
can impair the functioning of the wa‐
ter softener.
o add dish‐
ergent will dam‐
ergent.
The water softener requires dishwasher
salt.
Depending
(< 3.8 mmol/l, or 21 °d - German scale),
dishwasher salt is not required if combi‐
nation tablets are being used (see "Op‐
eration - Detergent").
on the water hardness level
25
Before using for the first time
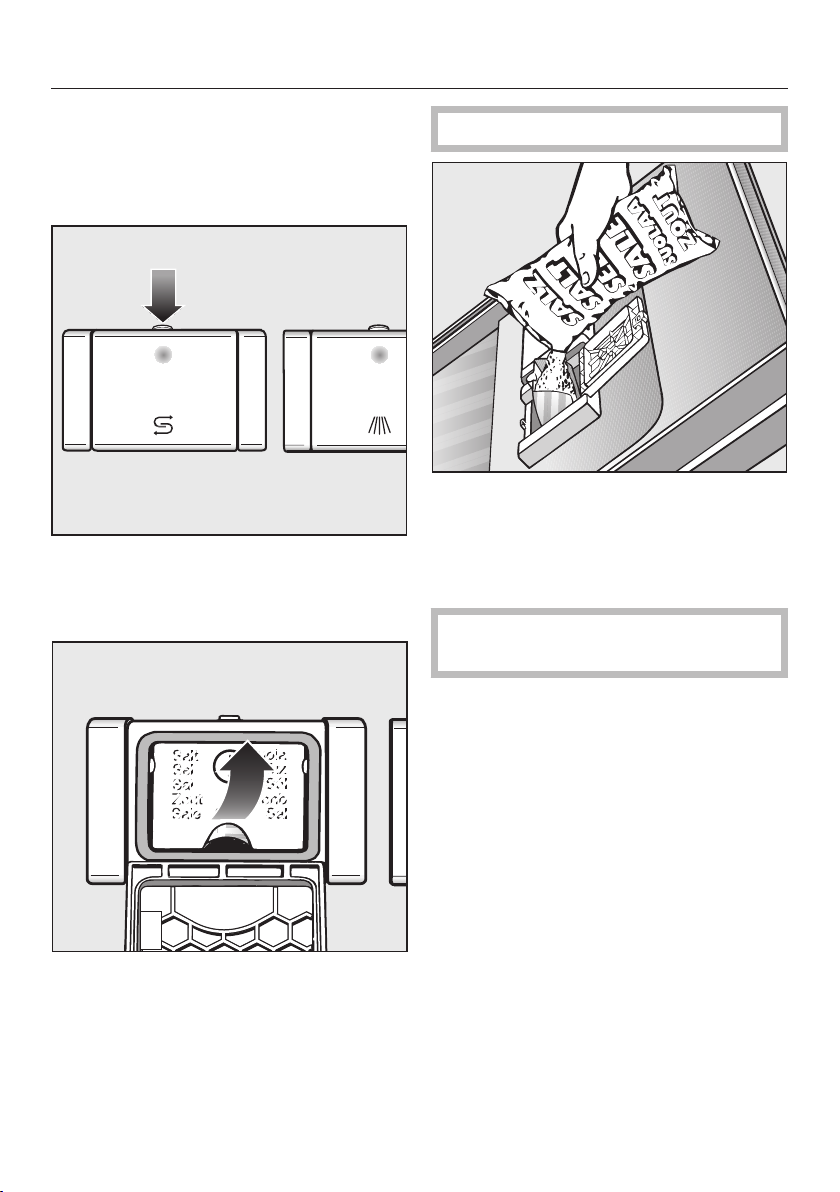
Filling the salt reservoir
When fill
open the door halfway to ensure
that all the salt gets into the reservoir.
P
ress the button on the lid of the salt
reservoir in the direction of the arrow.
The flap will spring open.
ing the salt reservoir only
Do not fill the reservoir with water.
Add dishwasher salt only until the
eservoir is full or until water runs out
r
of the opening. The salt reservoir
holds approx. 1 kg of salt, depending
on the brand used.
Do not add any more than 1kg of
salt.
As the salt reservoir is filled, displaced
wat
er may overflow.
Lift up the funnel.
26
Cle
an any excess salt from around
the reservoir opening and then close
the flap.
Immediat
voir, run the
with the
lected and without any crockery in
the dishwasher, to remove any traces
of salt from the cabinet.
ely after filling the salt reser‐
Quick wash pr
Short pr
ogramme option se‐
ogramme

Before using for the first time
Add salt reminder
Fi
ll the salt reservoir with dishwasher
salt for reactivation when Insuffi-
cient salt appears in the display (If it
appears during a programme, wait
until the end of the programme).
Confirm with OK.
The message will go out.
Risk of corr
Immediately after filling the salt res‐
ervoir, run the Quick wash programme
with the Short programme option se‐
lected and without any crockery in
the dishwasher to remove any traces
of salt from the cabinet.
After the salt reservoir has been filled,
efill reminder may still appear in the
the r
display if the salt concentration has not
yet reached the correct level. If this is
the case, confirm again with
The refill reminder will be switched off if
you have
for a water hardness below 0.9 mmol/l
(5°d - German scale).
programmed the dishwasher
osion!
OK.
If you only ever use multi-function
combina
washer, you can switch off both refill
reminders for salt and rinse aid if you
wish (see "Settings menu - Switching
off the refill reminders").
If you switch to using detergent that
does not contain salt or rinse aid, it
is impor
dishwasher salt and rinse aid and to
switch the reminders back on.
tion products in your dish‐
tant to remember to add
27
Before using for the first time
Rinse aid
Rinse aid is necessary to ensure water
does not cling and leave marks on
cr
ockery during the drying phase and
helps crockery dry faster after it has
been washed.
Rinse aid is poured into the storage res‐
ervoir and the amount set is dispensed
automatically.
nadvertently filling the rinse aid
I
reservoir with powder or liquid deter‐
gent will damage the reservoir. Only
pour rinse aid formulated for domes‐
tic dishwashers into the reservoir.
Alternatively, it is possible to use
– household vinegar with a max. 5%
aci
d content
or
– liquid citric acid up to 10% acid con‐
t
ent
The resulting rinsing and drying quality
will not, however, be as good as when
rinse aid is used.
If you only ever use combination
products containing rinse aid in your
dishwasher, you do not need to add
rinse aid.
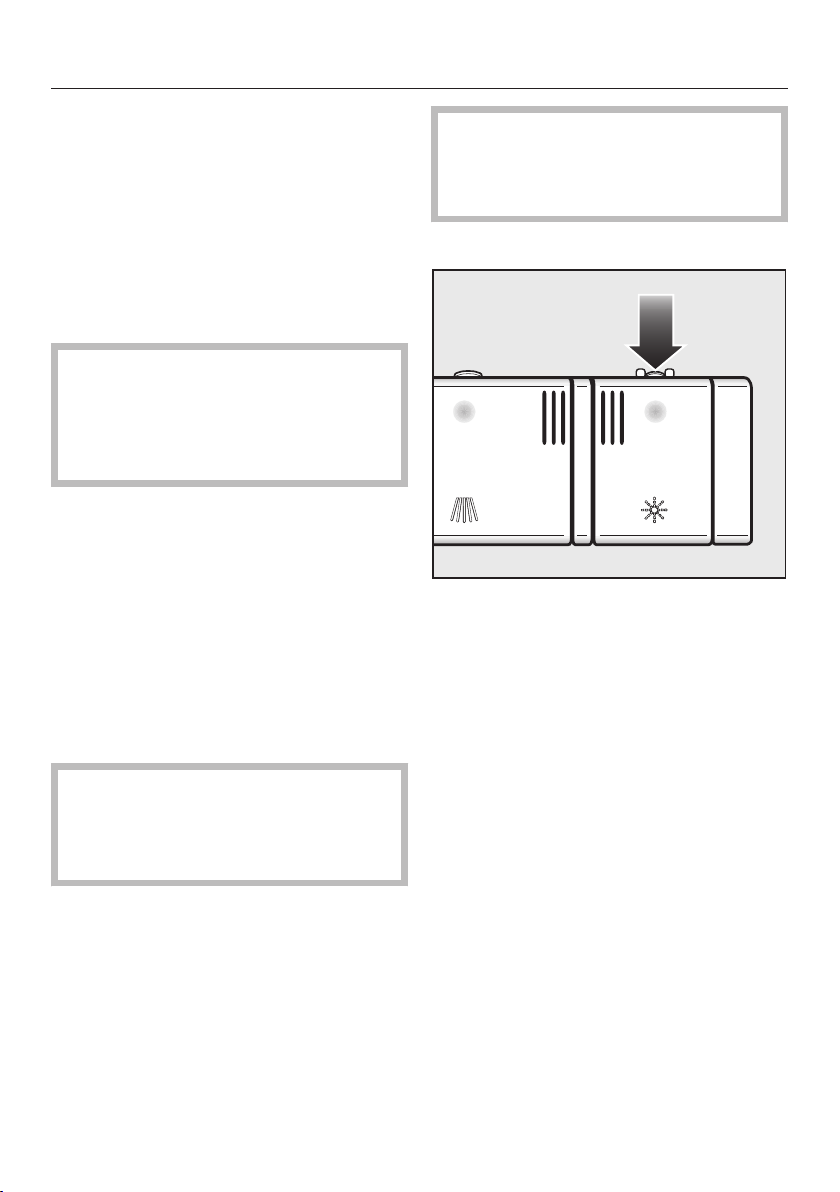
Adding rinse aid
ress the button on the lid of the
P
rinse aid reservoir in the direction of
the arrow until the flap springs open.
Do not use vinegar with a higher
a
cid content (e.g. vinegar essence
25% acid).
This would damage the dishwasher.
28

Add rinse aid only until it is visible in
the opening.
The rinse aid reservoir holds approx.
110 ml.
Close the flap firmly so that it clicks
o place. Otherwise water can enter
int
the rinse aid reservoir during a pro‐
gramme.
Before using for the first time
Add rinse aid reminder
When the Insufficient rinse aid mes‐
sag
e appears in the display, the reser‐
voir contains sufficient rinse aid for 2 3 programmes only.
Add rinse aid in plenty of time.
Confirm with OK.
The message will go out.
If you only ever use multi-function
combina
washer, you can switch off both refill
reminders for salt and rinse aid if you
wish (see "Settings menu - Switching
off the refill reminders").
If you switch to using detergent that
does not contain salt or rinse aid, it
is impor
dishwasher salt and rinse aid and to
switch the reminders back on.
tion products in your dish‐
tant to remember to add
W
ipe up any spilled rinse aid. This
prevents over-foaming occurring dur‐
ing the next programme.
You can adjust the rinse aid dosage
for best r
Rinse aid").
esults (see "Settings menu -
29

Loading the dishwasher
Notes
Remove coarse food residues from
ockery.
cr
There is no need to rinse items under
ng water.
runni
Do not wash it
ash, sand, wax, lubricating grease or
paint in the dishwasher. Ash does
not dissolve and is distributed in the
wash cabinet. Wax, sand, lubricating
grease and paint cause damage to
the dishwasher.
Crockery can be loaded anywhere in
the baskets, but the following notes
should be observed:
– Do not place crockery and cutlery in‐
side other piece
concealed.
– Load the crockery so that water can
acce
ss all surfaces. This ensures that
they get properly cleaned.
ems soiled with
s where they may be
– The spray arms must not be blocked
by it
ems which are too tall or hang
through the baskets. If in doubt, test
for free movement by manually rotat‐
ing the spray arms.
– Make sure that small items cannot
through the holders in the bas‐
fall
kets.
Small items, e.g. lids, should there‐
fore be placed in the cutlery tray or
cutlery basket (depending on model).
Some foodstuffs may contain natural
dyes, e.g. carrots, tomatoes or toma‐
to sauce. Plastic items in the dish‐
washer may discolour if large quanti‐
ties of these foodstuffs find their way
into the dishwasher on the crockery.
The stability of plastic items is not
affected by this discolouration.
Cleaning silver cutlery in the dish‐
washer may also cause plastic items
to discolour.
– Make sure that all items are securely
positioned.
– Hollow items such as cups, glasses,
pans, etc. must b
basket.
– Tall, narrow, hollow items, e.g. cham‐
pagne glasses, should be placed in
the cen
better water coverage.
– Wide based items should be placed
at an ang
them freely.
30
tre of the basket to ensure
le so that water can run off
e inverted in the
 Loading...