

Page 1

Installation instructions / Instructions
d'installation
/ Instrucciones de instalación
Heater/Merging Kit for SF models /
Trousse de juxtaposition /
Equipo de combinación para modelos SF
To prevent misuse
read these instructions
before installation or use.
Afin d'éviter une utilisation inappropriée
veuillez lire ces instructions avant
l'installation ou l'utilisation.
Para prevenir usos inadecuados,
lea este instructivo antes de la
instalación o utilización.
en, fr, es - US, CA, MX
M.-Nr. 07 343 771
Page 2

en...............................................................3
Before you begin ...................................................3
Side-by-side ....................................................3
. . . without partition...............................................3
. . . with partition.................................................4
Required accessories and tools .......................................4
Tools ..........................................................4
Other ..........................................................4
Prepare the appliances ..............................................5
Installing the heating mat.............................................6
Connect the appliances..............................................7
fr ...............................................................9
Avant de commencer l'installation......................................9
Côte à côte .....................................................9
. . . sans cloison .................................................9
. . . avec cloison................................................10
Outils et accessoires nécessaires .....................................10
Outils.........................................................10
Autres ........................................................10
Préparation des appareils ...........................................11
Installation de la plaque de chauffage .................................12
Connexion des appareils............................................13
es ..............................................................15
Antes de comenzar ................................................15
Instalaciones adyacentes .........................................15
. . . sin división .................................................15
. . . con división.................................................16
Accesorios y herramientas necesarias .................................16
Herramientas ..................................................16
Otros .........................................................16
Preparación de los aparatos .........................................17
Instalación de la esterilla eléctrica ....................................18
Conexión de los aparatos ...........................................19
Page 3

en
This merging kit should be used for
side-by-side installation of the following
models:
– K 18x1 SF, K 19x1 SF
– F 14x1 SF, F 18x1 SF, F 19x1 SF
– KF 18x1 SF, KF 19x1 SF
– KWT 16x1 SF
For side-by-side installation of
appliances with a stainless-steel
front, you also need a Top-frame.
Contact Miele to obtain a top-frame
in the required width. The width of
the Top-frame corresponds to the
total width of your side-by-side
combination.
Before you begin
Please read all instructions in this
manual, as well as the manual which
accompanied your machine, before
installation and use.
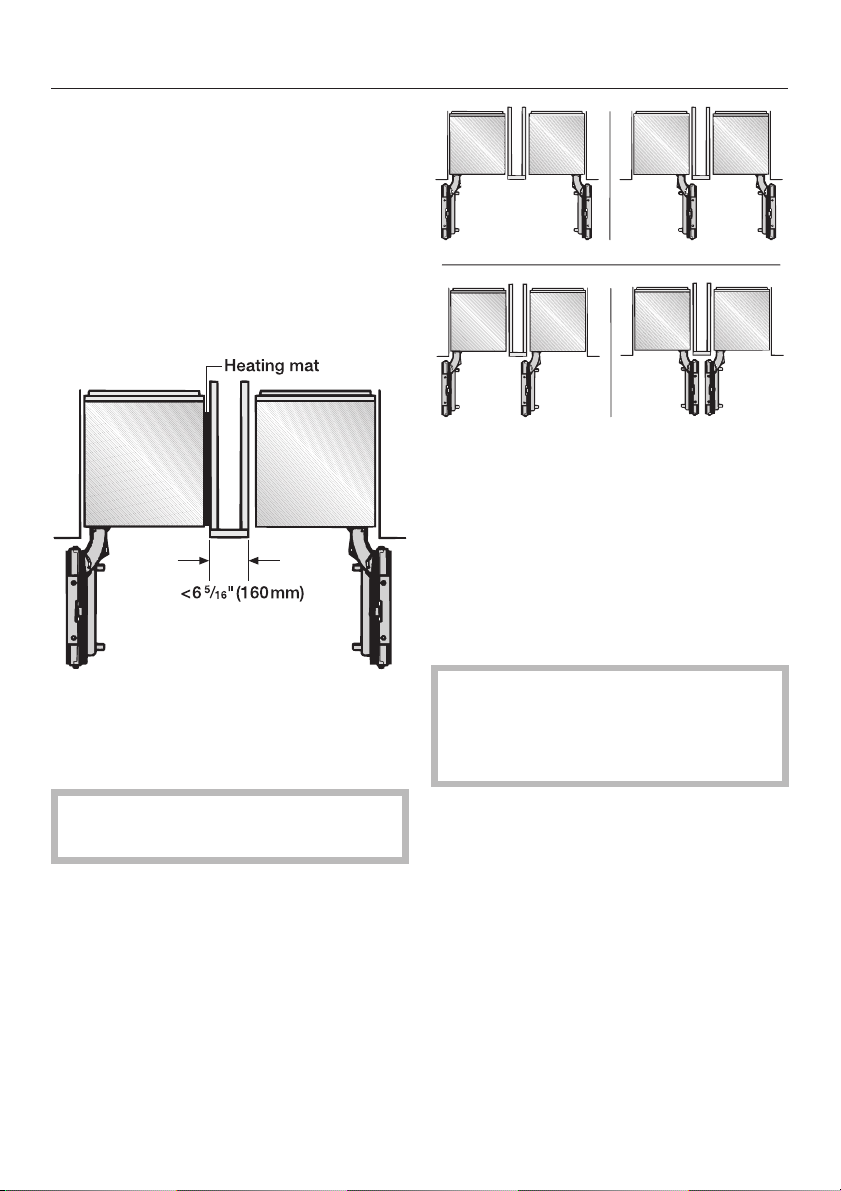
Side-by-side
. . . without partition
If the appliances are installed directly
next to each other (without a partition),
they need to be attached together. A
heating mat must also be installed. This
will help avoid condensation and
prevent damages.
Installing the heating mat will
increase energy consumption.
This appliance is top-heavy and
must be secured to prevent the
possibility of tipping forward.
Keep the doors closed until the
appliance is completely installed
and secured per the installation
instructions.
To reduce the risk of injury or
damage to the product, two people
should be used for installation.
3
Page 4
en
. . . with partition
The minimum thickness of the partition
5
is
/8" (16 mm).
If there is a partition with a thickness
5
from
/8" (16 mm) to 65/16" (160 mm)
between the adjacent appliances, then
each appliance should be individually
installed within its own niche using the
mounting accessories included.
When finding the dimensions for the
partition in model 4, note the thickness
of the custom door panels and the door
handles. This will prevent damage to
the doors if they are opened at the
same time.
Required accessories and
tools
In this case, you will only need the
heating mat from the "Merging Kit" to
avoid condensation and prevent
damages.
Installing the heating mat will
increase energy consumption.
4
To connect a side-by-side
combination, you will need a
Top-frame, which can be obtained
from Miele.
Tools
–
T 20 Torx screwdriver
–
T 20 Torx bit + magnetic holder
–
Adjustable wrench
Other
–
Various bit sizes, suitable for material
–
Piece of thin material (for example,
linoleum) to protect the floor from
damage
–
Adhesive tape
Page 5
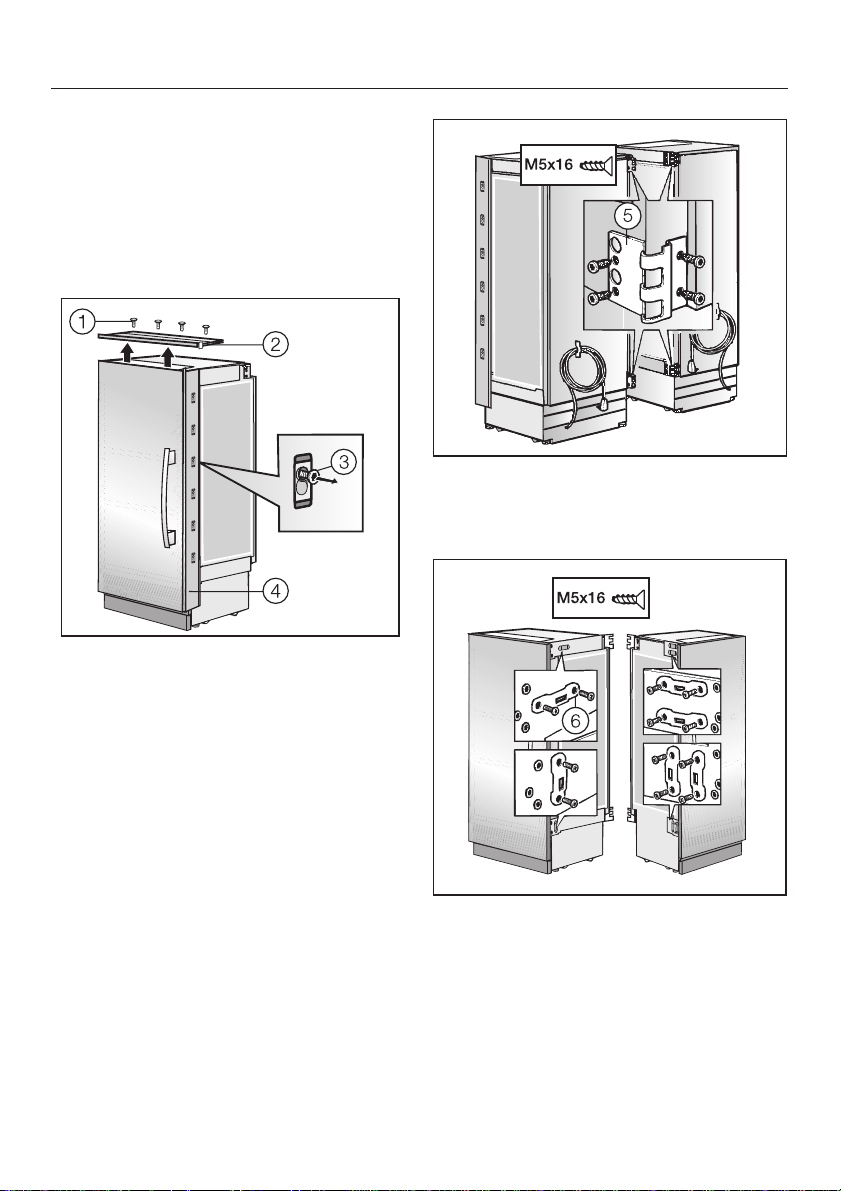
Prepare the appliances
Place the appliances next to each
^
other in the intended configuration.
Remove the mounting frames located
on the top and inside (handle side) of
each appliance.
en
^ Take the hinge halves e from the
side-by-side kit and screw them to
both appliances.
^ On each appliance, remove the
screws a from the upper mounting
frame b and pull the frame up and
off.
^
Loosen the screws c a few turns on
the side mounting frame d of each
appliance.
^
Slide each side mounting frame d
slightly upward and then outward to
unhinge.
^
Screw the screws c all the way in
again or remove them completely.
^
Screw the side plates f to both
appliances. Check the position of
both appliances!
5
Page 6
en
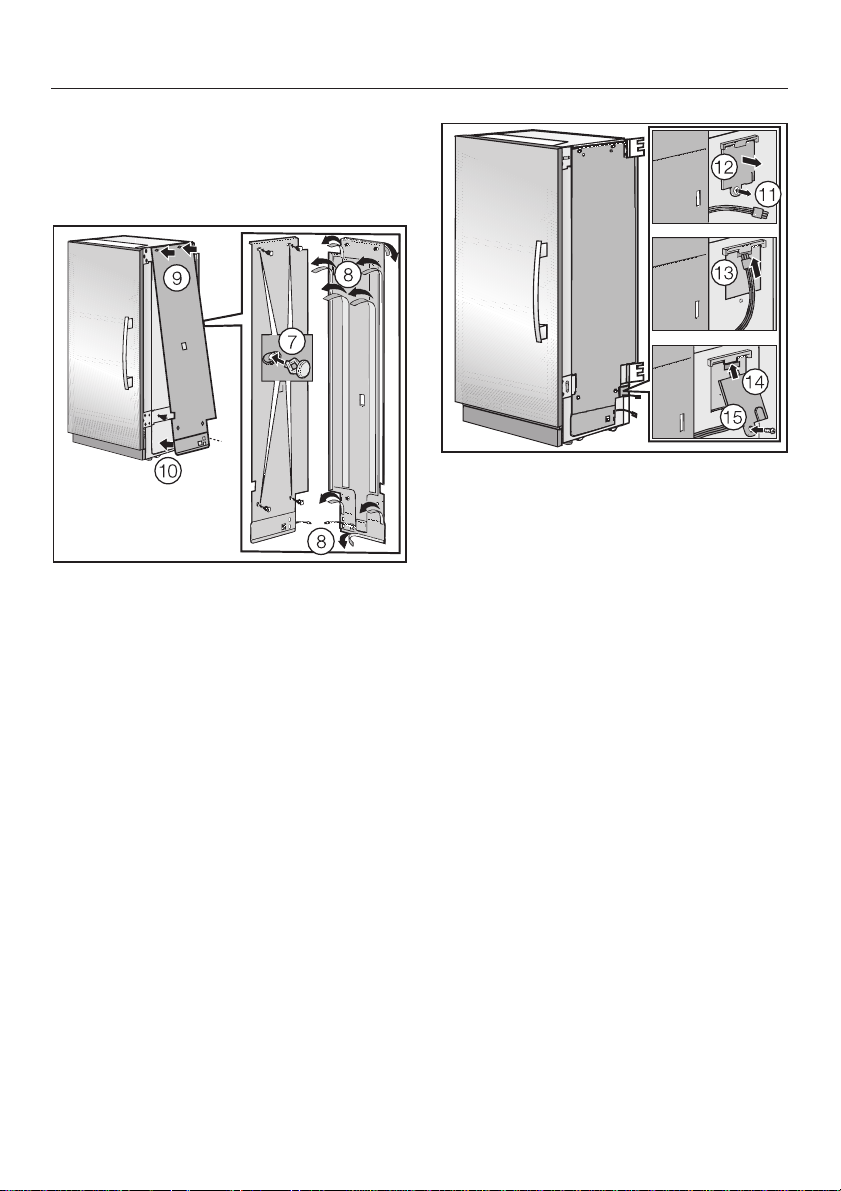
Installing the heating mat
The heating mat has to be secured on
the right side of the left-standing
appliance.
^ Loosen the screws from the
connection box k.
^ Open the connection box l.
^ Insert pins through the prepared
holes g.
^ Pull the protective strip off of the
adhesive tape h.
^ Insert the pins into the upper holes,
while keeping the heating mat away
from the bottom of the appliance i.
^
Adhere the heating mat from top to
bottom, and insert the lower pins into
the holes j.
6
^ Attach the cable m.
^ Close the connection box lid n.
^ Secure the connection box screws
o.
Page 7
Loosen the screws on the rear side of
^
the appliance p. Do not unscrew
completely.
en
^ Hang the cable cover by its hinge on
the heating mat and, from below,
push into the screws q.
^ Tighten the screws r.
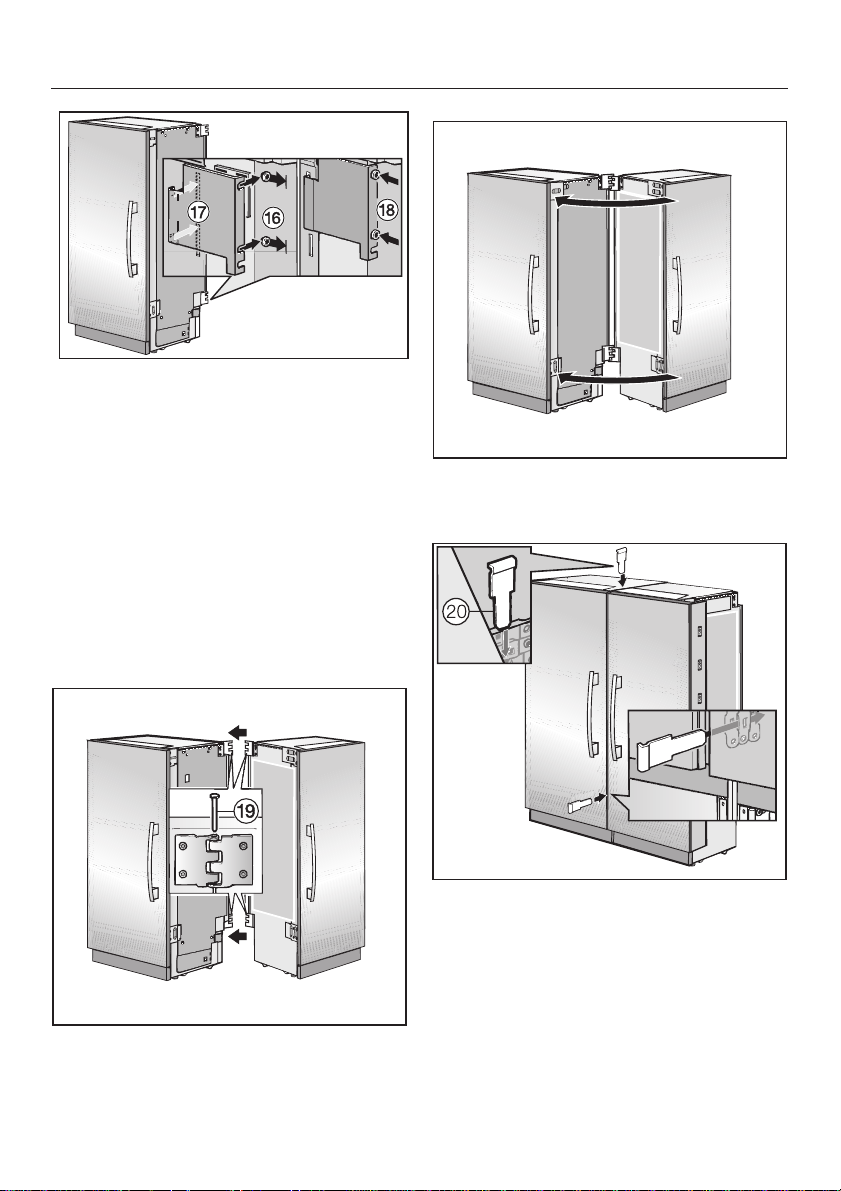
Connect the appliances
^ Push the appliances together until
the hinge halves interlock.
^ Push the appliances together as far
as possible.
^
Once the appliances have been
pushed together, insert the metal
bracket t into the upper and lower
plates. Use a tool to push the bracket
in all the way.
^
Insert the pins s into the hinges.
7
Page 8
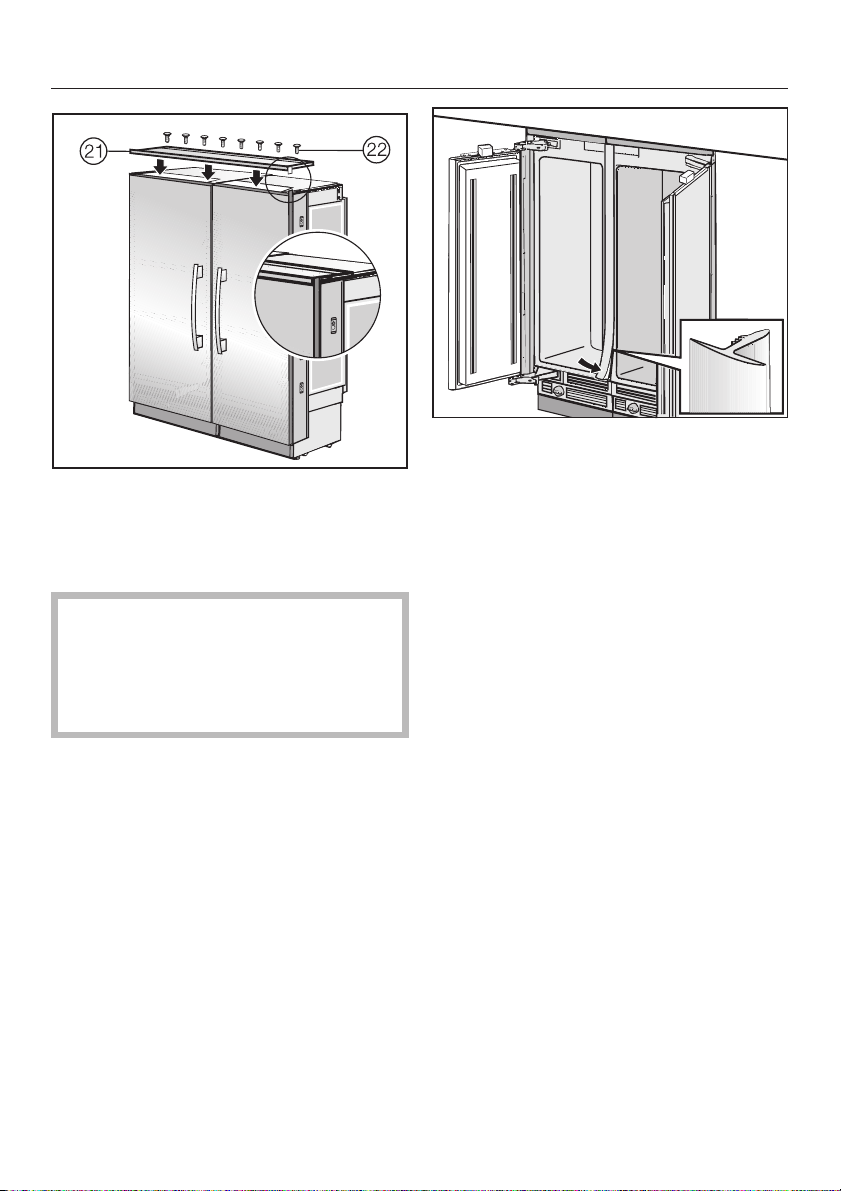
en
^ Place the Top-frame u on the
side-by-side combination, hook it into
the keyholes, and fasten it to the
appliances with the screws v.
Now attach the appliance
combination to the installation niche.
For instructions, refer to the
installation instructions for each
appliance.
Insert the cover strip into the seam
^
between the appliances.
The remaining frames and screws are
no longer needed for the side-by-side
combination.
8
Page 9

fr
Cette trousse de juxtaposition doit être
utilisée pour l'installation côte à côte
des modèles suivants :
– K 18x1 SF, K 19x1 SF
– F 14x1 SF, F 18x1 SF, F 19x1 SF
– KF 18x1 SF, KF 19x1 SF
– KWT 16x1 SF
Pour procéder à une installation côte
à côte des appareils dont le devant
est en acier inoxydable, vous devez
utiliser un cadre supérieur.
Communiquez avec Miele afin
d'obtenir un cadre supérieur de la
largeur requise. La largeur du cadre
supérieur doit correspondre à la
largeur totale de votre installation
côte à côte.
Avant de commencer
l'installation
Veuillez lire toutes les instructions du
présent manuel, ainsi que le manuel
de votre appareil avant d'installer et
d'utiliser l'appareil.
Côte à côte
. . . sans cloison
Si les appareils sont installés
directement côte à côte (sans cloison),
ils devront être fixés ensemble. Une
plaque chauffante doit également être
installée pour permettre d'éviter la
formation de condensation et ne pas
endommager les appareils.
L'installation de la plaque de
chauffage augmentera la
consommation énergétique.
Comme le haut de cet appareil est
lourd, il faut le fixer afin d'éviter qu'il
se renverse.
Gardez les portes fermées jusqu'à
ce que l'appareil soit complètement
installé et fixé selon les directives
d'installation.
Pour réduire les risques de
blessures ou éviter d'endommager
l'appareil, deux personnes doivent
effectuer l'installation.
9
Page 10

fr
. . . avec cloison
La cloison doit avoir une épaisseur d'au
5
moins
S'il y a entre deux appareils adjacents
une cloison d'une épaisseur comprise
entre
(160 mm), alors chaque appareil doit
être individuellement installé dans son
propre emplacement (meuble) à l'aide
des accessoires de montage fournis.
/8po (16 mm).
5
/8po (16 mm) et 65/16po
Lorsque vous relevez les dimensions
pour la cloison sur le modèle 4, tenez
compte de l'épaisseur des panneaux de
porte sur mesure et des poignées de
porte. De cette manière, les portes des
appareils ne seront pas endommagées
si elles sont ouvertes en même temps.
Outils et accessoires
nécessaires
Dans ce cas, vous devez seulement
utiliser la plaque de chauffage a de la
"trousse de juxtaposition" afin d'éviter la
formation de condensation et de ne pas
endommager les appareils.
L'installation de la plaque de
chauffage augmentera la
consommation énergétique.
10
Pour procéder à une installation côte
à côte, vous devez utiliser un cadre
supérieur que vous pouvez obtenir
en communiquant avec Miele.
Outils
–
un tournevis Torx T 20;
–
une mèche Torx T 20 + un aimant de
retenue;
–
une clé ajustable.
Autres
–
des mèches de plusieurs tailles,
adaptées aux matériaux;
–
une pièce de matériau fin (par ex. du
linoléum) pour protéger le sol;
–
du ruban adhésif.
Page 11

Préparation des appareils
Placez les appareils côte à côte dans
^
la position voulue.
Retirez les cadres de montage situés
au dessus et sur le côté intérieur de
chaque appareil (côté de la poignée).
fr
^ Vissez en position les demi-
charnières e de la trousse de
juxtaposition sur les deux appareils.
^ Retirez les vis a du cadre de
montage supérieur b de chaque
appareil puis enlevez le cadre.
^
Dévissez de plusieurs tours les vis c
du cadre de montage latéral d de
chaque appareil.
^
Retirez les cadres de montage
latéraux d de la charnière en les
faisant glisser vers le haut.
^
Revissez les vis c ou enlevez les
complètement.
^
Vissez les plaques latérales f sur
les deux appareils. Vérifiez ensuite la
position des deux appareils.
11
Page 12

fr
Installation de la plaque de
chauffage
La plaque de chauffage doit être fixée
sur la droite de l'appareil situé à
gauche.
^ Dévissez les vis de la boîte de
raccordement k.
^ Ouvrez la boîte de raccordement l.
^ Reliez le câble m.
^ Placez les attaches dans les trous
pré-usinés g.
^ Retirez la pellicule protectrice du
ruban adhésif h.
^
Placez les attaches dans les trous
supérieurs tout en maintenant la
plaque de chauffage à distance du
bas de l'appareil i.
^
Appuyez sur la plaque de chauffage
de bas en haut puis placez les
attaches dans les trous inférieurs j.
12
^ Replacez le couvercle de la boîte de
raccordement n.
^ Vissez de nouveau les vis de la boîte
de raccordement o.
Page 13

Desserrez les vis situées au bas de
^
l'appareil p. Ne les dévissez pas
complètement.
fr
^ Placez le couvercle qui protège le
câble au-dessus de la plaque de
chauffage et replacez les vis q par
en-dessous.
^ Serrez les vis r.
Connexion des appareils
^ Poussez les appareils l'un contre
l'autre jusqu'à ce que les
demi-charnières s'emboîtent.
^ Poussez les appareils l'un contre
l'autre à l'avant le plus possible.
^
Une fois les appareils l'un contre
l'autre, placez le support métallique
t sur les plaques inférieure et
supérieure. Utilisez un outil pour
pousser le support jusqu'au bout.
^
Placez les attaches dans les
charnières s.
13
Page 14

fr
^ Placez le cadre supérieur u
au dessus de l'installation côte à
côte, enfoncez le dans les orifices et
fixez le aux appareils à l'aide des vis
v.
Fixer maintenant les deux appareils
au meuble. Référez-vous aux
instructions d'installation de chaque
appareil.
Placez Ia baguette de recouvrement
^
dans l'espace qui sépare les deux
appareils.
Les cadres et les vis qui restent ne sont
plus nécessaires pour procéder à une
installation côte à côte.
14
Page 15

es
Este equipo de combinaciones debe
usarse en las instalaciones adyacentes
de los siguientes modelos:
– K 18x1 SF, K 19x1 SF
– F 14x1 SF, F 18x1 SF, F 19x1 SF
– KF 18x1 SF, KF 19x1 SF
– KWT 16x1 SF
Para la instalación adyacente de
aparatos con frente de acero
inoxidable, también necesitará un
Marco superior.
Comuníquese con Miele para
obtener un marco superior del
ancho necesario. El ancho del
marco superior corresponde al
ancho total de su combinación de
aparatos adyacentes.
Antes de comenzar
Lea todas las instrucciones de este
manual, al igual que las del manual
que viene con su aparato antes de
la instalación o utilización.
Instalaciones adyacentes
. . . sin división
Si los aparatos se instalan directamente
uno al lado del otro (sin una división),
será necesario acoplarlos. También se
debe instalar una alfombrilla térmica.
Esto ayudará a evitar la condensación
y evitará daños.
La instalación de la alfombrilla
térmica aumentará el consumo de
energía.
El peso de este aparato se
concentra en su parte superior y
debe sujetarse para evitar la
posibilidad de que se incline hacia
adelante.
Mantenga las puertas cerradas
hasta que el aparato esté
completamente instalado y
afianzado según las instrucciones
de instalación.
Se deben usar dos personas para la
instalación a fin de reducir el riesgo
de lesiones o daños al producto.
15
Page 16

es
. . . con división
El grosor mínimo de la división es de
16 mm (5/8").
Si el grosor de la división entre los
aparatos adyacentes es de 16 mm
5
(
/8") a 160 mm (65/16"), cada uno de
ellos deberá instalarse en forma
individual dentro de su propia cavidad
empleando los accesorios de montaje
suministrados.
Al determinar las dimensiones de la
división correspondiente al modelo 4,
tenga en cuenta el grosor de las áreas
frontales del mueble y las manijas de las
puertas. Esto impedirá que las puertas se
dañen si se abren al mismo tiempo.
Accesorios y herramientas
necesarias
En este caso, lo único que necesitará
es la alfombrilla térmica a del "Equipo
de combinación" para prevenir la
condensación y evitar daños.
La instalación de la alfombrilla
térmica aumentará el consumo de
energía.
16
Para conectar la combinación de
aparatos adyacentes, necesitará un
marco superior, que podrá obtener
de Miele.
Herramientas
–
Desatornillador con cabeza Torx T 20
–
Broca Torx T 20 y portabrocas
magnético
–
Llave ajustable
Otros
–
Diversos tamaños de brocas,
adecuados para el material
–
Pieza de material delgado (por
ejemplo, linóleo) para proteger el
piso contra daños
–
Cinta adhesiva
Page 17

Preparación de los aparatos
Coloque los aparatos uno al lado del
^
otro según la configuración prevista.
Saque los marcos de montaje ubicados
en la parte superior e interior (lado de
las manijas) de cada aparato.
es
^ Tome cada mitad de las bisagras e
del equipo para instalaciones
adyacentes y atorníllelas a ambos
aparatos.
^ En cada aparato, saque los tormillos
a del marco de montaje superior b
y quite el marco sacándolo hacia
arriba.
^
Suelte los tornillos c girándolos un
par de veces en el marco de montaje
lateral d de cada aparato.
^
Deslice cada marco de montaje d
ligeramente hacia arriba y luego
hacia afuera para sacarlo de su
bisagra.
^
Apriete los tornillos c al máximo o
quítelos.
^
Atornille las placas laterales f a
ambos aparatos. Examine la posición
de los dos aparatos.
17
Page 18

es
Instalación de la esterilla
eléctrica
La esterilla térmica debe sujetarse
sobre el lado derecho del aparato
ubicado al lado izquierdo.
^ Afloje los tornillos de la caja de
conexiones k.
^ Abra la caja de conexiones l.
^ Conecte el cable m.
^ Introduzca los pasadores a través de
los orificios preparados g.
^ Jale y retire la tira de protección de
la cinta adhesiva h.
^
Introduzca los pasadores en los
orificios superiores, al tiempo que
mantiene la esterilla térmica lejos de
la parte inferior del aparato i.
^
Pegue la esterilla térmica en
dirección de arriba hacia abajo e
introduzca los pasadores inferiores
en los orificios j.
18
^ Cierre la tapa de la caja de
conexiones n.
^ Coloque y apriete los tornillos de la
caja de conexiones o.
Page 19

Afloje los tornillos de la parte
^
posterior del aparato p. No los
desatornille totalmente.
es
^ Cuelgue la tapa del cable de su
bisagra en la alfombrilla térmica y,
por abajo, empújela hacia los
tornillos q.
^ Apriete los tornillosr.
Conexión de los aparatos
^ Empuje los aparatos para acercarlos
y hasta que las mitades de las
bisagras se acoplen.
^ Acerque los aparatos lo máximo
posible.
^
Una vez unidos los aparatos,
introduzca el puntal de metal t en
las placas superior e inferior. Utilice
una herramienta para empujar el
puntal hasta insertarla por completo.
^
Introduzca los pasadores s en las
bisagras.
19
Page 20

es
^ Coloque el marco superior u en la
combinación de aparatos
adyacentes, engánchelo en los
orificios y fíjelo a los aparatos con los
tornillos v.
Ahora sujete la combinación de
aparatos a la cavidad de la
instalación. Para obtener las
instrucciones, consulte las
instrucciones de instalación de cada
aparato.
Introduzca la tira de recubrimiento en
^
la juntura entre los aparatos.
Los marcos y tornillos que quedan ya
no son necesarios para la combinación
de aparatos adyacentes.
202122
Page 21

Page 22

Page 23

23
Page 24

Alteration rights reserved / Tous droits réservés /
Modificaciones con derechos reservados/ 4309
For the most updated manual see the Miele website. / Pour obtenir la version la plus récente du guide,
consultez le site Web de Miele./ Consulte el sitio web de Miele para obtener el manual más
actualizado.
M.-Nr. 07 343 771 / 02
 Loading...