

Miele ESW6880WH Installation
Installation Instructions
ESW 6380 / ESW 6580 / ESW 6680
ESW 6780 / ESW 6880
IMPORTANT: SAVE FOR THE LOCAL ELECTRICAL INSPECTOR'S USE
Information is subject to change.
Please refer to our website to obtain the most current product specification,
technical & warranty information.
To prevent accidents
and machine damage
read these instructions
before
installation or use.

IMPORTANT SAFETY INSTRUCTIONS
Before installation make sure that
~
the voltage and frequency listed on the
data plate correspond with the
household electrical supply. This data
must correspond in order to avoid risk
of damage to the appliance. If in doubt,
consult a qualified technician.
The electrical outlet should be easily
~
accessible after installing the unit.
The gourmet warming drawer must
~
be installed only in combination with
other appliances specified by Miele.
When installed with other appliances,
the warranty is void since the
manufacturer cannot guarantee the
safe use of the warming drawer.
A solidly installed base must be
~
present for the installation of the
gourmet warming drawer and the
combination device to ensure the
required load carrying capacity for both
appliances.
The combination appliance is
~
placed directly onto the installed
gourmet warming drawer; an
intermediate base is not required.
The gourmet warming drawer is
~
available in two variants differing in
height. The required niche dimensions
result from the installation dimensions
of the gourmet warming drawer and the
installation dimensions of the
combination device.
Note to the installer:
Please leave these instructions with the
consumer of the appliance for the local
building inspectors use.
SAVE THESE
INSTRUCTIONS
The appliance must be installed in
~
such a manner that the contents of the
dishes can be seen. Scalding due to
spilling of hot food can be avoided.
Sufficient space must be given to pull
the drawer out.
24
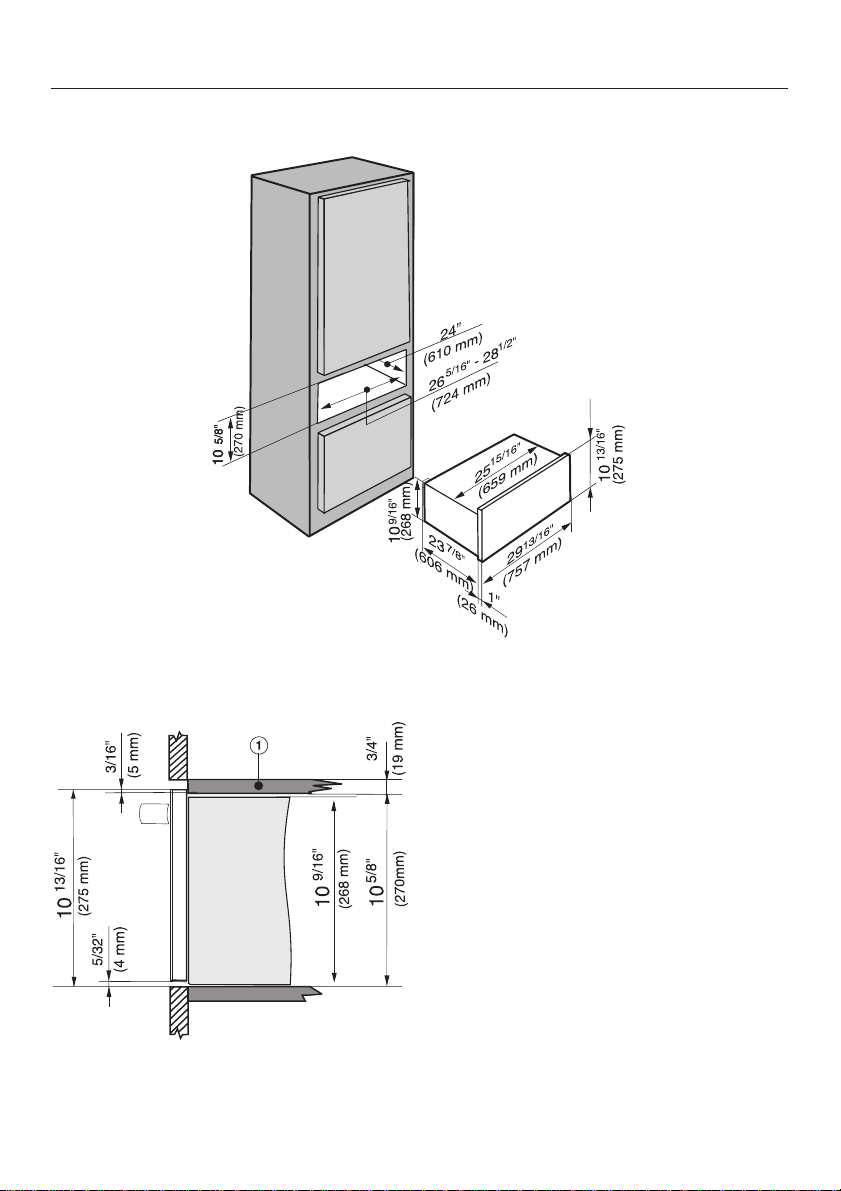
Solo installation
Installation dimensions
Side view
a Fixed shelf
* Appliances with glass front
** Appliances with stainless steel front
25

Installation dimensions
Installation with an oven
26
Side view with oven
* Appliances with glass front
** Appliances with stainless steel front

Installation
Check that the base of the warming drawer is clean and
level. Only then will it function properly.
When inserting the appliance, wear work gloves to avoid
injuries.
Push the drawer into the cabinet as far as the vapor strip,
^
and align it.
^ Open the drawer, and use the 4 screws provided to secure
the drawer to the side walls of the cabinet.
^
Install the combination appliance according to the manual
included with that appliance.
27
 Loading...