

Page 1
Operating instructions
Built-in steam oven
DG 155-1
DG 163
It is essential to read these
operating instructions before
installing or using the machine,
to avoid the risk of accident
or damage to the machine.
WO
M.-Nr. 05 246 571
Page 2

Contents
Description of the appliance. . . . . . . . . . . . . . . . . . . . . . . . . . . . . . . . . . . . . . . . . 4
Illustration of the appliance . . . . . . . . . . . . . . . . . . . . . . . . . . . . . . . . . . . . . . . . . . . 4
Control panel . . . . . . . . . . . . . . . . . . . . . . . . . . . . . . . . . . . . . . . . . . . . . . . . . . . . . . 5
Accessories supplied . . . . . . . . . . . . . . . . . . . . . . . . . . . . . . . . . . . . . . . . . . . . . . . 6
Optional accessories . . . . . . . . . . . . . . . . . . . . . . . . . . . . . . . . . . . . . . . . . . . . . . . . 8
Warning and Safety instructions . . . . . . . . . . . . . . . . . . . . . . . . . . . . . . . . . . . . . 9
Caring for the environment . . . . . . . . . . . . . . . . . . . . . . . . . . . . . . . . . . . . . . . . . 14
Before using for the first time. . . . . . . . . . . . . . . . . . . . . . . . . . . . . . . . . . . . . . . 15
Setting the water hardness level . . . . . . . . . . . . . . . . . . . . . . . . . . . . . . . . . . . . . . 16
Cleaning and heating up for the first time . . . . . . . . . . . . . . . . . . . . . . . . . . . . . . . 17
Use . . . . . . . . . . . . . . . . . . . . . . . . . . . . . . . . . . . . . . . . . . . . . . . . . . . . . . . . . . . . 19
Before each use. . . . . . . . . . . . . . . . . . . . . . . . . . . . . . . . . . . . . . . . . . . . . . . . . . . 19
Procedure in brief: . . . . . . . . . . . . . . . . . . . . . . . . . . . . . . . . . . . . . . . . . . . . . . . . 20
Select the function . . . . . . . . . . . . . . . . . . . . . . . . . . . . . . . . . . . . . . . . . . . . . . . . . 20
Function chart . . . . . . . . . . . . . . . . . . . . . . . . . . . . . . . . . . . . . . . . . . . . . . . . . . . . 21
Altering the recommended temperature . . . . . . . . . . . . . . . . . . . . . . . . . . . . . . . . 22
Altering the recommended temperature permanently. . . . . . . . . . . . . . . . . . . . . . 23
Setting the cooking time . . . . . . . . . . . . . . . . . . . . . . . . . . . . . . . . . . . . . . . . . . . . 25
Starting a function . . . . . . . . . . . . . . . . . . . . . . . . . . . . . . . . . . . . . . . . . . . . . . . . . 26
Interrupting a function . . . . . . . . . . . . . . . . . . . . . . . . . . . . . . . . . . . . . . . . . . . . . . 28
Altering a function . . . . . . . . . . . . . . . . . . . . . . . . . . . . . . . . . . . . . . . . . . . . . . . . . 28
At the end of cooking time. . . . . . . . . . . . . . . . . . . . . . . . . . . . . . . . . . . . . . . . . . . 29
Insufficient water / water container not in place . . . . . . . . . . . . . . . . . . . . . . . . . . 30
Protection from overheating. . . . . . . . . . . . . . . . . . . . . . . . . . . . . . . . . . . . . . . . . . 31
Safety lock . . . . . . . . . . . . . . . . . . . . . . . . . . . . . . . . . . . . . . . . . . . . . . . . . . . . . . . 32
Practical tips. . . . . . . . . . . . . . . . . . . . . . . . . . . . . . . . . . . . . . . . . . . . . . . . . . . . . 33
Suitable containers . . . . . . . . . . . . . . . . . . . . . . . . . . . . . . . . . . . . . . . . . . . . . . . . 33
Cooking charts. . . . . . . . . . . . . . . . . . . . . . . . . . . . . . . . . . . . . . . . . . . . . . . . . . . . 35
Reheating . . . . . . . . . . . . . . . . . . . . . . . . . . . . . . . . . . . . . . . . . . . . . . . . . . . . . . . 39
Defrosting . . . . . . . . . . . . . . . . . . . . . . . . . . . . . . . . . . . . . . . . . . . . . . . . . . . . . . . 40
2
Page 3

Contents
Defrosting . . . . . . . . . . . . . . . . . . . . . . . . . . . . . . . . . . . . . . . . . . . . . . . . . . . . . . . 41
Bottling . . . . . . . . . . . . . . . . . . . . . . . . . . . . . . . . . . . . . . . . . . . . . . . . . . . . . . . . . 42
Preparing a whole meal . . . . . . . . . . . . . . . . . . . . . . . . . . . . . . . . . . . . . . . . . . . . . 43
Meal planning . . . . . . . . . . . . . . . . . . . . . . . . . . . . . . . . . . . . . . . . . . . . . . . . . . . . 44
Blanching . . . . . . . . . . . . . . . . . . . . . . . . . . . . . . . . . . . . . . . . . . . . . . . . . . . . . . . 45
Blanching with steam. . . . . . . . . . . . . . . . . . . . . . . . . . . . . . . . . . . . . . . . . . . . . . . 45
Disinfecting baby bottles . . . . . . . . . . . . . . . . . . . . . . . . . . . . . . . . . . . . . . . . . . . . 45
Cleaning and care . . . . . . . . . . . . . . . . . . . . . . . . . . . . . . . . . . . . . . . . . . . . . . . . 46
General notes . . . . . . . . . . . . . . . . . . . . . . . . . . . . . . . . . . . . . . . . . . . . . . . . . . . . 46
Appliance front. . . . . . . . . . . . . . . . . . . . . . . . . . . . . . . . . . . . . . . . . . . . . . . . . . . . 47
Drip tray, rack and cooking containers . . . . . . . . . . . . . . . . . . . . . . . . . . . . . . . . . 47
Removable door and drip plate. . . . . . . . . . . . . . . . . . . . . . . . . . . . . . . . . . . . . . . 48
Cooking compartment . . . . . . . . . . . . . . . . . . . . . . . . . . . . . . . . . . . . . . . . . . . . . . 49
Runners . . . . . . . . . . . . . . . . . . . . . . . . . . . . . . . . . . . . . . . . . . . . . . . . . . . . . . . . . 49
Connecting valve . . . . . . . . . . . . . . . . . . . . . . . . . . . . . . . . . . . . . . . . . . . . . . . . . . 50
O-Ring . . . . . . . . . . . . . . . . . . . . . . . . . . . . . . . . . . . . . . . . . . . . . . . . . . . . . . . . . . 52
Descaling. . . . . . . . . . . . . . . . . . . . . . . . . . . . . . . . . . . . . . . . . . . . . . . . . . . . . . . . 53
Problem solving guide. . . . . . . . . . . . . . . . . . . . . . . . . . . . . . . . . . . . . . . . . . . . . 56
Electrical connection. . . . . . . . . . . . . . . . . . . . . . . . . . . . . . . . . . . . . . . . . . . . . . 58
After sales service . . . . . . . . . . . . . . . . . . . . . . . . . . . . . . . . . . . . . . . . . . . . . . . . . 60
Data plate . . . . . . . . . . . . . . . . . . . . . . . . . . . . . . . . . . . . . . . . . . . . . . . . . . . . . . . 60
3
Page 4

Description of the appliance
Illustration of the appliance
a Control panel
b Rubber door seal
c Side runners with 4 levels
d Temperature sensor
e Outlet for air in the cooking
compartment
f Ventilation outlet
4
g Steam inlet
h Water container contact
i Water return feed
j Water container connection valve
k Valve for connecting the water
container to the appliance
l Drip channel
Page 5
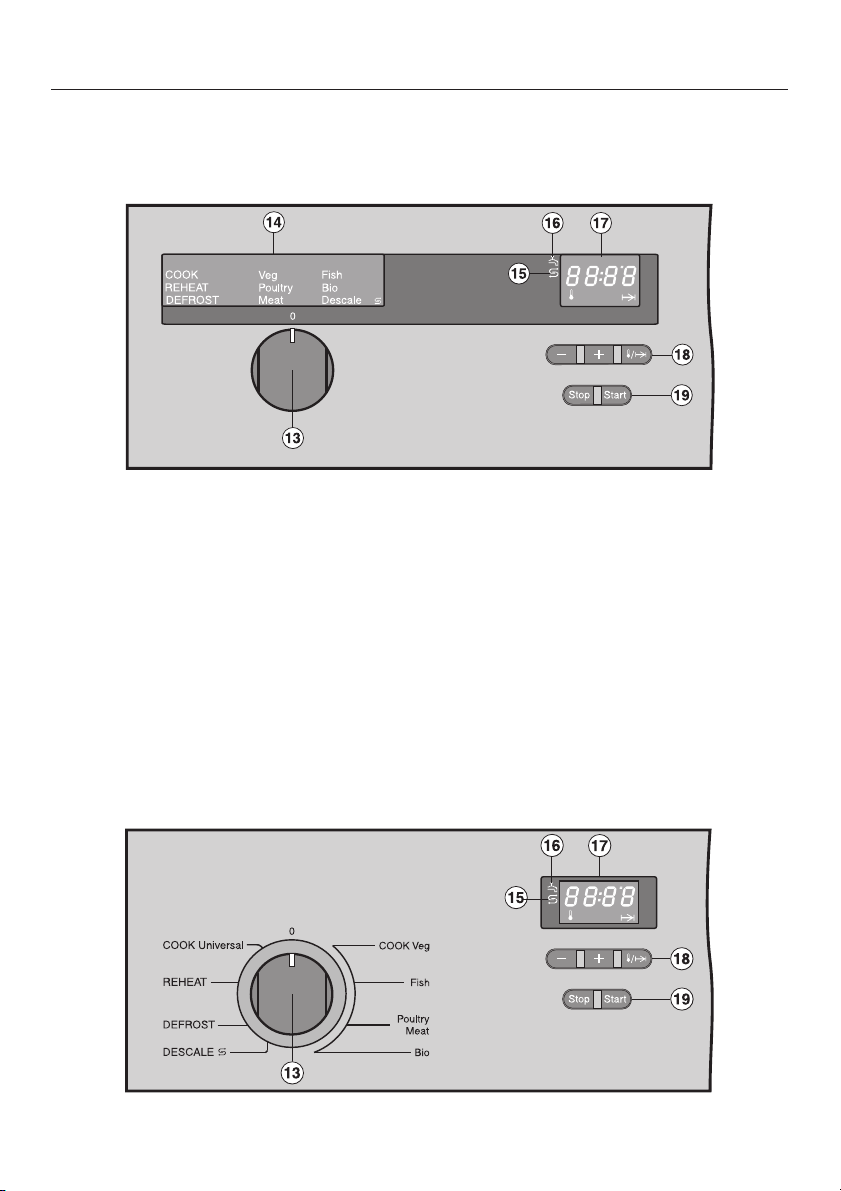
Control panel
DG 155-1
Description of the appliance
m Function selector switch
Displays for:
n Operating functions
(only on DG 155-1)
o Descale k
p Insufficient water p
q Temperature and
Temperature symbol z
Time and time symbol g
DG 163 / DG 163-1
Buttons with light bars for:
r - Decrease
+ Increase
z / g Temperature/Cooking time
s Stop and Start
5
Page 6
Description of the appliance
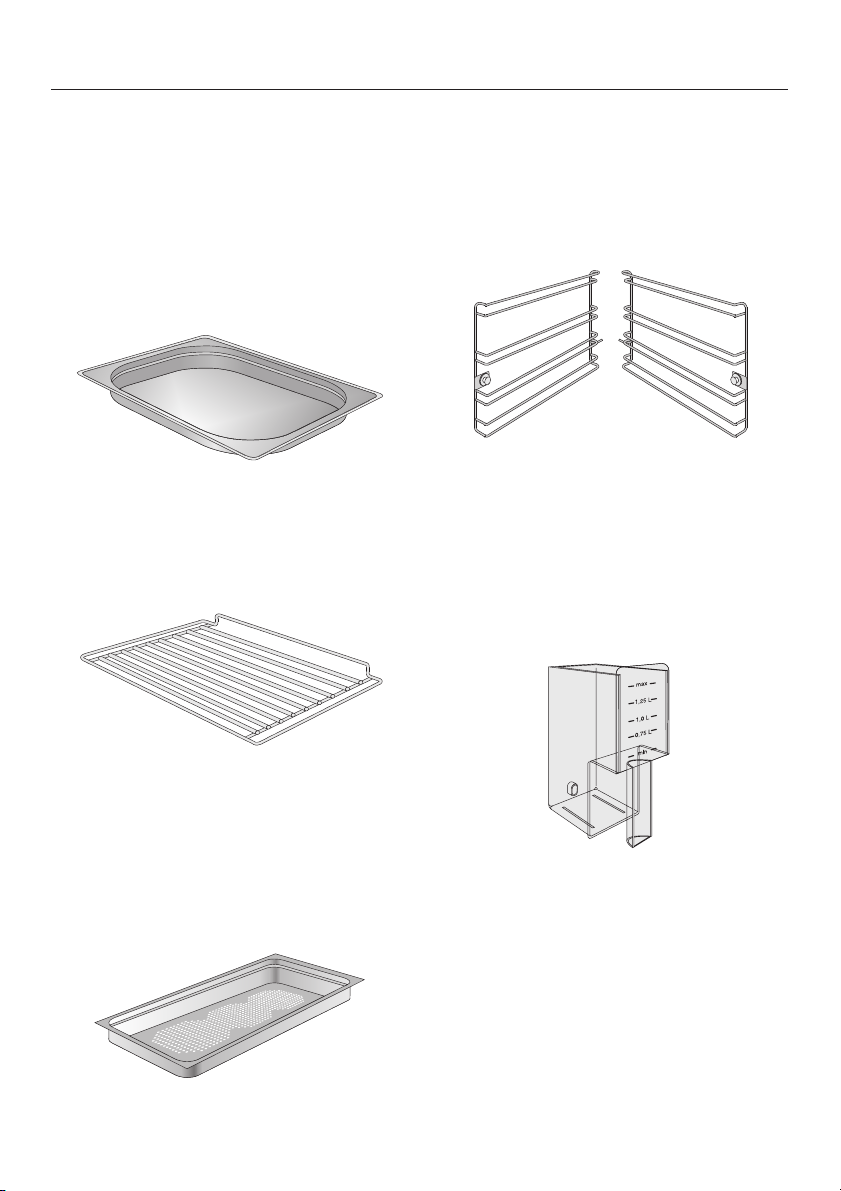
Accessories supplied
Your appliance is supplied with the following accessories. All the accessories can
be ordered at extra cost.
Drip tray (net capacity 1.7 l)
For catching excess liquids
Gastronorm container GN 1/2
Rack
To place cooking containers on
Side runners
Cookery book
Water container
2 cooking containers DGGL 1,
perforated (net capacity 0.9 l)
For steaming
Gastronorm container GN 1/3
6
Page 7

Description of the appliance
Silicone grease
For lubricating the O-Rings on the
connecting valve of the water container.
See "O-Ring" section of "Cleaning and
care" for more details
Connecting valve
with
Valve insert t, white
Rubber pad u, grey
O-Ring v, black
These parts can be ordered individually
or together as a repair kit.
7
Page 8

Description of the appliance
Optional accessories
Stainless steel containers
Container Net capacity in
litres
DGG 2
solid
DGG 3
solid
DGGL 4
perforated
DGGL 5
perforated
DGGL 6
perforated
DGG 7
solid
Lid - DGD Tool
2.0 6 GN 1/3
3.1 6 GN 1/2
3.1 6 GN 1/2
2.0 6 GN 1/3
2.8 10 GN 1/3
2.8 10 GN 1/3
Height in cm Gastronorm size
For removing and inserting the valve
insert
Can be ordered individually, or together
with the parts for the connecting valve
as a repair kit.
8
Page 9

Warning and Safety instructions
Installation and connection
The appliance may be connected
via a plug and fused socket.
However, if the appliance is to be
connected to an isolator switch this
must be done by a suitably qualified
and competent person in accordance
with local and national safety
regulations. The manufacturer cannot
be held responsible for the
consequences of incorrect installation
or connection.
The electrical safety of this
appliance can only be guaranteed
when continuity is complete between
the appliance and an effective earthing
system which complies with local and
national safety regulations.
It is imperative that this basic safety
requirement is tested and where there
is any doubt, the electrical system of
the house should be tested by a
qualified electrician.
The manufacturer cannot be held
responsible for the consequences of an
inadequate earthing system (e.g.
electric shock).
This equipment is not designed for
maritime use or for use in mobile
installations such as caravans, aircraft
etc. However it may be suitable for
such usage subject to a risk
assessment of the installation being
carried out by a suitably qualified
engineer.
Do not install the appliance too
high. It should be at a suitable
height for all users to be able to safely
access all cooking levels and
containers. Otherwise any spillages
could cause burns or scalding.
Do not connect the appliance to
the mains electrical supply by an
extension lead. Extension leads do not
guarantee the required safety of the
appliance.
9
Page 10

Warning and Safety instructions
Correct usage
Before using the appliance for the
first time, read the operating
instructions carefully. They contain
important notes on the safety, the
operation and care of the appliance.
This way you will avoid the risk of
accidents and damage to the
appliance.
For safety reasons this appliance
must only be operated as a built-in
appliance. This is necessary to ensure
that all electrical components are
shielded.
This appliance is intended
exclusively for domestic use. It
should not be used for commercial
purposes.
Only use the appliance to prepare
food in the home. Any other usage
is at the owner"s own risk and could be
dangerous. The manufacturer cannot
be held responsible for damage
caused by improper use of the
appliance.
Wipe out the oven interior with an
absorbent cloth after each use,
and do not forget to wipe down the
ventilation outlet and the drip channel.
Leave the door open until the
moisture in the cooking
compartment has dissipated and the
interior is dry.
If the appliance is not going to be
used for a longer period of time,
e.g. whilst on holiday, it should be
thoroughly cleaned beforehand to
prevent the build up of odours etc.
Refer to the section "Before using for
the first time" and carry out the
procedure as described. Leave the
door open afterwards.
10
Page 11

Warning and Safety instructions
Safety with children
The appliance must be installed at
such a height that small children
cannot reach the appliance door which
gets hot during use.
Use the safety lock to prevent
children operating the appliance or
altering the settings.
The appliance is only intended for
use by adults who have read these
operating instructions.
This appliance is not a toy. Keep
children well away from it and do
not allow them to play with it or with the
controls. They will not understand the
potential danger of touching a hot
appliance. They should be supervised
at all times when you are working with
it.
The appliance becomes very hot
during use and remains hot for
some time after switching off. To
safeguard against burning, keep
children out of the vicinity of the
appliance until it has cooled down.
Warning: Take care in the area
around the hinges. Danger of
injury. Keep children well away.
Do not allow children to lean
against the open oven door, nor to
sit on it or swing on it.
Food packaging (e.g. cling film,
polystyrene) and plastic wrappings
must be kept out of the reach of babies
and young children. Danger of
suffocation. Dispose of all packaging
safely as soon as possible.
11
Page 12

Warning and Safety instructions
Protection from damage
Do not heat up unopened tins of
food in the oven as pressure will
build up in the tin and it will explode
damaging the cooking compartment.
There is also a danger of personal
injury and scalding.
Do not leave cooked foods
standing for an unneccessary
length of time in the oven. This is to
prevent condensation building up
which could cause corrosion to the
appliance.
Do not use metallic containers or
utensils in the oven which are likely
to rust. This can cause corrosion.
When descaling the oven only use
descaling agents with a citric acid
base. Do not use vinegar or agents
containing vinegar as this is corrosive
and would damage the appliance.
Follow the manufacturer"s safety
instructions on the packaging.
Protection from burning
and injury
When in use, the appliance,
particularly the inner side of the
door as well as the outer side of the
appliance in the region of the ventilation
outlet, becomes very hot and remains
so for a while after the oven has been
switched off.
Wear oven gloves when working
with a hot appliance.
When handling cooking containers
take care not to let the contents
spill over. Ensure that you do not come
into contact with hot steam. There is a
danger of scalding.
Do not use a steam cleaner to
clean this appliance. The steam
from the cleaning appliance could
reach the live electrical components
and cause a short circuit. Pressurised
steam could also cause permanent
damage to the surface and to other
components, for which the
manufacturer cannot accept liability.
Do not lean or sit on the open door
of the appliance, or place heavy
items on it. The door can support a
maximum weight of 8 kg.
12
Page 13

Warning and Safety instructions
With a damaged appliance
In the event of damage or a defect,
switch off the appliance immedi
ately. Disconnect completely from the
electricity supply. Contact the Service
department.
The appliance is only completely
isolated from the electricity supply
when:
- it is switched off at the wall socket and
the plug removed (pull on the plug, not
the cable), or the mains fuse is
withdrawn, or the screw-out fuse is
removed in countries where this is
applicable.
Ensure that current is not supplied to
the appliance while maintenance or
repair work is being carried out.
Repairs may only be carried out by
a suitably qualified and competent
person to ensure safety. Repairs by
unauthorised personnel could be
dangerous. Tampering with electrical
connections or components and
mechanical parts is highly dangerous
to the user and can cause operational
faults. On no account open the outer
casing of the appliance.
While the appliance is under
guarantee repairs should only be
undertaken by a service engineer
authorised by the manufacturer.
Otherwise the guarantee is invalidated.
-
General notes
When using an electric socket near
the steam oven, care should be
taken that the cable of the electrical
appliance does not come into contact
with the steam oven door. The
insulation on the cable could become
damaged, giving rise to an electric
shock hazard.
Warning: Take care in the area
around the hinges. Danger of
injury.
Always ensure that food is
sufficiently cooked or reheated.
Many factors will affect the overall
cooking time, including the size and
amount of food, its temperature,
changes to the recipe and the shape
and size of cooking container. Some
foods may contain micro organisms
which are only destroyed by thorough
cooking. Therefore when cooking or
reheating foods, e.g. poultry, it is
particularly important that food is fully
cooked through. If in doubt select a
longer cooking or reheating time.
Do not use plastic containers. They
may melt at high temperatures. The
oven could then be damaged.
In countries which may be subject
to infestation by cockroaches or
other vermin, pay particular attention to
keeping the appliance and its
surroundings in a clean condition at all
times. Any damage which might be
caused by cockroaches or other vermin
will not be covered by the appliance
guarantee.
13
Page 14

Caring for the environment
Disposal of the packaging
material
The transport and protective packing
has been selected from materials which
are environmentally friendly for disposal
and can normally be recycled.
Ensure that any plastic wrappings,
bags etc. are disposed of safely and
kept out of the reach of babies and
young children. Danger of suffocation!
Rather than just throwing these
materials away, please ensure that they
are offered for recycling
Disposal of old appliances
Old appliances contain materials which
can be reclaimed or recycled. Please
contact your dealer, your local waste
collection centre or scrap merchant
about potential recycling schemes.
Before disposing of an old
appliance, switch off at the mains
electricity supply. Cut off and render
any plug useless. Cut off the cable
directly behind the appliance to
prevent misuse. This should be done
by a competent person. Ensure that
the appliance presents no danger to
children while being stored for
disposal.
14
Page 15

Before using for the first time
Do not be worried if your appliance
makes some unusual noises. They
occur when the steam generating unit
is being filled or emptied out and when
pumping is taking place.
When the appliance is switched on the
fan which extracts steam from the oven
can also be heard. The fan will continue
running for a while after the oven has
been switched off.
Please stick the data plate supplied
with the appliance documentation into
the space provided at the end of this
operating instruction booklet.
Keep these instructions in safe place
for reference, and pass them on to any
future user.
15
Page 16
Before using for the first time
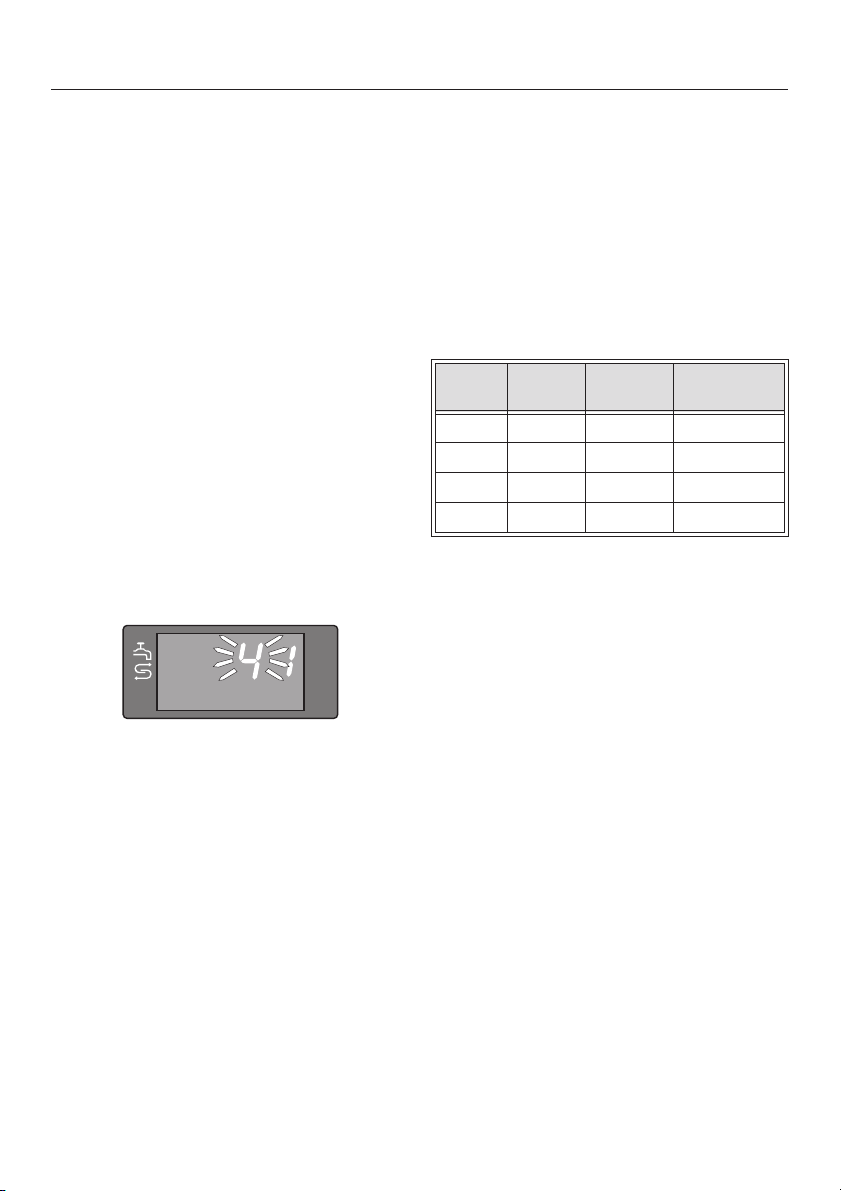
Setting the water hardness
level
The steam oven is set at the factory to
water hardness setting IV (4) .
If your water is harder or softer than this
you can adjust the setting, if this has
not already been done by the Service
Department.
Please ensure that the function selector
is at "0".
Procedure:
^ Press and hold the - button.
^ Turn the function selector either
clockwise or anti-clockwise to
DESCALE k.
4 1 will appear in the display.
You can use the test strip supplied to
check the water hardness level or your
local water supplier will advise you on
the water hardness of your area.
The water hardness is shown as
settings I to IV equivalent to the
German scale 1 to>21 °dH (20 - 380
mg/l).
Setting Display °dH mg/l
I 1 1-7 °dH <20-130 mg/l
II 2 8-14 °dH 140-250 mg/l
III 3 15-21 °dH 270-380 mg/l
IV 4 >21 °dH >380 mg/l
The 1 indicates the type of operation.
The 4 shows the pre-set water
hardness setting.
^
Select water hardness setting III (3), II
(2) or I (1) as required by pressing or + .
The water hardness setting you have
selected will be stored in memory as
soon as the function selector is turned
to another position.
16
Page 17

Cleaning and heating up for
the first time
For the appliance to be fully functional,
it is necessary before using it for the
first time to run the DESCALE operation
k, without adding descaling agent.
This process sets the appliance for the
boiling temperature of water, which will
vary depending on the altitude in your
area.
If this is not done too much steam will
be released from the appliance during
use.
Procedure:
^ Fill the water container with 1.0 l wa-
ter, place it in the appliance and
close the door.
Before using for the first time
Do not adjust the function selector
during this period as otherwise the
descaling programme will have to
be started from the beginning again.
An audible tone will sound when there
are 8 minutes remaining and the
following will alternate in the display:
^ Select DESCALE k with the function
selector.
The following will be displayed:
^
Press Start.
The time will count down from the
starting point of 33 minutes as shown in
the display.
^ Empty out the water container, re-fill it
with 1.0 l of fresh water, place it in the
steam oven and close the door.
^
Press Start.
The above procedure must be repeated
twice more when the audible tone
sounds.
Do not be alarmed at the amount of
steam emitted.
17
Page 18

Before using for the first time
When the time has counted down
you will see the following display:
Turn the function selector to "0".
^
Wait until the appliance has pumped
^
the residual water back into the water
container and then open the door.
Take care. Hot steam will escape
when the door is opened.
Remove, empty and thoroughly dry
^
out the water container.
Wipe out the oven interior with an
^
absorbent cloth and leave the door
open until the moisture in the cooking
compartment has dissipated.
Remember to wipe down the
ventilation outlet and the drip
channel.
See the section on Descaling for further
information.
18
Page 19

Before each use
Fill the water container.
^
Only use mains tap water. Never
use distilled or mineral water.
The water level must be between the
1.0 l and 1.25 l markings.
On no account exceed the "max"
(maximum) level marker.
1.0 l water is enough for a cooking time
of approximately 20 minutes, 1.25 l for
a cooking time of approximately 60
minutes when cooking about 4 servings
of food.
^ Always place the drip tray onto the
lowest shelf runner to catch any
moisture that may build up during
cooking.
Push the water container into the
^
appliance until it connects.
Use
19
Page 20

Use
Procedure in brief:
To use the appliance the following
steps need to be carried out:
A Select the function
B Alter the recommended temperature
if necessary
C Set the cooking time
D Press Start
The appearance of a light bar between
the buttons prompts you to set the next
appropriate step.
The set-up steps are described in more
detail below.
Select the function
Procedure:
Turn the function selector to the
^
required function, e.g. COOK - Veg.
The recommended temperature, e.g.
100 °C will appear in the display for a
short time.
If you are happy with the temperature
recommended proceed to "Setting the
cooking time". Otherwise follow the
instructions in "Altering the
recommended temperature".
20
Page 21

Function chart
Use
Function Symbol Recommended
temperature
in °C
COOK
Universal
COOK
Veg
COOK
Poultry /
Meat
COOK
Fish
COOK
Bio
DEFROST N 55 50-60 For defrosting meat,
REHEAT P 95 80-100 For warming up food
Q 100 80-100 For food which can be
Q1 100 90-100 For all types of
;G 100 90-100 For all types of meat
_ 75 70-95 For all types of fish
Bio 75 70-80 For food which needs
Temperature
range which
can be set
in °C
Suggested
use
cooked at a high
temperature, for
bringing to the boil
vegetables
and poultry which is
suitable for steaming.
very gentle cooking
fish, fruit, etc.
which has been cooked
previously
DESCALE k - - For descaling
21
Page 22

Use
Altering the recommended
temperature
The recommended temperature for a
function can be altered in 5 °C-steps
within the range available for that
function. See Function chart for details.
Procedure:
While the recommended temperature
^
is showing in the display, use the + or
- to raise or lower the temperature.
If the display is showing the cooking
time or the current temperature of the
cooking compartment you can switch
back to viewing the pre-set temperature
by pressing the z/g button once.
The recommendedt temperature can
be changed at any time even if a
programme has already started.
22
Page 23

Use
Altering the recommended temperature permanently
Each function is allocated a specific recommended temperature.
It is, however, possible to permanently alter these pre-set temperatures, but only
within the range of temperatures available for that particular function (see the
chart below).
Please ensure that the function selector is at "0" .
Function Symbol Function
number
COOK
Universal
REHEAT P 3 95 80-100
DEFROST N 4 55 50-60
COOK
Veg
COOK
Fish
COOK
Poultry /
Meat
Bio Bio 8 75 70-80
Q 2 100 80-100
Q1 5 100 90-100
_ 6 75 70-95
;G 7 100 90-100
Recommended temperature
set ex-works
in °C
Temperature
range
available in °C
23
Page 24

Use
Procedure:
Press and hold the - button.
^
Select DESCALE k with the function
^
selector.
4 1 will appear in the display.
Press the z/g button.
^
1002 will appear in the display.
The flashing figures in the first three
positions show the temperature, 100 °C
in the above example. The figure in the
fourth position, the number 2 in the
example, shows the number of the
corresponding function (see the chart).
^ To alter the recommended
temperature for this function press or +, e.g. to set 80 °C for COOK
Universal.
When you have finished making
^
alterations to recommended
temperatures turn the function
selector to the "0" position.
The altered recommended temperature
is now stored in memory. The next time
you select that function, the altered
recommended temperature, e.g. 80 °C
for COOK Universal will appear in the
display.
^
Press the z/g, button to move to the
next function, e.g. No. 3 in the chart
and alter its temperature as
described above.
24
Page 25

Use
Setting the cooking time
Three zeros and the symbol for cooking
time g will appear in the display.
The light bar between the - and +
comes on.
Procedure:
^ Use + or - to enter the desired
cooking time, e.g. 20 minutes.
A time of between 1 minute (0:01) and
4 hours 59 minutes (4:59) can be set.
The cooking time can be altered at any
time as long as it is showing in the
display, i.e. before the beginning of
cooking as well as during a function. If
the display has already changed, you
can switch back to view the cooking
time you wish to alter by pressing the
z/g button twice.
The charts later in these operating
instructions and the cookery book give
suggested cooking times for various
types of food. Remember that the
cooking time is not dependent on the
amount of food, but on the size of the
food. For example, large potatoes will
take longer to cook than smaller
potatoes.
To achieve good results using the times
quoted, please do not cook quantities
of food for more than 6-8 servings.
Make sure that you are also using the
correct sized container. See container
chart in "Description of the appliance".
The light bar between the Stop and
Start buttons will appear as soon as a
cooking time has been set.
25
Page 26

Use
Starting a function
Procedure:
Press Start.
^
The two light bars will go out and the
display will change to show the current
temperature of the cooking
compartment , e.g. 20 °C and the
temperature symbol z
26
Page 27

Use
After the steam oven has begun to
operate you will hear a pumping noise
as water is pumped from the water
container into the steam generating
unit.
The appliance will then heat up. During
this heating up time the rise in
temperature in the cooking
compartment shows in the display.
As soon as the set temperature has
been reached, the display will change
to show the cooking time set and the
time will begin to count down. This is
indicated by the colon flashing between
the figures.
Please note that the total time, i.e. the
time between the beginning and end of
a function, is made up of the heating up
time and the set cooking time added
together. The heating up time and
therefore also the total time will depend
on the quantity of food to be cooked.
The larger the quantity, the longer the
heating up time.
Please also note that if the cooking
temperature selected is 85 °C or higher
and the cooking time is longer than 30
minutes, then the steam generating unit
will switch off 3 minutes before the end
of cooking time to make use of residual
energy. This is indicated by the letters
EC in the display.
27
Page 28

Use
Interrupting a function
You can interrupt a function which is in
operation at any time.
Procedure:
Press Stop.
^
The colon in the display stops flashing.
The light bar between Stop and Start
comes on.
The heating is switched off and the
cooking time remaining is stored in
memory.
You can now open the door, for
example, to stir something.
Take care. Hot steam will escape
when you open the door. Make sure
that the contents do not spill over
when taking containers out of the
steam oven. Danger of burning or
scalding!
If the function has been interrupted for
a longer period, the appliance will have
cooled down and will need to heat up
again. In this case, the display will
show the current oven temperature
rising until it reaches the set
temperature. Only when the set
temperature has been reached, does
the display switch to show the cooking
time remaining.
Altering a function
If you wish to select a different function
whilst the oven is in operation, turn the
selector to the new function and then
enter time and temperature as
previously described.
To continue:
^
Close the door.
^
Press Start.
If you have only interrupted the function
briefly, you will see the cooking time
remaining continue to count down in
the display after the door has been
closed.
28
Page 29

Use
At the end of cooking time
At the end of the set cooking time an
audible tone sounds 5 times and 4
zeros appear in the display.
A tone will sound once a minute to
remind you to take the food out of the
oven.
You can now either continue cooking or
you can switch the appliance off.
To continue cooking:
^ Open the door, but do not turn the
function selector to "0" .
The audible tone will stop once the
door is opened.
To switch off:
Turn the function selector to "0".
^
The audible tone and all displays
disappear.
Wait until all remaining residual water
^
is pumped from the steam generating
unit back into the water container
before opening the door.
After use
Remove and empty out the water
^
container and then dry it.
^ Wipe the cooking compartment with
a cloth and also wipe the ventilation
outlet and drip tray.
^ Leave the door open as long as the
cooking compartment is still damp.
Take care. Hot steam will escape
when you open the door. Make sure
that the contents do not spill over
when taking containers out of the
steam oven. Danger of burning or
scalding!
^
Then either select a new cooking
time and press Start or select a new
function, temperature and cooking
time as described in the previous
section and then press Start.
29
Page 30

Use
Insufficient water / water
container not in place
After a function has been started:
If the water container is not in place or
there is not enough water in the water
container, the display will show a small
j next to the symbol for insufficient
water p and a continual audible tone
will sound.
Procedure:
^ Open the door.
^ Check the water level and add more
water if required.
^ Push the water container fully into
position and close the door.
After switching off:
(with the function selector at "0")
If there is still residual water in the
steam generating unit and the water
container is not in place in the
appliance, a continual tone will sound
and F1 will appear in the display.
Procedure:
Place the water container in the
^
appliance and close the door.
Press Start.
^
Now the remaining residual water can
be pumped back out of the steam
generating unit into the water container.
^
Press Start.
The function will now continue as
normal.
30
Page 31

Use
Protection from overheating
The appliance has a safety feature
which prevents it overheating. If the
temperature in the steam generating
unit becomes too high the appliance
switches off automatically.
It is evident that the appliance has
switched off if:
during operation the display goes out
–
and shows only the temperature
going down.
after starting a new function the oven
–
temperature displayed fails to rise
even after a period of time has
elapsed.
Procedure:
Turn the function selector to "0" and
^
wait until the appliance has cooled
down.
Begin again.
^
If the appliance still does not heat up
then please contact the Customer Ser
vice department so that they can
resolve the problem. (See back page
for the address).
-
31
Page 32

Use
Safety lock
Keep children away from the steam
oven for their own safety.
The appliance is equipped with a safety
lock to prevent it being switched on by
accident.
To activate the safety lock:
Select "DESCALE" k .
^
Press the - button for at least 5
^
seconds.
The symbol a for the safety lock will
appear in the display.
^ Turn the function selector back to "0".
The appliance cannot be used any
more until the safety lock is
de-activated.
How to de-activate the safety lock:
Select "DESCALE" k.
^
Press the - button for at least 5
^
seconds until the a symbol goes
out.
32
Page 33

Suitable containers
Some stainless steel cooking
containers are supplied with the
appliance.
Other containers, are available in a
variety of sizes, both perforated and
solid, as optional accessories. When
choosing the most suitable container
for the particular food you are cooking,
please note:
Use perforated cooking containers
–
whenever possible, e.g. for cooking
vegetables. The steam can reach the
food from all sides and the food is
cooked evenly.
– With large items of food, such as
whole potatoes, the steam can work
effectively because there are spaces
between the individual pieces into
which the steam can penetrate. This
way a large quantity will take the
same time to cook as a smaller
amount and large, deep containers
can be used. Where possible space
the food out to allow the steam more
room.
Practical tips
More compact dishes such as
–
casseroles or bakes, or food such as
peas or asparagus spears, which
have little or no space between them
will take longer to cook because the
steam has less space to work in. The
fuller the container the longer it will
take to cook. It is best to use 2 or 3
flatter containers rather than one
deep one for this type of food and
then only fill them between 3 and 5
cm deep. Cooking times quoted are
calculated on this principle. Deeper
dishes will take longer to cook.
– To ensure even results when cooking
with more than one container do not
use more than one gastronorm size
GN 1/2 container.
– The steam oven is designed to cook
quantities of up to 6-8 portions. Be
careful not to exceed the amounts
quoted.
You will find various tips on how to use
the steam oven in the following sections
or in the cook book.
33
Page 34

Practical tips
You can also use your own containers
and dishes. However, please note the
following:
The container must be heat resistant
–
to 100° C. Heat resistant glass or
ceramic glass, porcelain
(chinaware), stainless steel and
enamel dishes are all suitable.
Food will take considerably longer to
–
cook than the time quoted if the dish
has thick sides.
Place the container on the rack
–
supplied.
Ensure that there is a gap of at least 3
cm between the upper rim of the
container and the top of the cooking
compartment to allow sufficient steam
into the container.
34
Page 35

Cooking charts
Practical tips
Food Function Temperature
in °C
Vegetables
Artichokes Cook vegetables 100 25-40
Asparagus | 100 7-9
Broccoli, florets | 100 7-8
Broccoli, whole | 100 10-18
Brussels sprouts | 100 8-15
Carrots, diced | 100 3-6
Carrots, sliced | 100 3-6
Carrots, whole | 100 8-15
Cauliflower, florets | 100 3-4
Cauliflower, whole | 100 15-20
Celery, sliced | 100 8-10
Green beans | 100 3-4
Green cabbage, shredded | 100 4-10
Kohlrabi, diced | 100 8-10
Leeks, sliced | 100 4-6
Leeks, whole | 100 6-10
Peas | 100 4-8
Potatoes, peeled | 100 10-15
Potatoes, unpeeled | 100 15-20
Red cabbage, chopped | 100 10-15
Savoy cabbage, chopped | 100 10-15
Spinach | 100 6-8
Stuffed peppers | 90 40-50
White cabbage, chopped e 100 15-25
Time in
minutes
Note:Data and times given in this chart are for guidance only. Values have been
obtained from an oven designed for the German market.
35
Page 36

Practical tips
Food Function Temperature
in °C
Meat and sausage
Beef stew Poultry / Meat 100 80-100
Chicken breast | 100 10-20
Chicken thighs l 100 18-22
Cutlets in gravy | 100 15-20
Gammon steaks | 100 6-12
German sausage | 95 3-5
Rib of pork e 100 50-70
Fish and seafood
Cod steaks Fish 75 6-10
Cod, fillet l 75 4-8
Mackerel, whole l 75 10-15
Mussels | 95 10-12
Salmon, fillet | 75 8-12
Sole, fillet | 75 4-6
Trout, whole e 75 10-18
Bakes
Cheesy rice bake COOK Universal 100 25-35
Macaroni bake l 100 50-60
Quark and apple bake e 100 30-40
Pate
Chicken pate Bio 75 40-60
Fish pate e 75 60-80
Time in
minutes
Note:
Data and times given in this chart are for guidance only. Values have been
obtained from an oven designed for the German market.
36
Page 37

Practical tips
Food Function Temperature
in °C
Pasta, Rice and grains
Rice COOK Universal 100 20-25
Noodles | 100 15-20
Soaking grains e 90 20-40
Pulses
Beans, pre-soaked COOK Universal 100 30-40
Lentils, not pre-soaked l 100 25-35
Peas, pre-soaked e 100 15-20
Side dishes
Potato dumplings, small Bio 75 12-18
Potato dumplings, large | 75 20-40
Bread dumplings e 75 20-22
Eggs
Boiled COOK Universal 100 4-10
Royale / garnish e 100 12-15
Fruit
Apples COOK Universal 100 3-6
Apple slices | 100 2-5
Pear halves | 100 3-5
Peaches | 100 2-4
Dried fruit e 100 5-7
Desserts
Creamy desserts, in portions COOK Universal 90 30-40
Soufflé, in portions | 90 15-20
Steam puddings e 90 12-15
Time in
minutes
Note:
Data and times given in this chart are for guidance only. Values have been
obtained from an oven designed for the German market.
37
Page 38

Practical tips
Tips on steaming
Steam prevents food from drying out
–
so it remains moist, and juices are
not lost. This applies to a wide variety
of food, including dumplings, steam
puddings, fish and meat dishes, as
well as vegetables.
You can select any shelf level. You
–
can also cook on several levels at
the same time. This will not alter the
cooking time.
Food does not brown or get crisp
–
from over-cooking. It is gently
steamed, and not roasted or baked.
Cheese melts perfectly without
getting burnt. It is a healthy way of
cooking, and it brings out the distinct
flavour of the food.
– When cooking frozen food, e.g.
vegetables, ensure that any large
clumps frozen together are broken
up first so that they cook evenly. The
cooking time is approximately the
same as for fresh vegetables.
Only fill solid containers with liquid
–
up to the lower edge.
Dried foods like pasta and rice must
–
be cooked in liquid. Pasta should be
well covered with liquid. With rice,
pulses etc. the proportion of food to
liquid should be 1:1.
Cooking liquids do not boil away.
–
They are either absorbed by the
food, as with rice and pasta, or they
remain in the dish to form a sauce,
as with casseroles. The sauce can
then be thickened or added to after
cooking.
– Grease perforated containers
beforehand if using them to cook
fish, and solid containers if using to
cook dishes containing eggs.
– To avoid any transfer of tastes
caused by moisture dripping down
from above, solid containers should
be placed on the rack above any
perforated containers.
–
Cooking with steam retains the true
taste of the food better than
conventional cooking. Food should
not therefore be seasoned until after
it has been cooked.
38
Page 39

Reheating
Your steamer is very effective at
reheating dishes which have been
prepared previously.
Procedure:
Place the food on a flat plate and
^
cover it with a deeper plate or some
heat-resistant foil.
Select the REHEAT function.
^
Select a cooking time of between 5-8
^
minutes, depending on the type of
food.
Press Start.
^
39
Page 40

Defrosting
e
Defrost time
in
Minutes
Food to be defrosted Function Weight in g
Meat
Roasting joints DEFROST per cm height 60 8-10 15-20
Minced meat | 250 g 50 15-20 10-15
Minced meat | 500 g 50 20-30 10-15
Minced meat | 1000 g 50 30-40 10-15
Stew | 250 g 60 20-25 10-15
Stew | 500 g 60 30-40 10-15
Stew | 1000 g 60 50-60 10-15
Liver | 250 g 60 20-25 10-15
Liver | 500 g 60 25-35 10-15
Liver | 1000 g 60 30-40 10-15
Rabbit | 500 g 50 30-40 10-15
Venison | 1000 g 50 40-50 10-15
Cutlets, sausages | 800 g 60 25-35 15-20
Poultry |
Chicken | 1000 g 60 40-50 15-20
Chicken drumsticks | 150 g 60 20-25 15
Turkey | 2000 g 60 80-90 15-20
Turkey drumsticks | 500 g 60 40-45 10-15
Turkey drumsticks | 1000 g 60 45-55 10-15
Duck | 1000 g 60 40-50 10-15
Goose | 2000 g 60 80-90 10-15
Fish |
Fillet | 300 g 60 10-15 5-10
Trout | 300 g 60 15-20 5-10
Whole fish | 1000 g 60 30-40 10-15
Vegetables |
Frozen in a block, e.g.
spinach, green
cabbage
Fruit |
Berries e 300 g 60 6-10 10-12
|
|
|
or
Height in cm
300 g 60 20-25 10-15
Temperatur
in °C
Standing-
time in
Minutes
Note: Data and times given in the chart are for guidance only. Values have been
obtained from an oven designed for the German market.
40
Page 41

Defrosting
Deep frozen food can be defrosted in
the steam oven in considerably shorter
times than when defrosting at room
temperature.
Procedure:
Select the DEFROST function.
^
If necessary alter the temperature
^
(see chart).
Select the defrost time (see chart).
^
Press Start.
^
Tips on defrosting
– The time needed for defrosting
depends on the type and weight of
the food, and at what temperature it
was deep frozen.
– Use the rack with the drip tray
underneath it to defrost food which
will drip. This way the frozen food will
not be lying in defrosted liquid.
Fish does not need to be fully
–
defrosted before cooking. Defrost so
that the surface is sufficiently
defrosted to take herbs and
seasoning.
Fish which is to be given a coating of
breadcrumbs should be fully
defrosted so that the coating sticks
to the flesh.
Turn, stir or separate food about
–
half-way through the defrosting time.
Allow food to stand at room
–
temperature at the end of the
defrosting time. This standing time
(see chart) is necessary to ensure
that the food is fully defrosted right
through to the core.
– Do not refreeze food once it has
thawed.
– Defrost deep frozen pre-cooked
meals according to the
manufacturer’s instructions.
It is particularly important to observe
food hygiene rules when defrosting
poultry. Do not use the liquid from
defrosted poultry. Pour it away and
wash the tray, the sink and your
hands.
–
Food which will not drip can be
placed on the rack or in a dish once
the wrapping has been removed.
– Defrost baked goods in a sealed
freezer bag.
41
Page 42

Bottling
Bottling should only be undertaken
by an experienced cook who has
received proper training in this
method of preserving fruit and
vegetables, and understands the
implications of the chemical
reactions involved.
Important
When bottling in the steam oven a
maximum temperature of 98°C must
not be exceeded.
For bottling select the COOK Universal
function.
Function COOK Universal
Produce Temperature
Berries
Strawberries
Red /
Blackcurrants
Gooseberries
Blackberries
Fruit with stones
Apricots
Cherries
Plums
Greengages
Mirabelle plums
Fruit with pips
Apples
Pears
Quinces
Vegetables
Beans
Peas
Carrots
* The times quoted are for 1.0 litre jars.
If using 0.5 litre jars reduce the time by about 15
minutes.
If using 0.25 litre jars reduce the time by about
20 minutes.
in °C
80
80
80
80
85
85
85
85
85
90
90
90
90
90
90
Total time
in
minutes*
45
50
55
55
55
55
55
55
55
50
65
55
120
120
90
Procedure:
Insert the drip tray at level 1 and
^
place the rack above it.
Put the prepared jars (all the same
^
size) on the rack, ensuring that they
do not touch one another.
This allows the hot steam to surround
the jars on all sides.
We recommend that you place two jars
behind and two in front (see
illustration).
^ Select COOK Universal and lower the
recommended temperature to 80-90
°C (see chart).
^
Set the total time (see chart).
^
Press Start.
^
To make use of residual heat, wait 30
minutes after the oven has switched
off before removing the jars from the
cooking compartment.
^
Cover the jars with a cloth and allow
to cool for approx. 24 hours.
42
Page 43

Bottling
Preparing a whole meal
Menu suggestions Function Time in minutes
1. Gammon and sauerkraut,
Boiled potatoes
2. Green cabbage with smoked bacon,
Boiled potatoes
3. Stuffed peppers,
Boiled potatoes
4. Beef ragout,
Boiled potatoes
5. Stuffed cauliflower,
Potatoes boiled in their skins
6. Macaroni bake,
Stewed apple with raisins
7. Red mullet in wine & veg. sauce,
Boiled potatoes
8. Fillets of plaice in dill sauce,
Rice
9. Stuffed sole in a creamy sauce,
Rice with peas
10. Blue trout,
Parsley potatoes
COOK Universal
|
|
|
|
|
|
|
|
|
|
|
|
|
|
e
Fish
|
|
|
23-35
10-15
29-37
10-15
40-60
10-15
100-140
10-15
40-50
20-40
75-85
3-5
15-20
10-15
10-14
20-25
10-12
20-25
12-18
10-15
11. Fish with oriental vegetables,
Rice
It is very economical and practical to cook a whole meal at the same time in the
steam oven.
A few examples are given in the above chart. Consult the cookery book for more
information.
e
|
35-45
20-25
43
Page 44

Meal planning
Procedure:
Place cooking containers on different
^
levels or place them side by side or
one on top of the other on the rack.
Insert the drip tray at the lowest level.
^
In general, the cooking times will vary
according to the type of food. This
means that you will need to open the
steam oven at different times to add a
particular dish. Calculate cooking times
as follows:
Stuffed peppers 40 minutes
with
Boiled potatoes 10 minutes
First place the dish with the longest
^
cooking time, e.g. the stuffed
peppers, in the oven.
To calculate the cooking time
^
subtract the shorter cooking time
from the longer time, i.e. 40 minutes 10 minutes = 30 minutes in the
example given above.
Press Start.
^
The cooking process stops
automatically after 30 minutes.
When this happens the second dish,
^
e.g. the potatoes in this example,
should be placed in the oven.
^ Set the cooking time for the second
dish, e.g. 10 minutes.
^ Press Start again.
At the end of cooking time an audible
tone will sound and you can then
remove both dishes at the same time.
(see menu suggestion 3 in the chart).
44
Page 45

Blanching
Blanching with steam
You can use your steam oven to blanch
vegetables to prepare them for
freezing.
Blanching (short heat treatment) is
usually necessary so that the enzymes
which are contained in the vegetables
are made inactive. Active enzymes
cause changes in colour and also
break down active substances, for
example vitamin C.
Asparagus, cucumber and herbs need
not be blanched.
As a rule, fruit can also be frozen raw.
Only a few varieties which go brown
easily (apples, pears) should be
blanched first.
Procedure:
^ Put the prepared vegetables
(cleaned, washed, chopped etc.) into
a perforated cooking container.
^
Place the container on the rack in the
oven and insert the drip tray at the
lowest level.
Disinfecting baby bottles
The steam oven can be used to
disinfect baby bottles and other
containers. Check beforehand that all
parts, teats etc., are declared by the
manufacturer to be heat-resistant to
100 °C.
Proceed as follows:
Place the drip tray on the first shelf
^
level and place the rack above it.
Dismantle, clean and thoroughly
^
rinse the bottles and space the
individual parts out on the rack,
ensuring that they do not touch one
another. This allows the hot steam to
reach them from all sides.
^ Select COOK Universal Q.
^ Set a time of at least 15 minutes.
^ Dry thoroughly using a fresh, clean
tea towel after disinfection. All parts
of the bottles must be completely dry
before they are reassembled to keep
them germ free.
^
Blanch using COOK Universal at a
temperature of 90 °C.
^
Set a time of 1-2 minutes.
^
Press Start.
^
Once blanched, plunge the
vegetables into cold water to cool
them down quickly. You can then
freeze them when they have dried off
thoroughly.
45
Page 46

Cleaning and care
General notes
Allow the appliance to cool down
before cleaning.
Clean the whole appliance and then dry
it thoroughly after each use.
Make sure the appliance is completely
dry before closing the door.
Do not use a steam cleaner to clean
this appliance. The steam from the
cleaning appliance could reach the
live electrical components and
cause a short circuit. Pressurised
steam could also cause permanent
damage to the surface and to
components, for which the
manufacturer cannot accept liability.
Never use cleaners containing
alkalines, soda, acids or chlorides,
oven sprays, dishwasher detergents
or abrasive cleaning agents, hard
brushes, scouring pads and cloths
or steel wool. You should also not
use sponges etc. which have
previously been used with abrasive
cleaning agents. These would
damage the surface.
46
Page 47

Cleaning and care
Appliance front
The appliance front and controls should
be cleaned using a mild solution of hot
water with a little washing up liquid,
applied with a damp cloth. Wipe dry
using a soft cloth.
Appliances with aluminium fronts (see
dataplate) and/or with metal coloured
lacquered controls:
Parts of the appliance front made from
aluminium and the metal coloured
lacquered controls are susceptible to
damage from scratches and abrasion
as well as from alkaline and acidic
substances. It is therefore essential to
clean these with care as described
above. Do not use cleaning agents for
stainless steel or descaling agents on
these surfaces. Soiling should be wiped
off as soon as possible after using the
appliance. If the soiling is left for a long
time it can have a damaging effect on
the surfaces.
Drip tray, rack and cooking
containers
The drip tray, rack and cooking
containers should be washed and dried
each time they are used.
They can be washed in the dishwasher.
Stainless steel fronts:
Please contact your local Spare Parts
department for information on the
appropriate cleaning product.
47
Page 48

Cleaning and care
Removable door and drip plate
Removing the door will make it easier to
reach into the oven interior and also this
will allow you to remove the drip plate
w.
Procedure:
Open the door fully.
^
Flip up the clamps in front of the door
^
hinges.
Holding the door with both hands, lift
^
up the door until the hinges
disengage. Remove the door.
^ If necessary the drip plate w can be
removed for cleaning. After cleaning
dry it and then put it back into the
oven again, ( cut-out to the rear).
^
Slowly close the door until the raised
clamps are touching the frame of the
oven interior.
48
To re-fit the door reverse the above
procedure:
^
Place the door on the hinges.
^
Open the door fully and push the
clamps back down.
^
Close the door.
Page 49

Cleaning and care
Cooking compartment
The cooking compartment including the
door seal and the steam oven door
should be cleaned after each use.
Allow the oven to cool down before
cleaning.
Most cooking residues can be easily
removed using a sponge cloth, a little
washing up liquid and warm water.
If your water is very hard, a white
deposit can build up on the interior
walls. A little vinegar on a damp cloth
can be used to remove this. (Note:
vinegar must not be used in the
Descaling
programme).
Wipe the interior with clean water and
rub dry.
Runners
It is helpful to remove the side runners
before cleaning the cooking
compartment.
Procedure:
Pull on the fixing knob to release it.
^
The runners can then be removed
easily. Remove them by pulling them
first of all towards the centre of the
oven a, and then towards you b .
The runners can be cleaned with water
and a little washing up liquid or in a
dishwasher.
To re-fit the runners reverse the above
procedure. Insert them into the rear of
the oven and them push them in at the
sides.
49
Page 50

Cleaning and care
Connecting valve
The connecting valve on the water
container consists of a valve insert t,
a rubber pad u and an O-Ring v.
There is also a connecting valve on the
appliance itself, this however only
consists of the valve insert t.
The connecting valve or parts of it may
need replacing if
– an unusually large amount of water is
collecting in the bottom of the
appliance where the water container
connects into the valve on the
appliance.
–
an audible tone is sounding and the
symbol for insufficient water is lit up,
even though the water container is
full and located correctly.
Visually check the connecting valves
for obvious wear and tear. If it is not
obvious which part is faulty replace the
valve inserts t in the water container
and in the appliance. If the fault is still
not corrected then replace the O-Ring
v and the rubber pad u in the water
container connecting valve.
To replace the valve insert t :
Insert the pointed end of the special
^
tool (see Accessories at the
beginning of this book) into the valve
insert and pull it out:
of the water container
50
of the appliance
Page 51

Cleaning and care
Attach a new valve insert u to the
^
blunt end of the special tool.
Insert this into the opening in the
^
connecting valve.
Make sure that sealing ring on the valve
insert is at the front.
^ Press the valve insert firmly into
position using the blunt end of the
tool.
To change the rubber pad u on the
water container:
Using tweezers or pointed pliers pull
^
the extension piece through the
opening so that the small thicker end
sits in the inside of the water
container.
To change the O-Ring v on the water
container:
Lay the water container on its side.
^
Use a finger nail, knife or a small
^
screwdriver to to get underneath the
O-Ring.
^ Pull the old O-Ring off.
^ Push the new O-Ring onto the
connecting valve. Then lubricate it
with the silicone grease supplied
(see "O-Ring" in "Cleaning and
Care").
^
Pull the old rubber pad out of the
connecting valve.
^
Dampen the new rubber pad with
water.
^
Push the new rubber pad into the
connecting valve so that the
extension piece on the rubber pad
sticks out through the opening in the
water container.
51
Page 52

Cleaning and care
O-Ring
It is possible that during the course of
time the water container becomes
harder to put into the appliance and
take out again.
If this happens the black O-Ring v
should be lubricated with the silicone
grease supplied (see Accessories").
Leave the new O-Ring on the
connecting valve. Only use a very small
amount of grease!
When handling silicone grease please
observe the following safety measures:
– Remove any silicone grease from
your skin either by wiping it off or by
washing it off.
– If the grease gets into the eyes it
must be rinsed out with plenty of
clean water.
When lubricating the O-Ring only
use the silicone grease supplied. On
no account must margarine or oil or
any other domestic grease or fats be
used as these can cause the O-Ring
to deteriorate.
– If it is swallowed seek medical
advice.
52
Page 53

Cleaning and care
Descaling
The appliance will need descaling after
a certain number of operating hours.
The display will alert you when this
needs to be done.
If, after selecting the programme j 5
appears for a short time in the display,
then the appliance needs to be
descaled.
The display indicates that the appliance
can be used a further 5 times before it
locks out. If the appliance is not
descaled immediately a 4 will appear in
the display the next time the appliance
is switched on, and so on.
If the display shows a j 0 ,
the appliance is locked and an audible
tone will sound.
The machine cannot be used until
descaling has been carried out.
53
Page 54

Cleaning and care
When descaling the oven, only use
citric acid based descaling agents.
Follow the manufacturer's safety
instructions on the packaging. Do
not use vinegar or descaling agents
containing vinegar, as these can
cause corrosion.
On aluminium fronted appliances
(see dataplate) do not let descaling
agent get onto aluminium surfaces.
If this does happen it must be wiped
off immediately as otherwise it will
mark the surface.
A small j will appear in the display
next to the symbol for descaling k and
a running time of 33 minutes. At the
same time the light bar between the
Stop and Start buttons will come on.
Procedure:
^ Using a proprietary household
descaling agent with a citric acid
base, dilute with water to make 1.0
litre. Follow the manufacturer"s safety
instructions given on the packaging.
^
Place the solution in the water
container and push it into the
machine until it engages in position.
^
Turn the programme selector to
DESCALE k .
^ Press Start.
^ The descaling programme can only
be cancelled during the 1st minute
after pressing the Start button. A new
programme cannot be selected until
the descaling process has been
completed.
Do not adjust the function selector
during the descaling process. If it is
turned before the end of the process
the whole process will have to be
started from the beginning again.
54
Page 55

When 8 minutes show in the display an
audible tone will sound and the
following will alternate in the display:
Cleaning and care
Take care when opening the door as
hot steam will escape.
Take the water container out of the
^
appliance, empty it and dry it with a
soft cloth.
Wipe out the oven interior with an
^
absorbent cloth. Remember to wipe
down the ventilation outlet and the
drip channel.
Leave the door open until the
^
moisture in the cooking compartment
has dissipated and the interior is dry.
^ Empty the water container and refill it
with 1.0 litre of fresh water,
reposition it in the appliance and shut
the door.
^ Press Start.
This procedure must be repeated twice
more when the audible tone sounds.
Do not be surprised at the amount of
steam that is emitted.
At the end of the process the following
will appear in the display:
^
Turn the programme selector to "0".
^
Wait until the appliance has pumped
any remaining water back into the
water container before opening the
door.
If there is a power cut during the
descaling process, the time of 33
minutes will show again in the display
once power has been restored and the
light bars between the Stop and Start
buttons will come on.
^ To continue the process press the
Start button again.
If the function selector is moved
during a power cut , the display will
remain dark after power has been
restored and the light bar between the
Stop and Start buttons will flash.
^
Turn the programme selector back to
the DESCALE k position and press
the Start button.
55
Page 56

Problem solving guide
Maintenance and repairs to
electrical appliances should only be
carried by a suitably qualified and
competent person to ensure safety.
Repairs and other work by
unqualified persons could be
dangerous. The manufacturer
cannot be held responsible for
unauthorised work.
electrician or the Miele Service
Department.
... the water container has become
harder to put into the appliance and
take out again.
Lightly lubricate the O-Ring on the
connecting valve in the water container
with the silicone grease supplied (see
"O-Ring" in "Cleaning and Care").
What to do if ...
... the fan can still be heard after the
appliance has been switched off
The appliance is fitted with a fan which
removes steam from the oven.
The fan will continue to run for a while
after the oven has been switched off.
... the appliance does not heat up
when switched on
Check whether
– the Start button has been pressed.
–
the safety lock has been activated.
–
the overheating protection
mechanism has been triggered (see
section "Protection from
overheating").
–
the mains fuse has blown.
If these are not the case then
disconnect the appliance from the
mains supply for about 1 minute, by
... a great deal of steam comes out of
the appliance while it is in use.
It is possible that the appliance was not
rinsed through using the "Descaling"
function before it was used for the first
time.
Refer to the section "Before using for
the first time" and carry out the
procedure as described.
If this does not solve the problem, call
the Miele Service Department.
... steam escapes out of a closed
appliance door or any other part of
the steam oven
Check whether the door seal
–
is correctly fitted. If necessary press
it in all the way round the door to
make sure it is evenly located.
–
shows any signs of wear and tear,
e.g. cracks. If so it must be replaced.
Call the Miele Service Department.
–
switching it off at the socket, or
–
by withdrawing the mains fuse.
Reconnect to the mains supply and
switch the appliance on. If it still does
not heat up then contact a qualified
56
Page 57

Problem solving guide
... the following symbols and figures
appear in the display and an audible
tone sounds:
p j: Insufficient water
Check whether
the water container has been pushed
–
as far as it will go into the appliance.
there is sufficient water in the water
–
container.
any parts of the connecting valve
–
have deteriorated or broken and
need replacing.
See the "Connecting valve" section
for details.
k j 0: The appliance has locked itself
and requires descaling (see the
"Descaling" section).
...the oven cavity temperature and
the temperature symbol are flashing
in the display:
There was a power cut during a
programme. Press the Start button
again.
... after switching the appliance off
(function selector switch at the "0"
position) a continual audible tone is
heard and F1 appears in the display
Check whether the water container is
positioned in the appliance ready to
take residual water being pumped back
out of the appliance.
57
Page 58

Electrical connection
All electrical work should be carried out
by a suitably qualified and competent
person in strict accordance with local
and national safety regulations.
The voltage, rated load and fuse rating
are given on the data plate. Please
ensure that these match the household
mains supply.
The appliance must only be
operated when built-in. This is to
ensure that all electrical parts are
shielded. No live parts must be
exposed to the touch.
The appliance is supplied with a mains
cable for connection to an a.c. single
phase 230 -240 V, 50 Hz supply.
Connection should be made via a
suitable switched socket and the on/off
switch should be easily accessible after
the appliance has been built in.
For extra safety it is advisable to install
a residual current device (RCD) with a
trip current of 30 mA.
Test marks Electrical safety,
C-Tick Mark
Important
The wires in the mains lead are
coloured in accordance with the
following code:
Green/yellow = earth
Blue = neutral
Brown = live
As the colours of the wires in the mains
lead of this appliance may not
correspond with the coloured markings
identifying the terminals in your plug,
proceed as follows:
The wire which is coloured green and
yellow must be connected to the
terminal in the plug which is marked
with the letter E or by the earth symbol
z or coloured green or green and
yellow.
The wire which is coloured blue must
be connected to the terminal which is
marked with the letter N or coloured
black.
The wire which is coloured brown must
be connected to the terminal which is
marked with the letter A or coloured
red.
58
WARNING
THIS APPLIANCE
MUST BE EARTHED
Page 59

Electrical connection
Important
The electrical safety of this appliance
can only be guaranteed when
continuity is complete between the
appliance and an effective earthing
system, which complies with local and
national safety regulations. It is
imperative that this basic safety
requirement is tested and where there
is any doubt, the electrical system of
the house should be tested by a
qualified electrician.
The manufacturer cannot be held
responsible for damage or injury, such
as an electric shock, caused by the
lack or inadequacy of an effective
earthing system.
The manufacturer cannot be held
responsible for damage which is the
direct or indirect result of incorrect
installation or connection.
59
Page 60

Electrical connection
After sales service
In the event of faults which you cannot easily remedy yourself, or if the appliance
is under guarantee, please contact:
your Miele Dealer
or
the nearest Miele Service Department, (see address on the back page).
When contacting the Service Dept. please quote the Model and Serial number of
your appliance, both of which are shown on the data plate
Data plate
Space for extra adhesive data plate label supplied with the appliance. Make sure
that the model designation matches that given on the front of this Operating
Instruction booklet.
606162
Page 61

Page 62

Page 63

63
Page 64

Alteration rights reserved / 5003
M.-Nr. 05 246 571 / 02
This paper consists of cellulose which has been bleached without the use of chlorine.
 Loading...