


OPERATING INSTRUCTIONS
..............................................................................................................................
Ovens
B 4.64 UP
B 5.64 UP
The second number represented by the point (.) refers to the colour of the appliance.
Q

Contents
Contents
Guide to the appliance. . . . . . . . . . . . . . . . . . . . . . . . . . . . . . . . . . . . . . . . . . . . . . 4
General view . . . . . . . . . . . . . . . . . . . . . . . . . . . . . . . . . . . . . . . . . . . . . . . . . . . . . . 4
Control panel . . . . . . . . . . . . . . . . . . . . . . . . . . . . . . . . . . . . . . . . . . . . . . . . . . . . . . 4
Accessories . . . . . . . . . . . . . . . . . . . . . . . . . . . . . . . . . . . . . . . . . . . . . . . . . . . . . . . 5
Warning and safety instructions. . . . . . . . . . . . . . . . . . . . . . . . . . . . . . . . . . . . . . 6
Before using for the first time. . . . . . . . . . . . . . . . . . . . . . . . . . . . . . . . . . . . . . . 12
IMPORTANT: Set the clock. . . . . . . . . . . . . . . . . . . . . . . . . . . . . . . . . . . . . . . . . . . 12
Cleaning and heating up for the first time . . . . . . . . . . . . . . . . . . . . . . . . . . . . . . . 14
Setting the time of day initially . . . . . . . . . . . . . . . . . . . . . . . . . . . . . . . . . . . . . . . . 15
Use . . . . . . . . . . . . . . . . . . . . . . . . . . . . . . . . . . . . . . . . . . . . . . . . . . . . . . . . . . . . 16
Selecting oven functions . . . . . . . . . . . . . . . . . . . . . . . . . . . . . . . . . . . . . . . . . . . . 16
Oven function chart . . . . . . . . . . . . . . . . . . . . . . . . . . . . . . . . . . . . . . . . . . . . . . . . 17
Adjusting the pre-set temperature . . . . . . . . . . . . . . . . . . . . . . . . . . . . . . . . . . . . . 18
Runner levels . . . . . . . . . . . . . . . . . . . . . . . . . . . . . . . . . . . . . . . . . . . . . . . . . . . . . 19
Rack . . . . . . . . . . . . . . . . . . . . . . . . . . . . . . . . . . . . . . . . . . . . . . . . . . . . . . . . . . 21
Safety lock . . . . . . . . . . . . . . . . . . . . . . . . . . . . . . . . . . . . . . . . . . . . . . . . . . . . . . . 22
Door contact . . . . . . . . . . . . . . . . . . . . . . . . . . . . . . . . . . . . . . . . . . . . . . . . . . . . . 23
Safety switch off. . . . . . . . . . . . . . . . . . . . . . . . . . . . . . . . . . . . . . . . . . . . . . . . . . . 23
Baking . . . . . . . . . . . . . . . . . . . . . . . . . . . . . . . . . . . . . . . . . . . . . . . . . . . . . . . . . . 24
Roasting . . . . . . . . . . . . . . . . . . . . . . . . . . . . . . . . . . . . . . . . . . . . . . . . . . . . . . . . 27
Grilling. . . . . . . . . . . . . . . . . . . . . . . . . . . . . . . . . . . . . . . . . . . . . . . . . . . . . . . . . . 30
Drying food . . . . . . . . . . . . . . . . . . . . . . . . . . . . . . . . . . . . . . . . . . . . . . . . . . . . . . 32
Bottling . . . . . . . . . . . . . . . . . . . . . . . . . . . . . . . . . . . . . . . . . . . . . . . . . . . . . . . . . 33
Yoghurt . . . . . . . . . . . . . . . . . . . . . . . . . . . . . . . . . . . . . . . . . . . . . . . . . . . . . . . . . 34
Warming plates. . . . . . . . . . . . . . . . . . . . . . . . . . . . . . . . . . . . . . . . . . . . . . . . . . . 35
Meals . . . . . . . . . . . . . . . . . . . . . . . . . . . . . . . . . . . . . . . . . . . . . . . . . . . . . . . . . . . 36
2

Contents
Clock / timer . . . . . . . . . . . . . . . . . . . . . . . . . . . . . . . . . . . . . . . . . . . . . . . . . . . . . 37
Setting . . . . . . . . . . . . . . . . . . . . . . . . . . . . . . . . . . . . . . . . . . . . . . . . . . . . . . . . . . 37
Setting and altering the time . . . . . . . . . . . . . . . . . . . . . . . . . . . . . . . . . . . . . . . . . 37
Setting the minute minder . . . . . . . . . . . . . . . . . . . . . . . . . . . . . . . . . . . . . . . . . . . 38
Switching off automatically. . . . . . . . . . . . . . . . . . . . . . . . . . . . . . . . . . . . . . . . . . . 40
Switching on and off automatically . . . . . . . . . . . . . . . . . . . . . . . . . . . . . . . . . . . . 42
Cleaning and care . . . . . . . . . . . . . . . . . . . . . . . . . . . . . . . . . . . . . . . . . . . . . . . . 44
Appliance front. . . . . . . . . . . . . . . . . . . . . . . . . . . . . . . . . . . . . . . . . . . . . . . . . . . . 44
Switching on the oven interior lighting . . . . . . . . . . . . . . . . . . . . . . . . . . . . . . . . . . 44
Removable oven door . . . . . . . . . . . . . . . . . . . . . . . . . . . . . . . . . . . . . . . . . . . . . . 45
Pyrolytic self-cleaning system . . . . . . . . . . . . . . . . . . . . . . . . . . . . . . . . . . . . . . . . 46
Baking trays, grill pan / oven tray, rack and roasting rack. . . . . . . . . . . . . . . . . . . 49
Changing the oven lamp . . . . . . . . . . . . . . . . . . . . . . . . . . . . . . . . . . . . . . . . . . . . 49
Problem solving guide. . . . . . . . . . . . . . . . . . . . . . . . . . . . . . . . . . . . . . . . . . . . . 50
Electrical connection . . . . . . . . . . . . . . . . . . . . . . . . . . . . . . . . . . . . . . . . . . . . . 53
Electrical connection U.K. . . . . . . . . . . . . . . . . . . . . . . . . . . . . . . . . . . . . . . . . . . . 53
After sales service . . . . . . . . . . . . . . . . . . . . . . . . . . . . . . . . . . . . . . . . . . . . . . . . 55
Customer contact. . . . . . . . . . . . . . . . . . . . . . . . . . . . . . . . . . . . . . . . . . . . . . . . . . 55
Data plate. . . . . . . . . . . . . . . . . . . . . . . . . . . . . . . . . . . . . . . . . . . . . . . . . . . . . . . . 55
3
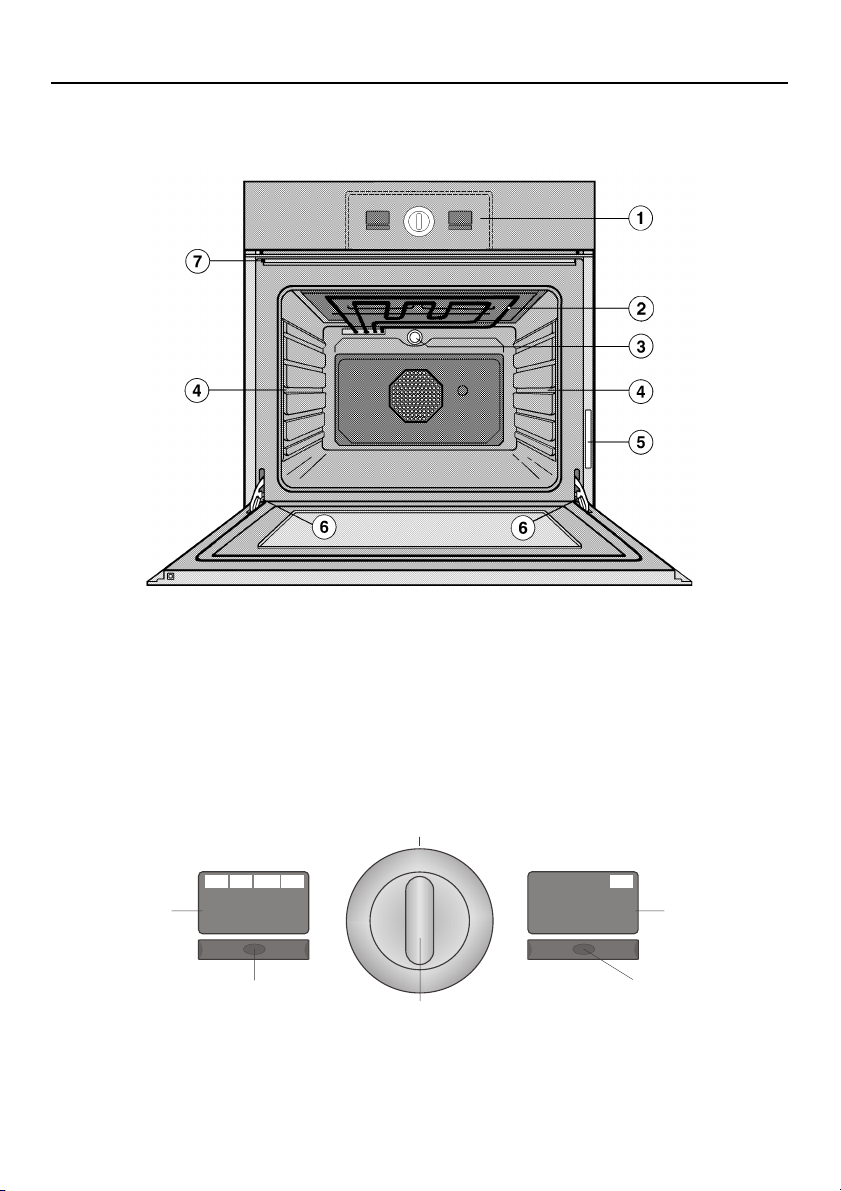
Guide to the appliance
Guide to the appliance
General view
Control panel
b
Top heat / Grill
c
Oven interior lighting
d
Runner levels
e
Control panel
i
Temperature display
i
Temperature button
j
Multi-function switch
k
4
{
LOCK
a
$
88:88
-
°C
+
a
j
Data plate
f
Safety hinges for removing
g
the door
Door contact switch
h
j
-
k
Clock / timer button
l
Clock / timer display
m
l
u
j
8888
m
+
l
Guide to the appliance
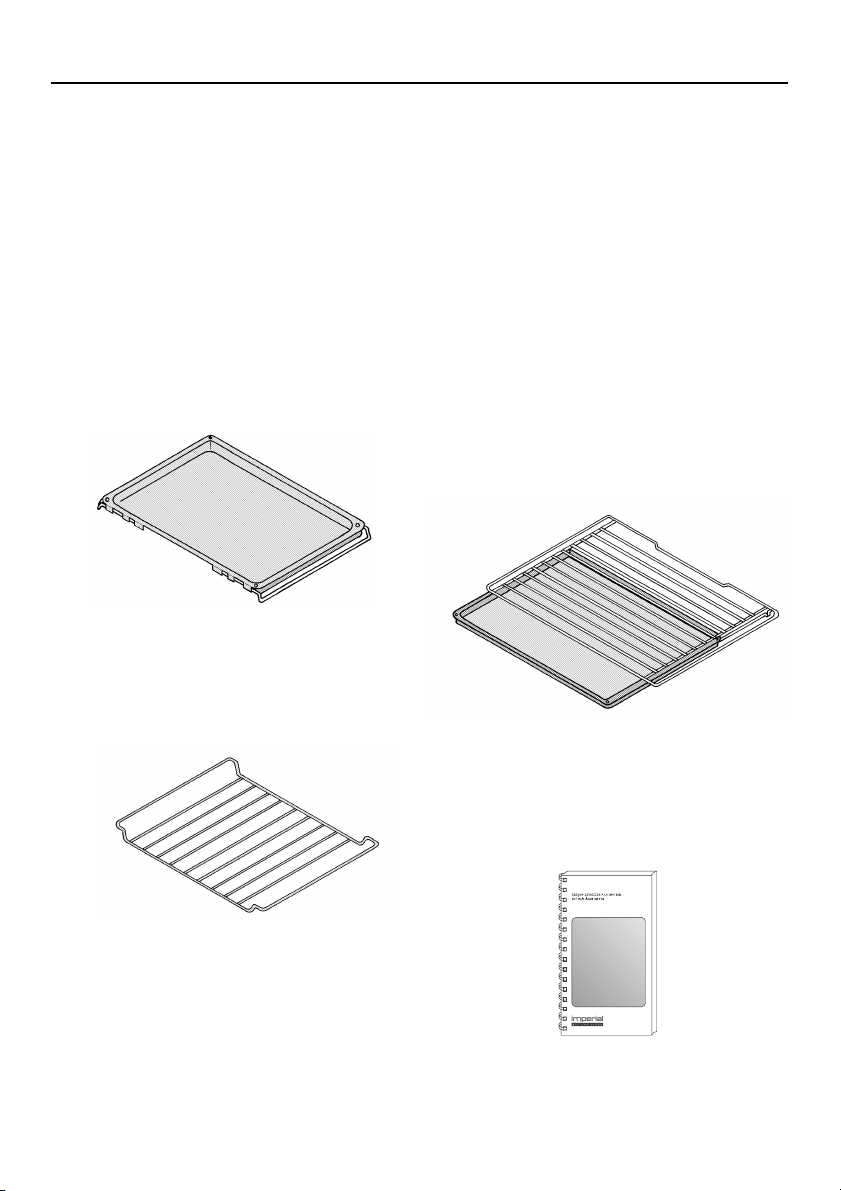
Accessories
Your oven will be supplied with most of the following accessories as standard.
However, if required, additional accessories can be ordered at extra cost.
Please quote the relevant M. Nr. (material number).
2 Baking trays
For small cakes and tray baking etc.
M.-Nr. 68 842
Rail:
M.-Nr. 68 880
Rack
Two way, height adjustable
M.-Nr. 68 840
Grill pan / oven tray (extra deep)
together with roasting rack
M.-Nr. 68 839
Grill pan / oven tray (separate item):
M.-Nr. 68 873
Roasting rack (separate item)
M.-Nr. 68 841
Cookery book
M.-Nr. 8 210 550 (German)
T.-Nr. 9 604 202 (English)
Stainless steel cleaner
M.-Nr. 95827 (Germany)
M.-Nr. 8095828 (U.K.)
Leitfaden und Rezept-Ideen
5

Warning and safety instructions
Warning and safety instructions
This appliance complies with all
relevant legal safety requirements.
Improper use of the appliance can,
however, present a risk of both personal injury and material damage.
Before installation and before using
the appliance for the first time, read
the operating instructions carefully.
They contain important notes on
safety, operation and care of the appliance. This way you will avoid the
risk of accidents and damage to the
appliance.
Do not let children access the appliance or its controls. Supervise its
use by the elderly or infirm.
Keep these instructions in a safe
place and pass them on to any future user.
Installation and connection
* This appliance must be installed
and connected by a suitably qualified and competent person in strict
accordance with national and local
safety regulations. The manufacturer
cannot be held responsible for damage caused by incorrect installation
or connection.
* The electrical safety of this ap-
pliance can only be guaranteed
when continuity is complete between the appliance and an effective earthing system, which complies with local and national
regulations. It is most important that
this basic safety requirement is
tested by a qualified electrician. The
manufacturer cannot be held responsible for the consequences of an inadequate earthing system (e.g. electric shock).
* Do not connect the appliance to the
mains electricity supply by an extension lead. Extension leads do not
guarantee the required safety of the
appliance (e.g. danger of overheating).
* For safety reasons this appliance
must only be operated as a built-in
appliance. This is necessary to ensure that all electric components are
shielded.
6

Warning and safety instructions
Repair work
* Should a fault occur switch the ap-
pliance off. The appliance is only
completely isolated from the electricity supply when it is switched off
at the wall socket, or the mains fuse
is withdrawn, or the screw-out fuse
is removed (in countries where this
is applicable).
Ensure power is not supplied to the
appliance while maintenance or repair work is being carried out.
* Repairs may only be carried out by
a suitably qualified and competent
person in strict accordance with national and local safety regulations.
Repairs and other work by unqualified persons could be dangerous.
The manufacturer cannot be held responsible for unauthorised work.
* Repairs to the appliance while it is
still under guarantee must only be
carried out by an authorised service
agent. Otherwise any subsequent repair work will not be covered by the
guarantee.
* On no account should the appliance
housing be opened. Tampering with
electrical connections or components and mechanical parts is
highly dangerous to the user and
can cause operational faults.
7

Warning and safety instructions
Correct usage
* This appliance is intended for do-
mestic use to cook food, and in particular to bake, roast, defrost, dry
fruit etc. and to grill. Any other
usage is at the owner’s risk and
could be dangerous. It must not be
used for commercial purposes. The
manufacturer cannot be held responsible for damage caused by improper use of the appliance.
* Always ensure that food is suffi-
ciently cooked or reheated. Many
factors will affect the overall cooking
time, including the size and amount
of food, its temperature, changes to
the recipe and the shape and size
of cooking container. Some foods
may contain micro organisms which
are only destroyed by thorough
cooking at temperatures over 70°C
for a minimum of 10 minutes. Therefore when cooking or reheating
foods, e.g. poultry, it is particularly
important that food is fully cooked
through. If in doubt select a longer
cooking or reheating time. It is important that the heat is allowed to
spread evenly throughout the food
being cooked.
* Do not store any inflammable object
in the oven. This could be a fire hazard if the oven were turned on inadvertently.
* Never line the floor of the oven with
aluminium foil when operating the
oven.
Never place a dish, tin, baking tray
or similar object on the floor of the
oven. This would block the heat and
could damage the anti-stick enamelling. Do not push pots and pans
around on the oven floor as this
could damage the surface.
* Put any deep frozen products such
as pizza on baking paper on the
rack. Do not place them on the baking tray or in the grill pan / oven tray.
This could cause the metal to distort.
* Do not heat up unopened tins or jars
of food in the oven, as pressure can
build up and they may explode. This
could result in injury or damage.
8

Warning and safety instructions
* Cover any food which is left in the
oven to be kept hot. This avoids the
food drying out. It also prevents
steam condensing and possibly
leading to moisture damage in the
oven.
* Fruit juice drips or splashes may
leave marks behind. These may still
be visible even when splashes have
been removed properly.
* Under no circumstances use a
steam cleaner to clean this appliance. The steam could attack the
electrical components and cause a
short circuit.
* Do not lean or sit on the open oven
door, or place heavy objects on it.
This could damage the appliance.
The oven door can suppport a maximum load of 10 kg. Keep children
well away.
9

Warning and safety instructions
Caution - danger of burning
* During the pyroloytic cleaning pro-
cess the outer oven door becomes
hotter than in normal oven use and
can reach a temperature of approx. 150 °C. Do not touch the oven
door which may be very hot.
Children should be prevented in any
event from touching the appliance
during pyrolytic operation. Danger
of burning.
* Remove all accessories and ensure
that the oven is completely empty
before using the pyrolytic cleaning
function. Otherwise there would be
a danger of fire.
* The oven interior and the inside of
the door, as well as the upper area
of the outer door get hot during use
and stay hot for some time after the
oven is switched off. Keep children
well away.
* Do not use the oven to heat up the
room. Due to the high temperatures
radiated, objects left near the oven
could catch fire.
* Always wear oven gloves when plac-
ing food in the oven or removing it.
Take great care to avoid coming into
contact with the top / grill element inside the oven, as this becomes very
hot.
* Never add water directly to food in a
hot oven. This could result in a sudden build up of steam which could
cause burns and could also damage the anti-stick enamelling.
* Do not leave the appliance unat-
tended when cooking with oils and
fats as these can be a fire hazard if
allowed to overheat.
* If alcohol such as rum, cognac,
wine etc. is used in cooking, high
temperatures in the oven can cause
the alcohol to vaporise. Please take
note that under adverse circumstances the alcohol can catch light
on the hot elements.
* Do not use plastic containers. They
will melt at high temperatures.
* When using kitchen appliances con-
nected to sockets near the oven, ensure that the cable cannot get
trapped in a hot oven door, which
could melt the cable insulation and
be dangerous. Danger of electric
shock.
10

Warning and safety instructions
Other dangers
* Take care in the region of the oven
door hinges. Keep children well
away.
* Keep children away from the ap-
pliance if it is switched on.
* In countries where there are areas
which may be subject to infestation
by cockroaches or other vermin,
pay particular attention to keeping
the appliance and its surroundings
in a clean condition at all times. Any
damage which might be caused by
cockroaches or other vermin will not
be covered by the appliance guarantee.
The manufacturer cannot be held
liable for damage caused by noncompliance with these Warning and
Safety instructions.
11

Before using for the first time
Before using for the first time
IMPORTANT: Set the clock
Before the oven can be used you must
either, set the clock (see “Setting the
time of day initially”) or press the
middle of the clock / timer button underneath the clock / timer display once
briefly.
Please stick the extra data plate supplied with this appliance in the space
provided in the “After Sales Service”
section at the end of these instructions.
Keep these instructions handy for reference whilst using the oven.
12

Before using for the first time
Caring for the environment
The transport and protective packing
has been selected from materials
which are environmentally friendly for
disposal and can normally be recycled.
Rather than just throwing these materials away, please ensure they are offered for recycling.
Disposal of your old appliance
Old appliances contain materials which
can be reclaimed or recycled. Please
contact your dealer, your local waste
collection centre or scrap merchant
about potential recycling schemes, before disposing of the appliance.
Ensure that the appliance presents
no danger to children while being
stored for disposal.
Switch off and disconnect it from the
power supply. Cut off and render any
plug useless. Cut off the cable directly
behind the appliance to prevent
misuse. This should be done by a competent person.
13

Before using for the first time
Cleaning and heating up for
the first time
Before using for the first time clean the
appliance and accessories with a mild
solution of hot water and a little washing up liquid and then rub dry.
P
Empty the oven completely. Turn the
multi-function switch to the
bol for pyrolytic cleaning and start
the process by pressing the temperature button for approx. 5 seconds
(see section on “Pyrolytic self-cleaning system”).
i sym-
It is important to ensure that the room is
well ventilated. We recommend that
you vacate the room while you are heating the oven up for the first time.
Metal components have a protective
coating which may give off a slight
smell the first time your new appliance
is heated up.
The smell and any vapours will dissipate after a short time and do not indicate a faulty connection.
14
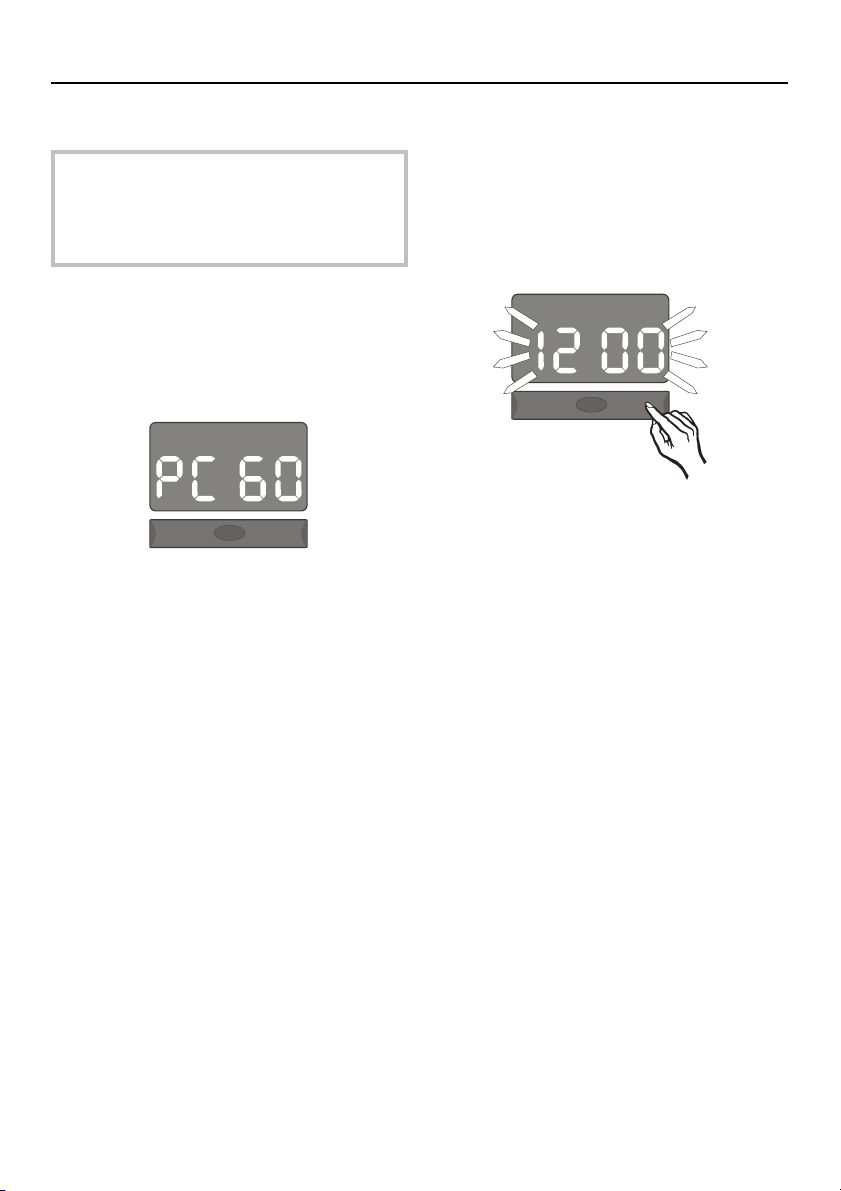
Before using for the first time
Setting the time of day initially
When using the oven for the first
time or after a power cut it is essential to enter the correct time of day;
otherwise the oven cannot be used.
When the oven is first connected to the
power supply (or after an interruption to
the power supply) a reference number
for the appliance, e.g. ‘PC 60’ appears
in the temperature display.
-
°C
This reference number is only intended
for the service technician and disappears as soon as the time of day is set.
A time of 12.00 will flash in the clock /
timer display.
+
a
Proceed as follows:
P
While 12 00 is flashing in the clock /
timer display enter the time of day
using the
/ timer button. Use
+ or - buttons on the clock
+ to increase and
- to decrease the time.
-
+
u
Storing the time of day in the memory
The time of day is stored in memory
after a few seconds or if the middle of
the clock / timer button is pressed.
The time will stop flashing in the clock /
timer display.
If you wish to alter a time of day which
has already been entered then proceed as described in section “Clock /
Timer - Setting or altering the time of
day”.
15
Use
Use
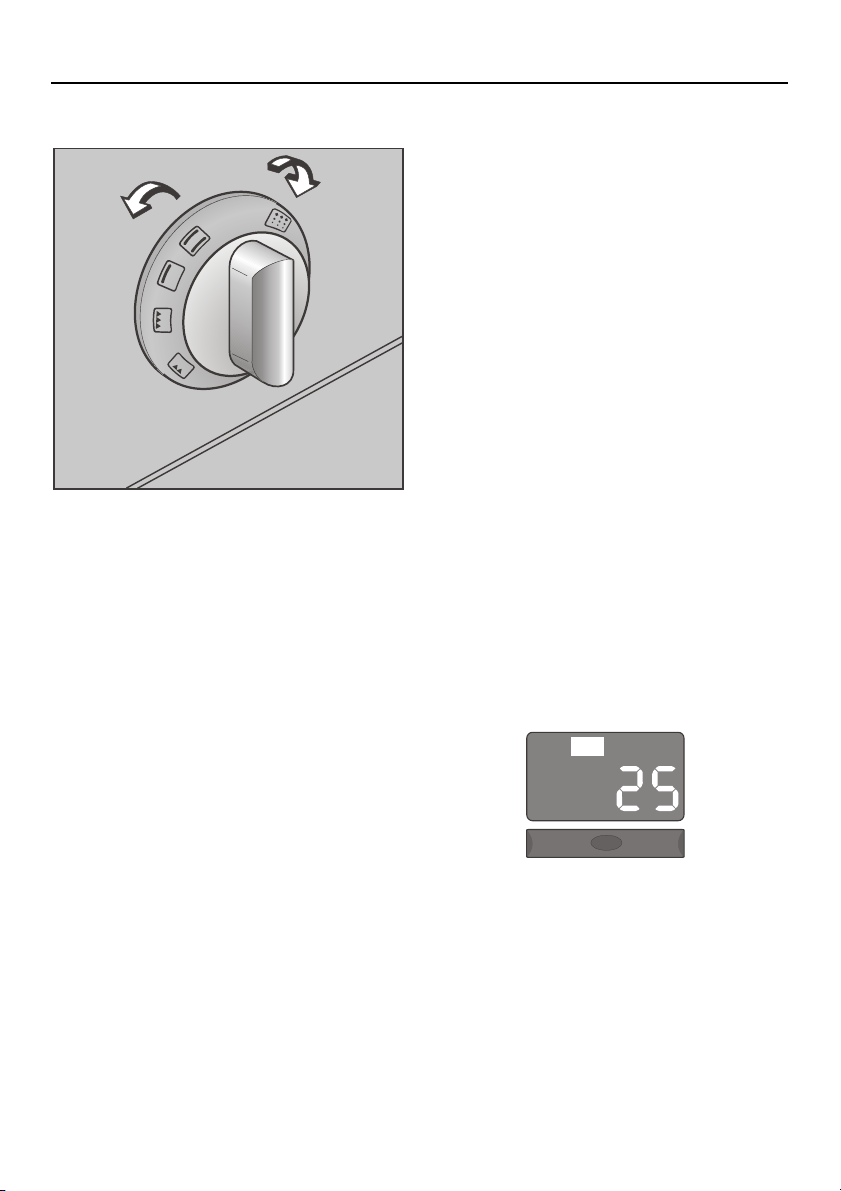
Selecting oven functions
Proceed as follows:
P
0
Turn the multi-function switch to the
required function.
The ring around the multi-function
switch will light up.
The pre-set temperature for that function will appear in the temperature display. See the section on “Adjusting the
pre-set temperature” for more information.
The oven switches itself on after a few
seconds.
The temperature display then changes
to show the current temperature of the
also
oven, e.g. 25 °C. The symbol
lights up in the display until the temperature in the oven has reached the
pre-set temperature.
{
16
The temperature display shows the temperature of the oven rising.
{
-
°C
+
a
Oven function chart
Use
Symbol Oven function Pre-set
temperature
in °C
A
C
n
m
p
o
D
G
i
Top and Bottom heat 190 Fine, moist cakes,
Top heat 190 For blind baking. Can be
Infra-red full grill 275 For toasting, browning a
Economy grill 275 For toasting, browning a
Fan grill system 165 For roasting larger pieces of
Pizza (intensive)
system
Fan heat 160 For dishes with sauce,
Defrost no rec.
Pyrolytic self-
cleaning system
160 For pizza, savoury flans,
temperature
- Self-cleaning
Suitable
for
such as sponge cakes,
almond cakes, fruit cakes,
shortbread.
switched on towards the end
of baking time for cakes with
a moist topping where the
base should not be too moist.
topping, “au gratin” dishes,
and grilling under the full
width of the grill.
topping, “au gratin” dishes,
and grilling under the inner
grill area only.
meat or poultry.
quiches, cheesecakes.
meringues, small cakes,
reheating, biscuits, complete
meals and drying fruit.
For defrosting without heat.
the oven.
17

Use
Adjusting the pre-set temperature
Our test kitchen cooked different
dishes to establish optimum temperatures for the oven functions. The preset temperatures are based on these results.
However, you can alter the pre-set temperatures for all the oven functions (except Defrost which does not use heat)
at any time within a range of between
30 °C and 275 °C in 5 °C steps.
To adjust:
P
While the pre-set temperature is
showing in the temperature display,
change the temperature using the
or - buttons on the temperature
button. Use
decrease the temperature.
+ to increase and - to
+
If the
{ symbol is lit up in the display,
press the middle of the temperature
button briefly once to view the pre-set
temperature again.
18
°C
-
+
a

Use
Runner levels
We recommend using the runner levels
as illustrated to achieve good results.
Further information on the which runner
levels to use can be found in the following sections.
Cooking on one level
with the following oven functions
A Top and Bottom heat
D Fan heat
n Infra-red full grill
m Economy grill
p Fan grill system
Cooking on one level
with the following oven functions
C Top he at
n Infra-red full grill
m Economy grill
Cooking on one level
o only with Pizza (intensive) system
19

Use
Cooking on two levels
D only with Fan heat
Cooking on all levels
D only with Fan heat
20

Rack
The rack can be used for baking, roasting and grilling.
It can be either used way up, giving a
choice of two different heights to suit
the recipe.
Use
21

Use
Safety lock
The oven is fitted with a safety lock to
prevent it being either switched on, or
the temperature increased, unintentionally, by children for example.
The safety lock can be activated with
the oven switched on or off.
If the safety lock is activated when the
oven is switched off, then the oven
cannot be switched on again.
If the safety lock is activated when the
oven is in operation then the oven
can only be used as follows:
* The oven temperature which has al-
ready been set can be decreased
but not increased.
* Once the oven is switched off it can-
not be switched back on again.
* Changing to another oven function
automatically switches the oven off.
F 08 will appear in the temperature
display (see “Problem solving
guide”).
To activate the safety lock:
P
Press the temperature button briefly
five times in succession.
A long tone will sound and the
bol for the safety lock will light up.
a
-
M sym-
+
°C
To de-activate the safety lock:
P
Press the temperature button briefly
five times in succession.
M symbol goes out.
The
22

Use
Door contact
If the oven door is opened while the
oven is operating, a door contact
switch (see arrow) automatically switches off the heating and turns the lighting on. The cooling fan continues to
operate and can still be heard.
Safety switch off
Your oven is equipped with a safety
switch off device which will switch the
oven off automatically if it has been
heating for a very long period of time
and was not switched off.
Set Oven switches off
Temperature: automatically after:
up to 100 °C 12 hours
over 100 °C 6 hours
The fault message F 07 will show in the
temperature display if the oven has
switched off automatically.
P
Turn the multi-function switch to ‘0’.
The oven can now be used again.
After closing the door the oven lighting
stays on for 2 minutes if the temperature is above 50 °C, and for 10 minutes
if the temperature is below 50 °C. After
that the lighting switches off automatically.
23

Baking
Baking
Baking chart
Type of food A Top and Bottom heat D Fan heat
Temperature
in °C
Yeast mixture
Crumble cake
Stollen (German fruit cake)
Fresh fruit cake (tray)
Onion tart
Pizza (tray)
Wholemeal bread
Creamed mixture
Victoria sandwich
Fresh fruit cakes, with topping
Fresh fruit cake
Madeira
Whisked mixture
Thick flan base
Thin flan base
Swiss roll
Rubbed-in mixture
Biscuits
Apple pie
Cheese cake
Egg-white mixture
Macaroon
Meringue
Flaky pastry
Baking with flaky pastry 175-190 15-20 150-170 30-40
Choux pastry
Eclairs 175-190 25-35 150-170 30-40
Dishes with sauce
Pasta dishes
Chicken and leek pie
Quiche Lorraine
Gratin dishes
180-200
165-185
175-190
175-190
175-190
175-190
175-190
175-190
175-190
175-190
175-190
175-190
175-190
175-190
175-190
150-170
130-150
100-110
175-190
175-190
175-190
175-190
Baking time
in minutes
30-40
60-70
40-60
50-70
50-70
60-80
60-80
40-60
50-60
50-70
35-45
25-35
15-20
20-30
50-70
55-65
30-50
110-120
55-65
55-60
50-60
50-60
Temperature
in °C
150-170
150-170
150-170
150-170
150-170
150-170
150-170
150-170
150-170
150-170
150-170
150-170
150-170
150-170
150-170
130-150
120-140
90-110
150-170
150-170
150-170
150-170
Baking time
in minutes
30-40
60-70
50-60
50-60
50-70
60-80
60-80
50-70
50-70
50-70
35-45
25-35
15-20
20-30
50-70
55-65
30-50
100-120
50-65
50-60
50-60
50-60
The information given in this chart is intended as a guide only.
See the cook book supplied with your oven for further details.
24

o Pizza (intensive) system
Temperature
in °C
-
-
-
150-170
150-170
-
Baking time
in minutes
-
-
-
40-60
40-60
-
Baking
Please note:
* The suggested oven function is in
bold print.
* All figures are for using the oven
from cold. If the oven is still warm
from previous cooking, or has been
pre-heated, the baking time can be
reduced by up to 10 minutes.
* Temperatures and times given are
suggestions only and may vary according to personal taste.
-
-
-
-
-
-
-
-
150-170
130-150
-
-
150-170 15-20
--
-
150-170
150-170
-
-
-
-
-
-
-
-
-
40-50
50-60
-
-
-
45-55
45-55
-
* When baking on several levels at
the same time (using Fan heat), baking times may need to be increased
by about 5-10 minutes.
25

Baking
Hints on baking
* Top h eat C is ideal if you want to
brown a topping or a souffle, make
“au gratin” dishes or meringues.
* When baking cakes with a deep
fresh fruit filling, e.g. plum or damson, place the tin in the grill pan /
oven tray (without the roasting rack)
on the oven rack. This will prevent
juices from spilling over and will
make it easier to clean the oven.
Splashes of fruit juice can leave
marks which cannot be removed
afterwards.
* Use dark coloured tins for baking.
These conduct the heat more swiftly
to the mixture. Uncoloured tins reflect the heat away, so cakes take
longer to cook and do not brown
evenly.
* Bread dough can be put in the oven
to rise.
Turn the multi-function switch to Fan
D and reduce the pre-set tem-
heat
perature to 30°C. Cover the container.
Energy saving tips
* When using Top and Bottom
heat
A only pre-heat the oven if the
baking time is less than 30 minutes
or for mixes which require a preheated oven, e.g. biscuits.
* When using Fan heat
portunity to bake on several levels
at the same time.
* Switch the oven off approx. 5
minutes before the end of cooking
time, and leave the cake or biscuits
in the oven for a further 5-10
minutes with the door closed to take
advantage of the residual heat.
D take the op-
26

Roasting
Roasting
Roasting chart
p Fan grill system 165 °C
Type of food Cooking time in minutes:
1 kg 2 kg 3 kg
Pork
Loin 100-120 120-130 130-140 well done
Shoulder 100-120 120-130 130-140 well done
Leg cut 100-120 120-130 130-140 well done
“Kasseler” rib 50-60 60-70 65-75 well done
Beef
Topside 100-120 120-130 130-140 well done
Fillet 45-55 55-60 60-65 medium rare
Sirloin 45-55 55-60 60-65 medium rare
Veal
Neck - 80-90 - medium rare
Shoulder 100-110 110-120 120-130 well done
Leg cut 100-110 110-120 120-130 well done
Fillet 45-55 55-60 60-65 medium rare
Lamb
Loin - 55-60 - medium rare
Shoulder - 130-140 - well done
Poultry
Chicken 50-60 - - well done
Duck - 80-90 90-100 well done
Goose - - 120-150 well done
Turkey - - 130-150 well done
Game
Venison - 50-60 60-70 medium rare
Pieces - 100-120 120-150 well done
Joint - 100-130 - well done
The information given in this chart is intended only as a guide.
See the cook book supplied with your oven for further details.
27

Roasting
Hints on roasting
Splashes of fat can leave marks on
the grill pan / oven tray which cannot be removed afterwards.
* For a succulent roast with a crispy
finish use the Fan grill system
which the Infra-red full grill and the
fan work together. Turning is not
necessary. On the whole, splashes
are avoided and the oven interior
walls stay relatively clean.
* You can also roast with Top and Bot-
tom heat
temperature approx. 20-30 °C
higher than is stated in the table.
With Fan heat turn the temperature
down to approx. 165 °C after about
15-20 mins. of roasting. The oven
can get more heavily soiled than
when using the Fan grill system
* Always defrost meat before cooking.
* If adding salt to meat only do so
shortly before roasting to prevent
the meat losing its juices.
* Since there is no need to baste
when roasting with the Fan grill system
be rubbed into the meat before
roasting. Adding a little oil makes it
easier to rub dry herbs into the meat.
A or Fan heat D. Set the
p, salt and seasoning should
p in
p.
* For braising, however, place the
meat into a roasting dish or directly
in the grill pan / oven tray. Do not
use the roasting rack in this case.
* Always place the roast in the centre
of the oven. Very tall roasts and
large poultry should be placed on
the lowest shelf level.
* The traditional British method of cal-
culating roasting time is to allow 15
to 20 minutes to the lb., according
to the type of meat, plus approx. 20
minutes, adjusting length of time as
roasting proceeds, to obtain the required result.
Alternatively, roasting time can be
calculated by the height of the joint.
Calculate approx. 10-12 minutes per
centimeter height of meat.
* Meat which has been stored at a
very low temperature will need a
longer roasting time than that given
in the chart.
* If the overall cooking time is quite
long and if vegetables, such as
onions, tomatoes, carrots etc. are to
be added to the roast, we recommend that you do not add these
until more than half-way through the
cooking time. Otherwise they can
become too dark and give the gravy
a bitter taste.
* Put joints for roasting e.g. pork with
crackling, as well as poultry or
poultry pieces directly on the roasting rack with the grill pan / oven tray
underneath. This enables the meat
to brown on all sides and the pan
catches the juices.
28

Roasting
* If a recipe calls for broth, stock or
water to be added (e.g. half-way
through cooking time), this should always be heated first before adding
to the roast.
* Allow a standing time of approx. 10
minutes after the end of cooking so
that the meat juices are evenly distributed.
Tips on saving energy
* It is not necessary to pre-heat the
oven before roasting.
* More than one piece of meat can be
roasted side by side.
* Switch the oven off approx. 5
minutes before the end of cooking
time and leave the roast to stand for
5-10 minutes in the closed oven to
make use of the residual heat.
29

Grilling
Grilling
Grilling chart
n Infra-red full grill
Economy grill
m
Food to be grilled Temperature
in °C
Steaks 275 18-22
Kebabs 220 18-22
Pork chops
Liver 275 8-10
Burgers
Sausage 220 16-20
Fish fillet
Trout
Toast 275 4-6
To ma t oe s 2 20 6 -1 0
Peach halves 275 6-8
1)
1)
1)
1)
275 16-20
275 14-18
275 16-20
220 10-14
Grilling time
in minutes
1) Also suitable for cooking with the Fan grill system
cooking time by about 5-10 minutes.
The information given in this chart is intended only as a guide.
See the cook book supplied with your oven for further details.
Note
* Pre-heat the grill
minutes.
* Select the Infra-red full grill
grilling several items or browning
across the whole width.
Select the Economy grill
ing or browning only in the centre of
the grill.
* Place the rack at level 2 for thick
cuts e.g. chicken pieces, and at
level 3 for thinner items, e.g. steaks
30
n, m for 5-10
n, for
m for grill-
* Use the roasting rack with the grill
pan / oven tray.
* Turn food being grilled once or more
if necessary.
Grill with the oven door closed.
- increase the
p

Grilling
Defrosting
The Defrost function is particularly suitable for defrosting delicate frozen
foods such as breads, fruit, fish, and
cream gateaux.
With the Defrost
runs but the oven heating systems are
switched off. It is not possible to select
a temperature.
With the constant movement of air in
the oven, defrosting is much faster than
in still air.
Leaving the oven door open as far
as possible whilst defrosting ensures a constant supply of fresh air
at room temperature and enables
the cooled air to be expelled.
G function, the fan
Practical tips
* Where possible remove the packa-
ging and put the food to be defrosted on a baking tray or into a
suitable dish.
* All meat and poultry should be fully
defrosted before cooking.
When defrosting meat or poultry
place the grill pan / oven tray underneath the rack to catch the defrosted liquid, so that the meat is not
lying in this liquid.
It is particularly important to
observe food hygiene rules when
defrosting poultry. Do not use the
liquid from the defrosted poultry.
Pour it away, wash the pan, the sink
and your hands.
* Fish does not need to be fully de-
frosted before cooking. Defrost so
that the surface is sufficiently
thawed to take herbs and seasoning.
* Do not refreeze food once it has
thawed.
* For defrosting frozen ready made
meals follow the manufacturer’s in-
structions on the packaging.
The time needed for defrosting depends on the type and weight of the
food, and at what temperature it
was frozen.
31

Drying food
Drying food
Drying food chart
D Fan heat
Food Temperature in °C Drying time in hours
Apple rings 50-70 6-8
Pear halves or quarters 70-80 10-12
Plums 50-70 8-12
Herbs 40-60 2-4
Mushrooms 50-80 5-7
The information given in this chart is intended only as a guide.
Proceed as follows:
P
Prepare the fruit, mushrooms and
herbs. Space them out on baking
parchment on the roasting rack in
the grill pan / oven tray. The grill pan
/ oven tray will catch any drips or
juice.
P
Select Fan heat D.
P
Lower the pre-set temperature to between 40-80 °C (see chart).
P
Dry with the oven door closed.
32

Bottling
Important
Bottling should only be undertaken by
an experienced cook who has received
proper training in this method of preserving fruit and vegetables and understands the implications of the chemical
reactions involved.
Bottling
33

Yoghurt
Yogh ur t
Proceed as follows:
P
Mix 100 g yoghurt (with live culture)
with 1 litre of unchilled full cream
milk.
P
Pour this milk mixture into 6 or 7 portion sized glass dishes and cover
with cling film. Special yoghurt
dishes may also be used.
P
Position the rack at level 2 in the
oven and place the covered dishes
on the rack.
P
Select Fan heat D and lower the
pre-set temperature to between 4060 °C.
The yoghurt will be ready in about 5
hours.
P
Allow the yoghurt to cool and then
place in the refrigerator.
The yoghurt will keep for up to about
one week.
Yoghurt prepared in this way can also
be used to prepare new yoghurt.
However, if the yoghurt fails to thicken
you will need to buy a new tub of yoghurt containing live cultures and start
again.
34

Warming plates
Warming plates
Warming plates in the oven before serving helps prevent food from cooling
down too quickly.
Proceed as follows:
P
Place the plates on the rack or on
the floor of the oven. Switch on Fan
D and lower the pre-set tem-
heat
perature to between 60-70 °C.
Individual items take approx. 10
minutes and stacks of plates approx.
20 minutes to warm up.
35

Meals
Meals
Cooking whole meals
Cooking entire meals at the same time
is both practical and energy saving.
Proceed as follows:
P
Place the various dishes next to one
another or one above the other on
the rack at its lowest runner.
Soup
b
Vegetables
c
Roast
d
Potatoes
e
Ensure containers are suitable and that
lids and handles are ovenproof.
36

Clock / timer
Please read the following section
once through completely before
proceeding as described. There are
only a few seconds available (while
the display is flashing) in which to
set the time.
Clock / timer
Setting and altering the time
It is sometimes necessary to adjust the
time, e.g. from Winter to Summer time.
The time of day cannot be set if an
oven function has been selected.
If the clock / timer is being set for the
first time, please read the section “Set-
ting the time of day”.
Setting
First press the middle of the clock /
timer button. Then use the
tons to increase or decrease the time.
+ or - but-
Proceed as follows:
P
Press the middle of the clock / timer
button and keep pressed in until an
audible tone sounds and the time of
day flashes in the clock / timer display.
-
+
u
P
While the time of day is flashing,
enter the time of day using the
- buttons on the clock / timer button.
The time of day is stored in memory
after a few seconds or if the middle of
the clock / timer button is pressed.
+ and
37

Clock / timer
Setting the minute minder
The minute minder works only as a kitchen timer and does not switch the
oven on and off.
Proceed as follows:
P
Press the middle of the clock / timer
button briefly once.
The time of day disappears, 00 appears and a bell symbol
-
lflashes.
l
+
u
P
While the bell symbol is flashing, use
+ button on the clock / timer but-
the
ton to set the required time, e.g. 30
minutes.
A time of between 1 minute and 6
hours can be set.
l
-
+
Setting and altering the minute minder time is only possible while the
bell symbol
bell symbol
then start again from the beginning.
The minute minder time selected is
stored in memory after a few seconds
or if the middle of the clock / timer button is pressed. The time of day will reappear in the display and the bell sym-
l will light up at the same time.
bol
l is flashing. If the
l is no longer flashing
l
-
+
u
The time set for the minute minder
counts down unseen in the background.
At the end of the set minute minder
time an audible tone sounds and the
bell symbol
The audible tone lasts for a maximum
of 3 minutes. The tone can be switched
off at any time by pressing the clock /
timer or the temperature button.
l flashes in the display.
38
u

Clock / timer
To change:
Press the clock / timer button until the
bell symbol
minute minder time using the
buttons.
To check :
Press the clock / timer button briefly.
The minute minder time remaining will
appear in the display.
l flashes. Then alter the
+ and -
To cancel:
Press the clock / timer button until the
bell symbol
minute minder time back to 00 with the
button.
l flashes. Then set the
-
39

Clock / timer
Switching off automatically
The length of cooking time is set. The
oven then switches on immediately and
switches off automatically at the end of
the time selected.
P
While both are flashing, set the
length of cooking time, e.g. 40
minutes using the
A time of between 1 minute and 6
hours can be set.
+ and - buttons.
Proceed as follows:
P
Turn the multi-function switch to the
required function.
P
If necessary, alter the pre-set temperature.
P
Press the middle of the clock / timer
button repeatedly until the light ring
around the multi-function switch and
the symbol for the oven
flashing.
00 appears in the clock /timer display.
j start
j
-
+
u
j
-
+
u
40

Clock / timer
Shortly after setting the time:
The display changes to showing the
word End flashing alternately with the
end of cooking time which has been
calculated automatically by the electronic unit.
A few seconds later the display reverts
to showing the current time of day. The
oven switches on immediately.
To show that “Automatic” has been activated, the symbol for the oven
the temperature display and the light
ring around the multi-function switch
light up constantly.
The oven switches off automatically at
the end of the cooking time selected
and an audible tone sounds ten times.
The symbol for the oven
tinue to flash until the multi-function
switch is set to ‘0’.
An audible tone sounds once a minute
to remind you to switch the oven off.
j in
j will con-
To change:
Press the clock /timer button repeatedly until the length of cooking
time set appears. Then alter the length
of cooking time using the
tons.
To check:
Press the clock / timer button until the
length of cooking time remaining appears in the display.
To cancel:
Turn the multi-function switch to ‘0.
+ and - but-
41

Clock / timer
Switching on and off
automatically
Both the length of cooking time and the
end of cooking time are set.
The start time of the cooking process is
then delayed accordingly. The oven
switches on and off automatically.
To set the length of cooking time:
P
Turn the multi-function switch to the
required function.
P
If necessary, alter the pre-set temperature.
P
While the word End is flashing alternately with the end of cooking time
(which has been calculated automatically by the electronic unit) use the
on the clock / timer button to set the
required end of cooking time, e.g.
12.00.
j
j
+
P
Press the middle of the clock / timer
button repeatedly until the light ring
around the multi-function switch and
the symbol for the oven
flashing.
00 appears in the clock / timer display.
P
While they are both flashing, set the
length of cooking time, e.g. 40
minutes by pressing the
clock / timer button.
A time of between 1 minute and 6
hours can be set.
j start
+ of the
-
+
u
42

Clock / timer
Shortly after setting the times:
The display automatically reverts to
showing the current time of day
The electronic unit calculates the start
of cooking time (11.20 in this example
= 12.00 minus 40 minutes cooking
time). The oven remains switched off
until this time of day (11.20) is displayed on the clock / timer. The oven
will then switch on automatically.
The symbol for the oven
the clock / timer display indicating that
“Automatic” has been activated. The
light ring around the multi-function
switch only lights up when the oven
switches on automatically.
The oven switches off automatically at
the end of the cooking time selected
and an audible tone sounds ten times.
The symbol for the oven
tinue to flash until the multi-function
switch is set to ‘0’.
j appears in
j will con-
To change:
Press the clock /timer button repeatedly until the length of cooking
time / end of cooking time set appears.
Then alter the length of cooking time /
end of cooking time using the
buttons.
To check:
Press the clock / timer button until the
length of cooking time / end of cooking
time already set appears in the display.
To cancel:
Turn the multi-function switch to ‘0.
+ or -
An audible tone sounds once a minute
to remind you to switch the oven off.
43

Cleaning and care
Cleaning and care
Under no circumstances use a
steam cleaner to clean this appliance. The steam could attack the
electrical components and cause a
short circuit.
Never use cleaners containing alkalines / soda, acids or chlorides or
abrasive cleaning agents or scouring agents, e.g. hard brushes,
scouring pads or cloths, steel wool.
These attack the surfaces and
cause damage.
Do not leave accessories in the oven
when the oven is being used.
Appliance front
The appliance front and controls
should be cleaned using a mild solution of hot water with a little washing up
liquid, applied with a damp cloth. Wipe
dry using a soft cloth.
Switching on the oven interior
lighting
The oven lighting switches on automatically when the door is opened and
stays on for some time before switching
off.
If you want the oven lighting on for
longer for cleaning the oven, you can
switch it on again by opening and closing the door as often as necessary.
Use a non-abrasive proprietary cleaning agent for stainless steel surfaces.
Apply with an even pressure following
the direction of the “grain”. Wipe over
with a damp cloth and rub dry with a
soft cloth.
44

Removable oven door
It is much easier to clean the oven interior if you remove the oven door first.
To remove the oven door:
P
Open the door fully.
P
Flip the two release catches b on
both door hinges up over hooks
c
Cleaning and care
P
Now using both hands lift the door
up out of the hinges at an angle.
.
P
Gradually raise the door until it rests
nearly shut.
To put the oven door back on:
Do the above in the reverse order:
P
Set the door on the hinges.
P
Open the door fully.
P
Flip the two release levers down into
their original resting postion.
P
Close the door.
The oven door is heavy. It should be
gripped firmly at the sides when
being removed or refitted.
45

Cleaning and care
Pyrolytic self-cleaning system
The oven interior is coated with pyrolytic enamel which makes cleaning
easy.
During pyrolytic cleaning the oven is
heated up to approx. 500 °C. Any residual soiling burns off and any remaining
ashes are easily removed after the
cleaning process is finished.
During the pyrolytic cleaning process the outer oven door becomes
hotter than in normal use and can
reach a temperature of approx.
150 °C.
Do not touch the oven door. Children should be prevented in any
event from touching the appliance
during pyrolytic operation. Danger
of burning.
In addition to the oven door becoming
hot during the pyrolytic process, hot air
is expelled at the front of the oven. It is
advisable to run the pyrolytic function
in the evening when there is no one
around.
Proceed as follows:
P
Remove all accessories before starting the pyrolytic cleaning process.
The oven must be empty.
P
Remove any large pieces of debris
from the oven interior before starting
the pyrolytic process.
P
Turn the multi-function switch to the
pyrolytic function
In the temperature display the word
pyro flashes alternately with the light
ring around the multi-function switch.
In the clock / timer display, the
bol for the oven flashes and a suggested pre-set cleaning time of 2 hours
appears.
i.
-
°C
+
a
j sym-
j
During the pyrolytic process the oven
interior lighting is switched off and the
door locks automatically as soon as the
temperature rises above approx.
300 °C.
46
-
+
u

Cleaning and care
P
If necessary, adjust the pre-set time
and - buttons on the
using the
clock / timer button. The time can be
shortened to 1 hour 30 minutes if the
oven is not particularly soiled. Increase the time to 3 hours if the oven
is very soiled.
P
Press the middle of the temperature
button in until you have heard
5audible tones.
The word pyro will stop flashing in the
temperature display. In the clock / timer
display the word End will flash alternately with the end time for the pyrolytic
process which has been calculated by
the electronic unit, e.g. 13.00.
+
j
j
-
+
u
P
While these are flashing, you can , if
necessary, alter the end time for the
pyrolytic process using the
buttons on the clock / timer button.
+ and -
A few seconds later the clock / timer
display will revert to showing the current time of day. The light ring around
the multi-function switch lights up constantly as soon as the pyrolytic process
begins.
The length of cleaning time counts
down unseen in the background.
To show that the automatic cleaning
process has been activated, the word
pyro will appear in the temperature dis-
and
+
j in
-
play and the symbol for the oven
the clock / timer display
For safety reasons the oven door locks
automatically as soon as the temperature rises above approx. 300 °C.
The word LOCK $ appears in the tem-
perature display to show that the door
has been locked.
To check:
To check the cleaning time remaining
or the end of the cleaning time, press
the clock / timer button repeatedly until
the remaining cleaning time / end time
alternates with the word End in the
clock / timer display.
To change:
If the oven lock has not yet been activated, you can alter the length of cleaning time or the end time for the cleaning process while it is showing in the
clock / timer display, using the
buttons on the clock / timer button.
To cancel:
Set the multi-function switch to ‘0’ .
47

Cleaning and care
After the pyrolitic process is completed:
The oven heating switches off and a
single beep sounds. The oven sym-
j will flash in the clock / timer dis-
bol
play and the word pyro disappears
from the temperature display. The oven
is then cooled down to below 300 °C
by a powerful fan. This cooling down
process takes approx. 30 minutes.
Throughout this time LOCK $ lights up
in the temperature display.
The oven door is unlocked automatically once the oven has cooled down.
LOCK $ goes out and an audible tone
sounds ten times. The time of day and
the pre-set length of cleaning time of 2
hours appear alternately in the clock /
timer display. The word pyro in the temperature display, the oven symbol
the clock / timer display and the light
ring around the multi-function switch all
continue to flash until the multi-function
switch is turned to ‘0.
j in
Once the oven has cooled down completely, a damp cloth can be used to
remove the pyrolitic debris (e.g. ash).
After the cleaning process mat patches
or some discolouration may be visible
on the pyrolytic enamel surface. This is
quite normal and will not affect the function of the oven any way.
48

Cleaning and care
Baking trays, grill pan / oven
tray, rack and roasting rack
Wash and dry after each use.
Stubborn residues should be loosened
with water and removed using a soft
nylon brush.
They can be cleaned in a dishwasher
or by hand.
Changing the oven lamp
The oven lamp is easily replaced
(25 W, 230-240 V, 300 °C, Socket: E 14):
P
Disconnect the appliance from the
power supply. Switch off at the isolator or the mains fuse box.
P
Turn the glass cover approximately a
quarter of one complete turn in an
anti-clockwise direction
.
off
c
P
Unscrew the bulb and replace it with
a new one.
and pull
b
P
Screw the glass cover back on.
P
Reconnect the appliance to the electricity supply.
49

Problem solving guide
Problem solving guide
Installation, maintenance and repairs to the electrical components
of this appliance should only be carried out by a suitably qualified and
competent person in accordance
with national and local safety regulations. Repairs and other work by unqualified persons could be dangerous. The manufacturer cannot
be held responsible for unauthorised work.
Some minor problems however can be
dealt with as follows:
What to do if ...
... the fan can still be heard after the
oven has been switched off
The oven is fitted with a cooling system
which prevents the oven over-heating
during use causing possible damage
to adjacent kitchen furniture. The cooling fan continues to run after the oven
has been switched off until the oven
has cooled down to approx. 70 °C. The
temperature will fall faster with the door
open.
If none of the above is the case, then
disconnect the appliance from the electricity supply for approx. 1 minute. To
do this:
* switch off at the isolator or
* withdraw the mains fuse.
Reconnect the appliance to the electricity supply and if the oven still does
not heat up contact a qualified electrician or the Service Department.
... cakes or biscuits are not cooked
properly
Check whether,
* the correct temperature was set.
* there were any alterations to the
recipe. For example, a moister mix
or more eggs can lengthen baking
time.
... the oven does not heat up after
being switched on
Check whether,
* the safety lock has been activated.
* the oven clock has been set.
* the timer has been programmed.
* the mains fuse has blown.
50

Problem solving guide
... cakes or biscuits are unevenly
browned
A small difference in browning is not unusual. Manufacturers use a percentage
figure in their product information data
for browning levels.
If browning is very uneven, check
* when baking with Fan heat
whether the temperature set was too
high or whether the roasting filter
was left in place.
* when baking with Top and Bottom
A, check the colour and com-
heat
position of the baking tins being
used. Light coloured, shiny or thin
walled tins are less suitable.
* whether you have used the recom-
mended runner level.
D,
51

Problem solving guide
... “ F” and a number appear in the
temperature display
F 06 The oven has switched itself off
having detected a possible fault with
the thermostat. Call the Miele Service
department, quoting the fault code.
F 07 The oven has switched itself
off automatically during use (see the
section on “Safety switch off”).
F 08 (flashing) and a beep sounding
at the same time.
The multi-function switch was adjusted
with the safety lock activated. This
caused the oven to switch itself off automatically.
Turn the multi-function switch back to
its original position. The oven will now
continue to operate as normal.
If you wish to set a different oven function, you must first turn the multi-function switch back to ‘0’ and de-activate
the safety lock (see the section on
“Safety lock”). You can then select a different oven function.
F 09 The maximum temperature has
been exceeded causing the oven to
switch itself off automatically. Turn the
multi-function switch to ‘0’.
As soon as the temperature has fallen
to an acceptable level the fault message disappears. You can now switch
the oven back on again. If this fault
message occurs again, please call the
Miele Service department, quoting the
fault code.
F 11 The door lock for the pyrolytic
function
automatically switched itself off on
reaching a temperature of 300 °C.
Turn the multi-function switch to ‘0’. Call
the Miele Service department, quoting
the fault code, to arrange for the oven
lock to be repaired.
In the meantime you can continue to
use the other oven functions as normal.
F ...
If any other fault message appears in
the display, a service visit is required.
Call the Miele Service department,
quoting the fault code.
i is defective. The oven has
52

Electrical connection
Electrical connection
Electrical connection U.K.
See Installation Instruction Booklet before making electrical connection.
All electrical work should be undertaken by a suitably qualified and
competent person in strict accordance with national and local safety
regulations.
Installation, repairs and other work
by unqualified persons could be
dangerous. The manufacturer cannot be held responsible for unauthorised work.
Ensure power is not supplied to the
appliance while installation or repair
work is being carried out.
The appliance must only be operated when built-in. This is to ensure
that all electrical parts are shielded.
Live parts must not be exposed.
If the socket is not accessible after installation (depending on country) an additional means of disconnection must
be provided for all poles.
For extra safety it is advisable to install
a residual current device with a trip current of 30 mA (in accordance with DIN
VDE 0664, VDE 0100 Section 739).
When switched off there must be an allpole contact gap of 3 mm in the isolator switch (including switch, fuses and
relays according to EN 60 335).
The voltage, rated load and fusing are
given on the data plate, visible when
the oven door is open.
Ensure that these match the household
mains supply. Please quote these data,
and the model and serial number when
contacting the Service dept.
Connection of this appliance should be
made via a suitable isolator which complies with national and local regulations
and the on/off switch should be easily
accessible after the appliance has
been built in.
53

Electrical connection
Important U.K.
This appliance is supplied for connection to a single phase 230-240 V 50 Hz
supply with a 3-core cable.
The wires in the mains lead are coloured in accordance with the following
code:
Green/yellow = earth
Blue = neutral
Brown = live
In other countries check these details
with your supplier.
WARNING
THIS APPLIANCE MUST BE
EARTHED
Important
The electrical safety of this appliance
can only be guaranteed when continuity is complete between the appliance and an effective earthing system, which complies with local and
national regulations. It is most important that this basic safety requirement is
tested by a qualified electrican. The
manufacturer cannnot be held responsible for the consequences of an inadequate earthing system such as an electric shock.
The manufacturer can assume no
responsibility for damage which is
the direct or indirect result of incorrect installation or connection.
54

After sales service
After sales service
Customer contact
The address of the nearest Service Department is given on the back page.
The voltage and rated load are given on the data plate, visible when the oven door
is open. Please give the model description, and serial (machine) number (which is
normally in the form of a barcode) when contacting the Service Department.
Please note that telephone calls
may be monitored and recorded to
improve our service.
Data plate
Space in which to stick the extra data plate supplied with the appliance. Ensure
that the model number is the same as the one on the front of these operating instructions.
55

M.-Nr. 08 211 920 / 02-4099 Alteration rights reserved
This paper consists of cellulose which has been bleached without the use of chlorine.
 Loading...