

Page 1
User Guide
This guide shows you how to operate the Take-it S3/D3 and provides information on basic functions, still
image shooting, movie/audio clip recording, playback, and troubleshooting.
Before using the camera, be sure to read the safety precautions to prevent injuries or damage to users or
equipment.
All manuals and user guides at all-guides.com
all-guides.com
Page 2
2
Copyright© 2003 Microtek International, Inc.
All rights reserved
Microtek® is a registered trademarks of Microtek
International, Inc. Macintosh® and Apple® are registered
trademarks of Apple Computer, Inc. Windows® is a
registered trademark of Microsoft Corporation. Adobe®
and Acrobat® are registered trademarks of Adobe
Systems Incorporated. All other products or name
brands are trademarks of their respective holders.
Pictures you may acquire from any of the bundled
software and/or pictures, or documents you take a
snapshot may be protected under copyright law. The
unauthorized use of such materials could be a violation
of the rights of the copyright holder.
September 2003
Disclaimer of Warranty
Microtek does not guarantee the content of any written
materials or software, and is not liable for losses
sustained by the purchaser arising from the use or
inability to use these written materials, software or
equipment.
Warning
If you take pictures of or use copyrighted material, you
may violate copyright laws. Microtek holds no
responsibility for the use of Microteks equipment to
violate any such copyright laws.
Microtek Lab, Inc.
16941 Keegan Avenue, Carson, CA 90746
Main: 310-687-5800
Fax: 310-687-5950
http://www.microtekusa.com
Microtek International, Inc.
6, Industry East Road 3, Science Based Industrial Park
Hsinchu, 300, Taiwan
Tel: 886-3-5772155
Fax: 886-3-5772598
http://www.microtek.com
Microtek Europe B.V.
Klompenmakerstraat 76, 3194DE Hoogvliet-RT
The Netherlands
Tel: 31-10-2425688
Fax: 31-10-2425699
http://www.microtekeurope.com
All manuals and user guides at all-guides.com
Page 3
3
Federal Communications Commission Interference
Statement
This equipment (MDSC-TKS3CMOS or ES-330) has
been tested and found to comply with the limits for a
Class B digital device, pursuant to Part 15 of the FCC
rules. These limits are designed to provide reasonable
protection against harmful interference in a residential
installation. This equipment generates, uses and can
radiate radio frequency energy and, if not installed and
used in accordance with the instructions, may cause
harmful interference to radio communications.
However, there is no guarantee that interference will
not occur in a particular installation. If this equipment
does cause harmful interference to radio or television
reception, which can be determined by turning the
equipment off and on, the user is encouraged to try to
correct the interference by one or more of the following
measures:
Reorient or relocate the receiving antenna.
Increase the separation between the equipment and
receiver.
Connect the equipment into an outlet on a circuit
different from that to which the receiver is
connected.
Consult the dealer or an experienced radio/TV
technician for help.
Notes: A shielded USB interface cable with ferrite core
installed on the camera connector end must be used
with this equipment.
Caution: Changes or modifications not expressly
approved by the manufacturer responsible for
compliance could void the user's authority to operate
the equipment.
This device complies with Part 15 of the FCC Rules.
Operation is subject to the following two conditions: (1)
This device may not cause harmful interference, and
(2) this device must accept any interference received,
including interference that may cause undesired
operation.
Responsible Party:
Loi Han
Microtek Lab, Inc.
16941 Keegan Avenue
Carson, CA 90746
USA
Phone: 310-687-5800
Fax: 310-687-5950
Tested to Comply
With FCC Standards
FOR HOME OR OFFICE USE
All manuals and user guides at all-guides.com
Page 4

4
All manuals and user guides at all-guides.com
Page 5

5
Federal Communications Commission Interference
Statement ........................................................ 3
Safety Precautions ............................................. 7
Introduction ...................................................... 9
Camera Package ............................................... 9
Camera Components .........................................10
Front View .................................................. 10
Bottom View................................................10
Rear View ...................................................11
LCD Screen Display ...........................................12
Photo Mode .................................................12
Movie Mode ................................................. 13
Audio Mode ................................................. 13
Playback Mode ............................................. 14
Getting Started
Attaching the Strap ...........................................16
Loading the Battery ...........................................16
Inserting the SD Card .........................................18
Turning the Camera On/Off ................................ 19
Setting the Date and Time ..................................20
Selecting the Language ..................................... 21
Formatting the SD Card ..................................... 22
Before Shooting
Using the Mode Switch ......................................23
Turning On/Off LCD Screen ................................23
Using the Menus ...............................................24
Using the Multifunction Buttons ........................... 25
Using the Shutter Button .................................... 25
Using the Viewfinder ......................................... 26
Holding the Camera ...........................................26
Shooting
Shooting Still Images .........................................27
Using the Digital Zoom .......................................28
Using the Flash ................................................. 29
Using the Self-Timer ..........................................30
Continuous Shooting ..........................................30
Recording a Voice Memo ...................................31
Shooting Movies ............................................... 32
Customizing Shoot Settings
Selecting Photo Size ..........................................33
Selecting Photo Quality ...................................... 34
Selecting a Shooting Mode .................................34
Adjusting the EV Compensation ........................... 35
Adjusting the White Balance ...............................35
Adjusting the Sharpness ..................................... 36
Turning On/Off Voice Memo ...............................36
Audio
Recording Audio ............................................... 37
Switching between Movie and Audio mode ....... 37
Table of Contents
All manuals and user guides at all-guides.com
Page 6
6
Playback
Single-image Display ......................................... 38
Nine-image Display ............................................38
Selecting a Recording ........................................ 39
Playing Back Still Images ................................... 39
Playback Zoom ................................................. 40
Playing Back Movies .........................................41
Playing Back Audio ...........................................41
Slide Show ......................................................42
Rotating Images ................................................42
Viewing via a Television Set ...............................43
Deleting and Printing
Deleting Still Images or Movie/Audio Clips ............. 44
Deleting Current ............................................44
Deleting Selected ..........................................44
Deleting All .................................................. 44
Printing Still Images ...........................................45
Printing Selected ...........................................46
Printing All ................................................... 46
Camera Setup
Brightness .......................................................47
Beep .............................................................. 47
Date ............................................................... 47
Time .............................................................. 47
Date Stamp .....................................................47
Video Out ........................................................47
Format ............................................................ 48
Copy to SD ...................................................... 48
Reset ..............................................................48
Frequency ....................................................... 48
Power Saving .................................................. 48
Language ........................................................ 48
USB Switch .....................................................48
Downloading to Your Computer
Installing the Camera Driver ................................ 49
Getting the Camera Ready ................................. 50
Connecting the Camera ..................................... 50
Copying Files ................................................... 51
Browsing Files .................................................. 52
Value-bundled Software .....................................52
Appendixes
Appendix A Web Cam .................................... 53
Appendix B Using the Battery .......................... 54
Appendix C Using the SD Card ......................... 56
Appendix D Maintenance ................................ 57
Appendix E Troubleshooting ............................. 58
Appendix F Warning and Error Messages ............ 66
Appendix G Menus and Factory Defaults ............ 67
Appendix H Specifications ...............................68
All manuals and user guides at all-guides.com
all-guides.com
Page 7
7
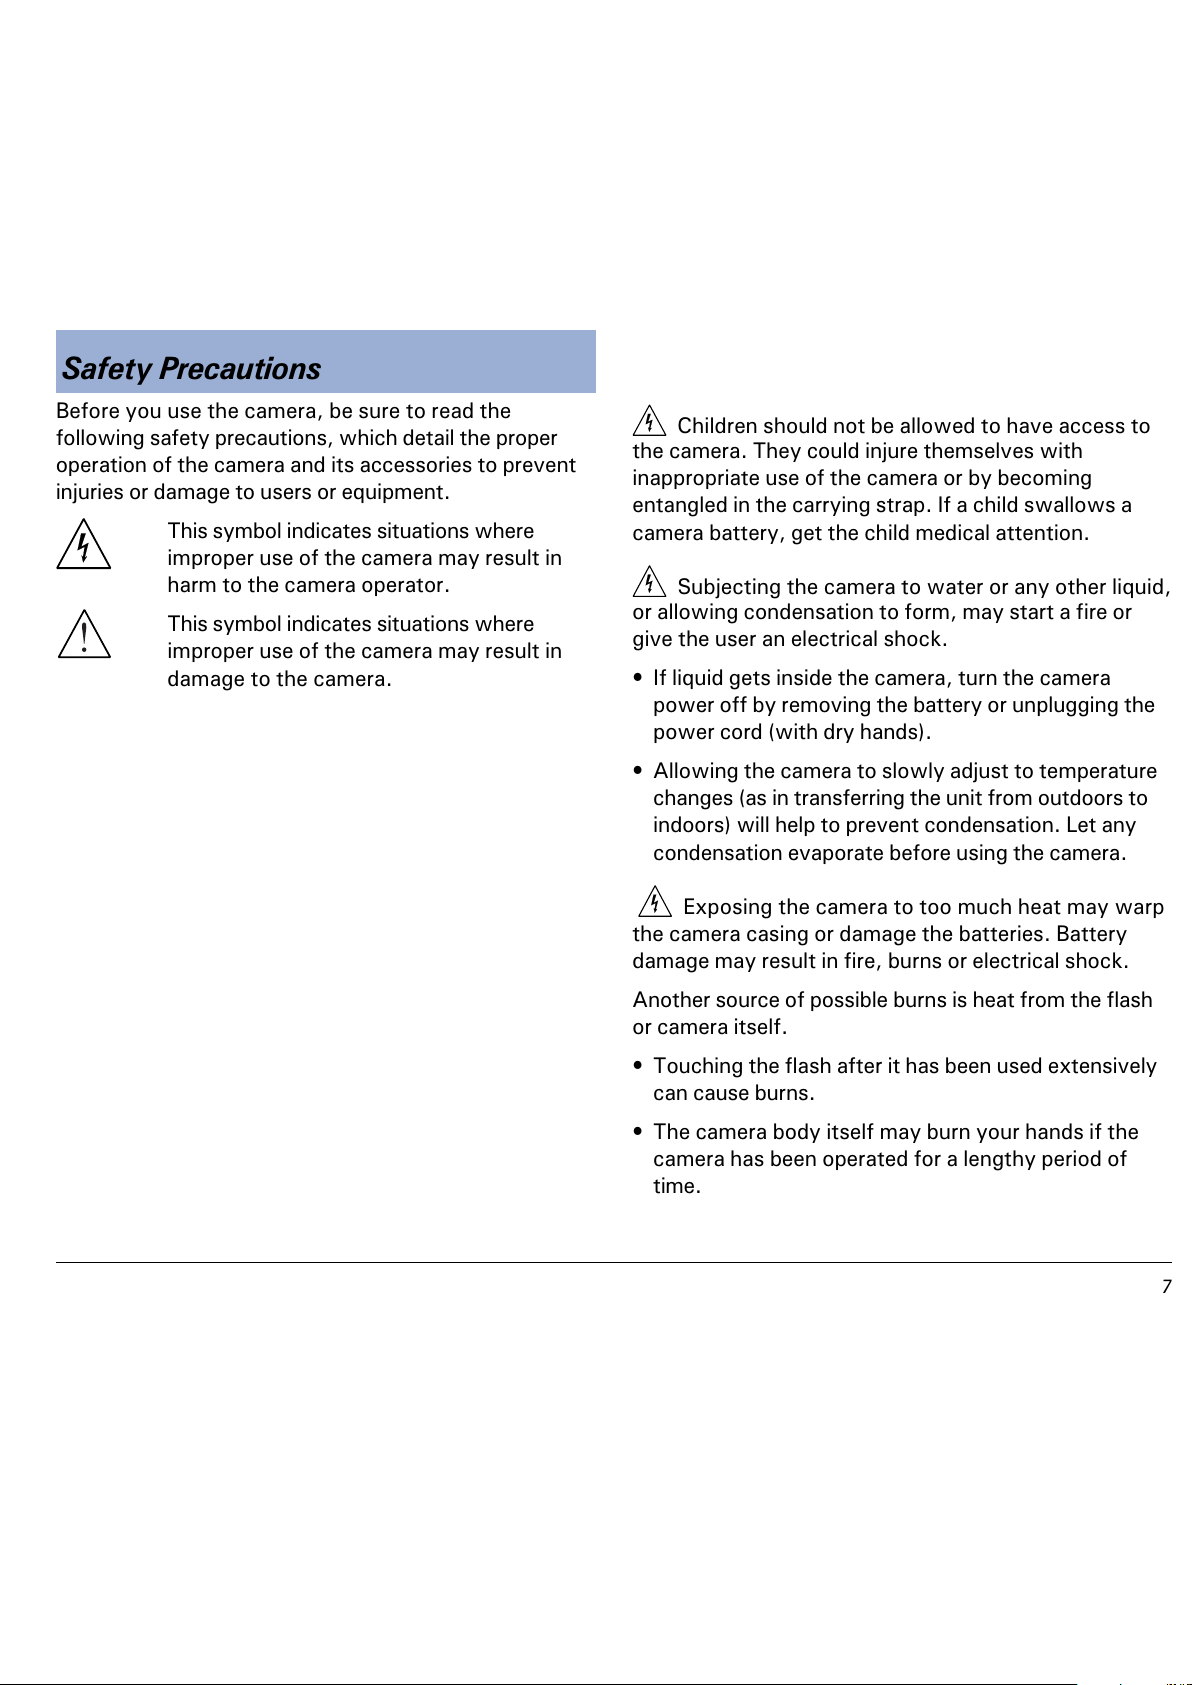
Before you use the camera, be sure to read the
following safety precautions, which detail the proper
operation of the camera and its accessories to prevent
injuries or damage to users or equipment.
This symbol indicates situations where
improper use of the camera may result in
harm to the camera operator.
This symbol indicates situations where
improper use of the camera may result in
damage to the camera.
Children should not be allowed to have access to
the camera. They could injure themselves with
inappropriate use of the camera or by becoming
entangled in the carrying strap. If a child swallows a
camera battery, get the child medical attention.
Subjecting the camera to water or any other liquid,
or allowing condensation to form, may start a fire or
give the user an electrical shock.
If liquid gets inside the camera, turn the camera
power off by removing the battery or unplugging the
power cord (with dry hands).
Allowing the camera to slowly adjust to temperature
changes (as in transferring the unit from outdoors to
indoors) will help to prevent condensation. Let any
condensation evaporate before using the camera.
Exposing the camera to too much heat may warp
the camera casing or damage the batteries. Battery
damage may result in fire, burns or electrical shock.
Another source of possible burns is heat from the flash
or camera itself.
Touching the flash after it has been used extensively
can cause burns.
The camera body itself may burn your hands if the
camera has been operated for a lengthy period of
time.
Safety Precautions
All manuals and user guides at all-guides.com
Page 8
8
Do not drop batteries or let them be banged
around. This could damage the casings, causing the
batteries to leak.
If the internal parts or components of the battery
come into contact with your eyes or your mouth,
flush the affected site with water and get medical
help.
Do not short-circuit the battery terminals, and be
sure to cover the terminals before you throw
batteries away. If the terminals contact metal, they
may overheat and explode, causing a fire.
Black or bright (red, green, blue, and white) dots
may sometimes appear on the LCD screen. These are
merely misfiring pixels, and have no effect on the
recorded image.
If you aim the camera at the sun, or shoot the
flash close to someones eyes, you may injure your
eyesight or that of someone else.
If you see smoke or smell a burning odor coming
from your camera, turn the camera off. If you continue
to operate the camera, it could cause a fire or give you
an electrical shock.
Do not clean the camera with flammable liquid, as
these may cause a fire.
Do not leave the camera in humid or dusty areas.
Dust and humidity can cause the camera to short
circuit, leading to a fire.
If the camera gets anywhere near a strong
magnetic field, it may not work correctly, or the
pictures taken may be ruined or adversely affected.
Use a soft, absorbent cloth to clean the surface of
your camera.
All manuals and user guides at all-guides.com
Page 9
9
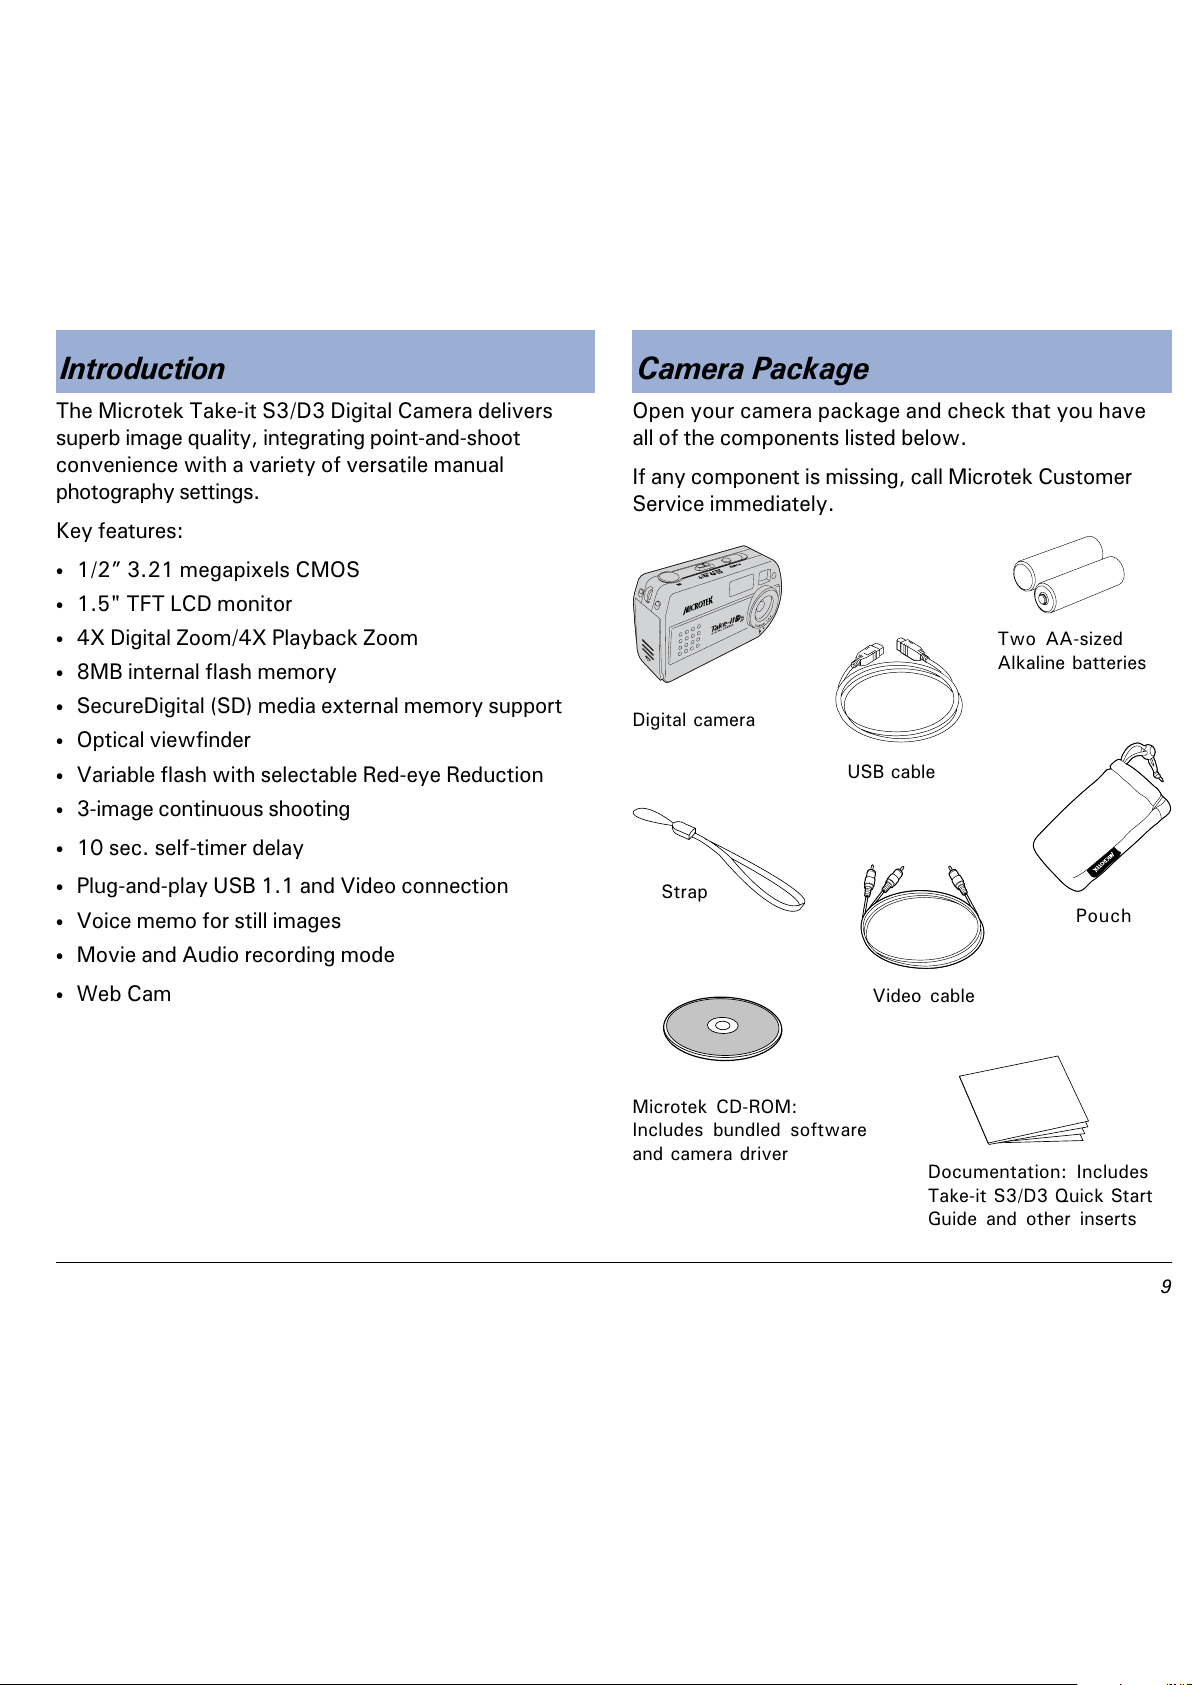
Introduction
The Microtek Take-it S3/D3 Digital Camera delivers
superb image quality, integrating point-and-shoot
convenience with a variety of versatile manual
photography settings.
Key features:
1/2 3.21 megapixels CMOS
1.5" TFT LCD monitor
4X Digital Zoom/4X Playback Zoom
8MB internal flash memory
SecureDigital (SD) media external memory support
Optical viewfinder
Variable flash with selectable Red-eye Reduction
3-image continuous shooting
10 sec. self-timer delay
Plug-and-play USB 1.1 and Video connection
Voice memo for still images
Movie and Audio recording mode
Web Cam
Open your camera package and check that you have
all of the components listed below.
If any component is missing, call Microtek Customer
Service immediately.
Camera Package
USB cable
Video cable
Digital camera
Strap
Two AA-sized
Alkaline batteries
Microtek CD-ROM:
Includes bundled software
and camera driver
Documentation: Includes
Take-it S3/D3 Quick Start
Guide and other inserts
Pouch
All manuals and user guides at all-guides.com
Page 10
10
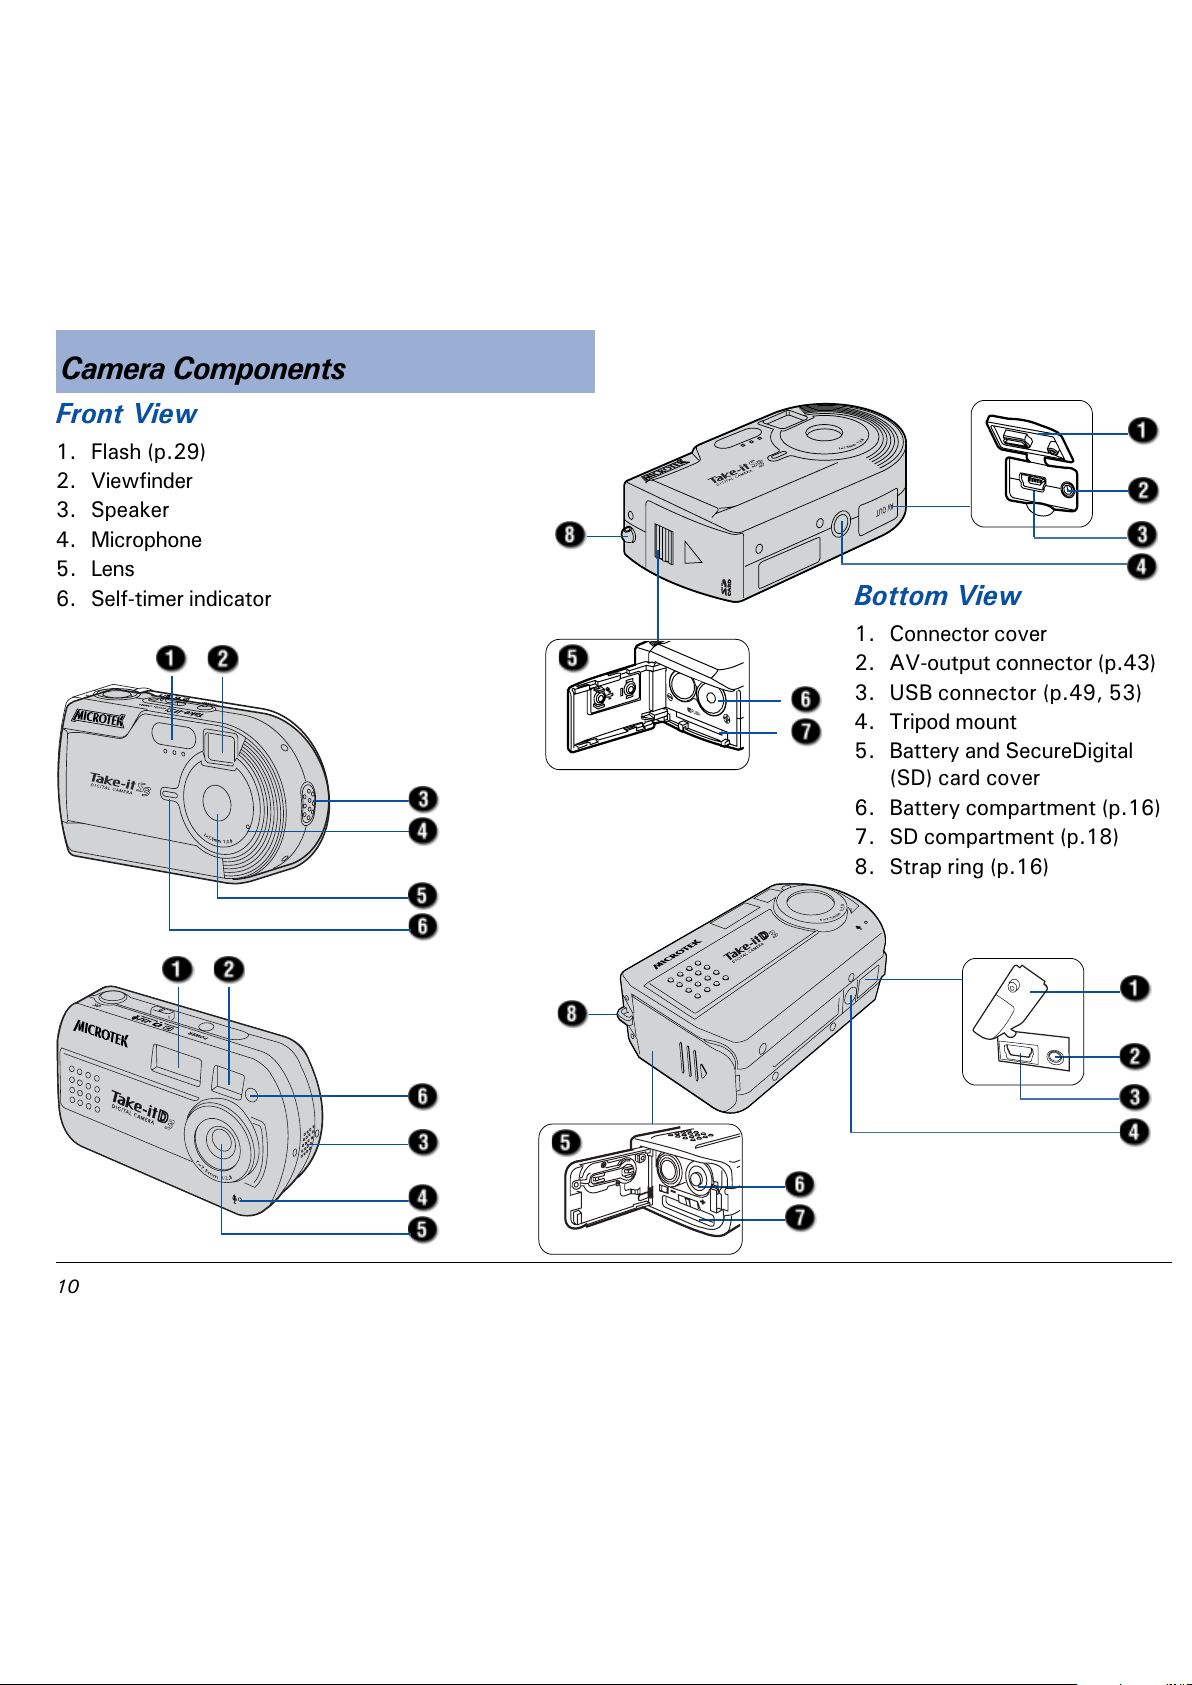
Camera Components
Front View
1. Flash (p.29)
2. Viewfinder
3. Speaker
4. Microphone
5. Lens
6. Self-timer indicator
Bottom View
1. Connector cover
2. AV-output connector (p.43)
3. USB connector (p.49, 53)
4. Tripod mount
5. Battery and SecureDigital
(SD) card cover
6. Battery compartment (p.16)
7. SD compartment (p.18)
8. Strap ring (p.16)
All manuals and user guides at all-guides.com
Page 11
11
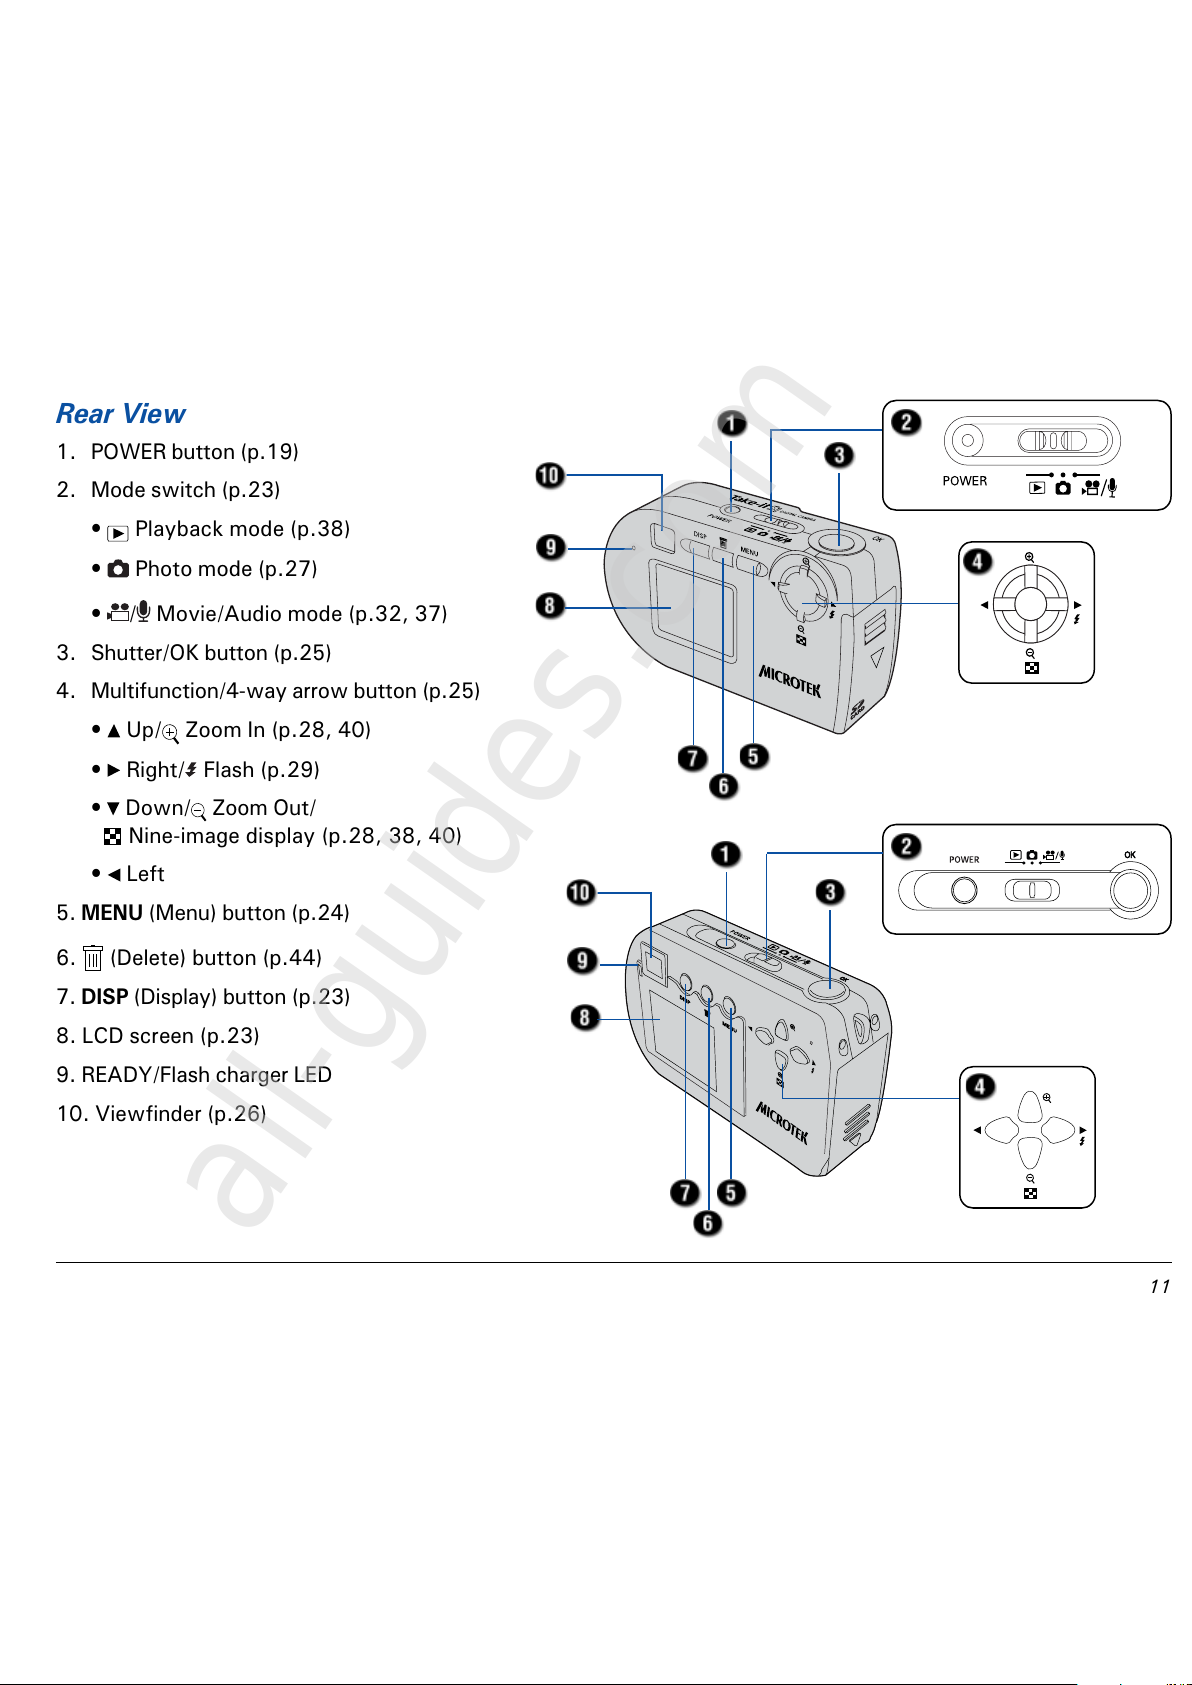
Rear View
1. POWER button (p.19)
2. Mode switch (p.23)
Playback mode (p.38)
Photo mode (p.27)
/ Movie/Audio mode (p.32, 37)
3. Shutter/OK button (p.25)
4. Multifunction/4-way arrow button (p.25)
Up/ Zoom In (p.28, 40)
Right/ Flash (p.29)
Down/ Zoom Out/
Nine-image display (p.28, 38, 40)
Left
5. MENU (Menu) button (p.24)
6.
(Delete) button (p.44)
7. DISP (Display) button (p.23)
8. LCD screen (p.23)
9. READY/Flash charger LED
10. Viewfinder (p.26)
All manuals and user guides at all-guides.com
all-guides.com
Page 12

12
LCD Screen Display
Photo Mode
* No icon is shown when the setting is default.
1. Photo mode
2. Size
- 2560x1920 pixels (Interpolated)
- 2048x1536 pixels
- 1600x1200 pixels
- 1280x960 pixels
- 640x480 pixels
3. Quality (Compression)
( Best / Fine/ Normal)
4. Flash mode
( Auto/ Auto with Red-eye Reduction/ Forced flash/
Forced flash with Red-eye Reduction/ Flash off)
5. Voice memo
6. Battery status indicator
( Full/ Half/ Low)
7. SecureDigital (SD) card indicator
8. Number of pictures remaining
9. Digital zoom level
10. Sharpness
( Low/ Normal/ High)
11. Exposure Compensation (EV)
12. Drive mode
( Self-timer/ * Normal/ Continuous)
13. White Balance (WB)
( Auto/ Daylight/ Cloud/ Tungsten/
Fluorescent)
1
2
3
4
5
6
78
13 12 11 10 9
All manuals and user guides at all-guides.com
Page 13
13
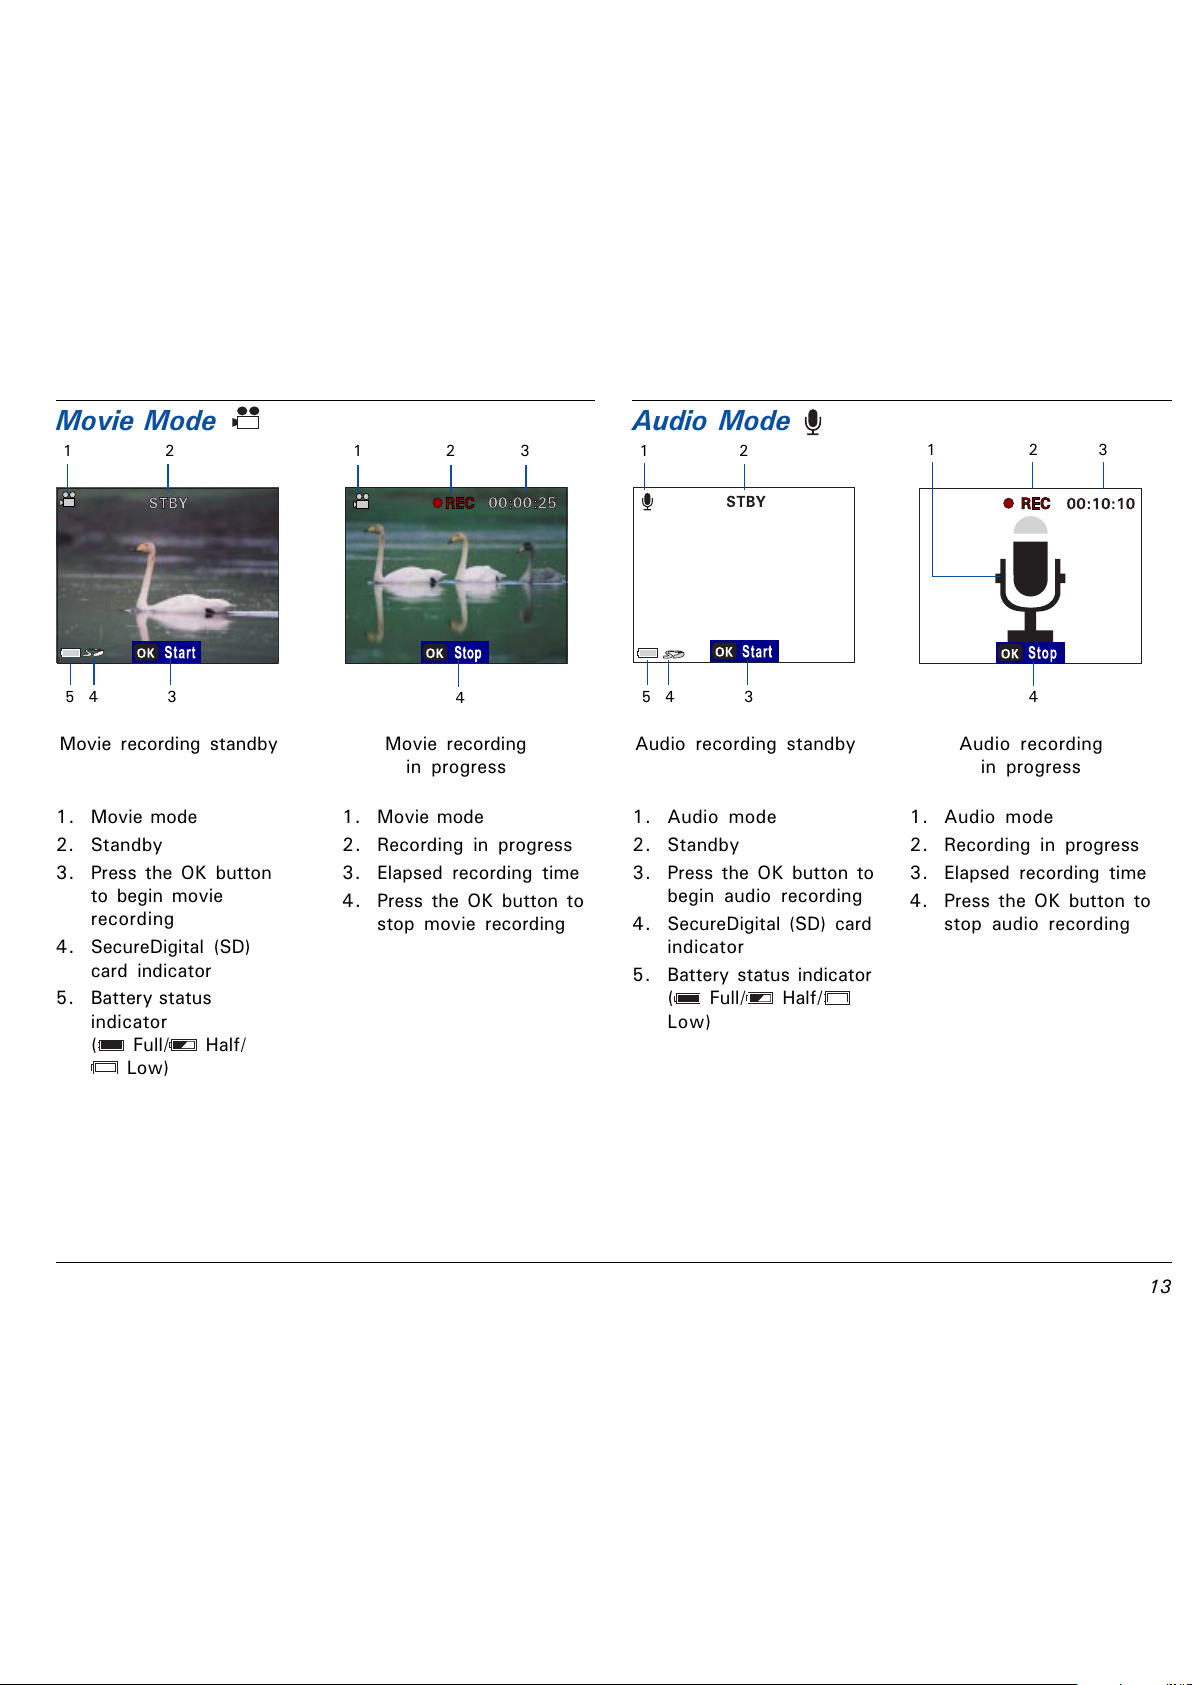
Movie Mode
Movie recording standby Movie recording
in progress
Audio Mode
1. Audio mode
2. Standby
3. Press the OK button to
begin audio recording
4. SecureDigital (SD) card
indicator
5. Battery status indicator
( Full/ Half/
Low)
Audio recording standby
1. Audio mode
2. Recording in progress
3. Elapsed recording time
4. Press the OK button to
stop audio recording
Audio recording
in progress
1. Movie mode
2. Standby
3. Press the OK button
to begin movie
recording
4. SecureDigital (SD)
card indicator
5. Battery status
indicator
( Full/ Half/
Low)
1. Movie mode
2. Recording in progress
3. Elapsed recording time
4. Press the OK button to
stop movie recording
1 2 1 2 3
5 4 3
4
1 2
1 2 3
5 4 3
4
All manuals and user guides at all-guides.com
Page 14
14
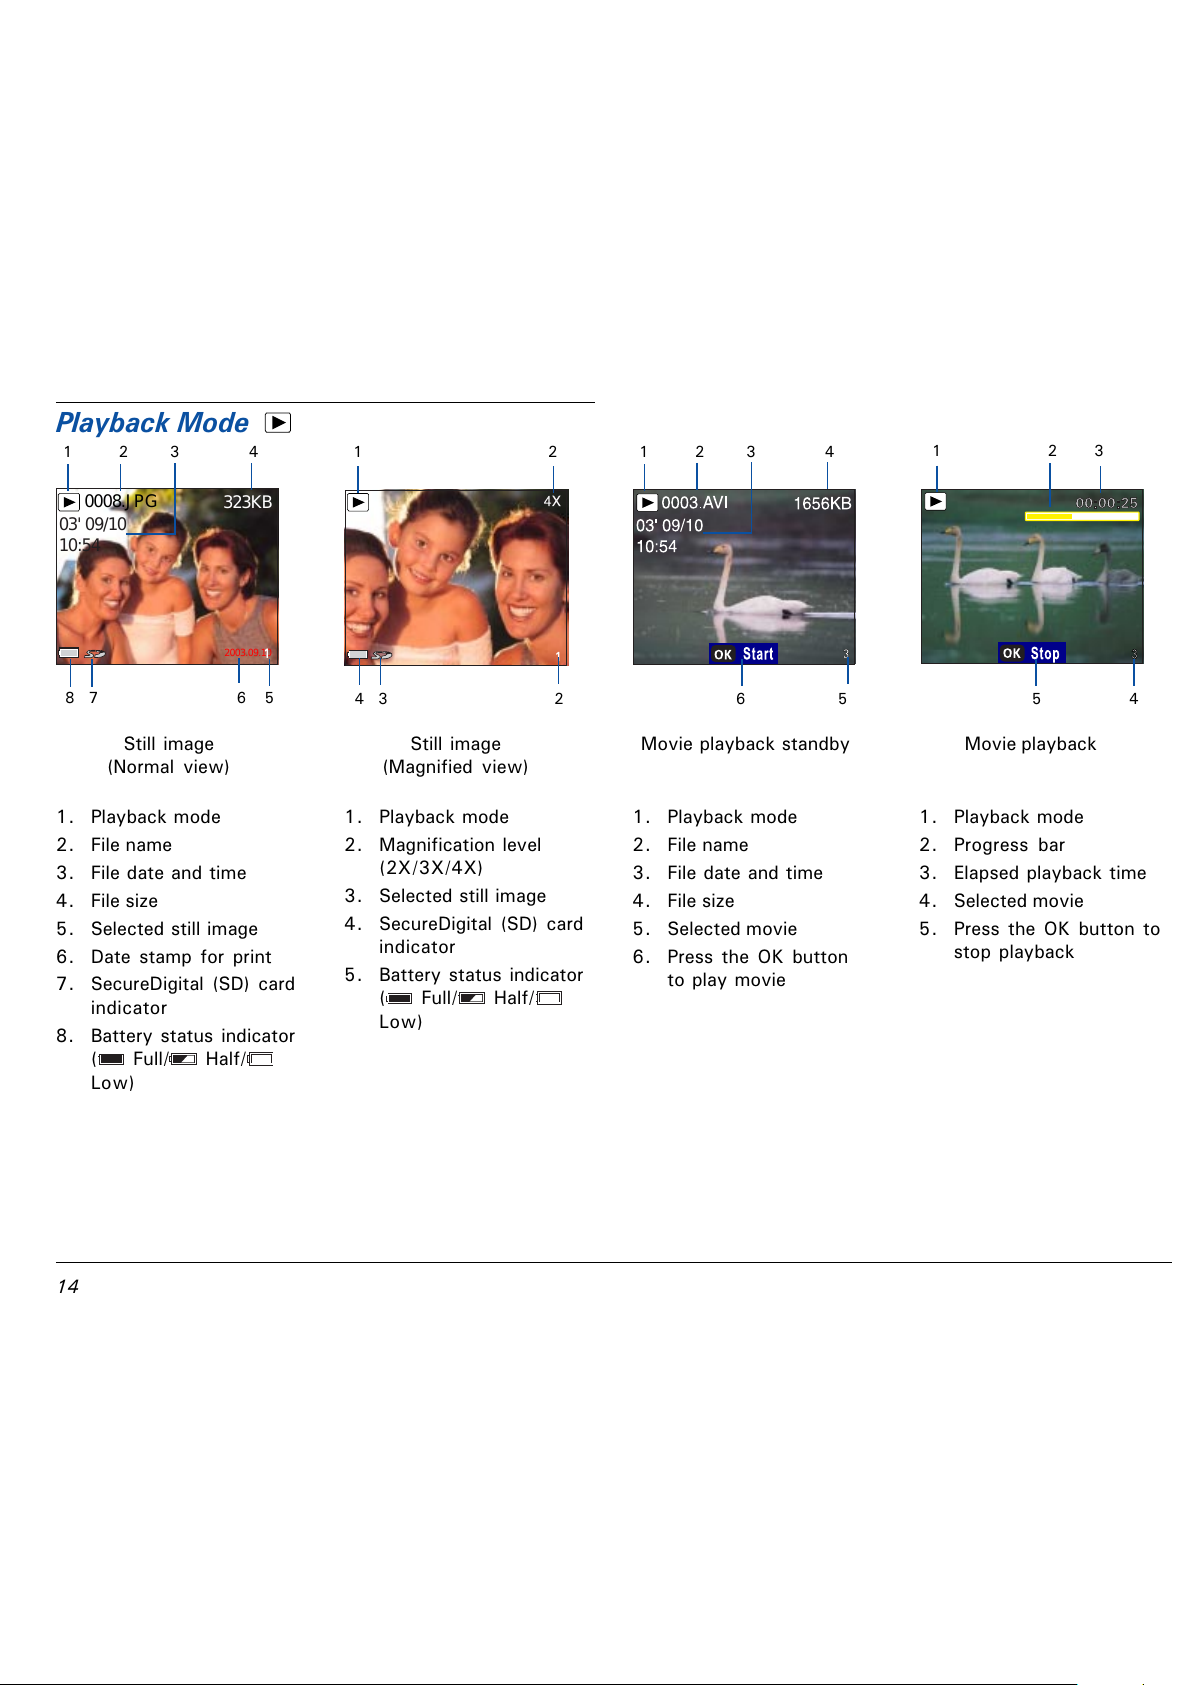
Playback Mode
1. Playback mode
2. Progress bar
3. Elapsed playback time
4. Selected movie
5. Press the OK button to
stop playback
Movie playback standby
1. Playback mode
2. File name
3. File date and time
4. File size
5. Selected still image
6. Date stamp for print
7. SecureDigital (SD) card
indicator
8. Battery status indicator
( Full/ Half/
Low)
Still image
(Normal view)
1. Playback mode
2. Magnification level
(2X/3X/4X)
3. Selected still image
4. SecureDigital (SD) card
indicator
5. Battery status indicator
( Full/ Half/
Low)
Still image
(Magnified view)
0008.JPG
03' 09/10
10:54
323KB
2003.09.10
1
1 2 3 4 1 2
8 7 6 5
4 3 2
5 4
6 5
1. Playback mode
2. File name
3. File date and time
4. File size
5. Selected movie
6. Press the OK button
to play movie
Movie playback
1 2 3 4
1 2 3
All manuals and user guides at all-guides.com
Page 15
15
1 2 3 4
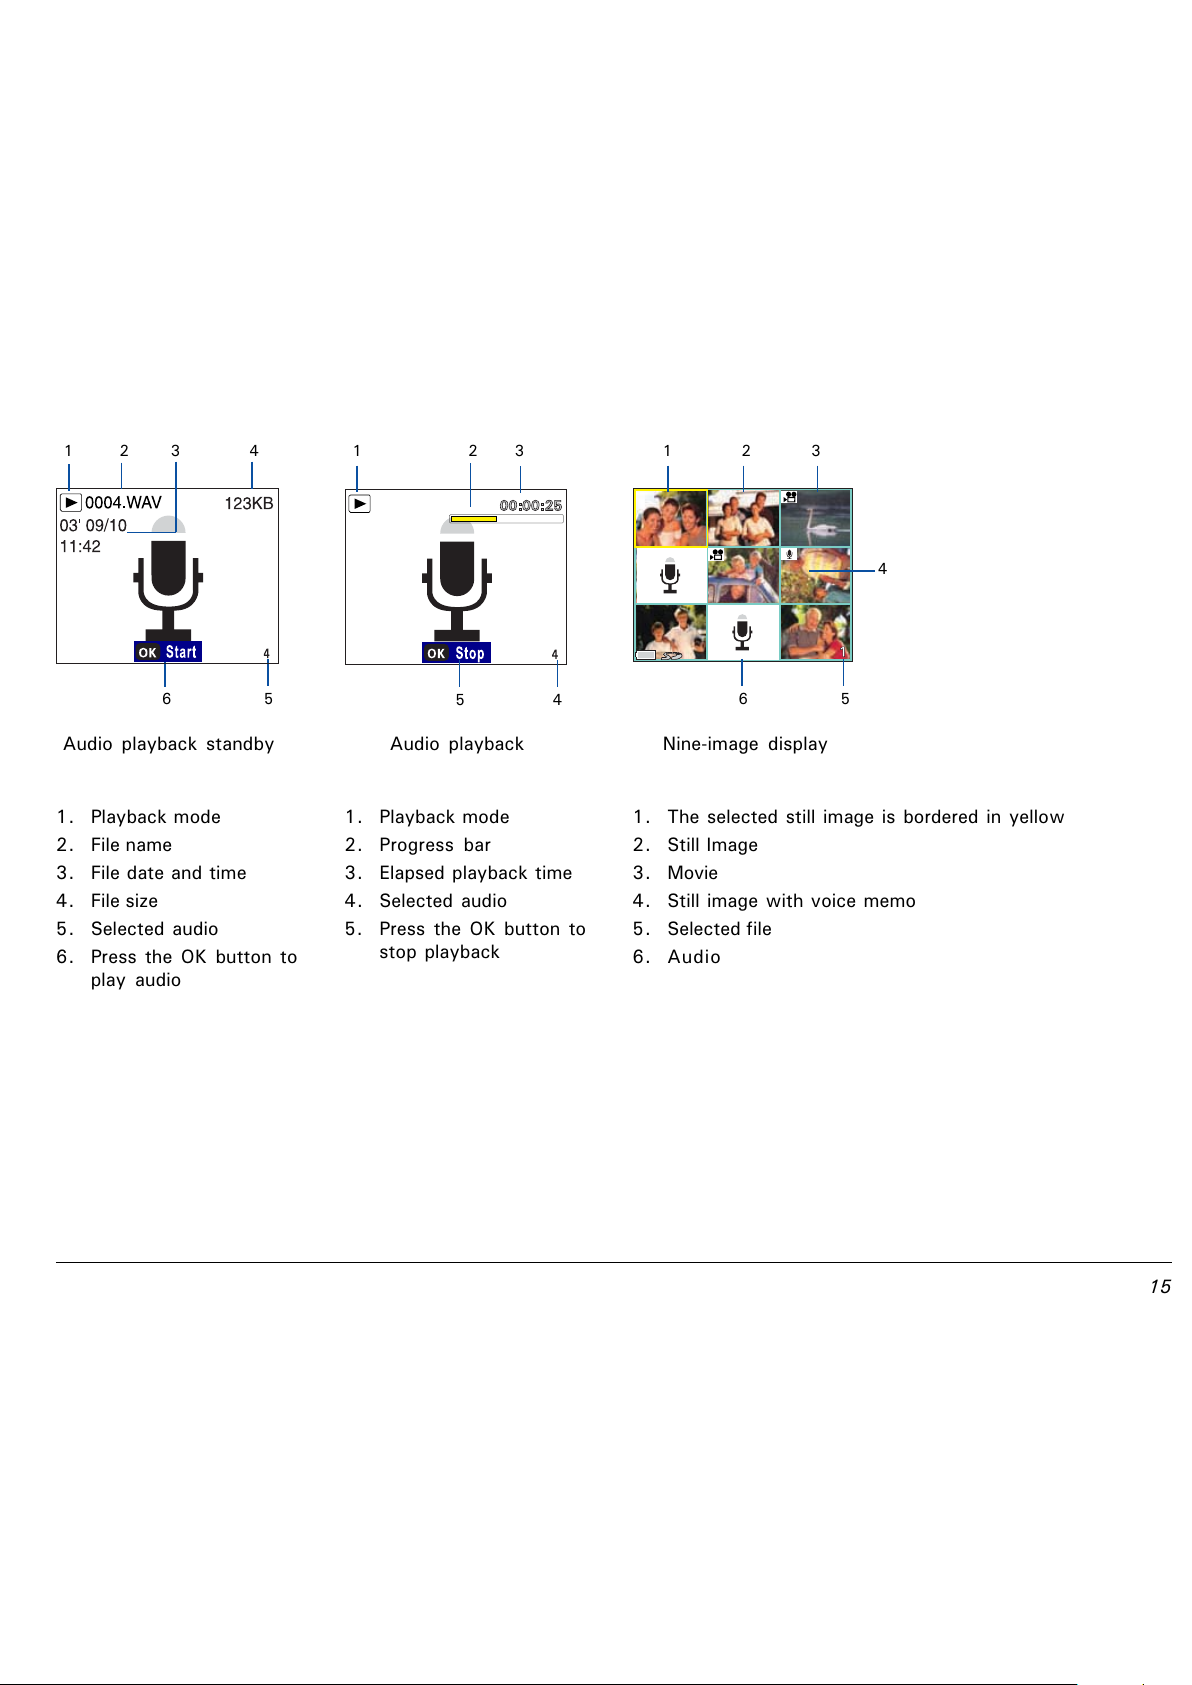
1. The selected still image is bordered in yellow
2. Still Image
3. Movie
4. Still image with voice memo
5. Selected file
6. Audio
Nine-image display
1. Playback mode
2. Progress bar
3. Elapsed playback time
4. Selected audio
5. Press the OK button to
stop playback
Audio playback
1 2 3
6 5
5 4
6 5
1. Playback mode
2. File name
3. File date and time
4. File size
5. Selected audio
6. Press the OK button to
play audio
Audio playback standby
1 2 3
4
All manuals and user guides at all-guides.com
Page 16
16
Getting Started
Loading the Battery
Use two AA-sized Alkaline batteries (supplied), or two
AA-sized Nickel Metal Hydride (NiMH) batteries as the
power source for the camera.
1. Ensure that the camera is
turned off; then push the
battery cover in the
direction of the arrow to
open it.
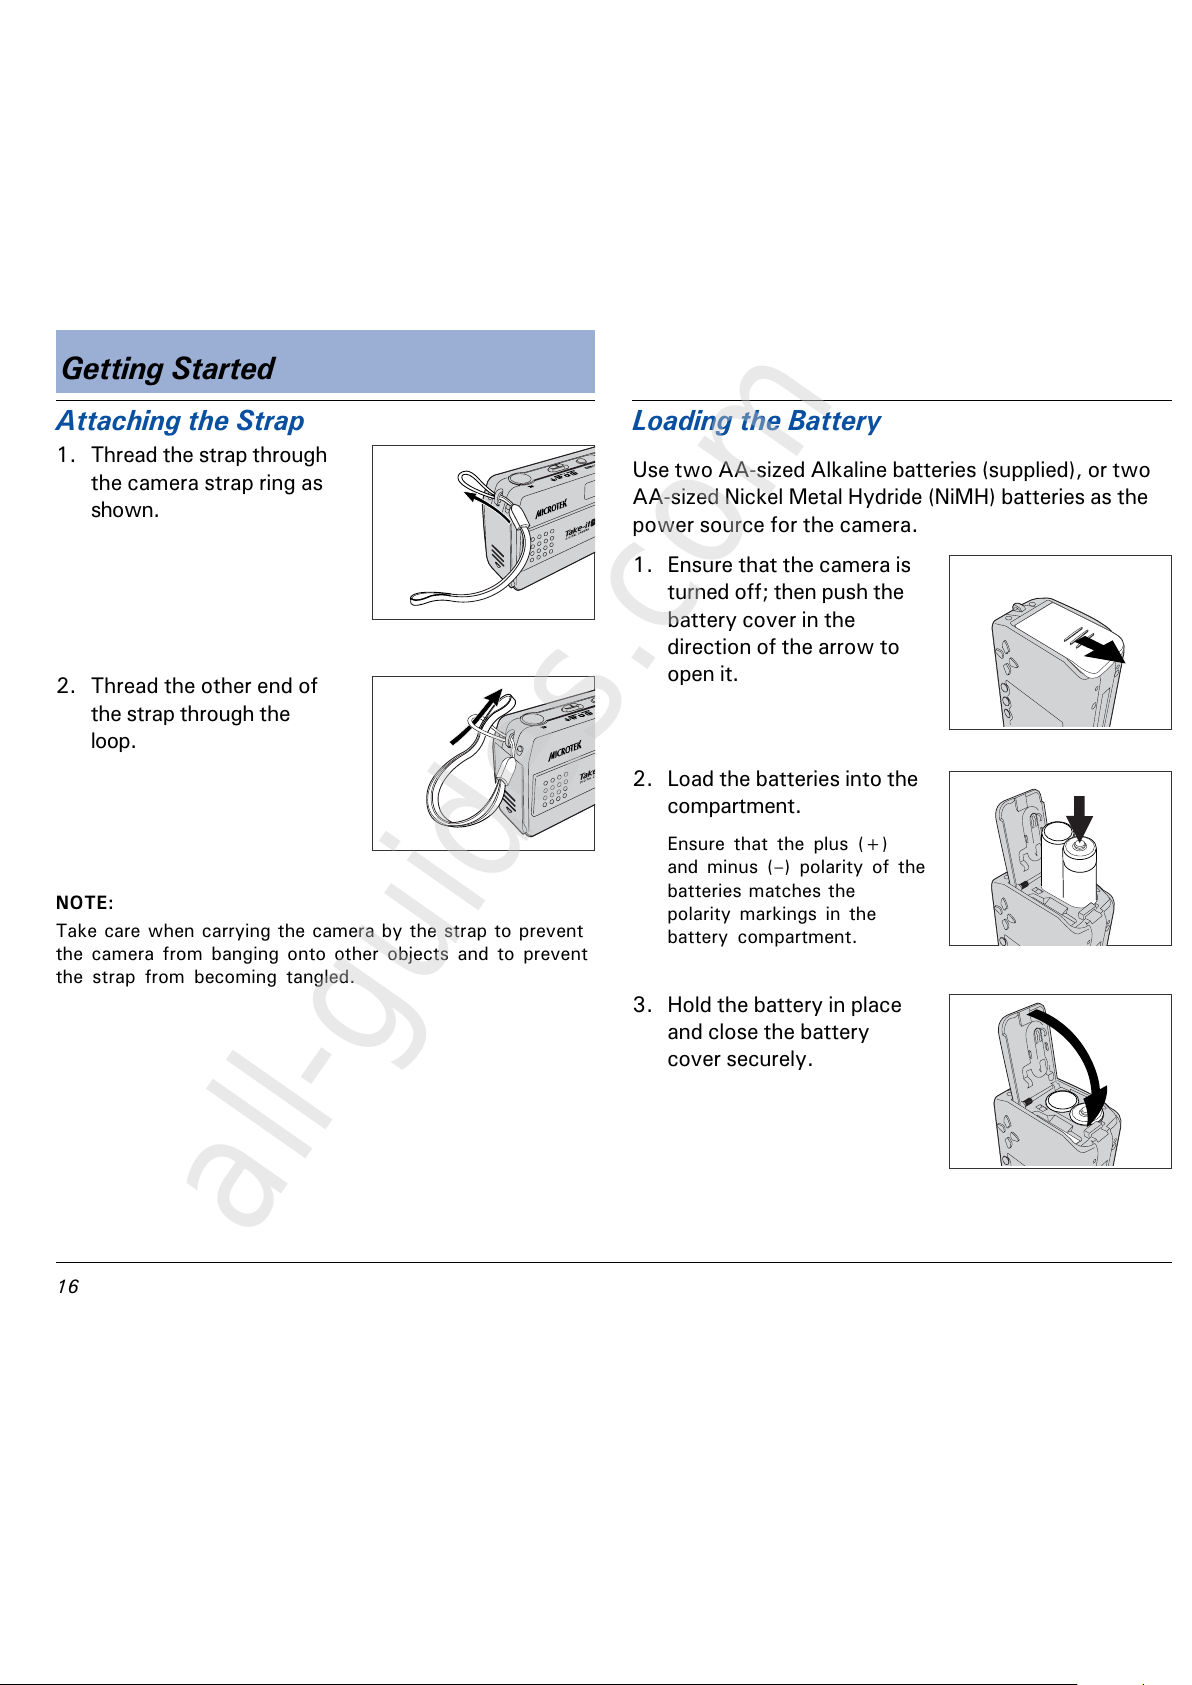
Attaching the Strap
1. Thread the strap through
the camera strap ring as
shown.
2. Thread the other end of
the strap through the
loop.
NOTE:
Take care when carrying the camera by the strap to prevent
the camera from banging onto other objects and to prevent
the strap from becoming tangled.
2. Load the batteries into the
compartment.
Ensure that the plus (+)
and minus () polarity of the
batteries matches the
polarity markings in the
battery compartment.
3. Hold the battery in place
and close the battery
cover securely.
All manuals and user guides at all-guides.com
all-guides.com
Page 17
17
To remove the batteries, open the battery cover and
take the batteries out. Make sure the camera is turned
off before removing batteries.
NOTE:
Do not mix old batteries with new ones.
Do not mix different types of batteries or batteries from
different manufacturers (brands).
Remove batteries and store them when not using the
camera to prevent the batteries from leaking and
damaging the camera.
For more information, see the Appendix Using the
Battery.
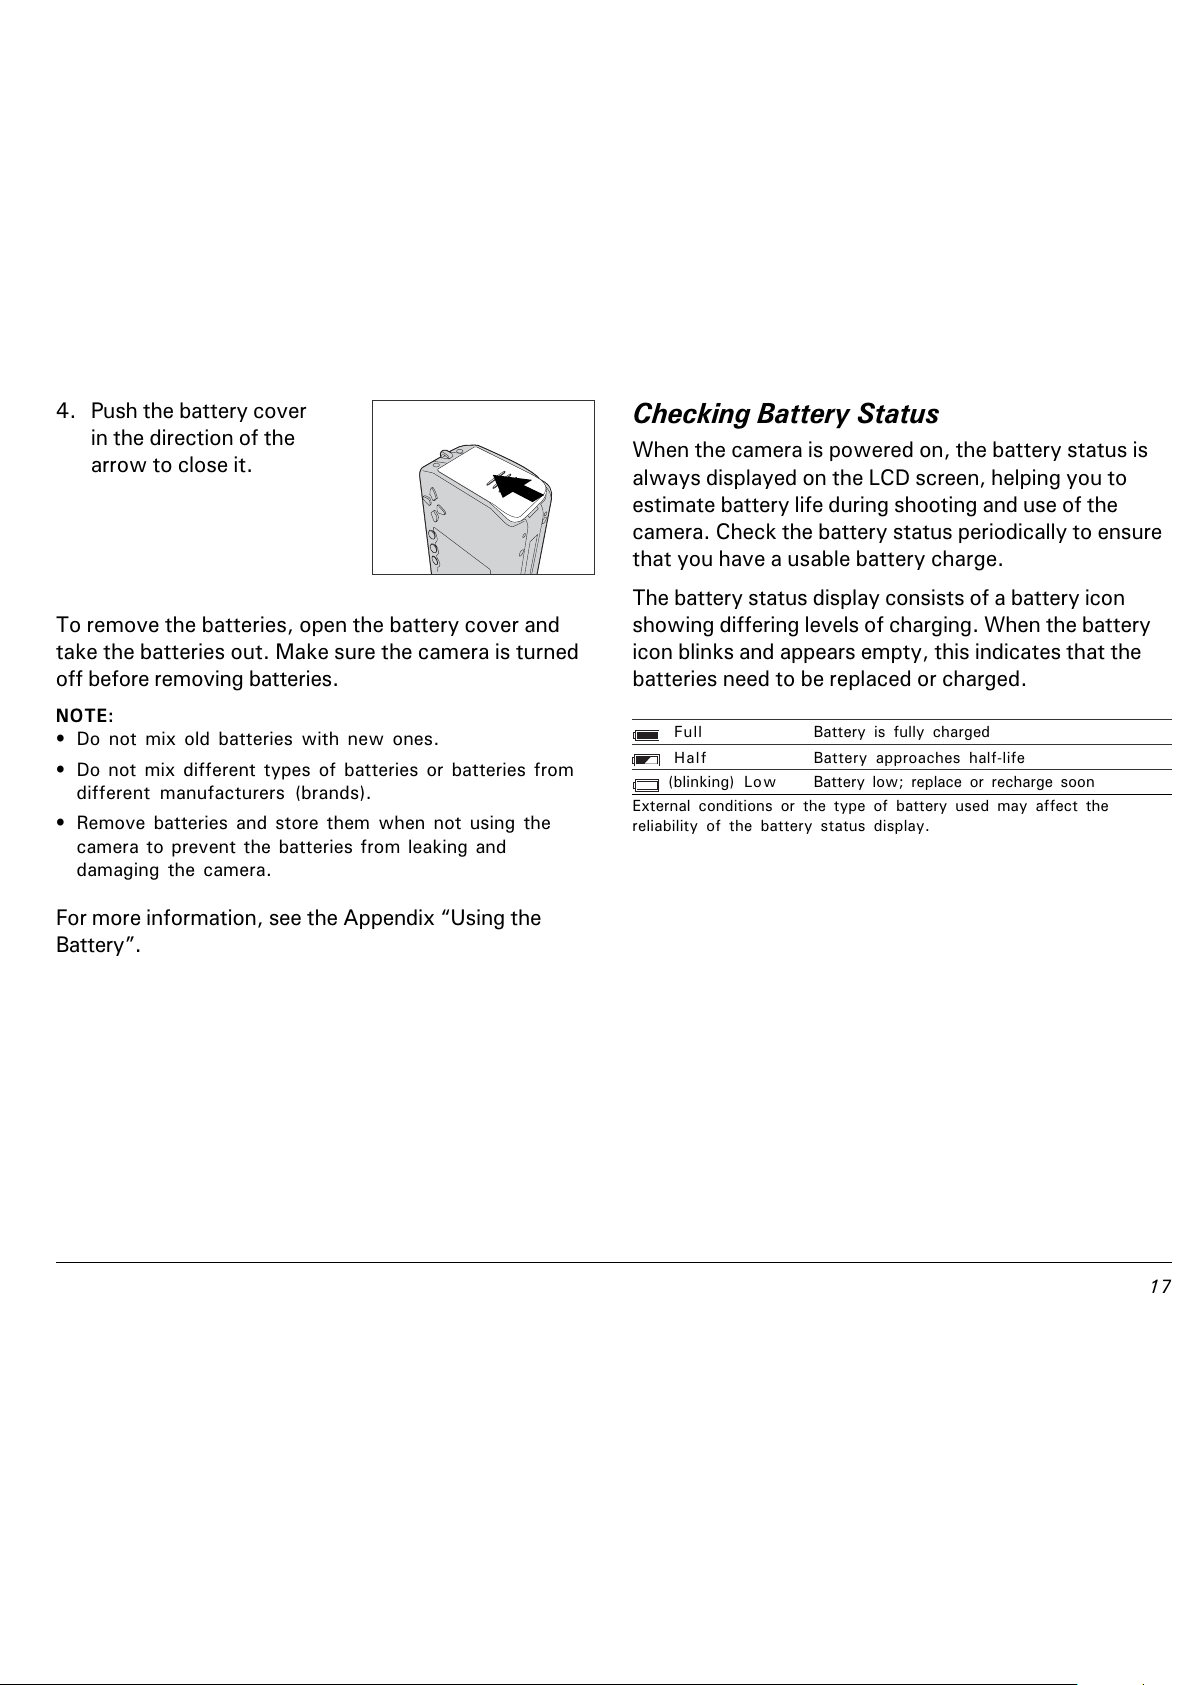
Checking Battery Status
When the camera is powered on, the battery status is
always displayed on the LCD screen, helping you to
estimate battery life during shooting and use of the
camera. Check the battery status periodically to ensure
that you have a usable battery charge.
The battery status display consists of a battery icon
showing differing levels of charging. When the battery
icon blinks and appears empty, this indicates that the
batteries need to be replaced or charged.
Full Battery is fully charged
Half Battery approaches half-life
(blinking) Low Battery low; replace or recharge soon
External conditions or the type of battery used may affect the
reliability of the battery status display.
4. Push the battery cover
in the direction of the
arrow to close it.
All manuals and user guides at all-guides.com
Page 18
18
To remove the SD card, open the SD card cover, push
the card in, and release; the card pops out.
NOTE:
Incorrect insertion of the SD card may cause a memory
error, blocking you from storing any data in the SD card.
You may lose or damage data if you remove the SD card
while it is in operation.
For more information, see the Appendix Using the SD
card.
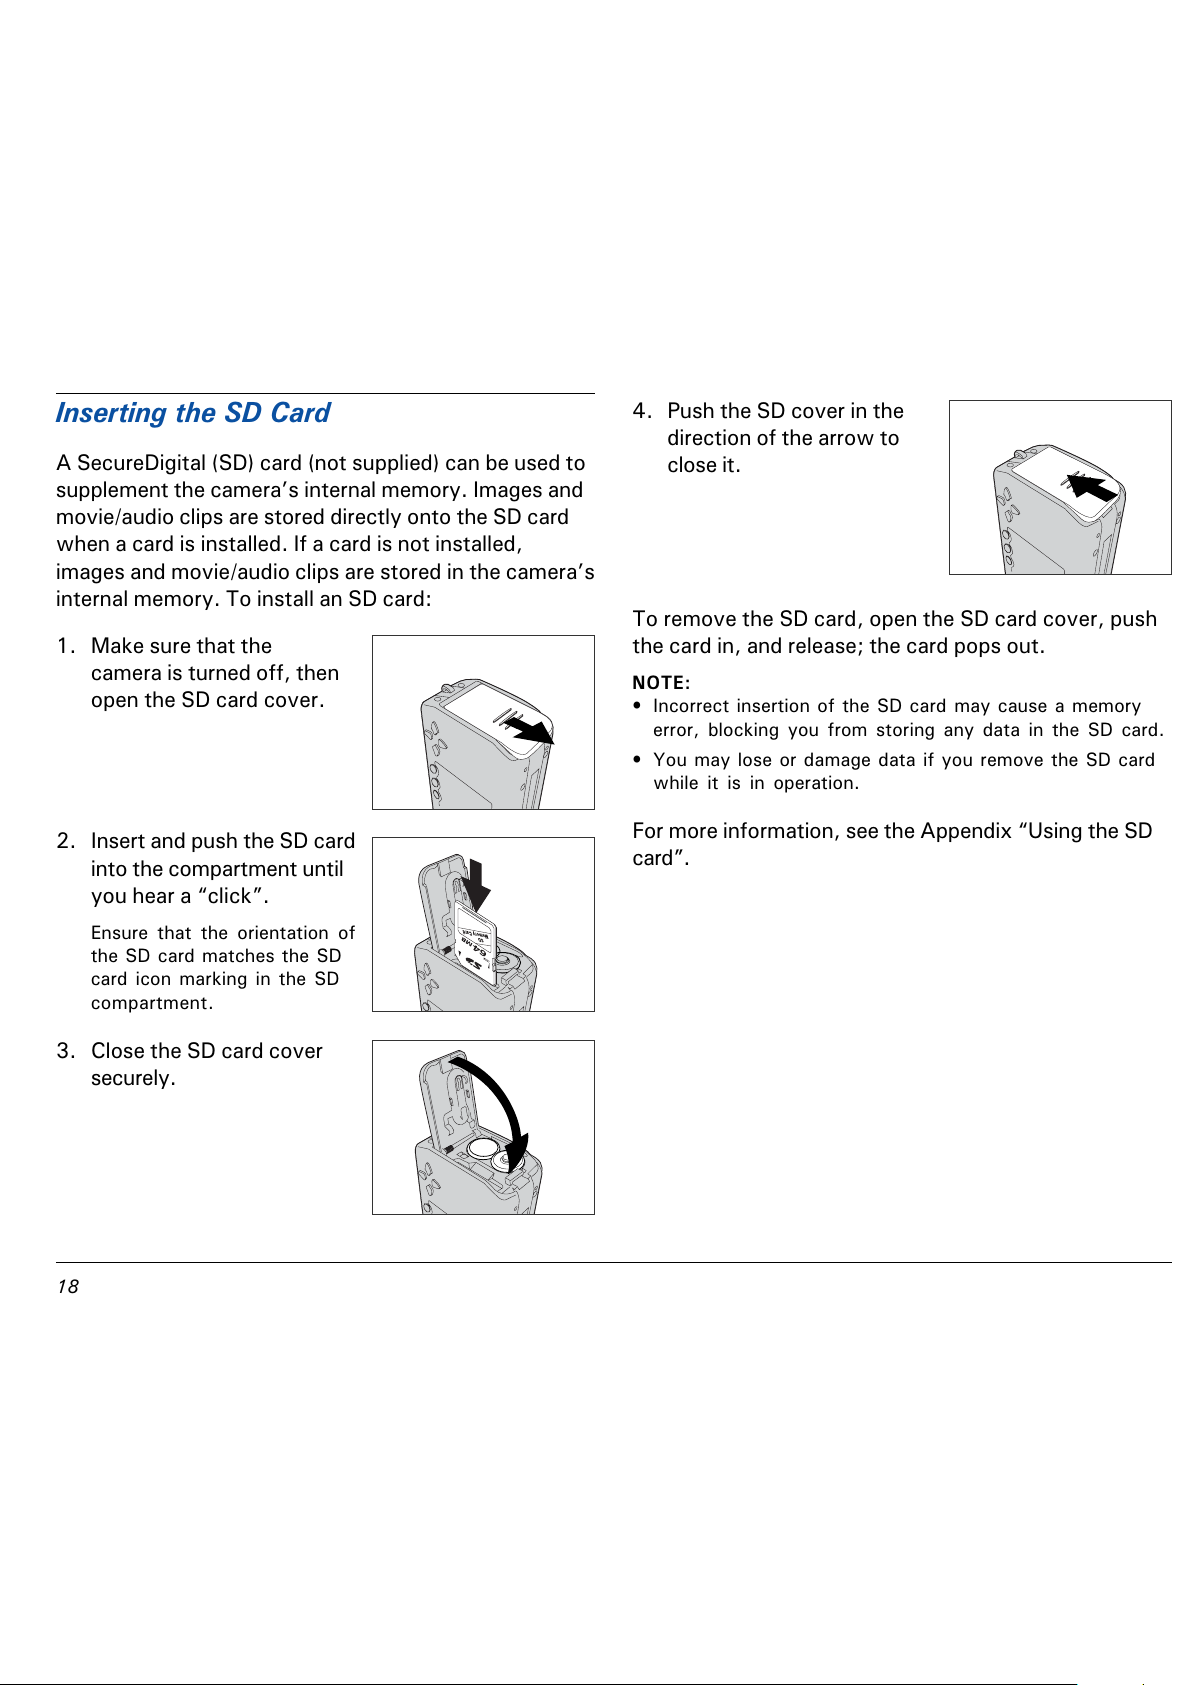
Inserting the SD Card
A SecureDigital (SD) card (not supplied) can be used to
supplement the cameras internal memory. Images and
movie/audio clips are stored directly onto the SD card
when a card is installed. If a card is not installed,
images and movie/audio clips are stored in the cameras
internal memory. To install an SD card:
1. Make sure that the
camera is turned off, then
open the SD card cover.
2. Insert and push the SD card
into the compartment until
you hear a click.
Ensure that the orientation of
the SD card matches the SD
card icon marking in the SD
compartment.
3. Close the SD card cover
securely.
4. Push the SD cover in the
direction of the arrow to
close it.
All manuals and user guides at all-guides.com
Page 19
19
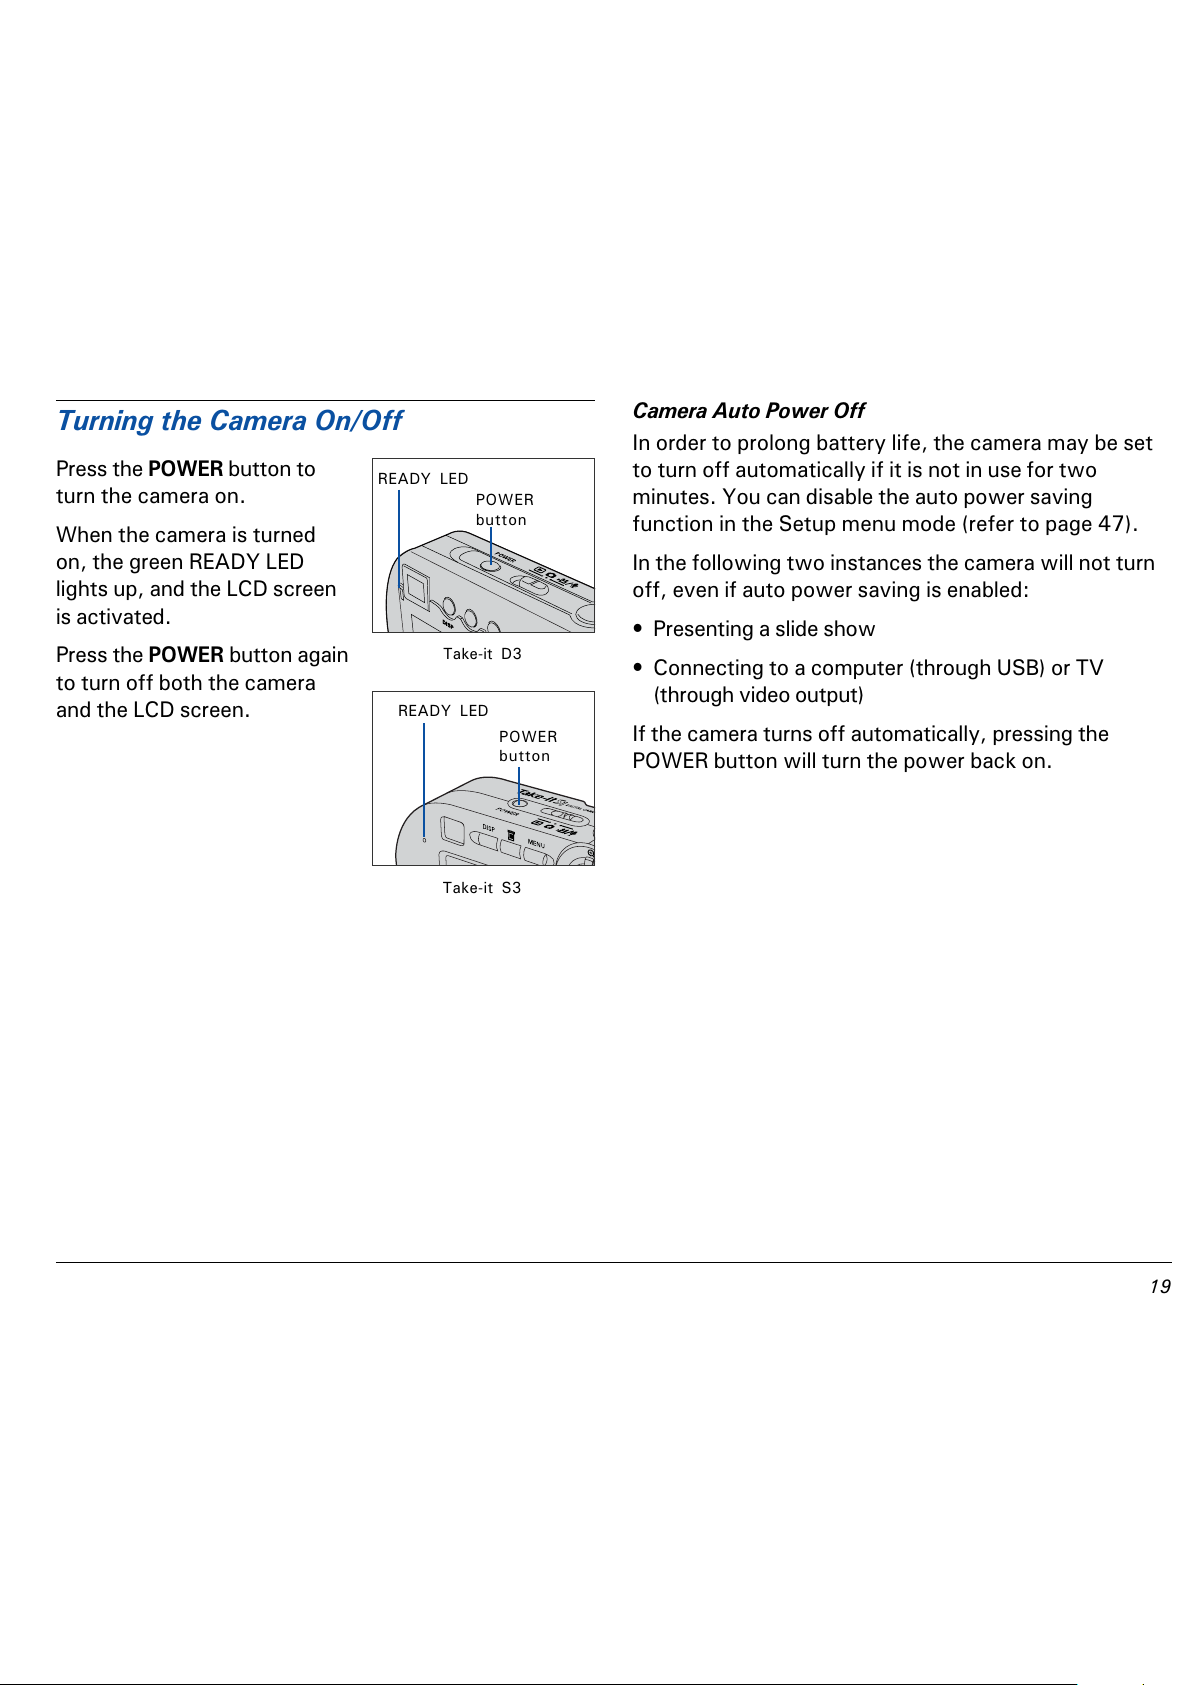
Turning the Camera On/Off
Press the POWER button to
turn the camera on.
When the camera is turned
on, the green READY LED
lights up, and the LCD screen
is activated.
Press the POWER button again
to turn off both the camera
and the LCD screen.
Camera Auto Power Off
In order to prolong battery life, the camera may be set
to turn off automatically if it is not in use for two
minutes. You can disable the auto power saving
function in the Setup menu mode (refer to page 47).
In the following two instances the camera will not turn
off, even if auto power saving is enabled:
Presenting a slide show
Connecting to a computer (through USB) or TV
(through video output)
If the camera turns off automatically, pressing the
POWER button will turn the power back on.
READY LED
POWER
button
Take-it S3
Take-it D3
READY LED
POWER
button
All manuals and user guides at all-guides.com
Page 20
20
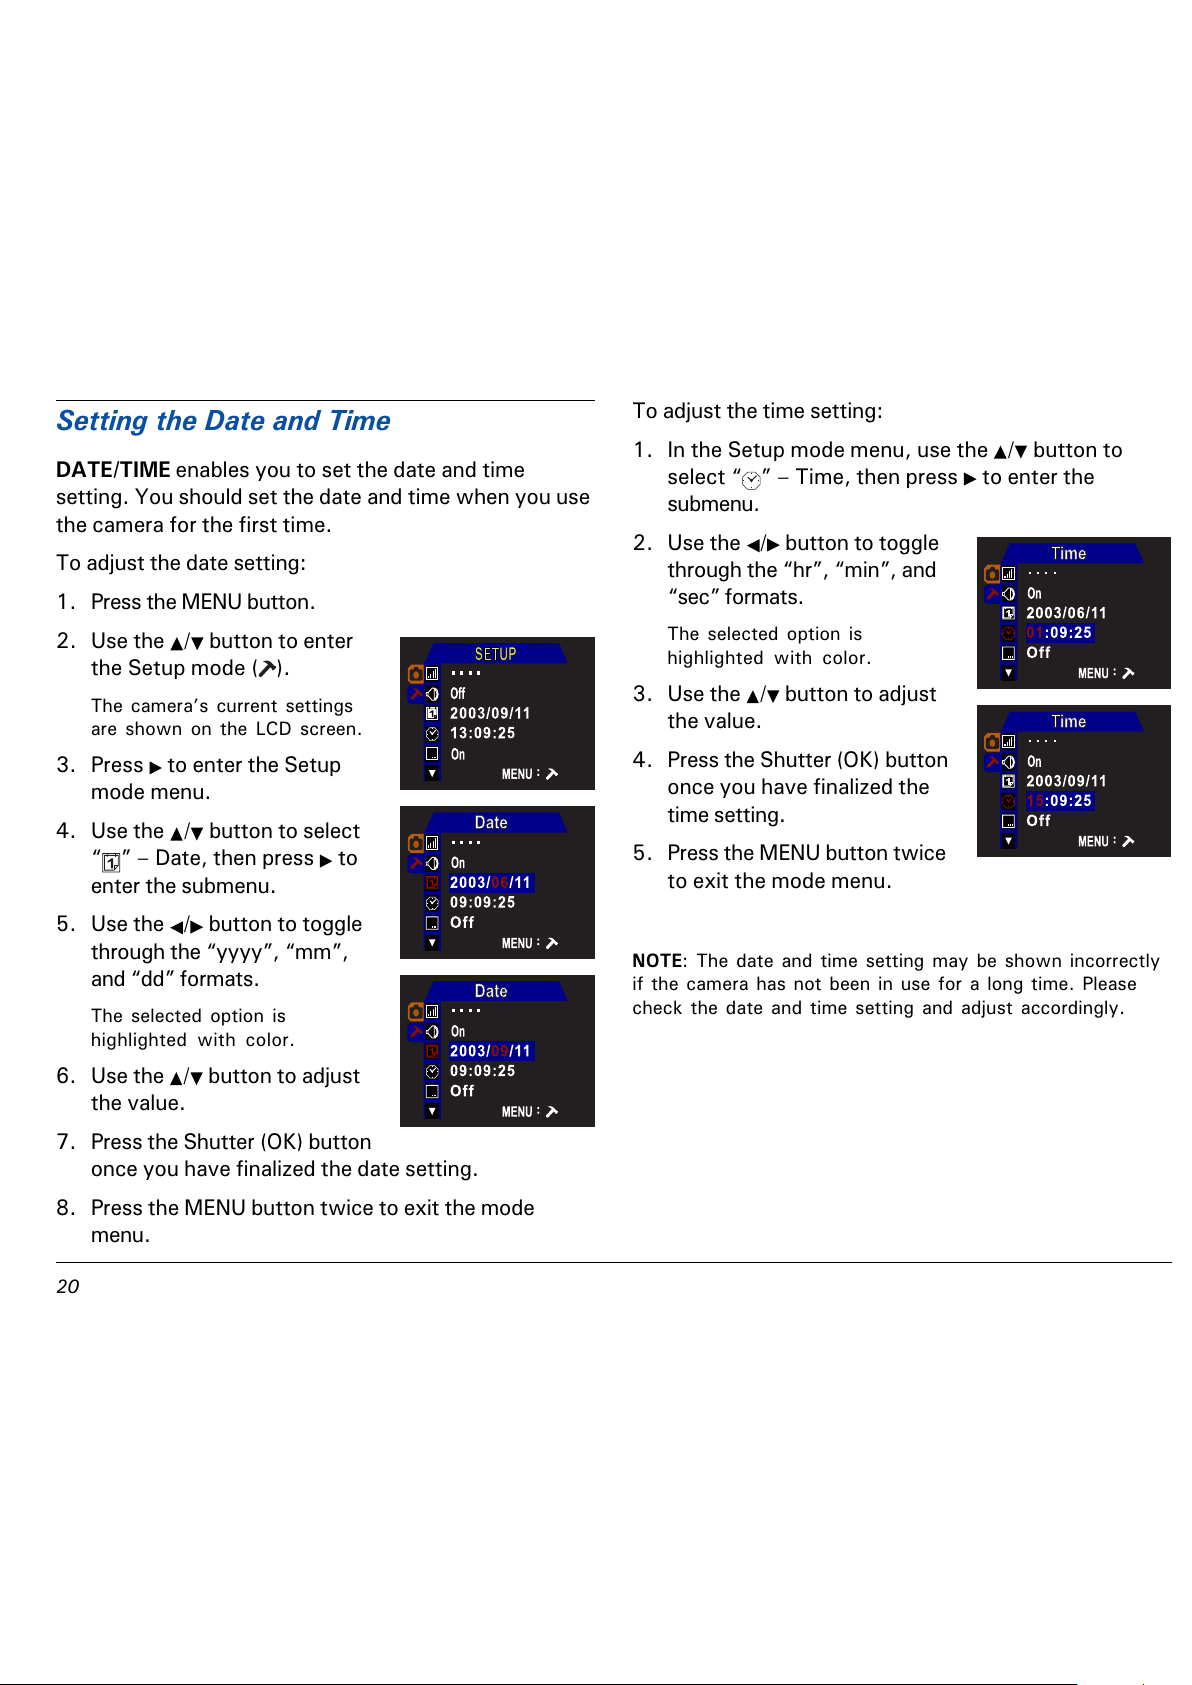
Setting the Date and Time
DATE/TIME enables you to set the date and time
setting. You should set the date and time when you use
the camera for the first time.
To adjust the date setting:
1. Press the MENU button.
2. Use the
/ button to enter
the Setup mode ( ).
The cameras current settings
are shown on the LCD screen.
3. Press to enter the Setup
mode menu.
4. Use the
/ button to select
Date, then press to
enter the submenu.
5. Use the
/ button to toggle
through the yyyy, mm,
and dd formats.
The selected option is
highlighted with color.
6. Use the / button to adjust
the value.
7. Press the Shutter (OK) button
once you have finalized the date setting.
8. Press the MENU button twice to exit the mode
menu.
To adjust the time setting:
1. In the Setup mode menu, use the
/ button to
select Time, then press to enter the
submenu.
2. Use the
/ button to toggle
through the hr, min, and
sec formats.
The selected option is
highlighted with color.
3. Use the / button to adjust
the value.
4. Press the Shutter (OK) button
once you have finalized the
time setting.
5. Press the MENU button twice
to exit the mode menu.
NOTE: The date and time setting may be shown incorrectly
if the camera has not been in use for a long time. Please
check the date and time setting and adjust accordingly.
All manuals and user guides at all-guides.com
Page 21
21
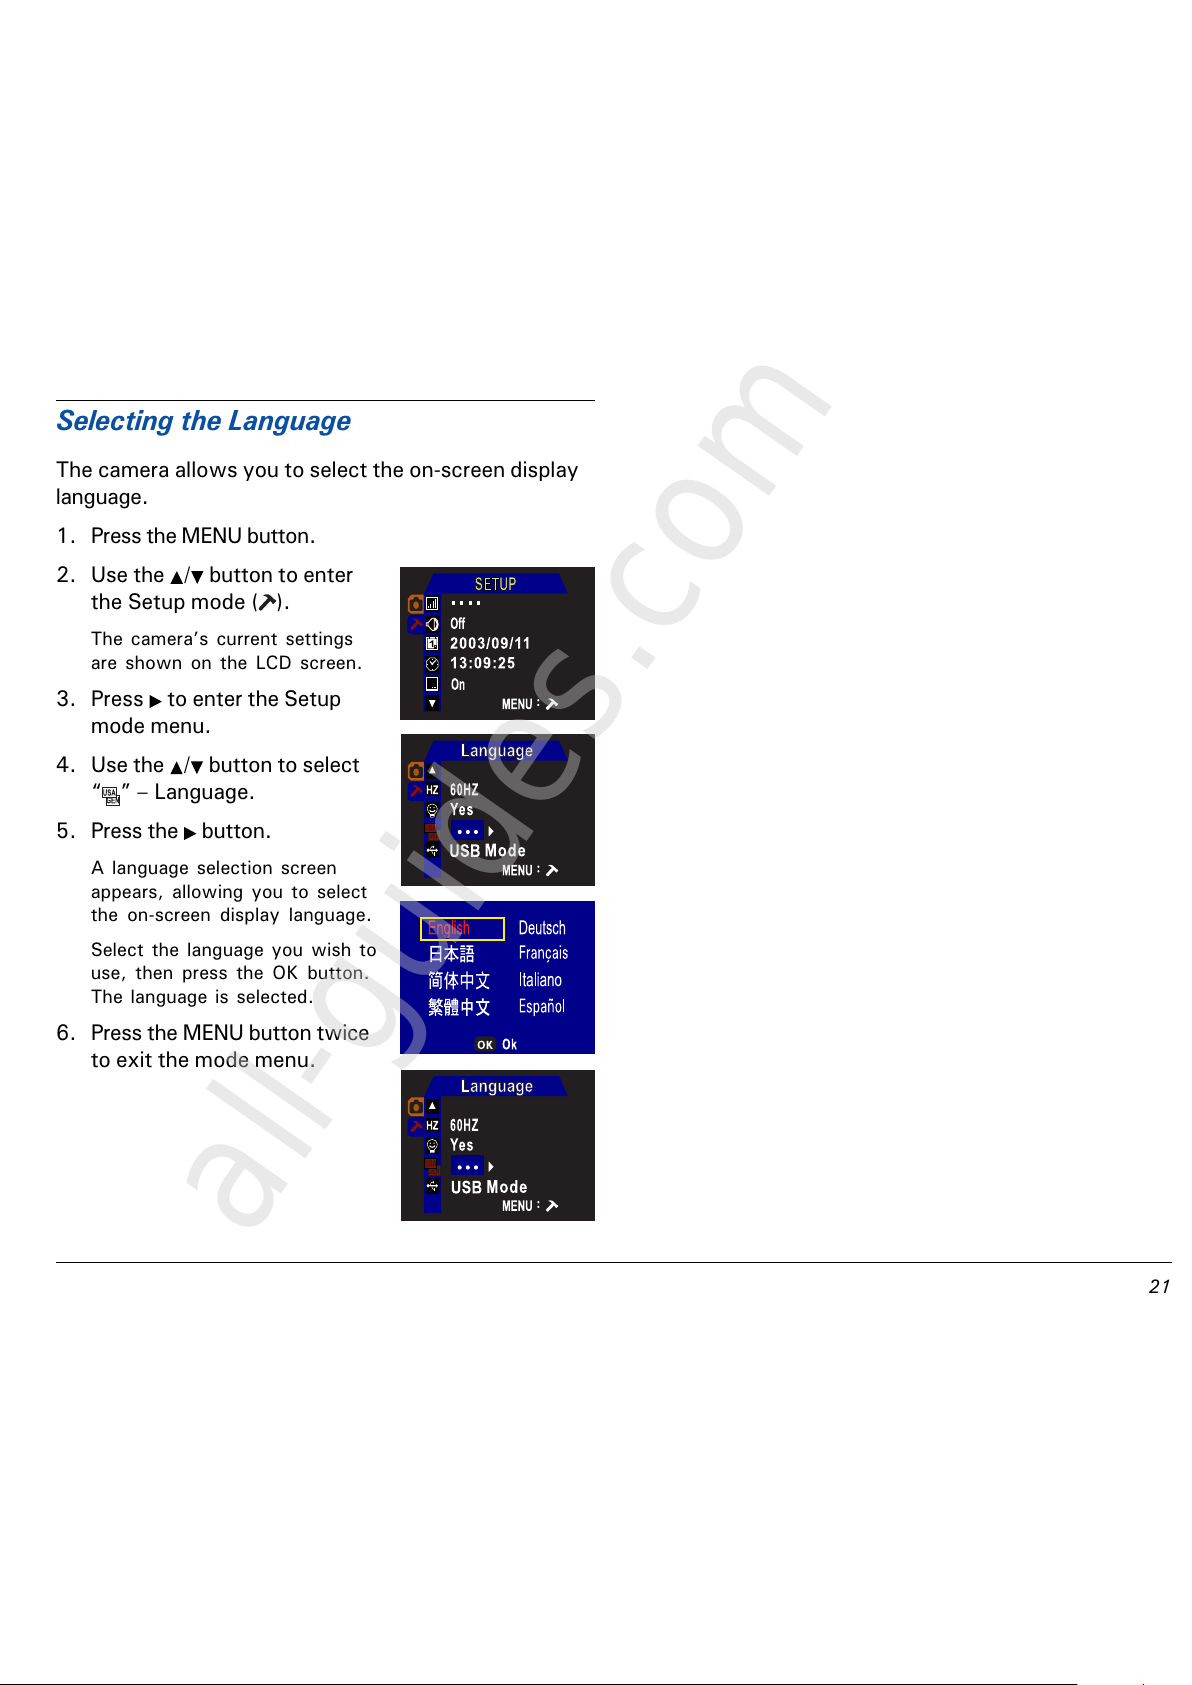
Selecting the Language
The camera allows you to select the on-screen display
language.
1. Press the MENU button.
2. Use the
/ button to enter
the Setup mode ( ).
The cameras current settings
are shown on the LCD screen.
3. Press to enter the Setup
mode menu.
4. Use the
/ button to select
Language.
5. Press the
button.
A language selection screen
appears, allowing you to select
the on-screen display language.
Select the language you wish to
use, then press the OK button.
The language is selected.
6. Press the MENU button twice
to exit the mode menu.
All manuals and user guides at all-guides.com
all-guides.com
Page 22

22
Formatting the SD Card
NOTE: The SD card is not included in your camera package.
Before you insert an SD card into your camera for the
first time, you will need to format the SD card with the
camera. In most cases, the newly purchased SD card
can be directly used for storing images. To prevent
possible malfunction, it is best to format the SD card
before image shooting or movie/audio recording.
1. Press the MENU button.
2. Use the
/ button to enter
the Setup mode ( ).
The cameras current settings
are shown on the LCD screen.
3. Press to enter the Setup
mode menu.
4. Use the
/ button to select
Format.
When selected, the OK?
setting appears as well and is
highlighted in red, allowing you
to format the installed SD card.
5. Press the Shutter (OK) button.
A screen appears to allow you
to format the installed SD card
or to cancel.
6. Use 4-way arrow button to
select OK, then press the
Shutter (OK) button.
The SD card formatting begins.
When formatting is completed, the LCD screen returns
to the selected mode screen.
NOTE:
With the formatting of the SD card, previous all files on
the SD card are erased.
A MEMORY FULL message appears on the LCD screen if
the internal memory or the SD card is full. To resolve --
- Connect the camera to your computer, then transfer
the stored files from the camera's internal memory or
the SD card to the computer.
- Remove all the files in the SD card or the cameras
internal memory, or use a new SD card.
Improper use of the SD card may damage its stored files.
For better storage, transfer the files from your SD card to
your computer, and back up the files to a hard disk or
CD-ROM.
Format ?
Ok Cancel
All manuals and user guides at all-guides.com
Page 23

23
Turning On/Off LCD Screen
The LCD screen with camera status is automatically
activated when the camera is powered on, displaying
the camera settings relevant to your current camera
mode. You can use the LCD screen to frame your shots,
to view images and to play back movie/audio clips, as
well as to display menus for each mode.
In any camera mode, the LCD screen can be manually
turned off by pressing the DISP button located on the
back of the camera.
Using the Mode Switch
The Mode switch allows you to switch among
Playback, Photo, and Movie/Audio modes of operation.
Before Shooting
Screen onlyScreen with camera
status
LCD screen off
Playback Mode (p.38)
Allows you to play back the stored still images or
movie/audio clips that were made with the camera.
You can browse, delete, and mark DPOF for printing.
Photo Mode (p.27)
Allows you to capture images with automatic
exposure, providing a full selection of manual controls
over all camera settings.
/ Movie/Audio Mode (p.32, 37)
Allows you to record movie/audio clips of unlimited
length (maximum length dependent on the SD card).
All manuals and user guides at all-guides.com
Page 24

24
Using the Menus
Different menus are available for Playback, Photo,
Movie/Audio, and Setup modes. You can customize the
camera settings for your own use, as well as for
shooting-related functions. Press the MENU button to
display a menu for the selected mode. (The Setup
menu is displayed in all modes.)
To access the menus:
1. Set the Mode switch to any
camera mode.
2. Press the MENU button.
The selected mode menu is
displayed on the LCD screen.
Use the button to enter
the function menu.
Use the / button to
navigate through function
items.
Use the / button to
toggle through options.
The selected function/option is
highlighted with color.
3. Press the MENU button twice
to exit the mode menu.
Functions Playback Photo Movie/Audio Page
Size o 33
Quality o 34
Drive Mode o o 34
EV Compensation o 35
White Balance o o 35
Sharpness o 36
Voice Memo o 36
Slide Show 42
Erase All o 44
Rotation o 42
Print o 45
Functions Setup Page
Brightness o 47
Beep o 47
Date o 47
Time o 47
Date Stamp o 47
Video Out o 47
Format o 48
Reset o 48
Copy to SD o 48
Frequency o 48
Power Saving o 48
Language o 48
USB Switch o 48
(o: Available, : Unavailable)
M
All manuals and user guides at all-guides.com
Page 25

25
Using the Shutter Button
Press the Shutter (OK) button
all the way down to take a
picture.
NOTE:
When the Shutter button is
pressed you will hear a beep
sound if the BEEP function is
enabled in the Setup menu (refer
to Beep on page 47.)
Using the Multifunction Buttons
The Multifunction/4-way arrow buttons provide Up,
Down, Left, and Right arrow selections for navigating
the Menu screens. In addition, the buttons can perform
differing functions depending on the selected camera
mode, as shown by the table below.
Button Playback Photo Movie/Audio
Zoom In Zoom In
Previous
Pan
Next Flash
Pan Auto Flash
Auto with Red-eye Red.
Forced On
Forced Flash with Red-eye Red.
Flash Off
Zoom Out Zoom Out
Next
Pan
Nine-image
display
Previous
Pan
(: Unavailable)
Take-it S3
Take-it D3
All manuals and user guides at all-guides.com
Page 26

26
Holding the Camera
Hold the camera with both
hands. Frame the subject in
the center of the LCD screen
or Viewfinder. The framed
image is recorded when you
press the Shutter button.
NOTE:
Avoid obstructing the camera or flash when shooting
photos or movies.
Hold the camera securely with both hands to prevent the
camera from shaking and producing a blurry picture. Use
a tripod for best results, especially when using the self-
timer or in poorly lit places when the flash is turned off.
Do not touch the lens or the flash.
Using the Viewfinder
In addition to the LCD screen,
the Viewfinder can be used to
frame your images.
To conserve battery power,
press the DISP button to turn
off the LCD screen, the
viewfinder can be used
instead.
Use the Viewfinder to center and frame the subject
before you press the Shutter (OK) button to shoot
images.
Viewfinder
All manuals and user guides at all-guides.com
all-guides.com
Page 27

%
Shooting
Shooting Still Images
The Photo mode allows you to capture images with
automatic exposure, and providing a full selection of
manual controls over all camera settings.
1. Set the Mode switch to Photo mode (
).
Some shooting information (e.g., photo size, photo
quality, flash, etc.) appears on the LCD screen
automatically.
2. Frame the subject using the LCD screen.
3. Press the Shutter button.
The still image is taken when a
beep sounds.
Do not move the camera until
you hear the beep.
The camera is ready to take
another picture when Busy
message vanishes from the
LCD screen.
The following table lists the available functions that can
be manually adjusted in the menu mode.
Function Description Page
Size 33
Quality 34
Drive Mode 34
EV Compensation 35
White Balance 35
Sharpness 36
Voice Memo 36
NOTE:
The effective shooting distance, from the lens to your
subject, is 3.28 ft. (1m) to infinity.
Be careful when shooting the following subjects
because they are difficult to bring into focus:
- Low-contrast subjects such as a flat white surface
- Flat, smooth objects
- Quickly moving objects
- Subjects that are dimly illuminated
- Reflective surfaces
- Subjects in a place with bright backlight
For best results, focus on a separate object that is near
your subject, then shoot the picture.
The use of a tripod is recommended to prevent
blurring when taking a photo
M
All manuals and user guides at all-guides.com
Page 28

&
Using the Digital Zoom
The / button allows you to rescale the image view
without changing the shooting distance.
Press the
button to Zoom in and make the subject
larger. The maximum zoom scale is 4X.
Press the
button to Zoom out and make the subject
smaller.
To shoot zoom images:
1. Set the Mode switch to Photo mode (
).
2. Frame the subject using the
LCD screen.
3. Press the Zoom-in (
) button
until the desired zoom value
is reached.
A zoom level value is displayed
on the LCD screen indicating
the zoom status.
4. Press the Shutter button.
The image is captured.
NOTE:
For best results, compose your shots on the LCD screen
when using zoom feature.
The zoom setting is disabled when you change modes.
All manuals and user guides at all-guides.com
Page 29

'
Using the Flash
The flash serves as a built-in supplemental light source
for taking pictures in environments with insufficient
lighting. The effective flash range is from 3.28 to 6.56
ft. (1 to 2.0 m).
The flash with red-eye reduction allows you to reduce
the phenomenon of red eyes when human or animal
subjects are photographed using the flash.
By pressing the Flash (
) button you can toggle through
the following flash modes:
Auto (Auto flash) The flash fires when ambient
lighting conditions require its use.
Auto with Red-eye reduction The flash will fire
when ambient lighting conditions require its use and will
reduce the red-eye effect.
Forced flash The flash fires every time you take a
picture, regardless of ambient lighting conditions.
Forced flash with Red-eye reduction The flash
fires every time you take a picture regardless of lighting
conditions and will reduce the red-eye effect.
Flash off The flash will not fire.
To shoot images with a desired flash mode:
1. Set the Mode switch to Photo mode (
).
2. Frame the subject using the LCD screen.
3. Press the Flash (
) button until
the desired flash mode
appears on the LCD screen.
The factory default flash is
Flash off.
4. Press the Shutter button.
The image is captured.
Auto with Red-eye
Reduction
Before After
NOTE:
Flash mode remains set until you change the Flash mode.
When the flash is charging, the LCD screen turns off and
the flash LED blinks. Once charging is complete, the LCD
screen turns on, indicating that the camera is ready to
take a picture.
Using the Flash to take a shot at a distance shorter that
the effective range may result in overexposed images.
All manuals and user guides at all-guides.com
Page 30

!
Using the Self-Timer
The Self-timer enables you to automatically take an
image after a delay of 10 seconds.
To shoot with the Self-timer:
1. Set the Mode switch to Photo mode (
).
2. Press the MENU button.
3. Use the 4-way arrow button to select
M
- Drive
Mode, then select (Self-timer).
4. Press the MENU button twice to exit the mode
menu.
The Self-timer icon appears on the LCD screen.
5. Frame the subject in the LCD screen, and press the
Shutter button.
The Self-timer countdown begins. You have 10 seconds
to get into position before the picture is taken. A tone
beeps for two seconds before the camera takes the
shot.
NOTE: Self-timer mode is automatically switched off after
the images have been taken.
Before After
Continuous Shooting
The continuous shooting mode enables you to shoot
three images in rapid succession with a single press of
the Shutter button.
To shoot images continuously:
1. Set the Mode switch to Photo Mode (
).
2. Press the MENU button.
3. Use the 4-way arrow button to select
M
- Drive
Mode, then select (Continuous shooting).
4. Press the MENU button twice to exit the mode
menu.
The Continuous shooting icon appears on the LCD
screen.
5. Frame the subject in the LCD screen, and press the
Shutter button.
Three images are taken in rapid succession after the
Shutter button is pressed.
NOTE:
Continues shooting mode is automatically switched off
after the images have been taken.
If the SD card is filled, the camera will stop taking
pictures.
To prevent blurred images, hold the camera steady before
you press the Shutter button.
All manuals and user guides at all-guides.com
Page 31

!
Recording a Voice Memo
The Voice Memo allows you to record a maximum 10-
second voice memo to a captured image.
To record a voice memo:
1. Get ready to shoot.
When Voice Memo is enabled, a
Voice Memo icon appears on
the LCD screen. If you cannot
find this icon, enable Voice
Memo in the Photo menu.
2. Shoot an image as normal.
After an image is captured,
voice memo recording begins,
with the elapsed recording time
shown on the LCD screen.
When recording ends or the
maximum 10-second length is
reached, the recording stops
and returns to shooting mode.
NOTE:
In Continuous shooting, the Voice Memo function is
inactive even though the Voice Memo is enabled.
To get better voice quality during recording, locate the
position of the cameras microphone. In addition, the
distance between the speaker and the microphone should
be as close as possible. Do not touch or cover the
microphone during recording.
Turning On Voice Memo
1. In the Photo mode (
), press the MENU button.
2. Use the 4-way arrow button to select
Voice
Memo then select On.
3. Press the MENU button twice to exit the mode
menu.
When voice memo is turned on, the voice memo icon
appears on the LCD screen. You are now ready to
shoot.
All manuals and user guides at all-guides.com
all-guides.com
Page 32

!
Shooting Movies
The camera allows you to record movies with sound in
the Movie mode. Movie clips are recorded in AVI file
format at a resolution of 320 x 240 pixels and are
captured 20 frames per second. Length of the recorded
movie clip is unlimited (maximum length dependent on
SD card).
To shoot movies:
1. Set the Mode switch to Movie/Audio mode (
/ ).
The movie standby recording
screen appears on the LCD
screen.
See the section Switching
between Movie and Audio
mode for details on page 37.
2. Compose your shot using the
LCD screen.
3. Press and release the Shutter (OK) button to shoot.
Movie recording begins, with
the elapsed recording time is
shown on the LCD screen.
4. Press the Shutter (OK) button
once more to stop.
The movie is recorded. The
camera is ready to shoot
another movie.
NOTE: For best results hold the camera steady to pan
motions when recording movies.
The following table lists the available functions that can
be manually adjusted in the menu mode.
Function Description Page
Drive Mode 37
White Balance 35
M
All manuals and user guides at all-guides.com
Page 33

!!
This section lists the available shooting-related settings.
You can modify selected functions by changing the
parameter for a given option.
The following table lists the available functions for the
Photo/Movie mode. For detailed information, see the
following pages.
Function Photo Movie Page
Size o 33
Quality o 34
Drive Mode o 34
EV Compensation o 35
White Balance o o 35
Sharpness o 36
Voice Memo o 36
(o: Available, : Unavailable)
Customizing Shoot Settings
Selecting Photo Size
You can record images in five different photo size
settings: 5M, 3M, 2M, 1M, VGA.
Option Description
5M 2560x1920 (interpolated)
3M 2048x1536 pixels
2M 1600x1200 pixels
1M 1280x960 pixels
VGA 640x480 pixels
Higher photo size settings provide detailed images and
photo quality prints; the file size, however, is larger.
Lower photo size settings provide smaller file sizes;
photo quality, however, is slightly degraded. The low
photo size setting is often used for images that are
viewed through the Internet or sent via email.
1. In the Photo mode (
), press the MENU button.
2. Use the 4-way arrow button
to select
Size, then
select 5M, 3M, 2M,
1M, or VGA.
3. Press the MENU button twice
to exit the mode menu.
A selected photo size icon
appears on the LCD screen.
You are now ready to shoot.
M
All manuals and user guides at all-guides.com
Page 34

!"
Selecting Photo Quality
Three quality compression ratio options are provided for
capturing images. The less the compression ratio, the
better the photo quality.
Option Description
(Best) Provides a more detailed image for photo quality
prints, but takes up more memory space.
(Fine) The normal setting used for general photography.
(Normal) Allows more photos to be taken, and takes up less
memory space.
1. In the Photo mode ( ), press the MENU button.
2. Use the 4-way arrow button
to select
Quality, then
select , , or .
3. Press the MENU button twice
to exit the mode menu.
A selected photo quality icon
appears on the LCD screen.
You are now ready to shoot.
Selecting a Shooting Mode
This mode enables you to determine how you want to
shoot your still images. Three shooting mode are
provided for capturing images.
Option Description
(Self-timer) Enables you to automatically take an
image after a delay of 10 seconds.
(Normal shooting) Enables you to shoot an image as normal.
This is the default mode.
(Continuous shooting) Enables you to shoot three images in
rapid succession with a single press of
the Shutter button.
1. In the Photo mode ( ), press the MENU button.
2. Use the 4-way arrow button
to select
M
Drive Mode,
then select , , or
.
3. Press the MENU button twice
to exit the mode menu.
A selected shooting mode icon
appears on the LCD screen.
You are now prepare to shoot.
All manuals and user guides at all-guides.com
Page 35

!#
Adjusting the EV Compensation
EV Compensation is required when there is a large
discrepancy in brightness between the subject and
background. Use the EV setting to improve the relative
brightness of the subject in focus with its surroundings.
For example, when the subject is backlit or is situated in
snow/beach-type surroundings, the exposure may not
be correct. Choose a positive EV setting to brighten the
entire image and to make the subject brighter.
EV adjustments are made from -2.0 to +2.0 in 0.5-
step increments.
1. In the Photo mode (
), press the MENU button.
2. Use the 4-way arrow button
to select
EV
Compensation, then select a
desired EV value for your
need.
3. Press the MENU button twice
to exit the mode menu.
A selected EV setting icon appears on the LCD screen.
You are now ready to shoot.
Before
After
Adjusting the White Balance
The White Balance feature enables you to adjust the
color balance in shots taken under different lighting
conditions. With the white balance supported, the
camera also can eliminate color variations caused by
lighting conditions. In most cases, if you choose Auto,
the camera automatically adjusts the White Balance to
the environment.
Option Description
(Auto) Adjusts white balance automatically.
(Daylight) Uses outdoors for sunny days.
(Cloud) Uses outdoors for cloudy days.
(Tungsten) Uses indoors to correct tungsten/light bulb
illumination.
(Fluorescent) Uses indoors to correct fluorescent bulb
illumination.
1. In the Photo mode ( ), press
the MENU button.
2. Use the 4-way arrow button
to select
White
Balance, then select ,
, , , or .
3. Press the MENU button twice
to exit the mode menu.
A selected white balance icon appears on the LCD
screen. You are now ready to shoot.
All manuals and user guides at all-guides.com
Page 36

!$
Adjusting the Sharpness
The Sharpness feature allows you to sharpen (highlight)
or soften (blend) the edges of the image. Higher
sharpness makes edges visible, and a lower sharpness
makes softer edges.
Option Description
(High) Sharpens the edges of the image, and increases image
clarity or crop image.
(Normal) No special effects; no adjustment.
(Low) Softens the edges of the image; good for portrait shots.
1. In the Photo mode ( ), press the MENU button.
2. Use the 4-way arrow button
to select
Sharpness,
then select , , or .
3. Press the MENU button twice
to exit the mode menu.
A selected sharpness icon
appears on the LCD screen.
You are now ready to shoot.
Low Normal High
Turning On/Off Voice Memo
The Voice Memo feature allows you to attach a
maximum 10-second voice message immediately to the
captured image you just made. The Voice Memo file
will have the same basic file name as the captured
image with a different file extension .WAV.
1. In the Photo mode (
), press the MENU button.
2. Use the 4-way arrow button
to select
Voice Memo
then select On or Off.
3. Press the MENU button twice
to exit the mode menu.
When voice memo is turned on,
the voice memo icon appears
on the LCD screen. You are
now ready to shoot.
Voice Memo OnVoice Memo Off
All manuals and user guides at all-guides.com
all-guides.com
Page 37

!%
Audio
Recording Audio
The Audio mode allows you to record audio clips of
unlimited length in the WAV file format (limited by the
size of available memory).
To record audio:
1. Set the Mode switch to Movie/Audio ( / )
The audio standby recording
screen appears when the
camera is switched to Audio
mode.
See the section Switching
between Movie and Audio
mode for details in the
following section.
2. Press and release the Shutter (OK) button.
Audio recording begins, with
the elapsed recording time
shown on the LCD screen.
Switching between Movie and Audio mode:
1. Set the Mode switch to Movie/Audio (
/ )
2. Press the MENU button.
3. Use the 4-way arrow button to select
M
Drive
Mode, then toggle between
and .
Select for movie recording, for Audio
recording.
3. Press the MENU button twice to exit the mode
menu.
The movie standby recording
screen appears on the screen
when drive mode is switched to
Movie mode ( ). You are now
ready to shoot movies.
The audio standby recording
screen appears on the screen
when drive mode is switched to
Audio mode ( ). You are now
ready to record audio.
3. Press the Shutter (OK) button once more to stop
recording.
All manuals and user guides at all-guides.com
Page 38

!&
Playback
When you operate the camera, the image or movie
made with the camera is available for viewing on the
LCD screen.
Image and movie viewing is accomplished through the
Playback mode, which displays the last photo or movie/
audio taken. Playback mode also allows you to browse
all the stored images or movie/audio clips. In addition,
the stored images can be magnified, presented as a
slide show, or added with a print mark (DPOF) for print
shop service.
The following table lists the available functions that can
be manually adjusted in the menu mode.
Function Description Page
Slide Show 42
Rotation 42
Erase All 44
Print 45
Single-image Display
With this display mode, stored
images or movie/audio clips can
be viewed one at a time.
Normal display is the last
recording you made with the
camera, filling the entire LCD
screen.
Nine-image Display
With this display mode, stored
images or movie/audio clips can
be viewed as a composite
display of nine images at the
same time on the LCD screen.
Press the
button to display
nine-image display. The selected recording is bordered
by a yellow frame.
Press the Shutter (OK) button in nine-image display .
The selected recording returns to single-image display.
All manuals and user guides at all-guides.com
Page 39

!'
Playing Back Still Images
To play back still images:
1. Set the Mode switch to Playback mode (
).
If the last recording is a still image, the still image fills
the entire screen, and the file name will have the JPG
extension.
Otherwise, use the / button to select a stored still
image.
Use the / button to select another still image, if
required.
The voice memo plays back automatically if the still
image includes a voice memo.
Without voice memo With voice memo
Selecting a Recording
1. Set the Mode switch to Playback mode ( ).
If the last recording you made
with the camera is a still image,
the still image will fill up the
entire screen, and the file name
will have the JPG extension.
If the last recording you made
with the camera is a movie, the
first frame of the movie will
appear on the screen, and the
file name will have the AVI
extension.
If the last recording you made
with the camera is an audio,
the audio recording will be
shown on the screen, and the
file name will have the WAV
extension.
2. Use the / button to select a different recording.
scroll forward
scroll backward
- or-
Press the button to enter
the nine-image display mode,
then use the / / / button
to select a different recording.
All manuals and user guides at all-guides.com
Page 40

"
In a magnified image, you can use the cameras Pan
feature to scroll through the partially magnified image
and bring it into view.
To pan the magnified image:
1. Ensure that you are currently viewing a magnified
image, then press the Shutter (OK) button.
A Pan icon (
) appears on
the LCD screen next to the
image magnification level.
2. Use the 4-way arrow button
to scroll through parts of a
magnified image into view.
3. Press the Shutter (OK) button again to disable the
Pan feature.
Press the OK button; the magnified image returns to the
original viewing size.
Playback Zoom
In playback mode, the magnification feature allows you
to enlarge a captured image at up to four times the
original viewing size. It only works on captured still
images.
Press the
button repeatedly to enlarge the image
from normal, to twice the size, and to four times the
size.
Press the
button repeatedly to reduce the magnified
image to a nine-image display.
Magnified imageNormal image
All manuals and user guides at all-guides.com
Page 41

"
Playing Back Audio
To play back audio:
1. Set the Mode switch to Playback mode (
).
If the last recording is an audio,
the audio recording is shown
on the screen, and the file
name will have the .WAV
extension.
Otherwise, use the / button
to select a stored audio.
2. Press the Shutter (OK) button.
The audio begins playback,
with the elapsed playback time
shown on the LCD screen.
3. Press the Shutter (OK) button again to stop audio
playback.
Playing Back Movies
To play back movies:
1. Set the Mode switch to Playback mode (
).
If the last recording is a movie,
the first frame of the movie
appears on the screen, and the
file name will have the .AVI
extension.
Otherwise, use the / button
to select a stored movie.
2. Press the Shutter (OK) button.
The movie begins playback,
with the elapsed playback time
shown on the LCD screen.
3. Press the Shutter (OK) button again to stop movie
playback.
All manuals and user guides at all-guides.com
all-guides.com
Page 42

"
Slide Show
The Slide Show function enables you to view your
stored images by playing them back in sequence (if you
have stored more than one image).
To run a slide show:
1. Set the Mode switch to Playback mode (
).
2. Press the MENU button.
3. Use the 4-way arrow button
to select
Slide Show.
When selected, the OK?
setting appears as well and is
highlighted in red, allowing you
to run a slide show.
4. Press the Shutter (OK) button.
The slide show starts.
5. Press the Shutter (OK) button again to stop the slide
show.
Rotating Images
If you take a picture while holding the camera
vertically, this selection enables you to rotate the image
to a horizontal position when you play it back later for
viewing.
To rotate the image:
1. Set the Mode switch to Playback mode (
).
2. Press the MENU button.
3. Use the 4-way arrow button
to select
Rotation.
When selected, the OK?
setting appears as well and is
highlighted in red, allowing you
to rotate an image.
4. Press the Shutter (OK) button.
A screen appears to allow you
to rotate the image or to
cancel.
5. Use the 4-way arrow button
to select 90°, 180°, or
270°, then press the
Shutter (OK) button.
The picture is rotated.
All manuals and user guides at all-guides.com
Page 43

"!
The camera is equipped with an AV-output connector
that allows you to view images recorded by the camera
on a TV instead of on the LCD screen.
To view recorded images on a TV, select the video
output system first.
1. Press the MENU button to enter the Setup mode
(
).
2. Use the 4-way arrow button to select
Video
Out, then select NTSC or PAL.
NTSC: For USA, Canada,
Mexico, Taiwan, Korea, Japan,
etc.
PAL: For Europe, Australia,
China, Singapore, etc.
3. Press the Shutter (OK) button
twice to exit the mode menu.
To view images on a TV set:
1. Make sure that both TV set and camera are turned
off.
2. Connect the camera to your TV set, using the
provided Video cable.
Connect one end of the
Video cable to the cameras
TV-output connector.
Connect the other end of
the cable to the Video-In jack
of the TV set.
3. Turn on the TV set and select the channel through
the Video Input.
4. Power on the camera, set the Mode switch to
Playback mode (
).
The last recorded image appears on the TV monitor.
Viewing via a Television Set
All manuals and user guides at all-guides.com
Page 44

""
Deleting and Printing
Deleting Still Images or Movie/Audio
Clips
The Delete control allows you to remove stored still
images and movie/audio clips from the camera's
internal memory as well as from the SD card. This
allows you to free up memory space in which to store
future recordings.
In the following sections, the terms recordings and
files represent the still images, movie clips, or audio
clips being recorded.
Deleting Current
If you are currently playing back a recording and intend
to remove it:
1. In the Playback mode, press the
(Delete) button.
A confirmation screen prompts
you to confirm your decision to
delete the current recording.
2. Use the 4-way arrow button
to select OK, then press the
Shutter (OK) button.
The displayed recording is removed permanently from
the memory and will no longer be available for playback.
Deleting Selected
1. In the Playback mode, press the button.
A nine-image display appears,
allowing you to select the
recordings you wish to delete.
2. Use the 4-way arrow button
to select the unwanted
recording.
The selected recording is bordered in yellow.
3. Press the (Delete) button.
A trash icon ( ) appears and
the selected recordings border
color changes to red, indicating
that the selected recording is
checked and can be deleted.
Use the 4-way arrow button to
select more files to delete if so
desired.
6. Press the (Delete) button again.
A confirmation screen appears,
allowing you to delete the
selected recordings or to cancel
the checked recording.
7. Select Delete Selected,
then press the Shutter (OK)
button.
The selected recordings are removed permanently from
the memory and will no longer be available for playback.
All manuals and user guides at all-guides.com
Page 45

"#
Printing Still Images
The Print control allows you add a DPOF (Digital Print
Order Format) print mark on stored images for
professional print services or for a DPOF printer.
1. In the Playback mode, press the MENU button.
2. Use the 4-way arrow button to select
Print.
When selected, the OK? option
is selected as well and
highlighted in red.
3. Press the Shutter (OK) button.
A confirmation screen appears,
allowing you to print all
images, to print the selected
images, or to cancel.
Deleting All
1. In the Playback mode, press the MENU button.
2. Use the 4-way arrow button to select
Erase
All.
When selected, the OK? setting
appears as well and is
highlighted in red, allowing you
to erase all recordings.
4. Press the Shutter (OK) button.
A confirmation screen appears to
allow you to erase all
recordings or to cancel.
5. Use the 4-way arrow button
to select OK, then press the
Shutter (OK) button.
All the recordings are removed
from the memory and will no
longer be available for playback.
NOTE: To cancel the checked recording you just made,
select Uncheck Current. The screen will return to
nine-image display and uncheck the selected recording
you wish to delete.
If you want to cancel another checked recording,
choose from the nine-image display, then press
(Delete) button.
Select Uncheck Current, and the selected recording is
unchecked from the memory. Follow this procedure
until all desired selected recordings are unchecked from
the memory.
All manuals and user guides at all-guides.com
Page 46

"$
Printing All
1. In the Print Pictures
confirmation screen, use the
4-way arrow button to select
All, then press the OK
button.
A confirmation screen appears.
2. Use the / button to set the
number of copies, then press
the OK button.
A nine-image display appears
when the Busy message
vanishes from the LCD screen.
You can see all the stored
images marked with a DPOF
print mark respectively.
3. Press the MENU button twice
to exit the mode menu.
Printing Selected
1. In the Print Pictures
confirmation screen, choose
Select, then press the OK
button.
A nine-image display appears,
allowing you to select the
images you wish to print.
In this nine-image display, the
selected image is bordered in
yellow and has a confirmation
screen.
Use the / button to set the
number of copies if desired.
2. Use the / button to select
more files to print if so
desired.
3. Press the MENU button twice
to exit the mode menu.
01
01
01
01
01
01
01
01
01
01
03
02
01
01
All manuals and user guides at all-guides.com
all-guides.com
Page 47

47
Camera Setup
The camera provides some manual settings that enable
you to customize the functions of the camera for your
specific needs. The basic settings are entered in the
Setup mode.
To enter Setup mode menu:
1. Set the Mode switch to any
camera mode.
2. Press the MENU button.
3. Use the
/ arrow button to
enter the Setup mode ( ).
4. Use the 4-way arrow button
to navigate through the available functions.
For details on how to use the menu, see Using the
Menu on page 24.
Brightness
Use this function to adjust the brightness level of the
LCD monitor. The brightness level can be adjusted by
using / arrow button.
Beep
Use this function to adjust the sound produced by the
camera when the Shutter button is pressed. The
available options are: On, Off.
Date
Use this function to set the date for the camera.
Configure the date setting using the / arrow button.
Time
Use this function to set the time for the camera.
Configure the time settings using the / arrow button.
Date Stamp
Use this function to mark the date stamp on the
captured images. The date stamp for print is
permanently shown on the right corner of the image in
red. The available options are: On, Off.
Video Out
Use this function to select your video system standard
NTSC or PAL allowing you to match your camera's
video system to that of your television.
All manuals and user guides at all-guides.com
Page 48

48
Format
Use this function to enable you to prepare the SD card
to record media. Formatting the SD card will erase all
the media that previously existed in the SD card.
Copy to SD
Use this function to enable you to copy media stored in
internal memory to an external-memory SD card.
Reset
Use this function to return the camera settings to default
values except for Date, Time, and Flash.
Frequency
Use this function to allow you to match the cameras
frequency to that of the local AC power supply; select
either 50 Hz or 60 Hz.
Power Saving
Use this function to enable you to set the camera to
turn off automatically when it is idle for a fixed amount
of time so as to conserve battery power.
If the camera turns off automatically, press the POWER
button to resume use.
Language
Use this function to select the LCD screen display
language. The available options are: English, Japanese,
Simplified Chinese, German, Spanish, French, and
Italian.
USB Switch
Use this function to allow you to toggle between USB
Mode and Web Cam.
All manuals and user guides at all-guides.com
Page 49

49
Dowloading to Your Computer
The camera is equipped with an USB connector that
allows you to view images recorded by the camera on
a computer instead of on the LCD screen.
NOTE: If you use Windows 98/98SE, please follow
the steps below to install the camera driver first:
1. Turn on your PC and insert
the supplied Microtek CD-
ROM in the CD-ROM drive.
The Microtek Software
Installer screen appears
automatically.
2. Click Camera Driver when it appears on the
screen, then follow the on-screen instructions to
install.
3. Click EXIT on the Microtek Software Installer
screen when the camera driver has been installed.
4. Restart your computer.
System Requirements
CD-ROM drive (for installing software)
A display with 24-bit color output capability
128MB RAM or more recommended
PC Windows 98/98SE/2000/Me/XP
Pentium PC or higher with USB port
Mac Mac OS 9.x; Mac OS X 10.1.3 or later
Apple Macintosh series with built-in USB port
To view the recorded images on your computer, follow
the steps below:
1. Get the camera ready.
2. Connect the camera to the computer.
3. Copy the camera's images to the computer.
4. View the camera's images on the computer.
All manuals and user guides at all-guides.com
Page 50

50
Getting the Camera Ready
1. Make sure the SD card
containing the images you
wish to download is inserted
in the camera.
Connecting the Camera
1. Make sure your computer is turned on.
2. Connect the camera to your computer, using the
provided USB cable.
Connect the narrow end of
the USB cable to the
cameras USB connector.
Connect the flat end of the
USB cable to the USB
connector of your
computer.
In a few moments, your
computer will automatically
detect the camera.
A USB Mode screen
appears, indicating that USB
connection is complete.
2. Make sure that the USB Switch is switched to USB
Mode.
If the USB Switch is set to the incorrect mode, you will
need to do the following:
a. Press the MENU button to
enter the Setup mode ( ).
b. Select USB Switch,
then select USB Mode.
c. Press the MENU twice to exit
the mode menu.
NOTE:
With an SD card installed in your camera, the system
reads the contents from the SD card alone.
Without an SD card installed in your camera, the system
reads contents from the camera's internal memory.
The SD card may be placed into any card reader device.
The still images, movies, and audio stored on the card
can then be read from the card reader and copied to the
computer.
All manuals and user guides at all-guides.com
Page 51

51
Copying Files
After connection, a newly created icon appears on the
desktop, indicating the camera is connected to your
computer successfully. Files can now be transferred into
any folder on your hard drive.
1. For PC Users: Double-click the My Computer icon,
then double-click Removable Disk.
For Mac Users: Double-click the newly created icon
(e.g., Take-it or Take-it.SD) on the desktop.
Mac OS X
Mac OS 9.X
Mac OS X
Mac OS 9.X
With an SD card installedWithout an SD card installed
A folder (DCIM) appears, containing all the stored
still images or movie/audio clips that were made
with the camera.
2. Double-click the DCIM icon, then double-click the
100_MDSC folder to display the files.
3. Drag and drop the files into
any folder on your computer.
File Structure
File names vary, depending upon the type of recording being
described. The 100_MDSC folder containing the files are named
IMAGxxxx.JPG for still images, IMAGxxxx.AVI for video clips,
and IMAGxxxx.WAV for audio clips or voice memo.
DCIM 100_MDSC IMAG0001.JPG
Still image
Still Image+Voice memo
IMAG0001.WAV
IMAG0002.JPG
IMAG0003.JPG
IMAG0007.JPG
IMAG0008.WAV
IMAG0008.JPG
IMAG0009.JPG
101_MDSC
Movie
Audio
IMAG0010.AVI
IMAG0011.AVI
IMAG0012.WAV
IMAG0013.WAV
IMAG0014.WAV
IMAG9999.JPG
IMAG0001.JPG
Still Image+Voice memo
Still image
Windows 98/98SE/2000/Me Windows XP
All manuals and user guides at all-guides.com
all-guides.com
Page 52

52
Browsing Files
Double-click a file in the folder
that contains the files
downloaded from the camera.
The file opens with your
systems default image, audio or
video application.
NOTE:
If the movie cannot be played back in Windows 98/98SE/
2000, install the DirectX driver appropriate for your
system. Version 8.1 or later is recommended.
If you could not play the transferred files with your
systems default application, install the bundled
application that contained in Microtek CD-ROM.
Value-bundled Software
The software bundled with your camera provides user-
friendly tools for image editing and management,
allowing you to open, view, print, email, upload to web
or manage transferred images. For more details, refer to
the CD-ROM accompanying your camera.
All manuals and user guides at all-guides.com
Page 53

#!
Appendixes
Appendix A Web Cam (Windows Only)
A Web Cam is a digital camera attached to a computer
that sends images or live video streams to a Web page
and is ideal for video conferencing.
To use the camera as a Web Cam, you need a
computer, the appropriate software, and an Internet
connection.
To set up the camera for use as a Web Cam, follow the
steps outlined below.
1. Install the Camera Driver.
a) Turn on your computer, and
insert the supplied Microtek
CD-ROM into the CD-ROM
drive.
NOTE: For Windows 98/98SE users: If the camera
driver has been installed for viewing images on the
computer, its not required to reinstall camera driver.
b)When the Microtek Software Installer screen comes
up, click Camera Driver, then follow the on-screen
instructions to install.
c) Click EXIT on the Microtek Software Installer screen
when the driver has been installed.
d)Restart your computer.
2. Set the camera to Web Cam
mode.
a. Press the MENU button to
enter the Setup mode ( ).
b.Select USB Switch, then select Web Cam.
c. Press the MENU twice to exit the mode menu.
3. Connect the camera to your computer, using the
provided USB cable.
Connect one end of the USB
cable to the cameras USB
connector.
Connect the other end of the
USB cable to the USB
connector of your computer.
In a few moments, your
computer will automatically
detect the camera.
A Web Cam screen appears,
indicating that connection is
complete.
4. Position your camera to the
person being teleconferenced
what you want to show.
5. Launch your Web camera
software (e.g. Microsoft Net
Meeting) and start the video
conferencing function. If the
software permits video recording, you can save the
recorded video in a file for later use.
6. When finished, disconnect your camera from the
computer.
All manuals and user guides at all-guides.com
Page 54

#"
Appendix B Using the Battery
With the batteries correctly loaded, press the POWER
button; wait for the READY LED to stop blinking and
stay on steady.
NOTE: When the READY LED is blinking, the camera is
starting up; do not turn the power off or open the battery
cover at this time.
Battery Handling Precautions
The following precautions are provided for you to safely
get the most from your battery performance.
Do not mix old and new, different types, or different
manufacturers of batteries.
Do not drop batteries or let them be banged around.
This could damage the casings, causing the batteries
to leak.
If the internal parts or components of the battery
come into contact with your eyes or your mouth,
flush the affected site with water and get medical
help.
Do not short-circuit the battery terminals, and be sure
to cover the terminals before you throw batteries
away. If the terminals contact metal, they may
overheat and explode, causing a fire.
Inspect your batteries before using them. Anything
abnormal may indicate a damaged battery that may
leak, overheat or burst.
The battery has a direct effect on the operation
capabilities of the camera. This appendix discusses the
following topics:
Acceptable battery types
Battery insertion
Battery-handling precautions
Battery charging
Acceptable Battery Types
The acceptable battery specifications for the camera
are:
Two AA-sized Alkaline batteries (included)
Two AA-sized Nickel Metal Hydride (NiMH)
rechargeable batteries
Take note of the following information when using
Alkaline batteries.
To lengthen battery life, turn the LCD screen off and
shoot images via the Viewfinder.
Alkaline batteries may not be operated in low
temperatures (+41°F / +5°C).
Battery Insertion
To insert the battery, refer to the section Loading the
Batteries. Notice that the batteries should be inserted
with the correct polarity as marked in the battery
compartment.
All manuals and user guides at all-guides.com
Page 55

##
Remove the batteries and store them when not using
the camera to prevent them from leaking and
damaging the camera.
Keep the batteries warm until just before using them
in the camera. A cold environment reduces battery
power.
Intensive use of the LCD screen or Zoom quickly
reduces battery power.
Prepare several sets of batteries on hand when using
the camera, and test them before use.
Battery Charging
A battery charger (not supplied) should be safely used
to recharge the NiMH batteries.
Precautions on battery charging:
Do not mix new and used batteries.
For a multiple-battery charger, if batteries are to be
charged together, they require nearly the same
amount of charged level. For a single-battery charger,
make sure the two batteries are all fully charged.
Recharge batteries only when necessary. Do this in a
moderate temperature in an open area to provide
ventilation.
Rechargeable batteries will charge only a limited
number of times. When they no longer hold a charge,
you need new batteries.
Store the charger after use, ensuring that the
batteries have been removed. If a problem occurs
during charging, unplug the battery charger.
Periodically cleaning the battery poles ensures a
proper charge.
It may be necessary to recharge new NiMH batteries
if they have been shelved for some time.
All manuals and user guides at all-guides.com
Page 56

#$
Appendix C Using the SD Card
A SecureDigital (SD) card can be inserted in the camera
to provide external memory in which to store images
and movie/audio clips. This section covers the following
topics:
Inserting the SD card
Formatting the SD card
SD card handling precautions
SD Card Insertion
To insert the SD card, refer to section Inserting the SD
card" elsewhere in this manual. Ensure that the
orientation of the SD card matches the SD card marking
in the SD compartment. When the READY LED is
flashing, the camera is busy and may be performing an
operation with the SD card, and the images and movie/
audio clips are stored directly onto the SD card.
NOTE:
Incorrect insertion of the SD card will cause a memory
error, blocking you from storing any data in the SD card.
You may lose or damage data if you remove the SD card
while it is in operation.
SD cards which have data on them that was created on a
different system may cause camera malfunction.
SD Card Formatting
Formatting allows you to prepare the SD card to record
images and movie/audio clips. Take note that this will
remove the contents of the card to be formatted.
Ensure that the data on the SD card is backed up or not
needed insignificant before formatting the card.
NOTE: Formatting an SD card may solve most camera
operation problems. It may also be necessary to format a
card if it is used by a different camera.
SD Card Handling Precautions
The following precautions are provided for you to safely
get the best performance from your SD card.
Abuse of the SD card may cause it fail in an
operating situation. Do not attempt to disassemble,
bend, shake, or apply force to the card. Do not
subject the SD card to water, condensation, dust,
sand, or high humidity and temperature, as well as to
static electricity and noise.
The SD card is equipped with a write-protected tab to
prevent inadvertent recording over saved images. You
cannot record when it is set to LOCK.
You may lose or damage data if you remove the SD
card while it is in operation.
Store the card in its supplied case.
Do not touch the card terminals or the card with any
foreign material.
All manuals and user guides at all-guides.com
all-guides.com
Page 57

#%
Appendix D Maintenance
Always follow the Safety
Precautions that came with the
camera.
Use a soft cloth, tissue or lint-free cloth to clean the camera body.
Use a lens brush to remove particulate matter from the lens, and then
clean the lens with a soft eyeglass lens tissue or cloth.
Do not use synthetic cleaning solutions or other solvents to clean the
camera body or lens. If you are unable to remove marks or dirt from the
lens, contact Microtek Customer Service.
Do not rub the LCD screen forcefully or apply excessive pressure to it to
avoid scratching the surface.
Do not use water, detergents, paint thinner or benzene to clean any part
of the camera, as this may damage the camera body or LCD screen.
Use a lens brush, soft cloth, or eyeglass tissue/cloth to clean the LCD
screen and Viewfinder.
All manuals and user guides at all-guides.com
Page 58

#&
Appendix D Troubleshooting
A1: The camera is not powered up.
Press and hold the POWER button for a few moments to see if the
READY LED is lit.
A2: The batteries are inserted incorrectly.
Insert the batteries with the correct polarity as marked in the battery
compartment.
A3: The battery has poor electrical contact with the terminals in the
battery compartment.
Clean the battery terminals with a dry cloth, reinsert them, and try
to power on the camera again.
A4: Battery power is depleted.
Recharge the batteries if they are rechargeable, or replace the
batteries with new ones.
A5: The incorrect type of battery is being used.
Replace with two new AA-size Alkaline or NiMH batteries.
A6: The battery/SD card cover is open.
Close the battery/SD cover securely.
A1: Your camera has a two-minute time-out setting for saving the battery
consumption.
You can disable the Power Saving feature in the camera's Setup
mode menu. Press the POWER button to turn the camera back on.
A2: Battery power is depleted.
Recharge the batteries if they are rechargeable, or replace the
batteries with new ones.
Camera Problems
The camera does not power on.
The camera turns off suddenly.
All manuals and user guides at all-guides.com
Page 59

#'
The camera does not shoot images,
movies, or record audio clips.
The subject is not in the LCD
screen.
A1: The Mode switch is set to the incorrect mode.
Set the Mode switch to Photo mode ( ) to capture still images.
Set the Mode switch to Movie/Audio mode (
/ ) to record movie/
audio clips.
A2: The flash has not finished charging.
Wait until the flash is fully charged. When the Flash charger LED
stops blinking and steadily illuminates in green, the flash is fully
charged.
A3: There is no available memory left on the SD card.
Download files to your computer and removes the existing files from
the SD card, then you will have more available memory space.
Replace with a new SD card.
A4: The SD card is write-protected.
Set the write-protected tab on the SD card to the unlocked position.
A5: The SD card is corrupted or not formatted correctly.
Reformat the SD card.
The SD card may be damaged; contact your dealer.
A1: The Mode switch is set to the incorrect mode.
Set the Mode switch to Photo mode (
) or Movie/Audio mode ( /
).
A2: The LCD screen is manually switched off.
Press the DISP button to turn it on.
A: Digital Zoom is disabled when shooting movies.
A: The Date Stamp setting is disabled.
Enter the Setup mode and enable the Date Stamp function.
A: The date and time are incorrectly set.
Enter the Setup mode, then set the correct date and time.
Digital Zoom does not function.
The date stamp could not be found
on the printed image.
The time/date stamp on the images
or movie/audio clips is incorrect.
All manuals and user guides at all-guides.com
Page 60

$
A1: The incorrect type of battery is being used.
Replace the batteries with two AA-sized Alkaline or NiMH batteries.
A2: The battery temperature is lower than standard operating condition.
Battery performance deteriorates in a cold environment.
If the ambient temperature is low, store the batteries in a warm
place (e.g., your pouch) before you use.
A3: The rechargeable batteries have not been used in over a year.
To obtain optimal performance, recharge the batteries several times.
A4: The service life of rechargeable batteries may have been reached.
Stop using the rechargeable batteries and replace them with new
ones that follow the same specifications.
A1: The rechargeable batteries were, most likely, incorrectly placed in the
charger.
Ensure that the batteries are placed in the charger with the correct
polar orientation.
A2: There is poor electrical contact between the batteries and the
chargers contacts.
Ensure that the two batteries are correctly placed in the charger.
Ensure that the correct power cable is properly connected to your
charger, and that the cable is plugged into an operating electrical
outlet.
A3: The battery has reached its service life.
Replace with a new rechargeable battery.
Rechargeable batteries cannot be
successfully charged.
Battery Problems
The battery power is depleted
prematurely.
All manuals and user guides at all-guides.com
Page 61

$
A1: The camera was moved while a shot was being taken.
Hold the camera firmly when shooting, using a tripod if necessary.
A2: The subject is not within the cameras acceptable focus range.
For normal shooting, make sure that the subject is at least 3.28 ft.
(1 m) away from the camera lens.
A1: There is not enough ambient light.
Turn the flash on.
A2: Your subject is backlit (i.e., light comes from the back of the subject).
To improve, choose a positive EV value.
A3: The White Balance (WB) setting is incorrect.
Adjust the White Balance setting.
A4: The subject is too far to be reached by the flash.
The subject should not be more than 6.56 ft. (2 m) away.
A1: There is not enough distance between the flash and the subject.
The subject should be within 3.28 to 6.56 ft. (1 to 2 m) of the lens
when the flash is used.
A2: The subject is under strong light.
To improve, choose a negative EV value.
A3: The light source shines directly into the camera lens.
Change the angle of the camera, or move the camera away from
the light source.
A4: The flash fires in every shot taken.
Do not set the flash mode to Forced flash or Forced flash with
Red-eye reduction.
A: The flash mode is set to Flash off.
Select any flash mode except Flash off.
Photography Problems
Shots are out of focus and blurry, or
photograph quality is not as good as
expected.
Photographed subject is too dark or
underexposed.
Photographed subject is too bright
or overexposed.
The flash does not fire.
All manuals and user guides at all-guides.com
all-guides.com
Page 62

$
Images or Movie/Audio clips cannot
be played back.
A: The Mode switch is set to the incorrect mode.
Set the Mode switch to Playback mode ( ).
A: The SD card is write-protected.
Set the write-protected tab on the SD card to the unlocked position.
A1: The Mode switch is set to the incorrect mode.
Set the Mode switch to Playback mode (
).
A2: The Video Out setting is set to the incorrect system.
Enter the Setup mode, set Video Out to NTSC or PAL depending
on your video output system.
A3: The camera is disconnected from the TV set.
Make sure the video cable is properly connected to both the camera
and the TV set.
The camera cannot delete images
or movie/audio clips.
Images or Movie/Audio clips cannot
be played back on TV.
All manuals and user guides at all-guides.com
Page 63

$!
A1: The USB Switch setting is set to the incorrect mode.
Enter the Setup mode, set USB Switch to USB Mode.
A2: The camera is disconnected from the computer.
Reconnect the USB cable.
A3: The files in the camera have not been transferred to the computer.
With the USB cable properly connected to both ends, drag and drop
the files to your computer.
A1: The USB Switch setting is set to the incorrect mode.
Enter the Setup mode, set USB Switch to USB Mode.
A2: The camera is disconnected from the computer.
Make sure one end of the USB cable is connected to your computer
and the other end to your cameras USB connector, then turn on the
camera.
For Windows 98/98SE, check to see if Camera Driver has been
installed on your computer.
Go to the Windows Control Panel and double-click Add/Remove
Programs. If the camera driver does not appear in the list, you must
install the camera driver from the Microtek CD-ROM.
Check if the camera is detected by your system.
1) Right-click the My Computer icon and click Properties. The
System Properties window appears.
2) Click the Hardware tab and then click the Device Manager
button. Expand the Disk drives tree; the removable disk drive
should be in the list.
Computer Problems
The transferred files cannot be
viewed on a computer.
Windows cannot find the
Removable Disk drive.
All manuals and user guides at all-guides.com
Page 64

$"
A1: The Apple QuickTime Player is not installed.
Install Apple QuickTime Player form the Microtek CD-ROM.
A2: The DirectX driver is not installed.
Install the DirectX driver appropriate for your system from Microtek
CD-ROM. Version 8.1 or later is recommended. The DirectX is
automatically installed each time you install Ulead Photo Explorer 8.
A1: The USB Switch setting is set to the incorrect mode.
Enter the Setup mode, set USB Switch to USB Mode.
A2: The camera is disconnected to the computer.
Make sure one end of the USB cable is connected to your computer
and the other end to your cameras USB connector.
Make sure the USB cable is properly connected to both the camera
and the computer.
A1: The USB Switch setting is set to the incorrect mode.
Enter the Setup mode, set USB Switch to Web Cam.
A2: The camera is disconnected from the computer.
For Windows Users,
Make sure one end of the USB cable is connected to your computer
and the other end to your cameras USB connector, then turn on the
camera.
Check to see if Camera Driver has been installed on your
computer.
Go to the Windows Control Panel and double-click Add/Remove
Programs. If the camera driver (for Web Cam) does not appear in
the list, you must install the camera driver from the Microtek CD-
ROM.
The movie cannot be played back
in Windows 98/98SE/2000/ME.
Mac OS cannot find the newly
created icon (Take-it, Take-it.SD)
on the desktop.
The camera does not operate in
Web Cam mode
All manuals and user guides at all-guides.com
Page 65

$#
Check if the camera is detected by your system.
1) Right-click the My Computer icon and click Properties. The
System Properties window appears.
2) Click the Hardware tab and then click the Device Manager
button. Expand the Image Device tree; the camera should be in
the list.
For Macintosh Users,
Make sure one end of the USB cable is connected to your computer
and the other end to your cameras USB connector, then turn on the
camera.
Check to see if Camera Driver has been installed on your
computer.
For Mac OS 9.x,
1) Go to the Apple menu and select Apple System Profiler. The
Apple System Profiler window appears.
2) Click the Devices and Volumes tab; the camera related drivers
should be in the USB tree.
All manuals and user guides at all-guides.com
Page 66

$$
Appendix F Warning and Error Messages
The table below lists warnings and error messages associated with operating the camera. Follow the recommended
solutions to resolve errors.
Warning and Error Messages Problem Solution
(Blinking) Batteries are exhausted Turn the camera off; replace or recharge batteries
BATTERY LOW!!! Battery power is depleted; Replace or recharge batteries
camera will shut down soon.
CARD ERROR! The SD card contact area Use cotton swab dipped with industrial alcohol to clean
is smudged or soiled the contacts
The SD card is damaged Replace the SD card
Incorrectly formatted SD card Reformat or replace the SD card
Camera is faulty Contact Microtek Customer Service
MEMORY FULL! The memory space is fully recorded Erase some data or use an SD card that has ample free space
All manuals and user guides at all-guides.com
all-guides.com
Page 67

$%
Appendix G Menus and Factory Defaults
The displayed menu functions differ depending on the selected camera mode, with the camera displaying only the
functions that can be adjusted for that mode. In the table below, default settings are indicated with an asterisk (*).
Photo Menus Options Description
Size , *, , , Selects the pixel recording size for images
Quality , *, Adjusts the compression rate for images
Drive Mode , *, Toggles among Self-timer, Normal, and Continuous shooting modes
EV Compensation -2.0, -1.5, -1.0, 0.0*, +0.5, +1.0, Compensates for extreme differences between background and foreground lighting
+1.5, +2.0
White Balance *, , , , Adjusts the White Balance according to the light conditions for the recording
Sharpness , *, Adjusts the image outline for images
Voice Memo On, Off* Records a voice memo for a captured image
Movie/Audio Menus Options Description
Drive Mode *, Toggles between Movie and Audio recording modes
White Balance *, , , , Adjusts the White Balance according to the light conditions for the recording
Playback Menus Options Description
Slide Show OK? Plays back all the stored images in a continuous slide show
Erase All OK? Erases all recorded images and movie/audio clips
Rotation OK? Rotates pictures up to 270 degrees
Print OK? Adds a DPOF print mark on the recording for professional print services to determine
which prints are to be printed at a photofinisher
Setup Menus Options Description
Brightness , I, II*, III, IIII Adjusts the brightness level of the LCD screen
Beep On*, Off Adjusts the sound produced by the camera
Date yyyy/mm/dd Sets the date for the camera
Time 00:00:00 (hr/min/sec) Sets the time for the camera
Date Stamp On, Off* Stamps the time on the captured images
Video Out NTSC*, PAL Selects your video output system
Format OK ? Formats the SD card
Reset OK? Resets the function settings to their default configurations
Copy to SD OK? Copies the data stored in internal memory to the SD card
Frequency 50HZ, 60HZ* Sets the power frequency to accommodate local AC power
Power Saving On*, Off Sets the camera to power off after two minutes of inactivity
Language English*, Japanese, Simplified Chinese, Sets the LCD language
Traditional Chinese, German, French, Italian, Spanish
USB Switch Web Cam, USB Mode* Toggles between USB Mode and Web Cam modes
M
M
All manuals and user guides at all-guides.com
Page 68

$&
Appendix H Specifications
Movie Clip 320 x 240 pixels; 20 fps;
unlimited length (maximum length
dependent on SD card)
Audio Clip Unlimited length (maximum length
dependent on SD card)
File Formats Still images: JPEG (Exif 2.2)
Movie clips: AVI
Audio clips: WAV
Print Format DPOF (Digital Print Order Format)
Quality Levels Best, Fine, Normal
Storage Media (External) SD (SecureDigital) card support
Storage Included 8 MB internal flash memory
Driver USB mass storage device driver
I/O Terminals (Connectivity) USB 1.1, AV output (Video Out)
Video Output NTSC, PAL
Power Saving 2 min.
Power Source Two AA-sized Alkaline or
rechargeable NiMH batteries
Weight
Take-it S3: Approx. 3.5 oz. (100 g)
Take-it D3: Approx. 4.2 oz. (120 g)
Dimensions
Take-it S3: 4.1 x 2.3 x 1.3 (103 x 58 x 32 mm)
Take-it D3: 3.7 x 2.2 x 1.3 (95 x 56 x 32 mm)
Tripod Mount Yes
Microphone Yes
Speaker Yes
Environment
Operating Temperature: 32° to 104° F (0° to 40° C)
Relative Humidity: 0 to 85%
Storage Temperature: 14° to 140° F (-10° to 60° C)
Image Sensor 3.21 megapixels CMOS
Sensor Size 1/2
Resolution Still image:
2560x1920 (interpolated),
2048x1536, 1600x1200, 1280x960,
640x480 pixels
Movie clips: 320 x 240 pixels
Image Ratio (w:h) 4 : 3
Lens Aperture F2.8
Focal Length f=7.5 mm
(35 mm equivalent: 38 mm)
Digital Zoom 4X
Playback Zoom 4X
Focus Range 3.28 ft. (1 m) to infinity
LCD screen 1.5" screen size, TFT LCD type
Viewfinder Optical
White Balance Auto, Daylight, Cloud, Tungsten,
Fluorescent
Exposure
Exposure Adjustment -2.0 EV to +2.0 EV in 0.5 EV step
Exposure Metering Full-zone Average
Shutter Speed 1/8 1/4000 sec.
Sensitivity Equivalent ISO 100
Flash
Built-in Flash Fixed
Flash Modes Auto, Auto with Red-eye reduction,
Forced flash, Forced flash with
Red-eye reduction, Flash off
Flash Range 3.28 - 6.56 ft. (1 to 2.0 m)
Continuous Shooting 3 images in sequence
Self-timer 10 sec. delay
All manuals and user guides at all-guides.com
 Loading...