

Page 1
Page 2

Copyright © 2000 Microtek International Inc.Copyright © 2000 Microtek International Inc.
Copyright © 2000 Microtek International Inc.
Copyright © 2000 Microtek International Inc.Copyright © 2000 Microtek International Inc.
All rights reserved.
November 2000
TT
rademarksrademarks
T
rademarks
TT
rademarksrademarks
Microtek
TM
is a registered trademarks of Microtek International Inc. Macintosh®,
and Apple® are registered trademarks of Apple Computer Inc. Windows® is a
trademark of Microsoft corporation. Adobe ® , Acrobat®, and Photoshop are
registered trademark of Adobe Systems Incorporated. Ulead®, PhotoExpress ®,
PhotoImpact®, and PhotoExplorer ® are registered trademarks of Ulead Systems Inc.
Bridgewell
T rellix Web
TM
and Page abc® are trademarks of Bridegwell Incorporated. T rellix
TM
are trademarks of T r ellix Corporation. All other products or name
TM
and
brands are trademarks of their respective holders.
ImportantImportant
Important
ImportantImportant
Pictures you may acquire from any of the bundled software and/or Pictures, or
Documents you scan may be protected under copyright law. The unauthorized use
of such materials could be a violation of the rights of the copyright holder. Micr otek
bears no responsibility for the unauthorized use of copyrighted materials.
Page 3

Table of Contents
Package ContentsPackage Contents
Package Contents
Package ContentsPackage Contents
FeaturesFeatures
Features
FeaturesFeatures
Camera ComponentsCamera Components
Camera Components
Camera ComponentsCamera Components
Getting ReadyGetting Ready
Getting Ready
Getting ReadyGetting Ready
Other Modes of OperationOther Modes of Operation
Other Modes of Operation
Other Modes of OperationOther Modes of Operation
Erasing All Images from CameraErasing All Images from Camera
Erasing All Images from Camera
Erasing All Images from CameraErasing All Images from Camera
Connecting the Camera to PCConnecting the Camera to PC
Connecting the Camera to PC
Connecting the Camera to PCConnecting the Camera to PC
Utility Software InstallationUtility Software Installation
Utility Software Installation
Utility Software InstallationUtility Software Installation
Using the TUsing the T
Using the T
Using the TUsing the T
....................................................................................................................................................................................
..........................................................................................
....................................................................................................................................................................................
A. Loading the Battery ....................................................................................4
B. Basic Picture T aking Operation....................................................................5
A. 107 Shots Mode.........................................................................................6
B. 26 Shots Mode...........................................................................................7
C. Continuous Shooting Mode........................................................................ 8
D. Self-Timer Mode ........................................................................................ 9
A. Installing Camera Driver .......................................................................... 12
B. Installing Other Bundled Software ............................................................. 13
Take-it 350 Digital Camera Interface..............................................................14
Zoom ....................................................................................................... 14
Acquire ..................................................................................................... 14
Acquire All................................................................................................ 14
Download .................................................................................................14
A VI Creator .............................................................................................. 14
Exit.......................................................................................................... 14
..........................................................................................................................................................
.............................................................................
..........................................................................................................................................................
..............................................................................................................................................
.......................................................................
..............................................................................................................................................
..............................................................................................................................................................
...............................................................................
..............................................................................................................................................................
........................................................................................................................
............................................................
........................................................................................................................
............................................................................................................
......................................................
............................................................................................................
..................................................................................................................
.........................................................
..................................................................................................................
................................................................................................................
........................................................
................................................................................................................
ake-it 350 as a Digital Cameraake-it 350 as a Digital Camera
ake-it 350 as a Digital Camera
ake-it 350 as a Digital Cameraake-it 350 as a Digital Camera
................................................................................
........................................
................................................................................
4-54-5
4-5
4-54-5
6-96-9
6-9
6-96-9
1010
10
1010
1111
11
1111
12-1312-13
12-13
12-1312-13
1414
14
1414
11
1
11
22
2
22
33
3
33
Page 4

Downloading Images to your PCDownloading Images to your PC
Downloading Images to your PC
Downloading Images to your PCDownloading Images to your PC
Using Adobe PhotoDeluxe ............................................................................15
Using Ulead PhotoExplorer 6........................................................................16
Using T rellix Web Microtek Edition ............................................................... 17
................................................................................................
................................................
................................................................................................
15-1715-17
15-17
15-1715-17
Using the TUsing the T
Using the T
Using the TUsing the T
A. Select Camera Source ................................................................................ 18
B. Send a Video Mail ...................................................................................... 19
AppendicesAppendices
Appendices
AppendicesAppendices
Appendix A: T ake-it 350 Digital Camera Specifications................................... 20
Appendix B: FCC Statement .......................................................................... 21
Appendix C: Declaration of Conformity ......................................................... 22
ake-it 350 as a PC/Wake-it 350 as a PC/W
ake-it 350 as a PC/W
ake-it 350 as a PC/Wake-it 350 as a PC/W
................................................................................................................................................................
................................................................................
................................................................................................................................................................
eb Cameb Cam
eb Cam
eb Cameb Cam
..........................................................................
.....................................
..........................................................................
18-1918-19
18-19
18-1918-19
20-2220-22
20-22
20-2220-22
Page 5
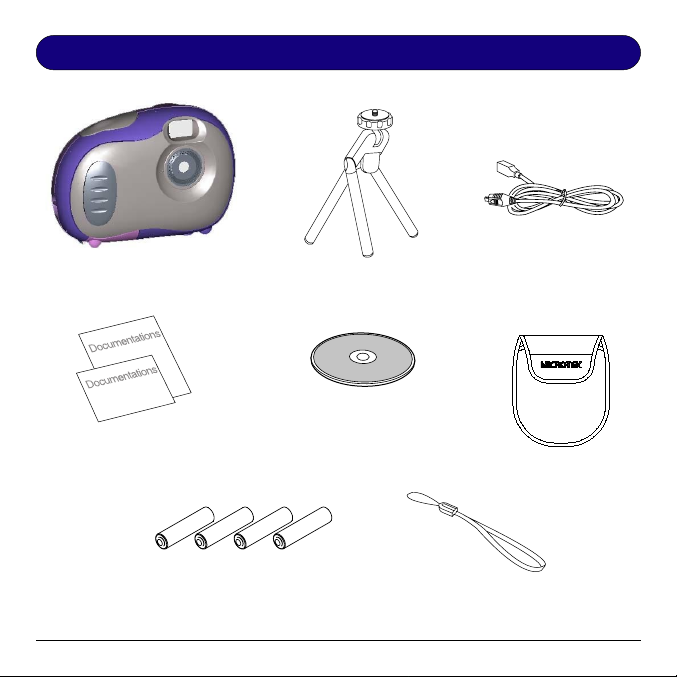
Package Contents
Take-it 350
Digital Camera Special USB cable
Mini-Tripod
Warranty and Quick
Reference Cards
(Alkaline is recommended)
(Contains digital camera driver,
software, and user's manual)
4 AAA Batteries
Digital Camera CD-ROM
Camera Pouch
Camera Safety Strap
1
Page 6

Features
••
Compact and lightweightCompact and lightweight
•
Compact and lightweight
••
Compact and lightweightCompact and lightweight
::
Size
: 102 x 71 x 35 mm Weight
::
••
Easy to operateEasy to operate
•
Easy to operate
••
Easy to operateEasy to operate
Fixed focus with only two-button (mode select and shutter) operation
••
Three choices of picture taking modesThree choices of picture taking modes
•
Three choices of picture taking modes
••
Three choices of picture taking modesThree choices of picture taking modes
Continuous shooting mode (26 or 107 shots maximum)
Self-Timer mode (10 seconds delay)
VGA (26 shots) QVGA (107 shots) image recording mode (640x480 &
320 x 240 pixels respectively)
••
AA
VI Image ConversionVI Image Conversion
•
A
VI Image Conversion
••
AA
VI Image ConversionVI Image Conversion
Easily transfer "Still" images into "Moving pictures" using the A VI
(Audio Video Interlead) format application.
••
Instant image frames erasureInstant image frames erasure
•
Instant image frames erasure
••
Instant image frames erasureInstant image frames erasure
All images can be cleared instantly to start a new picture taking session.
••
Low power consumption with auto energy-save modeLow power consumption with auto energy-save mode
•
Low power consumption with auto energy-save mode
••
Low power consumption with auto energy-save modeLow power consumption with auto energy-save mode
New batteries can take up to 1000 shots. Camera automatically enters into
"sleep" (energy-saving) mode when it remains inactive for 30 seconds.
••
Supports USB interfaceSupports USB interface
•
Supports USB interface
••
Supports USB interfaceSupports USB interface
With USB, download of images to your PC is accomplished at higher speed.
••
Software package bundleSoftware package bundle
•
Software package bundle
••
Software package bundleSoftware package bundle
Adobe PhotoDeluxe
Ulead Photo Explorer 6
EyeStar Mail Microtek Edition (PC camera software)
T r ellix Web Microtek Edition
Adobe Acrobat Reader
::
: 84g (w/o batteries)
::
2
Page 7
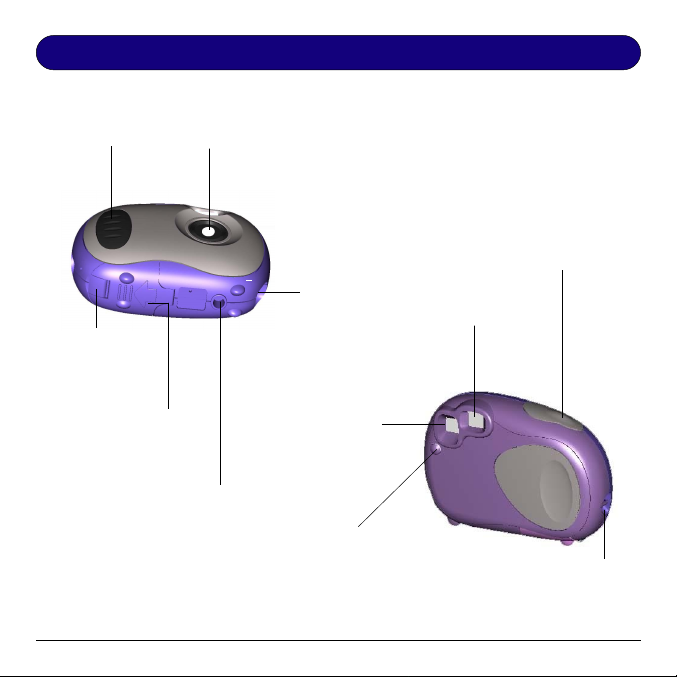
Camera Components
GRIP
BATTERY
COMPARTMENT
LOCK
BATTERY
COMPARTMENT
LENS
TRIPOD MOUNT
POWER AND FUNCTION MODE
USB PORT
VIEWFINDER
LCD DISPLAY
PANEL
SELECTION BUTTON
3
SHUTTER
BUTTON
STRAP MOUNT
Page 8
Getting Ready
BATTERY
COMPARTMENT
LOCK
LIFT away
from the
camera to
unlock
A . Loading the Battery
(4 AAA size batteries, Alkaline recommended)
1 Unlock the battery compartment cover by
lifting the lock toward "OPEN" position.
2 Slide compartment cover outward (as
indicated by the arrow shown on top of the
cover) and open the cover.
Slide toward
arrow
direction to
open battery
cover
++
+
++
__
_
__
__
_
__
++
+
++
Correct battery polarity at outer end of
the compartment are indicated at the
back of cover or as illustrated above.
3 Insert each of the 4 AAA batteries into its
chambers making sure that the positive (+)
and negative (-) ends are properly oriented
with the polarity indicated on top of each
chamber and at the back of the cover.
4 Close and slide the battery compartment
cover back to its original position and lock
the cover.
WARNING
starts to blink, it indicates that the batteries
power is low. Stop taking pictures and transfer the
images data to your PC within a week before the
batteries completely lose its power. Otherwise, all
the images will be erased.
4
: When the LCD Panel display
Page 9

B .Basic Picture T aking Operation
NOTENOTE
NOTE
: The camera is designed without a power switch. It uses energy-saving or "sleep"
NOTENOTE
mode to control its power. If the camera is off, press the Function Mode button to turn the
camera back on.
11
1 With the camera strap looped around your wrist, hold the camera by its grip.
11
Look through the viewfinder and set up your picture. Adjust size of your
composition by increasing or decreasing distance between camera and subject but
not nearer than one meter .
22
2 Press the Shutter button to take a picture of
22
your subject. A short beep sound emits at
each click of the shutter to confirm that a
shot has been taken and the camera is ready
to take the next picture.
NOTES
with erase capability (see next page for details).
After each shot, the LCD Panel will show the
number of remaining shots available.
For the mode, the LCD screen will only show
“99” pictures. However, when you start to take
the first 8 shots -- the no. of pictures taken (in
between these 8 shots) will not be deducted from
“99” until you take the 9th shot.
WARNING
exposure is too dark for a normal picture taking. No image is taken when this condition
occurs.
: A warning beep (longer and lower tone compared to normal beep) will emit if
: 26 or 107 shots mode is available
5
Page 10
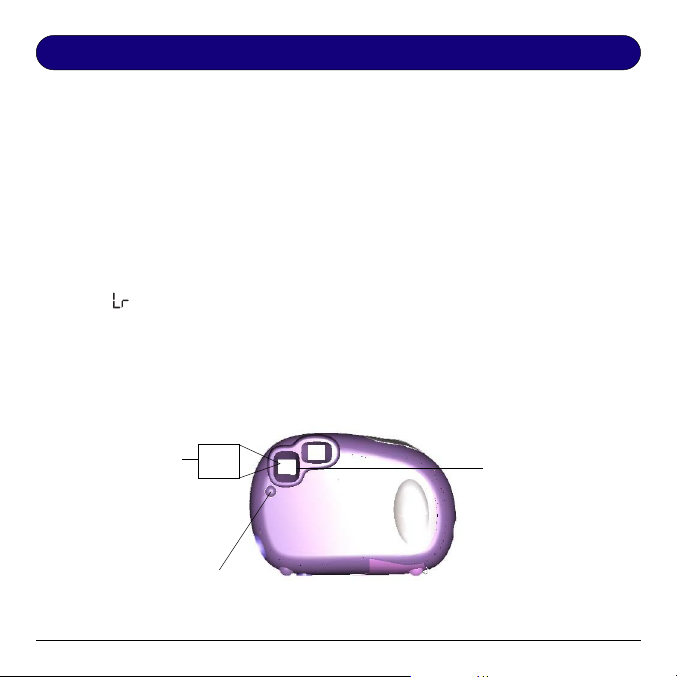
Other Modes of Operation
A. 107 Shots Mode
This mode of operation allows you to take 107 shots of lower-resolution images in
(320 x 240) QVGA format. To set your camera into 107 Shot mode-
11
1 Repeatedly press the Function Mode button until the "
11
LCD Display Panel.
LrLr
Lr" icon is displayed on the
LrLr
22
2 Press the Shutter button and the "
22
LrLr
Lr" icon becomes "
LrLr
9999
99" which would indicate
9999
that the 106 Shot mode is ready.
For the mode, the LCD screen will only show “99” pictures. However, when you
start to take the first 8 shots -- the no. of pictures taken (in between these 8 shots)
will not be deducted from “99” until you take the 9th shot.
NOTE:
Switching from 107 pictures mode to 26 pictures modes will not erase any images
in the camera. If you attempt to continue shooting at the end of 107th shot, a repetitive beep
will emit when you press the Shutter button.
107 Shots mode is
ready only when the
LCD Panel displays
Function Mode button
9999
the "
99" icon
9999
Repeatedly press this
until the "
LrLr
Lr" icon is
LrLr
displayed
99
6
When the "
appears on the LCD
Panel, press Shutter to
display the "
LrLr
Lr" icon
LrLr
9999
99" icon
9999
Page 11

B . 26 Shots Mode
This mode of operation allows you to take 26 shots of images at higher resolution
(640 x 480) VGA format. T o set your camera back to 26 Shot mode after operating
in 106 shots mode-
1 Repeatedly press the Function Mode button until the "
LCD Display Panel.
HrHr
Hr" icon is displayed on the
HrHr
2 Press the Shutter button and the "
HrHr
Hr" icon becomes "
HrHr
2626
26" which would indicate
2626
that the 26 Shot mode is ready.
WARNING:
images in the camera.
If you attempt to continue shooting at the end of 26th shot, a repetitive beep will emit when
you press the Shutter button.
26 Shots mode is
ready only when the
LCD Panel displays
Repeatedly press this
Function Mode button
until the "
Switching from 26 pictures mode to 107 pictures modes will not erase any
26
2626
the "
26" icon
2626
HrHr
Hr" icon is
HrHr
displayed
7
When the "
appears on the LCD
Panel, press Shutter to
display the "
HrHr
Hr" icon
HrHr
2626
26" icon
2626
Page 12

C . Continuous Shooting Mode
This mode of operation allows you to take
Continuous Shooting
mode is ON when this
LCD Panel displays
the " " icon
CLCL
CL
CLCL
Repeatedly press this Function Mode
button until the Continuous Shooting
mode icon is displayed
multiple frames of images when holding
down the Shutter button while aiming at
your subject. A maximum of 26 or 107
shots can be taken depending on which
shooting mode you are in. Continuous
shooting under 26 Shots mode takes about
1.5 seconds to fully consume the 26
frames, while it takes about 6.5 seconds
under 107 Shots mode. If you release the
Shutter midway, only part of the available
frames will be loaded with images.
T o set camera into Continuous Shooting
mode, repeatedly press the Function Mode
select button until the "
displayed on the LCD Display Panel.
CLCL
CL
CLCL
" icon is
8
Page 13

D . Self-Timer Mode
The Self-Timer mode of operation allows a 10 seconds shutter release delay after
pressing the Shutter button. Mount the camera in a tripod when operating under
Self-Timer mode.
1 Set camera into Self-Timer mode by repeatedly pressing the Function Mode
select button until the "
2 Then press the Shutter to start the 10 second countdown.
Self-Timer mode is ON
when this LCD Panel
displays the
Repeatedly press this
Function Mode button
until the Self-Timer
mode icon is displayed
" icon is displayed on the LCD Display Panel.
SLSL
SL
SLSL
" " icon
SLSL
SL
SLSL
Press the Shutter button to
start the delay countdown
9
Page 14

Erasing All Images from Camera
Whenever you wish to discard the images you have already taken, you can erase
them from the camera. T ake note that this erase feature functions only as "All-FrameErase." No partial erasure is allowed.
1 Enable the "All-Frame-Erase" feature by repeatedly pressing the Function Mode
select button until the "
2 Press the Shutter button twice to start erasing all images in the camera.
NOTE
: If you do not press the Shutter a second time within 5 seconds, the erase function is
aborted.
"All-Frame-Erase" is ON
when this LCD Panel
displays the " " icon
Repeatedly press this
Function Mode
button until the
"All-Frame-Erase"
icon is displayed
" icon is displayed on the LCD Display Panel.
CLCL
CL
CLCL
CLCL
CL
CLCL
Press the Shutter button to
start the delay countdown
10
Page 15

Connecting the Camera to PC
NOTE
: It is assumed that you have already installed the bundled software into your
computer. If not, install software as instructed in the section on "Utility Software Installation"
of this manual.
T o transfer (download) the images data from the
camera to your PC, connect the camera to your
PC with the supplied USB cable.
1 Insert the smaller terminal of the USB cable
into the camera's USB port.
2 Plug the other end of the USB cable into the
USB port of your computer.
3 Perform downloads to your PC by referring
to the section on Downloading images later
in this manual.
4 Operate the camera as web camera by
referring to the EyeStar Mail user's manual
provided in the T ake-it 350 Digital Camera
utility CD.
11
Page 16

Utility Software Installation
The Utility CD that accompanies your camera contains the T ake-it 350 Digital
Camera Driver bundled with valuabe image-editing software.
Click this
Click this button to
start camera driver
installation
icon to
view the
User’s
Manual
3 Connect one end of the USB cable
to your PC and the other end to
your T ake-it 350’s USB port.
4 Install all the other software as set
on the next page.
A. Installing Camera
Driver
1 Insert the utility CD into the CD-ROM
drive.
NOTE
: If the installer screen does not
automatically display, click Start button,
then click Run from Windows Start menu,
and execute the file cdsetup.exe from the
CD.
TT
2 When the
Installer Installer
Installer screen appears, click the
Installer Installer
Camera DriverCamera Driver
Camera Driver install button from the
Camera DriverCamera Driver
ake-it 350 Softwarake-it 350 Softwar
T
ake-it 350 Softwar
TT
ake-it 350 Softwarake-it 350 Softwar
Installer screen. Follow the on-line
instructions to complete the driver
intallation.
::
NOTE
: You may be prompted to restart
::
the computer at this point. Do not restart
your computer until all the software has
been installed.
12
ee
e
ee
Page 17

Click any of these buttons
to start installing each
software component.
Click "EXIT"
Click any of these
icons to view the
user's manual
2 A desktop shortcut of the program is
automatically created after
successful installation.
computer when you have finished
installing all of the above software.
to close the
Installer
program.
.
Restart Restart
Restart your
Restart Restart
B. Installing Other Bundled Software
TT
1 From the
Installer Installer
Installer screen, click each software in
Installer Installer
the order that it appears on the screen,
follow the on-line instructions to
complete the installation of all software
components:
Adobe PhotoDeluxe
This is your Image-editing software for
creating digital photo albums.
Ulead Photo Explorer 6Ulead Photo Explorer 6
Ulead Photo Explorer 6
Ulead Photo Explorer 6Ulead Photo Explorer 6
This is your Image-editing software that
includes a free Photo-sharing site to
instantly upload your images to the
W eb.
EyeStar Mail Microtek EditionEyeStar Mail Microtek Edition
EyeStar Mail Microtek Edition
EyeStar Mail Microtek EditionEyeStar Mail Microtek Edition
This is your PC and/or W eb Camera
software.
TT
rr
ellix Wellix W
T
r
ellix W
TT
rr
ellix Wellix W
Easily create, publish, and update your
own W eb site.
Adobe Acrobat ReaderAdobe Acrobat Reader
Adobe Acrobat Reader
Adobe Acrobat ReaderAdobe Acrobat Reader
Software for reading and printing
manuals on your CD-ROM.
13
ake-it 350 Softwarake-it 350 Softwar
T
ake-it 350 Softwar
TT
ake-it 350 Softwarake-it 350 Softwar
eb Micreb Micr
otek Editionotek Edition
eb Micr
otek Edition
eb Micreb Micr
otek Editionotek Edition
ee
e
ee
Page 18

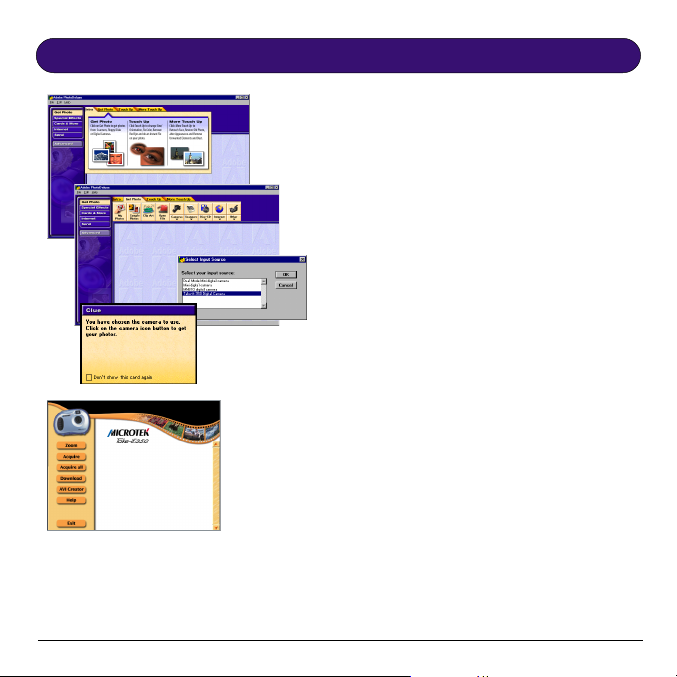
Using the Take-it 350 as a Digital Camera
TT
ake-it 350 Digital Cameraake-it 350 Digital Camera
The
T
ake-it 350 Digital Camera interface will be launched, when you start
TT
ake-it 350 Digital Cameraake-it 350 Digital Camera
downloading images from your digital camera to any of your image-editing software.
Zoom
Click the
image interpolation application for
downloaded images.
Acquire
Double-click the image that you wish to
send and process to an image-editing
software, and then click the
button.
ZoomZoom
Zoom button to enable/disable
ZoomZoom
AcquireAcquire
Acquire
AcquireAcquire
AVI Creator
AA
VI CrVI Cr
Click the
and/or download “Still” images from your
T ake-it 350 Camera and convert it into
“Moving Pictures” through the A VI (Audio
Video Interleaved format application.
eator eator
A
VI Cr
eator button to transfer
AA
VI CrVI Cr
eator eator
Exit
Click the
T ake-it 350 Digital Camera Interface.
ExitExit
Exit button to close/quit
ExitExit
Acquire All
Click the
and process all the thumbnail images on
the panel to a selected application.
Download
Click the
and/or download another set of images
from your Take-it 350 Camera. Existing
images will be overwritten.
14
Acquire AllAcquire All
Acquire All button to send
Acquire AllAcquire All
DownloadDownload
Download button to tramsfer
DownloadDownload
Page 19
Installation Under Windows 98
Downloading Images to your PC
Using Adobe
PhotoDeluxe
For more details on how to enhance
your images, please refer to the Help
menu of
Adobe PhotoDeluxeAdobe PhotoDeluxe
Adobe PhotoDeluxe.
Adobe PhotoDeluxeAdobe PhotoDeluxe
1. Launch the
You can also use any application with a
TWAIN acquire menu item. (e.g.
Photoshop, etc.)
2. Click the
Get PhotoGet Photo
Get Photo tab, and then click the
Get PhotoGet Photo
bottom half of the Camera button.
3. From the
choose the
sources, and then click
4. Click the
Digital Camera interface appears.
Double-click any of the thumbnail
image(s) you wish to transfer to
Adobe PhotoDeluxeAdobe PhotoDeluxe
Adobe PhotoDeluxe .
Adobe PhotoDeluxeAdobe PhotoDeluxe
5 Click
return to
enhance the selected image(s).
12
Adobe PhotoDeluxeAdobe PhotoDeluxe
Adobe PhotoDeluxe.
Adobe PhotoDeluxeAdobe PhotoDeluxe
Get Photo Get Photo
Get Photo button; click the
Get Photo Get Photo
Select Data source Select Data source
Select Data source box,
Select Data source Select Data source
TT
ake-it 350 ake-it 350
T
ake-it 350 from the list of
TT
ake-it 350 ake-it 350
OKOK
OK.
OKOK
Camera Camera
Camera icon/button. The
Camera Camera
ExitExit
Exit when you are ready to
ExitExit
Photo Deluxe Photo Deluxe
Photo Deluxe to further
Photo Deluxe Photo Deluxe
Page 20

Using Ulead Photo Explorer 6
1 Launch
2 From the Menu Bar, select
Photo ExplorerPhoto Explorer
Photo Explorer b y doing the
Photo ExplorerPhoto Explorer
erer
er.
erer
StartStart
Start,
StartStart
following in succession:
-- Photo Explor-- Photo Explor
-- Photo Explor
- Photo Explor-- Photo Explor
AcquireAcquire
Acquire,
AcquireAcquire
TT
T
TT
Select SourceSelect Source
Select Source dialog box.
Select SourceSelect Source
Select SourceSelect Source
Select Source, and then choose
Select SourceSelect Source
ake-it 350 Digital Camera ake-it 350 Digital Camera
ake-it 350 Digital Camera fr o m t h e
ake-it 350 Digital Camera ake-it 350 Digital Camera
FileFile
File,
FileFile
ProgramsPrograms
Programs
ProgramsPrograms
TWTW
AINAIN
TW
AIN
TWTW
AINAIN
3 From the
AcquireAcquire
Acquire, then click
AcquireAcquire
start acquiring images from your camera.
4 The
interface appears. Double-click the
image(s) you wish to transfer to
Explorer Explorer
Explorer from the panel.
Explorer Explorer
5 Click
to
the selected images.
For more details on how to enhance and
incorporate special effects/filters to your
images, refer to
menu.
16
FileFile
File menu, choose
FileFile
Acquire now Acquire now
Acquire now to
Acquire now Acquire now
TT
ake-it 350 Digital Cameraake-it 350 Digital Camera
T
ake-it 350 Digital Camera
TT
ake-it 350 Digital Cameraake-it 350 Digital Camera
ExitExit
Exit when you are ready to return
ExitExit
Photo Explorer Photo Explorer
Photo Explorer to further enhance
Photo Explorer Photo Explorer
Photo ExplorPhoto Explor
Photo Explor
Photo ExplorPhoto Explor
TWAINTWAIN
TWAIN
TWAINTWAIN
Photo Photo
Photo
Photo Photo
er’er’
er’
er’er’
s s Help
s Help
s s
Page 21

6 Click
ExitExit
Exit when you are ready to
ExitExit
W W
return to the T r ellix
For further details, please refer to
TT
rr
ellix Wellix W
eb’eb’
T
r
ellix W
TT
rr
ellix Wellix W
eb’
eb’eb’
s s
s Help
s s
eb eb
W
eb screen.
W W
eb eb
menu.
Using T rellix Web Microtek Edition
TT
rr
ellix Wellix W
1 Launch
2 The
3 From the
4 The
5 Double-click the images from the
17
T
TT
following in succession:
PrPr
ograms -- Tograms -- T
Pr
ograms -- T
PrPr
ograms -- Tograms -- T
StarStar
t Using Tt Using T
Star
t Using T
StarStar
t Using Tt Using T
appears, select your preferred option for
your web page from the dialog box,
OKOK
click
OK, and then follow the
OKOK
instructions on your screen.
section of the area where you want to
position the image, choose the
menu, and then select
Digital Camera ImageDigital Camera Image
Digital Camera Image.
Digital Camera ImageDigital Camera Image
Insert Scanner/Digital CameraInsert Scanner/Digital Camera
Insert Scanner/Digital Camera
Insert Scanner/Digital CameraInsert Scanner/Digital Camera
Image Image
Image dialog box appears,
Image Image
TT
ake-it 350 Digital Cameraake-it 350 Digital Camera
T
ake-it 350 Digital Camera, and then
TT
ake-it 350 Digital Cameraake-it 350 Digital Camera
click the
downloading the images from your
camera to your
Camera Camera
Camera interface.
Camera Camera
thumbnail to transfer the selected
images to your
Insert Insert
Insert button to start
Insert Insert
ebeb
r
ellix W
eb by doing the
rr
ellix Wellix W
ebeb
rr
ellix Wellix W
r
ellix W
rr
ellix Wellix W
rr
r
rr
TT
rr
ellix Wellix W
T
r
ellix W
TT
rr
ellix Wellix W
TT
ake-it 350 Digitalake-it 350 Digital
T
ake-it 350 Digital
TT
ake-it 350 Digitalake-it 350 Digital
TT
rr
ellix ellix
T
r
ellix web page.
TT
rr
ellix ellix
StartStart
Start button,
StartStart
ebeb
eb.
ebeb
ellix Wellix W
ellix W
ellix Wellix W
eb eb
eb panel,
eb eb
Scanner orScanner or
Scanner or
Scanner orScanner or
choose
ebeb
eb dialog box
ebeb
click the
Insert Insert
Insert
Insert Insert
Page 22

Using the Take-it 350 as a PC/Web Cam
NOTENOTE
NOTE
NOTENOTE
EyeStar MailEyeStar Mail
The
EyeStar Mail is a complete consumer video package for recording audio and
EyeStar MailEyeStar Mail
EyeStar Mail EyeStar Mail
::
: The
EyeStar Mail is required only when the camera is used as a PC camera.
::
EyeStar Mail EyeStar Mail
video clips that you can send to your family and friends. This package includes all the
software you will need for capturing, creating personalized cards, and sending
messages on-line.
A. Select Camera Source
1 Launch
EyeStar MailEyeStar Mail
EyeStar Mail b y:
EyeStar MailEyeStar Mail
a) Double-clicking the
EyeStar MailEyeStar Mail
EyeStar Mail
EyeStar MailEyeStar Mail
icon on your desktop; or
b) From
indows Tindows T
W
indows T
WW
indows Tindows T
askbaraskbar
askbar,
askbaraskbar
WW
double-click the following in
StartStart
succession:
MailMail
EyeStar MailEyeStar Mail
Mail,
EyeStar Mail.
MailMail
EyeStar MailEyeStar Mail
2 When the
click the
video video
video options button, and
video video
then select
CameraCamera
Camera from the
CameraCamera
send a video mailsend a video mail
3 To
send a video mail, follow the steps
send a video mailsend a video mail
ProgramsPrograms
Start,
Programs,
StartStart
ProgramsPrograms
EyeStar MailEyeStar Mail
EyeStar Mail panel appears,
EyeStar MailEyeStar Mail
TT
ake-it 350 Digitalake-it 350 Digital
T
ake-it 350 Digital
TT
ake-it 350 Digitalake-it 350 Digital
cameracamera
camera
cameracamera
EyeStarEyeStar
EyeStar
EyeStarEyeStar
source listsource list
source list.
source listsource list
as described on the next page.
CAUTION
Photo Express, Ulead PhotoExplorer, Trellix Web etc.) from the camera before using
it as a PC/Web cam under EyeStar Mail. Otherwise, you will lose all the images you
have taken.
: Be sure to download images to any image-editing software (Ulead
18
Page 23

B. Send a Video Mail
1 Launch your
EyeStar Mail EyeStar Mail
EyeStar Mail, and adjust your camera to the desired view that you
EyeStar Mail EyeStar Mail
want to capture.
2 Click
3 Click
4 Click
RecordRecord
Record to start capturing video and audio data.
RecordRecord
Stop Stop
Stop to end recording.
Stop Stop
Send MailSend Mail
Send Mail t o run the
Send MailSend Mail
Send Mail Send Mail
Send Mail program with the captured data in order to
Send Mail Send Mail
automatically attach the video image to your E-mail message.
For a more detailed operation and information on
User’User’
s manuals manual
User’
s manual (Adobe .pdf for mat) on your Microtek CD-ROM.
User’User’
s manuals manual
22
2
22
33
3
33
19
EyeStar MailEyeStar Mail
EyeStar Mail, please refer to the
EyeStar MailEyeStar Mail
44
4
44
Page 24

Appendices
Appendix A:
Take-it 350 Digital Camera Specifications
Dimensions in mm:
Weight with battery:
Memory and Storage:
Memory type:
Platform(s):
Sensor:
Resolution:
Interface(s):
Indicator:
Lens type:
View angle:
Distance:
Battery:
Driver:
PC
1/3” CMOS
350K pixels
USB
2 Digit LCD
102 x 71 x 35 mm
84 g (without batteries)
Fixed Lens
56.5º
50 - INF cm
26 Pictures (VGA) or 107 Pictures (QVGA)
Internal 8MB SDRAM
AAA x 4 (Alkaline batteries recommended)
TWAIN and WDM (Windows 98, 2000, and Me)
20
Page 25

Appendix B:
Federal Communications Commission (FCC) Statement
This equipment (Trade name: Digital Camera, Model: MN-350M) has been tested
and found to comply with the limits for a Class B digital device, pursuant to Part 15
of the FCC Rules. These limits are designed to provide reasonable protection against
harmful interference in a residential installation. This equipment generates, uses and
can radiate radio frequency energy and, if not installed and used in accordance with
the instructions, may cause harmful interference to radio communications. However,
there is no guarantee that interference will not occur in a particular installation. If this
equipment does cause harmful interference to radio or television reception, which can
be determined by turning the equipment off and on, the user is encouraged to try to
correct the interference by one or more of the following measures:
• Reorient or relocate the receiving antenna.
• Increase the separation between the equipment and receiver.
• Connect the equipment into an outlet on a circuit different from that to which the
receiver is connected.
• Consult the dealer or an experienced radio/TV technician for help.
21
Page 26

Appendix C:
Declaration of Conformity
Supplier: Name: Microtek International Inc.
Address: No. 6, Industry East Road 3
Declares that:
Type of Equipment: Digital Camera
Model Number: MN-350M
Complies with the following:
Standards Directive
EN 50081-1/1992 EN 55022/B(1997)
EN 50082-1/1997 EN 61000-4-2/1995
Person responsible for making this declaration:
C.T. Youe
(Name, Surname)
R & D Center, Vice President
(Position/Title)
Hsinchu
(Place)
Science-based East Road 3
Hsinchu 30077, Taiwan
EN 61000-3-2/1995
EN 61000-3-3/1995
EN61000-4-4/1995
EN61000-4-5/1997
EN61000-4-6/1997
EN61000-4-11/1997
ENV50204/1995
May 5, 2000
(Date)
22
 Loading...