

Page 1
Page 2

Microsoft ®
®
Visual Studio
A Beginner’s Guide
2010
Page 3

About the Author
Joe Mayo started his software development career in 1986, working on an RCA
Spectrum 70 mainframe computer, programming in assembly language where input was
via Hollerith card, output was a line printer, and the debugging experience was a light
panel where you had to push buttons to load registers and step through commands. Since
then, Joe has worked with various mini-computers, workstations, and PCs. The operating
systems he’s worked on include proprietary, UNIX-based, MS-DOS, and Windows.
Besides assembly and dozens of scripting languages, Joe has worked professionally with
C, C++, VBA, Visual C++, Forte Tool, Java, VB.NET, and C#. In addition to software
engineering, he has worked in many positions, including team lead, supervisor, manager
(even running a 24×7 computer operations center with over 50 people). Today, Joe runs
his own company, Mayo Software, providing custom software development services
and specializing in Microsoft .NET technology. He is the author of LINQ Programming
(McGraw-Hill Professional, 2008) and other books. Joe is also the recipient of multiple
Microsoft MVP awards. You can follow Joe on Twitter: @JoeMayo.
About the Technical Editor
Roy Ogborn has worn almost every hat one time or another during his interesting and
continuing career in the Information Technology field. He was systems manager and
developer for Texaco Europe Research, Inc., in Moscow, USSR, during the attempted coup.
Back in the United States, he has designed and implemented a GIS system for managing
oil and gas wells and leases, and has architected and implemented an enterprise workflow
system that managed the business process of taking wells from conception to completion.
He architected a system for Forest Oil in Denver that linked disparate accounting, lease
management, and production tracking systems for business intelligence for senior executives’
daily and strategic decisions. Recently he architected and designed a SharePoint-, Silverlight-,
and CSLA-based greenhouse gas emissions evaluation, prediction, and decision tool for a
multinational environmental engineering firm using the new Visual Studio 2010 Architecture
Edition tools. Roy is an independent software architect consultant in the Denver Metro Area
specializing in custom solutions that leverage SharePoint. In January 2010 he presented
SharePoint 2010 for Developers at the Denver Visual Studio .NET User Group.
Page 4

Microsoft ®
®
Visual Studio
A Beginner’s Guide
Joe Mayo
2010
New York Chicago San Francisco
Lisbon London Madrid Mexico City
Milan New Delhi San Juan
Seoul Singapore Sydney Toronto
Page 5

Copyright © 2010 by The McGraw-Hill Companies. All rights reserved. Except as permitted under the United States Copyright Act of 1976,
no part of this publication may be reproduced or distributed in any form or by any means, or stored in a database or retrieval system, without
the prior written permission of the publisher.
ISBN: 978-0-07-166896-5
MHID: 0-07-166896-9
The material in this eBook also appears in the print version of this title: ISBN: 978-0-07-166895-8, MHID: 0-07-166895-0.
All trademarks are trademarks of their respective owners. Rather than put a trademark symbol after every occurrence of a trademarked name,
we use names in an editorial fashion only, and to the benefi t of the trademark owner, with no intention of infringement of the trademark.
Where such designations appear in this book, they have been printed with initial caps.
McGraw-Hill eBooks are available at special quantity discounts to use as premiums and sales promotions, or for use in corporate training
programs. To contact a representative please e-mail us at bulksales@mcgraw-hill.com.
Information has been obtained by McGraw-Hill from sources believed to be reliable. However, because of the possibility of human or
mechanical error by our sources, McGraw-Hill, or others, McGraw-Hill does not guarantee the accuracy, adequacy, or completeness of any
information and is not responsible for any errors or omissions or the results obtained from the use of such information.
TERMS OF USE
This is a copyrighted work and The McGraw-Hill Companies, Inc. (“McGrawHill”) and its licensors reserve all rights in and to the work. Use
of this work is subject to these terms. Except as permitted under the Copyright Act of 1976 and the right to store and retrieve one copy of the
work, you may not decompile, disassemble, reverse engineer, reproduce, modify, create derivative works based upon, transmit, distribute,
disseminate, sell, publish or sublicense the work or any part of it without McGraw-Hill’s prior consent. You may use the work for your own
noncommercial and personal use; any other use of the work is strictly prohibited. Your right to use the work may be terminated if you fail to
comply with these terms.
THE WORK IS PROVIDED “AS IS.” McGRAW-HILL AND ITS LICENSORS MAKE NO GUARANTEES OR WARRANTIES AS
TO THE ACCURACY, ADEQUACY OR COMPLETENESS OF OR RESULTS TO BE OBTAINED FROM USING THE WORK,
INCLUDING ANY INFORMATION THAT CAN BE ACCESSED THROUGH THE WORK VIA HYPERLINK OR OTHERWISE,
AND EXPRESSLY DISCLAIM ANY WARRANTY, EXPRESS OR IMPLIED, INCLUDING BUT NOT LIMITED TO IMPLIED
WARRANTIES OF MERCHANTABILITY OR FITNESS FOR A PARTICULAR PURPOSE. McGraw-Hill and its licensors do not warrant
or guarantee that the functions contained in the work will meet your requirements or that its operation will be uninterrupted or error free.
Neither McGraw-Hill nor its licensors shall be liable to you or anyone else for any inaccuracy, error or omission, regardless of cause, in the
work or for any damages resulting therefrom. McGraw-Hill has no responsibility for the content of any information accessed through the
work. Under no circumstances shall McGraw-Hill and/or its licensors be liable for any indirect, incidental, special, punitive, consequential
or similar damages that result from the use of or inability to use the work, even if any of them has been advised of the possibility of such
damages. This limitation of liability shall apply to any claim or cause whatsoever whether such claim or cause arises in contract, tort or
otherwise.
Page 6

To my son, Kamo.
Page 7

This page intentionally left blank
Page 8

Contents at a Glance
PART I Understanding Visual Studio 2010 Essentials
1 Introducing Visual Studio 2010 . .. . . . .. .. . . .. . . . .. .. . . .. . . .. . . .. . . . .. .. . . . 3
2 Learning Just Enough C# or VB.NET: Basic Syntax . .. .. . . . .. .. . . .. . . .. . 35
3 Learning Just Enough C# and VB.NET: Types and Members . .. . . .. . . .. . 67
4 Learning Just Enough C# and VB.NET: Intermediate Syntax . . . .. .. . . . . 89
PART II Learning the VS 2010 Environment
5 Creating and Building Projects . . . . .. .. . . .. . . .. . . . .. .. . . .. . . .. . . . .. .. . . .. . 113
6 Debugging with Visual Studio . .. .. . . .. . . .. . . . .. .. . . .. . . .. . . . .. .. . . .. . . .. . . 143
7 Working with Data . .. .. . . .. . . .. . . .. . . . .. .. . . .. . . .. . . . .. .. . . .. . . .. . . . .. .. . . 181
PART III Building Programs with VS 2010
8 Building Desktop Applications with WPF . . .. .. . . .. . . .. . . . .. .. . . .. . . .. . . . . 217
9 Creating Web Applications with ASP.NET MVC . . .. . . .. . . .. . . . .. .. . . .. . . 249
vii
Page 9

10 Designing Silverlight Applications . . . . .. .. . . . .. .. . . .. . . .. . . .. . . . .. .. . . .. . . 285
11 Deploying Web Services with WCF . . .. . . .. . . .. . . . .. .. . . .. . . .. . . .. . . . .. .. . 299
PART IV Enhancing the VS 2010 Experience
12 Customizing the Development Environment . .. . . . .. .. . . .. . . .. . . .. . . . .. .. . 341
13 Extending Visual Studio 2010 . . .. . . .. . . . .. .. . . .. . . .. . . .. . . . .. .. . . .. . . .. . . . 371
PART V Appendixes
A Introduction to XML . .. .. . . . .. .. . . . .. .. . . .. . . .. . . .. . . . .. .. . . .. . . .. . . . .. .. . 403
B Introduction to XAML . .. .. . . .. . . .. . . . .. .. . . .. . . .. . . . .. .. . . .. . . .. . . . .. .. . . 409
Index . .. . . . .. .. . . .. . . .. . . .. . . . .. .. . . .. . . .. . . . .. .. . . .. . . .. . . . .. .. . . .. . . .. . . . 417
Page 10

Contents
ACKNOWLEDGMENTS . .. .. . .. .. .. .. .. .. . . .. .. . . .. .. . . .. .. . . .. .. .. .. .. .. .. .. .. .. . xvii
INTRODUCTION . .. .. .. .. .. .. .. .. .. .. . . .. .. . . .. .. . . .. .. . . .. .. .. .. .. .. .. .. .. .. . . .. . xix
PART I
1 Introducing Visual Studio 2010 . .. . . . .. .. . . .. . . . .. .. . . .. . . .. . . .. . . . .. .. . . . 3
Understanding Visual Studio 2010 Essentials
What Is Visual Studio 2010 About? . .. .. . . .. .. . . .. .. .. .. .. .. .. .. .. .. . . .. .. . . .. .. . . .. . 4
Automatically Generated Code . .. .. .. .. .. .. .. .. .. .. . . .. .. . . .. .. . . .. .. . . .. .. .. . 4
Rapid Coding Experience . .. . . .. .. . . .. .. .. .. .. .. .. .. .. .. . . .. .. . . .. .. . . .. .. . . .. 5
Everything at Your Fingertips . .. .. .. .. .. .. .. .. .. .. . . .. .. . . .. .. . . .. .. . . .. .. .. .. 5
Customizability and Extensibility . .. . . .. .. . . .. .. . . .. .. .. .. .. .. .. .. .. .. . .. .. .. . 5
Installing Visual Studio 2010 . . . .. .. .. .. .. .. .. .. .. .. . . .. .. . . .. .. . . .. .. . . .. .. .. .. .. .. 6
Navigating the Visual Studio 2010 Environment . .. .. . . .. .. . . .. .. . . .. .. .. .. .. .. .. .. . 13
The Menu . . . .. .. . . .. .. . . .. .. .. .. .. .. .. .. .. .. . . .. .. . . .. .. . . .. .. . . .. .. .. .. .. .. . 14
Toolbar . .. .. .. . .. .. .. .. .. .. . . .. .. . . .. .. . . .. .. . . .. .. .. .. .. .. .. .. .. .. . . .. .. . . .. . 15
Work Area . .. .. .. .. . . .. .. . . .. .. . . .. .. .. .. .. .. .. .. .. .. . .. .. .. .. .. .. . . .. .. . . .. .. 15
Toolbox . .. .. .. .. . .. .. .. .. .. .. . . .. .. . . .. .. . . .. .. . . .. .. .. .. .. .. .. .. .. .. . . .. .. . . 16
Solution Explorer . .. .. .. .. .. .. .. .. .. . . .. .. . . .. .. . . .. .. .. .. .. .. .. .. .. .. . .. .. .. . 16
Status Bar . . . .. .. . . .. .. .. .. .. .. .. .. .. .. . .. .. .. .. .. .. . . .. .. . . .. .. . . .. .. . . .. .. .. 16
Managing VS Windows . .. .. .. .. .. .. .. . . .. .. . . .. .. . . .. .. . . .. .. .. .. .. .. .. .. .. .. . . .. .. 16
Expanding and Collapsing Windows . .. . . .. .. . . .. .. .. .. .. .. .. .. .. .. . . .. .. . . .. . 17
Docking Windows .. .. . . .. .. .. .. .. .. .. .. .. .. . . .. .. . . .. .. . . .. .. . . .. .. .. .. .. .. .. 18
ix
Page 11

Floating Windows . .. .. .. .. . .. .. .. .. .. .. . . .. .. . . .. .. . . .. .. . . .. .. .. .. .. .. .. .. .. 19
Tabbed Windows . .. .. . . .. .. . . .. .. .. .. .. .. .. .. .. .. . . .. .. . . .. .. . . .. .. . . .. .. .. .. 20
Closing and Opening Windows . .. .. .. . .. .. .. .. .. .. . . .. .. . . .. .. . . .. .. . . .. .. .. . 21
Modifying Environment Settings after Setup .. .. .. . . .. .. . . .. .. . . .. .. . . .. .. .. .. .. .. .. 22
Exporting Selected Environment Settings . . .. .. . . .. .. . . .. .. . . .. .. .. .. .. .. .. .. . 23
Importing Selected Environment Settings . . .. .. . . .. .. . . .. .. . . .. .. .. .. .. .. .. .. . 24
Resetting All Settings . . .. .. . . .. .. . . .. .. . . .. .. .. .. .. .. .. .. .. .. . . .. .. . . .. .. . . .. . 28
Familiarization with Visual Studio Project Types . .. .. .. .. .. .. .. .. .. . . .. .. . . .. .. . . .. . 30
Windows Projects . . .. .. . . .. .. . . .. .. . . .. .. .. .. .. .. .. .. .. .. . . .. .. . . .. .. . . .. .. . . 32
Web Projects . .. .. . . .. .. . . .. .. . . .. .. .. .. .. .. .. .. .. .. . . .. .. . . .. .. . . .. .. . . .. .. .. 33
Office Projects . .. .. .. .. .. .. .. .. . . .. .. . . .. .. . . .. .. . . .. .. .. .. .. .. .. .. .. .. . . .. .. . 34
SharePoint Projects . .. .. . . .. .. . . .. .. .. .. .. .. .. .. .. .. . .. .. .. .. .. .. . . .. .. . . .. .. . 34
Database Projects . .. .. .. .. .. .. .. .. .. . .. .. .. .. .. .. . . .. .. . . .. .. . . .. .. . . .. .. .. .. . 34
Summary . .. .. .. .. .. .. . . .. .. . . .. .. . . .. .. . . .. .. .. .. .. .. .. .. .. .. . . .. .. . . .. .. . . .. .. . . .. 34
2
Learning Just Enough C# or VB.NET: Basic Syntax . . . . .. .. . . .. . . . .. .. . . 35
Starting a Bare-Bones Project . .. .. . . .. .. . . .. .. .. .. .. .. .. .. .. .. . . .. .. . . .. .. . . .. .. . . .. 36
Examining the Code Skeleton .. .. .. .. . . .. .. . . .. .. . . .. .. . . .. .. .. .. .. .. .. .. .. .. . . .. .. . 39
The Main Method . .. .. .. .. .. .. .. .. . . .. .. . . .. .. . . .. .. . . .. .. .. .. .. .. .. .. .. .. . . . 40
The Program Class . . . .. .. . . .. .. . . .. .. . . .. .. .. .. .. .. .. .. .. .. . . .. .. . . .. .. . . .. .. 41
The FirstProgram Namespace . . .. .. . . .. .. . . .. .. . . .. .. .. .. .. .. .. .. .. .. . . .. .. . . . 42
An Overview of the VS Code Editor .. .. .. .. .. .. .. .. .. .. . . .. .. . . .. .. . . .. .. . . .. .. .. .. 43
Class and Member Locators . .. . .. .. .. .. .. .. . . .. .. . . .. .. . . .. .. . . .. .. .. .. .. .. .. . 4
Bookmarks .. .. .. .. .. .. .. . . .. .. . . .. .. . . .. .. . . .. .. .. .. .. .. .. .. .. .. . . .. .. . . .. .. . 44
Setting Editor Options .. .. . . .. .. . . .. .. . . .. .. .. .. .. .. .. .. .. .. . . .. .. . . .. .. . . .. .. 45
Saving Time with Snippets . . .. .. . . .. .. . . .. .. . . .. .. .. .. .. .. .. .. .. .. . . .. .. . . .. .. 47
Coding Expressions and Statements .. .. . . .. .. . . .. .. .. .. .. .. .. .. .. .. . .. .. .. .. .. .. . . .. 49
Making Intellisense Work for You . .. . . .. .. . . .. .. . . .. .. . . .. .. .. .. .. .. .. .. .. .. . . 49
Running Programs . .. . . .. .. . . .. .. . . .. .. . . .. .. .. .. .. .. .. .. .. .. . . .. .. . . .. .. . . .. . 51
Primitive Types and Expressions . .. .. . . .. .. .. .. .. .. .. .. .. .. . . .. .. . . .. .. . . .. .. . 52
Enums .. . . .. .. . . .. .. . . .. .. .. .. .. .. .. .. .. .. . . .. .. . . .. .. . . .. .. . . .. .. .. .. .. .. .. .. 55
Branching Statements . .. . . .. .. .. .. .. .. .. .. .. .. . . .. .. . . .. .. . . .. .. . . .. .. .. .. .. .. 57
Loops . .. . . .. .. . . .. .. . . .. .. . . .. .. .. .. .. .. .. .. .. .. . . .. .. . . .. .. . . .. .. . . .. .. .. .. . 61
Summary . .. .. .. .. .. .. . . .. .. . . .. .. . . .. .. . . .. .. .. .. .. .. .. .. .. .. . . .. .. . . .. .. . . .. .. . . .. 66
4
3
Learning Just Enough C# and VB.NET: Types and Members . .. .. . . .. . . . 67
Creating Classes . . . .. .. . . .. .. . . .. .. . . .. .. .. .. .. .. .. .. .. .. . . .. .. . . .. .. . . .. .. . . .. .. .. . 68
Class Syntax . .. .. .. .. . . .. .. . . .. .. . . .. .. . . .. .. .. .. .. .. .. .. .. .. . . .. .. . . .. .. . . .. . 68
Class Inheritance . .. .. .. .. . . .. .. . . .. .. . . .. .. . . .. .. .. .. .. .. .. .. .. .. . . .. .. . . .. .. 70
The class Snippet . .. .. .. .. .. .. .. .. .. . . .. .. . . .. .. . . .. .. . . .. .. .. .. .. .. .. .. .. .. . . 71
Writing Methods . . .. .. . . .. .. . . .. .. . . .. .. .. .. .. .. .. .. .. .. . . .. .. . . .. .. . . .. .. . . .. .. .. .. 72
Declaring and Using a Method . .. . . .. .. . . .. .. . . .. .. .. .. .. .. .. .. .. .. . . .. .. . . .. . 72
Declaring Parameters and Passing Arguments . .. .. .. .. .. .. .. .. .. . .. .. .. .. .. .. . 75
Page 12

Contents xi
Returning Data and Using Method Results .. .. .. .. .. .. .. .. .. . . .. .. . . .. .. . . .. .. 78
Method Snippets . .. .. .. .. .. .. .. .. .. . .. .. .. .. .. .. . . .. .. . . .. .. . . .. .. . . .. .. .. .. .. 80
Coding Fields and Properties . .. .. . . .. .. .. .. .. .. .. .. .. .. . . .. .. . . .. .. . . .. .. . . .. .. .. .. . 81
Declaring and Using Fields . .. . . .. .. . . .. .. . . .. .. .. .. .. .. .. .. .. .. . . .. .. . . .. .. . . 81
Declaring and Using Properties . .. .. .. .. .. .. . . .. .. . . .. .. . . .. .. . . .. .. .. .. .. .. .. 83
The Property Snippet . .. .. . . .. .. . . .. .. .. .. .. .. .. .. .. .. . . .. .. . . .. .. . . .. .. . . .. .. 86
Summary . .. .. .. .. .. .. . . .. .. . . .. .. . . .. .. . . .. .. .. .. .. .. .. .. .. .. . . .. .. . . .. .. . . .. .. . . .. 87
4
Learning Just Enough C# and VB.NET: Intermediate Syntax . . .. .. . . . .. 89
Understanding Delegates and Events . . .. .. . . .. .. .. .. .. .. .. .. .. .. . . .. .. . . .. .. . . .. .. . . 90
Events . .. .. .. .. .. .. .. . . .. .. . . .. .. . . .. .. . . .. .. .. .. .. .. .. .. .. .. . . .. .. . . .. .. . . .. . 91
Delegates . . .. .. . . .. .. . . .. .. .. .. .. .. .. .. .. .. . .. .. .. .. .. .. . . .. .. . . .. .. . . .. .. . . .. 94
Event, Delegate, and Handler Code Completion . .. . . .. .. .. .. .. .. .. .. .. .. . . .. .. 95
Implementing Interfaces .. .. . . .. .. . . .. .. .. .. .. .. .. .. .. .. . . .. .. . . .. .. . . .. .. . . .. .. .. .. 96
Creating an Interface . .. .. .. .. .. .. .. .. .. .. . . .. .. . . .. .. . . .. .. . . .. .. .. .. .. .. .. .. . 97
Making Classes Implement the Interface .. . . .. .. . . .. .. . . .. .. .. .. .. .. .. .. .. .. . . 98
Writing Code That Uses an Interface .. .. .. .. .. .. .. .. .. . .. .. .. .. .. .. . . .. .. . . .. . 101
The interface Snippet .. .. .. .. .. .. .. .. .. .. . . .. .. . . .. .. . . .. .. . . .. .. .. .. .. .. .. .. . 106
Applying Arrays and Generics . .. .. .. .. .. .. .. .. .. . . .. .. . . .. .. . . .. .. . . .. .. .. .. .. .. .. . 107
Coding Arrays .. .. .. .. .. . . .. .. . . .. .. . . .. .. . . .. .. .. .. .. .. .. .. .. .. . . .. .. . . .. .. . . 107
Coding Generics . . .. .. .. .. .. .. .. .. .. .. . . .. .. . . .. .. . . .. .. . . .. .. .. .. .. .. .. .. .. .. 109
Summary . .. .. .. .. .. .. . . .. .. . . .. .. . . .. .. . . .. .. .. .. .. .. .. .. .. .. . . .. .. . . .. .. . . .. .. . . .. 110
PART II
5 Creating and Building Projects . . . . .. .. . . .. . . .. . . . .. .. . . .. . . .. . . . .. .. . . .. . 113
Learning the VS 2010 Environment
Constructing Solutions and Projects .. .. . . .. .. . . .. .. .. .. .. .. .. .. .. .. . . .. .. . . .. .. . . .. . 114
Creating a New Project . .. .. . . .. .. .. .. .. .. .. .. .. .. . . .. .. . . .. .. . . .. .. . . .. .. .. .. 115
Navigating the Solution Explorer . .. .. . . .. .. .. .. .. .. .. .. .. .. . .. .. .. .. .. .. . . .. . 116
Examining Property Settings .. .. . .. .. .. .. .. .. . . .. .. . . .. .. . . .. .. . . .. .. .. .. .. .. .. .. .. . 118
Assembly Name . .. .. .. .. .. .. .. .. .. .. . . .. .. . . .. .. . . .. .. . . .. .. .. .. .. .. .. . .. .. .. 119
Default Namespace . .. .. .. .. .. .. . . .. .. . . .. .. . . .. .. . . .. .. .. .. .. .. .. .. .. .. . . .. .. 119
Target Framework .. .. .. .. .. .. .. .. . . .. .. . . .. .. . . .. .. . . .. .. .. .. .. .. .. .. .. .. . . .. 119
Output Type .. .. . . .. .. .. .. .. .. .. .. .. .. . . .. .. . . .. .. . . .. .. . . .. .. .. .. .. .. .. .. .. .. 119
Startup Object .. .. . . .. .. .. .. .. .. .. .. .. .. . .. .. .. .. .. .. . . .. .. . . .. .. . . .. .. . . .. .. . 120
Icon and Manifest . .. .. .. .. .. .. .. .. . .. .. .. .. .. .. . . .. .. . . .. .. . . .. .. . . .. .. .. .. .. 120
Assembly Information .. .. .. .. .. .. .. .. .. . . .. .. . . .. .. . . .. .. . . .. .. .. .. .. .. .. .. .. 121
Referencing Assemblies .. .. .. .. .. .. .. .. .. . .. .. .. .. .. .. . . .. .. . . .. .. . . .. .. . . .. .. .. .. . 122
Adding a .NET Assembly Reference .. .. .. .. . . .. .. . . .. .. . . .. .. . . .. .. .. .. .. .. .. 123
Managing Assembly References . .. .. .. .. .. .. .. .. . . .. .. . . .. .. . . .. .. . . .. .. .. .. . 124
Referencing Your Own Class Libraries . .. .. .. .. .. .. .. .. . . .. .. . . .. .. . . .. .. . . .. . 125
Using Code in Class Libraries . .. . . .. .. .. .. .. .. .. .. .. .. . .. .. .. .. .. .. . . .. .. . . .. 126
Page 13

Compiling Applications . .. .. .. .. .. .. .. .. .. .. . . .. .. . . .. .. . . .. .. . . .. .. .. .. .. .. .. .. .. .. 129
Building Solutions/Projects .. .. .. .. .. .. . . .. .. . . .. .. . . .. .. . . .. .. .. .. .. .. .. .. .. . 129
Rebuilding Solutions/Projects .. .. .. .. . . .. .. . . .. .. . . .. .. .. .. .. .. .. .. .. .. . .. .. .. 130
Cleaning Solutions/Projects . .. .. .. .. .. .. . . .. .. . . .. .. . . .. .. . . .. .. .. .. .. .. .. .. .. 130
Managing Dependencies and Build Order . .. .. . . .. .. . . .. .. .. .. .. .. .. .. .. .. . . .. 131
Managing Compilation Settings .. . . .. .. . . .. .. . . .. .. .. .. .. .. .. .. .. .. . . .. .. . . .. . 133
Navigating a Project with Class View .. .. . . .. .. .. .. .. .. .. .. .. .. . . .. .. . . .. .. . . .. .. . . . 136
Using the Class Designer . . . .. .. . . .. .. . . .. .. .. .. .. .. .. .. .. .. . . .. .. . . .. .. . . .. .. . . .. .. 137
Class Designer Visualization . .. . . .. .. . . .. .. .. .. .. .. .. . .. .. .. .. .. .. . . .. .. . . .. .. 137
Class Designer Code Generation . .. . . .. .. . . .. .. .. .. .. .. .. .. .. .. . . .. .. . . .. .. . . . 138
Summary . .. .. .. .. .. .. . . .. .. . . .. .. . . .. .. . . .. .. .. .. .. .. .. .. .. .. . . .. .. . . .. .. . . .. .. . . .. 141
6
Debugging with Visual Studio . . . .. . . .. . . .. . . .. . . . .. .. . . .. . . .. . . .. . . . .. .. . . 143
Example Code for This Chapter .. . . .. .. . . .. .. . . .. .. . . .. .. .. .. .. .. .. .. .. .. . . .. .. . . .. . 144
Development-Time Code Tools . .. .. .. .. .. .. .. . .. .. .. .. .. .. . . .. .. . . .. .. . . .. .. . . .. .. . 148
Configuring Debug Mode . .. .. .. .. .. .. .. .. .. .. . . .. .. . . .. .. . . .. .. . . .. .. .. .. .. .. .. .. .. 150
Setting Breakpoints . .. .. . . .. .. .. .. .. .. .. .. .. .. . . .. .. . . .. .. . . .. .. . . .. .. .. .. .. .. .. .. .. 155
Creating a Breakpoint . .. .. . . .. .. . . .. .. . . .. .. .. .. .. .. .. .. .. .. . .. .. .. .. .. .. . . .. . 156
Customizing a Breakpoint . .. . . .. .. . . .. .. . . .. .. . . .. .. .. .. .. .. .. .. .. .. . . .. .. . . . 157
Managing Breakpoints . .. .. .. .. .. .. .. .. .. . . .. .. . . .. .. . . .. .. . . .. .. .. .. .. .. .. .. . 158
Stepping Through Code . .. .. .. .. .. .. . . .. .. . . .. .. . . .. .. .. .. .. .. .. .. .. .. . .. .. .. .. .. .. . 158
Inspecting Application State . . . .. .. . . .. .. . . .. .. .. .. .. .. .. .. .. .. . .. .. .. .. .. .. . . .. .. . . 160
Locals and Autos Windows . .. .. . . .. .. . . .. .. . . .. .. .. .. .. .. .. . .. .. .. .. .. .. . . .. . 16
Watch Windows . .. .. .. .. . . .. .. . . .. .. . . .. .. . . .. .. .. .. .. .. .. .. .. .. . . .. .. . . .. .. . 161
The Immediate Window . .. . . .. .. .. .. .. .. .. .. .. .. . . .. .. . . .. .. . . .. .. . . .. .. .. .. . 162
The Call Stack Window . .. .. . . .. .. .. .. .. .. .. .. .. .. . . .. .. . . .. .. . . .. .. . . .. .. .. .. 163
The Quick Watch Window . .. . . .. .. . . .. .. . . .. .. . . .. .. .. .. .. .. .. .. .. .. . . .. .. . . . 163
Watching Variables with Pin To Source .. .. .. .. . .. .. .. .. .. .. . . .. .. . . .. .. . . .. .. 164
Working with IntelliTrace . . . .. .. .. .. .. .. .. .. .. .. . . .. .. . . .. .. . . .. .. . . .. .. .. .. .. 165
Solving Problems with VS Debugger . .. .. . . .. .. .. .. .. .. .. .. .. .. . .. .. .. .. .. .. . . .. .. . 166
A Program with Bugs .. .. .. .. .. .. . . .. .. . . .. .. . . .. .. . . .. .. .. .. .. .. .. .. .. .. . . .. . 167
Finding the Bug . .. .. . . .. .. . . .. .. . . .. .. .. .. .. .. .. .. .. .. . . .. .. . . .. .. . . .. .. . . .. . 171
Fixing the First Bug . .. .. . . .. .. . . .. .. . . .. .. .. .. .. .. .. .. .. .. . . .. .. . . .. .. . . .. .. . 174
Debugging and Resolving NullReferenceException Problems .. .. .. .. .. .. .. .. . 175
Summary . .. .. .. .. .. .. . . .. .. . . .. .. . . .. .. . . .. .. .. .. .. .. .. .. .. .. . . .. .. . . .. .. . . .. .. . . .. 180
0
7
Working with Data . . .. .. . . .. . . . .. .. . . .. . . .. . . .. . . . .. .. . . .. . . .. . . . .. .. . . .. . 181
Working with Databases .. .. .. .. .. .. .. . . .. .. . . .. .. . . .. .. . . .. .. .. .. .. .. .. .. .. .. . . .. .. 182
Introduction to Server Explorer . .. .. .. .. .. .. . .. .. .. .. .. .. . . .. .. . . .. .. . . .. .. . . . 182
Creating a Database . .. . . .. .. . . .. .. .. .. .. .. .. .. .. .. . . .. .. . . .. .. . . .. .. . . .. .. .. . 183
Adding Tables . .. .. .. .. .. .. .. . . .. .. . . .. .. . . .. .. . . .. .. .. .. .. .. .. .. .. .. . . .. .. . . . 185
Relating Tables with Foreign Keys . .. .. .. .. .. .. .. . . .. .. . . .. .. . . .. .. . . .. .. .. .. . 187
Adding Stored Procedures . .. .. . . .. .. . . .. .. . . .. .. .. .. .. .. .. .. .. .. . . .. .. . . .. .. . 192
Configuring Database Options .. . . .. .. . . .. .. .. .. .. .. .. .. .. .. . . .. .. . . .. .. . . .. .. 193
Page 14

Contents xiii
Learning Language Integrated Query (LINQ) . .. .. .. .. .. .. .. .. .. .. . . .. .. . . .. .. . . .. .. 194
Querying Object Collections with LINQ . .. .. .. .. . .. .. .. .. .. .. . . .. .. . . .. .. . . .. 194
Creating a LINQ Projection with Anonymous Types . .. .. .. .. . . .. .. . . .. .. . . .. . 198
Using LINQ to Sort Collection Results . .. .. . . .. .. . . .. .. .. .. .. .. .. .. .. .. . . .. .. . 199
Handling Data with LINQ to SQL .. . . .. .. . . .. .. .. .. .. .. .. .. .. .. . . .. .. . . .. .. . . .. .. .. 200
Setting Up LINQ to SQL . . .. .. . . .. .. .. .. .. .. .. .. .. .. . . .. .. . . .. .. . . .. .. . . .. .. . 200
Working with the LINQ to SQL Designer . .. . . .. .. .. .. .. .. .. .. .. .. . . .. .. . . .. .. 201
Introduction to Querying LINQ to SQL . .. .. . . .. .. . . .. .. . . .. .. .. .. .. .. .. .. .. .. 203
Performing Queries on Multiple Tables . .. . . .. .. . . .. .. . . .. .. . . .. .. .. .. .. .. .. .. 205
Inserting Data with LINQ to SQL .. .. . . .. .. .. .. .. .. .. .. .. .. . . .. .. . . .. .. . . .. .. . 210
Updating Data with LINQ to SQL .. . . .. .. . . .. .. .. .. .. .. .. .. .. .. . . .. .. . . .. .. . . 211
Deleting Data with LINQ to SQL . .. .. .. .. .. .. .. . . .. .. . . .. .. . . .. .. . . .. .. .. .. .. 212
Summary . .. .. .. .. .. .. . . .. .. . . .. .. . . .. .. . . .. .. .. .. .. .. .. .. .. .. . . .. .. . . .. .. . . .. .. . . .. 214
PART III
8 Building Desktop Applications with WPF . . .. .. . . .. . . .. . . . .. .. . . .. . . .. . . . . 217
9
Building Programs with VS 2010
Starting a WPF Project . .. . . .. .. . . .. .. . . .. .. . . .. .. .. .. .. .. .. . .. .. .. .. .. .. . . .. .. . . .. .. 218
Understanding Layout . .. . . .. .. . . .. .. . . .. .. .. .. .. .. .. .. .. .. . . .. .. . . .. .. . . .. .. . . .. .. . 220
Grid Layout . .. . . .. .. . . .. .. . . .. .. . . .. .. .. .. .. .. .. .. .. .. . . .. .. . . .. .. . . .. .. . . .. . 220
StackPanel Layout . .. . . .. .. . . .. .. . . .. .. . . .. .. .. .. .. .. .. .. .. .. . . .. .. . . .. .. . . .. . 222
DockPanel Layout . .. .. .. .. .. .. .. . . .. .. . . .. .. . . .. .. . . .. .. .. .. .. .. .. .. .. .. . . .. . 223
WrapPanel Layout .. .. . . .. .. .. .. .. .. .. .. .. .. . . .. .. . . .. .. . . .. .. . . .. .. .. .. .. .. .. 224
Canvas Layout . .. .. .. .. .. . .. .. .. .. .. .. . . .. .. . . .. .. . . .. .. . . .. .. .. .. .. .. .. .. .. .. 225
Using WPF Controls
Managing Windows for Controls . .. . . .. .. . . .. .. . . .. .. .. .. .. .. .. .. .. .. . .. .. .. .. 226
Setting Properties . .. .. .. .. .. .. .. .. .. . . .. .. . . .. .. . . .. .. .. .. .. .. .. .. .. .. . .. .. .. . 228
Handling Events . . . .. .. . . .. .. . . .. .. . . .. .. .. .. .. .. .. .. .. .. . . .. .. . . .. .. . . .. .. . . . 228
Coding Event Handlers . . .. .. . . .. .. .. .. .. .. .. .. .. .. . . .. .. . . .. .. . . .. .. . . .. .. .. . 233
Working with Data in WPF . .. .. .. .. .. .. .. .. .. . . .. .. . . .. .. . . .. .. . . .. .. .. .. .. .. .. .. .. 234
Setting Up a Data Source . .. .. .. .. . .. .. .. .. .. .. . . .. .. . . .. .. . . .. .. . . .. .. .. .. .. . 235
Configuring a ComboBox . .. .. .. .. . .. .. .. .. .. .. . . .. .. . . .. .. . . .. .. . . .. .. .. .. .. . 241
Reading and Saving Data .. .. .. .. .. .. .. .. . . .. .. . . .. .. . . .. .. . . .. .. .. .. .. .. .. .. . 243
Using the DataGrid .. .. .. . . .. .. . . .. .. . . .. .. . . .. .. .. .. .. .. .. .. .. .. . . .. .. . . .. .. . 244
Summary . .. .. .. .. .. .. . . .. .. . . .. .. . . .. .. . . .. .. .. .. .. .. .. .. .. .. . . .. .. . . .. .. . . .. .. . . .. 247
.. .. .. .. . . .. .. . . .. .. . . .. .. . . .. .. .. .. .. .. .. .. .. .. . . .. .. . . .. .. . . .. 226
Creating Web Applications with ASP.NET MVC . .. . . .. . . .. . . .. . . . .. .. . . . 249
Understanding ASP.NET MVC .. .. .. .. . .. .. .. .. .. .. . . .. .. . . .. .. . . .. .. . . .. .. .. .. .. .. 250
Starting an ASP.NET MVC Project .. . . .. .. . . .. .. .. .. .. .. .. .. .. .. . . .. .. . . .. .. . . .. .. . 251
Creating the Models . .. .. .. .. . . .. .. . . .. .. . . .. .. . . .. .. .. .. .. .. .. .. .. .. . . .. .. . . .. .. . . . 254
Building Controllers . .. . . .. .. . . .. .. .. .. .. .. .. .. .. .. . . .. .. . . .. .. . . .. .. .. .. .. .. .. .. .. . 254
Displaying Views . .. .. . . .. .. .. .. .. .. .. .. .. .. . . .. .. . . .. .. . . .. .. . . .. .. .. .. .. .. .. . .. .. . 256
Looking Inside a View . .. .. . . .. .. .. .. .. .. .. .. .. .. . . .. .. . . .. .. . . .. .. . . .. .. .. .. . 256
Organizing View Files . .. .. . . .. .. . . .. .. . . .. .. . . .. .. .. .. .. .. .. .. .. .. . . .. .. . . .. . 258
Page 15

Assigning MasterPage Files . . . .. .. .. .. .. .. .. .. .. .. . . .. .. . . .. .. . . .. .. . . .. .. .. .. 258
Partial Views (a.k.a. User Controls) .. .. .. .. .. .. .. .. .. . . .. .. . . .. .. . . .. .. . . .. .. . 260
Managing Routing . .. . . .. .. . . .. .. . . .. .. . . .. .. .. .. .. .. .. .. .. .. . . .. .. . . .. .. . . .. .. . . .. . 262
Building a Customer Management Application . .. .. .. .. .. .. . . .. .. . . .. .. . . .. .. . . .. .. . 264
Creating a Repository .. . . .. .. . . .. .. . . .. .. .. .. .. .. .. .. .. .. . . .. .. . . .. .. . . .. .. . . . 265
Creating a Customer Controller . .. .. .. .. .. .. .. .. .. .. . . .. .. . . .. .. . . .. .. . . .. .. .. 268
Displaying a Customer List .. .. .. .. .. .. .. .. .. . . .. .. . . .. .. . . .. .. . . .. .. .. .. .. .. . 269
Adding a New Customer .. .. .. .. .. .. .. . . .. .. . . .. .. . . .. .. . . .. .. .. .. .. .. .. .. .. .. 274
Updating Existing Customers . .. .. . . .. .. .. .. .. .. .. .. .. .. . . .. .. . . .. .. . . .. .. . . .. 279
Deleting a Customer . .. . . .. .. . . .. .. . . .. .. .. .. .. .. .. .. .. .. . . .. .. . . .. .. . . .. .. . . . 281
Summary . .. .. .. .. .. .. . . .. .. . . .. .. . . .. .. . . .. .. .. .. .. .. .. .. .. .. . . .. .. . . .. .. . . .. .. . . .. 284
10
Designing Silverlight Applications . . . . .. .. . . . .. .. . . .. . . .. . . .. . . . .. .. . . .. . . 285
Starting a Silverlight Project .. . . .. .. . . .. .. . . .. .. . . .. .. .. .. .. .. .. .. .. .. . . .. .. . . .. .. . . 286
Navigating the Silverlight Designer . .. . . .. .. . . .. .. .. .. .. .. .. .. .. .. . .. .. .. .. .. .. . . .. . 290
Using Silverlight Controls . .. .. . . .. .. . . .. .. .. .. .. .. .. . .. .. .. .. .. .. . . .. .. . . .. .. . . .. .. 290
Running Silverlight Out-of-Browser (OOB) . .. .. . . .. .. . . .. .. . . .. .. .. .. .. .. .. .. .. .. . . 294
Deploying Silverlight Applications . .. . . .. .. .. .. .. .. .. .. .. .. . . .. .. . . .. .. . . .. .. . . .. .. . 297
Summary . .. .. .. .. .. .. . . .. .. . . .. .. . . .. .. . . .. .. .. .. .. .. .. .. .. .. . . .. .. . . .. .. . . .. .. . . .. 298
11
Deploying Web Services with WCF . . .. . . .. . . .. . . . .. .. . . .. . . .. . . .. . . . .. .. . 299
Starting a WCF Project . .. .. .. .. .. .. .. .. .. .. . . .. .. . . .. .. . . .. .. . . .. .. .. .. .. .. .. .. .. .. 301
Specifying a Contract with WCF Interfaces . .. .. . . .. .. .. .. .. .. .. .. .. .. . . .. .. . . 302
Implementing Logic with WCF Classes . .. .. .. .. .. .. . . .. .. . . .. .. . . .. .. . . .. .. ..
Hosting a WCF Service . .. . . .. .. . . .. .. . . .. .. . . .. .. .. .. .. .. .. .. .. .. . . .. .. . . .. .. . . .. .. 314
Following General Hosting Procedures . .. .. . . .. .. . . .. .. .. .. .. .. .. . .. .. .. .. .. .. 315
Installing IIS 7 on Windows 7 .. .. . . .. .. . . .. .. .. .. .. .. .. .. .. .. . . .. .. . . .. .. . . .. . 315
Creating a Web Site on IIS 7 on Windows 7 . .. . . .. .. . . .. .. . . .. .. .. .. .. .. .. .. .. 317
Deploying the WCF Service to IIS . .. .. . . .. .. . . .. .. . . .. .. .. .. .. .. .. .. .. .. . . .. . 321
Communicating with a WCF Service . .. .. . . .. .. . . .. .. . . .. .. .. .. .. .. .. .. .. .. . . .. .. . . . 326
Creating a Service Reference . .. .. . . .. .. .. .. .. .. .. .. .. .. . . .. .. . . .. .. . . .. .. . . .. 326
Coding Web Service Calls . .. .. .. .. .. . . .. .. . . .. .. . . .. .. . . .. .. .. .. .. .. .. .. .. .. . 329
Deploying a Client That Consumes a Web Service . .. .. . . .. .. . . .. .. . . .. .. .. .. . 336
Creating a Web Service in a Web Site . .. .. .. .. . . .. .. . . .. .. . . .. .. . . .. .. .. .. .. .. 337
Summary . .. .. .. .. .. .. . . .. .. . . .. .. . . .. .. . . .. .. .. .. .. .. .. .. .. .. . . .. .. . . .. .. . . .. .. . . .. 338
308
PART IV
12 Customizing the Development Environment . .. . . . .. .. . . .. . . .. . . .. . . . .. .. . 341
Enhancing the VS 2010 Experience
Implementing Custom Templates . .. .. .. .. . .. .. .. .. .. .. . . .. .. . . .. .. . . .. .. . . .. .. .. .. . 342
Creating New Project Templates .. .. . . .. .. .. .. .. .. .. .. .. .. . .. .. .. .. .. .. . . .. .. . 343
Creating New Item Templates . .. . . .. .. .. .. .. .. .. .. .. .. . . .. .. . . .. .. . . .. .. . . .. .. 347
Creating Custom Snippets . .. .. . . .. .. . . .. .. . . .. .. .. .. .. .. .. .. .. .. . . .. .. . . .. .. . . .. .. . 353
Creating a New Snippet . .. .. . . .. .. . . .. .. . . .. .. .. .. .. .. .. .. .. .. . . .. .. . . .. .. . . .. 353
Managing the Snippet Library . .. .. . . .. .. . . .. .. . . .. .. . . .. .. .. .. .. .. .. .. .. .. . . . 358
Page 16

Contents xv
Writing Macros . .. .. .. .. .. .. .. . . .. .. . . .. .. . . .. .. . . .. .. .. .. .. .. .. .. .. .. . . .. .. . . .. .. . . 360
Recording a Macro . .. . . .. .. . . .. .. . . .. .. .. .. .. .. .. .. .. .. . . .. .. . . .. .. . . .. .. . . .. 360
Saving a Macro . .. . . .. .. . . .. .. .. .. .. .. .. .. .. .. . . .. .. . . .. .. . . .. .. . . .. .. .. .. .. .. 364
Editing Macros .. .. .. .. .. .. .. .. . . .. .. . . .. .. . . .. .. . . .. .. .. .. .. .. .. .. .. .. . . .. .. . 365
Summary . .. .. .. .. .. .. . . .. .. . . .. .. . . .. .. . . .. .. .. .. .. .. .. .. .. .. . . .. .. . . .. .. . . .. .. . . .. 370
13
Extending Visual Studio 2010 . . .. . . .. . . . .. .. . . .. . . .. . . .. . . . .. .. . . .. . . .. . . . 371
Creating a Visual Studio Add-In .. .. . . .. .. . . .. .. . . .. .. .. .. .. .. .. .. .. .. . . .. .. . . .. .. . . 372
Running the Add-In Project Wizard . . . .. .. . . .. .. . . .. .. . . .. .. .. .. .. .. .. .. .. .. . . 372
Examining an Add-In Wizard Solution . .. .. . . .. .. .. .. .. .. .. .. .. .. . . .. .. . . .. .. . 377
Drilling into the Connect Class . .. .. .. .. . .. .. .. .. .. .. . . .. .. . . .. .. . . .. .. . . .. .. .. 378
Adding Functionality to an Add-In .. . . .. .. .. .. .. .. .. .. .. .. . . .. .. . . .. .. . . .. .. . . .. .. .. 383
Reviewing the OnConnection Method . .. . . .. .. . . .. .. . . .. .. . . .. .. .. .. .. .. .. .. .. 384
Implementing the Exec Method . .. .. .. .. .. .. .. .. .. .. . . .. .. . . .. .. . . .. .. . . .. .. .. 391
Setting Status with QueryStatus .. .. .. .. .. .. .. .. . .. .. .. .. .. .. . . .. .. . . .. .. . . .. .. 395
Deploying an Add-In . .. .. . . .. .. . . .. .. . . .. .. .. .. .. .. .. . .. .. .. .. .. .. . . .. .. . . .. .. . . .. . 397
Where to Go Next . .. .. . . .. .. .. .. .. .. .. .. .. .. . . .. .. . . .. .. . . .. .. . . .. .. .. .. .. .. .. .. .. . 399
Summary . .. .. .. .. .. .. . . .. .. . . .. .. . . .. .. . . .. .. .. .. .. .. .. .. .. .. . . .. .. . . .. .. . . .. .. . . .. 4 00
PART V
A Introduction to XML . .. .. . . . .. .. . . . .. .. . . .. . . .. . . .. . . . .. .. . . .. . . .. . . . .. .. . 403
B
Appendixes
VS 2010 XML Editor .. .. .. .. .. .. . . .. .. . . .. .. . . .. .. . . .. .. .. .. .. .. .. .. .. .. . . .. .. . . .. . 404
XML Prefixes .. .. .. .. .. .. .. .. .. . . .. .. . . .. .. . . .. .. . . .. .. .. .. .. .. .. .. .. .. . . .. .. . . .. .. 404
XML Elements . . . .. .. .. .. .. .. .. .. .. .. . . .. .. . . .. .. . . .. .. . . .. .. .. .. .. .. .. .. .. .. . . .. .. 405
Attributes . .. . . .. .. . . .. .. . . .. .. .. .. .. .. .. .. .. .. . . .. .. . . .. .. . . .. .. . . .. .. .. .. .. .. .. . .. . 405
Namespaces .. .. . . .. .. . . .. .. . . .. .. . . .. .. .. .. .. .. .. .. .. .. . . .. .. . . .. .. . . .. .. . . .. .. .. .. 406
The XML Menu . .. .. . . .. .. .. .. .. .. .. .. .. .. . . .. .. . . .. .. . . .. .. . . .. .. .. .. .. .. .. .. .. .. . 407
Configuring XML Options . .. .. .. .. .. .. . . .. .. . . .. .. . . .. .. . . .. .. .. .. .. .. .. .. .. .. . . .. . 407
Summary . .. .. .. .. .. .. . . .. .. . . .. .. . . .. .. . . .. .. .. .. .. .. .. .. .. .. . . .. .. . . .. .. . . .. .. . . .. 407
Introduction to XAML .. . . .. . . . .. .. . . .. . . .. . . .. . . . .. .. . . .. . . .. . . . .. .. . . .. . 409
Starting a WPF Project . .. . . .. .. . . .. .. . . .. .. . . .. .. .. .. .. .. .. . .. .. .. .. .. .. . . .. .. . . .. .. 410
Elements as Classes . .. . . .. .. .. .. .. .. .. .. .. .. . .. .. .. .. .. .. . . .. .. . . .. .. . . .. .. . . .. .. .. 411
Attributes as Properties . . .. .. . . .. .. .. .. .. .. .. .. .. .. . . .. .. . . .. .. . . .. .. . . .. .. .. .. .. .. . 411
Executing the XAML Document .. . . .. .. . . .. .. . . .. .. . . .. .. .. .. .. .. .. .. .. .. . . .. .. . . .. 411
Property Elements .. . . .. .. . . .. .. . . .. .. . . .. .. .. .. .. .. .. .. .. .. . . .. .. . . .. .. . . .. .. . . .. .. 412
Markup Extensions .. .. . . .. .. .. .. .. .. .. .. .. .. . .. .. .. .. .. .. . . .. .. . . .. .. . . .. .. . . .. .. .. 414
Summary . .. .. .. .. .. .. . . .. .. . . .. .. . . .. .. . . .. .. .. .. .. .. .. .. .. .. . . .. .. . . .. .. . . .. .. . . .. 416
Index .. .. . . . .. .. . . .. . . . .. .. . . .. . . .. . . .. . . . .. .. . . .. . . .. . . . .. .. . . .. . . .. . . . .. . 417
Page 17

This page intentionally left blank
Page 18

Acknowledgments
work of this magnitude is never the ramblings of a single author, but a successful
combination of dedication from a team of highly skilled professionals. I would like
A
to personally thank several people who helped make this book possible.
Jane Brownlow, Executive Editor, helped kick off the book and got it started on the
right path. Megg Morin, Acquisitions Editor, took the reins from Jane and led the rest
of the way. Joya Anthony, Acquisitions Coordinator, helped keep the flow of chapters
moving. Madhu Bhardwaj, Project Manager, and Patty Mon, Editorial Supervisor, helped
coordinate copy edits and final layout. I would really like to thank you all for your
patience and assistance. There are many more people at McGraw-Hill who helped put this
book together, and I am appreciative of their contributions and professionalism.
Roy Ogborn was the technical editor for this book. I’ve known Roy for several years
and was delighted when he agreed to tech edit the book. Besides catching many of my
errors, Roy provided valuable insight that made a difference in several areas, continuously
asking the question of whether a beginner would understand a concept, what is the proper
application of the language to accomplish a goal, and perspective on what parts of a
technology needed emphasis. Thanks to Roy for outstanding technical editing and advice.
xvii
Page 19

This page intentionally left blank
Page 20

Introduction
isual Studio has been the primary integrated development environment (IDE) for
Microsoft software development for several years. Visual Studio 2010 (VS), the
V
subject of this book, is therefore a mature evolution, building upon the success of its
predecessors. This book will show you how to leverage Visual Studio 2010 to your
advantage, increasing your skill set, and helping you become more productive in building
software. The software you will learn to write will be for .NET (pronounced “Dot Net”),
which is a Microsoft platform for writing different types of applications.
As the title suggests, this is a book for beginners. However, there are many opinions
about who a beginner is, so let’s discuss what beginner means in the context of this book.
You should probably have some understanding of what programming is from a general
perspective. It would help to have at least written a batch file, macro, or script that
instructed the computer to perform some task. A beginner could also be someone who
has written software with technology, such as Cobol, Dreamweaver, or Java, but who is
unfamiliar with Visual Studio. Whatever your background, this book provides a gradual
on-ramp to developing applications with Visual Studio 2010.
xix
Page 21

This book has 13 chapters and is divided into four parts and a couple of appendixes as
reference material. The following provides an overview of each section:
● Part I: Understanding Visual Studio 2010 Essentials Chapter 1 begins with an
explanation of what VS is, its benefits to you, and what type of applications VS will
help you build. Hands-on guidance starts at the point of installation, giving you tips
as to what is being installed and where it goes on your computer. Chapters 2 through
4 are an introduction to C# and VB, two of the most widely used programming
languages supported in VS. Notice that the titles of these chapters include “Just
Enough,” indicating that you will learn the language features you need throughout
this book. As you progress through the book, you’ll be exposed to all of the language
features discussed and see how they are used. Even if you already know how to
program, you might want to peruse the programming language chapters anyway
because I’ve sprinkled in dozens of valuable tips that will make your coding
experience in VS much more pleasurable.
● Part II: Learning the VS 2010 Environment There are a few universal tasks most
developers perform every day, which include working with projects, debugging code,
and manipulating data. While Chapter 5 is titled “Creating and Building Projects,”
there is much involved when working with projects. Pay particular attention to the
guidance on assemblies and class libraries, as they tend to become more prominent
as your development activities progress beyond simple programs. Regardless of your
development philosophy, the need to fix bugs has always existed and will continue
to be important in the future. Chapter 6 is designed to help you use the many tools of
VS to find and fix bugs. Another common task you’ll have is working with data. VS
allows you to create databases, add tables, and much more. When the database is ready
to use, you’ll learn how to write code that works with the database. I chose to cover
LINQ to SQL because it’s one of the simpler database technologies, yet powerful
enough for professional application development.
● Part III: Building Programs with VS 2010 With the foundations of programming
languages and a feel for the VS environment, you’ll be ready to use VS to build
applications. The .NET platform supports various technologies, and this book takes
a forward-looking approach, choosing technologies that were the most recently
introduced. The focus in these chapters is not to teach you everything about these
technologies, which can fill entire books themselves, but rather to show you how to
leverage VS in building applications. You’ll get the foundations that will give you a
head start in building your own applications. Both Chapters 8 and 10 use a form of
Page 22

Introduction xxi
Extensible Markup Language (XML) called XML Application Markup Language
(XAML). Considering that this is a beginner’s book, I added a couple of appendixes
that cover XML and XAML. I recommend that you read the appendixes before
reading Chapters 8 and 10. Additionally, you should read Chapter 8 before reading
Chapter 10, because many of the same concepts used to work with Windows
Presentation Foundation (WPF), a technology for building desktop applications,
are applicable to Silverlight, a technology to build Web applications. The other two
chapters in this part will show you how to build Web applications with ASP.NET
MVC and how to create Web services with Windows Communications Foundation.
● Part IV: Enhancing the VS 2010 Experience In addition to all of the wizards,
tools, and editing help that VS offers, you can extend VS to make it work even better.
Chapter 12 shows you how to create your own project and project item wizards, how
to create code snippets that automatically generate code, and how to create macros
that automate the VS environment. If the macro capability you learn about in VS
isn’t powerful enough, read Chapter 13, which shows you how to build an Add-In,
a program that you can install to add new features to VS.
From installation to customization of the IDE, VS is a helpful and powerful tool.
I hope you enjoy this book and that it helps you learn how to make VS work for you.
Page 23

This page intentionally left blank
Page 24

Part I
Understanding Visual
Studio 2010 Essentials
Page 25

This page intentionally left blank
Page 26

Chapter 1
Introducing Visual Studio 2010
3
Page 27

4 Microsoft Visual Studio 2010: A Beginner’s Guide
Key Skills & Concepts
● Learn What Visual Studio 2010 Can Do for You
● Install and Choose Among Installation Options
● Understand What Types of Applications You Can Build
our first experience with Visual Studio (VS) 2010 is often installation. As with most
software, VS is rather easy to install; this chapter describes the installation process
Y
and gives you tips to help understand available options. Once installation is complete,
you’ll open VS for the first time and need to know how to navigate the VS environment;
this chapter gives you a high-level view of how VS is organized, how to find the features
you need, and how to work with windows. Finally, you’ll learn how to find the different
application types that VS helps you build. At this point, you know that VS will help you
build .NET applications, but let’s start off with a more detailed explanation of what VS
will do for you.
What Is Visual Studio 2010 About?
Visual Studio 2010 (VS) is an integrated development environment (IDE); a set of tools
in a single application that helps you write programs. Without VS, you would need to
open a text editor, write all of the code, and then run a command-line compiler to create
an executable application. The issue with the text editor and command-line compiler is
that you would lose a lot of productivity through manual processes. Fortunately, you have
VS to automate many of the mundane tasks that are required to develop applications. The
following sections explain what VS will do for you and why VS is all about developer
productivity.
Automatically Generated Code
VS includes a suite of project types that you can choose from. Whenever you start a new
project, VS will automatically generate skeleton code that can compile and run immediately.
Each project type has project items that you can add, and project items include skeleton
code. In the next chapter, you’ll learn how to create projects, add project items, and view
Page 28

Chapter 1: Introducing Visual Studio 2010 5
automatically generated code. VS offers many premade controls, which include skeleton
code, saving you from having to write your own code for repetitive tasks. Many of the more
complex controls contain wizards that help you customize the control’s behavior, generating
code based on wizard options you choose.
Rapid Coding Experience
The VS editor optimizes your coding experience. Much of your code is colorized; you
have Intellisense, tips that pop up as you type; and keyboard shortcuts for performing a
multitude of tasks. There are a few refactorings, features that help you quickly improve
the organization of your code while you’re coding. For example, the Rename refactoring
allows you to change an identifier name where it is defined, which also changes every
place in the program that references that identifier. VS introduces even more features,
such as a call hierarchy, which lets you see the call paths in your code; snippets, which
allow you to type an abbreviation that expands to a code template; and action lists for
automatically generating new code.
Everything at Your Fingertips
You’ll really want to learn how to navigate the VS environment because a plethora of
tools are available to aid you in your quest to rapidly create quality software. Y
the Toolbox jam-packed with controls, a Server Explorer for working with operating
system services and databases, a Solution Explorer for working with your projects, testing
utilities, and visual designers. By the way, there are compilers too.
ou have
Customizability and Extensibility
You can customize many parts of the VS environment, including colors, editor options,
and layout. The options are so extensive that you’ll need to know where to look to find
them all. If the out-of-the-box VS development environment doesn’t offer a feature you
need, you can write your own macros to automate a series of tasks you find yourself
repeating. For more sophisticated customization, VS exposes an application programming
interface (API) for creating add-ins and extensions. Several third-party companies
have chosen to integrate their own applications with VS. For example, Embarcadero’s
Delphi language and development environment is hosted in Visual Studio. The rich and
customizable development environment in VS helps you work the way you want to.
As you move through this book, keep these important concepts in mind and look for
all of the tips that will help you use VS to your advantage. Your first step in using VS will
be installation, which is discussed in the next section.
Page 29
6 Microsoft Visual Studio 2010: A Beginner’s Guide
Installing Visual Studio 2010
Hopefully the preceding discussion whets your appetite on what VS can do for you. If
you haven’t already installed VS, this section walks you through the setup process. The
guidance along the way will explain how to choose among available options to customize
the installation to your needs. The following steps explain how to install VS:
System Requirements
As of this writing Microsoft recommends you have a 32-bit x86 or 64-bit (x64) CPU,
at least 1GB RAM, a 5400 RPM hard disk drive, 3GB hard disk space, DVD-ROM,
DirectX video at 1280 × 1024 resolution, and a 1.6 GHz processor. Recommended
operating systems include
SP2 or later (all versions except for Starter), Windows 7 (only Ultimate at the time this
chapter was written), Windows 2003 (SP1 or R2 or later), and Windows 2008 (SP1 or
R2 or later). Be sure to check Microsoft Developer Network (MSDN) online, as system
requirements can change over time.
Windows Vista (all versions except for Starter), Windows XP
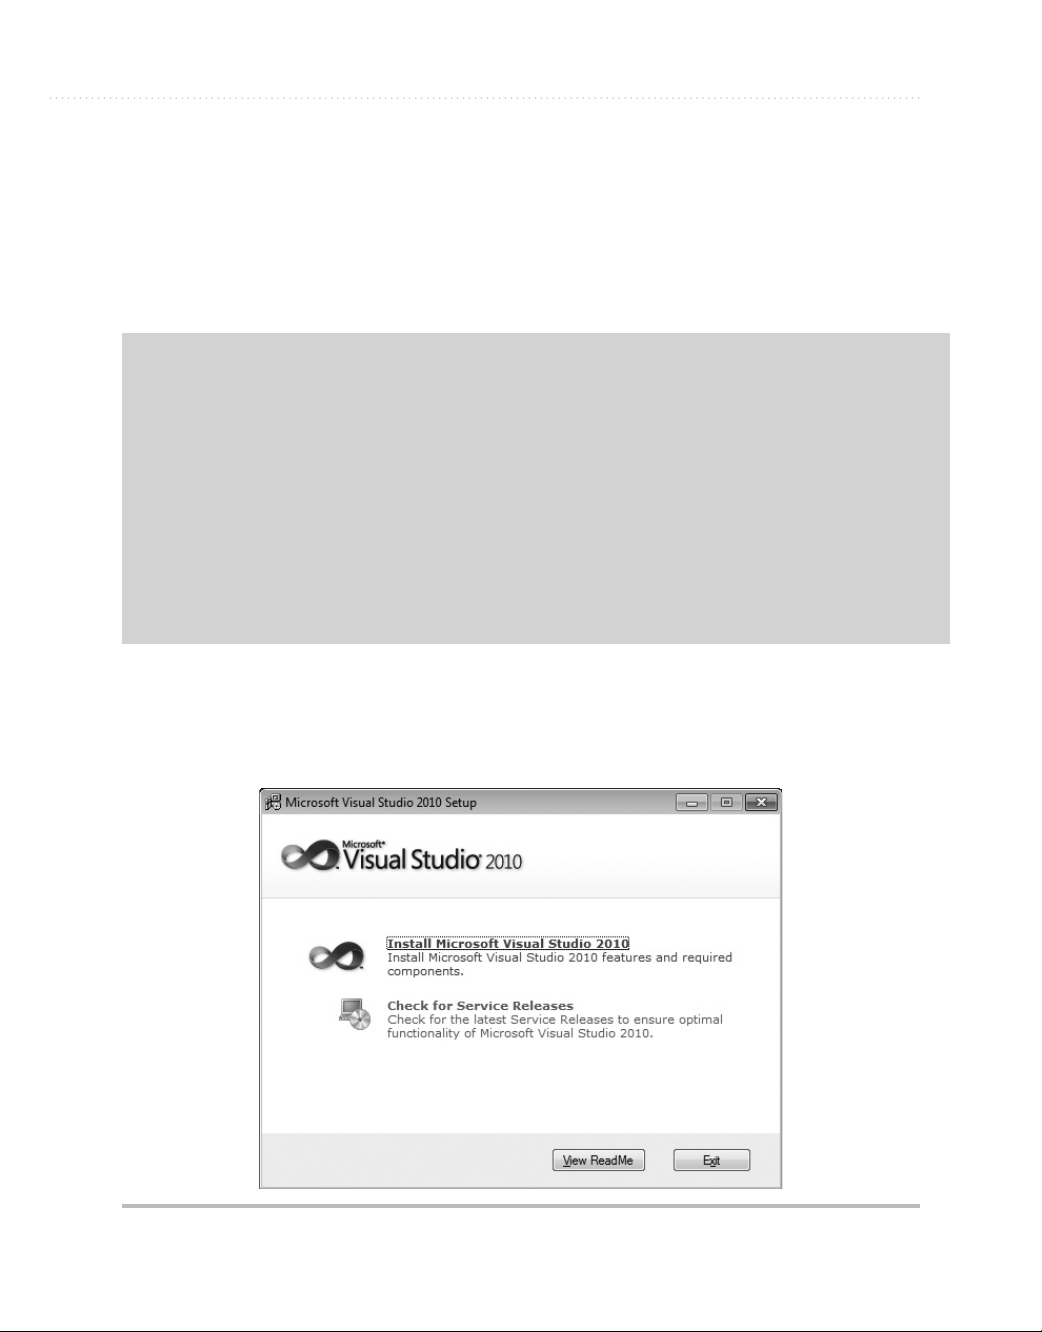
1. When you first place the VS DVD into the drive, you’ll see the Microsoft Visual Studio
2010 window, shown in Figure 1-1. Available options are to Install Microsoft Visual
Studio 2010 and Check For Service Releases. Click Install Microsoft Visual Studio 2010.
Figure 1-1 Microsoft Visual Studio 2010 Setup window
Page 30
Chapter 1: Introducing Visual Studio 2010 7
Figure 1-2 Setup Welcome window
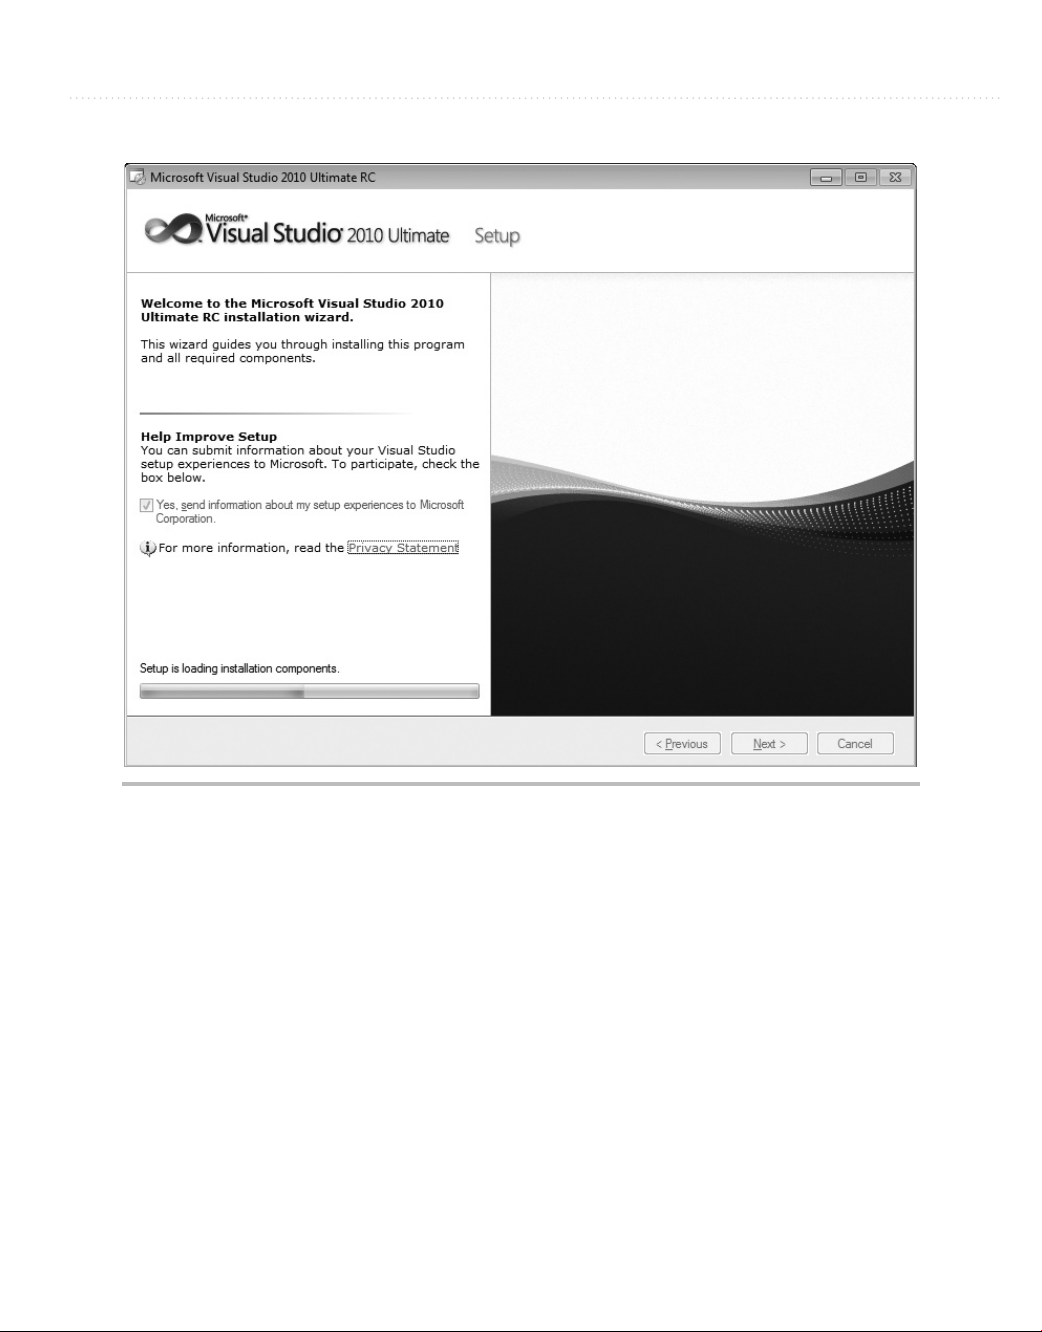
2. The next window you’ll see, Figure 1-2, is the welcome window, titled Microsoft Visual
Studio 2010. Figure 1-2 shows that I’m installing the Ultimate version. Installation for
other versions is similar, but the number of features available to install varies.
If you check the box on this page in the Help Improve Setup section, the installer
will gather logs produced during the setup process and send them across the Internet
to Microsoft after the setup is complete. To help you make an informed choice as to
whether to check this box, there is a Privacy Statement link under the check box to
click and read if you would like more information about what Microsoft does with
setup information. When you’re ready, click Next. After setup components are loaded,
you’ll see the licensing screen in Figure 1-3.
Page 31

8 Microsoft Visual Studio 2010: A Beginner’s Guide
Figure 1-3 Setup Licensing window
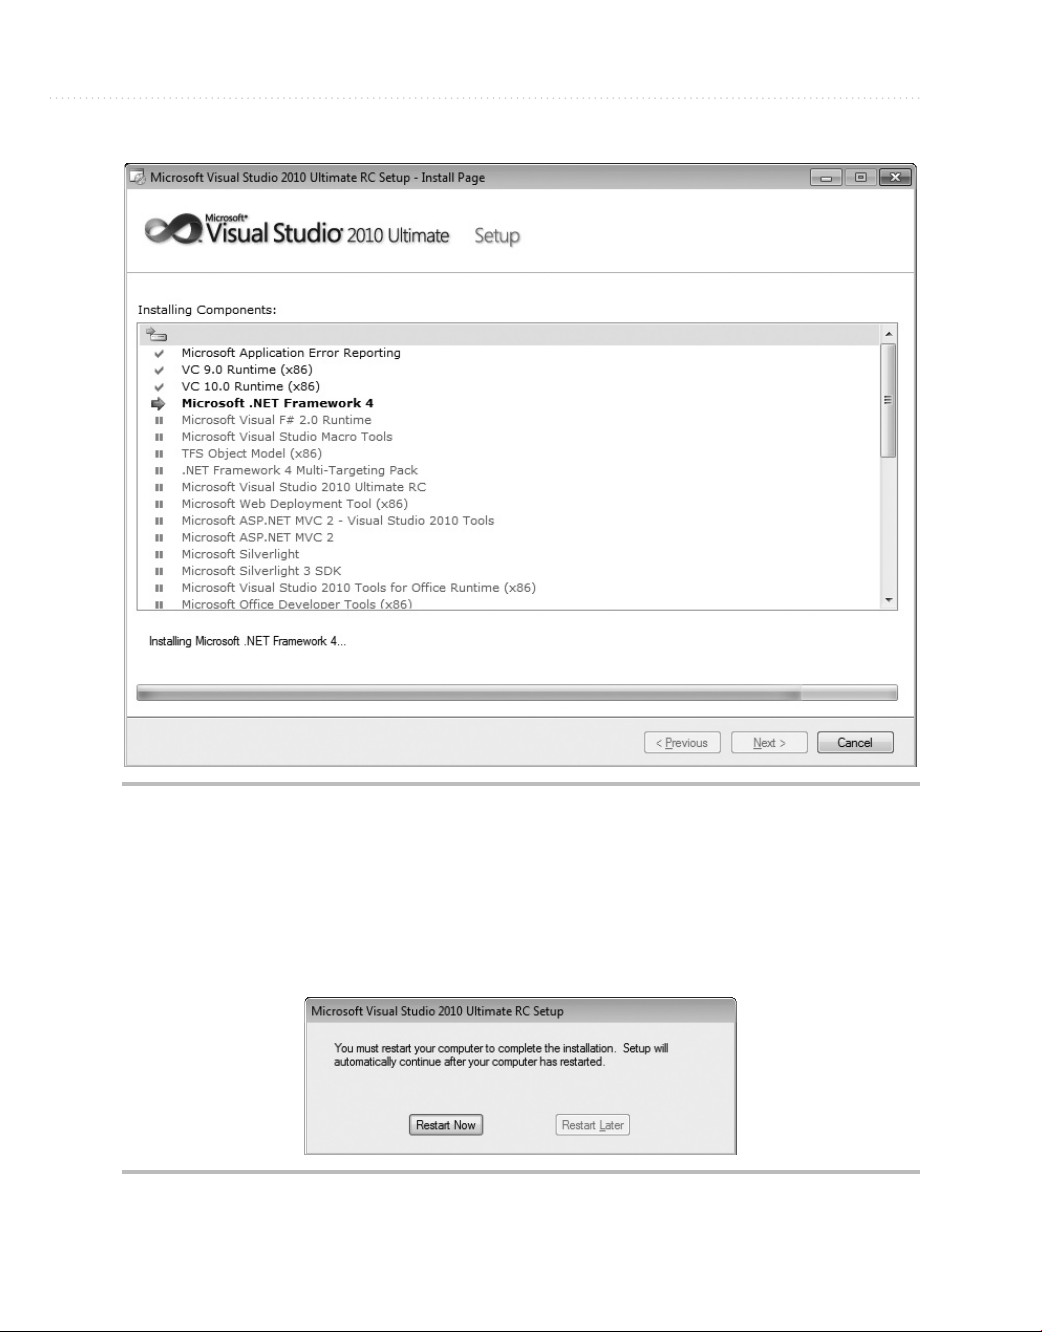
3. In Figure 1-3, you’ll see what components will be installed. You’ll need to read the VS
license to ensure you understand what the terms are. The licensing terms can differ,
depending on what type of package you acquired and your particular country or region.
Once you’ve read the license, you’ll need to check “I have read and accept the license
terms” to proceed. Next, enter the license key that comes with your software and enter
your name. The installer will automatically fill in the product key if you downloaded
VS via Microsoft Developer Network (MSDN). Click Next and you’ll see options for
customizing product installation.
4. Figure 1-4 lets you choose between full and custom installation. If you click the
Custom option, you’ll be able to choose precisely which components should be
installed. This is a good opportunity to uncheck the items you won’t ever use. If this is
Page 32

Chapter 1: Introducing Visual Studio 2010 9
Figure 1-4 Setup Customization window
your first installation and you have plenty of storage, you might want to go through the
list and check everything to take a look at what is available. You can always return to
this installation later and make adjustments.
The configuration screen in Figure 1-4 shows that you can also change the location of
where to install VS. Take note of the installation location because this is where you will
go to find sample code, common assemblies, and more items affecting the development
environment. Evaluate the disk space requirements to ensure you have enough available
storage. You’ve now completed the configuration options for installation. Click Install to
start the installation. You’ll see a screen similar to Figure 1-5 during the installation process
where the small check marks indicate which VS components have successfully installed.
Page 33
10 Microsoft Visual Studio 2010: A Beginner’s Guide
Figure 1-5 Setup Progress window
5. During the installation, the VS installer will need to reboot your computer, showing the
restart message in Figure 1-6. Make sure you close any applications you currently have
open so that you don’t lose your work, and then click Restart Now.
Figure 1-6 Setup Restart window
Page 34
Chapter 1: Introducing Visual Studio 2010 11
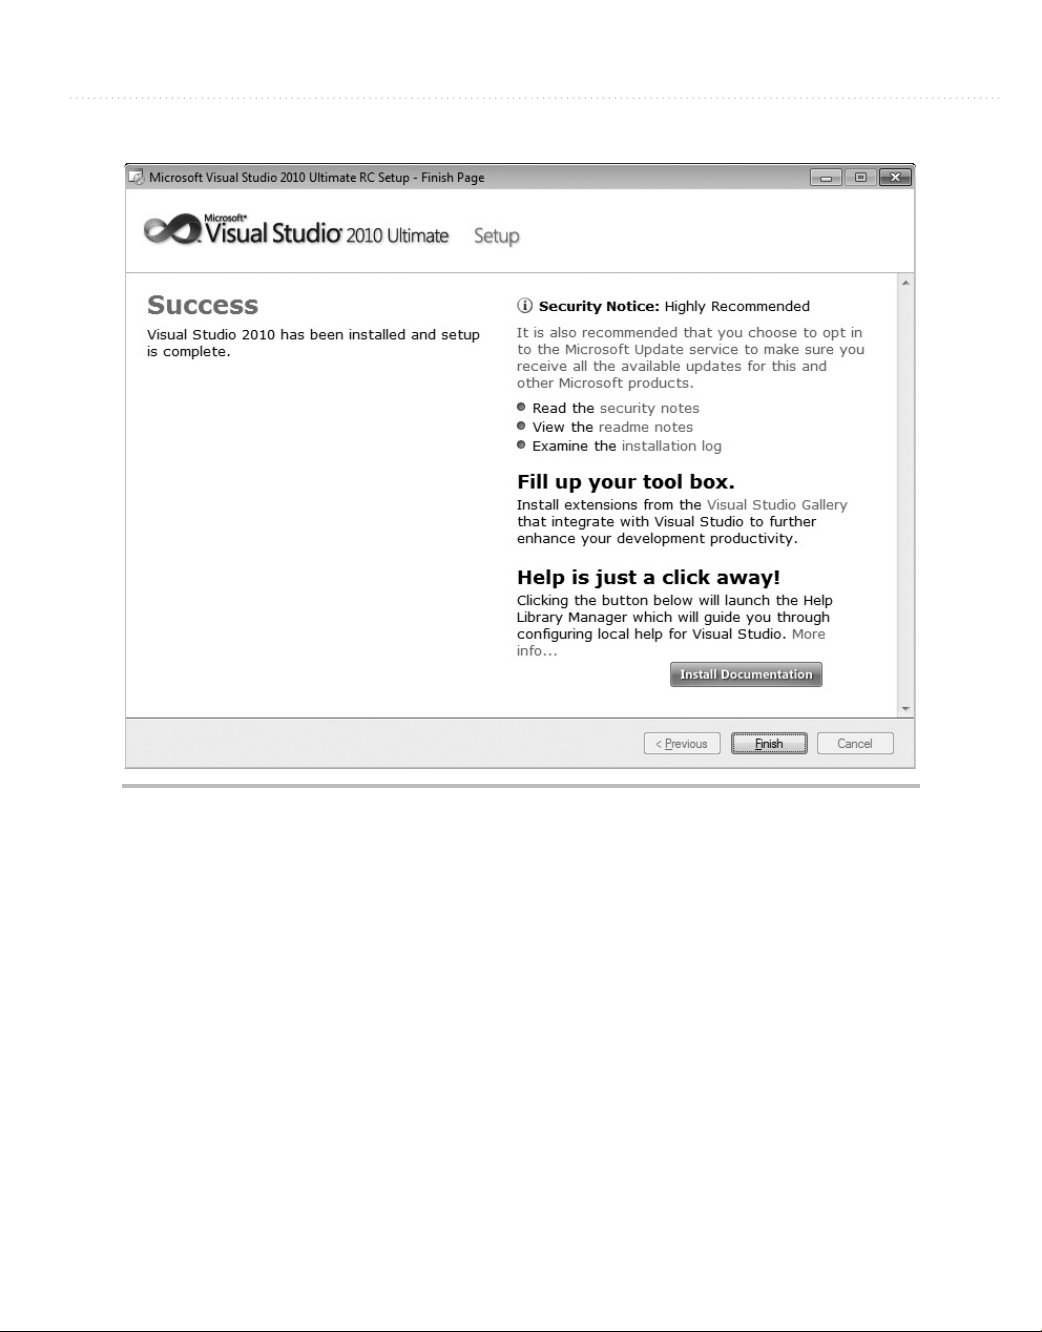
Figure 1-7 Setup Success window
6. When installation completes without error, you’ll see the Success window, shown in
Figure 1-7. If you have errors during installation, this window will give you guidance
on what to do to solve the problem.
Your installation is now almost complete. You can install product documentation by
clicking the Install Documentation button, shown in Figure 1-7. The initial installation
screen that appeared when beginning the installation will reappear, as shown in Figure 1-8.
You should also check for service releases; not only for the updated functionality to VS,
but also because service releases often include important security updates.
You are now ready to run VS for the first time. At that point, you’ll need to perform
one more easy configuration step, where you will choose your default environment
settings, as shown in Figure 1-9.
Page 35

12 Microsoft Visual Studio 2010: A Beginner’s Guide
Figure 1-8 Checking for service releases
Figure 1-9 Default Environment Settings window
Page 36

Chapter 1: Introducing Visual Studio 2010 13
The choice you make for default environment settings depends a lot on what
language or environment you’ll use to write software in. The environment settings
choice isn’t locked in stone and can be reset if you decide you don’t like the settings.
A later section of this chapter, “Modifying Environment Settings after Setup,” explains
how to change environment settings. This book covers both VB and C#, so you would
most likely want to choose the setting specific to the language you will use. The
examples in this book will use either VB or C# settings, depending on the topic. The
choice of settings determines how VS will lay out the windows and the default options
that are set throughout the VS IDE.
NOTE
C# or VB, which Should I Choose? Both C# and VB are first-class languages on the
.NET platform. The languages themselves are stripped down to bare syntax, with all
additional services moved into the .NET Framework Class Library, which is common
to all languages. There are a few small differences between the languages, but in
reality, the choice really comes down to personal preference. In practice, knowing
both languages is an advantage because much has been written in articles and books
showing how to use .NET techniques that doesn’t depend on which language was
used. You’ll not want to miss out on excellent content regardless of the language it is
written in.
You should now have a good installation with the configuration and environment
settings of your choosing. With VS open for the first time, the next section describes the
high-level parts of the Start page.
Navigating the Visual Studio 2010 Environment
This section is a high-level view of VS, describing what is available when you first
start Visual Studio 2010, also known as the Visual Studio integrated development
environment, commonly known as the IDE, which is pronounced by saying the letters
I-D-E. Seeing what is available will help you find features more quickly. Additionally,
knowing what is available by default will help you differentiate between default
functionality and the context-sensitive features of the software items you’re working on.
Figure 1-10 shows how VS appears when first started. It refers to portions of the screen,
helping you see how the IDE is organized. The following description will associate each
feature with a name so that you can understand where to look when discussing these features
in more depth throughout the rest of this book.
The following sections describe portions of the Start screen shown in Figure 1-10.
Page 37

14 Microsoft Visual Studio 2010: A Beginner’s Guide
Figure 1-10 Visual Studio 2010 Start screen
The Menu
At the very top left of Figure 1-10, you’ll see the menu bar, which includes the words
“File,” “Edit,” “View,” “Tools,” and so on. The menu bar is a standard part of most
windows applications. Besides standard file management functionality, the File menu is
where you visit to create new projects. The File menu also gives you access to recently
opened files and projects.
The Edit menu has your standard cut, copy, and paste operations. It also gives you
access to a bookmark feature for providing easy navigation through source code.
It would be worth your effort to explore the View menu to see what is available, but if
you are just learning Visual Studio and how to write software, it’s best to not click these
different views just yet; we’ll explore most of those views and what they’re used for later.
The View menu gives you access to all of the tool windows in VS. The View menu also
has a menu item named Other Windows that includes more application windows that will
come in handy as you create new software.
Page 38

Chapter 1: Introducing Visual Studio 2010 15
The Tools menu contains a grab-bag of functionality; for instance, you can attach a
debugger to see your other programs run, line by line; connect to a database for data; set
add-ins, macros, and more. One very important menu item on the Tools menu is Options,
which exposes hundreds of settings for customizing your VS environment.
You can use the Test menu to find all of the functionality for performing unit tests to
test your new software one part at a time. This is also where other editions of VS include
access to other types of testing tools.
The Analyze, Architecture, and Team menus have advanced functionality for improving
the performance of an application, working with application architecture, and integrating
with Microsoft’s Team Foundation Server.
The Windows and Help menus are similar to most other application types, where the
Windows menu allows you to manipulate the VS windows and the Help menu is where
you visit to find the technical documentation on VS.
TIP
Many menu items contain shortcut keys that perform the same action as selecting the
menu item. If you are curious about what shortcut keys are associated with a particular
action, you can often find them by opening the menu to see if there are shortcuts
associated with that action. For example, to open the Solution Explorer window and
visit the View menu, the shortcut keys are
CTRL-W, S.
Toolbar
Beneath the menu in Figure 1-10, you’ll find a toolbar. The toolbar contains frequently
accessed functionality that is a subset of what is available via menus. The toolbars are
context-sensitive, showing and hiding depending on what you are doing in VS.
display any toolbar by selecting View | Toolbars.
You can also customize toolbars by right-clicking the toolbar of your choice, scrolling
to the bottom of the list, and selecting Customize. The toolbar customization window
allows you to add any feature you would like to the current toolbar.
You can
Work Area
In the center of Figure 1-10, you can see the Start page. This is the same area that you’ll
use to write code and work with visual designers. The Start page is divided into two
sections: project management and information. The project management side of the page,
on the left, offers a quick way to start new projects or work with a list of recently opened
projects. The information side of the page, on the right, contains resources to help you get
started with VS, such as links to the Microsoft Web site, walkthroughs to help you learn
new features, and a tab that updates with the latest developer news from Microsoft.
Page 39

16 Microsoft Visual Studio 2010: A Beginner’s Guide
Toolbox
On the far left side of Figure 1-10 is a vertical tab, titled Toolbox, which contains a contextsensitive list of controls that can be dragged and dropped onto the current designer surface.
The term “context-sensitive” means that certain items are visible or hidden, depending on
where you’ve clicked last or what context you are working in, such as creating or editing
a new Web page. If you’re following along, you don’t have a designer surface open right
now, so the Toolbox is empty.
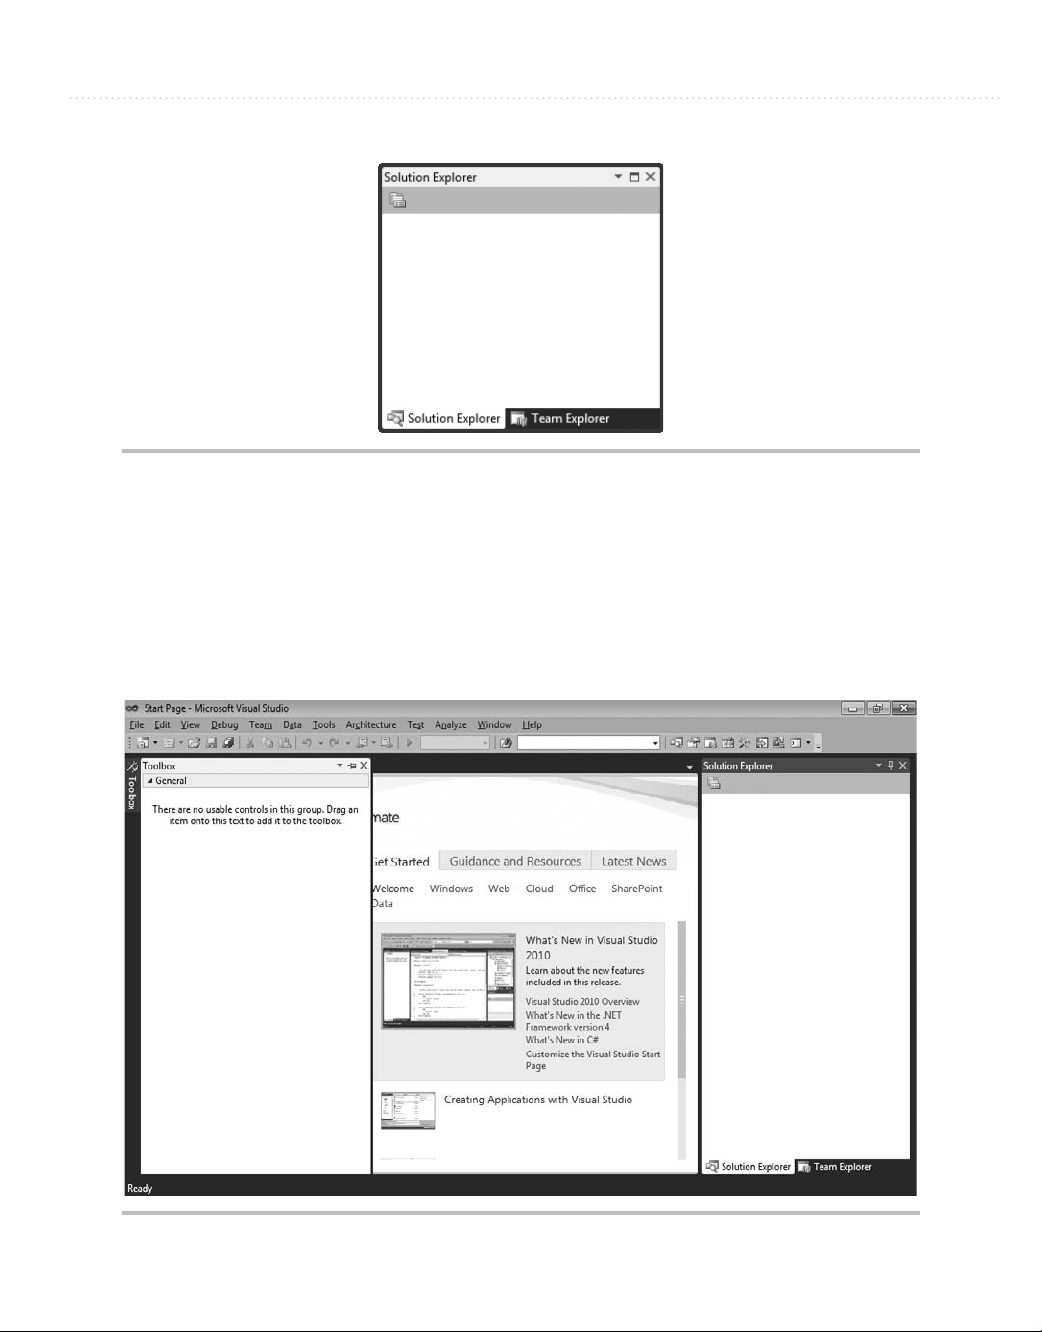
Solution Explorer
The Solution Explorer window, to the right of the Start page in Figure 1-10, is where your
solutions, projects, and project items will appear. This is where you can find and organize
all of the files and settings that belong to a project. In Figure 1-10, the Solution Explorer
is blank because there isn’t an open solution. If you close this window and need to find it
again, just remember the View menu discussed earlier.
Status Bar
At the very bottom of Figure 1-10 is the Status bar, which communicates what is happening
with VS at the current time. In Figure 1-10, the Status bar displays the word “Ready” to
indicate you can begin using VS at any time. As you work with VS, the Status bar changes
in a context-sensitive way to give you information specific to the task you are working on.
For example, the editor displays line, column, and other information pertaining to the status
of the editor.
Managing VS Windows
Looking at the VS screen in Figure 1-10, you can see how the windows in the work area—
Toolbox, Start, and Solution Explorer—are decorated with various title bars. Window
title bars include a set of three icons: Window Position (down arrow), Maximize/Restore
Down (window), and Close (cross). Figure 1-11 shows the Solution Explorer with these
three icons on its title bar at the top-right corner.
The Window Position allows you to treat the window as Dock, Float, Dock As Tabbed
Document, Auto Hide, and Hide. You can expand a window to fill the entire work area or
allow the window to be resized and float freely around the work area with the Maximize/
Restore Down icon. In the docked position, the Maximize/Restore Down icon becomes
a pin that can be used to pin the window open or allow it to slide shut. The Close icon
allows you to close a window. The following sections describe how use these title icons to
manipulate these windows through expanding and collapsing, docking, floating, tabbing,
and closing and opening.
Page 40
Chapter 1: Introducing Visual Studio 2010 17
Figure 1-11 Window title bar icons
Expanding and Collapsing Windows
Hovering over the Toolbox tab will expand the Toolbox and display a set of three icons in
the title bar of the Toolbox window: Window Position (down arrow), Hide (pin), and Close
(cross). You can see what the Toolbox window looks like when expanded in Figure 1-12;
the pin in the Hide icon is sideways and the vertical tab still appears in the left margin.
Figure 1-12 Expanded Toolbox
Page 41

18 Microsoft Visual Studio 2010: A Beginner’s Guide
If you move the carat away from the Toolbox, the Toolbox will collapse and turn back
into a tab on the left side of the screen.
For any collapsed window, such as the Toolbox, you can expand that collapsed
window and click the Hide (pin) icon to pin the window, which will make the window
layout similar to the Solution Explorer. Figure 1-13 shows the pinned window; the pin in
the Hide icon (above the Auto Hide tooltip) is vertical and you no longer see the Toolbox
tab in the left margin.
Clicking the Hide icon on any expanded window will cause the window to collapse
and display as a tab, similar to the Toolbox. Another way to collapse a window is by
selecting the Auto Hide option on the Window Position (down arrow) menu.
Docking Windows
The Dock option displays the window in an open docked position, similar to the Solution
Explorer in Figure 1-10. You can move a docked window to any position in the work
area. To move a docked window, select its title bar and drag the window out of its current
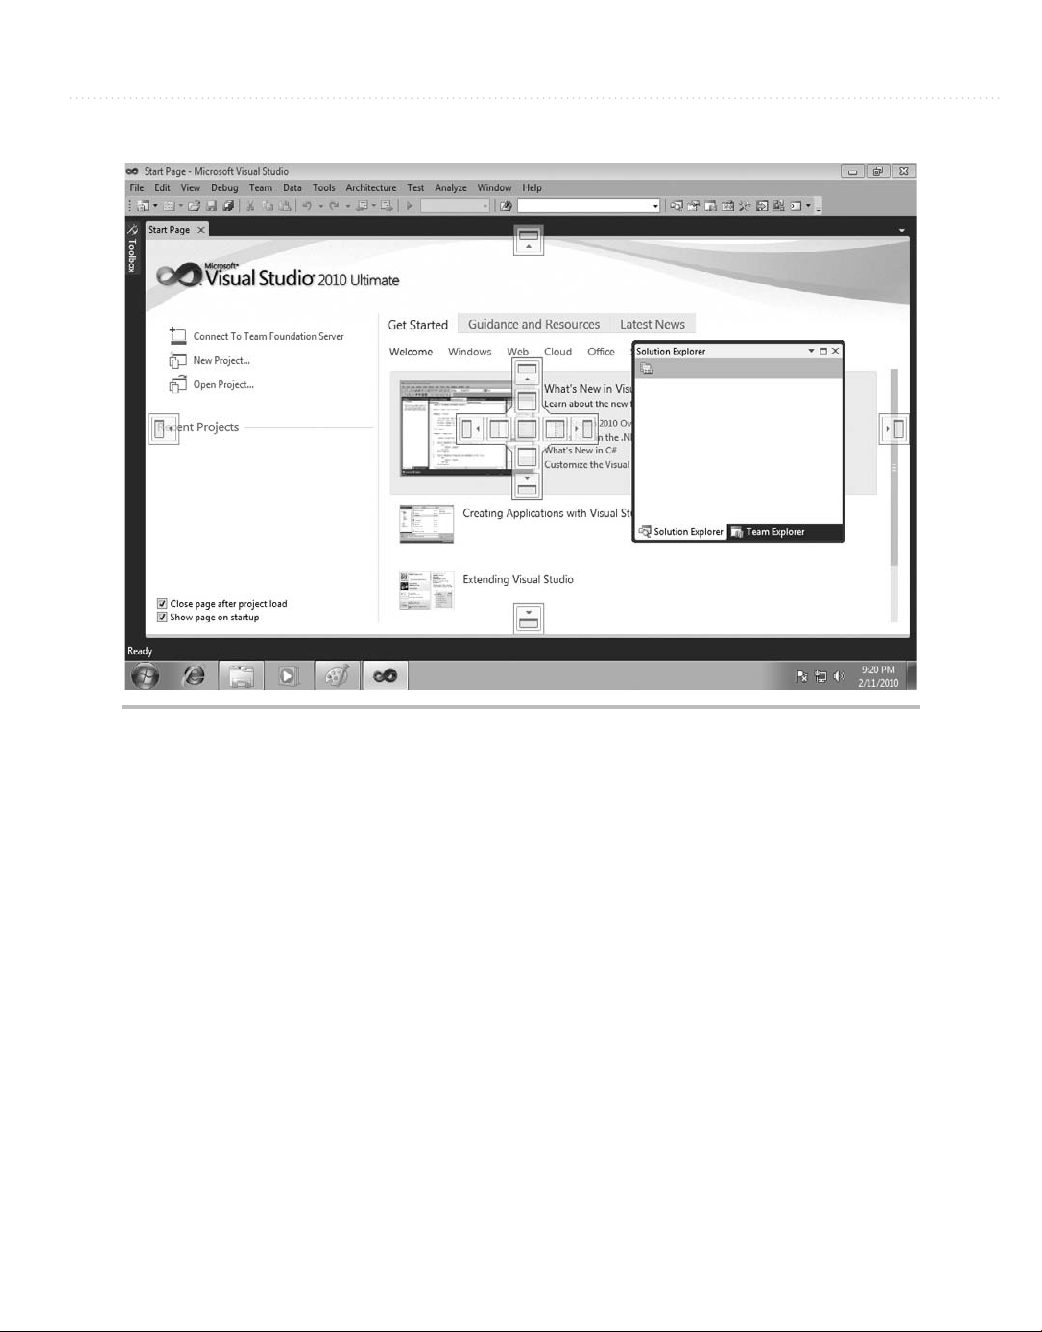
position. Figure 1-14 shows VS when you’re dragging a window.
Figure 1-13 Pinned Toolbox
Page 42
Chapter 1: Introducing Visual Studio 2010 19
Figure 1-14 Dragging a window for docking
As shown in Figure 1-14, you’ll see a visual set of icons appear over the workspace,
indicating the docking zones where you can move the window to. The shadow of the
window will show what the new location will be whenever you drag a window into a
docking zone. Dropping the window into the docking zone will move the window from its
old docking zone into the new docking zone.
Floating Windows
The Float option allows windows to appear anywhere in the VS IDE, where you can move
them at will. You move a floating window by selecting the floating window’s title bar and
moving the carat to the new location where you want the window to be. Alternatively,
you can double-click on the title bar. Figure 1-15 shows the Toolbox floating over other
windows.
Page 43

20 Microsoft Visual Studio 2010: A Beginner’s Guide
Figure 1-15 Floating a window
Tabbed Windows
An example of using the Dock As Tabbed Document option is the Start page. Any window
set as Dock As Tabbed Document will appear as a new tab in the work area, along with all
the other windows set as Dock As Tabbed Document. For example, if the Toolbox is set
as Dock As Tabbed Document, it will become a tabbed document in the same group as the
Start window, as shown in Figure 1-16.
TIP
Position windows in a way that makes you most productive. In practice, you probably
don’t want your Toolbox to be a tabbed window. You’ll see examples in later chapters
of this book that drag-and-drop items from the Toolbox to a designer page, which is
also laid out as a tabbed document window. So, trying to drag-and-drop between two
tabbed document windows can be cumbersome. There are several options for working
with Windows in VS, and after working with VS for a while, you’ll want to pick the
layout that works best for you.
To change a window from a tabbed document, select the tab and drag the window
away from the other documents, making it a floating window.
Page 44

Chapter 1: Introducing Visual Studio 2010 21
Figure 1-16 Tabbed document windows
Closing and Opening Windows
Clicking the Close icon on a window title bar will close the window. Another way to close
the window is by selecting the Hide option from the Window Position icon menu.
Reopening a window depends on what type of window it is: VS or Project Item. If the
window is from VS, you can re-visit the View menu and select the window you need to
open. Alternatively, you can use a keyboard shortcut key to open a window. These shortcut
keys for the windows are displayed on the right side of the menu item in the V
Other windows are for project items in the Solution Explorer. In most cases, you
would re-open a project item by locating it in the appropriate project of Solution Explorer
and double-clicking it. There are edge cases where you open project items by rightclicking the project item in Solution Explorer and selecting a menu item, but I’ll explain
those cases when I discuss them specifically in the rest of this book.
You can now manipulate windows, customizing the layout of your VS environment as
you need. Sometimes, though, you’ll want to reset your layout to the original default, as
you’ll learn about in the next section.
iew menu.
Page 45
22 Microsoft Visual Studio 2010: A Beginner’s Guide
Modifying Environment Settings after Setup
Reasons for modifying environment settings include wanting to reset everything back to a
default, importing shared settings from another developer, or switching between settings
for different projects. This section will explain how to modify your settings and achieve
each of these goals.
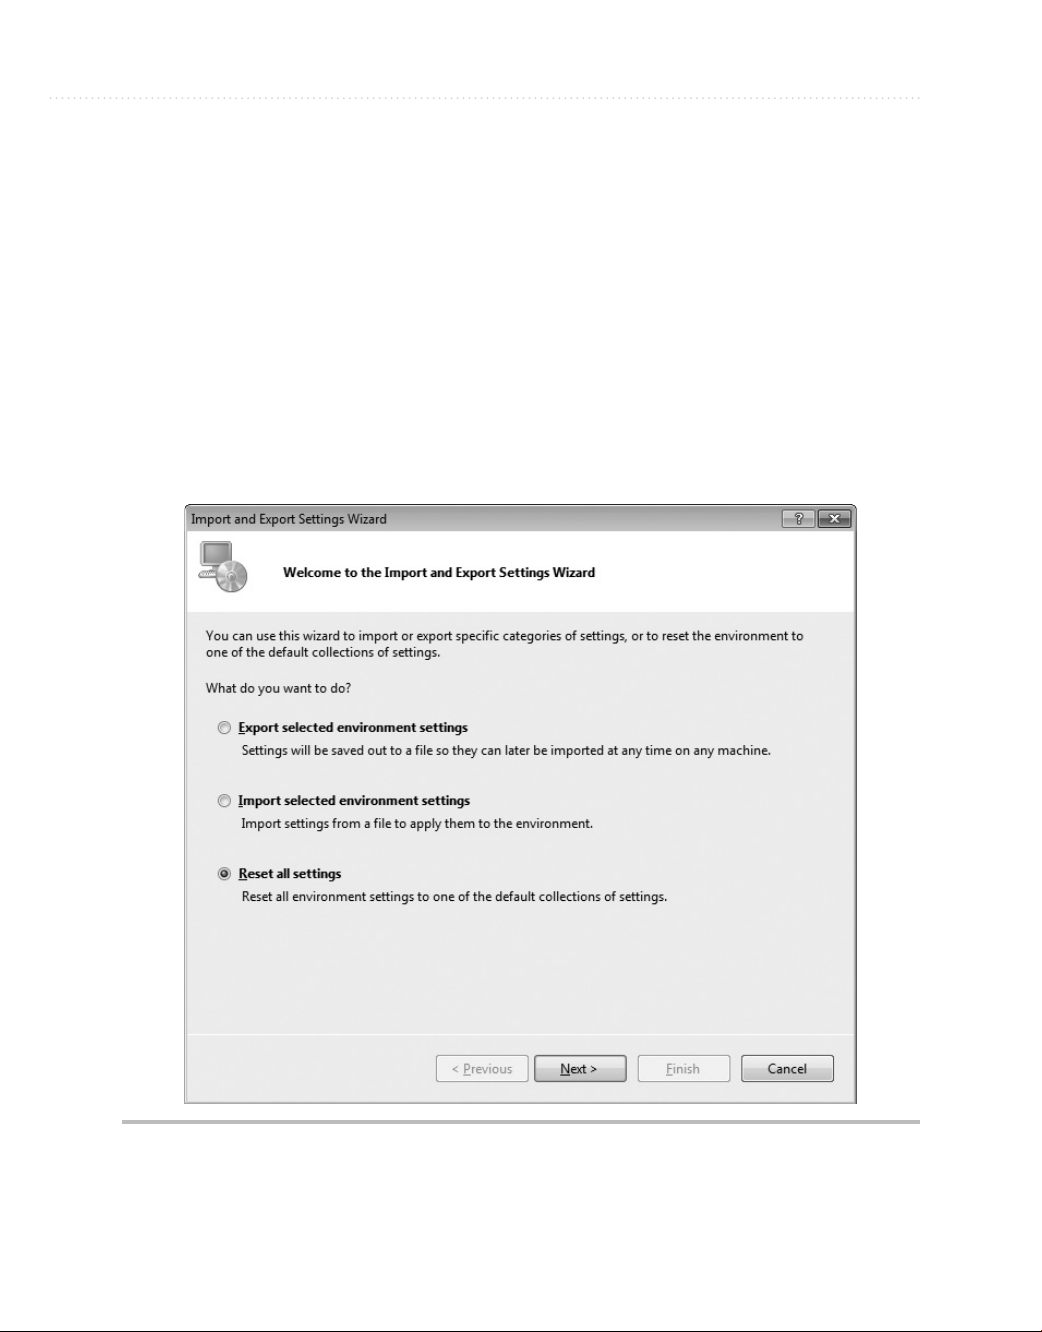
With VS open, select Tools | Import And Export Settings, which will start the Import
and Export Settings Wizard shown in Figure 1-17.
From Figure 1-17, you can see the options to Export, Import, and Reset settings. The
following sections explain each of these options.
Figure 1-17 Import and Export Settings Wizard
Page 46
Chapter 1: Introducing Visual Studio 2010 23
Exporting Selected Environment Settings
We’ll start off with export, which you might use to share your settings with another
developer. This could also be useful if you planned to make significant changes to your
settings and wanted a backup in case you wanted to revert to previous settings. T
the export, choose the “Export selected environment settings” option from Figure 1-17
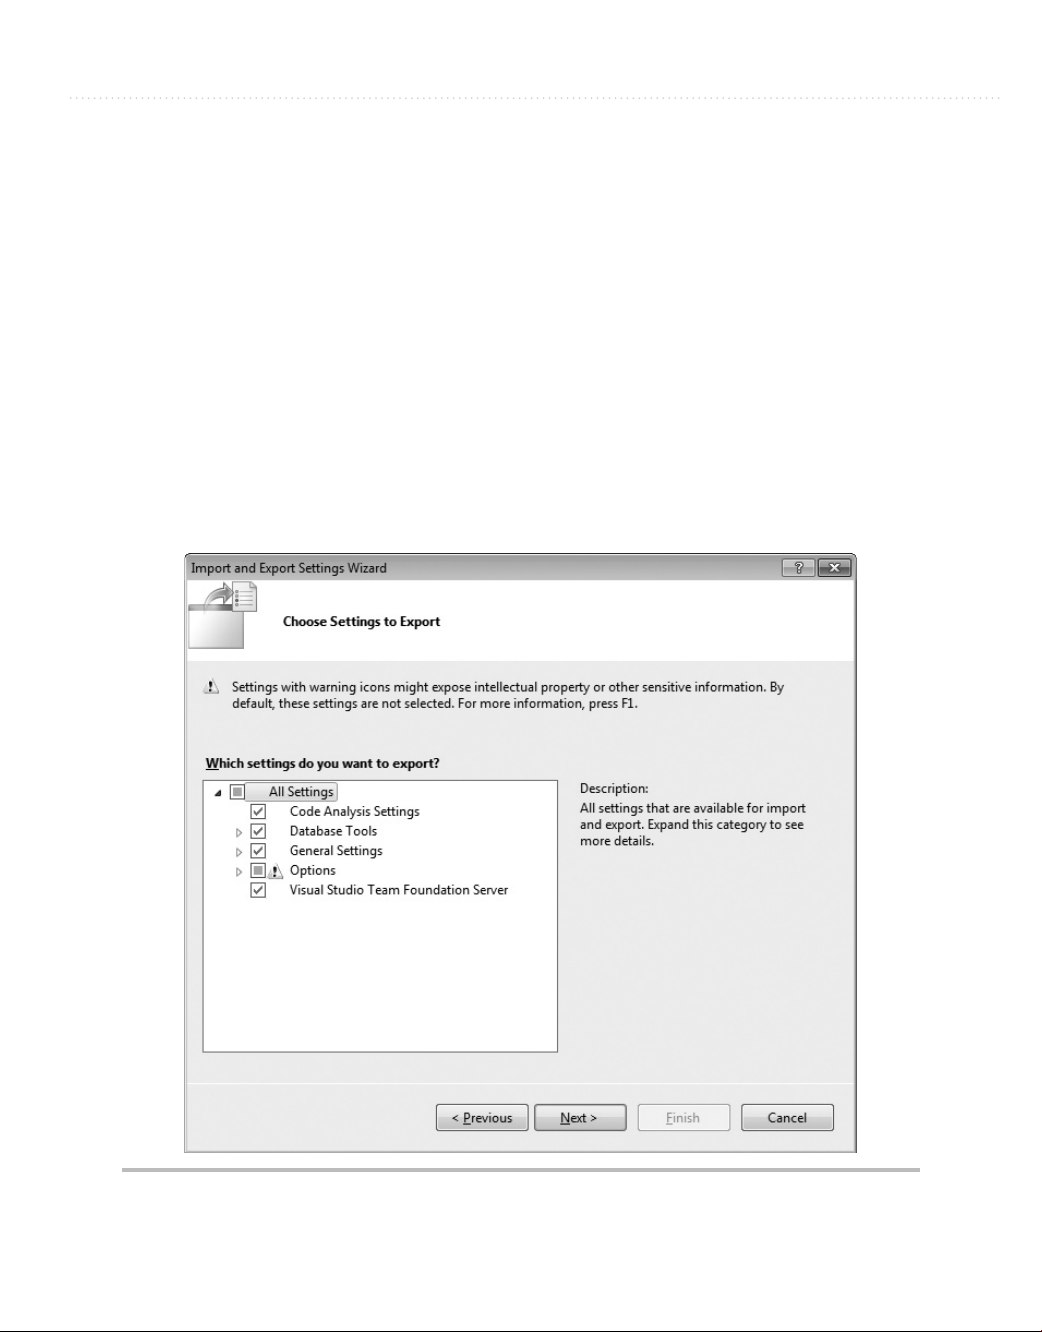
and click Next to display the Choose Settings To Export window in Figure 1-18.
There is a tree of options you can choose from to determine what settings to export.
The warning sign indicates settings that you might not want to export for personal or
security reasons. The warning settings typically have something to do with system file
paths or something outside of VS that you wouldn’t normally share with other people.
After you’ve selected options, click Next to display the Name Your Settings File window
in Figure 1-19.
o perform
Figure 1-18 Choose Settings To Export window
Page 47
24 Microsoft Visual Studio 2010: A Beginner’s Guide
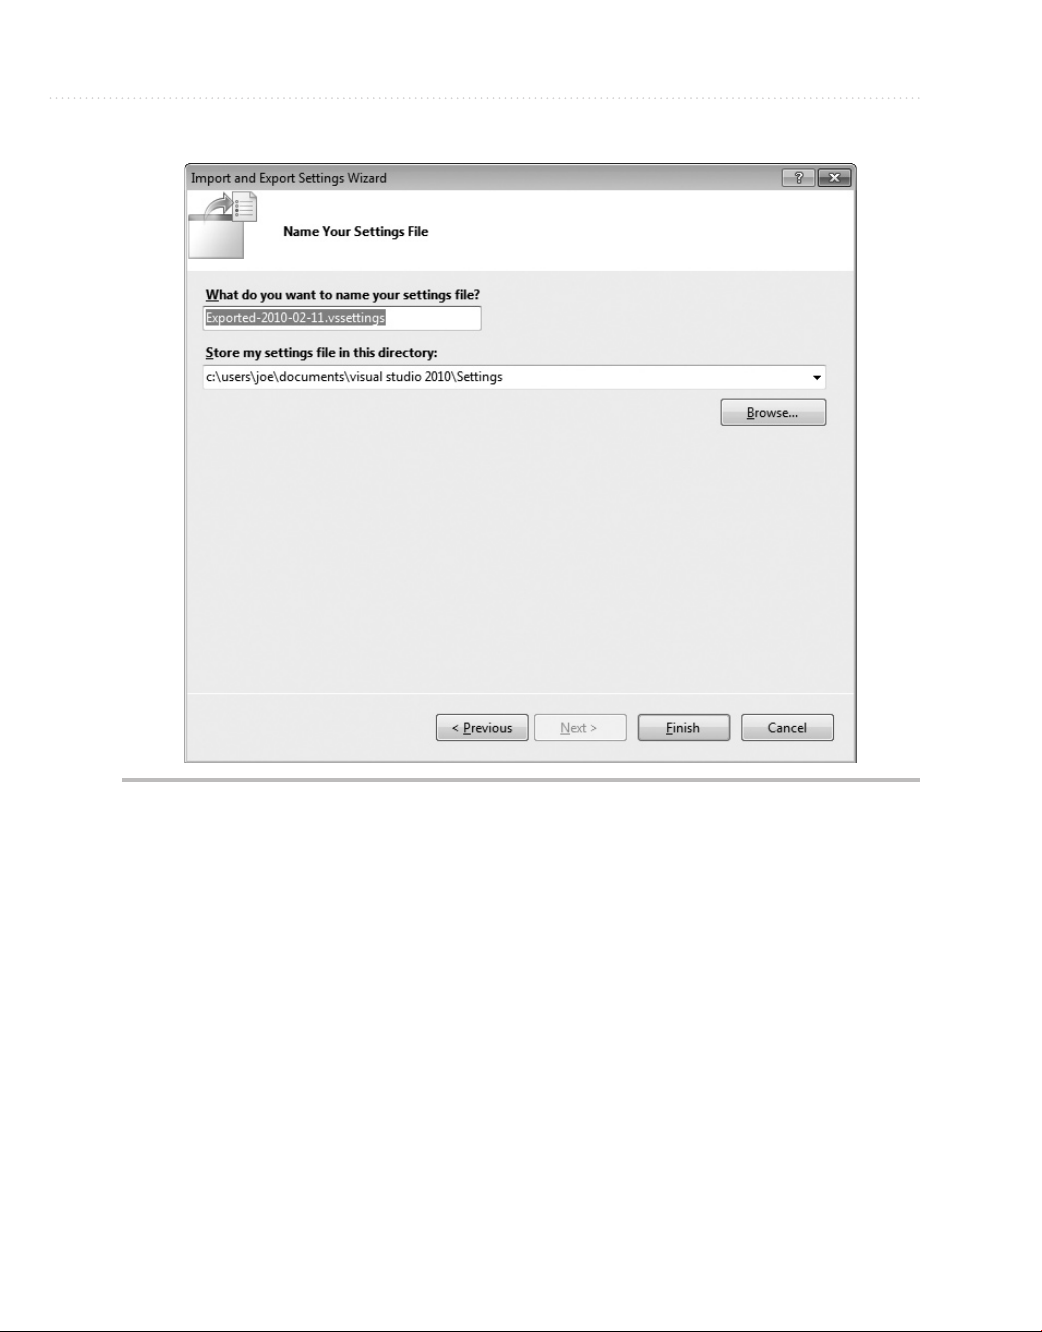
Figure 1-19 Name Your Settings File window
The two text boxes in Figure 1-19 are for a filename and path where the settings file
will be saved. Notice that the default filename includes the date, which could be helpful
if you ever need to restore settings. Click Finish, which will perform the export and show
you the Complete window in Figure 1-20 after the export operation is done.
Click Close to close the window. With an exported settings file, you or another person
can perform an import with that file, as described in the next section.
Importing Selected Environment Settings
You would perform a settings import to restore previous settings, import settings from another
person, or change to specific settings for a project you’re working on. To perform an import,
Page 48

Chapter 1: Introducing Visual Studio 2010 25
Figure 1-20 Export Complete window
open VS and select Tools | Import and Export Settings, which opens the Import and Export
Settings Wizard shown in Figure 1-17. Choose the “Import selected environment settings”
option and click Next to view the Save Current Settings window shown in Figure 1-21.
TIP
You can search for various color schemes for Visual Studio on the Internet to
download. One site, at the time of this writing, is http://winterdom.com/2007/11/
vs2008colorschemes; it offers schemes made for Visual Studio 2008 but that also
import into Visual Studio 2010.
Page 49

26 Microsoft Visual Studio 2010: A Beginner’s Guide
Figure 1-21 Save Current Settings window
The Save Current Settings window allows you to back up your current environment
settings before changing them. If you do a backup, you will be able to restore later in case
something doesn’t work out the way you intended with the import. You can choose not to
back up also. Click Next to view the Choose A Collection Of Settings To Import window
in Figure 1-22.
As shown in Figure 1-22, you can import some of the predefined settings that are
part of VS under the Default Settings branch or import custom settings under the My
Settings branch. Custom settings include the current settings and any other settings that
you’ve saved to the default path, shown in Figures 1-19 and 1-21. Optionally, you can
Page 50

Chapter 1: Introducing Visual Studio 2010 27
Figure 1-22 Choose A Collection Of Settings To Import window
click Browse and navigate to the location where a settings file is located. After selecting
a settings file, click Next, which brings you to the Choose Settings To Import window
shown in Figure 1-23.
The Choose Settings To Import window allows you to specify only those settings that
you want in your environment. It will only update the settings checked in Figure 1-23.
All of your other current settings, those that are unchecked in Figure 1-23, will not be
changed. Click Finish to begin the import operation. When import is done, you’ll see the
Import Complete window, shown in Figure 1-24.
Page 51

28 Microsoft Visual Studio 2010: A Beginner’s Guide
Figure 1-23 Choose Settings To Import window
Your import is now complete, and you can click the Close window. Another settings
option is to reset your current settings to one of the VS default options, explained next.
Resetting All Settings
You could reset settings if you wanted to restore the default settings in VS or if you
wanted to switch between default VS settings. For this book, I switched between default
settings for VB and C# to ensure the environment settings were appropriate for whichever
language I was discussing. To perform a reset, open VS and select Tools | Import And
Export Settings, which will open the Import and Export Settings Wizard shown earlier
in Figure 1-17.
Choose the Reset All Settings option and click Next. You’ll see the Save Current
Settings window, which is exactly the same as Figure 1-21. Choose your save option and
click Next to view the Default Collection Of Settings window shown in Figure 1-25.
Page 52
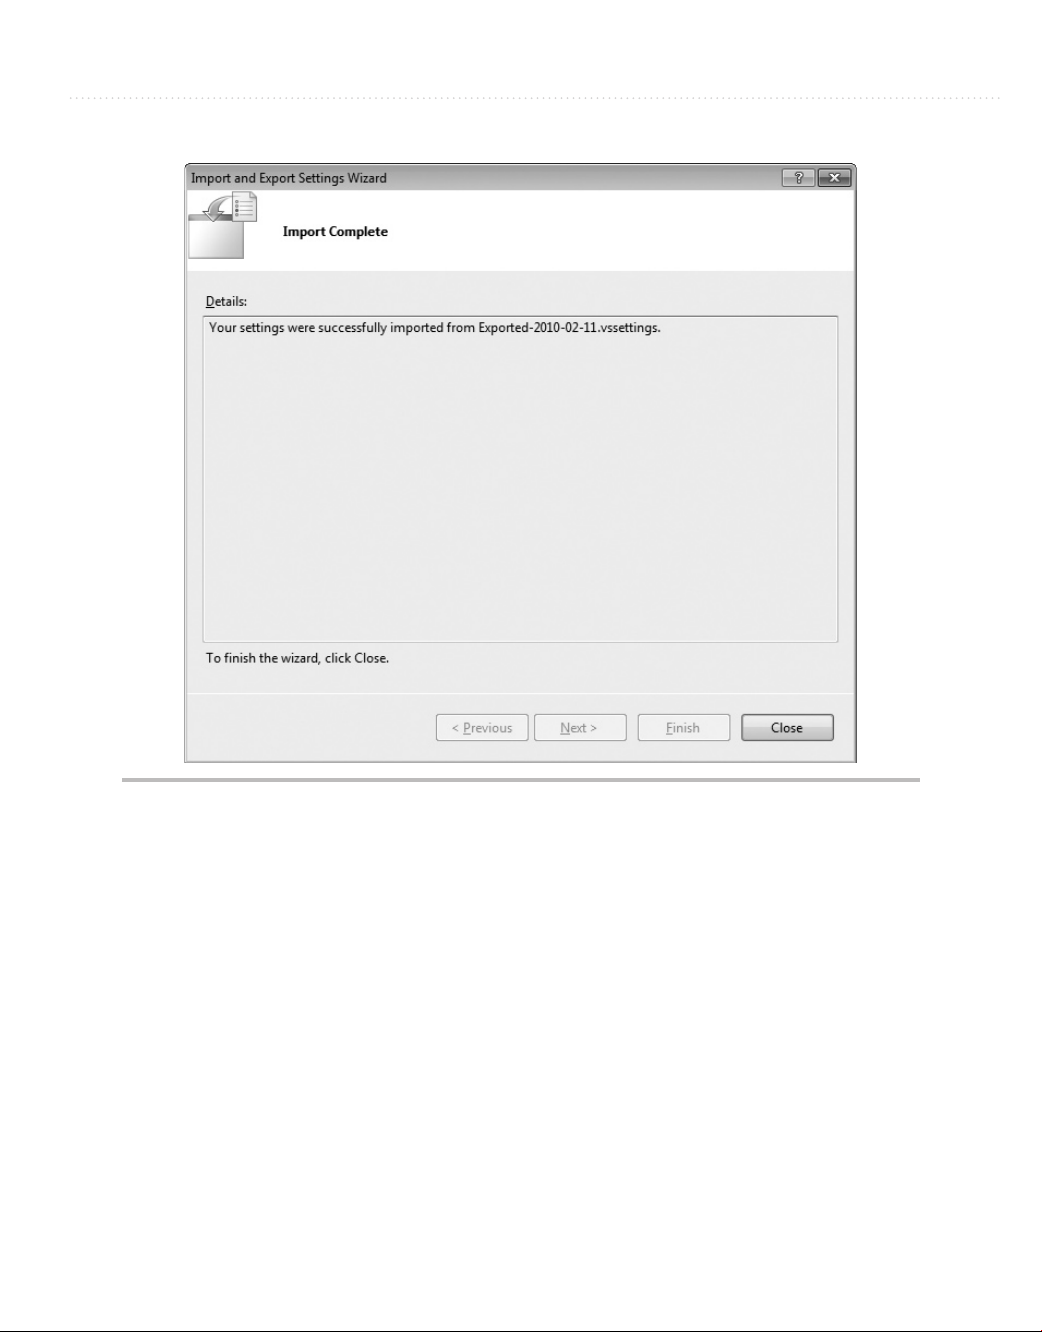
Chapter 1: Introducing Visual Studio 2010 29
Figure 1-24 Import Complete window
Figure 1-25 shows that you can select among a set of default settings for VS. Each
of these default settings are the same as what you selected during installation, previously
shown in Figure 1-9 and the Default Settings branch of Figure 1-22. Choose a setting and
click Finish, which starts the reset operation. When the reset is done, you’ll see the Reset
Complete window, shown in Figure 1-26. The reset is now complete, and you can click
Close to close the window when you’re finished.
Earlier in the chapter, we discussed projects very lightly, but we will gradually dig
deeper as this book progresses. The next section takes you a little bit further by describing
what project types are available in VS.
Page 53

30 Microsoft Visual Studio 2010: A Beginner’s Guide
Figure 1-25 Default Collection Of Settings window
Familiarization with Visual Studio Project Types
Visual Studio includes a plethora of project types, making it easy to build applications
with premade templates. The following discussion will show how to find what project
types are available and describe what those project types are.
To see what projects are available, select File | New | Project, as shown in Figure 1-27.
NOTE
If you’ve set your environment up for VB, you’ll notice right away that the option to
select is File | New Project, which is only two menu choices, rather than 3 for C#.
While the exact wording and placement of options won’t always match, you can rely on
the functionality being the same, except for when I explain otherwise.
Page 54

Chapter 1: Introducing Visual Studio 2010 31
Figure 1-26 Reset Complete window
In addition to a new project, Figure 1-27 shows that you can create a new Web site,
just open a file for editing, or open a wizard that creates a new project from existing files.
We’ll look at many of these options later in the book, but let’s take a look at the New
Project window, Figure 1-28, which opened as a result of selecting File | New | Project.
The New Project window in Figure 1-28 shows that there are many projects to select
from, including Windows, Web, Office, SharePoint, Cloud, Reporting, Silverlight, Test,
WCF, and Workflow. Some of these project types don’t appear in Figure 1-28, but if you
scroll down the Templates list in the New Project window, you’ll see them. Figure 1-28
also shows the appearance for C# projects, but there are also similar projects for other
programming languages that ship with VS; including VB, C++ (pronounced see-plus-plus),
and F# (pronounced f-sharp). If you had selected VB settings during the setup process,
Page 55

32 Microsoft Visual Studio 2010: A Beginner’s Guide
Figure 1-27 Selecting a New Project via the File menu
earlier in this chapter, the default set of project types would have been VB and C# projects
would be listed in the Other Languages branch. The following sections describe the types
of projects available, some of which you’ll learn how to create later in this book.
Windows Projects
Selecting Windows Projects will show you a list of project types that can be created for
desktop applications, including Windows Presentation Foundation (WPF), Windows
Forms, and Console. Console applications are for building applications that don’t need a
graphical user interface (also known as GUI and pronounced “goo-ee”) and are generally
for creating utilities that administrators can write scripts with or for writing a quick test for
your program. You’ll be using Console applications when learning VB and C# languages
later in this book because it is a simple way to concentrate on the language without any
distractions. Windows Forms is an older desktop GUI technology. The new desktop GUI
technology for .NET is called WPF, which is covered in a later chapter in this book.
Page 56
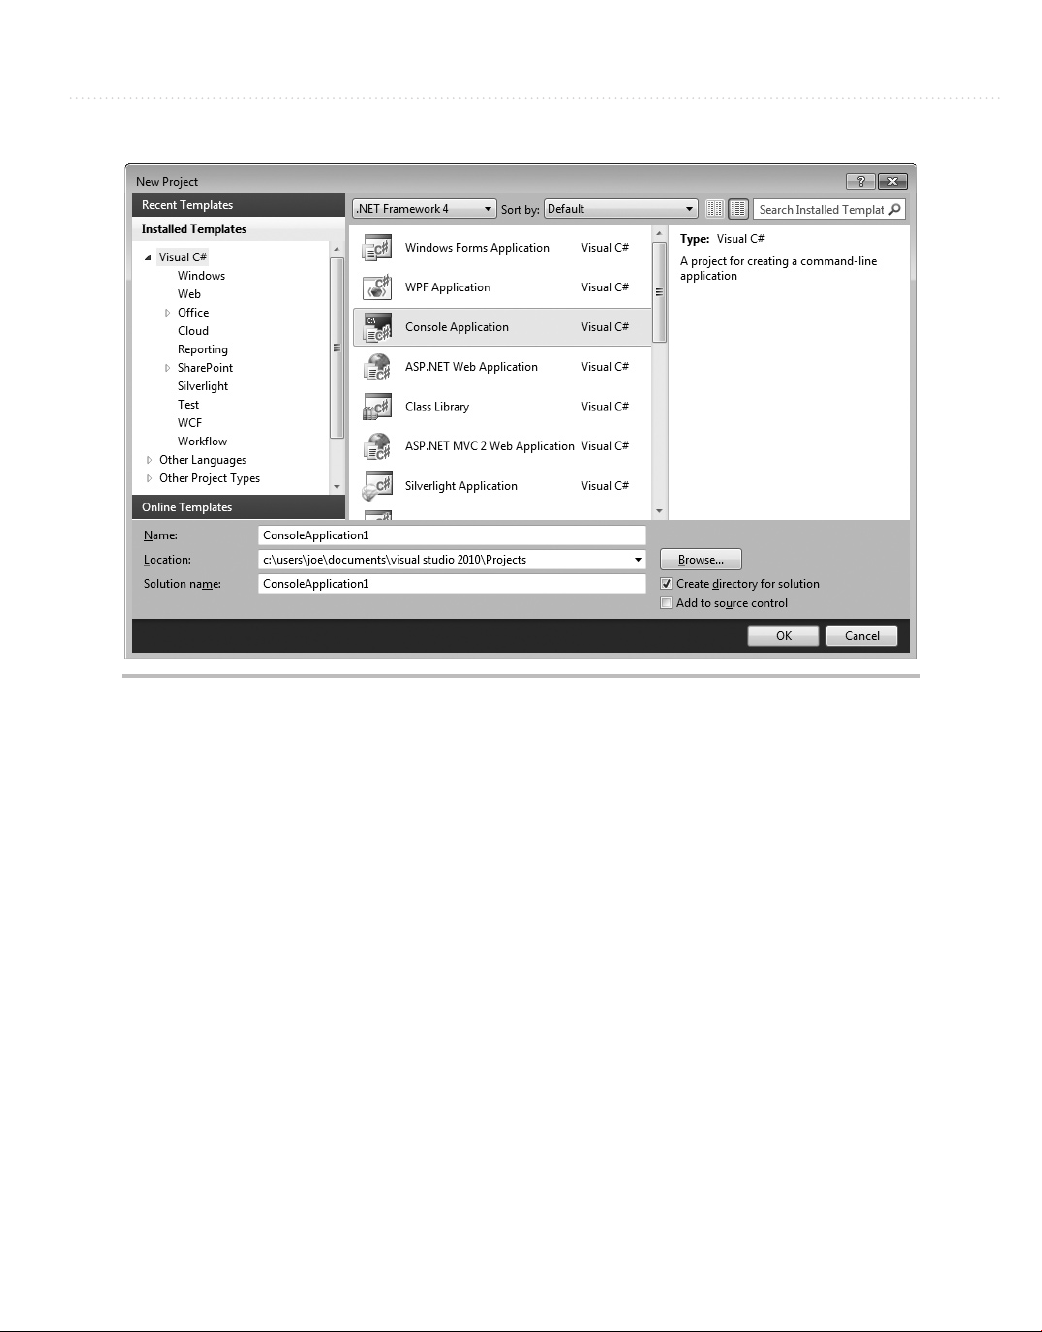
Chapter 1: Introducing Visual Studio 2010 33
Figure 1-28 New Project window
Other windows projects include Windows Services, which are applications that are
always on and run as a service in the background without a GUI, Class Libraries for
holding reusable code often referred to as middleware, and Control Libraries for holding
graphical controls that can be dragged-and-dropped from the Toolbox onto a visual
designer within VS.
Web Projects
Web projects include ASP.NET, Server Controls, Web Services, and Dynamic Data. An
ASP.NET project allows you to write an application that is hosted by a Web server, such
as Internet Information Server (IIS), and runs in a Web browser. A Server Control project
enables you to build a library of GUI controls that can be dragged-and-dropped onto the
design surface of a Web page in VS. Web Services are reusable components that you
can call from across the Internet. An important feature of Web Services is that they use
ubiquitous protocols to enable code from any platform to call them, facilitating integration
among heterogeneous computing systems. Dynamic Data projects offer a quick way to
build a working Web site, based on an existing database schema.
Page 57

34 Microsoft Visual Studio 2010: A Beginner’s Guide
Office Projects
For years, developers have been writing Visual Basic for Applications (VBA) programs
to automate Microsoft Office applications. An Office project allows you to automate
Office applications through .NET using languages such as VB and C#. Supported Office
applications include Excel, Word, Project, PowerPoint, Outlook, Visio, and InfoPath.
SharePoint Projects
SharePoint is a technology for building portal-style Web applications. It is closely
associated with Office applications and managing workgroup collaboration. In order
to create and run SharePoint projects, the computer you use to run VS will need to be
running one of Microsoft’s server platforms, such as Server 2008. SharePoint does not run
on Windows 7, Vista, or Windows XP.
Database Projects
Database projects include a SQL Server project type, offering close integration with SQL
Server for building .NET code that runs inside of SQL Server. For example, you can write
stored procedures and functions in either C# or VB and have the benefit of the .NET
Framework in your code. VS makes it easy to deploy your code to SQL Server with a
single mouse click.
Summary
By knowing the benefits of VS, you have an appreciation for what VS can do for you,
increasing your productivity through automatically generated code, rapid coding and
visual design, and extensibility. You should be able to install VS, choosing the options that
prepare the environment specifically for the work you want to do. Another set of skills
you gained was the ability to manipulate the layout of your environment and manage
environment settings, including how to get your environment back to the default settings
if you’ve made too many changes. Having grown acquainted with each of the major
features of the IDE, you can open VS and find the features that you need. With your
knowledge of the advantages of VS, proper installation, and awareness of VS capabilities,
you are now ready to start your first software development project, which you’ll learn
about in the next chapter.
Page 58

Chapter 2
Learning Just Enough C# or VB.NET: Basic Syntax
35
Page 59

36 Microsoft Visual Studio 2010: A Beginner’s Guide
Key Skills & Concepts
● Learn Basics of Starting a Project
● Use the VS Editor
● Code Expressions and Statements
he .NET platform supports several different programming languages. Since all of the
languages run on the same platform and share the same class libraries, language choice
T
becomes a personal choice of preference. In other words, you can accomplish the same
tasks, regardless of what programming language you use. With .NET, you have a choice of
language but retain the same benefits of having all of the features of .NET available to you.
Visual Studio (VS) 2010 ships with four programming languages: C#, C++, F#, and
Visual Basic.NET (VB). The pronunciation of each of these languages, respectively, is See
Sharp, See Plus Plus, Eff Sharp, and Vee Bee. C# and VB are the two most popular .NET
programming languages and have the greatest support in VS. Therefore, this book uses both
C# and VB in all examples. While you may choose one of these languages as your favorite,
there is great benefit in knowing both. Most of what is written online, in magazines, and
in books contains examples for either C# or VB, and sometimes, but not always, both. You
might not want to miss great content because of a limited language choice.
Chapter 1 danced around projects and what is available. It was important to have that
overview, but I’m sure you’re eager to see some code. This chapter will be satisfying in
that you’ll learn how to create a project, see what code is generated, and learn how to add
code yourself. This is the first chapter of three that covers language syntax, combining
each language feature with tips on how VS helps you code. You’ll start off by creating a
simple project and then learn about language types and statements.
Starting a Bare-Bones Project
Chapter 1 described the project types that you can create. This chapter takes you a step
further; actually creating a project. Because the primary focus of this chapter is on
learning C# and VB, the project type will be a Console application. A Console application
is very simple, allowing you to read and write text from and to the Command Prompt
window. Later chapters introduce you to the project types used most, such as WPF
and ASP.NET.
Page 60
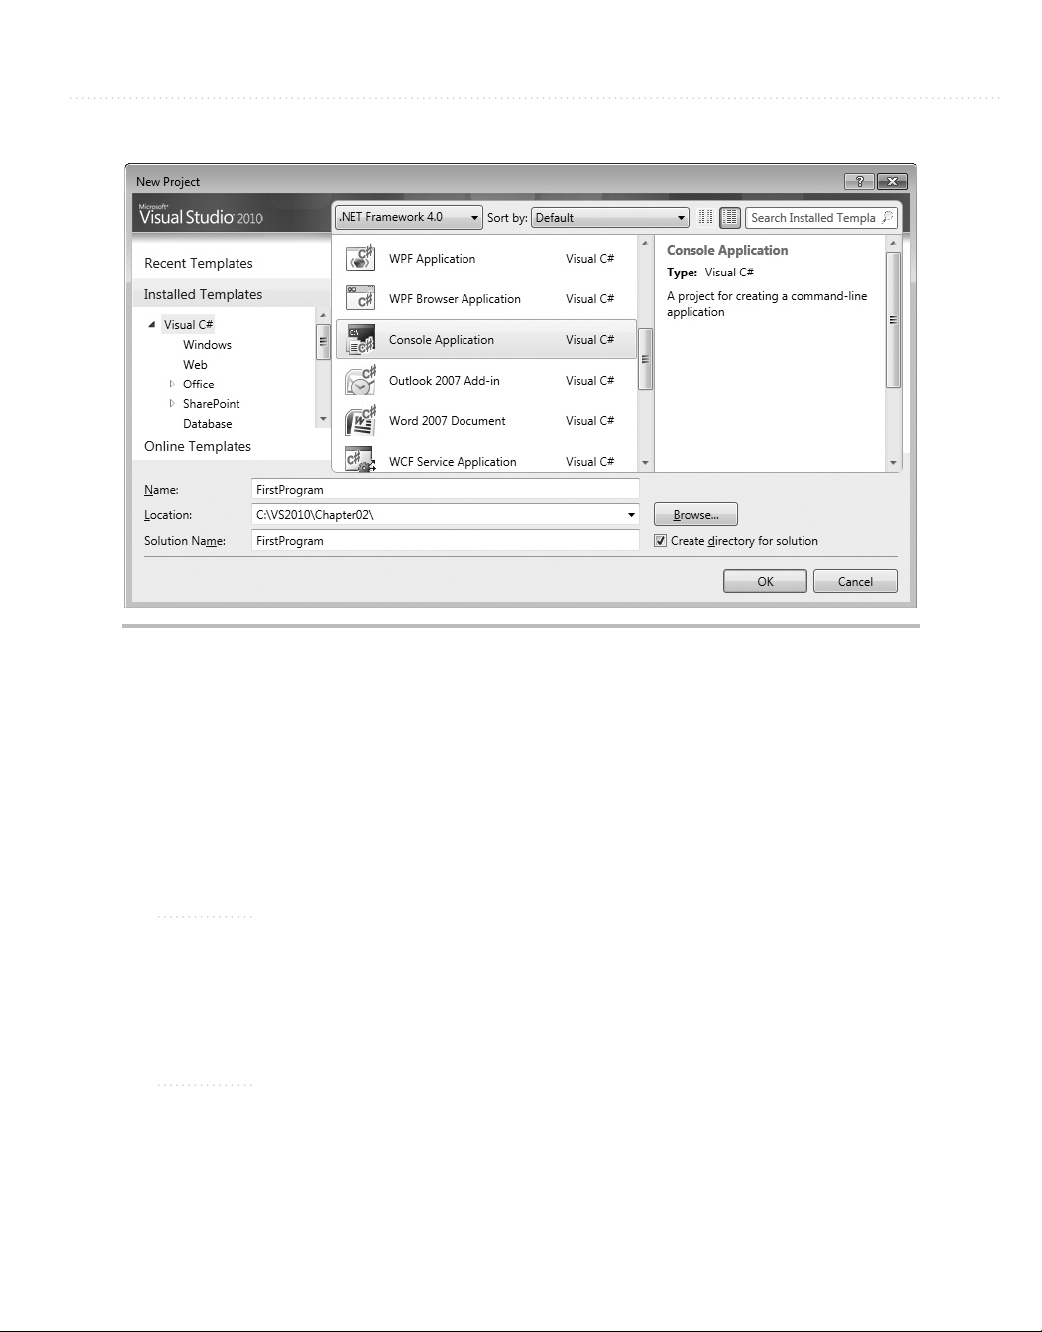
Chapter 2: Learning Just Enough C# or VB.NET: Basic Syntax 37
Figure 2-1 The New Project window
To get started, open VS and select File | New | Project. You’ll see the New Project
window, shown in Figure 2-1. Your first task is to select Console Application as the
program type. Then set the program name to FirstProgram and specify a location of your
choice for where the project will be created. Other features of the New Project window
include the ability to specify the .NET Framework version, sorting options, icon size
options, and a search capability.
NOTE
It’s often useful to choose a project location other than the default. The default is your
personal “My Documents” folder, which is long to type, cumbersome to navigate to, and
error prone. Choosing a shorter path helps alleviate these problems. If you’re working
on a team with other developers, it’s also helpful to use a common location for projects
where everyone has their files in the same location.
NOTE
In the example code that accompanies this book, the projects are named
FirstProgramCS (containing C# examples) and FirstProgramVB (containing VB
examples). You’ll see this convention, specifying the language in the project name suffix,
in all of the code examples accompanying this book.
Page 61
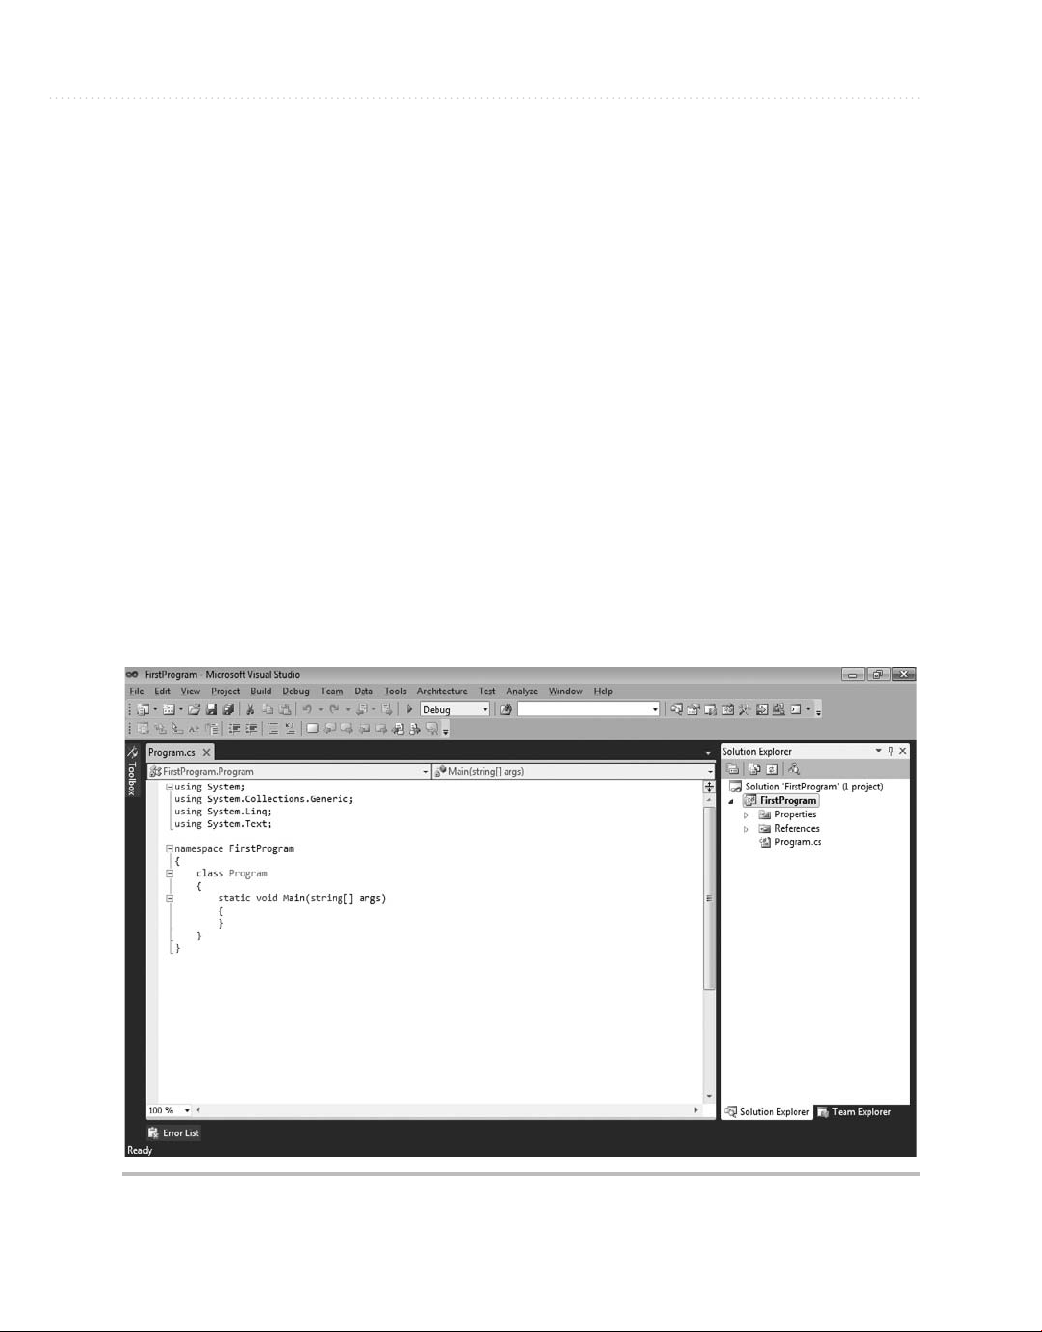
38 Microsoft Visual Studio 2010: A Beginner’s Guide
Along the very top center of the dialog shown in Figure 2-1, the .NET Framework
is the set of class libraries, runtime, and languages that is the development platform
supported by VS. VS allows you to target multiple versions of the .NET Framework,
including versions 2.0, 3.0, 3.5, and 4.0. VS will compile your code against the version
you choose. Generally, you’ll want to begin all new projects with the latest version, 4.0,
because you’ll want to be able to use the newest and most productive .NET features.
primary reason for using an earlier version is if you must perform work on code that is
already written for an earlier version of .NET. The sorting and searching features to the
right of this selection enable you to find project types in different ways, whichever is most
comfortable for you.
Clicking OK will produce a Console application project in the programming language
you chose, which you can see in the Solution Explorer, shown in Figure 2-2. The Solution
Explorer in Figure 2-2 contains a solution, which is a container for multiple projects.
Later, you’ll gain a stronger appreciation for the role of the solution when organizing
projects to support a software application. Under the solution is the FirstProgram project.
Within the FirstProgram project are project items, such as files and settings. Many
different types of project items can go into a project, and the specific project items that go
The
Figure 2-2 A Console application in the Solution Explorer
Page 62

Chapter 2: Learning Just Enough C# or VB.NET: Basic Syntax 39
into a project depend on the project type. For example, there are project items that are part
of a WPF application but wouldn’t be part of a Console application. Of particular interest
in the FirstProgram project is the file named Program.cs (or Module1.vb if programming
in VB), which is a code file, as we’ll discuss in the next section.
Examining the Code Skeleton
Having run the New Project Wizard for a Console application, you’ll see a file named
Program.cs (or Module.vb) that contains skeleton code in the editor.
skeleton code using built-in templates for most project types that you create. Y
to add, remove, or modify this code as you see fit. Listing 2-1 contains the skeleton code,
which I’ll explain next.
Listing 2-1 Console application skeleton code
C#:
using System;
using System.Collections.Generic;
using System.Linq;
using System.Text;
namespace FirstProgram
{
class Program
{
static void Main(string[] args)
{
}
}
}
VS will create
ou’re free
VB:
Module Module1
Sub Main()
End Sub
End Module
Page 63

40 Microsoft Visual Studio 2010: A Beginner’s Guide
The skeleton code in Listing 2-1 is what VS created when the new Console application
was created. It is there to give you a head start on writing your program. What you now
have is a whole computer program. This program doesn’t do much of anything at this
point, but it will actually run and then end itself. Looking at the whole program, you can
see that there are sets of nested curly braces in the C# code. The VB code has Module and
Sub with corresponding End identifiers to indicate the boundaries of a block. The braces
in C# code always come in pairs and define a block. The following explanation works
from the inside out to help you understand what this code means.
The Main Method
The innermost block of the C# code is the static void Main(string[] args) definition,
which is called a method. The method in VB is called Sub Main and is identical in
purpose. You’ll learn later that methods are one way you can group code into logical
chunks of functionality. You can think of methods as actions where you, as the method
author, tell the computer what to do. The name of this particular method is Main, which is
referred to as the entry point of the program, the place where a Console application first
starts running. Another way of thinking about Main is that this is the place your computer
first transfers control to your program. Therefore, you would want to put code inside of
Main to make your program do what you want it to.
In C#, Main must be capitalized. It’s also important to remember that C# is casesensitive, meaning that Main (capitalized) is not the same as main (lowercase). Although
VS capitalizes your code for you if you forget to, VB is not case-sensitive. Capitalization
is a common gotcha, especially for VB programmers learning C#.
In C#, methods can return values, such as numbers, text, or other types of values, and
the type of thing they can return is specified by you right before the method name. In VB,
a Sub (a shortened keyword derived from the term subroutine) does not return a value,
but a Function does, and you’ll see examples soon. Since Main, in the C# example, does
not return a value, the return type is replaced with the keyword void. Methods can specify
parameters for holding arguments that callers pass to the method. In the case of Main, the
parameter is an array of strings, with a variable name of args. The args parameter will
hold all of the parameters passed to this program from the command line.
One more part of the C# Main method is the static keyword, which is a modifier that
says there will only ever be a single instance of this method for the life of the program. T
understand instances, consider that methods are members of object types where an object
can be anything in the domain of the application you’re writing, such as a Customer,
Account, or Vehicle. Think about a company that has multiple customers. Each customer
is a separate instance, which also means that each Customer instance contains methods
o
Page 64

Chapter 2: Learning Just Enough C# or VB.NET: Basic Syntax 41
that belong to each instance. If an object such as Customer has methods that belong to
each instance, those methods are not static. However, if the Customer object type has a
method that is static, then there would only be a single copy of that method that is shared
among all Customer objects. For example, what if you wanted to get a discount price
for all customers, regardless of who the customer is; you would declare a static method
named GetCustomerDiscount. However, if you wanted information that belonged to
a specific customer, such as an address, you would create an instance method named
GetAddress that would not be modified as static.
VB uses the term shared, which has the same meaning as static. Modules are
inherently shared, and all module methods must be shared. Therefore, the VB Main
method is shared.
In C#, the curly braces define the begin and end of the Main method. In VB, Main
begins with Sub and is scoped to End Sub. Next, notice that the C# Main method is
enclosed inside of a set of braces that belong to something called a class that has been
given the name Program. The VB Main method is enclosed in something called a module.
You’ll learn about the enclosing class and module next.
The Program Class
Methods always reside inside of a type declaration. A type could be a class or struct for
C# or a class, module, or struct in VB. The term type might be a little foreign to you, but it
might be easier if you thought of it as something that contains things. Methods are one of
the things that types contain. The following snippet, from Listing 2-1, shows the type that
contains the Main method, which is a class in C# and a module (in this example) in VB:
class Program
{
// Main Method omitted for brevity
}
VB:
Module Module1
' Main omitted for brevity
End Module
Most object types you create will be a class, as shown in the previous C# example.
In VB, you would replace Module with Class. Although VS uses Module as the default
object type for a new project, it’s a holdover from earlier versions of VB. In practice, you
shouldn’t use the VB Module but should prefer Class. The Program class contains the
Main method. You could add other methods to the Program class or Module1 module,
Page 65

42 Microsoft Visual Studio 2010: A Beginner’s Guide
which you’ll see many times throughout this book. The Console application defined the
skeleton code class to have the name Program. In reality you can name the class anything
you want. Whatever names you choose should make sense for the purpose of the class.
For example, it makes sense for a class that works with customers to be named Customer
and only contain methods that help you work with customers. You wouldn’t add methods
for working directly with invoices, products, or anything other than customers because
that would make the code in your Customer class confusing. Classes are organized with
namespaces, which are discussed next.
The FirstProgram Namespace
A namespace helps make your class names unique and therefore unambiguous. They
are like adding a middle name and surname to your first name, which makes your whole
name more unique. A namespace name, however, precedes the class name, whereas your
middle name and surname follow your first or given name. A namespace also helps you
organize code and helps you find things in other programmers’ code. This organization
helps to build libraries of code where programmers have a better chance to find what
they need. The .NET platform has a huge class library that is organized into namespaces
and assemblies; this will become clearer the more you program. The main .NET
namespace is System, which has multiple sub-namespaces. For example, guess where
you can find .NET classes for working with data? Look in System.Data. Another quick
test: Where are .NET classes for working with networking protocols like TCP/IP, FTP, or
HTTP? Try System.Net.
Another benefit of namespaces is to differentiate between classes that have the same
name in different libraries. For example, what if you bought a third-party library that has a
Customer class? Think about what you would do to tell the difference between Customer
classes. The solution is namespaces, because if each Customer has its own namespace,
you can write code that specifies each Customer by its namespace. Always using
namespaces is widely considered to be a best practice.
The Program class in Listing 2-1 belongs to the FirstProgram namespace, repeated
here for your convenience (in C#):
namespace FirstProgram
{
// Program class omitted for brevity
}
You can put many classes inside of a namespace, where inside means within the
beginning and ending braces for a namespace.
Page 66

Chapter 2: Learning Just Enough C# or VB.NET: Basic Syntax 43
The using directives at the top of the C# part of Listing 2-1 are really a shortcut that
makes it easier for you to write code. For example, the System namespace contains the
Console class. If the using System directive were not present, you would be required
to write System.Console.WriteLine instead of just Console.WriteLine. This was a short
example, but using directives can help clean up your code and make it more readable.
A VB module must be declared at the global level, meaning that it can’t be added to
a namespace that you create. The following example demonstrates what a VB namespace
looks like:
Namespace FirstProgram
Public Class Customer
End Class
End Namespace
In this example, you can see that the FirstProgram namespace contains a Customer
class. The next task you’ll want to take on is writing code, but before doing so, let’s look
at some of the features of the VS Code editor.
An Overview of the VS Code Editor
The VS Code editor is where you’ll be performing much of your coding work. This section
will point out a few features you will be interested in and show you how to perform
customizations. Figure 2-3 shows the editor with the Console application skeleton code
from the C# part of Listing 2-1.
Figure 2-3 The VS Code editor
Page 67

44 Microsoft Visual Studio 2010: A Beginner’s Guide
The following sections examine various elements of the Code editor, starting with
class and member locators.
Class and Member Locators
The two drop-down lists, class locator and member locator, at the top of the editor are for
navigating the code. If you have multiple classes in your file, you can use the class locator
drop-down list on the left to select the class you want to find, and the editor will move
you to the first line of that class declaration. In practice, I only put a single class within
a single file, so the class locator doesn’t get much attention. However, you will have VS
wizards that automatically generate code and put many classes in the same file, and the
class locator is very useful if you want to find a particular class and learn about what the
automatically generated code is doing. The member locator drop-down list on the top right
contains a list of methods and other members for the class selected in the class locator.
The only class member we’ve discussed so far is the method, but there are more, as you’ll
learn in upcoming chapters. Selecting a member causes the editor to move you to the
first line of that class member. Whenever you find yourself scrolling through a large file,
remember that the member locator will help you find what you’re looking for quickly.
The vertical bar on the left side of the editor is called the indicator margin, where
you’ll see icons for features such as bookmarks and debug breakpoints. The next section
discusses bookmarks.
Bookmarks
Figure 2-3 shows a bookmark on the line for the program class. Bookmarks allow you to
navigate code quickly without manual navigation when working with multiple documents
or multiple locations within the same document. Table 2-1 shows a list of keyboard
commands for bookmarks.
Key Code Meaning
CTRL-B, T Toggle a bookmark on or off
CTRL-B, N Move to next bookmark
CTRL-B, P Move to previous bookmark
CTRL-B, C Clear all bookmarks
CTRL-W, B Open the Bookmarks window
Table 2-1 Bookmark Shortcut Keys
Page 68

Chapter 2: Learning Just Enough C# or VB.NET: Basic Syntax 45
Figure 2-4 The Bookmarks window
One of the entries in Table 2-1, CTRL-W, B opens the Bookmarks window shown in
Figure 2-4, allowing you to manage bookmarks throughout your application.
The bookmark has a toolbar, which is the same toolbar that appears in VS when the
editor window is active. The actions on the toolbar include the items from Table 2-1, plus
the ability to move between folders.
Within the Bookmark list, you can check to make a bookmark active or inactive. When
the bookmark is inactive, previous and next navigation will not stop at the bookmark. You
can change the name of the bookmark by clicking the name twice. The File Location and
Line Number tell you where the bookmark is located.
Setting Editor Options
The editor is very configurable, and there are more options available than many people
realize. You can view available options by selecting Tools | Options to show the Options
window in Figure 2-5. As you can see from the figure, selecting Environment | Fonts And
Colors allows you to change the appearance of VS. Regarding our current discussion of
the editor, this is where you can customize the coloration of code elements that appear
in the editor.
TIP
If you want to share your custom editor settings, you can use the Import and Export
Settings Wizard that you learned about in Chapter 1. There is also an Import And
Export Settings branch right below Fonts And Colors in the Options window.
Most editor customizations are in a language-specific branch of the Options window.
Figure 2-6 shows the options available for C# programmers.
Page 69

46 Microsoft Visual Studio 2010: A Beginner’s Guide
Figure 2-5 The Options window
Figure 2-6 C# code editor options
Page 70

Chapter 2: Learning Just Enough C# or VB.NET: Basic Syntax 47
The Options window in Figure 2-6 is opened to Text Editor, C#, Formatting New
Lines. As you can see, there are very detailed settings for even how the editor automatically
formats new lines and where braces appear. If the code doesn’t format the way you want it
to, visit this page to set the options to what you please.
Saving Time with Snippets
Snippets are important to learn because they will save you time. A snippet is a set of
keystrokes that form a template for a piece of code. The code for a snippet is typically
something that is common in normal programming. You’ll see many common statements
and blocks of code in this chapter, many of which have associated snippets. This section
shows you the mechanics of using snippets, and you’ll see more examples throughout the
rest of this chapter.
To use a snippet, begin typing the snippet prefix until the snippet acronym appears in
the Intellisense completion list, press the
tabbing through each field. Press
ENTER when you’re done.
Since you’ve already learned about namespaces, I’ll show you the namespace snippet.
To start, open any code file and click to start typing in a part of the file outside of all code
blocks, such as directly below any using statements but above any existing namespace
statements. Type the letter n and watch the completion list go straight to the namespace
element. Type an a and you’ll see the namespace alone in the completion list, as shown
in Figure 2-7.
TAB key twice, and fill in the snippet form while
NOTE
The CTRL-ALT-SPACE keystroke in Figure 2-7 switches between the Intellisense modes
Consume First and Standard mode. In Standard mode, which shows CTRL-ALT-SPACE,
typing characters automatically selects keywords. However, there are situations where
you are trying to type a word that doesn’t exist yet and Intellisense is too aggressive by
adding the selected completion list item, instead of what you typed. In those cases, you
can press the
be selected. You can still use the DOWN ARROW key on your keyboard in Consume First
mode to select the highlighted term in the completion list.
Figure 2-7 Using snippets
CTRL-ALT-SPACE keys to go to Consume First mode and what you’ve typed will
Page 71
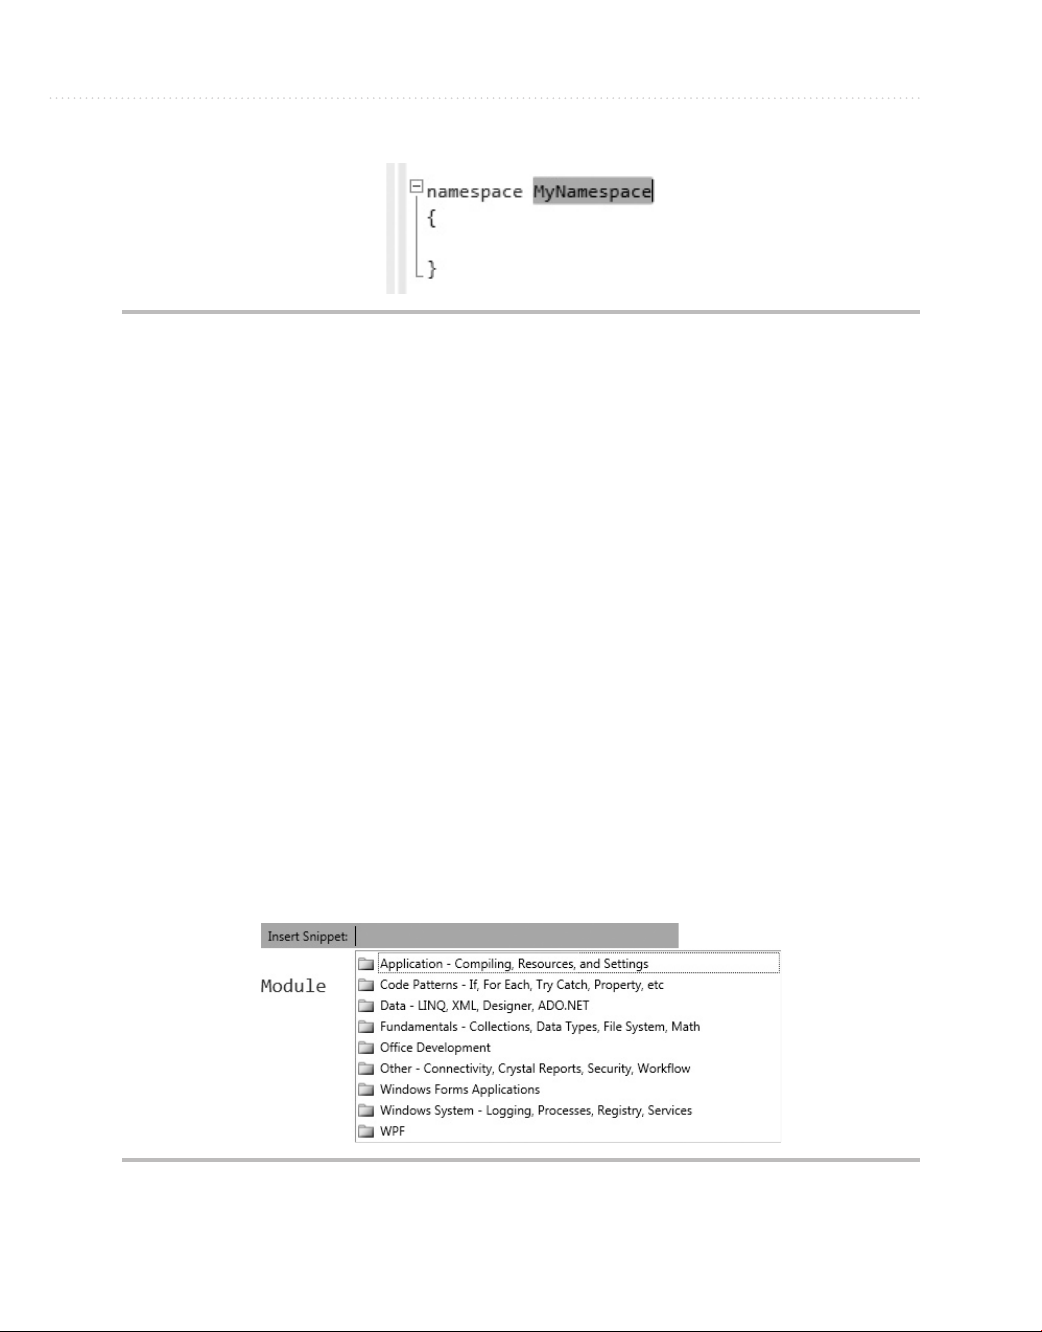
48 Microsoft Visual Studio 2010: A Beginner’s Guide
Figure 2-8 Filling in the Snippet template
You can identify snippets in the completion list by the torn paper icon. At this point,
you can press the TAB key to complete the namespace keyword. Then press TAB again to
produce a template where you can fill out the highlighted fields. Figure 2-8 shows the
results of creating a namespace snippet by typing n and pressing
As shown in Figure 2-8, you would type in the Namespace name in the highlighted
form field to replace MyNamespace, which is placeholder text. For templates with more
fields, you would press the
shown in Figure 2-8, there is only one field in the template to complete.
VB offers a couple of ways to add snippets: by typing prefixes or via a pick list. To see
how VB snippets work, place your carat inside of the Module1 module, underneath End
Main (not inside of the Main block). Type Su and press
Sub (method) along with a template containing a field for filling out the Sub snippet.
Another way to add VB snippets is to type a ? and press
as shown in Figure 2-9. You can navigate this pick list to find the snippet you need, as
classified in one of the folders. VB ships with many more built-in snippets than for C#.
Now that you know how to use snippets, let’s move on to the different types of
statements you can have in C# and VB and how snippets work with those statements.
TAB key to move between fields. In the case of the namespace
TAB, and notice that VS creates a
TAB, TAB.
TAB. You’ll receive a pick list,
Figure 2-9 VB snippet pick list
Page 72

Chapter 2: Learning Just Enough C# or VB.NET: Basic Syntax 49
Coding Expressions and Statements
There are various types of statements you can write with both C# and VB, including
assignment, method invocations, branching, and loops. We’ll start off by looking at
primitive types, such as integers and strings, and then I’ll show how to build expressions
and set values by performing assignments. Then you’ll learn about branching statements,
such as if and switch in C# or the case statement in VB. Finally, you’ll learn about various
loops, such as for and while. I describe these language features in general terms because
they differ between C# and VB, but you’ll learn that the concepts are essentially the same.
Before writing any code, you should know how Intellisense works; it is an important
productivity tool that reduces keystrokes for common coding scenarios.
Making Intellisense Work for You
Previously, you saw how snippets work. Snippets use Intellisense to show a completion
list. Intellisense is integrated into the VS editor, allowing you to complete statements with
a minimum number of keystrokes. The following walkthrough shows you how to use
Intellisense, as we add the following line to the Main method. Don’t type anything yet;
just follow along to see how Intellisense works:
C#:
Console.WriteLine("Hello from Visual Studio 2010!");
VB:
Console.WriteLine("Hello from Visual Studio 2010!")
The following steps show you how VS helps you save keystrokes:
1. Inside the braces of the Main method, type c and notice how the Intellisense window
appears, with a list of all available identifiers that start with c. This list is called a
completion list.
2. Type o and notice that the completion list filters all but those identifiers that begin
with co.
3. Type n and you’ll see that the only identifier available is Console. This is what we
want, and you only needed to type three characters to get there.
4. At this point most people press the ENTER or TAB key to let VS finish typing Console,
but that is effectively a waste of a keystroke.
Page 73

50 Microsoft Visual Studio 2010: A Beginner’s Guide
You know that there is a dot operator between Console and WriteLine, so go ahead
and type the period character, which causes VS to display “Console.” in the editor and
show you a new completion list that contains members of the Console class that you
can now choose from.
NOTE
So, I’ll admit that I spent a couple paragraphs trying to explain to you how to save a
single keystroke, but that’s not the only thing you should get out of the explanation.
The real value is in knowing that there are a lot of these detailed options available to
increase your productivity. Every time you take advantage of a new VS option, you
raise the notch of productivity just a little higher.
5. Now type write and notice that both Write and WriteLine appear in the completion list.
Now type the letter l and notice that WriteLine is the only option left in the completion list.
NOTE
If you’ve typed WriteLine a few times, you’ll notice that the completion list goes straight
to WriteLine after a few characters, rather than just Write. This is because Intellisense
remembers your most frequently used identifiers and will select them from the list first. If
you continue to type, Intellisense will then highlight those identifiers with exact matches.
Notice the checked option in Figure 2-10; Intellisense preselects most recently used
members, showing that this behavior is turned on by default.
6. Save another keystroke and press the ( key to let VS finish the WriteLine method name.
7. At this point, you can finish typing the statement, resulting in a Main method that looks
like this:
C#:
static void Main(string[] args)
{
Console.WriteLine("Hello from Visual Studio 2010!");
}
VB:
Sub Main()
Console.WriteLine("Hello from Visual Studio 2010!")
End Sub
If you’re a C# developer and want to change Intellisense options, open Tools | Options
and select Text Editor | C# | Intellisense, and you’ll see the Intellisense options in Figure 2-10.
This option isn’t available for VB.
Page 74
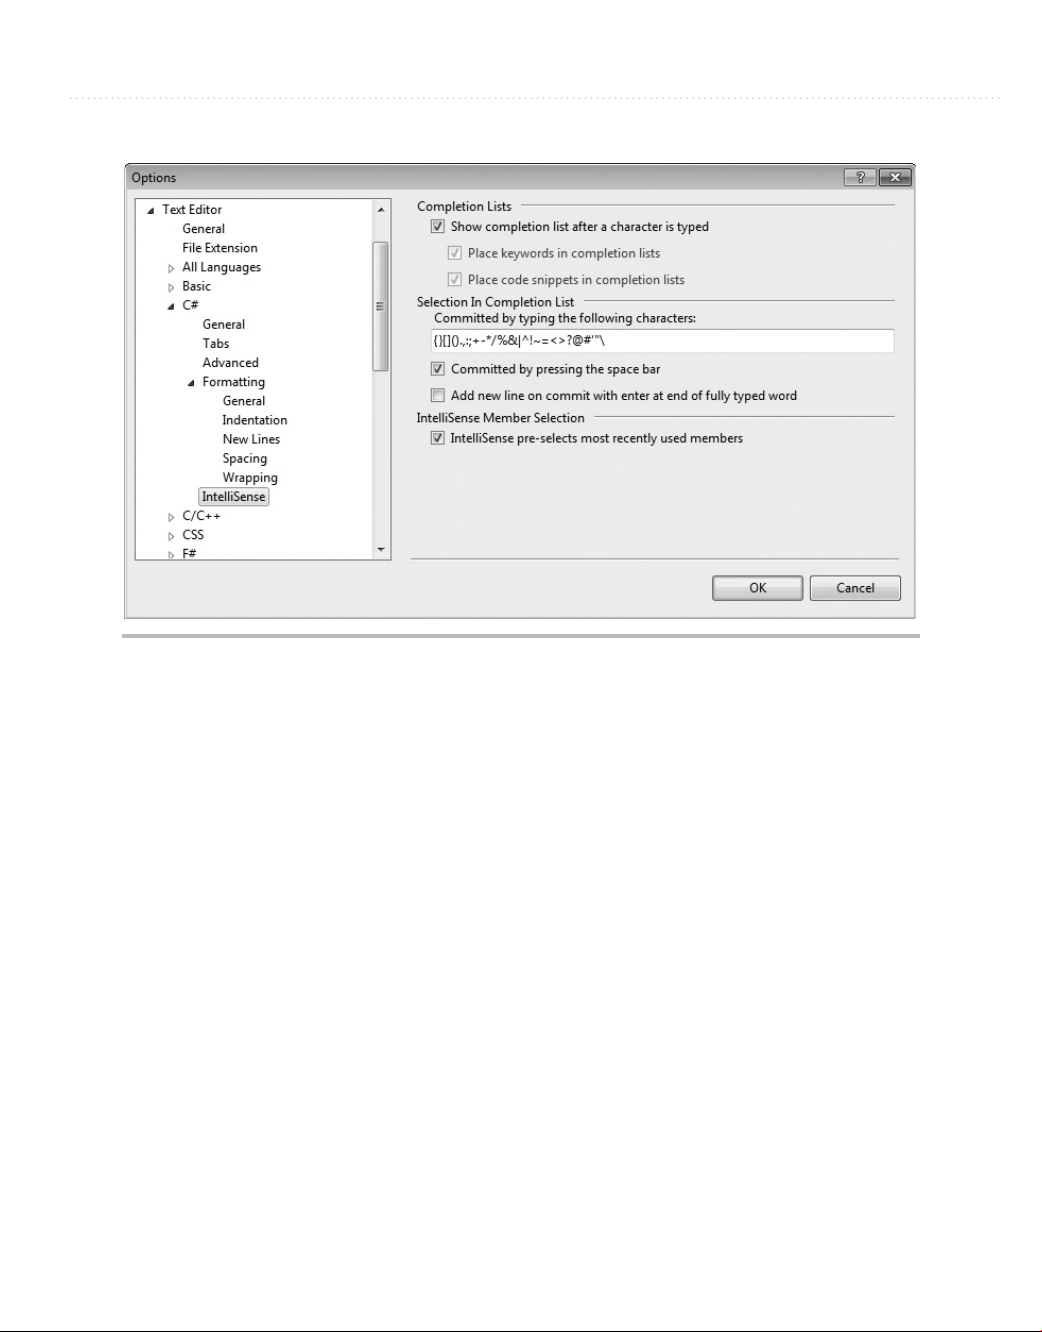
Chapter 2: Learning Just Enough C# or VB.NET: Basic Syntax 51
Figure 2-10 Intellisense options
Notice that there is a text box titled “Committed by typing the following characters,”
which contains a set of characters that will cause VS to type the rest of the selected
identifier in the completion list plus the character you typed. Referring back to Step 4, this
is how you know that a period commits the current selection.
You now have a program that does something; it can print a message to the console.
The next section will explain how you can run this program.
Running Programs
In VS, you can run a program either with or without debugging. Debugging is the
process of finding errors in your code. If you run with debugging, you’ll be able to set
break points and step through code, as will be described in Chapter 6. Running without
debugging allows you to run the application, avoiding any breakpoints that might have
been set.
To run without debugging, either select Debug | Start Without Debugging or press
CTRL-F5. This will run the Command Prompt window, where you’ll see the words “Hello
from Visual Studio 2010!” or whatever you asked the computer to write, on the screen.
The Command Prompt window will stay open until you press
ENTER or close the window.
Page 75

52 Microsoft Visual Studio 2010: A Beginner’s Guide
To run with debugging, either select Debug | Start Debugging or press F5. Because
of the way the application is coded so far, the Command Prompt window will quickly
run and close; you might miss it if you blink your eyes. To prevent this, you can add a
Console.ReadKey statement below Console.WriteLine, which will keep the window open
until you press any key. Here’s the updated Main method:
C#:
static void Main(string[] args)
{
Console.WriteLine("Hello from Visual Studio 2010!");
Console.ReadKey();
}
VB:
Sub Main()
Console.WriteLine("Hello from Visual Studio 2010!")
Console.ReadKey()
End Sub
Pressing F5 will show “Hello from Visual Studio 2010!” on the Command Prompt
window, just as when running without debugging.
To understand why there are two options, think about the difference between just
running a program and debugging. If you run a program, you want it to stay open until
you close it. However, if you are debugging a program, you have most likely set a
breakpoint and will step through the code as you debug. When your debugging session is
over, you want the program to close so that you can start coding again right away.
Now that you know how to add code to the Main method and run it, you can begin
looking at the building blocks of algorithms, starting in the next section.
Primitive Types and Expressions
The basic elements of any code you write will include primitive types and expressions, as
explained in the following sections.
Primitive Types
You can define variables in your programs whose type is one of the primitive types.
Variables can hold values that you can read, manipulate, and write. There are different
types of variables, and the type specifies what kind of data the variable can have. In .NET
there are primitive types (aka built-in) and custom types. The custom types are types that
you create yourself and are specific to the program you are writing. For example, if you
are writing a program to manage the customers for your business, then you would create
a type that could be used as the type of a variable for holding customer types. Y
ou’ll
Page 76

Chapter 2: Learning Just Enough C# or VB.NET: Basic Syntax 53
VB C# .NET Description
Byte byte Byte 8-bit unsigned integer
SByte sbyte SByte 8-bit signed integer
Short short Int16 16-bit signed integer
UInt16 ushort UInt16 16-bit unsigned integer
Integer int Int32 32-bit signed integer
UInt32 uint UInt32 32-bit unsigned integer
Long long Int64 64-bit signed integer
UInt64 ulong UInt64 64-bit unsigned integer
Single float Single 32-bit floating point
Double double Double 64-bit floating point
Boolean bool Boolean true or false
Char Char Char 16-bit Unicode character
Decimal decimal Decimal 96-bit decimal (used for money)
String string String String of Unicode characters
Table 2-2 Primitive Types
learn how to create custom types later. First, you need to learn about primitive types. The
primitive types are part of the programming languages and built into .NET. A primitive
type is the most basic type of data that you can work with in .NET, which can’
t be broken
into smaller pieces. In contrast, a custom type can be made up of one or more primitive
types, such as a Customer type that would have a name, an address, and possibly more bits
of data that are primitive types. Table 2-2 lists the primitive types and descriptions.
Looking at Table 2-2, remember that C# is case-sensitive and all of the primitive types
are lowercase. You can also see a third column for .NET types. Occasionally, you’ll see
code that uses the .NET type, which aliases the C# and VB language-specific types. The
following example shows how to declare a 32-bit signed integer in both C# and VB, along
with the .NET type:
C#:
int age1;
Int32 age2;
VB:
Dim age1 as Integer
Dim age2 as Int32
Page 77

54 Microsoft Visual Studio 2010: A Beginner’s Guide
Consistent with Table 2-2, C# uses int and VB uses Integer as their native type
definitions for a 32-bit signed integer. Additionally, you see age defined in both C# and
VB using the .NET type, Int32. Notice that the .NET type is the same in both languages.
In fact, the .NET type will always be the same for every language that runs in .NET. Each
language has its own syntax for the .NET types, and each of the language-specific types is
said to alias the .NET type.
Expressions
When performing computations in your code, you’ll do so through expressions, which are
a combination of variables, operators (such as addition or multiplication), or referencing
other class members. Here’s an expression that performs a mathematical calculation and
assigns the result to an integer variable:
C#:
int result = 3 + 5 * 7;
VB:
Dim result As Int32 = 3 + 5 * 7
A variable that was named result in this example is a C# type int or a VB type Int32,
as specified in Table 2-2. The variable could be named pretty much anything you want;
I chose the word result for this example. The type of our new variable result in the VB
example is Int32, which is a primitive .NET type. You could have used the VB keyword
Integer, which is an alias for Int32 instead. The expression is 3 + 5 * 7, which contains
the operators + (addition) and * (multiplication) and is calculated and assigned to result
when the program runs. The value of result will be 38 because expressions use standard
algebraic precedence. In the preceding example, 5 * 7 is calculated first, multiplication
has precedence, and that result is added to 3.
You can modify the order of operations with parentheses. Here’s an example that adds
3 to 5 and then multiplies by 7:
C#:
int differentResult = (3 + 5) * 7;
VB:
Dim differentResult As Int32 = (3 + 5) * 7
Because of the grouping with parentheses, differentResult will have the value 56 after
this statement executes.
Page 78

Chapter 2: Learning Just Enough C# or VB.NET: Basic Syntax 55
The Ternary and Immediate If Operators
The C# ternary and VB immediate if operators allow you to test a condition and return
a different value depending on whether that condition is true or false. Listing 2-2 shows
how the ternary and immediate if operators work.
Listing 2-2 A ternary operator example
C#:
int bankAccount = 0;
string accountString = bankAccount == 0 ? "checking" : "savings";
VB:
Dim accountString As String =
IIf(bankAccount = 0, "checking", "saving")
The conditional part of this operator evaluates if bankAccount is equal to 0 or not
when the program runs (commonly known as “at runtime”). Whenever the condition is
true, the first expression, the one following the question mark for C# or following the
comma for VB, “checking” in this case, will be returned. Otherwise, if the condition
evaluates to false, the second expression, following the colon for C# or after the second
comma for VB, will be returned. That returned value, either the string “checking” or
“savings” in this case, is assigned to the accountString variable that was declared.
NOTE
In earlier versions of the VB programming language, you were required to place an
underline at the end of a statement that continued to the next line. In the latest version
of VB, line continuations are optional. If you’ve programmed in VB before, the missing
statement continuation underline might have caught your attention, but it is now
perfectly legal.
Enums
An enum allows you to specify a set of values that are easy to read in code. The example
I’ll use is to create an enum that lists types of bank accounts, such as checking, savings,
and loan. To create an enum, open a new file by right-clicking the project, select Add |
New Item | Code File, call the file BankAccounts.cs (or BankAccounts.vb), and you’ll
have a blank file. Type the enum in Listing 2-3.
Page 79

56 Microsoft Visual Studio 2010: A Beginner’s Guide
Listing 2-3 An example of an enum
C#:
public enum BankAccount
{
Checking,
Saving,
Loan
}
VB:
Enum BankAccount
Checking
Saving
Loan
End Enum
Listing 2-4 shows how you can use the BankAccount enum:
Listing 2-4 Using an enum
C#:
BankAccount accountType = BankAccount.Checking;
string message =
accountType == BankAccount.Checking ?
"Bank Account is Checking" :
"Bank Account is Saving";
VB:
Dim accountType As BankAccount = BankAccount.Checking
Dim message =
IIf(accountType = BankAccount.Checking,
"Bank Account is Checking",
"Bank Account is Saving")
Page 80

Chapter 2: Learning Just Enough C# or VB.NET: Basic Syntax 57
The accountType enum variable is a BankAccount and is initialized to have the value
of the Checking member of BankAccount. The next statement uses a ternary operator
to check the value of accountType, evaluating whether it is Checking. If so, message is
assigned with the first string. Otherwise, message is assigned with the second string. Of
course, we know it’s the first string because the example is so simple that you can see it is
coded that way.
Branching Statements
A branching statement allows you to take one path of many, depending on a condition.
For example, consider the case for giving a customer a discount based on whether that
customer is a preferred customer. The condition is whether the customer is preferred or
not, and the paths are to give a discount or charge the entire price. Two primary types of
branching statements are if and switch (Select Case in VB). The following sections show
you how to branch your logic using if and switch statements.
Expressions
If statements allow you to perform an action only if the specified condition evaluates to
true at runtime. Here’s an example that prints a statement to the console if the contents of
variable result is greater than 48 using the > (greater than) operator:
C#:
if (result > 48)
{
Console.WriteLine("result is > 48");
}
VB:
If result > 48 Then
Console.WriteLine("Result is > 48")
End If
C# curly braces are optional if you only have one statement to run after the if when
the condition evaluates to true, but the curly braces are required when you want two or
more statements to run (also known as “to execute”) should the condition be true. The
condition must evaluate to either a Boolean true or false. Additionally, you can have an
else clause that executes when the if condition is false. A clause is just another way to
say that an item is a part of another statement. The else keyword isn’t used as a statement
Page 81

58 Microsoft Visual Studio 2010: A Beginner’s Guide
Figure 2-11 The C# if statement snippet template
itself, so we call it a clause because it can be part of an if statement. An example of an
else clause is shown here:
C#:
if (result > 48)
{
Console.WriteLine("result is > 48");
}
else
{
Console.WriteLine("result is <= 48");
}
VB:
If result > 48 Then
Console.WriteLine("Result is > 48")
Else
Console.WriteLine("Result is <= 48")
End If
As the preceding example shows, if result is not greater than 48, then it must be less
than or equal to 48.
if and else Snippets
The if snippet creates a template for you to build an if statement. To use the if snippet, type
if and press
Figure 2-12 The VB if statement snippet template
TAB, TAB; you’ll see the template in Figure 2-11 for C# or Figure 2-12 for VB.
Page 82

Chapter 2: Learning Just Enough C# or VB.NET: Basic Syntax 59
As shown in Figure 2-11, the template brings you to a highlighted field for specifying
the condition of the if statement. For C#, type the condition you want evaluated and press
ENTER; the snippet completes by placing your carat within the if statement block. For VB,
just place your cursor where you want to begin typing next.
In C#, the else statement snippet is similar to if. Type else and press
TAB, TAB—the
else template appears with the carat between the blocks of the else. There isn’t a VB else
snippet; just type Else between the last statement of the If and the End If.
Switch/Select Statements
A switch statement (Select Case statement for VB) tells the computer to evaluate one or
many conditions and branch appropriately. Here’s an example that will perform different
actions depending on the value of a name variable:
C#:
var name = "Megan";
switch (name)
{
case "Joe":
Console.WriteLine("Name is Joe");
break;
case "Megan":
Console.WriteLine("Name is Megan");
break;
default:
Console.WriteLine("Unknown Name");
break;
}
VB:
Dim name As String = "Megan"
Select Case name
Case "Joe"
Console.WriteLine("Name is Joe")
Case "Megan"
Console.WriteLine("Name is Megan")
Case Else
Console.WriteLine("Unknown name")
End Select
In the C# example, you can see the keyword switch with the value being evaluated
in parentheses. The code to execute will be based on which case statement matches the
switch value. The default case executes when there isn’t a match. The break keyword
Page 83
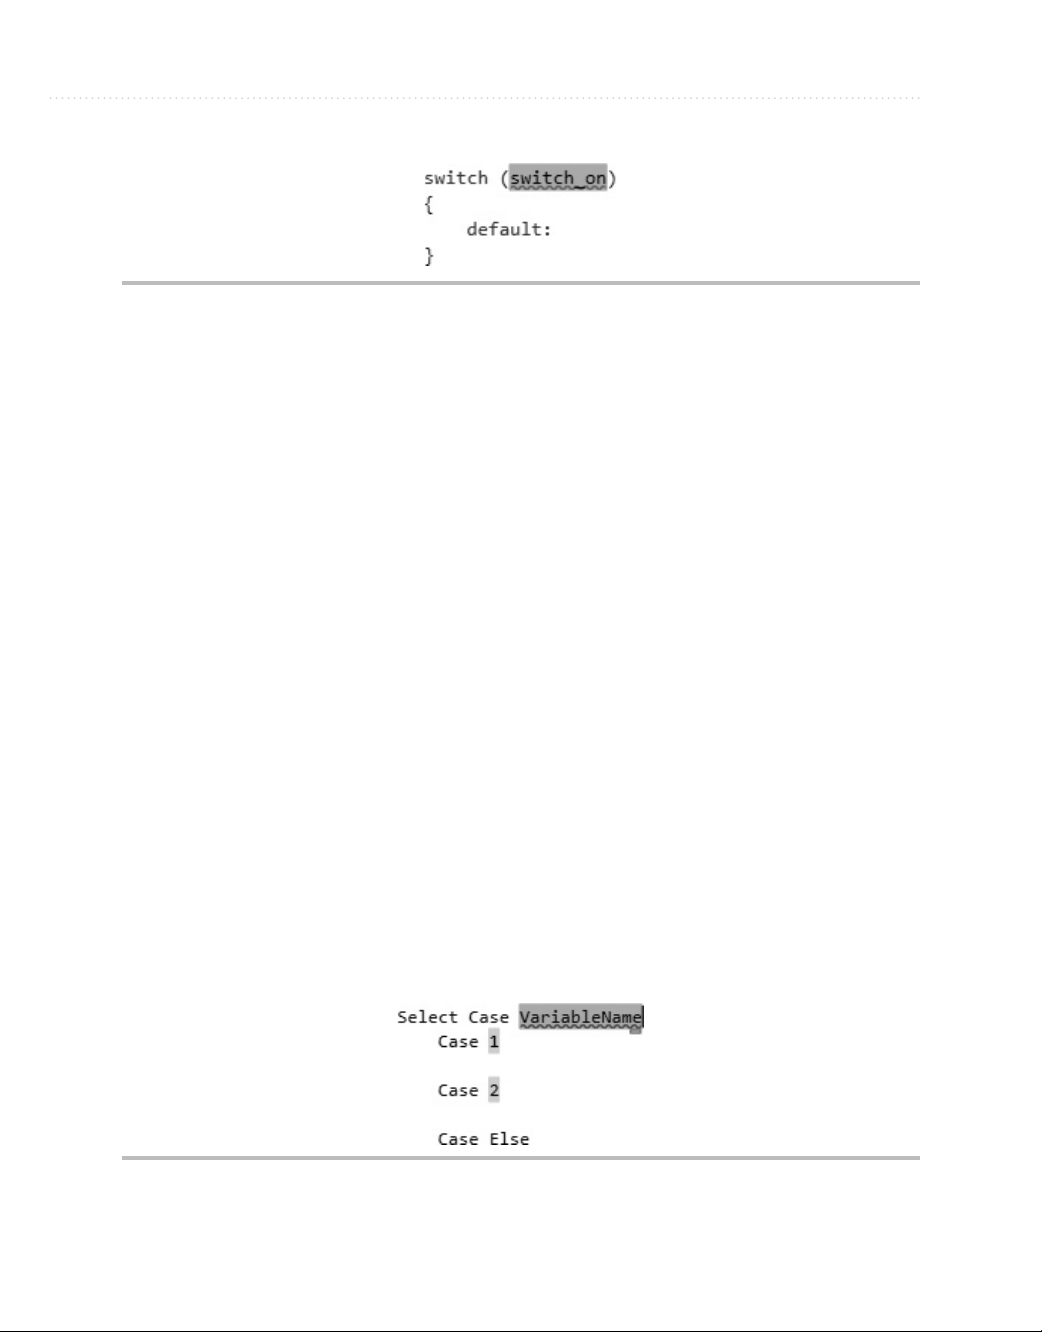
60 Microsoft Visual Studio 2010: A Beginner’s Guide
Figure 2-13 A switch snippet template
is required. When the program executes a break statement, it stops executing the switch
statement and begins executing the next statement after the last curly brace of the switch
statement.
For the VB example, the Select Case statement uses name as the condition and
executes code based on which case matches name. The Case Else code block will run if
no other cases match.
Switch Statement Snippets
There are two scenarios for switch statement snippets: a minimal switch statement and an
expanded switch with enum cases. First, try the minimal switch statement by typing sw
and pressing
You would replace the switch_on in Figure 2-13 with a value you want to use in the
switch statement. After pressing
with a default case, as follows:
TAB, TAB, resulting in the switch statement in Figure 2-13.
ENTER, you’ll see the snippet expand to a switch statement
switch (name)
{
default:
break;
}
VB Select statements work similar to the C# switch; type Se and press TAB, TAB; you’ll
see the VB template shown in Figure 2-14.
Figure 2-14 The Select Case snippet template
Page 84

Chapter 2: Learning Just Enough C# or VB.NET: Basic Syntax 61
In C#, you normally just add the case statements you need. However, there is a special
feature of the switch snippet that makes it even more efficient to use enums, creating a
case for each enum value automatically. In the following example, we use the accountType
variable of the enum type BankAccount from Listing 2-3. To see how the switch statement
works with enums, type sw and press
condition field highlighted. Type accountType in the field and press
snippet will automatically generate cases for each of the BankAccount enum members
as follows:
switch (accountType)
{
case BankAccount.Checking:
break;
case BankAccount.Saving:
break;
case BankAccount.Loan:
break;
default:
break;
}
TAB, TAB ; you’ll see the switch template with the
ENTER. The switch
The enum comes through as a convenience that is easy to read and minimizes potential
spelling mistakes when using strings. Now that you know how branching statements work,
let’s move on to loops.
Loops
You can perform four different types of loops: for, for each, while, and do. The following
sections explain how loops work.
For Loops
For loops allow you to specify the number of times to execute a block of statements.
Here’s an example:
C#:
for (int i = 0; i < 3; i++)
{
Console.WriteLine("i = " + i);
}
VB:
For i As Integer = 0 To 2
Console.WriteLine("i = " & i)
Next
Page 85

62 Microsoft Visual Studio 2010: A Beginner’s Guide
Figure 2-15 The C# for loop snippet template
In the preceding C# loop, i is a variable of type int, the loop will continue to execute
as long as i is less than 3, and i will be incremented by one every time after the loop
executes. The condition, i < 3, is evaluated before the loop executes, and the loop will not
execute if the condition evaluates to false.
The VB For loop initializes i as an integer, iterating (repeating) three times from
0 to 2, inclusive.
The for Loop Snippet
To use the C# for loop snippet, type fo and press TAB, TAB; you’ll see the snippet template
in Figure 2-15.
NOTE
The + and & operators from the preceding code example perform string concatenation.
Although i is an integer, it will be converted to a string prior to concatenation.
The same key sequence (fo, TAB, TAB) works for VB For loop snippets too, except that
you’ll see the snippet template in Figure 2-16.
The C# for loop snippet template is different from previous templates in that you
have two fields to fill out. First, name your indexer, which defaults to i, and then press
TAB, which moves the focus to the loop size field, containing Length as the placeholder.
If you like the variable name i, which is an understood convention, just press the
key and set the length of the loop. You’ll end up with a for loop and the carat inside
of the block.
For Each Loops
For each loops let you execute a block of code on every value of an array or collection.
Arrays store objects in memory as a list. Collections are more sophisticated than arrays
Figure 2-16 The VB For loop snippet template
TAB
Page 86

Chapter 2: Learning Just Enough C# or VB.NET: Basic Syntax 63
and hold objects in memory in different forms, which could be Stack, List, Queue, and
more. Here’s an example that loops on an array of strings:
C#:
string[] people = { "Megan", "Joe", "Silvia" };
foreach (var person in people)
{
Console.WriteLine(person);
}
VB:
Dim people = {"Megan", "Joe", "Silvia"}
For Each person As String In people
Console.WriteLine(person)
Next
In this example, people is an array of strings that contains three specific strings of
text. The block of the loop will execute three times, once for each item in the array. Each
iteration through the loop assigns the current name to person.
The For Each Loop Snippet
To add code using a for each snippet in C#, type fore and press TAB, TAB, which results in
the snippet template shown in Figure 2-17.
The for each loop snippet gives you three fields to complete. The var is an implicit
type specifier that allows you to avoid specifying the type of item; the compiler figures
that out for you, saving you from some keystrokes. The item field will be a collection
element type. You may leave var as is or provide an explicit type, which would be string
in this case. You can tab through the fields to add meaningful identifiers for the item and
collection you need to iterate through.
To execute the VB For Each snippet, type ?,
you’ll see the For Each loop template shown in Figure 2-18.
Figure 2-17 The C# for each loop snippet template
TAB, C, ENTER, C, ENTER, f, ENTER and
Page 87

64 Microsoft Visual Studio 2010: A Beginner’s Guide
Figure 2-18 The VB For Each loop snippet template
While Loops
A while loop will allow a block of code to execute as long as a specified condition is true.
Here’s an example that does a countdown of numbers:
C#:
int count = 3;
while (count > 0)
{
Console.WriteLine("count: " + count);
count--;
}
VB:
Dim count As Integer = 3
While count > 0
Console.WriteLine("count: " & count)
count -= 1
End While
The while loop executes as long as count is greater than 0. Since count is 3 and will
decrement by one each time through the loop, the value will change from 3 to 2 to 1 and
then the loop won’t execute anymore. Be careful not to create endless loops.
The while Loop Snippet
To create a while loop snippet, type wh and press TAB, TAB; and you’ll see the snippet
template in Figure 2-19 (C#) or Figure 2-20 (VB).
For C#, filling in the condition and pressing
loop block.
Figure 2-19 The C# while loop snippet template
ENTER places the carat inside the while
Page 88

Chapter 2: Learning Just Enough C# or VB.NET: Basic Syntax 65
Figure 2-20 The VB while loop snippet template
Do Loops
You can use a do loop if you want the code in the loop to execute at least one time. Here’s
an example that demonstrates a simple menu that obtains user input:
C#:
string response = "";
do
{
Console.Write("Press 'Q' and Enter to break: ");
response = Console.ReadLine();
} while (response != "Q");
VB:
Do
Console.Write("Press Q and Enter to break: ")
response = Console.ReadLine()
Loop While response <> "Q"
In this example, you’ll always get the prompt for Press ‘Q’ and Enter to break:. The
Console.ReadLine reads the user input, which is of type string. If the input is a string that
contains only a capital Q, the loop will end.
VB has another variation of loops that use the Until keyword, as follows:
Do
Console.Write("Press Q and Enter to break: ")
response = Console.ReadLine()
Loop Until response = "Q"
In this code, you can see that the Until condition will continue looping while the
condition is not true, which is opposite of the Do Loop While.
The Do Loop Snippet
To use the do loop snippet, type do and press TAB, TAB; you’ll see the do loop template
shown in Figure 2-21.
Figure 2-21 The C# do loop snippet template
Page 89

66 Microsoft Visual Studio 2010: A Beginner’s Guide
Figure 2-22 The VB do loop while snippet template
Fill in the condition on the do loop and press ENTER, placing the carat in the
do loop block.
For a VB Do snippet type ?,
the variant of Do loop that you want. Figure 2-22 shows an example of the Do Loop
While template.
TAB, C, ENTER, C, ENTER, and use an arrow key to select
Summary
Working with languages is a core skill when building .NET applications. Two of the most
used languages in .NET are C# and VB, which is why this chapter is dedicated to those
two languages. You learned about types, expressions, statements, code blocks, conditions,
and branching. Additionally, you learned some of the essential features of VS for writing
code, such as the code editor, bookmarks, Intellisense, and snippets.
Chapter 3 takes you to the next step in your language journey, teaching you about
classes and the various members you can code as part of classes.
Page 90

Chapter 3
Learning Just Enough C# and VB.NET: Types and Members
67
Page 91

68 Microsoft Visual Studio 2010: A Beginner’s Guide
Key Skills & Concepts
● Create Classes
● Write Methods
● Code Fields and Properties
type is a general term for classes, modules, enums, and more. This chapter will
specifically discuss the class type, which allows you to create your own custom types.
A
You’ll also see the value of a class when you learn about class members. You’ll see how
the field, method, and property class members can be used. We’ll start with learning how
to create and use classes.
Creating Classes
Previously, you learned about the primitive types, which are built into languages and alias
the underlying .NET types. You can also create your own types, via classes, which you
can instantiate and create objects with. The following section explains how to create
a class and then instantiate an object from it.
Class Syntax
To create a new custom class definition, right-click the project, select Add | Class, name
the class Employee for this example, and type the file extension .cs for C# or .vb for VB;
then click Add (VS will add this file extension for you if you don’t). You’ll see a file with
the same code as Listing 3-1.
Listing 3-1 A new Employee class
C#:
using System;
using System.Collections.Generic;
using System.Linq;
using System.Text;
namespace FirstProgram
Page 92

Chapter 3: Learning Just Enough C# and VB.NET: Types and Members 69
{
public class Employee
{
public string FirstName;
}
}
VB:
Public Class Employee
Public Dim FirstName As String
End Class
The C# Employee class is nearly the same as the Program class that you created in the
preceding chapter, except that the class name here is Employee. In VB, you’ve only created
a module before, and the Employee class is your first class for this book. You can add
members to a class, which could be events, fields, methods, and properties. Listing 3-1 shows
an example of a field, FirstName, and you’ll learn about events, methods, and properties in
later sections of this chapter. A field is a variable in a class that holds information specific to
that class.
Listing 3-2 shows how to instantiate an object of type Employee, which is your new
custom type, and use it. You would put this code inside of Main or another method. You’ll
learn more about methods in the later section “Writing Methods.”
Listing 3-2 Code that uses a class
C#:
Employee emp = new Employee();
emp.FirstName = "Joe";
VB:
Dim emp As New Employee
emp.FirstName = "Joe"
In Listing 3-2, you can see that emp is a variable declared as type Employee. The C#
new Employee() or VB New Employee clause creates a new instance of Employee, and you
can see that this new instance is being assigned to emp. With that new instance, via the emp
variable, you can access the Employee object, including its instance members. In Listing 3-2,
the FirstName field of that particular instance of Employee is assigned a string value of "Joe".
Here you see that an object can contain data.
Page 93

70 Microsoft Visual Studio 2010: A Beginner’s Guide
Now that you can define a new class, create an instance from that class, and use it, the
next section shows you another feature of classes called inheritance.
Class Inheritance
One class can reuse the members of another through a feature known as inheritance. In
programming terms, we say a child class can derive from a parent class and that child
class will inherit members (such as fields and methods) of the parent class that the parent
class allows to be inherited. The following example will create a Cashier class that
derives from the Employee class. To create this class, right-click the project, select Add |
Class, and name the class Cashier. Listing 3-3 shows the new class and modifications for
implementing inheritance.
Listing 3-3 Class inheritance
C#:
using System;
using System.Collections.Generic;
using System.Linq;
using System.Text;
namespace FirstProgram
{
public class Cashier : Employee
{
}
}
VB:
Public Class Cashier
Inherits Employee
End Class
The C# inheritance relationship is indicated by the colon after the Cashier identifier,
followed by the class being derived from, Employee. In VB, you write the keyword
Inherits, on a new line, followed by the class being derived from. Essentially, this means
that Cashier has all of the same members as Employee. Listing 3-4 demonstrates the
benefits of inheritance.
Page 94

Chapter 3: Learning Just Enough C# and VB.NET: Types and Members 71
Listing 3-4 Code using inheritance
C#:
Cashier cashr = new Cashier();
cashr.FirstName = "May";
VB:
Dim cashr As New Cashier
cashr.FirstName = "May"
According to Listing 3-4, Cashier does not have a field named FirstName. However,
Employee does have a FirstName field and Cashier derives from Employee. Because
of inheritance, Cashier automatically inherits FirstName, and the code in Listing 3-4 is
perfectly legal. Inheritance can be thought of as specialization in the sense that, in this
example, Cashier is a specialized kind of Employee. To take advantage of this specialization,
you could add a new field to your new Cashier class called “assignedCashRegister” where
now, not only does the Cashier class have the fields and methods of Employee, it is able to
hold the value for a specific cash register name or number. An instance of the Employee
class would not be able to contain this information. The .NET Framework uses inheritance
extensively to offer you reusable class libraries.
TIP
You can often use the phrase “is a” to describe the relationship between inherited
classes when starting from the child class. For example, you can say “Cashier is an
Employee.” If you apply this phrase technique to your software design and the sentence
sounds logically correct, then you’ve probably used inheritance correctly.
The class Snippet
C# has a class snippet, but VB doesn’t. Before using the class snippet, create a new class
file by right-clicking the project, select Add | New Item | Code File, and name the file
Manager. You’ll now have a blank file to work with. To use the class snippet, type cl and
press
TAB, TAB; and you’ll see the snippet template in Figure 3-1.
Figure 3-1 The C# class snippet template
Page 95

72 Microsoft Visual Studio 2010: A Beginner’s Guide
Just type in the class name in the field and press ENTER. The carat will locate to the
inside of the class block. Now that you know how to create classes, you’ll need to know
how to add members, starting with methods.
Writing Methods
You can divide your algorithms into blocks of code called methods. In different programming
languages, methods are called functions, procedures, or subroutines. I’ll use the term method
as a generic term, except when I need to be more specific. You’ve already used methods
when coding Console.WriteLine, where WriteLine is a method of the Console class. A
method contains one or more statements. Reasons for creating methods include the ability to
modularize your code, isolate complex operations in one place, or group a common operation
that can be reused in multiple places. The following sections show you how to declare and
use methods.
Declaring and Using a Method
To start off, I’ll show you a very simple method so that you can see the syntax and
understand the program flow. Listing 3-5 will move the Console.Writeline statement from
the Main method discussed in Chapter 2 into a new containing method and then add a
statement to the Main method that calls the new method.
Listing 3-5 Declaring and calling a method
C# (Program.cs)
using System;
using System.Collections.Generic;
using System.Linq;
using System.Text;
namespace FirstProgram
{
class Program
{
static void Main(string[] args)
{
MessagePrinter msgPrint = new MessagePrinter();
msgPrint.PrintMessageInstance();
}
}
Page 96

Chapter 3: Learning Just Enough C# and VB.NET: Types and Members 73
C#: (MessagePrinter.cs)
using System;
using System.Collections.Generic;
using System.Linq;
using System.Text;
namespace FirstProgram
{
class MessagePrinter
{
public static void PrintMessageStatic()
{
Console.WriteLine("Hello from a static method.");
}
public void PrintMessageInstance()
{
Console.WriteLine("Hello from an instance method.");
}
}
}
VB (Module1.vb):
Module Module1
Sub Main()
MessagePrinter.PrintMessageShared()
Dim msgPrint As New MessagePrinter()
msgPrinter.PrintMessageInstance()
End Sub
End Module
VB (MessagePrinter.vb)
Public Class MessagePrinter
Public Shared Sub PrintMessageShared()
Console.WriteLine("Hello from a shared method.")
End Sub
Public Sub PrintMessageInstance()
Console.WriteLine("Hello from an instance method.")
End Sub
End Class
Page 97

74 Microsoft Visual Studio 2010: A Beginner’s Guide
Listing 3-5 has two types of methods, static and instance. In VB, shared methods are
the same as static. You can tell which type of method each is because static methods have
the static modifier (shared in VB), but instance methods don’t have a static (or shared in
VB) modifier. First, let’s look at the static (shared) method declaration, and then you’ll see
how it’s called.
The static (shared in VB) method, PrintMessageStatic (PrintMessageShared in VB)
has a public access modifier, which means that any other code using the containing class,
MessagePrinter, will be able to see the method. If you didn’t include the public access
modifier, the method would automatically default to being private and only other code
residing within the MessagePrinter class would be able to use that method.
PrintMessageStatic has a void keyword, meaning that this method does not return a
value. In VB, you indicate that a method does not return a value by making it a Sub, as
was done in Listing 3-5. Later, you’ll learn how to create a method that does return values
to its calling code that invokes this method. The empty parameter list appended to the
PrintMessageStatic (PrintMessageShared in VB) means that there are not any parameters
for this method. Parameters allow callers to pass information to the method; a subject
we’ll discuss soon.
Within the method block, you can see that there is a Console.WriteLine statement.
You can add as many statements as you need for the purpose of the method. Next, we’ll
examine how PrintMessageStatic (PrintMessageShared in VB) is called, which the
following code repeats from Listing 3-5:
C#:
Program.PrintMessageStatic();
VB:
MessagePrinter.PrintMessageShared()
Viewing the preceding example, which shows a statement inside of the Main method,
you can see the call to Program.PrintMessageStatic (PrintMessageShared in VB).
Notice that the class (aka type) that contains all the methods is named MessagePrinter.
In C#, a static method is called through its containing type, which is why you call
PrintMessageStatic with the Program prefix. In VB, you can invoke shared methods
through either the method’s type or an instance of that type. We discuss instance
methods next.
The next method, PrintMessageInstance, is an instance method; it has no static
modifier. The rest of the method definition mirrors that of the PrintMessageStatic method.
Page 98

Chapter 3: Learning Just Enough C# and VB.NET: Types and Members 75
Since PrintMethodInstance is an instance method, you call it differently; through an
instance of its containing type, which the following code repeats from Listing 3-5:
C#:
MessagePrinter msgPrint = new MessagePrinter();
msgPrint.PrintMessageInstance();
VB:
Dim msgPrint As New MessagePrinter()
msgPrinter.PrintMessageInstance()
As this example shows, the type of msgPrint is MessagePrinter. Using the statement new
MessagePrinter creates a new instance of MessagePrinter at runtime, which is assigned to the
msgPrint variable. Now that you’ve created an instance of a MessagePrinter and msgPrint
has a reference to that instance, you can call the instance method, PrintMessageInstance, via
the msgPrint variable. Next, let’s look at how to add parameters to a method and discuss why
that’s important.
Declaring Parameters and Passing Arguments
Passing parameters to a method is a great way to make code more reusable. For example,
what if you had a method that printed a report containing the names of all customers? It
wouldn’t make sense to create one method for each customer, especially when the list
changes all the time. Listing 3-6 shows a method that takes a list of customers and prints
a report with customer names.
Listing 3-6 Declaring a method that takes parameters
C# (Program.cs):
using System;
using System.Collections.Generic;
using System.Linq;
using System.Text;
namespace FirstProgram
{
class Program
{
static void Main(string[] args)
Page 99

76 Microsoft Visual Studio 2010: A Beginner’s Guide
{
MessagePrinter msgPrint = new MessagePrinter();
string[] customerNames = { "Jones", "Smith", "Mayo" };
string reportTitle = "Important Customer Report";
msgPrint.PrintCustomerReport(customerNames, reportTitle);
}
}
C# (MessagePrinter.cs):
using System;
using System.Collections.Generic;
using System.Linq;
using System.Text;
namespace FirstProgram
{
public void PrintCustomerReport(
string[] customers, string title = "Customer Report")
{
Console.WriteLine(title);
Console.WriteLine();
foreach (var name in customers)
{
Console.WriteLine(name);
}
}
}
}
VB (Module1.vb):
Module Module1
Sub Main()
Dim msgPrint As New MessagePrinter()
Dim customerNames = {"Jones", "Smith", "Mayo"}
Dim reportTitle As String = "Important Customer Report"
msgPrint.PrintCustomerReport(customerNames, reportTitle)
End Sub
End Module
Page 100

Chapter 3: Learning Just Enough C# and VB.NET: Types and Members 77
VB (MessagePrinter.vb):
Public Class MessagePrinter
Sub PrintCustomerReport(ByVal customers As String(), ByVal title
As String)
Console.WriteLine(title)
Console.WriteLine()
For Each name In customers
Console.WriteLine(name)
Next
End Sub
End Class
Parameters are a comma-separated list of identifiers, along with the type of each
identifier, which clearly indicates what type of parameter the method is expecting. In
Listing 3-6, the PrintCustomerReport method has two parameters: title of type string and
customers of type string array. The method displays the title in the console window when
you run the program, displays a blank line, and then iterates through the list, displaying
each customer name to the console.
You can see how the Main method creates a new instance of MessagePrinter,
which msgPrint points to, and then calls PrintCustomerReport using msgPrint. The
arguments being passed, reportTitle and customerNames, match the position and types
of the parameters for PrintCustomerReport, which are of the correct types that the
PrintCustomerReport method is expecting.
In the preceding example, the calling code must provide arguments, actual data,
for all parameters. However, you can specify parameters as being optional, allowing
you to omit arguments for the optional parameters if you like. Here’s a modification to
PrintCustomerReport where the title becomes an optional parameter:
C#:
public void PrintCustomerReport(
string[] customers, string title = "Customer Report")
{
Console.WriteLine(title);
Console.WriteLine();
foreach (var name in customers)
{
Console.WriteLine(name);
}
}
 Loading...