

Page 1

Microsoft® Windows
®
Storage Server 2003 R2
x64 Edition
Getting Started Guide
使用入门指南
入門指南
はじめに
시작 설명서
www.dell.com | support.dell.com
Page 2

Page 3

Microsoft® Windows
®
Storage Server 2003 R2
x64 Edition
Getting Started Guide
www.dell.com | support.dell.com
Page 4

Notes, Notices
NOTE: A NOTE indicates important information that helps you
make better use of your computer.
NOTICE: A NOTICE indicates either potential damage to
hardware or loss of data and tells you how to avoid the problem.
____________________
Information in this document is subject to change without notice.
© 2006 Dell Inc. All rights reserved.
Reproduction in any manner whatsoever without the written permission of
Dell Inc. is strictly forbidden.
Trademarks used in this text: Dell and the DELL logo, PowerEdge, and Dell
OpenManage are trademarks of Dell Inc.; Windows Server is a trademark, and
Microsoft and Windows are registered trademarks of Microsoft Corporation.
Other trademarks and trade names may be used in this document to refer to either
the entities claiming the marks and names or their products. Dell Inc. disclaims
any proprietary interest in trademarks and trade names other than its own.
February 2006 P/N GJ804 Rev. A01
Page 5

Contents
Introduction. . . . . . . . . . . . . . . . . . . . . . . . . . . . . . 5
Entering the Default Administrator User Name
and Password
. . . . . . . . . . . . . . . . . . . . . . . . . . . . 6
Configuring the Network IP Address
for the NAS System
Configuring Your System For Network Access
. . . . . . . . . . . . . . . . . . . . . . . . . 6
. . . . . 7
Configuring Your System Using a Keyboard,
Monitor, and Mouse
Changing the Administrator Password
. . . . . . . . . . . . . . . . . . . . . . . . 8
. . . . . . . . . . . 9
Localizing Your System Using the Multilanguage
User Interface
. . . . . . . . . . . . . . . . . . . . . . . . . . . . 9
Starting the Windows Storage Server
Management Console
. . . . . . . . . . . . . . . . . . . . . . 10
Contents 3
Page 6

Accessing the Microsoft Management Console . . . . 10
Access the MMC Locally on the Host . . . . . . . . . . . . . . . 10
Access the System Using Remote Desktop Connection
. . . . . . 11
Installing Dell OpenManage Server
Administrator
Accessing Server Administrator . . . . . . . . . . . . . . . . . . 13
Adding Trusted Sites to Your Browser
Updating Your System
Updating Your Microsoft Windows Software
. . . . . . . . . . . . . . . . . . . . . . . . . . . . 12
. . . . . . . . . . . . . . . 14
. . . . . . . . . . . . . . . . . . . . . . . . 14
. . . . . . . . . . . . 15
Other Documents You May Need. . . . . . . . . . . . . . . 15
4 Contents
Page 7

This document provides an overview of the Microsoft® Windows®
Storage Server 2003 R2 x64 operating system and information about
configuring, localizing, and installing your Dell™ PowerEdge™ Network
Attached Storage (NAS) system on a corporate network.
This document provides information about the following topics:
• Operating system overview
• Entering your user name and password
• Configuring the network IP address
• Configuring your system for network access
• Configuring your system using a keyboard, monitor, and mouse
• Changing the administrator password
• Localizing your system using the Multilanguage User Interface (MUI)
• Starting the Windows Storage Server Management Console
• Accessing the MUI
™
• Installing Dell OpenManage
Server Administrator
Introduction
The Windows Storage Server 2003 R2 x64 Edition operating system adds
new search capabilities, simplified setup and storage management,
extensibility, and is specially tuned to provide optimal NAS performance.
Windows Storage Server 2003 R2 x64 Edition is the latest release in this
operating system series and provides significant enhancements in storage
management scenarios, as well as ease of installation.
Your PowerEdge NAS system is pre-configured with the Windows
Server 2003 R2 x64 Edition operating system. Most of the setup
procedures are completed for you and do not require user intervention.
When your system boots for the first time, the Microsoft Mini Setup
process begins. When completed, your system automatically reboots.
After the Mini Setup procedure has completed, you can access the server
locally or remotely.
The following sections provide information about completing the
operating system installation procedures.
Storage
Getting Started Guide 5
Page 8

NOTE: If your system is pre-configured with software RAID 5, the system
performs a RAID synchronization to optimize the array. The process runs in the
background and may affect your overall system performance until it completes.
If the system is powered off before the process completes, RAID
synchronization will begin again when the system is powered up and continue
until it completes.
For More Information
For more information about the Windows Storage Server 2003 R2 x64
Edition operating system, see the Microsoft Windows Storage Server 2003
R2 x64 Administrator’s Guide located on the Dell Support website at
support.dell.com
For information about minimum supported BIOS, firmware, and RAID
controller versions, see the Microsoft Windows Storage Server 2003 R2 x64
Important Information document located on the Dell Support website at
www.dell.com/ostechsheets.
Entering the Default Administrator User Name and Password
When logging into the NAS system for the first time, you must enter an
administrator user name and password. The default administrator user
name for your NAS system is administrator and the default password
is storageserver.
Configuring the Network IP Address for the NAS System
If you have a DHCP server on your network, you are not required to
configure your NAS system’s IP address because DHCP automatically
assigns an address to the NAS system. If your network is not configured
with a DHCP server, configure the NAS system’s IP address through
the Network Configuration window.
To access the Network Configuration window, click Start and select
Settings→ Control Panel→ Network Configuration.
6 Getting Started Guide
Page 9

NOTE: If you do not have a DHCP server on your network, a local keyboard,
monitor, and a mouse is required to complete your NAS configuration. See
"Configuring Your System Using a Keyboard, Monitor, and Mouse" for more
information.
NOTE: The Windows Firewall is enabled by default. When you access the
remote system, you may experience issues with connectivity.
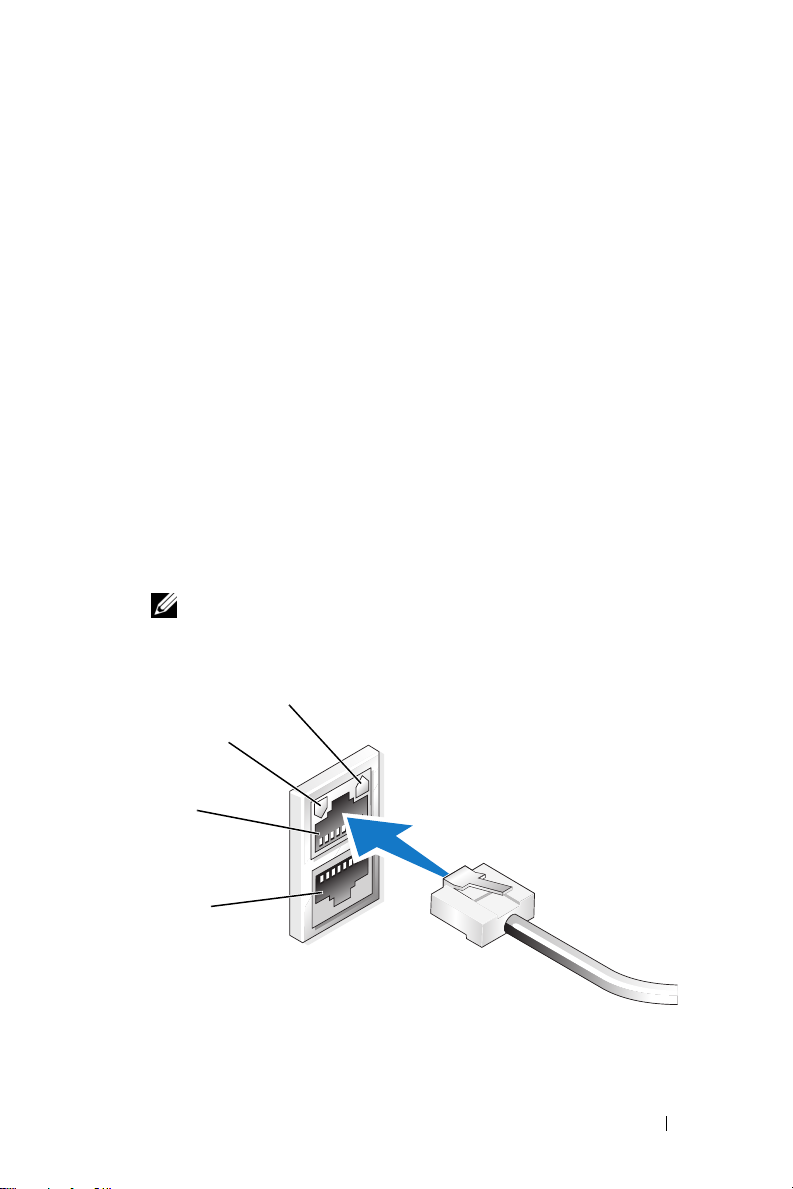
Configuring Your System For Network Access
1
If your NAS system is powered on, turn it off.
2
Connect one end of an Ethernet cable into one of the 10/100/1000
RJ-45 NIC connectors (see Figure 1-1) on the back of your NAS
system.
For more information on the location of system connectors, see your
NAS system’s
3
Connect the other end of the Ethernet cable to a functioning Ethernet
jack.
4
Push the power button to turn on the NAS system.
5
Verify that the server is connected to the Ethernet by ensuring that the
LED associated with the NIC connector is illuminated. See Figure 1-1.
If the NIC connector’s LED is a steady green color, then the
connection is good. If the NIC connector’s LED is a flashing amber
color, then data is successfully being transferred.
If the LED is not illuminated, check to make sure that each end of the
Ethernet cable is seated properly in the NIC connector and the
Ethernet jack.
User’s Guide
.
The NAS system retrieves the required information to set up network
parameters (the IP address, gateway subnet mask, and DNS server
address) from a DHCP server on the network.
NOTE: It may take several minutes for the NAS system to boot, depending
on your configuration and the amount of storage attached to the system.
Getting Started Guide 7
Page 10

Figure 1-1. NIC Connector
NIC 1 LED
NIC 2 LED
NIC 1
NIC 2
Configuring Your System Using a Keyboard, Monitor, and Mouse
NOTE: Depending on your method of configuration, local KVM connections
may be required to complete the installation and configuration procedures.
If your remote system can complete the configuration procedures, local KVM
connections are not required for operation.
1
Connect a keyboard, monitor, and mouse to the NAS system.
For information about system connectors, see your system’s
.
Guide
User’s
2
Push the power button to turn on the NAS system.
3
Log in to the NAS system.
NOTE: The default administrator user name is administrator
and the default password is storageserver.
8 Getting Started Guide
Page 11

Changing the Administrator Password
1
Click
Start
and select
Management
2
In the
Management (Local)
Users
.
3
In the right window pane, right click
Password
4
In the
5
Enter and confirm your password in the appropriate fields and
click
OK
6
Close the
.
Computer Management
.
Set Password for Administrator
.
Computer Management
Administrative Tools→
window in the
tree, expand
Local Users and Groups
Administrator
window, click
window.
Computer
Computer
and select
Proceed
and select
Set
.
Localizing Your System Using the Multilanguage User Interface
The NAS system allows you to change the native language for the
operating system's user interface. Many languages are installed on your
system by default. The Multilanguage User Interface (MUI) allows the
NAS system to display operating systems menus, dialogs, and help files
in multiple languages.
If your system was pre-configured with the Windows Storage Server 2003
R2 x64 Edition operating system, the MUI is pre-configured with your
localized language in both the regional settings and in the browser
settings. No user intervention is required.
To change the default browser language:
1
Open an Internet Explorer browser.
2
In the
To ol s
3
In the
4
In the
5
In the
6
Click OK.
menu, select
General
Language Preference
Language
tab, click
box, select a language.
Internet Options
Languages
window, click
.
.
Add
.
Getting Started Guide 9
Page 12

Starting the Windows Storage Server Management Console
The Windows Storage Server Management Console appears in the
Microsoft Management Console (MMC), providing an easy and
convenient method for system administration. The Management Console
opens automatically when you are logged into the Windows Storage
Server 2003 R2 x64 operating system.
To open the Windows Storage Server Management Console, click Start
and select All Programs→ Windows Storage Server Management.
In the Management Console window, the left window pane shows the
File Server Management (Local) node as the default node. The center
window pane provides selectable scenarios that assist you with operating
system administration.
Accessing the Microsoft Management Console
The MMC is configured by default as part of the Microsoft Start menu.
The MMC can be used for disk management, configuring NFS, and as a
general NAS management station. See the Microsoft MMC document
included with your system for more information.
Using MMC, you can configure your storage using one of the following
methods:
• Access the MMC locally on the host
• Access the MMC remotely using a Remote Desktop Connection
Access the MMC Locally on the Host
The MMC appears on the host as a selectable item in the Start menu.
If the MMC does not appear in the Start menu after startup, perform
the following steps:
1
Click
Start
and select
2
In the
Open
field, type the following and click OK:
nas.msc
NOTE: The nas.msc file is located at c:\windows\system32.
10 Getting Started Guide
Run
.
Page 13

Access the System Using Remote Desktop Connection
Use Remote Desktop Connection for remote server administration to
reduce the overhead associated with remote administration. Enabled by
Terminal Services technology, Remote Desktop for Administration is
specifically designed for server management.
Remote Desktop for Administration does not require a special license for
client systems that access the server. Additionally, you are not required to
install Terminal Server Licensing when using Remote Desktop for
Administration.
Administrators can also fully administer computers running Windows
Storage Server 2003 R2 x64 Edition from systems running earlier versions
of Windows by installing Remote Desktop Connection.
NOTE: To connect to Remote Desktop for Administration from a remote system,
use Remote Desktop Connection.
Create and Save a Remote Desktop Connection To Your Desktop
To create and save a Remote Desktop connection to Windows Storage
Server 2003 R2 x64 Edition, perform the following steps:
1
Click
Start
2
and select
In the
Open
field, type the following and then click OK.
mstsc
The
Remote Desktop Connection
Run
.
window appears.
3
In the
Computer
storage server and then click
4
In the
Remote Desktop Connection
5
settings
In the
box, click
Save As
connection and include the default
6
In the
Save in
field, type the computer name or IP address of the
Options
Save As
window in the
.
File name
drop-down menu, select
.
window in the
Connection
field, type a name for the
.rdp
extension.
Desktop
and then click
Save
.
Your connection is saved to your desktop.
For more information about configuring your remote desktop connection,
click Help in the Remote Desktop Connection window.
Getting Started Guide 11
Page 14

Installing Dell OpenManage Server Administrator
Dell OpenManage Server Administrator provides a comprehensive,
one-to-one system management solution using an integrated, Web
browser-based interface (the Server Administrator home page) or a
command line interface (CLI) through the operating system.
Server Administrator allows you to manage NAS systems on a network
locally and remotely and to focus on managing the entire network with
comprehensive, one-to-one system management.
NOTE: For the purpose of using Server Administrator, a "system" can be a
stand-alone system, a server with Network Attached Storage units in separate
chassis, or a modular system consisting of one or more server modules in a
chassis.
See your Server Administrator documentation for more information.
Installing Server Administrator
The Dell Installation and Server Management CD provides a setup
program to install, upgrade, and uninstall Server Administrator and other
managed system software components on your managed system.
Additionally, you can install Server Administrator on multiple systems
through an unattended installation across a network.
Using the setup program on the Dell Installation and Server Management
CD, you can install and upgrade Server Administrator on systems running
all supported Windows Storage Server 2003 R2 x64 Editions operating
systems.
To install Server Administrator, perform the following steps:
1
Insert the
system’s CD drive.
The CD autoloads and the
appears.
Dell Installation and Server Management
Server Administrator Installer
CD into your
window
2
Click
Install, Modify, Repair or Remove Server Administrator
3
In the
License Agreement
and click
12 Getting Started Guide
Next
.
.
window, read and understand the agreement
Page 15

4
In the
Setup Type
configuration and click Next.
5
In the
Ready to Install
6
In the
Install Wizard Completed
window, select the appropriate setup type for your
window, click
Install
.
window, click
Finish
.
Accessing Server Administrator
You can access Server Administrator locally through the host by doubleclicking the Server Administrator icon on the desktop.
To access Server Administrator directly from a client system on the same
network, open Internet Explorer 6.0 or later and connect to the secure
port, 1311, of your NAS system.
For example, type:
https://DELL1234567:1311
where DELL1234567 is the name of your NAS system.
If port 1311 is disabled by the firewall, use the following procedure to set
an exception to enable port 1311 for OpenManage use.
1 Click Start and select Settings→ Control Panel→ Windows
Firewall
2
Click the
3
Click on
4
Ty p e
in the
5
Ty p e
6
Click OK.
7
If prompted, restart the firewall service.
.
Exceptions
Add port
Dell OpenManage Server Administrator
Name
field.
1311
in the
tab.
.
Port number
field.
Getting Started Guide 13
Page 16

Adding Trusted Sites to Your Browser
Due to enhanced Microsoft security standards, you may be prompted to
add an internet or intranet site to the trusted sites zone when you initially
access the site.
To add trusted sites to Internet Explorer, perform the following steps:
1
In the
Tools
menu, click
The
Internet Options
2
Click the
The
3
Click
The
4
Click
The
5
In the
using the https: secure protocol, and click
The site appears in the
6
Repeat step 5 to add any additional sites and click OK.
The
7
Click OK.
Security Tab
Security
Trusted sites
Trusted sites
Internet Options
tab menu appears.
Trusted Sites
option appears.
Sites
.
window appears.
Add this Web site to the zone:
Internet Options
window appears.
.
.
Web sites:
window appears.
.
field, type the address of the site,
Add
.
box.
Updating Your System
The Server Update Utility CD contains an application for identifying and
applying updates to your server. The Server Update Utility (SUU) also can
be downloaded from the Dell Support website at support.dell.com. See
the Server Update Utility User’s Guide for more information.
To update individual Server Administrator components, use componentspecific Dell Update Packages, which may be found on the Dell PowerEdge
Updates CD. The SUU compares the versions of components currently
installed on your Dell PowerEdge NAS system with update components
that are packaged on the Dell PowerEdge Updates CD. Use the SUU to
view a comparison report of the versions and to update an entire system.
14 Getting Started Guide
Page 17

Updating Your Microsoft Windows Software
To update your Windows Storage Server 2003 R2 x64 Edition operating
system, see the Microsoft Support website at support.microsoft.com. All
updates to Windows Server™ 2003 R2 x64 Editions apply to Windows
Storage Server 2003 R2 x64.
Other Documents You May Need
NOTICE: The Product Information Guide provides important safety and
regulatory information. Warranty information may be included within this
document or as a separate document.
• The
• The
• The
• The system’s
• Systems management software documentation describes the features,
• Operating system documentation describes how to install
Rack Installation Guide
with your rack solution describes how to install your system into a rack.
Administrator’s Guide
configuration procedures on your system and a general overview of
Windows Storage Server 2003 R2 x64 Edition features.
Important Information
and software requirements and all known issues.
User's Guide
and technical specifications.
requirements, installation, and basic operation of the software.
(if necessary), configure, and use the operating system software.
or
Rack Installation Instructions
provides information about completing the
document provides the minimum hardware
provides information about system features
included
Getting Started Guide 15
Page 18

• Documentation for any components you purchased separately provides
information to configure and install these options.
• Updates are sometimes included with the system to describe changes
to the system, software, and/or documentation.
NOTE: Always read the updates first because they often supersede
information in other documents.
• Release notes or readme files may be included to provide last-minute
updates to the system, documentation, or advanced technical reference
material intended for experienced users or technicians.
• The
Server Update Utility User's Guide
describes how you can use the
Server Update Utility to view the software versions on your system and
update your system’s software. It can be downloaded from the Dell
Support website at
support.dell.com
.
16 Getting Started Guide
Page 19

Microsoft® Windows
®
Storage Server 2003 R2
x64 Edition
使用入门指南
www.dell.com | support.dell.com
Page 20

注和注意
注:注表示可以帮助您更好地使用计算机的重要信息。
注意:注意表示可能会损坏硬件或导致数据丢失,
并告诉您如何避免此类问题。
____________________
本说明文件中的信息如有更改,恕不另行通知。
© 2006 Dell Inc.
未经
Dell Inc.
本文中使用的商标:
是
Dell Inc.
Microsoft 和 Windows 是 Microsoft Corporation
本文件中述及的其它商标和产品名称是指拥有相应商标和名称的公司或
其制造的产品。
品名称不拥有任何专有权。
2006 年 2
版权所有,翻印必究。
书面许可,严禁以任何形式进行复制。
的商标;
月
Dell、DELL
Windows Server 是 Microsoft Corporation
Dell Inc.
对本公司的商标和产品名称之外的其它商标和产
P/N GJ804
徽标、
PowerEdge 和 Dell OpenManage
修订版
的注册商标。
的商标,
A01
Page 21

目录
简介 . . . . . . . . . . . . . . . . . . . . . . . . . . . . . . . . . . 21
输入默认管理员名称和密码
为
系统配置网络
NAS
IP
配置系统进行网络访问
使用键盘、显示器和鼠标配置系统
更改管理员密码
. . . . . . . . . . . . . . . . . . . . . . . . . 24
使用多语种用户界面本地化系统
启动
Windows Storage Server
访问
Microsoft
在主机上本地访问 MMC . . . . . . . . . . . . . . . . . . . . . . 26
使用远程桌面连接访问系统
安装
Dell OpenManage Server Administrator
访问 Server Administrator. . . . . . . . . . . . . . . . . . . . . . 29
将可信站点添加到您的浏览器
更新系统
更新 Microsoft Windows 软件
管理控制台
. . . . . . . . . . . . . . . . . . . . . . . . . . . . . . 30
. . . . . . . . . . . . . . . . 22
. . . . . . . . . . . . . . . 22
地址
. . . . . . . . . . . . . . . . . . . 23
. . . . . . . . . . 24
. . . . . . . . . . . . 25
管理控制台
. . . . . . . . . . . . . . . . . 26
. . . . . . . . . . . . . . . . . . . . 26
. . . . . . . . . . . . . . . . . . 29
. . . . . . . . . . . . . . . . . . . 30
. . . . . . 25
. . . . 27
您可能需要的其它说明文件 . . . . . . . . . . . . . . . . 30
目录 19
Page 22

20 目录
Page 23

本说明文件概要介绍
作系统,并提供有关在公司网络上配置、本地化和安装
网络连接存储器
本说明文件提供有关以下主题的信息:
•
操作系统概览
•
输入用户名和密码
•
配置网络
•
配置系统进行网络访问
•
使用键盘、显示器和鼠标配置系统
•
更改管理员密码
•
使用多语种用户界面
•
启动
Windows Storage Server
•
访问
MUI
•
安装
Dell OpenManage™ Server Administrator
Microsoft® Windows® Storage Server 2003 R2 × 64
(NAS)
IP
系统的信息。
地址
(MUI)
本地化系统
管理控制台
简介
操
Dell™ PowerEdge™
Windows Storage Server 2003 R2 × 64 Edition
能,简化了设置和存储管理过程,提高了可扩展性,并经过专门优化以提
供最佳的
作系统系列的最新版本,它在存储管理方面提供了重要的增强功能,
并且易于安装。
PowerEdge NAS
操作系统。大多数设置过程已经完成,无需用户干预。
第一次引导系统时,将开始
过程。此过程完成后,系统将自动重新引导。完成
装)过程后,用户可以本地或远程访问服务器。
以下各节介绍有关完成操作系统安装过程的信息。
注:如果系统已预配置了软件 RAID 5,系统将执行 RAID 同步以优化阵列。
此过程在后台运行,在完成之前可能会影响系统的整体性能。如果在此过
程完成之前关闭系统电源,则在系统通电时将再次开始 RAID 同步,
直至此过程完成。
性能。
NAS
系统已预配置了
Windows Storage Server 2003 R2 × 64 Edition
Windows Storage Server 2003 R2 × 64 Edition
Microsoft Mini Setup(Microsoft
操作系统增加了新的搜索功
是本操
袖珍安装)
Mini Setup
使用入门指南 21
(袖珍安
Page 24

有关详情
有关
Windows Storage Server 2003 R2 × 64 Edition
请参阅
Dell 支持 Web
Storage Server 2003 R2
Storage Server 2003 R2
有关支持的最低
支持
Web 站点
Server 2003 R2
Server 2003 R2
×
×
站点
support.dell.com
×
64 Administrator’s Guide(《Microsoft Windows
×
管理员指南》)
64
、固件和
BIOS
www.dell.com/ostechsheets
64 Important Iormation(Microsoft Windows Storage
重要信息)说明文件。
64
控制器版本的信息,请参阅
RAID
上的
输入默认管理员名称和密码
操作系统的详情,
上的
Microsoft Windows
Dell
Microsoft Windows Storage
首次登录
管理员用户名为
为
NAS
如果网络上已配备
因为
DHCP
务器,则通过
地址。
IP
要访问
Network Configuration
然后选择
Configuration
注:如果网络上未配备 DHCP 服务器,则需要使用本地键盘、显示器和
鼠标来完成 NAS 配置。有关详情,请参阅“使用键盘、显示器和鼠标配
置系统”。
注:默认情况下,已启用 Windows 防火墙。在访问远程系统时,
可能会遇到与连接有关的问题。
系统时,必须输入管理员用户名和密码。
NAS
administrator
系统配置网络
DHCP
会自动为
Network Configuration
Settings
(设置)
(网络配置)。
服务器,则无需配置
NAS
系统分配地址。如果网络中未配置
→
,默认密码为 storageserver
地址
IP
(网络配置)窗口配置
(网络配置)窗口,请单击
Control Panel
(控制面板)
NAS
NAS
系统的
Start
→
系统的默认
IP
NAS
(开始),
Network
。
地址,
DHCP
系统的
服
22 使用入门指南
Page 25

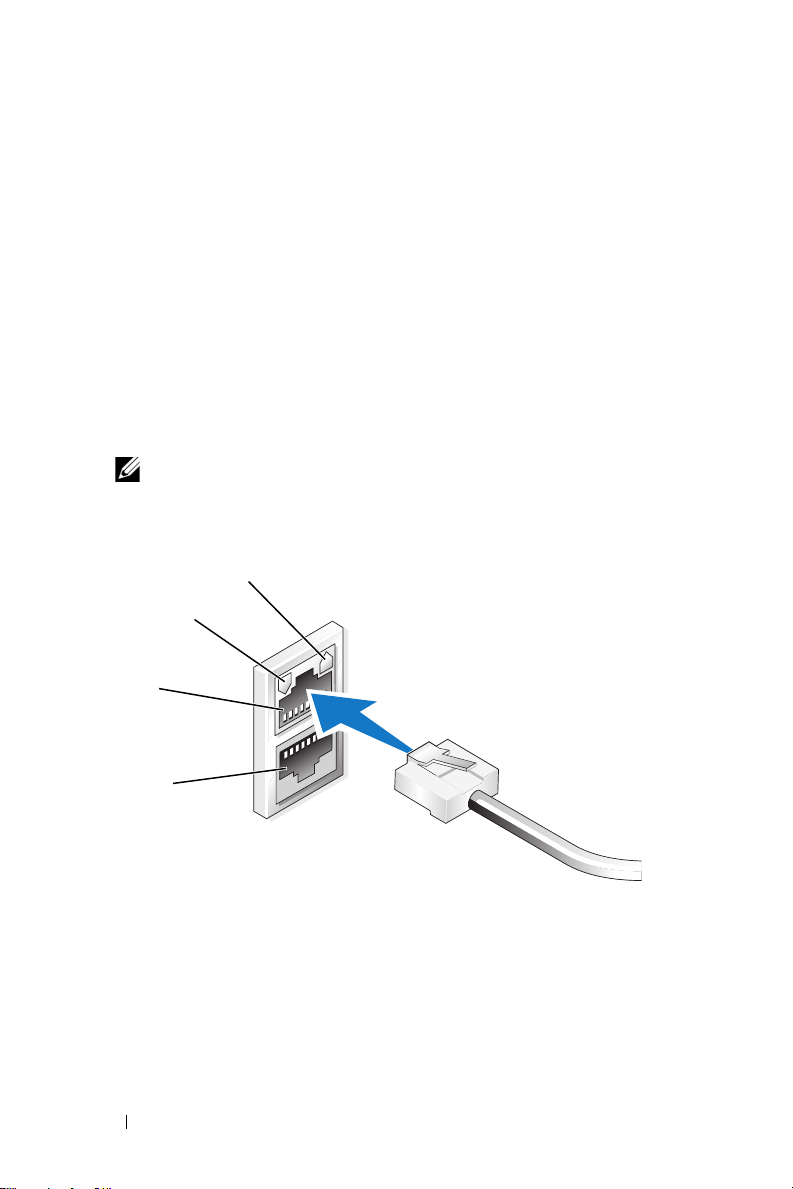
配置系统进行网络访问
如果已打开
1
将以太网电缆的一端连接到
2
连接器(请参阅图
NIC
有关系统连接器位置的详情,请参阅
将以太网电缆的另一端连接到有效的以太网插孔。
3
按电源按钮打开
4
确保与
5
NIC
请参阅图
1-1
接是正常的。如果
系统的电源,请关闭电源。
NAS
系统背面上的一个
NAS
)。
1-1
系统。
NAS
连接器相关的
。如果
NIC
连接器的
NIC
亮起,验证服务器已连接至以太网。
LED
连接器的
NAS
LED
呈琥珀色闪烁,则表明正在成
LED
功地传输数据。
如果
地插入
NAS
息(
图
1-1. NIC
NIC 2 LED
未亮起,请进行检查,以确保以太网电缆的两端分别正确
LED
连接器和以太网插孔中。
NIC
系统将从网络中的
地址、网关子网掩码和
IP
注:引导 NAS 系统可能需要几分钟,具体视连接至系统的存储设备
的配置和数量而定。
连接器
NIC 1 LED
DHCP
DNS
服务器上检索设置网络参数所需的信
服务器地址)。
10/100/1000 RJ-45
系统的《用户指南》。
呈绿色持续亮起,则表明连
NIC 1
NIC 2
使用入门指南 23
Page 26

使用键盘、显示器和鼠标配置系统
注:根据配置方法,您可能需要进行本地 KVM 连接,才能完成安装和配
置过程。如果远程系统可以完成配置过程,则无需进行本地 KVM 连接,
系统即可正常运行。
将键盘、显示器和鼠标连接至
1
NAS
系统。
有关系统连接器的信息,请参阅《用户指南》。
按电源按钮打开
2
登录到
3
注:默认的管理员用户名为 administrator,默认密码为
storageserver。
NAS
系统。
NAS
系统。
更改管理员密码
单击
1
Computer Management
在
2
Management (Local)
and Groups
在右侧窗格中,右键单击
3
Passw ord
在
4
单击
在相应字段中输入并确认密码,然后单击OK(确定)。
5
关闭
6
(开始),选择
Start
Administrative Tools
(计算机管理)。
Computer Management
(计算机管理)窗口的
(计算机管理 [本地])树中,展开
(本地用户和组),然后选择
Administrator
(设置密码)。
Set Password for Administrator
Proceed
Computer Management
(继续)。
(计算机管理)窗口。
Users
(管理员),然后选择
(为管理员设置密码)窗口中,
(管理工具)
Computer
Local Users
(用户)。
→
Set
24 使用入门指南
Page 27

使用多语种用户界面本地化系统
系统允许您更改操作系统用户界面的母语。默认情况下,系统中安
NAS
装了多种语言。多语种用户界面
作系统菜单、对话框和帮助文件。
如果系统预配置了
则
干预。
要更改默认的浏览器语言:
在区域设置和浏览器设置中都已预配置了本地化语言。无需用户
MUI
打开
1
2
3
4
5
6
Internet Explorer
在
To ol s
在
General
在
Language Preference
在
Language
单击
OK
Windows Storage Server 2003 R2 × 64 Edition
(工具)菜单中,选择
(常规)选项卡中,单击
(语言)框中,选择语言。
(确定)。
(MUI) 允许 NAS
浏览器。
(语言首选项)窗口中,单击
Internet Options(Internet
Languages
系统用多种语言显示操
(语言)。
Add
操作系统,
选项)。
(添加)。
启动
Windows Storage Server
中,可提供简单便捷的系统管理方法。当您登录到
2003 R2
要打开
然后选择
Management
在
Management (Local)
中间窗格提供多种可供选择的方案,帮助您进行操作系统管理。
Windows Storage Server
管理控制台显示在
×
操作系统时,系统将自动打开该管理控制台。
64
Windows Storage Server
All Programs
(
Windows Storage Server
Management Console
(所有程序)
(管理控制台)窗口中,左窗格中将显示
(文件服务器管理 [本地])节点作为默认节点。
管理控制台,请单击
→
Windows Storage Server
管理)。
管理控制台
Microsoft
管理控制台
Windows Storage Server
Start
使用入门指南 25
(开始),
File Server
(MMC)
Page 28

访问
默认情况下,
行磁盘管理和配置
请参阅系统随附的
通过
Microsoft
配置为
MMC
NFS
Microsoft MMC
,可以使用以下方法之一配置存储设备:
MMC
•
在主机上本地访问
使用远程桌面连接远程访问
•
管理控制台
Microsoft
,还可用作常规的
MMC
开始菜单的一部分。
说明文件。
MMC
管理站。有关详情,
NAS
MMC
可用于进
在主机上本地访问
在主机上,
后,在
1
2
注:nas.msc 文件位于
MMC
(开始)菜单中未显示
Start
单击
Start
在
nas.msc
(打开)字段中,键入以下命令,然后单击
Open
MMC
显示为
(开始),然后选择
(开始)菜单中的一个可选项。如果启动
Start
c:\windows\system32
,则执行以下步骤:
MMC
(运行)。
Run
下。
(确定):
OK
使用远程桌面连接访问系统
使用远程桌面连接来进行远程服务器管理,可以减少与远程管理相关的额
外开销。用于管理的远程桌面通过终端服务技术实现,它是专门为管理服
务器而设计的。
对于访问服务器的客户机系统,用于管理的远程桌面不需要特殊许可。
此外,在使用用于管理的远程桌面时,无需安装终端服务器许可。
通过安装远程桌面连接,管理员也可以从运行
上全面管理运行
注:要从远程系统连接到用于管理的远程桌面,请使用远程桌面连接。
Windows
Windows Storage Server 2003 R2 × 64 Edition
较早版本的系统
的计算机。
26 使用入门指南
Page 29

创建远程桌面连接并保存到您的桌面上
要创建和保存指向
面连接,请执行以下步骤:
单击
1
2
Start
在
Open
mstsc
Windows Storage Server 2003 R2 × 64 Edition
(开始),然后选择
(打开)字段中,键入以下命令,然后单击
Run
(运行)。
的远程桌
(确定)。
OK
屏幕将显示
在
Computer
3
地址,然后单击
在
Remote Desktop Connection
4
settings
在
Save As
5
键入连接的名称,并包含默认的
在
Save in
6
然后单击
此连接已保存到您的桌面上。
有关配置远程桌面连接的详情,请单击
(远程桌面连接)窗口中的
安装
Dell OpenManage Server Administrator
器的界面(
理解决方案,同时通过操作系统提供了一个命令行界面
借助于
统;同时,通过全面、一对一的系统管理功能,可以将精力集中在整个网
络的管理上。
Dell OpenManage Server Administrator
Server Administrator
注:使用 Server Administrator 的“系统”既可以是独立式系统,也可以是
在单独的机箱中装有多个网络连接存储器装置的服务器,还可以是在机箱
中安装了一个或多个服务器模块的模块化系统。
Remote Desktop Connection
(计算机)字段中,键入计算机名称或存储服务器的
Options
(连接设置)框中,单击
(另存为)窗口的
(保存于)下拉式菜单中,选择
(保存)。
Save
Server Administrator
(选项)。
(远程桌面连接)窗口的
Save As
File name
.rdp
(帮助)。
Help
主页)提供了一个全面、一对一的系统管
,用户可以本地和远程管理网络上的
(远程桌面连接)窗口。
Connection
(另存为)。
(文件名称)字段中,
扩展名。
Remote Desktop Connection
通过一个集成的、基于
Desktop
(桌面),
Web
(CLI)。
NAS
IP
浏览
系
有关详情,请参阅
Server Administrator
说明文件。
使用入门指南 27
Page 30

安装
Server Administrator
Dell Installation and Server Management
所管理的系统上安装、升级和卸载
Server Administrator
提供了一个设置程序,用于在
CD
和其它所管理的系
统软件组件。此外,还可以采用无人参与安装方式,通过网络在多个系统
上安装
Server Administrator
使用
Dell Installation and Server Management
行所有支持的
统上安装和升级
要安装
将
1
Windows Storage Server 2003 R2 × 64 Edition
Server Administrator
Server Administrator
Dell Installation and Server Management
。
上的设置程序,可以在运
CD
。
,请按以下步骤进行:
CD
操作系统的系
插入系统的光盘驱
动器。
自动载入程序,并显示
CD
(
Server Administrator
单击
2
Install, Modify, Repair or Remove Server Administrator
(安装、修改、修复或删除
在
License Agreement
3
然后单击
在
Setup Type
4
然后单击“
在
Ready to Install
5
在
Install Wizard Completed
6
(下一步)。
Next
(安装类型)窗口中,选择与配置相应的安装类型,
”(下一步)。
Next
(准备安装)窗口中,单击
Server Administrator Installer
程序)窗口。
Server Administrator
)。
(许可协议)窗口中,阅读并理解此协议,
(安装)。
Install
(安装向导完成)窗口中,单击
Finish
(完成)。
28 使用入门指南
Page 31

访问
Server Administrator
在主机上,双击桌面上的
Administrator
。
Server Administrator
要从位于同一网络中的客户机系统直接访问
Internet Explorer 6.0
或更新版本,并连接
图标可以本地访问
Server Administrator
系统的安全端口
NAS
例如,键入:
https://DELL1234567:1311
其中,
DELL1234567 是
如果防火墙禁用了端口
可用于
OpenManage
单击
1
Start
(开始)
(控制面板)
单击
单击
在
Name
Exceptions
Add port
(名称)字段中,键入 Dell OpenManage Server
2
3
4
Administrator
在
Port number
5
单击
6
如果出现提示,请重新启动防火墙服务。
7
(确定)。
OK
1311
。
→
Windows Firewall(Windows
(例外)选项卡。
(添加端口)。
。
(端口号)字段中,键入 1311
系统的名称。
NAS
,请使用以下过程设置例外,以使端口
,然后选择
Settings
(设置)
防火墙)。
将可信站点添加到您的浏览器
由于提高了
Microsoft
系统可能会提示您将这些站点添加到可信站点区域。
要将可信站点添加到
在
1
(工具)菜单中,单击
To ol s
屏幕将显示
单击
2
Security
屏幕将显示
单击
3
Trusted Sites
屏幕将显示
单击
4
Sites
屏幕将显示
安全标准,因此当您初次访问互联网或内部网时,
Internet Explorer
Internet Options(Internet
,请执行以下步骤:
Internet Options(Internet
选项)窗口。
(安全)选项卡。
Security
(安全)选项卡菜单。
(受信任的站点)。
Trusted sites
(受信任的站点)选项。
(站点)。
Trusted sites
(可信站点)窗口。
→
Control Panel
。
Server
,请打开
1311。
1311
选项)。
使用入门指南 29
Page 32

在
Add this Web site to the zone:
5
中,使用
该站点将出现在
安全协议键入站点的地址,然后单击
https
:
Web sites:
(将该网站添加到区域中:)字段
Add
(网站:)框中。
(添加)。
重复步骤
6
屏幕将显示
单击
7
添加任何其它的站点,然后单击
5
Internet Options(Internet
(确定)。
OK
(确定)。
OK
选项)窗口。
更新系统
Server Update Utility
应用程序。也可以从
Update Utility
Update Utility User
要更新
件包,您可以在
前安装在
中的更新组件进行比较。使用
CD
个系统。
更新
Microsoft Windows
要更新
Microsoft
Edition
(服务器更新公用程序,
Server Administrator
Dell PowerEdge Updates
Dell PowerEdge NAS
Windows Storage Server 2003 R2 × 64 Edition
支持网站
的所有更新均适用于
包含一个用于识别服务器和对服务器应用更新的
CD
Dell 支持 Web 站点
’s
(《服务器更新公用程序用户指南》)。
Guide
的单独组件,请使用组件特定的
系统上的组件版本与
SUU
support.dell.com
)。有关详情,请参阅
SUU
上找到该软件包。
CD
Dell PowerEdge Updates
查看版本比较报告,然后更新整
下载 Server
Dell
软件
操作系统,请参阅
support.microsoft.com。Windows Server 2003 R2 × 64
Windows Storage Server 2003 R2 × 64。
您可能需要的其它说明文件
注意:《产品信息指南》,提供了重要的安全信息和管制信息。保修信
息可能包括在该说明文件中,也可能作为单独的说明文件提供。
•
随机架解决方案附带的《机架安装指南》或《机架安装说明》,
介绍了如何在机架中安装系统。
•
《管理员指南》,提供了有关完成系统配置过程的信息,并简要概
述了
Windows Storage Server 2003 R2 × 64 Edition
•
重要信息说明文件,提供了最低硬件和软件要求及所有的已知问题。
系统的《用户指南》,提供了有关系统功能和技术规格的信息。
•
的功能。
更新软
SUU
Server
将当
30 使用入门指南
Page 33

•
系统管理软件说明文件,介绍了软件的功能、要求、安装和基本
操作。
•
操作系统说明文件,介绍了如何安装(如果有必要)、配置和使用
操作系统软件。
•
单独购买的任何组件所附带的说明文件,提供了有关配置和安装这
些选件的信息。
•
系统有时附带更新,用于说明对系统、软件和/或说明文件所做的
更改。
注:请始终先阅读这些更新,因为更新通常用于替代其它说明文件中的
信息。
•
系统可能附带版本注释或自述文件,以提供系统、说明文件的最新
更新,或者为有经验的用户或技术人员提供高级技术参考资料。
•
Server Update Utility User’s Guide
(《服务器更新公用程序用户指
南》),说明了如何使用服务器更新公用程序来查看系统上的软件
版本和更新系统的软件。可以从
Dell 支持 Web 站点
support.dell.com
下载该指南。
使用入门指南 31
Page 34

32 使用入门指南
Page 35

Microsoft® Windows
®
Storage Server 2003 R2
x64 Edition
入門指南
www.dell.com | support.dell.com
Page 36

備註和注意
備註:「備註」指出可協助您善加利用電腦的重要資訊。
注意:「注意」表示可能會損壞硬體或導致資料遺失,
並告訴您如何避免此類問題的發生。
____________________
本文件中的資訊如有變更,恕不另行通知。
© 2006 Dell Inc. 版權所有。
未經 Dell Inc. 的書面許可,不准以任何形式進行複製。
本文件中使用的商標:Dell、DELL 標誌、Pow erE dge 和 Dell OpenManage
為 Dell Inc. 的商標;Windows Server 為商標,而 Microsoft 和 Windows
為 Microsoft Corporation 的註冊商標。
本文件中述及的其他商標和商業名稱可能指擁有相應商標和名稱的公司
實體或其產品。Dell Inc. 對本公司之外的商標和產品名稱不擁有任何專
有權。
2006 年 2 月 P/N GJ804 修訂版 A01
Page 37

內容
簡介 . . . . . . . . . . . . . . . . . . . . . . . . . . . . . . . . . . 37
輸入預設管理員使用者名稱和密碼
組態 NAS 系統的網路 IP 位址
設定系統進行網路存取
. . . . . . . . . . . . . . . 38
. . . . . . . . . . . . . . . . . . . 39
使用鍵盤、顯示器和滑鼠設定系統
變更管理員密碼
. . . . . . . . . . . . . . . . . . . . . . . . . 40
使用多語言使用者介面本土化系統
啟動 Windows Storage Server 管理主控台
存取 Microsoft 管理主控台
在主機上從本機存取 MMC . . . . . . . . . . . . . . . . . . . . 42
使用遠端桌面連線存取系統
. . . . . . . . . . . . . . . . . 41
. . . . . . . . . . . . . . . . . . . . 42
. . . . . . . . . . 38
. . . . . . . . . . 40
. . . . . . . . . . 41
. . . . . . 41
安裝 Dell OpenManage Server Administrator . . . . 43
存取 Server Administrator. . . . . . . . . . . . . . . . . . . . . . 44
將「信任的網站」新增至瀏覽器
更新系統
更新 Microsoft Windows 軟體
. . . . . . . . . . . . . . . . . . . . . . . . . . . . . . 45
. . . . . . . . . . . . . . . . . 45
. . . . . . . . . . . . . . . . . . . 46
其他您可能需要的文件 . . . . . . . . . . . . . . . . . . . 46
內容 35
Page 38

36 內容
Page 39

本文件概述
以及關於在公司網路中設定、本土化和安裝
Attached Storage (NAS)
本文件提供關於下列主題的資訊:
•
•
•
•
•
•
•
•
•
•
Microsoft® Windows® Storage Server 2003 R2 × 64
系統的資訊。
作業系統概觀
輸入您的使用者名稱和密碼
設定網路
設定系統進行網路存取
使用鍵盤、顯示器和滑鼠設定系統
變更管理員密碼
使用多語言使用者介面
啟動
存取
安裝
IP
位址
(MUI)
Windows Storage Server
MUI
Dell OpenManage™ Server Administrator
本土化系統
管理主控台
簡介
作業系統
Dell™ PowerEdge™ Network
Windows Storage Server 2003 R2 × 64 Edition
簡化的設定和儲存管理、擴充性,並已專門調整為提供最佳的
Windows Storage Server 2003 R2 × 64 Edition
版本,大大增強了儲存管理功能,並且簡化了安裝。
您的
PowerEdge NAS
Edition
在系統第一次啟動時,
時,系統自動重新啟動。迷你安裝程式完成安裝程序後,您可以從本機
或遠端存取伺服器。
下列各節詳述如何完成作業系統安裝程序。
作業系統預先組態。大多數設定程序均已完成,無需使用者介入。
備註:如果您的系統已使用軟體 RAID 5 預先組態,系統將執行 RAID 同
步以最佳化陣列。同步程序在背景中執行,執行期間可能會影響您的整
體系統效能。如果在該程序完成之前關閉了系統電源,則在系統加電時,
RAID 同步將重新開始,直到完成為止。
系統已使用
Microsoft
Windows Storage Server 2003 R2 × 64
迷你安裝程式即會開始安裝。安裝完成
作業系統新增了搜尋功能、
NAS
效能。
是本作業系統系列中的最新
入門指南 37
Page 40

更多資訊
如需
Windows Storage Server 2003 R2 × 64 Edition
請參閱
Dell
支援網站 support.dell.com 上的
×
Server 2003 R2
2003 R2
如需有關最小支援的
網站
www.dell.com/ostechsheets 上的 Microsoft Windows Storage Server 2003
R2
×
64 Important Information (Windows Storage Server 2003 R2 × 64
) 文件。
資訊
64 Administrator’s Guide (Microsoft Windows Storage Server
×
64
管理員指南)。
BIOS
、韌體和
RAID
控制器版本,請參閱
作業系統的詳細資訊,
Microsoft Windows Storage
輸入預設管理員使用者名稱和密碼
Dell
支援
重要
在第一次登入
NAS
系統的預設管理員使用者名稱為 administrator
storageserver
NAS
系統時,必須輸入管理員使用者名稱和密碼。
。
,預設密碼為
組態 NAS 系統的網路 IP 位址
如果您的網路上有
因為
DHCP
伺服器組態,請透過
系統的
IP
位址。
要存取
Network Configuration (網路組態)
並選擇
Settings (設定) →
Configuration
備註:如果您的網路上沒有 DHCP 伺服器,則需要本機鍵盤、顯示器和
滑鼠來完成 NAS 組態。請參閱「使用鍵盤、顯示器和滑鼠設定系統」
以獲得更多資訊。
備註:Windows 防火牆預設為啟用。在存取遠端系統時,您可能會遇到
連接性問題。
DHCP
會自動指定位址給
(
網路組態)。
伺服器,則無需組態
Network Configuration (網路組態)
Control Panel (控制台) →
NAS
NAS
系統。如果您的網路未使用
視窗,請按一下
系統的
視窗組態
Network
IP
Start (開始)
位址,
DHCP
NAS
38 入門指南
Page 41
設定系統進行網路存取
1
如果
NAS
系統電源已開啟,請關閉。
2將 Ethernet
NIC
如需系統連接器位置的詳細資訊,請參閱
電纜的一端連接至
連接器 (請參見圖
1-1)
NAS
。
系統背面的一個
NAS
系統的使用者指南。
10/100/1000 RJ-45
3將 Ethernet
4
按電源按鈕以開啟
5
可透過觀察與
Ethernet
電纜的另一端連接至運作中的
NIC
。請參見圖
則表明連接狀況良好。如果
則表明資料正在順利傳送。
LED
如果
接至
NAS
數
(IP
圖 1-1. NIC 連接器
NIC 2 LED
NIC 1
未亮起,請檢查
NIC
連接器和
系統將從網路上的
位址、閘道子網路遮罩和
備註: NAS 系統啟動可能需要幾分鐘,視您的組態和系統安裝的儲
存容量而定。
NIC 1 LED
NAS
系統。
關聯的
1-1
。如果
Ethernet
DHCP
Ethernet
LED
是否亮起來確認伺服器是否連接至
NIC
NIC
連接器的
Ethernet
插座。
連接器的
電纜的各端是否正確穩定地連
LED
LED
插座。
呈綠色持續亮起,
呈琥珀色閃爍,
伺服器擷取所需的資訊來設定網路參
DNS
伺服器位址)。
NIC 2
入門指南 39
Page 42

使用鍵盤、顯示器和滑鼠設定系統
備註:視您的組態方法而定,可能需要進行本機 KVM 連接才能完成安裝
和組態程序。如果遠端系統可以完成組態程序,則無需本機 KVM 連接即
可進行操作。
1
將鍵盤、顯示器和滑鼠連接至
如需系統連接器的資訊,請參閱系統的使用者指南。
2
按電源按鈕以開啟
3
登入
NAS
系統。
備註: 預設管理員使用者名稱為 administrator,預設密碼為
storageserver。
NAS
系統。
NAS
系統。
變更管理員密碼
1
按一下 Start (開始)
Management
2在
Computer Management (電腦管理) 視窗的 Computer Management
(Local)
使用者和群組
3
在右窗格中,用滑鼠右鍵按一下 Administrator (管理員) 並選擇
Set Password (設定密碼)。
4在
Proceed (繼續)。
5
在對應的欄位中輸入並確認您的密碼,然後按一下
6
關閉 Computer Management (電腦管理)
(
電腦管理(本機))
Set Password for Administrator (設定管理員密碼) 視窗中,按一下
並選擇
Administrative Tools (管理工具)→ Computer
(
電腦管理)。
樹中,展開 Local Users and Groups (本機
)
並選擇 Users (使用者)。
視窗。
OK (確定)。
40 入門指南
Page 43

使用多語言使用者介面本土化系統
NAS
系統允許您變更作業系統使用者介面的原始語言。系統預設安裝有
許多語言。多語言使用者介面
系統功能表、對話方塊和說明檔案。
如果您的系統已經使用
系統預先組態,則
先組態。而無需使用者介入。
若要變更預設的瀏覽器語言,請:
1
開啟
Internet Explorer
2在工具
3在一般
4在語言喜好設定
5在語言
6
按一下確定。
MUI
功能表中,選擇
標籤中,按一下語言。
視窗中,按一下新增。
方塊中,選擇一種語言。
(MUI) 允許 NAS
Windows Storage Server 2003 R2 × 64 Edition
的區域設定和瀏覽器設定將會用本土化的語言預
瀏覽器。
網際網路選項
系統以多種語言顯示作業
。
啟動 Windows Storage Server 管理主控台
作業
Windows Storage Server
中,提供簡便的系統管理方法。該管理主控台在您登入
Server 2003 R2
若要開啟
程式
→ Windows Storage Server 管理。
Management Console (管理主控台) 視窗中,左窗格顯示 File Server
在
Management (Local)
中央窗格提供協助您管理作業系統的可選情景。
×
Windows Storage Server
管理主控台將出現在
64
作業系統時自動開啟。
管理主控台,請按一下開始並選擇
(
檔案伺服器管理(本機
Microsoft
管理主控台
Windows Storage
))
節點作為預設節點。
(MMC)
存取 Microsoft 管理主控台
MMC
預設組態為
理、組態
MMC
利用
•
•
NFS
文件以獲得更多資訊。
MMC
在主機上從本機存取
使用遠端桌面連線從遠端存取
Microsoft
以及用作一般的
,可藉下列任一方法組態您的儲存系統:
開始功能表的一部份。
NAS
管理站。請參閱系統隨附的
MMC
MMC
MMC
可用於磁碟管
入門指南 41
Microsoft
所有
Page 44

在主機上從本機存取 MMC
MMC
在主機上顯示為開始功能表中的一個可選項目。如果
後沒有顯示在
1
按一下開始,然後選擇執行。
2在開啟
開始
功能表中,請執行下列步驟:
欄位中,鍵入下列內容,然後按一下確定:
MMC
在啟動
nas.msc
備註:nas.msc 檔案位於 c:\windows\system32。
使用遠端桌面連線存取系統
使用遠端桌面連線進行遠端伺服器管理可以降低與遠端管理相關的費用。
「用於管理的遠端桌面」由終端機服務技術支援,專門設計用於伺服器
管理。
「用於管理的遠端桌面」不需要特殊的用戶端系統授權即可存取伺服器。
此外,在使用「用於管理的遠端桌面」時,也無需安裝終端機伺服器授權。
安裝遠端桌面連線之後,管理員亦可從早期版本的
理執行
Windows Storage Server 2003 R2 × 64 Edition
備註:若要從遠端系統連接至「用於管理的遠端桌面」,請使用遠端桌
面連線。
建立並儲存遠端桌面連線至桌面
若要建立並儲存遠端桌面連線至
R2
×
64 Edition
1
按一下開始,然後選擇執行。
2在開啟
,請執行下列步驟:
欄位中,鍵入下列內容,然後按一下確定:
Windows Storage Server 2003
mstsc
Windows
的電腦。
系統完全管
螢幕上將會出現 Remote Desktop Connection (遠端桌面連線)
3在
Computer (電腦) 欄位中,鍵入儲存伺服器的電腦名稱或
然後按一下
4在
Remote Desktop Connection (遠端桌面連線)
settings
5在
Save As (另存新檔) 視窗的 File name (檔案名稱) 欄位中,
鍵入連線的名稱,要包括預設的
Options (選項)。
視窗的 Connection
(
連線設定) 方塊中,中,按一下 Save As (另存新檔)。
.rdp 副檔名。
42 入門指南
IP
視窗。
位址,
Page 45

6在
Save in (儲存位置) 下拉功能表中,選擇 Desktop (桌面),
然後按一下
您的連線即會儲存至桌面。
如需有關設定遠端桌面連線的詳細資訊,請在 Remote Desktop Connection
(
遠端桌面連線) 視窗中按一下 Help (說明)。
Save (儲存檔案)。
安裝 Dell OpenManage Server Administrator
Dell OpenManage Server Administrator
瀏覽器的介面
的一對一管理解決方案。
Server Administrator
以及透過全面的一對一管理來集中管理整個網路。
備註:為了使用 Server Administrator,「系統」可以是獨立的系統、將
Network Attached Storage 單元安裝於獨立機殼的伺服器、或在機殼中包
括一或多個伺服器模組的模組化系統。
請參閱您的
安裝 Server Administrator
Dell
安裝與伺服器管理
Server Administrator
您也可以透過自動網路安裝在多個系統上安裝
Dell
使用
Windows Storage Server 2003 R2
Administrator
若要安裝
1將
該
(
伺服器管理員安裝程式) 視窗。
2
按一下 Install, Modify, Repair or Remove Server Administrator
(
安裝、修改、修復或移除伺服器管理員)。
3在
然後按一下
(Server Administrator 首頁)
可讓您從本機和遠端管理網路上的
Server Administrator
CD
提供安裝程式,用以安裝、升級和解除安裝
以及受管理系統上的其他受管理系統軟體元件。
安裝與伺服器管理
。
Server Administrator
Dell
安裝與伺服器管理
CD
將自動載入,並且螢幕上出現 Server Administrator Installer
License Agreement (授權合約) 視窗中,閱讀並理解合約,
Next (下一步)。
CD
透過作業系統使用整合式、基於
或指令行介面
文件以獲得更多資訊。
Server Administrator
上的安裝程式,您可以在所有支援的
×
64 Editions
,請執行下列步驟:
CD
插入系統的光碟機。
作業系統上安裝和升級
(CLI)
NAS
系統,
Web
提供全面
。
Server
入門指南 43
Page 46

4在
Setup Type (安裝類型) 視窗中,選擇適合您的組態的安裝類型,
然後按一下
5在
Ready to Install (準備安裝) 視窗中,按一下 Install (安裝)。
6在
Install Wizard Completed (安裝精靈完成) 視窗中,按一下 Finish
(
完成)。
Next (下一步)。
存取 Server Administrator
您可以連按兩下桌面的 Server Administrator (伺服器管理員) 圖示,
透過主機從本機存取
若要直接從同一網路的用戶端系統存取
Explorer 6.0
例如,鍵入:
https://DELL1234567:1311
或更新版本,然後連接至
Server Administrator
Server Administrator
NAS
。
系統的安全連接埠
,請開啟
1311。
Internet
其中 DELL1234567 為
如果連接埠
1311 供 OpenManage
埠
1 按一下開始,選擇設定→ 控制台→
2
3
4在
5在
6
7
1311
按一下 Exceptions (例外) 標籤。
按一下 Add port (新增連接埠)。
Name (名稱) 欄位中鍵入 Dell OpenManage Server
Administrator
Port number (連接埠號碼) 欄位中鍵入 1311
按一下 OK (確定)。
如果出現提示,請重新啟動防火牆服務。
NAS
系統的名稱。
已被防火牆停用,請使用下列程序設定例外以啟用連接
使用。
。
Windows
防火牆
。
。
44 入門指南
Page 47

將「信任的網站」新增至瀏覽器
由於
Microsoft
提示您將網際網路或公司內部網站新增至信任的網站區域。
若要將信任的網站新增至
1在工具
螢幕上將會出現
2
按一下
螢幕上將會出現
3
按一下
螢幕上將會出現
4
按一下網站。
螢幕上將會出現
安全保護標準的提高,在您開始存取網站時,系統可能會
Internet Explorer
功能表中,按一下
網際網路選項
安全性
標籤。
安全性
標籤功能表。
信任的網站
。
信任的網站
信任的網站
網際網路選項
視窗。
選項。
視窗。
,請執行下列步驟:
。
5在將此網站加到該區域:
協定,然後按一下
該網站將出現在
6
重複步驟5 以新增任何其他網站,然後按一下確定。
螢幕上將會出現
7
按一下確定。
網站:
網際網路選項
欄位中,鍵入網址,使用
新增
。
方塊中。
視窗。
https:
更新系統
Server Update Utility (
新至伺服器的應用程式。
support.dell.com 下載。請參閱 Server Update Utility User’s Guide
站
(
伺服器更新公用程式使用者指南)
若要更新個別
件,這些套件可在
到。
SUU
PowerEdge Updates
較報告和更新整個系統。
Server Administrator
會將您
伺服器更新公用程式) CD
Server Update Utility (SUU)
以獲得更多資訊。
元件,請使用元件特定的
Dell PowerEdge Updates (Dell PowerEdge
Dell PowerEdge NAS
CD
上封裝的更新元件進行比較。請使用
系統上目前安裝的元件版本與 Dell
包含用於辨識和套用更
亦可從
更新) CD
SUU
入門指南 45
安全通訊
Dell
Dell
支援網
更新套
中找
檢視比
Page 48
更新 Microsoft Windows 軟體
若要更新
Microsoft
R2
Windows Storage Server 2003 R2 × 64 Edition
支援網站 support.microsoft.com
×
64 Editions
更新均適用於
Windows Storage Server 2003 R2 × 64。
作業系統,請參閱
。所有
Windows Server 2003
其他您可能需要的文件
注意:產品資訊指南提供重要的安全與管制資訊。保固資訊包含於此文
件或以單獨文件附加。
•
機架安裝指南或機架安裝說明隨附於機架解決方案,說明如何將系
統安裝於機架中。
•
管理員指南提供在系統上完成組態程序的資訊,並概述
Storage Server 2003 R2
•
重要資訊文件提供最低的硬體及軟體要求,並列出所有已知的問題。
系統的使用者指南提供有關系統功能和技術規格的資訊。
•
•
系統管理軟體說明文件說明軟體的功能、要求、安裝和基本操作。
作業系統說明文件說明如何安裝 (如有必要)、組態和使用作業系統
•
軟體。
•
您單獨採購的任何元件之說明文件提供這些選件的組態和安裝資訊。
•
有時候更新會包含在系統中以描述系統、軟體和/或說明文件的變更。
備註:請務必先閱讀更新內容,因為它們經常在其他文件中更新資訊。
•
可能會隨附附註說明或讀我檔案以提供最新的系統更新、說明文件
或進階的技術參考資料以供有經驗的使用者或技術人員使用。
•
伺服器更新公用程式使用者指南說明如何使用伺服器更新公用程式
檢視系統上的軟體版本和更新系統軟體。該公用程式可從
網站
support.dell.com 下載。
×
64 Edition
的功能。
Windows
Dell
支援
46 入門指南
Page 49

Microsoft® Windows
®
Storage Server 2003 R2
x64 Edition
はじめに
www.dell.com | support.dell.com
Page 50

メモ、注意
メモ: コンピュータを使いやすくするための重要な情報
を説明しています。
注意:
示し、その危険を回避するための方法を説明しています。
____________________
ハードウェアの損傷やデータの損失の可能性を
本書の内容は予告なく変更されることがあります。
©2006すべての著作権は Dell Inc. にあります。
Dell Inc. の書面による許可のない複製は、いかなる形態においても厳
重に禁じられています。
Dell
および
DELL
ロゴ、
本書で使用されている商標について:
Dell OpenManage
および
は Microsoft Corporation の商標です。
は Microsoft Corporation の登録商標です。
本書では、必要に応じて上記以外の商標や会社名が使用されている場
合がありますが、これらの商標や会社名は、一切 Dell Inc. に帰属する
ものではありません。
2006 年 2 月 P/N GJ804 Rev. A01
は Dell Inc. の商標です。
Microsoft
PowerEdge
Windows Server
および
Windows
、
Page 51

目次
はじめに . . . . . . . . . . . . . . . . . . . . . . . . . . . . . . 51
デフォルトの管理者ユーザー名と
パスワードの入力
. . . . . . . . . . . . . . . . . . . . . . . 52
NAS システムのネットワーク IP
アドレスの設定
. . . . . . . . . . . . . . . . . . . . . . . . . 53
ネットワークにアクセスするための
システム設定
. . . . . . . . . . . . . . . . . . . . . . . . . . . 53
キーボード、モニター、および
マウスを使用したシステムの設定
管理者パスワードの変更
. . . . . . . . . . . . . . . . . . 55
. . . . . . . . . . 55
多言語ユーザーインタフェースを使用して
システムをローカライズする方法
. . . . . . . . . . 56
Windows Storage Server 管理
コンソールの起動
Microsoft 管理コンソールへのアクセス
. . . . . . . . . . . . . . . . . . . . . . . 56
. . . . . . 57
ホストでローカルから MMC にアクセス . . . . . . . . . . . . 57
リモートデスクトップ接続を使用して
システムにアクセス
. . . . . . . . . . . . . . . . . . . . . . . . 57
目次 49
Page 52

Dell OpenManage Server Administrator の
インストール
Server Administrator へのアクセス . . . . . . . . . . . . . . . . 60
信頼済みサイトのブラウザへの追加
システムのアップデート
Microsoft Windows ソフトウェアのアップデート
. . . . . . . . . . . . . . . . . . . . . . . . . . . 58
. . . . . . . . . . . . . . 61
. . . . . . . . . . . . . . . . . . . . . 62
. . . . . . . 62
その他のマニュアル . . . . . . . . . . . . . . . . . . . . . . 62
50 目次
Page 53

本書では、
ティングシステムの概要、および
Storage
ローカライズする手順について説明します。
本書は次のトピックに関する情報を提供しています。
•
•
•
•
•
•
•
•
•
•
Microsoft® Windows® Storage Server 2003 R2 x64
Dell™ PowerEdge™ Network Attached
(
NAS
)システムを企業ネットワークに設置し、設定、
オペレーティングシステムの概要
ユーザー名とパスワードの入力
ネットワーク
ネットワークにアクセスするためのシステム設定
キーボード、モニター、およびマウスを使用したシステムの設定
管理者パスワードの変更
多言語ユーザーインタフェース(
カライズする方法
Windows Storage Server
MUI
へのアクセス
Dell OpenManage™ Server Administrator
IP
アドレスの設定
MUI
)を使用してシステムをロー
管理コンソールの起動
はじめに
オペレー
Windows Storage Server 2003 R2 x64 Edition
テムは、新しい検索機能、ストレージ管理、拡張性が加わり、セット
NAS
アップが簡易化されているほか、
れるように特別に調整されています。
R2 x64 Edition
リリースであり、インストールが容易に行えるだけでなく、ストレー
ジ管理のさまざまな面が大幅に改善されています。
お使いの
Storage Server 2003 R2 x64 Edition
ストールされ、設定済みです。セットアップ手順のほとんどが完了し
ており、ユーザーの操作は不要です。
システムを初めて起動したときに、
始します。完了すると、システムが自動的に再起動します。
の処理が完了すると、ローカルでもリモートからでもサーバーにアク
セスできます。
は、このオペレーティングシステムシリーズで最新の
PowerEdge NAS
システムには、工場出荷時に
の最適なパフォーマンスが得ら
Windows Storage Server 2003
オペレーティングシステムがイン
Microsoft Mini Setup
オペレーティングシス
Windows
の処理が開
はじめに 51
Mini Setup
Page 54

以下の項では、オペレーティングシステムのインストール手順を完了
する方法について説明します。
メモ:お使いのシステムがソフトウェア RAID 5 で設定済みの場合、シ
ステムは RAID の同期化を実行してアレイを最適化します。この処理は
バックグラウンドで実行され、完了するまでシステム全体のパフォー
マンスが影響を受けることがあります。処理が完了する前にシステム
の電源が切られた場合は、システムに再度電源を入れた時点で RAID の
同期化が再開し、完了するまで続行されます。
詳細情報
Windows Storage Server 2003 R2 x64 Edition
テムの詳細については、デルサポートサイト
『
Microsoft Windows Storage Server 2003 R2 x64 Administrator's
』(
Guide
イド)を参照してください。
BIOS
低いバージョンについては、デルサポートサイト
www.dell.com/ostechsheets で『
Microsoft Windows Storage Server 2003 R2 x64
、ファームウェア、
RAID
コントローラのサポートされている最も
Microsoft Windows Storage
Server 2003 R2 x64 Important Information
Storage Server 2003 R2 x64
重要情報)を参照してください。
オペレーティングシス
support.dell.com で
管理者ガ
』(
Microsoft Windows
デフォルトの管理者ユーザー名とパスワー ドの入力
はじめて
スワードを入力する必要があります。お使いの
ルトの管理者ユーザー名は
ドは
NAS
システムにログインする際には、管理者ユーザー名とパ
storageserver です。
52 はじめに
administrator で、デフォルトのパスワー
NAS
システムのデフォ
Page 55
NAS システムのネットワーク IP アドレスの 設定
ネットワーク上に
自動的に
スを設定する必要はありません。お使いのネットワークが
バーで設定されていない場合は、
システムの
ネットワークの設定 ウィンドウにアクセスするには、
クし、
クします。
NAS
設定→
メモ:ネットワーク上に DHCP サーバーがない場合は、NAS の設定を
完了するためにローカルのキーボード、モニター、およびマウスが必
要です。詳細については、「
スを使用したシステムの設定
メモ:Windows ファイアウォールはデフォルトで有効です。リモート
システムにアクセスする際に、接続に関する問題が発生する場合があ
ります。
DHCP
システムに割り当てるので、
IP
アドレスを設定します。
コントロールパネル→
サーバーがある場合、
ネットワークの設定 ウィンドウで
キーボード、モニター、およびマウ
」を参照してください。
DHCP が IP
NAS
システムの
ネットワークの設定 の順にクリッ
アドレスを
IP
アドレ
DHCP
スタート をクリッ
サー
NAS
ネットワークにアクセスするためのシステ ム設定
1
NAS
システムに電源が入っている場合は、オフにします。
2
Ethernet
RJ-45 NIC
システムコネクタの位置の詳細については、
『ユーザーズガイド』を参照してください。
ケーブルの一方の端を
コネクタ(図
1-1
を参照)の
NAS
システム背面の
1
10/100/1000
つに接続します。
NAS
システムの
3
Ethernet
ジャックに接続します。
4
電源ボタンを押して、
ケーブルのもう一方の端を機能している
NAS
システムの電源を入れます。
Ethernet
はじめに 53
Page 56
5
NIC
コネクタと関連する
Ethernet
が
てください。
は正常です。
に接続されていることを確認します。図
NIC
NIC
LED
コネクタの
コネクタの
の点灯を確かめることで、サーバー
LED
LED
データの転送が正常に行われています。
LED
が点灯していない場合は、
ネクタと
ます。
Ethernet
ジャックに正しく接続されていることを確認し
Ethernet
1-1
を参照し
が緑色に点灯していれば、接続
が黄色に点滅している場合は、
ケーブルの両端が
NIC
コ
システムは、ネットワーク上の
NAS
クパラメータのセットアップに必要な情報(
ウェイサブネットマスク、および
DNS
します。
メモ: 設定やシステムに接続されているストレージの容量によっ
ては、NAS システムが起動するのに数分かかることがあります。
図 1-1 NIC コネクタ
NIC 1 LED
NIC 2 LED
NIC 1
NIC 2
DHCP
サーバからネットワー
IP
アドレス、ゲート
サーバーアドレス)を検索
54 はじめに
Page 57

キーボード、モニター、およびマウスを使 用したシステムの設定
メモ:設定方法によっては、インストールと設定の手順を完了するの
にローカル KVM 接続が必要な場合があります。リモートシステムで設
定手順を完了できる場合は、操作のためにローカル KVM 接続は必要あ
りません。
1
キーボード、モニター、およびマウスを
ます。
システムコネクタの詳細については、お使いのシステムの
『ユーザーズガイド』を参照してください。
2
電源ボタンを押して、
3
NAS
システムにログインします。
メモ: デフォルトの管理者ユーザー名は administrator
で、デフォルトのパスワードは storageserver です。
NAS
システムの電源を入れます。
NAS
システムに接続し
管理者パスワードの変更
1
スタート をクリックし、
に選択します。
2
コンピュータの管理 ウィンドウの コンピュータの管理(ローカル)
ツリーで ローカルユーザーとグループ を展開し、
択します。
3
右ウィンドウペインで Administrator を右クリックし、
パスワードの設定 を選択します。
4
Administrator
クします。
5
パスワードの入力と確認入力を各フィールドで行い、OK
クします。
6
コンピュータの管理 ウィンドウを閉じます。
のパスワードの設定 ウィンドウで、続行
管理ツール→
コンピュータの管理 の順
ユーザー を選
をクリッ
をクリッ
はじめに 55
Page 58

多言語ユーザーインタフェースを使用して システムをローカライズする方法
NAS
システムでは、オペレーティングシステムのユーザーインタフェー
スに使用される言語を変更できます。システムには、デフォルトで多数
の言語がインストールされています。多言語ユーザーインタフェース
(
MUI
)により、
ダイアログ、およびヘルプファイルを複数の言語で表示することがで
きます。
お使いのシステムが
ペレーティングシステムで設定済みの場合、
ウザの設定のどちらにおいても、お使いの言語にあらかじめ設定され
ています。ユーザーは何も行う必要がありません。
デフォルトのブラウザ言語を変更するには、次の手順を実行します。
1
2
3
4
5
6
Internet Explorer
ツール メニューで インターネットオプション を選択します。
全般 タブで、言語
言語の優先順位 ウィンドウで 追加 をクリックします。
言語 ボックスで言語を選択します。
OK をクリックします。
NAS
システムはオペレーティングシステムメニュー、
Windows Storage Server 2003 R2 x64 Edition
MUI
は地域の設定とブラ
ブラウザを開きます。
をクリックします。
オ
Windows Storage Server 管理コンソールの起動
Windows Storage Server
(
MMC
)内に表示され、これを使用すれば、システムの管理が容易に
なります。
ステムにログインすると、管理コンソールは自動的に開きます。
Windows Storage Server
リックし、
の順に選択します。
管理コンソール ウィンドウには、左ウィンドウペインに File Server
Management
ドがデフォルトノードとして表示されます。中央ウィンドウペインに
は、オペレーティングシステムの管理に役立つ選択可能な例が用意さ
れています。
56 はじめに
Windows Storage Server 2003 R2 x64
すべてのプログラム→
(
Local)(ファイルサーバー管理(ローカル))ノー
管理コンソールは
管理コンソールを開くには、
Windows Storage Server
Microsoft
オペレーティングシ
管理コンソール
スタート をク
の管理
Page 59

Microsoft 管理コンソールへのアクセス
MMC
はデフォルトで
ています。
NAS
ムに同梱の
MMC
•
•
MMC
管理ステーションとして使用できます。詳細については、システ
Microsoft MMC
を使用すると、次のいずれかの方法でストレージを設定できます。
ホストでローカルから
リモートデスクトップ接続を使用してリモートから
セス
ホストでローカルから MMC にアクセス
MMC
はホストで、
れます。起動後に
次の手順を実行します。
1
スタート をクリックし、
2
名前 フィールドに次のテキストを入力し、OK
nas.msc
メモ:nas.msc ファイルは c:\windows\system32 にあります。
リモートデスクトップ接続を使用してシステムにアクセス
リモートサーバーの管理にリモートデスクトップ接続を使用して、リモー
ト管理によるオーバーヘッドを低減します。ターミナルサービステクノ
ロジによって有効にされる管理用リモートデスクトップ(
for Administration
管理用リモートデスクトップは、サーバーにアクセスするクライアン
トシステム用に特別なライセンスを必要としません。また、管理用リ
モートデスクトップ使用時には、
トールは不要です。
管理者はまた、リモートデスクトップ接続をインストールすることで、
Windows Storage Server 2003 R2 x64 Edition
タを
Windows
することができます。
メモ:リモートシステムから管理用リモートデスクトップに接続する
には、リモートデスクトップ接続を使用します。
Microsoft Start
は、ディスク管理と
のマニュアルを参照してください。
MMC
スタート メニュー内に選択可能な項目として表示さ
MMC が
)は、サーバー管理専用に設計されています。
の旧バージョンを実行しているシステムから十分に管理
スタート メニューに表示されない場合は、
ファイル名を指定して実行 を選択します。
メニューの一部として設定され
NFS
の設定に、また、一般的な
にアクセス
MMC
をクリックします。
Remote Desktop
Terminal Server Licensing
を実行しているコンピュー
にアク
のインス
はじめに 57
Page 60

リモートデスクトップ接続を作成し、デスクトップに保存する方法
リモートデスクトップ接続を作成し、
R2 x64 Edition
1
スタート をクリックし、
2
名前 フィールドに次のテキストを入力し、OK
mstsc
リモートデスクトップ接続 ウィンドウが表示されます。
3
コンピュータ フィールドにストレージサーバーのコンピュータ名
または
4
リモートデスクトップ接続 ウィンドウの Connection settings
(接続の設定)ボックスで 名前を付けて保存 をクリックします。
5
名前を付けて保存 ウィンドウの ファイル名 フィールドに、デフォ
ルトの
6
保存先 ドロップダウンメニューで デスクトップ を選択し、
保存 をクリックします。
接続がデスクトップに保存されます。
リモートデスクトップ接続の設定の詳細については、
トップ接続
に保存するには、次の手順を実行します。
ファイル名を指定して実行 を選択します。
IP
アドレスを入力し、
.rdp 拡張子を含めて接続用の名前を入力します。
ウィンドウの ヘルプ をクリックしてください。
Windows Storage Server 2003
をクリックします。
オプション をクリックします。
リモートデスク
Dell OpenManage Server Administrator
のインストール
Dell OpenManage Server Administrator
ウザベースのインタフェース(
またはオペレーティングシステムを通じてコマンドラインインタフェー
CLI
ス(
備わっています。
Server Administrator
管理により、ネットワーク上の
トで管理し、ネットワーク全体の管理に集中することができます。
詳細については、お使いの
してください。
)を使用する総合的な
を使用することで、総合的な
メモ:Server Administrator を使用するには、「システム」はスタンドア
ロン、別のシャーシ内に NAS ユニットを備えたサーバー、1 つのシャー
シ内に 1 つまたは複数のサーバーモジュールを組み込んだモジュラーシ
ステムのいずれでもかまいません。
Server Administrator
1 対 1
NAS
Server Administrator
には、統合されたウェブブラ
のホームページ)
のシステム管理ソリューションが
1 対 1
システムをローカルまたはリモー
のマニュアルを参照
のシステム
58 はじめに
Page 61

Server Administrator のインストール
『
Dell Installation and Server Management
Administrator
ネントをお使いのシステムにインストール、アップグレードし、アン
インストールするためのセットアッププログラムが用意されています。
また、
Server Administrator
に無人インストールすることも可能です。
Dell Installation and Server Management
『
ログラムを使用して、サポートされているすべての
Server 2003 R2 x64 Edition
システムに
することができます。
Server Administrator
1
システムの
CD
』をセットします。
CD
ウィンドウが表示されます。
2
Install, Modify, Repair or Remove Server Administrator
(
Server Administrator
除)をクリックします。
3
ライセンス契約 ウィンドウの契約内容を読んで理解したら、
次へ をクリックします。
4
セットアップの種類 ウィンドウで、使用する構成にふさわしいセッ
トアップの種類を選択し、
5
Ready to Install
ウで、
6
Install Wizard Completed
ました)ウィンドウで、
およびその他のシステム管理ソフトウェアのコンポー
をネットワークを介して複数のシステム
オペレーティングシステムを実行している
Server Administrator
をインストールするには、次の手順を実行します。
CD
ドライブに『
がオートロードし、
(インストールの準備が整いました)ウィンド
インストール をクリックします。
をインストールし、アップグレード
Dell Installation and Server Management
Server Administrator
のインストール、変更、修復、または削
次へ をクリックします。
(インストールウィザードが完了し
終了 をクリックします。
CD
』には、
CD
』のセットアッププ
Server
Windows Storage
インストーラ
はじめに 59
Page 62

Server Administrator へのアクセス
デスクトップの Server Administrator アイコンをダブルクリックす
ることで、ホストを通じてローカルで
スできます。
同じネットワーク上にあるクライアントシステムから
に直接アクセスするには、バージョン
Explorer
に接続します。
たとえば、次のように入力します。
https://DELL1234567:1311
を開き、お使いの
NAS
Server Administrator
Server Administrator
6.0
またはそれ以降の
システムのセキュアポート(
にアクセ
Internet
1311
)
DELL1234567
1311
ポート
の手順で例外を設定し、ポート
うに有効にします。
1
スタート
ファイアウォール の順に選択します。
2
例外 タブをクリックします。
3
ポートの追加 をクリックします。
4
名前 フィールドに Dell OpenManage Server Administrator
と入力します。
5
ポート番号 フィールドに 1311 と入力します。
6
OK をクリックします。
7
ファイアウォールサービスの再起動を指示するメッセージが表示
されたら、ファイアウォールサービスを再起動します。
は NAS
がファイアウォールによって無効にされている場合は、次
をクリックし、
システムの名前です。
1311 を OpenManage
設定→
コントロールパネル→
で使用できるよ
Windows
60 はじめに
Page 63

信頼済みサイトのブラウザへの追加
Microsoft
ントラネットのサイトにはじめてアクセスする場合、サイトを信頼済
みサイトゾーンに追加するように求めるメッセージが表示される場合
があります。
信頼済みサイトを
します。
1
2
3
4
5
の高度なセキュリティ基準により、インターネットまたはイ
Internet Explorer
ツール メニューで インターネットオプション をクリックします。
インターネットオプション ウィンドウが表示されます。
セキュリティ タブをクリックします。
セキュリティ タブのメニューが表示されます。
信頼済みサイト をクリックします。
信頼済みサイト オプションが表示されます。
サイト をクリックします。
信頼済みサイト ウィンドウが表示されます。
次の
Web
サイトをゾーンに追加する フィールドに
protocol
します。
Web
を使用してサイトのアドレスを入力し、追加
サイト ボックスにサイトが表示されます。
に追加するには、次の手順を実行
https: secure
をクリック
6
手順5 を繰り返して他のサイトを追加し、OK
インターネットオプション ウィンドウが表示されます。
7
OK をクリックします。
をクリックします。
はじめに 61
Page 64
システムのアップデート
『
Server Update Utility
サーバーに適用するためのアプリケーションが入っています。
(
Update Utility
らダウンロードすることも可能です。詳細については、
Utility
の『ユーザーズガイド』を参照してください。
Server Administrator
は、コンポーネントに固有の
ください。
CD
』に入っています。
ムに現在インストールされているコンポーネントのバージョンを
『
Dell PowerEdge Updates
ネントと比較します。
照し、システム全体をアップデートしてください。
SUU
Dell
アップデートパッケージは『
CD
』には、アップデートを識別してお使いの
Server
)は、デルサポートサイト support.dell.com か
Server Update
の個々のコンポーネントをアップデートするに
Dell
アップデートパッケージを使用して
Dell PowerEdge Updates
SUU
は、お使いの
CD
』に入っているアップデートコンポー
SUU
を使用してバージョンの比較レポートを参
Dell PowerEdge NAS
システ
Microsoft Windows ソフトウェアのアップデート
Windows Storage Server 2003 R2 x64 Edition
テムをアップデートする場合は、
support.microsoft.com を参照してください。
2003 R2 x64 Edition
Server 2003 R2 x64
に対するアップデートはすべて
に適用されます。
Microsoft
オペレーティングシス
のサポートサイト
Windows Server™
Windows Storage
その他のマニュアル
注意 : 『製品情報ガイド』には、安全および認可機関に関する情報が
記載されています。保証に関する情報については、『サービス&サポー
トのご案内』を参照してください。
•
システムをラックに取り付ける方法については、ラックに付属の
『ラック取り付けガイド』に説明があります。
•
『管理者ガイド』には、お使いのシステムの設定手順を完了する
ための情報、および
の機能に関する概要が記載されています。
•
『重要情報』には、ハードウェアとソフトウェアの最小要件とす
べての既知の問題が記載されています。
•
システムの『ユーザーズガイド』では、システム機能および仕様
について説明しています。
62 はじめに
Windows Storage Server 2003 R2 x64 Edition
Page 65

•
システム管理ソフトウェアのマニュアルでは、システム管理ソフ
トウェアの機能、動作要件、インストール、および基本操作につ
いて説明しています。
•
オペレーティングシステムのマニュアルでは、オペレーティング
システムソフトウェアのインストール手順(必要な場合)や設定
方法、および使い方について説明しています。
•
システムとは別に購入した各種コンポーネントのマニュアル。こ
れらのオプションを取り付けて設定する方法を説明しています。
•
システム、ソフトウェア、またはマニュアルの変更に関して記載さ
れたアップデート情報がシステムに付属していることがあります。
メモ:このアップデート情報には他の文書の内容を差し替える情報が
含まれていることがあるので、必ず最初にお読みください。
•
リリースノートまたは
readme
ファイルには、システムまたはマ
ニュアルの最新のアップデート情報や、専門知識をお持ちのユー
ザーや技術者のための高度な技術情報が含まれていることがあり
ます。
•
Server Update Utility
Utility
を使用してお使いのシステムのソフトウェアバージョンを
の『ユーザーズガイド』では、
Server Update
表示し、ソフトウェアをアップデートする方法を説明しています。
『ユーザーズガイド』は、デルサポートサイト
support.dell.com
からダウンロードできます。
はじめに 63
Page 66

64 はじめに
Page 67

Microsoft® Windows
®
Storage Server 2003 R2
x64 Edition
시작 설명서
www.dell.com | support.dell.com
Page 68

참고 , 알림
참고: 참고는 컴퓨터를 보다 효율적으로 사용하는데 도움이
되는 중요 정보를 제공합니다.
주의사항: 알림은 하드웨어의 손상 또는 데이터 유실 위험
을 설명하며, 이러한 문제를 방지할 수 있는 방법을 알려줍
니다.
____________________
본 설명서에 수록된 정보는 사전 통보 없이 변경될 수 있습니다.
© 2006 Dell Inc. All rights reserved.
Dell Inc.의 사전 승인 없이 어떠한 경우에도 무단 복제하는 것을 엄격히 금
합니다.
본 설명서에 사용된 상표인 Dell, DELL 로고, PowerEdge 및 Dell OpenManage
는 Dell Inc.의 상표입니다. Windows Server는 상표이며 Microsoft 및 Window
는 Microsoft Corporation의 등록 상표입니다.
본 설명서에서 특정 회사의 표시나 제품 이름을
나 상호를 사용할 수도 있습니다. Dell Inc.는 자사가 소유하고 있는 것 이
외에 기타 모든 등록 상표 및 상표 이름에 대한 어떠한 소유권도 보유하지
않습니다.
2006 년 2 월 P/N GJ804 Rev. A01
지칭하기 위해 기타 상표
Page 69

차례
소개 . . . . . . . . . . . . . . . . . . . . . . . . . . . . . . . . . . 69
기본 관리자 사용자 이름 및 암호 입력
NAS 시스템용 네트워크 IP 주소 구성
네트워크 액세스용 시스템 구성
. . . . . . . . . . . . . 70
. . . . . . . . 70
. . . . . . . . . 70
키보드 , 모니터 및 마우스를 사용한
시스템 구성
관리자 암호 변경
. . . . . . . . . . . . . . . . . . . . . . . . . . . . 72
. . . . . . . . . . . . . . . . . . . . . . . . 72
MUI(Multilanguage User Interface)
를 사용한 시스템 한글화
Windows 스토리지 서버 관리 콘솔
MMC(Microsoft Management Console) 액세스
호스트에서 MMC 로컬 액세스 . . . . . . . . . . . . . . . . . . 74
원격 데스크탑 연결을 사용한 시스템 액세스
. . . . . . . . . . . . . . . . . . 73
. . . . . . . . . . . 73
. . . 74
. . . . . . . . . . 74
Dell OpenManage Server Administrator 설치 . . . . 75
Server Administrator 액세스 . . . . . . . . . . . . . . . . . . . . 76
브라우저에 신뢰할 수 있는 사이트 추가
시스템 업데이트
Microsoft Windows 소프트웨어 업데이트
. . . . . . . . . . . . . . . . . . . . . . . . . . 78
. . . . . . . . . . . . . 77
. . . . . . . . . . . . 78
기타 필요한 설명서 . . . . . . . . . . . . . . . . . . . . . . 78
차례 67
Page 70

68 차례
Page 71

본 설명서는
개요 및 Dell™ PowerEdge™ Network Attached Storage (NAS)
의
기업 네트워크에서 구성, 한글화 및 설치하는 방법에 대한 내용에 대해 설
명합니다
본 설명서는 다음 항목에 대한 정보를 설명합니다
•
•
•
•
•
•
• MUI(Multilanguage User Interface)를
• Windows
•MUI
• Dell OpenManage™ Server Administrator
Microsoft® Windows® Storage Server 2003 R2 × 64 운영
.
.
운영 체제 개요
사용자 이름 및 암호 입력
네트워크
네트워크 액세스용 시스템 구성
키보드, 모니터 및 마우스를 사용한 시스템 구성
관리자 암호 변경
IP 주소
스토리지 서버 관리 콘솔
액세스
구성
사용한 시스템 한글화
설치
체제
시스템을
소개
Windows Storage Server 2003 R2 × 64 Edition
기능, 간단해진 설치 및 스토리지 관리, 확장성이 추가되었으며 최적의
성능을 제공합니다
체제 계열의 최신 버전이며 쉬운 설치뿐만 아니라 스토리지 관리 시나
영
리오에
대한
PowerEdge NAS
영
체제로 이미 구성되어 있습니다. 대부분의 설치 과정이 완료되므로 사
용자가
개입할 필요가 없습니다
시스템이 처음으로 부팅되면
치가
완료되면 시스템이 자동으로 재부팅됩니다. 최소 설치 과정이 완료
된
후
서버를 로컬 또는 원격으로 액세스할 수 있습니다
다음 절에서는 운영 체제 설치 과정 완료에 대한 내용을 설명합니다
참고 : 시스템이 소프트웨어 RAID 5 로 이미 구성되어 있으면 시스템이 RAID
동기화 작업을 수행하여 배열을 최적화합니다 . 이 과정은 백그라운드에
서 실행되며 완료될 때까지 시스템의 전체 성능에 영향을 줄 수 있습니다 .
과정이 완료되기 전에 시스템의 전원이 꺼지는 경우 전원이 다시 켜지면
RAID 동기화가 시작되어 완료될 때까지 계속 실행됩니다 .
. Windows Storage Server 2003 R2 × 64 Edition은 이
향상된 기능도 제공합니다
시스템은
Windows Storage Server 2003 R2 × 64 Edition
.
Microsoft 최소 설치
운영 체제에는 새로운 검색
.
과정이 시작됩니다. 설
.
시작 설명서 69
NAS
운
운
.
Page 72
추가 정보
Windows Storage Server 2003 R2 ×64 Edition 운영
용은
Dell 지원 웹
Server 2003 R2
최소 지원되는
은
Dell 지원 웹
Storage Server 2003 R2
사이트(support.dell.com )의 Microsoft Windows Storage
×
64 관리
BIOS,
사이트(www.dell.com/ostechsheets)의 Microsoft Windows
설명서를 참조하십시오
펌웨어 및
×
64 중요 정보
RAID
컨트롤러 버전에 대한 자세한 내용
문서를 참조하십시오
체제에 대한 자세한 내
.
.
기본 관리자 사용자 이름 및 암호 입력
처음으로
야
이고 기본 암호는 storageserver.
합니다
NAS
시스템에 로그인하면 관리자 사용자 이름 및 암호를 입력해
. NAS
시스템의 기본 관리자 사용자 이름은 administrator
입니다
.
NAS 시스템용 네트워크 IP 주소 구성
네트워크에
소를
트워크가
NAS
네트워크 구성 창을 액세스하려면 시작을
트워크
참고 : 네트워크에 DHCP 서버가 없는 경우 NAS 구성을 완료하려면 로컬
DHCP
할당해주므로
DHCP
시스템의
구성을 선택하십시오
키보드 , 모니터 및 마우스가 필요합니다 . 자세한 내용은 " 키보드 , 모니터
및 마우스를 사용한 시 스템 구성 " 을 참조하십시오 .
참고 : Windows 방화벽은 기본값으로 활성화되어 있습니다 . 원격 시스템
을 액세스하면 연결 문제가 발생할 수 있습니다 .
서버가 있는 경우
NAS
시스템의
서버로 구성되어 있지 않은 경우 네트워크 구성 창에서
IP
주소를 구성하십시오
.
DHCP는
IP
주소를 구성하지 않아도 됩니다. 네
.
자동으로
클릭하고 설정→
NAS
시스템에 주
제어판→
네트워크 액세스용 시스템 구성
1
NAS
시스템의 전원이 켜져 있으면 끄십시오
2
Ethernet
RJ-45 NIC
시스템 커넥터 위치에 대한 자세한 내용은
서를
케이블의 한쪽 끝을
커넥터 (그림
참조하십시오
NAS
1-1
참조)의 끝에 연결하십시오
.
시스템 뒤쪽에 있는
.
10/100/1000
NAS
시스템의 사용 설명
네
.
3
Ethernet
70 시작 설명서
케이블의 다른 쪽 끝을
Ethernet 기능 잭에
연결하십시오
.
Page 73

4
전원 단추를 눌러
5
NIC
커넥터와 연관된
NAS
시스템을 켜십시오
LED가 켜져
에 연결되어 있는지 점검하십시오. 그림
커넥터의
NIC
송
LED
및
LED가 계속
커넥터의
중이라는 의미입니다
LED가
가 깜박거리지 않으면
Ethernet 잭에
제대로 장착되어 있는지 확인하십시오
녹색이면 연결 상태가 좋다는 의미입니다
황색으로 깜박거리면 데이터가 성공적으로 전
.
Ethernet
.
있는지 확인하여 서버가
1-1를
참조하십시오
케이블의 양쪽 끝이
NIC
.
Ethernet
. NIC
.
커넥터
시스템은 필요한 정보를 검색하여 네트워크의
NAS
네트워크 매개 변수
서버 주소)를 설치합니다
참고: NAS 시스템이 부팅하려면 시스템에 장착된 스토리지의 구성 및
양에 따라 몇 분이 걸릴 수 있습니다.
그림 1-1. NIC 커넥터
NIC 1 LED
NIC 2 LED
NIC 1
NIC 2
DHCP
(IP
주소, 게이트웨이, 서브넷 마스크 및
.
서버에서
DNS
시작 설명서 71
Page 74
키보드 , 모니터 및 마우스를 사용한 시 스템 구성
참고 : 구성 방법에 따라 설치 및 구성 과정을 완료하기 위해 로컬 KVM 연
결이 필요할 수 있습니다 . 원격 시스템이 구성 과정을 완료할 수 있으면 로
컬 KVM 연결은 필요하지 않습니다 .
1
NAS
시스템에 키보드, 모니터, 마우스를 연결하십시오
시스템 커넥터에 대한 자세한 내용은 시스템의 사용 설명서를
참조하십시오
2
전원 단추를 눌러
3
NAS
시스템에 로그인합니다
참고: 기본 관리자 이름은 administrator 이고 기본 암호는
storageserver입니다.
.
NAS
시스템을 켜십시오
.
.
.
관리자 암호 변경
1
시작을
2
컴퓨터 관리(로컬) 트리의 컴퓨터 관리 창에서 로컬 사용자 및
그룹을
3
오른쪽 창에서 관리자를
암호 설정을
4
관리자용 암호 설정 창에서 계속을
5
해당 필드에 암호를 입력하고 확인을
6
컴퓨터 관리 창을 닫으십시오
클릭하고 관리자 도구→
확장하고 사용자를
선택하십시오
선택하십시오
마우스 오른쪽 단추로 클릭한 다음
.
.
컴퓨터 관리를
.
클릭하십시오
클릭합니다
선택하십시오
.
.
.
72 시작 설명서
Page 75

MUI (Multilanguage User Interface) 를 사용한 시스템 한글화
NAS
시스템을 사용하면 운영 체제의 사용자 인터페이스 기본 언어를 변
경할
수
있습니다. 기본값으로 많은 언어가 시스템에 설치됩니다
(Multilanguage User Interface)
대화 상자 및 도움말 파일을 여러 언어로 표시할 수 있습니다
시스템이
구성되어 있는 경우
언어로 미리 구성됩니다. 사용자가 개입하지 않아도 됩니다
기본 브라우저 언어를 변경하려면 다음과 같이 수행하십시오
1
2
3
4
5
6
Windows Storage Server 2003 R2 × 64 Edition 운영
MUI가 지역
Internet Explorer
도구 메뉴에서 인터넷 옵션을
일반 탭에서 언어를
언어 기본 설정 창에서 추가를
언어 상자에서 언어를 선택합니다
확인을
클릭합니다
브라우저를 엽니다
를 사용하면
설정과 브라우저 설정 양쪽에 해당 지역
클릭합니다
.
NAS
.
선택합니다
.
클릭합니다
.
시스템이 운영 체제 메뉴
.
.
.
Windows 스토리지 서버 관리 콘솔
. MUI
.
체제로 이미
.
,
Windows
에 나타나며 시스템 관리를 쉽고 편리하게 해줍니다
2003 R2
Windows
그램
관리 콘솔 창에서 왼쪽 창은 파일 서버 관리 (로컬)
줍니다
스토리지 서버 관리 콘솔은
×
64 운영
스토리지 서버 관리 콘솔을 열려면 시작을
→ Windows
. 중간 창은 운영 체제
체제에 로그인하면 관리 콘솔이 자동으로 열립니다
스토리지 서버 관리를
관리를 도와줄 시나리오 목록을 보여줍니다
MMC(Microsoft Management Console)
선택합니다
. Windows Storage Server
.
클릭하고 모든 프로
.
노드를 기본 노드로 보여
.
시작 설명서 73
Page 76

MMC (Microsoft Management Console) 액세스
MMC는 Microsoft
디스크 관리
.
자세한 내용은 시스템에 포함된
다
MMC
를 사용하여 다음 방법 중 하나를 통해 스토리지를 구성할 수 있습
니다
.
•
호스트에서
•
원격 데스크탑 연결을 사용한
시작 메뉴의 일부로 기본값으로 구성됩니다
, NFS 구성 및 일반 NAS 관리
MMC 로컬
액세스
스테이션으로 사용할 수 있습니
Microsoft MMC
MMC 원격
액세스
. MMC는
문서를 참조하십시오
호스트에서 MMC 로컬 액세스
MMC는
후
호스트에 시작 메뉴에서 선택 가능한 항목으로 나타납니다. 시작
MMC가 시작
1
시작을
2
열기 필드에서 다음을 입력하고 확인을
nas.msc
참고 : nas.msc 파일은 c:\windows\system32 에 있습니다 .
메뉴에 나타나지 않으면 다음 단계를 수행하십시오
클릭하고 실행을
선택합니다
.
클릭합니다
.
.
원격 데스크탑 연결을 사용한 시스템 액세스
원격 서버 관리에 원격 데스크탑 연결을 사용하여 원격 관리와 연관된 오
버헤드를
크탑은
관리용 원격 데스크탑에는 서버에 액세스하는 클라이언트 시스템용 특별
라이센스가 필요하지 않습니다. 또한 관리용 원격 데스크탑을 사용할 때
Terminal Server Licensing
관리자는 또한 원격 데스크탑 연결을 설치하여 하위
된
퓨터까지
줄이십시오. 터미널 서비스 기술로 활성화된 관리용 원격 데스
서버
관리를 위해 특별히 설계되었습니다
을 설치하지 않아도 됩니다
시스템에서
참고 : 원격 시스템에서 관리용 원격 데스크탑에 연결하려면 원격 데스크
탑 연결을 사용하십시오 .
Windows Storage Server 2003 R2 × 64 Edition이
전체 관리할 수 있습니다
.
.
.
Windows
버전이 탑재
탑재된 컴
.
74 시작 설명서
Page 77

원격 데스크탑 연결 생성 및 데스크탑에 저장
원격 데스크탑 연결을 생성하고
에 저장하려면 다음 단계를 수행하십시오
1
시작을
2
열기 필드에서 다음을 입력하고 확인을
mstsc
클릭하고 실행을
Windows Storage Server 2003 R2 × 64 Edition
.
선택합니다
.
클릭합니다
.
원격 데스크탑 연결 창이 나타납니다
3
컴퓨터 필드에서 컴퓨터 이름 또는 스토리지 서버의
한
다음 옵션을 클릭합니다
4
연결 설정 상자의 원격 데스크탑 연결 창에서 다른 이름으로 저장을
클릭합니다
5
파일 이름 필드의 다른 이름으로 저장 창에서 연결 이름을 입력하고
기본 .rdp 확장자를 포함시킵니다
6
저장 위치 드롭 다운 메뉴에서 바탕 화면을
합니다
그러면 연결이 바탕 화면에 저장됩니다
원격 데스크탑 연결 구성에 대한 자세한 내용은 원격 데스크탑 연결 창에
서
도움말을
.
.
클릭합니다
.
.
.
IP
주소를 입력
.
선택한 다음 저장을
.
선택
Dell OpenManage Server Administrator 설치
Dell OpenManage Server Administrator는
이스
(Server Administrator 홈
Interface)
Server Administrator
으로
할
자세한 내용은
를 사용하는 종합 일-대일 시스템 관리 솔루션을 제공합니다
를 사용하면 네트워크의
관리할 수 있으며 종합 일대일 시스템 관리로 네트워크 전체를 관리
수
있습니다
참고 : Server Administrator 의 용도로써 " 시스템 " 은 별도의 섀시에 네트워
크 스토리지 장치 또는 섀시에 하나 이상의 서버 모듈로 구성된 모듈 시스
템이 장착된 서버와 같은 독립형 시스템이 될 수 있습니다 .
.
Server Administrator
페이지) 또는 운영 체제의
통합된 웹 브라우저 기반의 인터페
CLI(Command Line
NAS
시스템을 로컬 및 원격
설명서를 참조하십시오
.
.
시작 설명서 75
Page 78

Server Administrator 설치
Dell Installation and Server Management
업그레이드 및 제거를 위한 설치 프로그램과 시스템에서 관리되는 기타
소프트웨어 구성 요소가 들어 있습니다. 또한 네트워크 상의 무인 설치를
통해 여러 시스템에
Dell Installation and Server Management
지원되는 모든
탑재된 시스템에서
니다
.
Server Administrator
1
Installation and Server Management
넣습니다
가 자동으로 실행되고 Server Administrator Installer 창이
CD
납니다
2
Install, Modify, Repair or Remove Server Administrator
(Server Administrator 설치, 수정 또는
3
License Agreement (사용 계약) 창에서 계약 내용을 숙지하고 Next
(
다음)을 클릭합니다
4
Setup Type (설치 유형) 창에서 구성에 적합한 설치 유형을 선택하
고
Next(
5
Ready to Install (설치 대기)
6
Install Wizard Completed (설치 마법사 완료) 창에서 Finish
(
마침)를 클릭합니다
Server Administrator를
Windows Storage Server 2003 R2 × 64 Editions
Server Administrator를 설치 및
를 설치하려면 다음 단계를 수행하십시오
.
.
.
다음)를 클릭합니다
.
CD에는 Server Administrator 설치,
설치할 수 있습니다
CD의 설치
CD를
제거)를 클릭합니다
.
창에서 Install (설치)을 클릭합니다
프로그램을 사용하여
업그레이드할 수 있습
시스템의
운영 체제가
.
CD
드라이브에
.
나타
.
.
Server Administrator 액세스
바탕 화면에서 Server Administrator 아이콘을 두 번 클릭하여 호스트에서
Server Administrator
동일한 네트워크의 클라이언트 시스템에서 직접
액세스하려면
포트에 연결하십시오
예를 들면, 다음을 입력하십시오
https://DELL1234567:1311
여기서 DELL1234567은 NAS
76 시작 설명서
를 로컬 액세스할 수 있습니다
Internet Explorer 6.0
.
이상의 버전을 열고
.
시스템의 이름입니다
.
Server Administrator를
NAS
시스템의
.
1311
Page 79

1311
포트가 방화벽에 막혀 있으면 다음 절차를 통해 예외 규칙을 적용하
OpenManage
여
1
시작
2
예외 탭을 클릭하십시오
3
포트 추가를
4
이름 필드에 Dell OpenManage Server Administrator
를 입력합니다
5
포트 번호 필드에 1311을
6
확인을
7
메시지가 표시되면 방화벽 서비스를 재시작하십시오
용으로
을 클릭하고
클릭합니다
.
클릭합니다
1311
포트를 활성화하십시오
설정→
제어판→
.
.
입력합니다
.
Windows
.
.
방화벽을
선택합니다
.
브라우저에 신뢰할 수 있는 사이트 추가
Microsoft 보안
는
인트라넷 사이트를 신뢰할 수 있는 사이트 영역에 추가할지 묻는 메시
표시될 수 있습니다
지가
신뢰할 수 있는 사이트를
행하십시오
1
도구 메뉴에서 인터넷 옵션을
인터넷 옵션 창이 나타납니다
2
보안 탭을
보안 탭 메뉴가 나타납니다
규정의 강화로 인해 처음 사이트에 액세스할 때 인터넷 또
.
.
클릭합니다
Internet Explorer에
클릭합니다
.
.
.
추가하려면 다음 단계를 수
.
.
3
신뢰할 수 있는 사이트를
신뢰할 수 있는 사이트 옵션이 나타납니다
4
사이트를
신뢰할 수 있는 사이트 창이 나타납니다
5
영역에 웹 사이트 추가:
사이트의 주소를 입력하고 추가를
해당 사이트가 웹 사이트:
6
다른 사이트를 추가하려면 단계5를 반복한 다음 확인을
인터넷 옵션 창이 나타납니다
7
확인을
클릭합니다
클릭합니다
클릭합니다
.
필드에서
상자에 나타납니다
.
https: 보안
클릭합니다
.
.
.
.
프로토콜을 사용하여
.
.
클릭합니다
시작 설명서 77
.
Page 80

시스템 업데이트
Server Update Utility
들어 있습니다
(
support.dell.com)에서도 다운로드할 수 있습니다. 자세한 내용은
Server Update Utility 사용
Server Administrator
Updates
SUU
전과
합니다
데이트합니다
CD에
는
Dell PowerEdge NAS
Dell PowerEdge Updates
. SUU를
CD에는 서버
. SUU(Server Update Utility)는 Dell 지원 웹
설명서를 참조하십시오
구성 요소를 개별 업데이트하려면 Dell PowerEdge
있는 구성 요소별
사용하여 버전 비교 보고서를 검토하고 시스템 전체를 업
.
업데이트 확인 및 적용 응용프로그램이
사이트
.
Dell
업데이트 패키지를 사용하십시오
시스템에 현재 설치되어 있는 구성 요소의 버
CD에 들어 있는
업데이트 구성 요소를 비교
Microsoft Windows 소프트웨어 업데이트
Windows Storage Server 2003 R2 × 64 Edition 운영
Microsoft
Server™ 2003 R2
Server 2003 R2
지원 웹 사이트(support.microsoft.com)를 참조하십시오
×
64 Edition에 대한 모든
×
64에
적용됩니다
.
체제를 업데이트하려면
업데이트는
Windows Storage
. Windows
기타 필요한 설명서
주의사항 : 제품 정보 안내는 중요한 안전 지침 및 규제 관련 정보를 제공
합니다 . 보증 정보는 본 설명서에 포함되어 있거나 별도의 문서로 제공됩
니다 .
•
랙 솔루션과 함께 제공되는 랙 설치 설명서 또는 랙 설치 안내 지침
에는
시스템을 랙에 설치하는 방법이 기술되어 있습니다
관리 설명서는 시스템에서 구성 절차를 완료하는 방법 및
•
Storage Server 2003 R2
•
중요 정보 문서는 최소 하드웨어 및 소프트웨어 요구 사항 및 알려진
모든 문제에 대해 설명합니다
•
시스템의 사용 설명서는 시스템 기능 및 기술 사양에 대해 설명합니다
×
64 Edition 기능
.
개요에 대해 설명합니다
.
Windows
.
.
.
78 시작 설명서
Page 81

•
시스템 관리 소프트웨어 설명서는 소프트웨어 기능, 요구사항, 설치
및 기본 작동을 설명합니다
운영 체제 설명서에는 운영 체제 소프트웨어 설치(필요한 경우
•
성
및
사용 방법이 기술되어 있습니다
별도로 구입한 구성요소의 설명서에는 옵션을 구성하고 설치하는
•
내용이 기술되어 있습니다
•
시스템, 소프트웨어 또는 설명서의 변경 사항이 포함된 갱신본이 시
함께
스템과
참고 : 업데이트본에는 최신 정보가 수록되어 있으므로 다른 설명서를 읽
기 전에 반드시 먼저 참조하시기 바랍니다 .
•
릴리즈 노트나
이나
전문가 또는 기술자를 위한 고급 기술 참조 자료가 포함되어 있
기도
합니다
SUU (Server Update Utility) 사용
•
제공되기도 합니다
readme
.
.
.
.
.
파일에는 시스템에 대한 최신 업데이트 사항
설명서는
SUU(Server Update Utility)
를 사용하여 시스템의 소프트웨어 버전을 검토하고 시스템 소프트
웨어를
업데이트하는 방법에 대해 설명합니다
(
support.dell.com)에서 다운로드할 수 s있습니다
. Dell 지원 웹
.
사이트
),
구
시작 설명서 79
Page 82

80 시작 설명서
 Loading...