

Page 1

Pri or to fir st use, p lease r ead the m anual c arefu lly
High Performance Sound
All other brand a nd product names are tradema rks of their respective hold ers. Actual contents may differ sli ghtly from those shown in prin t. All
specificati ons and designs are subjecte d to changes without any prior n otice.
M-930
User Manual
80-M930-97-0001-02chu
Page 2
1
Impo rt an t Safety In st ruction s
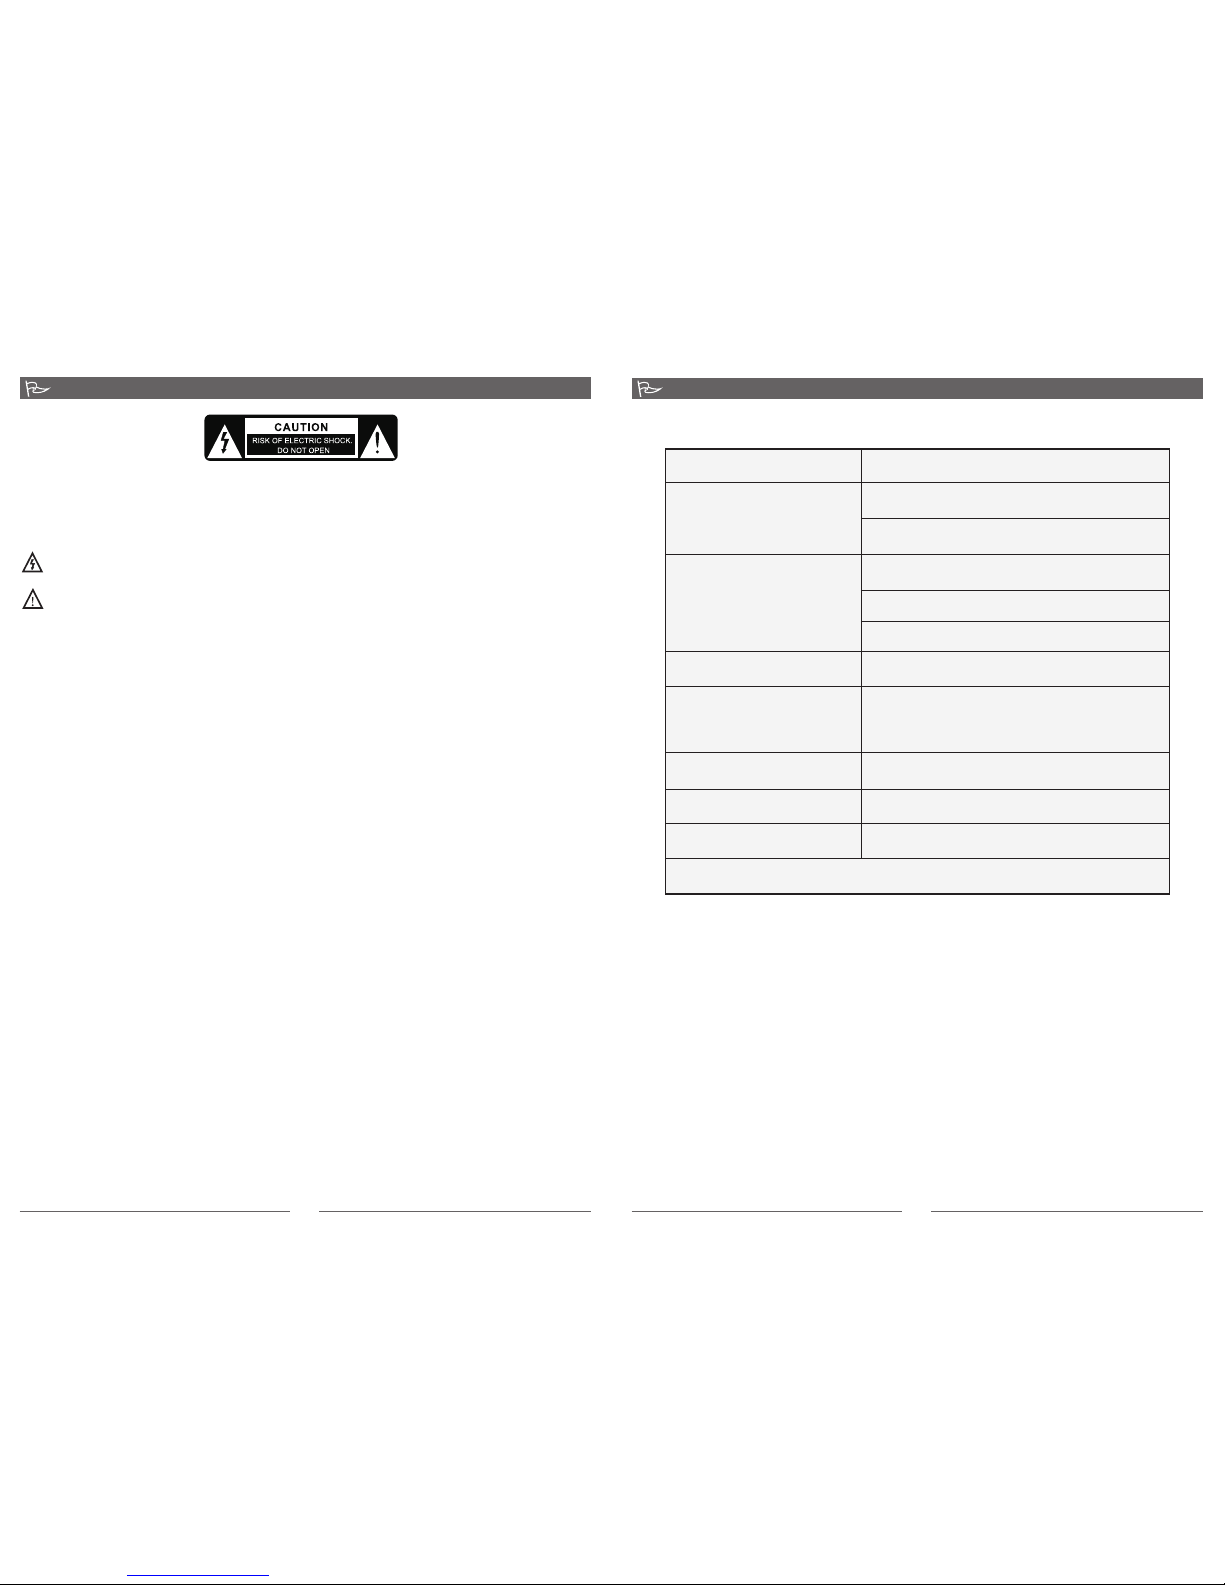
TroubleShoot in g
Frequently Asked Questions Answers
Check if the system is powered on
Check the power plug well connected
Check if the audio source is working well
Check if the audio and speaker cables well
connected
Check if the volume at right level
Static sound heard when
volume knob is turned
What are the products
supported?
Where to place this speaker
If the problem still exists, please contact the distributor or ask for professional service
6
Check if the volume at lower level
WARNINGS:
1. Read Instruc tions - All the safety an d operating ins tructions mus t be read before the product is op erated.
2. Retain Instr uctions - The safe ty and operatin g instruction s should be kept pr oduct for futur e reference.
3. Heed warni ngs - All warnings on the p roduct and in the o perating inst ructions should be adhered t o.
4. Follow instruct ions - All operatin g and use instructions shoul d be followed.
5. Installati on - Install in accordance wit h the manufacturer's instr uctions.
6. Power source s - This product s hould be operat ed only from the ty pe of power sourc e indicated by the marking adj acent to
the power cord e ntry. If you are not sure of t he type of power su pply to your home , consult your pr oduct dealer or l ocal
power compan y.
7. Grounding or p olarisation - t he product is not r equired to be gro unded. Ensure the plug is full y inserted into the wall outl et
or extension c ord receptacl e to prevent blad e or pin exposure . Some versions of the product a re equipped with a power
cord fitted wi th a polarized al ternating lin e plug (a plug havi ng one blade wide than the other ). This plug wil l fit onto the
power outlet o nly one way. This is a safety fe ature. If you are unable to inse rt the plug fully into the outle t, try reversing the
plug. If the plu g should still fa il to fit, contac t your electric ian to replace yo ur obsolete outlet. Do not def eat the safety
purpose of the p olarised plug . When using an ext ension power- supply cord or a power-suppl y cord other than that
supplied wit h the appliance , it should be fitt ed with the appro priate moulded-on plugs an d carry safety approval
appropriat e to the country of u se.
8. Power cord prot ection - Power- supply cords sh ould be routed so t hat they are not li kely to be walked o n, kinked or pinched
by items place d on or against the m, paying parti cular attenti on to cords from plugs, recept acles and the point where they
exit from the ap pliance.
9. Overloadi ng - Do not overloa d wall outlets, e xtension cord s or multiple soc kets, as this can r esult in a risk of fi re or electric
shock.
10. Ventilat ion - The product mu st be properly ve ntilated. Do no t place the produ ct on a bed, sofa, or o ther similar su rface.
Do not cover the p roduct with any i tems such as tabl ecloths, news papers, etc.
11. Heat - The p roduct should be situated a way from heat sou rces such as radi ators, heat reg isters, stove s, or other produ cts)
including am plifiers that p roduce heat.N o naked flame sou rces,such as lighted candl es, should be placed on the
apparatus.
12. Water and m oisture - To reduce the risk of fi re or electric sh ock, do not expos e the product to tr ain, dripping , splashing or
excessive mo isture such as in a s auna or bathroo m. Do not use this pr oduct near waterfor example , near a bathtub,
washbowl, ki tchen sink, lau ndry tub, in a wet ba sement, or near a s wimming pool and the like.
13. Obje ct and Liquid Ent ry - Never push obj ects of any kind in to this product t hrough openin gs, as they may touch dangerou s
voltage poin ts or short-cir cuit parts that c ould result in a fi re or electric sh ock. Never spill liquid of any k ind on the product.
Do not place any o bject contain ing liquid on top o f the product.
14. Clea ning - Unplug the p roduct from the w all outlet befo re cleaning. The c abinet of the sub woofer may be cle aned by
dusting with a d ry cloth. If you wi sh to use an aeroso l cleaning spra y, do not spray direct ly on the cabinet ; spray onto the
cloth. Be care ful not to damage t he drive units.
15. Atta chments - Do not us e attachments n ot recommende d by the product ma nufactures, a s they may cause hazards.
16. Acce ssories - Do not pl ace this produc t on an unstable ca rt, stand, trip od, bracket or ta ble. The product may fall, caus ing
serious inju ry to a child or adul t, and serious da mage to the produ ct. Use only with a cart, stand, t ripod, bracket or table
recommende d by the manufact urer or sold with t he product. Any mount ing of the product should foll ow the manufacturer's
instructio ns and should use a m ounting acces sory recommen ded by the manufacturer.
17. Movi ng the product - A product and ca rt combinatio n should be moved w ith care. Quick stops, exces sive force and
uneven surfa ces may cause the p roduct and cart c ombination to o verturn.
18. Unus e periods - The powe r cord of the appli ance should be un plugged from th e outlet during l ightning stor ms or when the
Caution:
To reduce the risk of electr ic shock, do not di smantle the pro duct and do not exp ose the apparatus to rain or mo isture. No
user-servi ceable parts in side. Refer ser vicing to quali fied personnel only.
Explanatio n of Graphical Sy mbols:
The lightnin g flash within an e quilateral tr iangle is intend ed to alert you to the presence of u ninsulated“dangerous
voltage”with in the product' s enclosure tha t may be of sufficien t magnitude to constitute an e lectric shock to a person or
persons.
The exclamat ion point withi n an equilatera l triangle is inte nded to alert you to the presenc e of important operating an d
Check if the satellite cable well connected
One or more satellite no sound
Power LED won't light up
No Sound
Sound is distorted
Turn off the playback source first, then turn
the speaker volume knob several times. Playback
again and monitor. The static noise is due to dust,
so simply turning the volume will remove it easily.
It is magnetically shielded so can be placed
near LCD TV Monitor without any distortion
Any playback devices such as PC, Media
Players with 3.5mm stereo plug.
80-M930-97-0001-02chu
Page 3

2
Unpac king :
·Fol d th e car ton f la ps ri gh t bac k and i nv ert t he c art on an d co nte nt s.
·Lif t th e car ton c le ar of t he c ont ent s.
·Rem ov e the i nne r pa cki ng f rom t he pr od uct .
We sugg est you r etain t he pac king fo r futur e use.
Packa ge con tents
Subwo ofer a mplif ier 1pc
Satel lite s peake rs 2pcs
Remot e cont rol 1pc
Batte ries 2pcs
3.5mm - 2 x R CA signa l cable s 1pc
User ma nual 1pc
Unpacking the gif tb ox
Spec if ic ations
Tech ni ca l In fo rm at io n
5
Features
19. Serv icing - Do not atte mpt to service th is product your self, as openin g or removing cov ers may expose you to
dangerous vo ltage or other ha zards. Refer al l servicing to qu alified service personne l.
20. Plea se remove the pow er plug form the ma in power source o r wall power sour ce when not in use. When plugged i n to a
power source , the system is in st andby mode, so th e power is not enti rely cut off.
21. Repl acement parts - W hen replaceme nt parts are requ ired, ensure th e service technician has use d replacement parts
specified by t he manufactur er or have the same c haracterist ics as the origin al part. Unauthorized subs titutions may
result in fire , electric shoc k or other hazard s.
22. Main s fuses - For conti nued protecti on against fire h azard, use fuse s only of the corre ct type and rating. The correct
fuse specifi cation for each v oltage range is m arked on the prod uct.
23. Do not t urn up the volume w hile listenin g to a section with v ery low level inp uts or no audio signals. If you do , the
speaker may be d amaged when a pea k level section i s suddenly play ed.
24. The on ly means of compl etely disconn ecting the prod uct from the powe r supply is by removing the powe r cord from the
wall outlet or t he product. The wa ll outlet or the po wer cord entry to t he product must r emain freely ac cessible at all
times while th e product is in use .
25. Try to inst all the product n ear a wall socket o r exetension cord and shall be e asily accessible.
0
26. The hi ghest environ mental temper ature suitabl e for this produc t is 40 C.
30 Watt
16 Watt
7 Watt x 2
220 V - 240V ~ 50Hz 140 mA
5" dri ver
2.5 " magnet ica lly shie lde d dri ver s
201 x 381 x 413mm
95 x 149 x 99m m
5.9 kg
&Hi-Fi quality 2.1 speaker system with amplifier for producing near theater
effects in your own room or favourite couch
&30 Watt of pure acoustic power with 5" subwoofer and 2 x 2.5" satellites.
Full audio spectrum performances, ideal for your favourite entertainment on
Mp3, Mp4, CD/DVD movies and digital playbacks
&Specially designed subwoofer with Microlabs X-Bass technology on the
subwoofer produces deep bass and resolution
&Wooden cabinets for ideal sound dynamics and acoustic excellence
&Comes with 2 input options: 3.5mm stereo and RCA connections
&Magnetically shielded satellites for safe positioning near TV or LCD
monitors with interference free use
Amp lif ier:
Out put powe r
Spe ake r
Sub woo fer
Sat ell ites
AC pow er
Spe ake r uni t:
Sub woo fer
Sat ell ites
Pro duc t dim ens ion (W x H x D):
Sub woo fer
Sat ell ites
Weight
80-M930-97-0001-02chu
Page 4

Sys tem Con nection
4
Function Inst ru ct io n
3
Fro nt Pane l ( Illus trati on 1 )
Opera tion
1. Plug th e AC power p lug to th e wall AC sou rce or a ny AC power d istri buti on sock ets.
2. Ensure t he vol ume lev el is low ered t o zero.
3. Turn on the powe r switc h on the rear pan el of the s ubwoofer to p ut the sy stem to stand by (STBY) mod e with i ts LED il lumin ated .
4. Next , turn t he mast er volu me kno b to turn O N the sys tem.
5. Depre ss the I NPUT SEL bu tton to s elec t the aud io inpu ts bet ween IN PUT1 an d INPU T2. The
INPUT S EL butto n is loca ted on th e Subw oofer f ront pa nel or t he remo te cont rol. N ote: th e
remot e cont rol hav e dupli cate d butto n funct ions a s the Sub woofe r fron t panel .
Con necti on ( Draw ing 3 )
Rem ote Con trol (I llust ratio n 3)
INSTALLATION
Precaution: Prior to connecting the speakers, ensure the AC power plug is removed from the AC
source. Secondly, ensure the volume knob is set to zero.
1. Connect the satellite speaker cables to the Left (L) and Right (R) audio outputs at the rear panel of
the Subwoofer. Next, position the left channel satellite on the left of the Subwoofer and the right
channel satellite on the right side of the Subwoofer.
2. Connecting the playback source (VCD, DVD, CD player) to the speaker systems with the included
audio cable (3.5mm stereo - 2 x RCAs). Plug the 2 x RCA plugs to left and right channel RCAs on
the playback source such as VCD, DVD, or CD player. Next plug the 3.5mm stereo plug to the Input
socket(INPUT2) at the rear panel of the Subwoofer. Alternatively, you can purchase a 2 x RCA - 2 x
RCA cable for a second playback source and connect to INPUT1 at the rear panel of the
Subwoofer.
3. Connecting to a PC (alternative), use the 3.5mm - 2 x RCA audio cable. Plug the 3.5mm stereo
connector to the computer's soundcard or the audio output socket (green coloured: 3.5mm stereo
socket) of of the PC. Next, plug the 2 x RCA to the INPUT1 socket at the rear panel of the
Subwoofer.
4. Ensure all plugs are seated properly and the AC power supply is properly connected. Please always
ensure the AC power ratings printed on the rear panel of the Subwoofer tally with your country's AC
power supply ratings. If they do not match, please do not connect and turn ON the power. This will
SPE AKER PO SITIO NING
For i deal st ereop honic e ffect s, w e rec ommen d the ste reo spe akers o r satel lites b e place d
app roxim ately 7 0cm apa rt and ab out 50c m to 100 cm a way fro m the lis tener. T he b est l isten ing
pos ition i s to sit in t he midd le of the t wo sate llite s peake rs. The re a re no s pecia l requi remen ts
on th e Subwo ofer pl aceme nt, it ca n be plac e in posi tion in t he room . Subwo ofer ha ndles t he
bas s and dep th, the l ow freq uency r ange ha s no dire ction al effe ct o n our e ars.
Front pa nel controls
1. LED dis play window
and remo te control
infrar ed sensor
2. INPUT se lection butt on
3. Maste r volume knob
(Note: M aster volume
can be con trolled from
this kno b or the remote
contro l)
Subwoofe r rear panel
Left satell ite
Right satel lite
3.5mm stereo
RCA Left
AC IN
ON OFF
AC power supp ly:
220V - 240V 50H z
PC
Mp3 \ Mp 4
Medi a playe r
CD\ VC D \ DVD
RCA Right
+ -
+ -
( Put the ba tteri es in
the batt ery com partm ent )
70 cm
Left
Right
100 c m
3.5mm stere o socket
FUSE
T315mAL250V
80-M930-97-0001-02chu
 Loading...