

Page 1
OPERATING INSTRUCTIONS
Chorus LED 100
Linea LED 100
with Chassis 611
Metz - alwas first class.
611 47 2050.A1
12/21/21
Page 2

2
1 Installation . . . . . . . . . . . . . . . . . . . . . . . . . . . . . . . .4
1.1 Proper use . . . . . . . . . . . . . . . . . . . . . . . . . . . . . . . . .4
1.2 Connecting and switching on . . . . . . . . . . . . . . . . . . .5
2 Safety notes . . . . . . . . . . . . . . . . . . . . . . . . . . . . . . .6
3 The Remote Control (RM 16) . . . . . . . . . . . . . . . . . . . .8
4 Daily Operation sound and picture . . . . . . . . . . . . . .10
5 Station selection and management of programme
positions . . . . . . . . . . . . . . . . . . . . . . . . . . . . . . . . .11
5.1 Selecting stations from the station table . . . . . . . . . . .11
6 User Help (Information) . . . . . . . . . . . . . . . . . . . . . .12
7 Menu Control . . . . . . . . . . . . . . . . . . . . . . . . . . . . .13
8 Videotext . . . . . . . . . . . . . . . . . . . . . . . . . . . . . . . .14
9 Selecting the Operating Mode . . . . . . . . . . . . . . . . .16
10 AV Playback . . . . . . . . . . . . . . . . . . . . . . . . . . . . . .17
10.1 AV Playback - VCR function . . . . . . . . . . . . . . . . . . .19
10.2 AV Playback MPEG noise reduction . . . . . . . . . . . . . .20
10.3 AV Playback Picture Format . . . . . . . . . . . . . . . . . . .21
10.4 AV Playback Noise reduction . . . . . . . . . . . . . . . . . .22
11 General Picture Settings . . . . . . . . . . . . . . . . . . . . . .23
11.1 Select power options . . . . . . . . . . . . . . . . . . . . . . . .24
11.2 MPEG noise reduction . . . . . . . . . . . . . . . . . . . . . . .26
11.3 Signal adjustment . . . . . . . . . . . . . . . . . . . . . . . . . . .27
11.4 Picture profile adjustment . . . . . . . . . . . . . . . . . . . . .28
11.5 selected picture profile . . . . . . . . . . . . . . . . . . . . . . .29
11.6 Adjust border colour . . . . . . . . . . . . . . . . . . . . . . . .30
11.7 Setting zoom / panorama mode . . . . . . . . . . . . . . . .31
11.8 Picture Settings for Programmes via TV Menu . . . . . . .32
11.9 Picture Settings for Programmes via Station Table . . . .33
12 General Sound Settings . . . . . . . . . . . . . . . . . . . . . .34
12.1 Sound Settings for Programmes via TV Menu . . . . . . .38
12.2 Sound Settings for Prog. via the Station Table . . . . . . .40
12.3 Mute Function . . . . . . . . . . . . . . . . . . . . . . . . . . . . .41
12.4 HiFi-output . . . . . . . . . . . . . . . . . . . . . . . . . . . . . . . .42
12.5 Speakers . . . . . . . . . . . . . . . . . . . . . . . . . . . . . . . . .43
12.6 Sound Settings, Overview . . . . . . . . . . . . . . . . . . . . .44
12.7 Connecting Headphones . . . . . . . . . . . . . . . . . . . . . .47
12.8 Sound 1, Sound 2 . . . . . . . . . . . . . . . . . . . . . . . . . .47
13 Automatic zoom . . . . . . . . . . . . . . . . . . . . . . . . . . .48
14 Childlock . . . . . . . . . . . . . . . . . . . . . . . . . . . . . . . . .49
15 Timer Control . . . . . . . . . . . . . . . . . . . . . . . . . . . . .51
15.1 Setting the Time and Date . . . . . . . . . . . . . . . . . . . . .52
15.2 Recording Control . . . . . . . . . . . . . . . . . . . . . . . . . .53
16 Photo Viewer . . . . . . . . . . . . . . . . . . . . . . . . . . . . . .55
Photograph Displayzoom function . . . . . . . . . . . . . . .56
Photograph Displayslide show . . . . . . . . . . . . . . . . . .57
Foreword
Dear customer,
thank you for selecting a Metz
LCD TV set.
We have equipped this TV set
with a menu system which uses
"file cards" and believe that this
will provide you with a user
interface that is easy to understand.
If you have any problems, you can
press the
INFO
key to display a
help function that will assist you in
setting up your TV set.
However, you should read at
least sections 1 to 9 of the Operating Instructions before putting
your new TV set into service.
TV sets with the type
designation “HDTV” provide
the possibility of showing
HDTV programmes.
Your METZ-WERKE
Contents
HDTV
inside
Page 3

3
Contents
17 Special Functions Recording with a timer .58
Special Functions Direct recording of a
programme . . . . . . . . . . . . . . . . . . . . . .60
Special Functions Picture format . . . . . . . .61
Special Functions Picture Position . . . . . . .63
Special Functions Audio / language selection
64
Special Functions Select Subtitle . . . . . . . .65
Special Functionsviewing-time shift mode .67
Special Functionsviewing-time shift mode .69
18 Programming the Function Keys . . . . . . .71
19 EPG . . . . . . . . . . . . . . . . . . . . . . . . . . . .72
19.1 Activating the EPG . . . . . . . . . . . . . . . . .72
19.2 Collecting EPG data . . . . . . . . . . . . . . . .73
19.3 Using the EPG . . . . . . . . . . . . . . . . . . . . .76
19.4 Using the EPG Recording a Programme . .79
20 Setting the Country and Language . . . . .80
21 Setting Stations Setting the reception mode81
21.1 TV-Standard for analogue stations . . . . . .82
21.2 Analogue TV . . . . . . . . . . . . . . . . . . . . .83
21.3 Colour standard for analogue stations . . .84
21.4 DVB-T, Antenna supply voltage . . . . . . . .85
Automatic DVB-T station search . . . . . . . .86
Manual DVB-T station search . . . . . . . . . .87
21.5 Automatic DVB-C stationsearch . . . . . . . .88
Manual DVB-C station search . . . . . . . . .89
21.6 Set-up of Sat System Antenna system . . . .90
Set-up of satellite system Unicable . . . . . .91
Set-up of satellite system LNB supply
voltage . . . . . . . . . . . . . . . . . . . . . . . . . .92
Set-up of satellite systemDiSEqC system . . .93
Set-up of satellite systemSelecting satellites 94
Setting the stations Automatic search . . . .95
Setting the stations Manual search . . . . . .96
21.7 Setting the stations Updating the data . . . .98
21.8 DVB Prog. Info. signal quality . . . . . . . . .99
21.9 DVB Portal stations . . . . . . . . . . . . . . . .100
22 Station Logo . . . . . . . . . . . . . . . . . . . . .101
23 Sorting stations, individual . . . . . . . . . .102
Sorting stations, block-by-block . . . . . .103
24 Initial Programme Position . . . . . . . . . .104
25 DVB Radio Mode . . . . . . . . . . . . . . . . .105
26 Scope of Operation . . . . . . . . . . . . . . .106
27 Cleaning the TV Set . . . . . . . . . . . . . . .108
28 Connections on the Rear left side . . . . . .109
Connections on the Rear of the Set bottom
110
28.1 Connecting a Hifi Amplifier . . . . . . . . . .110
29 Registering AV Devices . . . . . . . . . . . . .112
Registering AV Devices . . . . . . . . . . . . .113
29.1 Registering AV Devices Setting RGB . . . .114
29.2 Registering AV Devices Setting HDMI . . .115
29.3 Registering AV Devices Data Logic . . . . .116
Registering AV Devices Data Logic . . . . .117
29.4 Registering AV DevicesData Logic Settings118
29.5 Removing AV Devices . . . . . . . . . . . . . .119
30 Copying between AV Devices Direct
recording . . . . . . . . . . . . . . . . . . . . . . .120
31 Inserting / Removing CA Modules . . . . .122
32 Connecting a PC to the TV set:
HDMI Ü HDMI . . . . . . . . . . . . . . . . . . .123
32.1 Setup DVI-D Ü HDMI connection . . . . . .124
32.2 Connecting a PC: sound from the
speakers of TV . . . . . . . . . . . . . . . . . . .125
33 Glossary . . . . . . . . . . . . . . . . . . . . . . .126
34 Problem, Possible cause, Remedy . . . . .128
35 Upgrade Kits . . . . . . . . . . . . . . . . . . . .130
36 Technical Data . . . . . . . . . . . . . . . . . . .131
Battery disposal . . . . . . . . . . . . . . . . . . . . . .133
Index . . . . . . . . . . . . . . . . . . . . . . . . . . . . . .134
Page 4

4
• Take care that no bright artificial light
or sunshine falls directly on the screen.
This could cause reflections which have
a negative effect on the brilliance of
the picture.
• The best viewing distance is five times
the screen diagonal, i.e.
- Approx. 2 m (6.3 ft) for 26" screens
- Approx. 2.4 m (7.6 ft) for 32" screens
- Approx. 2.8 m (9 ft) for 37" screens
- Approx. 3.2 m (10.3 ft) for 42" screens
- Approx. 3.5 m (11.0 ft) for 47" screens
- Approx. 4.2 m (13.8 ft) for 55” screens
This distance can also be reduced by
one half for HDTV.
• The antenna cable and any other components (such as a video recorder)
connected between the antenna socket
in the wall and the TV set must comply
with the European standard
EN 60966-2-4.
• The antenna cable used for connecting
the TV set must have a screening attenuation of at least 75 dB.
• The use of non-approved cables will
invalidate the operating permission for
the TV set.
1 Installation
• Only use Metz bases as a stand for the
LCD TV.
• If you want to mount the TV set on the
wall, only Metz wall brackets should be
used. Furthermore, only specialists should
carry out such work.
• The TV set should not be mounted on the
ceiling.
• To prevent injuries, the TV set must be fastened safely to the floor / wall in accordance with the installation instructions.
• Strong tobacco consumption at the
installation location of the TV can lead
to nicotine and soot deposits behind the
panel glass and thus to an impairment of the image quality. Such deposits can only be removed by a specialist. In extreme cases the panel may
be damaged permanently, which may
require to replace the panel.
The cleaning and / or the replacement
of the panel is not covered by warranty claims.
This TV set is exclusively designed for the
reception and replay of picture and
sound signals.
The TV set is designed for dry rooms
(living rooms and offices).
The room climate should be in a range
from +5°C to +35°C with 75% air humidity.
The TV set must not be used in rooms
with higher air humidity (e.g. bathroom,
sauna, etc.).
The TV set must not be used in rooms
with a high concentration of dust (e.g. a
workshop).
If, as an exception, you operate the TV
set outdoors, then please make sure that
it is protected against moisture (rain,
water spray, dew).
1.1 Proper use
Page 5
5
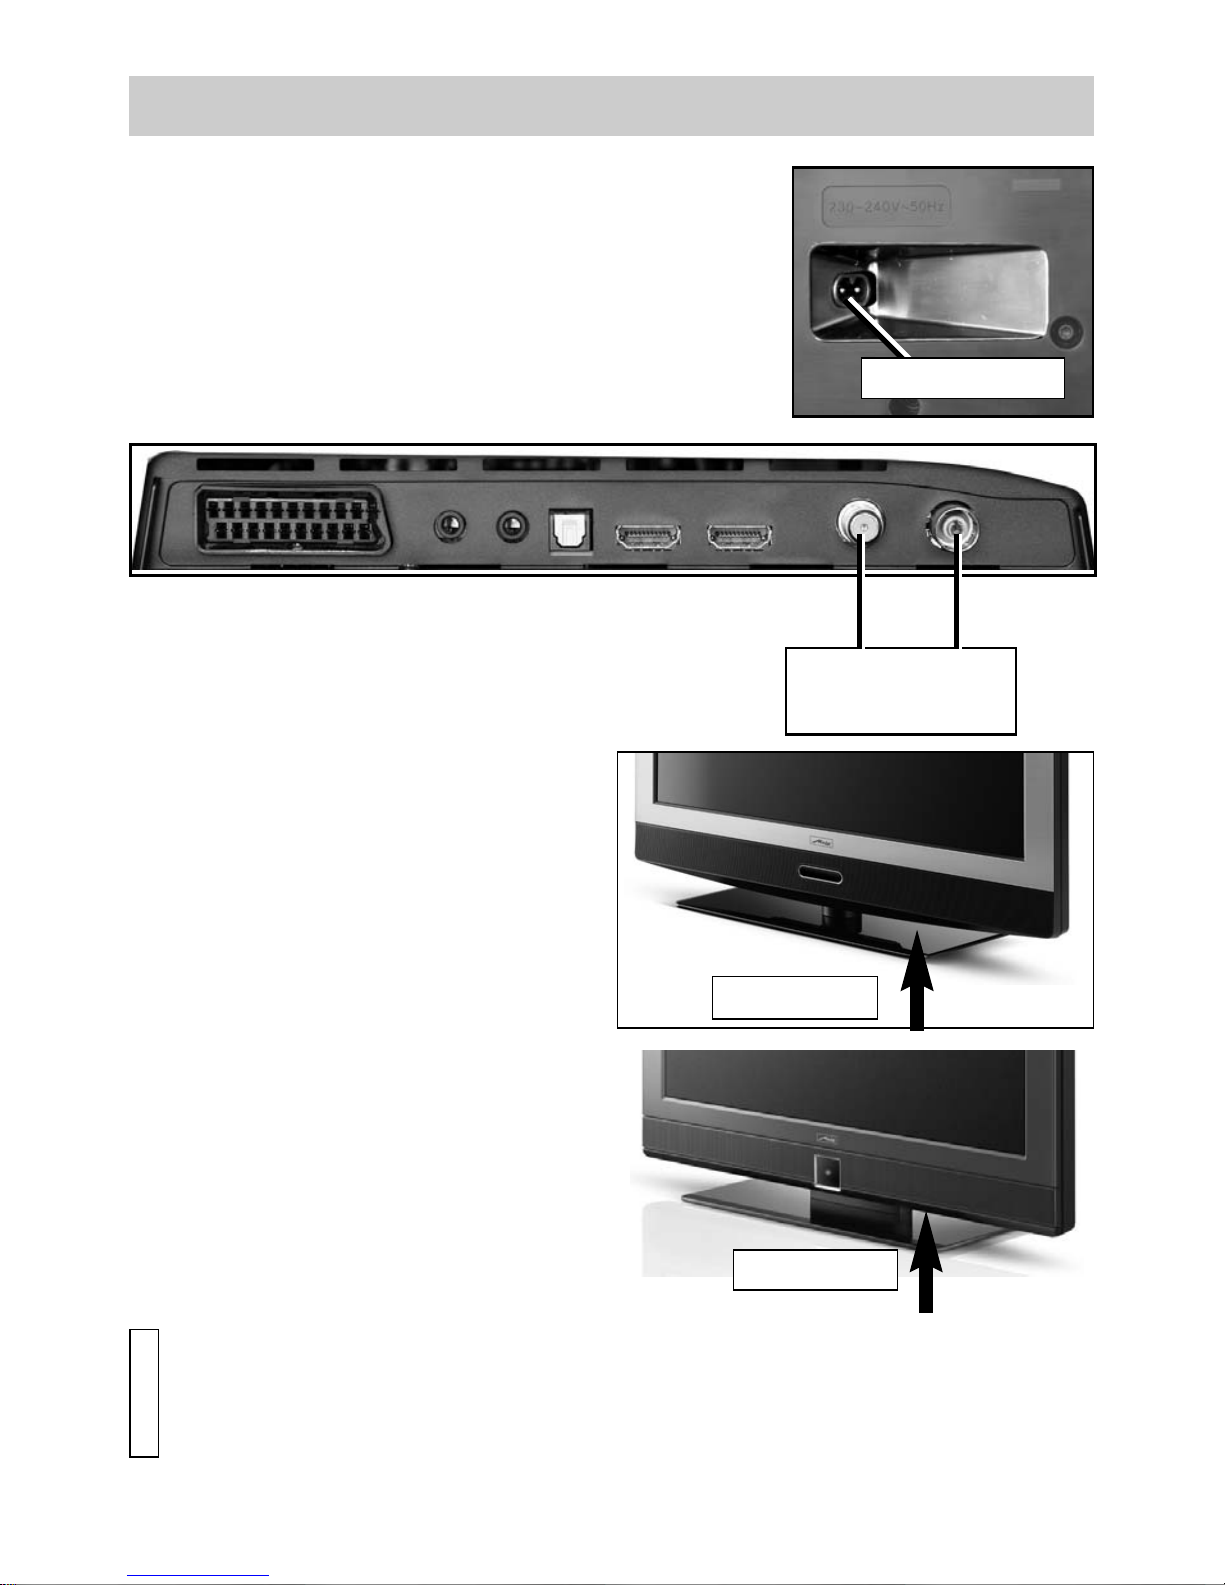
1.2 Connecting and switching on
Power connector (on the back of the TV set)
Connect the TV set to the wall socket with the accompanying power cord.
Antenna connector (Back of the TV set at the bottom)
Connect the TV set to the antenna socket
with an antenna cable.
Switching on
Switch on the TV set with the main switch.
the TV set switches to programme position
1 or to the programmed initial programme
position, see also chapter 24 - Initial Programme Position.
Power connector
DVB-S2 DVB-CT
Antenna connector
Switching on
Switching on
If no other command is received from the remote control, a message will appear
after approx. 10 minutes asking for one of the remote control keys to be pressed.
If no command is received from the remote control, the TV set is switched to
stand-by mode.
i
Page 6

6
1.2 Connecting and switching on
• Always place the monitor on a solid,
stable surface.
• If a cold TV set is moved to a warm
room, always allow any condensation
on the screen to evaporate before switching it on.
• The TV set is intended for use in a dry
room. If, in exceptional circumstances,
you use it outdoors, take care that is
protected against moisture (rain, splashed water, dew).
• Do not expose TV set to dripping or
splashes (e.g. rain)!
• TV sets need adequate ventilation.
Never cover the openings on the rear of
the set with curtains, doilies, newspapers, etc. Also take care that the slits in
the bottom of the case are freely accessible so that the intake of the cooling air
is not hindered.
• If you place the TV set in a wall unit,
leave sufficient space on all sides for
the circulation of cooling air.
• Do not place the TV set close to a radiator, since this would effect adequate
cooling.
Switching on from stand-by mode
Use the numeric keys of the remote control to select any programme.
Programme position 1 is selected by pressing the key or . If an initial
programme position has been configured, this will be switched on. See also
chapter 24 – Initial Programme Position.
The LED is green.
Switching off
You can switch the TV set to stand-by
mode by pressing the key on the
remote control.
a) If EPG data is collected when the
TV set is stand-by mode, the orange
LED will light up (see also chapter
19.2 Collecting EPG data).
b) If the red stand-by indicator is on,
we recommend cutting the power to
the TV set by pressing the power
switch.
Delivery contents
• TV set
• Remote control plus 2 AAA
batteries
• Power cable
• User guide
2 Safety notes
Page 7

7
2 Safety notes
• Do not place
- burning candles or
vessels containing liquids (vases, etc.)
on top of the TV set, since any hot wax
or water dripping into the set could
cause serious damage to the electronic
components and could also jeopardize
the electrical safety of the set.
• Lightning can damage electrical equipment. A lightning flash entering the
power cable or the aerial cable can
damage the TV set even if it is switched off. You should therefore disconnect the power cable and aerial cable
from their outlets or from the TV set in
the case of a thunder storm.
• The monitor may be opened and
repaired only by a qualified person.
CAUTION! HIGH VOLTAGES CAN KILL !
If repairs should be necessary, consult
your local dealer.
• Always switch off the TV set before
cleaning it.
• Do not hold the remote control directly
in front of your eyes and press a button. The remote control emits infrared
radiation!
• Do not place rechargeable batteries in
the battery compartment of the remote
control. Use only two 1.5 V dry batteries of the type LR03/AM4/AAA
(Micro).
• The TV set is intended only for the
reception and reproduction of picture
and sound signals.
• The TV set may be operated only from
a mains voltage of 230-240V VAC,
50 Hz. Australia: 240 VAC.
• For maintenance and repair work, the
power plug or the power-cord input of the
TV represents a means to disconnect the
device from the mains and must therefore
be kept in a usable state in line with applicable standards.
•
Lay the power cable so that nothing
stands on it and no-one can trip over it.
• Do not display still images, logos, 4:3
pictures with stripes etc. over an extended period. These still images can
result in marks on the screen.
• Keep candles and open flames away
from this product at all times to prevent
fire spreading.
• Grime and dust deposits can accumu-
late behind the front panel glass of the
LCD TV set without a visible source
being present. These grime and dust
deposits are also known as „fogging“
or „magic dust“. There are scattered
instances of this phenomenon, but
especially during the warm-up period
and after renovation work or in new
constructions. Various factors can cause the above mentioned phenomenons,
see also reports on the Internet.
In such cases cleaning or replacement
of the panel is excluded from the
guarantee, since it does not involve a
set defect, but rather an external
influence.
Page 8
8
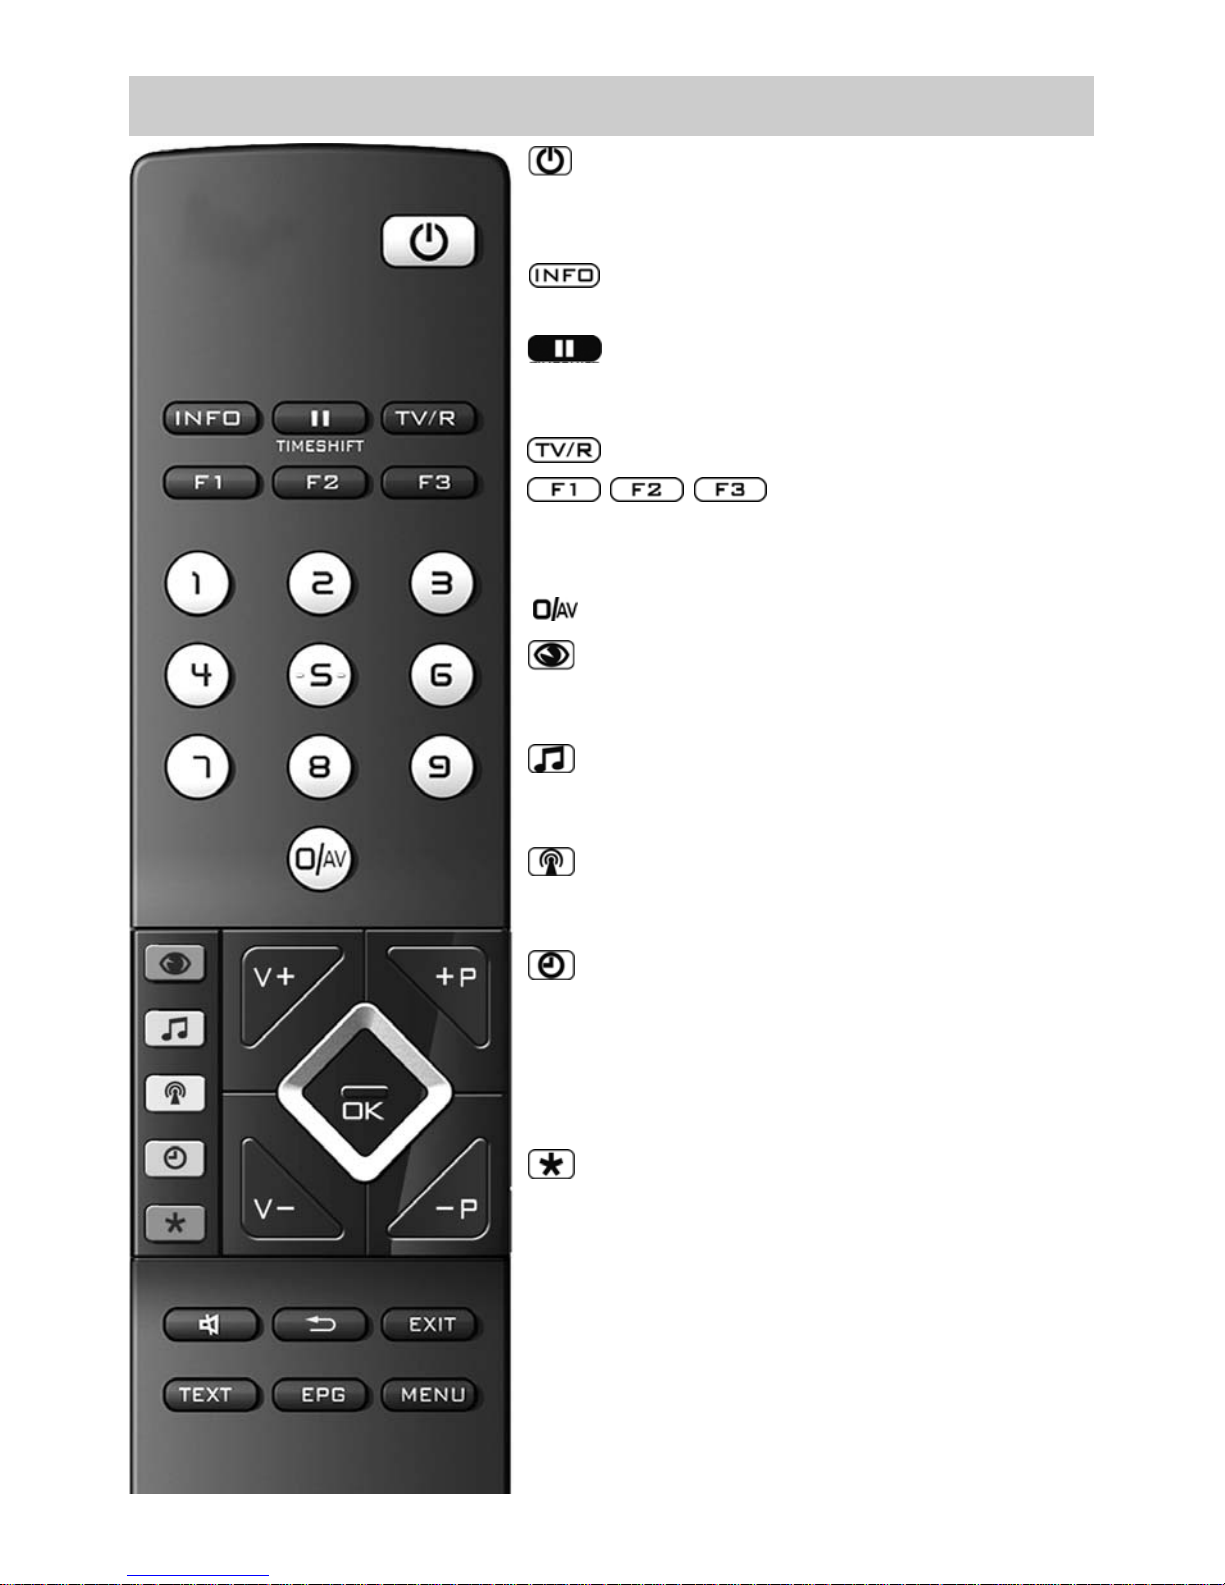
3 The Remote Control (RM 16)
ON at program position 1 or at the pro-
grammed start program position.
OFF, enter stand-by setting.
Call “Information“.
Back to table of contents in “Information“.
In TV mode: Start time shift
When set to Play: Still picture/Pause
Hold down when set to Play: Slow motion
Switch to TV -> Radio
1)
/ Radio1)-> TV
Function keys
Press briefly: for factory programming
Hold down: display of the special functions selection
Select AV device
Select picture settings
In TV menu: Adjust the settings for “picture and sound”
Select sound settings
In TV menu: Adjust the settings “AV devices”
Select program table,
In the TV menu: Adjust the settings “Program table” or station features
Display date, time info on program
In the TV menu: Adjust the settings “Time
settings”
In video text: Scroll by markers
When set to time shift: Display playback
position
In the TV menu: Adjust the settings “Configuration“
In video text: Set or delete marker
Mark TV program for recording in EPG
V+ volume + / In the menu: Change value
+P Progr. + / In the menu: Change value
V– volume – / In the menu: Change value
–P Progr. – / In the menu: Change value
Page 9
9
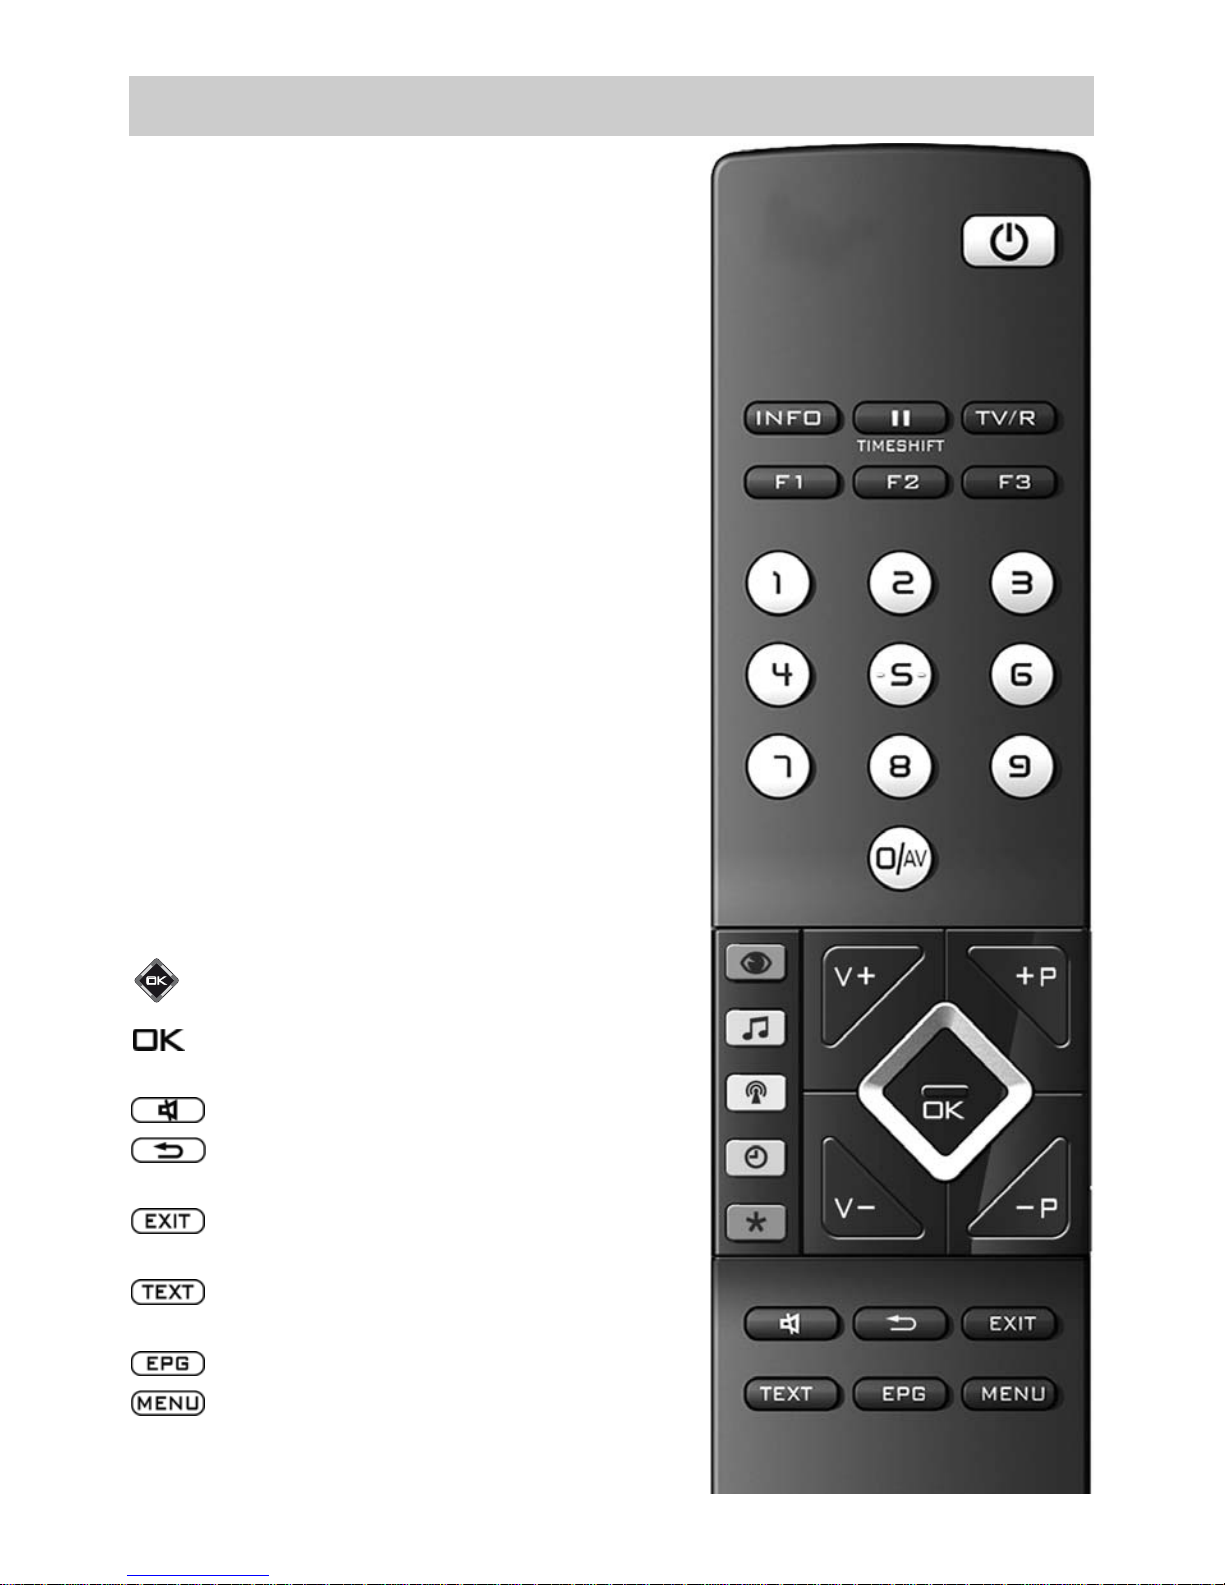
3 The Remote Control (RM 16)
Cursor control key
Confirmation key
In the menu: Save
Mute/sound stop
Back to last program
In the menu: Delete
Exit menu without saving any changes
that have been made
Select video text
In video text: Scroll by markers
Select the electronic program guide
Select the TV menu.
In the menu: Return to main menu point
Page 10

10
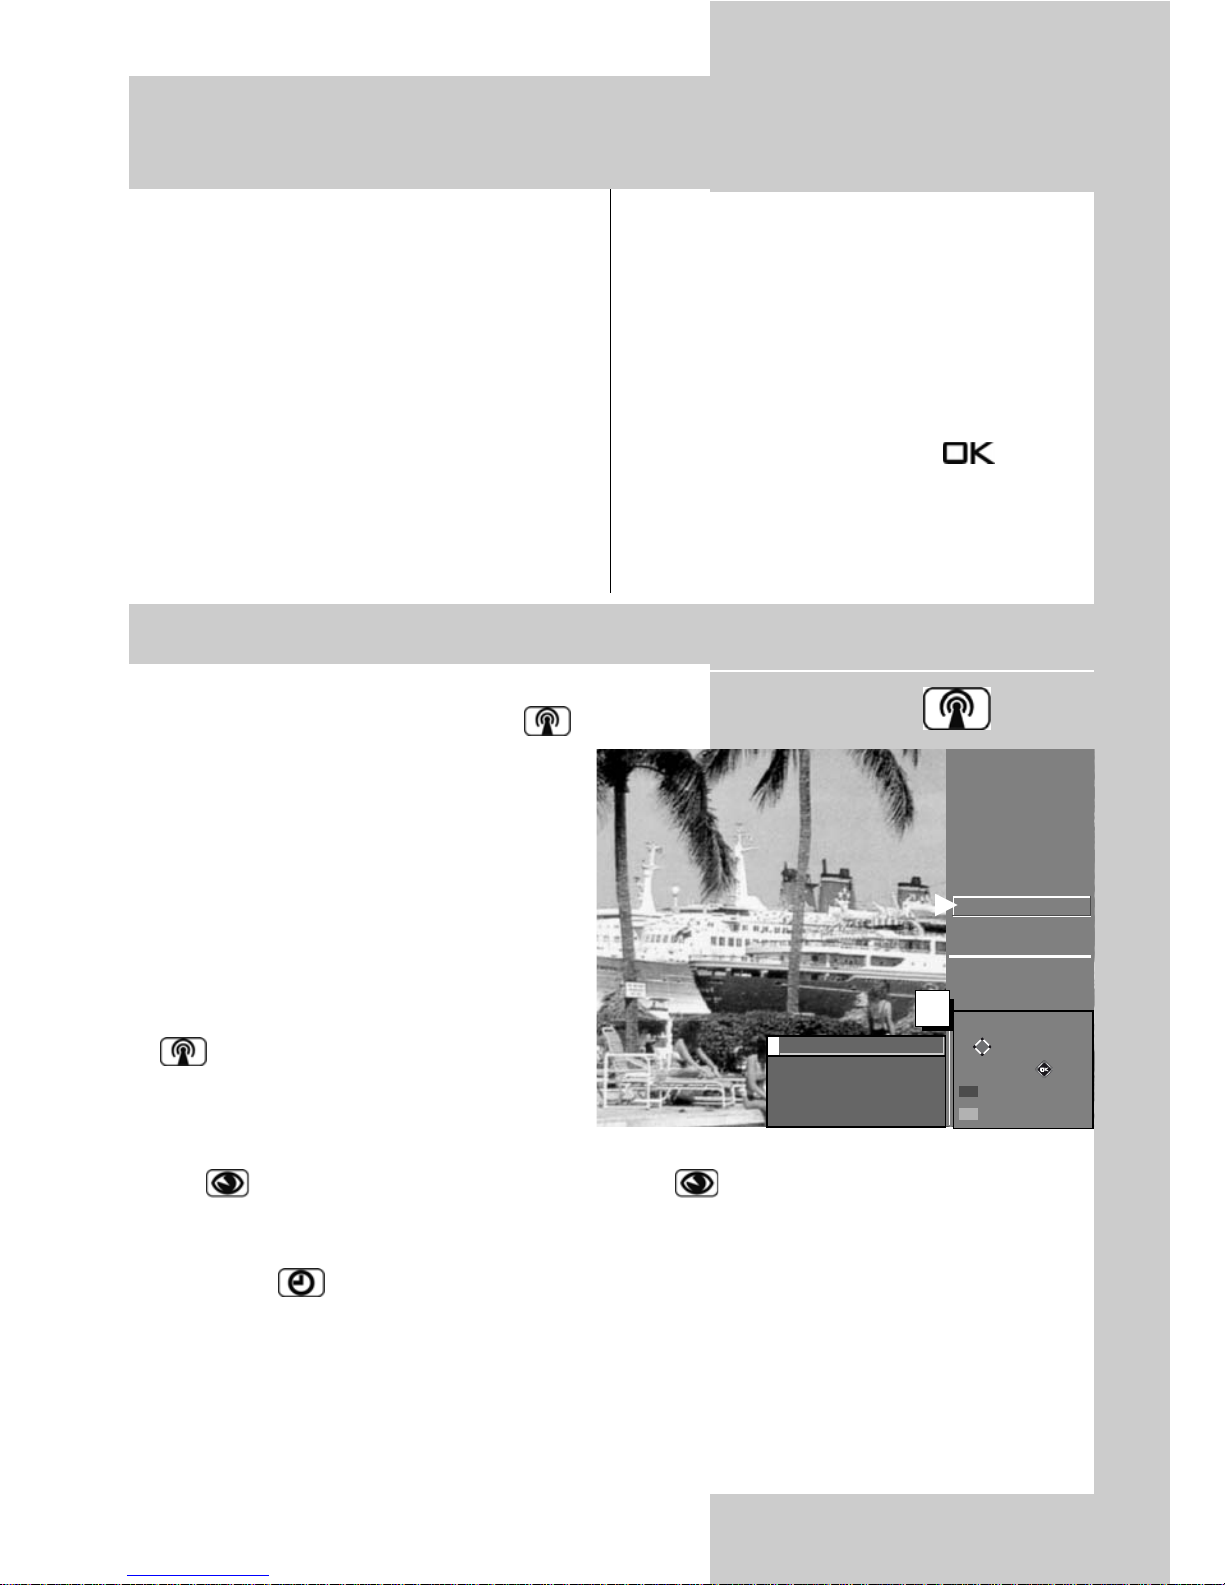
4 Daily Operation sound and pictu
re
Changing picture settings
The picture settings can be accessed with the blue
button . The settings box with the individual
functions (see picture) appears on the bottom left
of the screen.
Select the desired function with the
rocker
switch and adjust it with the V–/V+ key.
The individual picture characteristics can also be
saved as default values for all programmes. See
Chapter 11 for this.
Volume settings
Use the – + key to change the volume
.
Changing the sound settings
The sound settings can be accessed with the yellow button . The settings box with the indivi-
dual functions (see picture) appears on the bottom
left of the screen.
Select the desired function with the
rocker
switch and adjust it with the V–/V+ key.
The individual sound characteristics can also be
saved as default values for all programmes. See
Chapter 12 for this.
The settings that are made here are only temporary and are not saved. If the TV set is switched to stand-by mode or switched off, all
settings will be reset to the preset default
values.
Colour intensity
Brightness 65%
Profil
Colour impr.
MPEG noise red. med.
Noise reduct.
Sharpness
Colour intensity 50%
Brightness
Noise reduct.
Sharpness 7
Colour intensity
MPEG noise red.
Noise reduct. light
Sharpness
Volume
Tone settings normal
Sound mode
Sound mode
Volume
50%
Tone settings
Speakers
Sound mode Stereo
Volume
Haedphone Vol.
Speakers on
Sound mode
i
Page 11
11
In normal TV or radio 1)mode, you can display the
station table by pressing the white key.
• Programmes can be selected with the
cursor key or numeric keys in the
table displayed. It is possible to skip
to the next or last 15 programmes
with the cursor control key . You
can display the programme selected
with the key OK.
• A key pad is displayed as a result of
repeated pressing of the white key
. The station table can be ordered
alphanumerically with the corresponding key.
• All HD stations saved in the station table are displayed by pressing the blue
key . By renewed pressing of the blue key all stations are once again
displayed in the station table.
• By selection with the cursor control key of another station and pressing the
green key , you can see the short information of the station on the programme
and the start and end times (only DVB stations, not analogue stations).
• By using the joker character % you can look for text characters inside the station
name. For example, enter “%FER” and all station names are listed in which the
character string “FER” occurs, e.g. “hr-fernsehen”, “SWR Fernsehen”.
5 Station selection and management of
programme positions
5.1 Selecting stations from the station table
If less than ten programme positions are
occupied, the first digit you enter automatically becomes the "units" digit.
After pressing any numeric key, you have
three seconds to press further numeric
keys.
The programme can be changed
immediately by pressing the button.
The TV set can store the settings for up to
3000 TV stations and 3000 radio stations
in so-called programme positions. You
can select any of these programme positions with the numeric keys, with the oval
rocker key
or from the station table.
If you use the numeric keys for station
selection, the first digit you enter is normally the "thousands" digit. If less than
1000 programme positions are occupied,
it automatically becomes the "hundreds"
digit.
2 x
10 Kabel 1
9 Nord 3
8 RTL
7 PRO 7
6 Nord 3
5 PRO 7
4 SAT1
3 Bayern 3
2 ZDF
1 ARD
56 Hessen 3
55 SW-BW
%
ABC DEF
GHI
JKL
MNO
PQRS TUV
WXYZ
Select with ...
or .
Confirm with .
show HD stations
Short info prog.
Pr
Pr
Page 12

12
During the design of this TV set, we have made
every effort to make it as easy a possible for you
to use it and we hope that you will enjoy familiarising yourself with your new TV set.
With the "Information" menu, the TV set is able to
answer the many questions which may come up
during installation and setup.
To display this menu, simply press the key
for the table of contents.
The "Information" menu (user help)
In the table of contents or the index, you can select
the item of interest with the cursor control key.
Use the cursor-right key to scroll forwards through the contents or index ...
Use the cursor-left key to scroll backwards through the contents or index ...
Use the cursor-up key to select the last
underlined item ...
Use the cursor-down key to select the
menu lines...
... and then press the key to display
the explanation of the selected item.
You can select any underlined word in the
table of contents, the index or the explana-
tion of a selected item with the cursor. Pressing the key then displays the explanation
for this word.
You can also scroll forwards and backwards
through previously displayed pages with the aid
of the red and green keys.
6 User Help (Information)Opening the Info
INFO
Information
Contents
Index
Station selection
Picture settings
Sound settings
AV playback
Recording facilities:
- Timer recording
- Direct recording
- AV copying
Teletext
Function keys
DVB radio mode
Electronic Programm Guide (EPG)
Select the underlined text with the cursor.
:
further information
:
table of contents
Visited pages
:
back
forward
Page 13
13
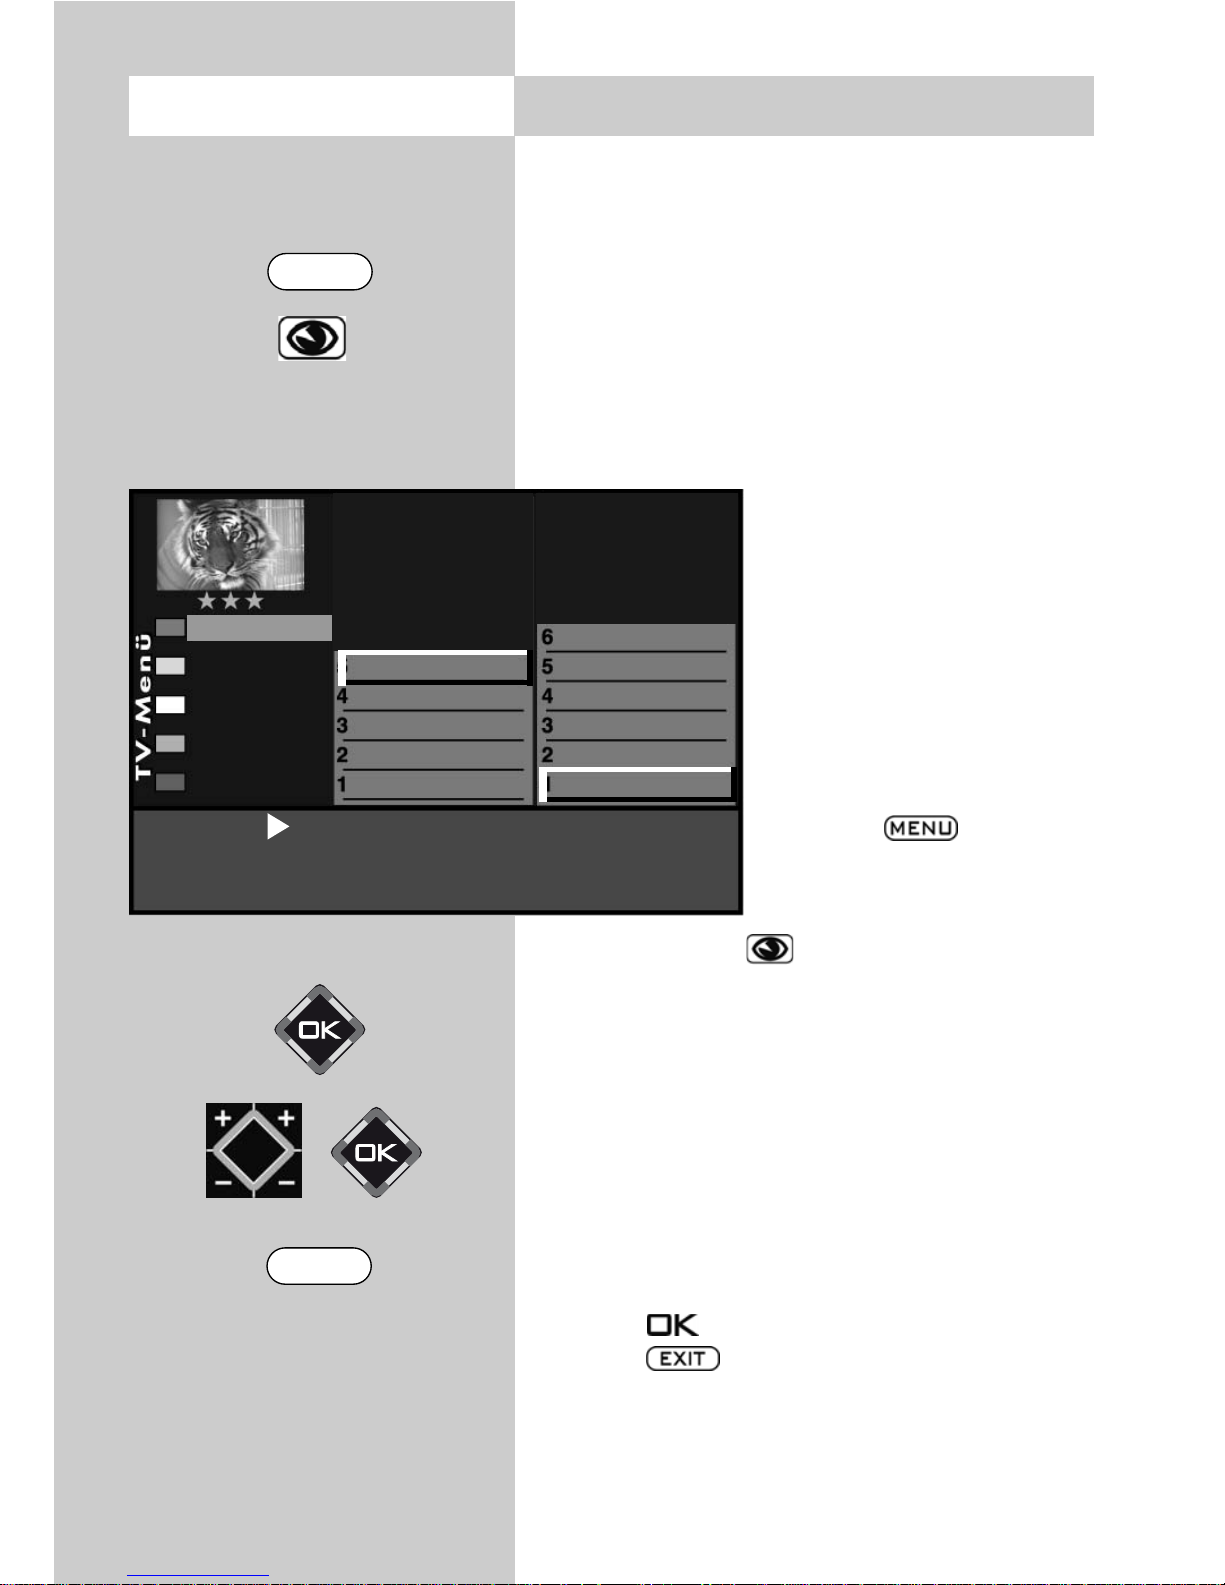
With the "TV menu", we provide you with an
assistant to help you find your way through the
many possible settings of the TV set.
Don't be afraid to change any
settings in the various menus.
No changes will be saved
unless you press the key
to confirm them. If you are not
sure whether you want to
keep a changed setting, you
can exit from the menu at any
time, without saving any
changes, by pressing the
key.
Within the TV menu, you can
return to the previous main menu
item at any time by pressing the
key. If you are not sure
what a menu item does, press the
key for more information.
In order to return to the menu, press the
key twice.
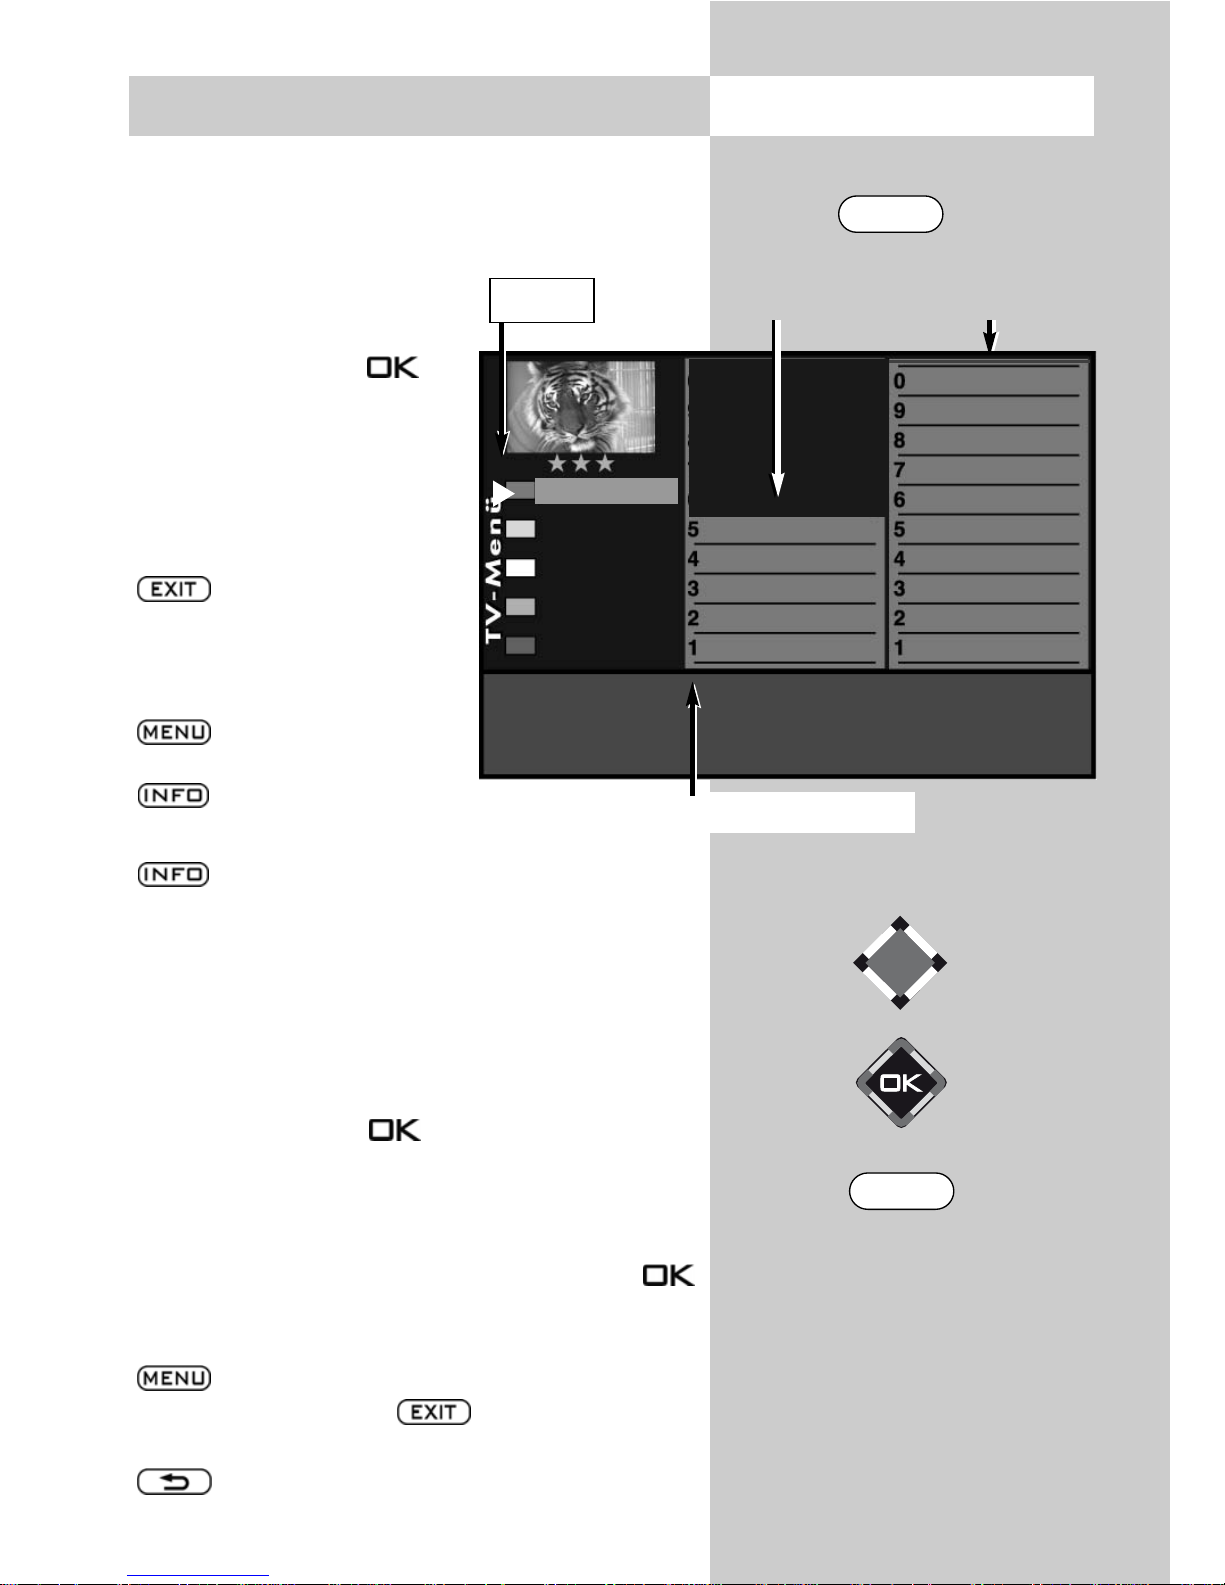
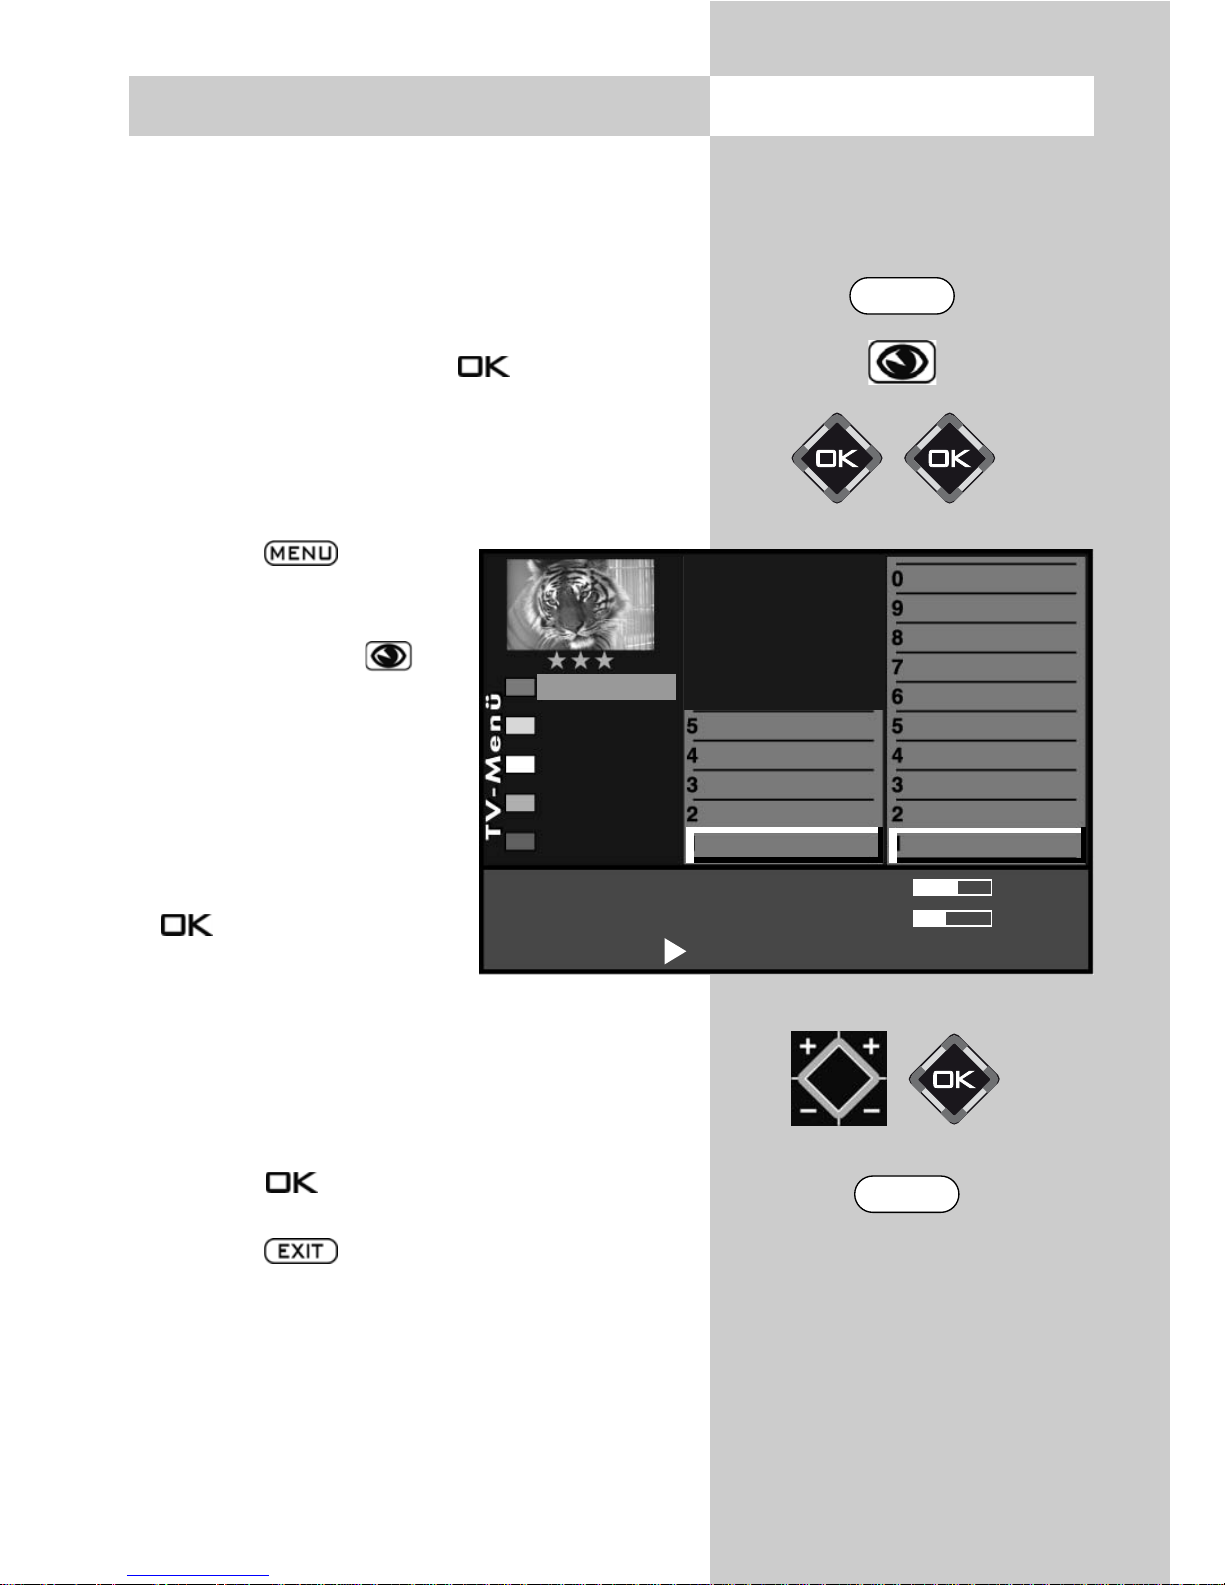
You can open each of the five main sections of the menu
with the key of the corresponding colour. The "card file"
which is then displayed is subdivided into Subjects (on
the left) and Sections (on the right), and you can select
these by moving the red, triangular cursor with the oval
cursor control key or with the numeric keys.
When you press the key, the current setting
for the selected item is shown in the "Setting window" below the card file and can be adjusted
with the V–/V+ key.
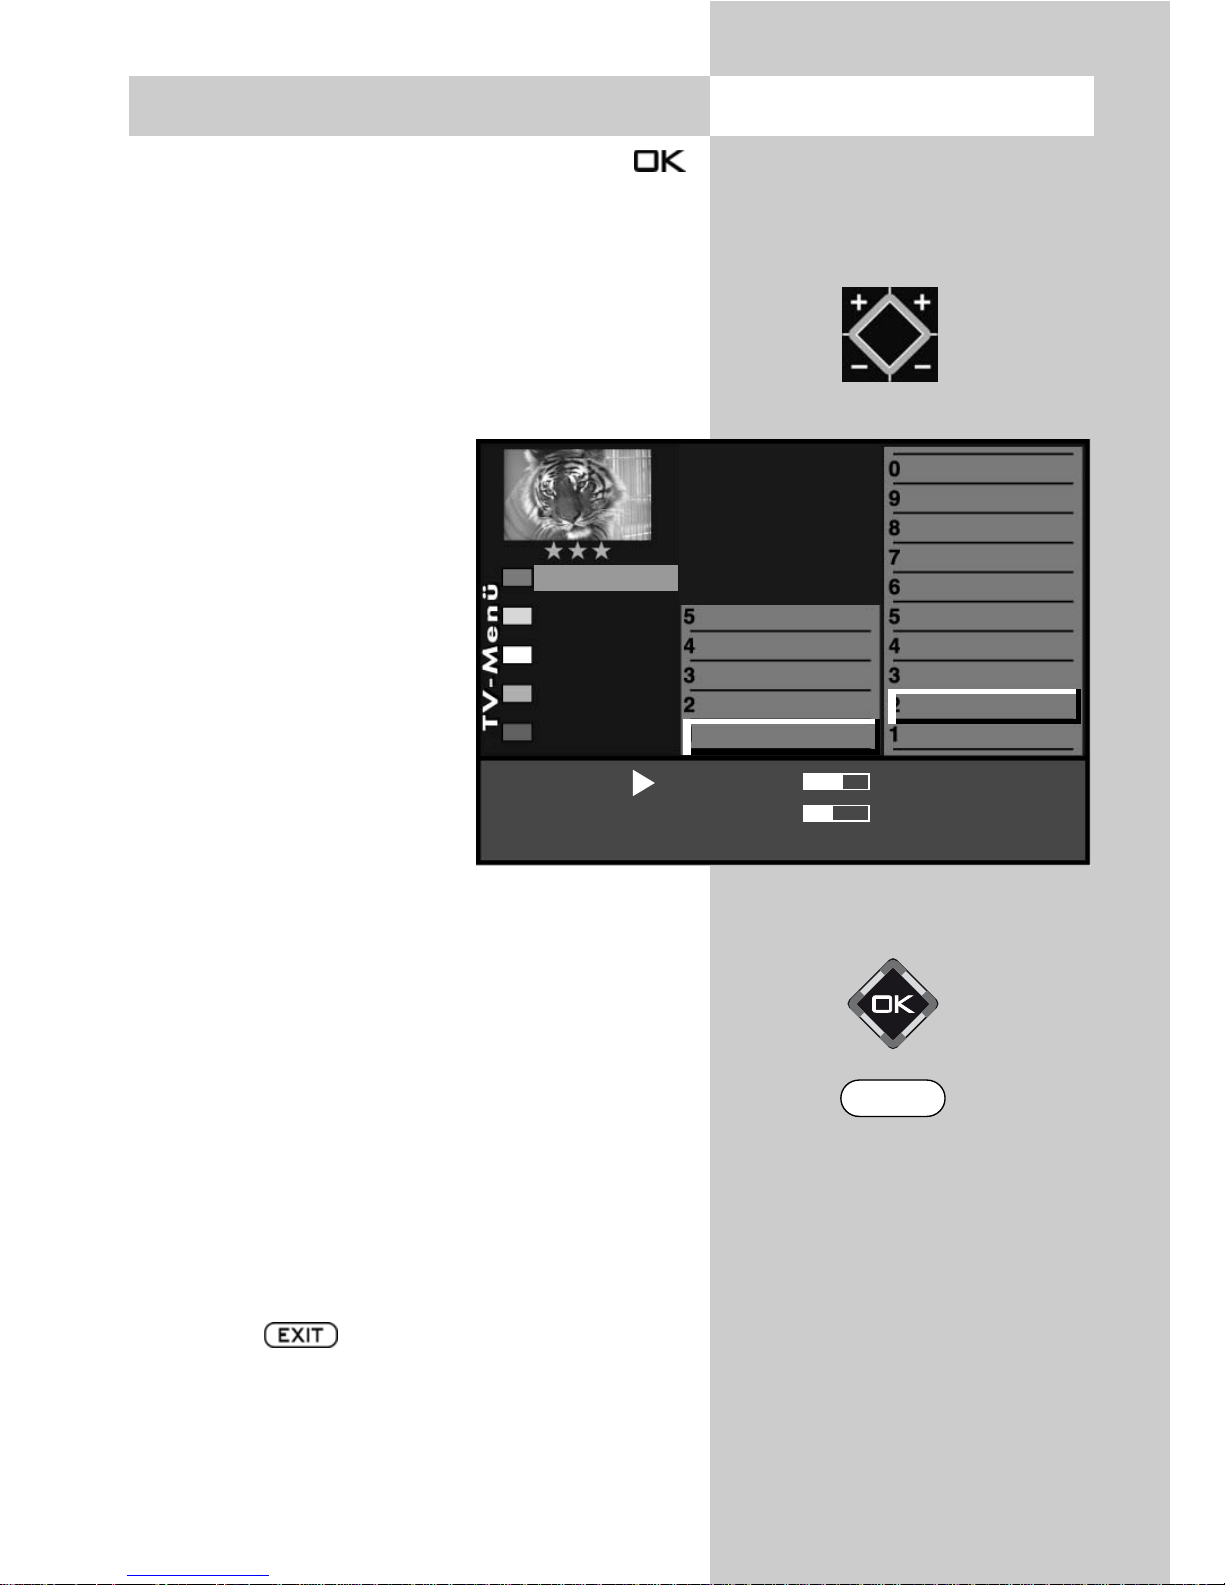
You can save the new setting by pressing the
key, which also returns you to the list of sections. If
you do not want to save the new setting, press the
key to return to the corresponding main
menu item or press the key to close the
menu. You can delete any incorrect inputs with the
key.
7 Menu Control Opening the menu
* The number of subjects and sections
depends on the selected scope of operation.
Depending on the configuration of the TV
set, the various menu items may be displayed in a different order and numbered differently.
Cursor
Section*
Subject*
Signal adjustment
Picture profile selection
Zoom/Panorama
Noise reduction
MPEG Noise reduction
Picture sharpness
Colour impr.
Colour intensity
Power options
Brightness
Picture profile adjustment
Sound set,.prog.posn
Sound settings, gen.
Pict.set.,prog.posn.
Picture settings, gen.
Setting window
Picture-Volume
Related numeric keys
EXIT
MENU
Page 14
14
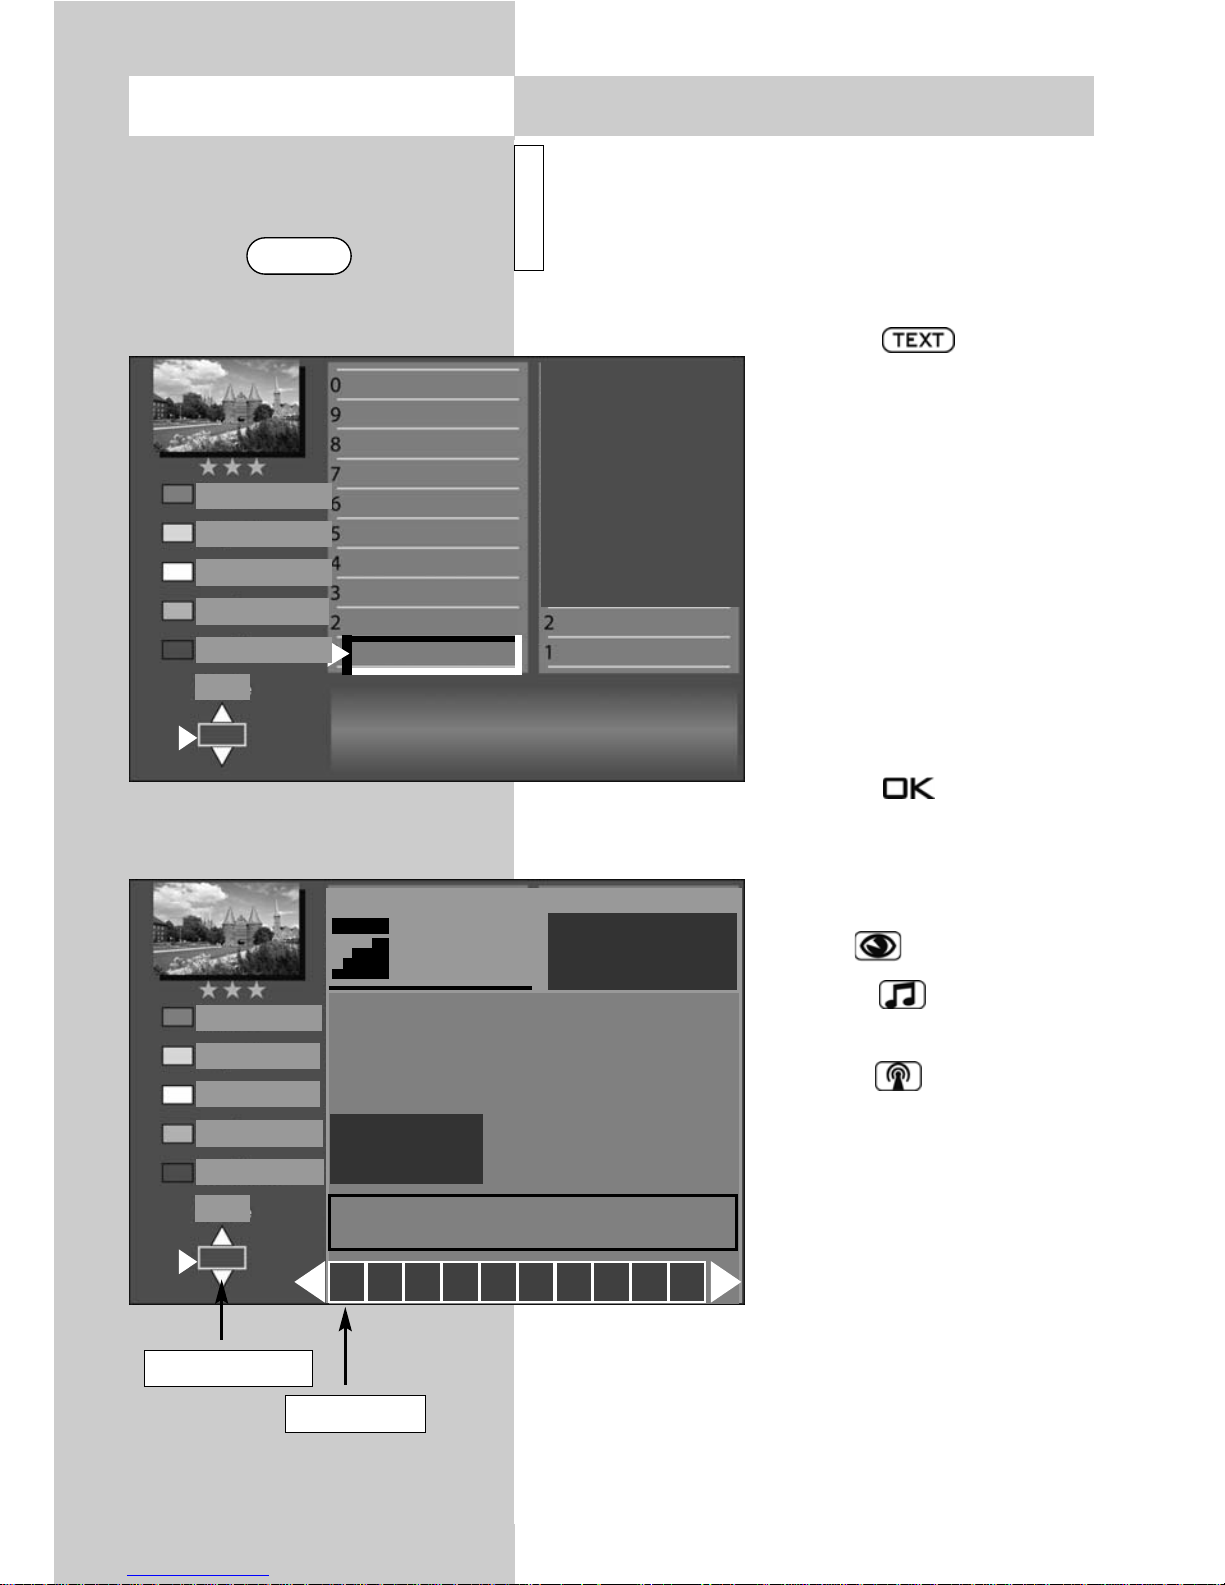
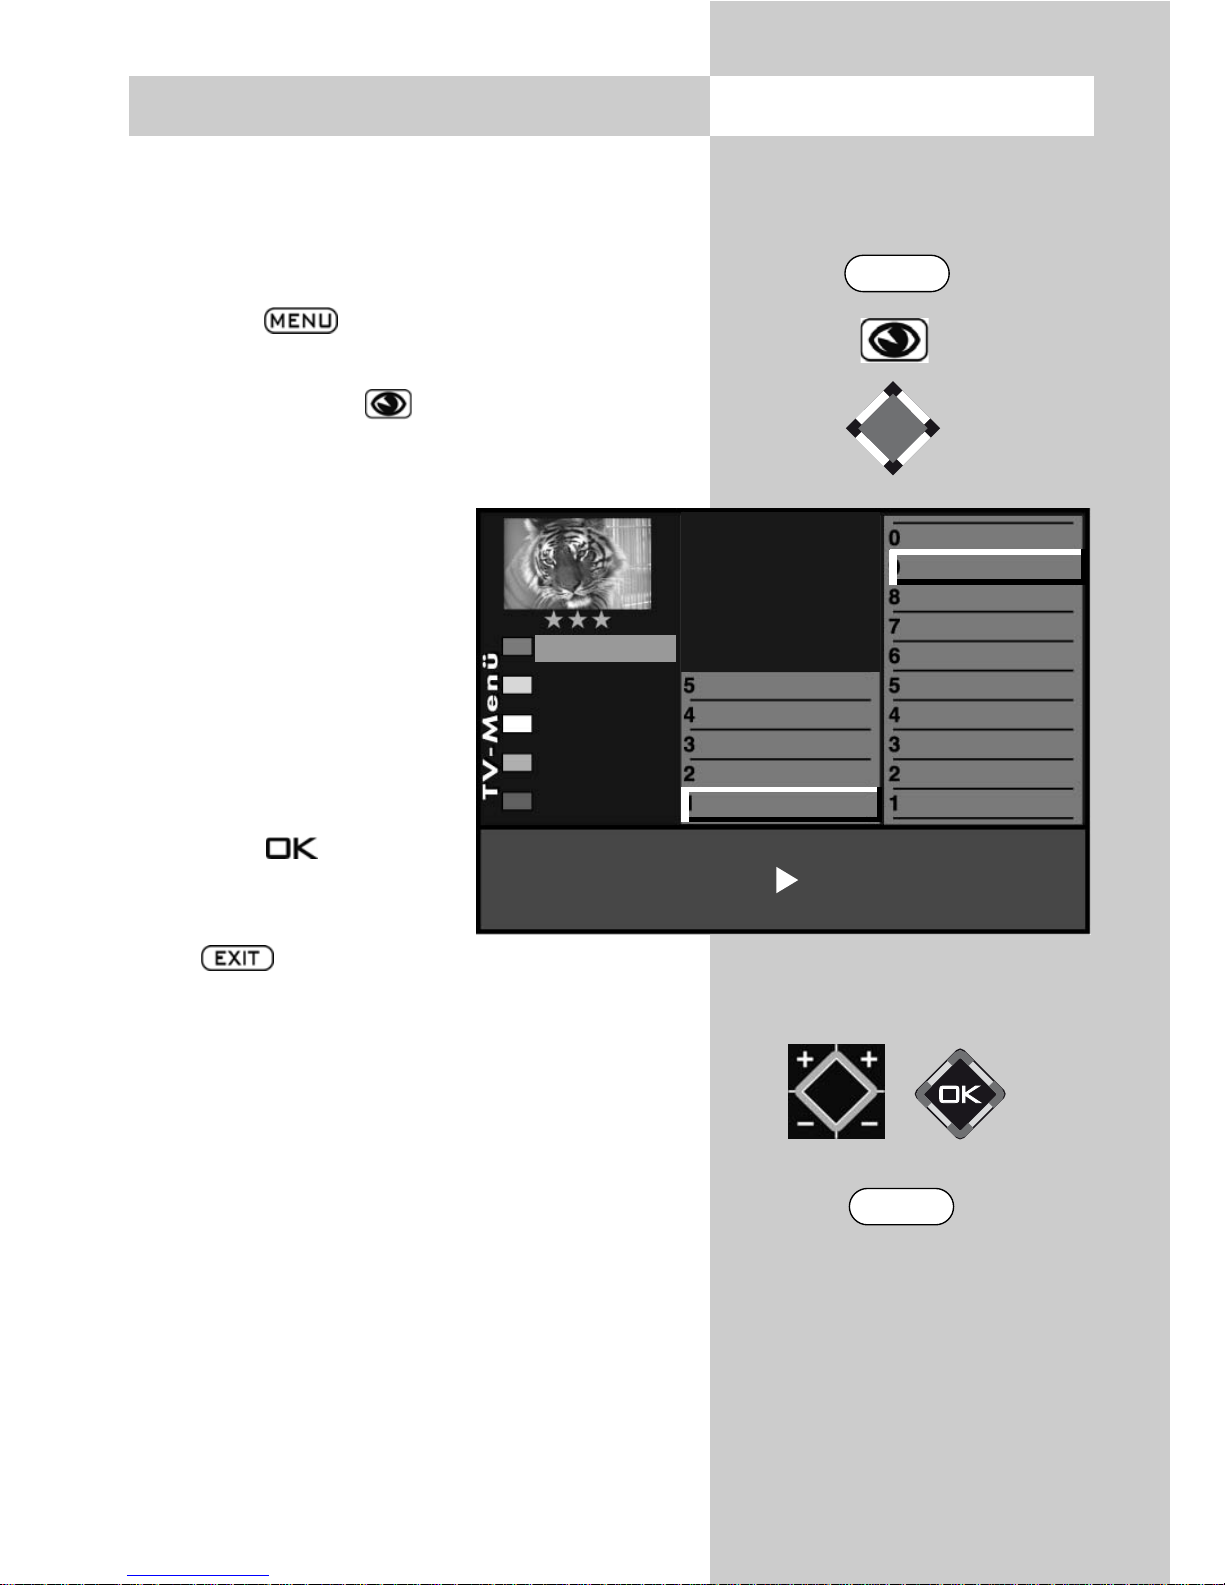
Teletext is an additional service provided free of
charge by many TV stations. It is an "electronic
magazine" through which you can browse in
various ways.
Opening Teletext:
• Press the key. If the
selected station offers
"TOP-Text", a "card file" is
displayed (see the picture
on the left). If "TOP-Text" is
not available, Teletext page
100 is displayed (see the
picture below).
• In the TOP-Text card file,
you can select the desired
cards with the cursor control key or with the numeric
keys.
• Press the key to open
the selected card.
Controlling Teletext with
pages displayed:
Blue key – next subject.
Yellow key – next
section.
White key – next page.
After pressing the coloured
pre-selection key, you can
step through the subjects,
sections or pages with the
cursor control key or with the
numeric keys.
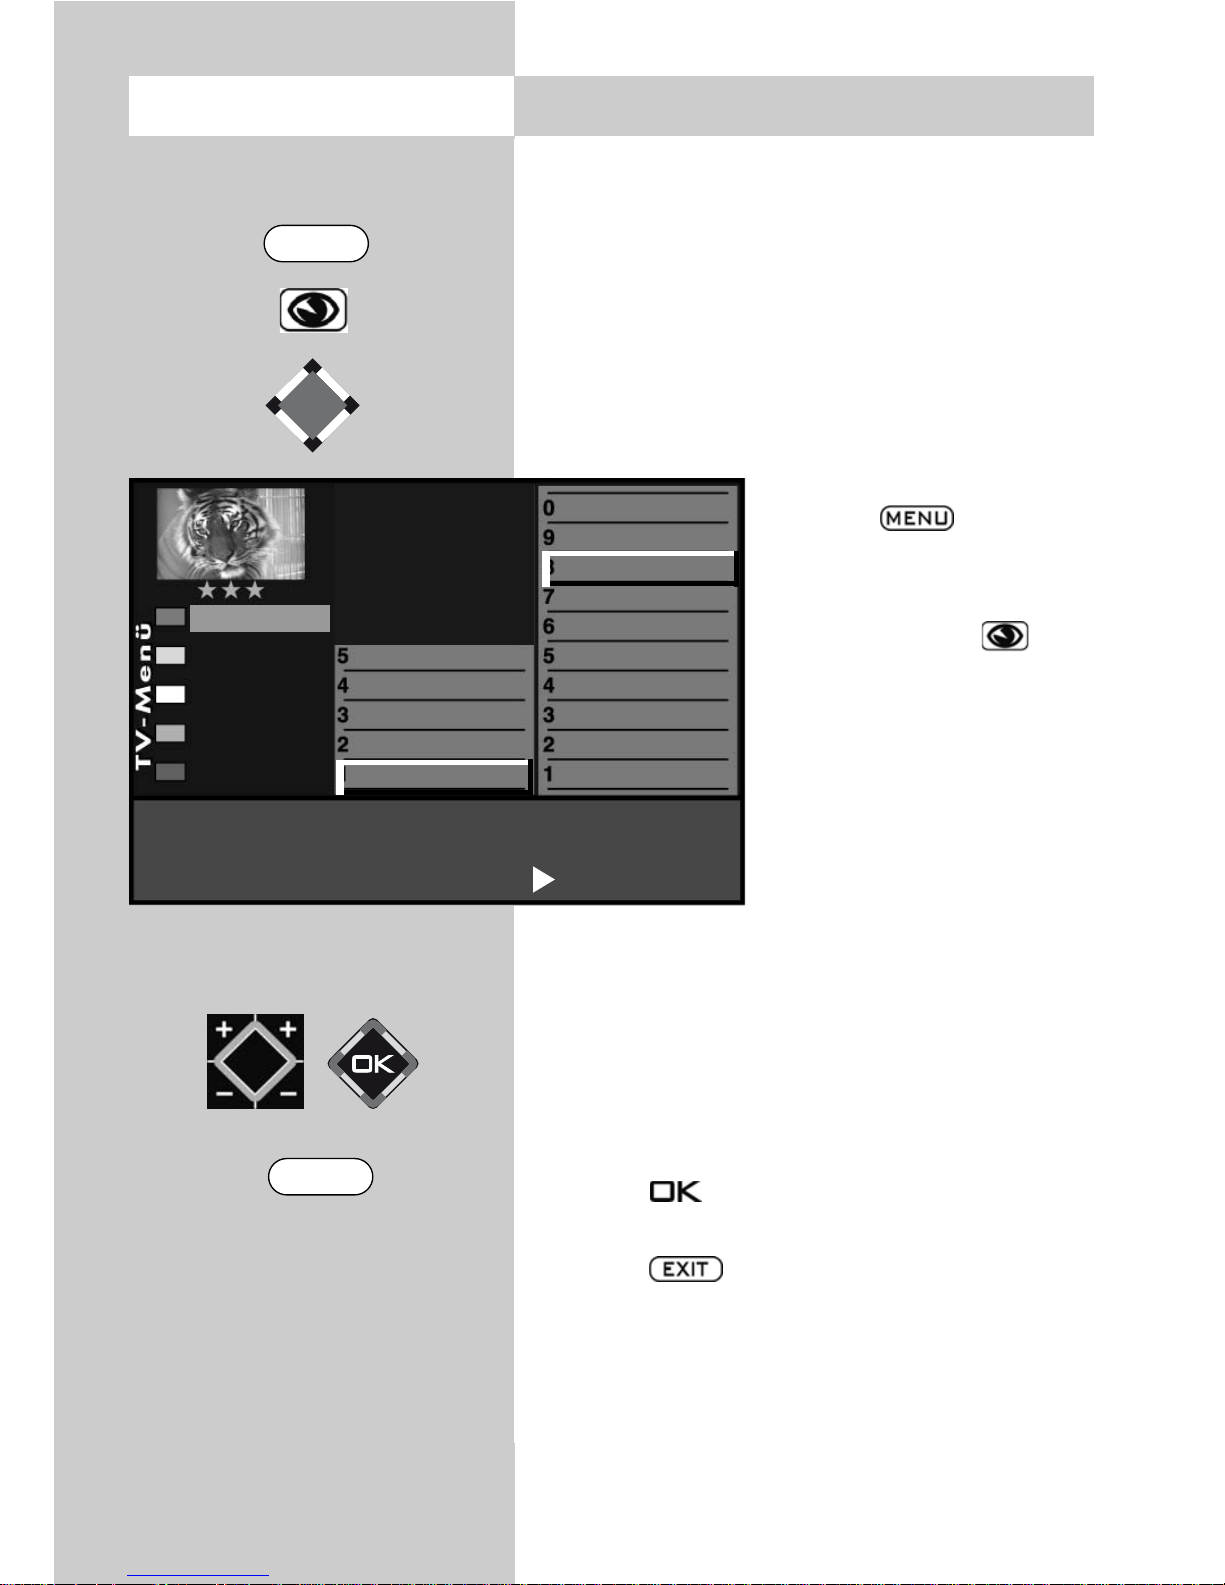
If you wish to select a specific page, enter its page
number on the numeric keys. If sub-pages exist for
the selected page, the page numbers are displayed in black. In the example shown here, there are
five sub-pages. You can step through these subpages with the cursor control key.
8 Videotext
Opening the menu
i
100
Gehörlose
Börse
Service
BR-Intern
Hörfunk
Fernsehen
Sport
Bayern
Schlagzeilen
Übersicht
Impressum
A-Z
Subjects
Chapter
Pages
Next Book Ma
select
mark
TEXT
Page number
Sub-pages
100 ProSieben Datum Uhrzeit
100
Aktuelle Meldungen . . . . . . . . . . . . . . 112
Computer Wurm . . . . . . . . . . . . . . . . . 113
TED: Brauchen wir Schutz ? . . . . . . . . . 123
Weitere Meldungen. . . . . . . . . . . . . . . 135
09.56 talk talk talk . . . . . . . . . . . . . . . 334
10.56 S.O.S.Style & Home . . . . . . . . . 335
00 01 02 03 04 05 06 07 08 09
Tipps
Seite
> 500
Dein
persönliches Bier
bestellen 880
Subjects
Chapter
Pages
Next Book Ma
select
mark
Page 15

Double font size
You can double the size of the font used for Teletext pages with the key. Pressing this key once displays an enlarged picture of the upper third of the page. Pressing it a second and third time displays the centre and lower thirds of the page. Pressing a fourth time displays the entire page again.
Riddle key (display hidden text)
Function key is programmed in the factory to display hidden text, such as the
answers to riddles.
Stop page scrolling
The key or the key can be used to stop the automatic scrolling executed
by some pages, and to enable this again.
Page selection with the cursor
Press the key to stop page scrolling. The cursor is now positioned at the top
left corner of the page and you can use the cursor control key to position it
anywhere on the displayed page. This function is useful on index pages (such as
pages 100, 200, etc.) in order to select a page you want to see. After positioning
the cursor on the desired page number, press the "OK" key to display its contents.
Setting marks in Teletext
6)
Up to 10 marks can be set for each programme position.
As a user of Teletext, you will probably want to visit certain pages (such as stockmarket news, news pages or the weather forecast) regularly.
In order to find these pages quickly, you can set marks to suit your personal requirements.
To do this, open a page for which you want to set a mark.
• Press the red key for "Set" to place a mark on this page. The number of the
mark you have just set is displayed above the window containing the number of
the Teletext page. In the case of multiple pages, the mark is always set and displayed for the currently displayed sub-page.
Scrolling through marked Teletext pages
6)
With the Teletext window open, you can step sequentially through the marked pages
with the green key.
An even easier method is by pressing the key while the TV programme is displayed. Each time you press this key, the next marked page is displayed. After the last
marked page, the TV picture is displayed again.
+
8 Videotext
6) Not possible with an external receiver !
15
Page 16

16
Marker overview
6)
If markers (bookmarks) have been set for a programme position, then a marker
overview can be displayed and hidden using the key. This markers overview
shows you where the markers are located. The numeric keys can be used to select
specific markers.
Clearing Teletext marks 6)
Open the Teletext page whose mark is to be deleted and press the red key
"Delete" to delete the mark.
Subtitles in Teletext
Your TV set is capable of displaying subtitles. When a programme for which subtitles
exist starts, the TV station displays a box showing the Teletext page on which these
can be found.
• Press the key to open Teletext.
• If this is a "TOP-Text" station, the card file is displayed. Press the key and
open any available page.
• Use the numeric keys to enter the number of the page containing the subtitles.
Split-Screen
When a video text page is displayed, the screen presentation can be split by pressing the button. The video text page is shown on the right, on the left you can
continue to watch the programme running. By pressing the key again, you
can return to pure video text representation.
8 Videotext
6) Not possible with an external receiver !
9 Selecting the Operating Mode
You can switch the TV set between its various operating modes with the keys and .
You can also switch from standby mode to the
desired operating mode with these keys.
= TV mode/DVB Radio mode
1)
= TV mode with input from AV devices
(e.g. video tape recorder, DVD
player, etc.)
If you would like to switch back to TV or radio
1)
,
press the
key for both TV and Radio
modes.
1) Possible only in DVB mode !
TV/R
0/
AV
Page 17

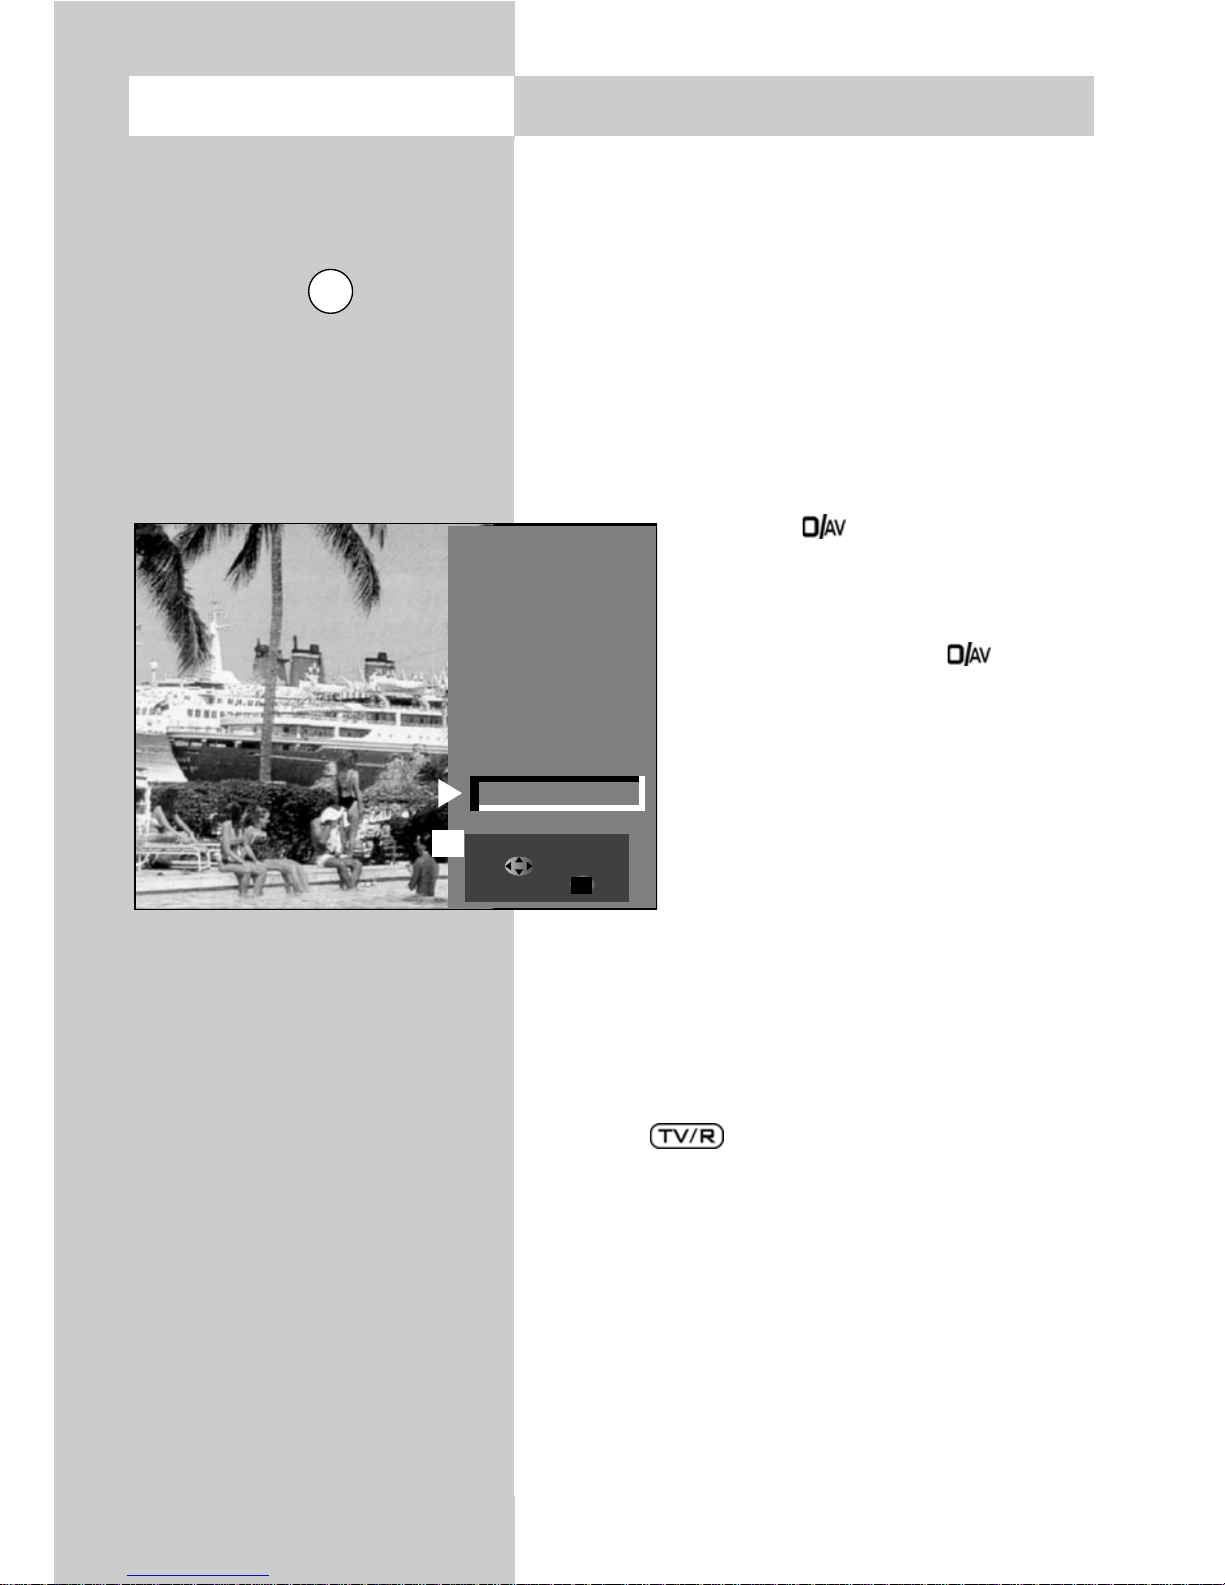
17
Opening the menu
AV playback
(devices with switching voltage)
Before they can be used, AV devices must
be registered and assigned to the appropriate input sockets in the menu (see
Section 29 "AV devices".
Playing back a recording from a video cassette, DVD,
etc. on a connected AV device is called AV playback.
In order to see the picture,
you must programme your TV
set to execute an automatic
programme change at the
EURO socket to which the AV
device is connected.
Programming a programme change
This menu item is not
available in a 2 **
menu (see Section 26,
Scope of Operation).
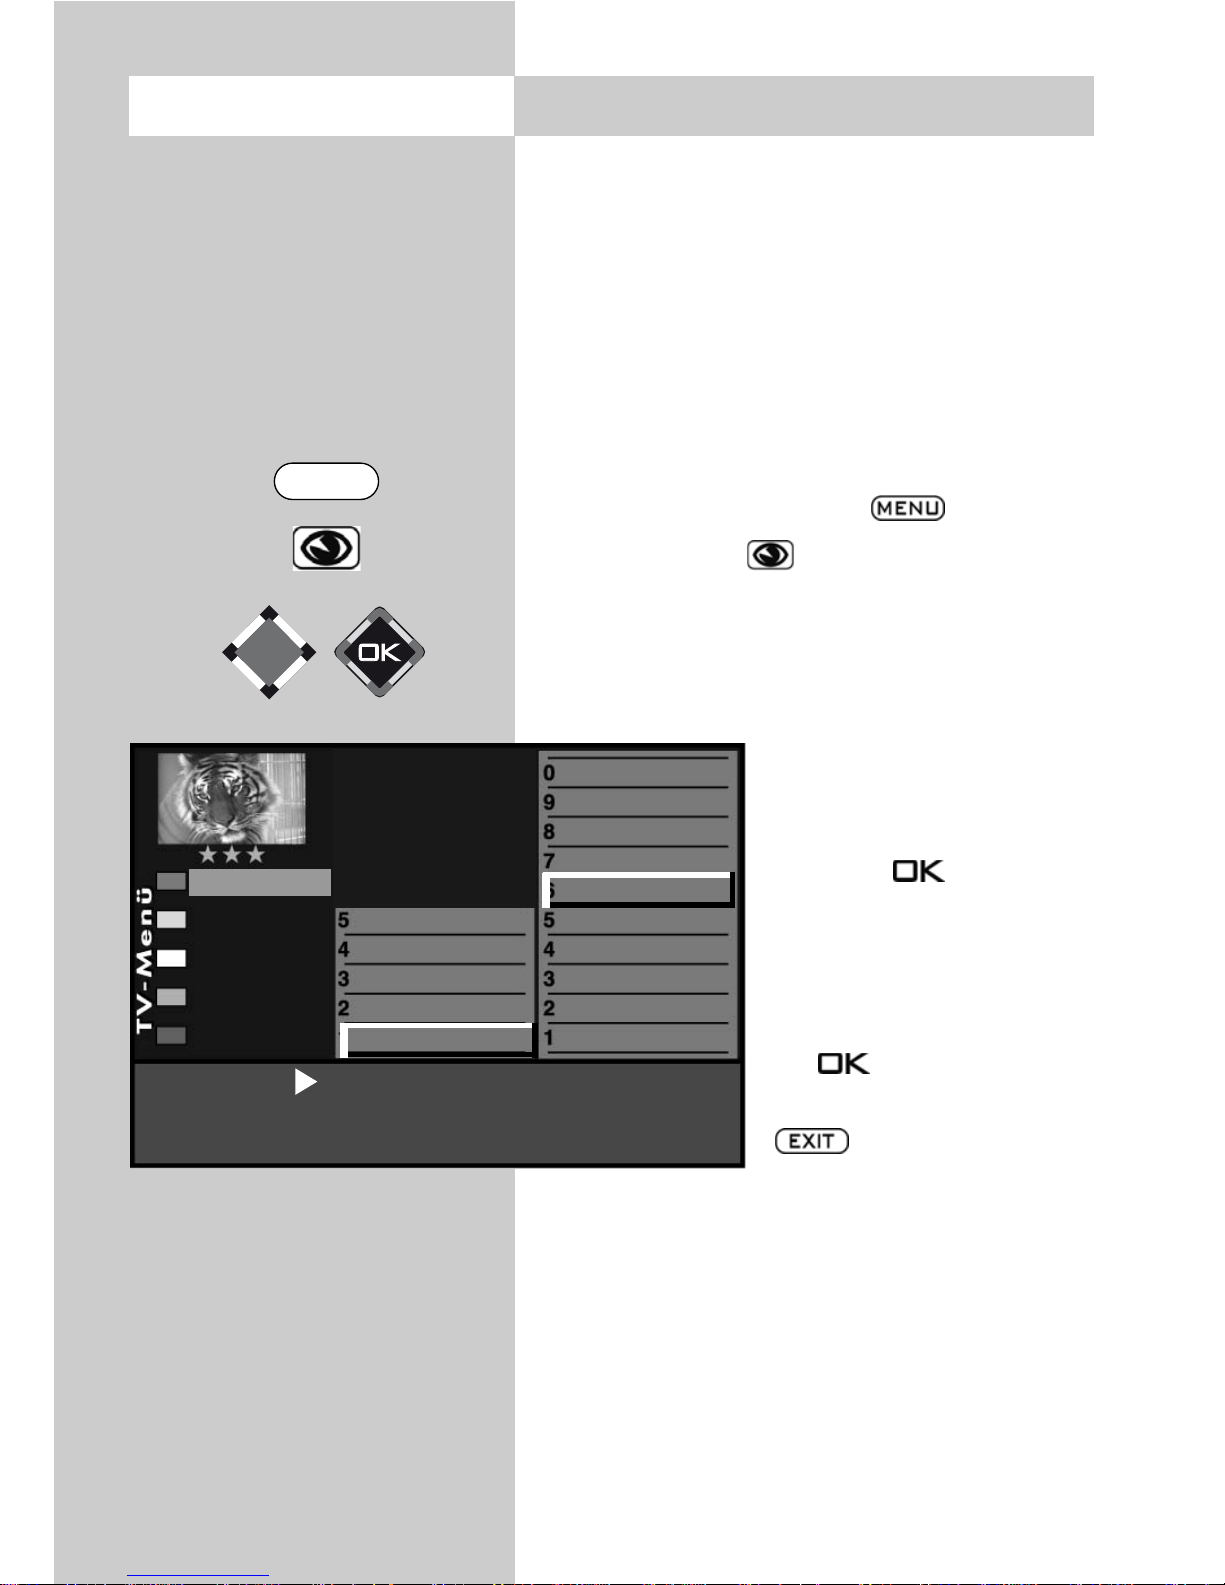
The automatic programme change is set in the factory to
"ON" for all EURO sockets.
• Press the "MENU" key.
The TV menu appears on the screen.
• Press the red key . The menu
"Configuration" is displayed.
• Use the corresponding numeric key
or the cursor control key to select the menu
item "EURO sockets".
• Press the key and then, in the setting window, use the V–/V+ key to select "Programme
change on".
• Press the key to save the new setting.
• Press the key to close the TV menu.
+
+
+
10 AV Playback
The number of subjects and sections depends
on the selected scope of operation. Depending
on the configuration of the TV set, the various
menu items may be displayed in a different
order and numbered differently.
Change stations on
EURO 1
Function for F3
Function for F2
EURO sockets
DVB-C
DVB-T
DVB-S
Analog-TV
Country
Language
Operating
Configuration
MENU
EXIT
Page 18
18
If you now start to play back a recording on the
connected AV device, the TV set changes automatically from any other programme position to the
playback mode.
AV playback
(devices without switching voltage)
Before they can be used, AV devices must
be registered and assigned to the appropriate input sockets in the menu (see Section
29"AV devices".
• Press key briefly - the function
programmed for AV devices (see
Chapter 17
„Programming function buttons“) is
executed. Press button or
approx. 3 seconds - the max. possible selection is displayed.
• Use the corresponding numeric
key to select the AV device you
want to use.
• The TV set now changes from the
current programme to the selected
playback device.
• Start the replay function on the AV device.
This AV selection remains active until you switch
to any other programme position.
• After watching the film from the AV device,
press the key to return to normal
TV mode.
If the same AV device is to be selected quite
often, then the AV button can also be programmed for that AV device. See Chapter
18. “Programming Function Buttons“.
+
+
10 AV PlaybackOpening the menu
5 Photo
4 Front-HDMI
3
PC
2
BD/DVB Player1
1
DVD/Videorec.1
Select with...
or .
Confirm with .
OK
AV
0/
AV
Page 19
19
10.1 AV Playback - VCR function
The menu item "VCR" is not available in a
2 ** menu.
Picture quality when playing back from
tape devices
The VCR function ensures an optimum picture
quality when playing back recordings from tape
devices such as video cassette recorders or camcorders.
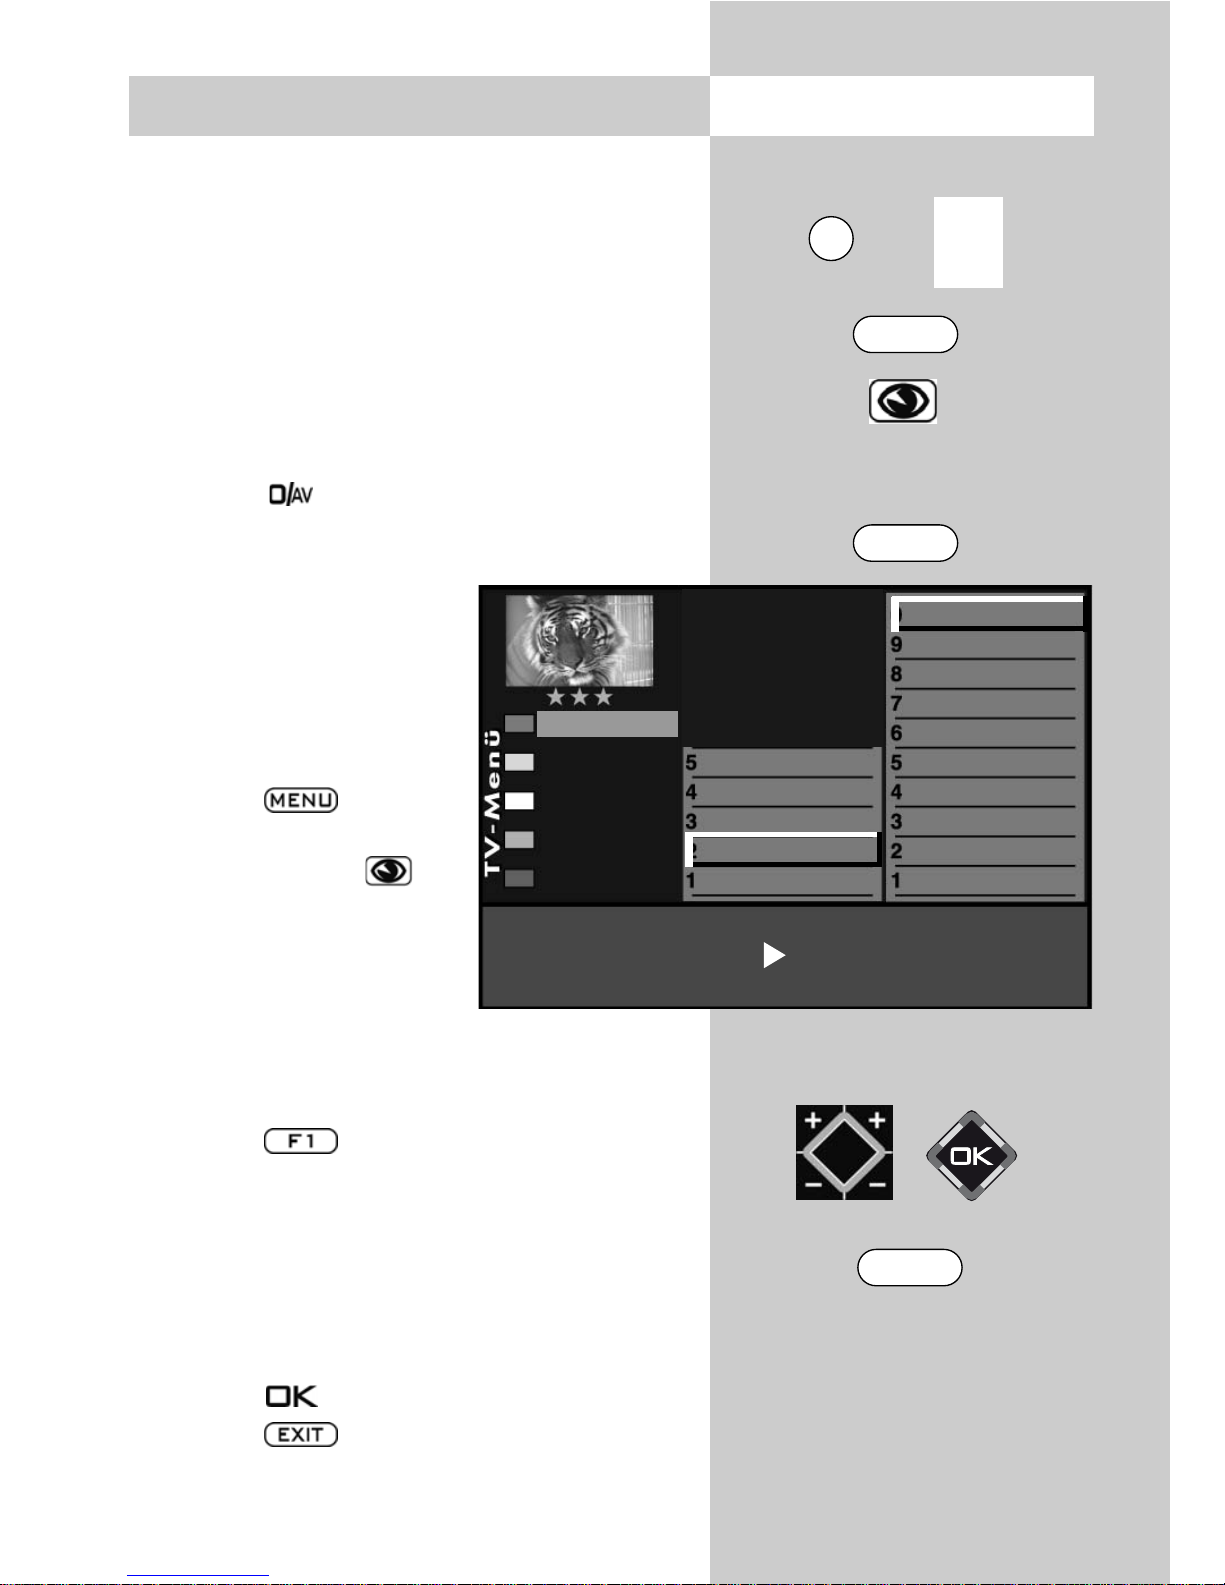
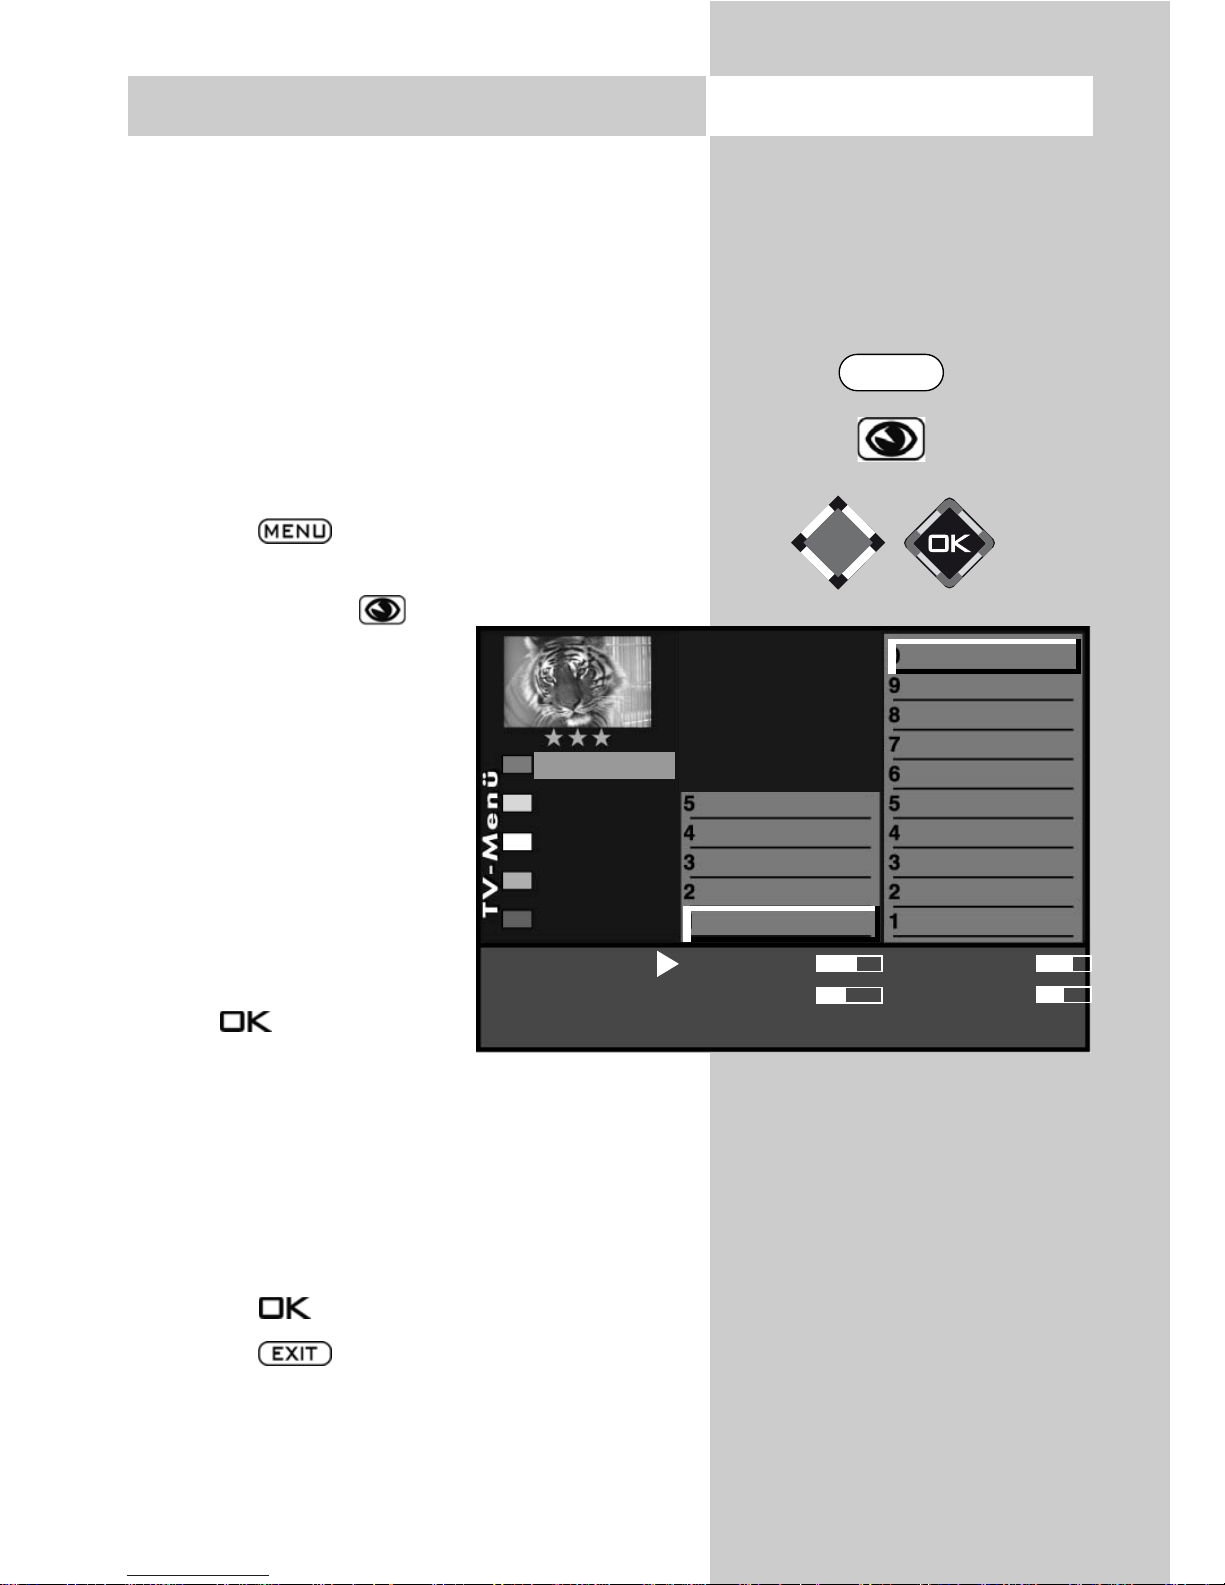
Setting the VCR function
• Press key briefly - the function programmed
for AV devices (see Chapter 18 „Programming
function buttons“) is executed. Press button AV
or approx. 3 seconds the
max. possible selection is
displayed.
• Select the AV device that is
to provide the picture with
the numeric keys.
• Press the key to
open the TV menu.
• Press the blue key .
The menu "Picture-Volume"
and the menu item "General picture settings" are
pre-selected.
• Use the corresponding numeric key (in the
example:
)
to select the menu item
"Pict.settings for Pr."
• Press the key to display the entire selection.
• Use the corresponding numeric key (in the
example:
)
to select the menu item "VCR".
• Use the
V–/V+
key to select "Opt.1". If this setting does not produce a satisfactory result, you
can try using "Opt.2".
• Press the key to save the new setting.
• Press the key to close the TV menu.
+
Opening the menu
The number of subjects and sections depends
on the selected scope of operation. Depending
on the configuration of the TV set, the various
menu items may be displayed in a different
order and numbered differently.
3) See glossary for an explanation.
7) Available only for analogue stations!
VCR
3) 7)
Colour standard
3) 7)
Colour offset
3) 7)
Signal adjustment
Picture forma
Noise reduction
3)
MPEG noise reduction
Picture sharpness
Picture profile
Colour intensity
Picture profile adjustment
Sound set,.prog.posn
Sound settings, gen.
Pict.set.,prog.posn.
Picture settings, gen.
VCR settings Opt.1
Picture-Volume
EXIT
0/
AV
MENU
F1
Page 20
20
In AV mode, when playing back digitally encoded
films, system-related digital picture faults that can
be seen as a rectangular pattern (formation of tiny
blocks) in moving areas can be reduced with the
help of MPEG noise reduction.
The rectangular pattern (formation of tiny blocks)
can be corrected in the “MPEG Noise Reduction”
menu option.
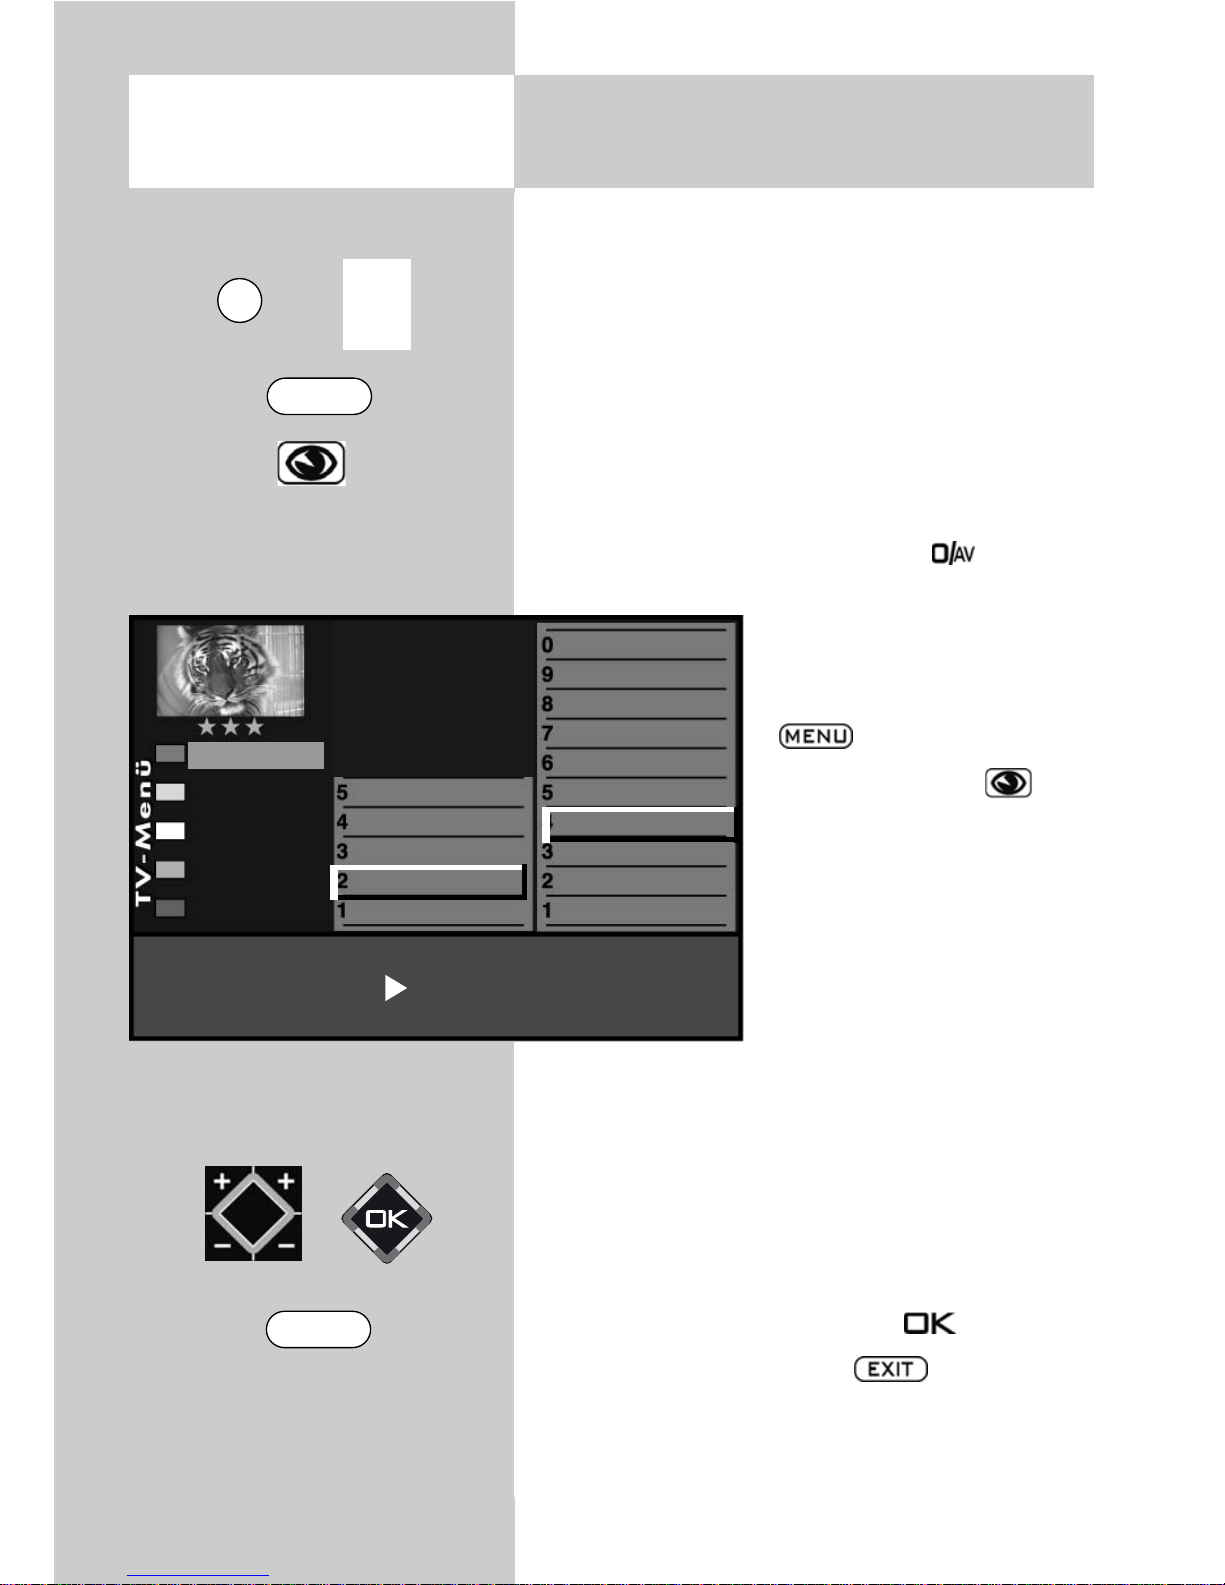
Set MPEG noise reduction:
• Select the AV level by pressing the button
and using the numeric buttons to select the AV
device that is to provide the
picture..
• Select the TV menu with the
button.
• Press the blue key
.The menu “Picture and
sound“ and the menu item
“Picture settings, gen.“ is
pre-selected.
• Use the corresponding
numeric button (in the
example ) to select the
menu item “Pict. set.,
prog.posn.”.
• Use the corresponding numeric button (in the
example: to select the menu item “MPEG noise reduction”.
• Set the “MPEG noise reduction” with
the V-/V+ button.
• Save the setting by pressing the button.
• Clear the TV menu with the button.
Opening the menu
3) See glossary for an explanation.
7) Available only for analogue stations!
10.2 AV Playback
MPEG noise reduction
VCR
3) 7)
Colour standard
3) 7)
Colour offset
3) 7)
Signal adjustment
Picture forma
Noise reduction
3)
MPEG noise reduction
Picture sharpness
Picture profile
Colour intensity
Picture profile adjustment
Sound set,.prog.posn
Sound settings, gen.
Pict.set.,prog.posn.
Picture settings, gen.
MPEG noise reduction medium
Picture-Volume
EXIT
0/
AV
MENU
Page 21
21
10.3 AV Playback
Picture Format
Opening the menu
Some of the following menu items are not
available on a 2 ** menu.
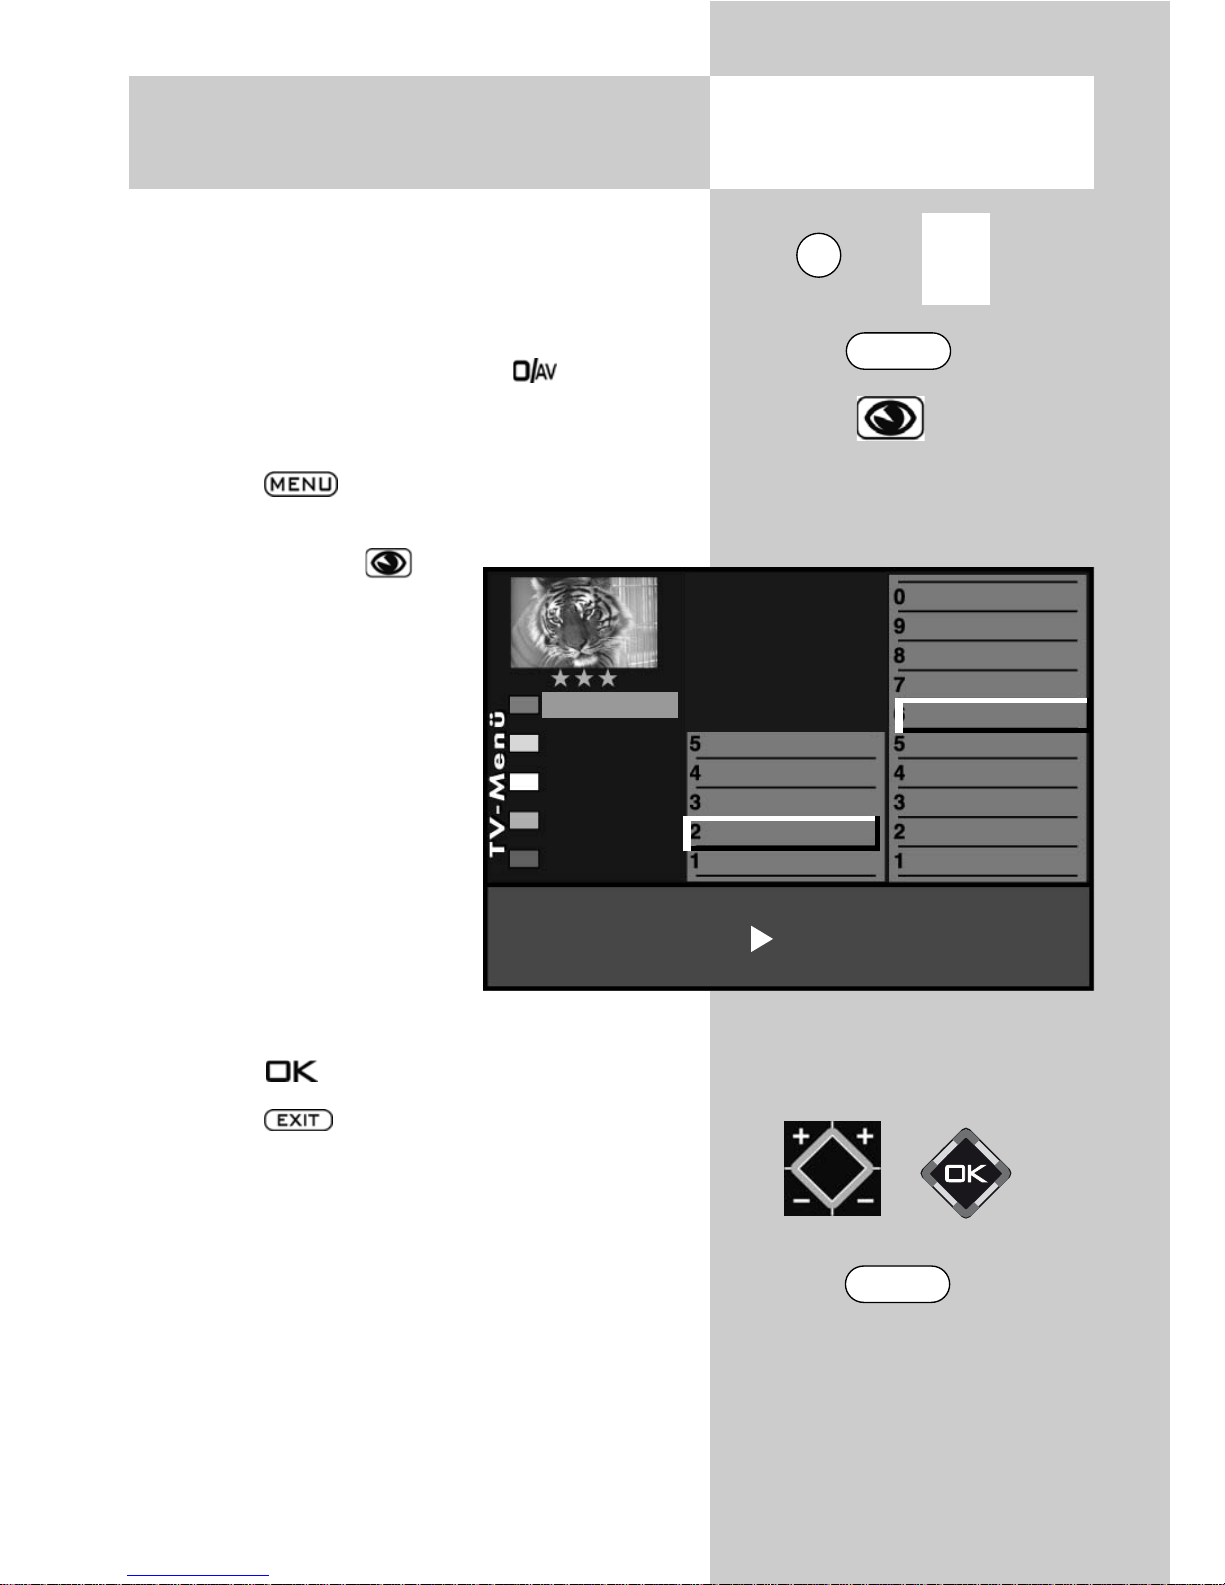
Setting the picture format:
• Select the AV programme position which delivers the picture by pressing the key and
then pressing the numeric key corresponding to
the device you want to use.
• Press the key. The TV menu appears on
the screen.
• Press the blue key to
open the menu "PictureVolume". The menu item
"General picture settings"
is preselected.
• Press numeric key
to
select the menu item "Pict.
settings for Pr.".
• Use the corresponding
numeric key (in the example:
) to select the func-
tion "Picture format".
• Use the V–/V+ key to set
the picture format setting to "Automatic".
• Press the key to save the new setting.
• Press the key to close the TV menu.
+
The number of subjects and sections depends
on the selected scope of operation. Depending
on the configuration of the TV set, the various
menu items may be displayed in a different
order and numbered differently.
3) See glossary for an explanation.
7) Available only for analogue stations!
VCR
3) 7)
Colour standard
3) 7)
Colour offset
3) 7)
Signal adjustment
Picture forma
Noise reduction
3)
MPEG noise reduction
Picture sharpness
Picture profile
Colour intensity
Picture profile adjustment
Sound set,.prog.posn
Sound settings, gen.
Pict.set.,prog.posn.
Picture settings, gen.
Picture format Auto. mode
Picture-Volume
EXIT
0/
AV
MENU
Page 22
22
Some of the menu items are not available
in a 2 ** menu.
There may be a “noisy” picture, among other
things, when playing back from AV devices.
Noise reduction can be enabled to compensate
for a “noisy” picture.
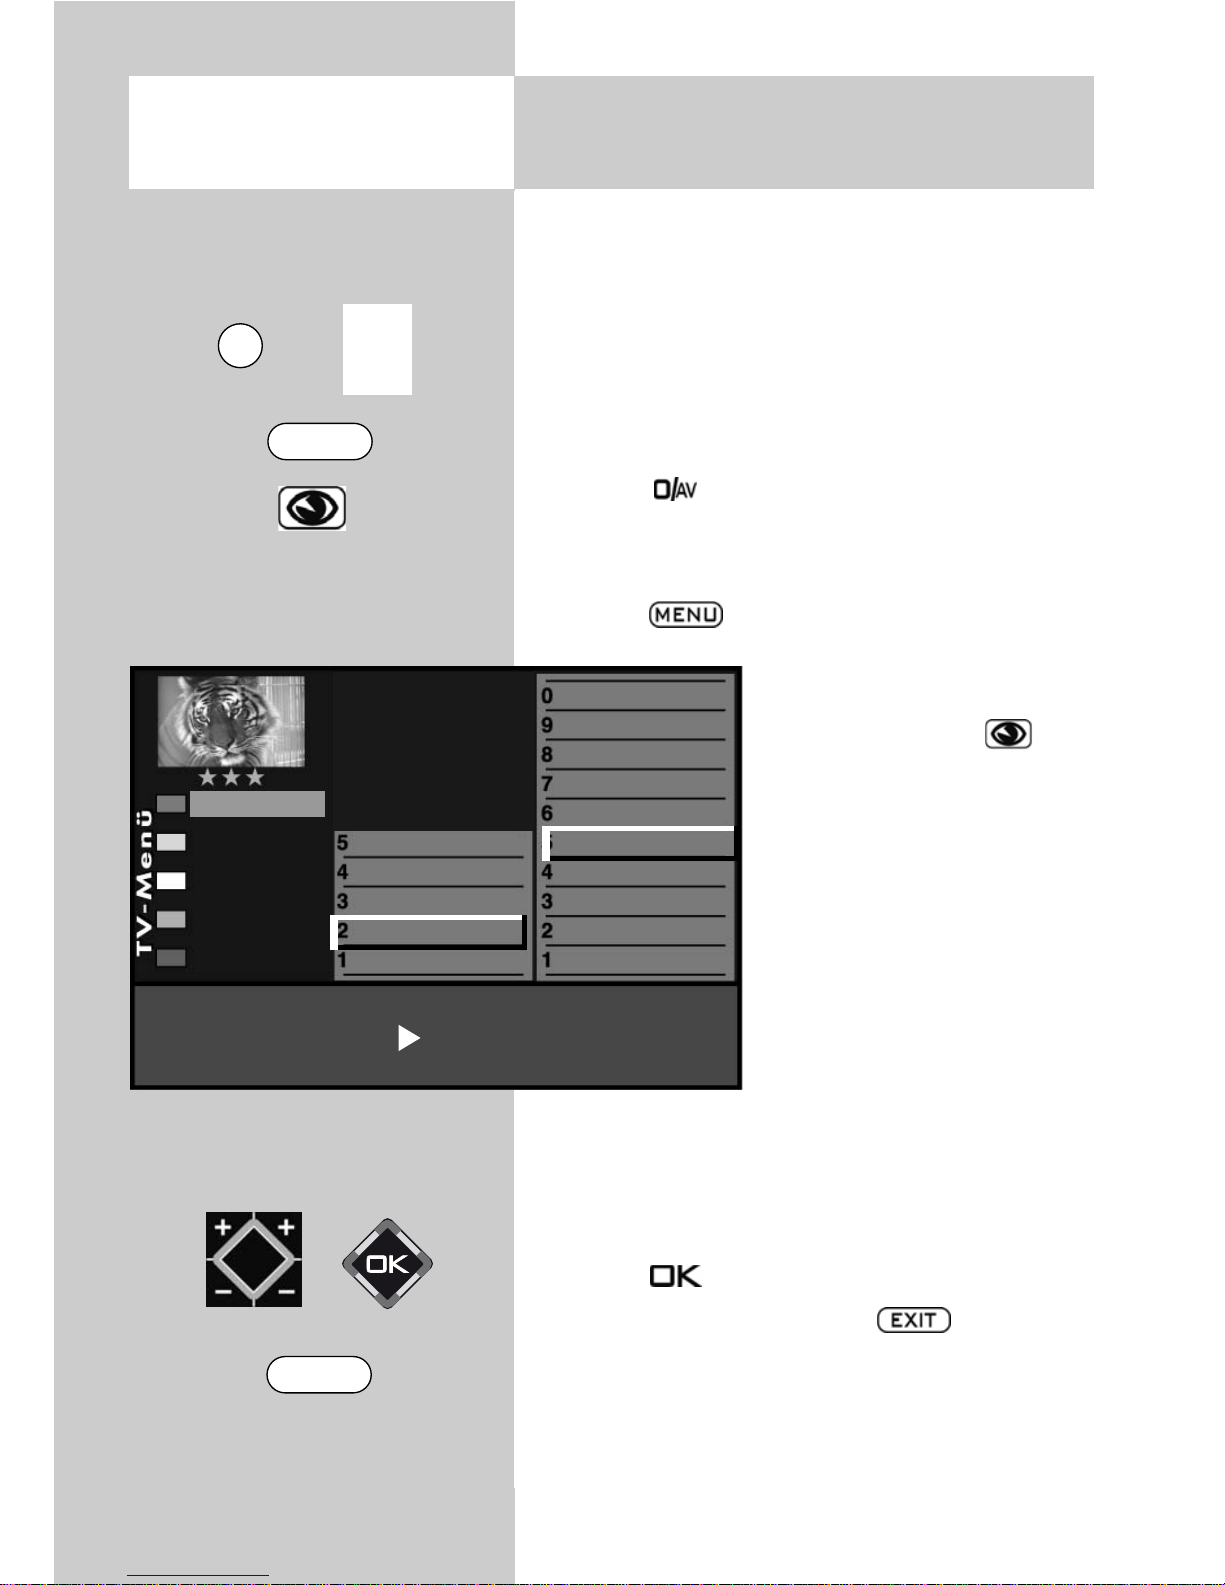
Setting the noise reduction:
• Press key .
• Select the AV device that is to provide the picture with the numeric keys.
• Press the key.
The TV menu appears on the
screen.
• Press the blue key The
menu "Picture-Volume"
and the menu item "Picture
settings, gen." is pre-selected.
• Press numeric key
to
select the menu item "Pict.
settings for Pr.".
•
Use the corresponding
numeric buttons (in this
example it is for noise
reduction), to select the individual menu items.
• In the setting window, change the setting with
the
V–/V+
button.
• Press the button to save the new settings.
• Clear the “TV menu” with the button.
+
Opening the menu
10.4 AV Playback
Noise reduction
3) See glossary for an explanation.
7) Available only for analogue stations!
VCR
3) 7)
Colour standard
3) 7)
Colour offset
3) 7)
Signal adjustment
Picture forma
Noise reduction
3)
MPEG noise reduction
Picture sharpness
Picture profile
Colour intensity
Picture profile adjustment
Sound set,.prog.posn
Sound settings, gen.
Pict.set.,prog.posn.
Picture settings, gen.
Noise reduction gen
Picture-Volume
EXIT
0/
AV
MENU
Page 23
23
11 General Picture Settings
Some of the menu items are not available
in a 2 ** menu.
The picture settings brightness, contrast, colour
intensity, sharpness and noise reduction can be
set generally for all programme positions and
saved as standard values which can be recalled
at any time by pressing the key.
Opening the picture settings menu:
This example describes how the brightness is
adjusted. The other picture settings can be adjusted in a similar manner.
• Press the key.
The TV menu appears on
the screen.
• Press the blue key . The
menu "Picture-Volume" and
the menu item "General
picture settings" are preselected.
• Use the cursor control
key E to select the menu
item "Brightness"and press
key.
• In the setting window, use
the V–/V+ key to change the setting.
• Use the cursor control key to select the third
line "Save as standard values".
• If you wish to save the new setting, use the
V–/V+ key to select "Yes".
• Press the key to save the changed setting
as a standard value.
• Press the key to close the TV menu.
If the standard values do not provide a satisfactory picture in some programme positions, you
can make settings for these positions which differ from the standard values. See the next sections. 11.1 and 11.2.
+
+
Opening the menu
The number of subjects and sections depends
on the selected scope of operation. Depending
on the configuration of the TV set, the various
menu items may be displayed in a different
order and numbered differently.
Signal adjustment
Picture profi selectl
Zoom/Panorama
Noise reduction
MPEG noise reduction
Picture sharpess
Color impr.
Colour intensity
Power options
Brightness
Picture profile adjustment
Sound set,.prog.posn
Sound settings, gen.
Pict.set.,prog.posn.
Picture settings, gen.
Brightness
61%
Standard value
50%
Use as default value: Yes
Picture-Volume
MENU
EXIT
Page 24

24
Three different power options can be set in the
“Power options” menu option.
Eco Mode
The “Eco Mode” setting is a good compromise
between energy consumption and picture quality.
In addition, the TV set switches to stand-by mode
if no buttons are pressed for 4 hours. “Eco Mode”
is the preferred setting for normal home operation.
Presentation
The “Presentation” setting is optimised for presentation rooms; it involves higher energy consumption, however. Automatic change-over to stand-by
mode is not enabled.
Picture quality
In this mode, all controls can be used for picture
maximisation in order to meet the needs of all
individual conditions.
Setting the power options:
• Automatically after the initial start-up after pressing
the red button . See
“Important information“, or
•
Press the key.
The TV menu appears on the
screen
•
Press the blue key . The
menu
"Picture-Volume"
and
the menu item “General picture settings” are pre-selected.
• Use the cursor control key to select the
menu item “power options” and press the
button
• Use the V–/V+ key to select the “Eco Mode“,
„Presentation“, or “Picture Quality“ setting.
Opening the menu 11.1 Select power options
The number of subjects and sections depends
on the selected scope of operation. Depending
on the configuration of the TV set, the various
menu items may be displayed in a different
order and numbered differently.
Signal adjustment
Picture profi selectl
Zoom/Panorama
Noise reduction
MPEG noise reduction
Picture sharpess
Color impr.
Colour intensity
Power options
Brightness
Energy setup Eco mode
Control
ambient light-dependen
Picture profile adjustment
Sound set,.prog.posn
Sound settings, gen.
Pict.set.,prog.posn.
Picture settings, gen.
Picture-Volume
MENU
Page 25
25
Opening the menu11.1 Select power options
• Save the set power option by pressing the
button.
For the “Presentation” or “Picture Quality”
settings, the types of control described under a)
to e) can be set as well.
a) Off:
he backlighting is set to maximum. (highest
level of power consumption).
b) ambient light-dependent:
The backlighting is governed by the room light and
always provides the same
picture appearance
regardless of changes in
room lighting.
c) Picture content-depen-
dent
9)
: The backlighting is
governed by the picture
content. In the case of dark
picture content, the brightness of the backlighting is
reduced to increase contrast.
d) Manual: The backlighting is set to a fixed value
in the menu.
e) Automatic
9)
: Combination of b) room light
dependent and c) picture content dependent
The level control indicates the level of backlighting brightness currently in operation.
The backlighting (lamps that light up the screen)
is adjusted automatically depending on the
power option selected.
The brightness of the lamps has an influence on
the device’s power consumption.
• Press the key to close the TV menu.
The number of subjects and sections depends
on the selected scope of operation. Depending
on the configuration of the TV set, the various
menu items may be displayed in a different
order and numbered differently.
9) depending on the panel
Signal adjustment
Picture profi selectl
Zoom/Panorama
Noise reduction
MPEG noise reduction
Picture sharpess
Color impr.
Colour intensity
Power options
Brightness
Picture profile adjustment
Sound set,.prog.posn
Sound settings, gen.
Pict.set.,prog.posn.
Picture settings, gen.
Backlight
70%
Energy setup Presentation
Standard value
50%
Control ambient light-dependen
Use as default value:
No
Level
100%
Picture-Volume
EXIT
Page 26
26
11.2 MPEG noise reductionOpening the menu
When TV programms or in AV mode, when playing back digitally encoded films, system-related
digital picture faults that can be seen as a rectangular pattern (formation of tiny blocks) in moving
areas can be reduced with the help of MPEG noise
reduction.
The rectangular pattern (formation of tiny blocks)
can be corrected in the “MPEG Noise Reduction”
menu option.
Set MPEG noise reduction:
• Call up the TV menu with the button.
• Press the blue key
.
The menu "Picture-Volume" and the menu item "Picture settings, gen." is
pre-selected.
• Use the cursor control key and to select the
menu item "Brightness".
• Use the corresponding
numeric button to select
the menu item
“MPEG noise reduction”
and press key
• Set the “MPEG noise reduction” with
the V–/V+ button.
• Save the setting by pressing
the button.
• Clear the TV menu with the
button.
3) See glossary for an explanation.
7) Available only for analogue stations!
MPEG noise reduction
off
Standard value
off
Use as default value
No
Picture profile adjustment
Sound set,.prog.posn
Sound settings, gen.
Pict.set.,prog.posn.
Picture settings, gen.
Picture-Volume
Signal adjustment
Picture profi selectl
Zoom/Panorama
Noise reduction
MPEG noise reduction
Picture sharpess
Color impr.
Colour intensity
Power options
Brightness
MENU
Page 27
27
The settings in the “Signal adjustment” menu are
optimised for the picture settings and should not be
changed.
If the settings in the “Signal offset” and “Signal
contrast” menus are changed, this will usually lead
to a deterioration in picture quality.
Changes should generally only be made here if a
connected analogue AV device (e.g. a video recorder) is providing an unsatisfactory picture.
Signal adjustment setting
• Press the key.
The TV menu appears on the screen.
• Press the blue key The
menu "Picture-Volume" and
the menu item "Picture
settings, gen." is pre-selected.
• Use the cursor control key
to select the menu item
"Brightness".
• Use the corresponding
numeric button to select
the menu item
"Signal adjustment". and
press key
• In the setting window, use the V–/V+ key to
change the setting.
• Use the cursor control key to select the third
line "Save as standard value".
• If you wish to save the new setting, use the
V–/V+ key to select "Yes".
• Press the key to save the new setting.
• Press the key to close the TV menu.
11.3 Signal adjustment Opening the menu
Signal adjustment
Picture profi selectl
Zoom/Panorama
Noise reduction
MPEG noise reduction
Picture sharpess
Color impr.
Colour intensity
Power options
Brightness
Picture profile adjustment
Sound set,.prog.posn
Sound settings, gen.
Pict.set.,prog.posn.
Picture settings, gen.
Signal-offset 61% Signal-Contrast 60%
Standard value50% Standard value 80%
Use as default value. No
Picture-Volume
The number of subjects and sections depends
on the selected scope of operation. Depending
on the configuration of the TV set, the various
menu items may be displayed in a different
order and numbered differently.
9) depending on the panel
MENU
Page 28
28
11.4 Picture profile adjustment
Picture profiles are a combination of very special
picture parameters that make it possible to always
create the best picture reproduction quality for different types of programmes or for replaying from
different video sources.
The “Standard” picture profile is a good compromise for all types of transmission, and is set at the
factory.
However, in order to obtain the maximum picture
reproduction quality, it is useful to assign the
appropriate picture profile to a specific applica-
tion.
If you are technically inclined, you also have the possibility of adjusting each individual picture profile
yourself, as well as to create
a separate additional picture
profile according to your
individual taste.
Picture profile settings:
• Press the key.
The TV menu appears on
the screen.
• Press the blue key . The menu "PictureVolume" and the menu item „Picture settings,
gen.“ are pre-selected.
• Press the numeric key to select the “Picture
profile settings” menu option.
• Use the assigned numeric key to access the picture profile that is to be changed.
•
Use the cursor control key to access the
menu option that is to be changed.
• Change the setting with the V–/V+ key.
• Press the button to save the new settings.
• Press the key to close the TV menu.
Opening the menu
3) See glossary for an explanation.
Motion compensation
medium
Colour accentuation
medium
Load factory settings No
Dyn. contrast 3) light Standard
User
PC monitor
Game pad
Brilliant
Sport
Standard
Picture profile adjustment
Sound set,.prog.posn
Sound settings, gen.
Pict.set.,prog.posn.
Picture settings, gen.
Picture-Volume
EXIT
MENU
Page 29
29
Opening the menu
The picture profiles that were set up earlier can
now be generally assigned to all or only individual programme positions.
Selected Profile Standard :
• Press the key.
The TV menu appears on the screen
• Press the blue key . The menu "PictureVolume" and the menu item „Picture settings,
gen.“ are pre-selected.
• Use the cursor control key
to select the “Brightness”
menu option.
• Use the assigned numeric
key
to select “Picture
profile selection”.
• Use the V–/V+ key to
change the settings for
„Picture profile selection“.
• Press the button to
save the new settings.
• Clear the “TV menu” with
the button.
The picture profile can also be temporarily
changed during a programme without the
change being saved. See Chapter 4 for this.
+
11.5 selected picture profile
The number of subjects and sections depends
on the selected scope of operation. Depending
on the configuration of the TV set, the various
menu items may be displayed in a different
order and numbered differently.
Profile Standard
Signal adjustment
Picture profi selectl
Zoom/Panorama
Noise reduction
MPEG noise reduction
Picture sharpess
Color impr.
Colour intensity
Power options
Brightness
Picture-Volume
Picture profile adjustment
Sound set,.prog.posn
Sound settings, gen.
Pict.set.,prog.posn.
Picture settings, gen.
EXIT
MENU
Page 30
30
11.6 Adjust border colour
Some of the menu items are not available
in a 2 ** menu.
Displays that do not fill the screen produce black
border. These border can be changed to a grey
tone to avoid "image sticking"3).
Displaying the picture in 4:3 format, for example,
produces these black border at the left and right.
Adjust border colour:
• Press the key.
The TV menu appears on
the screen.
• Press the blue key . The
menu "Picture-Volume" and
the menu item "General
picture settings" are preselected.
• Use the cursor control key
to select the menu item
"Brightness".
• Use the assigned numeric
keys
to select
"Zoom/Panorama".
• Use the cursor control key to select the desired
menu items.
• Use the
V–/V+
key to change the settings for
"Border colour".
• Press the key to save the new settings.
The picture shows the factory settings.
• Press the key to close the TV menu.
The setting is only possible if the function
“Panorama” is set to “No”.
+
+
Opening the menu
Zoom value
0 Panorama No
Picture pos., vert
0%
Automatic zoom
off
Border colour
grey
Signal adjustment
Picture profi selectl
Zoom/Panorama
Noise reduction
MPEG noise reduction
Picture sharpess
Color impr.
Colour intensity
Power options
Brightness
Picture profile adjustment
Sound set,.prog.posn
Sound settings, gen.
Pict.set.,prog.posn.
Picture settings, gen.
Picture-Volume
EXIT
MENU
Page 31

31
Opening the menu
11.7 Setting zoom/panorama mode
Some of the menu items are not available
in a 2 ** menu.
The picture settings zoom, vertical position, automatic zoom and panoramacan be set and saved
as general settings for all programme positions.
Setting the zoom/panorama mode:
• Press the key.
The TV menu appears on the screen.
• Press the blue key .
The menu "Picture-Volume"
and the menu item "General picture settings" are
pre-selected.
• Use the cursor control key
to select the menu item
"Brightness".
• Use the assigned numeric
keys
to select
"Zoom/Panorama".
• Use the cursor control key
to select the desired menu
items.
• Use the V–/V+ key to change the settings for
"Zoom/Panorama".
• Press the key to save the new settings.
The picture shows the factory settings.
• Press the key to close the TV menu.
The functions "Panorama" and "Zoom"
can be combined with each other.
+
+
The number of subjects and sections depends
on the selected scope of operation. Depending
on the configuration of the TV set, the various
menu items may be displayed in a different
order and numbered differently.
Zoom value
1 Panorama
Yes
Picture pos., vert.
0%
Pan. mode
Non-linear
Automatic zoom
off
Border colour black
Signal adjustment
Picture profi selectl
Zoom/Panorama
Noise reduction
MPEG noise reduction
Picture sharpess
Color impr.
Colour intensity
Power options
Brightness
Picture-Volume
Picture profile adjustment
Sound set,.prog.posn
Sound settings, gen.
Pict.set.,prog.posn.
Picture settings, gen.
EXIT
MENU
Page 32

32
11.8 Picture Settings for
Programmes via TV Menu
Opening the menu
Picture settings for individual programme
positions are not available in a 2 ** menu.
If the standard values do not provide a satisfactory picture in some programme positions, you can
make different settings for these positions which
override almost all of the general picture settings.
These individual settings apply only to the programme position for which they are made, and
they cannot be overwritten with the standard
values. In addition to the general picture settings,
the individual settings also
include the settings colour
offset, colour standard and
VCR.
Individual picture settings
for programme position xy:
• Select the programme
position whose picture
settings you wish to change.
• Press the key.
The TV menu appears on
the screen.
• Press the blue key . The menu
"Picture-Volume" and the menu item "General
picture settings" are pre-selected.
• Press numeric key
to select the menu item
"Pict. settings for Pr.".
• Use the corresponding numeric keys (in this
example:
for noise reduction) to select the
desired menu items.
• In the setting window, use the V–/V+ key to
change the setting.
• Press the key to save the new setting.
• Press the key to close the TV menu.
+
3) See glossary for an explanation.
7) Available only for analogue stations!
Noise reduction light
Picture profile adjustment
Sound set,.prog.posn
Sound settings, gen.
Pict.set.,prog.posn.
Picture settings, gen.
Picture-Volume
VCR
3) 7)
Colour standard
3) 7)
Colour offset
3) 7)
Signal adjustment
Picture forma
Noise reduction
3)
MPEG noise reduction
Picture sharpness
Picture profile
Colour intensity
EXIT
MENU
Page 33

33
Opening the menu
11.9 Picture Settings for
Programmes via Station Table
Individual picture settings for
programme position xy:
• Select the programme position whose picture
settings you wish to change.
• Press the key.
The TV menu appears on the screen.
• Press the white key . The station table is displayed with the currently active programme
position highlighted.
• Press the key to
enable editing of the station table.
• Press the cursor control
key to move to the subject side.
• Use the corresponding
numeric keys (in this
example:
for the pictu-
re quality) to select the
desired menu items.
• In the setting window, use
the cursor control key to
select the desired function.
• Use the V–/V+ key to change the setting.
"gen." means here that the new setting will
overwrite the related general picture setting
(see page 23).
The individual settings made here which
differ from the general settings remain
saved.
• Press the key to save the new settings.
• Press the key to close the TV menu.
+
3) See glossary for an explanation.
5) Available only for DVB stations!
7) Available only for analogue stations!
Picture sharpness
gen.
Noise reduction
gen.
Colour offset
0
VCR
off
Sound corrections
Colour standard
3) 7)
Picture quality
Picture correct.
Enter logo
Station contained in EPG
Frequency/channe
5)
CA module
7)
Signal quality
5)
DVB-prog. info
5)
0010 Hessen 3
0009 Südwest
0008 MDR
0007 PRO 7
0006 RTL 2
0005 RTL
0004 SAT 1
0003 Bayern 3
0002 ZDF
0001 ARD
Station table
MENU
F2
EXIT
Page 34

34
Opening the menu 12 General Sound Settings
Some of the menu items are not available in
a 2 ** menu.
The sound settings volume, treble, bass, stereo
wide and spatial sound can be set generally for all
programme positions and saved as standard
values which can be recalled at any time by pressing the key.
Opening the sound settings menu:
• Press the key.
The TV menu appears on the screen.
• Press the blue key . The menu
"Picture-Volume" and the
menu item "General picture
settings" are pre-selected.
• Use the assigned numeric
keys
to select "Sound
settings general".
• Press the key to open
the selected menu item for
editing.
• In the setting window, use
the V–/V+ key to change
the setting.
• Use the cursor control key
to select the third line
"Save as standard value".
• If you wish to save the new setting, use the
V–/V+ key to select "Yes".
• Press the key to save the new settings as
standard values.
• Press the key to close the TV menu.
If the standard values do not provide satisfactory results for some programme positions, you can make different individual settings for these positions. See sections 12.1.
+
+
Volume
45%
Standard value
50%
Use as default value:
Yes
Factory settings
Balance
Tone setting
Volume headphones
Equalizer
Automatic volume control
Volume
Picture profile adjustment
Sound set,.prog.posn
Sound settings, gen.
Pict.set.,prog.posn.
Picture settings, gen.
Picture-Volume
EXIT
MENU
Page 35

35
Automatic volume correction
Some TV stations transmit their commercials at a
higher sound volume than that for the normal programme. In order to save you from adjusting the
volume each time with the remote control, you can
activate automatic volume correction.
With this function active, there is little difference in
the volume levels for the normal programme and
the commercials. The setting made here applies to
all programme positions.
Opening the volume correction menu:
• Press the "MENU" key.
The TV menu appears on
the screen.
• Press the blue key .
The menu "Picture-Volume" and the menu item
"General picture settings"
are pre-selected.
• Use the corresponding
numeric key (in the example:
) to select "Sound
settings general".
• Use the corresponding numeric key (in the
example:
) to select "Automatic volume
control".
• In the setting window, use the V–/V+ key to
change the setting.
• Press the key to save the new setting.
• Press the key to close the TV menu.
The function "Volume correction" in the
menu "General sound settings" does not
overwrite the function "Volume correction"
in the menu "Sound settings for Pr...".
+
Opening the menu
12 General Sound Settings
Volume control
on
Factory settings
Balance
Tone setting
Volume headphones
Equalizer
Automatic volume control
Volume
Picture-Volume
Picture profile adjustment
Sound set,.prog.posn
Sound settings, gen.
Pict.set.,prog.posn.
Picture settings, gen.
EXIT
MENU
Page 36

36
12 General Sound Settings
Some of the menu items are not available
in a 2 ** menu.
Audio frequencies can be individually adjusted to
your personal tastes in the "Equalizer" menu.
Adjust Equalizer:
• Press the key.
The TV menu appears on the screen.
• Press the blue key . The menu
"Picture-Volume" and the
menu item "General picture
settings" are pre-selected.
• Use the corresponding
numeric key (in the example:
) to select "Sound
settings general".
• Use the corresponding
numeric key (in the example:
) to select "Equali-
zer".
• Press Cursor control key
and adjust each slider in
turn.
• Change the setting with the V–/V+
key.
• With the cursor control key activate the line
"Equalizer".
• With the cursor control key activate the line
"Use as default value.".
• To save the new value press the
V–/V+
key and
select "Yes".
• Press the key to save the new setting.
• Press the key to close the TV menu.
+
Opening the menu
Equalizer
Use a default value. No
Factory settings
Balance
Tone setting
Volume headphones
Equalizer
Automatic volume control
Volume
12 kHz
7,5 kHz
3 kHz
1,2 kHz
500 Hz200 Hz100 Hz
00000010
Picture-Volume
Picture profile adjustment
Sound set,.prog.posn
Sound settings, gen.
Pict.set.,prog.posn.
Picture settings, gen.
EXIT
MENU
Page 37

37
Some of the menu items are not available
in a 2 ** menu.
The headphone volume can be set to a volume
which can also be adopted as a standard value.
Adjusting the volume headphones:
• Press the key.
The TV menu appears on the screen.
• Press the blue key . The menu
"Picture-Volume" and the menu item “General
picture settings“ are preselected.
• Use the corresponding
numeric key (in the example:
) to select
“Sound settings for Pr.“.
• Use the corresponding
numeric key (in the example:
) to select "Volume
headphones".
• In the setting window, use
the V–/V+ key to change
the setting.
• Press the key to save the new settings.
• Press the key to close the TV menu.
+
Opening the menu12 General Sound Settings
Vol. headphone
45%
Standard value
50%
Use as default value. Ja
Picture profile adjustment
Sound set,.prog.posn
Sound settings, gen.
Pict.set.,prog.posn.
Picture settings, gen.
Factory settings
Balance
Tone setting
Volume headphones
Equalizer
Automatic volume control
Volume
Picture-Volume
EXIT
MENU
Page 38

38
12.1 Sound Settings for
Programmes via TV Menu
Opening the menu
Some of the menu items are not available
in a 2 ** menu.
Volume correction
Various TV stations broadcast their programmes
with different sound volumes. This volume difference can be minimised by correcting the volume.
This adjustment remains active even if the standard sound values are recalled.
Adjusting the volume correction:
• Press the key.
The TV menu appears on
the screen.
• Press the blue key . The
menu "Picture-Volume" and
the menu item "General
picture settings" are
pre-selected.
• Use the corresponding
numeric key (in the example:
) to select "Sound
settings for Pr.".
• Press the key and
then, in the setting widow,
use the V–/V+ key to change the
setting.
• Press the key to save the new settings.
• Press the key to close the TV menu.
Individual sound settings can also be made
in the station table.
+
+
Volume correction
-15
Tone settings
Volume correction
Picture-Volume
Picture profile adjustment
Sound set,.prog.posn
Sound settings, gen.
Pict.set.,prog.posn.
Picture settings, gen.
EXIT
MENU
Page 39

39
12.1 Sound Settings for
Programmes via TV Menu
Opening the menu
Some of the menu items are not available
in a 2 ** menu.
Tone setting
The tone setting can be set to "Normal" or
"Speech". The setting "Speech" should be used
primarily for stations which broadcast mainly programmes with a lot of speech, such as news stations. The setting "Normal" is better for music programmes.
Adjusting the tone setting :
• Press the key.
The TV menu appears on
the screen.
• Press the blue key . The
menu
"Picture-Volume" and the
menu item "General picture
settings" are pre-selected.
• Use the corresponding
numeric key (in the example:
) to select
"Sound settings for Pr.".
• Use the corresponding
numeric key (in the example:
) to select
"Tone settings".
• In the setting window, use the V–/V+ key to
change the setting.
• Press the key to save the new settings.
• Press the key to close the TV menu.
Individual sound settings can also be made
in the station table.
+
+
Tone settings Speech
Tone settings
Volume correction
Picture profile adjustment
Sound set,.prog.posn
Sound settings, gen.
Pict.set.,prog.posn.
Picture settings, gen.
Picture-Volume
EXIT
MENU
Page 40

40
12.2 Sound Settings for Prog. via
the Station Table
Opening the menu
Some of the menu items are not available
in a 2 ** menu.
Making sound corrections:
• Select the programme position whose sound
settings you wish to change.
• Press the key.
The TV menu appears on the screen.
• Press the white key . The station table is displayed with the currently active programme
position highlighted.
• Press the key to
enable editing of the station table.
• Use the cursor control key
to move to the subjects
side.
• Use the corresponding
numeric keys (in this example:
for sound correc-
tions) to select the desired
menu items.
• In the setting window, use
the cursor control key to
select the desired functions.
The use of the V–/V+ key to change the selected
setting. "gen." means here that the new setting
will overwrite the general sound settings
(see pages 34).
The individual settings made here, which
differ from the standard values, remain
saved.
• Press the key to save the new settings.
• Press the key to close the TV menu.
+
+
3) See glossary for an explanation.
7) Available only for analogue stations!
Volume correction 0 Tone settings gen.
Sound corrections
Colour standard
3)7)
Picture quality
Picture correct.
Enter logo
Station contained in EPG
Frequency/channel
7)
CA module
Signal quality
DVB-prog. info
0010 Hessen 3
0009 Südwest
0008 MDR
0007 PRO 7
0006 RTL 2
0005 RTL
0004 SAT 1
0003 Bayern 3
0002 ZDF
0001 ARD
Station table
F2
EXIT
MENU
Page 41

41
In the menu "Sound settings", you can activate a
two-stage mute function.
When this function is active, the volume in TV
mode can be reduced in two stages with the mute
key .
Activating the mute function
• Press the key to open the TV menu.
• Press the red key to open the "Configuration" menu.
•
Press the key to move to the right side of the
menu.
• Use the cursor control key or
the corresponding numeric key
(in the example: to select
the menu item "Sound
settings".
• In the setting window, use the
V–/V+ key to set the function
"Mute (2-stage)"
to "On".
• Press the key to save the
setting.
• Press the key to close
the TV menu.
In normal TV mode, the mute key is
used as follows:
• Press it once to reduce the volume by 12 scale
divisions.
• Press it again within five seconds to reduce the
volume to "00".
• Pressing the key once again restores the
volume to its original level.
Preset value (Audio-Discription)
During films for the blind, the scenes are described in the dialogue intervals. Under "Dual chan-
nel", select "Audio 2" if you want to receive films
for the blind (with audio descriptions).
12.3 Mute Function Opening the menu
Mute (two-stage) on Speakers on
Preset value Channel 1
Function for F3
Function for F2
EURO sockets
DVBC
DVB-T
DVB-S
Analog-TV
Country
Language
Operating
Configuration
Subtitle
Data Logic adjustment
CI dialogue via
EPG settings
Operating
AV table
Sound settings
HiFi output
Time shift
Init. prog.position
EXIT
MENU
Page 42

42
On the back of the TV set, there are audio sockets
(see picture and page 28) with which you can
connect an AV device to the TV set.
Settings in the “Hi-fi output” and “Sound
settings” menu options are then only necessary if the TV set will be connected to an
AV device, for example a hi-fi receiver,
radio headphones, Surround decoder etc.
The “Hi-fi output” and “Sound settings” menu
options are linked to each other. The link is described on pages 42-44 .
The sound can be output via a RCA cable or an
optical audio cable (“Toslink”, available in an
accessories shop).see chapter 28.
HiFi output settings
• Press the key to open the TV menu.
• Press the red button to open the “Configuration” menu.
• Use the cursor control key to access “Init.
prog. position”.
• Select the menu option “hifi output” with the assigned
numeric key. In the example it is
.
• Set the desired parameters
in the settings window with
the V–/V+ key
.
• Press the button to
save the new settings.
• Press the key to close the TV menu.
For normal TV mode, the yellow button and the V–
/V+ key can be used to set “Speaker on”.
+
12.4 HiFi-outputOpening the menu
AUDIO OUT
DIGITAL OUT
Optical
output
HiFi output constant
Output level 50%
Subtitle
Data Logic adjustment
CI dialogue via
EPG settings
Operating
AV table
Sound settings
HiFi output
Time shift
Init. prog.position
Function for F3
Function for F2
EURO sockets
DVBC
DVB-T
DVB-S
Analog-TV
Country
Language
Operating
Configuration
EXIT
MENU
Page 43

43
The “hi-fi output” and “Sound settings” menu
options are linked together. The link is described on
chapter 12.6 Sound Settings, Overview.
Speaker settings
• Call up the TV menu with the button.
• Use the red button to open the “Configuration” menu.
• ress the button and change to the right
column.
• With the cursor control key
or the assigned
numeric key in the example), select the
„Sound settings“ function.
• In the settings window, use the cursor control key
to access the “Speakers”
menu option.
• Set “Centre speaker” with
the V–/V+ key
.
• Press the button to
save the new settings.
• Clear the TV menu with the
button.
For TV mode, the yellow button and the V– /V+ key
can be used to set “Speakers”
temporarily.
12.5 Speakers Opening the menu
Mute (two-stage) on Speakers on
Preset value Channel1
Subtitle
Data Logic adjustment
CI dialogue via
EPG settings
Operating
AV table
Sound settings
HiFi output
Time shift
Init. prog.position
Function for F3
Function for F2
EURO sockets
DVBC
DVB-T
DVB-S
Analog-TV
Country
Language
Operating
Configuration
EXIT
MENU
Page 44
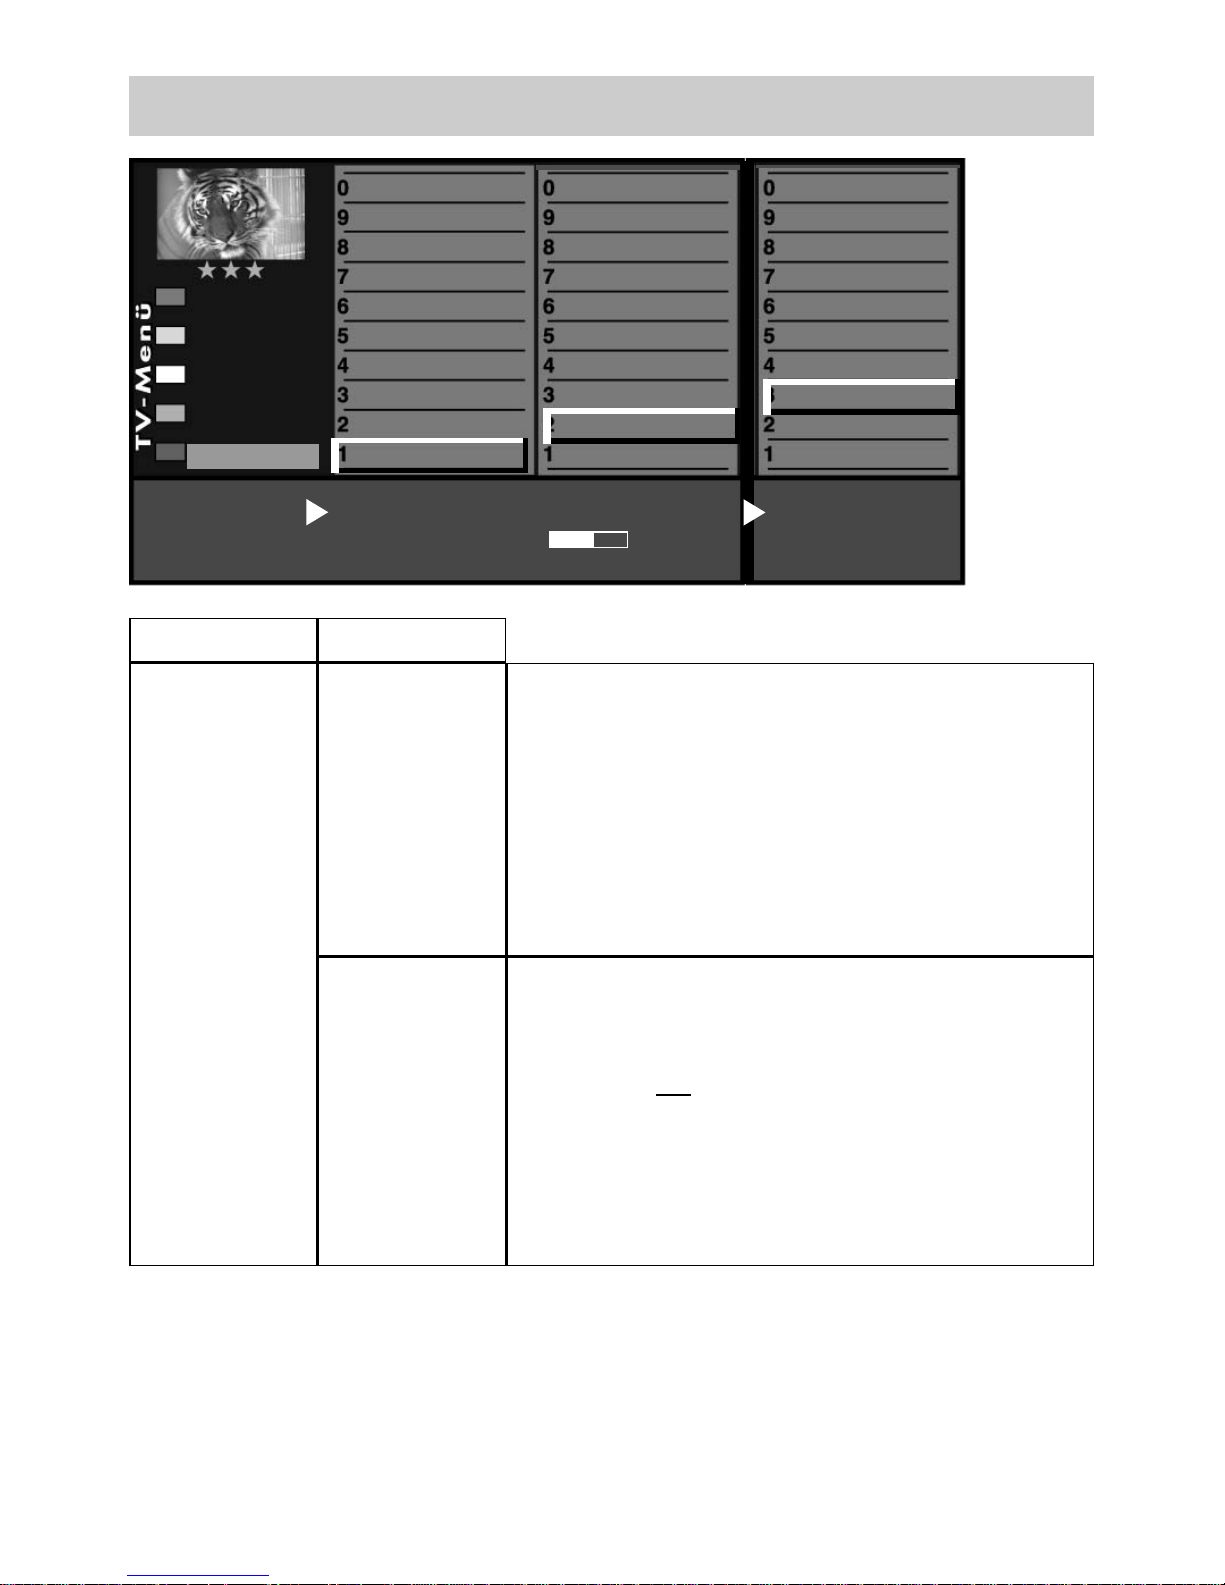
44
12.6 Sound Settings, Overview
„HiFi output“
„Sound settings“
HiFi output
„constant“
Speakers
„On“
The volume on the "AUDIO OUT" sockets” on the
back of the TV set remains “constant” at the % value
set in the menu.
The sound is also output via the speakers of the
TV set.
The volume of the TV set speaker can be changed
with the
V–/V+
button of the remote control.
Speakers
„Off“
The volume on the "AUDIO OUT" sockets” on the
back of the TV set remains “constant” at the % value
set in the menu.
The sound is not
output via the speakers of the TV
set. The symbol for the mute setting appears on the
screen ı.
The volume cannot be changed with the
V–/V+
but-
ton of the remote control.
Speakers on
Subtitle
Data Logic adjustment
CI dialogue via
EPG settings
Operating
AV table
Sound settings
HiFi output
Time shift
Init. prog.position
HiFi output constant
Output level 75%
Subtitle
Data Logic adjustment
CI dialogue via
EPG settings
Operating
AV table
Sound settings
HiFi output
Time shift
Init. prog.position
Function for F3
Function for F2
EURO sockets
DVB-C
DVB-T
DVB-S
Analog-TV
Country
Language
Operating
Configuration
Page 45

45
12.6 Sound Settings, Overview
„HiFi output“
„Sound settings“
HiFi output
„variabel“
Speakers
„On“
The volume on the "AUDIO OUT" sockets” on the
back panel of the TV set is adjustable.
The sound is also output via the speakers of the TV
set.
The volume of the TV set speakers and the volume
on the "AUDIO OUT" sockets” can be changed
with the
V–/V+
button of the remote control.
The volume on the "AUDIO OUT" sockets” on the
back panel of the TV set is adjustable.
The sound is not output via the speakers of the TV
set. The symbol for the mute setting appears on the
screen
ı
The volume on the "AUDIO OUT" sockets” can be
changed with the
V–/V+
button of the remote
control.
Speakers on
Subtitle
Data Logic adjustment
CI dialogue via
EPG settings
Operating
AV table
Sound settings
HiFi output
Time shift
Init. prog.position
HiFi output variabe
Subtitle
Data Logic adjustment
CI dialogue via
EPG settings
Operating
AV table
Sound settings
HiFi output
Time shift
Init. prog.position
Function for F3
Function for F2
EURO sockets
DVB-C
DVB-T
DVB-S
Analog-TV
Country
Language
Operating
Configuration
Speakers
„Off“
Page 46

46
12.6 Sound Settings, Overview
HiFi output
„Headphone“
Speakers
„On“
The volume on the "AUDIO OUT" sockets” on the
back panel of the TV set is adjustable.
The sound is also output via the speakers of the TV set.
The volume of the TV set speakers can be changed
with the
V–/V+
button of the remote control. Changing
the volume on the "AUDIO OUT" sockets”:
- press the yellow button
.
- press cursor button or and select “Headph. vol.”.
-
use the
V–/V+ Tbutton to change the volume.
The headphones output on the front or side will also be
changed.
Speakers
„Off“
The volume on the "AUDIO OUT" sockets” on the
back panel of the TV set is adjustable.
The sound is not output via the speakers of the TV set.
The symbol for the mute setting appears on the
screen
ı
The volume on the "AUDIO OUT"sockets” can be changed
with the
V–/V+
button of the remote control. The headphone
output on the front or side will also be changed.
„HiFi output“
„Sound settings“
Speakers off
Subtitle
Data Logic adjustment
CI dialogue via
EPG settings
Operating
AV table
Sound settings
HiFi output
Time shift
Init. prog.position
HiFi output Headphone
Subtitle
Data Logic adjustment
CI dialogue via
EPG settings
Operating
AV table
Sound settings
HiFi output
Time shift
Init. prog.position
Function for F3
Function for F2
EURO sockets
DVB-C
DVB-T
DVB-S
Analog-TV
Country
Language
Operating
Configuration
Page 47

47
12.7 Connecting Headphones
The headphones connector
(3.5 mm jack) is located on
the left-hand side, see also
Chapter 28 „
Connections to
the set
“.
Radio headphones can also
be connected to the AUDIO
OUT sockets on the back of
the TV set, see also Chapter 28,
„
Connections to the set
“.
The sound settings for the radio headphones should then be set as described
on page 44.
We recommend headphones with impedance that is not less than 32 Ohm.
For headphones with less impedance
(approx. 8 Ohm), the dynamic range is
smaller.
The headphones volume can be saved as
a default value (see Chapter 12.)
Setting the volume too high
when using headphones or earphones can result in damage to
the ears - including the complete
loss of hearing.
When receiving a dual-language programme, you can switch between the
two sound channels.
In TV mode, press and hold the yellow
key until the sound function "Sound
mode" is selected.
Then use the V–/V+ key to select Sound
1 or Sound 2.
12.8 Sound 1, Sound 2
Headph. Vol.
Sound mode Channel 2
Headph. Vol.
Audio OUT, jack Ø 3.5 mm
To connect a hi-fi amplifier or radio headphones, for example.
You will need an adapter cable to do this:
from a 3.5 mm stereo jack to a 2-cinch connector
Headphone socket,
diameter 3.5 mm
Page 48

48
Opening the menu
13 Automatic zoom
The menu item "Automatic zoom" is not
available in a 2 ** menu.
When the automatic zoom function is active, programmes in a "widescreen" format (such as programmes in 16:9) are expanded to fill as much of
the screen as possible.
If the function is inactive, the programmes are displayed in their original format.
Activating the automatic zoom
• Press the key. The TV menu appears on
the screen.
• Press the blue key .
The menu "Picture and
sound" and the menu item
"General picture settings"
are pre-selected.
• Use the cursor control key
to select the menu item
"Brightness".
• Use the corresponding
numeric key (in the example:
) to select the func-
tion "Zoom/Panorama".
• Use the cursor control key
to select the menu item
"Automatic zoom".
• Use the V–/V+ key to change the setting.
• Press the key to save the new setting.
• Press the key to close the TV menu.
+
Zoom value 0 Panorama Yes
Picture pos., vert. 0% Pan. mode
Non-linear
Automatic zoom on Border colour black
Signal adjustment
Picture profile selection
Zoom/Panorama
Noise reduction
3)
MPEG-noise reduction
Picture sharpness
Colour impr.
Colour intensity
Power options
Brightness
Picture profile adjustment
Sound set,.prog.posn
Sound settings, gen.
Pict.set.,prog.posn.
Picture settings, gen.
Picture-Volume
EXIT
MENU
Page 49

49
Opening the menu14 Childlock
With the aid of the childlock function, you can
determine whether or not the TV set can be switched on and which stations may be selected at
which times. The childlock can be set such that:
a) it is always active,
b) one to six TV, radio or AV programmes (Prog A
... Prog F) are exempted from the locking function (permitted programmes), or
c) all programmes, or programmes which are not
locked, may be viewed during a permitted time
period (TV start – TV end).
The childlock must be saved
once with a 4-digit "code"
(password).
a) Activating the childlock
• Press the key.
The TV menu appears on
the screen.
• Press the green key to
open the menu "Timer".
• Use the cursor control key
to select "Settings" and
press the key.
• In the setting window, use the cursor control key
to select the menu item "Activate" and then use
the
V–/V+ key to set the childlock to "Active".
• Use the cursor control key to select "Code"
and enter your personal 4-digit code with the
numeric keys.
Make a note of this code!
• Press the key to save the new setting.
• Press the key to close the TV menu.
The number of subjects and sections depends
on the selected scope of operation. Depending
on the configuration of the TV set, the various
menu items may be displayed in a different
order and numbered differently.
Start viewing time --:-- End viewing time --:-Code **** Activation on
Permitted AV prog.
Permitted radio prog.
Permitted TV prog.
Settings
Recording control
Timer setting
Timer control
Childlock
Timer
EXIT
MENU
Page 50

50
14 Childlock
b) Permitted programmes:
Activate the childlock as described in step a).
Use the corresponding numeric key to select the menu
item "Permitted xx progs." (xx = TV, radio or AV).
Press the key and, in the setting window, enter
the programme positions with the numeric keys or
use the
V–/V+
key to select
the desired programme positions.
• Press the key to save
the new settings.
c) TV start – TV end
Activate the childlock as described in step a). In the setting window, use the cursor
control key to select the start
and end times and enter the
desired times with the numeric keys. Press the key to
save the settings.
Protecting the childlock settings with your code
• Use the cursor control key to select "Code" and
enter your personal code (password) with the
numeric keys.
Make a note of this code, since the child lock
can be deactivated only if the correct code is
entered !
• Press the key to save the settings.
• Press the key to close the TV menu.
• Switch off the TV set with the key.
The childlock is not fully activated until the TV
set is switched off.
Deactivating the childlock
If the childlock is active, a window requesting your
personal code is displayed each time the TV set is
switched on. Entering the correct code enables the TV
set and it can then be used normally until it is switched off again. To cancel the childlock function, proceed as described in step a), above, and set the
childlock to "Inactive".
+
+
Prog A Kabel 1 Prog B ----Prog C ----- Prog D ----Prog E ----- Prog F -----
Timer
Permitted AV prog.
Permitted radio prog.
Permitted TV prog.
Settings
Recording control
Timer setting
Timer control
Childlock
Ä
Factory setting
Code: 0000
"
Page 51

51
The menu items "On time" and "Off time" are
not available in a 2 ** menu.
In the menu item "Timer control", you can programme a switch-on time, a switch-off time and a sleep
timer (switch off after ...).
The switch-on time is the time at which the TV set is to
be switched on automatically.
The switch-off time is the time at which the TV set is to
be switched off automatically.
The sleep timer (switch off after...) switches off the TV
set after a programmed
delay (which can be set in
steps of 15 minutes).
Setting the on time and
off time
• Press the key to
open the TV menu.
• Press the green key to
open the "Timer" menu.
• Press the numeric key
to
select "Timer control".
• Press the key and
then, in the setting window, enter the desired time
(four digits) with the numeric keys.
• Press the key to save the setting.
• Press the key to close the TV menu.
At the programmed on time, the TV set is switched on
from the standby state (red LED lights). You must confirm this automatic action by pressing any key on the
remote control. If this is not done, the TV set will switch
back to the standby state after 10 minutes. This ensures that the TV set does not stay on if you are not at
home.
If you do not want to have the TV set switch
itself on each day, you must clear the on and
off times in the menu by pressing the
key.
+
+
15 Timer Control
Opening the menu
Time --:--
Timer
Switch off after...
Switch-off time
Switch-on time
Recording control
Timer setting
Timer control
Childlock
. . . .
EXIT
MENU
Page 52

52
Normally, the TV set will determine the current date
and time from the Teletext signals of the currently
selected station (providing this station sends Teletext).
Note: For this the device must be turned on with
the mains switch.
If this is not the case, or if an incorrect date or time is
displayed, you can set the date and time manually.
In almost all cases, you will not need to do this.
Even the changeover between winter time and
summer time is executed
automatically.
Setting the time and date
manually:
• Press the key to
open the TV menu.
• Press the green key to
open the "Timer" menu.
• Press the numeric key
to select "Time settings".
• Press the key and
then, in the setting window, enter the current time
with the numeric keys.
• You can then start the internal clock precisely by
pressing the key when the time you have
entered is reached.
• Press the numeric key
to select
"Current date".
• In the setting window, enter the date with the
numeric keys.
• Press the key to save the settings.
• Press the key to close the TV menu.
The local time offset is the difference between
the local time where the TV set is installed and
Greenwich Mean Time (GMT). The TV set
normally detects this time offset and also the
additional changeover to summer time.
The time needs to be set manually only if it is
not detected automatically.
15.1 Setting the Time and DateOpening the menu
i
Time 19:24:06
Local time offset
Current date
Current lokal time
Timer
Recording control
Timer setting
Timer control
Childlock
. . . .
EXIT
MENU
Page 53

53
This menu item is not available in a 2 **
menu.
In the menu item "Recording control", you can set a
lead time and an overrun time for timer recordings.
The TV set is automatically switched to the programme position from which the recording is to
be made at a time which is the number of minutes
programmed as the lead time before the programmed starting time for the recording.
At the end of the programmed recording time, the
TV set remains set to this programme position for the period programmed as the over-
run time.
Setting the lead time and
overrun time
• Press the key to
open the TV menu.
•
Press the green key to
open the "Timer" menu.
•
Use the corresponding numeric key (in the example: ) to
select the menu item
"Recording control".
• Use the cursor control key to select the desired
menu item.
• Press the key and then, in the setting window, use the V–/V+ key to set the desired lead
or overrun time.
• Press the key to save the settings.
• Press the key to close the TV menu.
+
15.2 Recording Control Opening the menu
Lead time 5 min
Overrun time
Lead time
Timer
Recording control
Timer setting
Timer control
Childlock
EXIT
MENU
Page 54

54
15.2 Recording Control
Application example:
You wish to record a programme received via
DVB-T. The programme starts at 22:45 hours,
ends at 23:40 hours and is broadcast on ITV.
Set up a "manual timer" as described in Section
17, "Special Functions 2" or set a timer with the
aid of the EPG as described in Section 19.3
“Using EPG, Recording a Programme". The timer
recording does not use VPS.
Set the lead time to 3 minutes and the overrun
time to 10 minutes.
At the programmed start time minus the programmed lead time of three minutes, the TV set is
either:
- switched on from the standby state (red LED
lights) with the programme position for ITV selected, whereby the screen remains dark but the
programme is sent via the EURO socket to your
recorder,
or
- switched to the programme position for ITV if it is
already switched on.
At the programmed end of the recording (at
23:40 hours) the programme position for
ITV remains selected for the programmed
overrun time of 10 minutes.
It is not possible to switch to another programme position during the programmed
lead and overrun times.
+
Page 55

55
Opening the menu16 Photo Viewer
The JPEG photograph display is an image viewer
for JPEG formats. The automatic image resizing
and a full-picture mode ensure smooth, pleasant
display.
Starting the photograph viewer:
• Connect the memory stick (exchangeable storage medium) to the USB socket /see chapter 28).
The photograph display overview appears on
the screen. The JPEG photograph display can
also be started as follows:
- Press the key for approximately 2
seconds. The maximum possible selection
appears.
- Press the numeric key to call up the JPEG
photograph display. The
JPEG photograph
display menu appears
on the screen.
• Use the cursor control keys
to select the desired image folder.
• Press the key to open
the image folder.
• Use the cursor control keys
to select the
individual images.
• Press the key to open
the selected image.
• Using the green key, the selected image can be
rotated clockwise; with the red key, it can be
rotated counter-clockwise.
Note: Images that have already edited on a PC
cannot be rotated or displayed. When processing pictures on a PC, turn off “JPEG
progressive”.
• To delete the image, press the key.
Press the key to exit the photograph
viewer.
Photo Viewer
Bilder
W-Fuchs.jpg
Aida.jpg
Nacht.jpg
Beduinen.jpg
Claudia.jpg
Strobo.jpg
Schlitten.jpg
Ã
File imanager
Slide Show
Close
Fullscreen
Select
Zoom
Rotate
Rotate
Delete
F1
F2
F3
F2
EXIT
Page 56

56
Opening the menu
16 Photograph Display
zoom function
Starting the zoom function:
• When an image is displayed, the zoom function
can be activated with the V+ key.
A red outlined quadrangle appears in the
image.
• Use the V–/V+ key to select the zoom factor
(x2, x4, x8).
• Use the cursor control keys to move
the red zoom quadrangle in the image in order
to determine the image section to be magnified.
• Press the key for a
magnified display of the
selected image section.
• Use the cursor control keys
to scroll the
magnified image section.
• Return to the full screen
picture by pressing the
key. The rectangular
red frame will be displayed on the screen. The red
frame will be hidden if you
press the V– key several
times, the magnifier function will then be disabled.
• Pressing the key returns you to the main
menu of photo display.
Zoom x4
EXIT
Page 57

57
16 Photograph Display
slide show
Opening the menu
Starting the slide show:
• Use the cursor control keys to select
the desired image folder.
• Press the key to open the selected image
folder.
• Press the key and select the "Slide Show"
function.
• The display of the individual images (display time
3 - 60 seconds) can be
adjusted with the V–/V+
key.
• Press the key to start
the slide show.
• During the slide show, the
II key has the "Pause"
function. Press the
key to resume the slide
show.
• When the slide show is finished or stopped with
or , the photograph viewer appears
again.
Press to return to the TV picture.
Prior to unplugging the
USB memory stick, be sure
to exit the photo display
with the key!
There is otherwise a risk of
losing data on the memory
stick.
Slide Show
Bilder
W-Fuchs.jpg
Aida.jpg
Nacht.jpg
Beduinen.jpg
Claudia.jpg
Strobo.jpg
Schlitten.jpg
Ã
File manager
Photo Viewer
Start
Stop
Pause
Endless
Time
3s
II
F1
F2
F2
EXIT
Page 58

58
Opening the menu
If you wish to record a programme which your
video recorder or DVD recorder cannot receive
directly because it does not have a suitable tuner
(such as DVB-T or DVB-C), you can use the "Timer
overview" to make such programmes available to
the recording device.
Setting a timer manually for a recording:
• Press the key.
If you press briefly, the function programmed for (see Section 18. "Programming the function keys") is executed.
If you hold down for about two seconds,
all possible selections are displayed.
• If all possible selections are displayed, press the
corresponding numeric key (in the example:
)
to open the timer menu.
•
Press the key.
The cursor is located at the
left of the first line
"Record". Use the
V–/V+
key to set this menu item
to "Yes".
• If desired, press cursor
control key and use
the
V–/V+
key to acti-
vate the reminder function. If the reminder
function is active, a
reminder window is
displayed on the screen
one minute before the
start time programmed
for the timer.
•
Use the numeric keys to select the programme
position (see the station table of the TV set) which
is to make the programme available for
recording.
• Press the cursor control key and use the
numeric keys to enter the date, start time and
end time of the programme you want to record..
Recording Yes
Reminder No
Pr ---
Date --.--.
Start --:-End --:-VPS No
Recording device
Videorecorder
Timer
17 Special Functions
Recording with a
timer
Mon Tue Wed Thu Fri Sat Sun
No entries found
F2
F1
Page 59

59
If you inadvertently enter a wrong time,
you can delete it with the I key or
overwrite it with the numeric keys.
• Press the cursor control key and use the
V–/V+ key to select the recording device
connected to the TV set which is to be used for
the recording.
•
Press the key to save the programmed
settings. The settings are stored in the timer
memory.
• Press the key to close the TV menu.
Clearing a timer:
• Press the key.
• Press numeric key
to
open the timer menu.
• Use the cursor control
key to select the timer
you wish to clear and
press to mark it
for deletion. A window
is displayed on the
screen, asking whether
you really want to clear
this timer.
Confirm the intended
action by pressing the appropriate key.
+
17 Special Functions
Recording with a time
r
Opening the menu
Recording Yes
Reminder No
Pr ---
Date --.--.
Start --:-End --:-VPS No
Recording device
Videorecorder
Timer
Mon Tue Wed Thu Fri Sat Sun
20:00 33 Das Erste -20:15
Tagesschau
22:45 33 SAT 1 -23:40
Planetopia
Page 60

60
Opening the menu
If you wish to record the programme you are currently watching, you can start a direct (one-touch)
recording to make the current programme available to a recording device connected to the EURO
sockets.
Starting a direct recording:
• Press the key.
If you press briefly, the function programmed for F2 (see Section 18. "Programming
the Function keys") is executed.
If you hold down for about 3 seconds,
all possible selections are displayed.
• Press numeric key
to open
the timer menu window.
The timer menu window displays the programme
position, the date and the
EPG data (see chapter 19.3)
for the current programme or
for the next two hours.
• If there is more than one AV
device connected to your TV
set, use the cursor control key
to select the proposed
recording device and use the
V-/V+ key to select the desired device.
• Press the key to save the settings.
On the recording device (e.g. video recorder), select the AV programme position and
start the recording by pressing the appropriate button (REC, OTR, etc.).
+
Recording Yes
Reminder Yes
Pr Sat1
Date 13.10.
Start 22:45
End 23:40
VPS No
Recording device
Videorecorder
17 Special Functions
Direct recording of a programme
Timer
F2
Page 61

61
Adjusting the picture format:
• Press the key.
If you press F3 briefly, the function programmed
for (see Section 18. "Programming the Function keys") is executed.
If you hold down for about two
seconds, all possible selections are displayed.
• Press numeric key to select the
function "Picture format menu".
• Use the rocker key to select the
desired function. After selection of a
picture format, you can also adjust the
zoom setting by pressing the V–/V+
key within five seconds.
• The settings made here (except for the automatic
zoom set in the TV menu) remain active until you switch to a different programme position or switch off the
TV set.
Zoom / Picture position
After selecting the function "Zoom", you
can adjust the zoom factor with the V–
/V+ key. In addition, you can move the
picture position 4) up and down on the
screen in order, for example, to keep the
station logo or the subtitles visible. To
change the picture position, press and
hold the F3 key until the selection is displayed.
Then press numeric key and use the V–/V+
rocker key to move the picture.
Standard 4:3
This is the standard setting for all programmes in
the 4:3 picture format.
17 Special Functions
Picture format
Opening the menu
16:9
full picture
+
Zoom
Standard 4:3 —
Special functions 3
1 Picture format
2 Pic. form., vertikal
F3
V–
V
+
Page 62

62
Panorama
With the aid of the panorama function,
you can expand programmes broadcast
in 4:3 format to fill the screen of a 16:9
TV set. The picture is expanded uniformly
in the horizontal direction. You can also
zoom the picture. The panorama function
can be activated and deactivated in the
menu item "General picture settings" of
the menu "Picture and sound".
16:9 Full picture
This function serves to display pictures from external devices (such as a 16:9 video recorder) with
the correct aspect ratio.
Automatic
The TV set automatically chooses the optimum picture format (with DVB stations this is dependent on
the programme).
17 Special Functions
Picture format
Standard 4:3 +
Panorama
16:9
full picture
—
Panorama
16:9
full picture
Zoom —
Opening the menu
Page 63

63
If desired, the picture can be shifted up or down in
order, for example, to make subtitles visible or to
hide "ticker" displays.
Adjusting the picture position:
• Press the key.
If you press briefly, the function
programmed for F3 (see Section 18, "Programming the Function keys") is executed.
If you hold down for about two
seconds, all possible selections are displayed.
• Press numeric key
to select the
function "Picture position vertical".
• You can now use the V–/V+ key to
move the picture up and down on the
screen so that, for example, the station
logo or the subtitles are visible.
This setting is not saved. If you wish to save
it as a global setting, use the procedure
described in Section 11 to set it.
+
17 Special Functions
Picture Position
Opening the menu
Special functions 3
1 Picture format
2 Pic. form., vertikal
F3
V–
V
+
Page 64
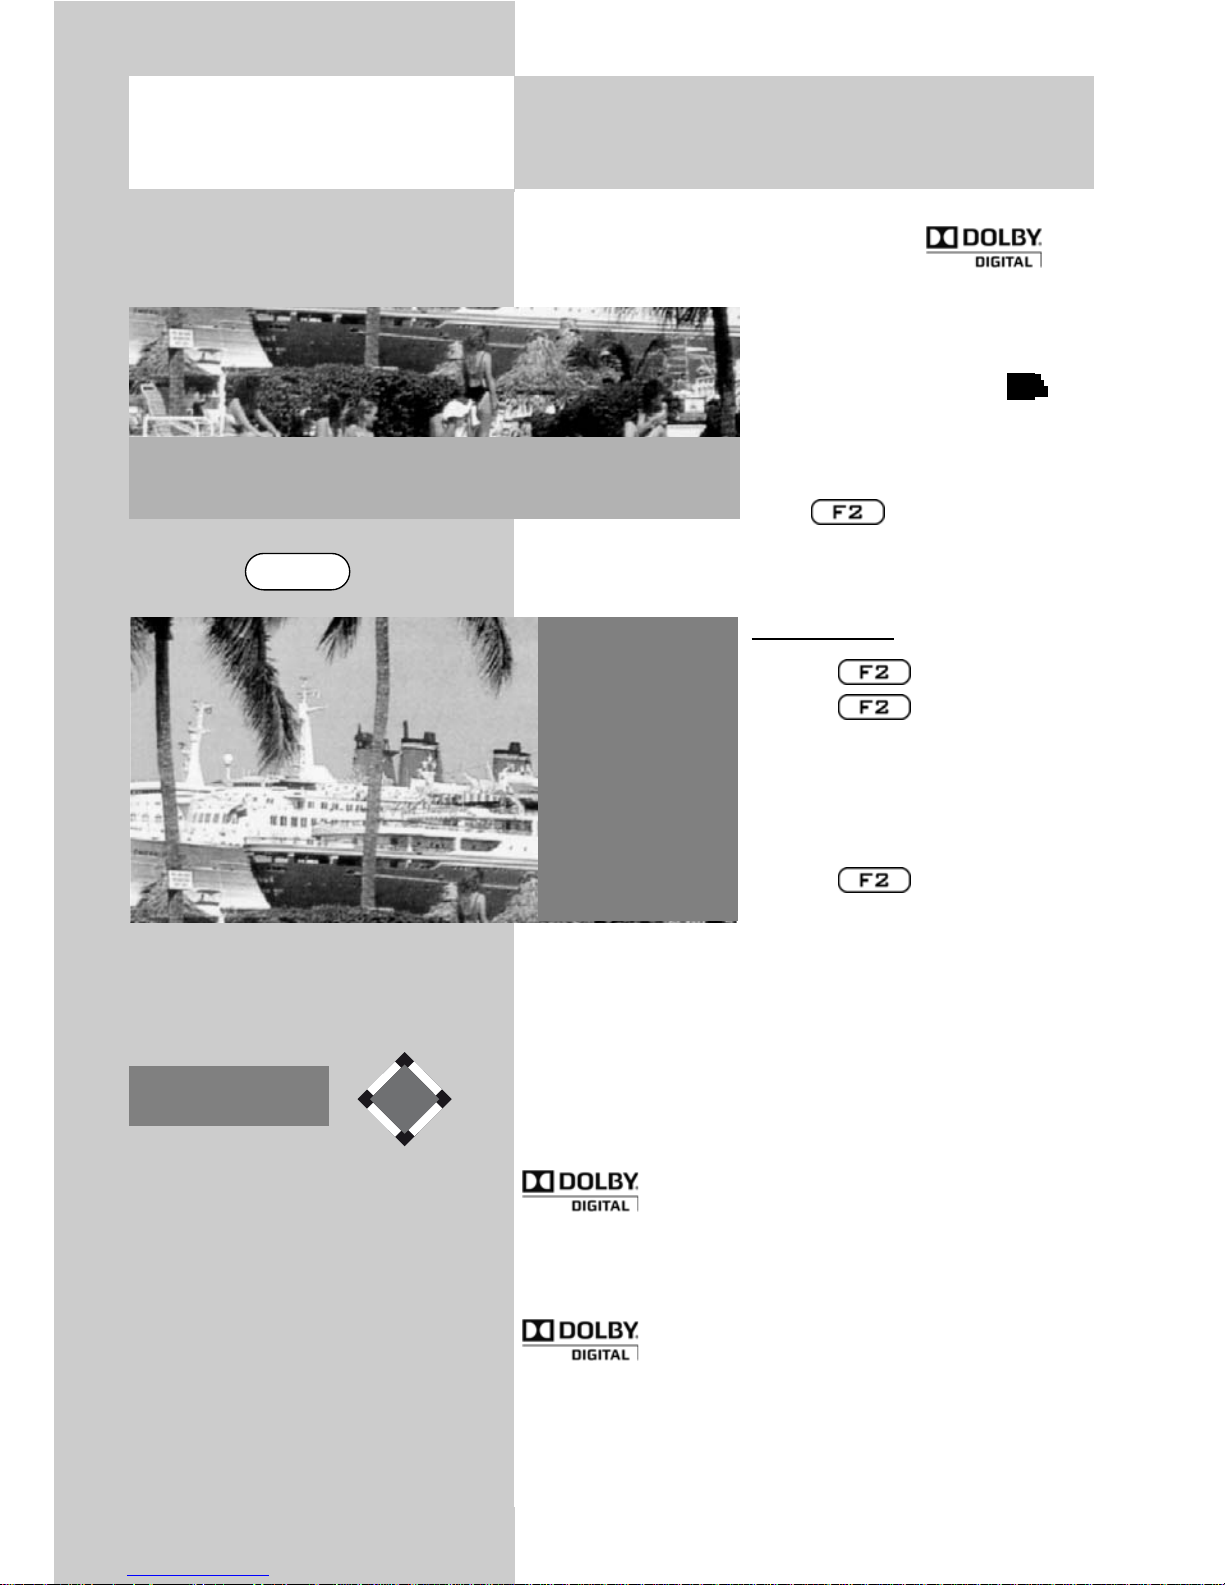
64
Various programs are transmitted with several
audio channels (e.g. multilingual or ).
If you are receiving a multilingual programme the information box on the bottom left of
the screen features the
logo.
Press to see the list of
available languages.
Open menu:
• Press .
Press briefly to run
the function programmed
for the key (see Chapter
18. "Programming function
keys").
Press for approx.
3 seconds and the max.
possible selection is displayed.
• Press numeric key
and select the "Programme
language" function.
• Select a language with the cursor control key
.
Symbol in grey:
Other audio options e.g. dd = "Dolby digital" are
available but are not selected.
Symbol in white:
One of the audio options has been selected.
Ä
)
)
)
Pr 30 Stereo
arte
05.04.07
Ä
)
)
)
17 Special Functions
Audio / language selection
Opening the menu
Special fuctions 2
1 Normal/Speech
2
Language of progr.
9 Timer overview
0 Direct recording
1 German
2
France
F2
Page 65

65
People with a hearing impairment can make use of
the subtitles function.
By default, the “Subtitles” function has to be activated first of all via the TV menu.
Activating subtitles
• Select the TV menu with the key.
.
• Use the red button to open the “Configuration” menu.
• Use the cursor control key to switch to the
menu item “Initial program
position“.
• Use the respective numeric
key to select the “Subtitles“
menu item.
• In the settings window, use
the V–/V+ key to set the
“Subtitles“ function to “on“.
• If desired, a language can
be selected here.
• Save the changed setting
with the key .
• Close “TV menu” with the key .
Displaying subtitles - see next page.
17 Special Functions
Select Subtitle
Opening the menu
Subtitle on Language select.1 Deutsch
Language select.2 English
Language select.3 Français
Subtitle
Data Logic adjustment
CI dialogue via
EPG settings
Operating
AV table
Sound settings
HiFi output
Time shift
Init. prog.position
Function for F3
Function for F2
EURO sockets
DVB-C
DVB-T
DVB-S
Analog-TV
Country
Language
Operating
Configuration
MENU
EXIT
Page 66

66
If a TV program has subtitles, they can be
displayed by pressing the green button
.
A program marked in this manner comes
with subtitles.
Displaying subtitles:
• Press .
Press briefly to run the function programmed for the key (see Chapter 18. "Programming function keys"). Press for
approx. 3 seconds and the max. possible selection is displayed.
• Use the numeric key to call up the
“Subtitles“ function.
• Use the cursor control keys
t
o make
a selection if this is offered by the station
or the program
.
The station or program is exclusively responsible for offering and
displaying subtitles
.
+
17 Special Functions
Select Subtitle
Opening the menu
Special functions2
1 Normal/Sprache
2
Language of prog.
3 Subtitle
9 Timer overview
0 Direct recording
Pr 2 Stereo
ZDF
16.02.10 20:25:35
Ä
)
16:9
µ
)
)
1 OFF
2 German
3 English
F2
Page 67

67
The “Time shift television” feature is only
available with Chorus 611 LED.
The factory setting for the time shift feature is activated for time-delayed viewing. This feature can be
switched on or off from the TV menu.
There are a variety of setting options in the “time
shift” menu:
“Off”
The feature is switched off. The
key now
only freezes an image.
“after a pause”
Pressing the key switches the time-delayed television back on.
“permanent”
Time-delayed television is
always switched on.
Setting time shift
• Open the TV menu with the
key.
• Open the “Configuration”
menu with the key.
• Use the cursor control key to select
“Init. prog. position”.
• Select “time shift” with the assigned numeric key in
example
.
• Set the desired parameters in the settings window
using the V– /V+ key.
• Save the changed setting with the key.
• Hide the TV menu with the
key.
+
Opening the menu
17 Special Functions
viewing-time shift mode
MENU
EXIT
Time shift after break
Subtitle
Data Logic adjustment
CI dialogue via
EPG settings
Operating
AV table
Sound settings
HiFi output
Time shift
Init. prog.position
Function for F3
Function for F2
EURO sockets
DVB-C
DVB-T
DVB-S
Analog-TV
Country
Language
Operating
Configuration
The number of subjects and sections depends
on the selected scope of operation. Depending
on the configuration of the TV set, the various
menu items may be displayed in a different
order and numbered differently.
Page 68
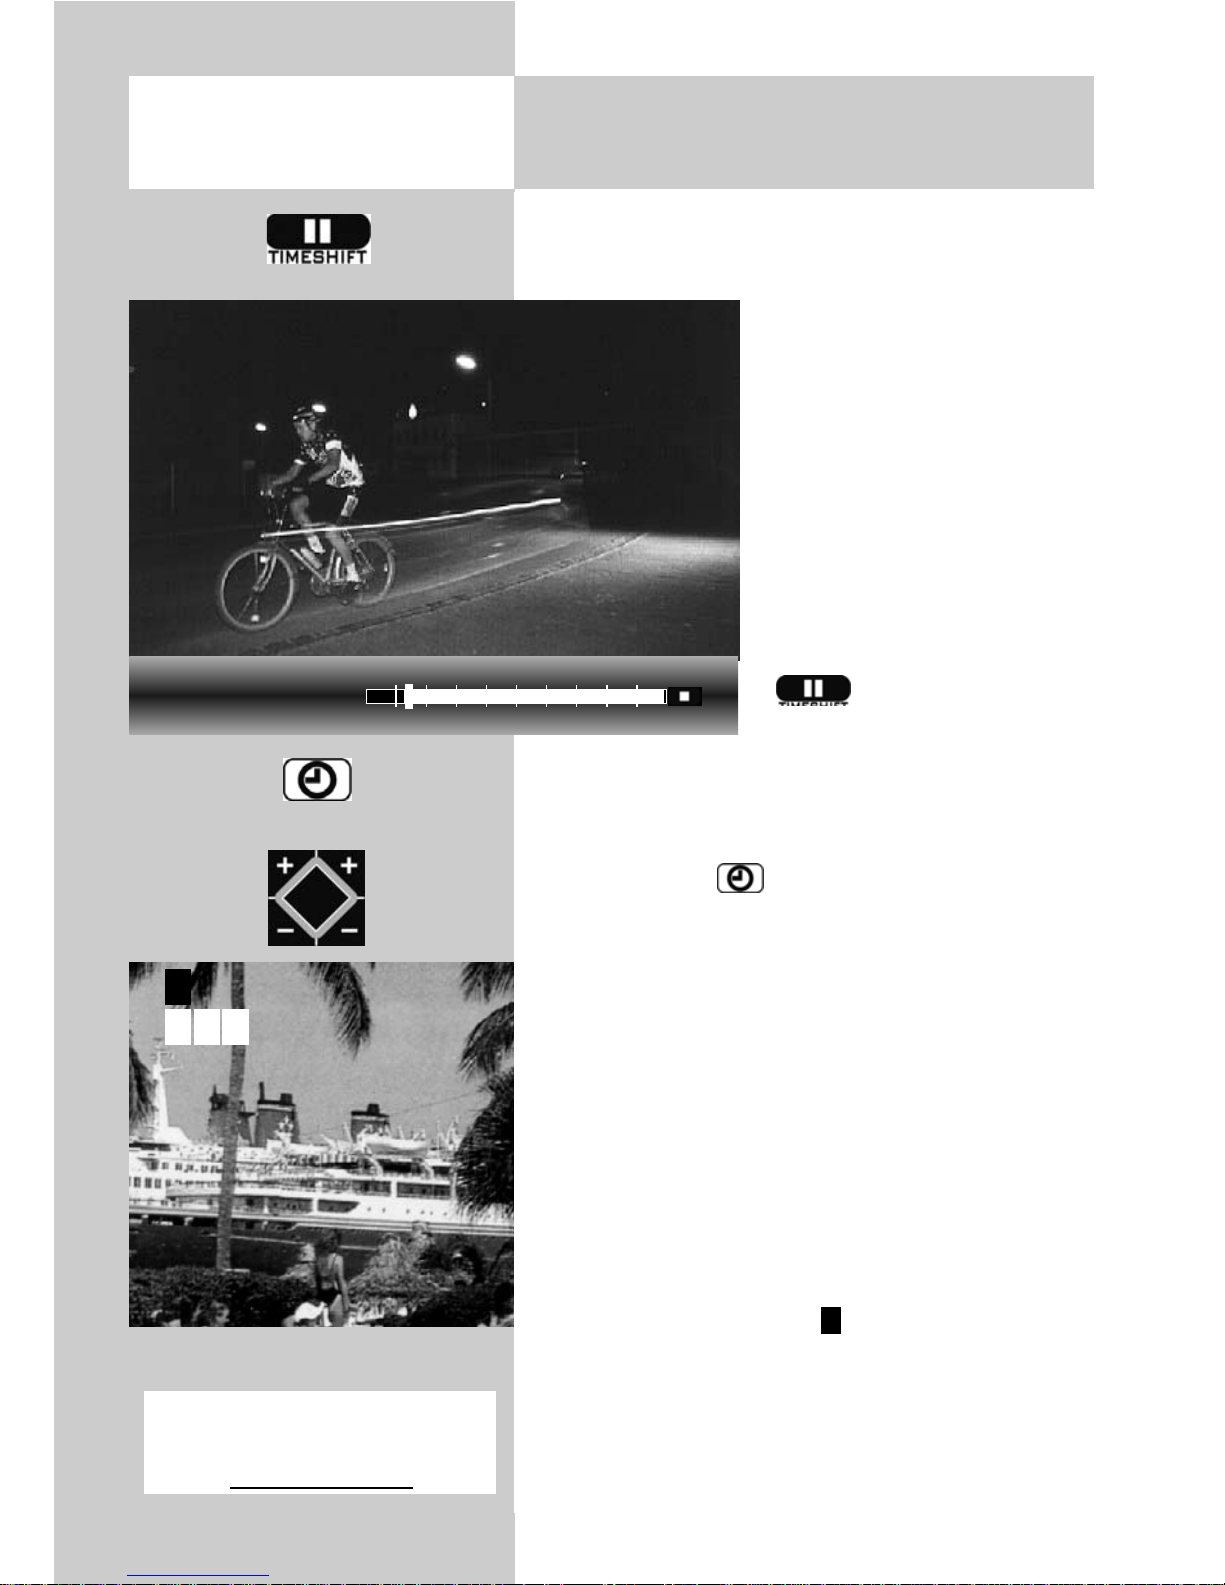
68
The TV set stores the recordings in temporary digital storage (time shift buffer).
The temporary digital storage
is sufficient for recording
approx. 130-300 min (SD)
and 70-120 min (HD=HDTV
programs).
This information only represents approximate values,
which can vary depending
on the volume of data in the
recording.
• Pause the program with the
button.
The recording of the broadcast is starting in time shift buffer.
The name of the “paused” program appears in
the upper left corner of the screen.
The green button can be used to make the
status display, which gives you information about
the current position in time shift mode, visible.
The time since the program was “paused“ or
alternatively recorded (05:50:00 in the example)
is shown on the left below the bar display.
The time indicating your current position within
the time shift buffer is displayed below the bar
graph (7:30 min in the example).
During pause mode, you can also change to a
different program position
12)
, to watch the news
for example. Then, in addition to the name of
the program, the symbol appears as a sign
that the program is “parked“.
P
17. Special Functions
viewing-time shift mode *)
Opening Timeshift
Bayerisches FS
PVR
Stereo
Pause
– 08:25 min
Live
18.04.08 20:30:10 – 07:30 min
Bayerisches FS
RPT L
*) The “Time shift television”
feature is only available
with Chorus 611 LED
12) depending on the built-in tuners
Page 69

69
In pause mode, the broadcast can be rewound or
fast-forwarded in increments of 10% with the cursor control keys or .
When the news is over, you can press the
button again to continue the previously paused
program without having missed anything.
The time shift bar fills in with colour in accordance
with the length of the pause. Everything that lies
further in the past than the set time is lost.
• Press the I button again to continue wat-
ching the paused and
recorded program.
• Press the green button
and show the play bar (see
picture below).
• By briefly pressing the cursor control keys repeatedly
the playback can be
forwarded in increments of
+1 minutes and rewound in
increments of -20 seconds.
• By holding down the cursor control keys the
forward/rewind mode is activated at twice the
speed. By repeated pressing the recording can
be forwarded and rewound at up to 32-times
normal speed.
17 Special Functions
viewing-time shift mode *)
Opening Timeshift
PVR
Stereo
Timeshift
– 08:25 min
Live
18.04.08 20:30:10 – 05:50 min
*) The “Time shift television”
feature is only available
with Chorus 611 LED
.
Page 70

70
17 Special Functions
viewing-time shift mod *)
If you want to return to the current status of the
program (“Live”) from time shift mode, then press
the green button to cause the status display to
appear (play bar, see display insert in picture)
and then press the key for the “LIVE picture”
of the current program.
If the TV set is in stand-by mode or swit-
ched off, the recording will be lost.
+
Opening Timeshift
PVR
Stereo
Timeshift
– 08:25 min
Live
18.04.08 20:30:10 – 05:50 min
*) The “Time shift television”
feature is only available
with Chorus 611 LED
.
Page 71

71
The remote control has four function keys: ,
and . You can programme these function keys (F2, F3
and AV) with any of the available
functions.
If you press and hold any function
key, a window with the available
functions is displayed. The picture
on the left shows the functions
available for the key.
Programming function key F2,
F3 or AV with a function
• Press the key to open the
TV menu.
• Press the red key to open the "Configura-
tion" menu.
• Use the cursor control key or the correspon-
ding numeric keys to select the desired "Function for.." (in this example: ).
• Press the key and then use the cursor con-
trol key to select one of the available functions.
• Press the key to
assign this function to the
selected function key (the
selected function is marked
with "X").
• Press the key to clo-
se the TV menu.
If a function key is
programmed with a
function, this function
can be called by briefly pressing the function key. Pressing and
holding the function
key displays a list of all available functions.
+
18 Programming the Function Keys
Opening the menu
Function for F2 Timer overview
Direct recording
Timer overview
File manager
Photo Viewer
Subtitle
Language of prog
AV function
Function for F3
Function for F2
EURO sockets
DVB-C
DVB-T
DVB-S
Analog-TV
Country
Language
Configuration
7
EXIT
MENU
F2
Special functions 2
2 Language of
progr.
4 Photo Viewer
5 File manager
9 Timer overview
0 Direct recording
Page 72

72
19 EPG
EPG (Electronic Program Guide) is an electronic
TV guide covering all major channels.
So-called DVB-SI data is transmitted with the TV
picture in the TV signal (DVB-S or DVB-C).
DVB-SI (Digital Video Broadcasting-Service Infor-
mation) is a service provided by different broadcasters. Programme details are broadcast digitally
by each broadcaster exclusively for those programmes it offers.
19.1 Activating the EPG
Not possible with an external receiver !
The function is activated by pressing the button
marked “EPG”.
Factory EPG settings:
• EPG On
• DVB-SI selection TV
• Prog. selection in the channel table all free
slots*)
*) In the menu, “retain” is dis-
played, i.e. when you
make an adjustment, this
change is displayed in
plain text after it is confirmed by selecting in
the menu. “Retain” is then
displayed in the menu as
an indication that the previously confirmed setting
has been retained.
EPG on Pr sel. in stationtable
lock all now
DVB-SI selection
Subtitle
Data Logic adjustment
CI dialogue via
EPG settings
Operating
AV table
Sound settings
HiFi output
Time shift
Init. prog.position
Function for F3
Function for F2
EURO-socket
DVB-C
DVB-T
DVB-S
Analog-TV
Country
Language
Opertion
Configuration
EPG
MENU
Page 73

73
19.2 Collecting EPG data
EPG data is broadcast by each station for its program contents. I
nformation will therefore vary accordingly.
Switch on your TV, so that EPG data can be com-
piled and/or updated.
While data is being compiled the orange LED is lit
or “EPG“ lights in the display.
After switching on the TV set or if a recording timer has been programmed, the collection of data is interrupted until a switch
back occurs to stand-by mode or the recording timer is terminated.
Please note
All free- to-air stations found are listed in the TV
set’s station table and shown in the program guide
unless you make a different selection in the station
table.
The data collection operation is interrupted if:
• the TV set is switched off with the power switch;
• the Teletext function is called;
• a recording is programmed in the menu "AV
recording";
• a "timer recording” is active or will start within
one hour;
• the Teletext function "Subtitles" is activated.
If the TV set is switched to stand-by, the orange
LED on the TV set will light up to show that the
collection process is running. After completion of
the collection process, the TV set switches to
stand-by mode (red LED).
Do not switch off the TV set during the collection process. Give the TV set a chance to
collect all EPG data at least one time.
+
+
Not possible with a set top box
Page 74

74
19.2 Collecting EPG data
Opening the menu
Exclude stations from the EPG TV guide:
You can decide which channels should appear in
the EPG program guide.
As a rule, the collection process gathers data for
all free channels. The following options are available to exclude selected channels from the EPG
program guide:
Solution 1:
• Press the key. The TV menu appears on
the screen.
• Press the white key The menu channel table
appears with the active program slot selected.
• Press to permit editing of the channel list.
• Press to switch to the menu page.
• Using and select “Include channel in EPG”
and dedeselect rows marked (7) with .
• To exclude other channels from the EPG pro-
gram guide, use to
select the channel and
repeat the procedure.
Not possible with a set top box
Sound correction
Picture quality
Picture correction
Enter logo
Station contained in EPG
CA module
Signal quality
DVB-S prog. info
0010 Hessen 3
0009 Südwest
0008 MDR
0007 PRO 7
0006 RTL 2
0005 RTL
0004 SAT 1
0003 Bayern 3
0002 ZDF
0001 ARD
7
Station table
MENU
F2
Page 75

75
Solution 2:
• Press the key. The TV menu appears on
the screen.
• Press the white key. The menu channel
table appears with the active programme slot
selected.
• Follow the steps described under “23. Sort
channels” to sort and save your favourite channels so that they appear at the top of the list, for
example sort 1-50 and save them.
• Select “EPG Settings” from the Configuration
menu and under “Prog. select. in the channel
table”, select “Channels 1-50” using the V–/V+
key and save by pressing .
The collection process will be halted or
stopped if:
• the TV set is switched off with the power switch.
• videotext is opened.
• a recording is programmed in the “AV
Recording” menu.
• a “timer recording” is running or will begin in
an hour.
• the videotext “subtitle” feature is switched on.
If the TV is switched to standby during the
collection process, the green LED will light up or
"EPG" will appear in display 2) to indicate that
the collection process is still running.
Do not switch the TV set off during the
collection process. Give the TV set a chance
to collect all EPG data.
+
19.2 Collecting EPG data
Not possible with a set top box
Page 76

76
19.3 Using the EPG
When the complete data is available, the EPG TV guide
appears after pressing the “EPG” button and shows the
programme that is currently running in that programme
position.
Sort the display by station list.
Sort a station by the timetable.
Sort all stations by time
The display selected with the
, ,
button is retained after exiting the EPG display.
Select programme.
Scroll page forwards -
backwards
Watch the selected pro-
gramme set a reminder
+P/–P Scroll time of day for-
wards/backwards
After pressing the
button, the station can be
changed with button +P/-P.
0-9 Enter a time. Program-
mes can be selected as
of the time entered.
blue : Programme selection of all programmes
yellow : User can set interests – or – programme
selection in accordance with the set interests
of the user
white : in F1 status, scroll time of day forwards,
in F2 status, scroll stations forwards.
green : in F1 status, scroll time of day backwards,
in F2 status, scroll stations backwards.
red : The selected programme is ready to be recor-
ded (see pg. 69)
Back to TV picture.
V+/V– Day of week forwards/backwards.
+
Not possible with an external receiver !
Sort. station table
Sort. selected station
Sort. time
select
select time
view
Record
Time «
Time »
Interest
All programmes
Mon Tue Wed Thu Fri Sat Sun
Wed
EPG
EXIT
Page 77

77
19.3 Using the EPG
Select, watch, remind programme
A programme can be selected in the TV guide
with the cursor control key.
• Press the button and
- watch the selected programme if the programme is already running.
- or set a reminder for it, if the starting time is
still in the future. A green checkmark appears
behind the starting time.
• Press the button to show or hide the
content description of the programme. It is not
possible to display the content description for all
programmes.
Interests settings
Areas of interest can be set in the EPG TV guide.
To do this:
•
Press the yellow button .
• use the cursor control key
or the assigned numeric key
to access one of the themes.
• Use the cursor control key
to change to the other
page.
• Use the cursor control key
to access the theme and
mark it with the button
(7).
• The markings (7) can be
deleted again with the button.
The way in which the interest selection you
have configured is displayed depends on
how the broadcasting channels maintain
their data.
+
Opening the menu
Not possible with an external receiver !
Interest
All programmes
EPG
EPG
7
7
7
winter sports
water sports
moter sports
athletics
team sports
tennis/squash
football/soccer
sports magazine
special events
sports (general)
team sports
water sports
special sportst
Arts/Culture
Music/Ballet/Dance
Education/Science
Children/School
Sport
Leisure
Shows
Current affairs
Feature film
Page 78

78
Programme Information (Now Showing: ..)
After switching to a channel, a box is
displayed at the bottom of the screen as
shown in the picture.
This box contains the following information:
- Channel number (in this example:
Pr4).
- Audio mode (stereo/mono).
- Start/end time of the programme
- The time bar shows the elapsed programme time.
- Broadcasting station
- Programme title
- Date and time
- Time details and title of the following
programme
Press the green key to view additional information about the programme currently showing, provided
the respective station broadcasts such
information.
Repeatedly press the green key to
view additional information about the
following programme, provided the
respective station broadcasts such
information.
To hide the information, press .
Not possible with an external receiver !
19.3 Using the EPGOpening the menu
Pr 4 Stereo 13:45 - 14:40
RTL Skispringen: Top 50
04.01.06 11:35:12 14:40 - 15:00 Skispringen: Die Entscheidung
Pr 4 Stereo 13:45 - 14:40
RTL Skispringen: Top 50
04.01.06 11:35:12 14:40 - 15:00 Skispringen: Die Entscheidung
Erster Durchgang des dritten Springens der Vierschanzentournee auf der Bergisel-Schanze in Innsbruck
EXIT
Page 79

79
19.4 Using the EPG
Recording a Programme
Selecting a programme for recording:
If you have a video recorder with the dialogue
system, the EPG permits you to start a recording
by pressing a single key.
• Press the "EPG" key to open the .
• Use the cursor control key to select the programme you wish to record.
If a video recorder with dialogue system is
connected (see also Section 30):
- Switch on the video recorder.
- Insert a cassette.
- Press the red key on the
remote control.
If a video or DVD recorder
without a dialogue system is
connected:
- Switch on the video recorder.
- Insert a cassette.
- Press the red key on the
remote control to programme the
TV timer
(see also "Direct recording (OTR)").
- On the AV programme position of the video
recorder, programme a timer with the data and
time of the programme which will be provided
by the TV timer.
Opening the menu
Not possible with an external receiver !
Recording Yes
Reminder No
Pr 1
Das Erste
Date 01.05.
Start 22:45
End 23:40
VPS no
Recording device
Videorecorder
EPG
Page 80

80
20 Setting the
Country and Language
The menu items "Language" and "Country"
are not available in a 2 ** menu.
Selecting the language in the TV menu
You can select any of the available languages for
the TV menu. All texts in the menu and in the help
screen (Information) are then displayed in the
selected language.
Setting the country
After installation of the TV
set, you must enter the country in which it is installed
(such as Great Britain) in
order to assign certain basic
settings (such as the channel
assignments, the order in
which the stations are stored,
etc.).
Setting language and
country:
• Press the key to
open the TV menu.
• Press the red key to
open the menu "Configuration".
• Use the corresponding
numeric keys to select
"Language" or "Country".
• Press the key to confirm your selection.
• Press the key to close the TV menu.
+
Opening the menu
Selected language English
Dansk
Suomi
Norsk
Português
Español
Français
Italiano
Nederlands
English
Deutsch
Function for F3
Function for F2
EURO sockets
DVB-C
DVB-T
DVB-S
Analog-TV
Country
Language
Operating
7
Configuration
Selected country
Great Britan
Luxemburg
Italy
Great Britan
France
Finland
Germany
Denmark
Belgiun
Baltic states
Australia
Function for F3
Function for F2
EURO sockets
DVB-C
DVB-T
DVB-S
Analog-TV
Country
Language
Operating
7
Configuration
EXIT
MENU
Page 81

81
This TV set is equipped for up to four different
types of reception, depending on the configuration or retrofitting:
Analogue TV:
The broadcasting technology which has been used
for many years. The
signals can be received via a rooftop antenna or
a cable.
DVB-T:
The new digital broadcasting technology
whose signals can be received via an existing
(analogue) rooftop antenna or an indoor antenna
(depending on the strength of the available signal). For more details, please consult your local TV
dealer or search for “DVB-T” in the Internet.
DVB-C:
The new digital broadcasting technology whose
signals are received via a cable connection. For
further details, please consult your local cable
provider or TV dealer or search for “DVB-C” in
the Internet.
DVB-S: (for HD-TV)
The digital broadcasting
technology that can be received via a satellite. Ask your
local TV dealer about it, or
find out more at "www.lyngsat.de".
Select the reception mode to
match the broadcasting technology available in your
area.
Setting the reception
mode
• Press the key to open the TV menu.
• Press the red key to open the menu "Configuration".
• Use the corresponding numeric key to select the
appropriate reception mode .
MENU
21 Setting Stations
Setting the reception mode
Opening the menu
Start station search
General settings
Manual search
Automatic search
Antenna
Function for F3
Function for F2
EURO sockets
DVB-C
DVB-T
DVB-S
Analog-TV
Country
Language
Operating
Configuration
MENU
Page 82

82
Various TV standards for picture and sound are
used in different countries. If the wrong TV standard is selected, you will not be able to hear the
sound, or it will be distorted. The TV standard "L"
also uses a different standard for transmission of
the picture. The TV standard must therefore be set
before you execute a station search.
The TV set is set in the factory to the TV standard B/G.
Setting the TV standard
• Press the key to
open the
TV menu.
• Press the red key to
open the menu "Configuration".
• Use the corresponding
numeric key (in the example:
) to select "Analo-
gue TV".
• The menu item "Search settings" is already
selected.
• Press the key and, in the setting window,
use the V–/V+ key to select the desired TV standard.
• Press the key to confirm your selection.
• Press the key to close the TV menu.
21.1 TV-Standard for analogue
stations
Opening the menu
TV-standard B/G
DataLogic
Analogue station search
Search settings
Function for F3
Function for F2
EURO sockets
DVB-C
DVB-T
DVB-S
Analog-TV
Country
Language
Operating
Configuration
The number of subjects and sections depends
on the selected scope of operation. Depending
on the configuration of the TV set, the various
menu items may be displayed in a different
order and numbered differently.
EXIT
MENU
Page 83

83
21.2 Analogue TV
Terrestrial station search
The terrestrial station search automatically searches the entire range of available reception frequencies for stations. All stations which are found
are placed in the station table which is displayed
at the end of the search operation. If you are not
satisfied with the order in which the stations are
displayed, you can move them to other positions
or delete unwanted stations
(see Section 23., "Sorting stations".
Executing a terrestrial station search
• Press the key to open the TV menu.
• Press the red key to open the menu "Configuration".
• Use the corresponding
numeric key (in the example:
to select
"Analogue TV".
• Use the corresponding
numeric key (in the example:
to select
"Analogue station search".
• Press the key and, in
the setting window, confirm the menu item
"Start station search".
• The TV set starts to search
for available stations.
A station table with the newly found stations is
displayed on the left half of the screen. If a station table already existed before the search, the
newly found stations are automatically appended after the last existing station.
• After completion of the search, all stations which
have been found are sorted.
• You can delete any unwanted stations from the
station table by selecting them with the cursor
control key and pressing the key.
Opening the menu
The number of subjects and sections depends
on the selected scope of operation. Depending
on the configuration of the TV set, the various
menu items may be displayed in a different
order and numbered differently.
Start stadion search
DataLogic
Analogue station search
Search settings
Function for F3
Function for F2
EURO sockets
DVB-C
DVB-T
DVB-S
Analog-TV
Country
Language
Operating
Configuration
MENU
Page 84

84
The TV set will normally detect the colour standard
automatically.
If this automatic selection does not provide satisfactory results (which should happen only rarely),
you can select the colour standard manually for
each programme position.
The colour standard is set in the factory to "Automatic".
Setting the colour standard
3) 7)
• Press the key to open the TV menu.
• Press the white key to open the station
table.
• Press the key to
enable editing of the station table.
• Use the cursor control key
to select the programme
position whose colour standard you wish to change.
• Press the cursor control key
to move to the left
column.
• Use the corresponding
numeric key (in the example:
to select
"Colour standard".
• Use the V–/V+ key to select the desired colour
standard, or to step through the available colour
standards until the picture is displayed clearly.
• Press the key to confirm your selection.
• Press the key to close the TV menu.
21.3 Colour standard for analogue stations
3) See glossary for an explanation.
5)
Can only be selected for DVB stations.
7) Available only for analogue stations!
Opening the menu
The number of subjects and sections depends
on the selected scope of operation. Depending
on the configuration of the TV set, the various
menu items may be displayed in a different
order and numbered differently.
Colour standard SECAM
Sound corrections
Colour standard
3)7)
Picture quality
Picture correct.
Enter logo
Station contained in EPG
CA module
5)
Signal quality
5)
DVB-C-prog. info
5)
Frequency/channel
7)
0076 TF3
0075 TF2
0074 TF1
0073 TV France
0072 RTL 2
0071 RTL
0070 SAT 1
0069 Bayern 3
0068 ZDF
0067 ARD
Station table
MENU
F2
EXIT
Page 85

85
With this menu item, you switch the supply voltage
for a DVB-T antenna on or off.
On:
The antenna supply voltage is constantly on (Select
this setting if you have a TV-Set with two DVB-TTuners but only one active antenna or if you receive also analog stations via the active antenna).
Switched:
The antenna supply voltage is only
active for DVB-T-programmes
(e.g. for controlling a relay to switch between
DVB-T-antenna and broadband cable, if they coexist).
Off:
For a passive antenna or a
community antenna
Setting the antenna supply voltage
• Press the key to
open the TV menu.
• Press the red key to
open the "Configuration"
menu.
• Use the corresponding
numeric key (in the example:
) to select the function "DVB-T".
• Press the key and, in the setting window,
use the V–/V+ key to select the antenna supply
voltage.
• Press the key to save the new settings.
• Press the key to close the TV menu.
21.4 DVB-T, Antenna supply voltage
Opening the menu
Supply voltage on
General settings
Manual search
Automatic search
Antenna
Function for F3
Function for F2
EURO sockets
DVB-C
DVB-T
DVB-S
Analog-TV
Country
Language
Operating
Configuration
EXIT
MENU
Page 86
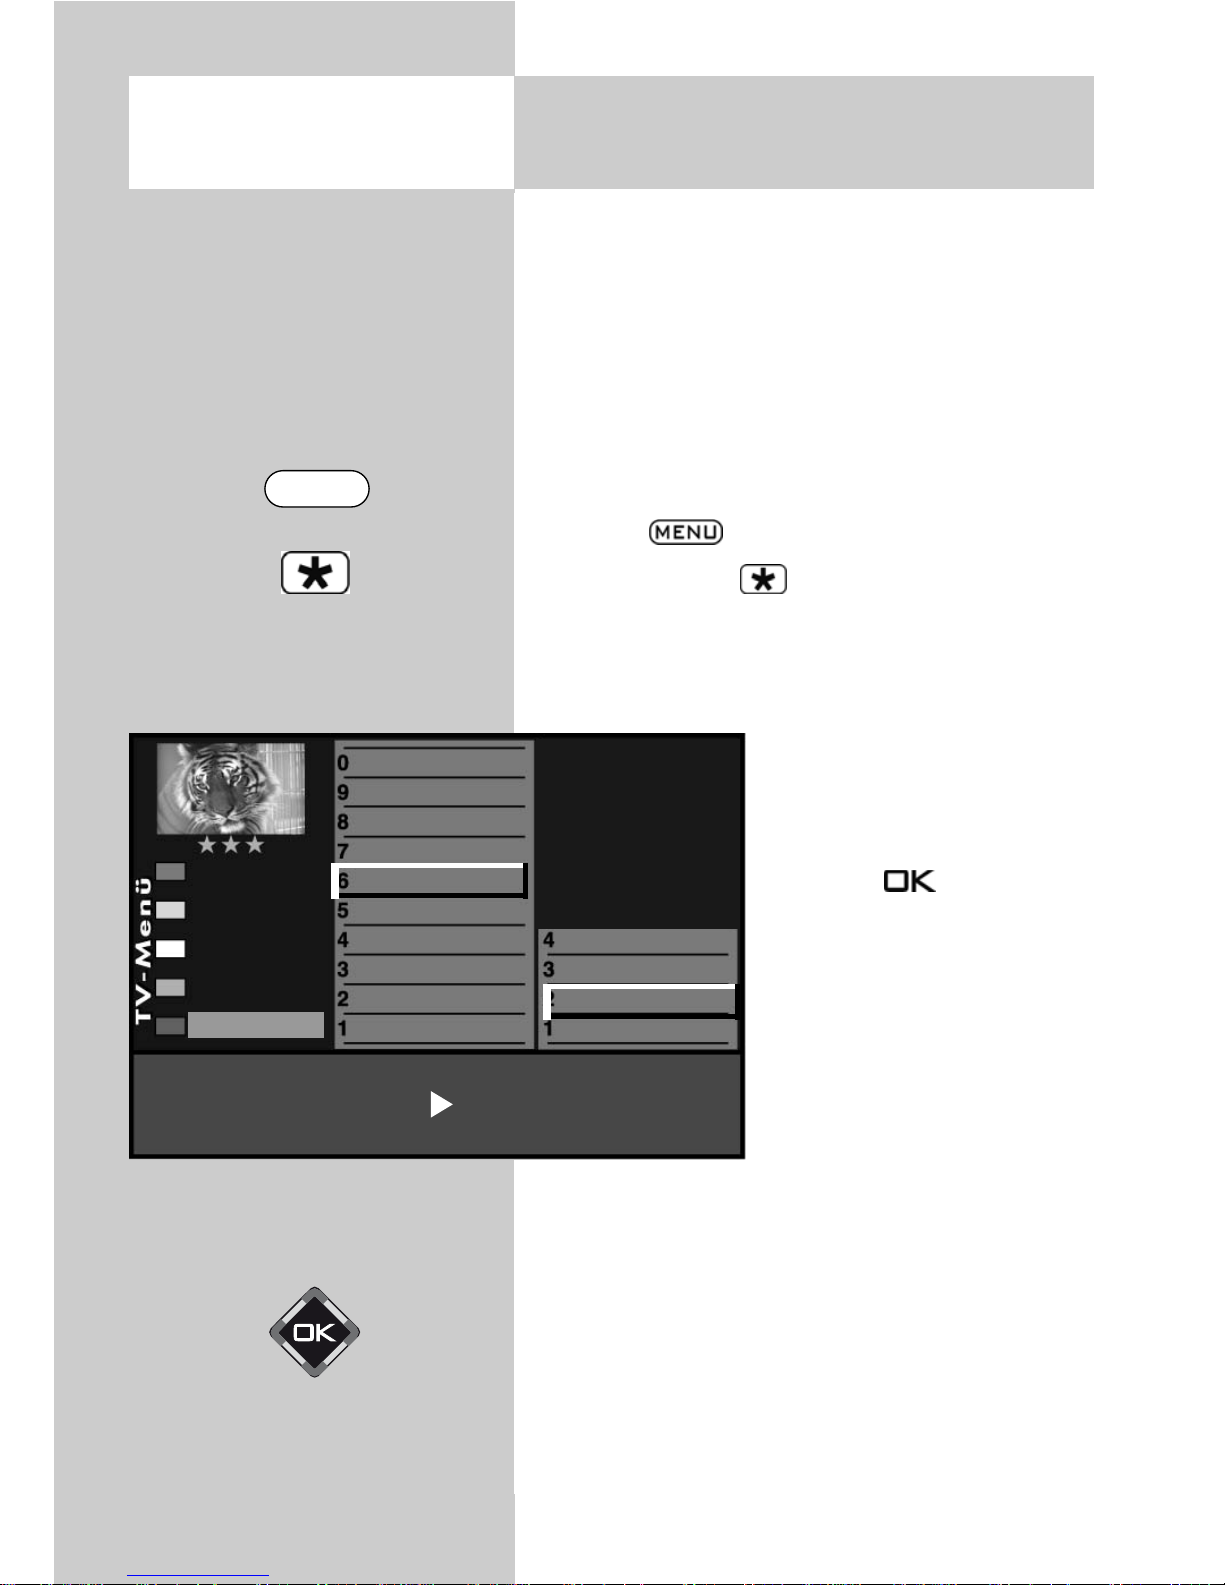
86
The DVB-T station search operation searches the
entire frequency band for TV and radio stations.
All stations which are found are placed in separate TV and radio station tables. See Section 25 for
details of DVB radio mode.
If you are not satisfied with the order in which the
stations are displayed, you can move them to
other positions or delete unwanted stations (see
Section 23., "Sorting stations".
Executing the automatic station search
• Press the key to open the TV menu.
• Press the red key to open the menu "Configuration".
•
Use the corresponding numeric key (in the example: ) to select " DVB-T".
• Make a selection with the
assigned numeric key, in
the example “Automatic
search”.
• Press key and confirm
the question about the station search with the corresponding numeric key:
freely receivable programmes
3)
all programmes
3
free + CICAM programmes3).
After pressing the corresponding numeric key the
programme search begins.
21.4 Automatic DVB-T station
search
Opening the menu
3) See glossary for an explanation.
Start station search
General settings
Manual search
Automatic search
Antenna
Function for F3
Function for F2
EURO sockets
DVB-C
DVB-T
DVB-S
Analog-TV
Country
Language
Operating
Configuration
MENU
Page 87

87
For a manual station search, you must know the
channel number or the frequency of the station
you wish to find.
Executing the manual search
• Press the key to open the TV menu.
• Press the red key to open the menu "Configuration".
• Use the corresponding numeric key (in the
example: ) to select " DVB-T".
• In the setting window "Antenna", you can switch
the supply voltage for
an antenna on or off
with the V–/V+ key
(see also page 79).
• Make a selection with
the assigned numeric
key, in the example
,
“Manual search”.
• Enter the channel number or frequency in the
setting window with the
numeric keys. If additional data of a programme is known, then
select the “Mod- parameter” menu item and
change the setting to “manual” using the
V–/V+ key. Additional data can now be
entered.
• After entering the programme data with the
cursor control key, select “Start programme
search”.
• Press key and confirm the question about
the station search with the corresponding
numeric key:
freely receivable programmes
3)
all programmes
3)
free + CICAM programmes3).
After pressing the corresponding numeric key the
programme search begins.
21.4 Manual DVB-T station search Opening the menu
3) See glossary for an explanation.
Transmission 8k Mode Modulation64 QAM
Mod. Parameter manuell
Guard Intervall 1/8
Code rate 3/4 Start station search
Channel 05 Frequency
177.500 Mhz
Mod.-Parameter
auto. Start station search
General settings
Manual search
Automatic search
Antenna
Function for F3
Function for F2
EURO sockets
DVB-C
DVB-T
DVB-S
Analog-TV
Country
Language
Operating
Configuration
MENU
Page 88

88
The DVB-C station search operation searches the
entire frequency band for TV and radio stations.
All stations which are found are placed in separate TV and radio station tables. See Section 25 for
details of DVB radio mode. If you are not satisfied
with the order in which the stations are displayed,
you can move them to other positions or delete
unwanted stations (see Section 23., "Sorting stations".
Executing the automatic search
• Press the key to open the TV menu.
• Press the red key to open the menu "Configuration".
• Press the numeric key
to
select "DVB-C".
• The cursor is now on the
menu line "Search
settings".
• Press key .The cursor
is on symbol rate 1.
The most common symbol
rates3)were set in the factory. Changing the setting
is normally unnecessary.
If this setting of the symbol
rates does not lead to the desi-
red result, other symbol rates must be set and saved
with the key .
Ask your cable network provider or the person setting
up the system about this. Fine search is required if the
stations are not tuned to the channel centre.
• Select the menu line “Start programme search”
with the cursor control key .
• P
ress key and confirm the question about the
station search with the corresponding numeric key:
freely receivable programmes
3)
all programmes
3)
free + CICAM programmes3).
After pressing the corresponding numeric key the
programme search begins.
+
21.5 Automatic DVB-C stationse
archOpening the menu
3) See glossary for an explanation.
Symbol rate 13) 6900 Precision search off
Symbol rate 2 6875 Start station search
Symbol rate 3
Home channel
General settings
Manual search
Automatic search
Function for F3
Function for F2
EURO sockets
DVB-C
DVB-T
DVB-S
Analog-TV
Country
Language
Operating
Configuration
MENU
Page 89

89
For a manual station search, you must know the
channel number or the frequency of the station
you wish to find.
Executing the manual search
• Press the key to open the TV menu.
• Press the red key to open the menu
"Configuration".
• Use the corresponding numeric key (in the
example:
) to select "DVB-C".
• Make a selection with the assigned numeric key,
in the example
“Manual search”.
• The cursor is on “Channel”.
• Enter the channel number
or special channel number
or frequency in the setting
window with the numeric
keys. If additional data of a
programme is known, then
select the corresponding
menu items “Modulation”
and “Symbol rate” and
change the setting using the
V–/V+
key or with the
numeric keys.
• Select “Start programme search” with the cursor
control button in the setting window.
• P
ress key and confirm the question about the
station search with the corresponding numeric key
:
freely receivable programmes
3)
all programmes
3)
free + CICAM programmes3).
After pressing the corresponding numeric key the
programme search begins.
21.5 Manual DVB-C station search Opening the menu
3) See glossary for an explanation.
Channel 05 Cable channel -Frequency 64.500MHz
Symbol rate 6900
Madulation Auto.mode Start station search
Home channel
General settings
Manual search
Automatic search
Function for F3
Function for F2
EURO sockets
DVB-C
DVB-T
DVB-S
Analog-TV
Country
Language
Operating
Configuration
MENU
Page 90

90
Opening the menu
The sat. antenna system must be reported to the TV
set in the “Configuration” menu.
Antenna
Normal
In the “Normal” setting, the DVB-S receivers in the
LCD TV set each have a separate antenna cable.
Single Cable (Single Cable Distribution SDC)
With the “Single cable” setting, the DVB-S recei-
vers have one feed line. The
programme selection is preset according to the structural conditions of the satellite
system. No antenna control
signals can be sent over the
feed line.
Unicable
The antenna system with a
channel router feeds one
cable and is designed to
receive the full programme
selection. For this purpose,
each receiver is assigned
one specific frequency in the satellite frequency
range (950-2150 MHz). The channel router has
multiple fixed frequencies (SCR-Freq.) saved in a
frequency bank. See the user’s guide for the channel router.
The satellite antenna splitter 010ZR1199 is
required for all satellite single cable solutions.
+
21.6 Set-up of Sat System
Antenna system
i
Antenna normal Power compensation off
LNB supply voltage off DiSEqC system off
General settings
Manual search
Automatic search
Satellite D
Satellite C
Hot Bird 13°
Astra 19,2°
Aerial facility
Function for F3
Function for F2
EURO sockets
DVB-C
DVB-T
DVB-S
Analog-TV
Country
Language
Operating
Configuration
EXIT
MENU
Page 91

91
Each DVB-S receiver must be assigned a subscriber number (SCR no.) and the associated subscriber frequency (SCR freq.) from the frequency
bank (see channel router or its user’s guide)
Each subscriber number and subscriber
frequency may only be assigned once.
The DVB-S receiver in the TV set requests the data
for the desired programme
from the channel router.
Setting the SCR no. and
SCR freq.
• Call up the TV menu with
the button
•
Use the red button to
open the “Configuration”
menu.
• Select the menu option
“DVB-S” with the assigned
numeric buttons. In the
example it is .
• Press the button and the “Arial facility”
setup window opens.
• Use the cursor control buttons to select
“Antenna” and then the V–/V+ button to select
“Unicable”.
• Use the cursor control buttons to select the SCR
data for each receiver.
• Enter the required data with the
numeric buttons.
• Confirm the setting by pressing the button.
• Clear the “TV menu” with the button.
21.6 Set-up of satellite system
Unicable
Opening the menu
Antenna Unicable Power compensation off
SCR1 no. 1
SCR1 freq. 1284 MHz
General settings
Manual search
Automatic search
Satellite D
Satellite C
Hot Bird 13°
Astra 19,2°
Arial facility
Function for F3
Function for F2
EURO sockets
DVB-C
DVB-T
DVB-S
Analog-TV
Country
Language
Operating
Configuration
EXIT
MENU
Page 92

92
Opening the menu
The settings of the satellite antenna system must
be entered in the menu "Configuration" so that
the TV set knows them.
These settings should always be made in the order
in which they are shown in the right-hand column
of the menu, starting at the bottom,
i.e. LNB supply voltage, DiSEqC system, etc.
LNB supply voltage
The LNB voltages for selection of the polarisation (horizontal H = 18V, vertical V = 14V) are al-
ready set and do not normally
need to be changed.
If the cable to the satellite antenna is very long, the voltages
reaching the LNB may be too
low. In such cases, the voltages
can be increased by 1 V by
activating the line-compensation
function.
If any changes should be
necessary, they can be made
as follows.
Change settings
• Call up the TV menu with the button
.
• Use the red button to
open the
“Configuration” menu.
•
Select the menu option “DVB-S” with the
assigned numeric buttons. In the example it is .
• Press the button and the “Arial facility”
setup window opens.
• Use the cursor control buttons to select “LNB
supply voltage” and then use the - + button to
set the LNB supply voltage on or off.
• Confirm the setting by pressing the button.
• Press the key to close the TV menu.
If the TV set is connected to a community
antenna, the LNB supply voltage must
always be set to "Off".
+
21.6 Set-up of satellite system
LNB supply voltage
i
Antenna normal Power compensation off
LNB supply voltage off DiSEqC system off
General settings
Manual search
Automatic search
Satellite D
Satellite C
Hot Bird 13°
Astra 19,2°
Aerial facility
Function for F3
Function for F2
EURO sockets
DVB-C
DVB-T
DVB-S
Analog-TV
Country
Language
Operating
Configuration
EXIT
MENU
Page 93

93
21.6 Set-up of satellite system
DiSEqC system
"DiSEqC" makes it possible to control the
satellite antenna digitally via the existing
antenna cable and is a prerequisite for the
reception of signals from more than two
satellites (e.g. Astra, Eutelsat, Hotbird).
If you wish to receive signals from at least three
satellites (e.g. ASTRA 19.2°, Eutelsat 16°, Hotbird 13°) the antenna system can be controlled
only with the aid of "DiSEqC".
This menu item is not available in a 2**
menu.
Switching DiSEqC on and
off
•
Press the key to open
the TV menu.
• Press the red key to
open the menu "Configuration".
• Press the appropriate
numeric key (in this example
to select "DVB-S".
• Press the button and
the “Arial facility” setup
window opens.
• Use the cursor control buttons to select “DiSEqC”
and then use the V–/V+ button to set DiSEqC on
or off.
• Press the key to confirm the new setting.
• Press the key to close the TV menu.
+
i
Opening the menu
Antenna normal Power compensation off
LNB supply voltage off DiSEqC system off
General settings
Manual search
Automatic search
Satellite D
Satellite C
Hot Bird 13°
Astra 19,2°
Aerial facility
Function for F3
Function for F2
EURO sockets
DVB-C
DVB-T
DVB-S
Analog-TV
Country
Language
Operating
Configuration
EXIT
MENU
Page 94

94
Opening the menu
21.6 Set-up of satellite system
Selecting satellites
You can set up to four satellites in the menu
"Configuration". No satellite is set in the factory.
The LNB frequency is used to switch between the
high and low frequency bands. The default frequencies Low band 9.75 GHz and High band
10.60 GHz are set in the factory.
Selecting satellites
• Press the key to open the TV menu.
• Press the red key to open the menu "Configuration".
• Press the appropriate
numeric key (in this example
to select "DVB-S".
• Press the appropriate
numeric key (in this example
to select
"Satellite A".
• Use the V–/V+ key to
select the desired satellite.
The most common satellites
are displayed one after the
other, together with the
symbol rates for each one.
Depending on the satellite, it may be necessary
to set additional symbol rates manually if the
selected satellite uses different symbol rates and
you wish to find the related transponders in an
automatic station search.
• Use the cursor control key to select "Low band"
or "High band". The settings depend on the
components installed in the satellite antenna.
For the correct settings, please consult the data
sheet or the label of the LNB(s) being used.
• Press the key to confirm the new settings.
• Press the key to close the TV menu.
Satellite Astra 19,2°
Low band 9,75 GHz
High band 10,60 GHz
General settings
Manual search
Automatic search
Satellite D
Satellite C
Hot Bird 13°
Astra 19,2°
Aerial facility
Function for F3
Function for F2
EURO sockets
DVB-C
DVB-T
DVB-S
Analog-TV
Country
Language
Operating
Configuration
EXIT
MENU
Page 95

21.6 Setting the stations
Automatic search
Opening the menu
The DVB-S station search scans the entire reception band for TV and radio stations and stores
them in separate TV and radio station tables. For
details of the DVB radio mode, see Section 25 in
the operating instructions for the TV set.
If you are not satisfied with the order in which the stations are stored, you can move stations to other positions in the table or delete them. For further details,
see Section 23, "Sorting stations" in the operating
instructions for the TV set.
+
The station search will function correctly only
if the LNB frequencies have been set and stored correctly.
Executing the automatic
station search
•
Press the key to open
the TV menu.
• Press the red key to
open the menu "Configuration".
• Press the appropriate
numeric key (in this example
to select "DVB-S".
• Press the appropriate
numeric key (in this example
to select "Automatic
search".
•
In the setting window, use the
V–/V+
key to select
the desired satellite.
• Use the cursor control key to move to the
menu line "Start station search".
• P
ress key and confirm the question about the
station search with the corresponding numeric key
:
freely receivable programmes
3)
all programmes
3)
free + CICAM programmes3).
After pressing the corresponding numeric key the
programme search begins.
3) See glossary for an explanation.
Satellite Astra 19,2° Start station search
General settings
Manual search
Automatic search
Satellite D
Satellite C
Hot Bird 13°
Astra 19,2°
Aerial facility
Function for F3
Function for F2
EURO sockets
DVB-C
DVB-T
DVB-S
Analog-TV
Country
Language
Operating
Configuration
EXIT
MENU
95
Page 96

96
21.6 Setting the stations
Automatic search
If necessary, the stations can also be sorted,
moved, or deleted. See Chapter 23 for this.
21.6 Setting the stations
Manual search
For the manual search, you must know the frequency, the symbol rate and the polarisation of the
station for which you want to search.
Executing the manual search
•
Press the key to open the TV menu.
• Press the red key to open the menu
"Configuration"
• Press the appropriate numeric key (in this example
to select "DVB-S".
•
Select the menu option “Manual search” with the
assigned numeric keys. In the example it is
.
• The cursor then moves to "Satellite". If more than
one satellite is available, use the V–/V+ key to
select the desired satellite.
Page 97

97
• In the setting window, use the cursor control key
to select the menu line "Frequency".
• Use the numeric keys or the V–/V+
key to set
the frequency.
For a HD station search, the information for
the DVB system (e.g. DVB-S2) must also be
entered.
• If all the data has been entered, use the cursor
control key in the settings window to access the
„Start programme search” menu item and confirm with the key .
• Press key and confirm
the question about the station search with the corresponding numeric key:
freely receivable
programmes
3)
all programmes
3)
free + CICAM programmes3).
After pressing the corresponding numeric key the programme search begins.
If necessary, the stations can
also be sorted, moved, or deleted.
See Chapter 23 for this.
+
21.6 Setting the stations
Manual search
Opening the menu
3) See glossary for an explanation.
Satellite Astra 19,2° Frequency 11836 MHz
Symbol rates 27500 Polarisation H
DVB system Start station search
General settings
Manual search
Automatic search
Satellite D
Satellite C
Hot Bird 13°
Astra 19,2°
Aerial facility
Function for F3
Function for F3
EURO sockets
DVB-C
DVB-T
DVB-S
Analog-TV
Country
Language
Operating
Configuration
EXIT
MENU
Page 98

98
With the menu item, "General settings", you can
specify whether or not the data are to be saved in
the non-volatile memory of the TV set when transmission parameters are changed.
This update function applies to stations which use
different transmission parameters at different times
of the day, such as when they transmit regional
programmes.
Setting the data update function
•
Press the key to open the TV menu.
• Press the red key to open the menu "Configuration".
• Press the appropriate
numeric key (in this example
to select "DVB-S".
• The cursor is located on
the line "Aerial facility".
• Press the appropriate
numeric key (in this example
to select "General
settings".
• In the setting window, use
the V–/V+
key to set
"Update data" to "On".
• Press the key to confirm the new setting.
• Press the key to close the TV menu.
21.7 Setting the stations
Updating the data
Opening the menu
Update data on
General settings
Manual search
Automatic search
Satellite D
Satellite C
Hot Bird 13°
Astra 19,2°
Aerial facility
Function for F3
Function for F2
EURO sockets
DVB-C
DVB-T
DVB-S
Analog-TV
Country
Language
Operating
Configuration
EXIT
MENU
Page 99

99
The displays for the DVB prog. info or signal
quality are only for informational purposes. DVB
prog. info. shows the data for the displayed
station.
The signal quality display is not directly related to
the picture quality. The bit error rate fluctuates
between the transponders and increases if a rain
front is approaching, for example.
• Select the programme position for the DVB
prog. info or signal quality
that is to be displayed.
• Press the key.
The TV menu appears on
the screen.
• Press the white key
The station table menu
appears on the screen and
the active programme
position is selected.
• Press the button.
• Press the cursor control
key and switch to the
menu page.
• Use the assigned numeric
keys to select the DVB
prog. info. or the signal
quality menu option.
• Clear the “TV menu” with
the button.
21.8 DVB Prog. Info. signal quality Opening the menu
Sound corrections
Picture quality
Picture corrections
Enter logo
Station contained in EPG
CA module
Signal quality
DVB-prog. info
0010 Hessen 3
0009 Südwest
0008 MDR
0007 PRO 7
0006 RTL 2
0005 RTL
0004 SAT 1
0003 Bayern 3
0002 ZDF
0001 ARD
7
Satellite Astra 19,2° Frequency 11953 MHz
Symbol rates 27500 Polarisation H
Encryption No DVB system DVB-S
Station table
Sound corrections
Picture quality
Picture corrections
Enter logo
Station contained in EPG
CA module
Signal quality
DVB-prog. info
0010 Hessen 3
0009 Südwest
0008 MDR
0007 PRO 7
0006 RTL 2
0005 RTL
0004 SAT 1
0003 Bayern 3
0002 ZDF
0001 ARD
7
Signal level
82%
Bit error rate
0%
C/N 40,8 dB
Station table
MENU
F2
Page 100
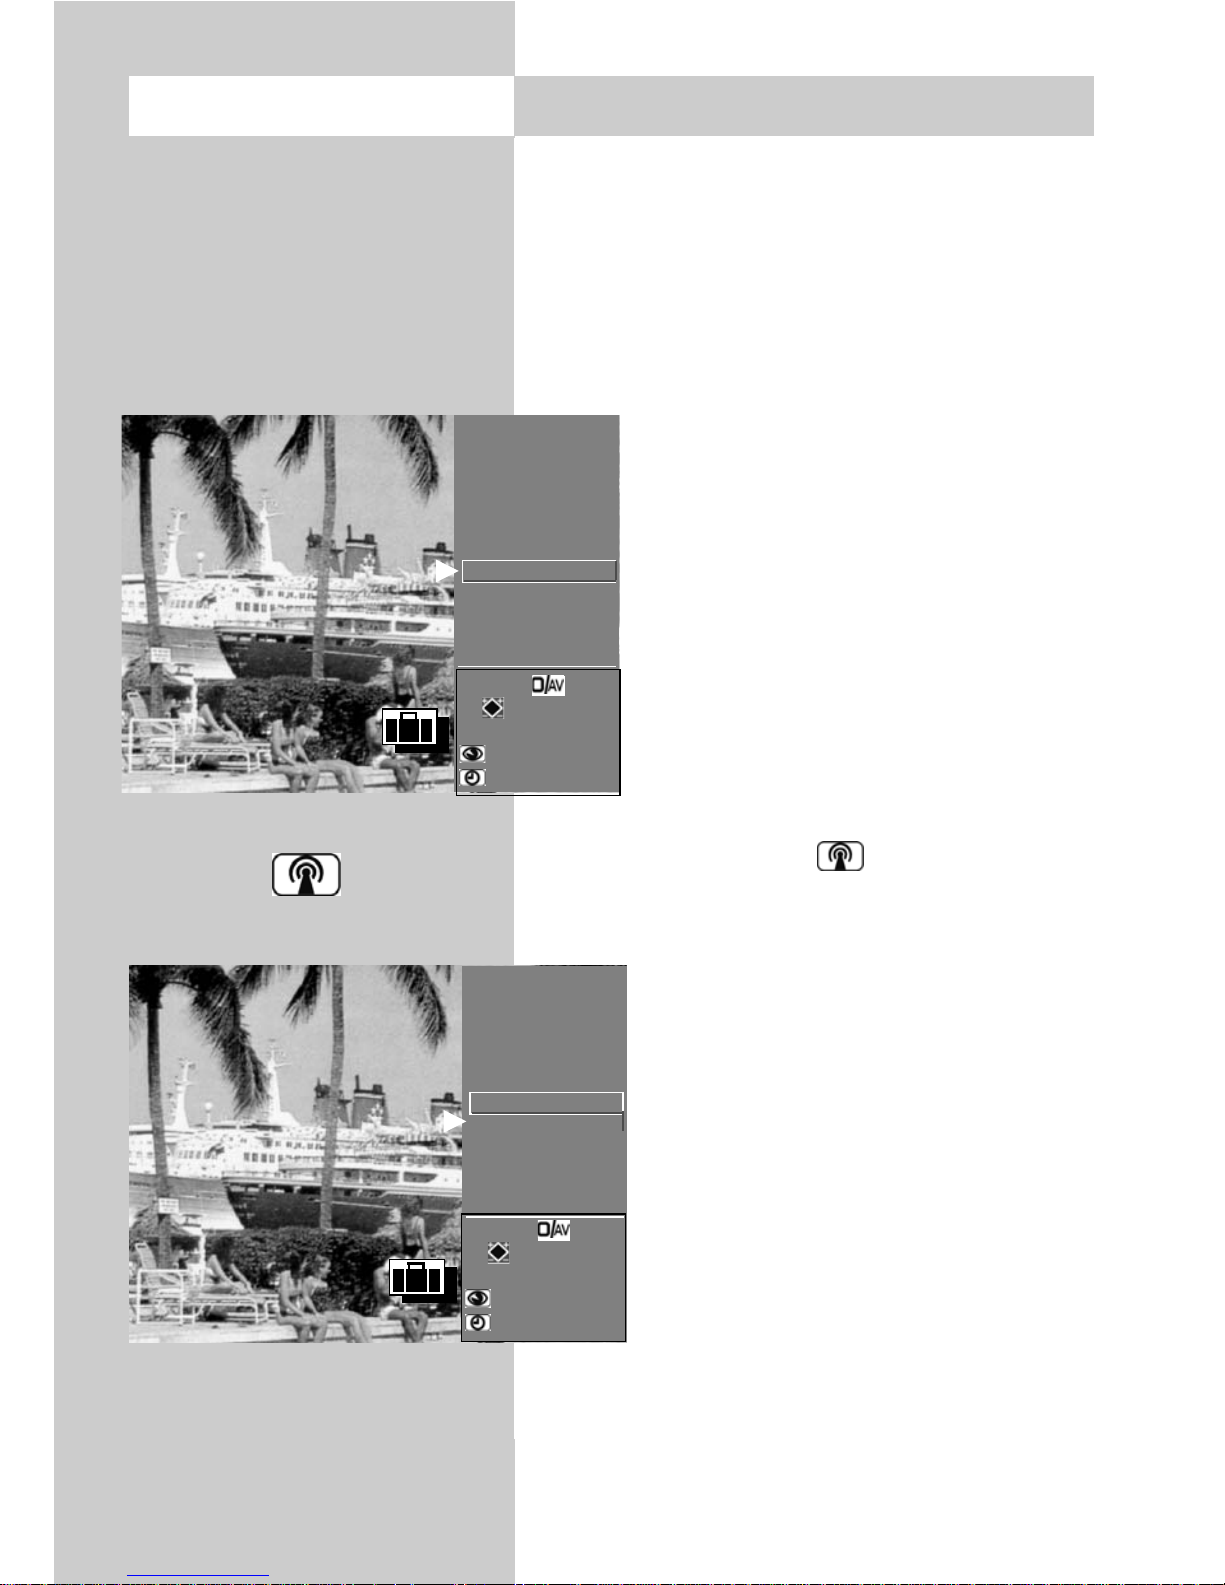
100
Various pay TV stations broadcast portal stations.
These portal stations are filled with sub-stations or
optional channels.
In station search (see ch. 21) in "Search settings"
the setting "all", "only free" or "free+CICAM"
must be set so that these stations can be found
too.
After a station search, the portal stations
and the accompanying optional channels (may also be identified in the station table as SID=xy) will be shown in
the station table on various program
places.
We have programmed a simple way for
you to find optional channels
quickly.
If you select a portal station via the station table (see p. 11), a suitcase symbol
appears next to the station logo.
This suitcase can be opened by pressing
the white button repeatedly. All
optional channels included in this suitcase then appear in the station table.
Other stations are not shown simultaneously.
In this way, you can switch quickly between the optional channels.
21.9 DVB Portal stationsOpening the menu
9 Nord 3
8 RTL
7 PRO 7
6 Nord 3
5 PRO 7
4 SAT1
3
Portalsender
2 ZDF
1 ARD
56 Hessen 3
55 SW-BW
54 N-TV
Select with
...9
or .
Confirm with OK.
show HD stations
Short info prog.
5 Optionskanal 4
4 Optionskanal 3
3 Optionskanal 2
2 Optionskanal 1
1 Portalsender
Select with
...9
or .
Confirm with OK.
show HD stations
Short info prog.
 Loading...