

Page 1

TV. VIDEO. AUDIO. MECABLITZ
Astral-MF 63 TG 63 - 100 MT
Spectral-MF 55 TG 68 - 100 MT
Nordkap-S 70 TG 73 - 100 MT
Stratos–SF 72 TG 85 - 100 MT
Linos-S 84 TG 87 - 100 MT
Operating instructions
Page 2

2
Contents
Remote control handset RB11 . . . . . . . . . . . . . . . . . . . . . . . . .3
1. Setting up and connecting . . . . . . . . . . . . . . . . . . . . . . . . . .4
1.1 Turning the TV on and off . . . . . . . . . . . . . . . . . . . . . . . . . . . .5
1.2 Language selection in the TV menu . . . . . . . . . . . . . . . . . . . . .5
2. Programme selection . . . . . . . . . . . . . . . . . . . . . . . . . . . . . .6
Programme position management . . . . . . . . . . . . . . . . . . . . . .6
Back to last programme . . . . . . . . . . . . . . . . . . . . . . . . . . . . .7
2.1 TV menu and operator help . . . . . . . . . . . . . . . . . . . . . . . . . . .7
3. Presetting TV stations . . . . . . . . . . . . . . . . . . . . . . . . . . . . . .8
Colour and transmission standards . . . . . . . . . . . . . . . . . . . . .8
Direct channel entry/station search . . . . . . . . . . . . . . . . . . . . .9
Autostore function . . . . . . . . . . . . . . . . . . . . . . . . . . . . . . . . .10
3.1 Sorting stations . . . . . . . . . . . . . . . . . . . . . . . . . . . . . . . . . . .11
3.2 Fine tuning . . . . . . . . . . . . . . . . . . . . . . . . . . . . . . . . . . . . . .12
3.3 Allocating a station logo . . . . . . . . . . . . . . . . . . . . . . . . . . . .13
4. Changing individual picture settings . . . . . . . . . . . . . . . . .14
4.1 Changing individual sound settings . . . . . . . . . . . . . . . . . . . .14
4.2 Adjusting the video and audio standard values . . . . . . . . . . .15
5. Equipment configuration . . . . . . . . . . . . . . . . . . . . . . . . . .16
Assigning the function keys . . . . . . . . . . . . . . . . . . . . . . . . . .16
Settings for programme change . . . . . . . . . . . . . . . . . . . . . .18
6. Volume adjustment and forced mono . . . . . . . . . . . . . . . .19
6.1 Correcting picture deviations . . . . . . . . . . . . . . . . . . . . . . . . .20
Noise reduction and CTI function . . . . . . . . . . . . . . . . . . . . . .20
7. AV recording . . . . . . . . . . . . . . . . . . . . . . . . . . . . . . . . . . . .22
Camcorder ➜ video recorder . . . . . . . . . . . . . . . . . . . . . . . .22
Video recorder ➜ video recorder . . . . . . . . . . . . . . . . . . . . . .23
8. Time settings . . . . . . . . . . . . . . . . . . . . . . . . . . . . . . . . . . . .24
Switch-on/off and reminder time . . . . . . . . . . . . . . . . . . . . . .25
8.1 Childlock . . . . . . . . . . . . . . . . . . . . . . . . . . . . . . . . . . . . . . . .26
Switching on . . . . . . . . . . . . . . . . . . . . . . . . . . . . . . . . . . . . .26
Permitted programmes . . . . . . . . . . . . . . . . . . . . . . . . . . . . .26
8.2 Recording with the timer . . . . . . . . . . . . . . . . . . . . . . . . . . . .28
9. Connecting headphones . . . . . . . . . . . . . . . . . . . . . . . . . . .29
Adjusting the headphones volume . . . . . . . . . . . . . . . . . . . . .29
10. Hi Text . . . . . . . . . . . . . . . . . . . . . . . . . . . . . . . . . . . . . . . . .30
Basic functions . . . . . . . . . . . . . . . . . . . . . . . . . . . . . . . . . . .30
Multiple pages . . . . . . . . . . . . . . . . . . . . . . . . . . . . . . . . . . .32
Page selection by cursor . . . . . . . . . . . . . . . . . . . . . . . . . . . .33
Direct page selection . . . . . . . . . . . . . . . . . . . . . . . . . . . . . . .33
Return to last index page . . . . . . . . . . . . . . . . . . . . . . . . . . . .33
Topical or news-flash pages . . . . . . . . . . . . . . . . . . . . . . . . .33
Doubling the font size . . . . . . . . . . . . . . . . . . . . . . . . . . . . . .34
Setting marks . . . . . . . . . . . . . . . . . . . . . . . . . . . . . . . . . . . .35
Infotext . . . . . . . . . . . . . . . . . . . . . . . . . . . . . . . . . . . . . . . . .37
Erasing marks . . . . . . . . . . . . . . . . . . . . . . . . . . . . . . . . . . . .38
Subtitles . . . . . . . . . . . . . . . . . . . . . . . . . . . . . . . . . . . . . . . .39
Riddle solutions key . . . . . . . . . . . . . . . . . . . . . . . . . . . . . . .39
11. Special picture effects . . . . . . . . . . . . . . . . . . . . . . . . . . . .40
Variable zoom . . . . . . . . . . . . . . . . . . . . . . . . . . . . . . . . . . . .40
Still picture . . . . . . . . . . . . . . . . . . . . . . . . . . . . . . . . . . . . . .41
12. Operation without remote control . . . . . . . . . . . . . . . . . . .41
13. Remote control handset for video recorders . . . . . . . . . . .42
14. Connecting peripheral equipment . . . . . . . . . . . . . . . . . . .43
Camcorder, videorecorder . . . . . . . . . . . . . . . . . . . . . . . . . . .43
Connecting peripheral equipment . . . . . . . . . . . . . . . . . . . . .43
Connecting external devices . . . . . . . . . . . . . . . . . . . . . . . . .44
Connecting video recorders . . . . . . . . . . . . . . . . . . . . . . . . . .45
Video recorders, video signal . . . . . . . . . . . . . . . . . . . . . . . . .46
Connecting a Pay-TV decoder (e.g. Premiere) . . . . . . . . . . . .47
Video signal for Pay-TV decoder . . . . . . . . . . . . . . . . . . . . . .48
15. Technical data . . . . . . . . . . . . . . . . . . . . . . . . . . . . . . . . . . .49
15.1 Upgrade kits . . . . . . . . . . . . . . . . . . . . . . . . . . . . . . . . . . . . .49
15.2 Guarantee . . . . . . . . . . . . . . . . . . . . . . . . . . . . . . . . . . . . . . .49
16. Glossary . . . . . . . . . . . . . . . . . . . . . . . . . . . . . . . . . . . . . . . .50
17. Data Logic . . . . . . . . . . . . . . . . . . . . . . . . . . . . . . . . . . . . . .51
Automatic transfer of station information . . . . . . . . . . . . . . . .51
18. Index . . . . . . . . . . . . . . . . . . . . . . . . . . . . . . . . . . . . . . . . . .52
Troubleshooting and care of the set . . . . . . . . . . . . . . . . . . .53
Hints for use of the Operating Instructions
Do not be put off by the size of the Operating Instructions. Initially, it is
sufficient to read the instructions in Sections 1.1, 2 and 4.
In order to familiarise yourself with the TV set and its many functions,
we recommend that you read the Operating Instructions step by step,
carrying out the described actions on your TV set as you do so.
This method, often called "learning by doing", is the easiest way
of learning how to execute the various functions.
Do not be afraid to change the settings in the various menus (the
TV menu, the TV station table, programming of the function keys,
etc.). If you make any changes to these settings, the TV set reacts immediately, but the changes are not yet stored. After each
change in a menu, a red box is displayed at the bottom right of
the screen, asking if you want to save the changes.
• If you want to save the changes, press the OK key to do so.
• If you are not sure, or if you do not want to save a changed setting, press the MENU key and then the TV key to exit from the
menu without saving the new settings.
We have made every effort to provide a detailed table of contents
and a comprehensive index to help you to find the information
you need. The Section "Glossary" contains explanations of
various technical terms used in the manual.
In the descriptions of the various functions, the left-hand column
shows which keys you must press in order to see the screen display given in the centre column. Do not press the keys too quickly. It may occur that the TV set will not recognise the next key you
press and may therefore not display the menu shown in the centre column but something completely different. The right-hand
column of the function description provides additional information which may be useful but is not absolutely necessary for execution of the function.
If you comply with these hints, you should have no problems in
the operation of your TV set.
Your Metz-Werke
Page 3
3
Batteries:
Insert the enclosed batteries in the remote
control, observing the symbols on the cover of
the battery compartment.
Remove exhausted batteries from the remote
control and return them to your dealer or to an
authorised battery collection point.
Nota:
For explanation of the video level for
the remote control of video recorders,
please refer to Section 13, page 42.
Do not point the remote control
unit into your eyes and press a
key on it !
Do not use rechargeable batteries
in the remote control unit.
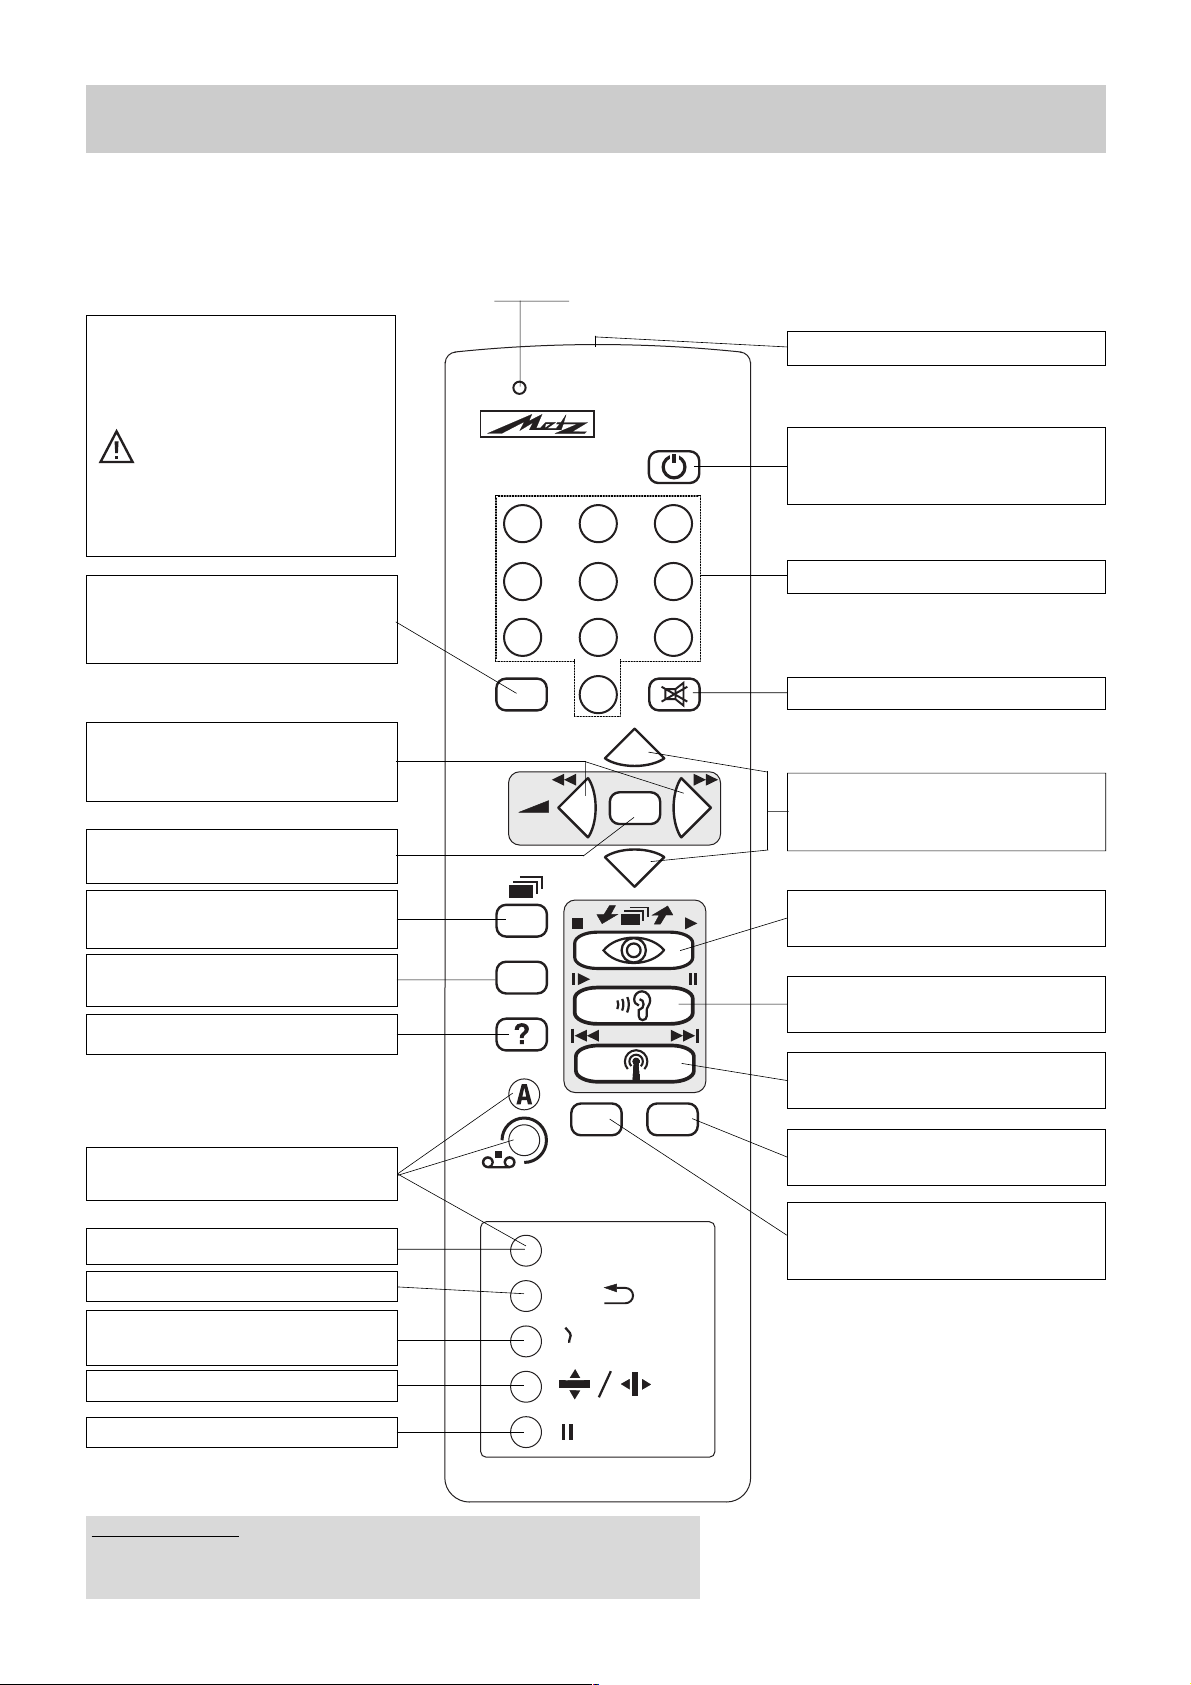
Remote control handset RB 11
• ON - Set switches to last viewed programme
• OFF (standby setting)
• Infrared window
• Switch between the TV and radio functions (radio only if a SAT upgrade kit
is installed)
•
Function keys, depending on
programming
(page 16)
•
Logo display (display of time, program-
me, and sound mode
• HiText- set or delete mark (pages 35/38)
•
AV recording (page 23)
•
HiText - skip to next mark (page 37)
•
Select sound function (page 14)
•
HiText - select chapter (page 30)
•
Call station table
•
HiText - next page (page 31)
•
Select picture function (page 14)
•
HiText - select subject (page 30)
• Change the setting
• HiText - select page of a multiple-
page subject (page 32)
•
Basic picture and sound settings (page 15)
• Hi-Text - display the page (page 33)
• Call TV menu (page 7)
Within a menu, move back one step
• Return to TV picture from menu or
from Hi Text
• Numeric keys
• Mute (page 14)
• Next programme (page 6)
• HiText - select page number from table
of contents with cursor (page 32)
• Operator Help
• Clear key in various menus
• Return to the last programme (page 7)
• Changeover from spoken to
music broadcasts
• C
hange of format (variable zoom
) (page 40)
• Still picture (page 41)
The remote control sends commands to the TV set with the aid of infrared light. For this reason, you should always point the remote control at
the TV set for reliable operation. Use of the remote control may interfere with the operation of other devices or systems controlled which use
infrared light (such as infrared headphones).
The television must be switched on or in standby mode (ON/OFF key depressed) when it is to be operated by remote control. Always point the
remote control in the direction of the TV for operation. A pilot lamp starts to flash as soon as a key on the remote control handset is pressed.
Disposal of batteries
Do not dispose of spent batteries with domestic rubbish.
Please return spent batteries to collecting points should they exist in your country !
100 H z
VTR
123
456
789
0
-/--
TIMER
P
+
-
OK
P
-
TV
RB11
+
MENU
AV
B
REC
C
PRG.
ɮ
IJ
Ȅ
IJ
Page 4
4
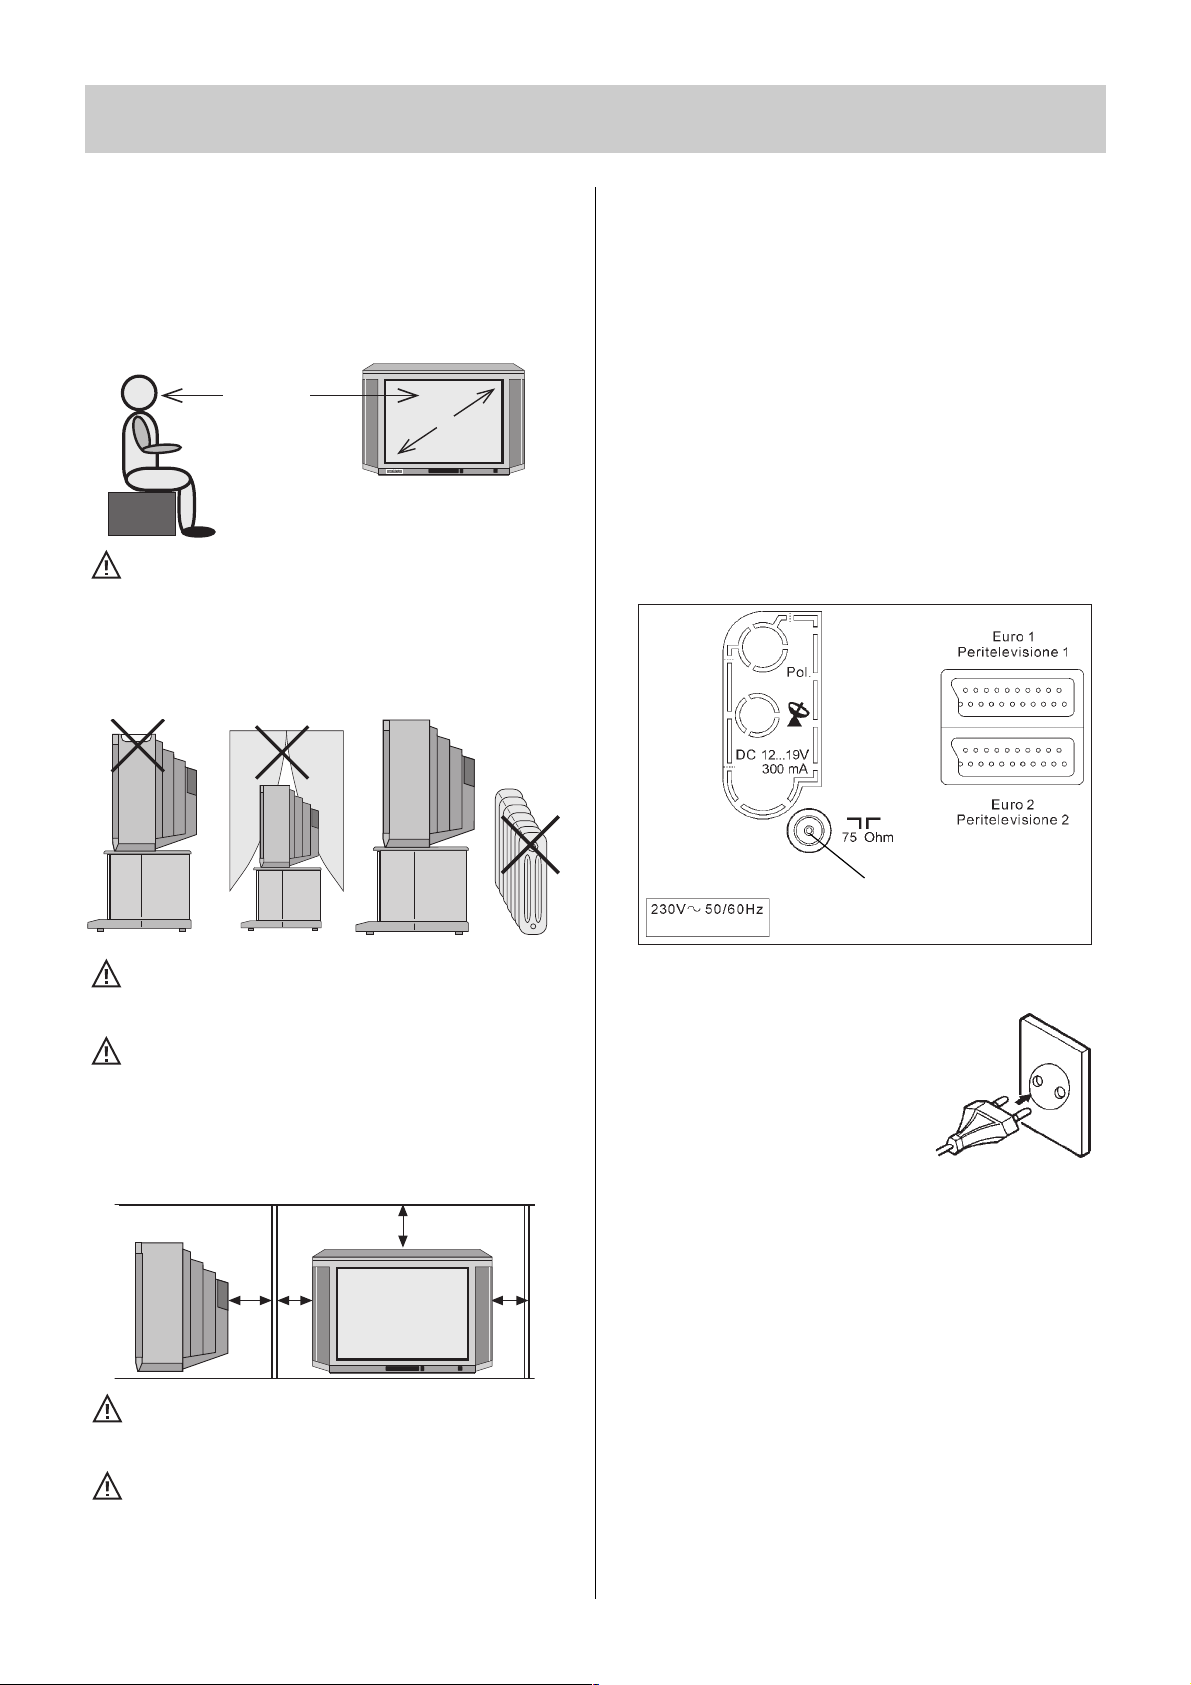
Connecting the aerial
Standard SAT and terrestrial station aerial sockets are fitted at
the rear of the TV.
Thunderstorms represent a danger for all electrical appliances! If
lightning strikes the power line or the aerial, the TV may be damaged even if it is switched off. Therefore, always unplug the mains
lead AND aerial during thunderstorms.
If the TV is not going to be used for an extended period of time, for
instance when on holiday, then disconnect the set both from the
mains and the aerial.
1. Setting up and connecting
Setting up
When selecting a suitable place for the TV, be sure that no bright
light or sunlight falls on the screen. Light may cause reflections
and impair the brilliance of the image.
The best viewing distance is five times the picture tube diagonal,
e.g. about 3.5 m for TV sets with a 70 cm screen.
TV sets require adequate ventilation. The ventilation
slots at the rear of the set should therefore never be
covered by curtains, doilies, newspapers or similar
objects. Likewise, all slots at the bottom of the set
must be freely accessible so that the intake of air is
not impaired in any way
Do not set up the TV near a radiator as this would
impair adequate cooling.
Do not place
-
burning candles or
- flower vases filled with water
on top of the TV set.
Hot wax and liquids destroy the electrical components
and jeopardize the electrical safety of the set
Mains voltage
Plug the mains lead into a wall
outlet. The TV set is equipped for
230 V ac (Australia 240 V ac).
If you place the set in a wall unit, leave sufficient space
on all sides so that the air can circulate freely.
Your TV set is intended for use in dry rooms. If you wish
to use it occasionally outdoors, be sure to protect it
against any kind of moisture (rain, splashes, dew, etc.).
Aerial connection
5x cm
cm
y
y
2EURO-600
Page 5
5
Turning on with the ON/OFF key
Before turning on a cold TV in a warm room, first
allow any condensation mist that may have formed
on the screen to evaporate.
Press the ON/OFF key.
Programme position 1 is then selected. Depending on the assign
ments made, the following information will appear in the screen
box:
The programme position is also shown on the permanent display.
Turning on with the remote control
The programmes can be directly selected with the 0-9 keys
when the television is in standby mode.
The last programme watched before the television was switched
off can be set with the key.
The television is automatically set to standby mode ten minutes
after station closedown. However, this is not the case if the
station starts to transmit a test card within these ten minutes.
Turning off with the remote control
Press the key to switch the TV to standby mode. The standby status is indicated by the red lamp.
Turning off with the ON/OFF key
Press the ON/OFF key. The television is now disconnected from
the mains. You are advised to turn off the TV with the ON/OFF
key after station closedown and when it is not going to be used
for an extended period of time.
1.1 Turning the TV on and off
ARD
Pr 1 MONO
18:15:33
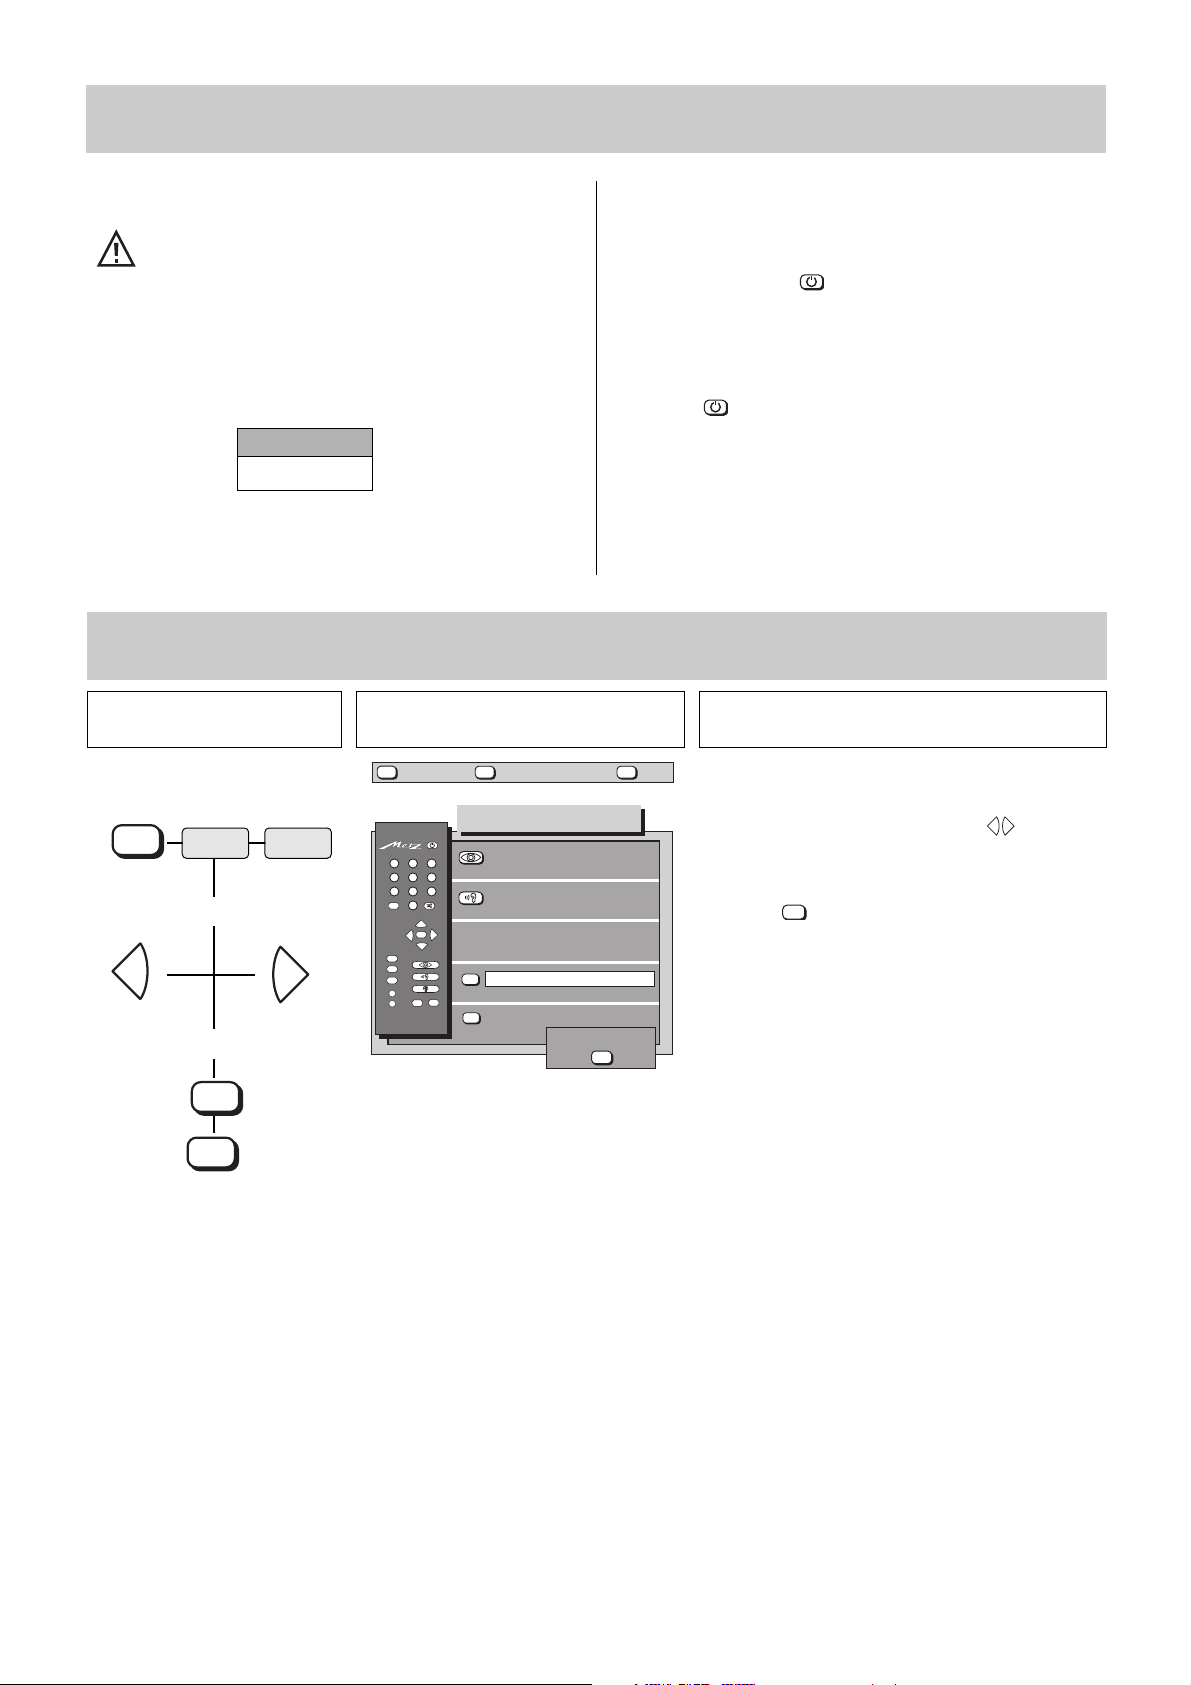
Press this key on the remote
control....
The screen displays Explanation
1. Call the Equipm.
Configuration menu
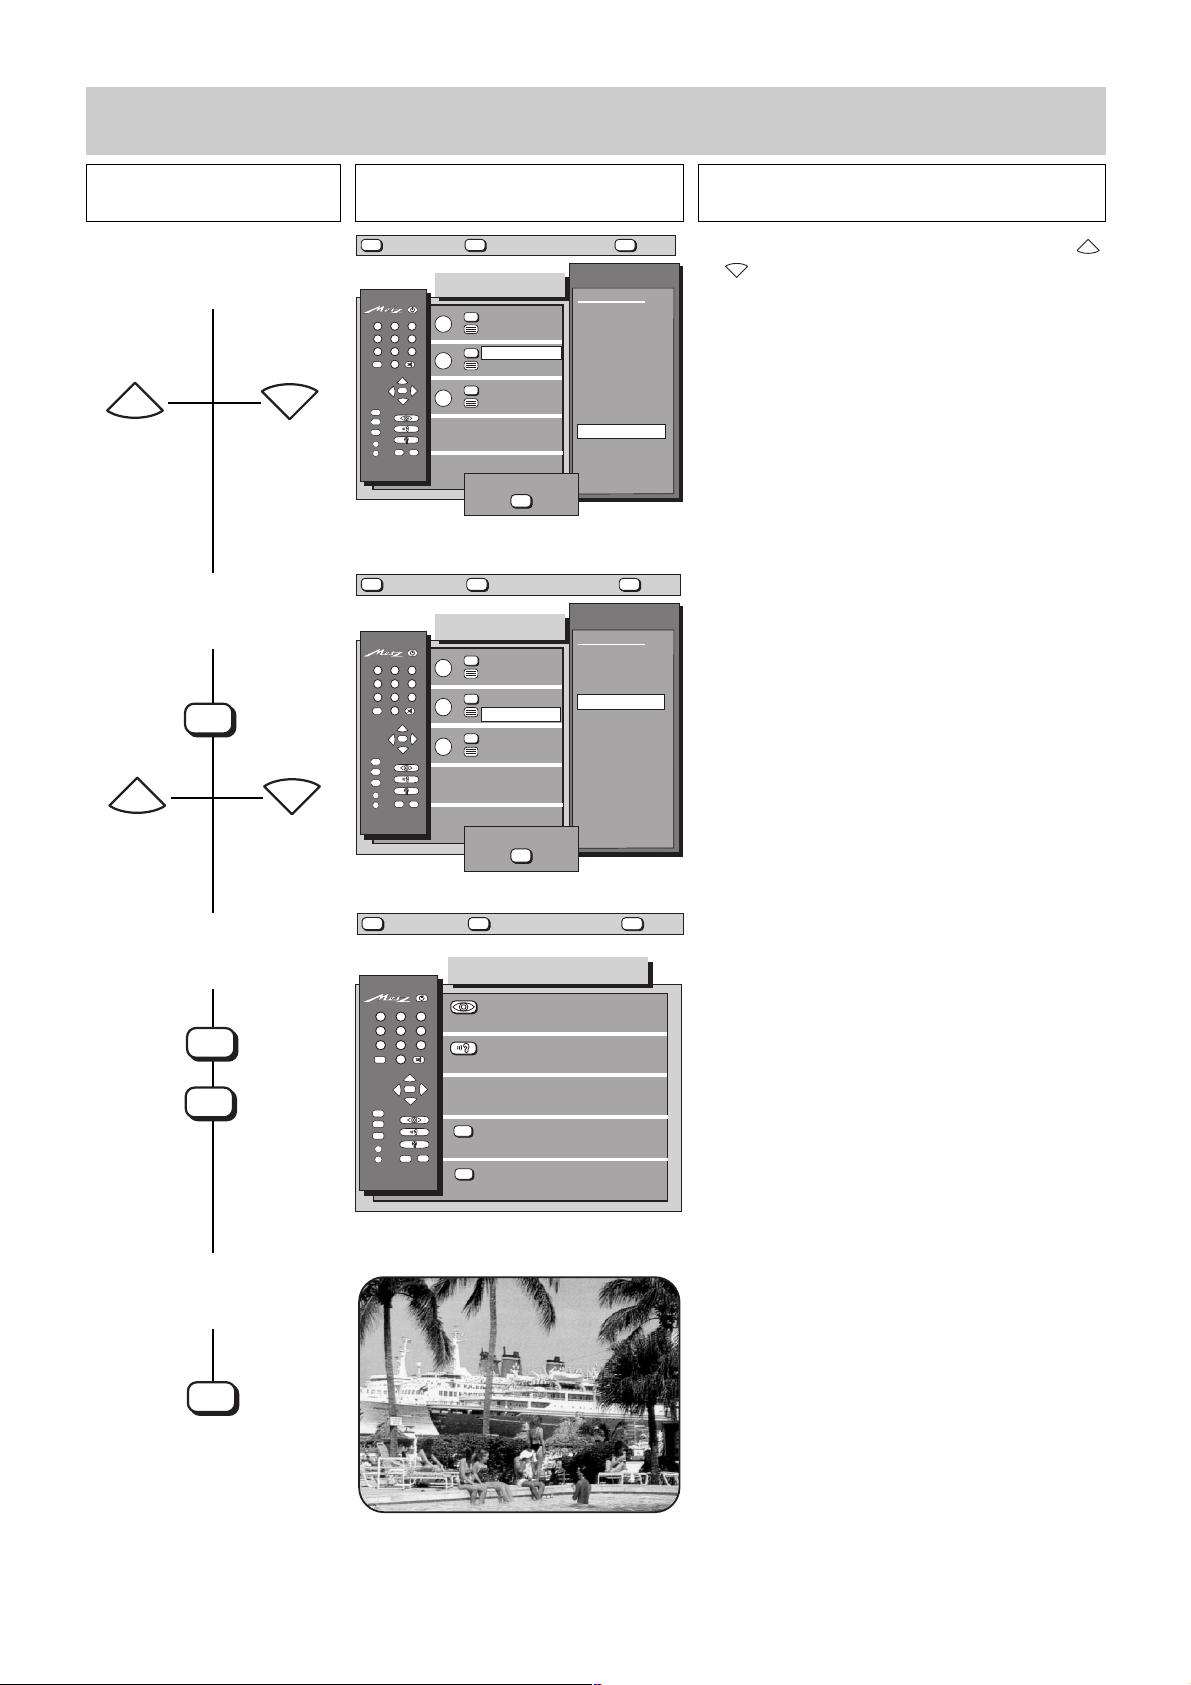
1.2 The TV menu
The desired language for the entire TV menu is
adjusted in the „Equipm.Configuration“ menu.
Select the desired language with the keys when
the submenu for the language is displayed on a green
background.
Press the key to confirm and store the selection
made. The complete text in the TV menu is then
displayed in the selected language.
2. Adjust the language
3. Store the selected langua
ge
TV picture
red
green
MENU
-
+
MENU
return Help
TV
picture
Equipm. configuration
123
456
789
--/-
0
P
+
+
-
OK
P
-
TV
MENU
?
A
AV
B
696+05A-GB
Function keys
Device connection
SAT settings
Language: English
AV
further
store ?
?
+
-
OK
English
OK
OK
TV
Page 6

6
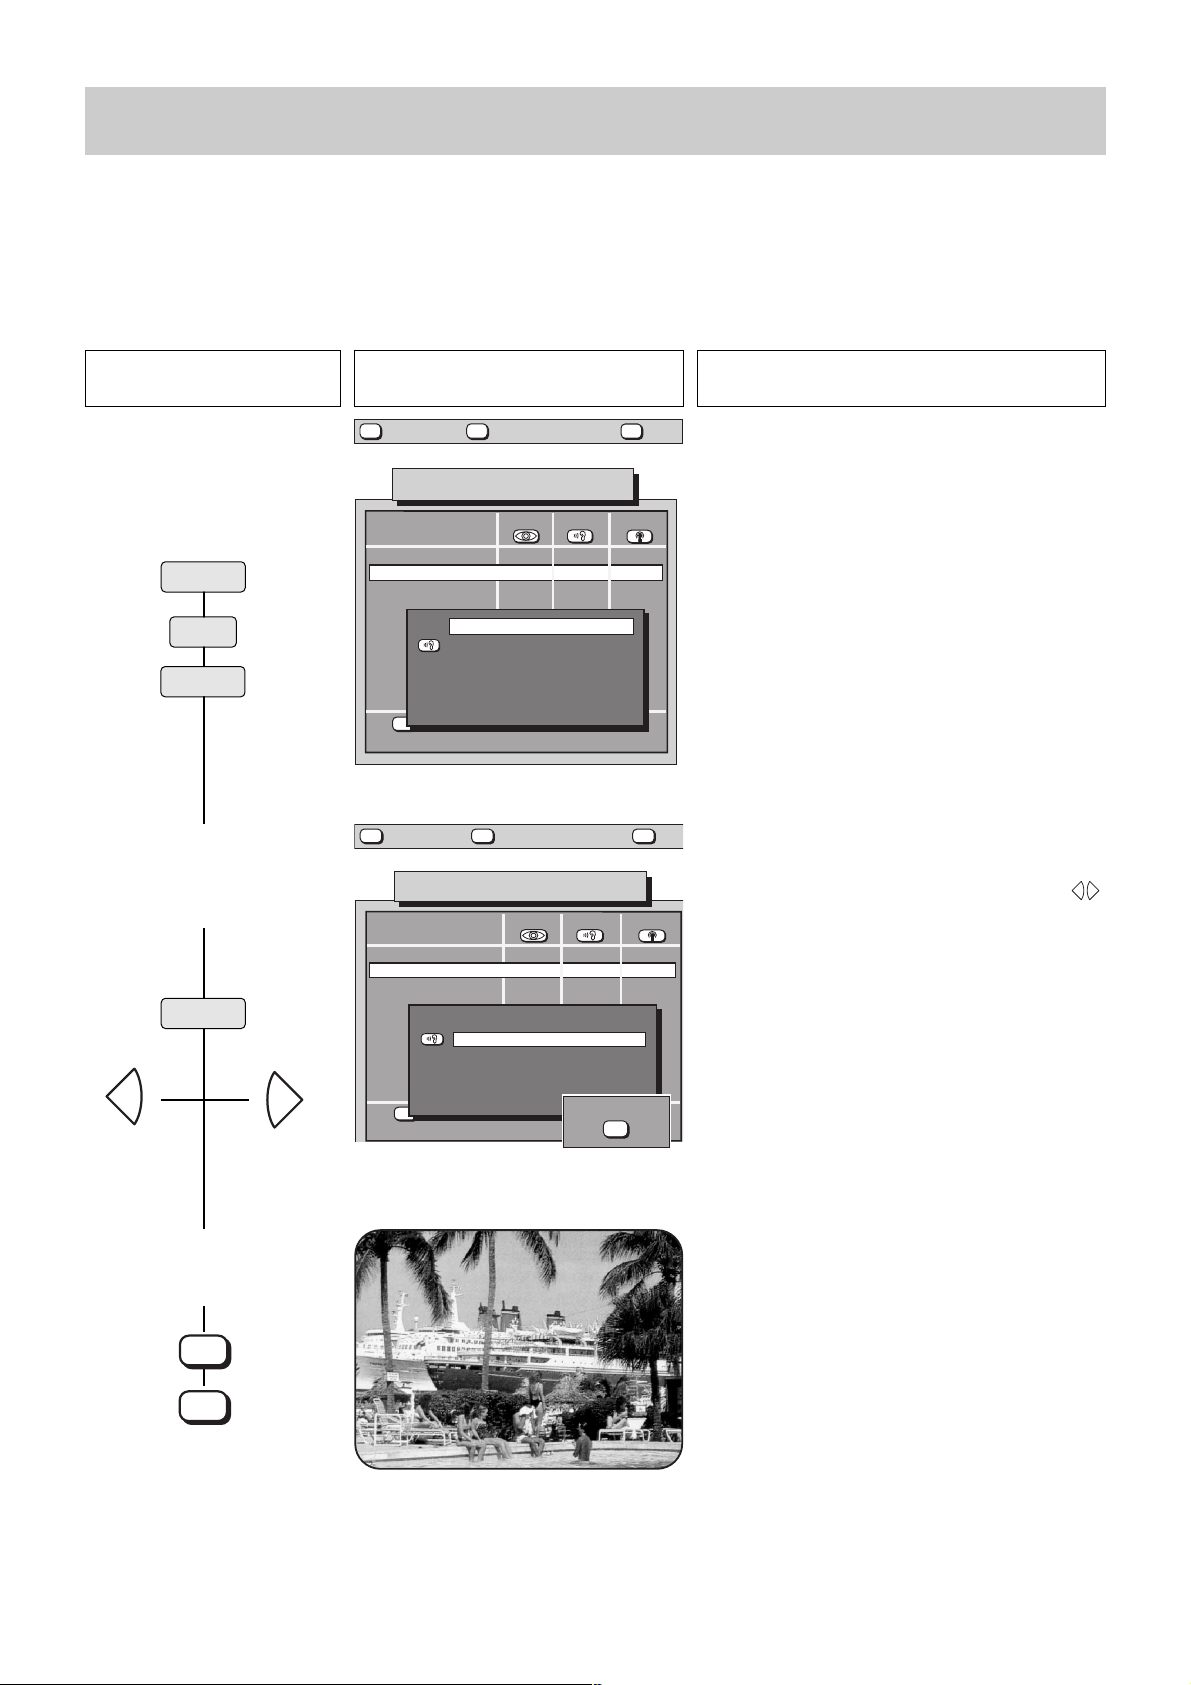
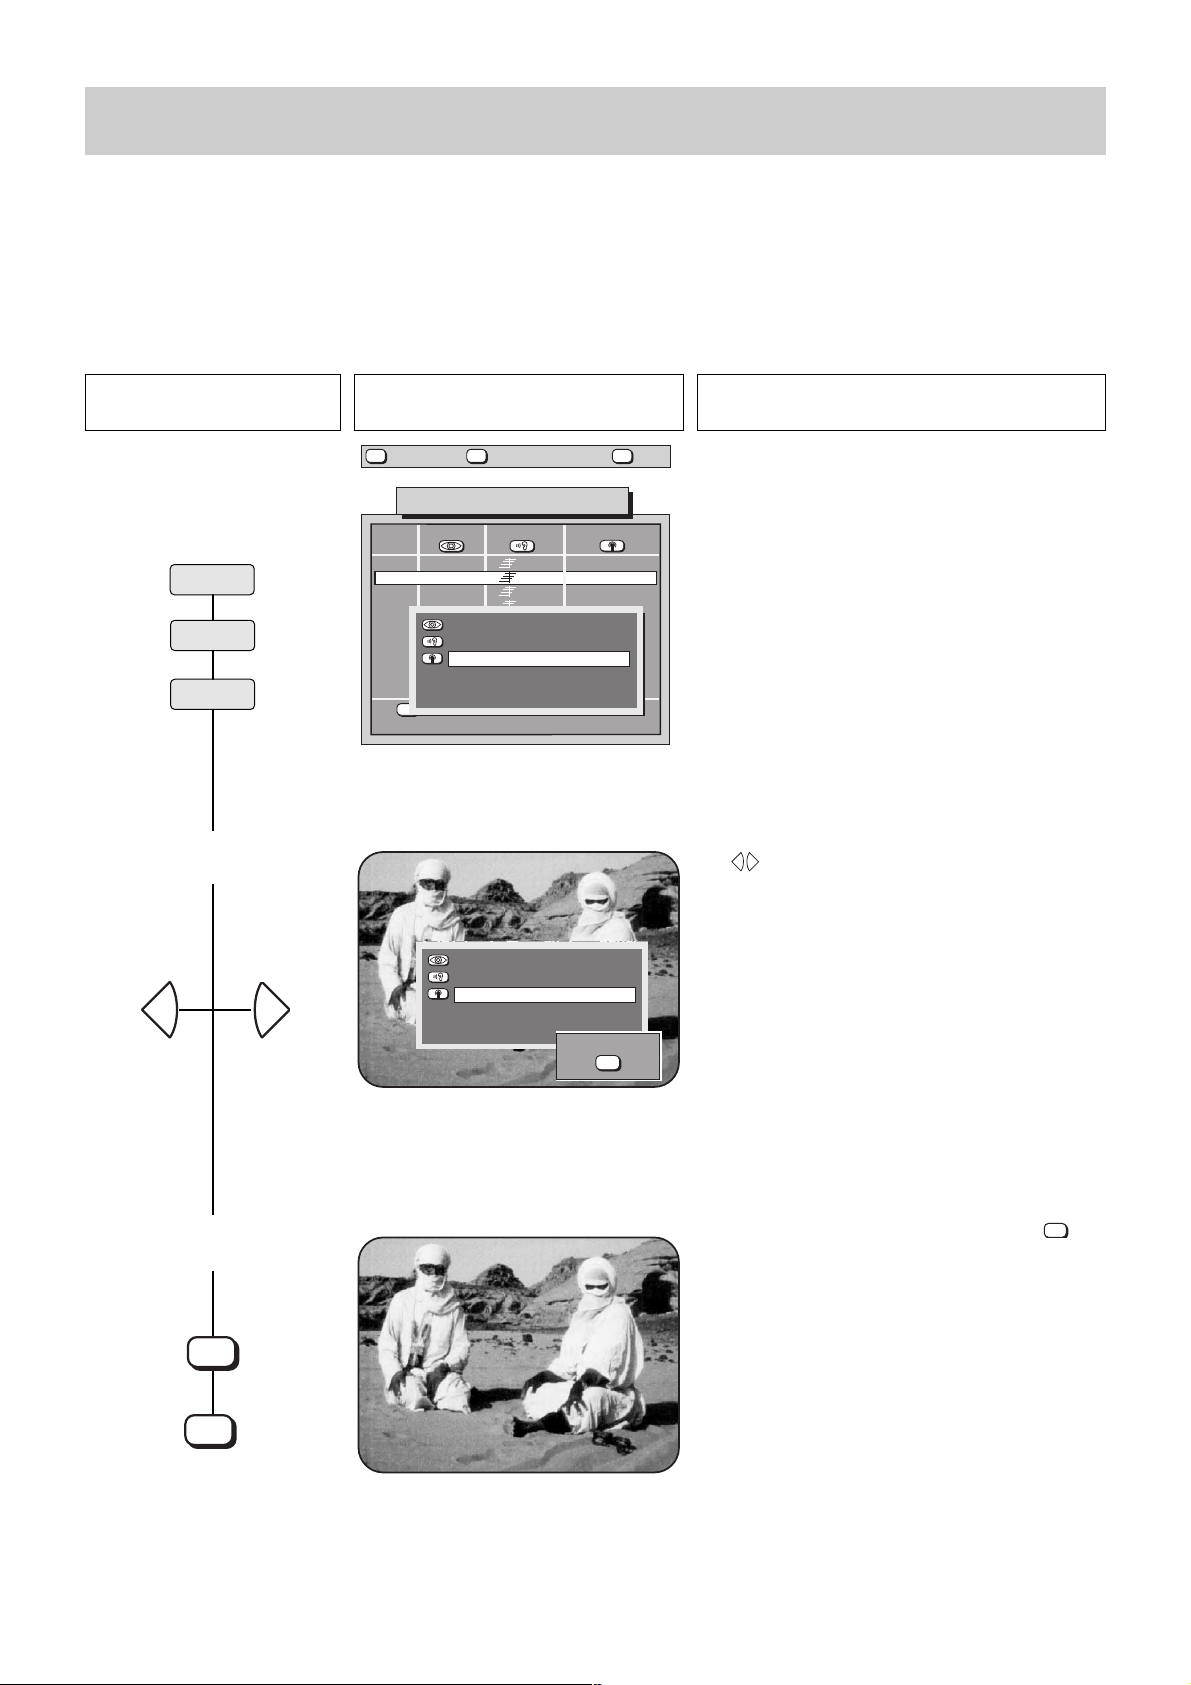
2. Programme selection
1. Select programme position
2 (only the first 9 programme
positions in the station table
are occupied)
4. Next programme
You can step sequentially through the programme
positions with the keys. If either of these keys
is held down for more than two seconds, a programme
box for selection of the desired programme is displayed
on the screen. Release the or key as soon as
the desired logo is highlighted in white: this programme
position will then be selected.
2
2
5
This TV set can manage up to 225 TV programme positions. If you are connected to a cable network or use a terrestrial aerial, you will not need all
of these positions at the moment. If, however, you have a SAT upgrade kit installed, the number of programmes can increase drastically. We do not
know how many programmes will be available in the future. For this reason, we have provided plenty of programme positions in reserve. For
selection of the desired programme position, we have invented a simple input method which saves you having to enter three digits for each position.
The first digit you enter is normally the hundreds digit. If, however, you have less than 100 programmes stored, this digit automatically moves to the tens position. If you have less than ten programmes stored, it moves to the units position.
Example: you have stored programmes in positions 1 to 35 and you want to select position 3. Press the keys and or
simply and
confirm with . Programme position 4 can be selected by simply entering , since there are no programme positions higher than 39.
Further examples are shown in the following text.
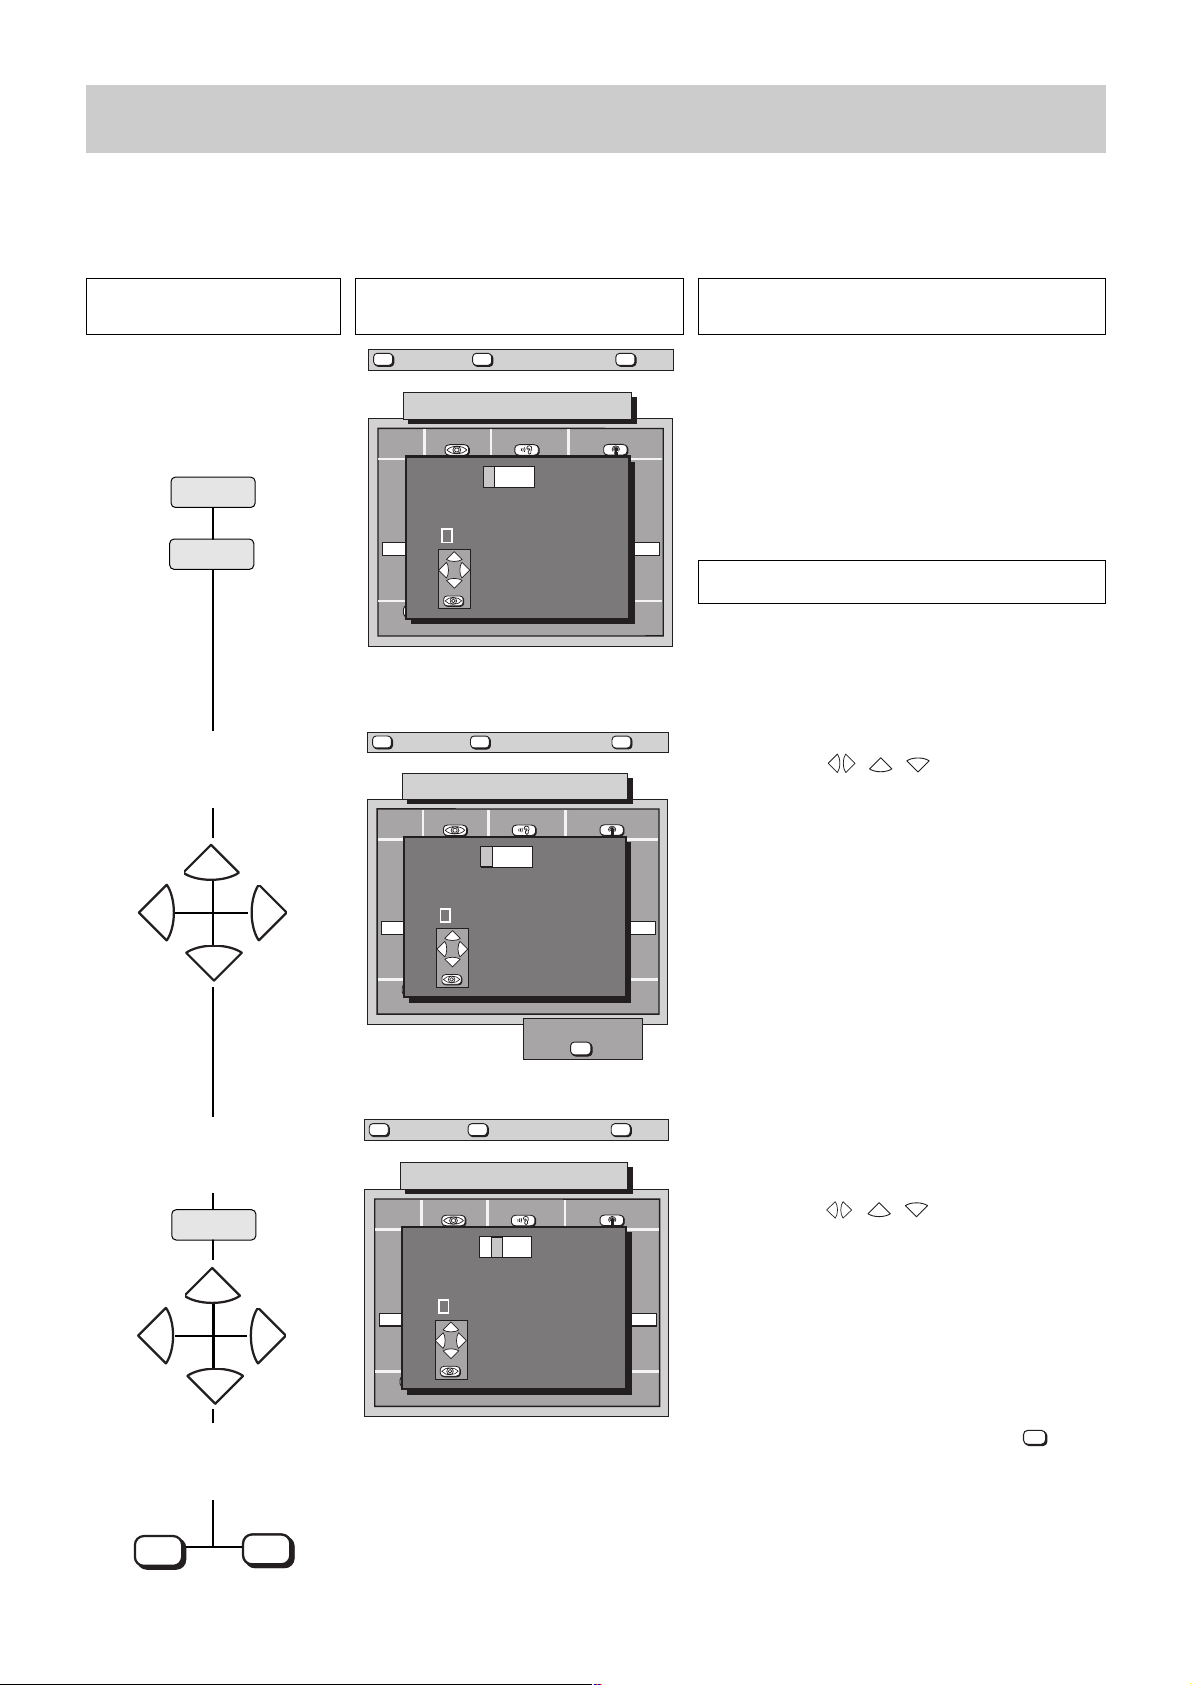
2. Select programme position
25 (only the first 99 programme positions in the
station table are occupied)
Only the programme positions 0-99 in the station table
may be occupied if a programme is to be selected by
pressing two numeric keys.
After a programme has been selected successfully, a box
containing the programme position number, the time and the
current sound mode (e.g. stereo) is displayed on the screen.
To select a programme position with only a single-digit
number, you must enter before the related digit,
e.g. and ; alternatively, you can press and
then press .
S-RTL
Pr 25 MONO
18:15:48
1 0
1
3. Select programme position
101 (more than 100 programme positions in the
station table are occupied)
In this case, more than 100 programme positions in
the station table are occupied, which means that you
have to press three numeric keys.
After a programme has been selected successfully, a box
containing the programme position number, the time and the
current sound mode (e.g. stereo) is displayed on the screen.
To select a programme positions with a single-digit or
two-digit number, you must enter before the
related digit(s), e.g.
and ; alternatively, you
can press and then press .
Nord3
Pr 101 MONO
18:15:48
Bayern 3
Pr 3 MONO
18:15:48
ZDF
Pr 2 MONO
18:15:33
Programme position
management
Only the programme positions 0-9 in the station table
may be occupied if a programme is to be selected by
pressing one numeric key.
Pressing the numeric key opens a time-delay window* which waits for 3 seconds for the input of
further digits. If no further
numeric key is pressed,
the TV set switches to the programme
position
selected with the first digit.
* The operating mode of this time delay window can
be changed: see page 18, item 5, „PC time out“.
Press this key on the remote
control....
The screen displays Explanation
OK
OK
P
+
P
-
ZDF
BR3
RTL
SAT1
RTL2
PRO7
EUSPO
NTV
NORD3
MDR3
SWF3
OK
P
-
P
+
P
-
P
+
Page 7
7
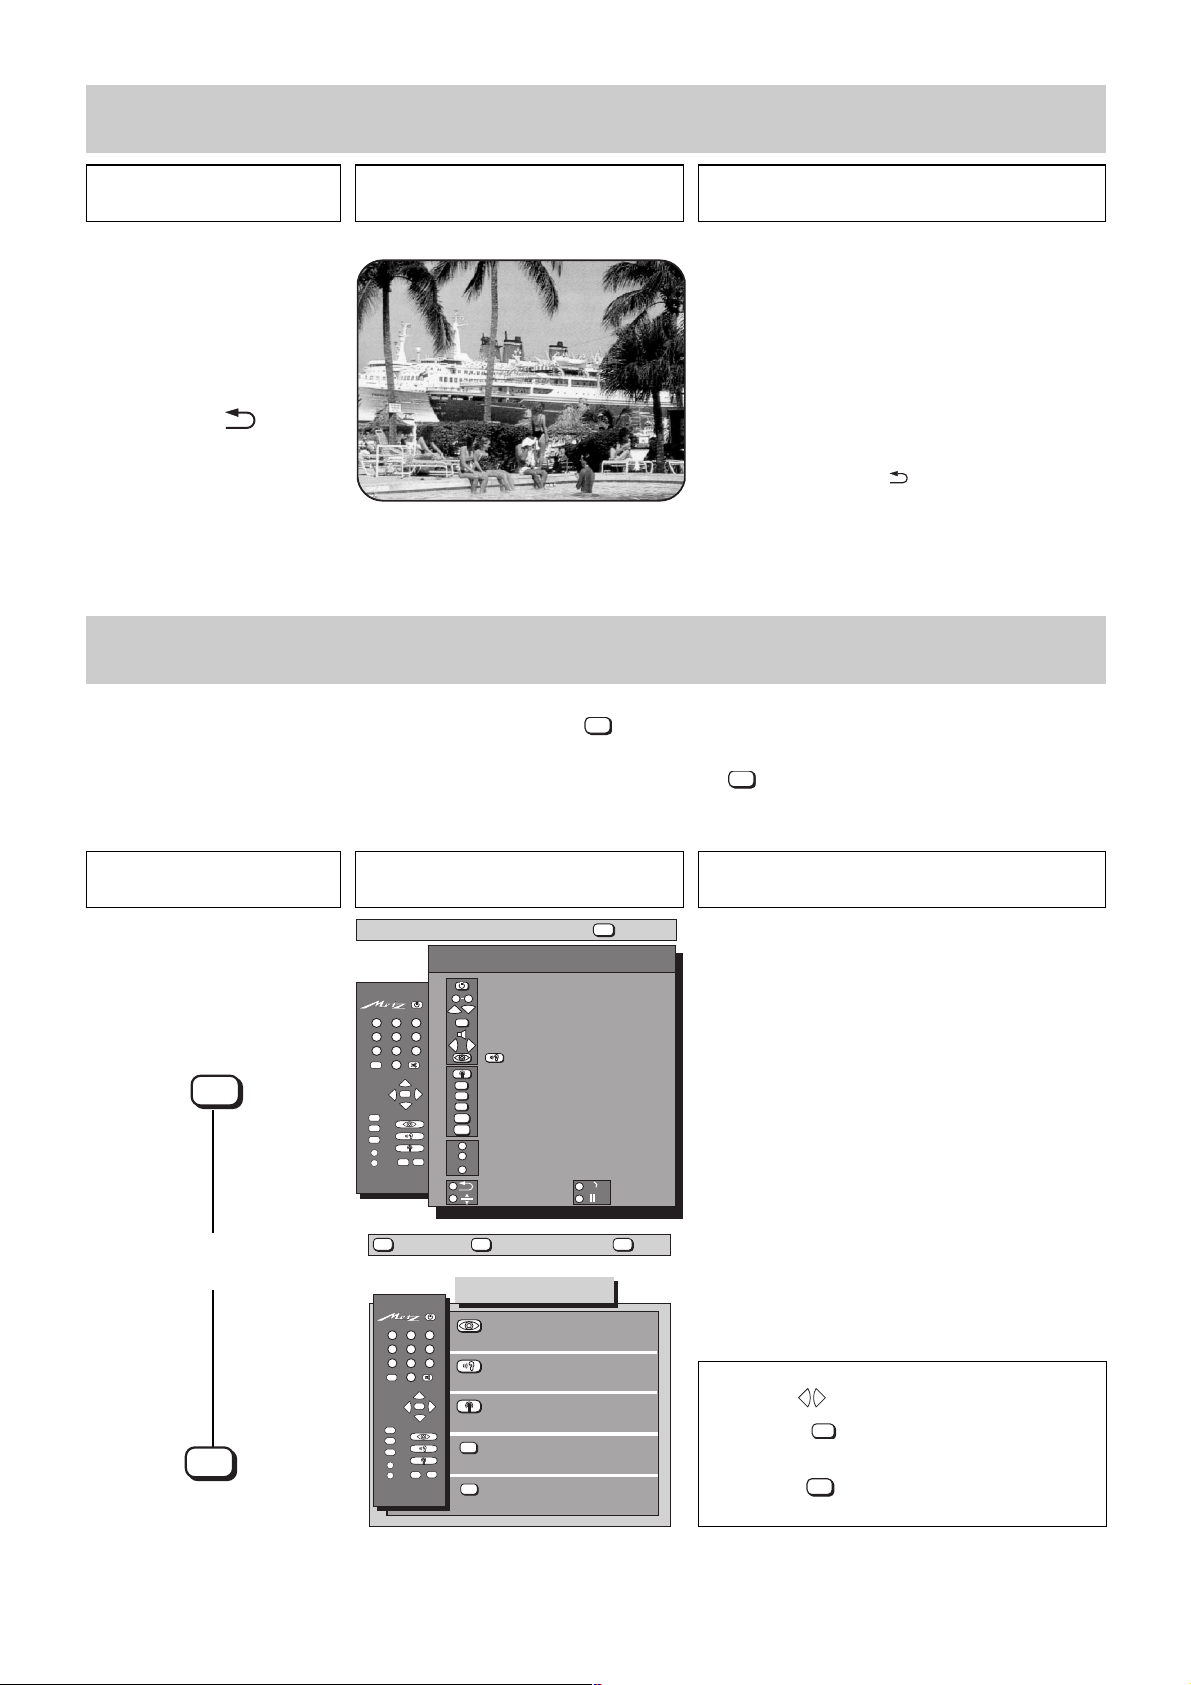
2. Programme selection
Press this key on the remote
control....
The screen displays Explanation
Press this key on the remote
control....
The screen displays Explanation
2.1 TV menu and operator help
Operator Help: Call/exit
TV menu: Call/exit
Operator Help shows the functions of the individual
keys when in TV mode.
The A, B, and C function keys can be programmed by
the user. Consequently their functions can differ to
those shown in the adjoining picture.
Operator Help can be called for each menu displayed
on the screen. (Example: Operator Help with displayed
TV menu).
The individual menu lines are selected with the coloured
keys of the remote control, to open the corresponding
submenu. Keys not enhanced in white or colour on the
displayed menu have no function in the current
operating state.
Menu control of the TV, and the versatility of the system, ensure that supposed complicated settings and entries are made easily and clearly
comprehensible for everyone. Operator Help can be called with the key when in TV mode. Operator Help indicates the functions of the
individual keys.
All settings are entered by way of different submenus. Simply call Operator Help with the key should you encounter difficulties in entering
the different equipment configurations or if problems arise in operating the TV. Operator Help is specifically matched to the corresponding
menu
and functions as a reminder when settings are entered or programmed.
Settings in the submenus can be changed
with the keys.
Press the key to confirm and store the
new setting.
Press the key to move back by one step
within the TV menu.
With this key, you can switch back and forth between
the last two programme positions you selected.
Example:
You are watching a programme on ITN; during the
commercials, you switch to BBC with the aid of the
numeric keys
. .
You can now switch back and forth between ITN and
BBC by pressing the key.
Last programme
PRG.
PRG.
?
?
?
MENU
Operator help
Switch set on/off
Prog select
90
P
-
P
Next programme
+
Basic video/audio settings
123
456
789
--/-
0
-
TV
MENU
?
A
B
600+Help-GB
MENU
OK
Sound interrupt
-
+
Change vol./adj. function
/
Sel.video/audio funct.
P
+
+
OK
P
-
AV
return Help
Station table
AV
AV recording
Logo
TV
Teletext/TV picture
MENU
TV-menu
Operator help : ON / OFF
?
A
Muting -12dB
B
sound effects
C
Infotext
Last program
Var. format
IJ
TV
picture
TV-menu
123
456
789
--/-
0
P
+
-
OK
P
-
TV
MENU
?
A
B
696+02-GB
+
AV
Video standard values
Audio standard values
Station settings
AV
Timer/childlock
Equipm. configuration
?
ɮ
return
Spch/mus.
Still
?
+
-
OK
MENU
Page 8
8
3. Presetting TV stations
In the sub-menu Standard, you can select the colour and/or the transmission standard. The TV set normally recognises the colour standards (PAL, SECAM, NTSC) automatically, but the transmission standard must always be set manually. The multi-standard upgrade kit is
required for the additional transmission standards L, I, D/K and NTSC 4.43. In exceptional cases, the colour standard may not be recognised; if this happens, you must set it as described below.
Example:
The colour standard „NTSC“ is to be set.
Press this key on the remote
control....
The screen displays Explanation
The automatic function of the submenu „Standard“ is
preset in the factory.
The settings PAL, SECAM and NTSC need to be selecte
d
manually only if the automatic detection function does
not recognize the colour standard correctly.
☞ The transmission standard must always be set
manually.
The various standards can be selected with the
keys.
In this example, the transmission standard NTSC is
selected.
The multi-standard upgrade kit 031 NC 1030 (optional
extra) is required for the reception of the transmission
standards L, I, D/K and NTSC 3,58.
Colour and transmission
standards
1. Call submenu „Standard“
2. Select the transmission
standard or colour standard
(e.g. standard I)
3. Store the settings and
return to the TV picture
red
yellow
white
white
-
+
MENU
return Help
TV
picture
TV station table
Programme StdPict.
▲▼
0
VTR1
1
ARD
2
ZDF
3
SAT 1
4
5
6
7
8
9
600+03K-GB
MENU
return Hel
Standard B/G
Colour standard Automatic
<< weitere Einstellungen
Logo, Channel, Signal
TV
—
—
—
—
picture
Sound
—
—
—
—
TV station table
Programme StdPict.
▲▼
0
VTR1
1
ARD
2
ZDF
3
SAT 1
4
5
6
7
8
9
Standard B/G
Colour standard NTSC
<< weitere Einstellungen
Logo, Channel, Signal
Sound
—
—
—
—
—
—
—
—
store ?
OK
?
Auto.
Auto.
Auto.
Auto.
Auto.
Auto.
Auto.
Auto.
Auto.
Auto.
?
Auto.
Auto.
Auto.
Auto.
Auto.
Auto.
Auto.
Auto.
Auto.
Auto.
+
-
OK
TV
Page 9
9
Press this key on the remote
control....
The screen displays Explanation
4. Store the setting and return
to TV picture
TV picture
3. Presetting TV stations
Direct channel entry/
station search
When the TV set leaves the factory, there are no stations programmed. Depending on where you live, the stations have different channel
numbers. There are three possible ways of programming the stations:
a) Direct channel input b) Station search c) the Autostore function
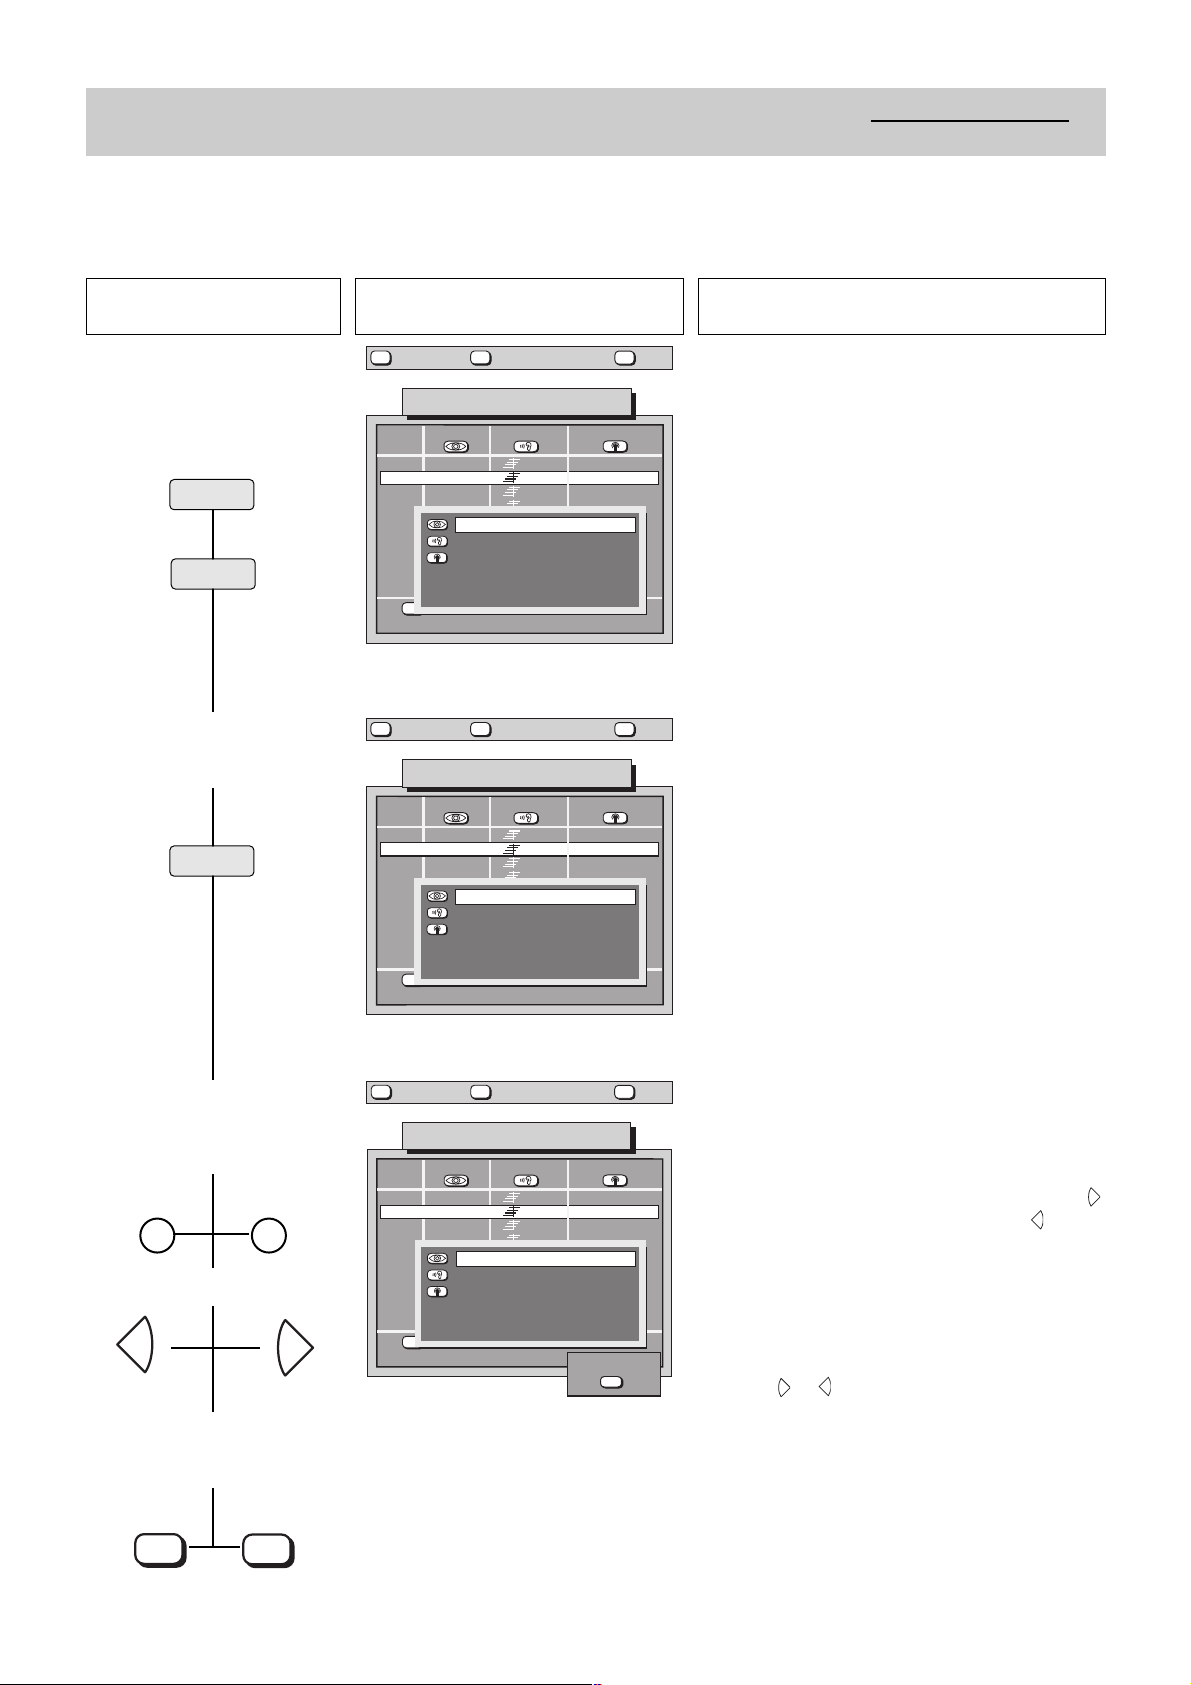
1. Call the station table and
channel type survey
2. Select the type of channel
(e.g. standard channel)
3. Enter the channel number
(Example: Standard channel
06) or start station search
With direct channel entry it is necessary to know the
type of channel and the channel number.
If type and number of channel are not known, you can
scan through the entire reception range with the
search function to locate stations.
The station table lists all the preset stations.
These stations can be changed at any time.
The cursor always highlights the type of channel
currently preset in the given programme position.
For the search function it is advisable to switch to a
vacant programme position.
Two types of channels are offered in the box with the
yellow frame. Select the desired channel type with the
related coloured keys.
Once the channel type has been selected, a channel
number is displayed for the highlighted item if a station
is stored in this programme position. If no station is
stored, two dashes are displayed.
„SAT freq.“ and „Aerial control“ can be selected only if
a SAT upgrade kit is installed in the TV set.
With direct channel entry, the station table is briefly
faded out when the channel number is entered, and
the selected station is displayed.
The station search proceeds from the displayed
channel number in a forward sequence with the
key, and in a reverse sequence with the key.
Search proceeds from the lower channel area
upwards or downwards when two lines are displayed.
The search stops when a station has been found.
Proceed as described in step 4 if the located station is
to be stored.
Press the or key if the located station is not to be
stored so that the search can be continued.
Complete fine tuning if station reception is not clear
(see Section 3.2).
-
6
0
or
yellow
blue
white
MENU
return Help
TV
picture
TV station table
Prog Logo
▲▼
LOGIC
0
ARD
1
ZDF
2
SAT 1
3
4
5
6
7
8
9
696+03A-GB
MENU
return Help
Chan./Freq
Std channel 06 ARD
Spec. channel
Fine tuning
SAT-Frequ.
Aerial control
>> weitere Einstellungen
Std, Pict., Sound
TV
picture
.
00
06
34
40
Signal
Video Rec.1
Aerial
Aerial
Aerial
TV station table
Prog Logo
▲▼
LOGIC
0
ARD
1
ZDF
2
SAT 1
3
4
5
6
7
8
9
>> weitere Einstellungen
696+03A-GB
Std, Pict., Sound
Chan./Freq
Std channel 06 ARD
Spec. channel
Fine tuning
SAT-Frequ.
Aerial control
.
00
06
34
40
Signal
Video Rec.1
Aerial
Aerial
Aerial
?
?
-
+
MENU
return Help
TV
picture
TV station table
Prog Logo Signal
▲▼
LOGIC
0
ARD
1
ZDF
2
SAT 1
3
4
5
6
7
8
9
696+03A-S-GB
Chan./Freq
Std channel 06 ARD
Spec. channel
Fine tuning
SAT-Frequ.
Aerial control
>> weitere Einstellungen
Std, Pict., Sound
.
00
06
34
40
?
Video Rec.1
Aerial
Aerial
Aerial
store ?
OK
-
+
+
OK
TV
Page 10
10
3. Presetting TV stations
Autostore function,
sorted to countries
The autostore function automatically scans through the entire reception range to locate stations. The located stations are presented in
the station table and can then be stored by way of the key.
If you do not like the order in which the stations appear in the station table, you can sort the stations to match your own requirements as
described on the next page.
Press this key on the remote
control....
The screen displays Explanation
1. Call the menu
„Station settings“
2. Call and start the autostore
function
3. Edit and store the station list
➞ VTR
Press the yellow key to call the autostore function.
The coloured keys can now be used to select the
country so that the stations which are detected are
stored in a logical order for this country.
Press the key to start the station search. The TV
set now scans through the entire reception range.
This function can be cancelled by pressing the
key.
0
1 2 3
4 5 6
7 8 9
When all available stations have been found, a station
list is displayed on the screen.
The channel number and an automatic logo are displayed. The auto logo only appears for stations which
transmit a VPS signal.
You can now delete stations which are not wanted, or
which are received only poorly, by pressing the blue
key.
Enter the number of the programme position at which
storage of the detected stations is to start.
Now proceed as described in Section 3.1 Sorting
station.
yellow
blue
white
OK
MENU
OK
MENU
return Help
TV
picture
Station settings
123
456
789
--/-
0
P
+
+
-
OK
P
-
TV
MENU
?
A
AV
B
600+03B-GB
MENU
return Help
Station table
Autostore
SAT programming
AV
Station table
TV
picture
Autostore
sort for
Germany
Austria
Switzerland
AV
others
Channel
Signal
Programme
?
?
OK
TV
OK
696+03C1-GB
MENU
return
TV
picture
Autostore
Programme Channel
ARD
ZDF
SAT 1
BR 3
WDR 3
MDR
PRO 7
RTL
ARD delete
696+03D1-GB
18 stations
from nr. of progr. 0 0 1
06
34
40
59
25
05
21
40
start ?
OK
?
Signal
Aerial
Aerial
Aerial
Aerial
Aerial
Aerial
Aerial
Aerial
Help
Page 11
11
3.1 Sorting stations
In the „Sort“ submenu you can move, exchange, copy, or delete the stationss stored in the programme positions. The „Sort“ submenu is
displayed automatically after the autostore function has found all available stations.
This menu can also be called at any time from the station table display for subsequent modification of the station programming.
Press this key on the remote
control....
The screen displays Explanation
1. Call the „Sort“ submenu
and move the station
2. Exchanging two programme
positions
3. Store the settings
4. Return to TV picture
When the „Sort“ submenu is displayed, the function
„Move“ is preset. The station displayed for the
currently selected programme position can be stored
or moved to any other programme position.
For a move, exchange or copy operation, the threedigit number of the destination programme position
must be entered with the numeric keys. The blinking
hyphen on the right of the sub-menu is the prompt for
input of a programme position number.
If you inadvertently delete a station you wanted to
keep, you can restore it with the B key.
An incorrectly entered programme position number
can be deleted with the C key.
You can swap the contents of two programme positions
by pressing the yellow key and entering the digits.
After the contents of a programme position have been
moved, exchanged, copied or deleted, a red store box is
displayed to ask if you want to store the new settings.
Press the key to store the new settings or press
the key to abort the operation.
A
either automatically after autostore
or
0
1 2 3
4 5 6
7 8 9
yellow
white
MENU
return Help
TV
picture
?
TV station table
ProgLogo Channe
▲▼
VTR2
0
ARD
1
ZDF
2
SAT 1
3
RTL
4
BR 3
5
N 3
6
MDR 3
7
SWF 3
8
MDR 3
9
sort
move Pr1 ➔ Pr - -
exchange Pr1 ➔ Pr - -
696+03E-GB
copy Pr 1 ➔
AV
Pr 1 delete
MENU
return Help
TV
l
Pr - -
picture
Pr 1 ➔ Pr -
-
Pr 1 ➔ Pr -
-
S23
S05
Sign
al
02
06
34
40
36
59
12
45
Video
Rec.2
Aerial
Aerial
Aerial
Aerial
Aerial
Aerial
Aerial
Aerial
Aerial
?
TV station table
ProgLogo Channe
▲▼
VTR2
0
ARD
1
ZDF
2
SAT 1
3
RTL
4
BR 3
5
N 3
6
MDR 3
7
SWF 3
8
MDR 3
9
sort
move Pr1 ➔ Pr - -
exchange Pr1 ➔ Pr - -
696+03F-GB
copy Pr 1 ➔
AV
Pr 1 delete
l
Pr - -
S23
S05
Sign
al
02
06
34
40
36
59
12
45
Video
Rec.2
Aerial
Aerial
Aerial
Aerial
Aerial
Aerial
Aerial
Aerial
Aerial
OK
TV
MENU
return Help
TV
picture
TV station table
ProgLogo Channe
▲▼
VTR2
0
ARD
1
ZDF
2
SAT 1
3
RTL
4
BR 3
5
N 3
6
MDR 3
7
SWF 3
8
MDR 3
9
sort
move Pr1 ➔ Pr - -
exchange Pr1 ➔ Pr - -
696+03F-S-GB
copy Pr 1 ➔
AV
Pr 1 delete
l
Pr - -
S23
S05
Sign
al
02
06
34
40
36
59
12
45
store ?
?
Video
Rec.2
Aerial
Aerial
Aerial
Aerial
Aerial
Aerial
Aerial
Aerial
Aerial
OK
OK
TV
Page 12
Press this key on the remote
control....
The screen displays Explanation
12
3.2 Fine tuning
The individual channels are automatically tuned to channel centre for station tuning. As a rule, this automatic tuning will be sufficient.
Apply manual fine tuning if automatic tuning does not produce satisfactory results.
Select the programme number at which fine tuning is to be completed.
1. Select the fine tuning
function
2. Adjust the fine tuning
3. Store the fine tuning and
return to TV picture
The „Fine tuning“ function is only activated when the
corresponding line is highlighted.
Adjust fine tuning within the range of -99 to +99 with
the keys.
The station table is blanked out for better picture
assessment.
Once the station is correctly tuned, press the key
to store the new setting.
yellow
white
white
>> weitere Einstellungen
SAT 1 40
Aerial
Std channel
Spec. channel
Fine tuning 00
SAT-Frequ.
Aerial control
MENU
return Help
TV
picture
TV station table
Prog Logo Signal
▲▼
LOGIC
0
ARD
1
ZDF
2
SAT 1
3
4
5
6
7
8
9
696-03G-GB
Chan./Freq
Std channel
Spec. channel
Fine tuning 00
SAT-Frequ.
Aerial control
>> weitere Einstellungen
Std, Pict., Sound
.
05
LogicVTR+D
06
34
40
Aerial
Aerial
Aerial
?
+
-
-
+
OK
TV
store ?
OK
OK
Page 13
Press this key on the remote
control....
The screen displays Explanation
13
TV picture
3.3 Allocating a station logo
A logo of up to 8 characters is provided for each station via the VPS signal. The station RTL 2, for example, receives the logo RTL 2.
Manual logo allocation is not necessary with most stations. The corresponding station logo appears a few seconds after the picture when
a station is selected by direct channel entry. However, an automatic logo only appears for stations which transmit a VPS signal.
1. Call the logo menu
2. Select the first character
3. Move the cursor to the
second position and select
the second character
The logo is automatically displayed if the selected programme position already has a logo. The field remains
blank if a logo has not yet been allocated.
Automatically identified logos may consist of up to
8 characters. Manually allocated logos are limited
to 5 characters.
Select the desired character (in our example the letter
R) with the keys , , .
This will overwrite any existing logo.
The cursor is moved within the logo field with the blue
key.
Select the desired character (in our example the letter
T) with the keys , , .
Repeat this procedure to enter the entire logo.
After input of the desired logo, press the key to
store it.
The programmed logo automatically appears in the
station table.
Any existing logo will be overwritten.
4. Store the setting and return
to TV picture
blue
blue
white
P
+
-
+
P
-
MENU
return Help
TV
picture
TV station table
P
+
select
+
-
P
-
next number
TV
Chan./Freq
picture
Prog Logo Signal
▲▼
0
Logo:
1
2
ABCDEFGHIJKLMNOPQRSTUVW
3
4
5
XYZ 0123456789 !+-
6
7
8
9
Ȅ
696+03H-GB
MENU
return Help
.
E1 FBAS
Antenne
Antenne
Antenne
Antenne
Antenne
Antenne
Antenne
Antenne
Antenne
TV station table
R
P
+
select
+
-
P
-
next number
Chan./Freq
Prog Logo Signal
▲▼
0
Logo:
1
2
ABCDEFGHIJKLMNOPQRSTUVW
3
4
5
XYZ 0123456789 !+-
6
7
8
9
Ȅ
696+03I-GB
.
store ?
OK
E1 FBAS
Antenne
Antenne
Antenne
Antenne
Antenne
Antenne
Antenne
Antenne
Antenne
?
?
+
-
P
-
P
+
P
+
-
+
P
-
TV
OK
TV
MENU
return Help
TV
picture
TV station table
RT
P
+
select
+
-
P
-
next number
Chan./Freq
Prog Logo Signal
▲▼
0
Logo:
1
2
ABCDEFGHIJKLMNOPQRSTUVW
3
4
5
XYZ 0123456789 !+-
6
7
8
9
Ȅ
696+03J-GB
.
E1 FBAS
Antenne
Antenne
Antenne
Antenne
Antenne
Antenne
Antenne
Antenne
Antenne
?
+
-
P
-
P
+
OK
Page 14
14
4. Changing individual picture settings
14
Note:
All settings modified in this menu can be stored by calling the „Video standard values“ or „Audio standard values“ menu respectively
and pressing the key. The stored values can be recalled at any time with the key.
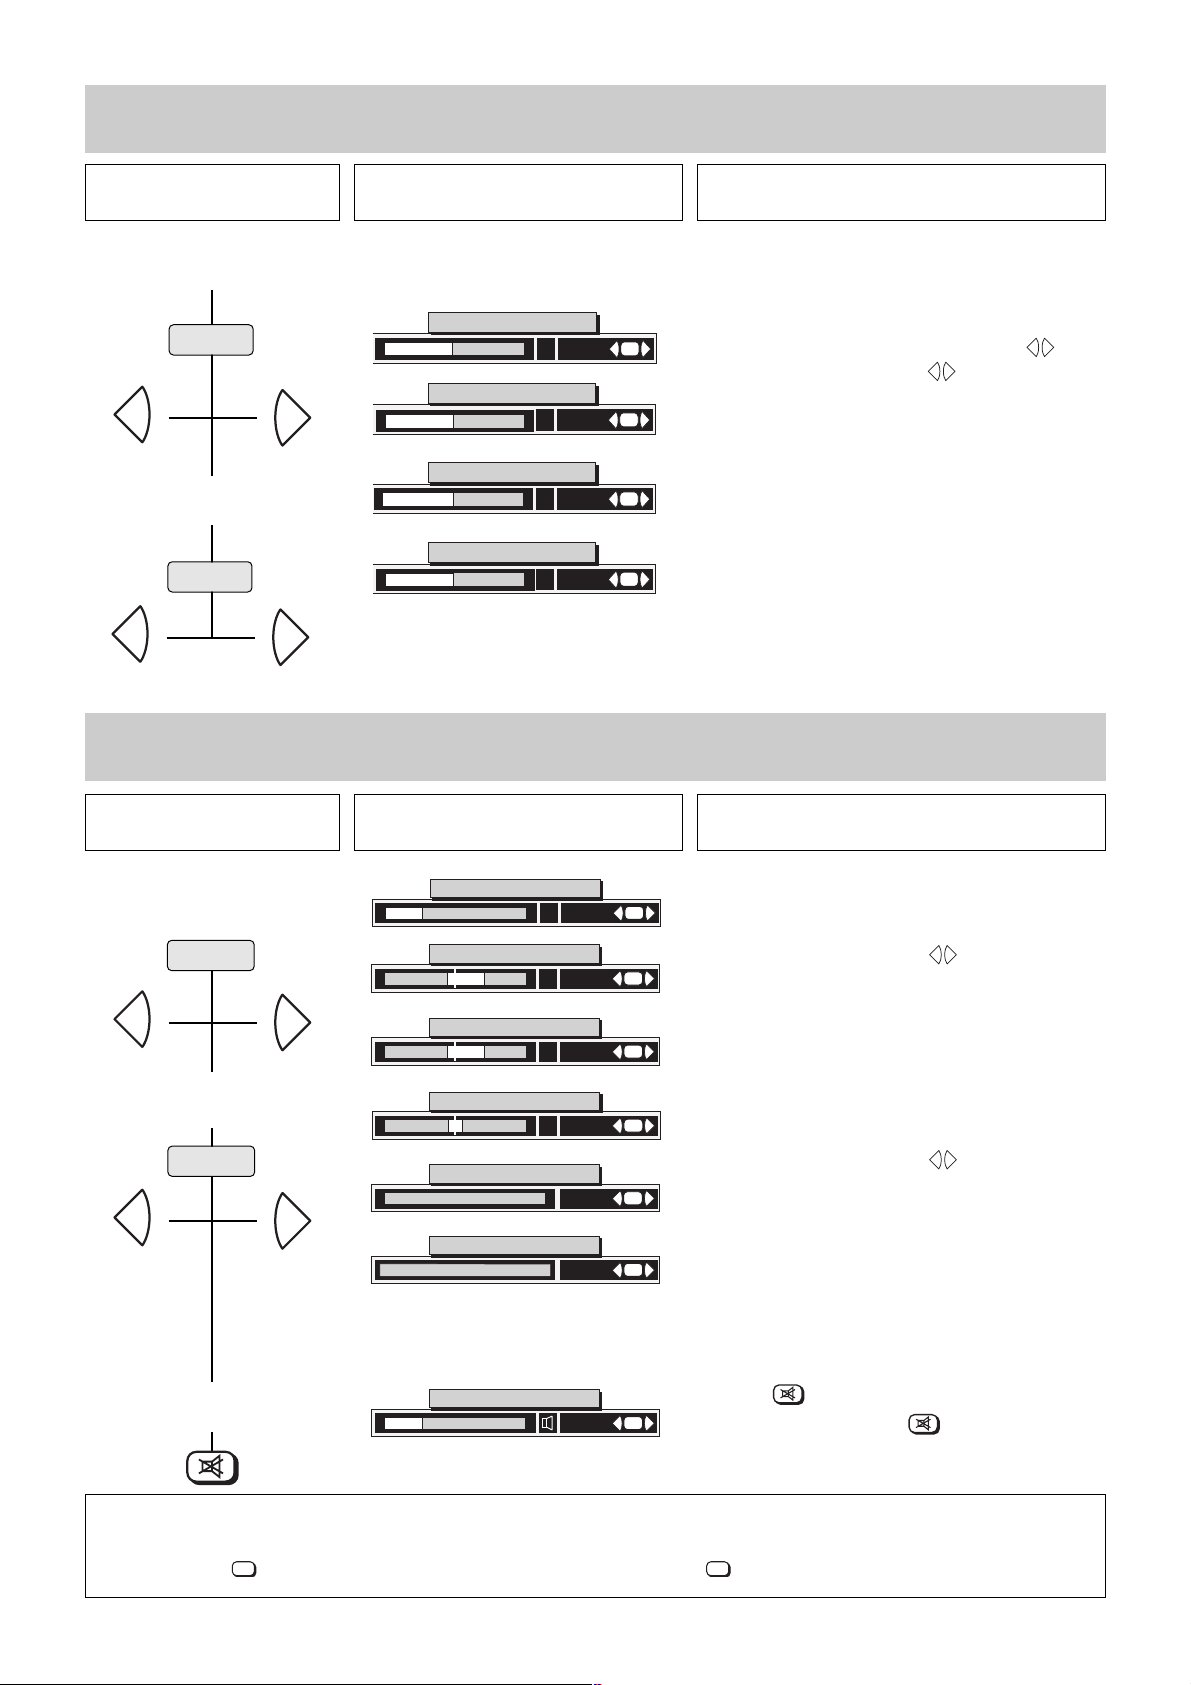
4.1 Changing individual sound settings
Press this key on the remote
control....
The screen displays Explanation
1. Adjusting the volume
2. Adjusting the treble setting
Press the yellow key to display the last adjusted function.
Continue pressing the yellow key until the volume field
is displayed on the screen.
Set the desired value with the keys.
Press the yellow key a number of times until the treble field is displayed on the screen.
Set the desired value with the keys.
Bass, balance, sound effects and speaker sound-
mode settings are adjusted in the same manner.
3. Sound mute
Press the key to mute the sound.
Renewed depression of the key resets the sound
to the previously adjusted volume.
yellow
yellow
Press the blue key to display the last adjusted function.
Continue pressing the blue key until the picture setting
value to be changed (e.g. luminance) is displayed.
You can now adjust the contrast with the keys.
Set the desired value with the keys.
Chrominance and sharpness are adjusted in the
same manner.
Press this key on the remote
control....
The screen displays Explanation
1. Adjusting the luminance
2. Adjusting the contrast
blue
blue
-
+
-
+
Luminance
40
Contrast
40
Chrominance
+
40
Sharpness
R
02
change:
change
change
change
-
OK
-
OK
-
OK
-
OK
+
+
+
+
+
-
+
-
-
+
-
+
Volume
change:
30
Treble
-
-
LR
Sound effects
Spatial sound On/Off
Sound-mode speaker
Mono/Stereo/Chann.1/Chann.2
+
Bass
+
Balance
25
25
00
change
change
change
change
change
-
OK
-
OK
-
OK
-
OK
-
OK
-
OK
695-D-GB
+
+
+
+
+
+
+
-
+
-
Volume
change:
-
OK
695+DX-GB
+
OKOK
Page 15

Press this key on the remote
control....
The screen displays Explanation
15
4.2 Adjusting the video and audio standard values
1. Call the TV menu
2. Example 1: Call the „Video
standard values“ submenu. Adjust and store
the sharpness.
3. Example 2: Call the „Audio
standard values“ submenu. Adjust and store
the volume.
4. Return to TV picture
Press any coloured key to step through the submenus.
Pressing the blue key selects the „Video standard
values“ submenu, pressing the yellow key selects the
„Audio standard values“ submenu
Luminance, contrast, chrominance, tint * and sharpness
can be adjusted in the „Video standard values“ submenu. Select the menu line with the value to be changed by pressing the assigned colour keys.
The picture sharpness can be set as the standard
value for all programme positions in the menu „Video
standard values“. The new value can be saved by
pressing the key.
The volume
, treble, bass and balance settings, as well
as the headphones volume, can be adjusted in a similar
manner in the „Audio standard values“ submenu.
The menu item „colour balance“ is displayed only
when receiving from an NTSC station.
Adjust the desired value with the keys.
If no other video standard values or audio standard
values are to be changed, then press the key to
store the new setting.
The red store box disappears when the key is
pressed.
The value set in this manner remains stored even if
the TV is switched off with the main power switch.
yellow
red
blue
MENU
-
+
OK
-
+
OK
MENU
return Help
TV
picture
TV-menu
123
456
789
--/-
0
P
+
+
-
OK
P
-
TV
MENU
?
A
AV
B
696+02-GB
MENU
return Help
Video standard values
Audio standard values
Station settings
AV
Timer/childlock
Equipm. configuration
TV
picture
Video standard values
123
456
789
--/-
0
P
+
+
-
OK
P
-
TV
MENU
?
A
AV
B
696+04Aa-GB
MENU
return Help
Luminance
Contrast
Chrominance
Tint
-
Sharpness
TV
picture
store ?
OK
Audio standard values
123
456
789
--/-
0
P
+
-
OK
P
-
TV
MENU
?
A
B
696+04B-GB
+
AV
Volume
Treble
-
Bass
-
AV
Balance
-
Volume headphones
store ?
OK
?
?
40
50
36
OK
+
00
2
+
-
OK
?
OK
48
+
23
+
42
+
00
36
TV
Page 16
Press this key on the remote
control....
The screen displays Explanation
16
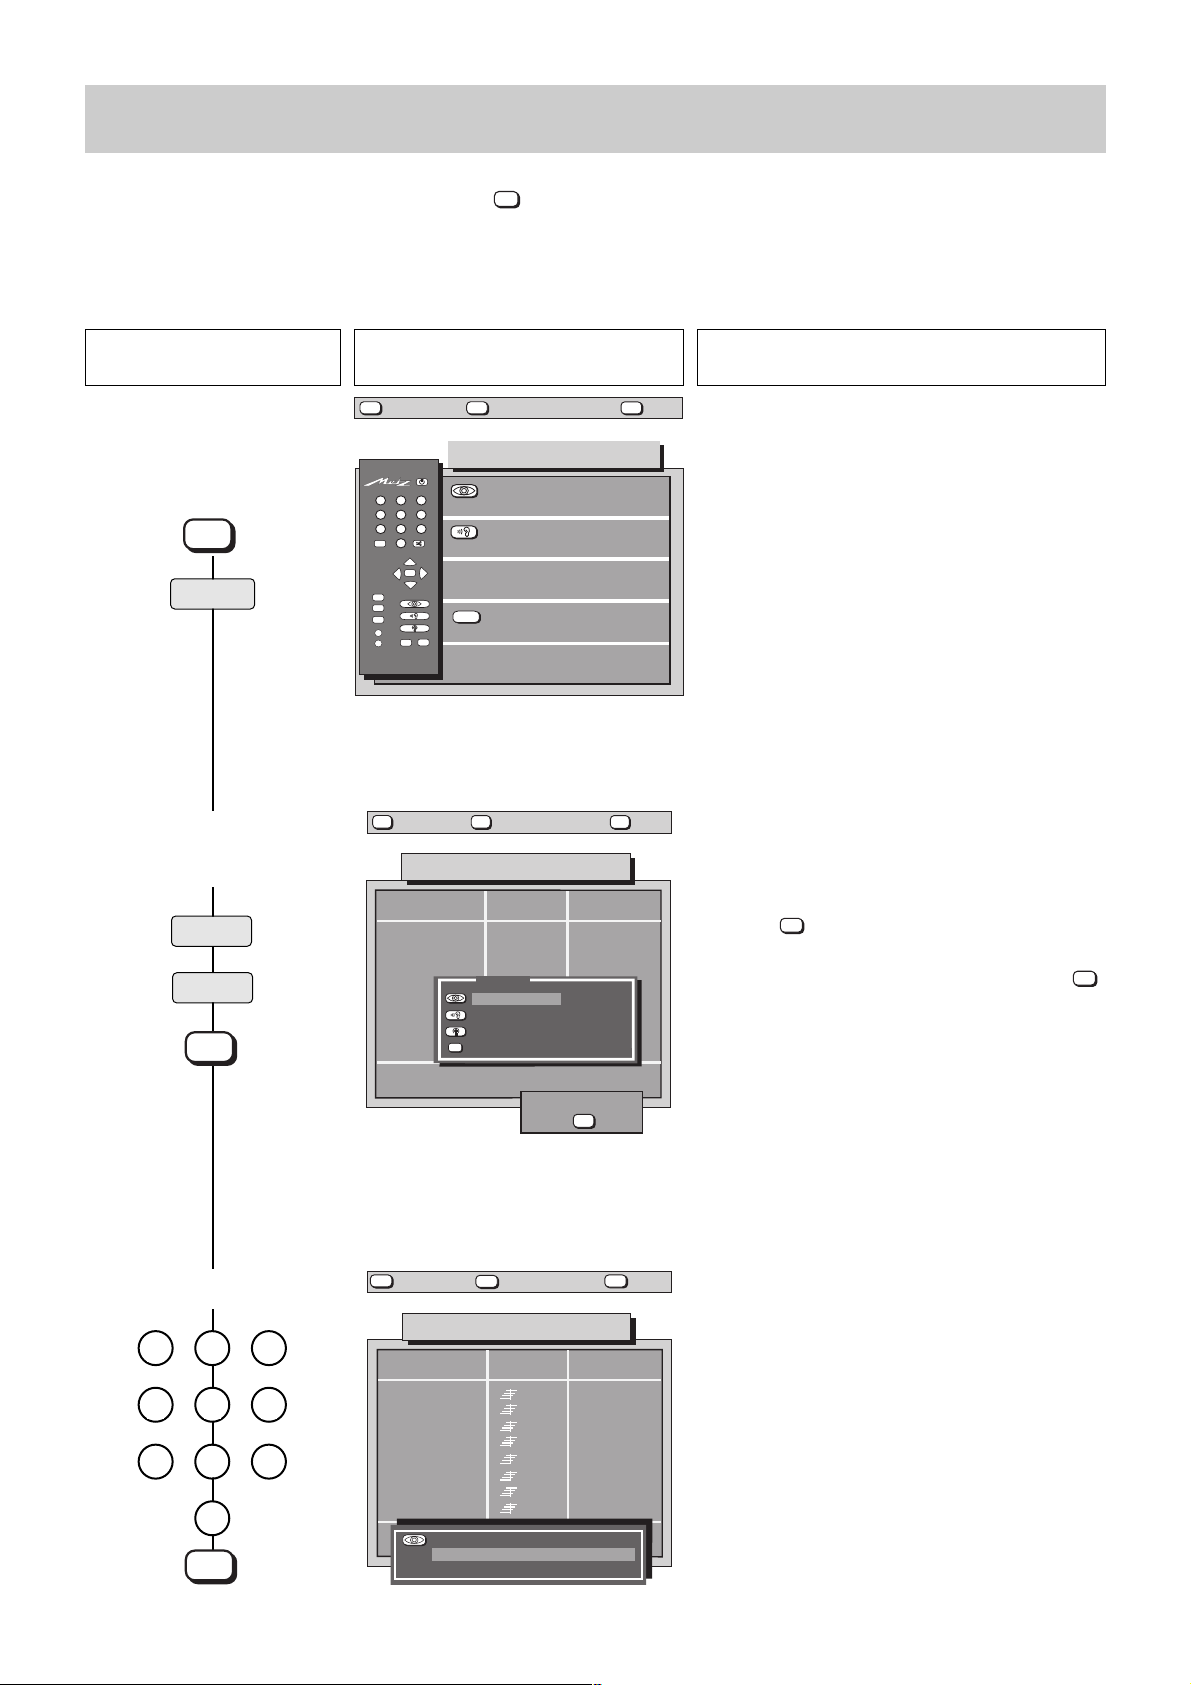
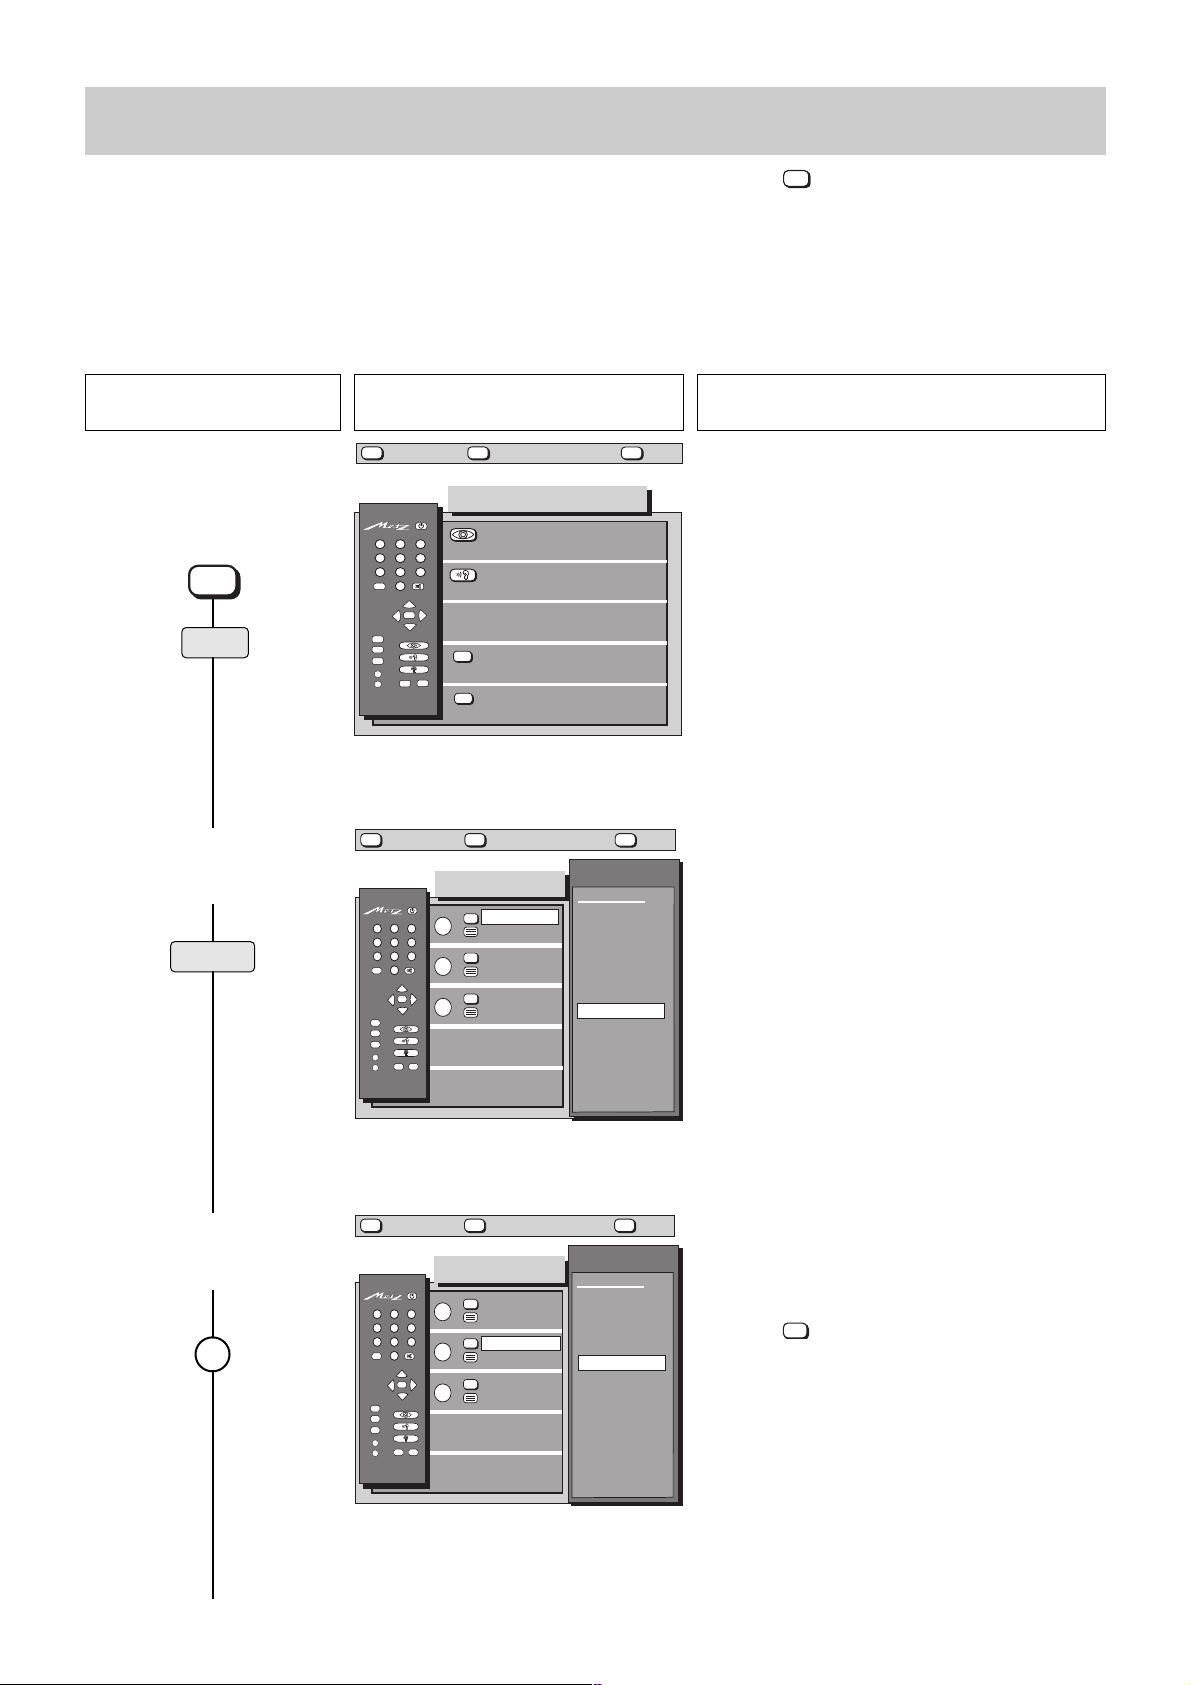
5. Equipment configuration
Assigning the
function keys
The remote control handset has three factory programmed function keys A, B and C. Press the key in normal television mode to reveal
the factory programming. The displayed Operator Help text describes the current programming in the last-but-one paragraph. This programming can be changed according to your requirements in conformity with the displayed selection. This choice is described in the
„Glossary“ chapter.
Example of programming function key B: In TV mode, the B key is to activate the „subtitles“ function; in Hi Text mode, you can use it
for the „page stop“ function.
1. Call the „Equipment
configuration“ menu
2. Call the „Function keys“
menu
The left-hand side of this menu shows the currently
valid programming of the function keys.
The window on the right-hand side indicates the selection that can be programmed.
The individual functions are explained in detail in
the „Glossary“ on page 50.
red
blue
3. Press the function key to be
programmed (in this example: B key)
Two functions can be programmed for function key B.
The upper line indicates the function programmed for
TV mode, the lower line the function programmed for
Hi Text mode.
Press the key to switch between the two lines.
Press the B key to display the currently programmed
function.
B
?
MENU
return Help
TV
picture
?
MENU
123
456
789
--/-
TV
MENU
?
A
B
696+05A1-GB
Equipm. configuration
Function keys
0
P
+
+
-
OK
P
-
AV
Device connection
SAT settings
AV
Language:
further
English
MENU
return Help
123
456
789
--/-
0
P
+
-
OK
P
-
TV
MENU
?
A
B
600+05M-GB
MENU
return Help
123
456
789
--/-
0
P
+
-
OK
P
-
TV
MENU
?
A
B
TV
Function keys
TV
A
TV
B
+
TV
C
AV
TV
Function keys
TV
A
TV
B
+
TV
C
AV
picture
Muting -12dB
Answer
Sound effects
Large letters
Infotext
Infotext
picture
Muting -12dB
Answer
Sound effects
Large letters
Infotext
Infotext
Functions
Television
DVB On/Off
Logo
Pict. format
Speech-music
Sound effects
Stereo/ch. 1-2
Muting -12dB
Infotext
Subtitles
Large subtitles
VTR-Operation
Functions
Television
DVB On/Off
Logo
Pict. format
Speech-music
Sound effects
Stereo/ch. 1-2
Muting -12dB
Infotext
Subtitles
Large subtitles
VTR-Operation
?
▲
▼
?
▲
▼
TV
600+05N-GB
Page 17
Press this key on the remote
control....
The screen displays Explanation
17
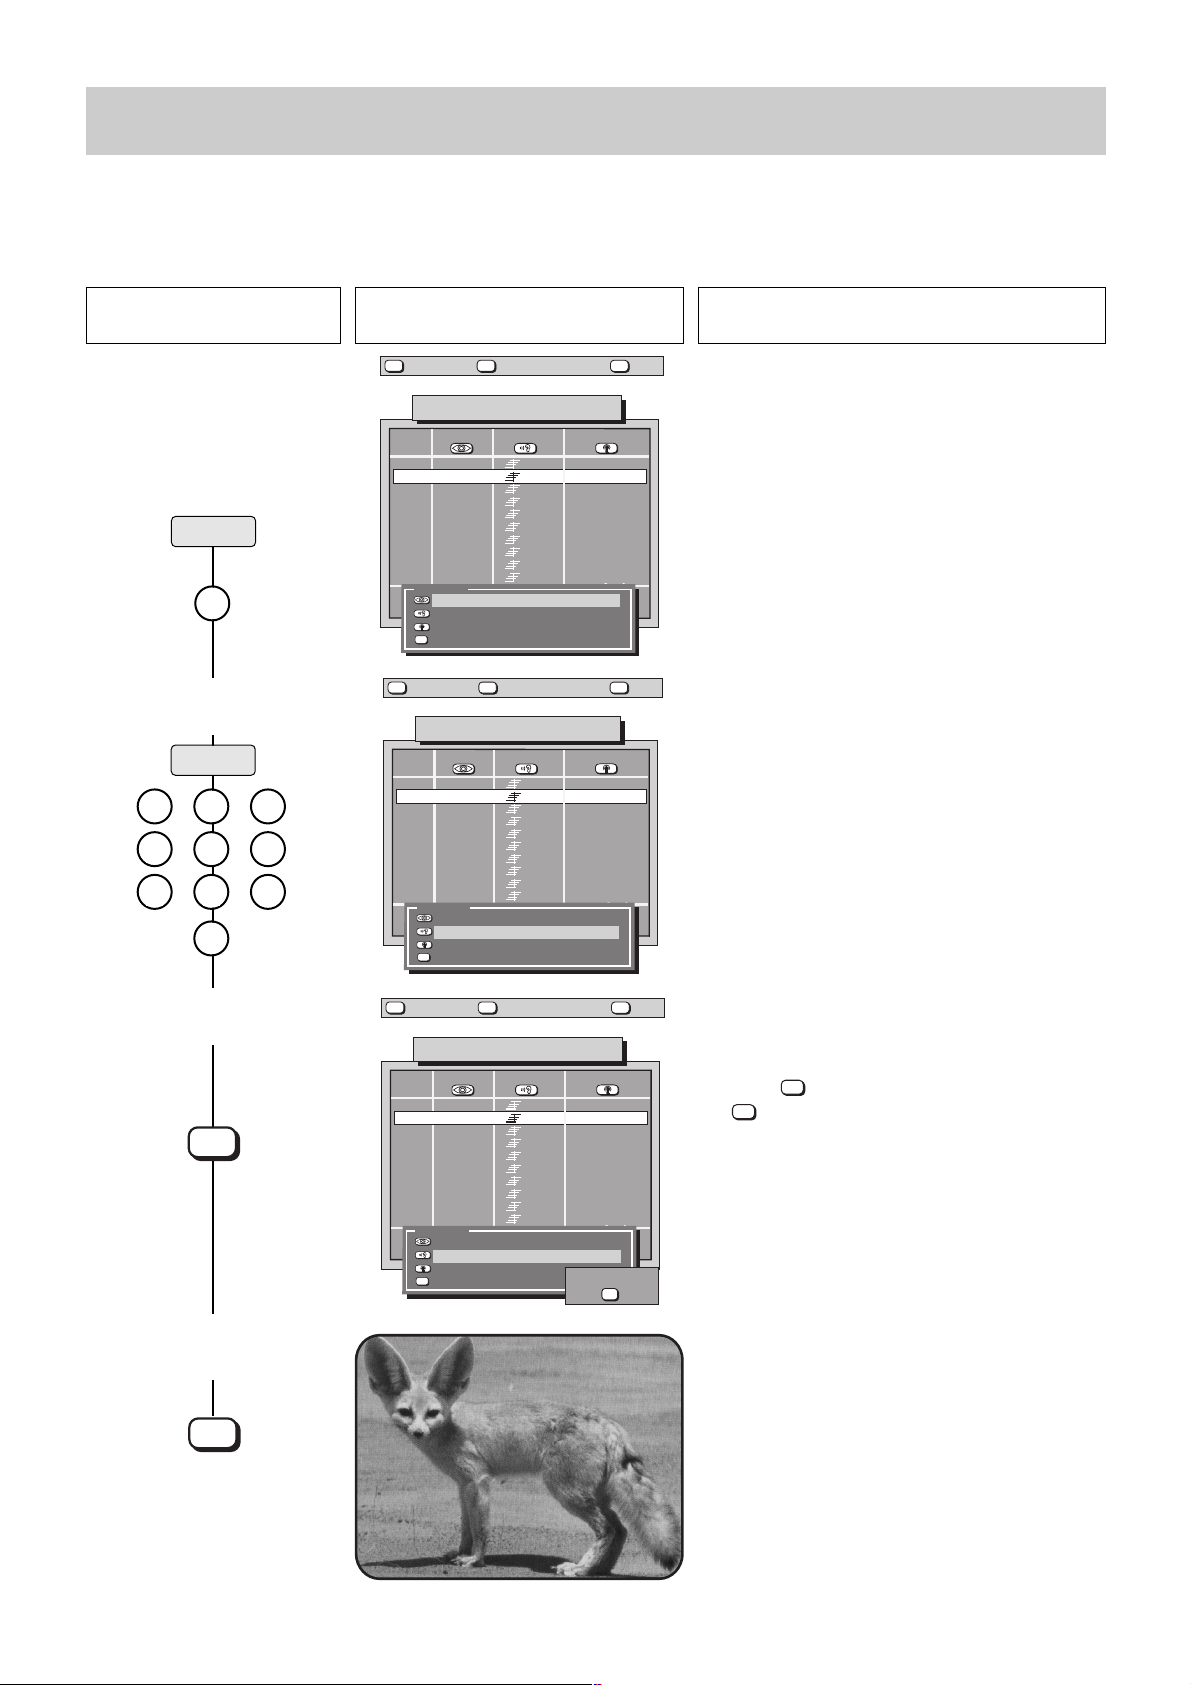
5. Equipment configuration
Assigning the
function keys
4. Select the function for TV
mode (in this example
„Subtitles“)
5. Switch to Hi Text mode and
program the function keys
6. Store the assignments and
return to the „Equipment
Configuration“ menu
Select the function in the right-hand field with the
or key. The text on the left-hand side changes as
soon as the cursor (a white bar) is moved.
If the function „Subtitles“ has been programmed for
key B, the subtitles will be displayed when the TV set
is switched, if subtitles are actually transmitted with
the programme.
The cursor (a white bar) is now located in the second
line, on the currently programmed function.
The desired Hi Text functions can now be programmed
in
the sequence described in steps 3 and 4, above.
7. Return to TV picture
P
P
+
-
TV
P
P
+
-
MENU
return Help
123
456
789
--/-
0
P
+
-
OK
P
-
TV
MENU
?
A
B
600+05O-GB
MENU
return Help
123
456
789
--/-
0
P
+
-
OK
P
-
TV
MENU
?
A
B
600+05P-GB
Function keys
A
B
+
C
AV
Function keys
A
B
+
C
AV
TV
picture
Muting -12dB
TV
Answer
TV
Subtitles
Large letters
TV
Infotext
Infotext
store ?
TV
picture
Muting -12dB
TV
Answer
TV
Sound effects
Large letters
TV
Infotext
Infotext
store ?
Functions
Television
DVB On/Off
Logo
Pict. format
Speech-music
Sound effects
Stereo/ch. 1-2
Muting -12dB
Infotext
Subtitles
Large subtitles
VTR-Operation
OK
Functions
Videotext
no function
Infotext
Answer
Large letters
Stop page
OK
?
P
▲
▼
-
P
+
?
▲
▼
OK
MENU
TV
MENU
return Help
TV
picture
Equipm. configuration
123
456
789
--/-
0
P
+
-
OK
P
-
TV
MENU
?
A
B
696+05A1-GB
+
AV
Function keys
Device connection
SAT settings
AV
Language:
further
English
?
Page 18

Press this key on the remote
control....
The screen displays Explanation
18
5. Equipment configuration
Settings for
programme change
2. Call the settings for
programme change
3. Set spatial sound when
changing programmes
4. Set the PC „time out“
5. Store the settings and
return to the TV picture
In this menu you can define the sound functions for a
programme change.
In the first line of the menu, use the keys to select
whether the mute function is to be retained („Yes“) or
to be cancelled („No“) when you change programmes.
The new settings can be stored by pressing the
key.
Use the keys in this menu line to define whether
the spatial sound is to be switched on or off when the
programme is changed to a monaural station.
When in mono mode, you can change over to spatial
sound by pressing a self-defined function key (sound
effects).
If no other values are to be changed, then press the
key to store the new setting.
The term „spatial sound“ is explained in the section
„Glossary“ on page 50.
The programme change „time out“ can be set to On or
Off.
On = the programme position changes three seconds
after input of the first digit.
Off = after input of the first digit, further digits must
be entered or the key must be pressed to
change the programme position.
Select the setting On or Off with the keys.
Store the new settings with the key
1. Call the „Equipment
configuration“ menu
The various TV stations transmit the sound at different
volumes. Some stations, for example, are always louder
than others, and some stations increase the volume
during the commercials.
If volume adaptation is active, these volume variations
are smoothed out.
The setting selected here applies to all programme
positions.
yellow
red
yellow
blue
green
2x
2x
OK
TV
white
MENU
-
+
MENU
return Help
TV
picture
Equipm. configuration
123
456
789
--/-
0
P
+
+
-
OK
P
-
TV
MENU
?
A
AV
B
600+05B-GB
MENU
return Help
Prog. change settings
Volume adaptation On
TV
picture
Prog. change settings
123
456
789
--/-
0
P
-
OK
P
TV
MENU
?
A
B
+
+
-
AV
No sound on PC :
Spat. sound on PC :
Stereo wide on PC :
AV
PC time out
?
?
+
-
Yes
Off
Off
On
OK
-
-
+
+
696+05C-GB
MENU
return Help
TV
picture
store ?
OK
Prog. change settings
123
456
789
--/-
0
P
+
+
-
OK
P
-
TV
MENU
?
A
AV
B
696+05D-GB
MENU
return Help
No sound on PC :
Spat. sound on PC :
Stereo wide on PC :
AV
PC time out
TV
picture
store ?
OK
Prog. change settings
123
456
789
--/-
0
P
+
-
OK
P
-
TV
MENU
?
A
B
+
AV
No sound on PC :
Spat. sound on PC :
Stereo wide on PC :
AV
PC time out:
?
?
Yes
Off
Off
On
Yes
Off
Off
+
-
OK
On
OK
+
-
OK
696+05T-GB
Page 19

Press this key on the remote
control....
The screen displays Explanation
19
6. Volume adjustment and forced mono
It is possible for TV stations to be received at different volume levels although the volume level settings on the individual programme
positions are identical. To overcome this problem, you can set a volume correction factor for each programme position.
Example:
Programme 1 is soft: volume value 40. Programme 3 is loud: volume value 40. Programme 1 is to be adjusted to the same volume as
Programme 3.
Switch over to programme position 1.
1. Call the sound submenu
and adjust the volume
2. Set forced mono
3. Store the setting and return
to TV picture
In this submenu, you can assign a volume correction
factor to a programme position and, if necessary,
activate forced mono sound mode.
A volume correction factor can be set with the keys
when the text is displayed on a blue background.
Press the key to enter a positive correction factor
which is added to the standard volume value (increasing the volume). Press the key to enter a negative
correction factor which is subtracted from the
standard volume value (decreasing the volume).
In our example:
Press the key and increase the volume until it is the
same as the volume on Programme 3. The resulting
correction factor could , for example, be displayed as 05.
It may happen that the TV set inadvertently switches
from mono to stereo during a transmission,
although no stereo programme is being received.
This usually depends upon the prevailing reception
conditions.
Use the keys to select forced mono.
If this setting is stored, all transmissions received in
this programme position will always be reproduced in
mono.
All changed settings are stored.
red
yellow
yellow
white
-
+
-
+
MENU
return Help
TV
picture
TV station table
Programme StdPict.
▲▼
0
LOGIC
1
ARD
2
ZDF
3
SAT 1
4
5
6
7
8
9
696+06A-GB
MENU
Volume adjustment
Forced mono
<< weitere Einstellungen
Logo, Channel, Signal
return Help
TV
—
—
—
—
picture
Sound
—
—
—
—
store ?
OK
TV station table
Programme StdPict.
▲▼
0
LOGIC
1
ARD
2
ZDF
3
SAT 1
4
5
6
7
8
9
696+06B-GB
Volume adjustment
Forced mono
<< weitere Einstellungen
Logo, Channel, Signal
Sound
—
—
—
—
—
—
—
—
store ?
OK
+00
+00
Off
Off
?
Auto.
Auto.
Auto.
Auto.
Auto.
Auto.
Auto.
Auto.
Auto.
Auto.
?
Auto.
Auto.
Auto.
Auto.
Auto.
Auto.
Auto.
Auto.
Auto.
Auto.
+
-
+
-
+
+
-
OK
TV
Page 20

20
Press this key on the remote
control....
The screen displays Explanation
6.1 Correcting picture deviations
It is possible for stations to be received with differing levels of chrominance, picture sharpness and contrast, even though the settings on
the individual programme positions are identical. For this reason, your TV set enables you to correct the value for each programme
position and/or to select a picture correction function (CTI, noise reduction).
1. Call the first picture menu in
the station table and correct
the picture sharpness
2. Switch on the noise
reduction
3. Switch on the CTI function
4. Call the second picture
menu and adjust the
chrominance
The picture menu contains all settings which can
change the picture.
The picture sharpness can be adjusted separately for
each station in the station table. This setting overrides
the standard setting.
The new value can be saved by pressing the key.
The value set in this manner remains stored even if the
TV is switched off with the main power switch.
This TV set is equipped with a special noise-reduction
function for use where the picture contains „snow“ or
is unclear. The noise reduction function can be set to
A1: automatic motion compensation, slight noise
reduction
A2: automatic motion compensation, high noise
reduction,
A3: no motion compensation, slight noise reduction),
or OFF.
CTI stands for Colour Transient Improvement and
improves the transitions between different coloured
areas of the picture, making the picture appear much
sharper. The CTI function is effective for both transmissions received by way of the aerial input and for
signals received via the AV sockets. CTI also provides
a visible improvement when playing back from a video
recorder.
However, in certain applications (such as playing back
from an S-VHS video recorder), the CTI function may
just have the opposite effect.
When playing back from such recorders, CTI can result
in a lower-quality picture. For this reason, this menu
permits you to switch off the CTI function for specific
programme positions.
In this second picture menu, the chrominance, colour
offset and contrast can be corrected individually for
each programme position.
In our example, the chrominance of Programme 1 is to
be diminished. Hold down the key until the colour
intensity is the same as in programme position 3.
The chrominance adjustment range is -15 to +15.
If no other values are to be changed, then press the
key to store the new setting.
red
yellow
blue
white
white
red
-
+
-
+
-
+
-
+
MENU
return Help
TV
picture
TV station table
Programme
▲▼
0
VTR1
1
ARD
2
ZDF
3
SAT 1
4
5
6
7
8
9
600+06C-GB
MENU
return Help
Sharpness
Noise reduction
CTI
further
<< weitere Einstellungen
Logo, Channel, Signal
TV
picture
Sound
—
—
—
—
—
—
—
—
store ?
OK
TV station table
Programme
▲▼
0
VTR1
1
ARD
2
ZDF
3
SAT 1
4
5
6
7
8
9
600+06D-GB
MENU
return Help
Sharpness
Noise reduction
CTI
further
<< weitere Einstellungen
Logo, Channel, Signal
TV
picture
Sound
—
—
—
—
—
—
—
—
store ?
OK
TV station table
Programme
▲▼
0
VTR1
1
ARD
2
ZDF
3
SAT 1
4
5
6
7
8
9
600+06E-GB
MENU
return Help
Sharpness
Noise reduction
CTI
further
<< weitere Einstellungen
Logo, Channel, Signal
TV
picture
Sound
—
—
—
—
—
—
—
—
store ?
OK
TV station table
Pict.
Programme
▲▼
0
LOGIC
1
ARD
2
ZDF
3
SAT 1
4
5
6
7
8
9
696+06G-GB
Chrom. adjustm.
Col. offset adj.
Contrast adj.
Picture format
AV
VCR
<< weitere Einstellungen
Logo, Channel, Signal
Sound
—
—
—
—
—
—
—
—
0
4:3
Off
store ?
OK
00
00
?
Auto.
Auto.
Auto.
Auto.
Auto.
3
Auto.
A1
Auto.
Auto.
On
Auto.
Auto.
?
Auto.
Auto.
Auto.
Auto.
Auto.
3
Auto.
A1
Auto.
Auto.
On
Auto.
Auto.
?
Auto.
Auto.
Auto.
Auto.
Auto.
3
Auto.
A1
Auto.
Auto.
On
Auto.
Auto.
?
Auto.
Auto.
Auto.
Auto.
Auto.
Auto.
Auto.
Auto.
Auto.
Auto.
StdPict.
StdPict.
StdPict.
Std
OK
-
OK
Page 21

Press this key on the remote
control....
The screen displays Explanation
21
6.1 Correcting picture deviations
5. Adjust the colour offset
or contrast
6. Change the picture format
7. Store all settings and return
to TV picture
Normally, it is not necessary to adjust the colour offset.
However, if external units are connected it is possible that
colour and black-and-white pictures are not accurately
superimposed. A similar effect is sometimes encountered
in journals when the black-and-white and colour
impressions do not register, with the result that the
contours are blurred. The colour offset adjustment has
no effect on an RGB input.
The contrast adjustment range is -15 to +15.
If no other values are to be changed, then press the
key to store the new settings.
The picture format of a normal TV set is 4:3. If an input
signal in 16:9 format is applied to the EURO socket,
the picture format is changed automatically. If a 16:9
input signal is applied to the phono (cinch) sockets or
the mini-DIN (YC) socket, the picture format must be
changed manually.
An external switching voltage of 4-7 V at the EURO
socket automatically switches the TV to 16:9 format,
provided that the signal type was stored under the
heading „...controls AV operation“ in the menu
„Equipm. configuration, device connection“.
yellow
white
green
or
-
+
-
+
MENU
return Help
TV
picture
TV station table
Pict.
—
—
—
—
picture
Sound
—
—
—
—
store ?
OK
00
0
00
4:3
Off
Programme
▲▼
0
LOGIC
1
ARD
2
ZDF
3
SAT 1
Chrom. adjustm.
4
Col. offset adj.
5
6
Contrast adj.
7
AV
Picture format
8
VCR
9
<< weitere Einstellungen
Logo, Channel, Signal
696+06H-GB
MENU
return Help
TV
TV station table
Pict.
Programme
▲▼
0
LOGIC
1
ARD
2
ZDF
3
SAT 1
Chrom. adjustm.
4
Col. offset adj.
5
6
Contrast adj.
7
AV
Picture format
8
VCR
9
<< weitere Einstellungen
Logo, Channel, Signal
696+06I-GB
Sound
—
—
—
—
—
—
—
—
00
0
00
4:3
Off
store ?
OK
?
Std
Auto.
Auto.
Auto.
Auto.
Auto.
Auto.
Auto.
Auto.
Auto.
Auto.
?
Std
Auto.
Auto.
Auto.
Auto.
Auto.
Auto.
Auto.
Auto.
Auto.
Auto.
OK
OK
TV
Page 22

Press this key on the remote
control....
The screen displays Explanation
22
The copy operation with the selected devices is now
active.
If any subsequent switching operations could interfere
with copying, a warning box with the text „AV recording“ will be displayed and the requested switching
operation will not be executed.
To check the progress of the operation, press the key
to display the picture from the input device on the screen.
If you wish to execute the copy operation in standby
mode, you can switch the TV set to this mode by pressing the key.
If this setting is not stored, the programme position must
be selected again in order to display the TV programme.
7. AV recording
In the „AV recording“ menu, you can define which of the connected peripheral AV devices are to be used for copying a recording.
AV device is a generic term for all external video units, such as video recorders, camcorders,video disk players, photo CD players, etc
which can be connected to a TV.
Example: You wish to copy a film recorded with an S-VHS/Hi8 camcorder to an LogicVTR video recorder which is also connected to the
TV set.
1. Call the AV menu
2. Select the desired AV devi-
ces (in this example: Camcorder and LogicVTR)
3. Store the settings and clear
the menu
In the „AV recording“ menu , you can select how the
AV devices connected to your TV set (see Section 14,
„Equipment configuration/Connecting external devices“)
are to be used for copying a recording.
The left side of the menu (Input) shows the devices
which supply picture and sound for the copy operation.
Selection of an input for a programme is meaningful
only for SAT or decorder operation.
The right side of the menu (Output) shows the devices
capable of recording the picture and sound.
After calling this menu, you must first select the input
device, i.e. the device which is to supply the picture.
After selection of an input, the menu automatically
returns to the output page, where the AV device for
recording is selected.
Back to the example:
You want to copy the film from the camcorder to Logic
VTR.
Press the white key to display the signal from the
camcorder on the screen.
4. Terminate or abort the
copy operation
AV
Camcorder ➜ video recorder
white
MENU
return Help
TV
picture
AV-recording
Input
Video Rec.2
LogicVTR
Camcorder
Pr: RTL 2
no recording
600+07F-GB
Device connection
A
MENU
return Help
TV
picture
Output
Video Rec.2
LogicVTR
AV-recording
Input
Video Rec.2
LogicVTR
Camcorder
Pr: RTL 2
FRONT:
Camcorder ➜ LogicVTR
Video
600+07G-GB
Device connection
A
Output
Video Rec.2
LogicVTR
record ?
?
?
EURO2:
Video
OK
OK
TV
AV
OK
TV
AV
Page 23

Press this key on the remote
control....
The screen displays Explanation
23
7. AV recording
Video recorder ➜ video recorder
Example:
You want to play back a film from the logic video recorder connected to the EURO 2 socket and record it on the video recorder 2 connected
to the EURO 1 socket.
1. Call the AV menu
2. Select the desired AV device
(in this example: LogicVTR)
3. Store the settings and
clear the menu
The copy operation with the selected devices is now
active.
If any subsequent switching operation could interfere
with copying, a warning box with the text „AV recording“ will be displayed and the requested switching
operation will not be executed.
To check the progress of the operation, press the
key to display the picture from the input device on the
screen.
If you wish to execute the copy operation in standby
mode, you can switch the TV set to this mode by pressing the key.
4. Terminate or abort the
copy operation
TV picture
TV
TV
OK
After calling the menu, you must first select the input
device which is to supply the picture. In our example,
you select Logic VTR by pressing the yellow key.
Once you have done this, the cursor moves to the output side of the menu and the logic video recorder is
selected automatically, since there is no other choice.
yellow
Logic VTR ➜ Videorec.2
AV
MENU
return Help
TV
picture
AV-recording
Input
Video Rec.2
LogicVTR
Camcorder
Pr: RTL 2
no recording
600+07F-GB
Device connection
A
MENU
return Help
TV
picture
Output
Video Rec.2
LogicVTR
AV-recording
Input
Video Rec.2
LogicVTR
Camcorder
Output
Video Rec.2
LogicVTR
?
?
AV
OK
Pr: RTL 2
FRONT:
Video
600+07H-GB
Camcorder ➜ LogicVTR
Device connection
A
record ?
OK
EURO2:
Video
AV
Page 24

Press this key on the remote
control....
The screen displays Explanation
24
8. Time settings
Switch-on/off and
reminder time
In the „Time settings“ menu, you can enter settings which will instruct the TV to switch itself on or off, and to display a reminder at a given time.
Switching from summer time to winter time and vice versa is carried out automatically by the teletext clock or when the set is
switched from standby mode to programme position 1.
The switch-on time function will automatically turn on the TV at the preset time if the television is in standby mode. The switch-off time
function will automatically switch it off as desired. The reminder service is intended to help you remember things which you have to do
later on, for instance a telephone call. All three settings can be jointly programmed.
Example: The TV is to switch itself on at 20:00 hr, remind you of something at 21:45 hr, and switch itself off at 23.30 hr.
1. Call the „Time settings“
menu
2. Enter the switch-on time
(Example: 20.00 hr)
3. Enter the switch-off time
(Example: 23.30 hr)
The adjoining picture shows the appearance of the
„Time settings“ menu when no times have been programmed.
First press the blue key and then press the
or the
key to switch on the function.
Enter the desired switch-on time with the numeric keys.
The function is activated after input of the last digit.
Henceforth the TV set will switch itself on every day at
the preprogrammed time.
When switched on, the TV displays the programme position which was selected when it was last switched off.
The screen displays On - -.
-
If you press the yellow key, the text in the second line
is displayed on a yellow background.
Now press the or the key to switch on the function.
Enter the desired switch-off time with the numeric
keys. The function is activated after input of the last
digit.
The switch-on/switch-off times can be deleted with
the keys (function OFF).
2 0 0 0
2
When the set has switched itself on automatically,
you must press any key you choose on the remote
control, otherwise the set will return to standby
mode after about 10 min. This is a safety precaution
to ensure that the television does not stay on if
you are not at home.
0
3
3
yellow
blue
blue
green
MENU
-
+
MENU
return Help
TV
picture
Time settings
123
456
789
--/-
0
P
+
+
-
OK
P
-
TV
MENU
?
A
AV
B
696+08A-GB
MENU
return Help
Switch-on time:
Switch-off time:
Reminder time
AV
Time of day:
TV
picture
Time settings
123
456
789
--/-
0
P
+
-
OK
P
-
TV
MENU
?
A
B
696+08B-GB
+
AV
Switch-on time:
Switch-off time:
Reminder time
AV
Time of day:
?
Off
Off
-- : --
08 : 22
?
20:00
Off
-- : --
08 : 22
+
+
-
+
-
-
+
MENU
return Help
TV
picture
Time settings
123
456
789
--/-
0
P
+
-
OK
P
-
TV
MENU
?
A
B
696+08C-GB
+
AV
Switch-on time:
Switch-off time:
Reminder time
AV
Time of day:
?
20:00
23:30
-- : --
08 : 22
Page 25

25
TV picture
Press this key on the remote
control....
The screen displays Explanation
4. Enter the reminder time
(Example: 21.45 hr)
If you press the white key, the text in the third line is
displayed on a white background.
Enter the desired reminder time with the numeric
keys. The function is activated after input of the last
digit.
From the standby mode, the TV set will switch itself on
at 20.00 hr, remind you of the telephone call you wish
to make at 21.45 hr, and switch back to standby mode
at 23.30 hours.
The reminder time can be deleted with the C key.
At the programmed time, a box with the text „Hallo“ is
displayed on the screen if the TV set is switched on.
This box disappears if you press the or key or
switch to a different programme position.
If you switch to a programme position in which teletext
has been stored, the current time automatically
appears in this menu .
.
To set the clock manually, simply enter the time with
four digits.
8. Time settings
Switch-on/off and
reminder time
2 1 4 5
From the standby mode, the TV set will switch itself on
at 20.00 hr, remind you of the telephone call you wish
to make at 21.45 hr, and switch back to standby mode
at 23.30 hours.
1 4
4
2
Hallo
white
green
5. Enter the time manually
(Example: 14.24 hr)
or
OK
TV
6. Switch to standby mode
MENU
return Help
TV
picture
Time settings
123
456
789
--/-
0
P
+
-
OK
P
-
TV
MENU
?
A
B
696+08D-GB
+
AV
Switch-on time:
Switch-off time:
Reminder time
AV
Time of day:
?
20:00
23:30
21:45
08 : 22
TV
OK
MENU
return Help
TV
picture
Time settings
123
456
789
--/-
0
P
+
+
-
OK
P
-
TV
MENU
?
A
B
696+08E-GB
AV
Switch-on time:
Switch-off time:
Reminder time
AV
Time of day:
?
Off
Off
-- : --
-- : --
Page 26

Press this key on the remote
control....
The screen displays Explanation
26
8.1 Childlock
Switching on
Your TV set can be protected against unauthorized use. It is possible to prevent any use of the television at all or to permit viewing of up to
five specific programmes. Consequently, the childlock can be set to prevent a child from seeing violent films, yet still provide access to
children’s programmess on selected channels. Access to such permitted programmes can be provided in general or within a specified
period of time.
Example:
The children shall only be allowed to watch programmes on the programme positions 01, 02 and 05 from 14.00 to 18.00 hr. Access to all
other programme positions shall be excluded.
1. Call the „Timer/childlock“
menu
2. Call the „Childlock“
submenu and switch on
the childlock
3. Select and store permitted
programmes
The childlock can be switched on and off with the
keys.
If you set the childlock to „ON“, you must also enter a
4-digit personal code number.
The TV set can now still be switched on, but programmes
will not be shown on the screen. Instead the „Childlock“
menu will be displayed with the cursor on the „Enter
code“ line.
The childlock can be turned off again by entering the
4-digit personal code number.
The TV is automatically switched to standby mode after
approx. 10 minutes if it has not been switched off
manually in the meantime.
A maximum of 5 programme positions can be entered
to which access is permitted.
These programme positions are entered with the
numeric keys; all entries can be erased with the C key.
Back to the example:
Enter the programme positions which are to be
accessible. In this example, the programme positions
01, 02 and 05 have been entered.
Before continuing with the next programming steps,
the permitted programme positions entered above
must be stored; otherwise the entries will be lost.
0
1 2 3
4 5 6
7 8 9
yellow
yellow
blue
green
MENU
-
+
MENU
return Help
TV
picture
Timer/childlock
123
456
789
--/-
0
P
+
+
-
OK
P
-
TV
MENU
?
A
AV
B
696+08F-GB
MENU
return Help
Time settings
Childlock
Timer recording
Basic setting of MVS
TV
picture
Childlock
123
456
789
--/-
0
P
+
+
-
OK
P
-
TV
MENU
?
A
AV
B
696+08G1-GB
Childlock. . . . .
Permitted programmes:
-- -- -- -- --
Enter code . . . . :
AV
Begin viewing . :
End viewing . . . :
----
--
--
?
+
?
-
On
:
--
:
--
OK
MENU
return Help
TV
picture
Childlock
123
456
789
--/-
0
P
+
+
-
OK
P
-
TV
MENU
?
A
AV
B
696+08H1-GB
Childlock. . . . .
Permitted programmes:
01 02 05 -- --
Enter code . . . . :
AV
Begin viewing . :
End viewing . . . :
----
--
--
store ?
OK
?
On
:
--
:
--
Page 27

27
Press this key on the remote
control....
The screen displays Explanation
4. Enter your personal code
5. Enter the beginning and
end of the viewing period
Call the TV menu and enter
your personal code
Enter your personal 4-digit code at this point.
The digits are entered with the numeric keys. The
entered code number is NOT displayed!
Ask your local dealer for help if you have forgotten
your personal code number.
Here you can enter the times between which viewing
of the permitted programmes is allowed.
The TV is not automatically switched on at the beginning of this period; it is, however, automatically switched off at the end of it.
If no permitted programmes have been entered all TV
transmissions within this period can be viewed.
Entry of the personal code number switches off the
childlock and the selected programme is displayed on
the screen.
Ask your local dealer for help if you have forgotten
your personal code number.
6. Activate the childlock
8.1 Childlock
Switching off
The childlock is activated when the set is switched off
with the key or with the ON/OFF key.
0
1 2 3
4 5 6
7 8 9
114 0 0
0 08
0
1 2 3
4 5 6
7 8 9
8.1 Childlock
Switching on
red
white
green
MENU
return Help
TV
picture
Childlock
123
456
789
--/-
0
P
+
+
-
OK
P
-
TV
MENU
?
A
AV
B
696+08I-GB
MENU
return Help
Childlock. . . . .
Permitted programmes:
01 02 05 -- --
Enter code . . . . :
AV
Begin viewing . :
End viewing . . . :
TV
picture
----
--:--
--
Childlock
123
456
789
--/-
0
P
-
OK
P
TV
MENU
?
A
B
696+08J-GB
+
+
-
AV
Childlock. . . . .
Permitted programmes:
01 02 05 -- --
Enter code . . . . :
AV
Begin viewing . :
End viewing . . . :
----
?
:
?
14 : 00
18 : 00
Off
Off
--
MENU
return Help
123
456
789
--/-
0
-
OK
TV
MENU
?
A
B
696+08I-GB
TV
picture
Childlock
Childlock. . . . .
Permitted programmes:
P
+
+
P
-
AV
01 02 05 -- --
Enter code . . . . :
AV
Begin viewing . :
End viewing . . . :
----
--:--
--
?
Off
:
--
Page 28

Press this key on the remote
control....
The screen displays Explanation
28
8.2 Recording with the timer
The menu "Timer recording" is intended primarily for recording Pay-TV programmes (e.g. Premiere). When using a Metz video recorder
with „Data Logic“ you can also record SAT programmes* with this menu. For this purpose, the video recorder must be connected to the
EURO 2 socket. *only if a SAT upgrade kit is fitted
8 timers can be programmed up to 2 months in advance.
Example: A VHS video recorder with Data Logic is connected to the EURO 2 socket of the TV, while a Pay-TV decoder (e.g. Premiere) is
connected to the EURO 1 socket. You now wish to record a film running on a Pay TV channel.
1. Call the „Timer recording“
menu
2. Enter the date and time of
the film to be recorded
(see example)
3. Store the programmed data
and return to the TV picture
or standby mode
If no timers have been programmed before, the table in
the menu is empty. If you have previously programmed
timer recordings, these will be displayed in the table.
The current time of day and the current date are needed for programming in the timer menu. The time is
normally obtained from the Hi Text function and the
date from the VPS signal. Note that some stations do
not transmit VPS signals and/or Hi Text.
If the time and/or date are not detected automatically, you must enter them manually.
The month, the day, the hours and the minutes must
each be entered in the form of two digits, e.g. 01.09
for September 1 and 09:00 for 9 AM.
If you make a mistake when entering the date and
time, you can delete the entry in the current column or
the entire line by pressing the C key. The entire line
can be deleted only if the key symbols at the top of the
menu are displayed in colour.
In the column "VTR", which can be selected only if a
video recorder with "Data Logic" is connected, one of
the following settings can be selected with key A:
—
No timer data are transferred to the video recorder.
The video recorder must be programmed manually.
LV 1)If a "Data Logic" video recorder is connected.
1)
A "Data Logic" video recorder will not function automatically without "LV" and must be programmed manually.
0
1 2 3
4 5 6
7 8 9
or
Timer recordings are not possible if the childlock
is switched on.
This does not apply to video recorders with data
transfer!
The same data must also be entered on the AV
programme position of the video recorder or on a
programme position where the video recorder
does not receive a station.
The recording can be aborted at any time by pres-
sing the keys , and sequentially, in
this order, or by pressing the C key with the timer
menu displayed.
white
green
MENU
MENU
return Help
TV
picture
Timer recording
TV / R
-/--
- -
enter date 04.01 14:20
Imissione data 11.12 14:20
600+08K-GB
MENU
return Help
Prog
—
—
—
—
—
—
—
—
—
—
Date
TV
.
.
.
.
.
.
.
.
.
.
picture
:
:
—
:
:
—
:
:
—
:
:
—
:
:
—
:
:
—
:
:
—
:
:
—
:
:
—
:
:
:
—
Time of day
Timer recording
Time of day
TV / R
-/--
26
enter date 04.01 14:20
Imissione data 11.12 14:20
600+08L-GB
Prog
Premiere
—
—
—
—
—
—
—
—
—
Date
07.01
.
.
.
.
.
.
.
.
.
20:15
:
:
:
:
:
:
:
:
:
22:10
—
:
—
:
—
:
—
:
—
:
—
:
—
:
—
:
—
:
—
store ?
VPS
—
—
—
—
—
—
—
—
—
—
VPS
—
—
—
—
—
—
—
—
—
—
OK
?
AV
—
—
—
—
—
—
—
—
—
—
?
AV
—
—
—
—
—
—
—
—
—
—
OK
TV
MENU
return Help
TV
picture
Timer recording
Time of day
TV / R
-/--
26
--
enter date 04.01 14:20
Imissione data 11.12 14:20
600+08M-GB
Prog
Premiere
—
—
—
—
—
—
—
—
—
Date
07.01
.
.
.
.
.
.
.
.
.
20:15
:
:
:
:
:
:
:
:
:
22:10
—
:
—
:
—
:
—
:
—
:
—
:
—
:
—
:
—
:
—
VPS
AV
—
—
—
—
—
—
—
—
—
—
?
AV
OK
TV
—
—
—
—
—
—
—
—
—
—
Page 29

29
9. Connecting headphones
Headphones can be connected to the TV by way of the connecting socket underneath the fascia cover at the front. The socket will only
accept headphones with a 3.5 mm (Nordkap 6.3 mm) jack plug.
We recommend the use of headphones with an impedance of at least 32 Ohms. Headphones of a lower impedance (down to approx.8
Ohms) will impair the sound quality.
The headphones volume can be stored as a standard value. The headphones and the TV speakers can be used together.
In the event of 2-channel sound transmissions it is possible to listen to either channel 1 or 2 on the headphones, irrespective of the chan-
nel set for the TV speakers.
Press this key on the remote
control....
The screen displays Explanation
1. Switch off the TV speakers
and adjust the headphones
volume
2. Store the headphones volume as a standard value
Sound mode selection for
headphones
It is advisable to switch off the TV speakers with the
key when adjusting the volume for the headphones.
Press the yellow key to display the bar for the headphones volume.
Adjust the volume with the keys.
The standard value for the headphones volume can
only be stored by way of the TV menu.
All standard values can be stored in the „Audio standard values“ submenu.
The volume has already been adjusted (see step 1).
It is now only necessary to press the key to store
the headphones volume.
With two-channel sound transmissions it is possible to
select either channel 1 or channel 2.
If headphones are connected, it is possible to listen,
for example, to the English sound track on the speakers (channel 1) and to the other language on the
headphones (channel 2).
This setting can also be called with the sound mute
active by pressing the yellow key. The desired channel
can then be selected with the keys.
9. Headphones
Volume
3. Return to TV picture
TV
TV picture
change
+
-
OK
Volume headphones
65
yellow
yellow
yellow
yellow
-
+
MENU
OK
MENU
return Help
123
456
789
--/-
0
P
+
-
OK
P
TV
MENU
?
A
B
696+04B-GB
TV
picture
Audio standard values
Volume
Treble
+
-
AV
-
Bass
-
AV
Balance
-
Volume headphones
store ?
OK
+
?
48
+
+
23
42
+
00
36
-
OK
Sound-mode headphones
Mono / stereo / Chann.1 / Chann.2
B15-GB
change
-
+
OK
+
-
Page 30

30
The Hi Text file displays all the subjects available on
a
specific programme position and the chapters belonging
to the currently selected subject.
The range of subjects and chapters depend on the
transmitting station and can therefore be completely
different in each programme position.
For some stations, for example, only numbers, rather
than the header lines, appear in the Hi Text file.
Each time the blue key is pressed, the next subject is
selected and the corresponding file card is raised. Prolonged depression of the blue key raises all of the subjects sequentially.
Press the right side of the key to step backwards
through the subjects, or the left side of the key to step
forwards.
The displayed choice of chapters is adapted to the
currently selected subject.
Each time the yellow key is pressed, the next chapter
is selected and the corresponding file card is raised.
Press the right side of the key to step backwards, or
the left side of the key to step forwards.
Prolonged depression of the yellow key raises all the
chapters sequentially.
10. Hi Text
Press this key on the remote
control....
The screen displays Explanation
1. Call Hi Text
2. Select a subject
3. Select a chapter
Basic functions
The first page of the selected subject and chapter is
displayed.
File symbols with arrows in the bottom line indicate
that the corresponding coloured keys will activate subject-by-subject, chapter-by-chapter or page-by-page
leafing.
The blue text window shows the name of the currently
selected subject, while the yellow shows the name of
the currently selected chapter.
4. Open the first page
of the chapter
Hi Text permits broadcasting stations to improve the display of information and graphics. In the past, there were only eight colours
available; with Hi Text, there are 4096 possibilities.
Furthermore, the introduction of so-called pixel graphics makes it possible to present the information pictorially. The broadcasting stations
are currently in the process of adopting these innovations.
We have implemented Hi Text in your TV set in such a manner that you can switch it on and off as desired. Pressing the -/-- key switches
from Hi Text to Megatext or vice versa.
The currently selected mode („Megatext“ or „Hi Text“) is displayed at the top of each page.
yellow
blue
TV
MENU
TV-picture
TOP
Hi Text
Bundesligen
Fußball
Sport
Aktuelles
Übersicht
Subj.
696+10A-GB
MENU
TV-picture
TOP
Hi Text
Bundesligen
Fußball
Sport
Aktuelles
Übersicht
Subj.
696+10B-GB
?
Help
?
Help
Börse
Wetter
ARD-Programm
Football
Börse
Wetter
ARD-Programm
Football
OK
OK
View page
VT-Redaktion
VT-Zentrale
Index
Inhalt
Chapter
on subject
View page
jetzt im TV
morgen
heute
Inhalt
Chapter
on subject
Hinweise
übermorgen
OK
MENU
TOP
Hi Text
TV-picture
OK
Börse
Wetter
ARD-Programm
Football
Bundesligen
Fußball
Sport
Aktuelles
Übersicht
Subj.
696+10C-GB
ARD heute
ARD morgen
ARD-Wochenübersicht
TV-Guide: Zeitschema
TV-Guide: Spartenschema
ARD: Jetzt
im Programm
. . . . . 333
UntertitelVorschau
. . . . . 398
696+10D-D
. . . . . . . . . . . . . .
. . . . . . . . . . . . . .
View page
jetzt im TV
morgen
heute
Inhalt
Chapter
on subject
. . . . . .
. . . . . .
InhaltTV-Guide
übermorgen
301-319
321-339
. . .
. . .
. .
. . .
ARD / ZDF
340
350
375
?
Help
Page 31

31
This function enables you to run through the individual
pages. Just as in a book, you can leaf forwards or
backwards from the displayed page.
Press the right side of the key to step backwards, and
the left side of the key to step forwards.
This function enables you to run through the individual
chapters.
Each time you press the yellow key, the first page of
the next or previous chapter is opened.
Press the right side of the key to step backwards, and
the left side of the key to step forwards.
10. Hi Text
Press this key on the remote
control....
The screen displays Explanation
5. Page-by-page paging
6. Chapter-by-chapter paging
Basic functions
Each time you press the blue key, the first page of the
next or previous subject is opened. In most cases, this
will be an index page.
Press the right side of the key to step backwards, and
press the left side of the key to step forwards.
7. Subject-by-subject paging
yellow
blue
white
MENU
?
Hilfe
Kartei
301 ARD/ZDF So. 5.01.97 13:45:00
Marke: neu nächste
ARD
ARD-Morgenmagazin
06.00
Tagesschau
09.00
Dallas
09.03
Tele-Gym
09.45
Tagesschau
10.00
auslandsjournal
10.03
ZDF-Info Gesundheit
10.45
Tagesschau
11.00
Cappuccino Melange
11.03
Fernsehfilm, 1993 . . . . . . .
Umschau
12.35
Presseschau
12.55
Tagesschau
13.00
ARD-Mittagsmagazin . . . .
13.05
696+10E-D
?
Hilfe
bis 13.45 Uhr
Inhalt 300
MENU
321 ARD/ZDF So. 5.01.97 14:19:00
Nachmittag auf 302
Kartei
ARD
ARD-Morgenmagazin
05.30
Tagesschau
09.00
ML Mona Lisa
09.03
Kneippen für die
09.45
Gesundheit
Tagesschau
10.00
Weltspiegel
10.03
Fall auf Fall - . . . . . . . . .
10.45
Jedem sein Recht
Tagesschau / Börse
11.00
Salomonberries
11.03
Spielfilm, D 1991
Umschau . . . . . . . . . . . .
12.35
Presseschau
12.55
Tagesschau
13.00
696+10F-D
Inhalt 300
Nachmittag auf 322
AV
Sonntag, 5. Januar 1997
307
313
InhaltARD heute
Marke: neu nächste
Montag, 6. Januar 1997
InhaltARD morgen
AV
326
326
MENU
?
Hilfe
Deutschland
Wettervorhersage
Früh- bzw. Mittagstemperaturen
Aussichten für die nächsten Tage
Europäisches Reisewetter
Nord- und Nordwesteuropa
Mittel- und Südosteuropa
Süd- und Südwesteuropa
Wassertemperaturen
Temperaturen international
696+10G-D
Kartei
400 ARD/ZDF So. 5.01.97 14:19:00
Quelle: METEO CONSULT / DWD
Marke: neu nächste
InhaltWetter
AV
WETTER
ÜBERSICHT
401
402
403
404
405
406
. . . . . . . .
407
408
Page 32

32
Multiple pages are indicated by a dark bar with the
subpage numbers on the left-hand side of the displayed page.
The bright numbers indicate the number of subpages
contained in this multiple page. The number of subpages is transmitted by the stations at intervals of 20
seconds. Consequently, it may take some time until all
subpage numbers are displayed.
If there are more than 5 subpages, the cursor (white
bar) can be moved to the right with the key to
dis-
play the next group of subpage numbers (for example
01
to 11).
Some stations do not provide multiple page identifica-
tion; in this case, the subpages are displayed sequentially. To stop a page for reading, one of the A or B
function keys must be programmed with the „Stop
page“ function in Hi Text mode. Renewed depression
of the „Stop page“ function key advances to another
subpage (the one the station is currently transmitting).
Use the
keys to move
the cursor (coloured bar)
upwards and downwards through the page numbers.
The page number highlighted by the cursor can be
called directly with the key.
The cursor (coloured bar) can be moved up and down
with the and keys. The page number on
which the cursor is located can be called directly by
pressing the key.
10. Hi Text
Press this key on the remote
control....
The screen displays Explanation
1. Recognizing multiple pages
2. Selecting subpages
Multiple pages
10. Hi Text
Page selection by cursor
-
-
01 02 03 04 05
589 ARD/ZDF So 5.01.97 15:34:00
-
Marke: neu nächste
computer
Hallo und herzlich willkommen . . .
Auf den folgenden Seiten informieren
wir Sie über unseren Service rund um
das erste regelmäßige Online-Magazin
im deutschen Fernsehen.
Technische Mindestausstattung,
Online-Kosten
Vollständige Liste aller
Internetcafes
netNite im Internet
(http://www.zdfmsn.de)
Zuschauer-Postbox
netNite Chat
netNite Weiterbildung
Nächste Sendung
ZDF: netNite - das Online - Magazin >>
696+10H-D
. . . . . . . . . . . . . . . . . . .
. . . . . . . . . . . . . . . . . . . .
. . . . . . . . . . . .
. . . . . . . . . . . . . . .
. . . . . . . . . . . . . . . . . . . . .
. . . . . . . . . . . . .
. . . . . . . . . . . . . . . .
ComputerService
AV
1/8
2/9
3/9
4/9
5/9
6/9
7/9
8/9
+
-
P
+
-
1,92 DM
4,20 DM
-
2/8
+
-
OK
+
-
<< 01 02 03 04 05 06 07 08 09 10 11 >>
589 ARD/ZDF So 5.01.97 15:40:00
computer
Technische Mindestausstattung, Online
Kosten
Computer mit 486 Prozessor
mindestens 8 MB Speicher (16 MB
ideal)
mindestens 500 MB Festplatte
Super VGA-Grafikkarte
mindestens 15" Farb-Monitor
Soundkarte mit Aktivboxen
Zu veranschlagende Kosten:
ca. 1500 - 2000 DM
Surf-Kosten (eine Stunde T-Online)
Telefongebühren (ab 21.00Uhr)
Online-Zeittakt und Internet Gebühr
696+10I-D
. . . . . . . . . . . . . . . . . . . .
ZDF: netNite - das Online - Magazin >>
ComputerService
ARD heute
ARD morgen
ARD-Wochenübersicht
TV-Guide: Zeitschema
P
-
TV-Guide: Spartenschema
. . . . . . . . . . . . . .
. . . . . . . . . . . . . .
. . . . . .
. . . . . .
301-319
321-339
. . .
. . .
. .
. . .
340
350
375
P
-
P
+
OK
OK
ARD: Jetzt
im Programm
. . . . . 333
UntertitelVorschau
. . . . . 398
696+10D-D
ARD / ZDF
InhaltTV-Guide
Page 33

33
10. Hi Text
10. Hi Text
Press this key on the remote
control....
The screen displays Explanation
Direct page selection
Return to last index page
After depression of the first numeric key, the number of this key, followed by two hyphens, appears at
the top left of the screen. Enter the complete 3-digit
number. A green line with the text „Wait for page ...“
is displayed at the top of the screen after the last
digit has been entered. A red line with the message
„Page is not transmitted“ is displayed if the entered
page number does not exist. Otherwise the TV searches
for the specified page and displays it as soon as it is
located.
Press the 0 key to return to the last index page.
The adjoining picture shows the index page of the ARD
channel as an example.
1. Enter the page number
e.g. page 589
85 9
0
Return to last index page
Some stations transmit Teletext pages with news flashes,
general information, football results, etc.
Once you have selected such a page and hidden it by
pressing the key, the page will be displayed again
whenever it is updated by the TV station.
10. Hi Text
Suppressing news-flash pages
Topical or news-flash
pages
white
-
-
01 02 03 04 05
589 ARD/ZDF So 5.01.97 15:34:00
-
Marke: neu nächste
computer
Hallo und herzlich willkommen . . .
Auf den folgenden Seiten informieren
wir Sie über unseren Service rund um
das erste regelmäßige Online-Magazin
im deutschen Fernsehen.
Technische Mindestausstattung,
Online-Kosten
Vollständige Liste aller
Internetcafes
netNite im Internet
(http://www.zdfmsn.de)
Zuschauer-Postbox
netNite Chat
netNite Weiterbildung
Nächste Sendung
ZDF: netNite - das Online - Magazin >>
696+10H-D
. . . . . . . . . . . . . . . . . . .
. . . . . . . . . . . . . . . . . . . .
. . . . . . . . . . . .
. . . . . . . . . . . . . . .
. . . . . . . . . . . . . . . . . . . . .
. . . . . . . . . . . . .
. . . . . . . . . . . . . . . .
ComputerService
ARD heute
ARD morgen
ARD-Wochenübersicht
TV-Guide: Zeitschema
TV-Guide: Spartenschema
. . . . . . . . . . . . . .
. . . . . . . . . . . . . .
. . . . . .
. . . . . .
301-319
321-339
. . .
. . .
. .
. . .
AV
340
350
375
1/8
2/9
3/9
4/9
5/9
6/9
7/9
8/9
TV
ARD: Jetzt
im Programm
. . . . . 333
UntertitelVorschau
. . . . . 398
696+10D-D
ARD / ZDF
InhaltTV-Guide
MENU
?
LETZTE MELDUNG: Eurocard bestätigt doppelte
Abbuchungen von Auslandsumsätzen im
November. . . . . . . . . . . . . . . . . . . 121
Nachrichten - Übersichten . . . . . . .112 – 115
696+12A-D
Kartei
Hilfe
111 ARD/ZDF So. 5.12.97 14:19:00
Marke: neu nächste
InhaltWetter
AV
TV
Page 34

34
When the B* key is pressed for the first time, the upper
part of the selected page is displayed with the font size
doubled.
You can scroll slowly through the page by holding
down the key.
* The B key was programmed in the factory for this
function, but this programming can be changed (see
Section „Equipment configuration - Assigning the
function keys“).
When the B* key is pressed for the second time, the
displayed page is scrolled upwards.
10. Hi Text
Press this key on the remote
control....
The screen displays Explanation
1. Select double font size,
e.g. press the B* key
2. Scroll the page upwards,
e.g. press the B* key
Doubling the font size
* Depending on the assignment of the
function keys. The factory setting is B.
When the B* key is pressed for the third time, the displayed page is scrolled further, and so on.
Press the B* key for a fifth time to return to normal font
size.
3. Scroll the page further,
e.g. press the B* key
4. Return to normal font size
g
10.00
T
*
*
*
*
A
C
C
B
or
A
B
or
A
B
or
A
B
or
C
C
MENU
?
Hilfe
Kartei
301 ARD/ZDF So. 5.01.97 13:45:00
Marke: neu nächste
ARD
06.00
09.00
09.03
09.45
10.00
10.03
10.45
11.00
11.03
12.35
12.55
13.00
13.05
696+10E-D
?
Hilfe
ARD-Morgenmagazin
Tagesschau
Dallas
Tele-Gym
Tagesschau
auslandsjournal
ZDF-Info Gesundheit
Tagesschau
Cappuccino Melange
Fernsehfilm, 1993 . . . . . . .
Umschau
Presseschau
Tagesschau
ARD-Mittagsmagazin . . . .
bis 13.45 Uhr
Inhalt 300
MENU
Kartei
Sonntag, 5. Januar 1997
Nachmittag auf 302
InhaltARD heute
Marke: neu nächste
301 ARD/ZDF So. 5.01.97 13:45:00
ARD
Sonntag, 5. Januar 1997
ARD-Morgenmagazin
06.00
Tagesschau
09.00
Dallas
09.03
Tele-Gym
09.45
Tagesschau
10.00
auslandsjournal
10.03
307
313
AV
AV
Sonntag, 5. Januar 1997
ARD-Morgenmagazin
06.00
Tagesschau
09.00
Dallas
09.03
Tele-Gym
09.45
Tagesschau
10.00
auslandsjournal
10.03
ZDF-Info Gesundheit
10.45
Tagesschau
11.00
Cappuccino Melange
11.03
Fernsehfilm, 1993 . . . . . . .
Umschau
12.35
Presseschau
12.55
esschau
Ta
13.00
agesschau
auslandsjournal
10.03
ZDF-Info Gesundheit
10.45
Tagesschau
11.00
Cappuccino Melange
11.03
Fernsehfilm, 1993 . . . . . . .
Umschau
12.35
Presseschau
12.55
Tagesschau
13.00
ARD-Mittagsmagazin . . . .
13.05
307
307
313
bis 13.45 Uhr
Inhalt 300
Nachmittag auf 302
InhaltARD heute
Page 35

35
There will be certain Hi Text pages, e.g. stock market, news, weather forecast, etc., that you willl want to read repeatedly. We have programmed a way of making it easier to read such pages: Hi Text pages can be flagged with the aid of marks (similar to tabs in a file).
We provide a total of 100 marks. Up to 10 marks may be assigned to each programme position, as long as the total number of
marks assigned does not exceed 100.
You can set the marks on any desired pages and you can delete them again when they are no longer needed. If marks are set on a page,
you can page from one to another by pressing the green key when HiText is active.
In the ARD channel, for example, page 589 is a multiple
page.
On multiple pages, marks are always set on the main
page.
10. Hi Text
Press this key on the remote
control....
The screen displays Explanation
1. Call the desired page
e.g. page 400
2. Set the first mark
3. Select the next page
e.g. 589
Setting marks
4
0 0
5
8 9
If marks have not yet been set in this programme
position, then press the key to set the 1st mark.
„MARK 1
“ is displayed at the top lefthand corner of the
screen.
red
MENU
?
696+10G-D
?
Hilfe
MARKE 1 400 ARD/ZDF So. 5.01.97 14:19:00
Deutschland
Wettervorhersage
Früh- bzw. Mittagstemperaturen
Aussichten für die nächsten Tage
Europäisches Reisewetter
Nord- und Nordwesteuropa
Mittel- und Südosteuropa
Süd- und Südwesteuropa
Wassertemperaturen
Temperaturen international
696+10J-D
Kartei
Hilfe
400 ARD/ZDF So. 5.01.97 14:19:00
Deutschland
Wettervorhersage
Früh- bzw. Mittagstemperaturen
Aussichten für die nächsten Tage
Europäisches Reisewetter
Nord- und Nordwesteuropa
Mittel- und Südosteuropa
Süd- und Südwesteuropa
Wassertemperaturen
Temperaturen international
Quelle: METEO CONSULT / DWD
MENU
Quelle: METEO CONSULT / DWD
Marke: neu nächste
InhaltWetter
Kartei
Marke: entf. nächste
WETTER
ÜBERSICHT
InhaltWetter
AV
WETTER
ÜBERSICHT
. . . . . . . .
AV
. . . . . . . .
401
402
403
404
405
406
407
408
401
402
403
404
405
406
407
408
-
-
01 02 03 04 05
MARKE 2 589 ARD/ZDF So 5.01.97 15:34:00
-
Marke: entf. nächste
AV
computer
Hallo und herzlich willkommen . . .
Auf den folgenden Seiten informieren
wir Sie über unseren Service rund um
das erste regelmäßige Online-Magazin
im deutschen Fernsehen.
Technische Mindestausstattung,
Online-Kosten
Vollständige Liste aller
Internetcafes
netNite im Internet
(http://www.zdfmsn.de)
Zuschauer-Postbox
netNite Chat
netNite Weiterbildung
Nächste Sendung
ZDF: netNite - das Online - Magazin >>
696+10K-D
. . . . . . . . . . . . . . . . . . .
. . . . . . . . . . . . . . . . . . . .
. . . . . . . . . . . .
. . . . . . . . . . . . . . .
. . . . . . . . . . . . . . . . . . . . .
. . . . . . . . . . . . .
. . . . . . . . . . . . . . . .
ComputerService
1/8
2/9
3/9
4/9
5/9
6/9
7/9
8/9
Page 36

36
When the required page is displayed (in our example
page 589), press the red key again to set the second
mark.
„MARK 2“ is now displayed at the top left-hand corner
of the screen.
10 marks can be set on each programme position, as
long as the total number of marks assigned does not
exceed 100. See steps 1 - 4.
If all of the 100 available marks have been used,
the red dot in the title line of the menu changes to
grey.
10. Hi Text
Press this key on the remote
control....
The screen displays Explanation
4. Set the second mark
5. Set further marks
e.g. page 500
6. Return to TV picture
Setting marks
5 0 0
red
red
-
-
01 02 03 04 05
MARKE 2 589 ARD/ZDF So 5.01.97 15:34:00
-
Marke: entf. nächste
AV
computer
Hallo und herzlich willkommen . . .
Auf den folgenden Seiten informieren
wir Sie über unseren Service rund um
das erste regelmäßige Online-Magazin
im deutschen Fernsehen.
Technische Mindestausstattung,
Online-Kosten
Vollständige Liste aller
Internetcafes
netNite im Internet
(http://www.zdfmsn.de)
Zuschauer-Postbox
netNite Chat
netNite Weiterbildung
Nächste Sendung
ZDF: netNite - das Online - Magazin >>
696+10K-D
. . . . . . . . . . . . . . . . . . .
. . . . . . . . . . . . . . . . . . . .
. . . . . . . . . . . .
. . . . . . . . . . . . . . .
. . . . . . . . . . . . . . . . . . . . .
. . . . . . . . . . . . .
. . . . . . . . . . . . . . . .
ComputerService
1/8
2/9
3/9
4/9
5/9
6/9
7/9
8/9
MENU
?
Hilfe
MARKE 3 500 ARD/ZDF So. 5.01.97 13:47:00
Kartei
Marke: entf. nächste
AV
SERVICE
. . . . . . . . . . . . . . . . . . .
Kultur
Ratgeber: ARD/ZDF-Infos
Lotto/Gewinnzahlen
Reise/Verkehr
halbstarl!! - Jugendprogramm
Videotext-Preisrätsel
Computer
A la carte
Weltzeituhr
696+10M-D
. . . . . . . . . . . . . . . .
. . . . . . . . . . . . . . . .
. . . . . . . . . . . . . . .
. . . . . . . .
. . . . . . . . . . . . .
InhaltService
. . . .
. . . . . . .
501/502
530
540
550
570
575-577
580
590
599
TV
Page 37

37
After the C key has been pressed, a panel with „Mark
1“ will be displayed.
On programme positions without a mark, a white field
will be displayed with the text „No mark“.
Each time the green key is pressed, you advance to
the next mark. In this manner you can run through all
pages on which marks are set.
The C key will return you to the TV picture after having
run through all marks.
Press the key to return directly to the TV picture
without having to page through all the marks.
* Depending on how the function keys are programmed.
The factory setting is C.
10. Hi Text
Press this key on the remote
control....
The screen displays Explanation
1. From TV picture to
the first mark
2. Step forward to the
next mark
3. Return to TV picture
Infotext (Mark by mark paging)
The basic idea of Infotext is that you can quickly retrieve and read pages which have previously been marked as described on the two previous pages of this manual. Once marks have been set, you can page through the related pages at any time by pressing a programmed
function key
Once the marks have been set, you can step through all of the marked pages from the current TV programme by pressing a programmed
key (key C is programmed in the factory for this purpose).
green
*
A
B
or
C
MENU
?
Hilfe
Deutschland
Wettervorhersage
Früh- bzw. Mittagstemperaturen
Aussichten für die nächsten Tage
Europäisches Reisewetter
Nord- und Nordwesteuropa
Mittel- und Südosteuropa
Süd- und Südwesteuropa
Wassertemperaturen
Temperaturen international
696+10G-D
-
01 02 03 04 05
MARKE 2 589 ARD/ZDF So 5.01.97 15:34:00
Kartei
400 ARD/ZDF So. 5.01.97 14:19:00
Quelle: METEO CONSULT / DWD
Marke: neu nächste
WETTER
ÜBERSICHT
InhaltWetter
-
-
Marke: entf. nächste
AV
. . . . . . . .
AV
computer
Hallo und herzlich willkommen . . .
Auf den folgenden Seiten informieren
wir Sie über unseren Service rund um
das erste regelmäßige Online-Magazin
im deutschen Fernsehen.
Technische Mindestausstattung,
Online-Kosten
Vollständige Liste aller
Internetcafes
netNite im Internet
(http://www.zdfmsn.de)
Zuschauer-Postbox
netNite Chat
netNite Weiterbildung
Nächste Sendung
ZDF: netNite - das Online - Magazin >>
696+10K-D
. . . . . . . . . . . . . . . . . . .
. . . . . . . . . . . . . . . . . . . .
. . . . . . . . . . . .
. . . . . . . . . . . . . . .
. . . . . . . . . . . . . . . . . . . . .
. . . . . . . . . . . . .
. . . . . . . . . . . . . . . .
ComputerService
401
402
403
404
405
406
407
408
1/8
2/9
3/9
4/9
5/9
6/9
7/9
8/9
TV
TV
Page 38

38
Press the C key to call the page where the mark is to
be erased.
* Depending on how the function keys are program-
med. The factory setting is C.
Erasure of the mark on the current text page changes
the sequence of the remaining marks.
Example:
3 marks have been set in the current programme position:
- Mark 1 on text page 400
- Mark 2 on text page 500
- Mark 3 on text page 589
You now erase the mark 1 on text page 400.
The sequence of the remaining marks is immediately
re-arranged and is now:
- Mark 1 on text page 500
- Mark 2 on text page 589
10. Hi Text
Press this key on the remote
control....
The screen displays Explanation
1. Call the desired page
e.g. page 400
2. Erase the mark
3. Return to TV picture
Erasing marks
red
B
A
C
*
or
MENU
?
Hilfe
MARKE 1 400 ARD/ZDF So. 5.01.97 14:19:00
Deutschland
Wettervorhersage
Früh- bzw. Mittagstemperaturen
Aussichten für die nächsten Tage
Europäisches Reisewetter
Nord- und Nordwesteuropa
Mittel- und Südosteuropa
Süd- und Südwesteuropa
Wassertemperaturen
Temperaturen international
696+10J-D
?
Hilfe
Deutschland
Wettervorhersage
Früh- bzw. Mittagstemperaturen
Aussichten für die nächsten Tage
Europäisches Reisewetter
Nord- und Nordwesteuropa
Mittel- und Südosteuropa
Süd- und Südwesteuropa
Wassertemperaturen
Temperaturen international
696+10G-D
Kartei
Marke: entf. nächste
WETTER
ÜBERSICHT
Quelle: METEO CONSULT / DWD
MENU
Kartei
400 ARD/ZDF So. 5.01.97 14:19:00
Quelle: METEO CONSULT / DWD
InhaltWetter
Marke: neu nächste
WETTER
ÜBERSICHT
InhaltWetter
AV
. . . . . . . .
AV
. . . . . . . .
401
402
403
404
405
406
407
408
401
402
403
404
405
406
407
408
TV
Page 39

39
The teletext transmitted by the station is superimposed on the picture at the bottom of the screen.
The subtitle function can be activated or deactivated
with the A*, B* or C* function key.
This TV enables you to display programme subtitles automatically.
For this purpose one of the three A, B or C function keys must be programmed on the remote control handset. Please refer to Section
„Equipment configuration - Assigning the function keys“ for programming. The subtitles will only be displayed automatically after a
function key has been programmed accordingly.
Example: You wish to watch the news with its subtitles. Program a function key with the „Subtitle“ function.
The subtitle function can be switched off and on again
with the correspondingly programmed function key.
Note: If the subtitle function is programmed for
one of the function keys, it will automatically be activated when the TV set is
switched on.
Hi Text contains riddles with hidden answers.
The solutions to these riddles can be displayed with
the A*, B* or C* function key.
10. Hi Text
10. Hi Text
Press this key on the remote
control....
The screen displays Explanation
1. Display of subtitles in the
current programme
2. Blank out the subtitles*
Access to riddle solutions
Subtitles
Riddle solutions key
* Depending on the assignment of the function keys
* Depending on the assignment of the function keys.
In Ballungsgebieten sind solche Bilder selten
automatic
A
C*
or
or
*
*
B
A
C*
or
or
*
*
B
Page 40

40
Press this key on the remote
control....
The screen displays Explanation
11. Special picture effects
1. Switch on the zoom function
and enlarge the picture
2. Call the zoom function for
the current programme
position
Variable Zoom
All programmes that are not transmitted in the traditional 4:3 screen format, such as cinema films in Cinemascope or Super-Cinemascope
or
16:9 format, have black bars at the top and bottom of the screen.
With the zoom function, you can increase the size of the picture and make the black bars disappear. Although this also causes part of the
picture to move off the screen at each side, the resulting loss of information is slight and less disturbing than the black bars.
IJ
IJ
IJ
IJ
3. Switch off the zoom function
Zoom
Zoom
IJ
IJ
Zoom
IJ
2x
Press the button until the black bars at the
top and bottom of the screen have disappeared.
The entire picture is enlarged uniformly.
The selected enlargement factor is automatically
stored for this programme position as long as the
TV set is not switched off. Switching to another
station will restore the picture to its normal size.
If you return to the station for which you activated the zoom function, the picture will be automatically enlarged if the same programme is
still running.
If you wish to use the selected enlargement also
for other programmes, press the key again
after setting the zoom factor with the key.
This returns the picture to its normal size, but
stores the current enlargement factor for subsequent use.
If the TV set has been switched off with the
remote control or the main switch, the stored
enlargement factor can be recalled by pressing
the key twice.
IJ
P
+
P
+
IJ
P
+
IJ
Page 41

41
11. Special picture effects
Still picture
The current frame is „frozen“ on the screen
when you press the II key. The TV programme (or
the video film) continues to run in the background.
Pressing the II key again switches back to the
current programme (or video film).
1. Activate the still picture
function
Press this key on the remote
control....
The screen displays Explanation
2. Deactivate the still picture
function
II
II
12. Operation without remote control
Programme selection:
Press the - + keys.
Volume:
Hold down the preselect key F until the bar display for the volume appears on the screen. Now press the - + keys to adjust the
volume.
Contrast:
Hold down the preselect key F until the bar display for contrast
appears on the screen. Then press the - + keys to adjust the
contrast.
This mode is only intended for an emergency when the battery in
the remote control handset is flat, or if the remote control is not
available.
The TV controls are underneath a cover at the front of the set.
You can control the following functions on the TV without the
remote control handset. The function remains preselected for 10
seconds.
Page 42

42
13. Remote control handset for video recorders
RB11
123
456
789
0
OK
P
+
P
-
AV
TV
MENU
+
-
VTR
REC
TIMER
B
100 H z
-/--
Ȅ
C
PRG.
IJ
IJ
ɮ
• Video recorder On/OFF
• Programme position selection
• Next programme
• Video recorder timer ON/OFF
•
To switch the remote control to video
recorder mode:
Press and hold this key and press
the desired function key.
In order to permit control of a video
recorder, function key B for the TV level
must be programmed to „VTR operation“
in the menu „Equipment configu-
ration/Assigning the function keys“
on the TV set.
•
REC - Start recording
• Still - Pause
•
Index - Video index search forward
•
Switch to AV mode AV 1, AV 2, ...
.
•
Play - Start playback
• Stop
• Next programme
•
FF (fast forward)
From STOP: fast forward
From PLAY: picture search forward
•
On video recorders with the data
transfer facility, immediate recording
of the programme currently displayed
on the screen
1) Press the keys B and /VTR
together.
2) Press the keys B and /TV-REC
together.
•
REW (rewind)
From STOP: fast rewind
From PLAY: picture search reverse
•
Slow-motion playback
•
Operator help for video rec. operation
• I
ndex - Video index search reverse
•
Stop - Terminates playback or recording
Some of the basic functions of Metz video recorders can be controlled with the remote control unit. Point the remote control handset
towards the video recorder when using it.
I
n order to permit control of a video recorder, function key B for the TV level must be programmed to „VTR operation“
in
the menu „Equipment configuration/Assigning the function keys“ on the TV set.
Whenever a key is pressed, an indicator on the remote control unit blinks.
Batteries:
Insert the enclosed batteries in the remote
control, observing the symbols on the
cover of the battery compartment.
Remove exhausted batteries from the
remote control and return them to your
dealer or to an authorised battery collection
point.
Nota:
Do not point the remote control
unit into your eyes and press a
key on it !
Do not use rechargeable batteries in the remote control unit.
Page 43

43
14. Connecting peripheral equipment
Video recorders can be connected to the TV set via the antenna socket or one of the EURO sockets. We recommend that you use one of
the EURO (Scart) sockets for this purpose, since only the EURO sockets have separate inputs and outputs for picture
and sound signals.
Camcorders
can be connected to the TV set with special cables (available from your dealer). The following connection diagram applies
in principle to all of our products, although the various sockets may be located in different positions on different units.
Camcorder
Videorecorder
Camcorder (video camera)
TV set, rear view
e.g. hama no. 42387 or hama no .42394
Euro or Scart cable
Cinch-Scart cable for VHS-Scart or S-VHS-Scart connection
Euro 2
AV 1
Euro 1
Video recorder, rear view
Page 44

44
14. Connecting peripheral equipment
Connecting external
devices
In the menu „Device connection“, you can define which AV devices are connected to the various sockets on the TV set. The box „Devices“
contains a list of common AV devices. Only certain devices can be connected to the FRONT sockets.
Wherever possible, the AV devices should be connected to specific EURO sockets, namely:
EURO 1: VHS PC, games console ( e.g.Nintendo, photo CD, SAT receiver, Pay-TV decoder, DVD, S-VHS playback unit.
EURO 2:
S-VHS/Hi8 video recorder, S-VHS/Hi8 video recorder + Pay-TV decoder, VHS video recorder, SAT receiver, SVHS/Hi8-videorecorder+Pay-TVDecoder, SAT-receiver.
The connections are pre-programmed in the factory as shown in the picture for step 1.
Press this key on the remote
control....
The screen displays Explanation
1. Call the „Device
connection“ menu
2. Change the device
connections
3. Change the signal type
4. Store the settings and
return to TV picture
In the „Device connection“ menu, you can assign one
of the defined AV devices to each of the EURO sockets.
The abbreviations in the box on the right have the
following meanings:
Video rec. = video recorder (up to 2 may be connected).
Video rec. 1 is the video recorder which is always
connected; Video rec. 2 is used for copying from one
recorder to another.
Logic VTR = video recorder with data transfer to/from
the TV set(e.g. DataLogic, QLink, EasyLink, Megalogic)
VTR+Dec. = video recorder and Pay-TV decoder (e.g.
Premiere), where the decoder is connected only to the
video recorder.
Camcorder = video camera
Decoder = Pay-TV decoder (e-g- Premiere)
SAT = external satellite receiver
Game = games console
The default settings can be modified to meet your own
requirements. You should, however, note the following
input and output signal allocations when doing this.
To change the settings, select the appropriate EURO
socket with the coloured keys and then select the
device to be connected with the and keys.
When the devices are selected, the signal type is
always set to „video“. Pressing the red key displays a
box for selection of the signal type.
Differences between the signal types:
• continuous AV operation:
the screen displays the
picture provided by the AV device. The channel setting
of the TV set has no effect.
• . . . controls AV operation:
if the AV device is set to
„play“, the screen displays the picture provided by the
AV device; if the AV device is set to „stop“, the screen
displays the picture of the selected TV programme
position.
TV picture
OK
TV
red
yellow
red
yellow
blue
white
green
S-VHS / Hi8
(= Y/C =S-Video)
Input
EURO 1
EURO 2
Front
Output
VHS
(= Video)
Input Output
RGB
Input
Yes Yes Yes Yes Yes
Yes
Yes
No
-
Yes
Yes
Yes
-
Yes
No
MENU
P
+
P
+
MENU
return Help
TV
picture
Device connection
+
AV
EURO1: Video
Video Rec. 2
EURO2: Video
Video Rec. 1
Front: Video
Camcorder
Ȅ
Signal type
selection
123
456
789
--/-
0
P
+
-
OK
P
-
TV
MENU
?
A
B
600-14L-GB
?
Devices
no device
Video Rec. 1
Video Rec. 2
LogicVTR
LogicVTR+D
VTR+DEC(1)
VTR+DEC(2)
Camcorder
Mixer
PC
Decoder A
Decoder B
DVD
Photo CD
SAT/SetTop
Games
▲
▼
MENU
return Help
TV
picture
Device connection
+
AV
EURO1: Video
Video Rec. 2
EURO2: Video
Video Rec. 1
Front: Video
Camcorder
Ȅ
Signal type
selection
123
456
789
--/-
0
P
+
-
OK
P
-
TV
MENU
?
A
B
600-14M-GB
P
-
?
Devices
no device
Video Rec. 1
Video Rec. 2
LogicVTR
LogicVTR+D
VTR+DEC(1)
VTR+DEC(2)
Camcorder
Mixer
PC
Decoder A
Decoder B
DVD
Photo CD
SAT/SetTop
Games
▲
▼
P
P
MENU
return Help
TV
picture
Device connection
+
AV
EURO1: Video
Video Rec. 2
EURO2: Video
Video Rec. 1
Front: Video
Camcorder
Ȅ
Device
selection
123
456
789
--/-
0
P
+
-
OK
P
-
TV
P
-
MENU
?
A
B
600-14N-GB
?
Sign. type
Video Rec. 2
controls AV
operation
continuous
AV operation
Video
YC in
▲
▼
+
-
Page 45

45
The picture quality of a video film can be improved in a terrestrial programme position with a
standard channel.
The video signal for this programme position
must be set to „Aerial“.
To ensure optimum picture quality the „VCR“
function must be switched on.
Set the „VCR“ function to „1“ with the keys
and press the key to store the setting in the
programme position.
Press the key to return to the TV picture.
If setting 1 does not result in a satisfactory picture
quality, you can switch to setting 2.
1. Select the station table and
call the picture submenu
2. Call the second picture submenu and adjust VCR
14. Connecting peripheral equipment
Video recorders
Connecting a video recorder via the aerial socket
• Connect the aerial output (RF-out) of the video recorder to the aerial socket of your TV by means of the aerial cable.
• Load a recorded video cassette in the video recorder.
• Start playback or switch on the test pattern of the video recorder. The test pattern of most video recorders is located within the standard
channels Ch 30 to Ch 40 (see operating instructions of the video recorder).
• Execute a station search, beginning with standard channel 25. See Section 3. Presetting TV stations, station search.
• If the playback picture or the test pattern of the video recorder is displayed on the screen, then this channel can be stored. See Section
3. Presetting TV stations.
• In order to ensure optimum picture quality at all times, select the option „VCR 1“. To do so, proceed as described below.
Press this key on the remote
control....
The screen displays Explanation
red
red
blue
white
red
-
+
OK
MENU
return Help
TV
picture
TV station table
—
—
—
—
Sound
—
—
—
—
Programme
▲▼
0
VTR1
1
ARD
2
ZDF
3
SAT 1
4
5
6
7
8
9
600+06C1-GB
MENU
return Help
Sharpness
Noise reduction
CTI
further
<< weitere Einstellungen
Logo, Channel, Signal
TV
picture
TV station table
Pict.
—
—
—
—
Sound
—
—
—
—
00
0
00
4:3
Programme
▲▼
0
LOGIC
1
ARD
2
ZDF
3
SAT 1
4
5
6
7
8
9
600+06J-GB
Chrom. adjustm.
Col. offset adj.
Contrast adj.
AV
Picture format
VCR
<< weitere Einstellungen
Logo, Channel, Signal
?
Auto.
Auto.
Auto.
Auto.
Auto.
3
Auto.
A1
Auto.
Auto.
On
Auto.
Auto.
?
Auto.
Auto.
Auto.
Auto.
Auto.
Auto.
Auto.
Auto.
Auto.
1
Auto.
StdPict.
Std
+
OK
-
TV
Page 46

46
14. Connecting peripheral equipment
Video recorders
Video signal
In the following example, logic video recorder 1 is to be connected to the EURO 1 socket.
Example: Connect video recorder 1 to the EURO 1 socket.
Press this key on the remote
control....
The screen displays Explanation
1. Select any desired programme position and call the
station table
2. Call the submenu
„Video signal“
3. Select the video signal
EURO 1: „Video Rec.1“
4. Store the setting and return
to the TV picture
TV picture
Select any desired programme position (in this
example: position 25).
The video signal is normally supplied directly by the
aerial.
In order to display the picture from the video cassette
on the screen, the video signal must be set to
„EURO1“.
In the case of a connection via a EURO cable, you
should also set the function „VCR“ to „1“ (see also
page 45).
0
1 2 3
4 5 6
7 8 9
white
white
yellow
MENU
return Help
TV
picture
TV station table
Prog. Logo
▲▼
PRO7
20
RTL2
21
VOX
22
DSF
23
EUSPO
24
-
25
DISCO
26
MTV
27
MDR
28
CNN
29
696+11D-GB
MENU
return Help
Channel Signal
41
24
29
52
28
36
12
42
53
>> further settings
Pict., Sound, Std.,
TV
61
picture
Aerial
Aerial
Aerial
Aerial
Aerial
Aerial
Aerial
Aerial
Aerial
Aerial
TV station table
Prog. Logo Channel Signal
▲▼
PRO7
20
RTL2
21
VOX
22
DSF
23
EUSPO
24
Aerial
PREMI
25
EURO1: Video Rec. 2
DISCO
26
MTV
27
EURO2: LogicVTR
MDR
28
AV
Front: Camcorder
CNN
29
>> weitere Einstellungen
Ȅ
Pict., Sound, Std.
600+14I-GB
41
24
29
52
28
46
12
42
53
61
Aerial
Aerial
Aerial
Aerial
Aerial
Antenne
Antenne
Antenne
Antenne
Antenne
?
?
OK
TV
MENU
return Help
TV
picture
TV station table
Prog. Logo Channel Signal
▲▼
PRO7
20
RTL2
21
VOX
22
DSF
23
EUSPO
24
Aerial
PREMI
25
EURO1: Video Rec. 2
DISCO
26
MTV
27
EURO2: LogicVTR
MDR
28
AV
Front: Camcorder
CNN
29
>> weitere Einstellungen
Ȅ
Pict., Sound, Std.
600+14J-GB
41
24
29
52
28
46
12
42
53
61
Aerial
Aerial
Aerial
Aerial
Aerial
Antenne
Antenne
Antenne
Antenne
Antenne
?
Page 47

47
14. Connecting peripheral equipment
Pay-TV decoder
This Pay-TV decoder decodes the scrambled signals of a Pay-TV station (e.g. Premiere) so that they can be displayed on the screen of the
TV set. For connection of a Pay-TV decoder, you need a EURO (=Scart) cable in which all 21 pins are assigned.
If you want to record Pay-TV programmes with a video recorder, we recommend that you connect the Pay-TV decoder directly to the video
recorder. If this is not possible, the Pay-TV decoder can be connected to the EURO 1 or EURO 2 socket (see also „Connecting external
devices“ on page 44).
The following diagram shows two different connections of a Premiere decoder Typ G2
EURO EURO
Decoder (e.g. Premiere)
Decoder (e.g. Premiere)
Connections on the rear of the TV set
VHS Video recorder
S-VHS/HI8 Video recorder
EURO 1
EURO 1 EURO 2
EURO 1
Metz cable 087928919
Only for copying S-VHS/Hi8 films coming from the FRONT
sockets or from EURO 1 (Scart or EURO output) to EURO 2
(phono input).
Fully assigned SCART or EURO cable, for S-VHS/Hi8 playback only
or
2EURO-600
2EURO-600
Page 48

48
14. Connecting peripheral equipment
Pay-TV decoder
Video signal
Press this key on the remote
control....
The screen displays Explanation
1. Select the Pay-TV programme position and call the
station table
2. Call the submenu „Signal“
3. Select video signal „via
decoder“
4. Store the setting and return
to TV picture
The video signal is normally supplied directly from the
aerial.
A Pay-TV signal must always be unscrambled in a
decoder before it can be displayed on the screen.
You can switch between „Aerial direct“ and „Aerial via
decoder“ with the aid of the keys.
For the following explanation it is assumed that the Pay-TV decoder A (Premiere) is connected to the EURO 1 socket.
The following settings must be made on the TV set:
Connect the decoder as shown in the figure on page 47
.
Call the Device connection menu on the TV set (see
page 44):
Assign the connection configuration, such as Decoder
A“ or „VTR+DEC (1)“, depending on how the decoder
is connected, to one of the EURO sockets.
white
white
MENU
return Help
TV
picture
Station table
Prog. Logo
▲▼
PRO7
20
RTL2
21
VOX
22
DSF
23
EUSPO
24
PREMI
25
DISCO
26
MTV
27
MDR
28
CNN
29
red
>> further settings
698-11A-GB
MENU
Std., Pict., Sound
return Help
Channel Signal
41
24
29
52
28
46
12
42
53
61
TV
picture
Aerial
Aerial
Aerial
Aerial
Aerial
Aerial
Aerial
Aerial
Aerial
Aerial
TV station table
Prog. Logo Channel Signal
▲▼
PRO7
20
RTL2
21
VOX
22
DSF
23
EUSPO
24
Aerial direct
PREMI
25
EURO1: Decoder A
DISCO
26
MTV
27
EURO2: LogicVTR
MDR
28
AV
Front: Camcorder
CNN
29
>> weitere Einstellungen
Ȅ
600+14O-GB
Pict., Sound, Std.
41
24
29
52
28
46
12
42
53
61
Aerial
Aerial
Aerial
Aerial
Aerial
Antenne
Antenne
Antenne
Antenne
Antenne
?
?
-
+
OK
TV
MENU
return Help
TV
picture
TV station table
Prog. Logo Channel Signal
▲▼
PRO7
20
RTL2
21
VOX
22
DSF
23
EUSPO
24
Aerial via Decoder A
PREMI
25
EURO1: Decoder A
DISCO
26
MTV
27
EURO2: LogicVTR
MDR
28
AV
Front: Camcorder
CNN
29
>> weitere Einstellungen
Ȅ
600+14K-GB
Pict., Sound, Std.
41
24
29
52
28
46
12
42
53
61
Aerial
Aerial
Aerial
Aerial
Aerial
Antenne
Antenne
Antenne
Antenne
Antenne
store ?
OK
?
+
-
Page 49

49
15. Technical data
Guarantee
15.1 Upgrade kits
• SAT upgrade kit 081 NB 1010
For satellite reception without an additional receiver.
• SAT upgrade kit 083 NB 1018
A SAT receiver. Can also receive uncoded ADR (Astra Digital
Radio) transmissions.
• DVB-S upgrade kit 020 NG 101A
For reception of analog and digital TV and radio satellite stations, including Astra Digital (ADR), without additional receiver.
Ask your dealer for additional upgrade kits.
When you purchase the television, ensure that your dealer includes the completed TV „passport“. It must specify the date, the
dealer’s stamp and signature.
Keep this document in a safe place, together with the invoice. Any
claims under the warranty will only be accepted if these documents are submitted. Keep your TV clean and handle it with care.
Power consumption
(to CENELEC/TC 59 X):
Music power output to DIN 45324
at 4 Ohms and 1 kHz
(sine output)
Power consumption/h
Astral 118 Wh
Nordkap 110 Wh
Linos-S 142 Wh
Spectral 90 Wh
Stratos 122 Wh
Standby (all sets): ca. 1.7 W
Aerial input: 75 Ohms, asymmetric DIN 45325
Channel coverage: Standard channels 2...12, 21...69
Special channels S1...S20, S21...S41
S42...S46 (Belgian OIR channels)
Mains voltage: 230 V AC 50/60 Hz
Power consumption:
Astral
ca. 118 W
2 x 12 W
(2 x 8 W)
Nordkap ca. 110 W
2 x 12 W
(2 x 8 W)
Linos-S ca. 142 W
2 x 12 + 24 W
(2 x 8 W + 16 W)
Spectral ca. 90 W
2 x 12 W
(2 x 8 W)
Stratos ca. 122 W
2 x 12 + 24 W
(2 x 8 W + 16 W)
Page 50

50
2-channel sound transmission:
Separate reproduction of 2 sound channels, e.g. 2 different languages.
Audio
Latin for „I hear“ - The sound frequency range audible to the
human ear is between 60 to 20,000 Hz approx.
Camcorder
A video camera with integrated video recorder.
Cinch (phono)
Single-pole plug connector for separate audio and/or video
copying.
Data Logic
Until now, your TV set and your video recorder were two separate and independent devices. With the new "Data Logic", we have
created a dialogue system with which the TV set and the video
recorder can exchange data.
Decoder
An electronic circuit that decodes TV signals; required to receive
coded TV transmissions, such as Premiere.
Dual-Band LNC
An LNC that can simultaneously process two transponder frequency ranges (11 GHz and 12 Ghz)
FBAS = CVBS
C = composite, V = video, B = blanking, S = signal
Function keys - Television:
• No function
No function has been assigned to this key.
• Logo
The display of the station logo is meaningful only if a PIP up-
grade kit has been installed.
• Picture format (variable zoom)
Changes from 4:3 to 16:9 in the presence of a switching voltage.
• Speech - music
The treble and bass boost settings are reduced in the position
„Speech“.
• Sound effects
Activates or de-activates spatial sound or base width.
• Stereo/Sound 1-2
Switches to mono when a stereo programme is being received.
To select channel 1 or 2 for two-language transmissions.
• Muting -12 dB
Reduces the sound volume by 12 dB.
• Infotext
Switches from the TV picture to the user defined marks 1, 2, etc.
• Subtitles
Displays the subtitle with corresponding transmissions.
• Large subtitles
100% enlarged subtitles are displayed with corresponding
programmes.
16. Glossary
Function keys - Teletext
• No function
No function has been assigned to this key.
• Answer or Riddle solutions
Display of the hidden answers to riddles
• Large font
Doubles the font size in teletext.
• Stop page
Running through multiple pages consisting of more than 15 subpages is automatic. This can be stopped at any page with the
„Stop page“ key so that „leafing“ can be continued manually.
Noise reduction
Can be switched on to enhance the picture quality.
OSD (On Screen Display)
Convenient display of all functions to adjust the television. They
are superimposed on the current programme.
Phono (cinch)
Single-pole plug connector for separate audio and/or video copying.
RGB control
R = red, G = green, B = blue. Indicates separate colour signal
processing.
Spatial sound
Mono transmissions can be reproduced with an artificial stereo effect.
Standard channels
02-12 and 21-69 can be received by way of the aerial and cable system.
Standby mode
The TV has been switched off with the remote control, or it has
switched itself off.
Stereo wide
For stereo broadcasts, the distance between the speakers can
be increased artifically to achieve a wider stereo effect.
Timer
Used to program automatic recording, or to switch a video recorder
or TV automatically on and off at a preset time.
Page 51

51
What is Data Logic?
Until now, your TV set and your video recorder were two separate
and independent devices.
With the new "Data Logic", we have created a dialogue system
with which the TV set and the video recorder can exchange data.
Video recorders with Data Logic offer the following functions:
•
Automatic transfer of station information for terrestrial or cable reception.
• Direct TV recording:
the video recorder records the programme currently displayed
on the TV screen, regardless of whether this comes from a terrestrial antenna, a cable system or a satellite.
• Direct control of recording:
with the menu "AV recording" or "Timer recording".
• Status messages (such as "Timer recording started") are sent
from the video recorder to the TV set and displayed there. (Not
available on VC Series)
• Automatic switching to the AV programme position
(Not available on VC Series).
• Automatic power-off of the video recorder if the TV set is switched to standby mode. (Not available on VC Series)
Video recorders of the Metz VC series, in combination with a Metz
TV set with SAT facility, offer you the tremendous advantage of
problemfree recording of SAT programmes.
1. Connecting a Data Logic video recorder to your TV set
Connect the AV-1 socket of the video recorder to the Euro-2 socket
of your TV set, using a fully connected Scart cable.
Data Logic will work only if there is a connection from
the AV-1 socket to the Euro-2 socket.
• Switch on the video recorder.
2. Setting the TV set for Data Logic
• Select programme position 0 on the TV set.
The TV set has been programmed in the factory for video recorder
operation on programme position 0.
In order to check this, press the white key to display the station table with
programme position 0 selected. The picture signal for this programme
position must be set to "EURO2: LogicVTR" or "EURO2: LogicVTR+D"
.
If the picture signal is set otherwise, you must set it to EURO 2
"LogicVTR" or "LogicVTR+D" in the menu "Device connection"
(see Page 44 of the Operating Instructions.
+
Devi
Devi
▲
17. Data Logic
Automatic transfer of station information
for terrestrial or
cable reception only !
The automatic transfer of station information saves you the tedious procedure of programming the tuner in your video recorder.
After transfer of the information, timer recordings can also be programmed with the video recorder.
Press this key on the
remote control:
The screen displays: Explanation
1. Call the menu "Station set-
tings" on the TV set
2. Close the menu and set the
date and time on the video
recorder.
Select video programme position (factory setting:
Pr. 0) on the TV set!
Station table ➜ VTR
This menu item can be selected only if there is a fully
connected Scart cable between TV and VTR.
If no
stations have been set on the video recorder, the TV
station table can be transferred to the video recorder.
To transfer the station information:
• Switch on the video recorder.
• Select the menu item "Station table ➜ VTR".
•
Confirm this selection by pressing - the main
menu of the video recorder appears in the background.
• After transfer of the station information, a blue menu
of the video recorder appears in the background.
• Close the menu "Station settings" by pressing .
•
Set and save the date and time on the video recorder.
white
green
TV station table
Prog Logo Signal
▲▼
LOGIC
0
ARD
1
Chan./Freq
ce connection
123
456
789
--/-
0
P
+
EURO1: Video
Decoder A
EURO2: Video
LogicVTR
.
05
LogicVTR+D
06
no device
Video Rec. 1
Video Rec. 2
LogicVTR
LogicVTR+D
VTR+DEC(1)
VTR+DEC(2)
Aerial
ces
▼
MENU
OK
TV
MENU
123
456
789
--/-
TV
MENU
?
A
B
6oo+03B2-GB
return Help
TV
picture
?
Station settings
Station table
0
P
+
+
-
OK
P
-
AV
Ȅ
Autostore
SAT programming
AV
Station table ➜ VTR
start ?
OK
OK
TV
Page 52

52
18. Index
Access to riddle solution (Hi Text). . . . . . . . . . . . . . . . . . . . 39
Aerial connection . . . . . . . . . . . . . . . . . . . . . . . . . . . . . . . . . 4
Allocating a station logo . . . . . . . . . . . . . . . . . . . . . . . . . . . 13
Audio standard values . . . . . . . . . . . . . . . . . . . . . . . . . . . . 15
Autostore function . . . . . . . . . . . . . . . . . . . . . . . . . . . . . . . 10
AV equipment, connecting. . . . . . . . . . . . . . . . . . . . . . 43 - 48
AV recording. . . . . . . . . . . . . . . . . . . . . . . . . . . . . . . . . . . . 22
Balance . . . . . . . . . . . . . . . . . . . . . . . . . . . . . . . . . . . . 14, 15
Bass. . . . . . . . . . . . . . . . . . . . . . . . . . . . . . . . . . . . . . . 14, 15
Brightness, luminance . . . . . . . . . . . . . . . . . . . . . . . . . 14, 15
Camcorder, connecting . . . . . . . . . . . . . . . . . . . . . . . . . . . 43
Channel entry . . . . . . . . . . . . . . . . . . . . . . . . . . . . . . . . . . . . 9
Childlock . . . . . . . . . . . . . . . . . . . . . . . . . . . . . . . . . . . . . . 27
Chrominance, colour intensity . . . . . . . . . . . . . . . . . 14, 15,20
Cleaning. . . . . . . . . . . . . . . . . . . . . . . . . . . . . . . . . . . . . . . 53
Code. . . . . . . . . . . . . . . . . . . . . . . . . . . . . . . . . . . . . . . . . . 27
Connecting peripheral equipment . . . . . . . . . . . . . . . . 43 - 48
Contrast . . . . . . . . . . . . . . . . . . . . . . . . . . . . . . . . . . . . 14, 15
Cooling. . . . . . . . . . . . . . . . . . . . . . . . . . . . . . . . . . . . . . . . . 4
Colour standard . . . . . . . . . . . . . . . . . . . . . . . . . . . . . . . . . . 8
Copying (programme positions) . . . . . . . . . . . . . . . . . . . . . 11
CTI function . . . . . . . . . . . . . . . . . . . . . . . . . . . . . . . . . . . . 20
Data Logic . . . . . . . . . . . . . . . . . . . . . . . . . . . . . . . . . . . . . 51
Decoder, connecting . . . . . . . . . . . . . . . . . . . . . . . . . . 47 - 48
Deleting programme positions . . . . . . . . . . . . . . . . . . . . . . 11
Direct page selection . . . . . . . . . . . . . . . . . . . . . . . . . . . . . 33
Entering the time manually. . . . . . . . . . . . . . . . . . . . . . . . . 27
Erasing marks . . . . . . . . . . . . . . . . . . . . . . . . . . . . . . . . . . 38
FBAS (CVBS) . . . . . . . . . . . . . . . . . . . . . . . . . . . . . . . . . . . 50
Fine tuning . . . . . . . . . . . . . . . . . . . . . . . . . . . . . . . . . . . . . 12
Forced mono . . . . . . . . . . . . . . . . . . . . . . . . . . . . . . . . . . . 19
Function keys . . . . . . . . . . . . . . . . . . . . . . . . . . . . . . . . 17, 50
Glossary. . . . . . . . . . . . . . . . . . . . . . . . . . . . . . . . . . . . . . . 50
Guarantee. . . . . . . . . . . . . . . . . . . . . . . . . . . . . . . . . . . . . . 49
Headphones, sound channel selection . . . . . . . . . . . . . . . . 29
Hi Text (Teletext) . . . . . . . . . . . . . . . . . . . . . . . . . . . . . 30 - 38
Infotext (Mark by mark paging). . . . . . . . . . . . . . . . . . . . . . 37
Language selection (for TV menu) . . . . . . . . . . . . . . . . . . . . 5
Logo. . . . . . . . . . . . . . . . . . . . . . . . . . . . . . . . . . . . . . . . . . 13
Mains connection . . . . . . . . . . . . . . . . . . . . . . . . . . . . . . . . . 4
Mark-by-mark advance . . . . . . . . . . . . . . . . . . . . . . . . . . . 37
Moving stations . . . . . . . . . . . . . . . . . . . . . . . . . . . . . . . . . 11
Multiple pages . . . . . . . . . . . . . . . . . . . . . . . . . . . . . . . . . . 32
Noise reduction . . . . . . . . . . . . . . . . . . . . . . . . . . . . . . . . . 20
Operator help. . . . . . . . . . . . . . . . . . . . . . . . . . . . . . . . . . . . 7
Page selection by cursor . . . . . . . . . . . . . . . . . . . . . . . . . . 32
Peripheral equipment . . . . . . . . . . . . . . . . . . . . . . . . . 43 - 48
Picture format (video recorder) . . . . . . . . . . . . . . . . . . . . . . 21
Picture settings. . . . . . . . . . . . . . . . . . . . . . . . . . . . . . . . . . 14
Picture sharpness. . . . . . . . . . . . . . . . . . . . . . . . . . . . . 14, 20
Premiere decoder. . . . . . . . . . . . . . . . . . . . . . . . . . . . . . . . 47
Presetting stations . . . . . . . . . . . . . . . . . . . . . . . . . . . . . . . . 9
Programme selection . . . . . . . . . . . . . . . . . . . . . . . . . . . . . . 6
Remote control. . . . . . . . . . . . . . . . . . . . . . . . . . . . . . . . . . . 3
Riddle solutions key . . . . . . . . . . . . . . . . . . . . . . . . . . . . . . 39
Setting marks . . . . . . . . . . . . . . . . . . . . . . . . . . . . . . . . . . 36
Sorting stations . . . . . . . . . . . . . . . . . . . . . . . . . . . . . . . . . 11
Sound channels1/2. . . . . . . . . . . . . . . . . . . . . . . . . . . . . . . 29
Sound effects . . . . . . . . . . . . . . . . . . . . . . . . . . . . . . . . . . . 14
Sound mute . . . . . . . . . . . . . . . . . . . . . . . . . . . . . . . 3, 14, 16
Spatial sound . . . . . . . . . . . . . . . . . . . . . . . . . . . . . . . . 18, 50
Standby . . . . . . . . . . . . . . . . . . . . . . . . . . . . . . . . . . . . . . . . 5
Station closedown . . . . . . . . . . . . . . . . . . . . . . . . . . . . . . . . 5
Station search (see also Autostore). . . . . . . . . . . . . . . . . . . 10
Stereo wide . . . . . . . . . . . . . . . . . . . . . . . . . . . . . . . . . 18, 50
Still picture. . . . . . . . . . . . . . . . . . . . . . . . . . . . . . . . . . . 3, 40
Stop page. . . . . . . . . . . . . . . . . . . . . . . . . . . . . . . . . . . . . . 50
Summer time/winter time. . . . . . . . . . . . . . . . . . . . . . . . . . 24
Subtitles. . . . . . . . . . . . . . . . . . . . . . . . . . . . . . . . . . . . . . . 39
Switch ON/OFF time . . . . . . . . . . . . . . . . . . . . . . . . . . . . . . 24
Teletext (see Hi Text) . . . . . . . . . . . . . . . . . . . . . . . . . 30 - 38
Thunderstorms. . . . . . . . . . . . . . . . . . . . . . . . . . . . . . . . . . . 5
Time settings . . . . . . . . . . . . . . . . . . . . . . . . . . . . . . . . . . . 24
Timer . . . . . . . . . . . . . . . . . . . . . . . . . . . . . . . . . . . . . . . . . 28
Transmission standard . . . . . . . . . . . . . . . . . . . . . . . . . . . . . 8
Treble. . . . . . . . . . . . . . . . . . . . . . . . . . . . . . . . . . . . . . 14, 15
TV menu. . . . . . . . . . . . . . . . . . . . . . . . . . . . . . . . . . . . . . 5, 7
Upgrade kits . . . . . . . . . . . . . . . . . . . . . . . . . . . . . . . . . . . 49
Variable zoom . . . . . . . . . . . . . . . . . . . . . . . . . . . . . . . . . . 40
Video camera . . . . . . . . . . . . . . . . . . . . . . . . . . . . . . . . . . . 43
Video recorder, connecting . . . . . . . . . . . . . . . . . . . . . . . . . 43
Video standard values. . . . . . . . . . . . . . . . . . . . . . . . . . . . . 15
Volume. . . . . . . . . . . . . . . . . . . . . . . . . . . . . . . . . . . . . 14, 15
Volume adjustment. . . . . . . . . . . . . . . . . . . . . . . . . . . . . . . 19
Zoom . . . . . . . . . . . . . . . . . . . . . . . . . . . . . . . . . . . . . . . . . 40
Subject to changes as a result of technical advances. Errors
and omissions excepted.
Page 53

53
Troubleshooting and care of the set
If there is a technical fault in your TV set, the complete lamp
assembly must be replaced by a trained technician!
The TV set may be opened and repaired only by a trained technician.
Any unauthorized attempts to open or repair the TV may result in
the guarantee becoming null and void.
Adequate shielding is provided against X-ray radiation (see
approval certificate on the rear panel of the TV).
Changing the high voltage or fitting a different type of picture tube
may cause an increased amount of X-ray radiation. Televisions
modified in such a manner are no longer in keeping with this
approval certificate and must not be used!
Cleaning the set
Always switch off the TV with the ON/OFF key before
you clean it!
Cleaning notes for glossy surfaces
Cleaning:
- Clean with a soft, antistatic cloth or
- with a damp cloth and a mild detergent.
Polishing:
- Polish with a soft cloth and furniture polish.
- Minor scratches can be removed with car polish (type for asnew paintwork without abrasives).
Repairs
The TV should only be opened and repaired by qualified
service personnel!
CAUTION! DANGER!
Consult your dealer when repairs are necessary.
Page 54

ķ 600 47 2020.A1
TV. VIDEO. AUDIO. MECABLITZ
Metz. Always first class.
Videorecorder
Camcorder
DVD
Audio
mecablitz
Quality – A matter of principle.
With the trend-setting Metz technology you will
allways make the correct choice.
See your Metz dealer.
He will be happy to demonstrate the current
Metz range.
Metz-Werke GmbH & Co KG
Postfach 1267, D-90506 Zirndorf
Internet: www.metz.de
E-Mail: info@metz.de
Availability and technical details
subject to change without notice.
01/42/18
 Loading...