

Page 1

HOME ENTERTAINMENT
Operating Instructions
Plasma-TV-Set 42“ PIP 42TN92
06/30/24
606 47 0060.A1
Metz - always first class.
Page 2

Contents
Remote control handset RK18 ............. 33
PLASMA TV ...........................................3 4
Installation Of Plasma Panel To The
Wall (Optional) .................................... 36
Assembling The Speakers (Optional) 36
Preparation ........................................... 38
Features .............................................3 8
Safety Precautions ...............................3 8
Before Switching On Your TV ............... 40
Power Connection .............................. 4 0
Connections To The Aerial Input
Socket ................................................. 40
How To Connect Other Devices ......... 40
Inserting Batteries In The Remote
Control Ha ndset .................................40
Switching The TV ON/OFF.....................40
To switch the TV on: ............................ 40
To switch the TV off: ............................ 41
Initial Settings .......................................41
Initial APS (Automatic Programming
System) ..............................................41
Operating The TV .................................. 41
Operating with the buttons on the
TV set ..................................................41
Operating With Remote Control ......... 41
Menu System ........................................42
Picture menu ...................................... 42
Sound menu .......................................4 3
Feature menu .....................................45
Install menu ....................................... 46
Program menu ...................................47
Source menu ...................................... 48
PC Mode ................................................ 49
Installation .......................................... 49
Menu System in PC mode ................. 49
PC Picture Position Menu ..................49
PC Picture Menu .................................49
Sound Menu .......................................50
Feature Menu .....................................50
Source Menu ...................................... 50
Sound in PC mode ............................. 50
Other Features ......................................50
TV Status............................................. 50
Mute Indicator ..................................... 50
PIP and PAP modes ........................... 50
Freeze Picture..................................... 51
Zoom Modes ......................................51
Teletext .................................................. 52
To Operate Teletext .............................52
To Select A Page Of Teletext ...............52
To Select Index Page .......................... 5 2
To Sele c t Te let e x t W ith A TV
Programme ........................................52
To Select Double Height Text .............52
To Reveal “Concealed” Information ...52
To Stop Automatic Page Change........52
To Select A Subcode Page .................5 3
To Exit Teletext ....................................53
To Display The Time ..........................53
Fastext ................................................ 53
Connect Peripheral Equipment ............54
Via The Scart ......................................54
Via Aerial Input ....................................5 4
Decoder.............................................. 54
TV And Video Recorder....................... 54
Playback NTSC ..................................54
Copy Facility .......................................54
Search For And Store The Test Signal
Of The Video Recorder.......................54
Camera And Camcorder .................... 55
EXT-3 S Mode .....................................55
Connect The Decoder To The Video
Recorder............................................. 55
Connecting Headphones................... 55
Connecting Subwoofer....................... 55
Connecting External Equipment ........ 55
PC Input Typical Display Modes .........56
Cleaning and care ................................. 57
Tips ........................................................58
Specifications ....................................... 60
-32-
Page 3
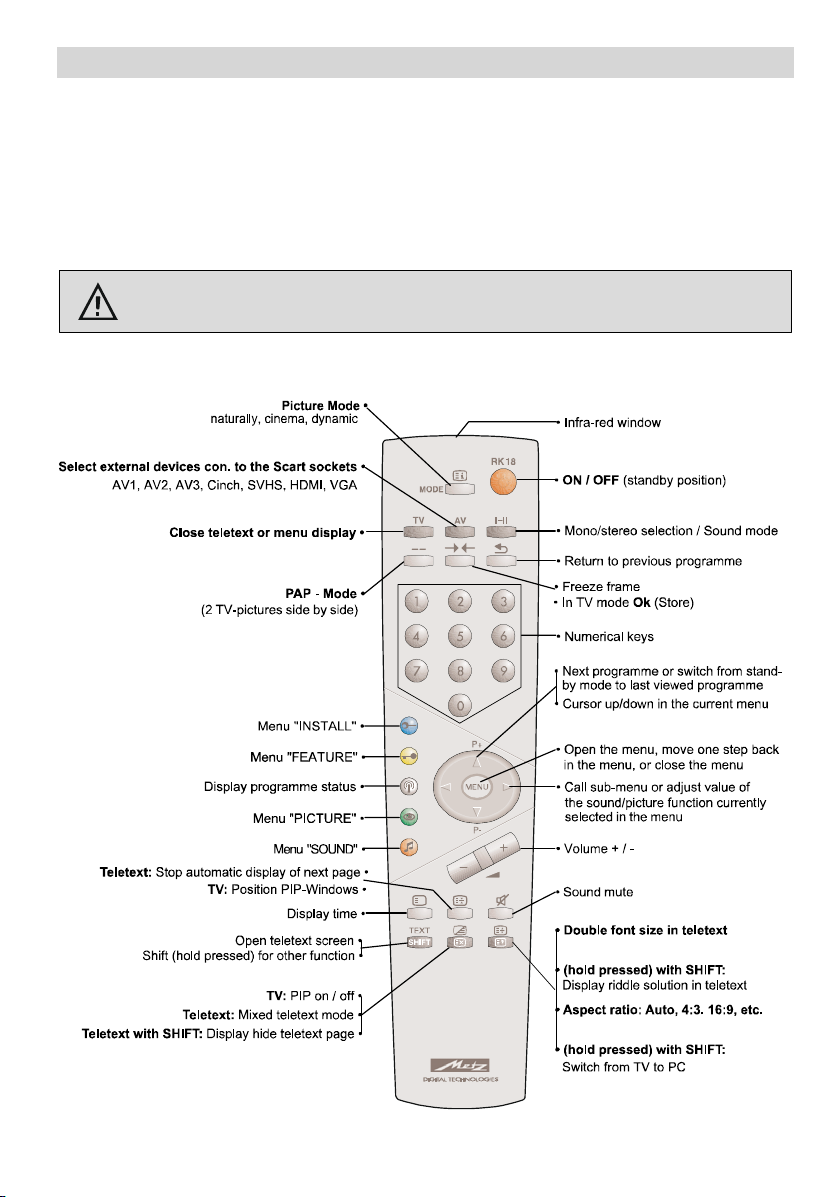
Remote control handset RK18
The remote control handset sends its commands to the TV set with the aid of infra-red light.
For this reason, it must always be pointed towards the TV set in order to operate correctly.
Use of the remote control may possibly interfere with other devices or systems which are
controlled by infra-red signals (such as infra-red headphones).
The remote control handset may not operate correctly if the TV set is exposed to direct sunlight, because the TV set is not able to detect the infra-red s ignals. The TV set must be
switched on with its main switch before the remote control handset can be used.
Infra-red light! Do not point the remote control handset at your eyes and press
any of the buttons on it !
-33-
Page 4
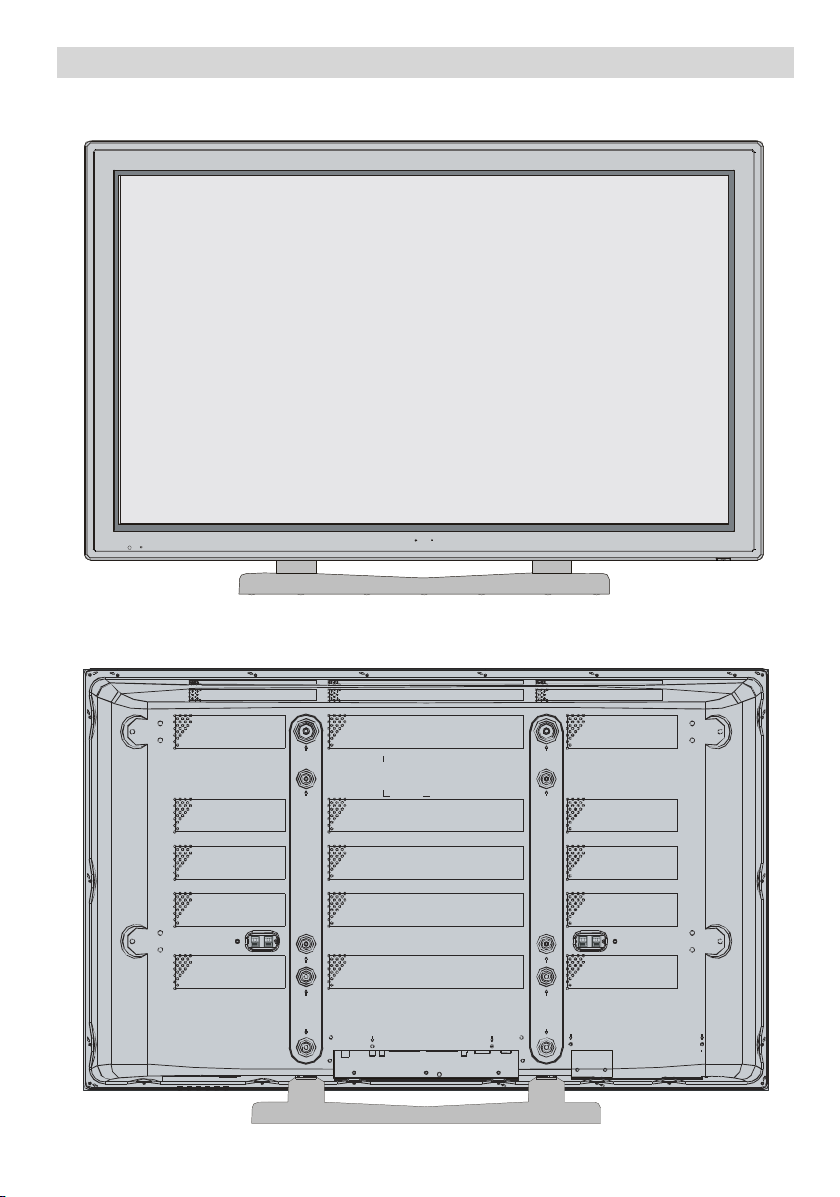
FRONT VIEW
REAR VIEW
PLASMATV
-34-
Page 5
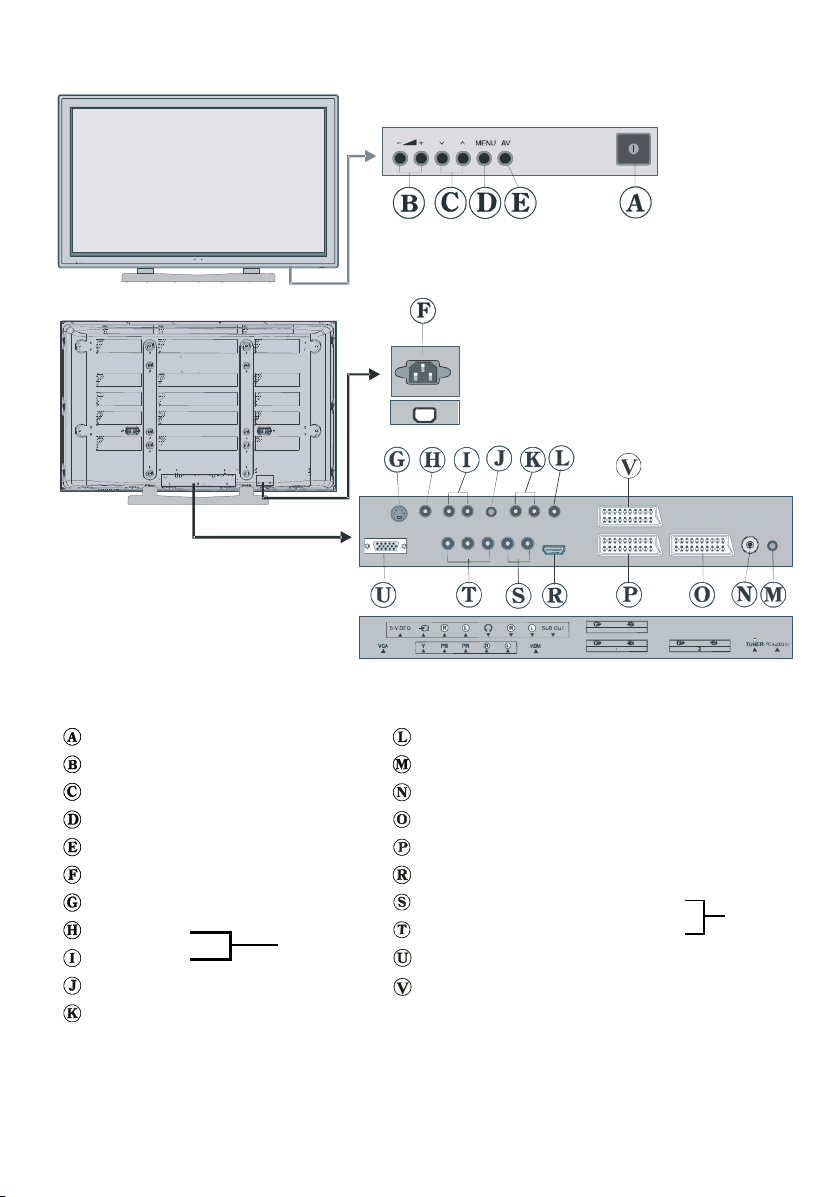
220V-240V
AC~50Hz
On/Off switch
Volume Up, Volume Down buttons
Prog. Up, Prog. Down buttons
MENU button
TV/A V button
Power cord input
S-VHS Input (EXT-5S)
Video Input
Audio Inputss
EXT-5
Headphone
AudioLineOutss
Subwoofer Out
PC Audio Input
Aerial
Scart 2 (EXT-2)
Scart 1 (EXT-1)
HDMI Input (EXT-6)
Component Audio Inputss
Component Video (YPbPr) Inputs
VGA Input
Scart 3 (EXT-3)
-35-
EXT-4
Page 6
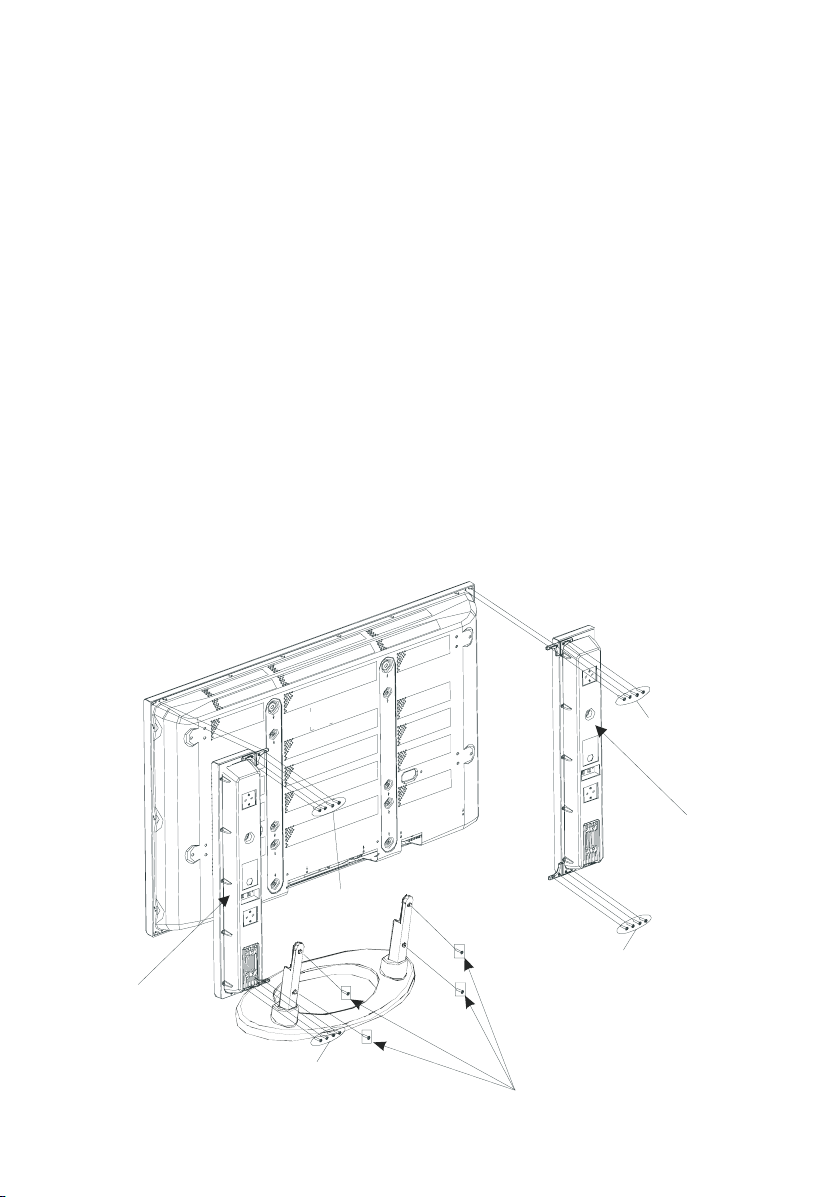
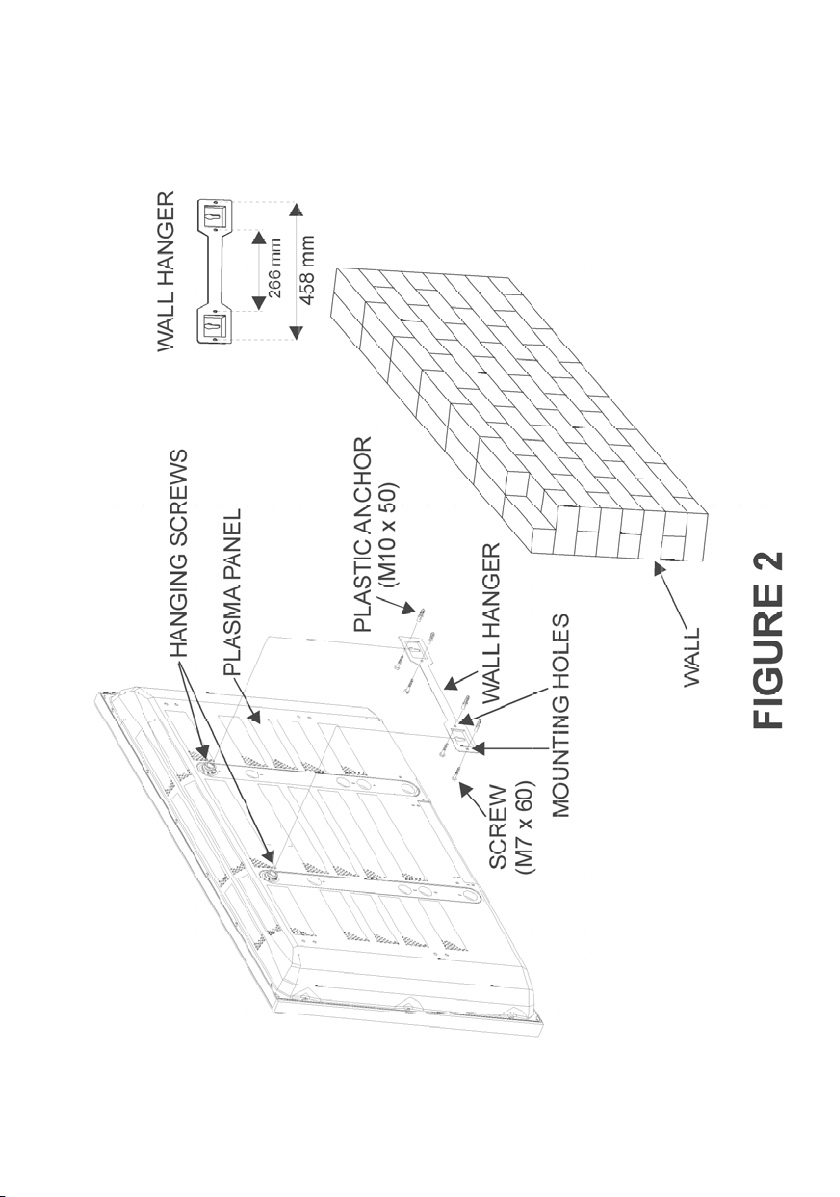
Installation Of Plasma Panel To The Wall (Optional)
GU
1- To install the plasma panel on the wall, first of all, foot assembly should be removed.
(Figure 1). Unscrew the 4 screws (M5 x 12) that attach the foot assembly to the panel and
remove the foot assembly from the panel.
The plasma TV can be installed to the wall with or without speakers.
2- Install the wall hanger as in figure 2 to the wall with 4 anchors (M10 x 50) and 4 screws
(M7 x 60).
Decide the place on the wall where the plasma panel would be placed. Level and mark
with a pencil the 4 mounting points on the wall hanger. Drill pilot holes for the plastic anchors and then fix the wall hanger with 4 screws (M7 x 60).
3- Raise the plasma panel and hang it to the holes on the wall hanger from the 2 hanging
screws at the rear of the plasma panel.
Assembling The Speakers (Optional)
Turn the rear side of the plasma panel and place it on a solid surface such as a table or a
desk. Put the speakers to the left and right sides of the panel. Place the speaker holders (2
on the left speaker and 2 on the right speaker) on the holes at the plasma panel and fix one
holder with 3 screws (M3 x 12) to the speaker and the panel. Connect the speaker cables to
the speakers and the Plasma Panel.
HOLDER SPK AL PART
CREW
3X12
FI
SCREW
3X12
RE 1
-36-
CREW M5X12
SCREW
3X12
HOLDER SPK AL PART
PDP 4210
SCREW
3X12
Page 7
-37-
Page 8

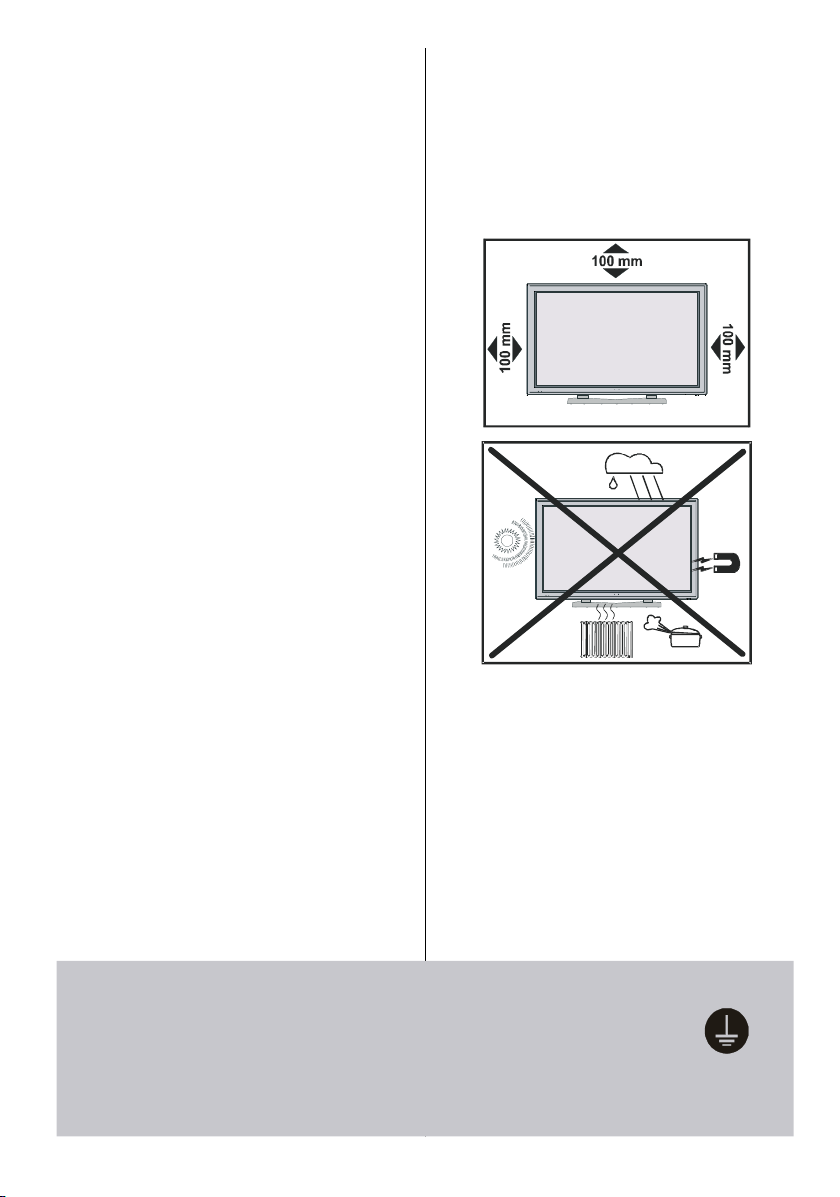
Preparation
For ventilation, leave a space of at least 10
cm free all around the set. To prevent any
fault and unsafe situations, please do not
place any objects on top of the set.
Use this apparatus in moderate climates.
Features
• Remote controlled colour television.
• 100 programmes f rom VHF, UHF bands or
cable channels can be preset.
• It can tune cable channels.
• Controlling the TV is very easy by its menu
driven system.
• It has 3 Scart sockets for external devices
(such as video, video games, audio set,
etc.)
• Stereo sound system (3D Panorama).
• Full function Teletext .
Fastext (1000 Pages), TOP text.
• Headphone connection.
• Direct channel access.
• A.P .S. (Automatic Programming System).
• All programmes can be named.
• Forward or backward automatic tuning.
• Sleep timer.
• Child Lock.
• Automatic sound mute when no trans mission.
• NTSC Playback.
• AV in and S-VHS in are available.
• It has VGA connector for external devices
such as computer.
• It has an HDMI connector for Digital Video
and Audio. This connection is also de-
signed to accept High Definition signals.
• It has PIP / PAP/P AT functions.
• AVL (Automatic Volume Limiting)
• When no valid signal is detected, after 5
minutes the TV switches itself automatically
to stand-by mode.
•PLL(Frequency Search)
• PC Input (Support up to 1280 x 768)
• Stereo PC Audio Input
• Plug&Play for Window s 9X, ME, 2000, XP
•3DCombFilter
• Audio Line Out
Safety Precautions
Please read the fol lowing recommended
safety precautions carefully for your safety.
1. Power Source
The set s hould be operated only from a
230V AC, 50 Hz. outlet. Ensure you select
the correct voltage setting for your conve-
nience.
2. Power Cord
Do not place the set, a piece of furniture,etc.
on the power cord(mains lead) or pinch the
cord.Handle the pow er cord by the plug.Do
not pull out the plug by tugging the cord and
never touch the power cord when your
hands are wet as this could cause a short
circuit or electric shock.Never make a knot in
the cord or tie it with other cord.The power
cord shoul d be placed in such a way that
they are not likely to be stepped on.
A damaged power cord can cause fire or
give you an electric shock. When it is damaged and need to be changed, it should be
done by qualified personel.
3. Moisture and Water
Do not use this equipment in a humid and
damp place (avoid the bathroom, the sink in
the kitchen, and near the washing machine).
Do not expose this equipment to rain or wa-
ter, as this may be dangerous and do not
place obj ects filled with liquids,such as
flower vases on top of the set. Avoid from
dripping or splashing.
If any solid object or liquid falls into the cabinet, unplug the set and have it checked by
qualified perso nnel before operating it any
further.
4. Clean ing
Before cleaning, unplug the set from the wall
outlet. Do not use liquid or aerosol cleaners.
Use soft and dry cloth.
-38-
Page 9
5. Ventilation
The slots and openings on the back cover
are intended for ventilation and to ensure re-
liable operation. To prevent overheating,
these openings must not be blocked or covered in anyway.
6. Heat and Flames
The set should not be placed near to naked
flames and sources of intense heat,such as
an electric heater. Ensure that no naked
flame sources, such as lighted candles, are
placed on top of the set.
7. Lightning
In case of storm and lightning or when going on holiday, disconnect the power cord
from the wall outlet.
8. Replacement Part
When replacement parts are required, be sure
the service technician has used replacement
parts which are specified by the manufacturer
or have the same specifications as the original one. Unauthorised substitutions may result in fire, electrical shock, or other hazards.
9 . Servicing
Please refer all servicing to q ualified personnel. Do not remove the cover yourself as
this may result in an electric shock.
Instructions for waste disposal:
• Packaging and packaging aids are recyclable and should principally be recycled.
Packaging materials, such as foil bag, must
be kept away from children.
• Battery, including those which is heavy
metal-free, should not be disposed of with
household waste. Please dispose of used
battery in an environmentally sound man-
ner. Find out ab out the legal regulatio ns
which apply in your area.
• The mains plug is used to disconnect the TV
from the mains and therefore it shall remain
readily operable.
Warning: To prevent injury, this device must
be securely attached to the floor/wall in accordance with the installation instrutions.
“The Plasma TV is a very high techolo gy
product giving you fine picture details. Occasionally, a few non-active pixels may remain
still on the screen. Long-time unmoving still
pictures may cause permanent shade effect
on the screen and even the picture has been
changed, its in flu ence l ast s as ghost picture. This ghost effect may disturb the user
even though it will diminish in the course of
time. To prevent this, don't leave still pictures
for example teletext pages or frozen pictures
Be sure to ground the connection properly.
Connect the ground terminal of the AC inlet of this dis play with the
ground terminal provided
at the power outlet using the enclosed power cord. If the provided plug
does not fit your outlet, consult an electrician for replacement of the
obsolete outlet.
-39-
urelyconnect
heground wire.
Page 10
on the screen for a long time. Please note
that this does not affect the performance of
your product.”
“DO NOT LEAVE YOUR TV AT STAND-BY
OR OPERATING WHEN YOU LEAVE YOUR
HOUSE”
Before Switching On Your TV
Power Connection
IMPORTANT: The TV set is designed to op-
erate on 230V AC, 50 Hz.
• After unpacking, allow the TV set to reach the
ambient room temperature before you connect the set to the mains.
Connections To The Aerial Input
Socket
75
:
CABLE TV
VHF/UHF
REAR OF THE TV
• Connect the aerial or cable TV plug to the
Aerial input socket located at the rear of the
TV and connect the cable plug coming out
from the TV out socket loc ated on the devices (VCR, DVB-T etc.) to this socket as
well.
How To Connect Other Devices
IMPORTANT: Switch off the TV before con-
necting any external device.
Sockets for external connections are at the
rear side of the TV. For connection of other
devices via Scart refer to the manuals of the
related devices.
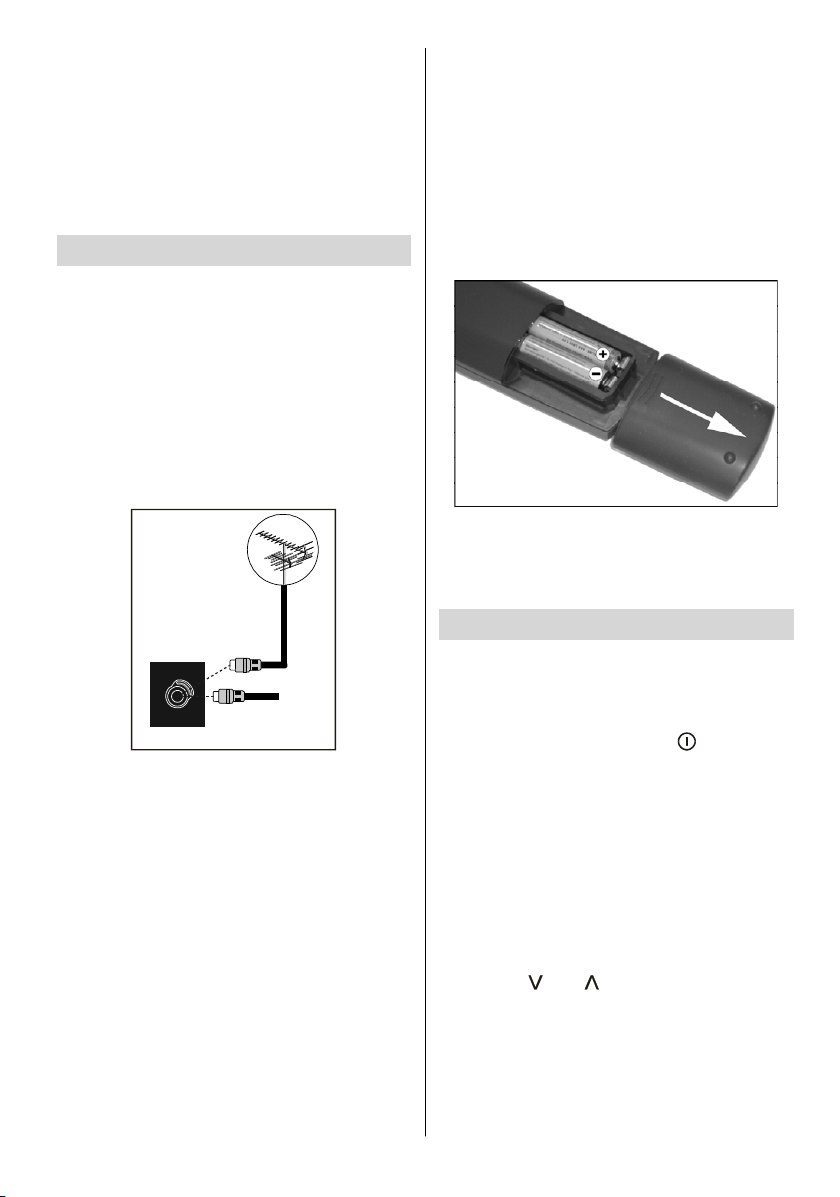
Inserting Batteries In The Remote
Control Handset
• Remove the battery cover located on the
back of the handset by gently pulling down-
wards from the indicated part.
•InserttwoAAA/LR03 or equivalent type batteries inside. Place the batteries in the right
directions.
• Replace the battery cover.
NOTE: Remove the batteries from remote
control handset when it is not to be used for
a long period.Otherwise it can be damaged
due to any leakage of batteries.
Switching The TV ON/OFF
To switch the TV on:
Your TV will switch on in two steps:
1- Connect the power supply cord to the sys-
tem. Press On/Off switch “
tom right side of the TV. Then the TV
switches itself to stand-by mode and the
led becomes red located on the front of
the TV.
2- To switch on the TV from stand-by mode
either:
Press a digit button on the remote control so
that a programme number is selected,
or,
Press the "
"or" " button at the bottom of
the TV or press the “-P/CH” or “P/CH+” button on the remote control, so that last mode
switched off is selected.
By either ways the TV will switch on and the
led becomes green.
” at the bot-
-40-
Page 11

To switch the TV off:
•Pressthe“ (stand-by)” button on the remote control, so the TV will switch to stand-by
mode and the GREEN LED will become RED.
To power down the TV complet ely, p ress
On/Off switch “
”,
or,
Unplug the power cord from the mains
socket.
Initial Settings
Initial APS (Automatic Programming
System)
The following menu will be displayed on the
screen when you turn your TV on for the first
time. APS, searches and sorts all channels
and stores them automatically on your TV,
according to the transmission of
programme systems in your area.
AUTO PROGRAM
Language
Country
English
K
If you do not accept the locations and / or the
programme nam es of programmes, you
can c hange them from the Program Menu.
(See page 48)
Operating The TV
You can operate your TV using both the remote control handset and the buttons on the
set.
Operating with the buttons on the
TV set
Volume setting and programme selection
canbemadebyusingthebuttonsonthe
control panel at the bottom of the TV.
Vol ume S et ti ng
Press the “-
or the “
a volume level scale (slider) will be displayed at the bottom of the screen.
Programme Selecting
Press the “
programme or the “
previous programme.
” button to decrease volume
+” button to increase volume, so
” button to select the next
” button to select the
PLEASE CHECK ANTENNA CABLE
AUTO. PROGRAMMING SY STEM
ancel
K
First of all choose Language and Country by
using
a
/
and
/
buttons. This will af-
fect the sort process in APS. To start APS,
press the RED or “OK” button.
APS is ru nn ing...
UK - I 155,25 Mhz
ancel
After APS is finalized, the programme table
will appear on the screen. In the programme
table you will see the programme numbers
and names assigned to the programmes.
EnteringThe Menu
Press th e “MENU”buttononthecontrol
panel at the bottom of the TV to enter the
menu.
/ ”and“ + / - ” buttons on the TV
“
are used as navig ation butto ns in the menu.
AV M o de
Press the “AV” button on the control panel
at the bottom of the TV to switch your TV to
EXT modes.
Operating With Remote Control
The remote control handset of your TV is designed to control all the functions of your TV.
The functions will be described in accordance with the menu system of your TV.
Functions o f the menu system are described in Menu System section.
-41-
Page 12
Vol ume S et ti ng
Press the “V+” button to increase volume.
Press the “-V” button to decrease volume. A
volume level scale (slider) will be displayed
at the bottom of the screen.
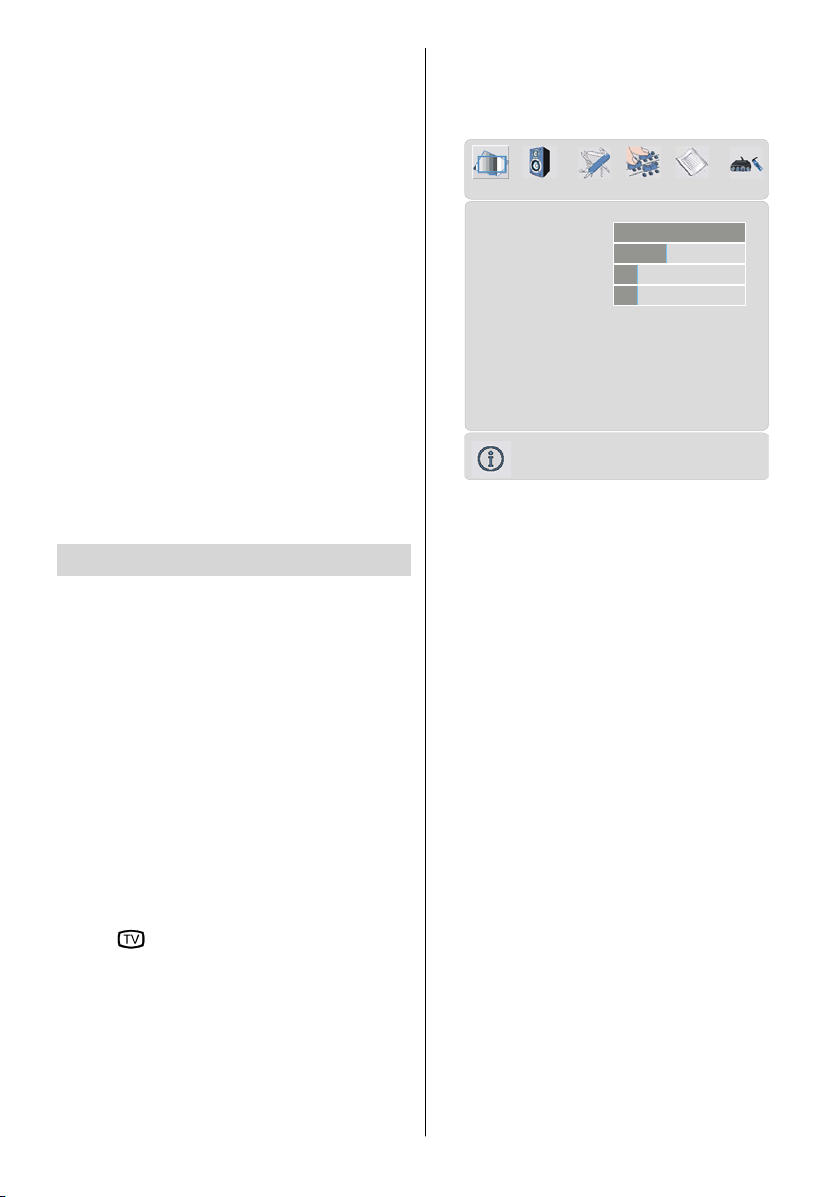
Picture menu
By pressing
Picture menu appears on the screen.
/ ` button, select the first icon.
Programme Selecting
(Previous or next programme)
•Pressthe“- P” button to select the previous
programme.
•Pressthe“P +” button to select the next
programme.
Programme Selecting (direct access):
Press digit buttons on t he remote control
handset to select programmes between 0
and 9. The TV will switch to the selected
programme after a short delay.
• For a two digit programme number enter the
second digit after pressing the first digit
within 2 seconds.
Menu System
Your TV has been designed with a menu
system to provide easy manipulation of a
multifunction sy stem.
Press the “M” button to enter the menu.
Press
then
You can access the menus directly by
pressing the coloured buttons on the remote
control:
Red Button Sound Menu
Green Button Picture Menu
Yellow Button Feature Menu
Blue Button Install Menu
•Press
•Pressthe“M” button to return to the previous
/
button to select a menu title and
/
button to select a menu item and
a
/
or “OK” button to enter the menu item.
button to exit the menu.
menu.
PICTURE
Mode Cinema
Contrast
Brightness
harpness
olour
olour Temp Warm
Noise Reduction
Film Mode Off
DComb Off
Reset
PAL 50Hz
62
24
10
32
Off
Mode
By pressing
Press
_ / ` button to choose one of these
/bbutton, select Mode .
options: Natural, Cinema and Dynamic.
Picture mode can be changed direc tly by
pressing the PP button.
Contrast
By pressing
Press
/
button, select Contrast.
button to increase contrast. Press
button to decrease contrast. Contrast level
can be adjusted between 0 and 63.
Brightness
/
By pressing
ness.Press
Press
a
`
_ button to decrease brightness.
button, select Bright-
button to increase brightness.
Brightness level can be adjusted between 0
and 63.
Sharpness
By pressinga/
ness.Press
ness. Press
button, select Sharp-
button to increase sharp-
button to decrease sharpness. Sharpness level can be adjusted between 0 and 31.
-42-
Page 13

Colour
q
p
y
/
By pressing
Press
button to increase colour. Press
a
button, select Colour.
button to decrease colour. Colour level can
be adjusted between 0 and 99.
Hue
This item is displayed in picture menu when
the TV receives an NTSC signal. By press-
ing
/bbutton, select Hue.Press` button
to increase hue level.Press
_ button to de-
crease hue level. Hue level can be adjusted
between -31 and 31.
Colour Temp
By pressinga/
Temp.Press
button, select Colour
/
button to choose one of
these options: Cool, Normal and Warm.
Noise Reduction
Sound menu
By pressing
icon. Sound menu appears on the screen.
olume
E
Balance
Head
ound Mode
AVL
Effect
D
ubwoofer
D Panorama
/
ualizer
hone
namic Bass
button, select the second
SOUND
10
tereo
Off
Off
0
n
ff
ff
This item is used to reduce the image noise
and improve the picture quality at weak sig-
nals.
By pressing
duction. Press
/
button, select Noise Re-
a
/
buttontosetNoise re-
duction level to Off, Low, Medium or High.
Film Mode
Films are recorded at a different number of
frames per second to norma l television
programmes.
By pressing
Press
_/`
/
button, select Film Mode.
a
button to set this feature On or
Off. Turn this feature on when you are watching films to see the fast motion scenes
clearly.
3D Comb
3D Comb is used to improve colour transitions and colour quality of pictures.
By pressing
Press
/
button, select 3D Comb.
a
/
button to set this feature On or
Off.
Reset
/
By pressing
Press
/
a
or “OK” button to reset the picture
button, select Reset.
modes to factory default settings.
Volu me
/
By pressing
Press
Press
button to increase volume level.
button to decrease volume level.
button, select Volume.
Volume level can be adjusted between 0
and 63.
Equalizer
By pressing
Press
_
/bbutton, select Equalizer.
/ ` or “OK” button to enter equalizer
menu.
Equalizer
ound Mode User
120Hz
500Hz
1.5kHz
5kHz
10kHz
0
0
0
0
0
-43-
Page 14
In equalizer menu the sound mode can be
changed to User, Pop, Rock, Jazz, Flat and
Classic by pressing
button. Equalizer
_/`
menu settings can be changed only when
Sound Mode is User. Select the desired fre-
quency by
crease the frequency gain by pressing
/
button and increase or de-
/
button.
Press the “M” button to return to the previ-
ous menu.
Balance
By pressing
Press
right. Press
/
button, select Balance.
button to i ncrease balance to the
button to increase balance to
the left. Balance level can be adjusted between -31 and 31.
Headphone
By pressing
phone. Press
/bbutton, select Head-
a
/
or “OK” button to enter
hedphone menu.
OUND
Headphone
Vol ume
Sound Mode
Balance
10
tereo
0
sound mode
By pressinga/
Mode. Press
button, select Sound
/
button to change sound
mode.
Sound mode is used to identify sound mode of
the headphone and can be set to mono, ste-
reo, dual a or dual b according to the transmission.
balance
By pressing
Press
right. Press
/
button, select Balance.
a
button to increase balance to the
button to decrease balance to
the left. Balance level can be adjusted between -31 and 31.
Press the “M” button to return to the previous menu.
Sound Mode
By pressing
Mode. Pre ss
a
/
button, select Sound
/
button to ch ange the
mode.
You can select Mono, Stereo, Dual A or Dual
B mode, only if the selected channel sup-
ports that mode.
In case of bilingual broadcast (Dual Sound),
you can select original or dubbed language
using mode option.
AVL
Automatic Volume Limiting (AVL) function
adjusts the sound to obtain fixed output level
between programs, having different sound
levels.
Pressing
_ /
button will turn this feature on
or off.
volume
/
By pressing
Press
Press
button to increase hp volume level.
button to decrease hp volume level.
_
a
button, select Volume.
Headphone volume level can be adjusted
between 0 and 63.
Effect
You can use this feature to switch the sound
effect on or off. If the current sound system is
Mono and the sound effect is switched on,
then the sound will be heard as if it is Stereo. If the c urrent sound system is Stereo,
switching this effect on will give a more spatial effect.
Pressing
/
button will turn this feature on
or off.
-44-
Page 15

Dynamic Bass
Dynamic Bass is used to increase bass effect of the TV set.
By pressing
Bass. By pressing
/bbutton, select Dynamic
_
/
button set Dynamic
bass to Low, High or Off. It is not recommended to select High if listening at high
volume levels. There is a subwoofer output
that can accept an active subwoofer if you
wish to create very high levels of Bass.
Subwoofer is active only if Dynamic Bass is
set to Off.
SubWoofer
It is possible to connect an external, active
subwoofer to the set to give a much deeper
bass effect.
By pressing
/
button, select Subwoofer.
a
Subwoofer can be set to On or Off.
Dynamic Bass is not available if Subwoofer
is set to On.
Set Subwoofer to On when you connect an
external subwoofer to the set.
3D Panorama
This function creates a 3-dimensional
sound by using your 2 existing loudspeak-
ers on your TV set. It does not need any additional center or surround speakers. You
must be close to your TV set (about 3
meters) and be in front of it to hear the 3D
Panorama effect better.
If 3D Panorama is set to on, equalizer, AVL
and effect become inactiv e and can not be
accessed.
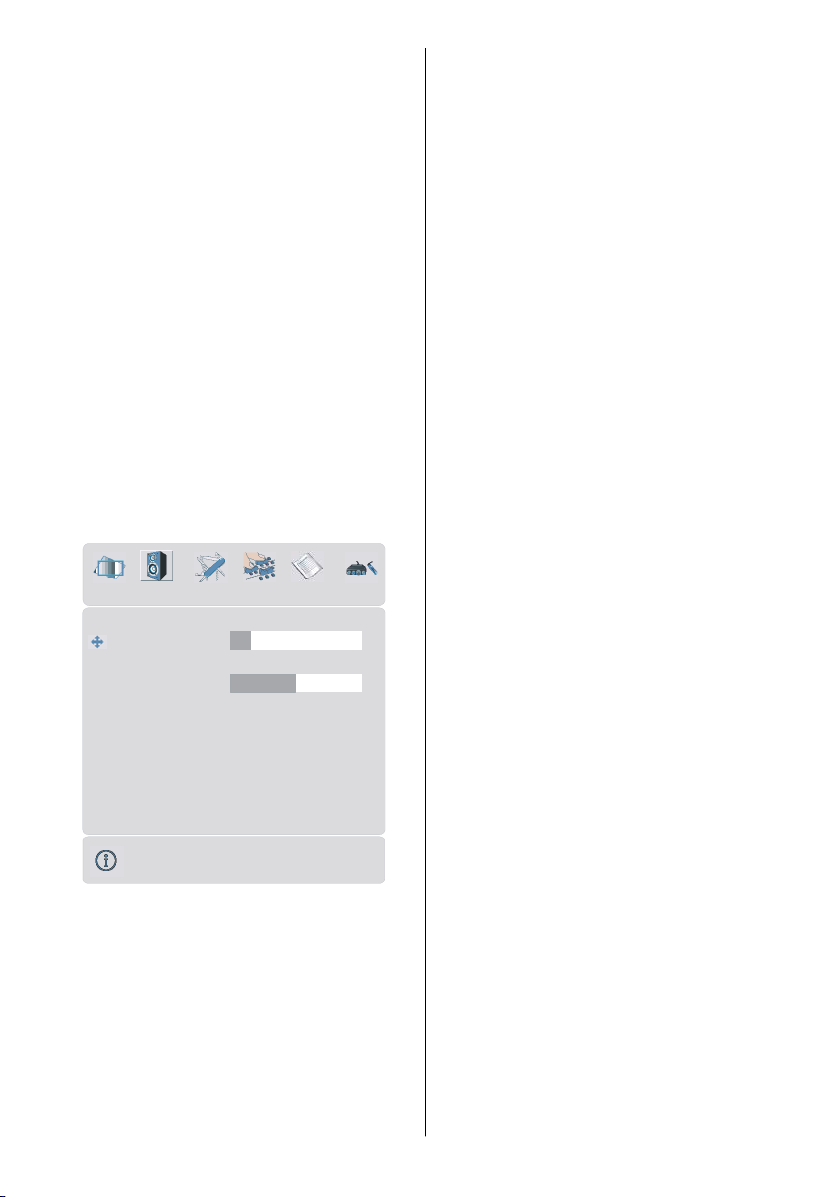
Feature menu
By pressing_/`button, select the third icon.
Feature menu appears on the screen.
FEATURE
Sleep Timer
hild Lock
Language
Ext-2 Out
efault Zoom
enu Background
enu Timeout
eletext LanguageWest
creen Saver
Off
Off
English
EXT - 1
Panoramic
Translucent
30 sec
Sleep Timer
/
By pressing
Timer. The timer can be programmed be-
a
button, select Sleep
tween Off and 2 hours in steps of 10 minutes by pressing
/
button. If sleep timer
is activated, at the end of the selected time,
the TV automatically goes into stand-by
mode.
Child Lock
You can use this feature to prevent children
from turning the TV on or changing pro-
grams or adjustments etc. without remote
control.
The child lock feature can be set by
_ /
`
but-
ton to either on or off. When off is selected,
there will be no difference in the operation of
your TV. When on is selected, the TV can
only be con trolle d b y t he rem ote control
handset. In this case the control panel but-
tons, except the Power on/off button, at the
bottom of the TV will not work. If one of these
buttons is pressed, “Child Lock On” will be
displayed on the screen.
Language
By pressing
By pressing
language.
-45-
/bbutton, select Language.
a
/
button, you can select the
Page 16

Ext-2 Out
/
By pressing
button, select Ext-2 Out.
a
You can set Ext-2 Out to TV, EXT-1, EXT-3,
EXT-4, EXT-5, EXT-6 or PC by pressing
/
button.
Default Zoom
By pressing
/bbutton, select Default
Zoom. You can set Default Zoom to Panoramic, 4:3 or 14:9 Zoom by pressing
_/`
button.
If there is no WSS or aspect ratio (picture
size) information and zoom mode is selected as Auto by pressing the “WIDE” but-
ton, then the zoom mode will automatically
change to Default Zoom setting. See also
Zoom Modes on page 51.
Menu Background
By pressing
a
/
button, select Menu
Background. You can change menu background to Translucent or Opaque by press-
ing
_
/
button.
Menu Timeout
By pressing
Timeout. Press
/bbutton, select Menu
a
_/`
button to change menu
timeout to 15 sec, 30 sec or 60 sec.
Teletext Language
/
By pressing
Language. Pr es s
button, select Tele text
button to change
_/`
Teletext Language to West, East, Cyrillic,
Turk/Gre or Arabic. This will normally be set
to We st for Western Europe.
Screen Saver
By pressing
Saver. Press
/bbutton, select Screen
a
/
or “OK” button to enter
screen saver menu.
This menu has three items related to pos-
sible image retention problem in plasma
display panels. Firs t two items (Screen
Wipe, Inverse) of this menu are used to re-
move the effects after the problem occured
and the last item (Pixel Shift) is used to prevent this problem.
Screen Wipe : W hen OK is pressed on this
item the panel is driven with full white picture
for one hour unless any user command is
entered. During this mode if any user command is entered, Screen Saver menu will be
displayed on the screen with Screen Wipe
highlighted.
Inverse:WhenOKispressedonthisitem
the colour of each pixel of the displayed image is inverted for one hour unless any user
command is entered.
Pixel Shift : This item can be set to off,5,
10, 20, 40 min. or 1 hour. Whole picture is
shifted 2 pixels in the directions of the figure
shown below.
ixel
f
5
f
1
f
23
4
f
f
The time entered in this setting refers to the
time between the picture being moved. If you
are using games consoles or similar set to
5 mins but try not to leave static images on
the screen for long periods of time.
Install menu
By pressing
icon. Install menu appears on the screen.
Program
Band
Channel
olour System
ound System
Fine Tune
Search
VCR
tore Program
/
button, select the fourth
INSTALL
AUTO
224.25
1
C
12
BG
0
Off
-46-
Page 17

Program
PROGRAM
/
By pressing
Press
/
button, select Program.
a
button to select the program
number. You can also enter a number via
digit buttons on the remote control. There
are 100 program storage between 0 and 99.
Band
Band can be selected either “C” or “S” by
pressing
_
/ ` button.
Channel
/
Channel can be changed by
button or
Digit Buttons.
Colour System
/
By pressing
System. Press
a
button, select Colour
/`button to change the
colour system to PAL, SECAM, PAL60 or
AUTO.
If Sound System is set to I, SECAM is not
available for the Colour System.
Note: In EXT mode, you can choose NTSC
3.58 and NTSC 4.43 as well.
Sound System
By pressing
System. Press
a
/
button, select Soun d
/
button to change the
sound system to BG, DK, I, LorLP.
Fine Tune
By pressing
Press
/bbutton, select Fine Tune.
a
/
button to adjust the tuning.
Search
By pressing
Press
/bbutton, select Search.
a
/
button to start program search-
ing. The searching will stop when a signal is
found. You can also enter a frequency value
directly by pressing the digit buttons.
VCR (Video Cassette Recorder)
• This item can be seen in all modes except
EXT-3, EXT-5, EXT-6 and PC.
• If you want to watch a VCR source from one of
these modes, then it will be better to set VCR
mode “on”. For this, while the cursor is on this
item press the
/
buttons to set it “On”.
• If you want to watch a DVD , then you must
set this item “Off”.
Store Program
/
By pressing
gram. Press
button, select Store Pro-
/
or “OK” button to store the
_
adjustments. “Program Sto red” will be displayed on the screen.
Program menu
By pressing
Program menu appears on the screen.
1ITV
2ZDF
3CH5
4C-02
5C-05
6C-06
7C-08
8C-21
9C-23
10 C - 35
By moving the cursor in four directions you can
reach 20 programmes in the same page. You
can scroll the pages up or down by pressing
the navigation buttons to see all the
programmes in TV mode (except the AV mode).
By cursor actio n , programme sel ection is
done automatically.
Name:
To change the name of a decided
programme, select the programme and
press the RED button.
The first letter of the selected name starts to
blink. Press
ter and
By pressing the RED button, you can store
the name.
/
button, select the fifth icon.
11 C - 4 3
12 C - 64
13 C - 68
14 S - 40
15 -----
16 -----
17 -----
18 -----
19 -----
20 -----
Name Insert
elete APS
/
button to change that let-
button to select the other letters.
_/`
-47-
Page 18

Insert:
y
Select the programme which you want to insert by navigation buttons. Press the
GREEN button. By navigation buttons move
the selected programme to the decided
programme s pac e and press the GREEN
button again.
Delete:
To delete a programme , press the YELLOW
button. Pressing the YELLOW button again
erases the selected programme from the
programme list, and the programmes below
shift one up.
APS (Automatic Programming System)
When you press the BLUE button for APS, the
following warning screen will be displayed.
Source menu
By pressing _ / ` button, se le ct the sixth
icon. Source menu appears on the screen.
OURCE : TV
V
EXT - 1
EXT - 2
EXT - 3
EXT - 4
EXT - 5
EXT - 5S
EXT - 6
C
PROGRAM
ountr
ARNING !
All prestored programs
will be deleted
K
K
ancel
Press the BLUE button to cancel APS if you
do not want to delete your existing
programme list.
To continue APS, first select the country by
pressing
/
button and then press the
RED or “OK” button.
APS is running...
UK - I 155,25 Mhz
01 - C-01
Cancel
After APS is finalized, the programme table
will appear on the screen.
In sour ce menu, highl ight a source by
pressing
mode by pressing
/bbutton and switch to that
/
or “OK”button.
-48-
Page 19

PC Mode
Installation
• Power off both Computer and Display before
making any connections.
• Set your PC’s resolution correctly before
connecting to the TV. See the table on page
56 for supported modes.
• Use a D-SUB cable to connect the TV’s PC
input to the computer’s RGB output termi-
nal.
15 Pin Mini D-Sub Connector
Autoposition
If you shift the picture horizontally or vertically
to an unwanted position, use this item to put
the picture into correct place automatically.
• Select Autoposition item by using
a
/
buttons.
•Press
or “OK” button.
Warning: Auto position adjustment recommended to be done with the full screen im-
age for the proper adjustment.
H (Horizontal) Position
This item shifts the image horizontally to
right hand side or left hand side of the
screen.
• Select H Position item by using
ton.
•Use
/
button to adjust the value.
/bbut-
a
• Tighten the screws of the Display cable until
the connectors are fastened securely (fin-
ger-tighten only).
In TV mode, you can directly enter the PC
mode via pressing the PC button.
Menu System in PC mode
Press the M button. The menu will be dis-
played in the middle of the screen.
PC Picture Position Menu
By pressing
PC Picture Position menu appears on the
screen.
/`button, select the first icon.
PC PICTURE POSITION
Autoposition
H Position
V Position
Dot Clock
Phase
50
50
50
50
V (Vertical) Position
This item shifts the image vertically towards
the top or bottom of the screen.
•SelectV Position item by using
ton.
•Use
button to adjust the value.
_/`
/bbut-
a
Dot Clock
Dot Clock adjustments correct interference
that appear as vertical banding in dot intensive presen tations like s preadshee ts or
paragraphs or text in smaller fonts.
•Use
button to adjust the value.
_/`
Phase
Depending on the resolution and scan frequency that you input to the TV Set, you may
see a hazy or noisy picture on the screen. In
such a case you can use this item to get a
clear picture by trial and error method.
•Use
_ / ` button to adjust the value.
PC Picture Menu
By pressing
icon. PC Picture menu appears on the
screen.
/
button, select the second
-49-
Page 20

p
Sound in PC mode
PC PICTURE
ontrast
rightness
olour Tem
R
G
B32
Reset
46
30
Normal
32
32
• Conne ct the PC’s Audio output to t he TV’s
PC Audio In socket with an audio cable.
Other Features
TV Status
Programme Numbe r, Programme Name,
Sound Indicator and Zoom Mode are dis-
played on the upper right side of the screen
when a new programme is entered but-
ton is pressed.
Mute Indicator
It is placed in the upper lef t side of the
screen when enabled.
Contrast, Brightness an d Colour Temperature adjustments in this menu are identical
to adjustments defined in TV picture menu.
When Colour Temp is Manual, you can also
adjust the R,G,B items. R, G and B adjust
the TV image colour in PC mode. You can
change the TV colour to your desired colour:
R (Red), G (Green), B (Blue)
Select Reset and press
/
or “OK” button to re-
set the picture modes to factory default settings.
Sound Menu
By pressing_/`button, select the third icon.
Sound menu appears on the screen.
The items in this menu are described at
Sound menu starting page 43.
Feature Menu
By pressing_/`button, select the fourth
icon. Feature menu appears on the screen.
The items in this menu are described at
Feature menu starting page 45.
Source Menu
By pressing
Source menu appears on the screen.
In sour ce menu, highl ight a source by
pressing
mode by pressing
/
button, select the fifth icon.
/bbutton and switch to that
a
_/`
or “OK”button.
To cancel mute, there are two alternatives;
the first one is pressing the
the second o ne is increasing/decreasing
the volume level.
PIP and PAP modes
Press the button to switch to PIP mode.
At PIP Mode, a small picture (PIP picture) is
displayed on the main picture. There are 1
size and 4 positions (upper left, upper right,
bottom left and bottom right)(optional) avail-
able for the PIP window. You can use
button to change the PIP position. Aspect
Ratio of the PIP window is fixed and 4:3.
When PIP Mode is entered, the default active
window is PIP window and the active window is indicated by a white frame around it.
The active window can be changed by
pressing
belongs to active window. The place of the
status OSDs are same for both windows.
By pressing "P+" or "-P" button or directly
entering the channel number, you can watch
the channel you want at the active window.
Press the
active window.
AV
button and
/
button. The status info OSD
button to select the source for
-50-
Page 21

Press "M" button to see the main menu in
PIP mode. Items change due to the case
whether the active window is PIP window or
main window.
You can see the available sources in source
menu.
Press the
mode.
Press the
At PAP Mode, two pictures with equal sizes
are displayed on the screen. Aspect Ratios
of the windows are fixed.
When you switch to PAP Mode, Main window
in PAP Mode is displayed on the right side of
the screen. The active window can be
changed by pressing
By pressing "P+" or "-P" button or directly
entering the channel number, you can watch
the channel you want at the active window.
Press the
active window.
Press "M" button to see the main menu in
PAP mode. Items change due to the c ase
whether the active window is PAP window or
main window.
You can see the available sources in source
menu.
In PAP mode:
Press the teletext (
teletext page of the channel at the main window. It is displayed at the left window. Press
the teletext (
exit from teletext.
Press the
mode.
button again to exit the PIP
button to switch to PAP mode.
/
button.
AV
button to select the source for
) button to display the
) button or TV ( ) button to
button again to exit the PAP
Zoom Modes
Zoom mode can be changed by pressing
the
size according to the picture aspect ratio.
Select the optimum one from the following
ZOOM modes.
Note: You can only choose 4:3 and FULL in PC mode.
Auto:
When a WSS (Wide Screen Signalling) signal, which shows the aspect ratio of the pic-
ture, is included in the broadcast signal or
the signal from an external device, the TV
automatically changes the ZOOM mode according to the WSS signal.
• When the AUTO mode does not function cor-
Full:
This uniformly stretches the left and right
sides of a normal picture (4:3 aspect ratio)
to fill the wide TV screen.
• For 16:9 aspect ratio pictures that have been
Cinema:
This zooms up the wide picture (16:9 aspect
ratio) to the full screen.
button. You can change the screen
rectlyduetopoorWSS signal quality or
when you want to change the ZOOM mode,
change to another ZOOM mode manually.
squeezed into a normal picture (4:3 aspect
ratio), use the Full mode to restore the picture to its original shape.
Freeze Picture
You can freeze the picture on the screen by
pressing the OK button. At PIP and PAP lay-
outs; only the main picture can be frozen.
16:9 Subtitle:
This zooms up the wide picture (16:9 aspect
ratio) with subtitles to the full screen.
-51-
Page 22

“Default Zoom” Modes:
4:3
Use to view a normal picture (4:3 aspect ratio) as this is its original shape.
the top left corner of the screen. The Teletext
page counter searches until the selected
page number is located, the desired page is
then displayed on the screen.
•Pressthe
text screen forward one page at a time.
• Press the
text screen backward one page at a time.
or P+ button to move the Tele-
a
or -P button to move the Tele-
14:9 Zoom:
This zooms up the wide picture (14:9 aspect
ratio) to the upper and lower limits of the
screen.
Panoramic:
This stretches the left and right sides of a
normal picture (4:3 aspect ratio) to fill the
screen, without making the picture appear
unnatural.
The top and bottom of the picture are slightly
cut off.
T eletext
Teletext is an information system that displays text on your TV screen. Using the Teletext information system you can view a page
of information on a subject that is available
in the list of contents (index).
To Operate Teletext
• Select a TV station where Teletext i s being
transmitted.
•PresstheTEXT button. Usually the list of
contents (index) is displayed on the screen.
To Select A Page Of Teletext
• Press the appropriate digit buttons for the
required Teletext page number.
The selected page number is displayed in
To Select Index Page
• To select the page number of the index (generally page 100), press the
button.
To Select Teletext With A TV
Programme
•Pressthe button. The text is now superimposed over the program me on the
screen.
•Pressthe bu tton again to return to the
Teletext page.
To Select Double Height Text
•Pressthe button for the top half of the information page to be displayed in double
height text.
•Pressthe
of the information page to be displayed in
double height text.
•Pressthe
page of normal height text.
button again for the bottom half
buttononcemoreforthefull
To Reveal “Concealed”
Information
• Pressing the button once will reveal answers on a quiz or games page.
• Pressing the
the revealed answers.
button again will conceal
To Stop Automatic Page Change
The telete xt page you have selected may
contain more information than what is on the
screen; the rest of the inf ormation will be
displayed after a period of time.
•Pressthe
page change.
button to stop the automatic
-52-
Page 23

•Pressthe button againtoallowthenext
page to be displayed.
To Select A Subcode Page
Subcode pages are subsections of long
Teletext pages that can only be displayed on
the screen one section at a time.
• Select the required Teletext page.
• Press the
• Select the required subcode page number
by pressing four digit buttons (e.g. 0001).
• If the selected subcode page is not displayed
in a short time, press the
programme will be displayed on the screen.
• Teletext page number will be displayed on
the upper left corner of the screen when the
selected page is found.
• Press the
Teletext page.
button.
button. TV
button to display the selected
To Exit Teletext
• Press the button. The screen will switch
to TV mode.
To Display The Time
• While watching a TV programme with Teletext transmission press the
current time information, captured from T eletext will be displayed on the screen.
• If the programme being watched does not
have Teletext transmission, no information
will be displayed.
button.The
•Pressthe
screen backward one page at a time.
For Fastext
The subject-heading for the information may
have a particular colour.
• Press an appropriate RED, GREEN, YELLOW
or BLUE button in order to reach the relevant
page quickly.
For TOP text
TOP text mode of operation will be activated
automatically according to the transmission.
• If TOP text transmission is present, colour
coded buttons will appear in status row.
• If TOP text transmission is not present, status row will not appear.
The subject-heading for information may be
located in coloured box.
In Top mode the
quest the next or previous page respectively.
If TOP text transmission is not available, in
case of operation of these commands,
wraparound occurs. For example page 100
appears to be one greater than page 199.
b
button to move the Teletext
or
a
commands will re-
Fastext
Your TV supports the 1000 page Teletext
system. When the p age number of an y of
the 1000 pages in memory is enter ed, the
system will not search for the requested
page; instead it will display the page automatically. If the requested page is not in
memory, the system will search for the requested page number and save the 1000
pages including the requested page into
memory after finding it.
•Pressthe
screen forward one page at a time.
button to move the Teletext
a
-53-
Page 24

Connect Peripheral
Equipment
There is a wide range of audio and video
equipment that can be connected to your TV.
The following connection diagrams show
you where the different (Optional) equipment
should be connected at the rear side of the
TV.
Your PLASMA Television is capable of displaying High Definition pictures from devices
such as a High Definition Satellite Receiver
or DVD Player. These devices must be connected via the HDMI socket (EXT-6) or Component Socket (EXT-4). These sockets can
accept either 720p or 1080i signals.
Note: For proper connection of a device to
HDMI input o f your TV via using a DVI-to-
HDMI cable, use PC Audio In input for sound
connection.
Via The Scart
Plasma TV has 3 Scart sockets. If you want
to connect peripherals (e.g. video, decoder,
etc.) which have Scart sockets to the TV, use
SCART 1, SCART 2 or SCART 3.
If an external device is connected via the
Scart sockets, the TV will be switched to AV
mode automatically.
• Do not connect Digital Set Top Box devices
viaScart1.UseScart2.Use Scart 3.
Via Aerial Input
If you want to connect to your TV, peripherals
like video recorders or decoders, but the de-
vice you want to connect does not have a
Scart socket, you should connect it to the
Aerial input of the TV.
If the VCR is connected via Aerial input it
is suggested to use Programme 0.
Decoder
Cable TV offers you a wide choice of
programmes. Most of them are free, others
are to be paid for by the viewer. This means
that you will need to subscribe to the broadcasting organisation whose programmes
you wish to receive. This organisation will
supply you a corresponding decoder unit to
allow the programmes to be unscrambled.
For further information ask your dealer. See
also the booklet supplied with your decoder.
Connect a decoder with an aerial socket
to the TV
• Connect the aerial cable.
Connect a decoder without an aerial
socket to the TV
• Connect the decoder to the TV with a Scart
cable to SCART 1.
TV And Video Recorder
• Connect the aerial cables.
Better picture quality can be obtained if you
also connect a Scart cable to SCART sockets.
Playback NTSC
To use this option you can;
• Connect an NTSC VCR player to a Scart
socket at the rear side of the TV .
• Connect an NTSC VCR player to RCA Jacks
at the rear side of the TV.
Then, press
ate source.
AV
button to select appropri-
Copy Facility
Source selection for VCR recording.
• Select Feature menu.
• Select Ext-2 Out by pressing
• Select a source to copy the picture from that
source.
/
button.
Search For And Store The Test
Signal Of The Video Recorder
• Unplug the aerial cable from the aerial
socket of your video recorder .
• Switch on your TV and put the video recorder
on the test signal. (See the booklet for your
video recorder.)
• Enter the Install menu and select search.
• Search for the test signal of your video re-
-54-
Page 25

corder in the same way as you searched for
and stored the TV signals. Store the test sig-
nal under programme number 0.
• Replace the aerial cable in the aerial socket
of your video recorder once you have stored
the test signal.
Camera And Camcorder
To Connect To AV Input
Connect your camera or camcorder to AV
(EXT-5) input at the rear side of the TV.
• Connect your equipment to the TV via VIDEO
(yellow), AUDIO R (red) and AUDIO L (white)
inputs. You must connect the jacks to the in-
put using the same colour.
To Connect To S-VHS Input
Connect your camera or camcorder S-VHS
input (EXT-5S) at the rear side of the TV.
• Connect your equipment to the TV via S-VHS
input and audio inputs of AV inputs by using
S-VHS cables.
EXT-3 S Mode
If the equipment connected to your TV set
supports S-Video (Y/C) output from
Euroconnector, you can have a better picture
quality by selecting EXT-3 S mode and con-
necting your equipment to the EXT.3 (EXT-3
S) terminal of TV. See your equipment's
booklet to check if your equipment has such
feature.
Connecting Headphones
Use the stereo headphone socket at the
rear side of the TV, to connect headphones.
Connecting Subwoofer
Use Subwoofer Out socket to connect an
external, active subwoofer to the set to give a
much deeper bass effect.
Connecting External Equipment
To connect audio amplifiers or home theatre
systems to your TV, use the Audio Line Outs
of the TV.
Connect The Decoder To The
Video Recorder
Some video recorders have a special Scart
socket for decoder.
• Connect a Scart cable to the Scart socket of
your decoder and to the special Scart socket
of your video recorder. Refer to the booklet
of your video recorder.
• To connect your video recorder to the TV, refer to the TV and Video Recorder section.
If you want to connect more equipment to
your TV, consult your dealer.
-55-
Page 26

PC Input T y pical Display Modes
The display has a maximum resolution of 1280 x 768, vertical sync. frequency range of 56-85
Hz and a horizontal sync. frequency range of 30-69 KHz.
The following table is an illustration of some of the typical video display modes.
Mode
Resolution Frequency
Horizontal Vertical Hor.(kHz) Ver.(Hz)
1 640 400 31,5 70
2 640 480 31,5 60
3* 848 480 31 60
4 640 480 37,9 72
5 640 480 37,5 75
6 640 480 43,3 85
7 800 600 35,2 56
8 800 600 37,9 60
9 800 600 48,1 72
10 800 600 46,9 75
11
12
13 1024 768 56,5 70
14 1024 768 60 75
15 1024 768 68,7 85
16 1152 864 67,5 75
17* 1280 768 47,8 60
18* 1280 768 56,1 70
800 600 53,7 85
1024 768 48,4 60
-56-
Page 27

Cleaning and care
Before cleaning, the appliance is to
be turned off with the main switch!
Improper handling and cleaning can
damage the sc reen irreparably.
Therefore pay attentionto the rules in
regards of the treatment and care of
the appliance.
Treatment:
Treat the surface of the screen very care f ully .
Avoid all mechanical strain of the surface of
the s creen such as, scra ping, pushing,
pressure, etc, since damage can occur.
Prevent the contact with pointed, sh arpedged or hard objects.
The surface is to be protected from soiling.
Care and cleaning:
Before cleaning disconnect the appliance and
the power-supply plug.
The cleaning of the surface must be done with
a dry soft cleaning cloth (for example Microfiber
cloth). If stronger soiling is present, the surface
can be cleaned with a moistened, soft cloth.
Pay attention that no water or other liquids ever
penetrate into the appliance. This will damage
the appliance.
Immediately pull the power-supply plug, if foreign bodies like water, other liquids, metal
parts etc. reach onto the screen. Do not put
your hand or any other objects into the appli-
ance.
There is danger of an electric shock or accident.
-57-
Page 28

Tips
Care Of The Screen
Clean the screen with a slightly damp, soft
cloth. Do not use abrasive solvents as they
may damage the TV screen coating layer.
Poor Picture
Have you selected the correct TV system? Is
your TV set or house aerial located too close
to non-earthed audio equipment or neon
lights, etc.?
Mountains or high buildings can cause
double pic tures or ghost ima ges. Some-
times you can improve the picture quality by
changing the direction of the aerial.
Is the picture or Teletext unrecognisable?
Check if you have entered the correct fre-
quency.
The picture quality may degrade when two
peripherals are connected to the TV at the
same time. In such a case, disconnect one
of the peripherals.
No Picture
Remote Control
Your TV no longer responds to the remote
control. Perhaps the batteries are exhausted. If so you can still use the local buttons at the bottom of the TV.
Have you selected the wrong menu? Press
the
the “M” button to return to the previous
menu.
button to return to TV mode or press
No solution:
Switch your TV set off and on. If this does not
work, call the service personnel; never attempt to repair it yourself.
Is the aeri al connected properly? Are the
plugs connected tightly to the aerial socket?
Is the aerial cable damaged? Are suitable
plugs used to connect the aerial? If you are
in doubt, consult your dealer.
No Picture could mean that your TV is not
receiving a transmission. Have you selected
the correct button on the remote control? Try
once more.
Sound
You can not hear any sound. Did you per-
haps interrupt the sound, pressing the
button?
Sound is coming from only one of the
speakers. Is the balance set to one ex-
treme? See Sound menu.
-58-
Page 29

Su produc to Metz ha sido concebido y fabricado con
materiales y componentes de alta calidad, que pueden
ser reciclados y reutilizados.
Este s ímbolo significa que los aparat os eléctricos y
elect rón icos, a l final de su vida ú til, debe rán ser
separados de los residuos domésticos y reciclados.
Rogamos llevar este aparato al punto de recogida de su
municipio o a un centro de reciclaje.
Por favor, contribuya Vd. también en la conservación del
Il vostro prodotto Metz è stato progettato e realizzato
con materia li e compone nt i pregi at i che possono
essere riciclati e riutilizzati. Questo simbolo significa
che gli ap parecchi e l ettrici ed e lettroni ci d ev o n o
essere s maltiti separatament e dai rifiuti domestici
alla fine del loro utilizzo.
Vi pre ghiamo di smaltire que sto app arecchio negl i
appositi punti di raccolta locali o nei centri preposti al
riciclaggio.
Your Metz product was developed and manufactured with
highquality materials and components which can be re-
cycled and/or re- used .
This s ym bol indicates that electri cal an d electronic
equipment must be disposed of separately from normal
garbage at the end of its operational lifetime.
Please dispose of this product by bringing it to your local
collection point or recyc ling centre for such equipment.
Thi s will he lp to p rotect t he en vir on men t i n which we al l live.
Contribuiteanchevoi atutelare l’ambiente nel quale viviamo.
ambiente en que viv imos.
elekt ro nisch e appa rat uur a an het e inde v an zijn
levensduur gescheiden van het huisvuil apart m oet
E
worden ingeleverd.
NL
Bren g dit app araat na ar e en van d e pl aats el ij ke
verzamelpunten of naar een kringloopwinkel.
He lp s .v.p . m ee, h et mi lieu waar in w e lev e n te
beschermen.
GB
Ihr Metz-Produkt wurde mit hochwertigenMaterialien und
Komponenten entworfen und hergestellt,die recycelbar
sind und wieder verwendetwerden können.
Dieses Symbol bedeutet, dass elektrische und
elektronische Geräte am Ende ihrer Nutzungsdaue r
vom Hausmüll getrennt entsorgt werden müssen.
Bitte entsor gen Sie dieses Gerät bei Ihrer örtlichen
kommunalen Sammelstelle oder im Rec ycling Centre.
Bitte helfen Sie m it, die Umwelt in der wir leben, zu
erhalten.
Votre produit Metz a été conçu et fabriqué avec des
matériaux et composants de haut e qualité,
susceptibles d'être recyclés et réutilisés.
D
I
Uw Metz-product is ontworpen voor en gebouwd uit
hoogwaardige materialen en c omponenten di e g ere cycled
ku nn en wo rd en e n du s g esc hikt zijn voor h er gebruik.
Ce symbole signifie que les appareils élec triques et
électroniques, lorsqu'ils sont arrivés en fin de vie, doiv ent
être éliminés séparément des ordures ménagères.
Veuillez rapporter cet appareil à la déchetterie
communale ou à un centre de recyclage.
Vous cont ribuez ainsi à la préservation de
l'en vironnement.
F
Dit sym boo l bet ekent, dat elek tris che en
-59-
Page 30

Specifications
TV BROADCASTING
PAL/SECAM B/G D/K K' I/I' L/L'
RECEIVING CHANNELS
VHF (BAND I/III)
UHF (BAND U)
HYPERBAND
CABLE TV (S1-S20/ S21-S41)
NUMBER OF PRESET CHANNELS 10 0
CHANNEL INDICA T OR
On Screen Display
RF AERIAL INPUT
75 Ohm (unbalanced)
OPERA TINGVOLT AGE
230V AC, 50 Hz.
AUDIO
3D PANORAMA
AUDIO OUTPUT POWER (W
)(%10 THD)
RMS.
2x10
POWER CONSUMPTION (W)
330 W
< 10 W (Stand-by)
PAN EL
16:9 display, 42” (106 cm visible) Screen
Size
DIMENSIONS (mm)
DIMENSIONS (mm)
Weigh t (k g)
DLH
96 1045 645
without foot
and speakers)
30
-60-
Page 31

Page 32

쐃
Service Centre
Training Centre
Administration and development
Storage/Dispatch
Mecablitz production
TV production
Plastics technology
쐃
Metz - Werke GmbH & Co. KG - Zirndorf near Nürnberg
Core competence in the areas of electronics and plastics
technology to form the basis of the excellent reputation of the
Metz Werke that has been built up throughout the world over
a period of many decades.
Metz offers quality made in Germany:
Consumer electronics, mecablitz flash units,
plastics technology and industrial electronics.
Metz-Werke GmbH & Co. KG
Postfach 1267, D-90506 Zirndorf
Fon: +49 911 - 97060
Fax: +49 911 - 9706340
www.metz.de
info@metz.de
Errors excepted. Subject to changes !
ķ Printed in Germany
Metz - always first class.
 Loading...