

Page 1
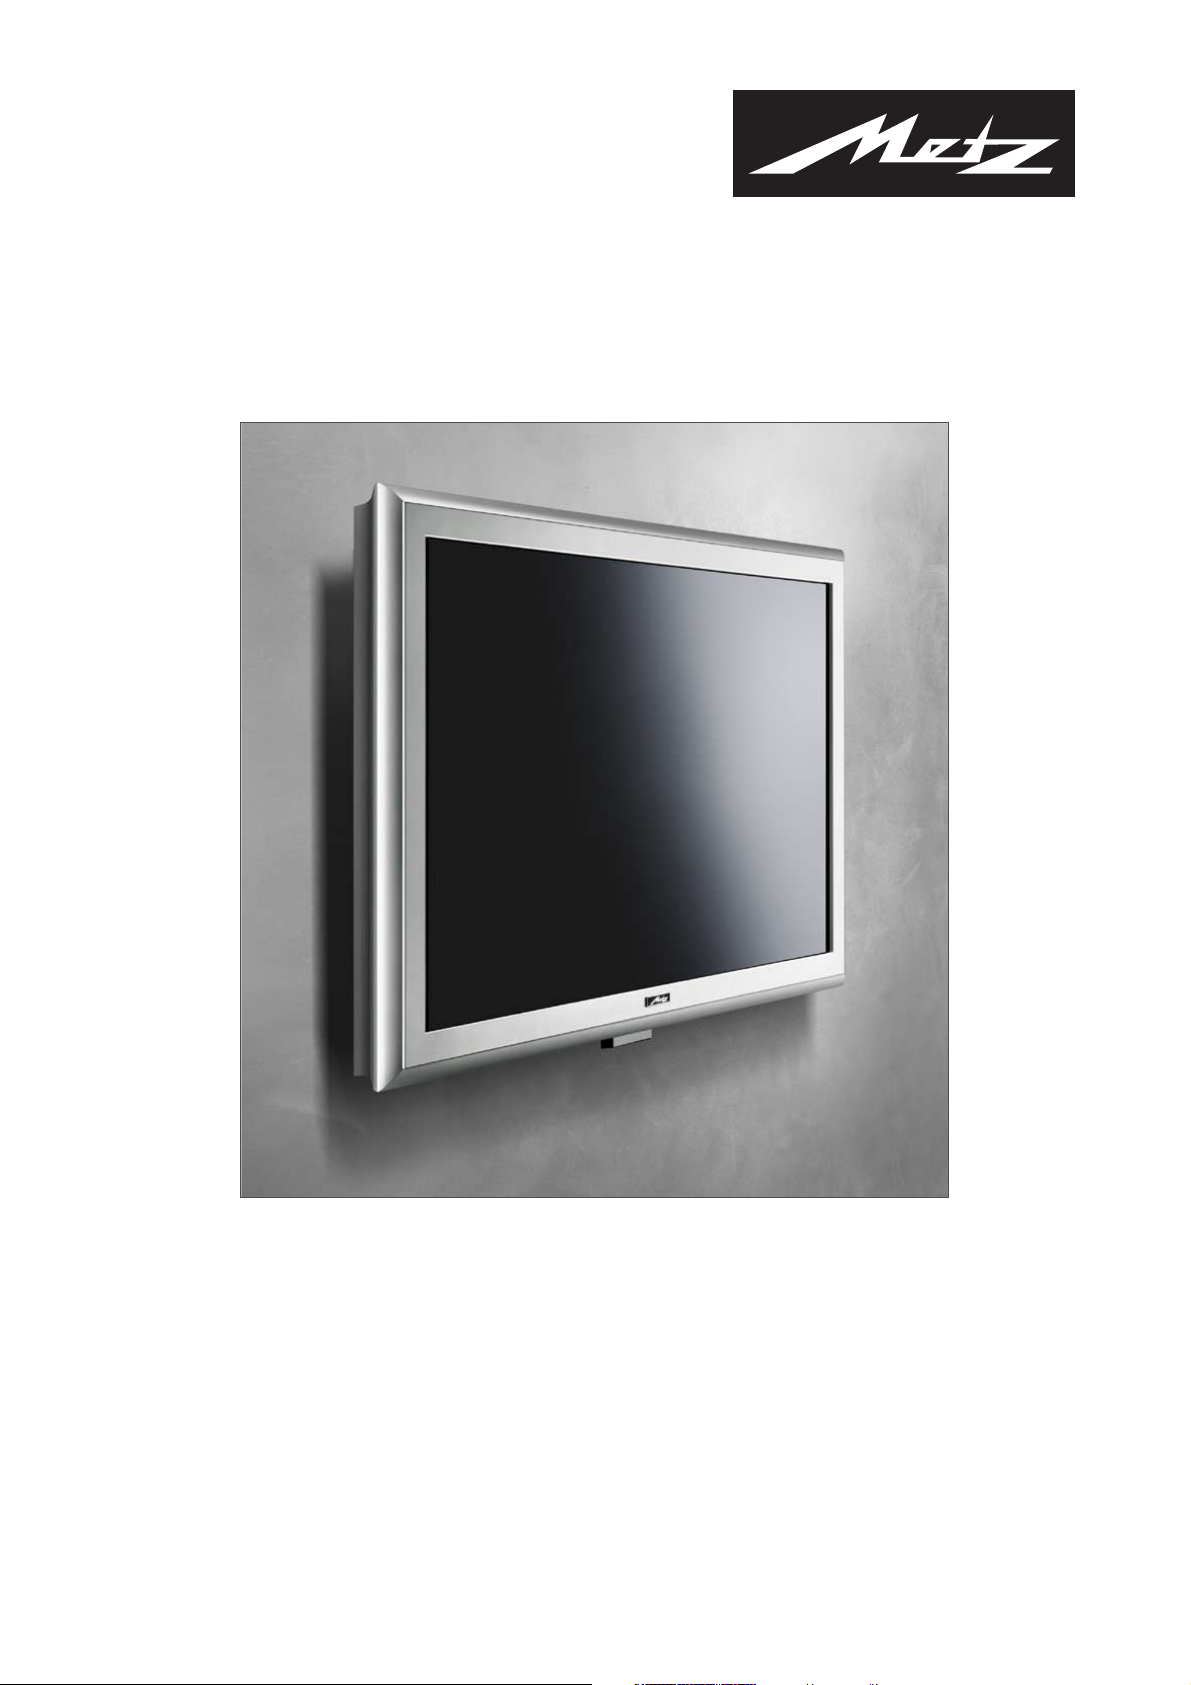
Flat-Cinema-TV 40“
40 TK 81
Operating Instructions
Page 2

Thank you
Dear customer,
thank you for choosing a Metz product.
Before using the TV set for the first time, you should read these operating instructions carefully.
Your METZ-WERKE
Contents
1. Standards . . . . . . . . . . . . . . . . . . . . . . . .3
2. Safety Notes . . . . . . . . . . . . . . . . . . . . . . .3
3. Overview . . . . . . . . . . . . . . . . . . . . . . . . .6
3.1 Scope of Delivery . . . . . . . . . . . . . . . . . . . .7
3.2 Connections . . . . . . . . . . . . . . . . . . . . . . .8
3.3 Keys and Functions of the Remote Control . . .9
4. Putting into Service . . . . . . . . . . . . . . . . . .12
4.1 Unpacking and Positioning . . . . . . . . . . .12
4.2 Wall Mounting . . . . . . . . . . . . . . . . . . . .13
4.3 Connecting and Switching On . . . . . . . . . .14
4.4 Using the TV Menu . . . . . . . . . . . . . . . . . .15
4.5 Basic TV-Menu Settings . . . . . . . . . . . . . .16
4.6 First-Time Settings . . . . . . . . . . . . . . . . . . .17
5. Day-to-Day Operation . . . . . . . . . . . . . . . .21
5.1 Switching On and Off . . . . . . . . . . . . . . . .21
5.2 Adjusting the Sound . . . . . . . . . . . . . . . . . .21
5.3 Adjusting the Picture . . . . . . . . . . . . . . . .22
5.4 TV Mode . . . . . . . . . . . . . . . . . . . . . . . . . .23
Teletext . . . . . . . . . . . . . . . . . . . . . . . . . . .24
5.5 PC Mode . . . . . . . . . . . . . . . . . . . . . . . . . .24
5.6 Operation with External Devices . . . . . . . . .25
5.7 Special Functions . . . . . . . . . . . . . . . . . . . .26
6. Troubleshooting . . . . . . . . . . . . . . . . . . . . .28
7. Technical Data . . . . . . . . . . . . . . . . . . . . . .29
Code List . . . . . . . . . . . . . . . . . . . . . . . . . . . . . .30
Local Controls . . . . . . . . . . . . . . . . . . . . . . . . .36
2
Page 3

3
1. Standards
This monitor is an information-technology device and complies with the following directives and standards of the
European Union:
• 89/336/CEE dated 3 May 1989 with subsequent modifications (Directive 92/31/CEE dated April 1992 and
Directive 93/68/CEE dated 22 July 1993)
• 73/23/CEE dated 19 February 1973 with subsequent modifications (Directive 93/68/CEE dated
22 July 1993)
• EN55022, EN55024, EN61000-3-2/-3 (Electromagnetic Compatibility)
• EN60065 (Safety Requirements).
The compliance with the requirements of these standards is certified by the markings applied to the device.
2. Safety Notes
In order to avoid the risk of injuries and accidents during normal use, you should read and comply with the following safety notes. Incorrect installation or connection of the monitor could result in damage to the monitor itself
and to other devices connected to it. Observe the warnings on the monitor and in these operating instructions.
Never allow children to operate electrical equipment without supervision.
General information
The monitor you have purchased complies with the highest quality requirements in this sector and has been
inspected for pixel faults in accordance with the strict standard ISO 13406-2, Fault Class II. In spite of the extreme
care taken during manufacture, its is still possible, for technological reasons, that a few pixels do not function correctly.
Please note that such pixel faults cannot be regarded as a sufficient reason for warranty claims as long as they do
not exceed the limits laid down in the above-mentioned standard.
Under certain circumstances, there may be some hum on the sound channel of the monitor. This normally originates from the main voltage and may be caused by connecting the earthing wires of different devices together. You
can prevent it by connecting a so-called sheath-current filter between the incoming antenna cable and the antenna
input to the monitor. Such filters, which look like a small adapter, can be purchased from your local dealer.
For technical reasons, the monitor may also generate some noise, but this may not exceed the value shown in the
device specification.
If your monitor is connected to an external antenna, this antenna must be earthed to prevent electric shocks and to
discharge any static electricity which may be generated. The earth connection must comply with the applicable
national regulations.
Ambient conditions
Never use the monitor in ambient conditions which do not comply with the technical data shown at the end of these operating instructions.
Use of the monitor under other conditions can result in electric shocks, fire or failure of the monitor.
Protect the monitor against moisture. This includes continuous high relative-humidity values, water in the immedia-
te vicinity, water dripping or splashing from other objects and rain. Do not place objects filled with water, such as
flower vases, on the monitor. When connecting an external antenna, take care that no water can enter at the point
where the antenna cable passes through the external wall.
When installing the monitor, allow it to adapt itself to the temperature in the room in which it is installed. If moisture condenses on the monitor, allow it to evaporate completely before switching on.
If this is not done, there is a risk of electric shocks and irreparable damage to the monitor.
Protect the monitor against high temperatures. Do not expose it to direct sunlight. Do not install it close to fires,
radiators or other sources of heat. Take care that the heat generated by the monitor can be dissipated: do not
block the ventilation slits. Ensure that there is sufficient space between the ventilation slits and other pieces of furniture (above and below the monitor and on both sides). Do not allow curtains or drapes to hang over the monitor.
If this is not done, the monitor may overheat and may even catch fire.
Page 4

Mains connection and operation
In order to safely disconnect the monitor from the mains supply, turn off the main power switch and remove the
mains cable from the outlet socket. Connect the monitor only to a correctly installed and earthed mains outlet sokket. Make sure that the mains voltage matches the value specified in the technical data of the monitor. Ensure that
the mains plug and the outlet socket can be reached easily at any time.
Non-compliance with the above may result in electric shocks, fire or failure of the monitor.
Lay the mains cable so that nobody can trip over it.
If the monitor falls from its table or mounting bracket, persons may be injured and there may be irreparable
damage to the monitor.
Use only the mains cable supplied with the monitor. Take care that it is not damaged and do not make any modifi-
cations to it. Never use a damaged mains cable. If the mains cable or the plug is damaged, the monitor may not
be used, since there is a risk of electric shock, fire or failure of the monitor.
Never touch the mains switch or the mains cable with wet hands. This could result in an electric shock.
Never remove the mains plug from the outlet socket by pulling the cable. Avoid laying the cable in the vicinity of
hot objects, since this could result in fire or electric shocks.
Before leaving the monitor unattended for a long period, or in the case of a thunderstorm, remove the mains plug
from the outlet socket and remove the plug of the antenna cable from the antenna socket as a precautionary measure to prevent fires and the risk of electric shocks.
Always switch off the monitor and the signal source before connecting them together in order to prevent electric
shocks and injuries.
Faults
If the monitor or its mains cable is damaged in any manner, immediately disconnect the mains cable from the outlet socket.
You should also immediately disconnect the mains cable from the outlet socket if you notice smoke, unpleasant
smells or unusual noises emanating from the monitor. The same applies if there is no picture on the screen when
you switch on the monitor or during normal operation. Never attempt to continue using the monitor under these
conditions.
Never attempt to open or repair the monitor. There are no components inside the monitor which you can repair or
replace. In the case of a fault, consult your local dealer.
Cleaning and care
Incorrect use and cleaning can cause irreparable damage to the monitor. You should therefore observe the following instructions for the cleaning and care of the monitor.
Handling:
Take great care when handling the screen surface.
Avoid all possible mechanical damage which could result from shocks, pressure, scratches, etc.
Do not touch the screen with sharp or hard objects.
Keep the screen clean.
Care and cleaning:
Before cleaning the monitor, switch it off and disconnect the mains cable from the outlet socket.
The screen may be cleaned only with a dry soft cloth (such as a microfleece duster). If the screen is very dirty, it
may be cleaned with a soft cloth moistened slightly with water. Take care that no water or other liquids drips into
the monitor, since this can damage it.
Immediately disconnect the mains cable from the outlet socket if foreign objects, such as water, other liquids, metal
objects, etc., fall into the monitor. Never attempt to insert objects of any kind into the monitor and never place
your hands inside the monitor, since this can result in an electric shock.
4
Page 5

5
Batteries
If swallowed, batteries can cause serious injuries. For this reason, keep batteries out of reach of children. If someone swallows a battery, consult a doctor immediately.
Remove exhausted batteries immediately from the remote control, since they may leak and damage the remote
control.
The batteries enclosed with the monitor may not be recharged, reactivated by any means, taken apart, thrown
into a fire or short-circuited.
Exhausted batteries must be disposed of in accordance with local regulations.
Other important notes
Note that the monitor is still connected to the mains voltage when it is switched to standby mode. In order to
disconnect it completely from the mains voltage, move the mains switch to the position "O" and/or disconnect the
mains cable from the outlet socket.
For ergonomical reasons, it is not advisable to use red or blue fonts or other symbols on a dark background, since
the resulting low contrast can result in eyestrain for the user. Wherever possible, select a high-contrast display
such as black text on a white background.
In order to avoid eyestrain, the recommended viewing distance is about five to six times the screen diagonal
dimension. The illumination in the room should be bright enough to permit reading. If the room is too bright, the
screen contrast will be reduced. If the room is too dark, rapid changes in the brightness of the screen display can
strain your eyes.
If you wish to connect external loudspeakers, make sure that these comply with the technical data of the loudspeaker output. If the external loudspeakers are too small, the loudspeakers and/or the integrated amplifier may be
damaged.
The packing materials used for the monitor are suitable for recycling. When they are no longer needed, dispose
of them accordingly.
Page 6

3. Overview
The TFT monitor offers a multitude of connections for external devices such as personal computers, DVD players,
video recorders, video cameras, etc.
Regardless of whether the pictures come from the TV receiver, a video recorder or a PC, they are displayed with
high resolution and free of distortion on the absolutely flat screen. The screen display is extremely bright and
unusually brilliant. Other important features of the monitor are the large size of the screen, with an aspect ratio of
15:9, and the very flat design.
For the reception of TV programmes, a terrestrial antenna, a SAT receiver or a cable receiver is needed.
The monitor is operated interactively with the aid of the enclosed remote control and the on-screen display (OSD),
also called the menu. This can be used to make various settings for optimum picture quality.
An innovative cooling system permits the operation of the TFT monitor without the need for noisy fans. The monitor
is thus just as quiet as a conventional TV set and ideal for use in living rooms and conference rooms.
Features
• High-quality aluminium case
• Fan-free design
• Screen diagonal 100 cm
• 15:9 aspect ratio
• Viewing angle, horizontal/vertical 170 degrees
• Digital comb filter
• Compatible with PAL, SECAM and NTSC
• Compatible with VGA, SVGA, WXGA, XGA and SXGA
• Teletext
• Automatic programme identification
• Sleep timer
• 2 x SCART connectors
• 1 x S-Video (mini DIN)
• 1 x Cinch (FBAS video (CCVS))
• 1 x DVI (I) (analogue and digital)
6
Page 7
7
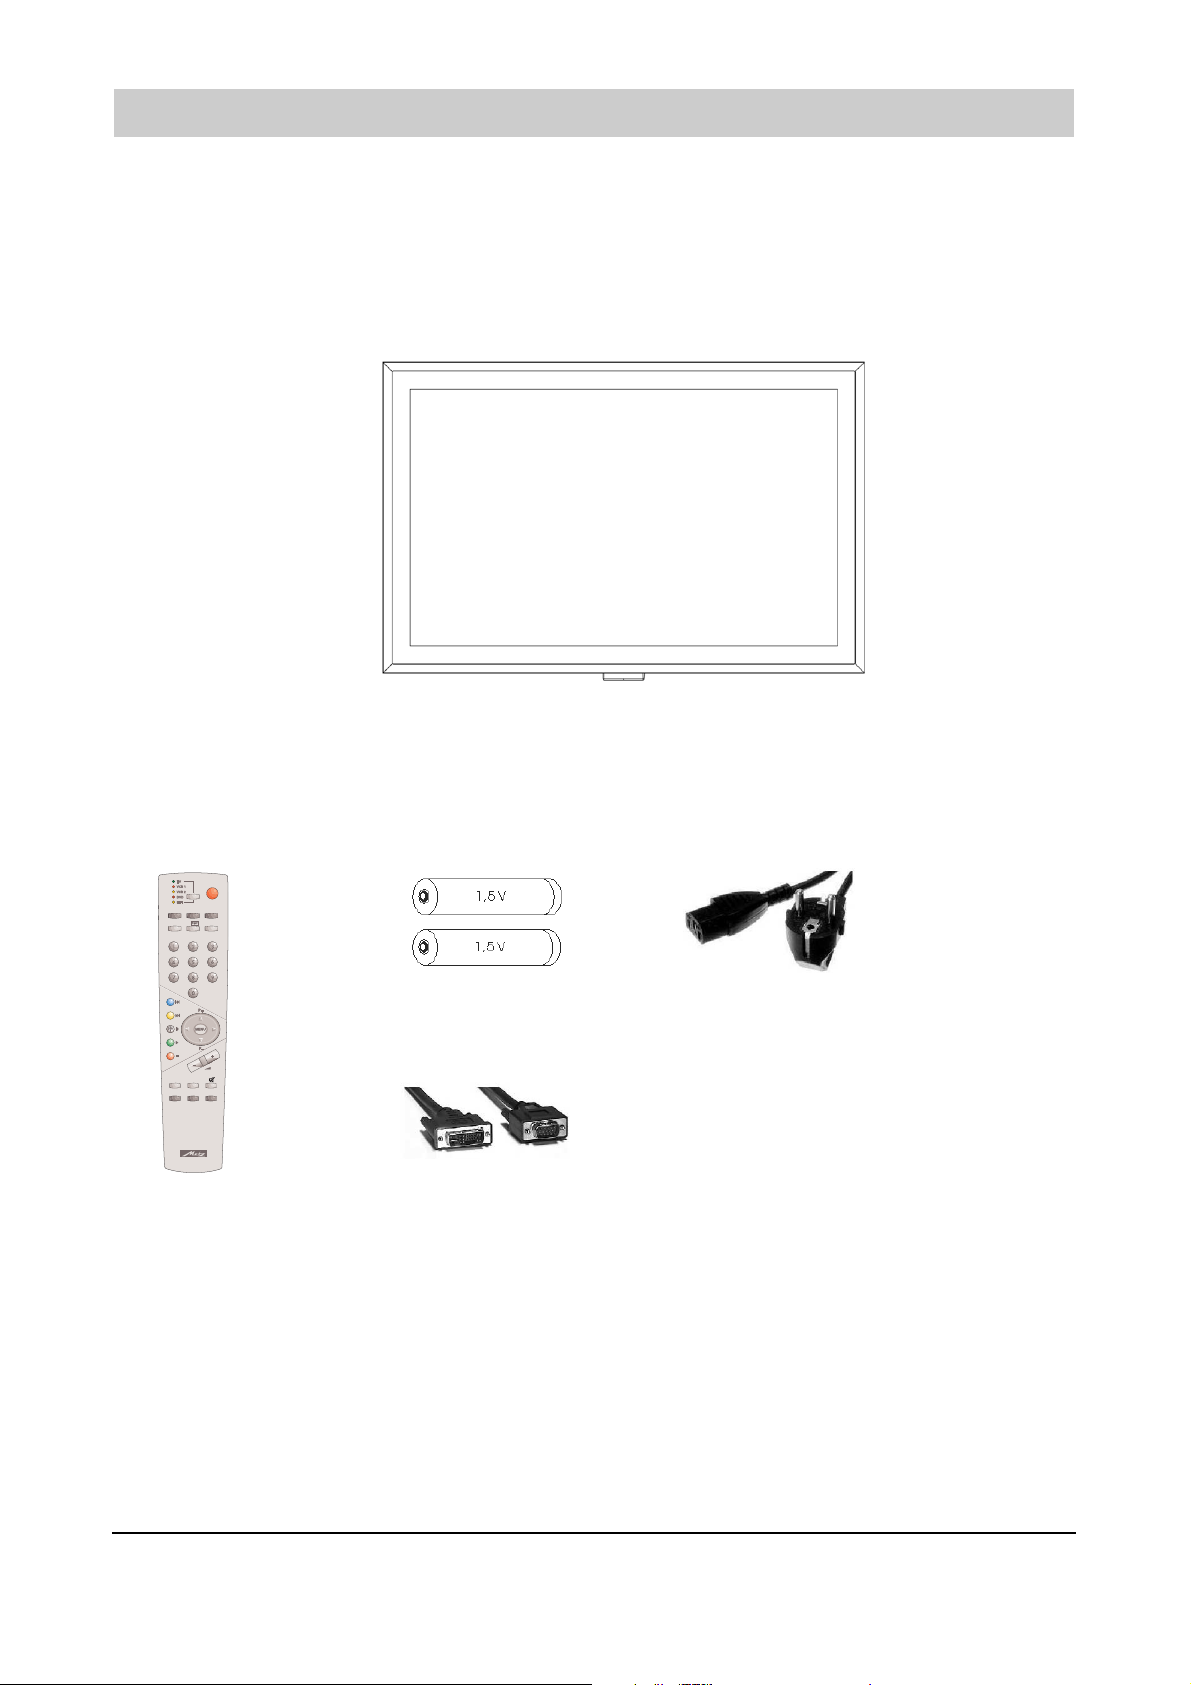
3.1 Scope of Delivery
Immediately after receipt, inspect your new TFT monitor for possible transport damage and check that all parts
have been delivered. The supplier can accept your claims for transport damage only if you inform him of this
before putting the monitor into service for the first time. If anything is missing, please call our service hotline. Keep
the packing materials for re-use if you have to transport the monitor again.
Standard scope of delivery
1 x TFT monitor
Standard accessories in accessory box
1x remote control 2x batteries LR03 1x mains cable, 2.5 m long
1x video cable, HD-Sub to DVI-I, 2.0 m long
Operating Instructions
RK 14
Ǽ
TV AV PC
M/S
–/–– F
M
INFO II
TEXT PIP MIX
Ȅ
DIGITAL TECHNOLOGY
Page 8
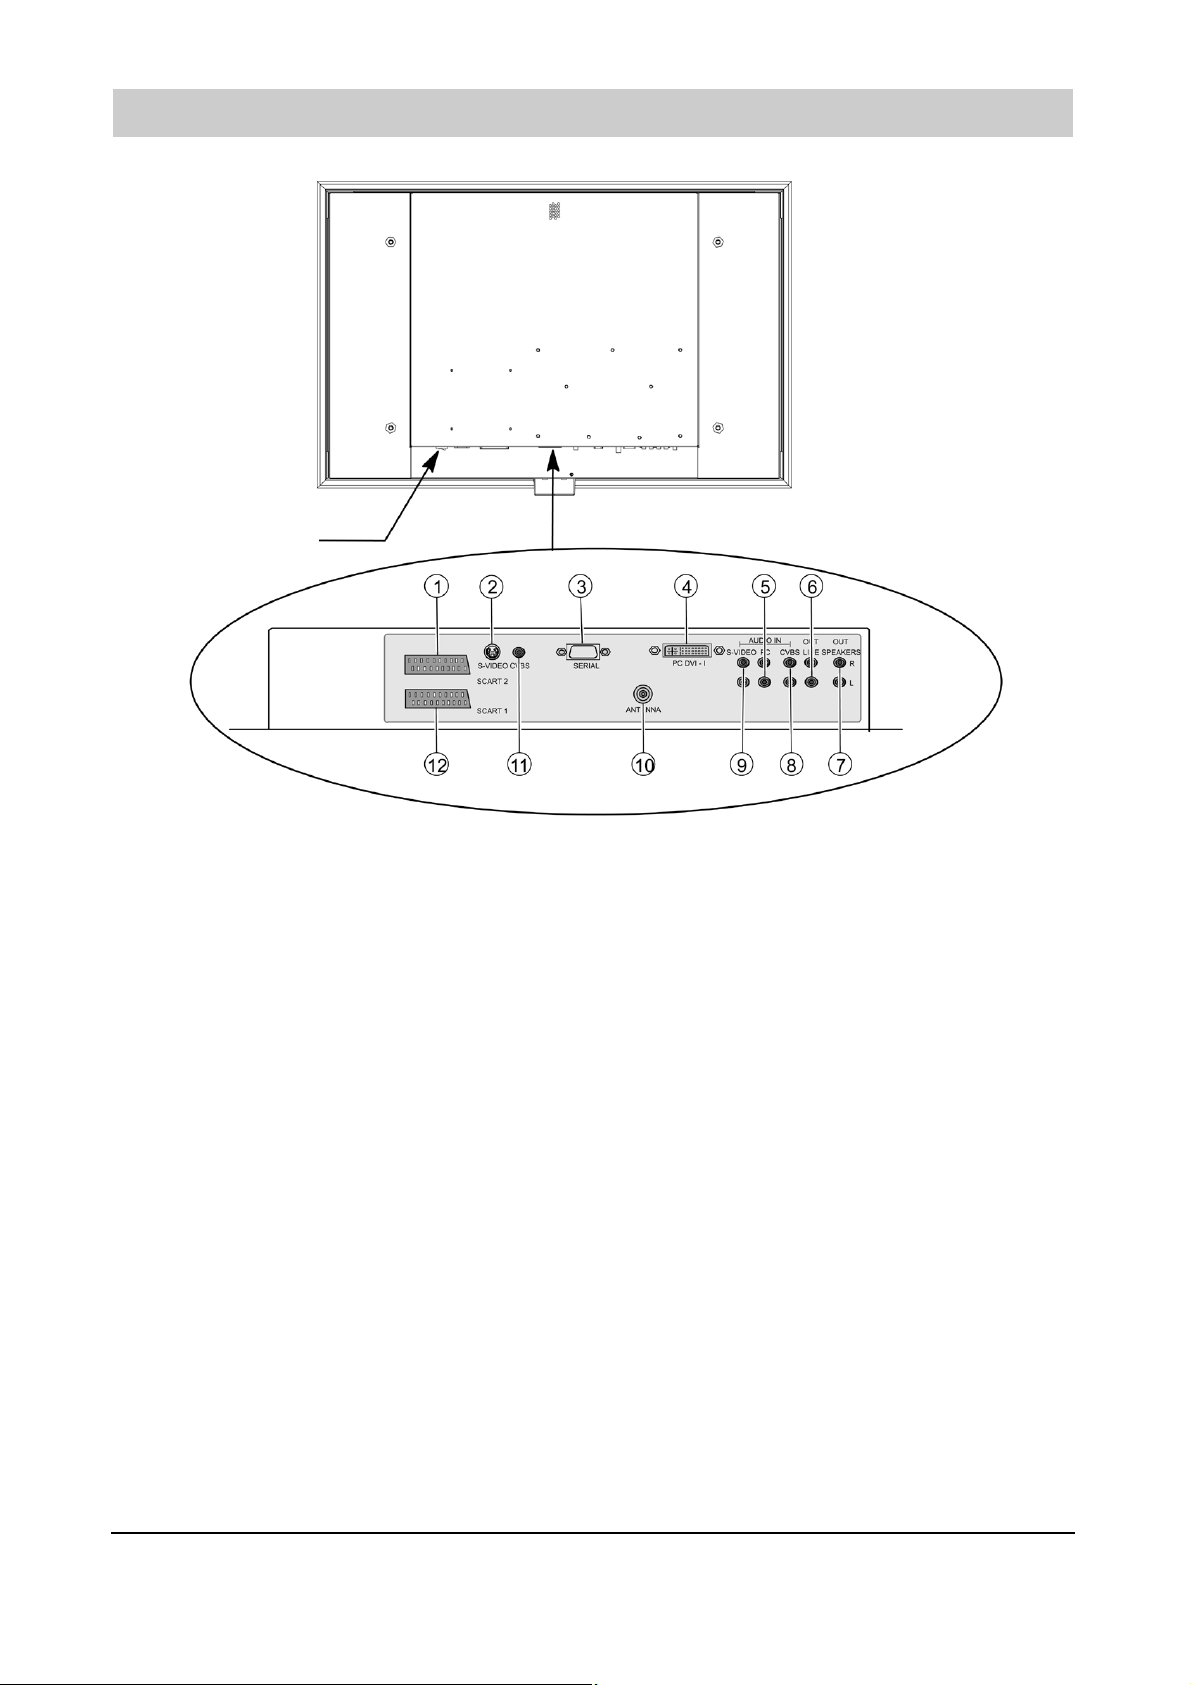
3.2 Connections
SCART 2 – e.g. for connection of a video recorder
S-VIDEO (Y/C) – e.g. for connection of a camcorder with S-Video connector
SERIAL - RS232 interface for service purposes
PC DVI-I - PC input connector (RGB for analogue signals, DVI for digital signals).
If your PC has an analogue VGA output, use the enclosed video cable DVI-I to
15-pin HD-Sub for connecting it to the monitor.
AUDIO IN PC – e.g. for connection of an audio signal from a PC with line-out connector
OUT LINE – e.g. for connection of an audio amplifier or a DVD receiver
OUT SPEAKERS – sockets for external loudspeakers
(The loudspeaker output provides a power of 2 x 7W sinusoidal into 4Ω.)
AUDIO IN CVBS – e.g. for connection of a camcorder to the Video-In socket
AUDIO IN S-VIDEO - e.g. for connection of a camcorder to the S-Video socket
ANTENNA – socket for the TV antenna signal (terrestrial antenna or cable outlet)
CVBS - e.g. for connection of a camcorder to the Video In socket
SCART 1 - e.g. for connection of a satellite receiver
8
Mains switch
Page 9
9
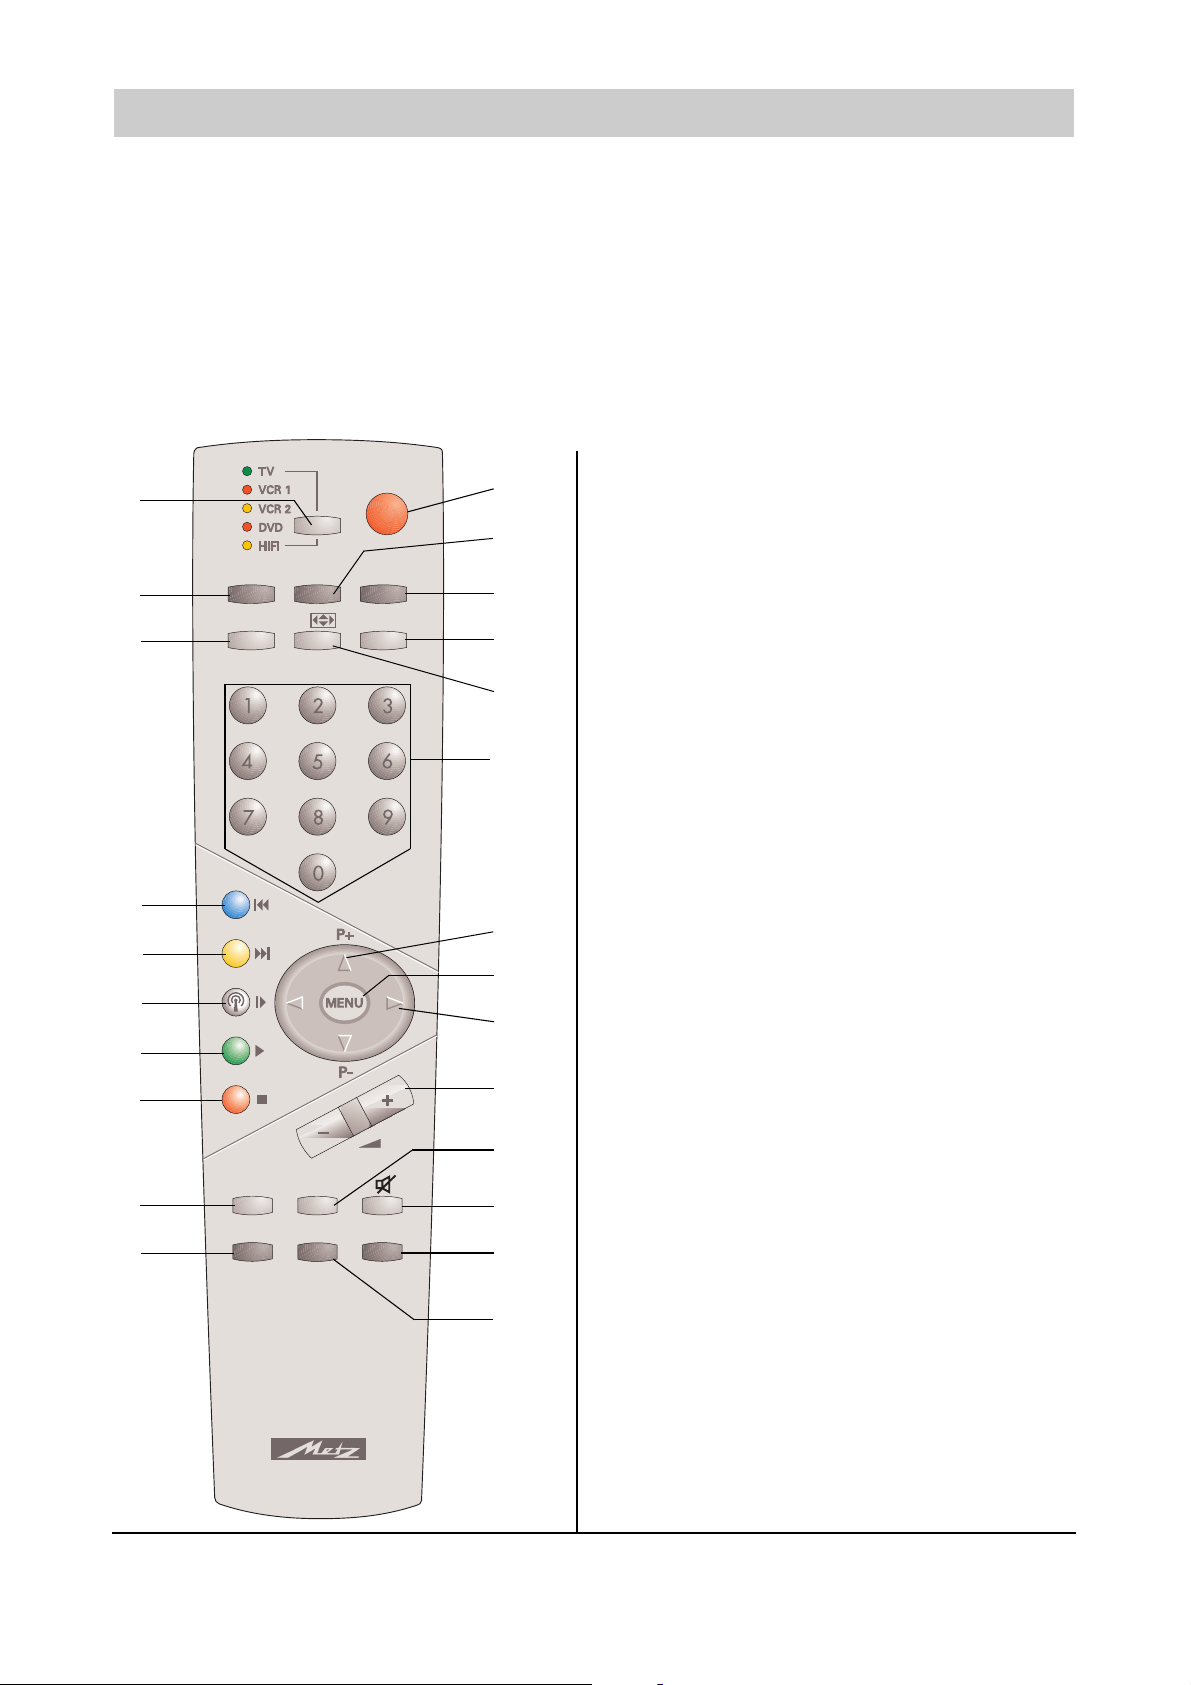
3.3 Keys and Functions of the Remote Control
Before you can control your TFT monitor with the remote control, you must plug it into a mains socket and switch it
on with the mains switch.
The infrared remote control will operate correctly only if there are no physical obstacles between it and the infrared sensor located at the bottom of the front side of the monitor. The maximum range of the remote control is
about 7 metres.
It may happen that the monitor cannot receive the signals from the remote control, or that the range of functions is
greatly restricted, although there are no obstacles in the way. In such cases, please reduce the distance between
the monitor and the remote control.
As the batteries become weaker, the range of the remote control will be reduced. In such cases, fit new batteries in
the remote control. Use only dry batteries of the type LR03 AAA 1.5 V.
Ǽ
RK 14
TV AV PC
–/–– F
M/S
Ȅ
TEXT PIP MIX
INFO II
DIGITAL TECHNOLOGY
M
21
22
23
24
OFF (standby)
Direct selection, video mode
Direct selection, PC mode
MONO/STEREO changeover
Aspect-ratio switching
Numeric keys 1 -9, 0
P+ / P- programme step
Open TV menu
Volume adjustment, Cursor left/right key
Volume adjustment
TV: freeze frame; TT: page hold
Mute
TV: display time
PIP (picture in picture, PC mode only)
SELECT: selection key for external AV devices
TV mode (back to TV picture from, for example,
DVD, PC, etc.)
Selection key for two-digit programme-position
numbers
Teletext: next subject
Teletext: next chapter
Open station table
Teletext: 1 page forwards
Memory – save menu settings
Teletext: 1 page back
Info key for display of station logo and sound mode
Open/close Teletext
21
22
23
24
Page 10

3.3 Keys and Functions of the Remote Control
Programming the remote control for the individual devices
Before you can control your AV devices with the remote control, you must enter a three-digit code number in each
of the various operating levels of the remote control.
• TV (TV set)
The TV control level is already programmed for this Metz TV set. No other code can be entered.
• VCR1 (video recorder 1)
VCR 2 (video recorder 2)
DVD player
HiFi (amplifier, tuner, tape deck, etc.)
The remote control must be programmed with the appropriate code numbers, as shown in the code list.
See the factory settings and the code list at the end of these operating instructions.
Programming the codes for VCR and DVD
After execution of the steps a). . . c), you have about 15 seconds to enter the code. After this,
the TV automatically returns to the TV level.
a) Use the Select key to select the desired operating level. The LED for the selected level lights.
b) Press and hold the keys und --/- on the remote control until the LED blinks twice.
c) Enter the desired code (see the code list) with the numeric keys. If the code is accepted, the LED again
blinks twice. If you have entered an invalid code, the LED lights once for about 2 seconds.
Programming the codes for CD player, tuner and tape deck
After execution of the steps a). . . c), you have about 15 seconds to enter the code. After this,
the TV automatically returns to the TV level.
a) Use the Select key to select the desired operating level. The LED for the selected level lights.
b) Press and release the key and then press and hold the key:
--/- for a CD player
for a tuner (radio)
M/S for a tape deck (cassette player)
until the LED blinks twice.
c) Enter the desired code (see the code list) with the numeric keys. If the code is accepted, the LED again
blinks twice. If you have entered an invalid code, the LED lights once for about 2 seconds.
Programming the code for a HiFi amplifier
After execution of the steps a). . . c), you have about 15 seconds to enter the code. After this,
the TV automatically returns to the TV level.
a) Use the Select key to select the HiFi operating level. The HiFi LED lights.
b) Press and release the key and then press and hold the M/S key until the LED blinks twice.
c) Press the --/- key. The LED blinks once.
d) Enter the desired code (see the code list) with the numeric keys. If the code is accepted, the LED again blinks
twice. If you have entered an invalid code, the LED lights once for about 2 seconds.
Searching for the code
Proceed as described above for VCR, DVD, CD, tuner, tape deck up to the point where the code number is to be
entered. Now enter "001" as the code for the search operation. The LED then blinks twice as an acknowledgement of the input. Press and hold the Search key (which depends on the operating level; see the table) until the
search stops or the TV is switched off (a STOP or OFF command is automatically generated every 1.5 seconds).
Release the Search key and press the Select key to confirm the selection (the code which was found is saved).
After completion of the search, or after all code numbers have been interrogated, the related LED blinks five times.
☞
☞
☞
☞
10
F
Page 11
11
Determining which codes are already programmed (read-out mode)
After execution of the steps a). . . c), you have about 15 seconds to enter the code. After this,
the TV automatically returns to the TV level.
a) To determine which code is programmed for an operating level, first execute steps 1.1 a) to b).
b) Then enter the code 002 with the numeric keys. The LED blinks twice to acknowledge the input.
c) Press numeric key 1 to display the first digit of the code. The LED blinks to display the digit (example: LED blinks
three times – the digit 3 is programmed).
d) Press numeric key 2 to display the second digit of the code. The LED blinks to display the digit (example: LED
does not blink – the digit 0 is programmed).
e) Press numeric key 3 to display the third digit of the code. The LED blinks to display the digit
(example: LED blinks seven times – the digit 7 is programmed).
The code previously programmed for this level is thus 3 0 7.
If you lose count of how many times the LED blinks, start again at step 2c).
☞
Key V C R 1 / 2
Stand-by
Record
Time in display
Num. keys: select programme
Programme +/–
Fast forward / rewind
Menu
Volume +/– TV
Mute TV
Off
PC
--/-
M/S
0...9
P +/–
< >
Menu
Vol.+/–
Mute
Text
INFO, TV set*
Pause
STOP / Search
PLAY
Slow-motion
AV - input
Select operating level
Info
I I
Red
Green
White
Yellow
Blue
TV
AV
Select
PIP
Switching voltage on/off
21
22
24
23
DVD
Stand-by
Return
Angle
Audio
Subtitle
Numeric keys: select title
Cursor up/down
Cursor left/right
Menu / Enter
Volume +/– TV
Mute TV
Display
INFO, TV set*
Pause
STOP / Search
PLAY
EJECT
Skip +
Skip –
Repeat
Select operating level
Title
H i F i
C D ( F 1)
T U N E R ( F 2 )
T A P E ( F 3 )
ON: Display Time/Track
ON & AV, EIN:on/standby
ON:
Radiotext on/off
ON & AV, Ein: on/standby
F1 & ON: CD F1 & ON: CD
F2 & ON: Tuner F2 & ON: Tuner
F3 & ON: tape input F3 & ON: tape input
Num. keys: select title
Num. keys: select progr.
Titele +/– Programme +/–
Frequenz +/–
Volume +/– AMP Volume +/– AMP Volume +/– AMP
INFO, TV set* INFO, TV set* INFO, TV set*
PAUSE
STOP / OPEN-CLOSE / Search
Numeric key =Search
Search
PLAY
AUX input AUX input AUX input
Select operating level Select operating level Select operating level
*) Available soon: when the TV set is on, hints for the selected
operating level are displayed.
Note:
The assignments of the remote control keys to the device functions are valid only for the AV devices programmed in the factory. If other AV devices are used and programmed as shown in
the table, the assignments may differ and/or restrictions may
apply.
Search:
Execute the programming procedure for VCR, DVD, CD, tuner,
tape deck up to the point where the code number is to be entered. Then enter the code number "001" for the search function.
The LED blinks twice. Press and hold the Search key (depends
on the operating level, see table) until the TV stops or switches
off (an OFF or STOP command is automatically generated every
1.5 seconds).
Release the Search key and press the Select to confirm the selection, The selected code is saved.
Reset:
Execute the programming procedure for VCR, DVD, CD, tuner,
tape deck up to the point where the code number is to be entered. Then enter the code number "000" for the reset function.
The LED blinks twice. All codes have now been reset to the factory settings.
The reset is executed simultaneously for all operating levels,
regardless of the level from which the operation is executed.
F
Page 12
4. Putting into Service
Switch off all devices, including the TFT monitor, before making any connections between them.
4.1 Unpacking and Positioning
Selecting the installation position
Viewing direction
•
Although the TFT monitor has a very wide viewing angle, the picture will be best if you view it directly from the
front. You should therefore adjust the position of the monitor to match the most frequently used viewing direction.
Position
• Reflected light
Avoid positioning the monitor directly opposite windows or other light sources
• Access to the mains input
The mains input and the mains switch should be easily accessible at all times.
• Ventilation
Ensure that there is a space of at least 10 cm, above and below the ventilation openings, between the monitor
and any other pieces of furniture, walls, etc.
• Ambient temperature
For safe and reliable operation, the ambient temperature must lie between 5°C and 35°C.
Unpacking
☞
Place the cardboard box upright on a firm surface. The arrows on the ends of the box point to the top of the
box.
12
Page 13

13
☞
Remove the adhesive tape from the top of the box and fold the top flaps of the box outwards.
☞
Remove the two polystyrene corner blocks and remove the accessory box. The accessory box is located at one
end, on the rear side of the monitor.
Before removing the monitor from its box, assemble the table-foot1), the wall bracket1) or the glass console1) and place it in the intended installation position.
Never attempt to lift the monitor on your own, since this can cause injuries. Always obtain assistance
from a second person when removing the monitor from its box.
☞
Never stand the monitor directly on its base, since the infrared sensor is mounted there and will be
damaged.
4.2 Wall Mounting (possible only with the wall bracket 1))
Non-compliance with the following instructions can result in serious injuries to persons and/or irreparable damage to the monitor.
The TFT monitor may be mounted only on a vertical wall, using the wall bracket
1)
.
Always obtain assistance from a second person when installing the wall bracket and placing the
monitor on it.
• Take great care when installing the wall bracket, since it must not only support the weight of the monitor but also
withstand vibrations, shocks, etc.
• Before installing the wall bracket, check the thickness and stability of the wall. Purchase suitable metal screws
and wall plugs from a DIY shop. We recommend using screws with a diameter of 8 mm.
• The wall must be solid (made of normal bricks, lime sand bricks or concrete) and capable of supporting the
weight of the monitor.
• For walls made of other materials, such as wood, and for hollow walls, have the wall bracket installed by an
experienced handyman.
Wall mounting with the wall bracket
1)
• The wall bracket1) consists of two vertical metal strips, connected together by horizontal strips, and provides the
connection between the monitor and the wall.
• A drilling template can be found in the accessory box. Use this template to drill the necessary holes and secure
the wall bracket to the wall. The manufacturer recommends using screws with a diameter of 8mm.
• Note that the monitor will sink by about 19 mm, compared with the position of the bracket, when it is mounted
on the bracket.
• After installing the bracket, check that it is securely mounted.
• After the bracket1) has been installed, you can hang the TFT monitor on it.
☞
There are four mounting studs on the back of the monitor. Insert all four studs into the large round openings in
the wall bracket and lower it so that the studs slide into the U-shaped slots.
1)
Accessory
Glass console
Mounting stud
Wall bracket
Table foot
Page 14

4.3 Connecting and Switching On
Connecting (see the picture on page 8 for an overview of the connections)
☞
Insert the mains cable into the input socket on the monitor and plug the other end into an outlet socket.
• Cable outlet or terrestrial antenna
If you have a cable outlet or a terrestrial antenna,
connect it to the socket ANTENNA.
• Satellite receiver
If you have a satellite receiver, use a SCART cable
to connect it to the socket SCART 1 or SCART 2.
• PC
To connect your PC to the TFT monitor, use the PC DVI-I socket. If your PC
has an analogue VGA output, use the enclosed cable (DVI-I to 15-pin HDSub) to connect it to the monitor.
On some older PC graphic cards, pin 9 of the connector may be
blanked off. If this is the case, please contact your local dealer.
Preparation
• Remote control
☞
Open the battery compartment on the back of the remote control and insert the two batteries supplied with the
monitor (type LR03 Micro AAA). Observe the battery polarity shown on the bottom of the battery compartment. Close the battery compartment again.
Switching on
☞
Set the mains switch on the back of the monitor to the
position "I". The monitor is now in standby mode
and can be switched on with the remote control.
• Cable outlet or terrestrial antenna
☞
Switch on the monitor by pressing the TV key or one
of the numeric keys on the remote control.
14
TV AV PC
–/–– F
RK 14
Ǽ
M/S
Page 15

15
• Satellite receiver
☞
Switch on your satellite receiver and press the AV key on the remote
control to switch on the monitor. Note that you may have to press the
AV key several times, depending on the SCART socket to which your
receiver is connected.
• PC
☞
Switch on the monitor by pressing the PC key on the remote control
and then select the appropriate signal input ( PC(RGB) or PC(DVI)).
To do this, press the MENU key on the remote control to open the TV
menu of the monitor and select the desired input signal in the submenu INPUTS > SOURCE.
4.4 Using the TV Menu
You can set up and operate your TFT monitor with the aid of the simple menu control system. This is done with six
keys on the remote control:
M key
Saves any changes you have made.
P - key
Moves upwards in the TV menu. The selected sub-menu or function is marked with a different coloured
background. If functions are displayed as values or bars, you can increase the value with this key.
P - key
Back to the previous menu. Exit from the currently selected sub-menu or function.
MENU - key
Opens the TV menu. The main menu is displayed at the top left corner of the screen. Pressing the MENU key
again closes the TV menu.
P - key
Activates the selected sub-menu or function. The selected menu item is displayed on a green background and
can be changed.
P - key
Moves downwards in the TV menu. The selected sub-menu or function is marked with a different coloured
background. If functions are displayed as values or bars, you can decrease the value with this key.
Saving changes
Any changes you have made in the TV menu are saved by pressing the M key on the remote control (see picture
above) or by closing the TV menu.
RK 14
Ǽ
TV AV PC
M/S
RK 14
Ǽ
M/S
–/–– F
TV AV PC
–/–– F
M
Page 16

4.5 Basic TV-Menu Settings
Menu language
Your monitor can display the TV menu in any of six languages (German, English, French, Italian, Dutch or
Spanish). To change the preset language, open the main menu and select the menu item SETUP. In the sub-menu,
activate the menu item LANGUAGE and select the desired language:
Changing the menu properties
To change the display of the TV menu or the time it remains displayed if you make no further entries, open the
main menu and select the menu item SETUP.
Info signal source:
On: an information window is displayed whenever you change the signal source.
Off: no information is displayed.
OSD settings:
Wait time: 5, 10,15 seconds or Off (close with MENU key).
Transparent: OSD semi-transparent (On) or not transparent (Off)
ECO mode/standby
Logo display does not function on model 040TK81.
Sync-signal evaluation (for PC input only)
Options: the monitor does not switch itself off automatically (Off) or switches automatically after a few minutes to
standby mode (On).
Resetting to the factory settings
If desired, you can reset all changes you have made in the TV menu to the original factory settings. To do this,
open the main menu and select SETUP. In this sub-menu, activate the menu item USE FACTORY SETTINGS.
16
Page 17

17
4.6 First-Time Settings
Automatic station search
• Press the TV key to switch on the monitor.
• Press the MENU key (8) to open the TV menu.
• Use the cursor key to move to the sub-menu "Inputs".
• Use the cursor key to select "Setup".
• Use the cursor key to move to the sub-menu "Settings".
• Use the cursor key to move to the sub-menu "Auto. Search".
• Use the cursor key to move to the settings for the "Auto. Search".
• Set the TV standard, if necessary, by using the cursor keys and to select the desired standard and pressing
the cursor key to accept it.
• Set the search mode:
a. All stations: the search places all receivable stations in the station table and sorts them.
b. New stations: the search adds all stations which are not yet in the station table and sorts them.
Use the cursor key to move to "Search mode" and press the key to activate it. Then use the cursor key to
select the desired search mode and press the cursor key to accept it.
• Define the starting position: use the cursor key to select "First programme position" and activate it with the
key. Then enter the desired first programme position with the numeric keys 0-9.
• Start the search: use the cursor key to select "Start search" and press the cursor key to start the search.
• The tuner now searches for stations, places them in the station table and sorts them. The search can be stopped
at any time by pressing the red key.
• After completion of the search, the monitor is set to programme position 1 and the station table is closed.
• You can open the station table with the white key.
Page 18

4.6 First-Time Settings
Sorting the TV stations
Note: before sorting the station table, you should delete any stations you do not need!
1. Press the TV key to switch on the monitor.
2. Press the MENU key to open the TV menu.
3. Use the cursor key to open the sub-menu "Inputs".
4. Use the cursor key to select "Settings".
5. Use the cursor key to open the sub-menu "Settings".
6. Use the cursor key to select "Sort".
7. Use the cursor key to open the sub-menu "Sort".
8. Select the station you want to move with the cursor (white field) and confirm your selection with the green key.
As a check: see the station number after "Current".
9. Use the cursor keys to select the desired new position for this station and press the yellow key to move the pre-
viously selected station there.
10. Repeat steps 8 and 9 for any other stations you wish to move.
11. When sorting the station table, it may be useful to insert an empty programme position with the blue key.
12. When you are finished, press the MENU key to exit from the sort function.
Deleting stations
1. Press the TV key to switch on the monitor.
2. Press the MENU key to open the TV menu.
3. Use the cursor key to open the sub-menu "Inputs".
4. Use the cursor key to select "Settings".
5. Use the cursor key to open the sub-menu "Settings".
6. Use the cursor key to select "Delete".
7. Use the cursor key to open the sub-menu "Delete".
8. Deleting stations:
18
ARD ZDF BR3 RTL SAT1 RTL2 PRO7 VOX KABEL WDR
___
Green key: Select a station. Current: 99 Menu: Close
Blue key: Insert an empty programme position
Yellow key: move selected station to selected position
ARD
Page 19

19
4.6 First-Time Settings
9. Deleting a single station: select the station to be deleted with the cursor key and press the red key to delete it.
10. Deleting several contiguous stations: select the first station you want to delete and press the green key. Then
select the last station you want to delete and press the yellow key.
Press the blue key to delete the entire block of stations.
11. When you are finished, press the MENU key to exit from the "Delete stations" window.
Changing the station names
If your TFT monitor can determine the station name from the TV signal, this name is saved at the selected programme position. If the station name cannot be determined, the number of the programme position is saved in the
programme position (e.g. PR02).
To change the saved station names, proceed as follows:
• Use the cursor key or to select the menu item "Name".
• Press the cursor key to select the first character of the name.
• Use the cursor keys or to scroll through the character set until the desired character appears at the selected
character position.
• Press the cursor key to move to the next character of the name.
• Repeat the above three steps until you have entered the desired name.
Note that the name may not be longer than five characters.
PC mode
Selecting the signal input
• Press the PC key on the remote control to switch on your monitor.
• Press the MENU key on the remote control to open the TV menu.
The menu item "INPUTS" is coloured.
• In the sub-menu "SOURCE", select the appropriate signal input [PC (RGB) or PC (DVI)].
Page 20

20
4.6 First-Time Settings
Auto-adjust function
The first time an analogue video format (RGB) is used, the TFT monitor automatically executes the auto-adjust function. While this is running, the display on the screen moves back and forth slightly in order to determine the optimum position and display format.
For some PC formats, the H/V (horizontal/vertical) position and the picture size have to be adjusted
manually. The auto-adjust function depends to a great degree on the picture being displayed. The best
results will be obtained with a full-screen display of a plain white picture.
You can save frequently used formats as so-called user formats. The monitor recognises such saved formats and
immediately uses them automatically without executing the auto-adjust function. To do this, proceed as follows.
• In the main menu, select the menu item "INPUTS" and then open the sub-menu "SETTINGS".
• Activate the menu item "User formats".
• Use the menu item "CALL" to determine the currently selected user format. Now you can save this user format in
one of the eight available positions by executing the menu item "SAVE".
Page 21

21
5. Day-to-Day Operation
5.1 Switching On and Off
Switching on
• Turn on the power for the TFT monitor by setting the mains switch to the position "I".
• The standby LED on the infrared sensor lights (red).
• Press any of the numeric keys or the "TV" key on the remote control to switch
the monitor to TV mode.
• The ready LED on the infrared sensor lights (blue).
Switching off
• Press the OFF key on the remote control to switch the monitor back to stand-
by mode.
• The standby LED on the infrared sensor lights (red).
• To completely switch off the TFT monitor, set the mains switch to the position "0".
5.2 Adjusting the Sound
Adjusting the volume
• Press the – (Vol -) or + (Vol +) key on the remote control to set the volume to the desired level.
Sound settings
With the menu item "EQUALIZER", you can select predefined sound settings.
Display of the current volume setting
Volume when the monitor is switched on
OFF
TV AV PC
–/–– F
RK 14
Ǽ
M/S
Page 22

22
To make your own individual settings, select the option "USER".
Mute function
• Press the key on the remote control. The sound is muted and the following info window is displayed on the
screen for about three seconds:
• To switch the sound on again, press the key again or press the – (Vol -) or + (Vol +) key on the remote
control. The following info window is displayed on the screen for about three seconds:
5.3 Adjusting the Picture
You can adjust the contrast, brightness, sharpness and colour of the picture to any desired values.
• Press the key to increase the value or the key to decrease it.
• The setting "SHARPNESS" permits you to adjust the sharpness of the picture.
• The menu item "COLOUR" (not available in PC mode) permits you to change the colour intensity:
Hue (available only for an RGB input signal via Scart1)
If you wish to change the hue of the picture delivered via the AV programme position "Scart1", select the menu
item "Hue". Pressing the cursor key will make the picture greener, and pressing the cursor key will make it
redder. In this case, the colour control has no effect.
DNC (Digital Noise Control)
In the case of a very noisy signal, the background noise can be reduced with the DNC function.
Photo CD (not available in PC mode)
The appearance of still pictures such as JPEG photos from a DVD player can be optimised by setting "Photo CD"
to ON.
Interlace
When using signal sources which generate non-interlaced signals, better results may be obtained by setting this
function to OFF.
TUNER: 2 ZDF
MUTE
TUNER: 2 ZDF
STEREO
Page 23

23
Aspect ratio
You can use the menu item DISPLAY > FORMAT > ZOOM to select one of several pre-defined aspect ratios.
The menu item USER ZOOM permits you to define your own user aspect ratio. To activate this setting, select the
menu item ZOOM and then USER ZOOM.
• Fullscreen
If this setting is selected, the width and height of the picture are adjusted so that the picture always fills the entire
screen.
• Video 4:3
This setting displays a PAL 4:3 picture with the correct aspect ratio. Dark bars are visible at the left and right
edges of the screen.
• Auto
Wide-screen pictures are automatically displayed so that they fill the screen.
• Video NLS (Non Linear Scaling)
With this setting selected, the width and height of the picture are automatically adjusted to fill the entire screen,
but the expansion is not linear. In other words, the centre part of the picture is displayed correctly but the outer
parts are expanded to an increasing degree towards the edges of the screen.
• User zoom
With this setting, you can define your own aspect ratio within the range of 40% to 140 % of the original picture
size.
• Zoom
Switching manually from the aspect ratio Video 4:3 to zoom expands the picture vertically and horizontally by
about 20% more than the fullscreen display. This reduces the dark bars which appear at the top and bottom
edges of the screen when watching a widescreen film transmitted in the aspect ratio 4:3.
• Video 16:9
This setting displays a PAL 4:3 picture so that no dark bars are visible at the left and right edges of the screen.
☞
You can switch between the various aspect ratios by repeatedly pressing the key on the remote control.
5.4 TV Mode
The TFT monitor is in standby mode.
• To switch it on, press the TV key on the remote control.
• The station (programme position) you were watching when the monitor was last switched off now appears on
the screen and the following info window is displayed for about 3 seconds:
• Press the P or P key to step to the next or previous programme position, respectively.
• You can also select a programme position directly with the numeric keys (or with the preselection key and the
numeric keys for two-digit programme position numbers).
TUNER: 2 ZDF
STEREO
F
Page 24

24
Teletext
There are three types of Teletext information which can be received with the TFT monitor:
FLOF (Fasttext), TOP-Text and Level 1.5.
• Select a station which transmits Teletext.
• Press the TEXT key on the remote control to display the Teletext information.
• Use the numeric keys for direct selection of the desired Teletext pages.
• Depending on the type of Teletext being received, the red, green, yellow and blue keys have different functions.
These functions are shown at the bottom of the Teletext window.
• To close the Teletext window, press the TEXT key on the remote control again.
Displaying Teletext subpages
Subpages are the individual pages of a multiple Teletext page.
• Select the desired Teletext page (e.g. ARD Teletext, Page 743).
• Press the -/-- key .
• Enter a four-digit number (e.g. 0004) to select the desired subpage.
• If the desired subpage is not displayed within a short period, press the MENU key to return to the
TV programme.
• When the desired subpage has been found, its number is displayed at the top left corner of the screen.
• To display the selected page, press the MENU key again.
5.5 PC Mode
• Ensure that the TFT monitor and the PC are both switched off.
• Connect your PC to the TFT monitor with the enclosed video cable, inserting the DVI plug into the monitor and
the HD-Sub plug into the PC.
• Switch on the TFT monitor and the PC.
• In the menu item "INPUTS-> SOURCE", you can select the appropriate input signal from the PC:
a) analogue RGB-Signal: select PC(RGB)
b) digital DVI signal: select PC(DVI)
When the TFT monitor is switched on, it automatically detects the picture format which is set on the PC. This information is shown in an Info window.
RGB-1024 x 768
Fullscreen
Page 25

25
5.6 Operation with External Devices
Video recorder
• Ensure that the TFT monitor and the video recorder are both switched off.
There are three ways of connecting a video recorder to the TFT monitor:
- via the antenna input (see the operating instructions for your video recorder);
- with a SCART cable connected to input SCART1 or SCART2;
- via the Y/C input if your video recorder has an S-Video output.
• Switch on the TFT monitor and the video recorder.
• To switch to the input where your video recorder is connected (such as SCART1), press the AV key several times.
DVD player
• Ensure that the TFT monitor and the DVD player are both switched off.
• Connect your DVD player to the SCART1 socket or, if the player has an S-Video output, to the Y/C input.
• Switch on the TFT monitor and the DVD player.
• To switch to the input where your DVD player is connected, press the AV key several times.
SCART 1
Fullscreen
SCART 1
Fullscreen
Page 26

26
5.7 Special Functions
Manual station search
1. Press the TV key to switch on the monitor and press the MENU key.
2. Use the cursor key to open the sub-menu "Inputs".
3. Use the cursor key to select the sub-menu "Settings" and press the key to open it.
4. Use the cursor key to select the sub-menu "Manual search" and press the key to open it.
5. Use the cursor key to open the settings for the "Manual search".
6. Select the programme position:
Use the cursor key to select the desired programme position and press the key to activate it. Alternatively,
enter the number of the desired programme position with the numeric keys.
7. Select the TV standard:
If necessary, use the cursor keys and to select the TV standard and press the key to confirm your selection.
8. Frequency: Use the cursor key to select the frequency and press the key to activate it. Alternatively, enter
the desired frequency with the numeric keys.
9. Name: You can enter a name for the programme position. To do this, use the cursor key to select "Name"
and press the key to activate it. Use the key to select the desired character and press the key to move to
the next position. When you are finished, press
to accept the input.
10. Press the MENU key to exit from the manual search.
11. You can display the station table by pressing the white key on the remote control.
Colour temperature
You can select one of three pre-defined colour temperatures or use the menu item COLOUR TEMPERATURE >
USER to define your own value.
A lower colour-temperature value increases the red component of the picture and makes it look "warmer". Higher
values increase the blue component of the picture and make it look "colder".
Freeze frame
You can freeze on the current frame by pressing the II key or with the menu item FREEZE FRAME.
User
Page 27

27
Picture-in-picture
The picture-in-picture (PIP) function permits you to display a video picture in a small window while displaying
signals from a PC.
• The menu item "Picture-in-picture" can be found in the menu INPUTS > SOURCE > PC(DVI) / PC(RGB) and is
used to select the source of the picture in the small window. The PIP key is used to activate the function.
☞
Press the PIP key to display the picture from the input selected under DISPLAY > PICTURE-IN-PICTURE >
SOURCE (such as the tuner) in a window within the currently displayed picture.
• If there is no signal connected to the selected input, a dark window is displayed in the current picture.
• You can change the size and position of the window by repeatedly pressing the PIP key.
Automatic power-off
You can set the TFT monitor so that it switches itself off after a certain time.
☞
Select one of the pre-defined times in the menu item POWER-OFF TIME.
• The TFT monitor will switch itself off automatically after this time.
Switching between dual-language channels and between MONO and STEREO
Dual-language sound is the term for the method used to transmit films with a synchronised sound channel and the
original sound channel. The viewers can then select which of these they want to hear.
When a dual-language programme is received, sound channel A is initially active.
☞
To switch to channel B, press the M/S key.
When receiving a MONO programme, you can switch from MONO to PSEUDO-STEREO.
When receiving a STEREO programme, you can switch from STEREO to STEREO WIDE.
Off / 0:30 / 1:00 / 1:30 / 2:00 / 2:30
TUNER: 2 ZDF
Mono
TUNER: 2 ZDF
Pseudo Stereo
Press the M/S key
TUNER: 2 ZDF
Stereo
TUNER: 2 ZDF
Stereo wide
Press the M/S key
Tuner
SCART1
SCART2
YC
FBAS
Page 28

28
6. Troubleshooting
If a problem occurs while you are using the TFT monitor, please read the following fault symptoms and try out the
suggested remedies before sending the monitor in for repair. In some cases, you can rectify the fault easily.
If, for example, the mains cable of the monitor is not plugged into an outlet socket, or if there is some problem
with the antenna, you might assume (incorrectly) that the monitor itself is faulty.
If the following suggestions do not rectify the fault, switch off the monitor with its mains switch and
disconnect the mains cable from the outlet socket. Never attempt to repair the monitor yourself. Under
no circumstances should you remove the rear cover of the monitor.
If the TFT monitor gets too hot, a red warning window is displayed at the top left
corner of the screen (see illustration on the left). If you do not provide the appropriate ventilation, the monitor may automatically switch to standby mode.
Temperature warning
F
Page 29

29
7. Technical Data
SCREEN
Size (diagonal): 39.6" (100 cm), aspect ratio 15:9
Displayable picture size: At least 862 mm (horizontal) x 517 mm (vertical)
Resolution: 1280 x 768 pixels
Colour display: 16.7 million colours simultaneously
Viewing angle: 170° (typical)
Contrast ratio: 600:1 (typical)
Noise output: ≤ 30 dBA
VIDEO STANDARDS
TV / video: PAL (BG, I, DK/K’, M, L/L’) / SECAM / NTSC
TV tuner: PAL / SECAM, 47 - 861 MHz (VHF, UHF, hyperband)
PALplus, Cinescope: Automatic aspect-ratio detection (fullscreen display)
Aspect ratios: 4:3, 16:9, Video NLS, fullscreen, zoom, user zoom (40% - 140%)
FREQUENCY RANGE (PC)
Horizontal frequency: 30 - 80 kHz
Vertical frequency: 50 - 90 Hz
Clock frequency: 140 MHz (typical)
Typical resolutions: VGA (640x480) SVGA (800x600) WVGA (848x480) XGA (1024x768)
Frequency: 50Hz - 90Hz 50Hz - 90Hz 50Hz - 90Hz 50Hz - 90Hz
Typical resolutions:
WXGA (1280x768) SXGA (1280x1024)
UXGA (1600x1200)
Frequency: 60Hz 50Hz - 75Hz 50Hz - 60Hz and many more
Formats: 1:1, fullscreen, full-format, zoom, user zoom
INPUTS / CONNECTORS / SYNCHRONISATION
PC/video input: RBG analogue with automatic sync detection
Video connectors TV Tuner: IEC, 75 Ohm input impedance
SCART1/2: RGB(1), composite-colour input and output,
audio input and output
Composite colour FBAS: RCA cinch
Y/C: MiniDIN (HOSIDEN)
PC connector, analogue/digital: DVI-I
Audio connectors: Stereo input: 3 x Cinch 1Vrms (FBAS, Y/C, PC),
2 x SCART 1 Vrms
Stereo output: 2 x cinch, adjustable
Stereo loudspeaker output: 2 x cinch, 7 W sin into 4 Ohms
Synchronisation: Sync on green, composite sync with automatic detection,
separate H and V sync
Controls: Mains switch, local controls, IR remote control (6-language TV menu)
OPERATING CONDITIONS
Temperature: 5°C - +35°C (operation), -20°C - +60°C (storage)
Relative humidity: 10% - 85% (no condensation)
Altitude: max. 2,000 m (7,000 ft)
SUPPLY VOLTAGE
Mains voltage: 230V AC
Mains frequency: 50/60 Hz
Power consumption: 250 W (5 W in standby mode)
DIMENSIONS AND WEIGHT
H x W x D: 641mm x 972mm x 124mm
Weight: 25 kg
Page 30

30
Codes Video
Metz VG61 532
VF21, VF44, VF46
VF61, VE21, VE43
VE44, VE45, VD21
VD43, VD44, VD45
VC21, VC43, VC44
VC62, 21VB11
42VB12, 21VA12
21VA13, 42VA11
64VA14, 9836,9837
9847, 9874, 9875
9876, 9877
Metz VF22, VF47 568
VF48, 9843, 9844
9849
Metz VH22, VH47 573
VH48
ACTION 468 481 547
ADMIRAL 481 487
ADVANTZ 481
ADVENTURA 468 481 547
ADYSON 487
AGHA 547
AIWA 481 505 562 572 477
AKAI 481 482 483 484 505
508 546 554 575 609
612
AKIBA 487
AKURA 487 505
ALBA 466 588 593
ALLORGAN 547
ALLSTAR 529
AMWAY 529
ANITECH 487 490 529
ART TECH 575
ASA 478 481 528
ASBERG 575
ASTRA 481 547
ASUKA 481 487
ASUKA 527
ASWO 528
AUDIO DYNAMICS 505
AUDIOSONIC 575 616
AUDIOTON 466
AUDIOVOX 481
AVIS 487 547
BAIRD 505
BANG & OLUFSEN 503 583
BASIC LINE 487
BAUR 513 547 565 599
607 609 612
BEAUMARK 547
BELL & HOWELL 468
BESTAR 466 616
BLACK PANTHER 616
BLAUPUNKT 491 496 502 507 508
527 530 532 607 609
610 612 614 621
BONDSTEC 466 487
BONDSTECBRANDT 505
BRANDT ELECTRONIQUE 503 504 505 524 574
BRAUN 570
BRIONVEGA 450 575
BROKSONIC 481
BRUNS 466 487 490
BUSH 588 590 593
CALIN 481
CALIX 481
CANDLE 481
CARRERA 547
CARVER 527
CGE 505
CIE 487
CIMLINE 487 481 487 547
CLARIVOX 606
Codes Video
CLASSIC 481
CLATRONIC 466
COLORTYME 547
COLT 487
CONDOR 466 616
CONTINENTAL EDISON 503 504 505
CRAIG 481 487 547
CROSLEY 481 507 527 547
CROWN 487
CROWN 490 575 616
CRYSTAL 575
CTC 466
CURTIS MATHES 505 547
CYBEREX 547
DAEWOO 466 468 553 616
DANSAI 487
DAWA 575
DAYTRON 466
DE GRAAF 529
DECCA 528
DECCAVIDEO 528
DENON 527
DIGITAL 477 481 505
DORIC 601
DTS 547
DUAL 503 504 505 527
530
DUEL 505
DUMONT 468 481 487 527
DYNATECH 487
ECONOMIC 510
EDISON 487
ELBE 616
ELCATECH 487
ELECTROHOME 481 547
ELECTROPHONIC 481
ELIN 547
ELTA 487 616
EMERSON 481
EPC 505 586 598
ESC 466 510 616
ETZUKO 487
EUROPHON 586
EXPERT 604
FERGUSON 501 505 523 524
555 574 595 596
FIDELITY 487
FINLUX 468 477 478 528
FIRST LINE 477 481 487 575
FISHER 468 473
FUNAI 481 487 571
GAB 487
GBC 466
GE 547
GEC 528 601 603 604
GELOSO 466
GITEM 575
GOLDHAND 487 490
GOLDSTAR 468 481 547 552 556
575 610
GOODMANS 466 487 530 616 617
621
GRAETZ 468 505 600 603
GRANADA 468 474 477 532 542
557 565 575 601 605
606 616
GRANDIN 481 487 604
GRUNDIG 451 452 453 454 457
458 459 460 461 462
463 464 491 492 493
495 496 497 507 527
530 531 563 584 585
600 606 609 610 611
612 613
GUTTRONIC 602
HANSEATIC 481 575
HANTAREX 575
HARLEY DAVIDSON 481
HARVARD 481 487
HCM 466 487 490
Code list
Page 31

31
Codes Video
HEADQUARTER 468
HINARI 487 509
HINARIHITACHI 475 476 477 478
HITACHI 481 485 503 505 530
535 601 603 604
HYPSON 487
IMPERIAL 510 575
INGERSOL 509
INNO HIT 510 547 575
INNO HIT 616
INTERBUY 481 487
INTERDISCOUNT 575
INTERFUNK 468 527 565 575 600
601 603 604
INTERVIDEO 466
INTERVISION 487
IRRADIO 481 487 575 606
ITT 450 468 483 505
ITV 466 481
JENSEN 505
JETPOINT 575
JVC 503 504 505 519 520
545
JVC_LCD 515 521
KAISER 575
KAISUI 487
KAPSCH 600 601 603
KARCHER 575
KENDO 483
KENWOOD 468 505
KLH 481 487
KLIT 487
KODAK 481
KORPEL 487
KUBA 473 504 505 510
LEYCO 487
LG 578
LIESENKOTTER 575 565
LLOYD 481 487 547
LLOYD’S 601 606
LOEWE 481 491 575
LOEWE OPTA 481 491 527
LOGIK 487 509 547
LUXOR 468 478 483 517 518
601
LXI 468 477 481
MAGNADYNE 575
M ELECTRONICS 547
MAGNASONIC 470 481 487 547
MAGNAVOX 481 507 527 547
MAGNIN 481 547
MAGNUM 581 582
MANESTH 487
MARANTZ 491 528 565 566
MARQUANT 487 490
MARTA 481
MATRIX 481
MATSUI 486 509 560 561 562
586 601 610
MATSUSHITA 527
MEDIATOR 527
MEMOREX 468 481 547
MEMPHIS 487
MGA 547
MGN 547
MINERVA 606 609 610 612
MINOLTA 477
MITSUBISHI 477 505 519 527 542
609 612 487 547 468
477 481
MULTITECH 466 481 487 575
MURPHY 601
NAD 547
NATIONAL 507
NEC 504 505 576
NECKERMANN 450 469 470 477 491
493 496 505
NECKERMANN 509 510 512 513 519
528 541 565 575 610
611 616
Codes Video
NEI 575
NESCO 487
NIKKAI 466
NIKKO 481
NOBLIKO 606
NOKIA 450 468 470 483 488
489 503 504 505 510
516 517 518 547 551
553 554 557 567 600
601 603 604 500 503
504 505 515 521 524
574 602
NOVATRONIC 575
OCEANIC 483 489 601 604
OKANO 487
OLYMPIC 466
OLYMPUS 507
ORION 481 509 531 536 537
538 558 559 560 561
589 591
OTTO VERSAND 527 474 493 496 508
512 513 541 544 565
575 599 609 610 611
612 616 620 621
PAEL 606
PALLADIUM 481 487 491 505 507
508 527 532 533 549
600 601 623
PATHE MARCONI 503 505
PAXSONIX 547
PENNEY 477 481 527 547
PENTAX 477
PERSHIN 606
PHILCO 481 507 527 547
PHILIPS 481 491 507 528
PHILIPS 529 530 547 548
PHILIPS 550 563 564 565
PHILIPS 568 575 620 621
PHILIPS 624 625
PHILIPS (F) 491 565 575
PHONOLA 527
PILOT 481
PIONEER 477 527 539 575
PRIMA 505 547
PROFEX 487 490 529
PROFILE 547
PROSCAN 477 481 483 547
PROTEC 487
PULSAR 481 547
PULSER 468 481 547
PYE 565 575
QTY1 592
QUARTER 468
QUARTZ 481 547
QUASAR 507 527
QUELLE 450 459 461 464
470 471 474 477
QUELLE 478 484 487 491
496 497 503 504
505 508 509 510
512 513 519 528
529 541 565 575
599 604 606 609
610 611 612 614
616 621
QUESTAR 466
RADIALVA 481 487 527
RADIOLA 527 575
RADIONETTE 601 604
RADIX 497
RANDEX 481
RANDIU 481
RANK/BUSH/MURPHY 601
RCA 477 481 483 547
REALISTIC 468 481 547
REDIFFUSION 601
REX 503 505
RICOH 481
ROADSTAR 481 487 547 617
ROYAL 466 487
Code list
Page 32

32
Codes Video
SABA 499 503 504 505
SABA 515 521 524 540
SABA 574 601 603
SAISHO 486 509 575
SALORA 467 468 470 483
SALORA 516 517
SAMBERS 606
SAMEX 547
SAMSUNG 510 547 575 575 597
SANKY 487
SANSUI 487 505 575
SANWA 509
SANYO 468 469 470 471 551
577 586
SBR 527
SCHAUB LORENZ 450 468 483 505
SCHNEIDER 477 478 481 487 510
527 529 530 563 564
569 571 573 575 578
581 582 604
SCOTT 481
SEARS 468 477 481
SEG 487 490 510 547
SEI-SINUDYNE 509 528
SELECO 503 504 505 545
SENTRA 466
SETRON 466 487
SHARP 468 544
SHINTOM 487
SHIVAKI 481 575
SHOGUN 547
SHORAI 509
SICE 609 612
SIEMENS 459 461 462 464 468
469 470 472 479 480
481 486 491 492 493
494
SIEMENS 495 496 497 498 511
525 530 584 607 609
610 611 612 614
SILMA 575
SILVA 481
SINGER 487 547 575 616
SINUDYNE 509 513 527 575 599
SOLAVOX 466 604
SONOKO 575
SONOLOR 601
SONTEC 481
SONY 506 512 513 514 541
599 623
SR1000 547
STS 477
SUNWOOD 487
SYLVANIA 527
SYMPHONIC 481 487 527
TAISHO 509
TALENT 609 612
TANDBERG 623
TANDY 468
TASHIKO 528 529
TATUNG 505 527
TEAC 505
TEC 466
TECHLINE 487
TECHNICS 527 532
TECHNILAND 575
TECHNISAT 563
TEKNANT 575
TEKNIKA 481
TELEAVIA 503
TELEAVIA 505
TELEFUNKEN 500 503 504 505 515
521 524 574 579 594
TELEORDER 547
TELERENT 505
TELESERVICE 609 612
TELETECH 487
TENOSAL 487
TENSAI 481 487 490 509 575
THOMAS 547
THOMSON 499 500 503 504 505
Codes Video
THOMSON 524 574 594 606 226
THORN 474 482 501 503 505
542 565 575 586 604
606 609 612
THORN-FERGUSON 501 503 504 505 575
601 604 606 609 612
TOKAI 481 487
TOSHIBA 474 481 505 527 547
TOTEVISION 481 547
TOWADA 487 490
TOWIKA 487
TRIAD 575
TRIX 481
TVA 466
UHER 466 477 481 503 505
510 543
ULTRAVOX 450 616
UMA 565 575 601 604
UMA 606 609 612 614
UNITECH 547
UNITED 560
UNIVERSUM 481 483 491 527 530
547 571 575 606 609
612 621
UNIVOX 604
VICTOR 505 545
VIDEOMASTER 466
VIDEOPLUS 554 562 589
VIDEOSONIC 547
VIEWMARK 481
VIEWMAX 481
WARDS 477 487 547
WEGAVOX 575
WELTBLICK 481
WHITE WESTINGHOUSE 450 565
WINSTON 575
WIZJA 528
WORLDVIEW 575
XR1000 487 547
YAMISHI 487
YOKAN 487
YOKO 466 481 487 490
510 547
ZENITH 481
Codes DVD-Player
METZ 204 239
AKAI 214
BLUEsky 254
Boxford 256
CYBER HOME 223
Cytron 247
DENON 216 230
D-i-K 243
DUAL 248
EMERSON 263
GAME 253
GOLDSTAR 262
GRAND PRIX 255
GRUNDIG 222 232 238
HARMAN/KARDON 206
HITACHI 205 210 260 261
JVC 212
KENWOOD 208 246 231 263
KISS 270
LABWAVE 200 201
LG 263
LINN 215
LOEWE 219
MARANTZ 218 219 236
MbyN 271 272
MEDIENCOM 241
MEDION 221 228
MEGATON 240
Code list
Page 33

33
Codes DVD-Player
MUSTEK 256 257 258
MYRYAD 269
NAD 207
NONAME 228
ONKYO 209 225 226
ORION 266
PANASONIC 216 267 274 275 276
PHILIPS 219 220 227 233 234
235 236 237 278
PIONEER 203 204 249 250 251
PROLINE 228 273
SAMSUNG 210 268
SCHAUB LORENZ 255
SCHNEIDER 244 248 263
SEG 201
SHERWOOD 224 263
SILVA SCHNEIDER 243
SONY 211 229 264 265
SUNKAI 242
TECHNICS 216 217
TEVION 228 259
THOMSON 213 277
TOSHIBA 202 245 246
UNITED 252 255 266
YAMAHA 216 278 234
Codes HIFI - CD
AIWA 815 816 817 884
AKAI 856 857 872 921
AKKAI 856
AMSTARD 957
AMSTRAD 929 940 942 956
ARCAM 908
ASWO 909
BANG & OLUFSEN 808
BRAUN 975 976
BUSH 888
CAMBRIDGE 945
CAMBRIDGE AUDIO 945
CARVER 908
DAEWOO 876
DENON 801 812 845 846 853
899 900 901 961 962
DIORA 949
DUAL 822 832 859 994
FISCHER 830 831 920 953
GOLDSTAR 885
GOODMANNS 872
GOODMANS 888
GRUNDIG 908 911 912 913
HARMAN KARDON 905 931 934 935
HITACHI 853
INTERSOUND 960
ITT 937
JVC 844 848 849 902 903
904 992
KENWOOD 820 847 858 859 877
878 879 925 948 963
KRELL 908
LINN 908 964
LUXMAN 924 946 967
METZ HE11 882
MARANTZ 833 908
MATSUI 908
MEDION 955
MERIDIAN 908
Codes HIFI - CD
MAGNAVOX 908
MICROMEGA 908
MINOWA 972
MISSION 908 909
MTC 955
NAD 947
NAIM 908
NAKAMICHI 930
NOKIA 938
NONAME 888
NSM 802 803 804 805 806
807
OKANO 869 871
ONKYO 819 827 861 881
PALLADIUM 810 851 866 870
PANASONIC 834 915 918
PHILIPS 833 908 909 911 965
PIONEER 824 825 826 850 862
863 864 922 923
PMG 906
PROTON 908
QUAD 908 965
RADIOTONE 958
RADMOR 911
REVOX 829
REVOX/STUDER 910
ROTEL 818 908
SABA 926
SAE 908
SAMSUNG 939 951 966 968
SANSUI 908
SANYO 852 860 919
SCHNEIDER 821 840 841 868 869
870 873 885 888 892
911 927 928 929 955
959 960 972 973 977
978 979 980 981 982
983 984 985 986 987
988 989
SHARP 799 800 813 847
SHERWOOD 936 943 944
SIEMENS 833 867 868 869 872
873 874 875 876 880
883 885 886 887 889
890 891 969 970 971
SINOTEC 892
SINOTEC
(PEPSI-DOSE)
892
SONY 842 843 893 895 896
897 898 932 990 991
SUPERTECH 888 945
SYLVANIA 908
T+A 882 974
T+A ELECTROAKUSTIK 882
TECHNICS 809 916 917 918
950 993
TENSAI 954
THOMSON 823
UHER 814
UNIVERSUM 869 872 908 952 966
979
UNKNOWN 995
YAMAHA 828 854 855 933 941
Codes HIFI - Tape
AIWA 842 843 844 962 963
AKAI 845 849 913 933
934 945 951 987
AMSTRAD 916
ASWO 976
BANG & OLUFSEN 836
BRAUN 870
Code list
Page 34

34
Codes HIFI - Tape
BUSH 835
DAEWOO 907
DENON 834 840 841 879 891
892 970 971 972
DIORA 899 900
DUAL 837 850 851 935 936
FISCHER 893 894 985 998
GOLDSTAR 964
GOODMANNS 833
GOODMANS 867
GRUNDIG 976 979 980
HARMAN KARDON 926 984
HITACHI 915 931
ITT 918 919
JVC 862 863 974 975
994 995 996 997
KENWOOD 848 917 935 936
957 958 990 993
LINN 888 889
LUXMAN 876 877 884 989
METZ HE11 961
MARANTZ 887 922 999
NAD 903 904 905 906
NAKAMICHI 927
NOKIA 920
OKANO 948 949
ONKYO 846 847 856 901 902
959 960
PALLADIUM 944
PANASONIC 928 929 982
PHILIPS 921 976 980 999
PIONEER 853 854 855 912 938
939 941 942 943 988
RADMOR 978
REVOX 860 861
REVOX/STUDER 977
SAMSUNG 883 885 886 896
897
SANY 985
SANYO 930 937 986
SCHNEIDER 866 867 868 869 872
873 874 878 918 919
947 964 976
SHARP 839 864 993
SHERWOOD 890 908 909 910 911
923
SIEMENS 880 881 882 946 947
950 951 952 953 954
955 956 964 976
SONY 865 925 965 966 967
968 969 991 992
T+A 871 961
TECHNICS 838 898 981 983
THOMSON 852
UNIVERSUM 868 875 886 895 947
950
YAMAHA 857 858 859 914 924
932
Codes HIFI - Tuner
AIWA 376 377 745
AKAI 734 737 993
AMSTRAD 452 455 464 468 469
ASH 744
ASWO 427
Codes HIFI - Tuner
BANG & OLUFSEN 369
BUSH 748
DAEWOO 458 739
DENON 371 372 423 424 445
471 991
DIORA 461
DUAL 370 381 994
FISCHER 434 449
GOLDSTAR 746
GOODMANNS 737
GOODMANS 748
GRUNDIG 427 429 450
HARMAN KARDON 418 730
HITACHI 453 991
ITT 412
JVC 414 425 444 447 448
KENWOOD 417 439 446 740 741
994
LINN 472
LUXMAN 438 474
METZ HE11 743
MARANTZ 450
MINOWA 409
MISSION 426
NOKIA 410
NAD 459
NAKAMICHI 419
NONAME 748
OKANO 733 736
ONKYO 379 440 460 742
PALLADIUM 731 735
PANASONIC 371 432 451
PHILIPS 427 450
PIONEER 383 384 436 437 996
997 998 999
REVOX 386
REVOX/STUDER 427
RADMOR 428
ROTEL 378
SAMSUNG 411 463 465 473 475
476
SANYO 433 990 995
SCHNEIDER 374 380 388 390 391
392 393 394 395 396
397 398 399 400 401
402 403 404 407 408
409 412 441 442 443
469 470 732 733 735
746 748 749
SHARP 373 446
SHERWOOD 413 456 457
SIEMENS 426 427 477 478 479
480 732 733 737 738
739 746 747
SINOTEC 749
SINOTEC
(PEPSI-DOSE)
749
SONY 389 416 420 421 422
SUPERTECH 466
T+A 405 743
TECHNICS 387 430 431 462
TENSAI 406
THOMSON 382
UHER 375
UNIVERSUM 403 467 473 733 737
YAMAHA 385 415 435 454 992
Code list
Page 35

35
Codes HIFI - Amp.
AIWA 777 985 986
AKAI 753 754 766
AMSTRAD 785 813 829 831 840
ASH 776
ASWO 793
BANG & OLUFSEN 996
BRAUN 960
BUSH 748 782
DAEWOO 770
DENON 751 789 790 791 817
988
DIORA 835
DUAL 952 981 995
FISCHER 750 820 839
GRUNDIG 794 795 804
GOODMANNS 749 766 782
GOLDSTAR 779
HARMAN KARDON 760 823
HITACHI 751
ITT 827
JBL 821 975
JVC 792 816 819
KENWOOD 755 771 818
LINN 794 795
LUXMAN 810 845 954 955
METZ HE11 774
MARANTZ 794 795 798
MEDION 785
MERIDIAN 795
MINOWA 978
MISSION 799
NOKIA 826
NAD 834
NAKAMICHI 822
NIAM 795
NONAME 782
OKANO 763 765
ONKYO 772 982
PALLADIUM 761 783 991
PALLADIUM/OKANO 764
PANASONIC 805 808 994
PHILIPS 793 794 795 796 797
798 803 992
PIONEER 757 758 795
PRO-LOGIC 957
QUAD 795
RADIOTONE 841
RADMOR 801 802 803
REVOX 843 977
REVOX/STUDER 796 797 798
ROTEL 983 984
SABA 811
SAMSUNG 828 837 844 846
SANYO 750 756
SCHNEIDER 763 764 768 779 782
783 784 785 786 794
812 813 814 815 827
840 842 951 953 956
961 962 963 964 965
966 967 968 969 970
SCHNEIDER 971 972 973 978
SHARP 818 990
SHERWOOD 825 832 833
SIEMENS 762 763 766 767 768
769 770 775 779 780
781 784 785 794 800
Codes HIFI - Amp.
SIEMENS 947 948 950
SINOTEC 786
SINOTEC
(PEPSI-DOSE)
786
SONY 787 788 974 991
SUPERTECH 782
T+A 774 959
TECHNICS 805 806 836 976 993
TENSAI 958
THOMSON 980
UHER 987
UNIVERSUM 763 766 838 844 963
YAMAHA 752 809 824 830 979
Code list
Page 36

36
Previous programme position In menu: cursor down
Next programme position In menu: cursor up
Volume – In menu: back to previous menu
Volume + In menu: next menu
Switch on from standby mode Open menu
Local Controls
Red LED:
lights in standby mode
Blue LED:
lights in TV mode
Page 37

373839
Page 38

Page 39

Page 40

Metz-Werke GmbH & Co KG • Postfach 1267 • D-90506 Zirndorf • info@metz.de • www.metz.de
Metz. Always first class.
Unterhaltungselektronik Fotoelektronik Kunststofftechnik Industrieelektronik
ķ
04/11/8
 Loading...