

Page 1

TV. VIDEO. AUDIO. MECABLITZ
Florida 37 TC 31-VT
Bedienungsanleitung
Operating Instructions
Page 2

2
Inhaltsverzeichnis
Wissenswertes
1. Die Fernbedienung . . . . . . . . . . . . . . . . . . . . . . . . . . . . .3
Bedientasten am Gerät . . . . . . . . . . . . . . . . . . . . . . . . . . .3
2. Aufstellen und Sicherheitshinweise . . . . . . . . . . . . . . . .4
3. Fernsehbetrieb . . . . . . . . . . . . . . . . . . . . . . . . . . . . . . . .5
Einschalten . . . . . . . . . . . . . . . . . . . . . . . . . . . . . . . . . . . .5
Standby Modus . . . . . . . . . . . . . . . . . . . . . . . . . . . . . . . . .5
Programmwahl . . . . . . . . . . . . . . . . . . . . . . . . . . . . . . . . .5
Einstellen der Lautstärke . . . . . . . . . . . . . . . . . . . . . . . . . .5
MUTE/Tonstopp . . . . . . . . . . . . . . . . . . . . . . . . . . . . . . . . .5
4. Die Menüs . . . . . . . . . . . . . . . . . . . . . . . . . . . . . . . . . . . .5
Bedienung der Menüs . . . . . . . . . . . . . . . . . . . . . . . . . . . .5
Ein- und Ausschalten der Menüs . . . . . . . . . . . . . . . . . . . .5
4.1 Das Programm-Menü . . . . . . . . . . . . . . . . . . . . . . . . . .6
Einstellen und Speichern der Sender . . . . . . . . . . . . . . . . .6
4.2 Das Bild-Menü . . . . . . . . . . . . . . . . . . . . . . . . . . . . . . . .6
Bildeinstellungen: „Normal“, „Normal+“, „Normal-“ . . . . .6
Verändern der Bildeinstellung . . . . . . . . . . . . . . . . . . . . . .6
Abruf persönlicher Grundeinstellungen . . . . . . . . . . . . . . .6
4.3 Das Ton-Menü . . . . . . . . . . . . . . . . . . . . . . . . . . . . . . . .7
Lautstärke . . . . . . . . . . . . . . . . . . . . . . . . . . . . . . . . . . . . .7
Tonstopp/Mute . . . . . . . . . . . . . . . . . . . . . . . . . . . . . . . . .7
4.4 Sonderfunktionen - EXTRA Menü . . . . . . . . . . . . . . . . .7
SLEEP Timer . . . . . . . . . . . . . . . . . . . . . . . . . . . . . . . . . . .7
Erinnerungstimer (ALARM) . . . . . . . . . . . . . . . . . . . . . . . . .7
Kindersicherung (LOCK) . . . . . . . . . . . . . . . . . . . . . . . . . . .7
Korrektur von Abweichungen . . . . . . . . . . . . . . . . . . . . . . .7
Bevorzugte Programme . . . . . . . . . . . . . . . . . . . . . . . . . . .7
Sehr geehrte Kundin,
sehr geehrter Kunde,
wir freuen uns, daß Sie sich für dieses TV-Gerät mit perfekter Technik entschieden haben.
Damit diese perfekte Technik zu einem ungetrübten Fernsehgenuß wird, sollten Sie sich ein wenig Zeit nehmen, die Bedienungsanleitung zu lesen.
Ihre METZ-Werke
5. Weitere Funktionen . . . . . . . . . . . . . . . . . . . . . . . . . . . . .8
Anschluß von Zusatzgeräten . . . . . . . . . . . . . . . . . . . . . . .8
Bildschirmanzeigen . . . . . . . . . . . . . . . . . . . . . . . . . . . . . .8
Umschalten von 4:3 auf 16:9 Format . . . . . . . . . . . . . . . . .8
6. Videotext . . . . . . . . . . . . . . . . . . . . . . . . . . . . . . . . . . . . .9
Aufrufen von Videotext . . . . . . . . . . . . . . . . . . . . . . . . . . .9
Wahl einer Videotextseite . . . . . . . . . . . . . . . . . . . . . . . . .9
Aufruf einer Indexseite (Übersicht) . . . . . . . . . . . . . . . . . . .9
Videotext bei laufendem TV-Programm . . . . . . . . . . . . . . .9
Umschalten zwischen Videotext und TV-Programm . . . . . .9
Doppelte Schriftgröße . . . . . . . . . . . . . . . . . . . . . . . . . . . .9
Antwortfreigabe oder Rätselauflösung . . . . . . . . . . . . . . . .9
Stoppen des automatischen Seitenwechsels . . . . . . . . . . .9
Zeitanzeige bei TV-Betrieb . . . . . . . . . . . . . . . . . . . . . . . . .9
Verlassen von Videotext . . . . . . . . . . . . . . . . . . . . . . . . . . .9
7. Anschluß von Zusatzgeräten . . . . . . . . . . . . . . . . . . . . .10
Pay-TV-Decoder . . . . . . . . . . . . . . . . . . . . . . . . . . . . . . . .10
Anschluß eines Pay-TV-Decoders an das TV-Gerät . . . . . .10
Anschluß eines Videorecorders . . . . . . . . . . . . . . . . . . . . .10
Anschluß eines Decoders an den Videorecorder . . . . . . . .11
Kopfhörer . . . . . . . . . . . . . . . . . . . . . . . . . . . . . . . . . . . . .11
8. Hinweise und Fehlersuche . . . . . . . . . . . . . . . . . . . . . . .11
9. Technische Daten . . . . . . . . . . . . . . . . . . . . . . . . . . . . . .12
Page 3
3
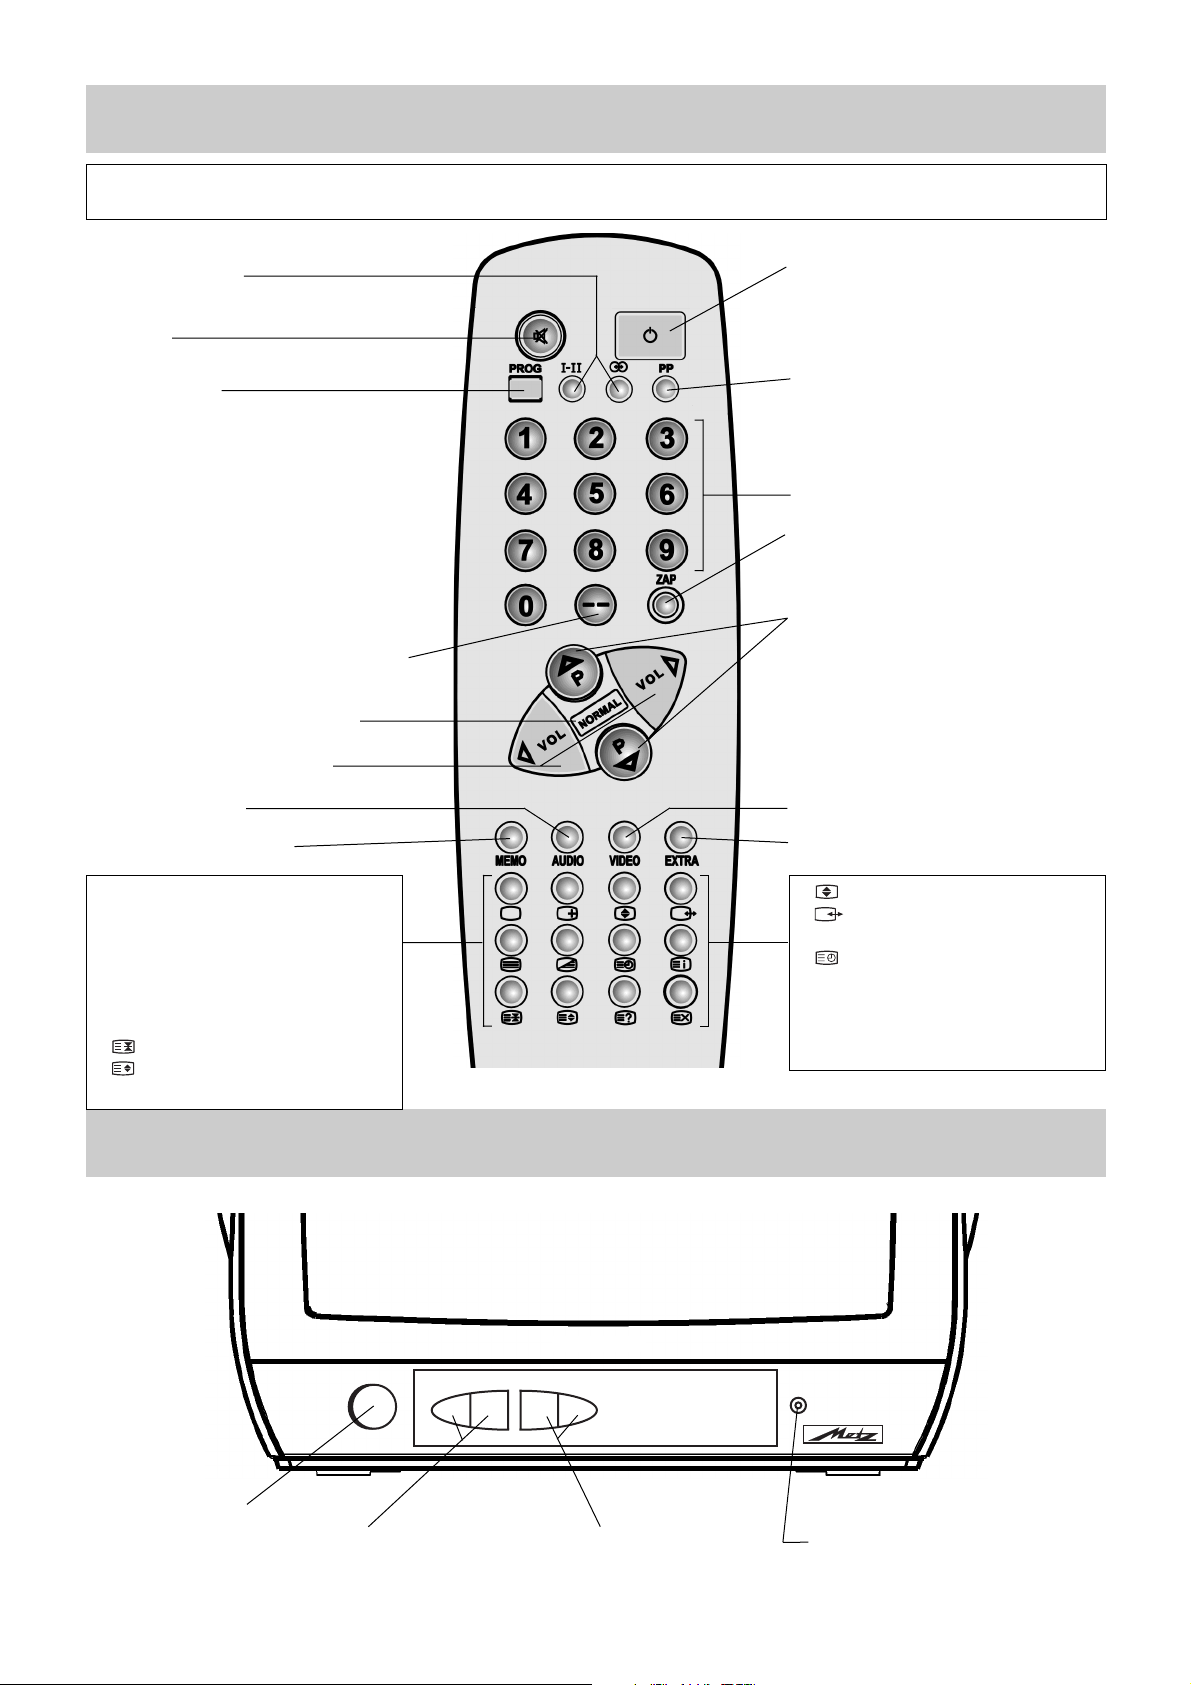
1. Die Fernbedienung
Bedientasten am TV-Gerät
• AUS (Stand-by Stellung)
• Vorwahl bei zweistelliger Zifferneingabe
• Bildeinstellmenü aufrufen
• Menü für Sonderfunktionen aufrufen
• Verändern der Werteinstellung
• Speichern (M = Memory)
• Tonmenü aufrufen
IJ Menü ausblenden / TV-Betrieb
IJ Einschalten auf den letzten Pro-
grammplatz vor dem Ausschalten.
Ȁ Status
ķ Videotext
ĸ Videotext Mixbetrieb
Seitenwechsel stoppen
Doppelte Schriftgröße
4:3 / 16:9 Umschaltung
Externe Geräte (VHS / SVHSUmschaltung
Zeiteinblendung
ɾ Indexseite aufrufen
Ƒ Antwortfreigabe
ƴ TV / Videotexteinblendung
• Bild- und Ton-Grundeinstellungen
• Menü aufrufen
Im aufgerufenen Menü einen Schritt
zurück.
• Aufrufen persönlicher Grundeinstellungen
• Zifferntasten
• Aufrufen bevorzugter Programme
• ohne Funktion
- Lautstärke + - Programm +
Kopfhöreranschluß
• Tonstopp
• Programmfortschaltung
• Einschalten auf den letzten Programmplatz vor dem Ausschalten.
Um das TV-Gerät mit der Fernbedienung bedienen zu können, muß es im Stand-by Betrieb stehen (Netztaste gedrückt) oder in den Fernsehbetrieb geschaltet sein. Die Fernbedienung sollte bei Benutzung in Richtung Fernsehgerät zeigen
Netztaste EIN/AUS
– VOLUME + – PROG. +
37TC01
Page 4
4
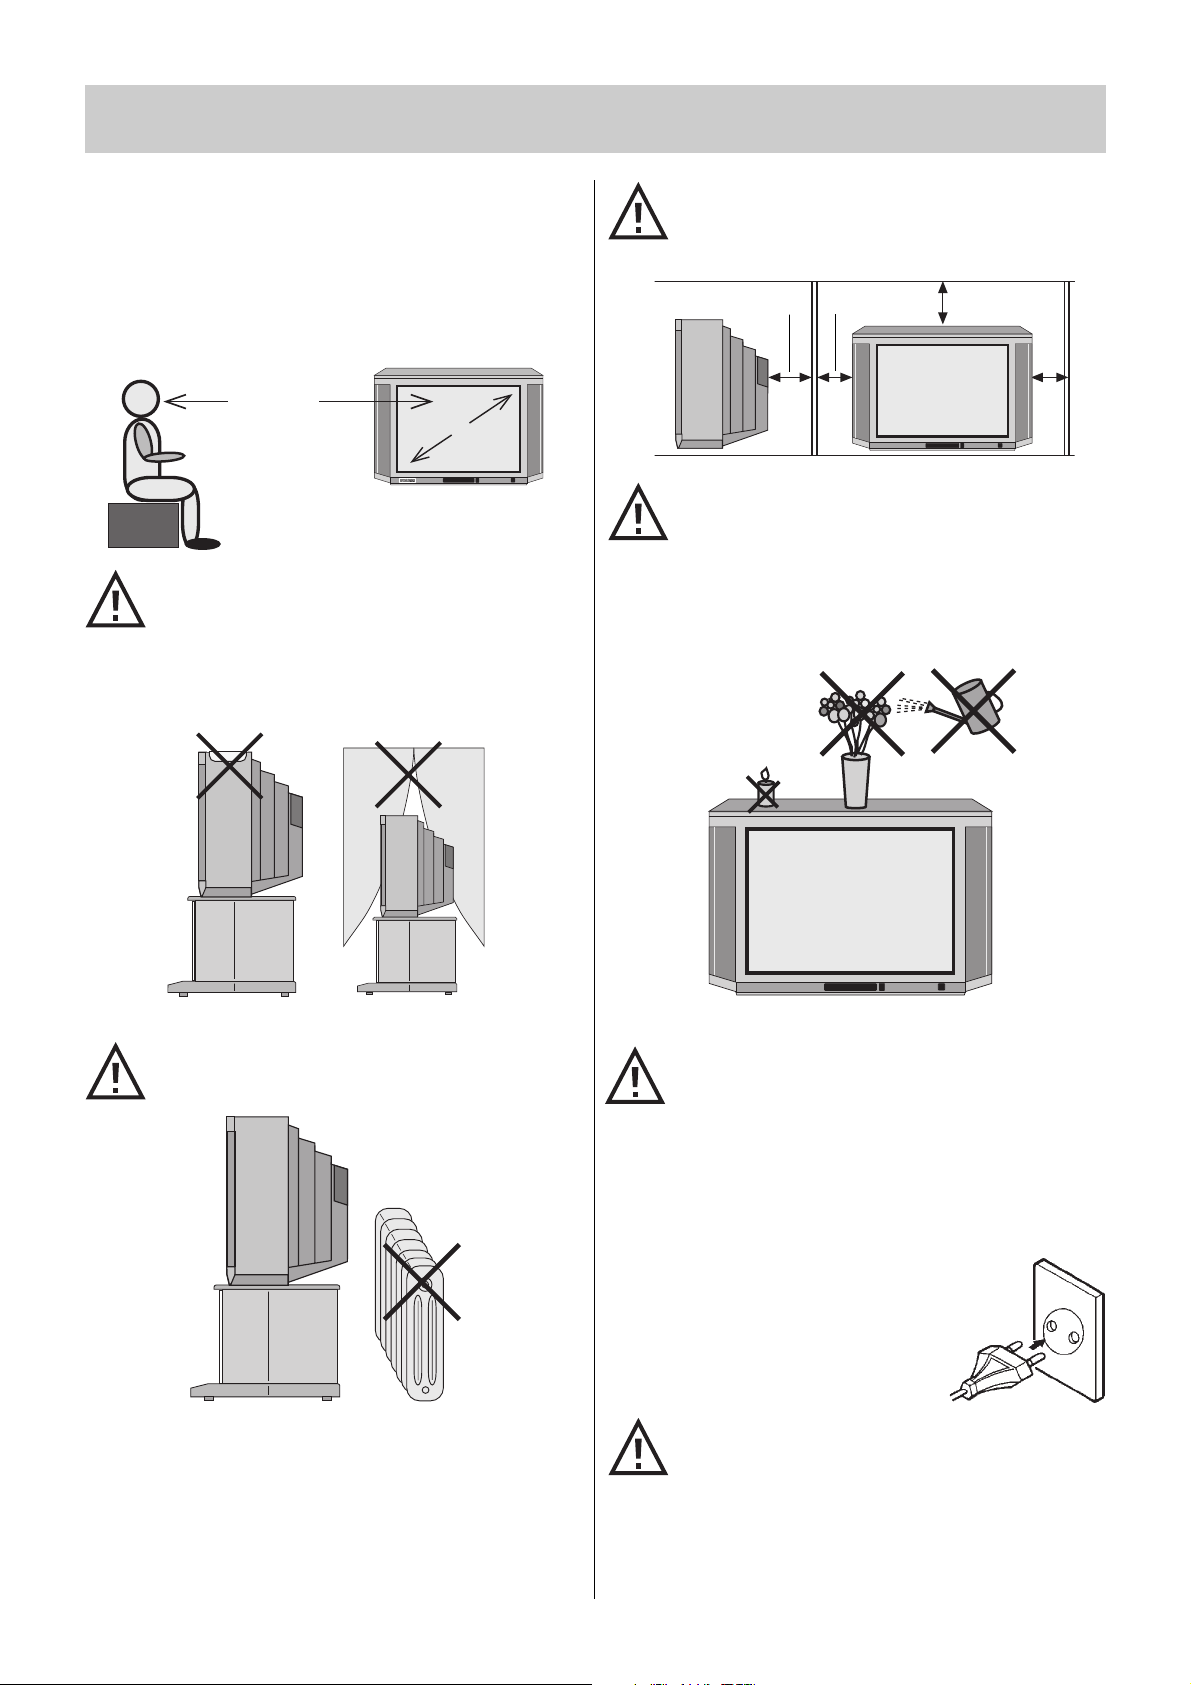
Aufstellen
Achten Sie darauf, daß kein helles Licht oder Sonnenschein direkt
auf den Bildschirm fällt. Es können Spiegelungen entstehen, die
die Brillanz des Bildes beeinträchtigen.
Der günstigste Betrachtungsabstand ist die 5-fache Bildschirmdiagonale, bei Geräten mit 37 cm Bildschirm also ca. 1,8 m.
Fernsehgeräte benötigen eine ausreichende Kühlung.
Die Öffnungen in der Rückwand dürfen nicht durch
Gardinen, Deckchen, Zeitungen o. ä. verdeckt werden.
Die Lüftungsschlitze an der Geräteunterseite müssen
frei zugänglich bleiben, denn darüber saugt das Gerät
die Kühlluft an.
Stellen Sie Ihr Gerät nicht direkt neben einer Heizung
auf; die Kühlung könnte beeinträchtigt werden.
Sorgen Sie für einen ausreichenden Kühlluftstrom,
wenn Sie Ihr Gerät in einen Einbauschrank stellen.
Auf oder über das TV-Gerät gehören keine
- brennenden Kerzen
- Gefäße mit Flüssigkeit.
Heißes Wachs und Flüssigkeiten, die ins Geräteinnere
gelangen, zerstören die elektrischen Bauteile Ihres
TV-Gerätes. Die elektrische Sicherheit des Gerätes ist
in solchen Fällen nicht mehr gewährleistet.
Ihr Gerät ist für den Betrieb in trockenen Räumen
bestimmt. Benutzen Sie Ihr TV-Gerät nicht in einem
feuchten Raum (z. B. Badezimmer, in der Nähe eines
Waschbeckens oder einer Waschmaschine). Sollten
Sie ausnahmsweise das Gerät im Freien betreiben, so
sorgen Sie bitte dafür, daß es vor Feuchtigkeit (Regen,
Wasserspritzer, Betauung) geschützt ist.
Netzanschluß
Verbinden Sie den Netzstecker mit einer
Steckdose. Das Gerät ist für 230 V Wechselspannung ausgelegt.
Bei Sturm oder Gewitter Netzstecker ziehen! Dies gilt
auch für längere Benutzungspausen, wie Urlaub.
Die in diesem TV-Gerät entstehende Röntgenstrahlung ist ausreichend abgeschirmt.
2. Aufstellen und Sicherheitshinweise
20 cm
10 cm
10 cm
5 cm
5x cm
cm
y
y
y
Page 5
5
3. Fernsehbetrieb 4. Die Menüs
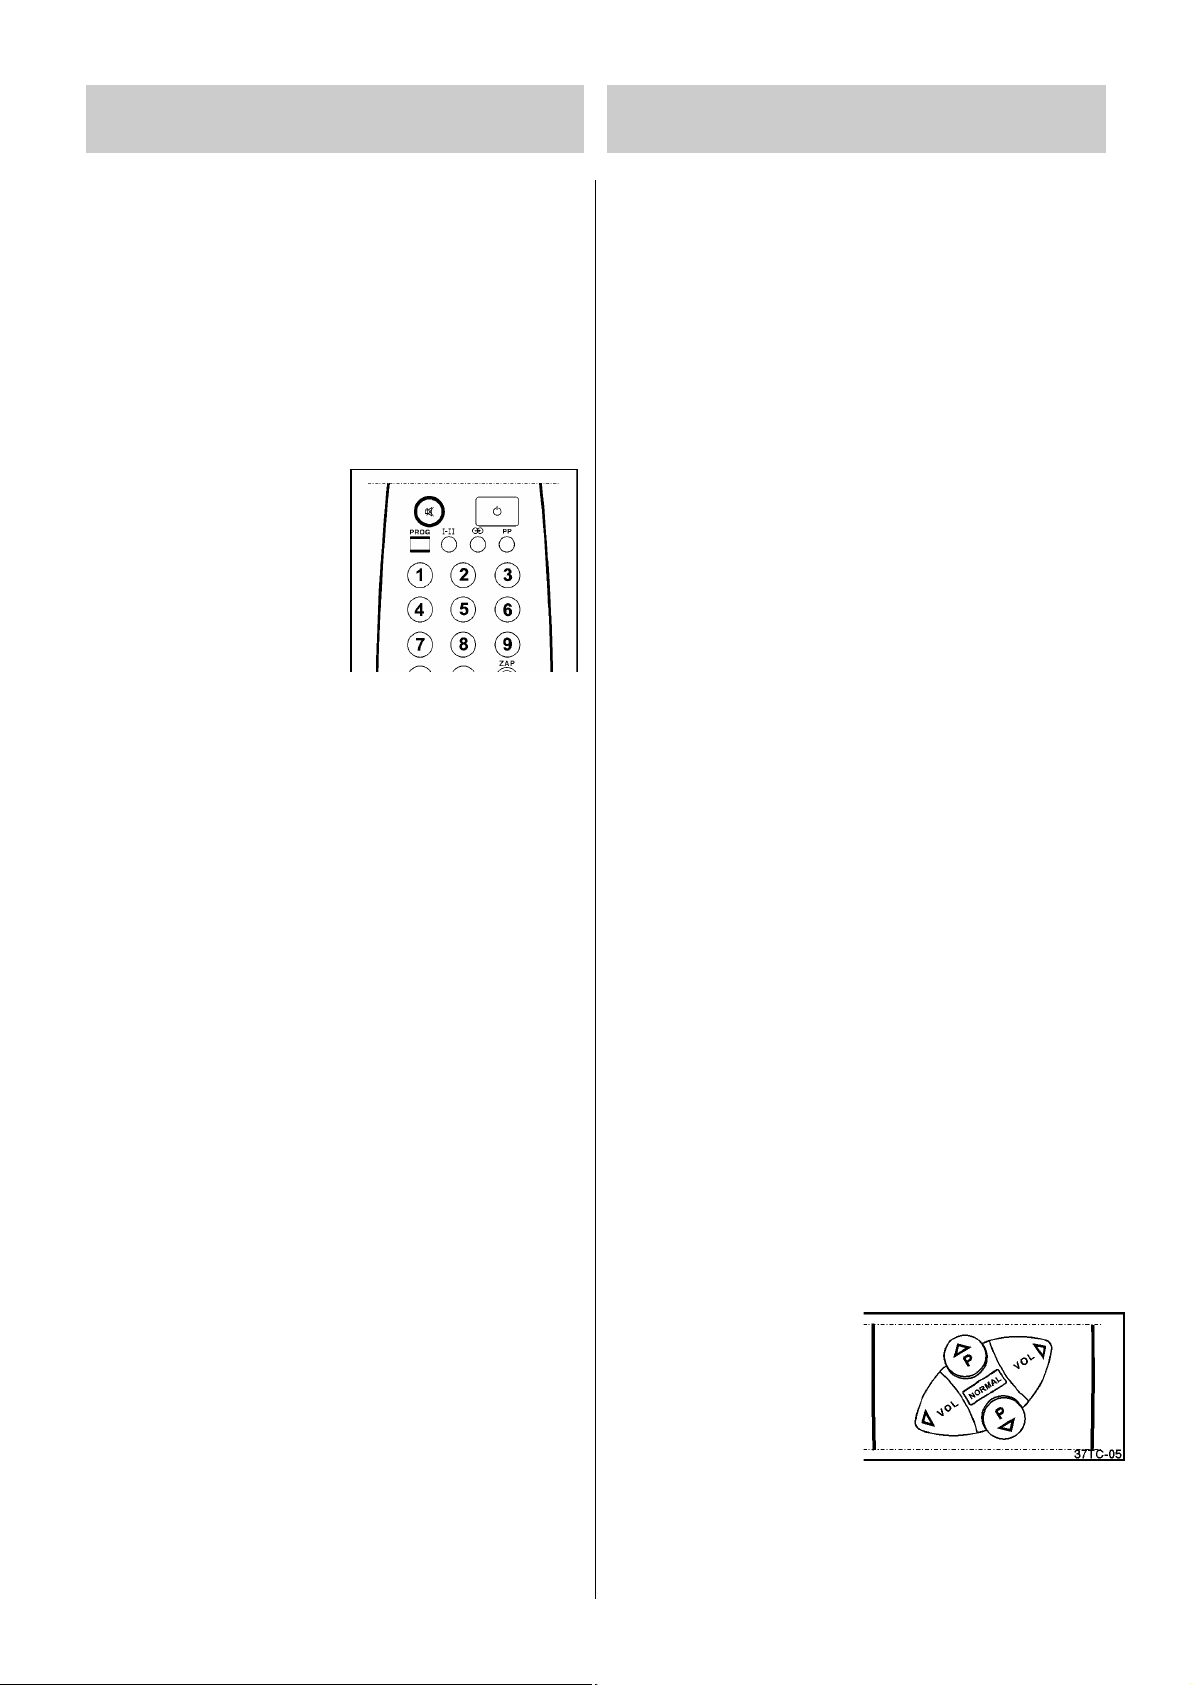
Einschalten
• Drücken Sie die Netztaste.
• Es blinkt eine rote Lampe auf. Das Gerät ist im Standby-Zustand.
• Drücken Sie eine Zifferntaste um das gewünschte Programm
einzuschalten.
• Mit der P oder P Taste wird der Programmplatz angewählt,
der vor dem Ausschalten gesehen wurde.
Standby Modus
• Mit der Taste
Ǽ rechts oben an
der Fernbedienung wird das
Gerät auf Standby geschaltet.
• Die rote Lampe zeigt den
Standby-Zustand an.
• Durch Drücken einer Ziffernoder P/P Taste auf der
Fernbedienung kann das Gerät
wieder eingeschaltet werden. 4
Minuten nach Sendeschluß schaltet es automatisch auf Standby.
Auch im Standby-Modus verbraucht Ihr Fernseher Energie. Wir
empfehlen daher, zum Sendeschluß das Gerät mit der Netztaste
auszuschalten.
Programmwahl
Das gewünschte Programm kann mit den Ziffern- oder den Tasten
P/P auf der Fernbedienung direkt angewählt werden.
Zweistellige Programmplätze geben Sie mit Vorwahl der Taste -ein. Sobald im Bildschirm das „--“ Symbol eingeblendet ist, können Sie mit den Zifferntasten den zweistelligen Programmplatz
eingeben.
Einstellen der Lautstärke
Die Tasten VOL / VOL dienen zum Einstellen der gewünschten
Lautstärke.
MUTE/Tonstopp
Nach Drücken der Taste
ı erscheint das Symbol ı auf dem Bild-
schirm und der Ton wird abgeschaltet. Bei erneutem Druck auf die
Taste ı oder Betätigen der Taste VOL wird der Ton wieder eingeschaltet.
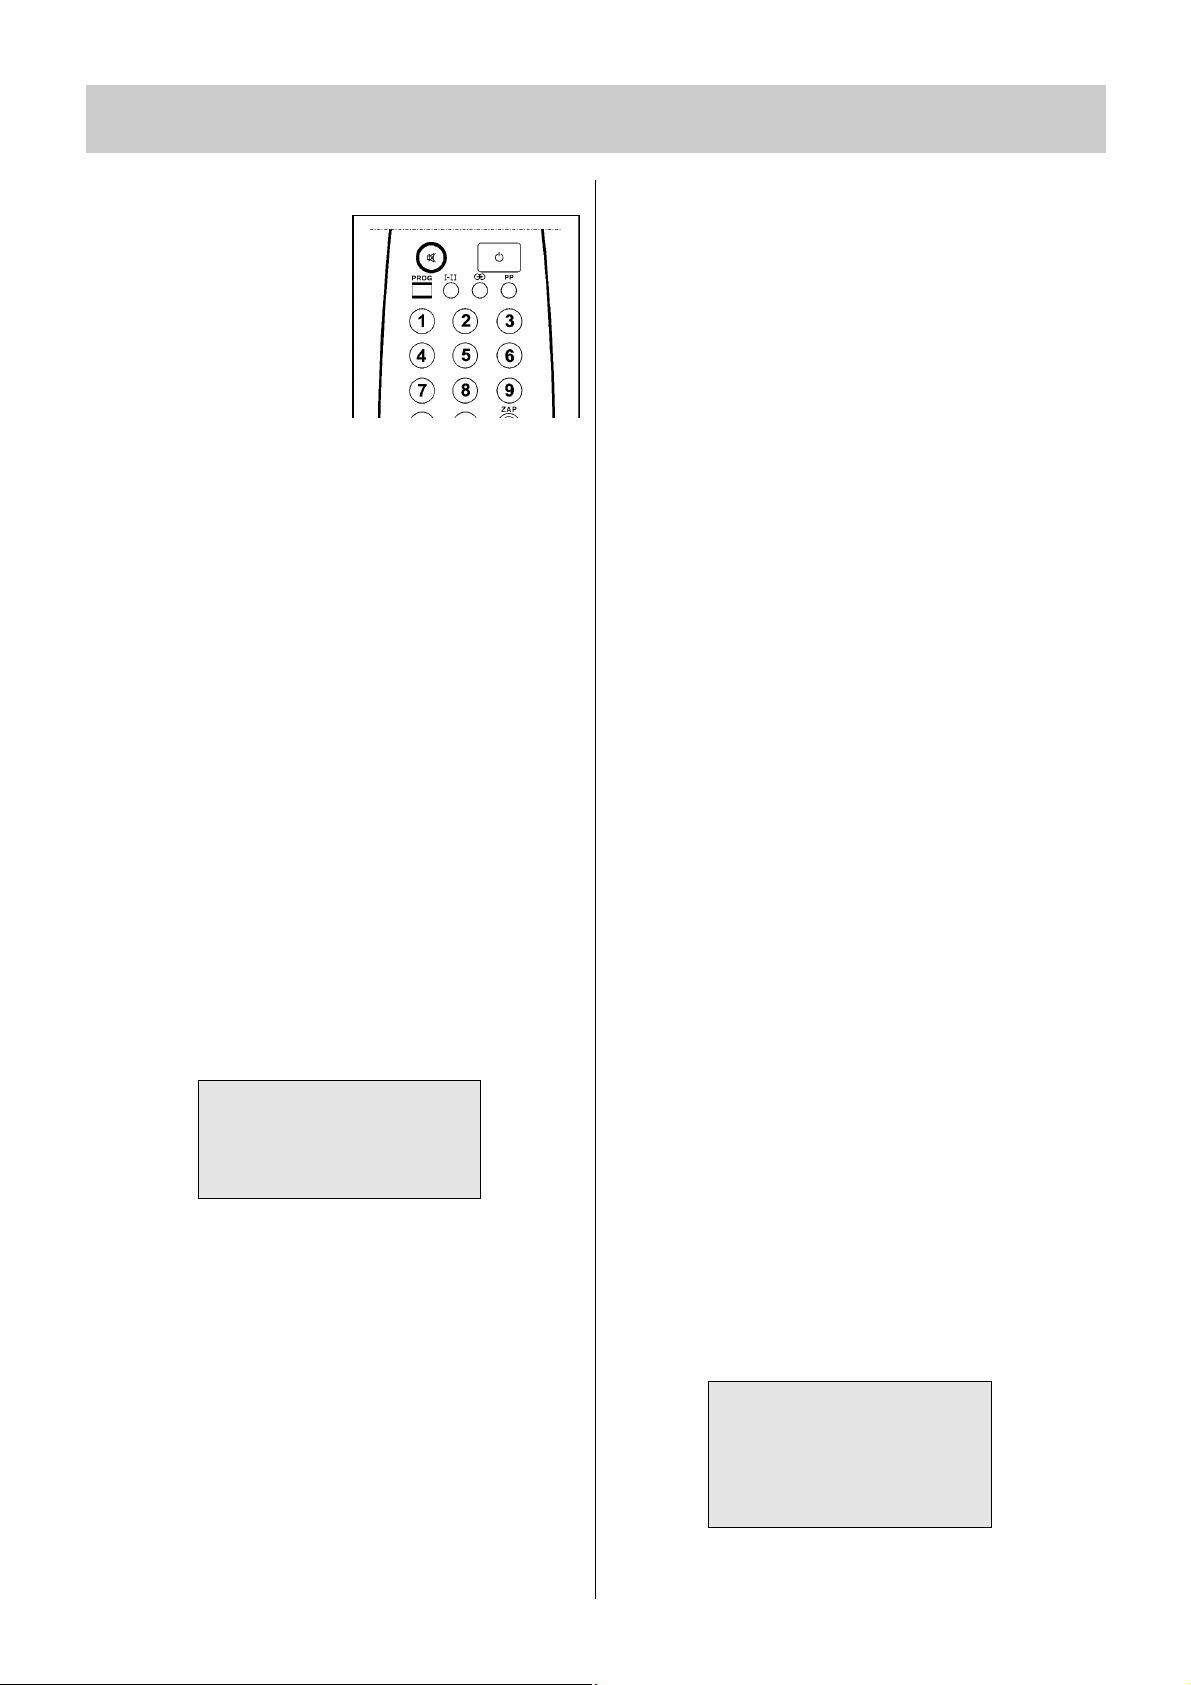
Die Menüsteuerung des TV-Gerätes ermöglicht eine leichte Handhabung der vielseitigen Funktionen. Die Steuerungsbefehle werden
auf dem Bildschirm angezeigt.
Bedienung der Menüs
Um die Zahl der Fernbedienungstasten einzuschränken, sind weniger häufig benutzte Funktionen über Menüs zugänglich. Sie können über folgende Tasten aufgerufen werden:
PROG Taste:
Aufruf des Programm-Menüs. Dieses Menü dient zur Ein-
stellung von Sendern, Sendenorm, VTR, der automatischen
Frequenzabstimmung (AFC) und der Speicherung von Sendern auf bestimmten Programmplätzen.
ROTE Taste:
Dient zum Speichern der Einstellungen.
GRÜNE Taste:
Aufruf des Ton-Menüs. Über dieses Menü wird die Laut-
stärke eingestellt.
GELBE Taste:
Aufruf des Bild-Menüs. Dient zur Einstellung von Helligkeit,
Farbstärke, Kontrast und Bildschärfe.
BLAUE Taste:
Aufruf des Menüs für Sonderfunktionen. Mit Hilfe dieses
Menüs werden Sleep Timer, Erinnerungstimer und Kindersicherung eingestellt.
Zum Verlassen des Menüs TV-Taste
IJ drücken!
Ein- und Ausschalten der Menüs
• Drücken Sie PROG oder die gewünschte farbige Taste auf der
Fernbedienung.
• Das gewählte Menü erscheint auf dem Bildschirm.
• Steuern Sie das gewünschte
Feld mit den P/P Tasten
an.
• Das gewählte Feld leuchtet auf.
• Mit den Tasten VOL oder VOL
können Sie nun Ihre Einstellung vornehmen.
• Speichern Sie diese Einstellung mit der ROTEN Taste.
• Verlassen Sie das Menü durch Druck auf die TV-Taste
IJ .
Auf den folgenden Seiten werden die einzelnen Menüs im Detail
beschrieben.
☞
☛
Page 6

6
4. Die Menüs
4.1 Das Programm-Menü
Das Programm-Menü dient zur Einstellung von Sendern. Mit der
PROG Taste wird das Menü aufgerufen.
Dieses Menü kann nicht aufgerufen werden, wenn ein
Zusatzgerät in Betrieb ist.
Einstellen und Speichern der Sender:
• Fernsehgerät mit der Netztaste einschalten.
• beliebigen Programmplatz anwählen. Wird auf dem angewählten
Programmplatz kein Sender empfangen, so erscheint auf dem
Bildschirm „NO SIGNAL“ und der Ausschalttimer zeigt die Zeit
bis zum automatischen Ausschalten an.
• PROG Taste drücken - am Bildschirm erscheint das Pro-
gramm–Menü.
• Das Feld „AUTO“ leuchtet auf und ist somit aktiv.
• Wenn bekannt ist, in welchem Empfangsbereich der Sender ausgestrahlt wird, kann mit der P das Feld „BAND“ angewählt
und mit den Tasten VOL oder VOL kann das Band VHF 1, VHF
3 oder U gewählt werden.
• Ist das „BAND“ nicht bekannt, so kann der automatische Suchlauf mit den Tasten VOL oder VOL gestartet werden. Wird
während des Suchvorgangs das Bandende erreicht, schaltet das
Fernsehgerät automatisch auf das nächste Band um.
• Wird ein Sender gefunden, bleibt der Suchlauf stehen. Mit der
Taste P kann bei Bedarf die Feineinstellung „FINE“ angewählt
und mit den Tasten VOL oder VOL verändert werden.
• Mit der Taste P das Feld „PRG“ anwählen und mit den Tasten
VOL oder VOL die Programmplatznummer einstellen, auf
dem der Sender gespeichert werden soll.
• ROTE Taste „MEMO“ drücken und die Einstellung speichern.
• Mit der Taste P wieder das Feld „AUTO“ anwählen und den
Suchlauf mit den Tasten VOL oder VOL erneut starten.
Mit diesen Bedienschritten können alle Sender der Reihenfolge
nach gespeichert werden.
Durch Drücken der Taste
IJ verlassen Sie das Programm-Menü.
4.2 Das Bild-Menü
Für die Bildeinstellungen Helligkeit (BRI), Farbstärke (COL), und
Kontrast (CON) sind werkseitig 3 Voreinstellungen programmiert:
1. Normaleinstellung
Hier werden die Einstellwerte vom Benutzer festgelegt und können
verändert werden.
2. „Normal+“ Einstellung (für Tagbetrieb)
In diesem Modus sind die Werte für die Bildeinstellung werkseitig
festgelegt.
3. „Normal-“ Einstellung (für Nachtbetrieb)
Auch hier handelt es sich um werkseitig festgelegte Einstellwerte.
Durch wiederholtes Drücken der NORMAL Taste an der Fernbedie-
nung können Sie eine der obigen 3 Einstellungen wählen.
Die Bildeinstellmöglichkeiten (NORMAL, NORMAL+, NORMAL-)
werden kurz in der Mitte des Bildschirms angezeigt.
Verändern der Bildeinstellung
• Drücken Sie die GELBE Taste an der Fernbedienung.
• Das Bild-Menü ist nun aufgerufen.
• Mit den Tasten P oder P können Sie die Felder für Helligkeit
(BRI), Farbstärke (COL), Kontrast (CON) oder Bildschärfe (SHA)
anwählen.
• Stellen Sie im gewählten Feld mit der VOL oder VOL Taste
den gewünschten Wert ein.
• Speichern Sie diesen Wert mit der ROTEN Taste.
• Blenden Sie das Menü durch Drücken der Taste
IJ aus.
• Die veränderten Einstellungen können nun mit der Taste PP aufgerufen werden.
Abruf „persönlicher“ Grundeinstellungen (PP)
„Persönliche“ Grundeinstellungen können nur abgerufen werden,
wenn das TV-Gerät in Betrieb, also nicht im Standby-Modus ist.
Drücken Sie hierzu die PP Taste.
Hinweis:
1. PP kann auch dann aktiviert werden, wenn ein Menü angezeigt
ist.
2. Mit PP können sowohl die Bild- als auch Tonnormwerte abgeru-
fen werden.
AUTO I I I I I I I I I I I I I I I I I I I I I I I I I
PRG 1 FINE I I I • I I I
BAND U
SYS BG
M
BRI I I I I I I I I I I I I I I I I I I I I I I
COL I I I I I I I I I I I I I I I I I I I I I I
CON I I I I I I I I I I I I I I I I I I I I I I
SHA I I I I I I I I I I I I I I I I I I I I I I
M AUDIO EXTR
Page 7
7
4. Die Menüs
4.3 Das Ton-Menü
In das Ton-Menü gelangen Sie
durch Drücken der GRÜNEN
Taste. Dort können Sie Änderungen an der Lautstärke vornehmen.
Das Ton-Menü ermöglicht die Eingabe persönlicher Einstellungen,
Veränderung der Lautstärke und
Tonstopp.
• Stellen Sie im Feld „VOL“ mit den Tasten VOL oder VOL den
gewünschten Wert ein.
• Speichern Sie diesen Wert mit der ROTEN Taste.
Lautstärke
Die Lautstärke kann sowohl im Ton-Menü als auch über die Fernbedienung mit den Tasten VOL oder VOL verändert werden.
Tonstopp/Mute
Mit der Taste
ı an der Fernbedienung kann der Ton ausgeschaltet
werden.
Um den Ton wieder einzuschalten, müssen Sie:
1. die Taste
ı erneut drücken.
2. die Taste VOL drücken.
3. Bei Aufheben des Tonstopps ist die letzte Einstellung wiederher-
gestellt.
Während des Tonstopps wird das Tonstoppsymbol auf dem Bildschirm angezeigt.
4.4 Sonderfunktionen - EXTRA Menü
In das EXTRA Menü gelangen Sie durch Drücken der BLAUEN
Taste. Hier können Sie verschiedene Sonderfunktionen aktivieren,
wie SLEEP und Erinnerungstimer (ALARM) , Kindersicherung
(LOCK) und die Untermenüs für bevorzugte Programme (LIST,
BLAUE Taste) und Korrektur von Abweichungen (GELBE Taste).
SLEEP Timer
Mit dem SLEEP Timer kann das TV-Gerät nach einer festgelegten
Ausschaltzeit (10 - 90 Min., in 10 Min.-Schritten) in den StandbyBetrieb geschaltet werden. In der letzten Minute vor dem Ausschalten leuchtet der Hinweis SLEEP auf dem Bildschirm.
• Drücken Sie die BLAUE Taste, um das EXTRA Menü aufzurufen.
• Wählen Sie mit der Taste P oder P das SLEEP Feld an.
• Stellen Sie die Ausschaltzeit durch Drücken der Taste VOL oder
VOL ein.
• Drücken Sie die TV-Taste
IJ um das Menü zu verlassen.
Erinnerungstimer (ALARM)
Die Erinnerungszeit wird im „Alarm“ Feld des EXTRA Menüs programmiert. Es kann eine Zeit von 01 - 60 Min. (in 1 Min.-Schritten)
festgelegt werden. Die Eingabe wird durch Drücken der ROTEN
Taste gelöscht.
• Drücken Sie die BLAUE (EXTRA) Taste, um das EXTRA Menü aufzurufen.
• Wählen Sie mit der Taste P oder P das ALARM Feld an.
• Stellen Sie die Erinnerungszeit durch Drücken der VOL oder
VOL Taste ein. Die Eingabe kann durch Drücken der ROTEN
Taste gespeichert werden.
• Drücken Sie die TV-Taste
IJ, um das Menü zu verlassen.
• Nach Ablauf der eingegebenen Zeit erscheint auf dem Bildschirm
„ALARM“ und ein Alarmton erklingt. Mit der ROTEN Taste kann
der ALARM gelöscht werden.
Kindersicherung
Bei diesem Fernsehgerät können einzelne Programmplätze Ihrer
Wahl gesperrt werden. Bild und Ton sind dann ausgeschaltet. Die
Kindersicherung wird im LOCK PRG Feld des EXTRA Menüs eingestellt und gelöscht. Wird ein gesperrtes Programm aufgerufen,
erscheint anstelle der Sendung ein entsprechender Hinweis auf
dem Bildschirm. Die Kindersicherung kann nur über das EXTRA
Menü wieder aufgehoben werden.
• Drücken Sie die BLAUE (EXTRA) Taste, um das EXTRA Menü aufzurufen.
• Wählen Sie mit der Taste P oder P das LOCK PRG Feld an.
• Sperren Sie das Programm durch Drücken der Taste VOL .
Neben der Programmnummer erscheint ein + Zeichen.
• Heben Sie die Sperrung durch Drücken der Taste VOL auf.
Neben der Programmnummer erscheint ein - Zeichen.
• Drücken Sie die TV-Taste
IJ um das Menü zu verlassen.
Korrektur von Abweichungen
Im Menü OFFSET können bei Anschluß externer Geräte Abweichungen in Lautstärke (XVOL) und Kontrast (XCON) ausgeglichen
werden. Das Feld TBRI dient zur Einstellung der Helligkeit im
Videotext Modus. Im aufgerufenen EXTRA Menü die GELBE Taste
drücken. Mit der Taste P oder P ein Feld anwählen und mit
der Taste VOL oder VOL den Wert ändern. Die geänderten Werte werden mit der ROTEN Taste gespeichert.
Bevorzugte Programme
Sie haben die Möglichkeit, im Untermenü LIST des EXTRA Menüs
bis zu 8 bevorzugte Programme in einer Liste zu speichern. Über
die COPY Funktion (GRÜNE Taste) wird der angewählte Programmplatz auf den ersten freien Platz der Liste gesetzt, usw.
Mit der blauen Taste können die gespeicherten Programme wieder
gelöscht werden.
☛
SLEEP ALARM LOCK PRG 4 -
OFFSET LIST
2-4-7-5--
M COPY CLEAR
Page 8

8
4. Die Menüs 5. Weitere Funktionen
Alternative Vorgehensweise:
• BLAUE Taste zweimal drücken.
• Mit der P oder P Taste eine Position in der Liste anwählen.
• Die VOL oder VOL Taste so oft drücken, bis der gewünschte
Programmplatz in der Liste steht.
• Soll ein Programmplatznummer gelöscht werden - die VOL
oder VOL Taste so oft drücken, bis - - erscheint.
• bearbeitete Liste mit der ROTEN Taste speichern.
Mit der Taste ZAP können im Fernsehbetrieb die in der Liste
gespeicherten bevorzugten Programme der Reihe nach abgerufen
werden.
Zusätzlich erscheint ein „+“ als Kennzeichen der ZAP-Liste hinter
der Programmplatznummer.
Anschluß von Zusatzgeräten an der EURO-Buchse
Ihr Fernsehgerät hat EXT und RGB Anschlüsse.
Mit der Taste für Zusatzgeräte können Sie auf den
gewünschten Modus umschalten.
Bildschirmanzeigen
Bei Druck auf die Statustaste
Ȁ erscheinen am Bildschirm kurz
folgende Anzeigen:
• Programmplatznummer und Empfangsbereich
• Tonmodus
• 4:3 oder 16:9 Bildformat
• Sleep Timer (Anzeige der Minuten bis zum
Abschalten des TV-Gerätes).
• Alarm (Anzeige der Minuten bis zum
Einschalten des Alarmes).
Bei Videotextübertragung wird das entsprechende Thema am
unteren Bildschirmrand angezeigt.
Umschalten von 4:3 auf 16:9 Format
Mit der Taste können Sie vom 4:3 auf 16:9 Format umschalten und umgekehrt.
Page 9

9
6. Videotext
Videotext ist ein Service, der den Empfang von Informationen über
ein in der Übersicht (Index) aufgeführtes Thema ermöglicht.
Bei Videotextbetrieb sind Veränderungen an Helligkeit,
Kontrast, Farbstärke, Bildschärfe oder Menüsteuerung
nicht möglich.
Aufrufen von Videotext
• Wählen Sie einen Sender, der Videotextinformationen übermittelt.
• Drücken Sie die Taste
ķ. Am Bildschirm erscheint eine Über-
sicht (Index).
Wahl einer Videotextseite
• Geben Sie die gewünschte Videotextseite mit den entsprechend
Zifferntasten ein.
Die gewählte Seitennummer erscheint links oben am Bildschirm.
Ist die betreffende Seite gefunden, wird sie am Bildschirm dargestellt.
• Zum Weiterblättern drücken Sie die Taste P.
• Zum Zurückblättern drücken Sie die Taste P.
Wahl einer Videotextunterseite
Im Videotextmodus können Sie durch Drücken der Taste
Videotextunterseiten direkt anwählen.
Beispiel: Die Videotextseite 423 in der ARD besteht aus vier Seiten
und Sie möchten die dritte Unterseite direkt aufrufen.
Rufen Sie im Videotextmodus die Seite 423 auf, drücken
die Taste und geben Sie die Seitennummer im Format „0003“ ein. Durch Drücken der Taste
ƴ können Sie
zum TV-Bild wechseln.
Nachdem die Unterseite „0003“ gefunden wurde,
erscheint auf dem Bildschirm links oben die Anzeige
. Drücken Sie nun die Taste
ƴ oder
ķ
und Sie
können die Seite betrachten.
Aufruf der Indexseite (Übersicht)
• Durch Drücken der Taste
ɾ wird die Übersicht aufgerufen.
• Sie können aber auch eine Seitennummer eingeben (z.B. 100,
200, 300 ...).
Videotext bei laufendem TV-Programm
• Mit der Mix Modus Taste
ĸ können Sie Videotext in das laufen-
de Programm einblenden.
• Durch erneutes Drücken der Videotexttaste
ķ kehren Sie in den
Videotext Modus zurück.
0003
Umschalten zwischen Videotext und TV-Programm
Wird im Videotext Modus eine Seitenzahl eingegeben und danach
die Taste
ƴ gedrückt, können Sie Ihr Fernsehprogramm weiter-
verfolgen (links oben am Bildschirm erscheint das Videotextsymbol
ķ). Sobald die eingegebene Seite gefunden ist, wird deren Num-
mer in das Fernsehprogramm eingeblendet.
Wenn Sie nun die Videotexttaste
ķ drücken, schaltet das Gerät
auf die gewählte Videotextseite um.
Doppelte Schriftgröße
• Bei Drücken der Taste wird der obere Teil der dargestellten
Seite in doppelter Schriftgröße angezeigt.
• Bei erneutem Drücken der Taste erscheint der untere Teil der
Seite in doppelter Schriftgröße.
• Der dritte Druck auf diese Taste führt zurück zur normalen
Schriftgröße der gesamten Seite.
Antwortfreigabe oder Rätselauflösung
• Verborgene Antworten zu Quiz- oder Rätselfragen werden angezeigt, wenn Sie die Auflösungstaste
Ƒ drücken.
• Durch erneuten Druck dieser Taste werden die Antworten wieder
verborgen.
Stoppen des automatischen Seitenwechsels
Es gibt Videotextseiten, die mehrere Unterseiten haben. Wird eine
solche Videotextseite angewählt, so werden die Unterseiten in kurzen Zeitabständen weitergeschaltet.
• Falls Sie den automatischen Seitenwechsel stoppen möchten,
drücken Sie die Stopptaste .
• Soll die nächste Textseite angezeigt werden, drücken Sie die
Stopptaste erneut.
Zeitanzeige bei TV-Betrieb
Zum Einblenden der Zeitanzeige zuerst die Taste
ķ zweimal
drücken und danach die Zeittaste einmal drücken. Auf dem
Bildschirm erscheint bei Sendern die Videotext ausstrahlen, die
Zeit in weiß auf blauem Hintergrund. Bei erneutem Druck auf die
Taste wird die Zeit wieder ausgeblendet.
Verlassen von Videotext
Drücken Sie die Taste
IJ oder die Videotext Taste ķ. Das vorher
eingestellte Fernsehprogramm erscheint dann wieder auf dem
Bildschirm.
☞
Page 10

10
7. Anschluß von Zusatzgeräten
Pay-TV-Decoder
Mit diesem Zusatzgerät können codiert gesendete Programme
(z.B. Premiere Sender) entschlüsselt und auf dem Bildschirm sichtbar gemacht werden. Um einen Decoder anschließen zu können,
benötigen Sie ein EURO Kabel (=Scart), bei dem alle 21 Pole belegt
sind.
Wenn Pay-TV-Sendungen auch mit einem Videorecorder aufgezeichnet werden sollen, empfehlen wir, den Decoder direkt an den
Videorecorder anzuschließen. Besteht diese Möglichkeit nicht, so
kann der Decoder am TV-Gerät angeschlossen werden.
Einzelheiten erfahren Sie von Ihrem Händler und aus den jeweiligen Decoder Unterlagen.
Anschluß eines Pay-TV-Decoders an das TV-Gerät über die
Antennenbuchse
Antennenkabel wie abgebildet anschließen.
Anschluß eines Decoders an das TV -Gerät über die EUROBuchse (Scart)
Falls Ihr Decoder über einen EURO Anschluß verfügt, können Sie
die Bildqualität verbessern, wenn Sie den Decoder mit einem EURO
Kabel an die EURO-Buchse anschließen.
Anschluß eines Videorecorders
Der SVHS - Betrieb an der EURO-Buchse ist nicht möglich.
Antennenkabel wie abgebildet anschließen. Auch hier empfehlen
wir den Anschluß über EURO Kabel an die EURO-Buchse, um eine
verbesserte Bildqualität zu erhalten.
Wenn Sie den Videorecorder starten, so schaltet das TV-Gerät,
sofern Ihr Videorecorder eine Schaltspannung liefert, automatisch
auf den AV-Programmplatz.
Suchen und Speichern des VCR Testsignals
• Antennenausgang des Videorecorders über Antennenkabel mit
der Antennenbuchse des TV-Gerätes verbinden.
Sie können verschiedene AV Geräte an
Ihren Fernseher anschließen.
Das Bild zeigt Ihnen, wie AV Geräte
angeschlossen werden können.
Page 11

11
7. Anschluß von Zusatzgeräten 8. Hinweise und Fehlersuche
Anschluß eines Videorecorder
• Bespielte Kassette in den Videorecorder einlegen.
• Wiedergabe starten oder das Testsignal des Videorecorders einschalten. Das Testsignal der meisten Videorecorder liegt im
Bereich der Standardkanäle Ch 30 bis Ch 40 (siehe Bedienungsanleitung des Videorecorders).
• Am Fernsehgerät das Programm Menü aufrufen.
• Nach dem Testsignal des Videorecorders auf die gleiche Weise
suchen wie beim Einstellen und Speichern der Sender. Siehe
Programm Menü.
• Testsignal auf einen Programmplatz zwischen 0 und 99 speichern. Wir empfehlen Programmplatz 0.
Anschluß eines Decoders an den Videorecorder
Einige Videorecorder haben einen EURO-Anschluß für Decoder.
Verbinden Sie ein EURO Kabel mit dem EURO Anschluß Ihres Deco-
ders und dem EURO Anschluß Ihres Videorecorders. Siehe auch
Videorecorder Bedienungsanleitung.
Kopfhörer
Kopfhörer an die Kopfhörerbuchse des TV-Gerätes anschließen.
Dadurch werden die Lautsprecher stummgeschaltet und die Ton-
wiedergabe erfolgt über den Kopfhörer.
Die Tasten VOL / VOL dienen zum Einstellen der gewünschten
Lautstärke.
Reinigung des Gerätes
Vor dem Reinigen ist das Gerät mit dem Netzschalter
auszuschalten!
Für das Gehäuse verwenden Sie bitte nur ein weiches, trockenes
oder ganz leicht angefeuchtetes Tuch. Vermeiden Sie die Anwendung von scharfen Reinigungsmitteln. Diese könnten den Lack und
die Bedruckung beschädigen.
Für den Bildschirm verwenden Sie ein leicht angefeuchtetes Fensterleder!.
Schlechte Bildwiedergabe
• Ist der Sender richtig eingestellt?
Befindet sich das TV-Gerät oder Antenne in unmittelbarer Nähe
von Lautsprechern, ungeerdeten Audiogeräten oder Neonlichtern?
• Berge und hohe Gebäude können Doppel- oder Geisterbilder verursachen.
In einigen Fällen kann die Bildqualität durch Verändern der Ausrichtung der Außenantenne verbessert werden.
• Sind TV-Bild oder Videotextinformation nicht zu erkennen?
Überprüfen Sie, ob die korrekte Kanal eingegeben ist und stellen
Sie ggf. den Kanal mittels Feineinstellung ein.
Kein Bild
• Ist die Antenne korrekt angeschlossen?
• Sind die Stecker ganz in die Antennenbuchse eingeschoben?
• Ist das Antennenkabel einwandfrei und mit geeigneten Steckern
versehen?
• Haben Sie die richtige Taste an der Fernbedienung gedrückt?
Versuchen Sie es noch einmal.
• Haben Sie nach Videotextempfang noch einmal die
ķ Taste
gedrückt?
• Haben Sie die Kindersicherung abgeschaltet?
Ton
• Haben Sie eventuell den Ton mit der Tonstopptaste (MUTE) abgeschaltet?
Fernbedienung
Wenn Ihr TV-Gerät nicht auf die Fernbedienung anspricht, drücken
Sie nochmals die Taste
IJ. Vielleicht sind die Batterien verbraucht.
Siehe „Aufstellen“. Sie können das Gerät immer noch über die
Tasten an der Frontseite bedienen.
Anschlüsse
Überprüfen Sie, ob Ihre Zusatzgeräte korrekt angeschlossen und
eingeschaltet sind.
Falls Sie keine Lösung finden, schalten Sie Ihr Fernsehgerät
für einige Sekunden aus und wieder ein.
Versuchen Sie nie, selbst Reparaturen vorzunehmen. Setzen Sie
sich mit Ihrem Händler oder einem qualifizierten Fernsehtechniker
in Verbindung.
3-polig 2-polig
Nur Kopfhörer mit einem 3-poligen Klinkenstecker
verwenden !
Die Verwendung eines Kopfhörers mit einem 2-poligen Klinken-
stecker kann zu einer Beschädigung des Gerätes führen.
Page 12

12
9. Technische Daten
Sendenorm PAL B/G
Empfangsbereich VHF (Kanal 2-4 / Kanal 5-12)
UHF (Kanal 21-69)
Hyperband Kabel TV (Sonderkanal S1-S20)
(Sonderkanal S21-S41)
Anzahl der Programmplätze 100 (0 - 99)
Programmanzeige OSD
Antenneneingang 75 Ohm (asymmetrisch)
Netzspannung 230V AC, 50 Hz
Leistungsaufnahme 50 W max.
Audioausgang Mono
Lautsprecher 16 Ω / 3W
Tonendstufe 2 W Musikleistung
Bildröhre 14“
Abmessungen (TxLxH) 376,5 x 376 x340 mm
Gewicht 9 kg
Page 13

13
Contents
Read this first
1. The remote control . . . . . . . . . . . . . . . . . . . . . . . . . . . . .14
Control keys on the TV . . . . . . . . . . . . . . . . . . . . . . . . . . .14
2. Setting up and safety notes . . . . . . . . . . . . . . . . . . . . . .15
3. TV operation . . . . . . . . . . . . . . . . . . . . . . . . . . . . . . . . . .16
Switching on . . . . . . . . . . . . . . . . . . . . . . . . . . . . . . . . . . .16
Standby mode . . . . . . . . . . . . . . . . . . . . . . . . . . . . . . . . . .16
Programme selection . . . . . . . . . . . . . . . . . . . . . . . . . . . .16
Adjusting the volume . . . . . . . . . . . . . . . . . . . . . . . . . . . . .16
Mute . . . . . . . . . . . . . . . . . . . . . . . . . . . . . . . . . . . . . . . . .16
4. Menu system . . . . . . . . . . . . . . . . . . . . . . . . . . . . . . . . . .16
Using the menus . . . . . . . . . . . . . . . . . . . . . . . . . . . . . . . .16
Calling and terminating the menus . . . . . . . . . . . . . . . . . .16
4.1 The Programme Menu . . . . . . . . . . . . . . . . . . . . . . . . . . .17
Selecting and storing stations . . . . . . . . . . . . . . . . . . . . . .17
4.2 The Video Menu . . . . . . . . . . . . . . . . . . . . . . . . . . . . . . . .17
Normal, Normal+, Normal- settings . . . . . . . . . . . . . . . . . .17
Adjusting the picture settings . . . . . . . . . . . . . . . . . . . . . .17
Calling „personal preference“ (PP) settings . . . . . . . . . . . .17
4.3 The Audio Menu . . . . . . . . . . . . . . . . . . . . . . . . . . . . . . .18
Volume . . . . . . . . . . . . . . . . . . . . . . . . . . . . . . . . . . . . . . .18
Mute . . . . . . . . . . . . . . . . . . . . . . . . . . . . . . . . . . . . . . . . .18
4.4 Special functions - the EXTRA Menu . . . . . . . . . . . . . . .18
SLEEP timer . . . . . . . . . . . . . . . . . . . . . . . . . . . . . . . . . . .18
ALARM timer . . . . . . . . . . . . . . . . . . . . . . . . . . . . . . . . . . .18
Childlock . . . . . . . . . . . . . . . . . . . . . . . . . . . . . . . . . . . . . .18
Correcting offsets . . . . . . . . . . . . . . . . . . . . . . . . . . . . . . .18
Favourite programmes . . . . . . . . . . . . . . . . . . . . . . . . . . .18
5. Further functions . . . . . . . . . . . . . . . . . . . . . . . . . . . . . .19
Connecting external devices . . . . . . . . . . . . . . . . . . . . . . .19
Screen displays . . . . . . . . . . . . . . . . . . . . . . . . . . . . . . . . .19
Switching between picture formats 4:3 and 16:9 . . . . . . . .19
6. Teletext . . . . . . . . . . . . . . . . . . . . . . . . . . . . . . . . . . . . . .20
FASTTEXT - TOPTEXT . . . . . . . . . . . . . . . . . . . . . . . . . . . .20
Calling the Teletext function . . . . . . . . . . . . . . . . . . . . . . .20
Selecting a Teletext page . . . . . . . . . . . . . . . . . . . . . . . . .20
Calling the index page . . . . . . . . . . . . . . . . . . . . . . . . . . . .20
Dear customer,
We are happy you have chosen this TV set of such a discerning design.
To ensure that the sophisticated technology of this television becomes the ultimate in
viewing pleasure, we recommend that you please study these Operating
Instructions carefully.
Displaying Teletext on top of the current TV programme . .20
Switching between Teletext and TV programme . . . . . . . .20
Double-height text . . . . . . . . . . . . . . . . . . . . . . . . . . . . . . .20
Revealing the answers to questions . . . . . . . . . . . . . . . . .20
Stopping automatic paging . . . . . . . . . . . . . . . . . . . . . . . .20
Displaying the time in TV mode . . . . . . . . . . . . . . . . . . . . .20
Quitting Teletext . . . . . . . . . . . . . . . . . . . . . . . . . . . . . . . .20
7. Connecting external devices . . . . . . . . . . . . . . . . . . . . .21
Pay-TV decoder . . . . . . . . . . . . . . . . . . . . . . . . . . . . . . . . .21
Connecting a Pay-TV decoder to the TV set . . . . . . . . . . . .21
Connecting a video recorder . . . . . . . . . . . . . . . . . . . . . . .21
Connecting a decoder to the video recorder . . . . . . . . . . . .22
Headphones . . . . . . . . . . . . . . . . . . . . . . . . . . . . . . . . . . .22
8. Notes and fault-finding . . . . . . . . . . . . . . . . . . . . . . . . . .22
9. Technical data . . . . . . . . . . . . . . . . . . . . . . . . . . . . . . . . .22
ķ
Page 14

14
The remote control
Control keys on the TV
• OFF (standby setting)
• Two-digit programme number entry
•
Video adjustment
•
Special functions menu
• Change the setting
• Memorize (M = Memory)
• Audio menu
IJ ON/OUT Menu/TV
IJ Switches to last viewed pro-
gramme
Ȁ Status
ķ Teletext
ĸ Teletext mix mode
Stop auto paging
Double-height text
4:3 / 16:9 selection
External sources (VHS / SVHS)
Time
ɾ Index page
Ƒ Reveal answers
ƴ Teletext/TV programme
switching
• Basic picture and sound settings
• Call TV menu
Within a menu, move back one step
•
Call personal preferences
•
Numeric keys
•
Scan favourite programmes list
• No function
- Volume + - Programme +
Headphones
• Mute
• Next programme
• Return to the last programme
The television must be in standby mode (ON/OFF key depressed) when it is to be operated by remote control. Always point the remote
control in the direction of the TV for operation.
ON / OFF key
ķ
– VOLUME + – PROG. +
37TC01
Page 15

15
2. Setting up and safety notes
Setting up
When selecting a suitable place for the TV, be sure that no bright
light or sunlight falls on the screen. Light may cause reflections
and impair the brilliance of the image.
The best viewing distance is five times the picture tube diagonal,
e.g. about 1,8 m for TV sets with a 37 cm screen.
TV sets require adequate ventilation. The ventilation
slots at the rear of the set should therefore never be
covered by curtains, doilies, newspapers or similar
objects. Likewise, all slots at the bottom of the set
must be freely accessible so that the intake of air is
not impaired in any way.
If you place the set in a wall unit, leave sufficient
space on all sides so that the air can circulate freely.
Do not place
- burning candles or
- flower vases filled with water
on top of the TV set.
Hot wax and liquids destroy the electrical
components and jeopardize the electrical
safety of the set.
Your TV set is intended for use in dry rooms. If you
wish to use it occasionally outdoors, be sure to protect
it against any kind of moisture (rain, splashes, dew,
etc.). Do not use the TV set in damp rooms (e.g. in the
bathroom) or in the vicinity of a washbasin or washing
machine. Do not expose the set to moisture and water
splashes.
Mains voltage
Plug the mains lead into a wall outlet.
The TV set is equipped for 230 V ac.
20 cm
10 cm
10 cm
5 cm
Do not set up the TV near a radiator as this would
impair adequate cooling.
Remove the mains plug from the outlet socket in the event
of thunderstorms and when the set is not to be used for a
prolonged period (e.g. when you are away on holiday).
The X-rays generated by this TV set are sufficiently shielded.
ķ
5x cm
cm
y
y
y
Page 16

16
3. TV Operation 4. Menu System
Switching on
• Press the power switch.
• A red lamp on the set lights up, indicating standby mode.
• Press one of the numeric keys on the remote control to select
the desired programme.
• Pressing the P or P key on the remote control selects the
last programme watched before the television was switched off.
Standby mode
• Pressing the
Ǽ key at the top right of the remote control swit-
ches the television to standby mode.
• The standby mode is indicated
by the red lamp.
• The set can be switched on
again by pressing one of the
numeric keys or the P or
P key on the remote control.
It automatically switches to
standby mode 4 minutes after
the current station closes
down. Note that your television still consumes power in standby
mode. We therefore recommend that you switch it off with the
power switch when you have finished viewing.
Programme selection
The desired programme can be selected directly with the numeric
keys and the P or P keys on the remote control.
For two-digit programme positions, first press the „- -“ key. The
„- -“ symbol appears on the screen and you can then enter the
two-digit number with the numeric keys.
Adjusting the volume
The volume can be set to the desired level with the VOL or VOL
keys.
MUTE
Pressing the
ı key switches off the sound and the ı symbol is
displayed on the screen. Pressing the ı again or pressing the
VOL keys switches the sound on again. The MUTE function can
also be used via the menu.
The menu system of your TV set permits easy handling of the many
functions of the set. The control commands are displayed on the
screen.
Using the menus
In order to minimise the number of keys on the remote control, the
less frequently used functions are accessible via menus which can
be called with the following keys.
PROG key:
calls the programme menu. This menu is used for initial tuning to stations, for selecting the transmission
standards, for selecting a VTR, for activating automatic
frequency control (AFC) and for storing stations in specific programme positions.
RED key:
stores the settings.
GREEN key:
calls the audio menu, to adjust the volume.
YELLOW key:
calls the video menu for adjusting the brightness,
colour, contrast and picture sharpness.
BLUE key:
calls the EXTRA functions menu for setting the sleep
timer, the alarm timer and the childlock.
To leave the menu, press the TV key
IJ .
Calling and terminating the menus
• Press the PROG key or the appropriate coloured key on the
remote control.
• The selected menu is displayed on the screen.
• Move the cursor to the
desired menu item with the
P or P keys.
• The selected item is highlighted.
• You can now make the desired setting with the VOL or VOL
keys.
• Store the settings pressing the RED key.
• Quit the menu by pressing the TV key
IJ.
The menus are described in detail on the following pages.
☞
☛
ķ
Page 17

17
4. Menu System
4.1 The programme menu
The programme menu is used to tune the television to the desired
stations. The menu is called with the PROG key.
It cannot be called if an external device connected to
the TV set (such as a video recorder) is running.
Selecting and storing stations
• Switch on the television with the power switch.
• Select any programme position. If there is no station being
received on this position, the text „NO SIGNAL“ is displayed on
the screen and the sleep timer displays the remaining time until
the set is automatically switched off.
• Press the PROG key to display the programme menu on the
screen.
• The field „AUTO“ is displayed in pink, indicating that it is active.
• If you know the band in which the desired station is transmitted,
you can select the field „BAND“ with the P key and then
select the band VHF1, VHF 3 or U with the VOL or VOL key.
• If you do not know the band, you can start the automatic station
search with the VOL or VOL key. When the end of a band is
reached during this search, the TV set automatically switches to
the next band.
• If a station is found, the search stops. If necessary, you can
select the fine-tuning field „FINE“ with the P key and adjust
the tuning with the VOL or VOL keys.
• Then select the field „PRG“ with the P key and use the VOL
or VOL key to select the programme position number under
which this station is to be stored.
• Press the red „MEMO“ key to store the setting.
• Press the P key to return to the field „AUTO“ and start the station search again with the VOL or VOL key.
Repeat the above steps to store all stations available in your area.
Exit from the menu by pressing the TV key
IJ.
4.2 The Video Menu
Three different picture settings have been preset in the factory for
the video values brightness (BRI), colour (COL) and contrast (CON).
1. Normal setting
These values are set by the user and can be modified as desired.
2. Normal+ setting (for daytime viewing)
The video values for this setting have been preset in the factory.
3. Normal- setting (for viewing in the evening)
These video values are also factory settings.
You can select one of the above settings by repeatedly pressing the
NORMAL key on the remote control until the desired setting is displayed.
The three possible settings (NORMAL, NORMAL+, NORMAL-) are
briefly displayed in the centre of the screen.
Adjusting the picture settings
• Press the YELLOW key on the remote control.
• The video menu is now displayed.
• Use the P or P keys to select the field for brightness (BRI),
colour (COL), contrast (CON) or sharpness (SHA).
• In the selected field, adjust the setting to the desired value with
the VOL or VOL key.
• Store the setting with the RED key.
• Exit from the menu by pressing the TV key
IJ.
• The modified settings can now be activated with the PP key.
Calling „Personal Preference“ settings (PP)
The Personal Preference settings can be called only when the TV
set is switched on and not in standby mode.
Press the PP key to call the settings.
Note:
1. PP may also be activated while a menu is displayed on the
screen.
2. PP can be used to call the preset values for both video and
audio.
BRI I I I I I I I I I I I I I I I I I I I I I I
COL I I I I I I I I I I I I I I I I I I I I I I
CON I I I I I I I I I I I I I I I I I I I I I I
SHA I I I I I I I I I I I I I I I I I I I I I I
M AUDIO EXTR
ķ
AUTO I I I I I I I I I I I I I I I I I I I I I I I I I
PRG 1 FINE I I I • I I I
BAND U
SYS BG
M
Page 18

18
4. Menu System
4.3 The Audio Menu
The audio menu is called by pressing the GREEN key and can be
used for adjusting the volume
with the aid of the VOL or VOL
keys.
The audio menu permits you to
enter your personal preferences,
adjust the volume and switch the
MUTE function on and off.
• In the selected field „VOL“ , adjust the setting to the desired
value with the VOL or VOL key.
• Store the setting with the RED key.
Volume
The volume can be adjusted either in the audio menu or with the
remote control.
Mute
The MUTE key
ı on the remote control switches off the sound.
To switch the sound back on again, you must:
1. press the MUTE key
ı again or
2. press the VOL key.
3.
When the MUTE function is switched off, the sound will be back
with the volume setting which existed before MUTE was activated.
The MUTE symbol is displayed on the screen as long as the MUTE
function is active.
4.4 Special Functions - the EXTRA Menu
The EXTRA menu is called by pressing the BLUE key and is used for
activating various special functions such as the sleep timer
(SLEEP), the alarm timer (ALARM), the childlock (LOCK), the submenus for favourite programmes (LIST, BLUE key) and for correction of offsets (YELLOW key).
SLEEP timer
The SLEEP timer can be used to automatically switch the TV set to
standby mode after a preset delay (10 - 90 minutes in increments
of 10 minutes). During the last minute of the delay period, the text
SLEEP is displayed on the screen.
• Press the BLUE key to call the EXTRA menu.
• Use the P or P key to select the SLEEP field.
• Set the delay by pressing the VOL or VOL key.
• Press the TV key
IJ to quit the menu.
ALARM timer
The alarm time is programmed in the „Alarm“ field of the EXTRA
menu and can be set to a value of 01 - 60 minutes (in increments
of 1 minute). The input can be cleared by pressing the RED key.
• Press the BLUE key to call the EXTRA menu.
• Use the P or P key to select the ALARM field.
• Set the alarm time by pressing the VOL or VOL key. The
input can be cleared by pressing the RED key.
• Press the TV key
IJ to quit the menu.
• When the alarm time elapses, the text „ALARM“ is displayed on
the screen and an audible alarm sounds. The alarm can be
switched off by pressing the RED key.
Childlock
On this TV set, you can lock individual programmes. Picture and
sound are then switched off if such a programme is selected. The
childlock is activated and deactivated in the LOCK PRG field of the
EXTRA menu. If a locked programme is selected, a text indicating
that the programme is locked is displayed instead of the TV picture.
The childlock can be deactivated only by way of the EXTRA menu.
• Press the BLUE key to call the EXTRA menu.
• Use the P or P key to select the LOCK PRG field.
•
Lock this programme by pressing the VOL key („+“ is displayed
beside the programme number) or
• unlock this programme by pressing the VOL key („-“ is displayed beside the programme number).
• Press the TV key IJ to quit the menu.
Correcting offsets
If external devices are connected, the menu OFFSET can be used
to correct differences in volume (XVOL) and contrast (XCON) between TV mode and operation with the external device. The TBRI
field in this menu is used for adjustment of the brightness in Teletext mode. To make the adjustments, press the YELLOW key with
the EXTRA menu displayed on the screen, select the desired field
with the P or P key and adjust the value with the VOL or
VOL key. Then store the new settings by pressing the RED key.
Favourite programmes
In the sub-menu LIST of the EXTRA menu, you can store up to eight
favourite programmes. The COPY function (GREEN key) copies the
currently selected programme position to the first free position in
this list. The updated list is then stored by pressing the RED key. If
you wish to delete a stored programme number, press the BLUE
key.
☛
SLEEP ALARM LOCK PRG 4 -
OFFSET LIST
2-4-7-5--
M COPY CLEAR
ķ
Page 19

19
4. Menu System 5. Further Functions
Alternative method for creating the list:
• Press the BLUE key twice.
• Select a position in the list with the P or P key.
• Press the VOL or VOL until the desired programme position
is displayed in the list.
• To delete a programme position from the list, press the VOL or
VOL key until - - is displayed.
• Save the updated list by pressing the RED key.
In TV mode, pressing the ZAP key switches to the next programme
in the list of favourite programmes.
Connecting external devices to the SCART socket
Your TV set has sockets for EXT and RGB.
You can switch to the desired mode by pressing the external source
key .
Screen displays
Pressing the status key Ȁ briefly displays the following information at the top right of the screen:
• Programme position number and Transmission standard
• Sound mode
• 4:3 or 16:9 picture format
• Sleep Timer
• Alarm
If Teletext is available, the corresponding subject is shown at the
bottom edge of the screen.
Switching between picture formats 4:3 and 16:9
You can switch between the picture formats 4:3 and 16:9 with the
key.
ķ
Page 20

20
6. Teletext
Teletext is a service which permits the reception of information
about a subject listed in the index.
The brightness, colour and sharpness cannot be adjusted
and no menus can be called while in Teletext mode.
Calling the Teletext function
• Select a station which transmits Teletext information.
• Press the
ķ key to display the index page.
Selecting a Teletext page
• Enter the number of the desired page with the numeric keys on
the remote control.
This number appears at the top left of the screen. When the page is
found, it is displayed on the screen.
• To display the next page, press the P key.
• To display the previous page, press the P key.
Selecting a teletext subpage
Press the key when in teletext mode to directly select teletext
subpages.
Example: The teletext page 423 in the ARD channel consists of 4
pages and you want to directly access the third subpage.
Call page 423 in teletext mode, press the key and
enter the page number in format "0003". By pressing the
ƴ key you can return to TV picture.
After the subpage "0003" has been located, will
appear on the upper left of the screen. Press key
ƴ or
ķ
to view the page.
Calling the index page
• Pressing the
ɾ key displays the index page.
• You can also enter the appropriate page number (e.g. 100, 200,
300 ...).
Displaying Teletext on top of the current TV programme
• Pressing the Mix key
ĸ displays the selected Teletext page on
top of the current TV programme.
• To return to Teletext mode, press the Teletext key
ķ again.
Switching between Teletext and TV programme
If you enter a page number in Teletext mode and then press the
ƴ
key, you can continue watching the current TV programme (the
Teletext symbol ķ appears at the top left of the screen). When the
selected page is found, its number is displayed on the screen.
Pressing the Teletext key ķ will then display the selected Teletext
page.
0003
Double-height text
• Pressing the displays the upper half of the current Teletext
page with double-height text.
• Pressing this key again displays the lower half of the page with
double-height text.
• Pressing this key a third time returns to the display of the entire
page with normal text height.
Revealing the answers to questions
• Hidden answers to quiz or puzzle questions can be displayed by
pressing the Reveal key
Ƒ.
• Pressing this key again hides the answers again.
Stopping automatic paging
Some Teletext pages have several sub-pages. If you select such a
Teletext page, the sub-pages are displayed sequentially at short
intervals.
• If you wish to stop this automatic paging, press the Hold key
.
• To restart automatic paging, press the Hold key again.
Displaying the time in TV mode
In order to display the time, first press the
ķ key twice and then
press the time key once. When the TV set is tuned to a station
which transmits teletext, the time will appear in white figures on a
blue background. Pressing the Time key again switches off the
time display.
Quitting Teletext
Press the TV key
IJ or the Teletext key ķ. The picture from the
currently selected TV station is again displayed on the screen.
☞
ķ
Page 21

21
7. Connecting External Devices
Pay-TV Decoder
This device decodes specially encoded programmes (such as the
German Premiere programme) for display on the screen. For
connection of such a decoder, you will need a EURO (SCART) cable
with all 25 pins assigned.
If you also want to record Pay-TV programmes on a video recorder,
we recommend connecting the decoder directly to the video recorder. If this is not possible, the decoder can be connected to the
SCART socket of the TV set.
For further details please contact your dealer or refer to the decoder documentation.
Connecting a Pay-TV decoder to the TV set via the aerial socket
Connect the aerial cable as shown in the picture.
Connecting a decoder to the TV set via the EORO socket
If your decoder has a EURO connector, you can receive programmes with a better picture quality if you connect the decoder via a
EURO cable to the SCART socket. Only the SCART socket may be
used in this case!
Connecting a video recorder (VTR)
It is not possible to connect an S-VHS device to the EURO socket.
Connect the aerial cable as shown in the picture. Again, we recommend connecting the video recorder via a EURO cable to the SCART
socket in order to obtain better-quality pictures.
Finding and storing the VTR test signal
• Connect the aerial output of your video recorder via the aerial
cable to the aerial socket of your TV set.
• Insert a recorded cartridge into the video recorder.
• Switch the video recorder to playback mode or activate the test
signal of the video recorder. On most video recorders, the test
signal is generated on a standard channel in the range Ch 30 to
Ch 40 (see the User’s Manual for the video recorder).
You can connect various AV devices to
your TV set.
The picture below shows how these
devices are connected.
Earphones
SAT receiver
ķ
Page 22

22
Check that you have entered the correct frequency. Did you
change the brightness and/or contrast settings during installation?
Press the PP key.
No picture
• Is the aerial connected correctly?
• Are the plugs fully inserted into the aerial sockets?
• Is the aerial cable in good condition and equipped with the
correct plugs?
• Have you pressed the correct key(s) on the remote control?
Try again.
• Have you pressed the
ķ again after viewing Teletext pages?
• Is the childlock active?
Sound
• Have you switched off the sound with the MUTE key?
Remote control
If your TV set does not react to the remote control, press the TV key
IJ again. The batteries may be exhausted. You can still operate the
TV set with the buttons on the front panel.
Connections
Check that any external devices are correctly connected and
switched on.
If you cannot determine the problem, switch off the TV set for
a few seconds and then switch it on again.
Never attempt to repair a defective TV set yourself. Contact your
local dealer or a qualified TV technician.
Transmission standard PAL B/G
Frequency bands
VHF (Standard channels 2-4)
(Standard channels 5-12)
UHF (Standard channels 21-69)
Hyperband (Special channels S1-S20)
(Special channels S21-S41)
Number of programme positions 100 (0 - 99)
Programme display OSD
Aerial input 75 Ohm (unbalanced)
Supply voltage 230V AC, 50 Hz
Power consumption 50 W max.
Audio output Mono
Loudspeaker 16 Ω / 3W
Audio output stage 2 W music
Picture tube 14“
Dimensions (DxLxH) 376,5 x 376 x340 mm
Weight 9 kg
7.
Connecting External
Devices
8.
Notes and FaultFinding
8.
Notes and FaultFinding
• Call the Programme Menu on the TV set.
• Search for the test signal from the VTR in the same manner as
described previously for finding and storing TV stations.
• Store the test signal on a programme position between 0 and 99
(we recommend programme position 0).
Connecting a decoder to the video recorder
Some video recorders have a EURO socket for a decoder.
Connect a EURO cable between the EURO socket of your decoder
and the EURO socket of your video recorder (see the User’s Manual
for the video recorder).
Headphones
Connect your headphones to the headphone socket on the TV set.
The headphone volume can be adjusted in the Headphone menu.
Press the MUTE key on the remote control if you want to switch off
the loudspeaker.
Cleaning the TV set
Before cleaning the TV set, switch it off with the power
switch!
Use only a soft, dry or slightly moist cloth to clean the cabinet. Do
not use any strong detergents as they may damage the paintwork
and destroy the printed markings.
Use a damp chamois leather to clean the screen.
Poor picture quality
• Is the TV set tuned correctly to the station?
• Is the TV set or its aerial located close to loudspeakers, ungrounded audio equipment or fluorescent lamps?
•
Hills and high buildings can cause double pictures or ghost images.
You can sometimes improve the picture quality by turning the
external aerial so that it points in another direction.
• Is the TV picture or the Teletext information unrecognisable?
9. Technical Data
ķ
Only use headphones with a 3-pole jack plug !
The use of headphones with a 2-pole jack plug can damage the
equipment!
3-pol 2-pol
Page 23

TV. VIDEO. AUDIO. MECABLITZ
Metz. Immer erster Klasse.
Videorecorder
Camcorder
DVD
Audio
mecablitz
Qualität aus Prinzip.
Mit Spitzentechnik von Metz treffen Sie immer
die richtige Wahl.
Sprechen Sie mit Ihrem Fachhändler.
Er führt Ihnen gerne die aktuellen Metz Geräte
vor.
Metz-Werke GmbH & Co KG
Postfach 1267, D-90506 Zirndorf
Internet: http://www.metz.de
E-Mail: info@metz.de
Liefermöglichkeiten und
Änderungen vorbehalten.
Ķķ
697 47 0044.A3
 Loading...