

Operating Instructions........... page
Mode d’emploi ......................page
Instrucciones de manejo .... página
Instruções de serviço ......... página
5
10
16
22
170 26 8570 - 1112
KHE 56
MHE 56

2
KHE 56 MHE 56
SDS-max SDS-max
P
1
W 1300 1300
P
2
W 650 650
T
in-lbs (Nm) 796 (90) -
n
1
/min 0 - 300 -
D
1
in (mm)
1
25
/32 (45)
-
D
2
in (mm)
3
15
/16 (100)
-
D
3
in (mm)
2
9
/
16
(65)
-
smax
/min
bpm
2840 2840
WJ 14 14
C- 12 12
mlbs (kg)14.8 (6,7) 13.9 (6,3)
14
© 2012
Metabowerke GmbH,
Postfach 1229
Metabo-Allee 1
D-72622 Nürtingen
Germany
3
1
3
2
4
5
6
7
7
b
a
8
8
9
10
12
13
14
15
89
10
12
13
11
14
15
KHE 56
MHE 56
4
A
B
6.31800
MHE 56
KHE 56
etc.
.
.
.
etc.
.
.
.

ENGLISH
5
ENG
1 Specified Use
2 General Safety Rules
3 Special Safety Rules
4 Functional Description
5 Special Product Features
6 Commissioning
6.1 Assembly of the bow handle or
additional handle
7Use
7.1 Adjusting the depth stop
(only for KHE 56)
7.2 Attaching and removing tools
7.3 Setting the operating mode
7.4 Adjusting the chisel position
7.5 Adjusting the impact force
7.6 Switching on and off
7.7 Metabo VibraTech (MVT)
8 Cleaning, Maintenance
9 Tips and Tricks
10 Troubleshooting
11 Accessories
12 Repairs
13 Environmental Protection
14 Technical Specifications
The KHE 56 is designed for hammer drilling and
chiselling in concrete, bricks, stone and similar
materials when used in combination with appropriate accessories.
The MHE 56 is designed for chiselling in concrete,
bricks, stone and similar materials when used in
combination with appropriate accessories.
The user bears sole responsibility for damage
caused by improper use.
Generally accepted accident prevention regulations and the enclosed safety information must be
observed.
General Power Tool Safety Warnings
WARNING
Read all safety warnings and
all instructions.
Failure to follow the warnings and instructions may result in electric shock,
fire and/or serious injury.
Save all warnings and
instructions for future reference! The term
"power tool" in the warnings refers to your mainsoperated (corded) power tool or battery-operated
(cordless) power tool.
1) Work area safety
a)
Keep work area clean and well lit. Cluttered
or dark areas invite accidents.
b)
Do not operate power tools in explosive
atmospheres, such as in the presence of
flammable liquids, gases or dust.
Power
tools create sparks which may ignite the dust
or fumes.
c)
Keep children and bystanders away while
operating a power tool. Distractions can
cause you to lose control.
2) Electrical safety
a)
Power tool plugs must match the outlet.
Never modify the plug in any way. Do not
use any adapter plugs with earthed
(grounded) power tools.
Unmodified plugs
and matching outlets will reduce risk of electric shock.
b)
Avoid body contact with earthed or
grounded surfaces, such as pipes, radiators, ranges and refrigerators.
There is an
increased risk of electric shock if your body is
earthed or grounded.
c)
Do not expose power tools to rain or wet
conditions.
Water entering a power tool will
increase the risk of electric shock.
d)
Do not abuse the cord. Never use the cord
for carrying, pulling or unplugging the
power tool. Keep cord away from heat, oil,
sharp edges or moving parts.
Damaged or
entangled cords increase the risk of electric
shock.
e)
When operating a power tool outdoors, use
an extension cord suitable for outdoor use.
Operating Instructions
Dear Customer,
Thank you for the trust you have placed in us by buying a Metabo power tool. Each Metabo power tool
is carefully tested and subject to strict quality controls by Metabo's quality assurance. Nevertheless, the
service life of a power tool depends to a great extent on you. Please observe the information contained
in these instructions and the enclosed documentation. The more carefully you treat your Metabo power
tool, the longer it will provide dependable service.
Contents
1 Specified Use
2 General Safety Rules

6
ENGLISH
ENG
Use of a cord suitable for outdoor use reduces
the risk of electric shock.
f)
If operating a power tool in a damp location
is unavoidable, use a residual current
device (RCD) protected supply.
Use of an
RCD reduces the risk of electric shock.
3) Personal safety
a)
Stay alert, watch what you are doing and
use common sense when operating a
power tool. Do not use a power tool while
you are tired or under the influence of
drugs, alcohol or medication.
A moment of
inattention while operating power tools may
result in serious personal injury.
b)
Use personal protective equipment.
Always wear eye protection. Protective
equipment such as dust mask, non-skid safety
shoes, hard hat, or hearing protection used for
appropriate conditions will reduce personal
injuries.
c)
Prevent unintentional starting. Ensure the
switch is in the off-position before
connecting to power source and/or battery
pack, picking up or carrying the tool.
Carrying power tools with your finger on the
switch or energising power tools that have the
switch on invites accidents.
d)
Remove any adjusting key or wrench
before turning the power tool on. A wrench
or a key left attached to a rotating part of the
power tool may result in personal injury.
e)
Do not overreach. Keep proper footing and
balance at all times. This enables better
control of the power tool in unexpected
situations.
f)
Dress properly. Do not wear loose clothing
or jewellery. Keep your hair, clothing and
gloves away from moving parts.
Loose
clothes, jewellery or long hair can be caught in
moving parts.
g)
If devices are provided for the connection
of dust extraction and collection facilities,
ensure these are connected and properly
used.
Use of dust collection can reduce
dust-related hazards.
4) Power tool use and care
a)
Do not force the power tool. Use the
correct power tool for your application. The
correct power tool will do the job better and
safer at the rate for which it was designed.
b)
Do not use the power tool if the switch
does not turn it on and off. Any power tool
that cannot be controlled with the switch is
dangerous and must be repaired.
c)
Disconnect the plug from the power
source and/or the battery pack from the
power tool before making any adjustments,
changing accessories, or storing power
tools.
Such preventive safety mea ures reduce
the risk of starting the power tool accidentally.
d)
Store idle power tools out of the reach
of children and do not allow persons
unfamiliar with the power tool or these
instructions to operate the power tool.
Power tools are dangerous in the hands of
untrained users.
e)
Maintain power tools. Check for misalignment or binding of moving parts, breakage
of parts and any other condition that may
affect the power tool's operation. If
damaged, have the power tool repaired
before use.
Many accidents are caused by
poorly maintained power tools.
f)
Keep cutting tools sharp and clean.
Properly maintained cutting tools with sharp
cutting edges are less likely to bind and are
easier to control.
g)
Use the power tool, accessories and tool
bits etc. in accordance with these instructions, taking into account the working
conditions and the work to be performed.
Use of the power tool for operations different
from those intended could result in a
hazardous situation.
5) Service
a)
Have your power tool serviced by a
qualified repair person using only identical
replacement parts.
This will ensure that the
safety of the power tool is maintained.
Wear ear protectors.
Exposure to noise can
cause hearingloss.
Use auxiliary handles supplied with the tool.
Loss of control can cause personal injury.
Hold power tools by insulated gripping
surfaces, when performing an operation where
the cutting tool may contact hidden wiring or its
own cord.
Cutting accessory contacting a "live"
wire may make exposed metal parts of the power
tool "live" and could give the operator an electric
shock.
Ensure that the spot where you wish to work is free
of
power cables, gas lines or water pipes
(e.g.
using a metal detector).
WARNING Read all safety warnings and
instructions.
Failure to follow all safety warnings and instructions may result in electric shock,
fire and/or serious injury.
Keep all safety instructions and information for
future reference.
3 Specific Safety Rules

ENGLISH
7
ENG
Before using this power tool, carefully read
through and familiarise yourself with all the
enclosed safety information (red booklet)
and the instructions. Keep all enclosed
documentation for future reference, and pass on
your power tool only together with this documentation.
For your own protection and for the
protection of your power tool pay attention to all parts of the text that are
marked with this symbol!
Pull the plug out of the plug socket before any
adjustments or servicing are performed.
Always work with the additional handle correctly
installed.
A damaged or cracked additional handle must be
replaced. Never operate a machine with a defective additional handle.
Always hold the machine with both hands using
the handles provided, stand securely and concentrate.
Always wear protective goggles, gloves, a dust
mask and sturdy shoes when working with this
tool.
Always work with the tool attached correctly. Pull
on the tool to check that it is seated correctly. (It
must be possible to move the tool a few centimetres in an axial direction.)
When working above ground level, make sure that
the area underneath is free.
Do not touch the tool or parts close to the tool
immediately after stopping work because they
may still be extremely hot and could cause skin
burns.
Always lay the power cable away from the back of
the machine.
Dust from material such as paint containing lead,
some wood species, minerals and metal may be
harmful. Contact with or inhalation of the dust may
cause allergic reactions and/or respiratory
diseases to the operator or bystanders.
Certain kinds of dust are classified as carcinogenic
such as oak and beech dust especially in conjunction with additives for wood conditioning (chromate, wood preservative). Material containing
asbestos must only be treated by specialists.
- Where the use of a dust extraction device is
possible it shall be used.
- The work place must be well ventilated.
- The use of a dust mask of filter class P2 is
recommended.
Follow national requirements for the materials you
want to work with.
SYMBOLS ON THE TOOL:
.... Class II Construction
V........ volts
A........amperes
Hz...... hertz
W.......watts
BPM ..beat per minute
~
.......alternating current
n
0
.......no load speed
rpm....revolutions per minute
See page 3.
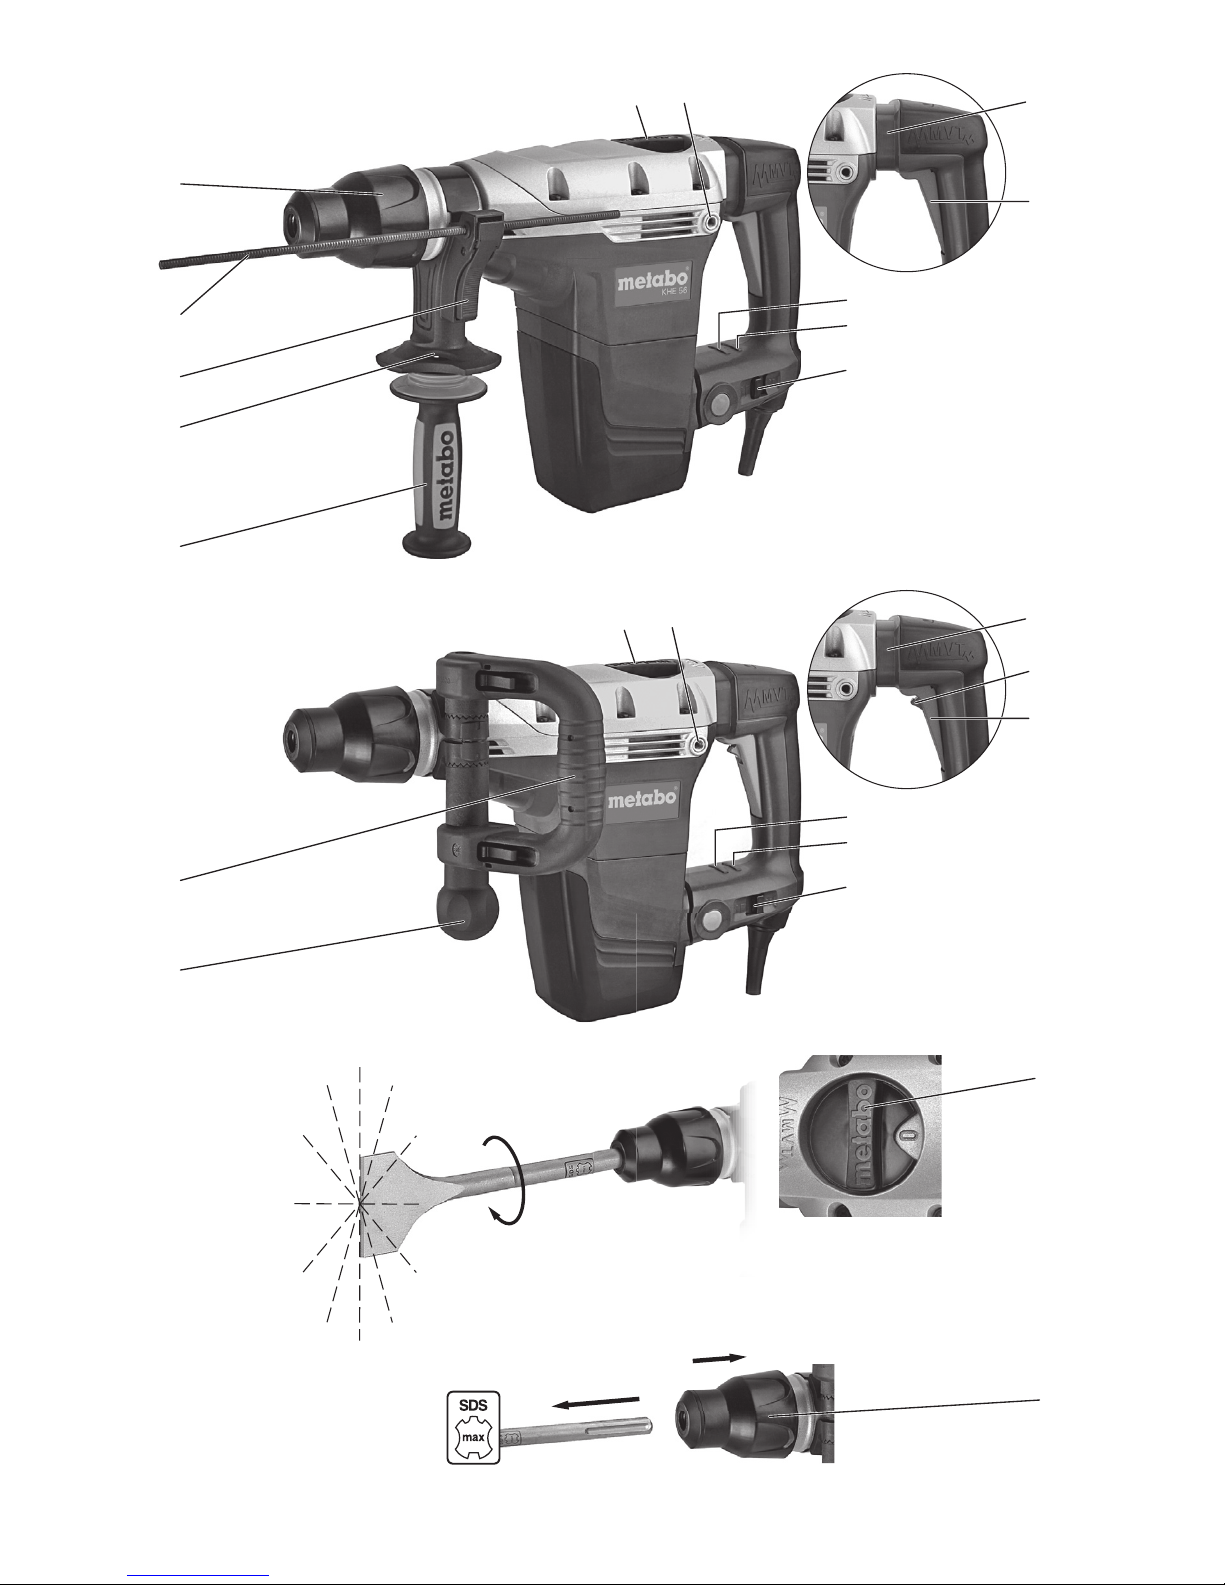
1 Clamping knob *
2 Bow handle *
3 Additional handle *
4 Additional handle holder *
5 Clamp lever for depth stop *
6 Depth stop *
7 Tool lock
8 Switch button
9 Thread for additional handle
10 Metabo VibraTech (MVT): integrated damping
system
11 Locking button for continuous activation *
12 Trigger switch
13 Carbon brush service indicator (lamp signal
for pending carbon brush change)
14 Operating indicator (light signal for mains
power supply)
15 Switch for optional impact reduction when
working on soft materials
* model-dependent
• Metabo VibraTech (MVT): integrated damping
system in the handles for reduced vibrations
and less stress on the hands
• Additional handle can be attached to the
housing at 2 different points
• Optional impact reduction of up to 30% for
working on softer materials such as brick
• Lockable switch for convenient operation
during continuous chiselling
• Electronic smooth start-up for precision drilling
• Low-weight cast magnesium gear housing
ensures excellent heat dissipation
• Service indicator e.g. for signalling pending
carbon brush changes and light signal for mains
power supply
4 Functional Description
5 Special Product Features

8
ENGLISH
ENG
Before plugging in, check to see that the
rated mains voltage and mains frequency,
as stated on the rating label, match with your
power supply.
Always use an extension cable with a minimum
diameter of 1.5 mm
2
. The extension cable must be
suitable for the machine power rating (see Technical Specifications). If using a roll of cable, always
roll up the cable completely.
6.1 Assembly of the bow handle or addi-
tional handle
For safety reasons, always use the bow
handle (2) or additional handle (3)
supplied.
MHE 56:
Release the clamping ring by turning the clamping
knob (1) anticlockwise. Adjust the bow handle (2)
to the required position and angle. Tighten the
clamping knob.
KHE 56:
Option 1
Open the clamping ring by turning the additional
handle (3) anticlockwise. Secure the additional
handle at the required angle. Tighten the additional
handle.
Option 2
Upright working position for reduced stress on the
back when working on floors:
The additional handle (3) can also be attached to
the motor housing. Unscrew the additional handle
from the handle holder (4), insert in one of the
threads (9) (on the left and right of the motor
housing) by hand and tighten.
7.1 Adjusting the depth stop
(only for KHE 56)
Press and hold the clamp lever (5). Set the depth
stop (6) to the required drilling depth and release
the clamp lever.
7.2 Attaching and removing tools
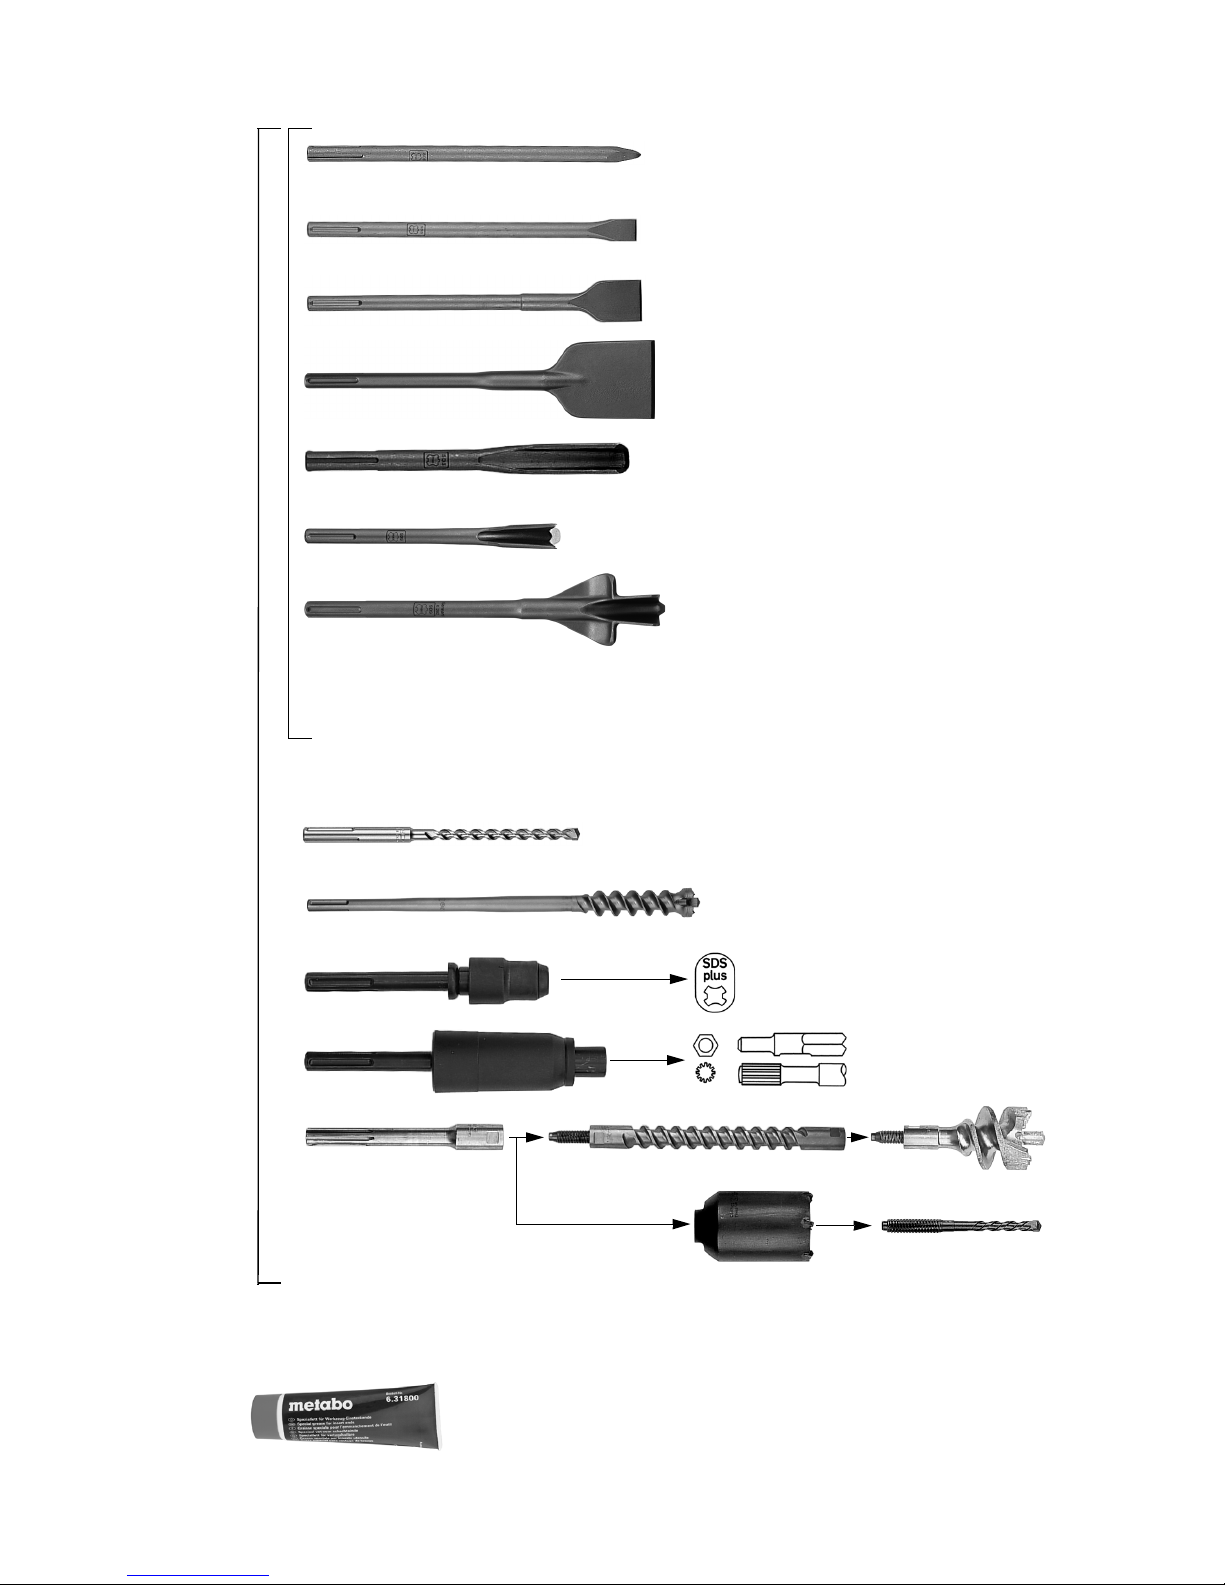
Before fitting tools, clean shank and apply
special grease enclosed with tool (accessories order no. 6.31800)! Use only SDS-max
tools.
Attaching tools:
Turn tool and insert until it engages. The tool is
automatically locked.
Pull on the tool to check that it is seated
correctly.
(It must be possible to move the
tool a few centimetres in an axial direction.)
Removing the tool:
Pull tool lock (7) backwards in direction indicated
by arrow (a) and remove tool (b).
7.3 Setting the operating mode
Turn the switch button (8) to select the desired
operating mode.
Hammer drilling (only for KHE 56)
Chiselling
When a chisel is fitted, only operate the
machine in the chiselling operating
mode
.
7.4 Adjusting the chisel position
The chisel can be secured in 12 different positions.
- Insert the chisel.
- Turn the switch button (8) to position .
- Turn the chisel to the required position.
- Turn the switch button (8) to position .
- Turn the chisel until it engages.
When a chisel is fitted, only operate the
machine in the chiselling operating
mode .
7.5 Adjusting the impact force
Slide the switch (15) to adjust the
impact force
(and speed)
setting.
Reduced impact force,
reduced speed
High impact force,
high speed
The correct setting depends on the task in hand.
Example: set the switch to "reduced impact force"
when working on soft, brittle material or trying to
minimise break-off.
Set the switch to "high impact force" when
working on harder materials.
7.6 Switching On and Off
Instantaneous activation (MHE 56, KHE 56):
To start the machine, press the trigger switch (12).
Release the trigger (12) to switch off.
Continuous operation
(MHE 56 only):
For continuous operation, the trigger switch (12)
can be locked using the lock button (11).
Press and release the trigger (12) again to switch
off.
6 Commissioning
7Use
 Loading...