

Page 1

eikon
®
Service & Parts Manual
WARNING MICROWAVE EMISSIONS
DO NOT BECOME EXPOSED TO EMISSIONS FROM THE
MICROWAVE GENERATOR OR PARTS CONDUCTING
MICROWAVE ENERGY.
®
Service & Parts Manual original instructions
Part Number 32Z3870 GB
Issue 4
1
Page 2
SYMBOLS
The symbols below are used, where applicable, as visual guidance throughout this manual.
The relevant safety precautions MUST be observed and implemented at all times.
DANGER!
This symbol is shown if there is a immediate risk of severe personal physical injury or death.
WARNING
This symbol is shown if there is a possible risk of severe personal physical injury.
CAUTION
This symbol is shown if there is a possible risk of personal physical injury.
NOTICE
This lettering is shown if damage may occur to the equipment.
INFORMATION
This symbol is used to highlight useful or important information. For example: The manual consists of
main sections (tab markers on the extreme left and right of the pages), followed by the main subject
heading, sub-headings and text. Text with a reference number or letter, such as (1) refers to the same
reference on the image.
1
2
Service & Parts Manual original instructions
Part Number 32Z3870 GB
Issue 4
Page 3
CONTENTS
SAFETY & REGULATIONS
1 SAFETY REQUIREMENTS 4
PRODUCT DETAILS
2 PRODUCT OVERVIEW & FUNCTIONS 5
3 MAIN FEATURES 6
4 TECHNICAL SPECIFICATIONS 7
4.1 Specications 7
4.2 Serial Number (Rating Plate) 7
4.3 Compliances 7
5 INSTALLATION 9
6 ELECTRICAL INSTALLATION 10
7 ELECTRICAL INSTALLATION GUIDE 11
7.1 Phase Loading 11
8 OVEN CONTROL SETTINGS 12
8.1 Oven mode/navigation settings (A) 12
8.2 Language options (B) 12
8.3 Oven temperature settings and labels (C) 12
8.4 Recipe counters (E) 13
8.5 Date and Time settings (F) 13
8.6 Sound levels (G) 13
8.7 Oven Timer (H) 13
8.8 USB oven programs (J) 14
8.9 Temperature Band (K) 14
8.10 Change Password (L) 14
8.11 Screen saver (M) 14
9 COOLING THE OVEN DOWN BEFORE CLEANING 15
9.1 Oven cool down 15
9.2 Preparing to clean the oven 15
10 COLD OVEN CLEANING INSTRUCTIONS 16
SERVICING
11 SERVICING THE OVEN 17
11.1 Servicing Procedure 17
11.2 Enter Service Mode 17
12 ERRORS & DIAGNOSTICS 18
12.1 ERROR MESSAGES 18
12.2 COPYING ERROR MESSAGES 18
12.3 ERROR LOG 18
12.4 OVEN COUNTERS 18
12.5 VISUAL VIEW 19
13 FIRMWARE UPDATES 20
TESTING COMPONENTS
14 OVEN TESTING 23
14.1 Equipment required 23
14.2 Earth/Insulation Test 23
14.3 Screen Calibration 23
14.4 Oven Tests 24
14.5 Microwave Power Test 24
14.6 Microwave Leakage Test 25
14.7 Temperature Control Test 26
14.8 Soak Test 27
14.9 Recommission Test 27
15 HIGH VOLTAGE COMPONENTS 28
15.1 High Voltage Transformer Test 28
15.2 High Voltage Rectier Test (Diode Board) 28
15.3 High Voltage Capacitor Test 29
15.4 High Voltage Magnetron Test 29
16 MAINS VOLTAGE COMPONENTS 30
16.1 Door Interlock Adjustment 30
16.2 Convection Fan Motor & Controller 31
SPARES & REPLACEMENT
17 OVEN COMPONENTS 32
18 SRB & QTS Circuit Boards 34
18.1 SRB replacement 34
18.2 QTS replacement 34
18.3 PM (Personality Module) replacement 35
19 SPARE PARTS EXPLODED VIEW 36
20 SPARE PARTS 37
21 FAULT FINDING 40
21.1 Operations Communication 40
21.2 Error Code List 41
21.3 Error Code for Re-commission test messages 43
21.4 Normal Messages 43
21.5 Error Messages. The Oven stops operating 43
ELECTRICAL CIRCUITS
22 SRB & QTS Circuit Boards 44
22.1 QTS LEDs 44
22.2 QTS Terminal Locations 44
22.3 SRB LED’s 45
22.4 SRB Terminal Locations: 46
23 CIRCUIT DIAGRAMS 47
23.1 POWER CONNECTIONS e4s 51
23.2 CONTROL CIRCUIT e4s 52
23.3 HEATER CIRCUIT e4s 53
23.4 MICROWAVE CIRCUIT e4s 54
COMMISSIONING
24 Commissioning the oven 55
24.1 Initial installation 55
24.2 After Service 55
SAFETY &
REGULATIONS
DETAILS
PRODUCT
SERVICINGSPARES &
TESTING
COMPONENTS
REPLACEMENT
FAULT FINDINGELECTRICAL
CIRCUITS
Service & Parts Manual original instructions
Part Number 32Z3870 GB
Issue 4
3
COMMISSIONING
Page 4
REGULATIONS
SAFETY &
1 SAFETY REQUIREMENTS
IMPORTANT INFORMATION READ CAREFULLY
This manual provides technical guidance for engineers
who have successfully undertaken a recognised product
familiarisation and training course run by Merrychef to carry
out service/repair tasks to the appliance/s shown on the
front cover of this manual which must not be used for any
other make or model of appliance.
Please remember that it is wiser not to attempt a service task
if you are unsure of being able to complete it competently,
quickly, and above all safely.
To avoid injury to yourself or others and to protect the
appliance from possible damage, ensure you have read and
understand all the relevant instructions and ALWAYS follow
the Safety Codes when servicing an oven.
1.0.1 Before attempting to repair the oven, check the oven for
microwave emissions using a calibrated microwave emission
detector.
1.0.2 Check that the oven is not emitting microwaves, even
when supposedly not in operation.
1.0.3 Check that the oven is not operating continuously,
whether the display indicates cooking or not.
1.0.4 Never manipulate the mains power lead whilst it is live.
1.0.5 Before removing the oven casing ALWAYS isolate the
oven from the mains electricity power supply. Switch o and
disconnect the oven plug from the wall socket, turn o isolator
switch to disconnect xed wired ovens.
NOTE: The oven switch does not provide adequate protection
against electric shock as it does not isolate all of the internal
wiring from the mains.
1.0.6 Ensure electrical supply is locked-o to prevent the oven
from being inadvertently powered up.
1.0.7 Do not leave the oven unattended without the oven
panels tted and keep within sight of other personnel
when testing the oven, ensuring persons other than trained
engineers are denied access.
1.0.8 The minimum number of panels should be removed and
the HT capacitors must be discharged before working on the
oven using a suitably insulated 10 MΩ Resistor.
1.0.9 Temporary insulation should be used to prevent
accidental contact with dangerous conductors.
1.0.10 Do not touch any internal wiring or connectors within
the oven, whether you believe it is live or not and avoid
touching the metalwork (casing, panels, etc) of the oven with
your body.
1.0.11 Only use electrically rated screwdrivers for adjusting
‘Pots’ etc., ensuring the tool touches nothing else.
1.0.12 Ensure the Test Equipment is set correctly before use.
1.0.13 Test Equipment such as meter test leads or clamps must
be tted and removed whilst the unit is dead, for each and
every test.
1.0.14 Do not undertake functional Magnetron testing with the
oven panels removed.
1.0.15 Avoid touching the Test Equipment, unless necessary for
the operation.
IF SMOKE IS OBSERVED
SWITCH OFF THE OVEN DISCONNECT/
ISOLATE FROM THE ELECTRICAL SUPPLY
KEEP THE OVEN DOOR CLOSED TO STIFLE ANY
FLAMES.
DANGER!
BEFORE REMOVING THE OVEN CASING,
ISOLATE THE OVEN FROM THE MAINS
ELECTRICITY POWER SUPPLY; SWITCH OFF,
DISCONNECT OVEN PLUG FROM WALL SOCKET,
TURN OFF ISOLATOR SWITCH TO DISCONNECT
FIXED WIRED OVENS AND LOCKOFF.
WARNING
ALWAYS DISCHARGE THE HT CAPACITORS
BEFORE WORKING ON THE OVEN USING A
SUITABLY INSULATED 10M RESISTOR.
1.0.16 Upon completion of a service follow the steps for
“Commissioning the oven” under the “Commissioning” section
of this manual.
4
Service & Parts Manual original instructions
Part Number 32Z3870 GB
Issue 4
Page 5
2 PRODUCT OVERVIEW & FUNCTIONS
CONSTRUCTION
Stainless Steel cavity and casework.
CONTROL SYSTEM
Colour touchscreen, icon driven.
Storage for up to 1024 programs with 6 stages per
cooking program providing a user instruction for
each stage.
USB memory stick data transfer.
Safety system: ensures control area temperature is
within limits.
MICROWAVE POWER
Two magnetrons.
Distribution system, rotating active antennae.
Microwave settings, o or 5-100% in 1% increments.
Safety system: agency approved monitored
interlock door system, current monitoring and
overheat detection for magnetrons.
PRODUCT
DETAILS
CONVECTED HEAT
Temperature settings 0°C o and from 100°C to
275°C in 1° C steps.
Distribution system, recirculating airow
impingement.
Convection fan setting, 10-100% in 1% increments.
Safety system: oven cavity overheat detection.
START UP SEQUENCE
With the oven switch in the OFF position and the
mains power ON, the QTS & SRB boards boot up.
When the oven switch is turned ON the splash
screen briey displays oven information and the
cabinet cooling fan is activated.
After completing a successful logic test, the safety
relay is energised and the oven preheats or displays
a preheat temperature choice. Once preheated the
oven displays the main menu if in FS mode or a
recipe selection if in QSR mode.
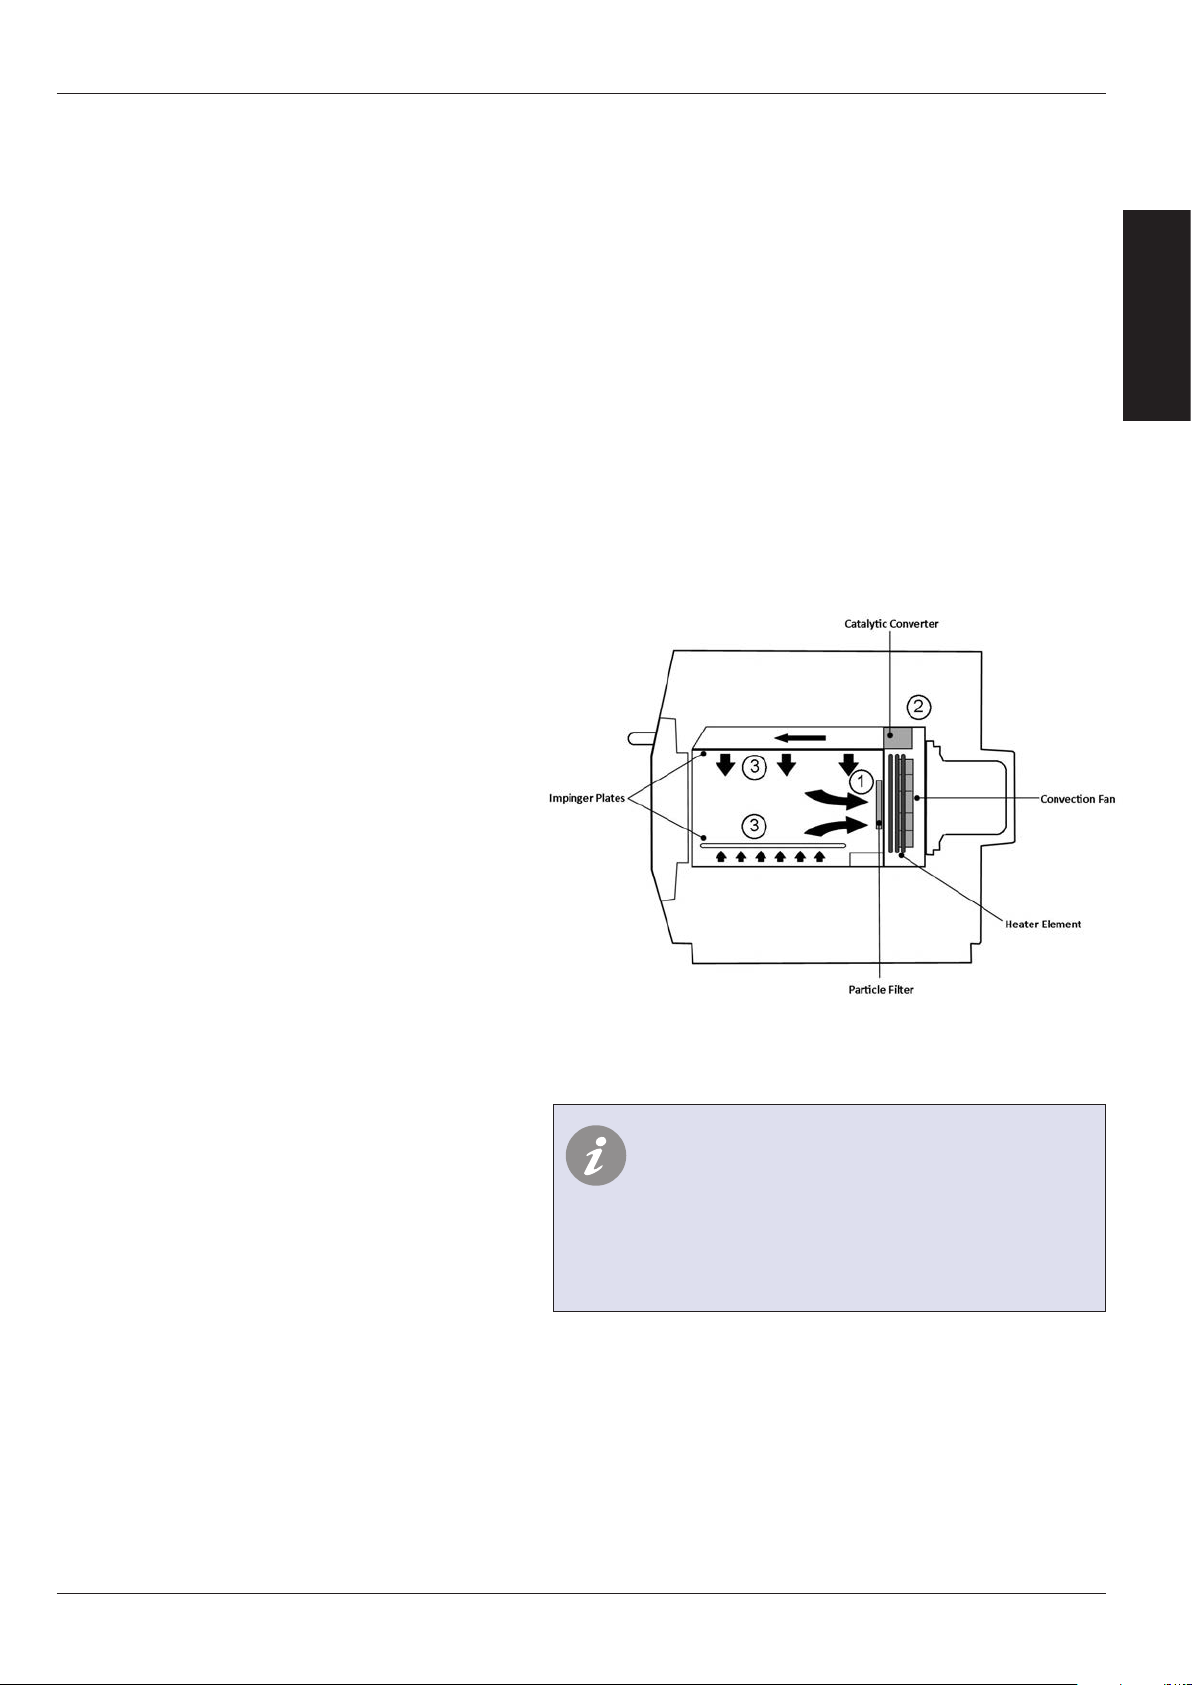
HOW IT WORKS
The convection fan pulls air in through the Air
Diuser (1) This is then heated and returned to the
cavity through the catalyst (2) and impinger plates
(3) to produce an even heat pattern in the oven. This
heat pattern allows food to cook evenly and produces
a crisp golden nish, everytime.
SHUTTING DOWN SEQUENCE
When oven switch is turned OFF the screen displays
‘Shutting Down’ and the cooling fan operates until
the cabinet temperature has been suciently
reduced (cavity temperature of 50°C).
The safety relay is de-energised and the QTS & SRB
boards remain active.
Service & Parts Manual original instructions
Part Number 32Z3870 GB
Issue 4
5
Page 6
PRODUCT
DETAILS
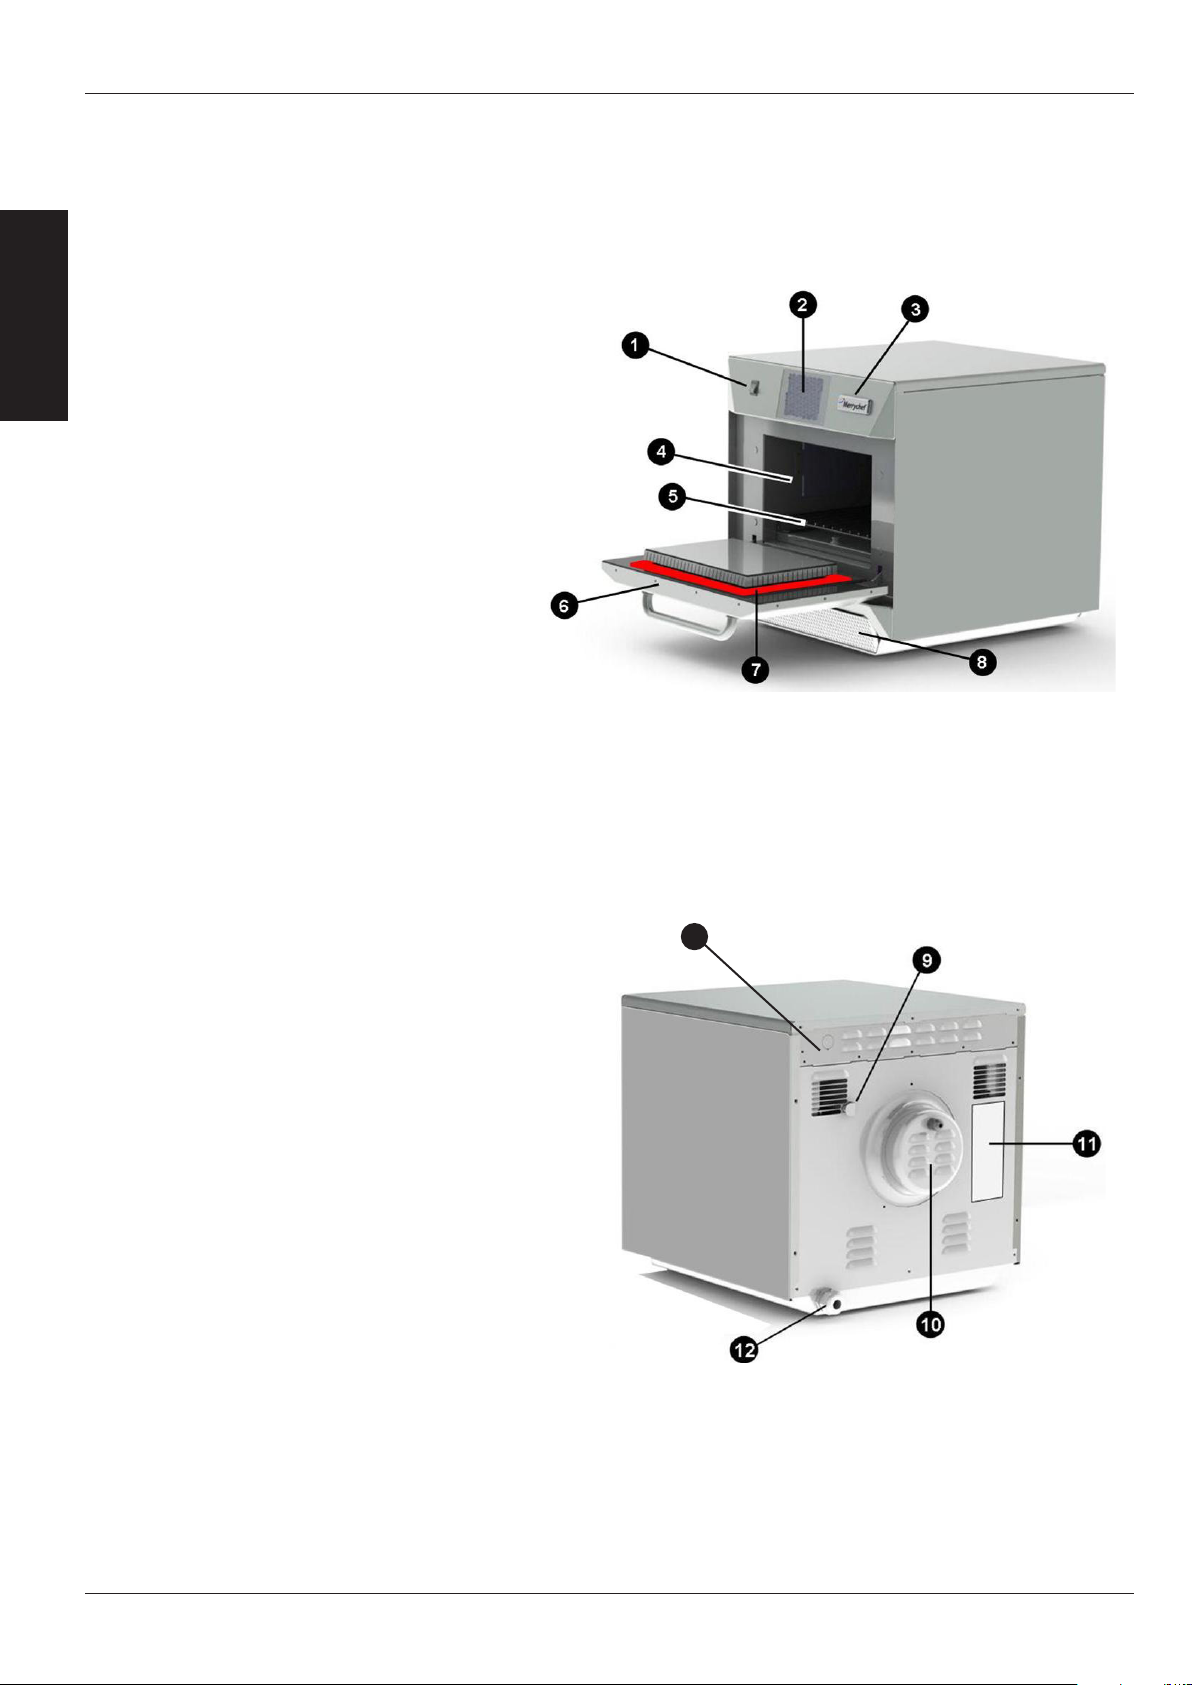
3 MAIN FEATURES
1 ON/OFF SWITCH
ON (I) activates the oven, OFF (0) switches the
oven to standby mode. IT DOES NOT ISOLATE
INTERNAL WIRING FROM THE MAINS SUPPLY.
2 CONTROL PANEL
Touch sensitive controls (easyToUCH®) for
controlling oven functions, including diagnostics
and service mode.
3 USB MenuKey®
A socket, located under the logo, allows a USB
MenuKey® to be used to update the cooking
programs and oven rmware on the pcb’s.
4 OVEN CAVITY
The oven cavity is mostly constructed from
stainless steel panels which must be kept clean
to avoid contamination of food products and
allow the oven to perform at peak eciency.
5 IMPINGER PLATES (Upper & Lower)
Direct the air in the cavity. They must be cleaned
on a regular basis, and kept free of debris.
6 OVEN DOOR
The twin-skinned door has a thermally insulated
inner section to lower the surface temperature
and incorporates a microwave choke.
7 DOOR SEAL
Provides a tight seal around the door and
must be kept clean. The seal must be checked
regularly and replaced if worn or damaged.
8 AIR FILTER
The air intake provides cooling air for internal
components and must be cleaned daily and
must NOT be obstructed. The lter must be in
place for the oven to function.
9 STEAM VENT
Vents steam from the oven cavity.
10 HOT AIR FAN
Circulates hot air through the catalytic
convertors and oven cavity.
11 RATING PLATE
The rating plate, located on the rear oven cover,
states the Model, Serial Number, Electrical
Ratings and Manufacturers telephone number.
12 MAINS ELECTRIC POWER CABLE
Located on the rear of the oven and must be
replaced if worn or damaged.
13 OH STAT ACCESS BOLT
To reset cavity OH Stat remove bolt to gain
access to stat.
13
6
Service & Parts Manual original instructions
Part Number 32Z3870 GB
Issue 4
Page 7
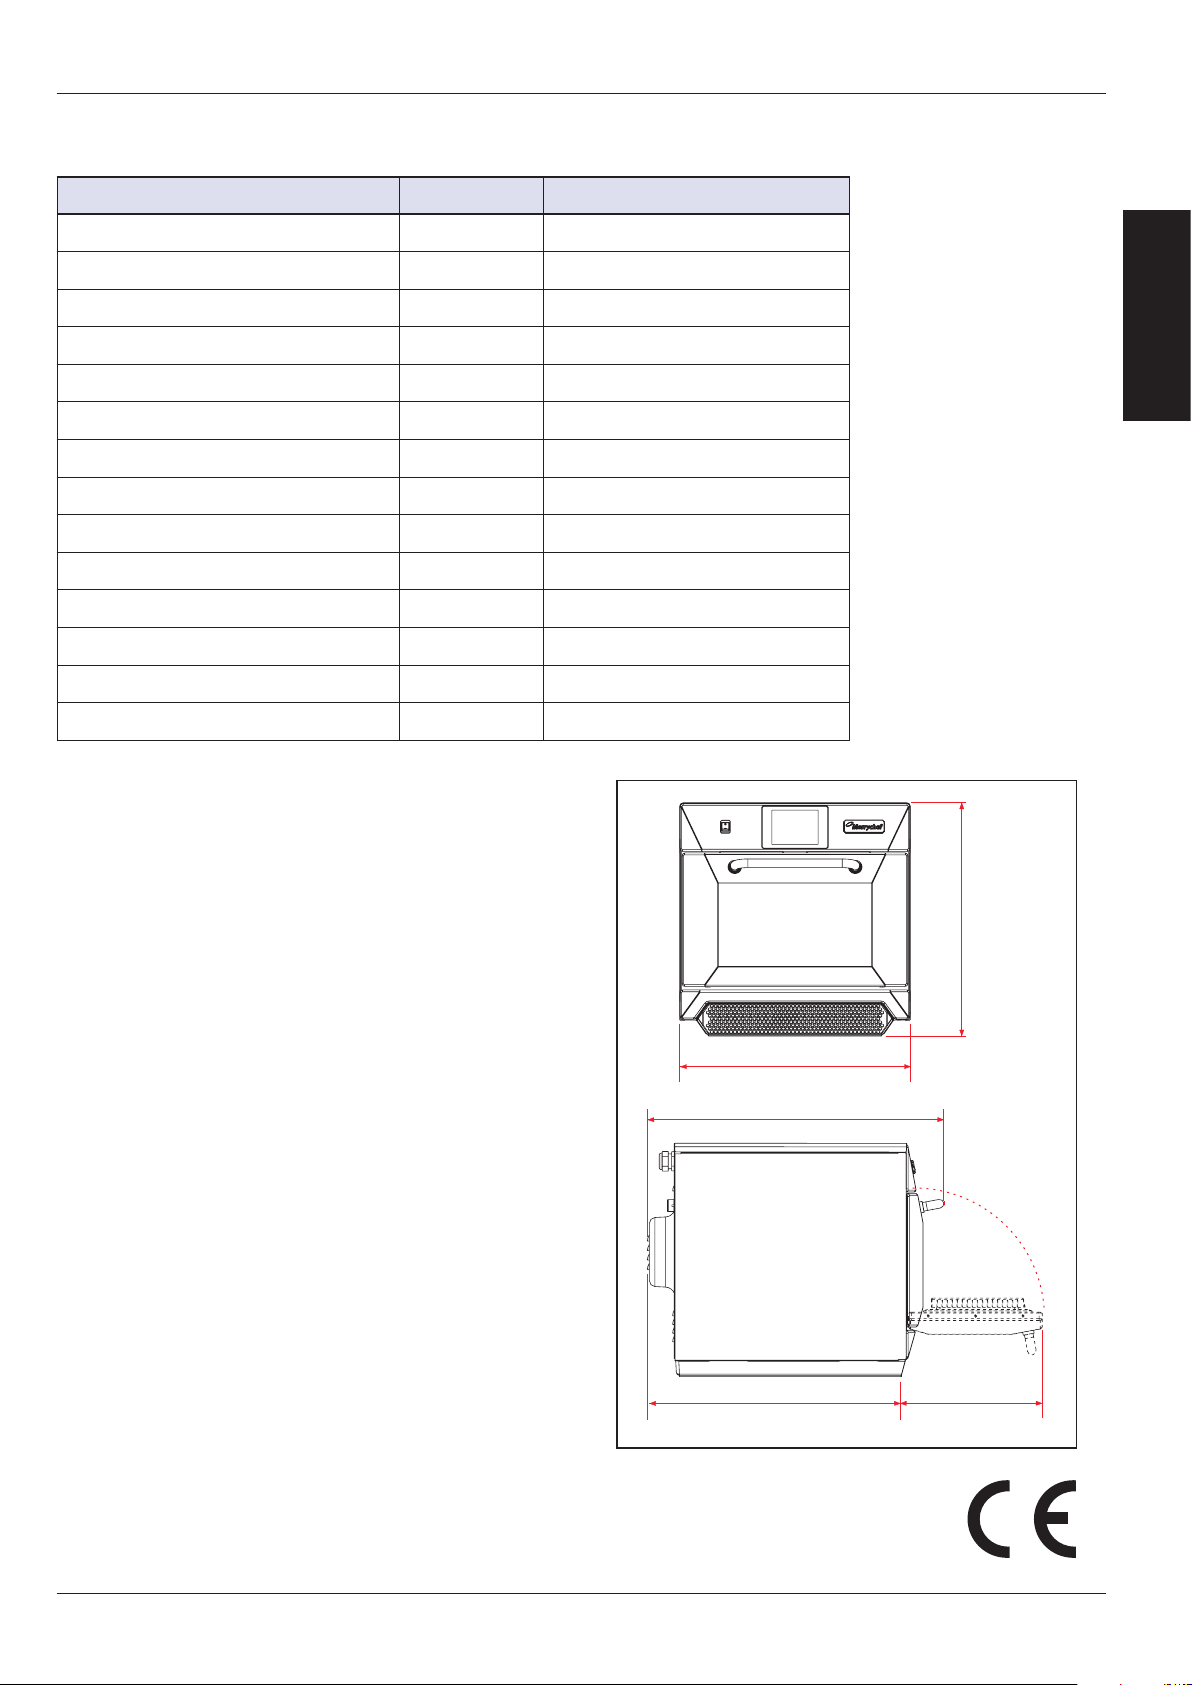
4 TECHNICAL SPECIFICATIONS
4.1 Specications
Description unit
Touch screen controls programs
Ambient operating temperature °C/°F
External HxWxD mm
External HxWxD inches
Internal HxWxD mm
Internal HxWxD inches
Cooking chamber Ltr (cu.ins)
Power output microwave Watts
Power output convection kW
Power supply Hz
Power supply V
Power supply kW
Unpackaged oven weight net Kg (lbs)
Sound pressure level dB(A)
e4s
1024
<40/104
591x584x750
23.3x23.0x29.5
218x375x361
8.6x14.8x14.2
29.5 (1800)
1800
3.2
50 or 60
230 (50Hz), 208/240 or 220 (60Hz)
6.2
86.3 (190)
<60
PRODUCT
DETAILS
4.2 Serial Number (Rating Plate)
Serial number: YY MM SITE SERIAL
i.e. 10 06 2130 12345 (1006213012345)
Oven manufactured 2013 in June at Sheeld (UK),
production number 12345.
Model Number: MODEL CONVECTION MICROWAVE
VOLTAGE HERTZ LEAD PLUG COMMUNICATION
VERSION CUSTOMER/ACCESSORY COUNTRY
i.e. e4s S T 30 5 H E U 1 GM EU (e4SST305HEU1GMEU)
model e4s, 3200W, 1800W, 230V, 50Hz, L+N+E(4mm
EU), 3-pin plug, USB, 1, General Market, European.
4.3 Compliances
EU Directives
EMC 2004/108/EC
LVD 2006/95/EC
RoHS 2011/65/EU
MD 2006/42/EC
23.0in
584mm
29.5in
750mm
25.3in
643mm
23.3in
14.0in
356mm
591m
Service & Parts Manual original instructions
Part Number 32Z3870 GB
Issue 4
7
Page 8

PRODUCT
DETAILS
EC Declaration of Conformity
Manufacturer
Manitowoc Foodservice UK Limited
Manitowoc, Provincial Park,
Nether Lane, Eccleseld,
Sheeld, S35 9ZX
Equipment details
Generic Model Numbers eikon e4s
Description Commercial Combination Microwave Oven
Declaration of Conformity with directives and standards
The manufacturer hereby declares that its commercial combination microwave ovens listed above comply with the following directives and
standards.
Compliance with Directives
The commercial combination microwave ovens comply with the relevant provisions of the following European Directives
EMC 2004/108/EC LVD 2006/95/EC RoHS 2011/65/EU MD 2006/42/EC
Harmonised Standards Applied
The commercial combination microwave ovens comply with the relevant requirements of the following European standards.
• EN 60335-2-90: 2006 +A1 (excluding Annex EE ship board requirements)
• EN 60335-1: 2012
• EN 62233:2008
• EN 55014-2:2009 in accordance with Category IV requirements
Electrostatic discharge IEC 61000-4-2:2008
Radiated RF interference IEC 61000-4-3:2006
Fast transient common mode, AC port IEC 61000-4-4:2004
Mains surge, AC port IEC 61000-4-5:2005
RF current, common mode, AC port IEC 61000-4-6:2008
Mains voltage dips & interruptions IEC 61000-4-11:2004
Flicker IEC 61000-3-11:2000
• EN 55011:2009 Classication: Class A, Group 2
Mains terminal disturbance voltage Table 6
Radiated disturbance, magnetic eld* Table 9
Radiated disturbance, electric eld Table 9
• AS/NZS CISPR 11
Radiated disturbance CISPR 11:2009 Class A
Conducted disturbance CISPR 11:2009 Class A
Quality and environmental management
Manitowoc Foodservice UK Limited (Sheeld) employs a quality management system in accordance with EN ISO 9001:2008 and a certied
environmental management system in accordance with EN ISO 14001.
8
Service & Parts Manual original instructions
Part Number 32Z3870 GB
Issue 4
Page 9
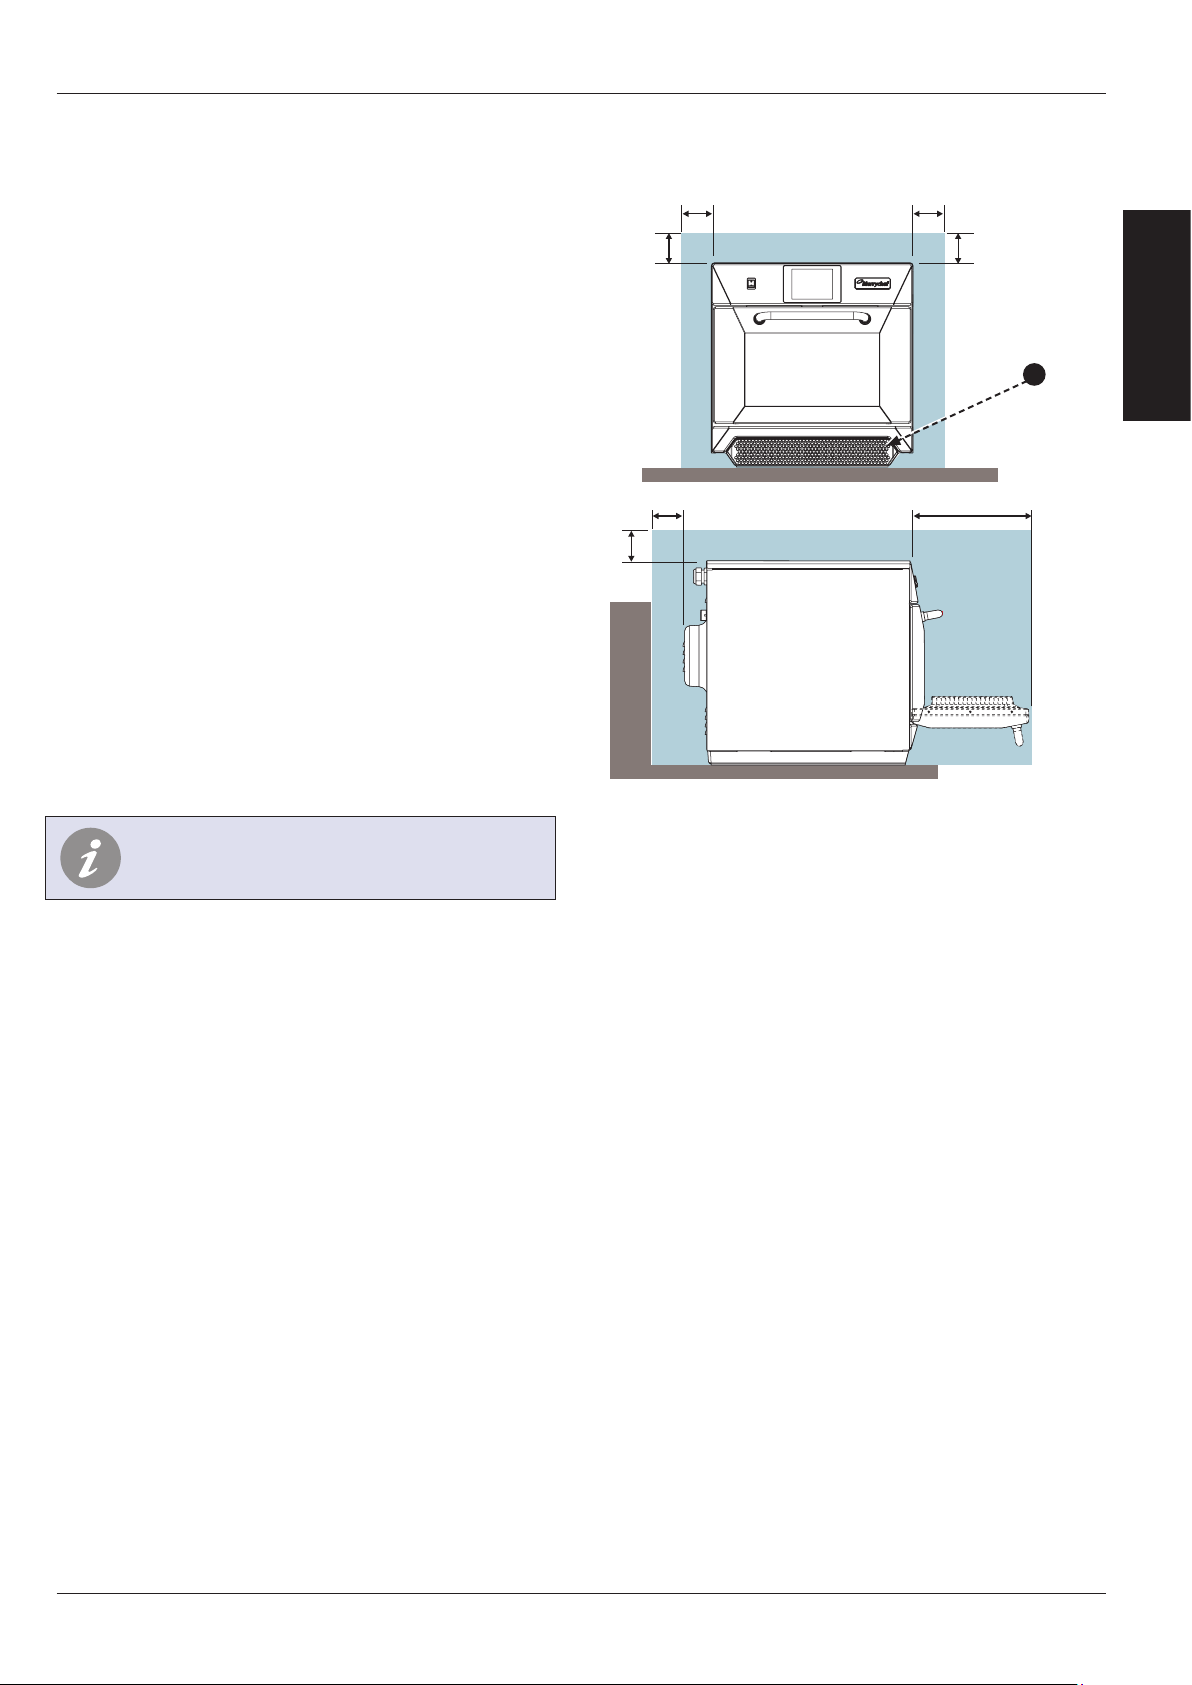
5 INSTALLATION
OVEN LOCATION AND POSITIONING
Choose a site away from major heat sources.
DO NOT position so that hot air is drawn in from
fryers, grills, griddles, etc.
A heat barrier to the height of the oven must be
installed if sited next to a burner, stove or range.
Place the oven on a permanent nonslip/
nonammable at surface that is LEVEL, STABLE and
STRONG enough for the oven and contents.
Allow a minimum clearance (A) of 2 inches (50mm)
around the oven for hot air to escape.
Allow sucient clearance (B), in front of the oven for
the door to open fully.
The air intake is located at the lower front of the
oven (1) and it is important that the airow is
as cool as possible and not preheated by other
appliances such as burners, stoves, ranges, fryers,
grills and griddles as this will deteriorate the life
and performance of the oven.
Do not ax labels/stickers to oven other than those
applied or approved by the manufacturer.
A A
A B
DETAILS
1
PRODUCT
The oven will not operate without the AIR FILTER
correctly tted in place.
HANDLING & STORAGE
When moving an oven always observe and follow
national and local requirements for lifting and
moving heavy objects. Do not use the oven door
handle to lift oven.
When not in use, electrically disconnect the oven
and store safely in a dry cool place, do not stack
ovens.
5.3.1 OVEN STACKING
Maximum of 2 high using stacking clamps (2), part
number ?????.
2
Service & Parts Manual original instructions
Part Number 32Z3870 GB
Issue 4
9
Page 10
PRODUCT
DETAILS
6 ELECTRICAL INSTALLATION
DANGER!
THIS APPLIANCE MUST BE EARTHED.
FAILURE TO DO SO MAY RESULT IN
ELECTRIC SHOCK AND DEATH.
The oven must be connected to a separate
electrical supply installed by a qualied and
approved electrician.
A suitably rated isolating switch with a 3mm
contact gap on all poles should be tted for
each oven installed.
Establishments with standard (Type ‘B’) circuit
breakers are sensitive to ‘surges’ which occur on
switching on freezers, refrigerators and other
catering equipment, including microwave ovens.
Because of this, we strongly recommend that
a separate Type ‘C’ circuit breaker (designed
specically for this type of equipment) must be
tted. An individual, suitably rated circuit breaker
should be tted for each oven installed.
This equipment complies with EN61000-3-11,
however, when connecting sensitive equipment
to the same supply as the oven, the user should
determine in consultation with the supply authority,
if necessary, that a low impedance supply is used.
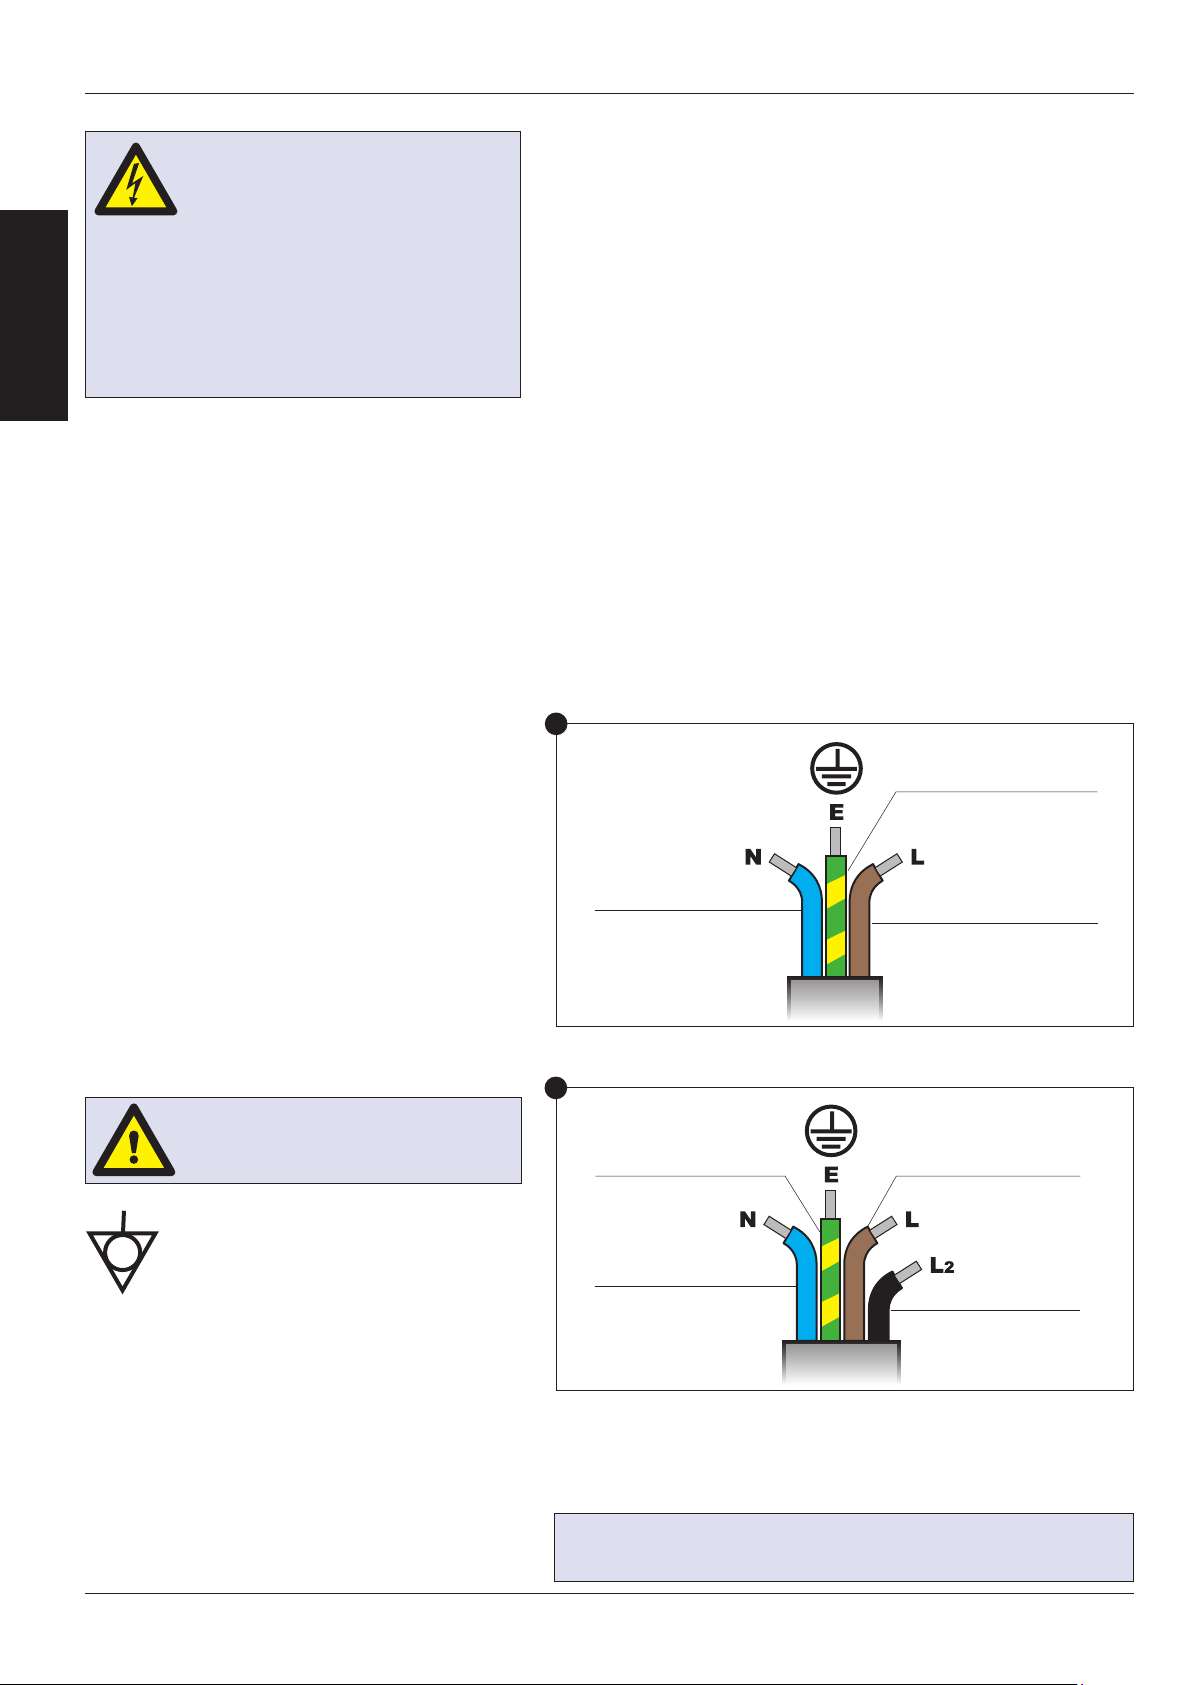
SINGLE PHASE (1)
UK models are tted with a Blue 32Amp Plug to IEC
60309 (EN 60309)
The Circuit Breaker should be rated at 40A (Type C).
TWIN PHASE (2)
Twin Phase models should be connected as shown.
The Circuit Breaker should be rated at 20A/Phase
(Type C).
WARNING
HIGH LEAKAGE CURRENT EARTH
CONNECTION IS ESSENTIAL.
EQUIPOTENTIAL
An Equipotential Earth point is provided
on the rear panel of the oven for
independent Earth (GND) connection.
1
SINGLE PHASE
BLUE (NEUTRAL)
2
TWIN PHASE
GREEN & YELLOW (EARTH)
BLUE (NEUTRAL)
GREEN & YELLOW (EARTH)
BROWN (LIVE)
BROWN TO LIVE No.1
BLACK TO LIVE No.2
POWER SUPPLY: EARTH LEAKAGE CIRCUIT
BREAKERS
If the oven is connected to an Earth Leakage Circuit
Breaker device, this should allow a minimum of 30
milliamperes earth current without interrupting the
circuit.
10
Service & Parts Manual original instructions
Part Number 32Z3870 GB
Issue 4
IF YOU ARE IN ANY DOUBT ABOUT YOUR ELECTRICAL
SUPPLY, SEEK THE ADVICE OF A QUALIFIED ELECTRICIAN.
Page 11
7 ELECTRICAL INSTALLATION GUIDE
DANGER!
THIS APPLIANCE MUST BE EARTHED.
FAILURE TO DO SO MAY RESULT IN
ELECTRIC SHOCK AND DEATH.
The oven must be connected to a separate
electrical supply installed by a qualied and
approved electrician.
A suitably rated isolating switch with a 3mm
contact gap on all poles should be tted for each
oven installed.
OTHER
EQUIPMENT
ELECTRICAL
SUPPLY
230V
WARNING
HIGH LEAKAGE CURRENT
EQUIPOTENTIAL
An Equipotential Earth point is provided on
the rear panel of the oven for independent
Earth (GND) connection.
TWIN PHASE OVEN
LOADING
Brown
16 Amps
Blue
400V
SINGLE PHASE OVEN
LOADING
Brown
32 Amps
Blue
PRODUCT
DETAILS
230V
Grey
Earth connection is essential.
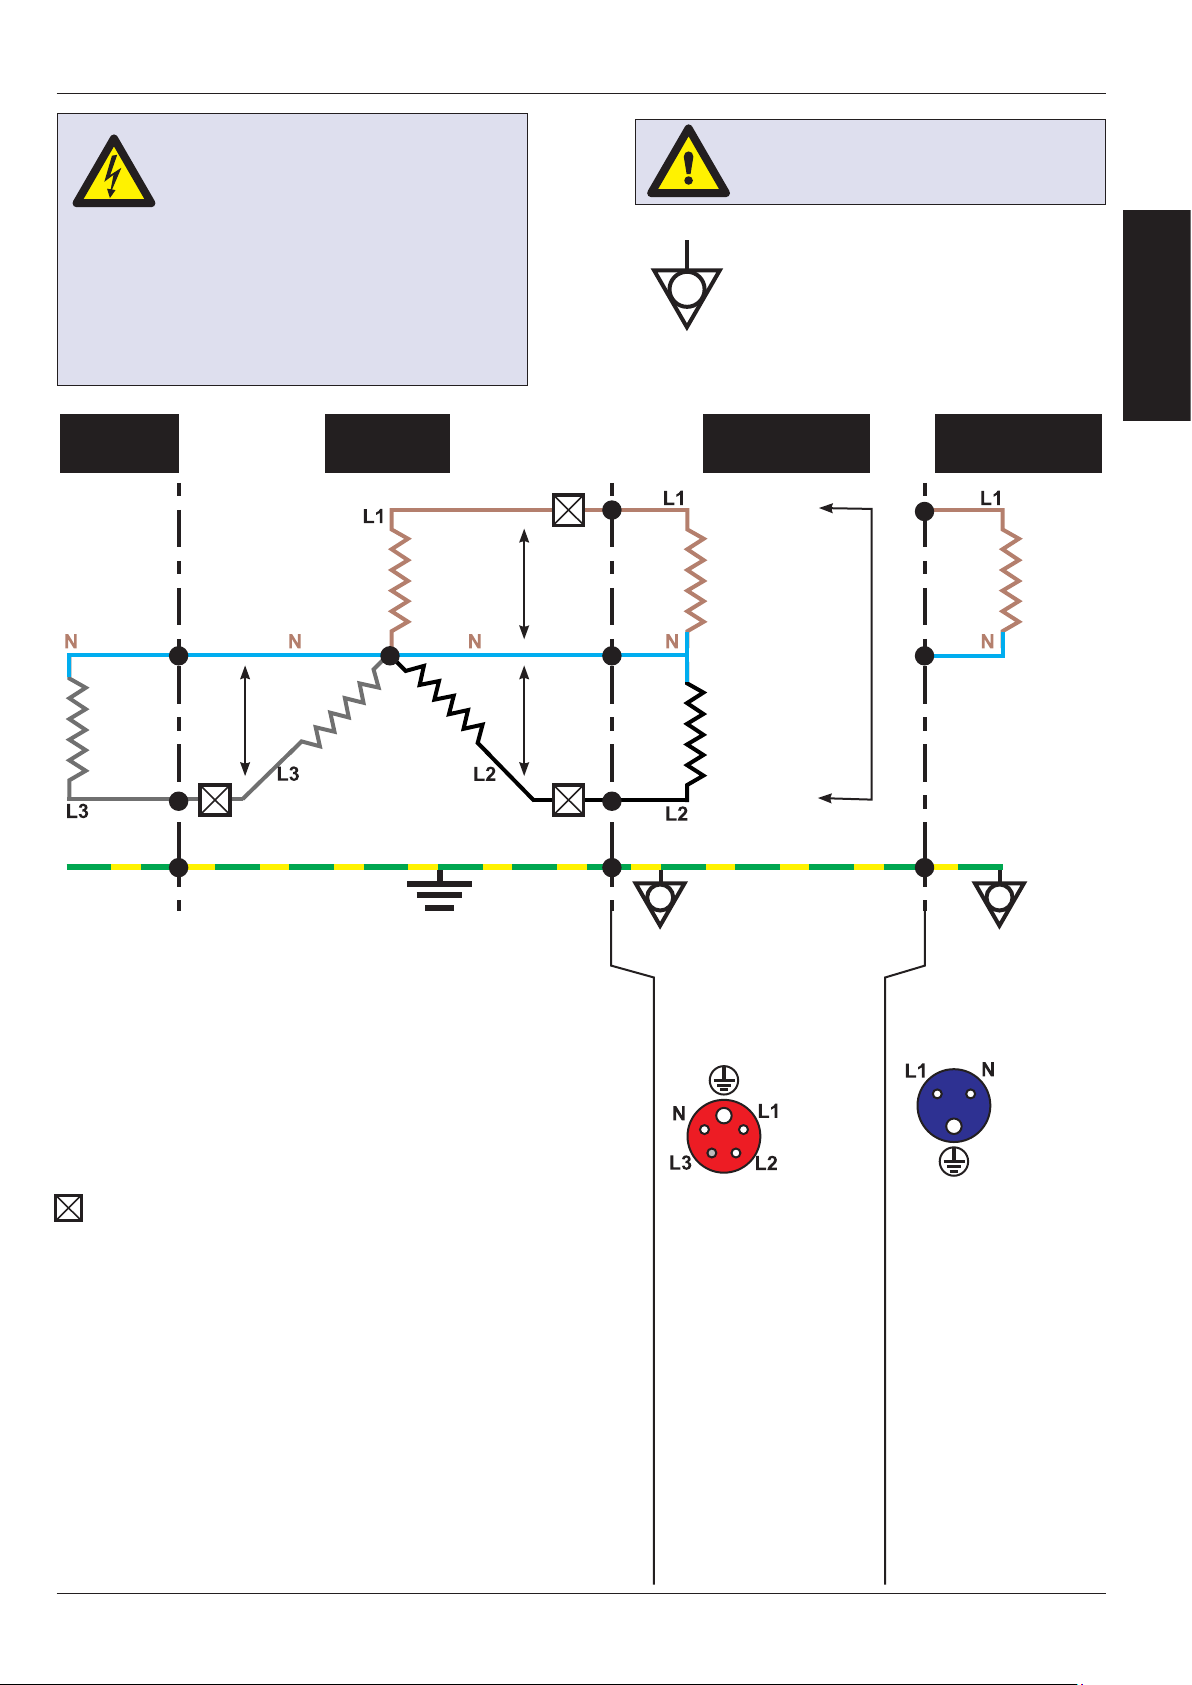
Phase Loading Diagram
7.2 Phase Loading
7.1
Oven loading per phase is not equal therefore we
recommend that other electrical equipment is
connected to L3+ N.
Circuit Breakers
TWIN PHASE
Circuit Breakers should be rated at 20A per Phase
and be Time Delay, Motor Start Type (European Type C).
SINGLE PHASE
Circuit Breakers should be rated at 40A per Phase
and be Time Delay, Motor Start Type (European Type C).
Earth Leakage Circuit:
If the oven is connected to an Earth Leakage Circuit
Breaker device, this should allow a minimum of 30
milliamps earth current without interrupting the circuit.
If you are in any doubt about your electrical supply,
seek the advice of a qualied electrician.
230V
16 Amps
Black
Yellow/GreenEarth
RED
Rear view of plug
Plug Type:
Three Phase
32Amp
IEC 60309
[EN60309]
L1+ L2+ N+ E
[L3 is not used]
20 Amp
BLUE
Rear view of plug
Plug Type:
Single Phase
32Amp
IEC 60309
[EN60309]
L1+N+E
40 Amp
Service & Parts Manual original instructions
Part Number 32Z3870 GB
Issue 4
11
Page 12
8 OVEN CONTROL SETTINGS
PRODUCT
DETAILS
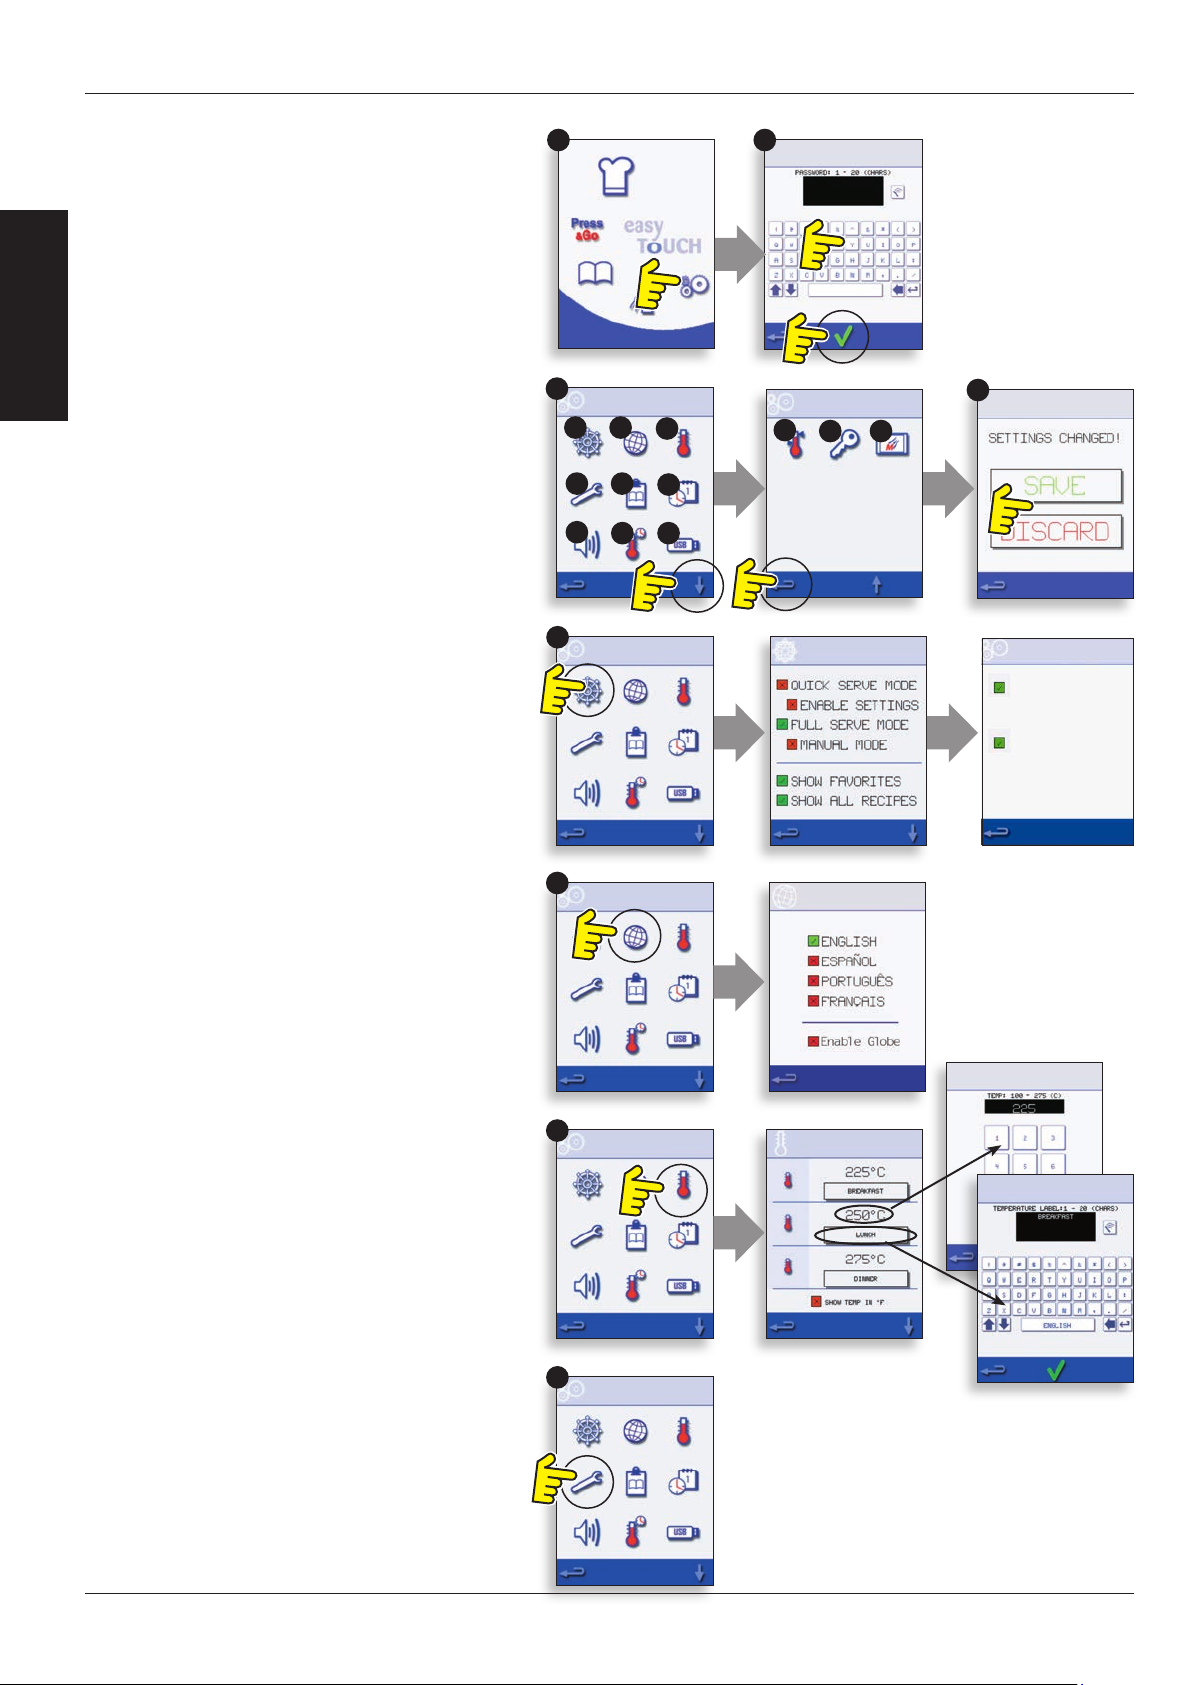
1. Select the ‘settings’ symbol from the main menu
screen.
2. Enter the password and select OK to display the
Settings menu (3) comprising:
A. Oven mode/navigation settings.
B. Language options.
C. Oven temperature settings and labels.
D. Service information and error logs (password
required).
E. Recipe counters.
F. Date & time settings.
G. Speaker sound levels.
H. Oven Timer (Temperature/ON/OFF).
J. USB program connection.
K. Temperature Band.
L. Change Settings/Service access passwords.
M. Screen saver.
When nished with a setting, select backspace to
return to the main settings menu.
To exit the settings menu, select backspace,
a prompt will be displayed to either ‘SAVE’ or
‘DISCARD’ any changed settings (4).
8.1 Oven mode/navigation settings (A)
8.1.1 Select the oven mode/navigation symbol (A)
from the ‘Settings’ menu.
8.1.2 Select ‘Quick Serve Mode’ for cooking only,
or ‘Full Serve Mode’ for cooking & development
programs or ‘Manual Mode’ to manually cook only via
the ‘chef’s hat’ symbol.
8.1.3 Select ‘Enable Settings’ to display an ‘unlock’
symbol on the Quick Serve Mode screen to allow
access to the ‘Settings’ menu.
1 2
3
A B
D
G
A
B
C
E
F
J
H
4
K
M
L
MAGNETRON ENERGY
DELAY
ENERGY SAVING
8.2 Language options (B)
8.2.1 Select the ‘Globe’ symbol (B).
8.2.2 Select the checkbox of the required language/s
from the list shown.
Select the ‘Enable Globe’ checkbox to display the
‘Globe’ icon in the menu screens to select a preset
language.
8.3 Oven temperature settings and
labels (C)
8.3.1 To change the oven preheat temperature, select
the temperature symbol (C) to display the keypad.
Enter the required temperature and select OK.
NOTE: The temperature options screen is only
displayed at start up when two or more temperatures
are set above minimum.
8.3.2 To change a temperature label, select the label
to display the keyboard, enter the required label name
and select OK.
For Service information & error logs (D) refer
to Servicing.
12
Service & Parts Manual original instructions
Part Number 32Z3870 GB
Issue 4
C
D
Page 13
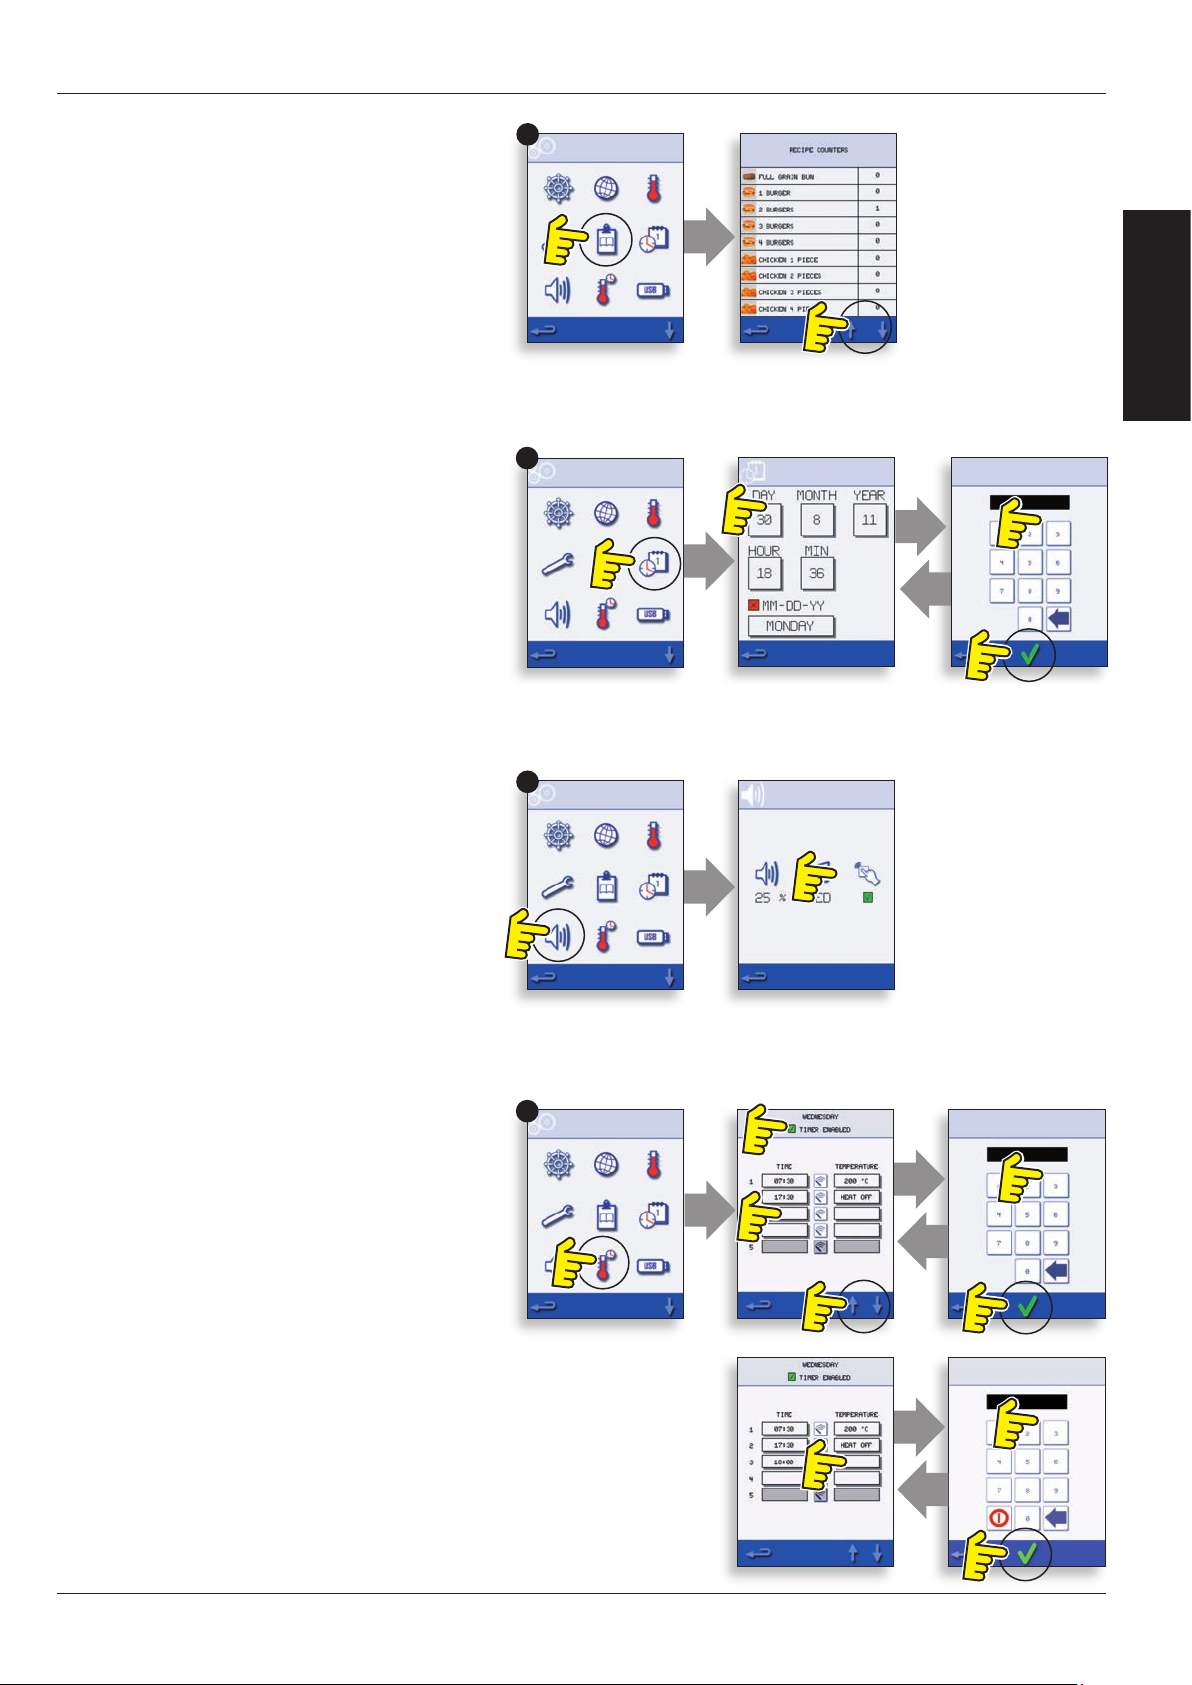
8.4 Recipe counters (E)
8.4.1 Select the clipboard symbol to display a listing of
recipe counters.
8.4.2 If shown, use the arrows (bottom right) to scroll
up and down the list.
8.5 Date and Time settings (F)
8.5.1 Select the time/date symbol to display the
setting options.
8.5.2 CHANGE THE DATE: Select ‘MONTH’, enter the
correct month on the keypad and select OK.
8.5.3 Select ‘DAY’, enter the correct day on the keypad
and select OK.
8.5.4 Select ‘YEAR’, enter the correct last two digits of
the year on the keypad and select OK.
8.5.5 To display the month rst, followed by the day
and year, select the ‘MM-DD-YY’ checkbox.
NOTE: The error logs are recorded using these settings.
8.5.6 CHANGE THE TIME: Select ‘HOUR’, enter the
correct hour on the keypad and select OK.
8.5.7 Select ‘MIN’, enter the correct minutes on the
keypad and select OK.
8.5.8 Select the day name shown to cycle through to
display the correct weekday.
E
DETAILS
PRODUCT
F
8.6 Sound levels (G)
8.6.1 Select the speaker symbol to adjust the volume
level suitable for the environment from none (OFF) to
the loudest (100%).
8.6.2 Select music note symbol to set LOW, MED or
HIGH tone.
8.6.3 Select the keypad symbol to switch the sound
ON or OFF when the touchscreen is pressed.
8.7 Oven Timer (H)
8.7.1 Select the thermometer/timer symbol.
8.7.2 Select the ‘Timer Enabled’ checkbox (green
check mark).
8.7.3 Select a weekday using the up/down arrows.
8.7.4 Select an empty ‘Time’ box (maximum of 5 per
day) or clear the box using the wipe symbol.
8.7.5 Enter the start time on the keypad and select
OK.
8.7.6 Select an empty ‘Temperature’ box opposite the
time box displaying the time just entered, or clear the
box using the wipe symbol next to it.
8.7.7 Enter the cavity temperature required on the
keypad and select OK.
NOTE: You can also select zero to turn the heat o.
Selecting the red circle symbol will switch the oven OFF.
G
H
Service & Parts Manual original instructions
Part Number 32Z3870 GB
Issue 4
13
Page 14
PRODUCT
DETAILS
8.8 USB oven programs (J)
IMPORTANT: Downloading from a USB will clear
all the existing programs.
Check that the key has the correct number/code
for the programs you want to load into the oven
memory (1 ‘.cbr’ + ‘autoupd.ate’).
8.8.1 With the oven switched o, slide the Merrychef
badge (oven front top right) upwards and insert the
USB Memory Stick into the slot.
8.8.2 Switch the oven ON.
8.8.3 The les automatically download from the USB
showing the progress and conrmation screens for
the update.
8.8.4 On completion the oven displays the start up
screen, then the thermometer symbol is displayed.
8.8.5 Remove the USB and keep it in a safe place.
Reposition the USB cover.
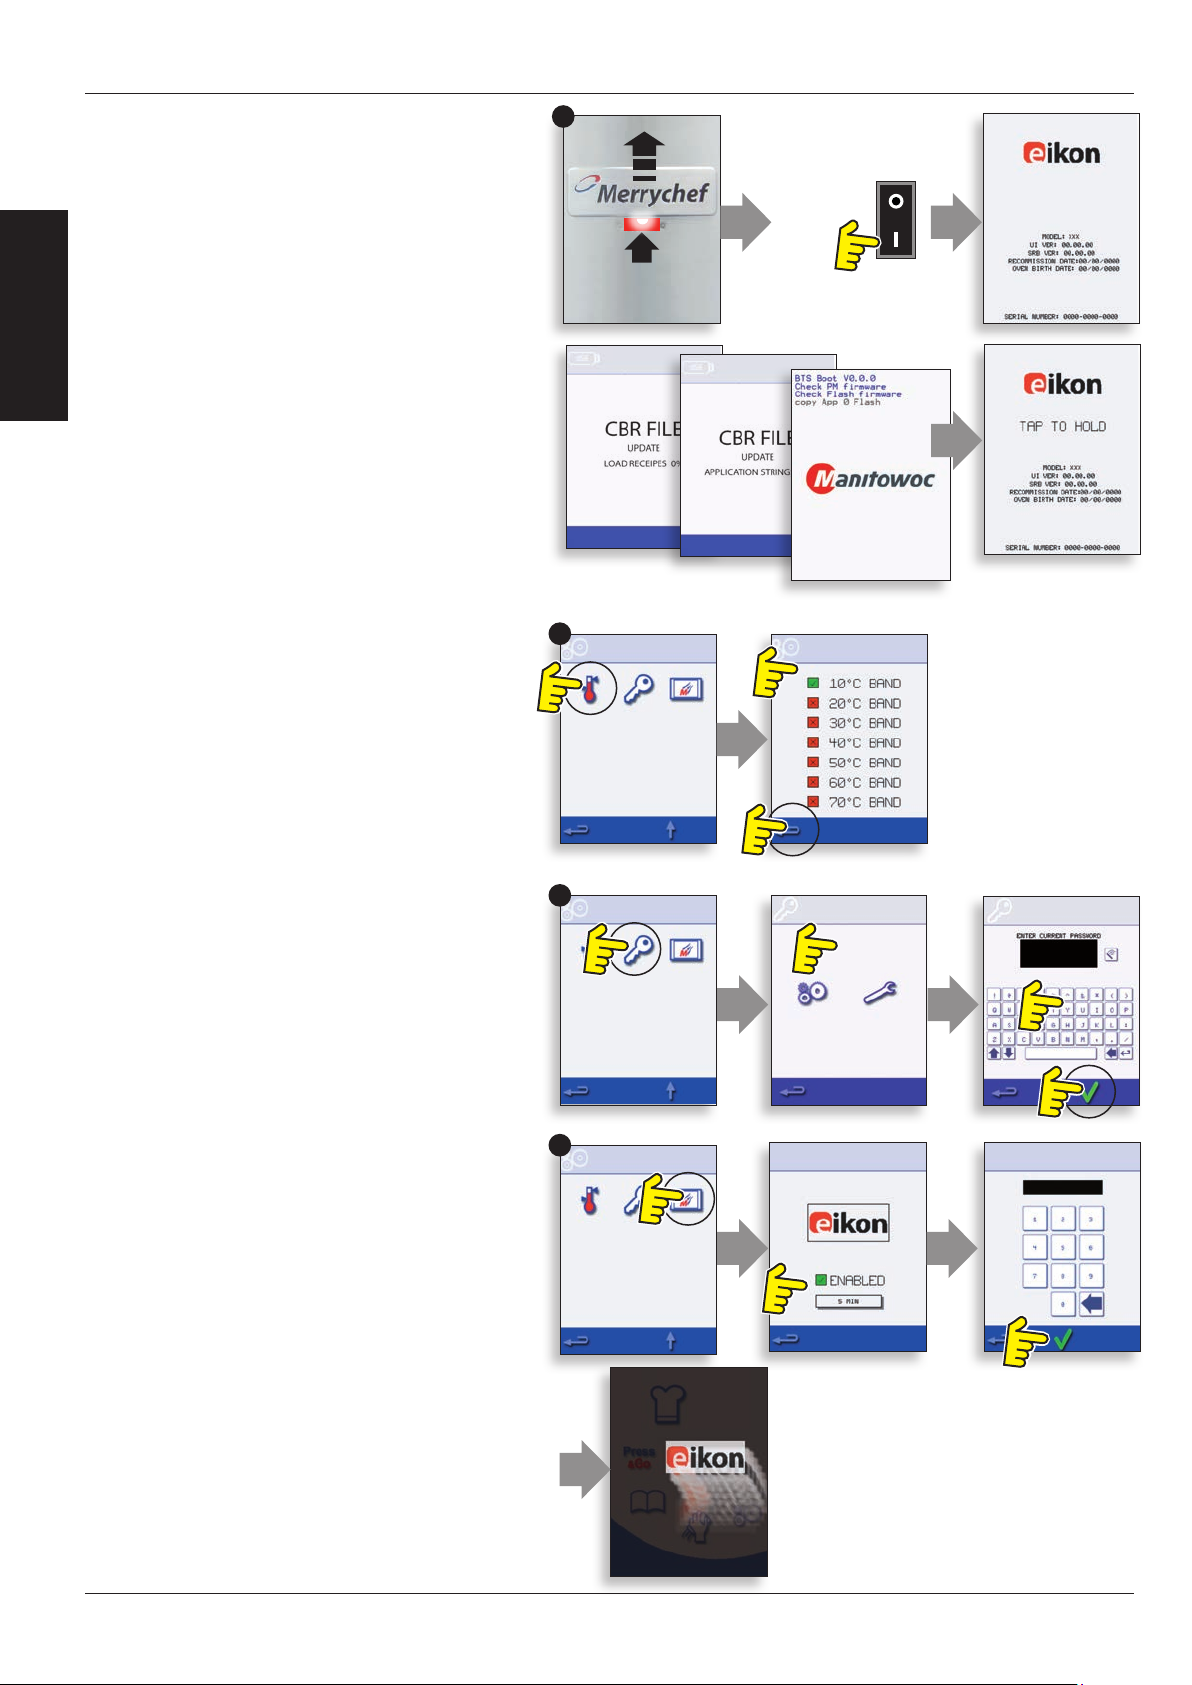
8.9 Temperature Band (K)
8.9.1 Select the ‘Temp Band’ symbol at which the oven
controls, e.g. 50°C.
8.9.2 Select the required temperature band checkbox,
shown by a green check mark.
NOTE: Although the lowest practical Temp Band
should be used, if the set oven temperature falls by
more than the selected Temp Band, the ready to cook
mode and Temp Band are deactivated until the oven
reaches the preheat temperature.
J
K
8.10 Change Password (L)
8.10.1 Select the key symbol to change the oven
passwords.
8.10.2 Select the oven settings or Service symbol.
8.10.3 Enter the existing password and select OK to
conrm.
8.10.4 Enter the new password, select OK.
8.10.5 Conrm new password, select OK.
8.11 Screen saver (M)
8.11.1 Select the ENABLED checkbox to switch the
screen saver ON or OFF.
8.11.2 Select the time box below to enter a time delay
on the keypad from 1 to 60 minutes before the screen
saver starts and select OK to conrm.
L
M
14
Service & Parts Manual original instructions
Part Number 32Z3870 GB
Issue 4
Page 15
9 COOLING THE OVEN DOWN BEFORE CLEANING
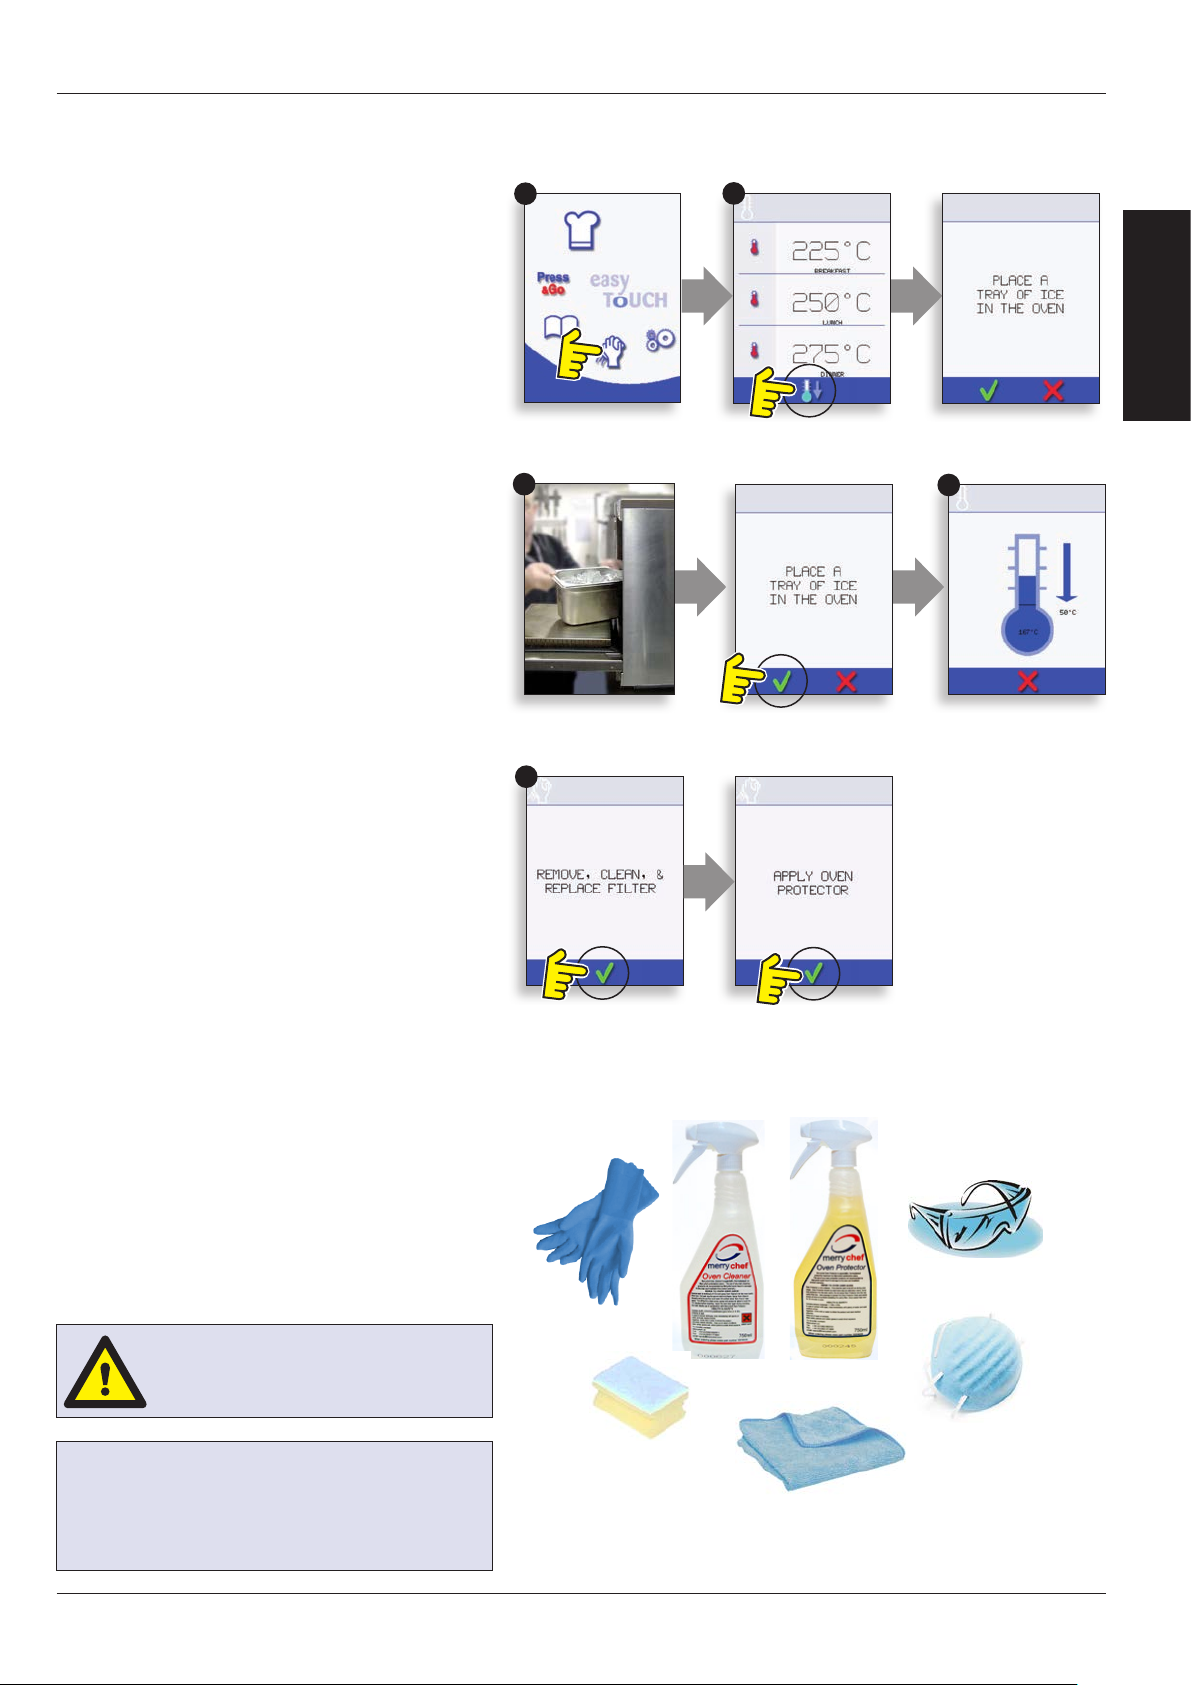
9.1 Oven cool down
IMPORTANT: the oven must be cooled down
before the cleaning processes are carried out.
1. In Full Serve mode, select the CLEANING symbol
from the main menu.
2. In Full or Quick Serve mode, select the blue
thermometer symbol to disable heating and start
the cooling cycle.
3. Taking all necessary precautions place a suitable
container of ice or cold water (to speed up the
cooling process) into the hot oven cavity. Select the
OK symbol to continue.
4. The cooling progress is displayed and takes
approximately 30 minutes. Note that the oven will
continue to cool should the door be opened during
the cool down procedure.
5. Once the cooling process is complete, carefully
remove the cool down pan. The pan and water
maybe hot so an oven cloth or gloves should be
used.
6. The oven is now ready for cleaning. Select OK on
the screen after completing each stage.
1
3
2
DETAILS
PRODUCT
4
9.2 Preparing to clean the oven
For the oven to operate at peak eciency, the
cavity, door, air lter and grease lter must be kept
clean.
A daily cleaning routine will ensure that you comply
with the required hygiene standards and will help to
maintain and prolong the eciency of your oven.
Equipment required (not supplied)
● Merrychef® approved oven cleaner
● Merrychef® approved oven protector (optional)
● Heat proof gloves
● Protective rubber gloves
● Non–abrasive nylon scrub pad
● Cleaning towel and cloths
● Eye protection
● Dust mask (optional)
CAUTION
WEAR PROTECTIVE RUBBER GLOVES
WHEN CLEANING THE OVEN.
5
NOTICE
DO NOT USE CAUSTIC CLEANERS ON ANY
PART OF THE OVEN OR OVEN CAVITY AS IT
WILL CAUSE PERMANENT DAMAGE TO THE
CATALYTIC CONVERTERS.
Service & Parts Manual original instructions
Part Number 32Z3870 GB
Issue 4
15
Page 16
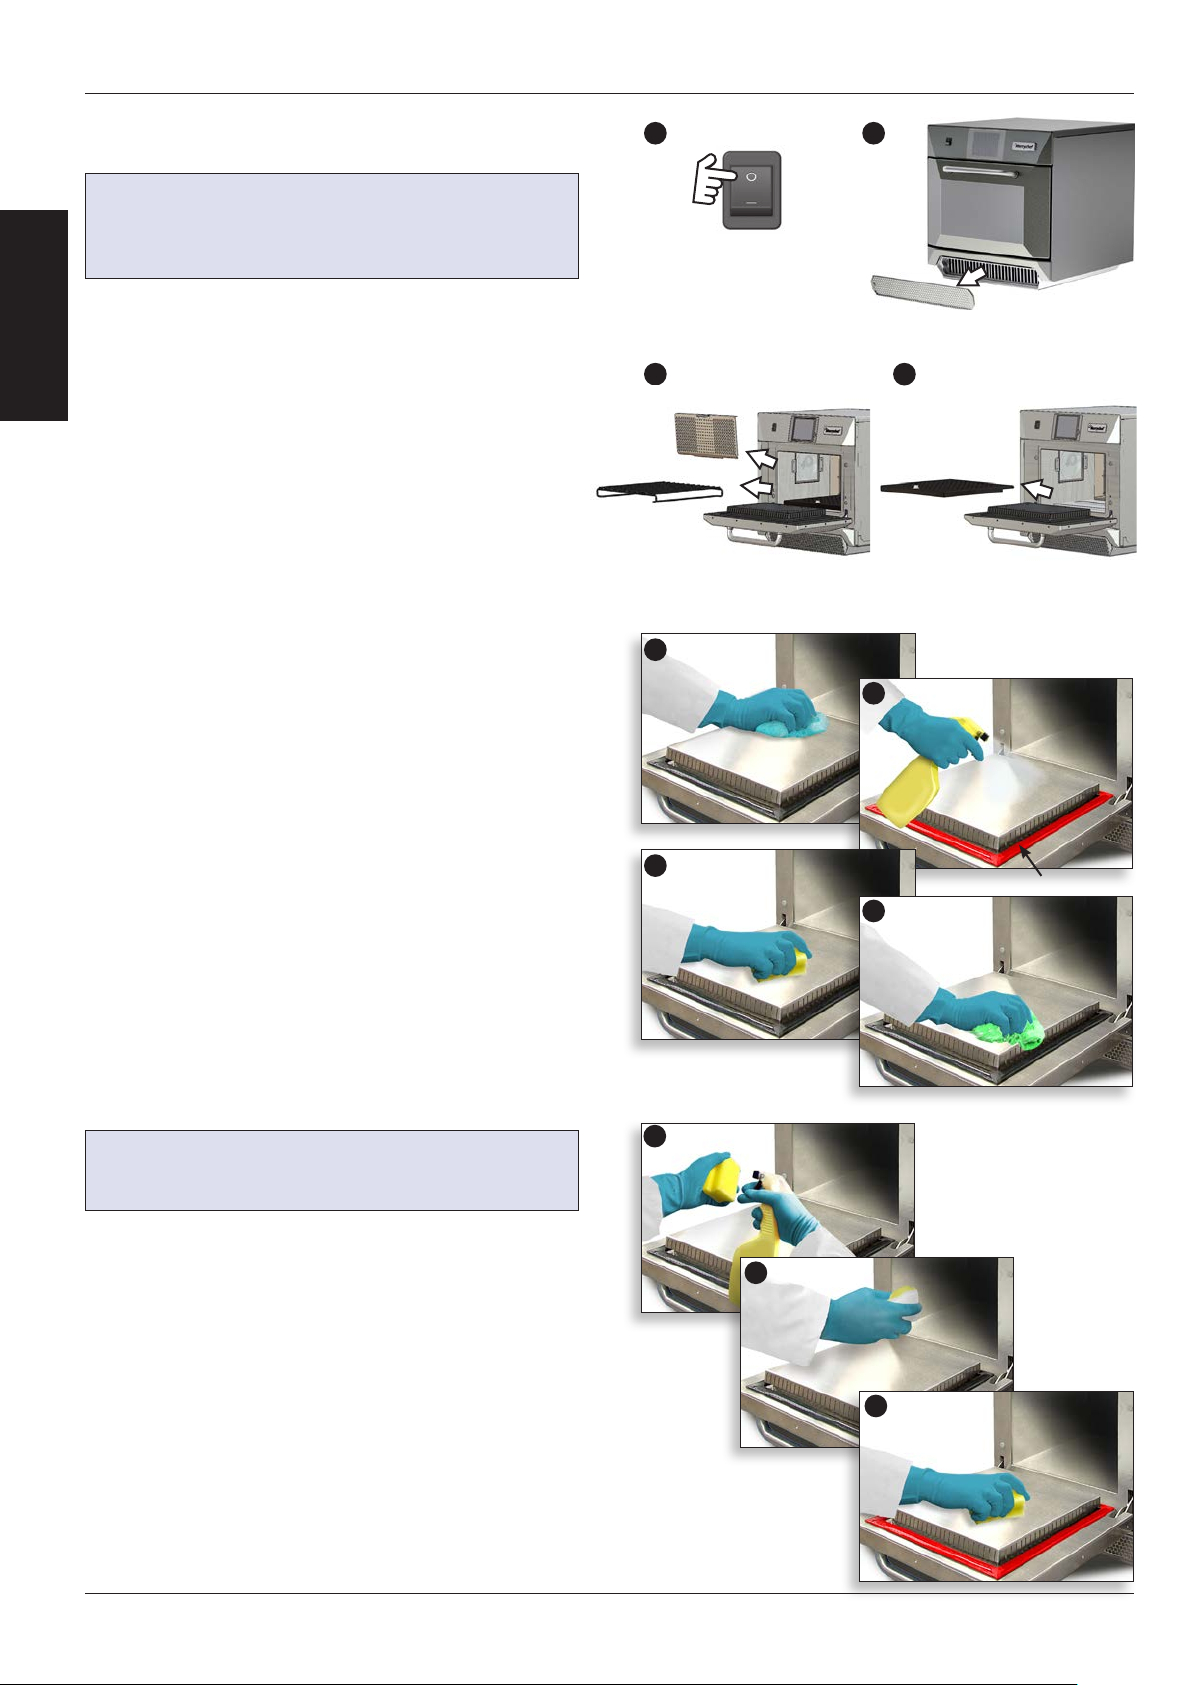
10 COLD OVEN CLEANING INSTRUCTIONS
PRODUCT
DETAILS
Complete COOL DOWN procedure and allow the oven and
accessories to cool before commencing cleaning.
NOTICE
DO NOT USE TOOLS.
NEVER USE SHARP IMPLEMENTS OR HARSH
ABRASIVES ON ANY PART OF THE OVEN.
REMOVE & CLEAN OVEN PARTS
1. Switch o the oven.
2. Remove the air lter at the base of the oven.
3. Open the oven door and remove any cooking trays/rack.
4. Wash all parts in warm soapy water. Wash o using a
clean cloth and plenty of clean, warm water. Ensure all
components are dry before re-tting them.
5. Dry using a fresh, clean cloth.
CLEAN THE OVEN
1. Remove any spillages with suitable cloth/paper towel.
Use a dry clean brush to remove any food particles from
between the oven oor and the inside of the front door.
2. Wear protective rubber gloves and protective glasses
following manufacturer’s recommendations. Carefully
spray a Merrychef® approved oven cleaner onto all the
internal surfaces of the oven except the door seal (A).
DO NOT spray directly into the fan opening at the rear
inside of the oven.
3. For dicult areas, leave to soak for 10 minutes with the
oven door open.
Use a non–abrasive nylon scrub pad/sponge to clean the
cavity, roof and the inside of the door. Do not scrub the
door seal or use metallic scourers.
4. Wash o using a clean cloth and plenty of clean warm
water and dry using a fresh clean cloth or paper towel.
Ensure all components are dry before re-tting them.
5. Replace all the cleaned oven parts.
6. Close the oven door and wipe the outside of the oven
with a damp cloth.
7. Now press the green check mark.
NOTICE
DO NOT USE THE OVEN WITHOUT A CLEAN
AIR FILTER IN PLACE.
1 2
3 4
1
2
3
A
4
1
APPLY OVEN PROTECTOR
1. Only apply to a clean oven. Spray a Merrychef® approved
oven protector onto a sponge.
2. Spread oven protector lightly onto all internal surfaces of
the oven avoiding cooking surfaces, fan inlets and outlets.
3. Spread oven protector lightly onto the internal surface of
the oven door avoiding the door seal.
4. Close the door and switch on the oven. If the air lter has
not been replaced the touch screen will display a warning.
Replace the air lter and then press the green check mark.
5. Preheat the oven. Once the oven has reached operating
temperature, it will take about 30 minutes to cure the oven
protector.
NOTE: Oven protector turns light brown when cured.
16
Service & Parts Manual original instructions
Part Number 32Z3870 GB
Issue 4
2
3
Page 17

11 SERVICING THE OVEN
11.1 Servicing Procedure
11.1.1 Disconnect/isolate the oven from the power
supply.
11.1.2 Check the oven is correctly installed as
described in the Installation Instructions (“Product
Details” section).
11.1.3 Visually check the cleanliness/condition of
the power supply/cable/gland, oven casing, cavity
and door for signs of wear, damage, distortion etc. If
required, refer to the “Spares & Replacement” section.
11.1.4 Complete an ‘Earth/Insulation test’ (“Testing
Components” section) on the oven before switching
on.
11.1.5 Check the display for Error Messages, if an error
is shown, refer to “Errors & Diagnostics” (“Servicing”
section).
NOTE: If a rmware update is required, follow the
instructions under “Firmware Updates” (“Servicing”
section) before continuing with the service procedure.
11.2 Enter Service Mode
1 On start up, tap the top right of the splash
screen to bypass oven preheat.
2 Enter the authorised user password, for
example, MANAGER and select OK to display the
‘Settings’ menu.
3 Select the spanner symbol.
4 Enter the service password, for example SERVICE
on the keyboard and select OK to display the
error log, service information and test options.
11.2.1 Check the Error Log for details of any logged
oven errors. See “Errors & Diagnostics” (“Servicing”
section) for more details.
11.2.2 Check the ‘Oven Counters’ to nd the usage of
components and the Controls area temperature within
the cabinet (see “Errors & Diagnostics”, “Servicing”
sections).
11.2.3 Check the operational performance of the
main components using the Visual View (see “Errors &
Diagnostics”, “Servicing” sections).
11.2.4 Perform the Oven Tests (see “Testing
Components” section). If required refer to the “Spares
and Replacement” section for any repairs needed
before continuing with the Oven Tests.
11.2.5 Follow the procedures under the
“Commissioning” section before commissioning the
oven for use.
DANGER!
BEFORE REMOVING THE OVEN CASING, ISOLATE THE
OVEN FROM THE MAINS ELECTRICITY POWER SUPPLY;
SWITCH OFF, DISCONNECT OVEN PLUG FROM WALL
SOCKET, TURN OFF ISOLATOR SWITCH TO DISCONNECT
FIXED WIRED OVENS AND LOCKOFF.
WARNING
ALLOW OVEN TO COOL. OBSERVE AND FOLLOW ALL
SAFETY PRECAUTIONS INCLUDING THOSE DESCRIBED
UNDER THE “SAFETY REGULATIONS” SECTION OF THIS
MANUAL BEFORE ATTEMPTING A SERVICE OR REPAIR.
WARNING MICROWAVE EMISSIONS
DO NOT BECOME EXPOSED TO EMISSIONS FROM THE
MICROWAVE GENERATOR OR PARTS CONDUCTING
MICROWAVE ENERGY.
SERVICING
1
4
2
3
Service & Parts Manual original instructions
Part Number 32Z3870 GB
Issue 4
17
Page 18
12 ERRORS & DIAGNOSTICS
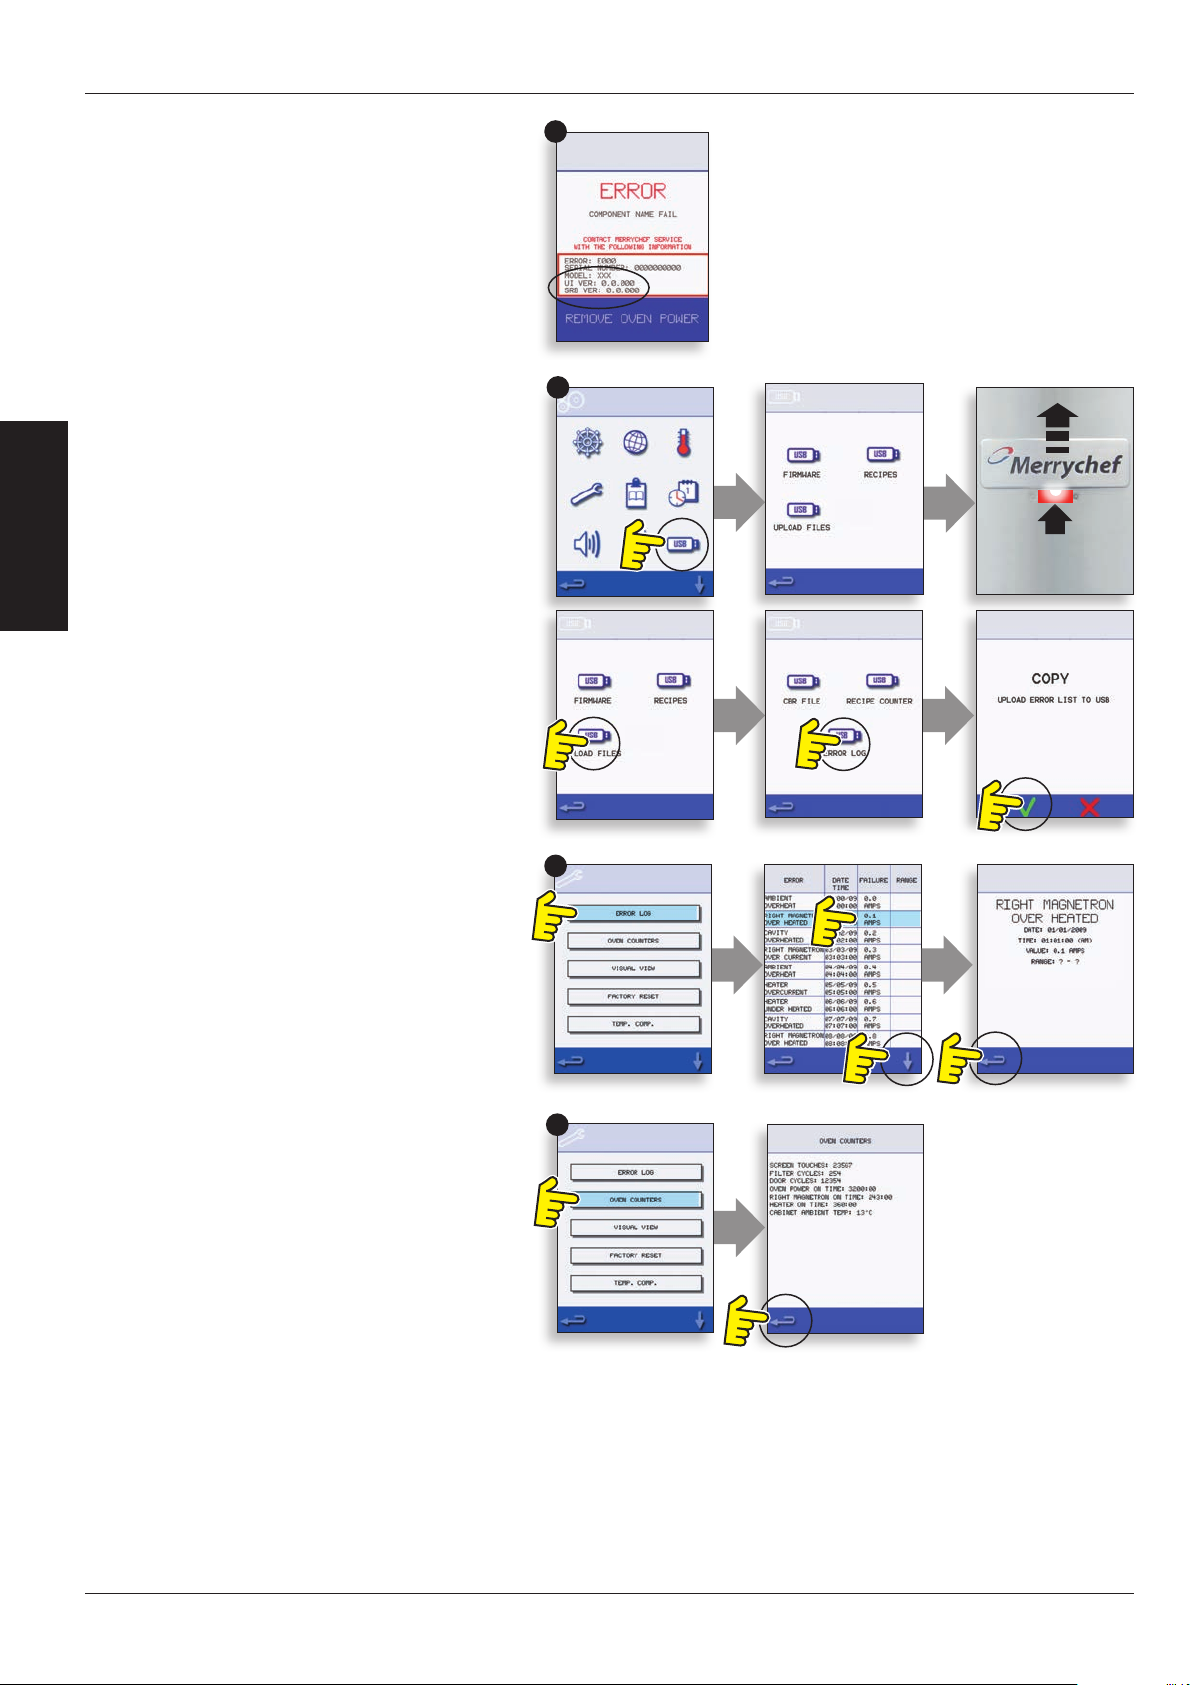
12.1 ERROR MESSAGES
12.1.1 A description of the type of error is shown.
Check for a number following ‘ERROR:’ (A) and refer
to the Error Codes (“Fault Finding” section) for more
details. The Oven Serial Number, Model, UI (QTS)
version and SRB version information is also displayed
below.
12.1.2 Clear the error message by power cycling the
mains power supply to the oven (not the oven ON/
OFF switch).
12.2 COPYING ERROR MESSAGES
12.2.1 Enter oven settings menu (B) and select the
USB symbol.
SERVICING
12.2.2 Slide up the USB cover and insert the USB
memory stick.
12.2.3 S elect ‘Upload Files’.
12.2.4 S elect ‘Error Log’.
12.2.5 Select OK to copy the Error Log to the USB
memory stick. The upload progress is shown followed
by the upload status.
12.2.6 Select backspace 3 times to return to the main
menu.
12.2.7 Remove the USB memory stick and replace the
USB cover.
A
B
12.3 ERROR LOG
12.3.1 Enter Service Mode and select ‘ERROR LOG’ (C)
to display a listing of oven component errors. Error
details include: component description, error caused,
date & time of the error with details of failure and
range.
12.3.2 Scroll down the list (if necessary) and select an
error from the list to display individual records.
12.3.3 Select backspace to return to the list, again to
return to the Service menu.
12.4 OVEN COUNTERS
12.4.1 Select ‘OVEN COUNTERS’ (D) to display the
oven component usage and ambient controls
area temperature. Details include the number of
screen touches, lter cycles, door cycles, total oven,
magnetron and heater element power on time and
the ambient controls area temperature in the cabinet.
12.4.2 Select backspace to return to the Service menu.
C
D
18
Service & Parts Manual original instructions
Part Number 32Z3870 GB
Issue 4
Page 19

12.5 VISUAL VIEW
12.5.1 Select VISUAL VIEW (E) to check the main oven
components. Select a component symbol to switch
on (red), select again to increase the level or turn o
(green).
12.5.2 Remove the front air intake lter, the colour
should change from green to red on the display
indicating that the magnetic reed switch circuit for the
air intake lter is operating. Replace the lter and the
colour should change back to green.
12.5.3 Open the oven door and check the colour
changes from green to red on the display to check
the door microswitch/interlock circuit is operating.
Place door spacers onto the oven door (refer to Door
Interlock Adjustment (“Testing Components” section)
for details), close the door and check the colour on
the display. Green indicates the door adjustment is
ok, red indicates that the Door Interlock Adjustment
procedure must be completed.
12.5.4 Select the cooling fan and check it’s operating
correctly.
12.5.5 Place a microwave safe container of water into
the oven, close the oven door and select a magnetron
to test the current draw at maximum output, this
will time-out after 30 seconds. For dual magnetron
models, test the magnetrons individually and together.
Using heat proof gloves, remove the container and
close the oven door. Individual Magnetron Test. If there
is a magnetron error present, then rst reset the error.
If during the magnetron test the amps show between
1.1 - 2.2 amps and the error re-occurs after 8 seconds
then the failure can be found in the 230V circuit. Refer
to the schematics to nd the fault for repair (fuses,
SRB, door switches, connections, power supply). If
during the magnetron test 0 amp and the error reoccurs after 8 seconds then the failure can be found
in the high voltage circuit. Replace HV components
(diode, capacitor or magnetron) to nd out the failing
component never measure in the HV circuit and
disconnect the oven from the main supply before
working on the HV circuit also the capacitor has to be
discharged.
12.5.6 Select the Convection Fan and check it is
operating correctly.
12.5.7 Select the Heating Element, it increases to
maximum temperature then cycles (the Convection
Fan is on by default). Check the cavity temperature
and heater element current draw at maximum are
correct.
E
SERVICING
Service & Parts Manual original instructions
Part Number 32Z3870 GB
Issue 4
19
Page 20

13 FIRMWARE UPDATES
NOTE: If icons are not displayed on the screen, press in
the same positions on screen as the missing icons to
select.
13.5.1 Switch on the oven.
13.5.2 Tap the top right of the screen (1) or the same
position if it is not displayed to bypass oven preheat.
13.5.3 Enter a password (i.e. “Manager”) and select OK
(2) or the same position if the green check mark is not
displayed.
13.5.4 Select the USB symbol (3) or the same position
if it is not displayed.
13.5.5 Select one of the USB options (4) or the same
position if it is not displayed: ‘Firmware’ for QTS & SRB
SERVICING
updates and ‘Recipe’ for Icons. Install the SRB update
rst, the QTS update second and Icons third or if you
have the Autoupd.ate le present on the USB be aware
that all les of your USB will be loaded and overwrites
the existing les. Also the Menu les must be saved
before uploading les. If you have a menu le on your
USB then the menu of the oven will be over written.
If you have no menu le on your USB the oven menu
stays as is.
13.5.6 Select the rmware to install and select OK
(5) to conrm or the same position for the OK (green
check mark), if it is not displayed.
13.5.7 The update screen displays the le version
and product, select OK (green check mark) to
conrm installation (6) or the same position if it is not
displayed.
1
3
4
2
5
6
20
Service & Parts Manual original instructions
Part Number 32Z3870 GB
Issue 4
Page 21

IMPORTANT:
Downloading from a USB will clear all existing
programs. Update the ‘SRB’ rst, the ‘QTS’ second
and the ‘Icons’ third (found under the USB ‘Recipe’
heading).
13.5.8 Switch on the oven and tap the top right of the
screen (1) to bypass the preheat stage.
13.5.9 Enter the password and select OK to display the
Settings menu, see (2).
13.5.10 Select the USB symbol (4).
13.5.11 Slide the Merrychef badge (oven front top
right) upwards and insert the USB Memory Stick into
the slot (3).
NOTICE
DO NOT REMOVE USB DURING DOWNLOAD
SEQUENCE AS THIS COULD CORRUPT THE USB
DATA.
13.5.12 Once the USB has stopped ashing, select the
‘FIRMWARE’ USB symbol (5).
13.5.13 The current QTS (Touch Screen) & SRB (Smart
Relay Board) Firmware versions are displayed at the
top left of the screen (6).
1
4
2
5
3
6
SERVICING
7
8
9
SRB FIRMWARE UPDATE
13.5.14 Select the ‘SRB’ le required (7).
13.5.15 Check the le information is correct before
selecting OK (8).
13.5.16 Update progress is displayed (9).
13.5.17 Select backspace (10) 3x to return to the USB
screen shown (11).
13.5.18 If the rmware versions are far apart an SRB
conict could cause an error message (12) to be
displayed.
QTS FIRMWARE UPDATE
13.5.19 Select the ‘QTS’ le (13) with the correct le
version number. Note; a tinted band over a le name
indicates the le is not valid for that oven.
13.5.20 Check the le information shown is correct
before selecting OK (14), if not, select ‘X’ and locate the
correct le.
13.5.21 The le update progress is displayed (15).
At 50% the cooling fan stops operating, after 100%
various screen displays appear as the software reboots.
13.5.22 Check the screen shows the correct QTS
version was installed (16), if not, repeat the process
using the correct le.
13.5.23 Remove the USB and keep in a safe place.
Reposition the USB cover.
13
10
16
11
14
12
15
Service & Parts Manual original instructions
Part Number 32Z3870 GB
Issue 4
21
Page 22

NOTICE
DO NOT REMOVE USB DURING DOWNLOAD
SEQUENCE AS THIS COULD CORRUPT THE USB
DATA.
IMPORTANT:
Downloading from a USB will clear all existing
programs.
Only use an empty USB memory stick formatted
as follows:
A) FAT16 to update from UI QTS-XXXXXXX-V1.2.16
B) FAT16 or FAT32 to update from UI QTS-XXXXXXX-V1.2.17 or later.
SERVICING
Copy the following rmware les to the ROOT
directory of the USB memory stick:
● QTS-eX-XXX-VX.X.XX.BIN
● SRB-eX_X_X_XXX.BIN
● VX-APP-eX.CBR
● Autoupd.ATE
For update A) follow all instructions:
For update B) follow the rst 2 instructions:
13.5.24 With the oven switched o, slide the
Merrychef badge (oven front top right) upwards and
insert the USB Memory Stick into the slot (1).
13.5.25 Switch the oven ON (2).
13.5.26 Tap the top right of the screen (3) to bypass
the preheat stage.
13.5.27 Enter the password and select OK to display
the Settings menu, see (4).
13.5.28 Select the USB symbol (5).
13.5.29 Select the ‘FIRMWARE’ USB symbol (6).
13.5.30 Select the ‘QTS’ le (7) with the correct le
version number. Note; a tinted band over a le name
indicates the le is not valid for that oven.
13.5.31 Check the le information shown is correct
before selecting OK (8), if not, select ‘X’ and locate the
correct le.
13.5.32 The CBR le is checked and the download
progress from the USB is displayed (9) followed by the
update status and conrmation screens.
13.5.33 The QTS, SRB and Application Icon les then
download automatically showing the progress, status
and reboot conrmation screens for each le update.
13.5.34 On completion the oven start up screen (10)
is displayed showing the updated rmware versions
followed by the oven pre-heat temperature screen.
10
1
2
4
7
9
5
8
3
6
CONFIRMING THE OVEN UPDATE
After an oven update the oven copies les back to
the USB memory stick.
13.5.35 Load the les from the USB memory stick to a
computer and open the update (UPDATE.txt) le.
13.5.36 An oven update is conrmed below the oven
serial number with ‘updated’ following the QTS/SRB
rmware and App Icons.
22
Service & Parts Manual original instructions
Part Number 32Z3870 GB
Issue 4
Page 23

14 OVEN TESTING
14.1 Equipment required
● Portable Appliance Tester (P.A.T.).
● Digital Multi-meter (D.M.M.).
● Megger / similar 500V d.c. resistance meter.
● Microwave detection / leakage meter.
● Temperature reader.
● Continuity meter.
● Door Spacer Kit (Part No. SA1109).
● Microwave safe 600ml glass beaker
● Microwave safe 2 litre container.
DANGER!
THIS APPLIANCE MUST BE EARTHED.
FAILURE TO DO SO MAY RESULT IN
ELECTRIC SHOCK AND DEATH.
DANGER!
BEFORE REMOVING THE OVEN CASING, ISOLATE THE
OVEN FROM THE MAINS ELECTRICITY POWER SUPPLY;
SWITCH OFF, DISCONNECT OVEN PLUG FROM WALL
SOCKET, TURN OFF ISOLATOR SWITCH TO DISCONNECT
FIXED WIRED OVENS AND LOCKOFF.
WARNING
ALWAYS DISCHARGE THE HT CAPACITORS BEFORE
WORKING ON THE OVEN USING A SUITABLY
INSULATED 10M RESISTOR.
WARNING
ALLOW OVEN TO COOL. OBSERVE AND FOLLOW ALL
SAFETY PRECAUTIONS INCLUDING THOSE DESCRIBED
UNDER THE “SAFETY REGULATIONS” SECTION OF THIS
MANUAL BEFORE ATTEMPTING A SERVICE OR REPAIR.
WARNING MICROWAVE EMISSIONS
DO NOT BECOME EXPOSED TO EMISSIONS FROM THE
MICROWAVE GENERATOR OR PARTS CONDUCTING
MICROWAVE ENERGY.
14.2 Earth/Insulation Test
14.2.1 Disconnect/isolate the oven from the power
supply.
14.2.2 Connect the mains lead from the oven to a
P.A.T. (Portable Application Tester).
14.2.3 Connect the Earth from the P.A.T. to the oven
hinge (A).
14.2.4 Place the P.A.T. in an open area, such as the
oor, away from any persons.
14.2.5 Perform a Class 1 test, a PASS indicates the oven
Earthing circuit is functioning ok.
14.2.6 If a FAIL is indicated, remove the oven casing
and check ALL earth connections before retesting.
14.2.7 NEVER operate an oven that has failed this test
as it could be potentially dangerous.
14.3 Screen Calibration
14.3.1 Apply continuous light pressure to the screen
while switching the oven on. Continue to hold until
the progress bar has completed.
14.3.2 Using a non-abrasive pointer, such as a
ball point pen, accurately press the center of each
crosshair displayed on the screen. Once calibrated the
screen will display the oven information.
A
TESTING
COMPONENTS
B
Service & Parts Manual original instructions
Part Number 32Z3870 GB
Issue 4
23
Page 24

COMPONENTS
TESTING
14.4 Oven Tests
14.4.1 Enter Service Mode (see “Servicing” section).
14.4.2 Select the down arrow to display the individual
Oven tests (A) for the oven to perform.
14.5 Microwave Power Test
Measuring the power output:
NOTE: The power output is established under IEC
705 standard method which is only workable in
laboratory controlled conditions. Power output is also
aected by line voltage under load, so this test is an
approximation only.
14.5.1 Ensure the oven is cold, then enter Service
mode to bypass oven preheating.
14.5.2 Select Visual View (B) to check the oven cavity
temperature reading is as close to 0°C as possible.
1 Fill a microwave safe container (glass or plastic)
with one litre (1.78 pints) of tap water at about
20°C (68°F).
2 Measure and record the water temperature in
the container using a thermometer capable of
reading ±0.1 degree increments.
3 Place the container centrally inside the oven.
4 Select ‘Microwave Power Test’ (C) from the
service mode tests (microwave power 100% for
63 seconds, fan minimum).
5 When the countdown has nished, remove the
container from the oven, immediately stir with
a plastic implement and measure the water
temperature.
6 Calculate the temperature rise of the water (end
temperature minus the start temperature).
A
B
C
The Temperature Rise should be:
21.5°C (42°F) ±10%
If the temperature rise is outside these limits:
● Check the microwave circuit and components
(see “Testing Components” section). Replace
magnetron and/or HV diode board if required.
24
Service & Parts Manual original instructions
Part Number 32Z3870 GB
Issue 4
Page 25

14.6 Microwave Leakage Test
Note before measuring:
● Make sure that the survey meter you are using
has been calibrated and is suitable for measuring
frequencies of 2,450 MHz.
● Do not exceed meter full scale deection,
leakage meter should initially be set to the
highest scale, then adjusted down as necessary
to ensure that low readings are measured on the
most sensitive range.
● To prevent false readings, hold the probe on the
grip provided and move at 2.5cm/second.
● Always hold the probe at right angles to the
oven and point of measurement, ensuring the
probe is reading 50mm from the test area.
● The leakage should not exceed 5mW/cm².
Procedure:
14.6.1 Add 275ml of cold water into a 600ml
microwave safe container.
14.6.2 Place the 600ml container in the centre of oven
and close the door.
14.6.3 Enter Service mode and select ‘Microwave
leakage test’ (A) from the oven tests.
14.6.4 Set the leakage meter to the appropriate scale/
range.
14.6.5 Move the survey meter probe across all
casework joins and vent areas including those marked
in yellow, shown opposite.
14.6.6 When the Magnetron circuit stops after 30
seconds, change the water and re-select the test to
continue.
14.6.7 Select the red ‘X’ on the display to stop the test
at any time.
14.6.8 Readings must be below 5mW/cm². If a level
greater than 5mW/cm² is observed, this should
be reported to the Merrychef Service Department
immediately, and the oven should not be used.
14.6.9 Notes should be kept of any leakage that is
observed in terms of the level and position on the
oven. This information should be kept with the service
documentation.
A
TESTING
COMPONENTS
Service & Parts Manual original instructions
Part Number 32Z3870 GB
Issue 4
25
Page 26

COMPONENTS
TESTING
14.7 Temperature Control Test
Measuring the oven cavity temperature.
NOTE: Re-calibrating the Thermocouple with the SRB
is normally only required when the Thermocouple has
been replaced or the oven is under or over cooking.
Procedure:
14.7.1 Place the probe of a temperature reader (A)
onto a heat sink or a metal plate in the centre of the
oven cavity and close the oven door.
14.7.2 Select ‘Temperature Control Test’ (B) from the
service mode tests. The oven heats up and cycles at
the maximum set point temperature over 30 minutes.
14.7.3 Once the oven is up to maximum temperature
check for a stable temperature reading.
14.7.4 Select the red X to nish the test, if necessary.
14.7.5 If the temperature reading is dierent to the
maximum set point, scroll up (C) to select TEMP.
COMP. (Temperature Compensation) (D) and enter the
password.
14.7.6 Enter the gure from the temperature reader
on the keypad (E) and select OK to calibrate the SRB to
the thermocouple.
14.7.7 Retest to check that the oven cavity
temperature reading is the same as the oven
maximum set point temperature.
If the temperature reading is unstable:
1 Disconnect and isolate the oven from the
electricity supply.
2 Allow the oven to cool down.
3 Remove the oven casing.
4 Check the cavity temperature sensor wire and
connections.
5 If the wire and connections are ok replace
the cavity temperature sensor (see “Spares &
Replacement” section).
6 Replace oven casing, switch ON and retest.
7 If the temperature is still unstable repeat
steps 1 to 3, replace the SRB (see “Spares &
Replacement” section), repeat step 6.
NOTE: Reuse the existing PM (Personality Module) on
the new SRB (enter Serial No. on reboot).
14.7.8 Repeat the Temperature Control Test
procedure.
A B
C
D
E
26
Service & Parts Manual original instructions
Part Number 32Z3870 GB
Issue 4
Page 27

14.8 Soak Test
Checking the oven cavity integrity.
Procedure:
14.8.1 Place an oven/microwave safe container with
approx. 2 litres of water into the oven.
14.8.2 Close the oven door and select ‘Soak Test’ (A)
from the Service mode oven tests (maximum oven
temperature, 50% microwave power, maximum fan
speed).
14.8.3 Run the test (30 minutes), carefully checking the
oven casing, joints and door seal for signs of steam or
water escaping from the oven cavity.
14.8.4 If necessary, rectify any leaks and repeat the test.
14.8.5 Safely remove the container from the oven.
A
14.9 Recommission Test
The Recommission tests are performed following
the completion of a service or repair to ensure
the oven is operational before handing back to
the customer.
Some of the tests have a countdown timer where
failing to carry out a test within the time limit will
cause a test failure and the Recommission test will
have to be restarted.
Procedure:
14.9.1 Select ‘Recommission Test’ (A) from the service
mode oven tests and follow the on screen instructions
to perform the tests. Do not select the red ‘X’unless
you want to stop the test.
14.9.2 After a test has successfully passed, select OK to
continue.
14.9.3 When all the tests have been successfully
performed the display shows the Recommission test
has passed, select OK to conrm.
14.9.4 In the event of a Recommission test failure,
the detail will be recorded in the Error log. Any error
should be rectied and the Recommission test run
again.
A
TESTING
COMPONENTS
Service & Parts Manual original instructions
Part Number 32Z3870 GB
Issue 4
27
Page 28

15 HIGH VOLTAGE COMPONENTS
COMPONENTS
TESTING
High voltages and large currents are present at
the High Voltage Capacitor. It is very dangerous
to work near this part when the oven is on.
NEVER make any voltage measurements at the
High Voltage circuits, including the magnetron
lament.
15.1 High Voltage Transformer Test
15.1.1 Disconnect and isolate the oven from the
electricity supply.
15.1.2 Allow the oven to cool down.
15.1.3 Remove the oven casing.
15.1.4 Ensure that the High Voltage Capacitor is
discharged before commencing work.
15.1.5 Remove all connections from the Power
Transformer.
15.1.6 Using a D.M.M., check the resistance of the
windings. Results should be as follows:
1 Mains winding between tags, approx. 1.1 Ω
2 High Voltage winding, approx. 60 Ω
3 Filament winding between terminals, less than
1 Ω
15.1.7 Using a Megger, test the insulation resistance
between:
● Primary winding and chassis, pass if reading is
over 10 MΩ
● Filament winding and chassis, pass if reading is
over 10 MΩ
One end of the High Voltage winding is connected
to the chassis, so this is not tested.
DANGER!
BEFORE REMOVING THE OVEN CASING, ISOLATE THE
OVEN FROM THE MAINS ELECTRICITY POWER SUPPLY;
SWITCH OFF, DISCONNECT OVEN PLUG FROM WALL
SOCKET, TURN OFF ISOLATOR SWITCH TO DISCONNECT
FIXED WIRED OVENS AND LOCKOFF.
WARNING
ALWAYS DISCHARGE THE HT CAPACITORS BEFORE
WORKING ON THE OVEN USING A SUITABLY INSULATED
10M RESISTOR.
WARNING
ALLOW OVEN TO COOL. OBSERVE AND FOLLOW ALL
SAFETY PRECAUTIONS INCLUDING THOSE DESCRIBED
UNDER THE “SAFETY REGULATIONS” SECTION OF THIS
MANUAL BEFORE ATTEMPTING A SERVICE OR REPAIR.
WARNING MICROWAVE EMISSIONS
DO NOT BECOME EXPOSED TO EMISSIONS FROM THE
MICROWAVE GENERATOR OR PARTS CONDUCTING
MICROWAVE ENERGY.
1
15.2 High Voltage Rectier Test (Diode
Board)
15.2.1 Disconnect and isolate the oven from the
electricity supply.
15.2.2 Allow the oven to cool down.
15.2.3 Remove the oven casing.
15.2.4 Ensure that the High Voltage Capacitor is
discharged before commencing work.
15.2.5 Remove all connections from the High Voltage
Rectier.
15.2.6 Using a Megger, test for continuity in both
directions. Results should be as follows:
● Open circuit both ways - FAIL
● Conducts one-way only - PASS
● Short circuit both ways - FAIL
● Conducts one way, leaks the other - FAIL
28
Service & Parts Manual original instructions
Part Number 32Z3870 GB
Issue 4
2
3
Page 29

High voltages and large currents are present at
the High Voltage Capacitor. It is very dangerous
to work near this part when the oven is on.
NEVER make any voltage measurements at the
High Voltage circuits, including the magnetron
lament.
15.3 High Voltage Capacitor Test
15.3.1 Disconnect and isolate the oven from the
electricity supply.
15.3.2 Allow the oven to cool down.
15.3.3 Remove the oven casing.
15.3.4 Ensure that the High Voltage Capacitor is
discharged before commencing work.
15.3.5 Remove all connections from the High Voltage
Capacitor.
15.3.6 Using a D.M.M., check for continuity between
the terminals. Results should be as follows:
1 Between Terminals, pass if approx. 10 MΩ
2 Between Terminals and case, pass if open circuit.
15.3.7 Using a Megger, test the insulation resistance
between the Terminals and case, pass if reading is over
100 MΩ.
1
2
TESTING
COMPONENTS
15.4 High Voltage Magnetron Test
15.4.1 Disconnect and isolate the oven from the
electricity supply.
15.4.2 Allow the oven to cool down.
15.4.3 Remove the oven casing.
15.4.4 Ensure that the High Voltage Capacitor is
discharged before commencing work.
15.4.5 Remove all connections from the High Voltage
Magnetron.
15.4.6 Using a Megger check for continuity. Results
should be as follows:
1 Filament terminals, pass if 1 Ω or less.
2 Between each lament terminal and the metal
outer case should read open.
1
2
Service & Parts Manual original instructions
Part Number 32Z3870 GB
Issue 4
29
Page 30

16 MAINS VOLTAGE COMPONENTS
COMPONENTS
TESTING
16.1 Door Interlock Adjustment
Located on the door hinges are 3 safety interlock
microswitches, to prevent microwave emissions
escaping when the oven door is opened:
The Primary (SW3) breaks the electrical supply
circuit to the transformers.
The Secondary (SW2) breaks the microwave circuit if
the primary fails.
The Monitor switch (SW1) will short out the
Microwave circuit blowing the fuse if both Primary
and Secondary interlocks fail.
IMPORTANT: in the event that the Monitor
switch causes the Microwave circuit fuse to
blow, the Secondary (SW2) and Monitor (SW1)
microswitches must be replaced due to exposure
from high short-circuit currents.
The purpose of the following adjustment procedure
is to set the interlock to switch o the Microwave
circuit when the door is opened more than 4mm
and for the Microwave circuit to operate when the
door is closed and the door seal expands.
16.1.1 Door Interlock Adjustment procedure:
16.1.2 Disconnect and isolate the oven from the
electricity supply.
16.1.3 Allow the oven to cool down.
16.1.4 Remove the oven casing.
16.1.5 Ensure that the High Voltage Capacitor is
discharged before commencing work.
16.1.6 Door Spacer Kit SA1109
1 Position Green 2mm spacers over the top
corners of the door seal and carefully close the
door ensuring the spacer is still in position.
2 Slacken the pivot screw.
3 Release the adjusting screws and move the
backplate until microswitch SW3 just activates
then secure all screws.
4 Open door to replace the Green 2mm spacers
with Red 4mm spacers and close the door.
5 Slacken the pivot screw.
6 Release the adjusting screws and move the
backplate until microswitch SW2 just activates
then secure all screws.
7 Remove the spacers, then open and close the
oven door 5-10 times.
IMPORTANT: CHECK THE SWITCHES OPERATE IN
THE FOLLOWING SEQUENCE AS MICROSWITCH SW3
MUST SWITCH THE LOAD CURRENT.
Closing the door:
● SW1 opens rst
● SW2 closes second
● SW3 closes third
Opening the door:
● SW3 opens rst
● SW2 opens second
● SW1 closes third
30
Service & Parts Manual original instructions
Part Number 32Z3870 GB
Issue 4
1
6
5
OVEN DOOR OPEN
L1
N
OVEN DOOR CLOSED
L1
N
SW2
SW1
SW2
SW1
SW3
SW2
SW3
SW3
3
2
SW1
Page 31

16.2 Convection Fan Motor & Controller
16.2.1 Convection Fan Motor.
The convection motor Is a 3-phase AC motor having
a maximum speed of 7200 rpm controlled by a
motor speed controller.
The windings are thermally protected and in the
event of a thermal fault a trip inside the motor will
operate and shut down the motor speed controller.
16.2.2 Motor Controller
Provides a 3-phase AC switched mode drive to the
convection motor and is controlled by a 0 - 10 Volt
signal from the SRB. This allows the motor to be
adjusted from approximately 1500 rpm to 7000 rpm
in steps of 5%.
● Door Open, 1500 RPM (20% @ 2V)
● Door Closed (not cooking), 2190 RPM (31% @
3.1V)
● Door Closed (cooking), speed as specied by
program or setting up to a Maximum of 7000
RPM, 100% @ 10V)
16.2.3 LED Status display (A):
● Inverter O/No supply, LED OFF.
● Power On/Ready, LED ashes ON/OFF x1 per
second.
● Inverter Running, LED ON continuously.
● General Warning, LED ON/OFF x2 per second.
● Fault Condition, LED ON/OFF x10 per second.
Convection Fan Motor & Controller tests:
16.2.4 Disconnect and isolate the oven from the
electricity supply.
16.2.5 Allow the oven to cool down.
16.2.6 Remove the oven casing.
16.2.7 Ensure that the High Voltage Capacitor is
discharged before commencing work.
16.2.8 Check the following:
1 Electrical supply into motor controller.
2 Three phase connections to motor.
3 Speed Controller connections to SRB.
4 Motor thermal cut-out (short circuit).
5 Motor rotates freely/not seized.
6 Motor winding resistances:
● Blue-Black 3 - 4 Ohms.
● Black-Brown 3 - 4 Ohms.
● Brown-Blue 3 - 4 Ohms.
● Black or Brown or Blue to Earth (Open circuit).
1
DC
U
V
W
PE
64
65
TESTING
L1
L2/N
L3
2
COMPONENTS
32
3
1
2
3
4
5
6
7
67
66
68
8
9
10
A
Service & Parts Manual original instructions
Part Number 32Z3870 GB
Issue 4
31
Page 32

17 OVEN COMPONENTS
DANGER!
BEFORE REMOVING THE OVEN CASING,
ISOLATE THE OVEN FROM THE MAINS
ELECTRICITY POWER SUPPLY; SWITCH
OFF, DISCONNECT OVEN PLUG FROM
WALL SOCKET, TURN OFF ISOLATOR
SWITCH TO DISCONNECT FIXED WIRED
OVENS AND LOCKOFF.
WARNING
ALLOW OVEN TO COOL. OBSERVE AND
FOLLOW ALL SAFETY PRECAUTIONS
INCLUDING THOSE DESCRIBED
UNDER THE “SAFETY REGULATIONS”
SECTION OF THIS MANUAL BEFORE
ATTEMPTING A SERVICE OR REPAIR.
WARNING MICROWAVE
EMISSIONS
DO NOT BECOME EXPOSED TO
EMISSIONS FROM THE MICROWAVE
GENERATOR OR PARTS CONDUCTING
MICROWAVE ENERGY.
REPLACEMENT
SPARES &
63 Door oven
80 Microswitch SW1, SW2
69 Stirrer motor assembly
77 Wave guide
41 Overheat stat oven cavity
78 Air intake lter (front)
79 Hinge assembly door RH
16 SRB Smart Relay Board with in-built 1.25A fuse
(Located in front of 24V transformer)
10 30Z1488 RFI Filter 30A
86 30Z1534 RFI Filter 20A x 2
84 HV capacitor
77 Wave guide
57 Temperature sensor (Thermocouple) oven cavity
69 Stirrer motor assembly
82 Microswitch SW3
83 Controller convection fan motor
81 Hinge assembly door LH
7 Fuse (20A)
5 Fuse Control circuit (13A) F3
8 Fuse LH Transformer (13A) F4
9 Fuse RH Transformer (13A) F5
86
32
Service & Parts Manual original instructions
Part Number 32Z3870 GB
Issue 4
Page 33

51 Magnetron cooling duct RH
11 Magnetron
33 Heater element x2 (connectors shown)
65 Motor assembly convection fan
24 Gland Power supply cable
52 Magnetron cooling duct LH
62 HT Diode
85 Transformer
69 Cooling fan motor
9 Capacitor 1.5µF (Silver) motor start
13 Overheat stat Magnetron
17 QTS Touch Screen PCB
6 Switch oven ON/OFF (rear connection)
40 Speaker unit
27 Ethernet port
SPARES &
REPLACEMENT
Service & Parts Manual original instructions
Part Number 32Z3870 GB
Issue 4
33
Page 34

18 SRB & QTS Circuit Boards
18.1 SRB replacement
18.1.1 Disconnect and isolate the oven from the
electricity supply.
18.1.2 Allow the oven to cool down.
18.1.3 Remove the oven casing.
18.1.4 Ensure that the High Voltage Capacitor is
discharged before commencing work.
18.1.5 Taking anti-static precautions, disconnect all
connections on the SRB.
18.1.6 Remove the PM (Personality Module) from the
SRB and place safely aside.
18.1.7 Release retaining screws and remove the SRB.
18.1.8 Replace SRB and secure retaining screws.
18.1.9 Reconnect all connections to the SRB, for
details see “SRB Terminal Locations” (“Electrical Circuits”
section).
1 Ensure the thermocouple negative (-)
connection (white) and positive (+) connection
(green) are tted the correct way round or the
oven temperature readings will be wrong.
2 Ret the PM removed from the old SRB to the
new SRB. Refer to the following PM replacement
if a new PM is tted.
21
18.2 QTS replacement
18.2.1 Disconnect and isolate the oven from the
electricity supply.
REPLACEMENT
18.2.2 Allow the oven to cool down.
18.2.3 Remove the oven casing.
SPARES &
18.2.4 Ensure that the High Voltage Capacitor is
discharged before commencing work.
18.2.5 Remove the top front panel.
18.2.6 Taking anti-static precautions, disconnect all
connections on the QTS.
18.2.7 Remove the PM (Personality Module) (3) from
the QTS and place safely aside.
18.2.8 Release the four retaining nuts and remove the
QTS assembly (4).
18.2.9 Ret the PM removed from the old QTS to the
new QTS. Refer to the following PM replacement if a
new PM is tted.
18.2.10 Replace the QTS assembly and secure with the
retaining nuts.
18.2.11 Reconnect all connections to the QTS, for
details see “QTS Terminal Locations” (“Electrical Circuits”
section).
3
4
34
Service & Parts Manual original instructions
Part Number 32Z3870 GB
Issue 4
Page 35

18.3 PM (Personality Module)
replacement
The PM on the SRB contains the Firmware.
The PM on the QTS contains the Firmware,
Oven Serial Number, Temperature
Calibration, Cooking Programs, Application
Icons and the Recipe Images.
18.3.1 With a new PM tted and casing retted, switch
on the oven and tap the screen to hold and check the
QTS and SRB versions (1) are the latest release, if not,
execute a Firmware update using the latest versions.
For details see “Firmware Updates” (“Servicing” section).
18.3.2 Tap the top right of the screen to bypass the
preheat stage (2).
18.3.3 Enter the service password and select OK to
display the Settings menu, see (3).
18.3.4 Select the USB symbol (4).
18.3.5 Slide the Merrychef badge upwards and insert
the USB Memory Stick into the slot (5).
18.3.6 Once the USB has stopped ashing, select the
required USB recipe symbol (6).
18.3.7 Select the Application Icons le to download
(7).
NOTE: A tinted band over a le name indicates the le
is not valid for that oven.
18.3.8 Check the le information shown is correct
before selecting OK (8), if not, select ‘X’ and locate the
correct le.
18.3.9 When completed, select recipes to load the
cooking programs (9). Once the programs are loaded
the oven restarts.
18.3.10 Enter the Date & Time settings (10). For
details see under ‘Oven Control Settings’ (see “Product
Information” section).
18.3.11 Enter the oven serial number (Found on the
oven Rating Plate at the rear of the oven)
18.3.12 Turn the oven switch OFF/ON.
18.3.13 Remove the USB and keep in a safe place.
Reposition the USB cover.
1
10
4
7
SPARES &
2
5
8
3
6
9
REPLACEMENT
Service & Parts Manual original instructions
Part Number 32Z3870 GB
Issue 4
35
Page 36

1
2
52
77
5
11
9
49
28
21
66
41
10
55
90
26
27
29
78
30
31
75
69
36
37
48
60
56
39
40
42
43
44
45
35
46
47
84
73
64
58
61
25
22
67
70
34
68
65
62
62
21
37
34
46
68
58
61
86
85
88
12
71
18
32
82
33
76
35
81
53
54
72
8
83
4
59
59
51
16
1288
77
3
23
14
38
79
80
24
17
89
86
57
50
15
52
5
87
74
7
13
63
6
63
19 SPARE PARTS EXPLODED VIEW
REPLACEMENT
SPARES &
36
Service & Parts Manual original instructions
Part Number 32Z3870 GB
Issue 4
Page 37

Recommended Parts List
Part
Number
Description
Qty
Per
Oven
Unit
1-10
Ovens
11-50
Ovens
51-100
Ovens
1st
Aid/To
Go Box
Service
Centre
Kit
e4s
Unique
Parts
over e4
105005 M3 CAGE NUT 10 EA 10 30 60
30Z0503 SWITCH ON/OFF ROCKER DPST 1 EA 1 2 4 1 1
30Z1177 20 AMP LITTLEFUSE FLM020 2 EA 2 6 12 2 4
30Z1178 30A FUSE HOLDER 2 EA 2 6 12 1 2
30Z1427 MAGNETRON OVERHEAT STAT 2 EA 2 6 12 1 1
30Z1430 MICROSWITCH (LARGE) 1 EA 2 6 12 1 1
30Z1459 MICROSWITCH 2 EA 1 3 6 1 4
30Z1521 e4s MOTOR SPEED CONTROLLER 1 EA 0 1 2 1 1
30Z5009
eikon TOUCH SCREEN & PCB
1EA136 1
30Z5011
CONTROL PCB
e4s SRB
1EA136 1 1
30Z5013 HT DIODE 750mA 2 EA 2 6 12 2 2 2
31Z0115 INSULATOR PAD 2 EA 2 6 12
31Z0186 SILASTIC BLACK (DOOR SEAL) TUBE 1 3 6 1 1
31Z0600 USB ADAPTOR MODULE 1 EA 1 3 6 1
31Z0620 BTS UI SRB CABLE (WHITE) 1 EA 1 3 6 1 1
31Z1252 BOLT M4 X 10 HEX HD FLANGE SS 8 EA 8 24 48 8
31Z1255 PG21 CABLE GLAND BLACK 1 EA 1 3 6
31Z1256 PG21 CABLE GLAND NUT 1 EA 1 3 6
31Z1259 SHEET COVER CAP 12MM DIA 4 EA 4 12 24
32Z4028 HALF SIZE GASTRONOM DISH 1 EA 1 3 6
32Z7075
PERSONALITY MODULE
SRB e4s
1EA136 1 1
32Z7076
PERSONALITY MODULE
QTS e4s
1EA136 1 1
6004011 RUBBER FOOT 0 40 X 25 1 EA 1 3 6
DR0006 REED SWITCH 1 EA 1 3 6 1 1
DR0007 MERRYCHEF BADGE 1 EA 1 3 6
DR0008 MERRYCHEF BADGE SLIDER 1 EA 1 3 6
DR0009 MERRYCHEF BADGE GUIDE 2 EA 2 6 12
DR0011 TOUCHSCREEN OVERLAY 1 EA 1 3 6 1
DR0021 HARMONISED SPEAKER 1 EA 1 3 6 1
DR0030 HANDLE SPACER 2 EA 2 6 12
DR0047 MERRYCHEF BADGE SEAL 1 EA 1 3 6
DR0060 STIRRER COVER - CERAMIC 2 EA 2 6 12 2 2
DR0079 OVEN TEMP STAT 1 EA 1 3 6 1 1
DV0168VIT DOOR CHOKE PRESSED VITREOUS 1 EA 1 3 6
DV0187 TOP PANEL (PRESSED) 1 EA 0 1 2
DV0202 CERAMIC PLATE RETAINER 4 EA 0 1 2 4
DV0370 LOWER IMPINGER HANDLE 1 EA 1 3 6 1
DV0403 CAST REAR DUCTING LH 1 EA 1 3 6
DV0431 DOOR HANDLE 1 EA 1 3 6
DV0437 LOWER FASCIA FINISHED 1 EA 1 3 6
DV0452 CAPACITOR CLIP 2 EA 0 1 2
DV0692 SEAL - CERAMIC COVER 2 EA 2 6 12 2 2
DV0714 e4s WIRE RACK 1 EA 0 1 2 1
DV0773 CAVITY HOT BOX FINISHED 1 EA 1 3 6 1
DV0815 e4s CAVITY THERMOCOUPLE 1 EA 1 3 6 1 1 1
DV0825 e4s CAST RH DUCT MODIFIED 1 EA 1 3 6 1
DV0838 CONTROL PANEL e4/e4s 1 EA 0 1 2
DV0840 e4s RH SIDE PANEL 1 EA 0 1 2 1
DV0841 e4s LH SIDE PANEL 1 EA 0 1 2 1
P30Z1415 MAGNETRON 2M303H 2 EA 0 1 2 1 2
PSA1215 e4s DOOR ASSEMBLY (COMPLETE) 1 EA 1 3 6 1
PSA1240 e4s UPPER IMPINGER PLATE 1 EA 0 1 2 1
PSA1241 e4s HOT AIR MOTOR ASSY KIT 1 EA 1 3 6 1 1
Merrychef eikon e4s Oven
Recommended Minimum Stock Holding & Service Kits
20 SPARE PARTS
Parts list & recommended minimum stock holding & Service Kits
Service & Parts Manual original instructions
Part Number 32Z3870 GB
SPARES &
REPLACEMENT
37
Issue 4
Page 38

Recommended Parts List
Part
Number
Description
Qty
Per
Oven
Unit
1-10
Ovens
11-50
Ovens
51-100
Ovens
1st
Aid/To
Go Box
Service
Centre
Kit
e4s
Unique
Parts
over e4
PSA1242 e4s HEATER ASSEMBLY KIT 1 EA 1 3 6 1 1
PSA1243 e4s GASKET KIT 1 EA 1 3 6 1 1
PSA2144 DOOR SKIN ASSY e4 1 EA 0 1 2
PSA2191 e4s IMPINGER PLATE LOW ER 1 EA 1 3 6 1
PSA2195 e4s COOLING FAN ASSEMBLY 1 EA 0 1 2 1 1
PSA2197 e4s DOOR+CHOKE ASSY 1 EA 0 1 2 1
PSA2201 e4s WAVEGUIDE ASSY 2 EA 1 3 6 2
PSA288 STIRRER MOTOR ASSY (PINNED) 2 EA 0 1 2 2
PSA291 STIRRER ASSY (PINNED) 2 EA 0 1 2 2
PSA3113 DOOR SEAL 1 EA 1 3 6 1 1
PSR e4s EIKON DOOR HINGE KIT EA 1 3 6 1
PSR102 EIKON M/SWITCH BRACKET KIT EA 1 3 6 1
SA3114 e4s CAVITY ASSY 1 EA 0 1 2
SA3127 AIR FILTER ASSY e4 1 EA 1 3 6 1 1
SA3132 e4s CAVITY INNER STEAM PIPE 1 EA 1 3 6 1
SA3134 REAR PANEL WELDED ASSY e4s 1 EA 1 3 6 1
SA3136 CAVITY WRAP KIT 1 EA 0 1 2 1
SA3150 e4s LOWER CAT ASSY 1 EA 0 1 2 1
SA3151 e4s UPPER CAT ASSY 1 EA 0 1 2 1
SA3153 e4s AIR DIFFUSER ASSY 1 EA 1 3 6 1 1 1
eikon e4s 230Volts 50Hz - UK/EU - Single Phase - Unique Parts
30Z0231 FUSEHOLDER 1in (13A) 3 EA 3 9 18 3 6
30Z0456 FUSE 1in 13A HRC 3 EA 3 9 18 3 6
30Z1425 TRANSFORMER 240V 50/60Hz 1 EA 1 3 6 1 2
30Z1431 1.2uF 2500V CAPACITOR 2 EA 2 6 12 2 2 2
30Z1488 e4s MAINS FILTER 1 EA 1 3 6 1 2 1
P30Z1413 230V 50Hz TRANSFORMER 2 EA 2 6 12 2
POWER SUPPLY LEAD (UK) 3C 1 EA 1 3 6
eikon e4s 230Volts 50Hz - UK/EU - Twin Phase - Unique Parts
30Z0231 FUSEHOLDER 1in (13A) 3 EA 3 9 18 3 6
30Z0456 FUSE 1in 13A HRC 3 EA 3 9 18 3 6
30Z1425 TRANSFORMER 240V 50/60Hz 1 EA 1 3 6 1 2
30Z1431 1.2uF 2500V CAPACITOR 2 EA 2 6 12 2 2 2
30Z1488 e4s MAINS FILTER 1 EA 1 3 6 1 2 1
P30Z1413 230V 50Hz TRANSFORMER 2 EA 2 6 12 2
SA2209 e4s 2P PLUG - 1P LEAD HC 1 EA 1 3 6
30Z0231 FUSEHOLDER 1in (13A) 3 EA 3 9 18 3 6
30Z0456 FUSE 1in 13A HRC 3 EA 3 9 18 3 6
30Z1425 TRANSFORMER 240V 50/60Hz 1 EA 1 3 6 1 2
30Z1431 1.2uF 2500V CAPACITOR 2 EA 2 6 12 2 2
30Z1534 e4s MAINS FILTER 20A 2 EA 2 6 12 1 2 1
P30Z1413 230V 50Hz TRANSFORMER 2 EA 2 6 12 2
SR233 e4s MAINS CABLE AZ 5P 1 EA 1 3 6
Merrychef eikon e4s Oven
Recommended Minimum Stock Holding & Service Kits
eikon e4s 230Volts 50Hz - AZ - Unique Parts
REPLACEMENT
SPARES &
38
Service & Parts Manual original instructions
Part Number 32Z3870 GB
Issue 4
Page 39

Recommended Parts List
Part
Number
Description
Qty
Per
Oven
Unit
1-10
Ovens
11-50
Ovens
51-100
Ovens
1st
Aid/To
Go Box
Service
Centre
Kit
e4s
Unique
Parts
over e4
30Z0231 FUSEHOLDER 1in (13A) 3 EA 3 9 18 3 6
30Z0456 FUSE 1in 13A HRC 3 EA 3 9 18 3 6
30Z1425 TRANSFORMER 240V 50/60Hz 1 EA 1 3 6 1 2
30Z1331 1.00uF 2500V CAPACITOR 2 EA 2 6 12 2 2
30Z1488 e4s MAINS FILTER 1 EA 1 3 6 1 2 1
P30Z1230 60HZ TRANS MULTI TAP 2 EA 2 6 12 2
POWER SUPPLY LEAD HE (EU) 1 EA 1 3 6
30Z0285 FUSEHOLDER 1 1/4in (13A) 3 EA 3 9 18 3 6
30Z1331 1.00uF 2500V CAPACITOR 2 EA 2 6 12 2 2
30Z1439 OMRON RELAY 12V 2 EA 2 6 12 1 2
30Z1455 TRANSFORMER LV CLASS 2 1 EA 1 3 6 1 2
30Z1488 e4s MAINS FILTER 1 EA 1 3 6 1 2 1
30Z1507 e4s USA 12A FUSE SLOW/B 3 EA 3 9 18 3 6 3
PLUG & LEAD ASSY (SUBWAY) 1 EA 1 3 6
P30Z1230 60HZ TRANS MULTI TAP 2 EA 2 6 12 2
Merrychef eikon e4s Oven
Recommended Minimum Stock Holding & Service Kits
eikon e4s 220Volts 60Hz - SA - Unique Parts
eikon e4s 208V & 240V 60Hz - USA - Unique Parts
Service & Parts Manual original instructions
Part Number 32Z3870 GB
FAULT FINDING
39
Issue 4
Page 40

21 FAULT FINDING
21.1 Operations Communication
21.1.1 The oven has 2 main parts being the QTS
assembly (Keyboard, Screen, Logic) and the SRB (Relay
board to switch and monitor the required operation).
21.1.2 The QTS is the master of the oven and instructs
the SRB what to do, in turn the SRB communicates
information on the operation back to the QTS.
21.1.3 The QTS and SRB have their own Personality
Module tted with the respective software to be able to
communicate and work with each other.
21.1.4 The power provision to the QTS and the
communication between QTS and SRB is enabled via
ONE cable with RJ45 connectors tted.
USB Memory Stick Connection:
21.1.5 Menu loading from USB into the oven (Recipes)
21.1.6 Software loading from the USB to the oven
(Firmware)
21.1.7 Error log saving from the oven to the USB
(Upload)
21.1.8 Menu copying from the oven to the USB
(Upload)
21.1.9 Recipe counter copying from the oven to the
USB (Upload)
FAULT FINDING
40
Service & Parts Manual original instructions
Part Number 32Z3870 GB
Issue 4
Page 41

21.2 Error Code List
Error
Code
E 101
E 102
E 103
Error Condition Description Trigger Possible Causes
The current
Magnetron failed
to energise
Detects a magnetron
is not working
correctly
measured by the
current sensing
transformer
was outside of
Failure of
component/s in
the microwave
circuit
tolerance.
If some current
>1A, one or more
heater elements
could have
failed. If current
measured <1A
possible wiring
fault stopping
power reaching
element.
Cooling fan failed.
Cooling fan
wired incorrectly.
Inlet air too hot.
Blocked inlet
lter.
Heater incorrect
current
Ambient overheat
>70°C
Detects a heating
element is not
working correctly
Detects if the controls
area is operating
above temperature
The current
measured by
the sensing
transformer on
the SRB was <1A
when heating
cycled on or >1A
when heating
cycled o.
The ambient
temperature
measured on the
QTS and SRB was
>70°C
Error
Level
Critical
Critical
Critical
System
Response
Display error
message until
system is
power cycled.
Display error
message until
system is
power cycled.
Display error
message
until ambient
controls area
temperature is
below 60°C
E 104
E 105
E 106
E 107
Magnetron /
Cavity Overheat
Supply Frequency
high / low
Cavity reaches
25°C above
setpoint once
it has been
controlling at
setpoint
Communication
error
Detects if the cavity
and magnetrons are
above temperature
Detects if the power
supply Frequency is
outside specication
Detects if the cavity
temperature has risen
above limits
No communication
can be made
between the QTS and
SRB
Cavity and
magnetron
overheat
thermostats
The power
supply to the
oven Frequency
sensor on the
SRB measures
too high / low
The setpoint of
the oven was
exceeded
Loss of
communication
between the SBR
and QTS
Cooling fan failed.
E103 / E106 not
triggering. Failed
SRB. Magnetron
failure. Wiring /
connection fault.
Blocked Inlet
lter.
Incorrect
mains voltage.
Poor internal /
external wiring
connections.
Faulty SRB.
Cavity re. Failed
convection fan.
No impeller or
loose impeller on
convection fan.
SRB / QTS
connection cable
unplugged or
damaged. Faulty
QTS or SRB.
Critical
Critical
Critical
Critical
Display error
message until
service call and
the magnetron
cools down or
the cavity stat
is reset.
Display error
message until
system power
cycled.
Display error
message until
system is
power cycled.
Display error
message until
system is
power cycled.
FAULT FINDING
E 108 QTS PM error
Wrong PM found / no
PM found
The QTS or SRB
either has an
incorrect PM
(Personality
Module) tted or
no PM is tted
The PM has been
changed and is
incorrect. The
PM has been
removed.
Service & Parts Manual original instructions
Critical
Part Number 32Z3870 GB
Display error
message until
system is
power cycled.
41
Issue 4
Page 42

Error
Code
Error Condition Description Trigger Possible Causes
Error
Level
System
Response
E 110
E 111
SRB version
conict
Cavity sensor
error
E112 SRB Sensor Fail
E 113
Magnetron Fail On
without request
SRB rmware version
incompatible with
QTS version
Cavity sensor broken
/ unplugged
SRB Ambient
temperature sensor
failure
Magnetron operates
without being
requested to do so.
The QTS has
found that
the rmware
running the SRB
is not supported.
The controller is
reading an open
circuit across the
thermocouple
input
Shorted SRB
Temperature
sensor
Magnetron
current sensed
at >1 Amp
Firmware update
has been carried
out to the QTS
and the SRB has
not been updated
to match.
The
thermocouple
is not
connected. The
thermocouple
is broken open
circuit. Failed SRB.
Shorted Ambient
temp sensor on
the SRB
Triac, Diode
or relay short
circuited on SRB
Critical
Critical
Critical
Critical
Display error
message until
system is
power cycled.
Display error
message until
system is
power cycled.
Display error
message until
service call and
the magnetron
cools down or
the cavity stat
Display error
message until
service call and
the magnetron
cools down or
the cavity stat
is reset.
E114
E116
Free – Currently
not used
Heater o on
request
FAULT FINDING
E117
N/A
N/A Air Filter removed
Magnetron
Overheat stat
Oven door open
longer than 1 min.
No heater current
detected when
requested
Mag overheat stat
has been triggered as
a result of excessive
temperature
Oven door open.
Oven inoperable.
Air lter not tted.
Oven inoperable.
Cavity does not
reach 100°C in
30mins
Magnetron stat
is open circuit
when running
microwave
Break in
switched feed
on SRB
Filter not tted.
Oven heater
element failure
Blocked air
lters/High
environmental
temperatures/
Positioning next
to heat sources or
failed magnetron
Door left open.
Failed door
switch/s or SRB.
Faulty wiring or
connection.
Failed reed
switch/s or SRB.
Faulty wiring or
connection.
Critical
Critical
Warning
Warning
Display error
message until
service call and
the magnetron
cools down or
the cavity stat
is reset.
Display error
message until
service call and
the magnetron
cools down or
the cavity stat
is reset.
Display
warning
message until
door is closed.
Display error
message until
lter replaced.
N/A Screen Frozen
42
Service & Parts Manual original instructions
Part Number 32Z3870 GB
Issue 4
Touch screen
inoperable
Continual
pressure of the
touch screen
Damaged touch
screen/touch
screen depress
for more than 15
seconds
Warning
Display error
message until
touch screen
press released
Page 43

21.3 Error Code for re-commission test messages
89 Cooling Test Fail
90 Convection Test Fail
91 Turntable Test Fail
92 Heater Test Fail
93 Magnetron Test Fail
94 Filter In Test Fail
95 Filter Out Test Fail
96 Door Closed Test Fail
97 Door Open Test Fail
98 Incomplete Cleaning
21.4 Normal Messages
86 On/O Switch Operated
99 Air Filter Override Accepted by the customer
100 Main Power On, oven connected to the supply Door open (for more than 1 minute)
If ‘Door Open’ message is shown while the door is closed, check the Magnetron 230V circuit power supply, see “Tips for Fault
Finding”.
21.5 Error Messages. The oven stops operating
88 Supply Voltage Error (+/- 10% of rated voltage)
101 Magnetron Failed On Request
102 Heater On Without Request
103 Ambient Overheat
104 Magnetron/Cavity Overheat trip, when oven in idle mode, (also see E117)
105 Supply Frequency Error (+/- 2Hz)
106 Cavity Reaches 75°C above set point or 25°C at 275°C
107 Communication Error QTS-SRB
108 QTS PM Error
109 SRB PM Error
110 Incompatible SRB Version
111 Cavity Sensor Failed
112 SRB Board Sensor Failed
113 Magnetron On Without Request
114 Free - Currently Not Used
115 Convection Fan Feedback (Speed controller cable disconnected)
116 Heater O On Request
117 Magnetron/Cavity trip during cook operation cycle (OH-12V gone for > 1sec)
If this OH trip happens in idle mode you get E104.
FAULT FINDING
To reset the error, disconnect the oven from the power supply and re-connect.
Service & Parts Manual original instructions
Part Number 32Z3870 GB
Issue 4
43
Page 44

22 SRB & QTS Circuit Boards
22.1 QTS LEDs
● Run - Pulsing 1 second ash, indicating that the
board has booted up.
● Power - Lit to show that there is a power supply
from the SRB.
● P-Bus - Irregular ashing, indicating data
communication with SRB.
● C-Bus - Lit to show data being loaded from the
PM onto the QTS.
● LD5 - Lit to show that a USB key is tted.
1 LD5
2 Power, Run, P-Bus, C-Bus.
4 5
6
22.2 QTS Terminal Locations
3 X6 - Speaker
4 X5 - USB socket
5 X4 - Communications to SRB
6 X11 - Screen backlight
7 X13 - Touch pad
8 X9 - Display Screen PCB
1
3
2
78
ELECTRICAL
CIRCUITS
44
Service & Parts Manual original instructions
Part Number 32Z3870 GB
Issue 4
Page 45

22.3 SRB LED’s
● P-Bus - Irregular ashing, indicating data
communication with QTS.
● Run - Pulsing 1 second ash, indicating that the
board has booted up.
● 12v & 5v - Lit to show voltage outputs from
inboard transformer.
● Relay & Triac - Lit to show that a signal has been
sent to energise that component.
1 Cooling fan.
2 Convection fan.
3 Stirrer.
4 5v supply.
5 12v supply.
6 Heater safety.
7 Heater drive.
8 P-BUS: ashes when data is being sent /
received. RUN: 1 second ash.
9 Oven Door.
10 Microwave safety relay.
11 Microwave 2 drive.
12 Microwave 1 drive.
13 LED (Lit to show that signal is recieved via
overheat trips). if lit it is ok.
1
2
3
4
5
6
13
7
8
9
10
11
12
ELECTRICAL
CIRCUITS
Service & Parts Manual original instructions
Part Number 32Z3870 GB
Issue 4
45
Page 46

22.4 SRB Terminal Locations:
1 X3 - Output for e4s Convection Fan Speed
Controller.
2 X101 - Voltage Selection Relay coil feeds.(US
Only)
3 X18b - Air intake Filter Reed Switch.
4 X18e - Right Magnetron Overheat Thermostat.
5 X18d - Left Magnetron Overheat Thermostat.
6 X18c - Cavity Overheat Thermostat.
7 X18a - On/O Switch.
8 X14 - Cavity Temperature Thermocouple.
9 X5 - Fan RPM Input.
10 X13 - P Bus, Ethernet Port.
11 X12 - C Bus, Development PC Port.
12 X11 - P/C Bus, BTS Cable.
13 X1 - 24V supply from Low Voltage Transformer.
14 X8 - Cooling Fan.
15 X17 - Not used.
16 X20 - Microwave Stirrers.
17 X9 - Mains Output, Convection Fan Controller.
18 X103.1 - Mains Output to Low Voltage
Transformer.
19 X103 - Mains Input, Live & Neutral.
20 X2.1 - Mains Input, Live for Heaters.
21 X2.2 - Mains Output, Live to Heaters.
22 X102a - Mains Input, Neutral for Magnetron
Transformers & Monitor Door Switch.
23 X102b - Mains Output, Neutral to Magnetron
Transformers & Monitor Door Switch.
24 X4a - Door Switch signal from Secondary Door
Switch (Live for Magnetron Transformers).
25 X10 - Connector Block for door switches.
26 X4b - Live for Magnetron Transformers.
14
13
15
16
17
18
19
12
20
11
21
10
22
9
23
8
24
7
25
6
ELECTRICAL
CIRCUITS
46
Service & Parts Manual original instructions
Part Number 32Z3870 GB
Issue 4
5
4
3
2
1
26
Page 47

3rd ANGLE PROJECTION
1 2
3
4
5 6 8
1 2
3
4
5 6 8
SW3
23
24
C
N/C
N/O
Secondary Micro Switch
20
C
22
C
Monitor Micro Switch Primary Micro Switch
Note
Switches Shown in
Door Closed Position
L
N
3
6
8
9
10
U V W
PE
64
65
67
66
68
82
Convection Fan
Motor Speed Controller
Black
Brow n
Blue
Green
Green
Red
Blue
Mains Filter
26
On/Off Switch
25
59
58
Blue
Brow n
Black
Blue
Brow n
Cooling Fan
F1
F2
F3
07
08
09
14
12
10
15
13
11
Fuse Rating
US ROW
25 Amp 25 Amp
25 Amp 25 Amp
12 Amp 13 Amp
Fuse
F1
F2
F3
F4 12 Amp 13 Amp
F5 12 Amp 13 Amp
Mains Input
L
L2
L1 N
E E
Star Delt a
Triac 1A Output
Triac 2A Output
Triac 1A Output
Volt age Selec tion
Relay s Driver
Current Sense Hybri d Relay 1
Triac 16A Output
Safety Relay Aux
Line V oltage M onitorin g
Conv ection F an
0...10V Passive
Isolated Output
Safet y Relay H eater
Safety Relay M.W.
Door Switch
Comm on Connect ors Bloc k
Interlock Switches
Power Switc h Feedback
Air Filter Feedback
MCU
Power Supply
12V 5V
Thermocouple
Motor Feedbac k
C/B Bus
C-Bus
P-Bus
2
1
2
1
2
1
1
2
3
1
2
1
2
1
2
1
2
1
2
1
2
1
2
3
2
1
2
1
1
2
3
4
1
2
3
4
1
2
3
1
2
Triac Out put Sch
Triac Out put Sch
Triac Out put Sch
Safety Relay Sch
Line Volt age Monitoring Sch
0—10V-out Sc h
Safety Relay Sch
Lcs Heater
Hybrid Rel ay Sch
Triac Out put Sch
Safety Relay Sch
Lcs MW
Door Switch De tection Sch
Current Sence Sch
Lcs MW
Voltage Selection Relay Driver Sch
Thermocoupl e Input Sch
Power Supply Sc h
Feedback Sch
MCU Sch
Safety Relay Sch
Feedback Sch
C-P Bus Sch
C-P Bus Sch
C-P Bus Sch
+12V
X102(N)
N
X2.1
X4a
Ext GND
X3.1
X3.2
N
N
N
N
N
N
L
L
L
X103
Aux
Power
X103.1
X102a
X4a
X2.1
X3
X9
X18b
X18a
X1
X10
X18c
X18d
X18e
SRB Transform er
M.W. Supply
Speed Controll er Rela y Coil
Heater Supply
Neutral In
Inter lock
Swit ch
Conn ector
24VAC
Supply
Overh eat Cavit y
Air Filter
On/Off
Overh eat MW1
X8
Cooli ng Fan
X17
X20
Stirrer Motor 1
X2.2
Heater Supply Out
X4b
MW 1
X101
Volt age Selec tion Rel ay MW1
X102b
Neut ral MW1
Interlock switches
Temperature Input
X14
X5
P/C - Bus
RJ-45
Coms Modules
C - Bus
RJ-12
P - Bus
RJ-11
BTS
1
2
3
X11
X12
X13
4
8
6
15
14
16
17
65
64
10
22
13
24
23
19
18
69
20
25
26
58
70
71
72
59
60
61
29
44
37
38
45
21
+
-
NOT USED
73
74
Overh eat MW2
Current Sense
Current Sence Sch
Safety Relay Supply
(Heater & MW Only)
66
67
68
Convection Fan
RED (0 - 10V)
GREEN - (10V)
BLUE - (GND)
62
63
Stirrer Motor 2
30
MW 2
51
52
MW 1
MW 2
31
Neut ral MW2
Hybri d Relay 2
G
N
D
N
N
1
2
3
X4b wires 30 & 44 being swapped will cause left & right
reference to be incorrect in visual view, error messages
etc for the magnetrons but will not affect the oven safety.
X102b wires 31, 45 & 21 - common Neutral points as long
as the wires have not changed the order is not relevant.
X20 wires 60, 61, 62 & 63 being reversed will not affect
the stirrer motor operation.
23 CIRCUIT DIAGRAMS
Service & Parts Manual original instructions
Part Number 32Z3870 GB
Issue 4
CIRCUITS
ELECTRICAL
47
Page 48

5 6 8
7
5 6 8
7
eikon e4s
e4s Wiring Diagram 50/60Hz
3
DRG.No. 32Z3845
A
First issue
B
Mains filter change
21/06/201 2
1
SRB Schematic
23/10/201 2
2
Concession to wire locations
11/07/201 3
3
20A Fuses changed to 25A
30/09/201 3
72 71
Magnetron 1
Overheat Stat
70
69
Cavity Overheat Stat
24
N/C
N/O
Secondary Micro Switch
SW2
20
12
C
N/O
N/C
SW1
22
21
C
N/C
N/O
Monitor Micro Switch Primary Micro Switch
M
62
63
Stirrer Motor
83
84
Speaker Wire
Auxiliary Transformer
208/240V
24V
17
16 19
18
M
60
61
Stirrer Motor
74 73
Magnetron 2
Overheat Stat
77 78
11
29
78
77
Heater 1.6kW
Heater 1.6kW
Blue
Brow n
Black
Blue
Brow n
Cooling Fan
30
31
45
44
Diode
HV07 - 16
MW 2
+
T2
42
43
41
230
0
F5
32
Diode
HV07 - 16
MW 2
+
T1
56
57
55
230
0
F4
46
MW2 Right Ha nd Side
(From The Front)
MW1 left Hand Side
(From The Front)
50Hz
Diode
HV07 - 16
MW 2
T2
42
43
41
208
240
0
NC
37
38
30
31
F5
60Hz
32
35
36
32a
Diode
HV07 - 16
MW 2
T1
56
57
55
208
240
0
NC
51
52
45
44
F4
46
49
50
45a
MW2 Right Ha nd Side
(From The Front)
MW1 left Hand Side
(From The Front)
Cooli ng Fan
Stirrer Motor 1
Heater Supply Out
MW 1
Neut ral MW1
Interlock switches
Temperature Input
BTS
NOT USED
Stirrer Motor 2
MW 2
MW 1
MW 2
Neut ral MW2
X4b wires 30 & 44 being swapped will cause left & right
reference to be incorrect in visual view, error messages
etc for the magnetrons but will not affect the oven safety.
X102b wires 31, 45 & 21 - common Neutral points as long
as the wires have not changed the order is not relevant.
X20 wires 60, 61, 62 & 63 being reversed will not affect
the stirrer motor operation.
ELECTRICAL
CIRCUITS
48
Service & Parts Manual original instructions
Part Number 32Z3870 GB
Issue 4
Page 49

1 2
5 6 8
5 6 8
24
N/C
N/O
Secondary Micro Switch
C
C
Switches Shown in
Door Closed Position
Blue
Brow n
Black
Blue
Brow n
Cooling Fan
Cooli ng Fan
Stirrer Motor 1
Heater Supply Out
MW 1
Volt age Selec tion Rel ay MW1
Neut ral MW1
Interlock switches
Temperature Input
Coms Modules
BTS
NOT USED
Stirrer Motor 2
MW 2
MW 1
MW 2
Neut ral MW2
X4b wires 30 & 44 being swapped wil l cause left & right
reference to be incorrect in visual view, error messages
etc for the magnetrons but will not affect the oven safety.
X102b wires 31, 45 & 21 - common Neutral points as long
as the wires have not changed the order is not relevant.
X20 wires 60, 61, 62 & 63 being reversed will not affect
the stirrer motor operation.
3rd ANGLE PROJECTION
3
4
Speed Controll er Relay Coil
Mains Filters
N
L2
Mains Input
L1
E
Fuse
25 Amp 25 Amp
F1
25 Amp 25 Amp
F2
12 Amp 13 Amp
F3
F4 12 Amp 13 Amp
F5 12 Amp 13 Amp
X103
L
Power
SRB T ransform er
Convection F an
RED (0 - 10V)
GREEN - (10V)
BLUE - (GND)
Heater Supply
M.W. Supply
Neutral In
Inter lock
Swit ch
Conn ector
24VAC
Supply
On/Off
Air Filter
Overh eat Cavit y
Overh eat MW1
Overh eat MW2
Aux
66
67
68
2
14
1
15
16
17
64
65
10
24
13
20
22
23
18
19
25
26
X18b
X18c
69
70
X18d
71
72
X18e
73
74
X103.1
2
1
X9
2
1
X3
1
2
3
X2.1
X4a
X102a
X10
1
2
3
X1
1
2
X18a
1
2
3
1
2
1
2
1
2
1
2
N
L
N
L
N
+12V
1 2
Fuse Rating
US ROW
X3.1
X3.2
Ext GND
X2.1
X4a
X102(N)
07
09
08
Safety Relay Sch
Safety Relay Aux
Line Volta ge Monitoring Sch
Line V oltage M onitorin g
0—10V-out Sc h
Conv ection Fan
0...10V Passive
Isolated Output
N
Safety Relay Sch
Safet y Relay H eater
Safety Relay Sch
Safety Relay M.W.
Door Switch De tection Sch
Door Switch
Comm on Connect ors Bloc k
Interlock Switches
Power Supply Sc h
Power Supply
12V 5V
Feedback Sch
Power Switch Feedback
Air Filter Feedback
MCU Sch
MCU
Safety Relay Sch
Safety Relay Supply
(Heater & MW Only)
F1
F3
F2
25
On/Off Switch
Lcs Heater
Lcs MW
11
15
10
14
13
12
26
Motor Speed Controller
U V W
Black
Brow n
Convection Fan
Triac Output Sch
Triac 1A Output
Triac Output Sch
Triac 2A Output
Triac Output Sch
Triac 1A Output
Current Sence Sch
Current Sense
Current Sence Sch
Current Sense Hyb rid Relay 1
Triac Output Sch
Triac 16A Output
Hybrid Rel ay Sch
Lcs MW
Hybri d Relay 2
Volt age Selec tion
Relay s Driver
Voltage Selection Relay Driver Sch
Thermocoupl e Input Sch
Thermocouple
Feedback Sch
Motor Feedbac k
C-P Bus Sch
C/B Bus
C-P Bus Sch
C-Bus
C-P Bus Sch
P-Bus
3
64
L
65
N
3
82
6
Green
67
8
Red
66
9
Blue
68
10
23
C
PE
Blue
Green
58
59
N
N
N
N
N
8
4
6
4
Service & Parts Manual original instructions
Part Number 32Z3870 GB
Issue 4
SW3
Note
X8
2
58
1
59
X17
2
1
X20
60
1
2
61
3
4
62
63
X2.2
29
X4b
1
44
2
30
X101
37
1
2
38
3
51
4
52
X102b
1
45
2
31
3
21
X14
1
+
2
-
X5
1
2
3
P/C - Bus
X11
RJ-45
X12
C - Bus
RJ-12
P - Bus
X13
RJ-11
G
N
D
49
CIRCUITS
ELECTRICAL
Page 50

5 6 8
+
7
N/C
24
Brow n
Blue
Cooli ng Fan
NOT USED
Stirrer Motor 1
Stirrer Motor 2
N/O
Blue
Brow n
Black
22
C
Monitor Micro Switch
20
C
Secondary Micro Switch
Cooling Fan
SW1
SW2
21
N/O
N/C
12
N/C
N/O
78
11
50Hz
MW1 left Hand Side
(From The Front)
70
Cavity Overheat Stat
83
84
Speaker Wire
Heater 1.6kW
Heater 1.6kW
45
44
69
72 71
1
First issue
14/05/201 3
61
63
Diode
HV07 - 16
11/07/201 3
30/09/201 3
Magnetron 1
2
Concession to wire locations
Overheat Stat
3
74 73
20A Fuses changed to 25A
Magnetron 2
Overheat Stat
77 78
77
29
F4
17
208/240V
16 19
Auxiliary Transformer
46
18
24V
230
0
T1
60
M
Stirrer Motor
62
M
Stirrer Motor
56
55
+
57
MW2
T2
Heater Supply Out
MW 1
MW 2
MW 1
MW 2
Neut ral MW1
Neut ral MW2
Interlock switches
Temperature Input
-
ELECTRICAL
CIRCUITS
BTS
X4b wires 30 & 44 being swapped wil l cause left & right
reference to be incorrect in visual view, error messages
etc for the magnetrons but will not affect the oven safety.
X102b wires 31, 45 & 21 - common Neutral points as long
as the wires have not changed the order is not relevant.
X20 wires 60, 61, 62 & 63 being reversed will not affect
the stirrer motor operation.
5 6 8
MW2 Right Hand Side
(From The Front)
60Hz
MW1 left Hand Side
(From The Front)
MW2 Right Hand Side
(From The Front)
F5
30
31
51
52
45
44
37
38
30
31
32
45a
F4
46
F5
32
32a
NC
NC
230
0
49
208
50
240
0
35
208
36
240
0
41
T1
55
T2
41
e4s Twin Ph ase Wiring Diagr am
7
MW2
42
+
43
Diode
HV07 - 16
MW2
56
57
Diode
HV07 - 16
MW2
42
43
Diode
HV07 - 16
eikon e4s
DRG.No. 32Z3885
3
50
Service & Parts Manual original instructions
Part Number 32Z3870 GB
Issue 4
Page 51

23.1 POWER CONNECTIONS e4s
Product e4s
Single Phase & Neutral Model
Microwave 1800W
Convection heater 3.2kW
Neutral
Live
11
13
15
07
08
09
Heater circuit
Microwave circuit
Control circuit
Heater circuit
Microwave circuit
Control circuit
Product e4s
Twin Phase & Neutral Model
Microwave 1800W
Convection heater 3.2kW
Neutral
11
15
L2 (Phase 2)
07
09
13
L1 (Phase 1)
08
Heater circuit
Control circuit
Heater circuit
Control circuit
Microwave circuit
Microwave circuit
ELECTRICAL
CIRCUITS
Service & Parts Manual original instructions
Part Number 32Z3870 GB
Issue 4
51
Page 52

23.2 CONTROL CIRCUIT e4s
ELECTRICAL
CIRCUITS
52
Service & Parts Manual original instructions
Part Number 32Z3870 GB
Issue 4
Page 53

23.3 HEATER CIRCUIT e4s
Mains Input - L2
RFI Filter
07
F1
20 Amp
10
Safety Heater Relay
Powered by Safety Supply
Relay
SRB Board
x2.1
Input for
Current
Sense
Processor Controlled
x2.2
29
7829 78
x14.1
x14.2
+
Temperature
Thermocouple
-
Heater Element
11
RFI Filter
Mains Input - L1
7711
CIRCUITS
ELECTRICAL
Service & Parts Manual original instructions
Part Number 32Z3870 GB
Issue 4
53
Page 54

23.4 MICROWAVE CIRCUIT e4s
Mains Input - L2
RFI Filter
08
F2
20 Amp
21 22
21
Microwave Powered
By Safety Supply Relay
x102b x102a
45
31
RFI Filter
Safety Relay
13
12
RHS SW2
Normally
20
Open
Door Interlock Switches Shown in
23
x.10
LHS SW3
Door Open Position so the switches are not activated
Normally
24
Open
x4a
Current Sense
To SRB E101 Sence
Hybrid
Relay
x4b2
30 44
F5
13 Amp
SRB Board
x4b1
F4
13 Amp
32
46
Mains Input - L1
ELECTRICAL
CIRCUITS
MW2
Diode
42
43
41
T2
208
240
0
37
38
31
54
Service & Parts Manual original instructions
Part Number 32Z3870 GB
Issue 4
51
52
45
208
240
T1
55
0
MW1
56
57
Diode
Page 55

24 Commissioning the oven
24.1 Initial installation
1 Unpack the Oven and check for damage.
2 Check Oven Accessories.
3 Check location will provide adequate Ventilation.
4 Locate Oven onto a strong, level, non-ammable
Surface.
5 Remove panels & check all wiring and components for
security.
6 Ret panels.
7 Position the Oven with a minimum air gap of 50mm,
sides & rear.
8 Check Electrical supply and connect.
9 Place a container of water within the oven and switch
it on.
10 Record Model version & check against serial plate.
11 Record QTS (UI) version.
12 Record SRB version.
13 Record Serial Number & check against serial plate.
14 Enter Service Mode.
15 Record Voltage & Frequency.
16 Record Magnetron Current Draw.
17 Check for Microwave leakage.
18 Record Heater current.
19 Check door opening on display.
20 Check lter removal on display.
21 Check fan speed.
22 Turn o the oven and remove the water.
23 Switch on oven and run up to temperature.
24 Operate Oven, Cooking a Standard Batch.
25 Supply User information & contact details to Customer.
26 Instruct Users with an Overview of the equipment,
Operation & Safety (Hazards).
27 Complete Service Report.
24.2 After Service
Complete the following checks after the Oven has been
Serviced/Repaired/Tested before connecting to the
mains electricity power supply:
24.2.1 All internal electrical connections are correct (see
wiring diagrams).
24.2.2 All wiring insulation is correct and is not touching any
sharp edges.
24.2.3 All grounding connections are electrically and
mechanically secure.
24.2.4 All door safety interlocks are secure and mechanically
sound.
24.2.5 The door activates all of the door interlock switches
and in the correct order.
24.2.6 The door operation is smooth, and the arms run freely
in the slots.
24.2.7 The temperature sensor is correctly connected to the
SRB.
24.2.8 The casing is securely retted with no trapped wires.
Before nishing a service call, recheck the following
points:
24.2.9 Run the Recommission tests to ensure the oven is
functioning correctly and the touch screen is working.
24.2.10 Microwave emissions are below permissible limit of
5mW/cm².
24.2.11 The power output of the oven is checked in
accordance with the procedure.
24.2.12 The oven has correct 50mm (2 inches) air gap all
round and 50mm (2 inches) above. Air ow should not be
restricted.
24.2.13 Complete the Service Report.
Service & Parts Manual original instructions
Part Number 32Z3870 GB
Issue 4
55
COMMISSIONING
Page 56

56
Service & Parts Manual original instructions
Part Number 32Z3870 GB
Issue 4
Page 57

Correct disposal of this product (Waste
Electrical & Electronic Equipment)
Applicable in the European Union
and other European countries with
separate collection systems.
This marking shown on the product
or its literature indicates that it should
not be disposed with other household
wastes at the end of its working life. To prevent
possible harm to the environment or human health
from uncontrolled waste disposal, please separate
this from other types of wastes and recycle it
responsibly to promote the sustainable reuse of
material resources.
Household users should contact either the retailer
where they purchased this product, or their local
government oce for details of where and how they
can take this item for environmentally safe recycling.
Business users should contact their supplier and
check the terms and conditions of the purchase
contract. This product should not be mixed with
other commercial wastes for disposal.
Service & Parts Manual original instructions
Part Number 32Z3870 GB
Issue 4
57
 Loading...