

Mercedes-Benz Light Truck ML 320, Light Truck ML 430 Operator's Manual

1
M-class
Operator’s Manual
Light Truck ML 320
Light Truck ML 430

2
Product information
Kindly observe the following in your own best interests:
We recommend using Mercedes-Benz original parts as well as conversion parts and accessories explicitly approved by us for
your vehicle model.
We have subjected these parts to a special test in which their reliability, safety and their special suitability for Mercedes-Benz
vehicles have been determined.
We are unable to make an assessment for other products and therefore cannot be held responsible for them, even if in individual cases
an official approval or authorization by governmental or other agencies should exist. Use of such parts and accessories could
adversely affect the safety performance or reliability of your vehicle. Please do not use them.
Mercedes-Benz original parts as well as conversion parts and accessories approved by us are available at your Mercedes-Benz
authorized dealer where you will receive comprehensive information, also on permissible technical modifications, and where
proper installation will be performed.
Printed in the U.S.A.
We reserve the right to modify the technical details of the vehicle as given in the data and illustrations of
this Owner's Manual. Reprinting, translation and copying, even of excerpts, is not permitted without our
prior authorization in writing.
Press time 09/30/98 MBNA/TI

3
Operator's manual
Our company and staff congratulate you on the purchase of your new Mercedes-Benz.
Your selection of our product is a demonstration of your trust in our company name. Further, it exemplifies your desire to own an
automobile that will be as easy as possible to operate and provide years of service.
Your Mercedes-Benz represents the efforts of many skilled engineers and craftsmen. To ensure your pleasure of ownership, and for
your safety and that of your passengers, we ask you to make a small investment of your time:
• Please read this manual carefully before putting it aside. Then return it to your vehicle where it will be handy for your reference.
• Please abide by the recommendations contained in this manual. They are designed to acquaint you with the operation of your
Mercedes-Benz.
We extend our best wishes for many miles of safe, pleasurable driving.
Daimler-Benz Aktiengesellschaft

4
Introduction
This Owner's Manual contains a great deal of useful information. We urge you to read it carefully and familiarize yourself with the
vehicle before driving.
For your own safety and longer service life of the vehicle, we urge you to follow the instructions and warnings contained in this
manual. Ignoring them could result in damage to the vehicle or personal injury to you or others. Vehicle damage caused by failure to
follow instructions is not covered by the Mercedes-Benz Limited Warranty.
Your vehicle may have some or all of the equipment described in this manual. Therefore, you may find explanations for optional
equipment not installed in your vehicle. If you have any questions about the operation of any equipment, your authorized
Mercedes-Benz dealer will be glad to demonstrate the proper procedures.
Owner's Service and Warranty Information
The Owner's Service and Warranty Information Booklet contains detailed information about the warranties covering your
Mercedes-Benz, including:
• New Car Limited Warranty,
• Emission System Warranty,
• Emission Performance Warranty,
• California and Massachusetts Emission Control System Warranty (California and Massachusetts only),
• State Warranty Enforcement Laws (Lemon Laws).
Important Notice for California Retail Buyers of Mercedes-Benz Automobiles
Under California law you may be entitled to a replacement of your vehicle or a refund of the purchase price, if Mercedes-Benz of
North America, Inc. or its authorized dealer fails to conform the vehicle to its express warranties after a reasonable number of repair
attempts during the period of one year or 12 000 miles from original delivery of the vehicle. A reasonable number of repair attempts is
presumed for a retail buyer (1) if the vehicle is out of service by reason of repair of substantial nonconformities for a cumulative total
of more than 30 calendar days or (2) the same substantial nonconformity has been subject to repair four or more times and you have
at least once directly notified us in writing of the need to repair the non-conformity and have given us an opportunity to perform the repair ourselves. Notifications should be sent to the nearest Mercedes-Benz Regional Office listed in the Owner's
Service and Warranty Information Booklet.
Maintenance
The Service Booklet describes all the necessary maintenance work which should be performed at regular intervals.
Always have the Service Booklet with you when you take the vehicle to your authorized Mercedes-Benz dealer for service.
The service advisor will record each service in the booklet for you.

5
Roadside Assistance
The Mercedes-Benz Roadside Assistance Program provides factory trained technical help in the event of a breakdown. Calls to the
toll-free Roadside Assistance number:
1-800-FOR MERCedes (in the U.S.A.) 1-800-387-0100 (in Canada)
will be answered by Mercedes-Benz Customer Assistance Representatives 24 hours a day, 365 days a year.
Roadside assistance will be provided in accordance with standard program guidelines which include providing service to the
vehicle up to a reasonable distance from a paved roadway. We will make every effort to assist in a breakdown situation,
however, the accessibility of your vehicle will be determined by our authorized Mercedes-Benz light truck dealer technician or
the tow service provider on a case by case basis and may be a factor in our ability to respond.
Additional charges may be applicable for a breakdown location determined not to be a reasonably accessible roadside location as
determined by our authorized technician and tow service provider.
For additional information refer to the Mercedes-Benz Roadside Assistance Program brochure in your glove box.
Operating Your Vehicle Outside the U.S.A. or Canada
If you plan to operate your vehicle in foreign countries, please be aware that:
• service facilities or replacement parts may not be readily available,
• unleaded gasoline for vehicles with catalytic converters may not be available; the use of leaded fuels will damage the catalysts,
• gasoline may have a considerably lower octane rating, and improper fuel can cause engine damage.
Change of Address or Ownership
If you change your address, be sure to send in the "Change of Address Notice" found in the Owner's Service and Warranty
Information booklet, or simply call the Mercedes-Benz Customer Assistance Center (in the U.S.A. only) at 1-800-FOR-MERCedes. It
is in your own interest that we can contact you should the need arise.
If you sell your Mercedes, please leave all owner's literature with the vehicle to make it available to the next owner.
If you bought this vehicle used, be sure to send in the "Notice of Purchase of Used Car" found in the Owner's Service and Warranty
Information booklet, or call the Mercedes-Benz Customer Assistance Center (in the U.S.A. only) at 1-800-FOR-MERCedes.

6
We continuously strive to improve our product, and ask for your understanding that we reserve the right to make changes in
design and equipment. Therefore, information, illustrations and descriptions in this Owner's Manual might differ from your vehicle.
Optional equipment is also described in this manual, including operating instructions wherever necessary. Since they are
special-order items, the descriptions and illustrations herein may vary slightly from the actual equipment of your vehicle.
If there are any equipment details that are not shown or described in this Owner's Manual, your authorized Mercedes-Benz
dealer will be glad to inform you of correct care and operating procedures.
The Owner's Manual and Service Booklet are important documents and should be kept with the vehicle.

7
Instruments and Controls
Starting the Engine
Driving Instructions
Operation
Driving
Practical Hints
Technical Data
Fuels, Coolants, Lubricants etc.
Consumer Information
Index
Literature

8
The First 1000 Miles (1500 km)
The more cautiously you treat your vehicle during the break-in period, the more satisfied you will be with its performance later on.
Therefore, drive your vehicle during the first 1000 miles (1500 km) at moderate vehicle and engine speeds.
During this period, avoid heavy loads (full throttle driving) and excessive engine speeds.
Avoid accelerating by kickdown. It is not recommended to brake the vehicle by manually shifting to a lower gear. We recommend
that you select positions "3", "2" or "1" only at moderate speeds (for hill driving).
After 1000 miles (1500 km) speeds may be gradually increased to the permissible maximum.
Check Regularly and Before a Long Trip
See last page.
Maintenance
Approximately 30 days or 2 000 miles (2 000 km) prior to the next recommended service, the remaining distance or days are
displayed in the multifunction indicator. See Flexible Service System (FSS) in Index.
We strongly recommend that you have your vehicle serviced by your authorized Mercedes-Benz dealer, in accordance with the
Service Booklet.
Failure to have the vehicle maintained in accordance with the Service Booklet may result in vehicle damage not covered by the
Mercedes-Benz Limited Warranty.
Radio Transmitters
Warning!
Never operate radio transmitters equipped with a built-in or attached antenna (i.e. without being connected to an external
antenna) from inside the vehicle while the engine is running. Doing so could lead to a malfunction of the vehicle's electronic
system, possibly resulting in an accident and personal injury.
Radio transmitters, such as a portable telephone or a citizens band unit should only be used inside the vehicle if they are connected to
an antenna that is installed on the outside of the vehicle.
Refer to the radio transmitter operation instructions regarding use of an external antenna.
9
Product information 2 Trip Computer 73
Operator's manual 4 Drinking and Driving 76
Consumer Information 147 Parking Brake 76
Problems with your vehicle 148 Driving Off 76
Reporting Safety Defects 149 Automatic Transmission 77
Index 151 Cruise Control 81
Instruments and controls 10 Trailer Operation 82
Instrument Cluster 12 Transmission Control - LOW RANGE Mode 83
Indicator Lamp Symbols 13 Charge Indicator Lamp 84
Catalytic Converter 14 Low Engine Oil Level Warning Lamp 84
Starting and Turning Off the Engine 15 Engine Oil Consumption 84
Driving Instructions 16 Fuel Reserve and Fuel Cap Placement Warning Lamp 85
Climate Control 23 Outside Temperature Indicator 85
Basic Setting
Coolant Temperature Gauge
85
Heater 24 Low Engine Coolant Level Warning 86
Air conditioner 24 Brake Pad Wear Indicator Lamp 86
Special Setting
Tachometer
86
Defrosting Windshield 24
Seat Belt Warning Lamp 86
Defogging Windows 25
Brake Warning Lamp 87
Air Recirculation 25
Flexible Service System (FSS) 87
Rear Window Defroster 26
Antilock Brake System (ABS) 89
Vehicle Keys 26
Brake Assist System (BAS) 90
Start Lock-Out 27
Four Wheel Electronic Traction System (4-ETS) 91
Central Locking System 27
Electronic Brake Proportioning (EBP) 91
Remote Control Operation 28
Electronic Stability Program (ESP) 92
Doors 29
Emission Control 93
Central Locking Switch 30
On-Board Diagnostic System 93
Liftgate 30
Off-Road Driving 94
Antitheft Alarm System 31
Winter Driving 95
Tow-away Protection 31
Traveling Abroad 95
Glass Breakage Sensor 31
Snow Chains 95
Seats, Front
Trailer Towing 96
Manual Seats 32
Hood 102
Power Seats 33
Checking Coolant Level 103
Heated Seats 34
Adding Coolant 103
Split Rear Seat Bench 35
Checking Engine Oil Level 104
Third Row Seats 37
Automatic Transmission Fluid Level 105
Removable Cargo Floor Plates 38
Spare Wheel 105
Adjustable Steering Wheel 39
Vehicle Jack 107
Cup Holders 40
Wheel Bolt Wrench 107
Seat Belts and Supplemental Restraint System (SRS) 40
Screwdriver 107
Seat Belts 40
Wheels 108
BabySmart™ Airbag Deactivation System 45
Changing Wheels 110
Self Test 45
Tire Inflation Pressure 112
Emergency Tensioning Retractor (ETR) 46
Exterior Lamps 113
Airbags 47
Fuses 118
Child Restraint 51
Battery 119
Enlarged Cargo Area 53
Jump Starting 120
Cargo Tie-Down Rings 53
Towing the Vehicle 121
Hooks 53
Stranded Vehicle 122
Partition Net 54
Cleaning and Care of the Vehicle 123
Loading Instructions 55
Remote Control Battery Replacement 127
Cargo Area Cover Blind 56
Synchronizing 127
Steering Lock 57
Head Restraints, Removal 128
Exterior Lamp Switch 58
Manual Release of Fuel Filler Flap 129
Front Fog Lamp Switch 59
Emergency Operation Sliding/Pop-Up Roof 129
Windshield Wiper/Washer Switch 60
Sky View Top 130
Rear Window Wiper/Washer 60
Replacing Wiper Blades 131
First Aid Kit 61
Roof Rack 132
Inside Rear View Mirror 61
Mercedes-Benz Spare Parts Service 133
Exterior Rear View Mirrors 62
Layout of Poly-V-Belt Drive 133
Ashtrays 63
Identification Labels 136
Lighter 63
Warranty Coverage 137
Electrical Outlet 64
Technical Data
Sun Visors 64
ML 320 138
Illuminated Vanity Mirrors 64
ML 430 140
Interior Lighting 65
Fuels, Coolants, Lubricants etc. 142
Storage Compartments 66
Capacities 142
Sliding/Pop-Up Roof 67
Engine Oils 144
Skyview Top 67
Engine Oil Additives 144
Power Windows 68
Air Conditioner Refrigerant 144
Rear Quarter Windows 69
Brake Fluid 144
Garage Door Opener Holder 69
Fuel Requirements 145
Instrument Lamps 72
Gasoline Additives 145
Display Illumination 72
Coolants 146
Odometer/Trip Odometer 72
Consumer Information 147
Clock 72
Problems with your Vehicle 148

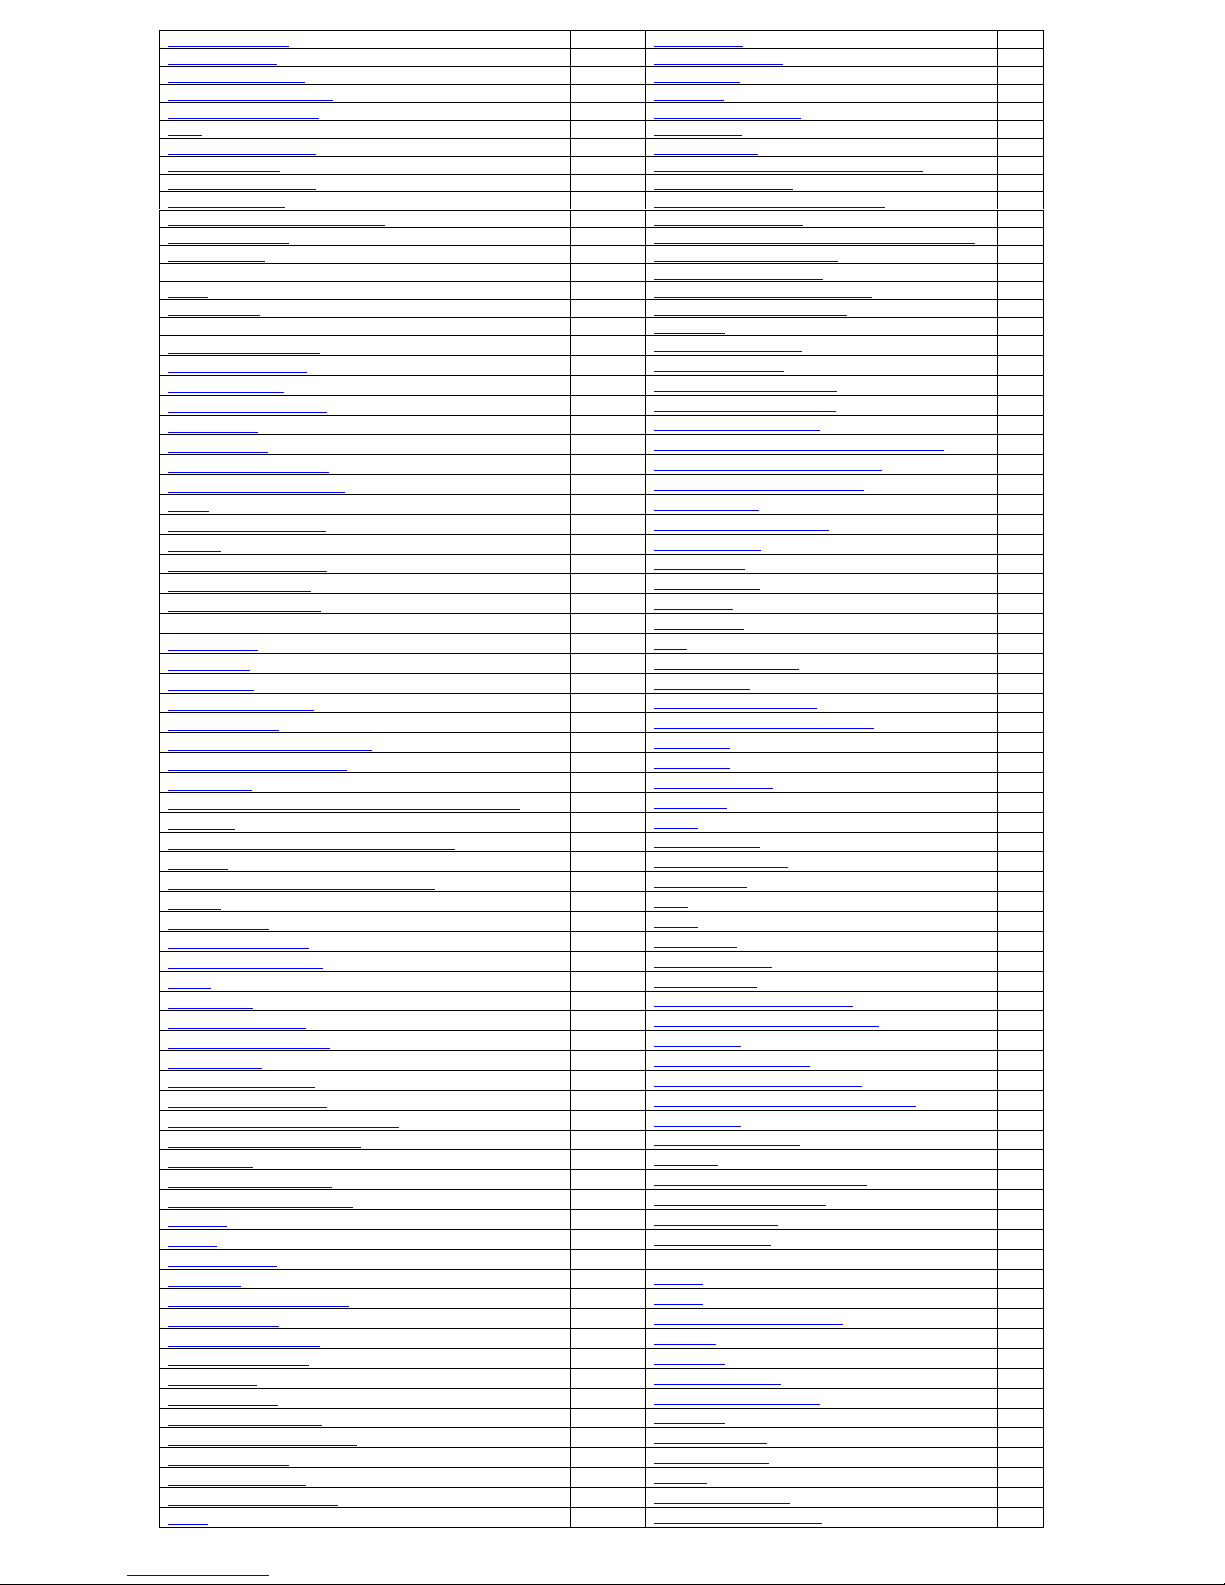
10
Instruments and Controls
20
Air recirculation switch
21
Air conditioner on/off switch
For more detailed descriptions see Index
For adjustment of air outlets, refer to Automatic Climate
Control (see Index).
22
Air volume control switch
1
Cup holder
23
Temperature selector switch
2
Parking brake release
24
Air distribution switch
3
Parking brake pedal
25
Driver seat heater switch
4
Steering wheel adjustment lever
26
Power window switch, rear compartment, left
5
Exterior lamp switch
27
Switch for rear window washer and wiper system
6
Cruise control switch
28
ESP control switch
7
Instrument cluster
29
Power window switch, rear compartment, right
8
Hazard warning flasher switch
30
Front passenger seat heater switch
9
Horn, airbag
31
Storage compartment
10
Steering lock with ignition starter switch
32
Selector lever
11
Windshield wiper/washer switch
33
Ashtray with lighter
12
Transmission control - LOW RANGE mode
34
Power window switch, left front door
13
Indicator lamp for antitheft alarm system
35
Central locking switch
14
Auxiliary front fog lamp/rear fog lamp switch
36
Rear window defroster switch
15
Radio
37
Power window switch, right front door
16
Storage compartment
38
Power window switch, left rear door
17
Glove box (illuminated with key in steering lock position 1 or 2)
39
Mirror adjustment switch
18
Cup holder
40
Power window lockout switch, rear doors
19
Storage compartment
41
Power window switch, right rear door
11
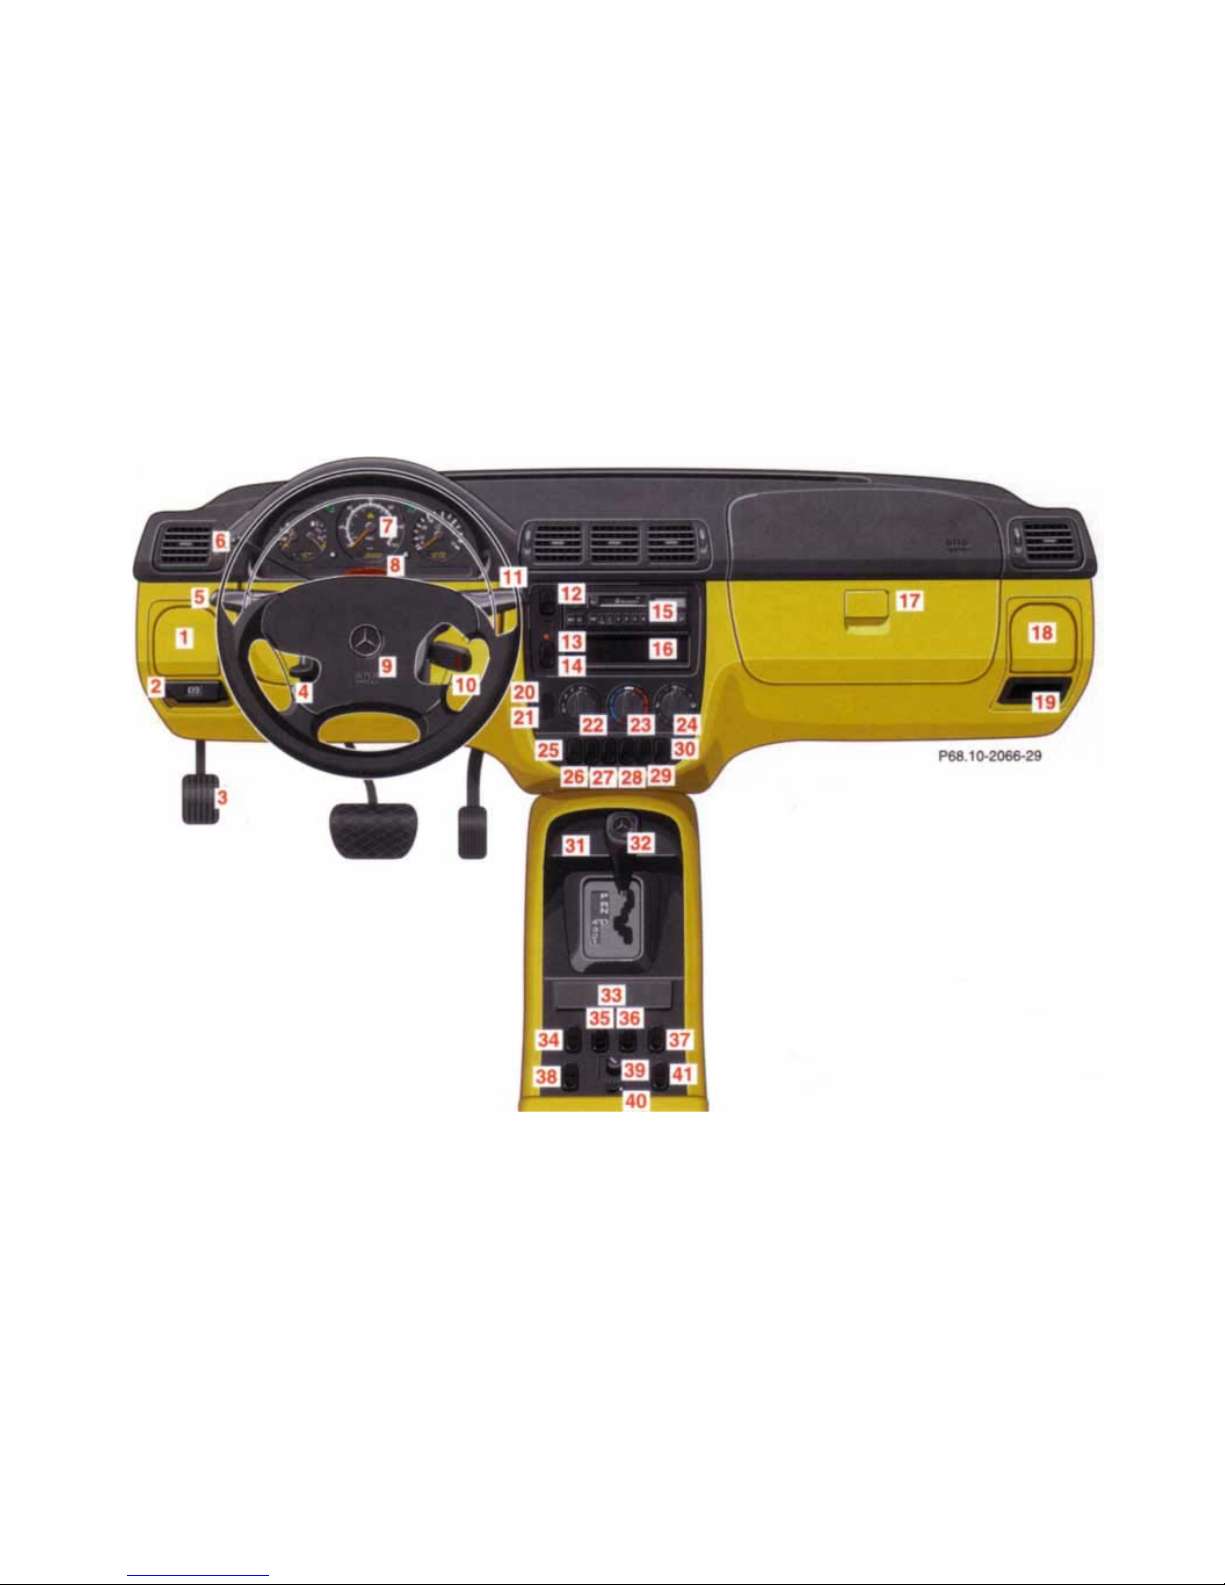
12
5 Knob for odometer/trip odometer
6
readout/reset, FSS indicator, and
intensity of instrument lamps.
ETS warning lamp
7 Speedometer
8 Trip odometer.
Main odometer,
FSS display, or
Engine oil level indicator
9 Right turn signal indicator
lamp(green)
10 Knob for setting clock. See Index
Instrument Cluster
1112Tachometer. See Index
Clock. See Index
1
Coolant temperature gauge. See
Index
3 Fuel gauge with reserve warning lamp
(yellow). See Index
2 Outside temperature
indicator,(optional). See Index
4
Left turn signal indicator lamp(green)

13
Indicator Lamp Symbols
Function Indicator Lamp
High beam Brake fluid low,
EBP malfunction,
Parking brake engaged. See Index
Warning Lamps
(should go out with the engine running)
Steering wheel adjustment not locked. See Index
BAS malfunction. See Index
ESP malfunction. See Index
Fasten seat belts. See Index
ETS malfunction. See Index
Airbag Off. See Index
ABS malfunction. See Index
Fog lamp (if so equipped). See Index
Brake pads worn down. See Index
Battery not being charged properly. See Index
Engine oil level low. See Index SRS malfunction. See Index
Transmission in LOW RANGE mode. See Index
ESP and ETS.
Adjust driving to road condition.
See Index
Coolant level low. See Index
If the lamp comes on when the engine is running, it
indicates a malfunction of the fuel injection system
or emission control system, or the fuel cap is not
closed tight. In all cases, we recommend that you
have the malfunction checked as soon as possible.
See Index

14
Catalytic Converter
Your Mercedes-Benz is equipped with monolithic type catalytic converters, an important element in conjunction with the oxygen
sensors to achieve substantial control of the pollutants in the exhaust emissions. Keep your vehicle in proper operating condition by
following our recommended maintenance instructions as outlined in your Service Booklet.
Caution!
To prevent damage to the catalytic converters, use only premium unleaded gasoline in this vehicle.
Any noticeable irregularities in engine operation should be repaired promptly. Otherwise, excessive unburned fuel may reach the
catalytic converter causing it to overheat, which could start a fire
Warning!
As with any vehicle, do not idle, park or operate this vehicle in areas where combustible materials such as grass, hay or
leaves can come into contact with the hot exhaust system, as these materials could be ignited and cause a vehicle fire.

15
Starting and Turning Off the Engine
Before Starting
Ensure that parking brake is engaged and that gear selector lever is in position "P" or "N". Turn key in steering lock to position 2.
The charge indicator lamp should come on.
Starting
Do not depress accelerator.
Briefly turn key in steering lock clockwise to the stop and release. The starter will engage until the engine is running.
If engine will not run, and the starting procedure stops, turn key completely to the left and repeat starting the engine.
After several unsuccessful attempts, have the system checked at the nearest authorized Mercedes-Benz light truck dealer.
A starting procedure can be interrupted by turning the key to steering lock position 0.
Important!
Due to the installed starter non-repeat feature, the key must be turned completely to the left before attempting to start the engine
again.
Turning Off
Turn the electronic key in the steering lock to position 0 to stop the engine.
The electronic key can only be removed with your foot off the brake pedal and the selector lever in position "P".

16
Driving Instructions
Warning!
If you feel a sudden significant vibration or ride disturbance, or you suspect that possible damage to your vehicle has
occurred, you should turn on the hazard warning flashers, carefully slow down, and drive with caution to an area which is a
safe distance from the roadway. Inspect the tires and under the vehicle for possible damage. If the vehicle or tires appear
unsafe, have it towed to the nearest Mercedes-Benz or tire dealer for repairs.
Power Assistance
Warning!
When the engine is not running, the brake and steering systems are without power assistance. Under these circumstances, a
much greater effort is necessary to stop or steer the vehicle.
Brakes
Warning!
After driving in heavy rain for some time without applying the brakes or through water deep enough to wet brake
components, the first braking action may be somewhat reduced and increased pedal pressure may be necessary. Be sure to
maintain a safe distance from vehicles in front. Resting your foot on the brake pedal will cause excessive and premature
wear of the brake pads. It can also result in the brakes overheating thereby significantly reducing their effectiveness. It may
not be possible to stop the vehicle in sufficient time to avoid an accident.
The condition of the parking brake system is checked each time the vehicle is in the shop for the required service.
If the parking brake is released and the brake warning lamp in the instrument cluster stays on and there is not audible warning
(EBP), the brake fluid level in the reservoir is too low. Brake pad wear or a leak in the system may be the reason for low brake fluid
in the reservoir. Have the brake system inspected at an authorized Mercedes-Benz light truck dealer immediately.
All checks and service work on the brake system should be carried out by an authorized Mercedes-Benz light truck dealer.
Install only brake pads and brake fluid recommended by Mercedes-Benz.
Warning!
If other than recommended brake pads are installed, or other than recommended brake fluid is used, the braking
properties of the vehicle can be degraded to an extent that safe braking is substantially impaired. This could result in an
accident.
17
Caution!
When driving down long and steep
grades, relieve the load on the brakes
by shifting into a lower gear to use the
engine's braking power. This helps
prevent overheating of the brakes and
reduces brake pad wear.
After hard braking, it is advisable to
drive on for some time, rather than
immediately parking, so the air stream
will cool down the brakes faster.
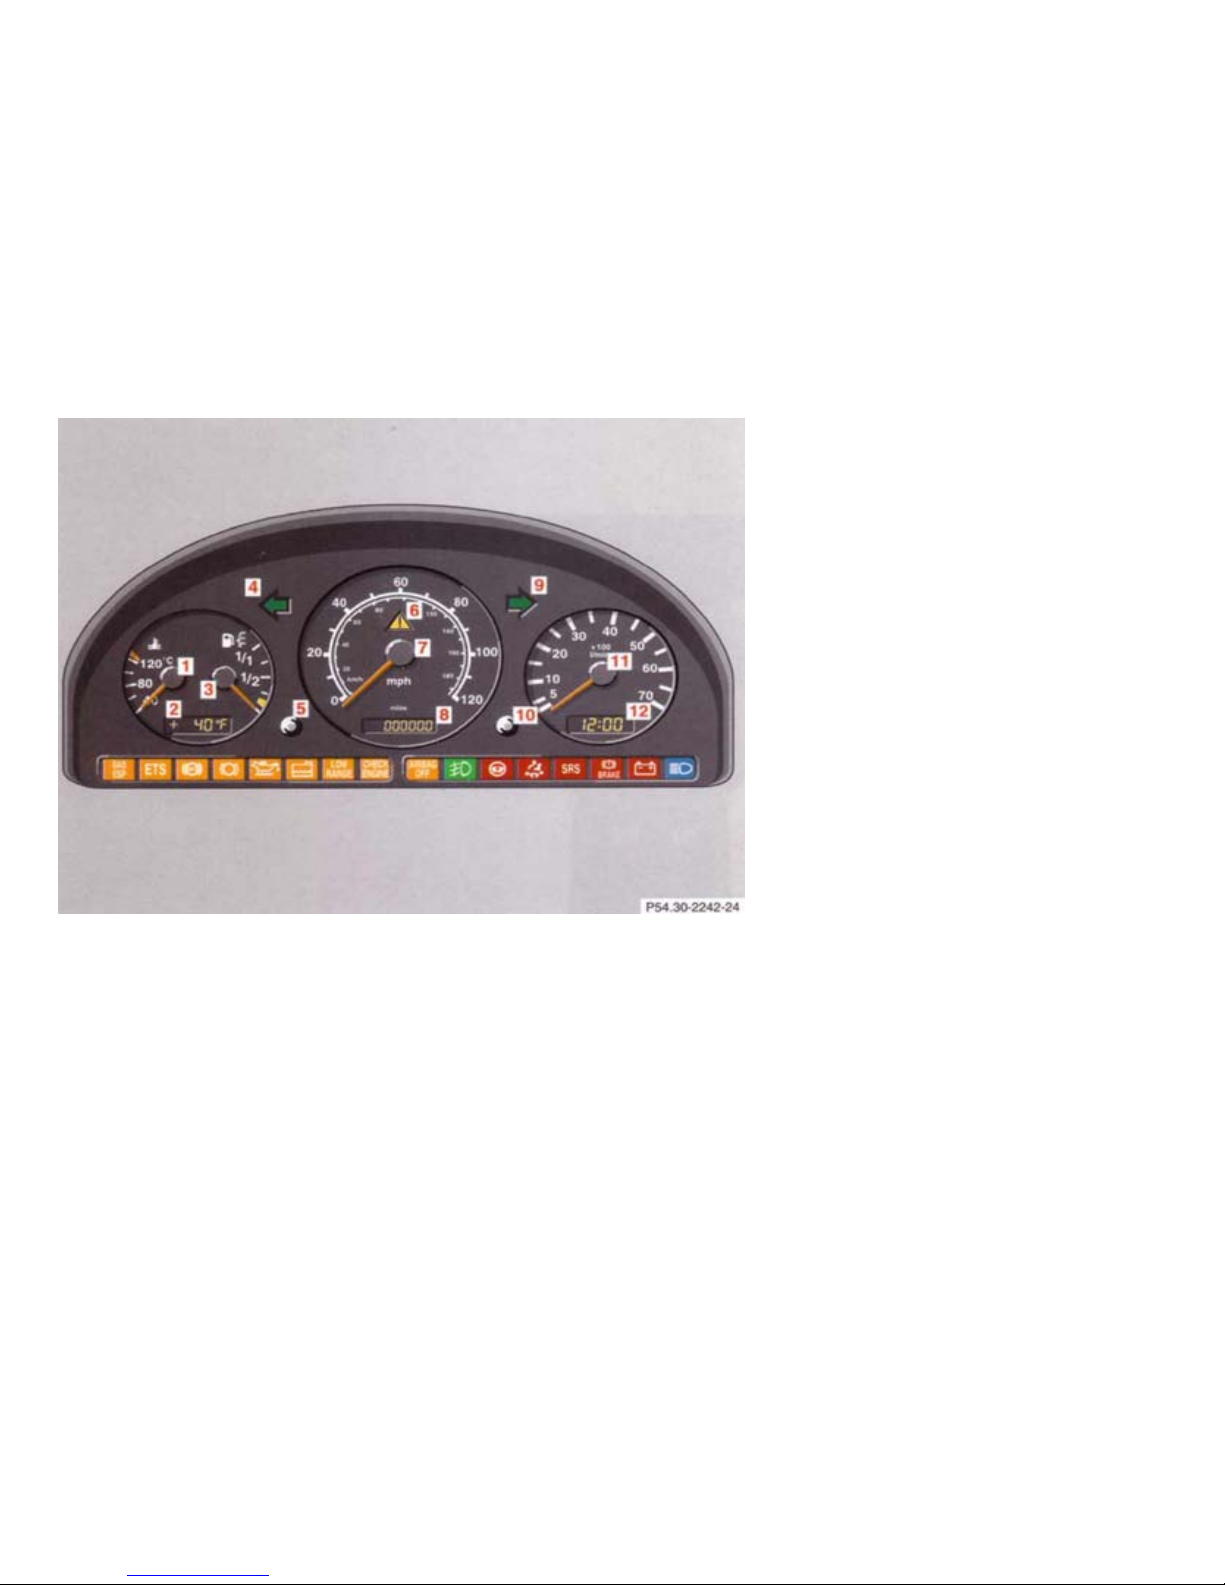
Tires
Tread wear indicators (TWI) are
required by law. These indicators are
located in six places on the tread
circumference and become visible at a
tread depth of approximately1/16in
(1.5 mm), at which point the tire is
considered worn and should be
replaced.
The tread wear indicator appears as a
solid band across the tread.
Warning!
Do not allow your tires to wear down
too far. As tread depth approaches
1
/16in (1.5 mm), the adhesion
properties on a wet road are sharply
reduced.
Depending upon the weather and/or
road surface (conditions), the tire
traction varies widely.
Specified tire pressures must be
maintained. This applies particularly if
the tires are subjected to high loads
(e.g. high speeds, heavy loads, high
ambient temperatures).
Warning!
Do not drive with a flat tire. A flat
tire affects the ability to steer or
brake the vehicle. You may lose
control of the vehicle. Continued
driving with a flat tire or driving at
high speed with a flat tire will cause
excessive heat build-up and possibly
a fire.
Aquaplaning
Depending on the depth of the water
layer on the road, aquaplaning may
occur, even at low speeds and with
new tires. Reduce vehicle speed, avoid
track grooves in the road and apply
brakes cautiously in the rain.

18
Tire Traction
The safe speed on a wet, snow covered
or icy road is always lower than on a dry
road.
You should pay particular attention to
the condition of the road whenever the
outside temperatures are close to the
freezing point.
Warning!
If ice has formed on the road, tire
traction will be substantially
reduced. Under such weather
conditions, drive, steer and brake
with extreme caution.
We recommend M+S rated radial-ply
tires for the winter season for all four
wheels to insure normal balanced
handling characteristics. On packed
snow, they can reduce your stopping
distance as compared with summer
tires. Stopping distance, however, is still
considerably greater than when the road
is not snow or ice covered.
Tire Speed Rating
Your vehicle is factory equipped with
"T"-rated tires, which have a European
speed rating of 118 mph (190 km/h).
Despite the tire rating, local speed limits
should be obeyed. Use prudent driving
speeds appropriate to prevailing
conditions.
Warning!
Even when permitted by law, never
operate a vehicle at speeds greater
than the maximum speed rating of
the tires.
Exceeding the maximum speed for
which tires are rated can lead to
sudden tire failure causing loss of
vehicle control and resulting in
personal injury and possible death.
Parking
Warning!
To reduce the risk of personal injury
as a result of vehicle movement,
before turning off the engine and
leaving the vehicle always:
1. Keep right foot on brake pedal.
2. Firmly depress parking brake
pedal.
3. Move the selector lever to
position "P".
4. Slowly release brake pedal.
5. Turn front wheels towards the
road curb.
6. Turn the electronic key to
steering lock position 0 and
remove.
7. Take the electronic key and lock
vehicle when leaving.
Important!
It is advisable to set the parking brake
whenever parking or leaving the vehicle.
In addition, move selector lever to
position "P".
When parking on hills, always set the
parking brake.

19
Winter Driving Instructions
The most important rule for slippery or
icy roads is to drive sensibly and to
avoid abrupt acceleration, braking and
steering maneuvers. Do not use the
cruise control system under such
conditions.
When the vehicle is in danger of
skidding, move selector lever to
position "N". Try to keep the vehicle
under control by corrective steering
action.
Caution!
Do not use LOW RANGE mode when
driving on ice or packed snow. At speeds
below 12 mph (20 km/h) vehicle steering
is adversely affected by the LOW
RANGE ABS.
Road salts and chemicals can adversely
affect braking efficiency. Increased
pedal force may become necessary to
produce the normal brake effect. We
therefore recommend depressing the
brake pedal periodically when traveling
at length on salt-strewn roads. This can
bring road salt impaired braking
efficiency back to normal.
A prerequisite is, however, that this be
done without endangering other drivers
on the road. If the vehicle is parked
after being driven on salt treated roads,
the braking efficiency should be tested
as soon as possible after driving is
resumed while observing the safety
rules in the previous paragraph.
Warning!
If the vehicle becomes stuck in snow,
make sure that snow is kept clear of
the exhaust pipe and from around
the vehicle with engine running.
Otherwise, deadly carbon monoxide
(CO) gases may enter vehicle interior
resulting in unconsciousness and
death.
To assure sufficient fresh air
ventilation, open a window slightly
on the side of the vehicle not facing
the wind.
Deep Water
Caution!
Do not drive through flooded areas or
water of unknown depth. Before driving
through water, determine its depth. It
should not be deeper than approximately
20 inches (50 cm).
If you must drive through deep water,
drive slowly to prevent water from
entering the engine compartment or
passenger compartment, or being
ingested by the air intake, possibly
causing damage to electrical
components or wiring, to engine or
transmission that is not covered by the
Mercedes-Benz Limited Warranty.
Passenger Compartment
Warning!
Always fasten items being carried as
securely as possible.
In an accident, during hard braking
or sudden maneuvers, loose items
will be thrown around inside the
vehicle, and cause injury to vehicle
occupants unless the items are
securely fastened in the vehicle.

20

21
Operation
22

23
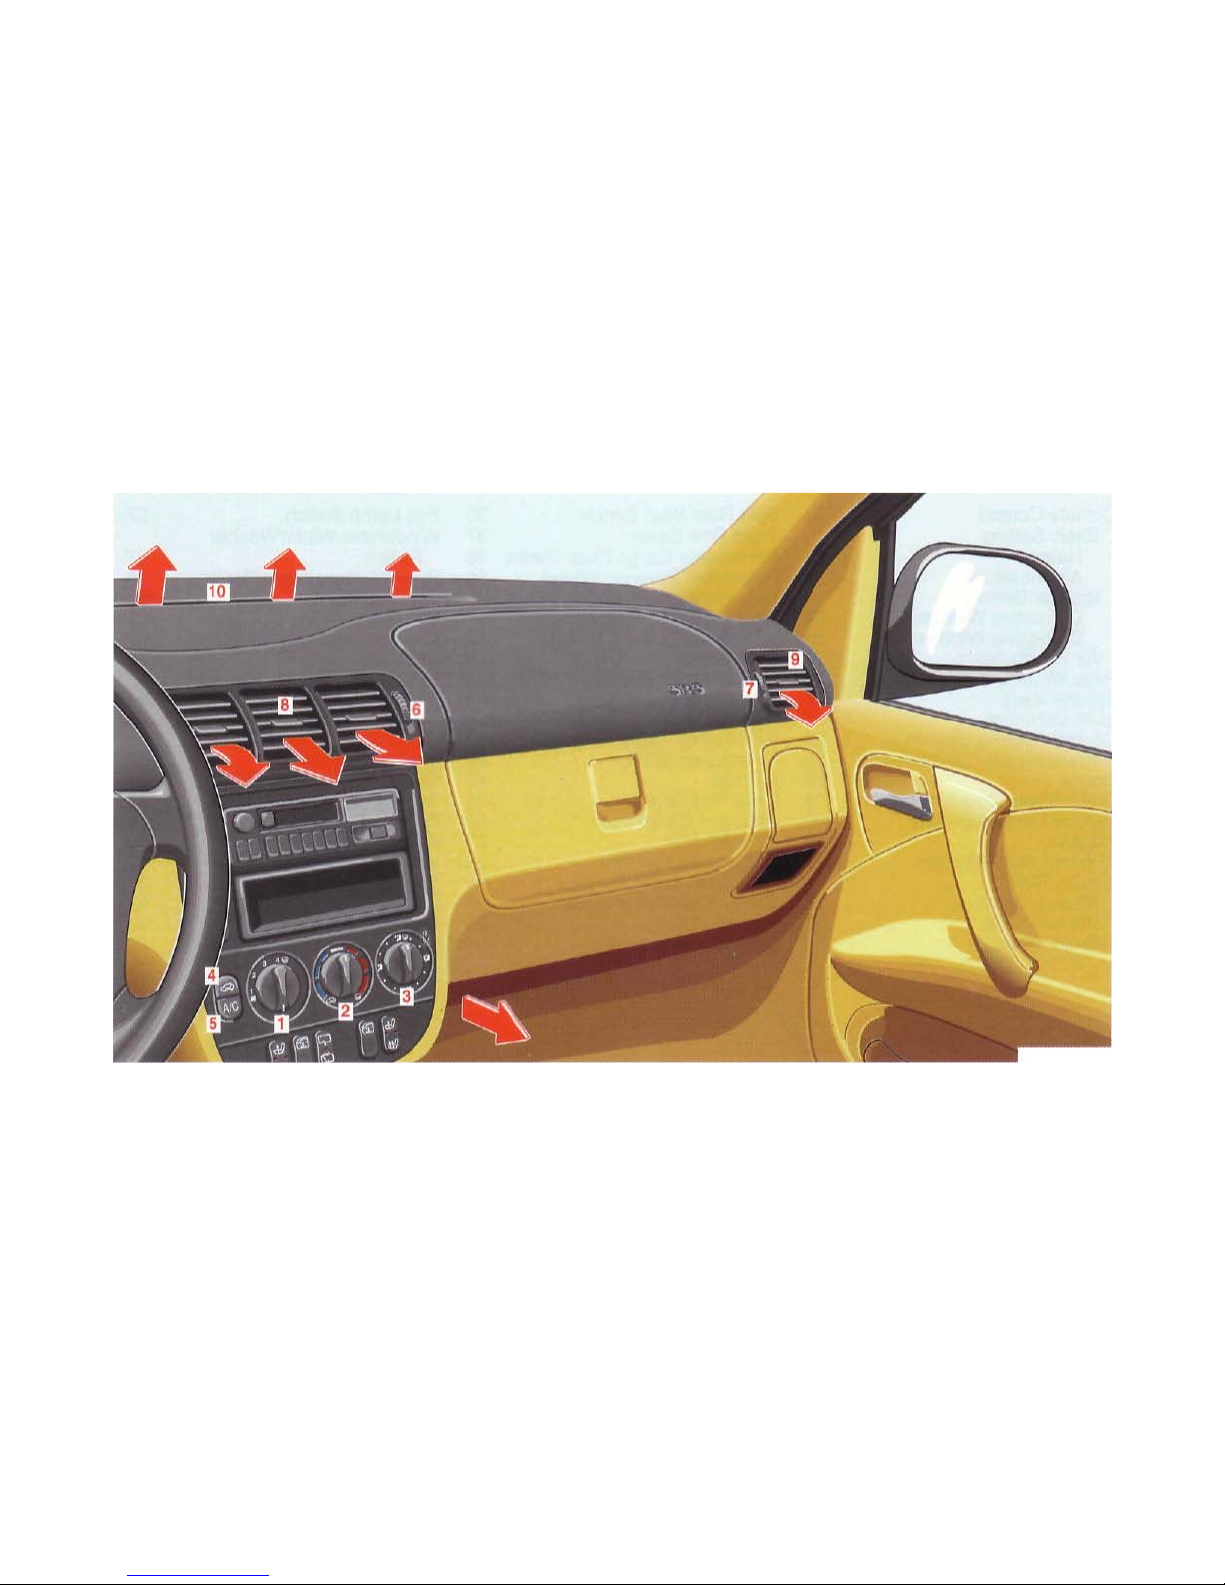
Climate Control
1 Air volume control switch
2 Temperature selector switch
3 Air distribution switch
4 Air recirculation
5 Air conditioning mode
6 Air volume control for center air outlets, turn wheel up to open.
7 Air volume control for side air outlet, turn wheel up to open.
8 Center air outlets, adjustable
9 Side air outlets, adjustable
10 Windshield air outlets
The air conditioning mode only operates with the button pushed, the air volume control switch set to position 1 to 4, and the
engine running.
To quickly cool down the passenger compartment, turn temperature selector switch fully to the left to position .
Turn temperature selector to maintain desired temperature.
The air conditioning mode removes considerable moisture from the air during operation in the cooling mode. It is normal for
water to drip on the ground through ducts in the underbody.
Important!
This vehicle is equipped with an air conditioner system that uses R-134a (HFC: hydrofluorocarbon) as a refrigerant. Repairs
should always be performed by a qualified technician, and refrigerant should be collected in a recovery system for recycling.
Note:
For the air flow-through system to function properly, the air vents, located in the left and right side rear passenger compartment
trim panel covers, should be kept unobstructed.
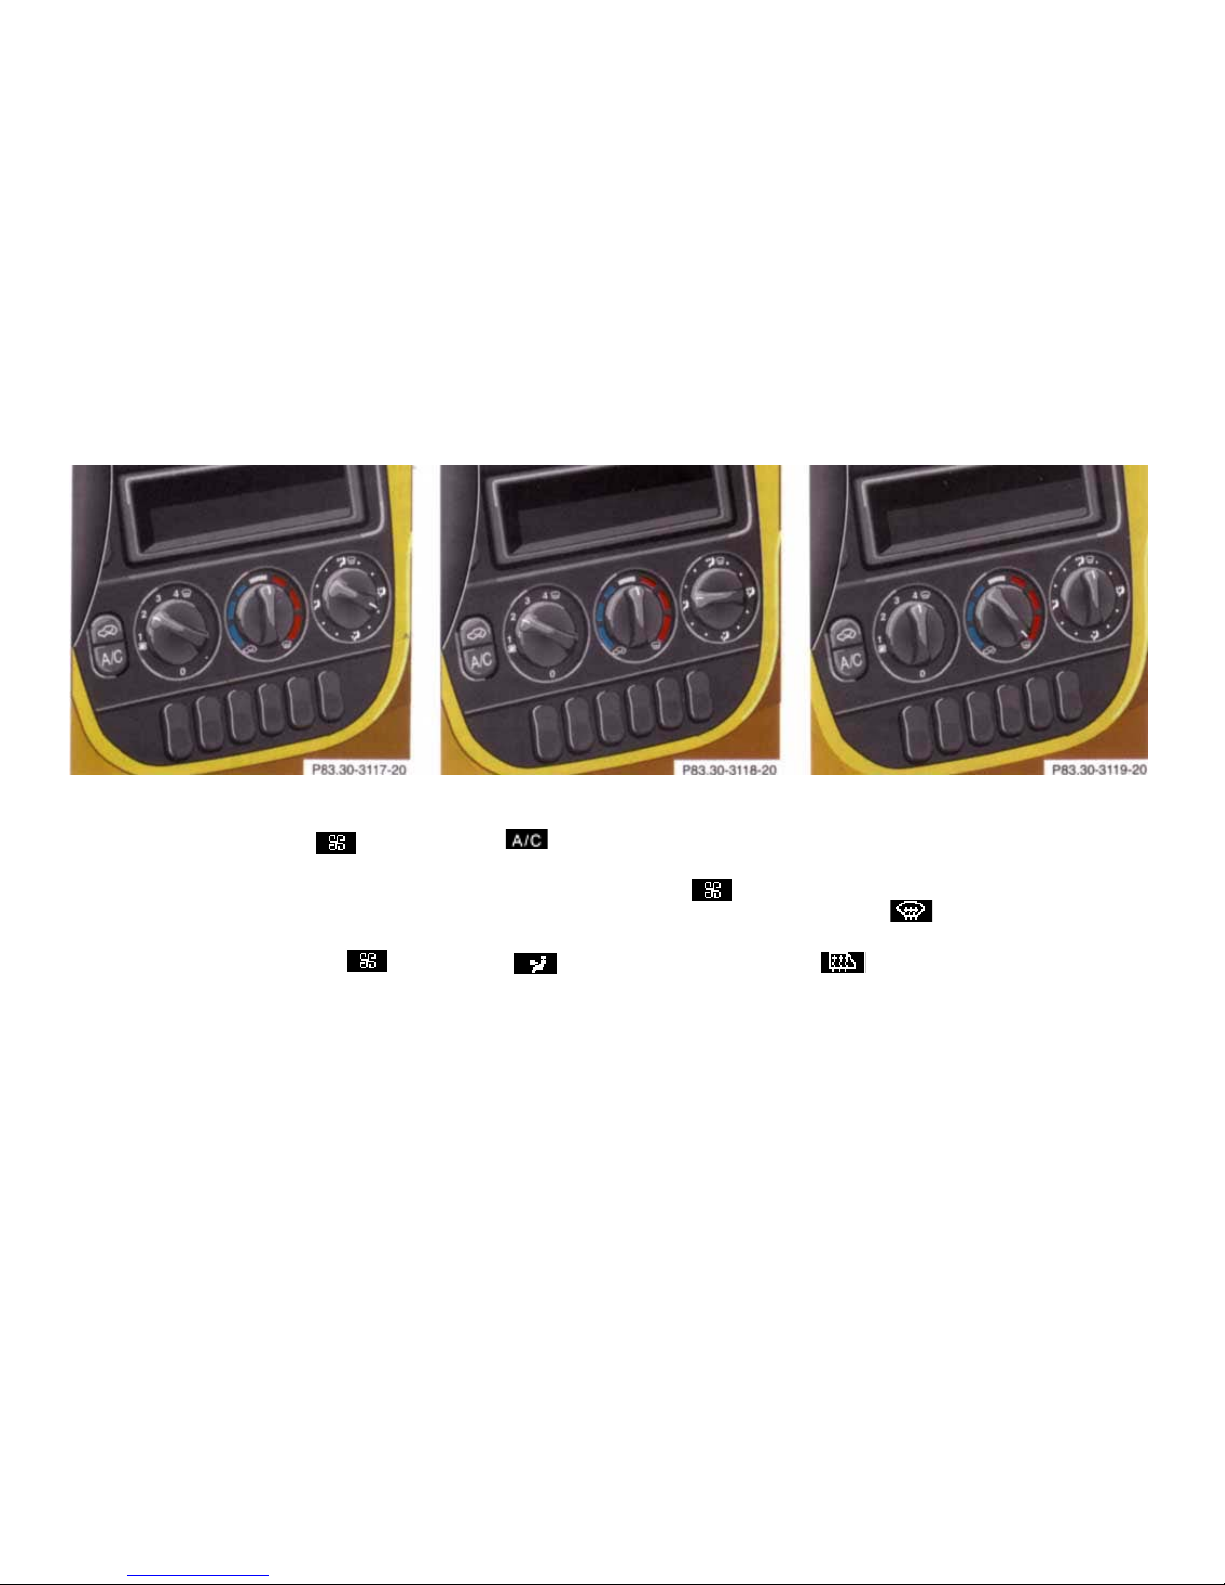
24
Basic Setting - Heater
Select temperature.
Select air volume with control
switch, set at least to position 2 to prevent
windows from fogging up.
Set air distribution control switch to
position shown above.
Turn side air outlets (7) to position
to open left and right side air outlets (9).
Adjust air outlets upward.
Open center air outlets as desired.
Basic Setting - Air Conditioner
Switch on air conditioner with
control
.
Select temperature.
Select air volume with control
switch, set at least to position 1.
Set air distribution control switch to
position
Open side air outlets.
Open center air outlets
Special Setting
(use only for short duration)
Defrosting Windshield
Set temperature selector and switches for
air volume and air distribution to
position
Turn side air outlets (7) to position
to open left and right side air
outlets (9). Adjust air outlets upward.
Close center air outlets.
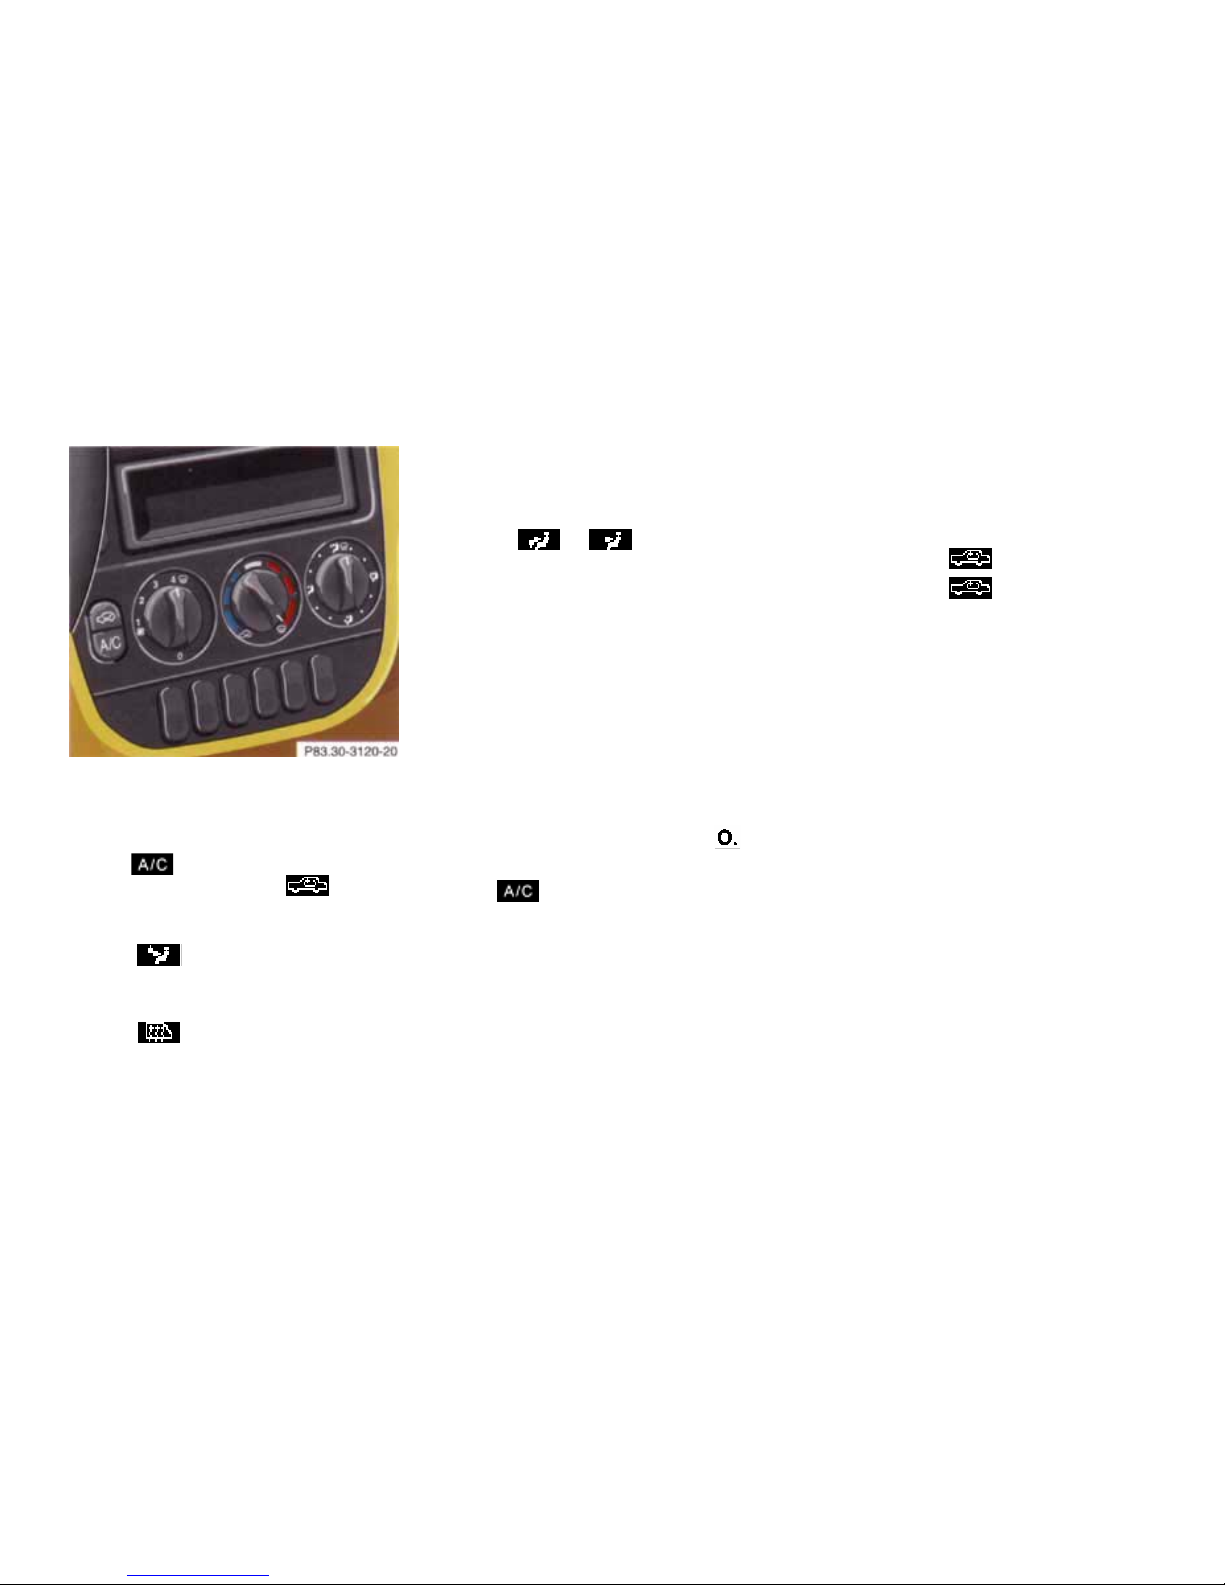
25
Windshield fogged up on outside.
Switch on wiper motor.
Set air distribution control switch to
position or
Dust Filter
Nearly all dust particles and pollen are
filtered out before outside air enters the
passenger compartment through the air
distribution system.
Note:
Keep the air intake grille in front of
windshield free of snow and debris.
Air Recirculation
This mode can be selected to
temporarily reduce the entry of annoying
odors or dust into the vehicle's interior.
To select, press button,
To cancel, press button again
Outside air is not supplied to the
vehicle's interior.
If the windows should fog up from the
inside, switch from recirculated air back
to fresh air.
Defogging Windows
Windows fogged up on inside.
Switch on air conditioning mode with
control .
Switch off air recirculation
Control lamp goes out.
Set air distribution control switch to
position
Increase air volume with control switch.
Turn side air outlets wheels (7) to
position
.
Close center air outlets.
Climate Control - OFF
To switch the climate control off, set air
volume control switch to position
Switch off air conditioning
Mode . Control lamp goes out
26
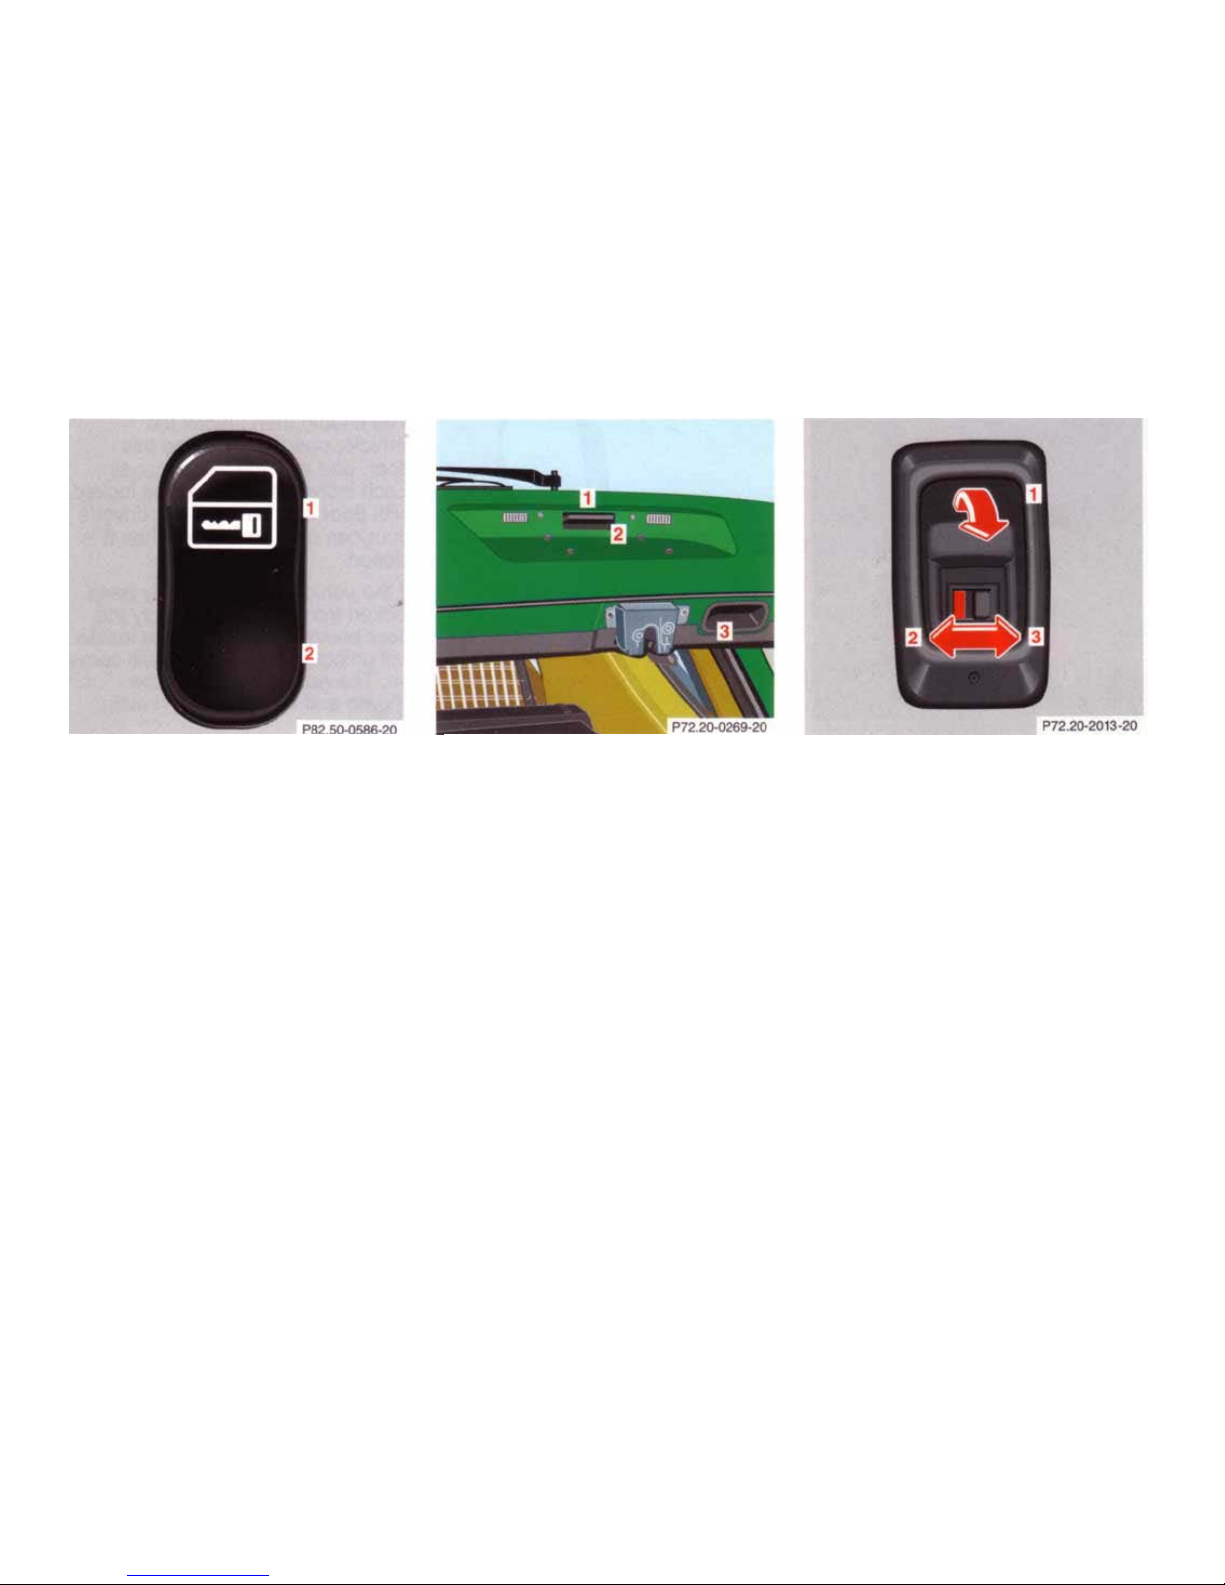
Rear Window Defroster
The switch is located on the center
console.
With the engine running, press switch.
Indicator lamp comes on.
To cancel, press switch again. Indicator
lamp goes out.
Notes:
Heavy accumulation of snow and ice
should be removed before activating
the defroster.
The rear window defroster uses a large
amount of power. To keep the battery
drain to a minimum, turn off the
defroster as soon as the window is
clear.
The defroster is automatically turned
off after approximately 10 minutes of
operation.
If several power consumers are turned
on simultaneously, or the battery is
only partially charged, it is possible
that the defroster will automatically
turn itself off (indicator lamp goes out),
or not switch on at all (indicator lamp
does not come on).
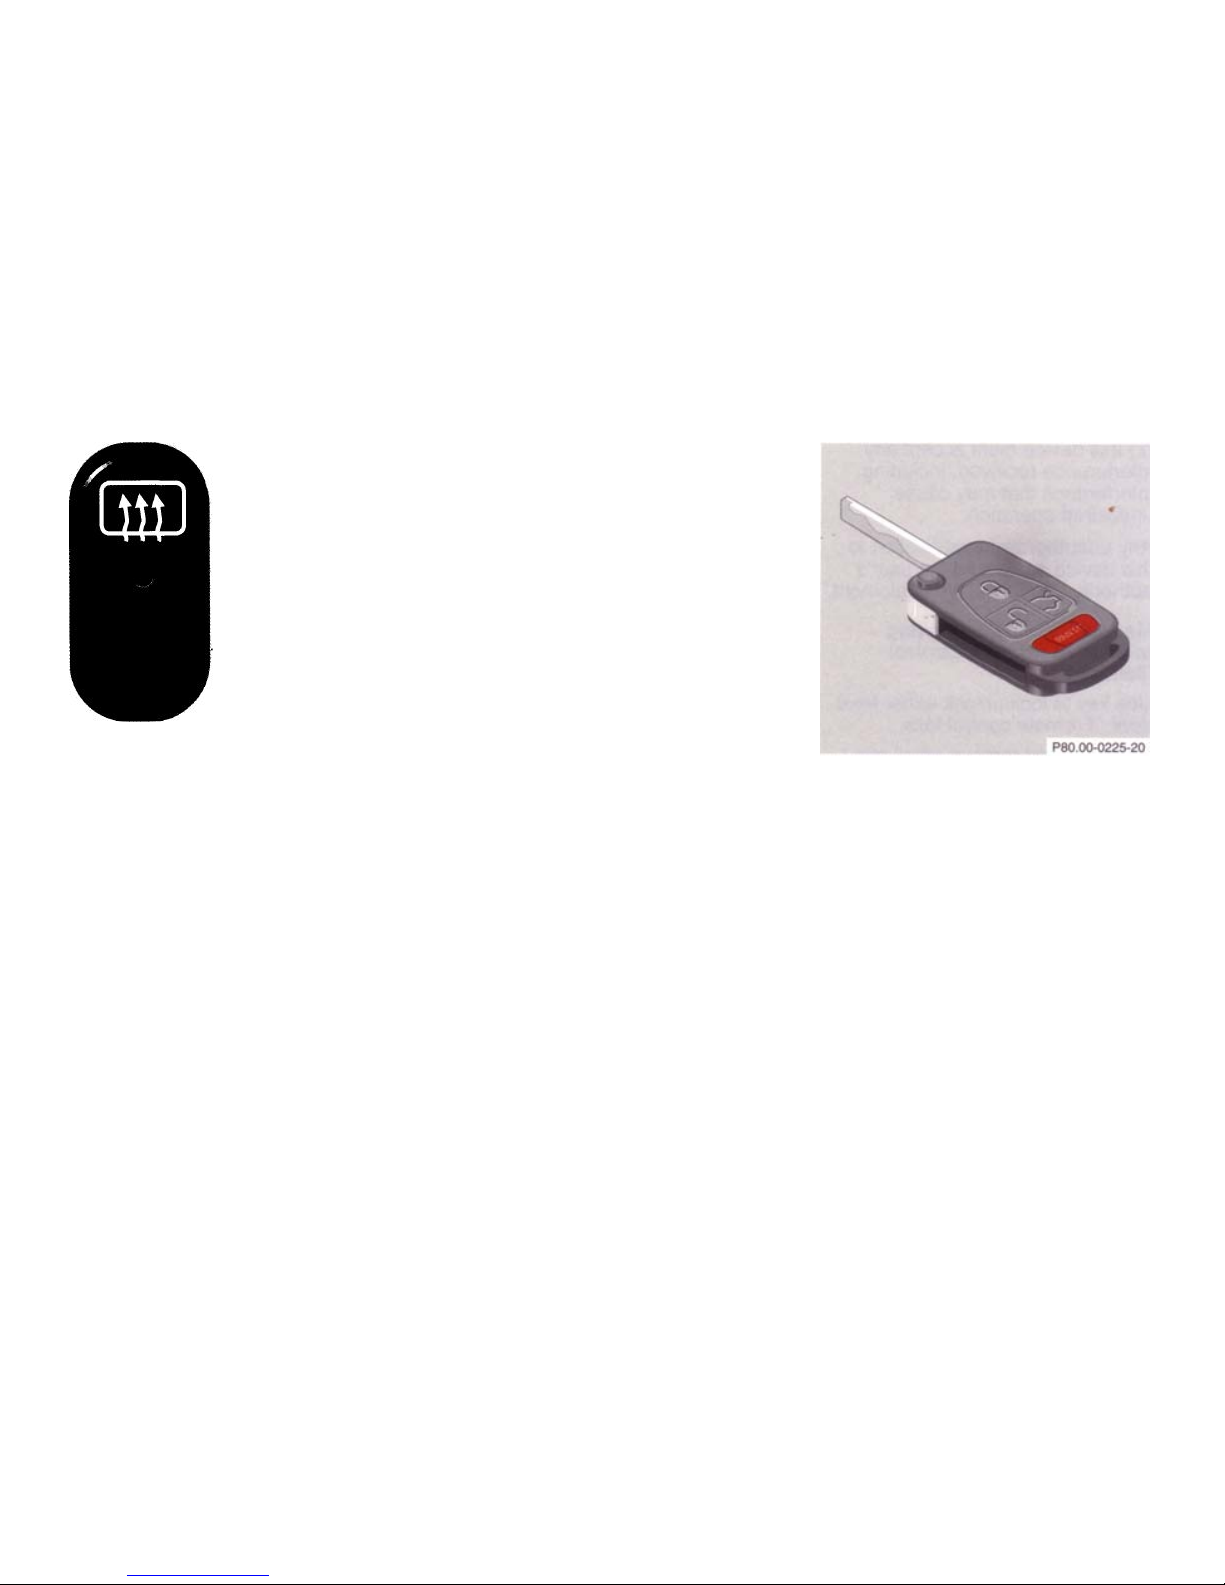
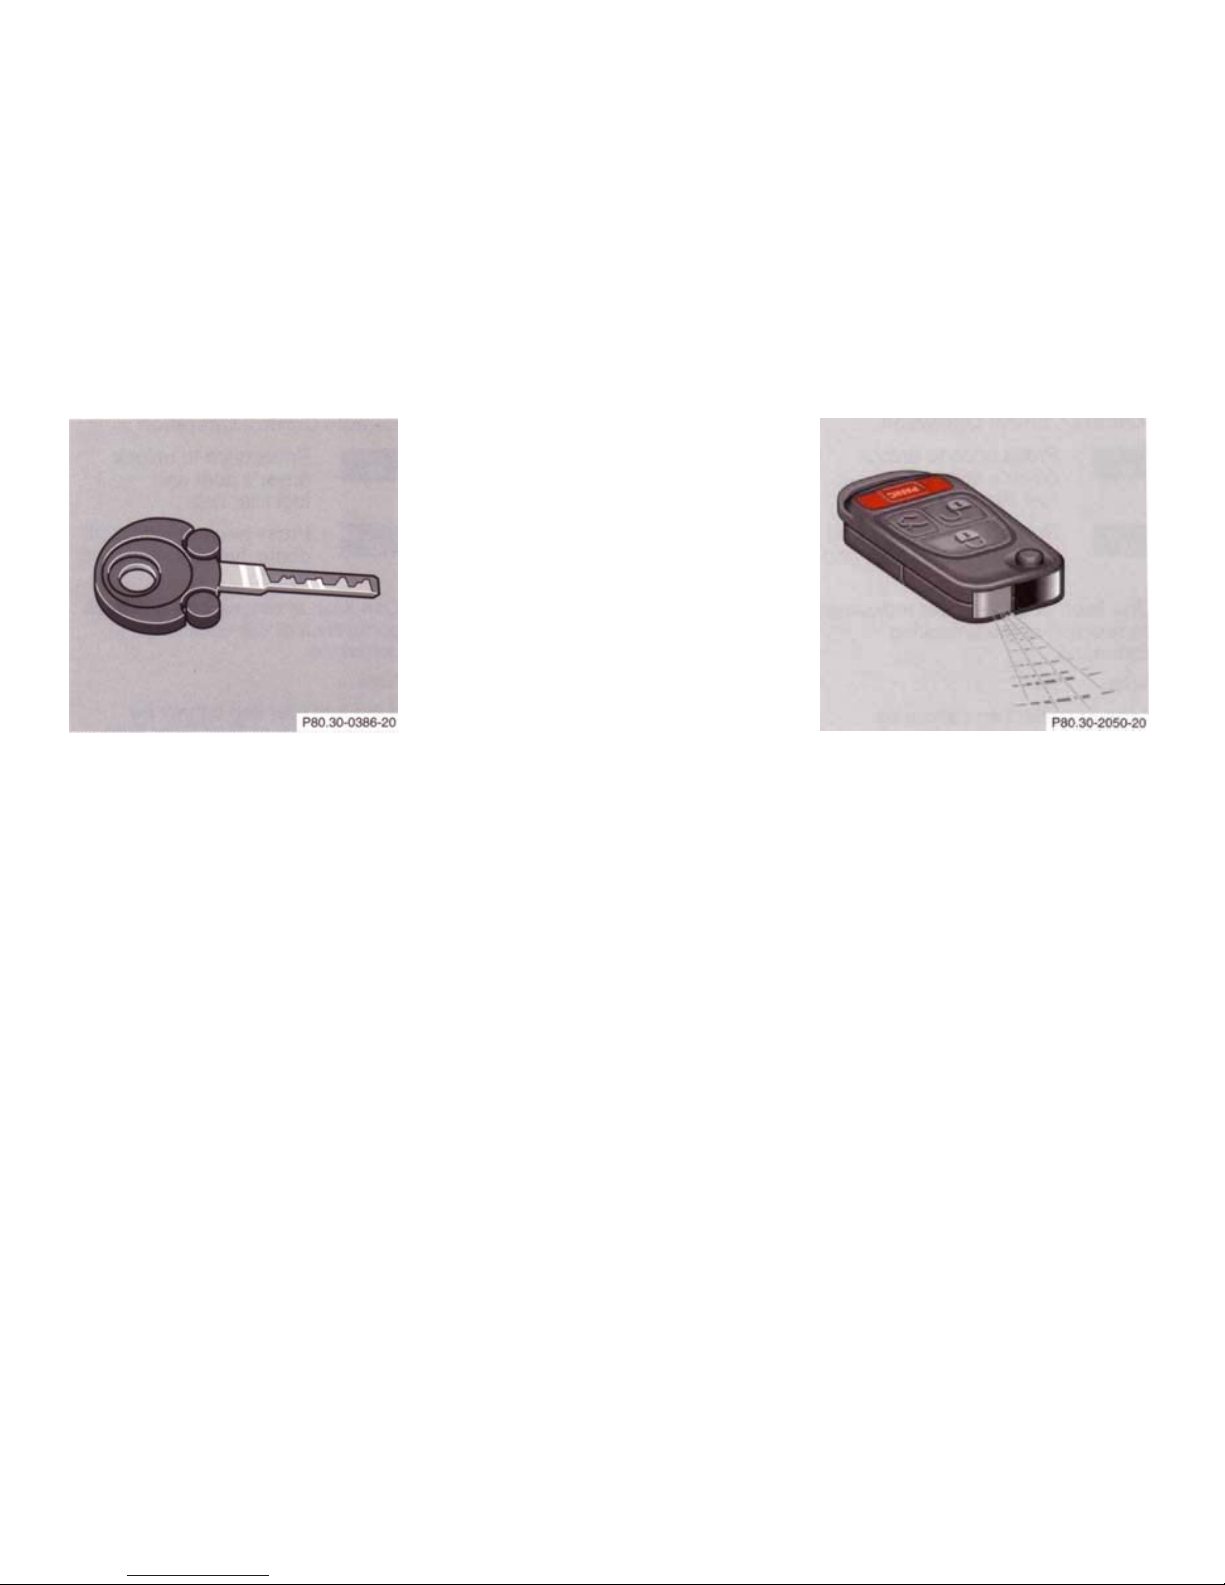
Vehicle Keys
Included with your vehicle are:
• 2 remote controls with folding key,
• 1 reserve key.
Note:
We recommend that you carry the
reserve key with you and keep it in a
safe place (e.g. your wallet) so that it is
always handy. Never leave the reserve
key in the vehicle.
27
Obtaining Replacement Keys
Your vehicle is equipped with a theft
deterrent locking system requiring a
special key manufacturing process. For
security reasons, replacement keys can
only be obtained from your authorized
Mercedes-Benz light truck dealer.
Start Lock-Out
Important!
Removing the key from the steering
lock activates the start lock-out.
The engine cannot be started.
Turning the key in the steering lock to
position 2 deactivates the start lockout.
Note:
In case the engine cannot be started,
the system is not operational. Contact
an authorized Mercedes-Benz dealer or
call 1-800-FOR-MERCedes.
Warning!
When leaving the vehicle always
remove the key from the steering
lock. Do not leave children
unattended in the vehicle, or with
access to an unlocked vehicle.
Unsupervised use of vehicle
equipment may cause serious
personal injury.
Central Locking System
Due to the extended operational range
of the remote control, it could be
possible to unintentionally lock or
unlock the vehicle by pressing the
transmit button.
The locking or unlocking is indicated
by the turn signals flashing once.

28
Remote Control Operation
Press once to unlock driver's door and fuel filler flap.
Press twice to unlock all doors, fuel filler flap, and liftgate.
One flash of turn signals indicates completion of the unlocking command.
Note:
If the fuel filler flap cannot be opened, refer to Fuel Filler Flap, Manual Release (see Index). After unlocking the vehicle,
if neither door nor liftgate is opened within approximately one minute, the vehicle is automatically locked again.
Press once to lock all doors, fuel filler flap, and liftgate.
One flash of turn signals indicate that the vehicle is locked and the Antitheft Alarm is activated.
Press to unlock liftgate.
Important!
A minimum height clearance of 7 ft (2.15 m) is required for the liftgate to swing open.
Press panic button for approximately one second to activate the visual and audible alarm.
Notes:
The alarm can be cancelled by pressing the lock, unlock or liftgate button for approximately one second, or by inserting and turning
key in steering lock to position 1. If key is inserted in steering lock, the vehicle cannot be locked or unlocked with the remote control.
In case the remote control fails, check its batteries. Refer to Index for Battery, remote control. This devise complies with Part 15 of
the FCC Rules. Operation is subject to the following two conditions:
(1) This device may not cause harmful interference, and
(2) this device must accept any interference received, including interference that may cause undesired operation.
Any unauthorized modification to this device could void the user's authority to operate the equipment.
Manual Locking/Unlocking in Case of Remote Control Malfunction
Use key to lock/unlock either front door, if remote control fails. To do so, first remove small cap from door lock.
Note:
Use of key does not arm or disarm the antitheft alarm system.
The alarm sounds when unlocking the door. Cancel alarm by turning key in steering lock to position 1, or with the remote control.
29
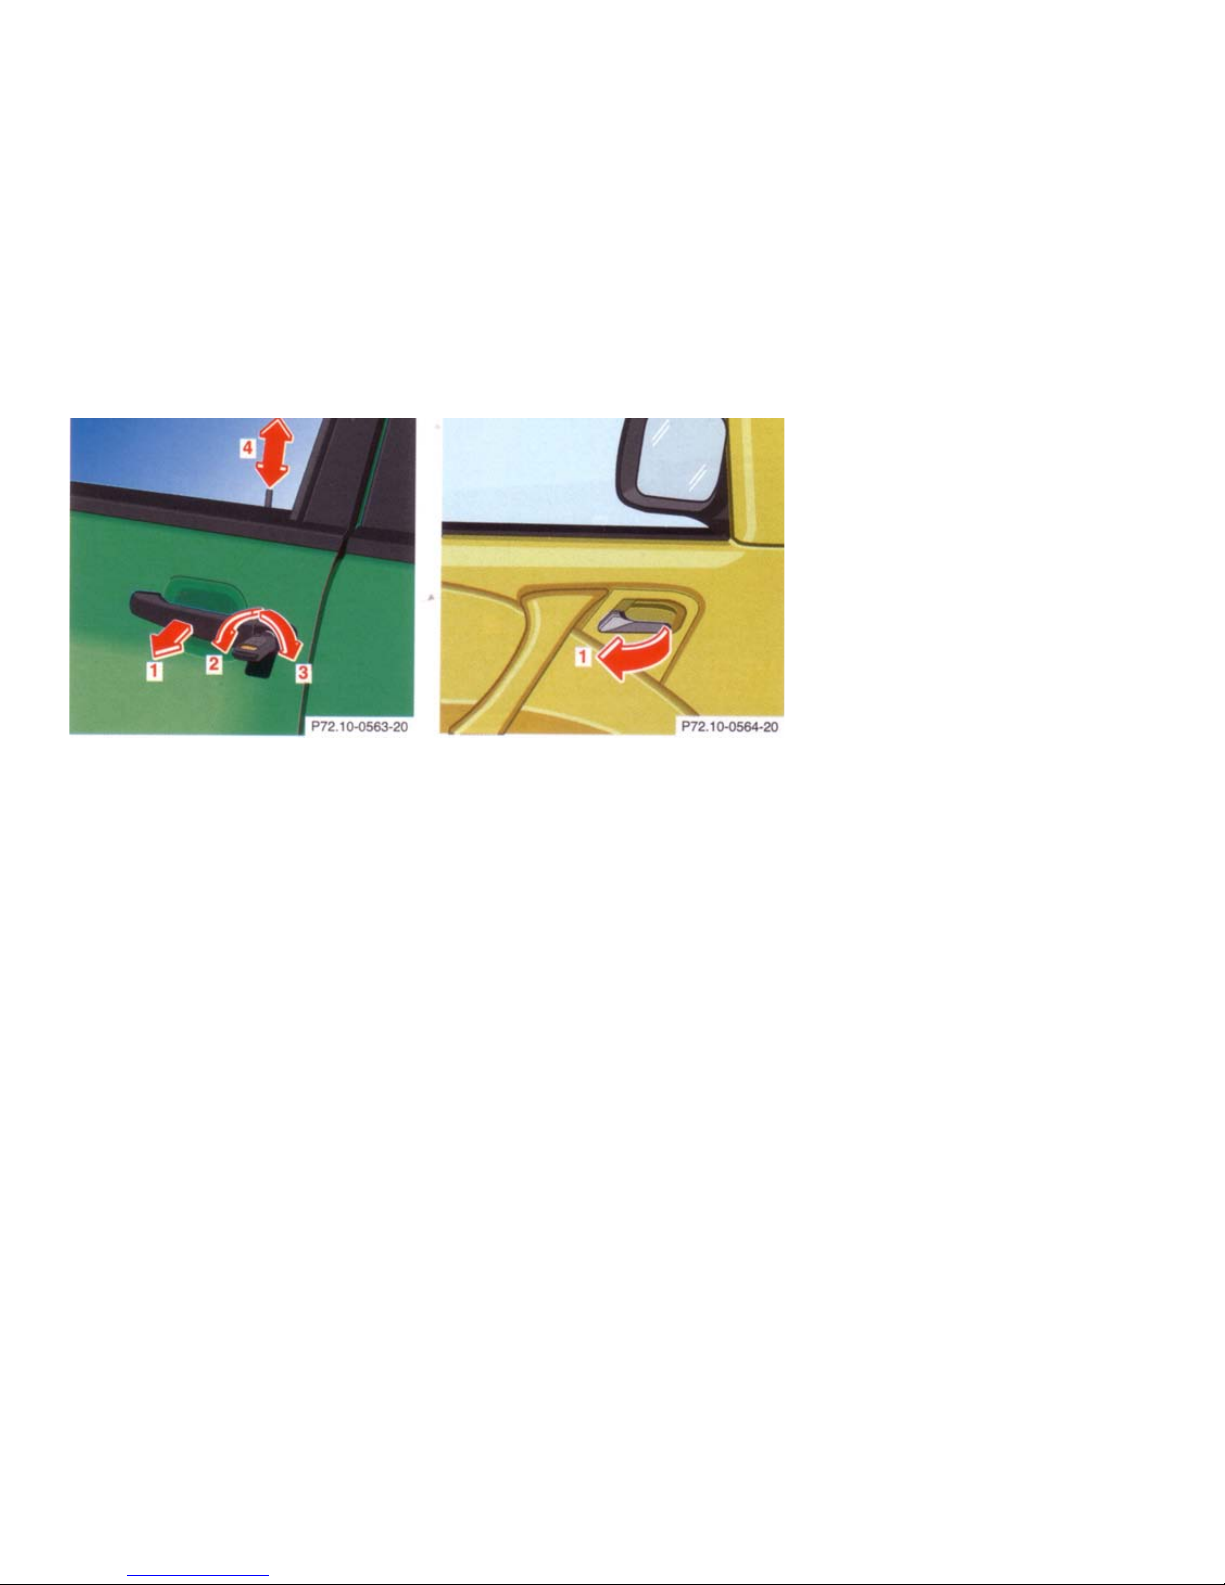
Doors
1 Opening - pull handle
2 Unlocking
3 Locking
4 Individual door from inside:
• Push lock button down to lock.
• Pull lock button up to unlock.
When you lock the car, all door lock
buttons should move down. If any one
stays up, the respective door is not
properly closed.
You should then unlock the car, open
and reclose this door, and lock the car
again.
Each individual door can be locked with
door lock button - the driver's door can
only be locked when it is closed.
If the car has previously been locked
from the outside, only the door being
opened from the inside will unlock, and
the alarm will come on. The remaining
doors, the trunk lid and fuel filler flap
remain locked.
Note:
In case of a malfunction in the central
locking system the doors can be locked
and unlocked individually.
30
Central Locking Switch
The central locking switch is located on
the center console.
The vehicle can be locked or unlocked
with the central locking switch.
If vehicle was previously locked with the
remote control, the doors and liftgate
cannot be unlocked with the central
locking switch.
Liftgate
1 Grip molding
2 Handle, outside
3 Recessed grip
To open:
From outside of vehicle, pull on
handle (2).
To close:
Pull down on recessed grip (3), and
close by using the grip molding (1).
1 Handle, inside
2 Locking
3 Unlocking
The liftgate can also be operated from
the inside of the vehicle.
 Loading...