

Page 1
Operating Instructions
Bedienungsanleitung
ENGLISHSVENSKASUOMI DANSK NORSK
Page 2

Page 3

Table of contents
Table of contents
1 For your safety ..................................................................................................................... 5
1.1 Symbols used ............................................................................................................ 5
1.2 Proper use ................................................................................................................... 6
1.3 Danger from electric current ............................................................................... 6
1.4 Risk of burns and scalds......................................................................................... 7
1.5 General safety............................................................................................................ 7
2 Overview of the appliance .............................................................................................. 8
2.1 The appliances at a glance ................................................................................... 8
2.2 Overview of the control panel ..........................................................................10
2.3 The Cappuccinatore at a glance .......................................................................12
3 First steps .............................................................................................................................13
3.1 Unpacking the appliance .................................................................................... 13
3.2 Checking the delivery contents ........................................................................ 13
3.3 Installing the appliance ....................................................................................... 14
3.4 Connecting the appliance .................................................................................. 14
3.5 Switching on and venting the appliance for the rst time .....................14
4 Basic operation ..................................................................................................................16
4.1 Switching the appliance on and o ................................................................16
4.2 Using the control panel .......................................................................................17
4.3 Filling coee beans into the bean container ...............................................17
4.4 Filling with water ....................................................................................................18
4.5 Adjusting the outlet for coee beverages ....................................................20
4.6 Connecting the Cappuccinatore ......................................................................20
4.7 Using milk ................................................................................................................. 21
4.8 Emptying the drip tray and coee grounds container .............................22
5 Using the My Bean Select® function ......................................................................... 23
5.1 Filling coee beans for the My Bean Select® function..............................23
6 Preparing beverages .......................................................................................................25
6.1 Setting the coee strength ................................................................................25
6.2 Preparing coee beverages ..............................................................................26
6.3 Setting the coee quantity ................................................................................26
6.4 Preparing two coee beverages simultaneously .......................................27
6.5 Stopping coee preparation .............................................................................27
6.6 Preparing milk foam or warm milk ..................................................................28
6.7 Preparing hot water ..............................................................................................29
ENGLISH
3
Page 4

ENGLISH
Table of contents
7 Changing basic settings ................................................................................................. 30
7.1 Calling up service mode ...................................................................................... 30
7.2 Setting the energy save programme ..............................................................30
7.3 Setting Auto OFF ....................................................................................................31
7.4 Setting the water hardness ................................................................................32
7.5 Setting the brewing temperature ....................................................................33
7.6 Resetting the appliance to the factory settings..........................................34
7.7 Setting the grinding neness ............................................................................ 34
8 Care and maintenance ....................................................................................................35
8.1 General cleaning .................................................................................................... 35
8.2 Cleaning the brewing unit .................................................................................. 36
8.3 Cleaning the Cappuccinatore ............................................................................38
8.4 Running the cleaning programme ..................................................................39
8.5 Running the descaling programme ................................................................42
8.6 Using a water lter .................................................................................................46
9 Problems ...............................................................................................................................48
10 Transport, storage and disposal .................................................................................50
10.1 Venting the appliance ..........................................................................................50
10.2 Transporting the appliance ................................................................................51
10.3 Disposing of the appliance .................................................................................51
11 Technical data ....................................................................................................................51
4
Page 5
Dear Customer,
Thank you for purchasing the Caeo®Varianza® CS or Caeo® Passione® fully
automatic coee maker.
The operating instructions will help you discover the diverse options
oered by the appliance and enjoy your coee to the full.
Read through the operating instructions carefully. This helps avoid personal
injury and material damage. Store the operating instructions carefully. If
you pass on the appliance, include the operating instructions with it.
Melitta accepts no liability for damage caused by failure to observe the
operating instructions.
If you require further information or have any questions on the appliance,
contact Melitta or visit our website at:
www.melitta.de
We hope you enjoy using your appliance.
1 For your safety
The appliance conforms to the following European directives:
ū 2006 / 95 / EC (low voltage),
ū 2004 / 108 / EC (electromagnetic compatibility),
ū 2011 / 65 / EU (RoHS),
ū 2009 / 125 / EC (eco-design / ErP).
The appliance has been built using the latest technology. Nevertheless,
some residual dangers remain.
Observe the safety instructions to avoid dangers. Melitta accepts no liability
for damage caused by failure to observe the safety instructions.
For your safety
ENGLISH
1.1 Symbols used
The following symbols indicate particular risks in using the appliance or
provide useful tips.
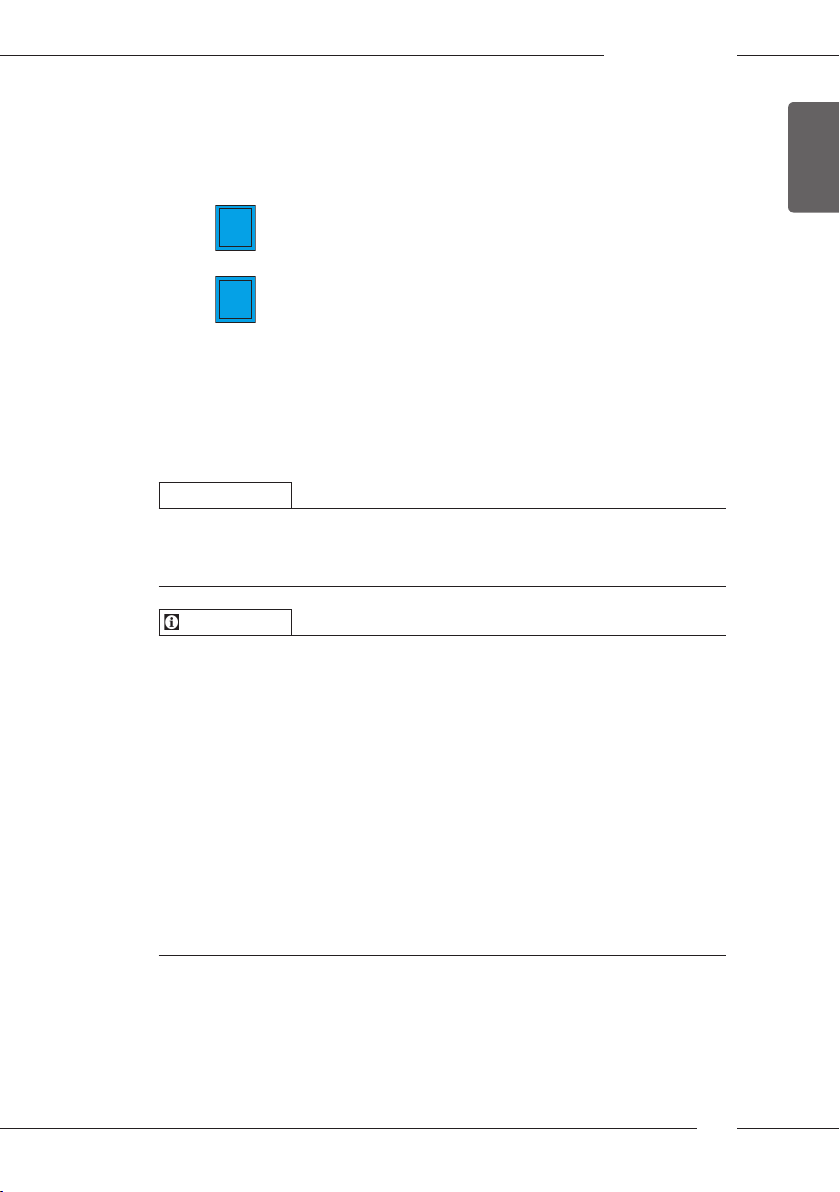
CAUTION
The signal word CAUTION indicates possible injuries.
5
Page 6

ENGLISH
For your safety
ATTENTION
The signal word ATTENTION indicates possible damage to the appliance.
Information
The signal word "Information" indicates additional notes and tips on using
the appliance.
1.2 Proper use
The appliance is used to prepare beverages made from
coee beans, and to heat milk and water.
The appliance is intended for use in private households.
Any other use is regarded as improper and may lead to
personal injury and material damage. Melitta accepts no
liability for damage that arises due to improper use of
the appliance.
1.3 Danger from electric current
If the appliance or the power cable is damaged, there is a
risk of fatal electric shock.
Observe the following safety instructions to avoid danger from electric current:
ū Do not use a damaged power cable.
ū A damaged power cable may only be replaced by the
manufacturer or its customer service or service partner.
ū Do not open any covers rmly screwed onto the appli-
ance housing.
ū Only use the appliance when it is in a technically aw-
less condition.
ū A defective appliance may only be repaired by an
authorised workshop. Do not repair the appliance
yourself.
ū Do not make any changes to the appliance, its compo-
nents or its accessories.
ū Do not immerse the appliance in water.
6
Page 7

1.4 Risk of burns and scalds
Escaping uids and steam may be very hot. Parts of the
appliance can also become very hot.
Observe the following safety instructions to avoid scalds
and burns:
ū Avoid escaping uids and steam coming into contact
with the skin.
ū When dispensing a beverage, do not touch the noz-
zles at the outlet or the steam pipe. Wait until the
components have cooled down.
1.5 General safety
Observe the following safety instructions to avoid personal injury and material damage:
ū Do not reach into the interior of the appliance during
operation.
ū Keep the appliance and its power cable out of the
reach of children under 8years of age.
ū This appliance may be used by children over 8 years of
age and by persons with reduced physical, sensory or
mental capabilities or a lack of experience and knowledge if they are supervised or have been instructed in
using the appliance safely and understand the resulting risks.
ū Children must not play with the appliance. Cleaning
and maintenance must not be undertaken by children
younger than 8 years of age. Children over 8 years of
age must be supervised during cleaning and maintenance.
ū Disconnect the appliance from the power supply
when left unsupervised for a long time.
For your safety
ENGLISH
7
Page 8
Overview of the appliance
2 Overview of the appliance
ENGLISH
2.1 The appliances at a glance
2
1
9
8
7
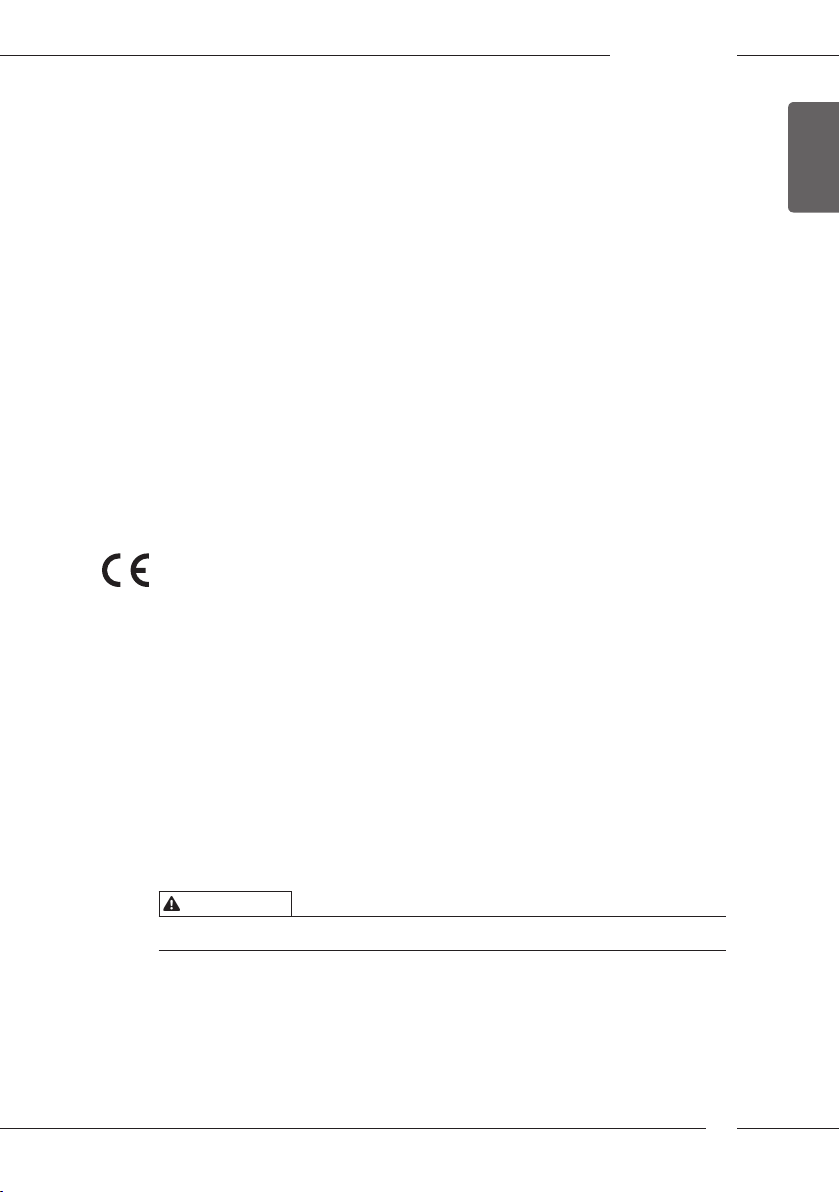
Fig. 1: Caeo® Passione® and Caeo® Varianza® CS from front left
1 Water tank with lid 6 Drip tray
2 Bean container with lid 7 ON/OFF button
3 Cup rest 8 Height-adjustable outlet for
4 Control panel 9
5 Coee grounds container (inner) 10 Measuring spoon* for the
3
4
5
6
coee beverages with 2 coee nozzles
"Grinding neness adjustment" lever
(inner)
My Bean Select
*Only present in Caeo® Varianza® CS
10
® function
8
Page 9
13
Overview of the appliance
ENGLISH
11
12
16
15
14
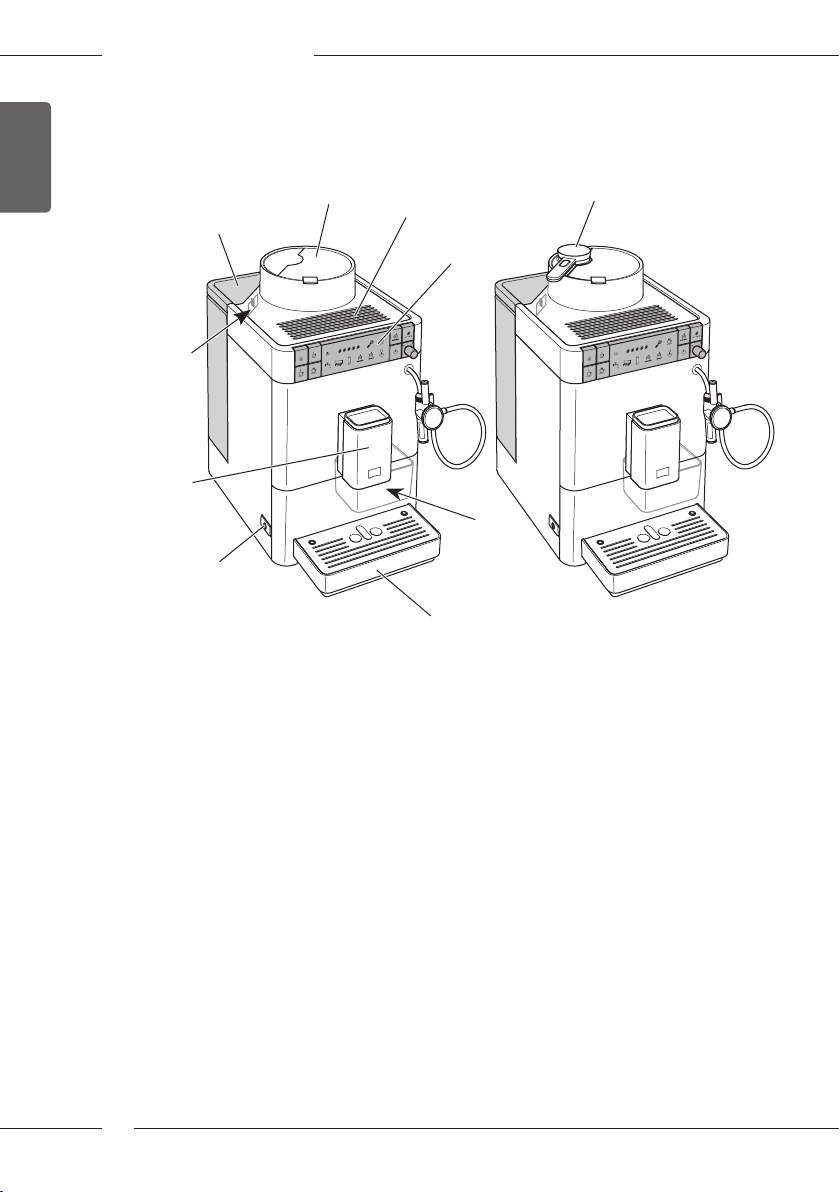
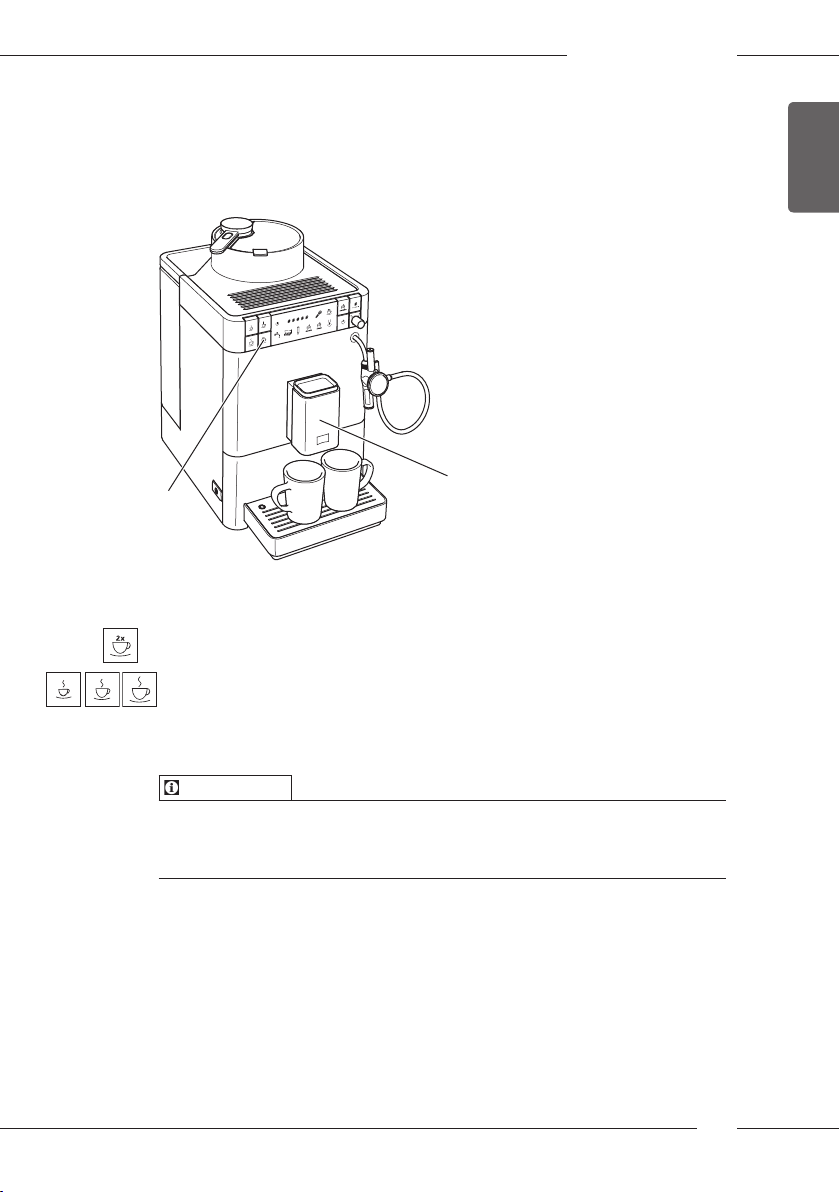
Fig. 2: Caeo® Passione® and Caeo® Varianza® CS from front right
11 Cover 14 Cappuccinatore
12 Brewing unit (inner) 15 Cup plate
13 Steam pipe 16 Float
9
Page 10
ENGLISH
Overview of the appliance
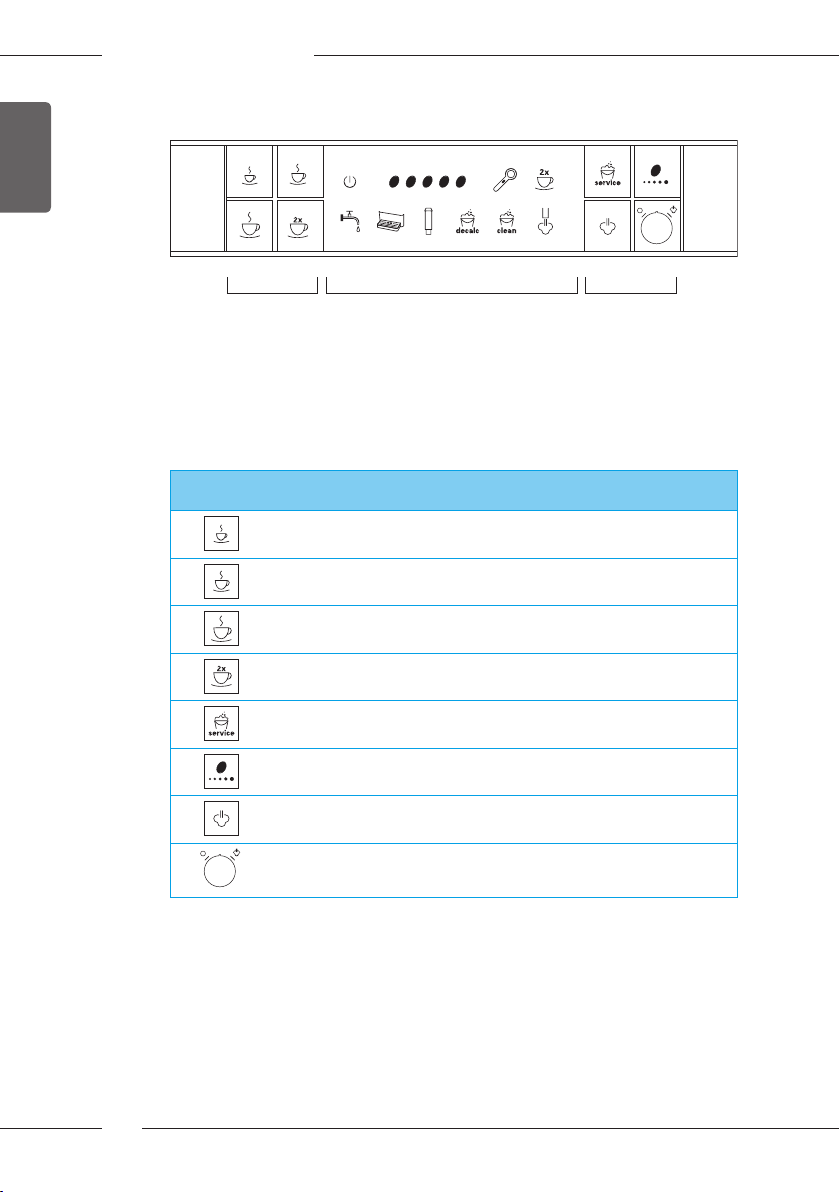
2.2 Overview of the control panel
191817
Fig. 3: Control panel
17 Direct keys
18 Displays
19 Control buttons and rotary regulator
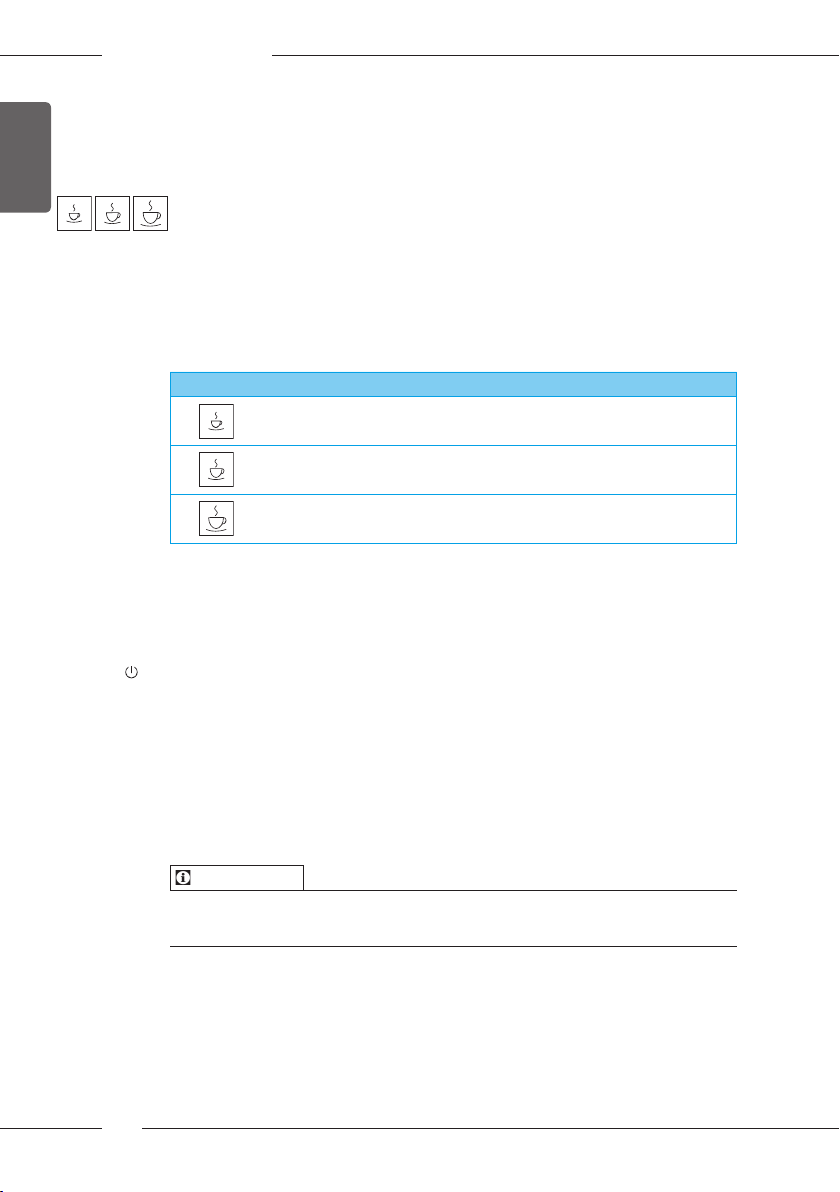
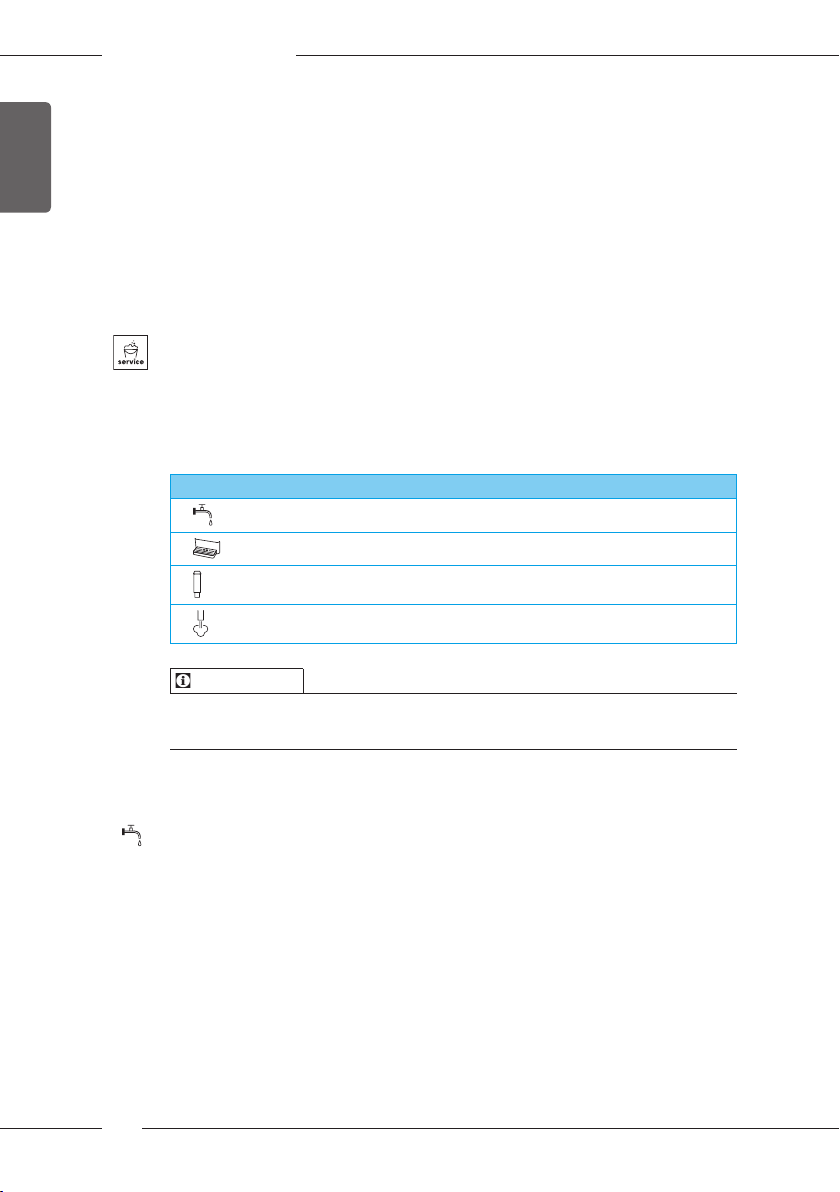
Button/
Regulator
Designation Function
Small cup Prepare small portion of coee
Medium cup Prepare medium portion of coee
Large cup Prepare large portion of coee
Two cups Set two-cup dispensing
Service Call up service mode
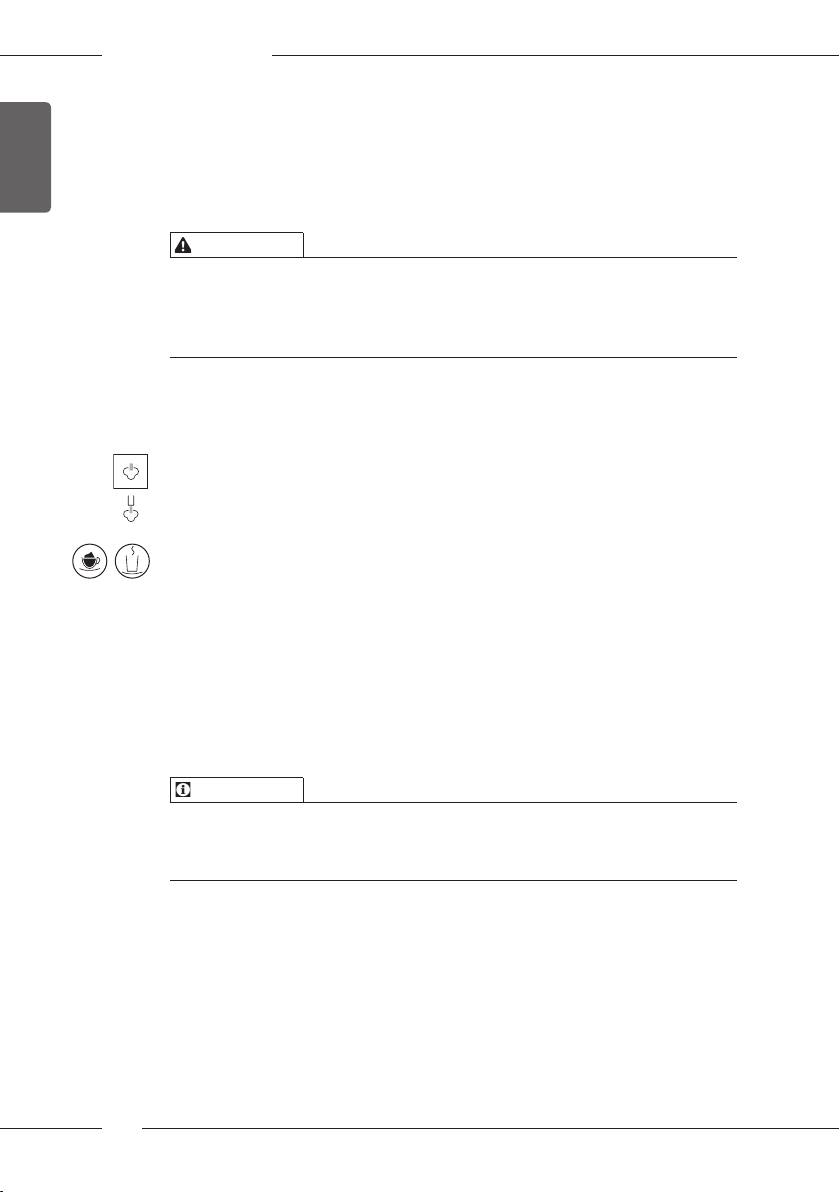
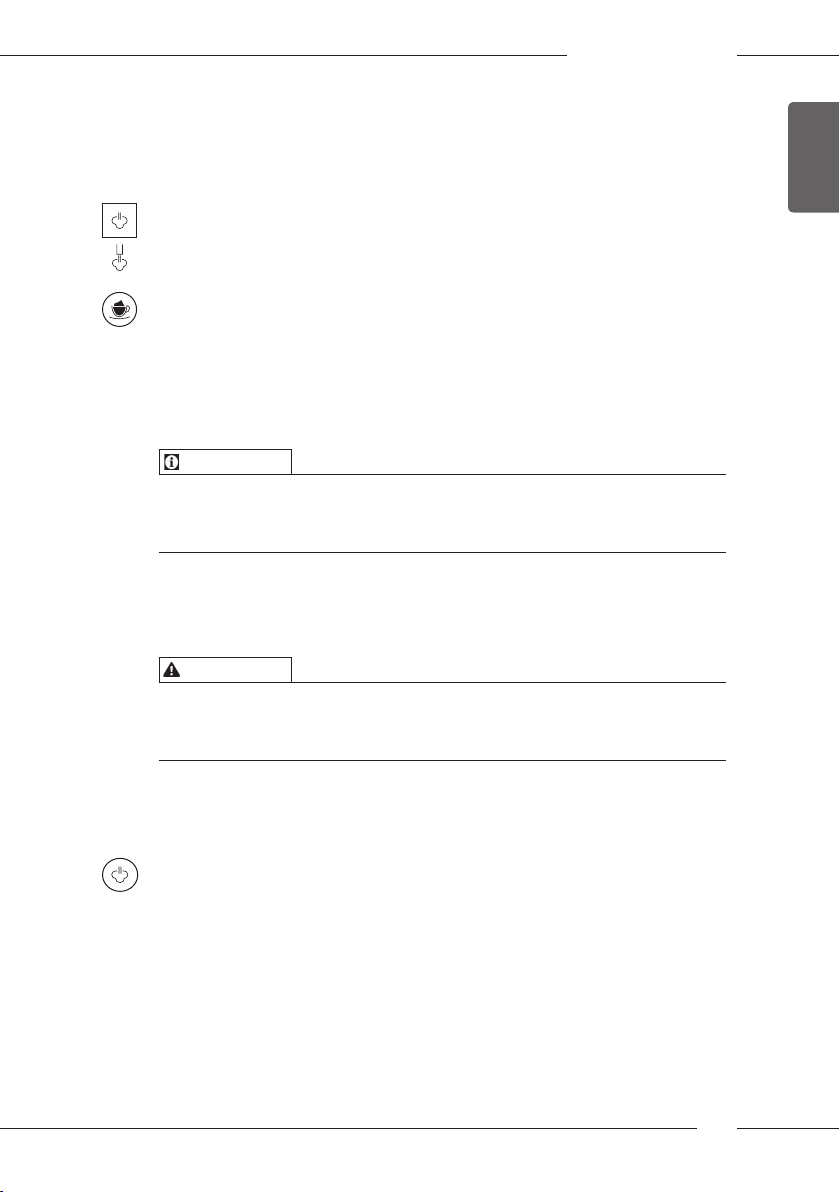
Coee
strength
Steam dispensing
Rotary regulator
Setting the coee strength
Appliance for steam dispensing heating
Switching hot water or steam on and o
10
Page 11
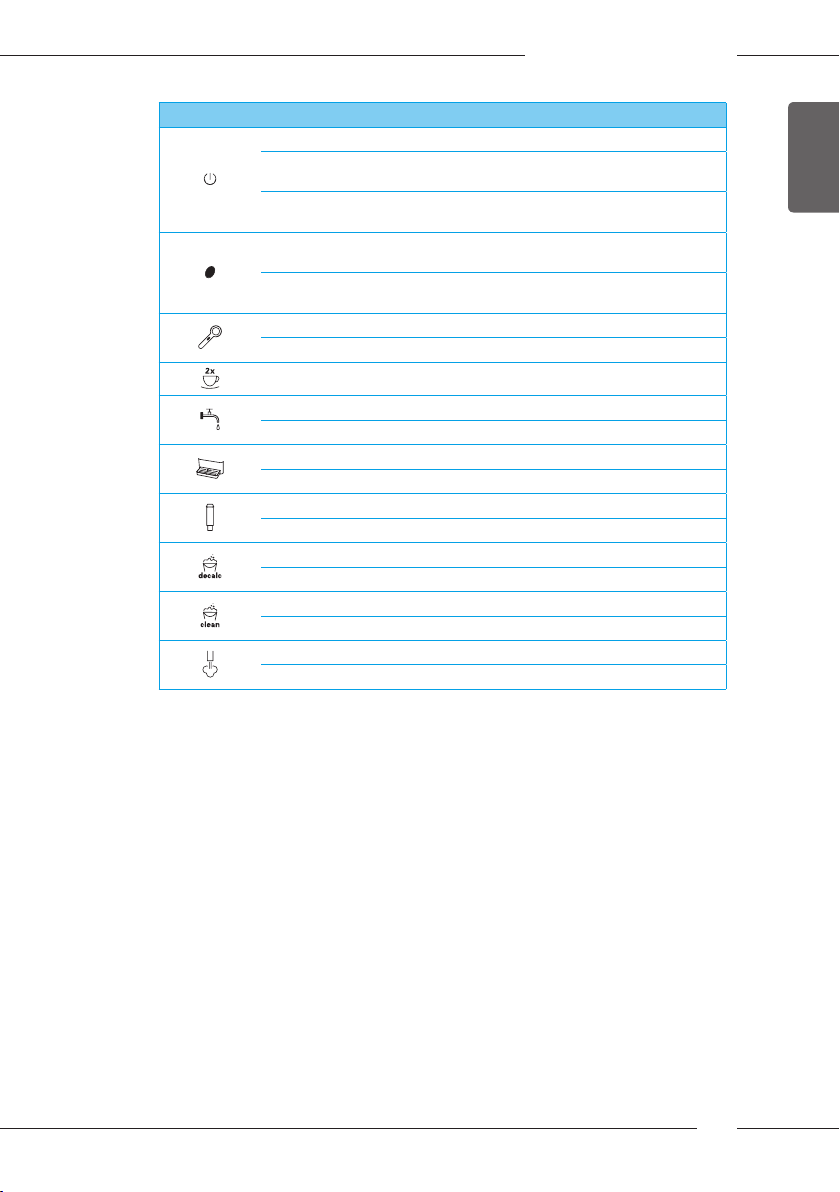
Display Meaning
Lights up Appliance is ready for operation
Flashing Appliance heating up or preparing a coee bever-
Flashing
quickly
Lights up Number of coee beans:
Flashing Fill bean container or
Lights up* My Bean Select® function is ready
Flashing* Fill bean chute
Lights up Two-cup dispensing is ready
Lights up Fill water tank
Flashing Insert water tank
Lights up Empty the drip tray and coee grounds container
Flashing Insert the drip tray and coee grounds container
Lights up Change lter
Flashing Change lter programme running
Lights up Descale appliance
Flashing Descaling programme running
Lights up Clean appliance
Flashing Cleaning programme running
Lights up Steam dispensing is ready
Flashing Appliance heating up for steam dispensing
age
Programme for setting coee amount running
Currently set coee strength
coee dispensing has stopped
Overview of the appliance
ENGLISH
*Only present with Caeo® Varianza® CS
11
Page 12
ENGLISH
Overview of the appliance
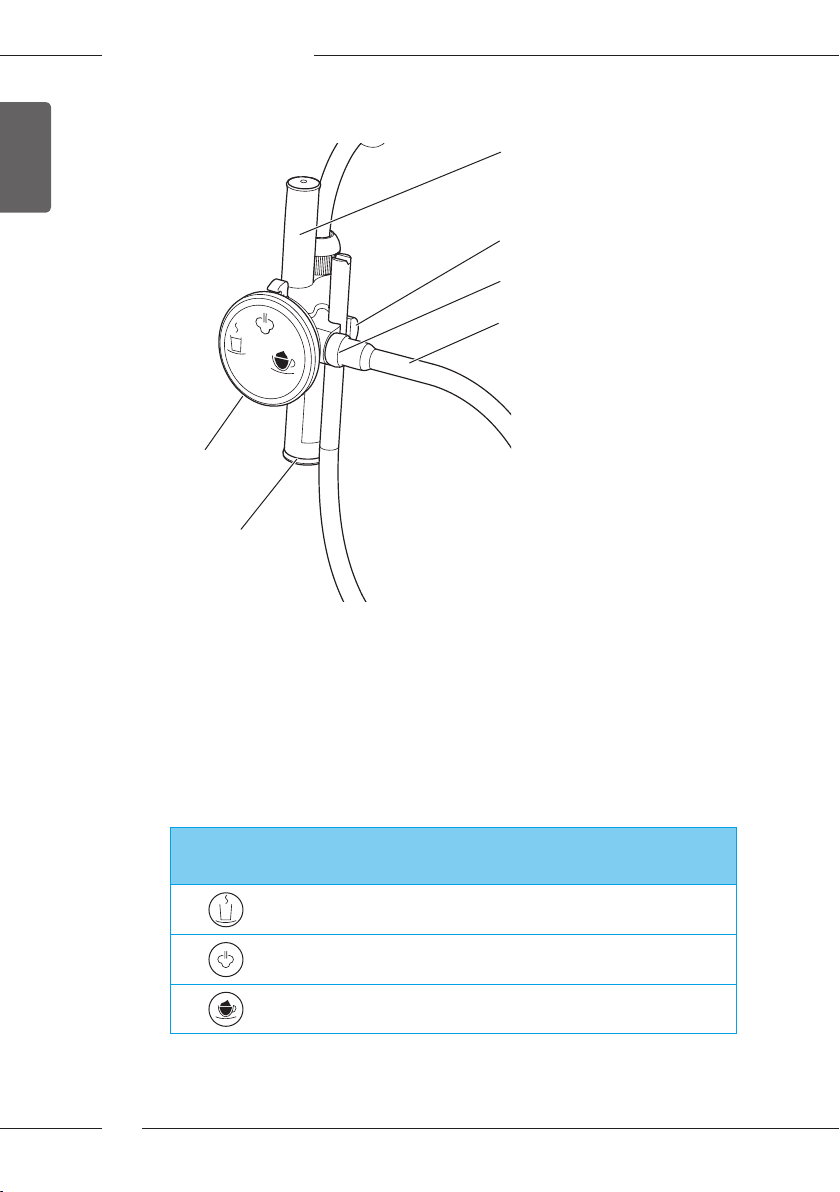
2.3 The Cappuccinatore at a glance
20
21
22
23
25
24
Fig. 4: Cappuccinatore
12
20 Air suction pipe
21 Holder for the milk hose
22 Connection of the milk hose
23 Milk hose
24 Outlet for hot water, milk or milk foam
25 Selector switch
Symbol on
the selector
switch
Function
Setting for
warm milk
Setting for
hot water
Setting for
milk foam
Page 13

3 First steps
This chapter describes how to prepare your appliance for use.
3.1 Unpacking the appliance
In addition to the appliance, there are further accessories in the packaging
such as cleaning aids and agents.
CAUTION
Contact with cleaning agents can lead to eye and skin irritation.
Keep the supplied cleaning agents out of the reach of children.
Unpack the appliance. Remove the packaging material, the adhesive
strips and the protective lms from the appliance.
Keep the packaging material for transport and possible return ship-
ments.
Information
The appliance may contain traces of coee and water. The appliance has
been tested in the factory to ensure that it functions perfectly.
3.2 Checking the delivery contents
Check the completeness of delivery using the following list. If parts are
missing, contact your retailer.
ū Cappuccinatore
ū Milk hose
ū Fully automatic coee makers cleaner
ū Milk system cleaning agent
ū Fully automatic coee makers descaling agent
ū Water lter
ū Screw-in aid for the water lter
ū Test strip for determining the water hardness.
First steps
ENGLISH
13
Page 14
ENGLISH
First steps
3.3 Installing the appliance
Observe the following instructions:
ū Do not install the appliance in damp rooms.
ū Install the appliance on a stable, at and dry surface.
ū Do not install the appliance in the vicinity of sinks or the like.
ū Do not install the appliance on hot surfaces.
ū Install the appliance at a sucient distance (approx. 10cm) from the
wall and other objects. The space above the appliance should be at least
20cm.
ū Route the power cable so it cannot be damaged by edges or hot sur-
faces.
3.4 Connecting the appliance
Observe the following instructions:
ū Make sure that the supply voltage matches the operating voltage speci-
ed in the technical data (see the Technical data on page51 table).
ū Only connect the appliance to a properly installed earthing contact
socket. If in doubt, consult a specialist electrician.
ū The earthing contact socket must have a fuse of at least 10 A.
3.5 Switching on and venting the appliance for the rst
time
Once you switch on the appliance for the rst time, the appliance performs
automatic rinsing. Hot water rst ows out of the Cappuccinatore, then out
of the outlet. The appliance is vented.
CAUTION
Hot water and hot steam owing out of the pipe
Do not touch the steam pipe during and immediately after use.
Wait until the steam pipe has cooled down.
Information
ū We recommend pouring away the rst two cups of coee after initial
start-up.
ū If you want to use a water lter, only insert this after starting up for the
rst time.
14
Page 15
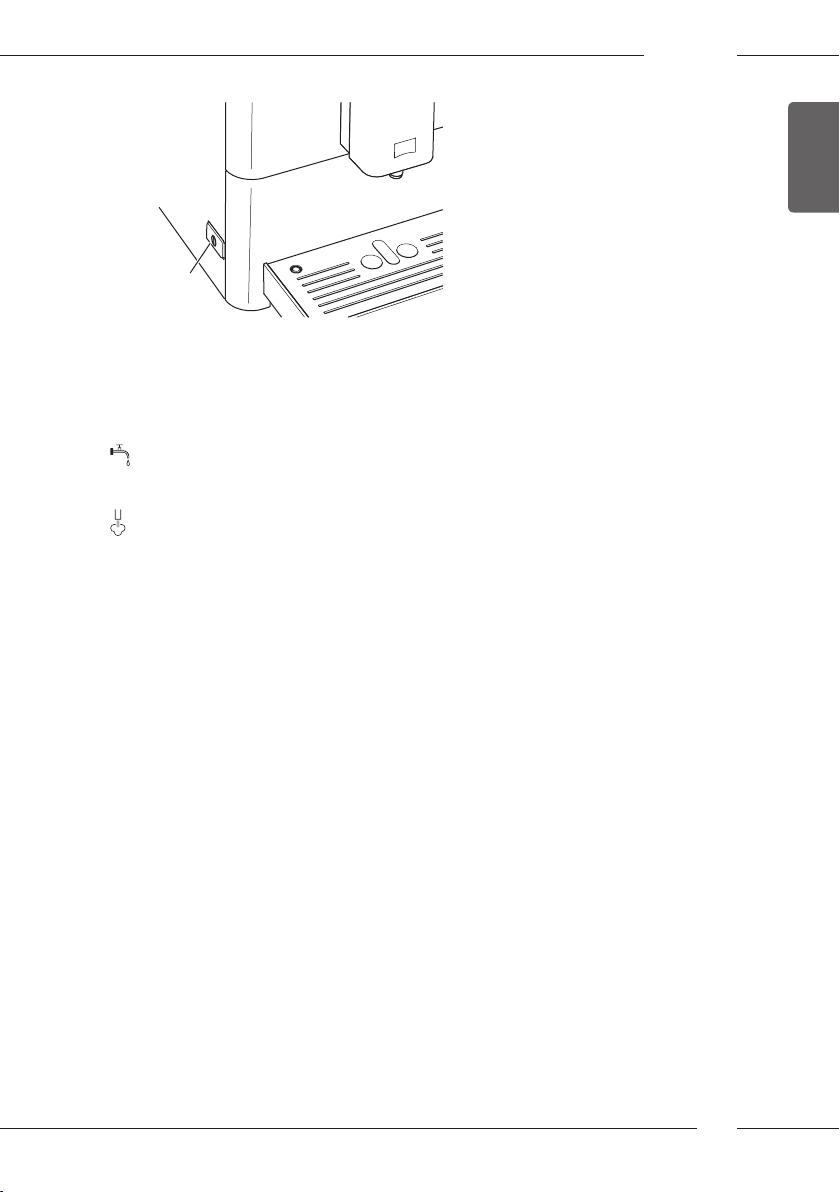
First steps
7
Fig. 5: ON/OFF button
Requirement: The appliance has been installed and connected.
1. Place a vessel beneath the Cappuccinatore.
2. Press the ON/OFF button (7).
» The appliance indicates that the water tank needs to be lled.
3. Remove the water tank. Rinse out the water tank with clean water. Fill
the water tank with fresh water and insert it.
» The lighted display indicates that the rotary regulator must be
actuated.
4. Turn the rotary regulator on the control panel clockwise up to the stop.
» Hot water ows out of the Cappuccinatore.
5. When water no longer ows out of the Cappuccinatore, turn the rotary
regulator anti-clockwise to the stop.
» Hot water ows out of the outlet.
» The appliance is vented.
6. Fill coee beans into the bean container (see section4.3 Filling coee
beans into the bean container on page17).
7. As required, you can now either
a) set the water hardness (see section7 Changing basic settings on
page30) or
b) use a water lter (see section8.6 Using a water lter on page46).
ENGLISH
15
Page 16

ENGLISH
Basic operation
4 Basic operation
This chapter describes basic operating steps for using the appliance on a
daily basis.
4.1 Switching the appliance on and o
Before switching on after starting up the appliance for the rst time, read
chapter 3.5 Switching on and venting the appliance for the rst time on
page14.
Information
ū When switched on and o, the appliance performs automatic rinsing.
ū During rinsing, rinsing water is also conducted into the drip tray.
Switching on the appliance
1. Place a vessel beneath the outlet.
2. Press the ON/OFF button (7).
3. The appliance heats up and performs automatic rinsing.
» The appliance indicates the last set coee strength.
Information
If the appliance was only switched o briey, there is no automatic rinsing
after switching on.
Switching o the appliance
1. Place a vessel beneath the outlet.
2. Press the ON/OFF button (7).
» The appliance performs automatic rinsing.
» The appliance switches o.
Information
ū The appliance switches o automatically when it is not operated for a
long time. Automatic rinsing is also carried out in this case.
ū The o time can be set in the service mode (see section7.3 Setting Auto
OFF on page31).
ū If no beverage has been prepared since switching on or if the water tank
is empty, no rinsing takes place.
16
Page 17
4.2 Using the control panel
The essential programmes can be accessed using the control panel.
Press the required button. Use the following actions to operate the buttons:
Brief press
Briey press a button to select a programme.
Long press
2s
Press a button for longer than 2 seconds to select a second
programme that may be available.
4.3 Filling coee beans into the bean container
Roasted coee beans lose their aroma. Only ll the bean container with as
many coee beans as you will consume over the next 3 to 4days.
ATTENTION
The use of unsuitable types of coee can lead to clogging of the grinder.
Do not use freeze-dried or caramelised coee beans.
Do not use any coee powder or instant products.
Information
Depending on the model, when changing the type of beans, remains of the
old type of beans can still be in the grinder.
Caeo® Passione®:
Even if the supply tank runs empty and is then lled with a new type of
bean, there are always remaining quantities of the old type of bean in
the grinder. For this reason, the rst two coees dispensed can contain
remains of the old type of bean.
Caeo® Varianza® CS:
In order that the coee beans are not mixed when changing the type
of bean (or when using the MyBeanSelect® function), the grinder is
emptied after each grinding process. Nevertheless, minimal coee type
mixing may occur. Grinding when empty causes a dierent type of noise
and is normal.
Basic operation
ENGLISH
17
Page 18
Basic operation
ENGLISH
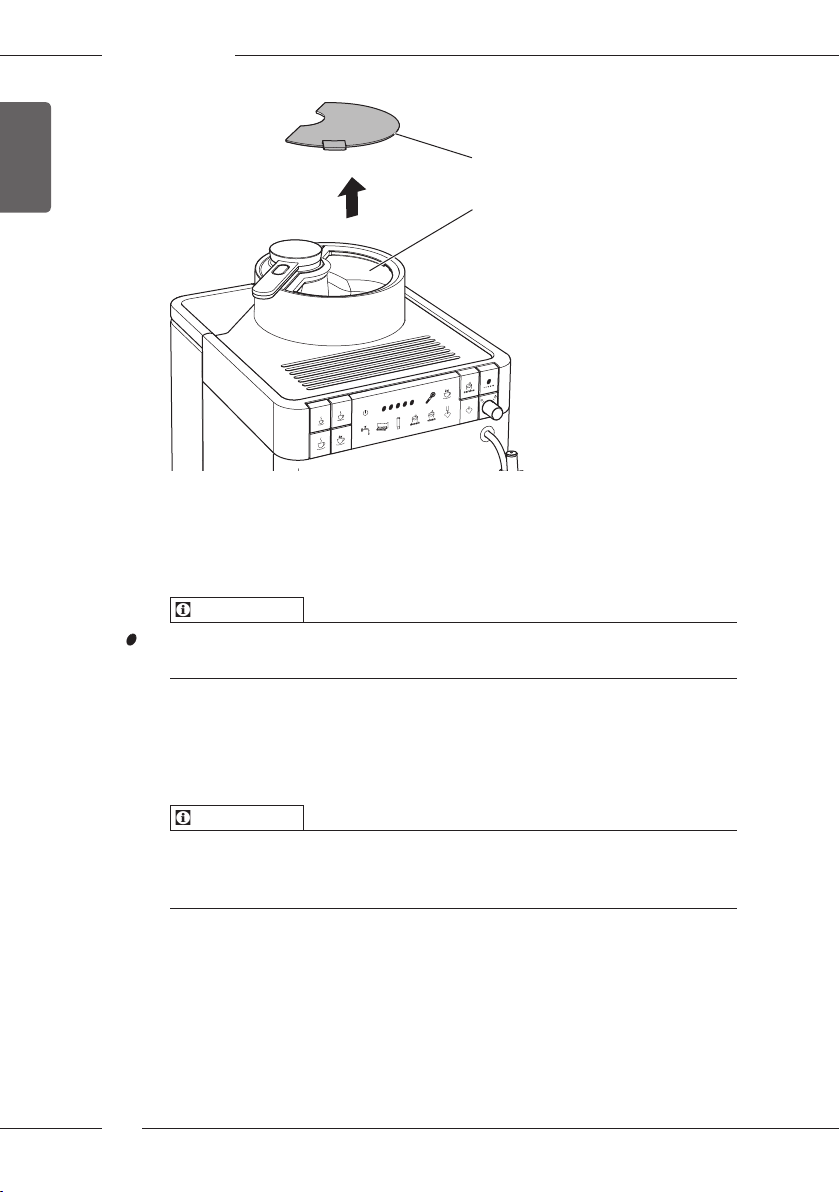
26
2
Fig. 6: Open the lid of the bean container (Caeo® Varianza® CS)
1. Open the lid (26) of the bean container(2).
2. Fill coee beans into the bean container.
3. Close the lid of the bean container.
Information
The ashing display requests you to rell coee beans. The next time a coffee is dispensed, the display no longer ashes.
4.4 Filling with water
Only use fresh, cold water without carbon dioxide for optimum coee
enjoyment. Change the water daily.
Information
The quality of the water largely determines the avour of the coee.
Therefore, use a water lter (see chapter 7.4 Setting the water hardness on
page32 and chapter 8.6 Using a water lter on page46).
18
Page 19
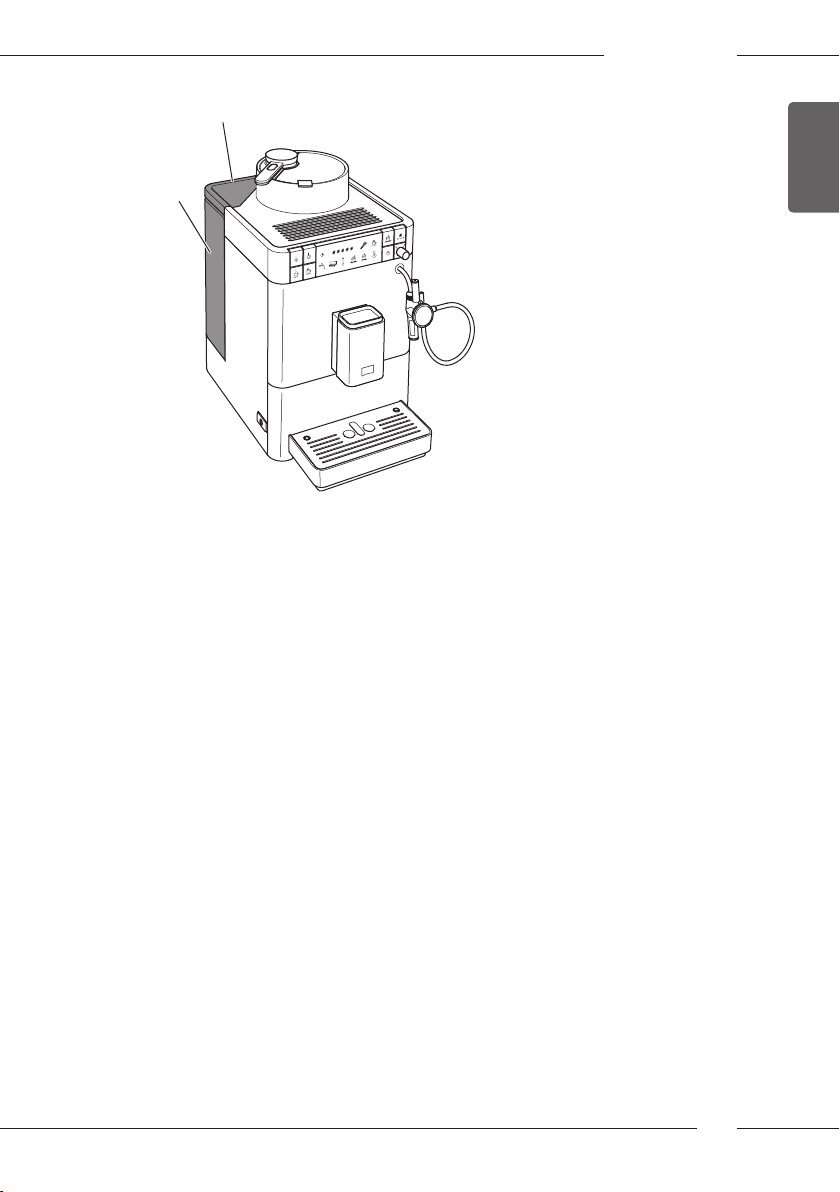
27
Basic operation
1
Fig. 7: Water tank (Caeo® Varianza® CS)
1. Open the lid of the water tank(27) and pull the water tank(1) upwards
out of the appliance by the handle.
2. Fill the water tank with water.
3. Insert the water tank into the appliance from above and close the lid.
ENGLISH
19
Page 20

ENGLISH
Basic operation
4.5 Adjusting the outlet for coee beverages
The outlet for coee beverages(8) is height-adjustable. Set the greatest
possible distance between the outlet and the vessel. Depending on the vessel, push the outlet up or down.
8
Fig. 8: Setting the outlet for coee beverages (Caeo® Varianza® CS)
4.6 Connecting the Cappuccinatore
You can prepare hot water, warm milk or milk foam with the Cappuccinatore. Use the selector switch(25) of the Cappuccinatore to select the
desired beverage.
13
21
28
25
Fig. 9: Connecting the Cappuccinatore
20
23
Page 21
1. Connect the Cappuccinatoreto the steam pipe(13). Slide the connection of the Cappuccinatore to the stop(28) of the steam pipe.
2. Connect the milk hose(23) to the Cappuccinatore.
3. If you do not want to use milk, clamp the milk hose in the holder(21).
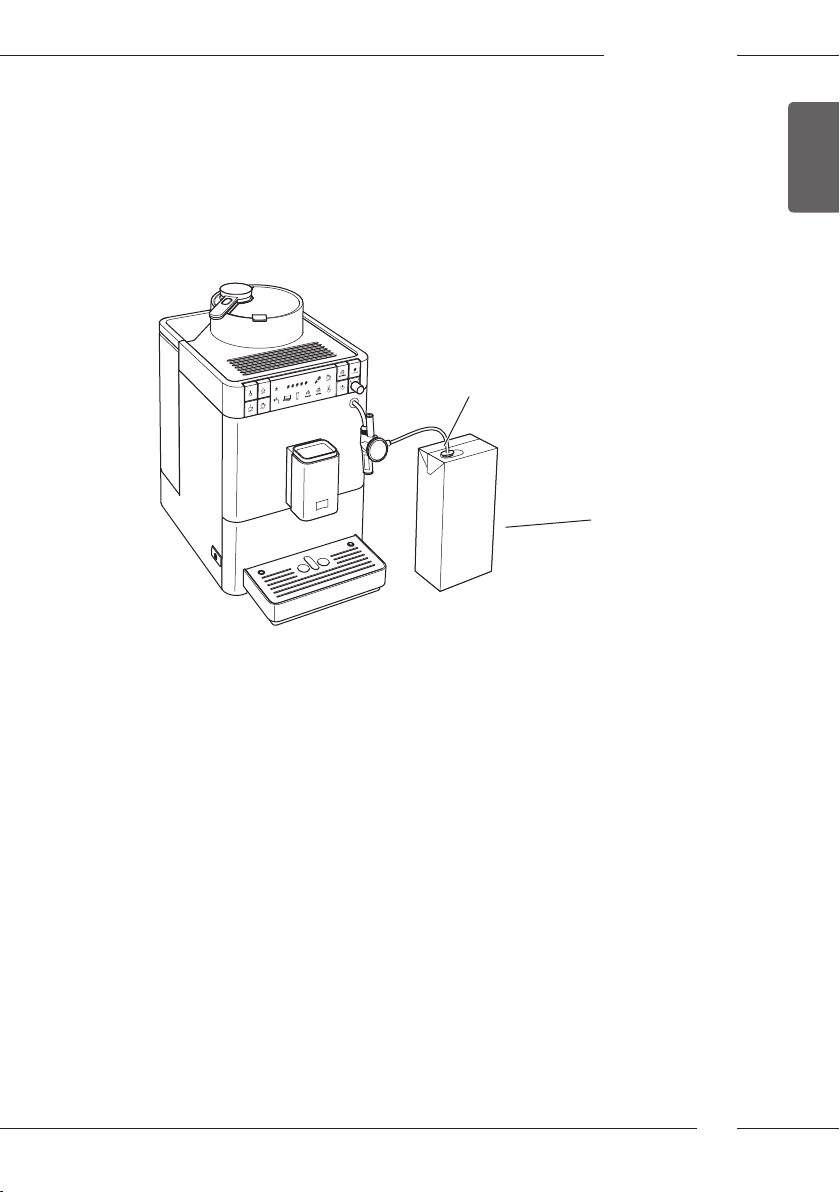
4.7 Using milk
Use cooled milk for optimum coee enjoyment.
23
Basic operation
ENGLISH
29
Fig. 10: Conventional milk pack (Caeo® Varianza® CS)
1. Remove the milk hose(23) from the holder (21).
2. Insert the milk hose into a conventional milk pack(29) or into a vessel
lled with milk.
21
Page 22
ENGLISH
Basic operation
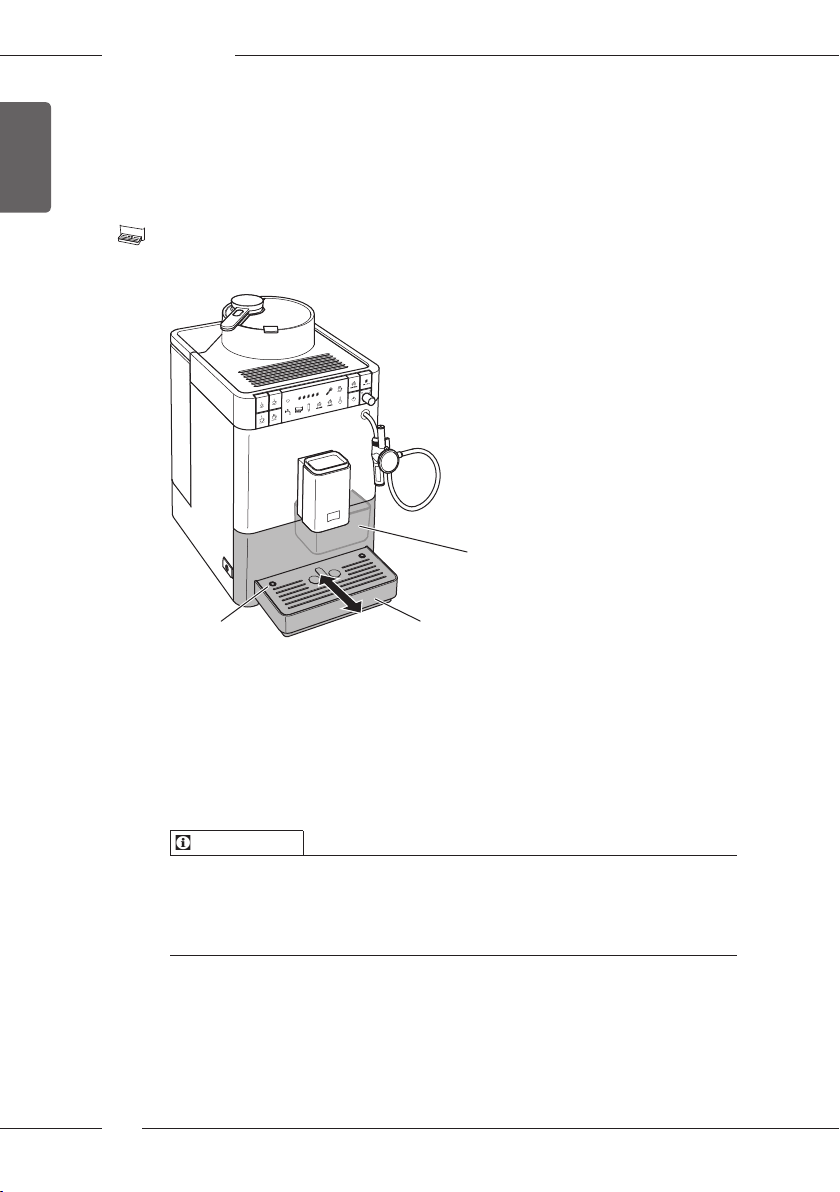
4.8 Emptying the drip tray and coee grounds container
After several beverage dispensing processes, the drip tray(6) and the coee
grounds container(5) can become full and must be emptied. The projecting
oat(16) indicates the current lling level of the drip tray.
After a specied number of beverage have been dispensed, the appliance
also shows that the drip tray and coee grounds container are full.
Always empty the drip tray and coee grounds container.
5
16
Fig. 11: Emptying the drip tray and coee grounds container
(Caeo® Varianza® CS)
1. Pull the drip tray (6) forwards out of the appliance.
2. Remove the coee grounds container (5) and empty it.
3. Empty the drip tray.
4. Insert the coee grounds container.
5. Push the drip tray into the appliance up to the stop.
Information
If you empty the drip tray and the coee grounds container while the appliance is switched o, the appliance does not register this process. Therefore,
it is possible that you are requested to empty the containers although the
drip tray and the coee grounds container are not yet full.
22
6
Page 23

Using the My Bean Select® function
5 Using the My Bean Select® function
The function for preparing single portions is only present in the
Caeo®Varianza® CS.
With the My Bean Select® function, a single coee beverage can be
prepared from a dierent type of coee. Separately ll a single portion of
coee beans to prepare the coee.
While the bean container is full with lightly roasted coee beans, for example, the My Bean Select® function can be used to prepare a coee beverage
from a single portion of darkly roasted coee beans.
5.1 Filling coee beans for the My Bean Select® function
ATTENTION
The use of unsuitable types of coee can lead to clogging of the grinder.
Do not use freeze-dried or caramelised coee beans.
Do not use any coee powder or instant products.
Information
Depending on the model, when changing the type of beans, remains of the
old type of beans can still be in the grinder.
Caeo® Varianza® CS:
So that the coee beans are not mixed when changing the type of bean
(or when using the MyBeanSelect® function), the grinder is emptied
after each grinding process. Nevertheless, minimal coee type mixing
may occur. Grinding when empty causes a dierent type of noise and is
normal.
ENGLISH
23
Page 24
Using the My Bean Select® function
ENGLISH
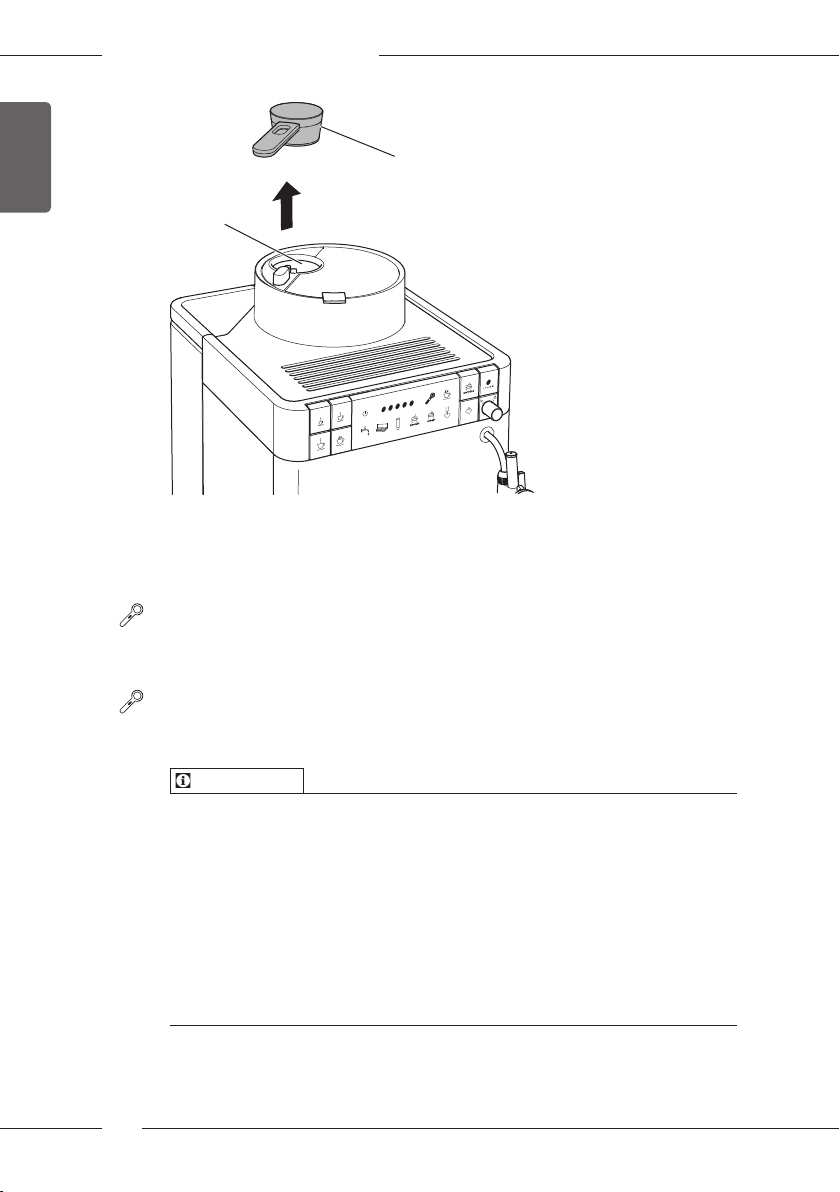
10
30
Fig. 12: Removing the measuring spoon (Caeo® Varianza® CS)
Requirement: The appliance is ready for operation.
1. Remove the measuring spoon(10) from the bean chute (30).
» The ashing display requests you to ll the bean chute.
2. Use the measuring spoon to ll a single portion of coee beans into the
bean chute(30).
3. Place the measuring spoon back onto the bean chute.
» The lighting display indicates that the My Bean Select® function is
ready.
4. Prepare any coee beverage.
Information
The measuring spoon is intended to help in lling the correct amount of
coee beans into the bean chute.
ū A full measuring spoon contains approx. 10 to 11 g of coee beans.
Depending on the desired coee strength, fewer coee beans can also
be lled.
ū If there are less than approx. 8g coee beans in the bean chute, the
My Bean Select® function is not activated. As soon as you hang up the
measuring spoon again, the display goes out. The next time a coee is
dispensed, the coee beans from the bean chute are mixed with the
coee beans from the bean container.
24
Page 25
Preparing beverages
6 Preparing beverages
There are two options for preparing beverages:
ū Preparing coee beverages at the outlet for coee beverages or
ū preparing hot water, warm milk and milk foam on the Cappuccinatore.
Note:
ū There should always be sucient water in the water tank. If the lling
level is too low, the appliance requests you to rell it.
ū There should always also be sucient coee beans in the bean con-
tainer. If there are no longer any coee beans present, the appliance
stops the preparation of a coee beverage.
ū The appliance does not indicate a lack of milk.
ū The vessels for the beverages should be suciently large (see table Fac-
tory settings on page52).
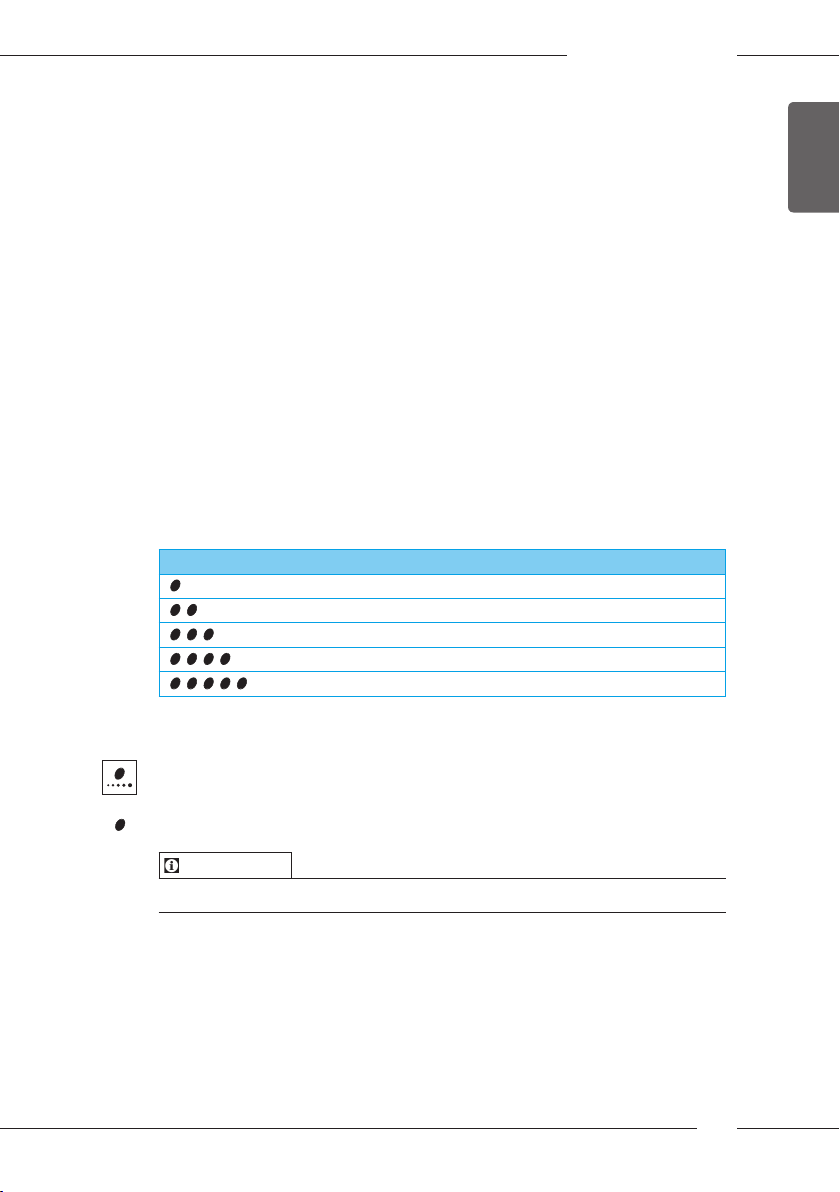
6.1 Setting the coee strength
As soon as the appliance is ready for operation, it displays the current setting of the coee strength. The following settings for the coee strength are
possible:
Display Coee strength
Very mild (without pre-brewing)
Mild
Normal
Strong
Very strong
ENGLISH
Requirement: The appliance is ready for operation.
1. Press the "Coee strength" button several times to set the desired coee
strength.
» The appliance indicates the selected coee strength.
Information
When switching o the appliance, the last set coee strength is stored.
25
Page 26
ENGLISH
Preparing beverages
6.2 Preparing coee beverages
Requirement: The appliance is ready for operation.
1. Place a vessel beneath the outlet.
2. Press the "Small cup", "Medium cup" or "Large cup" direct key.
» The grinding process and beverage dispensing start.
» Beverage dispensing ends automatically.
3. Remove the vessel.
6.3 Setting the coee quantity
The coee quantity can be specied by selecting a direct key.
Direct key Coee quantity (factory setting)
40 ml
120 ml
200 ml
The preset coee quantity can be changed from 25ml to220ml:
Requirement: The appliance is ready for operation.
1. Press the desired direct key for longer than 2 seconds.
» The quickly ashing display indicates that the programme for setting
the coee quantity is running.
» The grinding process and beverage preparation start.
2. Press the selected direct key again as soon as the desired coee quantity
is reached.
» Beverage dispensing stops.
» The appliance saves the new coee quantity.
» The appliance is ready for operation.
Information
The coee quantity can be reset to the factory settings (see section7.6
Resetting the appliance to the factory settings on page34).
26
Page 27
Preparing beverages
6.4 Preparing two coee beverages simultaneously
The "Two cups" button is used to prepare two coee beverages simultaneously. For two-cup dispensing, the appliance carries out two grinding
processes.
8
31
Fig. 13: Two-cup dispensing (Caeo® Varianza® CS)
1. Place two vessels beneath the outlet (8).
2. Press the "Two cups" button(31).
3. Press the "Small cup", "Medium cup" or "Large cup" direct key.
» The grinding process and beverage dispensing start.
» Beverage dispensing ends automatically.
4. Remove both vessels.
ENGLISH
Information
ū The setting only applies to the single beverage that is prepared.
ū If a coee beverage is not prepared within 1 minute, the appliance
switches to single-cup dispensing.
6.5 Stopping coee preparation
To stop coee beverage preparation prematurely, press the selected direct
key again.
27
Page 28
ENGLISH
Preparing beverages
6.6 Preparing milk foam or warm milk
Prepare milk foam and warm milk on the Cappuccinatore.
The preparation of milk foam and warm milk is similar. Steam is required for
the preparation.
CAUTION
Hot water and hot steam owing out of the pipe
Do not reach into the steam that is owing out.
Do not touch the steam pipe during and immediately after use. Wait
until the steam pipe has cooled down.
Requirement: The appliance is ready for operation. The Cappuccinatore is
connected to the appliance and milk is connected.
1. Place a vessel beneath the Cappuccinatore.
2. Press the "Steam dispensing" button.
» The ashing display indicates that the appliance is heating up for
steam dispensing.
» The lit-up display than indicates that steam dispensing is ready.
3. Turn the selector switch of the Cappuccinatore until the desired setting
for milk foam or warm milk points upwards.
4. Turn the rotary regulator on the control panel clockwise up to the stop.
» Beverage dispensing starts.
5. Turn the rotary regulator anti-clockwise up to the stop.
» Beverage dispensing stops.
6. Remove the vessel.
7. Prepare further beverages or rinse the Cappuccinatore:
a) Prepare further beverages and rinse the Cappuccinatore later.
b) Rinse the Cappuccinatore as described below.
Information
After 30 seconds, the appliance switches automatically from steam mode to
normal operating mode. Press the "Steam dispensing" button to switch to
the normal operating mode prematurely.
28
Page 29
Preparing beverages
Rinsing the Cappuccinatore
1. Fill a vessel with clear water.
2. Immerse the milk hose in the lled vessel.
3. Place an empty vessel beneath the Cappuccinatore.
4. Press the "Steam dispensing" button.
» The ashing display indicates that the appliance is heating up for
steam dispensing.
» The lit-up display than indicates that steam dispensing is ready.
5. Turn the selector switch of the Cappuccinatore until the setting for milk
foam points upwards.
6. Turn the rotary regulator clockwise up to the stop.
7. Turn the rotary regulator anti-clockwise up to the stop as soon as a clean
water/steam mixture ows into the empty vessel.
» The Cappuccinatore is rinsed.
Information
We recommend not only rinsing the Cappuccinatore, but dismantling and
cleaning it at regular intervals (see section8.3 Cleaning the Cappuccinatore
on page38).
6.7 Preparing hot water
Prepare hot water on the Cappuccinatore.
ENGLISH
CAUTION
Hot water and hot steam owing out of the pipe
Do not touch the steam pipe during and immediately after use.
Wait until the steam pipe has cooled down.
Requirement: The appliance is ready for operation. The Cappuccinatore is
connected.
1. Place a vessel beneath the Cappuccinatore.
2. Turn the selector switch of the Cappuccinatore until the setting for hot
water points upwards.
3. Turn the rotary regulator clockwise.
» Beverage dispensing starts.
4. Turn the rotary regulator anti-clockwise up to the stop.
» Beverage dispensing stops.
5. Remove the vessel.
29
Page 30
ENGLISH
Changing basic settings
7 Changing basic settings
The following chapter describes how to change the appliance's basic settings.
7.1 Calling up service mode
Some of the basic settings can only be changed in the service mode of the
appliance.
Requirement:
1. Press the "Service" button for longer than 2 seconds to call up the service
mode.
» The appliance indicates that it is in one of the service modes described
below.
Each service mode is assigned a display.
Display Meaning in service mode
The appliance is ready for operation.
Energy save programme
Auto OFF
Water hardness
Brewing temperature
Information
All four basic settings can be reset in service mode to the factory settings
(see section7.6 Resetting the appliance to the factory settings on page34).
7.2 Setting the energy save programme
If the adjacent display lights up in service mode, the energy save programme can be set.
The energy save programme causes lowering of the heating temperature.
The display on the control panel also becomes dimmer.
If the appliance is not operated for a long time, it automatically switches to
the energy save programme after a specied time.
30
Page 31

Changing basic settings
The following times can be set:
Display Time
3 min
30 min
60 min
120 min
240 min
Information
Finish the energy save programme by pressing any button.
Requirement: The service mode is called up.
Press the "Service" button repeatedly until the display for the energy
1.
save programme appears.
2. Press the "Coee strength" button repeatedly until the desired time is
set.
3.
Call up the next basic setting in the service mode or exit the service
mode:
a) Briey press the "Service" button to navigate to the next basic setting.
b) Press the "Service" button for longer than 2 seconds to exit the ser-
vice mode.
» The new time for switching on the energy save mode is stored.
ENGLISH
7.3 Setting Auto OFF
If the adjacent display lights up in service mode, the Auto OFF can be set.
If the appliance is not operated for a long time, it switches o automatically
after a specied time. The following times can be set:
Display Time
9 min
30 min
60 min
240 min
480 min
31
Page 32

ENGLISH
Changing basic settings
Requirement: The service mode is called up.
1. Press the "Service" button repeatedly until the display for the Auto OFF
service mode appears.
2. Press the "Coee strength" button repeatedly until the desired time is
set.
3. Call up the next basic setting in the service mode or exit the service
mode:
a) Briey press the "Service" button to navigate to the next basic setting.
b) Press the "Service" button for longer than 2 seconds to exit the ser-
vice mode.
» The new time for Auto OFF is stored.
7.4 Setting the water hardness
If the adjacent display lights up in the service mode, the water hardness can
be set.
Setting the water hardness regulates how frequently you are requested to
descale the appliance. The harder the water, the more frequently the appliance has to be descaled.
Information
The water hardness cannot be set if you use a water lter (see section8.6
Using a water lter on page46). If a water lter is used, the water hardness
is set to soft.
Determine the water hardness with the enclosed test strip. Observe the
instructions on the test strip packaging and in Table Water hardness on
page32.
Setting of the following water hardnesses is possible:
Display Water hardness
Soft, descaling after 150 litres
Medium, descaling after 100 litres
Hard, descaling after 60 litres
Very hard, descaling after 35 litres
32
Page 33

Changing basic settings
Requirement: The service mode is called up.
Press the "Service" button repeatedly until the display for the water
1.
hardness service mode appears.
2. Press the "Coee strength" button repeatedly until the desired water
hardness is set
.
3. Call up the next basic setting in the service mode or exit the service
mode:
a) Briey press the "Service" button to navigate to the next basic setting.
b) Press the "Service" button for longer than 2 seconds to exit the ser-
vice mode.
» The new setting for the water hardness is stored.
7.5 Setting the brewing temperature
If the adjacent display lights up in the service mode, the brewing temperature can be set.
The brewing temperature inuences the avour of the coee beverage. The
brewing temperature can be set to your requirements as follows:
Display Brewing temperature
Low
Medium
High
ENGLISH
Requirement: The service mode is called up.
Press the "Service" button repeatedly until the display for the brewing
1.
temperature service mode appears.
2. Press the "Coee strength" button repeatedly until the desired brewing
temperature is set.
3.
Call up the next basic setting in the service mode or exit the service
mode:
a) Briey press the "Service" button to navigate to the next basic setting.
b) Press the "Service" button for longer than 2 seconds to exit the ser-
vice mode.
» The new brewing temperature is stored.
33
Page 34

ENGLISH
Changing basic settings
7.6 Resetting the appliance to the factory settings
The appliance can be reset to the factory settings.
Information
If the appliance is reset to the factory settings, all personal basic settings in service mode are lost (see section 7.1 Calling up service mode on
page30).
Requirement: The appliance is ready for operation.
1. Press the "Service" button and also the "Medium cup" direct key.
» The ashing display indicates that the function has been activated.
» The appliance is reset to the factory settings (see Table Factory settings
on page52).
7.7 Setting the grinding neness
The grinding neness of the coee powder inuences the avour of the
coee. The grinding neness has been optimally set prior to delivery. We
recommend adjusting the grinding neness after around 1, 000 beverages
have been dispensed (after around 1 year) at the earliest.
9
Fig. 14: Lever for setting the grinding neness (Caeo® Varianza® CS)
34
Page 35

Care and maintenance
1. Remove the water tank.
» The "Grinding neness adjustment" lever (9) is visible on the housing.
2. Move the lever to the left or right, as shown on Fig. 14.
ū To the left = grinding neness ner
ū To the right = grinding neness coarser
3. Insert the water tank again.
Information
ū If the grinding neness is set ner, the coee avour is stronger.
ū The grinding neness is optimally set when the coee ows evenly out
of the outlet and a ne, dense crema appears.
8 Care and maintenance
Regular care and maintenance of the appliance ensure the consistent high
quality of your beverages.
8.1 General cleaning
Clean the appliance regularly. Immediately remove external soiling caused
by milk and coee.
ATTENTION
The use of unsuitable cleaning agents may lead to scratched surfaces.
Do not use any abrasive cloths, sponges or cleaning agents.
ENGLISH
Requirement: The appliance is switched o.
Clean the outside of the appliance with a soft, damp cloth and normal
washing-up liquid.
Rinse o the drip tray and the coee grounds container. Use a soft, damp
cloth and normal washing up liquid for this.
Clean the bean container with a soft, dry cloth.
The coee grounds container(5) and the cup plate(15) can be washed
in a dishwasher.
35
Page 36

ENGLISH
Care and maintenance
8.2 Cleaning the brewing unit
To avoid damage to the appliance, we recommend cleaning the brewing
unit once a week.
In the course of the cleaning operations, the coee residues behind the
cover on the appliance surfaces can be removed with a soft, dry cloth.
CAUTION
Electric shock when cleaning the open appliance
Switch o the appliance before cleaning the appliance surfaces behind
the cover.
11
12
Fig. 15: Removing the brewing unit (Caeo® Varianza® CS)
1. Open the cover (11). To do this, reach into the recess on the right of the
appliance and push the cover o backwards. Take o the cover.
2. Press and hold the red lever(32) on the handle of the brewing unit(12)
and turn the handle clockwise until it engages at the stop.
3. Pull the brewing unit out of the appliance by the handle.
36
32
Page 37

Care and maintenance
33
Fig. 16: Cleaning the brewing unit
1. Rinse the brewing unit thoroughly from all sides under running water.
» The brewing unit and the sieve(33) are free of coee residues.
2. Allow the brewing unit to drip dry.
3. Insert the brewing unit into the appliance. Press and hold the red lever
on the handle of the brewing unit and turn the handle counter anticlockwise until it engages at the stop.
4. Close the cover. To do this, insert the cover and move the cover forwards
until it engages.
ENGLISH
37
Page 38

ENGLISH
Care and maintenance
8.3 Cleaning the Cappuccinatore
In addition, we recommend cleaning the Cappuccinatore and the milk hose
regularly.
13
20
23
24
Fig. 17: Dismantling the Cappuccinatore
Proceed as follows to dismantle the Cappuccinatore:
1. Detach the Cappuccinatore from the steam pipe(13).
2. Detach the following individual parts from the Cappuccinatore:
ū Milk hose(23)
ū Air suction pipe(20)
ū Outlet(24)
3. Clean the Cappuccinatore and the individual parts with warm water.
4. Re-assemble the Cappuccinatore.
5. Connect the Cappuccinatore to the appliance (see section4.6 Connect-
ing the Cappuccinatore on page20).
38
Page 39

Care and maintenance
8.4 Running the cleaning programme
This cleaning programme is used to remove residues and coee oil residues
with the aid of fully automatic coee maker cleaning agents.
To avoid damage to the appliance, we recommend running the cleaning
programme every 2 months or as requested by the appliance.
The cleaning programme takes approximately 3 minutes and should not be
interrupted.
CAUTION
Contact with fully automatic coee maker cleaning agent may lead to
eye and skin irritation.
Observe the processing instructions on the packaging of the fully auto-
matic coee maker cleaning agent.
ATTENTION
The use of unsuitable fully automatic coee maker cleaning agent can
damage the appliance.
Only use the Melitta® PERFECT CLEAN Espresso Machines cleaning
tablets.
ENGLISH
39
Page 40

ENGLISH
Care and maintenance
Requirement: The appliance is ready for operation. The water tank is full.
Buttons Displays Steps
1. Press the "Service" button and also the
"Coffee strength" button for longer
than 2 seconds.
» The appliance indicates that:
ū the cleaning programme is
running
ū the rst programme stage is
reached
ū the drip tray and the coee
grounds container must be
emptied.
2. Empty the drip tray and the coee
grounds container (see section 4.8
Emptying the drip tray and coee
grounds container on page22).
3. Insert the drip tray without the coee
grounds container.
» The appliance indicates that the
second program stage is reached.
» The appliance rinses twice.
» The ashing display requests you
to remove the brewing unit and
insert a cleaning tablet.
Fig. 18: Placing a cleaning tablet in the brewing unit.
40
Page 41

Buttons Displays Steps
4. Place the coee grounds container
5. Remove the brewing unit and clean
6. Place a cleaning table in the brewing
7. Empty the drip tray and the coee
8. Insert the drip tray without the coee
9. Place the coee grounds container
10. Empty the drip tray and the coee
11. Insert the drip tray and the coee
Care and maintenance
beneath the outlet.
ENGLISH
it as described in section8.2 Cleaning
the brewing unit on page36. Do not
switch o the appliance.
unit (see Fig. 18). Insert the brewing
unit into the appliance as described in
section8.2 Cleaning the brewing unit
on page36.
» The appliance indicates that the
third programme stage is reached.
» The cleaning process starts.
» After several minutes, the appli-
ance indicates that:
ū the fourth programme stage is
reached
ū the drip tray and the coee
grounds container must be
emptied.
grounds container.
grounds container.
beneath the outlet.
» The appliance indicates that the
last program stage is reached.
» The cleaning process is continued.
» The appliance then indicates
that the drip tray and the coffee grounds container must be
emptied.
grounds container.
grounds container.
» The appliance is ready for operation.
41
Page 42

ENGLISH
Care and maintenance
8.5 Running the descaling programme
The descaling programme is used to remove limescale deposits in the interior of the appliance with fully automatic coee maker descaling agents.
To avoid damage to the appliance, we recommend running the "Descaling"
programme every 3 months or as requested by the appliance.
The descaling programme takes approximately 25 minutes and should not
be interrupted.
CAUTION
Contact with fully automatic coee maker descaling agent may lead to
eye and skin irritation.
Observe the processing instructions on the packaging of the fully auto-
matic coee maker descaling agent.
CAUTION
Hot water and hot steam owing out of the pipe
Do not touch the steam pipe during and immediately after use.
Wait until the steam pipe has cooled down.
ATTENTION
Use of unsuitable descaling agent may damage the appliance.
Only use the Melitta® ANTI CALC Espresso Machines liquid descaling
agent.
ATTENTION
A water lter may be damaged if it is screwed in during the descaling
programme.
Remove the water lter.
Place the water lter into a vessel lled with tap water during the descal-
ing programme.
The water lter can be reinserted and reused on completion of the des-
caling programme.
42
Page 43

Care and maintenance
Requirement: The appliance is ready for operation. 0.5 litres of descaling
solution has been prepared and is ready for use.
Symbol on the
selector switch
or buttons
Displays Steps
1. Press the "Service" button and also the
"Steam dispensing" button for longer
than 2seconds.
» The appliance indicates that:
ū the descaling program is run-
ning
ū the rst programme stage is
reached
ū the drip tray and the coee
grounds container must be
emptied.
2. Empty the drip tray and the coee
grounds container (see section 4.8
Emptying the drip tray and coee
grounds container on page76).
3. Turn the selector switch until the setting for hot water points upward.
4. Insert the drip tray without the coee
grounds container.
» The appliance indicates that:
ū the second programme stage is
reached
ū the water tank must be lled.
ū Descaling uid must be lled
into the water tank.
5. Place the coee grounds container
beneath the Cappuccinatore.
6. Open the lid of the water tank and
pull the water tank upwards out of the
appliance by the handle.
7. Fill 0.5 litres of descaling uid into the
water tank. Observe the corresponding instructions for use of the fully
automatic coee maker descaling
agent.
ENGLISH
43
Page 44

Care and maintenance
ENGLISH
Symbol on the
selector switch
or buttons
Displays Steps
8. Insert the water tank again.
» The descaling process starts.
» After several minutes, the appli-
ance indicates that:
ū the third programme stage is
reached
ū the rotary regulator must be
actuated.
9. Turn the rotary regulator clockwise up
to the stop.
» The descaling process is continued.
» After several minutes, the appli-
ance indicates that the drip tray
and the coee grounds container
must be emptied.
10. Empty the drip tray and the coee
grounds container.
11. Insert the drip tray without the coee
grounds container.
» The appliance indicates that:
ū the fourth programme stage is
reached
ū the water tank must be lled.
12. Place the coee grounds container
beneath the Cappuccinatore.
13. Open the lid of the water tank and
pull the water tankupwards out of the
appliance by the handle.
14. Empty and clean the water tank.
15. Fill the water tank with fresh water
and re-insert it.
» Hot water ows into the coee
grounds container.
16. As soon as hot water no longer ows,
turn the rotary regulator anti-clockwise to the stop.
44
Page 45

Care and maintenance
Symbol on the
selector switch
or buttons
Displays Steps
17. Empty the drip tray and the coee
18. Insert the drip tray and the coee
» The appliance is ready for operation.
» The appliance indicates that the
last program stage is reached.
» Hot water ows into the drip tray.
» After several minutes, the appli-
ance indicates that the drip tray
and the coee grounds container
must be emptied.
grounds container.
grounds container.
ENGLISH
45
Page 46

ENGLISH
Care and maintenance
8.6 Using a water lter
The use of a water lter extends the service life of the appliance and the
appliance has to be descaled less frequently. The water lter contained in
the scope of delivery lters calcium and other pollutants out of the water.
34
35
1
36
Fig. 19: Screwing/Unscrewing the water lter
The water lter(35) is screwed in and unscrewed from the thread (36) on
the base of the water tank(1)using the screwing aid(34).
Information
The water lter should not be left standing dry for a long period of time.
When it is not used for a long time, we recommend storing the water lter
in a vessel lled with tap water in the refrigerator.
46
Page 47

Care and maintenance
Inserting the water lter
Information
The water hardness cannot be set if you use a water lter. The water hardness is automatically set to soft (see section7.4 Setting the water hardness
on page32).
Requirement: The appliance is ready for operation. The new water lter is
at hand.
1. Press the "Service" button and also the "Two cups" button for longer
than 2 seconds.
» The appliance indicates that:
ū the lter programme is running
ū the drip tray and the coee grounds container must be emptied.
2. Empty the drip tray and the coee grounds container.
3. Insert the drip tray without the coee grounds container.
» The appliance indicates that the water tank needs to be lled.
4. Place the coee grounds container beneath the Cappuccinatore.
5. Open the lid of the water tank and pull the water tank upwards out of
the appliance by the handle.
6. Empty the water tank.
7. Insert a new lter in the water tank (see Fig. 19).
8. Fill the water tank.
9. Insert the water tank again.
» The lighted display indicates that the rotary regulator must be actu-
ated.
10. Turn the rotary regulator clockwise up to the stop.
» The lter is rinsed with water.
» Water ows into the vessel beneath the Cappuccinatore.
Information
If the appliance indicates that the water tank must be lled during this process, rst turn the rotary regulator anticlockwise to the stop. Fill the water
tank. As soon as you have inserted the lled water tank, turn the rotary
regulator clockwise back to the stop.
ENGLISH
11. If water no longer ows into the vessel and the appliance does not
indicate that the water tank must be lled, turn the rotary regulator anticlockwise to the stop.
12. Insert the coee grounds container in the drip tray again.
» The new lter is inserted and the appliance is ready for operation.
47
Page 48

Problems
Changing the water lter
Insert a new water lter (see section Inserting the water lter on page47).
ENGLISH
Permanently de-registering the water lter
If you have removed an inserted water lter and want to continue operating the appliance without a water lter, de-register the water lter from the
appliance:
1. Remove the water tank.
2. Remove the water lter (see Fig. 19).
3. Fill the water tank.
4. Press the "Service" button and also the "Large cup" direct key for longer
than 2 seconds.
» The water lter is de-registered.
» The water hardness is reset to the water hardness that the appliance
had stored prior to inserting a water lter.
5. Adjust the water hardness if necessary (see section 7.4 Setting the water
hardness on page32).
9 Problems
If the actions listed below fail to rectify the problems or other problems not
listed here occur, contact our hotline (local rate).
United Kingdom: +44 (0)800/ 0288 002
Problem Cause Action
Coee only emerges as
drips from the outlet.
Coee does not ow. Water tank is not lled
Grinding neness is
too ne.
Appliance is soiled. Clean the brewing unit (see
Appliance is covered
inside with limescale.
or is not correctly
inserted.
Brewing unit is
clogged.
Set a coarser grinding ne-
ness (see section 7.7 one
page34).
section 8.2 one page36).
Run the cleaning pro-
gramme (see section 8.4 one
page39).
Run the descaling pro-
gram (see section8.5 one
page42).
Fill the water tank and ensure
it is positioned correctly (see
chapter 4.4 one page18).
Clean the brewing unit (see
chapter 8.2 one page36).
48
Page 49

Problem Cause Action
When foaming milk,
there is not enough
milk foam.
Although the bean
container is full, the
appliance indicates
that coee beans must
be lled.
Loud grinder noise. Foreign objects in the
With the My Bean
Select® function, the
display goes o when
the measuring spoon is
put back on.
Brewing unit cannot be
inserted after removing.
Rapid alternate ashing of the displays:
Rapid alternate ashing of the displays:
Selector switch is not in
the correct position.
Cappuccinatore is
soiled.
Coee beans do not
drop into the grinder.
grinder.
There are less than 8 g
of coee beans in the
bean chute.
Handle for the locking
mechanism of the
brewing unit is not in
the correct position.
Drive is not in the correct position.
Software problem. Switch the appliance o and
Brewing unit is not
inserted.
Turn the selector switch to
the correct position (see section6.6 one page28).
Clean the Cappuccinatore (see
section8.3 one page38).
Press a direct key.
Tap lightly on the bean con-
tainer.
Clean the bean container.
Coee beans are too oily. Use
dierent coee beans.
Contact the hotline.
Top up coee beans (see sec-
tion5.1 one page23).
Check that the handle for the
locking mechanism is correctly
engaged (see section8.2 one
page36).
Press and hold the "Coee
strength" button. Also press
the ON/OFF button. The
appliance initialises. Release
buttons again.
on again (see chapter 4.1 one
page16).
Contact the hotline.
Insert brewing unit.
Problems
ENGLISH
The display lights up
without having been
activated:
Appliance is not fully
vented.
Vent the appliance, turn the
rotary regulator clockwise to
the stop for this. As soon as
water ows out of the Cap-
puccinatore, turn the rotary
regulator anti-clockwise to
the stop.
Clean the brewing unit (see
section 8.2 one page36).
49
Page 50

Transport, storage and disposal
10 Transport, storage and disposal
ENGLISH
10.1 Venting the appliance
We recommend venting the appliance when it is not used for a long period,
prior to transport and when there is a risk of frost.
During venting, residual water is removed from the appliance.
CAUTION
Hot water and hot steam owing out of the pipe
Do not reach into the steam that is owing out.
Do not touch the steam pipe during and immediately after use. Wait
until the steam pipe has cooled down.
Requirement: The appliance is ready for operation.
1. Place a vessel beneath the Cappuccinatore.
2. Press the "Service" button and also the "Small cup" direct key for longer
than 2 seconds.
» The display ashes for the duration of the venting.
» The lighting display indicates that the water tank must be removed.
3. Remove the water tank.
» The lighted display indicates that the rotary regulator must be actu-
ated.
4. Turn the rotary regulator clockwise up to the stop.
» Water and steam escape from the Cappuccinatore.
» The display ashes.
5. As soon as water and steam no longer escape, turn the rotary regulator
anti-clockwise to the stop.
» The appliance is vented and switches o automatically.
Information
If you put the appliance back into operation, automatic rinsing is carried
out after switching on and the appliance vented (see section3.5 Switching
on and venting the appliance for the rst time on page14).
50
Page 51

10.2 Transporting the appliance
ATTENTION
Freezing residual water can damage the appliance.
Prevent the appliance from being exposed to temperatures below 0°C.
Information
Transport the appliance in the original packaging. This avoids damage in
transit.
Before transporting the appliance, carry out the following activities:
1. Vent the appliance (see chapter 10.1 Venting the appliance on
page50).
2. Empty the drip tray and the coee grounds container.
3. Empty the water tank.
4. Empty the bean container.
5. Clean the appliance (see chapter 8.1 General cleaning on page35).
6. Secure loose parts (cup plate, etc.) with suitable adhesive tape.
7. Package the appliance.
10.3 Disposing of the appliance
Appliances marked with this symbol are subject to European Directive
2002 / 96 / EC for WEEE (Waste Electrical and Electronic Equipment).
Electrical appliances do not belong in domestic waste.
Dispose of the appliance in an environmentally friendly manner via suit-
able collection systems.
Technical data
ENGLISH
11 Technical data
Technical data
Operating voltage 220 V to 240 V, 50 Hz
Power consumption Maximum 1450 W
Pump pressure Static, max. 15 bar
Dimensions
Width
Depth
Height
– Caeo® Varianza® CS
– Caeo® Passione®
253 mm
380 mm
405 mm
390 mm
51
Page 52

ENGLISH
Technical data
Technical data
Capacity
Bean container
Measuring spoon
Water tank
Capacity limits per dispensing process
Continuous steam dispensing
Dispensing hot water
Weight (empty)
Ambient conditions
Temperature
Relative humidity
Water hardness range °d °e °f
Soft 0 to 10 0 to 13 0 to 18
Medium 10 to 15 13 to 19 18 to 27
Hard 15 to 20 19 to 25 27 to 36
Very hard <20 >25 >36
– Caeo® Varianza® CS
– Caeo® Passione®
125 g
10 g to 11 g (depending on coee type)
1.2 l
180 s
440 ml
11.2 kg
11,0 kg
10 °C to 32 °C
30 % to 80 % (non-condensing)
52
Factory settings
Small cup Beverage amount 40 ml
Coee strength Normal
Brewing temperature Normal
Medium cup Beverage amount 120 ml
Coee strength Normal
Brewing temperature Normal
Large cup Beverage amount 200 ml
Coee strength Normal
Brewing temperature Normal
Milk Foam amount 180 ml
Milk amount 180 ml
Page 53

ENGLISH
53
Page 54

ENGLISH
54
Page 55

Innehållsförteckning
Innehållsförteckning
1 Säkerhetsinformation .....................................................................................................57
1.1 Symboler i bruksanvisningen ............................................................................57
1.2 Avsedd användning ..............................................................................................58
1.3 Fara på grund av elektrisk ström ......................................................................58
1.4 Risk för bränn- och skållskador ......................................................................... 58
1.5 Allmän säkerhet ...................................................................................................... 59
2 Översikt ................................................................................................................................. 60
2.1 Översikt över maskinerna ................................................................................... 60
2.2 Översikt över manöverpanelen ........................................................................62
2.3 Översikt över cappuccinatore ...........................................................................64
3 Komma igång ..................................................................................................................... 65
3.1 Packa ut maskinen ................................................................................................. 65
3.2 Kontrollera leveransomfånget ..........................................................................65
3.3 Placering ...................................................................................................................66
3.4 Anslutning ................................................................................................................ 66
3.5 Sätta på och avlufta maskinen första gången ............................................. 66
4 Grundläggande användning .......................................................................................68
4.1 Sätta på och stänga av maskinen.....................................................................68
4.2 Hantera manöverpanelen ...................................................................................69
4.3 Fylla på kaebönor i bönbehållaren ...............................................................69
4.4 Fylla på vatten .........................................................................................................70
4.5 Ställa in utloppet för kaedrycker ................................................................... 72
4.6 Ansluta cappuccinatore .......................................................................................72
4.7 Använda mjölk ........................................................................................................73
4.8 Tömma droppskålen och behållaren för kaesump ................................. 74
5 Använda funktionen My Bean Select® ..................................................................... 75
5.1 Fylla på kaebönor för funktionen My Bean Select® ................................75
6 Tillreda drycker ..................................................................................................................77
6.1 Ställa in kaestyrka ............................................................................................... 77
6.2 Tillreda kaedrycker ............................................................................................78
6.3 Ställa in kaemängd ............................................................................................. 78
6.4 Tillreda två kaedrycker samtidigt .................................................................. 79
6.5 Avbryta kaetillredning .......................................................................................79
6.6 Tillreda mjölkskum eller varm mjölk ...............................................................80
6.7 Tillreda hett vatten ................................................................................................81
SVENSKA
55
Page 56

Innehållsförteckning
7 Ändra grundinställningar .............................................................................................82
7.1 Öppna serviceläget ............................................................................................... 82
7.2 Ställa in energisparprogrammet ......................................................................82
7.3 Ställa in automatisk avstängning .....................................................................83
7.4 Ställa in vattenhårdhet.........................................................................................84
7.5 Ställa in bryggtemperatur ..................................................................................85
7.6 Återställa maskinen till fabriksinställningar ................................................. 86
7.7 Ställa in malningsgrad..........................................................................................86
SVENSKA
8 Skötsel och underhåll .....................................................................................................87
8.1 Allmän rengöring ................................................................................................... 87
8.2 Rengöra bryggenheten ....................................................................................... 88
8.3 Rengöra cappuccinatore .....................................................................................90
8.4 Utföra rengöringsprogrammet .........................................................................91
8.5 Utföra avkalkningsprogrammet ....................................................................... 94
8.6 Använda vattenlter .............................................................................................98
9 Åtgärder vid fel ................................................................................................................101
10 Transport, lagring och avfallshantering ...............................................................102
10.1 Avlufta maskinen .................................................................................................102
10.2 Transport .................................................................................................................103
10.3 Avfallshantering ...................................................................................................104
11 Tekniska data ....................................................................................................................105
56
Page 57

Säkerhetsinformation
Bästa kund!
Gratulerar till köpet av din helautomatiska kaemaskin Caeo®Varianza® CS
eller Caeo® Passione®.
Bruksanvisningen hjälper dig att lära känna kaemaskinens många funktioner så att du kan njuta av olika kaespecialiteter.
Läs igenom bruksanvisningen uppmärksamt. På så sätt undviker du personskador och materiella skador. Förvara bruksanvisningen med omsorg. Om
kaemaskinen byter ägare ska den här bruksanvisningen medfölja.
Melitta ansvarar inte för skador som uppstår på grund av att bruksanvisningen inte följs.
Om du behöver mer information eller har frågor om kaemaskinen, kontakta Melitta eller besök vår hemsida:
www.melitta.se
Vi önskar dig mycket nöje med din kaemaskin.
1 Säkerhetsinformation
Maskinen uppfyller kraven enligt följande EG-direktiv:
ū 2006 / 95 / EG (lågspänning)
ū 2004 / 108 / EG (elektromagnetisk kompatibilitet)
ū 2011 / 65 / EU (begränsning av användningen av vissa farliga ämnen i
elektriska och elektroniska produkter)
ū 2009 / 125 / EG (ekodesign av energirelaterade produkter)
Maskinen har tillverkats enligt den senaste tekniken, men det nns ändå
vissa risker du behöver vara uppmärksam på.
Följ säkerhetsinformationen för att undvika dessa risker. Melitta ansvarar
inte för skador som uppstår på grund av att säkerhetsinformationen inte
följs.
SVENSKA
1.1 Symboler i bruksanvisningen
Följande symboler informerar om risker vid hantering av maskinen eller ger
praktiska anvisningar.
VARNING
Avsnitt med den här symbolen upplyser om möjliga risker för personskador.
57
Page 58

Säkerhetsinformation
VAR FÖRSIKTIG
Avsnitt med den här symbolen innehåller information om möjliga risker för
att maskinen kan skadas.
Information
Avsnitt med den här symbolen innehåller ytterligare anvisningar och tips
för hantering av maskinen.
SVENSKA
1.2 Avsedd användning
Maskinen är avsedd för tillredning av kaedrycker
genom kaebönor samt för värmning av mjölk och vatten.
Maskinen ska användas i privathushåll.
All annan användning gäller som ej avsedd och kan leda
till personskador och materiella skador. Melitta ansvarar
inte för skador som uppstår vid ej avsedd användning av
maskinen.
1.3 Fara på grund av elektrisk ström
Om maskinen eller nätkabeln är skadad föreligger livsfara på grund av risk för elektrisk stöt.
Följ nedanstående säkerhetsinformation för att undvika
risker genom elektrisk ström:
ū Använd inte nätkabeln om den är skadad.
ū En skadad nätkabel får endast bytas ut av tillverkaren,
dess kundtjänst eller dess servicepartner.
ū Öppna inga fastskruvade lock på maskinens hölje.
ū Maskinen får användas endast om den är tekniskt
felfri.
ū Defekt maskin får endast repareras av en auktoriserad
verkstad. Reparera inte maskinen själv.
ū Utför inga ändringar på maskinen, dess komponenter
eller tillbehör.
ū Sänk inte ned maskinen i vatten.
1.4 Risk för bränn- och skållskador
Vätska och ånga från maskinen kan vara mycket het.
Även delar av maskinen kan bli mycket heta.
58
Page 59

Säkerhetsinformation
Följ nedanstående säkerhetsinformation för att undvika
bränn- och skållskador:
ū Undvik hudkontakt med vätska och ånga från maski-
nen.
ū Vidrör inte munstyckena på utloppet eller ångröret
när en dryck håller på att tillredas. Vänta tills komponenterna har svalnat.
1.5 Allmän säkerhet
Följ nedanstående säkerhetsinformation för att undvika
personskador och materiella skador:
ū Vidrör aldrig maskinens invändiga delar under pågå-
ende användning.
ū Barn under 8 år får inte komma i kontakt med maski-
nen och dess nätkabel.
ū Maskinen får användas av barn från 8 år samt av
personer med nedsatt fysisk, sensorisk eller psykisk
förmåga eller personer som inte har erfarenhet och
kunskaper om hur maskinen ska hanteras, förutsatt
att de är under uppsikt eller informeras om hur maskinen ska användas på ett säkert sätt och förstår vilka
risker som föreligger.
ū Barn får inte leka med maskinen. Rengöring och
underhåll får inte utföras av barn under 8 år. Barn över
8 år måste hållas under uppsikt vid rengöring och
underhåll.
ū Dra ut nätkabeln ur eluttaget om maskinen inte är
under uppsikt en längre tid.
SVENSKA
59
Page 60

Översikt
2 Översikt
2.1 Översikt över maskinerna
2
1
3
4
SVENSKA
9
8
5
7
6
10
Bild 1: Vänster framsida av Caeo® Passione® och Caeo® Varianza® CS
1 Vattenbehållare med lock 6 Droppskål
2 Bönbehållare med lock 7 PÅ/AV-knapp
3 Avställningsyta för koppar 8 Utlopp som kan ställas in i höjdled för
4 Manöverpanel 9 Spak för inställning av malningsgrad
5 Behållare för kaesump (på
insidan)
kaedrycker med 2 kaemunstycken
(på insidan)
10 Doseringsmått* för
funktionen My Bean Select
*Finns endast på Caeo® Varianza® CS.
60
®
Page 61

Översikt
11
12
13
16
15
14
Bild 2: Höger framsida av Caeo® Passione® och Caeo® Varianza® CS
11 Skydd 14 Cappuccinatore
12 Bryggenhet (på insidan) 15 Spillbricka
13 Ångrör 16 Flottör
SVENSKA
61
Page 62

Översikt
2.2 Översikt över manöverpanelen
SVENSKA
191817
Bild 3: Manöverpanel
17 Snabbknappar
18 Indikeringar
19 Manöverknappar och vridreglage
Knapp/reglage
Betydelse Funktion
Liten kopp Tillreda en liten portion kae
Mellanstor
kopp
Stor kopp Tillreda en stor portion kae
Två koppar Ställa in tillredning av två koppar
Service Öppna serviceläget
Kaestyrka Ställa in kaestyrka
Ånga Värma upp maskinen för ånga
Vridreglage Sätta på och stänga av hett vatten eller ånga
Tillreda en mellanstor portion kae
62
Page 63

Indikering Betydelse
Lyser Maskinen är klar för användning.
Blinkar Maskinen värms upp eller tillreder en kaedryck.
Blinkar snabbt Programmet för inställning av kaemängd pågår.
Lyser Antal indikerade kaebönor:
aktuellt inställd kaestyrka
Blinkar Fyll på bönbehållaren eller
kaetillredningen har avbrutits.
Lyser* Funktionen My Bean Select® är klar för användning.
Blinkar* Fyll på bönfacket.
Lyser Tillredning av två koppar är klar för användning.
Lyser Fyll på vattenbehållaren.
Blinkar Sätt in vattenbehållaren.
Lyser Töm droppskålen och kaesumpbehållaren.
Blinkar Sätt in droppskålen och kaesumpbehållaren.
Lyser Byt lter.
Blinkar Programmet för lterbyte pågår.
Lyser Avkalka maskinen.
Blinkar Avkalkningsprogrammet pågår.
Lyser Rengör maskinen.
Blinkar Rengöringsprogrammet pågår.
Lyser Ångfunktionen är klar för användning.
Blinkar Maskinen värmer upp för ångfunktionen.
Översikt
SVENSKA
*Finns endast på Caeo® Varianza® CS.
63
Page 64

Översikt
2.3 Översikt över cappuccinatore
20
21
22
SVENSKA
25
24
Bild 4: Cappuccinatore
23
64
20 Luftinsugsrör
21 Fäste för mjölkslangen
22 Anslutning för mjölkslangen
23 Mjölkslang
24 Utlopp för hett vatten, mjölk eller mjölkskum
25 Väljare
Symbol på
väljaren
Funktion
Inställning för
varm mjölk
Inställning för
hett vatten
Inställning för
mjölkskum
Page 65

3 Komma igång
I det här kapitlet beskrivs hur du förbereder din maskin för användning.
3.1 Packa ut maskinen
Utöver maskinen innehåller förpackningen tillbehör som till exempel rengöringsutrustning och rengöringsmedel.
Komma igång
VARNING
Kontakt med rengöringsmedel kan irritera ögon och hud.
Förvara medföljande rengöringsmedel utom räckhåll för barn.
Packa ut maskinen. Ta bort förpackningsmaterial, klisterremsor och
skyddsfolier från maskinen.
Spara förpackningsemballaget så att det kan användas vid transporter
eller vid en eventuell retur.
Information
Det kan nnas spår av kae och vatten i maskinen. Det beror på att
maskinen funktionstestats på fabriken.
3.2 Kontrollera leveransomfånget
Kontrollera med hjälp av nedanstående lista att leveransen är komplett.
Kontakta din återförsäljare om komponenter fattas.
ū Cappuccinatore
ū Mjölkslang
ū Rengöringsmedel för helautomatiska kaemaskiner
ū Rengöringsmedel för mjölksystemet
ū Avkalkningsmedel för helautomatiska kaemaskiner
ū Vattenlter
ū Inskruvningsverktyg för vattenltret
ū Testremsa för bestämning av vattenhårdhet
SVENSKA
65
Page 66

Komma igång
3.3 Placering
Beakta följande anvisningar:
ū Maskinen får inte placeras i fuktiga utrymmen.
ū Placera maskinen på ett stabilt, jämnt och torrt underlag.
ū Placera inte maskinen i närheten av en diskho eller liknande.
ū Placera inte maskinen på heta underlag.
ū Kaemaskinen ska stå på ett tillräckligt avstånd på ungefär 10 cm från
vägg och andra föremål. Avståndet upptill ska vara minst 20cm.
SVENSKA
ū Dra nätkabeln så att den inte kan skadas genom kanter eller heta ytor.
3.4 Anslutning
Beakta följande anvisningar:
ū Kontrollera att den driftspänning som anges under Tekniska data
stämmer överens med nätspänningen (se tabell Tekniska data på
sidan105).
ū Anslut endast maskinen till ett korrekt installerat, jordat uttag. Kontakta
en elektriker om du är osäker.
ū Det jordade uttaget måste ha en säkring på minst 10 A.
3.5 Sätta på och avlufta maskinen första gången
När du sätter på maskinen första gången utför maskinen en automatisk
spolning. Hett vatten rinner först ut ur cappuccinatore, sedan ur utloppet.
På så sätt avluftas maskinen.
VARNING
Rinnande hett vatten och hett ångrör
Vidrör inte ångröret under och direkt efter användning.
Vänta tills ångröret har svalnat.
Information
ū Första gången du använder maskinen rekommenderar vi att du häller ut
de första två kopparna kae.
ū Om du vill använda ett vattenlter ska du sätta in det efter den första
idrifttagningen.
66
Page 67

Komma igång
7
Bild 5: PÅ/AV-knapp
Förutsättning: Maskinen är uppställd och ansluten.
1. Sätt en kopp under cappuccinatore.
2. Tryck på PÅ/AV-knappen(7).
» Maskinen indikerar att vattenbehållaren måste fyllas på.
3. Ta ut vattenbehållaren. Skölj ur den med klart vatten. Fyll vattenbehållaren med färskt vatten och sätt in den.
» När indikeringen lyser behöver vridreglaget manövreras.
4. Vrid vridreglaget på manöverpanelen medurs tills det tar stopp.
» Hett vatten rinner ut ur cappuccinatore.
5. När det inte längre kommer något vatten ur cappuccinatore, vrid vridreglaget moturs tills det tar stopp.
» Hett vatten rinner ut ur utloppet.
» Maskinen är avluftad.
6. Fyll på kaebönor i bönbehållaren (se kapitel4.3 Fylla på kaebönor i
bönbehållaren på sidan69).
7. Vid behov kan du nu antingen
a) Ställa in vattenhårdhet (se kapitel7 Ändra grundinställningar på
sidan82) eller
b) Använda ett vattenlter (se kapitel8.6 Använda vattenlter på
sidan98)
SVENSKA
67
Page 68

Grundläggande användning
4 Grundläggande användning
I det här kapitlet beskrivs grundläggande funktioner för daglig användning
av maskinen.
4.1 Sätta på och stänga av maskinen
Innan du sätter på maskinen för första gången, läs kapitel 3.5 Sätta på och
avlufta maskinen första gången på sidan66.
SVENSKA
Information
ū Vid påsättning och avstängning utför maskinen en automatisk spolning.
ū Vid spolningen leds även spolvatten till droppskålen.
Sätta på maskinen
1. Sätt en kopp under utloppet.
2. Tryck på PÅ/AV-knappen (7).
3. Maskinen värms upp och utför en automatisk spolning.
» Maskinen indikerar den senast inställda kaestyrkan.
Information
Om maskinen bara varit avstängd under en kort tid, utförs ingen automatisk
spolning när du sätter på den igen.
Stänga av maskinen
1. Sätt en kopp under utloppet.
2. Tryck på PÅ/AV-knappen (7).
» Maskinen utför en automatisk spolning.
» Maskinen stängs av.
Information
ū Maskinen stängs av automatiskt när den inte används under en längre
tid. Även i detta fall utförs en automatisk spolning.
ū Avstängningstiden kan du ställa in i serviceläget (se kapitel7.3 Ställa in
automatisk avstängning på sidan83).
ū Om ingen dryck tillretts sedan maskinen satts på eller vattenbehållaren
är tom, utförs ingen spolning.
68
Page 69

Grundläggande användning
4.2 Hantera manöverpanelen
De viktigaste programmen nns på manöverpanelen.
Tryck på önskad knapp. Så här använder du manöverpanelen:
Tryck kort
Tryck kort på en knapp för att välja ett program.
Tryck länge
2s
Tryck in en knapp i längre än 2 sekunder för att välja ett
andra program, om det nns ett.
4.3 Fylla på kaebönor i bönbehållaren
Rostade kaebönor tappar arom. Fyll bara på bönbehållaren med så mycket
kae bönor som går åt under de närmaste 3–4dagarna.
VAR FÖRSIKTIG
Vid användning av ej lämpliga kaesorter kan kvarnen sättas igen.
Använd inga frystorkade eller karamelliserade kaebönor.
Använd inte kaepulver eller snabbkaeprodukter.
Information
Om du byter bönsort kan det beroende på modell nnas kvar rester av den
gamla bönsorten i kvarnen.
Caeo® Passione®:
Även om bönbehållaren töms och sedan en ny bönsort fylls på, stannar
det alltid kvar rester av den gamla bönsorten i kvarnen. Därför kan de
första båda kopparna innehålla rester av den gamla bönsorten.
Caeo® Varianza® CS:
För att inte blanda kaebönorna vid byte av bönsort (eller vid användning av funktionen MyBeanSelect®) mals kvarnen tom efter varje
malning. Det kan ändå förekomma att kaesorterna blandas minimalt.
När kvarnen mals tom förändras ljudet, vilket är normalt.
SVENSKA
69
Page 70

Grundläggande användning
26
2
SVENSKA
Bild 6: Öppna locket på bönbehållaren (Caeo® Varianza® CS)
1. Öppna locket (26) på bönbehållaren(2).
2. Fyll på kaebönor i bönbehållaren.
3. Stäng locket på bönbehållaren.
Information
När indikeringen blinkar behöver du fylla på kaebönor. Vid nästa
kaetillredning blinkar inte indikeringen längre.
4.4 Fylla på vatten
För optimal kaesmak, använd endast färskt, kallt vatten utan kolsyra. Byt
vatten dagligen.
Information
Kaesmaken är mycket beroende av vattenkvaliteten. Använd därför ett
vattenlter från Melitta (se kapitel7.4 Ställa in vattenhårdhet på sidan84
och kapitel8.6 Använda vattenlter på sidan98).
70
Page 71

Grundläggande användning
27
1
Bild 7: Vattenbehållare (Caeo® Varianza® CS)
1. Öppna locket till vattenbehållaren(27) och dra upp vattenbehållaren(1) ur maskinen i handtaget.
2. Fyll vattenbehållaren med vatten.
3. Sätt i vattenbehållaren uppifrån i maskinen och stäng locket.
SVENSKA
71
Page 72

Grundläggande användning
4.5 Ställa in utloppet för kaedrycker
Utloppet för kaedrycker(8) kan ställas in i höjdled. Ställ in ett så litet
avstånd som möjligt mellan utloppet och koppen. Beroende på koppens
höjd dras utloppet uppåt eller nedåt.
SVENSKA
8
Bild 8: Ställa in utloppet för kaedrycker (Caeo® Varianza® CS)
4.6 Ansluta cappuccinatore
Med cappuccinatore kan du värma vatten och mjölk eller göra mjölkskum.
Med väljaren(25) på cappuccinatore kan du ställa in önskad dryck.
13
21
28
25
Bild 9: Ansluta cappuccinatore
72
23
Page 73

Grundläggande användning
1. Anslut cappuccinatoretill ångröret(13). Skjut därvid cappuccinatorens
anslutning på ångröret tills det tar stopp (28).
2. Anslut mjölkslangen(23) till cappuccinatoren.
3. Om du ännu inte vill använda mjölk kan du sätta fast mjölkslangen i
fästet(21).
4.7 Använda mjölk
Använd kall mjölk för optimal kaesmak.
23
SVENSKA
29
Bild 10: Mjölkförpackning (Caeo® Varianza® CS)
1. Ta bort mjölkslangen(23) från fästet (21).
2. Sätt mjölkslangen i en vanlig mjölkförpackning(29) eller i en behållare
med mjölk.
73
Page 74

Grundläggande användning
4.8 Tömma droppskålen och behållaren för kaesump
Efter era drycktillredningar kan droppskålen(6) och kaesumpbehållaren(5) vara fulla och behöva tömmas. Flöttören(16) indikerar nivån i
droppskålen.
Även maskinen indikerar efter ett visst antal drycktillredningar att droppskålen och kaesumpbehållaren är fulla.
Töm alltid droppskålen och kaesumpbehållaren.
SVENSKA
5
16
6
Bild 11: Tömma droppskålen och behållaren för kaesump
(Caeo® Varianza® CS)
1. Dra ut droppskålen(6) ur maskinen.
2. Ta ut behållaren för kaesump(5) och töm den.
3. Töm droppskålen.
4. Sätt in behållaren för kaesump.
5. Skjut in droppskålen i maskinen tills det tar stopp.
Information
Om du tömmer droppskålen och kaesumpbehållaren när maskinen är
avstängd, registreras det inte av maskinen. Det kan därför hända att du
uppmanas tömma droppskålen och kaesumpbehållaren, trots att de inte
är fulla än.
74
Page 75

Använda funktionen My Bean Select®
5 Använda funktionen My Bean Select®
Funktionen för tillredning av enskilda portioner nns endast på Caffeo®Varianza® CS.
Med funktionen My Bean Select® kan du tillreda en enskild kaedryck av en
annan kaesort. Fyll på en enkelportion kaebönor separat innan tillredningen.
Medan bönbehållaren är fylld med exempelvis ljusrostade kaebönor, kan
du med funktionen My Bean Select® tillreda en kaedryck av en enkelportion mörkrostade kaebönor
5.1 Fylla på kaebönor för funktionen My Bean Select®
VAR FÖRSIKTIG
Vid användning av ej lämpliga kaesorter kan kvarnen sättas igen.
Använd inga frystorkade eller karamelliserade kaebönor.
Använd inte kaepulver eller snabbkaeprodukter.
Information
Om du byter bönsort kan det beroende på modell nnas kvar rester av den
gamla bönsorten i kvarnen.
Caeo® Varianza® CS:
För att inte blanda kaebönorna vid byte av bönsort (eller vid användning av funktionen MyBeanSelect®) mals kvarnen tom efter varje
malning. Det kan ändå förekomma att kaesorterna blandas minimalt.
När kvarnen mals tom förändras ljudet, vilket är normalt.
SVENSKA
75
Page 76

Använda funktionen My Bean Select®
10
30
SVENSKA
Bild 12: Ta ut doseringsmåttet (Caeo® Varianza® CS)
Förutsättning: Maskinen är klar för användning.
1. Ta ut doseringsmåttet(10) från bönfacket (30).
» När indikeringen blinkar behöver du fylla på bönfacket.
2. Fyll på en portion kaebönor i bönfacket med doseringsmåttet(30).
3. Sätt tillbaka doseringsmåttet på bönfacket.
» När indikeringen lyser konstant är funktionen My Bean Select® klar
för användning.
4. Tillred en valfri kaedryck.
Information
Doseringsmåttet hjälper dig att fylla på rätt mängd kaebönor i bönfacket.
ū Måttet rymmer ca 10-11 g kaebönor. Beroende på önskad kaestyrka
kan du även fylla på en mindre mängd kaebönor.
ū Om du fyller på mindre än 8g kaebönor i bönfacket, är funktionen
My Bean Select® inte aktiverad. När du satt tillbaka doseringsmåttet
slocknar indikeringen. Vid nästa kaetillredning blandas kaebönorna
från bönfacket med kaebönorna från bönbehållaren.
76
Page 77

6 Tillreda drycker
Det nns två möjligheter för tillredning av drycker:
ū Tillredning av kaedrycker från utloppet för kaedrycker eller
ū Tillredning av hett vatten, varm mjölk och mjölkskum med
cappuccinatore
Tänk på att:
ū Det ska alltid nnas tillräckligt med vatten i vattenbehållaren. När nivån
är för låg uppmanas du att fylla på.
ū Även i bönbehållaren ska det alltid nnas tillräckligt med kaebönor.
Om det inte nns några kaebönor kvar, avbryter maskinen
tillredningen av en kaedryck.
ū Maskinen indikerar inte när det fattas mjölk.
ū Använd tillräckligt stora koppar för de olika dryckerna (se tabell
Fabriksinställningar på sidan105).
6.1 Ställa in kaestyrka
När maskinen är driftklar visar den aktuell inställning av kaestyrka.
Följande inställningar av kaestyrka är möjliga:
Indikering Kaestyrka
Mycket mild (utan förbryggning)
Mild
Normal
Stark
Mycket stark
Tillreda drycker
SVENSKA
Förutsättning: Maskinen är klar för användning.
1. Tryck era gånger på manöverknappen för kaestyrka för att ställa in
önskad kaestyrka.
» Maskinen indikerar vald kaestyrka.
Information
När maskinen stängs av sparas senast inställd kaestyrka.
77
Page 78

Tillreda drycker
6.2 Tillreda kaedrycker
Förutsättning: Maskinen är klar för användning.
1. Sätt en kopp under utloppet.
2. Tryck på snabbknappen för liten kopp, mellanstor kopp eller stor kopp.
» Malning och drycktillredning startas.
» Upphällningen av drycken avslutas automatiskt.
3. Ta ut koppen.
SVENSKA
6.3 Ställa in kaemängd
Genom att välja en snabbknapp kan du bestämma kaemängd.
Snabbknapp Kaemängd (fabriksinställning)
40 ml
120 ml
200 ml
Du kan ändra förinställda kaemängder från 25ml till220ml:
Förutsättning: Maskinen är klar för användning.
1. Tryck på önskad snabbknapp i längre än 2 sekunder.
» När indikeringen blinkar snabbt är programmet för inställning av
kaemängd aktivt.
» Starta malning och drycktillredning.
2. Tryck på vald snabbknapp igen när önskad kaemängd uppnåtts.
» Upphällningen av drycken avslutas.
» Maskinen sparar den nya kaemängden.
» Maskinen är klar för användning.
Information
Du kan återställa kaemängden till fabriksinställningarna (se kapitel7.6
Återställa maskinen till fabriksinställningar på sidan86).
78
Page 79

6.4 Tillreda två kaedrycker samtidigt
Med manöverknappen för två koppar tillreder du två kaedrycker samtidigt. Vid tillredning av två koppar maler maskinen två gånger.
8
31
Bild 13: Tillreda två koppar (Caeo® Varianza® CS)
1. Sätt två koppar under utloppet (8).
2. Tryck på manöverknappen för två koppar(31).
3. Tryck på snabbknappen för liten kopp, mellanstor kopp eller stor kopp.
» Malning och drycktillredning startas.
» Upphällningen av drycken avslutas automatiskt.
4. Ta ut båda kopparna.
Tillreda drycker
SVENSKA
Information
ū Inställningen gäller endast för en enskild drycktillredning.
ū Om du inte tillreder någon kaedryck inom 1 minut, återgår maskinen
till tillredning av en kopp.
6.5 Avbryta kaetillredning
Om du vill avbryta tillredningen av en kaedryck i förtid, tryck på vald
snabbknapp igen.
79
Page 80

Tillreda drycker
6.6 Tillreda mjölkskum eller varm mjölk
Mjölkskum och varm mjölk tillreds med cappuccinatore.
Tillredning av mjölkskum och varm mjölk går till på liknande sätt. Det
behövs vattenånga för tillredningen.
VARNING
Rinnande hett vatten och hett ångrör
SVENSKA
Undvik den utströmmande vattenångan.
Vidrör inte ångröret under och direkt efter användning. Vänta tills ång-
röret har svalnat.
Förutsättning: Maskinen är klar för användning. Cappuccinatore och mjölk
är anslutna till maskinen.
1. Sätt en kopp under cappuccinatore.
2. Tryck på snabbknappen för ånga.
» När indikeringen blinkar värms maskinen upp för att kunna avge
ånga.
» Därefter visar den lysande indikeringen att ångfunktionen är klar för
användning.
3. Vrid väljaren på cappuccinatore tills önskad inställning för mjölkskum
eller varm mjölk visar uppåt.
4. Vrid vridreglaget på manöverpanelen medurs tills det tar stopp.
» Upphällningen av drycken påbörjas.
5. Vrid vridreglaget moturs tills det tar stopp.
» Upphällningen av drycken avslutas.
6. Ta ut koppen.
7. Du kan tillreda er drycker eller spola cappuccinatore:
a) Tillred er drycker och spola cappuccinatore senare.
b) Spola cappuccinatore enligt nedan.
Information
Efter 30 sekunder skifter apparatet automatisk fra dampmodus til den
normale driftsmodus. Tryk på dampbetjeningsknappen for at skifte førtidigt
til den normale driftsmodus.
80
Page 81

Spola cappuccinatore
1. Fyll ett kärl med klart vatten.
2. Lägg mjölkslangen i det fyllda kärlet.
3. Sätt ett tomt kärl under cappuccinatore.
4. Tryck på snabbknappen för ånga.
» När indikeringen blinkar värms maskinen upp för att kunna avge
ånga.
» Därefter visar den lysande indikeringen att ångfunktionen är klar för
användning.
5. Vrid väljaren på cappuccinatore tills inställningen för mjölkskum visar
uppåt.
6. Vrid vridreglaget medurs tills det tar stopp.
7. När en ren vatten-/ångblandning rinner ut i det tomma kärlet, vrid
vridreglaget moturs tills det tar stopp.
» Cappuccinatoren är spolad.
Information
Vi rekommenderar att inte bara spola cappuccinatore, utan även att
regelbundet ta isär och rengöra den (se kapitel8.3 Rengöra cappuccinatore
på sidan90).
6.7 Tillreda hett vatten
Hett vatten tillreds med cappuccinatore.
Tillreda drycker
SVENSKA
VARNING
Rinnande hett vatten och hett ångrör
Vidrör inte ångröret under och direkt efter användning.
Vänta tills ångröret har svalnat.
Förutsättning: Maskinen är klar för användning. Cappuccinatore är ansluten.
1. Sätt en kopp under cappuccinatore.
2. Vrid väljaren på cappuccinatore tills inställningen för hett vatten visar
uppåt.
3. Vrid vridreglaget medurs.
» Upphällningen av drycken påbörjas.
4. Vrid vridreglaget moturs tills det tar stopp.
» Upphällningen av drycken avslutas.
5. Ta ut koppen.
81
Page 82

Ändra grundinställningar
7 Ändra grundinställningar
I följande kapitel beskrivs hur du kan ändra maskinens grundinställningar.
7.1 Öppna serviceläget
Vissa grundinställningar kan du endast ändra i maskinens serviceläge.
Förutsättning: Maskinen är klar för användning.
SVENSKA
1. Tryck på manöverknappen "service" i längre än 2 sekunder för att öppna
serviceläget.
» Maskinen indikerar ett den är i ett av de servicelägen som beskrivs
nedan.
Det nns en indikering för varje serviceläge.
Indikering Betydelse i serviceläge
Energisparprogram
Automatisk avstängning
Vattenhårdhet
Bryggtemperatur
Information
Alla fyra grundinställningar i serviceläget kan du återställa till
fabriksinställningarna (se kapitel7.6 Återställa maskinen till
fabriksinställningar på sidan86).
7.2 Ställa in energisparprogrammet
När indikeringen till vänster lyser i serviceläge kan du ställa in energisparprogrammet.
I energisparprogrammet sänks uppvärmningstemperaturen. Dessutom
lyser indikeringen på manöverpanelen svagare.
När du inte använt maskinen under en längre tid, övergår den automatiskt
till energisparprogrammet efter en angiven tid.
82
Page 83

Du kan ställa in följande tider:
Indikering Tid
3 min
30min
60 min
120 min
240 min
Ändra grundinställningar
Information
Du kan avsluta energiprogrammet genom att trycka på en valfri knapp.
Förutsättning: Serviceläget är aktivt.
Tryck på manöverknappen "service" upprepade gånger tills indike-
1.
ringen för energisparprogrammet visas.
2. Tryck på manöverknappen för kaestyrka upprepade gånger tills öns-
kad tid är inställd.
3.
Du kan öppna nästa grundinställning i serviceläge eller lämna serviceläge:
a) Tryck kort på manöverknappen "service" för att navigera till nästa
grundinställning.
b) Tryck på manöverknappen "service" i längre än 2 sekunder för att
lämna serviceläge.
» Den nya tiden för aktivering av energisparläget har sparats.
7.3 Ställa in automatisk avstängning
När indikeringen till vänster lyser i serviceläge kan du ställa in automatisk
avstängning.
När du inte använt maskinen under en längre tid, stängs den av
automatiskt. Du kan ställa in följande tider:
Indikering Tid
9 min
30 min
60 min
240 min
480 min
SVENSKA
83
Page 84

Ändra grundinställningar
Förutsättning: Serviceläget är aktivt.
1. Tryck på manöverknappen "service" upprepade gånger tills indikeringen för serviceläget automatisk avstängning visas.
2. Tryck på manöverknappen för kaestyrka upprepade gånger tills önskad tid är inställd.
3. Du kan öppna nästa grundinställning i serviceläge eller lämna serviceläge:
a) Tryck kort på manöverknappen "service" för att navigera till nästa
SVENSKA
grundinställning.
b) Tryck på manöverknappen "service" i längre än 2 sekunder för att
lämna serviceläge.
» Den nya tiden för automatisk avstängning har sparats.
7.4 Ställa in vattenhårdhet
När indikeringen till vänster lyser i serviceläge kan du ställa in vattenhårdhet.
Genom att ställa in vattenhårdhet reglerar du hur ofta maskinen uppmanar
dig att avkalka. Ju hårdare vatten, desto oftare behöver maskinen avkalkas.
Information
Om du använder ett vattenlter kan du inte ställa in vattenhårdhet
(se kapitel8.6 Använda vattenlter på sidan98). Vid vattenlter är
vattenhårdheten automatiskt inställd på mjukt.
Bestäm vattenhårdhet med den medföljande testremsan. Beakta anvisningarna på testremsans förpackning och tabellen Intervall för vattenhårdhet på
sidan105.
För vattenhårdhet nns följande inställningar:
Indikering Vattenhårdhet
Mjukt, avkalka efter 150 liter
Medel, avkalka efter 100 liter
Hårt, avkalka efter 60 liter
Mycket hårt, avkalka efter 35 liter
84
Page 85

Ändra grundinställningar
Förutsättning: Serviceläget är aktivt.
Tryck på manöverknappen "service" upprepade gånger tills indike-
1.
ringen för serviceläget vattenhårdhet visas.
2. Tryck på manöverknappen för kaestyrka upprepade gånger tills öns-
kad vattenhårdhet är inställd.
3. Du kan öppna nästa grundinställning i serviceläge eller lämna serviceläge:
a) Tryck kort på manöverknappen "service" för att navigera till nästa
grundinställning.
b) Tryck på manöverknappen "service" i längre än 2 sekunder för att
lämna serviceläge.
» Den nya inställningen av vattenhårdhet har sparats.
7.5 Ställa in bryggtemperatur
När indikeringen till vänster lyser i serviceläge kan du ställa in bryggtemperatur.
Bryggtemperaturen påverkar kaedryckens smak. För bryggtemperaturen
nns följande inställningar:
Indikering Bryggtemperatur
Låg
Medel
Hög
SVENSKA
Förutsättning: Serviceläget är aktivt.
Tryck på manöverknappen "service" upprepade gånger tills indike-
1.
ringen för serviceläget bryggtemperatur visas.
2. Tryck på manöverknappen för kaestyrka upprepade gånger tills öns-
kad bryggtemperatur är inställd.
3.
Du kan öppna nästa grundinställning i serviceläge eller lämna serviceläge:
a) Tryck kort på manöverknappen "service" för att navigera till nästa
grundinställning.
b) Tryck på manöverknappen "service" i längre än 2 sekunder för att
lämna serviceläge.
» Den nya bryggtemperaturen har sparats.
85
Page 86

Ändra grundinställningar
7.6 Återställa maskinen till fabriksinställningar
Du kan återställa maskinen till fabriksinställningarna.
Information
Om du återställer maskinen till fabriksinställningarna, går alla personliga
grundinställningar i serviceläge förlorade (se kapitel 7.1 Öppna serviceläget
på sidan82).
SVENSKA
Förutsättning: Maskinen är klar för användning.
1. Tryck på manöverknappen "service" och dessutom på snabbknappen
för mellanstor kopp.
» När indikeringen blinkar är funktionen aktiverad.
» Maskinen är återställd till fabriksinställningarna (se tabell
Fabriksinställningar på sidan105).
7.7 Ställa in malningsgrad
Kaepulvrets malningsgrad påverkar kaesmaken. Malningsgraden är optimalt inställd vid leverans. Vi rekommenderar att justera malningsgraden
efter ca 1 000 kaetillredningar (ca1år).
9
Bild 14: Spak för inställning av malningsgrad (Caeo® Varianza® CS)
86
Page 87

Skötsel och underhåll
1. Ta ut vattenbehållaren.
» På höljet ser du nu spaken för inställning av malningsgrad(9).
2. Skjut spaken åt vänster eller höger enligt Bild 14.
ū Åt vänster = nare malningsgrad
ū Åt höger = grövre malningsgrad
3. Sätt tillbaka vattenbehållaren.
Information
ū Om du ställer in nare malningsgrad blir kaesmaken starkare.
ū Malningsgraden är optimalt inställd när kaet passerar utloppet jämnt
fördelat och en n, tät crema bildas.
8 Skötsel och underhåll
Genom regelbunden skötsel och underhåll av maskinen säkerställer du
konstant hög kvalitet på dina drycker.
8.1 Allmän rengöring
Rengör maskinen regelbundet. Avlägsna genast rester av mjölk och kae på
utsidan.
VAR FÖRSIKTIG
Användning av olämpliga rengöringsmedel kan leda till att ytan får
repor.
Använd inga repande skurtrasor, skursvampar eller rengöringsmedel.
SVENSKA
Förutsättning: Maskinen är avstängd.
Rengör maskinen på utsidan med en mjuk, fuktig trasa och vanligt
diskmedel.
Skölj av droppskålen och kaesumpbehållaren. Använd därvid en mjuk,
fuktig trasa och vanligt diskmedel.
Rengör bönbehållaren med en mjuk, torr trasa.
Kaesumpbehållaren(5) och spillbrickan(15) kan diskas i diskmaskin.
87
Page 88

Skötsel och underhåll
8.2 Rengöra bryggenheten
För att undvika skador på maskinen rekommenderar vi att rengöra bryggenheten en gång i veckan.
Torka då även bort kaeresterna på maskinens ytor bakom skyddet med en
torr, mjuk trasa.
VARNING
SVENSKA
Risk för elstöt vid rengöring av den öppna maskinen
Stäng av maskinen innan du rengör maskinens ytor bakom skyddet.
11
12
32
Bild 15: Ta ut bryggenheten (Caeo® Varianza® CS)
1. Öppna skyddet(11). Greppa därvid i fördjupningen på maskinens högra
sida och skjut skyddet bakåt. Ta bort skyddet.
2. Tryck in och håll fast den röda spaken(32) på bryggenhetens handtag(12) och vrid handtaget medurs tills det hakar fast när det tar stopp.
3. Dra ut bryggenheten ur maskinen i handtaget.
88
Page 89

Skötsel och underhåll
33
Bild 16: Rengöra bryggenheten
4. Skölj grundligt av bryggenheten under rinnande vatten.
» Bryggenheten och silen(33) är rena från kaerester.
5. Låt bryggenheten droppa av.
6. Sätt in bryggenheten i maskinen. Tryck in och håll fast den röda spaken
på bryggenhetens handtag och vrid handtaget moturs tills det hakar
fast när det tar stopp.
7. Sätt tillbaka skyddet. Sätt därvid in skyddet och skjut det framåt tills det
snäpps fast.
SVENSKA
89
Page 90

Skötsel och underhåll
8.3 Rengöra cappuccinatore
Vi rekommenderar dessutom att regelbundet rengöra cappuccinatore och
mjölkslangen.
13
SVENSKA
20
23
24
Bild 17: Ta isär cappuccinatore
Gör så här för att ta isär cappuccinatore:
1. Dra bort cappuccinatore från ångröret(13).
2. Dra bort följande enskilda komponenter från cappuccinatore:
ū Mjölkslang(23)
ū Luftinsugsrör(20)
ū Utlopp(24)
3. Rengör cappuccinatore och enskilda komponenter med varmt vatten.
4. Sätt ihop cappuccinatore igen.
5. Anslut cappuccinatore till maskinen (se kapitel4.6 Ansluta cappuccina-
tore på sidan72).
90
Page 91

Skötsel och underhåll
8.4 Utföra rengöringsprogrammet
Under rengöringsprogrammet avlägsnas smuts och rester av kaeolja med
hjälp av rengöringsmedel för helautomatiska kaemaskiner.
För att undvika skador på maskinen rekommenderar vi att utföra rengöringsprogrammet en gång varannan månad – eller när maskinen uppmanar
dig att göra så.
Rengöringsprogrammet tar ungefär 10 minuter och ska inte avbrytas.
VARNING
Kontakt med rengöringsmedlet för helautomatiska kaemaskiner kan
irritera ögon och hud.
Följ anvisningarna på rengöringsmedlets förpackning.
VAR FÖRSIKTIG
Användning av olämpliga rengöringsmedel för helautomatiska
kaemaskiner kan leda till skador på maskinen.
Använd uteslutande rengöringstabletterna Melitta® PERFECT CLEAN
Espresso Machines.
SVENSKA
91
Page 92

Skötsel och underhåll
Förutsättning: Maskinen är klar för användning. Vattenbehållaren är full.
Knappar Indikeringar Åtgärder
1. Tryck på manöverknappen "service"
och dessutom på knappen för kaestyrka i längre än 2 sekunder.
» Maskinen indikerar följande:
ū Rengöringsprogrammet pågår.
SVENSKA
ū Det första programsteget körs.
ū Droppskålen och
kaesumpbehållaren behöver
tömmas.
2. Töm droppskålen och kaesumpbehållaren (se kapitel 4.8 Tömma dropp-
skålen och behållaren för kaesump på
sidan74).
3. Sätt in droppskålen utan kaesumpbehållaren.
» Maskinen indikerar att det andra
programsteget körs.
» Maskinen spolar två gånger.
» När den här indikeringen blinkar
ska du ta ut bryggenheten och
lägga i en rengöringstablett.
Bild 18: Lägg en rengöringstablett i bryggenheten.
92
Page 93

Knappar Indikeringar Åtgärder
4. Sätt kaesumpbehållaren under
utloppet.
5. Ta ut bryggenheten och rengör den
enligt beskrivningen i kapitel8.2
Rengöra bryggenheten på sidan88.
Stäng därvid inte av maskinen.
6. Lägg en rengöringstablett i bryggenheten (se Bild 18). Sätt in bryggenheten i maskinen enligt beskrivningen i
kapitel8.2 Rengöra bryggenheten på
sidan88.
» Maskinen indikerar att det tredje
» Rengöringsprocessen startar.
» Efter några minuter indikerar
7. Töm droppskålen och behållaren för
kaesump.
8. Sätt in droppskålen utan kaesumpbehållaren.
9. Sätt kaesumpbehållaren under
utloppet.
» Maskinen indikerar att det sista
» Rengöringsprocessen fortsätter.
» Därefter indikerar maskinen
10. Töm droppskålen och behållaren för
kaesump.
11. Sätt in droppskålen och kaesumpbehållaren.
Skötsel och underhåll
SVENSKA
programsteget körs.
maskinen följande:
ū Det ärde programsteget körs.
ū Droppskålen och
kaesumpbehållaren behöver
tömmas.
programsteget körs.
att droppskålen och
kaesumpbehållaren behöver
tömmas.
» Maskinen är klar för användning.
93
Page 94

Skötsel och underhåll
8.5 Utföra avkalkningsprogrammet
Med avkalkningsprogrammet avlägsnas kalkavlagringar på insidan av
maskinen med avkalkningsmedel för helautomatiska kaemaskiner.
För att undvika skador på maskinen rekommenderar vi att utföra programmet "Avkalkning" en gång var tredje månad – eller när maskinen uppmanar
dig att göra så.
Avkalkningsprogrammet tar ungefär 25 minuter och ska inte avbrytas.
SVENSKA
VARNING
Kontakt med avkalkningsmedlet för helautomatiska kaemaskiner kan
irritera ögon och hud.
Följ anvisningarna på avkalkningsmedlets förpackning.
VARNING
Rinnande hett vatten och hett ångrör
Vidrör inte ångröret under och direkt efter användning.
Vänta tills ångröret har svalnat.
VAR FÖRSIKTIG
Användning av olämpliga avkalkningsmedel kan leda till skador på
maskinen.
Använd uteslutande det ytande avkalkningsmedlet Melitta® ANTI
CALC Espresso Machines.
VAR FÖRSIKTIG
Ett fastskruvat vattenlter kan skadas under avkalkningsprogrammet.
Ta ut vattenltret.
Lägg vattenltret i en behållare med kranvatten under avkalkningspro-
grammet.
När avkalkningsprogrammet avslutats kan du sätta in vattenltret och
använda det igen.
94
Page 95

Skötsel och underhåll
Förutsättning: Maskinen är klar för användning. 0,5 liter avkalkningslösning
har blandats och nns till hands.
Symbol på
väljaren eller
knappar
Indikeringar Åtgärder
1. Tryck på manöverknappen "service"
och dessutom på knappen för ånga i
längre än 2 sekunder.
» Maskinen indikerar följande:
2. Töm droppskålen och kaesumpbehållaren (se kapitel 4.8 Tömma dropp-
skålen och behållaren för kaesump på
sidan74).
3. Vrid väljaren tills inställningen för hett
vatten visar uppåt.
4. Sätt in droppskålen utan kaesumpbehållaren.
» Maskinen indikerar följande:
5. Sätt kaesumpbehållaren under
cappuccinatore.
6. Öppna locket till vattenbehållaren och
dra upp vattenbehållarenur maskinen
i handtaget.
7. Fyll på 0,5 liter avkalkningslösning
i vattenbehållaren. Beakta därvid
bruksanvisningen för avkalkningsmedlet för helautomatiska kaemaskiner.
8. Sätt tillbaka vattenbehållaren.
» Avkalkningsprocessen startar.
» Efter några minuter indikerar
ū Avkalkningsprogrammet pågår.
ū Det första programsteget körs.
ū Droppskålen och
kaesumpbehållaren behöver
tömmas.
ū Det andra programsteget körs,
ū Vattenbehållaren är full,
ū Avkalkningslösningen ska fyllas
på i vattenbehållaren.
maskinen följande:
SVENSKA
95
Page 96

Skötsel och underhåll
Symbol på
väljaren eller
knappar
Indikeringar Åtgärder
ū Det tredje programsteget körs.
ū behöver vridreglaget
manövreras.
9. Vrid vridreglaget medurs tills det tar
stopp.
» Avkalkningsprocessen fortsätter.
SVENSKA
» Efter några minuter indikerar
maskinen att droppskålen och
kaesumpbehållaren behöver
tömmas.
10. Töm droppskålen och behållaren för
kaesump.
11. Sätt in droppskålen utan kaesumpbehållaren.
» Maskinen indikerar följande:
ū Det ärde programsteget körs.
ū Vattenbehållaren är full.
12. Sätt kaesumpbehållaren under
cappuccinatore.
13. Öppna locket till vattenbehållaren och
dra upp vattenbehållarenur maskinen
i handtaget.
14. Töm och rengör vattenbehållaren.
15. Fyll vattenbehållaren med färskt vatten och sätt in den igen.
» Hett vatten rinner i
kaesumpbehållaren.
16. När det inte kommer något mer hett
vatten, vrid vridreglaget moturs tills
det tar stopp.
» Maskinen indikerar att det sista
programsteget körs.
» Hett vatten rinner i droppskålen.
96
Page 97

Skötsel och underhåll
Symbol på
väljaren eller
knappar
Indikeringar Åtgärder
» Efter några minuter indikerar
17. Töm droppskålen och behållaren för
kaesump.
18. Sätt in droppskålen och kaesumpbehållaren.
» Maskinen är klar för användning.
maskinen att droppskålen och
kaesumpbehållaren behöver
tömmas.
SVENSKA
97
Page 98

Skötsel och underhåll
8.6 Använda vattenlter
Genom att använda ett vattenlter förlängs maskinens livslängd och du
behöver inte avkalka maskinen lika ofta. Det medföljande vattenltret ltrerar bort kalk och andra föroreningar från vattnet.
34
SVENSKA
35
1
36
Bild 19: Skruva fast eller lossa vattenltret
Vattenltret(35) skruvas fast i eller lossas från gängan(36) i botten på vattenbehållaren(1) med hjälp av inskruvningsverktyget(34).
Information
Vattenltret ska inte vara torrt under en längre tid. Vi rekommenderar att
förvara vattenltret i en behållare med kranvatten i kylskåpet om ltret inte
ska användas under en längre tid.
98
Page 99

Skötsel och underhåll
Sätta in vattenlter
Information
Om du använder ett vattenlter kan du inte ställa in vattenhårdhet.
Vattenhårdheten är automatiskt inställd på mjukt (se kapitel7.4 Ställa in
vattenhårdhet på sidan84).
Förutsättning: Maskinen är klar för användning. Det nya vattenltret nns
till hands.
1. Tryck på manöverknappen "service" och dessutom på manöverknappen
för två koppar i längre än 2 sekunder.
» Maskinen indikerar följande:
ū Filterprogrammet körs.
ū Droppskålen och kaesumpbehållaren behöver tömmas.
2. Töm droppskålen och behållaren för kaesump.
3. Sätt in droppskålen utan kaesumpbehållaren.
» Maskinen indikerar att vattenbehållaren måste fyllas på.
4. Sätt kaesumpbehållaren under cappuccinatore.
5. Öppna locket till vattenbehållaren och dra upp vattenbehållarenur
maskinen i handtaget.
6. Töm vattenbehållaren.
7. Sätt i ett nytt lter i vattenbehållaren (se Bild 19).
8. Fyll vattenbehållaren.
9. Sätt tillbaka vattenbehållaren.
» När indikeringen lyser behöver vridreglaget manövreras.
10. Vrid vridreglaget medurs tills det tar stopp.
» Filtret spolas med vatten.
» Vatten rinner i koppen under cappuccinatore.
Information
Om maskinen indikerar att vattentanken behöver fyllas på under det
här förloppet, vrid först vridreglaget moturs tills det tar stopp. Fyll
vattenbehållaren. När du har satt in vattenbehållaren, vrid vridreglaget
medurs tills det tar stopp.
SVENSKA
11. När det inte kommer något mer vatten i koppen och maskinen inte
längre indikerar att vattenbehållaren behöver fyllas på, vrid vridreglaget
moturs tills det tar stopp.
12. Sätt in kaesumpbehållaren i droppskålen igen.
» Det nya ltret har satts in och maskinen är klar för användning.
99
Page 100

Skötsel och underhåll
Byta vattenlter
Sätt in ett nytt vattenlter (se kapitel Sätta in vattenlter på sidan99).
Inaktivera vattenlter varaktigt
När du har tagit bort ett isatt vattenlter och vill använda maskinen utan
vattenlter, måste vattenltret inaktiveras på maskinen:
1. Ta ut vattenbehållaren.
SVENSKA
2. Ta ut vattenltret (se Bild 19).
3. Fyll vattenbehållaren.
4. Tryck på manöverknappen "service" och dessutom på manöverknappen
för stor kopp i längre än 2 sekunder.
» Vattenltret har inaktiverats.
» Vattenhårdheten är återställd till den hårdhetsgrad som maskinen
sparat innan ett vattenlter sattes in.
5. Ställ vid behov in vattenhårdheten på nytt (se kapitel 7.4 Ställa in vat-
tenhårdhet på sidan84).
100
 Loading...