

Page 1
Operating Manual
https://stomshop.pro
MELAdem®53
®
MELAdem
Ion exchanger
53 C
Dear Dr.
We should like to extend our thanks for the expression of trust in our company which you have displayed through the
purchase of this MELAG product.
As an owner-run and operated family concern founded in 1951, we have a long history of successful specialization in
hygiene products for practice-based use. Our focus on innovation, quality and the highest standards of operational
reliability has established MELAG as the world’s leading manufacturer in the instrument treatment and hygiene field.
You, our customer are justified in your demand for the best products, quality and reliability. Providing "competence in
hygiene" and "Quality – made in Germany", we guarantee that these demands will be met. Our certified quality
management systems is subject to close monitoring: one instrument to this end is our annual multi-day audit conducted
in accordance with ISO 13485 and ISO 9001. This guarantees that all MELAG products are manufactured and tested in
accordance with strict quality criteria.
The MELAG management and team.
Page 2
Symbol
Explanation
Draws your attention to a situation, which if not avoided, can result in damage to the water
Draws your attention to important information.
Symbol
Explanation
see Chapter 2
Reference to another text section or diagram within this manual.
https://stomshop.pro
General notes
Please read this operating manual carefully before commissioning the mixed-bed resin cartridge. The operating manual
includes important safety information. The functionality and value-retention of this mixed-bed resin depends on the care
accorded to it.
Please store this operating manual carefully and in close proximity to your mixed-bed resin cartridge. It represents a
component of the product.
User group
This operating manual is addressed to doctors, their assistants and service departments.
Validity
This operating manual applies to the water treatment unit MELAdem 53/MELAdem 53 C.
About this manual
Symbols used
Formatting rules
treatment unit.
Page 3

Contents
https://stomshop.pro
Contents
Chapter 1 – Performance Specifications ......................................................................................... 5
Intended Use ................................................................................................................................................................... 5
Mode of functioning ......................................................................................................................................................... 5
Chapter 2 – Device Description ....................................................................................................... 6
Scope of delivery ............................................................................................................................................................. 6
Views of the device .......................................................................................................................................................... 6
Chapter 3 – Commissioning ............................................................................................................ 7
Removing from the packaging ......................................................................................................................................... 7
Requirements of the set-up location ................................................................................................................................ 7
Space requirements......................................................................................................................................................... 7
Requirements for connection to the water pipe ............................................................................................................... 7
Connecting the MELAdem 53/MELAdem 53 C ................................................................................................................ 9
Commissioning .............................................................................................................................................................. 11
Installation example ....................................................................................................................................................... 11
Water distributor for connecting further devices ............................................................................................................ 15
Installing the water distributor ........................................................................................................................................ 15
Installation example ....................................................................................................................................................... 16
Combination with other MELAG devices ....................................................................................................................... 17
Chapter 4 – Maintenance .............................................................................................................. 18
Daily checks .................................................................................................................................................................. 18
Replacing the mixed-bed resin cartridge ....................................................................................................................... 18
Regenerating the exhausted mixed-bed resin cartridges............................................................................................... 19
Chapter 5 – Operating Pauses ...................................................................................................... 20
Operating pauses .......................................................................................................................................................... 20
Transport and storage ................................................................................................................................................... 20
Technical Data .............................................................................................................................. 21
Appendix A – Accessories ............................................................................................................ 22
Appendix B – Spare parts ............................................................................................................. 23
Page 4
Chapter 1 – Performance Specifications
https://stomshop.pro
Safety Instructions
When operating the mixed-bed resin cartridge, please observe the following safety instructions as well as
those contained in subsequent chapters.
Maintenance
Use only original replacement parts for maintenance.
Leaks
The water intake is to be closed upon the discovery of leaks. Check all hoses and hose
connections for leaks.
4
Page 5

Chapter 1 – Performance Specifications
https://stomshop.pro
Chapter 1 – Performance Specifications
Intended Use
This mixed-bed resin cartridge works according to the ion exchange procedure. It is used for the complete
demineralization of water (DI water) of drinking water quality.
The MELAdem 53/MELAdem 53 C must always be operated with the MELAtherm 10 washer-disinfector.
Optionally, further devices can be connected, e.g. one or more steam sterilizers.
Mode of functioning
The mixed-bed resin cartridge is filled with a cation and anion resin which removes the salts dissolved in
water using the so-called adsorption process.
The mixed-bed resin is exhausted after absorbing a certain amount of salt and must be replaced and
regenerated (see Chapter 4 – Maintenance).
The capacity of a mixed-bed resin cartridge depends on the hardness of the local water supply
(see Technical Data).
5
Page 6
Chapter 2 – Device Description
1
2
3
4
5 6 7
8
https://stomshop.pro
Chapter 2 – Device Description
Scope of delivery
Standard scope of delivery
2x mixed-bed resin cartridges (1 reserve)
1x MELAG transport packaging
1x Operating Manual
1x Connecting bend for the DI water connection
1x Bleed valve for decompression
1x Black rubber seal, 3 mm
4x Black rubber seal, 2 mm (2x as a reserve)
1x Water inflow hose, 2.5 m with a 180° arch and flat seal, green
1x Safety combination HD in accordance with EN 1717 with a mount and a green flat seal
1x Water inflow hose 80 cm
1x Sealable bag with cable tie
1x Water inflow distributor, Y-piece
1x Spanner (SW30)
Optionally
Water distributor for the connection of multiple devices in parallel
A leak detector (water stop) for the avoidance of water damage following leaks
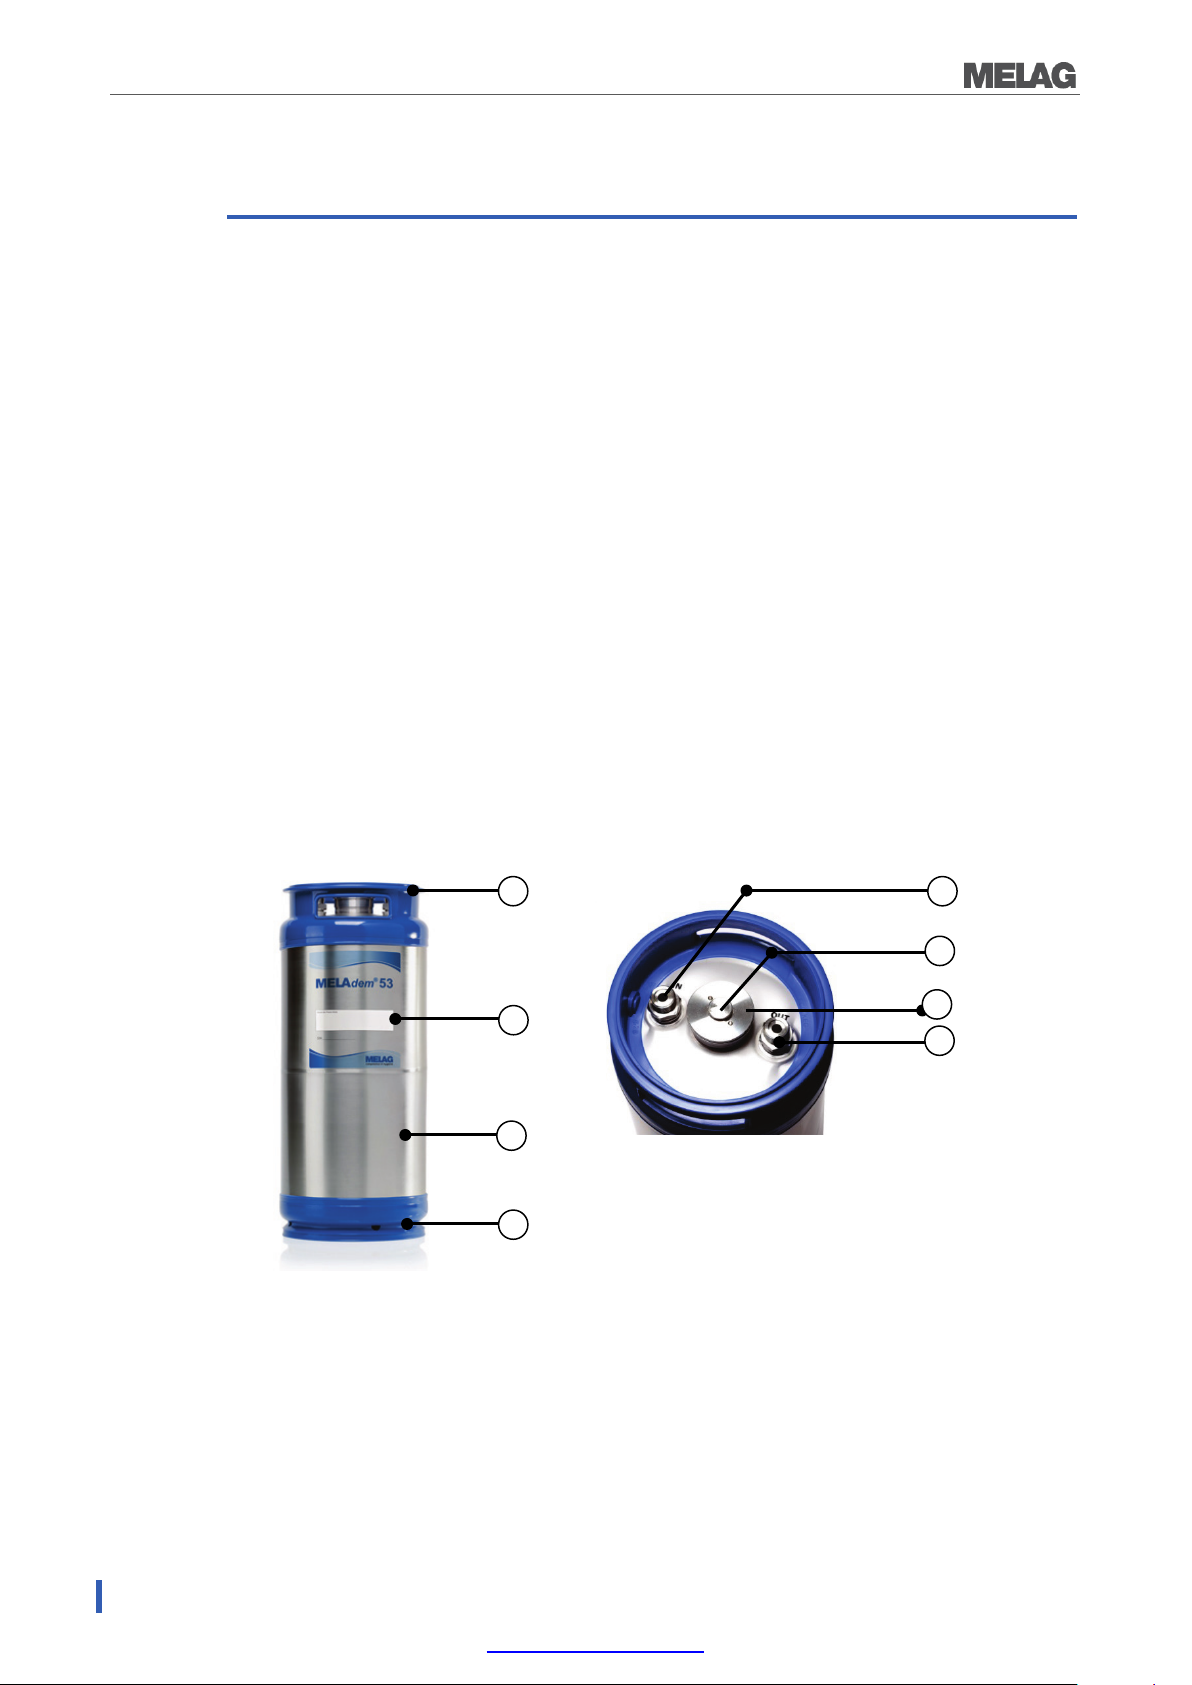
Views of the device
Fig. 1: Views of the device
(1) Polypropylene head-ring
(2) Label für die Seriennummer und Praxisadresse
(3) 20 l stainless steel mixed-bed resin cartridge
(4) Polypropylene foot ring
(5) Connection to the cold water pipe of the local drinking water supply (raw water IN)
(6) Ventilation screw
(7) Screw connection opening
(8) Connection to the MELAtherm
10 DI water inflow hose (clean water OUT)
6
Page 7
Chapter 3 – Commissioning
https://stomshop.pro
Chapter 3 – Commissioning
Removing from the packaging
1. Remove the two mixed-bed resin cartridges included in the scope of delivery from the packaging.
2. Store one of the two mixed-bed resin cartridges included in the scope of delivery as a reserve in
accordance with the storage conditions specified on page 20.
3. Retain the MELAG transport packaging (1 folded box, 2 foam inserts) in a safe and dry location.
These are required when returning the mixed-bed resin cartridge for regeneration.
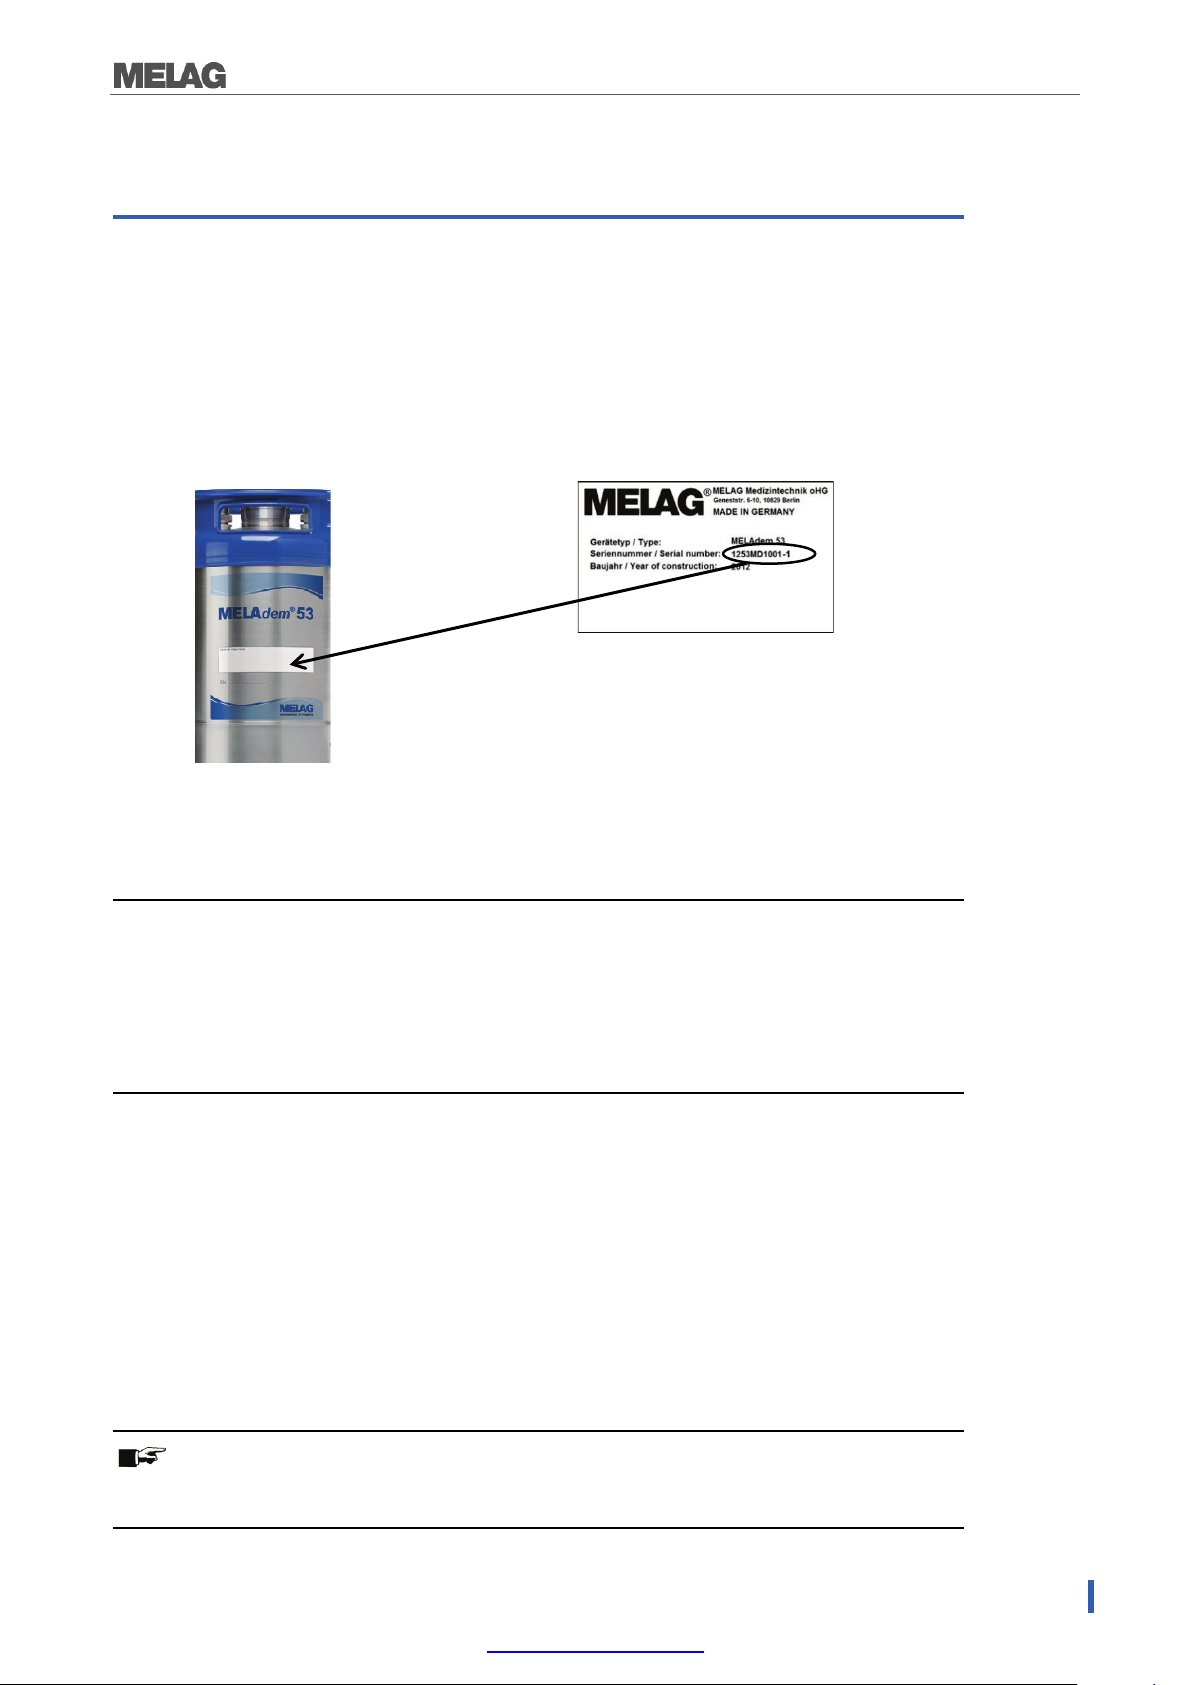
4. Note the serial number of the mixed-bed resin cartridge on the label for control purposes. The
serial number is located on the type plate on the rear of the mixed-bed resin cartridge.
Fig. 2: Label for entering the serial number
Requirements of the set-up location
The following conditions must be given:
The installation location is clean and frost-free.
The mixed-bed resin cartridge is installed in a perpendicular position.
The installation location is freely accessible for the installation, operation and regular replacement
of the mixed-bed resin cartridge.
The hose connections must be freely accessible.
Space requirements
The space requirement of the mixed-bed resin cartridge corresponds to its dimensions plus a minimum of
25 cm for the safety combination EN 1717 and free access to the hose connections. If the MELAtherm
is to be installed as an installation device, this should be placed in an adjacent floor unit.
10
Requirements for connection to the water pipe
Installation of a cut-off valve with a back-flow preventer and a 3/4" external thread connection in the
proximity of the installation location. In order to provide a standard-conform connection for the mixed-bed
resin cartridge with back-flow preventer and pipe aerator independent of the on-site installation, we
recommend one of the following connections:
PLEASE NOTE
To prevent water damage, we recommend the use of a leak detector e.g. the MELAG water stop
(order no. 01056).
7
Page 8

Chapter 3 – Commissioning
(1) Tap with back-flow preventer and pipe
(2)
(1) Ø 10 mm cold water supply (to the mixer tap)
(2)
(3)
(4)
https://stomshop.pro
Connection to the cold water supply
The water flow pressure of the on-site tap should be a minimum of 1.5 bars and may not exceed 10 bars.
Alternative connection 1
If a separate water connection (nominal width DN15 with 1/2" collar) is present / installed, a water tap with
a back-flow preventer and a pipe aerator is installed.
Fig. 3: Installation with back-flow preventer and pipe aerator
Alternative connection 2
If a cold water connection with an angle valve and a Ø 10 mm duct is present / installed, an additional
water tap with an integrated back-flow preventer and pipe aerator will be fitted directly to an existing angle
valve.
aerator (order no. 37310)
Cold water inflow hose
Additional water tap with an integrated
back-flow preventer and pipe aerator
Cold water inflow hose
Existing angle valve
Fig. 4: Installation with an angle valve
Protection with a safety combination in accordance with EN 1717
The connection of consumers to the drinking water system must be performed in accordance with EN
1717 so as to protect the drinking water supply from pollution. To this end, fit a safety combination of a
backflow preventer and a pipe aerator to the connection in accordance with EN 1717 part 4. The safety
combination included in the scope of delivery should be mounted on the wall, 25 cm over the mixed-bed
resin cartridge (see Fig. 6).
8
Page 9

Connecting the MELAdem 53/MELAdem 53 C
Open-end
https://stomshop.pro
1. Unscrew the yellow caps from the connection fitting before connecting the hoses.
PLEASE NOTE
The yellow caps must be retained to seal the connection fitting during transport e.g. when
replacing the exhausted mixed-bed resin cartridge.
Fasten the caps in the sealable bag (included in the scope of delivery) to the head-ring of the mixedbed resin cartridge using the cable ties (see Fig. 5).
Chapter 3 – Commissioning
Fig. 5: Example depiction using the MELAdem 53
9
Page 10

Chapter 3 – Commissioning
25 cm
31.5cm
https://stomshop.pro
Fig. 6 Connecting the mixed-bed rasin cartridge
(1) Cold water inflow hose connection of the MELAtherm
10
(2) Water tap (on-site)
(3) Connecting bend with long inflow hose
(4) Safety combination HD consisting of a backflow preventer and a pipe aerator in
accordance with EN 1717
(5) Connection bend with short inflow hose (IN)
(6) Connection bend for DI water connection (OUT)
(7) Bleed valve for decompression of the mixed-bed resin cartridge
(8) Connection of the DI water inflow hose of the MELAtherm
10
Proceed as follows to connect the mixed-bed resin cartridge (see Fig. 6):
1. Mount the safety combination HD (4)
25 cm over the mixed-bed resin cartridge on the wall in accordance with EN1717
2. Connect the connecting bend of the long water inflow hose (3) to the safety combination HD (4)
(above). Then connect the other end to the drinking water supply using a spanner.
3. Connect the short water inflow hose (5) to the safety combination (4) (below) using the green flat
seal.
4. Connect the connecting bend of the short water inflow hose (5)with the 2 mm thick black rubber
seal to the connection fitting "IN" of the mixed-bed resin cartridge. Use the open-end wrench.
5. Connect the connecting bend for DI water (6) with the 2 mm thick black rubber seal to the
connection fitting "OUT". Use the open-end wrench.
6. Connect the DI water inflow hose of the MELAtherm
10 to the connecting bend just mounted.
10
Page 11

Chapter 3 – Commissioning
(3)
(6)
(
7)
(5)
(4)
(2)
(1)
60 cm (recommended)
https://stomshop.pro
Commissioning
The mixed-bed resin cartridge must be de-aerated before initial commissioning und after the change as
followed (see Fig. 1):
1. Turn on the cold water tap.
2. Open the ventilation screw (6) a little (see fig. below pos. 2) and wait until water emerges.
PLEASE NOTE
When releasing the ventilation screw (6), ensure that the screw connection opening (7) does not
work loose.
3. Tighten the ventilation screw (6) as soon as the first drops of water emerge from it.
4. Finally check the hose connections for leaks.
The mixed-bed resin cartridge is now ready to operate.
Installation example
Example 1 – MELAtherm 10 with the MELAdem 53 C
Fig. 7: Installation exampel 1with MELAtherm 10 and the MELAdem 53 C
(1) Safety combination HD consisting of a backflow preventer and a pipe aerator in accordance with
DIN EN 1717
(2) Bleed valve for decompression of the DI cartridge
(3) DI water inflow hose of the MELAtherm 10
(4) Cold water inflow hose of the MELAtherm
(5) Y-piece (included in the scope of delivery of the mixed-bed rasin cartridge)
(6) Water tap (on-site)
(7) Effluent connection (on-site)
10
11
Page 12

Chapter 3 – Commissioning
(1)
(3)
(7)
(9)
(6)
(5)
(2)
(4)
(8)
https://stomshop.pro
Example 2 – MELAtherm 10 with the MELAdem 53 and MELAjet
Fig. 8: Installation example 2 with MELAtherm 10 and the MELAdem 53 and MELAjet
(1) Safety combination HD consisting of a backflow preventer and a pipe aerator in accordance
with EN 1717
(2) MELAjet spray pistol
(3) Water branch for feed water supply (order no. 37241)
(4) DI water inflow hose of the MELAtherm
(5) CW inflow hose of the MELAtherm 10
(6) Y-piece (included in the scope of delivery of the mixed-bed resin cartridge)
(7) Water tap (on-site)
(8) Leak detector (water stop) with cut-off valve and sensor (order no. 01056), recommended for a
permanent water supply
(9) Effluent connection (on-site)
10
12
Page 13

Chapter 3 – Commissioning
(1)
(3)
(8)
(4)
(5)
(7)
(9)
(12)
(13)
(10)
(11)
(6)
(2)
https://stomshop.pro
Example 3 – MELAtherm 10 with Vacuklav 40 B+/44 B+1 and MELAdem 53
Fig. 9: Installation example 3with MELAtherm 10, Vacuklav 40 B+/44 B+ and the MELAdem 53
(1) Safety combination HD consisting of a backflow preventer and a pipe aerator in accordance
with EN 1717
2
(2) Leak detector (water stop) with cut-off valve and sensor optional (order no. 01056), recommended for
a permanent water supply
(3) Wall outlet (on-site)
(4) Water tap (on-site)
(5) CW inflow hose of the mixed-bed resin cartridge
(6) Effluent hose of the MELAtherm 10
(7) Cooling water inflow hose to the steam sterilizer
(8) Y-piece (included in the scope of delivery of the mixed-bed resin cartridge)
(9) CW inflow hose of the MELAtherm
(10) DI water inflow hose of the MELAtherm
10
10
(11) Water branch (order no. 37241)
(12) Cooling water outflow 3/4"
(13) Steam sterilizer feed water connection
PLEASE NOTE
When using a Cliniklav 25, the mixed-bed resin cartridge must be connected to the steam
sterilizer reservoir.
1
Other MELAG steam sterilizers (with a permanent water supply) can also be connected
2
Please observe the fitting height of the safety combination EN 1717, see example 1
13
Page 14

Chapter 3 – Commissioning
(5)
(7)
(3)
(2)
(1)
(4)
(8)
(11)
(12)
(9)
(10)
(6)
https://stomshop.pro
Example 4 – MELAtherm 10 with Vacuklav 41 B+/43 B+1 and MELAdem 532
Fig. 10: Installation example 4 with MELAtherm 10, Vacuklav 41 B+/43B+ and the MELAdem 53
(1) Safety combination HD consisting of a backflow preventer and a pipe aerator in accordance
with EN 1717
3
(2) Leak detector (water stop) with cut-off valve and sensor optional (order no. 01056), recommended for
a permanent water supply
(3) Water tap (on-site)
(4) CW inflow hose of the MELAtherm 10
(5) Wall outlet (on-site)
(6) Effluent hose of the MELAtherm
10
(7) Y-piece (included in the scope of delivery of the mixed-bed resin cartridge)
(8) Cold water inflow hose of the mixed-bed resin cartridge
(9) DI water inflow hose of the MELAtherm
10
(10) Water branch for feed water supply (order no. 37241)
(11) Steam sterilizer feed water connection
(12) One-way discharge
14
1
Other MELAG autoclaves (stand-alone) can also be connected in a similar fashion
2
The MELAdem 53 C can be connected in a similar fashion.
3
Please observe the fitting height of the safety combination EN 1717, see example 1
Page 15

Chapter 3 – Commissioning
(1) Sealing screw
7
https://stomshop.pro
Water distributor for connecting further devices
We recommend the MELAG water distributor for the connection of further devices (order no. 69005).
The water distributor is connected to the output side of the mixed-bed resin cartridge on the connecting
bend (see Fig. 11). An additional washer - disinfector can be connected to the free connections e.g. a
MELAtherm
The following tools are required to make the connection: Open-end wrench 16 mm; 27 mm; 30 mm;
32 mm AF; Allen key 6 mm.
10 and max. three steam sterilizers.
(2) A straight screwed coupling with
O-Ring, for Ø 6 mm PUR hose for
connecting a MELAG steam
sterilizer or the MELAjet spray
pistol.
(3) Restricted fitting G 3/4" – G1/4“
zum Anschluss des MELAtherm
10
(4) Threadlocker LOCTITE 2701
(5) Hexagonal nut
(6) Connecting bend with bleed valve
(included in the scope of delivery
of the MELAdem
(7) Distributor block
®
53)
Fig. 11: Water distributor
Installing the water distributor
The water distributor must be fitted in accordance with the number of devices present in the practice.
Proceed as follows (Fig. 11):
1. Screw the hexagonal nut (5) 15to the connecting bend (6).
2. Apply the threadlocker Loctite 2701 (4) to at least one of the connecting bend threads (6).
3. Screw the connecting bend in the distributor block (7) in accordance with the local conditions and
4. The full drying time of the threadlocker Loctite 2701 until commissioning of the mixed-bed resin
5. Select the screw connections (1) and (3) which correspond to the housing which are to be
6. Unused openings are to be fitted with a sealing screw (1).
then counter the screw thread of the connecting bend with the hexagonal nut (5) .
cartridge amounts to 10 minutes.
connected to the water distributor.
15
Page 16

Chapter 3 – Commissioning
(7)
(9)
(4)
(3)
(5)
(6)
(14)
(12)
(13)
(8)
(10)
(11)
(1)
(2)
Autoklav
Autoklav
MELA
dem 53
MELAtherm 10
Freier
Anschluss für
Autoklav/
MELAtherm 10
(11)
https://stomshop.pro
Installation example
Example 5 – MELAtherm 10 with Vacuklav 41 B+/43 B+1, MELAquick 12+
and MELAdem 53
Fig. 12: Installation example 5 with MELAtherm 10, Vacuklav 41 B+/43B+, MELAquick 12+ and the MELAdem 53
(1) One-way discharge
(2) Feed water connection of the Vacuklav 41 B+/43 B+
(3) Safety combination HD consisting of a backflow preventer and a pipe aerator in accordance with
EN 1717
2
(4) Leak detector (water stop) with cut-off valve and sensor optional (order no. 01056), recommended for
a permanent water supply
(5) Water tap (on-site)
(6) Y-piece (included in the scope of delivery of the mixed-bed resin cartridge)
(7) Wall outlet (on-site)
(8) Effluent hose of the MELAtherm
(9) Cold water inflow hose of the MELAtherm
10
10
(10) Cold water inflow hose of the MELAdem 53
(11) Waste water container MELAquick
12+
(12) DI water inflow hose of the MELAtherm 10
(13) Water distributor (order no. 69005)
(14) Steam sterilizer feed water connection (MELAquick
12+)
16
1
Other MELAG autoclaves (stand-alone) can also be connected in a similar fashion
2
Please observe the fitting height of the safety combination EN 1717, see example 1
Page 17

Combination with other MELAG devices
Alternative 1
Additionally-required components
Order. No.:
1x water branch
37241
MELAdem 53/ MELAtherm 10 MELAjet
MELAdem 53 C
Alternative 2
Additionally-required components
Order. No.:
2x water inflow distributor,
37315
1x water distributor set
69005
MELAdem 53 MELAtherm 10 MELAtherm 10
Alternative 3
Additionally-required components
Order. No.:
1x distributor water inflow,
Y-piece1
37315
1x water branch or
37241
1x water distributor set
69005
5 m PUR hose, Ø 6 mm
28820
meter)
MELAdem 53/ MELAtherm 10 steam sterilizer (fixed water supply)*
*Premium-Plus-Class, Pro-Class and other steam sterilizers with fixed water connection
Alternative 4
Additionally-required components
Order. No.:
1x water branch or
37241
1x water distributor set
69005
5 m PUR hose, Ø 6 mm
28820
meter)
MELAdem 53/ MELAtherm 10 steam sterilizer (Stand-Alone)
*Premium-Plus-Class, Pro-Class, S-Class and other Stand-Alone steam sterilizers
Alternative 5
Additionally-required components
Order. No.:
1x water distributor set
69005
1x 5 m PUR hose, Ø 6 mm
28820
MELAdem 53 MELAtherm 10
+
+
+
+
+
+
+
+
+
max. three
+
https://stomshop.pro
Y-piece1
Chapter 3 – Commissioning
MELAdem 53 C
MELAdem 53 C
further
devices
Depending on the additional devices
to be connected, you will require
further parts e.g. distributor, water
inflow, Y-piece or a water branch.
(running
(running
(running
meter)
1
Required if only one on-site water connection is available.
17
Page 18

Chapter 4 – Maintenance
https://stomshop.pro
Chapter 4 – Maintenance
Daily checks
Check the mixed-bed resin cartridge and its connections for leaks and any damage on a daily basis.
Replacing the mixed-bed resin cartridge
The MELAtherm 10 and MELAG steam sterilizers check the conductivity of the DI water and issue a
warning if the water quality is bad. When connecting other devices (e.g. those from other manufacturers)
not equipped with internal conductivity measuring, the conductivity should be checked regularly using an
external monitor.
As soon as device issues an error message triggered by an insufficient conductivity value, the mixed-bed
resin cartridge. Use the second (reserve) mixed-bed resin cartridge for the replacement. The replacement
can be performed independently or by your stockist or an authorized MELAG customer services agent.
Proceed in the following manner to replace the mixed-bed resin cartridge (Fig. 6):
1. Turn off the cold water tap.
2. To do so, hold a small receptacle under the bleed valve on the connecting bend for DI water
(OUT) (6) and open the bleed valve (7).
3. Wait until no further water leaves the bleed vave (7).
4. Shut the bleed valve (7)
5. Unscrew the connecting bend of the cold water inflow hose (IN) (5) and that of the DI water
connection fitting (OUT) (6) using the spanner. Be prepared for an outflow of residual water.
18
Fig. 13: Using the open-end wrench, unscrew
the cold water inflow hose connecting bend
(IN) and the DI water connection fitting (OUT)
6. Empty the mixed-bed resin cartridge by placing it upside down in a small receptacle with a
capacity of c. 400 ml. Wait until the end of the water discharge.
7. Screw on the yellow caps to the connection fitting of the cold water connection
(Raw water IN) and the connection fitting DI water (OUT) (Pure water OUT) of the exhausted
mixed-bed resin cartridge.
8. Pack the empty mixed-bed resin cartridge in its MELAG packaging.
Page 19

Chapter 4 – Maintenance
https://stomshop.pro
Fig. 14: Screw on the yellow caps to the connection fitting
9. Connect the new/regenerated mixed-bed resin cartridge as shown in Chapter 3 –
Commissioning, Fig. 6 on page 10.
Regenerating the exhausted mixed-bed resin cartridges
To allow the mixed-bed resin cartridge to regenerate, please complete the regeneration form1 and send it
to your stockist or depot (mail or fax). Please include a copy of the completed form when dispatching your
mixed-bed resin cartridge. MELAG will commission your stockist or depot to perform the regeneration.
The mixed-bed resin cartridge will be collected from your practice. Pack the exhausted mixed-bed resin
cartridge in the MELAG transport packaging and keep this ready for collection.
Your mixed-bed resin cartridge will be filled with new mixed-bed resin and returned to the practice
After the cartridge has been filled, check the serial number on the name plate to ensure that it is the same
cartridge as you despatched.
2
.
Fig. 15: Aligning the serial number
1
You will find teh regenaration form in the donwload area of the MELAT website.
2
This applies to Germany only. In all other areas, the regenerated mixed-bed resin cartridge will be
returned to your stockist.
19
Page 20

Chapter 5 – Operating Pauses
https://stomshop.pro
Chapter 5 – Operating Pauses
Operating pauses
When making longer operating pauses, e.g. over-night or a weekend or during a holiday, switch off the
water shut-off valve or the central water shut-off valve, otherwise the insurance cover of the building can
be invalidated.
Transport and storage
WARNING
Incorrect storage and transport can result in damage to the mixed-bed resin cartridges and
mixed-bed resin filling. Should the storage temperature be exceeded over the long-term,
this can result in a loss of quality of the mixed-bed resin.
Comply with the specifications regarding storage and transport of the mixed-bed resin
cartridges.
Empty the mixed-bed resin cartridge in accordance with the work steps outlined on page 18.
Retain the yellow caps for transport purposes.
Please use exclusively MELAG packaging for its transport.
Store and transport the mixed-bed resin cartridge in a temperature of between 2-20°C.
If stored in a cool (max. 20 °C) and dry atmosphere, the mixed-bed resin cartridge can be stored for at
least 6 months from the date of purchase.
Protect the mixed-bed resin cartridge (contains water) against frost.
20
Page 21

Technical Data
Model name
MELAdem 53
MELAdem 53 C
Dimensions (DxH)
24 cm x 57 cm (c. 61.5 cm inc.
24 cm x 45 cm (c. 49 cm inc.
Weight (with mixed resin)
18 kg (per mixed-bed resin
14 kg (per mixed-bed resin
Amount of resin
20 l
15 l
Exterior connection
G 3/4“
G 3/4“
Capacity per cartridge
at 10 °dH: 2800 l
at 10 °dH: 2100 l
Max. through-flow volume
800 l/h
800 l/h
Resulting water quality
1 – 5 µS/cm
1 – 5 µS/cm
Admissible entry temperature of
5 °C - max. 40 °C
5 °C - max. 40 °C
minimal water pressure
1.5 bars
1.5 bars
Maximum water pressure
10 bars
10 bars
https://stomshop.pro
Technical Data
(depends on the water
hardness and the conductivity
of the local water)
the water
connecting bend)
cartridge)
at 20 °dH: 1200 l
at 25 °dH: 700 l
connecting bend)
cartridge)
at 20 °dH: 960 l
at 25 °dH: 650 l
21
Page 22

Technical Data
Optional accessories
Figure
Order. No.:
Tap with back-flow preventer and pipe aerator
37310
Tap with back-flow preventer and pipe aerator for fitting to
58130
Water inflow distributor, Y-piece
37315
Water branch for feed water connection
37241
PUR hose, black, Ø 6 mm, serial metre
28820
Water distributor for the connection of multiple devices in
69005
Leak detector (MELAG Water stop)
01056
MELAjet spray pistol
27300
https://stomshop.pro
Appendix A – Accessories
an existing angle valve
parallel
22
Page 23

Appendix B – Spare parts
Spare parts
Figure
Order. No.:
Rubber seal, 3 mm, black
56950
Rubber seal, 2 mm, black
52400
Flat seal, green
54920
Screw caps yellow with seal
58140
Water inflow hose EN1717; 2.5 m
24930
Water inflow hose MELAdem 53/MELAdem 53 C; 0,8 m
24932
Connecting bend G3/4" with bleed valve
70405
Spanner SW30 for MELAdem 53/MELAdem 53 C
15530
https://stomshop.pro
(on the hose of the safety combination)
(connections to the mixed-bed resin cartridge)
(to the cold water inflow hoses)
Technical Data
23
Page 24

Specialist dealer:
BA_GB_dem53_dem53C_v6.docx | Rev.: 6 – 16/1468
https://stomshop.pro
MELAG Medizintechnik oHG
Geneststraße 6-10
10829 Berlin
Deutschland
E-Mail: info@melag.de
Web: www.melag.de
Responsible for content: Technical Office
Subject to technical alterations
Date of update: 2016-07-04
 Loading...