


Table of Contents:
SAFETY AND MAINTENANCE ........................................... 2
Connection ................................................................ 2
Operating Environment ............................................. 3
Ambient temperature ................................................ 3
Channel / Usage Limitations....................................... 3
Maintenance .............................................................. 4
WHAT’S IN THE BOX? .................................................... 5
WHAT IS A ROUTER? ..................................................... 6
What does a router actually do?.................................... 7
GETTING STARTED........................................................ 8
Connecting ................................................................ 8
Connect your router to a DSL modem .......................... 8
Connect your router to a network ............................... 8
Connect your router a 56k modem .............................. 9
Connect your Modem cable to the electricity mains........ 9
Set up in an Ethernet network ...................................... 9
Set up in a wireless network....................................... 11
Router configuration.................................................. 12
Which details do you need for the configuration?......... 12
Router browser interface ......................................... 12
OneClick configuration............................................. 14
User Mode configuration .......................................... 17
Expert Settings ...................................................... 31
CUSTOMER SERVICE ................................................... 41
Troubleshooting........................................................ 41
LED signals .............................................................. 42
Technical Support ..................................................... 42
If you need further assistance ……............................. 43
Glossary .................................................................. 44
Limitation of Warranty............................................. 54
Limits of Liability .................................................... 55
Local Law .............................................................. 55
Making Copies of This Manual ..................................... 55

S
AAFFEETTYY AANNDD
S
Keep these instructions with your router at all times. The proper
set up, use and care can help extend the life of your product. In
the event that you transfer ownership of this device, please supply these instructions to the new owner.
Ö Whenever you edit or change your computer data, it is advisable
to make backup copies on an external data medium (CD-R/RW
or DVDR/RW). We are not liable for any loss of data and consequential damages.
Ö Follow the safety instructions for the computer to which you
are connecting the router.
Ö Never open up the component housings. This might lead to a
short circuit or even to a fire.
Ö Never allow children to use electronic devices unsupervised.
Children may not always correctly identify potential hazards.
Remove the power adapter of the router from the mains and contact our hotline:
• if any connections are cut or otherwise damaged;
• if liquid has entered the device housing;
• if the device does not operate correctly;
• if the device has been dropped or the housing damaged.
M
AAIINNTTEENNAANNCCE
M
E
CONNECTION
When connecting the router be sure to correctly observe the following instructions:
POWER SUPPLY
Ö The outlet must be in the vicinity of the router and must be
easily accessible.
Ö Only use the mains adapter on grounded sockets at 100 –
240V~ AC, 50/60 Hz. If you are unsure about the power being
supplied to the place of use, ask the relevant energy provider.
Ö Use only the power adapter provided with the router.
2
AFETY AND MAINTENANCE
S

Ö For additional safety, we recommend the use of a surge pro-
tector in order to protect your router from damage from electrical spikes or lighting strikes on the power network.
CABLING
Ö Arrange cables so that no-one can tread on them or trip over
them. Do not place any items on the cables.
OPERATING ENVIRONMENT
Ö Keep the device away from moisture and avoid dust, heat and
direct sunlight. Ensure an ambient temperature that is suitable
for office equipment.
Ö Position and operate the device only on a stable, even and
vibration-free surface or wall (if you have wall mounted the
router).
Ö Allow a clearance of at least 50 cm (19.7”) from sources of
high-frequency and magnetic interference (TV, mobile telephones, infrared devices, loudspeaker cabinets, etc), in order
to avoid malfunctions and/or loss of data.
Ö This device is not intended for use in a heavy industrial envi-
ronment.
AMBIENT TEMPERATURE
The device is most reliably operated at an ambient temperature
of between 41°F and 104°F (5°C and 40°C) and at a relative
humidity of between 10% and 90% (non-condensing).
This device has been tested and meets the European directives
for radio systems and telecommunications technical equipment
(R&TTE 1999/5/EG).
CE 0470 !
CHANNEL / USAGE LIMITATIONS
FRANCE: Only channels 10 to 13 (2457 MHz and 2472 MHz re-
spectively) may be used in French territory. It is not permitted to
operate the device on any other channel supported by the device.
Outdoor use is prohibited.
SPAIN: Only channels 10 to 13 (2457 MHz and 2462 MHz respectively) may be used in Spanish territory. It is not permitted to
operate the device on any other channel supported by the device.
Outdoor use is prohibited.
AFETY AND MAINTENANCE
S
3

GREECE: For private indoor applications ONLY.
Other countries: No limitations are known when this manual was
printed. However, please check with your local regulation authorities.
MAINTENANCE
 Warning: There are no user-serviceable or parts
that require cleaning inside the device housing.
Ö This device should only be repaired by an authorised service
centre. Please contact the hotline if you have any technical
problems.
Ö Before cleaning the device, remove the cable connection with
the computer. Clean the device and other components with a
damp cloth. Do not use any solvents, corrosives or gaseous
detergents.
4
AFETY AND MAINTENANCE
S

W
W
Please check the below-mentioned parts and accessories are supplied in the box. In case of any missing item(s) please contact
your local service centre accordingly. Any claim for missing parts
will only be accepted within 7 days from date of purchase.
cluded in delivery is the following:
T
’
HHAAT
SS IINN TTHHEE
’
1 - WLAN DSL router
1 - Ethernet cable (RJ45- RJ45)
1 - Modem cable (RJ11- RJ11) suitable for DSL or 56k modem
1 - Software driver/setup CDROM
1 - User manual
X
B
B
OOX
??
In-
HAT’S IN THE BOX?
W
5

W
HHAATT IISS AA RROOUUTTEER
W
Your new WLAN DSL router is a fully-equipped, high performance
router. What purpose does a router actually fulfill?
To answer this question, we must first consider how data is exchanged or transferred within a network. When copying a file
from a server, for example, the complete file is not put on the
network in one go, but is divided into small packets. Other information, such as a database request, for instance, is also broken
up into such packets.
These packets are transferred according to specific rules, the socalled protocols. Initially each computer manufacturer developed
it’s own protocol. Exchange between different protocols was only
possible with the help of special devices. Thanks to the success of
the Internet, the TCP/IP protocol family became obligatory for all
manufacturers, even for use within local networks.
Your data is accordingly broken down into several IP packets and
carried over the local Ethernet. So that the individual packets arrive at the correct recipient, each packet is provided with sender
and receiver information. This information is called the IP addresses and with the help of IP addresses servers and users can
be found within a network. If, however, you want to reach a
server on the Internet, for example a web page, it will usually not
be located in your local network. This is where a router comes
into play. It is the job of a router to connect your computer (or
network) to the remote servers. To do this, the router transmits
the single IP packets from the local network over DSL or 56k modem to the public Internet. Based on the IP address, the router
determines whether an IP packet should stay within the network
or whether it needs to be re-routed. In such cases, the router
establishes a connection via 56k modem or DSL to your Internet
provider – also called Internet Service Provider (ISP) – who in
turn transfers the packets to the Internet. The Internet provider
charges for this service and will offer several different tariffs and
billing methods. As soon as the router recognises that an IP
packet is not intended for the internal Ethernet, it logs in to the
ISP and transfers this IP packet to the Internet.
R
??
6
HAT IS A ROUTER?
W

WHAT DOES A ROUTER ACTUALLY DO?
A router connects different networks together. It can route
Ethernet networks, DSL, 56k modem and also wireless networks.
A number of further features have also been built into your WLAN
DSL router:
Firewall
A firewall protects a local network from attacks coming from
outside the network.
DHCP server (Dynamic Host Configuration Protocol)
A DHCP server automatically allocates the IP configuration of clients within a local network. As such, the users do not have to
manually enter their IP address.
DNS server
(Domain Name Server)
A DNS server translates the domain address for accessing a web
page (for example www.medion.com) into a valid IP address.
In the following pages of this user guide we will explain these
functions in more detail. To get started quickly and with no hassle, we recommend you start your configuration with the One-
Click page. As detailed on this page, all you need to enter are the
few details the WLAN DSL router requires to establish a connection to the Internet. In just “one click” this will give you almost
instantaneous high speed access to the Internet and other services.
HAT IS A ROUTER?
W
7
G
EETTTTIINNGG SSTTAARRTTEED
G
In the product box you will find the router, which should be connected
to your network as well as to the ADSL line and/or telephone (modem) line. This chapter describes how to easily connect your router.
D
CONNECTING
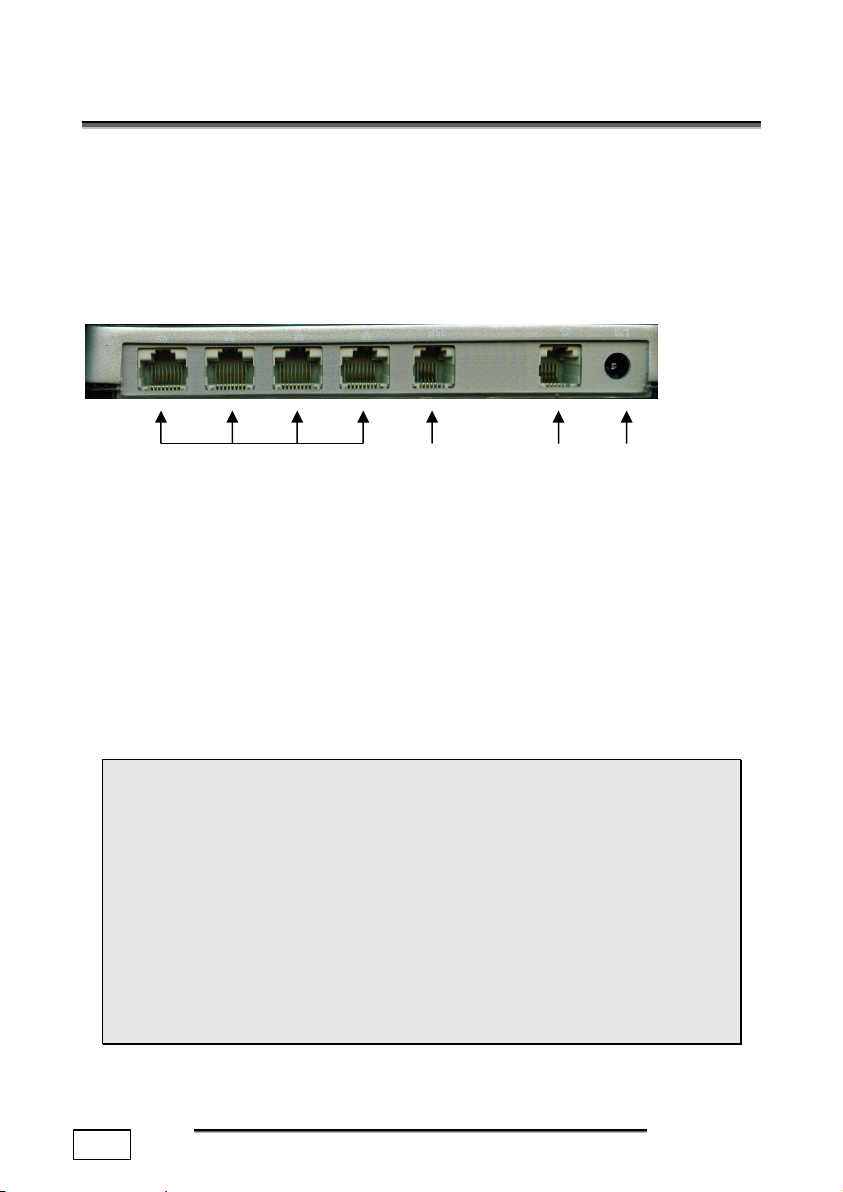
On the back of your router you will find ports for Ethernet, ADSL
and Modem as well as for the power supply of the device:
Ethernet (LAN) ADSL 56k Power
Modem Supply
Connect your router as follows:
CONNECT YOUR ROUTER TO ADSL
1. Put one plug of the supplied ADSL cable into the ADSL port of
the router.
2. Plug the other end of the ADSL cable into your ADSL splitter
(not supplied). The LED on top of the router next to the DSL
label lights up.
CONNECT YOUR ROUTER TO THE NETWORK
 If you wish to set up a wireless network, please refer to
“Set up in a wireless network” (page 11). However, we
recommend first setting up your router through a computer which is connected to Ethernet (LAN). This will avoid
any difficulty caused through improper security settings.
 Before you connect your router to the Ethernet LAN,
please check if you already use the automatic IP assignment (DHCP server) within your network. Furthermore,
make sure that the pre-configured router IP address
(192.168.0.100) is not already in use within the network.
8
ETTING STARTED
G

If the above conditions are met, you can connect your router directly to the Ethernet. For further information, please refer to section “Set up in an Ethernet network” (page 9).
If you have a small network, you can connect your DSL router
either to the network adapter of your computer or to a hub. You
have simply to pay attention to the choice of the cable. In section
“Set up in an Ethernet network” (page 9), it is explained under
which circumstances your router is to be connected to a computer
or to a hub.
1. Put one plug of the supplied blue Ethernet cable into the
Ethernet port of your router.
2. Plug the other end of the Ethernet cable into a free Ethernet
port of your computer, or alternatively a network hub.
3. The LED on top of the router next to the LAN label lights up.
CONNECT YOUR ROUTER MODEM
The router’s 56k modem is supposed to be a back-up solution in
case of a missing or non-functional ADSL connection.
1. Put one plug of the supplied modem cable into the Modem
port of the router.
2. Plug the other end of the modem cable into a telephone
socket.
3. The LED on top of the router next to the Modem label lights up.
CONNECT YOUR POWER CABLE TO THE ELECTRICITY MAINS
Use the power supply to connect your router to a mains socket.
 Make sure that you use only the power supply supplied
with your router and ensure that the voltage indicated on
the plug corresponds to your local voltage supply.
You have now finished connecting up your WLAN ADSL router.
SET UP IN AN ETHERNET NETWORK
Whether you should connect your router directly to the Ethernet
port of a computer or to an Ethernet hub depends on your current
network configuration. The two crucial issues are whether automatic IP address allocation (i.e. a DHCP server) or the preconfigured WLAN DSL router IP address (192.168.0.100) are already in use within your network.
ETTING STARTED
G
9

 For the DHCP server and client configuration, please re-
fer to the documentation of your operating system. A
short description of the DHCP client configuration can be
found at the end of this manual in section “How do I configure my computer as a DHCP client?” on page 41.
The following questions should help you decide how best to connect your router for the first set up:
Are the client addresses within your network automatically
allocated by an existing DHCP server?
• Yes:
In this case, the router may not perform this function and the
setting “Automatic client addresses” must be set to “No”
in the OneClick page.
• No:
You are free to decide whether the router should assume this
role within your network or not. We recommend using automatic IP address allocation in order to remove the need for
manual administration of the network addresses. In this case,
as the option “Automatic client addresses” is set by default to “Yes”, you should leave this setting unchanged. Make
sure that the networked computers are set up as DHCP clients, enabling them to request an IP address from the DHCP
server upon booting.
Is the router default address “192.168.0.100”
already in use in your network?
• Yes:
In this case, the IP address of your router must be changed.
Connect your router directly to the Ethernet port of a computer (one having a different IP address to that of your
router) and replace the pre-configured IP address with a
valid, free IP address from your network in the OneClick
configuration page. After doing so you can connect your
router directly to the Ethernet hub.
• No:
You can connect your router directly to the Ethernet hub using the supplied cable.
10
ETTING STARTED
G

SET UP IN A WIRELESS NETWORK
The wireless function of the router is activated by default. A few
minutes after connecting the device, the “Wireless” LED will light
up and you then have wireless access to your router.
In order to communicate over the wireless network with the
router, your computer has to be equipped with an IEEE 802.11b
or IEEE 802.11g compatible wireless card.
1. Make sure first that the TCP/IP configuration of your computer is set to “DHCP client” and that there is no entry for the
Domain Name Server.
2. Activate now the wireless card of your computer (Please refer
to the documentation of the wireless card or computer). The
router declares itself within the wireless network under the
name “Medion”.
3. Choose “Medion” from the list of the available wireless networks.
4. The WEP encryption is deactivated by default on your router.
5. You can now communicate with the router and proceed to
make any further setting changes, as required.
ETTING STARTED
G
11
ROUTER CONFIGURATION
WHICH DETAILS DO YOU NEED FOR THE CONFIGURATION?
Before starting to configure your router, we recommend you have
the following information ready to hand:
- Name of your ADSL Internet provider
- Your personal access details received from your ADSL
Internet provider upon signing up for the service
- A valid, free IP address for your router in case you need to
replace the default IP address.
Before you can start to use your router it must first be configured.
This can be done automatically with the help of the browser interface:
ROUTER BROWSER INTERFACE
The router browser interface enables you to configure your router
and control its activities.
In order to access the pages of the browser interface, enter the IP
address of your router in the address line of your browser application. The default IP address is “192.168.0.100”.
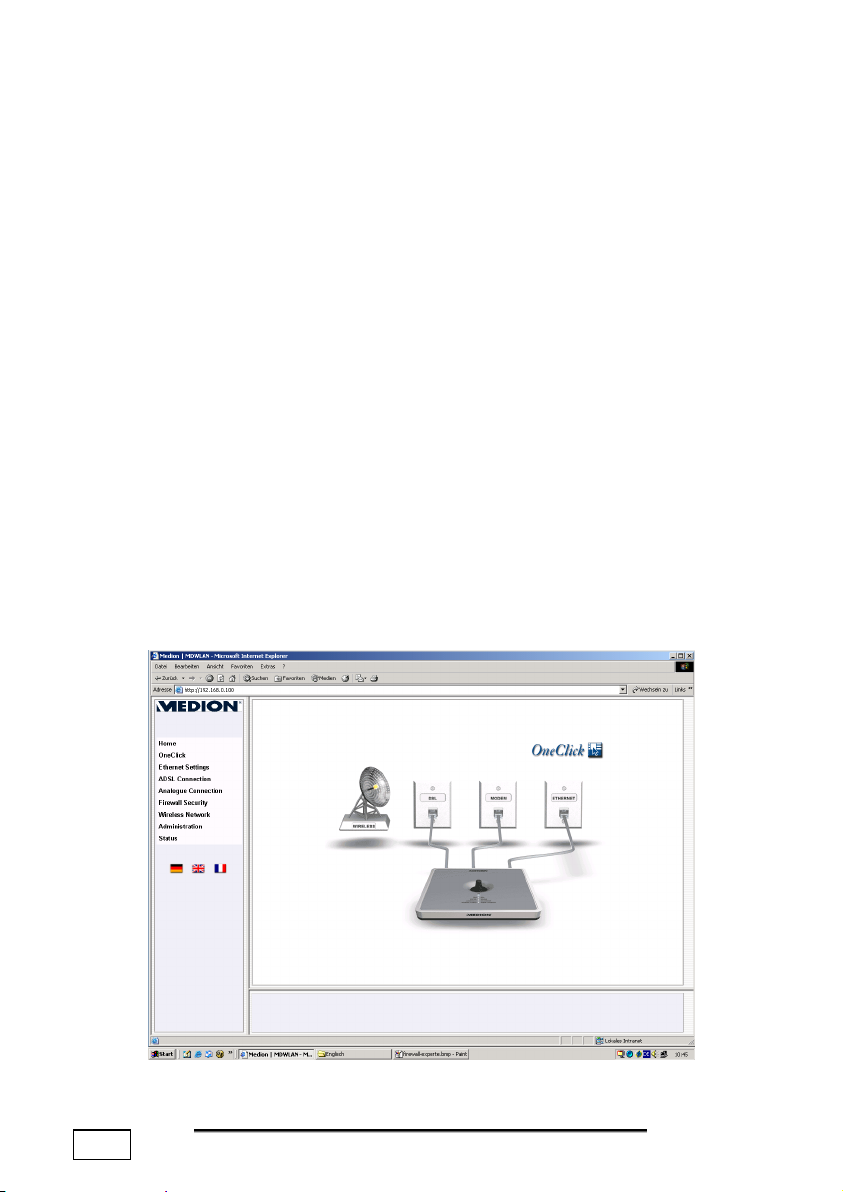
Once the router is successfully found, this Homepage is displayed:
12
ETTING STARTED
G
Upon first accessing one of the configuration pages you will be
prompted for the administrator user name and password.
The factory default settings are “admin” as user name and
“admin” as password. Please check your shift/caps lock settings
because the entry is case sensitive:
These settings can be modified in the Administration page.
To move around the configuration pages use either the navigation
bar on the left hand side of the window or simply click on the corresponding element in the main diagram on the Homepage.
The browser interface contains three configuration modes:
• OneClick mode: In this mode you need to enter just the essential settings for your router to give you immediate access
to the Internet. Details of this extremely easy-to-use configuration mode can be found on the next page.
• User mode: Here you can configure the basic settings for
your router, as described on page 17.
• Expert mode: In this mode, experts have access to advanced settings. The various configuration options under this
mode can be found on page 31.
In all modes detailed online descriptions and explanations help
you through the configuration process. These help texts appear
automatically in the bottom frame of your window upon moving
the mouse over the various elements. On starting your router for
the first time, you will access the OneClick page automatically.
User name and password will be requested.
ETTING STARTED
G
13

ONECLICK CONFIGURATION
To access the OneClick page click either on the “OneClick” logo in
the diagram or click the corresponding button in the navigation
bar on the left hand side. The following window is opened:
Enter on this page just the essential settings for your router to
give you immediate access to the Internet.
14
ETTING STARTED
G

ADSL settings
Here you should enter your personal access details received from
your ADSL Internet provider:
1. Choose the country you are in.
2. Select your Internet provider from the pop-up menu. If your
Internet provider is not listed, you can enter the necessary
settings manually in the “ADSL Connection” page.
3. Enter your account name in the field marked “User name”.
4. Enter the password assigned to your account in the field
marked “Password”.
Automatic client address
Within a network all devices must be individually “numbered” and
have their own client address – a so-called IP address. The allocation of these addresses can be automatically carried out by your
router. The advantage being that you do not have to
enter manually the IP address for all the networked devices.
Using the radio buttons, you can activate or deactivate the automatic IP address allocation carried out by the DHCP server incorporated in your router.
• Yes: By default, the automatic IP address allocation is
switched on. Ensure that the networked computers are set up
as DHCP clients. When set as DHCP client, the computer requests an IP address from the DHCP server upon booting.
• No: The automatic IP address allocation is deactivated. Remember to check the IP address management within the
network, as to work properly within a TCP/IP network all devices require unique IP addresses.
Router address
Your router is pre-configured with the IP address 192.168.0.100.
The subnet mask is automatically set to 255.255.255.0 and is not
shown in this mode. Here you can replace the pre-configured IP
address with another, valid IP address.
Apply
Click “Apply” to apply and save the settings in your router. You
will then be returned to the Home page.
Finished! In just these few clicks of your mouse you have completely set up your router ready for accessing the Internet. All
computers in your network can now ‘surf’ the Web.
ETTING STARTED
G
15
Cancel
Click “Cancel” to cancel your changes and restore the previous
settings. The OneClick page remains open, enabling you to make
further configuration changes as required. If a DHCP server and
automatic IP address allocation are already set-up within your
network, then you must deactivate this function within your
router. The default IP address of your router is 192.168.0.100.
This can be changed in the “Ethernet settings” page should the IP
address already exist within your network.
 Note: If you change the IP address of your router, you
must then login again using the new IP address, in order
to continue your configuration.
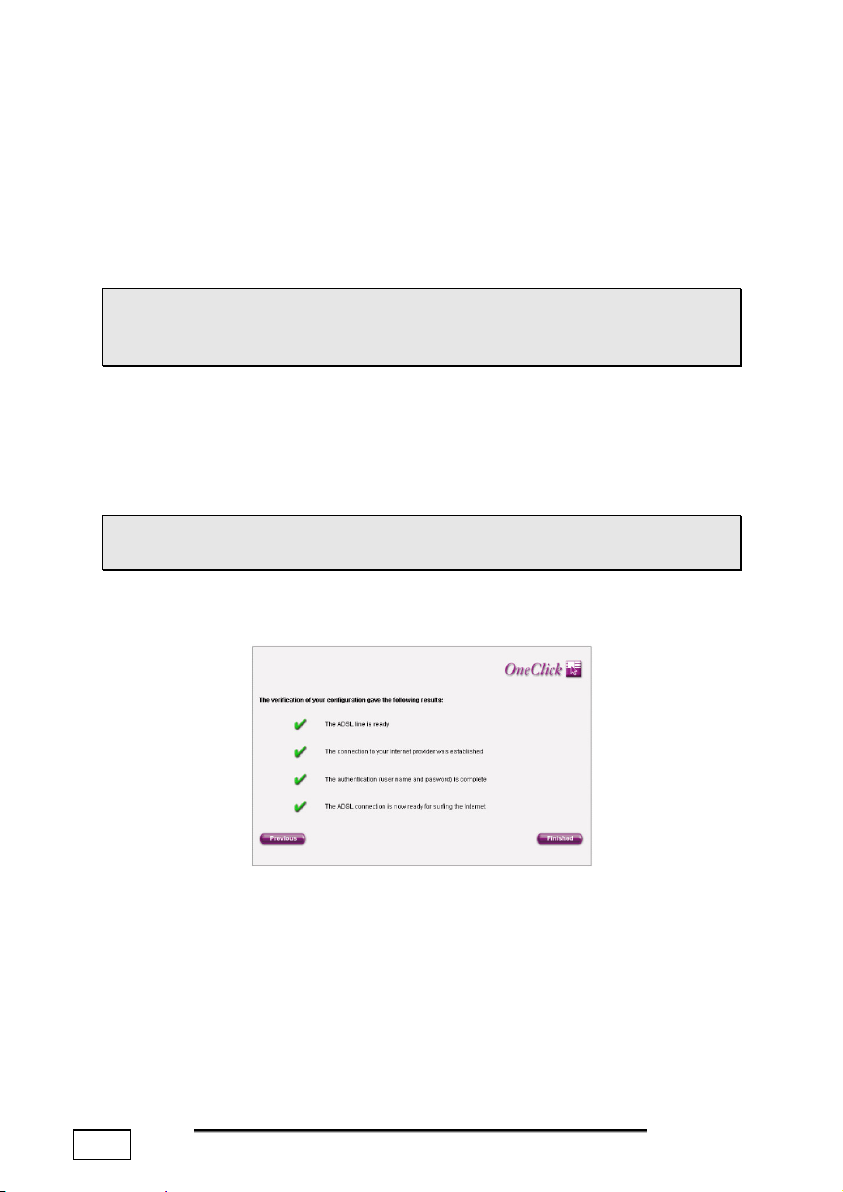
Verify
Click “Verify” to test your settings and ADSL line and establish a
connection to the Internet. The following confirmation page lists
the important steps of the login procedure and shows the result of
each step accordingly:
 Make sure that you have first saved and activated the
settings of your router by clicking “Apply”.
The following confirmation page lists the important steps of the
login procedure and shows the result of each step accordingly:
The results are displayed as follows:
9 The step was successful.
8 The step failed.
This enables you to easily locate the problem should the connection to the Internet not be successful. Click “Previous” to return to
the OneClick page and adjust the incorrect setting accordingly.
16
ETTING STARTED
G
USER MODE CONFIGURATION
In user mode (not using the OneClick configuration) you can configure the basic settings for your router. The various configuration
options are dependant on your product model and are listed in the
left hand navigation bar. To open the various configuration pages
select the item from the navigation bar or simply click on the corresponding element in the main diagram on the Home page.
ETHERNET SETTINGS
In this window you can configure your local network settings and
determine the behaviour of your router within the network. If
your router does not contain correct settings it will not be found
by the computers within the network.
DHCP server
Every computer in your network – just like your router - requires a
unique IP address. Dynamic Host Configuration Protocol (DHCP)
offers a way of automatically allocating IP client configurations
within your local network. If your router is configured as DHCP
server, then it will automatically allocate an IP address to a client
computer requesting address information within the network. The
client computer broadcasts a request, the DHCP server receives it,
assigns a new address for a specific period of time and sends it to
the client together with other required configuration information.
Your router can be set-up and used as a DHCP server and consequently manages the IP addresses within its TCP/IP network.
ETTING STARTED
G
17

Activate
Your router automatically allocates IP addresses to all networked
devices. The advantage being that you do not have to enter
manually the IP address for all the networked devices.
 By default, the automatic IP address allocation is
switched on. Ensure that the networked computers are
set up as DHCP clients. When set as DHCP client, the
computer broadcasts a request for IP configuration from
the DHCP server upon booting.
Ensure that there are no other DHCP servers within the
network. Should this be the case, you must deactivate
the DHCP server in your router.
Deactivate
The automatic IP address allocation is switched off. Remember to
check the IP address management within the network, as to work
properly within a TCP/IP network all devices require unique IP
addresses.
First router address
The IP address and subnet mask give every device in the network
a unique identification. As default, your router carries the IP address 192.168.0.100. The subnet mask is automatically set to
255.255.255.0. In these fields you can replace the default address with another valid IP address and subnet mask.
 If you change the IP address of your router you must
then login to the router again under this new IP address
in order to continue your configuration.
Second router address
As default your router uses 10.0.0.1 as its second IP
address and 255.0.0.0 as its second subnet mask. Should the
router be connected to a network with two separate address
ranges then you should also enter IP address and subnet mask for
the second network. The router uses the IP address
192.168.0.100 to communicate within the first network address
range and 10.0.0.1 for the second. The subnet mask must also be
defined for both networks.
In these fields you can replace both default settings with another
valid IP address and subnet mask.
18
ETTING STARTED
G

Apply
Click “Apply” to apply and save the settings in your router. You
will then be returned to the Home page.
Cancel
Click “Cancel” to cancel your changes and restore the previous
settings. The Ethernet settings page remains open, enabling you
to make further configuration changes as required.
Expert Mode
Click “Expert Mode” to access further advanced Ethernet settings
for your router, e.g. DHCP server set-up.
ADSL connection
Here you can configure your ADSL connection quickly and easily.
Personal details
1. Choose the country you are in.
2. Select your Internet provider from the pop-up menu.
If your Internet provider is not listed, you can enter the necessary settings manually in the Expert mode.
3. Enter your account name in the field marked “User name”.
4. Enter the password assigned to your account in the field
marked “Password”.
ETTING STARTED
G
19

Further settings of the ADSL line
1. Select the tariff agreed with your Internet provider from
the tariff type list. The most common tariffs are as follows:
- Flat rate:
A flat rate is the ideal tariff for surfers who spend a lot of
time in the Internet or who download large amounts of
data (MP3s, movies, etc.). This tariff is also recommended
for those planning to host an FTP or web server.
- Online time:
Billing charged according to time spent online is best
suited for users who only surf the Internet occasionally.
2. Enter in the field “Shorthold” the time in minutes after
which the connection should be dropped should there be
no activity on the line. This setting only makes sense if
your Internet connection is charged according to time
spent online.
Apply
Click “Apply” to apply and save the settings in your router. You
will then be returned to the Home page.
Cancel
Click “Cancel” to cancel your changes and restore the previous
settings. The ADSL connection page remains open, enabling you
to make further configuration changes as required.
Expert Mode
Click “Expert Mode” to access further advanced ADSL settings for
your router, e.g. access mode or encapsulation type.
ANALOGUE CONNECION (MODEM)
Modem Backup
The built-in Modem adapter serves as an automatic backup should
the ADSL line temporarily not be available. Your Internet connection thus remains available at all times. Modem backup is
switched off by default. Should you wish to use this, ensure that
your router is correctly connected to the phone outlet.
20
ETTING STARTED
G

To enable Modem backup click “Yes” and set the various parameters in the following fields on this page:
FIREWALL SECURITY
Your router contains comprehensive security mechanisms. They
guarantee security of data transferred and protection
against unwanted intruders.
ETTING STARTED
G
21

Firewall
A firewall protects the local network from unwanted attacks from
outside. Your router contains a so-called ‘Statefull Packet Inspection Firewall’. By default, the router firewall is activated and set to
a medium security level.
The firewall is activated by just clicking on one of the pre-defined
security levels or alternatively, turned off completely. We recommend, however, switching on at least the lower security level.
The ports set in the pre-defined security levels are as follows:
Service Port Description
http 80 World wide web
DNS 53 Domain Name Server
FTP 21 File Transfer Protocol
Telnet 23 Terminal session
SMTP 25 Simple Mail Transfer Protocol
POP3 110 Post Office Protocol Version 3
NNTP 119 Network News Transfer Protocol
ARCP 7070 Real audio & video
ICMP N/A Internet Control Message Protocol (error and
information messages)
H.323 1720 Video conference
T.120 1503 Whiteboarding (for video conference)
SSH 22 Secure Unix Shell, Remote login protocol
All other ports not contained in this list are blocked by default and
must be set to “Allowed” manually in the Expert Mode.
 For describing the firewall we use the term “service”. In
the context of a firewall, “service” means the request on
a particular port. This request can be initialised from outside or from within the local network. Thereby it is important who the initiator of the request is.
Example: If the outbound “service” for the port http is
allowed, a user within the local network can send an http
request to the outside. He will be returned the corresponding answer to his request, that means, he can surf
the Internet. The inbound “service” for http is blocked
most of the time (exception: webserver); This implies
that http requests coming from outside are denied.
22
ETTING STARTED
G

Security level: High - for the passive user
All inbound services are blocked.
The following outbound services are allowed: surfing, e-mails and
minimal management tools, ARCP.
The following outbound services are blocked: ARCP.
The settings for this level are summarised in the table below:
High security level:
Service Port Inbound Outbound
http 80 blocked allowed
DNS 53 blocked allowed
SMTP 25 blocked allowed
POP3 110 blocked allowed
ARCP 7070 blocked blocked
ICMP N/A blocked allowed
Security level: Medium - for the active user incl. video & audio
The only inbound activities allowed are real audio and video. All
other inbound services are blocked.
All outbound activities listed below are allowed.
The settings for this level are summarised in the table below:
Medium security level
Service Port Inbound Outbound
http 80 blocked allowed
DNS 53 blocked allowed
FTP 21 blocked allowed
Telnet 23 blocked allowed
SMTP 25 blocked allowed
POP3 110 blocked allowed
NNTP 119 blocked allowed
ARCP 7070 allowed allowed
ICMP N/A blocked allowed
H.323 1720 blocked allowed
T.120 1503 blocked allowed
SSH 22 blocked allowed
ETTING STARTED
G
23

Security level: Low - for the power user
The following inbound activities are allowed: real audio and video,
video conferencing, whiteboarding, SSH, error messages (ICMP),
DNS.
The following inbound services are blocked: Home banking, surfing
secured web pages, webserver, FTP, Telnet, SMTP, NNTP, POP3.
All outbound activities listed below are allowed.
The settings for this level are summarised in the table below:
Low security level
Service Port Inbound Outbound
http 80 blocked allowed
DNS 53 allowed allowed
FTP 21 blocked allowed
Telnet 23 blocked allowed
SMTP 25 blocked allowed
POP3 110 blocked allowed
NNTP 119 blocked allowed
ARCP 7070 allowed allowed
ICMP N/A allowed allowed
H.323 1720 allowed allowed
T.120 1503 allowed allowed
SSH 22 allowed allowed
Further measures
Under this item you can set further measures for the security of your
network.
Intruder detection activated
Activating this option automatically delays replies to repeated requests
coming from the same IP address. These repeated requests are a way
of scanning all the ports of the router in order to find an “open” door
to the internal network.
This is what happens:
The first request, for example from IP address 201.201.20.1, comes in
to your router. The router answers.
A second request comes from the same IP address a few seconds later.
The router delays its answer by a few seconds.
A third request, again coming from the same IP address, comes a few
24
ETTING STARTED
G

seconds afterwards. The router delays its answer by a few minutes. This
process is repeated until the router refuses to answer,
making such attacks futile.
The device should not respond to ping
Here you can stop the router from replying to requests coming
from outside the local network. Activating this option also automatically
activates the Intruder detection.
Apply
Click “Apply” to apply and save the settings in your router. You will then
be returned to the Home page.
Cancel
Click “Cancel” to cancel your changes and restore the previous settings.
The Firewall security page remains open, enabling you to make
further configuration changes as required.
Expert Mode
Click “Expert Mode” to access further advanced firewall settings for
your router, e.g. for adding rules for additional ports.
ETTING STARTED
G
25

WIRELESS NETWORK
The wireless LAN module is based on the international IEEE 802.11g
and IEEE 802.11b standards and, as such, this router is compatible with
all current 54 or 11Mbit/s wireless LAN adapters. In addition, the router
supports WEP encryption (Wired Equivalent Privacy).
The router has an integrated bridge and transfers all packets as they
are from the wireless to the cabled network. On doing so AppleTalk
packets are also transferred in Apple networks (e.g. for access of a
wireless computer to a cabled networked AppleTalk printer).
 The wireless module in your router should under no circum-
stances be removed. This may damage your device!
Activated / Deactivated
The wireless function enables you to set up a wireless network.
The router assumes the role of a wireless Access Point. The wireless function in this router is activated by default, but can, however, be deactivated if not required. Once deactivated, the router
no longer broadcasts radio signals and the wireless network cannot be accessed.
 If you are using the router in a wireless network and dis-
able the wireless function, please be aware that you will
no longer be able to access your device using the wireless network after having activated the change. In this
case, you will have to connect your device to the
Ethernet or a computer to access it again.
26
ETTING STARTED
G

Network name
To specify the network name.
Network name hidden
Activate this option to stop the router from broadcasting the
name of the wireless network. Hiding the name of the network
makes intrusion by unauthorised persons more difficult as the
router will not appear as wireless access point in the users’ selection list. As a consequence, it can then only be accessed by users
knowing where it can be received, what it is called and the password. This option is per default not activated.
Mode
To select whether to use IEEE 802.11g, IEEE 802.11b or both modes
simultaneously.
Radio channel
Here you can select the radio channel your router Wireless should
use to establish the wireless network. Only the channels approved
for use in your country are shown in the list: Radio channels are
reserved specifically according to the country. A list of the radio
channels used in each country can be found in the glossary at the
end of this user guide. Radio channel is set to 10 by default.
 If you change the radio channel set by default, you
should check that you choose a radio channel which is
not already in use for other purposes and which is supported by all wireless cards in the network. Otherwise
you may not be able to establish a radio connection to
your router.
Security
For improved security within the wireless network router
Wireless contains a 64 and 128 bit WEP or WPA encryption giving
added protection against line-tapping.
Expert
To manage ACL (Access Control Lists) based on MAC-addresses.
ETTING STARTED
G
27

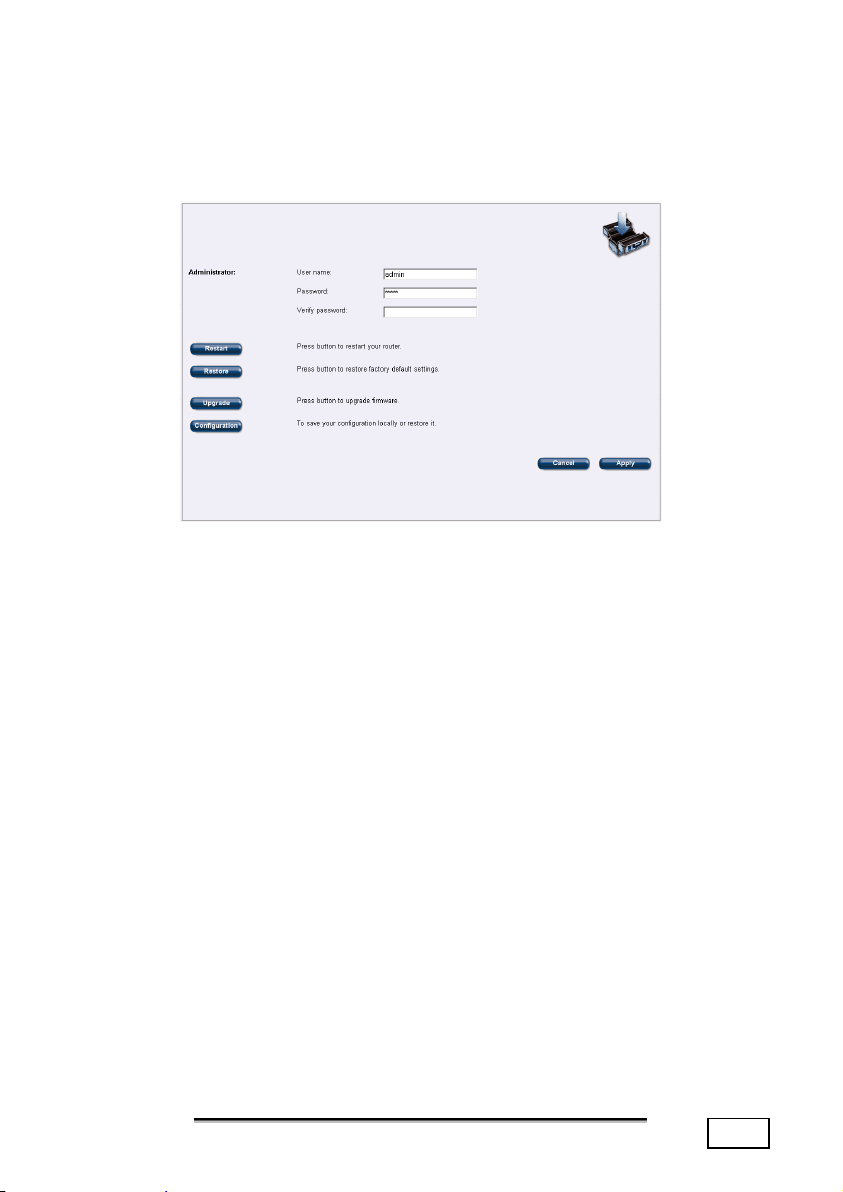
ADMINISTRATION
 For security reasons, we recommend changing the pre-
configured administrator user name and password and
assigning your own. These should also be changed at
regular intervals.
Restart
Click here to restart your router.
Restore
Click here to restore the factory default settings. On doing so,
your own settings will be deleted.
Upgrade
So that you can always use the latest software with your router, it
is fitted with a flash ROM chip, enabling you to easily upload new
firmware, without having to open up the device.
To update the software you need to load a new firmware onto
your router. New firmware can contain for example new functions,
improved performance and bug fixes for a previous version. If you
update your software, please read beforehand the read-me documentation. These detail the changes that have been made in the
firmware.
 After installing the new firmware you must restart your
router.
28
ETTING STARTED
G

Configuration
Click here to save or restore your configuration.
Apply
Click “Apply” to apply and save the settings in your router. You
will then be returned to the Home page.
Cancel
Click “Cancel” to cancel your changes and restore the previous
settings. The Administration page remains open, enabling you to
make further configuration changes as required.
STATUS
At a glance, this window gives you an overview of the status of
your router.
ADSL line
“No signal” indicates that there is no connection to your provider.
This usually comes down to a cable problem. Possible causes
could be that a plug has become disconnected somewhere, or that
workmen have damaged a main line, or that a switch at your local
Telcom distribution is faulty.
“Training”: Every now and then a so-called training phase can
occur. During this phase, the line quality is checked and the
modulation adapted as required.
“Line ready” indicates that the router is connected and ready to go.
Active connection to the Internet
• No: There is currently no active connection to the Internet.
• Yes: There is currently an active connection to the Internet.
ETTING STARTED
G
29

Modem
Modem line
“No signal” indicates that there is no connection to your provider. This usually comes down to a cable problem. Possible
causes could be that a plug has become disconnected somewhere, or that workmen have damaged a main line, or that a
switch at your local Telcom distribution is faulty. “Line ready”
indicates that your router is connected and ready to go.
Active connection to the Internet
• No: There is currently no active connection to the Internet.
• Yes: There is currently an active connection to the Internet.
Ethernet
At a glance, you can check the connection of your router
to the Ethernet.
Active connection to the Internet
No: Your router is not correctly connected to the Ethernet.
Please check that the cables are plugged properly.
10Base-T
Is displayed if your router is connected to an 10Base-T
Ethernet network.
100Base-T
Is displayed if your router is connected to an 100Base-T
Ethernet network.
System
You obtain here information about the firmware version and MAC
address of your router.
Refresh
The status display is updated at regular intervals. Click “Refresh”
to update the status display immediately.
 The Status page is updated automatically every 10 sec-
onds, unless your web browser does not support HTML
meta information.
Expert Mode
Click “Expert Mode” to access further advanced status information
of your router.
Wireless
Displays information about connected WLAN-clients.
30
ETTING STARTED
G

EXPERT SETTINGS
Expert mode offers you many more parameters and configuration
settings for your router. The various configuration options are
dependant on your product model and are listed in the left hand
navigation bar
The Expert mode settings are accessed by clicking on the Expert
button of the corresponding configuration page.
ETHERNET SET-UP
Every computer in your network – just like your router –
requires a unique IP address. Dynamic Host Configuration Protocol (DHCP) offers a way of automatically allocating IP client
configurations within your local network.
If your router is configured as DHCP server, then it will automatically allocate an IP address from a specified range of addresses to
a client computer requesting address information within the network. The client computer configured as DHCP client broadcasts a
request, the DHCP server receives it, assigns a new address for a
specific period of time and sends it to the client together with
other required configuration information. This has the advantage
that you do not need to manually configure fixed IP addresses for
the clients in your network. This not only reduces the network
administration overhead but also removes any chance of making
mistakes.
You can set an address range for the DHCP server from which the
router takes the IP addresses. The DHCP server also transfers the
ETTING STARTED
G
31

subnet mask as well as the addresses of specified Domain Name
Servers.
Your router can be set-up and used as a DHCP server
and consequently manages the IP addresses within its TCP/IP
network. In this window, you can configure the DHCP server along
with further more detailed Ethernet settings for your router.
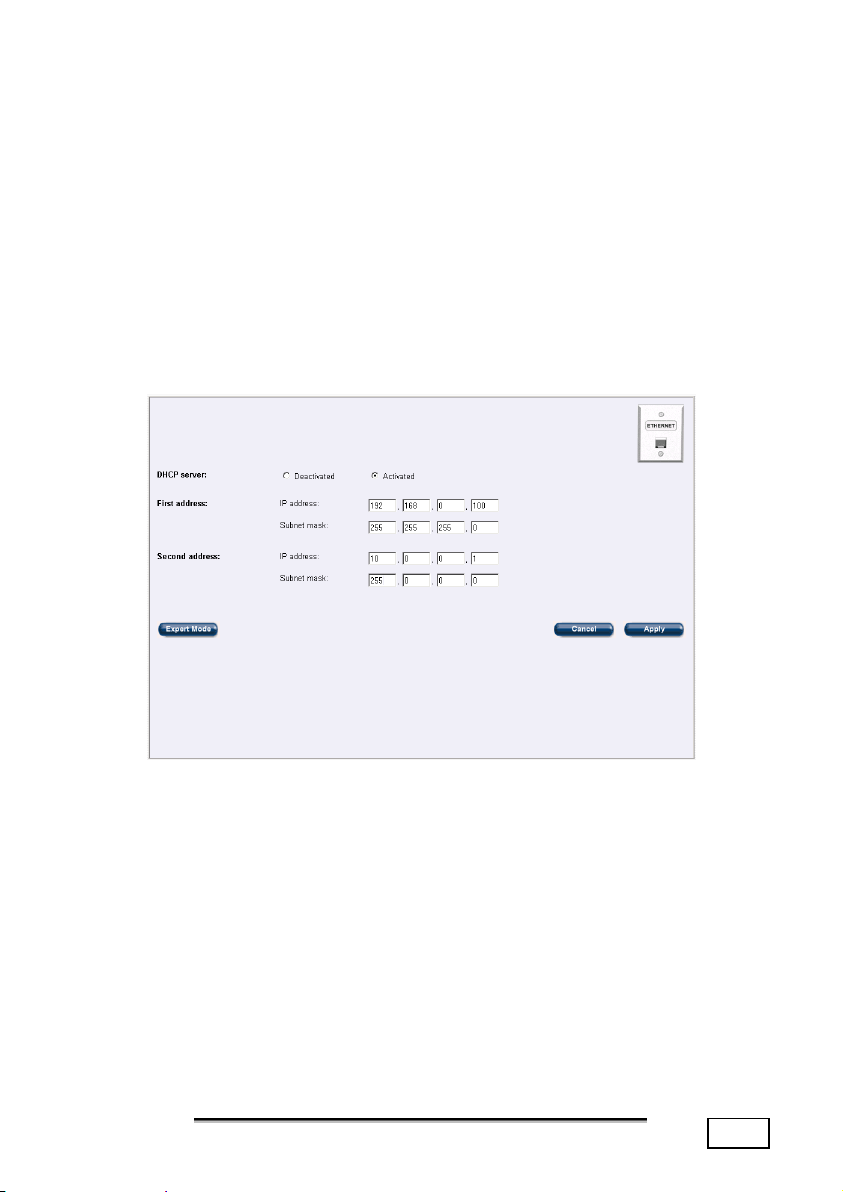
DHCP server
Deactivated
The automatic IP address allocation is switched off. Remember to check the IP address management within the
network, as to work properly within a TCP/IP network all
devices require unique IP addresses.
Activated
The router automatically allocates IP addresses to all networked devices set as DHCP client. The advantage being
that you do not have to enter manually the IP address for
all the networked devices.
 By default, the automatic IP address assignment is
switched on. Ensure that the networked computers are
set up as DHCP clients. When set as DHCP client, the
computer broadcasts a request for IP address configuration from the DHCP server on starting.
Ensure that there are no other DHCP servers within the
network. Should this be the case, you must deactivate
the automatic IP address assignment in your router.
32
ETTING STARTED
G

DHCP server settings
So that your router can allocate IP addresses to the client computers in the network, an address range from which it takes the
addresses must be determined.
You have two options for setting the address range:
- The IP addresses can be taken from the default IP address
range, which is set to 192.168.0.101 to 192.168.0.200.
- An address range (starting address and ending address) from
which the address should be taken can be manually set.
When a computer set as DHCP client in the network is started and
requests an IP address, the DHCP server will allocate an address
taken from the specified range. The DHCP server will not reallocate the address during the lease period and will attempt to return the same address every time the client requests an address.
Address range
Check this option if you want the router to use the pre-configured
default address range (192.168.1.2 to 192.168.1.128).
First IP address
Here you can manually set your own address range. Enter in this
field the first IP address of the address range.
Last IP address
Here you can manually set your own address range. Enter in this
field the last IP address of the address range.
If your router is set-up as DHCP server it will also automatically
assign the subnet mask.
Lease time
The allocated IP addresses can only be used for a certain period of
time – the so-called lease time. After this lease time has expired
the client can no longer use the address. So that the client does
not lose its addresses (most importantly its IP address) it requests an extension before the lease time expires. This is usually
granted. The address configuration will only be lost if the lease
time expires whilst the client computer is switched off.
The lease time can be determined using two settings.
Default lease time (in seconds)
Enter in this field the lease time which should be allocated
should the client computer not request a lease time.
The default setting 43.200 seconds represents approximately 12 hours.
ETTING STARTED
G
33

Maximum lease time (in seconds)
Enter in this field the maximum lease time that the DHCP
server can allocate to the client computers.
Even if the client computer requests a longer lease time,
the DHCP server will only grant the maximum lease time.
The default setting 86.400 seconds represents approximately 24 hours.
Gateway
Your router can be used as default gateway. This option is activated by default. As such, the DHCP server will configure the client computers with it’s own IP address as the gateway address. If
required, this setting can be manually over-written in the client
computer settings.
DNS server settings
In TCP/IP networks, the DNS (Domain Name Server) translates
network / domain names to IP addresses. This is necessary for
Internet communication. Every time a domain name (e.g.
www.medion.com) is used, a DNS is used to translate the “human-readable” domain name into a “machine-readable” IP address. Even within a local network or when connecting two separate networks it is advisable to use this in order to uniquely assign
the IP addresses within the network to the particular computer
names. Your router can also be used as a DNS server.
Your router obtains the necessary information from POP
(Point of Presence). This option is activated by default.
1st and 2nd IP address
If you wish to use different, external DNS servers, then enter the
IP addresses in these fields.
Apply
Click “Apply” to apply and save the settings in your router. You
will then be returned to the Home page.
Cancel
Click “Cancel” to cancel your changes and restore the previous
settings. The Ethernet Expert page remains open, enabling you to
make further configuration changes as required.
34
ETTING STARTED
G

ADSL CONNECTION
We advise that you only make modifications to the ADSL parameters if you know what you are doing! An incorrect configuration
could result in your device no longer working on your ADSL line.
Here you can see the technical parameters your ADSL connection is
based upon. During installation these values are set automatically
depending on your environment. If your Internet connection works
properly you can rely on these settings being correct. These parameters are specified by your ADSL provider and your router must
“talk the same language” to connect successfully.
Access mode
Select the access mode supported by your Internet provider from
the pop-up menu. Access mode is the protocol or “language” the
information is transferred with.
Encapsulation mode
Select the encapsulation mode supported by your Internet provider from the pop-up menu. According to the chosen protocol
(access mode) the Internet packets can be packed in different
ways to optimise the transport.
Modulation
Select the modulation type supported by your Internet provider
from the pop-up menu. The modulation defines the way signals
are decoded/encoded onto a carrier wave.
VPI / VCI
Enter in both fields the values given to you by your Internet provider. Virtual Path/Channel Identifier are used in combination as
ETTING STARTED
G
35

an identifier for an ATM connection and enable that the data
packets are transferred correctly via all switches and routers.
Further ADSL settings when using the access modes PPPoA or
PPPoE. The setup window is adapted to the technical details of the
chosen access mode. If “PPPoA” or “PPPoE” is selected, the following special settings are required.
Access details of the Internet provider
Enter your name in the field marked “User name”. Enter your
password in the field marked “Password”.
Further settings of the ADSL line
Select the tariff agreed with your Internet provider.
Further ADSL settings when using the access mode non PPP
The setup window is adapted to the technical details of the chosen
access mode.
Dynamic IP address
As a rule Internet providers allocate their customers with dynamic
IP addresses. Should, however, your Internet provider allocate
you with a fixed IP address, then you can enter this here. As
such, your router will register at the Internet provider under this
fixed IP address.
IP details of the Internet provider
Assigned IP address and subnet mask.
These fields contain the IP address and subnet mask assigned to
you from your Internet provider. These values are either automatically assigned from the DHCP router of the provider, or communicated to you by your Internet provider and you need to enter
them manually here.
IP address of the Internet provider
Here you can see the IP address of the router on the side of the
Internet provider.
Apply
Click “Apply” to apply and save the settings in your router. You
will then be returned to the Home page.
Cancel
Click “Cancel” to cancel your changes and restore the previous
settings. The ADSL Expert page remains open, enabling you to
make further configuration changes as required.
36
ETTING STARTED
G

Back
Click “Back” to return to the previous page (ADSL user mode).
FIREWALL SECURITY
On this page, specialists can modify the firewall parameters to fit
to their individual needs. This page is divided into two areas:
- In the upper area you can add new ports.
- In the lower area the ports are listed for which rules regarding in/outbound services have been specified. Any ports not
contained in this list are blocked by default.
Add rule
By defining a new port in the upper part of the screen and setting
rules for in and outbound services you can add new ports to your
firewall and either allow or block further services.
1. Enter a valid port number in the field “Port”. The port description is automatically displayed under “Description”.
2. Select either “TCP” or “UDP” from the pop-up menu “Type”.
 Port numbers are defined internationally and are conse-
quently unique.
3. In the field “Outbound” define if the port should be blocked or
allowed for outbound services.
4. In the field “Inbound” define if the port should be blocked or
allowed for inbound services.
5. Click “Add Rule” in order to add the security rule for the particular port to the firewall settings of your router. The new
port is now displayed in the lower area with the other activated ports. You can edit this port later directly in the list.
ETTING STARTED
G
37

Edit port settings
In and outbound services of a port can be modified with one click
directly in the list.
Red arrow (for in and/or outbound services)
The service is blocked for this port. Click on the arrow to change
the setting and allow the in/outbound service via that port.
Green arrow (for in and/or outbound services)
The service is allowed for this port. Click on the arrow to change
the setting and block the in/outbound service via that port.
Lock
One click on the lock completely blocks all inbound and outbound
services via the particular port.
Trashcan
The settings for that particular port can be deleted and the port
removed from the list by clicking on the trashcan. On doing so,
the port is returned to its original default state (blocked).
Apply
Click “Apply” to apply and save the settings in your router. You
will then be returned to the Home page.
Back
Click “Back” to return to the previous page (Firewall user mode).
WIRELESS NETWORK
Restricted access
The purpose of this setting is to control which devices are allowed
to access the wireless can set-up by the router.
You can choose between Unrestricted (all devices are allowed),
White-list (all devices are rejected except the ones added to the
list) or Black-list (all devices are granted access except the ones
in the list.
For the last two options you need to add the device’s MACAddress to the list.
To simplify things you can easily let connect all your wireless clients to the router and hit “Add new” next to the option “Add all
currently attached clients to the list”.
38
ETTING STARTED
G

STATUS
This page gives you further information about the status of your
router.
Router in the network
At a glance you can see which IP address and subnet mask your
router has within your network.
ADSL specifications
All important technical details about your ADSL connection are
summarised here.
Internet Provider
Here, the Internet provider you have configured is displayed.
Country
Here, the country you have configured is displayed.
Assigned IP Address
Under this item the external IP address assigned by your Internet
provider to your router is displayed.
Downstream and upstream rate
Depending on the Internet provider, the terms of condition of
your agreement, and local conditions, the downstream and upstream rates may vary. These fields show the actual maximum
rates offered by your ADSL line.
ETTING STARTED
G
39

VPI/VCI
The values for VPI/VCI are shown here.
Transfer statistics
Under this item you can see the number of received and sent data
packets. Information is also given about how many of those packets were damaged. This gives you feedback about the stability of
the ADSL line.
Refresh
The status display is updated at regular intervals. Click “Refresh”
to update the status display immediately.
 The Status page is updated automatically every 10 sec-
onds, unless your web browser does not support HTML
meta information.
Back
Click “Back” to return to the previous page (Status user mode).
40
ETTING STARTED
G

C
UUSSTTOOMMEERR SSEERRVVIICCE
C
E
TROUBLESHOOTING
If your router does not work as expected, please use the following
checklist to isolate the problem and solve it:
- Make sure your router is connected correctly.
- Make sure you have connected all cables correctly.
- Please make sure you are using the cables and power supply
supplied with your router.
- Check the connection to your Internet provider.
Make sure you have entered your user name and your password correctly (as well as the correct phone number for 56k
modem access).
- Check that the caps lock key is not pressed when entering the
password.
Changes made to settings are not taken into account!
- Make sure you have saved and activated all setting changes.
This is done by clicking on the “Apply” button of the appropriate page of the browser user interface.
How do I configure my computer as DHCP client?
- Configuration of a Windows computer as DHCP client:
1. Open the network control panel “LAN connection”.
2. Click “Properties”.
3. Select “Internet protocol (TCP/IP)” and click “Properties”.
4. Activate the option “Obtain an IP address automatically”
and save your changes.
Your Windows computer is now configured as DHCP client and will
automatically be assigned an IP address from the DHCP server
within the network.
USTOMER SERVICE
C
41

LED SIGNALS
The 5 LEDs on the top of your router give you useful
information regarding the status of your router and the line.
Description of the 5 LEDs from left to right:
- LED: Power
LED is not lit: The router is receiving no power.
LED is permanently lit: The router is correctly connected to
the power supply.
- LED: ADSL
LED is not lit: There is no ADSL connection to the switch.
LED is pulsing very fast: Training phase.
LED is permanently lit: ADSL connection is ready to be used.
LED is slowly pulsing: Connection is currently active.
- LED: WLAN (Wireless)
LED is not lit: The wireless function of your router
is not activated.
LED is permanently lit: The wireless function of your router is
activated and radio signals are emitted.
- LED: Ethernet
LED is not lit: The router is not connected to Ethernet.
LED is permanently lit: The router is correctly connected to
Ethernet (link indication).
- LED: Modem
LED is not lit: No modem connection to the telephone switch.
LED is permanently lit: Modem connection ready to be used.
LED is pulsing: A connection is currently active.
TECHNICAL SUPPORT
This product has been extensively and successfully tested in our
test laboratory with a number of different devices. However, it is
normal for the drivers to be updated periodically. If you are having difficulty using your device, you may need to update the
driver. Driver updates and the most up-to-date information on
this product can be found at the following Internet address:
Internet: www.medion.com
42
USTOMER SERVICE
C

IF YOU NEED FURTHER ASSISTANCE ……
If the suggestions in the above sections have not solved your
problem, please contact us. It will help us to help you if you can
have the following information available:
- What is your computer configuration?
- What additional peripherals are you using?
- What messages are appearing on the screen?
- What software was running when the fault occurred?
- What steps have you already taken to solve the problem?
- If you already have a customer number, please state this.
USTOMER SERVICE
C
43

GLOSSARY
10Base-T
A 10Mbit Ethernet connection using so-called twisted
pair cable. The cable is technically the same as ISDN
cables used for the telephone network, but usually with
a better shielding.
100Base-T
Also known as Fast Ethernet, 100Base-T uses the same
type of cable as 10Base-T. The maximum theoretical
transfer rate is 100Mbit/s.
802.11 Standard
Industrial standard for wireless networks (WLAN). The
most important variants of this standard are as follows:
802.11b: Maximum data transfer rate 11Mbit/s.
The frequency used is 2.45 GHz. This protocol allows
standard, basic encryption up to 128 bit. This standard
is used worldwide and in most wireless devices.
802.11a: Maximum data transfer rate 54Mbit/s. The
frequency used is 5 GHz. This standard is still relatively
new and not available everywhere.
802.11g: Maximum data transfer rate 54Mbit/s. The
frequency used is 2.45 GHz. This standard is compatible with the 802.11b standard and is used in the Apple
AirPort Extreme product, for example.
Access Point
In a wireless network (WLAN) the wireless connection
is performed by the Access Point. The Access Point enables communication between the wireless devices
and, if used, also with wired devices. The Access Point
can be connected to normal wired devices via Ethernet
as well as to an analogue or digital line via a modem or
44
USTOMER SERVICE
C

a router. In this way it can give the wireless devices
access to further communication lines and services.
ADSL (Asymmetric Digital Subscriber Line)
ADSL technology is one the many types of DSL technology. ADSL stands for Asymmetric Digital Subscriber
Line, i.e. an asymmetrical usage of the line. A significant advantage of ADSL is that existing telephone lines
can be used for providing broadband services without
effecting existing analogue or ISDN connections. The
download/downstream rate (i.e. the transfer speed
from the Internet to your computer) reaches far higher
speeds than the upload/ upstream rate (i.e. the transfer speed from your computer to the Internet). With
ADSL, transfer speeds of up to 8Mbit/s downstream
and 1.5Mbit/s upstream are possible. As such, large
amounts of data can be transferred very quickly. Because ADSL uses very high frequencies, there are limits over the distance that the signal can be reliably received. Most ADSL services have a maximum range of
5.5km – meaning only customers within this radius of
their local telephone exchange can take advantage of
ADSL.
For home users, who as a rule mainly download data
from the Internet, there are several cheaper offers
with lower transfer speeds.
ATM
ATM stands for Asynchronous Transfer Mode and is a
fast packet-oriented transfer and relay technology
widely used to send data, video and voice at ultra high
speeds. ATM is best known for its easy integration with
other technologies and for its sophisticated management features that allow carriers to guarantee quality
of service and data transfer in real time. As such, ATM
USTOMER SERVICE
C
45

is the world's most widely deployed backbone technology and is the preferred medium for applications like
interactive television, video conferencing etc.
Bandwidth
Bandwidth describes the amount of data that can pass
through a line within a certain period of time.
CAT-5 cable
Describes the type of cable used for 10Base-T twisted
pair. CAT-5 cable is suited for 100 MHz and is used in
10Mbit und 100Mbit networks.
Crossover cable
For networking just two computers together a crossover CAT-5 cable is recommended. This makes a direct
connection, send and receive lines are crossed. With
such a connection, a hub is not required.
Data packets
Data sent over a network is broken down into parts of
a certain size in bytes – so-called packets. Each packet
carries the information that will help it get to its destination: the sender’s IP address, the intended receiver’s
IP address, something that tells the network how many
packets the data being sent has been broken into and
the number of that particular packet. An e-mail can,
for example, travel around the world in many separate
packets, arrive in a different sequence and yet still be
recomposed again correctly. Should an error occur during the transfer, the faulty or lost packet must be requested again. This method used in large networks is
very efficient and fast.
46
USTOMER SERVICE
C

DHCP server (Dynamic Host Configuration Protocol)
A DHCP server automatically allocates the IP configuration of clients within a local network. As such, the users do not have to manually enter their IP address.
DNS server (Domain Name Server)
A DNS server translates the domain address for accessing a web page (for example www.medion.com)
into a valid IP address.
Downstream / Upstream
Describes the direction of the data flow to or from the
network.
DSL
DSL stands for “Digital Subscriber Line”. It uses the
standard copper wires that are used to carry telephone
lines into most homes. Theoretically data can be transferred at speeds up to 50Mbit/s.
The higher the frequency that is used to send a signal
over a piece of wire, the faster the signal will degrade
over distance. DSL uses very high frequencies and
consequently there are limits over the distance that
the signal can be reliably received. As such the distance from the telephone exchange is a critical factor.
Due to certain technical conditions (e.g. distance from
the telephone exchange, non-availability of copper
lines, etc.) DSL is not available everywhere.
With DSL, the use of a splitter is required to separate
the voice information and data transfer.
DSL router
A DSL router establishes a connection to the Internet
provider and diverts data within the network so that
several users can share the connection. A router man-
USTOMER SERVICE
C
47

ages all the internal addresses and often also offers
further options and features, such as DHCP, firewall,
etc. Routers are available for various technologies: for
ISDN, analogue, DSL or cable – the basic principle is
the same. If you wish to share a DSL connection between several users, then a router is absolutely necessary. Software routers are also available, which emulate the hardware within the software. In such cases a
small computer is sufficient to assume the role of a
router.
Encapsulation
In the ADSL settings, the encapsulation mode describes the way the Internet packets can be packed to
optimise the transport. According to the chosen protocol (access mode), this can be done in different ways.
Encryption
Encryption of data is used to protect against unauthorised access or line-tapping.
Ethernet
Ethernet was first implemented in 1976 by 3Com and
is today the standard technology for LAN architectures.
Typical Ethernet implementations include 10Base-T,
100Base-T and gigabit Ethernet. Network protocols
coming later, such as TCP/IP, were based on this architecture.
Firewall
Data sent within a network is sent in so-called packets,
which contain detailed information regarding the type
of packet, the sender, the recipient and so on. A firewall can filter out these packets according to certain
specified rules. Firewalls are available in hardware as
48
USTOMER SERVICE
C

well as software form and are often built directly into
routers. Firewalls are mainly used in critical environments to prevent, for example, unauthorised access to
the internal network.
Gateway
A gateway translates one network protocol into another. Routers are also referred to as gateways as they
facilitate access to another network. With DSL, for example, the PPPoE protocol (PPP over Ethernet) is converted to TCP/IP and vice-versa.
Hub
If several computers are to be connected using network cables, then a hub is required. This is a type of
duplicater which copies arriving packets and passes
them unfiltered on to other ports. As a rule, a hub has
between four and eight ports, and is alone sufficient
for small groups of computers. Larger networks require
a more intelligent way of communicating with one another, as data collisions within the network are likely to
occur. In such cases, switches are used.
ICMP (Internet Control Message Protocol)
With the ICMP protocol, error and information messages are exchanged between computers within the
network.
IP address
An IP address consists normally of four numbers having values between 0 and 255 and which are separated
by dots. This address is the unique identification number of a specific device. Every piece of equipment
within a network has an IP address as it is the only
way it can be found by other computers or servers try-
USTOMER SERVICE
C
49

ing to send it information. This can be compared to the
function of a postcode in locating a building on a
street. IP addresses can be allocated either manually
or automatically by a DHCP sever.
ISP (Internet Service Provider)
The Internet Service Provider provides the connection
to the Internet. The customer / user dials in to the
provider using the telephone number (used for analogue and ISDN connections), user name and password.
Kilobit
Data throughput is often given in kilobit. A kilobit is
equivalent to 1,024.bits or 128 bytes.
LAN (Local Area Network)
The local area network is an internal network having
its own IP addresses. A small group of computers is
usually referred to as a local area network. The Internet on the other hand is a world-wide network and as
such is referred to as WAN (Wide Area Network).
MAC Address
MAC stands for Media Access Control. It is the linchpin
of the communication within a network. A MAC address
is hard coded into each network adapter. MAC addresses are worldwide unique and distinctive. Through
MAC addresses, devices within the network can be selected in a reliable way in order to grant or deny them
specific rights on an IP packet level. MAC addresses
are often written on the devices in hexadecimal format.
50
USTOMER SERVICE
C

Modulation
In the ADSL settings, the modulation defines the way
signals are decoded/encoded onto a carrier wave.
NAT (Network Address Translation)
Network Address Translation is a commonly used IP
translation and mapping technology designed for conserving registered IP addresses in large networks and
simplifying IP addressing management tasks.
As its name implies NAT acts as an interpreter between
two networks, which translates IP addresses within private “internal” networks to “legal” IP addresses for
transport over public "external" networks (such as the
Internet). Incoming traffic is translated back for delivery within the inside network.
NAT therefore allows a company or home network with
unregistered “private” addresses to connect to the
Internet by translating those addresses into globally
registered IP addresses. As such it allows an entire
network to share a single internet connection over a
single IP address.
NAT also increases network privacy by hiding internal
IP addresses from external networks.
PPP
Alongside TCP/IP, the point-to-point protocol (PPP) is
one of the most popular protocols existing today. PPP
is used to establish a connection between two remote
sites. Most Internet providers establish a connection to
the customer using the PPP protocol.
PPPoE
A special form of the PPP protocol. “Point-to-Point over
Ethernet” establishes a connection between two remote sites over an Ethernet network.
USTOMER SERVICE
C
51

POTS (Plain Old Telephone Service)
POTS refers to traditional, analogue telephony und
telephone services.
Protocol
A protocol for data transfer communication determines
the way in which data is to be built-up and exchanged.
TCP/IP is a very widespread protocol. If a system does
not understand a protocol, then certain services within
the network may not be accessible.
Radio channel
The use of the radio channels is specified in each country by the relevant authority. A wireless product must
support the relevant channels in order to be used in
that particular country. Its sale within that country
must also be agreed by the corresponding authorities.
In the chapter “Safety and Maintenance” is a list with
all known exceptions.
RJ45
This is the terminology for the outlet and plug type
used for twisted pair network cables.
Server
A server is used to provide a wide variety of services
within a network. For example, a server can be used to
store files or as a backup system. Even if you just install
a programme on your computer and make it accessible
for other users, this can be classified as a server.
Splitter
A splitter distributes a DSL line in a telephone and a
data line. A DSL line can consequently be used for traditional telephone calls as well as for data transfer. The
52
USTOMER SERVICE
C

splitter is installed at the user’s end of the DSL line.
This is generally done by the provider of the line.
Static IP address
Some Internet providers and some devices within a
network (e.g. a server or a router) require the allocation of fixed IP addresses. This must be manually entered and remains allocated to that particular computer until it is changed. Most Internet providers operate on a dynamic IP basis. This means that each time
you connect to the Internet you are allocated a new IP
address. If setting a static address, the DHCP services
must be deactivated.
VPI / VCI
Virtual Path/Channel Identifier are used in combination
as an identifier for an ATM connection and enable that
the data packets are transferred correctly via all
switches and routers. Both values are given by the
ADSL Internet provider.
WEP (Wired Equivalent Privacy)
WEP is a data encryption method used in wireless networks and is part of the 802.11 standard. The standard
foresees a 64 (40) bit or 128 (104) bit key. 24 bit of
the 64 and 128 are used as initialising vector. This is
the reason why the encryption is sometimes described
as 40 and 104 bit.
WLAN /Wireless LAN
Wireless LANs are local wireless networks and are defined by the 802.11 standard. Individual networked
users are connected via radio in a wireless network. A
wireless access point establishes such a wireless network and assumes its management.
USTOMER SERVICE
C
53

Warranty
PLEASE READ THIS LIMITED WARRANTY CAREFULLY TO
UNDERSTAND YOUR RIGHTS AND OBLIGATIONS.
Your receipt is considered valid proof of purchase and should be kept
in a safe place. This receipt will be required for receiving any warranty service. This limited warranty is extended only to Medion products purchased from Medion or from a Medion authorized dealer. It is
extended only to the original purchaser of Medion products, and is not
transferable to anyone who subsequently purchases the hardware
from the original purchaser.
We warrant to the end user that each product, including related software, accessories, media and supplies, shall be free from defects in
materials and workmanship for the warranty time from date of purchase. This warranty covers only those defects that arise as a result
of normal use of the product. This warranty does not cover any other
problems, including problems that arise as a result of improper maintenance or modification; software, accessories, media or supplies not
provided or supported by us; or operation outside the manufacturer’s
specifications.
Any parts in this device repaired or exchanged by a valid service representative will be covered under the original warranty period. Products shipped without accessories will be returned without accessories.
Any replacement product or component may be either new or like
new, provided that its functionality is at least equal to that of the
product being replaced.
LIMITATION OF WARRANTY
In accordance to the extent allowed by local law, no other warranties or are made with respect to this personal computer or the
warranty services by any person, including but not limited to us
and our suppliers. The express warranty stated above is the only
express warranty made to you and is provided in lieu of all other
express or implied warranties and conditions (if any) including
any created by any other documentation or packaging. For additional warranty information, please refer to the enclosed warranty
card.
54
USTOMER SERVICE
C

LIMITS OF LIABILITY
In accordance to the extent allowed by local law, except for the
obligations specifically set forth in this warranty statement, in no
event shall we or our third party suppliers are liable for direct,
indirect, special, incidental, or consequential damage, whether
based on contract or any other legal theory and whether advised
of the possibility of such damages. This includes loss or damage
of personal data on your PC.
LOCAL LAW
This warranty statement gives you legal rights. You may also
have other rights which vary from jurisdiction to jurisdiction. To
the extent this warranty statement is inconsistent with local law,
certain disclaimers and limitations of this statement may not apply to the customer.
MAKING COPIES OF THIS MANUAL
This manual contains information protected by law. All rights reserved. Duplicating this information in mechanical, electronic, or
any other form, without the written approval by the manufacturer, is
prohibited by copyright law.
Copyright © 2005, all rights reserved.
The copyright is kept c/o the company MEDION
Trademark:
®
MS-DOS
All the other trademarks are of the property of their respective owners.
and Windows® are Microsoft
®
.
®
registered trademarks.
Except the rights for making technical and aesthetical
modifications and possible typing errors.
USTOMER SERVICE
C
55

56
USTOMER SERVICE
C
 Loading...