

Page 1

100 x 100 mm
12 May 2009
Contents
Safety instructions ............................................3
Safety and installation................................................ 3
Electromagnetic compatibility/ Conformity with
norms........................................................................7
Cleaning.........................................................9
Recycling and disposal ..................................... 12
Data security ................................................. 13
Introduction.................................................. 14
Notes on these Operating Instructions..................... 14
Service..................................................................15
Our target group.................................................. 15
Box contents ................................................. 16
System requirements ....................................... 16
Contents
1
Page 2

Setting up .................................................... 17
Connecting the cables ............................................. 17
Installing the hard disk.............................................19
Before you install your hard disk ..........................19
Partitioning programmes .....................................20
Partitioning the drive............................................21
Formatting the drive............................................. 21
Choosing between NTFS, FAT, and FAT32 ............ 22
Deleting hard disks from the system ........................28
Customer service ............................................ 30
Troubleshooting......................................................30
Localize the Cause................................................30
Requirements for optimal performance: ............... 30
Errors And Possible Causes ...................................31
Do you require additional support?...................... 32
Copying this manual ............................................ 33
2
English
Page 3

100 x 100 mm
12 May 2009
Safety instructions
Please read this chapter carefully and observe all listed
notes. This will ensure reliable operation and long life
expectancy of your product. Keep these instructions
with your product at all times. The proper set up, use
and care can help extend the life of your product. In the
event that you transfer ownership of this product,
please provide these instructions to the new owner.
Safety and installation
• Never allow children to use electronic devices
unsupervised. Children may not always correctly
identify potential hazards.
• Hard disks are extremely fragile. Never drop or shake
the hard drive - this could irreversibly damage the
data on the hard disk. Be especially careful when
transporting the hard disk as we provide no
guarantee for this type of damage.
Safety instructions
3
Page 4

• The hard drive consumes energy and becomes very
warm during operation. Remove the hard drive from
the data dock or from the plug power supply unit
when not in use.
• Follow the user guide for your PC.
• The slits and openings in the hard disk are for air
circulation. Do not cover these openings, as this
could lead to overheating.
• Never open the casing of your hard disk, if you do
the hard disk will no longer be covered by our
guarantee.
• The hard disk is not designed for use in commercial
applications/situations.
• After transportation, wait until the equipment is at
room temperature before turning it on. If there is a
large difference in temperature or humidity, damp
can build up through condensation and cause an
electrical short circuit.
4
English
Page 5

100 x 100 mm
12 May 2009
• Keep your hard disk and all connected equipment
away from damp and avoid dust, heat and direct
sunlight in order to prevent operational problems.
• In order to avoid damage from a fall, place the hard
disk on a stable and level surface which does not
vibrate.
• Arrange cables so no one can walk on or trip over
them.
• Do not place objects on any of the cables.
• The slits and openings in the hard disk are for air
circulation. Do not cover these openings, as this
could lead to overheating.
• The voltages and interfaces used in the equipment
are in line with the low voltage protection guidelines
set out in EN60950. Connections to other
equipment may only be made using similar
interfaces with low voltage protection in accordance
with EN 60950.
Safety instructions
5
Page 6

• Please use our Service Center if you have any
technical problems with your hard disk. If repairs are
needed, please exclusively use our authorised service
partners.
• In the first hours of operation, new devices may emit
a typical, unavoidable but completely harmless
smell, which will decline increasingly in the course
of time.
We recommend that you ventilate the room
regularly, to counteract the formation of the smell.
6
English
Page 7

100 x 100 mm
12 May 2009
Electromagnetic compatibility/
Conformity with norms
This device fulfils the requirements of electromagnetic
compatibility and electrical safety of the following
norms:
EN 55022
EN 55024
EN 61000-3-2
Information technology equipment Radio disturbance characteristics Limits and methods of measurement
Information technology equipment Immunity characteristics - Limits and
methods of measurement
Electromagnetic compatibility (EMC)
- Limits for harmonic current
emissions (equipment input current
up to and including 16 A per phase)
Safety instructions
7
Page 8

EN 61000-3-3
Electromagnetic compatibility (EMC)
- Limitation of voltage changes,
voltage fluctuations and flicker in
public low-voltage supply systems,
for equipment with rated current <=
16 A per phase and not subject to
conditional connection
EN 60950
Information technology equipment Radio disturbance characteristics Limits and methods of measurement
• On connecting the hard disk, you must keep to the
guidelines for electromagnetic compatibility.
• Ensure your hard disk is located at least one meter
away from sources of high frequency and magnetic
disturbance (TVs, speakers, mobile telephones,
etc. ) in order to avoid operational problems and
data loss.
8
English
Page 9

100 x 100 mm
12 May 2009
FCC Compliance Statement
This equipment has been tested and found to comply
with the limits for a Class B digital device, pursuant to
Part 15 of FCC Rules. These limits are designed to
provide reasonable protection against harmful
interference in a residential installation. This equipment
generates, uses, and can radiate radio frequency energy
and, if not installed and used in accordance with the
instructions, may cause harmful interference to radio
communications. However, there is no guarantee that
interference will not occur in a particular installation. If
this equipment does cause harmful interference to radio
or television reception, which can be determined by
turning the equipment off and on, the user is
encouraged to try to correct the interference by one or
more of the following measures:
• Reorient or relocate the receiving antenna.
• Increase the separation between the equipment and
receiver.
Safety instructions
9
Page 10

• Connect the equipment into an outlet on a circuit
different from that to which the receiver is
connected.
• Consult the dealer or an experienced technician for
help.
Changes or modifications not expressly approved by the
party responsible for compliance could void the user’s
authority to operate the equipment. Shielded interface
cables, if any, must be used in order to comply with the
emission limits.
10
English
Page 11
100 x 100 mm
12 May 2009
Cleaning
• Before cleaning your hard disk drive, always unplug
all connection cables.
• Do not use any solvents, corrosive or gaseous
cleaning products.
Caution!
This equipment does not include any parts that
need servicing or cleaning.
Cleaning
11
Page 12
Recycling and disposal
Device
At the end of its life, the appliance must not be disposed
of in household rubbish. Enquire about the options for
environmentally-friendly disposal with your retailer.
Packaging
All packaging and packaging materials that are no
longer required can and should be recycled.
12
English
Page 13
100 x 100 mm
12 May 2009
Data security
Every time you update your data make backup copies on an external storage medium.
We assume no liability for data loss or
damage to data storage units, and no claims
can be accepted for damages resulting from
the loss of data or consequential losses.
Data security
13
Page 14

Introduction
Notes on these Operating Instructions
We have structured these Operating Instructions for the
installation so that you will be able to look up the
necessary subject-related information by means of the
Contents List at any time.
The purpose of these instructions is to help you operate
and install your external hard disk safely, quickly and
easily.
In addition, many application programs include
extensive help functions. As a general rule, you can
access help functions by pressing F1 on the keyboard.
These help functions are available to you when you use
the Microsoft Windows
application programs.
14
®
operating system or the various
English
Page 15

100 x 100 mm
12 May 2009
Service
Our customer care is there to provide support and
assistance whenever you have questions or are
experiencing problems.
This manual contains a section specific to Customer
Service starting on page 28.
We are pleased to welcome you as our newest
customer.
Our target group
These instructions are intended for advanced users.
Regardless of the possible professional utilization, this
Notebook is designed for day-to-day household use. The
functions and applications for use have been designed
with the entire family in mind.
Introduction
15
Page 16

Box contents
Please check the contents of the box and notify us
within 14 days of purchase if the contents of this box is
incomplete. The following should be included with the
hard drive:
• Hard disk
• USB cable
• User manual
• Guarantee documents
System requirements
• Operating system Windows® Vista/XP
• Connection USB
16
English
Page 17
100 x 100 mm
12 May 2009
Setting up
Connecting the cables
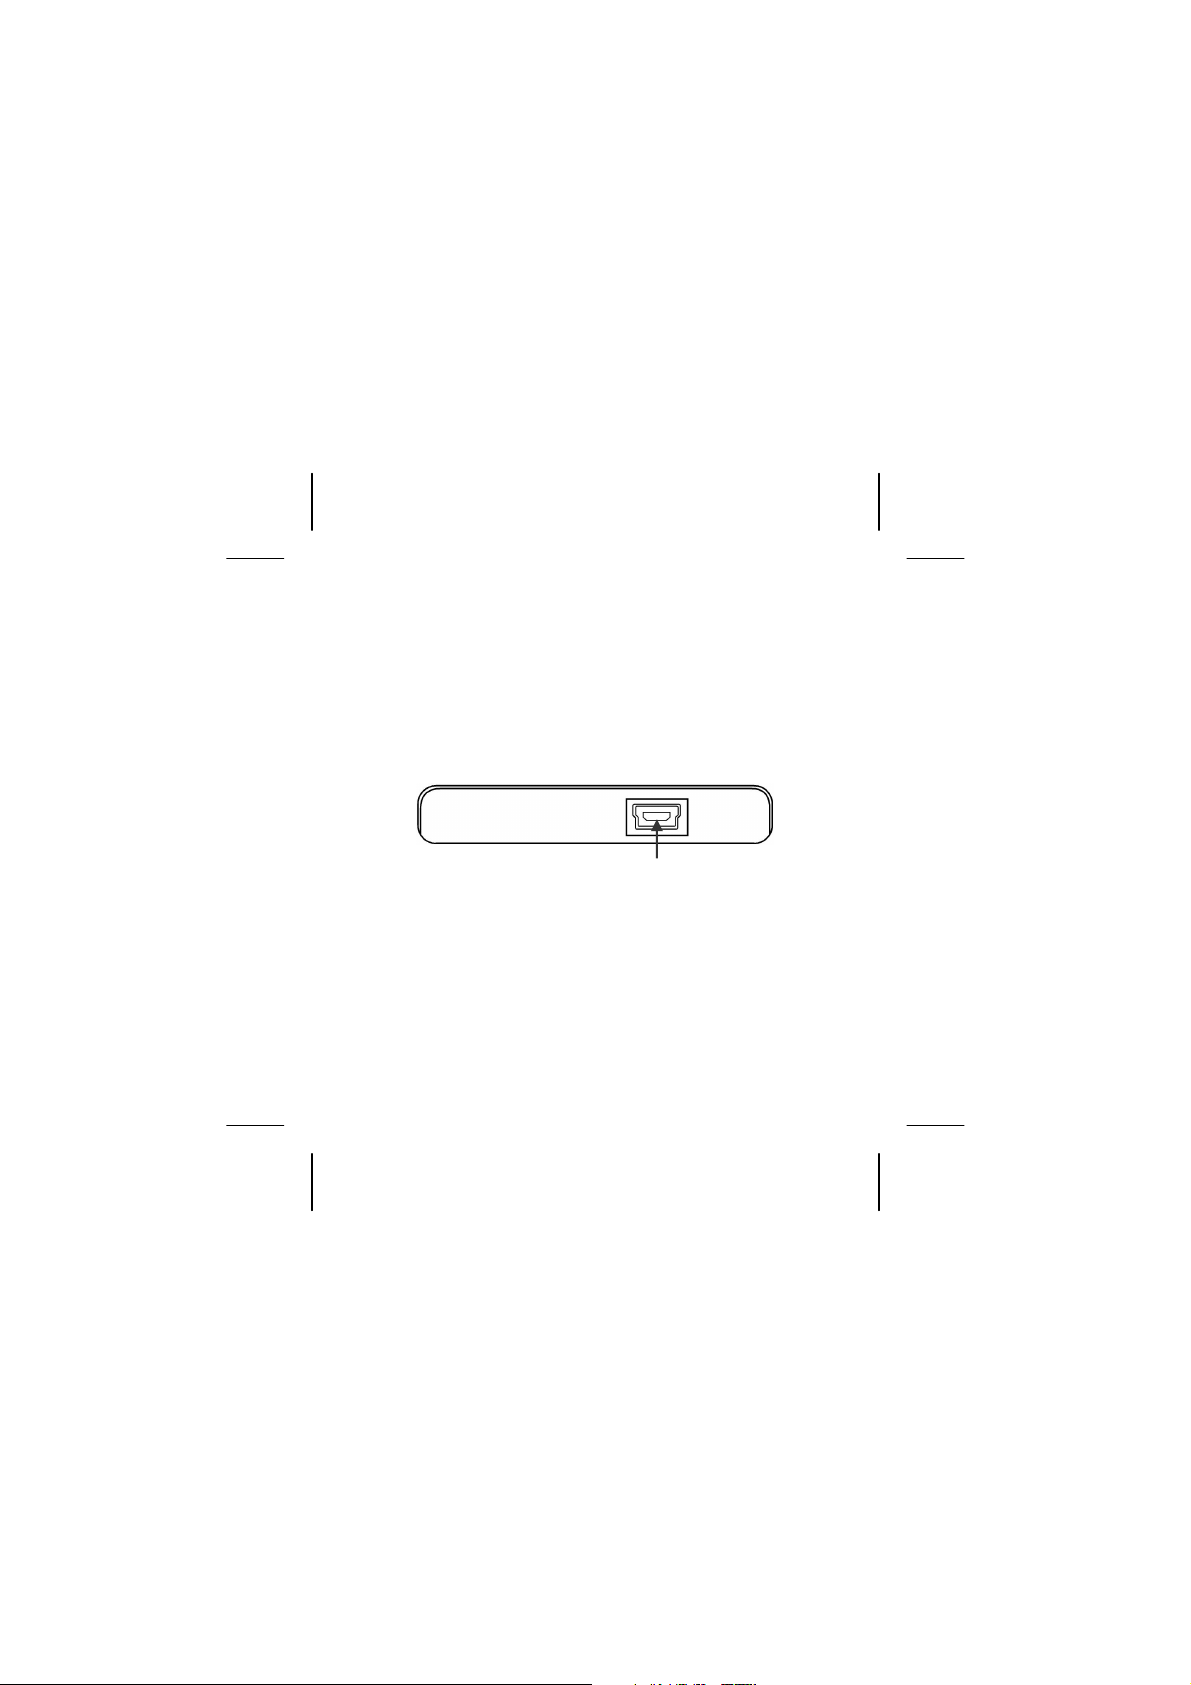
Connect the external hard disk to your computer using
a free USB port. You can also connect the hard disk to
computers with a USB 1.1 port however the speed of
transmission will be slower.
(Back view)
USB connection
1. Start your computer and wait until Windows® has
been fully loaded.
2. Connect the mini-USB connector of the supplied
USB cable to the USB port of your external hard disk.
3. Connect the other end of the USB cable to your PC /
Notebook.
Setting up
17
Page 18

4. The operating indicator (blue LED) will light up as
soon as the hard drive is connected to a source of
electricity.
5. With Windows
®
Vista/XP the hard disk will be
automatically recognized and connected.
18
English
Page 19
100 x 100 mm
12 May 2009
Installing the hard disk
Note
Your drive has already been set up (1 partition in
FAT32 format) and so it will not be necessary
to reformat or repartition it.
Caution!
Partitioning or formatting a disk drive deletes
data. We assume no responsibility for lost data.
Before you install your hard disk ...
We would like to remind you once again that when
installing the new hard disk some programmes are used
that could cause your data to be irreversibly lost if used
incorrectly.
Setting up
19
Page 20
Note
Make a backup of all your data and check that
the recovery procedure works.
Partitioning programmes
With Windows® Vista/XP use the disk management
help program in order to install the hard disk. You can
find the program in the computer management
section of control panel.
With these operating systems you must have
administration rights to install a hard disk.
Look under help in Windows for detailed information on
using this program.
20
English
Page 21
100 x 100 mm
12 May 2009
Partitioning the drive
Partitioning a drive divides the space into different areas
which can be accessed as separate logic drives (with
letters C:, D:, E: etc.). Read the manual of your
operating system to find out how to partition hard
drives with your particular system.
Formatting the drive
In order to remove data from the hard disk, the
partitions must be formatted.
Caution!
You must be totally sure about which drive letter
to enter so that you don’t format a drive that
contains data you wish to keep.
You can carry out the partitioning using Windows®
Explorer (right click on the drive and select format).
Read which formatting options you have in the next
section.
Setting up
21
Page 22

Choosing between NTFS, FAT, and FAT32
When you use Windows XP and Windows 2000 you can
choose between three file systems for disk partitions:
• NTFS,
• FAT and
• FAT32.
Use the information below to compare the file systems.
NTFS is more powerful than FAT or FAT32, and includes
features required for hosting Active Directory as well as
other important security features. You can use features
such as Active Directory and domain-based security only
by choosing NTFS as your file system.
It is easy to convert partitions to NTFS. The Setup
program makes conversion easy, whether your
partitions used FAT, FAT32, or the older version of NTFS.
This kind of conversion keeps your files intact (unlike
formatting a partition).
If you do not need to keep your files intact and you have
a FAT or FAT32 partition, it is recommended that you
22
English
Page 23

100 x 100 mm
12 May 2009
format the partition with NTFS rather than convert from
FAT or FAT32.
Formatting a partition erases all data on the partition
and allows you to start with a clean drive.
Whether a partition is formatted with NTFS or converted
using the convert command, NTFS is the better choice
of file system.
In order to maintain access control on files and folders
and support limited accounts, you must use NTFS.
. If you use FAT32, all users will have access to all files
on your hard drive, regardless of their account type
(administrator, limited, or standard.)
NTFS is the file system that works best with large disks.
(The next best file system for large disks is FAT32.)
There is one situation in which you might want to
choose FAT or FAT32 as your file system.
If it is necessary to have a computer that will sometimes
run an earlier version of Windows and other times run
Windows XP, you will need to have a FAT or FAT32
Setting up
23
Page 24
partition as the primary (or startup) partition on the
hard disk.
Earlier versions of Windows cannot access a partition if it
uses the latest version of NTFS.
The two exceptions are Windows 2000 and Windows
NT 4.0 with Service Pack 4 or later. Windows NT is not,
however, supported by this device.
You will obtain additional information about this on the
next page.
Important
Once you convert a drive or partition to NTFS,
you cannot simply convert it back to FAT or
FAT32. You will need to reformat the drive or
partition which will erase all data including
programs and personal files on the partition.
24
English
Page 25
100 x 100 mm
12 May 2009
Remark
There are some older programs that cannot be
run on a NTFS capacity. Because of this, you
should find out the actual requirements of the
software before the conversion.
Setting up
25
Page 26

The following table describes the compatibility of each
file system with various operating systems.
NTFS FAT FAT32
A computer running
Windows XP or
Windows 2000 can
access files on an
NTFS partition. A
computer running
Windows NT 4.0
with Service Pack 4
or later might be
able to access some
files. Other
operating systems
Access is
available
through MSDOS, all
versions of
Windows,
Windows NT,
Windows
2000,
Windows XP,
and OS/2.
Access is
available only
through
Windows 95
OSR2, Windows
98, Windows
Millennium
Edition,
Windows 2000,
and Windows
XP.
allow no access.
26
English
Page 27
100 x 100 mm
12 May 2009
The following table compares disk and file sizes possible
with each file system.
NTFS FAT FAT32
Recommended
minimum volume size
is approximately 10
megabytes (MB).
Volumes much larger
than 2 terabytes (TB)
are possible. Cannot be
used on floppy disks.
Volumes
from size up
to 4
gigabytes
(GB). Does
not support
domains.
Volumes from
512 MB to 2 TB.
In Windows XP,
you can format a
FAT32 volume
up to 32 GB
only. Does not
support
domains.
File size limited only by
size of volume.
Maximum file
size is 2 GB.
Maximum file
size is 4 GB.
Setting up
27
Page 28
Deleting hard disks from the system
Depending on the operating system, the external hard
disk must be disconnected before it can be deleted. This
is usually the case for Windows 2000. Read how this
works in the help files of your operating system.
1. Disconnect the hard disk from the operating system
if necessary using the safely remove hardware
wizard.
2. Now pull out the plug and disconnect all the
connection cables from the external hard disk.
Caution!
While accessing the hard disk, the hard disk must
not be deleted or turned off. This can lead to
data loss.
28
English
Page 29
100 x 100 mm
12 May 2009
You can see that data is being transmitted when
the LED display flashes blue. When the LED
display is constantly blue, no data is being
transmitted. However, you should make sure
that all files that you have opened from the hard
disk (documents, etc.) have been closed again
before you delete or turn off the hard disk.
Setting up
29
Page 30

Customer service
Troubleshooting
Localize the Cause
Errors can have simple causes, but sometimes they are
caused by faulty equipment. We would like to give you
some tips to help solve common problems.
Requirements for optimal performance:
• a stable, trouble-free computer
• a correctly installed operating system
• cables correctly attached to the hard disk
• regular execution of the Windows
and scandisk programs to remove sources of error
and increase the system performance.
30
English
®
defragmenter
Page 31

100 x 100 mm
12 May 2009
Errors And Possible Causes
We wish to give you a basic guide in the following, in
order for you to recognize a problem possibly present
and to remove the cause of it. We shall be glad to help
you further if the notes given here do not lead to
success.
PROBLEM: Is the motor of the hard disk
functioning?
• ANSWER: You should hear a quiet humming and
clicks after connecting the hard drive to electricity in
this case.
PROBLEM: The drive is not recognised by my
computer.
• ANSWER: Restart your computer.
PROBLEM: ScanDisk reports an unrecoverable
error.
• ANSWER: The Scandisk program tests drives for
errors. If ScanDisk finds a problem and is unable to
fix it, there may be a problem with the hard disk.
Customer service
31
Page 32

PROBLEM: The hard drive does not seem to have
as much storage capacity as I allocated.
• ANSWER: Check that your operating system and file
system support the desired amount.
Do you require additional support?
If the suggestions in the previous section have not
solved your problem, please contact the hotline. We will
try and help you over the telephone. However, before
you contact your nearest MEDION Technology Centre,
please have the following information available:
• How is your computer configured?
• What additional peripherals do you use?
• What messages, if any, appear on your screen?
• What software were you using when the error
occurred?
• What steps have you already undertaken to solve the
problem?
• If you have already been given a customer number,
please have this available.
32
English
Page 33

100 x 100 mm
12 May 2009
Copying this manual
This document contains legally protected information.
All rights reserved. Copying in mechanical, electronic
and any other form without the written approval of the
manufacturer is prohibited.
Customer service
33
Page 34

Copyright © 2009, 07/09
All rights reserved.
This manual is protected by Copyright.
The Copyright is owned by MEDION
Trademarks:
®
MS-DOS
and Windows® are registered trademarks of Microsoft®.
Other trademarks are the property of their respective owners.
We reserve the right to make technical changes.
34
English
®
.
 Loading...