


ES
EN
Prólogo
Este manual de instrucciones le ayudará a
• usar el teléfono DECT inalámbrico,
llamado de manera abreviada teléfono,
• de forma adecuada,
• segura
y ventajosa.
Toda persona que maneje,
• limpie
• o elimine
• este teléfono
debe haber leido completamente el
contenido de este manual de
instrucciones.
Este manual de instrucciones forma parte
del producto. Guarde este manual de
instrucciones siempre cerca del teléfono.
Entregue este manual de instrucciones
cuando venda el teléfono o si lo cede a
terceras personas.
Características de
estructuración
Los diferentes elementos del manual de
instrucciones poseen unas características
de estructuración fijas. Así se puede
diferenciar fácilmente si se trata de
un texto normal,
• enumeraciones,
` pasos de actuación,
“Indicadores de pantalla”,
TECLAS del teléfono o
de referencias cruzadas.
Estas indicaciones contienen
L
informaciones adicionales para el
uso rentable del aparato.
DE
DE
1

Catalógo
Prólogo................................................... 1
Características de estructuración........ 1
Catalógo .................................................2
Advertencias de seguridad...................5
Uso apropiado .........................................5
Advertencias de seguridad básicas.........5
Evitar descargas eléctricas ................. 5
Manipular las pilas .............................. 6
Evitar peligro de asfixia.......................6
Evitar peligros de incendio.................. 6
Evitar desperfectos ............................. 6
Características de estructuración de las
advertencias de seguridad ......................7
Descripción del aparato........................ 8
Volumen de suministro............................8
Gama de funciones .................................8
La estación base .....................................9
El terminal portátil..................................11
Indicaciones en la pantalla ....................13
Primeros pasos ...................................14
Desembalar ...........................................14
Colocar y conectar la estación base......14
Preparar el terminal portátil ................... 15
Colocar las pilas................................ 15
Fijar las pinzas para el cinturón ........15
Realizar los ajustes básicos...............16
Navegación por el menú........................16
Activar el terminal portátil ......................16
Ajustar el idioma de la pantalla..............16
Ajustar la fecha y la hora.......................17
Ajustar la melodía del timbre ............ 18
Ajuste del volumen del timbre........... 18
Ajustar los avisos acústicos .............. 18
Conectar y desconectar los avisos
acústicos para nuevos SMS ..............19
Denominar los terminales portátiles ..19
Registrar o eliminar un terminal portátil 20
Registrar el terminal portátil...............20
Eliminar terminales portátiles ............21
Activar o desactivar el contestador
automático ............................................ 21
Efectuar llamadas ............................... 22
Aceptar llamadas .................................. 22
Finalizar la conferencia......................... 22
Efectuar una llamada externa ............... 22
Efectuar una llamada interna ................ 22
Ajustar el volumen ................................ 23
Silenciar el teléfono............................... 23
Utilizar la rellamada .............................. 23
Marcar el número de teléfono con
rellamada...........................................23
Borrar el número de teléfono de la lista
de rellamada......................................23
Borrar la lista de rellamada................24
Utilizar la memoria de números de
teléfono ................................................. 24
Utilizar la lista de llamadas ................... 25
Marcar un número de la lista de
llamadas............................................25
Memorizar la entrada en la memoria de
números de teléfono..........................25
Borrar una entrada de la lista de
llamadas............................................26
Borrar todas las entradas ..................26
2

Editar la memoria de números de
teléfono ................................................27
Añadir o modificar entradas...................27
Seleccionar una entrada de la lista de
rellamada...............................................28
Borrar entradas .....................................28
Borrar la memoria de números de teléfono
..............................................................28
Números de teléfono VIP ......................28
Marcar con la tecla VIP..................... 28
Introducir o modificar los números de
teléfono VIP ......................................29
Borrar números de teléfono VIP
memorizados ....................................29
Activar el contestador automático..... 30
Escuchar mensajes ...............................30
Modificar los ajustes del contestador
automático.............................................31
Desconectar y conectar la grabación 31
Escuchar el mensaje saliente ...........31
Modificar el mensaje saliente............ 31
Activar o desactivar el contestador
automático ........................................32
Determinar el número de señales de
llamada .............................................32
Escuchar también..................................32
Aceptar la llamada desde el contestador
automático.............................................32
Borrar mensajes ....................................33
Utilización del control a distancia ..........33
Introducir PIN.................................... 33
Consultar el contestador automático. 34
Escuchar mensajes........................... 34
Modificar los ajustes ......................... 34
Enviar y recibir SMS ........................... 35
Requisitos ............................................. 35
Seleccionar el SMS-Center................... 35
Escribir SMS ......................................... 36
Introducir texto...................................36
Introducir el número de teléfono........36
Utilizar números de teléfono
memorizados.....................................37
Recibir y leer SMS ................................ 37
Leer SMS recibidos ...........................37
Leer los SMS de la lista de entradas de
SMS...................................................38
Guardar SMS........................................ 38
Enviar SMS guardados......................38
Leer y modificar SMS guardados ......39
Borrar SMS guardados......................39
Funciones especiales......................... 40
Activar o desactivar el bloqueo del teclado
.............................................................. 40
Llamar a los terminales portátiles
("Paging").............................................. 40
Usar rellamada...................................... 40
Usar el desvío de llamada .................... 41
Activar el desvío de llamadas............41
Desactivar el desvío de llamadas......41
Alternar llamadas.................................. 42
Usar aviso de llamada .......................... 42
Activar o desactivar el aviso de llamada
..........................................................42
Aceptar una segunda llamada durante
una conferencia interna.....................42
Rechazar una segunda llamada........42
Aceptar la segunda llamada..............43
Intercomunicación .............................43
ES
EN
DE
DE
3

Pasar una llamada ................................44
Bloqueo de la identificación de llamadas
..............................................................44
Ajustar la estación base .....................45
Cambiar el PIN del aparato ...................45
Determinar el tipo de marcación............45
Modificar el tiempo de flash................... 46
Introducir la característica de la central.46
Restablecer la estación base a su estado
original...................................................46
Buscar fallos........................................47
Manteninuento del teléfono................ 49
Especificaciones técnicas ..................50
Desmontar el teléfono......................... 50
Eliminar el aparato ..............................51
Embalaje ...............................................51
Pilas y baterías......................................51
Información de conformidad..................52
4

Advertencias de
seguridad
Lea cuidadosamente las advertencias de
seguridad antes de la puesta en
funcionamiento del teléfono. Preste
atención a todas las advertencias y
observe todas las indicaciones del
teléfono, de los mensajes y de este
manual de instrucciones.
Uso apropiado
El teléfono MD 81920 sirve
• para realizar llamadas telefónicas
internas y externas,
• para grabar llamadas entrantes,
• para escuchar llamadas grabadas,
• para enviar y recibir SMS.
Este teléfono está concebido
exclusivamente para estos fines y
solamente debe ser usado para ellos.
Solamente debe ser usado de la manera
descrita en el manual de instrucciones.
Cualquier otro uso es considerado como
inadecuado y puede causar daños
materiales.
El fabricante no asume ninguna
responsabilidad para daños causados por
un uso inadecuado.
Advertencias de seguridad
básicas
Evitar descargas eléctricas
• No abra nunca la carcasa de la
estación base o de los terminales
portátiles.
• Conecte la estación base solamente a
una toma de corriente de 230 V ~,
50 Hz, instalada profesionalmente.
Para en casos de emergencia poder
desconectar el teléfono rápida y
fácilmente de la red, la toma de
corriente debe ser accesible.
• En los siguientes casos, desconéctelo:
− cuando en el teléfono haya
entrado en contacto co
humedad,
− si no se utiliza el teléfono
durante un periodo prolongado
o
− en caso de una avería del
teléfono.
Desenchúfelo tirando solamente de la
clavija.
• No doble o aplaste el cable de red.
• Evite que entren humedad o líquidos en
el teléfono o las fuentes de
alimentación.
• No toque el cable de red con las manos
húmedas.
ES
EN
DE
DE
5

Advertencias de seguridad
• No utilice jamás el teléfono con un
cable de red deteriorado, después de
funciones erróneas o si el teléfono está
dañado. Deje que el servicio posventa
revise el teléfono o que lo repare antes
de utilizarlo nuevamente.
• Las reparaciones siempre deben ser
efectuadas por personal especializado
cualificado.
Manipular las pilas
• Utilice solamente baterías NiMH del tipo
AAA, 1,2 V, 600 mAh.
• No utilice pilas en los terminales
portátiles.
• Mantenga las pilas alejadas de los
niños. Si alguien se tragara una pila,
acuda inmediatamente a un médico.
• No mezcle diferentes tipos de pilas.
Sustituya las pilas solamente por pilas
del mismo tipo o uno equivalente.
• Antes de colocar las pilas, compruebe
que los contactos del aparato y los de
las pilas estén limpios. En caso
necesario habría que limpiarlos.
• Al colocar las pilas tenga en cuenta su
polaridad (+/–).
• No cortocircuite las pilas en.
• El calor fuerte y directo puede dañar las
pilas. Por ello, nunca exponga los
terminales portátiles a fuertes fuentes
de calor.
• No tire nunca las pilas al fuego.
• Si no utilizará los terminales portátiles
durante un tiempo prolongado, quite las
pilas.
• Retire inmediatamente del aparato las
pilas que derramen líquido. Limpie los
contactos antes de introducir pilas
nuevas. ¡El ácido es tóxico y caustico!
Evitar peligro de asfixia
• No permita que los niños pequeños
jueguen con el plástico u otras piezas
del embalaje.
Evitar peligros de incendio
• Desenrolle siempre el cable de red en
toda su longitud. En caso contrario
puede sobrecalentarse.
• No cubra nunca las fuentes de
alimentación de la estación base y los
cargadores. En caso contrario, las
fuentes de alimentación pueden
sobrecalentarse.
Evitar desperfectos
• Limpie el teléfono regularmente.
• Durante la limpieza no utilice ningún
objeto de metal.
• Coloque la estación base sobre una
superficie antideslizante. En caso
contrario, algunas superficies o
productos de limpieza pueden dañar las
patas de goma de la estación base. En
estos casos la superficie puede
ensuciarse o dañarse.
6
Características de
estructuración de las
advertencias de seguridad
ES
EN
DE
En este manual de instrucciones se
encuentran las siguientes categorías de
advertencias de seguridad y de
indicaciones:
¡AVISO!
Las indicaciones con la palabra
AVISO advierten de situaciones
peligrosas que pueden causar
la muerte o graves heridas.
¡Atención!
Las indicaciones con la palabra
ATENCIÓN advierten de una situación
que puede causar daños materiales o
del medio ambiente.
DE
7

Descripción del aparato
Descripción del
aparato
Volumen de suministro
El teléfono consiste en las siguientes
partes:
• la estación base
• un cable de teléfono
• un cable de red con fuente de
alimentación
• cuatro terminales portátiles
• cuatro pinzas para cinturón
• tres cargadores con cable de red
• ocho pilas NiMH
(Typ AAA, 1,2 V, 600 mAh)
• este manual de instrucciones.
Gama de funciones
• Registro automático de los terminales
portátiles en la estación base
• Indicación de la llamada entrante
(Función CLIP)
• Ajuste de la marcación por tonos o por
pulsos
• Función Manos Libres en el terminal
portátil
• Posibilidad de aceptar las llamadas al
descolgar el terminal portátil del
cargador (conexión directa)
• Indicación de duración de la
conversación
• Posibilidad de llamadas internas fuera
de la red telefónica
• Función de llamada para terminales
portátiles (Paging)
• Pasar llamadas
• Intercomunicación
• 50 entradas en la memoria de números
de teléfonos de cada terminal portátil
• Se pueden memorizar 10 números de
teléfono para el uso en común en la
estación base
• Indicación de las últimas 20 llamadas
entrantes
• Rellamada para los últimos números
marcados
• Posibilidad de función sin sonido
• Se pueden ajustar seis melodías de
timbre
• Se puede ajustar el timbre en cinco
niveles
• Se puede ajustar el volumen del
auricular en cinco niveles
• Se puede ajustar el número de timbres
• Enviar y recibir SMS
• Se pueden memorizar 20 mensajes
SMS
• Los mensajes también quedan
memorizados en caso de corte de
corriente
• Contestador automático con duración
de grabación de 15 minutos
• Dos textos de mensajes salientes
memorizados
• Posibilidad de consultas a distancia
• Nombre de los terminales portátiles
programable
• Pantalla en tres idiomas.
8
La estación base
ES
EN
DE
DE
13
1112 10 9 8 7 6 5
14
2
3
4
1
9

Descripción del aparato
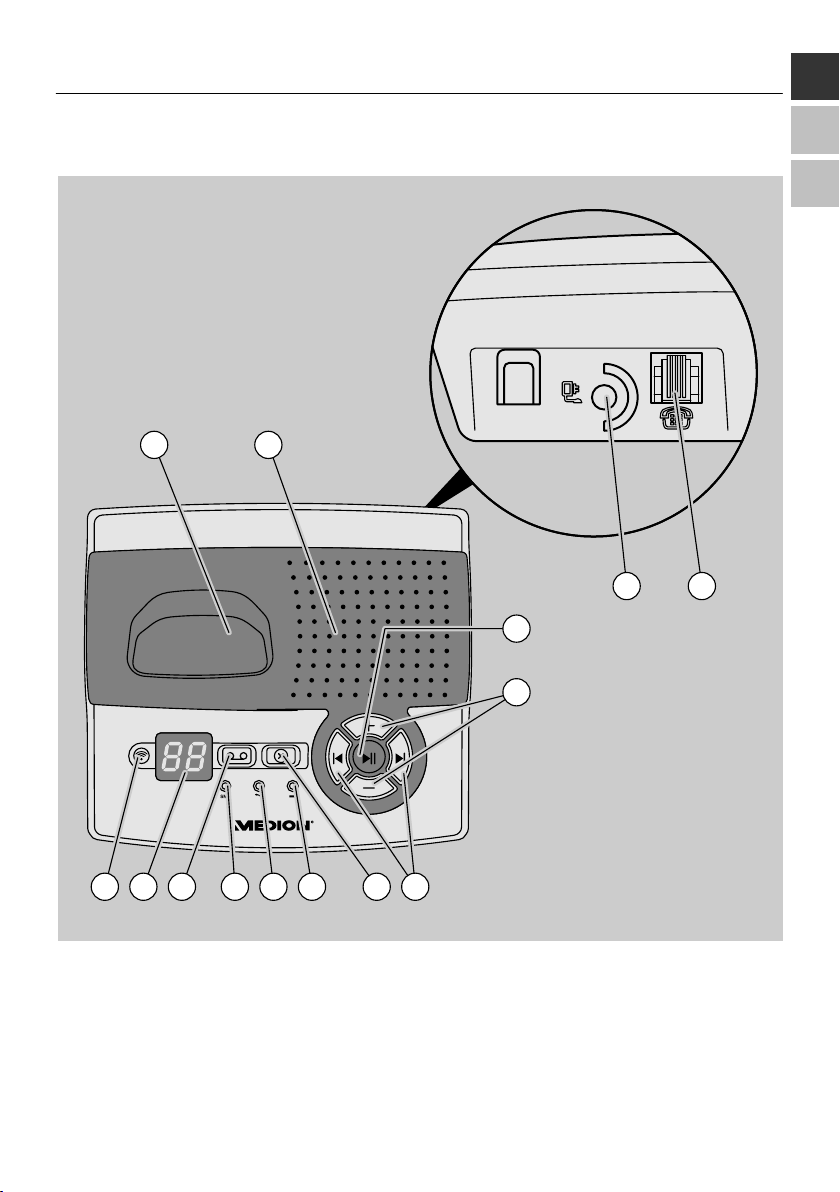
N° Función N° Función
1 Toma de conexión
para el cable telefónico
2 Toma de conexión para el cable de
red
3 Tecla f: Reproducir el mensaje e
interrumpir la reproducción
4 Tecla +: Subir el volumen
Tecla –: Bajar el volumen
5 Tecla |e: Reproducir mensaje
entrante anterior o iniciar la
reproducción al comienzo del mensaje
Tecla f|: Reproducir el mensaje
entrante siguiente
6 Tecla ⊗: Borrar mensaje entrante 13 Cargador
7 LED rojo: El terminal portátil se está
cargando
8 LED verde: Estación base en
funcionamiento
9 LED amarilla: SMS nuevo
10 Conectar y desconectar el
contestador automático, escuchar
mensaje saliente
11 Pantalla
12 Tecla de llamada (Paging)
14 Altavoz
10

El terminal portátil
ES
EN
DE
14
13
12
1
DE
2
3
4
5
6
7
11
10
8
9
11

Descripción del aparato
N° Función N° Función
1 Auricular 9 Conectar y desconectar el bloqueo del
teclado, introducir el signo especial “#“
2 Pantalla 10 Micrófono
3 VIP: Tecla especial para acceder a los
números comunes de todos los
terminales portátiles
4 MENÚ: Confirmar entradas, abrir el
menú
5 RELLAMADA: Tecla R 13 ALTAVOCES: Activar/desactivar el
6 Tecla NAVEGACIÓN: Abrir la guía
telefónica, seleccionar puntos del
menú
7 COLGAR: Terminar la conferencia,
cerrar el menú
8 Teclas numéricas (introducir números
y letras)
11 Conectar y desconectar el timbre,
introducir el signo especial “*“
12 DESCOLGAR: aceptar la llamada
funcionamiento de manos libres
14 CANCELAR: Cambiar al siguiente
menú superior, borrar entrada
– Altavoces (parte posterior del aparato)
– Compartimento para las pilas (parte
posterior del aparato)
12
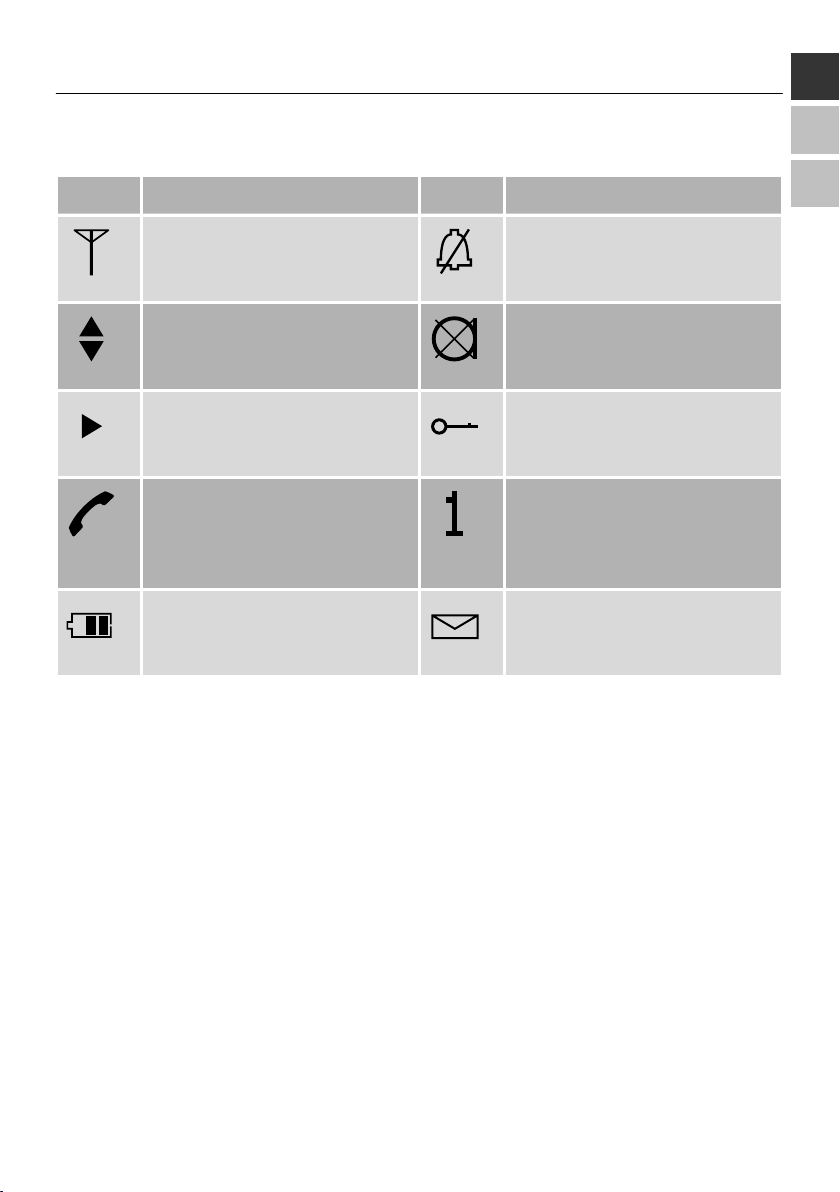
Indicaciones en la pantalla
Símbolo Función Símbolo Función
ES
EN
DE
Símbolo de comunicación: la
pieza portátil tiene comunicación
con la estación base.
El menú contiene submenús
Actual entrada marcada en el
menú
Símbolo de conferencia: este
símbolo aparece si se ha pulsado
la tecla DESCOLGAR o
ALTAVOZ.
Nivel de carga de las pilas:
cuantas más barras se ven, más
cargadas están las pilas.
Timbre: el timbre está
desconectado.
Función sin sonido: el micrófono
del terminal portátil está
desconectado.
Bloqueo del teclado: las teclas
del terminal portátil están
bloqueadas,
Terminal portátil X: el número o
la denominación del terminal
portátil. Debajo se indican la
fecha y la hora.
Ha entrado un SMS nuevo.
DE
13
Primeros pasos
Primeros pasos
Desembalar
` Desembale todas las piezas del
teléfono.
` Compruebe el volumen de suministro.
¡AVISO!
¡Peligro de asfixia al jugar con
los plásticos!
` No permita que los niños
jueguen con el plástico.
` Guarde el material de embalaje alejado
de los niños.
Colocar y conectar la estación
base
Elija la posición de la estación base según
las siguientes características:
• La estación base deberá encontrarse
tan cerca de los enchufes de conexión
como para que no se necesite ningún
alaegador.
• La estación base deberá estar colocada
sobre una superficie nivelada y estable.
¡Atención!
Algunas superficies o productos de
limpieza pueden dañar las patas de
goma de la estación base. En estos
casos la superficie puede ensuciarse o
dañarse.
` Coloque la estación base sobre una
superficie antideslizante.
` Coloque la estación base en la posición
deseada.
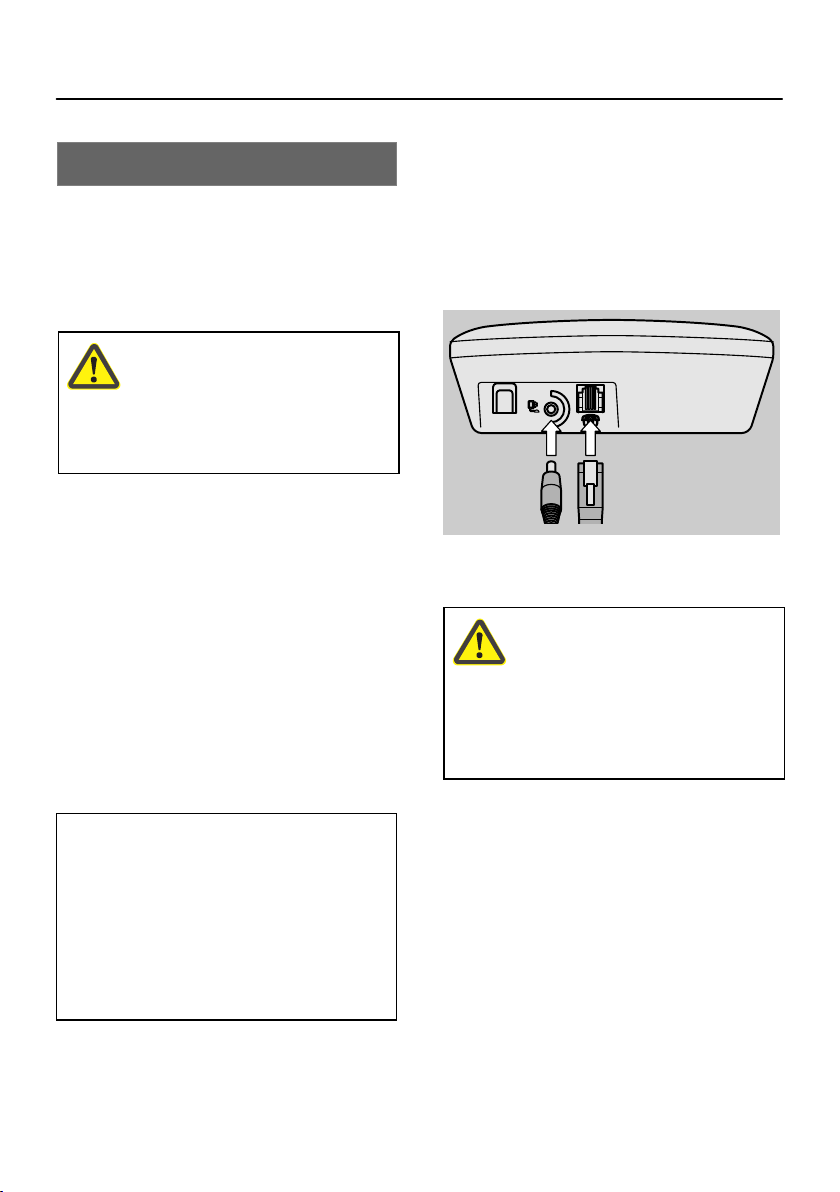
` Conecte el cable de teléfono en la toma
derecha de la estación base.
` Conecte el cable de red en la toma
izquierda de la estación base.
` Conecte el cable de teléfono a la toma
telefónica.
¡AVISO!
¡Peligro de muerte por
descarga eléctrica!
` Observe las advertencias de
seguridad del principio de
este manual.
` Introduzca la clavija de red en un
enchufe.
Si se oye un aviso acústico y en la
pantalla aparece “0”, la estación base está
correctamente conectada.
14
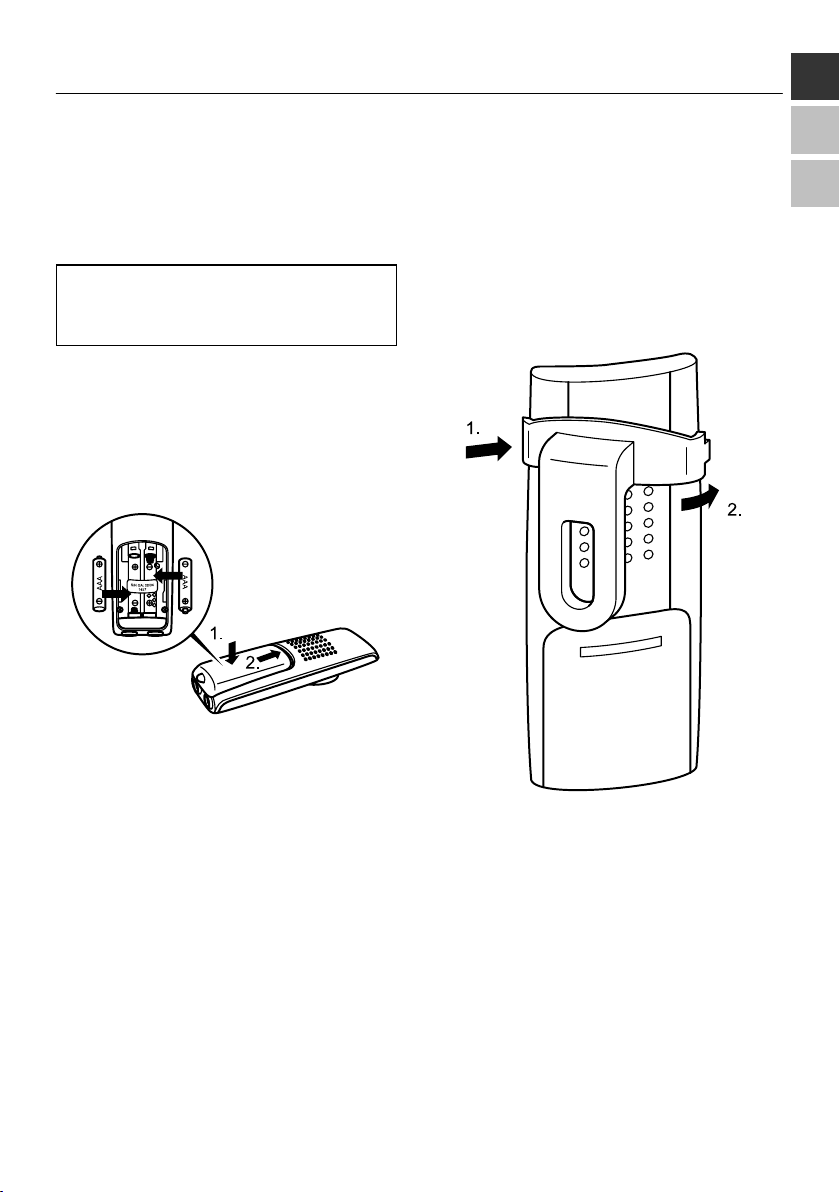
Preparar el terminal portátil
Colocar las pilas
` Abra la tapa en la parte posterior del
terminal portátil.
¡Atención!
Las baterías incorrectamente colocadas
pueden dañar los terminales portátiles.
` Coloque las pilas en la correcta
posición de los polos.
` Coloque la tapa sobre el terminal
portátil (1.).
` Cierre la tapa (2.).
Fijar las pinzas para el cinturón
` Coloque un estribo de sujeción de la
pinza para cinturón en el dispositivo
fijador del terminal portátil (1.).
` Presione el segundo estribo de sujeción
en el segundo dispositivo de fijación del
terminal portátil (2.).
ES
EN
DE
DE
` Coloque el terminal portátil en el
cargador.
` Para cargar las pilas del terminal
portátil completamente, déjelo que
permanezca en el cargador durante
aprox. 14 horas.
Se puede ver el nivel de carga de las pilas
en la pantalla.
En cuanto las pilas del terminal portátil
estén cargadas, se podrá realizar los
ajustes básicos para este terminal portátil.
15

Realizar los ajustes básicos
Realizar los ajustes
básicos
Navegación por el menú
` Pulse la tecla MENÚ.
Se abre el menú principal.
` Para marcar una opción o un submenú
pulse la tecla NAVEGACIÓN hasta que
el símbolo “f“ se encuentre delante de
la entrada deseada.
` Pulse la tecla MENÚ.
Se selecciona la entrada marcada en el
menú.
` Para abandonar el menú y cambiar al
siguiente menú superior, pulse la tecla
CANCELAR.
Activar el terminal portátil
Los terminales portátiles se registran
automáticamente en la estación base
después de haber colocado las pilas.
Los terminales portátiles serán numerados
consecutivamente.
Si desea sustituir este número por una
denominación propia proceda como se
indica en el apartado Denominar los
terminales portátiles a partir de la página
19.
De fábrica se han realizado los siguientes
ajustes básicos:
• Melodía del timbre 1
• Volumen del timbre 5
• Volumen del auricular 3
• Volumen del altavoz 3
• Idioma de pantalla alemán
• Tonos de aviso de las teclas
conectados
• Bloqueo del teclado desconectado
• no se ha ajustado ninguna fecha y
ninguna hora
Se pueden modificar estos ajustes como
se indica en los siguientes apartados.
Ajustar el idioma de la pantalla
` Pulse la tecla MENÚ.
` Seleccione el menú “Ajustar TP”.
` Pulse la tecla MENÚ.
` Seleccione el submenú “Idioma”.
` Pulse la tecla MENÚ.
Se indican los idiomas de pantalla
posibles. El idioma actualmente ajustado
está marcado con una flecha.
` Seleccione el idioma deseado.
` Pulse la tecla MENÚ.
En la pantalla aparece “memorizado” en el
idioma seleccionado.
16

Ajustar la fecha y la hora
` Pulse la tecla MENÚ.
` Seleccione el menú “Fecha/Hora”.
` Pulse la tecla MENÚ.
` Seleccione el submenú “Ajustar F/H”.
` Pulse la tecla MENÚ.
` Introduzca las últimas dos cifras del año
con las teclas numéricas.
` Pulse la tecla MENÚ.
` Introduzca el día y el mes de dos cifras
con las teclas numéricas.
` Pulse la tecla MENÚ.
` Introduzca la hora de cuatro dígitos con
las teclas numéricas.
` Pulse la tecla MENÚ.
Escuchará una señal acústica. En pantalla
aparece “Memorizado”.
Ahora la fecha y la hora quedan
L
memorizadas mientras la estación
base esté conectada a la red
eléctrica.
Si la fecha y la hora no están
memorizadas, en su lugar
aparecerá “_ _ : _ _“ en la pantalla.
Si desea que la fecha y la hora aparezcan
en otro formato, proceda como sigue:
` Pulse la tecla MENÚ.
` Seleccione el menú “Fecha/Hora”.
` Pulse la tecla MENÚ.
` Seleccione el submenú “Formato hora”.
` Pulse la tecla MENÚ.
Ahora se puede ajustar el formato de
indicación para la hora:
` Para que aparezca la hora en el
formato de 24 horas, seleccione la
opción “24 horas”.
` Para que aparezca la hora en el
formato de 12 horas, seleccione la
opción “12 horas”.
` Para aceptar la selección pulse la tecla
MENÚ.
Ahora se puede ajustar el formato de
indicación para la fecha:
` Para que la fecha aparezca en el
formato “Día.Mes”, seleccione la opción
“dd.mm”.
` Para que la fecha aparezca en el
formato “Mes.Día”, seleccione la opción
“mm.dd”.
` Para aceptar la selección pulse la tecla
MENÚ.
ES
EN
DE
DE
17

Realizar los ajustes básicos
Ajustar la melodía del timbre
Se puede seleccionar la melodía del
timbre.
` Pulse la tecla MENÚ.
` Seleccione el menú “Ajustar TP”.
` Pulse la tecla MENÚ.
` Seleccione el submenú “Melodía del
timbre”.
` Pulse la tecla MENÚ.
Ahora se puede seleccionar una de seis
melodías.
` Seleccione la melodía deseada con la
tecla NAVEGACIÓN.
Delante de la denominación de la melodía
seleccionada se encuentra el símbolo “f“.
Se oye la melodía seleccionada.
` Para aceptar la selección pulse la tecla
MENÚ.
Ajuste del volumen del timbre
Puede ajustar el volumen del timbre en
cinco niveles. De fábrica se ha ajustado el
nivel más alto 5.
` Pulse la tecla MENÚ.
` Seleccione el menú “Ajustar TP”.
` Pulse la tecla MENÚ.
` Seleccione el submenú “Volumen del
timbre”.
` Pulse la tecla MENÚ.
` Seleccione el nivel deseado con la tecla
NAVEGACIÓN.
` Para aceptar la selección pulse la tecla
MENÚ.
Ajustar los avisos acústicos
Los avisos acústicos le indican diferentes
informaciones:
• El nivel de carga de las pilas está
demasiado bajo.
• Ha pulsado una tecla.
• El terminal portátil se encuentra fuera
del alcance de la estación base.
Estos avisos se pueden conectar y
desconectar de la siguiente manera:
` Pulse la tecla MENÚ.
` Seleccione el menú “Ajustar TP”.
` Pulse la tecla MENÚ.
` Seleccione el submenú “tonos”.
` Pulse la tecla MENÚ.
` Para conectar o desconectar el tono de
advertencia de la pila, seleccione la
opción “Tono de advertencia de la pila”.
` Para conectar o desconectar la
advertencia de cobertura, seleccione la
opción “Cobertura”.
` Para conectar o desconectar la
confirmación de teclado, seleccione la
opción “Tonos de teclado”.
En la pantalla la opción actual activada
está marcada con una flechita.
` Para modificar el ajuste, pulse la tecla
NAVEGACIÓN.
` Para aceptar la modificación pulse la
tecla MENÚ.
18

Conectar y desconectar los avisos
acústicos para nuevos SMS
Se puede conectar y desconectar el aviso
acústico de la entrada de un SMS.
Proceda de la siguiente manera:
` Pulse la tecla MENÚ.
` Seleccione el menú “SMS“.
` Pulse la tecla MENÚ.
` Seleccione el submenú “Ajustes”.
` Pulse la tecla MENÚ.
` Seleccione la entrada “SMS-Alarm”.
` Pulse la tecla MENÚ.
En la pantalla el ajuste actual está
marcado con una flechita.
` Para seleccionar el ajuste deseado,
pulse la tecla NAVEGACIÓN.
` Pulse la tecla MENÚ.
El ajuste está memorizado.
Denominar los terminales portátiles
De fábrica los terminales portátiles están
numerados correlativamente. Los
terminales portátiles se pueden denominar
con números y letras. Proceda de la
siguiente manera:
` Pulse la tecla MENÚ.
` Seleccione el menú “Ajustar TP”.
` Pulse la tecla MENÚ.
` Seleccione el submenú “Nombre del
terminal portátil”.
En pantalla aparece “Terminal portátil_”.
Ahora se puede agregar este nombre o
borrarlo y adjudicar un nombre nuevo.
` Para borrar una letra, pulse la tecla
CANCELAR.
` Introduzca la denominación deseada
como se indica en el apartado Escribir
SMS a partir de la página 36.
` Para aceptar la entrada pulse la tecla
MENÚ.
En pantalla aparece “Memorizado”.
Cuando se abandona el menú aparecerá
en la pantalla la denominación
introducida.
No obstante, para mantener una
L
conferencia interna se tendrá que
marcar el número del terminal
portátil deseado. Por esta razón
este número aparece detrás de la
denominación introducida.
ES
EN
DE
DE
19

Realizar los ajustes básicos
Registrar o eliminar un terminal
portátil
Los terminales portátiles se registran
automáticamente en la estación base
después de haber colocado las pilas.
Registrar el terminal portátil
Se pueden registrar un máximo de cuatro
terminales portátiles en la estación base.
Si desea registrar otro terminal
L
portátil, primero deberá eliminar uno
de los cuatro terminales portátiles
registrados. Proceda como se indica
en el apartado Eliminar terminales
portátiles a partir de la página 21.
Registre un terminal portátil de la
siguiente manera:
` Pulse la tecla MENÚ.
` Introduzca la combinación de teclas
“* * # * # #“ .
En pantalla aparece “Registr./elimin. TP”.
` Pulse la tecla MENÚ.
` Para registrar un terminal portátil,
seleccione la entrada “Registrar TP”.
` Pulse la tecla MENÚ.
` Introduzca el PIN del aparato.
De fábrica el PIN del aparato es
L
“0000”. Se pueden modificar los PIN
de aparato como se indica en el
apartado PIN de aparato a partir de
la página 45.
Después de aprox. diez segundos se
oirán dos avisos acústicos.
` Suelte la tecla Paging.
Ahora el terminal portátil está registrado.
Si el registro no se ha realizado con éxito,
aparecerá “Ninguna base”.
` En este caso compruebe si la estación
base está correctamente ajustada y si
están registrados un máximo de tres
terminales portátiles.
` Repita el registro.
Si el registro ha tenido éxito, en la pantalla
aparecen el “terminal portátil” y su
número.
` Pulse la tecla MENÚ.
En la pantalla aparece “Buscar base”.
` Pulse la tecla PAGING de la estación
base y manténgala pulsada.
20

Eliminar terminales portátiles
` Pulse la tecla MENÚ.
` Introduzca la combinación de teclas
“* * # * # #“ .
En pantalla aparece “Registr./elimin. TP”.
` Pulse la tecla MENÚ.
` Para eliminar un terminal portátil,
seleccione la entrada “Eliminar TP”.
` Pulse la tecla MENÚ.
` Introduzca el PIN del aparato.
` Pulse la tecla MENÚ.
En la pantalla aparece una lista de todos
los terminales portátiles registrados. El
terminal portátil con el que se realiza la
eliminación está marcado con una flechita.
` Seleccione la entrada de aquel terminal
portátil que desea eliminar.
` Pulse la tecla MENÚ.
En pantalla aparece “¿Eliminar TP?”.
` Para eliminar el terminal portátil, pulse
la tecla MENÚ.
En pantalla aparece “Memorizado”.
` Si no desea eliminar el terminal portátil,
pulse la tecla CANCELAR.
Activar o desactivar el
contestador automático
El contestador automático está activado
una vez conectada la estación base.
` Para desactivar el contestador
automático, pulse la tecla “
estación base.
Se oirá un mensaje para la confirmación.
En la pantalla de la estación base aparece
“– –“ .
` Para activar el contestador automático,
pulse la tecla “
Se oirá un mensaje para la confirmación.
En la pantalla de la estación base aparece
el número de los mensajes grabados.
Más información acerca del
L
contestador automático se
encuentra en el capítulo Activar el
contestador automático, a partir de
la página 30.
“ de la estación base.
“ de la
ES
EN
DE
DE
21

Efectuar llamadas
Efectuar llamadas
Aceptar llamadas
` Para aceptar una llamada entrante,
pulse la tecla DESCOLGAR o
` pulse la tecla ALTAVOZ o
` retire el terminal portátil del cargador.
En la pantalla aparece el símbolo de
conferencia “§“.
Finalizar la conferencia
` Para finalizar una conferencia pulse la
tecla COLGAR o
` pulse la tecla ALTAVOZ o
` coloque el terminal portátil en el
cargador.
El símbolo de conferencia ha
desaparecido.
Efectuar una llamada externa
` Introduzca el número deseado con las
teclas numéricas.
` Pulse la tecla DESCOLGAR o
` pulse la tecla ALTAVOZ.
Se efectúa la conexión con el número
marcado.
También se puede proceder en orden
inverso:
` Pulse la tecla DESCOLGAR o
` pulse la tecla ALTAVOZ.
` Introduzca el número deseado con las
teclas numéricas.
Efectuar una llamada interna
` Pulse la tecla MENÚ.
` Seleccione el menú “Llamada interna”.
` Pulse la tecla MENÚ.
En la pantalla aparecen un cursor
parpadeando y “Número”.
` Introduzca el número interno del
terminal portátil deseado con las teclas
numéricas.
Se efectúa la conexión con el terminal
portátil marcado.
Las llamadas internas no son
L
transmitidas a través de su
operador de red y son gratuitas.
22

Ajustar el volumen
Durante una conferencia se puede ajustar
el volumen del auricular o del altavoz.
Puede ajustar el volumen en cinco
niveles.
` Durante la conferencia pulse la tecla
NAVEGACIÓN tantas veces hasta que
quede ajustado el volumen deseado.
` Pulse la tecla MENÚ.
` Siga con la conferencia.
Silenciar el teléfono
Si durante una conferencia desea
desconectar el micrófono del terminal
portátil, siga los siguientes pasos:
` Pulse la tecla CANCELAR durante la
conferencia.
En la pantalla aparece el símbolo de
"Silencio". Ahora su interlocutor no oye lo
que Usted dice.
` Para volver a conectar el micrófono,
vuelva a pulsar la tecla CANCELAR.
` Siga con la conferencia.
Utilizar la rellamada
Marcar el número de teléfono con
rellamada
Con la rellamada se puede volver a
marcar los últimos 20 números de
teléfono.
` Pulse la tecla DESCOLGAR.
Aparece en pantalla el último número
marcado.
` Para marcar otro número de teléfono
pulse la tecla NAVEGACIÓN hasta que
el símbolo “f“ se encuentre delante de
la entrada deseada.
` Pulse la tecla DESCOLGAR.
Se efectúa la conexión con el número
marcado.
Borrar el número de teléfono de la lista
de rellamada
` Pulse la tecla DESCOLGAR.
Aparece en pantalla el último número
marcado.
` Para marcar otro número de teléfono
pulse la tecla NAVEGACIÓN hasta que
el símbolo “f“ se encuentre delante de
la entrada deseada.
` Pulse la tecla MENÚ.
` Seleccione el menú “BORRAR“.
` Pulse la tecla MENÚ.
En pantalla aparece “¿Borrar?”.
ES
EN
DE
DE
23

Efectuar llamadas
` Para borrar el número de teléfono pulse
la tecla MENÚ.
En pantalla aparece “Borrado”.
` Si no desea borrar el número de
teléfono, pulse la tecla CANCELAR.
Borrar la lista de rellamada
Para borrar todas las entradas de la lista
de rellamada al mismo tiempo, proceda
como sigue:
` Pulse la tecla DESCOLGAR.
` Pulse la tecla MENÚ.
` Seleccione el menú “Borrar todo“.
` Pulse la tecla MENÚ.
En pantalla aparece “¿Borrar?”.
` Para borrar todos los números de
teléfono pulse la tecla MENÚ.
En pantalla aparece “Borrado”.
` Si no desea borrar los números de
teléfono, pulse la tecla CANCELAR.
Utilizar la memoria de números
de teléfono
En la agenda se pueden guardar hasta 50
números de teléfono frecuentemente
utilizados.
El almacenaje de los números de
L
teléfono se indica en el apartado
Editar la memoria de números de
teléfono a partir de la página 27.
Para marcar un número de teléfono
memorizado proceda de la siguiente
forma:
` Pulse la tecla NAVEGACIÓN.
Aparecerá la primera entrada de la
memoria de los números de teléfono.
` Pulse la tecla NAVEGACIÓN hasta que
el símbolo “f“ se encuentre delante de
la entrada deseada.
También se puede introducir la
L
primera cifra de la entrada deseada
mediante las teclas numéricas.
Se puede agregar el número de teléfono
seleccionado. Por ejemplo, se puede usar
un “prefijo de ahorro” económico.
Proceda de la siguiente manera:
` Pulse la tecla MENÚ.
` Seleccione el menú “Seleccionar“.
` Pulse la tecla MENÚ.
` Edite el número de teléfono como
desea.Para marcar el número de
teléfono pulse la tecla DESCOLGAR o
` pulse la tecla ALTAVOZ.
Se efectúa la conexión con el número
marcado.
24

Utilizar la lista de llamadas
En la lista de llamadas se memorizan las
20 últimas llamadas entrantes no
contestadas.
Solamente se puede utilizar esta
L
función si se ha solicitado la
identificación de llamadas entrantes
(CLIP) a su operador de red.
Se le indicarán las llamadas de la
siguiente manera:
• Si en la lista de llamadas hay llamadas
nuevas, en la pantalla aparecerá “Lista
de llamadas”.
• Si el número entrante ha sido
bloqueado, aparecerá “Anónimo”.
• Si el número de teléfono no está
disponible por otras razones, aparecerá
“Llamada”.
Marcar un número de la lista de
llamadas
` Si en la pantalla aparece “Lista de
llamadas” pulse la tecla NAVEGACIÓN.
Para utilizar un número de la lista de
llamadas, proceda de la siguiente manera:
` Pulse la tecla MENÚ.
` Pulse la tecla NAVEGACIÓN hasta que
el símbolo “f“ se encuentre delante de
la entrada “Lista de llamadas”.
` Pulse la tecla MENÚ.
Aparecerá el número de teléfono de la
última llamada entrante. Al mismo tiempo
aparecen la fecha y la hora de la llamada.
Si alguien ha intentado llamarle
L
varias veces, solamente aparecen
las indicaciones de la última
llamada.
` Para marcar otro número de teléfono
pulse la tecla NAVEGACIÓN hasta que
el símbolo “f“ se encuentre delante de
la entrada deseada.
Si lo desea se puede agregar este
número de teléfono de la siguiente
manera:
` Pulse la tecla MENÚ.
` Seleccione el menú “Seleccionar“.
` Pulse la tecla MENÚ.
` Añada el número de teléfono.
` Para marcar el número de teléfono
añadido pulse la tecla DESCOLGAR.
Memorizar la entrada en la memoria de
números de teléfono
` Pulse la tecla MENÚ.
` Pulse la tecla NAVEGACIÓN hasta que
el símbolo “f“ se encuentre delante de
la entrada “Lista de llamadas”.
` Pulse la tecla MENÚ.
Aparece en pantalla el último número
marcado.
` Para marcar otro número de teléfono
pulse la tecla NAVEGACIÓN hasta que
el símbolo “f“ se encuentre delante de
la entrada deseada.
` Pulse la tecla MENÚ.
` Seleccione el submenú “Memorizar nº”.
` Pulse la tecla MENÚ.
` Introduzca el nombre deseado
mediante las teclas numéricas.
ES
EN
DE
DE
25

Efectuar llamadas
La introducción de cifras se indica
L
en el apartado Escribir SMS a partir
de la página 36.
` Pulse la tecla MENÚ.
Ahora el número de teléfono está
memorizado bajo el nombre introducido.
Borrar una entrada de la lista de
llamadas
` Pulse la tecla MENÚ.
` Pulse la tecla NAVEGACIÓN hasta que
el símbolo “f“ se encuentre delante de
la entrada “Lista de llamadas”.
` Pulse la tecla MENÚ.
Aparece en pantalla el último número
marcado.
` Para marcar otro número de teléfono
pulse la tecla NAVEGACIÓN hasta que
el símbolo “f“ se encuentre delante de
la entrada deseada.
` Pulse la tecla MENÚ.
` Seleccione el menú “BORRAR“.
` Pulse la tecla MENÚ.
En pantalla aparece “¿Borrar?”.
` Para borrar el número de teléfono pulse
la tecla MENÚ.
En pantalla aparece “Borrado”.
` Si no desea borrar el número de
teléfono, pulse la tecla CANCELAR.
` Pulse la tecla NAVEGACIÓN tantas
veces hasta que el símbolo “f“ se
encuentre delante de la entrada “Lista
de llamadas”.
` Pulse la tecla MENÚ.
Aparece en pantalla el último número
marcado.
` Pulse la tecla MENÚ.
` Seleccione el submenú “Borrar todo“.
` Pulse la tecla MENÚ.
En pantalla aparece “¿Borrar?”.
` Para borrar todas las entradas pulse la
tecla MENÚ.
En pantalla aparece “Borrado”.
` Si no desea borrar las entradas, pulse
la tecla CANCELAR.
Borrar todas las entradas
` Pulse la tecla MENÚ.
26

Editar la memoria de
números de teléfono
La memoria de los números de teléfono
es su “listín telefónico” personal. En cada
terminal portátil se pueden memorizar un
máximo de 50 números y nombres en la
memoria de números de teléfono.
Un solo número puede tener un
L
máximo de veinte cifras, incl. signos
especiales y pausas de marcación.
Un nombre puede tener un máximo
de doce cifras, incl. los espacios.
La introducción de cifras se indica
en el apartado Escribir SMS a partir
de la página 36.
Añadir o modificar entradas
` Pulse la tecla NAVEGACIÓN.
Aparecerá la primera entrada de la
memoria de los números de teléfono.
` Pulse la tecla MENÚ.
` Seleccione el menú “Nuevo”.
` Pulse la tecla MENÚ.
` Introduzca el número deseado con las
teclas numéricas.
También se pueden introducir los
L
signos especiales * y # como
pausas de marcación:
` Para introducir una pausa de
marcación, pulse la tecla "0“ y
manténgala pulsada durante
aprox. 3 segundos.
En la pantalla aparece en lugar de
un número la letra “P”.
` Pulse la tecla MENÚ.
` Introduzca el nombre deseado con las
teclas numéricas, como se describe en
el apartado Escribir SMS a partir de la
página 36.
` Pulse la tecla MENÚ.
En pantalla aparece “Memorizado”.
` Para introducir más números de
teléfono pulse la tecla MENÚ.
` Seleccione el menú “Nuevo”.
` Introduzca el número de teléfono y el
nombre como se indica arriba.
ES
EN
DE
DE
27

Editar la memoria de números de teléfono
Seleccionar una entrada de la
lista de rellamada
` Pulse la tecla DESCOLGAR.
Aparece en pantalla el último número
marcado.
` Para marcar otro número de teléfono
pulse la tecla NAVEGACIÓN hasta que
el símbolo “f“ se encuentre delante de
la entrada deseada.
` Pulse la tecla MENÚ.
` Seleccione el menú “Memorizar nº”.
` Pulse la tecla MENÚ.
` Introduzca el nombre deseado
mediante las teclas numéricas.
La introducción de signos se indica
L
en el apartado Escribir SMS a partir
de la página 36.
` Pulse la tecla MENÚ.
Ahora el número de teléfono está
memorizado bajo el nombre introducido.
Borrar entradas
Para borrar una única entrada de la
memoria de números de teléfono, proceda
como sigue:
` Pulse la tecla DESCOLGAR.
Aparece en pantalla el último número
marcado.
` Para marcar otro número de teléfono
pulse la tecla NAVEGACIÓN hasta que
el símbolo “f“ se encuentre delante de
la entrada deseada.
` Pulse la tecla MENÚ.
` Seleccione el menú “BORRAR“.
` Pulse la tecla MENÚ.
En pantalla aparece “¿Borrar?”.
` Para borrar el número de teléfono pulse
la tecla MENÚ.
En pantalla aparece “Borrado”.
` Si no desea borrar el número de
teléfono, pulse la tecla CANCELAR.
Borrar la memoria de números
de teléfono
Para borrar todas las entradas de la
memoria de números de teléfono al
mismo tiempo proceda como sigue:
` Pulse la tecla DESCOLGAR.
` Pulse la tecla MENÚ.
` Seleccione el menú “Borrar todo“.
` Pulse la tecla MENÚ.
En pantalla aparece “¿Borrar?”.
` Para borrar todas las entradas pulse la
tecla MENÚ.
En pantalla aparece “Borrado”.
` Si no desea borrar las entradas, pulse
la tecla CANCELAR.
Números de teléfono VIP
Se pueden memorizar hasta diez números
de teléfono en la estación base y acceder
a ellos mediante las teclas VIP de todos
los terminales portátiles.
Marcar con la tecla VIP
` Pulse la tecla VIP.
28

Aparecerá el primer número memorizado.
` Para marcar otro número de teléfono
pulse la tecla NAVEGACIÓN hasta que
el símbolo “f“ se encuentre delante de
la entrada deseada.
` Pulse la tecla DESCOLGAR.
Se efectúa la conexión.
Introducir o modificar los números de
teléfono VIP
Los números de teléfono pueden tener
hasta 20 dígitos. Los nombres pueden
tener hasta 13 dígitos. Introduzca los
números VIP de la siguiente manera:
` Pulse la tecla VIP.
Aparecerá el primer número memorizado.
Si no está memorizado ningún número de
teléfono, aparecerá “Vacío”.
` Para marcar otro número de teléfono
pulse la tecla NAVEGACIÓN hasta que
el símbolo “f“ se encuentre delante de
la entrada deseada.
` Pulse la tecla MENÚ.
` Seleccione el menú “Modificar“.
` Pulse la tecla MENÚ.
` Introduzca el número deseado con las
teclas numéricas.
` Pulse la tecla MENÚ.
` Introduzca el nombre deseado
mediante las teclas numéricas.
La introducción de cifras se indica
L
en el apartado Escribir SMS a partir
de la página 36.
Ahora el número de teléfono está
memorizado bajo el nombre introducido.
Borrar números de teléfono VIP
memorizados
` Pulse la tecla VIP.
Aparecerá el primer número memorizado.
` Para seleccionar otro número de
teléfono pulse la tecla NAVEGACIÓN
hasta que el símbolo “f“ se encuentre
delante de la entrada deseada.
` Pulse la tecla MENÚ.
` Seleccione el menú “BORRAR“.
` Pulse la tecla MENÚ.
En pantalla aparece “¿Borrar?”.
` Para borrar el número de teléfono pulse
la tecla MENÚ.
En pantalla aparece “Borrado”.
` Si no desea borrar el número de
teléfono, pulse la tecla CANCELAR.
ES
EN
DE
DE
` Pulse la tecla MENÚ.
29

Activar el contestador automático
Activar el contestador
automático
Con el contestador automático se pueden
grabar hasta 15 minutos de mensajes. La
duración máxima de cada mensaje será
de un minuto.
El contestador automático se
L
activará automáticamente una vez
conectada la estación base.
Escuchar mensajes
Si en el contestador automático se
encuentran grabados mensajes, la
cantidad de los mensajes aparece en la
pantalla. Si se han grabado mensajes
nuevos, parpadea el símbolo “
pantalla de los terminales portátiles. Se
ilumina el LED “Mensaje nuevo” de la
estación base.
` Para que el mensaje se reproduzca,
pulse la tecla “f“ de la estación
base.
` Para bajar el volumen de la
reproducción, pulse la tecla “–“.
` Para subir el volumen de la
reproducción, pulse la tecla “+“.
` Para que se reproduzca el mensaje
siguiente pulse la tecla “f|“.
` Para que se reproduzca el mensaje
anterior pulse la tecla “|e“.
` Para borrar un mensaje pulse la tecla
“⊗“ .
“ en la
También se puede escuchar el
contestador automático desde el terminal
portátil. Proceda de la siguiente manera:
` Pulse la tecla MENÚ.
` Seleccione el menú “Contestador
autom.“
` Pulse la tecla MENÚ.
` Seleccione el submenú “Escuchar
mensaje”.
` Pulse la tecla MENÚ.
Se enciende el altavoz del terminal
portátil. Usted escuchará un mensaje
indicando la cantidad de los nuevos
mensajes.
Los mensajes se reproducirán
consecutivamente.
En la pantalla aparece el número del
mensaje actual, así como la fecha y la
hora de la llamada correspondiente.
` Para iniciar o finalizar la reproducción
del mensaje, pulse la tecla numérica 2.
` Para que el mensaje vuelva a
reproducirse, pulse la tecla numérica 4
durante la reproducción.
` Para que se reproduzca el mensaje
anterior, pulse la tecla numérica 4
durante la reproducción de la hora y
fecha.
` Para que se reproduzca el siguiente
mensaje pulse la tecla numérica 6.
` Para borrar un mensaje pulse la tecla
numérica 5 durante su reproducción.
Después de haber pulsado una tecla
numérica se oirá una confirmación.
30

Modificar los ajustes del
contestador automático
Se pueden modificar todos los ajustes del
contestador automático a través del menú
de los terminales portátiles.
` Pulse la tecla MENÚ.
` Seleccione el menú “Contestador
autom.“
` Pulse la tecla MENÚ.
` Seleccione el submenú “Ajustar TP”.
Se oirá un mensaje.
` Para modificar los ajustes del
contestador automático, siga las
instrucciones de este mensaje.
Se pueden modificar los siguientes
ajustes del contestador automático:
• conectar y desconectar la grabación
• escuchar el mensaje saliente actual
• modificar el mensaje saliente
• activar o desactivar el contestador
automático
• ajustar el número de señales de
llamada antes de la grabación.
Desconectar y conectar la grabación
Se puede emplear el contestador
automático de dos maneras:
• Con grabación, la persona que llama
puede dejar un mensaje después del
texto del mensaje saliente.
• Sin grabación, el contestador
automático se desconecta después del
mensaje saliente. Así, durante una
ausencia prolongada se podrá dejar un
mensaje para las personas que llaman.
` Para modificar el ajuste actual, pulse la
tecla numérica 7.
Se oirá un mensaje para la confirmación.
Escuchar el mensaje saliente
` Para que se reproduzca el mensaje
saliente actual pulse la tecla numérica
8.
Modificar el mensaje saliente
Se puede grabar un mensaje personal de
uno a dos minutos de duración.
` Para grabar un mensaje saliente pulse
la tecla numérica 9.
Ahora se puede grabar un mensaje
personal de uno a dos minutos de
duración.
` Grabe el mensaje saliente deseado
hablando al micrófono del terminal
portátil.
` Para borrar el mensaje saliente actual y
conectar el mensaje saliente
automático, pulse las teclas numéricas
9 y #.
ES
EN
DE
DE
31

Activar el contestador automático
Activar o desactivar el contestador
automático
` Para activar o desactivar el contestador
automático pulse la tecla numérica 0.
Determinar el número de señales de
llamada
Puede determinar el número de señales
de llamada tras el cual se conecta el
contestador. Dispone de las siguientes
opciones:
• 2 señales de llamada
• 4 señales de llamada
• 6 señales de llamada
• 8 señales de llamada
• modo de ahorro.
Para ahorrar gastos de teléfono en las
consultas a distancia, se puede conectar
el contestador automático en el modo de
ahorro. En este caso el contestador
automático se activa después de dos
señales de llamada si hay mensajes
nuevos. Si no hay mensajes nuevos, el
contestar automático se activará después
de seis señales de llamada.
Así podrá ver si hay nuevos mensajes sin
efectuar una conexión con gastos de
llamada.
Escuchar también
Se puede escuchar el mensaje durante su
grabación. Así podrá decidir si desea
aceptar la llamada o si sigue la grabación.
` Pulse la tecla MENÚ.
En pantalla aparece “¿Escuchar?”.
` Para escuchar el mensaje, pulse la
tecla MENÚ.
Se puede escuchar el mensaje desde el
terminal portátil. No se acepta la llamada y
la grabación sigue.
` Para escuchar el mensaje a través del
altavoz, pulse la tecla ALTAVOZ.
` Para finalizar la escucha, pulse la tecla
COLGAR o ALTAVOZ.
Aceptar la llamada desde el
contestador automático
` Para aceptar una llamada durante la
grabación del mensaje entrante, pulse
la tecla DESCOLGAR.
` Para cambiar la opción, pulse la tecla #
varias veces hasta que se oiga la
opción deseada.
32

Borrar mensajes
` Pulse la tecla MENÚ.
` Seleccione el menú “Contestador
autom.“
` Pulse la tecla MENÚ.
` Seleccione el submenú “Borrar
mensajes antiguos”.
` Pulse la tecla MENÚ.
En pantalla aparece “¿Borrar todos?”.
` Para borrar los mensajes entrantes
pulse la tecla MENÚ.
En pantalla aparece “Borrado”.
` Si no desea borrar los mensajes
entrantes, pulse la tecla CANCELAR.
Utilización del control a
distancia
Se puede controlar el contestador
automático mediante el control a distancia
desde cualquier otro teléfono. Para ello, el
teléfono desde el que desea controlar el
contestador automático debe poder enviar
impulsos de marcación por tonos.
Introducir PIN
Para activar la consulta a distancia del
contestador automático se deberá
modificar el PIN de consulta a distancia.
De fábrica el PIN de consulta a
L
distancia es “0000”. Si restablece la
estación base a su estado de
fábrica, se volverá a ajustar el PIN
de consulta a distancia a “0000”.
Proceda de la siguiente manera:
` Pulse la tecla MENÚ.
` Seleccione el menú “Contestador
autom.“
` Pulse la tecla MENÚ.
` Seleccione el submenú “CA-PIN
nuevo”.
` Pulse la tecla MENÚ.
` Introduzca el PIN actual de consulta a
distancia.
` Pulse la tecla MENÚ.
` Introduzca el PIN nuevo de consulta a
distancia con las teclas numéricas.
` Pulse la tecla MENÚ.
` Vuelva a introducir el nuevo PIN de
consulta a distancia.
` Pulse la tecla MENÚ.
El nuevo PIN de consulta a distancia está
memorizado.
ES
EN
DE
DE
33

Activar el contestador automático
Consultar el contestador automático
` Llame a su conexión desde una
conexión telefónica con marcación por
tonos.
Su contestador automático se activará
después del número ajustado de señales
de llamada.
En el modo de ahorro el contestador
L
automático se activa después de
dos señales de llamada si hay
mensajes nuevos. Si no hay
mensajes nuevos, el contestador
automático se activará después de
seis señales de llamada. Así podrá
ver si hay nuevos mensajes sin
efectuar una conexión con gastos
de llamada.
Pulse la tecla ∗ durante el mensaje
saliente.
Si el contestador automático está
desactivado, se activará después de diez
tonos de llamada. Escuchará la
indicación de introducir su PIN de consulta
a distancia.
` Introduzca el PIN de consulta a
distancia con las teclas numéricas.
Después de dos introducciones
L
erróneas del PIN de consulta a
distancia, se interrumpirá la
conexión automáticamente.
Ahora podrá escuchar los mensajes
entrantes grabados y modificar los ajustes
del contestador automático. Oirá un
mensaje acerca de las posibles funciones.
Escuchar mensajes
` Para que se reproduzcan todos los
mensajes entrantes pulse la tecla
numérica 1.
` Para que se reproduzcan todos los
mensajes entrantes nuevos, pulse la
tecla numérica 3.
` Para que el mensaje actual vuelva a
reproducirse, pulse la tecla numérica 4
durante la reproducción.
` Para que se reproduzca el mensaje
anterior, pulse la tecla numérica 4
durante la reproducción de la hora y
fecha.
` Para borrar el mensaje actual pulse la
tecla numérica 5.
Modificar los ajustes
` Para activar o desactivar la grabación
de mensajes, pulse la tecla numérica 7.
` Para escuchar el mensaje saliente
actual pulse la tecla numérica 8.
` Para grabar un mensaje saliente nuevo,
pulse la tecla numérica 9.
` Para activar o desactivar el contestador
automático pulse la tecla numérica 0.
` Para que se repita la indicación de
todas las funciones, pulse la tecla
numérica 0.
Se oirá un mensaje para la confirmación.
34

Enviar y recibir SMS
Requisitos
Para poder enviar y recibir los SMS se
deben cumplir los siguientes requisitos:
• El número de teléfono de un centro
SMS debe estar memorizado como
número especial “SMS-Center”.
• Su número de teléfono deberá ser
registrado en el Servicio-SMS
correspondiente.
• Para su número de teléfono, la
indicación del número de teléfono
(CLIP) y la identificación del número de
teléfono deben estar contratados con
su compañía telefónica.
` Consulte con su compañía telefónica el
proceso para registrarse en su SMSCenter.
Seleccionar el SMS-Center
Para poder enviar o recibir SMS deberá
estar registrado por lo menos con un
Centro-SMS.
Se pueden almacenar los números de
teléfono de cuatro centros de SMS. El
número del primer centro de SMS se
marcará automáticamente para el envío
de SMS.
De fábrica, como primer centro de SMS
está ajustado el centro de SMS de la
compañia de teléfono alemana.
Se puede elegir el centro de SMS para el
siguiente SMS que desea enviar. Una vez
enviado este SMS se volverá a utilizar el
primer centro de SMS.
Si desea utilizar permanentemente otro
centro de SMS, deberá memorizar este
número como “SMS-Center 1”.
Para marcar un centro de SMS proceda
de la siguiente forma:
` Pulse la tecla MENÚ.
` Seleccione el menú “SMS“.
` Pulse la tecla MENÚ.
` Seleccione el submenú “Ajustes”.
` Pulse la tecla MENÚ.
` Seleccione la entrada “SMS-Center”.
` Pulse la tecla MENÚ.
` Seleccione el centro de SMS deseado.
` Pulse la tecla MENÚ.
Aparecerá el número de teléfono
memorizado para este centro de SMS.
` Para modificar el número de teléfono
memorizado, introduzca el número
deseado con las teclas numéricas.
Si el teléfono está conectado a una
L
centralita telefónica, deberá
introducir la característica de la
central antes del prefijo.
` Pulse la tecla MENÚ.
El nuevo número del centro de SMS está
memorizado.
ES
EN
DE
DE
35

Enviar y recibir SMS
Escribir SMS
Introducir texto
Un SMS puede tener hasta 612
caracteres, incluidos los espacios.
` Pulse la tecla MENÚ.
` Seleccione el menú “SMS“.
` Pulse la tecla MENÚ.
Introduzca el texto deseado con las teclas
numéricas de la siguiente manera:
` Para cambiar entre letras mayúsculas y
minúsculas, pulse la tecla ∗.
` Para introducir un carácter, pulse la
tecla numérica correspondiente hasta
que el carácter aparezca en la pantalla.
En la siguiente tabla encontrará un
resumen de los caracteres disponibles.
Tecla Letra
mayúscula
1 Espacio, 1, €, £, $, %, &, <, >
2 A, B, C, 2, Ä, ? a, b, c, 2, ä, ?
3 D, E, F, 3 d, e, f, 3
4 G, H, I, 4, Ğ, İ g, h, I, 4, ğ, ı
5 J, K, L, 5 j, k, l, 5
6 M, N, O, 6, Ö m, n, o, 6, ö
7 P, Q, R, S, 7, Ş p, q, r, s, 7, ß
8 T, U, V, 8, Ü t, u, v, 8, ü
9 W, X, Y, Z, 9 w, x, y, z, 9
0 . , ? ! 0 + – : ' "
# #, *, @, \, /, _, (, ), =, §
` Pulse la tecla MENÚ.
En pantalla aparece “Número”.
Letra
minúscula
36
Introducir el número de teléfono
` Introduzca el número de teléfono del
destinatario con las teclas numéricas.
` Pulse la tecla MENÚ.
En pantalla aparece “Listín telefónico”.
` Para memorizar un SMS, seleccione la
entrada “Memorizar”.
` Para enviar un SMS, seleccione la
entrada “Enviar”.
` Pulse la tecla MENÚ.
Se ejecuta la función seleccionada.

Utilizar números de teléfono
memorizados
` Pulse la tecla MENÚ.
En pantalla aparece “Listín telefónico”.
` Seleccione la memoria en la que se ha
memorizado el número de teléfono
deseado.
` Pulse la tecla MENÚ.
En pantalla aparece “Número”.
` Para memorizar un SMS, seleccione la
entrada “Memorizar”.
` Para enviar un SMS, seleccione la
entrada “Enviar”.
` Pulse la tecla MENÚ.
Se ejecuta la función seleccionada.
Recibir y leer SMS
Leer SMS recibidos
Si recibe un SMS, se ilumina el LED “SMS
nuevo” de la estación base. En pantalla
aparece “SMS nuevo”. Adicionalmente
aparece el símbolo “
` Pulse la tecla MENÚ.
` Seleccione el menú “SMS“.
` Pulse la tecla MENÚ.
Aparece el último SMS recibido. Se puede
ver el número del remitente así como la
fecha y la hora de la entrada.
` Para mostrar otro SMS pulse la tecla
NAVEGACIÓN tantas veces hasta que
el símbolo “f“ se encuentre delante de
la entrada deseada.
` Pulse la tecla MENÚ.
` Para leer el SMS, seleccione mediante
la tecla NAVEGACIÓN la opción
“Contestar”.
Si se ha leído un SMS, éste se
L
desplazará a la lista de entrada de
SMS.
` Si desea volver a leer este SMS,
proceda como se indica en el
apartado Leer SMS de la lista de
entrada SMS a partir de la página
38.
` Para contestar este SMS, seleccione
mediante la tecla NAVEGACIÓN la
opción “Leer”.
` Para borrar el SMS, seleccione
mediante la tecla NAVEGACIÓN la
opción “Borrar”.
“ .
ES
EN
DE
DE
37

Enviar y recibir SMS
` Para llamar al remitente, seleccione
mediante la tecla NAVEGACIÓN la
opción “Llamar”.
` Para borrar todos los SMS entrantes,
seleccione mediante la tecla
NAVEGACIÓN la opción “Borrar todos”.
` Para confirmar su selección pulse la
tecla MENÚ.
Leer los SMS de la lista de entradas de
SMS
` Pulse la tecla MENÚ.
` Seleccione el menú “SMS“.
` Pulse la tecla MENÚ.
Aparece el último SMS recibido. Se puede
ver el número del remitente así como la
fecha y la hora de la entrada.
` Seleccione con la tecla NAVEGACIÓN
el submenú “Lista de entrada”.
` Seleccione el SMS como se indica en el
apartado Leer SMS recibido a partir de
la página 37.
Guardar SMS
` Escribe un SMS como se indica en el
apartado Escribir SMS a partir de la
página 36.
` Seleccione el submenú “Guardar”.
` Pulse la tecla MENÚ.
Se guarda el SMS.
Enviar SMS guardados
` Pulse la tecla MENÚ.
` Seleccione el menú “SMS“.
` Pulse la tecla MENÚ.
` Seleccione con la tecla NAVEGACIÓN
el submenú “Lista de salida”.
` Pulse la tecla MENÚ.
Aparece el último SMS guardado.
` Seleccione con la tecla NAVEGACIÓN
el SMS deseado.
` Pulse la tecla MENÚ.
` Para enviar el SMS, seleccione
mediante la tecla NAVEGACIÓN la
opción “Enviar”.
` Pulse la tecla MENÚ.
38

Leer y modificar SMS guardados
` Pulse la tecla MENÚ.
` Seleccione el menú “SMS“.
` Pulse la tecla MENÚ.
` Seleccione con la tecla NAVEGACIÓN
el submenú “Lista de salida”.
` Pulse la tecla MENÚ.
Aparece el último SMS guardado.
` Seleccione con la tecla NAVEGACIÓN
el SMS deseado.
` Pulse la tecla MENÚ.
` Para leer el SMS, seleccione mediante
la tecla NAVEGACIÓN la opción “Leer”.
` Para modificar el SMS, seleccione
mediante la tecla NAVEGACIÓN la
opción “Editar”.
` Para borrar el SMS, seleccione
mediante la tecla NAVEGACIÓN la
opción “Borrar”.
` Para borrar todos los SMS guardados
como salientes, seleccione mediante la
tecla NAVEGACIÓN la opción “Borrar
todos”.
` Para confirmar su selección pulse la
tecla MENÚ.
Borrar SMS guardados
` Pulse la tecla MENÚ.
` Seleccione el menú “SMS“.
` Pulse la tecla MENÚ.
` Seleccione con la tecla NAVEGACIÓN
el submenú “Lista de salida”.
` Pulse la tecla MENÚ.
Aparece el último SMS guardado.
` Seleccione con la tecla NAVEGACIÓN
el SMS deseado.
` Pulse la tecla MENÚ.
` Para borrar el SMS, seleccione
mediante la tecla NAVEGACIÓN la
opción “Borrar”.
` Para borrar todos los SMS guardados
como salientes, seleccione mediante la
tecla NAVEGACIÓN la opción “Borrar
todos”.
` Para confirmar su selección pulse la
tecla MENÚ.
ES
EN
DE
DE
39

Funciones especiales
Funciones especiales
Activar o desactivar el bloqueo
del teclado
` Para activar el bloqueo del teclado
pulse la tecla “#” y manténgala pulsada
durante tres segundos.
Escuchará una señal acústica. En la
pantalla aparece el símbolo de "bloqueo
del teclado". Ahora las teclas del terminal
portátil están bloqueadas. Puede recibir
llamadas pero no puede efectuarlas.
` Para desactivar el bloqueo del teclado
pulse la tecla “#” y manténgala pulsada
durante tres segundos.
Escuchará una señal acústica. El símbolo
de “bloqueo del teclado” desaparece.
Llamar a los terminales
portátiles ("Paging")
Con esta función activará un timbre en
todos los terminales portátiles. Así, por
ejemplo, puede encontrar un terminal
portátil que no sabe dónde está.
` Pulse la tecla “Paging” de la estación
base.
` Para finalizar el timbre, pulse la tecla
"Colgar“ en el terminal portátil o
` pulse nuevamente la tecla “Paging”.
Usar rellamada
Con esta función se efectuará
automáticamente una comunicación con
una conexión cuando ésta ya no esté
comunicando.
Debe haber solicitado esta función a
L
su compañía telefónica.
` Seleccione el número de teléfono
deseado.
` Si oye la señal de comunicado, espere
hasta que en la pantalla aparezca la
duración de la comunicación.
` Pulse la tecla MENÚ.
` Seleccione el submenú “Rellamada
com.”.
Se oirá un mensaje para la confirmación.
` Pulse la tecla COLGAR.
Se efectuará la comunicación cuando la
conexión a la que se desea llamar no esté
comunicando.
Esta función solamente es posible
L
durante aprox. 45 minutos. A
continuación deberá volver a marcar
el número.
` Para finalizar esta función antes de
tiempo, pulse la secuencia de teclas
„#37#“.
` Pulse la tecla DESCOLGAR.
Se oirá un mensaje para la confirmación.
40

Usar el desvío de llamada
Con esta función se puede desviar las
llamadas entrantes a otras conexiones.
Debe haber solicitado esta función a
L
su compañía telefónica.
Puede elegir entre tres opciones:
• Se desvían todas las llamadas
inmediatamente.
• Se desvían las llamadas si la conexión
propia está comunicando.
• Se desvían las llamadas si no se ha
contestado después de aprox. 20
segundos.
La duración de tiempo hasta el
L
desvío depende del ajuste de su
compañía telefónica o su centralita.
Activar el desvío de llamadas
` Para desviar todas las llamadas, pulse
las teclas “∗ 2 1 ∗“ consecutivamente.
` Para desviar las llamadas solamente
cuando Usted está comunicando, pulse
las teclas “∗ 6 7 ∗“ consecutivamente.
` Para desviar las llamadas si no se
contesta, pulse las teclas “∗ 6 1 ∗“
consecutivamente.
` A continuación introduzca el número de
teléfono al cual desea desviar las
llamadas.
` Pulse la tecla #.
` Pulse la tecla DESCOLGAR.
Se oirá un mensaje para la confirmación.
` Pulse la tecla COLGAR.
Desactivar el desvío de llamadas
` Para desactivar el desvío de todas las
llamadas, pulse las teclas “∗ 2 1 ∗“
consecutivamente.
` Para desactivar el desvío de las
llamadas solamente cuando Usted está
comunicando, pulse las teclas “∗ 6 7 ∗“
consecutivamente.
` Para desactivar el desvío de las
llamadas que Usted no contesta, pulse
las teclas “∗ 6 1 ∗“ consecutivamente.
` Pulse la tecla DESCOLGAR.
Se oirá un mensaje para la confirmación.
` Pulse la tecla COLGAR.
ES
EN
DE
DE
41

Funciones especiales
Alternar llamadas
Se puede interrumpir una conferencia,
para llamar a un segundo interlocutor.
Proceda de la siguiente manera:
` Pulse la tecla ALTERNAR LLAMADA
durante la conferencia.
` Marque el número externo deseado o
` marque el número interno (véase
página 40).
` Mantenga la conferencia con el
segundo interlocutor.
Mientras está hablando con el segundo
interlocutor, se mantiene la conexión con
el primero.
` Para finalizar la llamada con el segundo
interlocutor, pulse la tecla COLGAR.
Usar aviso de llamada
Mediante la función “Aviso de llamada” se
oirá un aviso acústico si le llaman durante
una conferencia telefónica. Entonces
puede decidir si desea continuar con la
primera llamada, interrumpirla o finalizarla.
Debe haber solicitado esta función a
L
su compañía telefónica.
Activar o desactivar el aviso de llamada
` Pulse la tecla MENÚ.
` Seleccione el menú “Ajustar BS”.
` Pulse la tecla MENÚ.
` Seleccione el submenú “Aviso de
llamada”.
` Pulse la tecla MENÚ.
` Seleccione la opción deseada.
` Pulse la tecla MENÚ.
Se oirá un mensaje para la confirmación.
La opción seleccionada está marcada con
una flechita.
` Pulse la tecla COLGAR.
Aceptar una segunda llamada durante
una conferencia interna
Si se oye la señal de aviso de llamada
mientras está con una conferencia interna,
proceda como sigue:
` Pulse la tecla COLGAR.
Se interrumpe la llamada interna.
` Para aceptar una llamada externa,
pulse la tecla DESCOLGAR.
Rechazar una segunda llamada
` Para continuar con la conferencia e
ignorar la segunda llamada, pulse
durante la conferencia la tecla MENÚ.
` Seleccione el submenú “Rechazar
llamada”.
` Pulse la tecla MENÚ.
Según el ajuste de su teléfono, se desvía
la segunda llamada a otra conexión o la
persona que llama oirá la señal de
comunicación.
42

Aceptar la segunda llamada
Para finalizar la primera conferencia y
para aceptar la segunda, proceda como
sigue:
` Para finalizar la primera conversación
pulse la tecla DESCOLGAR.
Se oirá el timbre.
` Para aceptar la segunda llamada,
vuelva a pulsar DESCOLGAR.
Intercomunicación
Para aceptar la segunda llamada sin
finalizar la primera conferencia, proceda
como sigue:
` Pulse la tecla MENÚ durante la
conferencia.
` Seleccione el submenú “Aceptar
llamada”.
` Pulse la tecla MENÚ.
Ahora está conectado con la segunda
llamada.
La conferencia con el primer interlocutor
no se finaliza, sino que se mantiene.
Ahora podrá alternar entre los dos
interlocutores.
` Pulse la tecla MENÚ.
` Seleccione el submenú “Alternar
llamadas”.
` Pulse la tecla MENÚ.
Ahora está conectado con el otro
interlocutor.
` Para volver a estar conectado con el
interlocutor anterior, repita estos tres
pasos.
Para estar conectado con los dos
interlocutores (conferencia a tres),
proceda como sigue:
` Pulse la tecla MENÚ.
` Seleccione el submenú “Conferencia”.
` Pulse la tecla MENÚ.
Para finalizar la conferencia entre tres,
proceda de la siguiente forma:
` Pulse la tecla MENÚ.
` Seleccione el submenú “Conferencia
individ.”.
` Pulse la tecla MENÚ.
Ahora puede volver a hablar con los dos
interlocutores por separado.
` Para finalizar la conferencia
completamente, pulse la tecla
COLGAR.
ES
EN
DE
DE
43

Funciones especiales
Pasar una llamada
Con esta función se puede pasar una
llamada a otro terminal portátil de la
misma estación base. Proceda de la
siguiente manera:
` Pulse la tecla MENÚ durante la
conferencia.
` Seleccione el submenú “Llamada
interna”.
` Pulse la tecla MENÚ.
` Introduzca el número del terminal
portátil deseado.
Se llama al terminal portátil.
` Si se acepta su llamada en el otro
terminal portátil, Usted avisará de una
llamada externa.
` Pulse la tecla COLGAR.
La llamada externa está conectada con el
otro terminal portátil.
` Si no se acepta su llamada en el otro
terminal portátil, pulse la tecla
COLGAR.
Ahora vuelve a hablar con la persona de
la llamada externa.
Bloqueo de la identificación de
llamadas
Si ha solicitado la identificación de
llamadas (CLIP) a su compañía telefónica,
se transmite su numero de teléfono a la
conexión a la que se llama. Si no lo
desea, puede desactivar la identificación
del número de teléfono con la función
“Llamada anónima” para la siguiente
llamada.
` Pulse la tecla MENÚ.
` Seleccione el menú “Llamada
anónima”.
` Pulse la tecla MENÚ.
En pantalla aparece “Número”.
` Introduzca el número deseado con las
teclas numéricas.
También se puede utilizar una entrada en
la memoria de números de teléfono, la
lista de llamadas o la lista de rellamadas.
Proceda de la siguiente manera si en la
pantalla aparece “Número”:
` Pulse la tecla MENÚ.
` Seleccione la opción deseada.
` Pulse la tecla MENÚ.
` Seleccione el número deseado.
` Pulse la tecla MENÚ.
Se efectuará la llamada sin la
identificación del número de teléfono. El
interlocutor no ve su número de teléfono.
44

Ajustar la estación
base
Cambiar el PIN del aparato
Con el PIN del aparato se protege su
teléfono contra una acceso no autorizado.
El PIN del aparato garantiza que
solamente se pueden registrar los
terminales portátiles suministrados en su
estación base.
Si desea restablecer los ajustes de la
estación base tendrá que conocer el PIN
del aparato.
De fábrica el PIN del aparato está
L
fijado como «0000».
Para modificar el PIN del aparato, proceda
de la siguiente forma:
` Pulse la tecla MENÚ.
` Seleccione el menú “Ajustar BS”.
` Pulse la tecla MENÚ.
` Seleccione el submenú “Modificar PIN”.
` Pulse la tecla MENÚ.
` Introduzca el PIN con las teclas
numéricas.
` Pulse la tecla MENÚ.
` Introduzca el PIN nuevo con las teclas
numéricas.
En pantalla aparece “repetir PIN”.
` Vuelva a introducir el nuevo PIN.
Si no coinciden las dos introducciones del
PIN nuevo, aparecerá “PIN incorrecto”. El
PIN antiguo quedará memorizado.
Si coinciden las dos introducciones del
PIN nuevo, aparecerá “Memorizado”.
` No olvide el PIN nuevo.
Si se olvida el PIN del aparato ya no
L
se podrá modificar este PIN ni
restablecer los ajustes de la
estación base a su estado original.
Determinar el tipo de marcación
Se puede cambiar el tipo de marcación de
su teléfono entre la marcación por
impulsos o por tonos. Proceda de la
siguiente manera:
` Pulse la tecla MENÚ.
` Seleccione el menú “Ajustar BS”.
` Pulse la tecla MENÚ.
` Seleccione el submenú “Tipo de
marcación”.
` Pulse la tecla MENÚ.
` Seleccione el tipo de marcación
deseado.
La entrada del tipo de marcación activado
está marcada con una flechita.
` Pulse la tecla MENÚ.
ES
EN
DE
DE
45

Ajustar la estación base
Modificar el tiempo de flash
Según la centralita en la que utiliza el
teléfono puede ser necesario ajustar un
tiempo de flash determinado.
Observe las indicaciones del
L
manual de instrucciones de su
centralita.
` Pulse la tecla MENÚ.
` Seleccione el menú “Ajustar BS”.
` Pulse la tecla MENÚ.
` Seleccione el submenú “Tiempo de
flash”.
` Pulse la tecla MENÚ.
Aparecerá una lista de los tiempos de
flash disponibles. La entrada para el
tiempo de flash activado está marcada
con una flechita.
` Seleccione el tiempo de flash deseado.
` Pulse la tecla MENÚ.
Introducir la característica de la
central
Si utiliza el teléfono con una centralita,
antes de efectuar llamadas externas
deberá introducir la característica de la
central.
Observe las indicaciones del
L
manual de instrucciones de su
centralita.
Para guardar la característica de la
central, proceda de la siguiente forma:
` Pulse la tecla MENÚ.
` Seleccione el menú “Ajustar BS”.
` Pulse la tecla MENÚ.
` Seleccione el submenú
“Caracter.Central”.
` Pulse la tecla MENÚ.
` Para borrar una característica de la
central, pulse la tecla CANCELAR.
` Introduzca la característica de la central
con las teclas numéricas.
` Pulse la tecla MENÚ.
La característica de la central está
memorizada.
Restablecer la estación base a
su estado original
Con esta función se pueden restablecer
todos los ajustes efectuados de la
estación base y los terminales portátiles a
su estado original.
El PIN del aparato no se restablece
L
a como estaba originalmente.
` Pulse la tecla MENÚ.
` Seleccione el menú “Ajustar BS”.
` Pulse la tecla MENÚ.
` Seleccione el submenú “Restablecer”.
` Pulse la tecla MENÚ.
Se le pedirá que introduzca el PIN del
aparato.
` Introduzca el PIN del aparato con las
teclas numéricas.
` Pulse la tecla MENÚ.
Se restablecen los ajustes del teléfono a
como estaban originalmente.
46

ES
EN
Buscar fallos
Característica Causa Solución
Después de pulsar
la tecla
DESCOLGAR no
se oye ningún tono
de marcación.
En la pantalla
aparece “Buscar
base”.
El cable del teléfono no
está bien conectado.
La fuente de alimentación
de la estación base no
está correctamente
conectada.
La línea está ocupada por
otro terminal portátil.
La estación base está
conectada con un cable de
teléfono incorrecto.
La estación base no está
bien conectada.
El terminal portátil se
encuentra fuera del
alcance de la estación
base.
` Conecte el cable del teléfono en la
estación base y en la toma para el
teléfono.
` Conecte el cable de red en la
estación base.
` Conecte la fuente de alimentación en
la toma de corriente.
` Espere hasta que la línea vuelva a
estar libre.
` Utilice únicamente el cable de
teléfono suministrado.
` Conecte el cable de red en la
estación base.
` Conecte la fuente de alimentación en
la toma de corriente.
` Acerque el terminal portátil a la
estación base.
DE
DE
En la pantalla no
aparece ninguna
indicación.
Las pilas del terminal
portátil están descargadas.
` Coloque el terminal portátil en un
cargador que esté conectado a la
red.
` Cargue el terminal portátil hasta que
el indicador de nivel de las pilas
muestre tres barras.
` Efectúe sus llamadas durante este
tiempo con otro terminal portátil.
47

Buscar fallos
Característica Causa Solución
El terminal portátil
no reacciona al
pulsar las teclas.
Ningún timbre en el
terminal portátil.
Durante una
llamada interna, en
la pantalla aparece
“No posible”.
Durante la
conferencia se oyen
pitidos cortos.
En la pantalla
aparece “Lleno” si
se desea
memorizar un
número de teléfono.
El bloqueo del teclado está
activado.
El terminal portátil está en
función silencio.
El terminal portátil al que
se llama no está registrado
o está fuera de cobertura
de la estación base.
Intentan llamarle desde el
exterior.
La memoria está llena.
` Pulse la tecla “#“ y manténgala
pulsada durante aprox. tres
segundos.
` Pulse la tecla ∗ y manténgala
pulsada durante aprox. tres
segundos.
` Asegúrese de que el terminal portátil
al que se llama está registrado en la
estación base y que tenga cobertura.
` Termine la llamada interna.
` Acepte la llamada externa.
` Borre una entrada que ya no
necesita o
` memorice el número en otra
memoria, p.ej., como número VIP.
48

Manteninuento del
teléfono
¡AVISO!
¡Peligro de muerte por
descarga eléctrica!
` Observe las advertencias de
seguridad del principio de
este manual.
` Antes de la limpieza
desenchufe el teléfono.
¡Atención!
¡Una carga electroestática o la entrada
de líquidos pueden dañar el teléfono!
` Utilice solamente un paño
ligeramente húmedo o un paño
antiestático.
` Asegúrese de que no entren líquidos
en los aparatos.
Si un terminal portátil entra en contacto
con líquido, proceda como sigue:
` Retire inmediatamente las pilas del
terminal portátil.
` Deje que se escurra el líquido del
terminal portátil.
` Seque cuidadosamente todas las
piezas del terminal portátil.
` Coloque el terminal portátil con el
compartimento para las pilas abierto
sobre el teclado durante por lo menos
72 horas en un lugar seco y caluroso.
` Coloque las pilas en el terminal portátil
solamente si éste está completamente
seco.
` Si el terminal portátil no funciona
correctamente, póngase en contacto
con el servicio de posventa.
ES
EN
DE
DE
` Limpie el teléfono regularmente con un
paño ligeramente húmedo o con un
paño antiestático.
49

Especificaciones técnicas
Especificaciones
técnicas
Estación base
Alimentación
eléctrica
Entrada:
Alimentación
eléctrica
Salida:
Cobertura fuera de
edificios
en edificios
Terminal portátil
Pilas 2 pilas NiMH 1,2 V,
Autonomía
Standby
Conferencia
Tiempo de carga aprox. 14 horas
Teléfono
Condiciones de
uso
230 V ~, 50 Hz, 60 mA
6 V Corriente continua
600 mA; 3,6 VA
máximo 300 m
máximo 50 m
600 mAh „AAA“
aprox. 100 horas
aprox. 10 horas
5 °C -40 °C
Humedad del aire
relat. 20 %–70 %
¡Las especificaciones técnicas están
sujetas a cambios sin previo aviso!
(Adaptador de red)
Desmontar el teléfono
Si desea desmontar el teléfono para, p.ej.
cederlo a otra persona, proceda como
sigue:
` Desenchufe la estación base y los
cargadores.
` Desenchufe el cable de teléfono.
` Presione el pestillo de la clavija del
teléfono de la estación base.
` Quite el cable de teléfono de la estación
base.
` Quite el cable de red de la estación
base.
` Retire las pilas de los terminales
portátiles.
` Envuelva el teléfono.
Temperatura de
almacenamiento:
Estándar DECT
Cobertura aprox. 300 m
-10 °C-60 °C
50

Eliminar el aparato
Cuide nuestro medioambiente; no tire
aparatos eléctricos a la basura doméstica.
Para la eliminación de aparatos eléctricos
utilice los puntos de recogida previstos y
entregue los aparatos que ya no utilizará.
Así se ayuda a evitar las potenciales
repercusiones sobre el medioambiente y
la salud de las personas causadas por
una eliminación incorrecta.
Así Usted contribuye a su reutilización, el
reciclaje y otras formas para el
aprovechamiento de viejos aparatos
eléctricos y electrónicos.
Recibirá información acerca de dónde
podrá eliminar sus aparatos en su
ayuntamiento o autoridad local.
` ¡Las especificaciones técnicas están
sujetas a cambios sin previo aviso!
Embalaje
Su teléfono DECT está
embalado para protegerlo
contra eventuales daños
durante el transporte. Los
embalajes son materias primas
y son reciclables o pueden ser
entregados al circuito de
reciclaje.
Pilas y baterías
No tire las pilas o baterías
usadas a la basura doméstica.
Las pilas o baterías deben ser
depositadas en un punto de
recogida para pilas usadas.
ES
EN
DE
DE
51

Eliminar el aparato
Información de conformidad
MEDION AG declara que el teléfono
DECT es comforme a los requisitos
básicos y otras disposiciones pertinentes
de la Directiva (R&TTE 199/5/EG).
Si lo desea puede recibir más información
sobre la declaración de conformidad por
medio de nuestro servicio de reparación.
52


ES
EN
Foreword
These operating instructions are designed
to aid
• correct,
• safe and
• beneficial
use of your cordless DECT MD 81920
telephone, or telephone for short.
Anyone who
• uses,
• cleans or
• disposes of
this telephone must have knowledge of
these operating instructions in their
entirety.
These operating instructions are an
integral part of the product. Keep this
manual near the telephone at all times. If
you sell or otherwise dispense with the
telephone please pass on these operating
instructions with it.
Style Features
Various parts of the operating instructions
can be identified by their specific style
features. This helps you to differentiate
easily between
normal text
• lists
` series of steps
“displays”
BUTTONS on the telephone, and
cross-references.
These tips contain additional
L
information for economic use of the
device.
DE
DE
1

Contents
Safety Instructions ................................4
Correct use..............................................4
Basic safety instructions..........................4
Avoiding electric shocks...................... 4
Use of rechargeable batteries............. 4
Avoiding danger of suffocation............ 5
Avoiding fire hazards .......................... 5
Avoiding damage ................................ 5
Style features used for safety instructions6
Product Description ..............................7
Package contents....................................7
Range of functions ..................................7
Base station.............................................8
Handset.................................................10
Readouts in the display .........................12
First Steps............................................13
Unpacking .............................................13
Setting up and connecting the base
station....................................................13
Preparing the handset ...........................14
Inserting rechargeable batteries........ 14
Affixing belt clips ............................... 14
Basic Settings......................................15
Navigating in the menu..........................15
Setting up the handsets.........................15
Setting the display language............. 16
Setting the date and time .................. 16
Setting the ring tone..........................17
Setting the ring tone volume .............17
Setting the audible signals ................ 17
Enabling and disabling audible signal
for new SMS messages .................... 17
Naming handsets.............................. 18
Registering and deregistering handsets 19
Registering handsets.........................19
Deregistering handsets......................20
Enabling and disabling the answering
machine ................................................ 20
Telephone Calls .................................. 21
Answering the telephone ...................... 21
Ending calls .......................................... 21
Making external calls ............................ 21
Making internal calls ............................. 21
Setting the volume ................................ 21
Using the mute facility for handsets ...... 22
Using the redial facility .......................... 22
Dialling the number using the redial
facility ................................................22
Deleting numbers from the redial list .22
Deleting the redial list ........................22
Using the call number memory ............. 23
Using the call list................................... 23
Selecting numbers from the call list...23
Saving entries in the call number
memory .............................................24
Deleting entries from the call list........24
Deleting all the entries.......................24
Using the Call Number Memory......... 26
Adding or changing entries ................... 26
Transferring entries from the redial list.. 27
Deleting entries..................................... 27
Deleting the call number memory ......... 27
VIP numbers ......................................... 28
Dialling with the VIP button................28
Entering or changing VIP call numbers
..........................................................28
2

Deleting VIP numbers from the memory
.......................................................... 28
Using the Answering Machine ...........30
Playing back messages.........................30
Changing the answering machine settings
..............................................................30
Enabling and disabling recording
function ............................................. 31
Listening to the recorded answer
message ...........................................31
Changing the recorded answer
message ...........................................31
Enabling and disabling the answering
machine ............................................ 32
Setting the number of rings............... 32
Interception............................................32
Intercepting calls from the answering
machine.................................................32
Deleting messages................................33
Using the remote control .......................33
Entering the PIN................................ 33
Retrieving messages from the
answering machine........................... 34
Playing back messages .................... 34
Changing settings ............................. 34
Sending Text Messages...................... 35
Basic requirements................................35
Selecting an SMS centre.......................35
Writing text messages ...........................36
Entering text...................................... 36
Entering the telephone number......... 37
Using saved telephone numbers....... 37
Receiving and reading text messages...37
Reading incoming text messages ..... 37
Reading text messages in the incoming
SMS list............................................. 38
Saving text messages........................... 38
Sending saved text messages...........38
Reading and changing saved text
messages..........................................39
Deleting saved text messages...........39
Special Functions ............................... 40
Enabling and disabling the keypad lock 40
Calling handsets (paging) ..................... 40
Using the call-back function .................. 40
Using the call transfer function.............. 40
Activating the call transfer function....41
Disabling the call transfer function.....41
Query calls............................................ 42
Using the call-waiting function............... 42
Enabling and disabling the call-waiting
function..............................................42
Taking a second call during an internal
call.....................................................42
Ignoring the second call.....................42
Accepting the second call..................43
Conference call facility.......................43
Switching .............................................. 44
Number withhold function ..................... 44
Setting the Base Station..................... 45
Changing the PIN number .................... 45
Setting the dialling mode....................... 45
Changing the flash time ........................ 46
Entering the dialling prefix..................... 46
Resetting the base station to the factory
setting ................................................... 46
Troubleshooting.................................. 47
Telephone Maintenance ..................... 49
Technical Data..................................... 50
Disconnecting the Telephone............ 50
Disposal............................................... 51
Conformity Declaration ......................... 52
ES
EN
DE
DE
3

Safety Instructions
Safety Instructions
Please read the safety instructions
through carefully before using the
telephone. Take heed of all warnings and
follow all the instructions on the telephone,
in recorded announcements, and in these
operating instructions.
Correct use
The MD 81920 telephone is designed for
• making internal and external telephone
calls
• recording incoming calls
• playing back recorded messages
• sending and receiving text messages.
It may be used for these purposes only, as
intended. It may only be used as specified
in these operating instructions.
Any other use is deemed improper and
can cause damage to the product.
The manufacturer accepts no liability for
damage caused by improper use.
Basic safety instructions
Avoiding electric shocks
• Never open the base station housing
or the mobile handsets.
• Connect the base station to a
professionally installed 230 V ~, 50 Hz
mains socket.
The plug socket should be freely
accessible so that the telephone can
be unplugged quickly and easily in an
emergency.
• Disconnect the mains plug in the
following cases:
− if moisture has penetrated the
telephone
− if you do not use the telephone for a
long period
− if the telephone has a fault.
In any of the above cases disconnect
the telephone at the mains plug only.
• Do not kink or crush the mains cable.
• Take measures to prevent moisture or
liquid from penetrating the telephone
or mains adaptor.
• Do not touch the mains cable with wet
hands.
• Never use the telephone if the mains
cable is damaged, after malfunctions,
or if the telephone is damaged.
Arrange for the telephone to be
checked and/or repaired by customer
service before using it again.
• Always have repairs carried out by
qualified professionals.
Use of rechargeable batteries
• Use NiMH batteries only, type AAA,
1.2 V, 600 mAh.
• Do not use batteries in the handsets.
• Keep the batteries out of the reach of
children. Seek medical attention
immediately if a battery is swallowed.
• Do not mix different types of battery.
Replace the batteries with the same or
equivalent type only.
4

• Before inserting the batteries, check
whether the contacts in the device and
on the batteries are clean. Clean the
contacts if necessary.
• Note the polarity (+/-) when inserting
the batteries.
• Never short-circuit the batteries.
• Direct intense heat can damage the
batteries. Therefore do not expose the
handset to any sources of direct heat.
• Do not throw the batteries into a fire.
• Remove the batteries if the handsets
are out of use for a long time.
• In the event of leakage remove
batteries from the device immediately.
Clean the contacts before inserting new
batteries. Risk of acid poisoning and
acid burns!
Avoiding danger of suffocation
• Do not let children play with plastic
wrapping or other packaging parts.
Safety Instructions
Avoiding damage
• Clean the telephone regularly.
• Do not use metal objects for cleaning.
• Place the base station on a non-slip
surface. Otherwise certain surfaces or
cleaning agents may damage the
rubber feet on the base station. In these
cases the product may be soiled or
suffer surface damage.
ES
EN
DE
DE
Avoiding fire hazards
• Always uncoil the entire length of the
mains cable. Otherwise the mains
cable may overheat.
• Never cover the power supply units of
the base station and charge cradle.
Otherwise the power supply units may
overheat.
5

Safety Instructions
Style features used for safety
instructions
These operating instructions contain the
following categories of safety instructions
and information:
WARNING!
Information accompanied by
the word WARNING alerts the
user to dangerous situations
which may lead to death or
serious injury.
Caution!
Information accompanied by the word
Caution alerts the user to situations
which may result in damage to property
or to the environment.
6

Product Description
Package contents
The telephone consists of the following
parts:
• Base station
• One telephone cable
• One mains cable with mains adaptor
• Four handsets
• Four belt clips
• Three charge cradles with mains cable
• Eight NiMH rechargeable batteries
(AAA, 1.2 V, 600 mAh)
• These operating instructions.
Range of functions
• Handsets register automatically on base
station
• Incoming call number displayed (CLIP
function)
• Choice of tone or pulse dialling
• Hands-free function on handset
• Handset can be taken from charge
cradle to answer calls (direct call pickup)
• Duration of call displayed
• Facility for internal calls outside
telephone network
• Call function for handsets (paging)
• Call transfer
• Conference call facility
• 50 contact numbers in each handset
memory
Product Description
• Memory capacity for 10 contact
numbers in base station for joint use
• Last 20 incoming call numbers
displayed
• Redial facility for last 20 numbers
dialled
• Mute facility
• Choice of six ring tones
• Five-level adjustment of ring tone
• Five-level adjustment of handset
volume
• Selectable number of rings
• Text message send and receive facility
• Storage capacity for 20 text messages
• Messages saved even in the event of
power failure
• Answering machine with 15 minutes’
recording time
• Storage capacity for two recorded
announcements
• Remote enquiry facility
• Programming facility for handset names
• Display in three languages.
ES
EN
DE
DE
7

Product Description
Base station
13
14
1112 10 9 8 7 6 5
2
1
3
4
8

No. Function No. Function
Product Description
ES
EN
DE
1 Telephone cable socket 8 Green LED: Base station in use
2 Mains cable socket 9 Yellow LED: New SMS
3 fbutton: Message playback and
pause
4 + button: Increase volume
– button: Decrease volume
5 |e button: Play back previous
message or begin playback at start of
a message
f| button: Play back next message
6 ⊗ button: Delete message 13 Charge cradle
7 Red LED: Handset charging 14 Loudspeaker
10 Answering machine on/off, recorded
announcement playback
11 Display
12 Call button (paging)
DE
9

Product Description
Handset
1
2
3
14
13
12
11
10
4
5
6
7
8
9
10

No. Function No. Function
Product Description
ES
EN
DE
1 Receiver 9 Keypad lock on/off, hash key “#”
2 Display 10 Microphone
3 VIP: Special button to call joint
numbers for all handsets
4 MENU: Confirm entries, open menu 12 PICK UP: Accept call
5 QUERY CALL: Flash key 13 LOUDSPEAKER: Hands-free set
6 NAVIGATION button: Open telephone
book, select menu items
7 HANG UP: End call, close menu – Loudspeaker (rear of handset)
8 Alphanumeric keys (entry of numbers
and letters)
11 Ring tone on/off, asterisk key “*”
on/off
14 CANCEL: Change up to next menu,
delete entries
– Battery compartment (rear of handset)
DE
11

Product Description
Readouts in the display
Symbol Function Symbol Function
Connection symbol: Connection
established between handset and
base station.
Menu contains sub-menus.
Menu item currently selected.
Call symbol: Symbol is displayed
if you have pressed PICK UP or
LOUDSPEAKER.
Battery charge: The more bars
displayed in the battery symbol,
the higher the charge.
Ring tone: Ring tone is disabled.
Mute: Handset microphone is
disabled.
Keypad lock: Handset buttons
are disabled.
Handset X: The number or name
of handset. Date and time are
displayed below.
A new SMS has been received.
12

First Steps
Unpacking
First Steps
` Place the base station in the required
position.
` Connect the telephone cable to the
right-hand socket on the base station.
ES
EN
DE
DE
` Unpack all parts of the telephone.
` Check that all the parts have been
supplied.
WARNING!
Risk of suffocation from plastic
packaging!
` Do not let children play with
the plastic packaging.
` Keep the packaging material out of the
reach of children.
Setting up and connecting the
base station
The following criteria should be applied
when selecting the location for the base
station:
• The base station should be near
enough to the socket to be connected
without an extension cable.
• The base station must be placed on a
level and stable surface.
Caution!
Some surfaces or cleaning agents may
damage the rubber feet on the base
station. In these cases the product may
be soiled or suffer surface damage.
` Place the base station on a non-slip
surface.
` Connect the mains cable to the left-
hand socket on the base station.
` Plug the telephone cable in at the
telephone socket.
WARNING!
Risk of electric shock!
` Please refer to the safety
information at the beginning
of these operating
instructions.
` Plug in to the mains socket.
An audible signal and the figure “0” in the
display indicate that the base station has
been correctly connected.
13

First Steps
Preparing the handset
Inserting rechargeable batteries
` Open the cover on the rear of the
handset.
Caution!
Incorrectly inserted batteries can cause
damage to the handsets.
` Insert the rechargeable batteries in the
handset with the correct polarity.
` Replace the cover on the handset (1.).
` Close the cover (2.).
` Place the handset in a charge cradle.
` Leave the handset in the charge cradle
for about 14 hours to charge the
batteries fully.
The charge status of the batteries is
indicated in the display.
Once the batteries in the handset are
charged it is possible to proceed with
basic settings for this handset.
Affixing belt clips
` Affix one bracket of the belt clip to the
attachment on the handset, as
illustrated (1.).
` Press the second bracket onto the
second attachment on the handset (2.).
14

Basic Settings
ES
EN
Basic Settings
Navigating in the menu
` Press the MENU key.
The main menu opens.
` In order to select an option or a sub-
menu, press the NAVIGATION key until
the item is highlighted next to the “f”
symbol.
` Press the MENU key.
The highlighted option in the menu is then
selected.
` In order to exit a menu and move up to
the next menu, press the CANCEL
button.
Setting up the handsets
After the batteries have been inserted the
handsets register automatically at the
base station.
The handsets are then numbered
consecutively. If you want to use a
different name of your own choice instead
of this number then follow the instructions
in the section entitled Naming handsets
from page 18 onwards.
The following basic settings are made at
the factory:
• Ring tone 1
• Ring tone volume 5
• Handset volume 3
• Loudspeaker volume 3
• Display language German
• Special information tones on
• Keypad lock off
• No date and time setting
You can change these settings as
instructed in the sections below.
DE
DE
15

Basic Settings
Setting the display language
` Press the MENU key.
` Select the “Set handset” menu.
` Press the MENU key.
` Select the “Language” sub-menu.
` Press the MENU key.
The possible languages are then
displayed. The language currently
selected is marked.
` Select the desired language.
` Press the MENU key.
“Saved” is then displayed in the selected
language.
Setting the date and time
` Press the MENU key.
` Select the “Date/Time” menu.
` Press the MENU key.
` Select the “Set D/T” sub-menu.
` Press the MENU key.
` Using the numeric keys, enter the last
two figures of the year.
` Press the MENU key.
` Key in the day and month as double-
digit entries using the numeric keys.
` Press the MENU key.
` Key in the time as a four-digit entry
using the numeric keys.
` Press the MENU key.
You will hear a beep. “Saved” appears on
the display.
The date and time settings will only
L
be saved while the base station is
connected to the mains.
If the date and time have not been
saved the display will show “_ _ : _
_” instead.
If you want the date or time to be
displayed in a different format please
follow the instructions below:
` Press the MENU key.
` Select the “Date/Time” menu.
` Press the MENU key.
` Select the “Time format” sub-menu.
` Press the MENU key.
You can now select the display format for
the time:
` For 24-hour clock format, select the
option “24 hours”.
` For 12-hour clock format, select the
option “12 hours”.
` Press the MENU key to confirm the
setting.
You can now select the display format for
the date:
` Select the option “dd.mm” if you want
the day displayed before the month.
` Select the option “mm.dd” if you want
the month displayed before the day.
` Press the MENU key to confirm the
setting.
16

Setting the ring tone
You can select the ring tone.
` Press the MENU key.
` Select the “Set handset” menu.
` Press the MENU key.
` Select the “Ring tone” sub-menu.
` Press the MENU key.
You can now choose between six
melodies.
` Use the NAVIGATION button to select
your preferred melody.
The chosen melody is indicated by the “f”
symbol. You will then hear the selected
melody.
` Press the MENU key to confirm the
setting.
Setting the ring tone volume
You can choose between five volume
settings for the ring tone. The factory
setting is the loudest level 5.
` Press the MENU key.
` Select the “Set handset” menu.
` Press the MENU key.
` Select the “Ring volume” sub-menu.
` Press the MENU key.
` Use the NAVIGATION button to select
the required volume.
` Press the MENU key to confirm the
setting.
Basic Settings
Setting the audible signals
The audible signals draw your attention to
various pieces of information:
• The battery is low.
• You have pressed a button.
• The handset is out of the base station
range.
You can enable and disable these signals
as follows:
` Press the MENU key.
` Select the “Set handset” menu.
` Press the MENU key.
` Select the “Tones” sub-menu.
` Press the MENU key.
` Select the “Battery alarm” option in
order to enable or disable the batterylow warning signal.
` Select the “Range” option in order to
enable or disable the out-of-range
warning signal.
` Select the “Button signals” option in
order to enable or disable the button
actuation confirmation signal.
The option currently selected is ticked in
the display.
` To change the setting press the
NAVIGATION button.
` Press the MENU key to accept the
change.
ES
EN
DE
DE
17

Basic Settings
Enabling and disabling audible signal
for new SMS messages
You can enable or disable the audible
signal on receipt of a text message.
Proceed as follows:
` Press the MENU key.
` Select the “SMS” menu.
` Press the MENU key.
` Select the “Settings” sub-menu.
` Press the MENU key.
` Choose the “SMS alarm” option.
` Press the MENU key.
The setting currently selected is ticked in
the display.
` To select your preferred setting press
the NAVIGATION button.
` Press the MENU key.
The setting is then stored.
Naming handsets
The handsets are numbered consecutively
at the factory. You can give the handsets
names consisting of numbers and letters.
Proceed as follows:
` Press the MENU key.
` Select the “Set handset” menu.
` Press the MENU key.
` Select the “Handset name” sub-menu.
“Handset_” appears on the display. You
can now add to this name or delete the
name and enter a new name.
` Press the CANCEL button to delete
letters.
` Enter the preferred name, as instructed
in the section headed Writing SMS
messages from page 36 onwards.
` Press the MENU key to confirm the
entry.
“Saved” appears on the display. When you
quit the menu the name you have entered
will be displayed.
18
In order to make an internal call,
L
however, you have to select the
number of the relevant handset as
before. This number is therefore
displayed after the name you have
entered.

Registering and deregistering
handsets
Basic Settings
“Searching for base” appears in the
display.
ES
EN
DE
After the rechargeable batteries have
been inserted the handsets register
automatically at the base station.
Registering handsets
You can register up to four handsets at
the base station.
If you want to register another
L
handset you have to deregister one
of the other four handsets first.
Follow the instructions in the section
Deregistering handsets from page
20 onwards.
The procedure for registering handsets is
as follows:
` Press the MENU key.
` Press the following sequence of keys
“
* * # *
“Reg./dereg. handset” appears on the
display.
` Press the MENU key.
` To register a handset choose the
"Register handset” option.
` Press the MENU key.
` Enter the PIN number.
# #”.
` Press and hold down the PAGING
button on the base station.
After about ten seconds you will hear two
beeps.
` Release the Paging button.
The handset is now registered.
If the registration process has not been
successful the display will read “No base”.
` If this is the case, check whether the
base station is correctly installed and
that no more than three handsets are
registered.
` Repeat the registration process.
If the process was successful the display
will read “Handset” and the number of the
handset.
DE
The factory setting for the PIN is
L
“0000”. You can change the PIN as
instructed in the section on
changing the PIN number from page
45 onwards.
` Press the MENU key.
19

Basic Settings
Deregistering handsets
` Press the MENU key.
` Press the following sequence of keys
“
* * # *
“Reg./dereg. handset” appears on the
display.
` Press the MENU key.
` To deregister a handset choose the
"Deregister handset” option.
` Press the MENU key.
` Enter the PIN number.
` Press the MENU key.
A list will appear in the display showing all
the handsets registered. The handset
currently involved in the deregistration
procedure is ticked.
` Select the entry for the handset which
you want to deregister.
` Press the MENU key.
“Deregister handset?” will then appear on
the display.
# #”.
Enabling and disabling the
answering machine
The answering machine is enabled after
connecting the base station.
` In order to disable the answering
machine, press the “
base station.
You will hear a message announcing
confirmation. “– –” appears on the base
station display.
` In order to enable the answering
machine, press the “
base station.
You will hear a message announcing
confirmation. The number of recorded
messages is shown on the base station
display.
For more information on the
L
answering machine please see the
chapter entitled Using the answering
machine from page 30 onwards.
” button on the
” button on the
` To deregister the handset press the
MENU key.
“Saved” appears on the display.
` If you do not want to deregister the
handset press the CANCEL button.
20

Telephone Calls
Telephone Calls
` Enter the relevant telephone number
using the numeric keys.
ES
EN
DE
Answering the telephone
` To accept an incoming call press the
PICK UP button or
` press the LOUDSPEAKER button or
` take the handset out of the cradle.
The call symbol “
display.
§” will appear in the
Ending calls
` To end a call press the HANG UP
button or
` press the LOUDSPEAKER button or
` replace the handset in the charge
cradle.
The call symbol is now no longer
displayed.
Making external calls
` Enter the relevant telephone number
using the numeric keys.
` Press the PICK UP button or
` press the LOUDSPEAKER button.
The telephone is then connected to the
number dialled.
Making internal calls
` Press the MENU key.
` Select the “Internal call” menu.
` Press the MENU key.
A flashing cursor and “Number” appear in
the display.
` Dial the internal number of the relevant
handset using the numeric keypad.
The telephone is then connected to the
handset dialled.
Internal calls are not transferred by
L
your network provider and are
therefore free of charge.
Setting the volume
You can set the volume of the receiver or
loudspeaker during a call. You can choose
between five volume settings.
` Press the NAVIGATION button during
the call until you reach the required
volume level.
` Press the MENU key.
` Continue the call.
DE
You can also carry out the procedure in
reverse:
` Press the PICK UP button or
` press the LOUDSPEAKER button.
21

Telephone Calls
Using the mute facility for
handsets
If you want to disable the microphone
during a call please proceed as follows:
` Press the CANCEL button during the
call.
The “Mute” symbol will appear in the
display. Now the person on the other end
of the line will not be able to hear what
you are saying.
` To reactivate the microphone press the
CANCEL button again.
` Continue the call.
Using the redial facility
Dialling the number using the redial
facility
The last 20 numbers dialled can be
redialled using the redial facility.
` Press the PICK UP button.
The last number dialled is displayed.
` In order to select a different telephone
number, press the NAVIGATION key
until the “f” symbol reaches the
required entry.
` Press the PICK UP button.
The telephone is then connected to the
number dialled.
Deleting numbers from the redial list
` Press the PICK UP button.
The last number dialled is displayed.
` In order to select a different telephone
number, press the NAVIGATION key
until the “f” symbol reaches the
required entry.
` Press the MENU key.
` Select the “Delete” menu.
` Press the MENU key.
“Delete?” appears on the display.
` To delete the number press the MENU
key.
“Deleted” appears on the display.
` If you do not want to delete the number
press the CANCEL button.
Deleting the redial list
In order to delete all the numbers in the
redial list at the same time please proceed
as follows:
` Press the PICK UP button.
` Press the MENU key.
` Select the “Delete all” menu.
` Press the MENU key.
“Delete?” appears on the display.
` To delete all the numbers press the
MENU key.
“Deleted” appears on the display.
22
` If you do not want to delete the
numbers press the CANCEL button.

Using the call number memory
You can store up to 50 frequently used
telephone numbers in the call number
memory.
The storage of telephone numbers
L
is covered in the section headed
Using the call number memory from
page 23 onwards.
To select a telephone number from the
memory, follow these steps:
` Press the NAVIGATION button.
The first entry in the call number memory
appears in the display.
` Press the NAVIGATION button until the
“f” symbol reaches the relevant
number.
You can also use the numeric
L
keypad to enter the first character of
the number you are looking for.
You can add to the call number selected.
You can, for example, use an “economy
dialling code”. Proceed as follows:
` Press the MENU key.
` Choose the “Select” menu.
` Press the MENU key.
` Make the necessary changes to the
telephone number.
` To dial the number press the PICK UP
key or
` press the LOUDSPEAKER button.
The telephone is then connected to the
number dialled.
Telephone Calls
Using the call list
The last 20 unanswered incoming call
numbers are stored on the call list.
You can only use this function if you
L
have requested the caller identity
function (CLIP) from your network
provider.
The calls are displayed as follows:
• “Call list” appears in the display if there
are new calls in the list
• If any callers withheld their numbers
they are shown as “Anonymous”.
• If the call number is not available for
any other reason then the word “Call" is
displayed.
Selecting numbers from the call list
` Press the NAVIGATION button when
“Call list” appears in the display.
To select a telephone number from the
call list, follow these steps:
` Press the MENU key.
` Press the NAVIGATION button until the
“f” symbol reaches the “Call list”.
` Press the MENU key.
The number of the last incoming call
appears in the display. The date and time
of this call are also shown.
If a caller has tried to ring you
L
several times the list shows the
details of the most recent call only.
ES
EN
DE
DE
23

Telephone Calls
` In order to select a different telephone
number, press the NAVIGATION key
until the “f” symbol reaches the
required entry.
If required you can add to this number as
follows:
` Press the MENU key.
` Choose the “Select” menu.
` Press the MENU key.
` Add to the telephone number.
` To dial the amended number press the
PICK UP key.
Saving entries in the call number
memory
` Press the MENU key.
` Press the NAVIGATION button until the
“f” symbol reaches the “Call list”.
` Press the MENU key.
The last number dialled is displayed.
` In order to select a different telephone
number, press the NAVIGATION key
until the “f” symbol reaches the
required entry.
` Press the MENU key.
` Select the “Save no.” sub-menu.
` Press the MENU key.
` Enter the relevant name using the
numeric keypad.
The use of keys for characters is
L
covered in the section headed
Writing SMS messages from page
36 onwards.
The telephone number is now saved
under the name entered.
Deleting entries from the call list
` Press the MENU key.
` Press the NAVIGATION button until the
“f” symbol reaches the “Call list”.
` Press the MENU key.
The last number dialled is displayed.
` In order to select a different telephone
number, press the NAVIGATION key
until the “f” symbol reaches the
required entry.
` Press the MENU key.
` Select the “Delete” menu.
` Press the MENU key.
“Delete?” appears on the display.
` To delete the number press the MENU
key.
“Deleted” appears on the display.
` If you do not want to delete the number
press the CANCEL button.
` Press the MENU key.
24

Deleting all the entries
` Press the MENU key.
` Press the NAVIGATION button until the
“f” symbol reaches the “Call list”.
` Press the MENU key.
The last number dialled is displayed.
` Press the MENU key.
` Select the “Delete all” sub-menu.
` Press the MENU key.
“Delete?” appears on the display.
` To delete all the entries press the
MENU key.
“Deleted” appears on the display.
` If you do not want to delete the entries
press the CANCEL button.
Telephone Calls
ES
EN
DE
DE
25

Using the Call Number Memory
Using the Call Number
Memory
The call number memory is your personal
“telephone directory”. You can save up to
50 telephone numbers and names in the
memory for each handset.
A telephone number can consist of
L
no more than twenty digits, including
special characters and interdigit
times.
A name can consist of no more than
twelve characters including spaces.
The use of keys for characters is
covered in the section headed
Writing SMS messages from page
36 onwards.
Adding or changing entries
` Press the NAVIGATION button.
The first entry in the call number memory
appears in the display.
` Press the MENU key.
` Select the “New” menu.
` Press the MENU key.
` Enter the relevant telephone number
using the numeric keys.
You can also enter the special
L
characters * and # as well as
interdigit times:
` To enter an interdigit time press
the “0” button and hold it down for
about three seconds.
A “P” appears in the display instead
of a number.
` Press the MENU key.
` Enter the required name using the
numeric keys, as instructed in the
section headed Writing SMS messages
from page 36 onwards.
` Press the MENU key.
“Saved” appears on the display.
26
` To enter additional telephone numbers
press the MENU key.
` Select the “New” menu.
` Enter the telephone number and the
name as described above.

Transferring entries from the
redial list
` Press the PICK UP button.
The last number dialled is displayed.
` In order to select a different telephone
number, press the NAVIGATION key
until the “f” symbol reaches the
required entry.
` Press the MENU key.
` Select the “Save no.” menu.
` Press the MENU key.
` Enter the relevant name using the
numeric keypad.
The use of keys for characters is
L
covered in the section headed
Writing SMS messages from page
36 onwards.
` Press the MENU key.
The telephone number is now saved
under the name entered.
Using the Call Number Memory
Deleting entries
In order to delete a single entry from the
call number memory proceed as follows:
` Press the PICK UP button.
The last number dialled is displayed.
` In order to select a different telephone
number, press the NAVIGATION key
until the “f” symbol reaches the
required entry.
` Press the MENU key.
` Select the “Delete” menu.
` Press the MENU key.
“Delete?” appears on the display.
` To delete the number press the MENU
key.
“Deleted” appears on the display.
` If you do not want to delete the number
press the CANCEL button.
ES
EN
DE
DE
27

Using the Call Number Memory
Deleting the call number
memory
In order to delete all the entries from the
call number memory at the same time
proceed as follows:
` Press the PICK UP button.
` Press the MENU key.
` Select the “Delete all” menu.
` Press the MENU key.
“Delete?” appears on the display.
` To delete all the entries press the
MENU key.
“Deleted” appears on the display.
` If you do not want to delete the entries
press the CANCEL button.
VIP numbers
You can save up to ten telephone
numbers in the base station and call them
via the VIP buttons on all the handsets.
Dialling with the VIP button
` Press the VIP button.
The first number in the memory is
displayed.
` In order to select a different telephone
number, press the NAVIGATION key
until the “f” symbol reaches the
required entry.
` Press the PICK UP button.
The connection is then established.
Entering or changing VIP call numbers
The telephone numbers can have up to 20
digits and spaces. The names can have
up to 13 digits and spaces. Enter the VIP
numbers as follows:
` Press the VIP button.
The first number in the memory is
displayed. If there are no numbers stored
in the memory the display reads “Empty”.
` In order to select a different telephone
number, press the NAVIGATION key
until the “f” symbol reaches the
required entry.
` Press the MENU key.
` Choose the “Change” menu.
` Press the MENU key.
` Enter the relevant telephone number
using the numeric keys.
` Press the MENU key.
` Enter the relevant name using the
numeric keypad.
The use of keys for characters is
L
covered in the section headed
Writing SMS messages from page
36 onwards.
` Press the MENU key.
The telephone number is now saved
under the name entered.
28

Deleting VIP numbers from the memory
` Press the VIP button.
The first number in the memory is
displayed.
` In order to select a different telephone
number, press the NAVIGATION key
until the “f” symbol reaches the
number no longer required.
` Press the MENU key.
` Select the “Delete” menu.
` Press the MENU key.
“Delete?” appears on the display.
` To delete the number press the MENU
key.
“Deleted” appears on the display.
` If you do not want to delete the number
press the CANCEL button.
Using the Call Number Memory
ES
EN
DE
DE
29

Using the Answering Machine
Using the Answering
Machine
The answering machine can record
messages totalling up to 15 minutes in
length. A message can be up to one
minute long.
The answering machine is
L
automatically enabled after
connecting the base station.
Playing back messages
If there are any messages recorded on the
answering machine then the number of
messages appears on the display. If new
messages have been recorded the “
symbol flashes on the handset displays.
The “New message” LED on the base
station lights up.
` In order to play back the messages,
press the “f” button on the base
station.
` To decrease the playback volume press
the “–” button.
` To increase the playback volume press
the “+” button.
` To play back the next message press
the “f|” button.
` To play back the previous message
press the “|e” button.
` To delete a message press the “⊗”
button.
”
You can also play back answering
machine messages on the handset.
Proceed as follows:
` Press the MENU key.
` Choose the “Answ. machine” menu.
` Press the MENU key.
` Select the “Mess. playback” sub-menu.
` Press the MENU key.
The handset loudspeaker is then enabled.
You will hear an announcement stating
the number of new messages.
The messages will be played back in
succession.
The display will show the number of the
message currently being played back and
the date and time the call was received.
` Press number 2 on the keypad to start
or end message playback.
` Press number 4 on the keypad during
playback to listen to the message again.
` Press number 4 on the keypad during
the date and time announcement in
order to listen to the previous message.
` Press number 6 on the keypad to play
back the following message.
` Press number 5 on the keypad during
playback in order to delete a message.
After pressing a number key you will hear
a confirmation.
30

Changing the answering
machine settings
You can change the answering machine
settings via the handset menu.
` Press the MENU key.
` Choose the “Answ. machine” menu.
` Press the MENU key.
` Select the “Set answ. machine” sub-
menu.
You will hear a recorded announcement.
` Follow the instructions in this recorded
announcement in order to change the
answering machine settings.
You can change the following settings on
the answering machine:
• Enable and disable recording function
• Listen to current answering message
• Change the recorded answering
message
• Enable or disable answering machine
• Set the number of rings before
recording starts.
Using the Answering Machine
Enabling and disabling recording
function
You can use the answering machine in
two ways:
• With recording enabled, the caller can
leave a message after the recorded
answer message.
• With recording disabled, the answering
machine is switched off after the
recorded answer message. You can, for
example, leave a message for callers in
the event of prolonged absences.
` To change the current setting press the
number 7 button.
You will hear a message announcing
confirmation.
Listening to the recorded answer
message
` Press number 8 on the keypad to play
back the current answer message.
Changing the recorded answer
message
You can record an answer message up to
two minutes in length.
ES
EN
DE
DE
` Press number 9 on the keypad to
record an answer message.
You can now record an answer message
up to two minutes in length.
` Speak into the handset microphone to
record the answer message.
` Press number 9 and # on the keypad to
delete the current answer message and
to enable the automatic announcement.
31

Using the Answering Machine
Enabling and disabling the answering
machine
` Press 0 on the keypad to enable or
disable the answering machine.
Setting the number of rings
You can set the number of rings before
the answering machine is activated. You
have the following options:
• 2 rings
• 4 rings
• 6 rings
• 8 rings
• Economy mode.
You can switch the answering machine to
economy mode in order to save telephone
charges for remote enquiry. In this case
the answering machine will respond after
two rings if there are new messages. If
there are no new messages the answering
machine will only respond after six rings.
You can therefore tell if new messages
have been recorded without incurring the
charges for making a connection.
Interception
You can listen in to messages while they
are recording. You can then decide if you
want to intercept the call or continue
recording.
` Press the MENU key.
“Intercept?” appears on the display.
` To listen in on the call press the MENU
key.
You can listen in to the message on the
handset. The call is not accepted and the
recording is continued.
` To listen in to the call via the
loudspeaker press the LOUDSPEAKER
key.
` To stop listening in press the HANG UP
or LOUDSPEAKER button.
Intercepting calls from the
answering machine
` To intercept a call during recording of
the message press the PICK UP button.
` In order to change the option press the
# key until the required option is
announced.
32

Deleting messages
` Press the MENU key.
` Choose the “Answ. machine” menu.
` Press the MENU key.
` Select the “Delete old messages” sub-
menu.
` Press the MENU key.
“Delete all?” appears on the display.
` To delete the messages press the
MENU key.
“Deleted” appears on the display.
` If you do not want to delete the
messages press the CANCEL button.
Using the remote control
You can operate the answering machine
by remote control from another telephone.
The telephone you want to use to access
the answering machine must be able to
send inband dialling signals.
Using the Answering Machine
Entering the PIN
You have to change the remote enquiry
PIN in order to activate the answering
machine’s remote enquiry function.
The factory setting for the remote
L
enquiry PIN is “0000”. If you restore
the base station to the factory
settings the remote enquiry pin will
return to “0000”.
Proceed as follows:
` Press the MENU key.
` Choose the “Answ. machine” menu.
` Press the MENU key.
` Select the “New answ. machine PIN”
sub-menu.
` Press the MENU key.
` Enter the current remote enquiry PIN
number.
` Press the MENU key.
` Key in the new remote enquiry PIN
using the numeric keys.
` Press the MENU key.
` Enter the new remote enquiry PIN
number again.
` Press the MENU key.
The new remote enquiry PIN is now
saved.
ES
EN
DE
DE
33

Using the Answering Machine
Retrieving messages from the
answering machine
` Call your connection from a touch tone
capable telephone extension.
The answering machine will cut in after the
set number of rings.
In economy mode the answering
L
machine will respond after two rings
if there are any new messages. If
there are no new messages the
answering machine will only
respond after six rings. You can
therefore tell if new messages have
been recorded without incurring the
charges for making a connection.
` Press the
answer message.
If the answering machine is switched off it
will cut in after ten rings. You will hear a
recorded announcement asking you to
enter your remote enquiry pin.
` Key in the remote enquiry PIN using the
numeric keys.
If you enter the wrong remote
L
enquiry PIN twice the connection is
automatically cut off.
You can now listen to the recorded
messages and change settings on the
answering machine. You will hear a
recorded announcement listing the
possible functions.
∗ button during the recorded
Playing back messages
` Press number 1 on the keypad to play
back all the messages.
` Press number 3 on the keypad to play
back all the new messages.
` Press number 4 on the keypad during
playback to repeat the current
message.
` Press number 4 on the keypad during
the date and time announcement in
order to listen to the previous message.
` Press number 5 on the keypad to delete
the current message.
Changing settings
` Press number 7 on the keypad to
enable or disable the message
recording function.
` Press number 8 on the keypad to play
back the current answer message.
` Press number 9 on the keypad to
record a new answer message.
` Press 0 on the keypad to enable or
disable the answering machine.
` Press 0 on the keypad to repeat the
announcement of all the functions.
You will hear a message announcing
confirmation.
34

Sending and Receiving
Text Messages
Basic requirements
The following requirements must be met in
order to be able to send and receive text
messages:
• The telephone number of an SMS
centre must be stored as a special
“SMS centre” number.
• Your telephone number must be
registered with the relevant SMS
service.
• The caller identity function (CLIP) and
call number transfer for your telephone
extension must be enabled by your
network provider.
` Ask your network provider about the
procedure for registering at the SMS
centre.
Selecting an SMS centre
You have to be registered with at least
one SMS centre in order to send or
receive text messages.
You can store the telephone numbers of
four SMS centres. The telephone number
of the first SMS centre is automatically
dialled to send a text message.
The first SMS centre listed on the factory
setting is the Deutsche Telekom SMS
centre.
Sending and Receiving Text Messages
You can select the SMS centre for the
next text message you want to send. Once
this text message has been sent the
telephone will automatically revert to the
first SMS centre when dialling the next
time.
If you want to use a different SMS centre
all the time then you have to save its
telephone number as “SMS centre 1”.
To select an SMS centre, follow these
steps:
` Press the MENU key.
` Select the “SMS” menu.
` Press the MENU key.
` Select the “Settings” sub-menu.
` Press the MENU key.
` Choose the “SMS centre” option.
` Press the MENU key.
` Select the preferred SMS centre.
` Press the MENU key.
The telephone number stored for this SMS
centre will appear in the display.
` To change the stored telephone number
enter the required telephone number
using the number keys.
ES
EN
DE
DE
35

Sending and Receiving Text Messages
If the telephone is connected to a
L
private branch exchange you have
to enter the dialling prefix before the
dialling code.
` Press the MENU key.
The new SMS centre number is now
stored.
Writing text messages
Entering text
A text message can contain up to 612
characters including spaces.
` Press the MENU key.
` Select the “SMS” menu.
` Press the MENU key.
Enter the text as follows using the number
keys:
` Press the
upper to lower case letters.
` To enter a character press the relevant
number key as many times as
necessary for the required character to
appear in the display.
∗ button to change from
The following table provides an overview
of the possible characters.
Key Upper case
letter
1 Spaces, 1, €, £, $, %, &, <, >
2 A, B, C, 2, Ä, Ҫ a, b, c, 2, ä, ҫƒ
3 D, E, F, 3 d, e, f, 3
4 G, H, I, 4, Ğ, İ g, h, I, 4, ğ, ı
5 J, K, L, 5 j, k, l, 5
6 M, N, O, 6, Ö m, n, o, 6, ö
7 P, Q, R, S, 7, Ş p, q, r, s, 7, ß
8 T, U, V, 8, Ü t, u, v, 8, ü
9 W, X, Y, Z, 9 w, x, y, z, 9
0 . , ? ! 0 + – : ' "
# #, *, @, \, /, _, (, ), =, §
` Press the MENU key.
“Number” appears on the display.
Lower case
letter
36

Entering the telephone number
` Enter the telephone number of the
person you wish to text using the
numeric keys.
` Press the MENU key.
“Telephone directory” appears on the
display.
` To save the SMS select the “Save”
option.
` To send the SMS select the “Send”
option.
` Press the MENU key.
The selected function will then be
executed.
Using saved telephone numbers
` Press the MENU key.
“Telephone directory” appears on the
display.
` Select the memory in which you have
stored the required telephone number.
` Press the MENU key.
“Number” appears on the display.
` To save the SMS select the “Save”
option.
` To send the SMS select the “Send”
option.
` Press the MENU key.
The selected function will then be
executed.
Sending and Receiving Text Messages
Receiving and reading text
messages
Reading incoming text messages
If you receive a text message the “New
SMS” LED will light up on the base station.
“New SMS” will then appear on the
display. The “
displayed.
` Press the MENU key.
` Select the “SMS” menu.
` Press the MENU key.
The last SMS received will be displayed.
You will see the sender’s telephone
number and the date and time of receipt.
` In order to display another text
message, press the NAVIGATION key
until the “f” symbol reaches the
required option.
` Press the MENU key.
` To read the text message use the
NAVIGATION button to select the
“Read” option.
When you have read a text
L
message it is moved to the incoming
SMS list.
` If you want to read this text
message again follow the
instructions in the section headed
Reading text messages in the
incoming SMS list from page 38
onwards.
” symbol will also be
ES
EN
DE
DE
37

Sending and Receiving Text Messages
` To reply to the text message use the
NAVIGATION button to select the
“Reply” option.
` To delete the text message use the
NAVIGATION button to select the
“Delete” option.
` To call the sender use the
NAVIGATION button to select the “Call”
option.
` To delete all the text messages
received use the NAVIGATION button
to select the “Delete all” option.
` Press the MENU key to confirm your
selection.
Reading text messages in the incoming
SMS list
` Press the MENU key.
` Select the “SMS” menu.
` Press the MENU key.
The last SMS received will be displayed.
You will see the sender’s telephone
number and the date and time of receipt.
` Use the NAVIGATION button to select
the “Incoming list” sub-menu.
` Select the SMS as described in the
section headed Reading incoming text
messages from page 37 onwards.
Saving text messages
` Write the SMS as described in the
section headed Writing text messages
from page 36 onwards.
` Select the “Save” sub-menu.
` Press the MENU key.
The SMS is now saved.
Sending saved text messages
` Press the MENU key.
` Select the “SMS” menu.
` Press the MENU key.
` Use the NAVIGATION button to select
the “Outgoing list” sub-menu.
` Press the MENU key.
The last SMS saved will be displayed.
` Use the NAVIGATION button to select
the required SMS.
` Press the MENU key.
` To send the text message use the
NAVIGATION button to select the
“Send” option.
` Press the MENU key.
38

Reading and changing saved text
messages
` Press the MENU key.
` Select the “SMS” menu.
` Press the MENU key.
` Use the NAVIGATION button to select
the “Outgoing list” sub-menu.
` Press the MENU key.
The last SMS saved will be displayed.
` Use the NAVIGATION button to select
the required SMS.
` Press the MENU key.
` To read the text message use the
NAVIGATION button to select the
“Read” option.
` To change the text message use the
NAVIGATION button to select the “Edit”
option.
` To delete the text message use the
NAVIGATION button to select the
“Delete” option.
` To delete all the text messages saved
in the outbox use the NAVIGATION
button to select the “Delete all” option.
` Press the MENU key to confirm your
selection.
Sending and Receiving Text Messages
Deleting saved text messages
` Press the MENU key.
` Select the “SMS” menu.
` Press the MENU key.
` Use the NAVIGATION button to select
the “Outgoing list” sub-menu.
` Press the MENU key.
The last SMS saved will be displayed.
` Use the NAVIGATION button to select
the required SMS.
` Press the MENU key.
` To delete the text message use the
NAVIGATION button to select the
“Delete” option.
` To delete all the text messages saved
in the outbox use the NAVIGATION
button to select the “Delete all” option.
` Press the MENU key to confirm your
selection.
ES
EN
DE
DE
39

Special Functions
Special Functions
Enabling and disabling the
keypad lock
` To enable the keypad lock press the #
key and hold it down for three seconds.
You will hear a beep. The “Keypad lock”
symbol will appear in the display. The
handset buttons are now disabled. You
can take incoming calls but cannot make
outgoing calls.
` To disable the keypad lock press the #
key and hold it down for three seconds.
You will hear a beep. The “Keypad lock”
symbol is no longer displayed.
Calling handsets (paging)
This function can be used to call all
handsets. It might also come in useful for
locating a handset which has been
mislaid.
` Press the “Paging” button on the base
station.
` To end the call press the “Hang up”
button on the handset or
` press the “Paging” button again.
Using the call-back function
This function can be used for automatic
connection to an extension as soon as it is
no longer engaged.
You need to have requested this
L
function from your network provider.
` Dial the required telephone number.
` If you hear the engaged tone wait until
the duration of the call appears on the
display.
` Press the MENU key.
` Select the “Engaged no. call-back” sub-
menu.
You will hear a message announcing
confirmation.
` Press the HANG UP button.
You will be put through as soon as the
extension is no longer engaged.
The function only lasts for about 45
L
minutes. After this length of time has
elapsed you will have to redial the
telephone number.
` In order to end this function before the
time is up press the key sequence
“#37#”.
` Press the PICK UP button.
You will hear a message announcing
confirmation.
40

Using the call transfer function
This function can be used to transfer
incoming calls to a different extension.
You need to have requested this
L
function from your network provider.
You can choose between three options:
• All calls are transferred immediately.
• Calls are transferred if your extension is
busy.
• Calls are transferred if you have not
picked up the receiver after about 20
seconds.
The length of time before transfer
L
depends on the settings at your
network provider or your exchange.
Activating the call transfer function
` To transfer all calls press the buttons
“∗ 2 1 ∗” one after the other.
` To transfer calls only when the
extension is busy, press the buttons
“∗ 6 7 ∗” one after the other.
` To transfer calls if the receiver is not
picked up, press the buttons “∗ 6 1 ∗”
one after the other.
` Then enter the telephone number to
which the calls should be transferred.
` Press the # key.
` Press the PICK UP button.
You will hear a message announcing
confirmation.
Special Functions
Disabling the call transfer function
` To disable the transfer of all calls press
the buttons “∗ 2 1 ∗” one after the other.
` To disable the transfer of calls when the
extension is busy, press the buttons
“∗ 6 7 ∗” one after the other.
` To disable the transfer of unanswered
calls, press the buttons “∗ 6 1 ∗” one
after the other.
` Press the PICK UP button.
You will hear a message announcing
confirmation.
` Press the HANG UP button.
ES
EN
DE
DE
` Press the HANG UP button.
41

Special Functions
Query calls
You can interrupt a call in order to
telephone a second person. Proceed as
follows:
` Press the QUERY CALL button during
the call.
` Dial the relevant external telephone
number or
` dial the internal telephone number (see
page 21).
` Conduct the telephone call with the
second person.
While you are telephoning the second
person you will remain connected to the
first person.
` To end the call with the second person
press the HANG UP button.
Using the call-waiting function
The “Call waiting” function beeps to
indicate if another call is coming in to your
extension during a telephone call. You can
then decide whether to continue, interrupt
or end the first call.
You need to have requested this
L
function from your network provider.
Enabling and disabling the call-waiting
function
` Press the MENU key.
` Select the “Set BS” menu.
` Press the MENU key.
` Select the “Call waiting” sub-menu.
` Press the MENU key.
` Select the required option.
` Press the MENU key.
You will hear a message announcing
confirmation. The selected option is ticked.
` Press the HANG UP button.
Taking a second call during an internal
call
If you hear the call-waiting signal during
an internal call, proceed as follows:
` Press the HANG UP button.
The internal call will be interrupted.
` To accept an external call press the
PICK UP button.
Ignoring the second call
` To continue the first call and ignore the
second call, press the MENU key during
the call.
` Select the “Ignore call waiting” sub-
menu.
` Press the MENU key.
Depending on the settings on your
telephone, the second caller will now be
transferred to another extension or will
hear an engaged tone.
42

Accepting the second call
To end the first call and accept the second
call, proceed as follows:
` To end the first call press the PICK UP
button.
You will hear the ringing tone.
` To take the second call press the PICK
UP button again.
Special Functions
` Press the MENU key.
To end the three-way conference, proceed
as follows:
` Press the MENU key.
` Select the “Single caller” sub-menu.
` Press the MENU key.
You can now speak alternately again with
both callers.
ES
EN
DE
DE
Conference call facility
To accept the second call without ending
the first call, proceed as follows:
` Press the MENU button during the call.
` Select the “Accept call waiting” sub-
menu.
` Press the MENU key.
You will now be connected to the second
caller.
The call to the first person is not ended but
held. You can now alternate between the
two callers.
` Press the MENU key.
` Select the “Alternate” sub-menu.
` Press the MENU key.
You will now be connected to the other
caller in any given case.
` Repeat these three steps in order to be
put back through to the previous caller.
To be connected with both callers at the
same time (three-way conference),
proceed as follows:
` To end the conference completely press
the HANG UP button.
` Press the MENU key.
` Select the “Conference” sub-menu.
43

Special Functions
Switching
This function can be used to switch a call
to another handset belonging to the same
base station. Proceed as follows:
` Press the MENU button during the call.
` Select the “Internal call” sub-menu.
` Press the MENU key.
` Enter the number of the required
handset.
The handset will then be called.
` If your call is taken on the other handset
you announce an external call.
` Press the HANG UP button.
The external caller is connected to the
other handset.
` If your call is not taken on the other
handset press the HANG UP button.
You will be speaking with the external
caller again.
Number withhold function
If you have requested number
identification (CLIP) from your network
operator your telephone number will be
displayed on the extension called. If you
wish to withhold your number you can
disable the number identification for the
next call via the “Anonymous call”
function.
` Press the MENU key.
` Select the “Anonymous call” menu.
` Press the MENU key.
“Number” appears on the display.
` Enter the relevant telephone number
using the numeric keys.
You can also use an entry in the call
number memory, call list or redial list.
Proceed as follows when “Number”
appears in the display:
` Press the MENU key.
` Select the required option.
` Press the MENU key.
` Select the required entry.
` Press the MENU key.
The connection is established without
disclosing the telephone number. The
caller will not see your telephone number.
44

Setting the Base
Station
Changing the PIN number
The PIN number protects your telephone
from authorised access. The PIN number
ensures that only the handsets supplied
can be registered on your base station.
If you want to adjust the settings on the
base you need to know the PIN number.
The factory setting for the PIN is
L
“0000”.
To change the PIN number, proceed as
follows:
` Press the MENU key.
` Select the “Set BS” menu.
` Press the MENU key.
` Select the “Change PIN” sub-menu.
` Press the MENU key.
` Enter the PIN using the numeric keys.
` Press the MENU key.
` Enter the new PIN using the numeric
keys.
“Repeat PIN” will then appear on the
display.
Setting the Base Station
When both entries for the new PIN are the
same the word “Saved” will appear on the
display.
` Make a note of the new PIN.
If you forget the PIN number you
L
cannot then alter this PIN or restore
the settings on the base station to
the factory settings.
Setting the dialling mode
You can change the dialling mode of your
telephone, choosing between pulse
dialling and tone dialling. Proceed as
follows:
` Press the MENU key.
` Select the “Set BS” menu.
` Press the MENU key.
` Select the “Dialling mode” sub-menu.
` Press the MENU key.
` Select the preferred dialling mode.
The active dialling mode is now ticked.
` Press the MENU key.
ES
EN
DE
DE
` Enter the new PIN number again.
If the second entry for the new PIN differs
from the first then “Incorrect PIN” appears
on the display. The old PIN remains in the
memory.
45

Setting the Base Station
Changing the flash time
Depending on whether you are operating
the telephone in a private branch
exchange, it may be necessary to set a
specific flash time.
Read the information in the
L
operating instructions for your
telephone system.
` Press the MENU key.
` Select the “Set BS” menu.
` Press the MENU key.
` Select the “Flash time” sub-menu.
` Press the MENU key.
A list of the available flash times will
appear in the display. The active flash
time is now ticked.
` Select the required flash time.
` Press the MENU key.
Entering the dialling prefix
If you are operating the telephone in a
private branch exchange you have to
enter a dialling prefix before making
external calls.
Read the information in the
L
operating instructions for your
telephone system.
To save the dialling prefix, proceed as follows:
` Press the MENU key.
` Select the “Set BS” menu.
` Press the MENU key.
` Select the “Dialling prefix” sub-menu.
` Press the MENU key.
` To delete a dialling prefix press the
CANCEL button.
` Enter the dialling prefix using the
numeric keys.
` Press the MENU key.
The dialling prefix is then stored.
Resetting the base station to the
factory setting
You can use this function to reset all the
adjustments made to the base station and
handsets and to restore the factory
settings.
The PIN number is not reset to the
L
factory setting.
` Press the MENU key.
` Select the “Set BS” menu.
` Press the MENU key.
` Select the “Reset” sub-menu.
` Press the MENU key.
You will be asked to enter the PIN
number.
` Enter the PIN using the numeric keys.
` Press the MENU key.
The telephone will be reset to the factory
settings.
46
 Loading...