

Page 1

Micro-Equipo CD
ES
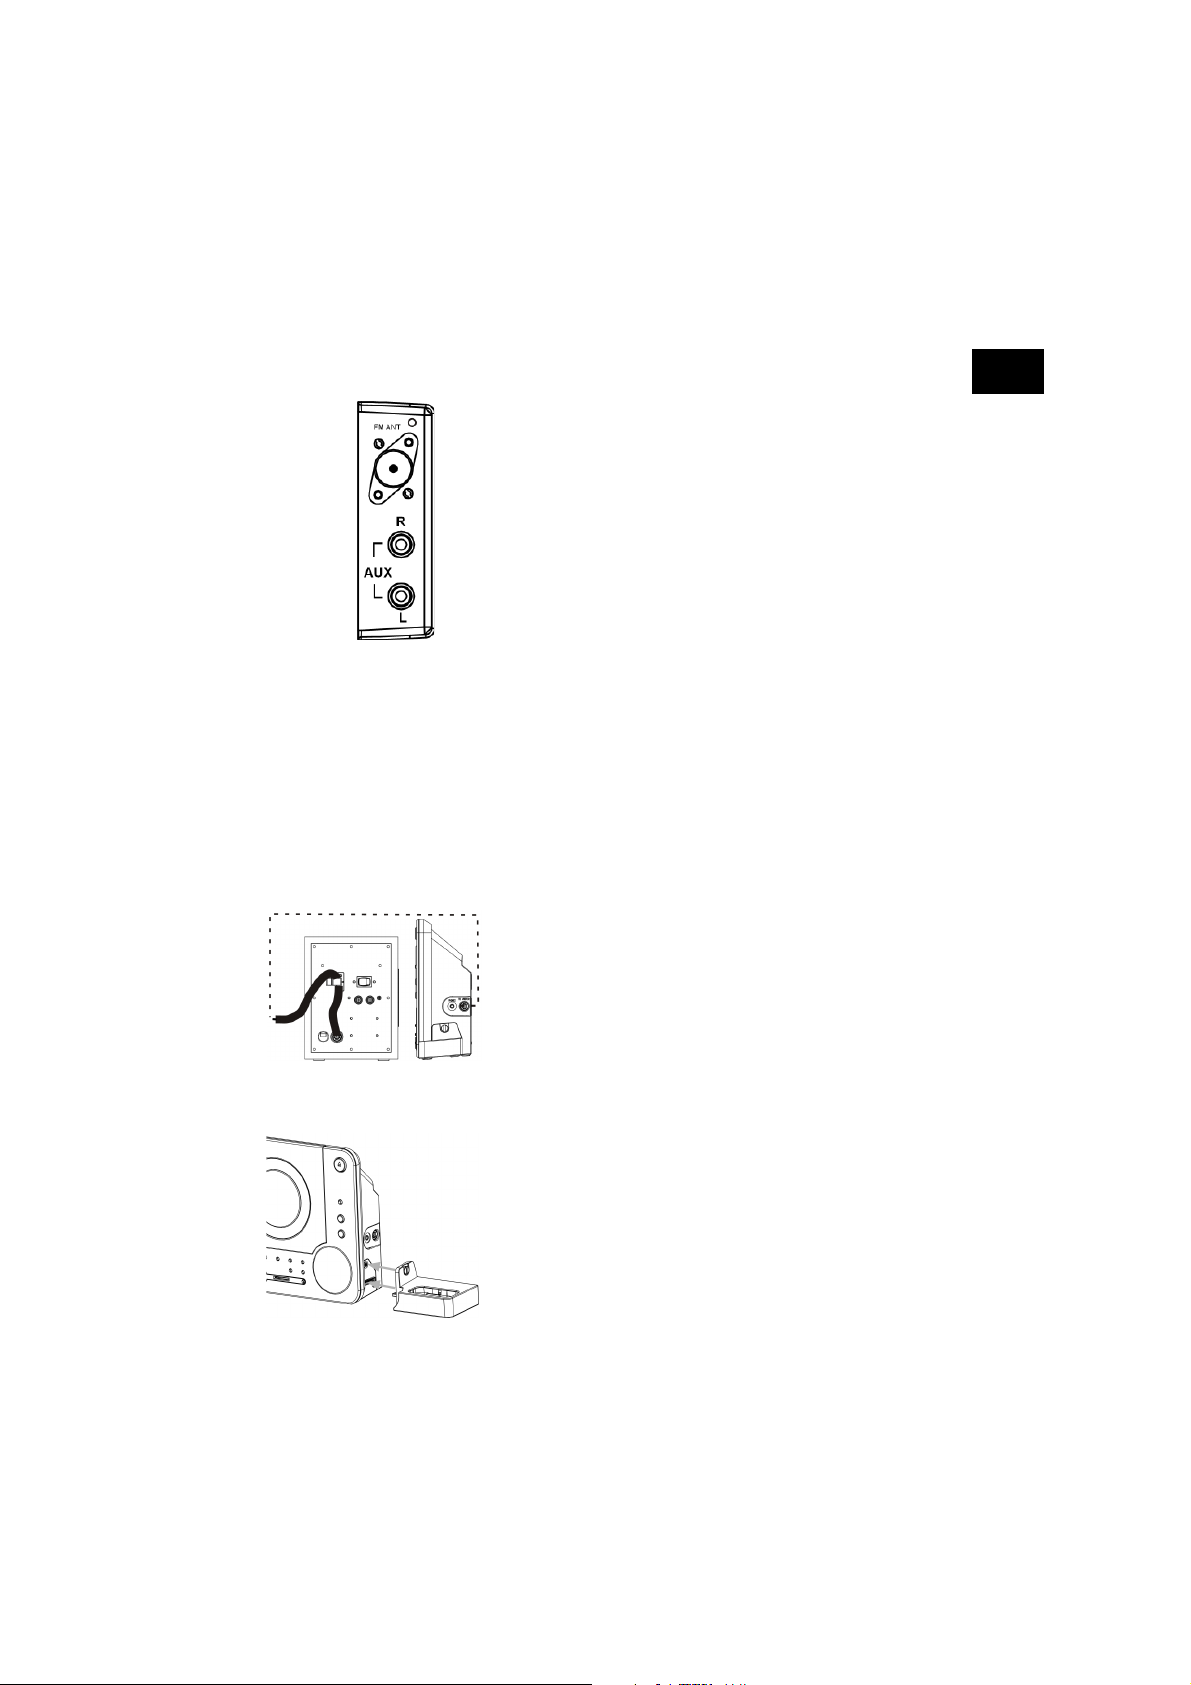
1. TOMA DE ANTENA : Toma de conexión a antena de 75
ohmios
2. TOMA CINCH: Entrada AUX (dcha.)
3. TOMA CINCH: Entrada AUX (izq.)
4. Tecla PRESET/FOLDER (UP): Acceder a las emisoras
memorizadas en orden ascendente
5. Tecla REPEAT : Seleccionar el modo de repetición
6. Tecla PRESET/FOLDER (DN): Acceder a las emisoras
memorizadas en orden descendente
7. Tecla STANDBY: Encender / apagar el aparato, Standby
8. TOMA USB : Entrada USB-Stick
9. TOMA CARD : Entrada tarjetas SD/MMC
10.Tecla / TUNING : Búsqueda de frecuencia hacia
abajo, búsqueda automática; SKIP : Salto al título
precedente; SEARCH : Retroceso rápido
11. Te cl a iPod/MEM/CLOCK-ADJ : Seleccionar modo iPod,
modo de memoria, modo ajuste de reloj (clock-adj.)
12.Tecla / TUNING : Búsqueda de frecuencia hacia
arriba, búsqueda automática; SKIP : Salto al título
siguiente; SEARCH : Avance rápido hacia delante
13. Te cl aPLAY/PAUSE/ENTER : Iniciar/interrumpir la
reproducción, Intro para iPOD
14. IR SENSOR : Sensor del mando a distancia
15. iPOD-DOCKING STATION: Compartimento para el
aparato iPod
16.PANTALLA LCD
17. Te cl a STOP/MENU : Parar la reproducción, acceder
al menú
18. Tec la VOLUME - : Regulador de volumen hacia abajo (-)
19. Tec la VOLUME + : Regulador de volumen hacia arriba (+)
20.Tecla FUNCTION : Seleccionar CD, USB, SD/MMC,
IPOD, AUX, o TUNER
21. TeclaOPEN/CLOSE : Abrir/cerrar el compartimento de
CDs
22.COMPARTIMENTO CD
23.PHONES: Toma para auriculares
24. TOMA DE CONEXIÓN (TO WOOFER): Toma para el
cable de conexión
25. TOMA VIDEO OUT: Toma de conexión para el televisor
26. COMPARTIMENTO PARA PILAS: Compartimento para
pilas para la memoria de funcionamiento
27. BOCALLAVES: Agujeros para el montaje sobre pared
Sistema de Sonido Micro CD/MP3 MD 81834 3
Page 2

Mando a distancia
1. Tecla STANDBY: Encender / apagar el aparato,
Standby
2. Tecla MUTE : Función sin sonido
3. Tecla PRESET (UP) : Acceder a las emisoras
memorizadas
4. Tecla PRESET (DN) : Acceder a las emisoras
memorizadas
5. Tecla RANDOM : Seleccionar reproducción aleatoria
6. Tecla / TUNING : Búsqueda de frecuencia hacia
abajo, Búsqueda automática, SKIP : Salto al título
precedente, SEARCH : Retroceso rápido
7. Te c l a TIMER : Seleccionar el modo de temporizador
8. TeclaVOLUME : Volumen hacia abajo (-)
9. Tecla FUNCTION : Seleccionar CD, USB, SD/MMC,
iPOD, AUX o TUNER
10. Tecla INTRO: Reproduce/inicia todos los Tracks
11. ID3/ESP/MONO/ST. Tecla: Modo ID3, modo ESP,
seleccionar cambio de estéreo/mono
12. Tecla REPEAT : Seleccionar el modo de repetición
13. Te cl a PLAY/PAUSE/ENTER : Iniciar/interrumpir
la reproducción, Intro para iPOD
14. Te cla EQ: Seleccionar el modo de ecualizador (PASS,
ROCK, JAZZ, CLASSIC o POP)
15.Tecla / TUNING : Búsqueda de frecuencia hacia
arriba, búsqueda automática, SKIP : Salto al título
siguiente, SEARCH : Avance rápido hacia delante
16. Tecla STOP/MENU : Parar la reproducción, Menú
para iPOD
17. Tecla iPOD/MEM/CLOCK-ADJ.: seleccionar los modos
de iPOD-Memoria-Reloj
18. Tecla SLEEP : Seleccionar el modo de apagado
automático
19.Teclas numéricas: seleccionar cifras
20.Tecla VOLUME : Subir volumen (+)
Subwoofer
1. Indicación Standby
2. Cable de red
3. Interruptor On/Off
4. Salidas para altavoces (dcha.), (izq.)
5. Toma cable de conexión (FROM MAIN)
4
Page 3

Índice
Advertencias de seguridad . . . . . . . . . . . . . . . . . . . . . . . . . . . . . . . . . 7
No permita que los niños toquen aparatos eléctricos . . . . . . . . . . . . . . . . . . . . 7
Colocación del equipo de forma segura . . . . . . . . . . . . . . . . . . . . . . . . . . . . . . 7
¡Advertencia! . . . . . . . . . . . . . . . . . . . . . . . . . . . . . . . . . . . . . . . . . . . . . . . . . . . 8
Mantener la toma de corriente accesible . . . . . . . . . . . . . . . . . . . . . . . . . . . . . . 8
Nunca efectúe Usted mismo la reparación del aparato . . . . . . . . . . . . . . . . . . . 8
El reproductor de CDs . . . . . . . . . . . . . . . . . . . . . . . . . . . . . . . . . . . . . . . . . . . . 8
Elimine las pilas de forma respetuosa con el medio ambiente . . . . . . . . . . . . . 8
Indicaciones referentes a las pilas . . . . . . . . . . . . . . . . . . . . . . . . . . . . . . . . . . . 9
Eliminar el embalaje . . . . . . . . . . . . . . . . . . . . . . . . . . . . . . . . . . . . . . . . . . . . . . 9
Eliminación . . . . . . . . . . . . . . . . . . . . . . . . . . . . . . . . . . . . . . . . . . . . . . . . . . . . . 9
Limpieza del equipo . . . . . . . . . . . . . . . . . . . . . . . . . . . . . . . . . . . . . . . . . . . . . . 9
Colocación del aparato . . . . . . . . . . . . . . . . . . . . . . . . . . . . . . . . . . . . 10
Uso como aparato de sobremesa . . . . . . . . . . . . . . . . . . . . . . . . . . . . . . . . . . . 10
Para el montaje sobre pared . . . . . . . . . . . . . . . . . . . . . . . . . . . . . . . . . . . . . . 11
Puesta en funcionamiento . . . . . . . . . . . . . . . . . . . . . . . . . . . . . . . . . 12
Desembalaje . . . . . . . . . . . . . . . . . . . . . . . . . . . . . . . . . . . . . . . . . . . . . . . . . . . 12
NXT . . . . . . . . . . . . . . . . . . . . . . . . . . . . . . . . . . . . . . . . . . . . . . . . . . . . . . . . . . 12
Conectar la tecnología de altavoces NXT . . . . . . . . . . . . . . . . . . . . . . . . . . . . 12
Conexión AUX IN . . . . . . . . . . . . . . . . . . . . . . . . . . . . . . . . . . . . . . . . . . . . . . . 13
Conectar subwoofer . . . . . . . . . . . . . . . . . . . . . . . . . . . . . . . . . . . . . . . . . . . . . 13
Conexión iPOD-Docking . . . . . . . . . . . . . . . . . . . . . . . . . . . . . . . . . . . . . . . . . 13
Colocar las pilas en el mando a distancia . . . . . . . . . . . . . . . . . . . . . . . . . . . . 14
Colocar las pilas en el aparato . . . . . . . . . . . . . . . . . . . . . . . . . . . . . . . . . . . . . 14
Conexión de antena . . . . . . . . . . . . . . . . . . . . . . . . . . . . . . . . . . . . . . . . . . . . . 14
Conectar auriculares . . . . . . . . . . . . . . . . . . . . . . . . . . . . . . . . . . . . . . . . . . . . 15
Conexión a la red . . . . . . . . . . . . . . . . . . . . . . . . . . . . . . . . . . . . . . . . . . . . . . . 15
ES
Funciones básicas . . . . . . . . . . . . . . . . . . . . . . . . . . . . . . . . . . . . . . . .16
Encender/Apagar – POWER . . . . . . . . . . . . . . . . . . . . . . . . . . . . . . . . . . . . . . . 16
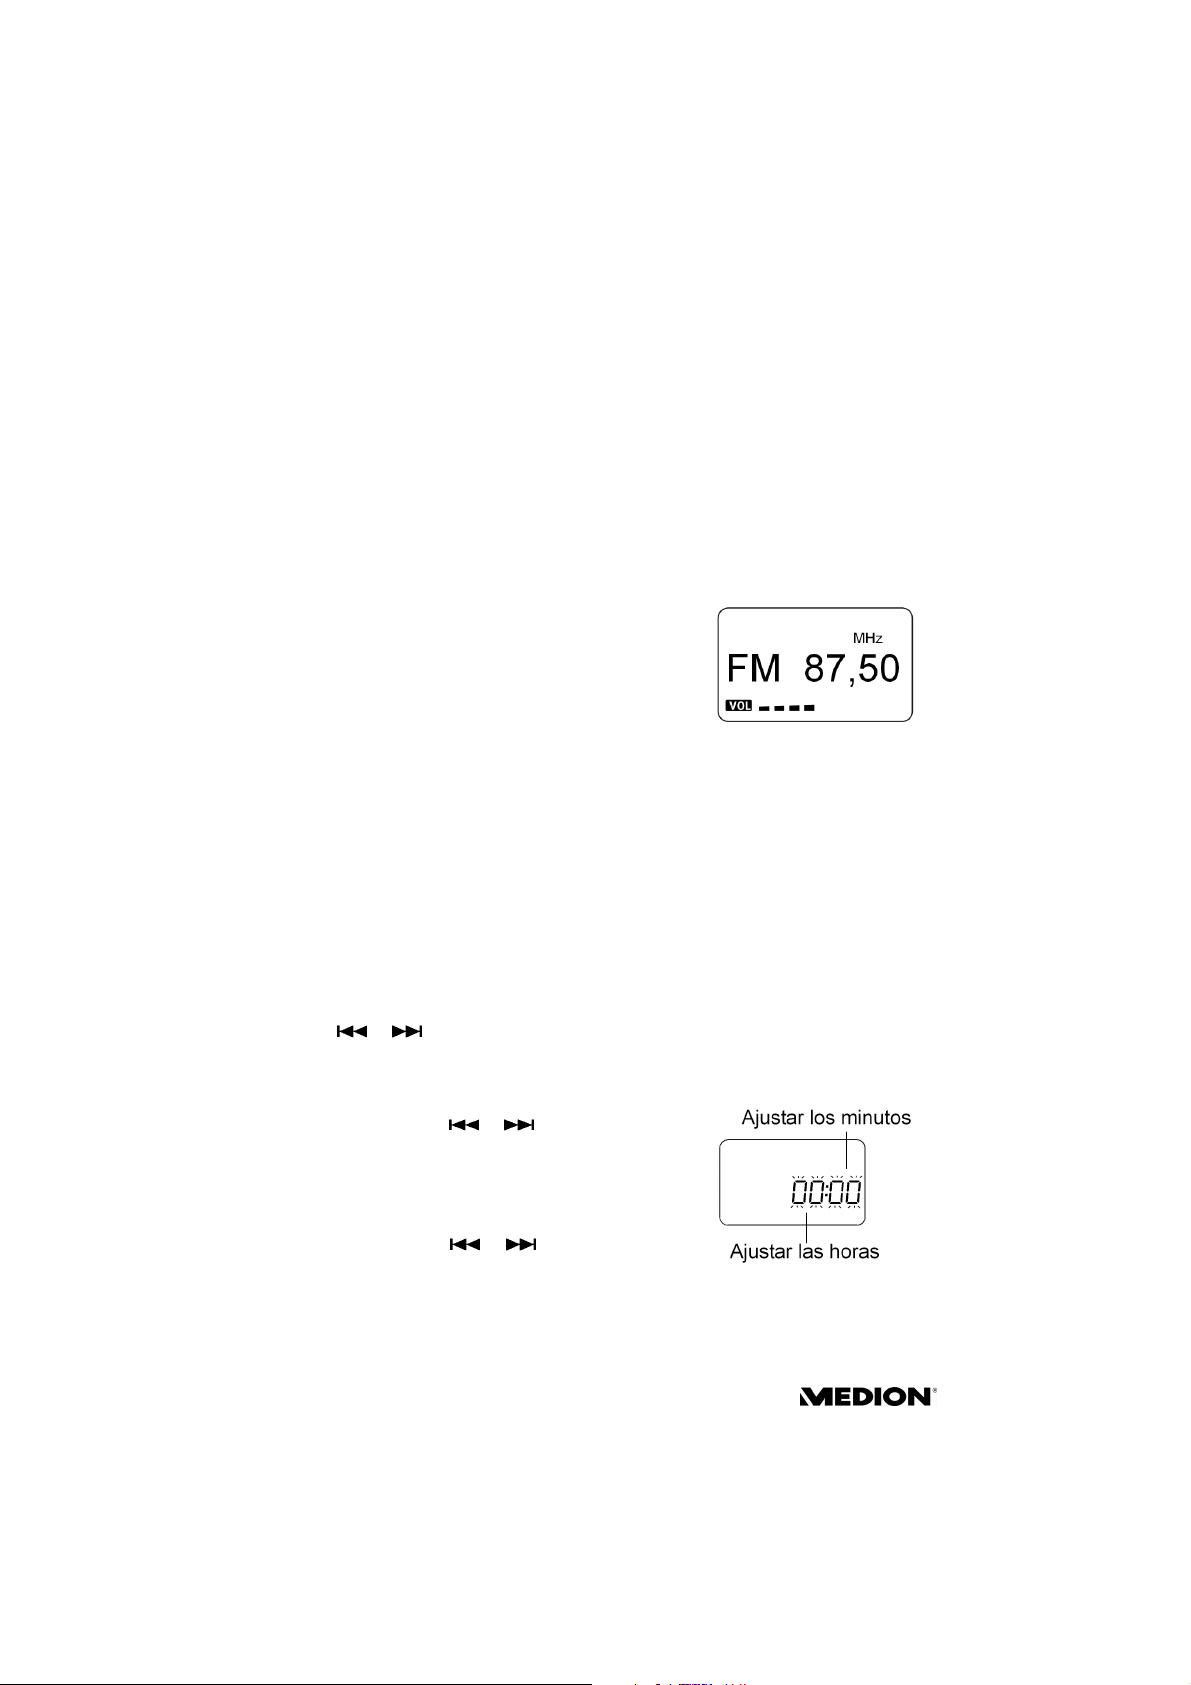
Ajustar la hora . . . . . . . . . . . . . . . . . . . . . . . . . . . . . . . . . . . . . . . . . . . . . . . . . 16
Modo radio . . . . . . . . . . . . . . . . . . . . . . . . . . . . . . . . . . . . . . . . . . . . . 17
Ajustes de sonido . . . . . . . . . . . . . . . . . . . . . . . . . . . . . . . . . . . . . . . . . . . . . . . 17
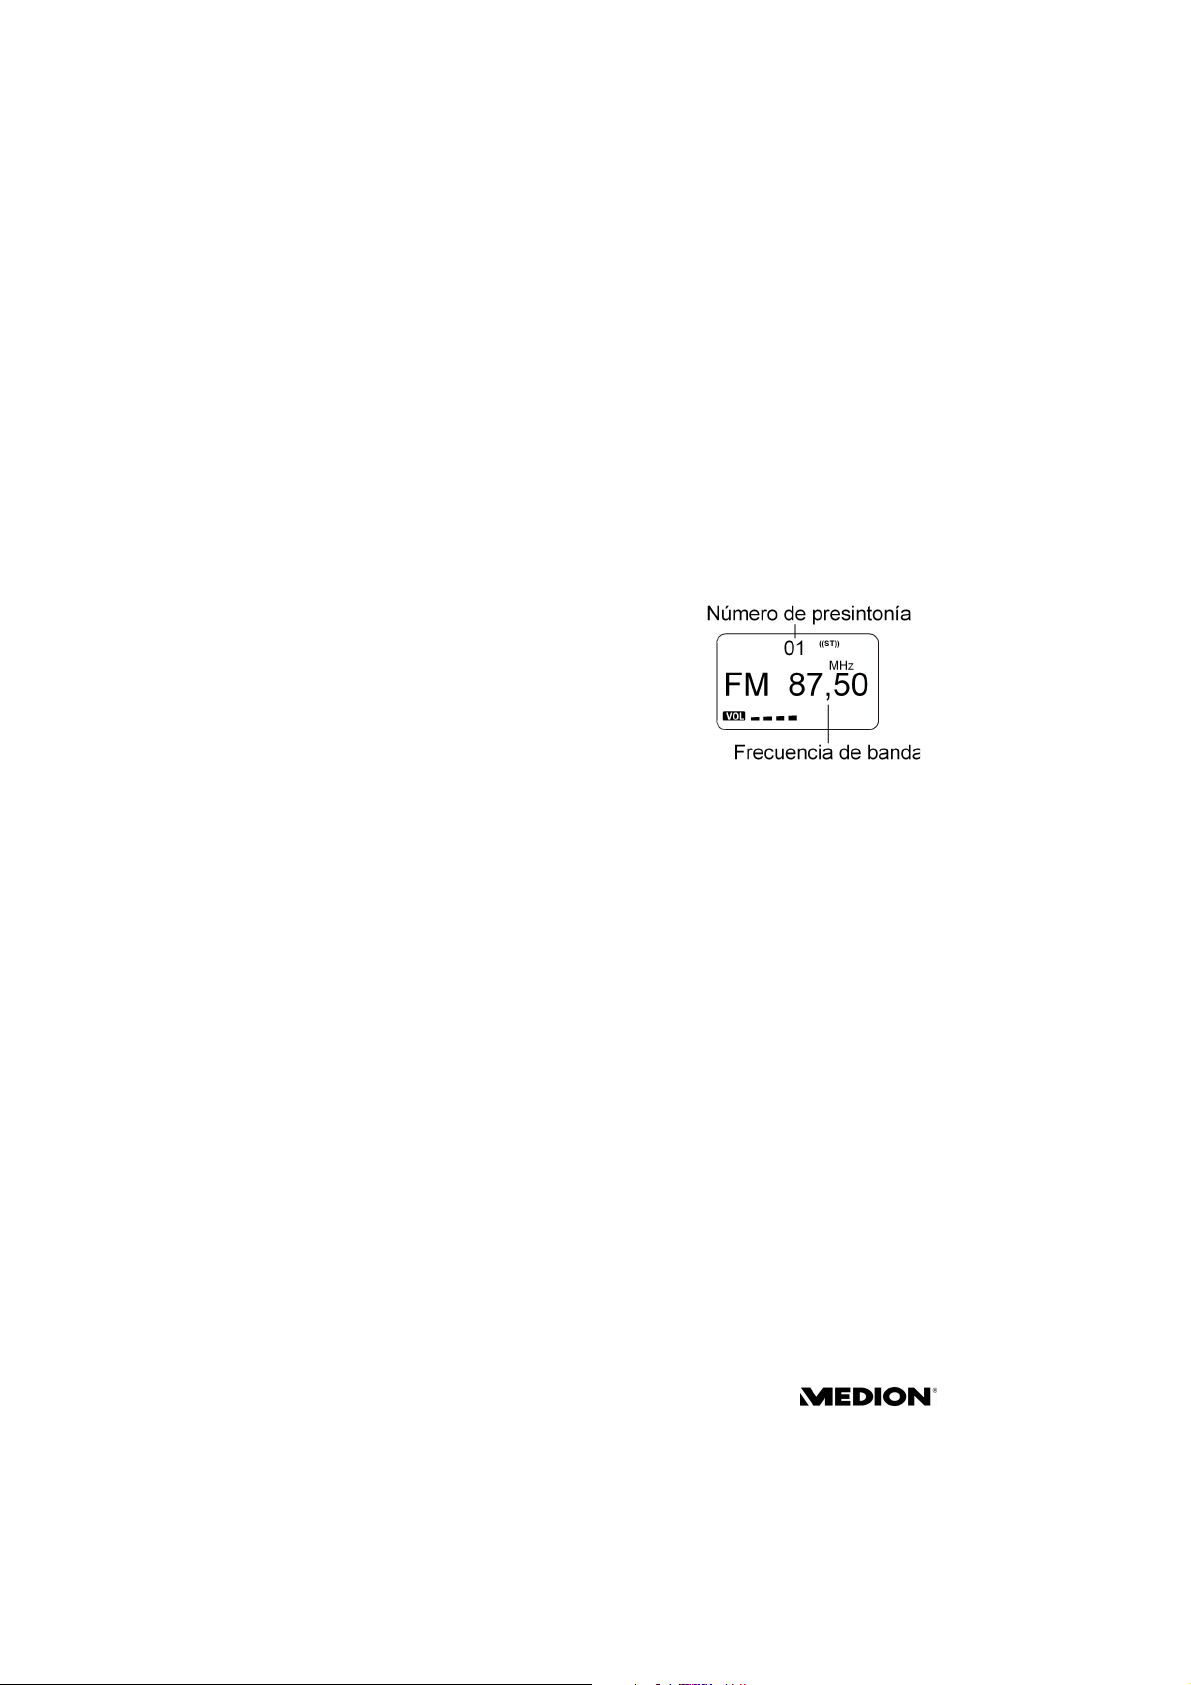
Sintonización de las emisoras . . . . . . . . . . . . . . . . . . . . . . . . . . . . . . . . . . . . . 17
Estéreo/Mono . . . . . . . . . . . . . . . . . . . . . . . . . . . . . . . . . . . . . . . . . . . . . . . . . . 18
Memorizar y activar una emisora . . . . . . . . . . . . . . . . . . . . . . . . . . . . . . . . . . . 18
Sistema de Sonido Micro CD/MP3 MD 81834 5
Page 4

Subwoofer
MODO CD-/MP3-/WMA-/USB-CARD . . . . . . . . . . . . . . . . . . . . . . . . 19
Soportes de datos reproducibles . . . . . . . . . . . . . . . . . . . . . . . . . . . . . . . . . . . 19
Acerca de “MP3” . . . . . . . . . . . . . . . . . . . . . . . . . . . . . . . . . . . . . . . . . . . . . . . . 19
Modo USB-CARD . . . . . . . . . . . . . . . . . . . . . . . . . . . . . . . . . . . . . . . . 20
Reproducir CDs . . . . . . . . . . . . . . . . . . . . . . . . . . . . . . . . . . . . . . . . . . 21
Introducir y extraer discos . . . . . . . . . . . . . . . . . . . . . . . . . . . . . . . . . . . . . . . . 21
PLAY, PAUSE, STOP, salto al siguiente título . . . . . . . . . . . . . . . . . . . . . . . . . . . 21
Modos de reproducción REPEAT, RANDOM . . . . . . . . . . . . . . . . . . . . . . . . . . .22
Programación del orden de reproducción . . . . . . . . . . . . . . . . . . . . . . . . . . . . 23
Conexión y desconexión programada (“Temporizador”) (“Función
Apagado automático”) . . . . . . . . . . . . . . . . . . . . . . . . . . . . . . . . . . . . 24
Ajustar el temporizador . . . . . . . . . . . . . . . . . . . . . . . . . . . . . . . . . . . . . . . . . . 24
Ajustar la desconexión automática . . . . . . . . . . . . . . . . . . . . . . . . . . . . . . . . . .25
Funciones iPOD . . . . . . . . . . . . . . . . . . . . . . . . . . . . . . . . . . . . . . . . . 26
Así se utilizan las funciones iPOD . . . . . . . . . . . . . . . . . . . . . . . . . . . . . . . . . . .26
Así se utiliza el menú iPOD . . . . . . . . . . . . . . . . . . . . . . . . . . . . . . . . . . . . . . . .26
Salida Vídeo Out (sólo para el aparato iPOD) . . . . . . . . . . . . . . . . . . . . . . . . .27
Especificaciones técnicas . . . . . . . . . . . . . . . . . . . . . . . . . . . . . . . . . . 28
Alimentación . . . . . . . . . . . . . . . . . . . . . . . . . . . . . . . . . . . . . . . . . . . . . . . . . . . 28
Radio . . . . . . . . . . . . . . . . . . . . . . . . . . . . . . . . . . . . . . . . . . . . . . . . . . . . . . . . . 28
Conexiones del aparato . . . . . . . . . . . . . . . . . . . . . . . . . . . . . . . . . . . . . . . . . .28
Reproductor de CDs, discos compatibles . . . . . . . . . . . . . . . . . . . . . . . . . . . . . 28
6
Page 5

Advertencias de seguridad
Advertencias de seguridad
Acerca de las presentes instrucciones
Antes de la puesta en marcha del aparato, lea atentamente las presentes
advertencias de seguridad. Preste atención a las advertencias y a las
instrucciones de funcionamiento.
Mantenga siempre a su alcance las instrucciones de funcionamiento. Si
vende o cede el aparato a otra persona, entréguele sin falta también las
presentes indicaciones.
No permita que los niños toquen aparatos
eléctricos
No deje los aparatos eléctricos al alcance de niños
pequeños sin vigilancia.
Las pilas y las pilas recargables pueden representar un
peligro de muerte si se tragan. Mantenga por ello el
aparato y las pilas fuera del alcance de los niños pequeños.
En caso de ingestión accidental de una pila hay que avisar
inmediatamente a un médico.
Mantenga también los embalajes alejados de los niños.
Existe el peligro de asfixia.
Colocación del equipo en un lugar seguro
ES
Coloque el equipo sobre una superficie firme y lisa. El
equipo no está diseñado para funcionar en espacios con
un alto nivel de humedad (como, por ejemplo, el cuarto de
baño). Preste atención a
que el equipo no esté expuesto a fuentes directas de
calor (p.ej. la calefacción);
que el equipo no esté expuesto a la luz solar directa;
que el aparato no entre en contacto con agua o
humedad;
que no se coloquen recipientes llenos de líquido
(jarrones o similares) sobre el aparato;
que el equipo no esté colocado al lado de campos
magnéticos (p.ej. el televisor u otros altavoces);
que no se encuentren fuentes de fuego (p.ej. velas
encendidas) cerca del equipo.
Sistema de Sonido Micro CD/MP3 MD 81834 7
Page 6
Advertencias de seguridad
¡Aviso!
Tenga en cuenta las distancias mínimas de seguridad y en
ningún caso cubra las rejillas de ventilación. Para una
ventilación suficiente se deberá guardar una distancia de
20 cm en todos los lados. Los orificios en el aparato no se
deben cubrir ni obstruir.
Mantenga la toma de corriente accesible
Conecte el equipo en una toma de corriente adecuada
(230 V ~ 50 Hz) y cercana al emplazamiento del equipo.
Para el caso de que deba desconectarse el equipo
rápidamente de la corriente, el enchufe debe permanecer
accesible.
Para evitar que alguien tropiece, no utilice cables de
prolongación.
No efectúe nunca Usted mismo la
reparación del aparato
En caso de desperfectos en el aparato o la toma de
corriente, desenchúfelo inmediatamente.
No intente en ningún caso abrir y/o arreglar Usted mismo
el aparato. ¡Existe el peligro de recibir una descarga
eléctrica! En caso de mal funcionamiento del aparato,
diríjase a nuestro servicio de reparación o a otro taller
especializado.
El reproductor de CDs
El reproductor de CDs es un producto láser de Clase 1. El
aparato está equipado con un sistema de seguridad que
impide la salida de los peligrosos rayos láser durante su uso
normal. Para evitar lesiones en los ojos, no manipule o
dañe nunca el sistema de seguridad del aparato.
Elimine las pilas de forma respetuosa con
el medio ambiente
No tire las pilas usadas a la basura doméstica. Las pilas
deben ser depositadas en un punto de recogida para pilas
usadas.
8
Page 7

Advertencias de seguridad
Indicaciones referentes a las pilas
Antes de colocarlas, limpie los contactos de las pilas y del
aparato, en caso de que sea necesario.
¡Retire inmediatamente del aparato las pilas gastadas! ¡Alto
peligro de derrame!
¡Nunca exponga las pilas a un calor excesivo como
radiación solar, fuego o similares!
Cambie siempre todas las pilas al mismo tiempo.
Utilice solamente pilas del mismo tipo; no utilice nunca
pilas de diferentes tipos o usadas y nuevas juntas.
Retire las pilas cuando no se use el aparato durante un
tiempo prolongado.
Eliminar el embalaje
Su aparato está embalado para protegerlo contra
eventuales daños durante el transporte. Los materiales
de embalaje son materias primas y por tanto pueden ser
reutilizados o reciclados.
Eliminación
Aparato
No tire bajo ningún concepto el Micro-Equipo CD a la
basura doméstica normal al final de su vida útil. Consulte
en su ayuntamiento o autoridad local la posibilidad de una
eliminación apropiada y respetuosa con el medio
ambiente.
ES
Limpieza del equipo
Antes de limpiar el aparato, desconéctelo de la red. Para
limpiarlo, emplee un paño seco y suave. Evite emplear
detergentes químicos y productos de limpieza, puesto que
podrían dañar las superficies y/o las inscripciones del
equipo.
Sistema de Sonido Micro CD/MP3 MD 81834 9
Page 8
Colocar el aparato
Colocar el aparato
Uso como aparato de sobremesa
Se pueden colocar el aparato del subwoofer y los altavoces
de forma vertical sobre una superficie lisa. La pantalla se
encuentra abajo a la derecha en la parte frontal del
aparato.
Posición vertical
` El aparato y el subwoofer tienen en su parte inferior
topes de caucho para que puedan ser colocados de
forma vertical sobre una superficie lisa. Los altavoces
disponen de pies premontados para poder
colocarlos de forma vertical. La superficie del mueble
queda protegida gracias a los topes de caucho.
10
Page 9
Colocar el aparato
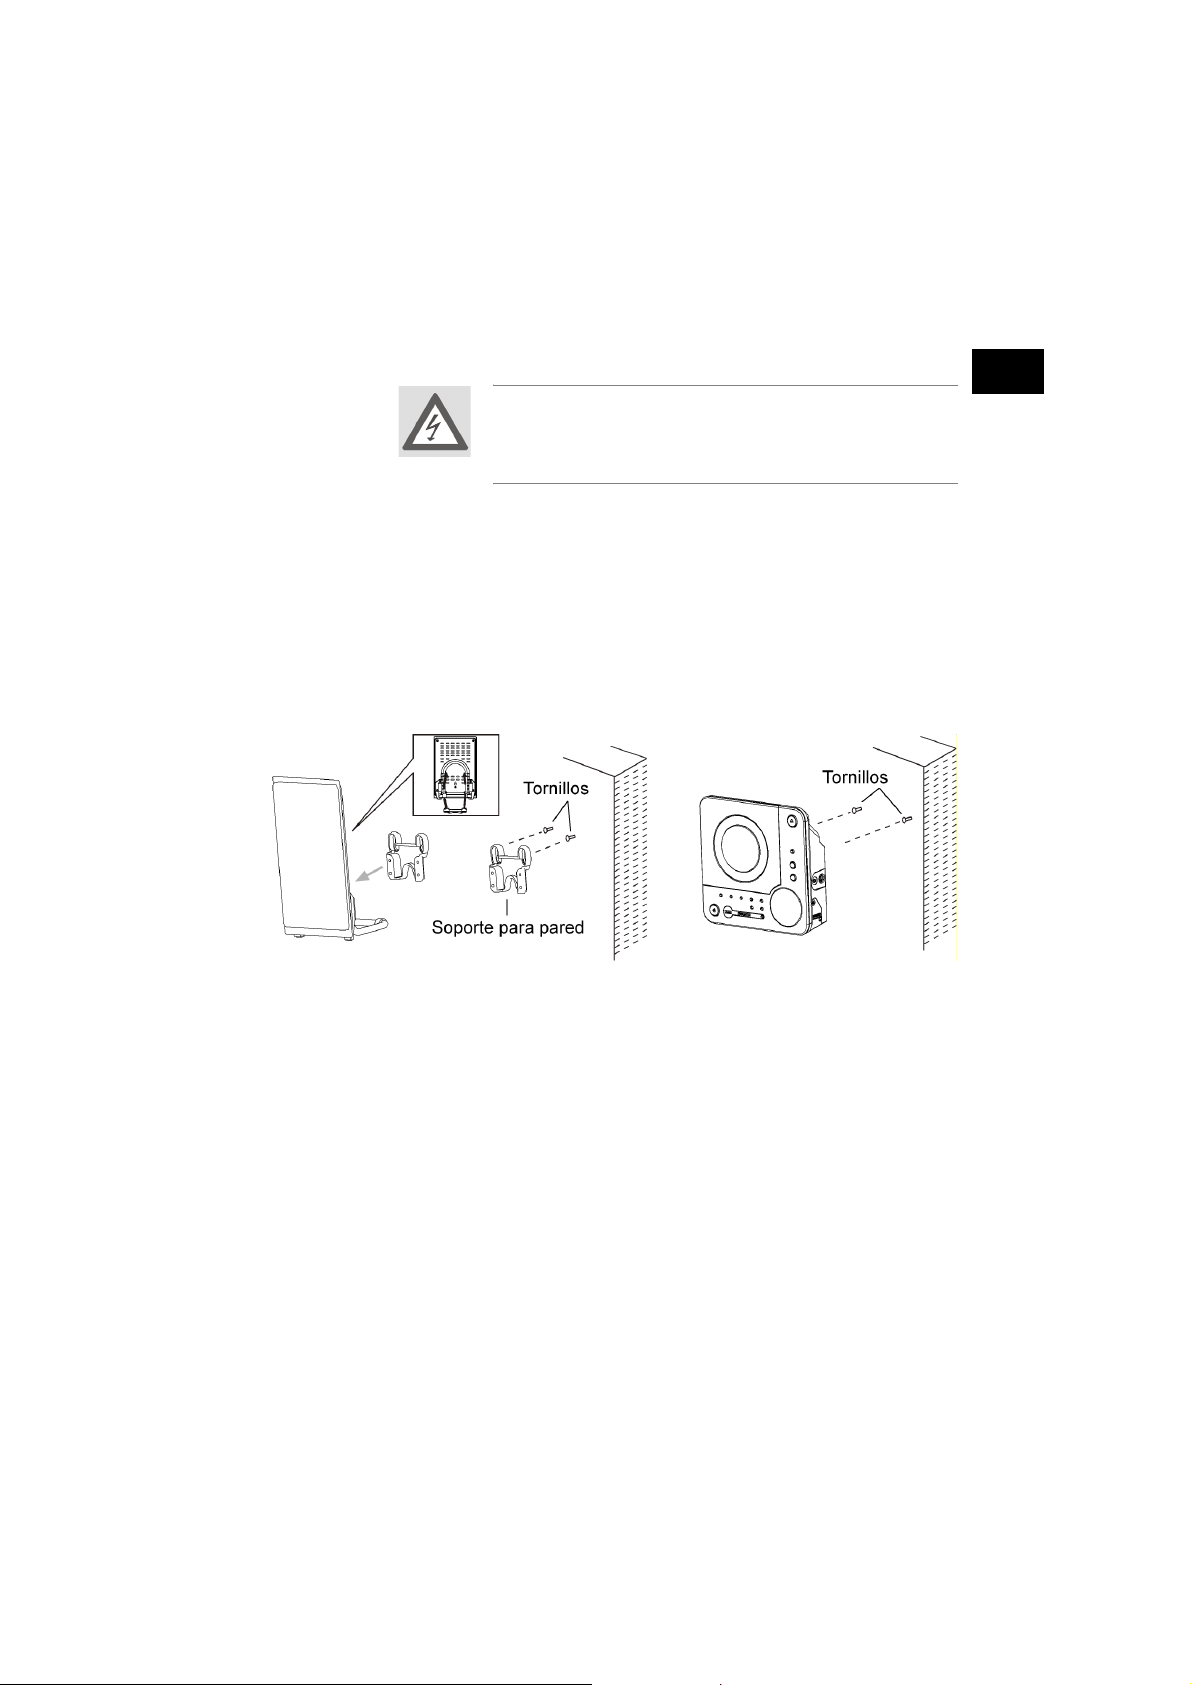
Para el montaje sobre pared
¡ATENCIÓN!
Asegúrese de que no se encuentren cables o tuberías
de suministro dentro de la pared antes de taladrar los
agujeros para el montaje.
` Marque los agujeros a taladrar.
` Taladre en estas marcas 6 agujeros para espigas de 6
mm.
` Introduzca las espigas de plástico de 6 mm en los
agujeros taladrados.
` Introduzca los tornillos en las espigas y apriételos
con un destornillador.
` Cuelgue el aparato principal y los altavoces
enganchándolos en las bocallaves previstas.
ES
Sistema de Sonido Micro CD/MP3 MD 81834 11
Page 10
Puesta en funcionamiento
Puesta en funcionamiento
Desembalar
` Retire todos los materiales de embalaje. Cuando abra
el compartimento para CDs, retire la protección de
transporte.
¡ATENCIÓN!
No permita que los niños pequeños jueguen
con el plástico. ¡Existe peligro de asfixia!
Compruebe el volumen de suministro
Cuando desembale la caja, asegúrese de que están incluidos los siguientes artículos:
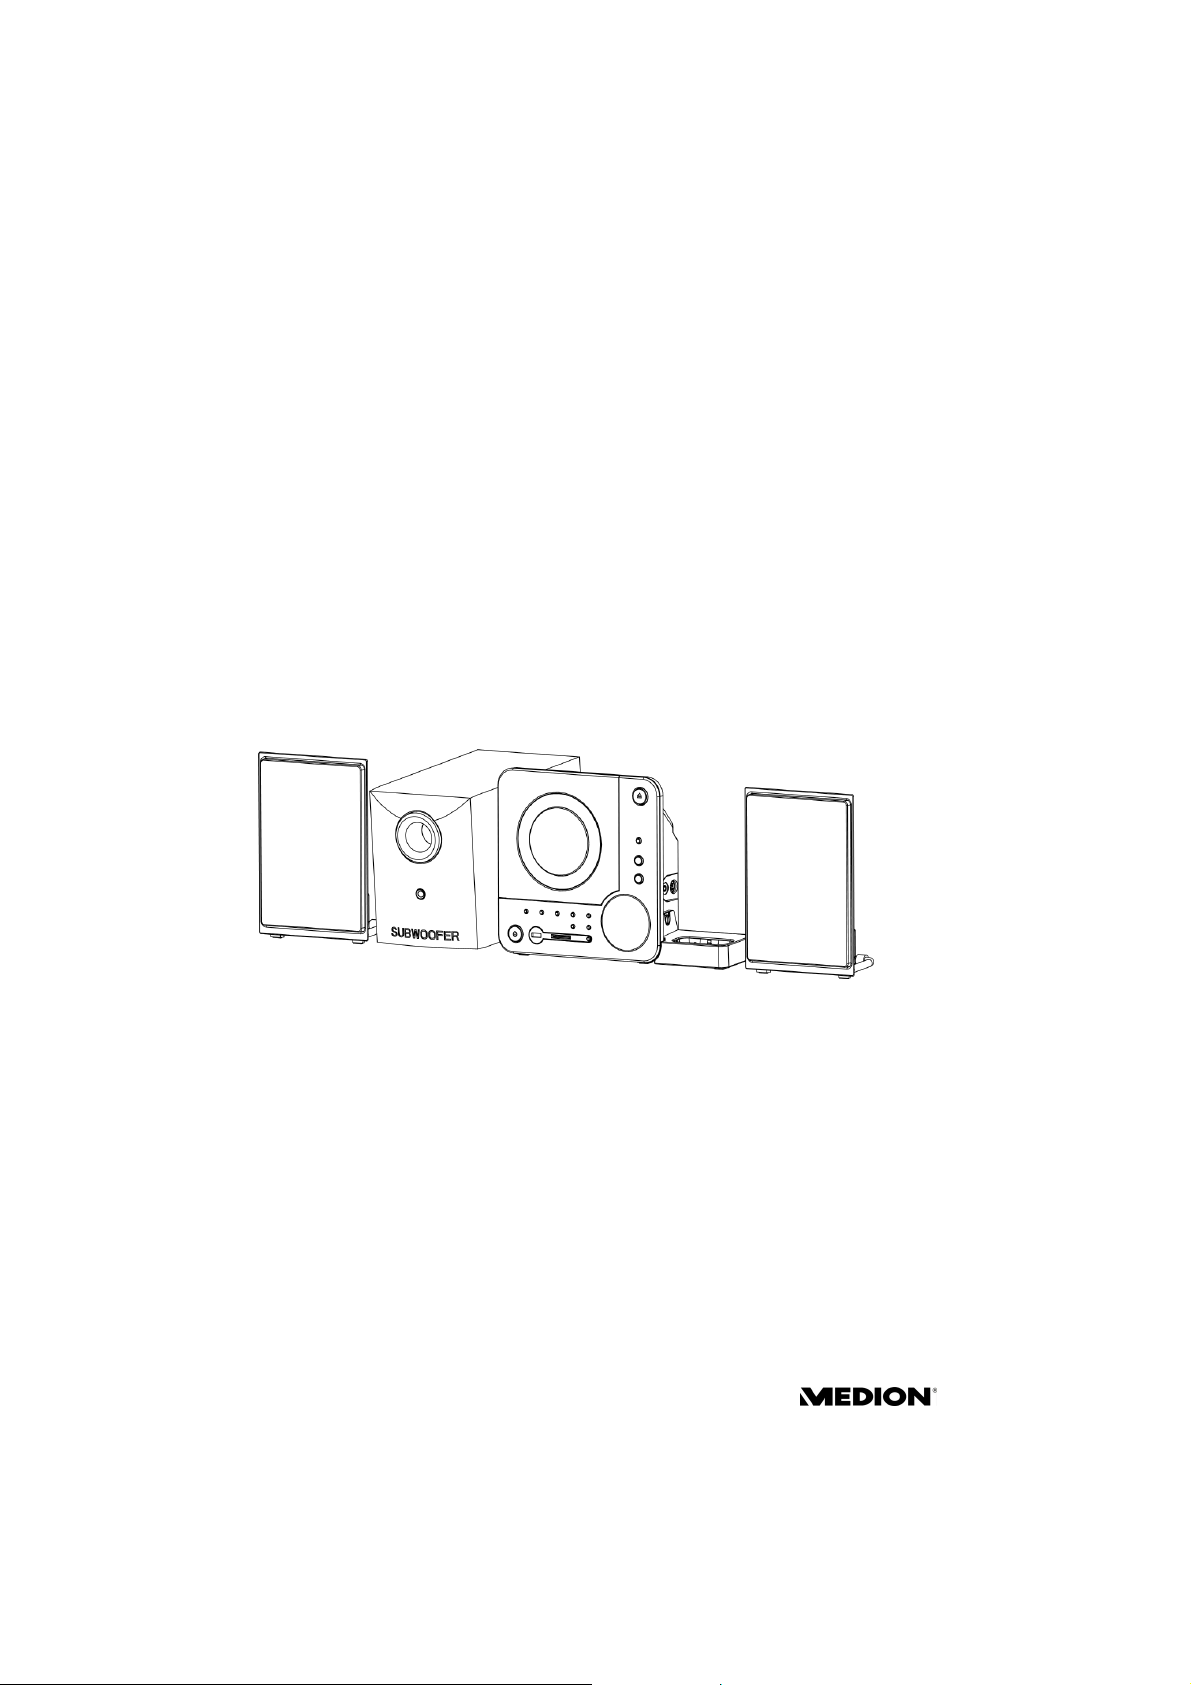
1 Equipo de Sonido Micro CD/MP3
2 altavoces con tecnología NXT
1 Subwoofer
1 mando a distancia
1 antena de cable
1 cable de conexión para el subwoofer
1 Estación iPOD-Docking
Instrucciones de funcionamiento y documentos de garantía
NXT
Trademark of New Transducers Limited
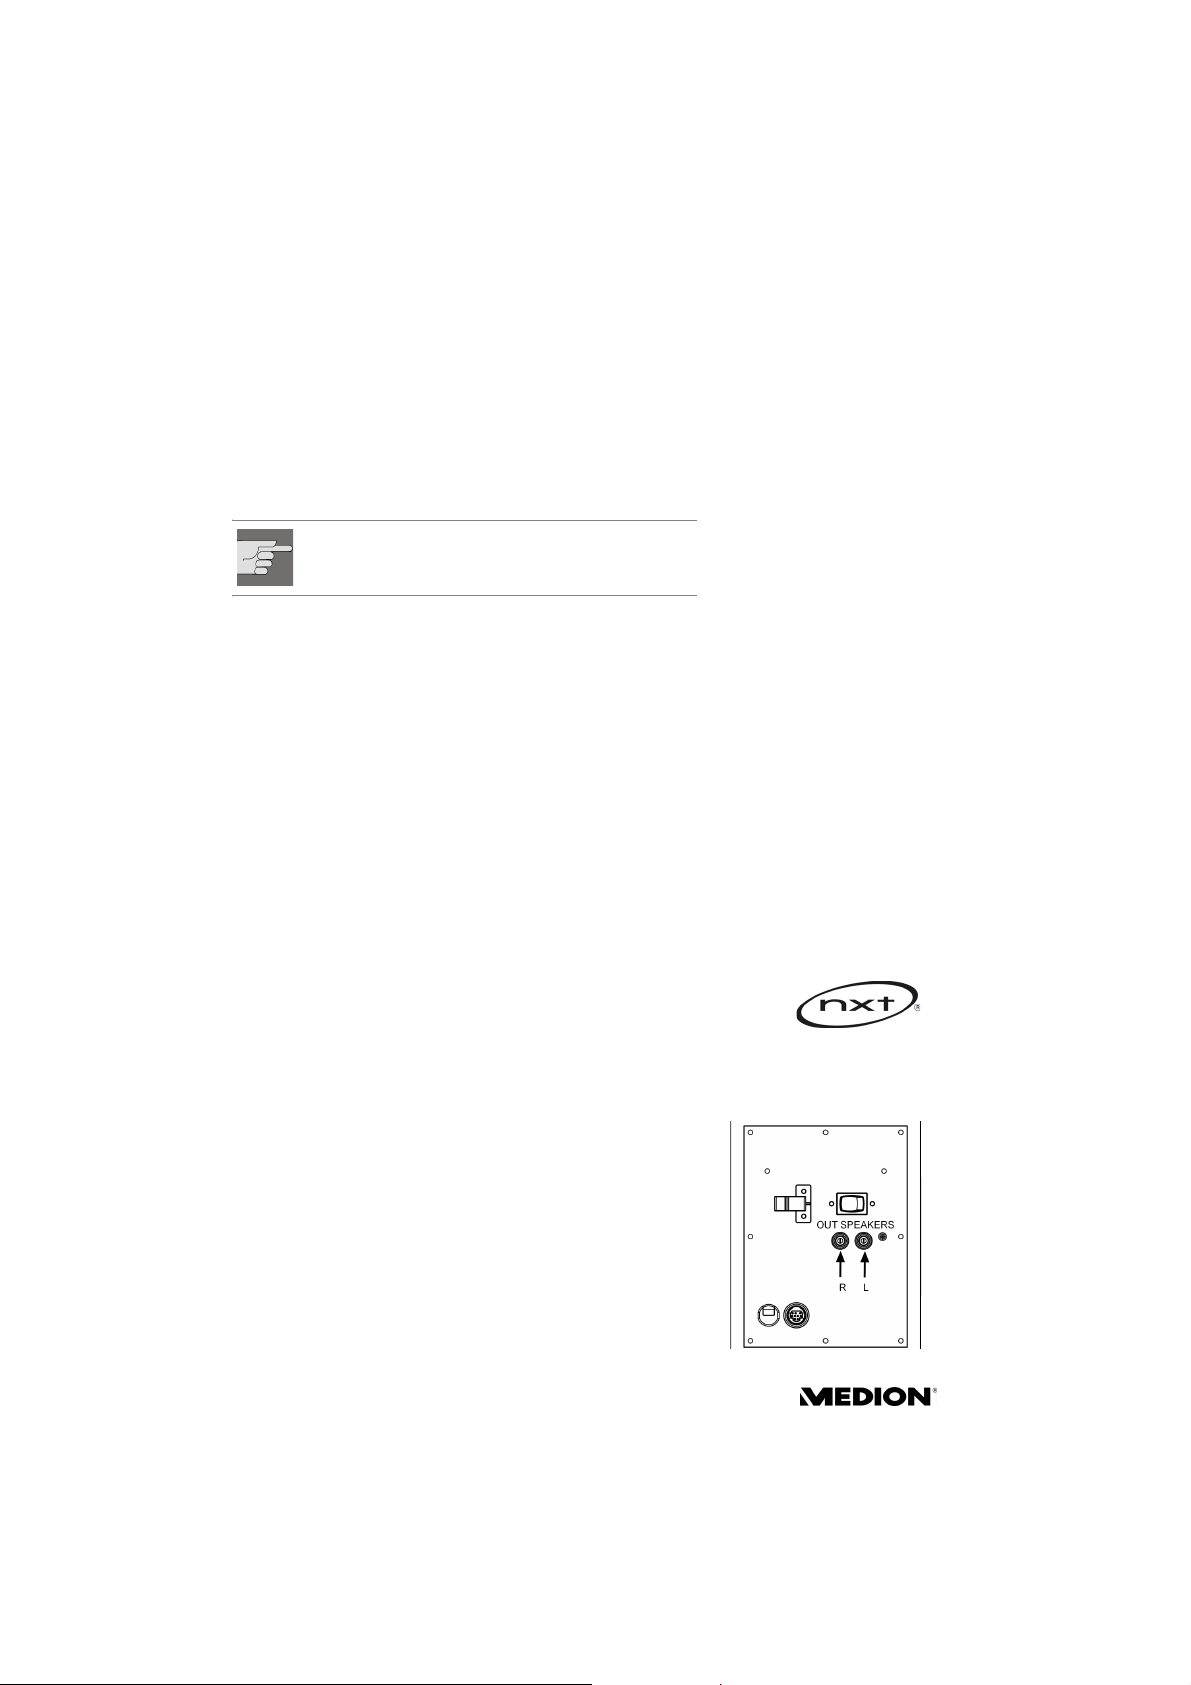
Conectar la tecnologia de altavoces NXT
` Conecte las clavijas cinch de los altavoces con las
tomas de color correspondientes del lado posterior
del subwoofer (OUT SPEAKERS). Rojo (R) es para la
toma del altavoz derecho y blanco (L) para la toma
del altavoz izquierdo.
12
Page 11
Puesta en funcionamiento
Conexión AUX IN
Se puede utilizar AUX IN (pulsar la tecla FUNCTION hasta
que en la pantalla aparezca
señalde audio externa (p. ej. de un reproductor de
cassette).
AUX) para la conexión a una
` Ponga el aparato en modo standby.
` Desconecte su aparato externo.
` Enchufe el extremo del cable Cinch (no incluido en el
volumen de suministro) en la clavija de entrada AUX
del lado derecho del aparato (preste atención a la
polaridad correcta de los canales derecho e
izquierdo).
` Conecte el otro extremo del cable Cinch a su aparato
externo.
` Conecte su aparato externo.
` Conecte su aparato pulsando la tecla STANDBY .
` Pulse la tecla FUNCTION del aparato o del mando a
distancia hasta que en la pantalla aparezca “AUX“.
Ahora se reproduce la señal de audio de su aparato
externo.
Conectar subwoofer
` Introduzca el extremo del cable de conexión
CONNECT WOOFER) en la toma (FROM MAIN) de la
(
parte posterior del
extremo del cable de conexión (
con la toma (
subwoofer está conectado con el aparato.
SUBWOOFER. Conecte el otro
CONNECT MAIN)
TO WOOFER) del aparato. Ahora el
ES
Conexión iPOD-Docking
Se puede conectar al aparato una estación iPOD-Docking.
Entonces en esta estación Docking se pueden utilizar
diferentes adaptadores. La estación iPOD-Docking dispone
en su lado posterior también de una salida (VIDEO OUT).
` Introduzca, como se indica en la figura en dirección
de la flecha, la estación iPOD-Docking en la toma
DOCKING IN).
(
Sistema de Sonido Micro CD/MP3 MD 81834 13
Page 12
Puesta en funcionamiento
` A continuación apriete el tornillo de la estación iPOD-
Docking en sentido de las agujas del reloj. Ahora se
puede usar la estación iPOD-Docking.
Colocación de las pilas en el mando a
distancia
Coloque 2 pilas Mignon 1,5 V, LR 6, tamaño AAA (no
incluidas en el suministro) en el mando a distancia.
` Abra la tapa del compartimento de las pilas pulsando
el clip de cierre en la dirección de la flecha.
` Coloque las pilas de tal modo que el polo negativo
esté en contacto con los muelles.
` Vuelva a colocar la tapa del compartimento de las
pilas.
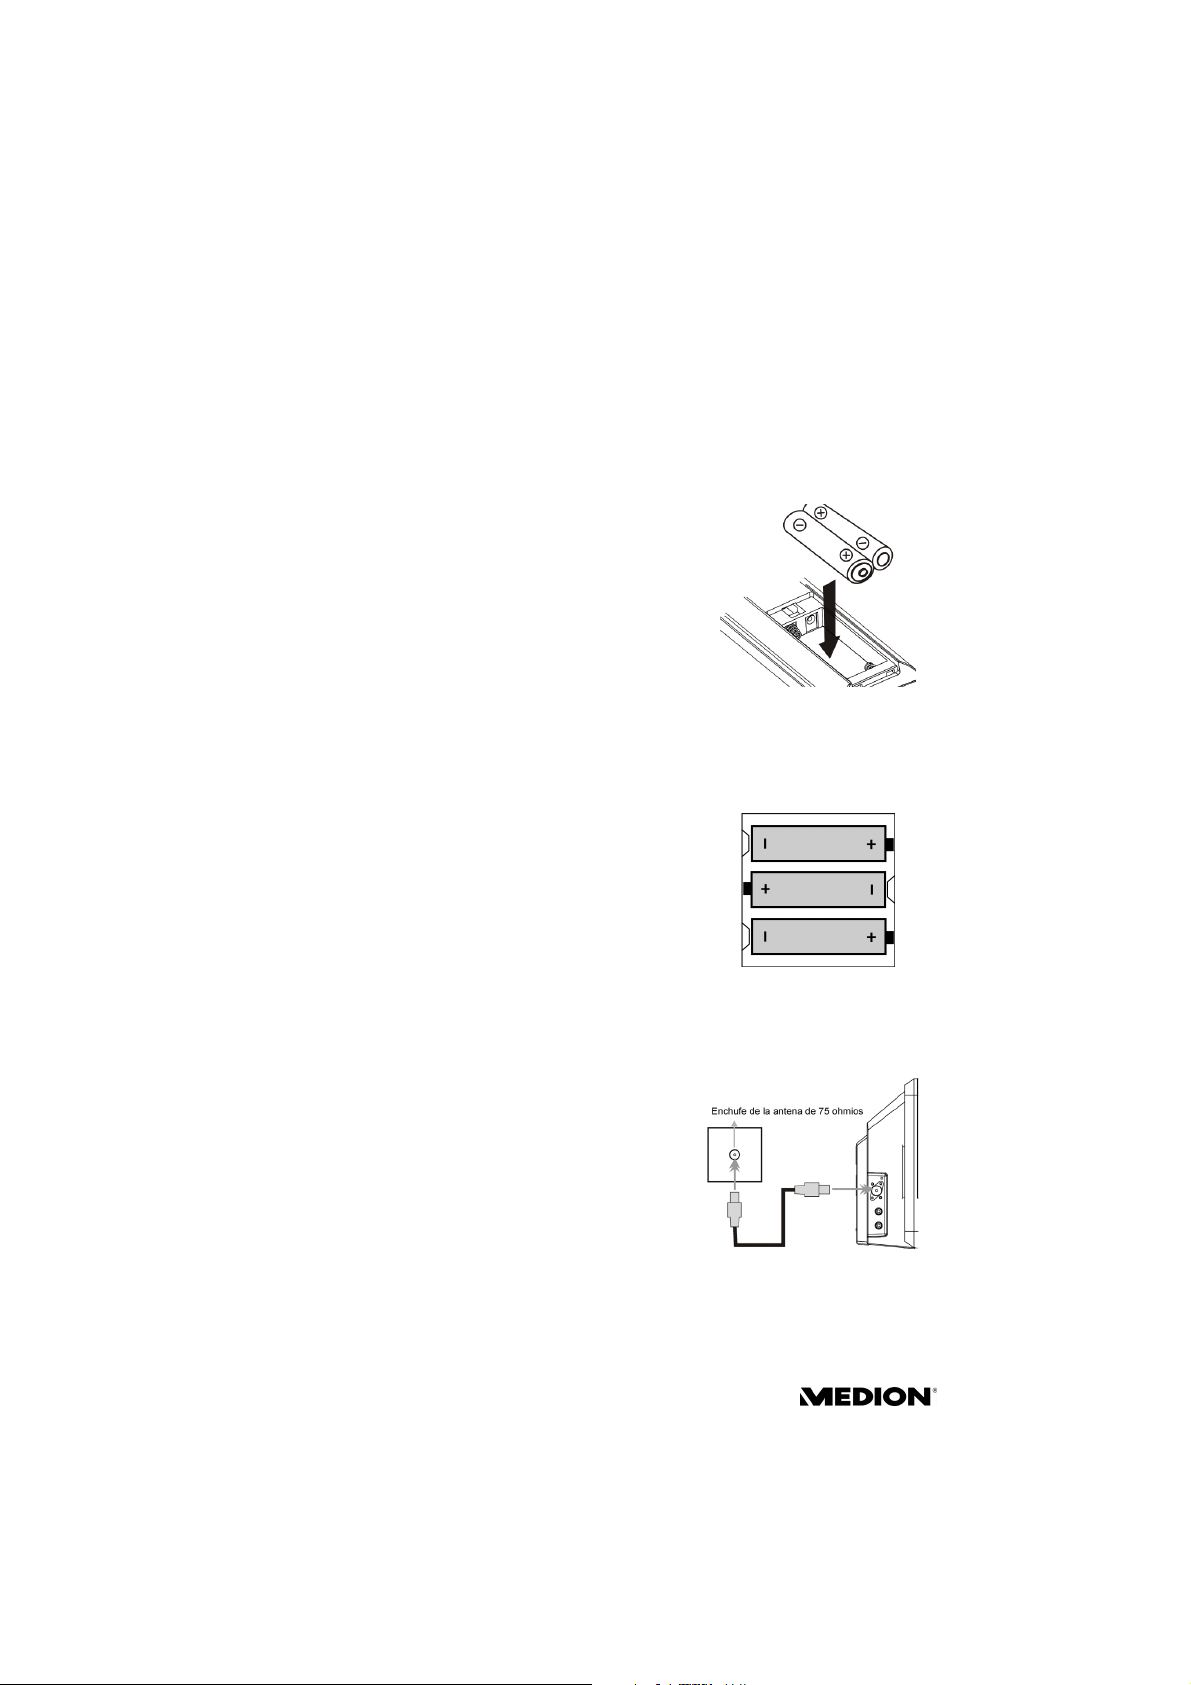
Colocar las pilas en el aparato
Coloque 3 pilas Mignon 1,5 V, LR 03, tamaño AAA (no
incluidas en el suministro) en el aparato. Las pilas sirven
para el almacenamiento de datos en caso de un corte de
luz.
` Abra la tapa del compartimento de las pilas pulsando
el clip de cierre en la dirección de la flecha.
` Coloque las pilas de tal modo que el polo negativo
esté en contacto con los muelles.
` Vuelva a colocar la tapa del compartimento de las
pilas.
Toma de antena
En la parte izquierda del aparato se encuentra la
entrada para la toma de antena (
puede conectar el aparato através de un cable de
antena de 75 ohmios (no incluido en el suministro)
en el enchufe de la antena.
Para la recepción de FM el aparato dispone de una
antena de cable que debería ajustar para una
recepción óptima.
Para la recepción AM, el aparato dispone de una
antena direccional de ferrita instalada de forma fija.
Por esta razón tal vez deberá girar el aparato para
una recepción óptima.
14
FM ANT). Aquí se
Page 13

Puesta en funcionamiento
Conectar los auriculares
` En la parte derecha del equipo se encuentra la toma
para auriculares (
auriculares con una clavija jack de 3,5 mm. Los
altavoces se desconectarán entonces
automáticamente.
¡ATENCIÓN!
Un volumen alto al usar auriculares puede
causar una pérdida auditiva. ¡Antes de
ponerse los auriculares, asegúrese de ajustar
el volumen al mínimo! ¡Su oído puede
dañarse si se mantiene el volumen muy alto o
si el oído se expone de golpe a un volumen
alto!
PHONES). Conecte unos
Conexión a la red
` Enchufe el aparato a una toma de corriente de
230 V ~ 50 Hz.
ES
Sistema de Sonido Micro CD/MP3 MD 81834 15
Page 14
Funciones básicas
Funciones básicas
Encender/Apagar - POWER
Antes conecte el aparato en el subwoofer (ON). El
interruptor ON/OFF se encuentra en el lado posterior del
subwoofer. Ahora el aparato se encuentra en Modo
Standby. La pantalla aparece ensombrecida. La hora
parpadeará mientras todavía no esté ajustada.
` Para conectar el aparato pulse la tecla STANDBY del
aparato o la tecla
Ahora el aparato está conectado y en la pantalla
aparece
frecuencia de radio.
En funcionamientos subsiguientes, en la pantalla
aparece el ultimo modo de funcionamiento
seleccionado (
HELLO; y en el primer funcionamiento, la
` Para desconectar el aparato, pulse la tecla STANDBY
del aparato o del mando a distancia. El aparato indica
Good BYE.
` Ahora, el aparato se encuentra en el modo Standby y
se ilumina un LED rojo en el subwoofer.
` En la pantalla aparece la hora.
STANDBY del mando a distancia.
CD, USB, SD/MMC, iPOD, AUX, TUNER ).
Ajuste del reloj
` Pulse la tecla iPOD/MEM/CLOCK-ADJ. en el modo
Standby del aparato. Seleccione entre la indicación
de hora en formato de 24 ó 12 horas con la tecla
SEARCH o . Vuelva a pulsar la tecla iPOD/
MEM/CLOCK-ADJ. . El indicador de las horas
parpadea. Introduzca las horas dentro de un plazo
de 6 segundos.
` Pulsela tecla SEARCH o repetidamente, o
manténgala pulsada, hasta que se indique la hora correcta.
` Vuelva a pulsar la tecla iPOD/MEM/CLOCK-ADJ. hasta
que parpadee el indicador de minutos. Introduzca
los minutos dentro de un plazo de 6 segundos.
` Pulse la tecla SEARCH o repetidamente, o
manténgala pulsada, hasta que se indiquen los
minutos correctos.
` Vuelva a pulsar la tecla iPOD/MEM/CLOCK-ADJ. . La
hora está ajustada y las cifras ya no parpadean.
16
Page 15
Radio
Radio
` Seleccione la función de radio (TUNER) con la tecla
FUNCTION del aparato o con la tecla FUNCTION del
mando a distancia (en caso necesario, conectarlo
antes mediante
` Ahora, el aparato puede recibir la banda de
frecuencia FM (UKW).
Ajustes de sonido
VOLUME – Volumen
` Pulse VOLUME (+) o (-) del aparato o del mando a distancia para aumentar o
disminuir el volumen. Aparecerá el nivel de volumen (máximo 30).
EQ (ecualizador):
` Pulse la tecla EQ del aparato o del mando a distancia para acceder a una
imagen acústica deseada:
Los tipos de sonido preajustados son
CLASSIC, POP.
Silencio
` Para apagar completamente el volumen, pulse MUTE (solamente en el mando
a distancia). En la pantalla parpadea el nivel de volumen. – Mediante
VOLUME se vuelve a activar el volumen.
STANDBY).
PASS (ajuste estándar), ROCK, JAZZ,
MUTE o
ES
Sintonización de las emisoras
` Pulse repetidamente TUNING o (del aparato
o del mando a distancia) varias veces para ajustar
manualmente una frecuencia determinada.
` Si se mantiene TUNING o presionadas unos
instantes, se inicia una búsqueda automática. La
búsqueda se detendrá al encontrar la primera
emisora potente.
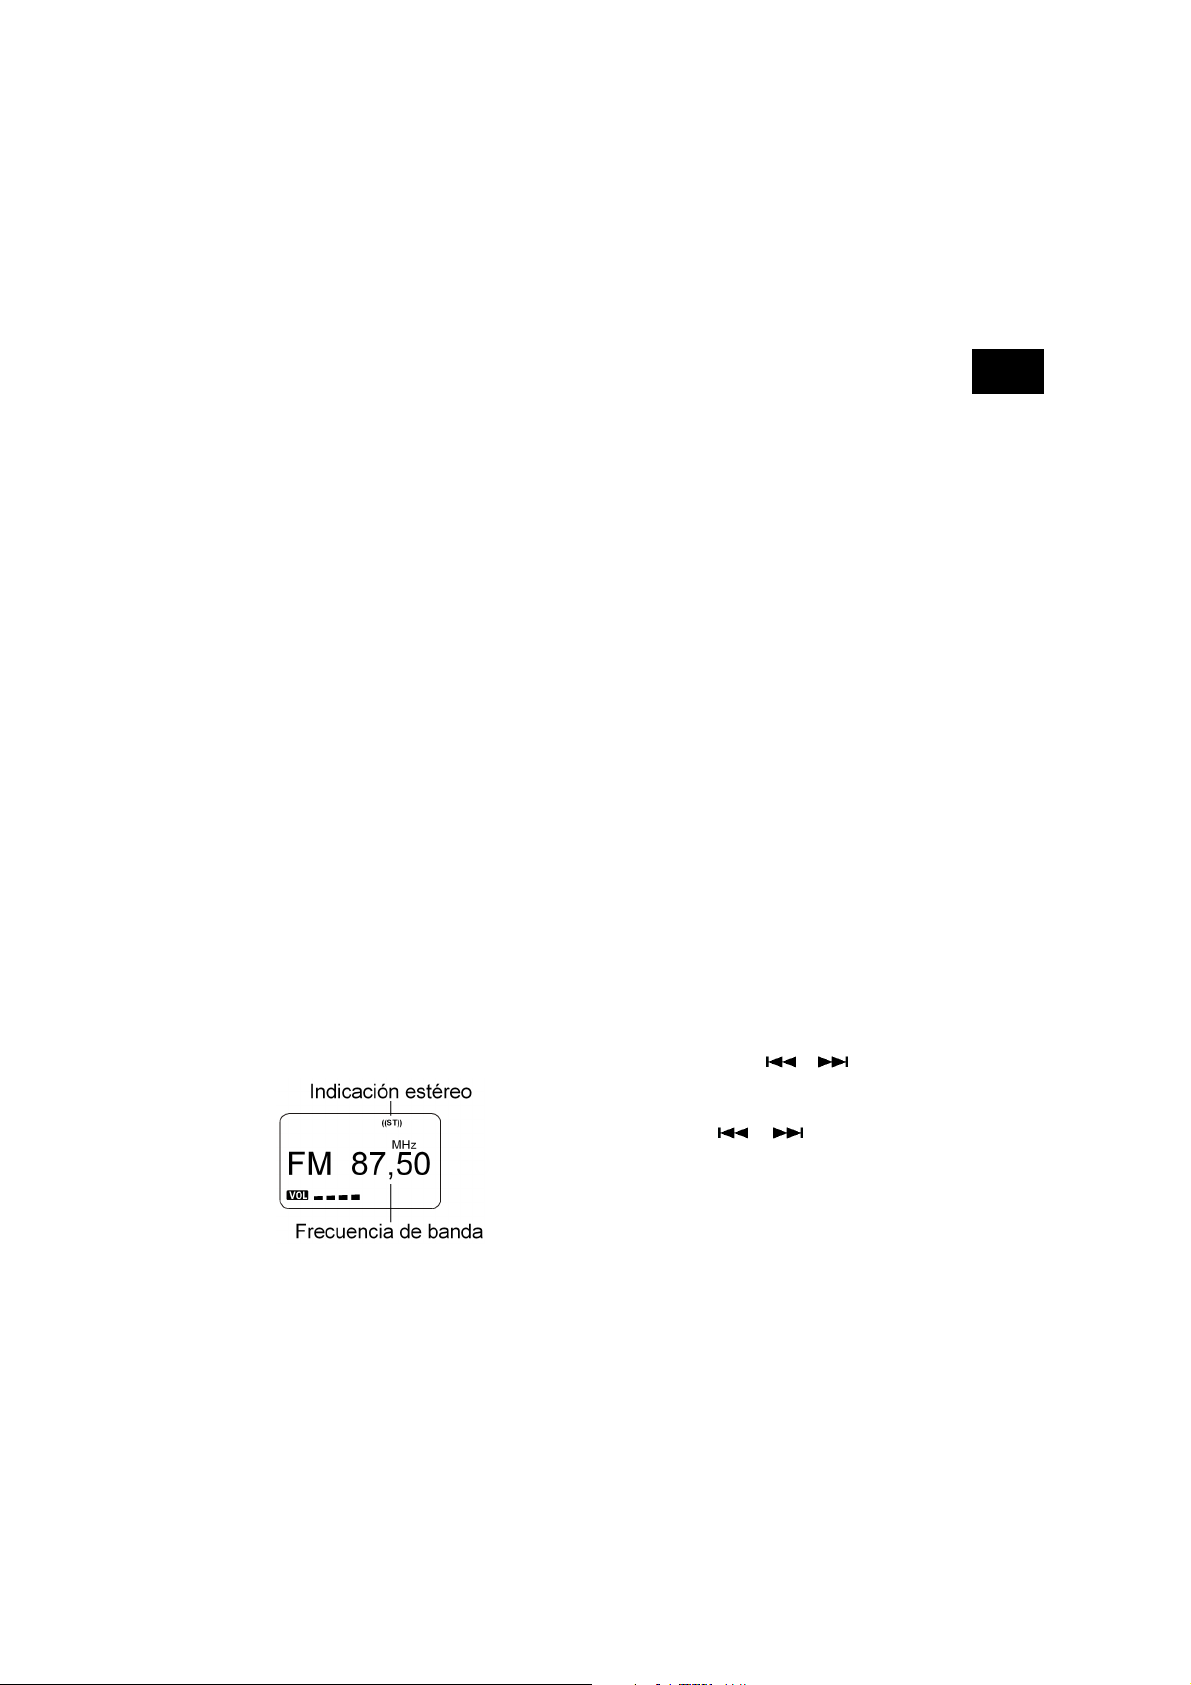
Si en la banda FM (UKW) se encuentra una emisora estéreo
aparece la indicación ((ST)).
Sistema de Sonido Micro CD/MP3 MD 81834 17
Page 16
Radio
Mono/Estéreo
La recepción estéreo de una emisora en el área FM se indica
en la pantalla. En caso de una recepción estéreo débil
(interferencias) recomendamos cambiar a Mono.
` Pulse la tecla del mando a distancia ID3/ESP/MONO/
ST para cambiar entre recepción estéreo y mono.
Memorizar y activar una emisora
Puede memorizar hasta 30 emisoras FM.
Ajuste una emisora que desee memorizar.
` Pulse la tecla del aparato o del mando a distancia
iPOD/MEM/CLOCK-ADJ.
parpadeando la indicación para el número de
presintonía.
` Mientras esté parpadeando la indicación, seleccione
PRESET/FOLDER (UP o DN) del aparato o del
con
mando a distancio el número de presintonía para
esta emisora.
` Vuelva a pulsar iPOD/MEM/CLOCK-ADJ. del aparato
o del mando a distancia para memorizar la emisora;
la posición de presintonía seleccionada (p. ej.,
permanecerá en pantalla.
Para memorizar más emisoras, repita estos pasos.
En la pantalla aparece
01)
Seleccionar una emisora
Pulsando la tecla PRESET/FOLDER (UP or DN) del
aparato o del mando a distancia se vuelve a acceder a la
emisora memorizada.
18
Page 17
MODO CD-/MP3-/WMA-/USB-CARD
MODO CD-/MP3-/WMA-/USB-CARD
Advertencias relativas al compartimento de CDs
• No coloque objetos extraños en el compartimento de CDs, dado que
podrían dañar su mecanismo.
• No deje la tapa del compartimento de CDs abierta durante mucho
tiempo a fin de evitar que entre polvo.
• No toque en ningún caso la lente en el compartimento de CDs.
• Si el CD está muy sucio o si tiene muchas huellas dactilares, puede
ocurrir que se produzcan retrasos en la reproducción o que ésta
empiece en otro sitio.
• Si la lente está sucia, pueden producirse interrupciones durante la
reproducción u otras irregularidades.
• Si quiere limpiar las partículas de polvo del compartimento de CDs,
utilice un pincel soplador como los que se venden en tiendas
especializadas en fotografía.
Soportes de datos reproducibles
Con el aparato se puede reproducir tanto CDs de
audio (incl. CD-Rs y CD-RWs) como CDs-MP3.
Además se pueden reproducir con este aparato
títulos MP3 desde un Memory Stick con clavija USB
(versión USB 1.1 y 2.0). Rogamos que observe que
no se puede garantizar al cien por cien la
compatibilidad con todos los Memory Sticks.
Las funciones de reproducción son casi
todas idénticas para estos soportes de
datos y por ello se describen conjuntamente.
ES
Acerca de “MP3”
Los discos con títulos en formato MP3 casi siempre
son discos creados por uno mismo que, como CDs
de datos utilizados en el ordenador, pueden estar
estructurados en carpetas, subcarpetas y archivos
individuales (títulos individuales). Normalmente,
los discos MP3 contienen muchos más títulos
individuales que un CD Audio por lo que aumenta la
velocidad de lectura y de navegación.
Sistema de Sonido Micro CD/MP3 MD 81834 19
Page 18
Modo USB-CARD
Al crear discos MP3 se graban los así llamados ID3Tags (según el programa de ajuste solamente
opcional). Estos ID3-Tags pueden contener
información como el nombre del intérprete, el
nombre de la obra y eventualmente más
información.
Con la función MP3 de su aparato se pueden leer
estos ID3-Tags y hacer que aparezcan en la pantalla.
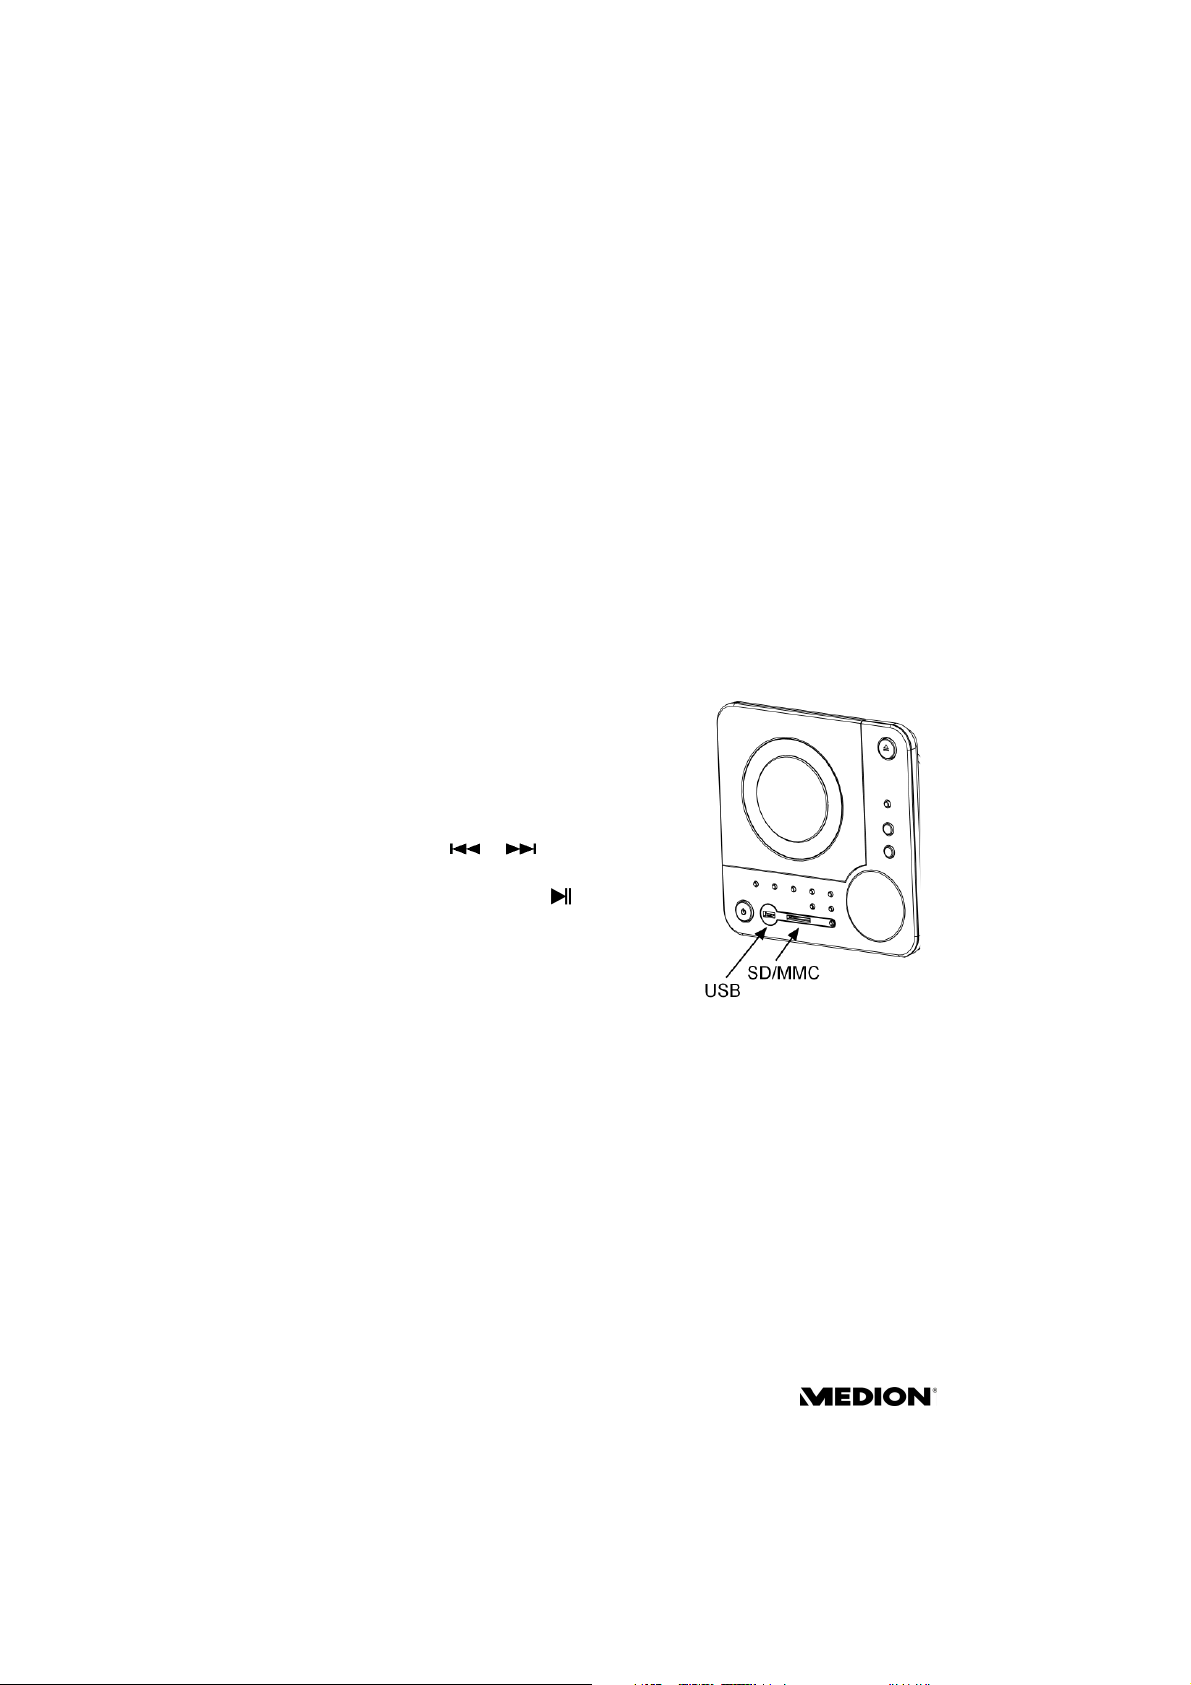
Modo USB-CARD
Función USB-CARD
` Introduzca el USB-Stick o la tarjeta SD/MMC en la
ranura prevista de la parte frontal del aparato.
` Pulse la tecla STANDBY del aparato o del mando a
distancia para encender el apararato.
` Pulse la tecla FUNCTION y seleccione la función USB
o SD/MMC.
` Pulse la tecla PRESET/FOLDER (UP o DN) del
aparato o del mando a distancia para seleccionar una
carpeta.
` Pulse la tecla SEARCH o del aparato o del
mando a distancia para seleccionar un título.
` Pulse la tecla PLAY/PAUSE/ENTER del aparato o
del mando a distancia para iniciar la reproducción.
Si los títulos existentes (MP3/WMA) están escritos en
formato ID3, pulse la tecla ID3/ESP/MONO/ST. y en la
pantalla aparecerá ID3 ON. La búsqueda se inicia
automáticamente. Si desea salir de la función ID3, vuelva a
pulsar la tecla ID3/ESP/MONO/ST. y en la pantalla
aparecerá ID3 OFF.
20
Page 19
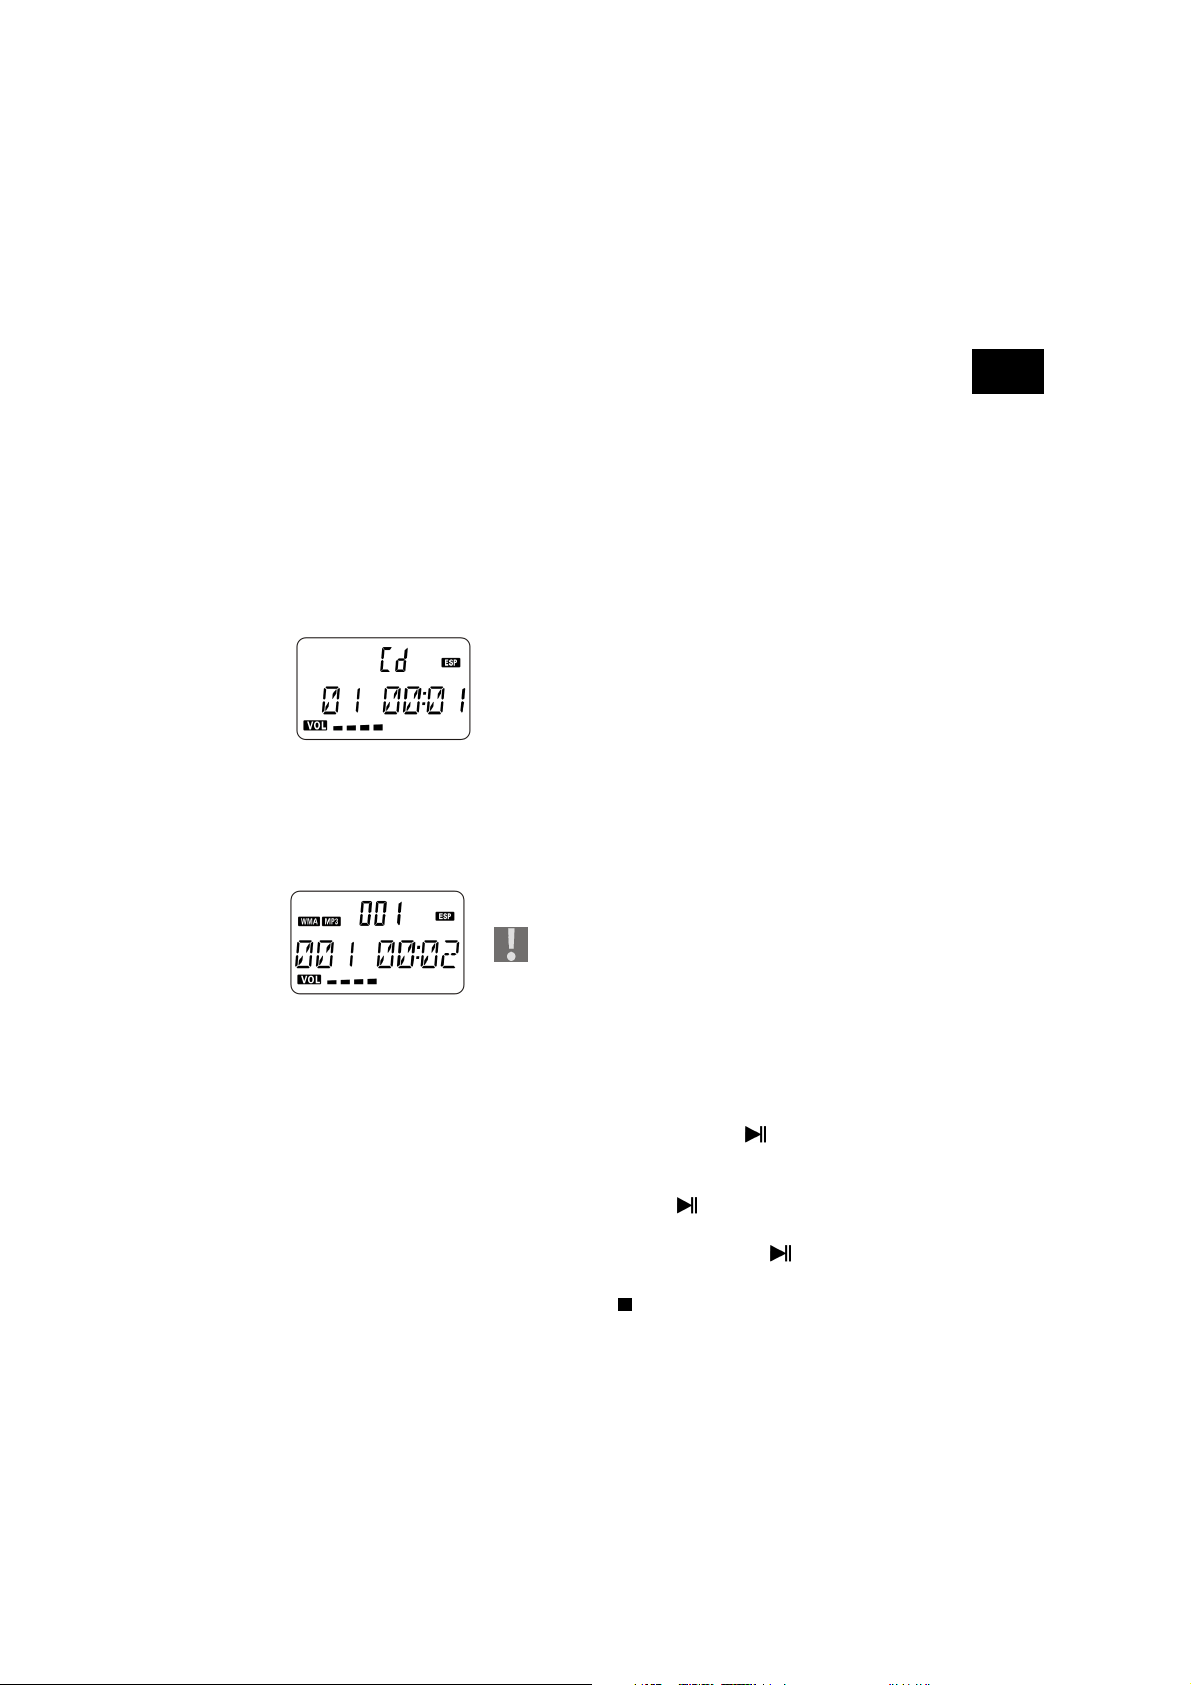
Reproducir CDs
Reproducir CDs
CD audio
Con el aparato se puede reproducir CDs de audio (CD-Rs, CD-RWs, MP3, WMA).
Introducir y extraer discos
` Pulse la tecla FUNCTION del aparato o del mando a
distancia y seleccione el modo CD que aparece en la
pantalla.
` Abra el compartimento para CDs, pulsando la tecla
OPEN/CLOSE del aparato. La tapa CD se abre hacia
arriba.
` Coloque un CD en el compartimento con el lado
impreso hacia arriba.
` Cierre el compartimento del CD pulsando
nuevamente la tecla
tecla Play del mando a distancia.
El CD empieza a girar y en la pantalla aparece
READ
.
` El CD inicia automáticamente la reproducción.
Si no se ha colocado ningún disco o un disco ilegible,
en la pantalla aparece
No abra el compartimento para CDs, si el CD todavía
se está reproduciendo o girando. Antes, pulse STOP.
Para retirar un CD, cójalo por los lados y al mismo
tiempo presione cuidadosamente hacia abajo el
soporte del centro.
OPEN/CLOSE o pulsando la
NO DISC.
ES
CD
PLAY, PAUSE, STOP, salto al siguiente título
` Pulse la tecla PLAY/PAUSE del aparato o del
mando a distancia para iniciar la reproducción.
` Para interrumpir la reproducción, vuelva a pulsar la
PLAY/PAUSE . En la indicación de PAUSA
tecla
parpadea el tiempo transcurrido.
` Vuelva a pulsar PLAY/PAUSE para reanudar la
reproducción desde el mismo punto.
` Pulse STOP para detener la reproducción.
Sistema de Sonido Micro CD/MP3 MD 81834 21
Page 20
Reproducir CDs
` Para saltar al inicio del título pulse la tecla o
del aparato o del mando a distancia.
` Si se mantiene pulsada la tecla o se inicia una
búsqueda rápida.
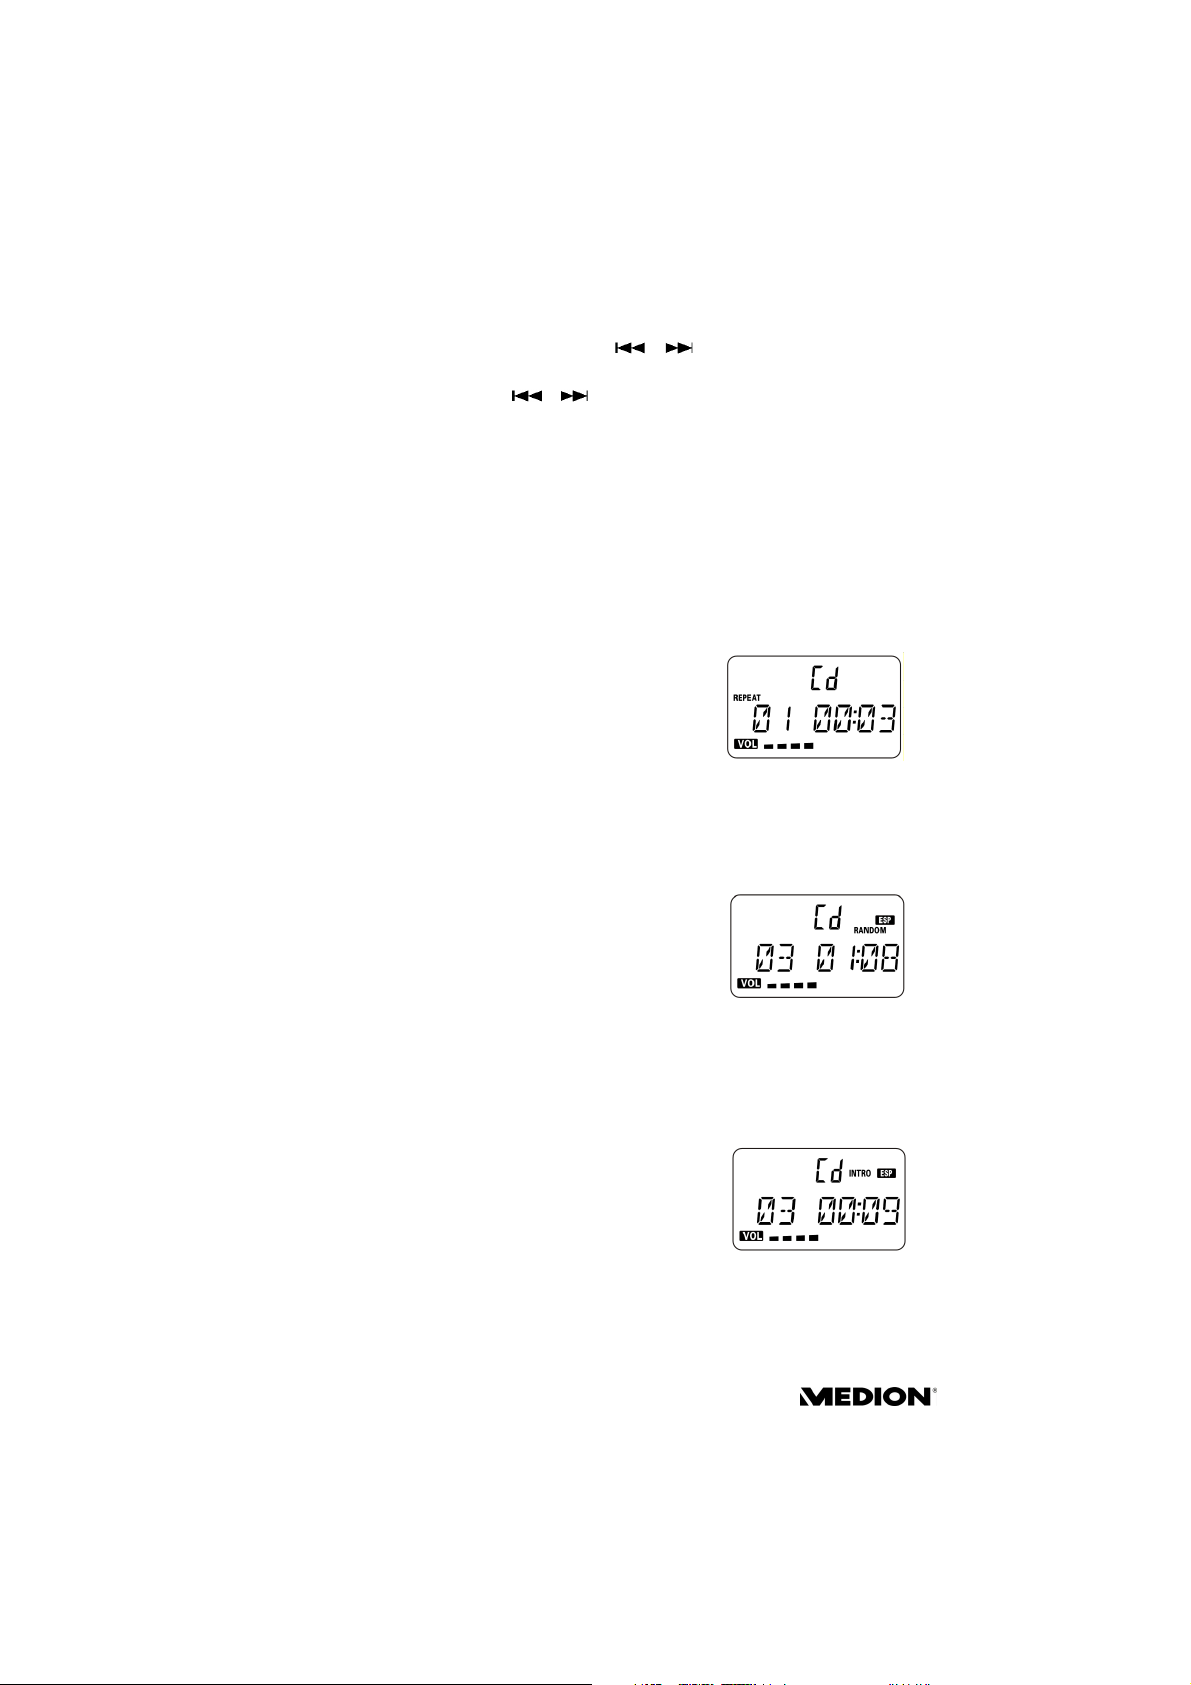
Modos de reproducción REPEAT, RANDOM,
INTRO
REPEAT – Funciones de repetición
` Durante la reproducción o estando en el modo de
parada, pulse la tecla
o del aparato. En la pantalla aparecerá
repite el título actual.
` Vuelva a pulsar la tecla REPEAT del mando a
distancia o del aparato. Ahora en la pantalla aparece
REPEAT ALL. Se repiten todos los títulos.
` Para finalizar la función REPEAT, pulse la tecla
REPEAT, hasta que desaparezca la indicación.
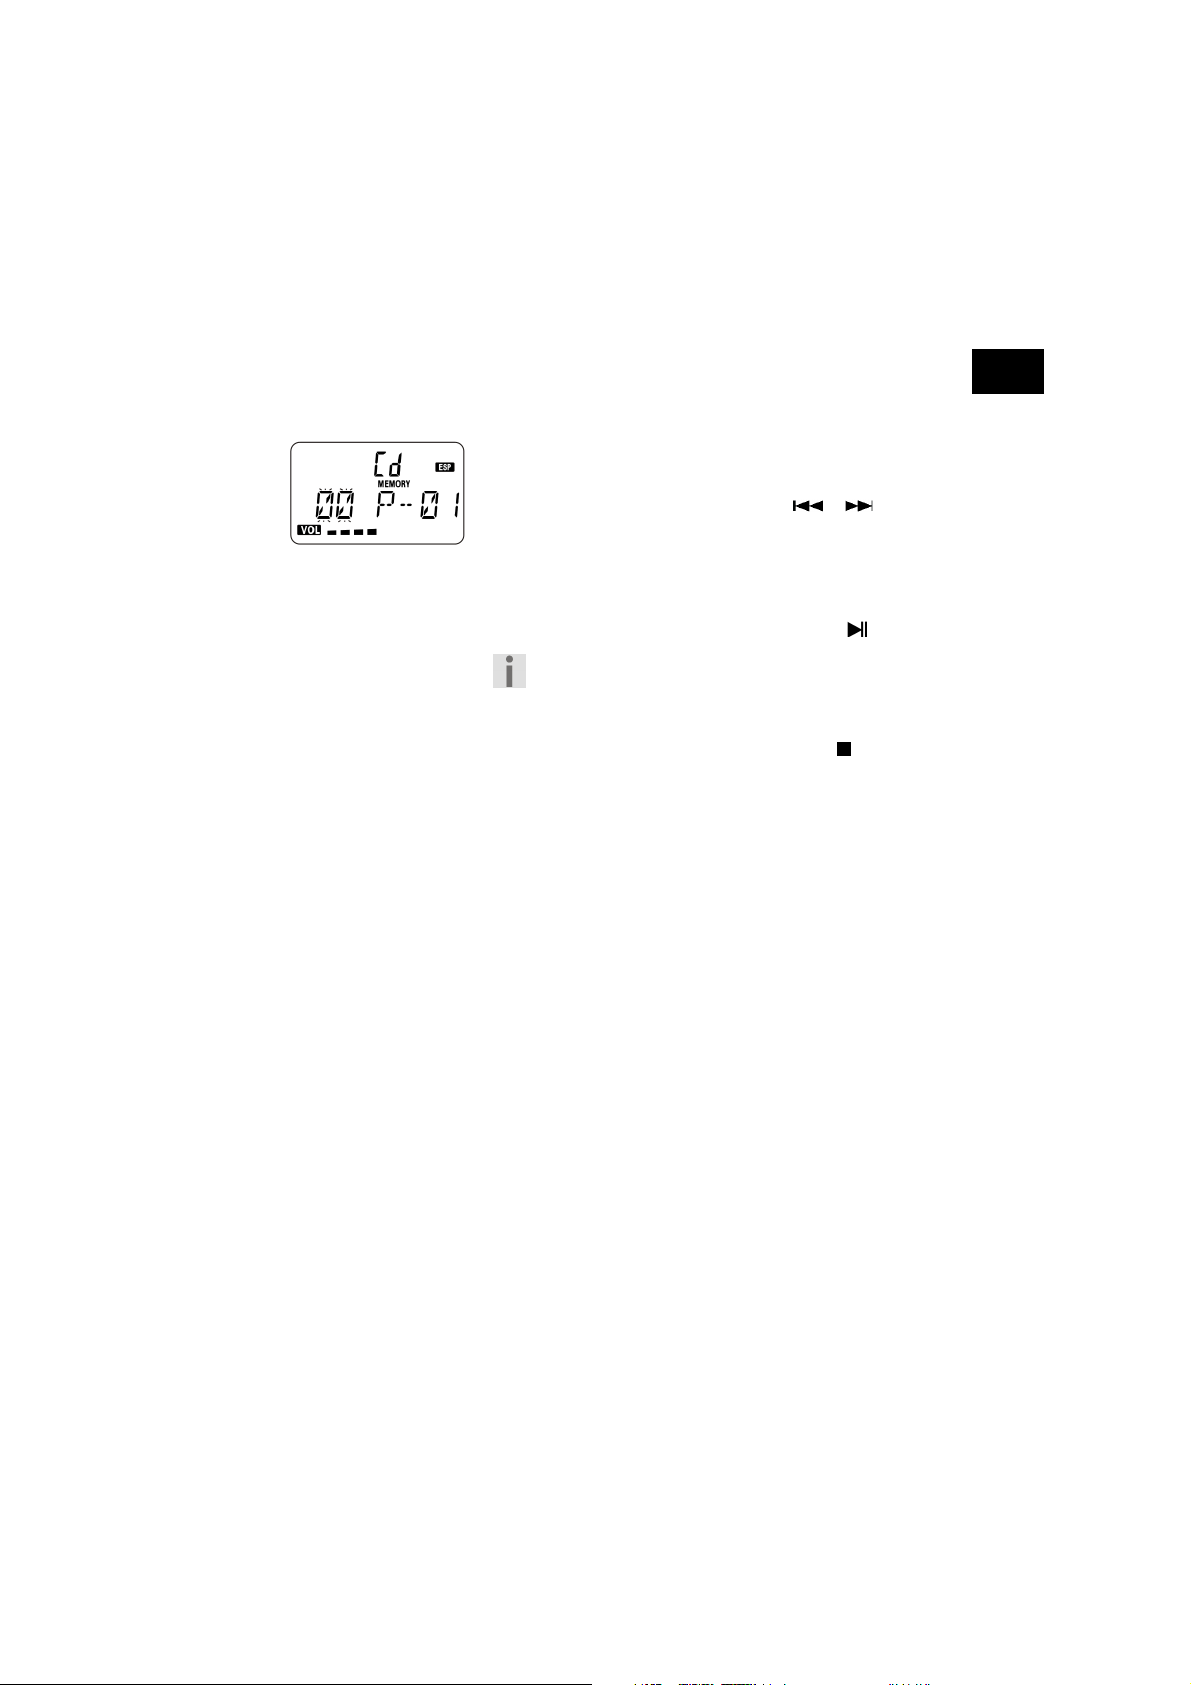
RANDOM - Reproducción aleatoria
Con la función RANDOM se reproducen todos los títulos
en un orden aleatorio.
` Durante la reproducción o estando en el modo de
parada, pulse la tecla
distancia. Se inicia la reproducción aleatoria.
` Vuelva a pulsar la tecla RANDOM para cambiar al
modo de reproducción normal.
REPEAT del mando a distancia
REPEAT. Se
RANDOM del mando a
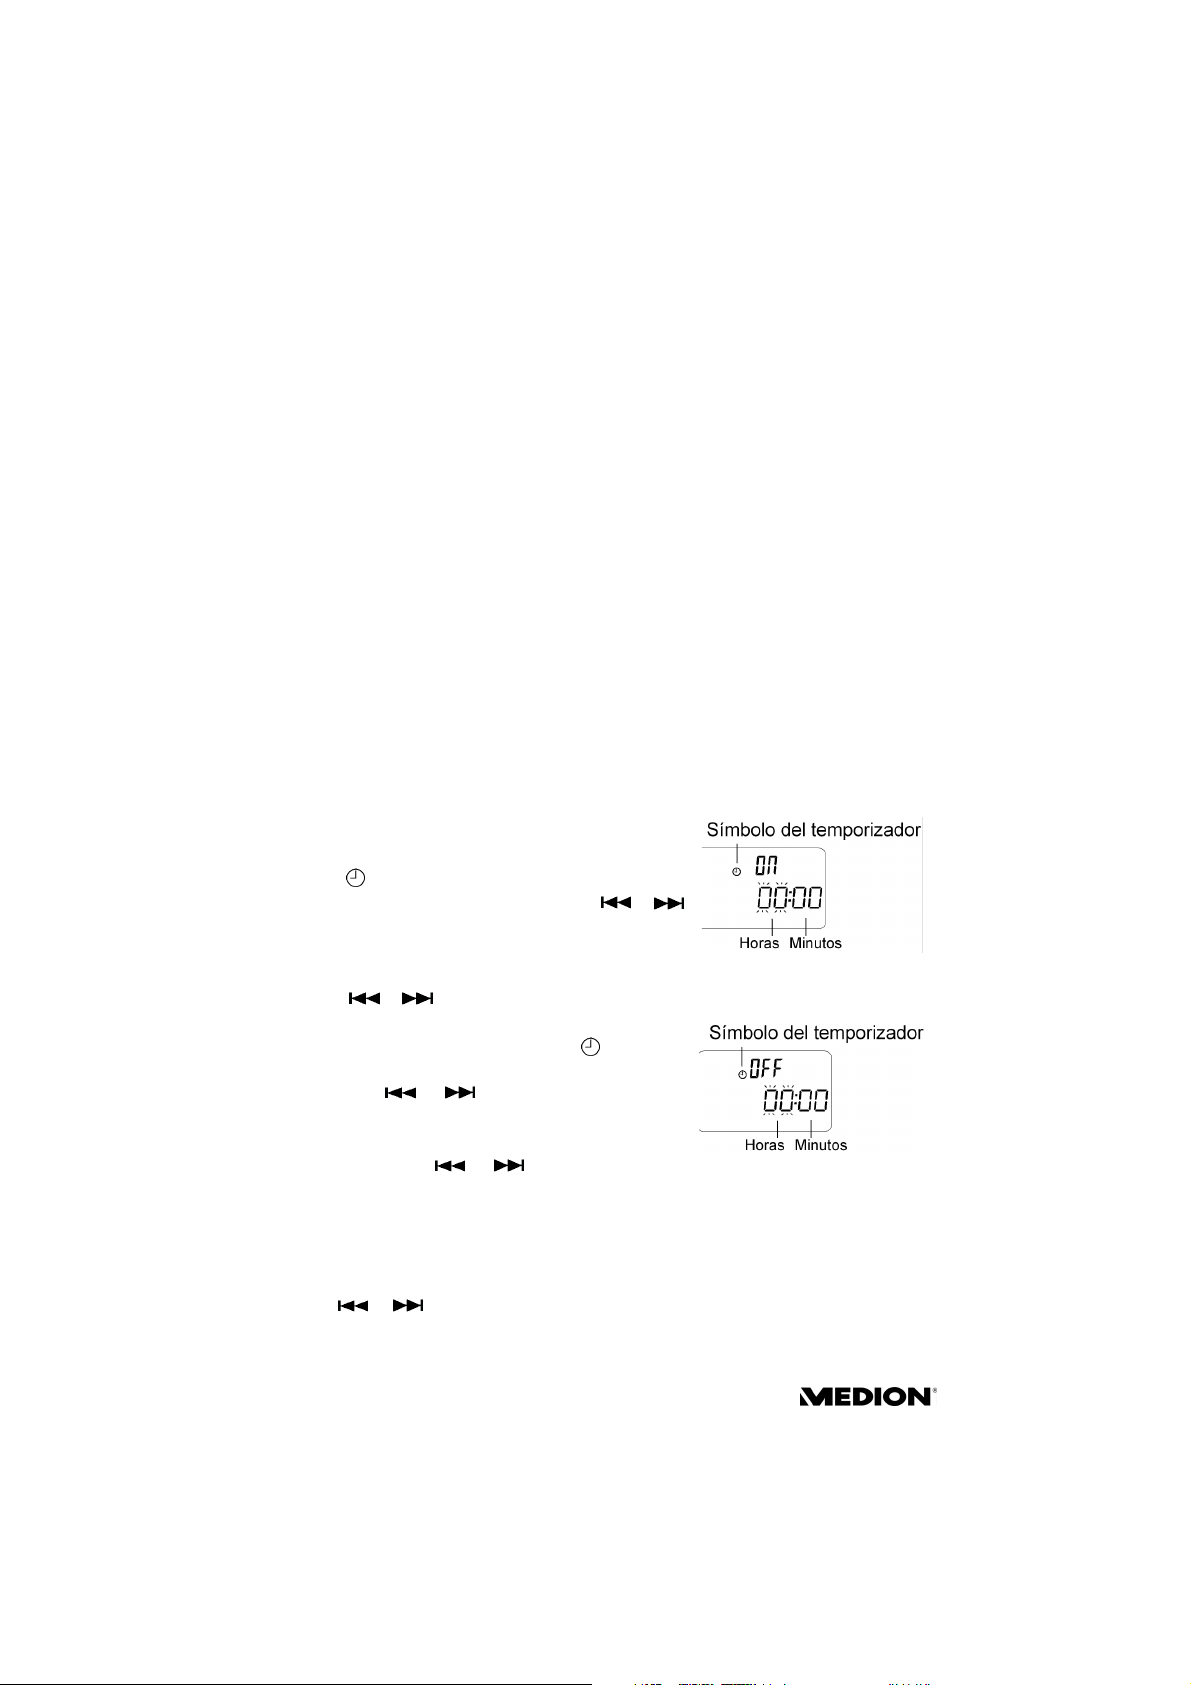
INTRO PLAY – iniciar título
` Pulse la tecla INTRO del mando a distancia. Ahora
Intro Play se ha iniciado. Se inician todos los títulos
que se encuentran en el CD durante 10 segundos.
` Vuelva a pulsar la tecla INTRO del mando adistancia
y Usted volverá encontrarse en el modo de
reproducción normal.
22
Page 21
Reproducir CDs
Programación del orden de reproducción
Puede programar el orden de reproducción de hasta 64
títulos. Para ello, el aparato debe encontrarse en modo de
parada.
` Pulse la tecla iPOD/MEM/CLOCK-ADJ del aparato o
del mando a distancia. En pantalla aparece
` Seleccione con la tecla SEARCH o
un título. El título se memoriza al volver a pulsar la
tecla iPOD/
MEM/CLOCK-ADJ . En pantalla aparecerá
Pr:0 2.
` Repita estos pasos para memorizar otros títulos.
` Si desea reproducir la lista, pulse PLAY .
Puede emplear las funciones de repetición, tal y
como se describe arriba, con la lista programada.
Modificar la lista programada
Finalice la reproducción con la tecla STOP . Vuelva a
pulsar la tecla iPOD/MEM/CLOCK-ADJ y en la pantalla
aparecerá
nuevo como desee.
MEMORY. Ahora Usted podrá ocupar la lista de
Eliminación de la lista programada
Se eliminará la lista programada
si se abre el compartimento del CD,
y si se desconecta el aparato de la red.
MEMORY.
ES
Sistema de Sonido Micro CD/MP3 MD 81834 23
Page 22
Conexión y desconexión programada (“Temporizador“) (“Función
Conexión y desconexión programada
(“Temporizador“) (“Función Apagado automático”)
Se puede ajustar el aparato de tal forma que se conecte o
desconecte a una hora preajustada (Función Temporizador).
Seleccionar la fuente de música.
Para que puedan iniciarse la radio o un CD a una hora
preajustada, las fuentes deberán estar preparadas
correspondientemente:
Radio: Seleccione la función de radio, sintonice la
emisora de radio deseada, ajuste el volumen y
conecte el aparato en modo Standby.
CD: Inserte el CD deseado, seleccione la función CD
y conecte el aparato en el modo Standby.
Ajustar el temporizador
Así se ajusta la hora de conexión y desconexión:
` Ponga el aparato en modo standby.
` Pulse la tecla TIMER del aparato o del mando a
distancia para ajustar la hora de conexión. Aparece la
indicación
` Pulse dentro de un plazo de 6 segundos o
(SKIP),
` Vuelva a pulsar la tecla TIMER. En pantalla parpadea
la indicación de los minutos.
` Ajuste con o los minutos.
` Vuelva a pulsar la tecla TIMER , para ajustar la hora
de desconexión. Aparece la indicación OFF y la
cifra de hora parpadea.
` Pulse SEARCH o para ajustar la hora.
` Vuelva a pulsar la tecla TIMER. En pantalla parpadea
la indicación de los minutos.
` Ajuste con SEARCH o los minutos.
` Vuelva a pulsar la tecla TIMER. En la pantalla
parpadea ahora la indicación TUNER. Vuelva a pulsar
la tecla TIMER para confirmar TUNER. Ahora
parpadea la indicación VOLUME en la pantalla.
Seleccione el volumen deseado con las teclas
SEARCH o y vuelva a confirmar con la tecla
TIMER.
ON y la cifra de hora parpadea.
para ajustar la hora.
24
Page 23
Conexión y desconexión programada (“Temporizador“) (“Función
El temporizador está ajustado. – En la pantalla se volverán
a indicar todos los parámetros ajustados y volverá a
aparecer la hora así como el símbolo de hora para el
temporizador programado.
Desconectar el temporizador
` Pulse la tecla TIMER del mando a distancia.
` Desaparecerá el símbolo de hora y el
temporizador queda desconectado.
Ajustar el apagado automático
Así se conecta SLEEP:
` Pulse la tecla SLEEP del mando a distancia. En
pantalla aparecerá
` Mantenga pulsada la tecla SLEEP hasta que esté
ajustado el tiempo deseado (máx. 90 minutos y mín.
10 minutos).
` Se indica el tiempo ajustado y SLEEP está activado.
Así se desconecta SLEEP:
` Pulse la tecla SLEEP repetidas veces hasta que
desaparezca en la pantalla la indicación
SLEEP .
SLEEP.
ES
Sistema de Sonido Micro CD/MP3 MD 81834 25
Page 24
Funciones iPOD
Funciones iPOD
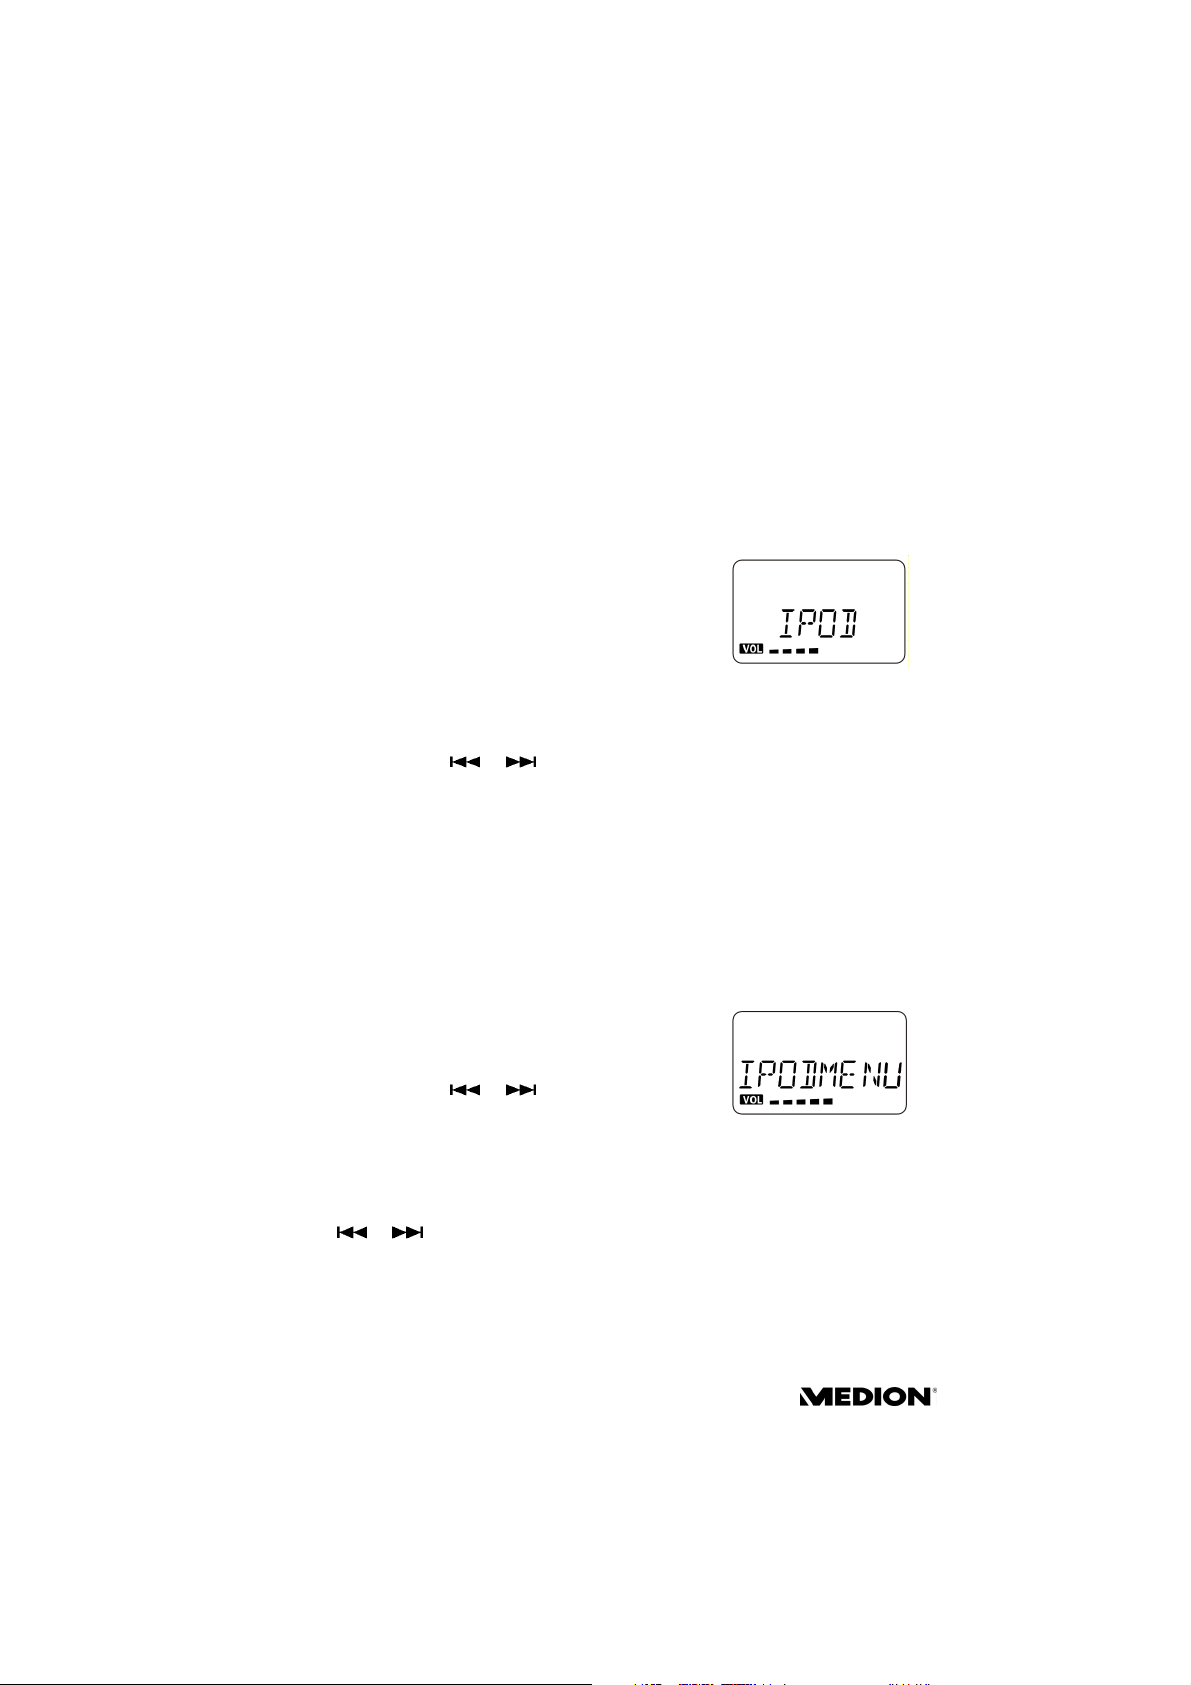
Así se utilizan las funciones iPOD
` Coloque el reproductor iPOD en la estación Docking.
` Ponga el aparato en modo Standby y seleccione con
la tecla
aparece la indicación
` Pulse la tecla PLAY/PAUSE/ENTER y el iPOD inicia la
reproducción.
` Pulse la tecla STOP/MENU para detener la
reproducción.
` Pulse la tecla PLAY/PAUSE/ENTER para interrumpir
la reproducción.
` Vuelva a pulsar la tecla PLAY/PAUSE/ENTER para
reanudar la reproducción en el mismo sitio.
` Pulse la tecla SEARCH o del aparato o del
mando a distancia para seleccionar un título.
` También se pueden seleccionar las funciones
REPEAT (repetir título) y RANDOM (reproducción
aleatoria) en el aparato o en el mando a distancia.
FUNCTION el modo iPOD. En la pantalla
iPOD.
Así se utiliza el menú iPOD
` Pulse la tecla iPOD/MEM/CLOCK-ADJ y se abrirá el
modo iPOD. En la pantalla aparecela indicación
` Pulse la tecla STOP/MENU para acceder al menú
iPOD (Music, Extras, Photo Import, Settings, Shuffle
Songs, Backlight, Now Playing).
` Pulse la tecla SEARCH o delaparato o del
mando a distancia para seleccionar un punto de
menú.
` Pulse la tecla PLAY/PAUSE/ENTER para abrir este
punto de menú.
` A continuación podrá seleccionar con la tecla
SEARCH o . Para la confirmación pulse
eventualmente la tecla PLAY/PAUSE/ENTER
` Pulse la tecla STOP/MENU para volver al menú iPOD.
` Para la reproducción pulse la tecla iPOD/MEM/
CLOCK-ADJ
26
iPOD.
Page 25

Funciones iPOD
También se puede cargar el aparato iPOD en la estación
Docking. Para ello el aparato debe encontrarse en el modo
Standby.
Salida Vídeo Out (sólo para el aparato
iPOD)
` Ponga el aparato en modo standby.
` Conecte la salida Vídeo Out, en el lado posterior de
la estación Docking, mediante un cable de conexión
(no incluido en el volumen de suministro) con el
televisor.
` Pulse la tecla MENU del reproductor iPOD y
seleccione la función de Vídeo.
iPod es una marca/marca registrada de Apple Inc.
ES
Sistema de Sonido Micro CD/MP3 MD 81834 27
Page 26

Especificaciones técnicas
Especificaciones técnicas
Alimentación
Tensión: 230 V ~ 50 Hz
Potencia: 83 vatios
Potencia de salida: 2 x 5 vatios RMS + 30 vatios RMS
Radio
Banda FM: 87,5 – 108 MHz
Conexiones del aparato
Altavoces: toma jack de 3,5-mm, estéreo
AUX: entrada de audio Cinch
SUBWOOFER 9-polos
USB/Card
Reproductor de CDs, discos compatibles
Potencia del láser: Láser clase 1
Discos compatibles:
Audio-CD, CD-Rs, CD-RWs, MP3-Disc
Si reproduce un CD-audio, utilice únicamente aquellos
CDs que están señalados del siguiente modo:
Por favor, tenga en cuenta que:
En la actualidad existen muchos procesos de grabación de CDs, en parte no
estandarizados, y procesos de protección contra copias de CDs, así como
diversos CD-R y CD-RW vírgenes. Por ello, cabe la posibilidad de que en
algunos casos se produzcan retrasos o errores de lectura. Dichos fallos no
implican un defecto del aparato.
Si ocurriera que por una combinación de manejo no prevista, un intercambio de
datos erróneo o una descarga electroestática (Electro Static Discharge) no se puede
manejar el Micro-Equipo CD, desconéctelo en este caso de la red y, a continuación,
vuelva a enchufarlo.
¡Las especificaciones técnicas están sujetas a
cambios sin previo aviso!
28
Page 27

CD Micro System
CD Micro System
1. ANTENNA SOCKET: 75-ohm antenna connection
2. PHONO SOCKET : AUX input (R)
3. PHONO SOCKET : AUX input (L)
4. PRESET/FOLDER (UP) button : Preset station selector
up
5. REPEAT button: Repeat mode selector
6. PRESET/FOLDER (DN) button : Preset station
selector down
7. STANDBY button: On/off switch, standby function
8. USB SOCKET: USB stick input
9. CARD SOCKET: SD/MMC cards input
10. Button / TUNING : Downward frequency search,
auto-search, SKIP : Skip back;
SEARCH : Fast rewind
11. iPod/MEM/CLOCK-ADJ button: Select iPod mode,
memory mode, clock adj.-mode
12. Button / TUNING : Upward frequency search,
auto-search, SKIP : Skip forwards;
SEARCH : Fast forward
13. PLAY/PAUSE/ENTER button: Start/pause play,
enter for iPod
14. IR SENSOR : Remote control sensor
15. iPOD DOCKING STATION: Compartment for the iPod
device
16.LCD DISPLAY
17. STOP/MENU button: Stop playing, access menu
18. VOLUME button: Volume control low (-)
19. VOLUME + button : Volume control high (+)
20.FUNCTION button : Select CD, USB, SD/MMC, IPOD,
AUX, or TUNER
21. OPEN/CLOSE button : Open/close CD compartment
22.CD COMPARTMENT
23.PHONES: Headphone socket
24. CONNECTION SOCKET (TO WOOFER): Connection
cable socket
25.VIDEO OUT SOCKET: Connection socket for TV system
26.BATTERY COMPARTMENT: Battery compartment for
the memory
27. KEYHOLE NOTCHES: Holes for wall mounting
EN
CD/MP3 Micro Audio System MD 81834 3
Page 28

Remote control
1. STANDBY button: On/off switch, standby function
2. MUTE button : Mute
3. PRESET (UP) button : Preset station selector
4. PRESET (DN) button : Preset station selector
5. RANDOM button : Random playback selector
6. Button / TUNING : Frequency search downwards,
Auto search, SKIP : Skip back, SEARCH : Fast rewind
7. TIMER button : Select timer mode
8. VOLUME button: Volume control low (-)
9. FUNCTION button : Select CD, USB, SD/MMC, iPOD,
AUX or TUNER
10. INTRO button : Plays all tracks
11. ID3/ESP/MONO/ST. button: ID3 mode, ESP mode,
Select stereo/mono switch
12. REPEAT button: Repeat mode selector
13. PLAY/PAUSE/ENTER button: Play
Start/pause play, enter for iPod
14. EQ button : Equalizer mode select (PASS, ROCK,
JAZZ, CLASSIC or POP)
15.Button / TUNING : Upward frequency search,
auto-search, SKIP : Skip forwards,
SEARCH : Fast forward
16. STOP/MENU button: Stop play, menu for iPOD
17. iPod/MEM/CLOCK-ADJ. button: Select iPOD memory
clock mode
18. SLEEP button: Sleep mode selector
19.Number buttons: Select numbers
20.VOLUME button: Volume high (+)
Subwoofer
1. Standby display
2. Power cable
3. On/Off switch
4. Loudspeaker output (R), (L)
5. Connection cable socket (FROM MAIN)
4
Page 29

Contents
Safety instructions . . . . . . . . . . . . . . . . . . . . . . . . . . . . . . . . . . . . . . . . 7
Keep electrical equipment out of reach of children . . . . . . . . . . . . . . . . . . . . . . 7
Safe installation . . . . . . . . . . . . . . . . . . . . . . . . . . . . . . . . . . . . . . . . . . . . . . . . . 7
Caution! . . . . . . . . . . . . . . . . . . . . . . . . . . . . . . . . . . . . . . . . . . . . . . . . . . . . . . . 8
Accessibility of mains power socket . . . . . . . . . . . . . . . . . . . . . . . . . . . . . . . . . . 8
Never undertake your own repairs . . . . . . . . . . . . . . . . . . . . . . . . . . . . . . . . . . . 8
CD- player . . . . . . . . . . . . . . . . . . . . . . . . . . . . . . . . . . . . . . . . . . . . . . . . . . . . . . 8
Correct disposal of batteries . . . . . . . . . . . . . . . . . . . . . . . . . . . . . . . . . . . . . . . . 8
Battery instructions . . . . . . . . . . . . . . . . . . . . . . . . . . . . . . . . . . . . . . . . . . . . . . 9
Disposing of packaging . . . . . . . . . . . . . . . . . . . . . . . . . . . . . . . . . . . . . . . . . . . 9
Disposal . . . . . . . . . . . . . . . . . . . . . . . . . . . . . . . . . . . . . . . . . . . . . . . . . . . . . . . . 9
Cleaning the unit . . . . . . . . . . . . . . . . . . . . . . . . . . . . . . . . . . . . . . . . . . . . . . . . 9
Positioning and setup . . . . . . . . . . . . . . . . . . . . . . . . . . . . . . . . . . . . .10
Tabletop use . . . . . . . . . . . . . . . . . . . . . . . . . . . . . . . . . . . . . . . . . . . . . . . . . . . 10
For wall mounting . . . . . . . . . . . . . . . . . . . . . . . . . . . . . . . . . . . . . . . . . . . . . . 11
Start of operation . . . . . . . . . . . . . . . . . . . . . . . . . . . . . . . . . . . . . . . . 12
Unpacking . . . . . . . . . . . . . . . . . . . . . . . . . . . . . . . . . . . . . . . . . . . . . . . . . . . . 12
NXT . . . . . . . . . . . . . . . . . . . . . . . . . . . . . . . . . . . . . . . . . . . . . . . . . . . . . . . . . . 12
Connect loudspeaker NXT technology . . . . . . . . . . . . . . . . . . . . . . . . . . . . . . 12
AUX IN- connection . . . . . . . . . . . . . . . . . . . . . . . . . . . . . . . . . . . . . . . . . . . . . 13
Connection subwoofer . . . . . . . . . . . . . . . . . . . . . . . . . . . . . . . . . . . . . . . . . . . 13
iPOD docking connection . . . . . . . . . . . . . . . . . . . . . . . . . . . . . . . . . . . . . . . . 13
Inserting the batteries in the remote control . . . . . . . . . . . . . . . . . . . . . . . . . . 14
Insert batteries in the appliance . . . . . . . . . . . . . . . . . . . . . . . . . . . . . . . . . . . . 14
Aerial connection . . . . . . . . . . . . . . . . . . . . . . . . . . . . . . . . . . . . . . . . . . . . . . . 14
Connecting headphones . . . . . . . . . . . . . . . . . . . . . . . . . . . . . . . . . . . . . . . . . 15
Mains connection . . . . . . . . . . . . . . . . . . . . . . . . . . . . . . . . . . . . . . . . . . . . . . . 15
EN
Basic functions . . . . . . . . . . . . . . . . . . . . . . . . . . . . . . . . . . . . . . . . . . 16
Switching on/off – POWER . . . . . . . . . . . . . . . . . . . . . . . . . . . . . . . . . . . . . . . . 16
Setting the time . . . . . . . . . . . . . . . . . . . . . . . . . . . . . . . . . . . . . . . . . . . . . . . . 16
Radio mode . . . . . . . . . . . . . . . . . . . . . . . . . . . . . . . . . . . . . . . . . . . . . 17
Sound settings . . . . . . . . . . . . . . . . . . . . . . . . . . . . . . . . . . . . . . . . . . . . . . . . . 17
Tuning . . . . . . . . . . . . . . . . . . . . . . . . . . . . . . . . . . . . . . . . . . . . . . . . . . . . . . . 17
Stereo/mono . . . . . . . . . . . . . . . . . . . . . . . . . . . . . . . . . . . . . . . . . . . . . . . . . . 18
Saving and selecting stations . . . . . . . . . . . . . . . . . . . . . . . . . . . . . . . . . . . . . . 18
CD/MP3 Micro Audio System MD 81834 5
Page 30

Subwoofer
CD-/MP3-/WMA-/USB-CARD OPERATION . . . . . . . . . . . . . . . . . . . . . 19
Playable storage media . . . . . . . . . . . . . . . . . . . . . . . . . . . . . . . . . . . . . . . . . . . 19
Using „MP3“ . . . . . . . . . . . . . . . . . . . . . . . . . . . . . . . . . . . . . . . . . . . . . . . . . . . 19
USB-CARD operation . . . . . . . . . . . . . . . . . . . . . . . . . . . . . . . . . . . . . 20
Playing CDs . . . . . . . . . . . . . . . . . . . . . . . . . . . . . . . . . . . . . . . . . . . . . 21
Inserting and removing discs . . . . . . . . . . . . . . . . . . . . . . . . . . . . . . . . . . . . . . 21
PLAY, PAUSE, STOP, track skip . . . . . . . . . . . . . . . . . . . . . . . . . . . . . . . . . . . . . . 21
Playback modes REPEAT, RANDOM, INTRO . . . . . . . . . . . . . . . . . . . . . . . . . . . 22
Programming playback order . . . . . . . . . . . . . . . . . . . . . . . . . . . . . . . . . . . . . .23
Programmed switch on/off (“Timer”) (“SLEEP”) . . . . . . . . . . . . . . . . 24
Setting the timer . . . . . . . . . . . . . . . . . . . . . . . . . . . . . . . . . . . . . . . . . . . . . . . . 24
Sleep setting . . . . . . . . . . . . . . . . . . . . . . . . . . . . . . . . . . . . . . . . . . . . . . . . . . . 25
iPOD functions . . . . . . . . . . . . . . . . . . . . . . . . . . . . . . . . . . . . . . . . . . 26
Using the iPOD function . . . . . . . . . . . . . . . . . . . . . . . . . . . . . . . . . . . . . . . . . .26
Using the iPOD menu . . . . . . . . . . . . . . . . . . . . . . . . . . . . . . . . . . . . . . . . . . . . 26
Video Out output (only for the iPOD device) . . . . . . . . . . . . . . . . . . . . . . . . . . 27
Technical data . . . . . . . . . . . . . . . . . . . . . . . . . . . . . . . . . . . . . . . . . . 28
Power supply . . . . . . . . . . . . . . . . . . . . . . . . . . . . . . . . . . . . . . . . . . . . . . . . . . 28
Radio . . . . . . . . . . . . . . . . . . . . . . . . . . . . . . . . . . . . . . . . . . . . . . . . . . . . . . . . . 28
Player connections . . . . . . . . . . . . . . . . . . . . . . . . . . . . . . . . . . . . . . . . . . . . . . 28
CD player, discs supported . . . . . . . . . . . . . . . . . . . . . . . . . . . . . . . . . . . . . . . . 28
6
Page 31

Safety instructions
Safety instructions
About these instructions
Read the safety instructions carefully before use. Note the warnings in the
operating instructions.
Always keep the operating instructions close to hand. If you sell the
appliance or give it away, please ensure that you also pass on these
instructions.
Keeping electrical equipment out of reach
of children
Never allow children to use electrical devices without
supervision.
If swallowed, batteries may be life-threatening. Therefore
keep the unit and batteries out of reach of small children. If
a battery is swallowed, please obtain immediate medical
assistance.
Keep plastic packaging out of reach of children. It may
cause suffocation.
Safe installation
Place the player on a stable, level surface. This player is not
designed for use in rooms with high humidity levels (e.g.
bathrooms). Always ensure that
there are no direct heat sources (e.g. heaters) that
could affect the player;
the player is not in direct sunlight;
contact with moisture, water and splashes is
avoided;
no liquid-filled containers are placed on the player
(e.g. vases);
the player is not placed close to magnetic fields (e.g.
televisions or other loudspeakers);
there are no naked flames (e.g. lit candles) near the
player.
EN
CD/MP3 Micro Audio System MD 81834 7
Page 32

Safety instructions
Caution!
Note the minimum safe distances and under no
circumstances cover the ventilation slots. There should be
a gap of 20 cm on all sides to ensure adequate ventilation.
The vents on the player must not be covered or blocked.
Accessibility of mains power socket
Always connect the player to a power point (230V ~ 50Hz)
that is easily accessible and close to the place where you
have set the player up. The power socket must be freely
accessible so that you can unplug the player quickly if
necessary.
Avoid the use of extension cables in order to prevent
tripping.
Correct repair procedure
If the player or mains cable is damaged, unplug the player
from the mains immediately.
Never try to open and/or repair the player yourself. You
may get an electric shock! If there is a fault, contact our
Service Centre or another suitable professional repair shop.
The CD player
The CD player is a Class 1 laser product. The unit has a
safety system that prevents dangerous laser beams from
escaping during normal use. In order to avoid injury to the
eyes, never tamper with or damage the unit's safety
system.
Correct disposal of batteries
Do not put used batteries in the household rubbish. The
batteries should be taken to a collection point for used
batteries.
Battery instructions
Clean battery and appliance contacts before inserting.
Remove empty batteries immediately from the unit!
Increased risk of leakage!
8
Page 33

Safety instructions
Never expose the batteries to excessive heat such as
sunshine, fire or similar!
Always exchange all batteries at the same time.
Only use batteries of the same type, do not mix different
types or used and new batteries.
Remove the batteries if the device is not used for a long
period of time.
Disposing of packaging
Your appliance has been packaged to protect it against
transportation damage. Packaging materials are primary
products and can therefore be reused or recycled.
Disposal
Appliance
At the end of its life, the micro CD player must not be
thrown away with the household rubbish. Seek the advice
of your local authority on environmentally-friendly
disposal facilities.
EN
Cleaning the unit
Before cleaning, remove the plug from the mains socket.
Use a dry, soft cloth. Avoid the use of chemical solutions
and cleaning products as these may damage the player’s
surface and/or markings.
CD/MP3 Micro Audio System MD 81834 9
Page 34

Positioning and setup
Positioning and setup
Tabletop use
The subwoofer unit and loudspeaker can be placed
vertically on a level surface. The display is on the bottom
right in the front area of the unit.
Vertical position
` The unit and subwoofer have rubber pads so that
they can be placed vertically on a level surface. The
loudspeakers have preassembled stands for vertical
placement. The rubber pads protect the surface of
the furniture.
10
Page 35

Positioning and setup
For wall mounting
WARNING!
Before drilling the holes make sure that there are no
electric mains or other supply cables in the wall.
` Mark the holes to be drilled.
` In these markings, drill 6 holes for 6 mm wall plugs.
` Insert the 6 mm plastic wall plugs in the drilled holes.
` Insert the screws in the wall plugs and tighten them
with a screwdriver.
` Hang up the main unit and the loudspeakers in the
appropriate keyhole notches.
EN
CD/MP3 Micro Audio System MD 81834 11
Page 36

Start of operation
Start of operation
Unpacking
` Remove all packaging materials. Open the CD
compartment and remove the transport protection
insert.
WARNING!
Do not let children play with the plastic
wrapping. There is a risk of suffocation!
Checking the package contents
Unpack the unit and ensure that the following parts are included:
1 CD/MP3 Micro Audio Unit
2 loudspeakers with NXT Technology
1 subwoofer
1 remote control
1 wire aerial
1 connection cable for the subwoofer
1 iPOD docking station
Operating instructions and warranty documents
NXT
Trademark of New Transducers Limited
Connect loudspeaker NXT technology
` Connect the loudspeaker phono cables to the
colour-coded sockets on the rear of the subwoofer
(OUT SPEAKERS). Red (R) is used for the right-hand
loudspeaker socket and white (L) for the left-hand
loudspeaker socket.
12
Page 37

Start of operation
AUX IN- connection
You can use the AUX socket (press the FUNCTION button
AUX appears in the display) for connection to an
until
external audiosignal (e.g. from a cassette recorder).
` Switch the player to standby mode.
` Switch your external unit off.
` Plug the end of the phono cable (not supplied) into
the AUX input socket on the right-hand side of the
player (note correct polarity of right and left
channels).
` Plug the other end of the phono cable into your
external unit.
` Switch your external unit on.
` Switch your player on using the STANDBY button.
` Press the FUNCTION button on the remote control or
on the player until “
audio signal from your external unit will now be
reproduced.
AUX” appears in the display. The
Connecting the subwoofer
` Insert the end of the connection cable (CONNECT
WOOFER) in the socket (FROM MAIN) on the rear of
SUBWOOFER. Connect the other end of the
the
connection cable to the appliance (
using the socket (
now connected to the appliance.
TO WOOFER). The subwoofer is
CONNECT MAIN)
EN
iPOD docking connection
You can connect an iPOD docking station to the player.
You can use different adapters with this docking station .
The iPOD docking station also has a (VIDEO OUT) output
on the rear side.
` As illustrated, insert the iPOD docking station in the
DOCKING IN) socket in the direction of the arrow.
(
` Then turn the screw of the iPOD docking station in a
clockwise direction. The iPOD docking station can
now be used.
CD/MP3 Micro Audio System MD 81834 13
Page 38

Start of operation
Inserting the batteries in the remote
control
Insert 2 Mignon AAA 1.5 V LR 03 batteries (not supplied) in
the remote control.
` Open the battery compartment by pushing the lid
catch in the direction of the arrow.
` Insert the batteries so that the negative end is placed
next to the springs.
` Close the battery compartment.
Insert batteries in the unit
Insert 3 Mignon AAA 1.5 V LR 03 batteries (not supplied) in
the unit. The batteries are used to store data in case of a
power cut.
` Open the battery compartment by pushing the lid
catch in the direction of the arrow.
` Insert the batteries so that the negative end is placed
next to the springs.
` Close the battery compartment.
Aerial connection
The aerial socket input (FM ANT) is on the left side of
the appliance. Here you can connect the player to
the aerial socket using a 75 Ohm aerial cable (not
provided).
The player has a wire aerial for VHF which needs to be
adjusted for optimum reception.
The player has a built-in directional ferrite antenna
for MW reception. You may therefore need to turn
the player to improve reception.
14
Page 39

Start of operation
Connecting headphones
` There is a headphone connection (PHONES) on the
right side of the player. Connect the headphones
with a 3.mm jack plug. The loudspeakers will then be
deactivated automatically.
WARNING!
Listening to the player at a high volume with
headphones or ear phones can damage your
hearing. Lower the volume before putting on
head/earphones Your hearing can be
damaged if you listen at high volumes over a
long period or if the volume is increased too
suddenly.
Mains connection
` Plug the mains plug into a 230V ~ 50Hz mains
socket.
EN
CD/MP3 Micro Audio System MD 81834 15
Page 40

Basic functions
Basic functions
Switching on/off – POWER
First switch on the player on the subwoofer (ON). The ON/
OFF switch is on the rear of the subwoofer. The player is
now in standby mode. The display is dimmed. The time
display flashes until the time is set.
` To switch on the player, press the STANDBY button
on the player or the
control. The player is now switched on and the
display reads
frequency.
Afterwards, the display will show the last mode
selected (
CD, USB, SD/MMC, iPOD, AUX, TUNER ).
` To switch the player off press the STANDBY button
on the player or on the remote control. The display
GoodBYE.
reads
` The player is now in standby mode and a red LED is
lit on the subwoofer.
` The time is displayed.
Setting the time
STANDBY button on the remote
HELLO and initially shows the radio
` Press the iPOD/MEM/CLOCK-ADJ. button in standby
mode on the player. Select either 24 or 12 hour
display with the
iPOD/MEM/CLOCK-ADJ. again The hour display
the
flashes. Enter the hour within 6 seconds.
SEARCH button or . Press
` Press the SEARCH button or as many times
and for as long as it takes for the correct number of
hours to appear.
` Press the iPOD/MEM/CLOCK-ADJ. button again until
the minute display flashes. Enter the minutes within
6 seconds.
` Press the SEARCH button or as many times
and for as long as it takes for the correct number of
minutes to appear.
` Press the iPOD/MEM/CLOCK-ADJ. button again. The
time is now set and the figures will have stopped
flashing.
16
Page 41

Radio mode
Radio mode
` You can select the radio function (TUNER) using the
FUNCTION button on the player or via the
FUNCTION button on the remote control (if
necessary, switch on via
` The unit can only receive the frequency band FM
(UKW).
STANDBY beforehand).
Tone settings
VOLUME
` Press VOLUME (+) or (-) on the player or on the remote control to increase or
decrease the volume. The volume level is displayed (maximum 30).
EQ (Equaliser)
` Press the EQ button on the player or on the remote control to select the
required tone:
The pre-set sound effects are
POP.
Mute
` To turn the sound off completely, press the MUTE button (on remote control
only). The volume level flashes in the display. – Press
restore the sound.
PASS (default setting), ROCK, JAZZ, CLASSIC,
MUTE or VOLUME to
EN
Tuning
` Press TUNING or (on player or remote
control) repeatedly to select a certain frequency
manually.
` If you press TUNING or for a little longer
it will trigger an automatic search. The search stops
at the first station with relatively strong reception.
If a stereo station is found on the FM (VHF) waveband then
((ST)) will appear in the display.
CD/MP3 Micro Audio System MD 81834 17
Page 42

Radio mode
Stereo/ mono
Stereo reception of a station in the VHF range is shown in
the display. We recommend switching to mono if the
stereo reception is weak (interference).
` Press the ID3/ESP/MONO/ST button on the remote
control to switch between stereo and mono
reception.
Saving and selecting stations
You can save up to 30 VHF stations stations.
Tune in a station that you would like to save.
` Press the iPOD/MEM/CLOCK-ADJ. button on the
player or the remote control. The display for the
program position flashes.
` While the display is flashing, use the PRESET/
FOLDER (UP or DN) buttons on the player or on the
remote control to select the program position for this
station.
` Press iPOD/MEM/CLOCK-ADJ. again on the player or
on the remote control to save the station; the chosen
programme number (e. g.
display.
Repeat these steps to store other stations.
01) will remain on the
Selecting stations
Use the PRESET/FOLDER (UP or DN) button on the
player or on the remote control to open the stored stations
again.
18
Page 43

CD-/MP3-/WMA-/USB-CARD OPERATION
CD-/MP3-/WMA-/USB-CARD OPERATION
Information on the CD compartment
• Never insert objects into the CD compartment as this could destroy the
mechanism.
• In order to prevent dust accumulating never leave the CD
compartment open for long periods of time.
• Never touch the lens in the CD compartment.
• If the CD is very dirty or has clear finger marks, playback may be
delayed or may start at another location.
• Dirt on the scanning lens may result in interruptions to playback or
other errors.
• If you want to remove dust particles from the CD compartment, simply
use a typical blower brush (found in photographic supplies shops).
Playable data media
You can use this device to play audio CDs (inc. CDRs and CD-RWs) as well as MP3 CDs.
With this player, you can also play MP3 tracks from
a memory stick using a USB socket (USB version 1.1
and 2.0). Please note that we cannot guarantee
100% compatibility with all memory sticks.
The playback functions are almost identical
for these data media and are described
together.
EN
About "MP3"
Discs with tracks in MP3 format are usually home
created discs which – like data CDs used on a
computer – can be structured into directories,
subdirectories and individual files (single tracks).
MP3 discs usually contain a lot more individual
tracks than an audio CD so that the reading and
navigation speed is increased.
So-called ID3 tags are allocated when MP3 discs are
created (only optional with some creating
programmes). These ID3 tags can contain
information such as the name of the musicians, the
name of the piece and possibly other information.
CD/MP3 Micro Audio System MD 81834 19
Page 44

USB-CARD operation
The ID3 tags can be read by your device’s MP3
function and then shown in the display.
USB-CARD operation
USB-CARD function
` Insert the USB stick or the SD/MMC card in the slot
provided on the rear of the player.
` Press the STANDBYbutton on the player or on the
remote control to switch on the player.
` Press the FUNCTION button and select the USB or
SD/MMC function.
` Press the PRESET/FOLDER button (UP or DN) on the
player or on the remote control to select a folder.
` Press the SEARCH button or on the player
or on the remote control to select a track.
` Press the PLAY/PAUSE/ENTER button on the
player or on the remote control in order to start
playback.
If the available tracks (MP3/WMA) are written in ID3, press
the ID3/ESP/MONO/ST. button and ID3 ON appears on
the display. The search is then started automatically. To
leave the ID3 function, press the ID3/ESP/MONO/ST.
button again and ID3 OFF appears on the display.
20
Page 45

Playing CDs
Playing CDs
Audio CDs
You can use this device to play audio CDs (incl. CD-Rs, CD-RWs, MP3, WMA).
Inserting and removing discs
` Press the FUNCTION button on the player or on the
remote control and select the CD mode which then
appears in the display.
` Open the CD compartment by pressing OPEN/
CLOSEon the player. The CD compartment opens
upwards.
` Insert a CD into the compartment with the label side
up.
` Close the CD compartment by pressing OPEN/
CLOSE again or by pressing the Play button on the
remote control.
The CD starts to rotate and
display.
` The CD starts to play automatically.
The display reads
or if the disc cannot be read.
Do not open the CD compartment while the disc is
playing or rotating. Press STOP first.
To remove a CD take it by the edges and carefully
press down the holder in the middle.
NO DISC if there is no disc inserted
CD READ appears in the
EN
PLAY, PAUSE, STOP, skip
` Press the PLAY/PAUSE button on the player or on
the remote control in order to start playback.
` To interrupt playback press PLAY/PAUSE again.
The remaining time appears in the PAUSE display.
` Press PLAY/PAUSE again to resume playback at
the same place.
` Press STOP to end playback.
` To jump to the start of a track press the or
button on the player or on the remote control.
` Hold down the to start fast forward/rewind.
CD/MP3 Micro Audio System MD 81834 21
Page 46

Playing CDs
Play functions REPEAT, RANDOM, INTRO
REPEAT - Repeat functions
` Press the REPEAT button on the remote control or
on the player during playback or in stop mode. The
display will read
be repeated.
` Press the REPEAT button again on the remote
control or on the player. The display will now read
REPEAT ALL. All the tracks will be repeated.
` To cancel the REPEAT function press the REPEAT
button until the word disappears from the display.
RANDOM – Random playback
With the RANDOM function enabled all the tracks are
played in a random order.
` Press the RANDOM button on the remote control
during playback or in stop mode. Random playback
now starts.
` Press the RANDOM button again to revert to normal
playback mode.
INTRO PLAY – Play track
` Press the INTRO button on the remote control. Intro
play has now started. All tracks on the CD are played
for 10 seconds.
` Press the INTRO button on the remote control again
to return to the normal play mode.
REPEAT. The current track will then
22
Page 47

Playing CDs
Programming playback order
You can programme the playing order for up to 64 tracks.
The player must be in stop mode before programming can
begin.
` Press the iPOD/MEM/CLOCK-ADJ. button on the
player or the remote control. The display will read
MEMORY .
` Use the SEARCH button or
to select a track. The track is then saved by pressing
the iPOD/
display will read
` Repeat these steps to save more tracks.
` Press PLAY to play through the list.
You can also use the REPEAT functions described
above with the programmed list.
Editing the programmed list
To end playback press the STOP button. Press the
iPOD/MEM/CLOCK-ADJ button again. MEMORY appears in
the display. You can now recreate the list as required.
Deleting the programmed list
The programmed list will be deleted if
the CD compartment is opened
the player is unplugged.
MEM/CLOCK-ADJ button again. The
Pr:0 2.
EN
CD/MP3 Micro Audio System MD 81834 23
Page 48

Programmed switch on/off (“Timer”) (“SLEEP”)
Programmed switch on/off (“Timer”) (“SLEEP”)
You can set the player to switch on or off at a specified time
(timer function).
Selecting music source
The sources need to be prepared so that the radio or a CD
can start at the set time:
Radio: Select the radio function, set the required
radio station and volume and switch the player to
standby mode.
CD: Insert the required CD, select the CD function
and switch the player to standby mode.
Setting the timer
How to set the switch on/off time:
` Switch the player to standby mode.
` Press the TIMER button on the remote control to set
the switch-on time. The display reads
hour digit flashes.
` Press or (SKIP) within 6 seconds to set the
hour.
` Press the TIMER button again. The minutes flash on
the display.
` Press or to set the minutes.
` Press the TIMER button again to set the switch-off
time. The display reads
flashes.
OFF and the hour digit
` Press SEARCH or to set the hour.
` Press the TIMER button again. The minutes flash on
the display.
` Press SEARCH or to set the minutes.
` Press the TIMER button again. TUNER now flashes in
the display. Press the TIMER button again to confirm
TUNER. VOLUME now flashes in the display. Select
the required volume using the
buttons and confirm again using the TIMER button.
The timer is now set. – All the settings are now displayed
once again before reverting to the time display, now also
featuring the clock symbol for the programmed timer.
SEARCH or
ON and the
24
Page 49

Programmed switch on/off (“Timer”) (“SLEEP”)
Switching off the timer
` Press the TIMER button on the remote control.
` The clock symbol disappears and the timer is
switched off.
Sleep setting
How to enable the SLEEP function:
` Press the SLEEP button on the remote control. The
display reads
` Press the SLEEP button until the required time is set
(maximum 90 min. and minimum 10 min.).
` The time setting is saved and the SLEEP function is
activated.
How to disable the SLEEP function:
` Keep pressing the SLEEP button until SLEEP
disappears from the display.
SLEEP.
EN
CD/MP3 Micro Audio System MD 81834 25
Page 50

iPOD functions
iPOD functions
Using the iPOD function
` Place the iPOD player in the docking station.
` Switch the player onto standby and use the
FUNCTION button to select the iPOD mode. The
display will flash
` Press the PLAY/PAUSE/ENTER button and the iPOD
starts to play.
` Press the STOP/MENU button to stop playback.
` Press PLAY/PAUSE/ENTER, to pause playback.
` Press PLAY/PAUSE/ENTER again to continue
playback from the same position.
` Press the SEARCH button or on the player
or on the remote control to select a track.
` You can also select the REPEAT (repeat track) and
RANDOM (random playback) functions on the player
or remote control.
iPOD.
Using the iPOD menu
` Press the iPOD/MEM/CLOCK-ADJ button and the
iPOD mode is opened. The display will flash
MENU
` Press the STOP/MENU button to access the iPOD
menu (Music, Extras, Photo Import, Settings, Shuffle
Songs, Backlight, Now Playing).
` Press the SEARCH button or on the player
or on the remote control to select a menu option.
` Press PLAY/PAUSE/ENTER, to open this menu option.
` Use the SEARCH key or to make a selection.
Press the
` Press the STOP/MENU button to return to the iPOD
menu.
` For playback, press the iPOD/MEM/CLOCK-ADJ
button
You can also use the iPOD player in the docking station.
The device must be in standby mode.
PLAY/PAUSE/ENTER button to confirm.
26
iPOD
Page 51

iPOD functions
Video Out output (only for the iPOD device)
` Switch the player to standby mode.
` Connect the Video Out output to the rear of the
docking station with the TV unit using a connection
cable (not provided)
` Press MENU on the iPOD player and select the Video
function.
iPOD is a trademark of Apple Inc.
EN
CD/MP3 Micro Audio System MD 81834 27
Page 52

Technical Data
Technical Data
Power supply
Voltage: 230V ~ 50Hz
Power consumption: 83 W
Output power: 2 x 5W RMS + 30 W RMS
Radio
FM band: 87.5 – 108 MHz
Player connections
Headphones: 3.5mm jack plug, stereo
AUX: Audio input phono
SUBWOOFER: 9-pole
USB/Card
CD player, discs supported
Laser output: Class 1 laser product
Discs supported:
Audio CDs, CD-Rs, CD-RWs, MP3 discs
Only play audio CDs
which are labelled as follows:
Please note:
These days there are many non-standard CD recording and copy protection
procedures as well as various blank CD-R and CD-RW discs. This can
occasionally lead to read errors or delays. This does not mean the player is
faulty.
If it is the case that the CD radio recorder can no longer be used due to unforeseen
usage combinations, incorrect data exchange, or electro static discharge, remove
the mains plug and switch on the appliance again.
Subject to technical modifications.
28
Page 53

CD Micro Anlage
CD Micro Anlage
1. ANTENNENBUCHSE : 75 Ohm Antennenanschlussbuchse
2. CHINCH BUCHSE : AUX Eingang (R)
3. CHINCH BUCHSE : AUX Eingang (L)
4. PRESET/FOLDER (UP) Taste : Gespeicherte Sender
aufrufen aufwärts
5. REPEAT Taste : Repeatmodus wählen
6. PRESET/FOLDER (DN) Taste : Gespeicherte Sender
aufrufen abwärts
7. STANDBY Taste: Gerät ein-/ausschalten, Standby
8. USB BUCHSE : USB-Stick Eingang
9. CARD BUCHSE : SD/MMC Karten Eingang
10. Taste / TUNING : Frequenzsuche nach unten,
Auto-Suche; SKIP : Titelsprung zurück;
SEARCH : Schnelllauf zurück
11. iPod/MEM/CLOCK-ADJ Taste: iPodmodus, Memorymodus, Clock-Adj.-Modus wählen
12. Taste / TUNING : Frequenzsuche nach oben,
Auto-Suche; SKIP : Titelsprung vor;
SEARCH : Schnelllauf vor
13. PLAY/PAUSE/ENTER Taste : Wiedergabe starten/
unterbrechen, Enter für iPOD
14. IR SENSOR : Fernbedienungssensor
15. iPOD-DOCKING STATION: Fach für das iPod Gerät
16. LCD-DISPLAY
17. STOP/MENU Taste: Wiedergabe stoppen, Menü
aufrufen
18. VOLUME - Taste: Lautstärkeregler runter (-)
19. VOLUME + Taste : Lautstärkeregler rauf (+)
20.FUNCTION Taste : CD, USB, SD/MMC, IPOD, AUX,
oder TUNER wählen
21. OPEN/CLOSE Taste : CD-Fach öffnen/schließen
22.CD-FACH
23.PHONES: Kopfhöreranschluss
24. ANSCHLUSSBUCHSE (TO WOOFER): Verbindungskabelanschluss
25.VIDEO OUT BUCHSE: Anschlussbuchse für TV-Gerät
26.BATTERIEFACH: Batteriefach für den Betriebsspeicher
27. SCHLÜSSELLÖCHER: Löcher für die Wandmontage
DE
CD/MP3-Micro-Audio-System MD 81834 3
Page 54

Fernbedienung
1. STANDBY Taste: Gerät ein-/ausschalten, Standby
2. MUTE Taste : Stummschaltung
3. PRESET (UP) Taste : Gespeicherte Sender aufrufen
4. PRESET (DN) Taste : Gespeicherte Sender aufrufen
5. RANDOM Taste : Zufallswiedergabe wählen
6. Taste / TUNING : Frequenzsuche nach unten,
Auto-Suche, SKIP : Titelsprung zurück,
SEARCH : Schnelllauf zurück
7. TIMER Taste : Timermodus wählen
8. VOLUME Taste: Lautstärke runter (-)
9. FUNCTION Taste : CD, USB, SD/MMC, iPOD, AUX
oder TUNER wählen
10. INTRO Taste : Spielt alle Tracks an
11. ID3/ESP/MONO/ST. Taste: ID3-Modus, ESP-Modus,
Stereo/Mono Umschaltung wählen
12. REPEAT Taste : Repeatmodus wählen
13. PLAY/PAUSE/ENTER Taste : Wiedergabe
starten/unterbrechen, Enter für iPOD
14. EQ Taste : Equalizermodus (PASS, ROCK, JAZZ,
CLASSIC oder POP) wählen
15. Taste / TUNING : Frequenzsuche nach oben,
Auto-Suche, SKIP : Titelsprung vor,
SEARCH : Schnelllauf vor
16. STOP/MENÜ Taste: Wiedergabe stoppen, Menü für
iPOD
17. iPOD/MEM/CLOCK-ADJ. Taste : iPOD-Memory-Clockmodus wählen
18. SLEEP Taste: Sleepmodus wählen
19.Zifferntasten: Ziffern wählen
20.VOLUME Taste: Lautstärke rauf (+)
Subwoofer
1. Standby Anzeige
2. Netzkabel
3. Ein/Aus Schalter
4. Lautsprecherausgänge (R), (L)
5. Verbindungskabel Anschluss (FROM MAIN)
4
Page 55

Inhaltsverzeichnis
Sicherheitshinweise . . . . . . . . . . . . . . . . . . . . . . . . . . . . . . . . . . . . . . . . 7
Elektrische Geräte nicht in Kinderhände . . . . . . . . . . . . . . . . . . . . . . . . . . . . . . 7
Die Anlage sicher aufstellen . . . . . . . . . . . . . . . . . . . . . . . . . . . . . . . . . . . . . . . . 7
Warnung! . . . . . . . . . . . . . . . . . . . . . . . . . . . . . . . . . . . . . . . . . . . . . . . . . . . . . . 8
Netzanschluss zugänglich lassen . . . . . . . . . . . . . . . . . . . . . . . . . . . . . . . . . . . . 8
Niemals selbst reparieren . . . . . . . . . . . . . . . . . . . . . . . . . . . . . . . . . . . . . . . . . . 8
Der CD-Spieler . . . . . . . . . . . . . . . . . . . . . . . . . . . . . . . . . . . . . . . . . . . . . . . . . . 8
Batterien umweltgerecht entsorgen . . . . . . . . . . . . . . . . . . . . . . . . . . . . . . . . . 8
Batteriehinweise . . . . . . . . . . . . . . . . . . . . . . . . . . . . . . . . . . . . . . . . . . . . . . . . . 9
Verpackung entsorgen . . . . . . . . . . . . . . . . . . . . . . . . . . . . . . . . . . . . . . . . . . . . 9
Entsorgung . . . . . . . . . . . . . . . . . . . . . . . . . . . . . . . . . . . . . . . . . . . . . . . . . . . . . 9
Die Anlage reinigen . . . . . . . . . . . . . . . . . . . . . . . . . . . . . . . . . . . . . . . . . . . . . . 9
Das Gerät aufstellen . . . . . . . . . . . . . . . . . . . . . . . . . . . . . . . . . . . . . . 10
Verwendung als Tischgerät . . . . . . . . . . . . . . . . . . . . . . . . . . . . . . . . . . . . . . . 10
Für die Wandmontage . . . . . . . . . . . . . . . . . . . . . . . . . . . . . . . . . . . . . . . . . . . 11
Inbetriebnahme . . . . . . . . . . . . . . . . . . . . . . . . . . . . . . . . . . . . . . . . . . 12
Auspacken . . . . . . . . . . . . . . . . . . . . . . . . . . . . . . . . . . . . . . . . . . . . . . . . . . . . 12
NXT . . . . . . . . . . . . . . . . . . . . . . . . . . . . . . . . . . . . . . . . . . . . . . . . . . . . . . . . . . 12
Lautsprecher NXT Technologie anschließen . . . . . . . . . . . . . . . . . . . . . . . . . . 12
AUX IN- Anschluss . . . . . . . . . . . . . . . . . . . . . . . . . . . . . . . . . . . . . . . . . . . . . . 13
Subwoofer anschließen . . . . . . . . . . . . . . . . . . . . . . . . . . . . . . . . . . . . . . . . . . 13
iPOD-Docking Anschluss . . . . . . . . . . . . . . . . . . . . . . . . . . . . . . . . . . . . . . . . . 13
Batterien in die Fernbedienung einlegen . . . . . . . . . . . . . . . . . . . . . . . . . . . . . 14
Batterien in das Gerät einlegen . . . . . . . . . . . . . . . . . . . . . . . . . . . . . . . . . . . . 14
Antennenanschluss . . . . . . . . . . . . . . . . . . . . . . . . . . . . . . . . . . . . . . . . . . . . . 14
Kopfhörer anschließen . . . . . . . . . . . . . . . . . . . . . . . . . . . . . . . . . . . . . . . . . . . 15
Netzanschluss . . . . . . . . . . . . . . . . . . . . . . . . . . . . . . . . . . . . . . . . . . . . . . . . . . 15
DE
Grundfunktionen . . . . . . . . . . . . . . . . . . . . . . . . . . . . . . . . . . . . . . . . 16
Ein-/Ausschalten – POWER . . . . . . . . . . . . . . . . . . . . . . . . . . . . . . . . . . . . . . . . 16
Uhr stellen . . . . . . . . . . . . . . . . . . . . . . . . . . . . . . . . . . . . . . . . . . . . . . . . . . . . 16
Radiobetrieb . . . . . . . . . . . . . . . . . . . . . . . . . . . . . . . . . . . . . . . . . . . . 17
Klangeinstellungen . . . . . . . . . . . . . . . . . . . . . . . . . . . . . . . . . . . . . . . . . . . . . 17
Sender einstellen . . . . . . . . . . . . . . . . . . . . . . . . . . . . . . . . . . . . . . . . . . . . . . . 17
Stereo/Mono . . . . . . . . . . . . . . . . . . . . . . . . . . . . . . . . . . . . . . . . . . . . . . . . . . 18
Sender speichern und aufrufen . . . . . . . . . . . . . . . . . . . . . . . . . . . . . . . . . . . . 18
CD/MP3-Micro-Audio-System MD 81834 5
Page 56

Subwoofer
CD-/MP3-/WMA-/USB-CARD BETRIEB . . . . . . . . . . . . . . . . . . . . . . . . 19
Abspielbare Datenträger . . . . . . . . . . . . . . . . . . . . . . . . . . . . . . . . . . . . . . . . . . 19
Über „MP3“ . . . . . . . . . . . . . . . . . . . . . . . . . . . . . . . . . . . . . . . . . . . . . . . . . . . 19
USB-CARD Betrieb . . . . . . . . . . . . . . . . . . . . . . . . . . . . . . . . . . . . . . . . 20
CDs abspielen . . . . . . . . . . . . . . . . . . . . . . . . . . . . . . . . . . . . . . . . . . . 21
Disk einlegen und entnehmen . . . . . . . . . . . . . . . . . . . . . . . . . . . . . . . . . . . . . 21
PLAY, PAUSE, STOP, Titelsprung . . . . . . . . . . . . . . . . . . . . . . . . . . . . . . . . . . . . 21
Abspielarten REPEAT, RANDOM, INTRO . . . . . . . . . . . . . . . . . . . . . . . . . . . . . .22
Abspielreihenfolge programmieren . . . . . . . . . . . . . . . . . . . . . . . . . . . . . . . . .23
Programmierte An- und Ausschaltung („Timer“) („SLEEP“) . . . . . . . 24
Timer einstellen . . . . . . . . . . . . . . . . . . . . . . . . . . . . . . . . . . . . . . . . . . . . . . . . . 24
Sleep einstellen . . . . . . . . . . . . . . . . . . . . . . . . . . . . . . . . . . . . . . . . . . . . . . . . . 25
iPOD Funktionen . . . . . . . . . . . . . . . . . . . . . . . . . . . . . . . . . . . . . . . . 26
So benutzen Sie die iPOD-Funktion . . . . . . . . . . . . . . . . . . . . . . . . . . . . . . . . .26
So benutzen Sie das iPOD-Menü . . . . . . . . . . . . . . . . . . . . . . . . . . . . . . . . . . .26
Video Out Ausgang (Nur für das iPOD-Gerät) . . . . . . . . . . . . . . . . . . . . . . . . .27
Technische Daten . . . . . . . . . . . . . . . . . . . . . . . . . . . . . . . . . . . . . . . . 28
Spannungsversorgung . . . . . . . . . . . . . . . . . . . . . . . . . . . . . . . . . . . . . . . . . . .28
Radio . . . . . . . . . . . . . . . . . . . . . . . . . . . . . . . . . . . . . . . . . . . . . . . . . . . . . . . . . 28
Geräteanschlüsse . . . . . . . . . . . . . . . . . . . . . . . . . . . . . . . . . . . . . . . . . . . . . . . 28
CD-Spieler, unterstützte Disks . . . . . . . . . . . . . . . . . . . . . . . . . . . . . . . . . . . . . 28
6
Page 57

Sicherheitshinweise
Zu dieser Anleitung
Lesen Sie vor Inbetriebnahme die Sicherheitshinweise aufmerksam
durch. Beachten Sie die Warnungen und in der Bedienungsanleitung.
Bewahren Sie die Bedienungsanleitung immer in Reichweite auf. Wenn
Sie das Gerät verkaufen oder weitergeben, händigen Sie unbedingt auch
diese Anleitung aus.
Elektrische Geräte nicht in Kinderhände
Lassen Sie Kinder niemals unbeaufsichtigt elektrische Geräte benutzen.
Batterien/Akkus können bei Verschlucken lebensgefährlich
sein. Bewahren Sie deshalb die Anlage und die Batterien für
Kleinkinder unerreichbar auf. Wurde eine Batterie verschluckt, muss sofort medizinische Hilfe in Anspruch genommen werden.
Halten Sie auch die Verpackungsfolien von Kindern fern. Es
besteht Erstickungsgefahr.
Die Anlage sicher aufstellen
Stellen Sie die Anlage auf eine feste, ebene Oberfläche. Die
Anlage ist nicht für den Betrieb in Räumen mit hoher Luftfeuchtigkeit (z. B. Badezimmer) ausgelegt. Achten Sie darauf, dass
keine direkten Wärmequellen (z. B. Heizungen) auf
die Anlage wirken;
kein direktes Sonnenlicht auf die Anlage trifft;
der Kontakt mit Feuchtigkeit, Wasser oder Spritzwas-
ser vermieden wird;
keine mit Flüssigkeit gefüllten Gefäße (Vasen oder
ähnliches) auf die Anlage gestellt werden;
die Anlage nicht in unmittelbarer Nähe von Magnet-
feldern (z. B. Fernseher oder anderen Lautsprechern)
steht;
keine offenen Brandquellen (z. B. brennende Kerzen)
in der Nähe der Anlage stehen.
Sicherheitshinweise
DE
CD/MP3-Micro-Audio-System MD 81834 7
Page 58

Sicherheitshinweise
Warnung!
Beachten Sie die Mindestabstände und verdecken Sie auf
keinen Fall die Lüftungsschlitze. Für eine ausreichende Belüftung muss nach allen Seiten ein Abstand von 20 cm eingehalten werden. Die Öffnungen an dem Gerät dürfen
nicht abgedeckt oder verstopft werden.
Netzanschluss zugänglich lassen
Schließen Sie die Anlage nur an eine gut erreichbare Steckdose (230 V ~ 50 Hz) an, die sich in der Nähe des Aufstellortes befindet. Für den Fall, dass Sie die Anlage schnell vom
Netz nehmen müssen, muss die Steckdose frei zugänglich
sein.
Um Stolperfallen zu vermeiden, verwenden Sie keine Verlängerungskabel.
Niemals selbst reparieren
Ziehen Sie bei Beschädigungen des Geräts oder der Anschlussleitung sofort den Netzstecker aus der Steckdose.
Versuchen Sie auf keinen Fall, das Gerät selber zu öffnen
und/oder zu reparieren. Es besteht die Gefahr des elektrischen Schlags! Wenden Sie sich im Störungsfall an unser
Service Center oder eine andere geeignete Fachwerkstatt.
Der CD-Spieler
Der CD-Spieler ist ein Laserprodukt der Klasse 1. Das Gerät
ist mit einem Sicherheitssystem ausgerüstet, das das Austreten von gefährlichen Laserstrahlen während des normalen Gebrauchs verhindert. Um Augenverletzungen zu
vemeiden, manipulieren oder beschädigen Sie niemals das
Sicherheitssystem des Geräts.
Batterien umweltgerecht entsorgen
Verbrauchte Batterien gehören nicht in den Hausmüll. Die
Batterien müssen bei einer Sammelstelle für Altbatterien
abgegeben werden.
Batteriehinweise
Batterie- und Gerätekontakte vor dem Einlegen bei Bedarf
reinigen.
8
Page 59

Verpackung entsorgen
Entsorgung
Sicherheitshinweise
Erschöpfte Batterien umgehend aus dem Gerät entfernen!
Erhöhte Auslaufgefahr!
Setzen Sie Batterien niemals übermäßiger Wärme wie
durch Sonnenschein, Feuer oder dergleichen aus!
Immer alle Batterien gleichzeitig austauschen.
Nur Batterien des gleichen Typs einsetzen, keine unter-
schiedlichen Typen oder gebrauchte und neue Batterien
miteinander verwenden.
Batterien bei längerer Nichtverwendung aus dem Gerät
entfernen.
Ihr Gerät befindet sich zum Schutz vor Transportschäden
in einer Verpackung. Verpackungen sind Rohstoffe und
somit wiederverwendungsfähig oder können dem Roh
stoffkreislauf zurückgeführt werden.
Gerät
Werfen Sie die CD-Micro-Anlage am Ende seiner Lebenszeit
keinesfalls in den normalen Hausmüll. Erkundigen Sie sich
in Ihrer Stadt- oder Gemeindeverwaltung nach Möglichkeiten einer umwelt- und sachgerechten Entsorgung.
DE
Die Anlage reinigen
Vor der Reinigung ziehen Sie bitte den Netzstecker aus der
Steckdose. Für die Reinigung verwenden Sie ein trockenes,
weiches Tuch. Chemische Lösungs- und Reinigungsmittel
sollten Sie vermeiden, weil diese die Oberfläche und/oder
Beschriftungen der Anlage beschädigen können.
CD/MP3-Micro-Audio-System MD 81834 9
Page 60

Das Gerät aufstellen
Das Gerät aufstellen
Verwendung als Tischgerät
Das Gerät der Subwoofer und die Lautsprecher können
senkrecht auf eine ebene Unterlage aufgestellt werden.
Das Display befindet sich unten rechts im Vorderbereich
des Gerätes.
Senkrechte Position
Das Gerät und der Subwoofer haben an der Unter-
`
seite Gummpuffer, so dass sie senkrecht auf eine
ebene Unterlage gestellt werden können. Die Lautsprecher haben vormontierte Standfüße um sie senkrecht aufzustellen. Die Möbeloberfläche wird durch
die Gummipuffer geschützt.
10
Page 61

Für die Wandmontage
Das Gerät aufstellen
ACHTUNG!
Vergewissern Sie sich, dass keine Strom- oder Versorgungsleitungen in der Wand verlaufen, bevor Sie die Löcher für die Montage bohren.
` Markieren Sie die zu bohrenden Löcher.
` Bohren Sie in diese Markierungen 6 Löcher für 6-mm
Dübel.
` Fügen Sie die 6-mm Plastikdübel in die gebohrten Lö-
cher ein.
` Fügen Sie die Schrauben in die Dübel ein und ziehen
Sie sie mit einem Schraubendreher fest.
` Hängen Sie das Hauptgerät und die Lautsprecher in
die vorgesehenen Schlüssellöcher ein.
DE
CD/MP3-Micro-Audio-System MD 81834 11
Page 62

Inbetriebnahme
Inbetriebnahme
Auspacken
` Entfernen Sie sämtliches Verpackungsmaterial.
Wenn Sie das CD-Fach öffnen, entfernen Sie den eingelegten CD-Fach-Transportschutz.
ACHTUNG!
Lassen Sie kleine Kinder nicht mit Folie spielen. Es besteht Erstickungsgefahr!
Lieferumfang prüfen
Vergewissern Sie sich beim Auspacken, dass folgende Teile mitgeliefert wurden:
1 CD/MP3-Micro-Audio-Anlage
2 Lautsprecher mit NXT Technologie
1 Subwoofer
1 Fernbedienung
1 Wurfantenne
1 Verbindungskabel für den Subwoofer
1 iPOD-Docking-Station
Bedienungsanleitung und Garantiedokumente
NXT
Trademark of New Transducers Limited
Lautsprecher NXT Technologie anschließen
` Verbinden Sie die Lautsprecher Chinchstecker mit
den farblich entsprechend gekennzeichneten Buchsen auf der Rückseite des Subwoofers (OUT SPEAKERS). Rot (R) ist für den rechten Lautsprecheranschluss und weiß (L) für den linken
Lautsprecheranschluss.
12
Page 63

AUX IN- Anschluss
Subwoofer anschließen
Inbetriebnahme
Sie können den Anschluss AUX (die Taste FUNCTION
drücken bis
zu einem externen Audiosignal (z. B. von einem Kassettenrecorder) nutzen.
` Schalten Sie das Gerät in den Standby-Modus.
` Schalten Sie Ihr externes Gerät aus.
` Stecken Sie das eine Ende des Cinchkabels (nicht im
Lieferumfang enthalten) in die AUX-Eingangsbuchse
auf der rechten Geräteseite (achten Sie auf die richtige Polarität des rechten und linken Kanals).
` Das andere Ende des Cinchkabels verbinden Sie mit
Ihrem externen Gerät.
` Schalten Sie Ihr externes Gerät ein.
` Schalten Sie Ihr Gerät mit der Taste STANDBY ein.
` Drücken Sie auf der Fernbedienung oder am Gerät
die Taste
wird. Das Audiosignal Ihres externen Gerätes wird
jetzt wiedergegeben.
` Stecken Sie das eine Ende des Verbindungskabels
CONNECT WOOFER) in die Buchse (FROM MAIN)
(
auf der Rückseite vom
das andere Ende des Verbindungskabels (
MAIN) mit der Buchse (TO WOOFER) am Gerät. Der
Subwoofer ist jetzt mit dem Gerät verbunden.
AUX im Display erscheint) für die Verbindung
FUNCTION, bis „AUX“ im Display angezeigt
SUBWOOFER. Verbinden Sie
CONNECT
DE
iPOD-Docking Anschluss
Sie können am Gerät eine iPOD-Docking Station anschließen. An dieser Docking Station können dann verschiedene
Adapter verwendet werden. Die iPOD-Docking Station besitzt auf der Rückseite auch einen (VIDEO OUT) Ausgang.
` Stecken Sie wie auf der Abbildung in Pfeilrichtung,
die iPOD-Docking Station in die Buchse (
IN).
DOCKING
` Drehen Sie dann die Schraube von der iPOD-Docking
Station im Uhrzeigersinn fest. Die iPOD-Docking Station kann nun genutzt werden.
CD/MP3-Micro-Audio-System MD 81834 13
Page 64

Inbetriebnahme
Batterien in die Fernbedienung einlegen
Legen Sie 2 Mignon 1,5 V-Batterien LR 03, Größe AAA
(nicht mitgeliefert) in die Fernbedienung ein.
` Öffnen Sie den Batteriefachdeckel, indem Sie den
Verschlussclip in Pfeilrichtung drücken.
` Legen Sie die Batterien so ein, dass der Minuspol der
Batterien an den Federn anliegt.
` Schieben Sie den Batteriefachdeckel wieder auf.
Batterien in das Gerät einlegen
Legen Sie 3 Mignon 1,5 V-Batterien LR 03, Größe AAA
(nicht mitgeliefert) in das Gerät ein. Die Batterien dienen
zur Datenspeicherung bei einem Stromausfall.
` Öffnen Sie den Batteriefachdeckel, indem Sie den
Verschlussclip in Pfeilrichtung drücken.
` Legen Sie die Batterien so ein, dass der Minuspol der
Batterien an den Federn anliegt.
` Schieben Sie den Batteriefachdeckel wieder auf.
Antennenanschluss
Auf der linken Seite des Gerätes befindet sich der An-
tennenbuchsen-Eingang (
das Gerät über ein 75-Ohm Antennenkabel (nicht
mitgeliefert) an die Antennensteckdose anschliessen.
FM ANT). Hier können Sie
Für den UKW-Empfang hat das Gerät eine Wurfan-
tenne, die Sie für den optimalen Empfang justieren
sollten.
Für den MW-Empfang hat das Gerät eine richtungs-
abhängige festeingebaute Ferritantenne. Deshalb
müssen Sie ggf. das Gerät für einen optimalen Empfang drehen.
14
Page 65

Kopfhörer anschließen
Netzanschluss
Inbetriebnahme
` An der rechten Seite der Anlage finden Sie den Kopf-
höreranschluss (
hörer mit einem 3,5-mm-Klinkenstecker an. Die Lautsprecher schalten sich dann automatisch ab.
ACHTUNG!
Hohe Lautstärke bei der Verwendung von
Ohrhörern oder Kopfhörern kann zum Verlust
des Hörsinns führen. Bevor Sie einen OhrKopfhörer aufsetzen, stellen Sie die Lautstärke auf ein Minimum! Ihr Gehör kann Schaden nehmen, wenn es zu lange oder zu plötzlich hohen Lautstärken ausgesetzt wird!
` Verbinden Sie den Netzstecker mit einer Netzsteck-
dose 230 V ~ 50 Hz.
PHONES). Schließen Sie einen Kopf-
DE
CD/MP3-Micro-Audio-System MD 81834 15
Page 66

Grundfunktionen
Grundfunktionen
Ein-/Ausschalten – POWER
Schalten Sie das Gerät vorher am Subwoofer (ON) ein. Der
Schalter ON/OFF befindet sich auf der Rückseite des Subwoofers. Das Gerät befindet sich nun im Standby-Modus.
Das Display erscheint im abgedunkelten Zustand. Die Uhrzeit blinkt, solange die Uhrzeit noch nicht eingestellt ist.
` Drücken Sie zum Einschalten des Gerätes den Schal-
STANDBY am Gerät oder die Taste STANDBY an
ter
der Fernbedienung. Das Gerät ist jetzt eingeschaltet
und das Display zeigt
Radiofrequenz an.
Im weiteren Betrieb wird die zuletzt eingegebene Betriebsart (
Display angezeigt.
CD, USB, SD/MMC, iPOD, AUX, TUNER ) im
` Um das Gerät auszuschalten, drücken Sie die Taste
STANDBY am Gerät oder an der Fernbedienung. Das
Gerät zeigt
Good BYE an.
` Das Gerät befindet sich nun im Standby-Modus und
eine rote LED am Subwoofer leuchtet.
` Im Display erscheint die Uhrzeit.
HELLO, und im Erstbetrieb die
Uhr stellen
` Drücken Sie die Taste iPOD/MEM/CLOCK-ADJ. im
Standby Betrieb am Gerät. Wählen Sie zwischen 24
oder 12-Stunden Anzeige mit der Taste
oder . Drücken Sie erneut die iPOD/MEM/CLOCK-
ADJ. Taste. Die Stundenanzeige blinkt. Geben Sie in-
nerhalb von 6 Sekunden die Stunden ein.
SEARCH
` Drücken Sie die Taste SEARCH oder so oft
oder so lange, bis die richtige Stunde angezeigt wird.
` Drücken Sie wieder iPOD/MEM/CLOCK-ADJ. Taste,
bis die Minutenanzeige blinkt. Geben Sie innerhalb
von 6 Sekunden die Minuten ein.
` Drücken Sie die Taste SEARCH oder so oft
oder so lange, bis die richtige Minute angezeigt wird.
` Drücken Sie wieder die iPOD/MEM/CLOCK-ADJ. Ta-
ste. Die Uhr ist gestellt und die Ziffern blinken nicht
mehr.
16
Page 67

Radiobetrieb
Radiobetrieb
` Wählen Sie die Radiofunktion (TUNER) mit der Taste
FUNCTION am Gerät oder über die Taste FUNCTION
an der Fernbedienung (ggf. vorher über
anschalten).
` Das Gerät kann nur das Freqenzband FM (UKW)
empfangen.
Klangeinstellungen
VOLUME – Lautstärke
`
Drücken Sie VOLUME (+) oder (-) am Gerät oder an der Fernbedienung, um
die Lautstärke zu erhöhen bzw. zu verringern. Der Lautstärkelevel wird eingeblendet (maximal 30).
EQ ( Equalizer)
Drücken Sie die EQ-Taste am Gerät oder an der Fernbedienung, um ein ge-
`
wünschtes Klangbild aufzurufen:
Die vorgewählten Klangfarben sind
JAZZ, CLASSIC, POP.
PASS (Standardeinstellung), ROCK,
Mute
`
Um die Lautstärke ganz auszuschalten, drücken Sie MUTE (nur an der Fernbedienung). Im Display blinkt der Lautstärkepegel. – Über
schalten Sie die Lautstärke wieder ein.
MUTE oder VOLUME
STANDBY
DE
Sender einstellen
` Drücken Sie TUNING oder (am Gerät oder
Fernbedienung) wiederholt, um manuell eine bestimmte Frequenz einzustellen.
` Wenn Sie TUNING oder etwas länger drü-
cken, startet ein automatischer Suchlauf. Beim ersten
stärkeren Sender hält die Suche an.
Wird im FM (UKW)-Band ein Stereosender gefunden,erscheint die Anzeige ((ST)).
CD/MP3-Micro-Audio-System MD 81834 17
Page 68

Radiobetrieb
Stereo/Mono
Der Stereoempfang eines Senders im UKW-Bereich wird
auf dem Display angezeigt. Bei schwachem Stereoempfang (Störgeräusche) empfehlen wir, auf Mono umzuschalten.
` Drücken Sie auf der Fernbedienung die Taste ID3/
ESP/MONO/ST, um zwischen Stereo- und Mono-
empfang hin- und herzuschalten.
Sender speichern und aufrufen
Sie können insgesamt bis zu 30 UKW-Sender speichern.
Stellen Sie einen zu speichernden Radiosender ein.
` Drücken Sie am Gerät oder auf der Fernbedienung
die Taste
nen blinkend die Anzeige für den Programmplatz.
iPOD/MEM/CLOCK-ADJ. Im Display erschei-
` Wählen Sie, während die Anzeige blinkt, mit PRE-
SET/FOLDER (UP oder DN) am Gerät oder auf der
Fernbedienung, den Programmplatz für diesen Sender.
` Drücken Sie iPOD/MEM/CLOCK-ADJ. erneut am Ge-
rät oder auf der Fernbedienung, um die Sender zu
speichern; der gewählte Programmplatz (z. B.
bleibt eingeblendet).
Um weitere Sender zu speichern, wiederholen Sie diese
Schritte.
01,
Sender aufrufen
Mit der Taste PRESET/FOLDER (UP oder DN) am Gerät
oder auf der Fernbedienung rufen Sie die gespeicherten
Sender wieder auf.
18
Page 69

CD-/MP3-/WMA-/USB-CARD BETRIEB
CD-/MP3-/WMA-/USB-CARD BETRIEB
Hinweise zum CD-Fach
• Legen Sie keine fremden Gegenstände in das CD-Fach, da hierdurch
die Mechanik zerstört werden kann.
• Um Verschmutzung durch Staub zu vermeiden, lassen Sie den Deckel
des CD-Fachs nicht für längere Zeit offen stehen.
• Berühren Sie auf keinen Fall die Linse im CD-Fach.
• Ist die CD stark verschmutzt oder weist sie starke Fingerabdrücke auf,
kann es passieren, dass das Abspielen verzögert wird oder an einer
anderen Stelle beginnt.
• Schmutz auf der Abtastlinse kann zu Unterbrechungen während des
Abspielens oder zu anderen Störungen führen.
• Wenn Sie Staubpartikel aus dem CD-Fach entfernen möchten, benutzen Sie hierfür einen handelsüblichen Staubblasepinsel (im Fotogeschäft erhältlich).
Abspielbare Datenträger
Sie können mit dem Gerät Audio-CDs (inkl. CD-Rs
und CD-RWs) sowie MP3-CDs abspielen.
Außerdem können Sie mit diesem Gerät MP3-Titel
von einem Memory Stick mit USB-Stecker abspielen
(USB-Version 1.1 und 2.0). Bitte beachten Sie, dass
die Kompatibilität mit allen Memory Sticks nicht zu
100 Prozent gewährleistet werden kann.
Die Abspielfunktionen sind für diese Datenträger weitgehend identisch und werden daher zusammen beschrieben.
DE
Über „MP3“
Disk mit Titeln im MP3-Format sind zumeist selbst
erstellte Disks, die - wie am Computer benutzte Daten CDs - in Verzeichnisse, Unterverzeichnisse und
Einzeldateien (Einzeltitel) strukturiert sein können.
MP3-Disks enthalten in der Regel sehr viel mehr Einzeltitel als eine Audio-CD, so dass sich die Einleseund Navigationsgeschwindigkeit erhöht.
Beim Erstellen von MP3-Disks werden so genannte
ID3-Tags (je nach Erstellungsprogramm nur optional)
CD/MP3-Micro-Audio-System MD 81834 19
Page 70

USB-CARD Betrieb
vergeben. In diesen ID3-Tags können Informationen
wie der Name der Interpreten, der Name des Stücks
und ggf. weitere Informationen enthalten sein.
Diese ID3-Tags können mit der MP3-Funktion Ihres
Gerätes ausgelesen und im Display angezeigt werden.
USB-CARD Betrieb
USB-CARD Funktion
Stecken Sie den USB-Stick oder die SD/MMC Karte, in
`
den auf der Vordserseite des Gerätes vorgesehenen
Schlitz.
` Drücken Sie die STANDBY Taste am Gerät oder auf
der Fernbedienung um das Gerät einzuschalten.
` Drücken Sie die Taste FUNCTION und wählen Sie
USB oder SD/MMC Funktion aus.
` Drücken Sie die PRESET/FOLDER Taste (UP oder
DN) am Gerät oder auf der Fernbedienung um einen
Ordner auszuwählen.
` Drücken Sie die Taste SEARCH oder am Ge-
rät oder auf der Fernbedienung um einen Titel auszuwählen.
` Drücken Sie die Taste PLAY/PAUSE/ENTER am
Gerät oder an der Fernbedienung, um die Wiedergabe zu starten.
Wenn die vorhandenen Titel (MP3/WMA) im ID3-Format
geschrieben sind, drücken Sie die ID3/ESP/MONO/ST. Taste und auf dem Dispaly erscheint ID3 ON. Die Suche wird
dann automatisch gestartet. Wenn Sie die ID3 Funktion
verlassen wollen, drücken Sie die ID3/ESP/MONO/ST. Taste erneut und auf dem Dispaly erscheínt ID3 OFF.
20
Page 71

CDs abspielen
CDs abspielen
Audio-CD
Sie können mit dem Gerät Audio-CDs (CD-Rs, CD-RWs, MP3, WMA) abspielen.
Disk einlegen und entnehmen
` Drücken Sie die Taste FUNCTION am Gerät oder auf
der Fernbedienung und wählen Sie den CD-Modus,
wird im Display angezeigt.
` Öffnen Sie das CD-Fach durch Druck auf die Taste
OPEN/CLOSE am Gerät. Die CD-Abdeckung öffnet
sich nach oben.
` Legen Sie eine CD mit der beschrifteten Seite nach
oben ein.
` Schließen Sie das CD-Fach durch nochmaliges Drü-
cken der Taste
Play Taste an der Fernbedienung.
Die CD beginnt zu rotieren und im Display erscheint
CD READ.
` Die CD startet automatisch mit der Wiedergabe.
Wenn keine oder eine nicht lesbare Disk eingelegt ist,
erscheint
Öffnen Sie das CD-Fach nicht, solange die CD noch
spielt oder rotiert. Drücken Sie vorher STOP.
Um eine CD zu entnehmen, fassen Sie sie an der
Seite an und drücken Sie die Halterung in der Mitte
gleichzeitig vorsichtig herunter.
DE
OPEN/CLOSE oder durch drücken der
NO DISK im Display.
PLAY, PAUSE, STOP, Titelsprung
` Drücken Sie die Taste PLAY/PAUSE am Gerät
oder an der Fernbedienung, um die Wiedergabe zu
starten.
` Um die Wiedergabe zu unterbrechen, drücken Sie
die Taste PLAY/PAUSE erneut. In der PAUSEN-Anzeige blinkt die ablaufende Zeit.
` Drücken Sie PLAY/PAUSE erneut, um die Wieder-
gabe zu an derselben Stelle fortzusetzen.
` Drücken Sie STOP , um die Wiedergabe zu been-
den.
CD/MP3-Micro-Audio-System MD 81834 21
Page 72

CDs abspielen
` Um an den Anfang eines Titels zu springen, drücken
Sie Taste
dienung.
oder am Gerät oder auf der Fernbe-
` Wenn Sie die Taste oder gedrückt halten,
starten Sie einen Schnellsuchlauf.
Abspielarten REPEAT, RANDOM, INTRO
REPEAT – Wiederholungsfunktionen
`
Drücken Sie während der Wiedergabe oder im
Stopp-Modus die Taste
nung oder am Gerät. Im Display erscheint
Der aktuelle Titel wird wiederholt.
REPEAT auf der Fernbedie-
REPEAT.
` Drücken Sie die Taste REPEAT erneut auf der Fernbe-
dienung oder am Gerät. Im Display erscheint nun
REPEAT ALL. Es werden alle Titel wiederholt.
` Um die REPEAT-Funktion zu beenden, drücken Sie
die Taste
REPEAT, bis die Anzeige verschwindet.
RANDOM – Zufallswiedergabe
Bei der RANDOM-Funktion werden alle Titel in einer zufälligen Reihenfolge wiedergegeben.
` Drücken Sie während der Wiedergabe oder im
Stopp-Modus die Taste
nung. Die Zufallswiedergabe startet nun.
RANDOM auf der Fernbedie-
` Drücken Sie die Taste RANDOM erneut, um in den
normalen Wiedergabemodus überzugehen.
INTRO PLAY – Titel anspielen
`
Drücken Sie die Taste INTRO auf der Fernbedienung.
Intro Play hat nun gestartet. Es werden alle Titel die
sich auf der CD befinden für 10 sekunden angespielt.
` Drücken Sie die Taste INTRO auf der Fernbedienung
erneut und Sie befinden sich wieder im normalen Abspielmodus.
22
Page 73

Abspielreihenfolge programmieren
Sie können eine Abspielreihenfolge für bis zu 64 Titel programmieren. Das Gerät muss sich hierfür im Stopp-Modus
befinden.
` Drücken Sie die Taste iPOD/MEM/CLOCK-ADJ am
Gerät oder auf der Fernbedienung. Im Display wird
MEMORY angezeigt.
` Wählen Sie mit der Taste SEARCH oder
einen Titel aus. Der Titel wird nun durch nochmaliges drücken der Taste iPOD/
speichert. Im Display erscheint
` Wiederholen Sie diese Schritte, um weitereTitel zu
speichern.
` Wenn Sie die Liste abspielen wollen, drücken Sie
PLAY .
Sie können die REPEAT-Funktionen wie oben beschrieben auf die programmierte Liste anwenden.
Programmierte Liste bearbeiten
Beenden Sie die Wiedergabe mit der STOP Taste. Drük-
ken Sie erneut die iPOD/MEM/CLOCK-ADJ Taste im Display erscheint die Anzeige MEMORY. Sie können nun die Liste nach Wunsch neu belegen.
CDs abspielen
DE
MEM/CLOCK-ADJ ge-
Pr:0 2.
Programmierte Liste löschen
Die programmierte Liste wird gelöscht, wenn
das CD-Fach geöffnet wird
das Gerät vom Netzt getrennt wird.
CD/MP3-Micro-Audio-System MD 81834 23
Page 74

Programmierte An- und Ausschaltung („Timer“) („SLEEP“)
Programmierte An- und Ausschaltung („Timer“)
(„SLEEP“)
Sie können das Gerät so einstellen, dass es sich zu einer
vorgegeben Zeit ein- oder ausschaltet (Timer-Funktion).
Musikquelle wählen
Damit zur eingestellten Zeit das Radio oder eine CD starten
können, müssen die Quellen entsprechend vorbereitet
sein:
Radio: Wählen Sie die Radiofunktion, stellen Sie den
gewünschten Radiosender und die Lautstärke ein
und schalten Sie das Gerät in den Standby-Modus.
CD: Legen Sie die gewünschte CD ein, wählen Sie die
CD-Funktion und schalten Sie das Gerät in den
Standby-Modus.
Timer einstellen
So stellen Sie die Ein- und Ausschaltzeit ein:
` Schalten Sie das Gerät in den Standby-Modus.
` Drücken Sie auf die Taste TIMER auf der Fernbedie-
nung, um die Einschaltzeit einzustellen. Die Anzeige
ON erscheint und die Stundenziffer blinkt.
` Drücken Sie innerhalb von 6 Sekunden auf oder
(SKIP), um die Stunde einzustellen.
` Drücken Sie die Taste TIMER erneut. Im Display
blinkt die Minutenanzeige.
` Stellen Sie mit oder die Minuten ein.
` Drücken Sie die Taste TIMER erneut, um die Aus-
schaltzeit einzustellen. Die Anzeige OFF erscheint
und die Stundenziffer blinkt.
` Drücken Sie auf SEARCH oder , um die
Stunde einzustellen.
` Drücken Sie die Taste TIMER erneut. Im Display
blinkt die Minutenanzeige.
` Stellen Sie mit SEARCH oder die Minuten
ein.
` Drücken Sie die Taste TIMER erneut. Im Display
blinkt nun die TUNER Anzeige. Drücken Sie die Taste
TIMER erneut um TUNER zu bestätigen. Jetzt blinkt
die VOLUME Anzeige im Display. Wählen Sie die ge-
24
Page 75

Programmierte An- und Ausschaltung („Timer“) („SLEEP“)
Sleep einstellen
wünschte Lautsträrke mit den Tasten SEARCH
oder aus und bestätigen Sie erneut mit der Taste
TIMER.
Der Timer ist gestellt. – Im Display werden noch mal alle
eingestellten Parameter angezeigt und es erscheinen wieder die Uhrzeit, sowie das Uhrsymbol für den programmierten Timer.
Timer abschalten
Drücken Sie die Taste TIMER auf der Fernbedienung.
`
` Das Uhrsymbol wird ausgeblendet und der Timer
ist ausgeschaltet.
So schalten Sie SLEEP ein:
` Drücken Sie die Taste SLEEP auf der Fernbedienung.
Im Display erscheint
SLEEP.
` Drücken Sie die Taste SLEEP solange, bis die ge-
wünschte Zeit (max. 90 Min. und min. 10 Min.) eingestellt ist.
` Die eingestellte Zeit wird übernommen und SLEEP
ist aktiviert.
DE
So schalten Sie SLEEP aus:
` Drücken Sie die Taste SLEEP solange hinter einander
SLEEP Anzeige im Display erlischt.
bis die
CD/MP3-Micro-Audio-System MD 81834 25
Page 76

iPOD Funktionen
iPOD Funktionen
So benutzen Sie die iPOD-Funktion
` Setzen Sie den iPOD Player in die Docking-Station.
` Schalten Sie das Gerät in den Standby-Modus und
wählen Sie mit der
dus. Im Display erscheint die
` Drücken Sie die PLAY/PAUSE/ENTER Taste und der
iPOD begint zu spielen.
` Drücken Sie die STOP/MENU Taste um die Wieder-
gabe zu stoppen.
` Drücken Sie die PLAY/PAUSE/ENTER Taste um die
Wiedergabe zu unterbrechen.
` Drücken Sie die PLAY/PAUSE/ENTER Taste erneut
um die Wiedergabe an der gleichen Stelle fortzusetzen.
` Drücken Sie die Taste SEARCH oder am Ge-
rät oder auf der Fernbedienung um einen Titel auszuwählen.
` Sie können auch die Funktionen REPEAT (Titel wie-
derholen) und
rät oder auf der Fernsteuerung wählen.
FUNCTION Taste den iPOD-Mo-
iPOD Anzeige.
RANDOM (Zufallswiedergabe) am Ge-
So benutzen Sie das iPOD-Menü
` Drücken Sie iPOD/MEM/CLOCK-ADJ Taste und der
iPOD-Modus wird geöffnet. Im Display erscheint die
iPOD MENU Anzeige
` Drücken Sie die STOP/MENU Taste um zum iPOD
Menü (Music, Extras, Photo Import, Settings, Shuffle
Songs, Backlight, Now Playing) zu gelangen.
` Drücken Sie die Taste SEARCH oder am Ge-
rät oder auf der Fernbedienung um einen Menüpunkt auszuwählen.
` Drücken Sie die PLAY/PAUSE/ENTER Taste um dann
diesen Menüpunkt zu öffnen.
` Mit der Taste SEARCH oder können Sie
dann auswählen. Drücken Sie gegebenenfalls die Ta-
PLAY/PAUSE/ENTER zur Bestätigung
ste
26
Page 77

` Drücken Sie die STOP/MENU Taste um zum iPOD-
Menü zurück zukehren.
` Für die Wiedergabe drücken Sie die iPOD/MEM/
CLOCK-ADJ Taste
Sie können das iPOD-Gerät auch in der Docking-Station laden. Dabei muss das Gerät im Standby-Modus sein.
Video Out Ausgang (Nur für das iPOD-Gerät)
` Schalten Sie das Gerät in den Standby-Modus.
` Verbinden Sie den Video Out Ausgang, hinten an der
Docking-Station, mit einem Verbindungskabel (nicht
im Lieferumfang) mit dem TV-Gerät.
` Drücken Sie die MENÜ Taste an dem iPOD Play er und
wählen die Video Funktion aus.
iPod ist eine Marke/Markenanmeldung der Apple Inc.
iPOD Funktionen
DE
CD/MP3-Micro-Audio-System MD 81834 27
Page 78

Technische Daten
Technische Daten
Spannungsversorgung
Spannung: 230 V ~ 50 Hz
Leistungsaufnahme: 83 W
Ausgangsleistung: 2 x 5 Watt RMS + 30 W RMS
Radio
UKW-Band: 87,5 – 108 MHz
Geräteanschlüsse
Kopfhörer: 3,5-mm-Klinkenstecker, Stereo
AUX: Audioeingang Cinch
SUBWOOFER: 9-polig
USB/Card
CD-Spieler, unterstützte Disks
Laserleistung: Laser Klasse 1
Unterstützte Disks:
Audio-CD, CD-Rs, CD-RWs, MP3-Disk
Wenn Sie Audio-CDs abspielen, verwenden Sie ausschließlich CDs, ,
die wie nebenstehend gekennzeichnet sind:
Bitte beachten Sie:
Es gibt heute viele, zum Teil nicht standardisierte CD-Aufnahmeverfahren und
Kopierschutzverfahren, sowie unterschiedliche CD-R- und CD-RW-Rohlinge.
Darum kann es in Einzelfällen zu Einlesefehlern oder -Verzögerungen kommen. Dies ist kein Defekt des Geräts.
Sollte es vorkommen, dass durch unvorhergesehene Bedienkombinationen, fehlerhaftem Datenaustausch oder elektrostatischer Entladung (Electro Static Discharge)
der CD-Radiorekorder nicht mehr bedient werden kann, ziehen Sie in diesem Fall
den Netzstecker und nehmen Sie das Gerät im Anschluss wieder in Betrieb.
Technische Änderungen vorbehalten!
28
 Loading...