

Page 1
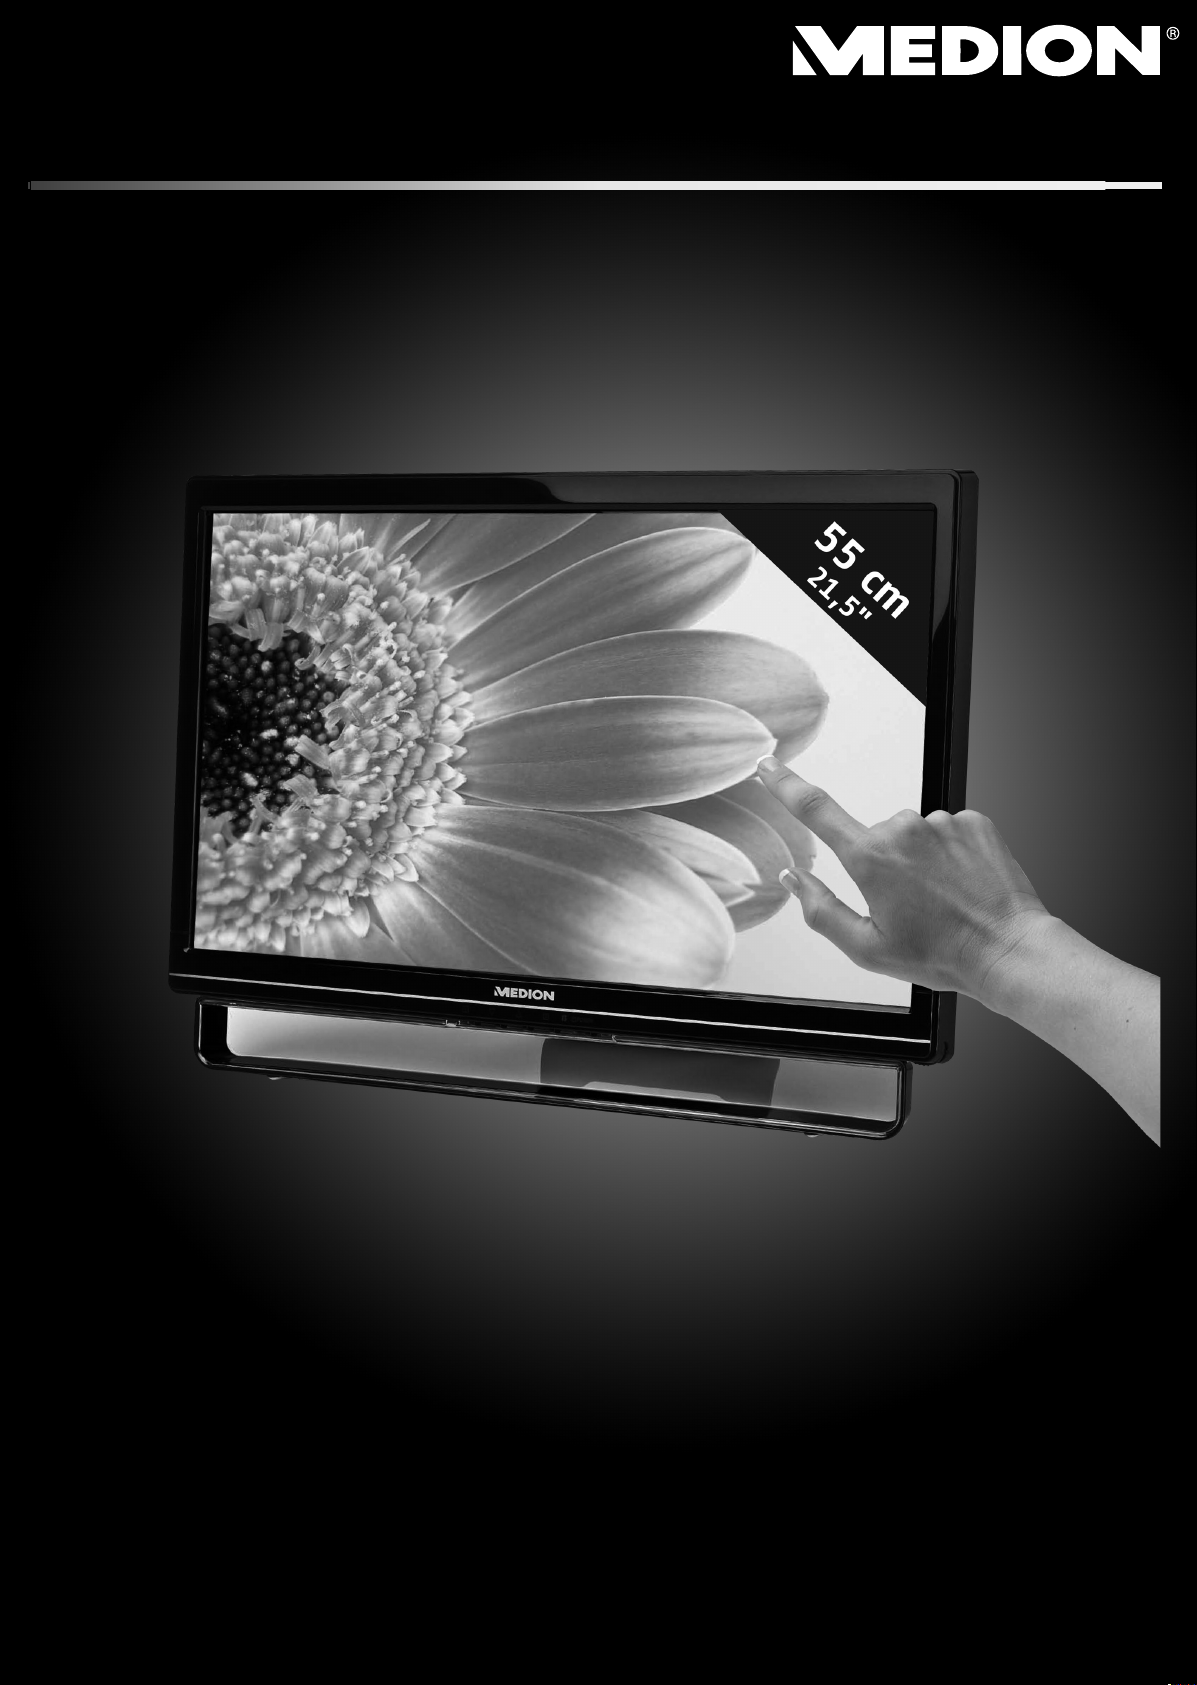
55 cm / 21,5"
Touchscreen-Monitor
MEDION
®
AKOYA® E54009 (MD 20125)
Bedienungsanleitung
Instruction Manual
Mode d'emploi
Manual de instrucciones
Handleiding
Page 2

Inhaltsverzeichnis
Sicherheitsbestimmungen....................................................................................................1
Erstes Setup ........................................................................................................................2
Kurzanleitung.......................................................................................................................2
Installieren des Touchscreen...............................................................................................3
Vorderseite des Produkts.....................................................................................................4
Rückseite des Produkts .......................................................................................................4
Verwenden der On Screen Display (OSD) Funktionen........................................................5
Unterstützte Zeitsteuerungen...............................................................................................8
Technische Informationen....................................................................................................9
Pflege und Aufbewahrung..................................................................................................10
Fehlerbehebung.................................................................................................................10
Eingeschränkte Garantie ...................................................................................................11
Deutsch
Page 3

Deutsch
Sicherheitsbestimmungen
Bei der Herstellung und Prüfung dieses Monitors stand die Sicherheit des zukünftigen
Nutzers immer im Vordergrund. Dennoch kann unsachgemäßer Betrieb und Installation zu
Schaden am Gerät und zu Gefahren für den Nutzer führen. Lesen Sie sich deshalb zuerst
sorgfältig die nachfolgenden Warnhinweise durch, bevor Sie mit der Installation beginnen.
Halten Sie dieses Handbuch immer parat.
WARNHINWEISE :
Achten Sie darauf, dass der Monitor mit einer Stromquelle verbunden ist, deren
technische Daten, denen auf dem Hinweisschild auf der Rückseite des Gerätes
entsprechen. Wenn Sie dahingehend Zweifel haben, so kontaktieren Sie Ihren
Händler oder den Stromversorger.
Reparieren Sie den Monitor nie selbst. Der technische Aufbau ist so kompliziert, dass
Sie diese Aufgabe unbedingt einem qualifizierten Fachmann überlassen sollten.
Entfernen Sie nicht das Monitorgehäuse. Die Hochspannungsteile im Innern des
Gerätes können sogar elektrische Schläge aussenden, wenn die Stromzufuhr
unterbrochen wurde.
Nutzen Sie das Gerät nicht, wenn das Gehäuse beschädigt wurde. In diesem Falle
muss zuerst eine Überprüfung durch einen Fachmann durchgeführt werden.
Stellen Sie den Monitor in einer sauberen, trockenen Umgebung auf. Unterbrechen
Sie sofort die Stromversorgung, wenn Feuchtigkeit in das Gerät eingedrungen ist und
wenden Sie sich an einen Fachmann um Hilfe.
Unterbrechen Sie stets die Stromversorgung, bevor Sie mit der Reinigung des
Monitors beginnen. Geben Sie ammoniakfreie Reinigungsflüssigkeit zuerst auf ein
Tuch , niemals jedoch gleich direkt auf den Glasbildschirm.
Beachten Sie einen größeren Abstand des Monitors zu magnetischen Gegenständen,
Motoren, Fernsehapparaten und Transformatoren.
Stellen Sie keine schweren Gegenstände auf Kabel und Stromversorgung.
Die Verbindungsbuchsen ANSCHLIEßBARER ZUSATZGERÄTE sollten sich in der
Nähe des Monitors befinden und leicht zugänglich sein.
Gemäß der WEEE-Bestimmungen darf dieser Bildschirm in Europa nicht als
Hausmüll entsorgt werden. Informationen zum Recycling finden Sie auf unserer
Website.
1
Page 4
Erstes Setup
A
Danke, dass Sie sich für diesen leistungsstarken Monitor entschieden haben!
Im Lieferumfang Ihres Monitors ist folgendes enthalten:
Netzkabel
VGA-Kabel (15 Pin)
Audiokabel
Touch-Pen
Benutzerhandbuch
USB-Kabel
Garantiekarte
Kurzanleitung
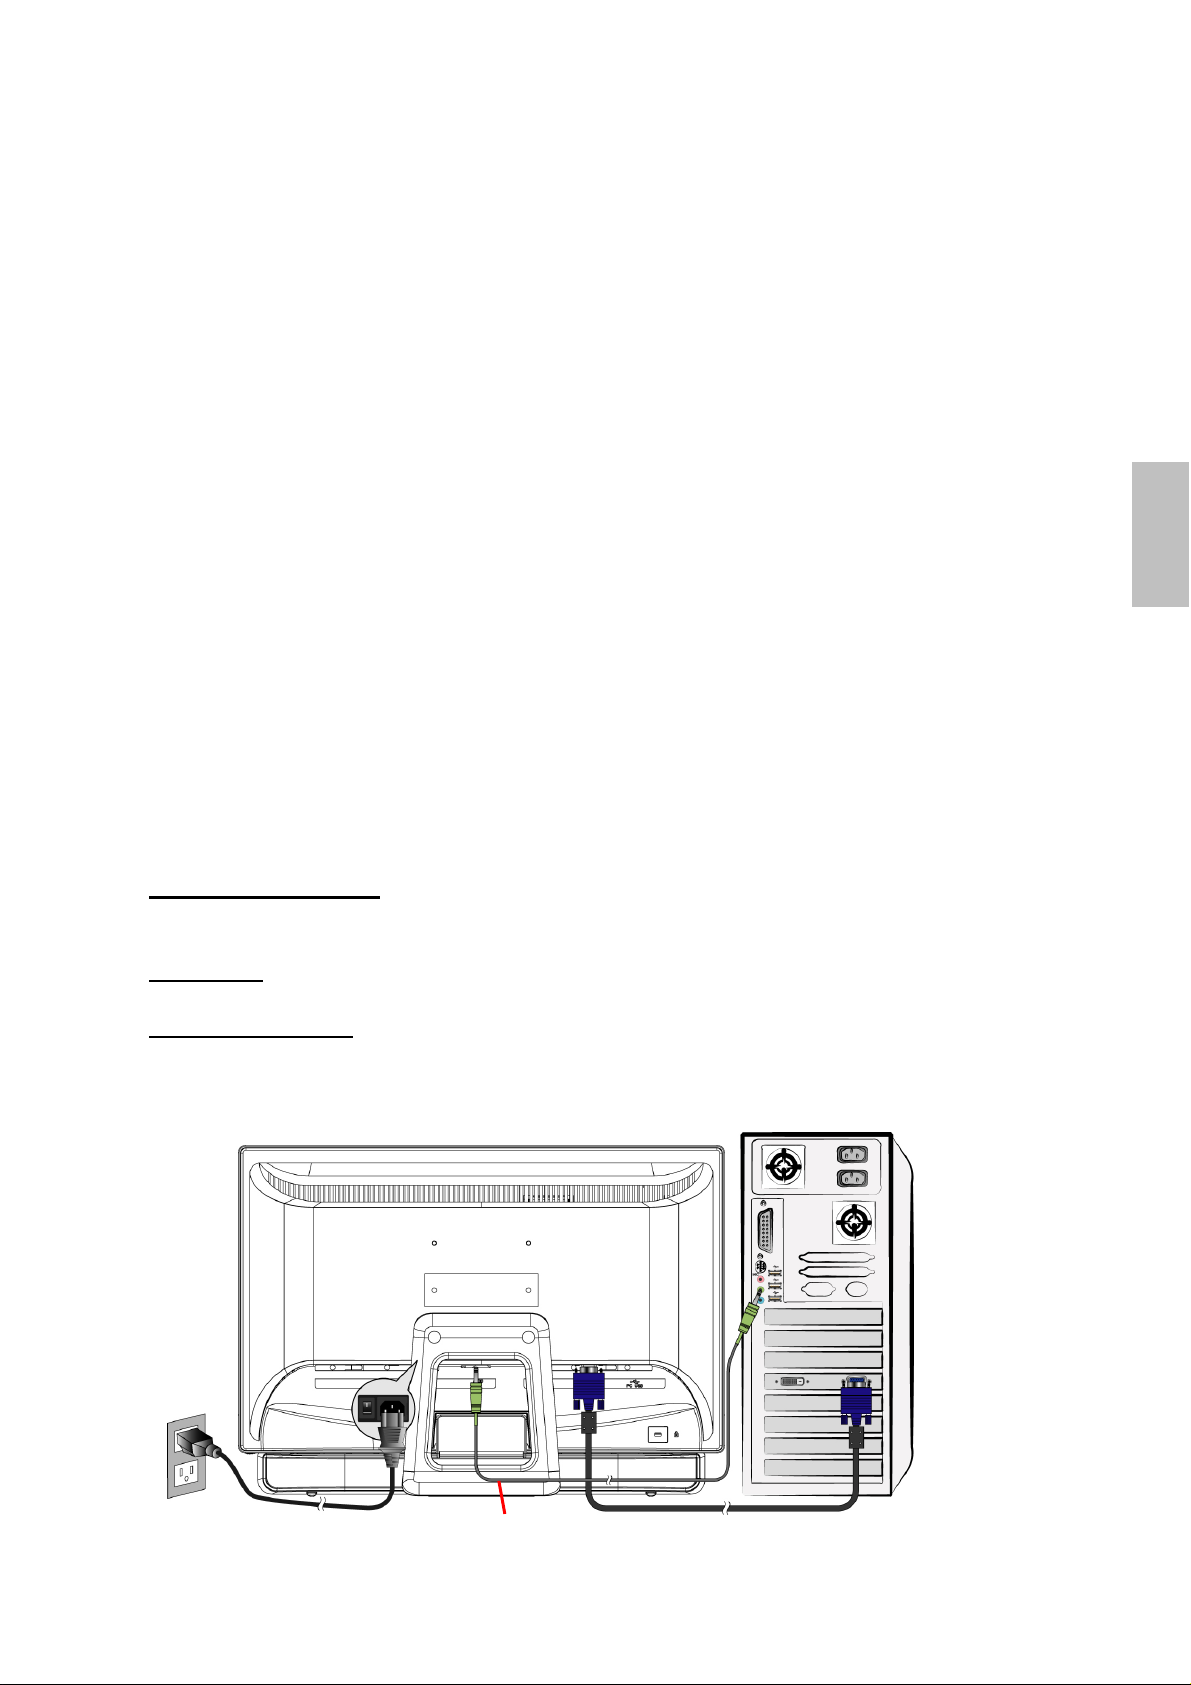
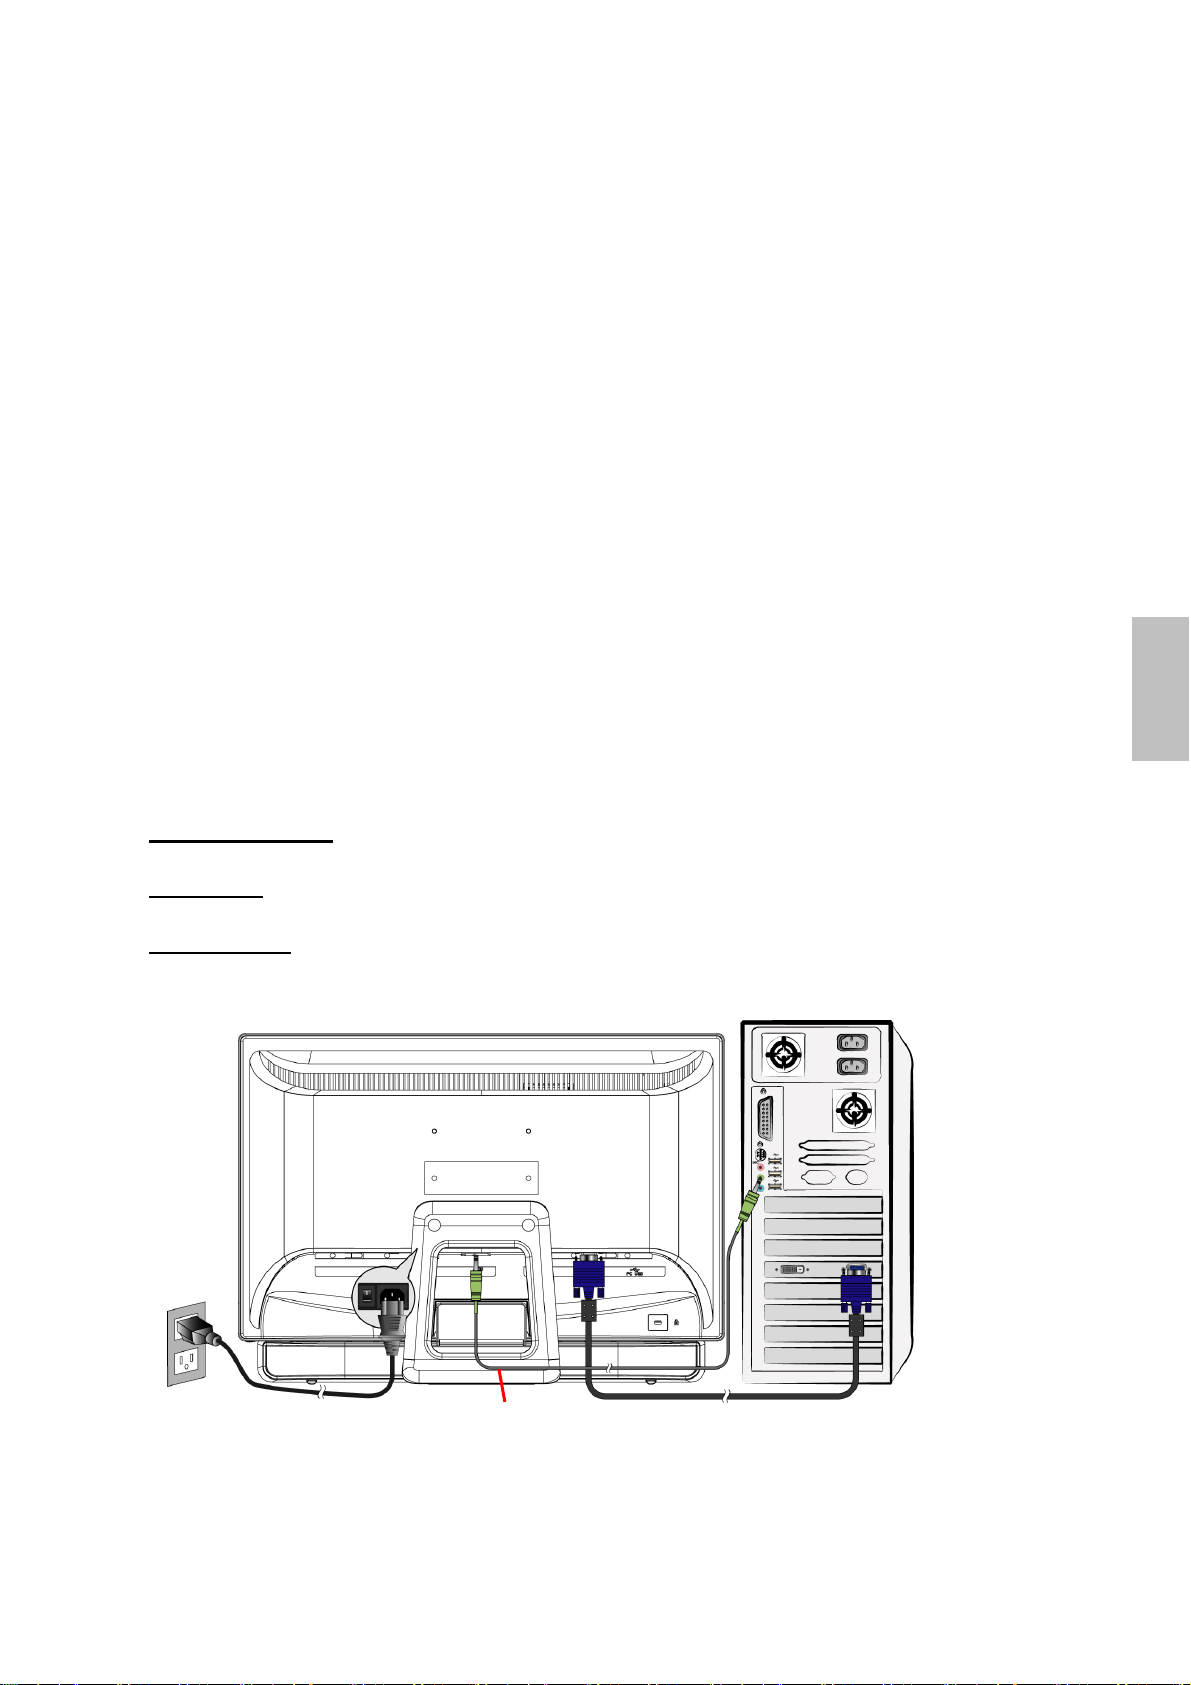
1. Anschließen des Videokabels (D-Sub-Kabel)
Vergewissern Sie sich, dass sowohl der Monitor als auch der Computer abgeschaltet
ist. Schließen Sie das Videokabel (D-Sub-Kabel) an den Computer und danach an den
Monitor an.
2. Anschließen des Netzkabels
Schließen Sie das Netzkabel an eine korrekt geerdete Wechselstromsteckdose und
dann an den Monitor an.
3. Anschließen des Audiokabels
Schließen Sie das Audiokabel vom Audioausgang des Computers an den
Audioeingang des Monitors an.
4. Einschalten von Computer und Monitor
Schalten Sie den Computer ein und schalten Sie danach den Monitor ein.
5. Windows-Benutzer :
Aktualisierungsrate)
Beispiel : 1920 x 1080 @ 60 Hz
Auflösung: Rechtsklicken Sie auf das Windows-Desktop > Eigenschaften >
Einstellungen > „Bildschirmauflösung“. Stellen Sie die Auflösung ein.
Aktualisierungsrate (vertikale Frequenz): Lesen Sie sich dazu bitte das
Benutzerhandbuch Ihrer Grafikkarte durch.
Beispiel :
Einstellen des Timing-Modus (Auflösung und
PC
Deutsch
Netzkabel
udiokabel
VGA-Kabel
2
Page 5
Deutsch
Installieren des Touchscreen
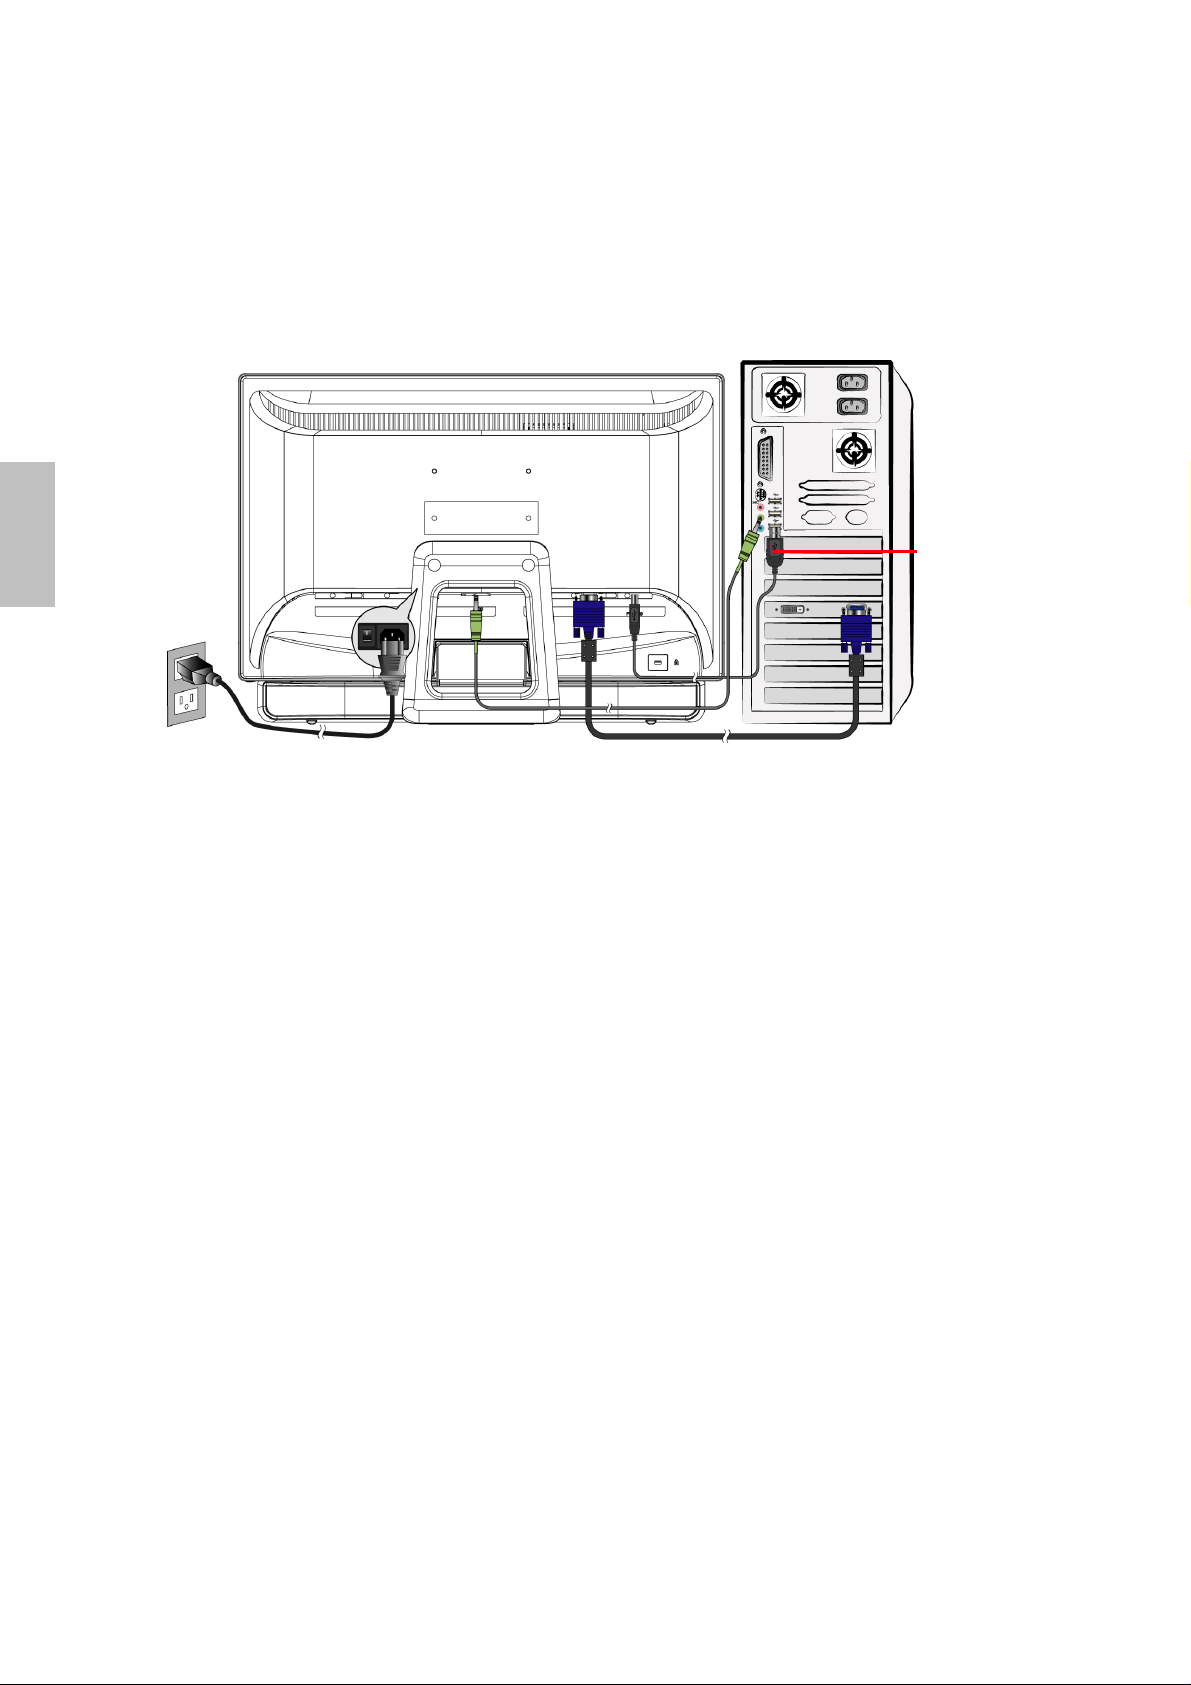
1. Nehmen Sie das USB 2.0 Kabel (im Lieferumfang des Monitors enthalten) und
stecken Sie das eine Ende in den Monitor und das andere in einen USB 2.0
Anschluss des Computers.
2. Windows sucht dann automatisch nach dem Touch-Modul und installiert den Treiber.
3. Die Multi-Touch-Funktion wird nur von Windows 7 unterstützt, andere
Betriebssysteme unterstützen die Multi-Touch-Funktion nicht.
USB 2.0 Kabel
Hardware Installation
Verbinden Sie Ihren Touchscreen-Monitor mittels eines USB-Kabels mit einem freien USB
2.0 Anschluss an Ihrem Computer. Windows erkennt das Gerät automatisch.
3
Page 6
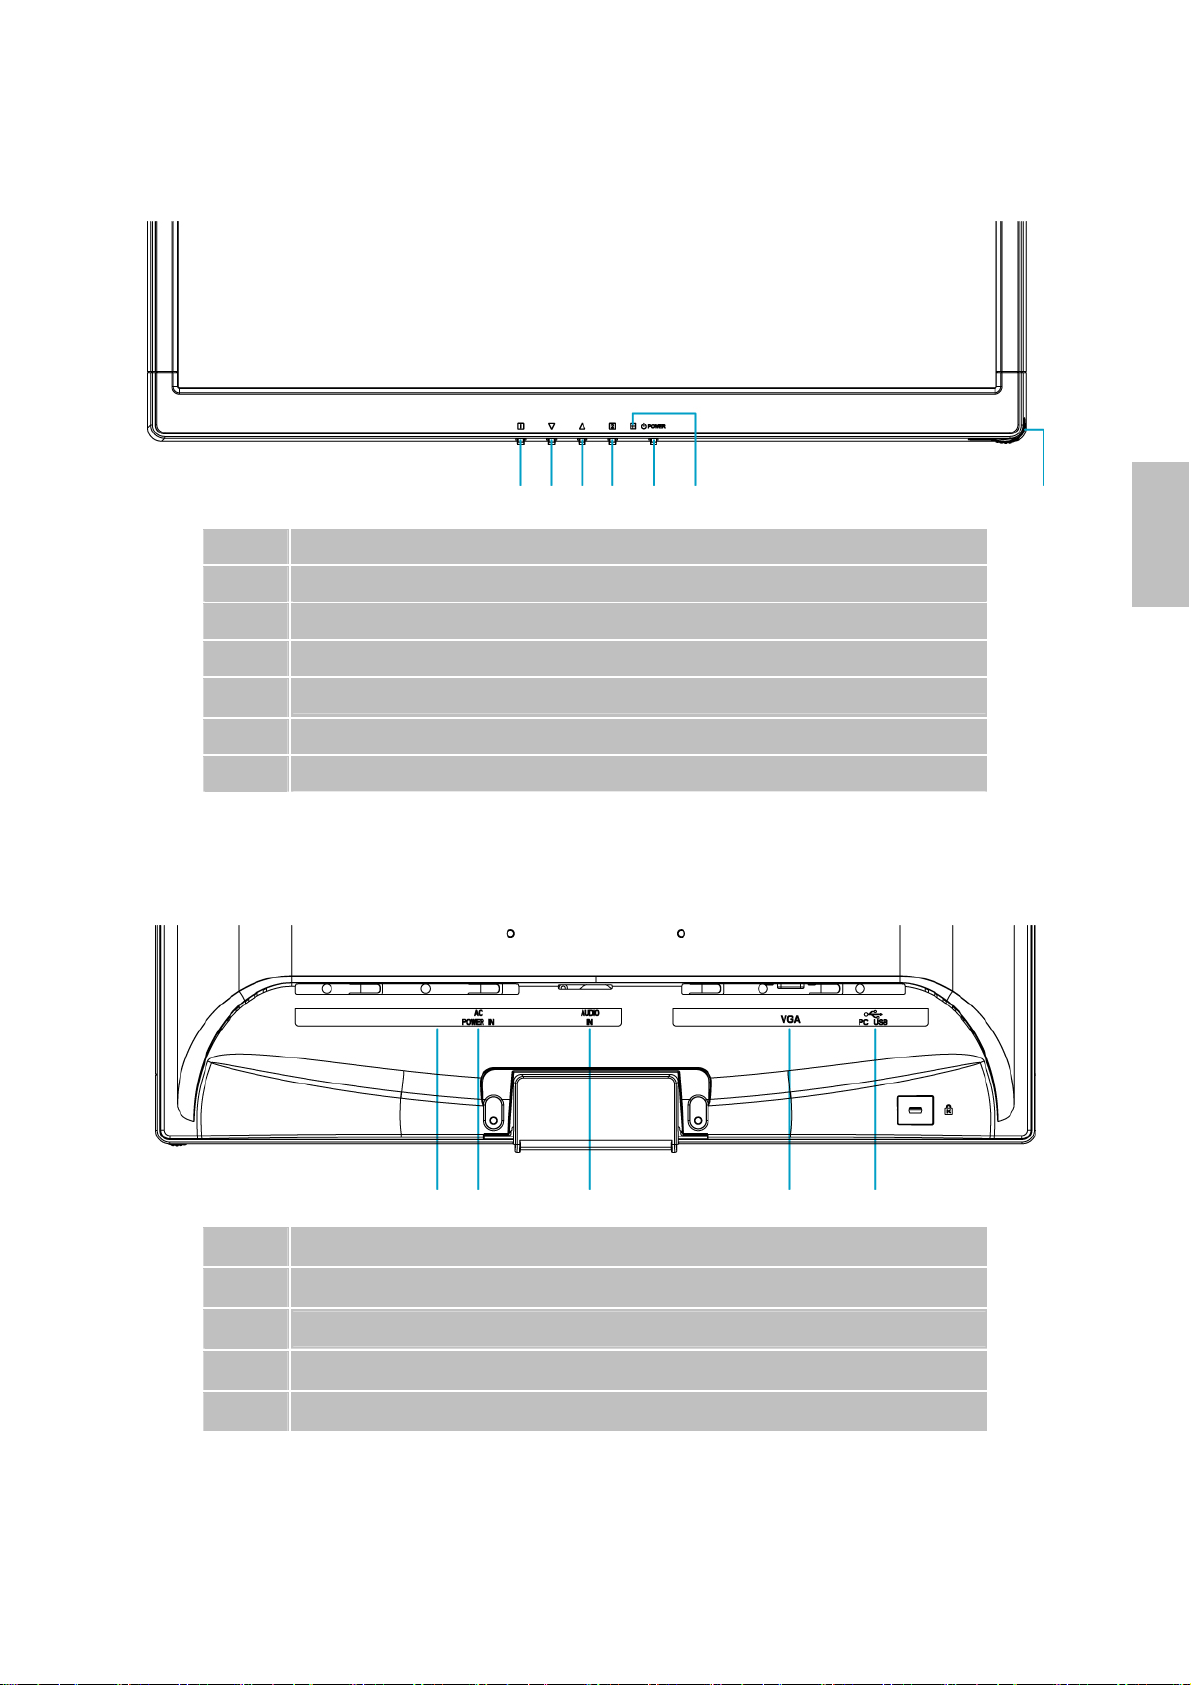
Vorderseite des Produkts
On Screen Display Menü Ein/Aus
Nach unten scrollen/ Verringern
Nach oben scrollen/ Erhöhen
Auswahl bestätigen
EIN/AUS
Netz-LED
Touch-Pen-Fach
Rückseite des Produkts
Deutsch
AC Ein-Ausschalter
Stromanschluss (AC-Eingang)
Audioeingang
VGA-Eingang (D-Sub 15 Pin)
Upstream-USB-Anschluss (zum PC)
4
Page 7
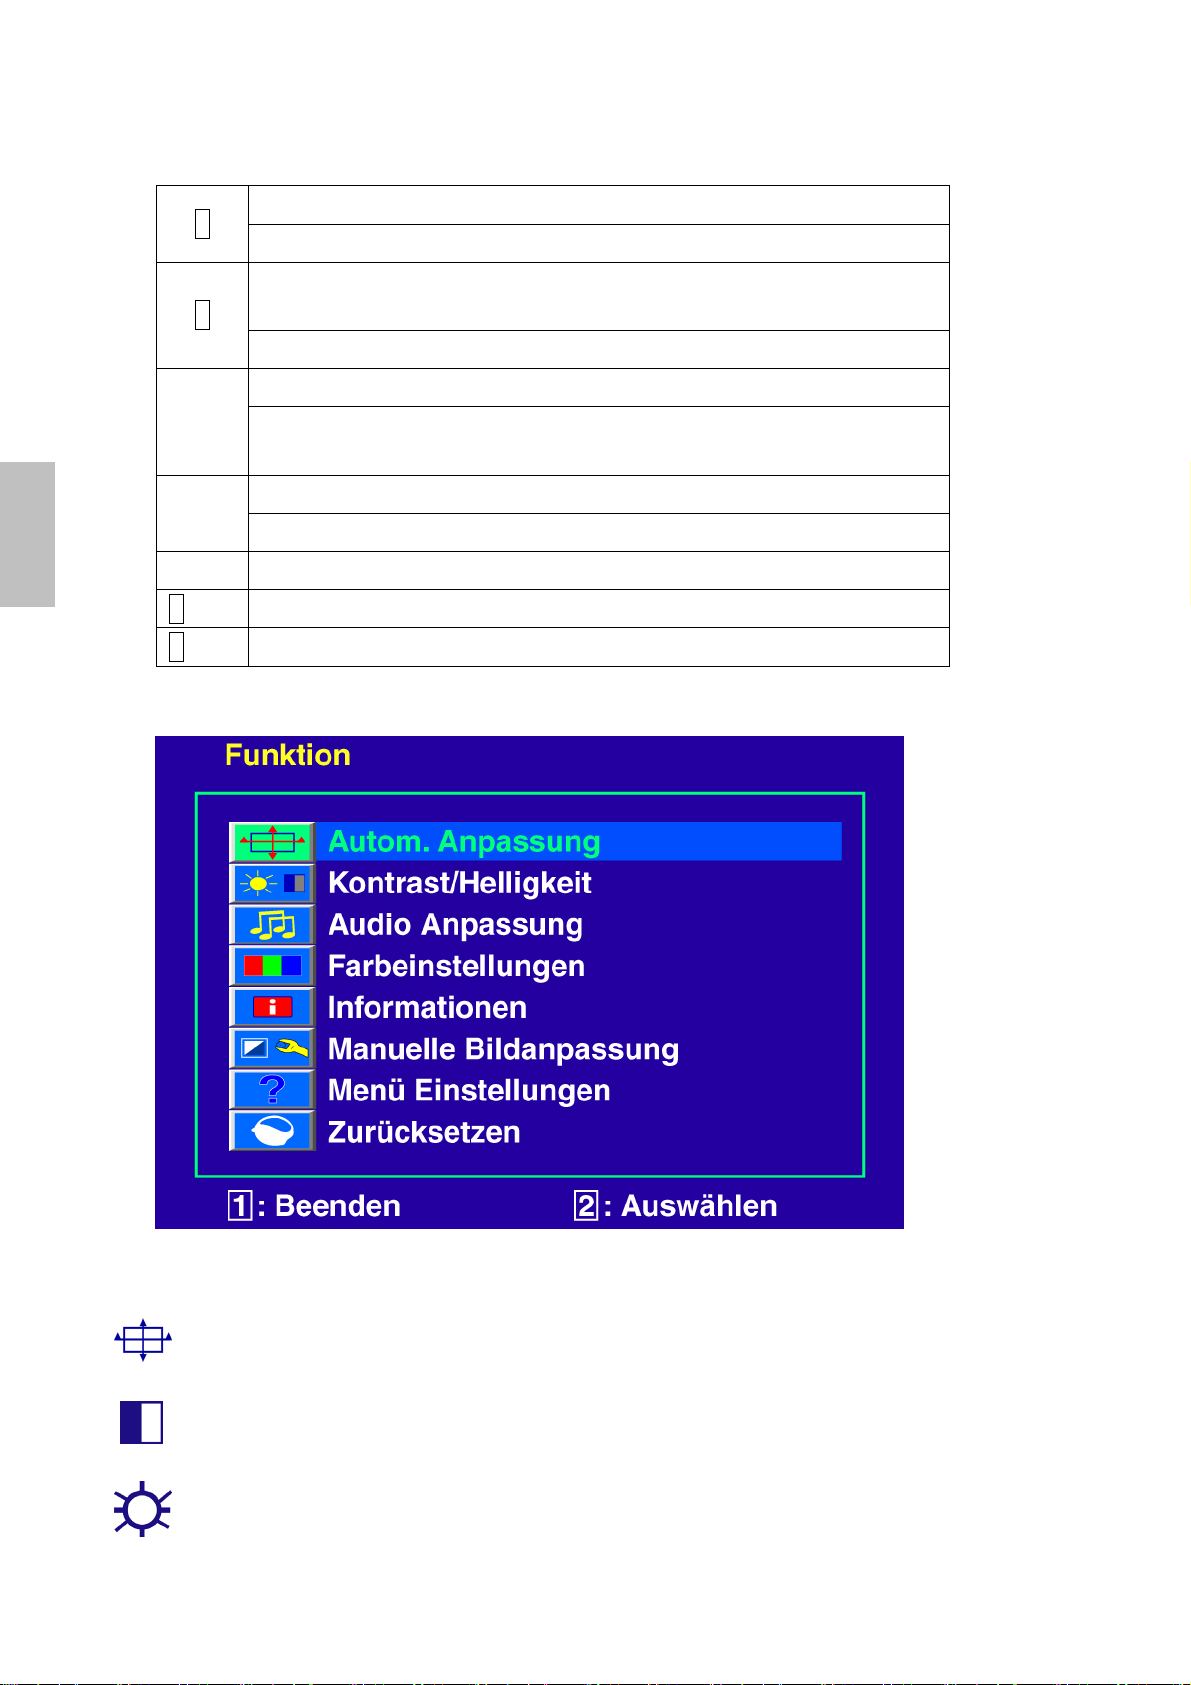
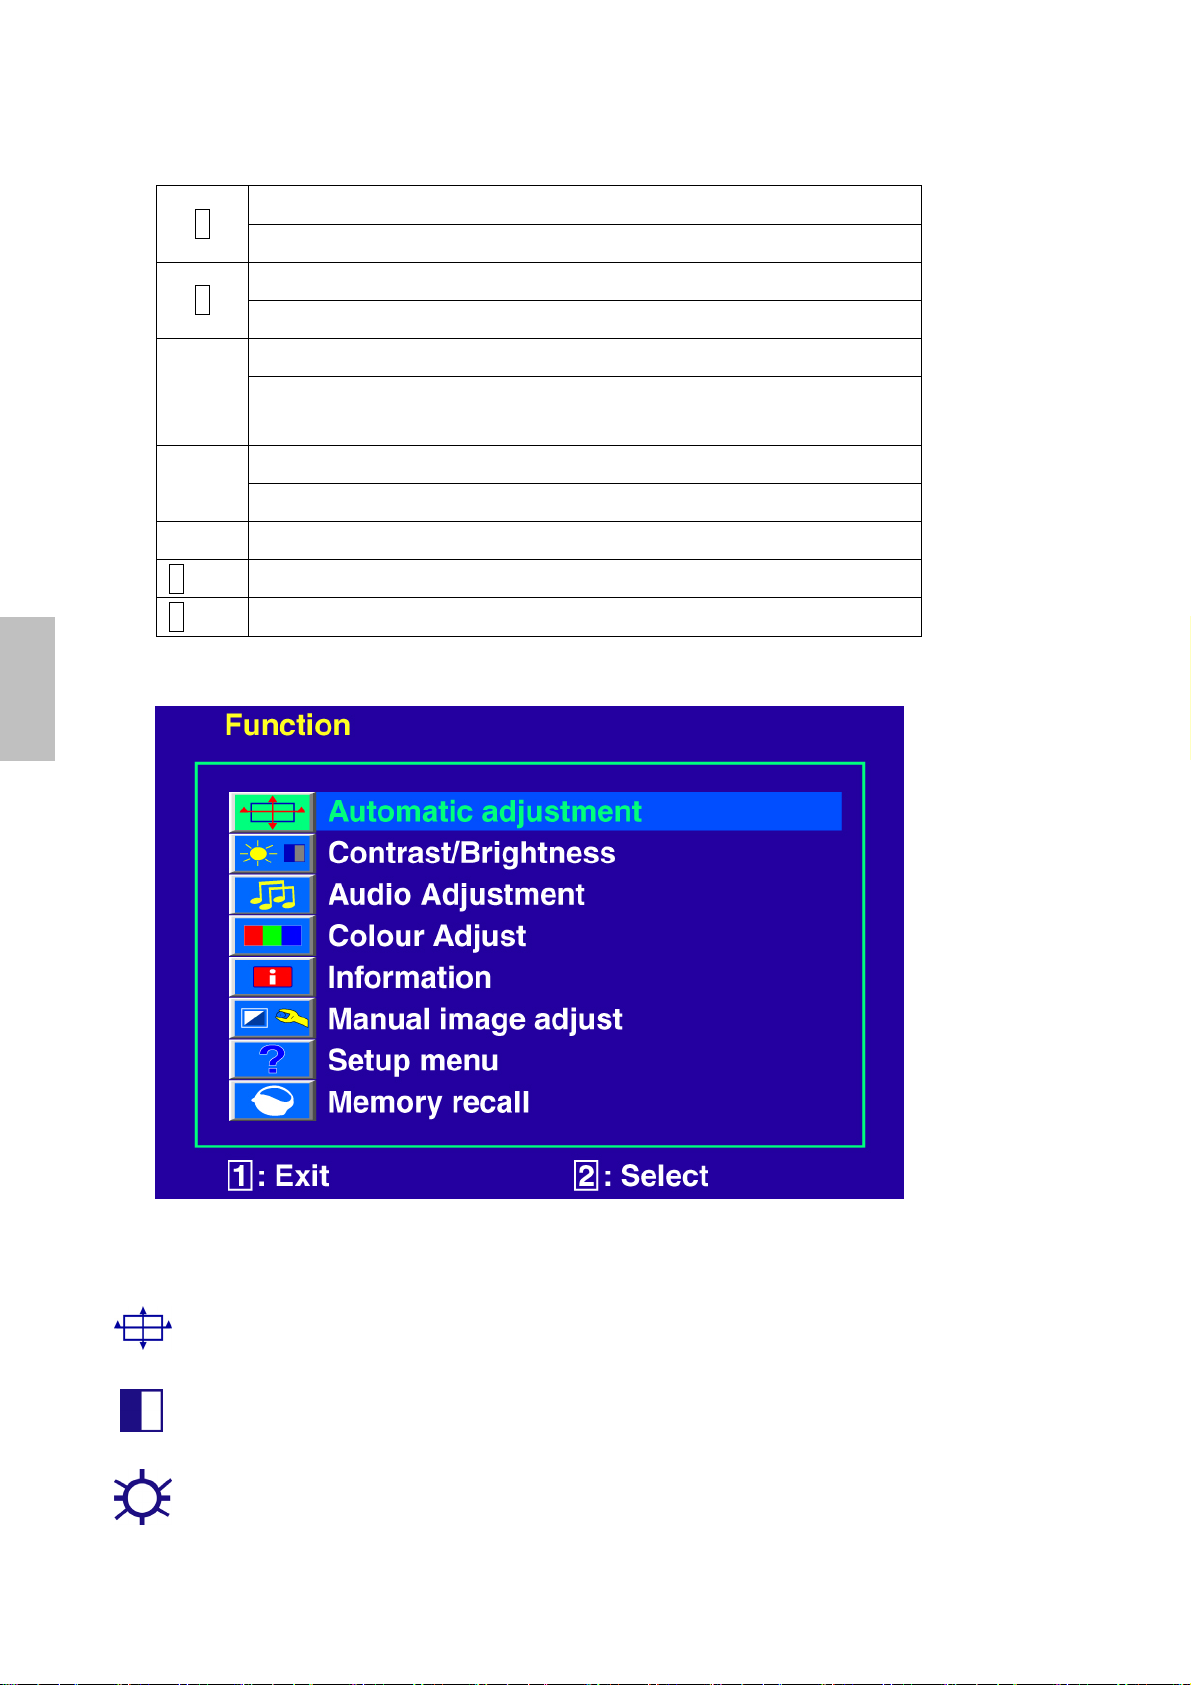
Verwenden der On Screen Display (OSD) Funktionen
Deutsch
1
Hauptmenü anzeigen.
OSD-Menü verlassen.
Automatisches Anpassung des Bildes, wenn Sie sich nicht im
2
Hauptmenü befinden.
Bestätigen der Auswahl.
Wählen Sie den gewünschten Punkt im OSD-Menü aus.
▼
Wenn nicht im OSD-Menü, führt direkt zu Kontrast/ Helligkeit/
DCR/ ECO-Modus-Menü
Select the desired item when in OSD menu.
▲
Wenn nicht im OSD-Menü, führt direkt zum Opti Farbmodus.
▼ + ▲ Ruft Kontrast und Helligkeit wieder auf.
1 + ▼ Power-Sperre (wenn Sie sich nicht im OSD-Menü befinden)
1 + ▲ OSD-Sperre (wenn Sie sich nicht im OSD-Menü befinden)
Hauptmenü
Schnelltastenfunktion
Autom. Anpassung: Stellt Horizontal- und Vertikal-Position, Phase
(Feineinstellung) und Takt (Horizontale Größe) automatisch ein.
Kontrast: Stellt den Weißwert des Bildschirmvordergrundes ein.
▲: Erhöht Kontrast, ▼: Verringert Kontrast.
Helligkeit: Zum Anpassen der Helligkeit des Videos.
▲: Helligkeit erhöhen, ▼: Helligkeit verringern.
5
Page 8
DCR Ein/Aus: Bei DCR „Ein“ liegt das Kontrastverhältnis bei ≥ 60000:1.
Audio Anpassung: Zur Einstellung der Audiofunktionen.
Lautstärke: Stellt die Tonausgabe der Lautsprecher ein.
Stummschaltung: Ermöglicht die Wahl von Stumm EIN/AUS.
Farbeinstellungen: Zum Auswahl der Farben, um die Helligkeit und
Farbsättigung zu verbessern. Zur Auswahl stehen: Kühl, Normal, Warm und
Benutzereinstellung.
Kühl: Fügt dem Bildschirm Blau hinzu und erzeugt ein kühleres Weiß.
Normal: Fügt dem Bildschirm Rot hinzu und erzeugt ein wärmeres Weiß und ein
prächtigeres Rot.
Warm: Fügt dem Bildschirm Grün hinzu und erzeugt einen dunkleren Farbton.
Deutsch
Benutzereinstellung: Individuelle Einstellung für rot(R), grün(G) und blau(B).
1. Drücken Sie die Taste 2 , um das Eingestellte zu übernehmen.
2. Drücken Sie die Taste ▲ oder ▼, um die ausgewählte Farbe einzustellen.
Informationen: Zeigt Informationen über das aktuelle Eingangssignal von der
Grafikkarte Ihres Computers an.
Hinweis: Weitere Informationen über das Ändern der Auflösung und der
Bildwiederholrate sind in der Bedienungsanleitung der Grafikkarte angegeben.
Manuelle Bildanpassung: Zur manuellen Anpassung von Horizontale Größe, H.
/V. Lage, Feineinstellung, Schärfe, Video Mode Adjust und Opti Farbmodus.
Horizontale Größe: Stellt die Breite des Bildschirms ein.
▲: erhöht die Breite des Bildschirms, ▼: verringert die Breite des Bildschirms.
H./V. Lage: Stellt die Horizontal- und Vertikal-Position des Videobildes ein.
H. Lage: ▲: Schiebt den Bildschirm nach rechts, ▼: Schiebt den Bildschirm nach
links.
V. Lage: ▲: Schiebt den Bildschirm nach oben, ▼: Schiebt den Bildschirm nach
unten.
Feineinstellung: Stellt die Verzögerungszeit ein.
Drücken Sie ▼ oder ▲, um den Benutzerwunsch einzustellen.
Schärfe: Zum Anpassen der Schärfe eines Nicht-Full HD (1920x1080) Signals mit
der Taste ▼ oder ▲.
Video Mode Adjust: Um den Videomodus zwischen Full Screen oder Over
Screen einzustellen.
Full Screen: Um die Bildgröße Vollbildschirm auszuwählen.
Over Screen: Um die Bildgröße Overscreen auszuwählen.
Opti Farbmodus: Ermöglicht eine optimale Anzeige abhängig vom dargestellten
Inhalt. Er beinhaltet 6 vom Benutzer wählbare Voreinstellungen.
Benutzer ist für eine allgemeine Windows-Umgebung und die Voreinstellung.
Spiel optimiert für PC-Spiele.
Video optimiert für Filme und Videos.
Landschaft optimiert für die Anzeige von Szenen im Freien.
6
Page 9
Deutsch
Text optimiert für Textbearbeitung und Darstellung in einer
Textverarbeitungsumgebung.
ECO Ermöglicht dem Benutzer das Ein- und Ausschalten der ECO-Funktion.
Kontrast- und Helligkeitsanpassung sind deaktiviert, wenn ECO aktiviert ist.
Menü Einstellungen: Um die Sprache, OSD Position, OSD Einblendzeit und
OSD Hintergrund auszuwählen.
Sprache: Ermöglicht dem Benutzer, aus vorhandenen Sprachen auszuwählen.
OSD Position: Drücken Sie die Taste ▲ oder ▼, um zwischen horizontaler und
vertikaler Einstellung der OSD-Position zu wählen.
H. Lage: Zur horizontalen Einstellung der OSD-Position.
▲: OSD nach rechts bewegen, ▼: OSD nach links bewegen.
V. Lage: Zur vertikalen Einstellung der OSD-Position.
▲: OSD nach oben bewegen, ▼: OSD nach unten bewegen.
OSD Einblendzeit: Zum automatischen Abschalten des On Screen Displays
(OSD) nach Ablauf einer voreingestellten Zeitspanne.
OSD Hintergrund: Ermöglicht das Ein-und Ausschalten des OSD-Hintergrunds.
Zurücksetzen: Zur Wiederherstellung der Werkseinstellungen für die Video- &
Audiosteuerung. Drücken Sie die Taste 2, um die Option
Speicher-Wiederherstellung auszuwählen.
7
Page 10
Unterstützte Zeitsteuerungen
VGA 720 x 400 @ 70Hz
VGA 640 x 480 @ 60Hz
MAC 640 x 480 @ 67Hz
VESA 640 x 480 @ 72Hz
VESA 640 x 480 @ 75Hz
VESA 800 x 600 @ 56Hz
VESA 800 x 600 @ 60Hz
VESA 800 x 600 @ 72Hz
VESA 800 x 600 @ 75Hz
MAC 832 x 624 @ 75Hz
VESA 1024 x 768 @ 60Hz
VESA 1024 x 768 @ 70Hz
VESA 1024 x 768 @ 75Hz
VESA 1280 x 960 @ 60Hz
VESA 1152 x 864 @ 75Hz
MAC 1152 x 870 @ 75Hz
VESA 1280 x 1024 @ 60Hz
VESA 1280 x 1024 @ 75Hz
VESA 1440 x 900 @ 60Hz
VESA 1440 x 900 @ 75Hz
CVT 1400 x 1050 @ 60Hz
VESA 1600 x 1200 @ 60Hz
VESA 1680 x 1050 @ 60Hz
VESA 1920 x 1080 @ 60Hz
Vorsicht: Stellen Sie die Bildwiederholrate der Grafikkarte Ihres Computers nicht auf
einen Wert ein, der obige Maximalwerte überschreitet. Andernfalls könnte Ihr Monitor
permanent beschädigt werden.
Deutsch
8
Page 11
Technische Informationen
Technische Daten
LCD-Bildschirm 21,5” TFT
Deutsch
Stromverwaltung
Anzeigbare Auflösung Full HD max. 1920 x 1080, Vertikale Frequenz max.60Hz
Pixelabmessungen 0,248 x 0,248 mm
LCD-Anzeigefarben 16,7M
Neigung 0°~20°
Aktiver Anzeigebereich 476,64 mm x 268,11 mm
Temperatur Betrieb: 5°C ~ +35°C
Erfüllte Vorschriften CE
Strom Eingangsspannung AC100-240 V
Lautsprecher 1W x 2
Optische Berührung Infrarot optische Struktur
Entspricht Energy Star, VESA
DPMS-kompatibel
< 1 W
Lagerung: -20°C ~ + 60°C
Sensor Auffrischung 120 Bilder/Sekunde
Sensor Auflösung 32767 x 32767
Anzeigegenauigkeit ≤ ± 2,5mm
Glasbeschichtung Keine Beschichtung
Abtastgröße Finger, jeder Abtaststift ≥3,6mm (Durchmesser)
Betriebssystem Windows 7
9
Page 12

Pflege und Aufbewahrung
Pflege
Setzen Sie Ihren Monitor nicht der direkten Sonneneinstrahlung oder anderen
Hitzequellen aus. Sonneneinstrahlung auf den Bildschirm sollte vermieden werden, um
unangenehme Reflektion zu vermeiden.
Stellen Sie Ihren Monitor an einem gut durchlüfteten Ort auf.
Legen Sie keine schweren Gegenstände auf das Gerät.
Verwenden Sie den Monitor in einer sauberen, trockenen Umgebung.
Achten Sie auf einen genügenden Abstand des Monitors zu Magnetquellen, Motoren,
Transformatoren, Lautsprechern und Fernsehgeräten.
Hinweise
Entnehmen Sie den LCD-Monitor aus der Verpackung und entfernen Sie die Plastikhülle
und den Polystyrolschaum.
Ziehen Sie den Sockel aus seiner parallelen Position senkrecht zur Bildschirmplatte.
Stellen Sie die Bildschirmplatte in einem Winkel von 0° vorwärts und 20° rückwärts ein.
Bei einem Winkel von mehr als 20° müssen Sie stärker drücken, diese Position ist
jedoch nur für die platzsparende Lagerung des Geräts gedacht. Achtung: Eine
Positionierung der Bildschirmplatte außerhalb des 0-20° Bereichs kann zu Instabilität
und Beschädigung führen.
Sicherheitstipps
Wenn aus dem Monitor Rauch aufsteigt, Sie seltsame Geräusche oder Gerüche
wahrnehmen, sollten Sie das Gerät unverzüglich abschalten und sich an einen
Fachmann um Hilfe wenden.
Entfernen Sie niemals die Rückwand des Gerätes. Im Innern befinden sich
Hochspannungsteile, deren Berührung zu elektrischen Schlägen führen kann.
Reparieren Sie den Monitor niemals selbst. Wenden Sie sich in Schadensfällen stets an
ein Servicecenter oder einen qualifizierten Fachmann.
Deutsch
Fehlerbehebung
Kein Strom
Vergewissern Sie sich, dass der Netzadapter richtig mit der Wechselstromquelle
verbunden ist und die Kabel zum Monitor fest in den Verbindungsbuchsen stecken.
Verbinden Sie ein anderes elektrisches Gerät mit der Stromversorgung, um die
Funktionstüchtigkeit der Stromquelle zu überprüfen.
Kontrollieren Sie nochmals die Installation aller kurzen Kabel.
Stromzufuhr gewährleistet, aber keine Bildwiedergabe
Vergewissern Sie sich, dass das mitgelieferte Videokabel fest mit dem Video-Ausgang
an der Rückseite des Computers verbunden ist. Wenn nötig, verbinden Sie es neu.
Stellen Sie die Helligkeit ein.
Fehlerhafte oder unnatürliche Farben
Wenn ein Farbton (Rot, Grün, Blau) fehlen sollte, so überprüfen Sie bitte den festen
Sitz des Videokabels. Lockere oder abgebrochene Pins im Verbindungsstecker können
die Signalübermittlung beeinträchtigen.
Verbinden Sie den Monitor mit einem anderen Computer.
10
Page 13

Deutsch
Eingeschränkte Garantie
I. Allgemeine Garantiebedingungen
1. Allgemeines
Die Garantie beginnt immer am Tag des Einkaufs des MEDION Gerätes von der MEDION oder einem
offiziellen Handelspartner der MEDION und bezieht sich auf Material- und Produktionsschäden aller Art, die
bei normaler Verwendung auftreten können. Die Garantiezeit ergibt sich aus der dem Gerät anliegenden
Garantiekarte in Zusammenhang mit dem Kaufbeleg des autorisierten MEDION-Handelspartners.
Liegt den Geräten keine Garantiekarte bei, besteht für diese Geräte keine Garantie. Neue Geräte
unterliegen den gesetzlichen Gewährleistungsfristen von 24 Monaten. Bei gebrauchten Geräten (B-Ware)
unterliegt die Ware der eingeschränkten Gewährleistungsfrist von 12 Monaten.
Bitte bewahren Sie den original Kaufnachweis und die Garantiekarte gut auf. MEDION und sein autorisierter
Servicepartner behalten sich vor, eine Garantiereparatur oder eine Garantiebestätigung zu verweigern,
wenn dieser Nachweis nicht erbracht werden kann.
Bitte stellen Sie sicher, dass Ihr Gerät im Falle einer notwendigen Einsendung transportsicher verpackt ist.
Sofern nichts anderes auf ihrer Garantiekarte vermerkt, tragen sie die Kosten der Einsendung sowie das
Transportrisiko. Für zusätzlich eingesendete Materialien, die nicht zum ursprünglichen Lieferumfang des
MEDION Gerätes gehören, übernimmt MEDION keine Haftung.
Bitte überlassen Sie uns mit dem Gerät eine möglichst detaillierte Fehlerbeschreibung. Zur Geltendmachung
ihrer Ansprüche bzw. vor Einsendung, kontaktieren sie bitte die MEDION Hotline. Sie erhalten dort eine
Referenznummer (RMA Nr.), die sie bitte außen auf dem Paket, gut sichtbar anbringen.
Diese Garantie hat keine Auswirkungen auf Ihre gesetzlichen Ansprüche und unterliegt dem geltenden
Recht des Landes, in dem der Ersterwerb des Gerätes durch den Endkunden vom autorisierten Händler der
MEDION erfolgte.
2. Umfang
Im Falle eines durch diese Garantie abgedeckten Defekts an ihrem MEDION Gerät gewährleistet die
MEDION mit dieser Garantie die Reparatur oder den Ersatz des MEDION Gerätes. Die Entscheidung
zwischen Reparatur oder Ersatz der Geräte obliegt MEDION. Insoweit kann MEDION nach eigenem
Ermessen entscheiden, das zur Garantiereparatur eingesendet Gerät durch ein generalüberholtes Gerät
gleicher Qualität zu ersetzen.
Für Batterien oder Akkus wird keine Garantie übernommen, gleiches gilt für Verbrauchsmaterialien, d.h.
Teile, die bei der Nutzung des Gerätes in regelmäßigen Abständen ersetzt werden müssen, wie z.B.
Projektionslampe in Beamer.
Ein Pixelfehler (dauerhaft farbiger, heller oder dunkler Bildpunkt) ist nicht grundsätzlich als Mangel zu
betrachten. Die genaue Anzahl zulässiger defekter Bildpunkte entnehmen Sie bitte der Beschreibung im
Handbuch für dieses Produkt.
Für eingebrannte Bilder bei Plasma oder LCD-Geräten, die durch unsachgemäße Verwendung des Gerätes
entstanden sind, übernimmt MEDION keine Garantie. Die genaue Vorgehensweise zum Betrieb Ihres
Plasmas bzw. LCD- Gerätes entnehmen Sie bitte der Beschreibung im Handbuch für dieses Produkt.
Die Garantie erstreckt sich nicht auf Wiedergabefehler von Datenträgern, die in einem nicht kompatiblen
Format oder mit ungeeigneter Software erstellt wurden.
Sollte sich bei der Reparatur herausstellen, dass es sich um einen Fehler handelt, der von der Garantie
nicht gedeckt ist, behält sich MEDION das Recht vor, die anfallenden Kosten in Form einer Handling
Pauschale sowie die kostenpflichtige Reparatur für Material und Arbeit nach einem Kostenvoranschlag dem
Kunden in Rechnung zu stellen.
3. Ausschluss
Für Versagen und Schäden, die durch äußere Einflüsse, versehentliche Beschädigungen, unsachgemäße
Verwendung, am MEDION Gerät vorgenommene Veränderungen, Umbauten, Erweiterungen, Verwendung
von Fremdteilen, Vernachlässigung, Viren oder Softwarefehler, unsachgemäßen Transport, unsachgemäße
Verpackung oder Verlust bei Rücksendung des Gerätes an MEDION entstanden sind, übernimmt MEDION
11
Page 14

keine Garantie.
Die Garantie erlischt, wenn der Fehler am Gerät durch Wartung oder Reparatur entstanden ist, die durch
jemand anderen als durch MEDION oder einen durch MEDION für dieses Gerät autorisierten Servicepartner
durchgeführt wurde. Die Garantie erlischt auch, wenn Aufkleber oder Seriennummern des Gerätes oder
eines Bestandteils des Gerätes verändert oder unleserlich gemacht wurden.
4. Service Hotline
Vor Einsendung des Gerätes an MEDION müssen Sie sich über die Service Hotline oder das MEDION
Service Portal an uns wenden. Sie erhalten insoweit weitergehende Informationen, wie Sie Ihren
Garantieanspruch geltend machen können.
Die Inanspruchnahme der Hotline ist kostenpflichtig.
Die Service Hotline ersetzt auf keinen Fall eine Anwenderschulung für Soft- bzw. Hardware, das
Nachschlagen im Handbuch oder die Betreuung von Fremdprodukten.
Zusätzlich bietet MEDION eine kostenpflichtige Hotline für über die Garantie hinaus gehende Anfragen.
II. Besondere Garantiebedingungen für MEDION PC, Notebook,
Pocket PC (PDA), Geräte mit Navigationsfunktion (PNA),
Telefongeräte, Mobiltelefone und Geräte mit Speicherfunktion
Hat eine der mitgelieferten Optionen (z.B. Speicherkarten, Modems etc.) einen Defekt, so haben Sie auch
einen Anspruch auf Reparatur oder Ersatz. Die Garantie deckt Material- und Arbeitskosten für die
Wiederherstellung der Funktionsfähigkeit für das betroffene MEDION Gerät.
Hardware zu Ihrem Gerät, die nicht von MEDION produziert oder vertrieben wurde, kann die Garantie zum
Erlöschen bringen, wenn dadurch ein Schaden am MEDION Gerät oder den mitgelieferten Optionen
entstanden ist.
Für mitgelieferte Software wird eine eingeschränkte Garantie übernommen. Dies gilt für ein vorinstalliertes
Betriebssystem, aber auch für mitgelieferte Programme. Bei der von MEDION mitgelieferten Software
garantiert MEDION für die Datenträger, z.B. Disketten und CD-ROMs, auf denen diese Software geliefert
wird, die Freiheit von Material- und Verarbeitungsfehlern für eine Frist von 90 Tagen nach Einkauf des
MEDION Gerätes von der MEDION oder einem offiziellen Handelspartner der MEDION. Bei Lieferung
defekter Datenträger ersetzt MEDION die defekten Datenträger kostenfrei; darüber hinausgehende
Ansprüche sind ausgeschlossen. Mit Ausnahme der Garantie für die Datenträger wird jede Software ohne
Mängelgewähr geliefert. MEDION sichert nicht zu, dass diese Software ohne Unterbrechungen oder
fehlerfrei funktioniert oder Ihren Anforderungen genügt. Für mitgeliefertes Kartenmaterial bei Geräten mit
Navigationsfunktion wird keine Garantie für die Vollständigkeit übernommen.
Bei der Reparatur des MEDION Gerätes kann es notwendig sein, alle Daten vom Gerät zu löschen. Stellen
Sie vor dem Versand des Gerätes sicher, dass Sie von allen auf dem Gerät befindlichen Daten eine
Sicherungskopie besitzen. Es wird ausdrücklich darauf hingewiesen, dass im Falle einer Reparatur der
Auslieferzustand wiederhergestellt wird. Für die Kosten einer Softwarekonfiguration, für entgangene
Einnahmen, den Verlust von Daten bzw. Software oder sonstige Folgeschäden übernimmt MEDION keine
Haftung.
Deutsch
12
Page 15

Deutsch
III. Besondere Garantiebedingungen für die Vorort Reparatur
bzw. den Vorort Austausch
Soweit sich aus der dem Gerät anliegenden Garantiekarte ein Anspruch auf Vorort Reparatur bzw. Vorort
Austausch ergibt, gelten die besonderen Garantiebedingungen für die Vorort Reparatur bzw. Vorort
Austausch für Ihr MEDION Gerät.
Zur Durchführung der Vorort Reparatur bzw. des Vorort Austauschs muss von Ihrer Seite Folgendes
sichergestellt werden:
• Mitarbeitern der MEDION muss uneingeschränkter, sicherer und unverzüglicher Zugang zu den Geräten
gewährt werden.
• Telekommunikationseinrichtungen, die von Mitarbeitern von MEDION zur ordnungsgemäßen Ausführung
Ihres Auftrages, für Test- und Diagnosezwecke sowie zur Fehlerbehebung benötigt werden, müssen von
Ihnen auf eigene Kosten zur Verfügung gestellt werden.
• Sie sind für die Wiederherstellung der eigenen Anwendungssoftware nach der Inanspruchnahme der
Dienstleistungen durch MEDION selbst verantwortlich.
• Sie haben alle sonstigen Maßnahmen zu ergreifen, die von MEDION zu einer ordnungsgemäßen
Ausführung des Auftrags benötigt werden.
• Sie sind für die Konfiguration und Verbindung ggf. vorhandener, externer Geräte nach der
Inanspruchnahme der Dienstleistung durch MEDION selbst verantwortlich.
• Der kostenfreie Storno-Zeitraum für die Vorort Reparatur bzw. den Vorort Austausch beträgt mind. 48
Stunden, danach müssen die uns durch den verspäteten oder nicht erfolgten Storno entstandenen
Kosten in Rechnung gestellt werden.
13
Page 16

Content
Safety Precautions...............................................................................................................1
First Setup ...........................................................................................................................2
Quick Installation .................................................................................................................2
Touching Screen Installation................................................................................................3
Front View of the Product ....................................................................................................4
Rear View of the Product.....................................................................................................4
Using On Screen Display (OSD) Functions .........................................................................5
Supporting Timing Modes....................................................................................................8
Technical Information ..........................................................................................................9
Care and Maintenance.......................................................................................................10
Troubleshooting .................................................................................................................10
Restricted Warranty ...........................................................................................................11
English
Page 17

English
Safety Precautions
This monitor is manufactured and tested on a ground principle that a user’s safety comes
first. However, improper use or installation may result danger to the monitor as well as to
the user. Carefully go over the following WARNINGS before installation and keep this
guide handy.
WARNINGS:
This monitor should be operated only at the correct power sources indicated on the
label on the rear end of the monitor. If you’re unsure of the power supply in your
residence, consult your local dealer or power company.
Do not try to repair the monitor yourself as it contains no user-serviceable parts. The
monitor should only be repaired by a qualified technician.
Do not remove the monitor cabinet. There is high-voltage parts inside that may cause
electric shock to human bodies, even when the power cord is disconnected.
Stop using the monitor if the cabinet is damaged. Have it checked by a service
technician.
Put your monitor only in a clean, dry environment. Unplug the monitor immediately if
gets wet and consult your service technician.
Always unplug the monitor before cleaning it. Clean the cabinet with a clean, dry cloth.
Apply non-ammonia based cleaner onto the cloth, not directly onto the glass screen.
Keep the monitor away from magnetic objects, motors, TV sets, and transformer.
Do not place heavy objects on the cable or power cord.
For PLUG CABLE EQUIPMENT, the Socket-outlet shall be installed near the
equipment and shall be easily accessible.
According to WEEE regulation, this monitor can't be handled as normal trash in
Europe when it is out of usage. Please refer to the recycle information from our
website to handle it.
1
Page 18
First Setup
A
Congratulation for purchasing this monitor of high performance!
This monitor comes with the following accessories :
Power cable
VGA cable (15 pin)
Audio cable
Touch pen
User guide
USB cable
Warranty card
Quick Installation
1. Connect video cable (D-Sub cable)
Make sure both monitor and computer are powered OFF. Connect the video cable
(D-Sub cable) to the computer, then to the monitor.
2. Connect power cord
Connect the power cord to a properly grounded AC outlet, then to the monitor.
3. Connect Audio cable
Connect the Audio cable from Audio output of computer to the Audio input of the
monitor.
4. Power-ON computer and monitor
Power-ON the computer, then Power-ON the monitor.
5. Windows users:
Setting the Timing Mode (Resolution and Refresh Rate)
Example: 1920 x 1080 @ 60 Hz
Resolution Right-click on the Windows desktop > Properties > Settings > “Desktop
Area”. Set the resolution.
Refresh Rate (vertical frequency) See your graphic card’s user guide for instructions.
Example:
PC
English
Power cable
udio cable
VGA cable
2
Page 19

English
Touching Screen Installation
1. Use the USB 2.0 cable (included with the monitor) to connect the monitor to one of
the USB 2.0 ports of the computer.
2. Windows will automatically search for the Touch Module, and proceed with the
installation of the driver.
3. Multi-touch function only support on Windows 7 operation system, others not support
Multi-touch function.
USB 2.0 cable
Hardware Installation
Connect your Touch Monitor’s USB cable to an available USB 2.0 port on your computer.
Windows automatically detects the device.
3
Page 20

Front View of the Product
OSD Menu On/Off
Scroll Down/ Decrease
Scroll Up/ Increase
Confirm Select
Power ON/OFF
Power LED Indicator
Touch Pen Slot
Rear View of the Product
English
AC Power switch
Power input (AC input)
Audio input
VGA input (D-Sub 15 pin)
Up-stream USB port (to PC)
4
Page 21
Using On Screen Display (OSD) Functions
English
1
Display main menu.
Exit from OSD menu.
Auto adjust the image when not in main menu.
2
Confirm the selection.
Select the desired item when in OSD menu.
▼
When not in OSD menu, directly enters Contrast/ Brightness/
DCR/ ECO Mode menu
Select the desired item when in OSD menu.
▲
When not in OSD menu, directly enters Opticolor Mode.
▼ + ▲ Recall both of Contrast and Brightness.
1 + ▼ Power Lock (when not in OSD menu)
1 + ▲ OSD Lock (when not in OSD menu)
Main Menu
Short Cuts Function from the button(s)
Automatic adjustment: To auto adjust Horizontal Position, Vertical Position,
Phase (Fine Tune) and Clock (H. Size) of the screen.
Contrast: To adjust the foreground white level of screen image.
▲: increase contrast, ▼: decrease contrast.
Brightness: To adjust the luminance of the video.
▲: increase brightness, ▼: decrease brightness.
5
Page 22
DCR On/Off: Contrast ratio will be ≥ 60000:1, when DCR turn on.
Audio Adjustment: To adjust the audio functions.
Volume: To adjust the volume of speaker output.
Mute switch: To turn the Mute ON/OFF.
Colour Adjust: To select the colour for improving brightness and colour
saturation between Cool, Normal, Warm, and User colour.
Cool: Adds blue to screen image for cooler white.
Normal: Adds red to screen image for warmer white and richer red.
Warm: Adds green to screen image for a darker colour.
User colour: Individual adjustments for red (R), green (G), blue (B).
1. Press button 2 to select the desired colour.
2. Press ▲ or ▼ button to adjust selected colour.
Information: To display the information, regarding the current input signal coming
from the graphic card in your computer.
Note: See your graphic card user guide for more information about changing the
resolution and refresh rate.
English
Manual image adjust: To manually adjust the Horizontal size, H. /V. position, Fine
tune, Sharpness, Video Mode Adjust and Opticolor Mode.
Horizontal size: To adjust the width of the screen image.
▼: decrease the width of screen image, ▲: increase the width of screen image.
H./V. Position: To adjust the horizontal and vertical position of the video.
H. Position: ▲: move screen to the right, ▼: move screen to the left.
V. Position: ▲: move screen up, ▼: move screen down.
Fine tune: To adjust the delay time of data and clock.
Press ▼ or ▲ to adjust to your preference.
Sharpness: To adjust the clarity of a non-Full HD (1920x1080) signal with ▼ or ▲
button.
Video Mode Adjust: To select the video mode from Full Screen or Over Screen.
Full Screen: To select full-screen size image.
Over Screen: To select over-screen size image.
Opticolor Mode: Provides an optimum display environment depending on the
contents displayed. It contains 6 user-selectable presets.
User is for general windows environment and monitor default setting.
Game optimized for PC game environment.
Video optimized for movie and video environment.
Landscape optimized for displaying outdoor scenery images.
Text optimized for text editing and viewing in a word processing environment.
ECO Allows the user to turn the ECO On or Off. Contrast and Brightness
adjustment disabled when ECO is active.
6
Page 23

English
Setup menu: To set up Language, OSD position, OSD time out and OSD
background.
Language: To allow users to choose from available languages.
OSD position: Press ▲ or ▼ button to select between horizontal and vertical
OSD Position adjustment.
H. Position: To horizontally adjust the OSD position.
▲: move OSD to the right, ▼: move OSD to the left.
V. Position: To vertically adjust the OSD position.
▲: move OSD up, ▼: move OSD down.
OSD time out: To automatically turn off On Screen Display (OSD) after a preset
period of time.
OSD background: Allows the user to turn the OSD background On or Off.
Memory recall: To recall factory settings for Video & Audio controls. Press button
2 to select the Memory Recall menu option.
7
Page 24
Supporting Timing Modes
VGA 720 x 400 @ 70Hz
VGA 640 x 480 @ 60Hz
MAC 640 x 480 @ 67Hz
VESA 640 x 480 @ 72Hz
VESA 640 x 480 @ 75Hz
VESA 800 x 600 @ 56Hz
VESA 800 x 600 @ 60Hz
VESA 800 x 600 @ 72Hz
VESA 800 x 600 @ 75Hz
MAC 832 x 624 @ 75Hz
VESA 1024 x 768 @ 60Hz
VESA 1024 x 768 @ 70Hz
VESA 1024 x 768 @ 75Hz
VESA 1280 x 960 @ 60Hz
VESA 1152 x 864 @ 75Hz
MAC 1152 x 870 @ 75Hz
VESA 1280 x 1024 @ 60Hz
VESA 1280 x 1024 @ 75Hz
VESA 1440 x 900 @ 60Hz
VESA 1440 x 900 @ 75Hz
CVT 1400 x 1050 @ 60Hz
VESA 1600 x 1200 @ 60Hz
VESA 1680 x 1050 @ 60Hz
VESA 1920 x 1080 @ 60Hz
Warning: Do not set the graphic card in your computer to exceed these maximum refresh
rates. Doing so may result in permanent damage to your monitor.
English
8
Page 25
Technical Information
Technical Specification
LCD Panel 21.5” TFT
English
Power Management
Displayable Resolution Full HD 1920 x 1080 max. Vertical Frequency 60Hz max.
Pixel Dimension 0.248 x 0.248 mm
LCD Display Colour 16.7M
Tilt 0°~20°
Active Display Area 476.64 mm x 268.11 mm
Temperature Operating: 5°C ~ +35°C
Compliance CE
Power Input Voltage AC100-240 V
Speaker 1W x 2
Optical Touch Infrared Optical Structure
Energy Star compliant VESA
DPMS compatible
< 1 W
Storage: -20°C ~ + 60°C
Sensor Refresh 120 frames/sec
Sensor Resolution 32767 x 32767
Accuracy ≤ ± 2.5mm
Glass Coating Non-coating
Stylus Size Finger, any stylus ≥3.6mm (diameter)
OS Windows 7
9
Page 26

Care and Maintenance
Care
Avoid exposing your monitor directly to sunlight or other heat source. Place your
monitor away from the sun to reduce glare.
Put your monitor in a well ventilated area.
Do not place any heavy things on top of your monitor.
Make certain your monitor is installed in a clean and moisture-free area.
Keep your monitor away from magnets, motors, transformers, speakers, and TV sets.
Note
Move the LCD out of the package and take off the plastic bag and Polystyrene Foam.
Pull the base from Parallel versus Panel to Vertical.
Adjust the Panel within 0 degree leaning forward and 20 degree leaning backward. You
must bend harder to exceed 20 degree backward but this range is for packing the unit
to a small size for storage only.
Safety Tips
If smoke, abnormal noise or odor came out from your monitor, caution you should
remove the power cord immediately and call your service center.
Never remove the rear cover of your monitor cabinet. The display unit inside contains
high-voltage parts and may cause electric shock to human bodies.
Never try to repair your monitor yourself. Always call your service center or a qualified
technician to fix it.
English
Troubleshooting
No power
Make sure A/C power cord is securely connected to the power adapter and the power
supply is firmly connected to the monitor.
Plug another electrical device into the power outlet to verify that the outlet is supplying
proper voltage.
Make sure all signal cables are installed.
Power on but no screen image
Make sure the video cable supplied with the monitor is tightly secured to the video
output port on back of the computer. If not, tightly secure it.
Adjust brightness.
Wrong or abnormal colours
If any colours (red, green, blue) are missing, check the video cable to make sure it is
securely connected. Loose or broken pins in the cable connector could cause an
improper connection.
Connect the monitor to another computer.
10
Page 27

English
Restricted Warranty
I. General Conditions of Warranty
1. General
This warranty covers defects relating to workmanship and manufacture in MEDION products. The period
during which this warranty is valid and during which claims against the warranty can be made to MEDION
must be in accordance with the following terms in order to be considered eligible:
• Is effective from the date of purchase or receipt of the MEDION product from an authorised seller of
MEDION products; and
• expires at the end of the warranty period specified on the warranty card provided with the product.
For the warranty to be valid, you must:
• provide suitable evidence of purchase, a copy of the original purchase receipt from an authorised seller
of MEDION products is preferred; or
• register your product within 28 days of purchase either online at www.MEDION.co.uk
and returning the pre-paid registration card included with the product.
Please keep the original purchase receipt and the warranty card in a safe place. MEDION and its authorised
sellers reserve the right to refuse a repair under warranty or a warranty confirmation if a proof of purchase
[or registration of purchase] cannot be established, or has not been, submitted.
When it is necessary to return your product for repair please ensure that your product is suitably packed for
transportation.
Provided that your product is still within warranty (please check the duration of the warranty period as
described above) and is eligible for repair or replacement under the terms of the warranty, to return your
product, please telephone MEDION on the service hotline number. You will be sent a pre-paid transportation
box suitable for returning your product to MEDION. PLEASE MAKE SURE THAT YOU HAVE A BACKUP
COPY OF ALL DATA ON THE PRODUCT BEFORE RETURNING THE PRODUCT TO MEDION. MEDION
shall bear the costs of postage and packaging for returning the product and the transportation risk. However,
if following examination of the defective product in question, MEDION, in its reasonable opinion, considers
that the defect has been caused by:
• your operating and/or using the product other than as instructed in the accompanying documentation;
• damage caused in transit as a result of your negligence in packaging of the product; and/or
• otherwise than in accordance with the terms of this warranty;
This warranty shall be void and you may be required by MEDION to reimburse MEDION for the reasonable
costs of postage and packaging before MEDION will return the product to you. If so and you would still like
MEDION to repair or replace the product, MEDION may do so but you will be charged MEDION’s standard
rates for repair and replacement for this service.
Before returning the product, please contact MEDION via the service hotline or via the internet
(www.MEDION.co.uk
the outside of your package to ensure that this reference number is clearly visible. Please submit a letter
containing as much detailed information as possible and, a full description of the defect or fault.
This should include:
• a description of the fault;
• when it occurred, how long it has been evident and how frequently it occurs ;
• any errors message(s) displayed when using the product;
• a description of the circumstance(s) and conditions in which the fault occurs; and
• whether it is an intermittent or persistent fault;
This will greatly assist MEDION in identifying the defect, when submitted together with the defective product.
Unless otherwise instructed by a MEDION representative in all cases, the product must be returned
complete with all parts which were included with the original product. Incomplete contents of the returned
package may lead to a delay in the repair or replacement. MEDION does not accept any liability for any
additionally submitted material(s) which were not supplied with the original MEDION product.
This warranty does not affect your statutory rights in any way and is subject to the applicable legal statutes
of the country where the product was sold to you by an authorised MEDION seller.
). You will receive a reference number (RMA No.) on the warranty card. Please mark
or by completing
11
Page 28

2. Scope
Subject to any exclusions set out within this warranty, where there is a defect in your MEDION product
covered by this warranty, MEDION will repair or replace the MEDION product. The decision whether to
repair or replace the product will be made solely at the discretion of MEDION. MEDION may, in its own
discretion, replace the product returned for repair under warranty with a replacement product that is either
identical or, in the event that such product(s) are no longer available, a product of equal or superior
specification and quality.
No warranty is given for batteries or rechargeable batteries or for consumable materials subject to wear and
tear, i.e. for parts which have to be replaced periodically during the normal use of the product, such as
video-projector lamp.
Non critical failures that fall within industry specified tolerances e.g. noise, LCD pixels are not covered by
this warranty. Please consult the appropriate section in your user or instruction manual for this product for
exact specifications and tolerances.
To the extent which is permitted under law, MEDION will accept no liability for burnt-in images on plasma or
LCD products as a result of normal wear and tear during the operation of the product. Please refer to your
user or instruction manual for this product for detailed operating instructions for your plasma or LCD product.
The warranty does not cover errors relating to the playback of data media in an incompatible format or
created with unsuitable software.
If it is found during repair or assessment that the defect concerned is not covered under warranty, MEDION
reserves the right to invoice you for all reasonable costs incurred by MEDION. These costs will be in relation
to the return of the product, including reasonable administration costs, plus reasonable costs for materials
used and labour provided when repairing or replacing the product. This is subject to MEDION providing you
with an estimate for carrying out such work prior to costs being incurred and that you have accepted the
estimate.
You are entitled to seek independent advice or consultation relating to your product or any of MEDION’s
findings. MEDION will not be liable for any costs incurred to you when doing so.
3. Exclusion from warranty
To the extent permitted by law, this warranty shall be void in the event that defects or loss caused by:
a. failure and damage resulting from the operation of the product in an environment other than that
recommended in the accompanying user or instruction manual (e.g. in direct sunlight or in a damp
room);
b. accidental damage;
c. use other than in accordance with the accompanying user or instruction manual;
d. modifications, conversions, expansions, maintenance and/or repairs made to the MEDION product
by unauthorised repairers or use of unauthorised third party parts;
e. negligence;
f. virus attack or software errors; or
g. improper transportation or packaging during return of the product.
This warranty will also be considered void if labels or serial numbers of the product or of a component of the
product are modified or made illegible.
To the extent permitted by law, MEDION shall; only be responsible for losses which are a reasonably
foreseeable consequence of the relevant defect in the product; MEDION will not be responsible for any
costs incurred in relation to software configuration; economic loss; loss of opportunity; loss of income; or loss
of data or software arising out of its repair or replacement of a MEDION product under this warranty.
4. Service Hotline
Before returning the product to MEDION you must contact us using the service hotline or via the internet
(www.MEDION.co.uk). You will receive further instructions for making your claim under warranty when you
call.
The service hotline is available on 362 days in the year, including Sundays and bank holidays but excluding
Christmas day, New Years Day and Easter day. The service hotline is subject to [national rate] telephone call
charges. These charges are subject to change. The price of your call will be stated at the beginning of the
call.
English
12
Page 29

English
II. Special warranty conditions for MEDION PC, notebook,
pocket PC (PDA) and navigation devices (PNA)
The following terms apply to MEDION PC, notebook, desktop, pocket PC and laptop products and optional
items included with such products. If one of these items has a fault, you also have a warranty claim for its
repair or replacement, from MEDION. The warranty covers the costs of materials and labour for repairing or
replacing the defective MEDION product or the optional item in question.
Hardware connected to your product that was not produced or marketed by MEDION can invalidate the
warranty if MEDION can reasonably demonstrate that damage to the MEDION product or of the optional
item included with the delivery was caused by such hardware. You are entitled to seek independent advice
or consultation relating to your product or any of MEDION’s findings. MEDION will not be liable for any costs
incurred to you when doing so.
This warranty is restricted in relation to any pre-installed operating system as well as to application
programme software that is included with the MEDION product in question. This warranty is restricted as
follows:
For pre-installed operating system as well as to application programme software included in the MEDION
product, MEDION only guarantees the data media (e.g. the diskettes and CD-ROMs) upon which this
software is delivered and warrants that such data media shall be free from material and processing defects
for a period of 90 days from the date of purchase of the MEDION product from an authorised seller of
MEDION. MEDION will replace defective data media free of charge.
Any claims in respect of defective pre-installed operating system as well as to application programme
software are hereby expressly excluded and you should contact the relevant licensor or copyright owner of
the defective software in question. MEDION does not guarantee that any software supplied with MEDION
products will function without interruption, will be free from errors or that it will fulfil your requirements.
MEDION does not guarantee the 100% accuracy of the maps provided with the Navigation device.
It may be necessary to delete all data in the product in order to repair the MEDION product. PLEASE MAKE
SURE THAT YOU HAVE A BACKUP COPY OF ALL DATA ON THE PRODUCT BEFORE RETURNING THE
PRODUCT TO MEDION. To the extent permitted by law, MEDION excludes all liability for loss of data and
MEDION recommends in all cases that you back up all data on your MEDION product before returning the
product to MEDION.
III. Special warranty conditions for repair on site or replacement
on site
If a claim for repair or replacement on site is included within the terms of the warranty card provided with the
product, the special warranty conditions for repair or replacement of your MEDION product on site apply.
The following provisions must be made by you for carrying out repairs or replacements on site:
• MEDION or its authorised personnel must have unrestricted, safe and immediate access to the products.
• Telecommunication facilities required by MEDION or its authorised personnel for proper execution of your
order, for testing and diagnostic purposes and for remedying faults are provided by you at your own
expense.
• You are responsible yourself for restoring the application software after the repair services have been
carried out by MEDION or its authorised personnel.
• You must take all other necessary steps to enable MEDION or its authorised personnel to carry out your
order properly.
• You are responsible yourself for connecting and configuring any existing external
after MEDION or its authorised personnel have carried out their repairs.
• The free cancellation period for repairs or replacements on site is 24 hours, thereafter our reasonable
costs resulting from late or missing cancellation shall be invoiced at your expense.
peripheral products
13
Page 30

Contenu
Consignes de sécurité .........................................................................................................1
Première installation ............................................................................................................2
Installation rapide.................................................................................................................2
Installation de l’écran tactile.................................................................................................3
Face avant du produit ..........................................................................................................4
Face arrière du produit ........................................................................................................4
Utiliser les fonctions d'affichage d'écran (OSD)...................................................................5
Support des modes minutage..............................................................................................8
Informations Technique .......................................................................................................9
Soins et Maintien ...............................................................................................................10
Dépannage ........................................................................................................................10
Garantie commerciale limitee ............................................................................................11
Français
Page 31

Français
Consignes de sécurité
Ce moniteur est fabriqué et testé sur le principe de base selon lequel la sécurité de
l’utilisateur passe avant tout. Cependant, une mauvaise utilisation ou installation peut
mettre en danger le moniteur ainsi que l’utilisateur. Lisez attentivement les
AVERTISSEMENTS avant l’installation et gardez ce guide à porté de main.
AVERTISSEMENTS :
Ce moniteur doit être utilisé uniquement avec les sources d’alimentation adéquates
indiquées sur l’étiquette située au dos du moniteur. Si vous n’êtes pas sûr de
l’alimentation dans votre résidence, appelez votre vendeur local ou la compagnie
d’électricité.
N’essayez pas de réparer vous-même le moniteur car il ne contient pas de pièces
réparables par l’utilisateur. Le moniteur doit être réparé uniquement par un technicien
qualifié.
Ne retirez pas le boîtier du moniteur. Il contient des pièces comportant un voltage
élevé, qui pourraient provoquer des électrocutions, même quand le cordon
d’alimentation est débranché.
Arrêtez d’utiliser le moniteur si le boîtier est endommagé. Faites-le vérifier par un
technicien qualifié.
Placez votre moniteur uniquement dans un environnement propre et sec. Débranchez
immédiatement le moniteur s’il était mouillé et faites appel à votre réparateur.
Débranchez toujours le moniteur avant de le nettoyer. Nettoyez le boîtier avec un
chiffon propre et sec. Appliquez un nettoyant sans ammoniaque sur le chiffon, mais
pas directement sur le verre de l’écran.
Maintenez le moniteur éloigné des objets magnétiques, moteurs, postes de TV, et
transformateurs.
Ne placez pas d'objets lourds sur le câble ou le cordon d'alimentation.
Pour les ÉQUIPEMENTS BRANCHÉS PAR CÂBLE, la prise de courant doit être
installée près de l’équipement et doit être facilement accessible.
D'après la réglementation WEEE, ce moniteur ne peut pas être éliminé avec les
déchets normaux en Europe quand il est hors d'usage. Veuillez vous reporter aux
informations de recyclage sur notre site web pour la marche à suivre.
1
Page 32

Première installation
Félicitations pour votre achat de ce moniteur à hautes performances !
Ce moniteur est accompagné des accessoires suivants :
Câble d'alimentation.
Câble VGA (15 broches)
Câble audio
Stylet tactile
Guide de l’utilisateur
Câble USB
Carte de garantie
Installation rapide
1. Connecter le câble vidéo (Câble D-Sub)
Vérifiez que le moniteur et l’ordinateur sont tous deux éteints. Connectez le câble
vidéo (Câble D-Sub) à l’ordinateur, puis au moniteur.
2. Connecter le cordon d’alimentation
Connectez le cordon d’alimentation à une prise CA secteur correctement mise à la
masse, puis au moniteur.
3. Connecter le câble audio
Connectez le câble Audio de la sortie Audio de l'ordinateur à l'entrée Audio du
moniteur.
4. Allumer l’ordinateur et le moniteur
Allumez l'ordinateur, puis le moniteur.
5. Utilisateurs de Windows :
vitesse de rafraîchissement)
Exemple : 1680 x 1050 @ 60 Hz
Résolution Faites un clic droit de la souris sur le bureau de Windows > Propriétés
>Paramètres > "Espace du bureau". Paramétrer la résolution :
Vitesse de rafraîchissement
carte graphique pour les instructions.
Exemple :
Paramétrer le mode de synchronisation (résolution et
(fréquence verticale) Voir le guide de l'utilisateur de votre
PC
Français
Câble d'alimentation
Câble Audio
Câble VGA
2
Page 33

Installation de l’écran tactile
1. Utilisez le câble USB 2.0 (inclus avec le moniteur) pour connecter le moniteur à l’un
des ports USB 2.0 de l'ordinateur.
2. Windows recherchera automatiquement le Module tactile, et effectuera l'installation du
pilote.
3. La fonction Multi-touch est prise en charge uniquement par le système d’exploitation
Windows 7, les autres ne prennent pas en charge la fonction Multi-touch.
Câble USB 2.0
Français
Installation matérielle
Connectez le câble USB de votre moniteur tactile à un port USB 2.0 disponible sur votre
ordinateur. Windows détecte automatiquement le périphérique.
3
Page 34

Face avant du produit
Menu d'affichage d'écran Activé/Désactivé
Défiler vers le bas/Diminuer
Défiler vers le haut/Augmenter
Confirmer la sélection
Marche/Arrêt
Voyant LED d'alimentation
Logement du stylet tactile
Face arrière du produit
Interrupteur d'alimentation CA
Français
Entrée d'alimentation (Entrée CA)
Entrée audio
Entrée VGA (D-Sub 15 broches)
Port USB en amont (vers PC)
4
Page 35

Utiliser les fonctions d'affichage d'écran (OSD)
Français
1
Afficher le menu principal.
Quitter le menu OSD.
Ajuster automatiquement l'image en dehors du menu principal.
2
Confirmer la sélection.
Sélectionnez l'élément désiré quand vous êtes dans le menu OSD.
▼
Hors du menu OSD, entre directement dans le menu du Mode Contraste/
Luminosité/ DCR/ ECO
Sélectionnez l'élément désiré quand vous êtes dans le menu OSD.
▲
Hors du menu OSD, entre directement en Mode Opti Color.
▼ + ▲ Rétablir à la fois le Contraste et la Luminosité.
1 + ▼ Verrouillage de l'alimentation (quand vous n'êtes pas dans le menu OSD)
1 + ▲ Verrouillage de l'OSD (quand vous n'êtes pas dans le menu OSD)
Menu Principal
Fonction de raccourci par bouton(s)
Réglage automatique : Ajuste automatiquement la position horizontale, la
position verticale, la phase(Réglage Image) et l'horloge (Taille horizontale).
Contraste : Pour ajuster le niveau blanc du premier plan de l'image de l'écran.
▲ : augmenter le contraste, ▼ : diminuer le contraste.
Luminosité : Pour régler la luminance de la vidéo.
▲ : augmenter la luminosité, ▼ : diminuer la luminosité.
5
Page 36

DCR Allumé/ Eteint : Le taux de contraste sera ≥ 60000:1, quand DCR est allumé.
Audio Ajustage : Pour régler les fonctions audio.
Volume : Pour ajuster la sortie du haut-parleur.
Muet : Pour sélectionner Silence Marche/Arrêt.
Réglage de la couleur : Pour sélectionner la couleur pour améliorer la
luminosité et la saturation de la couleur entre Froid, Normal, Chaud, et Couleur
personnalisée.
Froid : Ajoute du bleu à l'image de l'écran afin d'obtenir un blanc plus froid.
Normal : Ajoute du rouge à l'image de l'écran pour obtenir un blanc plus chaud et
un rouge plus riche.
Chaud : Ajoute du vert à l'image de l'écran pour obtenir une image plus sombre.
Couleur personnalisée : Réglage individuel pour le rouge(R), vert (V), bleu (B).
1. Appuyez sur le bouton 2 pour ajuster et sélectionner la couleur suivante à
ajuster.
2. Appuyez sur le bouton ▲ ou ▼pour ajuster la couleur sélectionnée.
Informations : Affiche les informations relatives au signal d'entrée du courant de
la carte graphique de votre ordinateur.
Remarque : Reportez-vous au guide de l'utilisateur de votre carte graphique pour
avoir des informations supplémentaires concernant les modifications de la
résolution et le taux de rafraîchissement.
Réglage manuel de I’image : Pour régler manuellement la Taille horizontale, la
Français
Position H./ V., le Réglage Image, la Netteté, Réglage du mode vidéo et le Mode
Opti Color.
Taille horizontale : Ajuste la largeur de l'image de l'écran.
▼ : diminue la largeur de l'image de l'écran, ▲ : augmente la largeur de l'image de
l'écran.
Position H./V. : Pour ajuster la position horizontale et verticale de la vidéo.
Position H. : ▲ : déplacer l'écran à droite, ▼ : déplacer l'écran à gauche.
Position V. : ▲ : déplacer l'écran vers le haut, ▼ : Déplacer l'écran vers le bas.
Réglage Image : Pour régler la durée du délai des données et de l'horloge.
Appuyez sur ▼ ou ▲ pour ajuster vos préférences.
Netteté : Pour régler la clarté d'un signal non-Full HD (1920x1080) avec le bouton
▼ ou ▲.
Réglage du mode vidéo : Pour sélectionner le mode vidéo parmi Full Screen ou
Over Screen.
Full Screen : Pour sélectionner l’image en taille plein écran.
Over Screen : Pour sélectionner l’image en taille sur écran.
Mode Opti Color : Offre un environnement d'affichage optimal selon le contenu
affiché. Il contient 6 préréglages sélectionnables par l'utilisateur.
Utilisateur est destiné à l'environnement de Windows général et le paramétrage
du moniteur par défaut.
6
Page 37

Français
Jeu optimisé pour l'environnement de jeu PC.
Vidéo optimisé pour l'environnement de film et vidéo.
Paysage optimisé pour afficher des images de paysages.
Texte optimisé pour l'édition et la visualisation de texte en environnement de
traitement de texte.
ECO Permet à l'utilisateur d'activer ou de désactiver ECO. Les réglages de
Contraste et Luminosité sont désactivés quand ECO est actif.
Configuration : Pour configurer Sélection de Langue, Position de I’OSD,
Interruption OSD et Arrière-plan OSD.
Langue : Permet à l'utilisateur pour choisir parmi les langues disponibles.
Position de I’OSD : Appuyez sur le bouton ▲ ou ▼ pour choisir entre les
réglages de position OSD horizontale et verticale.
Position H. : Pour régler horizontalement la position de l'OSD.
▲ : déplacer l'OSD à droite, ▼ : déplacer l'OSD à gauche.
Position V. : Pour régler verticalement la position de l'OSD.
▲ : déplacer l'OSD vers le haut, ▼ : déplacer l'OSD vers le bas.
Interruption de I’OSD : Pour désactiver automatiquement l'affichage d'écran
(OSD) après une durée prédéfinie.
Arrière-plan OSD : Vous permet d’activer ou de désactiver l’arrière plan à l’écran.
Réinitialiser : Pour rétablir les paramètres d'usine pour les contrôles vidéo &
audio. Appuyez sur le bouton 2 pour sélectionner l’option de menu de Rappel
Mémoire.
7
Page 38

Support des modes minutage
VGA 720 x 400 @ 70Hz
VGA 640 x 480 @ 60Hz
MAC 640 x 480 @ 67Hz
VESA 640 x 480 @ 72Hz
VESA 640 x 480 @ 75Hz
VESA 800 x 600 @ 56Hz
VESA 800 x 600 @ 60Hz
VESA 800 x 600 @ 72Hz
VESA 800 x 600 @ 75Hz
MAC 832 x 624 @ 75Hz
VESA 1024 x 768 @ 60Hz
VESA 1024 x 768 @ 70Hz
VESA 1024 x 768 @ 75Hz
VESA 1280 x 960 @ 60Hz
VESA 1152 x 864 @ 75Hz
MAC 1152 x 870 @ 75Hz
VESA 1280 x 1024 @ 60Hz
VESA 1280 x 1024 @ 75Hz
VESA 1440 x 900 @ 60Hz
VESA 1440 x 900 @ 75Hz
CVT 1400 x 1050 @ 60Hz
VESA 1600 x 1200 @ 60Hz
VESA 1680 x 1050 @ 60Hz
VESA 1920 x 1080 @ 60Hz
Avertissement : Ne réglez pas la carte graphique de votre ordinateur en dépassant ces
taux de rafraîchissement maximaux. Si vous le faites, cela va irrémédiablement détériorer
votre moniteur.
Français
8
Page 39

Informations Technique
Spécifications Techniques
Panneau LCD 21,5” TFT
Français
Gestion de Courant
Résolution Affichable Full HD 1920 x 1080 max. Fréquence Verticale maximale de
Dimension des Pixels 0,248 x 0,248 mm
Couleur de l’affichage
LCD
Inclination 0°~20°
Région d’affichage
Actif
Température Actif : 5°C ~ +35°C
Conformité CE
Alimentation Voltage d’Entrée 100-240 V CA
Energy Star conforme à VESA
compatible avec DPMS
< 1 W
60Hz.
16,7M
476,64 mm x 268,11 mm
Stockage : -20°C ~ + 60°C
Haut-parleur 1W x 2
Touche optique Structure optique infrarouge
Rafraîchissement du
capteur
Résolution du capteur 32767 x 32767
Précision ≤ ± 2,5mm
Revêtement du verre Pas de revêtement
Taille du stylet Doigt, tout stylet ≥3,6mm (diamètre)
SE Windows 7
120 trames/s
9
Page 40

Soins et Maintien
Soins
Evitez d'exposer votre moniteur aux rayons directs du soleil ou à toute autre source de
chaleur. Placez votre moniteur à l’abri du soleil pour diminuer les reflets.
Placez votre moniteur dans un emplacement bien ventilé.
Ne mettez pas d’objet lourd sur le moniteur.
Veillez à ce que votre moniteur soit installé dans un endroit sec et propre.
Gardez votre moniteur loin d’aimants, moteurs, transformateurs, haut parleurs et de set
de télévision.
Remarque
Sortez le LCD de l’emballage et enlevez le sac en plastique et la Mousse en Polystyrène.
Tirez la base de la position parallèle par rapport au panneau pour la mettre à la verticale.
Réglez l'inclinaison du panneau entre 0 degré en avant et 20 degrés en arrière. Vous
devez pousser plus fort pour dépasser 20 degrés en arrière mais cette position est
réservée à l'emballage de l'unité pour permettre un encombrement plus faible pour le
stockage seulement. Attention : Si l'inclinaison du panneau dépasse 0 à 20 degrés cela
peut rendre l'unité instable et pourrait présenter un danger.
Conseils de Sécurité
Si de la fumée, un bruit anormal ou une odeur sort de votre moniteur, éteignez
immédiatement le courant et appelez votre centre d’entretien.
N’enlevez jamais le panneau arrière de la caisse du moniteur. L’unité d’affichage à
l’intérieur contient des parties sous haut voltage qui peuvent causer des chocs
électriques à des corps humains.
N’essayez jamais de réparer le moniteur vous même. Appelez toujours votre centre
d’entretien ou un technicien spécialisé pour faire les réparations.
Français
Dépannage
Pas d’Alimentation
Contrôlez que le courant alternatif soit bien connecter à l’adaptateur de courant et que
le cordon alimentaire soit bien connecter au moniteur.
Connectez un autre appareil électrique à la prise murale pour vérifier qu’elle émets bien
le voltage souhaité.
Vérifiez que tous les câbles soient bien installés.
Allumé mais pas d ‘affichage à l’écran
Vérifiez que le câble vidéo, fourni avec le moniteur soit bien solidement fixé au port de
sortie du signal vidéo, situé à l’arrière de l’ordinateur. Sinon, fixé le convenablement.
Ajustez la clarté.
Couleurs incorrectes ou anormales
Si une des couleurs manque (rouge, vert, bleu), contrôlez le câble vidéo pour vous
assurez qu’il soit bien correctement connecté. Des broches desserrées ou cassées
peuvent créer une connexion incorrecte.
Connectez le moniteur à un autre ordinateur.
10
Page 41

Français
Garantie commerciale limitee
I. Conditions générales de la garantie commerciale
1. Dispositions générales
Les produits neufs MEDION, sauf ceux exclus aux sections 2 et 3 ci-dessous, bénéficient d’une garantie
commerciale limitée qui couvre les défauts de matériel et de fabrication susceptibles de nuire à une
utilisation normale du produit. La garantie commerciale concerne l’acheteur agissant en qualité de
consommateur à compter de la date d’achat du produit.
Cette garantie commerciale vous est consentie par la société MEDION AG, Am Zehnthof 77, D-45307 Essen,
Allemagne.
La garantie commerciale s’applique à tout achat des produits MEDION auprès de MEDION ou de l’un de
ses revendeurs agréés, en France ou à l’étranger. Elle est soumise au droit du pays dans lequel a eu lieu le
premier achat du produit par un client final.
La durée de la garantie commerciale dépend de la nature de votre produit. Elle est indiquée sur le bon de
garantie fourni par MEDION. Le délai de garantie commence à courir le jour de l'achat du produit auprès de
MEDION.
Pour la mise en œuvre de la garantie commerciale, nous vous prions de bien conserver la facture originale
d’achat et le bon de garantie. MEDION et ses partenaires commerciaux se réservent le droit de refuser la
réparation au titre de la garantie commerciale ou la confirmation de la garantie commerciale si ces preuves
d’achat ne sont pas produites.
Nous vous prions également de vous assurer que le produit que vous nous retournez est suffisamment bien
emballé pour ne pas être endommagé au cours du transport. Hormis mise en œuvre de la garantie légale et
sauf mention contraire sur votre bon de garantie, vous devez prendre en charge les frais d’envoi et
supporter le risque d'endommagement du produit lors de l’envoi du produit à MEDION.
Pour la mise en œuvre de la garantie commerciale et avant l'envoi du produit, nous vous prions de contacter
l’assistance technique téléphonique de MEDION. Celle-ci vous donnera un numéro de référence
(numéro RMA) que vous devrez reproduire de manière bien visible sur le paquet de retour. Nous vous
prions également de joindre au produit retourné une description complète et détaillée du défaut réclamé sur
papier libre (ou le cas échéant, en complétant un formulaire qui vous sera adressé).
Le produit défectueux doit nous être retourné de manière complète, c'est-à-dire que votre envoi doit contenir
toutes les pièces et accessoires faisant partie du lot initialement vendu. Nous attirons votre attention sur le
fait qu'un retour incomplet du produit peut entraîner des délais de réparation et/ou d’échange. La société
MEDION n’est pas responsable d’objets envoyés par vous qui ne faisaient pas partie du lot initial.
En tout état de cause, indépendamment de la garantie commerciale, MEDION reste tenue des défauts de
conformité du bien au contrat et des vices rédhibitoires dans les conditions prévues aux articles 1641 à
1649 du Code civil. La garantie légale oblige MEDION, en tant que vendeur professionnel, à garantir
l’acheteur contre toutes les conséquences des défauts ou vices cachés de la chose vendue ou du service
rendu. (art. R211-4 du code de la consommation).
Les articles L. 211-4, L. 211-5 et L. 211-12 du Code de la consommation ainsi que les articles 1641 et le
premier alinéa de l’article 1648 du Code civil sont rappelés à la section IV des présentes.
2. Étendue de la garantie commerciale
En cas de défaut d’un produit MEDION, couvert par la présente garantie, MEDION prendra en charge sa
réparation ou son remplacement. MEDION aura le choix entre la réparation et le remplacement du produit et
se réserve la possibilité de remplacer le composant défectueux par un composant d'occasion remis à neuf
de même qualité.
La présente garantie ne couvre pas les batteries et piles, ni les consommables, c'est-à-dire les fournitures
destinées à être remplacées régulièrement au cours de l'utilisation du produit MEDION par exemple: lampe
pour vidéo projecteur.
La présence d’un pixel défectueux sur un écran (point de l'image constamment coloré, clair ou foncé) ne
constitue pas, en soi, un défaut couvert par la garantie commerciale. Le nombre exact admissible de pixels
défectueux figure dans les spécifications techniques dans le manuel du produit.
La présente garantie commerciale ne couvre pas la détérioration du produit due à une mauvaise utilisation,
11
Page 42

notamment pour les écrans plasma ou LCD. L'utilisation correcte de votre écran plasma ou LCD figure dans
le manuel d'utilisation.
En outre, la garantie ne couvre pas les erreurs de lecture de supports de données formatés en un format
incompatible ou qui sont provoquées par l’utilisation d’un logiciel inadapté.
3. Exclusions de la garantie commerciale
La présente garantie commerciale ne couvre pas les défaillances et dommages provoqués par des causes
externes au produit telles que l’endommagement volontaire ou par négligence du fait de l’utilisateur,
l’utilisation inappropriée, l’usage abusif, la modification, la transformation ou l’extension de l'appareil, le vol,
l’utilisation de pièces provenant d’un constructeur tiers, l’absence d'entretien nécessaire, les brûlures,
l’humidité, les virus ou les erreurs de logiciels, le transport ou l’emballage inappropriés ou la perte du colis
lors de l’envoi du produit à la société MEDION.
La présente garantie commerciale s'éteint si le défaut du produit a été provoqué par une tentative de
réparation ou d'entretien par une personne n’appartenant pas à la société MEDION ou à l’un de ses
partenaires commerciaux. De même, la garantie commerciale s'éteint si des autocollants ou des numéros
de série se trouvant sur le produit ou l’un des accessoires sont altérés ou illisibles.
Après un retour du produit, en cas d’absence de défauts, MEDION facture au client titre de maintenance, un
forfait selon le barème préalablement défini.
Ordinateur de bureau 49,79 €
Ordinateur Portable 44,79 €
GPS et Assistant personnel 39,78 €
Electronique Grand Public 59 €
Télévision LCD 159 €
Télévision Plasma 299 €
En cas d’exclusion de garantie, MEDION facture un 29 €, hors frais de transport, l’établissement d’un devis.
Cette somme est offerte en cas d’acceptation du devis.
Dans ce cas, le propriétaire devra s’acquitter des frais de réparation (pièce détachée, main d’œuvre et frais
de transport).
4. L’assistance téléphonique
Avant de nous retourner le produit, vous êtes priés de vous adresser à l’assistance téléphonique MEDION.
Ce service vous indiquera les détails de la mise en œuvre de la garantie contractuelle.
Notre assistance téléphonique est à votre disposition du lundi au vendredi, de 9h00 à 19h00 sans
interruption. L’appel à ce service à partir d’un téléphone fixe en France coûte 0,15 EUR TTC par minute.
Pour les interventions ne relevant ni de la garantie contractuelle à de la garantie commerciale, les appareils
hors garantie, les problèmes liés à des logiciels ou mauvaises manipulations, vous pouvez également
joindre notre assistance téléphonique. Cette prestation vous sera facturée 0.34 cts/mn (0 892 35 05 40).
Français
12
Page 43

Français
II. Conditions particulières de garantie commerciale pour les
ordinateurs personnels, ordinateurs portables, ordinateurs de
bureau, ordinateurs de poche, appareil de navigation GPS
(PNA) :
En cas de défaut de l'une des options de votre produit, MEDION prendra en charge sa réparation ou son
remplacement. La garantie couvre les frais de matériel et le temps de travail nécessaires à la remise en état
du produit MEDION concerné.
L’utilisation d’accessoires qui n’ont pas été produits ou vendus par MEDION, peut entraîner l’extinction de la
garantie commerciale de votre produit MEDION s’il s’est avéré qu’un dommage a été causé au produit
MEDION ou à l’une de ses options par cet accessoire.
Les logiciels livrés avec le produit MEDION sont couverts par une garantie commerciale limitée spéciale.
Cette garantie commerciale couvre le système d’exploitation pré installé et les programmes livrés avec le
produit. Pour les logiciels livrés par MEDION et pour les
disquettes et les CD-ROM ou DVD-ROM sur lesquels les logiciels sont livrés, MEDION garantit l’absence de
défauts de fabrication et de matériau du support physique de données pendant une durée de 90 jours
suivant l’achat du produit auprès de MEDION ou de l’un de ses partenaires agréés. MEDION remplacera
gratuitement les supports de données qui étaient défectueux lors de leur livraison. Cette garantie
commerciale ne couvre que les supports physiques de données et non le fonctionnement des logiciels.
Aucune garantie n’est donnée concernant l’aptitude du produit à satisfaire à vos besoins, l’absence
d’erreurs dans l’exploitation des logiciels, le fonctionnement ininterrompu ou parfait les logiciels, la correction
possible ou effective de défauts dans les logiciels. MEDION ne garantit pas à 100 % l’exactitude des cartes
fournies avec l’appareil de navigation GPS (PNA).
Lors de la réparation du produit MEDION, il peut s’avérer nécessaire de supprimer toutes les données qui y
sont stockées. Par conséquent, avant le retour de l’appareil pour réparation, assurez-vous que vous êtes en
possession d’une sauvegarde de vos données. Nous attirons tout particulièrement votre attention sur le fait
que lors de la réparation le produit est remis dans son état initial. La société MEDION ne pourra pas être
tenue responsable pour les frais éventuellement nécessaires pour une reconfiguration des logiciels, du gain
manqué, de la perte de vos données ou de logiciels et/ou de tout dommage consécutif.
supports de données, par exemple les
III. Conditions de garantie particulières pour les réparations
et/ou échanges sur site
Dans la mesure où le bon de garantie de votre produit MEDION stipule le service de réparation et/ou
d’échange sur site, il sera fait application des présentes conditions de garantie pour la réparation et/ou les
échanges sur site.
Pour la bonne mise en œuvre de la réparation et/ou l’échange sur site, veuillez prendre en compte les points
suivants :
• Vous devez garantir à l’employé de MEDION l’accès sans restrictions, sûr et immédiat au produit
défectueux.
• Vous devez, à vos frais, mettre à disposition de l’employé de MEDION les installations de
télécommunication nécessaires pour les tests, le diagnostic et la réparation du produit.
• Vous êtes seul responsable de restaurer vos logiciels d’application après avoir eu recours aux services
de MEDION.
• Vous devez prendre toutes les mesures nécessaires à la bonne exécution de votre demande de
réparation.
• Vous êtes seul responsable de la reconfiguration éventuellement nécessaire de votre connexion internet
et des appareils périphériques existants après avoir eu recours aux services de MEDION.
• La période pendant laquelle vous pouvez annuler gratuitement une demande d’intervention sur site est
de 24 heures minimum avant le rendez-vous. Passé ce délai, nous vous facturerons les frais causés par
l’annulation tardive ou le défaut d’annulation.
13
Page 44

IV. Rappel des dispositions légales
Garantie légale de conformité (extrait du Code de la consommation)
Article L. 211-4 Code de la consommation
Le vendeur est tenu de livrer un bien conforme au contrat et répond des défauts de conformité existant lors
de la délivrance. Il répond également des défauts de conformité résultant de l'emballage, des instructions de
montage ou de l'installation lorsque celle-ci a été mise à sa charge par le contrat ou a été réalisée sous sa
responsabilité.
Nota : Ordonnance 2005-136 2005-02-17 art. 5 : Les dispositions de la présente ordonnance s'appliquent
aux contrats conclus postérieurement à son entrée en vigueur.
Article L. 211-5 Code de la consommation
Pour être conforme au contrat, le bien doit :
1° Etre propre à l'usage habituellement attendu d'un bien semblable et, le cas échéant :
correspondre à la description donnée par le vendeur et posséder les qualités que celui-ci a présentées à
l'acheteur sous forme d'échantillon ou de modèle
présenter les qualités qu'un acheteur peut légitimement attendre eu égard aux déclarations publiques faites
par le vendeur, par le producteur ou par son représentant, notamment dans la publicité ou l'étiquetage
2° Ou présenter les caractéristiques définies d'un commun accord par les parties ou être propre à tout
usage spécial recherché par l'acheteur, porté à la connaissance du vendeur et que ce dernier a accepté.
Nota : Ordonnance 2005-136 2005-02-17 art. 5 : Les dispositions de la présente ordonnance s'appliquent
aux contrats conclus postérieurement à son entrée en vigueur.
Article L. 211-12 Code de la consommation
L'action résultant du défaut de conformité se prescrit par deux ans à compter de la délivrance du bien.
Nota : Ordonnance 2005-136 2005-02-17 art. 5 : Les dispositions de la présente ordonnance s'appliquent
aux contrats conclus postérieurement à son entrée en vigueur.
De la garantie des défauts et vices cachés (extrait du Code civil)
Article 1641 Code civil
Le vendeur est tenu de la garantie à raison des défauts cachés de la chose vendue qui la rendent impropre
à l'usage auquel on la destine, ou qui diminuent tellement cet usage, que l'acheteur ne l'aurait pas acquise,
ou n'en aurait donné qu'un moindre prix, s'il les avait connus.
Article 1648 alinéa 1er Code civil
L'action résultant des vices rédhibitoires doit être intentée par l'acquéreur dans un délai de deux ans à
compter de la découverte du vice.
Français
14
Page 45

Français
Page 46

Inhoud
Veiligheidsmaatregelen........................................................................................................1
Eerste set-up .......................................................................................................................2
Snelle Installatie...................................................................................................................2
Installatie van het Aanraakscherm.......................................................................................3
Vooraanzicht van het Product..............................................................................................4
Achteraanzicht van het Product...........................................................................................4
On Screen Display (OSD) Functies gebruiken.....................................................................5
Ondersteunende Tijdsmodules ............................................................................................8
Technische Informatie .........................................................................................................9
Onderhoud en Verzorging..................................................................................................10
Oplossen van problemen...................................................................................................10
Garantievoorwaarden ........................................................................................................11
Nederlands
Page 47

Veiligheidsmaatregelen
Deze monitor werd gefabriceerd en getest met als basisprincipe in het achterhoofd dat de
veiligheid van de gebruiker hoogste prioriteit heeft. Onoordeelkundig gebruik of
onoordeelkundige installatie kunnen evenwel gevaar opleveren, zowel voor de monitor als
voor de gebruiker. Lees de volgende WAARSCHUWINGEN zorgvuldig door alvorens over
te gaan tot installatie en hou deze handleiding bij de hand.
WAARSCHUWINGEN:
Deze monitor mag enkel worden gebruikt met de juiste stroombronnen die aangeduid
staan op het label achteraan de monitor. Bent u niet zeker over de stroomvoorziening
bij u thuis, vraag dan uw locale verdeler of uw stroomleverancier om meer uitleg.
Probeer de monitor niet zelf te repareren, hij bevat geen onderdelen die door de
gebruiker kunnen worden onderhouden. De monitor mag enkel gerepareerd worden
door een erkend vakman.
Verwijder de behuizing niet. Er zitten onderdelen in de monitor die onder
hoogspanning staan, deze kunnen een elektrische schok veroorzaken, zelfs wanneer
het snoer niet aangesloten is.
Gebruik de monitor niet langer wanneer de behuizing beschadigd is. Laat het nakijken
door een erkend vakman.
Nederlands
Plaats uw monitor enkel in een schone, droge omgeving. Trek d stekker onmiddellijk
uit het stopcontact wanneer het toestel nat geworden is en raadpleeg uw vakman.
Trek het toestel altijd uit het stopcontact alvorens het schoon te maken. Maak de
behuizing met een droge, vochtige doek schoon. Gebruik een reinigingsmiddel zonder
ammoniak op een doek, breng de reiniger niet rechtstreeks op het glas aan.
Hou de monitor verwijderd van magnetische voorwerpen, motoren, tv-toestellen en
transformatoren
Plaats geen zware voorwerpen op de kabel of het stroomsnoer
Voor PLUG CABLE UITRUSTING, moet het stopcontact zich in de nabijheid van het
toestel bevinden en makkelijk bereikbaar zijn
Volgens de bepalingen van de WEEE is deze monitor geen huishoudelijk afval als hij
niet meer wordt gebruikt. Op onze website kunt u informatie vinden over hoe dit
product kan worden gerecycleerd.
1
Page 48

Eerste set-up
A
Gefeliciteerd met de aankoop van deze monitor met hoog vermogen!
Deze monitor heft volgende accessoires:
Stroomkabel
VGA kabel (15pin)
Audiokabel
Touch pen
Handleiding
USB kabel
Garantiekaart
Snelle Installatie
1. Sluit videokabel aan (D-subkabel)
Zorg ervoor dat monitor en computer beide UIT staan. Sluit de videokabel aan
(D-subkabel) op de computer, en dan op de monitor.
2. Sluit stroomsnoer aan
Sluit het stroomsnoer aan op een behoorlijk geaard stopcontact, en dan op de monitor.
3. Sluit audiokabels aan
Sluit de audiokabels aan op de Audio- output van de computer en op de Audio input
van de monitor.
4. Vermogen AAN computer en monitor
Zet eerst de computer AAN, daarna de monitor.
5. Windowsgebruikers:
De Tijdsmodus instellen (Resolutie en Hernieuwingsratio)
Voorbeeld: 1920 x 1080 @ 60 Hz
Resolutie rechtsklikken op de Windows desktop > Eigenschappen > Instellingen >
“Desktop Area”. Stel de resolutie in.
Hernieuwingsratio (verticale frequentie) Zie de gebruikershandleiding van uw grafische
kaart voor instructies.
Voorbeeld:
PC
Nederlands
Stroomkabel
udiokabel
VGA kabel
2
Page 49

Installatie van het Aanraakscherm
1. Gebruik de USB 2.0 kabel (geleverd met de monitor) om de monitor op een van de
USB 2.0 poorten van de computer aan te sluiten.
2. Windows start het zoeken naar de Aanraakmodule automatisch op, en gaat over tot
het installeren van de drijver.
3. Multi-touch functie wordt enkel ondersteund op systemen met Windows 7, andere
ondersteunen de Multi-touch functie niet.
USB 2.0 kabel
Nederlands
Installatie hardware
Sluit de USB-kabel van uw Touch Monitor aan op een beschikbare USB 2.0 poort op uw
computer. Windows detecteert het toestel automatisch.
3
Page 50

Vooraanzicht van het Product
OSD Menu Aan/Uit
Scroll Down/ Verminderen
Scroll Up/ Vermeerderen
Selecteren bevestigen
AAN/UIT
Vermogen LED Indicator
Touch Pen Slot
Achteraanzicht van het Product
Aan/uitschakelaar
Nederlands
Vermogen input (AC input)
Audio input
VGA input (D-sub 15pin)
Up-stream USB poort (naar pc)
4
Page 51

On Screen Display (OSD) Functies gebruiken
1
Toon hoofdmenu.
OSD menu verlaten.
Beeld automatisch aanpassen wanneer niet in het
2
hoofdmenu.
Bevestig de selectie.
Selecteer het gewenste item in OSD menu.
▼
Indien niet in OSD menu, direct invoeren Contrast/
Helderheid/ DCR/ ECO Mode menu
Selecteer het gewenste item in OSD menu.
▲
Indien niet in OSD menu, rechtstreeks naar
Opti-Kleurmodus.
▼ + ▲ Contrast en helderheid terugzetten.
1 + ▼ Vermogen slot (wanneer niet in OSD menu)
1 + ▲ OSD slot (wanneer niet in OSD menu)
Hoofdmenu
Nederlands
Short Cut functies van de knop(pen)
Autom. aanpassing: Om de horizontale positie, verticale positie, fase (Fine
tuning) en klok (Horizontale Grootte) van het scherm aan te passen .
Contrast: Om de witniveau op de voorgrond van het schermbeeld aan te passen.
▲: contrast versterken, ▼: contrast afzwakken.
5
Page 52

Helderheid: Om de helderheid van de video aan te passen.
▲: helderheid versterken, ▼: helderheid verminderen.
DCR Aan/Uit: Contrastratio is ≥ 60000:1, bij aanzetten DCR .
Audio-aanpassing: Om de audiofuncites aan te passen.
Volume: Om het volume van de speaker output aan te passen.
Mute: Om Mute AAN/UIT te zetten.
Kleurinstellingen: Om de kleur te selecteren om de helderheid te verbeteren en
kleursaturatie tussen Cool, Normaal, Warm en Gebruikerinstelling.
Cool: Voegt blauw toe voor een koeler wit.
Normaal: Voegt rood to voor een warmer wit en een rijker rood
Warm: Voegt groen toe aan het beeld voor een donkerdere kleur.
Gebruikerinstelling: Individuele aanpassingen voor rood (R), groen (G), blauw (B).
1. Druk op knop 2 om de gewenste kleur te selecteren.
2. Druk op ▲ of ▼ om de geselecteerde kleur aan te passen.
Informatie: Om informatie te tonen over het huidige inputsignaal afkomstig van
de grafische kaart in uw computer.
Nota: Zie uw handleiding voor uw grafische kaart voor meer informatie over het
wijzigen van de resolutie en de hernieuwingsratio.
Manuele beeldaanpassing: Om de Horizontale Grootte, H./V.positie, Fine tuning,
Scherpte, Video Mode Adjust en Opti-Kleurmodus aan te passen.
Horizontale Grootte: Om de breedte van het scherm aan te passen.
▼: schermbreedte verminderen, ▲: schermbreedte vergroten.
Nederlands
H./V.positie: Om de horizontale en verticale positie van de video aan te passen.
H.positie: ▲: scherm naar rechts bewegen, ▼: scherm naar links bewegen.
V.positie: ▲: scherm naar boven verplaatsen, ▼: scherm naar beneden
verplaatsen.
Fine tuning: Om de uitgestelde tijd van gegevens en klok aan te passen.
Druk op ▼ of ▲ om uw voorkeur aan te passen.
Scherpte: Om de helderheid van een niet-Full HD (1920x1080) signaal met de ▼
of ▲ knop.
Video Mode Adjust: Om de videomodus te selecteren vanuit Full Screen of Over
Screen.
Full Screen: Om een beeld op volledig scherm te selecteren.
Over Screen: Om een over-screen beeldafmeting te selecteren.
Opti-Kleurmodus: Voorziet een optimale displayomgeving afhankelijk van de
getoonde inhoud. Het bevat 6, door de gebruiker vooraf te selecteren instellingen.
Gebruiker is bedoeld voor algemene windowsomgeving en standaard
monitorinstellingen.
Spel geoptimaliseerd voor pc-game-omgeving.
Video geoptimaliseerd voor film- en video-omgeving.
6
Page 53

Landschap geoptimaliseerd voor het tonen van buitenlandschappen.
Tekst geoptimaliseerd voor tekstbewerking en het bekijken in een woordomgeving
ECO laat de gebruiker toe de ECO aan of uit te zetten. Contrast en helderheid
kunnen niet worden aangepast wanneer ECO actief is.
Menu-instellingen: Om Taal, OSD positie, OSD time out en OSD achtergrond in
te stellen.
Taal: Om gebruikers toe te laten te kiezen tussen de beschikbare talen.
OSD positie: Druk op de ▲ of ▼ knop om de horizontale of verticale OSD
positieaanpassing te selecteren.
H.ligging: Om de OSD-positie horizontal aan te passen.
▲: beweeg OSD naar rechts, ▼: beweeg OSD naar links.
V.ligging: Om de OSD-positie verticaal aan te passen.
▲: beweeg OSD naar boven, ▼: beweeg OSD naar beneden.
OSD time out: Om On Screen Display (OSD) automatisch uit te schakelen na
een vooraf ingestelde tijdsspanne.
OSD achtergrond: Laat de gebruiker toe de OSD achtergrond aan of uit te
zetten.
Terugzetten: Om fabriekssettings voor Video & Audio controles opnieuw in te
stellen. Druk op knop 2 om de menuoptie Memory Recall te selecteren.
Nederlands
7
Page 54

Ondersteunende Tijdsmodules
VGA 720 x 400 @ 70Hz
VGA 640 x 480 @ 60Hz
MAC 640 x 480 @ 67Hz
VESA 640 x 480 @ 72Hz
VESA 640 x 480 @ 75Hz
VESA 800 x 600 @ 56Hz
VESA 800 x 600 @ 60Hz
VESA 800 x 600 @ 72Hz
VESA 800 x 600 @ 75Hz
MAC 832 x 624 @ 75Hz
VESA 1024 x 768 @ 60Hz
VESA 1024 x 768 @ 70Hz
VESA 1024 x 768 @ 75Hz
VESA 1280 x 960 @ 60Hz
VESA 1152 x 864 @ 75Hz
MAC 1152 x 870 @ 75Hz
VESA 1280 x 1024 @ 60Hz
VESA 1280 x 1024 @ 75Hz
VESA 1440 x 900 @ 60Hz
VESA 1440 x 900 @ 75Hz
CVT 1400 x 1050 @ 60Hz
VESA 1600 x 1200 @ 60Hz
VESA 1680 x 1050 @ 60Hz
VESA 1920 x 1080 @ 60Hz
Waarschuwing: Stel de grafische kaart van uw computer niet zo in dat de maximale
hernieuwingsratio’s worden overschreden. Doet u dat wel, kunt u uw monitor mogelijk
permanent beschadigen.
Nederlands
8
Page 55

Technische Informatie
Technische Specificatie
LCD Panel 21.5” TFT
Nederlands
Stroombeheer
Toonbare Resolutie Full HD 1920 x 1080 max. verticale frequentie 60Hz max.
Pixeldimensie 0.248 x 0.248mm
LCD Display Kleur 16.7M
Tilt 0°~20°
Actieve Display Area 476.64mm x 268.11mm
Temperatuur In Werking: 5°C ~ +35°C
Voldoet aan CE
Stroom Input Voltage AC100-240 V
Speaker 1W x 2
Optische Touch Infrarood optische structuur
Sensorhernieuwing 120 frames/sec
Energy Star voldoet aan VESA
DPMS compatibel
< 1 W
Opgeslagen: -20°C ~ + 60°C
Sensor Resolutie 32767 x 32767
Accuratesse ≤ ± 2.5mm
Glascoating Non-coating
Stylus afmeting Vinger, elke stylus ≥3.6mm (diameter)
OS Windows 7
9
Page 56

Onderhoud en Verzorging
Verzorging
Vermijd om uw monitor aan direct zonlicht of een andere warmtebron bloot te stellen..
Plaats uw monitor uit de zon, om verblinding door zonlicht te verminderen.
Plaats uw monitor ineen goed verluchte ruimte.
Plaats geen zware dingen bovenop uw monitor.
Vergewis u ervan dat uw monitor in een schone en vochtvrije omgeving staat.
Hou uw monitor verwijderd van magneten, motoren, transformatoren, speakers en
televisietoestellen.
Nota
Haal de LCD uit de verpakking en verwijder de plastic verpakking en het polystyreenschuim.
Trek de basis van Parallel versus Panel naar Verticaal.
Pas het Panel aan binnen een stand van 0 graden naar voren en 20 graden naar
achteren. U moet harder duwen om 20 graden naar achteren te overschrijden, maar
deze marge is enkel bedoeld om het toestel in een klein formaat te kunnen opslaan.
Veiligheidstips
Al s er rook, een abnormaal geluid of een abnormaal geur uit uw monitor komt, moet u
het snoer onmiddellijk uit het stopcontact trekken en u onderhoudsvakman bellen.
Verwijder nooit het achterste gedeelte van de behuizing van de monitor. De display unit
bevat onderdelen die onder hoogspanning staan en elektrische schokken kunnen
veroorzaken.
Probeer nooit om zelf uw monitor te repareren. Doe altijd een beroep op de
onderhoudsdienst of een gekwalificeerd vakman voor herstellingen.
Oplossen van problemen
Nederlands
Geen stroom
Vergewis u ervan dat het snoer veilig aangesloten is op de stroomadapter en dat de
stroomtoevoer naar de monitor aan staat.
Steek een ander elektrisch toestel in het stopcontact om te kijken of het stopcontact
behoorlijk functioneert.
Zorg ervoor dat alle signaalkabels geïnstalleerd zijn.
Stroom maar geen beeld op het scherm
Vergewis u ervan dat de samen met de monitor geleverde videokabel stevig
aangesloten is op de poort voor video output aan de achterkant van de computer.
Indien dit niet het geval is, doe het dan alsnog.
Pas de helderheid aan.
Foute of abnormale kleuren
Indien er bepaalde kleuren ontbreken (rood, groen, blauw), controleer dan de
videokabel om na te gaan of die behoorlijk is aangesloten. Losse of gebroken pinnen in
de kabelconnector kunnen voor onbehoorlijke aansluiting zorgen.
Sluit de monitor op een andere computer aan.
10
Page 57

Nederlands
Garantievoorwaarden
I. Algemene garantievoorwaarden
1. Algemeen
De garantie begint altijd op de dag dat het MEDION product bij MEDION of bij een officiële MEDION
handelspartner is gekocht (koopdatum aankoopbewijs of datum origele afleveringsbon) en heeft betrekking
op alle soorten materiaal- en productiefouten die bij normaal gebruik kunnen ontstaan. Het type en de duur
van de garantie voor uw product treft u aan op de garantiekaart. De garantietermijn is geldig met de
garantiekaart die bij het product gevoegd is tezamen met de aankoopnota van de geautoriseerde MEDION
handelspartner en (indien van toepassing) de afleveringsbon.
Om aanspraak te kunnen maken op enige garantie dient u aan ons te kunnen overleggen:
• het originele aankoopbewijs;
• (indien van toepassing) de originele afleveringsbon;
• de garantiekaart
Bewaart u a.u.b. het originele aankoopbewijs, de originele afleveringsbon en de garantiekaart goed.
MEDION en haar geautoriseerde handelspartners behouden zich het recht voor om de garantie aanspraak
te weigeren als dit aankoopbewijs en/of de afleveringsbon en/of de garantiekaart niet overgelegd kunnen
worden.
Indien u het product naar ons moet opsturen, bent u er zelf verantwoordelijk voor dat het product
transportzeker verpakt is. Voor zover niet anders op de garantiekaart is aangegeven zijn de verzendkosten
en het transportrisico voor uw rekening.
U dient het defecte product aan ons aan te bieden voorzien van een begeleidend schrijven met daarin
vermeld de duidelijke en zo gedetailleerd mogelijke omschrijving van de klacht(en), uw naam en
adresgegevens, uw telefoonnummer, en alle noodzakelijke toebehoren voor de reparatie. Bij de uitvoering
van de werkzaamheden gaat MEDION uit van de klachten zoals beschreven zijn in uw begeleidend
schrijven. MEDION kan in ieder geval niet tot meer gehouden worden dan in deze beschrijving vermeld
staat.
Om recht te hebben op de garantie dient u, voordat u het product aan ons opstuurt, altijd contact op te
nemen met onze hotline. In de hotline krijgt u een referentienummer (het zgn. RMA-nummer) dat u aan de
buitenzijde van het pakket dient te vermelden.
Het product moet compleet, d.w.z. met alle bij de aankoop meegeleverde accessoires opgestuurd worden.
Indien het product niet compleet is leidt, dat tot vertraging van de reparatie/omruiling. Voor aanvullende
ingestuurde producten die niet behoren bij de bij de oorspronkelijke aankoop meegeleverde accessoires is
MEDION op geen enkele wijze verantwoordelijk.
Deze garantie heeft geen gevolgen voor uw wettelijke aanspraken en is onderworpen aan het geldende
recht in het betreffende land waar u als eerste het product heeft gekocht van een door MEDION
geautoriseerde handelspartner. Indien en voor zover deze garantievoorwaarden inbreuk maken op uw
wettelijke rechten gaan uw wettelijke rechten natuurlijk voor.
Garantiegevallen leiden niet tot een vernieuwing en/of verlenging van de oorspronkelijke garantietermijn.
2. Omvang en levering van garantieprestaties
In het geval er sprake is van een door deze garantie gedekt defect aan uw MEDION product, garandeert
MEDION met deze garantie de reparatie of de vervanging van het MEDION product of een onderdeel
hiervan. De beslissing tussen reparatie dan wel vervanging van het product berust bij MEDION. In zoverre
kan MEDION naar eigen inzicht beslissen om het voor reparatie ingestuurde product te vervangen door een
product van dezelfde kwaliteit.
De garantie beperkt zich tot het herstel of de vervanging van de hardware-functionaliteiten naar de toestand
van het originele product voor het defect zich heeft voorgedaan. De garantie omvat niet het herstellen van
gegevens, data of software. U dient vóór het opsturen van het product zelf ervoor zorg te dragen dat u een
reserve-kopie (back-up) maakt van eventuele in het product opgeslagen gegevens, data of software,
inclusief toepassings- en systeemsoftware. MEDION aanvaardt - behoudens aan MEDION toerekenbare
opzet of bewuste roekeloosheid - geen aansprakelijkheid voor het verlies van deze gegevens en informatie.
De vervanging van defecte onderdelen gebeurt bij materiaal- of productiefouten door nieuwe onderdelen.
11
Page 58

Eventueel wordt het volledige product vervangen door een gelijk of functioneel gelijkwaardig product. In elk
geval is de waarde van de garantieprestatie beperkt tot de waarde van het defecte product.
Defecte onderdelen, die door ons worden vervangen worden ons eigendom.
In de garantie zijn de arbeidsuren van (medewerkers van) MEDION alsmede de kosten van verpakking en
van de verzending door MEDION naar de Afnemer begrepen.
Het is u – op straffe van verval van elke aanspraak – niet toegestaan zelf of door derden
reparatiewerkzaamheden aan door MEDION geleverde zaken te (laten) verrichten.
3. Uitsluitingen
Niet onder de garantie vallen:
• normale slijtage;
• verbruiksmaterialen;
• zoals bv. projectielampen in beamers;
• producten waarvan merk-, typeaanduiding en/of serienummer zijn veranderd of verwijderd;
• de beschikbaarstelling van driver- of software-updates/upgrades;
• geringe afwijkingen die voor de functionaliteit van de zaak niet van belang zijn;
• defecten als gevolg van onjuist of onoordeelkundig gebruik;
• defecten als gevolg van verwaarlozing of gebrek aan of ondeugdelijk onderhoud;
• gebruik, montage of installatie van de zaken of onderdelen in strijd met de
gebruiksaanwijzing/documentatie;
• defecten als gevolg van niet aan MEDION toerekenbare computervirussen of softwarefouten;
• defecten of foutmeldingen die een gevolg zijn van een onjuiste voedingsspanning;
• gebreken die een gevolg zijn van blootstelling aan vocht of van chemische of elektrochemische inwerking
van water;
• gebreken die een gevolg zijn van gebruik van niet originele onderdelen, randapparatuur en/of
programmatuur;
• producten die tweedehands in omloop zijn gebracht;
• de afnemende capaciteit van batterijen en accu’s;
• pixelfouten (defecte beeldpunten) binnen de in de gebruiksaanwijzing/handleiding van uw product
toegestane marge;
• defecten als gevolg van inbranding of helderheidsverlies bij plasma- of LCD-producten die ontstaan zijn
door ondeskundig gebruik; de precieze handelwijze voor het gebruik van het plasma- of LCD-product
vindt u in de gebruiksaanwijzing/handleiding;
• weergavefouten van datadragers die in een niet compatibel formaat dan wel met niet geëigende software
opgebouwd zijn;
• defecten als gevolg van overmacht (zoals oorlog, oorlogsgevaar, burgeroorlog, terrorisme, oproer, molest,
brand, blikseminslag, waterschade, overstroming, werkstaking, bedrijfsbezetting, staking, stiptheidsacties,
in- en invoerbelemmeringen, overheidsmaatregelen, defecten aan machines, storingen in de levering
van gas, water- en elektriciteit, vervoersproblemen);
Mocht tijdens het onderzoek naar het defecte product blijken dat het defect niet wordt gedekt door de
garantie, dan zal MEDION u hiervan op de hoogte stellen en u hierbij in de gelegenheid stellen om aan de
hand van een offerte een beslissing te nemen over de vraag of u het defecte product toch
gerepareerd/vervangen wenst te zien. In deze offerte zal een opgave worden verstrekt van de met de
reparatie/vervanging gemoeide kosten.
4. Servicehotline
Voordat u uw product aan MEDION opstuurt, dient u contact op te nemen met de service hotline. Hier krijgt
u alle noodzakelijke informatie hoe u aanspraak kunt maken op de garantie.
(De service hotline staat u 365 dagen per jaar, ook op zon- en feestdagen ter beschikking. De kosten
bedragen € 0,15 per minuut).
De service hotline ondersteunt in geen geval een gebruikerstraining voor soft- en hardware, het opzoeken in
de handleiding dan wel de ondersteuning van niet van MEDION afkomstige producten.
Nederlands
12
Page 59

Nederlands
II. Bijzondere garantievoorwaarden voor MEDION PC,
Notebook, Pocket PC (PDA) u verwijderen en producten met
navigatiefunctie (PNA)
Heeft een van de meegeleverde opties een defect dan heeft u ook aanspraak op een reparatie of omruiling.
De garantie dekt de materiaal- en arbeidskosten voor het herstel van de functionaliteit van het betreffende
MEDION product.
Gebruik van hardware bij uw product die niet door MEDION is geproduceerd dan wel door MEDION is
verkocht, is verwijderen kan de garantie doen vervallen als daardoor bewijsbaar schade aan het MEDION
product of de meegeleverde opties ontstaan is.
Voor meegeleverde software wordt een beperkte garantie verstrekt. Dat geldt voor de voor-geïnstalleerde
systeem- en besturingssoftware alsmede voor meegeleverde toepassingsprogramma’s. Bij de door
MEDION meegeleverde software garandeert MEDION voor de gegevensdragers (bv. diskettes en CD-roms
waarop de software geleverd wordt ) een vrijheid van materiaal- en verwerkingsfouten voor de duur van zes
maanden, te rekenen vanaf de aankoopdatum van het MEDION product bij MEDION dan wel bij een
officiële handelspartner van MEDION.
Voor meegeleverd kaartmateriaal van producten met een navigatiefunctie wordt geen garantie geleverd op
de volledigheid.
Bij de levering van een defecte gegevensdrager vervangt MEDION deze zonder kosten.
III. Bijzondere garantiebepalingen voor de reparatie aan huis
respectievelijk de omruiling aan huis
Voor zover uit garantiekaart behorende bij het product blijkt dat u recht heeft op een reparatie dan wel een
omruiling aan huis gelden deze bijzondere garantiebepalingen alleen voor de reparatie dan wel omruiling
aan huis.
Om de reparatie/omruiling aan huis mogelijk te maken dient van uw zijde het volgende zeker gesteld te
worden:
• De medewerker van MEDION moet onbeperkt, zeker en zonder vertraging toegang tot het product
geboden worden;
• Telecommunicatiemiddelen die noodzakelijkerwijs gebruikt dienen te worden door de MEDION
medewerker om zijn opdracht uit te kunnen voeren, voor test- en diagnosedoeleinden alsmede voor het
oplossen van de klacht spatie verwijderen, moeten door u kostenloos ter beschikking gesteld worden.
• U bent zelf verantwoordelijk voor het herstel van uw eigen gebruikerssoftware na de gebruikmaking van
de dienstverlening van MEDION; .
• U dient alle overige maatregelen te treffen die voor het uitvoeren van de opdracht volgens de
voorschriften benodigd zijn.
• U bent zelf verantwoordelijk voor de configuratie en verbinding van de eventuele beschikbare externe
producten na de gebruikmaking van de dienstverlening van MEDION;
• De kostenvrije annuleringsperiode van de aan huis reparatie/omruilopdracht bedraagt minimaal 24 uur,
daarna worden de kosten veroorzaakt door de vertraagde annulering aan u in rekening gebracht;
13
Page 60

Contenido
Precauciones de Seguridad.................................................................................................1
Primer Paso.........................................................................................................................2
Instalación Rápida ...............................................................................................................2
Instalación de la pantalla táctil.............................................................................................3
Vista Frontal del Producto....................................................................................................4
Vista Trasera del Producto ..................................................................................................4
Usar las Funciones de la Muestra En Pantalla (OSD) .........................................................5
Tiempos soportados ............................................................................................................8
Información Técnica ............................................................................................................9
Mantenimiento y Cuidado ..................................................................................................10
Solución de Problemas......................................................................................................10
Garantía limitada ...............................................................................................................11
Español
Page 61

Precauciones de Seguridad
Este monitor ha sido manufacturado y probado bajo el principio de que la seguridad del
usuario es lo primero. Sin embargo, el uso o la instalación impropia puede resultar de
peligro para el monitor tanto como para el usuario. Lea cuidadosamente las siguientes
ADVERTENCIAS antes de la instalación y conserve a mano esta guía.
ADVERTENCIAS:
Este monitor debe ser operado solamente según las fuentes de energía indicadas en
la etiqueta en la parte trasera del monitor. Si usted no está seguro del suministro de
energía en su residencia, consulte a su vendedor local o a la compañía de energía
eléctrica.
No trate de reparar el monitor por usted mismo cuando esto concierne a partes no
ajustables por el usuario. El monitor debe ser reparado solamente por técnicos
cualificados.
No abra el monitor. Hay partes de alto voltaje adentro que pueden causar un golpe de
corriente sobre el cuerpo humano, incluso cuando el cable de la corriente esté
desconectado.
Deje de usar el monitor si se ha dañado la estructura externa del mismo. Hágalo
revisar primero por el servicio técnico.
Ponga su monitor solamente en un ambiente seco y limpio. Desenchufe el monitor
inmediatamente si este se moja y consulte a su servicio técnico.
Siempre desenchufe el monitor antes de limpiarlo. Limpie la cobertura con un tela
seca y limpia. Aplique limpiadores no basados en amoníacos sobre la tela que usará
para limpiar el monitor, nunca directamente sobre el vidrio de la pantalla.
Conserve el monitor lejos de objetos magnéticos, motores, televisores, y
transformadores de corriente.
Español
No coloque objetos pesados sobre los cables del monitor.
Para EQUIPOS AÑADIBLES, el enchufe del toma corriente debe estar cerca del
equipo y debe ser de fácil acceso.
Según la regulación WEEE, no se debe desechar este monitor, cuando se torna
obsoleto, como una basura común en Europa. Favor refiera a la información de
reciclaje de nuestro sitio web para tratarlo.
1
Page 62

Primer Paso
¡Felicidades por comprar este monitor de alto rendimiento!
Este monitor viene con los sigtes. accesorios:
Cable de alimentación
Cable VGA (15 pin)
Cable de Audio
Lápiz táctil
Guía de Usuario
Cable USB
Tarjeta de Garantía
Instalación Rápida
1. Conectar cable de vídeo (cable D-Sub)
Asegúre de que el monitor y el ordenador están APAGADOS. Conecte el cable de
vídeo (cable D-Sub) al ordenador, después al monitor.
2. Conectar cable de alimentación
Conecte el cable de alimentación a un receptáculo AC de tierra, después al monitor.
3. Conectar cable de audio
Conecte el cable Audio de la salida de Audio del ordenador a la entrada Audio del
monitor.
4. ENCENDER ordenador y monitor
Encienda el ordenador, después Encienda el monitor.
5. Usuarios de Windows:
Renovar)
Ejemplo: 1920 x 1080 @ 60 Hz
Resolución Clic derecho en el Windows escritorio > Propiedades > Configuraciones >
“Área Escritorio”. Configure la resolución.
Índice de Renovar (frecuencia vertical) Vea la guía de usuario de su tarjeta de gráficas
por las instrucciones.
Ejemplo:
Configurar el Modo Cronometraje (Resolución e Índice de
PC
Español
Cable de alimentación
Cable de Audio
Cable VGA
2
Page 63

Instalación de la pantalla táctil
1. Utilice el cable USB 2.0 (incluido con el monitor) para conectar el monitor a uno
de los puertos USB 2.0 de la computadora.
2. Windows buscará automáticamente el módulo táctil e instalará el controlador.
3. La función Multi-touch solo es compatible con el sistema operativo Windows 7; el
resto de los sistemas operativos no son compatibles con esta función.
Cable USB 2.0
Instalación del hardware
Conecte el cable USB del monitor táctil a un puerto USB 2.0 libre de la computadora.
Windows detecta automáticamente el dispositivo.
Español
3
Page 64

Vista Frontal del Producto
Encendido/Apagado del Menú de Muestra En Pantalla
Desplazar Abajo/Reducir
Desplazar Arriba/Aumentar
Confirmar Selección
Encendido/Apagado
Indicador LED de Alimentación
Ranura para el lápiz táctil
Vista Trasera del Producto
Interruptor de encendido de CA
Español
Entrada de alimentación (entrada AC)
Entrada de Audio
Entrada VGA (D-Sub 15pin)
Puerto USB Flujo Arriba (al PC)
4
Page 65

Usar las Funciones de la Muestra En Pantalla (OSD)
1
Muestra el menú principal.
Sale del menú OSD.
Ajuste automático la imagen cuando no está en el menú principal.
2
Confirma la selección.
Selecciona el ítem deseado cuando se encuentra en el menú OSD.
▼
Cuando no está en el menú OSD, ingresa directamente en el menú
Contraste/ Claridad/ DCR/ ECO.
Selecciona el ítem deseado cuando se encuentra en el menú OSD.
▲
Cuando no está en el menú OSD, ingresa directamente en el modo
Opticolor.
▼ + ▲ Vuelve a llamar el Contraste y Claridad.
1 + ▼ Bloquea suministro (cuando no se encuentra en el menú OSD)
1 + ▲ Bloquea OSD (cuando no se encuentra en el menú OSD )
Menú principal
Español
La Función de Atajo del botón(es)
Ajuste automático: Ajuste automático de posición horizontal, posición vertical,
fase (Sintonización) y reloj (Tamaño horizontal).
Contraste: Para ajustar el nivel de blanco de frente de la imagen de pantalla.
▲: aumentar contraste, ▼: disminuir contraste.
Claridad: Para ajustar la luminancia del vídeo.
▲: aumenta el brillo, ▼: reduce el brillo.
5
Page 66

DCR Encendido/Desactivado: Proporción de contraste será ≥ 60000:1, cuando
el DCR está encendido.
Ajuste del sonido: Para ajustar las funciones de audio.
Volumen: Para ajustar el volumen de los altavoces.
Silenciador: Para activar y desactivar el sonido.
Ajustes de color: Para seleccionar el color para mejorar el brillo y la saturación
de color entre Frío, Normal, Caliente, y Ajuste de color del usuario.
Frío: Añade azul a la imagen para hacer el blanco más frío.
Normal: Añade rojo a la imagen para hacer el blanco más cálido y el rojo más rico.
Caliente: Añade cerde a la imagen para hacer los colores más oscuros.
Ajuste de color del usuario: Ajustes individuales para rojo (R), verde (V), azul (A).
1. Pulse el botón 2 para fijar el ajuste y seleccione el siguiente color a ajustar.
2. Pulse ▲ o ▼para ajustar el color seleccionado.
Información: Muestra información acerca de la entrada actual desde la tarjeta
gráfica de su ordenador.
Nota: Consulte el manual de su tarjeta gráfica para más información acerca del
cambio de resolución y velocidad de fotograma.
Ajuste manual de la imagen: Para ajustar, manualmente, el Tamaño horizontal,
Posición H./V., Sintonización, Nitidez, Ajuste del modo Vídeo y modo OptiColor.
Tamaño horizontal: Ajusta la anchura.
▼: disminuye la anchura de la imagen en pantalla, ▲: aumenta la anchura de la imagen
en panalla.
Posición H./V.: Para ajustar la posición horizontal y vertical del video.
Posición H.: ▲: mueve la pantalla a la derecha, ▼: mueve la pantalla a la
izquierda.
Posición V.: ▲: mueve la pantalla hacia arriba, ▼: mueve la pantalla hacia
abajo.
Sintonización: Para ajustar el retardo temporal.
Pulse ▼ o ▲para ajustar a la preferencia del usuario.
Español
Nitidez: Para ajustar la claridad de una señal no Full HD (1920x1080) con el
botón ▼ o ▲.
Ajustes del modo Vídeo: Para seleccionar el modo de vídeo de Pantalla
completa o Más pantalla.
Pantalla completa: Para seleccionar imagen de tamaño de toda la pantalla.
Más pantalla: Para seleccionar imagen de tamaño que supera la pantalla.
Modo OptiColor: proporciona un entorno de visualización óptimo dependiendo
del contenido visualizado. Consta de seis preajustes seleccionables por el
usuario.
Usuario se utiliza para el entorno general de Windows y el ajuste predeterminado
del monitor.
Juego optimiza el entorno de juegos de la PC.
6
Page 67

Vídeo optimiza el entorno para películas y vídeo.
Paisaje optimiza la visualización de imágenes de escenas al aire libre.
Texto optimiza el entorno de procesamiento de textos para su edición y
visualización.
ECO permite al usuario encender y apagar este modo. Cuando el modo ECO
está activado se deshabilita el ajuste de Contraste y Claridad.
Configuración del menú: Para configurar Idioma, Posición de OSD,
Temporizador OSD y Imagen de fondo OSD.
Idioma: Permite al usuario escojer entre los idiomas disponibles.
Posición OSD: Oprima el botón ▲ o ▼para seleccionar entre el ajuste de
Posición OSD horizontal y vertical.
Posición H.: Para ajustar horizontalmente la posición OSD.
▲: mueve el OSD a la derecha, ▼: mueve el OSD a la izquierda.
Posición V.: Para ajustar verticalmente la posición OSD.
▲: sube el OSD, ▼: baja el OSD.
Temporizador OSD: Para apagar automáticamente la Muestra En Pantalla (OSD)
después de un período de tiempo prefijo.
Imagen de fondo OSD: Activar o desactivar el fondo de la presentación en
pantalla.
Restablecer: Para llamar las configuraciones de fábrica de vuelta para los
controles de Vídeo & Audio. Oprima el botón 2 para seleccionar la opción de
menú Memoria.
Español
7
Page 68

Tiempos soportados
VGA 720 x 400 @ 70Hz
VGA 640 x 480 @ 60Hz
MAC 640 x 480 @ 67Hz
VESA 640 x 480 @ 72Hz
VESA 640 x 480 @ 75Hz
VESA 800 x 600 @ 56Hz
VESA 800 x 600 @ 60Hz
VESA 800 x 600 @ 72Hz
VESA 800 x 600 @ 75Hz
MAC 832 x 624 @ 75Hz
VESA 1024 x 768 @ 60Hz
VESA 1024 x 768 @ 70Hz
VESA 1024 x 768 @ 75Hz
VESA 1280 x 960 @ 60Hz
VESA 1152 x 864 @ 75Hz
MAC 1152 x 870 @ 75Hz
VESA 1280 x 1024 @ 60Hz
VESA 1280 x 1024 @ 75Hz
VESA 1440 x 900 @ 60Hz
VESA 1440 x 900 @ 75Hz
CVT 1400 x 1050 @ 60Hz
VESA 1600 x 1200 @ 60Hz
VESA 1680 x 1050 @ 60Hz
VESA 1920 x 1080 @ 60Hz
Aviso: No configure la tarjeta gráfica de su ordenador de forma que exceda estas
frecuencias máximas de refresco. Si lo hace podría dañar permanentemente su monitor.
Español
8
Page 69

Información Técnica
Especificaciones Técnicas
Panel LCD 21,5” TFT
Administración de
energía
Resolución Visualizable Full HD máximo 1920 x 1080. Frecuencia Vertical máxima
Dimensión de Píxel 0,248 x 0,248 mm
Color de Muestra LCD 16,7M
Inclinación 0°~20°
Area de Visualización
Activa
Temperatura Operating: 5°C ~ +35°C
Conformidad CE
Energía Input Voltage AC100-240 V
Parlante 1W x 2
Energy Star conforme con VESA
Compatible con DPMS
< 1 W
60Hz.
476,64 mm x 268,11 mm
Storage: -20°C ~ + 60°C
Sistema táctil óptico Estructura óptica infrarroja
Actualización del sensor 120 cuadros/seg.
Resolución del sensor 32,767 x 32,767
Español
Precisión ≤ ± 2,5 mm
Revestimiento del cristal Sin revestimiento
Tamaño del puntero Dedo, cualquier puntero de ≥ 3,6 mm (diámetro)
SO Windows 7
9
Page 70

Mantenimiento y Cuidado
Cuidado
Evite exponer el monitor directamente a la luz del sol o otra fuente de calor.
Coloque su monitor lejos del sol para reducir el deslumbramiento.
Coloque su monitor en un área bien ventilada. No ponga nada pesado sobre el monitor.
Asegúrese de que el monitor esté instalado en un área limpia y libre de humedad.
Mantenga el monitor lejos de imánes, objetos magnéticos, motores, transformadores,
parlantes y televisores.
Nota
Saque el LCD del embalaje y quite la bolsa plástica y la goma esponjosa de poliestireno.
Estire la base de Paralelo versus Panel a Vertical.
Ajuste el Panel dentro de 0 grado inclinando hacia adelante y 20 grados hacia atrás.
Debe plegarlo con fuerza para exceder los 20 grados hacia atrás, pero este rango es
para embalar la unidad en un tamaño menor para almacenar. Precaución: el Panel que
excede de 0 a 20 grados puede causar inestabilidad a la undad y también daños
impredecibles.
Sugerencias de Seguridad
Si humo, o algún olor o ruido anormal sale de su monitor, desenchúfelo
inmediatamente y llame al servicio técnico.
Nunca quite la cubierta trasera o delantera del monitor. La unidad de visualización de
adentro contiene partes de alto voltaje que podrían causar golpes eléctricos sobre el
cuerpo humano.
Nunca trate de reparar su monitor usted mismo. Llame siempre a su servicio técnico o
a un técnico cualificado para arreglarlo.
Solución de Problemas
No enciende
Asegúrese que el cable del monitor esté bien conectado al transformador o adaptador
de corriente y este al enchufe de la corriente.
Enchufe otro electrodoméstico en el mismo enchufe para verificar que el mismo está
suministrando un voltaje correcto.
Asegúrese que todos los cables cortos estén bien instalados.
Encendido pero sin imagen en pantalla
Asegúrese que el cable de video suministrado con el monitor esté bien conectado al
puerto de salida de video en la parte de atrás de su computadora. Si no está
firmemente conectado, conéctelo nuevamente.
Ajuste el brillo.
Colores extraños o anormales
Si algún color (rojo, verde, azul) están faltando, revise el cable de video para
asegurarse que este está bien conectado. Pins sueltos o quebrados en el cable
conector podrían causar una conexión impropia o deficiente.
Conecte el monitor a otra computadora.
Español
10
Page 71

Garantía limitada
I. Condiciones generales de garantía
1. Aspectos generales
La garantía empieza siempre el día de entrega del aparato MEDION adquirido a MEDION o a un
distribuidor oficial de MEDION, y se refiere a todo tipo de daños de material y de producción que pueden
surgir durante el uso normal. El plazo de la garantía se infiere de la tarjeta de garantía adjunta al aparato
unida al comprobante de compra del distribuidor autorizado de MEDION.
Guarde cuidadosamente el comprobante de compra original y la tarjeta de garantía. MEDION y su
distribuidor autorizado se reservan el derecho a rechazar una reparación de garantía o una confirmación de
garantía si no se han presentado estos documentos.
En caso de que sea necesario remitirnos su aparato, asegúrese de que esté embalado de modo seguro
para el transporte, preferiblemente en su embalaje original. MEDION no asume la responsabilidad por otros
materiales enviados que no formen parte del volumen de suministro original del aparato MEDION.
Rogamos nos entreguen junto con el aparato una descripción del fallo lo más detallada posible. Antes de
remitirnos su aparato, póngase en contacto con la línea de atención al cliente de MEDION. Allí recibirá un
número de referencia (n° RMA), que deberá agregar de modo visible en el exterior del paquete.
Esta garantía no tiene ninguna repercusión sobre sus derechos legales y queda sujeta al derecho vigente
del país en el que se efectuó la primera compra del aparato por parte del cliente final en un comercio
autorizado por MEDION.
2. Alcance
En caso de darse un fallo de su aparato MEDION cubierto por esta garantía, MEDION asegura con esta
garantía la reparación o la sustitución del aparato MEDION. La decisión de si debe procederse a una
reparación o a una sustitución corresponde al cliente, pero sólo en el marco del principio de la
proporcionalidad. En este sentido, MEDION podrá decidir a su parecer, teniendo en cuenta los gastos de
reparación, si en lugar de la reparación va a sustituir el aparato por otro nuevo, o por uno acondicionado de
la misma calidad.
No se asume la garantía de pilas o baterías, ni tampoco de los materiales de consumo, es decir, piezas que
durante el uso normal del aparato tienen que sustituirse con regularidad, como por ejemplo la lámpara de
los proyectores.
Como regla general, un error de píxel (un punto de imagen permanente de color, más claro o más oscuro)
no se considera un fallo. El número exacto de puntos de imagen erróneos admisible puede consultarse en
la descripción del manual de este producto.
MEDION no asume la garantía por imágenes retenidas en aparatos de plasma o LCD, que han sido
Español
originadas por un uso inadecuado del aparato. El procedimiento a seguir para la operación de su aparato de
plasma o LCD puede consultarse en la descripción del manual de este producto.
La garantía no abarca los errores de reproducción de soportes de datos que fueron creados en un formato
no compatible o con un software inadecuado.
Si durante la reparación se comprobase que se trata de un fallo no cubierto por la garantía, MEDION se
reservará el derecho a facturar al cliente los gastos originados por la reparación en cuestión de material,
trabajo y demás gastos, después de presentar un presupuesto.
11
Page 72

3. Exclusión
MEDION no asume la garantía de fallos y daños originados por influencias externas, daños accidentales,
uso inadecuado, así como modificaciones, reformas, ampliaciones, uso de piezas procedentes de otros
fabricantes, descuido, virus o errores de software, transporte inadecuado, o embalaje inadecuado.
La garantía se extingue en caso de que el fallo del aparato se haya ocasionado durante un mantenimiento o
una reparación efectuados por personal ajeno a MEDION o al servicio técnico autorizado por MEDION para
este aparato. La garantía también cesa si los adhesivos, precintos de garantía, o números de serie del
aparato o de una parte integrante del mismo se han modificado, manipulado, o dañado de modo que sean
ilegibles.
4. Línea de atención al cliente
Antes de remitir el aparato a MEDION tiene que comunicarse con nosotros a través de la línea de atención
al cliente “Hotline”. Recibirá más informaciones de cómo hacer uso de su derecho de garantía.
El uso de la línea de atención al cliente no es gratuito.
La línea de atención al cliente no sustituye de ningún modo la formación del usuario en software o hardware,
la consulta en el manual, o la asistencia de productos procedentes de otras empresas.
MEDION ofrece adicionalmente una línea de atención al cliente de pago para consultas no asumidas por la
garantía.
II. Condiciones especiales de garantía para ordenadores de
sobremesa (PC), ordenadores portátiles (notebook),
ordenadores de bolsillo (PDA) y navegadores GPS (PNA) de
MEDION
Si una de las opciones incluidas en el suministro presenta un defecto, también tiene derecho a reparación o
sustitución. La garantía cubre gastos de material y de trabajo para restablecer la funcionalidad del aparato
MEDION en cuestión.
Si se usa para el aparato un hardware no fabricado ni distribuido por MEDION, esto puede provocar el cese
de la garantía, si por ello se generara un daño en el aparato de MEDION o en las opciones suministradas.
Se asume una garantía limitada por el software suministrado. Esto es válido para un sistema operativo
preinstalado, pero también para programas incluidos en el suministro. En el caso del software incluido en el
suministro, MEDION garantiza para los soportes de datos, p. ej., disquetes y CD-ROMs con los que se
suministra este software, que están exentos de fallos de material y de fabricación por un plazo de 6 meses
desde el día de compra del aparato a MEDION o a un distribuidor oficial de MEDION. En caso de suministro
de soportes de datos defectuosos, MEDION sustituirá los soportes de datos defectuosos gratuitamente; se
excluye cualquier otra reclamación que vaya más allá. Si hay indicios claros de que el soporte de datos se
usó o guardó de modo inadecuado, MEDION se reservará el derecho a rechazar dicha reclamación.
Exceptuando la garantía para los soportes de datos, todos los softwares se suministran sin garantía de
fallos. MEDION no asegura que este software funcione sin interrupciones o sin fallos o que satisfaga las
exigencias del cliente. MEDION no garantiza la exactitud del material cartográfico proporcionado con los
equipos de navegación.
Al proceder a reparar el aparato MEDION puede ser necesario borrar todos los datos del aparato.
Asegúrese antes de enviar el aparato de poseer una copia de seguridad de todos los datos que se
encuentran en el aparato. Advertimos expresamente que cuando se efectúa una reparación, se restaura el
estado original. MEDION no asume la responsabilidad de los costes de una configuración de software, de
pérdidas de ingresos, de la pérdida de datos o de software, ni de otros daños consecuenciales.
Español
12
Page 73

III. Condiciones especiales de garantía para la reparación in
situ y la sustitución in situ
Siempre que en la tarjeta de garantía adjunta al aparato figure un derecho a reparación in situ o a
sustitución in situ, se aplicarán a su aparato MEDION las condiciones especiales de garantía para la
reparación in situ y la sustitución in situ.
Para poder efectuar la reparación in situ o la sustitución in situ, deberá asegurar por su parte los siguientes
puntos:
• Deberá concederse al personal de MEDION un acceso ilimitado, seguro e inmediato a los aparatos.
• Deberá poner a disposición del personal de MEDION los dispositivos de telecomunicación que necesiten
para ejecutar correctamente su encargo, para fines de prueba y de diagnóstico, así como para la
eliminación de errores, asumiendo Ud. los gastos.
• Usted mismo es responsable de la recuperación de su propio software de aplicaciones después de
haber recurrido al servicio de asistencia de MEDION.
• Deberá tomar todas las demás medidas que MEDION precise para poder ejecutar su encargo
correctamente.
• Usted mismo se responsabiliza de la configuración y la conexión de aparatos externos, si los hubiere,
después de haber recurrido al servicio de asistencia de MEDION.
• El periodo de cancelación libre de costes para la reparación in situ o la sustitución in situ es de 48 horas
como mínimo; después tendremos que facturarles los gastos que se nos hayan presentado debidos a
una cancelación demorada o no efectuada.
Español
13
Page 74

Indice
Precauzioni di Sicurezza......................................................................................................1
Prima installazione...............................................................................................................2
Installazione rapida..............................................................................................................2
Installazione dello schermo tattile ........................................................................................3
Vista anteriore del prodotto..................................................................................................4
Vista posteriore del prodotto................................................................................................4
Utilizzo delle funzioni dell’OSD (On Screen Display) ...........................................................5
Modalità di frequenza supportate.........................................................................................8
Dati tecnici ...........................................................................................................................9
Cura e Manutenzione ........................................................................................................10
Guida alla Risoluzione dei Problemi ..................................................................................10
Garanzia limitata................................................................................................................11
Italiano
Page 75

Italiano
Precauzioni di Sicurezza
Questa periferica è stata costruita e testata in base al principio che la sicurezza dell’utente
viene prima di tutto. Tuttavia un uso od una installazione impropria potrebbe provocare
danni sia alla periferica che all’utente. Leggete attentamente i seguenti avvisi prima
dell’installazione e tenete comunque questa guida sempre a portata di mano.
Avvisi:
Questa periferica dovrebbe essere collegata solo al voltaggio corretto indicato
sull’etichetta presente nella parte posteriore della periferica. In caso di dubbi
riguardo alla tensione della rete elettrica installata nella vostra abitazione, consultate il
rivenditore locale o la compagnia elettrica.
Non tentate di riparare la periferica da soli perché non contiene parti manipolabili
dall’utente. La periferica dovrebbe essere riparata solo da tecnici qualificati.
Non rimuovete il rivestimento della periferica. I componenti ad alto voltaggio presenti
al suo interno potrebbe causare delle scosse elettriche anche nel caso il cavo di
alimentazione non sia collegato.
Non utilizzate la periferica se danneggiata. Essa deve essere controllata dal servizio
tecnico.
Posizionate la periferica in un ambiente pulito e privo di umidità. Scollegate
immediatamente la periferica nel caso si bagni e chiamate il servizio tecnico.
Scollegate la periferica dalla rete elettrica prima di iniziarne la pulizia. Utilizzate un
panno pulito e asciutto per la pulizia del rivestimento. Per la pulizia dello schermo
spruzzare un prodotto privo di ammoniaca un panno (mai direttamente sullo schermo)
Non posizionate la periferica vicino ad oggetti magnetici, motori, set TV e
trasformatori.
Non appoggiate oggetti pesanti sul cavo del segnale o di alimentazione.
Per EQUIPAGGIAMENTI SCOLLEGABILI, la presa di corrente dovrebbe essere
installata vicino all’apparecchio e dovrebbe essere facilmente accessibile.
In osservanza alla normativa WEEE, il presente monitor non può essere smaltito
come rifiuti normali. Per lo smaltimento, consultare le informazioni sul ricliclo
disponibili sul nostro sito Web.
1
Page 76

Prima installazione
Complimenti per l’acquisto di questo monitor a elevate prestazione.
Con il monitor sono in dotazione i seguenti accessori:
Cavo di alimentazione
Cavo VGA (15 pin)
Cavo audio
Touch pen
Guida utente
Cavo USB
Cartolina di garanzia
Installazione rapida
1. Collegare il cavo video (cavo D-Sub)
Accertarsi che il monitor e il computer siano spenti. Collegare il cavo video (cavo
D-Sub) prima al computer e quindi al monitor.
2. Collegare il cavo di alimentazione
Collegare il cavo di alimentazione prima a una presa di corrente alternata dotata di
messa a terra e quindi al monitor.
3. Collegare il cavo audio
Collegare il cavo audio dall’uscita audio del computer all’ingresso audio del monitor.
4. Accendere il computer e il monitor
Accendere prima il computer e quindi il monitor.
5. Utenti Windows:
Esempio: 1920 x 1080 a 60 Hz
Risoluzione Fare clic con il tasto destro del mouse sul desktop di Windows e scegliere
Proprietà > Impostazioni > “Area del desktop”. Impostare la risoluzione.
Frequenza di aggiornamento (
utente della scheda grafica in uso.
Esempio:
impostare la risoluzione e la frequenza di aggiornamento
frequenza verticale) Per le istruzioni consultare la guida
PC
Cavo di alimentazione
Cavo Audio
Italiano
Cavo VGA
2
Page 77

Installazione dello schermo tattile
1. Collegare il monitor a una delle porte USB 2.0 del computer per mezzo del cavo USB
2.0 in dotazione con il monitor.
2. Il modulo tattile sarà rilevato automaticamente da Windows e il driver sarà installato
automaticamente.
3. Solo il sistema operativo Windows 7 supporta la funzione multitattile; gli altri sistemi
operativi non offrono supporto per tale funzionalità.
Cavo USB 2.0
Italiano
Installazione dei componenti hardware
Collegare il cavo USB dello schermo tattile a una porta USB 2.0 disponibile sul computer
in uso. Il dispositivo sarà rilevato automaticamente da Windows.
3
Page 78

Vista anteriore del prodotto
Menu OSD Attiva/disattiva
Scorrimento in basso/diminuzione
Scorrimento in alto/aumento
Conferma della selezione
Alimentazione ON/OFF
Indicatore dell’alimentazione
Alloggiamento per touch pen
Vista posteriore del prodotto
Interruttore d’alimentazione CA
Italiano
Ingresso alimentazione (ingresso C.A.)
Ingresso audio
Ingresso VGA (D-Sub a 15 pin)
Porta USB (da collegare al PC)
4
Page 79

Utilizzo delle funzioni dell’OSD (On Screen Display)
1
Visualizza menu principale.
Esci dal menu OSD.
Regolazione automatica l’immagine quando non è visualizzato il menu
2
principale.
Conferma la selezione.
Seleziona la voce di interesse nel menu OSD.
▼
Quando il menu OSD non è attivo, consente di accedere direttamente
al menu delle modalità Contrasto/ Luminosità/ DCR/ ECO.
Seleziona la voce di interesse nel menu OSD.
▲
Quando il menu OSD non è attivo, consente di accedere direttamente
alla Modalità colore ottico.
▼ + ▲ Richiama sia Contrast sia Brightness.
1 + ▼ Blocca alimentazione (quando il menu OSD non è visualizzato)
1 + ▲ Blocca OSD (quando il menu OSD non è visualizzato)
Menu principale
Italiano
Funzioni rapide attivate dai tasti
Regolazione automatica: Questa opzione consente di regolare la posizione
orizzontale, la posizione verticale, la fase (Regolazione di precisione) e il clock
(Dimensione orizzontale).
Contrasto: Con il contrasto si regola il livello del bianco dello sfondo.
▲: aumento del contrasto, ▼: riduzione del contrasto.
5
Page 80

Luminosità: Consente di regolare la luminosità dello schermo.
▲: per aumentare la luminosità, ▼: per diminuire la luminosità.
DCR Acceso/Spento: se DCR è attivo, il rapporto di contrasto sarà ≥ 60000:1.
Regolazione audio: Consente di regolare le funzioni audio.
Volume audio: Per la regolazione del volume degli altoparlanti.
Circuito di muting: L’opzione Mute (disattiva volume) può essere attivata (on) o
disattivata (off).
Regolazione dei colori: Consente di selezionare il colore (Cool, Normale, Caldo
e Colore regolazione utente) per ottimizzare la luminosità e la saturazione dei
colori.
Cool: Incrementa il blu nell’immagine per ottenere un bianco più freddo.
Normale: Incrementa il rosso nell’immagine per ottenere un bianco più caldo ed un
rosso più intenso.
Caldo: Incrementa il verde nell’immagine per ottenere colori più scuri.
Colore regolazione utente: Consente di regolare separatamente il rosso (R), il
verde (V) e il blu (B).
1. Premere il pulsante 2 per impostare il valore desiderato e selezionare il colore
successivo da regolare.
2. Premere il pulsante ▲ o ▼per regolare il colore selezionato.
Informazioni: Questa opzione richiama le informazioni relative al segnale di
ingresso proveniente dalla scheda grafica del computer.
Nota: Per ulteriori informazioni sulle modalità di modifica della risoluzione e della
frequenza di aggiornamento, si rimanda alle istruzioni della scheda grafica.
Regolazione manuale dell’immagine: Consente di regolare manualmente le
opzioni Dimensione orizzontale, Posizione O./V., Regolazione di precisione,
Nitidezza, Video Mode Adjust e Modalità colore ottico.
Dimensione orizzontale: Questa opzione consente di regolare la larghezza
dell'immagine.
▼: per diminuire la larghezza dell’immagine, ▲: per aumentare regolare la
larghezza dell’immagine.
Posizione O./V.: Questa opzione serve a regolare la posizione orizzontale e
verticale del video.
Posizione O.: ▲: sposta lo scherma verso destra, ▼: sposta lo scherma verso
sinistra.
Italiano
Posizione V.: ▲: sposta lo schermo verso l’alto, ▼: sposta lo schermo verso il
basso.
Regolazione di precisione: L’opzione consente di regolare il ritardo.
Premere ▼ o ▲ per regolare la sintonia a propria scelta.
Nitidezza: Consente di regolare la chiarezza di un segnale diverso da Full HD
(1920x1080) con il tasto ▼ o ▲.
6
Page 81

Video Mode Adjust: Consente di selezionare la modalità video tra Full Screen o
Over Screen.
Full Screen: Seleziona la dimensione dell’immagine a schermo intero.
Over Screen: Seleziona la dimensione dell’immagine sovrapposta allo schermo.
Modalità colore ottico: Fornisce l'ambiente di visualizzazione ottimale in base al
contenuto visualizzato. Mette a disposizione 6 impostazioni per la selezione.
Utente: adatta per l'ambiente generale di Windows; è l'impostazione predefinita
del monitor.
Giochi: ottimizzata per l'ambiente dei videogiochi.
Video: ottimizzata per l'ambiente di filmati e video.
Paesaggio: ottimizzata per la visualizzazione di immagine panoramiche di
ambienti esterni.
Text: ottimizzata per la modifica e la visualizzazione in un ambiente di
elaborazione di testi.
ECO: consente di attivare e disattivare la modalità ECO. La regolazione del
contrasto e della luminosità non è attiva quando la modalità ECO è attivata.
Menu impostazioni: Consente di selezionare la lingua e di impostare la posizione
e la disattivazione automatica del menu OSD.
Lingua: Permette di selezionare una delle lingue disponibili.
Posizione OSD: Premere il tasto ▲ o ▼per selezionare la regolazione della
posizione orizzontale o verticale dell’OSD.
Posizione O.: Consente di regolare la posizione orizzontale dell’OSD.
▲: per spostare l’OSD a destra, ▼: per spostare l’OSD a sinistra.
Posizione V.: Consente di regolare la posizione verticale dell’OSD.
▲: per spostare l’OSD verso l’alto, ▼: per spostare l’OSD verso il basso.
Tempo di pausa OSD: Consente di disattivare automaticamente l’OSD dopo un
periodo di tempo predefinito.
OSD Primo piano: Consente di attivare o disattivare lo sfondo dell’OSD.
Ripristino: Consente di ripristinare le impostazioni di fabbrica dei controlli audio e
video. Per selezionare l’opzione di menu Memory Recall memoria premere il tasto
2.
Italiano
7
Page 82

Modalità di frequenza supportate
VGA 720 x 400 a 70Hz
VGA 640 x 480 a 60Hz
MAC 640 x 480 a 67Hz
VESA 640 x 480 a 72Hz
VESA 640 x 480 a 75Hz
VESA 800 x 600 a 56Hz
VESA 800 x 600 a 60Hz
VESA 800 x 600 a 72Hz
VESA 800 x 600 a 75Hz
MAC 832 x 624 a 75Hz
VESA 1024 x 768 a 60Hz
VESA 1024 x 768 a 70Hz
VESA 1024 x 768 a 75Hz
VESA 1280 x 960 a 60Hz
VESA 1152 x 864 a 75Hz
MAC 1152 x 870 a 75Hz
VESA 1280 x 1024 a 60Hz
VESA 1280 x 1024 a 75Hz
VESA 1440 x 900 a 60Hz
VESA 1440 x 900 a 75Hz
CVT 1400 x 1050 a 60Hz
VESA 1600 x 1200 a 60Hz
VESA 1680 x 1050 a 60Hz
VESA 1920 x 1080 a 60Hz
Avvertenza: Non impostare la scheda grafica del computer su valori di frequenza di
aggiornamento superiori a quelli indicati sopra. Potrebbero derivarne danni permanenti al
monitor.
Italiano
8
Page 83

Dati tecnici
Caratteristiche tecniche
Pannello LCD 21,5” TFT
Gestione consumi
Risoluzione
visualizzabile
Dimensione Pixel 0,248 x 0,248 mm
Colore schermo LCD 16.7M
Inclinazione 0°~20°
Area di visualizzazione 476,64 mm x 268,11 mm
Temperature Operativa: 5°C ~ +35°C
Normative CE
Energia Input di voltaggio AC100-240 V
Altoparlante 1W x 2
VESA conforme a Energy Star
Compatibile con DPMS
< 1 W
Full HD 1920 x 1080 max. Frequenza verticale 60 Hz max.
Deposit: -20°C ~ + 60°C
Italiano
Tecnologia Optical
Touch
Aggiornamento del
sensore
Risoluzione del sensore 32767 x 32767
Precisione ≤ ± 2,5 mm
Copertura del vetro Non coprente
Dimensioni del pennino Dita, qualsiasi pennino con diametro ≥ 3,6 mm
Sistema operativo Windows 7
Struttura ottica a raggi infrarossi
120 fotogrammi/sec
9
Page 84

Cura e Manutenzione
Cura
Non espone il monitor alla luce diretta del sole o ad altre fonti di calore. Posizione il
monitor lontano dalla luce solare per evitare dei fastidiosi riflessi.
Posizionate il monitor in un punto ben ventilato.
Non appoggiate nessun oggetto pesante sopra il vostro monitor.
Assicuratevi che il monitor sia stato installato in una stanza pulita e non umida.
Non avvicinate al monitor alcun tipo di magnete motore, trasformatore, altoparlante o
impianto TV.
Nota
Estrarre lo schermo LCD dall’imballaggio e rimuovere il sacchetto di plastica e il polistirolo.
Tirare la base da parallela opposta a pannello a verticale.
Regolare il pannello a un’inclinazione compresa fra 0 gradi in avanti e 20 gradi
all’indietro. Esercitando una certa forza, è possibile inclinare il pannello di oltre 20 gradi
all’indietro ma tali posizioni sono da utilizzare solo per ridurre l’unità a dimensioni
inferiori per riporla. Avvertenza: se l’inclinazione del pannello non è compresa fra 0 e 20
gradi, l’unità potrebbe diventare instabile, con conseguente rischio di lesioni.
Suggerimenti per la Sicurezza
Se il vostro monitor produce dei rumori anormali, del fumo o degli odori strani, spegnete
immediatamente l’apparecchiatura e chiamate il centro assistenza.
Non rimuovete per nessun motivo la copertura posteriore del vostro monitor. L’unità
contiene delle componenti ad alto voltaggio che potrebbero causare delle scosse
elettriche all’utente.
Non tentate mai di riparare il monitor da soli. Rivolgetevi sempre al vostro centro
assistenza o ad un tecnico specializzato per qualsiasi tipo di riparazione.
Guida alla Risoluzione dei Problemi
Alimentazione Mancante
Assicuratevi che l’alimentazione A/C sia connessa saldamente all’adattatore di corrente
ed al monitor.
Collegate un'altra periferica elettrica nella presenza di corrente per verificare che la
presa funzioni correttamente.
Assicuratevi che tutti i cavi siano collegati correttamente.
Il monitor è accesso ma non appare nessuna immagine su schermo
Assicuratevi che il cavo video fornito con il monitor sia saldamente collegato all’uscita
video presente nella parte posteriore del computer.
Regolate la luminosità dello schermo.
Colori errati o visualizzati in modo non corretto
Se uno dei colori fondamentali (rosso, verde o blu) è mancante, controllate che il cavo
video sia collegato correttamente. Se nella presa vi sono dei pin mancanti o rotti
potrebbero verificarsi una trasmissione dati non corretta.
Collegate il monitor ad un altro computer.
10
Italiano
Page 85

Italiano
Garanzia limitata
I. Condizioni generali di garanzia
1. Aspetti generali
La garanzia decorre dalla data di acquisto del prodotto MEDION direttamente da MEDION o da un suo
distributore o partner ufficiale e copre i difetti dovuti a malfunzionamento dei componenti e difetti di
fabbricazione che possano presentarsi durante il normale utilizzo dell’apparecchio.
Il periodo di garanzia è specificato nel coupon di garanzia che viene fornito insieme al prodotto ed è
convalidato dallo scontrino o documento fiscale rilasciato da un distributore o partner ufficiale MEDION.
Abbiate cura di conservare l’originale della ricevuta di acquisto e il coupon di garanzia in un posto sicuro.
MEDION e i suoi centri di assistenza autorizzati si riservano il diritto di non convalidare la garanzia e rifiutare
una riparazione in garanzia qualora la prova di acquisto non venisse fornita.
Nel caso in cui fosse necessario spedire il prodotto in riparazione, assicurarsi che questo sia imballato
correttamente. Salvo condizioni differenti riportate nel Vostro coupon di garanzia, i costi di spedizione del
prodotto e i relativi rischi legati al trasporto sono a carico vostro.
MEDION non si assume alcuna responsabilità relativamente all’invio di materiale aggiuntivo, non incluso
nella dotazione originale del prodotto MEDION.
Prima di procedere con la spedizione del prodotto vi chiediamo di allegare una descrizione dettagliata del
problema riscontrato. Per effettuare la segnalazione e comunque prima di procedere con il reso dell’unità
difettosa, contattate MEDION attraverso il MEDION Service Center. Vi verrà fornito un numero di riferimento
(RMA) che dovrà essere riportato in modo chiaro e visibile sulla parte esterna del pacco.
La presente garanzia non pregiudica i vostri diritti legali ed è soggetta alla legislazione in materia vigente nel
paese in cui è avvenuto il primo rapporto di compra vendita tra partner autorizzato o distributore MEDION e
il cliente finale.
2. Finalità
Qualora il vostro prodotto MEDION dovesse guastarsi durante il periodo di garanzia, MEDION procederà
con la sua riparazione o sostituzione.
La scelta se riparare o sostituire l’unità difettosa sarà a discrezione di MEDION. Questo consente a
MEDION di sostituire il prodotto in garanzia reso per riparazione con un altro prodotto avente caratteristiche
uguali o superiori.
Le batterie (anche ricaricabili) o il materiale di consumo, inteso come parti che devono essere
periodicamente sostituite durante il normale utilizzo dell’apparecchio (ad esempio, la lampada del video
proiettore) non sono coperti da garanzia.
Come regola generale, un pixel difettoso (punto immagine colorato, chiaro o scuro) non è da considerarsi un
difetto. Invitiamo alla consultazione del manuale di utilizzo del prodotto per verificare il numero esatto di pixel
difettosi che risultano accettabili e rientrano nei nostri standard di tolleranza.
MEDION non accetta alcuna responsabilità per le bruciature presenti sui Plasma o TV LCD dovuti ad un
utilizzo improprio del prodotto. La invitiamo a consultare il manuale presente nel vostro prodotto per le
istruzioni operative relativamente all’utilizzo del plasma o TV LCD.
La garanzia non copre errori di riproduzione di supporti multimediali creati con formati incompatibili o con
software inadeguati.
Se durante la riparazione risultasse che il guasto in questione non è coperto da garanzia, MEDION si riserva
il diritto di fatturare i relativi costi al cliente, previa emissione di un preventivo di riparazione. Tali costi
saranno calcolati considerando una quota fissa di gestione da sommare ai costi dei materiali e della
manodopera.
11
Page 86

3. Esclusioni dalla garanzia
La garanzia MEDION non si estende a difetti o guasti causati da fattori esterni, danni accidentali, uso
improprio, modifiche dell’apparecchio originale, espansioni, utilizzo di dispositivi o accessori non MEDION,
negligenza, virus e conflitti software, trasporto inadeguato o imballo improprio.
La garanzia decade se il difetto del dispositivo è stato causato da un intervento effettuato da tecnico o da un
centro di assistenza non autorizzato da MEDION.
La garanzia decade se l’etichetta, i sigilli o il serial number del prodotto o del suo componente sono stati
modificati o resi illeggibili.
4. Servizio di assistenza telefonica
Prima di restituire un apparecchio a MEDION è necessario contattarci chiamando il nostro servizio di
assistenza oppure utilizzando il servizio web presente sul portale di MEDION. Riceverete, quindi, ulteriori
istruzioni su come usufruire di un intervento in garanzia.
L’utilizzo del servizio di assistenza telefonica non è gratuito.
Il servizio di assistenza telefonica non deve fornire agli utenti formazione su operazioni generiche software e
hardware e non deve sostituirsi alla consultazione del manuale o essere utilizzato come strumento
informativo relativamente a prodotti/periferiche non MEDION.
In aggiunta, MEDION offre una linea telefonica differenziata, a tariffa maggiorata, per la gestione di richieste
sui prodotti non coperti da garanzia.
II. Condizioni speciali di garanzia per PC, notebook, pocket PC
(PDA) e navigatori satellitari (PNA)
Se uno degli accessori incluso nella dotazione originale presenta un difetto, è possibile esercitare il diritto di
garanzia e chiedere la riparazione o sostituzione. La garanzia copre i costi del materiale e della manodopera
necessari per ripristinare l’apparecchio MEDION difettoso.
Componenti hardware non prodotti o commercializzati da MEDION possono rendere nulla la garanzia nel
caso in cui sia provato che il danno causato al prodotto MEDION, o ad uno degli accessori incluso nella
dotazione originale, sia stato causato dal medesimo componente hardware.
Il software incluso nella dotazione originale è coperto da una garanzia limitata. Ciò si applica sia al sistema
operativo pre installato sia ai programmi applicativi inclusi nella dotazione originale.
Relativamente al software presente nella dotazione originale, MEDION garantisce l’integrità dei supporti
magnetici, ad esempio floppy disk e CD-ROM, relativamente a difetti di materiale e fabbricazione per un
periodo di 6 mesi dall’acquisto del prodotto MEDION da MEDION o da un suo distributore o partner ufficiale.
MEDION sostituirà il supporto magnetico difettoso senza alcun costo; ulteriori richieste segnalate
successivamente a tale limite non saranno considerate. Con la sola eccezione della garanzia sui supporti
magnetici, tutto il restante materiale software è consegnato privo di garanzia. MEDION non garantisce che
questo software funzionerà senza interruzione o senza errori o che risponda alle vostre esigenze. Medion
infine non garantisce l’accuratezza totale della cartografia fornita congiuntamente ai propri sistemi di
navigazione satellitare.
Durante la riparazione potrebbe essere necessario cancellare tutti i dati presenti sull’apparecchio MEDION.
Accertatevi di avere una copia di back up di tutti i dati contenuti nel prodotto prima di spedirlo in assistenza.
Informiamo espressamente che in caso di riparazione verrà ripristinato lo stato originale dell’apparecchio al
momento della vendita.
MEDION non si assume alcuna responsabilità per eventuali costi di configurazione software, mancato
guadagno, perdita di dati o software o per qualunque danno conseguente.
Italiano
12
Page 87

III. Condizioni speciali di garanzia per riparazioni o sostituzioni
on site
Se la garanzia specificata nel coupon fornito con il prodotto prevede la riparazione o la sostituzione on site,
verranno applicate speciali condizioni di garanzia che prevedono la riparazione o la sostituzione on site.
Affinché sia possibile procedere con la riparazione o la sostituzione on site, il cliente deve garantire le
seguenti condizioni:
• Il personale MEDION deve avere accesso illimitato, sicuro ed immediato al prodotto
• Il cliente deve mettere a disposizione, a proprie spese, dispositivi di telecomunicazione necessari per
effettuare l’intervento, affinché sia possibile testare, diagnosticare e riparare l’apparecchio.
• Il ripristino degli applicativi software successivamente all’intervento di MEDION dovrà essere effettuato
dal cliente.
• E’ necessario effettuare tutte le operazioni utili per consentire a MEDION di evadere l’ordine in modo
adeguato.
• E’ responsabilità del cliente provvedere alla configurazione e all’installazione di tutte le periferiche
esterne, successivamente all’intervento di riparazione da parte di MEDION.
• L’intervento di riparazione o sostituzione on site può essere annullato entro 48 ore; qualora non venisse
rispettato tale termine i costi derivanti dal mancato annullamento o ritardo saranno a carico del cliente.
Italiano
13
Page 88

DE
MTC - Medion Technologie Center
D-45467 Mülheim / Ruhr
Deutschland
Hotline: 01805 - 633 466
Fax: 01805 - 654 654
(0,14 Euro/Minute aus dem deutschen Festnetz
der Telekom, abweichende Mobilfunknetzpreise möglich.)
Servicebereich der Homepage:
www.medion.de/service
www.medion.de
UK
Medion Electronics Ltd.
120 Faraday Park, Faraday Road, Dorcan
Swindon SN3 5JF, Wiltshire
United Kingdom
Hotline (UK & N Ireland) : 0871 37 61 020
calls are charged at 7 pence per minute
from a standard landline,
calls from mobile could be higher
Hotline (Rep of Ireland): 1 800 992508
Fax: 01793 71 57 16
www.medion.co.uk
FR
Medion France
CS 90180
72207 La Flèche Cedex
France
Service Hotline: 02 43 48 15 68
Service PREMIUM hors garantie: 08 92 35 05 40
(0.34 EUR/min)
E-Mail: pc-support-fr@medion.com
www.medion.fr
Parque Empresarial "La Carpetania", N-IV Km. 13
NL
Medion Service Center
Antwoordnummer 4015
5980 ZX Panningen
Nederland
Hotline: 0900 - 633 4660
Fax: 0900 - 654 6540
www.medion.nl
BE
Medion Service Center
John F. Kennedylaan 16a
5981 XC Panningen
Nederland
Hotline: 022006198
Fax: 022006199
"Gebruikt u a.u.b het contactformulier op onze website www.medion.com/be onder
"Service en Ondersteuning."
Bitte benutzen Sie das Kontaktformular unter www.medion.com/be
"Pour nous contacter, merci de vous diriger sur notre site internet
www.medion.com/be, rubrique Service et Support.
www.medion.com/be
Hotline: 0810 - 001048 (0,10 EUR/min)
ES
Medion Service Center
Visonic S.A.
c/ Miguel Faraday, 6
28906 Getafe, Madrid
España
Hotline: 902151448 · Fax: 914604772
E-Mail: service-spain@medion.com
www.medion.es
CH
Medion Service
Siloring 9
5606 Dintikon
Schweiz
Hotline: 0848 - 33 33 32
www.medion.ch
AT
Medion Service Center
Franz-Fritsch-Str. 11
4600 Wels
Österreich
Fax: 07242 - 93967592
www.medion.at
 Loading...