

Page 1

Introduction 1
Congratulations on choosing to buy a Delta® product. By doing so you now have
the assurance and peace of mind that comes with purchasing a product made by
one of the leading manufacturers.
All products brought to you by Delta® are manufactured to the highest standards
of performance and safety, and, as part of our philosophy of customer service and
satisfaction, are backed by our comprehensive 3 Year Warranty.
Please fill in and return the Warranty Card to the address provided.
We hope you will enjoy using your purchase for many years to come.
Helpline No. UK/ North Ireland 0871 37 61 020 Rep. Ireland 1-800-992 508
Web Support www.medion.co.uk
Model Number: MD 11871
3
Page 2
Overview 2
Main components
Helpline No. UK/ North Ireland 0871 37 61 020 Rep. Ireland 1-800-992 508
Web Support www.medion.co.uk
Model Number: MD 11871
4
Page 3

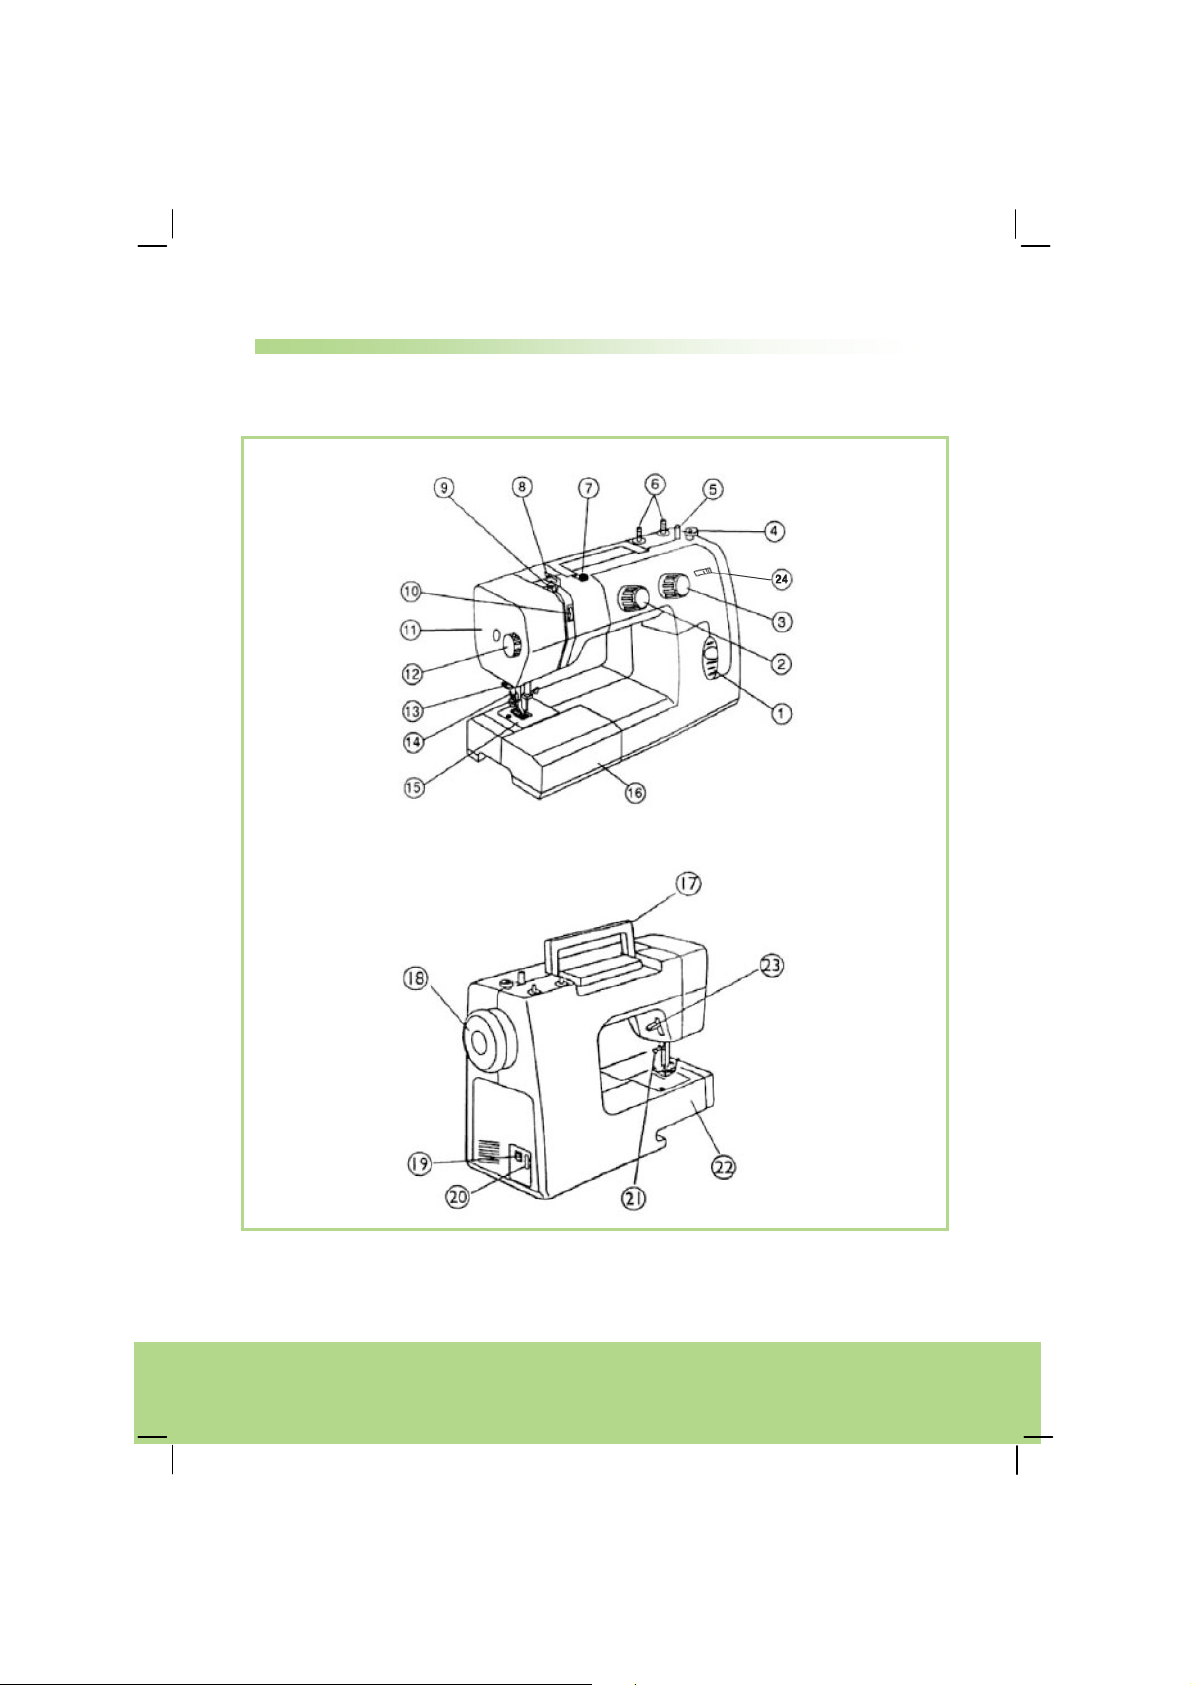
Caption of figure on page 4
1. Reverse lever
2. Stitch type selection dial
3. Stitch length regulator
4. Bobbin winder
5. Bobbin spindle
6. Spool holders
7. Winder tension disc
8. Thread guide
9. Thread take-up lever
10. Thread tension disc
11. Front flap / bulb cover
12. Sewing foot pressure selection dial
13. Ripper
14. Sewing foot
15. Needle plate
16. Extendable cloth plate with accessories box
17. Handle
18. Hand wheel
19. Main switch (motor and light)
20. Plug housing for foot pedal
21. Sewing foot holding screw
22. Free arm
23. Sewing foot lever
24. Double needle (twin needle) button
Helpline No. UK/ North Ireland 0871 37 61 020 Rep. Ireland 1-800-992 508
Web Support www.medion.co.uk
Model Number: MD 11871
5
Page 4

General Information 3
Please read these operating instructions thoroughly and follow the
safety notes in particular before using the appliance for the first time!
Anything done to or with this appliance should only be undertaken as
described in the operating instructions.
Keep these instructions in a safe place for further use. If you pass on
this sewing machine to a third party, please include these instructions.
Areas of use / Purpose of use
• This appliance is intended solely for household use.
• This appliance is not intended for use by persons (including children) with
reduced physical, sensory or mental capabilities, or lack of experience and
knowledge, unless they have been given supervision or instruction
concerning use of the appliance by a person responsible for their safety.
• Children should be supervised to ensure that they do not play with the
appliance.
• The sewing machine should never be allowed to get wet – there is the danger
of electric shocks!
• When the sewing machine is on, never leave it unattended. Do not use the
machine out of doors.
• The appliance can only be operated using the supplied foot pedal model
HKT7.
Included in the box
Check that nothing is missing from the packaging and inform us of any missing
parts within 14 days after purchase. The delivery of the sewing machine you have
purchased includes:
1. Sewing machine
2. Table extension with accessory box
3. Foot pedal
4. Cover hood
5. Operating instructions and guarantee documents
Helpline No. UK/ North Ireland 0871 37 61 020 Rep. Ireland 1-800-992 508
Web Support www.medion.co.uk
Model Number: MD 11871
6
Page 5
Accessories
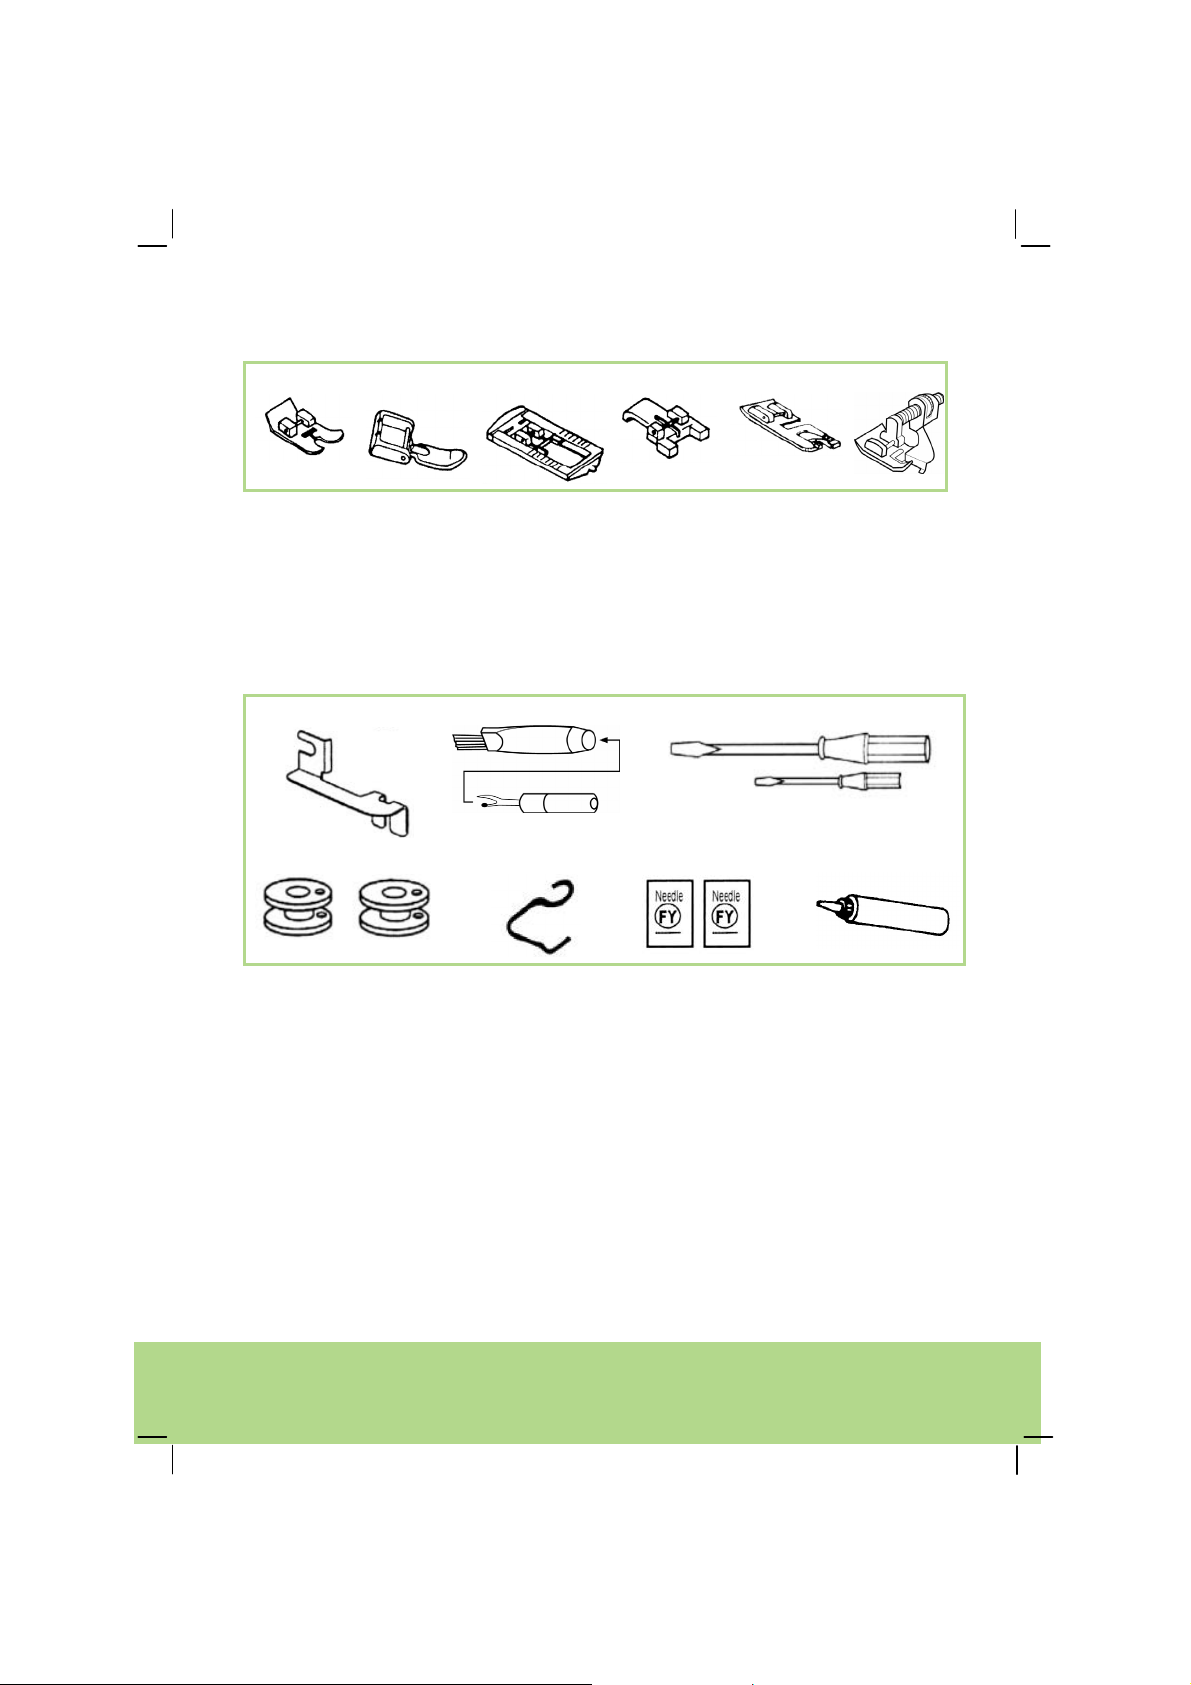
Sewing foots
1 2
3 4 5
6
1) Standard foot (straight stitch/zigzag stitch) (already attached)
2) Zip sewing foot
3) Buttonhole sewing foot
4) Button sewing foot
5) Hemming foot
6) Blind stitch foot
Other accessories
7
10
7) Guiding plate
8) Buttonhole knife (disconnecting knife) with brush
9) Screwdrivers (small and large)
10) Spare bobbin (4)
11) Finger protector (already attached)
12) Selection of needles (5 universal needles and 1 twin needle)
13) Oilcan
8
11
9
12
13
Helpline No. UK/ North Ireland 0871 37 61 020 Rep. Ireland 1-800-992 508
Web Support www.medion.co.uk
Model Number: MD 11871
7
Page 6

Safety instructions 4
Keep electrical equipment out of reach of children
Children are not aware of the dangers posed by electrical equipment.
Never allow children to use the sewing machine unsupervised. Remember that
needles can also cause injury even when the machine has been turned off.
Keep the packaging out of the reach of children. There is a risk of suffocation.
Mains cable and mains connection
• Only connect the appliance to a power socket (230 V ~ 50 Hz) that is easy to
reach and is close to the place where you have set up the appliance.
• The power socket must be freely accessible so that you can unplug the
appliance quickly, if necessary.
• When you unplug the appliance, always take hold of the plug itself, not the
cable.
Fully unwind the cable during operation of the appliance.
• The mains cable and extension cable must be positioned so that no one can
trip over them.
• Never expose the cable to hot surfaces.
• When you perform the following activities, switch off and unplug the sewing
machine: Threading, changing the needle, setting the sewing foot, replacing
the light bulb, cleaning and maintenance work, when you have finished
sewing, and if your work is interrupted.
Never undertake your own repairs
• If the plug, cable or appliance is damaged, pull the mains plug immediately.
• If the sewing machine or mains cable has visible damage, the appliance must
not be used, in order to avoid risks.
Warning
Never try to open and/or repair the appliance yourself. There is a
risk of electric shock! If there is a fault contact our Service Centre
or other suitable specialist workshop.
Helpline No. UK/ North Ireland 0871 37 61 020 Rep. Ireland 1-800-992 508
Web Support www.medion.co.uk
Model Number: MD 11871
8
Page 7

Handling the appliance safely
• Place the sewing machine on a sturdy, level work surface.
• During operation, the air vents must not be blocked: Do not allow any objects
(e.g. dust, threads, etc.) to enter the vents.
• Only use the accessories supplied.
• Only use special sewing machine oil to oil the appliance. Do not use any other
liquids.
• Be careful when using the moving parts of the machine, in particular the
needle. There is the risk of injury even when the machine has been turned off.
• When sewing, make sure that your fingers are never underneath the needle
holding screw.
• Do not use bent or blunt needles.
• When sewing, do not hold the fabric tight or pull the fabric. The needles could
break.
• When you have finished sewing, always move the needle to its highest
position.
Cleaning and storage
• Before cleaning, remove the plug from the mains socket. Use a dry, soft cloth
to clean the appliance. Avoid the use of chemical solutions and cleaning
products because these may damage the appliance surface or markings.
• Always store the sewing machine using the cover hood provided to protect
the machine from dust.
Helpline No. UK/ North Ireland 0871 37 61 020 Rep. Ireland 1-800-992 508
Web Support www.medion.co.uk
Model Number: MD 11871
9
Page 8
Getting Started 5
Electrical connections
The power switch turns both the machine and the sewing light on.
• Put the coupler plug of the supplied foot pedal into the connector housing on
the machine and then put the mains plug into the socket.
Only use the supplied foot pedal model HKT7.
Once you have finished working or before you start maintenance, always turn off
and unplug the machine.
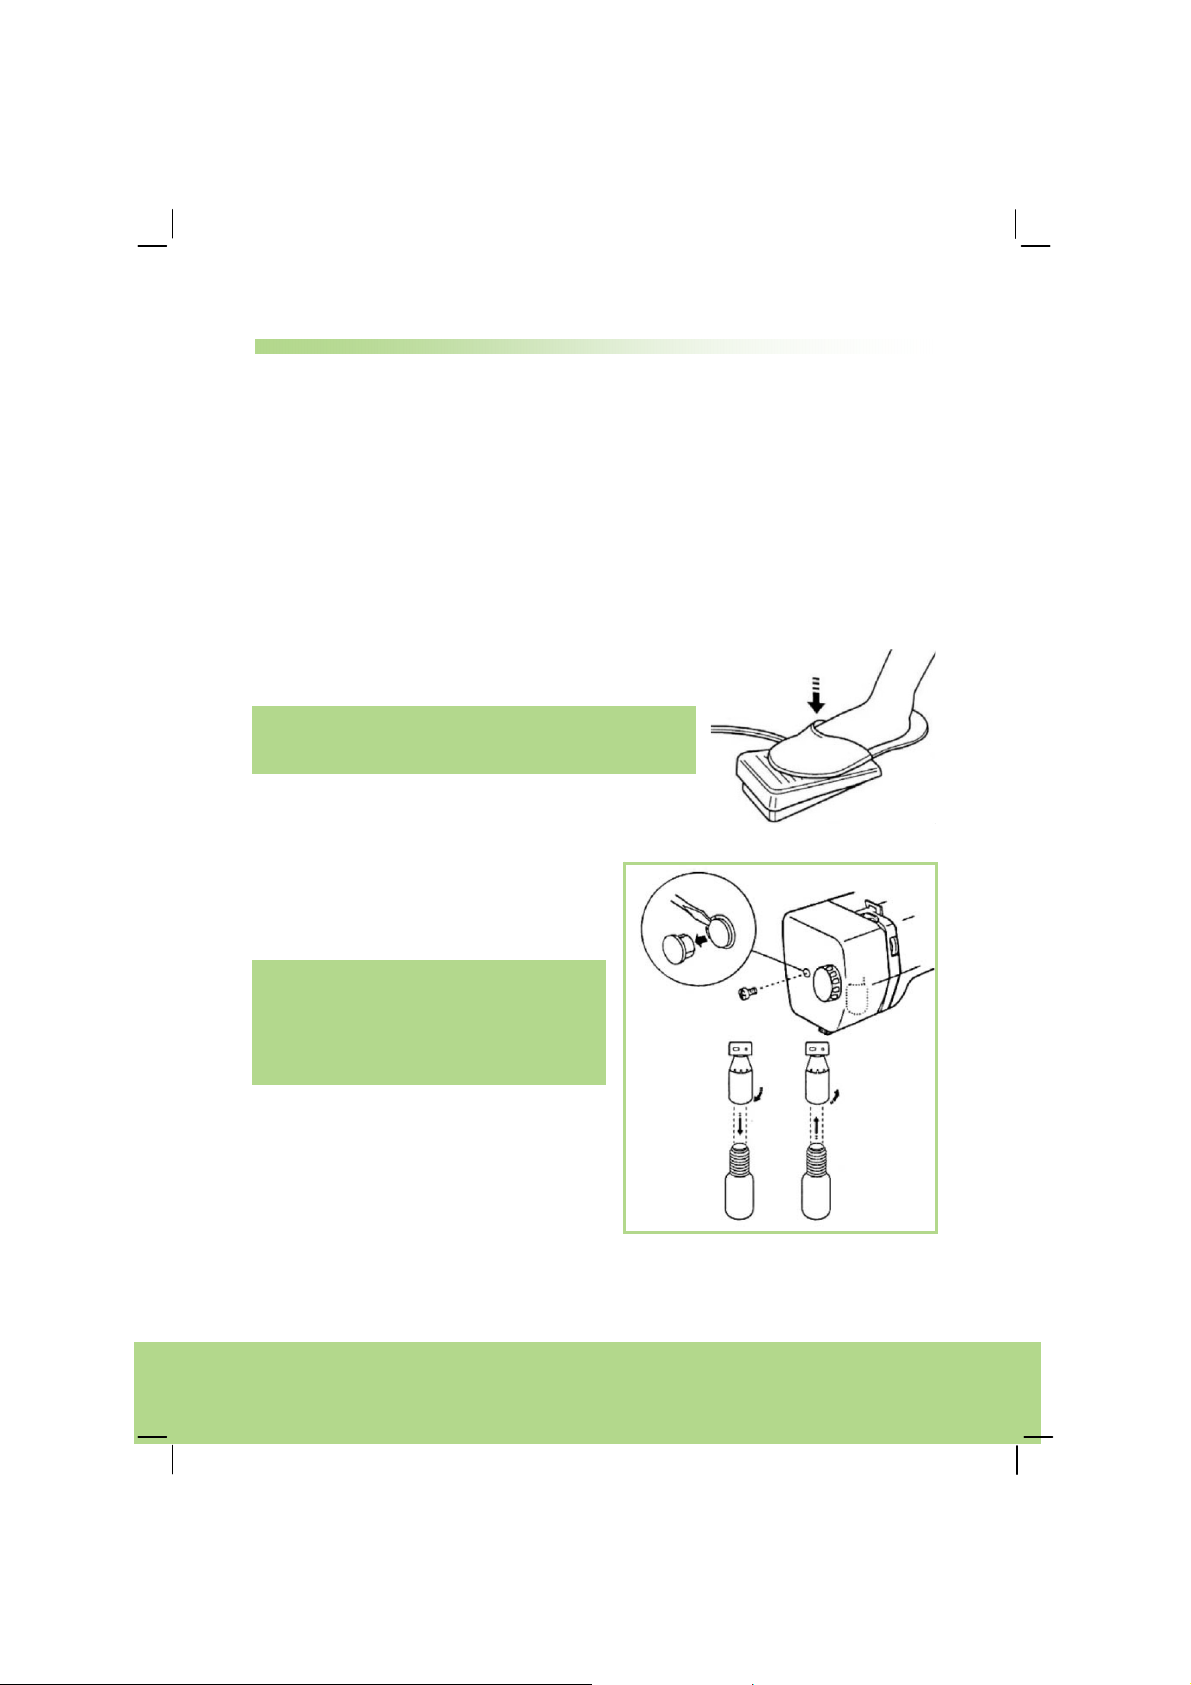
Foot pedal
The foot pedal controls the sewing speed.
Note:
The tighter the switch is pressed, the faster stitching
goes.
Sewing light bulb
The sewing light bulb you will find
behind the front flap.
Warning!
Before carrying out any maintenance
work, please always turn off and unplug
the machine.
• Remove the cover of the screw and
unscrew.
• Take off the front flap.
• Hold the bulb and screw off to the left
to take out the bulb.
• Hold the bulb and screw on to the
right to fit over a new bulb.
Helpline No. UK/ North Ireland 0871 37 61 020 Rep. Ireland 1-800-992 508
Web Support www.medion.co.uk
Model Number: MD 11871
10
Page 9
• Place the front flap and screw it tight.
Note:
The maximum permitted light bulb power rating in 15W. Light bulbs are available
from specialist retailers.
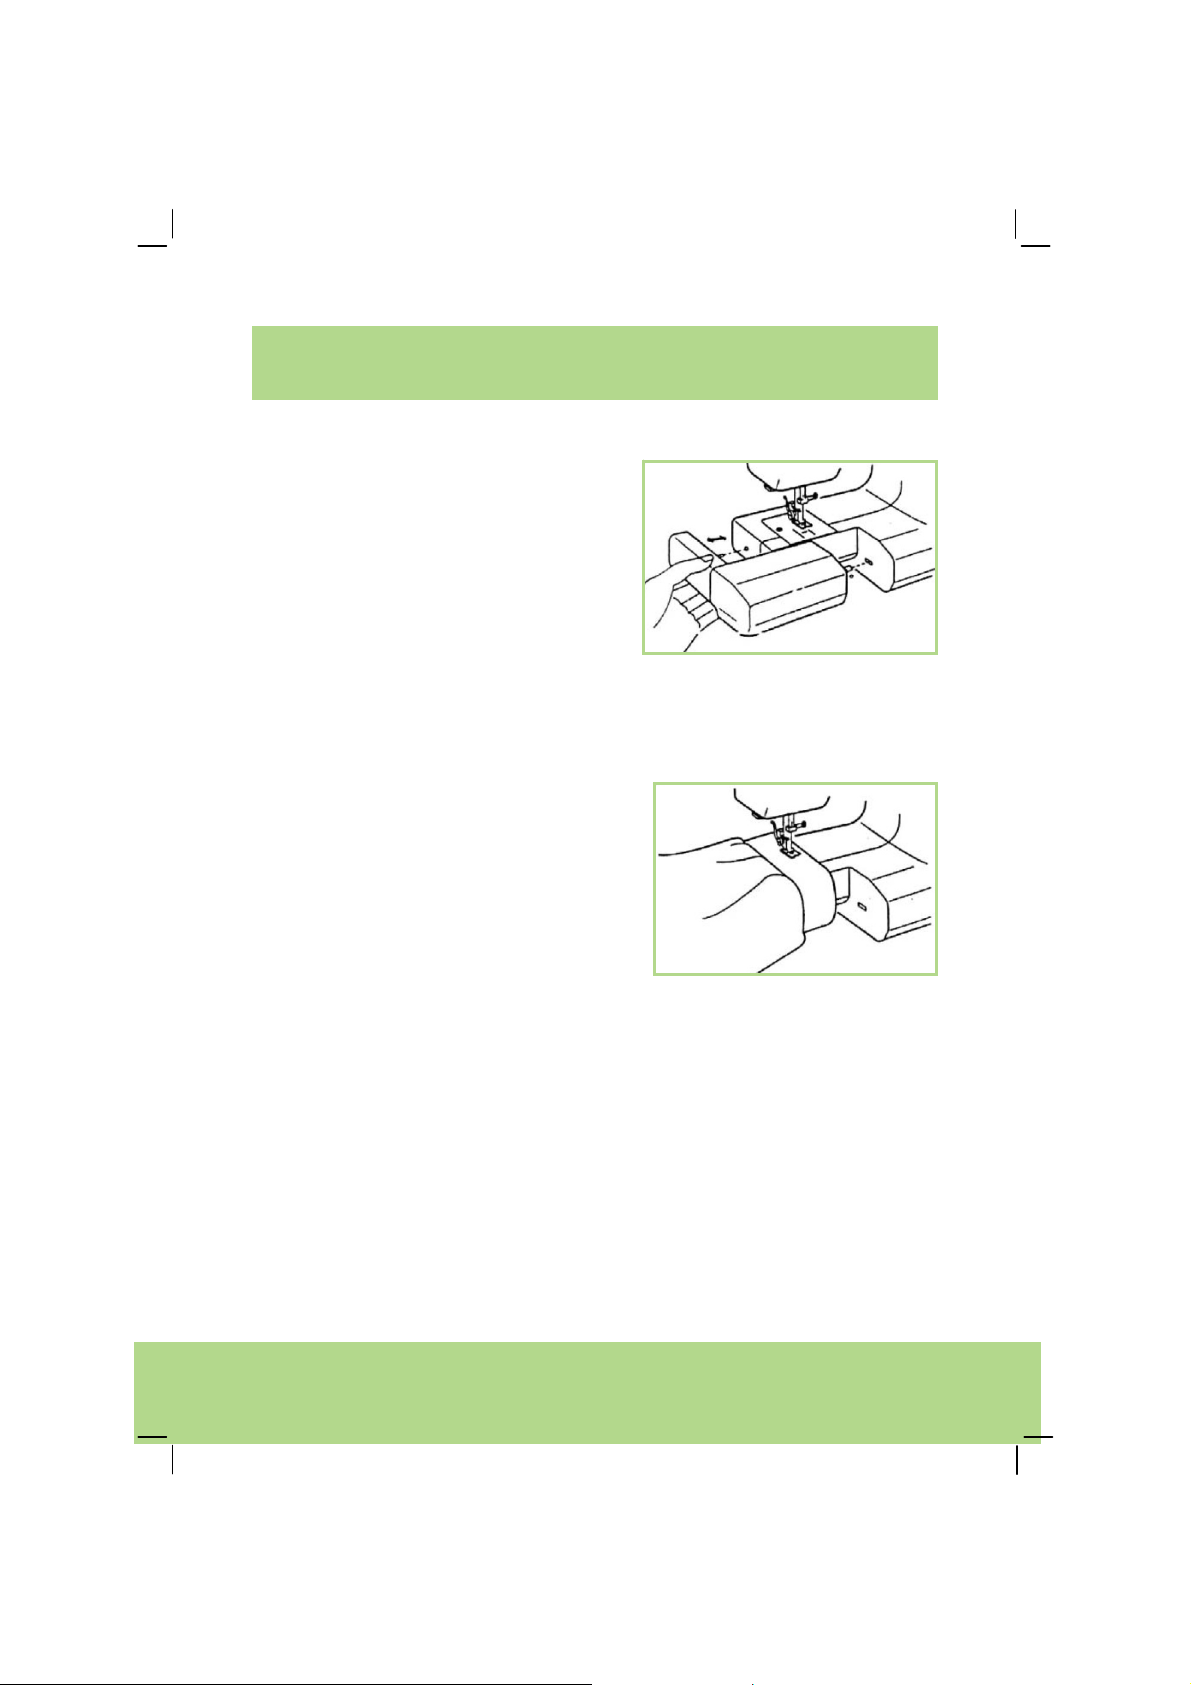
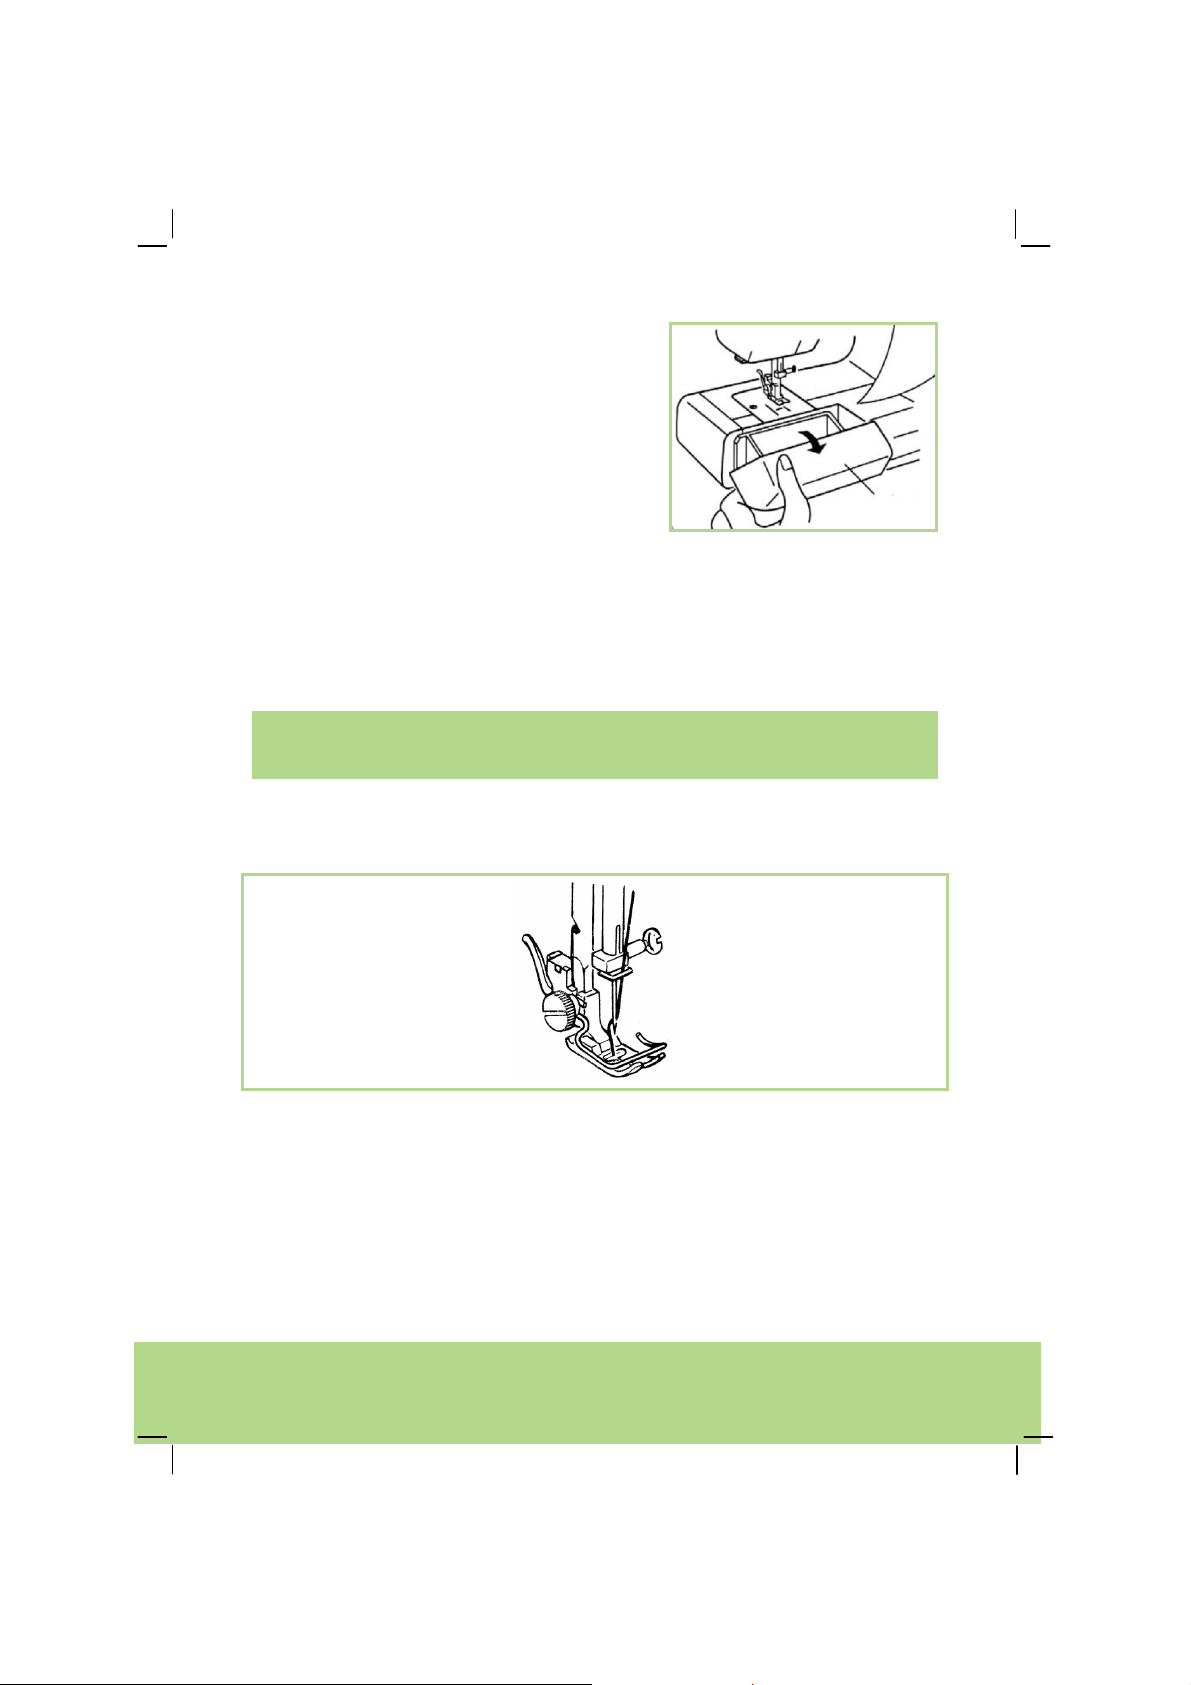
Extendable cloth plate
The machine has a free arm and is supplied
with an extendable cloth plate.
• Carefully pull the extendable cloth plate
to the left to disassemble it.
• To attach the cloth plate, carefully place
it to the projection guide in front and
back and push it to the right until it
catches.
Merits and application of free-arm cloth plate stitching
Sewing with free arm cloth plate avoids that
cloth piled up in front of needle while sewing
pockets, tucks and waist edges. Sew sleeves,
waist edges, trouser legs or other roundshaped costumes. Sew darn knees, elbows
and children clothes.
Helpline No. UK/ North Ireland 0871 37 61 020 Rep. Ireland 1-800-992 508
Web Support www.medion.co.uk
Model Number: MD 11871
11
Page 10
Accessories box
The accessories box is integrated in the table
extension.
• To open it, simply lift the lid of the table
extension towards you.
Spool holders
You can push down the spool holder for transporting or packing the machine.
• Pull up the spool holder when sewing before sewing
• Press the spool holder down before the machine is packed
Note
In case that the thread in use is tangling easily with spool holder or is knotting,
you can pull the thread through the hole.
Finger protector
This accessory prevents your hand from accidentally getting under the needle.
Helpline No. UK/ North Ireland 0871 37 61 020 Rep. Ireland 1-800-992 508
Web Support www.medion.co.uk
Model Number: MD 11871
12
Page 11
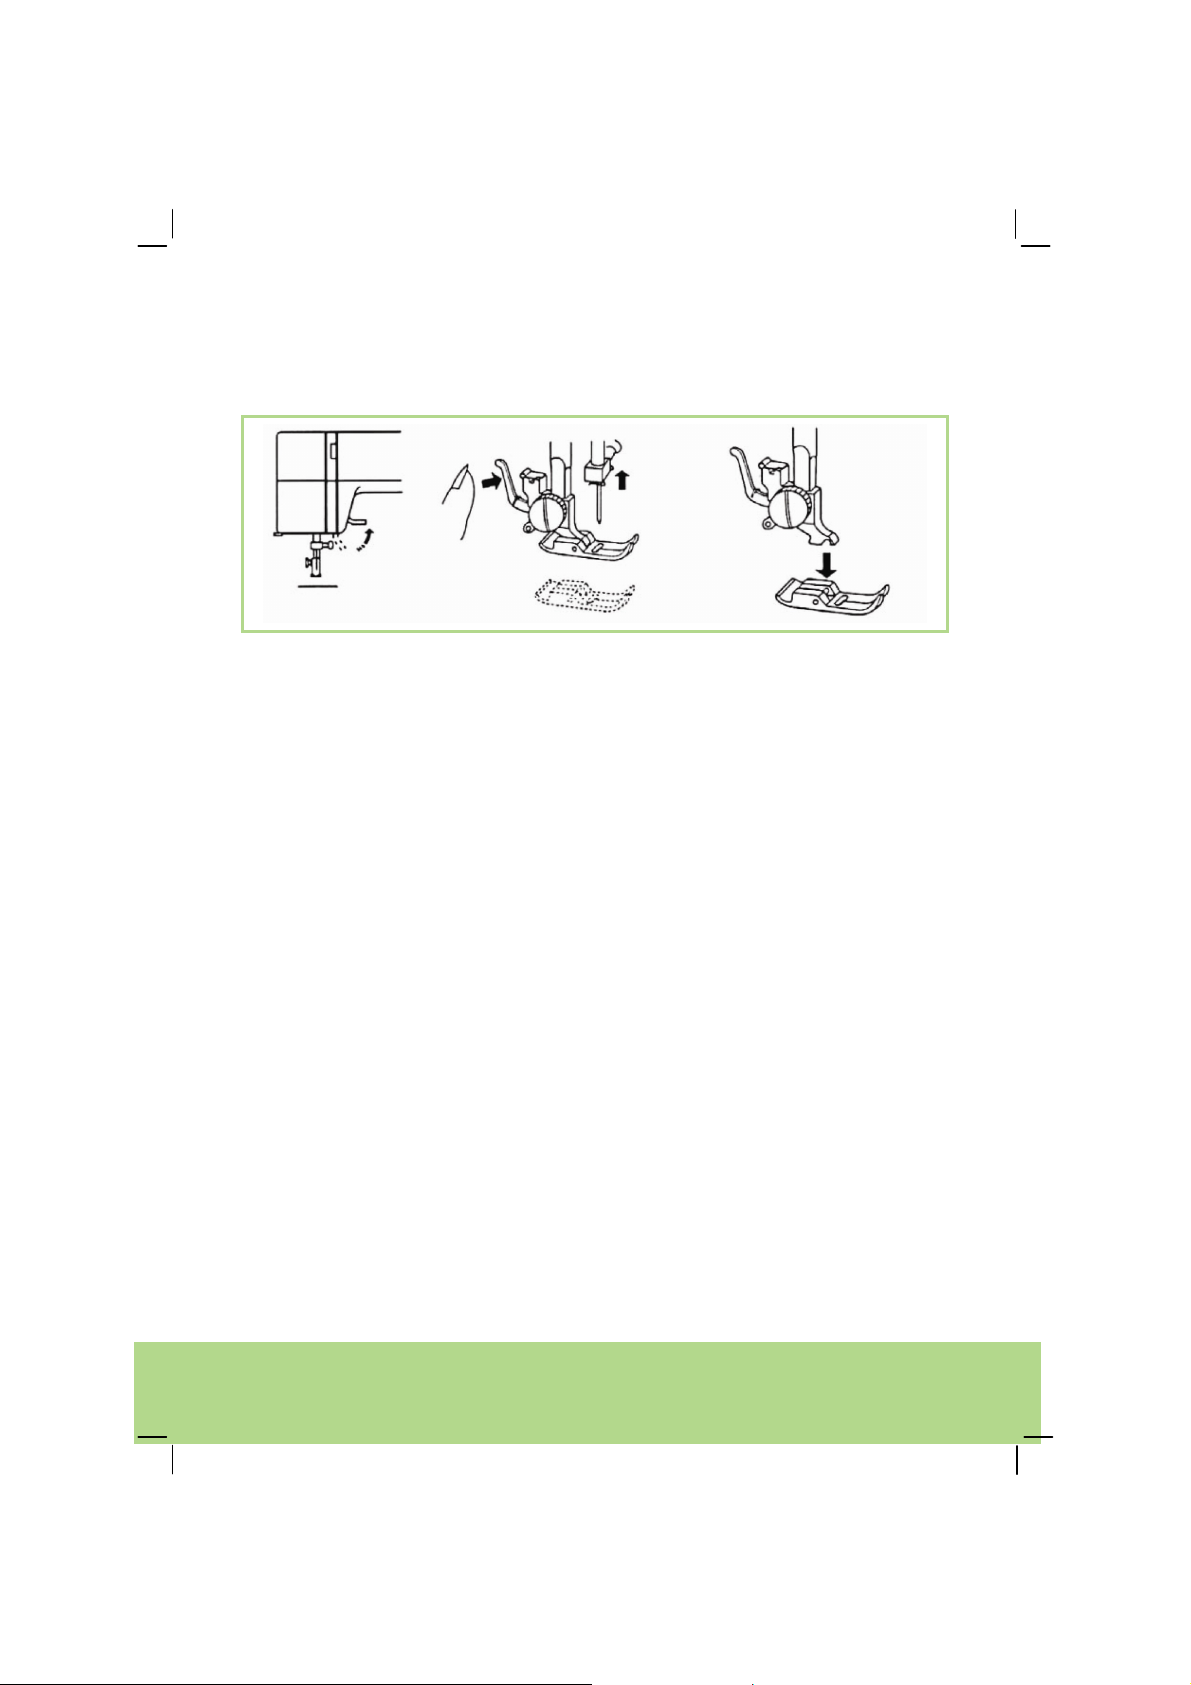
Removing the sewing foot
• Turn the hand wheel towards you until the needle has reached its highest
position.
• If the sewing foot is down, raise it by pushing up the sewing foot lever.
• Push up the sewing foot release lever behind the sewing foot holder to
release the foot. The sewing foot drops out.
• Attach the desired sewing foot so that the pin on the foot is directly under the
groove of the foot holder. Lower the sewing foot lever.
• Now push the sewing foot release lever upwards. The sewing foot
automatically clicks into place.
Helpline No. UK/ North Ireland 0871 37 61 020 Rep. Ireland 1-800-992 508
Web Support www.medion.co.uk
Model Number: MD 11871
13
Page 12
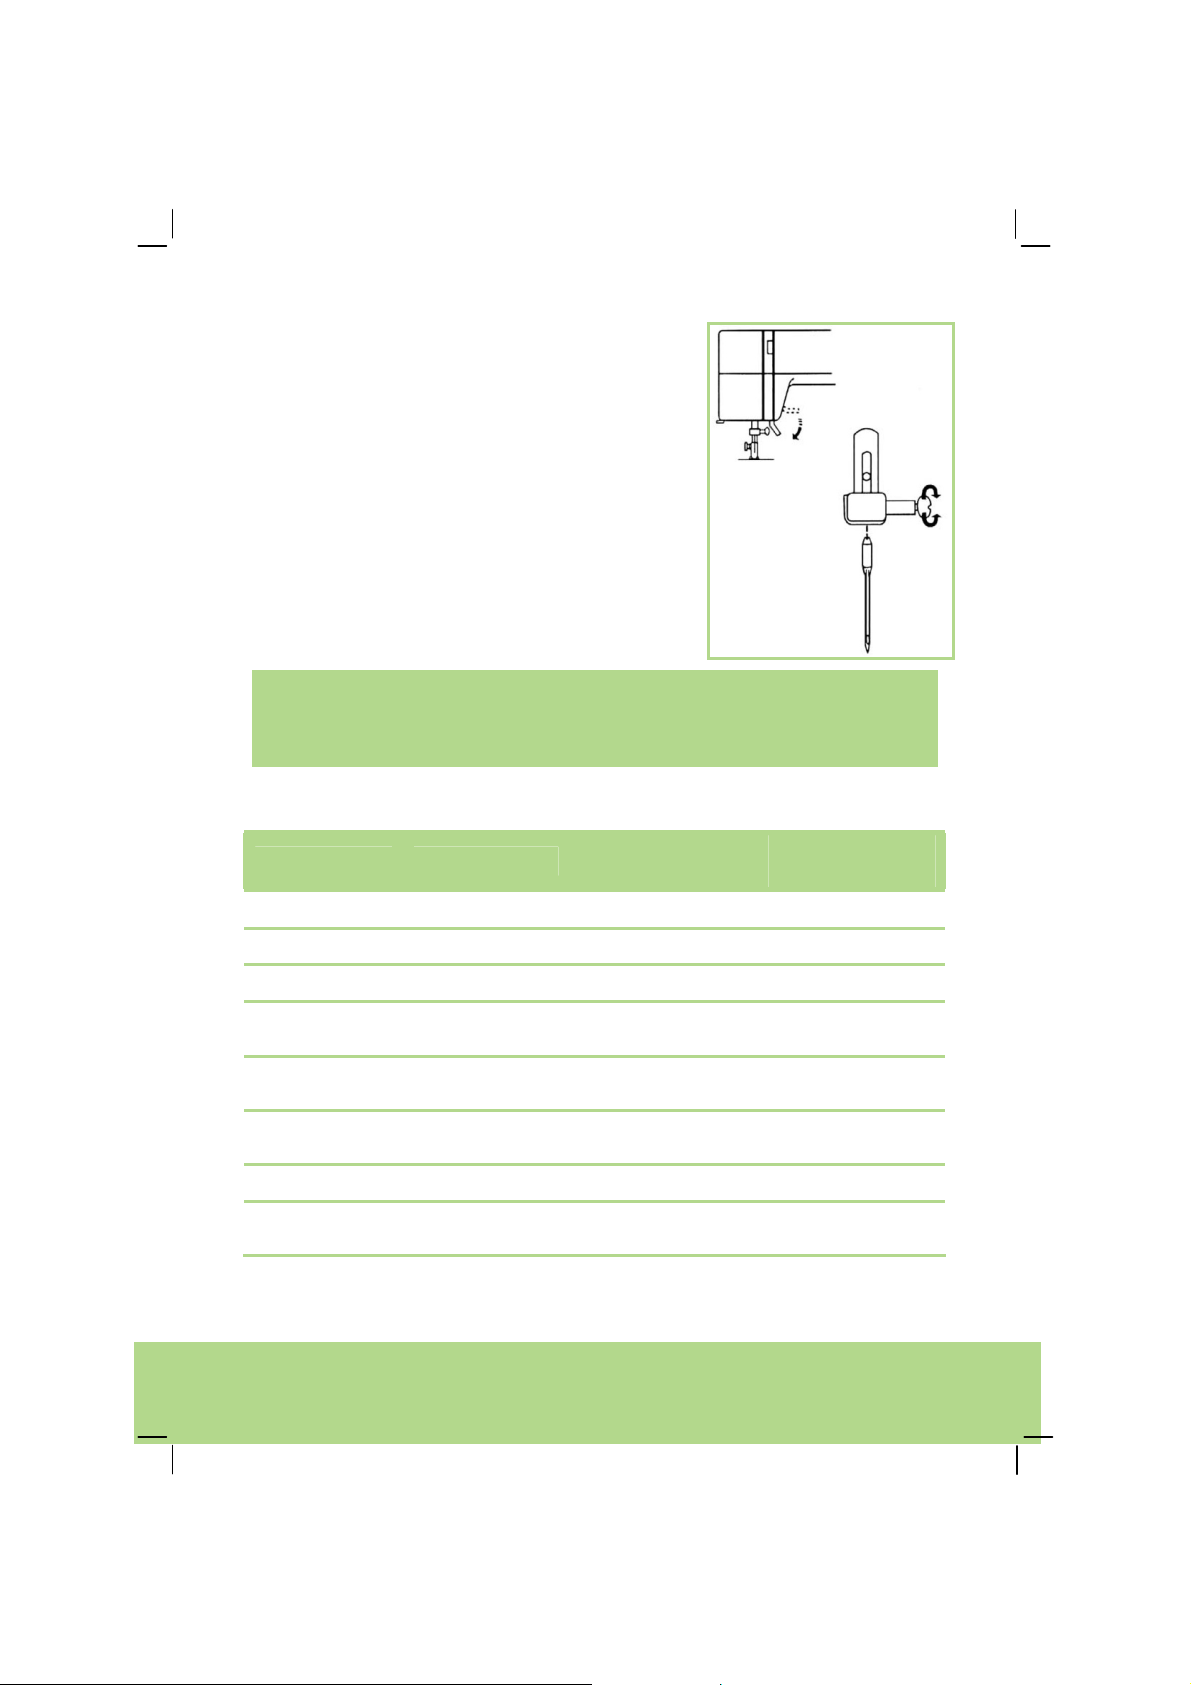
Replacing the needle
` Turn the hand wheel towards you until the needle
has reached its highest position.
` Lower the sewing foot.
` Loosen the needle holding screw by turning it
anticlockwise.
` Remove the needle from the needle holder.
` Insert a new needle with the flat side facing
backwards. Push the needle upwards until it can go
no further.
` Tighten the needle holding screw again.
Note:
Regular checking is necessary to ensure that the needle is never twisted or blunt.
Knitting materials, like silk or silk fabrics may frequently encounter knots and
skipping stitches, which are often caused by the damaged needles.
Thread and needle chart
Needle size Material
60 (#7) Fine silk 70 – 80 100 – 140
70 (#10) Crepe 70 – 80 100 – 140
80 (#12) Poplin, Pure Silk 50 – 60 80 – 100
80 – 90 (#12 –
14)
90 – 100 (#14 –
16)
90 – 100 (#14 –
18)
Elastic stitching
70 (#10)
Helpline No. UK/ North Ireland 0871 37 61 020 Rep. Ireland 1-800-992 508
Web Support www.medion.co.uk
Model Number: MD 11871
Woollen cloth,
Cotton
Wool 30 – 40 50 – 60
Jeans materials 30 45 – 50
Knitting
materials
Cotton thread
Specification
40 – 50 60 - 70
70 – 80 100 - 140
Silk thread
Specification
14
Page 13
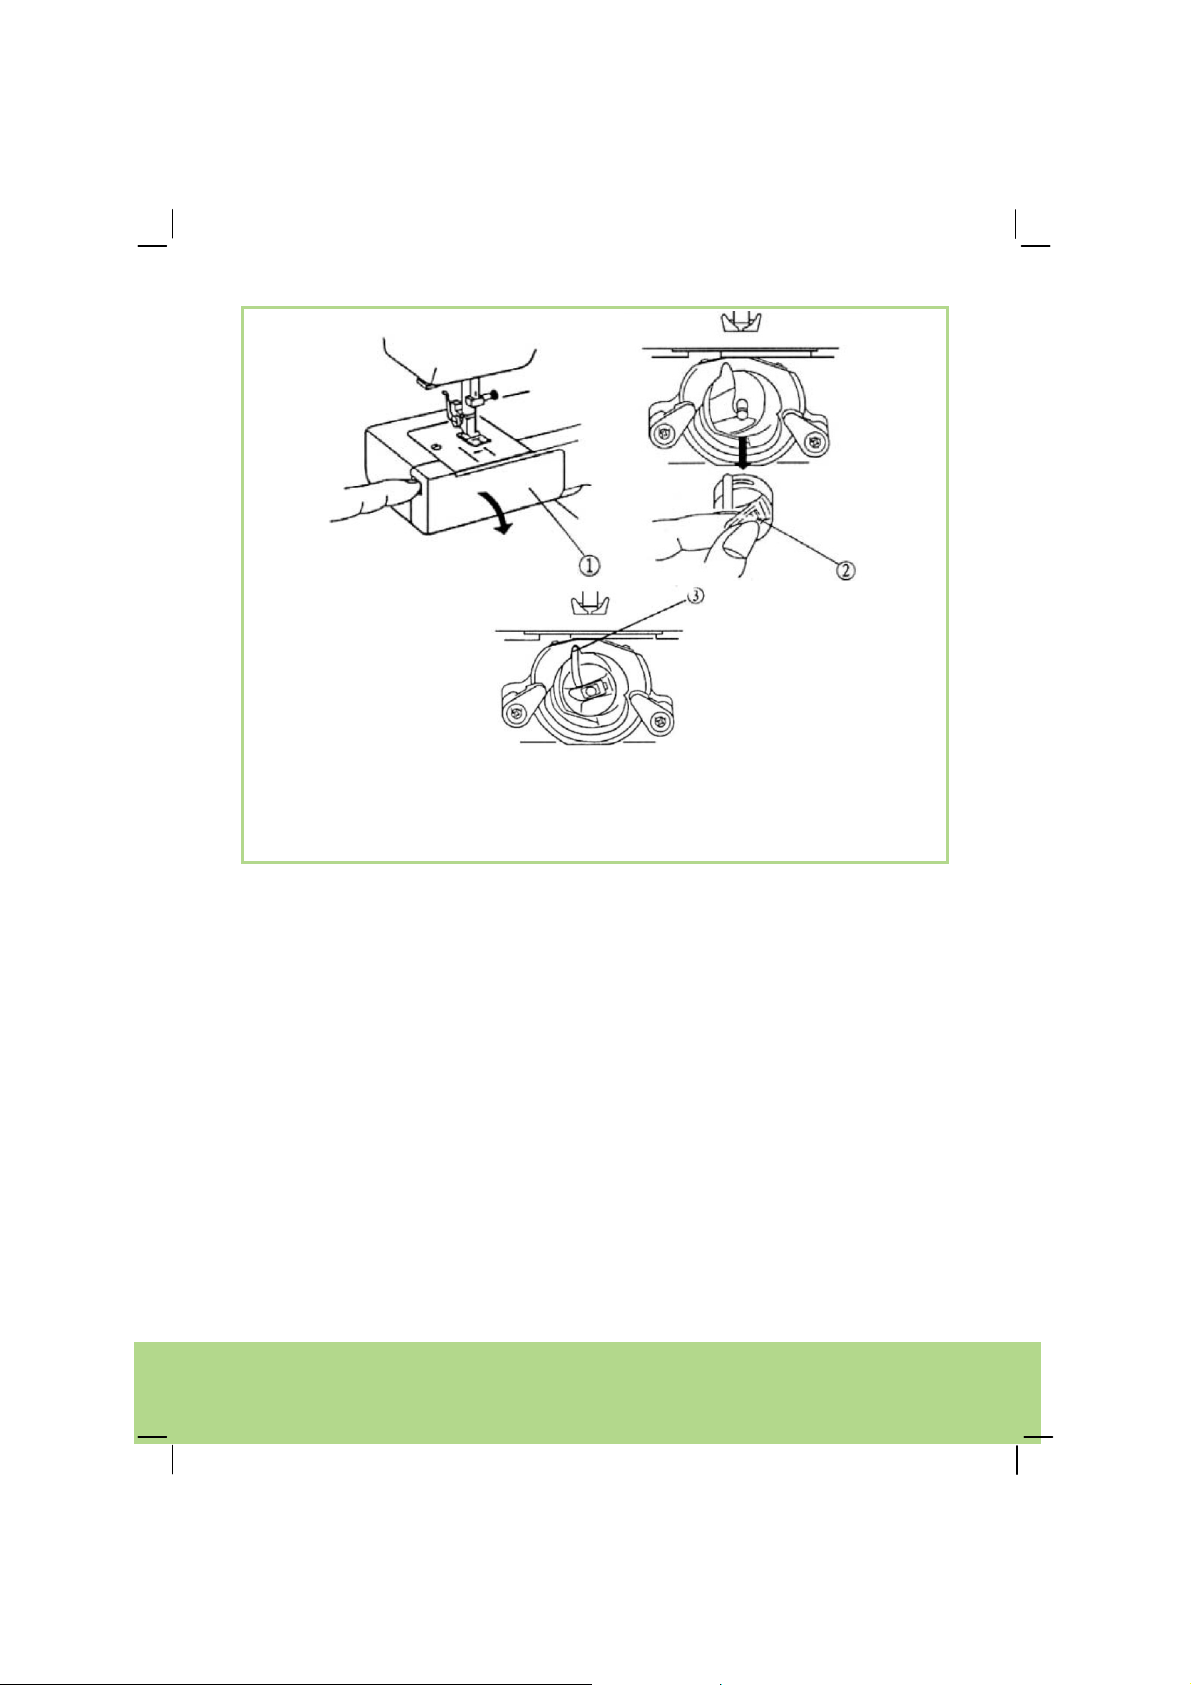
Remove and insert the bobbin case
Open the bobbin case cover (1).
1. Turn the hand wheel towards you until the needle has reached its highest
position.
2. Hold on the bobbin exit (2) and pull out of the bobbin case of the machine.
3. Press the bobbin case handle (3) to the innermost to ensure joining when
loading it into the bobbin case.
Helpline No. UK/ North Ireland 0871 37 61 020 Rep. Ireland 1-800-992 508
Web Support www.medion.co.uk
Model Number: MD 11871
15
Page 14
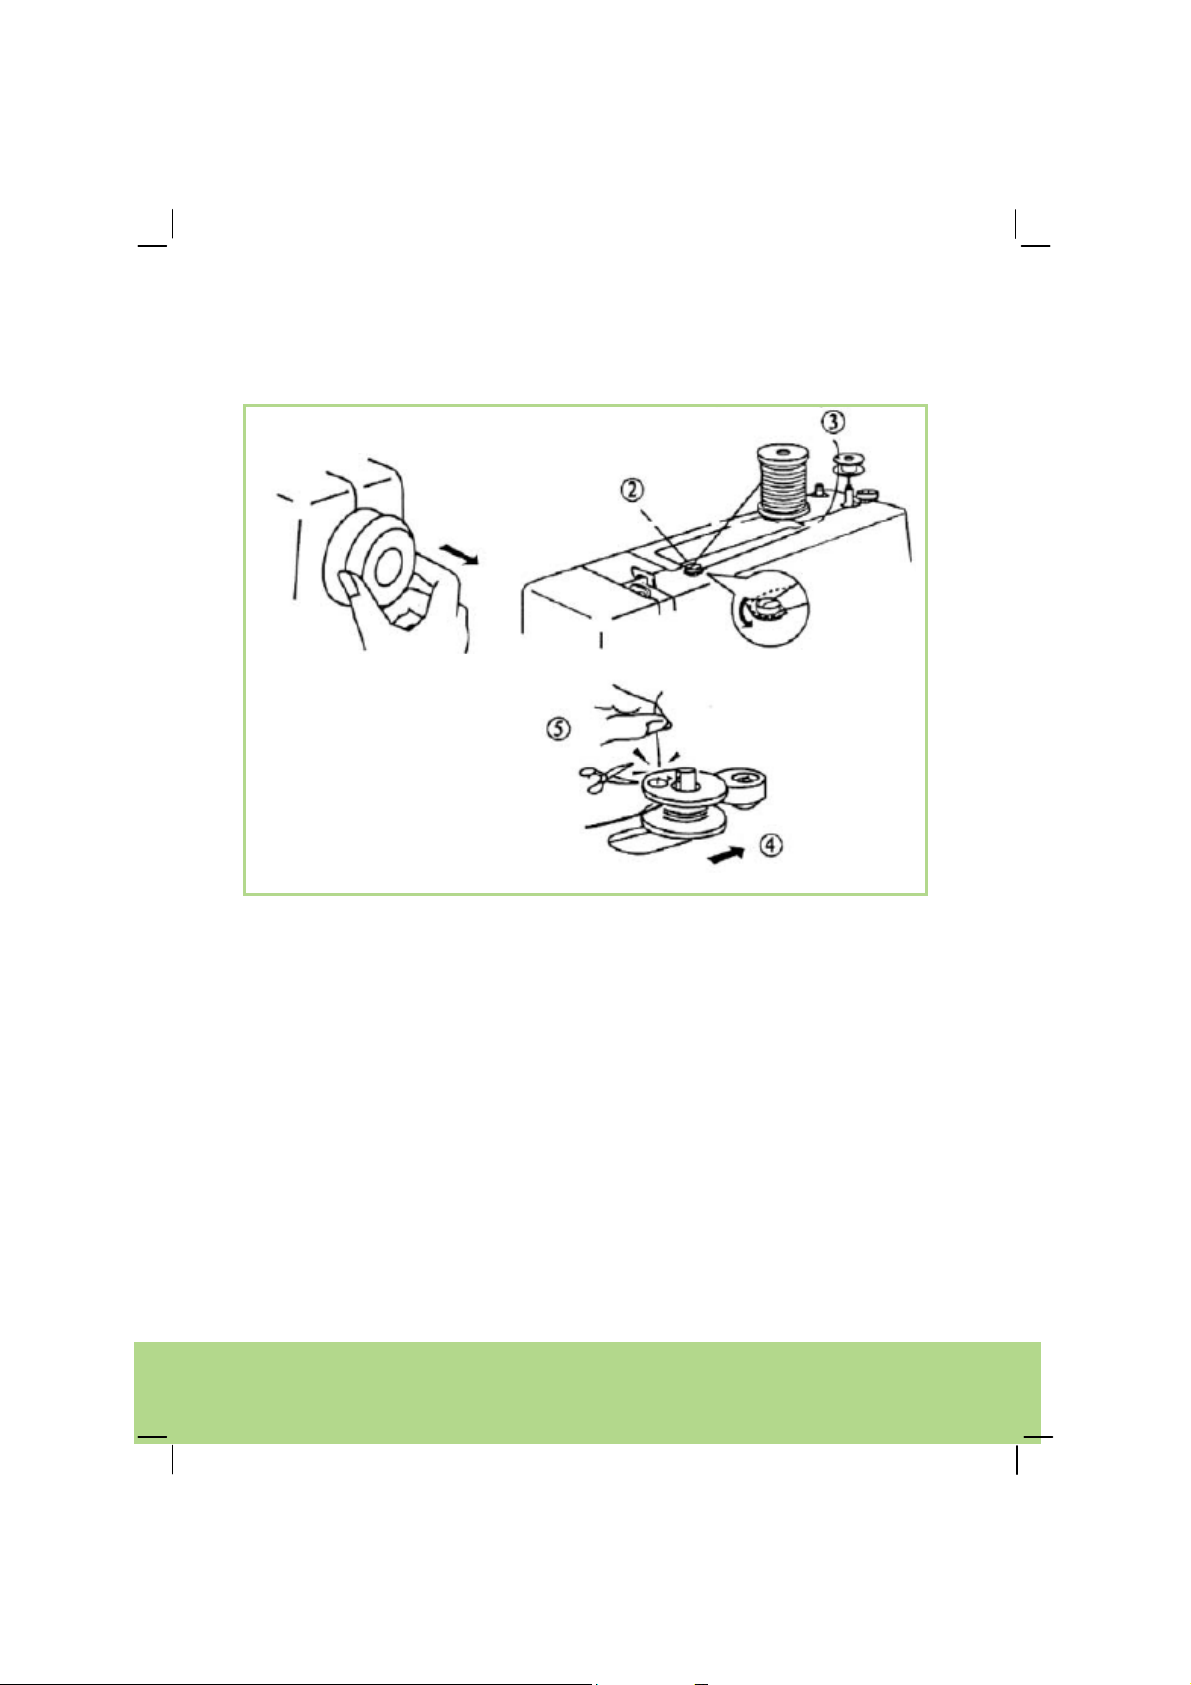
Winding thread to the bobbin
You can use the sewing machine to wind thread on to the bobbins easily. To do
so, take the thread from the spool through the thread guide to the bobbin.
1
1. Pull out the hand wheel slightly to prevent the needle from moving while
you wind thread on to the bobbin. Pull one of the spool holders completely
out and place a cotton reel on it.
2. Draw thread from the spool through the bobbin winder-tension disc.
3. Pull thread through the hole in the bobbin and insert the bobbin into the
bobbin shaft.
4. Turn the bobbin to the right.
5. Hold the end of the thread and press down the foot pedal. Stop after several
turns. Cut the excess thread close to the bobbin.
Helpline No. UK/ North Ireland 0871 37 61 020 Rep. Ireland 1-800-992 508
Web Support www.medion.co.uk
Model Number: MD 11871
16
Page 15
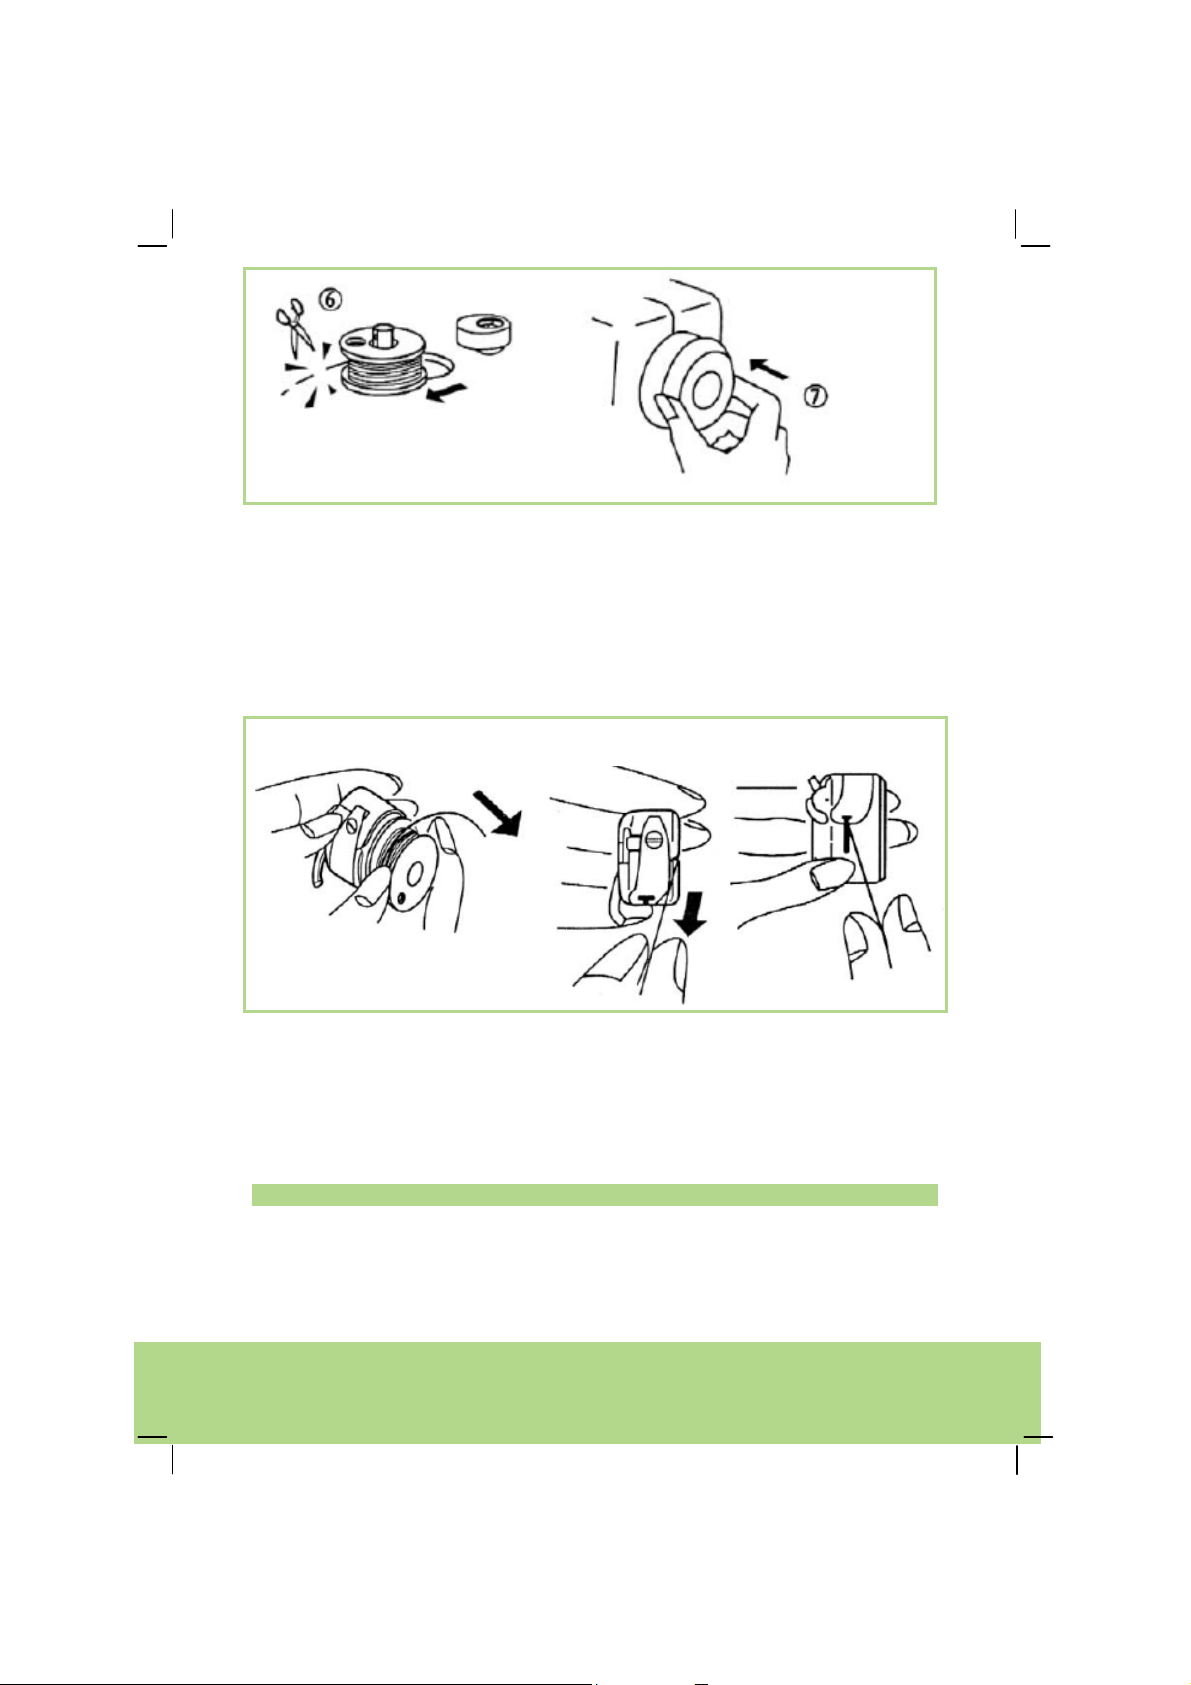
6. Press down again the foot pedal. Wind thread on to the bobbin until the
bobbin is full. Stop the machine. Push the shaft to the left and cut the thread.
7. Push the hand wheel to the left to close contact. (original position).
The needle will now move when you press the foot pedal.
Threading the bobbin case
1 2 3
1. Load bobbin in bobbin case. Make sure that you pull out the thread in the
direction indicated by the arrowhead (clockwise).
2. Pull thread into the slit of bobbin case.
3. Then pull thread through the bobbin tension-regulator spring to the outlet
hole.
Note: Make sure, that you pull around 10 cm of thread out of the bobbin.
Helpline No. UK/ North Ireland 0871 37 61 020 Rep. Ireland 1-800-992 508
Web Support www.medion.co.uk
Model Number: MD 11871
17
Page 16

Threading the upper thread
Please read the following instructions carefully as an incorrect sequence or thread
guiding can lead to broken threads, missed stitches and gathered fabric. A
diagram of how to guide the thread is provided on the front flap; you can also use
this drawing as a guideline.
1. Lower sewing foot and turn the hand wheel towards you until the needle has reached
its highest position.
2. Place a cotton reel on the spool holder and make sure the thread comes from
behind the cotton reel.
Helpline No. UK/ North Ireland 0871 37 61 020 Rep. Ireland 1-800-992 508
Web Support www.medion.co.uk
Model Number: MD 11871
18
Page 17

3. Lead the thread through the pre-tension (1).
4. Pass the thread along the right guide to the bottom and put it under the
thread tension disc.
5. Pass the thread upwards and pull up the thread tightly, which pushes up the
inner guide spring.
6. Insert the thread from the right side into the hook of thread take-up lever (3).
7. Now guide the thread along the left guide towards the needle and pass it
through the upper thread hook (4).
8. Then pass the thread further down and through the second thread hook (5).
9. Pass the thread through the eye of the needle (6) from the front to the back
and leave a thread end of around 10 cm.
Note
An upper thread tension of 3 is ideal for most applications.
Helpline No. UK/ North Ireland 0871 37 61 020 Rep. Ireland 1-800-992 508
Web Support www.medion.co.uk
Model Number: MD 11871
19
Page 18

Draw up the lower thread
2
1) Lift sewing foot and hold the upper thread lightly with your left hand.
2) Keep turning forward the hand wheel until thread take-up Iever is at its
highest position. Pull the upper thread upwards slightly to draw up the
lower thread.
3) Pull both threads out and pass them under the sewing foot toward the
back. Leave 5 cm of both threads.
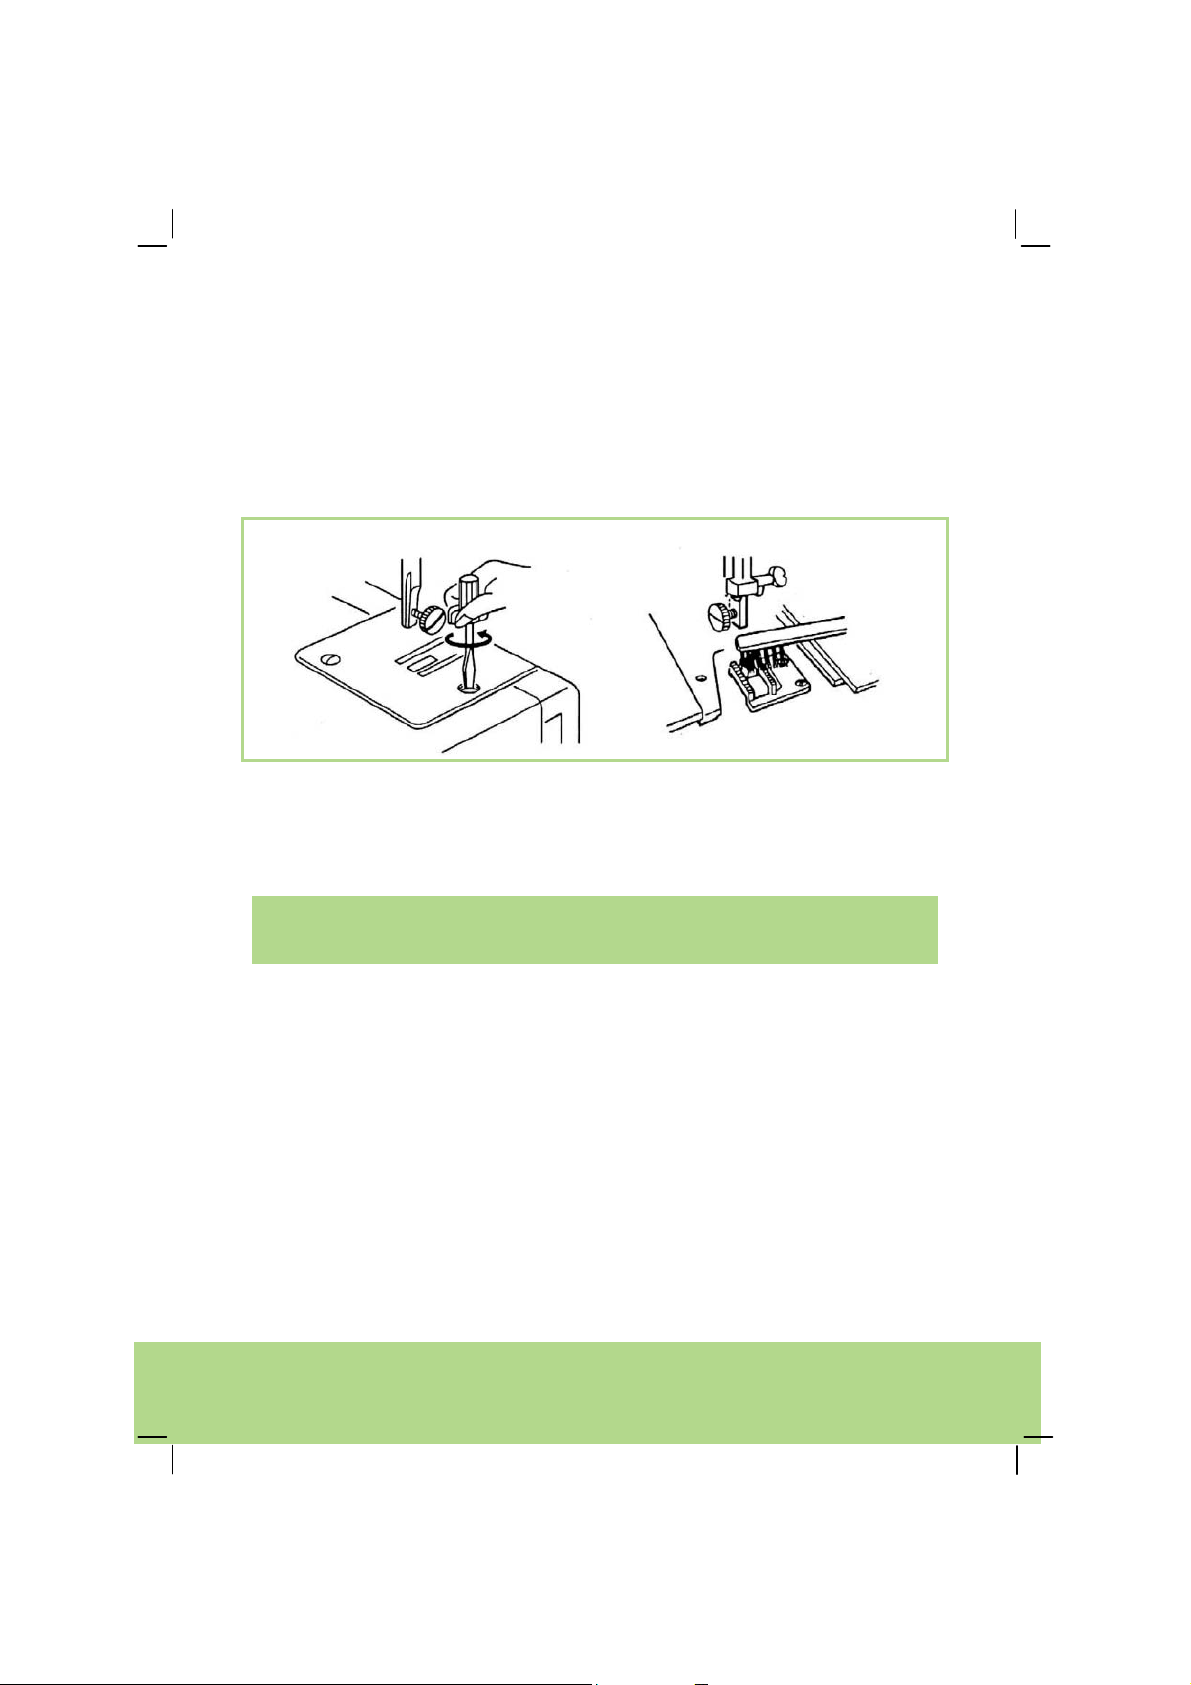
Fit the guiding plate
For several stitch type it is recommeded to use the
guiding plate.
1. Lower sewing foot, release the screw of the
fixed sewing foot and push forward the
guiding plate between the screw and
footplate groove.
2. Fix the screw and make sure that the stopper of guiding plate should be
installed in the middle of footplate.
Helpline No. UK/ North Ireland 0871 37 61 020 Rep. Ireland 1-800-992 508
Web Support www.medion.co.uk
Model Number: MD 11871
20
Page 19

Settings 6
Adjusting the upper thread tension
While doing straight stitching, both upper and lower threads must be knotted
between the two layers of garment.
Adjust selection dial of thread tension disc within the window.
Select upper thread tension
The lower the number is, the lower the
tension will be.
The tension you require depends on the strength and thickness of the fabric, the
number of layers of fabric you want to sew and the type of stitch you choose.
Helpline No. UK/ North Ireland 0871 37 61 020 Rep. Ireland 1-800-992 508
Web Support www.medion.co.uk
Model Number: MD 11871
The higher the number is, the
higher the tension will be.
21
Page 20

Tension of upper thread in case of zigzag stitching
In order to achieve good effect of zigzagging, the tension
of upper thread should be less than that of straight
stitching.
The upper thread should be visible from the reverse.
Selecting Double Needle
Turn double needle (twin needle) switch to position if you require sewing
double stitches.
Turn double needle (twin needle) switch to
single stitches, otherwise the stitches would be narrower.
position if you require sewing
Select the stitch type
On this sewing machine, you can select a number of different stitch types.
1. Turn the hand wheel towards you until the needle is pulling out from fabric.
2. Select the desired stitch type by turning the stitch type selection dial. (Please see
„Relationship between stitch types and settings“ on page 24)
Width of stitches changes seamlessly from positions 3 to 5.
When sewing elastic stitches and double action stitches
regulator must set to position +
Helpline No. UK/ North Ireland 0871 37 61 020 Rep. Ireland 1-800-992 508
Web Support www.medion.co.uk
Model Number: MD 11871
1
- -.
- the stitch length
1
22
Page 21

Select stitch length
` Turn the stitch length regulator to the desired stitch length. (Please see the stitch
types on page 24)
When you would like to sew elastic stitches or double action stitches
turn the stitch length regulator to position +
double needle as well.
- -. They can be used with
1
1
-
Position „
Range from 0.5 to 4 can be used of zigzag stitching.
” is the correct range of adjustment for making buttonholes.
How to make the elastic stitches better?
In case the elastic stitch turns out to be unsatisfactory, you may turn the selection
dial to “ - " and in this way, stitches would be thicker while turning to “+" they
would be more sparse.
Helpline No. UK/ North Ireland 0871 37 61 020 Rep. Ireland 1-800-992 508
Web Support www.medion.co.uk
Model Number: MD 11871
23
Page 22

Relationship between stitch types and settings
Note: Always raise the needle to its highest position before selecting the pattern.
Stitch type
selection dial
1
Stitch
Patterns for
sewing
buttonholes
Straight stitch
Needle
position:
middle
Stitch
length
regulator
0,5 - 1 3 - 5
1,5 - 4 2 - 6
Upper
thread
tension
Straight stitch
2
3
4
5
6
7
Needle
position: left
Zigzag
Zigzag
Zigzag
Sewn zigzag
(overlock)
Elastic
blind-stitch
1,5 - 4 2 - 6
1 - 4
1 - 2
1 - 4
1 - 2
1 - 4
1 - 2
1-2 4 - 6
1- 3 4 - 6
2 - 6
4 - 6
2 - 6
4 - 6
2 - 6
4 - 6
Helpline No. UK/ North Ireland 0871 37 61 020 Rep. Ireland 1-800-992 508
Web Support www.medion.co.uk
Model Number: MD 11871
24
Page 23

Stitch type
selection dial
8
9
10
1
2
Stitch
Stitch
Elastic blind-
stitch small
Shell-stitch 2 6 - 8
Elastic stitch 1 4 - 6
Triple straight
stitch
Needle
position:
middle
Triple straight
stitch
Needle
position: left
length
regulator
1 - 3 4 - 6
1 or 2 4 – 6
1 or 2 4 - 6
Upper
thread
tension
3
4
5
6
7
Helpline No. UK/ North Ireland 0871 37 61 020 Rep. Ireland 1-800-992 508
Web Support www.medion.co.uk
Model Number: MD 11871
Triple Zigzag
Triple Zigzag
Triple Zigzag
Honeycomb
stitch /
Smoking
stitch
Elastic
decorative
stitch
+
1 -
+
1 -
+
1 -
+
1 -
+
1 -
-
2 - 6
-
2 - 6
-
2 - 6
-
2 - 6
-
2 - 6
25
Page 24

Stitch type
selection dial
8
9
Stitch
Elastic
decorative
stitch
Stretch-
overlock
(elastic)
Double-
overlock
(elastic)
Stitch
length
regulator
+
1 -
+
1 -
+
1 -
Adjusting the lower thread tension
The lower thread tension rarely needs to be adjusted, as it was
setting by the manufacturer for general sewing work.
The lower thread tension is correct if you can pull the thread out
of the bobbin easily but with a slight resistance.
However, the lower thread needs to be adjusted for particularly
lightweight or heavy fabrics.
You set the lower thread tension by using the regulating screw
on the bobbin case. Adjust the screw using the small
screwdriver provided.
-
-
-
Upper
thread
tension
2 - 6
2 - 6
2 - 6
`
Remove the bobbin case:
Low tension: Turn the screw anticlockwise
Higher tension: Turn the screw clockwise.
Checking the lower thread tension
The easiest way of checking the lower thread tension is by sewing a medium
zigzag stitch on the fabric in question.
Use the appropriate needle and threads.
You can get a clearer picture by using different colours for the upper and lower
threads.
Sew a few zigzag stitches.
The thread tension is correct if the lower threads are not visible on the top surface
of the fabric.
Make sure that you always sew even stitches (see diagram on the left).
Helpline No. UK/ North Ireland 0871 37 61 020 Rep. Ireland 1-800-992 508
Web Support www.medion.co.uk
Model Number: MD 11871
26
Page 25

Stitching reverse
Use reverse stitches to reinforce the first and last stitches.
If the reverse button is pressed down, the machine will do reverse stitching.
If you want to change to forward stitching simply release the reverse lever.
Raising and lowering the feed dog
1. Open the bobbin case cover (1).
2. Lower the feed dog by pulling down the shaft of lower teeth lever (2) and moving it to
the right until it catches. Feed dog dischargs into the machine. (indicated by the
arrow head as shown in the illustration)
3. Raise the feed dog by pulling down the lower teeth lever (2) and moving it to position
“A”
Note: For ordinary sewing, feed dog shall be raised.
Feed dog discharged
Fabric is not
transported
Helpline No. UK/ North Ireland 0871 37 61 020 Rep. Ireland 1-800-992 508
Web Support www.medion.co.uk
Model Number: MD 11871
Feed dog raised
Fabric is transported
27
Page 26

Adjusting the sewing foot pressure
You need a higher sewing foot pressure when sewing multi-layer or thick fabrics.
You need a lower sewing foot pressure when sewing normal and lightweight
fabrics.
An incorrect sewing foot pressure results in poor fabric feed, poor material
guidance and imperfect stitches.
For ordinary sewing, foot pressure selection dial is present at "3".
The foot pressure drops to "2" when sewing appliqués, mesh fabrics and
embroidery.
As for chiffon, lace, yarn and other miscellaneous fine materials, you may put the
dial to "3". When sewing cotton flannel and braided stretch textile adjust to "1".
Helpline No. UK/ North Ireland 0871 37 61 020 Rep. Ireland 1-800-992 508
Web Support www.medion.co.uk
Model Number: MD 11871
28
Page 27

Sewing 7
Start sewing
Test the stitching on a swatch before using a stitch type for your actual work.
1. Raise sewing foot and put cloth beside leg
wire of needle plate.
2. Turn forward the hand wheel and lower the
needle down into the fabric. Lower sewing
foot and make sure that thread passed
backward. Step down foot pedal.
3. Fabric will go along leg wire and it is carried
forward automatically by feed dog.
4. In order to make end of thread firm, please
press the reverse stitch button and do
several reverse stitches.
Removing fabric from the sewing
machine
When you finish sewing, make sure that the
needle is at its highest position. To remove the
fabric, raise the sewing foot and pull out the
fabric from the back of the machine.
Changing the sewing direction
1. Stop the machine and turn the hand wheel towards you until the needle is in
the fabric.
2. Raise the sewing foot and turn the fabric around the needle to change the
direction as desired.
3. Lower the sewing foot and continue sewing.
Cutting the thread
Cut the thread using the thread cutter behind the sewing foot or with a pair of
scissors. Leave around 15 cm of the thread hanging from the eye of the needle.
Helpline No. UK/ North Ireland 0871 37 61 020 Rep. Ireland 1-800-992 508
Web Support www.medion.co.uk
Model Number: MD 11871
29
Page 28

Using the strips of leg wire on the needle plate
The Strips of leg wire on the needle plate is of
great help to maintaining width between the
needle and the thread.
Instruction: these data conform to the distance
between strips of leg wire and the needle.
Caption of figure
(1) Strips of leg wire
(2) Comer
(3) Needle plate
(4) Hole of needle plate
(5) The width of sewing to the center of needle
Figure on the needle
plate
Spacing in cm 1.0 1.5 2.0 1.0 1.3 1.6 1.9
10 15 20 3/8 4/8 5/8 6/8
Sewing a right angle
While doing right stitches, a space of 1.6
cm should be kept apart from the edge of
fabric
1. When the edge of fabric is aligned
with the corner, stop the machine
2. Turn the hand wheel towards you
until the needle is dropping into the
fabric.
3. Raise the presser foot, turn the fabric
around the needle to change direction until its edge is aligned with the strip
of leg wire of 5/8 (1.6 cm).
4. Lower the presser foot and sew in the new direction.
Helpline No. UK/ North Ireland 0871 37 61 020 Rep. Ireland 1-800-992 508
Web Support www.medion.co.uk
Model Number: MD 11871
30
Page 29

Using the Stitch Types 8
Straight stitch
Sewing foot......................................................................... Standard foot
Stitch type .......................................................................................... 1 or 2
Stitch length ..................................................................................... 1.5 – 4
Upper thread tension ........................................................................2 – 6
Suitable for general sewing and for top stitching.
Zigzag stitch
Sewing foot......................................................................... Standard foot
Stitch type ............................................................................................. 3 - 5
Stitch length .........................................................................................1 – 4
Upper thread tension ........................................................................2 – 6
The stitch is used for making over-lock so that thread at the edge of cloth shall
not fall apart.
Before you use the zigzag stitch, sew a few straight stitches to reinforce the
stitching.
TIPS FOR ZIGZAG STITCHES
For a better zigzag stitch, the upper thread tension must be lower than for
straight stitches.
The upper thread should be slightly visible on the underside of the fabric.
Helpline No. UK/ North Ireland 0871 37 61 020 Rep. Ireland 1-800-992 508
Web Support www.medion.co.uk
Model Number: MD 11871
31
Page 30

Sewn Zigzag
Sewing foot......................................................................... Standard foot
Stitch type ................................................................................................... 6
Stitch length .........................................................................................1 – 4
Upper thread tension ........................................................................2 – 6
The stitch is used for synthetic materials and other materials that get folds easily.
It also suits over-lock to avoid threads falling apart. It is fit for sewing elastic bends
and darning. Leave a strip of hemming-stitch with 1.5 cm. Cut off the strip of
hemming-stitching after sewing.
Helpline No. UK/ North Ireland 0871 37 61 020 Rep. Ireland 1-800-992 508
Web Support www.medion.co.uk
Model Number: MD 11871
32
Page 31

Blind stitch for blind hemming
Sewing foot................................... Standard foot with guiding plate
....................................................................................... or blind stitch foot
Stitch type ............................................................................................ 7 – 8
Stitch length .........................................................................................1 – 3
Upper thread tension ........................................................................4 – 6
Use a thread colour that exactly matches the fabric.
If you are sewing very light or transparent fabrics, use a transparent nylon thread.
1. Fold the fabric as illustrated.
2. Fit the guiding plate or use the blind stitch foot.
3. Sew on the fold, as illustrated. The straight stitches should be on the hem,
and only the points of the zigzag stitches should extend into the upper fold
of the fabric.
4. Remove the fabric from the machine and straighten it out.
The folded-out fabric now has a blind-hem.
Note: You can adjust the edge guide to the crease line of the outer fabric by
turning the screw of the foot.
Helpline No. UK/ North Ireland 0871 37 61 020 Rep. Ireland 1-800-992 508
Web Support www.medion.co.uk
Model Number: MD 11871
33
Page 32

Shell hem
Used for decorative hemming. It is particularly suitable for fabrics cut on the bias.
Sewing foot......................................................................... Standard foot
Stitch type ............................................................................................ 7 – 8
Stitch length .........................................................................................1 – 3
Upper thread tension ........................................................................4 – 6
Fold the fabric as illustrated and position
the sewing foot along the folded edge of
the fabric.
The needle should be positioned in
relation to the right-hand edge of the
fabric so that the stitches loop over the
outer edge of the hem.
Elastic stitch
Sewing foot......................................................................... Standard foot
Stitch type ................................................................................................ 10
Stitch length ................................................................................................1
Upper thread tension ........................................................................4 – 6
The stitches are most suitable for sewing
elastic cords over 3 mm of children's sleeves.
Tighten the elastic cord after sewing.
Such stitches are also suitable for sewing
heavyweight fabrics. Seamlessly fold the two
fabrics and stitch them together.
Helpline No. UK/ North Ireland 0871 37 61 020 Rep. Ireland 1-800-992 508
Web Support www.medion.co.uk
Model Number: MD 11871
34
Page 33

Triple straight stitch
Sewing foot......................................................................... Standard foot
Stitch type ..................................................................................... 1 oder 2
Stitch length .............................................................................+
Upper thread tension ........................................................................2 – 6
Two stitches forward and then one stitch
backward will make the stitching firm. Prior to
stitching garment pıeces, make a sample by using
pins. Such stitches are most suitable for sewing
crotches.
1 -
-
Triple zigzag stitch
Sewing foot......................................................................... Standard foot
Stitch type ............................................................................................. 3 - 5
Stitch length .............................................................................+
Upper thread tension ........................................................................2 – 6
If you want to sew stretch fabrics, this stitch enables you to avoid broken threads.
It is also suitable for stitches subject to greater strain.
A seam with this stitch is three times as strong as a
normal seam and is far more elastic.
The seam therefore stretches with the fabric
without the thread breaking.
The stitch is also suitable for sewing patches
(including leather patches) on jeans.
1 -
-
Helpline No. UK/ North Ireland 0871 37 61 020 Rep. Ireland 1-800-992 508
Web Support www.medion.co.uk
Model Number: MD 11871
35
Page 34

Honeycomb stitch (smoking stitch)
Sewing foot......................................................................... Standard foot
Stitch type ................................................................................................... 6
Stitch length .............................................................................+
Upper thread tension ........................................................................4 – 6
Straight stitch the tucked side with
spacing of 1 cm. Select "4” for its
stitch length.
Knot the thread on one side. Tighten
lower thread and make tucks with
even spaces.
Fix the thread on the other side. Make
a reticulate and decorative stitching
along the middle of tucks.
Then, extract the tuck stitches.
Note: Decrease upper thread tension will make tuck decoration easy.
1 -
-
Overlock stitch (feather stitch)
Sewing foot......................................................................... Standard foot
Stitch type ................................................................................................... 9
Stitch length .............................................................................+
Upper thread tension ........................................................................4 – 6
You can use this stitch for an attractive and lasting
stitch to trim the edges of materials that fray easily.
Position the fabric under the foot so that the stitch
is made over the edge. Lower the sewing foot and
start sewing, guiding the fabric gently.
Helpline No. UK/ North Ireland 0871 37 61 020 Rep. Ireland 1-800-992 508
Web Support www.medion.co.uk
Model Number: MD 11871
1 -
-
36
Page 35

Double overlock stitch (overlock-overcast stitch)
Sewing foot......................................................................... Standard foot
Stitch type ................................................................................................ 10
Stitch length .............................................................................+
Upper thread tension ........................................................................4 – 6
Fold in both sides with 1.5 cm each and iron it.
The folded sides should be fixed to non-woven
textiles with spacing of 0.3 cm. Slowly stitch and
make sure that each stitch should reach the
folding edges.
1 -
-
Sewing buttonhole
(1) (2)
Sewing foot.....................................................................Buttonhole foot
Stitch type ..................................................................
Stitch length .............................................................................0.5 - 1
Upper thread tension .........................................................................3 - 5
Stitch width is to be chosen arbitral with in between 0 and 1 range according to
variation of stitch length.
(1) For thicker stitching, adjust selection dial to "O".
Satin stitches suit lightweight material.
(2) For thicker stitching, adjust selection dial to "1”.
Loose stitches suit heavyweight material.
Note: Make trial stitching on some small cloth to find out the optimum effect.
Helpline No. UK/ North Ireland 0871 37 61 020 Rep. Ireland 1-800-992 508
Web Support www.medion.co.uk
Model Number: MD 11871
37
Page 36

1. Make the marks of buttonhole carefully on the
material.
2. Pull forward slide (A), keep the mark (C) on it in
conformity to the initial mark (B),The mark on
the presser foot should be aligned with that of
the material. Lower the sewing foot.
Instruction:
marks on the slide should be carved in cm.
3. Adjust stitch selection dial to
forward until comes to the marks in front of the
buttons and then stop sewing with needle
pausing at top left.
4. Adjust stitch selection dial to
stitches before stopping sewing with needle
pausing at top right.
5. Adjust stitch selection dial to
backward until come to the marks at the back of
buitons and then stop sewing with needle
pausing at top right.
6. Adjust stitch selection dial to
stitches before stopping sewing with needle
pausing at top left.
7. After sewing: buttonholes, take out fabrics.
Insert a pin at the back hole of buttonhole so that the end of thread of
buttonhole will not be cutting off. Cut out the buttonhole carefully with a
buttonhole cutter.
Note: Pin a safety pin in front of the top bar to stop you cutting through it.
. Keep stitching
. Make 4-6
. Keep stitching
. Make 4-6
Helpline No. UK/ North Ireland 0871 37 61 020 Rep. Ireland 1-800-992 508
Web Support www.medion.co.uk
Model Number: MD 11871
38
Page 37

Buttonholes with decorative stitching
1. Raise the foot plate of buttonholes sewing hang the laid in threads on the
positioning cam (1) at the back of presser foot,
2. Draw forward the end of additional thread under the presser foot and place it
under the centre of presser foot.
3. Hold tightly the additional thread and hook the fork in front of the sewing
foot.
4. Bring the needle into the fabrics before starting sewing and lower the presser
foot.
5. Slowly step down foot controller buttonholes, with each face of buttonholes
encasing the laid-in threads
6. Take out fabrics and clip sewing thread.
7. Pull the laid-in threads from left side and hold it tightly.
8. The end of thread should be wound to darning needle. Draw the thread to
the back and clip.
Note: While cutting out buttonholes, pay attention to the instruction on page
Fehler! Textmarke nicht definiert..
Sewing on buttons and hooks
Sewing foot................................... button sewing foot (transparent)
Stitch type ............................................................................................. 3 - 5
Stitch length ................................................................................................0
Upper thread tension ........................................................................1 – 3
Feed dog...................................................................................discharged
Helpline No. UK/ North Ireland 0871 37 61 020 Rep. Ireland 1-800-992 508
Web Support www.medion.co.uk
Model Number: MD 11871
39
Page 38

You can use the transparent blue sewing foot to sew on buttons, hooks and eyes
easily.
Use the stitch type selection dial to select a zigzag stitch width that corresponds
to the distance between the holes.
1. Align both holes of the button with groove slots while placing the left hole of
button directly under the needlepoint. Low sewing foot
2. Check if the button is positioned correctly by turning the hand wheel
manually. The needle must exactly enter the holes of the button, otherwise
the needle may be damaged. If necessary, change the width of the zigzag
stitch.
3. At a low speed, sew about 6 to 7 stitches per hole.
4. If the button has four holes, move the fabric and button: then sew 6 to 7
stitches in the other two holes. Once you have removed the fabric pass a
generous length of the upper thread to the underside of the fabric and knot
it to the lower thread there.
Sewing buttons with a shank
In the case of heavy fabrics, a button shank is often needed.
1. Place a needle or, for a thicker shank, a matchstick on the button and then
proceed to sew as for a normal button.
2. After about 10 stitches, remove the material from the machine.
3. Remove the needle or matchstick.
4. Leave a longer length of upper thread, pass it through the button and wind it
around the threads to create a shank, then pass it through to the underside
of the fabric and knot it to the lower thread.
Helpline No. UK/ North Ireland 0871 37 61 020 Rep. Ireland 1-800-992 508
Web Support www.medion.co.uk
Model Number: MD 11871
40
Page 39

Sewing in zips
Sewing foot..................................................................... Zip sewing foot
Stitch type ................................................................................................... 1
Stitch length ...................................................................................... 1.5 - 4
Upper thread tension .........................................................................4 - 6
Depending on which side of the zip band you are sewing, the sewing foot must
always be on the fabric.
For this reason, the sewing foot is attached on either the left-hand or right-hand
side, and not in the middle like all other sewing feet.
1. Raise the sewing foot and needle to its
highest position to switch the sewing
foot.
2. Place the zip on the fabric and place
the workpiece in position under the
foot.
3. To sew the right-hand side of the zip,
attach the zip sewing foot so that the
needle sews on the left-hand side (1).
4. Sew the right-hand side of the zip,
creating the stitches as close as
possible to the teeth. (1)
5. Sew the zip in with a bridge around 0.5
centimetres below the teeth.
6. To sew the left-hand side of the zip,
change the foot position on the sewing
foot holder.
7. Proceed in the same way as for the
right-hand side of the zip (2).
8. Before the foot reaches the slider on
the zip band, lift the foot up and open
the zip, keeping the needle in the
material. (3)
Helpline No. UK/ North Ireland 0871 37 61 020 Rep. Ireland 1-800-992 508
Web Support www.medion.co.uk
Model Number: MD 11871
41
Page 40

Pad stitching
Sewing foot......................................................................... Standard foot
Stitch type ................................................................................................... 5
Stitch length ...................................................................................... 0.5 - 1
Upper thread tension ........................................................................1 – 4
Sewing foot pressure................................................................................2
1. Adhere tightly the decorative parts to the fabrics or iron it with solvable nonwoven textiles.
2. Stitch around the decorative parts and make sure that suture beyond the
decorative parts should disappear.
3. Insert the needle into the cloth when encountering corner.
4. Raise the presser foot and pivot the cloth to the left or right.
Note: After sewing, adjust foot pressure selection dial to position “3”.
Helpline No. UK/ North Ireland 0871 37 61 020 Rep. Ireland 1-800-992 508
Web Support www.medion.co.uk
Model Number: MD 11871
42
Page 41

Rolled hemming
Sewing foot....................................................................... Hemming foot
Stitch type ................................................................................................... 5
Stitch length ..........................................................................................1 - 4
Upper thread tension ........................................................................2 – 6
You can use the roll hem/hemming sewing foot
to easily hem fine to medium materials, e.g.
blouses, silk scarves and flounces. Hemming
using the roll hemmer stops the edges from
fraying and creates a clean, durable edge.
1. Raise the sewing foot and needle to its
2. Fold the start of the hem around 2 mm in
3. Insert this folded hem into the coil of the roll
4. Carefully and slowly, sew a few stitches,
5. If the start of the hem was pulling into the
6. Always hold the edge of the fabric somewhat
7. • Make sure that the fabric does not slip
Note:
The hem can be inserted in the hemming foot more easily if you hold the end of
the fabric at a slight angle.
Before you start sewing, fix the hem with safety pins or iron down the start of the
hem.
For this work, you need to use suitable materials and have some experience in
order to obtain the best results.
highest position and replace the existing foot
with the hemming foot.
with a double fold.
hemming foot.
preferably by turning the hand wheel.
foot, carefully start sewing the hem.
over the left-hand side of the sewing foot, to
stop the fabric slipping out of the coil.
under the right-hand side of the sewing foot.
Helpline No. UK/ North Ireland 0871 37 61 020 Rep. Ireland 1-800-992 508
Web Support www.medion.co.uk
Model Number: MD 11871
43
Page 42

Sewing with a twin needle
The twin needle is available from well-stocked specialist retailers.
When buying a twin needle, make sure that the distance between the two
needles is no more than 2.5 mm.
By using the twin needle you can create attractive, two-coloured patterns if you
use different coloured threads when sewing.
Sewing foot......................................................................... Standard foot
Stitch type ......................................................................................... 1 – 10
Stitch length ......................................................................1 – 4 /
Upper thread tension .........................................................................2 - 6
1. Attach the twin needle in the same way as you would a single needle (see
page 14).
2. Place two equally fully cotton reels on the removable spool holders.
3. Pass the two threads through the thread holder in the same way as
4. for a single thread.
5. Guide both threads through the upper thread tension discs making sure that
one thread goes to the right of the central disc and the second thread goes
to the left of the disc.
6. Insert both threads in the thread guide.
7. Insert one thread through the eye of the needle on the right-hand side, and
one thread on the left-hand side.
Note:
To sew a corner using the twin needle, take the needle out of the fabric, as
otherwise the twin needle may bend or break.
1 -
Helpline No. UK/ North Ireland 0871 37 61 020 Rep. Ireland 1-800-992 508
Web Support www.medion.co.uk
Model Number: MD 11871
44
Page 43

Maintenance and Cleaning 9
Warning
Before carrying out any maintenance, cleaning or replacement work, please
always turn off and unplug the machine.
Cleaning pendular shuttle
Take out the pendular shuttle:
(1) Bobbin case (5) Shuttle carrier
(2) Shuttle lever (6) Centre pin
(3) Shuttle retaining ring (7) Slot
(4) Pendular shuttle
`
Raise needle to its highest position and lift shuttle cover. Remove the bobbin case
from the machine.
` Uncover shuttle lever and draw out the shuffle retaining ring.
` Clean the feed dog with a brush and soft and dry cloth.
Helpline No. UK/ North Ireland 0871 37 61 020 Rep. Ireland 1-800-992 508
Web Support www.medion.co.uk
Model Number: MD 11871
45
Page 44
Installation of the pendular shuttle:
` Hold shuttle centre pin and fit carefully back into the shuttle carrier.
` Refit shuttle-retaining ring and make sure that the following centre pin fixes in the
slot of the shuttle carrier.
` Lock retaining ring by turning levers back into starting position. Refit bobbin case
with bobbin.
Cleaning feed dog
` Remove the needle and sewing foot. Remove the screw on the left hand side of the
needle plate with a screwdriver. Remove the needle plate.
` Clean the teeth of feed dog with a fine brush and refit the needle plate.
` Fit the sewing foot and the needle, the machine is now ready for sewing
Note:
In case of frequent use, it is recommended to clean the feed dog frequently to
obtain the first rate effect of needlework.
Helpline No. UK/ North Ireland 0871 37 61 020 Rep. Ireland 1-800-992 508
Web Support www.medion.co.uk
Model Number: MD 11871
46
Page 45

Oiling the machine
Note:
Apply only one or two drops of machine oil, or cloth will be stained.
If the machine should not run well after being out of use for a long period, apply a
few drops of oil before running it and the machine gets full operating ability.
Oiling the machine behind the front flap
Remove the cover (1), screw (2) and front flap (3).
Oiling is required for the positions marked in the illustration.
Oiling the pendular shuttle
Open the bobbin cover case (4).
Oiling is required for the positions marked in the illustration
Helpline No. UK/ North Ireland 0871 37 61 020 Rep. Ireland 1-800-992 508
Web Support www.medion.co.uk
Model Number: MD 11871
47
Page 46

Disposal 10
Packaging
Your sewing machine is wrapped in packaging to protect it against
transportation damage. Packaging is raw material and can be re-used
or added to the recycling system.
Device
At the end of its useful life, the sewing machine should not be disposed
of with the household rubbish. Seek the advice of your local authority
on correct, environmentally friendly disposal.
Helpline No. UK/ North Ireland 0871 37 61 020 Rep. Ireland 1-800-992 508
Web Support www.medion.co.uk
Model Number: MD 11871
48
Page 47

Troubleshooting 11
If faults occur, please read the operating instructions to determine whether you
have followed all the instructions correctly. Please only contact our customer
services if none of the solutions provided is successful.
Malfunctions Cause Remedy
Upper thread breaks.
Lower thread breaks.
Needle breaks.
Upper thread is not guided
correctly.
Upper thread tension is too
tight.
Needle is bent or dull.
Needle is not inserted correctly. See page 14
Fabrics are not pulled backward
after sewing.
Thread thickness does not fit to
the needle.
Lower thread is not threat
properly in the shuttle hook.
Fibres block the bobbin case
handle.
Bobbin case is damaged and
does not work.
Needle is not inserted correctly. See page 14
Needle is bent or dull.
Needle clamp screw goes loos.
Upper thread tension is too
tight.
See page 18
See page 21
Insert a new
needle.
See page 27
See page 14
See page 15
Clean the
bobbin case.
Change the
bobbin case.
Insert a new
needle.
Screw the
needle clamp
screw again.
See page 21
Fabrics are not pulled backward See page 27
Helpline No. UK/ North Ireland 0871 37 61 020 Rep. Ireland 1-800-992 508
Web Support www.medion.co.uk
Model Number: MD 11871
49
Page 48

Malfunctions Cause Remedy
Machine skips stitches
Fabric puckers or gathers
of seam
after sewing.
Needle is too thin to stitch the
cloth.
Pattern selection dial I not
turned properly.
Needle is not inserted correctly. See page 14
Needle is bent or dull.
Neither needle nor thread fit for
sewing.
Upper threading is incorrect. See page 18
Upper thread tension is too
tight.
Threading is incorrect.
Sewing foot pressure is to high. See page 28
Stitches are too big to sew the
cloth.
Non-woven lining under the
cloth is required for stitching
very thin cloth.
See page 14
See page 22
Insert a new
needle.
See page 14
See page 21
See pages 15
and 18
Put a nonwoven lining
under the cloth.
Upper thread tension is too low. See page 21
Thread makes loops
Fabric does not feed
properly
Helpline No. UK/ North Ireland 0871 37 61 020 Rep. Ireland 1-800-992 508
Web Support www.medion.co.uk
Model Number: MD 11871
The combination of needle size,
thread size and fabric is
incorrect, either too thick or too
thin.
Fibres block the feed dog. See page 46
Feed dog is discharged. See page 27
Stitches are too small. See page 23
See page 14
50
Page 49

Malfunctions Cause Remedy
Stitch length is „0“. See page 23
Fabric feeds irregular
Machine does not work.
Machine does not run
free.
Machine is noisy and
works slowly
Thread ends in shuttle track. See page 45
Hand wheel is in winding
position.
Main power switch is turned off. See page 10
Thread tangled it the bobbin
case handle.
Hand wheel is in winding
position.
Insufficient oiling See page 47
Thread tangled it the bobbin
case handle.
Fibres block the feed dog. See page 46
Insufficient oiling See page 47
See page 16
See page 45
See page 16
See page 45
Helpline No. UK/ North Ireland 0871 37 61 020 Rep. Ireland 1-800-992 508
Web Support www.medion.co.uk
Model Number: MD 11871
51
Page 50

Technical Specifications 12
Sewing machine
Nominal voltage: 220 - 240 V ~ 50 Hz
Nominal consumption: total 85 W
Motor 70 W
Light 15 W
Light socket E14
Stitch speed: max. 800 stitches per minute
Foot pedal:
Model: HKT7
Nominal voltage: 200 - 240 V ~ 50 Hz
Safety class: II
Subject to technical changes.
Helpline No. UK/ North Ireland 0871 37 61 020 Rep. Ireland 1-800-992 508
Web Support www.medion.co.uk
Model Number: MD 11871
52
 Loading...