

Page 1
Page 2

Congratulations
Congratulationonyourpurchaseoftheprofessionaldigitalpiano.
Thispianoisaneasy-to-usedigitalpiano.Insidetheslimcabinet,ithassomanyprofessionaland
modernizedpresetstylesandsongs,easybutpowerfulfunctions,andfeaturesthatenhanceyour
performance.Enjoyyourperformancewiththepiano!
Youarerecommendedtostudythismanualcarefullybeforeusingtheunit.
InsideThispackage
Pleasemakesurethepackagecompletelycontainsthefollowing:
PianoCabinet(includingadaptercable)
RightSidePanel
RearPanel
InstructionManual
LeftSidePanel
PedalBox(includingpedalcable)
ScrewBag
Version:G01
2
Page 3
ImportantNotes
Pleasereadthefollowingcarefullybeforeuse:
Donotexposethepianotohightemperature,directsunlightandexcessivelydustyplaces.
Donotplacethepianotooclosetootherelectricalappliancessuchastelevisionandradio.
Itmaycauseinterference.
Donotplacethepianotoexcessivehumidarea.Avoidputtingcontainerwithliquidontopof
thepianoforpreventingthedamageoftheinternalpartsofthepianobyflowingliquid.
Alwaysunplugcablesbygrippingtheplugfirmly,butnotpullingonthecable.
Donotapplyexcessiveforcetotheswitchesandbuttons.
Whenthepianoisnotinuseorinthetimeofthunderstorm,pleaseremeberdisconnectthepowersupply.
Avoidadjustingthevolumeleveltothemaximumortothelevelsthatyoufeeluncomfortable,we
recommendyoutolimitthevolumeleveltotwo-thirdofthemaxtopreventthedamageof
audiorysense.
Unplugthepowercablebeforecleaningthepiano,anddonotconnectordisconnectthepowercable
withawethand.
Checkandcleanthepowerplugperiodically.
Toavoiddamagetothepianoandotherdevicestowhichitisconnected,turnthepower
switchesofallrelateddeviceoffpriortoconnectingordisconnectingcables.
Cleanthepianowithadrysoftcloth,aslightlydampclothcouldbeusedtoremovedirtaswell.
Neverusecleanerssuchasthinneroralcohol.TopreventdamagethesurfaceoftheLCDdisplay,
pleaseuselenscleaningtissuetocleanthedisplay.
Ifthepianocableisdamaged,pleasedonotusethepiano.Otherwiseitmaycausefireorelectrical
hazard.
Inthecaseofmalfunctionduetoimproperhandlingthepiano,pleaseswitchoffandonagain
after30seconds.
Donotattempttodisassembleorrepairthepianobyyourself,aswellastheinternalparts.
Ifthepianodoesnotworkproperly,pleasecontacttheapprovedrepairer.
3
Page 4

MainFeatures
Keyboard:
●
88-keystouchresponsekeyboardwith3touchlevels.
Display:
●
Multi-functionLCDdisplay.
Operation:
●
Friendlyuser-interface,usingdialoradd/subbuttontoselectstyles,songsandvoices.
Voices:
●
210voices.16voicescanbeselectedbydirectselectbutton.
Styles:
●
120styles.12stylescanbeselectedbydirectselectbutton.
Songs:
●
60songs(withMelodyofffunctions).
Demosongs:
●
3demosongs.
●
Chord:
Single-fingereddetectandmulti-fingereddetect
Recording:
●
oneusersong.
Memory:
●
4Banks,eachhas4Memories.
Stylescontrolling:
●
SYNC,START/STOP,FILLINA/NORMAL,FILLINB/VARIATION,INTRO/ENDING.
Otherfunctions:
●
DTRANSPOSE,TUNING,BEAT,TOUCH,SPLIT,DSPLEVEL,MIDIIN,MIDIOUT
UAL,SPLIT,O.T.S.,METRONOME,
Mixer:
●
DrumVolume,BassVolume,OrchestraVolume,VoiceR1Volume,VoiceR2Volume,VoiceLVolume.
Jacks:
●
1.USBjack.
2.HeadPhonejack.
3.Audiooutput.
4.Pedaljacks(sustain,soft,sostenuto).
NOTE:
Holddown[+]and[-]buttonssimultaneously
thenturnonthepower,thepianowillresetfactory
setting.Youwilllostallinformationthatyouset.
Presstogether
4
Page 5
Contents
Set-upGuide
GeneralGuide
TheConnectors
UsingtheACpowerjack
-
-Usingheadphonesjack
-UsingAUX.OUTjack
-Usingthefootpedals
-UsingtheUSBjack
BasicOperation
-PowerSwitchandMasterVolume
-Demo
VoiceandEffects
-Selectavoice
-Dualvoice
-LowerVoice/SplitPoint
6-8
9-10
11-12
11
11
11
12
12
13
10
10
14-15
14
14-15
15
Mixer
Memory
-MemoryBank
-Store/LoadParameter
-MemoryData
-ClearMemoryData
OneTouchSetting
Record
-RecordWaiting
-StartRecord
-StopRecord
-PlaybackRecord
Song
Specifications
25
26-27
26
26
26
27
27
28
28
28
28
28
29
30
AutoAccompaniment
-
Selectastyle
-TheAccompanimentSection
-Startthestyle
-FillA/B
-Stopthestyle
-Accompvolume
-Tempo
-ChordRecognize
-Metronome
Function
-Transpose
-Tune
-Beat
-Touch
-SplitPoint
16-22
16
16
17
18
18
19
19
20-21
22
22-24
23
23
23
23
24
Troubleshooting
Appendix1-VoiceList
Appendix2-stylelist
Appendix3-Demolist
Appendix4-Songlist
Appendix5-Chordchart
Appendix6-MIDIImplementation
Chart
30
31-32
33
34
34
35
36
-DSPLevel
-MIDIINChannel
-MIDIOUTChannel
5
24
24
24
Page 6
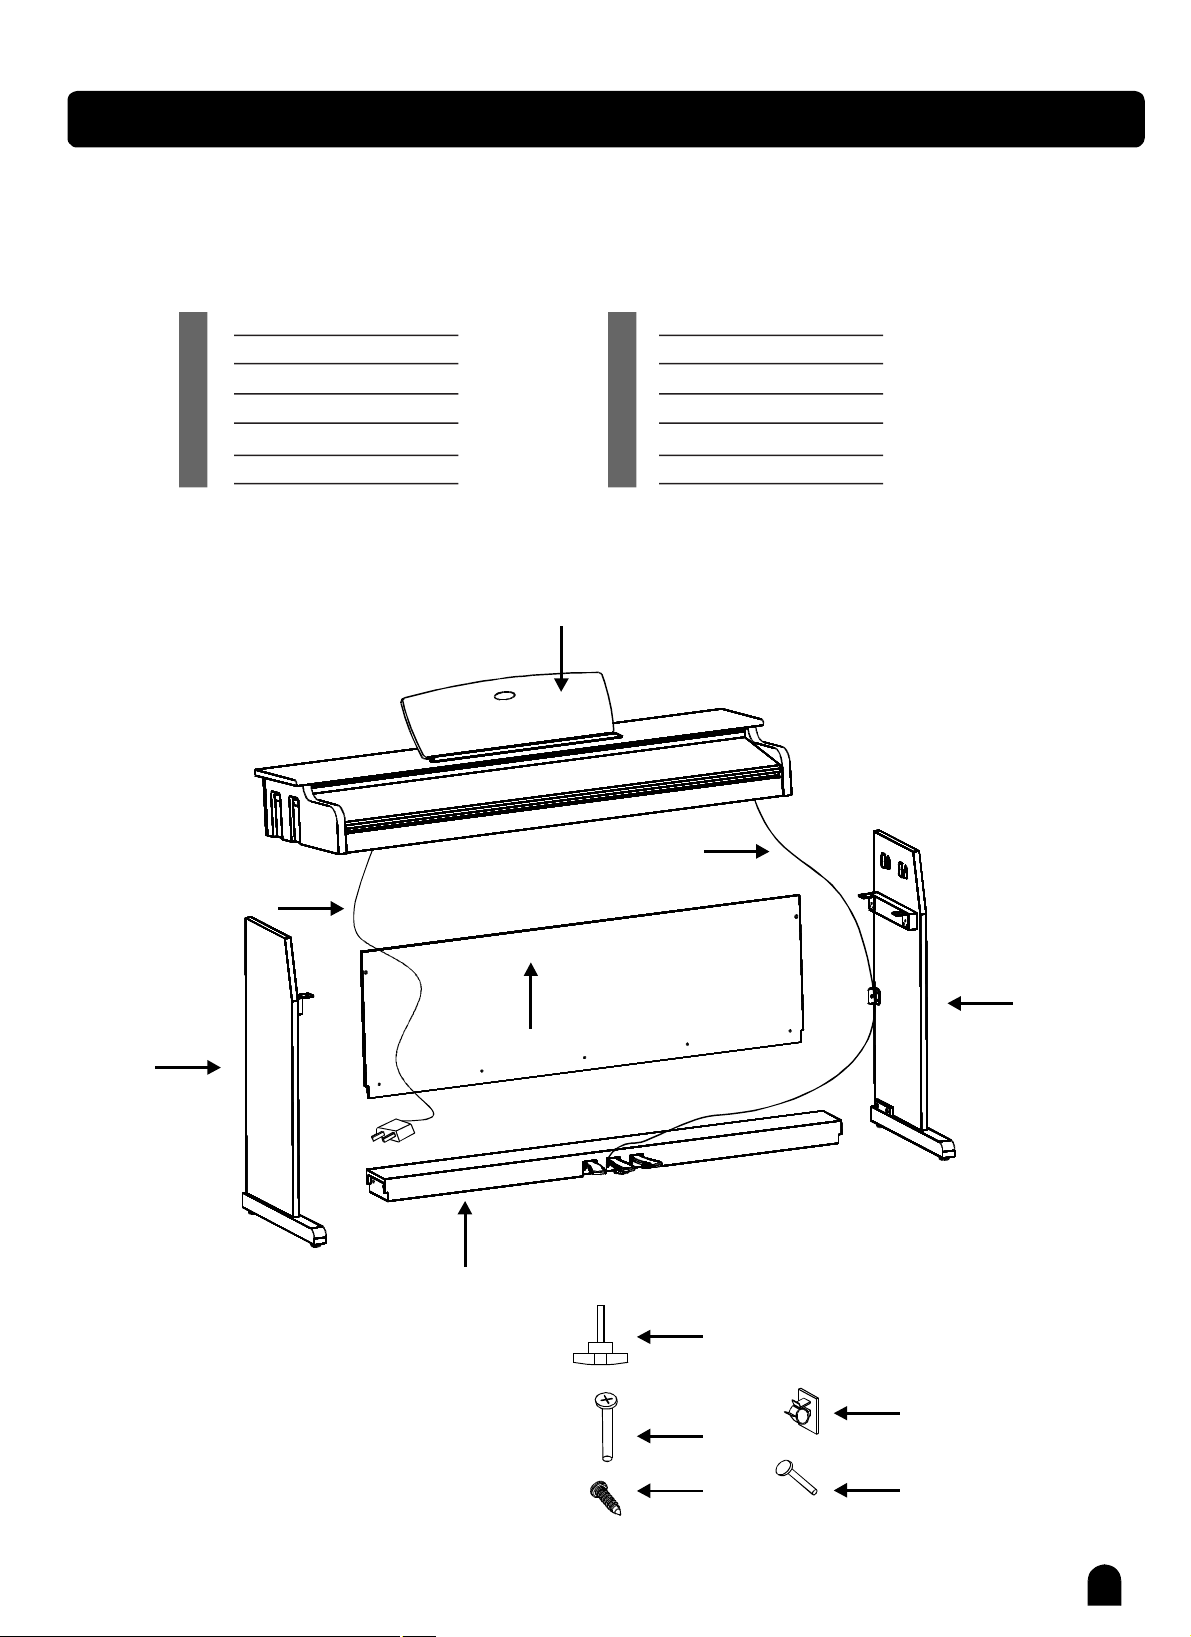
Set-upGuide
Beforeassembly,pleasemakesurethatallofthefollowingitemsarepresent.
1.PianoCabinet
2.RightSidePanel
3.LeftSidepanel
4.BigRearPanel
5.PedalBox
6.Screw(X4)
10
7.Screw6X30(X4)
8.Screw(X5)
9.AdhesiveClampX2()
10.PowerSupplyCable
11.Screw62Φ1X(X2)
12.PedalCable
Φ
Φ415X
1
12
2
4
3
5
6
9
7
8
11
6
Page 7
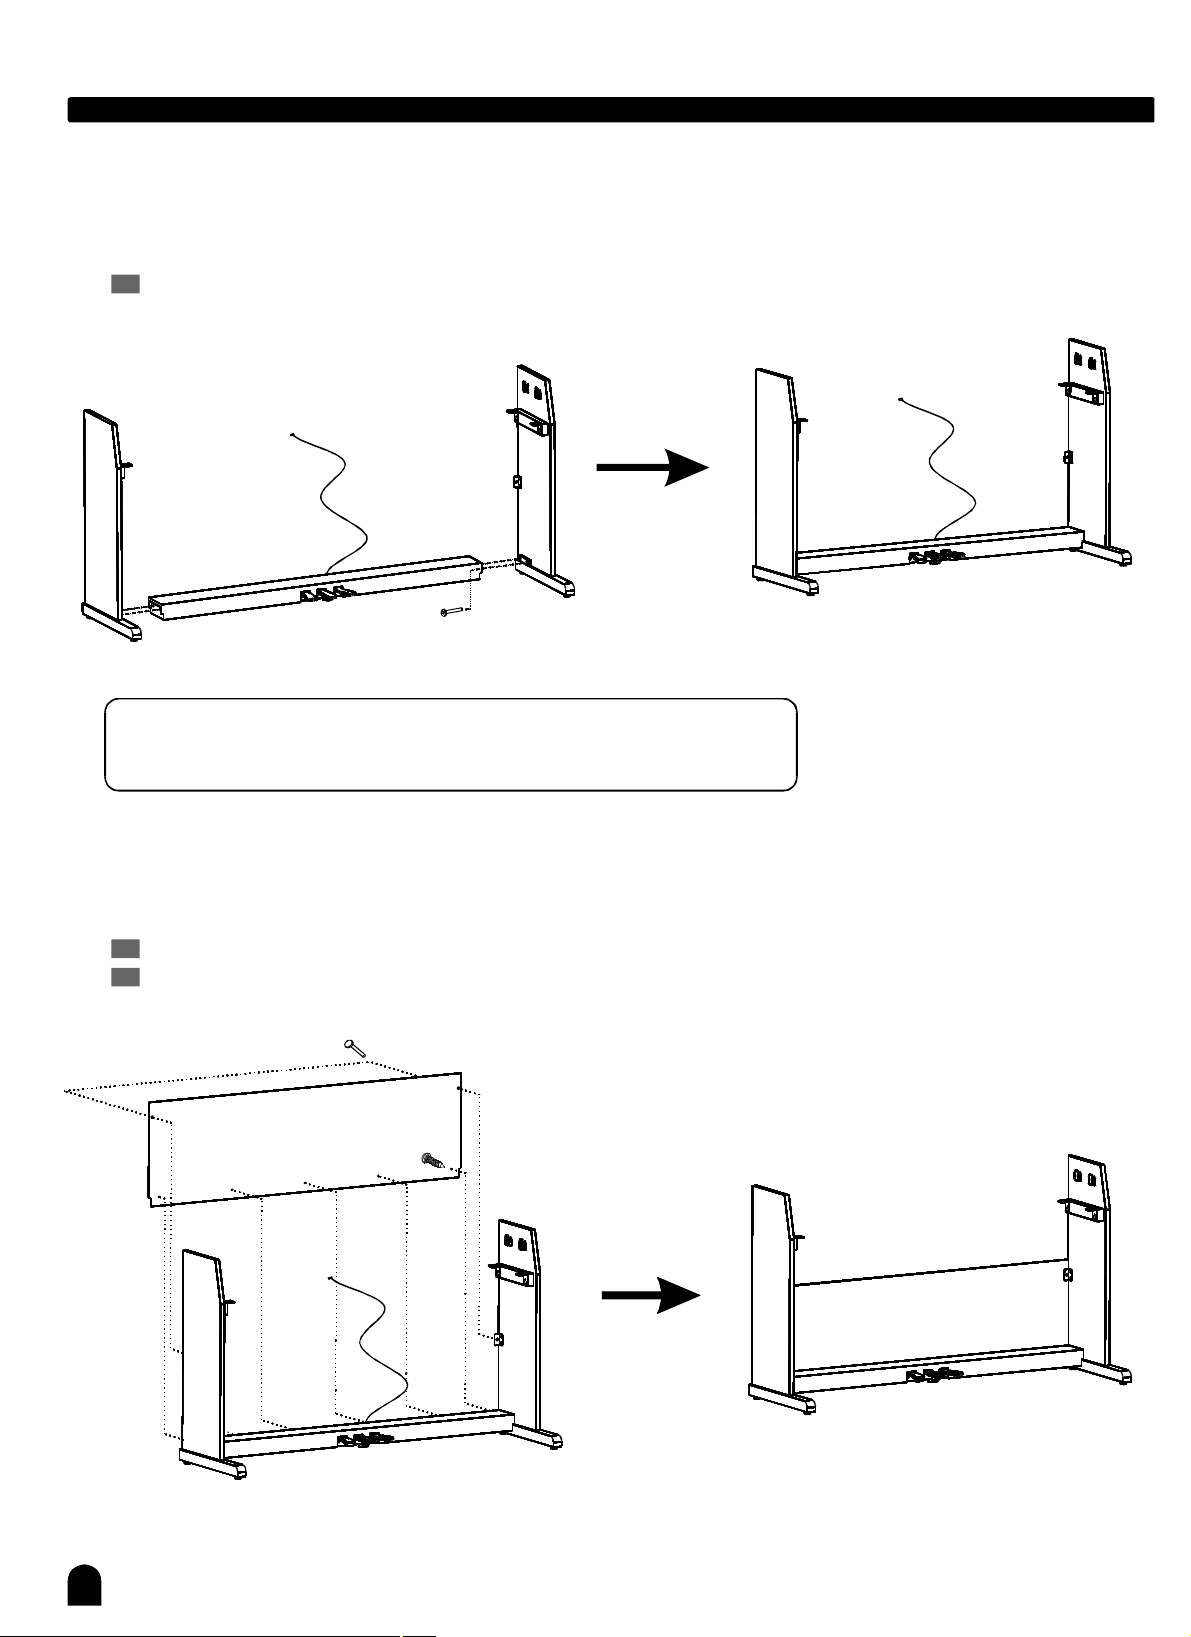
Set-upGuide
SidePanelandPedalBoxassembly
Placethepedalboxonthetwosidepanelsandthenusescrewstofastenthesidepanels.
7.Screws6X30(X4)
Φ
4PCS
NOTE:
Pleaseusethescrewsthatbesupplied,donotusetheotherscrews.
RearPanelassembly
Fixtherearpaneltothesidepanelswith2screwsandtothebottomoftherearpanelwith5screws.
8.Screws4X15(X5)Φ
11.Screws6X12(X2)Φ
2PCS
5PCS
7
Page 8
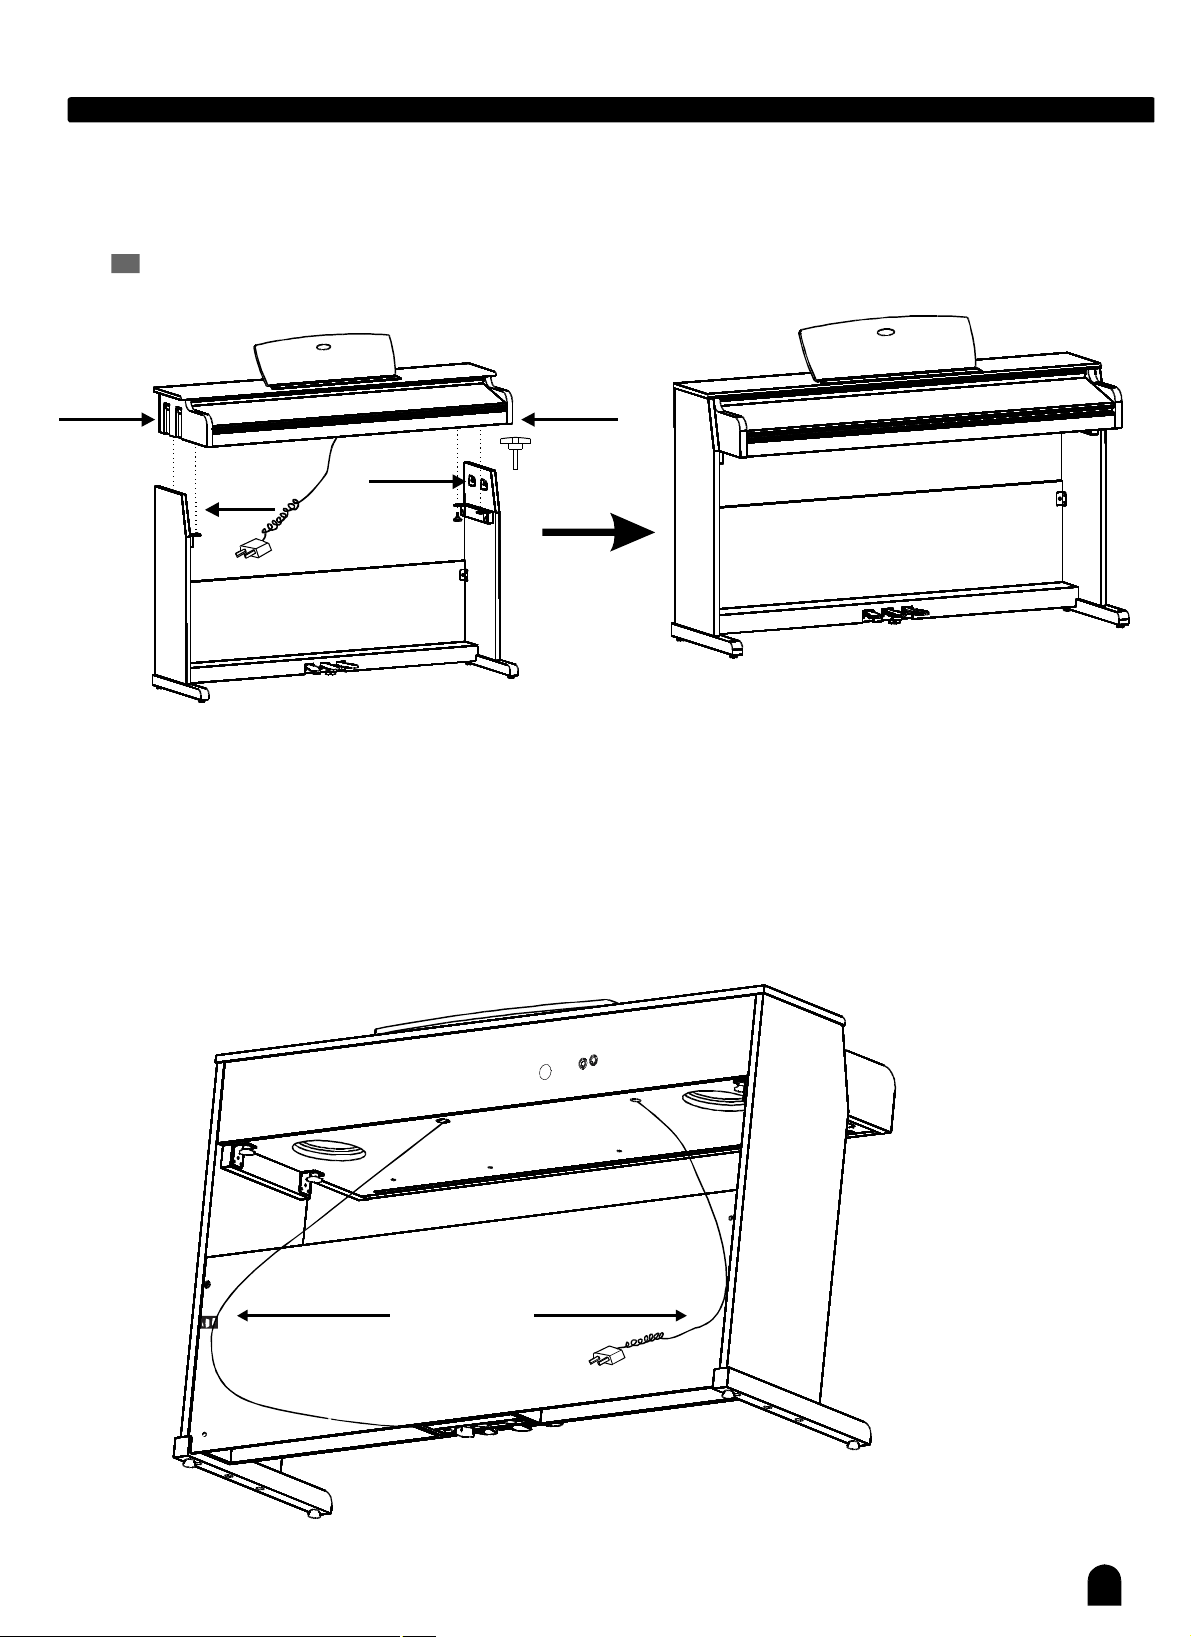
AttachthePianoCabinet
Placethepianocabinetonthestand,fixitusingfourscrews.
6.Screws(X4)
HookB
2X2PCS
()
HookA
2X2PCS
HookA
()
Set-upGuide
HookB
Fixthecables
Attach2adhesiveclampsonrightandtheleftsidepanelstofixthecables.
InserttheDINplugofpedalcableintothepropersocketofcabinet.
Placethepianoinitsfinallocationandadjustonfloorthepedalclogunderpedalsgroup.
Adhesiveclamps
8
Page 9
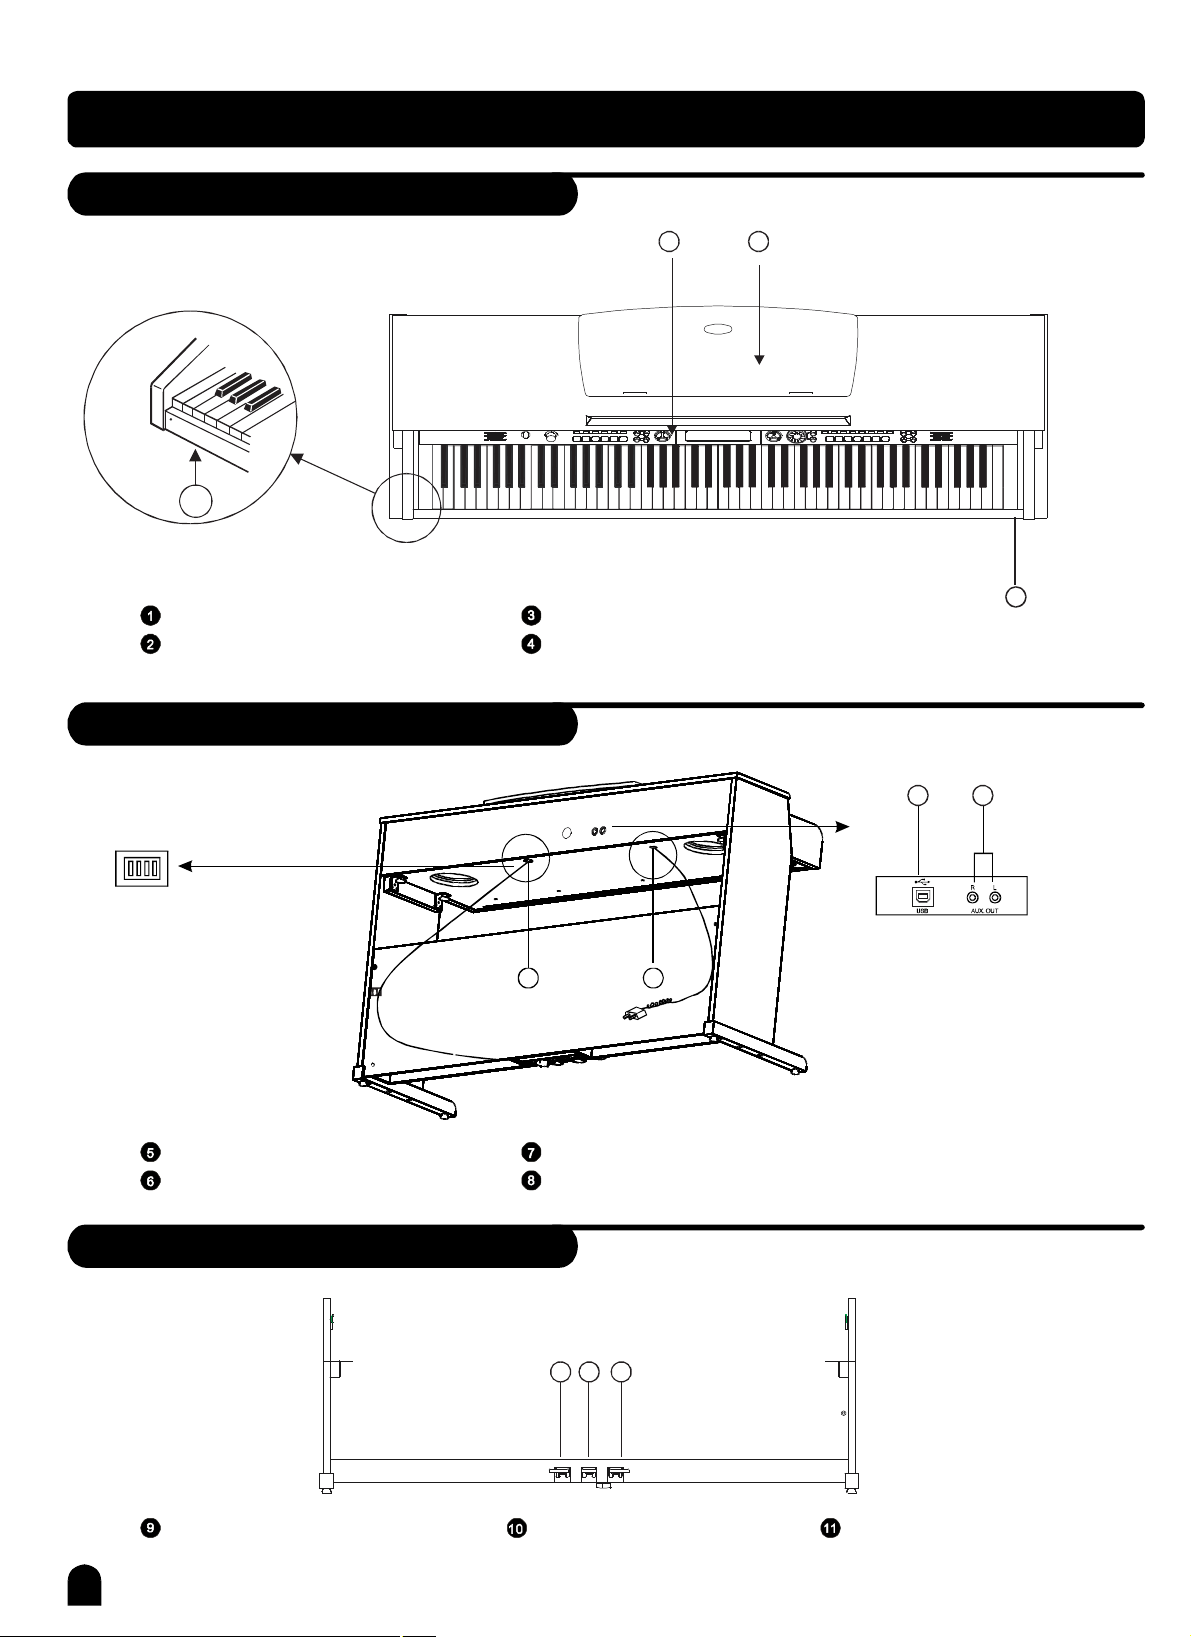
GeneralGuide
Plane
2
13
ControlPanel
HeadphonesJack
RearPanel
PedalJack
PowerSupplyCable
MusicStand
4
PianoKeyboard
78
56
USBJack
AUX.OUTJack
FrontPanel
SoftPedal SostenutoPedal
9
9
1110
SustainPedal
Page 10
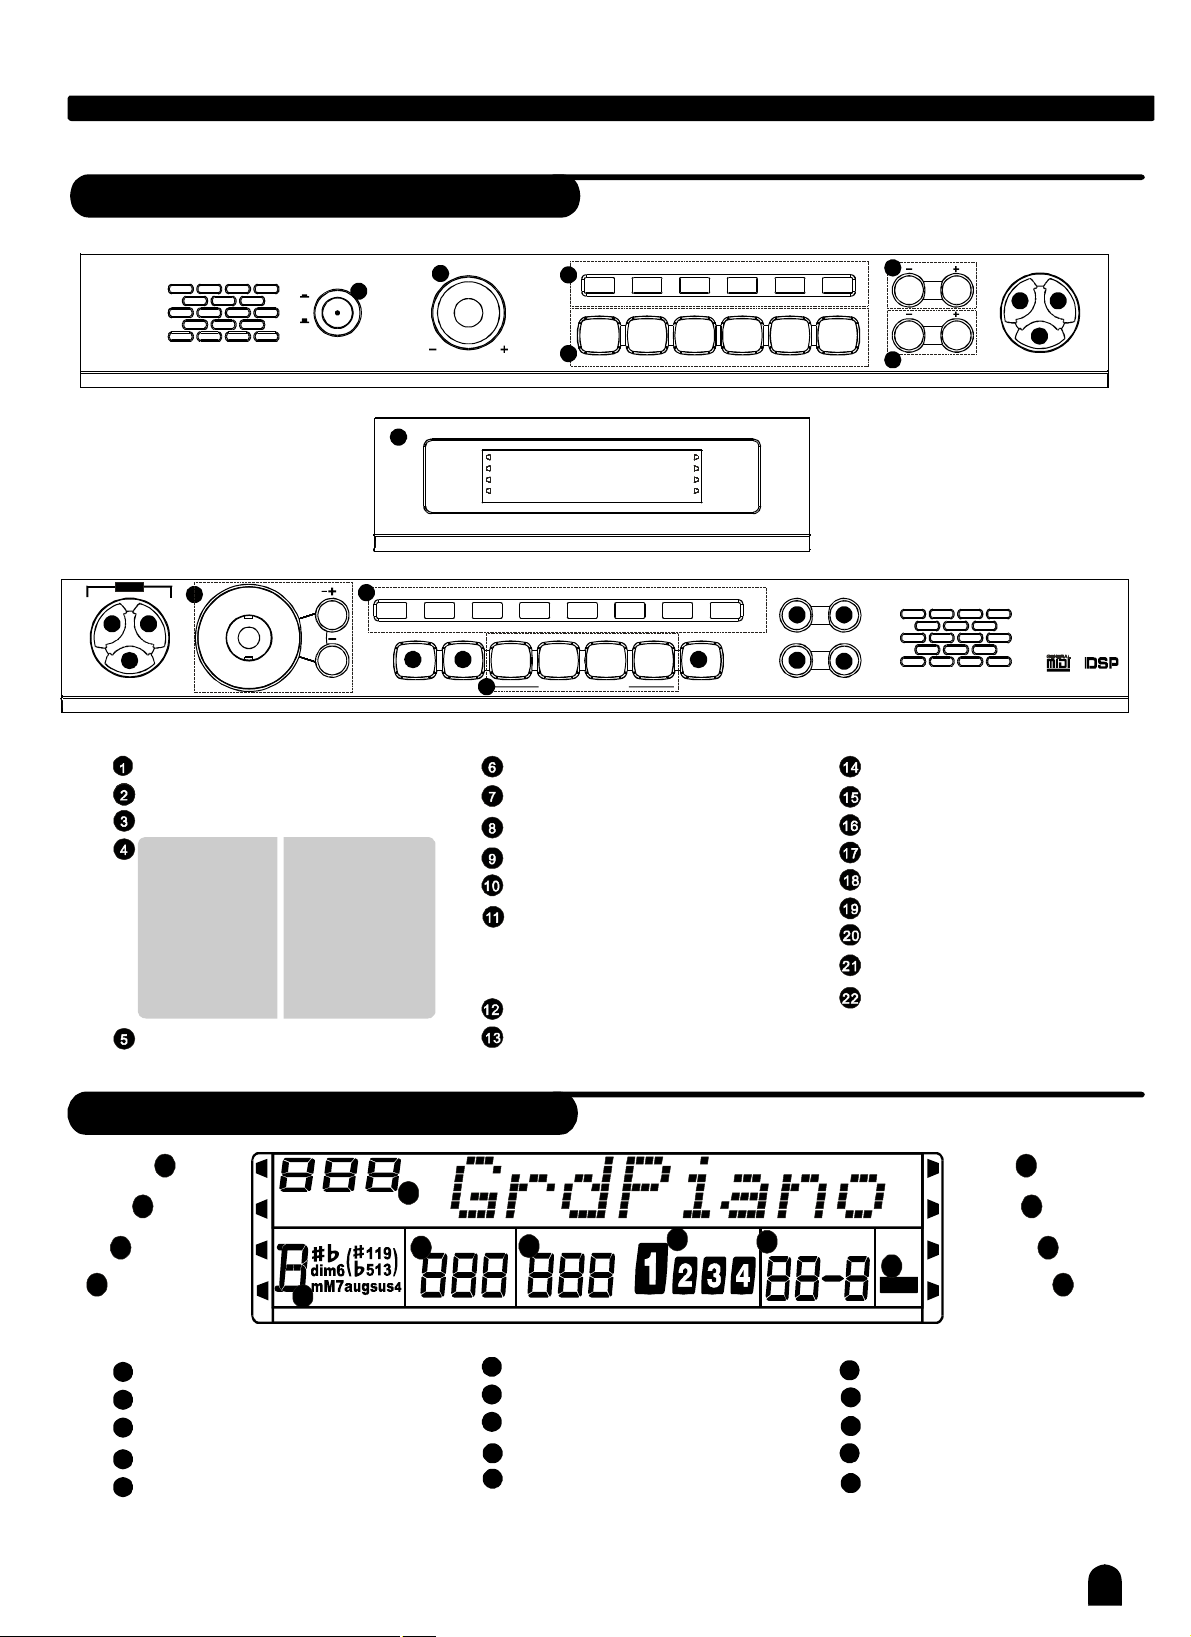
ControlPanel
GeneralGuide
STYLE
DEMO
10 11
12
SONG
VOICE
13
POWERSWITCH
MASTERVOLUME
STYLESDIRECTSELECT
STYLEMODE
-START/STOP
-SYNC
-INTRO/ENDING
-FILLA
-FILLB
-A.B.C.
ACCOMPVOLUME+/-
POWER
1
ON
OFF
10
001GrdPiano012Vibes022Accordin041Violin057Trumpet069Oboe188PiPa200Std-Kit1
14
005ElPiano1020ChrOrgan026SteelGt049Strings1067TenorSax072Clarinet191GuZhen 210ChinPerc
SONGMODE
-MELODYOFF
VOLUME
2
A.B.C.
FILLA
FILLB
MELODYOFF
BANKSTOREM1M2M3M4O.T.S.
15 16
17
3
008Pop16Bt1044Disco091Samba099Polka112Dandut2083Rhumba
START/STOPSYNCINTRO/ENDING
4
ONETOUCHSETTING
18
TEMPO+/MIXER
FUNCTON
METRONOME
STYLE
VOICE
Press[STYLE][VOICE]buttons
、
simultaneouslytoplayDEMO.
SONG
DIAL+-、、
DUAL
SPLIT
TOUCH
RECORD
FILLAFILLB
DUALSPLIT
102S.Waltz0018Beat034Rock087Tango096March062Swing
A.B.C.
MELODYOFF
19 20
RECPLAY/STOP
21
22
ACC.VOL
5
TEMPO
6
MIXER
FUNCTION
7 8
9
METRO
VOICEDIRECTSELECT
BANK
STORE
ONETOUCHSETTINGM1-M4()
ONETOUCHSETTING
DUAL
LOWER
RECORD
PLAY/STOP
LCDDisplay
1
A.B.C.
2
FILLA
3
4
MELODYOFF
1
2
3
4
FILLB
A.B.C
FILLA
FILLB
MELODYOFF
DUAL5
VOICELR12DIR
STYLESONGFILE
10
9
TEMPOMEASUREBEAT
11
12
6
SPLIT
7
TOUCH
8
RECORD
9
VOICE/STYLE/SONG/FORMAT/FILE
10
CHORD
13
MEMORY
14
TICKO.TS.
DUAL
SPLIT
TOUCH
15
card
DSP
11
TEMPO/VEL
12
MEASURE
13
BEAT
14
MEMORY/TICK/O.T.S.
15
DSP
RECORD
5
6
7
8
10
Page 11
TheConnectors
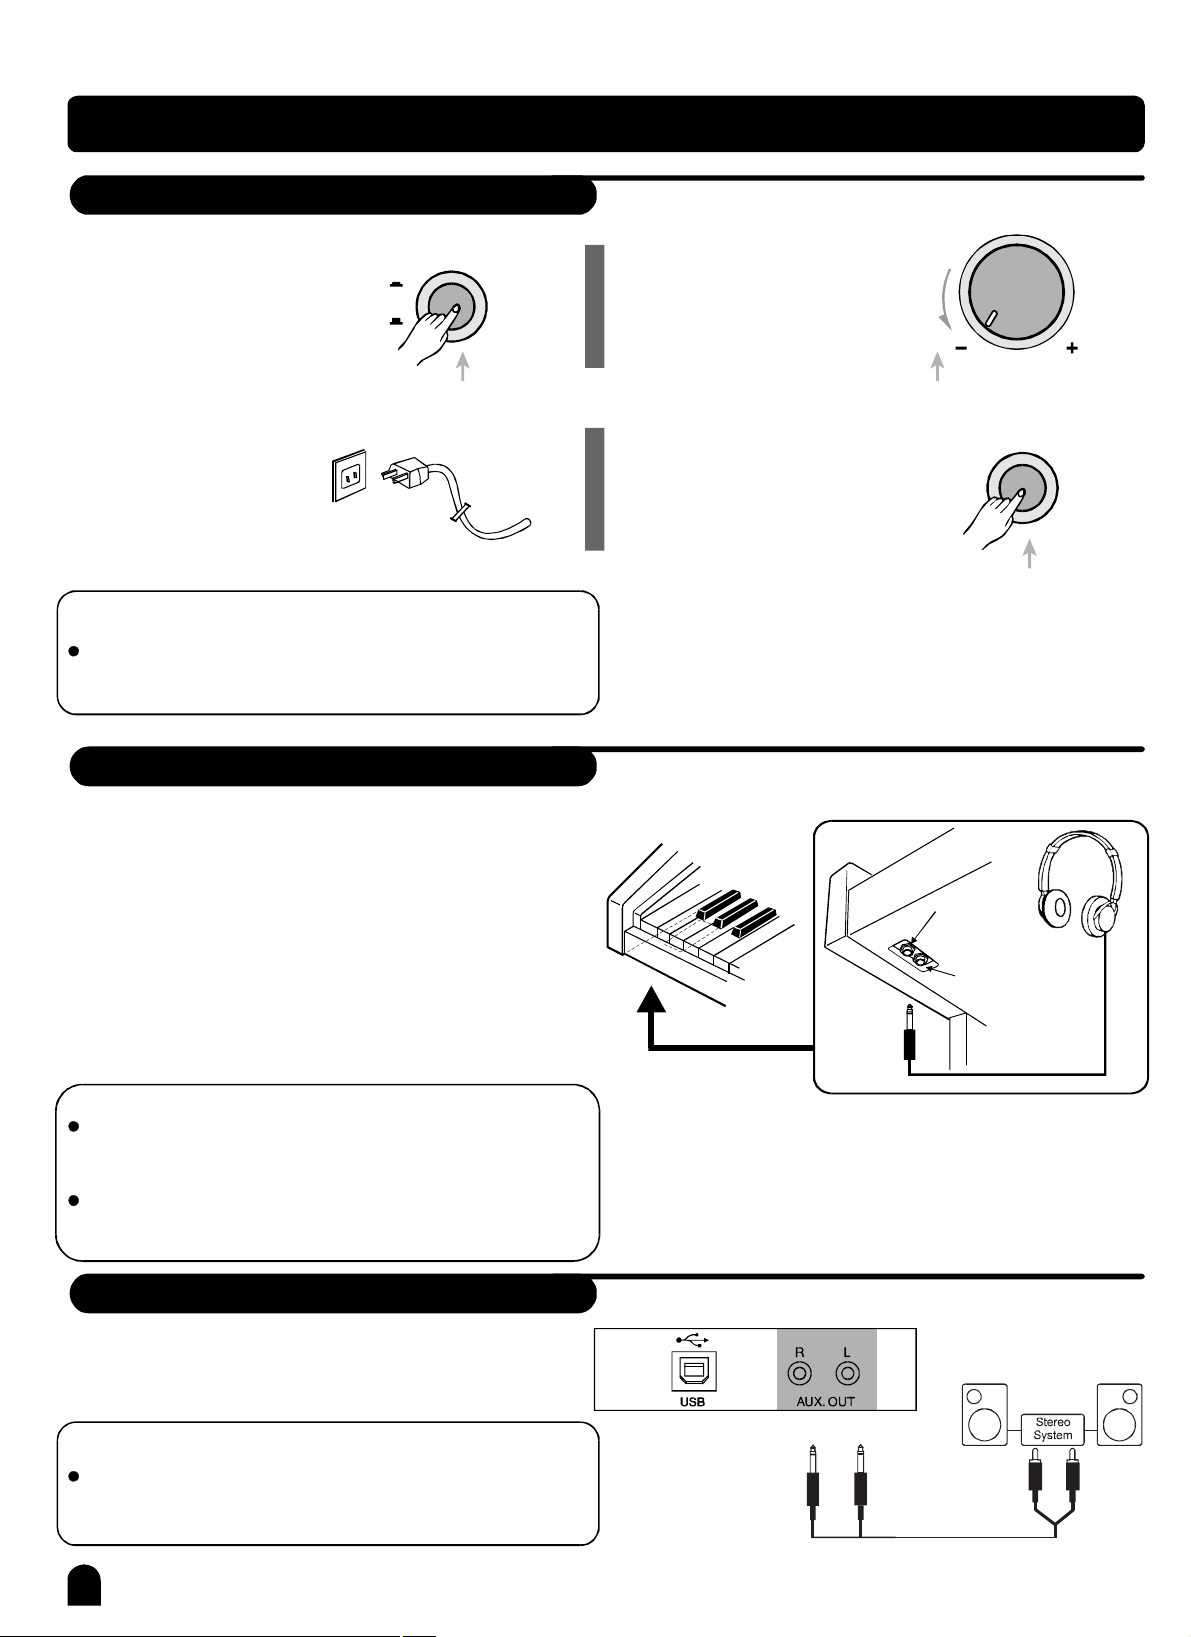
UsingtheACpowerjack
VOLUME
1、
Ensurethepianoisturned
offwhenconnectingand
disconnectiongthepower.
3、
Plugthepowercableinto
POWER
ON
OFF
anACpoweroutlet.
NOTE:
Whenthepianoisnotinuseorinthetimeofthunderstorm,pleasedisconnectthepowerforsafetysake.
Usingheadphonesjacks
Therearetwoheadphonesjacksontheleftunderneath
thepianobody.
Turnthevolumeswitch
2、
anti-clockwisetoreach
theminimumvolume
level.
Ifyouhavedonethe
4、
aboveproceduresyou
arenowsafetoturn
onthepiano.
SettominimumTurnoff
POWER
Turnon
Whenanoptionalsetofstereoheadphonesisconnected
1、
withtheheadphonesjack2,thesoundfromspeakers
willswitchoffautomaticallyresultinginonlythesound
fromheadphonetobeheard.
Whenjack1isconnectedwiththestereoheadphones,
2、
thesoundcanbeheardfrombothheadphonesand
speakersofthepiano.
NOTE:
Neverusetheheadphoneswithhighvolume,asitmay
hurtyourears.
Topreventthedamageofthespeakers,ensurethatthe
volumeissettotheminimumlevelbeforeconnecting
thepowerandotherdevices.
UsingtheAUX.OUTjack
Connecttherear-panelAUX.OUTjacktoamplified
speakers,amplifiersordomestichi-fi-unitsfor
externalamplification.
NOTE:
Connectbothleft(L)andright(R)channelsforthestereo
result.Ifyouonlyconnecteitheroneofthechannels,the
connectedchannelwillonlytakeeffect.
Headphones
Jack1
Headphones
Jack2
11
Page 12
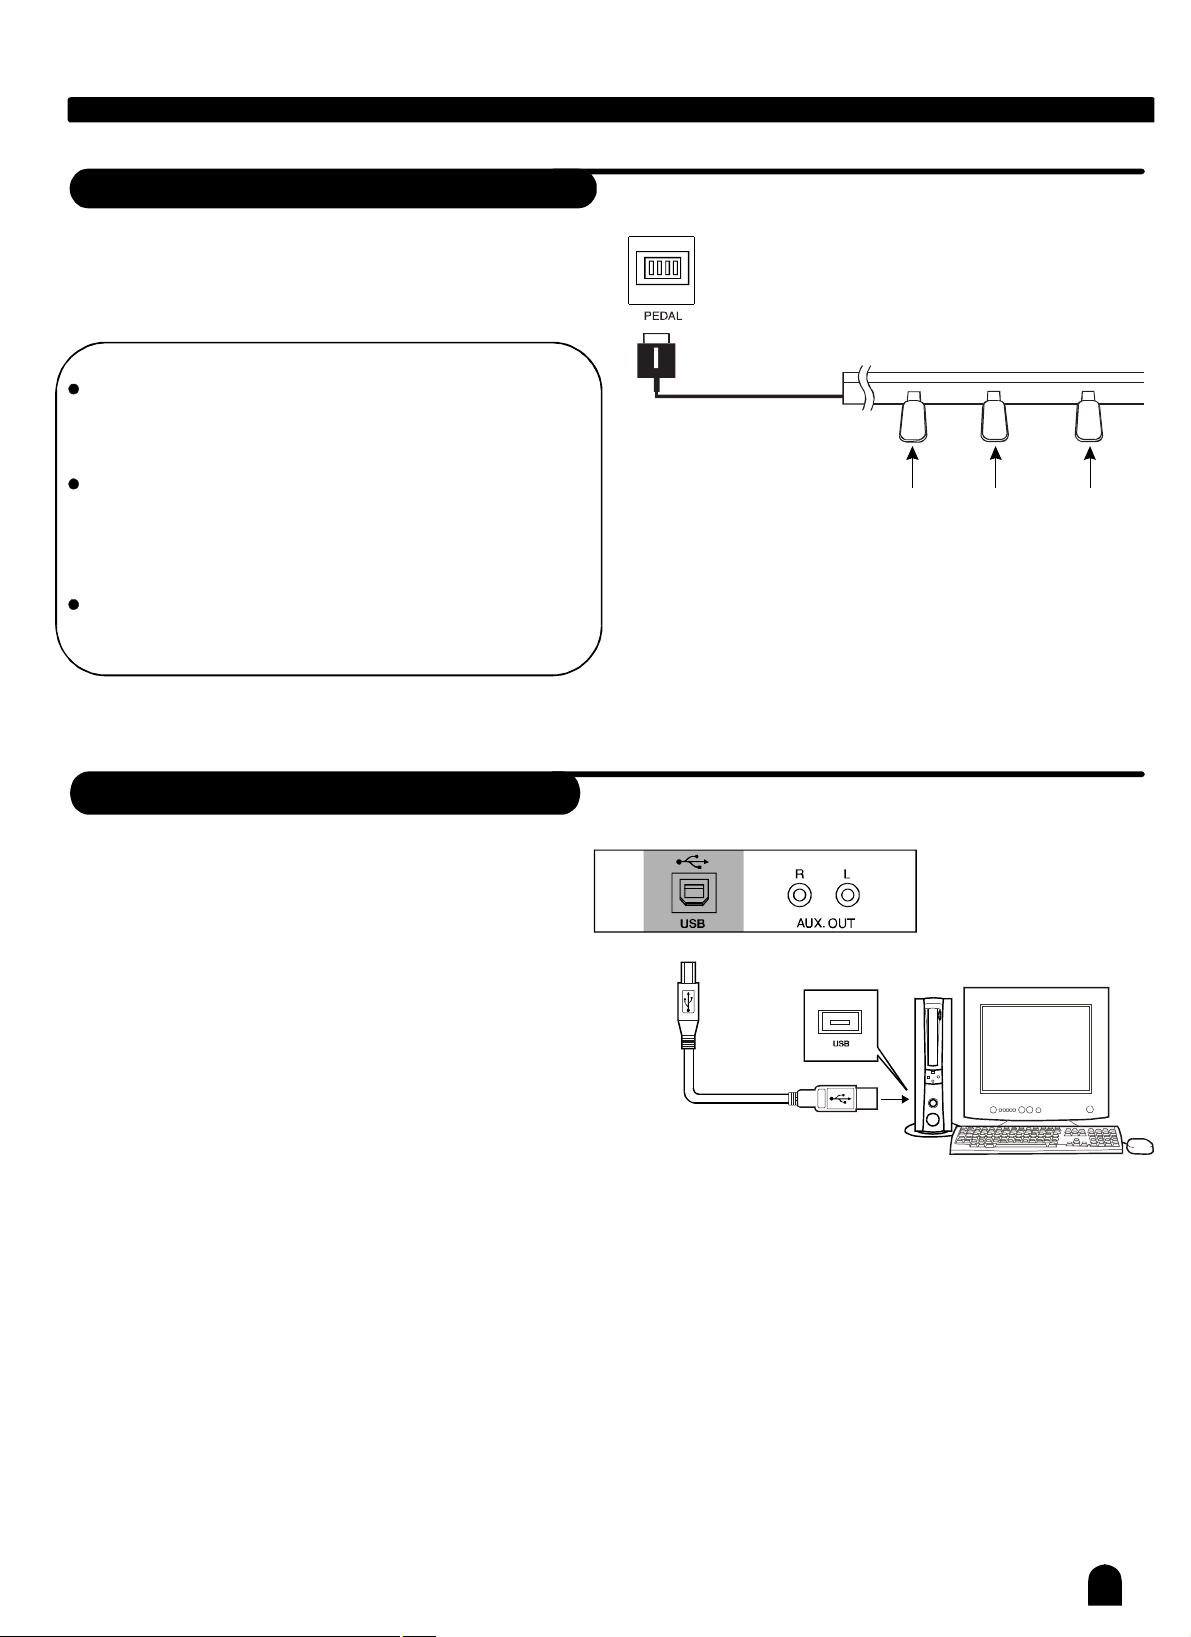
Usingthefootpedals
Connecttheplugofthefootpedalunittothepedaljack
ontherearpanel.
Youwillexperiencethesustain/soft/sostenutoeffect.
NOTE:
Whenthesustainpedalispressed,notescontinueto
playaftertheirkeyshavebeenreleased.Releasingthe
pedalwillsilencethesustainednotes.
Theconnectors
Ifyouplayanoteonthekeyboardandpressthe
sostenutopedalwhilethenotesareheld,thosenotes
willstillsustainaslongasyouholdthepedal.Butall
subsequentlyplayednoteswillnotbesustained.
Thesoftpedalreducesthevolumewhilethepedalis
pressed.Thesoftpedalwillnotaffectnotesthatare
alreadyplayingwhenitpressed.
UsingtheUSBJack
ConnectPCorotherUSBhostdevicesthatsupport
1、
USBaudio.
FordeviceswithUSBcable,youcansimplyconnect
2、
theMIDI/USBconvertortoyourUSBconnectoron
yourdevicesandplugtheMIDIinorMIDIoutcables
intothepiano,afterthedriverisinstalledandinitialization
isfinished,youcanchooseUSBAudioDeviceinthe
devicemenuofthesoftwaretotransfermididata.
SOFT
SOSTENUTO
SUSTAIN
12
Page 13
BasicOperation
PowerSwitchandMasterVolume
First,makesurethecorrectconnections.
1、
Turnthe[POWER]switchon.TheLCDdisplaylightsup.
2、
OFF
POWER
ON
STYLESONGFILE
TEMPOVELMEASUREBEAT
MEMORY
TICKO.TS.
card
DSP
Usethe[VOLUME]controlswitchtoadjustthevolume
3、
toyourdesiredlevel.
NOTE:
IftheLCDdisplaydoesnotlightupafteryouturnedon
thepiano,pleasecheckthepowersupply.
Ifthepianoissilent,thatmeansthevolumehasadjusted
toitsminimumlevel.
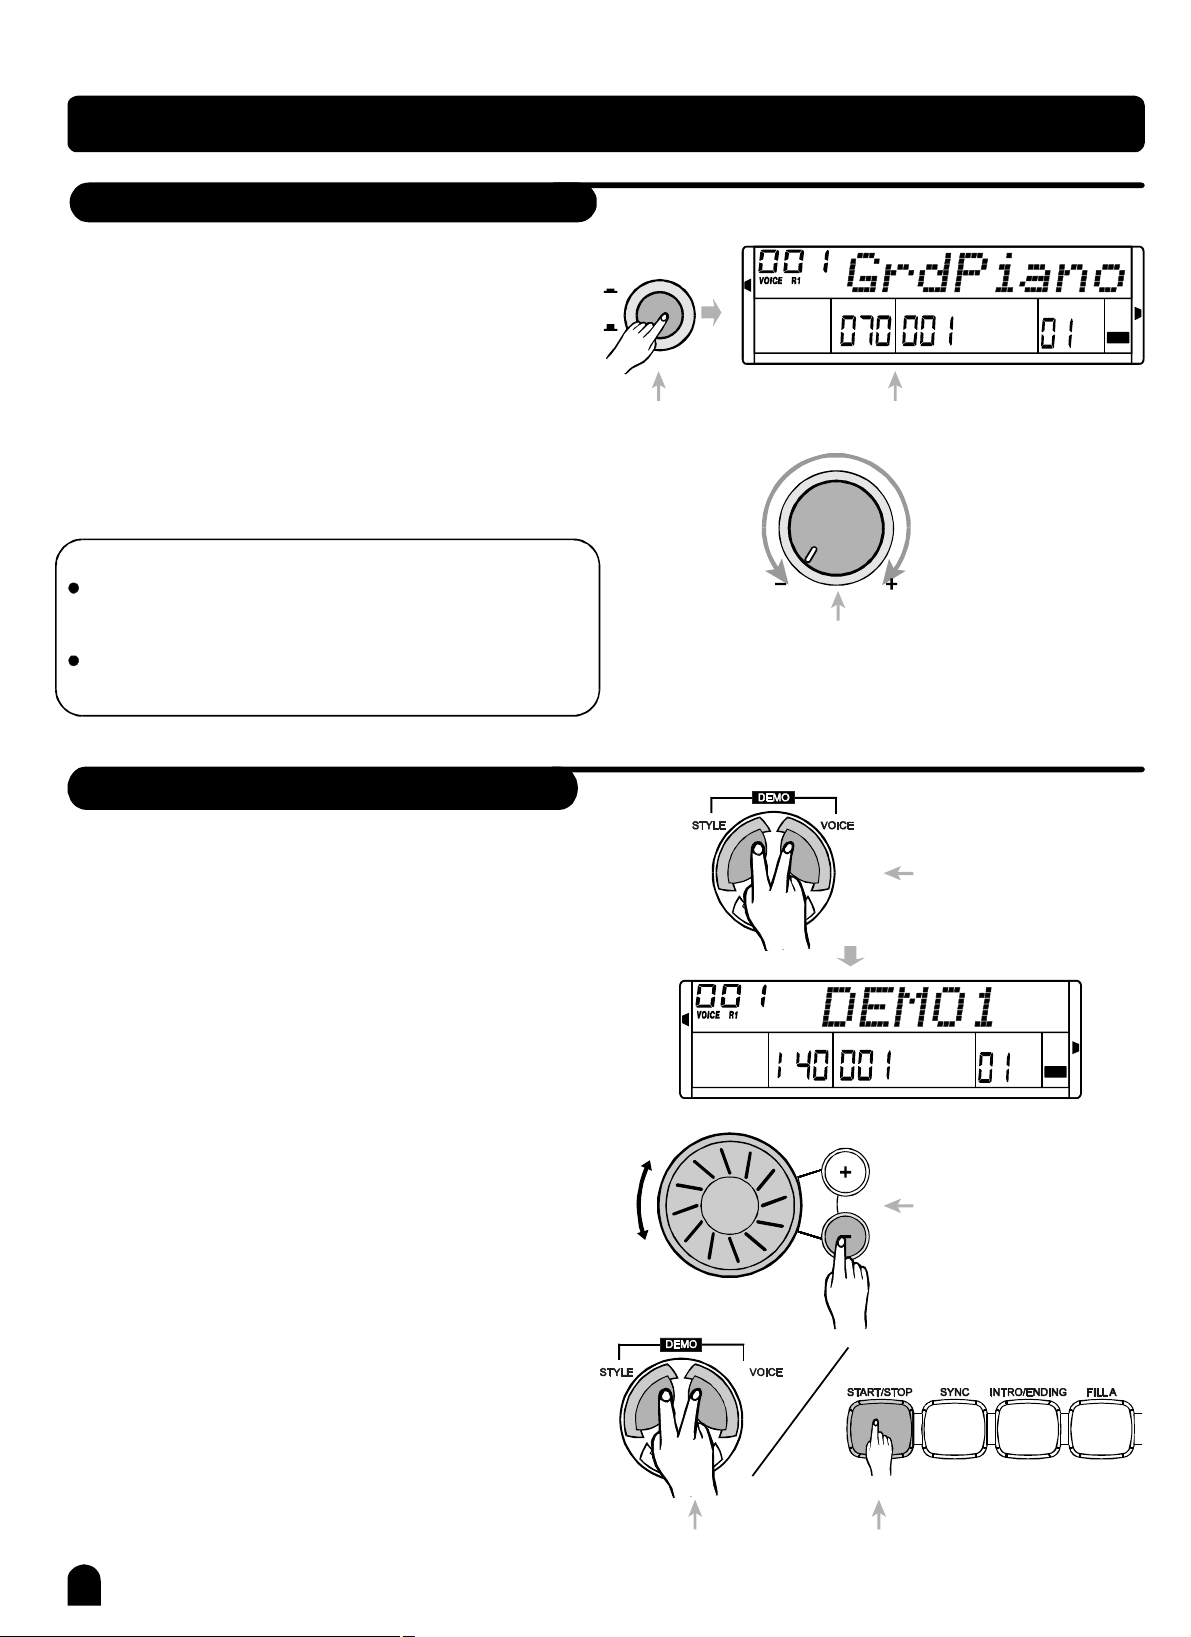
Demo
Therearetotal3demos.(Seeappendix)
Press[VOICE]&[STYLE]simultaneouslytoplaydemo
1、
song.
TurnonLCDlightsup
VOLUME
Rotatetoadjustthevolume
A.B.C.
FILLA
STYLESONGFILE
FILLB
MELODYOFF
TEMPOVELMEASUREBEAT
Pressthemsimultaneously
toplaydemo.
DUAL
card
DSP
SPLIT
TOUCH
RECORD
MEMORY
TICKO.TS.
Press[]/[]orrotatethedialtoselectdemosong
2、
+-
number.
Press[VOICE]&[STYLE]simultaneouslyagainorpress
3、
[START/STOP]tostopplaying.
13
Pressthemsimultaneously
toexitfromthedemomode.
Pressthemtoselectdemo.
Orpressittoexit
fromthedemomode.
Page 14

VoicesandEffects
Thereare210voicesintotal(seeappendix).
SelectaVoice
Whenpoweron,thedefaultVOICER1isNo.001,the
1、
VOICER1flaglitupandthevoicenameappearsonLCD.
2、
Press[VOICE]buttontoselectthreeseparatevoicemodes:
VOICER1,VOICER2,VOICEL.
3、
Youcanselectthevoiceyouwantedwith[]/[]button
+-
ordial.
4、
Usethe16VoicesDirectSelectButtontoselectthevoice
with2directvoicesineachbutton(upper&nether)
A.B.C.
FILLA
STYLESONGFILE
FILLB
MELODYOFF
Entervoicemode
001GrdPiano012Vibes022Accordin041Violin057Trumpet069Oboe188PiPa200Std-Kit1
005ElPiano1020ChrOrgan026SteelGt049Strings1067TenorSax072Clarinet191GuZhen 210ChinPerc
TEMPOVELMEASUREBEAT
MEMORY
TICKO.TS.
Selectavoice
card
DSP
DUAL
SPLIT
TOUCH
RECORD
Afterselectingavoice,youcannowplaythepiano.
5、
NOTE:
Whilechangingavoice,payattentiontotherules:
Ifyoupressthesamebutton,thevoicewillbechanged
betweentheupperandnetherkey.
Whentheupper/nethervoiceison,andthenyoupress
anotherdirectbutton,thecorrespondingupper/nether
voicewillbeselected.
DualVoice
Thepianohasdualvoice.Youcancreatethenewsound
throughthisfunctionforricherandpunchiersounds.
Itseemsthatyoucangettwodifferentsoundsatthe
sametimewhenyoupressakeyintherightareainthe
keyboard.
Press[DUAL]buttontoturnontheDUALVOICE,
1、
VOICE1lightoff,VOICER2andDUALflag
“”“”
wouldbothbedisplayedonLCD.Thedualvoicenameis
alsodisplayedonLCD.Then,youwillheartwodifferent
soundsatthesametimewhenyoupressakeyintheright
areaofthekeyboard.
A.B.C.
FILLA
FILLB
MELODYOFF
STYLESONGFILE
Enterdualvoicemode
TEMPOVELMEASUREBEAT
MEMORY
TICKO.TS.
Eg.Piano
Eg.Cello
Twovoiceswillsound
atthesametime.
card
DSP
DUAL
SPLIT
TOUCH
RECORD
14
Page 15

VoicesandEffect
2、
Press[]/[]button,orturnthedialtoselectthe
+-
dualvoicenumber.Thedefaultdualvoicenumberis
No.50Strings2.
Press[DUAL]buttonagaintoexittheDUALVOICEmode.
3、
NOTE:
InDUALVOICEstatus,onlysectionabovesplitpoint
onthekeyboardhasdualvoice.
LowerVoice/SplitPoint
A.B.C.
FILLA
FILLB
MELODYOFF
STYLESONGFILE
Selectthedualvoicenumber
TEMPOVELMEASUREBEAT
Exitdualvoicemode
MEMORY
TICKO.TS.
card
DSP
DUAL
SPLIT
TOUCH
RECORD
Thepianohaslowervoice.Youcansplitthekeyboardto
melodyandchordareabythisfunction.
1、
Press[SPLIT]buttontoturnontheLOWERVOICE,the
wholekeyboardwouldbespittedintorightandleftareas.
LCDlightenstheLOWERvoiceflaganddisplaysVOICEL
anditsname.
2、
Press[]/[]buttontoselectthelowervoicenumber.
+-
ThedefaultlowervoicenumberisNo.49Strings1.
3、
Press[SPLIT]buttonagaintoexittheLOWERVOICE
mode.LCDdarkenstheLowervoiceflag.
Enterlowervoicemode
“”
MELODYOFF
A.B.C.
FILLA
FILLB
STYLESONGFILE
Defaultsplit
pointF#
Chord
area
TEMPOVELMEASUREBEAT
Selectthelowervoicenumber
Exitthelowervoicemode
MEMORY
TICKO.TS.
Melody
area
card
DSP
DUAL
SPLIT
TOUCH
RECORD
15
Page 16

AutoAccompaniment
SelectaStyle
Thereare120stylesintotal,from001to
120(seeappendix).
Whenpoweron,thedefaultstylenumberis001.
1、
Press[STYLE]buttonorstyledirectselectbuttontoenter
thestylemode,theSTYLEflagislitupandthenameof
styleappearsonLCD.
A.B.C.
FILLA
FILLB
MELODYOFF
STYLE SONGFILE
TEMPOVELMEASUREBEAT
MEMORY
TICKO.TS.
card
DSP
DUAL
SPLIT
TOUCH
RECORD
Youcanpress[]/[]buttonordialtoselectthestyles
2、
+-
youwant.
Usethe6StylesDirectSelectButtontoselectthestyle
3、
with2directstylesineachbutton(upper&nether).
Afterselectingastyle,youcannowplaythepiano.
4、
NOTE:
Whilechangingastyle,payattentiontotherules:
Ifyoupressthesamebuttontwice,thestylewillbe
swappedfromonetoanother.
Whentheupper/nethervoiceison,andthenyoupress
anotherdirectbutton,thecorrespondingupper/nether
voicewillbeselected.
EnterstylemodeSelectastyle
062Swing
008Pop16Bt1044Disco091Samba099Polka112Dandut2083Rhumba
102S.Waltz0018Beat034Rock087Tango096March
TheAccompanimentSection
AccompanimentconsistsofINTRO,NORMAL,VARIATION,FILL,ENDING.Usingdifferentsectionbasedonthestructure
ofsongsenablesyoutoenhancemusicalperformance.
1、
INTRO
Pressthe[INTRO/ENDING]buttontoinsertanintrosectionbeforeyoustarttoplay.Themainsectionwillbefollowed
bytheINTROsection.
NORMALANDVARIATION
2、
Therearetwomainsection:normalandvariation.Eachsectionconsistsof2to4measures.
3、
FILL
Whiletheaccompanimentisplaying,youcanfillintherhythm/accompanimentbypressingthe[FILLA]button
orthe[FILLB]button.Thiswillautomaticallyinsertafillsection.
ENDING
4、
Whenyoupressthe[INTRO/ENDING]button,itbringsrhythmaccompanimentandyourperformancetotheend.
16
Page 17

AutoAccompaniment
StarttheStyle
1、
Startimmediately:
Press[START/STOP]buttontostartthestyle(onlydrum).
A.B.C.Mode:
2、
ThedefaultsettingofA.B.C.isoff.
Press[A.B.C./MELODYOFF]buttontoturnontheauto
basschord.TheA.B.C.iconwillappearontheLCD.
Theareatotheleftofsplitpointisknownasthechord
area.Whenplayingthechord,boththebassandthechord
voicesound.
Startthestyleimmediately
A.B.C.
FILLA
STYLE SONGFILE
FILLB
MELODYOFF
TEMPOVELMEASURE
BEAT
DUAL
card
DSP
SPLIT
TOUCH
RECORD
MEMORY
TICKO.TS.
EnterA.B.C.mode
NOTE:
Thereare2waystodetectthechord:
singlefingerdetectandfingersdetect.
Ifthechordplayedaccordingwithfingersdetect,itis
recognizedasthefingerschord.
Ifnot,singlefingerchordwillberecognized.
3、
SynchronousStart:
Pressthe[SYNC]buttontoentersSyncstartwaitingmode,
andthebeatindicatorsonLCDwillflash.
IftheA.B.C.modeisoff,playanykeyonkeyboardonly
startplayingthestylebydrumvoice.
IftheA.B.Cmodeison,playanykeyinleftareaofkeyboard
willstartplayingthestyle.
A.B.C.
FILLA
STYLE SONGFILE
FILLB
MELODYOFF
TEMPOVELMEASURE
EnterSyncstartwaitingmode
A.B.C.
FILLA
STYLE SONGFILE
FILLB
MELODYOFF
TEMPOVELMEASUREBEAT
Chordarea
Flashsimultaneously
BEAT
MEMORY
TICKO.TS.
MEMORY
TICKO.TS.
card
card
DSP
DSP
DUAL
SPLIT
TOUCH
RECORD
DUAL
SPLIT
TOUCH
RECORD
4、
INTROStart:
Press[INTRO/ENDING]buttontoinsertanintrosection
beforeyoustarttoplaythestyle.
Press[START/STOP]button,thenthenormalorvariation
stylewillplayaftertheintrostyle.
Press[INTRO/ENDING]buttonwhenthestyleisplaying,
stylewillbestoppedaftertheending.
17
Flashing
MELODYOFF
Insertanintrosection
A.B.C.
FILLA
STYLE SONGFILE
FILLB
TEMPOVELMEASUREBEAT
MEMORY
TICKO.TS.
card
DSP
DUAL
SPLIT
TOUCH
RECORD
Page 18

FILLA/B
InNORMALmode,press[FILLA]buttontoinsert1
1、
measurefillandLCDflashes'FILLA'.Afteronemeasure
isover,itwillsmoothlyleadtoNORMALstyle.
AutoAccompaniment
2、
InNORMALmode,press[FILLB]buttontoinsert1
measurefillandLCDflashes'FILLB'.Afteronemeasure
isover,itwillsmoothlyleadtoVARIATIONstyle.
InVARIATIONmode,press[FILLA]buttontoinsert1
3、
measurefillandLCDflashes'FILLA',Afteronemeasure
isover,itwillsmoothlyleadtoNORMALstylewillbe
returned.
InVARIATIONmode,press[FILLB]buttontoinsert1
4、
measurefillandLCDflashes'FILLB',Afteronemeasure
isover,itwillsmoothlyleadtoVARIATIONstylewillbe
returned.
NOTE:
Pressandholddownthe[FILLA]or[FILLB]button
whenthestyleisplaying,theselectedFILLpattern
repeatscontinuouslyuntilbuttonisreleased.
Press[FILLA]whenstylestop,itwillchangetothemain
section,the'FILLA'flagontheLCDwillbelightened.
Flashing
MELODYOFF
Flashing
MELODYOFF
A.B.C.
FILLA
FILLB
A.B.C.
FILLA
FILLB
STYLE SONGFILE
STYLE SONGFILE
TEMPOVELMEASUREBEAT
TEMPOVELMEASUREBEAT
Pressandholddown
MEMORY
TICKO.TS.
MEMORY
TICKO.TS.
card
card
DSP
DSP
DUAL
SPLIT
TOUCH
RECORD
DUAL
SPLIT
TOUCH
RECORD
Press[FILLB],itwillchangetothevariationsection,the
'FILLB抐lagontheLCDwillbelightened.
StopaStyle
Stopimmediately:
1、
Theaccompanimentcanbestoppedatanytimebypressing
the[START/STOP]button.
2、
EndingStop:
Pressthe[INTRO/ENDING]buttontocompletethesong
withendingsection.Theendingsectionwillbeginfrom
thetopofthenextmeasure.
SyncStop:
3、
Pressthe[SYNC]buttontostopplaying,andthesynchronizedstartmodewillactivated.
Pressandholddown
18
Page 19

AutoAccompaniment
AccompVolume
1、
Youcanchangethegeneralvolumeofstylethrough
Accompanimentvolumeadjustment.
2、
Pressthe[ACCOMP]/[ACCOMP]buttontoadjust
thevolume.
+-
STYLESONGFILE
TEMPOVELMEASUREBEAT
MEMORY
TICKO.TS.
card
DSP
3、
Whenyoupress[ACCOMP]and[ACCOMP]together,
+-
thevolumeyouaresettingwillturnoff.
Tempo
Pressthe[TEMPO+]or[TEMPO-]button,thetempo
1、
valuewouldbeflashingforabout2seconds.
Duringthattime,thetempocanbeadjustedbydialwith
2、
therangeof30280.
Pressandholdonthe[TEMPO+]or[TEMPO-]button
3、
toadjustthetempocontinuously.
-
STYLESONGFILE
STYLESONGFILE
TEMPOVELMEASUREBEAT
TEMPOVELMEASUREBEAT
Flashingtwosecnods
Pressandholdon.
MEMORY
TICKO.TS.
MEMORY
TICKO.TS.
card
DSP
card
DSP
Pressboth[TEMPO+]and[TEMPO-]simultaneously,
4、
thetempowillbesetbacktothedefaultvalue.
NOTE:
Thepianowillnottakeoutthedefaulttempoofthestyle
ifyouchangethestylewhenitisplaying.
19
STYLESONGFILE
TEMPOVELMEASUREBEAT
Presssimultaneously
MEMORY
TICKO.TS.
card
DSP
Page 20

ChordRecognize
"A.B.C."isdisabledduringthedefaultsetting.
Press[A.B.C./MELODYOFF]buttontoturnonthis
"autobasschord"function;theA.B.C.flagontheLCD
islightened.Theleftsectionofthekeyboardisknown
asthe"chordarea",whileplayingthechord,boththe
bassandthechordvoicesphonate.
NOTE:
SincethechorddetectionofA.B.C.isbasedonthe
ChordRootpriority,somechordsthatcouldbe
playedundertheChordDictionarymaynotbe
recognisedbyA.B.C.though,eg.B6,bB6,B6(9),
bB6,9,Baug,bBaug,bBm6,Bm6,Adim7,bBdim7,
Bdim.
A.B.C.
FILLA
FILLB
MELODYOFF
STYLE SONGFILE
AutoAccompaniment
TEMPOVELMEASUREBEAT
MEMORY
TICKO.TS.
card
DSP
DUAL
SPLIT
TOUCH
RECORD
Thereare2waystodetectachord:singlefingerdetectandmultifingers
detect.
Ifthechordplayedisbasedonmultifingersdetect,itisrecognizedasthemultifingerschord.
Ifnot,singlefingerchordwillberecognized.
"
""""
""
SingleFingerChords
Thismethodallowsyoutoplaychordseasilywithin
theaccompanimentrangeofthekeyboardusing
onlyone,two,orthreefingers.
ExamplesofSingleFingerChordareC,Cm,C7
andCm7shownasbelow:
",
Toplayamajorchord
Presstherootnoteofthechord
Toplayaminorchord
Presstherootnotetogetherwiththe
nearestblackkeytotheleftofit.
Toplayaseventhchord
Presstherootnotetogetherwiththe
nearestwhitekeytotheleftofit.
"
"""
MultiFingerChords
Thismethodallowsyoutoproduceanaccompanimentbyplayingchordswithnormalfingerings
withintheaccompanimentrangeofthekeyboard.
ToplayMultiChords(ExampleforCchords)
Atotalof32chordsareprovidedasbelow:
Toplayaminorseventhchord
Presstherootnotestogetherwith
thenearestwhiteandblackkeysto
theleftofit(threekeysaltogether).
NOTE:
WhenA.B.C.ison,pressthekeysontheleft
ofthesplitpoint.Thechordwillberecognized
assinglefingerchords.
Notesenclosedinparenthesesareoptional;
thechordscouldberecognizedwithoutthem.
20
Page 21

AutoAccompaniment
ChordBasics
Threeormorenotesplayedtogetherconstituteachord"".
Themostbasicchordtypeisthe"triad"consistingthreenotes:
theroot,third,andfifthdegreesofthecorrespondingscale.
A"Cmajortriad",forexample,ismadeupofthenotesC(theroot),
E(thethirdnoteoftheCmajorscale),andG(thefifthnoteofthe
Cmajorscale).
IntheCmajortriadshownasabove,thelowestnoteisthe"root"ofthechord(thisisthechord"root
position"...usingotherchordnotesforthelowestnoteresultsin"inversion").Therootisthecentral
soundofthechord,whichsupportsandanchorsotherchordnotes.
Thedistance(interval)betweenadjacentnotesoftriadinrootpositioniseitheramajororminorthird.
Thelowestintervalinourroot-positiontriad(betweentherootandthethird)determineswhetherthetriad
isamajororminorchord,andwecanshiftthehighestnoteupordownbyasemitonetoproducetwo
additionalchords,asshownbelow.
Thebasiccharacteristicsofthechordsoundremainintactevenifwechangetheorderofthenotestocreate
differentinversions.Successivechordsinachordprogressioncanbesmoothlyconnected,forexample,by
choosingtheappropriateinversions(orchord"voicings").
's
ReadingChordNames
Chordnamestellyoujustabouteverythingyouneedtoknowabout
achord(otherthantheinversion/voicing).Thechordnametellsyou
whattherootofachordis,whetheritisamajor,minor,ordiminished,
whetheritrequiresamajororflattedseventhandwhatalterations
ortensiondoesituse...allataglance.
SomeChordTypes
21
Page 22

METRONOME
Press[METRO]buttontoturnonmetronomeandthe
1、
metronomesoundwillbeplayed.
IntheFunctionmenu,youcanadjustthebeatwithdial,
2、
[+]/[-].Therangeis0,2~9.(SeeFunctionOperation).
3、
Press[METRO]buttonagain,youwillturnoffthe
metronome.
NOTE:
Metronomecanbeplayedintempowiththeaccompanimentwheneveryouturnonthestyle.
Whenstoppingstyle,turnontheMetronome,thebeattypewillfollowthemeasure.
STYLESONGFILE
AutoAccompaniment
TEMPOVELMEASUREBEAT
Indicatesthebeat
numberinthemeasure
MEMORY
TICKO.TS.
card
DSP
Whenplayingstyle,turnontheMetronome,themetronomesoundbeginstorespondinnextsection,
thebeattypewillfollowthestyle.
IffirstturnontheMetronome,thenplaythestyle,theMetronomewillautomaticallybesettomatchthetempo
ofthestyle,butyoucanalsochangethetempoyourself.
Function
Press[FUNCTION]buttontoenterfunctionmenu.Whenpoweron,thefirstoptionofthemenuisTranspose,
Press[FUNCTION]buttonrepeatedlytoselectfunctionoption,thenpress[]/[]ordialtoadjustitsparameter,
+-
seebelowtable:
content
Transpose
Tune
Beat
Touch
Splitpoint
DSPreverblevel
MIDIINchannel
MIDIOUTchannel
LCDDisplay
Transpos
Tune
Beat
Touch
Splitpt
DSPlevel
MidiIn
MidiOut
RangeDefaultValue
-12+120
—
-50500
—
0, 294
—
OFF,1,2,32
18834(F3#)
—
OFF 、 172
01 — 16 、 ALLALL
01 — 1601
—
“”
NOTE:
Ifyoudonotpressanybuttonfor5secondsafterenteringFUNCTIONmenu,itwillquitthismenuautomatically.
22
Page 23

Function
Transpose
SYNC.STOP
InTRANSPOSEmenu,thevalueoftransposeappearson
theLCD.
Youcanpress[]/[]buttonordialtoadjustthe
valuefrom12to12semitones.
Press[]and[]togethertosetthetransposevalueto0.
+-
+-
-
Thetransposevalueisvalidtochordrecognize.
Tune
InTUNEmenu,press[]/[]buttonordialtoadjust
tunevaluefrom50to50cents.
Press[]and[]togethertoresetitsdefaultvalue.
+-
-+
+-
STYLESONGFILE
STYLESONGFILE
TEMPOVELMEASUREBEAT
TEMPOVELMEASUREBEAT
MEMORY
TICKO.TS.
MEMORY
TICKO.TS.
card
DSP
card
DSP
Thetunevalueisvalidtochordrecognize.
Beat
Thebeattypeincludes0,2~9atall.
Press[]and[]buttonordialtoselectthebeattype.+-
Touch
InTOUCHmenu,youcanadjustTOUCHresponselevel
with[]and[]buttonordial.
+-
Thepianohas4touchresponselevelfromOFFto3.
STYLESONGFILE
STYLESONGFILE
TEMPOVELMEASUREBEAT
TEMPOVELMEASUREBEAT
MEMORY
TICKO.TS.
MEMORY
TICKO.TS.
card
DSP
card
DSP
Ifyouselect'OFF',theTOUCHsignwillbeerased.
23
Page 24

SplitPoint
Function
Insplitpointmenu,press[]and[]buttonor
+-
dialorpressthekeytosetitsvalue.
ParameterRange:from1to88,thedefaultvalueis34.
Thekeysontherightsidetothepointthatyousetis
righthandarea,andtheothersideislefthandarea
(chordarea).
DSPLevel
InDSPlevelmenu,press[]and[]buttonor
dialorpressthekeytosetitsvalue.
ParameterRange:fromoffto7,thedefaultvalueis2.
+-
STYLESONGFILE
STYLESONGFILE
TEMPOVELMEASUREBEAT
TEMPOVELMEASURE
BEAT
MEMORY
TICKO.TS.
MEMORY
TICKO.TS.
card
DSP
card
DSP
MIDIINChannel
InMIDIINchannelmenu,press[]and[]button
ordialorpressthekeytosetitsvalue.
ParameterRange:from1to16,all.
Thedefaultreceivingchannelisall.
+-
MIDIOUTChannel
InMIDIOUTchannelmenu,press[]and[]button
ordialorpressthekeytosetitsvalue.
ParameterRange:from1to16.
Thedefaulttransmittingchannelis01.
+-
STYLESONGFILE
STYLESONGFILE
TEMPOVELMEASURE
TEMPOVELMEASUREBEAT
BEAT
MEMORY
TICKO.TS.
MEMORY
TICKO.TS.
card
DSP
card
DSP
24
Page 25

MIXER
Press[MIXER]buttontoenterthemenuofMIXER.
ThedefaultoptionofthemenuisDrumvolume.When
youenterthismenunexttime,youwillfindtheoption
isthesameaslasttime.
Press
[MIXER]buttontoselecttheoptionyouwanttoset.
Youcanadjustkeyboardvoicevolume,stylevolume
throughMIXERbypressing[]and[]buttonorusing
dial.
Theoptionandtheparametersareasthefollow:
+-
STYLESONGFILE
TEMPOVELMEASURE
BEAT
MEMORY
TICKO.TS.
card
DSP
Adjustcontent
DRUMvolume
BASSvolume
ORCHESTRAvolume
UPPER1volume
UPPER2volume
LOWERvolume
LCDDisplay
DrumVol
BassVol
OcVol
VoiceR1
VoiceR2
VoiceL
NOTE:
Ifyoudonotpressanybuttonfor5secondsafter
enteringMIXERmenu,itwillquitthismenuautomatically.
Whenyoupress[+]and[-]together,thevolumeyou
aresettingwillturnoff.
RangeDefaultvalue
000-031020
000-031018
000-031021
000-031
000--
000
031
031
024
012
012
Presstogether
25
Page 26

Memory
Memorycanbeusedtomemorize16completecontrol
panelsetups(4bankswith4presetseach)thatyoucan
recallwheneverneeded.
MemoryBank
1、
Thereare4banksintotal,eachbankhas4memories
(M1M4).
-
2、
Press[BANK]toselectbank1bank4inturn,theLCD
diisplaysMEMORY0X.
Press[M1]~[M4],theMEMORY0XXwillappearon
3、
theLCD.
-
-
-
A.B.C.
FILLA
FILLB
MELODYOFF
A.B.C.
FILLA
FILLB
MELODYOFF
STYLESONGFILE
STYLESONGFILE
TEMPOVELMEASUREBEAT
TEMPOVELMEASURE
BEAT
MEMORY
TICKO.TS.
MEMORY
TICKO.TS.
card
DSP
card
DSP
DUAL
SPLIT
TOUCH
RECORD
DUAL
SPLIT
TOUCH
RECORD
Store/LoadParameter
Pressandhold[STORE]button,thenpress[M1]
1、
(or[M2][M4])meanwhile,thedatawillbestored
toM1(orM2M4).Pleasenotethatitwillclearthe
recordeddata.
PressM1(orM2M4)toloadthedatafrommemory,
2、
thememorynumberwillappearonLCD.
Ifyoupoweroffthepiano,thememorydatawillnotbe
3、
erased.
-
-
-
A.B.C.
FILLA
FILLB
MELODYOFF
A.B.C.
FILLA
FILLB
MELODYOFF
STYLESONGFILE
STYLESONGFILE
TEMPOVELMEASUREBEAT
PressandholdonSTORE,
thenpressM1.
TEMPOVELMEASUREBEAT
MEMORY
TICKO.TS.
MEMORY
TICKO.TS.
card
DSP
card
DSP
DUAL
SPLIT
TOUCH
RECORD
DUAL
SPLIT
TOUCH
RECORD
MemoryData
Thememorysavingdataincludes:mainvoice,dualvoice,
lefthandvoice,styles,tempo,function,mixer,accomp
-
volume,ABCmode,normal/variationmodeetc.
NOTE:
Oncethememorydatabemodified,thememorynumber
displayedonLCDwilldisappear.
26
Page 27

Memory
ClearMemoryData
Press[STORE]and[M1]together,thenturnonthepiano,
1、
thedefaultdatawillbeloadedtothepiano.
Press[]and[]together,thenturnonthepiano,the
2、
+-
defaultdatawillbeloadedtothepiano,andtherecord
songwillbelost.
OneTouchSetting
OneTouchSettingisapowerfulandconvenientfunction
thatallowsyoutoreconfigureallsettingsinstantlywiththe
touchofasinglebutton.Inthisfunction,4typesofparameters
(M1~M4)willbeloadedforoperatingthecurrentstyle.
Presstogether
Presstogether
POWER
ON
OFF
Turnon
POWER
ON
OFF
Turnon
TheparametersstoredintheO.T.S.Including:
VOICER1VOICER1VOLUMEVOICER1OCT
VOICER2VOICER2VOLUMEVOICER2OCT
、、
、、
1、
Selectoneofthestyles.
Eachstylehasfourpresets.
2、
3、
Pressthe[O.T.S.]buttontoturnthismodeonandtheO.T.S.
FlaglightenontheLCD.A.B.C.modewouldbeturnedon
automatically.
Pressanyofthe[M1]~[M4]buttonswhichiscorresponded
4、
toyourdesiredsetting.LCDdisplaysO.T.S.14.
5、
Press[O.T.S.]buttonagaintoexittheO.T.S.mode,LCD
-
displaysMEMORY.
A.B.C.
FILLA
FILLB
MELODYOFF
A.B.C.
FILLA
FILLB
MELODYOFF
A.B.C.
FILLA
FILLB
MELODYOFF
STYLESONGFILE
STYLESONGFILE
STYLESONGFILE
TEMPOVELMEASURE
TEMPOVELMEASURE
TEMPOVELMEASUREBEAT
BEAT
BEAT
MEMORY
MEMORY
MEMORY
O.TS.
O.TS.
O.TS.
card
DSP
card
DSP
card
DSP
DUAL
SPLIT
TOUCH
RECORD
DUAL
SPLIT
TOUCH
RECORD
DUAL
SPLIT
TOUCH
RECORD
NOTE:
Whileyouarerecordingorplayingbackarecordedsong,
pressanyofthe[M1]~[M4]button,noFILLINwill
“”
beinserted.
27
Page 28

Record
RecordWaiting
1、
Press[RECORD]toenterrecordwaitingmode,theRECf
laglituponLCD,thebeatstartsflashing.
Thenyoucanselectvoicenumber,stylenumberandadjust
2、
tempo,mixerparameters.
StartRecord
1、
Intherecordwaitingmode,press[START/STOP]or
pressanykeyonthekeyboardtostartrecording.
2、
Andthebeatwilldisplayaccordingtothecurrenttempo.
StartRecord
A.B.C.
FILLA
FILLB
MELODYOFF
A.B.C.
FILLA
FILLB
MELODYOFF
STYLESONGFILE
STYLESONGFILE
TEMPOVELMEASURE
Flashing
EnterRecordWaitingStatus.
TEMPOVELMEASUREBEAT
BEAT
MEMORY
TICKO.TS.
MEMORY
TICKO.TS.
card
DSP
card
DSP
POWER
DUAL
SPLIT
TOUCH
RECORD
DUAL
SPLIT
TOUCH
RECORD
NOTE:
Ifyoupoweroffthepiano,therecordeddatawillnotbe
erased.
Press[]and[]together,thenturnonthepiano,the
+-
defaultdatawillbeloadedtothepiano,andtherecorded
datawillbelost.
Press[RECORD]and[PLAY/STOP]together,thenturn
onthepiano,therecordeddatawillbelost.
StopRecord
Intherecordingmode,press[RECORD]tostoprecording.
1、
2、
Ifthememoryisfull,therecordingwillbestopped
automatically,FULLwillappearonLCD.“”
PlaybackRecord
Press[PLAY/STOP]buttontostartplayingtherecorded
1、
data.
2、
Press[PLAY/STOP]buttonagaintostopplaying.
STYLESONGFILE
Presstogether
Presstogether
TEMPOVELMEASUREBEAT
POWER
MEMORY
TICKO.TS.
Turnon
Turnon
card
DSP
NOTE:
Iftherecordingmemoryisempty,whenyoupress
[PLAY/STOP],EMPTYwillappeartemporarilyonLCD.
“”
STYLESONGFILE
TEMPOVELMEASUREBEAT
MEMORY
TICKO.TS.
card
DSP
28
Page 29

Song
Thepianohas60songswithMELODYOFF
function,whichallowsyoutolistentothe
Songplaybackwithoutthemelody,useful
foryoutoplaywiththesong.
1、
Press[SONG]toentersongmode,theflagofsonglitup
ontheLCD.
TEMPOVELMEASUREBEAT
MEMORY
TICKO.TS.
card
DSP
Press[START/STOP]toplaysong,press[START/STOP]
2、
againtostopsongplaying.
Whenyoustopthesongplay,press[STYLE],[VOICE],
3、
[DUAL]or[LOWER]toexitsongmode.
Press[]/[]ordialtoselectsongnumber,thename
4、
+-
ofsongwillappearontheLCD.
5、
Thesongstartstoplaywithitsownintroductorybeat
whichmeasureisfromnegativevalueto001.
Start/Stopsongplaying
A.B.C.
FILLA
FILLB
MELODYOFF
Entersongmode
TEMPOVELMEASUREBEAT
MEMORY
TICKO.TS.
card
DSP
DUAL
SPLIT
TOUCH
RECORD
6、
WheninSONGmode,press[MELODYOFF]couldturn
on/offthemainmelodyofthesong.
NOTE:
Whenstartplayingthesongwith[SONG],itwillplay
allofthesongsincircle.
Ifyouplaythesongbypressing[START/STOP],itwill
playthecurrentsongrepeatedly.
29
A.B.C.
FILLA
FILLB
MELODYOFF
Turnon/offthemainmelody
TEMPOVELMEASUREBEAT
MEMORY
TICKO.TS.
card
DSP
DUAL
SPLIT
TOUCH
RECORD
Page 30

Specifications
1Keyboard....................................................:
2Voices...........................................................:
3Styles........................................................:
4Demo/Song..................................................:
5Polyphony..................................................:
6Display........................................................:
7SwitchandButtons.......................................:
8AccompanimentControl.............................:
9Record......................................................:
10PanelMemory.........................................:
11MIDI.....................................................:
12Connectors............................................:
13Speaker...............................................:
14Dimension(LWH)....................................:
15Weight.......................................................:
16Accessories......................................................
××
88Keys,3kindsoftouchlevel.
210Voices.
120Voices.
3Demos60Songs.
64-noteturnoffDSPeffect38-noteturnonDSPeffect.
Multi-functionalLCDdisplaywithbluebacklit.
POWERSWITCHVOLUMEAUTOBASSCHORDMELODYOFF
ACCOMPVOLUME+/-TEMPO+/-FUNCTIONMIXER
METRONOMEDEMOSONGVOICESTYLE+/-BANK
STOREM1-M4ONETOUCHSETTINGDUALSPLITRECORD
PLAY/STOP.
START/STOPSYNCSTARTINTRO/ENDINGFILLAFILLB.
RECORDPLAY/STOP.
4Banks,eachhas4memories.
Receivetransmit.
AUX.OUTHEADPHONES3PEDALSUSBACPOWER.
8ohm25WX2.
1419460832mm.
40KG.
InstructionManual.
,
()、()
、、、、
、、、、
、、、、、、、
()、、、、、
、、、、
、
/
、、、、
××
*Allspecificationsandappearancesaresubjecttochangewithoutnotice.
TroubleShooting
ProblemPossibleCauseandSolution
Nomattertheinstrumentisturnedonoroff,apopping
soundwillbetemporarilyproduced.
Thereisnosoundevenwhenthekeyboardisplayedor
whenasongorstyleisbeingplayed.
Thisisnormalandindicatesthattheinstrument
isreceivingelectricalpower.
Checkifanycableorheadphoneisconnectedto
thePHONESjackontheleftunderneaththepiano
body..Whenasetofheadphonesispluggedinto
thisjack,nosoundisoutput.
30
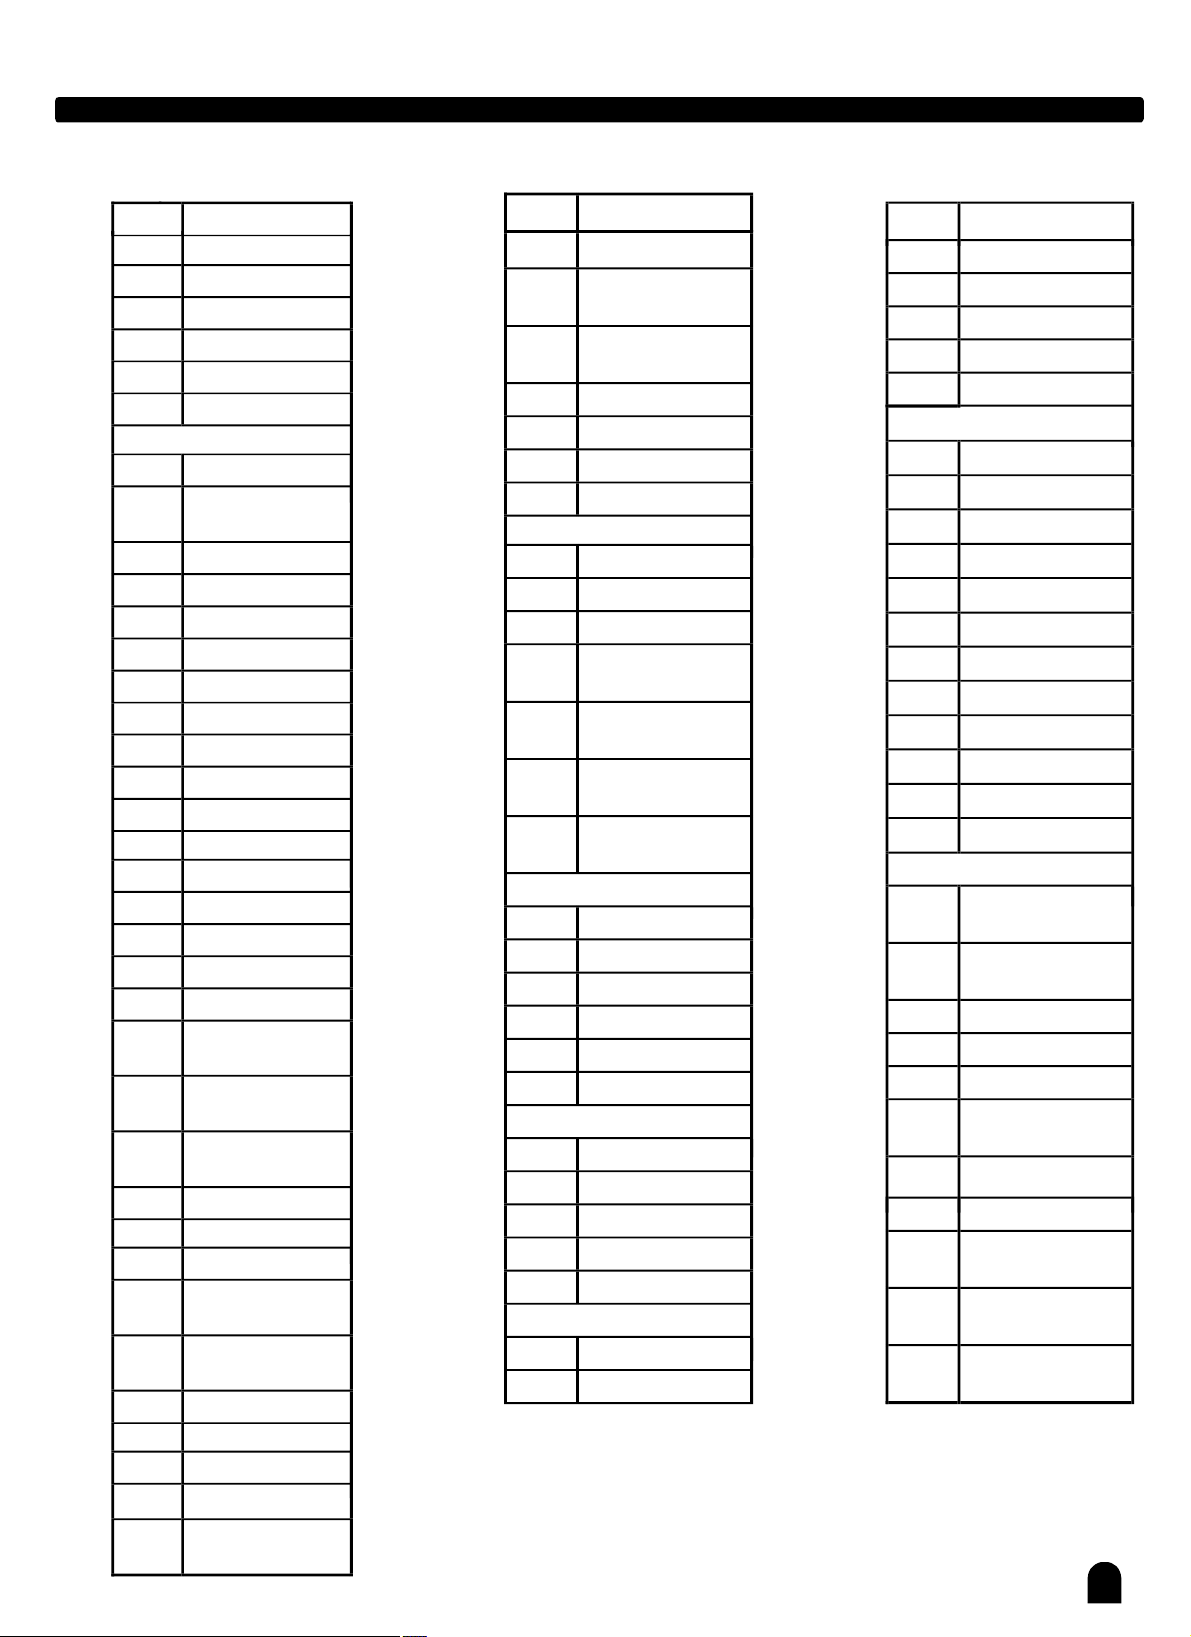
Page 31

Appendix1-VoiceList
NO
1AcousticGrand
2BrightAcoustic
3ElectricGrand
4Honky-TonkPiano
5ElectricPiano1
6ElectricPiano2
7Harpsichord
8Clavi
9Celesta
10Glockenspiel
11MusicBox
12Vibraphone
13Marimba
14Xylophone
15TubularBells
16Dulcimer
17DrawbarOrgan
18JazzOrgan
19RockOrgan
20ChurchOrgan
21ReedOrgan
22Accordion
23Harmonica
24TangoAccordion
25NylonGuitar
26SteelGuitar
27JazzGuitar
28CleanGuitar
29MutedGuitar
30OverdrivenGuitar
31DistortionGuitar
32GuitarHarmonics
33AcousticBass
34FingerBass
35PickBass
36FretlessBass
37SlapBass1
38SlapBass2
39SynthBass1
40SynthBass2
NAME
Piano
Piano
Piano
NAMENO
41Violin
42Viola
43Cello
44Contrabass
45TremoloStrings
46PizzicatoStrings
47OrchestralHarp
48Timpani
49StringsEnsemble1
50StringsEnsemble
51SynthStrings1
52SynthStrings2
53ChoirAahs
54VoiceOohs
55SynthVoice
56OrchestraHit
57Trumpet
58Trombone
59Tuba
60MutedTrumpet
61FrenchHorn
62BrassSection
63SynthBrass1
64SynthBrass2
65SopranoSax
66AltoSax
67TenorSax
68BaritoneSax
69Oboe
70EnglishHorn
71Bassoon
72Clarinet
73Piccolo
74Flute
75Recorder
76PanFlute
77BlownBottle
78Shakuhachi
79Whistle
80Ocarina
NAMENO
81Square
82Sawtooth
83Calliope
84Chiff
85Charang
86Voice
87Fifths
88BassLead
89Fantasia
90Warm
91PolySynth
92Choir
93Bowed
94Metallic
95Halo
96Sweep
97Fx1(rain)
98Fx2(soundtrack)
99Fx3(crystal)
100Fx4(atmosphere)
101Fx5(brightness)
102Fx6(goblins)
103Fx7(echoes)
104Fx8(sci-fi)
105Sitar
106Banjo
107Shamisen
108Koto
109Kalimba
110BagPipe
111Fiddle
112Shanai
113TinkleBell
114Agogo
115SteelDrums
116WoodBlock
117TaikoDrum
118MelodicTom
119SynthDrum
120ReverseCymbal
121GuitarFretNoise
122BreathNoise
31
Page 32
Appendix1-VoiceList
NAMENO
123Seashore
124BirdTweet
125
126Helicopter
127Applause
128Gunshot
129Pianostr
130Modern
131SoloPiano
132
133
134
135Bell
136Bell2
137Vibes2
138Vibesma
139Marimba2
140ElectricOrgan
141JazzOrgan2
142JazzOrgan
143ClikOrgan
144PopOrgan
145ChurchOrgan
146ElectricOrg
147Tremolo
148Q-Organ
149Accordion2
150Soft
151Soft
152Harmonic
153N-Gthamm
15412StrGuitar
Telephone Ring
Keybord
ElectricPiano
Polar
GrandHarpsi
Clavi2
Organ
3
2
an
2
Organ
Accordion
Accordion
Accordion2
gt&bass
NAMENO
156Solidwa
157Overdriven
Guitar2
158Tremolo
Guitar
159FunkGuitar
160BassCymbal
161SynthBass3
162SynthBass4
strings
163Viola2
164Cello2
165Cello3
166Strings
Ensemble3
167Strings
Ensemble4
168SynthStrings
3
169Dream
Strings
brass&pipe
170Trombone2
171FMHorn
172Bbbrass
173Hibrass
174Tenosax2
175Basso2
lead
176Whistle2
177PanFlute2
178Lead1
179Lead3
180Warplead
pad
181Sinepad
182Softpad
NAMENO
183Bellpad
184Synpad
185Hornpad
186Newagpad
187Bagpipe
chineseinstrument
188PIPA
189YUEQIN
190MIDRUAN
191GUZHEN
192YANGQIN
193ERHU
194GAOHU
195SUONA
196LUSHEN
197QUDI
198BANGDI
199XIAO
DRUMKIT
200Standard
Drum1
201Standard
Drum2
202RoomDrum
203RockDrum
204ElectricDrum
205Analog
Drumset
206Dance
Drumset
207JazzDrum
208Brush
Drumset
209Standard
Drumset
210Chinese
Percussion
155CleanGuitar
2
32
Page 33

Appendix2-StyleList
NAMENO
8BEAT&16BEAT
0018Beat
002GuitarPop1
0038BeatDisco
0048BeatDance
00560’s8Beat
006PopFunk
00716BeatBallad
008Pop16Beat1
009Pop16Beat2
01016BeatModern
011Modern16Beat
01216BeatBossaNova
01316BeatFunk
014CoolBeat
POP
015GuitarPop2
016Popbeat
017SoftBeat
018StingLatin
019BritPop1
020BritPop2
021NewAge
022PopHit
023FusionShuffle
BALLAD
024FolkBallad
025PopBallad1
026PopBallad2
027RockBallad
028EasyBallad
029LoveBallad
030NaturalBallad
031PianoBallad
032EPBallad
033NewR&BBallad
ROCK
034Rock
035FolkRock
036SlowRock1
037HardRock
NAMENO
0386/8Rock
039Rock&Roll
04070’sRock&Roll
041RockShuffle
0424/4Blues
DANCE
043ClubDance
044Disco
04570’sDiscoFunk
046Garage
047Rap1
048Rap2
049House
050EuroDance
051Techno
SOUL&FUNK
052JazzFunk
053CoolFunky
054Groove
055SambaFunk
056Soul
057SoulBeat
058HipHopSoul
059BritishSoulPop
060HipHopBeat
061R&BBallad
JAZZ
062Swing
063JazzBrush
064CoolJazzBallad
065AcidJazz1
066AcidJazz2
067BigBandMedium
068BigBandBallad
069SwingShuffle
070Fusion
071JazzFusion
COUNTRY
072Country8Beat
073CountryPop1
074CountryBallad
075ModernCountry
NAMENO
076CountryFolk
0772/4Country
078CountryPop2
079CountryShuffle
080CountryQuickSteps
081Bluegrass
LATIN/BALLROOM
082BossaNova1
083Rhumba
084ChaChaCha
085PopChaCha
086Beguine
087Tango
088SwingFox
089Mambo
090Salsa
091Samba
092Pasodoble
093SlowBolero
094Habanera
095LatinRock
TRADITIONAL
096March
097GermanMarch
0986/8March
099Polka
100PolkaPop1
101PolkaPop2
102SlowWaltz
103CountryWaltz
104JazzWaltz
105Musette
PIANO
106Pianist
107Ballad
108SlowRock2
109BossaNova2
110Twist
INDONESIA
111Dandut1
112Dandut2
113Dangdu
114Dangdut1
115Dangdut2
116
Dangdut3
117Kercong1
118Kercong2
119PopKcong
120Sdangdut
33
Page 34

附录六歌曲()中英文对照表:SONGAppendix3-SongList
NAMENO
PIANO
1ForAlice
2Habanera
3FourLittleSwans
4MosetaDance
5GermanicDance
6TurkishMarch
7March
8AwayInAManger
9Chopsticks
102-PartInvention#
13InAMinor.B.W.Iii
FOLK&COUNTRY
11Country
12Jambalaya
13Susanna
14Bridge
15
16TheOldGrayMare
17AmericanPatrol
18InTheRain
19
20
21OnlyYou
22EndOfTheWorld
23HouseOfRisingSun
24TheBlue25OverTheRainbow
26BeautifulDreamer
27Edelweiss
28OSoleMio
29SilentNight
30AveMaria
31FiveHundredMiles
BattleHymneOfTheRepublic
Sippin
GOLDEN&POP
AreYouLonesomeTonight
`CiderThroughAStraw
BellsOfScotland
NAMENO
32HappyNewYear
33It`SBeginn
ALotLikeChristmas
34
35MyBonnie
36
37TheStageCoach
38Entertainer
39AnnieLaurie
40KillingMeSoftly
41LastRoseOfSummer
42TheOldKingCole
43MapleLeafRag
44JuneSamba
45Funk
46ICan......
47SeaShore
48Guitar&Saxphone
49TheHipHop`SNight
50BlueLunch
51Cobweb
52Wine
53JazzOldMan
54DarkEyes
55Carlos
56Sad
57TheJazz
58SouthMudBay
59GiveYouARose
60FlowingRill
JeanieWithTheLight
BrownHair
SongOfThePearlfisher
WithHisSong
JAZZ&FUSION
CHINESE
ingToLook
Appendix3-SongList
NAMENO
1DEMO1
2DEMO2
3DEMO3
34
Page 35

Appendix5-ChordList
Madd9
C
35
Page 36

Appendix6-MIDIImplementationChart
FunctionTransmittedRecognizedRemarks
BasicDefault
ChangedChannel
Default
ModeMessages
Altered
Note
Number
Velocity:Noteon
:
Truevoice
〇 9nH,V=1-127 〇 9nH,V=1-127
Noteoff
After
Touch
Keys
Chs
PitchBend 〇〇
Control
Change
0
1
5
6
7
10
11
64
65
66
67
80
81
91
93
120
121
123
Program
Change :True#
SystemExclusive ×
System :SongPosition
:SongSelect
:Tune
System
RealTime
Aux
:Clock
:Commands
:Localon/off
:AllNotesoff
Messages
:Activesense
:Reset
Note:
*1Whentheaccompanimentisstarted,anFAHmessageistransmitted.
1ch
1-16ch
×
×
***********
9-120
***********
×
×
×
○
○
×
○
○
×
×
○
×
×
○
○
○
○
○
×
×
○
○
***********
1-16ch
1-16ch
3
×
×
0-127
0-127
×
×
×
○
○
○
○
○
○
○
○
○
○
○
○
○
○
○
○
○
○
○
0-127
BankSelect
Modulation
PortamentoTime
DataEntry
Volume
Pan
Expression
SustainPedal
PortamentoON/OFF
SostenutoPedal
SoftPedal
ReverbProgram
ChorusProgram
Reverb
ChorusLevel
AllSoundOff
ResetAllControllers
AllNotesOff
○
×
×
×
×
×
×
〇
×
×
Whenaccompanimentisstoped,anFCHmessageistransmitted.
WhenanFAHmessageisreceived,accompanimentisstarted.
WhenanFCHmessageisreceived,accompanimentisstoped.
×
×
×
×
×
×
〇
〇
〇
Level
Mode1:OMNION,POLYMode2:OMNION,MONO:YES
Mode3:OMNIOFF,POLYMode4:OMNIOFF,MONO:NO
O
X
36
 Loading...