

Page 1
aw_DP260_manual_G02_171226.pdf 1 17/12/26 15:52
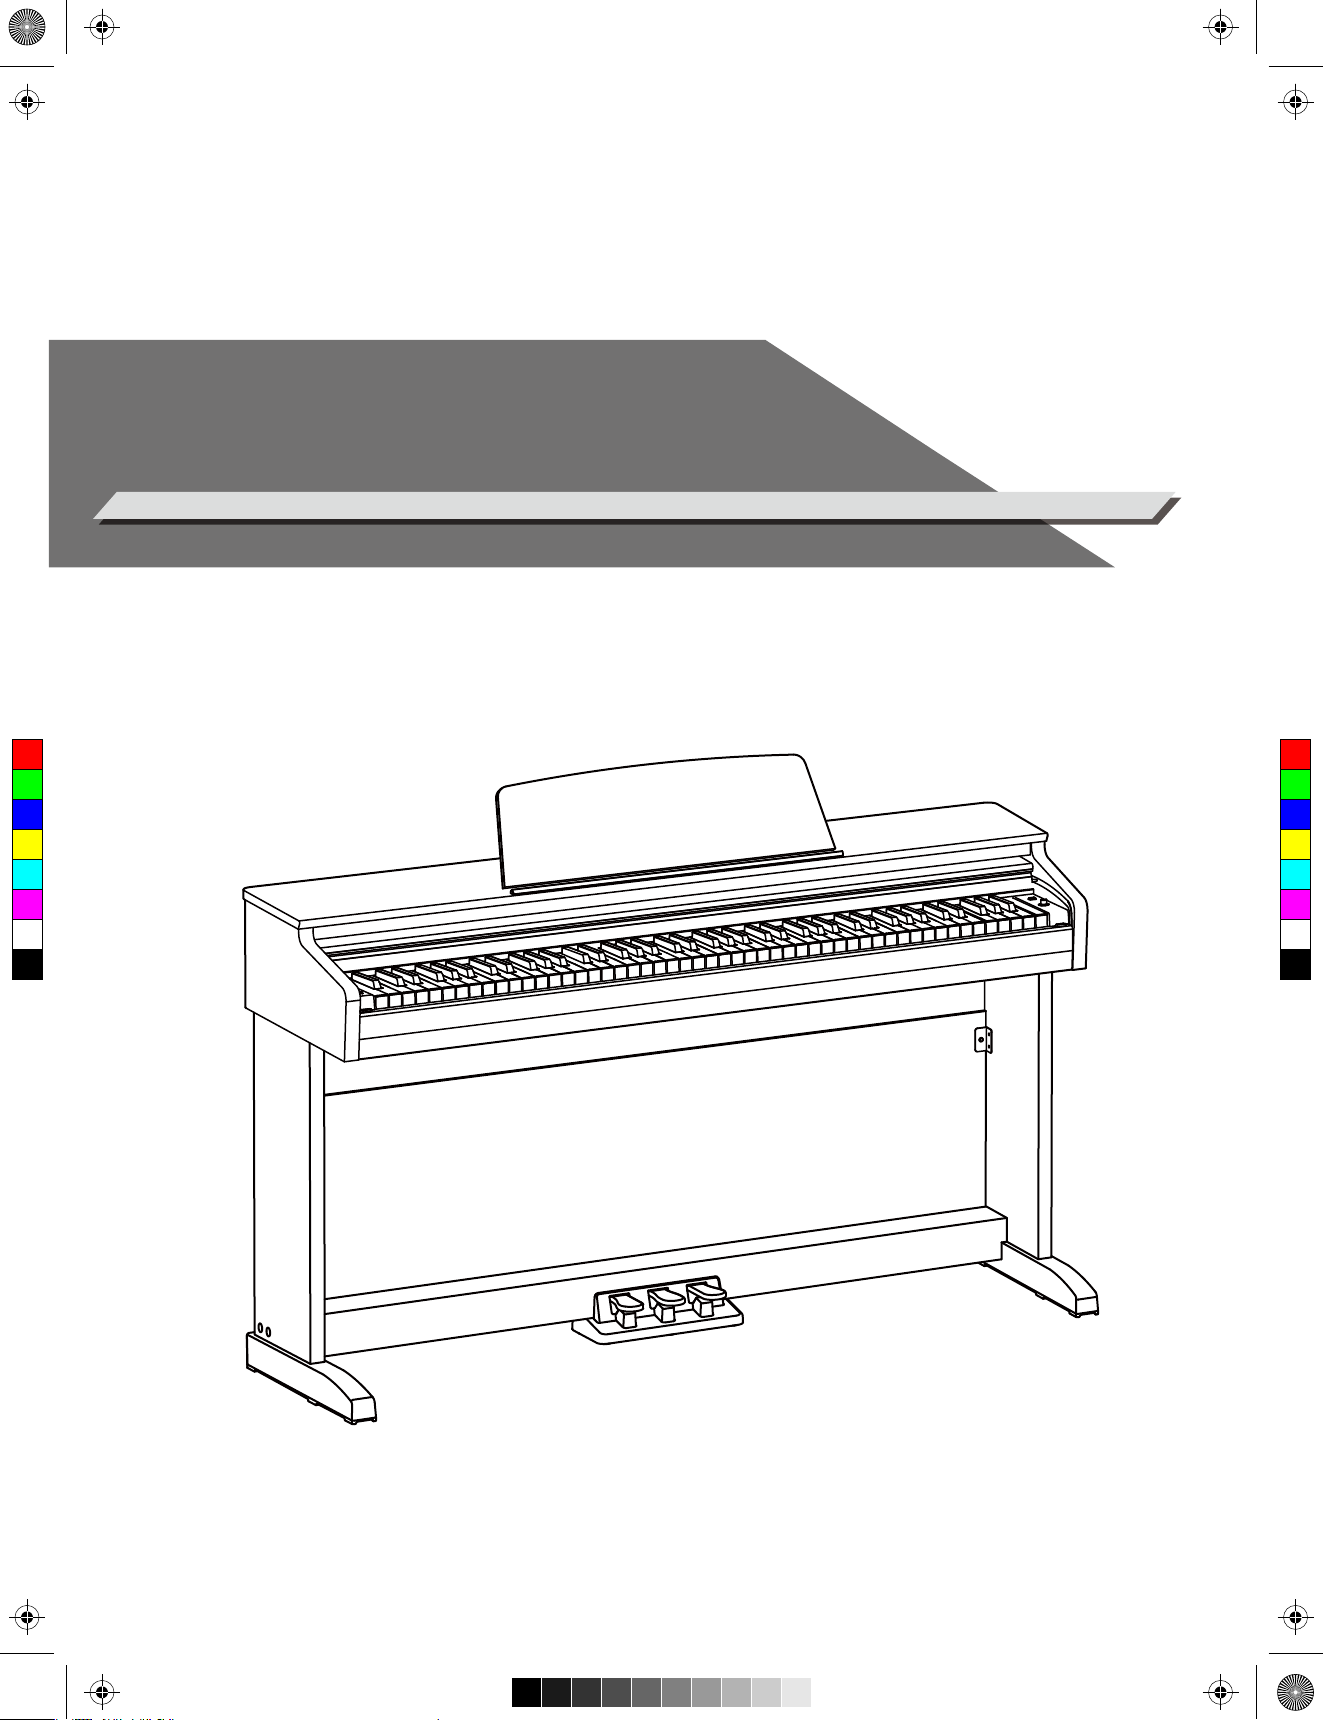
DIGITAL PIANO
Owner’s Manual
C
M
Y
CM
MY
CY
CMY
K
Page 2
aw_DP260_manual_G02_171226.pdf 2 17/12/26 15:52
INFORMATION FOR YOUR SAFETY!
THE FCC REGULATION WARNING (for USA)
This equipment has been tested and found to comply with
the limits for a Class B digital device, pursuant to Part 15 of
the FCC Rules.
These limits are designed to provide reasonable protection
against harmful interference in a residential installation. This
equipment generates, uses, and can radiate radio frequency
PLEASE READ CAREFULLY BEFORE PROCEEDING
Please keep this manual in a safe place for future reference.
Power Supply
Please connect the designated AC adaptor to an AC outlet
of the correct voltage.
PRECAUTIONS
energy and, if not installed and used in accordance with the
instructions, may cause harmful interference to radio
communications. However, there is no guarantee that
interference will not occur in a particular installation.
If this equipment does cause harmful interference to radio or
Do not connect it to an AC outlet of voltage other than that
for which your instrument is intended.
Unplug the AC power adaptor when not using the instrument, or during electrical storms.
television reception, which can be determined by turning the
equipment off and on, the user is encouraged to try to
correct the interference by one or more of the following
measures:
Reorient or relocate the receiving antenna.
C
M
Y
CM
MY
CY
CMY
K
Increase the separation between the equipment and
receiver.
Connect the equipment into an outlet on a circuit different
from that to which the receiver is connected.
Consult the dealer or an experienced radio/TV technician
for help.
Unauthorized changes or modification to this system can
void the user's authority to operate this equipment.
Connections
Before connecting the instrument to other devices, turn off
the power to all units. This will help prevent malfunction and
/ or damage to other devices.
Location
Do not expose the instrument to the following conditions to
avoid deformation, discoloration, or more serious damage:
Direct sunlight
Extreme temperature or humidity
Excessive dusty or dirty location
Strong vibrations or shocks
Close to magnetic fields
Interference with other electrical devices
Radios and televisions placed nearby may experience
reception interference. Operate this unit at a suitable
distance from radios and televisions.
CAUTION
The normal function of the product may be disturbed
by Strong Electro Magnetic Interference. If so, simply
reset the product to resume normal operation by
following the owner's manual. In case the function
could not resume, please use the product in other
location.
02
Cleaning
Clean only with a soft, dry cloth.
Do not use paint thinners, solvents, cleaning fluids, or
chemical-impregnated wiping cloths.
Handling
Do not apply excessive force to the switches or controls.
Do not let paper, metallic, or other objects into the instrument. If this happens, remove the electric plug from the
outlet. Then have the instrument inspected by qualified
service personnel.
Disconnect all cables before moving the instrument.
Page 3
aw_DP260_manual_G02_171226.pdf 3 17/12/26 15:52
Contents
Panel & Keyboard Description
Front Panel.........................................................................4
Pedal.................................................................................4
Keyboard............................................................................5
DSP Effect
Reverb.............................................................................16
Chorus.............................................................................16
D.A.S. (Dynamic Acoustic System)...................................16
Rear Panel.........................................................................5
Song
Setup
Setup Guide.......................................................................6
Connections
Connecting a pair of Headphones.....................................9
Connecting an Audio Equipment........................................9
Connecting an MP3/CD Player..........................................9
Connecting a Computer.....................................................9
Play the Songs.................................................................17
Practice the Songs...........................................................17
Song Recording
Prepare Recording...........................................................18
Start Recording................................................................18
Stop Recording................................................................18
Play back Recording........................................................18
Quick Start
Delete Recording.............................................................18
Power Supply...................................................................10
Adjusting the Master Volume...........................................10
Duet.................................................................................19
Playing the Demo ............................................................10
C
M
Y
CM
MY
CY
CMY
K
Playing the Voices............................................................10
Playing the Songs............................................................11
Recording........................................................................11
Playing the Voices
Playing a Voice................................................................12
Playing Two Voices Simultaneously.................................12
Playing Different Voices with Both Hands........................12
Voice Volume...................................................................13
Playing a Voice Demo......................................................13
Twinova..........................................................................19
MIDI Out Channel...........................................................20
Beep Tone.......................................................................20
Troubleshooting............................................................21
Specifications................................................................21
Touch Response..............................................................13
Transpose........................................................................14
Tune.................................................................................14
Pedal Resonance............................................................14
Metronome......................................................................14
Tempo..............................................................................15
Appendices
Voice List..........................................................................22
Song List..........................................................................22
Demo List.........................................................................22
MIDI Implementation Chart ..............................................23
03
Page 4
VOLUME
aw_DP260_manual_G02_171226.pdf 4 17/12/26 15:52
Panel & Keyboard Description
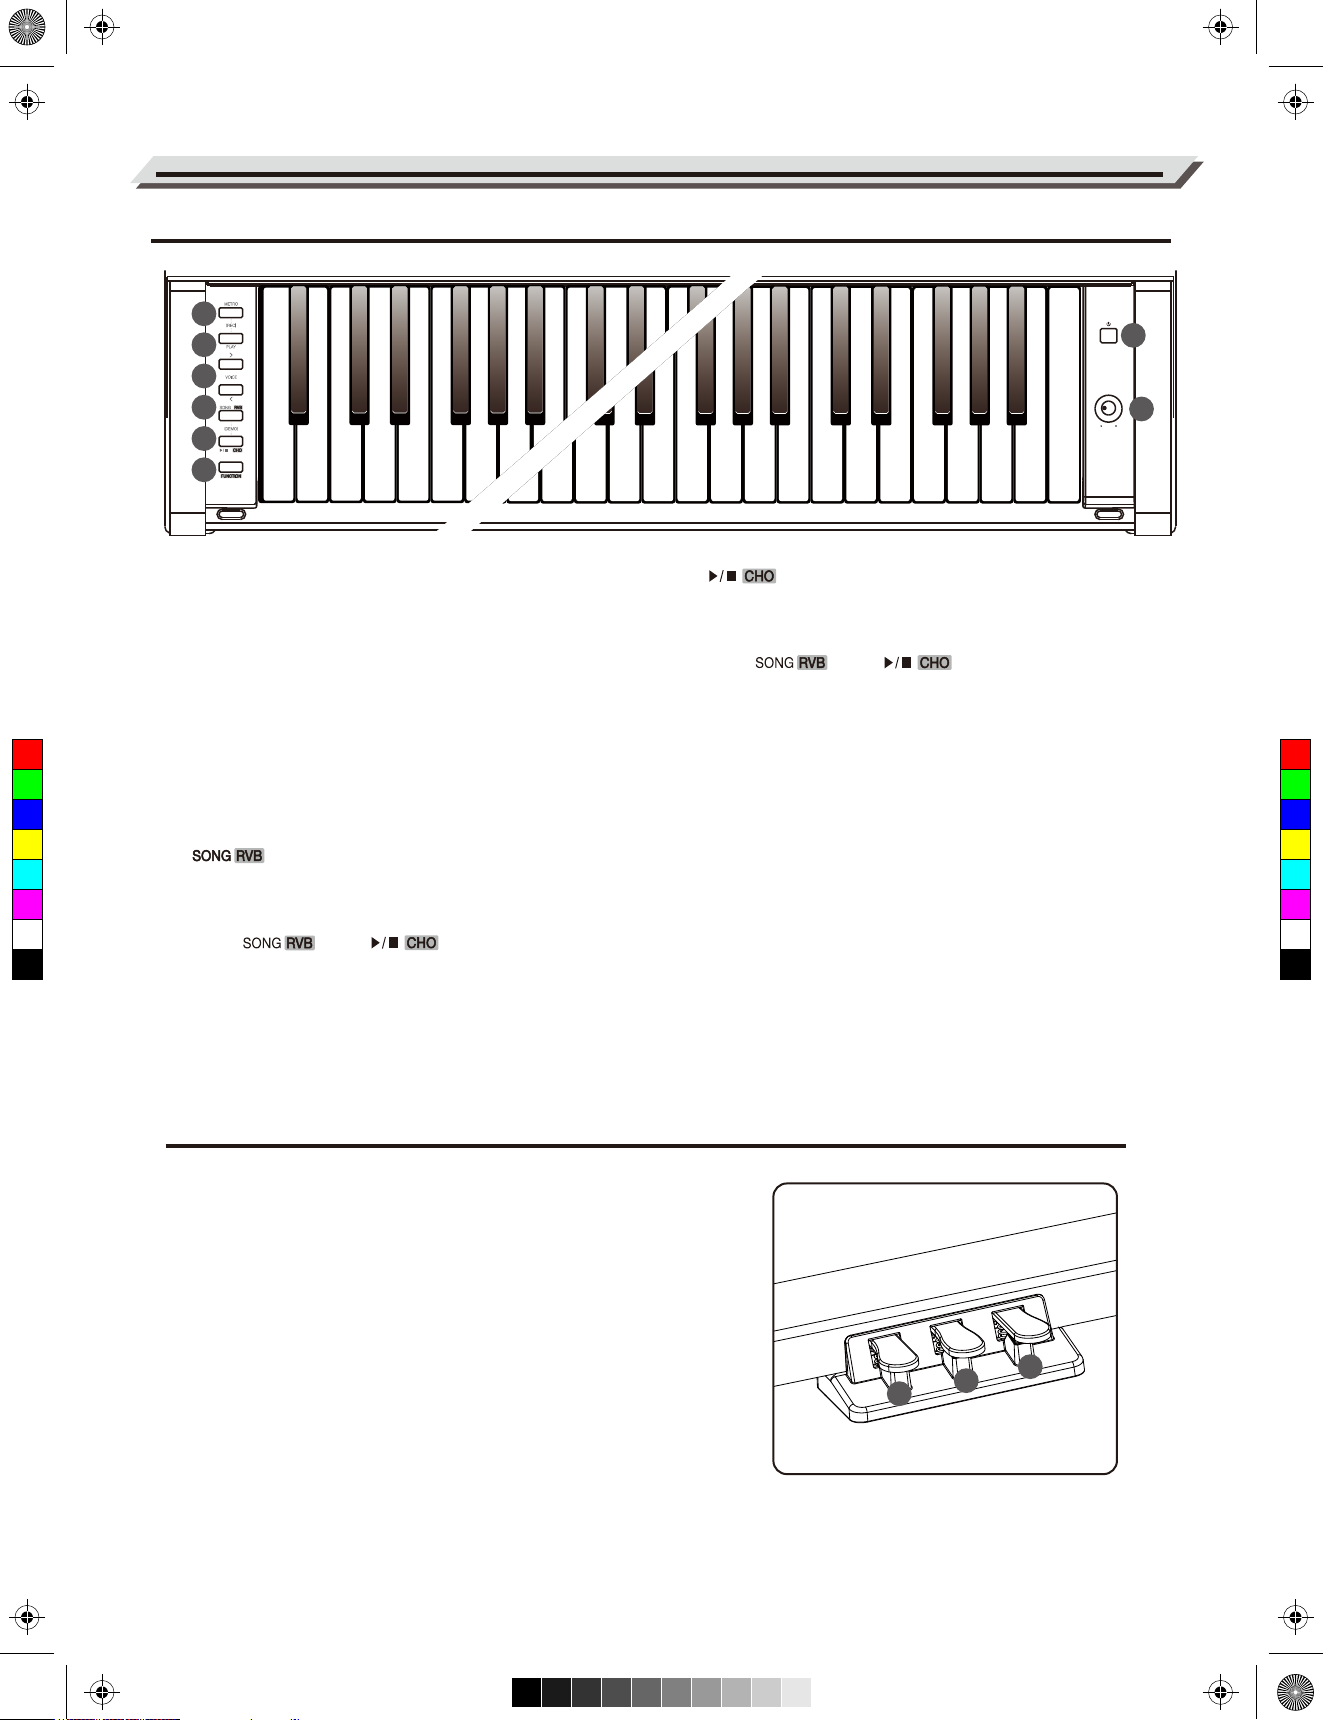
Front Panel
1
2
3
4
5
6
7
8
1. [METRO] Button
Press it to turn the Metronome on or off.
Press [METRO] and [PLAY] at the same time to
enter Record mode.
5. [ ] Button
Press it to start or stop song playback.
Press and hold [FUNCTION], then press this
button to turn Chorus on or off.
Press [ ] and [ ] at the same
2. [PLAY] Button
time to enter Demo mode.
Start or stop playing a recorded song.
Press [METRO] and [PLAY] at the same time to
C
M
Y
CM
MY
CY
CMY
K
enter Record mode.
3. [>] /[<] Buttons
Press to adjust the parameters.
4. [ ] Button
Press it to enter Song mode.
Press and hold [FUNCTION], then press this
button to turn Reverb on or off.
Press [ ] and [ ] at the same
time to enter Demo mode.
6. [FUNCTION] Button
Press and hold it to access secondary functions
of other buttons or keys.
7. [POWER] Switch
Press it to turn the power on or off.
8. [VOLUME] Knob
Adjust the master volume.
Pedal
9. Soft Pedal
Press the soft pedal, the notes played on the keyboard will
sound softer.
10. Sostenuto Pedal
Press the sostenuto pedal, the notes played before you step
on the pedal will have a sustain effect.
11. Sustain Pedal
Press the sustain pedal, the notes played on the keyboard
will have a longer sustain. The sustain pedal also supports
half-pedal operation. Perform with the sustain pedal to
achieve a smooth sustain effect.
04
9
10
11
Page 5
VOLUME
Dual
Lower
Twinova
Pedal Resonance
Duet +1
0
3
5
7
L
+1
1
3
6
Voice Demo
Split Point
Duet On/Off
Duet -1
1
2
4
6
8
9
R
TAP
-1
0
2
4
5
Grand Piano
Chorus Piano
Grand Piano 2
E.Piano 2
Clavi
Jazz Organ
Pipe Organ
Accordion
Soprano Sax
E.Piano 1
Harpsichord
Vibraphone
Drawbar Organ
Rock Organ
Harmonica
String Ensembles
C1 C2 C3 C4
VOLUME
aw_DP260_manual_G02_171226.pdf 5 17/12/26 15:52
Keyboard
Voice Select Song
Panel & Keyboard Description
C5 C6 C7 C8
+1
1
3
6
C
M
Y
TAP
-1
0
2
CM
MY
CY
CMY
K
4
Tempo Metro Beat RecordSetting
8
5
7
0
3
5
9
2
4
Transpose
Touch
Metro Volume
Dual Volume
Octave
6
Tune
Reverb Type
Chorus Type
Upper Volume
Lower Volume
MIDI Out
Setting +1
Setting -1
1
4
2
3
5
D.A.S.
Beep
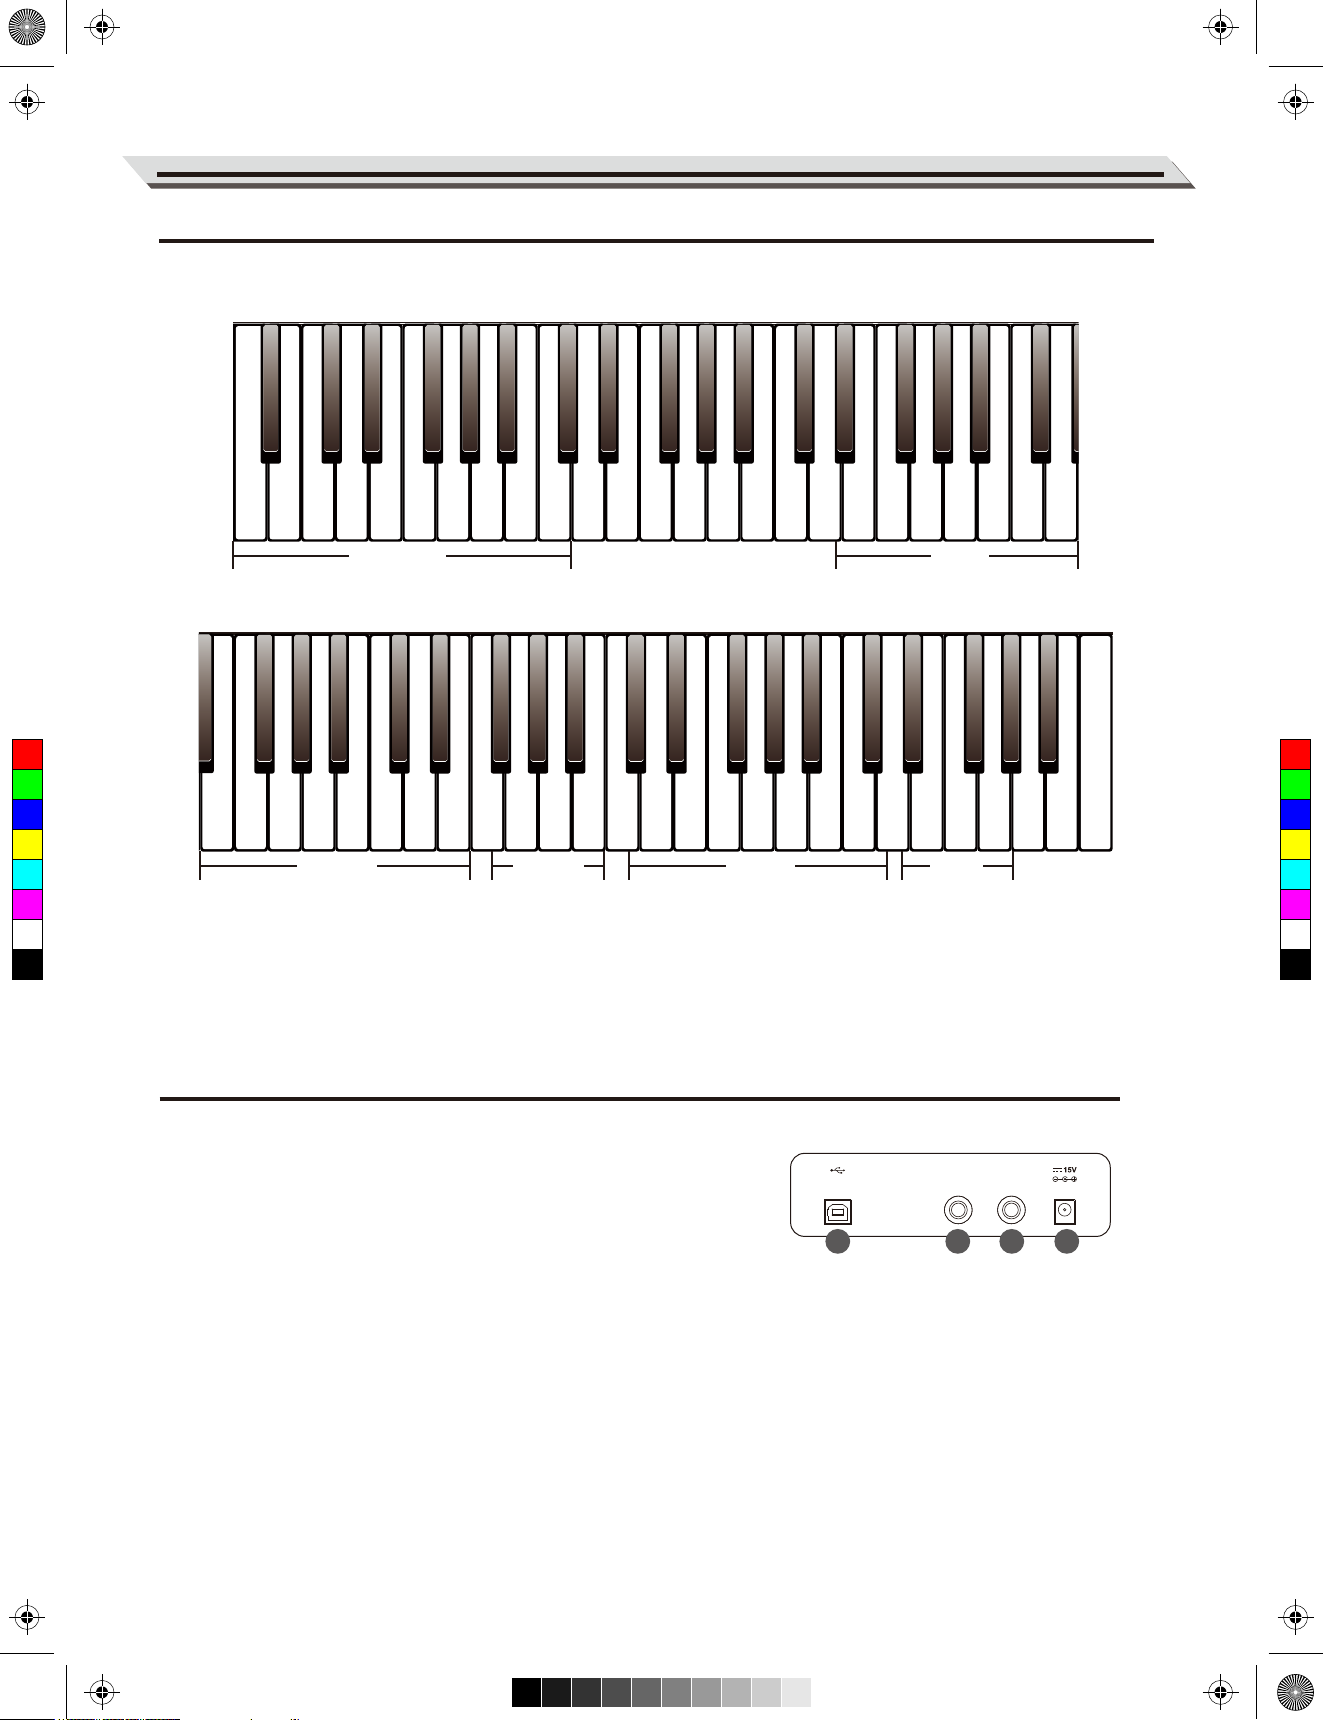
Rear Panel
12. USB Jack
Connect to a computer.
AUX OUT AUX IN
13. AUX OUT Jack
Connect to an external audio equipment.
14. AUX IN Jack
Connect an external audio source, such as an MP3 or CD player.
15. DC IN Jack
Connect the specified power adaptor.
12 13 14 15
05
Page 6
VOLUME
0
3
5
Transpose
Touch
Metro Volume
Dual Volume
Octave
Setting +1
1
4
2
4
6
Reverb Type
Chorus Type
Upper Volume
Tune
MIDI Out
Setting -1
2
3
5
D.A.S.
Beep
Lower Volume
aw_DP260_manual_G02_171226.pdf 6 17/12/26 15:52
Setup
This section contains information about setting up your instrument and preparing to play. Please go through this section
carefully before turning the power on.
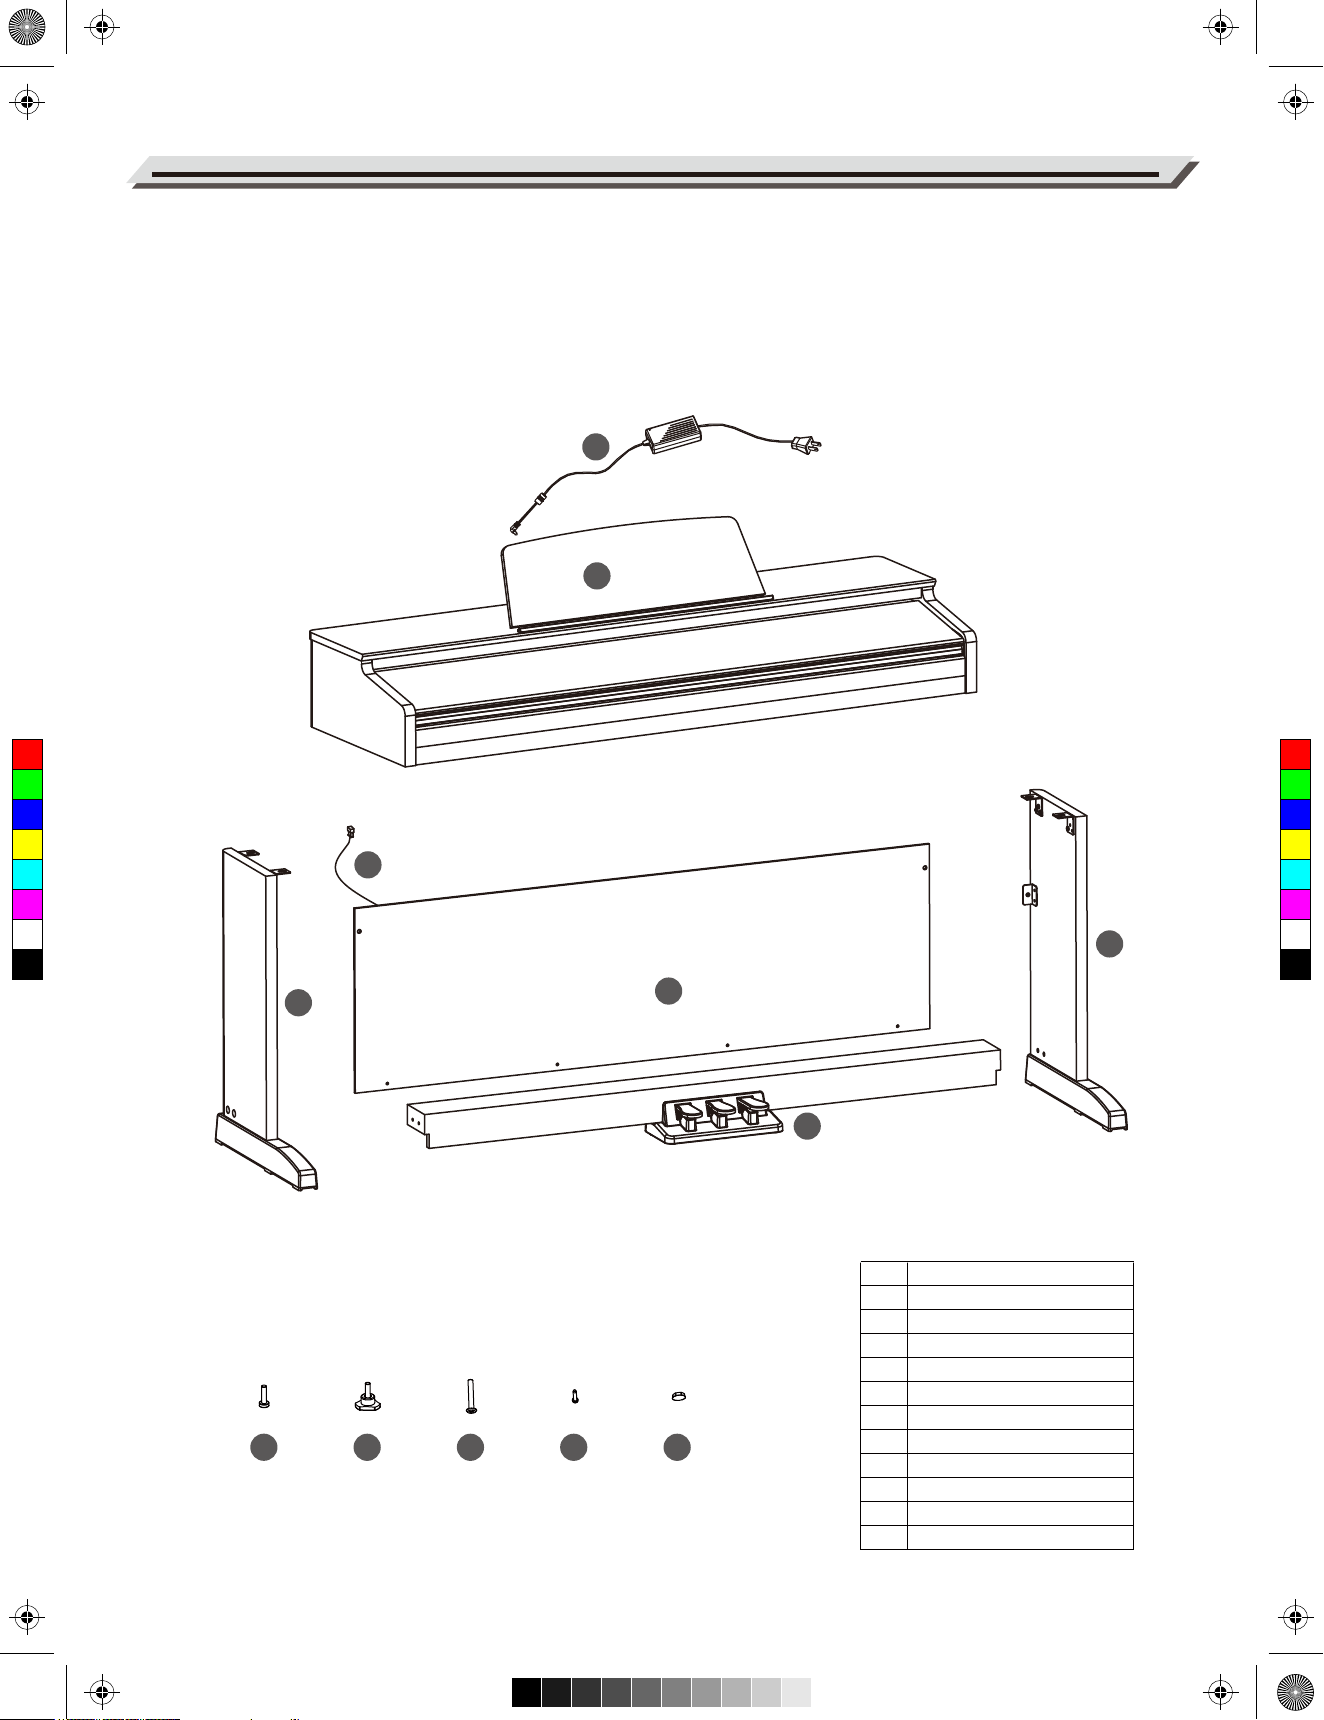
Setup Guide
To assemble the stand, you will need a Phillip's screwdriver (not supplied). Check that all the parts listed below are included
before proceeding.
12
1
C
M
Y
CM
MY
CY
CMY
K
2
11
3
5
4
Piano body
1.
Left leg
2.
Right leg
3.
Pedal box
4.
Big back board
5.
Screw 6 X 50 (2 pcs)
6.
Hand screw (4 pcs)
7.
Screw M6 X 18 (4 pcs)
6
7
8
9
10
8.
Screw 4 X 15 (4 pcs)
9.
Screw cap (4 pcs)
10.
Pedal cable
11.
AC power adaptor
12.
06
Page 7
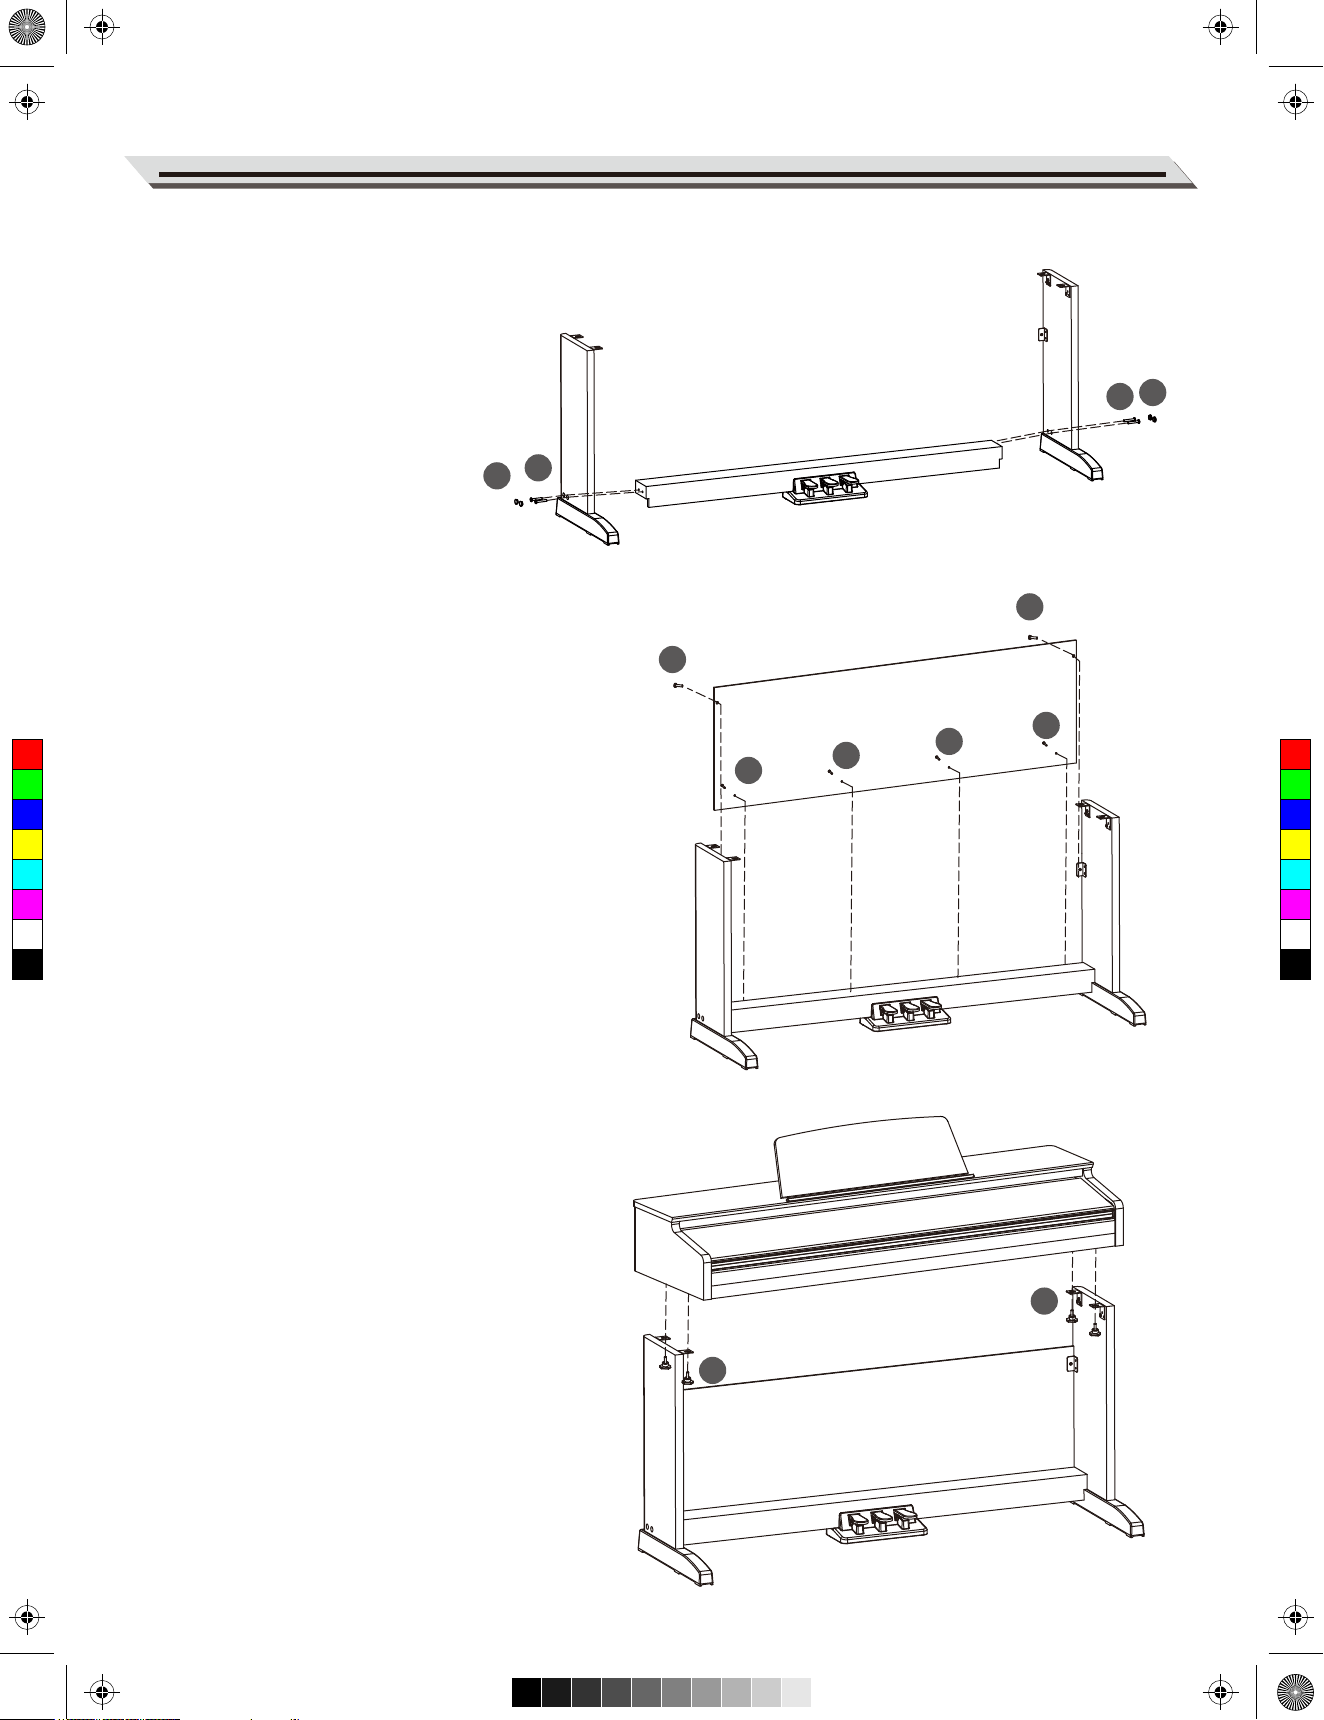
aw_DP260_manual_G02_171226.pdf 7 17/12/26 15:52
A. Put the pedal box (4) in between the left and right leg components
(2&3), use 4 pieces of screws (8) (2 on each side) to fix the legs
onto the foot pedal unit, then cover the screw caps (10) on top
(2 on each side) (Make sure the components are in the right
direction before installing.).
8
10
Setup
10
8
B. Place the big back board against the stand completed in Step
6
A, then use screw (9) and screw (6) to fix it to the stand.
6
9
C
M
Y
CM
MY
CY
CMY
K
9
9
C. Put the piano body on the top of the assembly finished in
Step B, then, use hand screw (7) to fix it.
9
7
7
07
Page 8
aw_DP260_manual_G02_171226.pdf 8 17/12/26 15:52
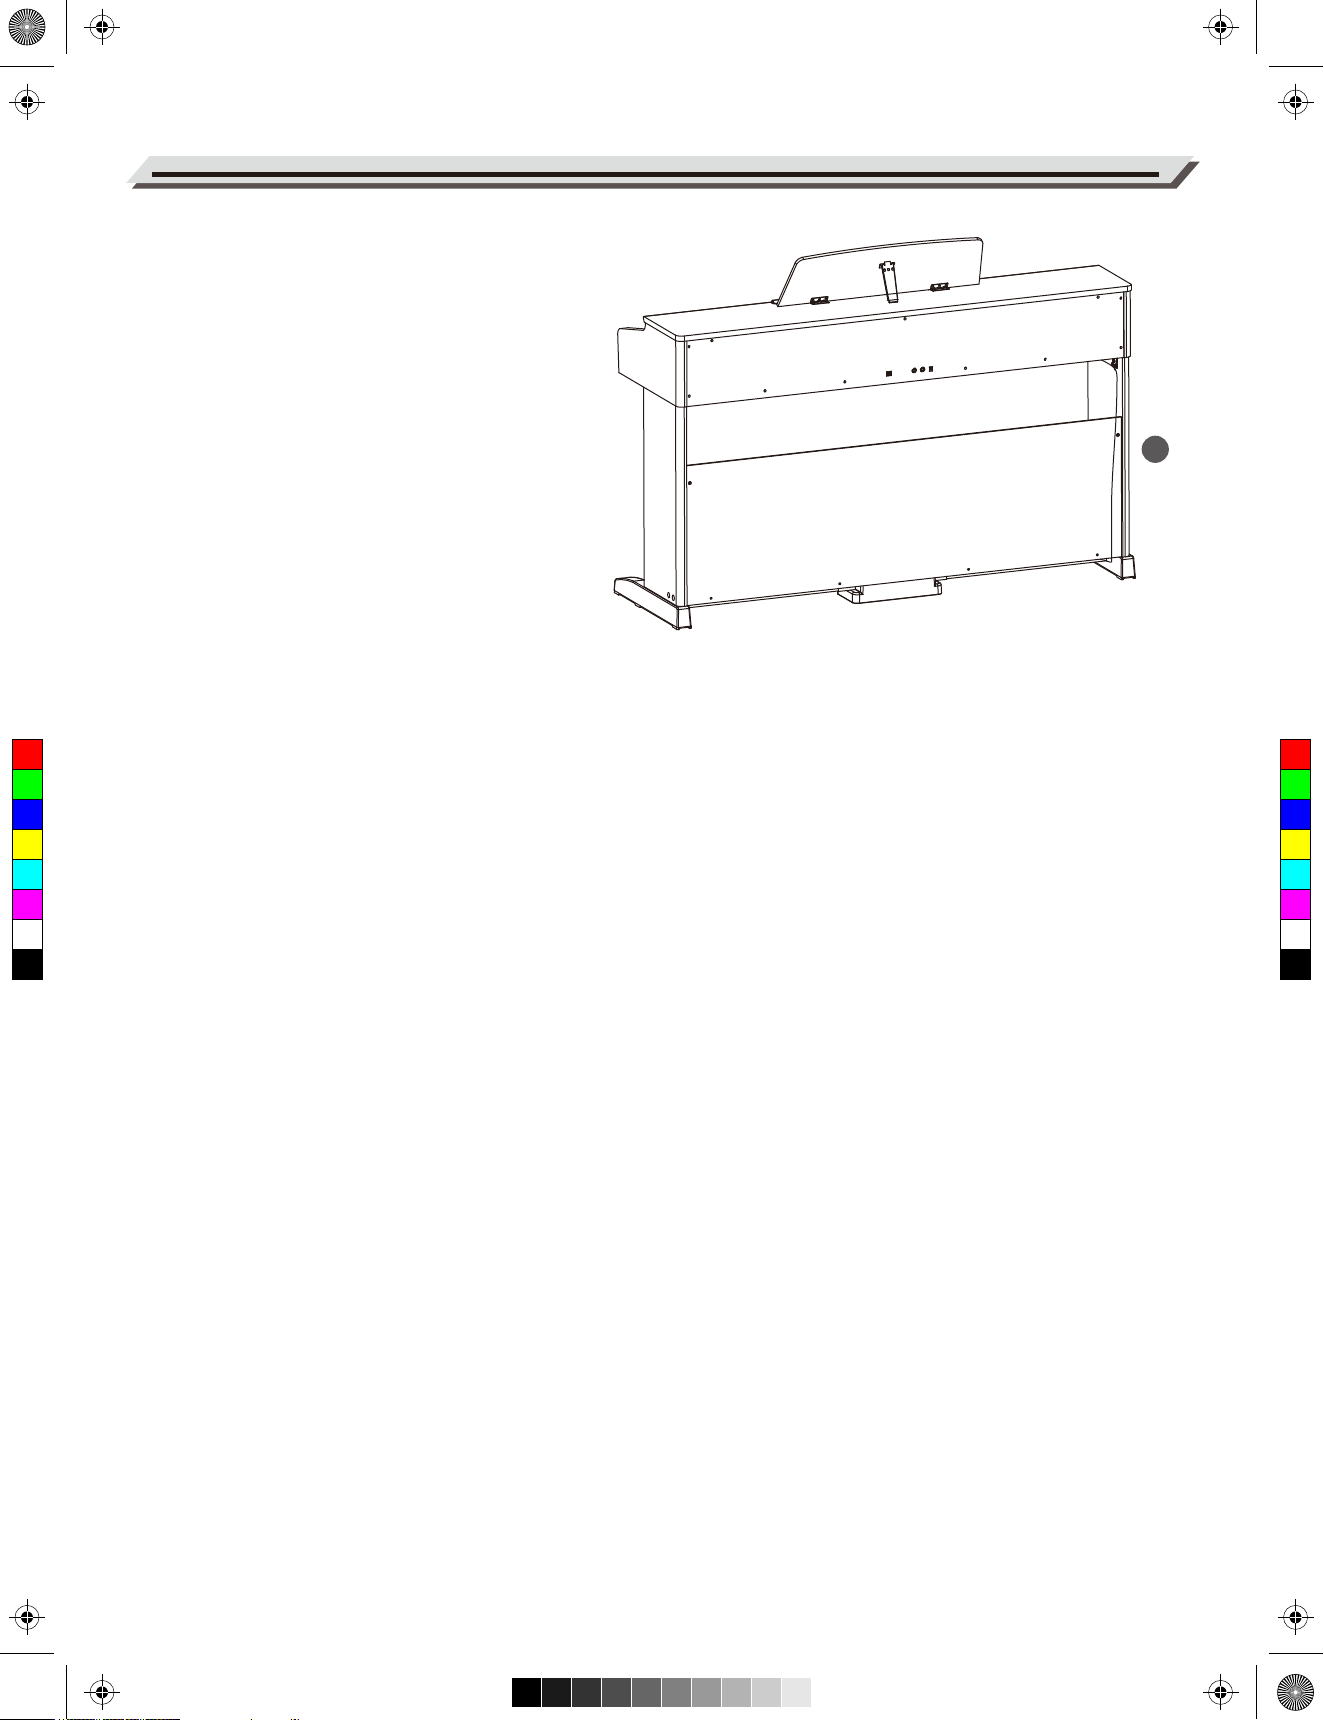
Setup
D. Connect the pedal cable to the pedal jack at the rear bottom of the
piano. The setup is completed, now the piano is ready to connect to
power supply.
11
C
M
Y
CM
MY
CY
CMY
K
08
Page 9

aw_DP260_manual_G02_171226.pdf 9 17/12/26 15:52
Connections
Connecting a pair of Headphones
Plug a pair of standard stereo headphones here for private practice or
late-night playing.
Jack 1: When headphones are connected, sound can be heard from the
headphones and speakers.
Jack 2: When headphones are connected, the internal speakers will be
muted, and the sound can only be heard from the headphones.
Note:
To avoid the risk of hearing loss, do not use headphones at high volume
level for a long period of time.
Connecting an Audio Equipment
The AUX OUT jack delivers the output of the instrument to external
audio equipment such as a keyboard amplifier, stereo sound system,
mixing console, or recording interface.
Use an audio cable to connect the AUX OUT jack of the instrument to
the INPUT jack of the external audio equipment.
C
M
Y
CM
MY
CY
CMY
K
Notes:
1. Turn off the power to all devices before connecting or disconnecting
external equipment.
2. To avoid damaging the speakers, set the master volume level to
minimum before turning on the power.
Connecting an MP3/CD Player
The AUX IN jack receives audio signals from an external audio source
such as an MP3 or a CD player.
AUX OUT AUX IN
AUX OUT AUX IN
Use an audio cable to connect the AUX IN jack of the instrument to the
OUTPUT jack of an MP3/CD player. The instrument’s speakers will play
the music transmitted from the external player, and you can play along.
Connecting a Computer
Use a standard USB cable to connect the USB jack of the instrument to
the USB port of a computer.
With USB, you can save a keyboard performance to the computer or
use the instrument to play back music played on the computer.
Note:
Do not set the USB MIDI device to be both input and output simultaneously when configuring the software on your computer. Otherwise, the
sound will be overlapped when playing the keyboard.
AUX OUT AUX IN
09
Page 10

aw_DP260_manual_G02_171226.pdf 10 17/12/26 15:52
Quick Start
Power Supply
1. Before connecting to power supply, please set the [POWER]
switch to “OFF” and set the master volume level to minimum.
2. Connect the power adaptor to the DC IN jack on the rear panel.
3. Plug the power adaptor into an appropriate AC outlet.
4. Press the [POWER] switch. The button indicator lights up, indicating
the instrument is powered on.
5. When you are ready to turn the instrument off, press and hold the
[POWER] switch for a second. The button indicator will turn off.
Notes:
1. In order to save energy, the instrument will automatically shut down
after 30 minutes when not in use. To turn off this function, press and
hold the key A0 (the first key to the left of the keyboard), then turn on
the power.
2. For your safety, please unplug the instrument when it is not in use or
during a thunderstorm.
C
M
Y
CM
MY
CY
CMY
K
Adjusting the Master Volume
Rotate the [VOLUME] knob clockwise to increase the master volume or
counter-clockwise to decrease it. Adjust to set the desired volume level.
Note:
If the speakers do not produce sound, please check if the master
volume is set too low or if headphones are plugged into Jack 2.
Playing the Demo
The instrument features a professional demo. Please refer to the Demo
List for details.
1. Press [ ] and [ ] buttons at the same time to start
playing the demo. Repeat this operation to stop the demo.
2. During demo playback, pressing the [ ] button will stop
playing and exit Demo mode.
Playing the Voices
The instrument features a variety of exceptionally realistic voices.
Please refer to the Voice List for details.
1. Press the [>]/[<] buttons to select a desired voice.
2. Alternatively, press and hold [FUNCTION], then press one of the
[A0] ‒ [C2] keys to select a voice.
10
A0 C1 C2
Page 11

VOLUME
VOLUME
aw_DP260_manual_G02_171226.pdf 11 17/12/26 15:52
Playing the Songs
The instrument features a variety of preset songs. Please refer to the
Song List for details.
1. Press the [ ] button to enter Song mode and start playing
all songs in a loop.
Quick Start
2. Press the [>]/[<] buttons to select a desired song.
D#3
3. Alternatively, press and hold [FUNCTION], then press the [D#3] ‒
[C4] keys to select a specific song.
4. During song playback, pressing the [ ] button will stop the
playback.
Pressing this button again will play the current song in a loop.
Note:
When using the [D#3] ‒ [C4] keys to select a song, you need to press 2
C3
C4
keys total. For example, press and hold [FUNCTION], then press [D#3]
and [B3] in sequence to select the “08” song.
Recording
C
M
Y
CM
MY
CY
CMY
K
You can record and save your keyboard performance as a user song on
the instrument.
1. Press [METRO] and [PLAY] buttons at the same time, then press
one of the [D#7] ‒ [G7] keys to select a user song to which the
recording will be saved. The button indicators for [METRO] and
[PLAY] will stay lit.
D#7 G7
2. Now it enters recording standby mode. The button indicator for
[ ] will blink. Now you can set the desired voice, tempo etc.
for recording.
3. Press the [ ] button or simply play the keyboard to start
recording.
4. During recording, if you press [METRO] and [PLAY] buttons at the
same time, recording will stop and be saved. The button indicators
for [METRO] and [PLAY] will turn off.
5. To play back a recorded song, press and hold [PLAY], then press
one of the [D#7] ‒ [G7] keys to select a song.
6. After selecting a recorded song, the button indicator for [PLAY] will
light up. Press this button again to play back the recording.
7. To stop the playback, press the [PLAY] button.
8. After selecting a recorded song for playback, if you press [METRO]
and [PLAY] buttons at the same time, it will delete the selected song.
Note:
If you do not select a user song for recording or playback, it will
automatically use the same user song in the last operation. When you
restart the instrument, it will select the first user song by default.
C7 C8
11
Page 12

VOLUME
aw_DP260_manual_G02_171226.pdf 12 17/12/26 15:52
Playing the Voices
The instrument features a variety of exceptionally realistic voices.
Please refer to the Voice List for details.
Playing a Voice
1. Press the [>]/[<] buttons to select a desired voice.
2. Press and hold [FUNCTION], then press one of the [A0] ‒ [C2] keys
to select a voice. Each of these keys has been assigned a preset
voice.
3. Play the keyboard to use the selected voice for performance.
Playing Two Voices Simultaneously
The Dual function allows two different voices to be layered together,
creating a more full and rich sound.
A0 C1
C2
1. Select a main voice (upper voice).
2. Turn on the dual function.
Press and hold [FUNCTION], then press the [F2] key to turn on the
dual function. The default dual voice is Strings.
3. Select a dual voice.
C
M
Y
CM
MY
CY
CMY
K
Press and hold [FUNCTION], then press the [F2] key once and then
press one of the [A0] ‒ [C2] keys to select a dual voice.
4. Play the voices.
Play the keyboard and you will hear two different voices playing
together, just like two different instruments being played at the same
time.
5. Turn off the dual function.
Press and hold [FUNCTION], then press the [F2] key to turn off the
dual function.
A0 C1 C2 F2
Note:
When the lower and dual functions are in use, only the right hand area
will play the layered voices.
Playing Different Voices with Both Hands
The Lower function splits the keyboard into two areas so as to create
different voices for each of your hands. The left hand voice is the lower
voice.
1. Select a main voice (upper voice).
2. Turn on the lower function.
Press and hold [FUNCTION], then press the [F#2] key to turn on
the lower function. The default lower voice is Strings.
3. Select a lower voice.
Press and hold [FUNCTION], then press the [F#2] key once and
then press one of the [A0] ‒ [C2] keys to select a lower voice.
4. Play the voices.
Play the keyboard with both hands and you will hear two different
voices from the left and right hand areas.
5. Turn off the lower function.
Press and hold [FUNCTION], then press the [F#2] key to turn off the
lower function.
12
F#2
A0 C1 C2
Page 13

VOLUME
VOLUME
VOLUME
aw_DP260_manual_G02_171226.pdf 13 17/12/26 15:52
Split point
The key that splits the keyboard into the left and right hand areas is
called “split point”. The default split point is F#3 (34), however, you can
assign it to any other key.
1. Press and hold [FUNCTION], then press the [A2] key once, and
then tap a key on the keyboard to assign the split point to that key.
2. Release the [FUNCTION] button to exit the edit mode.
Voice Volume
You can adjust separately the volume of the upper voice, the dual voice
and the lower voice.
1. Press and hold [FUNCTION], then press the [G6] key to edit the
upper voice volume.
Playing the Voices
C2 A2
C#7
2. In edit mode, press and hold [FUNCTION], then press the [C7]/
[C#7] keys to adjust the volume range from 0 to 15.
3. In edit mode, press and hold [FUNCTION], then press the [C7] and
[C#7] keys at the same time to reset the volume to default.
C
M
Y
CM
MY
CY
CMY
K
4. Set the dual voice volume and lower voice volume in the same way.
Press and hold [FUNCTION], then press the [G#6] key to edit the
dual voice volume, then use the [C7]/[C#7] keys to adjust the volume.
Press and hold [FUNCTION], then press the [A6] key to edit the lower
voice volume, then use the [C7]/[C#7] keys to adjust the volume.
Playing a Voice Demo
1. In Voice mode, press and hold [FUNCTION], then press the [G2] key
to start playing the current upper voice demo.
C6 G6 C7
2. During demo playback, press and hold [FUNCTION], then press the
[G2] key again to stop playing. Alternatively, press the [ ]
button to stop the playback.
C1 G2C2
Touch Response
The touch response feature allows you to expressively control the voice
level based on your playing dynamics, just as on an acoustic instrument.
There are 5 types of touch curves (Off, 1 ‒ 5). The default setting is 3.
1. Press and hold [FUNCTION], then press the [D#6] key to edit the
touch setting.
C#7D#6
2. In edit mode, press and hold [FUNCTION], then press the [C7]/[C#7]
keys to change the setting.
3. In edit mode, press and hold [FUNCTION], then press the [C7] and
[C#7] keys at the same time to restore the default setting.
Touch Setting
OFF
1
2
3
4
5
Description
Fixed
Soft 1
Soft 2
Medium
Hard 1
Hard 2
C6 C7
13
Page 14

VOLUME
VOLUME
VOLUME
VOLUME
aw_DP260_manual_G02_171226.pdf 14 17/12/26 15:52
Playing the Voices
Transpose
The transpose function allows the overall pitch of the instrument to be
transposed up or down by a maximum of one octave in semitone
steps.
1. Press and hold [FUNCTION], then press the [C#6] key to edit the
transpose setting.
2. In edit mode, press and hold [FUNCTION], then press the [C7]/
[C#7] keys to adjust the transpose range from -12 to +12.
C#7C#6
3. In edit mode, press and hold [FUNCTION], then press the [C7] and
[C#7] keys at the same time to restore the default setting “00”.
C6 C7
Notes:
1. For example, if you set the transpose value to -05 or +07, you will
hear “G” pitch when playing the “C” keys.
2. Transpose setting applies to the accompaniment and the entire
keyboard voice.
Tune
The tune function adjusts the pitch of the entire keyboard in 2-cent
C
M
Y
CM
MY
CY
CMY
K
increments over a range of ±50 (100 cents).
1. Press and hold [FUNCTION], then press the [D6] key to edit the
tune setting.
2. In edit mode, press and hold [FUNCTION], then press the [C7]/
[C#7] keys to change the setting.
3. In edit mode, press and hold [FUNCTION], then press the [C7] and
[C#7] keys at the same time to restore the default setting “00”.
Operation
C7
C#7
C7 + C#7
Description
Lower the overall pitch by 1.
Raise the overall pitch by 1.
Restore the default tune value.
C6 D6 C7
C#7
Pedal Resonance
When a piano voice is selected, pressing the sustain pedal will add
string resonance effect to the notes you play. The string resonance effect
faithfully recreates the resonance from the strings and soundboard of an
acoustic grand piano.
1. Press and hold [FUNCTION], then press the [A#2] key to turn this
function on or off.
2. Pedal resonance is turned on by default when you turn on the power.
Notes:
1. Chorus effect will be disabled when pedal resonance is in use.
2. There may be a slight pause in the sound if you switch pedal
resonance on/off while performing.
Metronome
The metronome provides a steady beat to help you practice at a preset
tempo.
Turn the metronome on or off.
Press the [METRO] button to turn the metronome on or off.
14
A#2
C2 C3
Page 15

VOLUME
VOLUME
VOLUME
aw_DP260_manual_G02_171226.pdf 15 17/12/26 15:52
When metronome is in use, the button indicator for [ ] will flash in
sync with the metronome sound. (Red for downbeat and blue for upbeat).
To adjust the metronome tempo, please refer to Tempo for details.
Set the metronome beat.
The instrument provides 6 beat types: 0, 2 ‒ 6.
When metronome is in use, press the [>]/[<] buttons to change the beat
type.
Alternatively, press and hold [FUNCTION], then press one of the [F#5] ‒
[B5] keys to select a beat type.
Set the metronome volume.
1. Press and hold [FUNCTION], then press the [F#6] key to edit the
metronome volume.
2. In edit mode, press and hold [FUNCTION], then press the [C7]/[C#7]
keys to adjust the volume range from 0 to 15.
3. In edit mode, press and hold [FUNCTION], then press the [C7] and
[C#7] keys at the same time to reset the volume to default.
Playing the Voices
F#5
C5 C6B5
F#6 C#7
Note:
The metronome is not available in song mode.
C6 C7
C
M
Y
CM
MY
CY
CMY
K
Tempo
You can change the tempo over the range from 30 to 280.
1. Press and hold [FUNCTION], then press the [F4]/[F#4] keys to
change the tempo.
2. Press and hold [FUNCTION], then press the [F4] and [F#4] keys at
the same time to restore the default tempo “120”. In Song mode, it
will reset to the default song tempo.
F#4
3. Press and hold [FUNCTION], then press the [>]/[<] buttons to adjust
the tempo in the step of 10.
C4 C5 E5E4
4. Press and hold [FUNCTION], then use the [G4] ‒ [E5] keys to enter
a tempo value. For example, pressing [A4],[G#4] and [B4] in
sequence will enter a tempo value of 214.
5. Press and hold [FUNCTION], then tap the [E4] key twice to get the
desired tempo. The instrument will start the metronome sound at the
tapping speed.
Operation
[F4]/[F#4] keys
[F4]+[F#4] keys
[>]/[<] buttons
[G4] ‒ [E5] keys
[E4] key
Description
Increase/decrease the tempo value by 1.
Restore the default tempo.
Increase/decrease the tempo value in the step of 10.
Enter a specific tempo value (pressing 3 keys).
Set the tempo at the tapping speed.
Notes:
1. When using [G4] ‒ [E5] keys to set the tempo value, you need to
press 3 keys total. For example, press [G4], [C#5] and [B4] in
sequence to enter a tempo value of 64.
2. In standby mode, if the times you tap the [E4] key equal to that of the
metronome beat, the instrument will start the metronome sound at
the speed of the last two tapping.
15
Page 16

VOLUME
VOLUME
VOLUME
VOLUME
aw_DP260_manual_G02_171226.pdf 16 17/12/26 15:52
DSP Effect
The DSP effects will add ambiance and depth to your performance in a
variety of ways.
Reverb
1. Press and hold [FUNCTION], then press the [ ] button to
turn reverb effect on or off.
2. Press and hold [FUNCTION], then press the [E6] key to edit the
reverb setting.
3. In edit mode, press and hold [FUNCTION], then press the [C7]/[C#7]
keys to select a reverb type from 1 to 5.
4. In edit mode, press and hold [FUNCTION], then press the [C7] and
[C#7] keys at the same time to restore the default reverb type “3
Church”.
Reverb Type
1
2
3
4
5
Description
Room
Hall
Church
Delay
Pan delay
C#7
C6 C7E6
Chorus
C
M
Y
CM
MY
CY
CMY
K
1. Press and hold [FUNCTION], then press the [ ] button to
turn chorus effect on or off.
2. Press and hold [FUNCTION], then press the [F6] key to edit the
chorus setting.
3. In edit mode, press and hold [FUNCTION], then press the [C7]/[C#7]
keys to select a chorus type from 1 to 5.
4. In edit mode, press and hold [FUNCTION], then press the [C7] and
[C#7] keys at the same time to restore the default chorus type
“Chorus 2”.
Chorus Type
1
2
3
4
5
Description
Chorus 1
Chorus 2
Chorus 3
Flanger
Rotary
D.A.S. (Dynamic Acoustic System)
The loudness of sound perceived by human ears over the frequency
spectrum is different. As the audio volume decreases, human ears’
sensitivity to extreme high and low frequencies will decline. As a result,
the audio may seem to become 'thin' sounding at low volumes, losing
bass and treble.
The D.A.S. function will dynamically adjust the sound of the instrument
according to the overall volume for better sound balance, giving you a
more clear, natural and rich sound.
C6 C7F6
Level
max
mid
min
20HZ
C#7
20000HZ
with D.A.S.
without D.A.S.
with D.A.S.
without D.A.S.
with D.A.S.
without D.A.S.
Frequency
Turn the D.A.S. function on or off
Press and hold [FUNCTION], then press the [A7] key to turn D.A.S. on
or off.
Note:
The D.A.S. function is turned on by default when you turn on the power.
16
A7 C8C7
Page 17

aw_DP260_manual_G02_171226.pdf 17 17/12/26 15:52
The instrument features a variety of preset songs. Please refer to the
Song List for details.
Play the Songs
1. Play all songs in a loop.
Press the [ ] button to start playing all preset songs in a
loop. The button indicator lights up.
2. Play the selected song in a loop.
When song playback stops, press the [ ] button to play the
current song in a loop.
Song
3. Select a song.
D#3
During song playback, press the [>]/[<] buttons to select a desired
song.
Alternatively, press and hold [FUNCTION], then use the [D#3] ‒ [C4]
keys to select a specific song.
4. Stop the playback.
During song playback, press [ ]/[ ] buttons to stop
the song.
C
M
Y
CM
MY
CY
CMY
K
Note:
When using the [D#3] ‒ [C4] keys to select a song, you need to press 2
keys total. For example, press and hold [FUNCTION], then press [D#3]
and [B3] in sequence to select the “08” song.
Practice the Songs
All preset songs can be practiced with melody-off.
1. Press and hold [FUNCTION], then press the [C#4] key to mute the
left hand melody. You can now practice the left hand melody of the
C3 C4
C#4
song. Repeat this operation to activate the left hand melody.
2. In the same way, press and hold [FUNCTION], then press the [D4]
key to mute the right hand melody. You can now practice the right
hand melody of the song.
C3
C4 D4
17
Page 18

VOLUME
VOLUME
VOLUME
VOLUME
aw_DP260_manual_G02_171226.pdf 18 17/12/26 15:52
Song Recording
You can record and save your keyboard performance as a user song on
the instrument, and then play it back.
Prepare Recording
1. Before recording starts, you need to select a user song to which the
recording will be saved. Press [METRO] and [PLAY] buttons at the
same time, then press one of the [D#7] ‒[G7] keys to select a user
song.
2. Now it enters recording standby mode. The button indicator for
[ ] will blink. Now you can set the desired voice, tempo etc.
for recording.
Start Recording
In recording standby mode, press the [ ] button or simply play
the keyboard to start recording. The button indicators for [METRO] and
[PLAY] will stay lit.
D#7
C7 C8
G7
Note:
If the current user song has data, the data will be overwritten after
recording.
C
M
Y
CM
MY
CY
CMY
K
Stop Recording
1. During recording, if you press [METRO] and [PLAY] buttons at the
same time, recording will stop and be saved. The button indicators
for [METRO] and [PLAY] will turn off.
2. During recording, if the memory gets full, recording will automatically
stop and be saved. The button indicators for [METRO] and [PLAY]
will turn off.
Play back Recording
D#7
1. After recording, press and hold [PLAY], then press one of the [D#7]
‒[G7] keys to select a recorded song.
2. Press the [PLAY] button to start playback. The button indicator will
stay lit.
3. To stop playback, press the [PLAY] button again. The button indicator
turns off.
G7C7 C8
Delete Recording
1. Delete all user songs.
Press and hold [METRO] and [PLAY] buttons, then turn on the power.
This operation will delete all user songs.
2. Delete a specific user song.
When selecting a user song to play back, if you press [METRO] and
[PLAY] buttons at the same time, it will delete the selected user song.
Note:
The saved user songs will not be lost after power off.
18
Page 19

aw_DP260_manual_G02_171226.pdf 19 17/12/26 15:52
The Duet function will enrich your performance. Simply play a chord with
your left hand, and the instrument will play a preset duet pattern and
produce a beautiful melody.
Turn the duet function on or off.
Press and hold [FUNCTION], then press the [B2] key to turn on the duet
function on or off.
Select a duet pattern.
Press and hold [FUNCTION], then press the [C3]/[C#3] keys to select a
duet pattern. There are 32 duet patterns. The default setting is “01”.
Duet
C#3
Note:
C2 C3B2
Each voice is matched with a preset duet pattern, so when you change a
voice, the default duet pattern will change as well.
Set the duet split point.
When duet function is in use, the keyboard will be split into two areas.
You can play chords in the left hand area, and play melody in the right
hand area. The default split point is the same as in the lower function:
F#3 (34). You can assign the split point to any other key.
1. Press and hold [FUNCTION], then press the [A2] key to edit the split
C
M
Y
CM
MY
CY
CMY
K
point, and then tap a key on the keyboard to assign the split point to
that key.
C2 A2
2. Release the [FUNCTION] button to exit the edit mode.
Twinova
The Twinova function splits the keyboard into two areas with the same
pitch and voice, for the convenience of playing together with a friend or
instructor.
G#2
Turn the Twinova function on or off.
Press and hold [FUNCTION], then press the [G#2] key to turn Twinova
function on or off.
The default split point is E3 (32). In Twinova mode, the dual and lower
functions are not available.
Select a voice for Twinova.
The upper voice selected before entering Twinova will become the
default voice for both areas. Press the [>]/[<] buttons to change the
voice.
Alternatively, press and hold [FUNCTION], then press one of the [A0] ‒
[C2] keys to select a voice.
Set the split point for Twinova.
1. In Twinova mode, press and hold [FUNCTION], then press the [A2]
key to edit the split point, and then tap one of the [C3] ‒ [C6] keys to
assign the split point.
2. Release the [FUNCTION] button to exit the edit mode.
C2 C3 E3
C2 C3A2
19
Page 20

VOLUME
VOLUME
VOLUME
VOLUME
VOLUME
VOLUME
VOLUME
aw_DP260_manual_G02_171226.pdf 20 17/12/26 15:52
Twinova
Set the octave for Twinova.
This function will shift the pitch of the keyboard up or down by one
octave. This function is available only in Twinova mode, and the octave
for both areas will be adjusted together. The octave setting will be reset
to default when you exit Twinova mode.
1. Press and hold [FUNCTION], then press the [A#6] key to edit the
octave setting.
2. In edit mode, press and hold [FUNCTION], then press the [C7]/[C#7]
keys to change the setting.
3. In edit mode, press and hold [FUNCTION], then press the [C7] and
[C#7] keys at the same time to restore the default setting “0”.
A#6
C#7
Note:
C7 C8
Twinova function is not available in song mode and demo mode.
C
M
Y
CM
MY
CY
CMY
K
MIDI Out Channel
1. Press and hold [FUNCTION], then press the [B6] key to edit the MIDI
Out channel setting.
2. In edit mode, press and hold [FUNCTION], then press the [C7]/[C#7]
C#7
keys to change the setting from 01 to 16.
3. In edit mode, press and hold [FUNCTION], then press the [C7] and
[C#7] keys at the same time to restore the default setting “01”.
C7B6 C8
Beep Tone
The instrument will produce a sound when using the keyboard to change
a setting. This function is turned on by default.
Press and hold [FUNCTION], then press the [B7] key to turn the beep
tone function on or off.
20
B7 C8
Page 21

aw_DP260_manual_G02_171226.pdf 21 17/12/26 15:52
Troubleshooting
Problem
The speakers produce a pop sound
Possible Cause and Solution
This is normal and no cause for alarm.
whenever the power is turned ON/OFF.
Speakers do not produce sound when the
keyboard is played.
There is noise when I use a mobile phone.
Check if the master volume is set too low or if headphones are plugged
into Jack 2.
Using a mobile phone in close proximity to the instrument may produce
interference. To prevent this, turn off the mobile phone or keep it away
from the instrument when using.
When connecting to computer, the instrument
cannot be recognized.
Check if the USB cable is firmly connected. Try connecting another USB
port on the computer. This instrument is plug and play and should work
without installing a driver.
C
M
Y
CM
MY
CY
CMY
K
Keyboard
Keyboard
Touch Response
Voices
Polyphony (max.)
Voices
Layer
Split
Duo (Twinova)
88 Graded Hammer-Action Keys
5 types, Off
128
16
Left, Right1, Right2
Yes
Yes
Effects
Reverb
Chorus
5 types, Off
5 types, Off
Performance Enhance
Duet
32 types
Song & Recording
Music Library
60 preset songs,
with L/R hand learning
Sequencer
Demo
5 user songs
1 piano demo, 16 voice demos
Pitch Adjustment
Transpose
Octave
Tuning
-12 ‒ +12
-1 ‒ +1 (Twinova)
-50 ‒ +50
Other Functions
Metronome
Tempo
Other control
Connections
Interaction & Expansion
Phones
Pedals
USB
Input
Output
Power Supply
Power
Power Off Protection
Amplifiers & Speakers
Amplifiers
Speakers
Dimensions & Weight
Dimensions LWH (mm)
Weight (kg)
* All specifications and appearances are subject to change
Specifications
0, 2 ‒ 6
30 ‒ 280
Voice demo, MIDI out channel,
D.A.S.
USB MIDI, PC software
2 standard stereo
Sustain, Soft, Sostenuto
USB MIDI
Standard stereo
Standard stereo
DC15V / 2500mA
Yes
20W x 2
10W x 2
1320 x 440 x 815
38.5
without notice.
21
Page 22

aw_DP260_manual_G02_171226.pdf 22 17/12/26 15:52
Voice List
No.
Voice Name
1
Grand Piano
2
Grand Piano 2
3
Chorus Piano
4
E.Piano 1
5
E.Piano 2
6
Harpsichord
7
Clavi
8
Vibraphone
Song List
9
Drawbar Organ
10
Jazz Organ
11
Rock Organ
12
Pipe Organ
13
Accordion
14
Harmonica
15
String Ensembles
16
Soprano Sax
Song Name
No.
The Entertainer
1
Rialto Ripples (Rag)
2
Neapolitan Song
3
Waltzes
4
Turkish March
5
Schos Doll's Dance No. 2
C
M
Y
CM
MY
CY
CMY
K
6
Minuet In D Major
7
Inquietude
8
Italian Polka
9
Moment Musical
10
Prelude In C-Sharp Major
11
The Happy Farmer
12
The Rag-Time Dance
13
Piano Sonata In C Major, K.330. III
14
Mazurka
15
Prelude In E Major
16
Piano Sonata In A Major, K.331. I
17
Waltz For Piano In G-Sharp Minor
18
Gavotte
19
L' Arabesque
20
Austria Variation
21
Schos Doll's Dance No. 7
22
To A Wild Rose
23
Gavotte I
24
Waltz
25
Minuet In G Major (BWV Anh. 116)
26
Innocence
27
Tchaikovsky Waltz
28
Salut d' Amour
29
Barcarolle
30
Robot Doll
31
Consolation
32
2-Part Invention #13 In A Minor.B.W. Iii
33
Minuet In G Major (BWV Anh. 114)
34
Barcarolle
35
Norwegian Dance No.2
36
Moseta Dance
37
The Small Gathering
38
The Return
39
The Wagtail
40
Bulie Dance
41
Tender Blossom
42
Grace
43
Cherish The Memories
44
Chopsticks
45
Four Little Swans
46
Progress
47
Eclogue
48
The Limpid Stream
49
Brave Cavalier
50
The Chatterbox
51
Tarantella
52
Frankness
53
Tender Grieving
54
The Farewell
55
The Chase
56
Habanera
57
Prelude In C Major
58
Fountain
59
Fur Elise
60
Demo List
No.1Song Name
Fantasia
22
Page 23

aw_DP260_manual_G02_171226.pdf 23 17/12/26 15:52
MIDI Implementation Chart
1ch
1–16ch
C
M
Y
CM
MY
CY
CMY
K
ALL
1–16ch
True
23
Page 24

aw_DP260_manual_G02_171226.pdf 24 17/12/26 15:52
C
M
Y
CM
MY
CY
CMY
K
DP260_G02
 Loading...