

Page 1
Installation and Maintenance Manual IM 1100
Air-Cooled Scroll Compressor Chiller
AGZ025DH - AGZ190DH
R-410A
50/60 Hz
Group: Chillers
Part Number: IM 1100
Date: October 18, 2010
© 2010 McQuay International
Page 2
Installation and Application Information . . . . . . . . 3
Modbus
*AHRI Certification and ETL Listing apply to 60Hz models only
©2010 McQuay International. Illustrations and data cover the McQuay International product at the time of publication and we reserve the right to
make changes in design and construction at anytime without notice. ™® The following are trademarks or registered trademarks of their
respective companies: LEED is a registered trademark of the U.S. Green Building Council; BACnet from ASHRAE; LONMARK, LonTalk,
LONWORKS, and the LONMARK logo are managed, granted and used by LONMARK International under a license granted by Echelon
Corporation; ElectroFin from AST ElectroFin Inc.; Modbus from Schneider Electric; FanTrol, MicroTech III, Open Choice from McQuay
International
Handling. . . . . . . . . . . . . . . . . . . . . . . . . . . . . . 3
Unit Placement. . . . . . . . . . . . . . . . . . . . . . . . . 4
Chilled Water Piping. . . . . . . . . . . . . . . . . . . . . 9
Water Piping. . . . . . . . . . . . . . . . . . . . . . . . . . 10
Flow Switch . . . . . . . . . . . . . . . . . . . . . . . . . . 12
Glycol Solutions . . . . . . . . . . . . . . . . . . . . . . . 13
Operating and Standby Limits . . . . . . . . . . . . 13
Dimensions . . . . . . . . . . . . . . . . . . . . . . . . . . . . . . . 15
Lifting and Mounting Weights. . . . . . . . . . . . . . . . 22
Physical Data . . . . . . . . . . . . . . . . . . . . . . . . . . . . . 28
Pressure Drop Data . . . . . . . . . . . . . . . . . . . . . . . . 34
Electrical Data . . . . . . . . . . . . . . . . . . . . . . . . . . . . 35
Electrical Data Notes . . . . . . . . . . . . . . . . . . 35
Field Wiring Diagram . . . . . . . . . . . . . . . . . . 36
Start-up and Shut-down Procedures. . . . . . . . . . 53
Pre Start-up. . . . . . . . . . . . . . . . . . . . . . . . . . 53
Start-Up. . . . . . . . . . . . . . . . . . . . . . . . . . . . . 53
Shutdown . . . . . . . . . . . . . . . . . . . . . . . . . . . 54
Component Operation . . . . . . . . . . . . . . . . . . . . . 55
Component Operation . . . . . . . . . . . . . . . . . . . . 55
Wind Baffles and Hail Guards . . . . . . . . . . . . . . . 57
. . . . . . . . . . . . . . . . . . . . . . . . . . . . . . . . . . . . . . . . 58
Revision History . . . . . . . . . . . . . . . . . . . . . . . . . . 60
Hazard Identification
DANGER
Dangers indicate a hazardous situation which will result in death or serious injury if not avoided.
WARNING
Warnings indicate potentially hazardous situations, which can result in property damage, severe personal injury, or death if not avoided.
CAUTION
Cautions indicate potentially hazardous situations, which can result in personal injury or equipment damage if not avoided.
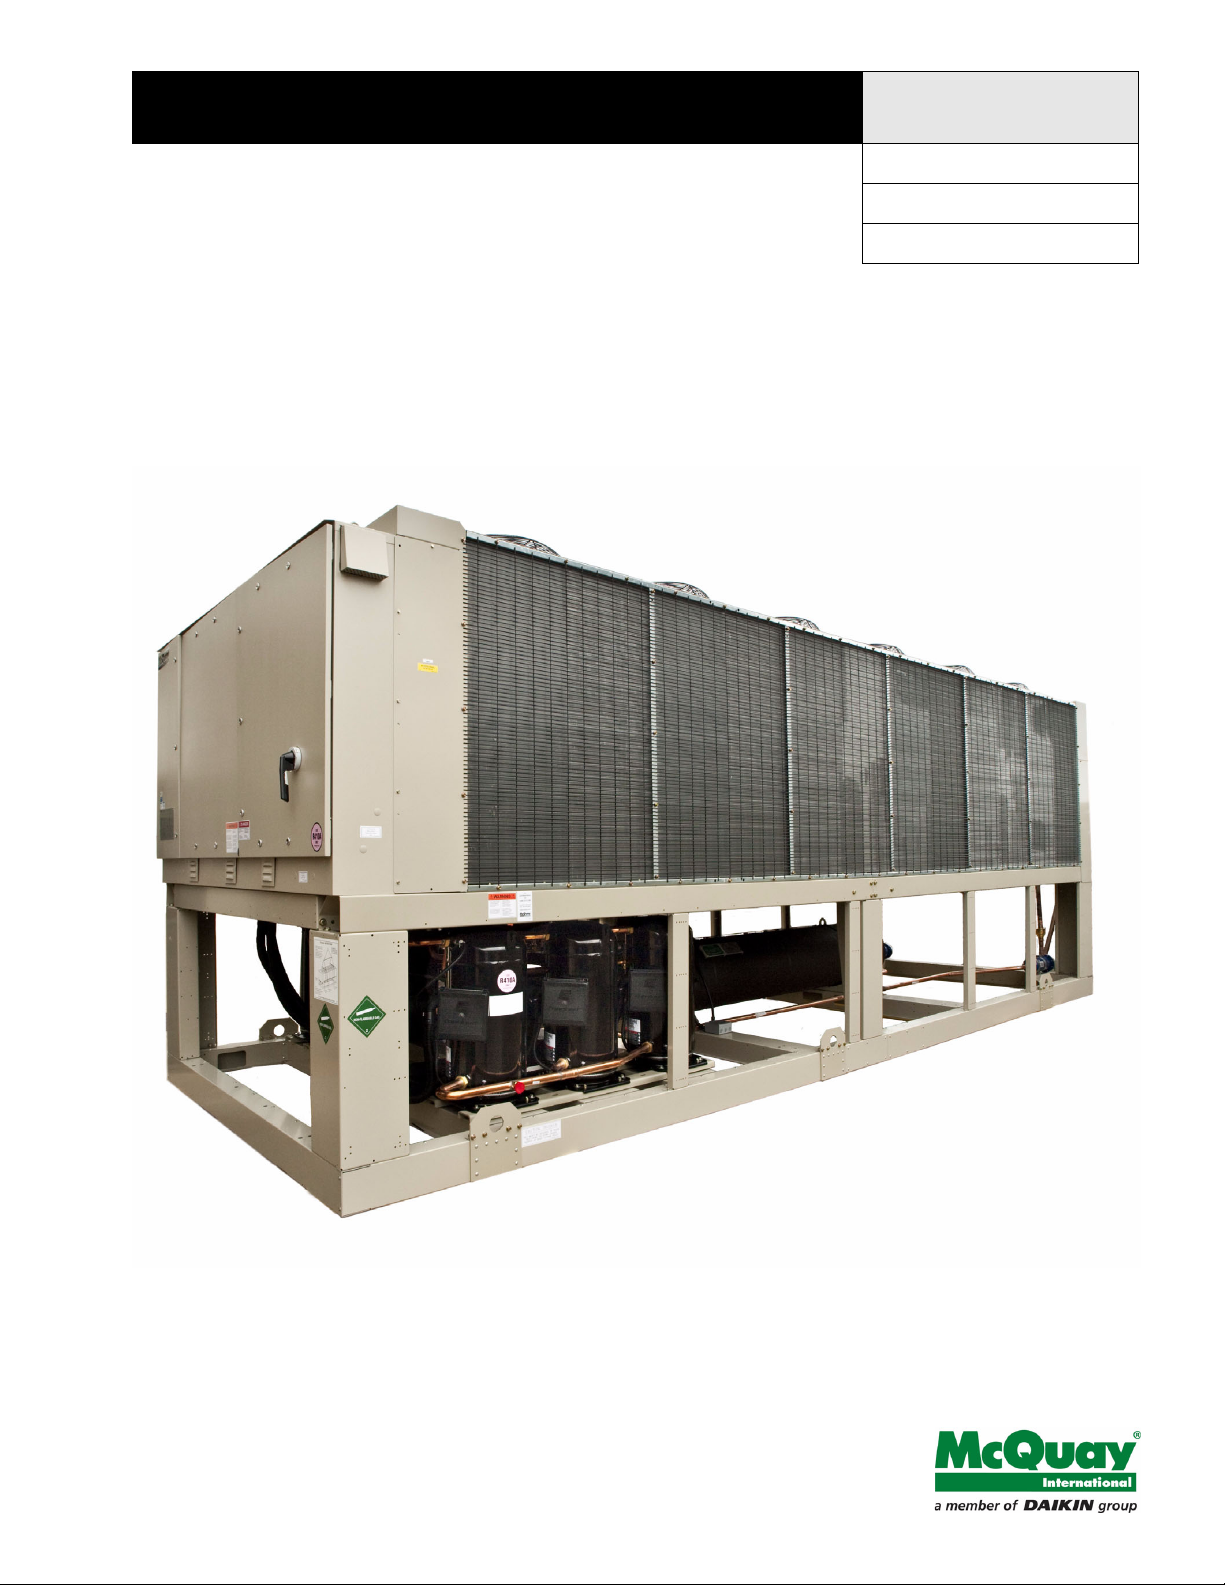
Note: Cover photograph is an AGZ190D with standard protective coil grilles.
This manual covers AGZ-D vintage air cooled scroll chillers. For AGZ-C vintage models, see IM 1078, available at www.mcquay.com.
Document: IM 1100
Issue Date: October 18, 2010
Revision Date: -Replaces: NEW
2 IM 1100
Page 3

Installation and Application Information
A
G Z XXX D H
Air-Cooled
Global Design
Scroll Compressor
Nominal Tons
Application
Design Vintage
H = Standard Packaged
Blocking is required
across full width
All rigging loc ation s
mu st be used.
Spreader ba rs
required
(use cautio n)
Number of fans may vary
from this diagram. The lifting
method will remain the same.
Spreader ba rs
required
(use cautio n)
Installation and Application Information
Chiller Nomenclature
WARNING
Installation is to be performed by qualified personnel who are familiar with local codes and regulations.
CAUTION
Sharp edges on unit and coil surfaces are a potential hazard to personal safety. Avoid contact with them.
General Description
McQuay Air-Cooled Water Chillers are complete, selfcontained automatic chiller units designed for outdoor
installation. Every unit is completely assembled, factory wired,
charged, and tested.
The electrical control center includes all equipment protection
and operating controls necessary for dependable automatic
operation.
Additional Manuals
This manual covers the installation, of dual circuit, AGZ-DH
packaged, scroll compressor chillers using R-410A.
Operating and maintenance information is contained in the
operating manual OMM 1087, available at www.mcquay.com.
Inspection
Check all items carefully against the bill of lading. Inspect all
units for damage upon arrival. Report shipping damage and
file a claim with the carrier. Check the unit nameplate before
unloading, making certain it agrees with the power supply
available. McQuay is not responsible for physical damage after
the unit leaves the factory.
Figure 1: Suggested Pushing Arrangment
Figure 2: Required Lifting Arrangement
Handling
Be careful to avoid rough handling of the unit. Do not push or
pull the unit from anything other than the base. Block the
pushing vehicle away from the unit to prevent damage to the
sheet metal cabinet and end frame (see Figure 1).
To lift the unit, 2-1/2" (64mm) diameter lifting eyes are
provided on the base of the unit. Arrange spreader bars and
cables to prevent damage to the condenser coils or cabinet (see
Figure 2).
IM 1100 3
CAUTION
All lifting locations must be used to prevent damage to unit.
Page 4
Installation and Application Information
Unit Placement
AGZ units are for outdoor applications and can be mounted
either on a roof or at ground level. For roof mounted
applications, install the unit on a steel channel or I-beam frame
to support the unit above the roof. For ground level
applications, install the unit on a substantial base that will not
settle. Use a one-piece concrete slab with footings extended
below the frost line. Be sure the foundation is level within the
lesser of 0.25” per foot (6mm per 254mm) or 0.5"(13mm) over
its length and width. The foundation must be strong enough to
support the weights listed in the Physical Data Tables
beginning on page 28.
Install the unit on vibration pads, springs or some other devise
to keep the steel rais off the concrete pad if the unit is so
mounted.
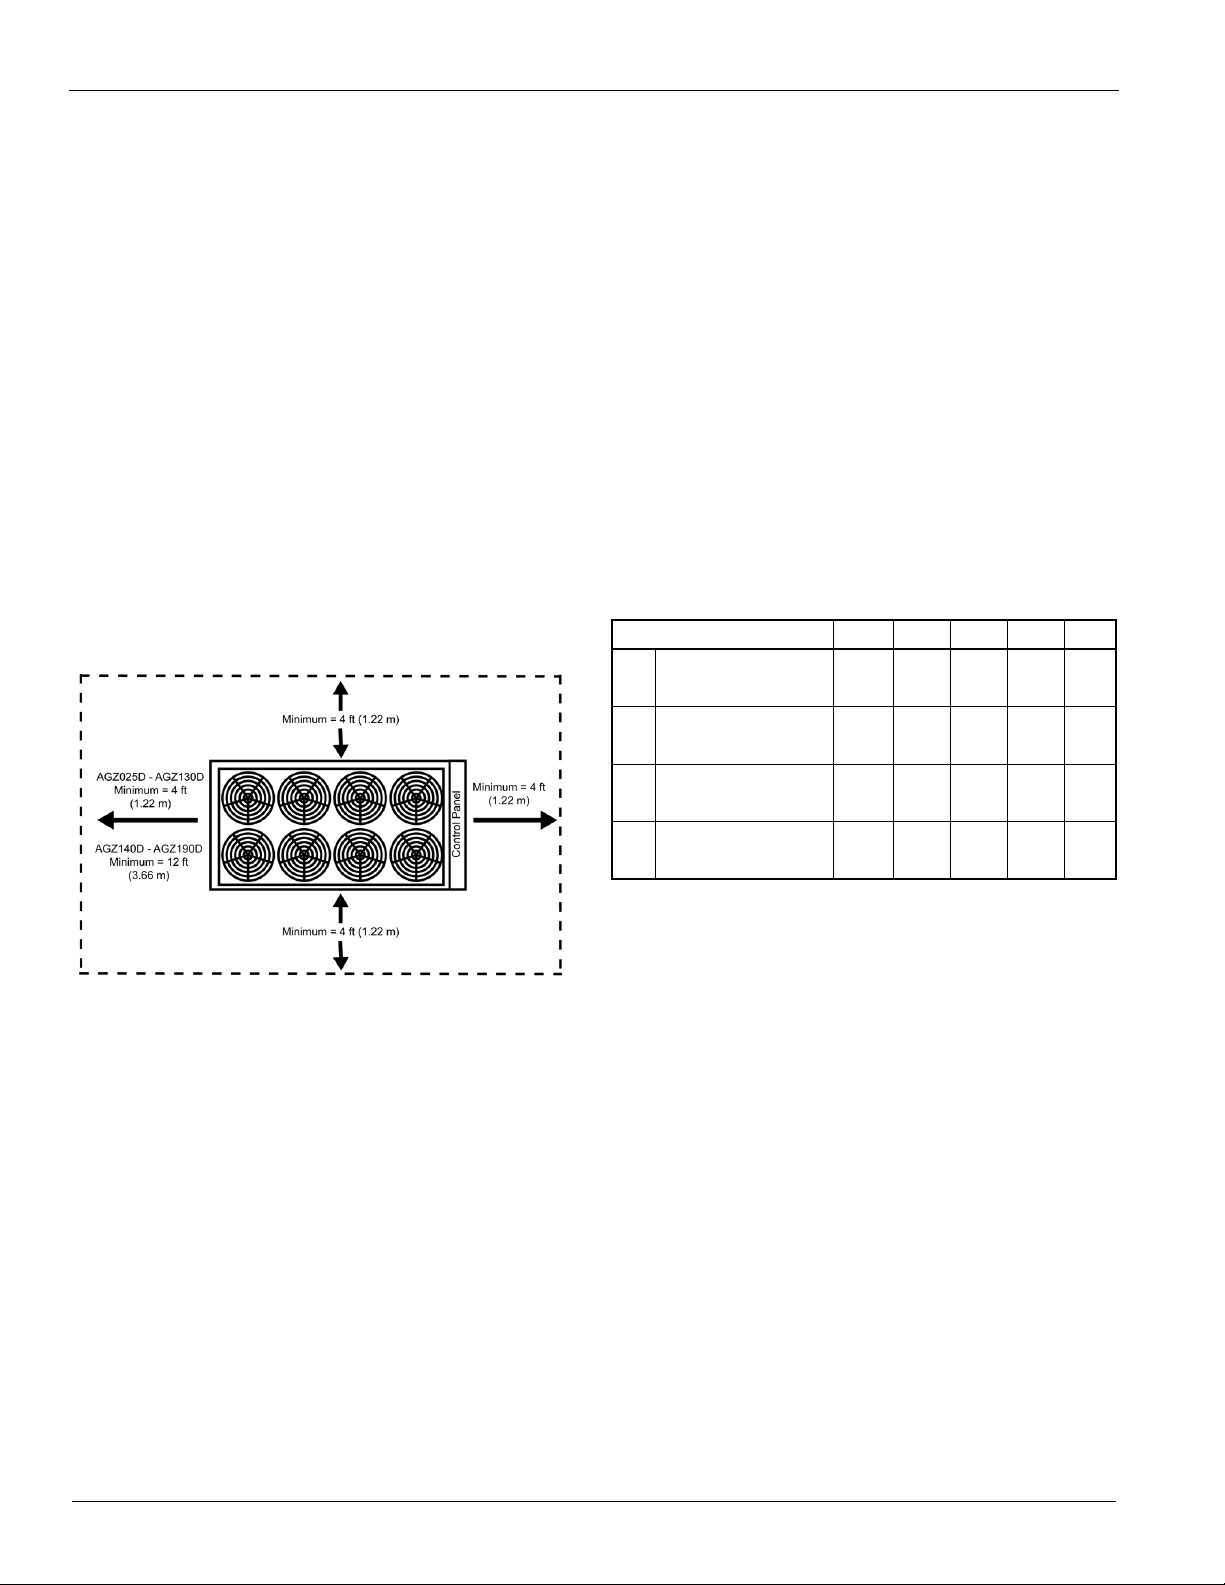
Service Clearance
Sides: Minimum of 4 feet (1.22 m)
Control panel end: Minimum of 4 feet
Opposite control panel:
• Minimum 4 feet on models 025 to 130;
• 12 feet on models 140-190 (allows clearance to remove
the evaporator ).
Air Clearance
Sufficient clearance must be maintained between the unit and
adjacent walls or other units to allow the required unit air flow
to reach the coils. Failure to do so will result in a capacity
reduction and an increase in power consumption. No
obstructions are allowed above the unit at any height.
Spacing Requirements
In general, with a small performance penalty in some cases,
AGZ-D units can be spaced at four feet from other units or a
wall. Curves on the following pages give the minimum
clearance for different types of installations and also capacity
reduction and power increase if closer spacing is used.
For convenience, the table below gives the minimum unit
spacing with no performance penalty. Closer spacing will incur
capacity penalties, however, these penalties are quite small and
a unit may still meet the building load requirements.
Wind diretion and velocity can affect recirculation.
Table 1: Minimum Full Capacity Unit Spacing
AGZ-D Unit Size 025-070 075-100 110-130 140-180 190
Case
Side Wall (Note 2)
1
4
(1.2)4 (1.2)6(1.8)6 (1.8)7 (2.1)
Case
2 Units, Side-by-Side
2
Case33 or More Units,
Side-by-Side (Note 3)
Case5Pit, No Deeper than
Unit Height (Note 4)
Note 1: Units of Measure: ft (m)
Note 2: For a wall higher than the unit, wall openings or greater distance is
required for full capacity.
Note 3: Use Case 3 table value for inside unit. Use Case 2 value for either
outside unit.
4
(1.2)4 (1.2)6(1.8)6(1.8)14(4.3)
4
(1.2)4 (1.2)8 (2.4)10(3.0)12(3.7)
6
(1.8)8(2.4)8 (2.4)10(3.0)10(3.0)
4 IM 1100
Page 5

Installation and Application Information
Full Load Capacity Reduction (AGZ110-130)
0.0
1.0
2.0
0 8 12 16 20 24
Wall Height (ft)
Distance = 4ft Distance = 5ft
Power Increase (AGZ110-130)
0.0
1.0
2.0
0 8 12 16 20 24
Wall Height (ft)
% Power Increase
Distance = 4ft Dista nce = 5f t
Full Load Capa city Reduction (AGZ140-180)
0.0
1.0
2.0
0 8 12 16 20 24
Wa ll Height (ft)
Distance = 4ft Distance = 6f t
Power Increase (AGZ140-180)
0.0
1.0
2.0
0 8 12 16 20 24
Wall Height (ft)
% Power Increase
Distance = 4ft Distance = 6ft
Full Load Capacity Reduction (AGZ190)
0.0
1.0
2.0
0 8 12 16 20 24
Wall Height (ft)
Dist ance = 4ft Distance = 5ft Distance = 7ft
Power Increase (AGZ190)
0.0
1.0
2.0
3.0
0 8 12 16 20 24
Wall Height (ft)
% Power Increase
Distance = 4ft Distance = 5ft Distance = 7ft
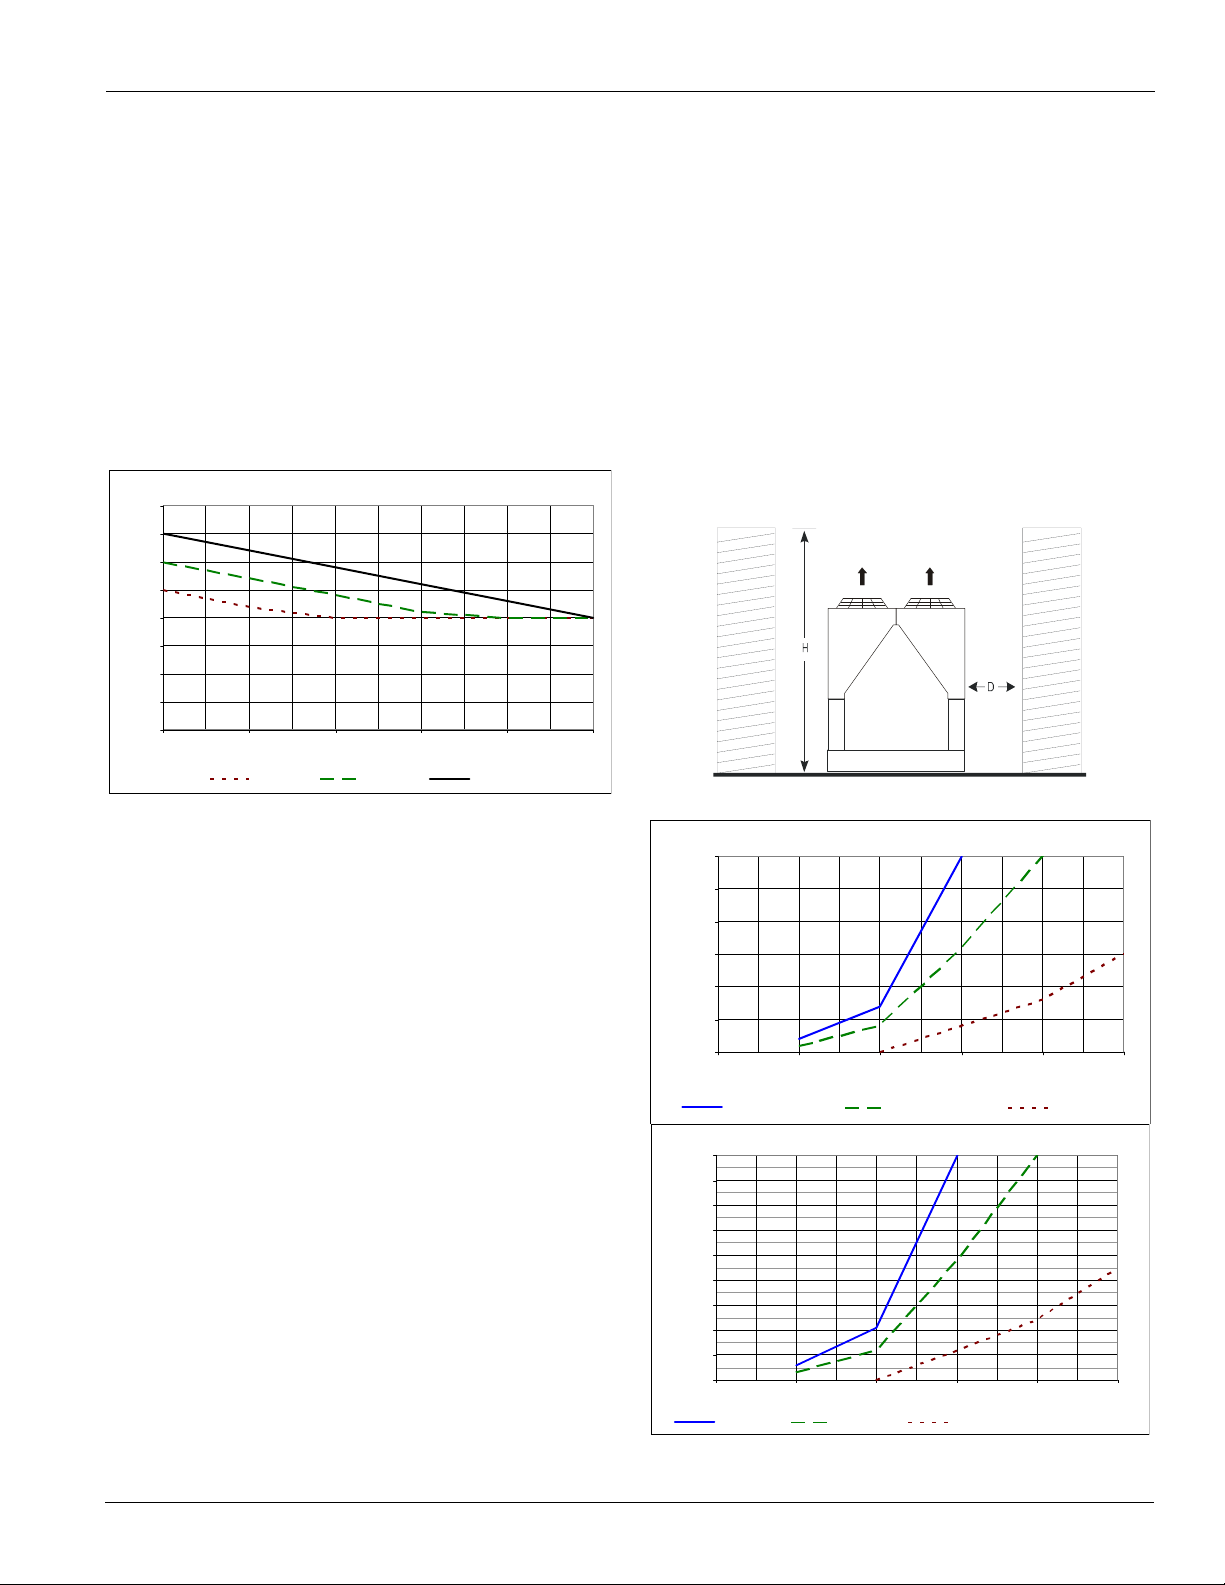
Case 1: Wall on One Side
In this case a solid wall up to 24-feet is considered. (For walls
higher than 24 ft, use the 24-foot values.) Also use these charts
for an adjacent building. For perforated screening walls, use
Case 4. Spacing is differentiated by unit size families.
Figure 3: Wall on One Side of Unit
Note: Maintain a minimum of 4-feet on all sides; except models
140-190, which require 12-feet opposite the control
panel to remove the evaporator.
For models AGZ 025-100: use 4 feet from any height wall. For
models 110-190, use Performance Adjustment curves below.
Figure 5: Case 1 Adjustment Factors (AGZ140D-180D)
% Capacity Reduction
Figure 4: Case 1 Adjustment Factors (AGZ110D-130D)
Figure 6: Case 1 Adjustment Factors (AGZ190D)
% Ca pacity Reduction
% Capacity Reduction
IM 1100 5
Page 6
Installation and Application Information
Full Load Capacity Reduction
0.0
0.5
1.0
1.5
2.0
2.5
3.0
4568
Distance Betwe en Units (ft)
% Capacity Reduction
AGZ075-100D AGZ110-130D AGZ140-180D AGZ190D
Power Increase
0.0
0.5
1.0
1.5
2.0
2.5
3.0
3.5
4.0
4.5
4568
Distance Between Units (ft)
% Power Increase
AGZ075-100D AGZ110-130D AGZ140-180D
D
Full Load Capacity Reduction
0
1
2
3
4
5
6
4568
Distance Between Units
% Capacity Reduction
AGZ075-100D AGZ110-130D AGZ 14 0-1 8 0D AGZ190D
Power Incre ase
0
1
2
3
4
5
6
7
8
9
4568
Distance Between Units (ft)
% Power Increase
AGZ075-100D AGZ110-130D AGZ140-180D AGZ190D
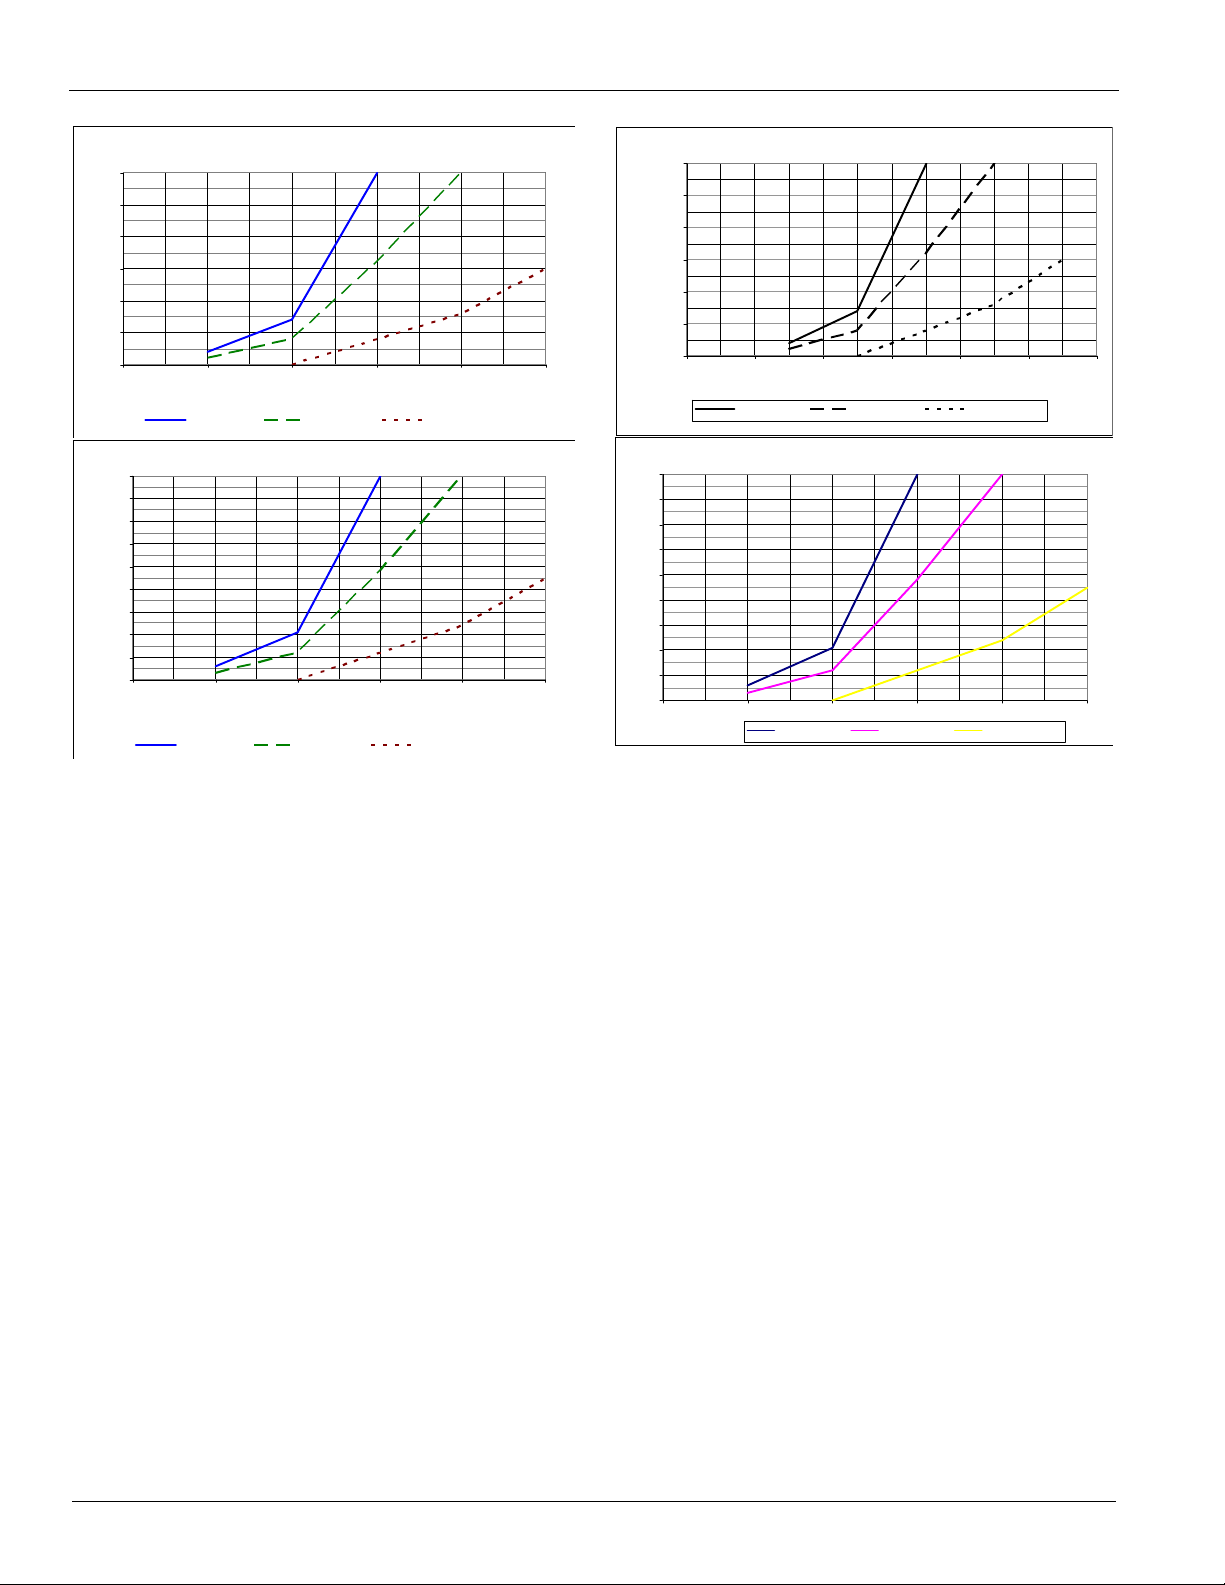
Case 2: Two Units, Side-by-Side
Maintain a minimum of 6-feet on all sides; except models 140190, which require 12-feet opposite the control panel to
remove the evaporator.
Figure 7: Case 2 - Two units side by side
For models AGZ 025-100: use 4 feet between units. For
models 110-190, use Performance Adjustment chart in
Figure 8.
Figure 8: Case 2 Adjustment Factors
Case 3: Three or More Units, Side-by-Side
Maintain a minimum of 6-feet on all sides; except models 140190, which require 12-feet opposite the control panel to
remove the evaporator. For more than three units, allow an
additional 2-feet clearance between units.
Figure 9: Case 3 - 3 units side by side
Data is for the middle unit - with a unit on each side. See Case
2, page 6 for Adjustment Factors for the two outside units.
Figure 10: Case 3 Adjustment Factors
6 IM 1100
AGZ190
Page 7
Installation and Application Information
Wall Free Area vs. Distance
0
1
2
3
4
5
6
7
8
0 1020304050
% Open Wall Area
Distance from Wall to Unit (ft)
AGZ025-070 AGZ075-130 AGZ140-190
Full Load Capacity Reduction (AGZ025-0 70)
0.0
1.0
2.0
3.0
4.0
5.0
6.0
0 8 10 12 13 14
Depth of Pit (ft)
% Capacity Red uction
Distance = 4 ft Distance = 5 ft Distance = 6 ft
Power Increase (AGZ025-070)
0.0
1.0
2.0
3.0
4.0
5.0
6.0
7.0
8.0
9.0
0 8 10 12 13 14
Depth of Pit (ft)
% Power Increase
Distance = 4 ft Distance = 5 ft Distance = 6 ft
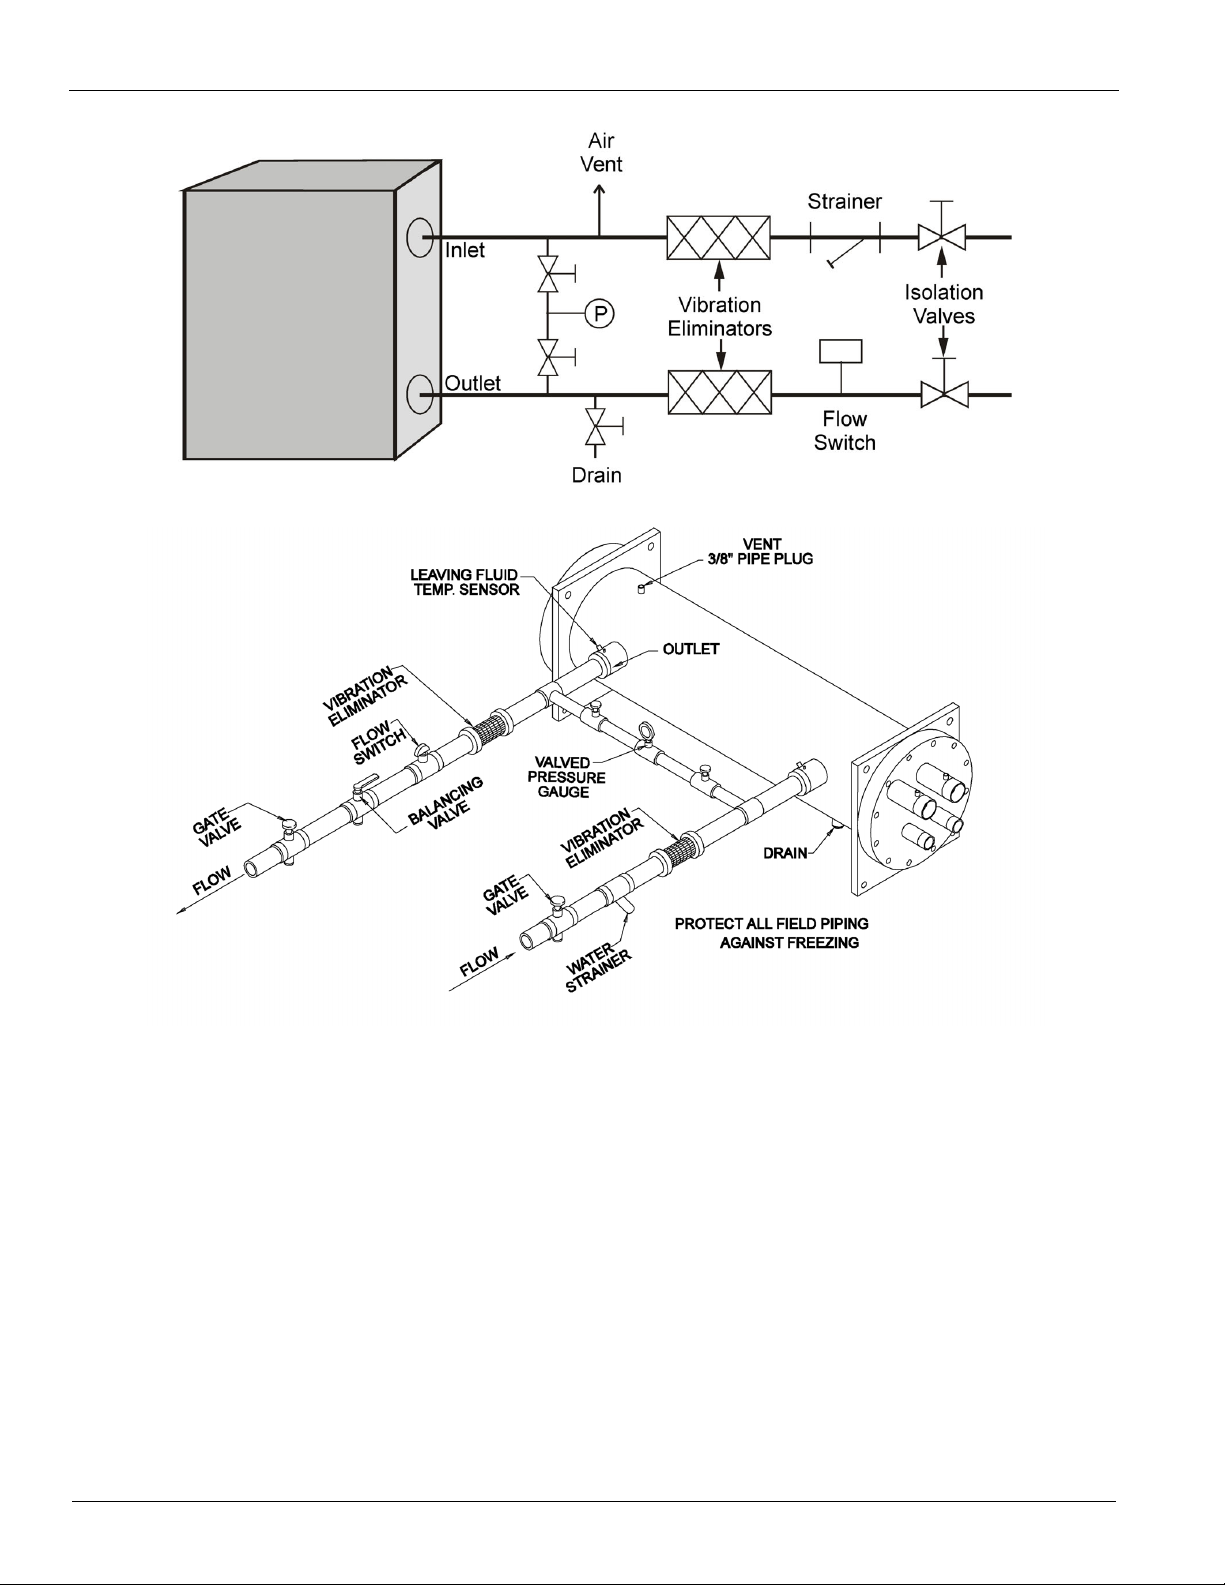
Case 4: Open Screening Walls
Decorative screening walls are often used to help conceal a
unit either on grade or on a rooftop. Design these walls such
that the combination of their open area and distance from the
unit do not require performance adjustment. It is assumed that
the wall height is equal to or less than the unit height when
mounted on its base support. If the wall height is greater than
the unit height, see Case 5, Pit Installation, page 7. The
distance from the sides of the unit to the side walls must be
sufficient for service, such as opening control panel doors. For
uneven wall spacing, the distance from the unit to each wall
can be averaged providing no distance is less than 4 feet.
Values are based on walls on all four-sides.
Figure 11: Case 4 Adjustment Factor
Case 5: Pit Installation
Pit installations can cause operating problems resulting from
recirculation and restriction, and require care that sufficient air
clearance is provided, safety requirements are met and service
access is provided. Pit covers must have abundant open area at
least equal to the chiller footprint.A solid wall surrounding a
unit is substantially a pit and this data should be used.
Steel grating is sometimes used to cover a pit to prevent
accidental falls or trips into the pit. The grating material and
installation design must be strong enough to prevent such
accidents, yet provide abundant open area to avoid
recirculation problems. Have any pit installation reviewed by
McQuay prior to installation to ensure it has sufficient air-flow
characteristics, and approved by the installation design
engineer avoid risk of accident.
Figure 12: Case 5 - Pit Installation
IM 1100 7
Figure 13: Case 5 Adjustment Factors (AGZ025D-070D)
Page 8
Installation and Application Information
Full Load Capacity Reduction (AGZ075-130)
0
1
2
3
4
5
6
0 8 10 12 13 14
Depth of Pit (ft)
% Capacity Reduction
Distance = 5 ft Distance = 6 ft Distance = 8 ft
Power Increase (AGZ075-130)
0.0
1.0
2.0
3.0
4.0
5.0
6.0
7.0
8.0
9.0
0 8 10 12 13 14
Depth of Pit / Wall Heig ht (ft )
% Power In crease
Distance = 5 ft Distance = 6 f t Distance = 8 f t
Full Load Capacity Reduction (AGZ140-190)
0.0
1.0
2.0
3.0
4.0
5.0
6.0
0 8 10 12 13 14
Depth of Pit (ft)
% Capacity Reduction
Distance = 6 ft Di sta nc e = 8 f t Dis tanc e = 10 ft
Power Increase (AGZ140-190)
0.0
1.0
2.0
3.0
4.0
5.0
6.0
7.0
8.0
9.0
0 8 10 12 13 14
Depth of Pit / Wall Height (ft)
% Power Increase
Distance = 6 ft Distance = 8 ft Distance = 10 ft
Figure 14: Case 5 Adjustment Factors (AGZ075D-130D) Figure 15: Case 5 Adjustment Factors (AGZ140D-190D)
8 IM 1100
Page 9

Installation and Application Information
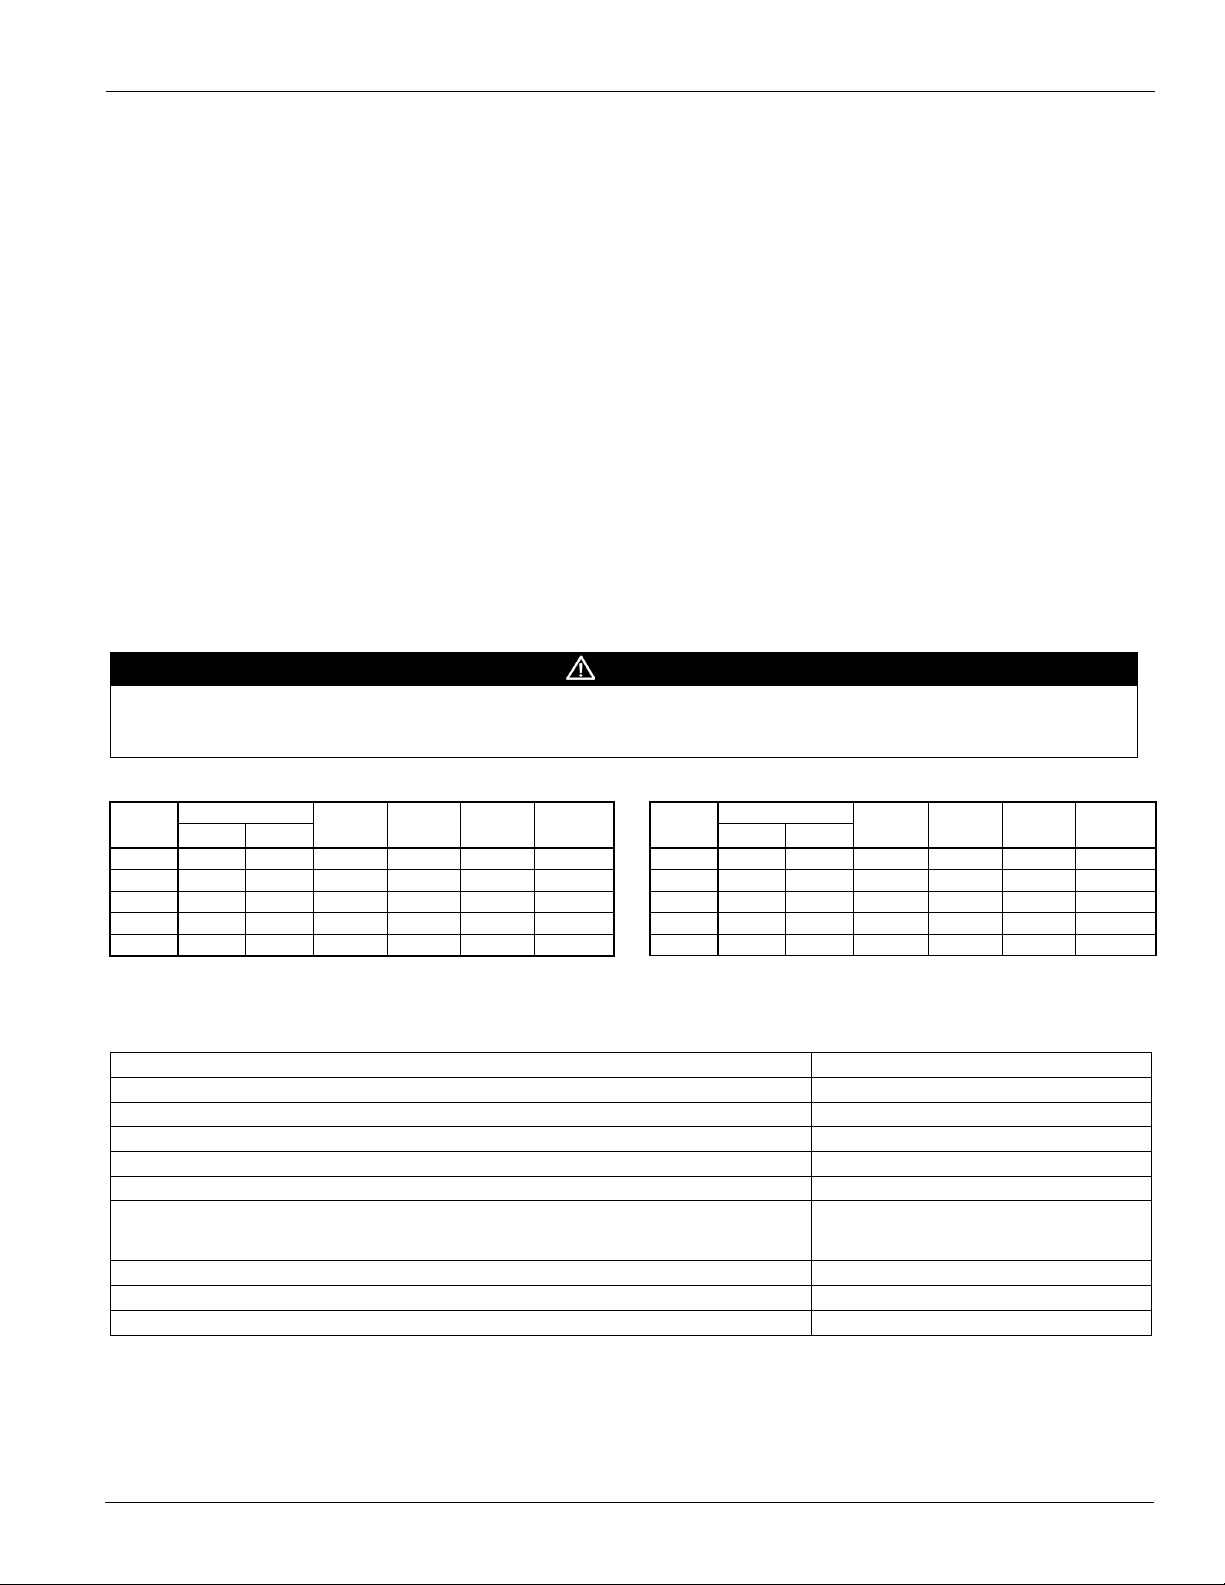
Chilled Water Piping
Flush the system water piping thoroughly before making
connections to the unit evaporator. Install a 40-mesh strainer in
the inlet pipe to the chiller. Design the water piping so the
chilled water circulating pump discharges into the evaporator
inlet.
Connect the return water line to the evaporator inlet
connection. Connect the supply water line to the evaporator
outlet connection.
Install a flow switch in the horizontal piping of the supply
(evaporator outlet) water line.
Provide drain connections at low points in the system to permit
complete drainage of the system. Locate air vents at the high
points in the system to purge air out of the system. A vent
connection on top of the evaporator vessel allows air to be
purged out of the evaporator. Purge air from the water system
before unit start-up to provide adequate flow through the
evaporator.
Install pressure gauges in the inlet and outlet water lines to the
evaporator. Measure pressure drop through the evaporator and
compare to flow as shown on page 34. Vibration eliminators
are recommended in both the supply and return water lines.
Insulate chilled water piping to reduce heat loss and prevent
condensation. Chillers not running in the winter should have
their water systems thoroughly drained to protect against
freezing. If the chiller operates year-round, or if the system is
not drained for the winter, protect the chilled water piping
exposed to outdoor temperature against freezing. Wrap the
lines with a heater cable and add proper amount of glycol to
the system to further protect the system.
Figure 16: Strainer Pressure Drop
Table 2: Strainer Data
AGZ Model
025-055 2.5 16.75 14
060-130 3.0 17.75 20
140-190 8.0 36.00 125
Strainer Size
(in.)
Strainer Plus Pipe
Length (in.)
Strainer
Weight (lbs)
Water Flow Limitations
Constant Flow
The evaporator flow rates and pressure drops shown on page
page 34 are for full load design purposes. The maximum flow
rate and pressure drop are based on a 6°F temperature drop.
Avoid higher flow rates with resulting lower temperature drops
to prevent potential control problems resulting from very small
control bands and limited start up/shut off temperature
changes.
The thermostat sensor is factory mounted in the leaving water
well. If a field supplied and installed return water sensor is
desired, install the sensor bulb in a field supplied well or strap
to the outside of the water line.
Optional Inlet Strainer
An inlet water strainer kit is available to be field-installed,
sized per Tabl e 2 and with the pressure drop show in
Figure 16. This pressure drop must be accounted for in the
total system pressure drop. The kit consists of:
• (1) Y-type 40% open area strainer with 304 stainless
steel perforated basket, Victaulic pipe connections and
strainer cap
• (1) Extension pipe with (2) Schrader fittings that can be
used for a pressure gauge and thermal dispersion flow
switch. The pipe provides sufficient clearance from the
evaporator for strainer basket removal.
• (1) ½-inch blowdown valve
• (2) Victaulic clamps
The minimum flow and pressure drop is based on a full load
evaporator temperature drop of 16°F. Evaporator flow rates
below the minimum values can result in laminar flow causing
freeze-up problems, scaling and poor control. Flow rates above
the maximum values will result in unacceptable pressure drops
and can cause excessive erosion, potentially leading to failure.
Evaporator Variable Flow
Reducing evaporator flow in proportion to load can reduce
system power consumption. The rate of flow change should be
a maximum of 10 percent of the flow per minute. For example,
if the maximum design flow is 200 gpm and it will be reduced
to a flow of 140 gpm, the change in flow is 60 gpm. Ten
percent of 200 gpm equals 20 gpm change per minute, or a
minimum of three minutes to go from maximum to minimum.
Do not reduce flow lower than the minimum flows listed in the
evaporator pressure drop section, page 45. The water flow
through the vessel must remain between the minimum and
maximum values listed on page 45. If flow drops below the
minimum allowable, large reductions in heat transfer can
occur. If the flow exceeds the maximum rate, excessive
pressure drop and tube erosion can occur.
IM 1100 9
Page 10
Installation and Application Information
Figure 17: Typical Piping, Brazed-Plate Evaporator (models AGZ025D-130D)
Figure 18: Typical Piping, Shell and Tube Evaporator (models AGZ140D-190D)
Water Piping
Piping for units with brazed-plate evaporators must have a
drain and vent connection provided in the bottom of the lower
connection pipe and to the top of the upper connection pipe
respectively. These evaporators do not have drain or vent
connections due to their construction.
Local authorities can supply the installer with the proper
building and safety codes required for safe and proper
installation.
Install piping with minimum bends and changes in elevation to
minimize pressure drop. The following issues should be
considered when designing and installing water piping:
1 Vibration eliminators to reduce vibration and noise
transmission to the building.
2 Shutoff valves are required to isolate the unit from the
piping during unit servicing.
10 IM 1100
3 Manual or automatic air vent valves at the high points of
the system. Drains must be installed at the lowest points
in the system.
4 Adequate water pressure must be maintained (expansion
tank or regulating valve).
5 Temperature and pressure indicators located at the unit
are required to aid in unit servicing.
6 A 40-mesh strainer or other means of removing foreign
matter from the water before it enters the evaporator
must be installed. The use of a strainer will prolong unit
life and help maintain system performance.
7 Chilled water piping and strainer must be supported
independently from the unit.
Page 11

Installation and Application Information
8 Models AGZ 025D through 130D require field-installed
drains and vents adjacent to the unit. Their brazed-plate
evaporators are not so equipped.
9 Flush the system water piping thoroughly before making
connections to the unit evaporator. Design the water
piping so the chilled water circulating pump discharges
into the evaporator inlet.
10 The unit's evaporator has a thermostat and heater to
prevent freeze-up down to -20 F ( 29 C). The heating
cable can be wired to a separate 115 V supply circuit. As
shipped from the factory, the heating cable is wired to the
control circuit. All water piping to the unit must also be
protected to prevent freezing.
11 If the unit is used as a replacement chiller, flush the
system thoroughly before unit installation. Regular water
analysis and chemical water treatment for the evaporator
loop is recommended immediately at equipment start-up.
12 The total water volume in the system should be sufficient
to prevent frequent "on-off" cycling. Turnover rate
should not be less than 4 minutes for normal variable
cooling loads.
13 When glycol is added to the water system for freeze
protection, the refrigerant suction pressure will be lower,
cooling performance less, and water side pressure drop
greater. If the percentage of glycol is high, or if
propylene is used instead of ethylene glycol, the added
pressure drop and loss of performance could be
substantial. When Glycol or Ice are selected as Unit
Mode, the MicroTech II control will automatically reset
the available range for the Leaving Water Temperature,
Freezestat and Evaporator Pressure settings.
14 Reset the freezestat setting to 6 degrees F (3.3 degrees C)
below the leaving chilled water setpoint temperature
after the glycol percentage is verified safe for the
application. See the section titled "Glycol Solutions" on
page 14 for additional information concerning glycol.
15 Perform a preliminary leak check before insulating the
piping and filling the system.
16 Piping insulation should include a vapor barrier to
prevent condensation and possible damage to the
building structure.
Water Connections
Bring water piping to the evaporator through the side between
the vertical supports. Provide taps for the connection of
pressure gauges and thermometers in the inlet and outlet lines.
Check the inlet and outlet labels on the unit against the
certified drawings supplied on the job and be sure the water
piping is hooked up correctly. Contact the McQuay sales office
if any discrepancies exist.
System Water Volume Considerations
All chilled water systems need adequate time to recognize a
load change, respond to that load change and stabilize, without
undesirable short cycling of the compressors or loss of control.
In air conditioning systems, the potential for short cycling
usually exists when the building load falls below the minimum
chiller plant capacity or on close-coupled systems with very
small water volumes. Some of the things the designer should
consider when looking at water volume are the minimum
cooling load, the minimum chiller plant capacity during the
low load period and the desired cycle time for the
compressors. Assuming that there are no sudden load changes
and that the chiller plant has reasonable turndown, a rule of
thumb of "gallons of water volume equal to two to three times
the chilled water gpm flow rate" is often used. A storage tank
may have to be added to the system.
BAS should enable chiller only when there is a cooling
demand.
Evaporator Freeze Protection
Evaporator freeze-up can be a concern in the application of aircooled water chillers. To protect against freeze-up, insulation
and electric heaters are furnished with the unit. Models 140
through 190 have immersion heaters with a thermostat; models
025 through 130 have an external plate heater and thermostat.
They protect the evaporator down to -20° F (-29° C) ambient
air temperature. Although the evaporator is equipped with
freeze protection, it does not protect water piping external to
the unit or the evaporator itself if there is a power failure or
heater cable burnout. Consider the following recommendations
for additional protection.
1 If the unit will not be operated during the winter, drain
evaporator and chilled water piping and flush with
glycol. Drain and vent connections are provided on the
evaporator to ease draining.
2 Add a glycol solution to the chilled water system to
provide freeze protection. Freeze point should be
approximately ten degrees (F) below minimum design
ambient temperature.
3 The addition of thermostatically controlled heat and
insulation to exposed piping.
The evaporator heater cable is factory wired to the 115 volt
circuit in the control box. This power should be supplied from
a separate source, but it can be supplied from the control
circuit. Operation of the heaters is automatic through the
ambient sensing thermostat that energizes the evaporator
heaters for protection against freeze-up. Unless the evaporator
is drained in the winter or contains an adequate concentration
of anti-freeze, the disconnect switch to the evaporator heater
must not be open.
Temperature and Water Flow Limitations
Evaporator flow rates below the minimum values can result in
laminar flow causing freeze-up problems, scaling and poor
control. Flow rates above the maximum values will result in
unacceptable pressure drops and can cause excessive erosion,
potentially leading to failure.
IM 1100 11
Page 12

Installation and Application Information
Low Ambient Operation
Compressor staging is adaptively determined by system load,
ambient air temperature, and other inputs to the MicroTech III
control. A low ambient option with fan VFD allows operation
down to -10° F (-23° C). The minimum ambient temperature is
based on still conditions where the wind is not greater than
five mph. Greater wind velocities will result in reduced
discharge pressure, increasing the minimum operating ambient
temperature. Field installed hail/wind guards are available to
allow the chiller to operate effectively down to the ambient
temperature for which it was designed.
High Ambient Operation
AGZ-D units for high ambient operation (105ºF to 125 F, 40.1
C to 51.7 C) require the addition of the optional high ambient
package that includes a small fan with a filter in the air intake
to cool the control panel.
All units with the optional VFD low ambient fan control
automatically include the high ambient option.
Flow Switch
All chillers require a chilled water flow switch to check that
there is adequate water flow through the evaporator ant to shut
the unit down if there isn't. McQuay has two options for
meeting this requirement.
1 A factory-mounted thermal dispersion flow switch.
2 A "paddle" type flow switch is available from McQuay
(part number 017503300) for field mounting and wiring.
Certain flow rates are required to open the switch and are
listed in Figure 3. Wire from switch terminals Y and R to
the unit control panel terminals shown on the field
wiring diagrams, page 36 and page 37. Mount the flow
switch in the leaving water line to shut down the unit
when water flow is interrupted. A flow switch is an
equipment protection control and should never be used to
cycle a unit.
Installation should be per manufacturer's instructions included
with the switch . There is also a set of normally closed contacts
on the switch that can be used for an indicator light or an alarm
to indicate when a "no flow" condition exists. Freeze protect
any flow switch that is installed outdoors. .
NOTE: Differential pressure switches are not recommended
for outdoor installation. They can freeze and not indicate a noflow condition
Table 3: Flow Switch Minimum/Maximum Flow Rates
Pipe Size (NOTE !)
Min.
Adjst.
Max.
Adjst.
1 A segmented 3-inch paddle (1, 2, and 3 inches) is furnished mounted, plus a 6-inch paddle loose.
2 Flow rates for a 2-inch paddle trimmed to fit the pipe.
3 Flow rates for a 3-inch paddle trimmed to fit the pipe.
4 Flow rates for a 3-inch paddle.
5 Flow rates for a 6-inch paddle
Flow
No
Flow
Flow
No
Flow
inch 1 1/4 1 1/2 2 2 1/2 3 4 5 6 8
mm 32 (2) 38 (2) 51 63 (3) 76 102 (4) 127 (4) 153 (4) 204 (5)
gpm 5.8 7.5 13.7 18.0 27.5 65.0 125.0 190.0 205.0
Lpm 1.3 1.7 3.1 4.1 6.2 14.8 28.4 43.2 46.6
gpm 3.7 5.0 9.5 12.5 19.0 50.0 101.0 158.0 170.0
Lpm 0.8 1.1 2.2 2.8 4.3 11.4 22.9 35.9 38.6
gpm 13.3 19.2 29.0 34.5 53.0 128.0 245.0 375.0 415.0
Lpm 3.0 4.4 6.6 7.8 12.0 29.1 55.6 85.2 94.3
gpm 12.5 18.0 27.0 32.0 50.0 122.0 235.0 360.0 400.0
Lpm 2.8 4.1 6.1 7.3 11.4 27.7 53.4 81.8 90.8
Drain Valves at Start-up
Model sizes AGZ 140 and larger have shell-and-tube
evaporators. They are drained of water in the factory and
shipped with evaporator drain plugs removed and stored in the
control panel or with an open ball valve in the drain holes. The
drain is located on the bottom of the vessel. Be sure to replace
plugs or close the valves prior to filling the vessel with fluid.
12 IM 1100
Page 13
Installation and Application Information
Glycol Solutions
The use of a glycol/water mixture in the evaporator to prevent
freezing will reduce system capacity and efficiency, as well as
increase pressure drop. The system capacity, required glycol
solution flow rate, and pressure drop with glycol may be
calculated using the following formulas and tables.
1 Capacity - Multiply the capacity based on water by the
Capacity correction factor from Tabl e 4 or Table 5.
2 Flow - Multiply the water evaporator flow by the Flow
correction factor from Tabl e 4 or Table 5 to determine
the increased evaporator flow due to glycol. If the flow is
unknown, it can be calculated from the following
equation:
For Metric Applications - Use the following equation for
metric applications:
3 Pressure drop - Multiply the water pressure drop from
Table 20, page 34 by Pressure Drop correction factor
from Tabl e 4 or Table 5 . High concentrations of
propylene glycol at low temperatures may cause
unacceptably high pressure drops.
4 Power - Multiply the water system power by Power
correction factor from Tabl e 4 or Table 5.
Test coolant with a clean, accurate glycol solution hydrometer
(similar to that found in service stations) or refractto determine
the freezing point. Obtain percent glycol from the freezing
point table below. It is recommended that a minimum of 25%
solution by weight be used for protection against corrosion or
that additional compatible inhibitors be added. Concentrations
above 35% do not provide any additional burst protection and
should be carefully considered before using.
CAUTION
Do not use an automotive-grade antifreeze. Industrial grade glycols must be used. Automotive antifreeze contains inhibitors
which will cause plating on the copper tubes within the chiller evaporator. The type and handling of glycol used must be
consistent with local codes.
Table 4: Ethylene Glycol Factors Table 5: Propylene Glycol Factors
% E.G.
10 26 -3.3 0.998 0.998 1.036 1.097
20 18 -7.8 0.993 0.997 1.060 1.226
30 7 -13.9 0.987 0.995 1.092 1.369
40 -7 -21.7 0.980 0.992 1.132 1.557
50 -28 -33.3 0.973 0.991 1.182 1.791
Freeze Point
o
F
o
Capacity Power Flow PD
C
% P.G.
10 26 -3.3 0.995 0.997 1.016 1.100
20 19 -7.2 0.987 0.995 1.032 1.211
30 9 -12.8 0.978 0.992 1.057 1.380
40 -5 -20.6 0.964 0.987 1.092 1.703
50 -27 -32.8 0.952 0.983 1.140 2.251
.
Freeze Point
o
F
Capacity Power Flow PD
o
C
Operating and Standby Limits
Table 6: Operating Limits
Maximum standby ambient temperature 130°F (55°C)
Maximum operating ambient temperature 105°F (40°C)
-with optional high ambient package (see information under High Ambient Operation‚ page 12 125°F (52°C)
Minimum operating ambient temperature (standard control) 35°F (2°C)
Minimum operating ambient temperature (with optional low-ambient control) -10°F (-23°C)
Leaving chilled water temperature 40°F to 60°F (2°C to 16°C)
Leaving chilled fluid temperatures (with anti-freeze) - Unloading is not permitted with fluid leaving
temperatures below 25°F (-4°C). When ambient air temperature is above 100º F, minimum leaving
chilled fluid temperature (with antifreeze) is 25°F (4°C)
Operating chilled water delta-T range 6 to 16°F (-14 to -9°C)
Maximum evaporator operating inlet fluid temperature 76°F (24°C)
Maximum evaporator non-operating inlet fluid temperature 100°F (38°C)
15°F to 60°F (-9°C to 16°C)
Vibration and Sound Isolation
Vibration isolators are recommended for all roof-mounted
installations or wherever vibration transmission is a
IM 1100 13
Page 14

Installation and Application Information
consideration. The tables beginning page 23 list isolator loads
for all unit sizes. Isolators are also recommended for slab
installations, primarily to keep the unit base from resting its
entire length directly on the slab.
Spring Isolator Installation
The unit should be initially installed on shims or blocks at the
listed free height. When all piping, wiring, flushing, charging,
etc. is completed, adjust the springs upward to load them and
to provide clearance to remove the shims or blocks.
Installation of spring isolators requires flexible piping
connections and at least three feet of conduit flex tie-ins.
Piping and conduit must be supported independently of the
unit.
Sound Isolation
The low sound level of the AGZ chiller is suitable for most
applications. When additional sound reduction is necessary,
locate the unit away from sound sensitive areas. Avoid
locations beneath windows or between structures where
normal operating sounds may be objectionable.
Reduce structurally transmitted sound by isolating water lines,
electrical conduit and the unit itself. Use wall sleeves and
rubber isolated piping hangers to reduce transmission of water
or pump noise into occupied spaces. Spring isolators are
effective in reducing the low amplitude sound generated by
scroll compressors and for unit isolation in sound sensitive
areas.
Compressor sound blankets are available as a factory or field
installed option. They will reduce sound levels by two or three
dB depending on unit size.
14 IM 1100
Page 15
Dimensions
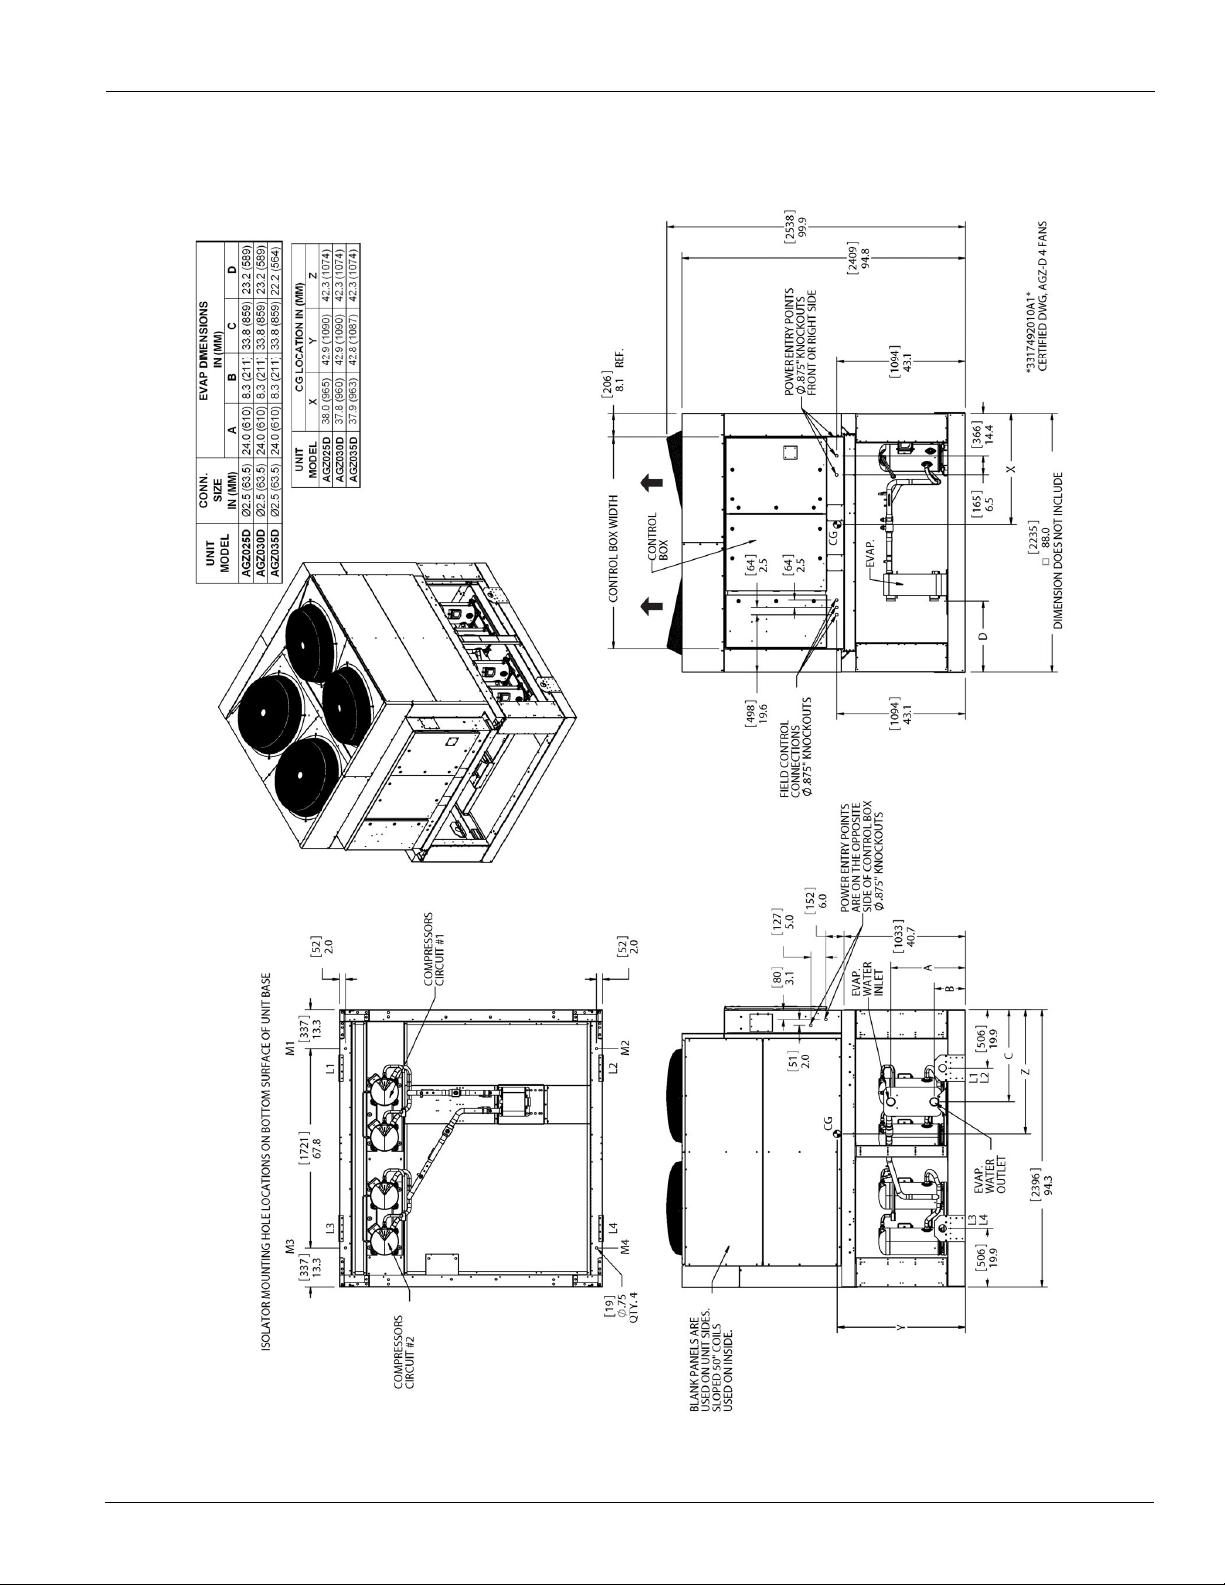
Figure 19: AGZ025DH - 035DH (Packaged)
Dimensions
IM 1100 15
Page 16

Dimensions
Figure 20: AGZ040DH - 070DH (Packaged)
16 IM 1100
Page 17

Figure 21: AGZ075DH - 100DH (Packaged)
Dimensions
IM 1100 17
Page 18

Dimensions
Figure 22: AGZ110DH - 130DH 208/230 volt models (460/575 next page)
18 IM 1100
Page 19

Figure 23: AGZ110DH - 130DH 460/575 volt models (208/230 previous page)
Dimensions
IM 1100 19
Page 20

Dimensions
Figure 24: AGZ140DH - 180DH (Packaged)
20 IM 1100
Page 21

Figure 25: AGZ190DH (Packaged)
Dimensions
IM 1100 21
Page 22

Lifting and Mounting Weights
CONTROL PANEL
L1
L2
L3
L4
L5
L6
CONTROL PANEL
L1
L2
L3
L4
AGZ190D - Approximate Lifting Locations
See Dimension Drawing for location
AGZ025D-180D - Approximate Lifting Locations
See Dimension Drawing for location
L1 L2 L3 L4 L5 L6
AGZ025D
1053 (478) 806 (366) 729 (331) 561 (254)
AGZ030D
1069 (485) 806 (366) 745 (338) 561 (254)
AGZ035D
1070 (485) 810 (367) 743 (337) 562 (255)
AGZ040D
1084 (492) 829 (376) 766 (347) 586 (266)
AGZ045D
1116 (506) 871 (395) 805 (365) 628 (285)
AGZ050D
1143 (518) 898 (407) 815 (370) 640 (290)
AGZ055D
1150 (522) 908 (412) 820 (372) 647 (293)
AGZ060D
1195 (542) 950 (431) 837 (380) 663 (301)
AGZ065D
1200 (544) 963 (437) 840 (381) 671 (304)
AGZ070D
1327 (602) 943 (428) 1063 (482) 752 (341)
AGZ075D
1770 (803) 1740 (789) 965 (438) 950 (431)
AGZ080D
1842 (836) 1842 (836) 916 (415) 915 (415)
AGZ090D
1836 (833) 1800 (816) 994 (451) 975 (442)
AGZ100D
1880 (853) 1843 (836) 1014 (460) 994 (451)
AGZ110D (208/230V)
2325 (1055) 2325 (1055) 1290 (585) 1290 (585)
AGZ110D (460/575V)
2297 (1042) 2300 (1043) 1286 (583) 1287 (584)
AGZ125D (208/230V)
2430 (1102) 2365 (1073) 1350 (612) 1310 (594)
AGZ125D (460/575V)
2405 (1091) 2340 (1061) 1344 (610) 1306 (592)
AGZ130D (208/230V)
2440 (1107) 2440 (1107) 1355 (615 1355 (615)
AGZ130D (460/575V)
2415 (1095) 2415 (1095) 1350 (612) 1350 (612)
AGZ140D
2631 (1193) 2555 (1159) 2092 (949) 2032 (922)
AGZ160D
2715 (1232) 2592 (1176) 2125 (964) 2029 (920)
AGZ180D
2746 (1246) 2670 (1211) 2134 (968) 2075 (941)
AGZ190D
2280 (1034) 2245 (1018) 1823 (827) 1795 (814) 1231 (558) 1212 (550)
UNIT MODEL
Lifting and Mounting Weights
Table 7: Lifting Locations
Table 8: Lifting Weights
LIFTI NG WEIGHT BY CORNER LBS (KG)
22 IM 1100
Page 23

Figure 26: Mounting Locations
2
4
1
3
CONTROL
PA NEL
2 4
1 3
CONTROL
PANEL
4 or 6 FAN UNIT
8 or 10 FAN UNIT
6
5
A
25 – 070 = 4-fan
A
– 100 = 6-fan
A
– 130 = 8-fan
A
– 180 = 10-fan
A
12 FAN UNIT
PANEL
7 3 5
4 6
8
lbs (kg) lbs (kg) lbs (kg) lbs (kg) lbs (kg) lbs (kg) lbs (kg) lbs (kg) lbs (kg) lbs (kg)
3148 3163 1028 781 769 584 71
(1428) (1435) (466) (354) (349) (265) (32)
3180 3195 1043 785 780 587 71
(1442) (1449) (473) (356) (354) (266) (32)
3185 3205 1043 789 780 590 72
(1445) (1454) (473) (358) (354) (268) (33)
3265 3285 1060 810 803 613 72
(1481) (1490) (481) (367) (364) (278) (33)
3420 3445 1095 856 839 656 119
(1551) (1563) (497) (388) (381) (297) (54)
3495 3525 1121 880 854 670 119
(1585) (1599) (509) (399) (387) (304) (54)
3525 3555 1128 890 859 678 119
(1599) (1613) (512) (404) (390) (307) (54)
3645 3680 1150 950 866 715 142
(1653) (1669) (522) (431) (393) (324) (65)
3675 3715 1159 961 872 723 142
(1667) (1685) (526) (436) (396) (328) (65)
4085 4125 1288 956 1079 801 142
(1853) (1871) (584) (434) (490) (364) (65)
5425 5470 1697 1667 1063 1044 218
(2461) (2481) (770) (756) (482) (473) (99)
5515 5565 1759 1759 1024 1024 218
(2502) (2524) (798) (798) (464) (464) (99)
5605 5660 1761 1729 1095 1075 218
(2542) (2567) (799) (784) (497) (488) (99)
5730 5795 1806 1773 1118 1098 218
(2599) (2629) (819) (804) (507) (498) (99)
Note: Weight Add for Copper fins is per mounting location
M1
Unit Siz e
AGZ075D
AGZ080D
AGZ090D
AGZ100D
AGZ060D
M2
Fans
(Qty)
6
6
6
6
Operating
Weight
Copper Fin Weight
Add - See Note
4
---
---
---
4
4
4
4
4
4
4
---
---
AGZ065D 4
AGZ070D 4
AGZ040D
AGZ045D
AGZ050D
AGZ055D
AGZ030D
AGZ035D
AGZ025D
Shipping
Weight
---
---
---
---
------
------
---
---
---
---
---
---
---
---
---
---
--- ---
---
---
M3 M4 M5 M6 M7 M8
---
---
------
------
---------
---
---
---
---
--- ---
---
---
---
------
------ ---
---
---------
------
Lifting and Mounting Weights
GZ 0
GZ 075
GZ 110
GZ 140
GZ 190 = 12-fan
Table 9: Isolator Loads at Each Mounting Location (with Aluminum Fins)
IM 1100 23
CO NTR OL
2
1
Page 24

Lifting and Mounting Weights
lbs (kg) lbs (kg) lbs (kg) lbs (kg) lbs (kg) lbs (kg) lbs (kg) lbs (kg) lbs (kg) lbs (kg)
7170 7240 1504 1504 1207 1207 909 909 193
(3252) (3284) ( 682) (682) (547) (547) 412 412 (87)
7230 7300 1517 1517 1217 1217 917 917 193
(3279) (3311) ( 688) (688) (552) (552) 416 416 (87)
7395 7475 1577 1534 1263 1229 949 923 193
(3354) (3391) ( 715) (696) (573) (558) 430 419 (87)
7455 7535 1590 1547 1273 1239 956 931 193
(3382) (3418) ( 721) (702) (578) (562) 434 422 (87)
7530 7620 1586 1586 1270 1270 954 954 193
(3416) (3456) ( 719) (719) (576) (576) 433 433 (87)
7590 7680 1598 1598 1280 1280 962 962 193
(3443) (3484) ( 725) (725) (581) (581) 436 436 (87)
9310 9792 1759 1711 1667 1622 1537 1496 266
(4223) (4442) ( 798) (776) (756) (736) 697 678 (121)
9460 9942 1819 1738 1710 1634 1555 1486 266
(4291) (4510) ( 825) (788) (776) (741) 705 674 (121)
9625 10107 1838 1789 1724 1677 1560 1518 266
(4366) (4584) ( 834) (811) (782) (761) 708 689 (121)
10585 11070 2013 1950 1637 1585 1237 737 714 239
(4801) (5021) ( 913) (884) (742) (719) 561 334 324 ( 109)
Note: Weight Add for Copper fins is per mounti ng locati on
1198
Weight
Fans
(Qty)
M1
M2
10
Weight
8
8
8
AGZ190D 12
8
AGZ180D
---
---
---
---
---
---
---
8
8
AGZ140D
AGZ160D1010 ---
---
---
---
M6
M7
---
---
---
---
---
---
---
M3M4M5
Copper Fi n We i g h t
Add - See Note
M8
AGZ125D
208-230V
AGZ130D
208-230V
AGZ110D
460-575V
AGZ110D
208-230V
AGZ125D
460-575V
AGZ130D
460-575V
NOTES:
MOUNT MATERIAL T O BE DURULENE RUBBE R.1.
MOLDED STEEL AND ELASTOMER MOUNT FOR2.
OUTDOOR SERVICE CONDITIONS.
3
ALL DIMENSIONS ARE IN DECIMAL INCHES
DR AWIN G N UMBE R
RAISED GRIP RIBS
3.75
5.00
6.25
3.87
.56 TYP.
GR IP RIBS
R4
R4
VM & C
VM&C
RP-4 Rubber-in-Shear (RIS) CP-2 Spring Isolator
Table 10: Isolator Loads at Each Mounting Location (with Aluminum Fins) (continued)
Uni t Size
Figure 27: Sping and RIS Isolators
3.00
. RP-4 MOUNT VERSION WITH STUD IN PLACE.
24 IM 1100
DURULENE
MATERIAL
RECESSED
1.13 ± .25
APPR OX.
ø .500-13NC-2B
4. 63
R.28
TYP.
R.250 TYP.
R.750 TYP.
1.63
.38
3314814
Page 25

Table 11: Kit Numbers
Spring Isolator Kit Numbers
Aluminum Fins Copper Fins
025
332320101 332320101
030
332320101 332320101
035
332320101 332320101
040
332320101 332320101
045
332320101 332320109
050
332320101 332320109
055
332320101 332320109
060
332320102 332320103
065
332320102 332320110
070
332320103 332320110
075
332320104 332320105
080
332320105 332320105
090
332320105 332320105
100
332320105 332320105
110
332320106 332320111
125
332320106 332320111
130
332320106 332320111
140
332320107 332320112
160
332320107 332320112
180
332320107 332320112
190
332320108 332320113
AGZ-D
Model
Packaged Unit
R-I-S Isolator Kit Numbers
Aluminum Fins Copper Fins
25
332325101 332325101
30
332325101 332325101
35
332325101 332325101
40
332325101 332325101
45
332325101 332325101
50
332325101 332325101
55
332325101 332325101
60
332325101 332325101
65
332325101 332325101
70
332325101 332325102
75
332325102 332325102
80
332325102 332325102
90
332325102 332325102
100
332325102 332325102
110
332325103 332325103
125
332325103 332325103
130
332325103 332325103
140
332325104 332325104
160
332325104 332325104
180
332325104 332325104
190
332325105 332325106
Packaged Unit
AGZ-D
Model
Lifting and Mounting Weights
IM 1100 25
Page 26

Lifting and Mounting Weights
M1 M2 M3 M4 M5 M6 M7 M8 M1 M2 M3 M4 M5 M6 M7 M8
RP-4 RP- 4 RP- 4 RP- 4 CP-2 CP- 2 CP- 2 CP- 2
Brow n Brow n Brow n Brow n Dark Grn Black Black Black
RP-4 RP- 4 RP- 4 RP- 4 CP-2 CP- 2 CP- 2 CP- 2
Brow n Brow n Brow n Brow n Dark Grn Black Black Black
RP-4 RP- 4 RP- 4 RP- 4 CP-2 CP- 2 CP- 2 CP- 2
Brown Brown Brown Brow n Dark Grn Black Black Black
RP-4 RP- 4 RP- 4 RP- 4 CP-2 CP- 2 CP- 2 CP- 2
Brown Brown Brown Brow n Dark Grn Black Black Black
RP-4 RP- 4 RP- 4 RP- 4 CP-2 CP- 2 CP- 2 CP- 2
Brown Brown Brown Brow n Dark Grn Black Black Black
RP-4 RP- 4 RP- 4 RP- 4 CP-2 CP- 2 CP- 2 CP- 2
Brown Brown Brown Brow n Dark Grn Black Black Black
RP-4 RP- 4 RP- 4 RP- 4 CP-2 CP- 2 CP- 2 CP- 2
Brown Brown Brown Brow n Dark Grn Black Black Black
RP-4 RP- 4 RP- 4 RP- 4 CP-2 CP- 2 CP- 2 CP- 2
Brow n Brow n Brow n Brow n Dark Grn Dark Prpl Black Black
RP-4 RP- 4 RP- 4 RP- 4 CP-2 CP- 2 CP- 2 CP- 2
Brow n Brow n Brow n Brow n Dark Grn Dark Prpl Black Black
RP-4 RP- 4 RP- 4 RP- 4 CP-2 CP- 2 CP- 2 CP- 2
Brow n Brow n Brow n Brow n Dark Grn Dark Grn Dark Grn Dark Prpl e
RP-4 RP- 4 RP- 4 RP- 4 CP-2 CP- 2 CP- 2 CP- 2
Brick Red Brick Red Brow n Brow n Dark Grn Dark Grn Dark Prpl Dark Prpl le
RP-4 RP- 4 RP- 4 RP- 4 CP-2 CP- 2 CP- 2 CP- 2
Brick Red Brick Red Brow n Brow n Gray Gray Dark Grn Dark Grn
RP-4 RP- 4 RP- 4 RP- 4 CP-2 CP- 2 CP- 2 CP- 2
Brick Red Brick Red Brow n Brow n Gray Gray Dark Grn Dark Grn
RP-4 RP- 4 RP- 4 RP- 4 CP-2 CP- 2 CP- 2 CP- 2
Brick Red Brick Red Brow n Brow n Gray Gray Dark Grn Dark Grn
RP-4 RP-4 RP-4 RP-4 RP-4 RP-4 CP-2 CP-2 CP-2 CP-2 CP-2 CP-2
Brick Red Brick Red Brick Red Brick Red Brow n Brow n Dark Grn Dark Grn Dark Grn Dark Grn Dark Pr pl Dark Pr pl
RP-4 RP-4 RP-4 RP-4 RP-4 RP-4 CP-2 CP-2 CP-2 CP-2 CP-2 CP-2
Brick Red Brick Red Brick Red Brick Red Brow n Brow n Dark Grn Dark Grn Dark Grn Dark Grn Dark Pr pl Dark Pr pl
RP-4 RP-4 RP-4 RP-4 RP-4 RP-4 CP-2 CP-2 CP-2 CP-2 CP-2 CP-2
Brick Red Brick Red Brick Red Brick Red Brow n Brow n Dark Grn Dark Grn Dark Grn Dark Grn Dark Pr pl Dark Pr pl
RP-4 RP-4 RP-4 RP-4 RP-4 RP-4 CP-2 CP-2 CP-2 CP-2 CP-2 CP-2
Brick Red Brick Red Brick Red Brick Red Brick Red Brick Red Gray Gray Gray Gray Dark Grn Dark Grn
RP-4 RP-4 RP-4 RP-4 RP-4 RP-4 CP-2 CP-2 CP-2 CP-2 CP-2 CP-2
Brick Red Brick Red Brick Red Brick Red Brick Red Brick Red Gray Gray Gray Gray Dark Grn Dark Grn
RP-4 RP-4 RP-4 RP-4 RP-4 RP-4 CP-2 CP-2 CP-2 CP-2 CP-2 CP-2
Brick Red Brick Red Brick Red Brick Red Brick Red Brick Red Gray Gray Gray Gray Dark Grn Dark Grn
RP-4 RP-4 RP-4 RP-4 RP-4 RP-4 RP-4 RP-4 CP-2 CP-2 CP-2 CP-2 CP-2 CP-2 CP-2 CP-2
Brick Red Brick Red Brick Red Brick Red Brick Red Brick Red Brow n Brow n Gray Gray Dark Green Dark Green Dark Green Dark Green Black Black
025
030
AGZ-D
Model
Rubber-In-Shear (RIS) M ounts Spring Isolator Mountings
035
040
045
050
055
060
065
070
075
080
090
100
110
120
130
140
160
180
190
Table 12: Isolator Locations (Aluminum Fins)
26 IM 1100
Page 27

Table 13: Isolator Locations (Copper Fins)
M1 M2 M3 M4 M5 M6 M7 M8 M1 M2 M3 M4 M5 M6 M7 M8
RP-4 RP-4 RP-4 RP-4 CP-2 CP-2 CP-2 CP-2
Brown Brown Brown Brow n Dark Grn Black Black Black
RP-4 RP-4 RP-4 RP-4 CP-2 CP-2 CP-2 CP-2
Brown Brown Brown Brow n Dark Grn Black Black Black
RP-4 RP-4 RP-4 RP-4 CP-2 CP-2 CP-2 CP-2
Brown Brown Brown Brow n Dark Grn Black Black Black
RP-4 RP-4 RP-4 RP-4 CP-2 CP-2 CP-2 CP-2
Brown Brown Brown Brow n Dark Grn Black Black Black
RP-4 RP-4 RP-4 RP-4 CP-2 CP-2 CP-2 CP-2
Brow n Brow n Brow n Brow n Dark Grn Dark Grn Dark Grn Black
RP-4 RP-4 RP-4 RP-4 CP-2 CP-2 CP-2 CP-2
Brow n Brow n Brow n Brow n Dark Grn Dark Grn Dark Grn Black
RP-4 RP-4 RP-4 RP-4 CP-2 CP-2 CP-2 CP-2
Brow n Brow n Brow n Brow n Dark Grn Dark Grn Dark Grn Black
RP-4 RP-4 RP-4 RP-4 CP-2 CP-2 CP-2 CP-2
Brow n Brow n Brow n Brow n Dark Grn Dark Grn Dark Grn Dark Purple
RP-4 RP-4 RP-4 RP-4 CP-2 CP-2 CP-2 CP-2
Brow n Brow n Brow n Brow n Gray Dark Grn Dark Grn Dark Grn
RP-4 RP-4 RP-4 RP-4 CP-2 CP-2 CP-2 CP-2
Brick Red Brick Red Brow n Brow n Gray Dark Grn Dark Grn Dark Grn
RP-4 RP-4 RP-4 RP-4 CP-2 CP-2 CP-2 CP-2
Brick Red Brick Red Brown Brow n Gray Gray Dark Grn Dark Grn
RP-4 RP-4 RP-4 RP-4 CP-2 CP-2 CP-2 CP-2
Brick Red Brick Red Brown Brow n Gray Gray Dark Grn Dark Grn
RP-4 RP-4 RP-4 RP-4 CP-2 CP-2 CP-2 CP-2
Brick Red Brick Red Brown Brow n Gray Gray Dark Grn Dark Grn
RP-4 RP-4 RP-4 RP-4 CP-2 CP-2 CP-2 CP-2
Brick Red Brick Red Brown Brow n Gray Gray Dark Grn Dark Grn
RP-4 RP-4 RP-4 RP-4 RP-4 RP-4 CP-2 CP-2 CP-2 CP-2 CP-2 CP-2
Brick Red Brick Red Brick Red Brick Red Brown Brow n Gray Gray Dark Grn Dark Grn Dark Grn Dark Grn
RP-4 RP-4 RP-4 RP-4 RP-4 RP-4 CP-2 CP-2 CP-2 CP-2 CP-2 CP-2
Brick Red Brick Red Brick Red Brick Red Brown Brow n Gray Gray Dark Grn Dark Grn n Dark Grn Dark Grn
RP-4 RP-4 RP-4 RP-4 RP-4 RP-4 CP-2 CP-2 CP-2 CP-2 CP-2 CP-2
Brick Red Brick Red Brick Red Brick Red Brown Brow n Gray Gray Dark Grn Dark Grn Dark Grn Dark Grn
RP-4 RP-4 RP-4 RP-4 RP-4 RP-4 CP-2 CP-2 CP-2 CP-2 CP-2 CP-2
Brick Red Brick Red Brick Red Brick Red Brick Red Brick Red Gray Gray Gray Gray Gray Gray
RP-4 RP-4 RP-4 RP-4 RP-4 RP-4 CP-2 CP-2 CP-2 CP-2 CP-2 CP-2
Brick Red Brick Red Brick Red Brick Red Brick Red Brick Red Gray Gray Gray Gray Gray Gray
RP-4 RP-4 RP-4 RP-4 RP-4 RP-4 CP-2 CP-2 CP-2 CP-2 CP-2 CP-2
Brick Red Brick Red Brick Red Brick Red Brick Red Brick Red Gray Gray Gray Gray Gray Gray
RP-4 RP-4 RP-4 RP-4 RP-4 RP-4 RP-4 RP-4 CP-2 CP-2 CP-2 CP-2 CP-2 CP-2 CP-2 CP-2
Li me L ime L ime Lime B rick Red Bric k Red
d
White White White White Gray Gray Gray Gray
AGZ-D
Model
Rubber-In-Shear (RIS) Mounts Spring Isolator Mountings
025
030
035
040
045
050
055
100
110
060
065
070
075
180
190
120
130
140
160
080
090
Lifting and Mounting Weights
IM 1100 27
rick Redrick Re
Page 28

Physical Data
BASIC DATA Ckt.1 Ck t.2 Ckt.1 Ckt.2 Ckt.1 Ckt.2 Ckt.1 Ck t.2
Unit Capacity @ AHRI Conditions (See Note 1), Tons (kW)
Number Of Refrigerant Circuits
28 28 32 32 32 32 39 39
(13) (13) (15) (15) (15) (15) (17) (17)
Unit Operating Weight, lbs (kg)
Unit Shipping Weigh t, lbs ( kg)
Add'l Weight for Copper Finned Coils, lbs (kg)
COMPRESSORS
Ty pe
Nominal tonnage of each Compressor 7.5 7.5 8.5 8.5 8.5 10 10 10
Number Of Compressors per Circuit 22222 2 22
85 85 110 110 110 110 110 110
(2410) (2410) (3119) (3119) (3119) (3119) (3119) (3119)
CA PA CIT Y REDUCT ION ST EPS - PERCENT OF COM PRESSOR DISPLA CEMENT
Staging, 4 Stages, Circuit #1 in Lead
Staging, 4 Stages, Circuit #2 in Lead
CONDENSERS - HI GH EFFIC IENCY FI N AND T UBE TY PE WITH I NTEGRAL SUBCOOL ING
Coil Face Area, ft
2
26.3 26.3 26.3 26.3 26.3 26.3 44.1 44.1
Coil Face Area, (m
2
) 2.4 2.4 2.4 2.4 2.4 2.4 4.1 4.1
50x75.6 50x75.6 50x75.6 50x75.6 50x75.6 50x75.6 42x75.6 42x75.6
(1270x1920) (1270x1920) (1270x 1920) ( 1270x1920) (1270x1920) (1270x1920) (1067x1920) (1067x1920)
Fins Per Inch x Rows Deep 16 x 3 16 x 3 16 x 3 16 x 3 16 x 3 16 x 3 16 x 2 16 x 2
Pumpdow n Capacity, 90% Full lbs (kg) 40 (18) 40 (18) 40 (18) 40 (18) 40 (18) 40 (18) 47 (21) 47 (21)
CONDENSER FANS - DIRECT DRIV E PROPELLER T YPE
Number Of Fans - Fan Diameter, in. (mm)
Number Of Motors - HP (kW) (Note 2)
Fan And Motor RPM, 60Hz
60 Hz Fan Tip Speed, FPM (m/sec)
60 Hz Total Unit Airflow , CFM (l/sec)
EV APORATOR - BRAZED PLATE-TO-PLATE
Number of Evaporators
Number of Refr igerant Circuits
Water V olume, Gallons, (l)
Max imum W ater Pre s s ure , ps ig ( kPa)
Max. Refrig. Working Pressure, psig (kPa)
Water Inlet / Outlet V ictaulic Conn. in. (mm)
Drain - NPT int, in. (mm) (Note 4)
Vent - NPT int, in. (mm) (Note 4)
Finned Height x Finned Length, in. (mm)
Unit Operating Charge, R-410A, lbs (kg)
Oil Charge Per Compressor, oz (g)
Cabinet Dimensions, L x W x H, in. (mm)
24,316 (11,478) 24,316 (11,478) 24,316 (11,478) 39,600 (18,692)
11
0-25-50-75-100 0-25- 50-75-100 27-50-73-100
Tandem Scrolls Tandem Scrolls
2.01 (7.6) 2.01 (7.6) 2.22 (8.4) 2.43 (9.2)
653 (4502) 653 (4502)
PHYSICAL DATA
AGZ-D MODEL NUMBER
25 30 35 40
38 (133)
22 2 2
27 (96) 32 (111) 35 (123)
94.4 x 88.0 x 100.4 94.4 x 88.0 x 100.4 94.4 x 88.0 x 100.4 94.4 x 88.0 x 100.4
(2398 x 2235 x 2550) (2398 x 2235 x 2550) (2398 x 2235 x 2550) (2398 x 2235 x 2550)
3163 (1435) 3195 (1449) 3205 (1454) 3285 (1490)
3148 (1428) 3180 (1442) 3185 (1445) 3265 (1481)
284 (129) 284 (129) 288 (130) 288 (130)
Tandem Sc rolls Tandem Scrolls
0-25-50-75-100 0-25- 50-75-100 23-50-73-100 0-25-50-75-100
0-25-50-75-100
4 – 30 (762) 4 – 30 (762) 4 – 30 (762) 4 – 30 (762)
4 – 1.5 (1.1) 4 – 1.5 (1.1) 4 – 1.5 (1.1) 4 – 1.5 (1.1)
1140 1140 1140 1140
8950 (45) 8950 (45) 8950 (45) 8950 (45)
11
22 2 2
653 (4502) 653 (4502)
653 (4502) 653 (4502) 653 (4502) 653 (4502)
2.5 (65) 2.5 (65) 2.5 (65) 2.5 (65)
Field Piping Field Piping Field Piping Field Piping
Field Piping Field Piping Field Piping Field Piping
Physical Data
Table 14: Physical Data - AGZ025D - AGZ040D
Note 1: Nominal capacity based on 95° F ambient air and 54° F/44° F water range.
Note 2: For all 380V/60 & 575V/60 models, HP = 2.0.
Note 3: Water connection shown is nominal pipe size.
Note 4: Brazed plate evaporators do not have drain or vent connections integral to the heat exchanger. The connections must be installed in the field inlet and
outlet piping as shown in Piping Section beginning on page 9.
28 IM 1100
Page 29

Table 15: Physical Data - AGZ045D - AGZ060D
BASIC DATA Ckt.1 Ckt.2 Ckt.1 Ckt.2 Ckt.1 Ckt.2 Ckt.1 Ckt.2
Unit Capacity @ AHRI Conditions (See Note 1), Tons
(kW)
Number Of Refrigerant Circuits
44 44 50 50 52 52 54 54
(20) (20) (23) (23) (24) (24) (25) (25)
Unit Operating Weight, lbs (kg)
Unit Shipping Weight, lbs (kg)
Add'l Weight for Copper Finned Coils, lbs (kg)
COMPRESSORS
Type
Nominal tonnage of each Compressor 11.5 11.5 13 13 13 15 15 15
Number Of Compressors per Circuit 2 2 2 2 2 2 2 2
110 110 110 110 110 110 110 110
(3119) (3119) (3119) (3119) (3119) (3119) (3119) (3119)
CAPACITY REDUCTION STEPS - PERCENT OF COM PRESSOR DISPLACEMENT
Staging, 4 Stages, Circuit #1 in Lead
Staging, 4 Stages, Circuit #2 in Lead
CO NDENSERS - HIGH EFFIC IENCY FIN A ND T UBE TY PE WI TH INT EGRAL SUBCOOL ING
Coil Face Area, ft
2
44.1 44.1 44.1 44.1 44.1 44.1 44.1 44.1
Coil Face Area, (m
2
) 4.1 4.1 4.1 4.1 4.1 4.1 4.1 4.1
42x75.6 42x75.6 42x75.6 42x75.6 42x75.6 42x 75.6 42x75.6 42x75.6
(1067x1920) (1067x1920) (1067x1920) (1067x1920) (1067x1920) (1067x1920) (1067x1920) (1067x1920)
Fins Per Inc h x Row s Deep 16 x 3 16 x 3 16 x 3 16 x 3 16 x 3 16 x 3 16 x 3 16 x 3
Pumpdow n Capacity, 90% Full lbs (kg) 69 (31) 69 (31) 69 (31) 69 (31) 69 (31) 69 (31) 69 (31) 69 (31)
CO NDENSER FANS - DIREC T DRIV E PROPEL LER TYPE
Number Of Fans - Fan Diameter, in. (mm)
Number Of Motors - HP (kW) (Note 2)
Fan And Motor RPM, 60Hz
60 Hz Fan Tip Speed, FPM (m/sec)
60 Hz Total Unit Airflow , CFM (l/sec)
EV APORATOR - BRAZED PLATE-TO-PLATE
Number of Evaporators
Number of Refrigerant Circuits
Water Volume, Gallons, (l)
Max imum W at er Pre s s ure , ps ig ( kPa)
Maximum Refrigerant Working Press ure, psig (kPa)
Water Inlet / Outlet Victaulic Connections, in. (mm)
Drain - NPT int, in. (mm) (Note 4)
Vent - NPT int, in. (mm) (Note 4)
Finned Height x Finned Length, in. (mm)
Oil Charge Per Compressor, oz (g)
Unit Operating Charge, R-410A, lbs (kg)
Cabinet Dimensions, L x W x H, in. (mm)
Field Piping Field Piping Field Piping
Field Piping Field Piping Field Piping
653 (4502) 653 (4502) 653 (4502)
2.5 (65) 2.5 (65) 3 (80)
3.28 (12.4) 3.49 (13.2) 4.04 (15.3)
653 (4502) 653 (4502) 653 (4502)
1
222
37,228 (17,572) 37,228 (17,572) 37,228 (17,572)
1140 1140 1140
8950 (45) 8950 (45) 8950 (45)
4 – 30 (762) 4 – 30 (762) 4 – 30 (762)
4 – 1.5 (1.1) 4 – 1.5 (1.1) 4 – 1.5 (1.1)
0-23-50-73-100 0-25-50-75-100
0-25-50-75-100 0-27-50-77-100 0-25-50-75-100
Tandem Scrolls Tandem Scrolls
1
0-25-50-75-100
Tandem Scrolls Tandem Scrolls
3495 (1585) 3525 (1599) 3645 (1639)
476 (216) 476 (216) 568 (258)
3555 (1613)
(2398 x 2235 x 2550)
3680 (1670)3525 (1599)
(2398 x 2235 x 2550) (2398 x 2235 x 2550)
94.4 x 88.0 x 100.4 94.4 x 88.0 x 100.4 94.4 x 88.0 x 100.
56 (197)
222
50 55 60
3445 (1563)
0-25-50-75-100
0-25-50-75-100
37,228 (17,572)
1140
4 – 1.5 (1.1)
4 – 30 (762)
45
2.5 (65)
653 (4502)
2
11
43 (150)
Field Piping
Field Piping
653 (4502)
2.85 (10.8)
8950 (45)
476 (216)
3420 (1551)
(2398 x 2235 x 2550)
94.4 x 88.0 x 100.4
PHYSICAL DATA
AGZ-D M ODEL NUMBER
48 (169) 52 (181)
2
Physical Data
Note 1: Nominal capacity based on 95° F ambient air and 54° F/44° F water range.
Note 2: For all 380V/60 & 575V/60 models, HP = 2.0.
Note 3: Water connection shown is nominal pipe size.
Note 4: Brazed plate evaporators do not have drain or vent connections integral to the heat exchanger. The connections must be installed in the field inlet and
outlet piping as shown in Piping Section beginning on page 9.
IM 1100 29
Page 30

Physical Data
BAS IC DATA Ck t.1 C k t.2 C k t.1 Ck t. 2
Unit Capacity @ AHRI Conditions (See Note 1), Tons (kW)
Number Of Refrigerant Circuits
58 58 60 60
(26) (26) (27) (27)
Unit Operating Weight, lbs (kg)
Unit Shipping Weight, lbs (kg)
Add'l Weight for Copper Finned Coils, lbs (kg)
COMPRESSORS
Type
Nominal tonnage of each Compressor 15 15 15/20 15/20
Number Of Compr essor s pe r Circuit 2 2 2 2
110 110 110/158 110/158
(3119) (3119) 3119/4479 3119/4479
CAPACITY REDUCTION STEPS - PERCENT OF COMPRESSOR DISPLACEMENT
Staging, 4 Stages, Circuit #1 in Lead
Staging, 4 Stages, Circuit #2 in Lead
CONDENSERS - HIGH EFFICIENCY FIN AND T UBE TYPE WIT H INT EGRAL SUBCOOLING
Coil Face Area, f t
2
52.6 52.6 52.6 52.6
Coil Face Area, (m
2
) 4.9 4.9 4.9 4.9
50x75.6 50x75.6 50x75.6 50x75.6
(1270x1920) (1270x1920) (1270x1920) (1270x 1920)
Fins Per Inch x Rows Deep 16 x 3 16 x 3 16 x 3 16 x 3
Pumpdow n Capacity, 90% Full lbs (kg) 81 (37) 81 (37) 81 (37) 81 (37)
CONDENSER FANS - DIRECT DRIV E PROPELL ER TY PE
Number Of Fans - Fan Diameter, in. (mm)
Number Of Motors - HP (kW) (2)
Fan And Motor RPM, 60Hz
60 Hz Fan Tip Spe ed, FPM (m/s ec )
60 Hz Total Unit Airf low , CFM (l/sec)
EVAPORATOR - BRAZED PLATE-TO-PLATE
Number of Evaporators
Number of Refrigerant Circuits
Water V olume, Gallons, (l)
Maximum Water Pressure, psig (kPa)
Maximum Refrigerant Working Pressure, psig (kPa)
Water Inlet / Outlet Victaulic Connections, in. (mm)
Drain - NPT int, in. (mm) (Note 4)
Vent - NPT int, in. (mm) (Note 4)
Finned Height x Finned Length, in. (mm)
Cabinet Dimensions, L x W x H, in. (mm)
Unit Operating Charge, R-410A, lbs (kg)
Oil Charge Per Compressor, oz (g)
AGZ-D M ODEL NUM BER
PHYSICAL DATA 65 70
58 (204) 64 (225)
22
94.4 x 88.0 x 100.4 94.4 x 88.0 x 100.4
(2398 x 2235 x 2550) (2398 x 2235 x 2550)
3715 (1683) 4125 (1869)
3675 (1665)
568 (258)
Tandem Scrolls Tandem Scrolls
4085 (1851)
568 (258)
0-25-50-75-100 0-21-50-71-100
0-25-50-75-100 0-28-50-78-100
4 – 30 (762) 4 – 30 (762)
4 – 2.0 (1.5) 4 – 2.0 (1.5)
1140 1140
8950 (45) 8950 (45)
43,452 (20,510) 43,452 (20,510)
11
22
4.76 (18.0) 4.76 (18.0)
653 (4502) 653 (4502)
653 (4502) 653 (4502)
3 (80) 3 (80)
Field Piping Field Piping
Field Piping Field Piping
Table 16: Physical Data - AGZ065D - AGZ070D
Note 1: Nominal capacity based on 95° F ambient air and 54° F/44° F water range.
Note 2: For all 380V/60 & 575V/60 models, HP = 2.0.
Note 3: Water connection shown is nominal pipe size.
Note 4: Brazed plate evaporators do not have drain or vent connections integral to the heat exchanger. The connections must be installed in the field inlet and
outlet piping as shown in Piping Section beginning on page 9.
30 IM 1100
Page 31

Table 17: Physical Data - AGZ075D - AGZ100D
BASIC DATA Ck t.1 Ck t.2 Ckt.1 Ckt.2 Ckt.1 Ckt.2 Ck t.1 Ckt.2
Unit Capacity @ AHRI Conditions (See Note 1), Tons
(kW)
Number Of Refrigerant Circuits
75 75 80 80 86 86 88 88
(34) (34) (36) (36) (39) (39) (40) (40)
Unit Operating Weight, lbs (kg)
Unit Shipping Weight, lbs (kg)
Add'l Weight for Copper Finned Coils, lbs (kg)
COMPRESSORS
Type
Nominal tonnage of each Compressor 20 20 20 25 25 25 25/30 25/30
Number Of Compressors per Circuit 2 2 2 2 2 2 2 2
158 158 158 230 230 230 230/213 230/213
(4479) (4479) (4479) (6520) (6520) (6520) 6520/6038 6520/6038
CAPACITY REDUCTION STEPS - PERCENT OF COM PRESSOR DISPLACEMENT
Staging, 4 Stages, Circuit #1 in Lead
Staging, 4 Stages, Circuit #2 in Lead
CONDENSERS - HIGH EFFICIENCY FIN AND TUBE TYPE WITH INTEGRAL SUBCOOLING
Coil Face Area, f t
2
66.2 66.2 66.2 66.2 78.8 78.8 78.8 78.8
Coil Face Area, (m
2
) 6.1 6.1 6.1 6.1 7.3 7.3 7.3 7.3
42 x113.4 42 x113.4 42 x113.4 42 x113.4 50 x113.4 50 x113.4 50 x 113.4 50 x113.4
(1069x2880) (1069x2880) (1069x2880) (1069x2880) (1270x2880) (1270x2880) (1270x 2880) (1270x2880)
Fins Per Inch x Row s Deep 16 x 3 16 x 3 16 x 3 16 x 3 16 x 3 16 x 3 16 x 3 16 x 3
Pumpdown Capacity, 90% Full lbs (kg) 111 (50) 111 (50) 111 (50) 111 (50) 130 (59) 130 (59) 130 (59) 130 (59)
CONDENSER FANS - DIRECT DRIVE PROPELL ER TYPE
Number Of Fans - Fan Diameter, in. (mm)
Number Of Motors - HP (kW)
Fan And Motor RPM, 60Hz
60 Hz Fan Tip Speed, FPM (m/sec)
60 Hz Total Unit Airf low , CFM (l/s ec )
EV APORATOR – BRAZED PLATE-TO-PLATE
Number of Evaporators
Number of Refrigerant Circuits
Water Volume, Gallons, (l)
Max. Water Pressure, psig (kPa)
Max. Refrigerant Working Pressure, psig (kPa)
Water Inlet/Outlet Victaulic Conn. in. (mm)
Drain - NPT int, in. (mm) (Note 3)
Vent - NPT int, in. (mm) (Note 3)
Cabinet Dimensions, L x W x H, in. (mm)
Oil Charge Per Compressor, oz (g)
Finned Height x Finned Length, in. (mm)
Unit Operating Charge, R-410A, lbs (kg)
(3426 x 2235 x 2550)
2
134.9 x 88.0 x 100.4 134.9 x 88.0 x 100.4 134.9 x 88.0 x 100.4 134.9 x 88.0 x 100.4
81 (285) 89 (314) 100 (351)
222
PHYSICAL DATA 75 80 90 100
73 (257)
(3426 x 2235 x 2550) (3426 x 2235 x 2550)
5470 (2478) 5565 (2521)
5425 (2458) 5515 (2498)
870 (395) 870 (395)
(3426 x 2235 x 2550)
5660 (2564) 5795 (2625)
5605 (2539) 5730 (2596)
Tandem Scrolls Tandem Scrolls Tandem Scrolls Tandem Sc rolls
653 (4502)
Field Piping
6 – 30 (762) 6 – 30 (762)
8950 (45)
1
2
653 (4502)
6 – 30 (762) 6 – 30 (762)
0-22-50-72-100 0-25-50-75-100 0-22-50-72-1000-25-50-75-100
870 (395) 870 (395)
1140
8950 (45)
1140
1,
8950 (45) 8950 (45)
1140 1140
6 – 2.0 (1.5) 6 – 2.0 (1.5) 6 – 2.0 (1.5) 6 – 2.0 (1.5)
3 (80)
653 (4502) 653 (4502)
2
7.85 (29.7)
653 (4502)
22
5.47 (20.7)
Field Piping
0-22-50-72-100
65,178 (30,765)
653 (4502) 653 (4502) 653 (4502)
3 (80) 3 (80) 3 (80)
0-28-50-78-100 0-25-50-75-100
Field Piping Field Piping
Field Piping Field Piping
6.18 (23.4) 6.66 (25.2)
11
Field Piping
AGZ-D M ODEL NUMBER
61,200 (28,888) 61,200 (28,888) 65,178 (30,765)
0-25-50-75-100
Field Piping
Physical Data
Note 1: Nominal capacity based on 95° F ambient air and 54° F/44° F water range.
Note 2: For all 380V/60 & 575V/60 models, HP = 2.0.
Note 3: Water connection shown is nominal pipe size.
Note 4: Brazed plate evaporators do not have drain or vent connections integral to the heat exchanger. The connections must be installed in the field inlet and
outlet piping as shown in Piping Section beginning on page 9.
IM 1100 31
Page 32

Physical Data
BASIC DATA Ckt.1 Ckt.2 Ckt.1 Ckt.2 Ckt.1 Ckt.2
Unit Capacity @ AHRI Conditions (See Note 1), Tons (kW)
Number Of Refrigerant Circuits
102 102 115 115 115 115
(46) (46) (52) (52) (52) (52)
Unit Operating Weight, lbs ( kg)
Unit Shipping Weight, lbs (kg)
Add'l Weight for Copper Finned Coils, lbs (kg)
CO M PRESSORS
Type
Nominal tonnage of each Compressor 20 20 20 25 25 25
Number Of Compressors per Circuit 3 3 3 3 3 3
158 158 158 230 230 230
(4479) ( 4479) (4479) (6520) (520) (6520)
CA PAC ITY REDUCT ION ST EPS - PERCENT OF C OM PRESSOR DISPL ACEM ENT
Staging, 6 Stages, Circuit #1 in Lead
Staging, 6 Stages, Circuit #2 in Lead
CONDENSERS - HIGH EFFIC IENCY FIN A ND T UBE TY PE WI T H INT EGRAL SUBCOOL ING
Coil Face Area, ft
2
88.4 88.4 105.3 105.3 105.3 105.3
Coil Face Area, (m
2
) 8.2 8.2 9.8 9.8 9.8 9.8
42 x151.6 42 x151.6 50 x151.6 50 x151.6 50 x151.6 50 x151.6
(1069x3851) (1069x3851) (1270x3851) (1270x3851) (1270x3851) (1270x3851)
Fins Per Inch x Row s Deep 16 x 3 16 x 3 16 x 3 16 x 3 16 x 3 16 x 3
Pumpdown Capacity, 90% Full lbs (kg) 142/64 142/64 166/75 166/75 166/75 166/75
CONDENSER FANS - DIREC T DRIV E PROPELLER T YPE
Number Of Fans - Fan Diameter, in. (mm)
Number Of Motors - HP (kW)
Fan And Motor RPM, 60Hz
60 Hz Fan Tip Speed, FPM (m/s ec)
60 Hz Total Unit Airflow , CFM (l/sec)
EVAPORATOR – BRAZED PLATE-TO-PLATE
Number of Evaporators
Number of Refrigerant Circuits
Water Volume, Gallons, (l)
Max. Water Pressure, psig (kPa)
Max. Refrigerant Working Pres sure, psig (kPa)
Water Inlet / Outlet Victaulic Conn, in. (mm)
Drain - NPT int, in. (mm) (N ote 3)
Vent - NPT int, in. (mm) (Note 3)
Finned Height x Finned Length, in. (mm)
Cabinet Dimensions, L x W x H, in. (mm)
Oil Charge Per Compres sor, oz (g)
Unit Operating Charge, R-410A, lbs (kg)
PHYSICAL DATA
AGZ-D M ODEL NUMBER
110 125 130
173.1 x 88.0 x 100.4 173.1 x 88.0 x 100.4
117 (412) 130 (456)
22
7300 (3307) 7535 (3413) 7680 (3479)
7230 (3275) 7455 (3377) 7590 (3438)
(4397 x 2235 x 2550) (4397 x 2235 x 2550)
106 (373)
2
173.1 x 88.0 x 100.4
(4397 x 2235 x 2550)
1155 (524) 1155 (524) 1155 (524)
Trio Scrolls Trio Scrolls Trio Scrolls
0-17-33-50-67-83-100 0-15-33-48-67-81-100 0-17-33-50-67-83-100
0-17-33-50-67-83-100 0-19-33-52-67-86-100 0-17-33-50-67-83-100
8 – 2.0 (1.5) 8 – 2.0 (1.5) 8 – 2.0 (1.5)
8 – 30 (762) 8 – 30 (762) 8 – 30 (762)
1140 1140 1140
8950 (45) 8950 (45) 8950 (45)
81,600 (38,517) 86,904 (41,020) 86,904 (41,020)
11 1
22 2
8.32 (31.5) 9.51 (36.0) 10.7 (40.5)
653 (4502) 653 (4502) 653 (4502)
653 (4502) 653 (4502) 653 (4502)
3 (80) 3 (80) 3 (80)
Field Piping Field Piping
Field Piping Field Piping
Field Piping
Field Piping
Table 18: Physical Data - AGZ110D - AGZ130D
Note 1: Nominal capacity based on 95° F ambient air and 54° F/44° F water range.
Note 2: For all 380V/60 & 575V/60 models, HP = 2.0.
Note 3: Water connection shown is nominal pipe size.
Note 4: Brazed plate evaporators do not have drain or vent connections integral to the heat exchanger. The connections must be installed in the field inlet and
outlet piping as shown in Piping Section beginning on page 9.
32 IM 1100
Page 33

Table 19: Physical Data - AGZ140D - AGZ190D
BASIC DATA Ckt.1 Ckt.2 Ckt.1 Ckt.2 Ckt.1 Ck t.2 Ck t.1 Ck t.2
Unit Capacity @ AHRI (See Note 1), Tons (kW)
Number Of Refrigerant Circuits
125 125 130 130 130 130 140 140
(57) (57) (59) (59) (59) (59) (64) (64)
Unit Operating Weight, lbs (kg)
Unit Shipping Weight, lbs (kg)
Add'l Weight for Copper Finned Coils, lbs (kg)
COMPRESSORS
Type
Nominal tonnage of eac h Compressor 25 25 25 30 30 30 30 30
Number Of Compres sors per Circuit 3 3 3 3 3 3 3 3
230 230 230 213 213 213 213 213
(6520) (6520) (6520) (6038) (6038) (6038) (6038) (6038)
CAPACITY REDUCTION STEPS - PERCENT OF COMPRESSOR DISPLACEM ENT
Staging, 6 Stages, Circuit #1 in Lead
Staging, 6 Stages, Circuit #2 in Lead
CONDENSERS - HIGH EFFICI ENCY FIN A ND TUBE TYPE WIT H INT EGRAL SUBC OOL ING
Coil Face Area, ft
2
131.8 131.8 131.8 131.8 131.8 131.8 158.3 158.3
Coil Face Area, (m
2
) 12.2 12.2 12.2 12.2 12.2 12.2 14.7 14.7
50 x 190 50 x 190 50 x 190 50 x 190 50 x 190 50 x 190 50 x 228 50 x 228
(1270x4821) (1270x4821) (1270x4821) (1270x4821) (1270x4821) (1270x4821) (1270x5791) (1270x5791)
Fins Per Inch x Row s Deep 16 x 3 16 x 3 16 x 3 16 x 3 16 x 3 16 x 3 16 x 3 16 x 3
Pumpdow n Capac ity, 90% Full lbs (kg) 202 (92) 202 (92) 202 (92) 202 (92) 202 (92) 202 (92) 242 (110) 242 (110)
CONDENSER FANS - DI RECT DRIVE PROPEL LER TYPE
Number Of Fans - Fan Diameter, in. (mm)
Number Of Motors - HP (kW)
Fan And Motor RPM, 60Hz
60 Hz Fan Tip Speed, FPM (m/sec)
60 Hz Total Unit Airf low , CFM (l/sec)
EV APORATOR - SHELL-AND-TUBE
Number of Evaporators
Number of Ref rigerant Circuits
Water V olume, Gallons, (l)
Max imu m Wa ter Pre ss ur e, ps ig (kPa)
Max. Refrig. Working Pressure, psig (kPa)
Water Inlet / Outlet V ictaulic Conn. in. (mm)
Drain - NPT int, in.
Vent - NPT int, in.
Finned Height x Finned Length, in. (mm)
Cabinet Dimensions, L x W x H, in. (mm)
Oil Charge Per Compressor, oz (g)
Unit Operating Charge, R-410A, lbs (kg)
180 (633)
PHYSICAL DATA
0-17-33-50-67-83-1000-17-33-50-67-83-100 0-15-33-48-67-81-100 0-17-33-50-67-83-100
(5552 x 2235 x 2545)
0-17-33-50-67-83-100
AGZ- D MODEL NUM BER
140 160 180 190
136 (479) 153 (539) 172 (605)
2
218.6 x 88.0 x 100.4 218.6 x 88.0 x 100.4 218.6 x 88.0 x 100.4 256.9 x 88.0 x 100.4
222
1915 (869)
(6525 x 2235 x 2545)
9792(4436) 9942 (4504) 10107 (4578) 11070 (5015)
9310 (4217)
0-17-33-50-67-83-100
Triple Scr olls Triple Scrolls Triple Scrolls Triple Scrolls
9625 (4360) 10585 (4795)
1596 (724) 1596 (724)
10 – 30 (762) 10 – 30 (762) 10 – 30 (762)
0-19-33- 52-67-86-100 0-17-33-50-67-83-100
1596 (724)
9460 (4285)
(5552 x 2235 x 2545) (5552 x 2235 x 2545)
12 – 30 (762)
10 – 2.0 (1.5) 10 – 2.0 (1.5) 10 – 2.0 (1.5) 12 - 2.0 (1.5)
1140 1140 1140 1140
2
11
8950 (45)
130,356 (61,522)
11
8950 (45) 8950 (45)
60 (227) 58 (219)
222
8950 (45)
108,630 (51,268) 108,630 (51,268) 108,630 (51,268)
57 (215)
152 (1048) 152 (1048) 152 (1048) 152 (1048)
60 (227)
8.0 (200)
450 (3103) 450 (3103) 450 (3103) 450 (3103)
½-in. NPTF ½-in. NPTF ½-in. NPTF
8.0 (200) 8.0 (200) 8.0 (200)
½-in. NPTF
½-in. NPTF½-in. NPTF ½-in. NPTF ½-in. NPTF
Physical Data
Note 1: Nominal capacity based on 95° F ambient air and 54° F/44° F water range.
Note 2: For all 380V/60 & 575V/60 models, HP = 2.0.
Note 3: Water connection shown is nominal pipe size.
IM 1100 33
Page 34

Pressure Drop Data
A
B
B
CCD
D
E
E
F
F
G
G
H
H
I
I
J
J
K
K
L
L
M
M
N
N
O
O
P
P
Q
Q
R
R
S
S
T
T
U
U
A
1
10
100
10 100 1000
Flow Rate (gpm)
Dp (ft)
A
B
C
D
E
F
G
H
I
J
K
L
M
N
O
P
Q
R
S
T
U
gpm DP ft. lps DP kpa gpm DP ft. lps DP kpa gpm DP ft. lps DP kpa
A025D
41.3 3.8 2.6 11.5 66.0 9.4 4.2 28.1 105.6 23.0 6.7 68.6
B030D
47.4 5.0 3.0 15.0 75.8 12.3 4.8 36.7 121.3 30.0 7.7 89.7
C035D
51.8 5.4 3.3 16.3 82.8 13.3 5.2 39.7 132.5 32.5 8.4 97.0
D040D
56.4 5.4 3.6 16.3 90.2 13.3 5.7 39.7 144.4 32.5 9.1 97.0
E045D
63.5 5.3 4.0 15.9 101.5 13.0 6.4 38.8 162.4 31.8 10.2 94.8
F050D
72.2 6.1 4.6 18.2 115.4 14.9 7.3 44.5 184.7 36.4 11.7 108.7
G055D
77.4 5.4 4.9 16.3 123.8 13.3 7.8 39.7 198.1 32.5 12.5 97.0
H060D
84.2 5.1 5.3 15.3 134.6 12.5 8.5 37.3 215.4 30.5 13.6 91.2
I065D
87.2 4.5 5.5 13.4 139.4 11.0 8.8 32.8 223.1 26.9 14.1 80.2
J070D
96.2 5.4 6.1 16.3 153.8 13.3 9.7 39.7 246.1 32.5 15.5 97.0
K075D
109.7 5.3 6.9 15.8 175.4 12.9 11.1 38.5 280.7 31.5 17.7 94.1
L080D
121.7 5.2 7.7 15.6 194.6 12.8 12.3 38.2 311.4 31.3 19.7 93.4
M090D
132.3 5.4 8.3 16.1 211.7 13.2 13.4 39.4 338.7 32.2 21.4 96.3
N100D
149.7 5.2 9.4 15.4 239.5 12.6 15.1 37.6 383.2 30.8 24.2 91.9
O110D
159.2 5.3 10.0 15.9 254.6 13.0 16.1 38.8 407.4 31.8 25.7 94.8
P125D
175.7 5.4 11.1 16.1 281.0 13.2 17.7 39.4 449.7 32.2 28.4 96.3
Q130D
194.3 5.5 12.3 16.5 310.8 13.5 19.6 40.3 497.3 33.0 31.4 98.5
R140D
204.3 4.8 12.9 14.4 326.9 11.8 20.6 35.2 523.0 28.8 33.0 86.1
S160D
230.0 5.9 14.5 17.7 367.9 14.5 23.2 43.3 588.7 35.4 37.1 105.8
T180D
258.3 7.4 16.3 22.0 413.3 18.0 26.1 53.7 661.2 44.0 41.7 131.3
U190D
270.2 9.0 17.0 26.9 432.2 22.0 27.3 65.7 691.6 53.7 43.6 160.5
Brazed Plate
Shell-and-Tube
Model
Ev ap o r a t or
Type
Curve
Re f .
Minimum Flow Rate Nominal Flow Rate Maxim um Flow Rate
IP SI IP SI IP SI
Pressure Drop Data
Figure 28: Pressure Drop Curves
Table 20: Pressure Drop Data
34 IM 1100
Page 35

Electrical Data
Electrical Data
Electrical Data Notes
Notes for Unit Amp Draw:
1 Compressor RLA values are for wiring sizing purposes
only. Normal operating current draw at rated capacity
may be less than the RLA value.
Notes for Electrical Data Single- and Multi-Point
1 Unit wire size ampacity (MCA) is equal to 125% of the
largest compressor-motor RLA plus 100% of RLA of all
other loads in the circuit.
2 The control transformer is furnished and no separate
115V power is required. For both single- and multi-point
power connections, the control transformer is in circuit
#1 with control power wired from there to circuit #2. In
multi-point power, disconnecting power to circuit #1
disconnects control power to the unit.
3 Wire sizing amps is 10 amps if a separate 115V power
supply is used for the control circuit.
4 Recommended power lead wire sizes for 3 conductors
per conduit are based on 100% conductor ampacity in
accordance with NEC. Voltage drop has not been
included. It is recommended that power leads be kept
short. All terminal block connections must be made with
copper (type THW) wire.
5 Recommended Fuse Sizes are selected at approximately
175% of the largest compressor RLA, plus 100% of all
other loads in the circuit.
6 Maximum Fuse or breaker size is equal to 225% of the
largest compressor RLA, plus 100% of all other loads in
the circuit.
7 The recommended power lead wire sizes are based on an
ambient temperature of 86°F (30°C). Ampacity
correction factors must be applied for other ambient
temperatures. Refer to the National Electrical Code
Handbook.
8 Must be electrically grounded according to national and
local electrical codes.
Notes for Wiring Data
1 Single-point power supply requires a single disconnect to
supply electrical power to the unit. This power supply
must either be fused or use a circuit breaker.
2 All field wiring to unit power block or optional non-
fused disconnect switch must be copper.
3 All field wire size values given in table apply to 75°C
rated wire per NEC.
Voltage Limitations:
1 Within 10 percent of nameplate rating.
2 Voltage unbalance not to exceed 2% with a resultant
current unbalance of 6 to 10 times the voltage unbalance
per NEMA MG-1, 2009 Standard Rev. 1-2010.
Circuit Breakers
Factory installed compressor circuit breakers for short circuit
protection are standard on units with single point power supply
only. This option provides unit installed compressor short
circuit protection and makes servicing easier.
Table 21: HSSCR Panel Rating
AGZ-D Model Size 208V-230V 380V-460V
025-190 100kA 65kA
Table 22: Standard Panel Rating
AGZ-D Model Size 208V 230V 380V 460V 575V
025-080, 125 5kA 5kA 5kA 5kA 5kA
090-110, 130-160 5kA 5kA 10kA 5kA 5kA
180,190 5kA 10kA 10kA 10kA 5kA
575V
25kA
Electrical Control Center
Operating and equipment protection controls and motor
starting components are separately housed in a centrally
located, weather resistant control panel with hinged and toollocked doors. In addition to the MicroTech III controller
described in the next sections, the following components are
housed in the panel:
• Power terminal blocks, multi-point connection standard
• Control, input, and output terminal block
• Control transformer
• Optional disconnect switch (through-the-door handle)
• Compressor motor inherent thermal and overload protection is standard
• Optional phase voltage monitor with under/over voltage
and phase reversal protection
• Fan contactors with short circuit protective devices.
• Optional ground fault protection
• FanTrol fan staging head pressure control system
• Power connections are per the following table
Power Connections
Table 23: Power Connection Availability
Power Connection
AGZ025D-190D
Optional Single Point
AGZ025D-190D
Standard Multi-Point
Power
Disc.
Block
Swt.
Std Opt. Std Opt
Std Opt. Not Avail. Opt.
Comp
Circuit
Breakers
Panel High Short
Circuit Current
Rating
Definitions:
1 Power Block: An electrical device to directly accept field
wiring without any disconnecting means.
2 Disconnect Switch: A molded case switch that accepts
field wiring and disconnects main power to the entire
unit or each main power supply if the multi-point power
supply option is selected. This option does not provide
overcurrent protection.
3 Compressor Circuit Breakers: A manually reset circuit
breaker for each compressor, providing compressor only
short circuit protection and located ahead of the
contactor.
4 Control Panel High Short Circuit Current Rating:
(Previously known as "withstand rating"). The entire
control panel is designed for short circuit current rating
as shown above. In the event of a short circuit, the
damage is contained within the control panel enclosure.
CAT 611 35
Page 36

Electrical Data
NOCOM
BELL
LESS
EVAPORATOR
ONLY
N
24 VAC
N
24 VAC
LIQUID LINE #2
SOLENOID
24VAC 1.5 AMP MAX
LIQUID LINE #1
SOLENOID
24VAC 1.5 AMP MAX
4-20MA FOR
DEMAND LIMIT
(BY OTHERS)
4-20MA FOR
EVAP. WATER RESET
(BY OTHERS)
CHW FLOW SWITCH
-MANDATORY(BY OTHERS)
NOR. OPEN PUMP
AUX. CONTACTS
(OPTIONAL)
ICE MODE
SWITCH
(BY OTHERS)
TIME
CLOCK
OFF
MANUAL
ON
AUTO
585
IF REMOTE STOP
CONTROL IS USED
REMOVE LEAD 585
FROM TERM
TB2-52 TO TB2-72
TIME
CLOCK
OFF
MANUAL
ON
AUTO
CHW2
PUMP NO.2 RELAY
(BY OTHERS)
120VAC @ 1.0AMP MAX
93A
TB2
92
TB2
93A
TB2
91
TB2
71
TB2
70
TB2
69
TB2
68
TB2
61
TB2
TB1
22
TB1
1A
TO
COMPRESSOR(S)
AND FAN MOTORS
ALARM BELL
RELAY
120
VAC
FU5
T1
FU6
CONTROL CIRCUIT
FUSE
SEE NOTE 1
FU4
REMOTE
STOP SWITCH
(BY OTHERS)
TB2
TB2
43
83
ALARM BELL
OPTION
N
N
120 VAC
120 VAC
120 VAC
(FACTORY WIRING)
TB1
TB1
TB1
TB1
TB1
TB1
TB2
TB2
TB2
TB2
TB2
ALARM BELL
RELAY
(BY OTHERS)
44
54
52
34
P2+
CHW1
PUMP NO.1 RELAY
(BY OTHERS)
120VAC @ 1.0AMP MAX
35
74
72
32A
31
33
ALARM
BELL OPTION
3 PHASE
POWER
SOURCE
DISCONNECT SWITCH
OR
POWER BLOCK
DISCONNECT
(BY OTHERS)
12
TB2
TB2
45
67
EXTERNAL
ALARM/
EVENT
DISCONNECT
(BY OTHERS)
N
120 VAC
FIELD
SUPPLIED
OPTION
FU
15A for 1.5 KVA
30A for 3.0KVA
(BY OTHERS)
Notes:
1.) IF FIELD SUPPLIED, CONTROL
POWER USER MUST REMOVE
FU6, AND WIRE NUMBERS 299, 301A
INSIDE CONTROL PANEL
FIELD WIRING DIAGRAM
WITH MICROTECH CONTROLLER
301A
301 299
ABR
ABR
SV1
SV2
_
+
_
+
GND
(317)
T3
T2
T1
L3
L2
L1
PANEL
Field Wiring Diagram
Figure 29: Typical Field Wiring Diagram (Single-point connection)
36 CAT 611
Page 37

NOCOM
BELL
LESS
EVAPORATOR
ONLY
N
24 VAC
N
24 VAC
LIQUID LINE #2
SOLENOID
24VAC 1.5 AMP MAX
LIQUID LINE #1
SOLENOID
24VAC 1.5 AMP MAX
4-20MA FOR
DEMAND LIMIT
(BY OTHERS)
4-20MA FOR
EVAP. WATER RESET
(BY OTHERS)
CHW FLOW SWITCH
-MANDATORY(BY OTHERS)
NOR. OPEN PUMP
AUX. CONTACTS
(OPTIONAL)
ICE MODE
SWITCH
(BY OTHERS)
TIME
CLOCK
OFF
MANUAL
ON
AUTO
585
IF REMOTE STOP
CONTROL IS USED
REMOVE LEAD 585
FROM TERM
TB2-52 TO TB2-72
TIME
CLOCK
OFF
MANUAL
ON
AUTO
CHW2
PUMP NO.2 RELAY
(BY OTHERS)
120VAC @ 1.0AMP MAX
93A
TB2
92
TB2
93A
TB2
91
TB2
71
TB2
70
TB2
69
TB2
68
TB2
61
TB2
TB1
22
TB1
TO CIRCUIT 1
COMPRESSOR(S)
AND FAN MOTORS
ALARM BELL
RELAY
120
VAC
FU5
T1
FU6
CONTROL CIRCUIT
FUSE
SEE NOTE 1
FU4
REMOTE
STOP SWITCH
(BY OTHERS)
TB2
TB2
43
83
ALARM BELL
OPTION
N
N
120 VAC
120 VAC
120 VAC
(FACTORY WIRING)
TB1
TB1
TB1
TB1
TB1
TB1
TB2
TB2
TB2
TB2
TB2
ALARM BELL
RELAY
(BY OTHERS)
44
54
52
34
P2+
CHW1
PUMP NO.1 RELAY
(BY OTHERS)
120VAC @ 1.0AMP MAX
35
74
72
32A
31
33
ALARM
BELL OPTION
3 PHASE
POWER
SOURCE
DISCONNECT SWITCH
OR
POWER BLOCK
DISCONNECT 1
(BY OTHERS)
12
TB2
TB2
45
67
EXTERNAL
ALARM/
EVENT
DISCONNECT
(BY OTHERS)
N
120 VAC
FIELD
SUPPLIED
OPTION
FU
Notes:
FIELD WIRING DIAGRAM
WITH MICROTECH CONTROLLER
TO CIRCUIT 2
COMPRESSOR(S)
AND FAN MOTORS
3 PHASE
POWER
SOURCE
DISCONNECT SWITCH
OR
POWER BLOCK
DISCONNECT 2
(BY OTHERS)
15A for 1.5 KVA
30A for 3.0KVA
(BY OTHERS)
1.) IF FIELD SUPPLIED, CONTROL
POWER USER MUST REMOVE
FU6, AND WIRE NUMBERS 299, 301A
INSIDE CONTROL PANEL
1A
301A
301 299
ABR
ABR
SV1
SV2
_
+
_
+
GND
(317)
T3
T2
T1
L3
L2
L1
PANEL
T3
T2
T1
L3
L2
L1
Figure 30: Typical Field Wiring Diagram (Multi-point connection)
Electrical Data
CAT 611 37
Page 38

Electrical Data
AGZ-D Volts/
Siz e Ph ase
#1 #3 #5 #2 #4 #6 #1 #3 #5 #2 #4 #6
208V/60 29. 5 29.5 29.5 29.5 195 195 195 195 4 5.8 23.3
230V/60 29. 5 29.5 29.5 29.5 195 195 195 195 4 5.8 23.3
380V/60 15. 4 15.4 15.4 15.4 123 123 123 123 4 4.1 20.0
460V/60 12. 8 12.8 12.8 12.8 100 100 100 100 4 2.8 13.0
400V/50 12. 8 12.8 12.8 12.8 100 100 100 100 4 2.8 13.0
575V/60 12. 2 12.2 12.2 12.2 80 80 80 80 4 3.0 14.0
208V/60 31. 6 31.6 31.6 31.6 225 225 225 225 4 5.8 23.3
230V/60 30. 1 30.1 30.1 30.1 225 225 225 225 4 5.8 23.3
380V/60 19. 2 19.2 19.2 19.2 140 140 140 140 4 4.1 20.0
460V/60 16. 7 16.7 16.7 16.7 114 114 114 114 4 2.8 13.0
400V/50 16. 7 16.7 16.7 16.7 114 114 114 114 4 2.8 13.0
575V/60 13 13 13 13 80 80 80 80 4 3.0 14.0
208V/60 31. 6 31.6 36.3 36.3 225 225 239 239 4 5.8 23.3
230V/60 30. 1 30.1 36 36 225 225 239 239 4 5.8 23.3
380V/60 19. 2 19.2 23.7 23.7 140 140 145 145 4 4.1 20.0
460V/60 16. 7 16.7 17.9 17.9 114 114 125 125 4 2.8 13.0
400V/50 16. 7 16.7 17.9 17.9 114 114 125 125 4 2.8 13.0
575V/60 13 13 13 13 80 80 80 80 4 3.0 14.0
208V/60 36. 3 36.3 36.3 36.3 239 239 239 239 4 5.8 23.3
230V/60 36 36 36 36 239 239 239 239 4 5.8 23.3
380V/60 23. 7 23.7 23.7 23.7 145 145 145 145 4 4.1 20.0
460V/60 17. 9 17.9 17.9 17.9 125 125 125 125 4 2.8 13.0
400V/50 17. 9 17.9 17.9 17.9 125 125 125 125 4 2.8 13.0
575V/60 13 13 13 13 80 80 80 80 4 3.0 14.0
208V/60 48. 1 48.1 48.1 48.1 245 245 245 245 4 5.8 23.3
230V/60 48. 1 48.1 48.1 48.1 245 245 245 245 4 5.8 23.3
380V/60 23. 7 23.7 23.7 23.7 145 145 145 145 4 4.1 20.0
460V/60 18. 9 18.9 18.9 18.9 125 125 125 125 4 2.8 13.0
400V/50 18. 9 18.9 18.9 18.9 125 125 125 125 4 2.8 13.0
575V/60 15. 1 15.1 15.1 15.1 100 100 100 100 4 3.0 14.0
208V/60 52. 8 52.8 52.8 52.8 300 300 300 300 4 5.8 23.3
230V/60 52. 8 52.8 52.8 52.8 300 300 300 300 4 5.8 23.3
380V/60 26. 9 26.9 26.9 26.9 139 139 139 139 4 4.1 20.0
460V/60 23. 1 23.1 23.1 23.1 150 150 150 150 4 2.8 13.0
400V/50 23. 1 23.1 23.1 23.1 150 150 150 150 4 2.8 13.0
575V/60 19. 9 19.9 19.9 19.9 109 109 109 109 4 3.0 14.0
208V/60 52. 8 52.8 56.6 56.6 300 300 340 340 4 5.8 23.3
230V/60 52. 8 52.8 55.8 55.8 300 300 340 340 4 5.8 23.3
380V/60 26. 9 26.9 34 34 139 139 196 196 4 4.1 20.0
460V/60 23. 1 23.1 26.9 26.9 150 150 172 172 4 2.8 13.0
400V/50 23. 1 23.1 26.9 26.9 150 150 172 172 4 2.8 13.0
575V/60 19. 9 19.9 23.7 23.7 109 109 132 132 4 3.0 14.0
Rated Load Amps Locked Rotor Amps Fan Motors
Circuit #1 Cir cuit #2 Circuit #1 Circuit #2
Qty FLA (ea) LRA (ea)
025D
030D
035D
040D
045D
050D
055D
Table 24: Unit Amp Draw, 50 & 60 Hz
38 CAT 611
Page 39

Table 25: Unit Amp Draw, 50 & 60 Hz continued
AGZ-D Volts/
Siz e Pha se
#1 #3 #5 #2 #4 #6 #1 #3 #5 #2 #4 #6
208V/60 56.6 56.6 56.6 56.6 340 340 340 340 4 5.8 23.3
230V/60 55.8 55.8 55.8 55.8 340 340 340 340 4 5.8 23.3
380V/60 34 34 34 34 196 196 196 196 4 4.1 20.0
460V/60 26.9 26.9 26.9 26.9 172 172 172 172 4 2.8 13.0
400V/50 26.9 26.9 26.9 26.9 172 172 172 172 4 2.8 13.0
575V/60 23.7 23.7 23.7 23.7 132 132 132 132 4 3.0 14.0
208V/60 56.6 56.6 56.6 56.6 340 340 340 340 4 7.8 31.7
230V/60 55.8 55.8 55.8 55.8 340 340 340 340 4 7.8 35.6
380V/60 34 34 34 34 196 196 196 196 4 4.1 20.0
460V/60 26.9 26.9 26.9 26.9 172 172 172 172 4 3.6 17.8
400V/50 26.9 26.9 26.9 26.9 172 172 172 172 4 3.6 17.8
575V/60 23.7 23.7 23.7 23.7 132 132 132 132 4 3.0 14.0
208V/60 56.6 74.5 56.6 74.5 340 505 340 505 4 7.8 31.7
230V/60 55.8 74.5 55.8 74.5 340 505 340 505 4 7.8 35.6
380V/60 34 38.2 34 38.2 196 290 196 290 4 4.1 20.0
460V/60 26.9 33 26.9 33 172 225 172 225 4 3.6 17.8
400V/50 26.9 33 26.9 33 172 225 172 225 4 3.6 17.8
575V/60 23.7 25.2 23.7 25.2 132 180 132 180 4 3.0 14.0
208V/60 74.5 74.5 74.5 74.5 505 505 505 505 6 7.8 31.7
230V/60 74.5 74.5 74.5 74.5 505 505 505 505 6 7.8 35.6
380V/60 38.2 38.2 38.2 38.2 290 290 290 290 6 4.1 20.0
460V/60 33 33 33 33 225 225 225 225 6 3.6 17.8
400V/50 33 33 33 33 225 225 225 225 6 3.6 17.8
575V/60 25.2 25.2 25.2 25.2 180 180 180 180 6 3.0 14.0
208V/60 74.5 74.5 89.1 89.1 505 505 544 544 6 7.8 31.7
230V/60 74.5 74.5 89.1 89.1 505 505 544 544 6 7.8 35.6
380V/60 38.2 38.2 51.9 51.9 290 290 353 353 6 4.1 20.0
460V/60 33 33 44.5 44.5 225 225 272 272 6 3.6 17.8
400V/50 33 33 44.5 44.5 225 225 272 272 6 3.6 17.8
575V/60 25.2 25.2 32.1 32.1 180 180 218 218 6 3.0 14.0
208V/60 89.1 89.1 89.1 89.1 544 544 544 544 6 7.8 31.7
230V/60 89.1 89.1 89.1 89.1 544 544 544 544 6 7.8 35.6
380V/60 51.9 51.9 51.9 51.9 353 353 353 353 6 4.1 20.0
460V/60 44.5 44.5 44.5 44.5 272 272 272 272 6 3.6 17.8
400V/50 44.5 44.5 44.5 44.5 272 272 272 272 6 3.6 17.8
575V/60 32.1 32.1 32.1 32.1 218 218 218 218 6 3.0 14.0
208V/60 89.1 116 89.1 116 544 599 544 599 6 7.8 31.7
230V/60 89.1 116 89.1 116 544 599 544 599 6 7.8 35.6
380V/60 51.9 69.2 51.9 69.2 353 358 353 358 6 4.1 20.0
460V/60 43 54.5 43 54.5 272 310 272 310 6 3.6 17.8
400V/50 43 54.5 43 54.5 272 310 272 310 6 3.6 17.8
575V/60 32.1 44.5 32.1 44.5 218 239 218 239 6 3.0 14.0
060D
090D
100D
065D
070D
075D
080D
Rated Load Amps Locked Rotor Amps Fan Motors
Circuit #1 Circuit #2 Circuit #1 Circuit #2
Qty FLA (ea) LRA (ea)
Electrical Data
CAT 611 39
Page 40

Electrical Data
AGZ-D Volts/
Siz e Ph ase
#1 #3 #5 #2 #4 #6 #1 #3 #5 #2 #4 #6
208V/60 74. 5 74.5 74.5 74.5 74.5 74.5 505 505 505 505 505 505 8 7.8 31.7
230V/60 74. 5 74.5 74.5 74.5 74.5 74.5 505 505 505 505 505 505 8 7.8 35.6
380V/60 38. 2 38.2 38.2 38.2 38.2 38.2 290 290 290 290 290 290 8 4.1 20.0
460V/60 30. 6 30.6 30.6 30.6 30.6 30.6 225 225 225 225 225 225 8 3.6 17.8
400V/50 30. 6 30.6 30.6 30.6 30.6 30.6 225 225 225 225 225 225 8 3.6 17.8
575V/60 25. 2 25.2 25.2 25.2 25.2 25.2 180 180 180 180 180 180 8 3.0 14.0
208V/60 86. 3 86.3 86.3 89.1 89.1 89.1 505 505 505 544 544 544 8 7.8 31.7
230V/60 86. 3 86.3 86.3 89.1 89.1 89.1 505 505 505 544 544 544 8 7.8 35.6
380V/60 38. 2 38.2 38.2 51.9 51.9 51.9 290 290 290 353 353 353 8 4.1 20.0
460V/60 30. 6 30.6 30.6 44.5 44.5 44.5 225 225 225 272 272 272 8 3.6 17.8
400V/50 30. 6 30.6 30.6 44.5 44.5 44.5 225 225 225 272 272 272 8 3.6 17.8
575V/60 25. 2 25.2 25.2 32.1 32.1 32.1 180 180 180 218 218 218 8 3.0 14.0
208V/60 89. 1 89.1 89.1 89.1 89.1 89.1 544 544 544 544 544 544 8 7.8 31.7
230V/60 89. 1 89.1 89.1 89.1 89.1 89.1 544 544 544 544 544 544 8 7.8 35.6
380V/60 51. 9 51.9 51.9 51.9 51.9 51.9 353 353 353 353 353 353 8 4.1 20.0
460V/60 44. 5 44.5 44.5 44.5 44.5 44.5 272 272 272 272 272 272 8 3.6 17.8
400V/50 44. 5 44.5 44.5 44.5 44.5 44.5 272 272 272 272 272 272 8 3.6 17.8
575V/60 32. 1 32.1 32.1 32.1 32.1 32.1 218 218 218 218 218 218 8 3.0 14.0
208V/60 89. 1 89.1 89.1 89.1 89.1 89.1 544 544 544 544 544 544 10 7.8 31.7
230V/60 89. 1 89.1 89.1 89.1 89.1 89.1 544 544 544 544 544 544 10 7.8 35.6
380V/60 51. 9 51.9 51.9 51.9 51.9 51.9 353 353 353 353 353 353 10 4.1 20.0
460V/60 44. 5 44.5 44.5 44.5 44.5 44.5 272 272 272 272 272 272 10 3.6 17.8
400V/50 44. 5 44.5 44.5 44.5 44.5 44.5 272 272 272 272 272 272 10 3.6 17.8
575V/60 32. 1 32.1 32.1 32.1 32.1 32.1 218 218 218 218 218 218 10 3.0 14.0
208V/60 89. 1 89.1 89.1 116 116 116 544 544 544 599 599 599 10 7.8 31.7
230V/60 89. 1 89.1 89.1 116 116 116 544 544 544 599 599 599 10 7.8 35.6
380V/60 51. 9 51.9 51.9 69.2 69.2 69.2 353 353 353 358 358 358 10 4.1 20.0
460V/60 44. 5 44.5 44.5 54.5 54.5 54.5 272 272 272 310 310 310 10 3.6 17.8
400V/50 44. 5 44.5 44.5 54.5 54.5 54.5 272 272 272 310 310 310 10 3.6 17.8
575V/60 32. 1 32.1 32.1 44.5 44.5 44.5 218 218 218 239 239 239 10 3.0 14.0
208V/60 128 128 128 128 128 128 599 599 599 599 599 599 10 7.8 31.7
230V/60 116 116 116 116 116 116 599 599 599 599 599 599 10 7.8 35.6
380V/60 69. 2 69.2 69.2 69.2 69.2 69.2 358 358 358 358 358 358 10 4.1 20.0
460V/60 57. 2 57.2 57.2 57.2 57.2 57.2 310 310 310 310 310 310 10 3.6 17.8
400V/50 57. 2 57.2 57.2 57.2 57.2 57.2 310 310 310 310 310 310 10 3.6 17.8
575V/60 44. 5 44.5 44.5 44.5 44.5 44.5 239 239 239 239 239 239 10 3.0 14.0
208V/60 128 128 128 128 128 128 599 599 599 599 599 599 12 7.8 31.7
230V/60 116 116 116 116 116 116 599 599 599 599 599 599 12 7.8 35.6
380V/60 69. 2 69.2 69.2 69.2 69.2 69.2 358 358 358 358 358 358 12 4.1 20.0
460V/60 57. 2 57.2 57.2 57.2 57.2 57.2 310 310 310 310 310 310 12 3.6 17.8
400V/50 57. 2 57.2 57.2 57.2 57.2 57.2 310 310 310 310 310 310 12 3.6 17.8
575V/60 44. 5 44.5 44.5 44.5 44.5 44.5 239 239 239 239 239 239 12 3.0 14.0
130D
110D
125D
140D
160D
180D
190D
Rated Load Amps Locked Rotor Amps Fan Motors
Circuit #1 Cir cuit #2 Circuit #1 Circuit #2
Qty FLA (ea) LRA (ea)
Table 26: Unit Amp Draw, 50 & 60 Hz continued
40 CAT 611
Page 41

Table 27: Electrical Data - Single Point (50/60 Hz)
Qty Wire GA Qty Size (in.)
Recom . Max.
208V/60 149 3 1/0 AWG 1 1.5 175 175
230V/60 149 3 1/0 AWG 1 1.5 175 175
380V/60 82 3 4 AWG 1 1 90 90
460V/60 66 3 4 AWG 1 1 70 70
400V/50 66 3 4 AWG 1 1 70 70
575V/60 64 3 6 AWG 1 0.75 70 70
208V/60 158 3 2/0 AWG 1 1.5 175 175
230V/60 152 3 2/0 AWG 1 1.5 175 175
380V/60 98 3 3 AWG 1 1 110 110
460V/60 83 3 4 AWG 1 1 90 90
400V/50 83 3 4 AWG 1 1 90 90
575V/60 68 3 4 AWG 1 1 80 80
208V/60 169 3 2/0 AWG 1 1.5 200 200
230V/60 165 3 2/0 AWG 1 1.5 200 200
380V/60 109 3 2 A WG 1 1.25 125 125
460V/60 85 3 4 AWG 1 1 100 100
400V/50 85 3 4 AWG 1 1 100 100
575V/60 68 3 4 AWG 1 1 80 80
208V/60 178 3 3/0 AWG 1 2 200 200
230V/60 177 3 3/0 AWG 1 2 200 200
380V/60 118 3 1 A WG 1 1.25 125 125
460V/60 88 3 3 AWG 1 1 100 100
400V/50 88 3 3 AWG 1 1 100 100
575V/60 68 3 4 AWG 1 1 80 80
208V/60 228 3 4/0 AWG 1 2 250 250
230V/60 228 3 4/0 AWG 1 2 250 250
380V/60 118 3 1 A WG 1 1.25 125 125
460V/60 92 3 3 AWG 1 1 110 110
400V/50 92 3 3 AWG 1 1 110 110
575V/60 77 3 4 AWG 1 1 90 90
208V/60 248 3 250 MCM 1 2 300 300
230V/60 248 3 250 MCM 1 2 300 300
380V/60 131 3 1/0 AWG 1 1.5 150 150
460V/60 110 3 2 A WG 1 1.25 125 125
400V/50 110 3 2 A WG 1 1.25 125 125
575V/60 97 3 3 AWG 1 1 110 110
208V/60 257 3 300 MCM 1 2.5 300 300
230V/60 255 3 250 MCM 1 2 300 300
380V/60 147 3 1/0 AWG 1 1.5 175 175
460V/60 118 3 1 A WG 1 1.25 125 125
400V/50 118 3 1 A WG 1 1.25 125 125
575V/60 106 3 2 A WG 1 1.25 125 125
050D
055D
Volts/Phase MCA
Power Supply
Fuse / Circuit Breaker
Size
Field W ire Field Hub.
Model
025D
030D
035D
040D
045D
Electrical Data
CAT 611 41
Page 42

Electrical Data
Qty W ire GA Qty Size (in.)
Re co m . M ax .
208V/60 264 3 300 MCM 1 2.5 300 300
230V/60 261 3 300 MCM 1 2.5 300 300
380V/60 161 3 2/0 AWG 1 1.5 175 175
460V/60 126 3 1 AWG 1 1.25 150 150
400V/50 126 3 1 AWG 1 1.25 150 150
575V/60 113 3 2 AWG 1 1.25 125 125
208V/60 272 3 300 MCM 1 2.5 300 300
230V/60 269 3 300 MCM 1 2.5 300 300
380V/60 161 3 2/0 AWG 1 1.5 175 175
460V/60 129 3 1 AWG 1 1.25 150 150
400V/50 129 3 1 AWG 1 1.25 150 150
575V/60 113 3 2 AWG 1 1.25 125 125
208V/60 312 3 400 MCM 1 2.5 350 350
230V/60 311 3 400 MCM 1 2.5 350 350
380V/60 171 3 2/0 AWG 1 1.5 200 200
460V/60 143 3 1/0 AWG 1 1.5 175 175
400V/50 143 3 1/0 AWG 1 1.5 175 175
575V/60 117 3 1 AWG 1 1.25 125 125
208V/60 364 6 4/0 AWG 1 3 400 400
230V/60 364 6 4/0 AWG 1 3 400 400
380V/60 187 3 3/0 AWG 1 2 225 225
460V/60 162 3 2/0 AWG 1 1.5 175 175
400V/50 162 3 2/0 AWG 1 1.5 175 175
575V/60 126 3 1 AWG 1 1.25 150 150
208V/60 397 6 250 MCM 1 3 450 450
230V/60 397 6 250 MCM 1 3 450 450
380V/60 218 3 4/0 AWG 1 2 250 250
460V/60 188 3 3/0 AWG 1 2 225 225
400V/50 188 3 3/0 AWG 1 2 225 225
575V/60 141 3 1/0 AWG 1 1.5 150 150
208V/60 426 6 4/0 AWG 2 2 500 500
230V/60 426 6 4/0 AWG 2 2 500 500
380V/60 246 3 250 MCM 1 2 250 250
460V/60 211 3 4/0 AWG 1 2 250 250
400V/50 211 3 4/0 AWG 1 2 250 250
575V/60 155 3 2/0 AWG 1 1.5 175 175
208V/60 485 6 250 MCM 2 2 600 600
230V/60 485 6 250 MCM 2 2 600 600
380V/60 285 3 300 MCM 1 2.5 350 350
460V/60 230 3 4/0 AWG 1 2 250 250
400V/50 230 3 4/0 AWG 1 2 250 250
575V/60 183 3 3/0 AWG 1 2 225 225
070D
075D
060D
065D
Volts/Phase MCA
Pow er Sup ply
Size
Field W ire Field Hub.
090D
100D
Model
080D
Table 28: Electrical Data - Single Point (50/60 Hz) continued
Fuse / Circuit Breaker
42 CAT 611
Page 43

Table 29: Electrical Data - Single Point (50/60 Hz) continued
Qty W ire GA Qty Size (in.)
Recom . Max.
208V/60 528 6 300 MCM 2 2.5 600 600
230V/60 528 6 300 MCM 2 2.5 600 600
380V/60 272 3 300 MCM 1 2.5 300 300
460V/60 221 3 4/0 AWG 1 2 250 250
400V/50 221 3 4/0 AWG 1 2 250 250
575V/60 182 3 3/0 AWG 1 2 200 200
208V/60 611 6 350 MCM 2 2.5 700 700
230V/60 611 6 350 MCM 2 2.5 700 700
380V/60 317 3 400 MCM 1 2.5 350 350
460V/60 266 3 300 MCM 1 2.5 300 300
400V/50 266 3 300 MCM 1 2.5 300 300
575V/60 204 3 4/0 AWG 1 2 225 225
208V/60 620 6 350 MCM 2 2.5 700 700
230V/60 620 6 350 MCM 2 2.5 700 700
380V/60 358 6 4/0 AWG 1 3 400 400
460V/60 307 3 350 MCM 1 2.5 350 350
400V/50 307 3 350 MCM 1 2.5 350 350
575V/60 225 3 4/0 AWG 1 2 250 250
208V/60 635 6 400 MCM 2 2.5 700 700
230V/60 635 6 400 MCM 2 2.5 700 700
380V/60 366 6 4/0 AWG 1 3 400 400
460V/60 315 3 400 MCM 1 2.5 350 350
400V/50 315 3 400 MCM 1 2.5 350 350
575V/60 231 3 250 MCM 1 2 250 250
208V/60 721 12 4/0 AWG 2 3 800 800
230V/60 721 12 4/0 AWG 2 3 800 800
380V/60 422 6 4/0 AWG 2 2 450 450
460V/60 347 6 4/0 AWG 1 3 400 400
400V/50 347 6 4/0 AWG 1 3 400 400
575V/60 271 3 300 MCM 1 2.5 300 300
208V/60 875 12 300 MCM 2 3.5 1000 1000
230V/60 800 12 250 MCM 2 3 800 800
380V/60 474 6 250 MCM 2 2 500 500
460V/60 394 6 250 MCM 1 3 450 450
400V/50 394 6 250 MCM 1 3 450 450
575V/60 309 3 350 MCM 1 2.5 350 350
208V/60 891 12 300 MCM 2 3.5 1000 1000
230V/60 816 12 250 MCM 2 3 800 800
380V/60 482 6 250 MCM 2 2 500 500
460V/60 401 6 250 MCM 1 3 450 450
400V/50 401 6 250 MCM 1 3 450 450
575V/60 315 3 400 MCM 1 2.5 350 350
Fuse / Circuit Breaker
Size
Fie ld W ir e Field Hub .
Volts/Phase MCA
Power Supply
160D
180D
190D
110D
125D
130D
Model
140D
Electrical Data
CAT 611 43
Page 44

Electrical Data
Qt y Wi re GA Qt y Siz e Rec. M ax. Qt y Wi re GA Qt y Si ze Re c. Max .
208V/60 78 3 4 AWG 1 1 100 100 78 3 4 AWG 1 1 100 100
230V/60 78 3 4 AWG 1 1 100 100 78 3 4 AWG 1 1 100 100
380V/60 43 3 8 AWG 1 0.5 50 50 43 3 8 AWG 1 0.5 50 50
460V/60 35 3 10 AWG 1 0.5 45 45 35 3 10 AWG 1 0.5 45 45
400V/50 35 3 10 AWG 1 0.5 45 45 35 3 10 AWG 1 0.5 45 45
575V/60 34 3 10 AWG 1 0.5 45 45 34 3 10 AWG 1 0.5 45 45
208V/60 83 3 4 AWG 1 1 110 110 83 3 4 AWG 1 1 110 110
230V/60 80 3 4 AWG 1 1 100 100 80 3 4 AWG 1 1 100 100
380V/60 52 3 6 AWG 1 0.75 70 70 52 3 6 AWG 1 0.75 70 70
460V/60 44 3 8 AWG 1 0.5 60 60 44 3 8 AWG 1 0.5 60 60
400V/50 44 3 8 AWG 1 0.5 60 60 44 3 8 AWG 1 0.5 60 60
575V/60 36 3 8 AWG 1 0.5 45 45 36 3 8 AWG 1 0.5 45 45
208V/60 83 3 4 AWG 1 1 110 110 94 3 3 AWG 1 1 125 125
230V/60 80 3 4 AWG 1 1 100 100 93 3 3 AWG 1 1 125 125
380V/60 52 3 6 AWG 1 0.75 70 70 62 3 6 AWG 1 0.75 80 80
460V/60 44 3 8 AWG 1 0.5 60 60 46 3 8 AWG 1 0.5 60 60
400V/50 44 3 8 AWG 1 0.5 60 60 46 3 8 AWG 1 0.5 60 60
575V/60 36 3 8 AWG 1 0.5 45 45 36 3 8 AWG 1 0.5 45 45
208V/60 94 3 3 AWG 1 1 125 125 94 3 3 AWG 1 1 125 125
230V/60 93 3 3 AWG 1 1 125 125 93 3 3 AWG 1 1 125 125
380V/60 62 3 6 AWG 1 0.75 80 80 62 3 6 AWG 1 0.75 80 80
460V/60 46 3 8 AWG 1 0.5 60 60 46 3 8 AWG 1 0.5 60 60
400V/50 46 3 8 AWG 1 0.5 60 60 46 3 8 AWG 1 0.5 60 60
575V/60 36 3 8 AWG 1 0.5 45 45 36 3 8 AWG 1 0.5 45 45
208V/60 120 3 1 AWG 1 1.25 150 150 120 3 1 AWG 1 1.25 150 150
230V/60 120 3 1 AWG 1 1.25 150 150 120 3 1 AWG 1 1.25 150 150
380V/60 62 3 6 AWG 1 0.75 80 80 62 3 6 AWG 1 0.75 80 80
460V/60 49 3 8 AWG 1 0.5 60 60 49 3 8 AWG 1 0.5 60 60
400V/50 49 3 8 AWG 1 0.5 60 60 49 3 8 AWG 1 0.5 60 60
575V/60 40 3 8 AWG 1 0.5 50 50 40 3 8 AWG 1 0.5 50 50
208V/60 131 3 1/0 AWG 1 1.5 175 175 131 3 1/0 AWG 1 1.5 175 175
230V/60 131 3 1/0 AWG 1 1.5 175 175 131 3 1/0 AWG 1 1.5 175 175
380V/60 69 3 4 AWG 1 1 90 90 69 3 4 AWG 1 1 90 90
460V/60 58 3 6 AWG 1 0.75 80 80 58 3 6 AWG 1 0.75 80 80
400V/50 58 3 6 AWG 1 0.75 80 80 58 3 6 AWG 1 0.75 80 80
575V/60 51 3 6 AWG 1 0.75 70 70 51 3 6 AWG 1 0.75 70 70
208V/60 131 3 1/0 AWG 1 1.5 175 175 139 3 1/0 AWG 1 1.5 175 175
230V/60 131 3 1/0 AWG 1 1.5 175 175 138 3 1/0 AWG 1 1.5 175 175
380V/60 69 3 4 AWG 1 1 90 90 85 3 4 AWG 1 1 110 110
460V/60 58 3 6 AWG 1 0.75 80 80 67 3 4 AWG 1 1 90 90
400V/50 58 3 6 AWG 1 0.75 80 80 67 3 4 AWG 1 1 90 90
575V/60 51 3 6 AWG 1 0.75 70 70 60 3 6 AWG 1 0.75 80 80
055D
040D
045D
AGZ
050D
e
025D
030D
035D
Volts/
Pha s e
MCA
e
MCA
Table 30: Electrical Data - Mutli-point (50/60 Hz)
Circuit #1 Circuit #2
Field Wir e Field Hub. Fuse Siz
44 CAT 611
Field Wir e Fi el d Hub.
Fus e Siz
Page 45

Table 31: Electrical Data - Mutli-point (50/60 Hz) continued
Qt y Wi re GA Qt y Si ze Rec. Ma x. Qty Wir e GA Qt y Size Re c. Max.
208V/60 139 3 1/0 AWG 1 1.5 175 175 139 3 1/0 AWG 1 1.5 175 175
230V/60 138 3 1/0 AWG 1 1.5 175 175 138 3 1/0 AWG 1 1.5 175 175
380V/60 85 3 4 AWG 1 1 110 110 85 3 4 AWG 1 1 110 110
460V/60 67 3 4 AWG 1 1 90 90 67 3 4 AWG 1 1 90 90
400V/50 67 3 4 AWG 1 1 90 90 67 3 4 AWG 1 1 90 90
575V/60 60 3 6 AWG 1 0.75 80 80 60 3 6 AWG 1 0.75 80 80
208V/60 143 3 1/0 AWG 1 1.5 175 175 143 3 1/0 AWG 1 1.5 175 175
230V/60 142 3 1/0 AWG 1 1.5 175 175 142 3 1/0 AWG 1 1.5 175 175
380V/60 85 3 4 AWG 1 1 110 110 85 3 4 AWG 1 1 110 110
460V/60 68 3 4 AWG 1 1 90 90 68 3 4 AWG 1 1 90 90
400V/50 68 3 4 AWG 1 1 90 90 68 3 4 AWG 1 1 90 90
575V/60 60 3 6 AWG 1 0.75 80 80 60 3 6 AWG 1 0.75 80 80
208V/60 166 3 2/0 AWG 1 1.5 225 225 166 3 2/0 AWG 1 1.5 225 225
230V/60 165 3 2/0 AWG 1 1.5 225 225 165 3 2/0 AWG 1 1.5 225 225
380V/60 90 3 3 AWG 1 1 125 125 90 3 3 AWG 1 1 125 125
460V/60 76 3 4 AWG 1 1 100 100 76 3 4 AWG 1 1 100 100
400V/50 76 3 4 AWG 1 1 100 100 76 3 4 AWG 1 1 100 100
575V/60 62 3 6 AWG 1 0.75 80 80 62 3 6 AWG 1 0.75 80 80
208V/60 191 3 3/0 AWG 1 2 250 250 191 3 3/0 AWG 1 2 250 250
230V/60 191 3 3/0 AWG 1 2 250 250 191 3 3/0 AWG 1 2 250 250
380V/60 99 3 3 AWG 1 1 125 125 99 3 3 AWG 1 1 125 125
460V/60 86 3 3 AWG 1 1 110 110 86 3 3 AWG 1 1 110 110
400V/50 86 3 3 AWG 1 1 110 110 86 3 3 AWG 1 1 110 110
575V/60 66 3 4 AWG 1 1 90 90 66 3 4 AWG 1 1 90 90
208V/60 191 3 3/0 AWG 1 2 250 250 224 3 4/0 AWG 1 2 300 300
230V/60 191 3 3/0 AWG 1 2 250 250 224 3 4/0 AWG 1 2 300 300
380V/60 99 3 3 AWG 1 1 125 125 130 3 1 AWG 1 1.25 175 175
460V/60 86 3 3 AWG 1 1 110 110 111 3 2 AWG 1 1.25 150 150
400V/50 86 3 3 AWG 1 1 110 110 111 3 2 AWG 1 1.25 150 150
575V/60 66 3 4 AWG 1 1 90 90 82 3 4 AWG 1 1 110 110
208V/60 224 3 4/0 AWG 1 2 300 300 224 3 4/0 AWG 1 2 300 300
230V/60 224 3 4/0 AWG 1 2 300 300 224 3 4/0 AWG 1 2 300 300
380V/60 130 3 1 AWG 1 1.25 175 175 130 3 1 AWG 1 1.25 175 175
460V/60 111 3 2 AWG 1 1.25 150 150 111 3 2 AWG 1 1.25 150 150
400V/50 111 3 2 AWG 1 1.25 150 150 111 3 2 AWG 1 1.25 150 150
575V/60 82 3 4 AWG 1 1 110 110 82 3 4 AWG 1 1 110 110
208V/60 257 3 300 MCM 1 2.5 350 350 257 3 300 MCM 1 2. 5 350 350
230V/60 257 3 300 MCM 1 2.5 350 350 257 3 300 MCM 1 2. 5 350 350
380V/60 151 3 2/0 AWG 1 1.5 200 200 151 3 2/0 AWG 1 1.5 200 200
460V/60 122 3 1 AWG 1 1.25 175 175 122 3 1 AWG 1 1.25 175 175
400V/50 122 3 1 AWG 1 1.25 175 175 122 3 1 AWG 1 1.25 175 175
575V/60 97 3 3 AWG 1 1 125 125 97 3 3 AWG 1 1 125 125
AGZ
090D
100D
065D
070D
075D
080D
MCA
MCA
060D
Volts/
Pha s e
Circuit #1
Field Wire Field Hub. Fuse Size
CAT 611 45
Field Wire Field Hub. Fuse Size
Electrical Data
Cir cuit #2
Page 46

Electrical Data
Qt y Wi re GA Qt y Siz e Re c. M ax. Qty Wir e GA Qt y Siz e Re c. Max.
208V/60 274 3 300 MCM 1 2.5 300 300 274 3 300 MCM 1 2. 5 300 300
230V/60 274 3 300 MCM 1 2.5 300 300 274 3 300 MCM 1 2. 5 300 300
380V/60 141 3 1/0 AWG 1 1.5 175 175 141 3 1/0 AWG 1 1.5 175 175
460V/60 114 3 2 AWG 1 1.25 125 125 114 3 2 AWG 1 1.25 125 125
400V/50 114 3 2 AWG 1 1.25 125 125 114 3 2 AWG 1 1.25 125 125
575V/60 94 3 3 AWG 1 1 110 110 94 3 3 AWG 1 1 110 110
208V/60 312 3 400 MCM 1 2.5 350 350 321 3 400 MCM 1 2. 5 400 400
230V/60 312 3 400 MCM 1 2.5 350 350 321 3 400 MCM 1 2. 5 400 400
380V/60 141 3 1/0 AWG 1 1.5 175 175 186 3 3/0 AWG 1 2 225 225
460V/60 114 3 2 AWG 1 1.25 125 125 159 3 2/0 AWG 1 1.5 200 200
400V/50 114 3 2 AWG 1 1.25 125 125 159 3 2/0 AWG 1 1.5 200 200
575V/60 94 3 3 AWG 1 1 110 110 117 3 1 AWG 1 1.25 125 125
208V/60 321 3 400 MCM 1 2.5 400 400 321 3 400 MCM 1 2. 5 400 400
230V/60 321 3 400 MCM 1 2.5 400 400 321 3 400 MCM 1 2. 5 400 400
380V/60 186 3 3/0 AWG 1 2 225 225 186 3 3/0 AWG 1 2 225 225
460V/60 159 3 2/0 AWG 1 1.5 200 200 159 3 2/0 AWG 1 1.5 200 200
400V/50 159 3 2/0 AWG 1 1.5 200 200 159 3 2/0 AWG 1 1.5 200 200
575V/60 117 3 1 AWG 1 1.25 125 125 117 3 1 AWG 1 1.25 125 125
208V/60 329 3 400 MCM 1 2.5 400 400 329 3 400 MCM 1 2. 5 400 400
230V/60 329 3 400 MCM 1 2.5 400 400 329 3 400 MCM 1 2. 5 400 400
380V/60 190 3 3/0 AWG 1 2 225 225 190 3 3/0 AWG 1 2 225 225
460V/60 163 3 2/0 AWG 1 1.5 200 200 163 3 2/0 AWG 1 1.5 200 200
400V/50 163 3 2/0 AWG 1 1.5 200 200 163 3 2/0 AWG 1 1.5 200 200
575V/60 120 3 1 AWG 1 1.25 150 150 120 3 1 AWG 1 1.25 150 150
208V/60 329 3 400 MCM 1 2.5 400 400 415 6 4/0 AWG 2 2 500 500
230V/60 329 3 400 MCM 1 2.5 400 400 415 6 4/0 AWG 2 2 500 500
380V/60 190 3 3/0 AWG 1 2 225 225 246 3 250 MCM 1 2 300 300
460V/60 163 3 2/0 AWG 1 1.5 200 200 196 3 3/0 AWG 1 2 225 225
400V/50 163 3 2/0 AWG 1 1.5 200 200 196 3 3/0 AWG 1 2 225 225
575V/60 120 3 1 AWG 1 1.25 150 150 160 3 2/0 AWG 1 1.5 200 200
208V/60 454 6 4/0 AWG 2 2 500 500 454 6 4/0 AWG 2 2 500 500
230V/60 415 6 4/0 AWG 2 2 500 500 415 6 4/0 AWG 2 2 500 500
380V/60 246 3 250 MCM 1 2 300 300 246 3 250 MCM 1 2 300 300
460V/60 204 3 4/0 AWG 1 2 250 250 204 3 4/0 AWG 1 2 250 250
400V/50 204 3 4/0 AWG 1 2 250 250 204 3 4/0 AWG 1 2 250 250
575V/60 160 3 2/0 AWG 1 1.5 200 200 160 3 2/0 AWG 1 1.5 200 200
208V/60 462 6 250 MCM 2 2 500 500 462 6 250 MCM 2 2 500 500
230V/60 423 6 4/0 AWG 2 2 500 500 423 6 4/0 AWG 2 2 500 500
380V/60 250 3 250 MCM 1 2 300 300 250 3 250 MCM 1 2 300 300
460V/60 208 3 4/0 AWG 1 2 250 250 208 3 4/0 AWG 1 2 250 250
400V/50 208 3 4/0 AWG 1 2 250 250 208 3 4/0 AWG 1 2 250 250
575V/60 163 3 2/0 AWG 1 1.5 200 200 163 3 2/0 AWG 1 1.5 200 200
160D
180D
190D
AGZ
110D
125D
130D
140D
MCA
MCA
Volts/
Pha se
Table 32: Electrical Data - Mutli-point (50/60 Hz) continued
Cir cuit #1
Field Wir e Fi eld Hub. Fu se Size
46 CAT 611
Field Wir e Fi el d Hub. Fus e Size
Cir cuit #2
Page 47

Table 33: Wiring Data - Single Point (50/60 Hz) Standard and HSCCR Panels
Size Lug Range Size Lug Range
208V/60 380A (1) 500 - #4 250A* (1) 4/0 - #4
230V/60 380A (1) 500 - #4 250A* (1) 4/0 - #4
380V/60 380A (1) 500 - #4 100A* (1) 1/0 - #14
460V/60 380A (1) 500 - #4 100A* (1) 1/0 - #14
400V/50 380A (1) 500 - #4 100A* (1) 1/0 - #14
575V/60 380A (1) 500 - #4 100A* (1) 1/0 - #14
208V/60 380A (1) 500 - #4 250A* (1) 4/0 - #4
230V/60 380A (1) 500 - #4 250A* (1) 4/0 - #4
380V/60 380A (1) 500 - #4 150A* (1) 1/0 - #14
460V/60 380A (1) 500 - #4 100A* (1) 1/0 - #14
400V/50 380A (1) 500 - #4 100A* (1) 1/0 - #14
575V/60 380A (1) 500 - #4 100A* (1) 1/0 - #14
208V/60 380A (1) 500 - #4 250A* (1) 4/0 - #4
230V/60 380A (1) 500 - #4 250A* (1) 4/0 - #4
380V/60 380A (1) 500 - #4 150A* (1) 1/0 - #14
460V/60 380A (1) 500 - #4 100A* (1) 1/0 - #14
400V/50 380A (1) 500 - #4 100A* (1) 1/0 - #14
575V/60 380A (1) 500 - #4 100A* (1) 1/0 - #14
208V/60 380A (1) 500 - #4 250A* (1) 4/0 - #4
230V/60 380A (1) 500 - #4 250A* (1) 4/0 - #4
380V/60 380A (1) 500 - #4 150A* (1) 1/0 - #14
460V/60 380A (1) 500 - #4 100A* (1) 1/0 - #14
400V/50 380A (1) 500 - #4 100A* (1) 1/0 - #14
575V/60 380A (1) 500 - #4 100A* (1) 1/0 - #14
208V/60 380A (1) 500 - #4 250A* (1) 4/0 - #4
230V/60 380A (1) 500 - #4 250A* (1) 4/0 - #4
380V/60 380A (1) 500 - #4 150A* (1) 1/0 - #14
460V/60 380A (1) 500 - #4 100A* (1) 1/0 - #14
400V/50 380A (1) 500 - #4 100A* (1) 1/0 - #14
575V/60 380A (1) 500 - #4 400A (1) 600 - #1
208V/60 380A (1) 500 - #4 400A (1) 600 - #1
230V/60 380A (1) 500 - #4 150A* (1) 1/0 - #14
380V/60 380A (1) 500 - #4 150A* (1) 1/0 - #14
460V/60 380A (1) 500 - #4 150A* (1) 1/0 - #14
400V/50 380A (1) 500 - #4 150A* (1) 1/0 - #14
208V/60 380A (1) 500 - #4 400A (1) 600 - #1
230V/60 380A (1) 500 - #4 400A (1) 600 - #1
380V/60 380A (1) 500 - #4 250A* (1) 4/0 - #4
460V/60 380A (1) 500 - #4 150A* (1) 1/0 - #14
400V/50 380A (1) 500 - #4 150A* (1) 1/0 - #14
575V/60 380A (1) 500 - #4 150A* (1) 1/0 - #14
Notes: * On HSCCR unit: 400A & (1) 600-#4
** On HSCCR unit: (2) 350 - #2/0
Volts/Phase
*
025D
Model
030D
035D
040D
045D
050D
055D
Power Block Disconnect
Electrical Data
CAT 611 47
Page 48

Electrical Data
Size Lug Range Size Lug Range
208V/60 380A (1) 500 - #4 400A (1) 600 - #1
230V/60 380A (1) 500 - #4 400A (1) 600 - #1
380V/60 380A (1) 500 - #4 250A* (1) 4/0 - #4
460V/60 380A (1) 500 - #4 150A* (1) 1/0 - #14
400V/50 380A (1) 500 - #4 150A* (1) 1/0 - #14
575V/60 380A (1) 500 - #4 150A* (1) 1/0 - #14
208V/60 380A (1) 500 - #4 400A (1) 600 - #1
230V/60 380A (1) 500 - #4 400A (1) 600 - #1
380V/60 380A (1) 500 - #4 250A* (1) 4/0 - #4
460V/60 380A (1) 500 - #4 150A* (1) 1/0 - #14
400V/50 380A (1) 500 - #4 150A* (1) 1/0 - #14
575V/60 380A (1) 500 - #4 150A* (1) 1/0 - #14
208V/60 380A (1) 500 - #4 400A (1) 600 - #1
230V/60 380A (1) 500 - #4 400A (1) 600 - #1
380V/60 380A (1) 500 - #4 250A* (1) 4/0 - #4
460V/60 380A (1) 500 - #4 250A* (1) 4/0 - #4
400V/50 380A (1) 500 - #4 250A* (1) 4/0 - #4
575V/60 380A (1) 500 - #4 150A* (1) 1/0 - #14
208V/60 760A (2) 500 - #4 400A (2) 250 - #1 **
230V/60 760A (2) 500 - #4 400A (2) 250 - #1 **
380V/60 380A (1) 500 - #4 250A* (1) 4/0 - #4
460V/60 380A (1) 500 - #4 250A* (1) 4/0 - #4
400V/50 380A (1) 500 - #4 250A* (1) 4/0 - #4
575V/60 380A (1) 500 - #4 150A* (1) 1/0 - #14
208V/60 760A (2) 500 - #4 600A (2) 350 - 2/0
230V/60 760A (2) 500 - #4 600A (2) 350 - 2/0
380V/60 380A (1) 500 - #4 250A* (1) 4/0 - #4
460V/60 380A (1) 500 - #4 250A* (1) 4/0 - #4
400V/50 380A (1) 500 - #4 250A* (1) 4/0 - #4
575V/60 380A (1) 500 - #4 250A* (1) 4/0 - #4
208V/60 760A (2) 500 - #4 600A (2) 350 - 2/0
230V/60 760A (2) 500 - #4 600A (2) 350 - 2/0
380V/60 380A (1) 500 - #4 400A (1) 600 - #1
460V/60 380A (1) 500 - #4 250A* (1) 4/0 - #4
400V/50 380A (1) 500 - #4 250A* (1) 4/0 - #4
575V/60 380A (1) 500 - #4 250A* (1) 4/0 - #4
208V/60 760A (2) 500 - #4 600A (2) 350 - 2/0
230V/60 760A (2) 500 - #4 600A (2) 350 - 2/0
380V/60 380A (1) 500 - #4 400A (1) 600 - #1
460V/60 380A (1) 500 - #4 250A* (1) 4/0 - #4
400V/50 380A (1) 500 - #4 250A* (1) 4/0 - #4
575V/60 380A (1) 500 - #4 250A* (1) 4/0 - #4
Notes : * On HSCCR unit: 400A & (1) 600-#4
** On HSCCR unit: (2) 350 - #2/0
*
070D
060D
065D
090D
100D
Volts/Phase
080D
Model
075D
Table 34: Wiring Data - Single Point (50/60 Hz) continued
Pow er Block Dis connect
48 CAT 611
Page 49

Table 35: Wiring Data - Single Point (50/60 Hz) continued
Size Lug Range Size Lug Range
208V/60 760A (2) 500 - #4 600A (2) 350 - 2/0
230V/60 760A (2) 500 - #4 600A (2) 350 - 2/0
380V/60 380A (1) 500 - #4 400A (1) 600 - #1
460V/60 380A (1) 500 - #4 250A* (1) 4/0 - #4
400V/50 380A (1) 500 - #4 250A* (1) 4/0 - #4
575V/60 380A (1) 500 - #4 250A* (1) 4/0 - #4
208V/60 760A (2) 500 - #4 800A (4) 500 - 3/0
230V/60 760A (2) 500 - #4 800A (4) 500 - 3/0
380V/60 380A (1) 500 - #4 400A (1) 600 - #1
460V/60 380A (1) 500 - #4 400A (1) 600 - #1
400V/50 380A (1) 500 - #4 400A (1) 600 - #1
575V/60 380A (1) 500 - #4 250A* (1) 4/0 - #4
208V/60 760A (2) 500 - #4 800A (4) 500 - 3/0
230V/60 760A (2) 500 - #4 800A (4) 500 - 3/0
380V/60 380A (1) 500 - #4 400A (1) 600 - #1
460V/60 380A (1) 500 - #4 400A (1) 600 - #1
400V/50 380A (1) 500 - #4 400A (1) 600 - #1
575V/60 380A (1) 500 - #4 250A* (1) 4/0 - #4
208V/60 760A (2) 500 - #4 800A (4) 500 - 3/0
230V/60 760A (2) 500 - #4 800A (4) 500 - 3/0
380V/60 380A (1) 500 - #4 600A (2) 350 - 2/0
460V/60 380A (1) 500 - #4 400A (1) 600 - #1
400V/50 380A (1) 500 - #4 400A (1) 600 - #1
575V/60 380A (1) 500 - #4 400A (1) 600 - #1
208V/60 1000A (4) 600 - #2 800A (4) 500 - 3/0
230V/60 1000A (4) 600 - #2 800A (4) 500 - 3/0
380V/60 760A (2) 500 - #4 600A (2) 350 - 2/0
460V/60 760A (2) 500 - #4 400A (1) 600 - #1
400V/50 760A (2) 500 - #4 400A (1) 600 - #1
575V/60 380A (1) 500 - #4 400A (1) 600 - #1
208V/60 1000A (4) 600 - #2 1000A (4) 500 - 3/0
230V/60 1000A (4) 600 - #2 1000A (4) 500 - 3/0
380V/60 760A (2) 500 - #4 600A (2) 350 - 2/0
460V/60 760A (2) 500 - #4 600A (2) 350 - 2/0
400V/50 760A (2) 500 - #4 600A (2) 350 - 2/0
575V/60 380A (1) 500 - #4 400A (1) 600 - #1
208V/60 1000A (4) 600 - #2 1000A (4) 500 - 3/0
230V/60 1000A (4) 600 - #2 1000A (4) 500 - 3/0
380V/60 760A (2) 500 - #4 600A (2) 350 - 2/0
460V/60 760A (2) 500 - #4 600A (2) 350 - 2/0
400V/50 760A (2) 500 - #4 600A (2) 350 - 2/0
575V/60 380A (1) 500 - #4 400A (1) 600 - #1
Notes: * On HSCCR unit: 400A & (1) 600-#4
** On HSCCR unit: (2) 350 - #2/0
180D
160D
Volts/Phase
190D
Model
110D
125D
130D
140D
Power Block Disconnect*
Electrical Data
CAT 611 49
Page 50

Electrical Data
Size Lug Range Size Lug Range Size Lug Range Size Lug Range
208V/60 175A (1) 2/0 - #14 100A [1] (1) 1/0 - #14 175A (1) 2/0 - #14 100A [1] (1) 1/0 - #14
230V/60 175A (1) 2/0 - #14 100A [1] (1) 1/0 - #14 175A (1) 2/0 - #14 100A [1] (1) 1/0 - #14
380V/60 175A (1) 2/0 - #14 100A [1] (1) 1/0 - #14 175A (1) 2/0 - #14 100A [1] (1) 1/0 - #14
460V/60 175A (1) 2/0 - #14 100A [1] (1) 1/0 - #14 175A (1) 2/0 - #14 100A [1] (1) 1/0 - #14
400V/50 175A (1) 2/0 - #14 100A [1] (1) 1/0 - #14 175A (1) 2/0 - #14 100A [1] (1) 1/0 - #14
575V/60 175A (1) 2/0 - #14 100A [1] (1) 1/0 - #14 175A (1) 2/0 - #14 100A [1] (1) 1/0 - #14
208V/60 175A (1) 2/0 - #14 150A (1) 1/0 - #14 175A (1) 2/0 - #14 150A (1) 1/0 - #14
230V/60 175A (1) 2/0 - #14 150A (1) 1/0 - #14 175A (1) 2/0 - #14 150A (1) 1/0 - #14
380V/60 175A (1) 2/0 - #14 100A [1] (1) 1/0 - #14 175A (1) 2/0 - #14 100A [1] (1) 1/0 - #14
460V/60 175A (1) 2/0 - #14 100A [1] (1) 1/0 - #14 175A (1) 2/0 - #14 100A [1] (1) 1/0 - #14
400V/50 175A (1) 2/0 - #14 100A [1] (1) 1/0 - #14 175A (1) 2/0 - #14 100A [1] (1) 1/0 - #14
575V/60 175A (1) 2/0 - #14 100A [1] (1) 1/0 - #14 175A (1) 2/0 - #14 100A [1] (1) 1/0 - #14
Circuit #2
Power Block Disconnect SwitchDisconnect SwitchPow er Block
Circuit #1
025D
Model
045D
055D
050D
Volts/
Phase
030D
035D
040D
Table 36: Wiring Data - Multi-point (50/60 Hz)
50 CAT 611
Page 51

Table 37: Wiring Data - Multi-point (50/60 Hz) continued
Size Lug Range Size Lug Range Size Lug Range Size Lug Range
208V/60 175A (1) 2/0 - #14 150A (1) 1/0 - #14 175A (1) 2/0 - #14 150A (1) 1/0 - #14
230V/60 175A (1) 2/0 - #14 150A (1) 1/0 - #14 175A (1) 2/0 - #14 150A (1) 1/0 - #14
380V/60 175A (1) 2/0 - #14 100A [1] (1) 1/0 - #14 175A (1) 2/0 - #14 100A [1] (1) 1/0 - #14
460V/60 175A (1) 2/0 - #14 100A [1] (1) 1/0 - #14 175A (1) 2/0 - #14 100A [1] (1) 1/0 - #14
400V/50 175A (1) 2/0 - #14 100A [1] (1) 1/0 - #14 175A (1) 2/0 - #14 100A [1] (1) 1/0 - #14
575V/60 175A (1) 2/0 - #14 100A [1] (1) 1/0 - #14 175A (1) 2/0 - #14 100A [1] (1) 1/0 - #14
208V/60 175A (1) 2/0 - #14 250A (1) 4/0 - #4 175A (1) 2/0 - #14 250A (1) 4/0 - #4
230V/60 175A (1) 2/0 - #14 250A (1) 4/0 - #4 175A (1) 2/0 - #14 250A (1) 4/0 - #4
380V/60 175A (1) 2/0 - #14 100A [1] (1) 1/0 - #14 175A (1) 2/0 - #14 100A [1] (1) 1/0 - #14
460V/60 175A (1) 2/0 - #14 100A [1] (1) 1/0 - #14 175A (1) 2/0 - #14 100A [1] (1) 1/0 - #14
400V/50 175A (1) 2/0 - #14 100A [1] (1) 1/0 - #14 175A (1) 2/0 - #14 100A [1] (1) 1/0 - #14
575V/60 175A (1) 2/0 - #14 100A [1] (1) 1/0 - #14 175A (1) 2/0 - #14 100A [1] (1) 1/0 - #14
208V/60 380A (1) 500 - #4 250A (1) 4/0 - #4 380A (1) 500 - #4 250A (1) 4/0 - #4
230V/60 380A (1) 500 - #4 250A (1) 4/0 - #4 380A (1) 500 - #4 250A (1) 4/0 - #4
380V/60 175A (1) 2/0 - #14 150A (1) 1/0 - #14 175A (1) 2/0 - #14 150A (1) 1/0 - #14
460V/60 175A (1) 2/0 - #14 100A [1] (1) 1/0 - #14 175A (1) 2/0 - #14 150A (1) 1/0 - #14
400V/50 175A (1) 2/0 - #14 100A [1] (1) 1/0 - #14 175A (1) 2/0 - #14 150A (1) 1/0 - #14
575V/60 175A (1) 2/0 - #14 100A [1] (1) 1/0 - #14 175A (1) 2/0 - #14 100A [1] (1) 1/0 - #14
208V/60 380A (1) 500 - #4 250A (1) 4/0 - #4 380A (1) 500 - #4 250A (1) 4/0 - #4
230V/60 380A (1) 500 - #4 250A (1) 4/0 - #4 380A (1) 500 - #4 250A (1) 4/0 - #4
380V/60 175A (1) 2/0 - #14 150A (1) 1/0 - #14 175A (1) 2/0 - #14 150A (1) 1/0 - #14
460V/60 175A (1) 2/0 - #14 150A (1) 1/0 - #14 175A (1) 2/0 - #14 150A (1) 1/0 - #14
400V/50 175A (1) 2/0 - #14 150A (1) 1/0 - #14 175A (1) 2/0 - #14 150A (1) 1/0 - #14
575V/60 175A (1) 2/0 - #14 100A [1] (1) 1/0 - #14 175A (1) 2/0 - #14 100A [1] (1) 1/0 - #14
208V/60 380A (1) 500 - #4 400A (1) 600 - #1 380A (1) 500 - #4 400A (1) 600 - #1
230V/60 380A (1) 500 - #4 400A (1) 600 - #1 380A (1) 500 - #4 400A (1) 600 - #1
380V/60 175A (1) 2/0 - #14 250A (1) 4/0 - #4 175A (1) 2/0 - #14 250A (1) 4/0 - #4
460V/60 175A (1) 2/0 - #14 150A (1) 1/0 - #14 175A (1) 2/0 - #14 150A (1) 1/0 - #14
400V/50 175A (1) 2/0 - #14 150A (1) 1/0 - #14 175A (1) 2/0 - #14 150A (1) 1/0 - #14
575V/60 175A (1) 2/0 - #14 100A [1] (1) 1/0 - #14 175A (1) 2/0 - #14 100A [1] (1) 1/0 - #14
Pow er Block
Circuit #1 Circuit #2
Disconnect Switch Disconnect Switch
100D
090D
080D
075D
070D
065D
Volts/
Phase
Pow er Block
060D
Model
Electrical Data
CAT 611 51
Page 52

Electrical Data
Size Lug Range Size Lug Range Size Lug Range Size Lug Range
208V/60 380A (1) 500 - #4 400A (1) 600 - #1 380A (1) 500 - #4 400A (1) 600 - #1
230V/60 380A (1) 500 - #4 400A (1) 600 - #1 380A (1) 500 - #4 400A (1) 600 - #1
380V/60 175A (1) 2/0 - #14 250A (1) 4/0 - #4 175A (1) 2/0 - #14 250A (1) 4/0 - #4
460V/60 175A (1) 2/0 - #14 150A (1) 1/0 - #14 175A (1) 2/0 - #14 150A (1) 1/0 - #14
400V/50 175A (1) 2/0 - #14 150A (1) 1/0 - #14 175A (1) 2/0 - #14 150A (1) 1/0 - #14
575V/60 175A (1) 2/0 - #14 150A (1) 1/0 - #14 175A (1) 2/0 - #14 150A (1) 1/0 - #14
208V/60 380A (1) 500 - #4 400A (1) 600 - #1 380A (1) 500 - #4 400A (1) 600 - #1
230V/60 380A (1) 500 - #4 400A (1) 600 - #1 380A (1) 500 - #4 400A (1) 600 - #1
380V/60 175A (1) 2/0 - #14 250A (1) 4/0 - #4 380A (1) 500 - #4 250A (1) 4/0 - #4
460V/60 175A (1) 2/0 - #14 150A (1) 1/0 - #14 175A (1) 2/0 - #14 250A (1) 4/0 - #4
400V/50 175A (1) 2/0 - #14 150A (1) 1/0 - #14 175A (1) 2/0 - #14 250A (1) 4/0 - #4
575V/60 175A (1) 2/0 - #14 150A (1) 1/0 - #14 175A (1) 2/0 - #14 150A (1) 1/0 - #14
208V/60 380A (1) 500 - #4 400A (1) 600 - #1 380A (1) 500 - #4 400A (1) 600 - #1
230V/60 380A (1) 500 - #4 400A (1) 600 - #1 380A (1) 500 - #4 400A (1) 600 - #1
380V/60 380A (1) 500 - #4 250A (1) 4/0 - #4 380A (1) 500 - #4 250A (1) 4/0 - #4
460V/60 175A (1) 2/0 - #14 250A (1) 4/0 - #4 175A (1) 2/0 - #14 250A (1) 4/0 - #4
400V/50 175A (1) 2/0 - #14 250A (1) 4/0 - #4 175A (1) 2/0 - #14 250A (1) 4/0 - #4
575V/60 175A (1) 2/0 - #14 150A (1) 1/0 - #14 175A (1) 2/0 - #14 150A (1) 1/0 - #14
208V/60 380A (1) 500 - #4 400A (1) 600 - #1 760A (2) 500 - #4 600A (2) 350 - 2/0
230V/60 380A (1) 500 - #4 400A (1) 600 - #1 760A (2) 500 - #4 600A (2) 350 - 2/0
380V/60 380A (1) 500 - #4 250A (1) 4/0 - #4 380A (1) 500 - #4 400A (1) 600 - #1
460V/60 175A (1) 2/0 - #14 250A (1) 4/0 - #4 380A (1) 500 - #4 250A (1) 4/0 - #4
400V/50 175A (1) 2/0 - #14 250A (1) 4/0 - #4 380A (1) 500 - #4 250A (1) 4/0 - #4
575V/60 175A (1) 2/0 - #14 150A (1) 1/0 - #14 175A (1) 2/0 - #14 250A (1) 4/0 - #4
208V/60 760A (2) 500 - #4 600A (2) 350 - 2/0 760A (2) 500 - #4 600A (2) 350 - 2/0
230V/60 760A (2) 500 - #4 600A (2) 350 - 2/0 760A (2) 500 - #4 600A (2) 350 - 2/0
380V/60 380A (1) 500 - #4 400A (1) 600 - #1 380A (1) 500 - #4 400A (1) 600 - #1
460V/60 380A (1) 500 - #4 250A (1) 4/0 - #4 380A (1) 500 - #4 250A (1) 4/0 - #4
400V/50 380A (1) 500 - #4 250A (1) 4/0 - #4 380A (1) 500 - #4 250A (1) 4/0 - #4
575V/60 175A (1) 2/0 - #14 250A (1) 4/0 - #4 175A (1) 2/0 - #14 250A (1) 4/0 - #4
140D
160D
180D
190D
Volts/
Phase
Circuit #1 Circuit #2
Pow er Block Dis connect Sw itch Pow er Block Dis connect Swit chModel
130D
125D
110D
Table 38: Wiring Data - Multi-point (50/60 Hz) continued
52 CAT 611
Page 53

Start-up and Shut-down Procedures
Start-up and Shut-down Procedures
Pre Start-up
Inspected the chiller to ensure no components became loose or
damaged during shipping or installation including leak test and
wiring check.
Pre-Startup Water Piping Checkout
1 Check the pump operation and vent all air from the
system.
2 Circulate evaporator water, checking for proper system
pressure and evaporator pressure drop. Compare the
pressure drop to the evaporator water pressure drop
curve.
3 Flush System and clean all water strainers before placing
the chiller into service.
4 Check water treatment and proper glycol percent.
Pre-Startup Refrigerant Piping Checkout
1 Check all exposed brazed joints for evidence of leaks.
Joints may have been damaged during shipping or when
the unit was installed.
2 Check that all refrigerant valves are either opened or
closed as required for proper operation of the chiller.
3 A thorough leak test must be done using an approved
electronic leak detector. Check all valve stem packing for
leaks. Replace all refrigerant valve caps and tighten.
4 Check all refrigerant lines to insure that they will not
vibrate against each other or against other chiller
components and are properly supported.
5 Check all connections and all refrigerant threaded
connectors.
6 Look for any signs of refrigerant leaks around the
condenser coils and for damage during shipping or
installation.
7 Connect refrigerant service gauges to each refrigerant
circuit before starting unit.
Pre-Startup Electrical Check Out
WARNING
Electrical power must be applied to the compressor crankcase
heaters 8 hours before starting unit to eliminate refrigerant
from the oil.
1 Open all electrical disconnects and check all power
wiring connections. Start at the power block and check
all connections through all components to and including
the compressor terminals. These should be checked
again after 3 months of operation and at least yearly
thereafter.
2 Check all control wiring by pulling on the wire at the
spade connections and tighten all screw connections.
Check plug-in relays for proper seating and to insure
retaining clips are installed.
3 Put System Switch (S1) to the Emergency Stop position.
4 Put both circuit #1 & #2 switches to the Pumpdown and
Stop position.
5 Apply power to the unit. The panel Alarm Light will stay
on until S1 is closed. Ignore the Alarm Light for the
check out period. If you have the optional Alarm Bell,
you may wish to disconnect it.
6 Check at the power block or disconnect for the proper
voltage and proper voltage between phases. Check
power for proper phasing using a phase sequence meter
before starting unit.
7 Check for 120 Vac at the optional control transformer
and at TB-2 terminal #1 and the neutral block (NB).
8 Check between TB-2 terminal #7 and NB for 120 Vac
supply for transformer #2.
9 Check between TB-2 terminal #2 and NB for 120 Vac
control voltage. This supplies the compressor crank case
heaters.
10 Check between TB-3 terminal #17 and #27 for 24 Vac
control voltage.
Start-Up
Refer to the MicroTech III Controller information in the
operating manual OMM 1078 to become familiar with unit
operation before starting the chiller.
There should be adequate building load (at least 50 percent of
the unit full load capacity) to properly check the operation of
the chiller refrigerant circuits.
Be prepared to record all operating parameters required by the
"Compressorized Equipment Warranty Form". Return this
information within 10 working days to McQuay International
as instructed on the form to obtain full warranty benefits.
Start-Up Steps
• Verify chilled water flow.
• Verify remote start / stop or time clock (if installed) has
requested the chiller to start.
• Set the chilled water setpoint to the required temperature.
(The system water temperature must be greater than the total
of the leaving water temperature setpoint plus one-half the
control band plus the start-up delta-T before the MicroTech
III controller will stage on cooling.)
• Set the Evap Delta T based on a percent of unit nominal flow
indicated in Table 12 and the Start Delta T as a starting
point. Delta-T=Tons x 24 / gpm
• Check the controller setpoints to be sure that factory defaults
are appropriate.
• Put both pumpdown switches (PS1 and PS2) to the ON
position.
• Put system switch (S1) to ON position
IM 1100 53
Page 54

Start-up and Shut-down Procedures
Table 39: Pumpdown and System Switch Positions
Switch
PS1, PS2,
Pumpdown
Switches
S1, System
Switch
Circuits will
operate in the
automatic mode
Unit will operate
in the normal
automatic mode
Switch Position
ON OFF
Circuit will go
through the normal
normal,
pumpdown cycle
and shut off.
Unit will shut off
immediately without
pumping down
(emergency stop)
Post Start-up
After the chiller has been operating for a period of time and
has become stable, check the following:
• Compressor oil level. (Some scroll compressors do not have
oil sight glasses.)
• Refrigerant sight glass for flashing
• Rotation of condenser fans
• Complete the "Compressorized Equipment Warranty Form"
Shutdown
when putting the unit back into service. The evaporator
heater will be able to function.
8 If electrical power is off, make provisions to power the
evaporator heater (if chilled water system is not drained
or is filled with suitable glycol). Tag all opened electrical
disconnect switches to warn against start-up before the
refrigerant valves are in the correct operating position.
To start the chiller after an extended shutdown, follow
the prestart-up and start-up instructions.
Temporary Shutdown
1 Put both circuit switches to the OFF position
(Pumpdown and Stop).
2 After compressors have stopped, put System Switch (S1)
to OFF (emergency stop).
3 Turn off chilled water pump. Chilled water pump to
operate while compressors are pumping down.
4 To start the chiller after a temporary shutdown, follow
the start-up instructions.
Extended Shutdown
1 Front seat both condenser liquid line service valves.
2 Put both circuit switches to the OFF position
(Pumpdown and Stop position).
3 After the compressors have stopped, put System Switch
(S1) to the OFF position (emergency stop).
4 Front seat both refrigerant circuit discharge valves (if
applicable).
5 If chilled water system is not drained, maintain power to
the evaporator heater to prevent freezing. Maintain heat
tracing on the chilled water lines.
6 Drain evaporator and water piping to prevent freezing.
7 If electrical power to the unit is on, the compressor
crankcase heaters will keep the liquid refrigerant out of
the compressor oil. This will minimize start-up time
54 IM 1100
Page 55

Component Operation
Component Operation
Component Operation
Hot Gas Bypass (Optional)
This option allows the system to operate at lower loads without
excessive on/off compressor cycling. The hot gas bypass
option is required to be on both refrigerant circuits because of
the lead / lag feature of the controller.
This option allows passage of discharge gas into the
evaporator inlet (between the TX valve and the evaporator)
which generates a false load to supplement the actual chilled
water or air handler load.
Note: The hot gas bypass valve will not generate a 100% false
load.
The pressure regulating valve is factory set to begin opening at
102 psig with R-410a and can be changed by changing the
pressure setting. The adjustment range is 75 to 150 psig. To
raise the pressure setting, remove the cap on the bulb and turn
the adjustment screw clockwise. To lower the setting, turn the
screw counterclockwise. Do not force the adjustment beyond
the range it is designed for, as this will damage the adjustment
assembly. The regulating valve opening point can be
determined by slowly reducing the system load while
observing the suction pressure. When the bypass valve starts to
open, the refrigerant line on the evaporator side of the valve
will begin to feel warm to the touch.
A solenoid valve is located ahead of the bypass valve and is
controlled by the MicroTech III controller. It is active when the
first stage of cooling on a circuit is active.
WARNING
The hot gas line may become hot enough to cause injury. Be
careful during valve checkout.
VFD Low Ambient Control (Optional)
The optional VFD fan control is used for unit operation below
35 F (2 C) down to a minimum of -10 F (-23.3 C). The control
looks at the saturated discharge temperature and varies
(pressure) at the "target" temperature. This temperature is
established as an input to a setpoint screen labeled "Sat
Condenser Temp Target".
Filter-Driers
Each refrigerant circuit is furnished with a replaceable core
type filter-drier. The core assembly of the replaceable core
drier consists of a filter core held tightly in the shell in a
manner that allows full flow without bypass. Pressure drop
across the filter drier must not exceed the following values.
PERCENT CIRCUIT
LOADING (%)
100% 10 (69)
75% 8 (55.2)
50% 5 (34.5)
25% 4 (27.6)
DROP ACROSS (KPA)
A condenser liquid line service valve is provided for isolating
the charge in the condenser, but also serves as the point from
which the liquid line can be pumped out. With the line free of
refrigerant, the filter-drier core(s) can be easily replaced.
System Adjustment
To maintain peak performance at full load operation, the
system superheat and liquid subcooling may require
adjustment. Read the following subsections closely to
determine if adjustment is required.
Liquid Line Sight Glass
The color of the moisture indicator is an indication of the
dryness of the system and is extremely important when the
system has been serviced. Immediately after the system has
been opened for service, the element may indicate a wet
condition. It is recommended that the equipment operate for
approximately 12 hours to allow the system to reach
equilibrium before deciding if the system requires a change of
drier cores.
Bubbles in the sight glass at constant full load indicates a
shortage of refrigerant, a plugged filter-drier, or a restriction in
the liquid line. However, it is not unusual to see bubbles in the
sight glass during changing load conditions.
Expansion Valve
The expansion valve's function is to keep the evaporator
supplied with the proper amount of refrigerant to satisfy the
load conditions.
Before adjusting superheat, check that unit charge is correct
and liquid line sight glass is full with no bubbles and that the
circuit is operating under stable, full load conditions.
The suction superheat for the suction leaving the evaporator is
set at the factory for 10 to 12 degrees F at full load. To have
full rated unit performance, the superheat must be about 8
degrees F at 95°F outdoor ambient temperature.
Crankcase Heaters
The scroll compressors are equipped with externally mounted
band heaters located at the oil sump level. The function of the
heater is to keep the temperature in the crankcase high enough
to prevent refrigerant from migrating to the crankcase and
condensing in the oil during off-cycle.
Power must be supplied to the heaters 8 hours before starting
the compressors.
Evaporator
On models AGZ-025D through 130D, the evaporator is a
compact, high efficiency, dual circuit, brazed plate-to-plate
type heat exchanger consisting of parallel stainless steel plates.
The evaporator is protected with an electric resistance heater
and insulated with 3/4" (19mm) thick closed-cell polyurethane
insulation. This combination provides freeze protection down
to -20°F (-29°C) ambient air temperature. The water side
IM 1100 55
Page 56

Component Operation
working pressure of the brazed plate type of evaporator is 653
psig (4502 kPa). Evaporators are designed and constructed
according to, and listed by, Underwriters Laboratories (UL).
On models AGZ-140D through -190D, the evaporator is a
direct-expansion, shell-and-U-tube type with water flowing in
the baffled shell side, and refrigerant flowing through the
tubes. The evaporator has an insertion heater and is insulated
with 3/4" (19 mm) thick vinyl nitrate polymer sheet insulation,
protecting against water freeze-up at ambient air temperatures
to -20° F ( 29° C). An water thermostat controls the heater
cable. The fitted and glued-in-place insulation has a K factor
of 0.28 Btu in/hr ft2 ºF at 75°F. The water side working
pressure of the shell-and-tube type of evaporator is 152 psig
(1048 kPa). Each evaporator is designed, constructed,
inspected, and stamped according to the requirements of the
ASME Boiler and Pressure Vessel Code. Double thickness
insulation is available as an option.
Phase Voltage Monitor (Optional)
Factory settings are as follows:
• Trip Delay Time: 2 seconds.
• Voltage Setting: set at nameplate voltage.
• Restart Delay Time: 60 seconds.
56 IM 1100
Page 57

Wind Baffles and Hail Guards
RIB FLANGES ON THE END
MUST PO INT TO CENTER
OF COIL TO HAVE A FINIS HED
LOOK. INTE RIOR RIB FLANGE S
CAN POINT IN ANY DIR ECTION.
ATTACH ALL RIBS TO
CO
A
B
C
D
E
PLACE FRONT "A" AND
FASTEN TO BOT H SIDES
OVER "A" AND REPEAT
ATTACHMENT PR OCEDURE.
U
N
I
T
V
E
1
3
2
A
B
C
D
ATTACH TOP "A" AT HORIZONTAL COIL CHANNE L FIRST.
THIS WILL S QUARE THE PANEL.
OVE RL AP TH E FRON T PANEL FLAN GE.
ATTACH LEFT SIDE SECOND.
LA P PANEL "B" O VER PANEL "A"
A
U
N
I
T
V
E
R
T
I
C
A
L
C
O
I
L
Step 1 - Rib Attachment
Step 2 - Front Panel Attachment
Step 3 - Top Panel Attachment
Front Panel, Install Second
Top Panel, Install
Las t
Wind Baffles and Hail Guards
Factory or field installed louvers are available for protection
against fin damage from hail. Protection against negative
operating effects from wind as well as hail protection can be
achieved from McQuay box-type enclosures described below.
Wind Baffles/Hail Guards are a field-installed option that is
used to stabilize unit operation in high wind areas and to assist
in operation at low ambient temperatures.
Figure 32 is a sketch of a typical panel assembly on an AGZ
unit. The actual number of panels and parts will vary by model
size, being one set per fan, on each side (see Physical Data
tables (beginning on page 28 for the number of fans). The parts
are shown in the Table 40 and referenced by balloon numbers.
Table 40: Packing List
Description
Vertical Support Rib 074758501 1
¼ - 20 x ½” Screw (Place in Poly Bag) 046093807
Top Cover 330409401 2
Front Panel 330409501 3
Part
Number
Bubble
Number
Figure 32: Installation Sequence
U
T
V
N
E
I
R
T
I
C
A
L
C
O
I
L
I
T
C
L
C
A
R
L
O
I
IL VERTICAL CHANNELS.
PLACE FR ONT "B" BY LAPPING
Figure 31: Components
E
ND RE PEAT ATT ACHMENT P ROC EDU RE.
IM 1100 57
Page 58

58 IM 1100
Page 59

IM 1100 59
Page 60

Revision History
Revision History
Number Date Description
IM 1100 10-18-09 Initial Release
60 IM 1100
Page 61

Page 62

McQuay Training and Development
Now that you have made an investment in modern, efficient McQuay equipment, its care should be a high priority.
For training information on all McQuay HVAC products, please visit us at www.mcquay.com and click on training,
or call 540-248-9646 and ask for the Training Department.
Warranty
All McQuay equipment is sold pursuant to its standard terms and conditions of sale, including Limited Product
Warranty. Consult your local McQuay Representative for warranty details. Refer to Form 933-43285Y. To find your
local McQuay Representative, go to www.mcquay.com.
This document contains the most current product information as of this printing. For the most up-to-date product
information, please go to www.mcquay.com.
© 2010 McQuay International • www.mcquay.com • 800-432-1342 10/10
 Loading...