

McCulloch Pro Mac 8000i Owner's Manual
AWICCULLOCH
CHIPPER/SHREDDER
UK OWNER’S MANUAL
READ CAREFULLY
o
a
287
.,
WARNING: TO REDUCE THE POTENllAL FOR ANY INJURY, COMPLY WITH THE FOLLOWfNG SAFETY
INSTRUCTIONS. FAILURE TO COMPLY WfTH THE lNSTRUCTfONS MAY RESULT IN PERSONAL INJURY.
m
.. ..
●
TRAINING
Read this owner’s manual carefully in its entirety before
attempting to assemble or operate this machine. Be
completely familiar with the controls and the proper use of
this machine before operating it. Keep this manual in a
safe place for future and regular reference or for ordering
replacement parts.
Children must never be allowed to op”erate this
equipment.
No one should operate this unit while intoxicated or while
taking medication that impairs the senses or reactions.
lWs equipment should never be operated in the vicinity of
children, pets or other persons.
Never run your machine in an enclosed area as the
exhaust from the engine contains carbon monoxide,
which is an odorless, tasteless and deadly poisonous gas.
Never place your hands or any part of your body or
clothing inside the feeding chamber, discharge. chute, or
near any moving part while the machine or engine is
running.
Hit is necessary for any reason to inspect or repair the
feeding chambers or any part of the machine where a
moving part can come in contact with your body .or
clothing, stop the machine, allow itto cool, disconnect the
spark plug wire from the spark plug and move it away from
the spark plug before attempting such inspection or
repair.
PREPARATION
Wear safety goggles, work gloves and shoes while
operating the chipper/shredder. Do not wear loose
cbthing or jewelry.
Operate chipper/shredder only on a level surface.
Do not operate the chipper/shredder on a paved or gravel
surface.
Before starting the chipper/shredder, check that all
screws, nuts, bolts and all other fasteners are properly
secured. Replace all damaged or unreadable warning
and operating decals.
Check fuel level before starting engine. Gasoline is highly
flammable; handle with care. Use only an approved
container.
Do not fill fuel tank indoors, when engine is running, or
until engine is allowed to cool. Do not smoke.
Reinstall fuel cap on tank and fuel container. Wipe the unit
clean of any spilled fuel.
oPERAmoN
Before starting the machine, operators shall make certain
that the cutting chamber is empty.
When feeding material into this equipment, be extremely
careful that pieces of metal, rocks, bottles, cans or other
foreign objects are not included. Personal injury or
damage to the machine could result.
INING:Thisunitis
red or grass~vered fand unless the engine’s exhaust system is equipped with a
@rk arrester is used, it should be maintained in effecdve workhg order by the operator.
e ~te of CStfofia the above is required by law (Section 4442 of the Cafifomia Pubfk Resources Coda). other states may have similar iaws
ml laws appfy on federal lands. A spark amester for the mufffer is available through your nearest engine authorized service dealer.
equipped with an internal combustion engine and should not be used on or near any unimproved foreskovered, brush-
n tfre cumng mecnamsm stnf(es any fore~n otqact or n
your machine should stari making an unusual noise or
vibration, immediately stop the engine, disconnect the
spark plug wire from the spark plug and move it away from
the spark plug. Allow the machine to stop and take the
following steps:
. Insf%t for damage.
Replace or repair any damaged parts.
Check for any loose parts and tighten to assure continued
safe operation.
The engine must be kept clean of debris and other
●
accumulations.
Do not allow an accumulation of processed material to
●
build up in the discharge area as this will prevent proper
discharge and can restilf in kti-back from feed opening.
Never place your hands or any other part of your body or
●
clothing inside the feeding chamber, dis~arge chute or
near any moving part while the engine.isrunning.
Keep all guards and deflectors in p!ace and in good
●
working condition to assure continued safe operation.
Always stand clear of the discharge area when operating
●
this machine.
Keep your face and body back from the feed opening to
●
avoid accidental bounce back of any material.
●
Do not over-reach. Keep proper balance and footing at all
times.
The engine governor settings on your machine must not
●
be altered, changed, or tampered with. The governor
controls the maximum safe: operating speeds and
protects the engine and all rnovmg parts from damage
caused by over-speed. Authorized service personnel
should perform these adjustments if a problem exist.
Do not transport machine while engine is running.
●
Do not operate engine if air cleaner or cover directly over
●
carburetor air :intake is removed, except for adjustment.
Removal,of stih~rts could create afire hazard.
ff chipperlshredder becomes clogged the operator must
●
shut-off engine, and disconnect SPSAplug before clearing
debris.
MAINTENANCE AND STORAGE
When this equipment is stoppad for servicing, inspection,
●
storage or to change an accessory, make sure the spark
plug wire is disconnected from the spark plug and moved
away from the spark plug. The machine should be
allowed to cool down before making such inspection,
adjustments, service, etc. Maintain your machine with
care and keep it clean for the best and continued safe
operation. Authorized service shall be sought if a problem
exists.
Do not use flammable solutions to clean the air filter.
●
When not in use, your machine should be stored out of
●
the reach of children. Keep where gasoline fumes will not
reach anopen flame or spark. For long periods of storage,
refer to the “Storage- secti?n of this manual.
spark arrester meeting applicable local or state laws (if any)
. . . ..
. . . . . ..
1
288
D
SAFETVRULES
TABLE OF CONTENTS .................................................
ASSEMBLY
OPERATION
MAINTENANCE .............................................................
..............................................................
..................................................................
................................................................
4-5
8-8
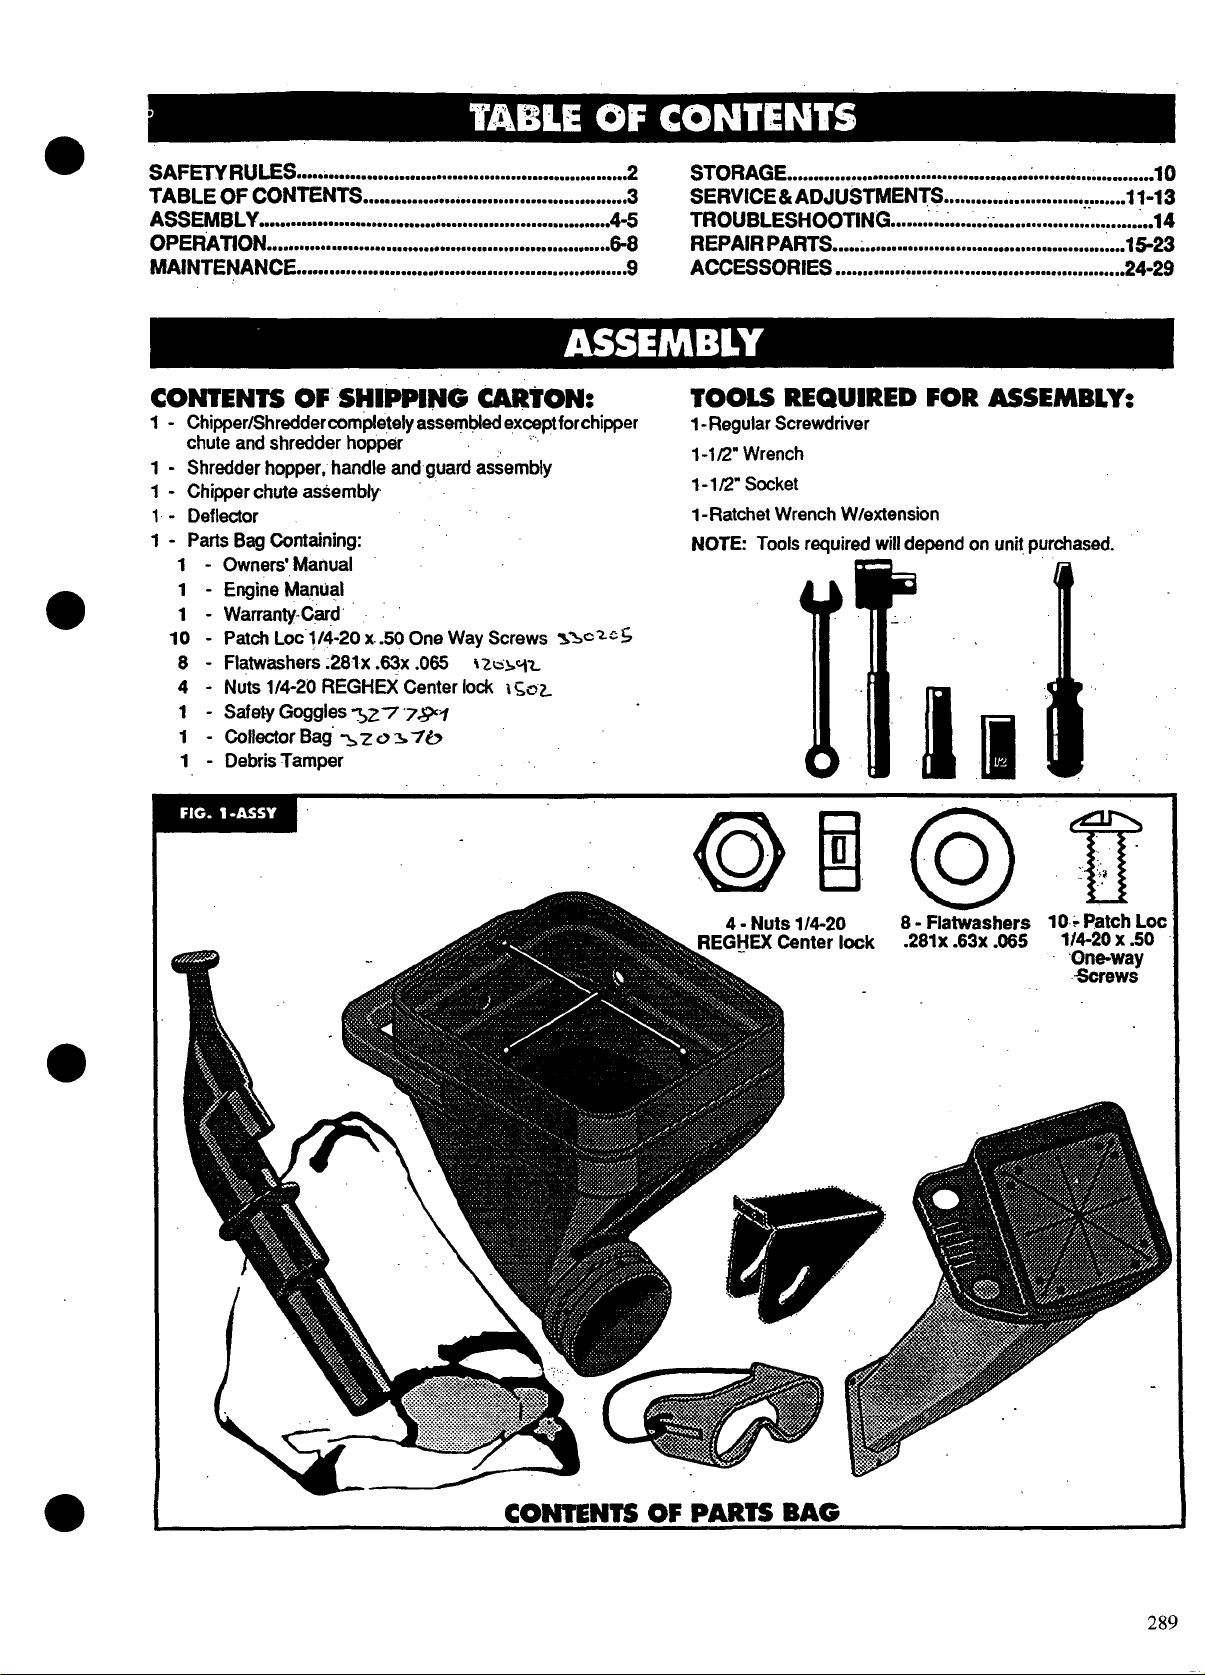
CONTENTS OF SHIPPING CARTON:
1 - Chipper/Shreddercompletely assern~ed exceptforchipper
chute and shredder hopper “
1 - Shredder hopper, handle and guard assembly
1- Chipper chute assembly
1 - Deflector
1 - Parts Bag Containing:
1 - Owners’ Manual
1
- Engine Manual
1 - Warranty-Cwd’ ~
10 - Patch Loc 1/4-20x.50 One Way Screws %%oZ55
8 - Flatwashers .281x .~x .085 ~2tis.qz
4
- Nuts 1/4-20 REGHEX Center lock i @L
1 - %fety Goggles ~z7 ‘7~7
1 - Collector Bag’ zz o 37ti
1 - Debris Tamper
2
3 SERVICE&ADJUSTMENTS
9
STORAGE
TROUBLESHOOTING - ““ 14
REPAIRPARTS
ACCESSORIES ......................................................
.....................................................................
.................................................
.......................................................
TOOLS REQUIRED FOR ASSEMBLY:
l-Regular Screwdriver
1-1/2” Wrench
1-1/2’ Socket
1-Ratchet Wrench W/extension
NOTE Tools required will depend on unit Purchased.
..................................
la
10
11-13
15-23
24-29
CONTENTS OF PARTS BAG
289
—
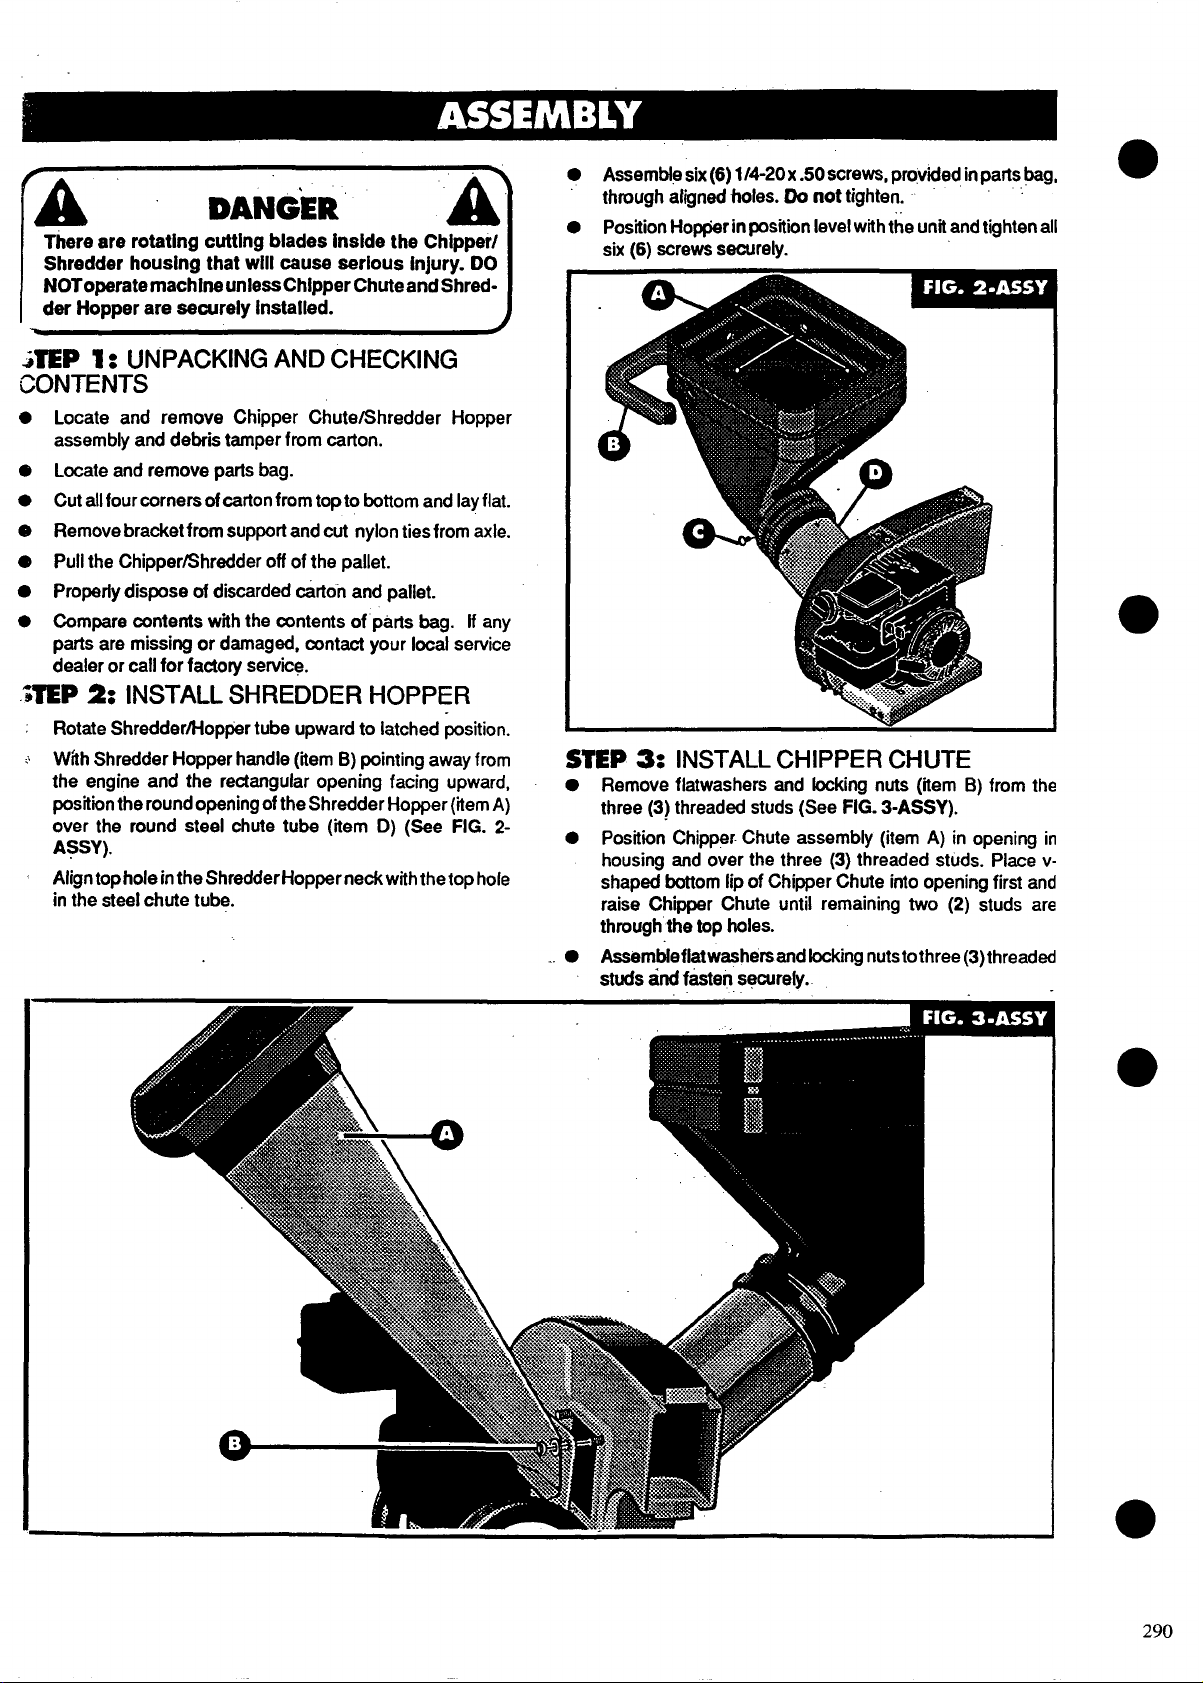
DANGER
There are rotating cutting blades inside the Chipper/
Shredder housing that will cause serious injury. DO
NOToperatemachlns unlessChlpperChuteand Shredder Hopper are seourely installed.
A
J~P 1: UNPACKING AND CHECKING
CONTENTS
Locate and remove Chipper Chute/Shredder Hopper
assembly and debrii tamper from carton.
Locate and remove parts bag.
Cut allfour corners ofcarton from top to bottom and layflat.
Remove bracket from supportandcut nylon ties from axle.
Pull the Chipper/Shredder off of the pallet.
Properfy dispose of discarded c&ton and pallet.
Compare contents with the contents of parts bag. If any
parts are missing or damaged, corrtaot your local service
dealer or call for factory service.
.$TEP2: INSTALL SHREDDER HOPPER
Rotate Shredder/1-foppsr tube upward to latched position.
~ With Shredder Hopper handle (iem B) pointing away from
the engine and the rectangular opening facing upward,
positiintheround opening of the Shredder Hopper (item A)
over the round steel chute tube (item D) (See FIG. 2ASSY).
Align top hole inthe ShredderHopperneck withthe top hole
in the steal chute tube.
● Assemble six(6) l/4-20x .50screws, pm,videdinparts bag,
through afignsd holes. Do not tighten. “” ““
● Position Hopper in position levelwith the unit and tighten all
six (6) screws seourely.
STEP 3: INSTALLCHIPPER CHUTE
● Remove flatwashers and locking nuts (iem B) from the
three (3) threadad studs (See FIG. 3-ASSY).
. Positiin Chipper. Chute assembly (item A) in opening in
housing and over the three (3) threaded sttids. Place vshapsd bottom lip of Chipper Chute into opening first and
raise Chipper Chute until remaining two (2) studs are
through the top holes.
● Assem~efletwashersand locking nutstothree (3)threaded
..
studs and f&ten securely.
●
290
c)
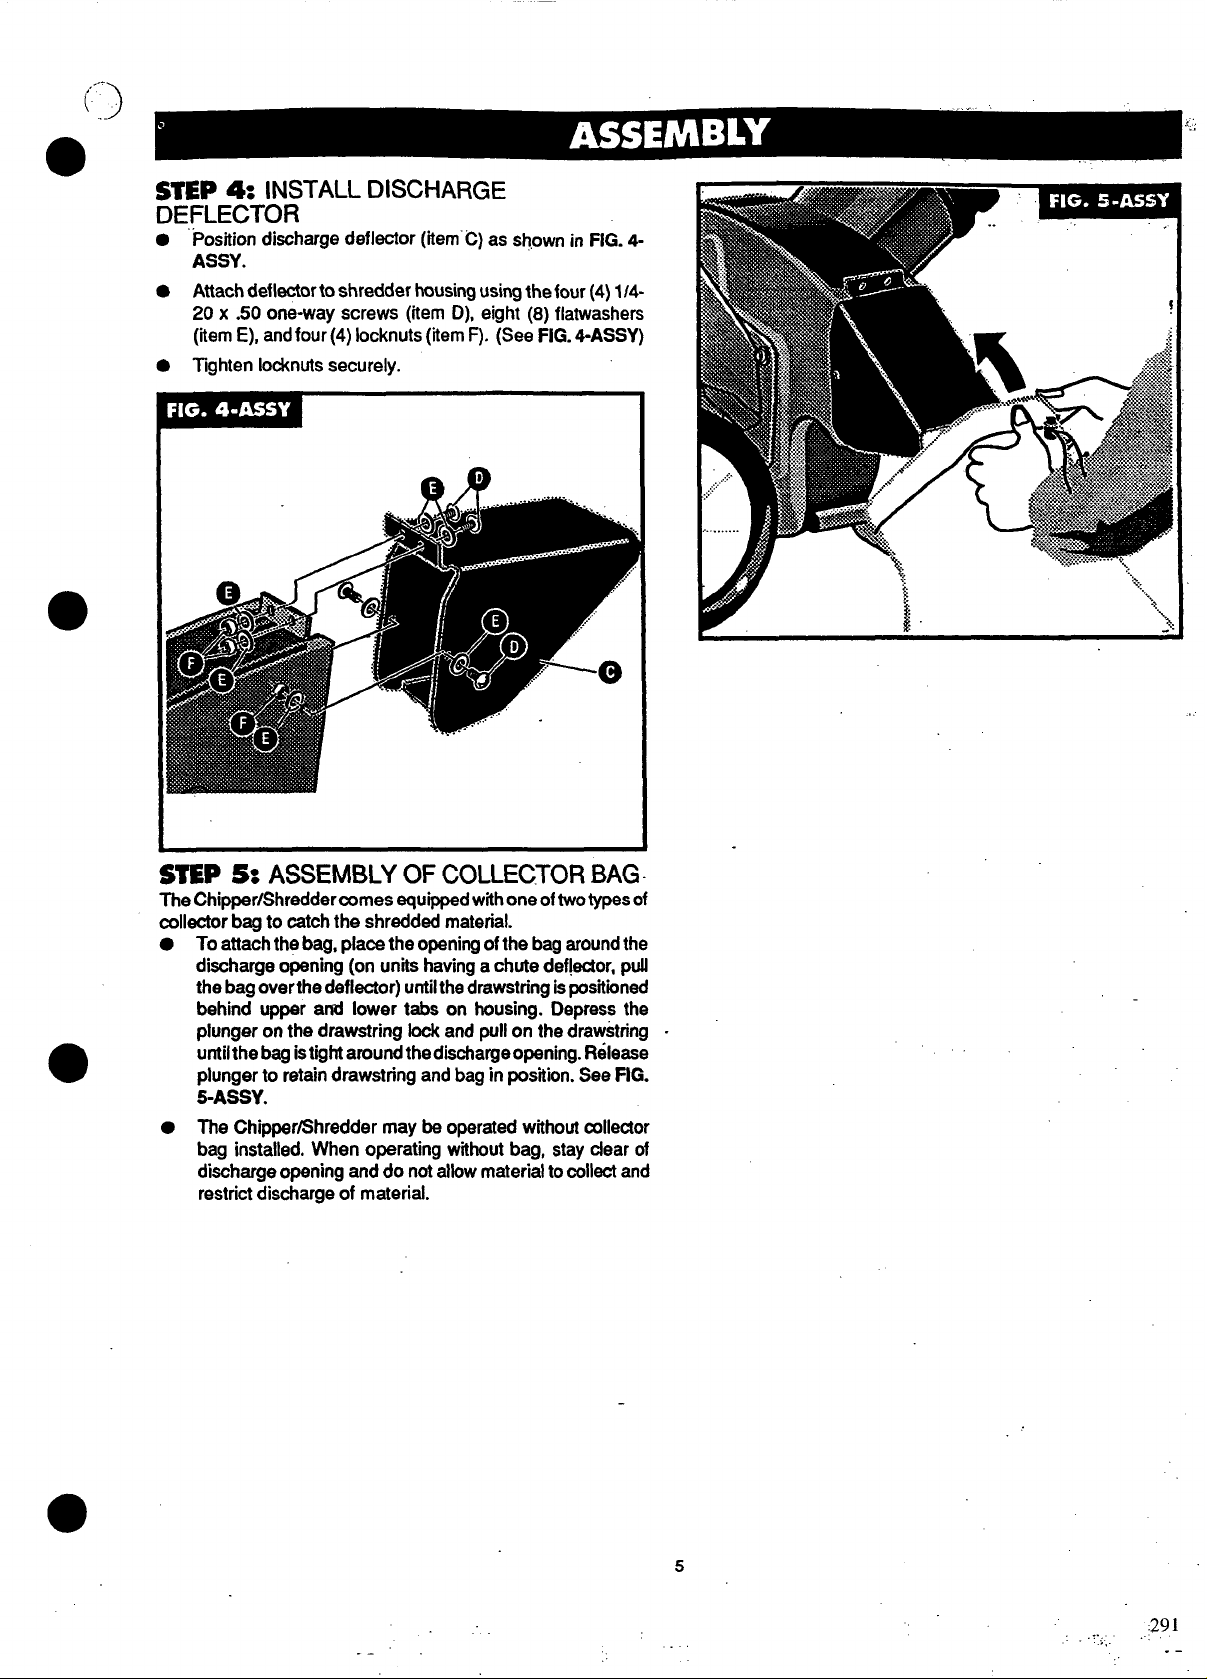
STEP 4: INSTALL DISCHARGE
DEFLECTOR
● “Positiondischarge deflector (item C) as shown in FIG. 4-
iassY.
. Attach deflector to shredder housingusing the four (4) l/4-
20 x .50 one-way screws (item D), eight (8) fiatwashers
(iem E), andfour(4) locknuts (item F). (See FIG. 4-ASSY)
● Tighten locknuts securely.
STEP 5: ASSEMBLY OF COLLECTOR BAG
The Chipper/Shreddercomes equippedwith one oftwotypes of
collector bag to catch the shredded material.
To atta~h the bag, place the opening of the bag around the
discharge opening (on units having a chute deflector, pull
the bag overthe deflector) untilthe drawstring is positioned
behind upper and lower tabs on housing. Depress the
plunger on the drawstring lock and pull on the drawstring
untilthe bag istight around the discharge opening. Release
plunger to retain drawstring and bag in position. See FfG.
5-ASSY.
The Chipper/Shredder may be operated without collector
bag installed. When operating without bag, stay dear of
discharge opening and do not allow material to collect and
restrict discharge of material.
,4
.-. .
5
..291
,,.,
,,.,
.-

c)
,\:-,.
<NOW YOUR CIMPPER-SHREDDER
WAOTHIS OWNER’S MANUALAND SAFETY RULES BEFORE OPERATING YOUR CHIPPER-SHREDDER.
hnpare the illustrations with yourchippar-shradderto familiarize yoursetf with the Iocat”mriofvarkius controls and adjustments. Save
hismanual for future reference.
●
MEEK ANSI SAFETY STANDARDS
Chipper-Shredders conform to the safety standards of the American National Standards Institute.
3PERAllNG CONTROLS
(D) SHREDDER HOPPER -Used forshredding small branches
SEE FIGe 1 OP) and other small debris.
(E)SHREDDER HOPPER RELEASE KNOB -Releases Shrad-
:) CHIPPER CHUTE- Usad forchippingbranches
2) COLLECTOR BAG- Used to collect all chipped, shredded
:‘ vacuumed debrisfor easydisposaf.
C) ENGINE CONTROLS - Throttle and Choke controls are
xatad here.(see enginemanualfor ind”widualcontrols)
*ORE
XGE 2 OF THIS MANUAL. ALWAYS BE CAREFUL.
~xlmum
N4S63!5).
h
USING YOUR CHIPPER-SHREDDER, AGAIN REFER TO THE “SAFETY RULES AS SHOWN ON
noise level measured in a distance of Im from shredder and 1.6m above ground = 97db(A) (as per
The operation of any chipper-shredder can result in foreign objects being thrown into the eyes,
which can resuft insevere eye damage. Always wear safety glasses or eye shields while chipping
or shredding, or performing any adjustments or repairs. We recommend WideVision Safety Mask
for over spectacles or standard glasses.
derHopparto rotatadtogroundpositiinforeasy rakingofleaves
and other debris intothe hopper.
(F) STARTER HANDLE - Used to manuallystafi the engine.
. .
6
..... ..:
.
.-
..:.
292

—
;.,,..
.....
..
●
●
BEFORE STARTING
1. Place the shredder on a firm, level surface.
2. Service engine with gasoline and oil as instructed in the
separate engine manual packed with your shredder.
3. Insure spark plug wire is attached to spark plug.
fA
BE SURE NO ONE OTHER THAN THE OPERATOR IS
STANDING NEAR THE CHIPPER-SHREDDER WHILE
STARTING OR OPERATING.
I
r
A
THE CHIPPEWSHREDDER IS SHIPPED WITHOUT
GASOUNEIN THE FUEL TANK AND VERY LlllLE OIL
IN THE ENGINE CRANKCASE. DO NOT OPERATE
ENGINE U.~L CRANKCASE HAS BEEN HUED WITH
OIL AS SPECIFfED IN THE ENGINE MANUAL PRO-
VIDED WfTH THE MACHINE.
DANGER
WARNING
A“
.
A
TO START ENGIN&
●
Insure spark plug wire and rubber boot is attached to spark
plug (See
Turn fuel shutdf valve to ‘ON” position (if so equipped)
●
EngineManual).
(seeEngine Manual).
●
Push stop switch to “ON” position (if so equipped).
Move choke control lever to “CHOKIVFULL CHOKE”
●
positiin. (See Engine Manual)
Move throttle control lever to ‘FAST/ON/RUN” positiin.
●
Grasp starter handle (See Engine Manual) and pull rope
●
out slowly until engine reaches start of compression cycle
(rope willpullslightly harderatthispoint. Letlhe roperewind
slowly.
Pull the rope with a rapid, continuous, full arm stroke. Keep
●
afirm grip on start handle. Let rope rewind slowly. DO NOT
let starter handle snap back against starter.
Repeat preceding two (2) instructions until engine fires.
●
When engine starts, move choke lever on engine halfway
between ‘CHOKE/FULLCHOKE” and“RUN/NOCHOKE”.
Move throttle control to idle positiin for a few minutes to
allow engine to warm-up. When engine is warm move
choke lever to “RUN positiin.
NOTE Inorderto idlesmoothly, anew engine may require three
(3)to five (5) minutes running above slow idle speed. Idlespeed
has been adjusted to be correct after this break-in period.
TO STOP ENG9NE:
● Movethrottle control leverto*’OFF/STOP/SLOW position.
(See Engine Manual)
● Push stop switch to “OFF position (ifso equipped).
● Do not choke carburetor to stop engine. Backfire or engine
damage may result if choke is used to stop engine.
NOTE: Closefuelshutoff valve (ifsoequipped)when transporting
or not operating Chipper/Shredder, to prevent fuel leakage.
HOW TO USE YOUR
CH9PPER-SHREDDER:
The Chipper/Shredder is designed for three (3)different meth-
ods of operation.
A
THECHIPPER-SHREDDER DISCHARGESMATERIALS
WITH CONSIDERABLE VELOCITY. KEEPAWAYFROM
THEAREAAROUND THE DISCHARGE ALWAYS STOP
THE ENGINE AND DISCONNECT THE SPARK PLUG
WfRE WHEN REMOVING OR AITACHING THE BAG
WHEN CHANGING CONTAINERS OR WHEN REMOVING THE SHREDDED MATERIAL. WEAR SAFETY
GLASSES AND GLOVES WHENEVER USING YOUR
CHIPPER-SHREDDER
● Leaves and small branches can be fed into the Hopper
assembly when it is inthe raised positiin (See FfG. 2-OP).
If it becomes necessary to push material intothe Chipper/
Shredder, use the suppfied debris tamper - NOT YOUR
●
A.
ANY ATTEMPT TO PUSH MATERIAL WITH ANYTHfNG
OTHER THAN THE DEBRfS TAMPER CAN RESULT IN
PERSONAL INJURY AND/OR MACHINE DAMAGE.
+
DANGER
DANGER .
..
A-
A’
4
..:
;.,
.-
,., .,..-.. .
;.,’.
:,:.
‘.:
,. :::
,:.
293
-.
A
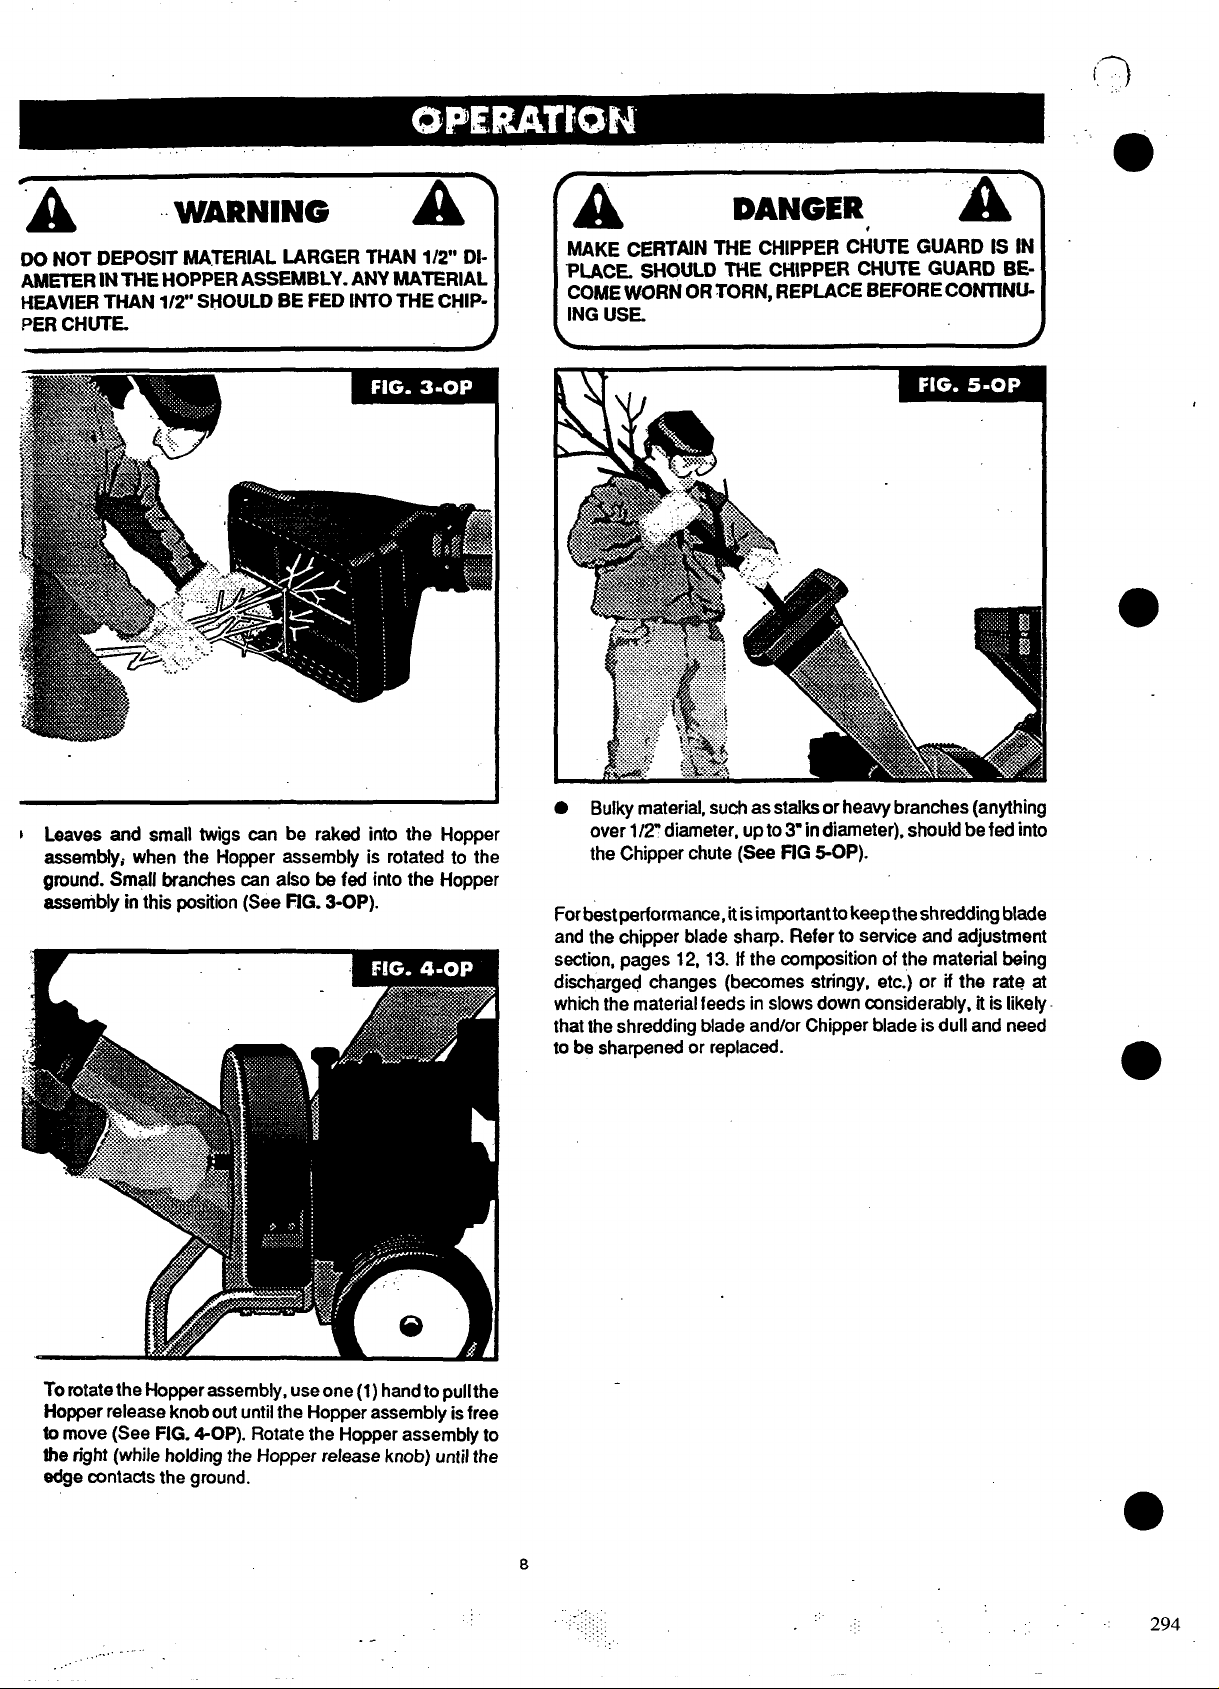
DO NOT DEPOSIT MATERIAL LARGER THAN 1/2” Dl-
AMETER IN THE HOPPER ASSEMBLY. ANY MATERIAL
HEAVIER THAN 1/2” SHOULD BE FED INTO THE CHIPPER CHUTE.
WARNING
r
A
MAKE CERTAIN THE CHIPPER CHUTE GUARD IS IN
PLACE. SHOULD THE CHIPPER CHUTE GUARD BE-
COME WORN OR TORN, REPLACE BEFORE CONTINUING USE.
I
DANGER
A
I Leaves and small twigs can be raked into the Hopper
assemblyi when the Hopper assembly is rotated to the
ground. Small branches can also be fed into the Hopper
assembly in this position (See FIG. 3-OP).
I
● Bulky material, such as stalks or heavy branches (anything
over 1/2” diameter, up to 3“ in diameter), should be fed into
the Chipper chute (See flG 5-OP).
Forbestperformance, it isimportanttokeepthe shredding blade
and the chipper blade sharp. Refer to service and adjustment
section, pages 12, 13. If the composition of the material being
discharged changes (becomes stringy, etc.) or if the rate at
which the material feeds in slows down considerably, it is likely
that the shredding blade and/or Chipper blade is dull and need
to be sharpened or replaced.
●
Torotatethe Hopper assembly, use one (1) hand to pullthe
Hopper release knob out untilthe Hopper assembly isfree
to move (See FIG. 4-OP). Rotate the Hopper assembly to
the right (while holding the Hopper release knob) until the
edge contacts the ground.
.-
.,-.. ...
8
,.
,::.
294
DANGER
NEVERSTOREYOUR CHIPPER-SHREDDER INDOORS
OR IN AN ENCLOSED, POORLY VENTILATED AREA
IF GASOUNE REMAINS IN THE TANK. FUMES MAY
REACH AN OPEN FiAM~ SPARK OR PILOT UGHT
FROM A FURNACEj WATER HEATER, CLOTHES
DRYER, CIGAREITEj ETC.
TOprevent engine damage ifchipper-shredderis not used for
awe than30 days, follow the steps below.
NOT12GASOLINE MUST BE REMOVED OR TREATED TO
PREVENT GUM DEPOSITS FROM FORMING IN THE TANK,
FILTER, HOSE AND CARBURETOR DURING STORAGE.
AEODURINGSTORAGE, ALCOHOL-BLENDED GASOLINE
THAT USES ETHANOL OR METHANOL (SOMETIMES
CALLEDGASOHOL) ATIRACTS WATER. IT ACTS ON THE
GASOLINE TO FORM ACIDS WHICH DAMAGE THE ENGINE.
A
To remove gasoline,run engine “untiltankisemptyandengine w
stops. if you do not want to remove gwdine,agasstabilizer
such as STA-BIL may be added to any gasoline left in the tank
to minimize gum deposits and ac”ds. If thetankis almost empty,
mixstabifiierwith fresh gasoline inaseparatecontainerand add
some to the tank.
container.Thenrun
Iizer is added to allow mixture to reach carburetor. Store
chipper-shredder in safe piace. See warning above.
Thefollowing stepsshould beteken to prepare yourshredderfor
storage.
. Clean unit thorougitly, including engine.
● Refer to engine manual for correct engine storage
instruct”mns.”
● Carefully inspect unit and repiace any worn, damaged, or
missing parts and tghten any ioose fasteners
● if storing in an unventilated or metal storage shed, coat
metal parts with a ~ghtoil or sifiine to prevent rusting.
● Store Chipper/Shredder in a dry, clean are% out of the ●
reach of children.
Alwaysfollow instructionson stsibiiizer
engine at feast 10 minutes after etabf-
.—.
. .
..
—.— .——-—.
10
:’:
‘. :,”
2,6:
.,
!
~~
 Loading...