


Operator’s manual Manuel d’utilisation Bedienungsanvwisung Manual de instrucciones
CS 360T CS 400T CS 420T
Please read the operator’s manual carefully and make sure you understand the instructions before using the machine. Lire attentivement et bien assimiler le manual d’utilisation avant d’utiliser la machine.
Lesen Sie die Bedienungsanweisung sorgfältig durch med und machen Sie sich mit dem Inhalt vertraut, bevor Sie des Gerät benutzen.
Lea detenidament el manual de instrucciones y asegúrese de entender su contenido antes de utilizar la máquina.
GB (2 - 21) FR (22 - 43) DE (44 - 65) ES (66 - 87)

TABLE OF CONTENTS
Introduction |
2 |
Working Techniques |
12 |
|
Identification of Symbols |
2 |
Service and Adjustments |
15 |
|
Identification (What is What?) |
3 |
Storage |
17 |
|
General Safety Precautions |
4 |
|||
Troubleshooting Table |
18 |
|||
Assembly |
7 |
|||
Technical Data |
19 |
|||
Fuel Handling |
10 |
|||
Starting and Stopping |
11 |
Declaration of Conformity |
21 |
INTRODUCTION
Dear Customer,
Thank you for choosing a McCulloch product. You are thereby part of a story that started long ago, when the McCulloch Corporation started its manufacturing of engines during World War II. In 1949, when McCulloch introduced its first light one-man chain saw, woodworking would never be the same again.
The line of innovative chain saws would continue over the decades, and business was expanded, first by airplane and kart engines in the 1950s, then by mini chainsaws in the 1960s. Later, in the 1970s and 80s, trimmers and blower/vacs were added to the range.
Today, as a part of the Husqvarna group, McCulloch continues the tradition of powerful engines, technical innovations, and strong designs that have been our hallmarks for more than half a century. Lowering fuel consumption, emissions and noise levels are of top priority to us, as is improving safety and user-friendliness.
We certainly hope that you will be satisfied with your McCulloch product, as it is designed to be your companion for a long time. By following this operators manual’s advice on usage, service, and maintenance, its lifespan can be extended. If you should need professional help with repair or service, please use the Service Locator at www.mcculloch.com.
McCulloch has a policy of continuous product development and therefore reserves the right to
modify the design and appearance of products without prior notice. This manual can also be downloaded at www.mcculloch.com.
IDENTIFICATION OF SYMBOLS
WARNING! This chain saw can be dangerous! Careless or improper use can cause serious or even fatal injury.
Always wear appropriate ear protection, eye protection
and head protection.
Always use two hands when
operating the chain saw.
Chain brake, activated (right)
Chain brake,
not activated (left)
Read and understand the instruction manual before using the chain saw.
Sound power level
Sound pressure level at 7,5 meters
This product is in accordance with applicable
EC directives.
WARNING! Contacting the guide bar tip with any object
should be avoided; tip contact may cause the guide bar to move suddenly upward and backward, which may cause serious injury.
2

IDENTIFICATION OF SYMBOLS
Starting Reminder
Move ON/STOP switch to the ON position.
Slowly press primer bulb 6 times.
Pull choke/fast idle lever out to the full extent (to the FULL CHOKE position).
Starting a warm engine
Pull the starter rope sharply with your right hand until the engine fires.
Push the choke/fast idle lever in to the HALF CHOKE position.
Pull the starter rope sharply with your right hand until
the engine starts.
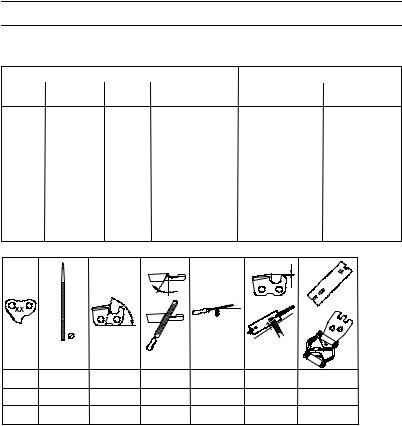
IDENTIFICATION (WHAT IS WHAT?)
Chain |
Front Hand Guard |
|
Front Handle |
|
Adjustment Tool |
|
Starter Rope Idle Speed Screw |
||
(Bar Tool) |
|
|
|
|
|
|
|
ON/STOP |
|
|
|
|
|
|
|
|
|
|
Switch Choke/Fast |
|
Chain |
Muffler |
|
Idle Lever |
|
|
|
|
|
Bumper |
Bar Oil Fill Cap |
|
|
|
|
|
|
|
|
spike |
|
Starter Housing Fuel Mix Fill Cap Primer Bulb |
||
Cylinder Cover |
|
Chain |
||
Throttle |
|
|
|
Brake |
|
|
|
|
|
Lock-out |
|
|
|
|
Rear |
|
|
|
|
Handle |
|
|
|
|
|
|
|
|
Guide Bar |
|
Clutch |
Outer |
|
Chain |
Throttle Trigger |
Bar |
Catcher |
||
Cover |
Tensioning |
|
||
|
|
Ring |
Knob |
|
|
|
|
|
|
3
GENERAL SAFETY PRECAUTIONS
 WARNING: Always disconnect spark
plug wire and place wire where it cannot contact spark plug to prevent accidental starting when setting up, transporting, adjusting or
making repairs except carburetor adjustments. This chain saw for forest service is only designed for cutting wood. Because a chain saw is a high-speed wood-cutting tool, special safe-
ty precautions must be observed to reduce the risk of accidents. Careless or improper use of this tool can cause serious injury.
PLAN AHEAD
S Read this manual carefully until you completely understand and can follow all safety rules, precautions, and operating instructions before attempting to use the unit.
SRestrict the use of your saw to adult users who understand and can follow safety rules, precautions, and operating instructions found in this manual.
Hearing |
Safety Hat |
|
Protection |
Protection |
|
Snug |
||
Heavy Duty |
||
Fitting |
||
Clothing |
Gloves |
|
|
Chaps |
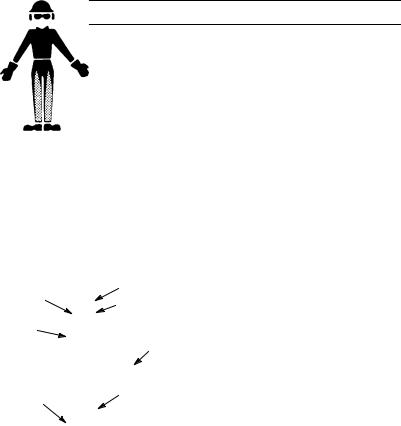
SWear protective gear. Always use steel-toed safety footwear with non-slip soles; snug-fit- ting clothing; heavy-duty, non-slip gloves; eye protection such as non-fogging, vented goggles or face screen; an approved safety hard hat; and sound barriers (ear plugs or mufflers) to protect your hearing. Secure hair
above shoulder length.
S Always use approved hearing protection. Regular users should have hearing checked
regularly as chain saw noise can damage hearing. Long--term exposure to noise can result in permanent hearing impairment.
SKeep all parts of your body away from the chain when the engine is running.
SKeep children, bystanders, and animals a minimum of 10 meters away from the work area. Do not allow other people or animals to be near the chain saw when starting or operating the chain saw.
SDo not handle or operate a chain saw when you are fatigued, ill, or upset, or if you have taken alcohol, drugs, or medication. You must be in good physical condition and mentally alert. Chain saw work is strenuous. If you have any condition that might be aggravated by strenuous work, check with your doctor before operating a chain saw.
SCarefully plan your sawing operation in advance. Do not start cutting until you have a clear work area, secure footing, and, if you are felling trees, a planned retreat path.
OPERATE YOUR SAW SAFELY
 WARNING: Long term inhalation of
the engine’s exhaust fumes, chain oil mist and dust from sawdust can result in serious personal injury.
 WARNING: This machine produces
an electromagnetic field during operation. This field may under some circumstances interfere with active or passive medical implants. To reduce the risk of serious or fatal injury, we recommend persons with medical implants to consult their physician and the medical implant manufacturer before operating this machine.
SDo not operate a chain saw with one hand. Serious injury to the operator, helpers, bystanders or any combination of these persons may result from one-handed operation.
A chain saw is intended for two-handed use.
SOperate the chain saw only in a well-venti- lated outdoor area.
S Do not operate saw from a ladder or in a tree, unless you are specifically trained to do so.
SMake sure the chain will not make contact with any object while starting the engine. Never try to start the saw when the guide bar
is in a cut.
SDo not put pressure on the saw at the end of the cut. Applying pressure can cause you to lose control of the chain saw when the cut is
completed and may cause serious personal injury.
S Stop the engine before setting the saw down.
SDo not operate a chain saw that is damaged, improperly adjusted, or not completely and securely assembled. Always replace bar, chain, hand guard, or chain brake immediately if it becomes damaged, broken or is
otherwise removed.
S With the engine stopped, hand carry the chain saw with the muffler away from your body, and the guide bar and chain to the rear, preferably covered with a scabbard.
S Secure the machine during transport.
CHAIN SAW SAFETY EQUIPMENT
NOTE: In this section, the safety features of
the chain saw and their function are explained. For inspection and maintenance, see instructions in the CHECKING, MAINTAINING AND SERVICING CHAIN SAW SAFETY EQUIPMENT section. See instructions under the
WHAT IS WHAT? section, to find where these parts are located on your chain saw. The life span of the machine can be reduced and the risk of accidents can increase if machine main-
tenance is not carried out correctly and if service and/or repairs are not carried out professionally. If you need further information, please contact your nearest service dealer.
4

GENERAL SAFETY PRECAUTIONS
SChain brake. Your chain saw is equipped with a chain brake that is designed to stop the chain from moving.
 WARNING: The chain brake is de-
signed to stop the chain immediately if you get a kickback. The chain brake reduces the risk of accidents, but only you can prevent them. DO NOT ASSUME THAT THE CHAIN BRAKE WILL PROTECT YOU IN THE EVENT OF A KICKBACK.
S Throttle trigger lock-out. The throttle lock--out is designed to prevent accidental operation of the throttle trigger.
S Chain catcher. The chain catcher is designed to catch the saw chain if it breaks.
SVibration damping system. Your chain saw is equipped with a vibration damping system that is designed to minimize vibration and make operation easier.
SAFETY NOTICE: Exposure to vibrations
through prolonged use of gasoline powered hand tools could cause blood vessel or nerve damage in the fingers, hands, and joints of people prone to circulation disorders or abnormal swellings. Prolonged use in cold weather has been linked to blood vessel damage in otherwise healthy people. If symptoms occur such
as numbness, pain, loss of strength, change in skin color or texture, or loss of feeling in the fingers, hands, or joints, discontinue the use of this tool and seek medical attention. An antivibration system does not guarantee the avoidance of these problems. Users who operate power tools on a continual and regular basis must monitor closely their physical condition and the condition of this tool.
SON/STOP switch. The ON/STOP switch should be used to stop the engine.
CHECKING, MAINTAINING AND SERVICING CHAIN SAW SAFETY EQUIPMENT
 WARNING: Never use a chain saw with defective safety equipment. Safety
equipment must be inspected and maintained. If your chain saw does not pass inspection, take the saw to your nearest service dealer for repair.
SChain brake. Brush off any wood dust, resin and dirt from the chain brake and clutch drum. Dirt and wear can impair operation of
the brake. For additional information, see OPERATING YOUR UNIT section.
S Throttle trigger lock-out. Check that the
throttle trigger can not be operated until the throttle lock--out is pressed.
S Chain catcher. Check that the chain catcher is not damaged and is firmly attached to the body of the chain saw.
S Vibration damping system. Regularly check the vibration damping units for cracks or deformation. Make sure the vibration damping units are securely at-
tached to the engine unit and handle unit.
S ON/STOP switch. Start the engine and make sure the engine stops when you move
the ON/STOP switch to the STOP position.
MAINTAIN YOUR SAW IN GOOD WORKING ORDER
SHave all chain saw service performed by a qualified service dealer with the exception of the items listed in the maintenance section of this manual. For example, if improper tools are used to remove or hold the flywheel when servicing the clutch, structural damage to the flywheel can occur and cause the fly-
wheel to burst.
SMake certain the saw chain stops moving when the throttle trigger is released. For correction, refer to CARBURETOR AD-
JUSTMENTS.
SNever modify your saw in any way. Use only attachments supplied or specifically
recommended by the manufacturer.
S Keep the handles dry, clean, and free of oil or fuel mixture.
SKeep fuel and oil caps, screws, and fasteners securely tightened.
S Use only McCulloch accessories and replacement parts as recommended.
HANDLE FUEL WITH CAUTION
SDo not smoke while handling fuel or while operating the saw.
SEliminate all sources of sparks or flame in the areas where fuel is mixed or poured. There should be no smoking, open flames, or work that could cause sparks. Allow engine to cool before refueling.
SMix and pour fuel in an outdoor area on bare ground; store fuel in a cool, dry, well ventilated place; and use an approved, marked container for all fuel purposes. Wipe up all
fuel spills before starting saw.
SMove at least 10 feet (3 meters) from fueling site before starting engine.
STurn the engine off and let saw cool in a non-combustible area, not on dry leaves, straw, paper, etc. Slowly remove fuel cap
and refuel unit.
SStore the unit and fuel in an area where fuel vapors cannot reach sparks or open flames from water heaters, electric motors or switches, furnaces, etc.
KICKBACK
 WARNING: Avoid kickback which
can result in serious injury. Kickback is the backward, upward or sudden forward motion of the guide bar occurring when the saw
chain near the upper tip of the guide bar contacts any object such as a log or branch, or when the wood closes in and pinches the saw chain in the cut. Contacting a foreign object in the wood can also result in loss of chain saw control.
SRotational Kickback can occur when the moving chain contacts an object at the upper tip of the guide bar. This contact can cause the chain to dig into the object,
5
GENERAL SAFETY PRECAUTIONS
which stops the chain for an instant. The result is a lightning fast, reverse reaction which kicks the guide bar up and back toward the operator.
SPinch-Kickback can occur when the the wood closes in and pinches the moving saw chain in the cut along the top of the guide bar and the saw chain is suddenly stopped. This sudden stopping of the chain results in a reversal of the chain force used to cut wood and causes the saw to move in the opposite direction of the chain rotation. The saw is driven straight back toward the operator.
S Pull-In can occur when the moving chain
contacts a foreign object in the wood in the cut along the bottom of the guide bar and the saw chain is suddenly stopped. This sudden stopping pulls the saw forward and away from the operator and could easily cause the operator to lose control of the saw.
Avoid Pinch-Kickback:
SBe extremely aware of situations or obstructions that can cause material to pinch the top of or otherwise stop the chain.
S Do not cut more than one log at a time.
SDo not twist the saw as the bar is withdrawn from an undercut when bucking.
Avoid Pull-In:
S Always begin cutting with the engine at full speed and the saw housing against wood.
S Use wedges made of plastic or wood. Never use metal to hold the cut open.
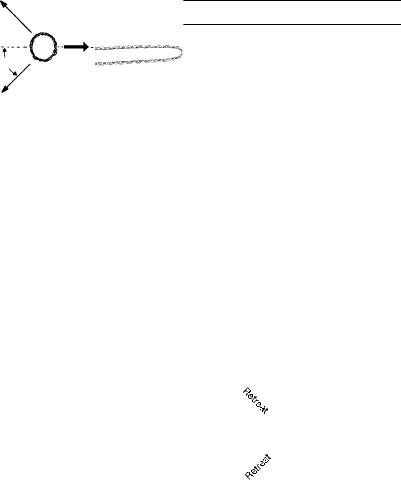
Kickback Path
Obstructions
Clear
Working Area
REDUCE THE CHANCE OF KICKBACK
S Recognize that kickback can happen. With a basic understanding of kickback, you can reduce the element of surprise
which contributes to accidents.
S Never let the moving chain contact any object at the tip of the guide bar.
SKeep the working area free from obstructions such as other trees, branches, rocks, fences, stumps, etc. Eliminate or avoid any obstruction that your saw chain could hit while you are cutting through a particular log or branch.
S Keep your saw chain sharp and properly
tensioned. A loose or dull chain can increase the chance of kickback occurring. Follow manufacturer’s chain sharpening and maintenance instructions. Check tension at regu-
lar intervals with the engine stopped, never with the engine running. Make sure the bar clamp nuts are securely tightened after tensioning the chain.
SBegin and continue cutting at full speed. If the chain is moving at a slower speed, there is greater chance of kickback occurring.
S Cut one log at a time.
SUse extreme caution when re-entering a previous cut.
SDo not attempt cuts starting with the tip of the bar (plunge cuts).
S Watch for shifting logs or other forces that could close a cut and pinch or fall into chain.
SUse the Reduced--Kickback Guide Bar and Low--Kickback Chain specified for your saw.
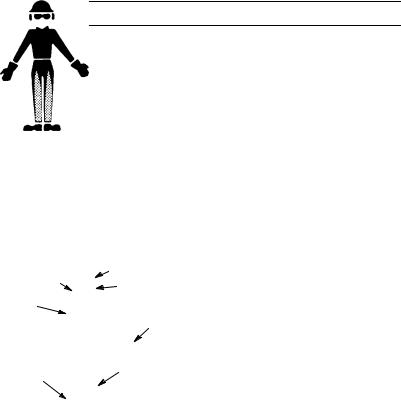
MAINTAIN CONTROL
Stand to the left the saw
Never reverse hand positions
 Elbow locked
 Thumb on underside of handlebar
SKeep a good, firm grip on the saw with both hands when the engine is running and don’t let go. A firm grip will help you reduce kickback and maintain control of the saw. Keep the fingers of your left hand encircling and your left thumb under the front handlebar. Keep your right hand completely around the rear handle whether your are right handed or left handed. Keep your left arm straight with
the elbow locked.
SPosition your left hand on the front handlebar so it is in a straight line with your right hand on the rear handle when making bucking cuts. Never reverse right and left
hand positions for any type of cutting.
S Stand with your weight evenly balanced on both feet.
SStand slightly to the left side of the saw to keep your body from being in a direct line
with the cutting chain.
SDo not overreach. You could be drawn or thrown off balance and lose control of the saw.
6

GENERAL SAFETY PRECAUTIONS
SDo not cut above shoulder height. It is difficult to maintain control of saw above shoulder height.I
KICKBACK SAFETY FEATURES
 WARNING: The following features
are included on your saw to help reduce the hazard of kickback; however, such features will
not totally eliminate this dangerous reaction. As a chain saw user, do not rely only on safety devices. You must follow all safety precautions, instructions, and maintenance in this manual to help avoid kickback and other forces which can result in serious injury.
SReduced--Kickback Guide Bar, designed with a small radius tip which reduces the size of the kickback danger zone on the bar tip. A Reduced--Kickback Guide Bar has been demonstrated to significantly reduce
the number and seriousness of kickbacks.
Reduced Kickback Symmetrical Guide Bar
 Small Radius Tip
Symmetrical
Large Radius Tip
S Low--Kickback Chain, designed with a
contoured depth gauge and guard link which deflect kickback force and allow wood to gradually ride into the cutter.
Low-Kickback Chain
Contoured Depth Gauge
Elongated Guard Link
Deflects Kickback
Force And Allows
Wood To Gradually
Ride Into Cutter
SHandguard, designed to reduce the chance of your left hand contacting the chain if your
hand slips off the front handlebar.
SPosition of front and rear handlebars, designed with distance between handles and “in-line” with each other. The spread and “in-line” position of the hands provided by this design work together to give balance and resistance in controlling the pivot of the saw back toward the operator if kickback occurs.
 WARNING: DO NOT RELY UPON
ANY OF THE DEVICES BUILT INTO YOUR SAW. YOU SHOULD USE THE SAW PROPERLY AND CAREFULLY TO AVOID KICKBACK. Reduced--kickback guide bars and low--kickback saw chains reduce the chance and magnitude of kickback and are
recommended. Your saw has a low kickback chain and bar as original equipment. Repairs on a chain brake should be made by an authorized servicing dealer. Take your unit to the place of purchase if purchased from a servicing dealer, or to the nearest authorized master service dealer.
STip contact in some cases may cause a lightning fast reverse REACTION, kicking the guide bar up and back toward the operator.
SPinching the saw chain along the top of the guide bar may push the guide bar rapidly
back toward the operator.
SEither of these reactions may cause you to lose control of the saw which could result in serious injury. Do not rely exclusively upon the safety devices built into your saw.
ASSEMBLY
Protective gloves (not provided) should be worn during assembly.
ATTACHING THE BUMPER SPIKE (if not already attached)
The bumper spike may be used as a pivot when making a cut.
1.Loosen and remove bar knob completely by lifting lever and turning counterclockwise. Remove clutch cover.
2.Attach the bumper spike with the two screws as illustrated.
7
ASSEMBLY
ATTACHING THE BAR AND CHAIN (if not already attached)
 WARNING: Recheck each assem-
bly step if the saw is received assembled. Always wear gloves when handling the chain. The chain is sharp and can cut you even
when it is not moving!
1.Move ON/STOP switch to the STOP position.
2.Loosen and remove bar knob completely by lifting lever and turning counterclockwise.
 Lever
Lever
LOOSEN
3.Remove clutch cover and plastic shipping spacer (if present).
Clutch Cover
Bar
Knob
Location of shipping
spacer
4.Slide guide bar on bar bolts until guide bar stops against clutch drum sprocket.
Clutch retainer/ |
Guide bar |
sprocket |
|
Bar bolts |
|
5.Carefully remove the chain from the package. Hold chain with the drive links as shown.
Tip of
Bar
CUTTERS MUST FACE IN
DIIRECTION OF ROTATION
Cutters |
Depth Gauge |
Drive Links
6.Place chain over and behind clutch retainer, fitting the drive links in the clutch drum sprocket.
7.Fit bottom of drive links between the teeth in the sprocket in the nose of the guide bar.
8.Fit chain drive links into bar groove.
9.Pull guide bar forward until chain is snug in guide bar groove. Ensure all drive links are in the bar groove.
10.Install clutch cover making sure the adjusting pin is positioned in the lower hole in the guide bar. This pin moves the bar forward (tightening the chain) and backward (loosening the chain) as the outer tensioning ring is turned.
Back of clutch cover
Adjusting pin
CAUTION: It is very important when instal-
ling the clutch cover that the adjusting pin aligns into the lower hole in the guide bar. Failure to install the clutch cover correctly may
result in permanent damage to your chain saw.
Clutch
Cover
Adjusting
11.Install bar knob. Once the chain is tensioned, you will need to tighten bar knob.
8
ASSEMBLY
CHAIN TENSION (including units with chain already installed)
 WARNING: Wear protective gloves
when handling chain. The chain is sharp and can cut you even when it is not moving.
NOTE: When adjusting chain tension, make sure the bar knob is finger tight only.
Attempting to tension the chain when the bar knob is tight can cause damage.
Checking the tension:
Use a screwdriver to move chain around guide
bar. If the chain does not rotate, it is too tight. If the chain is too loose, it will sag below the bar.
Guide
Bar

 Bar Screwdriver Outer Tensioning Ring Knob
Adjusting the tension:
Chain tension is very important. Chains stretch during use. This is especially true during the first few times you use your saw. Always check chain tension each time before you start the chain saw.
1.Lift lever on bar knob and turn counterclockwise 1 turn to loosen clutch cover.
 Lever
Lever
LOOSEN
2.Turn outer tensioning ring (clockwise) to tighten chain until chain solidly contacts bottom of guide bar rail. Lift tip of guide bar while adjusting tension.
Loosen |
Tighten |
chain |
|
Outer
Tensioning
Ring
3.Using a screwdriver, move chain around guide bar to ensure all links are in bar groove.
4.While lifting tip of guide bar, use the lever to tighten bar knob securely (clockwise).
Hand tighten only!
Bar
Knob
 Lever
Lever
TIGHTEN
5.Return lever on bar knob to original position.
 WARNING: Failure to return lever on
bar knob to original position could result in serious personal injury or damage to your chain saw.
6.Use a screwdriver to move chain around guide bar.
7.If chain does not rotate, it is too tight. Use the lever to loosen bar knob 1 turn (counterclockwise); then, loosen chain by turning the outer tensioning ring (counterclockwise). Retighten bar knob.
8.If chain is too loose, it will sag below the guide bar. DO NOT operate the saw if the chain is loose.
NOTE: The chain is tensioned correctly when
the weight of the chain does not cause it to sag below the guide bar (with the chain saw sitting in an upright position), but the chain still moves.
 WARNING: If the saw is operated with a loose chain, the chain could jump off the guide bar and result in serious injury.
 WARNING: Muffler is very hot during
and after use. Do not touch the muffler or allow combustible material such as dry grass or fuel to do so.
9

FUEL HANDLING
FUEL
Note! The machine is equipped with a twostroke engine and must always be run using a mixture of petrol and two-stroke oil. It is important to accurately measure the amount of
oil to be mixed to ensure that the correct mixture is obtained. When mixing small amounts of fuel, even small inaccuracies can drastically affect the ratio of the mixture.
 WARNING: Always ensure there is adequate ventilation when handling fuel.
PETROL
S Use good quality unleaded or leaded petrol.
SThe lowest recommended octane grade is 90 (RON).
SIf you run the engine on a lower octane grade than 90 so--called knocking can occur. This gives rise to a high engine temperature and increased bearing load, which can result in serious engine damage.
SWhen working with continuous high revs (e.g. limbing) a higher octane is recommended.
Running-in
AvoId running at a too high speed for extended periods during the first 10 hours.
TWO-STROKE OIL
SFor best results and performance use Universal, Universal powered by McCulloch two--stroke engine oil, which is specially formulated for our air cooled two--stroke
engines.
SNever use two-stroke oil intended for watercooled engines, sometimes referred to as
outboard oil (rated TCW).
SNever use oil intended for four--stroke engines.
SA poor oil quality and/or too high oil/fuel ratio may jeopardise function and decrease the lifetme of catalytic converters.
MIXING RATIO
1:50 (2%) with Universal, Universal powered by McCulloch two-stroke oil.
1:33 (3%) with oils class JASO FB or ISO EGB formulated for air-cooled, two-stroke engines.
Petrol, litre |
Two-Stroke Oil, litre |
|
|
2% (1:50) |
3% (1:33) |
5 |
0,10 |
0,15 |
10 |
0,20 |
0,30 |
15 |
0,30 |
0,45 |
20 |
0,40 |
0,60 |
MIXING
SAlways mix the petrol and oil in a clean container intended for fuel.
SAlways start by filling half the amount of the petrol to be used. Then add the entire amount of oil. Mix (shake) the fuel mixture.
Add the remaining amount of petrol.
S Mix (shake) the fuel mixture thoroughly before filling the machine’s fuel tank.
S Do not mix more than one month’s supply of fuel at a time.
SIf the machine is not used for some time the fuel tank should be emptied and cleaned.
CHAIN OIL
S We recommend the use of special oil (chain oil) with good adhesion characteristics.
SNever use waste oil. This results in damage to the oil pump, the bar and the chain.
SIt is important to use oil of the right grade (suitable viscosity range) to suit the air temperature.
S In temperatures below 0°C (32°F) some oils become too viscous. This can overload the oil pump and result in damage to the oil pump components.
SContact your service dealer when choosing chain oil.
FUELING
 WARNING: Taking the following pre-
cautions will lessen the risk of fire: do not smoke and do not place any hot objects in
the vicinity of fuel; always stop the engine and let it cool for a few minutes before refueling; when refueling, open the fuel cap slowly so that any excess pressure is released gently; tighten the fuel cap carefully after refueling; always move the machine away from the refueling area and source before starting.
Clean the area around the fuel cap. Clean
the fuel and chain oil tanks regularly. The fuel filter must be replaced at least once a year. Contamination in the tanks causes malfunction. Make sure the fuel is well mixed by shaking the container before refuelling. The capacities of the chain oil tank and fuel tank are carefully matched. You should therefore always fill the chain oil tank and fuel tank at the same time.
 WARNING: Fuel and fuel vapour are
highly flammable. Take care when handling fuel and chain oil. Be aware of the risks of fire, explosion and those associated with inhalation.
10
STARTING AND STOPPING
 WARNING: The chain must not
move when the engine runs at idle speed. If the chain moves at idle speed refer to CARBURETOR ADJUSTMENT within this manual. Avoid contact with the muffler. A hot muffler can cause serious burns.
To stop the engine, move the ON/STOP switch to the STOP position.
To start the engine, hold the saw firmly on the ground as illustrated below. Make sure the chain is free to turn without contacting any object.
Use only 15″ -- 18″ (40 -- 45 cm) of rope per pull.
Hold saw firmly while pulling starter rope. Starter Rope Handle
Left Hand on Front
Right Foot Through Rear Handle
IMPORTANT POINTS TO REMEMBER
When pulling the starter rope, do not use the full extent of the rope as this can cause the rope to break. Do not let starter rope snap back. Hold the handle and let the rope rewind slowly.
For cold weather starting, start the unit at full choke; allow the engine to warm up before squeezing the throttle trigger.
NOTE: Do not cut material with the choke/fast idle lever at the FULL CHOKE position.
STARTING A COLD ENGINE (or a warm engine after running out of fuel)
NOTE: In the following steps, when the choke/fast idle lever is pulled out to the full extent, the correct throttle setting for starting is set automatically.
IGNITION
SWITCH
ON
 STOP
STOP
 Choke
Choke
Lever
1.Move ON/STOP switch to the ON position.
2.Slowly press primer bulb 6 times.
3.Pull out choke/fast idle to the full extent (to the FULL CHOKE position).
4.Pull the starter rope sharply with your right hand until the engine fires, which can be heard through a “puff” sound. Then, proceed to the next step.
NOTE: If the engine sounds as if it is trying to start before the 5th pull, stop pulling and immediately proceed to the next step.
5.Push the choke/fast idle lever in to the HALF CHOKE position.
CHOKE/FAST IDLE LEVER
OFF
HALF
FULL
6.Pull the starter rope sharply with your right hand until the engine starts.
7.Allow the engine to run for approximately 30 seconds. Then, squeeze and release throttle trigger to allow engine to return to idle speed.
There is a simplified start reminder with
illustrations to describe each step on the rear edge of the chain saw.
STARTING A WARM ENGINE
1.Move ON/STOP switch to the ON position.
2.Pull the choke/fast idle lever out to the FULL CHOKE position to set the fast idle, then push the lever in to the HALF CHOKE position.
3.Slowly press the primer bulb 6 times.
4.Pull the starter rope sharply with your right hand until the engine starts.
5.Squeeze and release throttle trigger to allow engine to return to idle speed.
DIFFICULT STARTING (or starting a flooded engine)
The engine may be flooded with too much fuel if it has not started after 10 pulls. Flooded engines can be cleared of excess fuel by pushing the choke/fast idle lever in completely (to the OFF CHOKE position)
and then following the warm engine starting procedure listed above. Ensure the ON/ STOP switch is in the ON position.
Starting could require pulling the starter rope handle many times depending on how badly the unit is flooded. If engine fails to start, refer to the TROUBLESHOOTING TABLE.
11
WORKING TECHNIQUES
CHAIN BRAKE
 WARNING: Ensure chain brake is
disengaged by pulling the front hand guard back toward the front handle as far as possible. The chain brake must be disengaged before cutting with the saw.
SThis saw is equipped with a chain brake. The brake is designed to stop the chain if
kickback occurs.
SThe inertia activated chain brake is activated if the front hand guard is pushed forward, either manually or by centrifugal force.
S If the brake is already activated, it is disengaged by pulling the front hand guard back toward the front handle as far as possible.
SWhen cutting with the saw, the chain brake must be disengaged.
Disengaged
Engaged
IMPORTANT POINTS
 WARNING: Sometimes wood chips
get stuck in the clutch cover causing the chain to jam. Always stop the engine before cleaning.
SCheck chain tension before first use and after 1 minute of operation. See CHAIN TEN-
SION in the ASSEMBLY section.
S Cut wood only. Do not cut metal, plastics, masonry, non-wood building materials, etc.
S The bumper spike may be used as a pivot when making a cut.
SStop the saw if the chain strikes a foreign object. Inspect the saw and repair parts as necessary.
SKeep the chain out of dirt and sand. Even a small amount of dirt will quickly dull a chain
and increase the possibility of kickback.
SPractice cutting a few small logs using the following techniques to get the “feel” of using your saw before you begin a major sawing operation.
S Squeeze the throttle trigger and allow the engine to reach full speed before cutting.
S Begin cutting with the saw frame
against the log.
S Keep the engine at full speed the entire time you are cutting.
SAllow the chain to cut for you. Exert only light downward pressure.
SRelease the throttle trigger as soon as the cut is completed, allowing the engine to idle. If you run the saw at full throttle without a cutting load, unnecessary wear can occur.
STo avoid losing control when cut is complete, do not put pressure on saw at end of cut.
S Stop the engine before setting the saw down.
TREE FELLING TECHNIQUES
 WARNING: Felling a tree requires
chain saw skills and experience. Inexperienced users should not fell trees. Do not attempt any task that makes you feel uncomfortable or unsure.
 WARNING: Do not cut near buildings
or electrical wires if you do not know the direction of tree fall, at night since you will not be able
to see well, or during bad weather such as rain, snow, or strong winds. as fall is unpredictable. Carefully plan your sawing operation in advance. You need a clear area all around the
tree so you can have secure footing. Check for broken or dead branches which can fall on you causing serious injury.
Natural conditions that can cause a tree to fall in a particular direction include:
S The wind direction and speed.
S The lean of the tree. The lean of a tree might not be apparent due to uneven or sloping terrain. Use a plumb or level to determine the direction of tree lean.
S Weight and branches on one side. S Surrounding trees and obstacles.
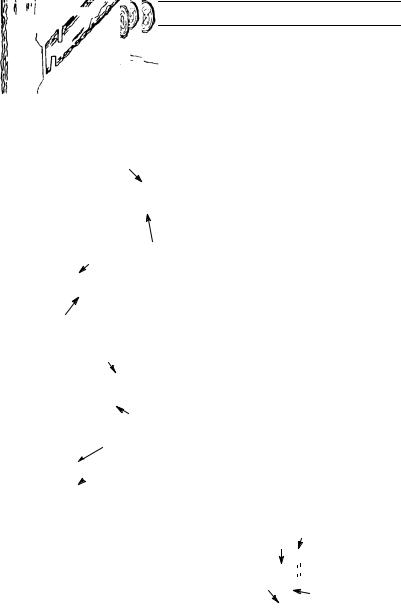
Look for decay and rot. If the trunk is rotted, it can snap and fall toward the operator. Make sure there is enough room for the tree to fall. Maintain a distance of 2-1/2 tree lengths from the nearest person or other objects. Engine noise can drown out a warning call. Remove dirt, stones, loose bark, nails, staples, and wire from the tree where cuts are to be made.
Plan a clear retreat path
Direction of Fall
45_
FELLING LARGE TREES (15 cm in diameter or larger)
The notch method is used to fell large trees. A notch is cut on the side of the tree in the desired direction of fall. After a felling cut is made on the opposite side of tree, the tree will tend to fall into the notch.
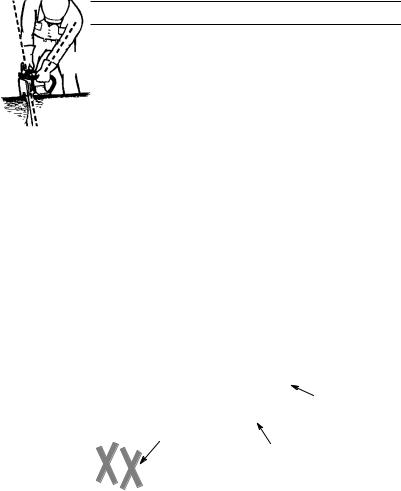
NOTCH CUT AND FELLING THE TREE
SMake notch cut by cutting the top of the notch first. Cut through 1/3 of the diameter of the tree. Next complete the notch by cutting the bottom of the notch. See illustration. Once the notch is cut remove the notch of wood from the tree.
12

WORKING TECHNIQUES
|
|
Use a sawhorse to cut small logs. Never |
||
Final cut here. 5 cm above |
S |
|||
center of notch. |
|
allow another person to hold the log while |
||
|
|
|
|
cutting and never hold the log with your leg |
|
|
|
|
|
|
|
|
|
or foot. |
|
|
|
S |
Do not cut in an area where logs, limbs, |
|
|
|
|
and roots are tangled. Drag the logs into a |
|
|
5 cm |
|
clear area before cutting by pulling out ex- |
|
|
|
|
posed and cleared logs first. |
|
|
TYPES OF CUTTING USED |
|||
|
|
FOR BUCKING |
|||
|
|
|
WARNING: If saw becomes pinched |
||
|
|
or hung in a log, don’t try to force it out. You |
|||
|
|
can lose control of the saw resulting in injury |
|||
S |
After removing the wood from the notch, |
and/or damage to the saw. Stop the saw, |
|||
drive a wedge of plastic or wood into the cut |
|||||
|
make the felling cut on the opposite side of |
||||
|
until the saw can be removed easily. Restart |
||||
|
the notch. This is done by making a cut about |
||||
|
the saw and carefully reenter the cut. Do not |
||||
|
5 cm higher than the center of the notch. |
||||
|
attempt to restart your saw when it is pinched |
||||
|
This will leave enough uncut wood between |
||||
|
or hung in a log. |
||||
|
the felling cut and the notch to form a hinge. |
||||
|
|
|
|
||
|
This hinge will help prevent the tree from fall- |
|
|
|
|
|
ing in the wrong direction. |
|
|
|
|
Hinge holds tree on stump and helps |
|
|
|
||
control fall |
Turn saw OFF and use a plastic or |
||||
|
Opening |
wooden wedge to force cut open. |
|||
|
of felling |
Overcutting begins on the top side of the log |
|||
|
cut |
||||
|
with the saw against the log. When overcut- |
||||
|
|
ting use light downward pressure. |
|||
NOTE: Before felling cut is complete, use |
|
|
|
||
wedges to open the cut when necessary to |
|
|
|
||
control the direction of fall. To avoid kickback |
|
|
|
||
or chain damage, use wood or plastic |
Undercutting involves cutting on the under- |
||||
wedges, but never steel or iron wedges. |
|||||
S |
Be alert to signs that the tree is ready to fall: |
side of the log with top of saw against the log. |
|||
When undercutting use light upward pres- |
|||||
|
cracking sounds, widening of the felling cut, |
sure. Hold saw firmly and maintain control. |
|||
|
or movement in the upper branches. |
||||
S As tree starts to fall, stop saw, put it down, |
The saw will tend to push back toward you. |
||||
|
and get away quickly on your planned re- |
|
WARNING: Never turn saw upside |
||
|
treat path. |
|
|||
S |
DO NOT cut down a partially fallen tree with |
down to undercut. The saw cannot be con- |
|||
|
your saw. Be extremely cautious with par- |
trolled in this position. |
|||
|
tially fallen trees that may be poorly sup- |
|
First cut on pressure side of log |
||
|
ported. When a tree doesn’t fall completely, |
|
|
|
|
|
set the saw aside and pull down the tree with |
|
|
|
|
|
a cable winch, block and tackle, or tractor. |
|
|
|
|
CUTTING A FALLEN TREE |
|
|
|
||
Second cut |
Second cut |
||||
|
|
||||
Bucking is the term used for cutting a fallen |
|
|
|||
|
|
|
|||
tree to the desired log length. |
|
|
|
||
|
WARNING: Do not stand on the log |
|
|
|
|
|
Any portion can roll causing loss |
|
First cut on pressure side of log |
||
of footing and control. Do not stand downhill |
|
||||
of the log being cut. |
BUCKING WITHOUT A |
||||
|
|
SUPPORT |
|||
S |
Cut only one log at a time. |
S |
Overcut through 1/3 of the diameter of the |
||
S |
Cut shattered wood very carefully; sharp |
|
log. |
||
|
pieces of wood could be flung toward oper- |
S |
Roll the log over and finish with a second |
||
|
ator. |
|
overcut. |
||
13
WORKING TECHNIQUES
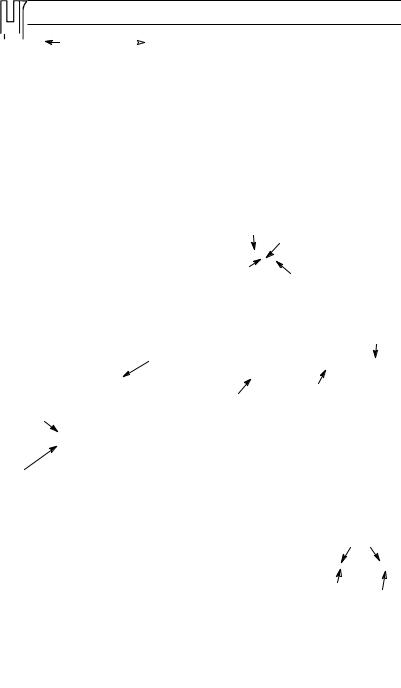
SGive special attention to logs under strain to prevent the saw from pinching. Make the first cut on the pressure side to relieve the stress on the log.
BUCKING USING A LOG OR SUPPORT STAND
SRemember your first cut is always on the pressure side of the log.
S Your first cut should extend 1/3 of the diameter of the log.
S Finish with your second cut.
Using a log for support
2nd Cut
1st Cut
1st Cut
2nd Cut
Using a support stand
2nd Cut
1st Cut
1st Cut
 2nd Cut
LIMBING AND PRUNING
 WARNING: Be alert for and guard
against kickback. Do not allow the moving chain to contact any other branched or objects at the nose of the guide bar when limbing or pruning. Allowing such contact can result in serious injury.
 WARNING: Never climb into a tree to
limb or prune. Do not stand on ladders, platforms, a log, or in any position which can cause you to lose your balance or control of the saw.
IMPORTANT POINTS
S Watch out for springpoles. Use extreme caution when cutting small size limbs. Slen-
der material may catch the saw chain and be whipped toward you or pull you off balance.
S Be alert for springback. Watch out for branches that are bent or under pressure. Avoid being struck by the branch or the saw when the tension in the wood fibers is released.
SKeep a clear work area. Frequently clear branches out of the way to avoid tripping over them.
LIMBING
SAlways limb a tree after it is cut down. Only then can limbing be done safely and prop-
erly.
S Leave the larger limbs underneath the felled tree to support the tree as you work.
SStart at base of the felled tree and work toward the top, cutting branches and limbs.
Remove small limbs with one cut.
SKeep the tree between you and the chain as much as possible.
SRemove larger, supporting branches with the cutting techniques described in BUCK-
ING WITHOUT A SUPPORT.
SAlways use an overcut to cut small and freely hanging limbs. Undercutting could cause limbs to fall and pinch saw.
PRUNING
 WARNING: Limit pruning to limbs
shoulder height or below. Do not cut if branches are higher than your shoulder. Get a professional to do the job.
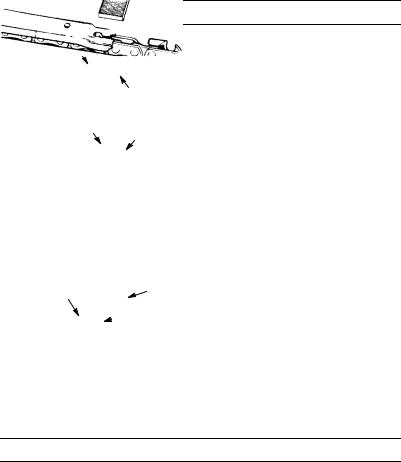
SMake your fist cut 1/3 of the way through the bottom of the limb.
SNext make a 2nd cut all the way through the limb. Then cut a third overcut leaving a 3 to 5 cm collar from the trunk of the tree.
Second cut
Third cut
Collar
First cut
Pruning technique
14

SERVICE AND ADJUSTMENTS
 WARNING: Improper maintenance
could result in serious engine damage or in serious injury.
 WARNING: Disconnect the spark
plug before performing maintenance, except for carburetor adjustments.
We recommend all service and adjustments not listed in this manual be performed by an Authorized Service Dealer.
MAINTENANCE SCHEDULE
Check:
Fuel mixture level . . . . Before each use Bar lubrication . . . . . . . Before each use Chain tension . . . . . . . Before each use Chain sharpness . . . . Before each use For damaged parts . . Before each use For loose caps . . . . . . Before each use For loose fasteners . . . Before each use For loose parts . . . . . . Before each use
Inspect and Clean:
Bar . . . . . . . . . . . . . . . . Before each use Complete saw . . . . . . . After each use Air filter . . . . . . . . . . . . . Every 5 hours* Chain brake . . . . . . . . Every 5 hours* Spark arresting screen
and muffler . . . . . . . . . Every 25 hours*
Replace spark plug . Yearly Replace fuel filter . . . Yearly * Hours of Operation
CHAIN BRAKE
 WARNING: If the brake band is worn
too thin it may break when the chain brake is triggered. With a broken brake band, the chain brake will not stop the chain. The chain brake should be replaced by an authorized service
dealer if any part is worn to less than 0,02″(0,5 mm) thick. Repairs on a chain brake should be made by an authorized service dealer. Take your unit to the place of purchase if purchased from a servicing dealer, or to the nearest authorized master service dealer.
BRAKING FUNCTION CONTROL
CAUTION: The chain brake must be checked several times daily. The engine must be running when performing this procedure. This is the only instance when the saw should be placed on the ground with the engine running.
Place the saw on firm ground. Grip the rear
handle with your right hand and the front handle with your left hand. Apply full throttle by fully depressing the throttle trigger. Activate the chain brake by turning your left wrist against the hand guard without releasing your grip around the front handle. The chain should stop immediately.
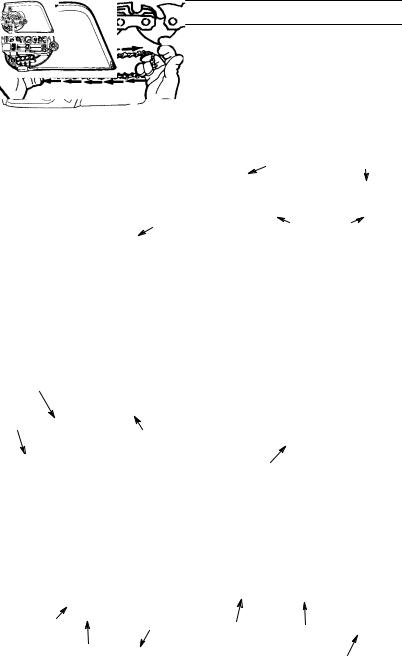
AIR FILTER
 CAUTION: Do not clean filter in gasoline or other flammable solvent to avoid
creating a fire hazard or producing harmful evaporative emissions.
Cleaning the air filter:
A dirty air filter decreases engine performance and increases fuel consumption and harmful emissions. Always clean after every 5 hours of operation.
1.Clean the cover and the area around it to keep dirt and sawdust from falling into the carburetor chamber when the cover is removed.
2.Remove the parts as illustrated.
3.Wash the filter in soap and water. Rinse in clean cool water. Air dry completely before reinstalling.
4.Reinstall parts.
Cylinder
Air Filter Cover
Cover
Air Filter
BAR MAINTENANCE
If your saw cuts to one side, has to be forced through the cut, or been run with an improper
amount of bar lubrication it may be necessary to service your bar. A worn bar will damage your chain and make cutting difficult.
After each use, ensure ON/STOP switch is in the STOP position, then clean all sawdust from the guide bar and sprocket hole.
To maintain guide bar:
SMove ON/STOP switch to the STOP position.
S Loosen and remove bar nuts and chain brake. Remove bar and chain from saw.
SClean the oil holes and bar groove after each 5 hours of operation.
Remove Sawdust From
Guide Bar Groove
Oil Holes
S Burring of guide bar rails is a normal
process of rail wear. Remove these burrs with a flat file.
SWhen rail top is uneven, use a flat file to restore square edges and sides.
15
SERVICE AND ADJUSTMENTS
File Rail Edges 
and Sides
Square
Worn Groove |
Correct Groove |
Replace guide bar when the groove is worn,
the guide bar is bent or cracked, or when excess heating or burring of the rails occurs. If replacement is necessary, use only the guide bar specified for your saw in the repair parts list or on the decal located on the chain saw.
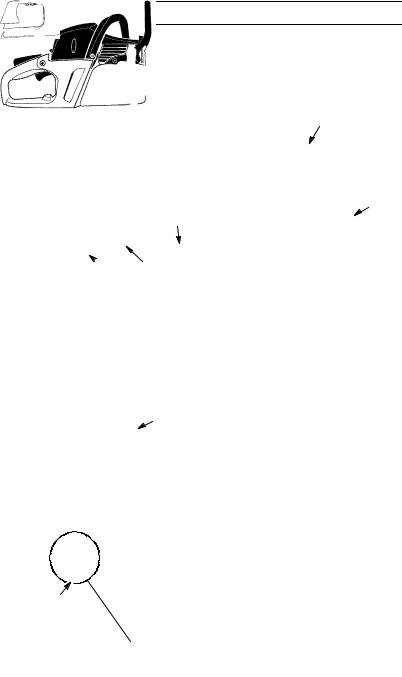
SPARK PLUG
The spark plug should be replaced each year to ensure the engine starts easier and runs better. Ignition timing is fixed and nonadjustable.
1.Loosen 3 screws on cylinder cover.
2.Remove the cylinder cover.
3.Pull off the spark plug boot.
4.Remove spark plug from cylinder and discard.
5.Replace with Champion RCJ--7Y spark plug and tighten securely with a 19 mm socket wrench. Spark plug gap should be 0,5 mm.
6.Reinstall the spark plug boot.
7.Reinstall the cylinder cover and 3 screws. Tighten securely.
Cylinder
Cover
Spark
Plug Boot
Spark
Plug
CHAIN SHARPENING
 WARNING: Improper chain sharpen-
ing techniques and/or depth gauge maintenance will increase the chance of kickback which can result in serious injury.
 WARNING: Wear protective gloves
when handling chain. The chain is sharp and can cut you even when it is not moving. Conditions which indicate the need for chain sharpening:
SReduction in size of wood chips. The size of the wood chip will decrease as the chain gets duller until it becomes more like a powder than a chip. Note that dead or
rotted wood will not produce a good chip. S Saw cuts to one side or at an angle.
S Saw has to be forced through the cut.
Tools required:
S 5/32 inch (4 mm) diameter round file and file holder
S Flat file
S Depth gauge tool
TO SHARPEN CHAIN:
1.Move ON/STOP switch to the STOP position.
2.Check chain for proper tension. Adjust chain tension if necessary.
3.Sharpen cutters.
STo sharpen the cutters, position the file holder level (90° ) so that it rests on the top edges of the cutter and depth gauge.
NOTE: The chain has both left and right hand cutters.
File Holder
File
90°
Cutter
Depth Gauge
SAlign the 30° file holder marks parallel with the bar and to the center of the chain.
Cutter
30° |
Cutter |
File Holder Line |
|
SSharpen cutters on one side of the chain first. File from the inside of each cutter to the outside. Then, turn the chain saw around and repeat the pro-
cess for the other side of the chain.
SFile on the forward stroke only. Use 2 or 3 strokes per cutting edge.
SKeep all cutters the same length when filing.
SFile enough to remove any damage to cutting edges (side plate and top plate of cutter).
All Cutters |
Remove Damage |
Same Length |
|
|
Top Plate |
|
Side Plate |
SFile chain to meet the specifications as shown.
80° 60°
30°
16
SERVICE AND ADJUSTMENTS
Hook Angle
|
0,65 mm |
|
Rounded |
Right |
Corner |
|
|
Too Much Hook Angle |
Squared Off |
|
Corner |
Wrong
 WARNING: Maintain the proper hook
angle according to the manufacturer’s specifications for the chain you are using. Improper
hook angle will increase the chance of kickback which can result in serious injury.
4. Check and lower depth gauges.
Depth Gauge Tool |
File |
 Depth Gauge
S Place gauge tool on cutter.
SIf the depth gauge is higher than the depth gauge tool, file it level to the top of the depth gauge tool.
SMaintain rounded front corner of depth gauge with a flat file.
NOTE: The very top of the depth
gauge should be flat with the front half rounded off with a flat file.
If you require further assistance or are unsure
about performing this procedure, contact your authorized service dealer.
CARBURETOR ADJUSTMENT
 WARNING: The chain will be moving
during most of this procedure. Wear your protective equipment and observe all safety precautions. The chain must not move at idle speed.
The carburetor has been carefully set at the factory. Adjustments may be necessary if you notice any of the following conditions:
S Chain moves at idle. See IDLE SPEED--T adjusting procedure.
SSaw will not idle. See IDLE SPEED--T adjusting procedure.
Idle Speed--T
Allow engine to idle. If the chain moves, idle is too fast. If the engine stalls, idle is too slow. Adjust speed until engine runs without chain movement (idle too fast) or stalling (idle too slow). The idle speed screw is located in the area above the primer bulb and is labeled T. S Turn idle speed screw (T) clockwise to in-
crease engine speed.
STurn idle speed screw (T) counterclockwise to decrease engine speed.
STORAGE
 WARNING: Stop engine and allow to
cool, and secure the unit before storing or transporting in a vehicle. Store unit and fuel in an area where fuel vapors cannot reach sparks or open flames from water heaters, electric motors or switches, furnaces, etc. Store unit with all guards in place. Position so that any sharp object cannot accidentally cause injury to passersby. Store the unit out of reach of children.
SBefore storing, drain all fuel from the unit. Start engine and allow to run until it stops.
S Clean the unit before storing. Pay particu-
lar attention to the air intake area, keeping it free of debris. Use a mild detergent and sponge to clean the plastic surfaces.
SDo not store the unit or fuel in a closed area where fuel vapors can reach sparks or an open flame from hot water heaters, electric motors or switches, furnaces, etc.
SStore in a dry area out of the reach of children.
SEnsure the machine is cleaned and that a complete service is carried out before
long--term storage.
S The guide bar and chain must always be covered with a scabbard when the machine
is being transported or in storage in order to prevent accident contact with the sharp chain. Even a non--moving chain can cause serious cuts to yourself or persons you bump into with an exposed chain.
 CAUTION: It is important to prevent
gum deposits from forming in essential fuel system parts such as the carburetor, fuel filter, fuel hose, or fuel tank during storage. Alcohol blended fuels (called gasohol or using
ethanol or methanol) can attract moisture which leads to fuel mixture separation and formation of acids during storage. Acidic gas can damage the engine.
17

TROUBLESHOOTING TABLE
WARNING: Always stop unit and disconnect spark plug before performing all of the recommended remedies below except remedies that require operation of the unit.
TROUBLE |
CAUSE |
REMEDY |
|
Engine will not |
1. |
Ignition switch off. |
1. Move ignition switch to ON. |
start or will run |
2. |
Engine flooded. |
2. See “Difficult Starting” in |
only a few |
|
|
Operation Section. |
seconds after |
3. |
Fuel tank empty. |
3. Fill tank with correct fuel mixture. |
starting. |
4. |
Spark plug not firing. |
4. Install new spark plug. |
|
5. |
Fuel not reaching |
5. Check for dirty fuel filter; replace. |
|
|
carburetor. |
Check for kinked or split fuel line; |
|
|
|
repair or replace. |
Engine will |
1. |
Idle speed requires |
1. See “Carburetor Adjustment” in the |
not idle |
|
adjustment. |
Service and Adjustments Section. |
properly. |
2. Carburetor requires |
2. Contact an authorized service dealer. |
|
|
|
adjustment. |
|
Engine will not |
1. Air filter dirty. |
1. Clean or replace air filter. |
|
accelerate, |
2. Spark plug fouled. |
2. Clean or replace plug and regap. |
|
lacks power, |
3. Chain brake engaged. |
3. Disengage chain brake. |
|
or dies under |
4. Carburetor requires |
4. Contact an authorized service dealer. |
|
a load. |
adjustment. |
|
|
Engine |
1. Too much oil mixed with |
1. Empty fuel tank and refill with |
|
smokes |
gasoline. |
correct fuel mixture. |
|
excessively. |
|
|
|
Chain moves |
1. Idle speed requires |
1. See “Carburetor Adjustment” in the |
|
at idle speed. |
adjustment. |
Service and Adjustments Section. |
|
|
2. Clutch requires repair. |
2. Contact an authorized service dealer. |
|
18

TECHNICAL DATA
Technical data
Engine |
CS 360T |
CS 400T |
CS 420T |
|
|
|
|
Cylinder displacement, cm3 |
36 |
40 |
42 |
Stroke, mm |
32 |
32 |
32 |
Idle speed, rpm |
3000 |
3000 |
3000 |
Power, kW (Europe) |
1,3/9000 |
1,5/9000 |
1,6/9000 |
Ignition system |
|
|
|
Spark plug |
Champion |
Champion |
Champion |
|
RCJ--7Y |
RCJ--7Y |
RCJ--7Y |
Electrode gap, mm |
0,5 |
0,5 |
0,5 |
Fuel and lubrication system |
|
|
|
Fuel tank capacity, litre |
0,3 |
0,3 |
0,3 |
Oil pump capacity at 8,500 rpm, ml/min |
4 -- 8 |
4 -- 8 |
4 -- 8 |
Oil tank capacity, litre |
0,2 |
0,2 |
0,2 |
Type of oil pump |
Automatic |
Automatic |
Automatic |
Weight |
|
|
|
Chain saw without bar or chain, |
|
|
|
empty tanks, kg |
5,5 |
5,5 |
5,5 |
Sound emissions |
|
|
|
(see Note 1) |
|
|
|
Sound power level, measured dB(A) |
108,7 |
108,7 |
108,7 |
Sound power level, guaranteed LWA dB(A) |
113 |
113 |
113 |
Sound levels |
|
|
|
(see Note 2) |
|
|
|
Equivalent sound pressure level at the |
|
|
|
operators’ ear, dB(A) |
99,7 |
99,7 |
99,7 |
Equivalent vibration levels, ahv,eq |
|
|
|
(see Note 3) |
|
|
|
Front handle, m/s2 |
2,4 |
2,4 |
2,4 |
Rear handle, m/s2 |
2,4 |
2,4 |
2,4 |
Chain/bar |
|
|
|
Standard bar length, inch/cm |
14/35, 16/40, 18/45 |
|
|
Recommended bar lengths, inch/cm |
14--18 / 35--45 |
|
|
Usable cutting length, inch/cm |
13--17 / 34--44 |
|
|
Pitch, inch |
0,375 / 3/8″ |
|
|
Thickness of drive links, inch/mm |
0,050/1,3 |
|
|
Type of drive sprocket/number of teeth |
6 |
|
|
Chain speed at max. power, m/sec |
18,5 |
|
|
Note 1: Noise emissions in the environment measured as sound power (LWA) in conformity with EC directive 2000/14/EC.
Note 2: Equivalent sound pressure level, according to ISO 22868, is calculated as
the time--weighted energy total for different sound pressure levels under various working conditions. Typical statistical dispersion for equivalent sound pressure level is a standard deviation of 1 dB(A).
Note 3: Equivalent vibration level, according to ISO 22867, is calculated as the time-- weighted energy total for vibration levels under various working conditions. Reported data for equivalent vibration level has a typical statistical dispersion (standard deviation) of 1 m/s2.
19
TECHNICAL DATA
Bar and chain combinations
The following cutting attachments are approved for model McCulloch CS 360T, CS 400T, and CS 420T.
|
|
|
Bar |
|
Chain |
|
|
Length, |
Pitch, |
Gauge, |
|
|
Length, |
|
inch |
inch |
mm |
Max. nose radius |
Type |
drive links (no.) |
|
14 |
0,375 / 3/8″ |
1,3 |
7T |
Husqvarna H37, |
52 |
|
|
|
|
|
Universal Outdoor |
|
|
|
|
|
|
Accessories |
|
|
|
|
|
|
CHO 022 |
|
|
16 |
0,375 / 3/8″ |
1,3 |
7T |
Husqvarna H37, |
56 |
|
|
|
|
|
Universal Outdoor |
|
|
|
|
|
|
Accessories |
|
|
|
|
|
|
CHO 027 |
|
|
18 |
0,375 / 3/8″ |
1,3 |
7T |
Husqvarna H37, |
62 |
|
|
|
|
|
Universal Outdoor |
|
Accessories
CHO 032
|
inch/mm |
|
|
|
inch/mm |
37 |
5/32″/4,0 |
60° |
30° |
0° |
0,025″/0,65 5796536-01 |
36 |
5/32″/4,0 |
60° |
30° |
0° |
0,025″/0,65 5056981-38 |
50R |
5/32″/4,0 |
60° |
30° |
0° |
0,025″/0,65 5310254-01 |
20
DECLARATION OF CONFORMITY
EC Declaration of Conformity (Only applies to Europe)
We, Husqvarna AB, SE-561 82 Huskvarna, Sweden, tel: +46--36--146500, as authorised representative in the Community, declare that the chain saw for forest service models McCulloch CS 360T, CS 400T, and CS 420T SAS-AV with serial numbers dating from 2012 and onwards (the year is clearly stated on the rating plate, followed by the serial number), comply with the requirements of the COUNCIL’S DIRECTIVES:
of 17 May 2006 “relating to machinery” 2006/42/EC;
of 15 December 2004 “relating to electromagnetic compatibility” 2004/108/EC, and applicable supplements; and
of 8 May 2000 “relating to the noise emissions in the environment” in accordance with Annex V of 2000/14/EC. For information relating to noise emissions, see Technical data section.
The following standards have been applied: ISO 12100:2010, CISPR 12:2007, ISO 11681-1:2011.
Notified body, 0404, SMP Svensk Maskinprovning AB, Fyrisborgsgatan 3 S--754 50 Uppsala, Sweden, has carried out EC type examination in accordance with the machinery directive’s (2006/42/EC) article 12, point 3b. The certificates for EC type examination in accordance with annex IX, have the numbers: 0404/12/2359.
The supplied chain saw conforms to the example that underwent EC type examination.
12--10--15
Ronnie E. Goldman, Director of Engineering Authorized representative for Husqvarna AB and responsible for technical documentation
21
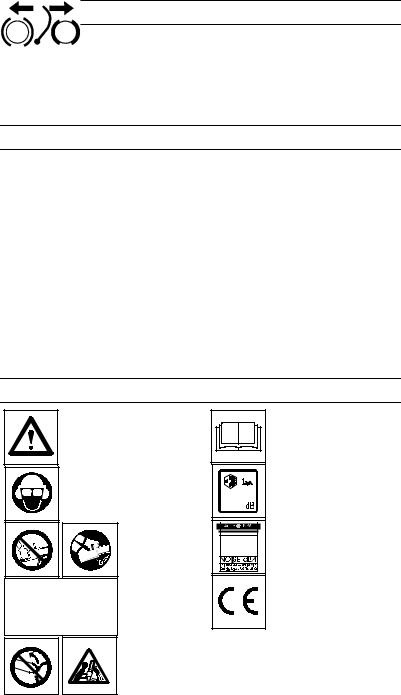
TABLE DES MATIÈRES
Introduction |
22 |
Techniques de travail |
33 |
|
Explication des symboles |
22 |
Réparations et réglages |
37 |
|
Description des pièces |
23 |
Rangement |
40 |
|
Instructions générales de sécurité |
24 |
|||
Tableau de dépannage |
40 |
|||
Montage |
28 |
|||
Donnees techniques |
41 |
|||
Manipulation du carburant |
30 |
|||
Démarrage et arrêt |
32 |
Déclaration de conformité |
43 |
INTRODUCTION
Cher client,
Nous vous remercions d’avoir choisi un produit McCulloch! Vous faites désormais partie d’une histoire débutée il y a longtemps, lorsque l’entreprise McCulloch commença à fabriquer des moteurs pendant la Seconde Guerre mondiale. En 1949, McCulloch lançait sa première tronçonneuse légère à utilisateur unique et révolutionnait le travail du bois à tout jamais.
La gamme de trononneuses innovantes allait se développer au fil des décennies et les activités
se diversifier, d’abord avec des moteurs d’avion et de kart dans les années 1950, puis avec des mini--tronçonneuses dans les années 1960. Plus tard, dans les années 1970 et 1980, les coupe-- herbes et aspiro--souffleurs venaient compléter la gamme.
Aujourd’hui, McCulloch a rejoint le groupe Husqvarna et poursuit la tradition de moteurs puissants, d’innovations techniques et de conceptions résistantes, nos marques de fabrique depuis plus d’un siècle. La réduction de la consommation en carburant, des émissions et des niveaux sonores est notre priorité, tout comme l’amélioration de la sécurité et de la convivialité du produit.
Nous espérons que ce produit McCulloch vous donnera toute satisfaction et qu’il vous accom-
pagnera pendant de longues années. Le respect des conseils de ce manuel d’utilisation relatifs à l’utilisation, à l’entretien et à la maintenance permettra de prolonger sa durée de vie. Si vous avez besoin de l’aide d’un professionnel pour une réparation ou un entretien, veuillez utiliser le service de localisation sur www.mcculloch.com.
McCulloch travaille continuellement au développement de ses produits et se réserve le droit d’en modifier, entre autres, la conception et l’aspect sans préavis.
Vous pouvez également télécharger ce manuel sur www.mcculloch.com.
EXPLICATION DES SYMBOLES
AVERTISSEMENT:
Cette tronçonneuse peut être
dangereuse! L’emploi négligeant ou impropre peut causer des blessures graves ou mêmes fatales.
Toujours utiliser casque de protection homologué, protecteurs
d’oreilles homologués, lunettes protectrices ou visière.
Lisez et comprenez le manuel d’instructions avant d’utiliser la tronçonneuse.
Niveau de puissance sonore garantie
Employez toujours l’appareil à deux mains.
Frein de chaîne, activé (droit)
Frein de chaîne, non activé (gauche)
Niveau de pression sonore à 7,5 mètres
Ce produit est conforme aux directives CE en vigueur.
AVERTISSEMENT! Il faudra éviter soigneusement
tout contact de la pointe de la barre avec n’importe quel objet; ce contact peut faire que la barre saute soudainement vers le haut et vers l’arrière, ce que pourrait entraîner des blessures graves.
22

EXPLICATION DES SYMBOLES
Symboles pour démarrage
Mettez l’interrupteur ON/
STOP en position «ON».
Pressez lentement 6 fois la poire d’amorçage.
Tirez le levier de l’étrangleur/du ralenti rapide au
maximum (dans la position «FULL CHOKE»).
Démarrage d’un moteur froid
Avec la main droite, tirez rapidement la corde de
démarreur jusqu’á ce que le moteur s’allume.
Mettez le levier de l’étrangleur/du ralenti rapide dans la position «HALF CHOKE».
Avec la main droite, tirez rapidement la corde de démarreur jusqu’á ce que le moteur dèmarre.
|
DESCRIPTION DES PIÈCES |
|||
Outil de réglage |
Protecteur de |
Poignée avant |
Vis du ralenti |
|
Corde du |
||||
|
||||
main avant |
|
|||
de la chaîne |
démarreur |
Interrupteur de |
||
|
||||
|
|
|
mise en route/d’ar- |
|
|
|
|
rêt (ON/STOP) |
|
|
Chaîne Silencieux |
|
Levier de |
|
|
|
l’étrangleur |
||
|
Capuchon de |
|
|
|
|
Crampon |
remplissage |
|
|
Poire |
|
(huile pour la |
|
|
|||
Amortisseur |
Boîtier du |
|
|||
barre) |
Capuchon de |
d’amorçage |
|||
|
|||||
|
|
démarreur |
remplissage (carburant) |
||
Couvercle du cylindre |
Frein de |
|
|
Verrouillage |
chaîne |
|
|
des gaz |
|
Poignée
arrière
Calibre Couteaux de profondeur
Direction de rotation de
la chaîne
Maillons d’entraînement
|
|
|
Capteur de chaîne Barre--guide |
Gâchette |
Couvercle |
Anneau de Bouton |
|
des gaz |
d’embrayage |
tension |
flèche |
|
|
externe |
|
23
INSTRUCTIONS GÉNÉRALES DE SÉCURITÉ
 AVERTISSEMENT: Déconnectez
toujours le fil de la bougie et placez--le de façon à ce qu’il ne touche pas la bougie pour éviter un démarrage accidentel lors du montage, du
transport, de l’ajustement ou d’une réparation, exception faite des réglages du carburateur. Cette tronçonneuse pour services forestiers est destinée à la seule coupe du bois. La
tronçonneuse étant un outil permettant de couper du bois à grande vitesse, il est nécessaire de respecter les règles de sécurité pour réduire le risque d’accidents. Une utilisation incorrecte ou imprudente de cet appareil peut provoquer des blessures graves.
PREPARATION
SLisez attentivement l’ensemble de ce manuel et respectez toutes les règles de sé-
curité, les précautions et les instructions d’utilisation avant d’utiliser l’appareil.
SN’autorisez à utiliser votre tronçonneuse que les adultes qui comprennent et suivent les règles de sécurité, les précautions et les instructions d’utilisation de ce manuel.
Protège-- |
Casque de sécurité |
|
Lunettes de |
||
oreilles |
||
Vêtement |
sécurité |
|
|
||
bien |
Gants |
|
ajusté |
||
renforcés |
||
|
||
Chaussures |
Jambières de |
|
de sécurité |
sécurité |
SPortez un équipement de protection. Portez toujours des chaussures au bout renforcé en acier avec des semelles antidérapantes ; des vêtements bien ajustés ; des gants de sécurité anti-dérapant ; des lunettes de sécurité ou un masque anti-buée et aéré(es) ; un casque de sécurité normé et des protège--oreilles pour protéger vo-
tre canal auditif. Attachez vos cheveux au--dessus des épaules.
SToujours utiliser des protecteurs d’oreille agréés. Les personnes utilisant souvent l’appareil devraient faire vérifier leur audition régulièrement, car le bruit de la tronçonneuse peut l’altérer. Une exposition prolongée au bruit risque de causer des lésions auditives permanentes.
S Ne touchez surtout pas la chaîne lorsque le moteur fonctionne.
SNe laissez ni enfants, ni spectateurs, ni animaux s’approcher à moins de 10 mètres de la zone de travail. Ecartez les personnes ou les animaux de la tronçonneuse lors de son démarrage ou fonctionnement.
SN’utilisez pas l’appareil si vous êtes fatigué, malade ou sous l’influence de l’alcool, de drogues ou de médicaments. Vous devez être en bonne forme physique et mentale. Le travail avec la tronçonneuse est très fatiguant. Si les efforts vous sont déconseillés dans votre état de santé, consultez votre
médecin avant d’utiliser la tronçonneuse.
SPréparez méticuleusement votre travail à l’avance. Ne commencez jamais à couper si la zone de travail n’est pas dégagée et si vous n’avez pas prévu de chemin de fuite dans le cas où vous abattez des arbres.
TRAVAILLEZ EN TOUTE SÉCURITÉ
 AVERTISSEMENT: Une inhala-
tion prolongée des gaz d’échappement du moteur, du brouillard d’huile de chaîne et de la poussière de copeaux peut constituer un danger pour la santé.
 AVERTISSEMENT: Cette
machine génère un champ électro-
magnétique en fonctionnement. Ce champ peut dans certaines circonstances perturber le fonctionnement d’implants médicaux actifs ou passifs. Pour réduire le risque de blessures
graves ou mortelles, les personnes portant des implants médicaux doivent consulter leur médecin et le fabricant de leur implant avant d’utiliser cette machine.
S N’utilisez jamais votre tronçonneuse d’une seule main. En utilisant la tronçonneuse d’une main, vous risquez de vous blesser gravement, ainsi que les personnes vous aidant ou les spectateurs. Une tronçonneuse est prévue pour être utilisée à deux mains.
SN’utilisez la tronçonneuse que dans une zone en plein air bien aérée.
S N’utilisez pas la tronçonneuse sur une échelle ou dans un arbre.
SAssurez--vous que la chaîne ne touche aucun objet lors du démarrage. N’essayez jamais de démarrer la tronçonneuse lorsque le
barre--guide est dans une entaille.
SN’appuyez pas la tronçonneuse sur la fin de l’entaille. En appuyant, vous risquez de
perdre le contrôle à la fin de la coupe et peuvent provoquer des blessures graves.
S Arrêtez le moteur avant de baisser la tronçonneuse.
SN’utilisez pas l’appareil qui est endommagée, incorrectement ajusté, ou pas complètement et solidement réuni. Substituez toujours la barre, la chaîne, le protège--main, ou le frein de chaînes immédiatement s’ il devient endommagé,
cassé ou êtes autrement retiré.
S Lorsque vous transporterez l’appareil, faites--le toujours avec le moteur arrêté, le silencieux eloigné du corps et la barre et la chaîne à l’arrière, couverts d’un fourreau.
S Sécurisez la machine pendant le transport.
24

INSTRUCTIONS GÉNÉRALES DE SÉCURITÉ
ÉQUIPEMENTS DE SÉCURITÉ DE LA TRONÇONNEUSE
REMARQUE: Cette section traite des
équipements de sécurité de la machine et de leur fonction. Pour le contrôle et l’entretien, voir les instructions au chapitre CONTRÔLE, MAINTENANCE ET ENTRETIEN DES ÉQUIPEMENTS DE SÉCURITÉ DE LA TRONÇONNEUSE. Voir le chapitre DESCRIPTION DES PIÈCES pour savoir où se trouvent équipements sur la machine. La durée de vie de la machine risque d’être écourtée et le risque d’accidents accru si la
maintenance de la machine n’est pas effectuée correctement et si les mesures d’entretien et/ou de réparation ne sont pas effectuées de manière professionnelle. Pour obtenir de plus amples informations, contacter l’atelier de réparation le plus proche.
SFrein de chaîne. Votre tronçonneuse est équipée d’un frein de chaîne conçu pour arrêter la chaîne.
 AVERTISSEMENT: Votre tron--
çonneuse est équipée d’un frein de chaîne conçu pour stopper la tronçonneuse immédiatement si vous êtes soudainement victime d’un recul. Le frein de chaîne réduit le risque d’accidents, mais vous seul pouvez les éviter. TOUTEFOIS, NE PENSEZ PAS
QUE LE FREIN DE CHAINE VOUS PROTEGERA EN CAS DE RECUL.
SVerrouillage des gaz. Le verrouillage des gaz est conçu pour empêcher toute activation involontaire de la gâchette des gaz.
SCapteur de chaîne. Le capteur de chaîne est construit pour rattraper une chaîne qui
a sauté.
SSystème anti-vibrations. La machine est équipée d’un système anti--vibrations conçu pour assurer une utilisation aussi confortable que possible.
AVIS DE SÉCURITÉ: Une longue exposi-
tion aux vibrations provoquées par un outillage à main et à essence peut entraîner des lésions des vaisseaux sanguins ou des nerfs des doigts, de la main et des articulations chez les personnes enclines à des troubles de la circulation ou à des enflures anormales. Certaines personnes habituellement saines ont connu des problèmes de vaisseaux sanguins lors d’une utilisation prolongée dans le froid. Si des symptômes tels qu’engourdissement,
douleurs, affaiblissement, changement de la couleur ou du grain de la peau ou encore perte de sensibilité dans les doigts, les mains ou les articulations apparaissent, arrêtez d’utiliser cet appareil et consultez un médecin. Un système anti--vibration ne permet pas d’éviter ces problèmes. Les personnes travaillant régulièrement ou continuellement avec un appareil électrique doivent contrôler minutieusement leur condition physique et l’état de l’appareil.
S Interrupteur d’arrêt. Le interrupteur d’arrêt est utilisé pour arrêter le moteur.
CONTRÔLE, MAINTENANCE ET ENTRETIEN DES ÉQUIPEMENTS DE SÉCURITÉ DE LA TRONÇONNEUSE
 AVERTISSEMENT: N’utilisez ja-
mais une machine dont les équipements de sécurité sont défectueux. Les équipements
de sécurité doivent être contrôlés et entretenus. Si les contrôles ne donnent pas un résultat positif, faites réparer votre machine par un atelier d’entretien.
SFrein de chaîne. Nettoyer le frein de chaîne et le tambour d’embrayage (copeaux, résine, saletés). La saleté et l’usure compromettent le bon fonctionnement du frein. Pour l’information additionnelle, voyez le section FONCTIONNEMENT.
S Verrouillage des gaz. Vérifier que la gâchette des gaz ne peut pas être serré jusqu’à ce que le verrouillage des gaz soit serré.
SCapteur de chaîne. Vérifier que le capteur de chaîne est en bon état et qu’il est
bien fixé dans le corps de la tronçonneuse.
SSystème anti-vibrations. Vérifier régulièrement l’état des éléments afin de détecter fissures et déformations. S’assurer que les éléments sont bien fixés entre le
moteur et les poignées.
SInterrupteur d’arrêt. Mettre le moteur en marche et s’assurer qu’il s’arrête lorsque le interrupteur d’arrêt est amené en position d’arrêt.
MAINTENEZ VOTRE TRONÇONNEUSE EN BON ETAT
SLa maintenance de la tronçonneuse doit être effectuée par un revendeur agréé sauf pour les objets cités dans la section maintenance de ce manuel. Par exemple, si des outils non conformes sont utilisés pour ôter ou maintenir le volant lors de la répa-
ration du boîtier, le volant pourrait être endommagé et éclater ultérieurement.
S Assurez--vous que la chaîne de la tronçonneuse s’arrête lorsque la manette de puissance est relâchée. Pour des ajustements, reportez--vous à la section « RÉGLAGES DU CARBURATEUR ».
S N’entreprenez aucune modification sur votre tronçonneuse. N’utilisez que les accessoires fournis ou spécifiquement re-
commandés par le fabricant.
S Les poignées doivent être sèches et propres, sans tâches d’huile ou de carburant.
SLes bouchons de carburant et d’huile ainsi que les vis et les écrous doivent être bien
serrés.
SN’utilisez que des accessoires et pièces de rechange McCulloch recommandés.
MANIEZ LE CARBURANT AVEC PRECAUTION
SNe fumez pas lorsque vous maniez du carburant ou en utilisant la tronçonneuse.
25
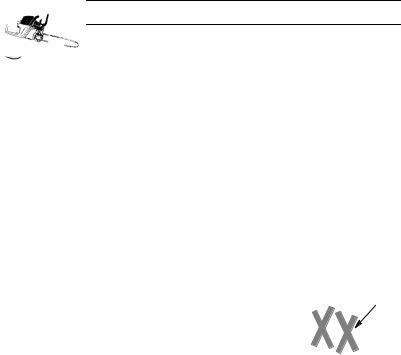
INSTRUCTIONS GÉNÉRALES DE SÉCURITÉ
S Eliminez toutes les sources éventuelles d’étincelles ou de flammes dans les endroits dans lesquels vous mélangez ou versez le carburant. Evitez la fumée, les flammes ou toute activité pouvant provoquer des étincelles. Laissez le moteur se refroidir avant de remettre du carburant.
SMélangez et versez du carburant à l’extérieur sur un sol plat ; entreposez le carburant dans un endroit frais, sec et bien aéré ; utilisez un récipient agréé et étiqueté pour contenir du carburant. Essuyez le carburant
répandu avant de démarrer la tronçonneuse.
SEcartez--vous d’au moins 3 mètres de l’endroit où vous avez rempli le réservoir avant de démarrer le moteur.
S Eteignez le moteur et laissez la tronçonneuse refroidir dans un endroit sans carburant, feuilles sèches, paille, papier, etc. Retirez lentement le bouchon et rechargez l’appareil.
SEntreposez l’appareil et le carburant dans un endroit où les vapeurs de carburant ne risquent pas d’entrer en contact avec des étincelles ou des flammes provenant de chauffe--eau, moteurs et interrupteurs électriques, chaudières, etc.
RECUL
 AVERTISSEMENT: Evitez le recul
qui peut entraîner des blessures graves. Le Recul est le mouvement vers l’arrière et/ou le
haut de la barre--guide qui se produit quand la partie de la chaîne du haut du bout de la barre-- guide entre en contact avec tout objet, tel qu’une autre bûche ou branche, ou quand le
bois se referme et pince la chaîne de la tronçonneuse dans la coupe. Entre en contact avec un objet étranger qui se trouve dans le bois peut également avoir comme conséquence la perte de commande à tronçonneuse.
S Le Recul de Rotation peut se produire quand la chaîne en mouvement entre en contact avec un objet à l’extrémité supérieure du bout de la barre-guide. Ce con-
tact peut enfoncer la chaîne dans cet objet, ce qui l’arrête pour un instant. Le résultat est une réaction ultra-rapide qui projette la barre-guide vers le haut et l’arrière, vers l’utilisateur.
S Le Pincement-Recul peut se produire quand le bois se referme et pince la chaîne en mouvement dans la coupe, le long du bout de la barre--guide et la chaîne s’arrête soudainement. Cet arrêt soudain de la
chaîne cause un renversement de la force de la chaîne utilisée pour couper le bois et projette la tronçonneuse dans la direction inverse de la rotation de la chaîne. La tronçonneuse directement vers l’utilisateur.
SLe Rétraction peut se produire quand le chaîne en mouvement entre en contact avec un objet étranger qui se trouve dans le bois, le long du bas de la barre--guide et la chaîne s’arrête soudainement. Cet arrêt
soudain de la chaîne tire la tronçonneuse en avant et loin de l’opérateur et pourrait facilement faire détruire l’opérateur la commande de la tronçonneuse.
Évitez le pincement-recul:
SSoyez très vigilant des situations ou des obstructions qui pourraient faire serrer la partie
supérieure ou autrement arrêter la chaîne. S Ne coupez pas plus d’un rondin d’une fois. S Ne tordez pas la tronçonneuse lorsque
vous l’enlevez d’une coupure ascendante lorsque vous sectionnez des rondins.
Évitez les rétraction:
SQuand vous commencez la coupe, asu- rez--vous toujours que le moteur est à
pleine vitese et que le chassis de la tronçonneuse est contre le bois.
SEmployez des cales en plastique ou bois, jamais en métal, pour tenir la coupure ouverte.
Direction de recul
les obstructions
Dégager l’endroit du
travail
REDUIRE LES RISQUES DE RECUL
S Souvenez--vous que le recul existe. En
ayant une connaissance de base du recul, vous pouvez réduire les risques entraînant des accidents.
S Ne touchez aucun objet avec le bout du barre--guide lorsque la chaîne est en mouvement.
SDégagez la zone de travail de tout objet encombrant tel que des arbres, branches, pierres, haies, souches etc. Enlevez ou évitez les objets encombrants que votre
tronçonneuse pourrait rencontrer lorsque vous coupez une bûche ou une branche.
SMaintenez votre tronçonneuse aiguisée. La chaîne doit toujours être bien tendue. Une chaîne détendue ou émoussée augmente le risque de recul. Suivez les instructions de maintenance et d’affûtage du fabricant de la chaîne. Contrôlez régulièrement la tension lorsque le moteur est arrêté, jamais lorsque le moteur fonctionne. Assurez--vous que les
écrous de l’attache sont bien serrés après avoir tendu la chaîne.
SCommencez et continuez à couper à plein régime. Si la chaîne tourne plus lente-
ment, le risque de recul sera plus grand. S Ne coupez qu’une bûche à la fois.
S Faites très attention lorsque vous entrez à nouveau dans une coupe.
SN’essayez pas de couper avec le bout du barre--guide (coupe en plongée).
26
INSTRUCTIONS GÉNÉRALES DE SÉCURITÉ
SFaites attention aux bûches mobiles et autres facteurs pouvant refermer la coupe et
bloquer ou tomber sur la chaîne.
SUtilisez le barre--guide et la chaîne au recul réduit définis pour votre tronçonneuse.
MAINTENEZ LE CONTRÔLE
Tenez-- bout
gauche tronçonneuse
|
Le pouce |
|
en bas de |
N’inversez |
l’anse. |
|
|
les positions |
|
mains. |
|
Le coude doit être tendu
 Placez le pouce sous le guidon
STenez fermement la tronçonneuse à deux mains lorsque le moteur fonctionne et ne la lâchez pas. En maintenant fermement la tronçonneuse, vous réduirez le risque de recul et ne perdrez pas le contrôle de la tronçonneuse. Maintenez les doigts de votre main gauche repliés et votre pouce gauche sous le guidon avant. Entourez complètement la poignée arrière votre main droite. Que vous soyez gaucher ou droitier ne joue aucun rôle. Votre bras gauche doit être tendu et le coude bloqué.
SPlacez votre main gauche sur le guidon avant pour qu’elle forme une ligne droite avec votre main droite sur la poignée arrière lorsque vous faite des tronçonnages. N’inversez jamais les positions des mains,
quelle que soit la coupe.
S Tenez--vous sur deux pieds, le poids également réparti.
SPositionnez--vous légèrement à gauche de la tronçonneuse pour ne pas vous trouver dans une ligne directe avec la chaîne de coupe.
SNe soyez pas trop tendu. Vous risqueriez de perdre l’équilibre et le contrôle de la tronçonneuse.
SNe coupez aucun objet situé au--dessus de vos épaules. Il est difficile de contrôler la tronçonneuse à cette hauteur.
DISPOSITIFS DE SÉCURITÉ POUR LE RECUL
 AVERTISSEMENT: Les disposi--
tifs suivants sont fournis avec votre tronçonneuse pour réduire le risque de recul ; de tels conseils ne le supprimeront néanmoins ja-
mais entièrement. En tant qu’utilisateur, ne vous fiez pas uniquement aux équipements de sécurité. Vous devez suivre toutes les recommandations, précautions et conseils de maintenance dans ce manuel pour éviter le recul et d’autres manoeuvres risquant d’entraîner des blessures graves.
SUn barre--guide au recul réduit, conçu avec un petit rayon d’extrémité permettant de réduire la zone de risque de recul au bout de la barre. Un barre--guide au recul réduit a été elaboré pour réduire de façon importante le nombre et la gravité des reculs.
Barre symétrique au recul réduit
Pointe de rayon réduit
Barre
Pointe de rayon large
SUne chaîne au recul réduit a été élaborée avec un indicateur de profondeur et un maillon de protection pour dévier la force de recul et permettre au bois d’entrer progressivement dans la coupeuse.
Indicateur de Profondeur
 de Forme Spéciale
|
Maillon Protecteur Allongé |
|
|
Détourne la Force du Recul |
|
Chaîne au |
et Permet que le Bois Entre |
|
Graduellement dans le |
||
Recul Réduit |
||
Coupeur |
S Protecteur de main d’avant: Protection
élaborée pour éviter que votre main gauche ne touche la chaîne si votre main dérape du guidon avant.
SLa position des anses d’avant et d’arrière, conçue avec distance entre les deux et en ligne. La séparation et la position en ligne offertes par cette conception coopèrent pour donner de l’équilibre et de la résistance dans le contrôle du pivotement de la tronçonneuse vers l’utilisateur dans le cas de recul.
 AVERTISSEMENT: NE VOUS
REPOSEZ PAS SUR N’IMPORTE QUEL DISPOSITIF INCORPORÉ DANS VOTRE TRONÇONNEUSE. VOUS DEVEZ UTILISER LA TRONÇONNEUSE CORRECTEMENT ET AVEC SOIN POUR ÉVITER LE RECUL. Les barres à recul réduit et les
27
 Loading...